

High Great HG-T01 User Manual
HG-T01
HG-T01 Infrared Thermal Image Detector
V1.1
User Manual V1.1
1

Table of Contents
Reading Tips .............................................................................................................................. 3
Symbol Description ........................................................................................................... 3
Usage Advice - Please Read before Using the Product ................................................... 3
Product Overview ...................................................................................................................... 5
Specifications & Parameters .............................................................................................. 5
Part Name........................................................................................................................... 8
Part Introduction ................................................................................................................ 9
Interface Introduction............................................................................................................... 11
Mode Switch .................................................................................................................... 12
WIFI ................................................................................................................................. 12
Settings ............................................................................................................................. 13
Temperature Settings ............................................................................................... 13
Alarm Settings ......................................................................................................... 15
Sound Settings ......................................................................................................... 17
Other Settings........................................................................................................... 18
Battery Level .................................................................................................................. 19
Mode Introduction ................................................................................................................... 20
Visible Light Mode .......................................................................................................... 20
Thermal Imaging Mode ................................................................................................... 21
Blending Mode................................................................................................................. 22
Add Blackbody ........................................................................................................ 23
Installation and Replacement of Battery .................................................................................. 25
Installation and Use of Product ................................................................................................ 28
HDMIHDMI Output Connection ..................................................................................... 28
Audio Output Connection ................................................................................................ 28
HDMIVGA HDMI to VGA ............................................................................................. 28
Diagram of Tripod Installation ........................................................................................ 29
Diagram of Site Layout .................................................................................................... 30
Disclaimer ................................................................................................................................ 31
Warranty Card .......................................................................................... 错误!未定义书签。
2
Reading Tips
Symbol Description
Attention
Tips
Attention refers to the matters needing attention in
the process of use. If you do not operate according
to the requirements, losses may be caused
Tips help to better experi ence the produc t funct ions
and performance during use
Usage Advice - Please read before using the product
3

! The detector uses a very sensitive thermal sensor. Therefore, under no
circumstances (p ow er on or pow er o ff) s hould the lens be di rectl y aimed at th e sour ce
of intense radia tion (su ch as the s un, di rec t la ser be am or re flecti on, etc.) , o therw ise i t
will cause permanent damage to the detector!
! The original packaging box must be used during transportation. Do not shake or
collide with the detector violently during use and transportation.
It is recomm ended to u se t he or ig inal pac kag ing box to store the detector, and place it
in a cool, dry, ventilated environment without strong electromagnetic field.
! Avoid oil stains and various chemicals from dirtying the lens surface and damaging
the surface. Please cover the lens after use.
! Please copy (back up) the data to a computer frequently to prevent the risk of data
loss.
! Before reading the data accurately, it may take 3-5 minutes to warm up when the
detector is powered on for the first time.
! In order to ensure mo re accurate t emperat ure measur ement, please put the det ector
within the range of 1-4m to the object to be measured.
! The Product uses two 18650 lithium batteries for power supply. Please install the
batteries correctly according to the instructions. Pay attention to the polarity of the
batteries during installation. Be sure to select the same brand and model when it is
required to replace the batteries, otherwise it may cause product damage or
explosion.
! Please do not open the case or modify it without authorization. Maintenance can
only be carried out by authorized personnel of the Company.
! Please be sure to read this manual carefully before use.
4

Product Overview
HG-T01 infrared thermal image detector is a non-contact, highly sensitive and
intelligent infr ar ed imaging detection syste m t hat does not need to be equi p ped with a
computer. It can be externally connect ed to audio and video device, and can be
flexibly and conveniently deployed. The product uses du al -light monitoring lens to
efficiently integrate infrared thermal imaging and AI recognition technology, uses
dual-light configuration for dynamic ranging, and high-performance infrared core to
bring in more accurate temper ature measurement, forming a complete set of
intelligent temperature monitoring solutions.
Specifications:
Product name: Infrared thermal image detector
Product model: HG-T01
Type of thermal imaging sensor: uncooled focal plane detector
Sensor pixel: 160*120
Response wave band: 7.5~14m
Pixel spacing: 17m
NETD60mK F/1300K 50Hz
NETD: 60mK (F/1, 300K, 50Hz)
Focusing mode: fixed foc us
5

Frame rate: 15Hz
Temperature measuring range: 20-50 (*Note 1)
Temperature measuring accuracy: 0.5 (with blackbody 0.3) (*Note 2)
Temperature measuring area: meet the requirements of simultaneous temperature
measuring of more than 5 points
Temperature measuring distance: 1-4m
Visible light camera resolution: 3280*2464
Display screen: 4.3-inch capacitive touch screen with resolution of 800x480
Storage: removable TF card, up to 128G
Image format: JPG
Video format: MP4
Interface language: Ch i nese and E ng l is h
Video output: HDMI port
Audio output: 3.5mm coaxial audio connector
Input power supply: 12V 3A
Battery voltage/capacity: 7.4V 3350mAh (two 18650 lithium batteries)
6

Battery life: >3h
WIFI frequency band: 2.4GH Z
Working temperature: 10 ~ 40 (*Note 3)
Storage temperature: -20 ~ +70
Product size: 119x130x107mm
Net weight (without batteries): 560g
Accessories: tripod, battery, power adapter , H D M I extension cord, HDMI to VGA cor d,
audio extension cord, TF card, blackbody (optional)
*Note 1: If the temperature measurement range is exceeded, the temperature
measurement accuracy will decrease.
*Note 2:The temperature mea surement accuracy is the typical value under the
specified mode and the calibration temperature is 33~42C.
*Note 3: When the object to be measured enters the detection range from another
environment wi th relat iv ely l arge temper ature differ enc e, it i s reco mmen ded to p ut t he
object to be measured and the det ector un der the same environme nt temperature for
more than 3 minutes and then measure it, so as to avoid inaccurate measurement
due to the influence of temperat ur e di ffer ence.
---
7
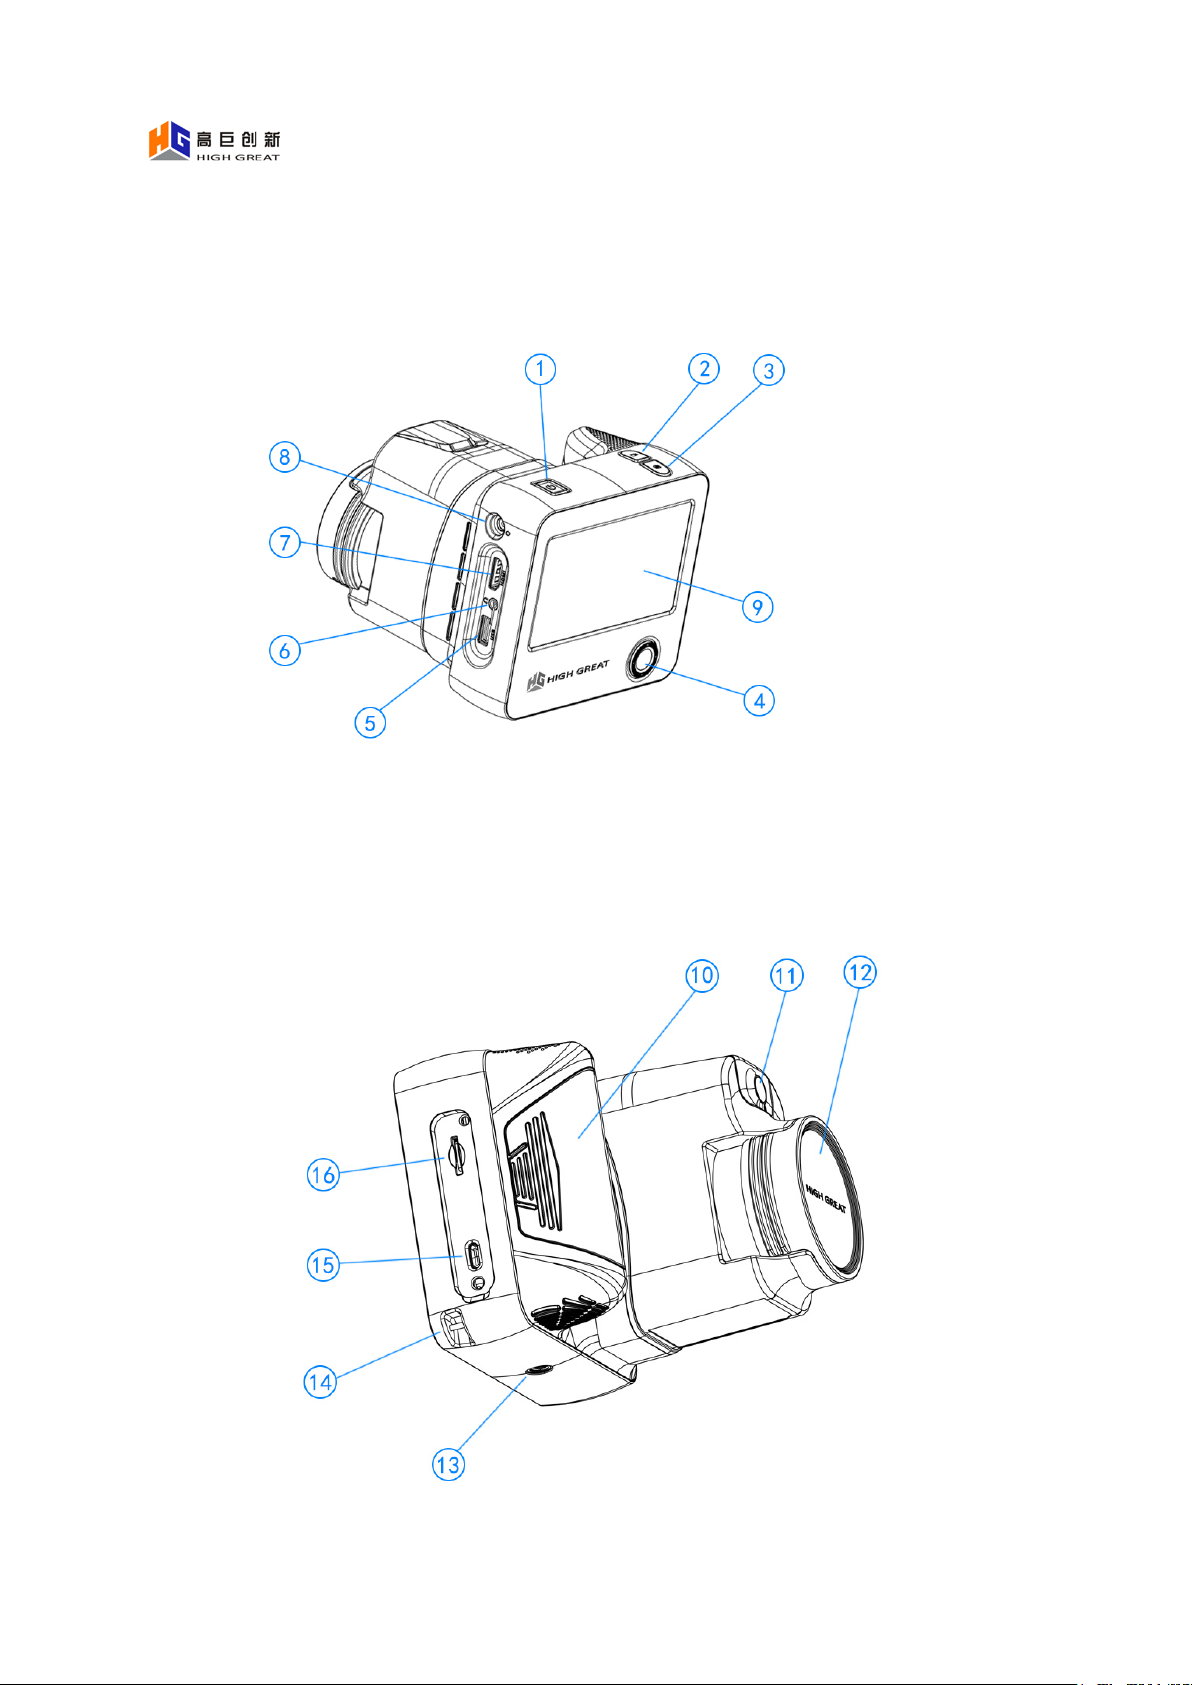
Part Name
8

① ON/OFF ⑨ Touch screen
②Record key ⑩Battery compartment cover
③ Photo key ⑪ Visible light lens
④ Direction key ⑫ Thermal imaging lens
⑤USB port ⑬ Tripod threaded hole
⑥ Audio output jack ⑭Lanyard buckle
⑦HDMI output ⑮ Type-C port
⑧ Power port ⑯ TF card slot
Part Introduction
①Long press the ON/OFF key for 3 seconds to turn on, and long press it for 3
seconds to turn off. When connecting with other display devices, short press it for 1
second to project images to the display.
②Press this key to record a video, and press it again to stop recording
③Press this key to take a photo
④Move, select and confirm the screen menu bar
⑤Connect peripheral devices such as mouse and keyboard through this USB port
⑥Connect devices such as loudspeaker box through this jack and output alarm
sound. This jack can be turned off or turned on in the "Output Setting" of the system.
9

⑦Output high-definition video signal through this interface, and can connect the
display, television, projector and other equipment.
⑧Connect the DC 12V-3A power adapter and the battery can be charged after
connection. If it is used for a long time, it is recommended to connect the adapter.
⑨ Display the picture through this screen, and can operate the detector through the
touch function at the same time.
⑩Open the battery compartment cover to replace the battery (Be sure to use the
battery provided by the original factory)
⑪ Image the visible light
⑫Image the heat source, and it is best that the lens and the temperature measuring
target are in the range of 1-4m when measuring the temperature
⑬Used for fixing the tripod
⑭Tie the lanyard here
⑮Connect computer equipment through this port to read the contents of the detector
and operate the TF card.
⑯Insert TF card into this slot, with maximum support of 128GB
10

Interface Introduction
Load the battery or connect the external power supply, long press the ON/OFF key
for 3 seconds to start up, and then enter the system interface after starting up.
11
 Loading...