

Welcome
Congratulations on your purchase of the Walkbuddy from HighGear.
This pedometer is packed with features to help you get the most out of
your exercise. It’s also so lightweight and convenient. Please take a
moment to familiarize yourself with the operation of the Walkbuddy, and
thanks again for choosing HighGear for your outdoor needs. Visit us on
the web to learn more about this and other HighGear products, at
www.highgearusa.com.
Features
• Adjustable pedometer sensitivity
• Record steps, distance, and calories burned.
• 12 or 24 hour mode digital clock.
• Automatic date function, accurate though 2025.
• Programmable daily alarm function.
• Chronograph (stopwatch) up to 24 hours.
• Calorie counter and distance counter are fully customizable by
weight and step distance.
• Target Step Mode counts down steps from the number you
specify and alerts you when you’ve reached it.
• Exercise timer counts the time you’re moving and starts and stops
automatically when you do. You can easily find out how much
time you’ve spent moving each day.
• Displays in miles or kilometers.
• Display time, date, and stopwatch information while the
Walkbuddy records your exercise.
In addition, the Walkbuddy PR adds Pulse Functionality:
• Finger touch heart rate monitor is accurate from 40-240 bpm.
• Gives accurate pulse reading in seconds.
• Check your pulse while the Walkbuddy continues to count your
steps.
• Programmable pulse settings alert you when your pulse if too high
or too low.
Getting Started
Meet the Walkbuddy.
If you hold the Walkbuddy with the belt clip facing you, and the digital
display facing up, you’ll see 4 buttons around the outside of the unit.
This view is shown below.
B2
(start/stop)
B1
(reset/scan)
Note that the four buttons are labeled as well.
Changing Modes
The MODE button, B4, at the bottom right, changes the primary modes.
There are three primary modes on the Walkbuddy and four primary
modes on the Walkbuddy PR (with pulse reader).
Wakbuddy:
Sensitivity
Switch
B3
(adjust/set)
B4
(mode/next)
Belt Clip
Time Æ CHRO Æ Move
Wakbuddy PR:
Time Æ PULSE Æ CHRO Æ Move
CHRO is short for Chronograph (Stopwatch).
The primary modes TIME and MOVE contain several sub-modes. You
use the SCAN button (B1) to cycle through the sub-modes.
Time:
Time Æ DATE Æ ALARM
Move:
STEP Æ CALORIE Æ TIMER Æ Distance
Æ Target
Remember: The MODE button changes primary Modes. The SCAN
button moves through the sub-modes of each Mode.
Getting Started (continued)
Battery
If the LCD is ever dim or the unit shows no information, you might need
to replace the battery with a CR2032 cell or equivalent. Please dispose
of the old battery responsibly.

TIME - Time
Setting Up:
The first time you use the Walkbuddy and anytime you change time
zones, you’ll need to set the time. First, make sure the Time is
displayed.
1. The word TIME displays for 1 second when you enter TIME mode.
2. Hold Adjust/Set (B3) for 3 seconds until Hours digits blink.
3. Use Start/Stop (B2) to increase hours (you can hold it down to
scroll quickly). The AM/PM indicator will change as you scroll past
11. (Note: A dot will appear beside the P in PM to indicate AM,
look carefully)
4. When you have set the hour, press B4 to move to the minutes. To
set the minutes, use the same process, pressing B2 to adjust to
the correct time.
5. Now set the seconds. Press B4 to move to the seconds. Use B2
to reset the seconds to zero. Note: when the seconds are above
30, pressing B2 sets them to zero and increases the minutes by
one.
6. Press B4 to move to 12/24 hour time preference. Press B2 to
choose between 12 h and 24 h (military time) displays.
7. Press B4 again. Press B3 again. The Time is set and displayed.
Note: All the features of the Walkbuddy use the same series of buttons
to setup. Hold B3 to enter setup. Use B2 to change the flashing value.
Then use B4 to move the next value. Then use B3 to exit setup. Now
that you can set the time, you know how to setup most of the features of
the Walkbuddy.
Using the Time Display:
In addition to displaying the time, this screen also displays an icon to
indicate whether the Alarm is on (pictured above). You can turn the
Alarm on or off from this screen by pressing B2. The icon is displayed
only when the alarm is on. Instructions for setting the alarm are found
under the ALARM heading.
TIME is the first of three displays within the TIME primary mode. You
can scroll through DATE and ALARM by pressing the RESET/SCAN
button, B1.
DATE – Date
Setting Up:
To display the date, first enter TIME mode by pressing B4 until TIME is
displayed. Then press B1 until DATE is displayed.
1. Press and hold B3 until just the month and the letter M appear.
2. Use B2 to increase the number of the month. Press B4 when
done.
3. Walkbuddy now shows the day and the letter D. Use B2 to
increase the date setting. Press B4 when done.
4. Now the year and the letter Y are displayed. Use B2 to increase
the year (through 2025). Press B4 when done.
5. Now press B3 again to exit setting mode.
If you see the date modes during setting, but cannot adjust the
numbers, press B3 once. Then press and hold B3 to start over.
Using Date:
To display the date at any time, press B4 until TIME is displayed. Then
press B1 until DATE is displayed.
ALARM – Alarm
Setting Up:
To display the alarm, first press B4 until TIME is displayed. Then press
B1 until ALARM is displayed.
1. Press and hold B3 until the hour flashes.
2. Use B2 to increase the hour, making sure to scroll past 12 for the
correct AM/PM setting display.
3. Press B4 to move to the minutes. Use B2 to increase the minutes
setting. Press B4 when done.
4. Now press B3 again to exit setting mode.
Using Alarm:
To display the ALARM at any time, press B4 until TIME is displayed.
Then press B1 until ALARM is displayed.
The ALARM is turned on or off from the TIME display screen. To turn
the Alarm on or off, follow the instructions at the end of the TIME
section.
When on, the Alarm will sound for 20 seconds. You can press any
button to stop the sound. The alarm will remain active daily, unless you
turn the Alarm off.
PULSE – Heart Rate Monitor
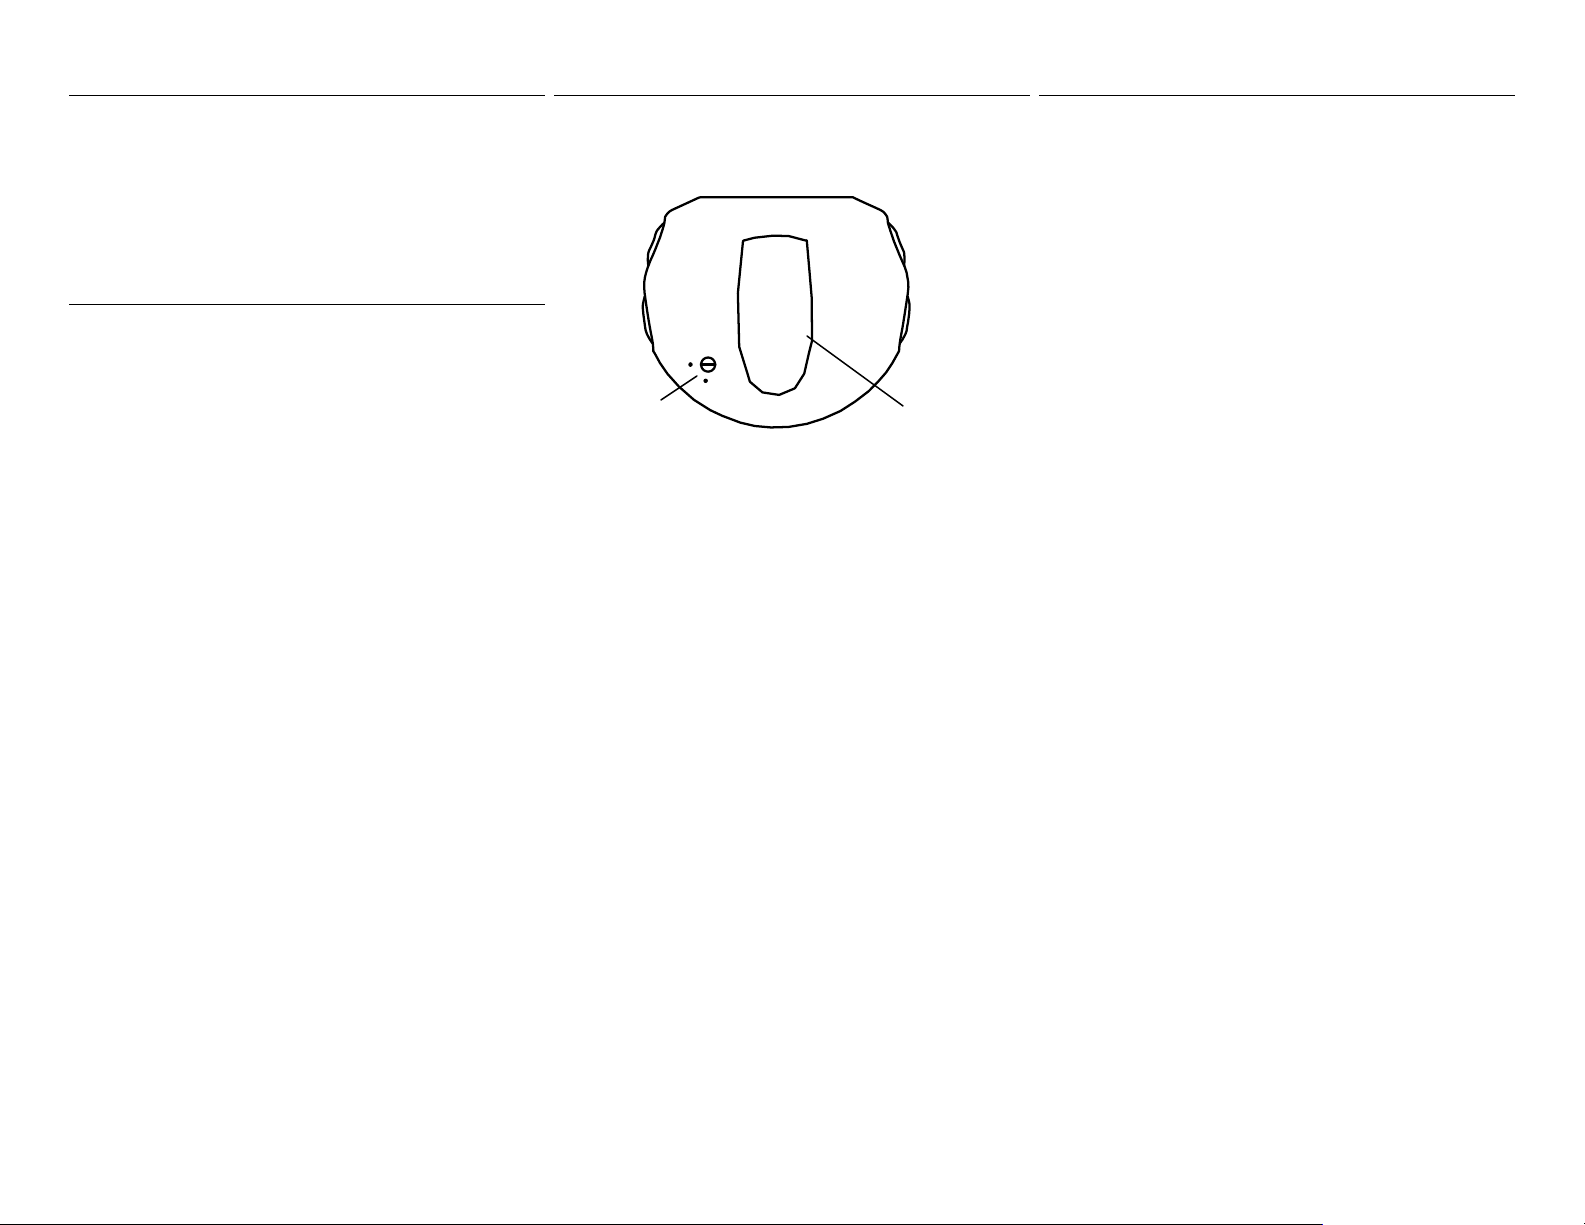
This feature is only available on the Walkbuddy PR. To identify your Walkbuddy, look at the side opposite the belt clip. The words “pulse sensor” appear at the top of the circle for the Walkbuddy PR.
Pulse Sensor
Setting Up
To display the PULSE function, press B4 until PULSE is
displayed.
Hold ADJUST/SET (B3) until AGE appears. Adjust to your age
using B2 (you may need to scroll past 99 to reach lower numbers).
Then press B4. Now, the Walkbuddy displays either FEMALE or
MALE. Use B2 to select your gender. Then press B4.
The Walkbuddy now displays a flashing number and the word HI.
This is the High alert setting. If you would like the Walkbuddy to
alert you when your pulse is too high or low, set this number to the
high setting using B2. Then press B4. Now set the low alert
setting using B2. Now press B4, then press B3 to exit setup.
Note: If you do not wish to have Walkbuddy alert you to low or
high pulse, set the HI to 230 and the low to 70. This will keep
Walkbuddy from alerting you during normal exercise for most
individuals.
Using PULSE:
To take your pulse, place your index finger (roughly opposite the
bottom of your nail) lightly on the clear circle located on the
opposite side of the Walkbuddy from the belt clip (and pictured
above). Wait 30 seconds. If pulse does not display, reposition
finger or change pressure and try again. For many people, the
appropriate pressure is roughly what it takes to press a key on a
computer keyboard. The area around the heart on the display
lights up when the pulse reader is functioning.
The Walkbuddy displays your pulse and beeps if the pulse if lower
or higher then the limits you set above. If outside the range you
set, the Walkbuddy also displays the words HI or LO together with
an arrow.
The Hi and Low limits are very useful if you choose to take your
pulse while exercising because you can take your pulse without
looking down at the Walkbuddy. It will alert you if your pulse is
out of range.
Pulse Indicator

CHRO – Chronograph
Using the Chronograph
Switch to CHRO mode by pressing MODE/SET (B4) until CHRO
is displayed.
Start the timer by pressing Start/Stop (B2). Stop the timer with the
same button. Pressing B2 again restarts the timer from the
current time.
To reset the Chronometer, press B2 to stop the timer and then
hold RESET/SCAN for 2 seconds until the chronograph resets to
zero.
Note: The chronograph displays minutes, seconds, and 1/100
seconds for the first hour. After that, the Walkbuddy displays
hours, minutes, and seconds. The Chronograph resets at 24
hours.
Stacking Functions: The chronograph will continue to time even
if you change functions. For instance, you could start the
chronograph, then move to the PULSE function (B4), take your
pulse while running, and return to the CHRO function (B4). The
chronograph will continue to time, even if you change to view the
pedometer, pulse, or time functions.
MOVE – Pedometer Functions
MOVE is a group functions that uses the pedometer feature of the
Walkbuddy.
Switch to MOVE mode by pressing MODE/SET (B4) until MOVE
is displayed.
Once MOVE is displayed for 2 seconds, the word STEP will
appear. This is one of five sub-modes within MOVE. You can
scan through these sub-modes by pressing the B1 Key.
STEP Æ CALORIE Æ TIMER Æ
Distance Æ Target
Each of these sub-modes uses data from the pedometer to
provide you with information about your exercise. The information
for each of these sub-modes is setup within the STEP function.
Learn more about each of these sub-modes in the following
sections.
All the features of MOVE except for TARGET function start
automatically when you begin exercising, so you can easily keep
track of your steps, calories burned, time spent exercising, and
distance traveled.
You can also continue to use the TIME, CHRO (stopwatch), and
PULSE (on the Walkbuddy PR) functions while the unit tracks
your movement.
Step – Step Counter
The Step Counter keeps track of the number of steps you’ve
taken.
Setting Up
Switch to MOVE by pressing MODE/SET (B4) until MOVE is
displayed. Once MOVE is displayed for 2 seconds the word
STEP will appear. To set up all the features in the step sub-mode,
you’ll need to know your current weight and the length of your
average stride for the type of exercise you’ll be doing.
You’ll need a tape measurer to accurately measure your stride.
For an accurate stride length, mark a spot on the ground. Start
with your toe to that point and take 10 natural strides of the type
you want to measure (run, walk, jog, etc). Mark the place where
the toe of your forward foot stopped. Measure the distance
between the two points, and divide by 10(for inches multiply by 12
for cementers multiply by 100). Once you know your weight and
stride length, you’re ready to setup the Walkbuddy.
Press and hold B3 until the current weight is displayed and either
lb (pounds) or kg (kilograms) is flashing. Using B2 to switch
between Kg and Lb depending on which you prefer. Then press
B4. Now the weight is flashing. Use B2 to increase the weight. If
you need to lower the weight, simply increase the weight until it
resets to 65 lbs. Now press B4 again.
Now the stride length is displayed an IN (inches) or CM
(centimeters if flashing). Use B2 to choose the measurement you
like, and then press B4 again. Now your stride length is flashing,
use B2 to set the length and press B4 again. Now press B3 to exit
the setup mode.
The last thing to setup is the +/- sensitivity switch located to the
left of the belt clip. This switch allows you to adjust the
Walkbuddy to accurately read your stride. Check the Step
number displayed on the Wallkbuddy and take 10 natural steps. If
the Walkbuddy recorded more then 10 steps, decrease the
sensitivity by turning the switch counterclockwise. If the
Walkbuddy recorded fewer then 10, increase the sensitivity by
turning the switch clockwise. Now take another 10 steps and
repeat the process. Because of natural variance in strides, the
Walkbuddy will provide an accurate, but not perfect count of your
strides, even when the sensitivity switch is correctly adjusted.
Using Step:
STEP displays the number of steps you have taken since you last
reset the counter. To reset the counter, hold B1 until 0 is
displayed. The Walkbuddy will keep count till you have reached
999999 steps.

CAL – Calories Burned
g
r
3
5
Setting Up
No setup is necessary. The Walkbuddy uses the information about
your weight and stride length you programmed under the STEP
function.
Using CAL:
Press B4 to enter the MOVE category. Press B1 until CAL is displayed.
The Walkbuddy displays an estimate of the calories you have burned
while exercising. The calculation is based on your weight, stride length,
and distance traveled. The calorie calculation is performed whenever
you are moving. It is cumulative until the STEP feature is reset.
Since bodies vary dramatically in how much energy they expend on
various kinds of exercise, you should use this number as one
component of your overall understanding of your health and fitness.
TMR – Timer Mode
Setting Up
No setup is necessary.
Using TMR:
Press B4 to enter the MOVE category. Press B1 until TMR is
displayed. The Walkbuddy displays the total time you have spent
moving since the last time the STEP or TMR feature was reset. It starts
timing every time you move, and stops timing two seconds after
movement ends. That means that TMR can provide you with an
estimate of the total time you spent exercising in a given day, or in a
given exercise program.
Holding B1 will reset both the Timer and the STEP counter back to
zero.
DIST – Distance Mode
Setting Up
No setup is necessary.
Using DIST:
Press B4 to enter the MOVE category. Press B1 until DIST is
displayed. The Walkbuddy displays an estimate of the total distance
you have traveled since the last time STEP was reset, using the
number of steps you have traveled and the stride length you provided
when setting up STEP.
Press B3 at any time to toggle the display between km and miles.
TRGT – Set a Step TARGET
Setting Up
Press B4 to enter MOVE category. Press B1 until TARGET is
displayed. Press and Hold B3 until the first digit start flashing. The
number you see is a six digit number so the first digit you are adjusting
represents how many hundreds of thousands of steps you want to take.
This number might be zero. Press B2 to adjust the first digit. Then
press B4 to move to the next digit. Repeat the process until you have
specified the number of steps you’d like to take. In the example below,
the Target has been set to 106,385 steps. Press B3 to exit Setup
.
106,385 Steps To Go.
et Mode Indicato
Tar
. Thanks for choosing
106
Using TRGT:
Once you’ve set the Target, the Walkbuddy counts down the steps
whenever you’re moving. The Walkbuddy will chime when you reach
your target.
To reset the Target back to the last setting at any time, press and hold
B1. To clear the target completely. Press and hold B1 again, until CLR
appears. The target then returns to zero.
Advanced Tips:
• Remember, all the features of the Walkbuddy can be used during
the same workout. Switching from one function to another doesn’t
stop the other functions from working!
• You can use SCAN (B1) to scan through sub-modes without using
B4 to change primary modes if you’re already in the primary mode
you wish to scan through. For instance, if you’re in DIST submode within MOVE, you can use B1 to move to STEP sub-mode
without using B4.
Further Help
Congratulations again on your purchase of the Walkbuddy... If you
need additional assistance with your Walkbuddy, you can get more help
on our website at www.highgearusa.com
HighGear for your outdoor needs. We have a wide range of products
for the outdoor enthusiast, please come visit us online at
www.highgearusa.com
Warranty Information
Insert Warranty Information
8
 Loading...