


1
eng lis h
2
eng lis h
INTRODUCTION
Congratulations on your purchase of your TRAIL TUNE FM/AM PLAYER. Designed to meet the needs of outdoor
enthusiasts, Trail Tune players are shock resistant enough to be safely used in the types of environments commonly
found while participating in outdoor recreational activities. The design of the Trail Tune player makes it easy and
convenient to use in an outdoor environment. Large buttons make operating the player quick and easy and the
carabiner clip system allows you to easily attach the player to your belt, jacket, backpack or hydration device.
Please read the following manual carefully to familiarize yourself with the functions of the player. Here are some of
the key features of your Trail Tune player:
• AM / FM Stereo Radio.
• 3 Radio Tuning Modes : Manual / Automatic / Memory.
• Capable of Storing up to 30 Radio Stations (20 for FM, 10 for AM).
• Self-activated Sleep Mode (10 – 100 min, user adjusted).
• Battery Consumption Display.
• Small in Size, and Highly Portable.
• Operates on 1 AAA Battery.
• Equipped with Stereo Headphones.
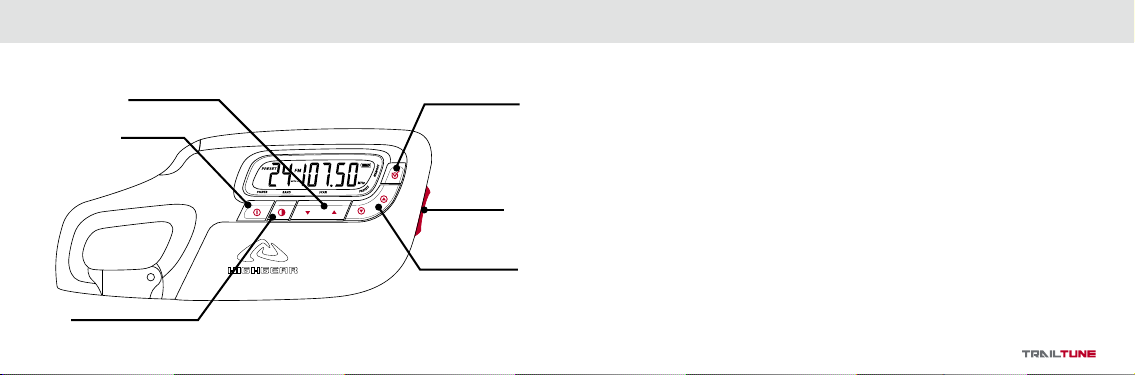
KEY REFERENCE
POWER KEY
SCAN UP / DOWN
AM / FM SELECTION KEY
MEMORY / SELECT
/ STORE STATION
PRESET STATIONS
UP / DOWN
VOLUME KEY

3
eng lis h
4
eng lis h
SAFETY INFORMATIO N
Modifications not authorized by the manufacturer may void user’s authority to operate this device.
This equipment has been tested and found to comply with limits for class B digital device, pursuant to part 15 of the
FCC rules. These limits are designed to provide reasonable protection against harmful interference in a residential
installation. This equipment generates, uses and can radiate radio frequency energy. If not installed and used in
accordance with the instruction, may cause harmful interference to radio communications. However, there are
no guarantees that interference will not occur in a particular installation. If this equipment does cause harmful
interference to radio or television reception, which can be determined by turning the equipment off and on, the user
is encouraged to try to correct the interference by one or more of the following measures:
Reorient or relocate the receiver player.
Increase the separation between the equipment and receiver.
Consult the dealer or an experienced radio / TV technician for help. Keep in mind that modifications not
authorized by the manufacturer may void users authority to operate this device.
Strong electro static charges may render the Trail Tune player inoperable and it will not respond to key presses. If
this occurs, simply open the player, remove and reinstall the battery.
WARNINGS AND CAUTIONS
WARNING: Do not use your Trail Tune player under conditions which require you to be aware of your surroundings
such a bicycling, skiing, running in populated areas. Wearing your Trail Tune player may impair your ability to hear
and quickly respond to certain situations.
CAUTION: Do not expose your Trail Tune player to unnecessary shock or extreme vibration.
CAUTION: Do not expose your Trail Tune player to chemicals, direct sunlight or extreme heat.
CAUTION: Keep your Trail Tune player away from strong magnetic fields as this may cause you to lose information
stored in the player’s memory.
CAUTION: While your Trail Tune player is designed to be water resistant when not being used, we strongly
recommend you avoid allowing the unit to become wet or submerged. When in use, the player remains mostly
water resistant. However, it is possible for water to enter the player at the headphone jack when the headphones
are installed. Failure to properly install any of the seals of the player will result in a reduction or elimination of
water resistance.
5
eng lis h
6
eng lis h
HOW TO USE THIS MANUAL 7
CARE & MAINTENANCE 8
REPLACING THE BATTERY 9
KEYS AND THEIR FUNCTIONS 10
COMPONENTS OF THE PLAYER 11
DISPLAY SYMBOLS AND THEIR MEANINGS 13
OPERATING THE TRAIL TUNE PLAYER 15
POWERING THE PLAYER ON / OFF 15
ADJUSTING THE VOLUME 15
SELF-ACTIVATED SLEEP MODE 16
TUNING THE RADIO RECEIVER 17
SETTING STATION PRESETS 19
CONNECTING THE HEADPHONES 20
SPECIFICATIONS AND RANGES 21
PACKAGE CONTENTS
HEADPHONES
TRAIL TUNE PLAYER
INSTRUCTION MANUAL /
PRODUCT WARRANTY CARD
TABLE OF C ON TE NT S

7
eng lis h
8
eng lis h
HOW TO USE THIS MANUAL
The Trail Tune has many unique features and functions. Be sure to read each section carefully so that you will fully
understand how the instruments and its features work.
The manual is divided into sections outlining each of the major functions of the player. A drawing of the player's
screen that represents the starting point or other important screen for each operational process is shown adjacent
to the instructions for the process; important keys are shown in color indicating PRESS & HOLD and PRESS. The
steps for the programming or operation are adjacent to the screen illustration. Key points and important information
are shown in highlighted blocks.
The Trail Tune player itself is an important part of this manual as it prompts you through its operation.
CARE & MAINTENANCE
Your Trail Tune player should be protected from shocks, extreme heat and extended exposure to direct sunlight. You
should only perform service procedures related to the changing of the battery as shown in this manual. NEVER
attempt to disassemble. Store your player in a clean, dry area at room temperature.
Clean your player using a moist cloth. Care should be taken when cleaning the lens not to rub dirt into the surface
as it can become scratched and hard to read.
Avoid shock or physical impacts to the device.
In case of prolonged storage, remove the battery to prevent leakage of corrosive liquid.

9
eng lis h
10
eng lis h
REPLACING THE BATTERY
PRE-USAGE INSPECTION
Before operating the device, check if the battery is correctly positioned (be aware of battery polarity).
TO REPLACE BATTERY:
1. Open battery hatch lid.
2. Remove old battery, insert one AAA battery into the slot
according to the indicated +/- diagram.
3. Securely replace the battery hatch lid.
IMPORTANT:
Once switched off, battery must be replaced within 10 sec. Otherwise, preset channel memories will be lost.
If battery is removed from the hatch when the player is switched on, stored memories will be lost. In case of
prolonged disuse, empty the battery hatch to prevent leakage of the battery’s corrosive liquid.
To maintain quality of radio reception, replace the battery when necessary. When the Low Battery symbol is shown
on the display the quality of the radio output may be affected, as the battery level is extremely low. When the Low
Battery symbol is shown the battery should be replaced.
KEYS AND THEIR FUNCTIONS
The Trail Tune has 6 individual keys. Each key has several functions. The drawing identifies the keys and their
names as used in this manual.
POWER KEY
SCAN UP / DOWN
AM / FM SELECTION KEY
PRESET STATIONS
UP / DOWN
VOLUME KEY
MEMORY / SELECT
/ STORE STATION

11
eng lis h
12
eng lis h
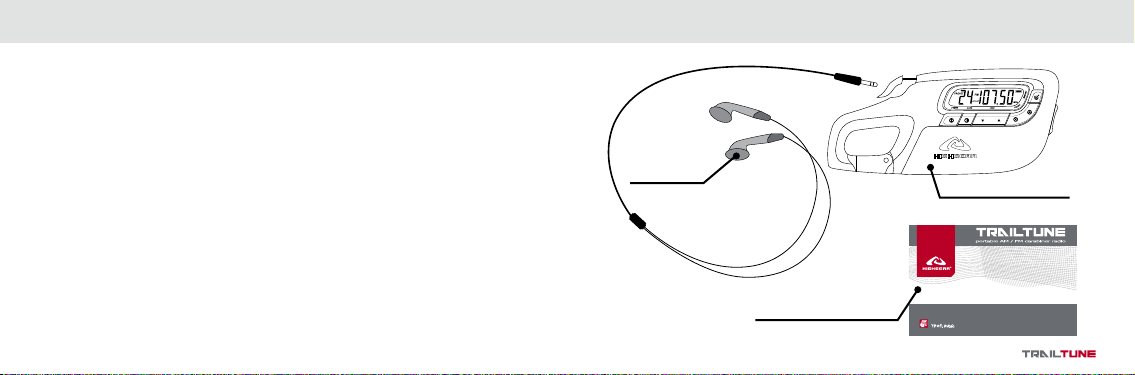
COMPONENTS OF THE PLAYER
HEADPHONE JACK allows you to connect the Trail Tune player to headphones or other output source.
CARABINER CLIP allows you to secure the Trail Tune player to clothing, backpack, etc.
BATTERY COVER secures power source of the Trail Tune player.
The battery cover of the Trail Tune player is specially designed to form a water tight seal when properly closed. To
assure a proper seal, press the door fully into position until it is fully flush with the main body of the player. Failure
to fully seal the battery door may result in moisture entering the player. The Trail Tune player uses one 1.5v AAA
battery as its power source. A fresh battery should supply enough power for approximately 15 hours of playing time.
When replacing the battery pay attention to the polarity of the battery.
COMPONENTS OF THE PLAYER
HEADPHONE JACK
BATTERY COVER
CARABINER CLIP

13
eng lis h
14
eng lis h
MODE SYMBOLS
symbol description what it means
PRESET RADIO CHANNEL
Displays when a preset radio channel is selected
FM RADIO
Indicates that the radio is operating on an FM frequency
AM RADIO
Indicates that the radio is operating on an AM frequency
AUTO OFF MODE
Auto Off mode is active when displayed
KILO HERTZ
Indicates that the radio is operating in Kilo Hertz
MEGA HERTZ
Indicates that the radio is operating in Mega Hertz
BATTERY SYMBOLS
symbol battery status what it means
SUFFICIENT BATTERY
Battery is in good condition.
LOW BATTERY
Battery is half full.
EXHAUSTED BATTERY
Battery needs to be replaced
DISPLAY S YM BO LS AND THEIR MEANINGS DISPLAY S YM BO LS AND THEIR MEANINGS

15
eng lis h
16
eng lis h
OPERATING T HE TRAIL TUNE PLAYER
POWERING THE PLAYER ON / OFF
To power the Trail Tune player ON or OFF, PRESS the POWER 1 key.
The Trail Tune is equipped with a conditional memory. When powered on,
the radio automatically tunes itself to the previous frequency.
ADJUSTING THE VOLUME
The Volume toggle switch is located on the outer edge of the player to
the right of the display screen. PRESS + to INCREASE HEADPHONE
VOLUME or PRESS – to DECREASE HEADPHONE VOLUME.
SELF-ACTIVATED SLEEP MODE
To minimize battery consumption and in case of neglect to switch off the player, it is recommended the user activate
the SELF-ACTIVATED SLEEP MODE. This function automatically powers off the player when the operation of the
radio is unaltered for a designated time.
SETTING THE SELF-ACTIVATED SLEEP MODE
1. When the player is “Off", PRESS & HOLD the POWER 1 key.
AUTO OFF will display. (Do not release the key.)
2. The display will cycle through waiting times in 10-minute increments
from 100 down to 10 minutes followed by OFF. (OFF indicates
function is disabled and player will remain ON until powered OFF.)
3. Release the POWER 1 key when the desired waiting time is
displayed.
OPERATING T HE TRAIL TUNE PLAYER

17
eng lis h
18
eng lis h
OPERATING T HE TRAIL TUNE PLAYER
SELECTING AM / FM FREQUENCY
PRESS the AM/FM SELECTION 2 key to select AM frequency or FM frequency. The selected frequency will
display in the LCD.
TUNING THE RADIO RECEIVER
The Trail Tune player is equipped with 3 search modes: Manual, Automatic, and Preset.
MANUAL SEARCH MODE
In MANUAL SEARCH MODE, the radio is tuned using the
SCAN DOWN 3 or SCAN UP4 keys to scroll through the radio
frequency. This mode allows user to tune the radio to an exact signal.
1. Rapidly PRESS the SCAN DOWN 3 or SCAN UP4 keys
repeatedly until the desired frequency is acquired.
AUTOMATIC SEARCH MODE
In Automatic Search Mode, the radio automatically tunes to the next occupied frequency. The Automatic Search
allows the user to quickly scroll though available stations with strong transmission signals.
1. PRESS & HOLD the SCAN DOWN 3 or SCAN UP4 keys. Release
the key, once the frequency display begins to change.
2. The Trail Tune will automatically tune itself to the next available
frequency and begin playing.
3. To use Automatic Search to find a specific station, continue holding
the SCAN DOWN 3 or SCAN UP4 keys until the display reading
is close to the desired frequency and release the key. The player will
automatically tune itself the next signal received.
4. Repeat until desired frequency is reached. In remote locations (with minimal signal reception) the search may
be aborted by PRESSING either SCAN DOWN 3 or SCAN UP4 keys.
NOTE: The “Automatic Search” is useful for searching stations with strong transmission signals. To more
quickly search for weaker signals, combine both Manual and Automatic search functions. Use Automatic
Search to tune the radio near the desired frequency, switch to Manual Search to pinpoint the exact
frequency.
OPERATING T HE TRAIL TUNE PLAYER

19
eng lis h
20
eng lis h
OPERATING T HE TRAIL TUNE PLAYER OPERATING T HE TRAIL TUNE PLAYER
PRESET SEARCH MODE
The Trail Tune player is equipped with a memory that allows the user to store up to 20 FM frequency presets and 10
AM frequency presets.
SETTING STATION PRESETS
1. Select AM or FM by pressing the AM/FM SELECTION 2 key.
2. Tune to the preferred frequency using either Manual Search or
Automatic Search modes.
3. PRESS & HOLD the MEMORY 7 key for 2 seconds. The Preset
number will display and flash (if no key is pressed for 3 seconds, the
player will exit this mode). Adjust the PRESET NUMBER by pressing
the SCAN DOWN 3 or SCAN UP4 keys. (If you select an existing
channel number to store a new station, the previous station will be
overwritten.)
4. PRESS the MEMORY 7 key to save the setting.
5. Repeat this sequence to program additional presets.
CONNECTING THE HEADPHONES
HEADPHONE PRECAUTIONS
• Always adjust the volume to an appropriate level to prevent hearing damage.
• If ringing in the ears occurs, reduce the volume of the radio, or perhaps, stop using it for a short period of
time.
• Avoid using the headphones when commuting in traffic, as this could cause distraction that could lead to
serious accidents.
HEADPHONE JACK

21
eng lis h
22
eng lis h
SPECIFICATIONS AN D RANGES
FREQUENCY RANGES
FM 87.5 – 108.0 MHz
AM 530 – 1710 KHz
NUMBER OF PRESET CHANNELS
30 in total
FM – 20 channels
AM – 10 channels
NOISE SENSITIVITY
FM beyond 10uv
AM beyond 2.0mv/m
MONO SIGNAL SELECTIVITY
beyond 20dB
VOLTAGE
DC 1.5 Volt Compatible Battery
Size (AAA) Battery
HEADPHONE JACK SIZE
D3.5 mm
DIMENSIONS
132×60×20mm approx.
MASS
70g (without battery)
WATER RESISTANCE
Up to 1 ATM
KEY REFERENCE
POWER KEY
SCAN UP / DOWN
AM / FM SELECTION KEY
PRESET STATIONS
UP / DOWN
VOLUME KEY
MEMORY / SELECT
/ STORE STATION

HIGHGEAR USA INC.
web: www.highgear.com
email: contacts@highgear.com
© 2006 HighGear USA, Inc. All Rights Reserved.
 Loading...