


Loft

TABLE OF CONTENTSTABLE OF CONTENTS
GENERAL INFORMATION
Introduction 1
Warning and Cautions 2
CARE AND MAINTENANCE
Care of the Wrist Unit 3
Care of the Heart Rate Transmitter 3
Changing Batteries In Watch 4
Replacing the Transmitter Battery 5
WEARING THE HEART RATE TRANSMITTER STRAP 6
WATCH DISPLAY ICONS 7-8
KEYS AND THEIR FUNCTIONS 9
PROGRAMMING THE WATCH 10
MODES OF OPERATION 11
TIME FUNCTIONS 12-13
View Time Zones 12
Setting the Time of Day 12
english
Secondary Time Modes 13
BAROMETER FUNCTIONS 14-15
Set Weather and Sea Level Barometric Pressure 14
Secondary Barometer Modes 15
ALTIMETER FUNCTIONS 16-19
How the Altimeter Works 16
Calibrate the Altimeter 17
Altitude Lock 17
Altimeter Displays 18
Storing Data Points 19
CHRONOGRAPH/HEART RATE MONITOR FUNCTIONS 20-28
Heart Rate Monitor Setup 20
Heart Rate Zone Settings 20-25
Operating the Heart Rate Monitor 26
Operating the Chronograph 26
Secondary Chronograph Modes 27-28
ALARM FUNCTIONS 29
SPECIFICATIONS AND RANGES 30
TROUBLESHOOTING 31-32
english
ALTIWARE SERIES
LOFT

WARNING AND CAUTIONSINTRODUCTION
Congratulations on your purchase of an Loft Outdoor Wrist Instrument. Our products represent the state-of-the-art in
recreational sensor watches. We use only the finest sensors and electronic components to create the most accurate and
dependable products possible.
The Loft unit features an altimeter/barometer/weather station and telemetric heart rate system along with a full
selection of watch and chronograph functions.
Please keep in mind, this watch is a sensitive technical instrument. With proper care and maintenance, it will last for
many years of use. However, improper care and handling can cause the various sensors to be damaged and to stop
functioning.
Please read all sections of this manual carefully and become fully familiar with the operation of the watch before using
it in the field.
english
WARNING: This products is an advanced training and fitness tools. Before starting any exercise program, we strongly
suggest you visit your doctor for a complete physical and to discuss your exercise plans.
CAUTION: Your watch is equipped with an altimeter pressure sensor; while the unit is designed to be water resistant to
a static pressure of 3 ATM and can be worn while showering and light swimming, we recommend that using the unit in
the water be avoided whenever possible as there is always the possibility water could enter through the altimeter sensor
port and damage the watch.
Under no circumstances should the unit be worn while snorkeling or scuba diving. The pressures encountered during
these activities will damage the altimeter sensor.
CAUTION: When using your Loft Outdoor Wrist Instrument in a wet environment, care should be taken not to press any
keys while the unit is wet or submerged as this can force moisture past the key seals and damage the unit.
WARNING: Products featuring an altimeter sensor are NOT designed to be used as a PRIMARY altitude instrument for
flying, skydiving, hang gliding or other sports where sudden major changes in altitude may occur or when there is a need
for industrial precision.
NOTICE TO PEOPLE WEARING PACEMAKERS: While the heart rate monitor in the Loft unit is a passive system
and should have no direct effect on a pacemaker, we strongly recommend anyone fitted with such a device contact their
physician or cardiologist before using this product or starting an exercise program.
english
1
ALTIWARE SERIES
LOFT
2

CARE AND MAINTENANCE
CARE AND MAINTENANCE
CARE OF THE WRIST UNIT
Your Outdoor Wrist Instrument should be protected from shocks, extreme heat and extended exposure to direct sunlight.
As the owner of the product you should only perform service procedures related to the changing of the battery as shown
in this manual. You should NEVER attempt to disassemble or otherwise service your watch. When not in use, your watch
should be stored in a clean, dry area at room temperature.
If your Outdoor Wrist Instrument gets dirty it should be carefully wiped clean using a moist cloth. Care should be taken
when cleaning the lens not to rub dirt into the surface as it can become scratched and hard to read.
CARE OF THE HEART RATE TRANSMITTER
Do not store the transmitter when wet as this may shorten the battery life. The transmitter should be stored flat rather
than folded and should never be bent or stretched as this may damage the electrodes. Never lay your heart rate
transmitter on a metal surface as this will quickly drain the battery.
english
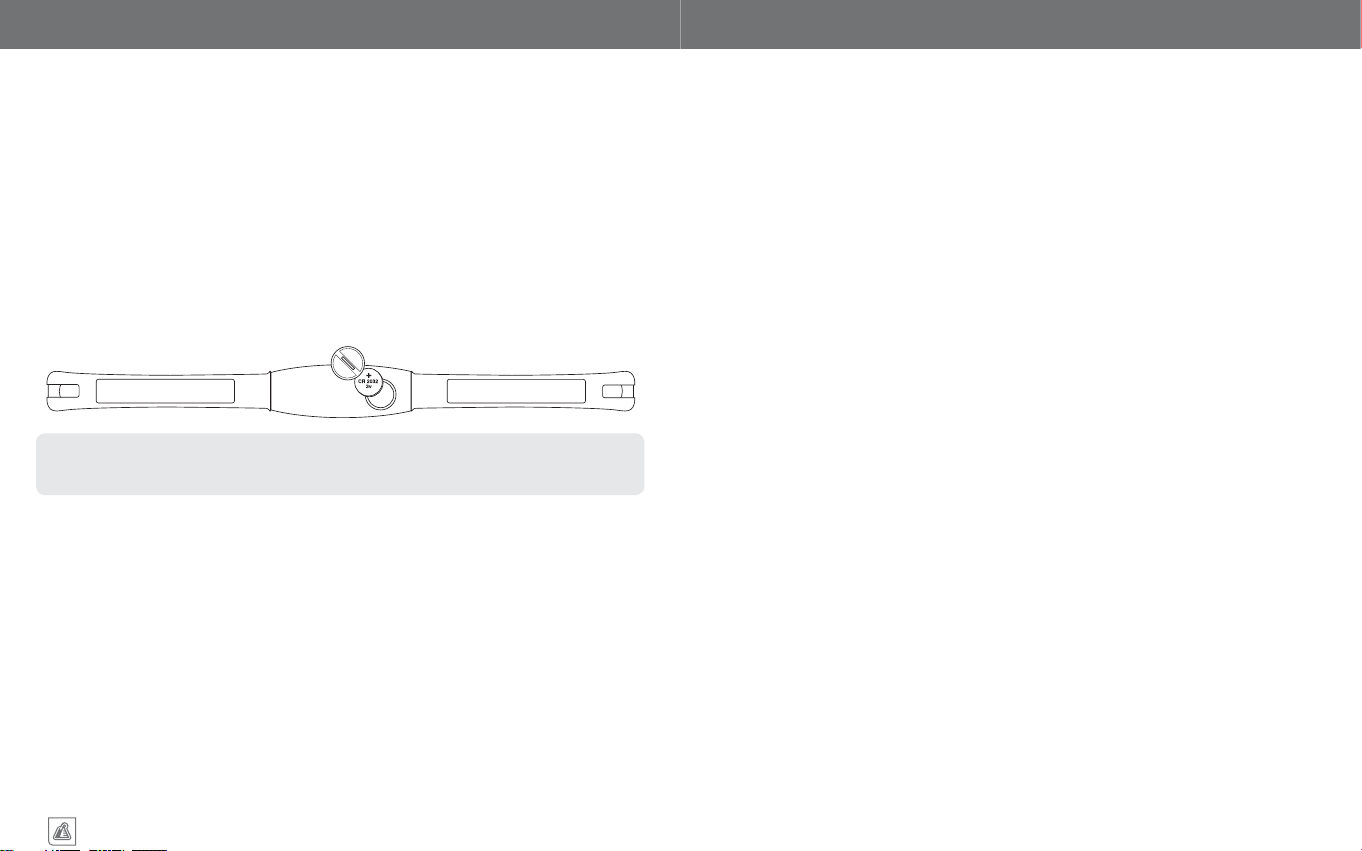
CHANGING BATTERIES IN WATCH
The Loft uses a common CR2032 3v Lithium battery in both the watch and heart rate transmitter. These batteries are
commonly available at camera, bicycle, electronics and drug stores. Normal battery life for the watch is approximately 1yr.
Heavy use of the Altimeter, Heart Rate or Backlight system may significantly reduce battery life.
A blank display or inaccurate altimeter or heart rate readings are indications that the battery is getting weak and
NOTE
should be replaced.
1. Remove battery door using a coin.
2. Turn the black plastic battery retainer counter-clockwise.
3. Carefully remove the retainer and old battery. Do not damage the O-ring seal.
4. Place a fresh battery in the battery compartment with the positive (+) side facing up.
5. Slide the battery retainer over the battery and position the tabs into their appropriate holes.
6. Both the battery and battery retainer should be positioned underneath the gold tab. Slide the
retainer counter clockwise.
7. Replace battery door using a coin.
8. If the O-ring has been damaged, replace it before reinstalling the battery door. Most jewelers and
watch shops should have replacement O-ring seals.
Extreme care should be taken when replacing the battery to ensure the unit remains fully water resistant. Failure
to properly replace the battery and correctly seal the unit may cause the unit to become damaged and may void
NOTENOTE
the warranty.
english
3
ALTIWARE SERIES
Lithium batteries of the type used in this watch are extremely sensitive to improper storage. It is our experience
that many of the batteries being sold as new have been stored improperly and are already dead or nearly dead
when purchased. If you replace the battery in your watch and it does not become functional, do not assume there
is something wrong with the watch. Try another battery and see if that solves things, most of the time it will.
LOFT
4
CARE AND MAINTENANCE
WEARING THE HEART RATE TRANSMITTER STRAP
REPLACING THE TRANSMITTER BATTERY
The Loft unit features a wireless heart rate transmission system. This system features a heart rate transmitter which
is worn on your chest. Like the watch unit, the transmitter is powered by a CR2032 3v Lithium battery. Under normal
conditions you can expect to get approximately 700-800 hours of transmitter use with a fresh battery.
1. Using a coin that closely fits the slot in the battery door located on the back of the transmitter, turn the
battery door counter clockwise until the door comes free of the transmitter body.
2. Take care not to damage the O-ring seal for the battery compartment and carefully remove the old
battery.
3. Place a fresh battery in the battery compartment with the positive (+) side facing up.
4. With the O-ring in the proper position, place the battery door over the opening and tighten it down by
using a coin and turning in a clockwise direction.
5. If the O-ring has been damaged, replace it before reinstalling the battery door. Most jewelers and
watch shops should have replacement O-ring seals.
english
Extreme care should be taken when replacing the battery to ensure the unit remains fully water resistant. Failure
to properly replace the battery and correctly seal the unit may cause the unit to become damaged and may void
NOTE
the warranty.
The heart rate transmitter strap consists of two conductive electrodes attached to a small radio transmitter housed in
the center of the strap. The electrodes sense the electrical potential created each time your heart contracts and the radio
transmitter sends a signal to the watch each time the electrodes sense the heart beat. For the best performance, a layer of
sweat should be built up between your skin and the electrodes of the transmitter. This makes it easier for the electrodes to
"see" the electrical signal. On cool days or at the beginning of your workout it may be necessary to moisten the electrodes
on the back of the transmitter using saliva or on of the commercially available electro conductive creams. DO NOT use tap
water to moisten the electrodes as tap water will act as an insulator rather than a conductor and may actually reduce the
performance of the system
The transmitter should be worn around the rib cage, just below the pectoral muscles. The elastic strap of the system should
be adjusted so that it is snug enough so it does not move during use, but not so tight as to restrict breathing. While the
wearing of the transmitter strap may feel a bit strange initially, most people become used to in within a few days and cease
to even notice they are wearing it.
INTERFERENCE
For reasons of size, cost and battery life, heart rate monitors function using a very low transmission frequency. Because
of this they are susceptible to interference from a variety of electromagnetic and microwave sources. High tension power
line, traffic light controls, home and automotive electronics, powered exercise equipment, home security and wireless
LAN systems and other things may interfere with the ability of the system to register a heart rate. Intermittent readings
of zero or of very high heart rates (exceeding 210 beats) are an indication of some type of interference. In general, the
interference caused by these sources is localized. After a few seconds or at most minutes, you should pass from the area
of interference and the operation of the watch should return to normal. Additionally, other heart monitors close by may
also interfere with the function of your unit. It is recommended that you separate yourself from other heart rate users by
a minimum of 3 feet (1 meter) in all directions.
english
5
ALTIWARE SERIES
LOFT
6
THE WATCH DISPLAY ICONSTHE WATCH DISPLAY ICONS
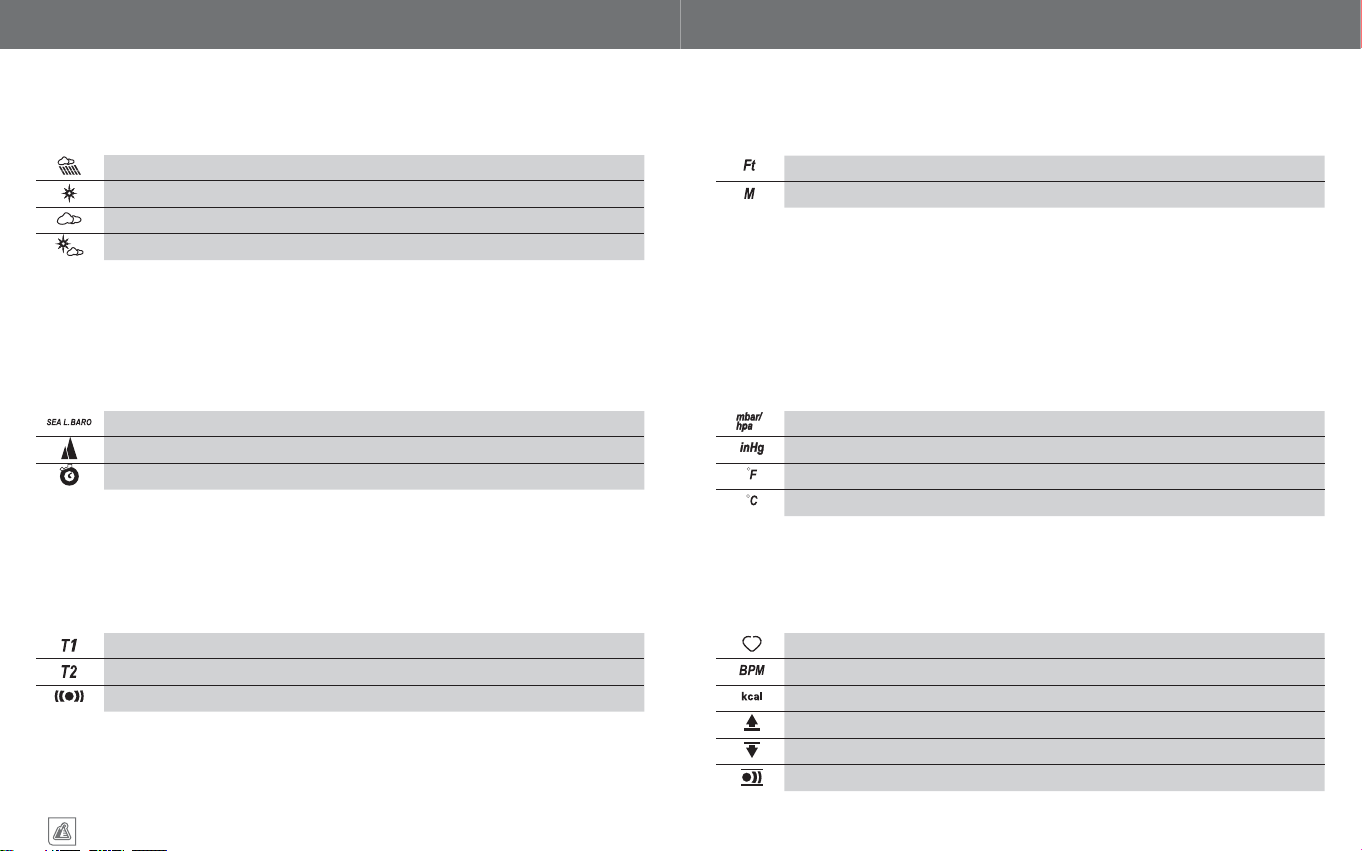
WEATHER ICONS
symbol description what it means
RAINY
SUNNY
CLOUDY
PARTLY CLOUDY
SCREEN IDENTIFIERS
symbol description what it means
BAROMETER
english
ALTIMETER
CHRONOGRAPH
TIME ICONS
symbol description what it means
TIME ZONE 1
TIME ZONE 2
DAILY ALARM
Barometric pressure very low or falling, raining or rain likely
Barometric pressure high, weather fair
Barometric pressure low, rain possible but not likely
Barometric pressure falling or rising, weather changeable
Barometer Display
Altimeter Display
Chronograph/Heart Rate Display
Time Zone 1 on Display
Time Zone 2 on Display
Daily Alarm Active
ALTIMETER ICONS
symbol description what it means
FEET
METERS
Current Altitude measured in feet
Current Altitude measured in meters
BAROMETER ICONS
symbol description what it means
Mbar
InHg
DEGREES F
DEGREES C
Millibar barometric pressure units
Inches of Mercury barometric pressure units
Fahrenheit temperature units
Centigrade temperature units
TIME ICONS
symbol description what it means
HEART RATE
BPM
Kcal
ABOVE TARGET ZONE
BELOW TARGET ZONE
HEART RATE ZONE ALARM
Heart rate system active
Beats per Minute
Kilocalories
Heart rate currently above programmed target zone
Heart rate currently below programmed target zone
Heart rate zone alarm active
english
7
ALTIWARE SERIES
LOFT
8

PROGRAMMING THE WATCHKEYS AND THEIR FUNCTIONS
KEYS AND THEIR FUNCTIONS
The Loft unit is equipped with 5 individual keys. Each key has several functions. The
drawing shows the keys and their names as used in this manual. To make it easy to
remember, some of the functions of the keys are also engraved on the bezel around the
lens of the watch.
S5 KEY
a. Enter/Exit Setting mode
for each function
b. Activate EL backlight
system
S1 KEY
a. Changes view in Time, Barometer
b. Stores memory information in
b. Advances variable in Setting
c. Starts/Split action in Chronograph
d. Turns Daily Alarms On/Off
english
S4 KEY
a. Advances display
through the various
operational modes
b. Selects variable in
Setting modes
S3 KEY
a. Changes view in
Barometer, Altimeter and
Chronograph modes
S2 KEY
a. View/Select Time 1 or Time 2 in
b. View/Select C/F and inHg/mbar
c. View/Select Ft/M in Altimeter
d. Reverses Variable in Setting
e. Stop Chronograph
f. Select Alarm 1/2
and Altimeter modes
Altimeter mode
modes
mode
Time of Day mode
in Barometer mode
mode
modes
KEY PRESSES
There are two key actions used to program the watch
QUICK PRESS – The key is pressed quickly and immediately released. This is the most common key action and
is used for most aspects of the watches operation
PRESS & HOLD – The key is pressed and held for 2-3 seconds. This key action is generally used to initiate a
programming sequence or to change an on screen variable.
Generally, when a PRESS & HOLD action is required, the word HOLD will appear on the center line of the
display.
COMMON KEY ACTIONS
All functions of the watch are programmed in the same basic way. The only thing which changes are the variables being
programmed.
ENTER A PROGRAMMING SEQUENCE – PRESS & HOLD THE S5 KEY
The words ADJUST---HOLD will appear in the top and center lines of the display. Continue to hold the key
until the display automatically advances to the first variable in the programming sequence.
ADJUST A VARIABLE IN A PROGRAMMING SEQUENCE – QUICK PRESS THE S1 AND S2 KEYS
Variables in a programming sequence are adjusted up using a quick press of the S1 key and down using a quick
press of the S2 key.
ADVANCE TO NEXT VARIABLE IN A PROGRAMMING SEQUENCE – QUICK PRESS THE S4 KEY
When you have chosen the variable you want for a particular portion of a programming sequence QUICK PRESS
the S4 key to set and advance to the next variable
As long as you QUICK PRESS the S4 key, you will continue to cycle through the variables for that sequence.
NOTENOTE NOTE
EXIT A PROGRAMMING SEQUENCE – QUICK PRESS THE S5 KEY
Once all variables of a programming sequence have been entered to your satisfaction, QUICK PRESS the S5 key
to exit the programming sequence and return to the initial main display.
english
9
ALTIWARE SERIES
ILLUMINATE THE BACKLIGHT – QUICK PRESS THE S5 KEY
In normal operating modes, QUICK PRESS the S5 KEY to operate the display backlight.
Backlight will not function if you are in a PROGRAMMING SEQUENCE. To operate backlight, you must exit
programming sequence by QUICK PRESSING the S5 key.
LOFT
10

MODES OF OPERATION
TIME FUNCTIONS
MAIN MODES
The Loft has 6 main modes:
TIME OF DAY ALTIMETER DATA
BAROMETER CHRONOGRAPH/HEART RATE
ALTIMETER DAILY ALARM
Advance through the above modes using a QUICK PRESS of the S4 key. Upon entering a mode, the name of the mode
will be displayed on screen for a period of 1.5 seconds before advancing automatically to the modes primary screen.
PRESS & HOLD the S4 key for 3-seconds in any mode to return directly to the Time of Day screen
NOTE
english
TIME OF DAY
BAROMETER ALTIMETER
VIEW TIME ZONE 1 / TIME ZONE 2
The Loft watch allows you to set two separate time zones in the watch. The Time Zone
being displayed is indicated by a small T1/T2 in the upper left corner of the display.
1. View the alternate TIME ZONE by a PRESS & HOLD of the S2 key
2. Continue to hold the S2 key for a period of 2-3 seconds to permanently change
the Time Zone display.
SETTING THE TIME OF DAY
1. Advance to the TIME display using QUICK PRESSES of the S4 key.
2. Select Time 1 or Time 2 using a PRESS & HOLD of the S2 key.
3. PRESS & HOLD the S5 key to enter the setting sequence.
4. Adjust the HOURS using QUICK PRESSES of the S1 and S2 key.
5. QUICK PRESS the S4 key to set HOURS and advance to setting MINUTES.
6. Adjust the MINUTES using QUICK PRESSES of the S1 and S2 key.
7. QUICK PRESS the S4 key to set MINUTES and advance to setting SECONDS.
8. Adjust the SECONDS using QUICK PRESSES of the S1 and S2 key.
9. QUICK PRESS the S4 key to set SECONDS and advance to setting the YEAR.
10. Adjust the YEAR using QUICK PRESSES of the S1 and S2 key.
11. QUICK PRESS the S4 key to set the YEAR and advance to setting the MONTH.
Adjust the MONTH using QUICK PRESSES of the S1 and S2 key.
12.
13. QUICK PRESS the S4 key to set the MONTH and advance to setting the DAY.
14. Adjust the DAY using QUICK PRESSES of the S1 and S2 key.
15. QUICK PRESS the S4 key to set the DATE and advance to setting the the 12 or
24 HOUR TIME format.
16. Exit setting sequence at any time by a QUICK PRESS of the S5 key.
17. Select alternate time zone and repeat the above procedure for second Time
Zone.
english
ALTIMETER DATA CHRONOGRAPH/HEART RATE DAILY ALARM
11
ALTIWARE SERIES
LOFT
12

BAROMETER FUNCTIONSTIME FUNCTIONS
-
SECONDARY TIME MODES
While time is always displayed in the center of the screen, the time display has three additional secondary display
options which are accessed by a QUICK PRESS of the S1 or S3 key. In response to a QUICK PRESS, the top line of the
display will display the name of the function being displayed followed by the information. The secondary display options
are as follows:
SCREEN ONE
This is the default display when you enter the Time screen.
TOP LINE: Day/Date
CENTER LINE: Time of Day
BOTTOM LINE: Current Temperature
SCREEN TWO
TOP LINE: Graph showing Sea Level Barometric Pressure Trends over the past 24-hrs
CENTER LINE: Time of Day
BOTTOM LINE: Current Barometric Pressure adjusted to Absolute Barometric Pressure
english
For more information on the barometric pressure graph see the section of this
manual covering the barometer functions.
NOTE
SCREEN THREE
TOP LINE: Graph showing Sea Level Barometric Pressure Trends over the past 24-hrs
CENTER LINE: Time of Day
BOTTOM LINE: Current Temperature
All three displays also have an icon in the upper right corner showing a visual
representation of the current weather.
NOTE
WEATHER ICONS: In all screens, to the right of the top line are icons which display a
forecast of the weather over the next 6 hours. (See page 14 for more information on the
weather icons.
The temperature sensor measures the temperature of the watch unit. If worn on
your wrist or exposed to direct sunlight, the sensor may read artificially high. For
NOTE
accurate temperature readings, remove the watch from your wrist and place in a
shaded area for 10-15 minutes.
The Loft is equipped with a highly sensitive barometer/weather station. The barometer measures the actual barometric
pressure at your location and calculates the barometric pressure corrected to mean sea level. You can choose to display
barometric pressure in either Inches of Mercury (inHg) or Millibar/Hectopascals (mbar/hpa). In the barometer display, the
top line of the display always shows a graphic representation of the sea level barometric pressure over the past 24-hours.
This graphic display updates once an hour and is the same graph as is displayed in the sub-functions of the Time mode.
SET WEATHER AND SEA LEVEL BAROMETRIC PRESSURE
There are four different Icons for weather. SUNNY , PARTLY CLOUDY , CLOUDY and RAIN . Choose the
icon which most closely matches the weather at the present time. The watch will track changes to barometric pressure
over time and change the icon being displayed to estimate what the weather will be like for the next 6-hours.
1. Advance to BAROMETER (BARO) display using QUICK PRESSES of the S4 key
2. PRESS & HOLD the S5 key to enter setting sequence
3. Adjust current weather using QUICK PRESSES of the S1 and S2 keys
4. Set current weather and advance to setting barometric pressure using a QUICK
PRESS of the S4 key
The local barometric pressure corrected to Mean Sea Level (MSL) may be adjusted if desired
to achieve the highest levels of accuracy.
5. Adjust corrected sea level barometric pressure using S1 and S2 keys
6. Set barometric pressure using a QUICK PRESS of the S5 and exit the barometer
setting sequence.
Do not randomly adjust the barometric pressure setting of the watch. Inaccurate
setting of the barometric pressure may result in inaccurate altimeter and weather
NOTE
readings. If you are not certain of the proper use of this function, it is better to leave
this variable at its factory setting.
-
english
13
ALTIWARE SERIES
LOFT
14

ALTIMETER FUNCTIONSBAROMETER FUNCTIONS
SECONDARY BAROMETER MODES
In the Barometer Mode, Barometric Pressure corrected to Mean Sea Level (MSL) is always displayed in the center of the
display and the Barometric Pressure Graph in the top line. The Barometer Mode has three additional secondary display
options in the lower line which are accessed by a QUICK PRESS of the S1 or S3 key.
SCREEN ONE
TOP LINE: Graph showing Sea Level Barometric Pressure Trends over the past 24-hrs
CENTER LINE: Barometric Pressure corrected to Mean Sea Level (MSL)
BOTTOM LINE: Time of Day
SCREEN TWO
TOP LINE: Graph showing Sea Level Barometric Pressure Trends over the past 24-hrs
CENTER LINE: Barometric Pressure corrected to Mean Sea Level (MSL)
BOTTOM LINE: Temperature in Degrees Centigrade or degrees Fahrenheit
english
CHANGE TEMPERATURE UNITS
While the current temperature is being shown in the lower line of the display, the user may
change the units of the display between degrees centigrade or degrees Fahrenheit by a
PRESS & HOLD of the S2 key. Pressing the key for less than two seconds will display the
alternative unit. Continuing to hold the key until the temperature icon stops flashing will
lock the display variable on screen
SCREEN THREE
TOP LINE: Graph showing Sea Level Barometric Pressure Trends over the past 24-hrs
CENTER LINE: Barometric Pressure corrected to Mean Sea Level (MSL)
BOTTOM LINE: Absolute Barometric Pressure
The Loft is equipped with an highly sensitive altimeter system which measures altitude and altitude changes using
variations in local barometric pressure. Your CURRENT ALTITUDE is always shown in the CENTER LINE OF THE
DISPLAY. The LOWER LINE of the display shows the TIME OF DAY, and the UPPER LINE displays your MAXIMUM
AND ACCUMULATED ALTITUDE along with a BAR GRAPH SHOWING ALTITUDE CHANGES OVER TIME.
HOW THE ALTIMETER WORKS
Because the altimeter system in the Loft relies on barometric pressure for its measurements, it is critical that you
regularly calibrate the unit to a known altitude. For maximum accuracy, daily calibration is a must and if you are using
the unit during times of changeable weather, the unit may need to be calibrated several times during the day. Generally,
the small pressure changes experienced during a day of use will have only a minor effect on the accuracy of the unit.
However, the arrival or departure of a weather front can change the current weather display by several hundred feet
or more. In spite of this, pressure based altimeters, if kept properly calibrated, are one of the most accurate means of
measuring altitude available
The best place to calibrate you unit is your home. If you do not know the actual altitude of your home, there are a couple
of ways you can find this out. The simplest is to find a topographical map of your area. This will give you the exact
altitude at your location. If this is not possible, go to some place where you can find out the actual altitude. A local
airport is a good choice. Calibrate your altimeter at the known location and return home, taking note of the altitude
reading when you return home. Keep this number handy and use it to calibrate your altimeter each time you go to use it.
english
15
CHANGE BAROMETER UNITS
While the actual pressure is being shown in the lower line of the display, the user may
change the units of the display for both the Absolute and Sea Level barometric pressure
between Inches of Mercury (inHg) and Millibars/HectoPascals (mbar/hPa) by a PRESS
& HOLD of the S2 key. Pressing the key for less than two seconds will display the
alternative unit. Continuing to hold the key until the temperature icon stops flashing will
lock the display variable on screen.
ALTIWARE SERIES
LOFT
16

ALTIMETER FUNCTIONS
ALTIMETER FUNCTIONS
english
CALIBRATE THE ALTIMETER
1. Advance to the Altimeter (ALTI) display, using QUICK PRESSES of the S4 key
2. PRESS & HOLD the S5 key to enter the setting sequence
3. The current altitude will appear in the center line of the display with the
abbreviation CAL (Calibrate) in the upper line
4. Adjust the current altitude up and down using a QUICK PRESS of the S1 and S2
keys
5. QUICK PRESS the S4 key to set the altitude and advance to the most recent
Maximum (MAX) Altitude display. QUICK PRESS the S1 or S2 to clear the
Maximum Altitude back to zero.
6. QUICK PRESS the S4 key to advance to the Accumulated (ACC) Altitude display.
QUICK PRESS the S1 or S2 to clear the Accumulated Altitude display back to
zero.
7. Exit the Altimeter Calibration sequence using a QUICK PRESS of the S5 key
If you wish to retain the Maximum or Accumulate Altitude settings, simply QUICK
PRESS the S5 key after adjusting the current altitude setting.
NOTE
ALTITUDE LOCK
If no significant changes in altitude for a period of 30-minutes the Loft unit will automatically activate the ALTITUDE LOCK function. ALTITUDE LOCK is INDICATED BY THE
WEATHER ICONS APPEARING ON THE ALTIMETER DISPLAY. When the unit enters
the Altitude Lock mode, the altitude at that time is locked in memory and will not change
in response to gradual external barometric pressure changes. You can unlock the Altitude
Lock function at any time simply by pressing any key. The Loft unit will automatically
deactivate the Altitude Lock function if it detects any major change in pressure/altitude
over a short period of time.
ALTIMETER DISPLAYS
ALTIMETER GRAPH
The top line of the altimeter display shows a graph showing altitude changes over the past
24 hours. The Altimeter Graph is updated automatically every 15-minutes regardless of
which mode the watch is in.
CHANGE ALTITUDE UNITS
The Loft unit is capable of displaying altitude in either feet or meters. The user may change
the units of the display between Feet or Meters using the S2 key while in the Altimeter
Display. Pressing the S2 key for less than two seconds will briefly display the alternative
altitude unit. Continuing to hold the S2 key until the Feet or Meters icon located at the
lower right of the altitude display stops flashing will lock the display variable on screen
VIEW MAXIMUM AND ACCUMULATED ALTITUDE
Each time you enter the Altitude display, the top line of the display will scroll showing you
the Maximum Altitude you have achieved and the amount of Accumulated altitude you
have in memory, prior to changing over to the Altimeter Graph display
A QUICK PRESS of the S1 key at any time will show your current maximum and
accumulated altitude scrolling in the top line of the display
DO NOT PRESS & HOLD the S1 key unless you wish to store the information on
the display as a Data Point (See Page 21 Altimeter Data Point Memory)
NOTE
english
17
ALTIWARE SERIES
LOFT
18

ALTIMETER FUNCTIONS
CHRONOGRAPH/HEART RATE MONITOR FUNCTIONS
The Loft is equipped with an Altitude Data Point memory system. This system allows you to capture to memory the
altitude of a particular location along with the date and time of the capture. The Loft unit is capable of storing up to 20
individual Altitude Data Points.
STORING DATA POINTS
At any time in the Altitude display, PRESS AND HOLD the S1 key for a period of approximately 3-seconds. During this time the top line of the display will show the word STORE,
and DATA will flash in the middle line with the number of the Data Point appearing in the
lower display line.
When the Data has been stored in memory, the top line will change from STORE to
STORED. Release the S1 key and the unit will return to the altitude display after approximately 2-seconds.
RETRIEVING DATA INFORMATION
Advance to the ALTITUDE DATA (Alti DATA) using QUICK PRESSES of the S4 key.
The top line of the display will show the file number, the middle and bottom lines will
show the time and date the file was captured. Every 3 seconds the display will change to
show the Altitude of the file in the middle line and Alti in the lower line. The user may also
english
DATA SCREEN 1
DATA SCREEN 2
manually advance the display using the S3 key.
Use a QUICK PRESS of the S1 or S2 keys to move through multiple captured files. The
number of the file will always be shown in the upper line of the display. The file system
works on a First-In Last–Out system, were the newest files are the ones with the highest
file numbers.
CLEARING DATA INFORMATION
To Clear the information in the Altitude Data memory, PRESS & HOLD the S5 key.
The display will show the word HOLD flashing in the center line of the display with the
words CLEAR – ALL in the top and bottom lines respectively. Continue to hold the S5 key
until DATA 01 appears in the top line along with 4-dashes in the middle line indicating all
data has been cleared from memory.
HEART RATE MONITOR SETUP
The Loft features an ECG accurate telemetric heart rate monitor system integrated with the units Chronograph.
The LOFT’s heart rate monitor is accurate to one beat per minute and is capable of displaying your heart rate in beats per
minute (BPM) or as a percentage of your maximum heart rate (% Max). The LOFT’s chronograph is accurate to 1/100th
of a second.
For the heart rate monitor system to function properly you must program a number of different variables into the unit.
Follow the subsequent steps carefully, improper programming may effect the accuracy of the unit.
HEART RATE ZONE SETTINGS
STEP 1–TURN HEART RATE ZONE ON/OFF
1. Advance to the CHRONOGRAPH (CHRO) screen using quick presses of the S4
key.
2. PRESS AND HOLD the S5 key to enter the setting sequence.
3. The first screen that appears allows you to turn the heart rate zone system of
the watch on and off. For the initial programming of the heart rate system use
the S1 or S2 key to select ON
4. QUICK PRESS the S4 key to advance to Setting the Heart Rate Zones.
The Heart Rate Zone system should normally be left set to ON. Turning the Heart
Rate Zone System OFF will disable the Audible and Visual Target Zone alarm as well
NOTENOTE
as disabling your ability to program a target zone.
To be able to enter the Heart Rate Monitor Setup sequence, the Chronograph must be
cleared to zero. If necessary, this is accomplished by Pressing and Holding the S5 key
for approximately 3-seconds.
english
19
ALTIWARE SERIES
LOFT
20

CHRONOGRAPH/HEART RATE MONITOR FUNCTIONSCHRONOGRAPH/HEART RATE MONITOR FUNCTIONS
STEP 2–SET ZONES USING BPM OR % OF MAXIMUM HEART RATE
The Loft unit allows you to program a single Training Zone.
The Training Zone can be established using one of two methods, Beats per Minute or Percentage of Maximum Heart
Rate.
Beats per Minute is the most common means of setting the target heart rate zone and requires the user to set specific
heart rate numbers for the upper and lower limits of the range.
Some coaches and training systems use % of Maximum Heart Rate as the basis for establishing their training zones if
you are working with this type of system, the Loft makes it simple to set your zones in this way.
1. Using a QUICK PRESS of the S1 or S2 keys to select Beats per Minute (BPM)
or Percentage of Maximum Heart Rate (% MAX) as the basis for your training
zone.
2. Set your choice and advance to setting the Upper and Lower limits using a
QUICK PRESS of the S4 key.
english
STEP 3–SET HEART RATE ZONE UPPER AND LOWER LIMITS
The next screens prompt you to set specific numbers for your upper and lower heart rate limits based on the either %
OF MAXIMUM HEART RATE or BEATS PER MINUTE as programmed previously. The zone you are programming is
indicated by ZN HI or ZN LO appearing in the lower line of the display.
Because of the way the watch is programmed, it is possible to set both the upper and lower limits for the same number.
Or even to have the upper limit programmed with a lower number than the lower limit. If the unit is programmed in
this manner, the audible and visual alert systems will not work properly. It is up to you to make sure that the number
programmed for the upper limit is larger than the number programmed for the lower limit.
1. Adjust the Upper Limit using QUICK PRESSES of the S1 and S2 keys.
2. Set your choice and advance to setting the Lower Limit using a QUICK PRESS
of the S4 key
3. Adjust the Lower Limit using QUICK PRESSES of the S1 and S2 keys
4. Set your choice and advance to setting the Training Zone Alarm using a QUICK
PRESS of the S4 key
SET UPPER LIMIT
SET LOWER LIMIT
STEP 4–SET AUDIBLE TRAINING ZONE ALARM ON/OFF
The Audible Training Zone Alarm sounds when your heart rate exceeds the programmed upper or lower limit settings
1. Select ON or OFF using the S1 and S2 keys to activate the audible heart rate
zone alarm system.
2. Set your choice and advance to the setting sequences for MAXIMUM HEART
RATE and CALORIES using a QUICK PRESS of the S4 key
english
21
ALTIWARE SERIES
If the Audible Zone Alarm is set to OFF the Visual Zone Alert will still be active as
long as the Heart Rate Zone System is ON. (STEP #1 Page 20)
NOTE
LOFT
22

CHRONOGRAPH/HEART RATE MONITOR FUNCTIONSCHRONOGRAPH/HEART RATE MONITOR FUNCTIONS
SETTINGS FOR MAXIMUM HEART RATE AND CALORIES
Using your age, weight, gender and fitness level, the Loft unit will estimate your maximum heart rate and establish an
algorithm for estimating the number of calories you consume during a workout.
STEP 5–SET GENDER
The first Variable you are asked to set is your Gender.
1. Select Male or Female using QUICK PRESSES of the S1 and S2 keys
2. Set your choice and advance to setting Pounds or Kilograms using a QUICK
PRESS of the S4 key
STEP 6–SET WEIGHT UNITS
Select the units you wish to use for programming your weight.
1. Select Pounds or Kilograms using QUICK PRESSES of the S1 and S2 keys
2. Set your choice and advance to setting your Weight using a QUICK PRESS of
english
the S4 key
STEP 7–SET WEIGHT
Enter your Weight
1. Adjust your weight using QUICK PRESSES of the S1 and S2 keys.
2. Set your choice and advance to setting your age using a QUICK PRESS of the
S4 key
STEP 8–SET AGE
Enter your Age in years
1. Adjust your age using QUICK PRESSES of the S1 and S2 keys
2. Set your choice and advance to setting your Maximum Heart Rate using a
QUICK PRESS of the S4 key
STEP 9–ADJUST MAXIMUM HEART RATE
When you enter the Maximum Heart Rate display, the number flashing on the center line of the screen is an estimate of
your maximum heart rate based on the information you have programmed into the watch.
If you know your actual Maximum Heart Rate, you may enter it at this time using QUICK
PRESSES of the S1 and S2 keys.
If you wish to use the estimated Maximum Heart Rate number, simply QUICK PRESS the
S4 key to select this number and advance to setting your VO2 Max.
The formula to calculate your Maximum Heart Rate is
220 – AGE = MAXIMUM HEART RATE
NOTE
english
23
ALTIWARE SERIES
LOFT
24

CHRONOGRAPH/HEART RATE MONITOR FUNCTIONSCHRONOGRAPH/HEART RATE MONITOR FUNCTIONS
STEP 10--SET VO 2 MAX
VO2 Max is an estimation of your fitness. If you have been tested, you may know exactly what your VO2 max is.
Otherwise, use the following chart to determine your VO2 Max. The VO2 Max setting is used to increase the accuracy of
the Calorie calculation.
1. Adjust your VO2 Max using QUICK PRESSES of the S1 and S2 keys
2. Set your choice and complete the programming of the Heart Rate system using
a QUICK PRESS of the S5 key
english
OPERATING THE HEART RATE MONITOR
The operation of the Heart Rate Monitor is largely automatic. Once you put the transmitter
strap on, it immediately begins transmitting heart rate information to the watch. There is a
small heart shaped icon just to the upper left of the center line of the Chronograph display.
If the unit is receiving heart rate information the center of this icon will flash each time the
unit receives a transmission from the chest strap.
OPERATING THE CHRONOGRAPH
The Loft is equipped with a 24-hour chronograph. For the first 59m 59s of timing the
resolution is 0.01 second. After the first hour the resolution of the timing is 1.0seconds
1. Advance to the CHRONOGRAPH mode using QUICK PRESSES of the
S4 key
2. Start the timing of the chronograph using a QUICK PRESS of the S1
key
3. Stop the timing of the chronograph using a QUICK PRESS of the S2
key
LAPS/SPLITS/RUNS
Once timing has been started, QUICK PRESSES of the S1 key will stop the timing on the
display for a period of 5 seconds and show your Split time up to that point.
CLEAR CHRONOGRAPH
With the chronograph stopped PRESS & HOLD the S5 key to clear the chronograph back
to zero.
Continuing to hold the S5 key after the chronograph has cleared will result in the
unit entering the Set sequences for the heart rate monitor.
NOTENOTE
The Loft is only equipped with a basic timing chronometer. It does not have the
capacity to store timing information in memory for later review
english
25
ALTIWARE SERIES
LOFT
26

CHRONOGRAPH/HEART RATE MONITOR FUNCTIONSCHRONOGRAPH/HEART RATE MONITOR FUNCTIONS
SECONDARY CHRONOGRAPH MODES
The Loft has 4 separate Heart Rate / Chronograph displays which can be viewed using QUICK PRESSES of the S3 key.
SCREEN ONE
TOP LINE: Heart Rate
CENTER LINE: Chronograph
BOTTOM LINE: Time of Day
SCREEN TWO
TOP LINE: HI or LO to indicate if you are above or below your Training Zone
CENTER LINE: Heart Rate
BOTTOM LINE: Chronograph
In the chronograph mode pressing the S1 key is used for the operation of the
chronograph and does not cause the unit to scroll through the secondary modes as it
NOTE
does in the Time of Day and Altimeter modes.
english
SCREEN THREE
TOP LINE: Calories Burnt for the Workout
CENTER LINE: Heart Rate
BOTTOM LINE: Chronograph
The chronograph must be running for the Loft unit to count calories.
The calorie number presented on the display of the watch is an estimation based on
a range of different variables. The number is best thought of as an indication of work
NOTE NOTE
performed over time. You can use the numbers you get from one day to the next to
make general comparisons about the amount of work you have done. The number is
not accurate enough to use for diet management or to compare your workout to that of
other people.
SCREEN FOUR
TOP LINE: Real Time Percentage of Maximum Heart Rate
CENTER LINE: Heart Rate
BOTTOM LINE: Chronograph
english
27
ALTIWARE SERIES
LOFT
28

FUNCTIONAL SPECIFICATIONS AND RANGESALARM FUNCTIONS
SET DAILY ALARM
The Loft unit is equipped with two individual daily alarms. Each alarm can be set to sound at a given hour and minute.
Once either alarm is programmed it is automatically set to ON. Active alarms will sound at the programmed time in both
Time zone 1 and Time zone 2.
SELECT ALARM 1 AND 2
1. Advance to the Alarm (ALRM) screen using QUICK PRESSES of the S4 key
The top line will show AL-1 or AL-2. Change between Alarms using QUICK
PRESSES of the S2 key
The middle line will show the time for which the alarm is set.
The bottom line will show ON or OFF indicating the status of the alarm.
2. Turn the alarm on or off using a QUICK PRESS of the S1 key
SETTING THE ALARM
1. Advance to the Alarm (ALRM) screen using QUICK PRESSES of the S4 key
english
2. Select which alarm you wish to program using QUICK PRESSES of the S2 key
3. PRESS & HOLD the S5 key to enter the setting sequence
4. Adjust the Hours using QUICK PRESSES of the S1 and S2 key
5. QUICK PRESS the S4 key to set hours and advance to setting minutes
6. Adjust the Minutes using QUICK PRESSES of the S1 and S2 key
7. QUICK PRESS the S4 key to set minutes and advance to set Chime
8. Select Chime ON or OFF using quick presses of the S1 and S2 keys
9. QUICK PRESS the S5 key to set the Chime and exit the Alarm Setting sequence.
The Chime is a single beep each time a key is pressed and a double beep at the
start of each hour. The Key Press Chime is useful if you are trying to operate the
NOTE
watch under circumstances where it is difficult to look at the watch to confirm that
an action has taken place when a key is pressed.
FUNCTIONAL SPECIFICATIONS AND RANGES
GENERAL
Operational Temperature -10C to +50C/ 14F to 122F
Water Resistance 3ATM
Watch Battery CR 2032 3v Lithium
Heart Rate Transmitter Battery CR 2032 3v Lithium
Auto Calendar 2000-2049
ALTIMETER
Range -702 to +9158m / -2306 to +30,045ft
Resolution 1m / 1ft
20 Memories with Date, Time and Altitude
THERMOMETER
Range -10 to +50C / +14 to +122F
Resolution 0.1C/0.1F
BAROMETER
Range 300 to 1100mbar/hPa or 8.86 to 32.48 inHg
Resolution 1mbar/hPa or 0.01inHg
HEART RATE MONITOR
Range 30-240 Beats per Minute
Resolution 1 Best per Minute
% of Maximum Heart Rate 1-100%
CHRONOGRAPH
Range 24 hours
Resolution 0.01 second for first hour; 1.0 second for hours 2-23
english
RESETTING THE WATCH
To RESET THE WATCH back to its default values press the S1, S2, S4 and S5 keys down at the same time. The display
will light up showing all segments followed by a sequence of screens showing various numbers. The watch will then
automatically change to the time of day screen at 12 o’clock on the first of January.
29
ALTIWARE SERIES
LOFT
30

TROUBLESHOOTING
TROUBLESHOOTING
TROUBLE SHOOTING – BASIC
The Loft is a very sensitive and sophisticated instrument. If properly cared for it should last and remain accurate for many
years. However, from time to time problems may occur. It has been our experience that the majority of the problems seen
by consumers with products such as the Loft are related to dead or dying batteries.
While the estimated life of a fresh battery in the unit is approximately one year, this can be shortened considerably if the
heart rate, altimeter or EL systems of the unit are used extensively. Whenever you are experiencing issues related to the
function of the unit it is recommended that you install a fresh battery as a first course of action, especially if it has been
more than a half a year since the last time the battery was replaced.
BE AWARE: Lithium batteries of the type used in this watch are very susceptible to improper storage. Many
times, batteries purchased as new are dead or weak before they are purchased. Do not assume that batteries in
stores are good. If you try a new battery and problems persist, please try a second battery from another source,
just to be certain.
If the battery on the watch unit of the Loft system is failing it may show itself in several ways. Indications of a weak
battery are:
1. A fading or blank display. Also if the display goes blank when the EL system is operated and then comes
back on when the EL system turns off.
2. Inaccurate readings from the Altimeter or Heart Rate systems
3. Reduced heart rate system reception distance.
english
TROUBLE SHOOTING – HEART RATE
INTERFERENCE
Heart rate monitors are subject to interference from a wide range of external sources of electromagnetic and microwave
radiation. High tension power lines, home and automotive electronics, exercise equipment, home security systems, traffic
light controls, airport radar systems and other things are capable under the right conditions of blocking the heart rate
transmission system. When this happens, the user will usually notice a very heart rate reading (200+ ) or a reading of
zero. Usually sources of interference are localized and the unit will return to proper operation in a few seconds or at most
minutes.
CROSS TALK
Exercising in close proximity to other people using heart rate monitors may cause your watch to pick up signals from
chest straps other than your own. This is known as Cross Talk. To avoid problems associated with Cross Talk it is
recommended that you separate yourself from others wearing heart rate monitors by a minimum of 3’ or 1m in all
directions.
TRANSMISSION RANGE
The heart rate monitor system has an effective range of 28-30 inches (.75 meters). If the monitor is separated from the
transmitter strap by a greater distance than this, you may not be able to receive a heart rate signal. Additionally, the
orientation of the watch and transmitter must be such that the reading direction of watch face is not aligned perpendicular to the transmitter. Having the system in this orientation will significantly reduce the units range.
english
ALTIWARE SERIES
LOFT
32

HIGHGEAR
a Division of Implus Footcare, LLC.
2001 T.W. Alexander Drive / Box 13925 / Durham, NC 27709-3925
800-446-7587 / help@4implus.com
www.highgear.com
©2013 Implus Footcare, LLC. All Rights Reserved.
©2013 Implus Footcare, LLC. Tous droits réservés.
©2013 Implus Footcare, LLC. Todos los derechos reservados.
©2013 Implus Footcare, LLC. 著作権を所有します。
© 2013 Implus Footcare, LLC. 版權所有。
Printed in China
Imprimé en Chine.
Impresos en China.
中国印刷物
中國印刷
 Loading...