

FitWareIM_rev3 8/22/05 12:30 PM Page 1
FITWARE
SERIES

FitWare FM Pulse
TABLE OF CONTENTS
FEATURES 1
SPECIFICATIONS AND RANGES 2
BASIC OPERATION OF BUTTONS 3-4
TIME MODE 5-6
INPUT YOUR PERSONAL DATA 7-8
STEP COUNTER MODE 9-10
CHRONOGRAPH MODE 11
USING THE FM RADIO
(FITWARE FM ONLY) 12
USING THE HEART RATE MONITOR
(FITWARE PULSE ONLY) 13-14
CHANGING THE BATTERIES 15
CARE OF YOUR FITWARE PEDOMETER 16
FITWARE SERIES
FitWareIM_rev3 8/22/05 12:30 PM Page 2

2
FitWare FM Pulse
1
FITWARE SERIES
TIME OF DAY
- 12/24hr format
- Resolution 1-second
- Auto Calendar 2004-2029
DAILY ALARM
- Resolution 1-minute
- 20-Second Alert
STEP COUNTER
- 1-999,999 steps
- Stride 4-60 inches; 10-150 cm
CALORIE COUNTER
- 0-9,999.9 kilocalories
- Resolution 0.1 kilocalories
HEART RATE
- Working Range 40-240 beats/minute
AGE
- 5-99 years
WEIGHT
- 33-550 lbs; 15-250 kg
DISTANCE
- 0-9,999.0 miles or kilometers
- Resolution 0.01 miles or kilometers
CHRONOGRAPH
- 0-23h 59m 59s
- Resolution 0.01 seconds from 0-10 minutes
- Resolution 1 second from 10 minutes to 23:59:59
EXERCISE TIMER
- 0-23h 59m 59s
- Resolution 1-second
SPECIFICATIONS AND RANGESFEATURES
This manual covers the operation of the FITWARE,
FITWARE FM and FITWARE PULSE units. FitWare
pedometers are designed to measure fitness activity.
WARNING: Before starting any exercise program, we
strongly suggest you visit your doctor for a complete
physical and to discuss your exercise plans.
FEATURES AND FUNCTION
PRIMARY OPERATIONAL MODES
The FitWare units have 5 common, primary operational
modes: TIME OF DAY, STEP COUNTER, DATA (SETUP),
DAILY ALARM, CHRONOGRAPH.
In addition, the FitWare Pulse and FitWare FM have the
PULSE and FM RADIO functions respectively.
Scroll through the Primary Operational Modes by pressing
the S1 key.
The following primary modes also have the following
secondary modes:
TIME OF DAY: Date
STEP COUNTER: Calories, Distance, Timer, Step Target
DATA (SETUP): Age, Gender, Weight, Stride Length, Heart
Rate Hi and Lo Limits and Heart Rate Alarm (FitWare Pulse
only)
Scroll through the Secondary Operational Modes by
pressing the S4 key.
FitWareIM_rev3 8/22/05 12:30 PM Page 4
4
FitWare FM Pulse
3
FITWARE SERIES
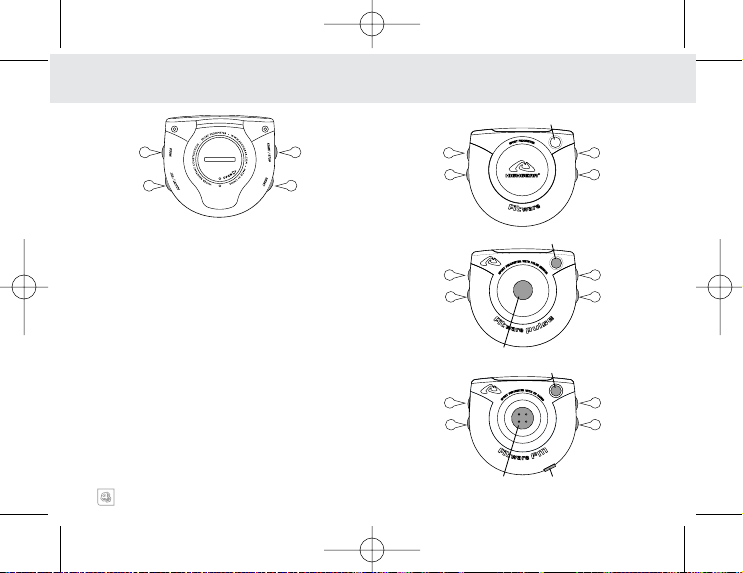
FITWARE
FITWARE PULSE
BASIC OPERATION OF BUTTONS
S1 KEY
- Change mode
- Advance to next setting option in TIME MODE
- Change Lbs/Kg
Change Inches/centimeters
S2 KEY
- Enter Setting Sequence (PRESS AND HOLD)
- Clear Step Counter (PRESS AND HOLD)
- Advance to next setting option in Data Mode
S3 KEY
- Decrease digit during programming
- View Day/Date in TIME MODE
S4 KEY
- Scroll through secondary screens in STEP and DATA
modes
- Increase digit during programming
- Daily Alarm on/off
- Pulse Alarm on/off
- Male/Female in DATA MODE
BASIC OPERATION OF BUTTONS
FITWARE FM
FitWareIM_rev3 8/22/05 12:30 PM Page 6
S1
S2
S4
S3
S4
S3
S4
S3
S4
S3
EL BACKLIGHT
EL BACKLIGHT
HEART RATE SENSOR
RESET CHANNELS
S1
S2
S1
S2
S1
S2
HEADPHONE JACKSCAN CHANNELS

6
FitWare FM Pulse
5
FITWARE SERIES
SET UP TIME OF DAY
1. Use the S1 key to advance to the TIME mode.
2. PRESS & HOLD S2 key for 2-seconds.
3. "ADJUST" will be shown on the display for 2-
seconds followed by the time with hours digits
flashing.
4. Adjust Hours, Minutes, 12/24h format, Year, Month
and Day using S3 and S4 to increase and decrease
the digits.
5. Store each setting to memory and advance to next
variable using the S1 key.
VIEW DATE
When in the TIME OF DAY screen, view the
Day/Date by pressing the S4 key. Day and Date will
be displayed for approximately 2-seconds.
NOTE: FitWare pedometers have a continuous
display. If the display screen is blank, the battery
may be dead (see page 15 “Changing the
Batteries”).
TIME MODE
(ALL MODELS)
SET DAILY ALARM
1. Use the S1 key to advance to the ALARM mode.
2. PRESS & HOLD S2 key for 2-seconds.
3. "ADJUST" will be shown on the display for 2-
seconds followed by the alarm time with the hours
digits flashing.
4. Adjust Hours and Minutes using the S3 and S4 keys
to increase and decrease the digits.
5. Store each setting to memory and advance to the
next variable using the S1 key.
6. Once set, the ALARM can be turned ON and OFF
using the S4 key. When active the display will show
ON to the right of the Alarm setting and a small
ALARM ICON will be visible in the upper
right corner of the display when you are in the TIME
and ALARM modes.
7. The Alarm will sound for 20-seconds when the alarm
function is on. PRESS ANY BUTTON to stop the
Alarm sound.
TIME MODE
(ALL MODELS)
FitWareIM_rev3 8/22/05 12:30 PM Page 8

8
FitWare FM Pulse
7
FITWARE SERIES
SET DATA
1. Use the S1 key to advance to the DATA mode.
2. Upon entering the Data Screen, AGE will automat-
ically be displayed on the screen.
3. Review your Data settings using the S4 key
4. To program the Data screen, PRESS & HOLD the
S2 key for 2-seconds.
5. "ADJUST" will be shown on the display for 2-
seconds followed by "AGE” with the number of
years flashing.
6. Adjust Age, Gender, Weight, Stride (length) using the
S3 or S4 keys. PRESS the S2 key to advance to the
next variable.
NOTE: See “Determining Your Stride Length” on
following page.
7. In the WEIGHT and STRIDE (length) programming
windows use the S1 key to change the units from
metric (Kg and Cm) to English (Lbs and In.)
NOTE: For the distance and calorie functions to
work properly, the Data section of the FitWare unit
must be programmed as accurately as possible.
Aerobic Pulse Rate Zone (FitWare Pulse Units Only)
8. On the FitWare Pulse unit you will also adjust HI and
LO PULSE LIMITS and turn the PULSE LIMIT
ALARM ON or OFF.
9. Store each setting to memory and advance to the
next variable using the S2 key.
INPUT YOUR PERSONAL DATA
(ALL MODELS)
DETERMINING YOUR STRIDE LENGTH
1. You will need a tape measure to accurately measure
your stride.
2. Mark a spot on the ground. Start with your toe to
that point and take 10 natural strides of the type you
want to measure (run, walk, jog, etc).
3. Mark the place where the toe of your forward foot
stopped.
4. Measure the distance between the two points in
inches or centimeters, and divide by 10.
5. Enter your STRIDE LENGTH in DATA mode. Use
the S1 key to select either inches or centimeters.
INPUT YOUR PERSONAL DATA
(ALL MODELS)
FitWareIM_rev3 8/22/05 12:30 PM Page 10

10
FitWare FM Pulse
9
FITWARE SERIES
The FitWare units allow you to program a target number
of steps for any workout. Once you program a target and
start walking the FitWare unit will automatically count
down from your target. When you reach zero an alarm
will sound indicating you have reached the target.
1. Enter STEP mode and press the S4 key 4 times until
TARGET is briefly displayed on the screen.
2. PRESS & HOLD the S2 key to clear any existing
targets and start the programming sequence.
3. 5 ZEROS will appear on the display with the far left
digit flashing.
4. ADJUST the flashing digit UP or DOWN using the
S3 and S4 keys.
5. Advance to the next digit using the S1 key.
6. When you have programmed your step target, press
& release the S1 key until no digits are blinking.
STEP COUNTER MODE
(ALL MODELS)
WEARING YOUR FITWARE PEDOMETER
The FitWear pedometer may be attached to the
waist band of your pants or belt in any location
which is convenient and easy for you to read. Make
sure the display of the unit is located at the top
when you are wearing it.
USING THE STEP COUNTER
1. Use the S1 key to advance to the STEP mode.
2. PRESSING & HOLDING the S2 key for 2-seconds
in any STEP COUNTER screen will clear the
following exercise information: NUMBER OF
STEPS TAKEN, CALORIES, DISTANCE or TIMER.
3. When starting to exercise, for greatest accuracy,
attach the unit to your belt or waistband and then
clear the step counter to zero by PRESSING &
HOLDING the S2 key for 2-seconds. Clearing the
unit to zero prior to attaching the unit to your belt or
waistband may result in extra "steps" being counted.
NOTE: FitWare pedometers will only record steps in
Step mode or Step sub-modes (Calories, Distance,
Timer and Target).
STEP COUNTER MODE
(ALL MODELS)
FitWareIM_rev3 8/22/05 12:30 PM Page 12

FITWARE SERIES
12
FitWare FM Pulse
11
USING THE CHRONOGRAPH FUNCTION
The FitWare units are equipped with a digital
chronograph.
1. START and STOP the CHRONOGRAPH by
PRESSING the S4 key.
2. When stopped, CLEAR THE CHRONOGRAPH by
PRESSING the S3 key.
NOTE: When you are viewing the Chronograph, the
FitWare unit will not count steps. If you are
exercising, do not stay in the Chronograph mode any
longer than necessary. REMEMBER: You do not need
to use the Chronograph to time your exercise
session. This is done automatically for you by the
TIMER secondary function in the STEP mode.
CHRONOGRAPH MODE
(ALL MODELS)
1. Plug the headphones into the jack located on the
side of the FitWare FM unit.
2. Reset the radio to the lowest frequency by pressing
the reset button to the upper right corner of the face
of the unit.
3. Advance to the next available frequency by
PRESSING the large SCAN button located at the
center of the face of the unit. CONTINUE TO
PRESS the SCAN button until a desired station is
reached (allow 4-5 seconds for station frequency to
register).
4. When you reach the end of the FM frequency range,
you must reset the unit to its starting frequency by
PRESSING the RESET CHANNEL button to repeat
scrolling through the available frequencies
5. To turn the radio off, unplug the headphones.
6. The volume control for the radio is located on the
headphone wire.
CAUTION: The headphone jack connection
automatically activates the FM RADIO mode.
Leaving the headphones plugged in the FitWare FM
unit for extended periods of time will drain the
battery.
USING THE FM RADIO
(FITWARE FM ONLY)
FitWareIM_rev3 8/22/05 12:30 PM Page 14

14
FitWare FM Pulse
13
FITWARE SERIES
USING THE HEART RATE MONITOR
(FITWARE PULSE ONLY)
6. If the HEART RATE ZONE ALARM is active, when
you check your pulse, if you are above or below your
programmed target zone the words HI or LO will
appear to the right of your pulse reading.
7. The heart rate display will remain active for approxi-
mately 10-seconds and then automatically return to
the Time of Day mode.
8. Avoid taking pulse readings in direct sunlight as it
may interfere with the sensor. If you must check your
pulse in bright sunlight, shield the FitWare unit with
your other hand.
1. After you have programmed your "AEROBIC PULSE
RATE ZONE" (Set Data Page 9), you are ready to
use the HEART RATE MONITOR portion of your
FitWare Pulse unit.
2. The FitWare Pulse uses an infrared sensor which
detects your pulse rate from the tip of your index
finger.
NOTE:The FitWare Pulse sensor will not work if you
are wearing gloves.
3. Use the S1 key to advance to the PULSE mode.
4. Place your index finger gently over the heart rate
sensor on the face of the FitWare unit.
NOTE: Pressing too hard on the heart rate sensor
may cause the heart rate system to malfunction.
5. The small heart icon located to the extreme left of
the display should begin flashing and your heart rate
should appear a few seconds later. The first few
heart rate numbers may change up and down while
the unit is making its measurement. A long beep
will indicate when the measurement is complete and
the heart rate number shown is correct.
USING THE HEART RATE MONITOR
(FITWARE PULSE ONLY)
FitWareIM_rev3 8/22/05 12:30 PM Page 16

15
FITWARE SERIES
1. Avoid Extreme Temperatures.
2. Clean your FitWare unit using a soft dry cloth.
NEVER use any type of chemical cleaning agent on
the unit.
3. Store your FitWare unit in a cool, dry place when not
in use.
4. Cold temperatures may cause the display to dim or
fail completely. Normal operation should return
when the unit warms up.
5. Store this manual in a safe place for future
reference.
.
CARE OF YOUR FITWARE PEDOMETER
16
FitWare FM Pulse
1. The FitWare units are powered by CR2032 3v
Lithium batteries. These batteries are very common
and can be found at most drug stores and camera
shops.
2. The FitWare and FitWare Pulse use a single battery.
3. The FitWare FM uses a pair of batteries.
FITWARE AND FITWARE PULSE
1. Remove battery door using a coin or other small
object.
2. Remove the old battery.
3. Install the new battery Positive (+) side up.
4. Replace and tighten battery door.
FITWARE FM
1. Remove battery door using a coin or other small
object.
2. Remove old batteries.
3. Install new batteries.
a. The bottom battery (power source for display and
pedometer unit) should be installed Positive (+) side
down and must be placed under the two small metal
prongs located in the lower right corner of the
battery compartment.
b. The top battery (power source for FM Tuner) must
be installed Negative (-) minus side down.
4. Replace and tighten the battery door.
CHANGING THE BATTERIES
FitWareIM_rev3 8/22/05 12:30 PM Page 18

HIGHGEAR USA INC.
web: www.highgear.com
email: contacts@highgear.com
© 2005 HighGear USA, Inc.
All Rights Reserved.
FitWareIM_rev3 8/22/05 12:30 PM Page 20
FITWARE
SERIES
 Loading...