


AXIO series
ENGLISH
ENGLISH
1

Welcome to the AXIO Series
Congra tulations on the p urchase of your A XIO series wr ist-based uni t.
This ser ies was specif ically design ed for consumer s looking for a lig ht-weight, str aight forward
altimet er for their outdo or adventures.
The Ax io series has many o f the same feature s available in our ot her altimeters , but we have streamlined th e Axio series t o bring you a full- featured altimeter wit hout the frustr ation of multiple modes
and conf using setting s.
Oh yeah, we a dded the aspect of style fo r those nights on t he town.
This manual cover s three product s in the AXIO ser ies
AXIO mini (Al timeter and Baro meter)
38.1 mm x 38.1 mm x 15.3 mm C ase
5 mm Butto ns
18 mm Visib le LCD
ENGLISH
2.0 ounc es / 57 grams
AXIO (Altimeter and Bar ometer)
44 mm x 44 mm x 15.3 mm Case
5 mm Butto ns
23 mm Visi ble LCD
2.2 ounces / 64 gr ams
AXIO max (Altimeter, Bar ometer and Digital Comp ass)
46 mm x 46 mm x 15. 85 mm Case
6 mm Butto ns
26 mm Visi ble LCD
2.5 ounc es / 71 grams
2

Table of Contents
FEATURES AND SPECIFICATIONS 4-5
WARNINGS AND CAUTIONS 6-7
AXIO SERIES MODE 8-9
BUTTON FUNCTIONS 10-11
TIME MODE SETTINGS 12-13
Selecting a TIME ZONE 12
Changing views in TIME mode 12
Setting TIME on your watch 13
COMPASS MODE (AXIO Max Only) 14-16
Display 14
Calibration 15
Settings 16
ALTIMETER / TEMPERATURE / BAROMETER 17-19
Views 17
Units 18
Calibrating Altitude and Barometer Readings 19
12 HOUR WEATHER FORECAST 20
CHRONOGRAPH MODE 21
DATA MODE 22
ALARM DESCRIPTIONS 23-24
SETTINGS ALARM 25
BATTERY INFORMATION AND DESCRIPTIONS 26
TROUBLESHOOTING 27
ENGLISH
3

Features of the AXIO Series
Sea- Level and Absolute Barometer Displ ay
ENGLISH
4
Mercur y Inches and Mi llibar / Hecto- Pascal Barom eter Display
Fahrenheit and Cel sius Temperature Display
East / West M agnetic Nort h Declination s etting ( AXIO max only )
Glass Re -Enforced N ylon Case
Minera l Glass Lens
5 ATM / 5 Bar Water Resistanc e
Comfor table and Dur able Strap
Stainl ess Steel Butto ns
EL Backl ight
Consum er Replaceable Batter y
2 Time Zon es
12 / 24 Hour Time Display
Automat ic Calendar (2008 to 2057 )
Day / Month / Weekday Dis play
Swiss A ir Pressure / Tempera ture Sensor
12 Hour Weather Forec ast Icon
Imperial and Met ric Local Altitude Dis play
Digital Compas s ( AXIO max onl y )
100 Hour C hronograph
10 Run Memo ry
2 Daily Al arms
1 Rest Ala rm
1 Hydrati on Alarm
2 Altitude Alar ms

Specifications and Ranges
GENERAL
Water resistance 5ATM
ALTIMETER
Range -702 to +9158m / -2305 to +30,045ft
Resolution 1m / 1f
THERMOMETER
Range -10 to +50C / +14 to +122F
Resolution 0.1C/0.1F
COMPASS
Resolution of 1 degree
Rotating digital bezel in quarter cardinal points
BAROMETER
Range 300 to 1100mbar/hPa or (8.86 inHg to 32.48 inHg)
Resolution 1mbar/hPa or 0.01InHg
CHRONOGRAPH
Range 99 hours
Resolution 0.01 second for the first 10 hours; 1.0 second for hours 10-99
DATA MODE
10 Run Memory
ALARM MODE
2x 24 Hour alarms
99 Hour countdown alarm
99 Hour countdown repeat alarm
2x Altitude alarms with range -702 to +9158m / -2305 to +30,045ft
ENGLISH
5

Product Care Cautions, Notes and Warnings
CAUTION: Your in strument is desi gned to be water res istant to a static p ressure of 164 fee t /
50 meter s / 5 Atmospheres / 5 B ar. This uni t is suited for sur face swimming a nd clear-water
shower ing or bathing. This unit should not be us ed for snorkelin g or scuba diving.
NOTE: Units of meters an d feet that indica te a pressure rati ng do NOT equal
the rec ommended depth f or scuba diving.
NOTE: One atm osphere (ATM) or Bar of p ressure, is equi valent to the pres sure exerted
on a stati c object lying in a depth of 10 metres (1 ATM or Bar equa ls 10 meters).
CAUTION: This press ure is increased with motion acco rdingly. Fast or rapi d movement under water
will inc rease the press ure on the unit dram atically. If you dive i nto a pool to a depth of 2 .5 meters,
the pres sure on the unit will not be 0.25 atmosp heres.
DO NOT wear the watch in a soapy dish water or bubble bath.
The alkali contained in soaps can damage the rubber seals.
ENGLISH
DO NOT use the watch in a hot tub or extremely hot shower or bath.
High temperatures and steam can damage the rubber seals.
DO NOT expose the watch to sudden changes of temperature by going from a hot tub to cold water.
This can make the rubber seals contract and allow water to penetrate.
6

Product Care Cautions, Notes and Warnings
ALWAYS rinse the watch with clear tap water after exposure to salt water.
Salt is highly corrosive and can damage both the rubber seals and the watch case.
LIGHT COLOR plastics will change color over time as a result of dirt and surface friction.
You should clean light plastics with a damp cloth often to preserve the color as long as possible.
NEVER push the buttons underwater, when the watch is wet or when you are cleaning or rinsing the unit.
You are actually pushing water inside the watch.
DO NOT use cleaning solvents to clean your watch. Solvents WILL damage the integrity of the plastic.
WARNING: This product is NOT designed to be used as a PRIMARY altitude instrument for flying,
skydiving, hang gliding or other sports where sudden major changes in altitude may occur
or when there is a need for industrial precision.
BE SURE to calibrate your digital compass often - especially before hiking or orienteering adventures.
Daily use around household appliances and magnetic fields WILL affect the compass.
We do not want to lose you on the trail. When orienteering, always bring an analog compass
to ensure multiple direction readings and accuracy.
CAUTION: Exposure to strong magnetic fields WILL cause the compass unit to malfunction and may
even permanently damage the compass sensor. Keep the unit away from magnetic sources.
NEVER attempt to disassemble or service the unit. This will void any warranty.
Detailed warranty information is available online at www.highgear.com or www.techtrail.com
ENGLISH
7
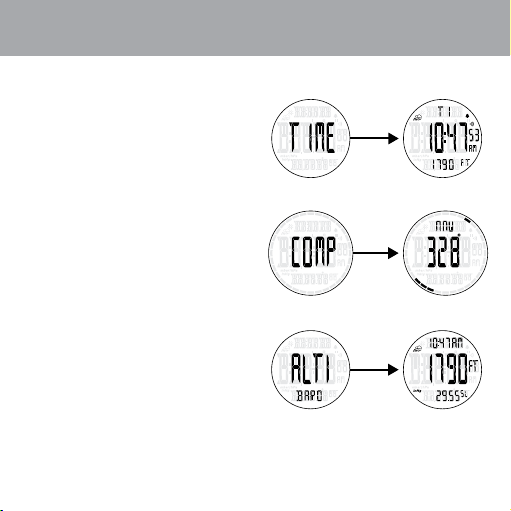
AXIO Series Modes
Modes ar e listed in sequen tial order as they appear on the user inte rface.
TIME Mode
12 / 24 Hour Time Display
2 Time Zon es
Automat ic Calendar (2008 to 2057 )
Month / Day Display
Weekday Di splay
Local A ltitude Displ ay
LCD Contr ast Adjustment
Button C hime ON / OFF
Weather Fo recast Icon
COMPASS Mode ( AXIO max only )
360 Degree Com pass Bearings
16 Cardina l Bearings
ENGLISH
Digital True North Arrow
Digital Compas s Re-call
Digital Compas s Calibration
East / West M agnetic Nort h Declination S etting
ALTIMETER / BAROMETER Mode
1 meter or 1 fo ot Local Altit ude Resolution
Weather Fo recast Icon
Local A ltitude / Barometer / Weath er Icon Adjustm ent
Time / Loc al Altitude / Se a-Level Barom eter Display
Time / Loc al Altitude / Temperature Di splay
Time / Sea -Level Barome ter / Absolute Barometer D isplay
8
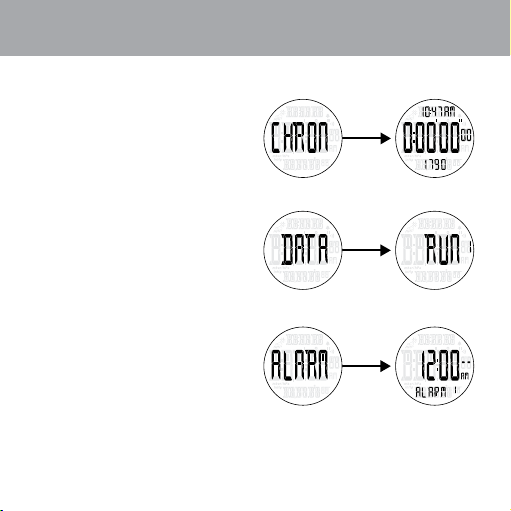
AXIO Series Modes
CHRONOGRAPH Mode
100 Hour C hronograph
1/100 Seco nd Resolution
Time Dis play
Local A ltitude Displ ay
DATA Mode
10 Run Memo ry
Starting Alt itude Record
Accumu lated Altitud e Record
Maxim um Altitude Rec ord
Total Exerc ise Time Record
Alarm Mode
Daily Al arm 1
Daily Al arm 2
Rest Ala rm
Hydrati on Alarm
Altitude Alar m 1
Altitude Alar m 2
Alarm O N / OFF
ENGLISH
9

Button Functions
1. ADJUST Button
• Pressandholdfor3secondst oentermod esettin gs(exceptinC HRONandDATAmodes).
• Exitset tingsata nytime.
• ResetChr onogra phwitho utsaving.
• Pressandholdfor3secondst oclearlastrunfro mDATAmode.
• Pressandholdfor6secondst oclearALLrunsfr omDATAmode.
2. MODE But ton
• Presson cetotogg lethrou ghmodese lectio ns.
• Movetonex tsettin gduringa djustme ntinanymode.
3. START / + Button ( RECALL / + )
N OTE: START / + is labeled as R ECALL / + on AXI O max.
• Presstov iewalter natetimez oneinTIM Emode.
• Pressandholdfor3secondst oswitchtoa lternatetimezon e.
• Presstov iewalter nateuniti nALTI-BA ROmode.
ENGLISH
• Pressandholdfor3secondst oswitchun itsinALTI- BAROmode.
• Presstov iewnextdatapointinDATAmode.
• Presson cetoincr easeset tingvalu e.
• Presstorecallth ecompas sinCOMPAS Smode.
4. STOP / - Button ( VIEW / - )
N OTE: STOP / - is labeled a s VIEW / - on AXIO m ax.
• Presstoswitchdis playviewinTIMEandA LTI-BA ROmodes.
• Pressandholdfor3secondst osaveruninC HRONmode.
• Presstos electru ndatainDATAmode.
• Presson cetodecr easeset tingvalu e.
• Presstorecallth ecompas sinCOMPAS Smode.
10

Button Functions
1
2
3
4
1
2
3
4
AXIO / A XIO MINI
ENGLISH
AXIO M AX
11

TIME Mode Settings
NOTE: START / + is labeled as R ECALL / + on AXI O max.
NOTE: STOP / - i s labeled as VIEW / - o n AXIO max.
Selecting a TI ME ZONE
1. D efault value is TIM E ZONE 1.
2. Pr ess START / + to view TIM E ZONE 2.
3. Pr ess and hold START / + for 3 second s
to switch to TIME ZONE 2.
Changing views in TIME mode
1. D efault view is MON TH / DAY.
2. Pr ess STOP / - to change v iew
to DAY OF WEEK or LO CAL ALTITUDE.
ENGLISH
12

TIME Mode Settings
Setting TIME on your watch
1. Us e START / + key to se lect the desire d time zone.
2. Pr ess and hold ADJ UST for 3 seconds t o begin setting t he time.
3. Set HOU R first by using START / + and STOP / - to change the value.
4 . Press MO DE to move to MINUTES setting.
5 . Again, us e START / + and STO P / - to change the valu e.
6 . Press MODE to move to SECON DS setting.
7. Pressi ng START / + or STO P / - will reset seco nds to zero.
8 . Following the s ame process, mo ve through MONT H, DAY, YEAR and 12 /24 HOUR settings.
9 . The next s etting is DISPL AY contrast.
10 . Press START / + and STO P / - to increase or de crease the disp lay contrast.
11. The last setting is the BUTTON CHI ME ON or OFF.
If the but ton chime is ON, a b eep will sound ever y time a button i s pressed.
The button chime i con will also app ear in TIME and AL ARM mode disp lay
when it is t urned ON.
12. Press ADJUST t o exit setting bac k to TIME mode.
ENGLISH
13

COMPASS Mode Display ( AXIO max only )
Viewing COMPASS mode
1. The four dots on the outside of the display point to true north.
The single dot is the north point of the arrow.
The three dots represent the south end of the arrow.
2. One of 16 cardinal point descriptions will appear in the upper display.
N - S - E - W - NE - NW - SW - SE
NNW - NNE - SSW - SSE
ESE - ENE - WNE - WNW
3. 360 degree compass reading in center display.
Recalling the Compass
1. Three dashes will appear in the compass display after 25 seconds.
2. The compass automatically shuts down after 25 seconds to save battery life.
3. Press RECALL / + or VIEW / - to re-activate the compass sensor.
ENGLISH
14

COMPASS Mode Calibration ( AXIO max only )
DAILY USE around household appliances and magnetic fields will affect the compass accuracy.
BE SURE to calibrate your digital compass often - especially before hiking or orienteering adventures.
We do not want to lose you on the trail.
NOTE: When orienteering, always bring an analog compass to ensure
multiple direction readings and accuracy.
NOTE: Read through the entire description below before attempting the calibration process.
The calibration needs to be executed with precision or it will fail.
Reading through the process first will help to achieve an accurate calibration.
Calibrating t he Compass
1. Pre ss and hold ADJU ST for 3 seconds to b egin calibration.
2 . Hold the wat ch head in a perpendicula r and level position to your ch est.
3 . Press RECA LL / + to begin.
4 . Holding the watc h face level, rotat e it slowly clock wise.
5 . The watc h face should be ro tated twice.
6 . Each rot ation should t ake approximatel y 12 to 15 secon ds to complete.
7. Af ter the two rotations, pr ess RECALL / + to end c alibration.
8 . If CALI B FAIL appe ars, the watch will automat ically begin re -calibrat ion.
Repeat step s 2 through 7.
9 . If DONE CA LIB appears in th e display, press MOD E to continue
to magneti c declination se tting. See decl ination setting on next p age.
10 . Or pres s ADJUST to exit ca libration and return to CO MPASS mode.
ENGLISH
15

COMPASS mode settings ( AXIO max only )
What is Magnetic Declination?
A magnetic compass points t o the earth’s magn etic north pole. Depen ding on your locat ion, this may
diffe r from True North. A djusting the mag netic declinat ion allows you to c ompensate for th is variation.
Magnet ic declination for an area c an be found on topo graphical map s. Declinatio n can range over
time and distanc e. Make sure the sour ce for your decli nation settin g is up to date. The foll owing
website s are good sources for fin ding up to date loca l magnetic declination r eadings.
http:/ / www.gsc.nrc an.gc.ca/geo mag/field /mdcalc_e.php
http:/ / www.ngdc.no aa.gov/seg/ge omag/jsp/ Declination .jsp
NOTE: If you d o not have a declination reference, leave the decl ination setti ng at the default, Z ERO.
Setting the Declination
1. Press and ho ld ADJUST for 3 se conds to begin c alibration.
2. Run throug h the calibrati on process or
pres s MODE to skip ca libration and enter decli nation settin gs.
ENGLISH
3. Press RECA LL / + or VIEW / - to chan ge the value
of the f irst digit of the d eclination setting.
4. Press mode to move to the s econd digit.
5. Press RECA LL / + or VIEW / - to chan ge value.
6. Press mode to move to E or W de clination set ting.
7. Pr ess RECALL / + or VIEW / - to select E or W decl ination.
8. Press ADJ UST to exit calibr ation and return to COMPASS mode.
16

ALTIMETER / TEMPERATURE / BAROMETER Views
NOTE: START / + is labeled as R ECALL / + on AXI O max.
NOTE: STOP / - i s labeled as VIEW / - o n AXIO max.
ALTI-BARO Mode Views
1. The t ime of the select ed TIME ZONE is always displ ayed in the upper dis play.
2 . TIME / LOCA L ALTITUD E / Sea-Level BA ROMETER is the de fault.
3 . Press STOP to c hange view to TIM E / LOCAL ALTITUDE / TE MPERATURE view
and TIME / Se a-Level BARO METER / Absolu te BAROMETER v iew.
4 . The weathe r forecast icon only appe ars in TIME / Sea- Level BAROME TER /
Absolute BAROMETER view.
ENGLISH
17

ALTIMETER / TEMPERATURE / BAROMETER Units
Setting Altitude, Temperature and Barometer Units
Within A LTI-BA RO mode; the altitude, temp erature and baro meter units
can only b e modified in certai n views.
NOTE: START / + is labeled as R ECALL / + on AXI O max.
NOTE: STOP / - i s labeled as VIEW / - o n AXIO max.
TIME / LO CAL ALTITUDE / Sea -Level BAROM ETER
1. Only the LOC AL ALTITUDE units c an be set in this vie w.
2. Default units are US Im perial FEET.
3. Press START / + to view LOCAL A LTITUDE in METERS.
4. Press and ho ld START / + for 3 second s
to swi tch to METERS.
TIME / LO CAL ALTITUDE / TEMP ERATURE
1. Only the TEMPERATU RE units can be set i n this view.
ENGLISH
2. Default units are FAHR ENHEIT degree s.
3. Press START / + to view TEMPE RATURE
in CELSIUS degrees.
4. Press and ho ld START / + for 3 second s to switch
to CELSIUS degrees.
TIME / Se a-Level BAR OMETER / Abso lute BAROMETER
1. Only the BA ROMETER unit s can be set in this vi ew.
2. Default units are Mercury I nches (InHg).
3. Press START / + to view BARO METER
in Mil libar / Hecto- Pascal (mbar / hPa).
4. Press and ho ld START / + for 3 second s
to swi tch to mbar / hPa.
18

ALTIMETER / BAROMETER Units
NOTE: Always use an acc urate source when adjust ing ALTI-BARO mode. If you set any of the u nits
incorrectly or ex tremely far away from the act ual readings, a ll measurements i n this mode will be
highly i naccurate.
NOTE: Never a djust the ALTI- BARO inside a pre ssurized enviro nment like an air plane, air condi -
tioned or heated ro om.
WARNING: Never adj ust the ALTI-BA RO while you are tr aveling at high sp eeds like inside a m oving
car or ski ing down the mount ain. Not only wil l the measurement s be highly inaccurate, hi tting a tree
can real ly hurt bad!
NOTE: START / + is labeled as R ECALL / + on AXI O max.
NOTE: STOP / - i s labeled as VIEW / - o n AXIO max.
Calibrating Altitude and Barometer Readings
1. Press a nd hold ADJUST f or 3 seconds to ente r LOCAL ALTITUDE ad justment.
2 . Pre ss START / + or STOP / - to increase or dec rease the value to a a ccurate sourc e.
3 . Pre ss MODE to move to Se a-Level BARO METER adjustm ent.
4 . Pre ss START / + or STOP / - to increase or dec rease the value to a a ccurate sourc e.
5 . Pre ss MODE to move to Absolute B AROMETER adj ustment.
6 . Pre ss START / + or STOP / - to increase or dec rease the value to a a ccurate sourc e.
7. Press M ODE to set 12-hour weather fo recast icon to known fore cast.
8 . Pre ss ADJUST to exit c alibration back to ALTI- BARO mode.
ENGLISH
19

12-Hour Weather Forecast Icons
The weath er forecast ico n will be updated au tomatically eve ry 12 hours.
The weath er forecast ico n will appear in the f ollowing mode v iews:
T IME mode - MON TH / DAY view and DAY OF WEEK view
A LTI-BARO mode - T IME / Sea-Level BAROM ETER / Absolute BAROM ETER view
NOTE: The w eather forecast cannot be active while alti tude is displayed on the watch.
You must scr oll to a view that does n ot have altitude to e nsure an accura te forecast.
NOTE: If you w ear the watch on a dail y basis in TIME or A LTI-B ARO mode with alt itude display, you
must scr oll to a view withou t altitude to begin the fore casting process. This process ta kes 12 hours.
NOTE: Dai ly use inside a movi ng car or pressur ized room will af fect the forecas t.
The fore cast is designed f or extended outdoor use.
Weather Forecast Icons
ENGLISH
20
Sunny
Partly Cloudy
Cloudy
Rain

CHRONOGRAPH Mode
NOTE: START / + is labeled as R ECALL / + on AXI O max.
NOTE: STOP / - i s labeled as VIEW / - o n AXIO max.
Chronograph Display
1. Current ti me of day is displayed i n the upper display.
2. Total time is dis played in the cente r display.
3. Local altitude is di splay in the lower di splay
Simple Chronograph Operation
1. Press START / + to begin rec ording total tim e of exercise.
2. Press STOP / - to p ause total time recordi ng.
3. Press START / + again to rest art recordin g.
or
4. Press and ho ld STOP / - for 3 secon ds to save to DATA mode. Chrono graph will be read y to
rec ord the next run. RUN 1, RUN 2, RUN 3 , etc...
or
5. Press and ho ld ADJUST for 3 se conds to RESET
chro nograph without saving t o DATA mode.
NOTE: The c hronograph ca n record up to 10 runs o r hikes
in DATA mode.
NOTE: The c hronograph re solution chan ges after 9:59’5 9”99.
After 10 ho urs, the display w ill no longer show 1/ 100 of a second.
ENGLISH
21

DATA Mode
NOTE: START / + is labeled as R ECALL / + on AXI O max.
NOTE: STOP / - i s labeled as VIEW / - o n AXIO max.
Information stored in DATA mode
1. S tarting Loc al Altitude of exer cise.
2 . Total Acc umulated Altit ude Gain during exercise. T he graph illustr ates a total accumulated
alt itude of 7000 fee t.
3 . Maximum Altitude Achieved dur ing exercise.
4 . Total Time o f entire exercise.
DATA Mode Operation
1. O nce you enter DATA mode, the detai ls of the last stored ru n will automatical ly scroll through t he
list above.
2 . Press STOP / - to move to t he details of the previous stored run.
3 . Press START / + to manua lly move through the detail s of any scrolling r un. After 3 seco nds with
no bu tton press, the d etails will agai n start to auto-scroll.
ENGLISH
Erasing DATA Mode Storage
1. P ress and hold ADJUST for 3 seconds to erase last stored exercise.
2 . Press and hold A DJUST for 6 seconds to eras e ALL runs stored .
22

Alarm Descriptions
Within A LARM mode, press STOP / - to toggle through th e multiple alar ms in the followi ng order:
Daily A larm 1, Daily Al arm 2, Rest Ala rm, Hydrati on Alarm, Al titude Alarm 1, Alti tude Alarm 2
Daily Alarms 1 and 2
1. Alarm will sound on set t ime of day.
2 . The alarm w ill sound continuously f or 20 seconds then stop for 4 0 seconds.
3 . The alarm w ill repeat the 20/40 second cycle three time s unless the alar m is disabled.
4 . Press any button to disable t he alarm sound du ring the 20 seco nd cycle.
5 . The time of day will fla sh in the display while daily alarm is so unding.
Rest Alarm
1. Use r sets hour and minutes of this c ount-down ti mer.
2 . The alarm w ill sound continuously f or 20 seconds then stop.
3 . Press any button to disable t he alarm sound du ring the 20 seco nd cycle.
4 . The time of day will fla sh in the display while rest al arm is sounding.
5 . The rest ala rm will automati cally turn OFF w hen sound cycles e nd or user
presses a button.
Hydration Alarm
1. User se ts hour and minute s of this repeatin g count-down t imer.
2 . The alarm will sound c ontinuously fo r 20 seconds then r eset the timer.
3 . Pre ss any button to sto p the alarm sound d uring the 20 sec ond cycle.
NOTE: Hydr ation Alarm is not disabl ed until turned O FF in Alarm Mode.
4 . A not ification to D RINK will fla sh in the display while hydrat ion alarm is soun ding.
5 . The hydratio n alarm will repe at to sound after t he set time increm ent until turned OFF
in alarm m ode.
ENGLISH
23

Alarm Descriptions
Altitude Alarms 1 and 2
1. User se ts desired altitude for al arm to sound.
2 . The alarm will sound c ontinuously fo r 20 seconds once desired a ltitude is reac hed.
3 . Pre ss any button to dis able the alarm sound duri ng the 20 second c ycle.
4 . The altitud e reading will fl ash in the display w hile altitude al arm is sounding.
5 . If us er continues to h ike past the set alti tude without tur ning the altitu de alarm
OFF in alarm mode, the alarm will sound a gain when user ret urns back down to t he set altitude.
NOTE: START / + is labeled as R ECALL / + on AXI O max.
NOTE: STOP / - i s labeled as VIEW / - on AXIO m ax.
Setting the Daily Alarms
1. U se the STOP / - key to select either daily alarm 1 or 2.
2 . Press and hold A DJUST for 3 seconds to begi n adjusting the ho ur setting.
3 . Press START / + or STOP / - to increase o r decrease the ho ur.
4 . Press MODE to move to minute s setting.
ENGLISH
5 . Press START / + or STOP / - to increase o r decrease the mi nutes.
6 . Press ADJUST t o exit setting. Th e daily alarm will a utomatically turn ON up on exit.
Setting the Rest Alar m
1. U se the STOP / - key to select the rest alarm.
2 . Press and hold A DJUST for 3 seconds to begi n adjusting the ho ur setting.
3 . Press START / + or STOP / - to increase o r decrease the ho ur.
4 . Press MODE to move to minute s setting.
5 . Press START / + or STOP / - to increase o r decrease the mi nutes.
6 . Press ADJUST t o exit setting. Th e rest alarm will au tomatically t urn ON
and b egin to count- down upon exit.
24

Setting Alarms
NOTE: START / + is labeled as R ECALL / + on AXI O max.
NOTE: STOP / - i s labeled as VIEW / - on AXIO m ax.
Setting the Hydration Alarm
1. U se the STOP / - key to select the hydration ala rm.
2 . Press and hold A DJUST for 3 seconds to begi n adjusting the ho ur setting.
3 . Press START / + or STOP / - to increase o r decrease the ho ur.
4 . Press MODE to move to minute s setting.
5 . Press START / + or STOP / - to increase o r decrease the mi nutes.
6 . Press ADJUST t o exit setting. Th e hydration alarm will auto matically tur n ON
and b egin to count- down upon exit.
Setting the Altitude Alar ms
1. U se the STOP / - key to select either altitud e alarm 1 or 2.
2 . Press and hold A DJUST for 3 seconds to begi n adjusting the al titude settin g.
3 . Press START / + or STOP / - to increase o r decrease the de sired altitude.
4 . Press ADJUST t o exit setting. Th e altitude alar m will automatic ally turn ON upon exit.
Turning Alarms ON or OFF
1. U se the STOP / - key to select desire d alarm.
2 . Press START / + to toggle the alar m between ON and O FF.
The a larm icon will appear in TI ME, ALTI-BARO, C HRON, DATA and ALARM
mod es when any alarm is t urned ON.
ENGLISH
25

Battery Information and Replacement
AXIO mini Bat tery: CR1632 3V L ithium
AXIO Batte ry: CR2032 3V L ithium
AXIO max Bat tery: CR2 032 3V Lithium
AXIO mini and A XIO Batte ry Life:
2 to 2.5 years depending on use
of the alt imeter and backlight.
AXIO max Bat tery Life:
1.5 to 2 years d epending on use of t he altimeter,
backli ght and digital c ompass.
NOTE: Heav y use of the altimeter, backlight
and comp ass will signif icantly reduc e
the quoted batter y life.
Battery Replacement
ENGLISH
1. Turn the bat tery hatch co unter-clock wise using only a C OIN in the slot.
2 . Take care not t o lose the rubbe r gasket or expose it to f oreign residu e.
3 . Carefully, remove t he plastic batt ery cover by turn ing it counter-c lockwise.
4 . Remove the old bat tery and repla ce with new batte ry with POSITI VE symbol (+) facing yo u.
5 . Replace plast ic battery cover.
6 . Ensure the rubb er gasket is proper ly in place befor e replacing the b attery hatch.
NOTE: Bla nk display, inaccurate alti tude and compass or fading b acklight are i ndications
that the ba ttery is getting low.
26

Troubleshooting
The unit is a very sen sitive and sophi sticated instr ument. If prope rly cared for it s hould last and
remain ac curate for many ye ars. However, from ti me to time proble ms may happen. It has b een our
experi ence that the maj ority of the pro blems seen by cons umers with products suc h as these are
related t o dead or dying bat teries.
While th e estimated life o f a fresh batter y in the unit is approximately 2 to 2.5 year s, this can be
short ened consider ably if the compass, alti meter or EL systems of t he unit are used ext ensively.
Wheneve r you are experien cing issues related to the f unction of the un it it is recommen ded that
you insta ll a fresh batter y as a first course of action, espe cially if it has been more tha n a half a year
since th e last time the bat tery was replac ed.
BE AWARE – Li thium batteri es of the type used in this watc h are very susce ptible to improper storage. Many t imes, batteri es purchased as ne w are dead or weak before they are purchas ed. Do not
assume t hat batteries in stores ar e good. If you try a new batter y and problems p ersist, pleas e try a
second batter y from another source, ju st to be certain .
If the bat tery on the watc h unit of the unit is fai ling it may show its elf in several ways. Indications of
a weak battery are:
1. A fad ing or blank displ ay.
2. If the di splay goes blank w hen the EL system is operated a nd
then c omes back on when t he EL system turns of f.
3. Inaccurate re adings from the A ltimeter or Com pass systems
Becaus e the compass is m agnetic it may be ef feced by local sources of electr omagnetic radi ation
(EMI). Avoi d using near appli ances, in cars, near home s ecurity syste ms and other sourc es of EMI.
The unit is equippe d with a display whi ch allows it to be use d in a wide variety of environ ments.
However, if th e unit is used in extr eme cold (<32 F or 1c) the fu nction of the dis play may be slower
than nor mal. If exposed to ex treme heat or co ld, the display may a lso darken. The display shou ld
return t o normal once the tempera ture returns to no rmal levels.
ENGLISH
27

HIGHGEAR
a Division of Implus Footcare, LLC.
2001 T.W. Alexander Drive / Box 13925 / Durham, NC 27709-3925
800-446-7587 / help@4implus.com
www.highgear.com
©2013 Implus Footcare, LLC. All Rights Reserved.
©2013 Implus Footcare, LLC. Tous droits réservés.
©2013 Implus Footcare, LLC. Todos los derechos reservados.
©2013 Implus Footcare, LLC. 著作権を所有します。
© 2013 Implus Footcare, LLC. 版權所有。
Printed in China
Imprimé en Chine.
Impresos en China.
中国印刷物
中國印刷
 Loading...