


ENGLISH
TABLE OF CONTENTS
TABLE OF CONTENTS
HOW TO USE THIS MANUAL 3
CARE & MAINTENANCE 4
WATCH FUNCTIONS 5-6
KEYS AND THEIR FUNCTIONS 7-8
DISPLAY SYMBOLS AND THEIR MEANINGS 9-10
MAIN DISPLAY MODES 11-12
SETTING THE WATCH FUNCTIONS
SETTING TIME, DATE & DISPLAY UNITS 13-14
CALIBRATING THE COMPASS 15-16
english
SETTING BAROMETRIC PRESSURE 17
SETTING ALTIMETER 18-22
SETTING DAILY ALARM 23
OPERATING THE WATCH
TIME MODE 24
COMPASS MODE 25
BAROMETRIC MODE 26-28
ALTIMETER MODE 29-33
LOG BOOK/DATA RECALL MODE 34
SKI CHRONOGRAPH MODE 35-36
CHRONOGRAPH MODE 37-38
SPECIFICATIONS AND RANGES 39
TROUBLE SHOOTING 40
CARE AND MAINTENANCE 41
REPLACING THE WATCH BATTERY 42
english
1
2

INTRODUCTION WARNINGS AND CAUTIONS
The ALTIS unit features an altimeter/barometer/weather station along with a full selection of advanced
watch and chronograph functions. Please keep in mind, your watch is a sensitive technical instrument. With
proper care and maintenance, it will last for many years. However, improper care and handling can cause
the various sensors to be damaged and to stop functioning.
This manual is prepared in easy-to-read sections to familiarize you with setting and operating the watch’s
functions. Please read all sections of this manual carefully and become fully familiar with the operation of
the watch before using it in the field.
Proper setup and operation will greatly enhance the watches usefulness and your enjoyment.
HOW TO USE THIS MANUAL
The manual is divided into sections outlining each of the major functions of the watch. A drawing of the
watch screen that represents the starting point or other important screen for each operational process is
shown adjacent to the instructions for the process; important keys are shown in color indicating PRESS &
and PRESS.
HOLD
english
The steps for the programming or operation are adjacent to the screen illustration. Key points and important
information are shown in highlighted blocks.
WARNING: Before starting any exercise program or performing any vigorous physical activity, we strongly
suggest you visit your doctor for a complete physical and to discuss your plans.
CAUTION: Your watch is designed to be water resistant to a static pressure of 5 ATM and can be worn while
showering and light swimming. However, we recommend that extensive use of the unit in the water be
avoided whenever possible as water could enter the unit through the altimeter sensor port and damage the
unit.
The unit should not be worn while snorkeling or scuba diving as these activities will damage the altimeter
sensor.
CAUTION: Care should be taken not to press any keys while the unit is wet or submerged as this can force
moisture past the key seals and damage the unit.
CAUTION: Exposure to strong magnetic fields will cause the compass unit to malfunction and may even
permanently damage the compass sensor. Keep the unit away from magnetic sources.
WARNING: This product is NOT designed to be used as a PRIMARY altitude instrument for flying, skydiving,
hang gliding or other sports where sudden significant changes in altitude may occur or when there is a need
for industrial precision.
english
3
4

WATCH FUNCTIONS
WATCH FUNCTIONS
TIME
• Time/Day/Date/Month
• Dual Time Zone
• Dual Daily Alarm
COMPASS
• Digital Compass
• Adjustable Declination
ALTIMETER
• Digital Altimeter
• Working Range: -2296 ft to 29520 ft (-700m to 9000m)
• Rate of Ascent and Descent
• Altitude Alarm
english
• 20 Log Book Files with Log Date, Average ascent and descent, Total ascent and
descent, number of laps and total time
BAROMETER
• Digital Barometer
• Sea Level Pressure and Absolute Pressure Display (mbar/hPa or inHg reading)
• 1 mbar (0.05 hPa) Resolution
• Working Range: 300 mbar to 1100 mbar (8.16 inHg to 32.48 inHg)
• Weather Forecast
• 24 Hour Graphic Pressure Trend Display
THERMOMETER
• Digital Thermometer
• User option for Fahrenheit or Celsius
• Working range from 14 °F to 140°F (-10°C to 50°C)
SKI CHRONO
• Calculates descent time from starting point to base altitude
• Calculates Rate of Descent
CHRONOGRAPH
• 1/100 Second Resolution
• 24 hr / 50 Laps
• 20 Run file memory with Lap/Split, with Best and Average Lap Times
OTHER
• EL Backlight System
• Water Resistant 50m (165ft)
• User Replaceable Battery
english
5
6
KEYS AND THEIR FUNCTIONS KEYS AND THEIR FUNCTIONS
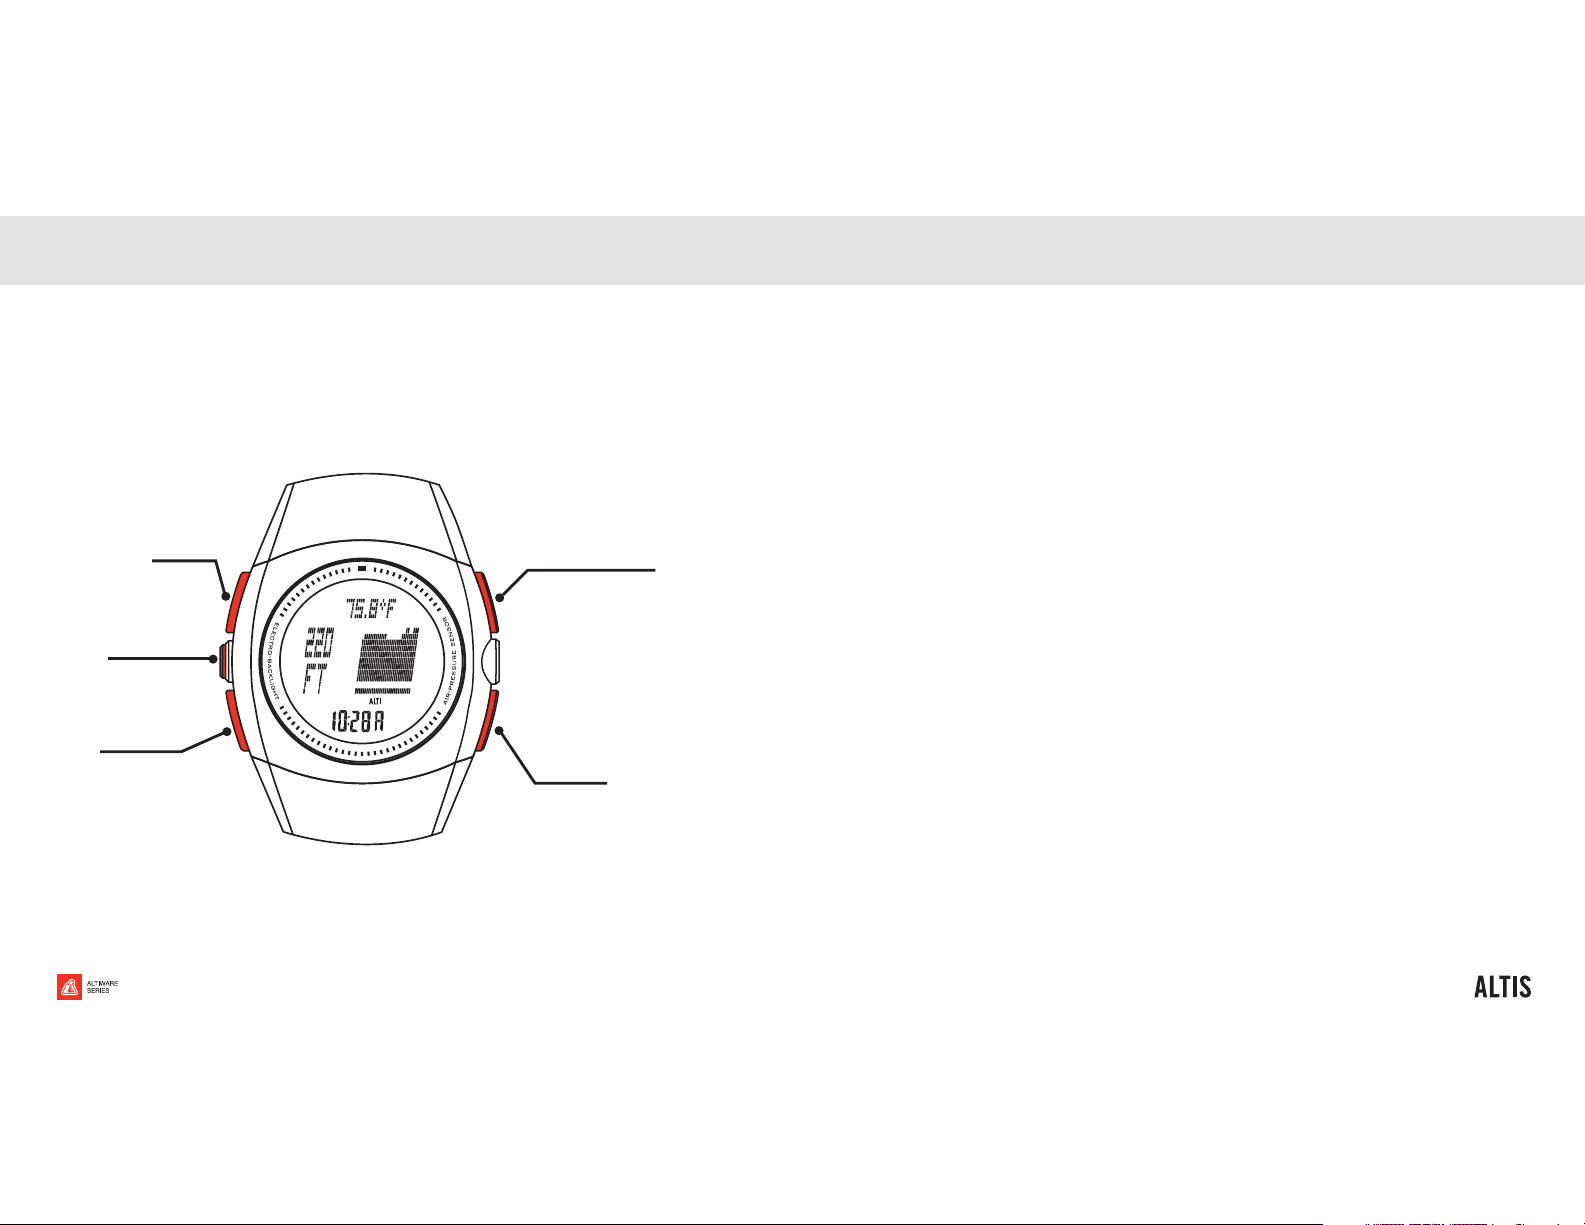
The ALTIS has 5 individual keys. Each key has several functions. The drawing identifies the keys and their
names as used in this manual.
english
SET KEY
EL/LIGHT KEY
MODE KEY
START/SPLIT KEY
STOP KEY
MODE KEY
• Scrolls through the various operational modes
• Selects variable in Setting Sequence
EL/BACKLIGHT KEY
• Activates the EL/Backlight System
SET KEY
• Enter/Exit a Setting Sequence
• Delete Data Log File
• Scrolls through Chronograph data
START/SPLIT KEY
• Accesses Time Zone 1 or Time Zone 2
• Reactivate Compass Function
• Switches temperature units (°F or °C)
• Switches Barometric Pressure units (mbar/hpa
or inHg)
• Activates Data Log
• Increases a variable in Setting Sequence
• Starts Lap Chronograph
• Activates Lap/Split in Chronograph mode
• Starts Ski Chronograph
• Turns Alarm On/Off
• Activates/Deactivates Chime
STOP KEY
• Scrolls through secondary modes
• Decreases variable in Setting Sequence
• Stops Chronograph
• Resets Chronograph
english
7
8
DISPLAY SYMBOLS AND THEIR MEANINGS DISPLAY SYMBOLS AND THEIR MEANINGS
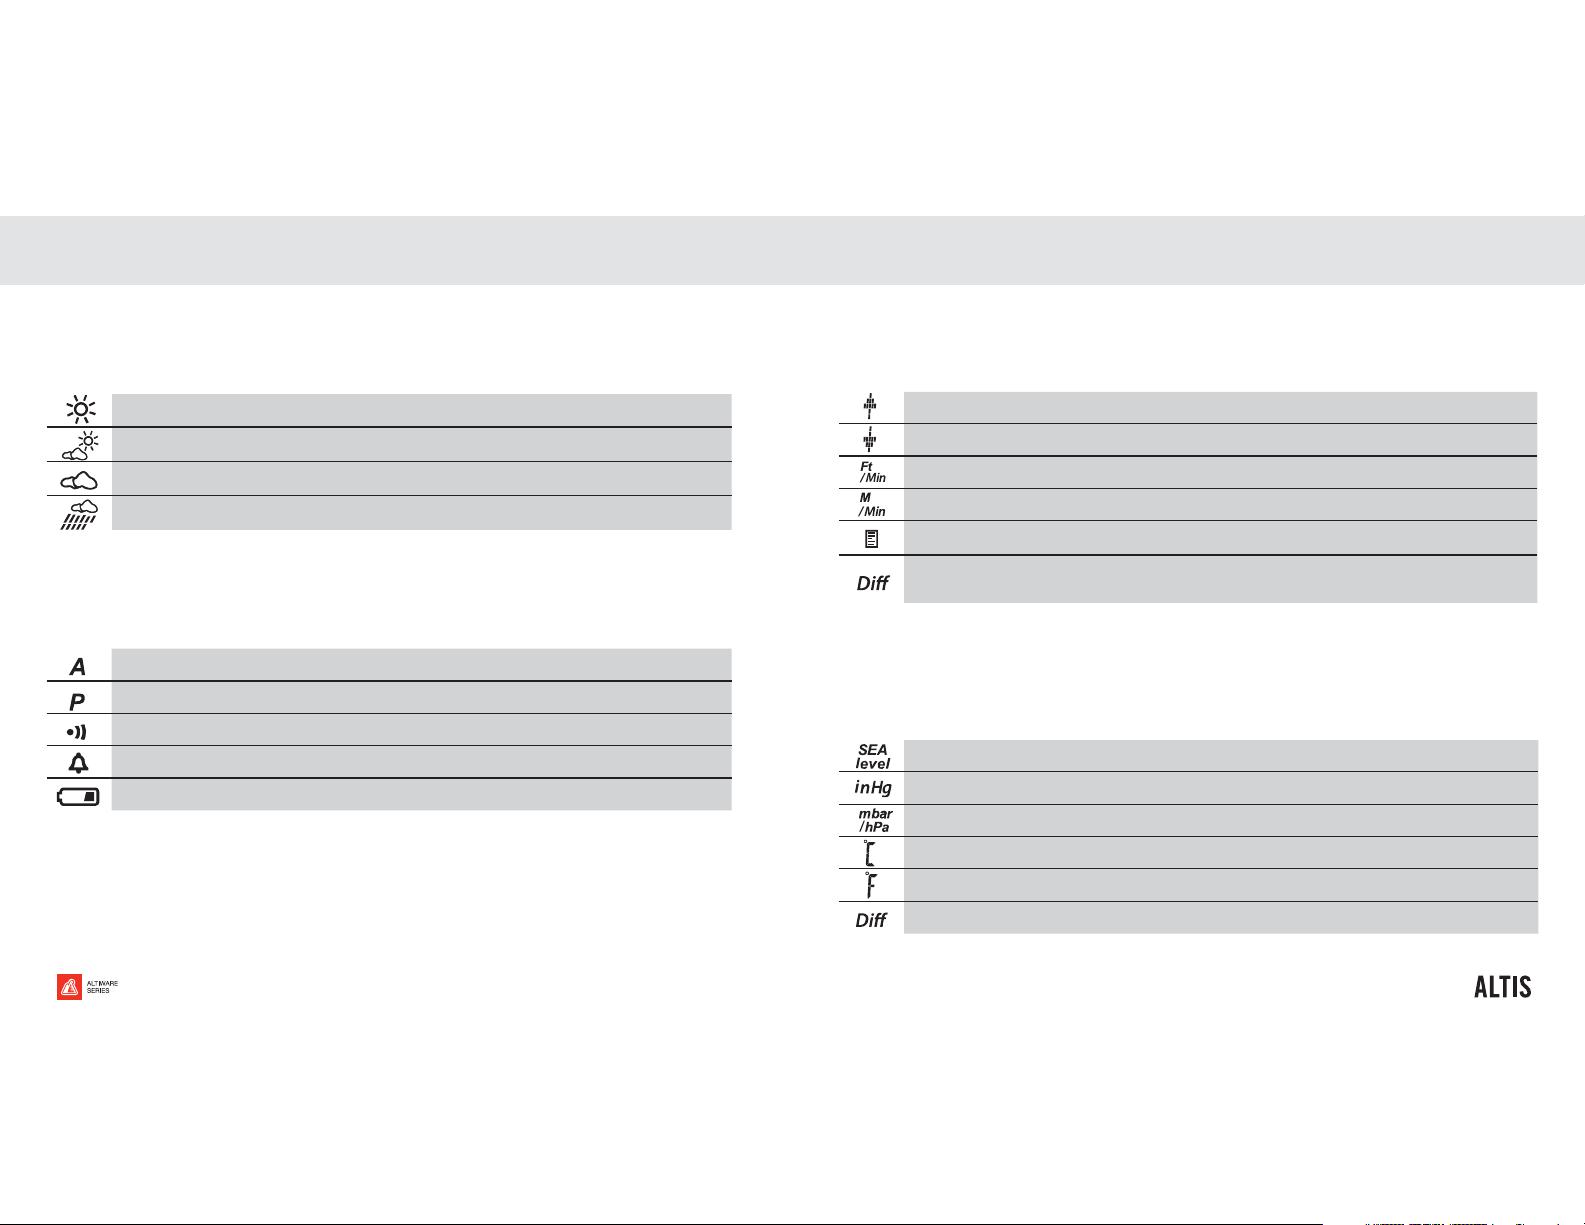
WEATHER ICONS
symbol description what it means
SUNNY
PARTLY CLOUDY
CLOUDY
RAINY
Barometric pressure high, weather fair
Barometric pressure falling or rising, weather changeable
Barometric pressure low, rain possible but not likely
Barometric pressure very low or falling, raining or rain likely
TIME ICONS
symbol description what it means
english
AM
PM
DAILY ALARM Daily Alarm is active
KEY CHIME Key Chime is active
LOW BATTERY INDICATOR Battery needs to be replaced
A.M. time
P.M. time
ALTIMETER ICONS
symbol description what it means
ASCENDING ARROW
DESCENDING ARROW
FEET PER MINUTE
METERS PER MINUTE
LOG BOOK RECORDING ICON Log Book recording in progress
ALTITUDE DIFFERENTIAL
READING
User is ascending
User is descending
Rate of ascent or descent in feet
Rate of ascent or descent in meters
Altitiude Differential Reading active when blinking
BAROMETER ICONS
symbol description what it means
SEA LEVEL
INHG
MBAR
DEGREES C
DEGREES F
BAROMETER DIFFERENTIAL
Sea Level Barometric Pressure reading
Inches of Mercury barometric pressure units
Millibar barometric pressure units
Centigrade temperature units
Fahrenheit temperature units
Barometric Pressure Differential Reading active when blinking
english
9
10
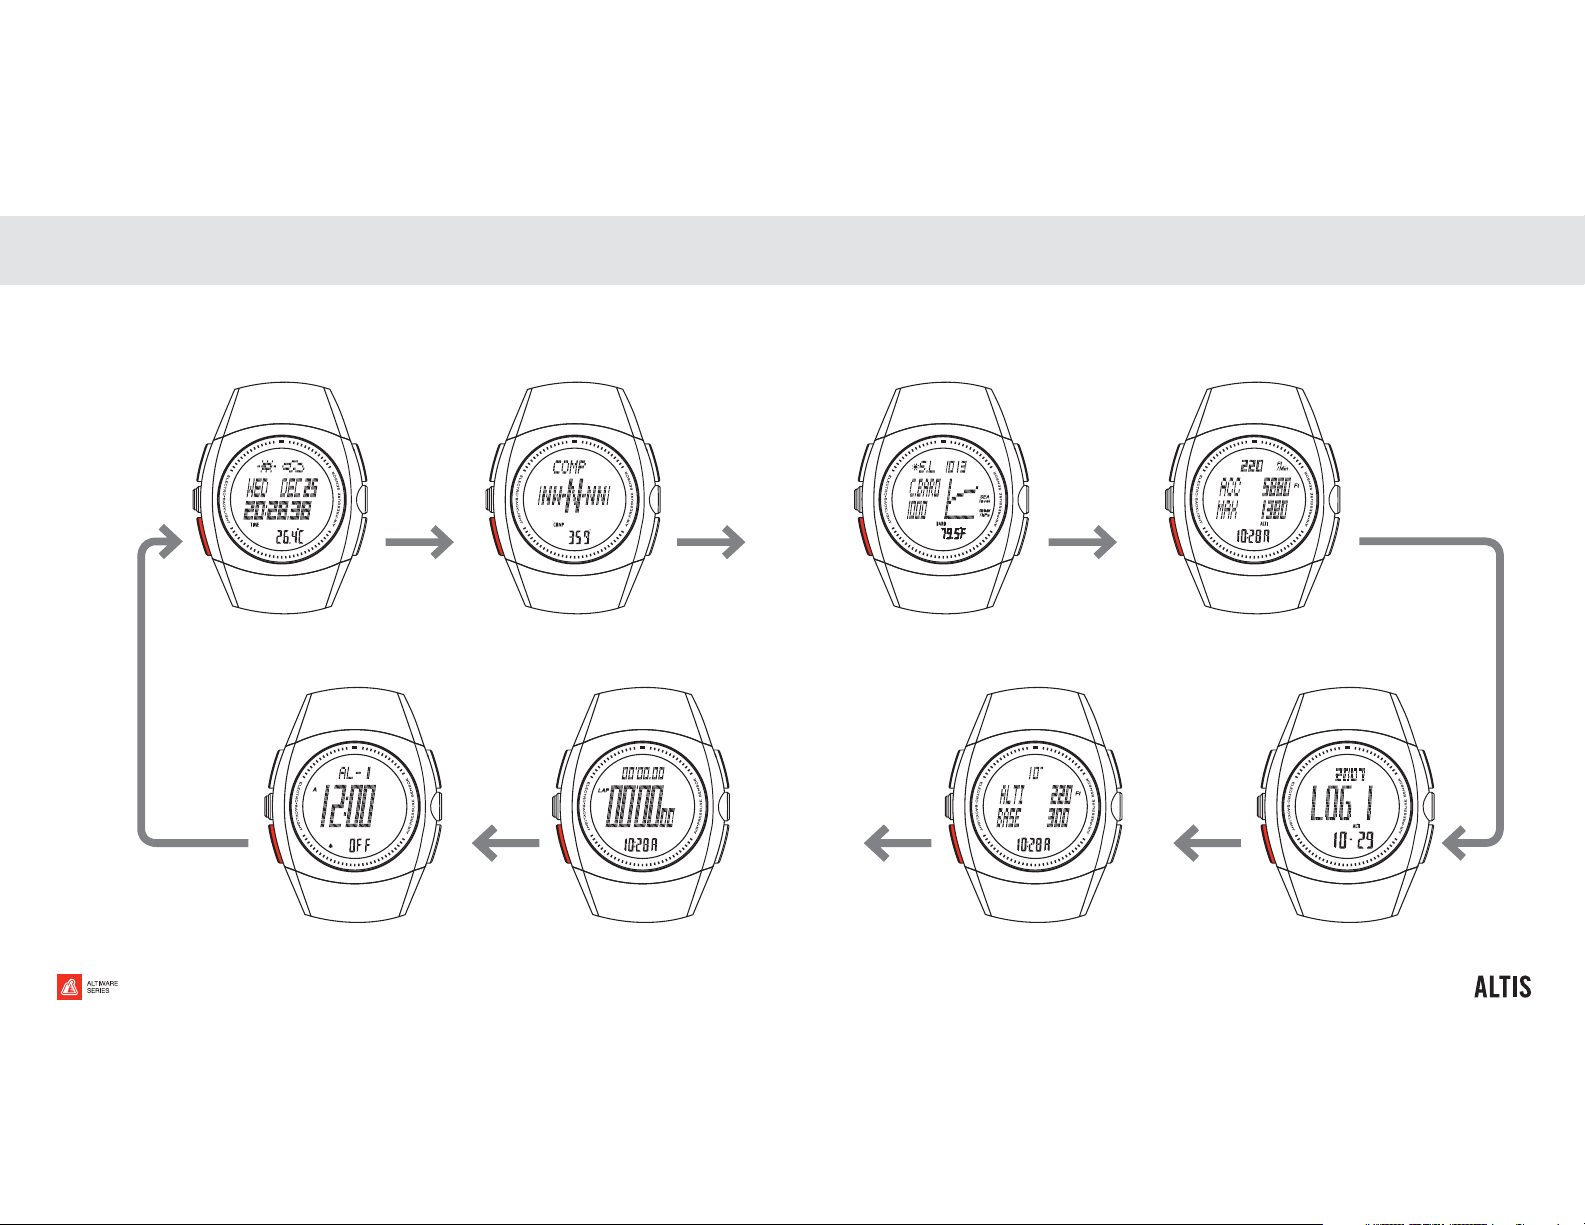
MAIN DISPLAY MODES MAIN DISPLAY MODES
The ALTIS has 8 main display modes. ADVANCE THROUGH MAIN MODES by PRESSING the MODE key.
SCROLL THROUGH SECONDARY MODES by PRESSING the STOP key.
english
english
11
TIME COMPASS ALTIMETER
CHRONOGRAPH
BAROMETER
SKI CHRONOALARM
DATA
12

SETTING THE WATCH FUNCTIONS SETTING THE WATCH FUNCTIONS
SETTING TIME, DATE & DISPLAY UNITS
1. Advance to TIME MODE by PRESSING the MODE key.
2. Select TIME ZONE 1 or TIME ZONE 2 by PRESSING & HOLDING the START/
3. PRESS & HOLD the SET key to enter the SETTING SEQUENCE.
4. ADJUST HOUR by PRESSING of the START/SPLIT or STOP keys.
5. Advance to SET MINUTES by PRESSING the MODE key. ADJUST by
6. Advance to SET SECONDS by PRESSING the MODE key. ADJUST by
7. Advance to SET YEAR by PRESSING the MODE key. ADJUST by PRESSING
english
8. Advance to SET MONTH by PRESSING the MODE key. ADJUST by PRESSING
9. Advance to SET DAY by PRESSING the MODE key. ADJUST by PRESSING the
10. Advance to 12 or 24-HOUR FORMAT by PRESSING the MODE key. ADJUST by
key.
SPLIT
NOTE: upper display will indicate display unit currently being set/adjusted.
The display unit currently being set will flash. Start/Split key will increase
variable being set and Stop key will decrease variable being set. Press &
Hold keys to fast scroll.
PRESSING the START/SPLIT or STOP keys.
PRESSING the START/SPLIT or STOP keys.
the START/SPLIT or STOP keys.
the
START/SPLIT or STOP keys.
START/SPLIT or STOP keys.
PRESSING the START/SPLIT or STOP keys.
SETTING TIME, DATE & DISPLAY UNITS (continued)
11. Advance to SET ALTIMETER UNITS (feet or meters) by PRESSING the MODE key.
ADJUST by PRESSING the START/SPLIT or STOP keys.
12. Advance to SET BAROMETRIC PRESSURE UNITS (INHG or MBAR) by PRESSING the
MODE key. ADJUST by PRESSING the START/SPLIT or STOP keys.
13. Advance to SET TEMPERATURE UNITS (°F or °C) by PRESSING the MODE key.
ADJUST by PRESSING the START/SPLIT or STOP keys.
NOTE: You may exit a Setting Sequence at any time by Pressing the Set key.
SETTING TIME ZONE 2
1. In TIME MODE, PRESS & HOLD the START/SPLIT key. Alternate Time Zone (T1 or T2)
will blink in lower display line.
2. PRESS & HOLD the SET key to ENTER the SETTING SEQUENCE.
3. ADJUST Hour, Minutes, Seconds, Month, Day and Year.
4. PRESS the SET key to EXIT the SETTING SEQUENCE.
NOTE: display units (12/24 hr., Altimeter, Barometer, Temperature, etc.) are not
independent of Time Zone selected.
english
13
14

SETTING THE WATCH FUNCTIONS
SETTING THE WATCH FUNCTIONS
CALIBRATING THE COMPASS
The ALTIS is equipped with a highly accurate digital magnetic compass with
reading in one-degree increments. The compass can be adjusted to compensate
for magnetic declination corresponding to the area of use.
The compass must be calibrated on a regular basis. The compass should be
calibrated any time it does not seem to be working properly. We recommend
calibrating the compass prior to any activity where optimal accuracy is desired,
such as a long back-country trip.
In Compass Mode:
1. PRESS & HOLD the SET key to enter the CALIBRATION SEQUENCE. ‘ROTATE
’ will appear in the display.
CAL
2. ROTATE THE WATCH CLOCKWISE for two complete rotations of approxi-
mately 15 seconds per rotation.
NOTE: For optimum accuracy, the compass must be held completely level
english
during the calibration process. We recommend placing the unit on top
of a drinking glass while performing the calibration, as this will make it
easier to keep the compass level.
3. Advance to SET DECLINATION by PRESSING the MODE key (see “Magnetic
Declination: next page).
NOTE: If you do not know the Magnetic Declination for your area, leave
this setting at zero and exit the Calibration Sequence by Pressing the
Set key.
4. ADJUST first digit (blinking digit) of declination setting by PRESSING the
START/SPLIT or STOP key.
5. Advance to SET second digit of declination setting by PRESSING the MODE
key. ADJUST by PRESSING the START/SPLIT or STOP keys.
6. PRESS the SET key to EXIT THE CALIBRATION SEQUENCE.
MAGNETIC DECLINATION
A magnetic compass points to the earth’s magnetic north pole. Depending on your
location, this may be different from True North. Adjusting the Magnetic Declination
allows you to compensate for this variation. Magnetic Declination for an area can be
found on topographical maps. Declination can change over time and distance. Make
sure the source for your declination settings is up to date. The following web sites are
good sources for finding local Magnetic Declination.
FOR U.S. DECLINATIONS:
http://www.ngdc.noaa.gov/seg/geomag/jsp/Declination.jsp
FOR CANADIAN DECLINATIONS:
http://gsc.nrcan.gc.ca/geomag/field/mdcalc_e.php
english
15
16

SETTING THE WATCH FUNCTIONS SETTING THE WATCH FUNCTIONS
SETTING BAROMETRIC PRESSURE
The ALTIS is equipped with a highly sensitive barometer/weather station. The
barometer measures the Absolute Barometric Pressure and calculates the
Barometric Pressure corrected to Mean Sea Level (MSL). Barometric pressure
may be displayed in either Inches of Mercury (inHg) or Millibar/HectoPascals
(mbar/hpa).
In Barometer Mode:
1. PRESS & HOLD the SET key.
2. SET CURRENT WEATHER ICON by PRESSING the START/SPLIT or STOP key.
NOTE: There are four different Icons for weather. SUNNY, PARTLY CLOUDY,
and RAIN. Choose the icon which most closely matches the
CLOUDY
weather at the present time. The icon will change to indicate an estimate
of what the weather will be like for the next 6-hours.
3. Advance to SET BAROMETRIC PRESSURE by PRESSING the MODE key.
english
NOTE: Do not randomly adjust the barometric pressure setting of the
watch. Inaccurate setting of the barometric pressure may result in
inaccurate altimeter and weather readings. If you are not certain of the
proper use of this function, it is better to leave this variable at its factory
setting. The Mean Sea Level barometric pressure may be adjusted if
desired to achieve the highest levels of accuracy.
4. ADJUST SEA LEVEL BAROMETRIC PRESSURE by PRESSING the START/SPLIT
or STOP key.
5. PRESS the SET key to EXIT THE SETTING SEQUENCE.
SETTING ALTIMETER
Because the altimeter system in the ALTIS relies on Barometric Pressure for its
measurements, it is critical that you regularly calibrate the unit to a known altitude. For
maximum accuracy, daily calibration is a must. If you are using the unit during times
of changeable weather, the unit may need to be calibrated more often. Generally, the
small pressure changes experienced during a day of use will have only a minor effect on
the accuracy of the unit, however, the arrival or departure of a weather front can change
the current weather display by several hundred feet or more.
NOTE: In the Altimeter Setting Sequence, the variable to be adjusted will
be indicated by a flashing display. Scroll through variables to be adjusted by
Pressing the Start/Split or Stop key. Select variable for adjustment by Pressing
the Mode key. Once the variable is set, Press the Mode key to return to the
Altimeter main setting sequence. You may exit the Setting Sequence any time by
Pressing the Set key.
The ALTIS is equipped with 6 Altimeter sub modes. Scroll through sub modes by
pressing the Stop key. You may enter the Altimeter Setting Sequence from any sub
mode except the TEMP/Altitude/TIME display. (See page 29 "Operating the Watch" for
a detailed explanation of submodes.)
english
17
18

SETTING THE WATCH FUNCTIONS SETTING THE WATCH FUNCTIONS
SETTING ALTIMETER (continued)
The ALTIS is equipped with three altimeter Preset Locations. Preset Locations allow
you to pre-program 3 known altitudes into the watch’s memory. These presets allow
you to easily compensate for altitude drift caused by changes in atmospheric pressure
and are useful in the daily calibration process. If you know the exact altitude of a
particular place (example: your home, a favorite trail head or the base of your favorite
ski hill), you can preset your ALTIS to this location for quick calibration at that location.
You can also adjust the current altitude of your watch independent of the Preset
Locations.
In Altimeter Mode (any Altimeter screen except TEMP/Altitude/TIME):
1. PRESS & HOLD the SET key. Upper display line will flash name of selected
location (
CURRENT ALTITUDE, LOCAL 1, LOCAL 2 OR LOCAL 3).
2. SCROLL through locations by PRESSING the START/SPLIT or STOP Key.
3. When selected location is flashing in the upper display line, PRESS the
MODE key to advance to set the Altitude of that location. The Altitude
display field will flash.
4. ADJUST Altitude by PRESSING the START/SPLIT (to increase) or STOP (to
english
decrease) key.
NOTE: Press & Hold the Start/Split or Stop keys to fast scroll altimeter
setting.
5. Once Altitude is adjusted, PRESS the MODE key to return to Altimeter
Setting Menu. Upper display line will flash. After all desired Altitude
Locations have been adjusted,
scrolling through Altimeter Settings.
PRESS the START/SPLIT key to continue
RESETTING MAXIMUM AND ACCUMULATIVE ALTITUDE
6. To RESET MAXIMUM ALTITUDE, PRESS the MODE key when MAX is flashing
in display. Maximum Altitude field will flash. PRESS START/SPLIT or STOP
key to reset.
NOTE: display will reset to O and assume current altitude reading when
you return to operation mode.
To preserve Max Altitude reading,
TO ALTIMETER SETTING MENU.
When ACC field is flashing, PRESS the MODE key to adjust. When the
7.
Accumulative Vertical field is flashing, PRESS START/SPLIT or STOP to
RESET.
NOTE: To preserve ACC reading, this step may be bypassed by Pressing
the Start/Split or Stop key when the ACC field is flashing and returning to
the Altimeter setting menu.
CONTINUED NEXT PAGE)
(
PRESS the START/SPLIT key to RETURN
english
19
20

SETTING THE WATCH FUNCTIONS SETTING THE WATCH FUNCTIONS
ALTITUDE ALARM
The ALTIS is equipped with an audible Altitude Alarm that will sound when a
pre-set altitude is crossed. This function may be turned
Altimeter Setting Sequence.
8. Advance to Altitude Alarm by PRESSING the START/SPLIT or STOP key.
ALRM will flash in the center display line.
9. PRESS the MODE key set Altitude alarm. ADJUST Altitude Alarm on (ON) or
--) by PRESSING the START/SPLIT or STOP key.
off (
NOTE: Alarm must be activated (ON) to advance to next step.
10. Advance to set designated altitude by PRESSING the MODE key. ADJUST
ALTITUDE
by PRESSING the START/SPLIT or STOP key.
NOTE: Press & Hold the Start/Split or Stop keys to fast scroll altimeter
setting.
11. Once Altitude is set, PRESS the MODE key to return to Altitude Alarm ON/
english
OFF window.
ACTIVATE/DEACTIVATE ALARM by PRESSING the START/SPLIT
or STOP key.
12. Return to Altimeter main SETTING SEQUENCE by PRESSING the MODE key.
13. To REVIEW ALTIMETER SETTINGS, PRESS START/SPLIT or STOP keys. PRESS
key to EXIT THE SETTING SEQUENCE and return to Operation Mode.
SET
ON and OFF from the
CALIBRATING THE WATCH USING ALTIMETER PRESETS
In Altimeter Mode:
1. PRESS & HOLD the SET key.
2. Scroll through Altimeter Presets (CURRENT, LOCAL 1, LOCAL 2 & LOCAL 3) by
PRESSING the START/SPLIT or STOP key.
3. When desired Preset is flashing, PRESS the SET key. The unit will be
automatically calibrated to corresponding Preset’s altitude setting.
NOTE: if you are calibrating the unit to a known altitude not in the Preset
menu, select Current and repeat steps 3 – 5 from "Setting Current
Altitude and Altimeter Presets" on page 19.
4. PRESS the SET key to return to Operation Mode.
english
21
22

SETTING THE WATCH FUNCTIONS OPERATING THE WATCH
SETTING DAILY ALARM
The ALTIS is equipped with 2 individual daily alarms.
Setting Daily Alarms
1. In Alarm Mode, SELECT ALARM 1 OR ALARM 2 (AL-1 or AL-2 in the upper
display line) by PRESSING the STOP key.
2. PRESS & HOLD the SET key.
3. ADJUST HOURS by PRESSING the START/SPLIT or STOP key.
4. PRESS the MODE key to advance to set Minutes. ADJUST MINUTES by
PRESSING the START/SPLIT or STOP key.
5. PRESS the SET key to EXIT THE SETTING SEQUENCE.
english
Turning Alarm ON or OFF
1. In Alarm Mode, SELECT ALARM 1 or ALARM 2 (AL-1 or AL-2 in the upper
display line) by
2. TURN ALARM ON or OFF (lower display line) by PRESSING the START/SPLIT
key.
3. PRESS the STOP key to SCROLL THROUGH OTHER ALARM SETTINGS.
4. When CHIME is displayed in upper display line, TURN THE KEY CHIME ON or
OFF by PRESSING the START/SPLIT key.
PRESSING the STOP key.
TIME MODE
The ALTIS is equipped with 5 different time display options. SCROLL THROUGH DISPLAY
by PRESSING the STOP key.
OPTIONS
Top Line: Weather/Date
Center Line: Weekday/Time
Bottom Line: Year
Top Line: Weather
Center Line: Date/Time
Bottom Line: Barometric
Top Line: Weather/Date
Center Line: Time
Bottom Line: Weekday
Pressure
Top Line: Weather
Center Line: Date/Time
Bottom Line: Altitude
Top Line: Weather
Center Line: Date/Time
Bottom Line: Temperature
english
23
VIEWING AND SELECTING TIME ZONES
To VIEW/CHANGE TIME ZONE, PRESS & HOLD the START/SPLIT key in any Time display mode.
24

OPERATING THE WATCH OPERATING THE WATCH
COMPASS MODE
There is only one screen display available in the Compass mode. The current
heading in quarter cardinal points is shown as a rotating scale across the center
line and the bottom line displays the current heading in degrees.
REACTIVATING COMPASS
To save power, the compass feature of the ALTIS unit remains active for a period of
30 seconds. To
english
25
REACTIVATE THE COMPASS display, PRESS the START/SPLIT key.
BAROMETER MODE
The ALTIS is equipped with 5 Barometer display modes. SCROLL THROUGH DISPLAY
by PRESSING the STOP key.
MODES
Top Line: Weather Icon/Barometric
Center Line: Local Unadjusted
Graph of Barometric
Bottom Line: Temperature
Pressure MSL
(ABSOLUTE) Barometric
Pressure /
Pressure for the past
24 hours
BAROMETRIC PRESSURE RECALL MODE
(see pg 28)
NOTE: In displays 1,2 and 3, you may change Barometric Pressure units (Inches of Mercury [INHG] or
Millibar/HectoPascals [
MBAR/HPA]) and Temperature display (°F or °C) by PRESSING & HOLDING the
START/SPLIT key.
Top Line: Weather Icon/Temperature
Center Line: Barometric Pressure MSL /
Local Unadjusted
Bottom Line: Time of Day
(ABSOLUTE) Barometric
Pressure
BAROMETRIC PRESSURE DIFFERENCE MODE
(see pg 27)
Top Line: Weather Icon/
Center Line: Local Unadjusted
Bottom Line: Temperature
Barometric Pressure
MSL
(ABSOLUTE)
Barometric Pressure
english
26

OPERATING THE WATCH
OPERATING THE WATCH
BAROMETRIC PRESSURE DIFFERENCE MODE
The ALTIS allows you to track changes in Barometric Pressure in real time.
When Barometric Pressure Difference is active:
Top Line: Weather Icon/Mode Indicator (DIFF)
Center Line: Change in Barometric Pressure MSL
Bottom Line: Time of Day
To record change in Barometric Pressure:
1. In Barometric Pressure Difference Mode, PRESS & HOLD the SET key. The upper
display line will read
english
2. PRESS the START/SPLIT or STOP key so the Sea Level & Current Barometric
Pressure readings (S.LEVEL & C.BARO in middle display line) are set to 0.
3. PRESS the SET key to BEGIN READING.
4. To TERMINATE A READING, PRESS & HOLD the SET key.
5. To ABORT this function, PRESS the START/SPLIT or STOP key until the Sea Level
& Current Barometric Pressure readings (
display actual pressure readings.
6. PRESS the SET key to RETURN TO BAROMETRIC PRESSURE MODE.
Change in Local Unadjusted
(ABSOLUTE) Barometric Pressure
SET DIFF.
S.LEVEL & C.BARO in middle display line)
DISPLAY MODE 5 BAROMETRIC PRESSURE RECALL MODE
The ALTIS tracks barometric pressure changes over the past 24 hours and charts the
trend in a scrolling graph.
PRESS the START/SPLIT key to SCROLL THROUGH TIME READINGS.
Top Line: Weather Icon/Mode Indicator (RECALL)
Center Line: Time line (from current) of Pressure reading /
Graph of Barometric Pressure for the past 24 hours
Bottom Line: Barometric Pressure MSL at time of reading
Local Unadjusted (ABSOLUTE) Barometric Pressure
english
27
28

OPERATING THE WATCH
OPERATING THE WATCH
ALTIMETER MODE
The ALTIS is equipped with 6 Altimeter display modes. SCROLL THROUGH DISPLAY
by PRESSING the STOP key.
MODES
ALTIMETER SUMMARY (see pg 30) DATA LOG MODE (see pg 30 & 31) ALTITUDE DIFFERENTIAL MODE
english
(see pg 32)
ALTIMETER SUMMARY
Upon entering Altimeter Mode, the ALTIS will display an altimeter summary for approximately 2 seconds then revert to the Log Book function. (Values can be reset in the
Altimeter Setting Sequence.)
Top Line: Current Altitude
Center Line: Accumulated Vertical (in Feet or Meters)
Bottom Line: Time of Day
Maximum Altitude (in Feet or Meters)
DATA LOG
The ALTIS records and stores up to 20 Altimeter Data Logs. Stored information includes
date, total vertical ascent/descent, average rate of ascent/descent, and total time.
When Data Log is active:
Top Line: Current Rate of Ascent/Descent (in Ft/M per minute)
Center Line: Total Vertical Ascent
Bottom Line: Current Altitude
Total Vertical Descent
english
29
ALTIMETER RECALL MODE (see pg 33) CURRENT ALTITUDE/TEMPERATURE/ TIME GRAPHICAL ALTITUDE DISPLAY
(see pg 33)
30

OPERATING THE WATCH
OPERATING THE WATCH
DATA LOG (continued)
To record a Data Log:
1. In the Data Log screen, PRESS & HOLD the START/SPLIT key.
2. The DATA LOG NUMBER will appear in upper display line. The center display
line will flash
appears (approximately 2 sec.).
english
To stop recording and store a Data Log:
1. In the Data Log screen, PRESS & HOLD the START/SPLIT key.
2. The DATA LOG NUMBER will appear in upper display line. The center display
line will flash
appears (approximately 2 sec.).
3. To view Data Log files, see DATA RECALL page 34.
START. CONTINUE HOLDING until the active Data Log window
STOP. CONTINUE HOLDING until the static Log Book window
ALTITUDE DIFFERENTIAL
The ALTIS allows you to track change in altitude from a set point and also tracks time
from beginning of recording.
When Altitude Differential is active:
Top Line: Ascent/Descent indicator arrow/Current Rate of Ascent/
Center Line: + or – change from base elevation
Bottom Line: Elapsed time
To activate Altitude Differential function:
1. In Altitude Differential Mode, PRESS & HOLD the SET key.
2. PRESS the START/SPLIT or STOP key so the ALTITUDE READING (middle display line)
is set to
0.
3. PRESS the SET key to BEGIN READING.
4. To TERMINATE A READING, PRESS & HOLD the SET key.
NOTE: You may also STOP and START A DATA LOG recording in this mode by
PRESSING AND HOLDING the START/SPLIT key.
5. To ABORT this function, PRESS the START/SPLIT or STOP key so the ALTITUDE
6. PRESS the SET key to RETURN TO BAROMETRIC PRESSURE MODE.
(middle display line) displays current altitude.
READING
Descent (in Ft/M per minute)
english
31
32

OPERATING THE WATCH
OPERATING THE WATCH
GRAPHICAL ALTITUDE DISPLAY
The ALTIS tracks your Altitude over the previous 24 hours and displays it in a bar graph
format.
Top Line: Ascent/Descent Rate for period displayed
Center Line: Elevation for time period
Bottom Line: Time line (from current) of Altimeter reading
NOTE: You may SWITCH ALTIMETER UNITS (feet or meters) by PRESSING AND
the START/SPLIT key.
HOLDING
english
ALTIMETER RECALL MODE
The ALTIS tracks Maximum Altitude over the past 24 hours and charts the trend in a
scrolling graph.
SCROLL THROUGH 24-HOUR TIME LINE by PRESSING the START/SPLIT key. PRESS the
STOP key to SCROLL THROUGH ALTIMETER MODES.
Top Line: Ascent/Descent Rate for period displayed
Center Line: Elevation for time period
Bottom Line: Time line (from current) of Altimeter reading
LOG BOOK/DATA RECALL MODE
Reviewing Altimeter Data Logs
Starting in the Data Log screen:
The watch will automatically display the most recent Altimeter Log File recorded with
LOG NUMBER in the center line of the display and the DATE of the file in the upper
the
and lower lines.
1. SCROLL through the recorded files by PRESSING the START/SPLIT key.
2. PRESS the STOP key to VIEW THE SELECTED DATA LOG.
3. SCROLL THROUGH DATA LOG INFORMATION by PRESSING the STOP key.
4. View the information in the following screens:
Screen 1
Total Ascent & Descent
DELETING DATA LOG FILES
Starting in the Data Log screen:
1. SCROLL through the recorded files by PRESSING the START/SPLIT key.
2. When selected file is displayed, PRESS & HOLD the SET key. The display will read HOLD CLEAR.
CONTINUE HOLDING the SET key. RELEASE the SET key.
3. To CLEAR ALL FILES from memory, CONTINUE TO HOLD the SET key. When all files are cleared, the
screen will display a series of 4 dashes (----). RELEASE the SET key.
Screen 2
Average Rate of Ascent
& Descent
Screen 3
Number of Hills
(A Hill corresponds to a
vertical ascent and decent
of greater than 150 ft.
or 50m)
Screen 4
Total Elapsed Time of
Data Log
english
33
34

OPERATING THE WATCH OPERATING THE WATCH
SKI CHRONOGRAPH
The ALTIS is equipped with a timing system which is started at the top of a vertical
drop (such as a ski run) and will track the time of your descent back to the base,
stopping at a preset base altitude (within 35 ft/10m to allow for altitude drift due to
barometric pressure changes).
STORING A BASE ALTITUDE
A Base Altitude can be stored either automatically or manually.
AUTOMATIC STORE
When you are physically at the location you want to establish as your base altitude
(such as if you are standing at the bottom of a run you want to time), in Ski Mode:
1. PRESS & HOLD the STOP key. The display will read STORE ALTI while the current
altitude is being stored as the base altitude.
2. When complete, the top line of the display will show STORED and you may
RELEASE the STOP key. Your new base altitude will now be displayed in the
lower center line of the display.
english
MANUAL STORE
If you wish to manually store a base altitude:
1. PRESS & HOLD the SET key. The display will read SET HOLD for a period of
approximately 3 seconds and then automatically change to the screen for
manual adjustment of the Base Altitude with Altitude displayed in the center
line.
2. ADJUST THE BASE ALTITUDE by PRESSING the START/SPLIT and STOP keys until
you have adjusted the display to your chosen altitude.
3. PRESS the SET key to EXIT THE SETTING MODE and return to the primary Ski
Chronograph screen.
NOTE: We recommend you store your base altitude often as local pressure
changes may cause it to shift up or down and effect the accuracy of the
timing.
35
OPERATING THE SKI CHRONOGRAPH
1. Once you have established a Base Altitude, at the top of a ski run, PRESS the
START/SPLIT key. The 10 second countdown timer will start.
2. When the timer reaches zero (0) the watch will beep. Begin skiing. The timer
will automatically stop once you reach your programmed base altitude.
3. At the end of a run, the display will read the following:
Top Line: Elapsed Time for Run
Center Line: Current Altitude
Base Altitude
Bottom Line: Time of day
4. To begin timing another run, PRESS the START/SPLIT key to use the current
base altitude or enter the Automatic or Manual base altitude storing sequence.
english
36

OPERATING THE WATCH OPERATING THE WATCH
CHRONOGRAPH MODE
The ALTIS features a sophisticated 24-hour, 50-lap digital chronograph. The chronograph
has a resolution of 0.01 seconds for the first hour (1-second resolution after that) and
displays both lap time and total time on screen simultaneously.
OPERATING THE CHRONOGRAPH
In chronograph mode:
1. To START TIMING, PRESS the START/SPLIT key. The display will read the following:
Top Line Current lap time
Center Line Total elapsed time
Bottom Line Time of Day
english
2. To TIME A LAP, PRESS the START/SPLIT key. The display will read the following:
Top Line Lap number/time of last Lap
Lower Line Split Time (Total elapsed time at end of Lap)
REVIEWING WORKOUT DATA
The ALTIS displays a summary of your latest workout.
In Chronograph Mode with the timer stopped:
1. PRESS the SET key.
Top Line Lap number/time for Lap (in ascending order from Lap 1)
Lower Line Split Time (Total elapsed time at end of Lap)
2. SCROLL THROUGH LAP DATA by PRESSING the SET key.
3. After Lap detail, the watch displays BEST LAP (shortest timed segment). PRESS
the
SET key to continue data recall.
4. The final display is Average Lap Time.
5. To EXIT DATA RECALL, PRESS the START/SPLIT or STOP key.
NOTE: you may PRESS the START/SPLIT key to RESUME TIMING without
clearing the Chronograph.
CLEARING THE CHRONOGRAPH
In Chronograph Mode with the timer stopped:
1. PRESS & HOLD the STOP key for approximately 2 seconds.
english
3. To STOP TIMING, PRESS the STOP key.
37
38

SPECIFICATIONS AND RANGES TROUBLE SHOOTING BASIC
GENERAL
Water Resistance 5ATM
Watch Battery CR 2032 3v Lithium
ALTIMETER
Range -702 to +9158m / -2305 to +30,045ft
Resolution 1m / 1ft
ALTIMETER LOG
20 Individual date coded files storing date, time, vertical ascent and decent distance
and rate, hills and total elapsed time
Log Book has a resolution of 7 ft/ 2 meters
THERMOMETER
Range -10 to +50C / +14 to +122F
Resolution 0.1C/0.1F
COMPASS
Resolution of 1 degree
Rotating digital bezel in quarter cardinal points
english
BAROMETER
Range 300 to 1100mbar/hPa or (8.86 inHg to 32.48 inHg)
Resolution 1mbar/hPa or 0.01InHg
CHRONOGRAPH
Range 24 hours
Resolution 0.01 second for first hour; 1.0 second for hours 2-23
CHRONOGRAPH LOG
50 Laps/Splits
20 Runs/Workouts showing Lap/split times, Best Lap, Average Lap
The ALTIS is a very sensitive and sophisticated instrument. If properly cared for it should last and remain
accurate for many years. However, from time to time problems may happen. It has been our experience
that the majority of the problems seen by consumers with products such as these are related to dead or
dying batteries.
While the estimated life of a fresh battery in the unit is approximately one year, this can be shortened
considerably if the compass, altimeter or EL systems of the unit are used extensively. Whenever you are
experiencing issues related to the function of the unit it is recommended that you install a fresh battery as
a first course of action, especially if it has been more than a half a year since the last time the battery was
replaced.
BE AWARE – Lithium batteries of the type used in this watch are very susceptible to improper storage.
Many times, batteries purchased as new are dead or weak before they are purchased. Do not assume that
batteries in stores are good. If you try a new battery and problems persist, please try a second battery from
another source, just to be certain.
If the battery on the watch unit of the ALTIS is failing it may show itself in several ways. Indications of a
weak battery are:
1. A fading or blank display.
2. If the display goes blank when the EL system is operated and then comes back on when the EL system
turns off.
3. Inaccurate readings from the Altimeter or Compass systems
Because the compass is magnetic it may be affected by local sources of electromagnetic radiation (EMI).
Avoid using the compass near appliances, in cars, near home security systems and other sources of EMI.
If after several compass calibration attempts, you still see an ERR message, please demagnetize your
compass. You can demagnetize your compass by holding your watch over a demagnetizing machine while
in compass mode with “CAL” displayed on the screen. Most retail stores and libraries have demagnetizing
machines for anti-theft purposes. An example of a demagnetizer is a machine that deactivates the magnetic
security strip within a product.
The ALTIS is equipped with a display which allows it to be used in a wide variety of environments.
However, if the unit is used in extreme cold (<32 F or 1c) the function of the display may be slower than
normal. If exposed to extreme heat or cold, the display may also darken. The display should return to normal
once the temperature returns to normal levels.
english
39
40

CARE AND MAINTENANCE CARE AND MAINTENANCE
The ALTIS should be protected from shocks, extreme heat and extended exposure to direct sunlight. You
should only perform service procedures related to the changing of the battery as shown in this manual.
NEVER attempt to disassemble or otherwise service your watch. Store your watch in a clean, dry area at
room temperature.
Clean your watch using a moist cloth. Care should be taken when cleaning the lens not to rub dirt into the
surface as it can become scratched and hard to read.
CHANGING WATCH BATTERY
The ALTIS use a common CR2032 3V Lithium battery.
Normal battery life is approximately 1yr.
NOTE: Heavy usage of the Altimeter, Compass or Backlight system may
significantly reduce battery life.
NOTE: A blank display or inaccurate altimeter or compass readings are indications that the battery is
getting weak and should be replaced.
english
REPLACING THE WATCH BATTERY
1. Remove battery door using a coin.
2. Turn the stainless steel battery retainer counter-clockwise.
3. Carefully remove the retainer and old battery. Do not damage the O-ring seal.
4. Place a fresh battery in the battery compartment with the positive (+) side facing up.
5. Slide the battery retainer over the battery and position the tabs into their appropriate holes.
6. Slide the retainer counter clockwise.
7. Replace battery door using a coin.
8. If the O-ring has been damaged, replace it before
reinstalling the battery door. Most jewelers and watch
shops should have replacement O-ring seals.
english
NOTE: Extreme care should be taken when replacing the battery to ensure the unit remains fully
water resistant. Failure to properly replace the battery and correctly seal the unit may cause the unit
to become damaged and may void the warranty.
41
42

HIGHGEAR
a Division of Implus Footcare, LLC.
2001 T.W. Alexander Drive / Box 13925 / Durham, NC 27709-3925
800-446-7587 / help@4implus.com
www.highgear.com
©2013 Implus Footcare, LLC. All Rights Reserved.
©2013 Implus Footcare, LLC. Tous droits réservés.
©2013 Implus Footcare, LLC. Todos los derechos reservados.
©2013 Implus Footcare, LLC. 著作権を所有します。
© 2013 Implus Footcare, LLC. 版權所有。
Printed in China
Imprimé en Chine.
Impresos en China.
中国印刷物
中國印刷
 Loading...