

Page 1
alterra/aerial
Page 2

ALTIWARE SERIES
1
english
alterra/aerial
2
english
TABLE OF CONTENTS TABLE OF CONTENTS
WARNINGS AND CAUTIONS 4
CARE AND MAINTENANCE 5
REPLACING THE WATCH BATTERY 6
THE WATCH DISPLAY ICONS 7
KEYS AND THEIR FUNCTIONS 9-11
Key actions – QUICK PRESS vs. PRESS & HOLD 10
Programming the Watch – Common Key Actions 10
MODES OF OPERATION 12-13
TIME FUNCTIONS 14
View Time Zone 1 / Time Zone 2 14
Setting the Time of Day 14
Secondary Time Screens 15-16
COMPASS (ALTERRA ONLY) 17
Compass Screen 17
Calibrating the Compass 17
Magnetic Declination 18
Reactivating Compass 18
BAROMETER 19
Programming the Barometer 19
Secondary Barometer Screens 20
Barometric Pressure Graph 21
Change Barometer Units 21-22
ALTIMETER 23
Setting the Altimeter 23-24
Secondary Altimeter Screens 25
Change Altitude Units 26
Max/Acc Scrolling Message 26
Altitude Lock 26
ALTIMETER DATA LOG MEMORY 27
Start/Stop Log Book 27
Clearing the Log Book Memory 27
Reviewing Altimeter Log Data 28
CHRONOGRAPH 29
Laps and Splits 29
Operating the Chronograph 30
CHRONOGRAPH DATA LOG MEMORY 31
Managing the Chronograph Data Log 31
Reviewing Runs 31
Clearing Laps and Runs 32
SKI CHRONOGRAPH 33
Setting the Ski Chronograph 33
Storing a Base Altitude 33
Operating the Ski Chronograph 34
DAILY ALARM 35
Turning Alarm On/Off 35
Selecting alarm 1 or 2 35
Setting the Daily Alarm 36
RESETTING THE WATCH 36
SPECIFICATIONS AND RANGES 37
TROUBLE SHOOTING 38
Page 3

ALTIWARE SERIES
3
english
alterra/aerial
4
english
INTRODUCTION AND GENERAL INFORMATION WARNINGS AND CAUTIONS
Congratulations on your purchase of an ALTERRA/AERIAL OUTDOOR WRIST INSTRUMENT. These
products represent the state-of-the-art in recreational sensor watches. We use only the finest Swiss
sensors to create the most accurate and dependable products possible.
The Aerial unit features an altimeter/barometer/weather station along with a full selection of advanced
watch and chronograph functions. The Alterra has all the features of the Aerial with the addition of a
highly accurate digital compass.
Please keep in mind, your watch is a sensitive technical instrument. With proper care and maintenance,
it will last for many years. However, improper care and handling can cause the various sensors to be
damaged and to stop functioning.
Please read all sections of this manual carefully and become fully familiar with the operation of the
watch before using it in the field.
WARNING: Before starting any exercise program or performing any vigorous physical activity, we
strongly suggest you visit your doctor for a complete physical and to discuss your plans.
CAUTION: Your watch is designed to be water resistant to a static pressure of 5 ATM and can be worn
while showering and light swimming. However, we recommend that extensive use of the unit in the
water be avoided whenever possible as water could enter the unit through the altimeter sensor port
and damage the unit.
The unit should not be worn while snorkeling or scuba diving as these activities will damage the
altimeter sensor.
CAUTION: Care should be taken not to press any keys while the unit is wet or submerged as this can
force moisture past the key seals and damage the unit.
CAUTION: Exposure to strong magnetic fields will cause the compass unit to malfunction and may
even permanently damage the compass sensor. Keep the unit away from magnetic sources.
WARNING: This product is NOT designed to be used as a PRIMARY altitude instrument for flying,
skydiving, hang gliding or other sports where sudden significant changes in altitude may occur or when
there is a need for industrial precision.
Page 4
ALTIWARE SERIES
5
english
alterra/aerial
6
english
CARE AND MAINTENANCE CARE AND MAINTENANCE
Your ALTERRA/AERIAL OUTDOOR WRIST INSTRUMENT should be protected from shocks, extreme
heat and extended exposure to direct sunlight. You should only perform service procedures related to
the changing of the battery as shown in this manual. NEVER attempt to disassemble or otherwise
service your watch. Store your watch in a clean, dry area at room temperature.
Clean your watch using a moist cloth. Care should be taken when cleaning the lens not to rub dirt into
the surface as it can become scratched and hard to read.
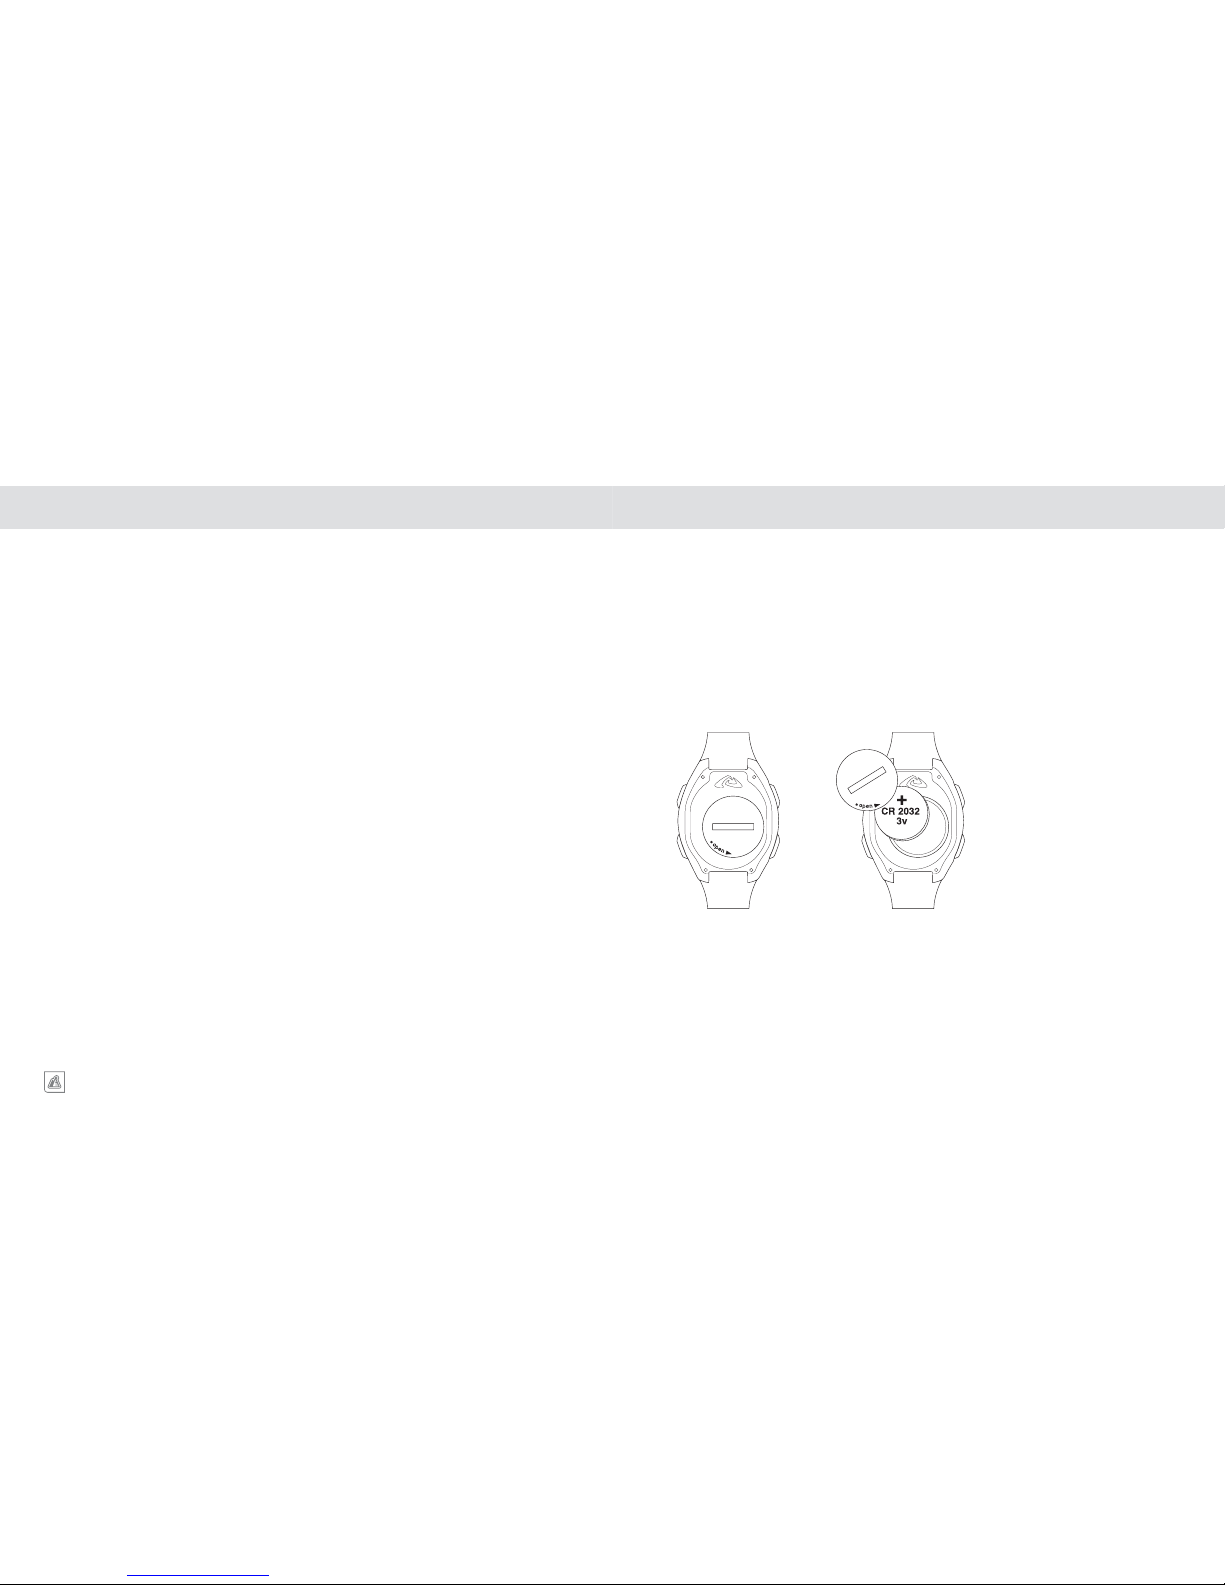
CHANGING WATCH BATTERY
The Alterra/Aerial use a common CR2032 3V Lithium battery.
Normal battery life is approximately 1yr.
NOTE: Heavy usage of the Altimeter, Compass or Backlight system may
significantly reduce battery life.
NOTE: A blank display or inaccurate altimeter or compass readings are indications that the
battery is getting weak and should be replaced.
REPLACING THE WATCH BATTERY
1. Remove battery door using a coin.
2. Turn the black plastic battery retainer counter-clockwise.
3. Carefully remove the retainer and old battery. Do not damage the O-ring seal.
4. Place a fresh battery in the battery compartment with the positive (+) side facing up.
5. Slide the battery retainer over the battery and position the tabs into their appropriate holes.
6. Slide the retainer counter clockwise.
7. Replace battery door using a coin.
8. If the O-ring has been damaged, replace it before reinstalling the battery door. Most jewelers and
watch shops should have replacement O-ring seals.
NOTE: Extreme care should be taken when replacing the battery to ensure the unit remains
fully water resistant. Failure to properly replace the battery and correctly seal the unit may
cause the unit to become damaged and may void the warranty.
Page 5
ALTIWARE SERIES
7
english
alterra/aerial
8
english
THE WATCH DISPLAY ICONS THE WATCH DISPLAY ICONS
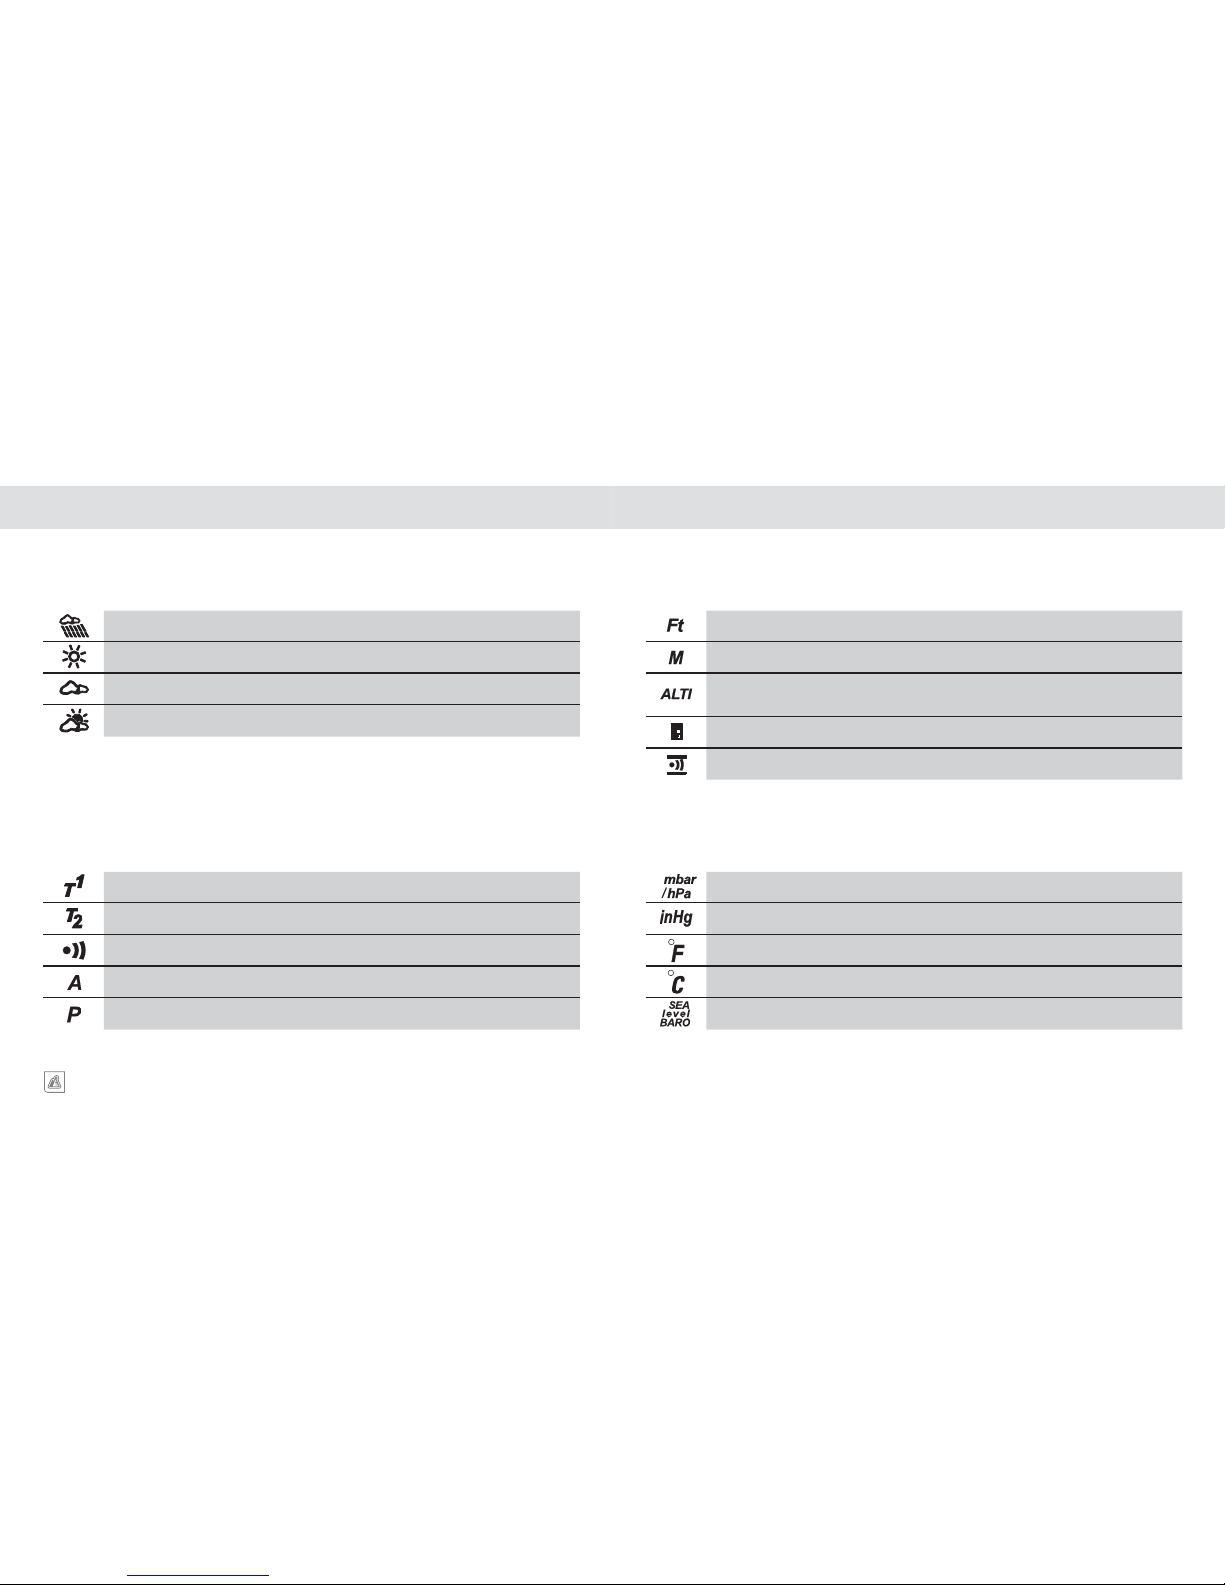
WEATHER ICONS
symbol description what it means
RAINY
Barometric pressure very low or falling, raining or rain likely
SUNNY
Barometric pressure high, weather fair
CLOUDY
Barometric pressure low, rain possible but not likely
PARTLY CLOUDY
Barometric pressure falling or rising, weather changeable
TIME ICONS
symbol description what it means
TIME ZONE 1
Time Zone 1 on Display
TIME ZONE 2
Time Zone 2 on Display
DAILY ALARM
Daily Alarm is active
AM
A.M. time
PM
P.M. time
ALTIMETER ICONS
symbol description what it means
FEET
Current Altitude measured in feet
METERS
Current Altitude measured in meters
ALTIMETER SCREEN
IDENTIFIER
Watch is in Altimeter mode
LOG BOOK RECORDING ICON
Log Book recording in progress
ALTIMETER ALARM
Altimeter Alarm is active
BAROMETER ICONS
symbol description what it means
MBAR
Millibar barometric pressure units
INHG
Inches of Mercury barometric pressure units
DEGREES F
Fahrenheit temperature units
DEGREES C
Centigrade temperature units
SEA LEVEL BAROMETER SCREEN IDENTIFIER
Page 6
ALTIWARE SERIES
9
english
alterra/aerial
10
english
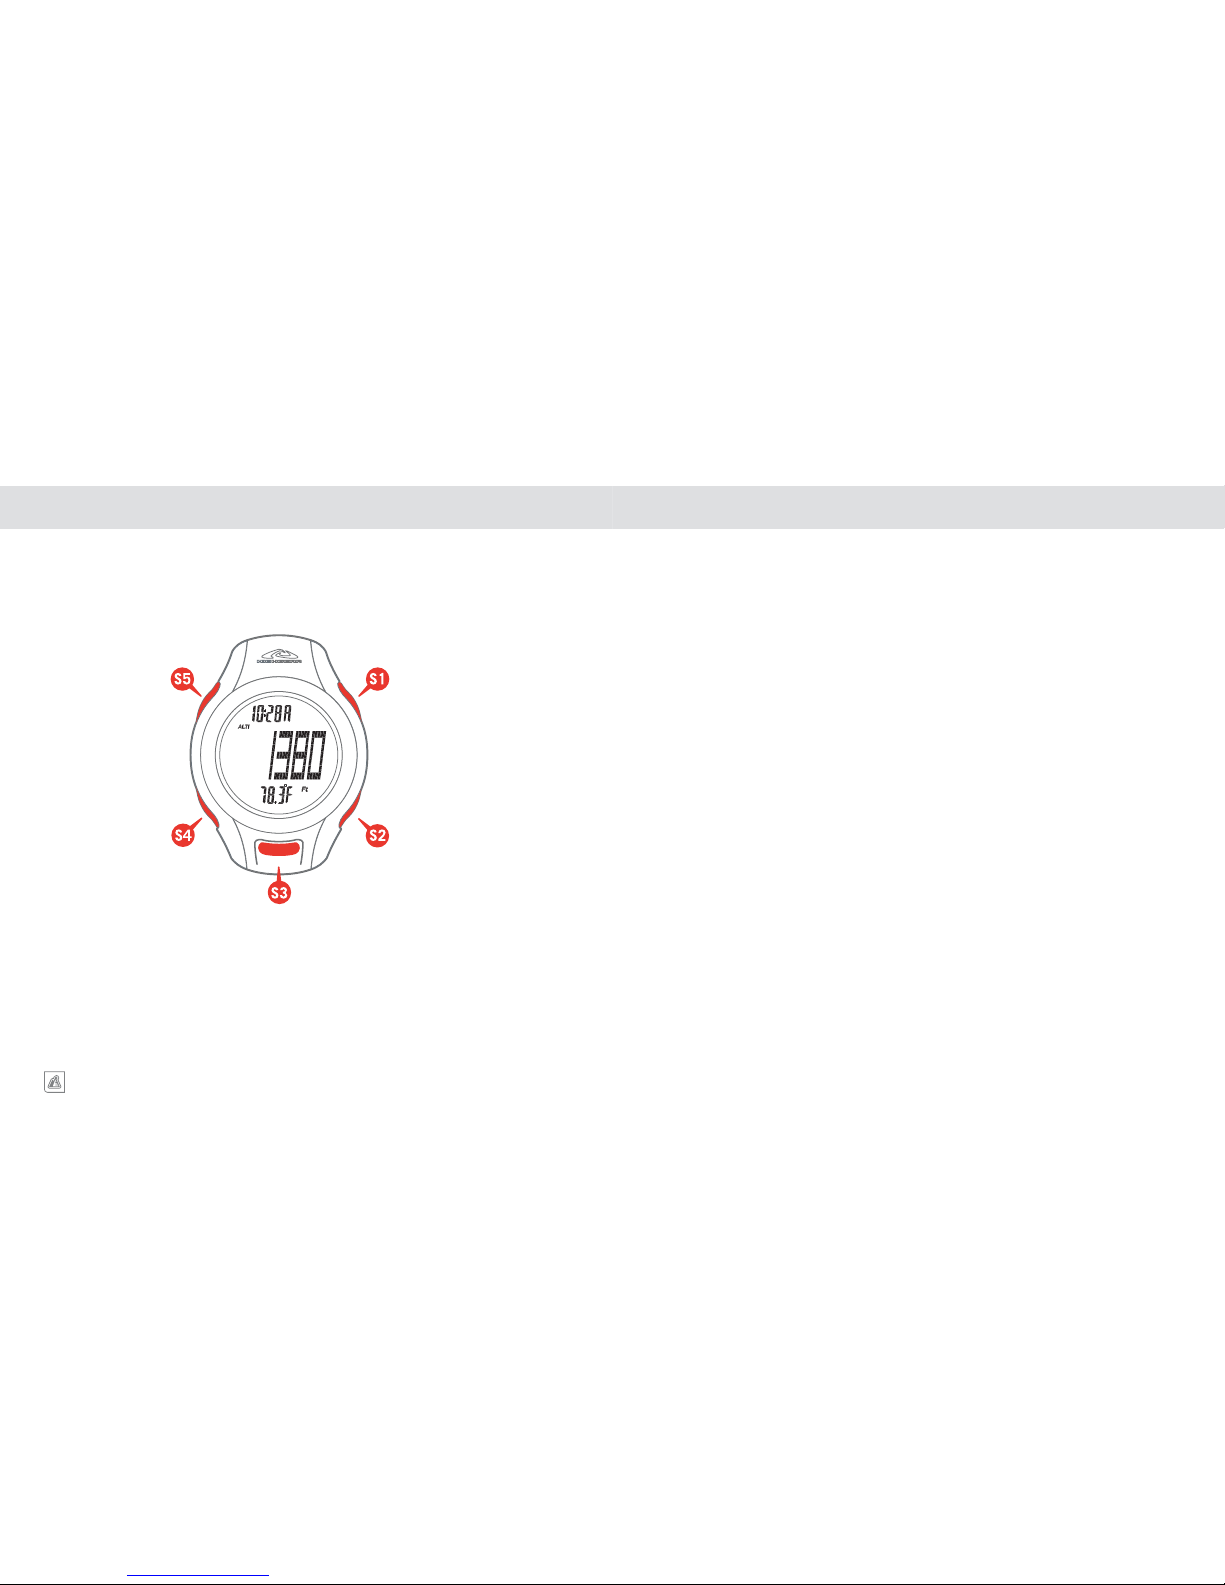
KEYS AND THEIR FUNCTIONS KEYS AND THEIR FUNCTIONS
S5 KEY
- Enter/Exit Setting mode for
each function
- Clear Chronograph and
Altimeter memories
S4 KEY
- Advances display through the
various operational modes
- Selects variable in setting mode
S3 KEY
- Activate EL Backlight
system
S2 KEY
- View/Select Time 1 / Time 2 in Time
of Day mode
- View/Select C/F and inHg/mbar in
Barometer mode
- View/Select Ft/M in Altimeter mode
- Scroll through Altitude Log files
- Turn Altimeter Alarm On/Off
- Stop Chronograph/Save
Chronograph Files
- Scroll through Chronograph Log
files
- Store Base Altitude in Ski
Chronograph
- Select Alarm 1 or 2
S1 KEY
- Changes View in Time, Barometer,
Altimeter, Altimeter Log and
Chronograph Log modes
- Start/Stop information storage in
Altimeter mode
- Advances variable in Setting mode
- Start/Lap/Split action in
Chronograph mode
- Starts Ski Chrono
- Turns Daily Alarm On/Off
The Alterra/Aerial unit is equipped with 5 individual keys. Each key has several functions. The drawing
identifies the keys and their names as used in this manual.
KEY ACTIONS – QUICK PRESS VS. PRESS AND HOLD
There are two key actions used to program the watch:
QUICK PRESS
The key is pressed quickly and immediately released. This is the most common key action and is
used for most aspects of operation
PRESS & HOLD
The key is pressed and held for 2-3 seconds. This key action is generally used to initiate a
programming sequence or to change an on-screen variable.
NOTE 1: Generally, when a PRESS & HOLD action is required, the word HOLD will appear on
the center line of the display.
NOTE 2: In this manual we will indicate when a PRESS & HOLD is required.
In most other instances a QUICK PRESS should be assumed.
PROGRAMMING THE WATCH – COMMON KEY ACTIONS
ENTER A PROGRAMMING SEQUENCE
PRESS & HOLD the S5 key.
The words HOLD – ADJUST will appear in the center and bottom lines of the display. Continue
to hold the key until the display automatically advances to the first variable in the programming
sequence.
ADJUST VARIABLE IN A PROGRAMMING SEQUENCE
QUICK PRESS the S1 or S2 keys.
Variables in a programming sequence are adjusted up using a QUICK PRESS of the S1 key and
down using a QUICK PRESS of the S2 key.
In most programming options, a PRESS & HOLD of either the S1 or S2 key will cause the variable
to fast advance, allowing you to quickly advance to a different number.
Continued next page.
Page 7
ALTIWARE SERIES
11
english
alterra/aerial
12
english
MODES OF OPERATIONKEYS AND THEIR FUNCTIONS
ADVANCE TO NEXT VARIABLE IN A PROGRAMMING SEQUENCE
QUICK PRESS the S4 key.
When you have chosen the variable you want for a particular portion of a programming sequence
QUICK PRESS the S4 key to set and advance to the next variable.
NOTE: As long as you press the S4 key, you will continue to cycle through the variables for
that sequence.
EXIT A PROGRAMMING SEQUENCE
QUICK PRESS the S5 key.
Once all variables of a programming sequence have been entered to your satisfaction, QUICK
PRESS
the S5 key to exit the programming sequence and return to the initial main display.
ACTIVATE THE DISPLAY BACKLIGHT SYSTEM-
QUICK PRESS the S3 key.
Activate the backlight system at any time with a QUICK PRESS of the S3 key. The backlight will
remain active for a period of 5-seconds after the press of the S3 key. If, while the backlight is
active, another key is pressed, the timer will be reset and the 5-second period will start again. This
will happen for as long as keys are pressed. This allows you to easily operate and program the
watch in low light situations.
NOTE: Excessive use of the backlight system will result in shorter battery life.
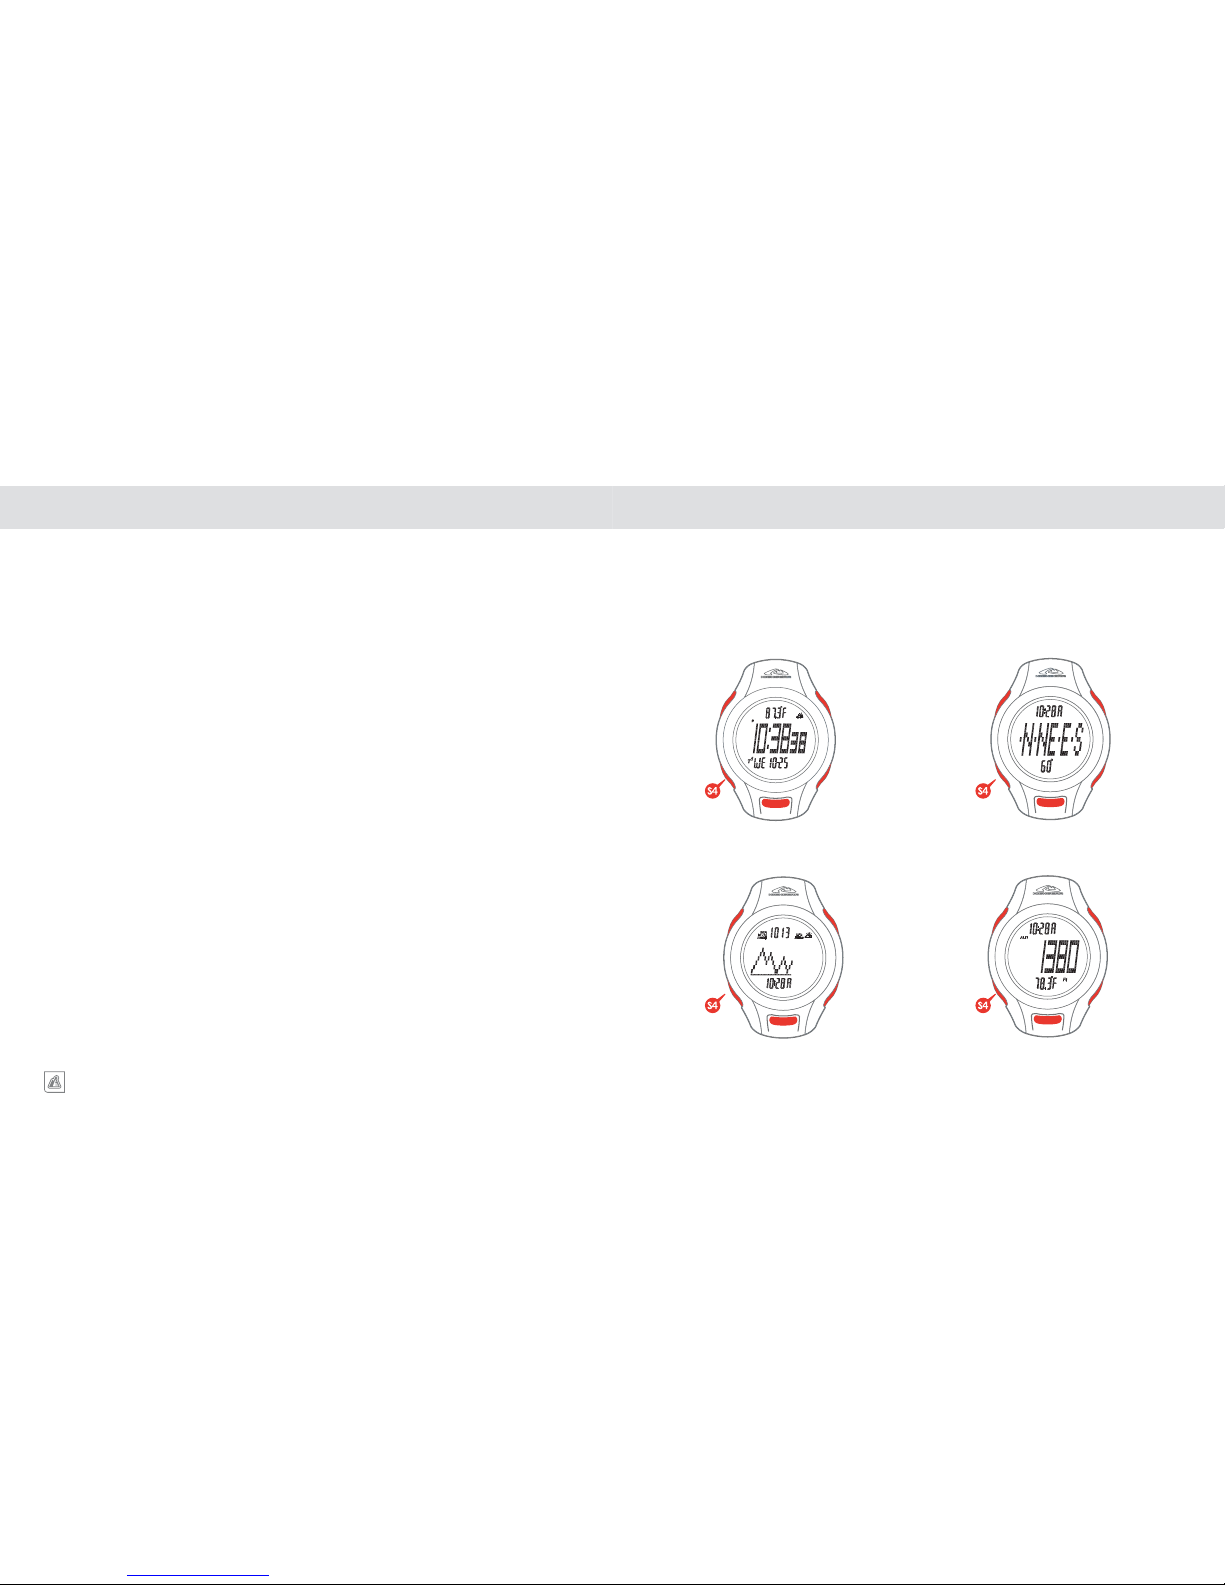
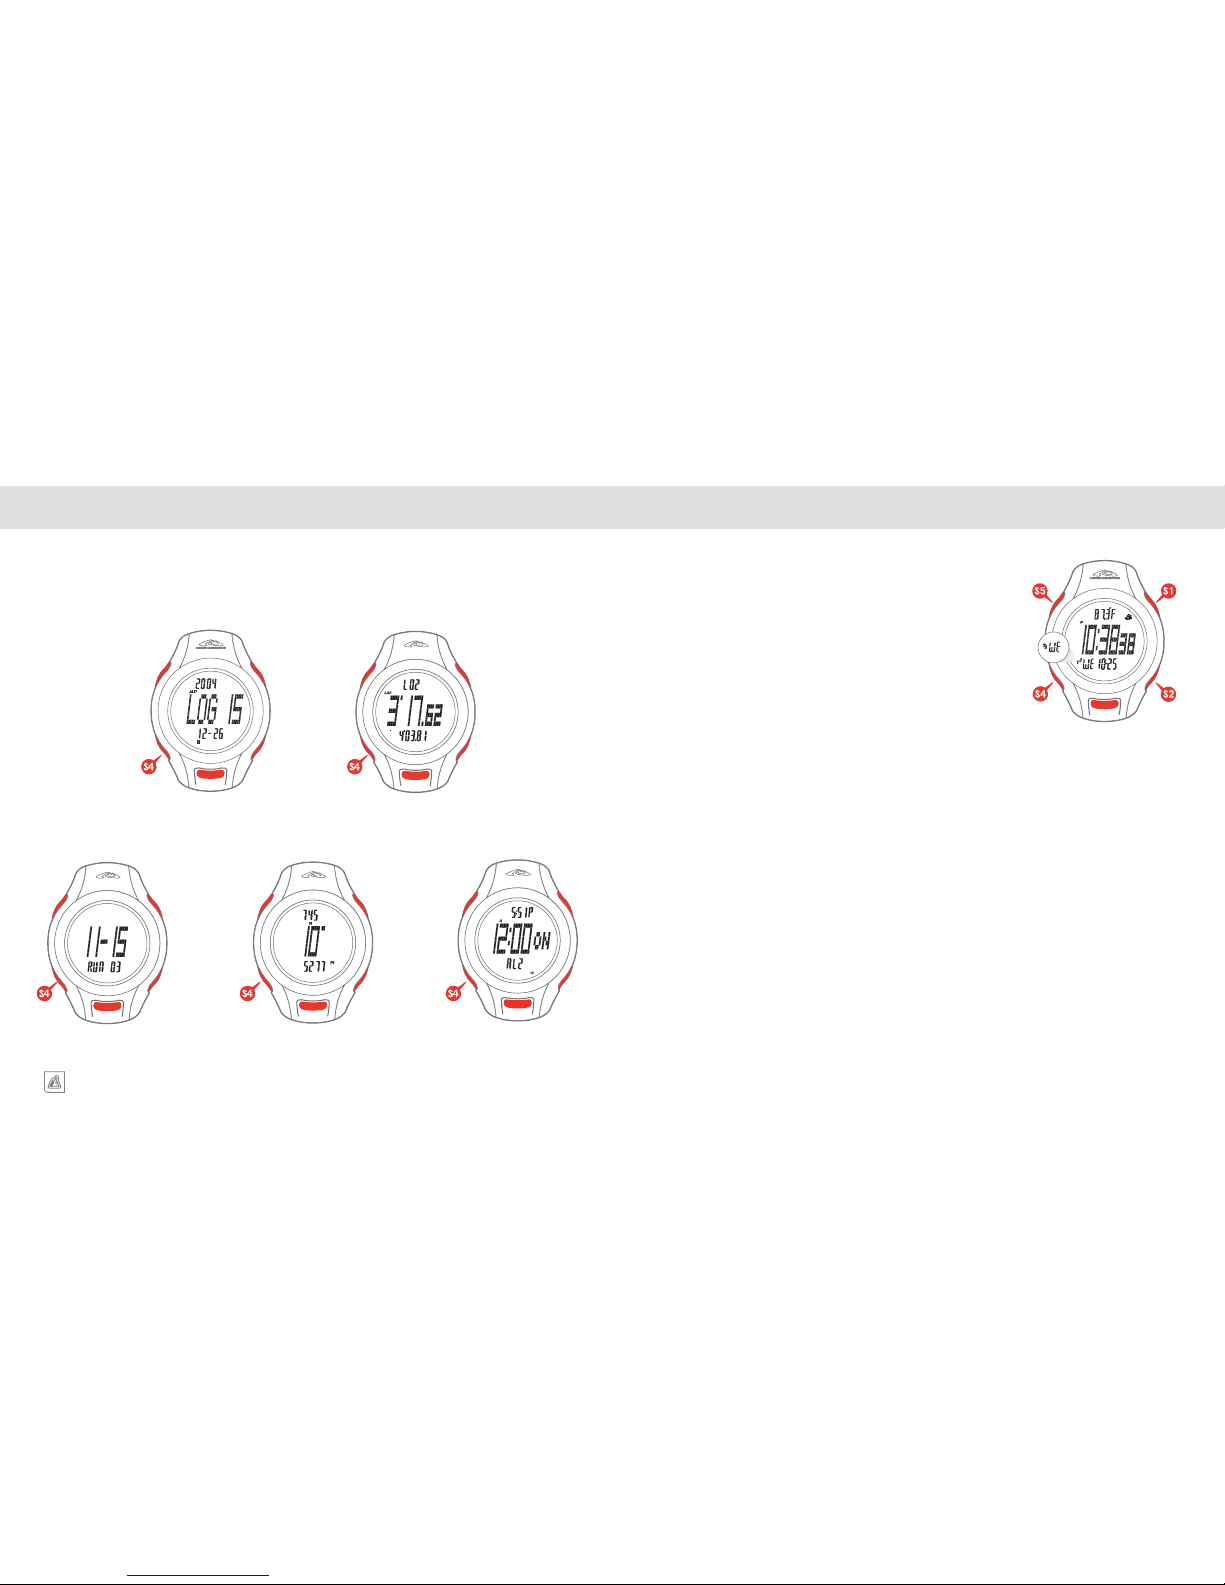
MAIN DISPLAY MODES
Advance through the modes below using QUICK PRESSES of the S4 key. Upon entering a mode, the
name of the mode will be displayed on screen for a period of 1.5 seconds before advancing automatically to the mode’s primary screen.
TIME
ALTIMETER
COMPASS (Alterra only)
BAROMETER
Page 8
ALTIWARE SERIES
13
english
alterra/aerial
14
english
TIME FUNCTIONS
english
MODES OF OPERATION
CHRONOGRAPH
DATA
ALTIMETER LOG
SKI CHRONOGRAPH
CHRONOGRAPH
ALARM
VIEW TIME ZONE 1 / TIME ZONE 2
The Alterra/Aerial unit is equipped with a full feature wrist watch
package including Time of Day, Day/Date/Day of Week, Two Time Zones
and Two Daily Alarms.
The Time Zone being displayed is indicated by a small T1/T2 in the
lower left corner of the display.
VIEW / CHANGE TIME ZONE: PRESS & HOLD the S2 key
SETTING THE TIME OF DAY
1. Start in TIME Mode.
2. Select TIME 1 or TIME 2 using the S2 key.
3. PRESS & HOLD the S5 to enter the setting sequence.
4. Adjust HOUR, MINUTES, SECONDS, YEAR, MONTH, DATE,
12/24 HOUR mode using the S1 and S2 keys. The variable being
programmed (Hours, Min, Sec, etc.) will be shown in the Bottom
Line of the display.
5. Set each variable using the a QUICK PRESS of the S4 key.
6. Exit setting sequence using the S5 key.
7. Select alternate time and repeat the above procedure.
MAIN DISPLAY MODES (continued)
Page 9
ALTIWARE SERIES
15
english
alterra/aerial
16
english
TIME FUNCTIONSTIME FUNCTIONS
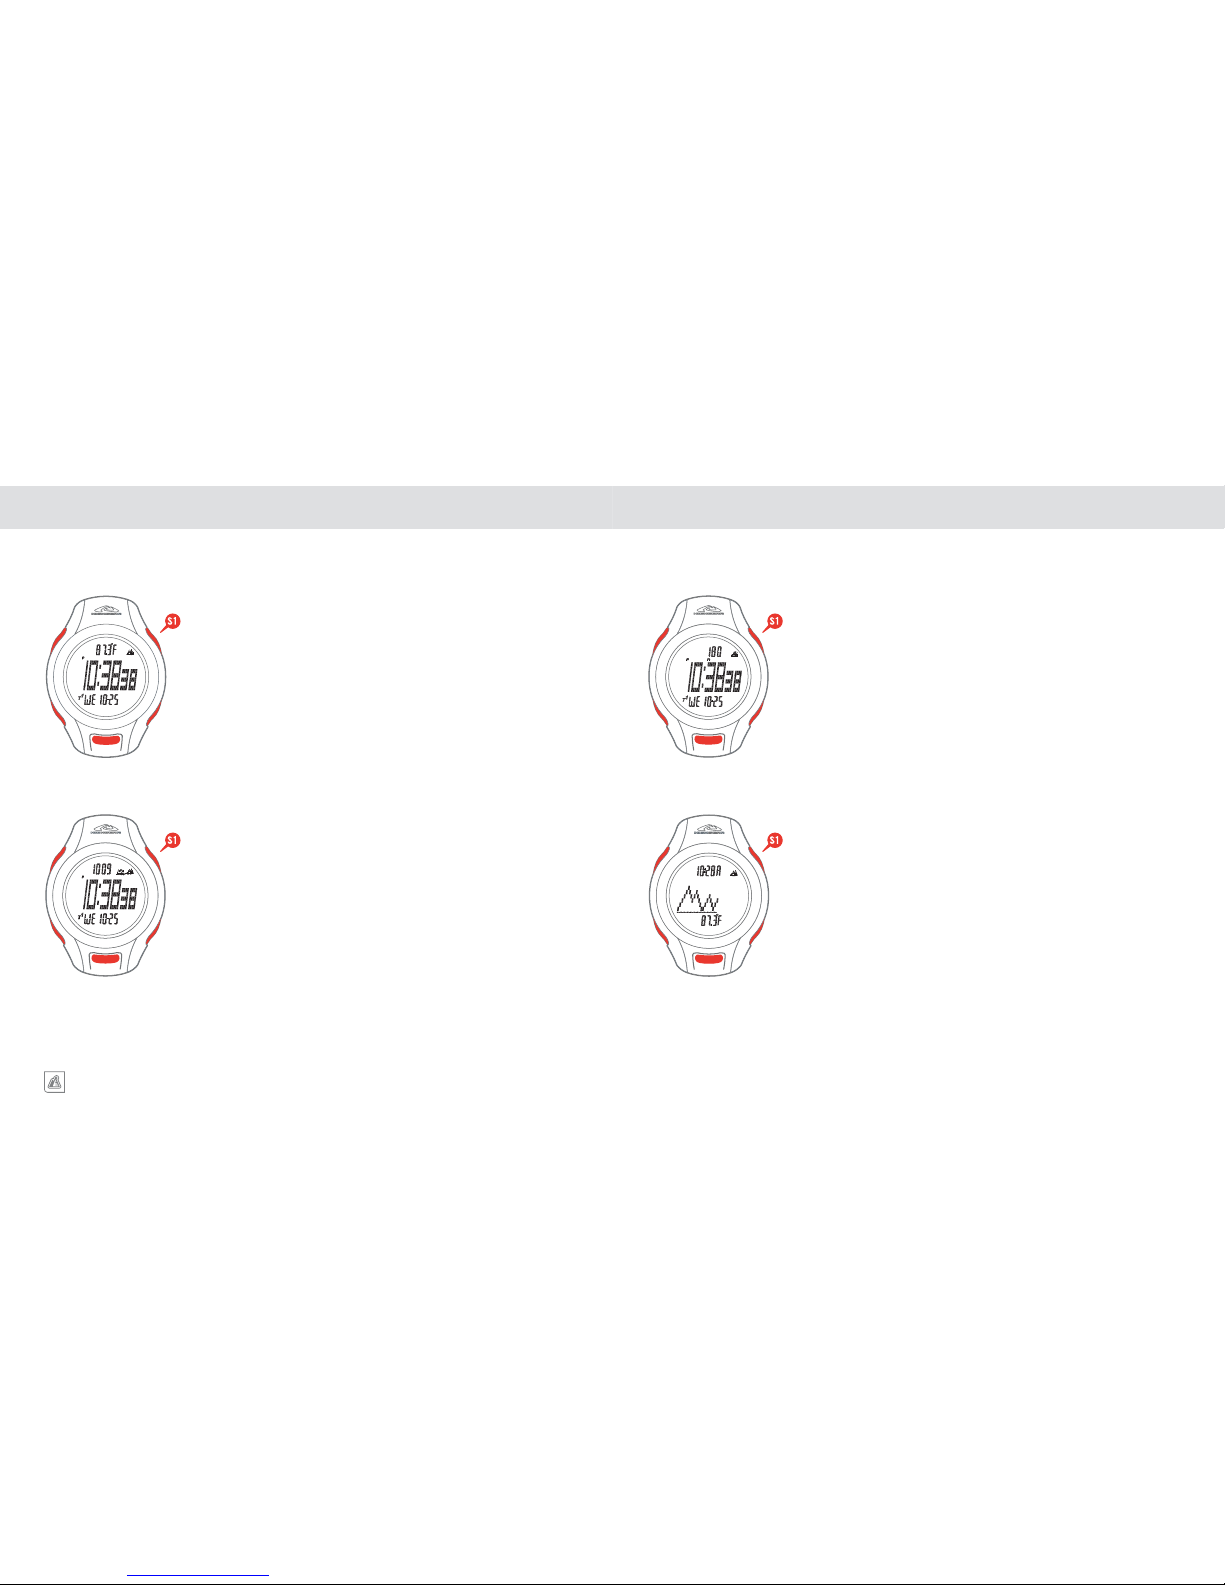
SECONDARY TIME SCREENS
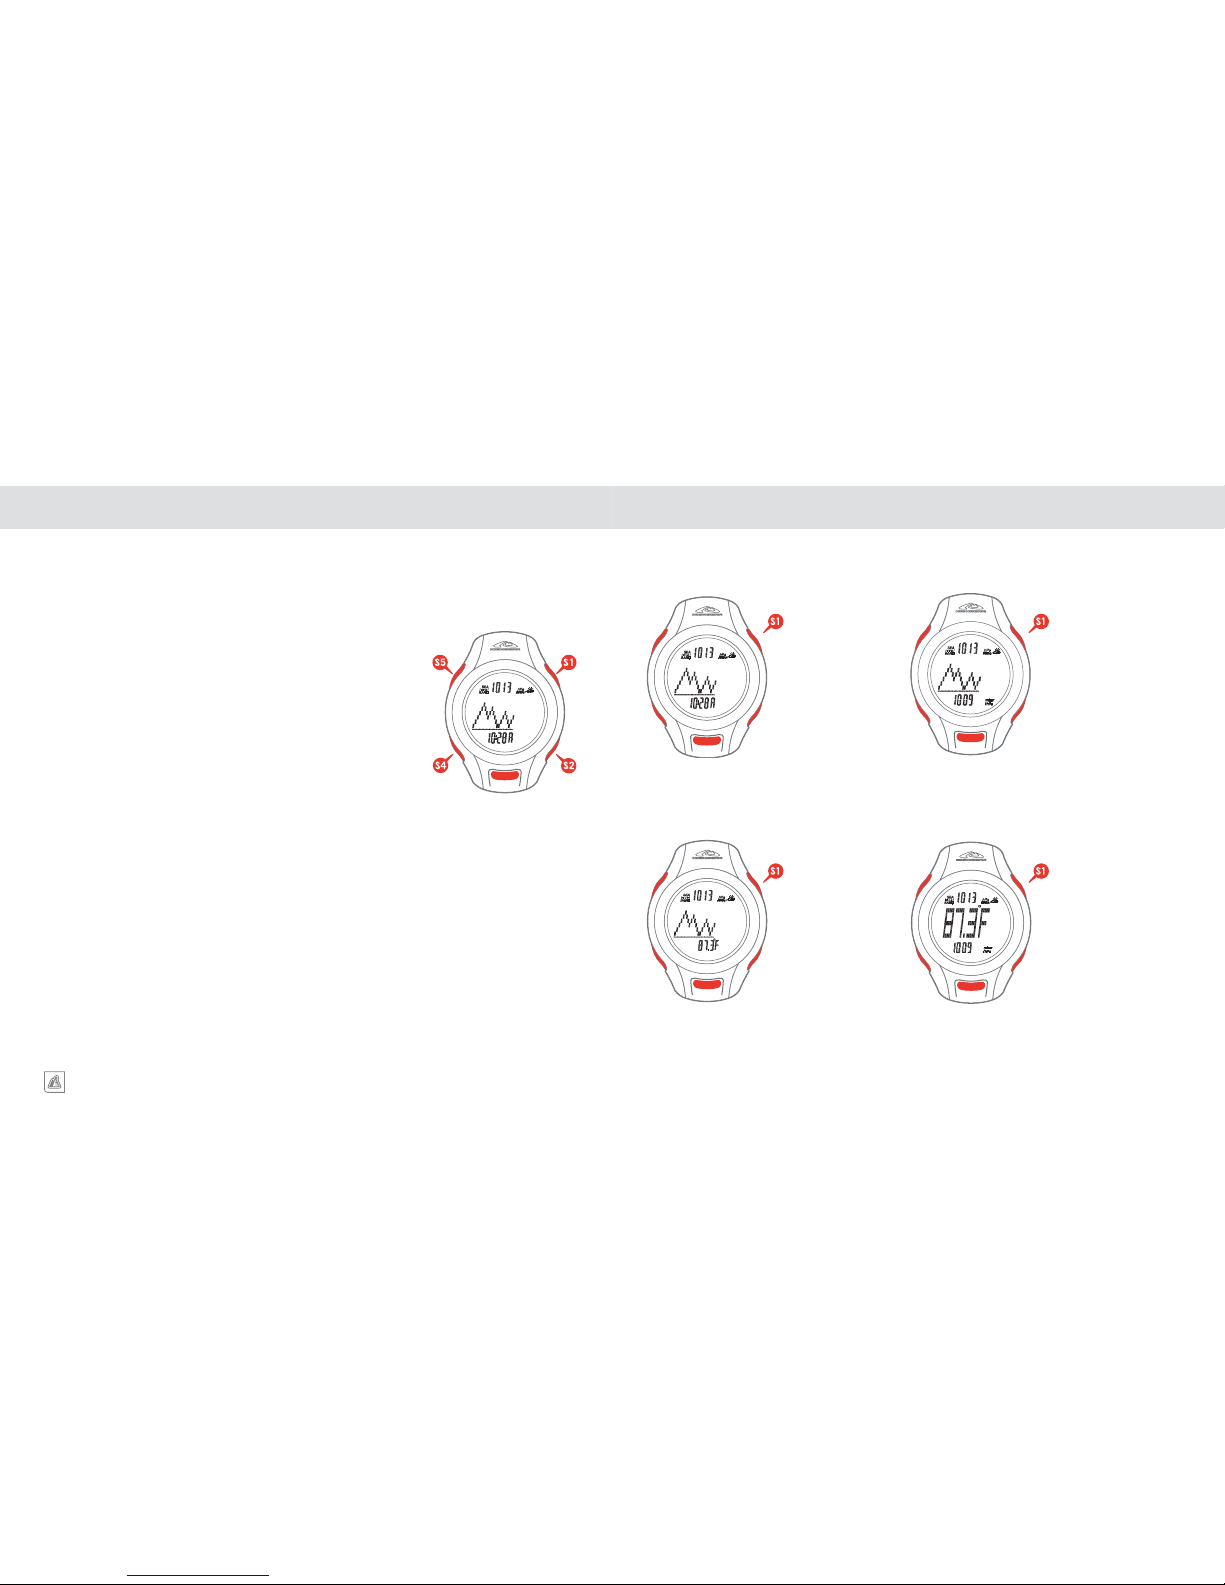
There are 4 secondary time display options accessed by QUICK PRESSES of the S1 key.
SCREEN 1
Top Line: TEMPERATURE
Center Line: TIME OF DAY
Bottom Line: DAY AND DATE
SCREEN 2
Top Line: LOCAL BAROMETRIC PRESSURE
Center Line: TIME OF DAY
Bottom Line: DAY AND DATE
SCREEN 4
Top Line: TIME OF DAY
Center Line: GRAPH OF BAROMETRIC PRESSURE
FOR THE PAST 24HOURS (see pg 21
Barometric pressure graph)
Bottom Line: TEMPERATURE
SCREEN 3
Top Line: CURRENT ALTITUDE
Center Line: TIME OF DAY
Bottom Line: DAY AND DATE
NOTE: All four screens also have an icon in the upper right hand corner
showing a visual representation of the current weather.
NOTE: The temperature sensor measures the temperature of the watch
unit. If worn on your wrist or exposed to direct sunlight, the sensor may read
artificially high. For accurate temperature readings, remove the watch from
your wrist and place in a shaded area for 10-15 minutes.
Page 10
ALTIWARE SERIES
17
english
alterra/aerial
18
english
COMPASS (ALTERRA ONLY)COMPASS (ALTERRA ONLY)
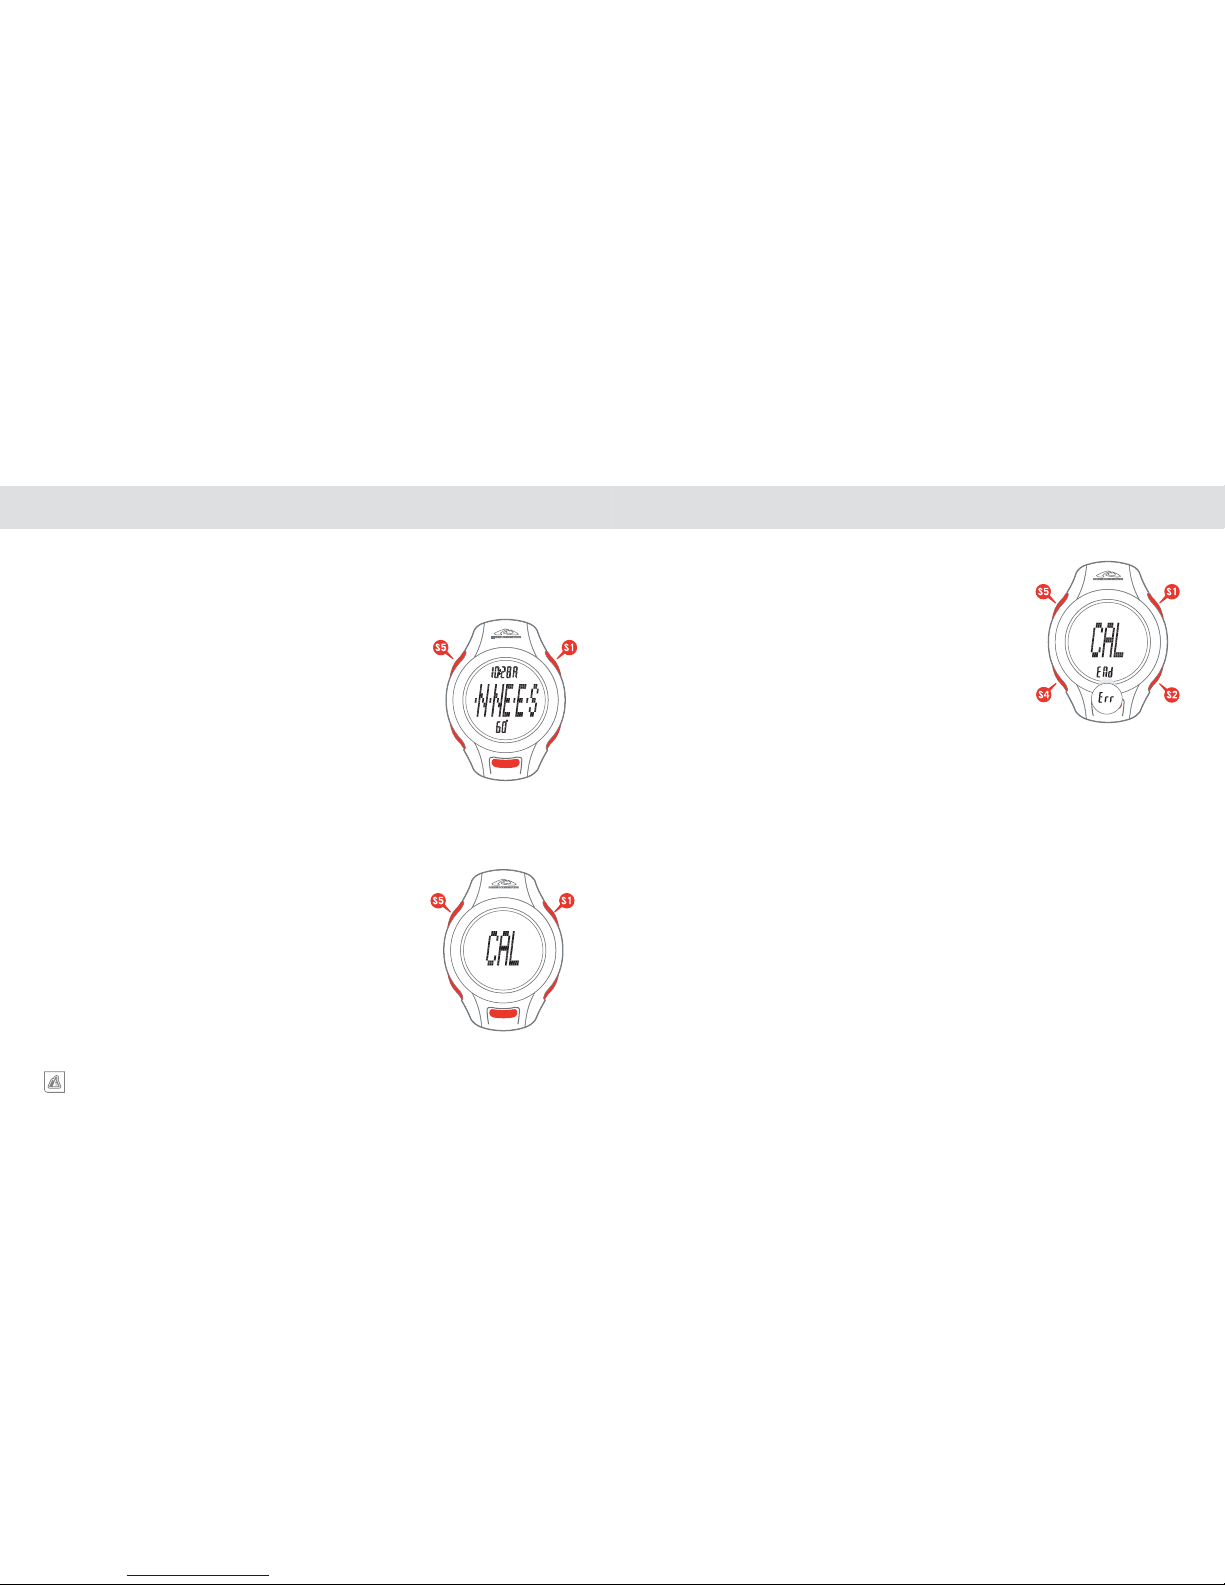
COMPASS SCREEN
There is only one screen display available in the COMPASS mode.
The display shows the TIME OF DAY in the top line. The CURRENT
HEADING IN QUARTER CARDINAL POINTS is shown as a rotating
scale across the center line and the bottom line displays the CURRENT
HEADING IN DEGREES.
CALIBRATING THE COMPASS
The COMPASS of the Alterra must be calibrated on a regular basis. The
compass should be calibrated any time it does not seem to be working
properly. We recommend calibrating the compass prior to any activity
where optimal accuracy is desired, such as a long back country trip.
1. Start in COMPASS mode.
2. PRESS & HOLD the S5 key to enter the calibration sequence.
3. CAL will appear in the center line of the display.
4. Rotate the watch clockwise for two complete rotations of
approximately 15-seconds per rotation.
5. To exit the calibration sequence at this point QUICK PRESS the S1
key. Or advance to setting the magnetic declination using a QUICK
PRESS of the S5 key.
NOTE: For the optimum accuracy, the compass must be held
completely level during the calibration process. We recommend
placing the unit on top of a drinking glass while performing
the calibration as this will make it easier to keep the compass
level.
The Alterra is equipped with a highly accurate digital magnetic compass with reading in one degree
increments. The compass can be adjusted to compensate for the magnetic declination corresponding to
the area where the compass is being used.
CALIBRATING THE COMPASS (continued)
6. If the calibration is successful the display will show CAL in the
center line and END in the lower line and automatically advance
to the compass display.
7. If the calibration was unsuccessful, an ERR message will appear
in the lower line of the display, and you will need to repeat the
calibration sequence.
8. If you have chosen to set a magnetic declination, adjust the
degrees and direction using the S1 and S2 keys. Set and advance
from variable to variable using the S4 key.
9. If you do not know the Magnetic Declination for your area, leave
this setting at ZERO.
10. When you have completely entered the magnetic declination, exit
the calibration sequence using the S5 key.
MAGNETIC DECLINATION
A magnetic compass points to the earth’s magnetic north pole. Depending on your location, this may
be different from True North. Adjusting the MAGNETIC DECLINATION allows you to compensate for
this variation. Magnetic Declination for an area can be found on topographical maps. Declination can
change over time and distance. Make sure the source for your declination settings is up to date. The
following websites are good sources for finding local Magnetic Declination.
http://www.gsc.nrcan.gc.ca/geomag/field/mdcalc_e.php
http://www.ngdc.noaa.gov/seg/geomag/jsp/Declination.jsp
REACTIVATING COMPASS
To save power, the compass feature of the Alterra unit only remains active for a period of 30-seconds.
To reactivate the compass display, QUICK PRESS the S1 key.
Page 11
ALTIWARE SERIES
19
english
alterra/aerial
20
english
BAROMETERBAROMETER
PROGRAMMING STEPS
1. Start in BAROMETER mode.
2. PRESS & HOLD the S5 key to enter setting sequence.
3. Adjust current weather using the S1 and S2 keys.
NOTE: There are four different Icons for weather. SUNNY,
PAR TLY CLOUDY, CLOUDY and RAIN. Choose the icon
which most closely matches the weather at the present time.
The icon will change to indicate an estimate of what the
weather will be like for the next 6-hours.
4. Advance to BAROMETER (BARO) display using QUICK
PRESSES of the S4 key.
NOTE: Do not randomly adjust the barometric pressure
setting of the watch. Inaccurate setting of the barometric
pressure may result in inaccurate altimeter and weather
readings. If you are not certain of the proper use of this
function, it is better to leave this variable at its factory
setting. The Mean Sea Level barometric pressure may be
adjusted if desired to achieve the highest levels of accuracy.
5. Adjust SEA LEVEL BAROMETRIC PRESSURE using S1 and S2
keys. Do not adjust your absolute barometric pressure.
6. Exit the barometer setting sequence using the S5 key.
The Alterra and Aerial are equipped with a highly sensitive barometer/weather station. The
BAROMETER measures the Absolute Barometric Pressure and calculates the Barometric Pressure
corrected to Mean Sea Level (MSL). Barometric pressure may be displayed in either Inches of Mercury
(inHg) or Millibar/HectoPascals (mbar/hpa).
SECONDARY BAROMETER SCREENS
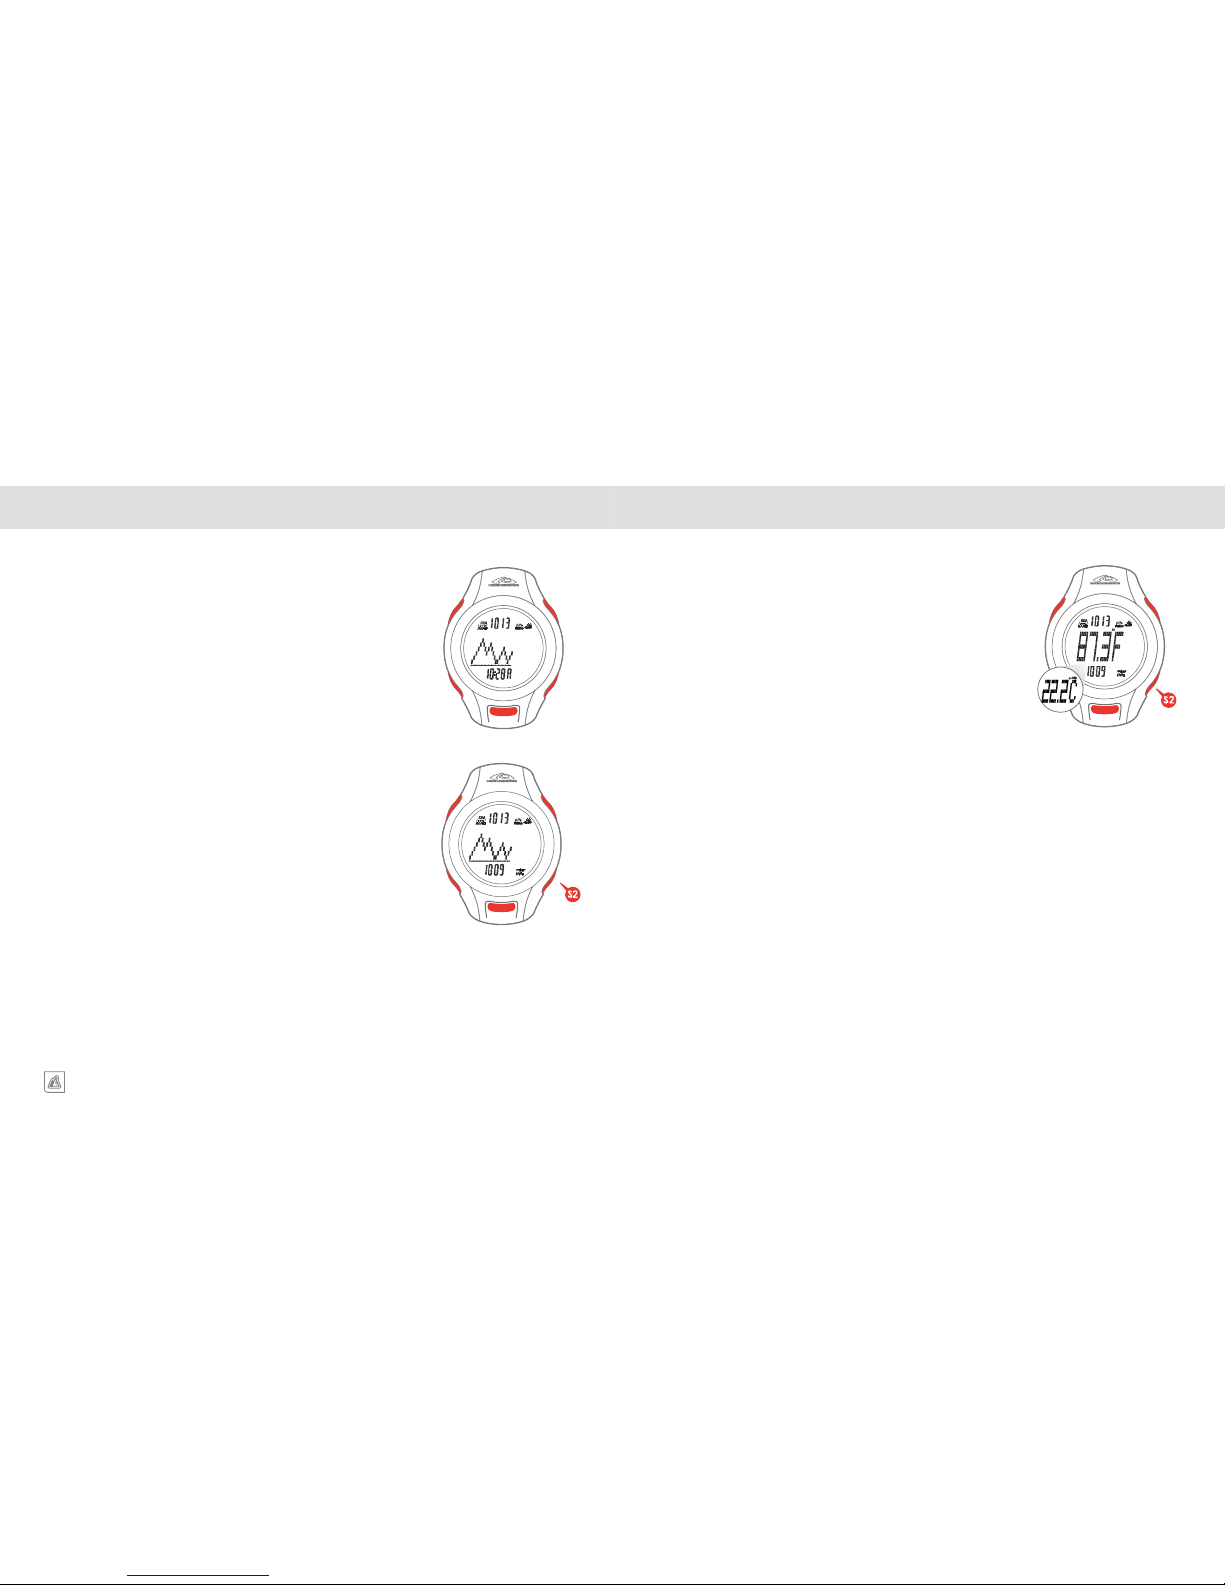
There are 4 secondary BAROMETER display options accessed by QUICK PRESSES of the S1 key.
SCREEN 4
Top Line: BAROMETRIC PRESSURE MSL
Center Line: TEMPERATURE
Bottom Line: LOCAL UNADJUSTED (ABSOLUTE)
BAROMETRIC PRESSURE
SCREEN 1
Top Line: BAROMETRIC PRESSURE MSL
Center Line: GRAPH OF BAROMETRIC PRESSURE FOR
THE PAST 24-HOURS
Bottom Line:TIME OF DAY
SCREEN 3
Top Line: BAROMETRIC PRESSURE MSL
Center Line: GRAPH OF BAROMETRIC PRESSURE
FOR THE PAST 24-HOURS
Bottom Line: TEMPERATURE
SCREEN 2
Top Line: BAROMETRIC PRESSURE MSL
Center Line: GRAPH OF BAROMETRIC PRESSURE
FOR THE PAST 24-HOURS
Bottom Line: LOCAL UNADJUSTED (ABSOLUTE)
BAROMETRIC PRESSURE
Page 12
ALTIWARE SERIES
21
english
alterra/aerial
22
english
BAROMETERBAROMETER
CHANGE TEMPERATURE UNITS
While the watch is in BAROMETER SCREENS 3 and 4, you can view
and change the TEMPERATURE DISPLAY UNITS between degrees
FAHRENHEIT and CELSIUS using a PRESS & HOLD of the S2 key.
Continue to hold the key until the temperature units icon stops flashing.
NOTE: The TEMPERATURE or BAROMETRIC PRESSURE
units chosen while in the BAROMETER mode will be the units
displayed in the TIME OF DAY and ALTIMETER modes.
BAROMETRIC PRESSURE GRAPH
The center line of several of the BAROMETER screens, as
well as one of the TIME OF DAY screens, shows a GRAPH OF
BAROMETRIC PRESSURE CHANGES over the past 24-hours. The
graph updates once every hour and only indicates changes relative to
the previous measurement.
CHANGE BAROMETER UNITS
While the watch is in BAROMETER SCREEN 1 and 2, you can
view and change the display units for barometric pressure between
INCHES OF MERCURY (inHg) and MILLIBAR/HECTOPASCALS
(mbar/hPa) using a PRESS & HOLD of the S2 key. Continue to hold
the key until the pressure units icon stops flashing.
Page 13
ALTIWARE SERIES
23
english
alterra/aerial
24
english
ALTIMETERALTIMETER
Because the ALTIMETER system in the Alterra/Aerial relies on Barometric Pressure for its
measurements, it is critical that you regularly calibrate the unit to a known altitude. For maximum
accuracy, daily calibration is a must. If you are using the unit during times of changeable weather, the
unit may need to be calibrated more often. Generally, the small pressure changes experienced during a
day of use will have only a minor effect on the accuracy of the unit, however, the arrival or departure of
a weather front can change the current weather display by several hundred feet or more.
SET ALTIMETER (continued)
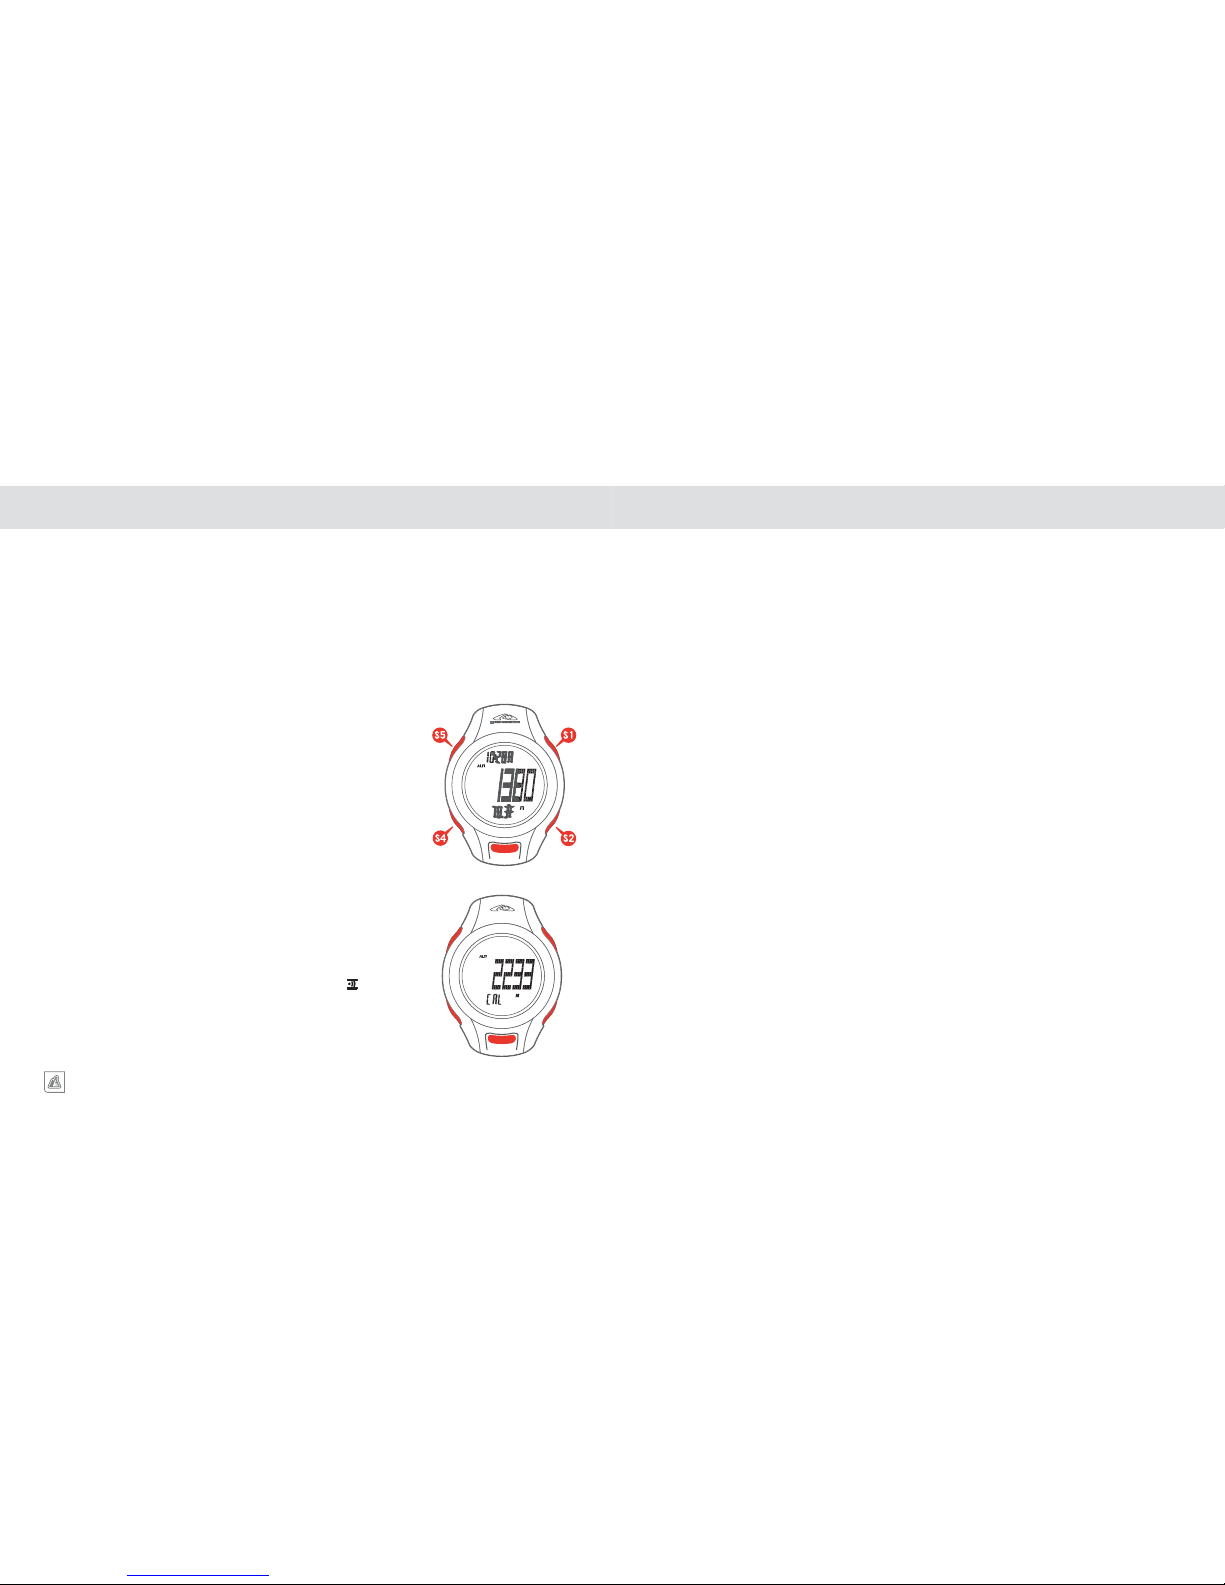
12. There are two altitude memory displays showing the MAXIMUM ALTITUDE and
ACCUMULATED ASCENT since the last time the memory was cleared. Clear each memory
using the
S1 or S2 key and advance from the MAXIMUM (HIGH) to the ACCUMULATED (ACC)
memories using the
S4 key.
13. Exit the ALTIMETER CALIBRATION sequence using a
QUICK PRESS of the S5 key.
SETTING THE ALTIMETER PRESETS
The Alterra/Aerial is equipped with three altimeter preset locations. Preset Locations are useful in
the daily calibration process. If you know the exact altitude of a particular place, you can preset your
Alterra/Aerial to this location for quick calibration.
1. Start in ALTIMETER mode
2.
PRESS AND HOLD the S5 key to enter the setting sequence.
3. “REAL” will display flashing on the screen.
4.
QUICK PRESS the S1 key to set altitude presets. Using S1, scroll through LOCATION 1,
LOCATION 2 and LOCATION 3.
5. Choose the Location you would like to set. QUICK PRESS the S4 key to set that Location’s
altitude. The LOCATION’S ALTITUDE will appear flashing in the center line of the display.
6. Adjust the ALTITUDE UP and DOWN using the
S1 and S2 keys.
7. Exit the ALTIMETER PRESET sequence using a
QUICK PRESS of the S5 key.
8. Follow steps 1 through 7 in order to set the remaining location presets.
RECALLING ALTIMETER PRESETS
1. Start in ALTIMETER mode
2.
PRESS AND HOLD the S5 key to enter the setting sequence.
3. “REAL” will display on the screen.
4.
QUICK PRESS the S1 key to scroll through “LOC 1”, “LOC 2” and “LOC 3.”
5. Once you have selected the desired Location,
QUICK PRESS the S5 key to set your altimeter to
that particular location.
SET ALTIMETER
1. Start in ALTIMETER mode.
2.
PRESS & HOLD the S5 key to enter the setting sequence.
3. “REAL” will display on the screen.
QUICK PRESS the S4 key and
the CURRENT ALTITUDE will appear flashing in the center line of
the display
4. Adjust the current altitude up and down using the
S1 and S2 keys.
5. Set the altitude and advance to Activating the Altitude Alarm using
the
S4 key.
The Alterra and Aerial are equipped with an Altitude Alarm which
will sound to warn you if you exceed a preset altitude.
6. Turn the ALTITUDE ALARM ON or OFF using the
S1 or S2 key.
7. Set your choice using the
S4 key.
8. If you choose “ON", the ALARM ALTITUDE will appear flashing
in the center line of the display with ALTI and ALM in the top and
lower lines.
9. Set the ALARM ALTITUDE using the
S1 key to increase and the
S2 key to decrease.
10. When the ALARM ALTITUDE is active, a small icon ( ) will be
shown on the Altimeter screen. When active, the Altitude Alarm
will sound any time you exceed the programmed altitude.
11. Advance to the ALTITUDE MEMORY displays using the
S4 key.
Page 14
ALTIWARE SERIES
25
english
alterra/aerial
26
english
ALTIMETERALTIMETER
SECONDARY ALTIMETER SCREENS
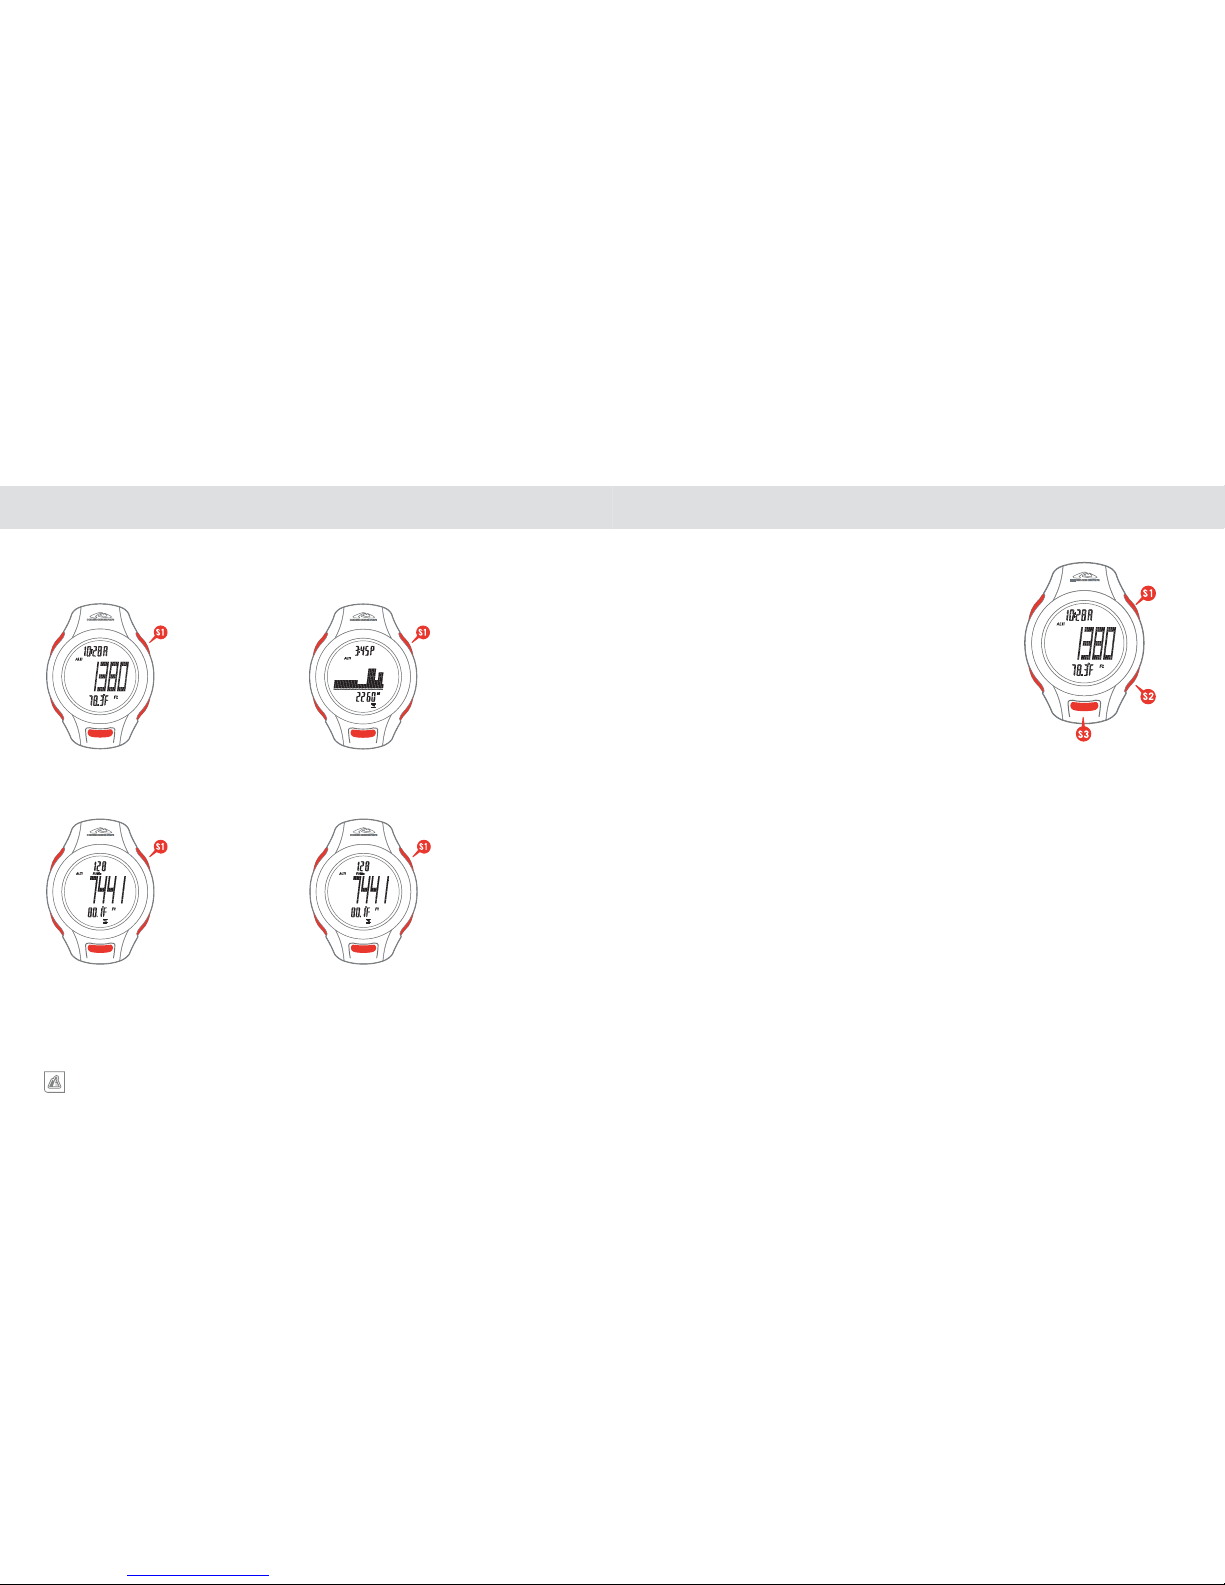
The ALTIMETER mode has 4 secondary display options which are accessed by a QUICK PRESS
of the S1 key.
SCREEN 1
Top Line: TIME OF DAY
Center Line: CURRENT ALTITUDE
Bottom Line: TEMPERATURE
SCREEN 3
Top Line: RATE OF ASCENT OR DESCENT IN FT OR
METERS PER MINUTE ACCORDING TO
ACTIVITY
Center Line: TOTAL FEET OR METERS ASCENDED.
PRESS S2 TO VIEW TOTAL FEET OR
METERS DESCENDED
Bottom Line: TEMP
SCREEN 2
Top Line: TIME OF DAY
Center Line: GRAPH SHOWING ALTITUDE CHANGES
OVER TIME
Bottom Line: CURRENT ALTITUDE
CHANGE ALTITUDE UNITS
While the watch is in ALTIMETER SCREENS 1 and 2, you can
view and change the display units for altitude between Feet and
Meters using a PRESS & HOLD of the S2 key. Continue to hold
the key until the altitude units icon stops flashing
MAX/ACC SCROLLING MESSAGE
When you enter the Altimeter mode, the center line of the display
will show you your maximum and accumulated altitude since the
last time you cleared the memories.
NOTE: To skip the scrolling QUICK PRESS the S1 or
S2 key.
NOTE: To see MAXIMUM and ACCUMULATED
ALTITUDES during use, PRESS & HOLD the S3 key
To CLEAR the MAXIMUM AND ACCUMULATED
MEMORIES, see Set Altimeter section.
ALTITUDE LOCK
If the altitude does not change significantly for a period of 30minutes the Alterra/Aerial unit will automatically activate the
ALTITUDE LOCK function. ALTITUDE LOCK is INDICATED BY
THE WEATHER ICONS APPEARING ON THE ALTIMETER
DISPLAY. When the unit enters the Altitude Lock mode, the
altitude at that time is locked in memory and will not change in
response to gradual external barometric pressure changes. You can
unlock the Altitude Lock function at any time simply by pressing
any key. The Altitude Lock function will automatically deactivate
if it detects any major change in pressure/altitude over a short
period of time.
SCREEN 4 (ONLY ACTIVE WHEN LOG BOOK IS ACTIVE)
Top Line: RATE OF ASCENT OR DESCENT IN FT OR
METERS PER MINUTE ACCORDING TO
ACTIVITY
Center Line: CURRENT ALTITUDE/TOTAL FT/M
DESCENDED/TOTAL FT/M ASCENDED
Bottom Line: TEMP/DESCENT/ASCENT
Page 15
ALTIWARE SERIES
27
english
alterra/aerial
28
english
ALTIMETER DATA LOG MEMORYALTIMETER DATA LOG MEMORY
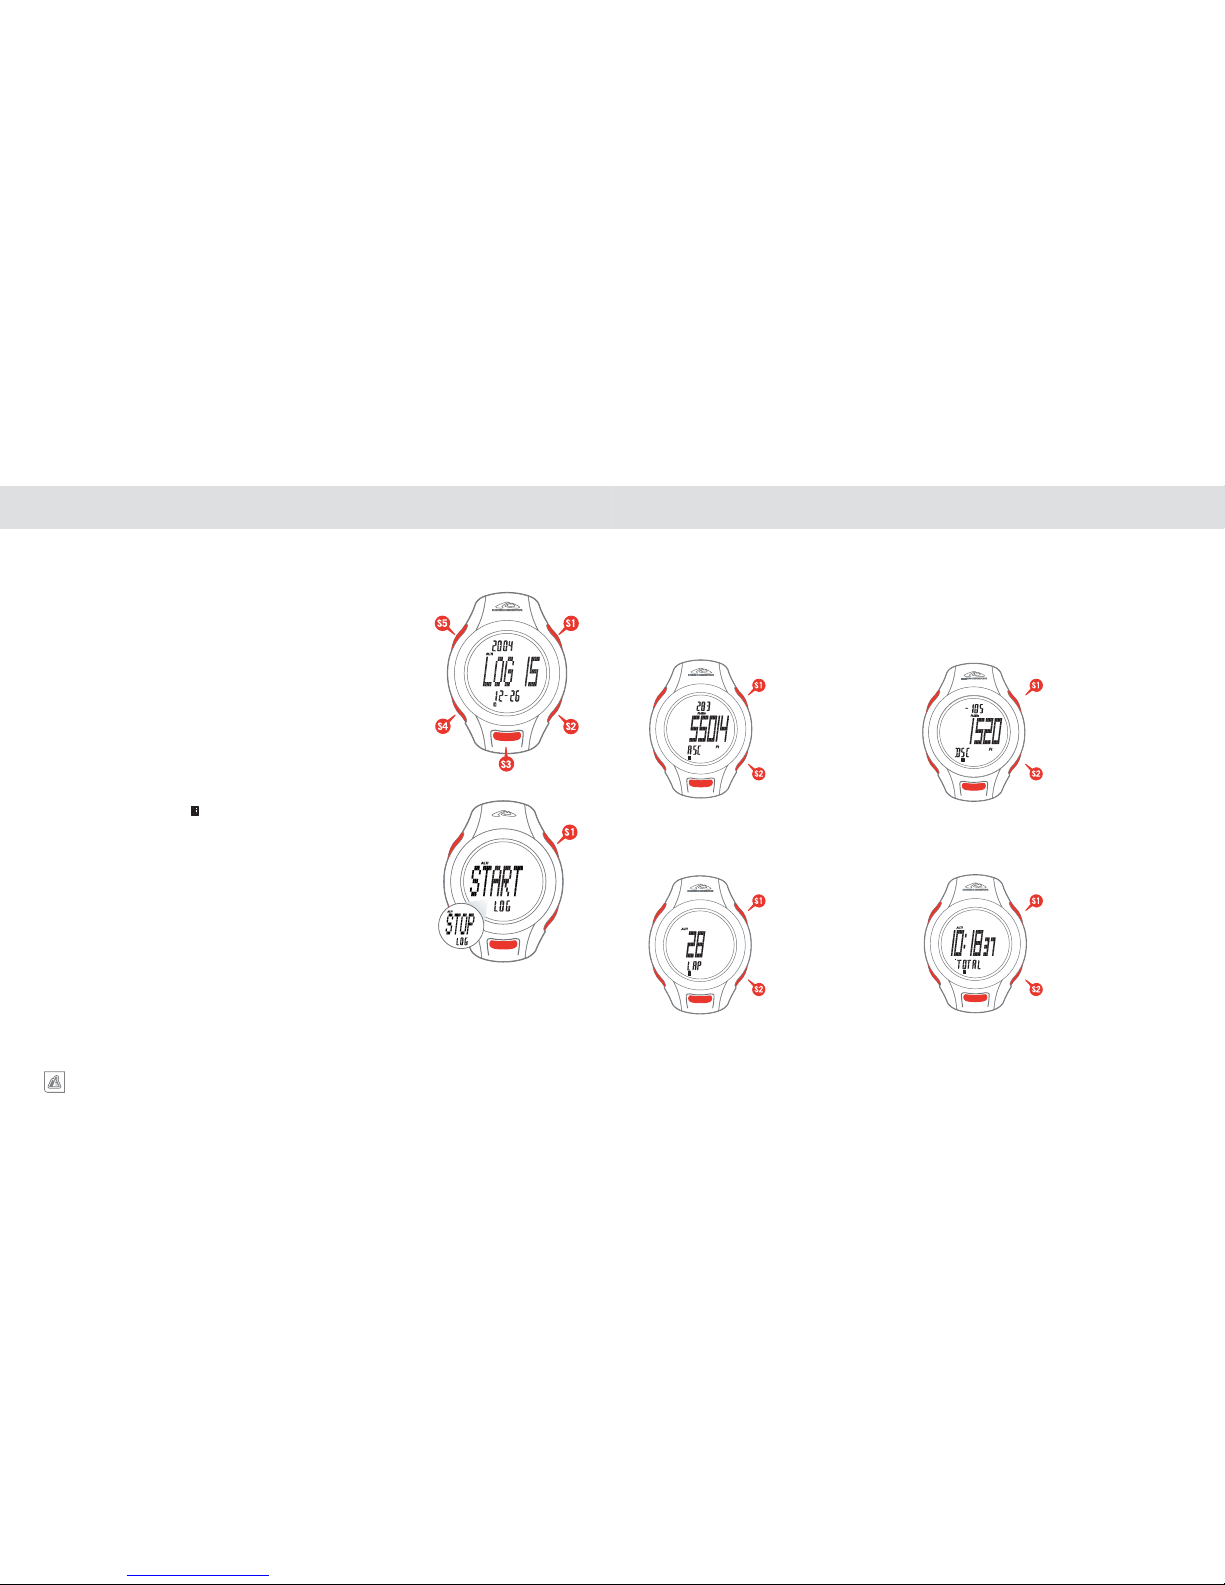
An ALTIMETER DATA LOG file tracks the following information:
1. TOTAL FEET or METERS ASCENDED and AVERAGE RATE OF
ASCENT.
2. TOTAL FEET or METERS DESCENDED and AVERAGE RATE OF
DECENT.
3. Number of LAPS. A LAP is counted as any change in altitude of
greater than 150’/50m UP and DOWN.
4. TOTAL TIME for file.
START/STOP LOG BOOK
1. Start In ALTIMETER mode,
2. Activate the ALTIMETER LOG –
PRESS & HOLD S1 key. START
and LOG will appear on screen
3. The display will automatically revert to the ALTIMETER screen with
the LOG BOOK ICON ( ) visible.
4. STOP the ALTIMETER LOG –
PRESS & HOLD S1 key. STOP and
LOG will appear on screen.
5. The display will automatically revert to the ALTIMETER screen with
the LOG BOOK ICON no longer on the display.
CLEARING THE LOG BOOK MEMORY
1. To CLEAR an individual LOG, advance to the desired LOG using the
S4 key.
2.
PRESS & HOLD the S5 key. HOLD, CLEAR and the LOG
NUMBER will appear flashing on the display.
3. Continue to
PRESS & HOLD the S5 key until the message in the
lower line changes from the LOG NUMBER to ALL.
4.
RELEASE the S5 key before the ALL indication stops flashing to
clear a single LOG.
5. To CLEAR ALL LOGS continue to
PRESS & HOLD the S5 key while
the ALL message is displayed in the lower line. When ALL files are
cleared, 4 DASHES will be displayed in the center line.
The ALTIMETER DATA LOG allows you to capture specific, detailed altitude information over a
specific period of time in up to 15 individual files.
REVIEWING ALTIMETER LOG DATA
Starting in the LOG DATA screen
The watch will automatically display the most recent ALTIMETER LOG FILE recorded with the LOG
NUMBER in the center line of the display and the Date of the file in the upper and lower lines.
SCROLL through the recorded files using the S2 key. Use the S1 key review the information in the
following screens:
SCREEN 1
Top line: AVERAGE RATE OF ASCENT
Center line: FEET OR METERS ASCENDED
Bottom line: ASC (ASCENT)
SCREEN 2
Top line: AVERAGE RATE OF DESCENT
Center line: FEET OR METERS DESCENDED
Bottom line: DSC (DESCENT)
SCREEN 3
Center line: NUMBER OF LAPS. (A lap corresponds to a
vertical ascent and decent of greater than 150’ or 50m)
Bottom line: LAP
SCREEN 4
Center line: TOTAL TIME FOR THE SEGMENT
Bottom line: TOTAL
Page 16
ALTIWARE SERIES
29
english
alterra/aerial
30
english
CHRONOGRAPHCHRONOGRAPH
WHAT ARE LAPS AND SPLITS
The Alterra/Aerial unit displays both LAP and SPLIT times on screen.
A LAP is a discrete period of time from when the CHRONOGRAPH
has started (Lap 1) or since the end of a previous lap. A SPLIT is the
cumulative total of all previous LAPS. Any time an individual lap is timed
it also automatically generates a corresponding split.
The Alterra/Aerial units feature a sophisicated digital CHRONOGRAPH timing system capable of
storing multiple timed workouts. The chronograph has a resolution of 0.01 seconds and displays both
lap time and split time on screen simultaneously.
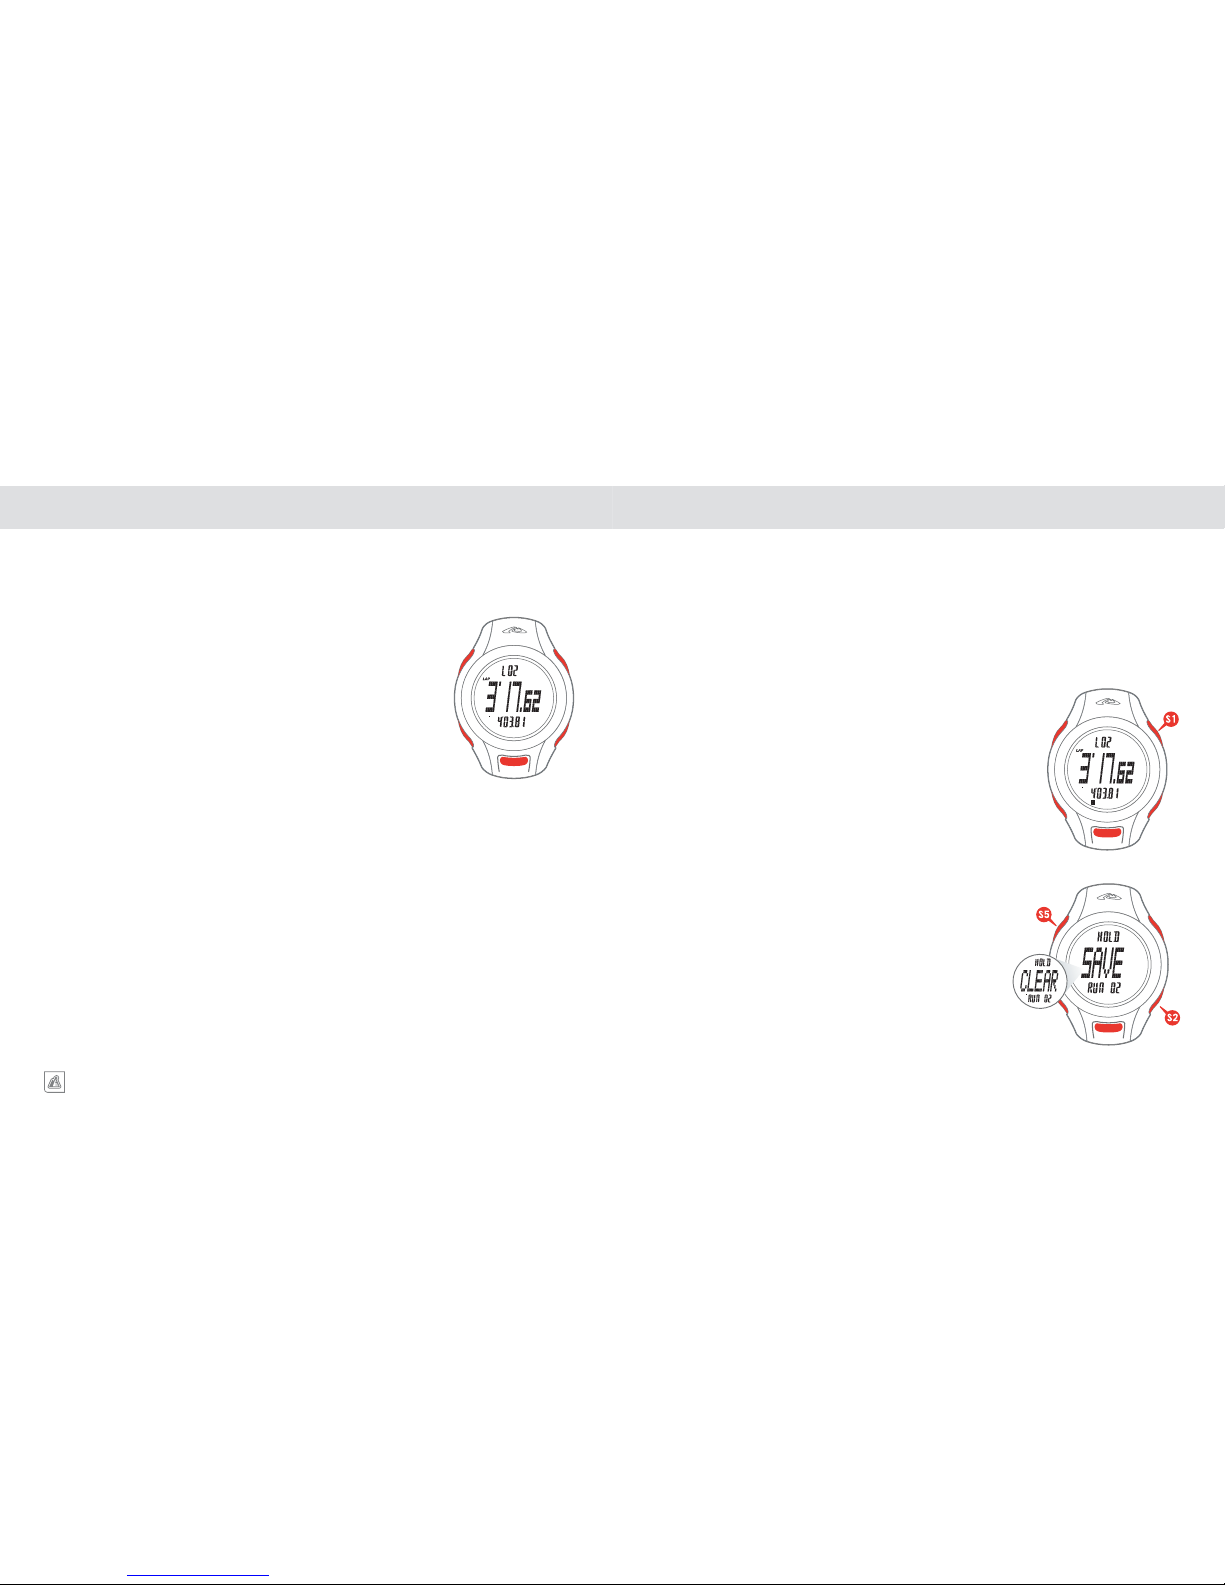
START TIMING
QUICK PRESS the S1 key
TIME A LAP/SPLIT
QUICK PRESS the S1 Key.
When the S1 key is pressed the display will flash for approximately
6 seconds showing the final lap and split time for the timed
segment as well as the number of the LAP and SPLIT on the top
line of the display. At the end of the 6-second period the display will
stop flashing and show the time for the currently timing lap and split
including the 6 seconds where the previous lap and split times were
flashing on the display.
STOP TIMING
QUICK PRESS the S2 key.
This will stop the CHRONOGRAPH and show the final times for the
last lap and split which was being timed. When timing has stopped,
you then have two options.
OPTION 1 – STORE A RUN/WORKOUT –
PRESS & HOLD the S2 key
OPTION 2 – CLEAR A RUN/WORKOUT PRIOR TO STORING
– PRESS & HOLD the S5 key
OPERATING THE CHRONOGRAPH
TIMING LAPS AND SPLITS (50)
The Alterra/Aerial unit is capable of timing up to 50 LAPS and SPLITS. These can be stored in any
combination in up to 20 individual Runs or workouts.
While the CHRONOGRAPH is running, the top line will display the number of the current lap, the
middle line will show the time for the current lap and the bottom line will show the current split
time.
Page 17
ALTIWARE SERIES
31
english
alterra/aerial
32
english
CHRONOGRAPH DATA LOG MEMORYCHRONOGRAPH DATA LOG MEMORY
When you store a Run/Workout using a PRESS & HOLD of the S2 key it
is captured by the CHRONOGRAPH DATA LOG MEMORY.
MANAGING THE CHRONOGRAPH DATA LOG
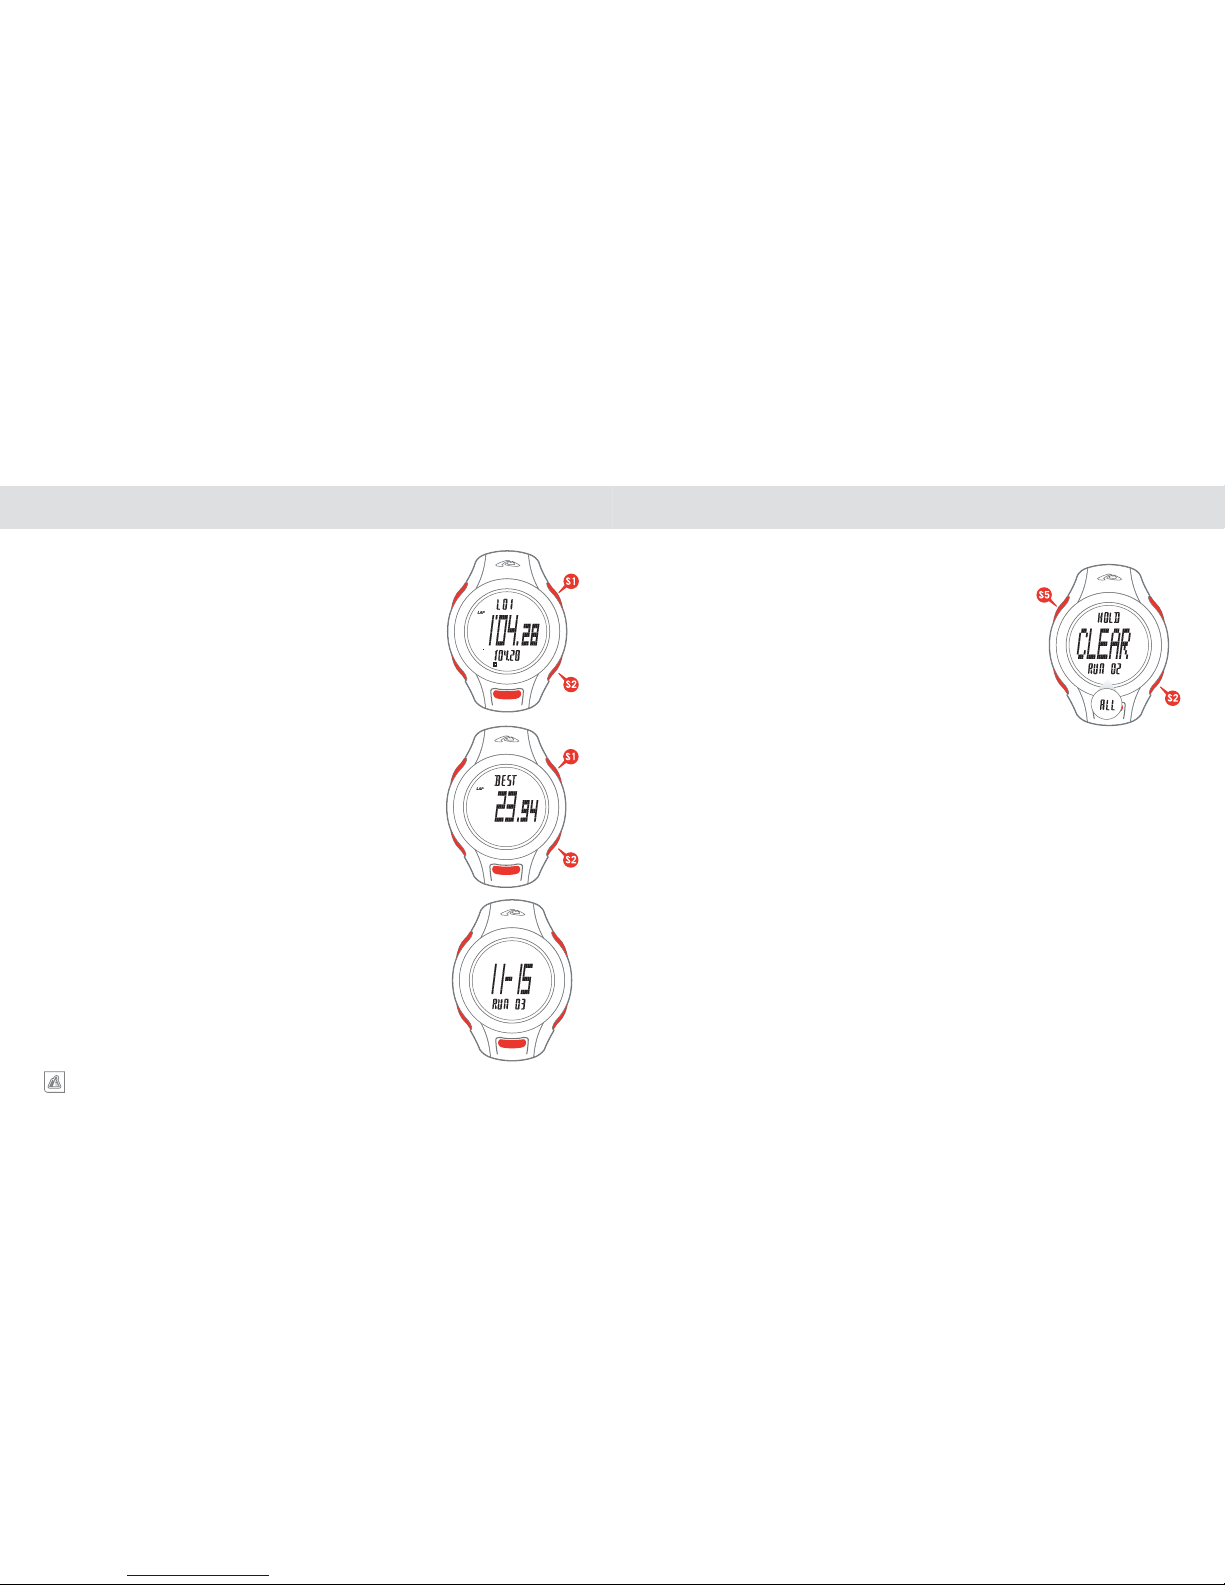
Runs are stored in the LOG MEMORY with the newest runs first. The
center line of the display will show the date the run was recorded and the
lower line will show the number 1-20 for the stored run.
REVIEWING RUNS
Move through the stored runs using the S2 key.
REVIEWING LAP/SPLIT DATA FOR EACH RUN
Once you have selected the RUN/WORKOUT, scroll through the stored
data using the S1 key. As you scroll through the data the display will show
the following information:
1. LAP and SPLIT TIMES for the recorded laps starting with Lap 1.
2. The TOP LINE will show the LAP #.
3. The CENTER LINE will show the LAP TIME.
4. The LOWER LINE will show the SPLIT TIME.
After reviewing all lap information the display will show the BEST TIME
OF ALL LAPS.
The final display will show the AVERAGE TIME OF ALL LAPS which
were timed.
CLEARING LAPS AND RUNS
To CLEAR an individual RUN/WORKOUT, advance to the desired Run/
Workout using the S2 key. PRESS & HOLD the S5 key. The display will
show HOLD in the top line of the display, CLEAR flashing in the center
line and the Run/Workout number in the lower line. Continue to HOLD
the S5 key until the message in the lower line changes from the RUN
number to ALL. RELEASE the S5 key before the ALL indication stops
flashing, or you will clear ALL the runs in memory.
To delete ALL RUN/WORKOUT files, continue to PRESS & HOLD the
S5 key while the ALL message is displayed in the lower line. When ALL
files are cleared, 4 DASHES will be displayed in the center line.
Page 18
ALTIWARE SERIES
33
english
alterra/aerial
34
english
SKI CHRONOGRAPHSKI CHRONOGRAPH
SETTING THE SKI CHRONOGRAPH
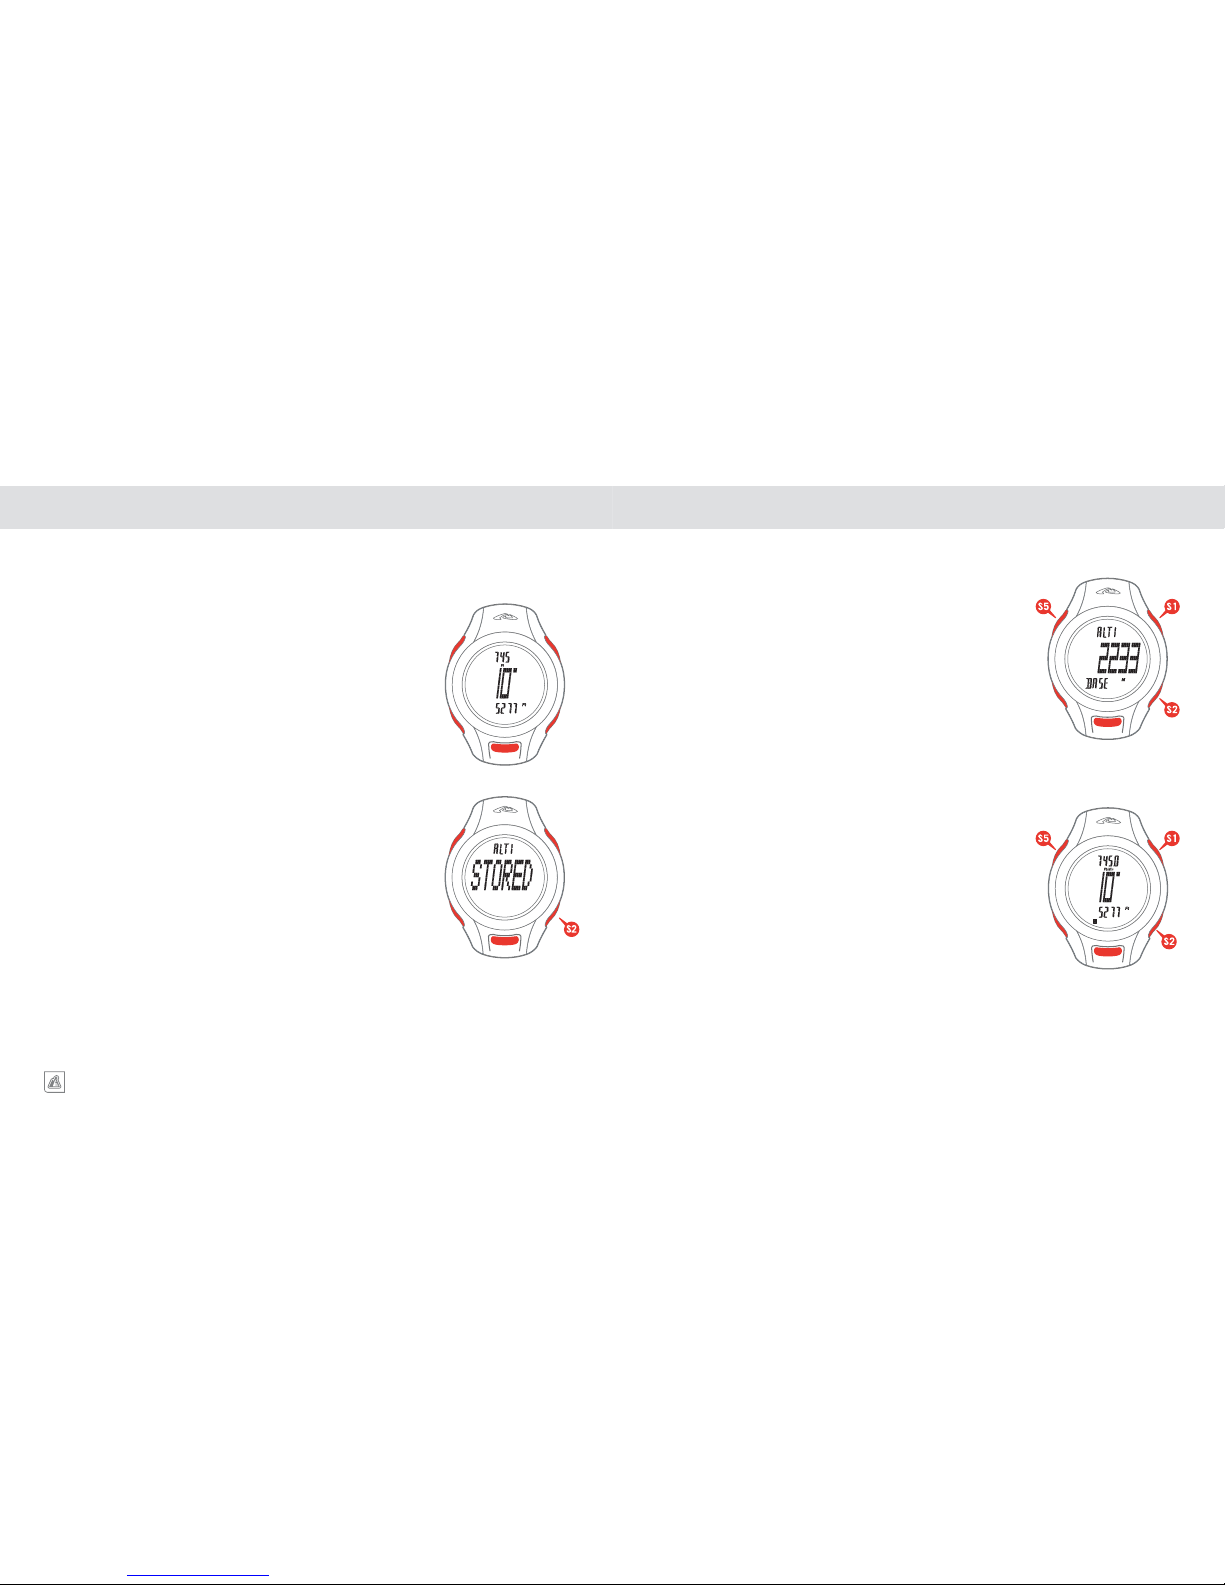
The primary display of the Ski Chronograph shows your current
altitude in the top line, a 10-second count-down timer in the center
line and your stored base altitude in the lower line.
STORING A BASE ALTITUDE
A Base Altitude can be stored either automatically or manually.
AUTOMATIC STORE –
When you are physically at the location you want to establish
as your base altitude (such as if you are standing at the bottom
of a run you want to time), simply PRESS & HOLD the S2
key. The center line of the display will show STORE while the
current altitude is being stored as the base altitude. When
complete the center line of the display will show STORED and
you may RELEASE the S2 key. Your new base altitude will
now be displayed in the lower line of the display.
The Alterra/Aerial units are equipped with a timer system which is started at the top of a run and will
track the time of your ski runs back to the base, stopping at a preset base altitude.
STORING A BASE ALTITUDE (continued)
MANUAL STORE –
If you wish to manually store a base altitude, PRESS & HOLD
the S5 key. The display will show HOLD in the center line
and ADJUST in the bottom line for a period of approximately
3 seconds and then automatically change to the screen for
manual adjustment of the BASE ALTITUDE with altitude
displayed in the center line. ADJUST the BASE ALTITUDE
using the S1 and S2 keys until you have adjusted the display
to your chosen altitude. QUICK PRESS the S5 key to exit the
setting mode and return to the primary SKI CHRONOGRAPH
screen.
NOTE: We recommend you store your base altitude often
as local pressure changes may cause it to shift up or down
and effect the accuracy of the timing.
OPERATING THE SKI CHRONOGRAPH
Once you have established a BASE ALTITUDE, go to the top of
a ski run. Before starting your run simply QUICK PRESS the S1
key. The 10 second countdown timer will start. When the timer
reaches zero (0) the watch will beep and you should begin skiing.
The timer will automatically stop once you reach your programmed
base altitude. At the end of a run, the display will show your
TIME FOR THE RUN in the center line of the display, your
AVERAGE RATE OF DESCENT in the upper line and your BASE
ALTITUDE in the lower line.
To clear the information from the display and get ready for
another run, QUICK PRESS the S5 key to return to the initial SKI
CHRONOGRAPH screen.
NOTE: If you reach the bottom of the run and the SKI
CHRONOGRAPH does not stop automatically, this means
a pressure change has caused the base altitude setting to
become inaccurate. To manually stop the timing, QUICK
PRESS the S2 key.
Page 19
ALTIWARE SERIES
35
english
alterra/aerial
36
english
DAILY ALARMDAILY ALARM
TURNING AN ALARM ON/OFF
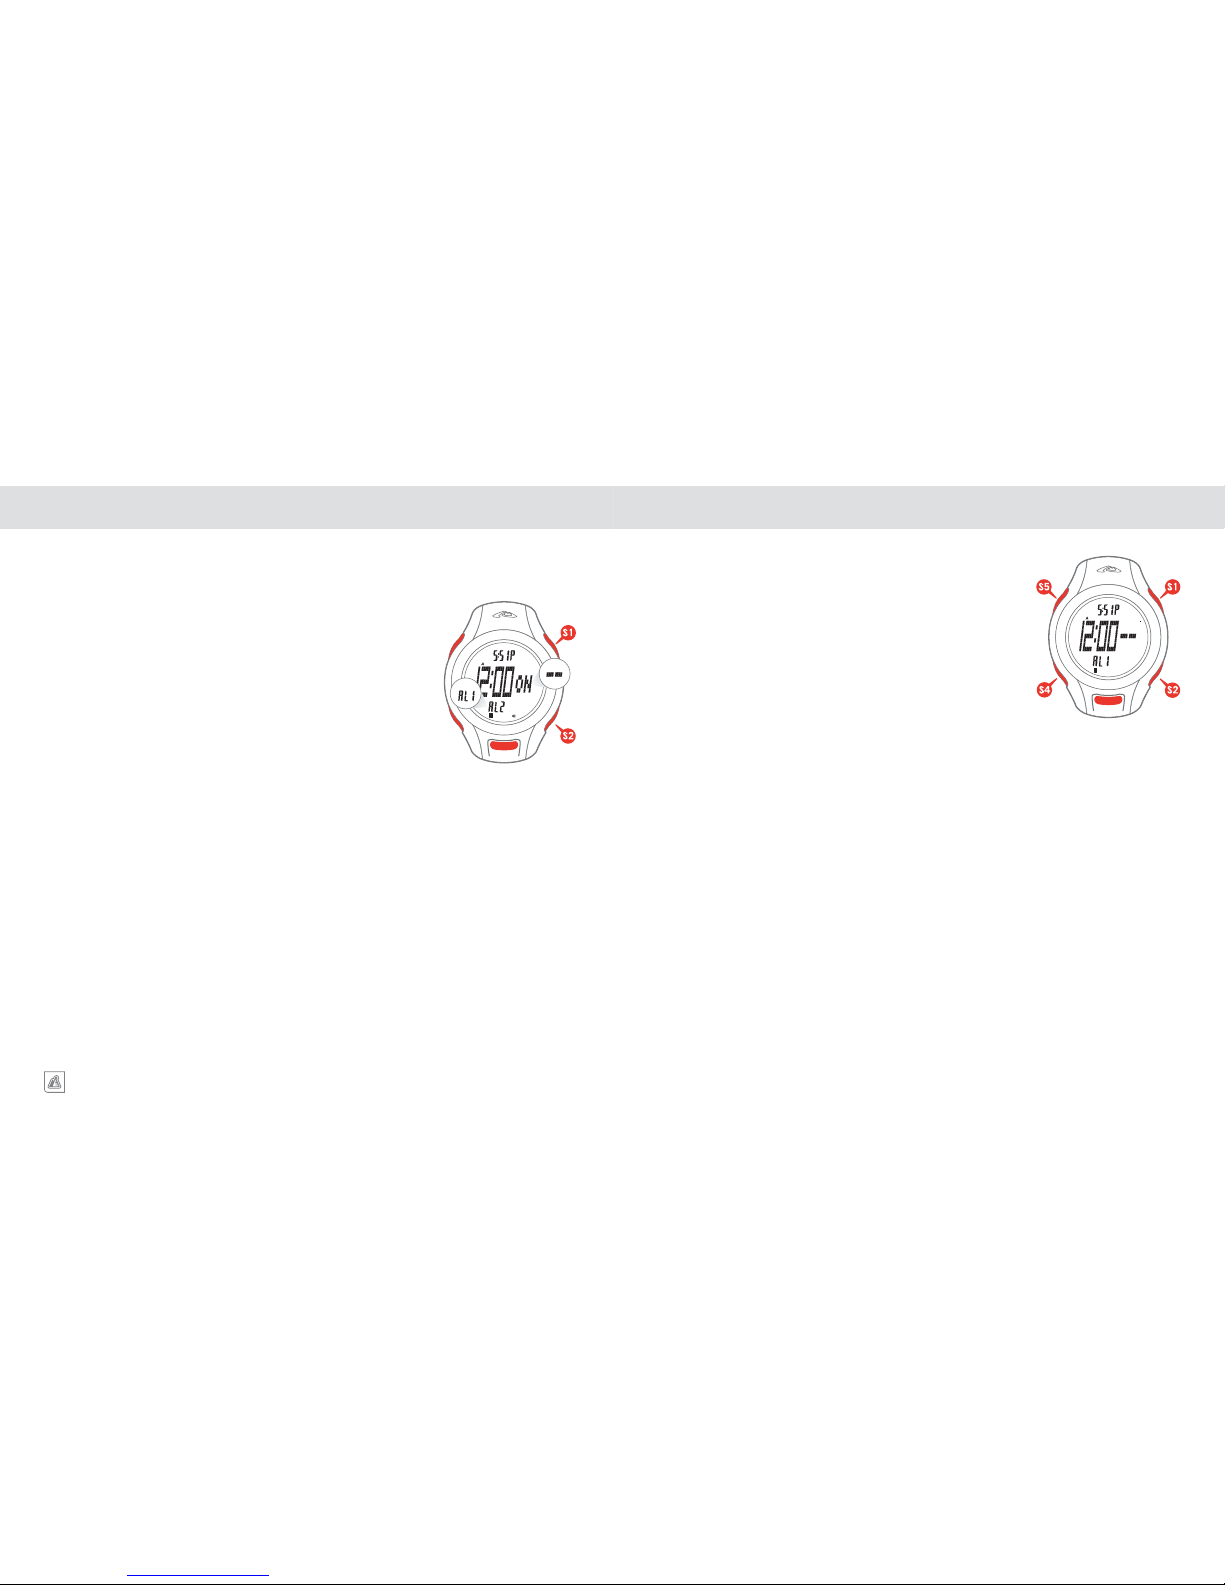
1. Start in ALARM mode.
2. The top line of the display will show the CURRENT TIME
OF DAY, the center line will show the CURRENT ALARM
SETTING and the lower line will show either AL1 or AL2
indicating the alarm currently being viewed.
3. To the right of the ALARM TIME are symbols indicating if the
alarm is on (ON) or off (- -). TOGGLE between ON and OFF
using the S1 key.
SELECTING ALARM 1 OR 2
TOGGLE between ALARM 1 and ALARM 2 shown in the lower
line of the display using the S2 key.
The Alterra/Aerial is equipped with two individual daily alarms which can be set to the hour and minute
for either Time Zone 1 or Time Zone 2.
SETTING THE DAILY ALARM
1. Starting in ALARM mode.
2. Choose the Time Zone you wish to program an alarm for in the
Time of Day screen.
3. SELECT the alarm you wish to program using the S2 key.
4. PRESS & HOLD the S5 key to enter the programming
sequence.
5. ADJUST the HOURS, MINUTES and CHIME using the S1
and S2 key.
6. SET and ADVANCE from variable to variable using the S4
key.
7. EXIT SETTING SEQUENCE using the S5 key.
NOTE: The CHIME is a single beep each time a key is
pressed and a double beep at the start of each hour. The
KEY PRESS CHIME is useful if you are trying to operate
the watch under circumstances where it is difficult to look
at the watch to confirm that an action has taken place
when a key is pressed.
NOTE: You must choose T1 or T2 in the TIME OF DAY
screen before setting the DAILY ALARM. The Time
Zone cannot be changed during the Alarm Programming
process.
RESETTING THE WATCH
To RESET the watch back to its default values PRESS the S1, S2,
S4 and S5 keys down at the same time. The display will light up
showing all segments followed by a sequence of screens showing
various numbers. The watch will then automatically change to the
TIME OF DAY screen at 12 o’clock on the first of January.
Resetting the watch will clear any information stored in the watch.
This should be done only as a last resort.
Page 20

ALTIWARE SERIES
37
english
alterra/aerial
38
english
TROUBLE SHOOTING – BASICSPECIFICATIONS AND RANGES
GENERAL
Water Resistance 5ATM
Watch Battery CR 2032 3v Lithium
ALTIMETER
Range -702 to +9158m / -2305 to +30,045ft
Resolution 1m / 1f
ALTIMETER LOG
20 Individual date coded files storing date, time, vertical ascent and decent distance
and rate, laps and total elapsed time
Log Book has a resolution of 7 ft/ 2 meters
THERMOMETER
Range -10 to +50C / +14 to +122F
Resolution 0.1C/0.1F
COMPASS
Resolution of 1 degree
Rotating digital bezel in quarter cardinal points
BAROMETER
Range 300 to 1100mbar/hPa or (8.86 inHg to 32.48 inHg)
Resolution 1mbar/hPa or 0.01InHg
CHRONOGRAPH
Range 24 hours
Resolution 0.01 second for first hour; 1.0 second for hours 2-23
CHRONOGRAPH LOG
50 Laps/Splits
20 Runs/Workouts showing Lap/split times, Best Lap, Average Lap
The Alterra/Aerial is a very sensitive and sophisticated instrument. If properly cared for it should last
and remain accurate for many years. However, from time to time problems may happen. It has been
our experience that the majority of the problems seen by consumers with products such as these are
related to dead or dying batteries.
While the estimated life of a fresh battery in the unit is approximately one year, this can be shortened
considerably if the compass, altimeter or EL systems of the unit are used extensively. Whenever you
are experiencing issues related to the function of the unit it is recommended that you install a fresh
battery as a first course of action, especially if it has been more than a half a year since the last time
the battery was replaced.
BE AWARE – Lithium batteries of the type used in this watch are very susceptible to improper storage.
Many times, batteries purchased as new are dead or weak before they are purchased. Do not assume
that batteries in stores are good. If you try a new battery and problems persist, please try a second
battery from another source, just to be certain.
If the battery on the watch unit of the Alterra/Aerial is failing it may show itself in several ways.
Indications of a weak battery are:
1. A fading or blank display.
2. If the display goes blank when the EL system is operated and then comes back on when the EL
system turns off.
3. Inaccurate readings from the Altimeter or Compass systems
Because the compass is magnetic it may be affected by local sources of electromagnetic radiation
(EMI). Avoid using the compass near appliances, in cars, near home security systems and other sources
of EMI. If after several compass calibration attempts, you still see an ERR message, please demagnetize
your compass. You can demagnetize your compass by holding your watch over a demagnetizing
machine while in compass mode with “CAL” displayed on the screen. Most retail stores and libraries
have demagnetizing machines for anti-theft purposes. An example of a demagnetizer is a machine that
deactivates the magnetic security strip within a product.
The Alterra/Aerial is equipped with a display which allows it to be used in a wide variety of
environments. However, if the unit is used in extreme cold (<32 F or 1c) the function of the display may
be slower than normal. If exposed to extreme heat or cold, the display may also darken. The display
should return to normal once the temperature returns to normal levels.
Page 21
alterra/aerial
HIGHGEAR USA/TECHTRAIL INC.
web: www.highgear.com
www.techtrail.com
email: [email protected]
© 2006 Highgear USA/TechTrail Inc.
All Rights Reserved.
 Loading...