

Page 1
®
audiovias.com
Studio ColoR
Automated Wash Luminaire
User’s Manual
.
P/N 60600061 Version 3.0
High End Systems Inc.
2105 Gracy Farms Lane
Austin, Texas U.S.A.
Page 2

© High End Systems, Inc. 1996-2004, All Rights Reserved
Information and Specifications in this document are subject to change with out notice. High End Systems, Inc.
assumes no responsibility or liability for any errors or inaccuracies that may appear in this manual.
Unlawful reproduction or distribution in any manner without the written permission of High End Systems is strictly
forbidden.
Trademarks used in this text: Ecodome is a trademark, Cyberlight, Lightwave Research, Lithopatterns,
and Studio Color are registered trademarks of High End Systems Inc.; Motorola is a registered trademark of
Motorola Inc.; Philips is a registered trademark of Philips Corporation.
Other trademarks and trade names such as Rosco, Lee, and 409 may be used in this document to ref er to either
the entities claiming the marks and names or their products. High End Systems discl aims any proprietary interest
in trademarks and trade names owned by others.
Studio Color uses one or more of the following patents: US 4,962,687; US 5,078,039; UK 2,043,769; US
5,331,822; US 5,402,326; US D 372550; UK 2292896; US D365165; US 5,430,629; US D360,404; US 5,455,748;
0475082; US 5,506,762; M9604224.9; US 5,515,254; US D370080; UK 2.291,814; US 5,545.951; UK 2055842;
UK 2,292,530; UK 2294909; UK 2292896; MR 8621996; and US 5,580,164.
Additional patents pending.
June 22, 2004
Studio Color User’s Manual
P/N 60600061 Rev. C
Printed in the U.S.A.
M.D.T.
.
Page 3

Declaration of Conformity
according to ISO/IEC Guide 22 and EN45104
Manufacturer’s name: High End Systems
Manufacturer’s address: 2105 Gracy Farms Lane
Austin, Texas 78758
U.S.A.
Distributor’s name: High End Systems Inc.
Distributor’s address: 2105 Gracy Farms Lane
Austin, Texas 78758
U.S.A.
Declares that the product
Product Name: Studio Color
Product Number: Studio Color 575-M
Studio Color 575-S
Product Options: All
conforms to the following EEC directives:
73/23/EEC, as amended by 93/68/EEC
89/336/EEC, as amended by 92/31/EEC and 93/68/EEC
Equipment referred to in this declaration of conformity first manufactured in 1996 in compliance with
the following standards:
Safety: EN 60598-1 : 1993
EN 60598-2-17 : 1989
A1-A3 : 1993
EMC: EN 55022, Class A ITE 1987
IEC 801-2, 1991 Level 2 (4/8 kV)
IEC 801-3, Draft 5 Level 2 (3 V/m) 1991
IEC 801-4, 1988 Level 2 (1 kV/0.5 kV)
U.S.A., June 22, 2004
Lanny Derryberry, Compliance Engineer
Page 4

IMPORTANT SAFETY INFORMATION
INSTRUCTIONS PERTAINING TO CONTINUED PROTECTION AGAINST FIRE, ELECTRIC
SHOCK, EXPOSURE TO EXCESSIVE UV RADIATION, AND INJURY TO PERSONS ARE
FOUND IN APPENDIX D.
READ ALL CAUTIONS AND WARNINGS PRIOR TO ASSEMBLY, MOUNTING, AND OPERATING THIS EQUIPMENT.
IMPORTANT: INFORMATIONS DE SÉCURITÉ
INSTRUCTIONS RELATIVES À UNE PROTECTION CONTINUE CONTRE L' INCENDIE, LE
CHOC ÉLECTRIQUE, L' EXPOSITION AUX RADIATIONS ULTRAVIOLETTES EXCESSIVES,
ET CONTRE DES BLESSURES POSSIBLES SUR DES INDIVIDUS SE TROUVENT DANS
L'APPENDICE D.
PRIÈRE DE LIRE TOUTES LES PRÉCAUTIONS ET LES AVERTISSEMENTS AVANT D'ASSEMBLER, DE MONTER, ET DE FAIRE FONCTIONNER CET ÉQUIPEMENT.
WICHTIGE SICHERHEITSHINWEISE
DIE NACHSTEHENDEN HINWEISE BETREFFEN DEN SCHUTZ GEGEN BRAND, ELEKTRISCHEN SCHLAG, ÜBERHÖHTE UV-STRAHLUNG SOWIE VERLETZUNGEN. SIE BEFINDEN SICH IN APPENDIX D.
LESEN SIE ALLE WARNUNGEN SORGFÄLTIG, BEVOR SIE DAS GERÄT ZUSAMMENBAUEN, INSTALLIEREN UND BENUTZEN!
INFORMACIÓN IMPORTANTE DE SEGURIDAD
SE ENCUENTRAN EN EL APÉNDICE D LAS INSTRUCCIONES CONCERNIENTES A LA PROTECCIÓN CONTINUA CONTRA INCENDIO, CHOQUE ELÉCTRICO, EXPOSICIÓN EXCESIVA
A RAYOS ULTRAVIOLETAS Y LESIONES A PERSONAS.
POR FAVOR LEA TODAS LAS PRECAUCIÓNS Y LAS ADVERTENCIAS ANTES DE ENSAMBLAR, MONTAR Y OPERAR ESTE EQUIPO.
INFORMAZIONI IMPORTANTI DI SICUREZZA
ISTRUZIONI PERTINENTI LA PROTEZIONE CONTRO IL FUOCO, LE SCOSSE ELETTRICHE,
L' ECCESSIVA ESPOSIZIONE AI RAGGI ULTRAVIOLETTI I DANNI ALLE PERSONE SI TRO
VANO NEL APPENDICE D.
LEGGERE TUTTI GLI AVVERMENTI PRIMA DI MONTARE E USARE QUESTO APPARECCHIO.
FCC Statement
This equipment has been tested and found to comply with the limits for a Class A digital device, pursuant to part 15 of the FCC rules. These limits are designed to provide reasonable protection against harmful interference when the equipment is operated in a commercial environment. This equipment
generates, uses, and can radiate radio frequency energy and, if not installed and used in accordance with
the instruction manual, may cause harmful interference to radio communications. Operation of this
equipment in a residential area is likely to cause harmful interference in which case the user will be
required to correct the interference at his own expense.
-
Page 5

Warranty Information
Limited Warranty
Unless otherwise stated, your product is covered by a two year parts and labor limited warranty.
Dichroic filters and Lithopatterns™ are not guaranteed against breakage or scratches to coating. It is the
owner's responsibility to furnish receipts or invoices for verification of purchase, date, and dealer or
distributor. If purchase date cannot be provided, date of manufacture will be used to determine warranty
period.
Returning an Item Under Warranty for Repair
It is necessary to obtain a Return Authorization Number (RA#) from your dealer/point of purchase
BEFORE any units are returned for repair. The manufacturer will make the final determination as to
whether or not the unit is covered by warranty. Lamps are covered by the lamp manufacturer's warranty.
Any Product unit or parts returned to High End Systems must be packaged in a suitable manner to
ensure the protection of such Product unit or parts, and such package shall be clearly and prominently
marked to indicate that the package contains returned Product units or parts and with a Return
Authorization (RA#) number. Accompany all returned Product units or parts with a written explanation
of the alleged problem or malfunction.
Please note: Freight Damage Claims are invalid for fixtures shipped in non-factory boxes and packing
materials.
Freight
All shipping will be paid by the purchaser. Items under warranty shall have return shipping paid by the
manufacturer only in the Continental United States. Under no circumstances will freight collect
shipments be accepted. Prepaid shipping does not include rush expediting such as air freight. Air freight
can be sent customer collect in the Continental United States.
REPAIR OR REPLACEMENT AS PROVIDED FOR UNDER THIS WARRANTY IS THE
EXCLUSIVE REMEDY OF THE CONSUMER. HIGH END SYSTEMS, INC. MAKES NO
WARRANTIES, EXPRESSED OR IMPLIED, WITH RESPECT TO ANY PRODUCT, AND HIGH
END SPECIFICALLY DISCLAIMS ANY WARRANTY OF MERCHANTABILITY OR FITNESS
FOR A PARTICULAR PURPOSE. HIGH END SHALL NOT BE LIABLE FOR ANY INDIRECT,
INCIDENTAL, OR CONSEQUENTIAL DAMAGE, INCLUDING LOST PROFITS, SUSTAINED
OR INCURRED IN CONNECTION WITH ANY PRODUCT OR CAUSED BY PRODUCT
DEFECTS OR THE PARTIAL OR TOTAL FAILURE OF ANY PRODUCT REGARDLESS OF THE
FORM OF ACTION, WHETHER IN CONTRACT, TORT, (INCLUDING NEGLIGENCE), STRICT
LIABILITY, OR OTHERWISE, AND WHETHER OR NOT SUCH DAMAGE WAS FORESEEN OR
UNFORESEEN.
Warranty is void if the product is misused, damaged, modified in any way, or for unauthorized repairs or
parts. This warranty gives you specific legal rights, and you may also have other rights which vary from
state to state.
Page 6

Page 7

Studio Color
Table Of Contents
Introduction................................................................................................. I-1
About This Manual............................................................................................. I-1
Caution and Warning Symbols .....................................................................I-2
Safety Instructions......................................................................................... I-2
Studio Color 575-S Features............................................................................... I-3
Studio Color 575-M Features ............................................................................. I-4
System Overview................................................................................................ I-5
MSR 575/2 and MSD 575 Lamps................................................................. I-5
Color Mixing and Capabilities...................................................................... I-5
Beam Shaping ...............................................................................................I-5
Full Mechanical Dimming ............................................................................I-6
Automatic Voltage Selection ........................................................................I-6
Power Factor Correction ............................................................................... I-6
Cooling..........................................................................................................I-6
DMX Control ................................................................................................I-6
Stepper Motors.............................................................................................. I-6
Optical Encoders ........................................................................................... I-7
Lamp Power Options..................................................................................... I-7
Automatic Power-Saving Mode.................................................................... I-7
Ease of Maintenance ..................................................................................... I-7
Safety............................................................................................................. I-7
Specifications...................................................................................................... I-8
Models...........................................................................................................I-8
Mechanical .................................................................................................... I-8
Electrical .....................................................................................................I-10
Lamp ........................................................................................................... I-11
Communication........................................................................................... I-11
Compliance....................................................................................................... I-11
Available Controllers........................................................................................ I-11
Accessories ....................................................................................................... I-12
Front and Side Panels ....................................................................................... I-13
Chapter 1 Installation and Setup............................................................... 1-1
Unpack Studio Color ......................................................................................... 1-1
Save the Shipping Materials......................................................................... 1-1
Inspect the Contents ..................................................................................... 1-1
Road Cases......................................................................................................... 1-2
Minimum Material Requirements................................................................ 1-2
Construction Requirements.......................................................................... 1-2
Before You Begin Installation........................................................................... 1-4
Table of Contents TOC-i
Page 8

Power Requirements........................................................................................... 1-4
Line Cord Cap Construction............................................................................... 1-5
Data Cable Construction .................................................................................... 1-5
Terminator Construction .................................................................................... 1-6
Lamp Installation................................................................................................ 1-7
Fixture Mounting................................................................................................ 1-9
Floor Mounting.............................................................................................1-9
Truss Mounting...........................................................................................1-10
Data Cabling..................................................................................................... 1-11
DMX Starting Channel..................................................................................... 1-12
Setting the Starting Channel by Fixture Number........................................1-12
Setting the Starting Channel by DMX Channel Number ...........................1-13
Patching DMX Controllers .........................................................................1-14
DMX Control of Functions .............................................................................. 1-15
Chapter 2 Operation................................................................................... 2-1
Overview ............................................................................................................ 2-1
MSpeed............................................................................................................... 2-1
Pan and Tilt ........................................................................................................ 2-2
Dimming............................................................................................................. 2-3
Strobe Effects ..................................................................................................... 2-3
Color Mixing...................................................................................................... 2-3
Fixed Color Wheel........................................................................................2-3
Subtractive Color Wheels .............................................................................2-3
Color Functions.................................................................................................. 2-4
Double Rotation of Color Mixing Wheels....................................................2-4
Enable MSpeed On Color Functions ............................................................2-4
Forward Color Spins and Synchronized Color Mix Sequences ...................2-4
Reverse Color Spins and Random Color Mix Cycling.................................2-4
Color Lock and Quickest Path......................................................................2-4
Beam Shaping..................................................................................................... 2-5
Remote Shutdown .............................................................................................. 2-5
Remote Homing and Lamp Restrike.................................................................. 2-5
Chapter 3 Menu System............................................................................. 3-1
Overview ............................................................................................................ 3-1
Menu Map .......................................................................................................... 3-2
Address Menu..................................................................................................... 3-5
Information Menu............................................................................................... 3-6
TOC-ii Studio Color User’s Manual
Setting the Starting Channel .........................................................................3-5
Viewing Lamp Hours....................................................................................3-6
Viewing Lamp Strikes ..................................................................................3-6
Viewing System Version Number ................................................................3-6
Resetting Lamp Hours ..................................................................................3-7
Page 9

Viewing Total Fixture Hours ....................................................................... 3-7
Resetting Fixture Hours ............................................................................... 3-7
Viewing the Current Internal Temperature.................................................. 3-7
Viewing the Minimum Internal Temperature .............................................. 3-8
Viewing the Maximum Internal Temperature.............................................. 3-8
Resetting Temperature Readings ................................................................. 3-8
Viewing DMX Errors and Function Values................................................. 3-9
Viewing DMX Data by Channel Number.................................................. 3-10
Viewing Supplemental Fixture Data.......................................................... 3-10
Test Menu ........................................................................................................ 3-11
Manually Homing the Fixture.................................................................... 3-11
Moving the Fixture to Setup Position ........................................................ 3-11
Self Tests.................................................................................................... 3-12
Changing Functions ................................................................................... 3-12
Changing Boot Codes ................................................................................ 3-12
Mode Menu...................................................................................................... 3-13
Selecting Operational Mode 1.................................................................... 3-13
Selecting Operational Mode 2.................................................................... 3-13
Cross-Loading Fixtures.............................................................................. 3-13
Set Menu.......................................................................................................... 3-14
Turning On and Off Factory Presets .......................................................... 3-14
Setting the Starting Channel by DMX Channel or by Fixture Number..... 3-14
Setting Display Output............................................................................... 3-14
Inverting Pan .............................................................................................. 3-15
Inverting Tilt .............................................................................................. 3-15
Swapping Pan and Tilt ............................................................................... 3-15
Setting Fixture Shutdown Time ................................................................. 3-16
Setting the Lamp Power............................................................................. 3-16
Calibrating Pan........................................................................................... 3-17
Calibrating Tilt........................................................................................... 3-17
Appendix A Troubleshooting and Maintenance ..................................... A-1
Overview............................................................................................................ A-1
Before You Begin.............................................................................................. A-1
Support Checklist............................................................................................... A-1
Acquiring Help .................................................................................................. A-2
Troubleshooting................................................................................................. A-2
Display Error Messages ...............................................................................A-3
General Troubleshooting..............................................................................A-8
Upload Troubleshooting.............................................................................A-10
Onboard Self-Tests.....................................................................................A-11
Testing DMX Data.....................................................................................A-11
Maintenance..................................................................................................... A-12
Table of Contents TOC-iii
Page 10

Replacing the Lamp...................................................................................A-12
Cleaning.....................................................................................................A-12
Exterior............................................................................................... A-12
Lens Interior ....................................................................................... A-13
Software Updates.......................................................................................A-14
Upload Dongle ................................................................................... A-16
Another Studio Color ......................................................................... A-16
Appendix B Accessory Installation .......................................................... B-1
Overview ........................................................................................................... B-1
Dichroic Glass Installation ................................................................................ B-2
Accessory Lens Installation............................................................................... B-7
Light Snoot........................................................................................................ B-8
Appendix C Supplemental Information .................................................. C-1
Color Matching.................................................................................................. C-1
Converting DMX Values to MSpeed Times ..................................................... C-5
Appendix D Important Safety Information............................................. D-1
Appendice D Importantes Informations Sur La Sécurité ................................. D-2
Anhang D Wichtige Hinweise Für Ihre Sicherheit ........................................... D-3
Apéndice D Información Importante De Seguridad.......................................... D-4
Appendice D Importanti Informazioni Di Sicurezza ........................................ D-5
Appendiks D Vigtig Sikkerhedsinformation..................................................... D-6
Index........................................................................................................... IX-1
List of Figures
Side View Dimensions ....................................................................................... I-8
Front Panel ....................................................................................................... I-13
Side Panels ....................................................................................................... I-14
Road Case Construction Overhead View ...........................................................1-2
Road Case Construction Side View ...................................................................1-3
Data Cable Construction ....................................................................................1-5
Terminator Construction ....................................................................................1-6
Removing the Lamp Access Cap .......................................................................1-7
Installing the Lamp .............................................................................................1-8
Floor Installation ................................................................................................1-9
Attaching Mounting Hardware .........................................................................1-10
Safety Cable Installation ..................................................................................1-10
Data In and Data Out Connectors .....................................................................1-11
Daisy Chaining Fixtures ...................................................................................1-11
Using the Front Panel .......................................................................................1-12
MSpeed Values ...................................................................................................2-2
Fixture Menu ......................................................................................................3-1
TOC-iv Studio Color User’s Manual
Page 11

Removing the Bezel .........................................................................................A-13
Device Code Upload Dialogue Box ................................................................A-14
Device Upload Status Information Window ....................................................A-15
Removing the Bezel ...........................................................................................B-2
Stepper Drive Cable Removal ...........................................................................B-3
Removing the Strobe Plate ................................................................................B-4
Locating the Color Wheel ..................................................................................B-4
Color Wheel and Factory Index Positions .........................................................B-5
Removing the Dichroic Glass ............................................................................B-5
Lens Removal ....................................................................................................B-7
Installing the Light Snoot (Exploded View) ......................................................B-8
Installed Light Snoot ..........................................................................................B-9
List of Tables
Breaker Requirements ....................................................................................... 1-4
DMX Starting Channel .................................................................................... 1-14
DMX Control ................................................................................................... 1-15
Display Error Messages .....................................................................................A-3
General Troubleshooting ...................................................................................A-8
Upload Troubleshooting ..................................................................................A-10
Color Matching .................................................................................................C-1
DMX Values to MSpeed Times ........................................................................C-5
Table of Contents TOC-v
Page 12

TOC-vi Studio Color User’s Manual
Page 13

Introduction
Congratulations on your purchase of the Studio Color® Automated Wash
Luminaire from High End Systems®.
About This Manual
This manual provides the means to setup and operate Studio Color. This
manual is organized in the following sections:
Introduction—introduces you to this manual, provides hardware
specifications, and technical support information.
Chapter 1 Installation and Setup—explains how to install and setup Studio
Color.
Chapter 2 Operation—explains the functionality and operation of the fixture
in detail.
Introduction
Chapter 3 Menu System—provides information on using the menu system
and its functions.
Appendix A Troubleshooting and Maintenance—provides directions for
troubleshooting problems, maintenance, and uploading software.
Appendix B Accessory Installation—provides information on installing
approved accessories.
Appendix C Supplemental Information—provides information on how to
color mix common gel colors and contains a reference chart for DMX values to
MSpeed times.
Appendix D Important Safety Information—provides safety information in
English, French, German, Spanish, Italian, and Danish.
Index—provides easy access to relevant topics and words.
Introduction I-1
Page 14
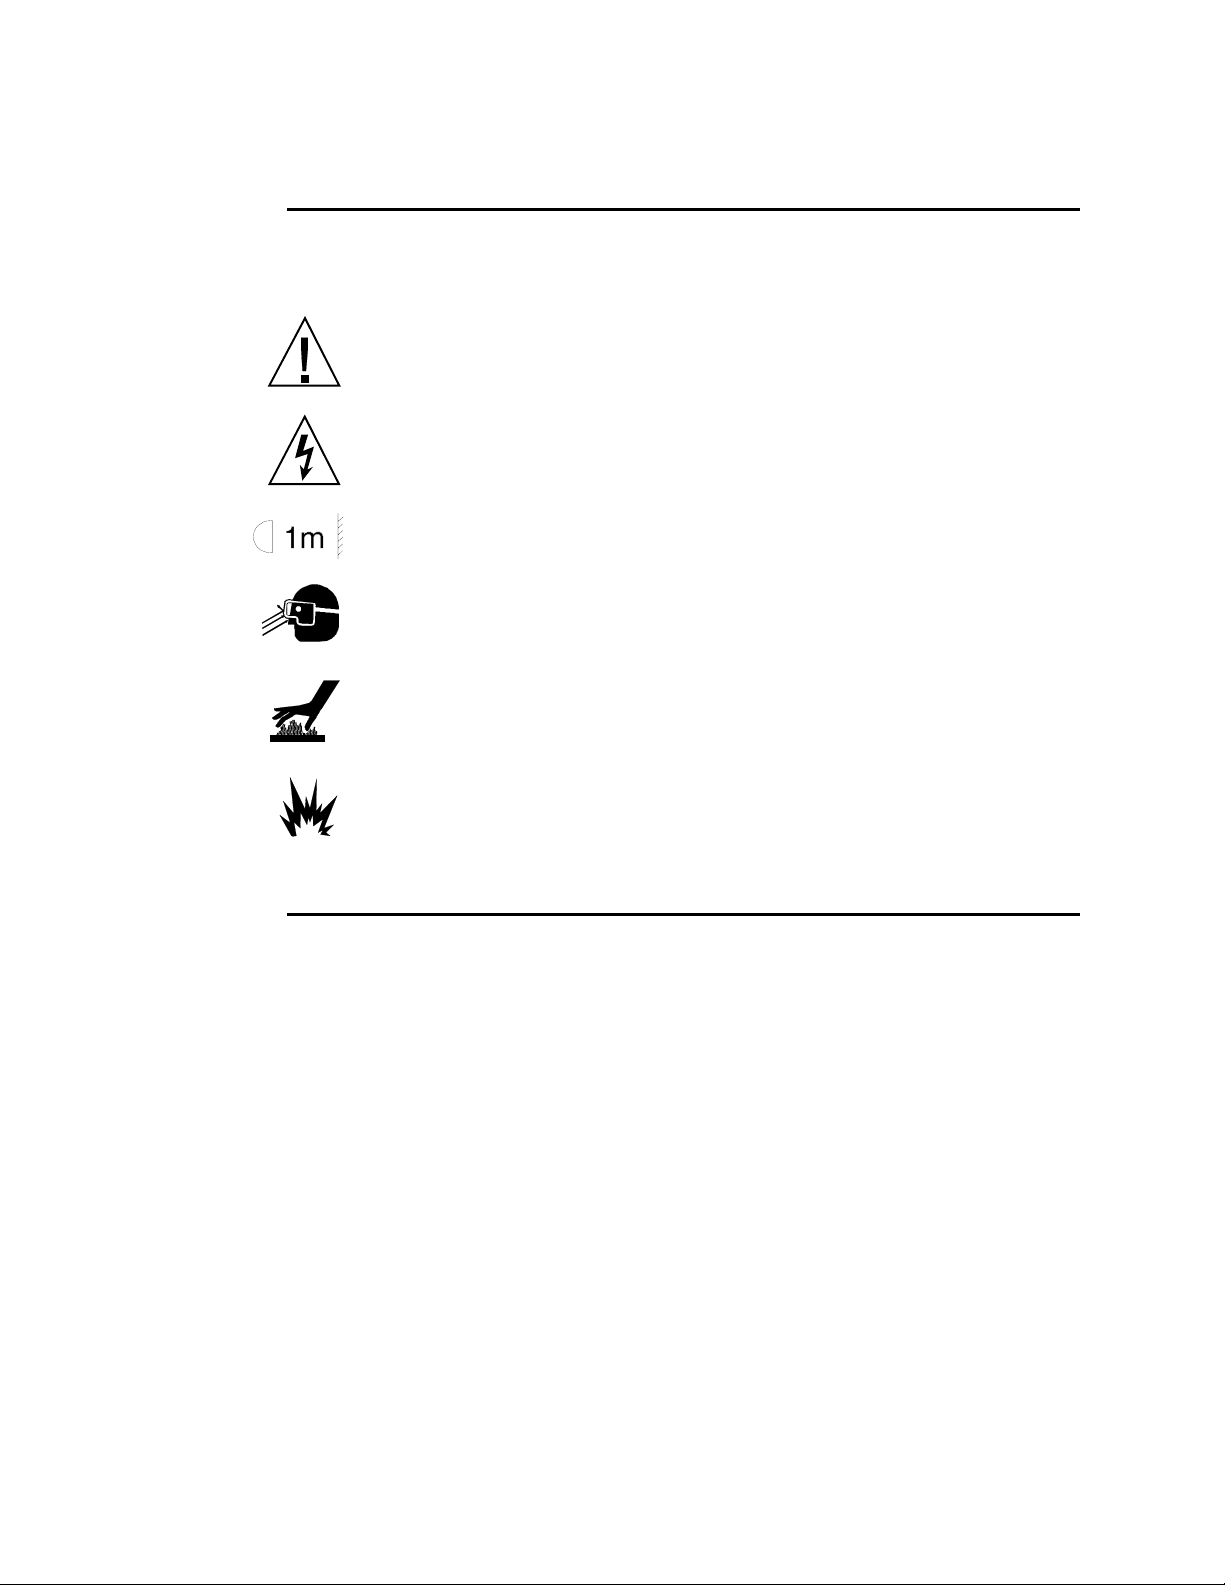
Caution and Warning Symbols
The following international symbols appear in margins throughout this manual to
highlight caution and warning messages.
Caution: This symbol appears adjacent to Caution messages. Ignoring
these messages could result damage to equipment.
Warning: This symbol appears adjacent to High Voltage Warning
messages. Ignoring these messages could result in serious personal injury.
This symbol indicates the minimum distance to a lighted object is 1 meter.
This symbol indicates eye protection is required.
This symbol indicates a hot surface.
This symbol indicates an explosion hazard.
Safety Instructions
• Heed all caution and warning messages throughout this manual and the
documentation that accompanies your fixtures.
• Servicing must be conducted by the manufacturer or other qualified service
personnel.
• Avoid allowing liquids in any form to come in contact with the fixture.
I-2 Studio Color User’s Manual
Page 15

Studio Color 575-S Features
• Automatic voltage selection for electronics, lamp, and motors at 50-60 Hz for all
international voltages
• Full power factor correction
• Convection cooled for quiet operation
• Utilizes stepper motors throughout
• All functions are controllable via DMX-512 protocol
• Subtractive color mixing system plus six position fixed color wheel (100 million
color permutations)
• 6200° K color temperature using the MSR 575/2 lamp and 5600° K using the MSD
575. The color correction filter fitted in the color wheel changes the MSR 575/2’s
color temperature to 3100° K and the MSD 575’s color temperature to 2800° K.
Virtually infinite up/down color correction is also available through the use of the
three variable subtractive color wheels.
Introduction
• Partial colors, color spins, synchronized color sequences, and random color
sequences are available for effects
• The 8° to 22° selectable beam angle may be further user shaped to variable
horizontal or vertical positioning through the use of proprietary secondary effects
lens systems.
• Variable frost
• Moving yoke achieves up to 370° pan and 240° tilt. Control accuracy is 11.6"
(sec.) (0.0032°).
• Optical encoders self-correct pan and tilt positions
• Accessory PAR type lenses are available in VNSP, NSP, WFL, MFL, and XWFL
PAR beams
• 15-segment four character alpha-numeric LED display shows data, status, and
internal diagnostic features
• LED indicators are provided to analyze power and data conditions
• Easy, quick, lamp replacement
• Integral AC power switch/breaker
• Integral floor mountable design with carrying handles. Mountable with standard
installation hardware.
• Smooth iris dimming
• Shutter providing instant blackout, strobe effects, and random strobe effects
• Flicker-free light output
• Lamp power reduction for special applications
• Automatic power-saving mode when the shutter is closed
• Remote fixture shutdown
• Enhanced lamp life
Introduction I-3
Page 16

Studio Color 575-M Features
• Robust magnetic ballast power supply for operation at 50 or 60 Hz at 208 or 230
volts
• Power factor correction
• Utilizes stepper motors throughout
• Convection cooled for quiet operation
• All functions are controllable via DMX-512 protocol
• Subtractive color mixing system plus six position fixed color wheel (100 million
color permutations)
• 6200° K color temperature using the MSR 575/2 lamp and 5600° K using the MSD
575. The color correction filter fitted in the color wheel changes the MSR 575/2’s
color temperature to 3100° K and the MSD 575’s color temperature to 2800° K.
Virtually infinite up/down color correction is also available through the use of the
three variable subtractive color wheels.
• Partial colors, color spins, synchronized color sequences, and random color
sequences are available for effects
• The 8° to 22° selectable beam angle may be further user shaped to variable
horizontal or vertical positioning through the use of proprietary secondary effects
lens systems
• Variable frost
• Moving yoke achieves up to 370° pan and 240° tilt. Positioning accuracy is 19.8"
(sec.) (0.0055°).
• Accessory PAR type lenses are available in VNSP, NSP, MFL, WFL, and XWFL
PAR beams
• 15-segment four character alpha-numeric LED display shows data, status, and
internal diagnostic features
• LED indicators are provided to analyze power and data conditions
• Easy, quick, lamp replacement
• Integral AC power switch/breaker
• Integral floor mountable design with carrying handles. Mountable with standard
installation hardware.
• Smooth iris dimming
• Shutter provides instant blackout, strobe effects, and random strobe effects
I-4 Studio Color User’s Manual
Page 17

System Overview
The following subsections provide a basic overview of the Studio Color
features.
MSR 575/2 and MSD 575 Lamps
Studio Color utilizes custom lamps which are critical to the achievement of a full
range of color permutations for the fixture. The MSR 575/2 provides a high color
rendering index and high color temperature of 6200° K.
An optional MSD 575 lamp is available for architectural applications. It has a
color temperature of 5600° K and offers extended lamp life.
Color Mixing and Capabilities
Color range is achieved through the use of two systems, a fixed color wheel and
three subtractive color wheels. The fixed color wheel contains six user selectable
filters. Custom color filters may be selected and ordered from High End Systems'
dichroic color filter selection and easily installed by the user in the fixed color
wheel.
Introduction
When the fixed color wheel is used in combination with the subtractive color
mixing gradient dichroic color wheels, over 100 million colors can be achieved.
Proprietary dichroic subtractive color mixing wheels employ computer generated
color distribution for uniform color of the beam and the most seamless three-color
mixing available. The coloration of the three filters (CYM) is optimized in High
End Systems' dichroic labs to provide the widest range of color available from
subtractive color mixing. A color correcting dichroic is fitted in the fixture's color
wheel to correct color temperature to 3100° K with the MSR 575/2 and 2800° K
with the MSD.
Special color functions allow MSpeed to control all color systems, color spins of
the fixed color wheel, random color combinations, double rotation of the
subtractive color wheels, and quickest path to the desired color.
Beam Shaping
An exclusive variable beam profiling effect is achieved through selectable lens and
frost systems. The standard beam angle selection is from 8° to 22°, which may be
further shaped through a secondary effects lens system. The beam retains full light
output while being profiled. This delivers virtually unlimited beam shaping in both
the horizontal and vertical planes. Additionally, a variable frost effect provides
progressive beam diffusion enhancement. These features deliver dynamic control
of beam shape, offering new features never before available in a traditional wash
fixture.
Introduction I-5
Page 18

Full Mechanical Dimming
The dimming system is optimized to provide extremely uniform dimming of the
beam. A dimming iris provides complete dimming without changing the color
temperature.
Automatic Voltage Selection
Studio Color 575-S features integral proprietary switching power supplies for the
on-board electronics packages and the lamp power supply. The fixture
automatically operates on all voltages between 100 V.A.C. and 250 V.A.C. at 50
to 60 hertz without changing a power tap, the lamp, or making any adjustments.
Power Factor Correction
Both Studio Color models are power factor corrected. The lamp's power supply is
also power factor corrected to optimize the light source's efficiency and deliver
maximized power economy.
Cooling
Studio Color is convection cooled and uses no fans. Careful optical design
provides a reduction of 65% heat between the lamp chamber and the optical
section.
DMX Control
Full control over all operating parameters of Studio Color is achieved via 16
channels of DMX-512 protocol. This includes 16-bit pan and tilt positioning
accuracy over the 370° x 240° range of movement, 8-bit accuracy for color wheels,
effects wheels, and 8-bit dimming. A full function alpha-numeric display provides
the ability to comfortably program the address channel, mode, offset, and other
functions of the fixture in easy to view characters. A full set of diagnostic
functions are available through the menu system. All parameters are controlled by
a built-in Motorola® 68340 microprocessor. Operating software can be uploaded
from the Lightwave Research Upload Dongle, the Wholehog III, Lighting Console,
or from another fixture, thus keeping the fixtures constantly updated with the latest
software version.
Stepper Motors
All motors are digitally controlled steppers, providing precision control and very
long life. The pan and tilt motors are special high torque stepper motors offering
40% greater torque than comparable steppers. All mechanical movements are
achieved via belt drives, insuring high reliability and very smooth, quiet
performance.
I-6 Studio Color User’s Manual
Page 19
Optical Encoders
The Studio Color 575-S utilizes optical encoders for the pan and tilt systems. The
encoders automatically correct position if a fixture is jolted from a programmed
position.
Lamp Power Options
For special applications, lamp power in the Studio Color 575-S can be reduced to
250 watts. This feature decreases light output, decreases heat, and saves power.
Automatic Power-Saving Mode
The Studio Color 575-S provides an automatic power-saving mode. When the
shutter is closed, lamp power decreases to 250 watts. When the shutter is reopened,
the lamp instantly returns to full power.
Introduction
Ease of Maintenance
Studio Color has been designed for the professional user. All electronics, motors,
and drive systems are easily accessible. Access to all color wheels, color motors,
and effects motors is provided via a removable impact resistance, high temperature
polymer front bezel. This front bezel is removable in seconds through two quick
release latches. All processor and power supplies are accessible by opening the
electronics housing and removing complete modules. Changing the lamp is quick
(typically less than 30 seconds) and convenient, being accessed through the rear of
the fixture via two access screws. The lamp assembly retains optimum lamp
alignment during movement and replacement.
Safety
The lamp cover is secured through a wiring harness for additional safety. Multipoint grounding is provided throughout for complete assurance of safe operation.
The bezel is secured to the unit by an additional safety cable. The fixture and all
electronics comply with current UL, CE, and CSA safety standards for
professional lighting fixtures.
Introduction I-7
Page 20
Specifications
Models
Studio Color 575-S
Studio Color 575-M
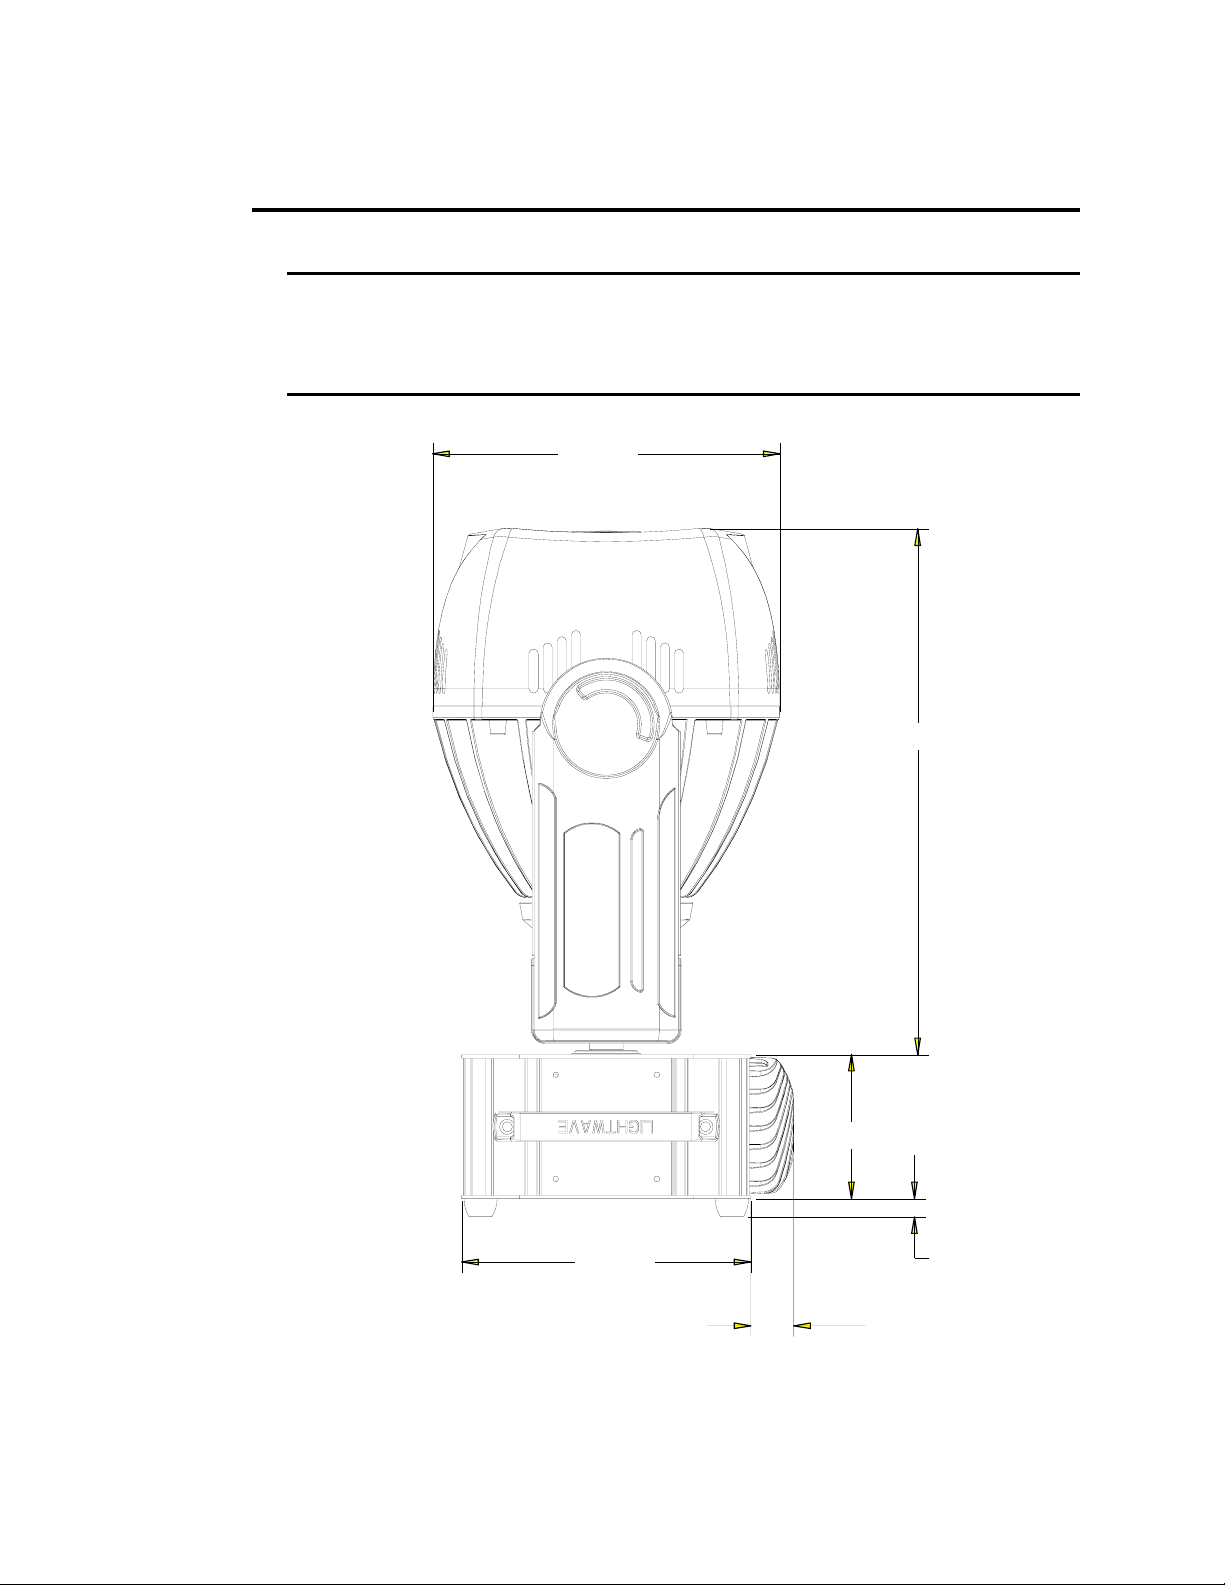
Mechanical
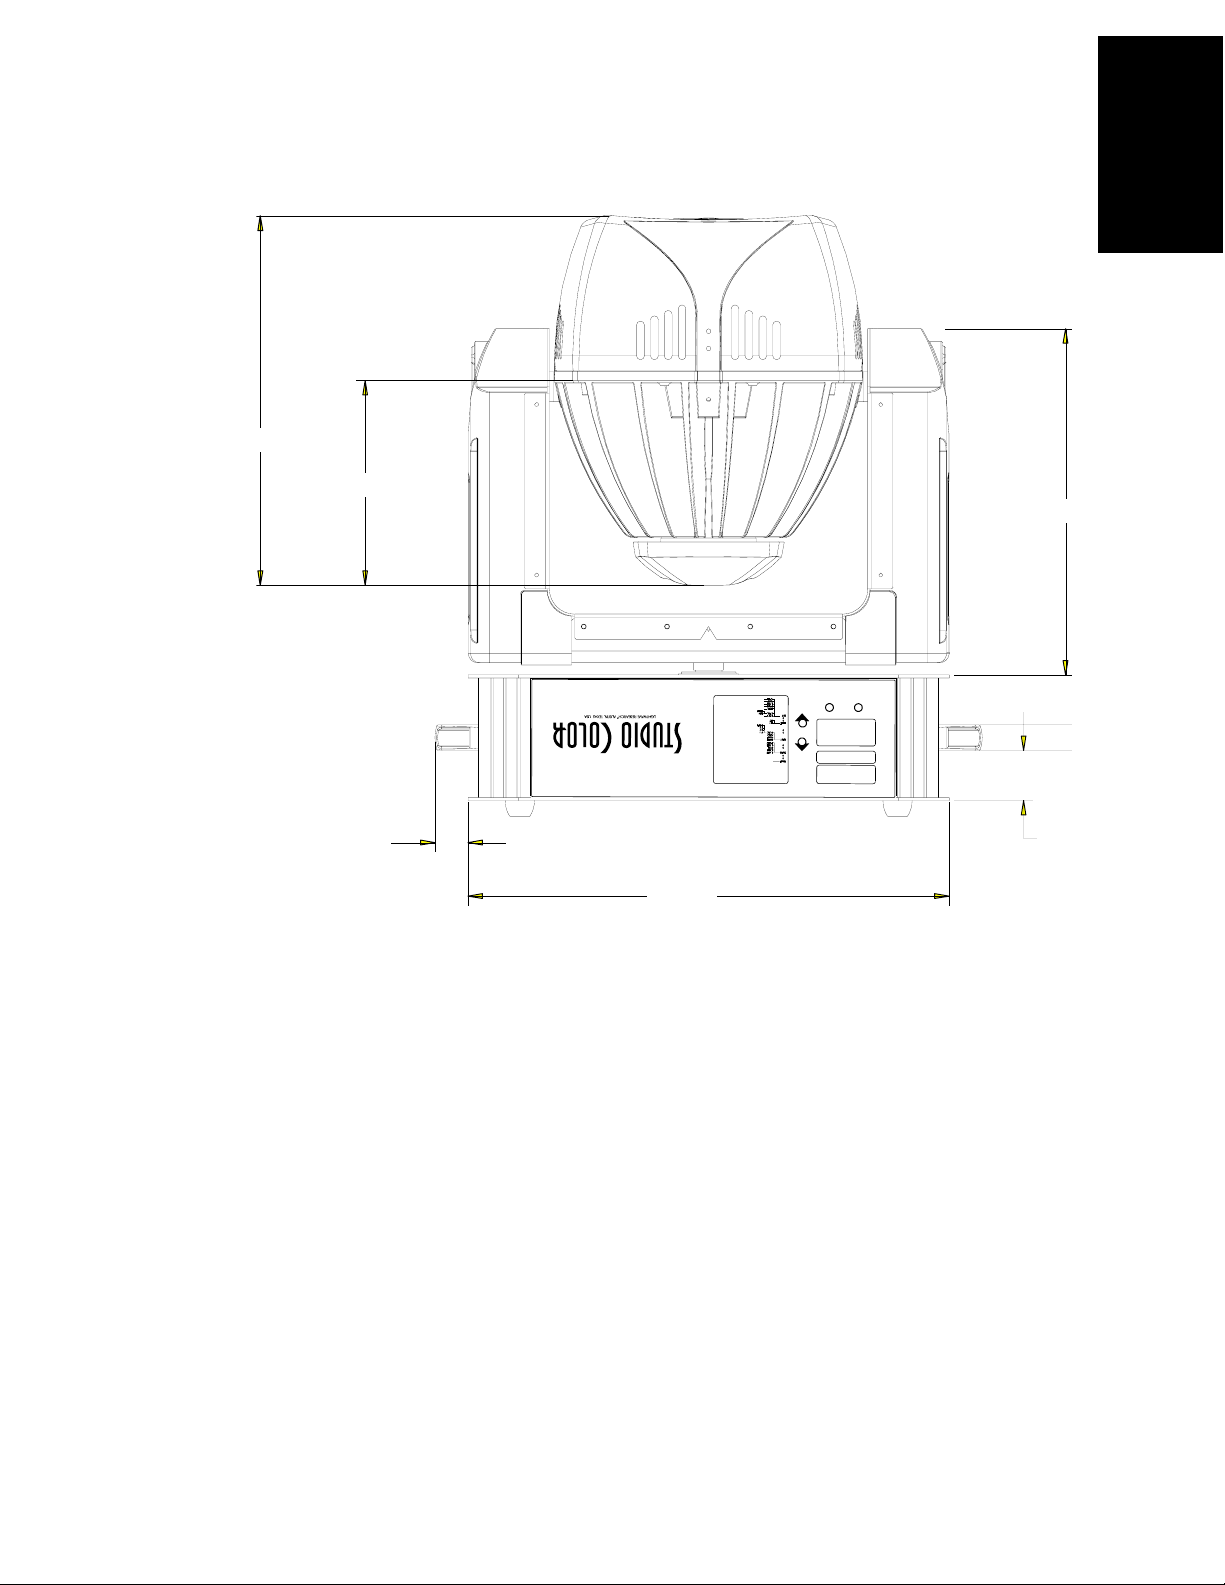
Dimensions:
305.05 mm
(12.01 in.)
461.77 mm
(18.18 in.)
¹Note: the 575-S has a proprietary heat sink which extends the fixture depth by
37.84 mm (1.49 in.).
I-8 Studio Color User’s Manual
Studio Color
126.49 mm
(4.98 in.)
254 mm
(10.00 in.)
Figure 1. Side View Dimensions
37.84 mm¹
(1.49 in.)
15.74 mm
(.62 in.)
Page 21
371.60 mm
(14.63 in.)
205.99 mm
(8.11 in.)
348.23 mm
(13.71 in.)
Introduction
R
E
E
T
n
e
N
t
,
e
s
t
h
t
u
h
i
s
t
n
m
o
e
¯
-
w
o
d
t
R
T
N
E
E
t
n
e
h
,
p
a
w
l
s
t
t
-
i
n
a
f
o
p
f
/
n
o
t
t
n
r
u
o
¯
-
R
T
E
N
E
t
,
n
e
h
t
r
e
v
f
o
t
f
/
n
o
t
t
i
l
n
r
u
o
¯
i
t
n
-
R
T
E
N
E
n
e
h
t
,
t
r
e
i
n
v
n
a
f
o
p
f
/
n
o
t
n
r
u
t
o
¯
-
R
E
T
N
n
l
e
p
h
a
f
o
E
y
t
,
i
d
f
s
/
n
o
t
t
n
r
u
o
¯
-
f
#
s
e
t
r
d
d
a
i
e
r
u
s
o
x
b
R
t
y
T
E
N
E
l
e
n
n
a
h
c
X
s
e
r
d
d
a
s
o
M
b
R
t
y
D
T
E
N
E
R
T
N
f
n
E
e
e
h
l
u
E
a
t
,
t
s
/
t
n
o
d
y
r
o
o
n
c
a
f
r
u
¯
f
-
f
t
E
R
E
N
T
2
#
e
d
o
i
g
n
m
t
a
s
r
e
p
o
t
l
o
e
R
c
e
t
E
T
N
E
1
#
e
d
o
i
g
n
m
t
a
s
r
e
p
o
t
l
o
e
R
c
e
t
T
N
E
E
E
N
T
E
R
3
#
r
o
t
o
m
t
t
s
e
o
R
t
T
N
E
E
2
#
r
o
t
o
m
t
t
E
s
e
o
R
t
T
N
E
1
#
r
o
t
o
m
t
t
s
e
o
R
E
t
T
N
E
s
l
e
t
t
t
f
s
t
r
e
a
s
t
o
R
E
T
N
E
i
s
i
n
o
t
e
e
e
s
o
p
t
s
p
t
u
o
R
E
E
T
N
e
r
u
t
f
i
e
x
m
o
h
t
o
R
E
T
N
E
N
T
E
R
E
o
s
r
u
t
e
r
u
t
o
e
e
h
t
f
a
l
s
i
t
x
o
R
E
T
N
E
s
r
u
o
h
p
l
t
m
e
a
s
e
r
t
o
R
E
E
T
N
#
i
n
o
s
r
e
v
m
e
t
s
y
s
e
e
s
t
o
R
E
T
N
E
s
e
i
k
r
p
t
l
s
m
a
#
e
e
s
t
o
R
E
T
N
E
s
r
u
o
p
h
l
m
a
e
e
s
t
o
R
E
T
N
E
E
R
N
T
E
R
E
T
N
s
e
d
t
E
i
t
o
d
e
n
r
e
s
h
s
e
a
,
r
d
d
¯
-
E
R
N
T
E
t
n
r
l
o
n
o
.
a
d
e
t
p
u
U
k
y
e
.
o
t
u
t
e
h
h
g
k
y
e
c
o
r
e
e
d
t
t
f
r
d
i
i
l
a
n
i
e
a
o
m
o
n
i
n
o
x
f
t
r
s
u
e
e
o
r
e
l
R
e
r
u
r
f
a
e
a
f
m
h
u
s
t
n
m
o
t
N
E
n
s
t
e
u
,
M
p
i
e
o
m
h
u
r
s
s
h
r
v
p
e
e
e
o
t
t
k
c
g
a
b
o
o
e
.
n
e
a
e
r
T
g
t
h
n
a
c
u
o
n
r
e
m
y
e
t
r
t
k
n
e
o
e
a
R
E
T
N
E
.
h
r
s
e
P
t
e
s
s
e
i
c
c
i
o
u
f
d
h
n
f
r
e
m
e
e
t
n
t
o
h
l
r
l
r
o
c
t
o
s
p
r
s
d
P
l
s
e
e
a
t
e
m
y
s
d
.
i
e
s
h
e
y
i
i
¯
k
t
u
i
l
n
u
f
t
e
t
i
r
h
n
s
e
m
t
U
N
E
M
l
d
o
a
s
d
h
n
s
,
r
s
r
e
e
u
p
k
e
y
h
s
n
s
e
d
c
u
u
e
l
t
n
o
n
k
a
T
m
c
s
o
a
c
s
e
33.27 mm
(1.31 in.)
M
T
484.63 mm
(19.08 in.)
Weight
575-S: 25.85 kg (57 pounds)
575-M: 30.68 kg (67.5 pounds)
N
R
T
E
E
N
U
E
M
R
e
c
e
i
v
e
r
T
i
s
t
m
a
n
5
V
L
a
m
p
o
r
o
M
t
50.54 mm
(1.99 in.)
Introduction I-9
Page 22

Electrical
Studio Color 575-S
Rated voltage: 100–230 V.A.C.¹
Rated current: 7.0 A @ 100 V/60 Hz.,
3.0 A @ 230 V/50 Hz.
Rated power: 700 W max.
Rated frequency: 50/60 Hz.
Max. ambient temperature, Ta: 40° C (104° F)
Max. exterior surface temperature: 140° C (284° F)
Power factor: 0.96 @ 230 V/50 Hz.,
1.0 @ 100 V/60 Hz.
Max. winding temperature, Tw: 130° C (266° F)
Max. capacitor temperature, Tc: 85° C (185° F)
Studio Color 575-M
Rated voltage: 208/230¹ V.A . C .
Rated frequency: 50/60 Hz.
Rated current: 3.2 A @ 208 V/60 Hz.,
3.0 A @ 230 V/50 Hz.
Rated power: 700 W max.
Max. ambient temperature, Ta: 40° C (104° F)
Max. exterior surface temperature: 140° C (284° F)
Power factor: 0.90 @ 60 Hz., 0.864 @ 50 Hz.
Max. winding temperature, Tw: 130° C (266° F)
Max. capacitor temperature, Tc: 100° C (212° F)
¹
Note: fixtures can operate with international 200, 240 and 250 V.A.C. supplies.
575-M fixtures must be re-tapped for some voltages. To retap 575-M
fixtures, contact your authorized dealer or High End Systems Service
Department.
I-10 Studio Color User’s Manual
Page 23

Lamp
Lamp type: Use only M Series, GX 9.5 base, 575
watt, metal halide type lamp
MSR 575/2 color temperature: 6200° Kelvin
MSD 575 color temperature: 5600° Kelvin
WARNING: Use only the lamps purchased from High End Systems. These lamps
were specifically designed for use in Studio Color.
Communication
Protocol: USITT DMX-512
Start code: 00h
Maximum load: 32 fixtures per DMX link
Required channels: 16
Introduction
Termination: 120 Ω
Compliance
Studio Color 575-M and 575-S are compliant to the following standards:
• UL 1572
• CSA 22.2 Number 9
• EN 60598-1 : 1993
• EN 60598-2-17 : 1989 A1-A3 : 1993
• EN 55022, Class A ITE
• IEC 801-2, 1991 Level 2 (4/8 kV)
• IEC 801-3, Draft 5 Level 2 (3 V/m)
• IEC 801-4, 1988 Level 2 (1 kV/0.5 kV)
• FCC-Class A digital device
Available Controllers
The following controllers from Lightwave Research® may be used to operate
Studio Color:
Wholehog III Lighting Console
Hog2 PC controller
Additionally, most DMX-512 controllers may be used to operate Studio Color.
Introduction I-11
Page 24

Accessories
The following items are currently available for Studio Color:
Accessory effect lenses (set of five) 99090029
Cheeseborough clamp 55040014
Color mixing assembly 80430044
Dark blue color filter 80510061
Orange color filter 80510060
Color corrector filter (full) 80510159
Purple color filter 80510063
Blue color filter 80510116
Green color filter 80510117
Indigo color filter 80510114
Magenta color filter 80510118
Yellow color filter 80510119
10-foot heavy duty data cable w/ Neutrik XLRs 55050005
25-foot heavy duty data cable w/Neutrik XLRs 55050006
50-foot heavy duty data cable w/ Neutrik XLRs 55050007
100-foot heavy duty data cable w/ Neutrik XLRs 55050008
Lightwave Research Upload Dongle 26040002
Ecodome™ 115 V (575-S only) 28010001
Ecodome 208/230 V 28010002
Keal Road Case for one fixture 26070000
Keal Road Case for two fixtures 26070001
Light snoot (fresnel light shield) 99190012
Philips MSR 575/2 lamp 55030045
Philips MSD 575 lamp 55030050
Safety cable 12040001
Studio Color User’s Manual 60600061
Studio Color Quick Reference Card 60600082
Notes: additional custom color filters are available from High End Systems. For
special applications, all Studio Color models are available in white. Contact
your authorized dealer or distributor for ordering information.
I-12 Studio Color User’s Manual
Page 25
Front and Side Panels
A
B
C
D
E
F
Introduction
J
I
GH
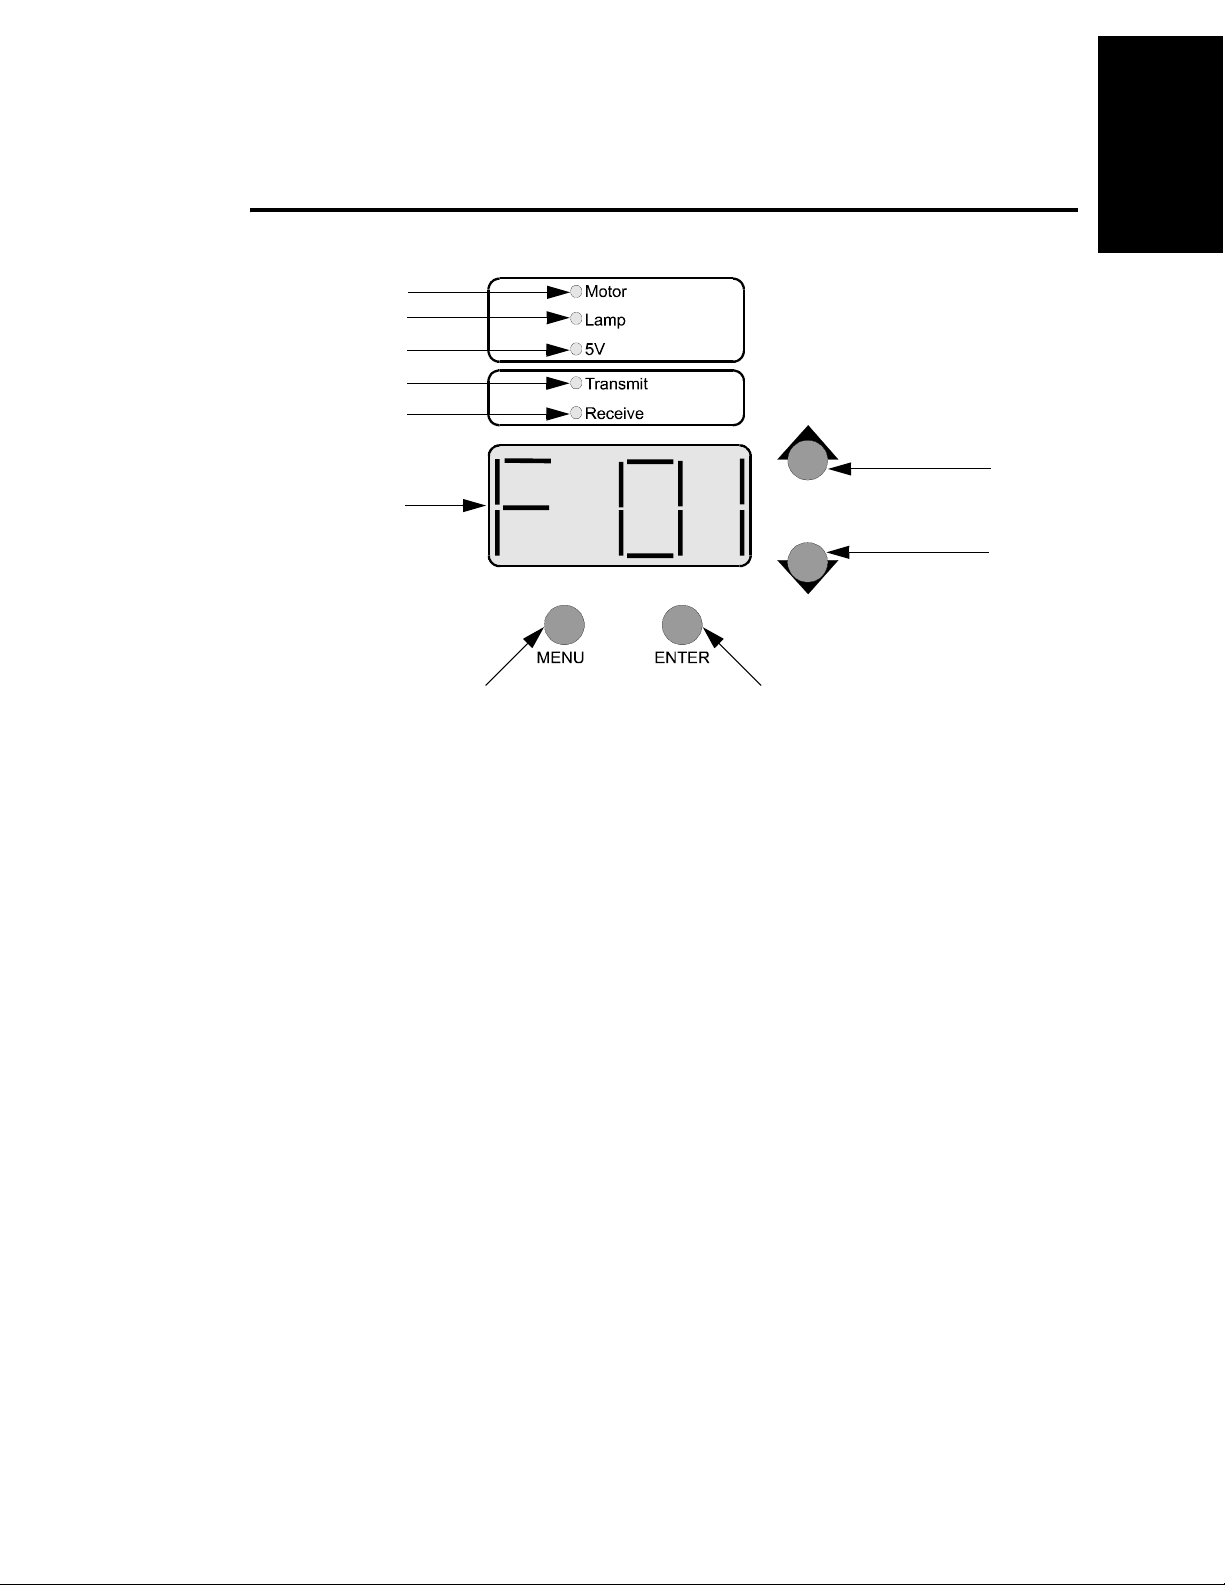
Figure 2. Front Panel
A- Motor power supply indicator. This LED is on when the motor power supply has the
proper voltage.
B- Lamp power supply indicator¹. This LED is on when the lamp is on, off if the lamp
is turned off, or flashing if there is a malfunction.
C- 5V supply indicator. This LED is on when the logic board is being supplied with +5
volts.
D- Transmit data indicator. This LED is on when the fixture is the bus master (not the
controller).
E- Receive data indicator. This LED reflects the state of the received data.
F- 15-segment four character alpha-numeric LED display. The display provides data,
status, and internal diagnostic features.
G- <MENU> button. This button recalls the menu system and backs out of the current
field.
H- <ENTER> button. This button enters the current field.
I- Down arrow button. This button scrolls downward through data fields.
J- Up arrow button. This button scrolls upward through data fields.
¹Note: the 575-M LED will always remain on.
Introduction I-13
Page 26
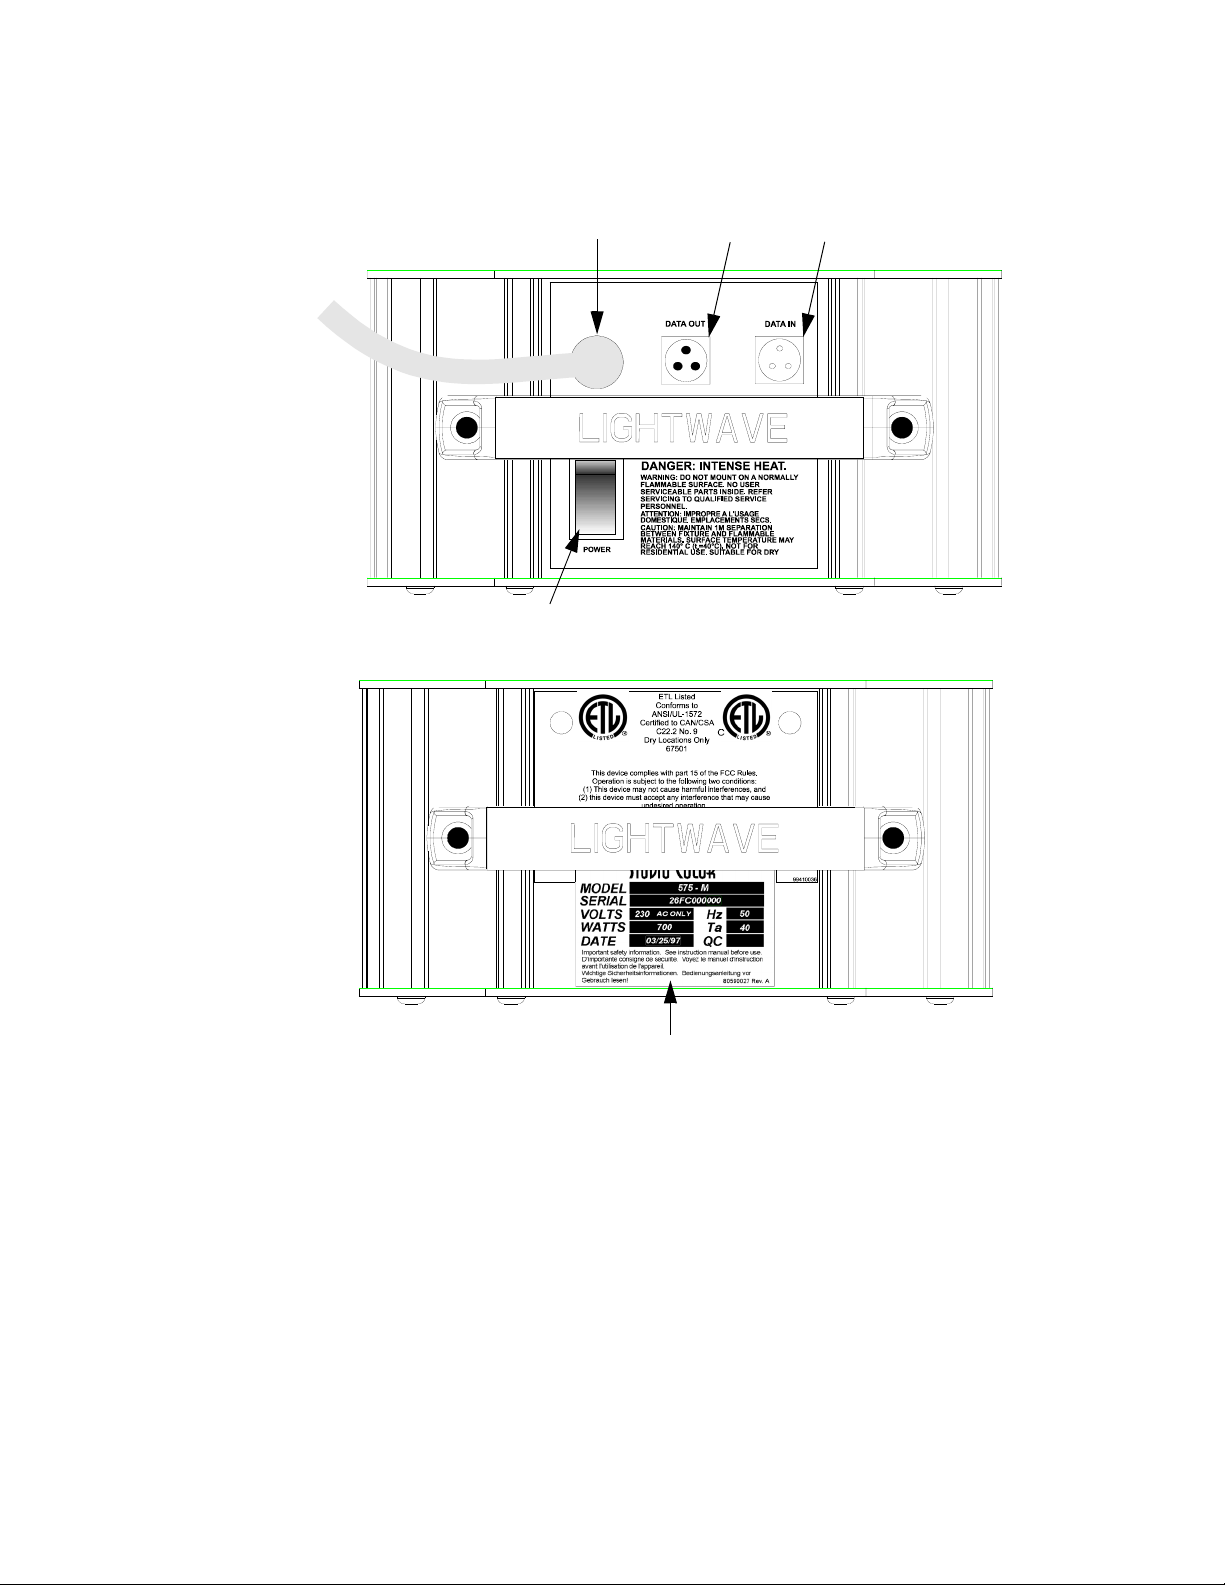
KLM
N
K- Line cord.
L- Data Out connector.
M- Data In connector.
N- Breaker/power switch.
O- QC/rating label.
I-14 Studio Color User’s Manual
O
Figure 3. Side Panels
Page 27
Chapter 1 Installation and Setup
In this chapter you will:
S unpack Studio Color (1-1)
S construct a road case (1-2)
S construct line cord caps (1-5)
S learn the power requirements (1-5)
S construct data cables (1-5)
S construct terminators (1-6)
S install the lamp (1-7)
S mount the fixture (1-9)
S connect data cables (1-11)
S set the starting address (1-12)
S patch fixtures into the controller (1-14)
S configure your DMX controller to control Studio Color (1-15)
Unpack Studio Color
1
Introduction
Installation and
Setup
In this section you unpack your Studio Color and verify that it arrived complete
and without any damage.
Save the Shipping Materials
Do not discard the shipping carton and packing materials. The carton and packing
materials are specifically designed to protect the fixture during transport.
If you ever need to return a product for repair or maintenance, you must return it in
its original shipping carton and packing materials. You will be billed for a new
shipping carton and new packing materials if you return your Studio Color in a
non-factory shipping carton with non-factory packing materials.
Note: Before returning anything to the factory, be sure to call your High End
Systems Dealer/Distributor for a Return Authorization Number. The factory
can not accept any goods shipped without an RA number.
Inspect the Contents
The carton contains the following:
• Studio Color fixture
• Philips MSR 575/2 or MSD 575 series lamp
• Studio Color User’s Manual
• Studio Color Quick Reference Card
Chapter 1 Installation and Setup 1-1
Page 28
Road Cases
If Studio Color fixtures will be transported after they are unpacked from their
original shipping box, a professional road case is strongly recommended. Road
cases must be purchased from High End Systems or constructed according to
the information in this section.
Minimum Material Requirements
Use the following materials to construct the road case:
• 3/4-inch pressed plywood
• 4 pound poly-ethylene foam
• steel or aluminum rivets
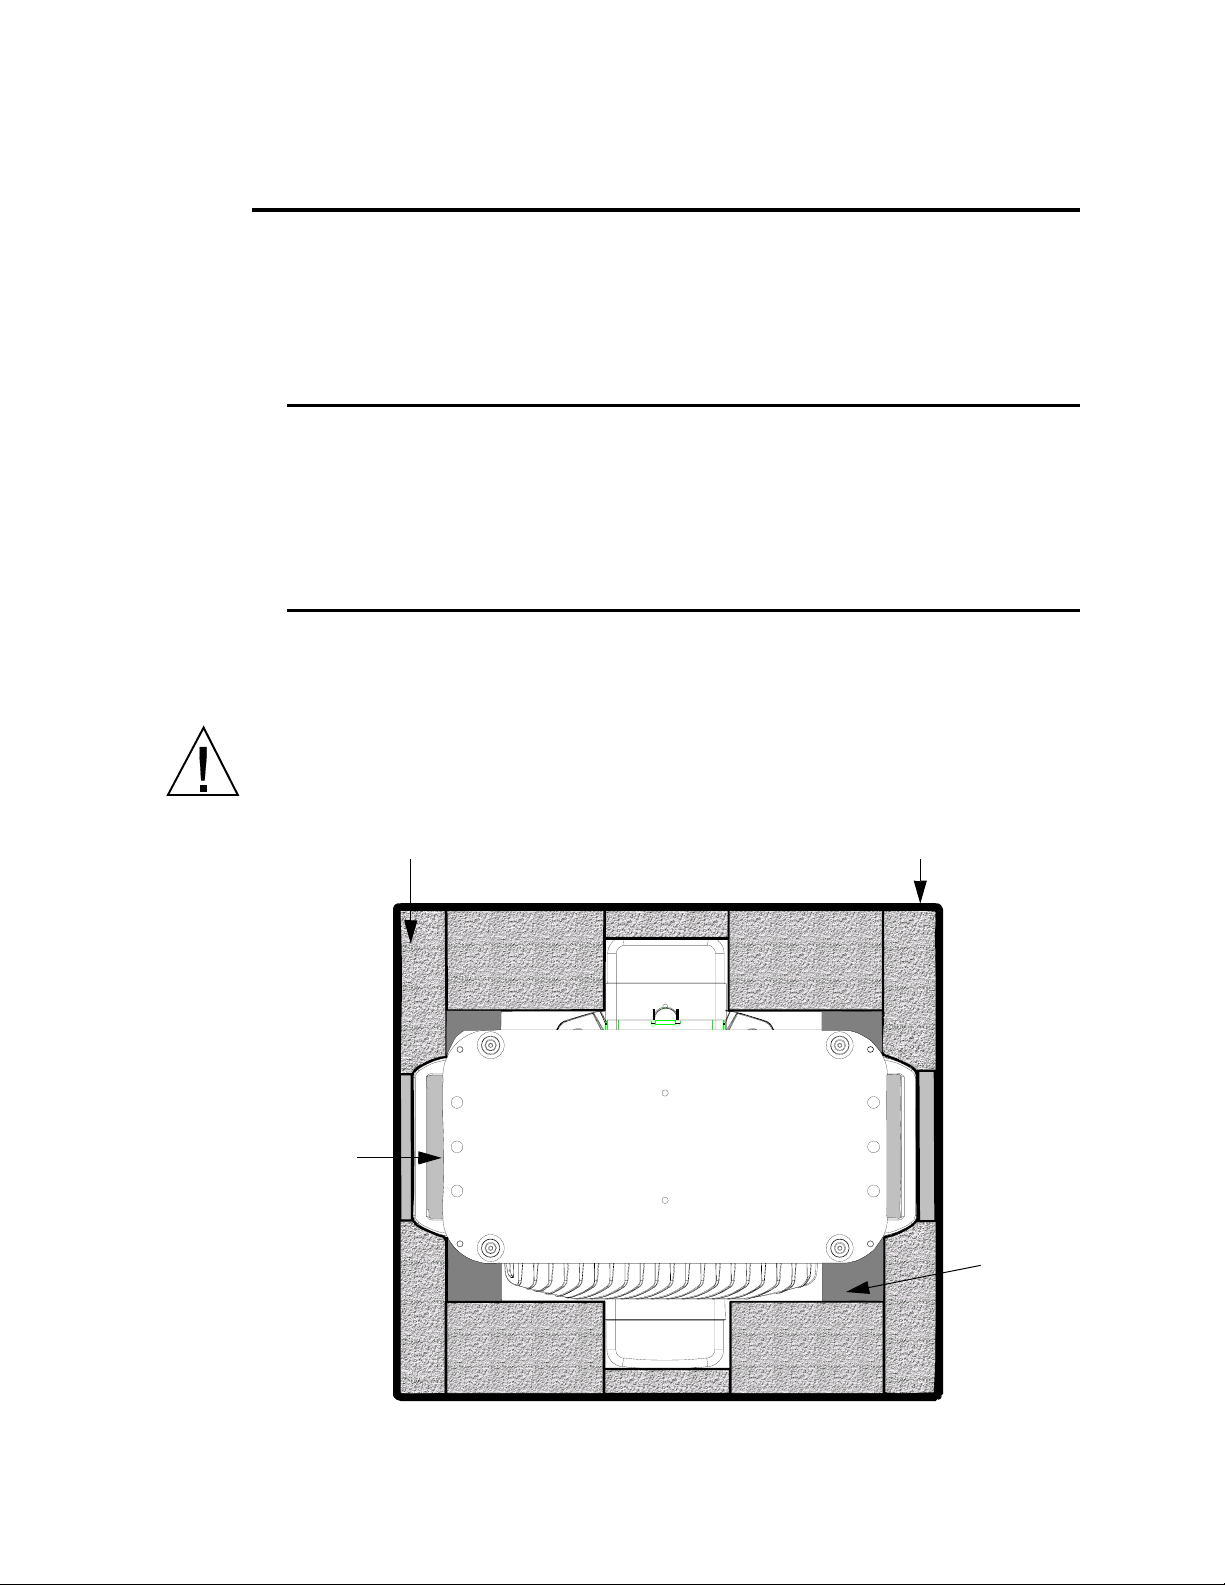
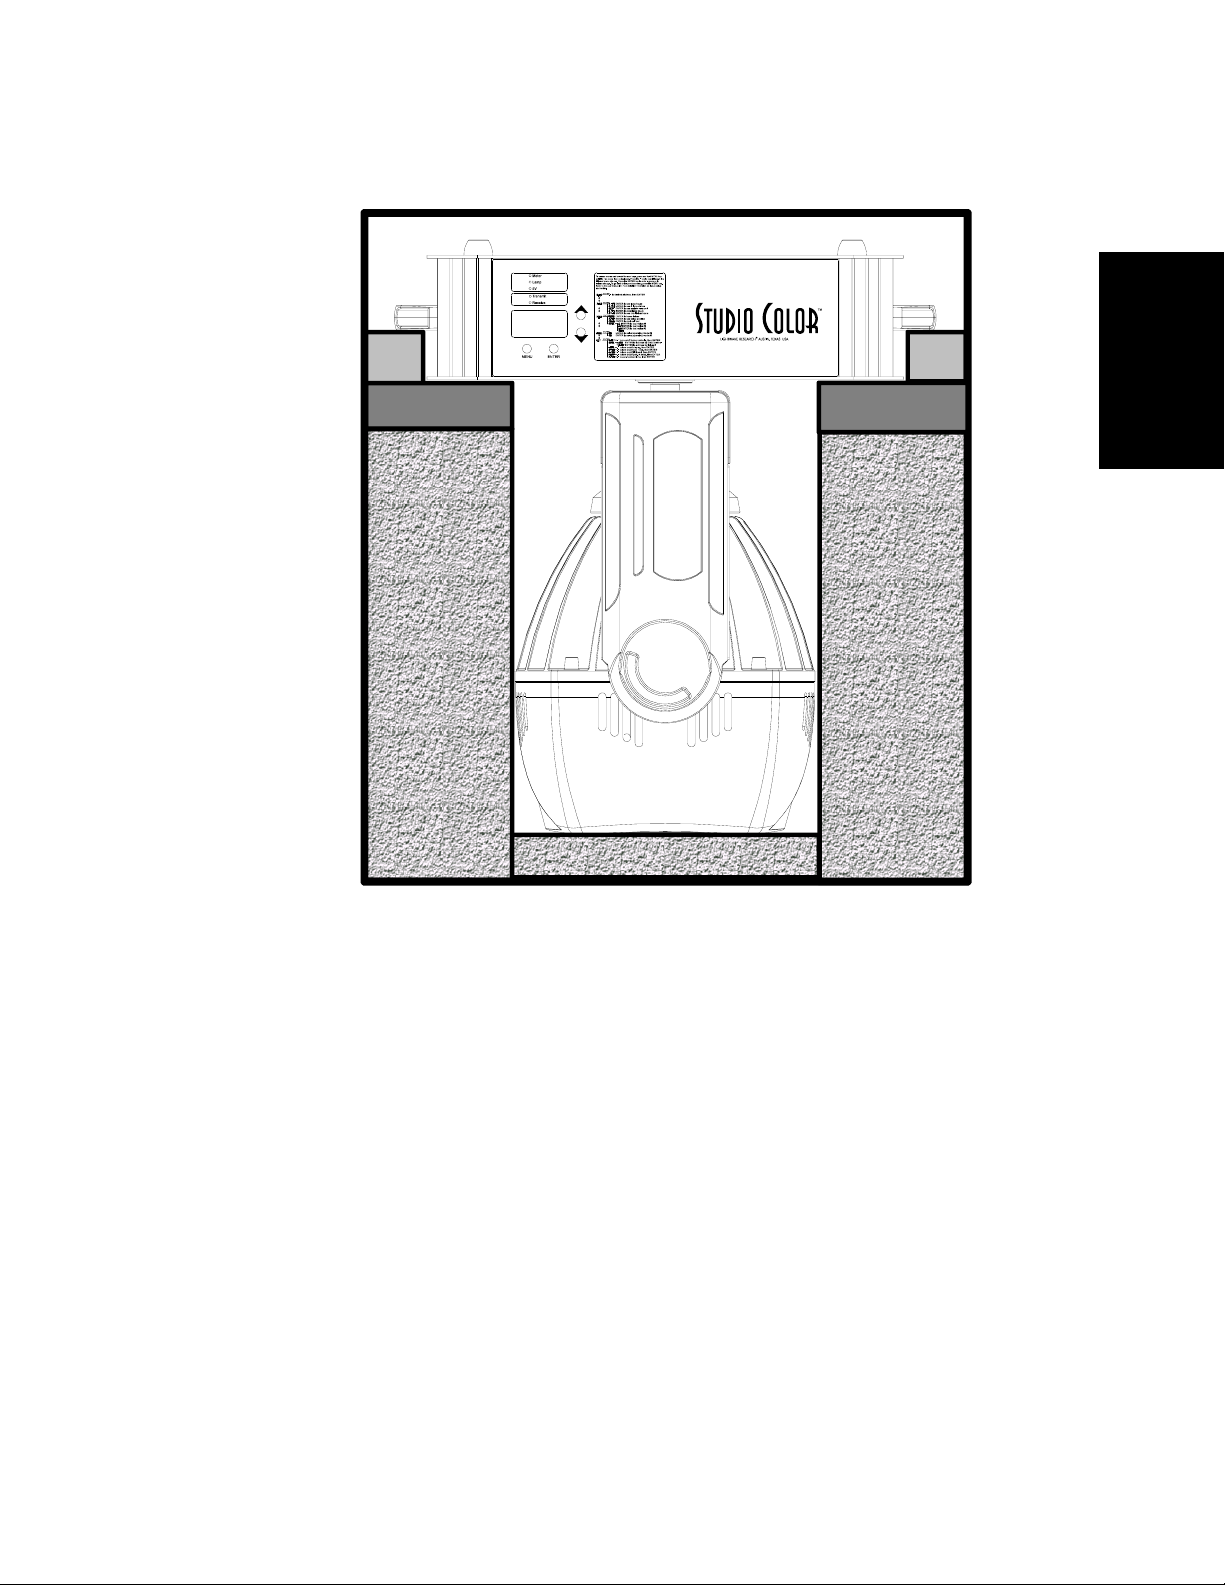
Construction Requirements
The road case must be constructed in a manner that supports the base and the
handles with the head pointed down and the yoke rotated 90°. Refer to Figure 1.1
and Figure 1.2.
Caution: For 575-S fixtures, allow a small gap in the foam around the heat sink to
ensure that the foam is not damaged by the heat from the fixture.
foam
foam over wood
supporting handles
fixture base
case exterior
foam over wood
supporting base
1-2 Studio Color User’s Manual
Figure 1.1. Road Case Construction Overhead View
Page 29
Studio Color
1
Introduction
Installation and
Setup
Figure 1.2. Road Case Construction Side View
Chapter 1 Installation and Setup 1-3
Page 30
Before You Begin Installation
Warning: Before you begin the installation read the following safety precautions.
1. Disconnect the fixture from power before removing the cover or changing the
lamp.
2. Allow the unit to cool for at least five minutes before removing cover or
accessing the lamp.
3. Wear protective gloves and goggles when working inside the unit.
Power Requirements
The following items must be used to provide power to Studio Color:
• 12 AWG stranded THHN or equivalent
• Branch Circuit Protection
• 20 A, high-surge thermal breakers (GE THQB, THQL, or equivalent). Refer to
Table 1.1.
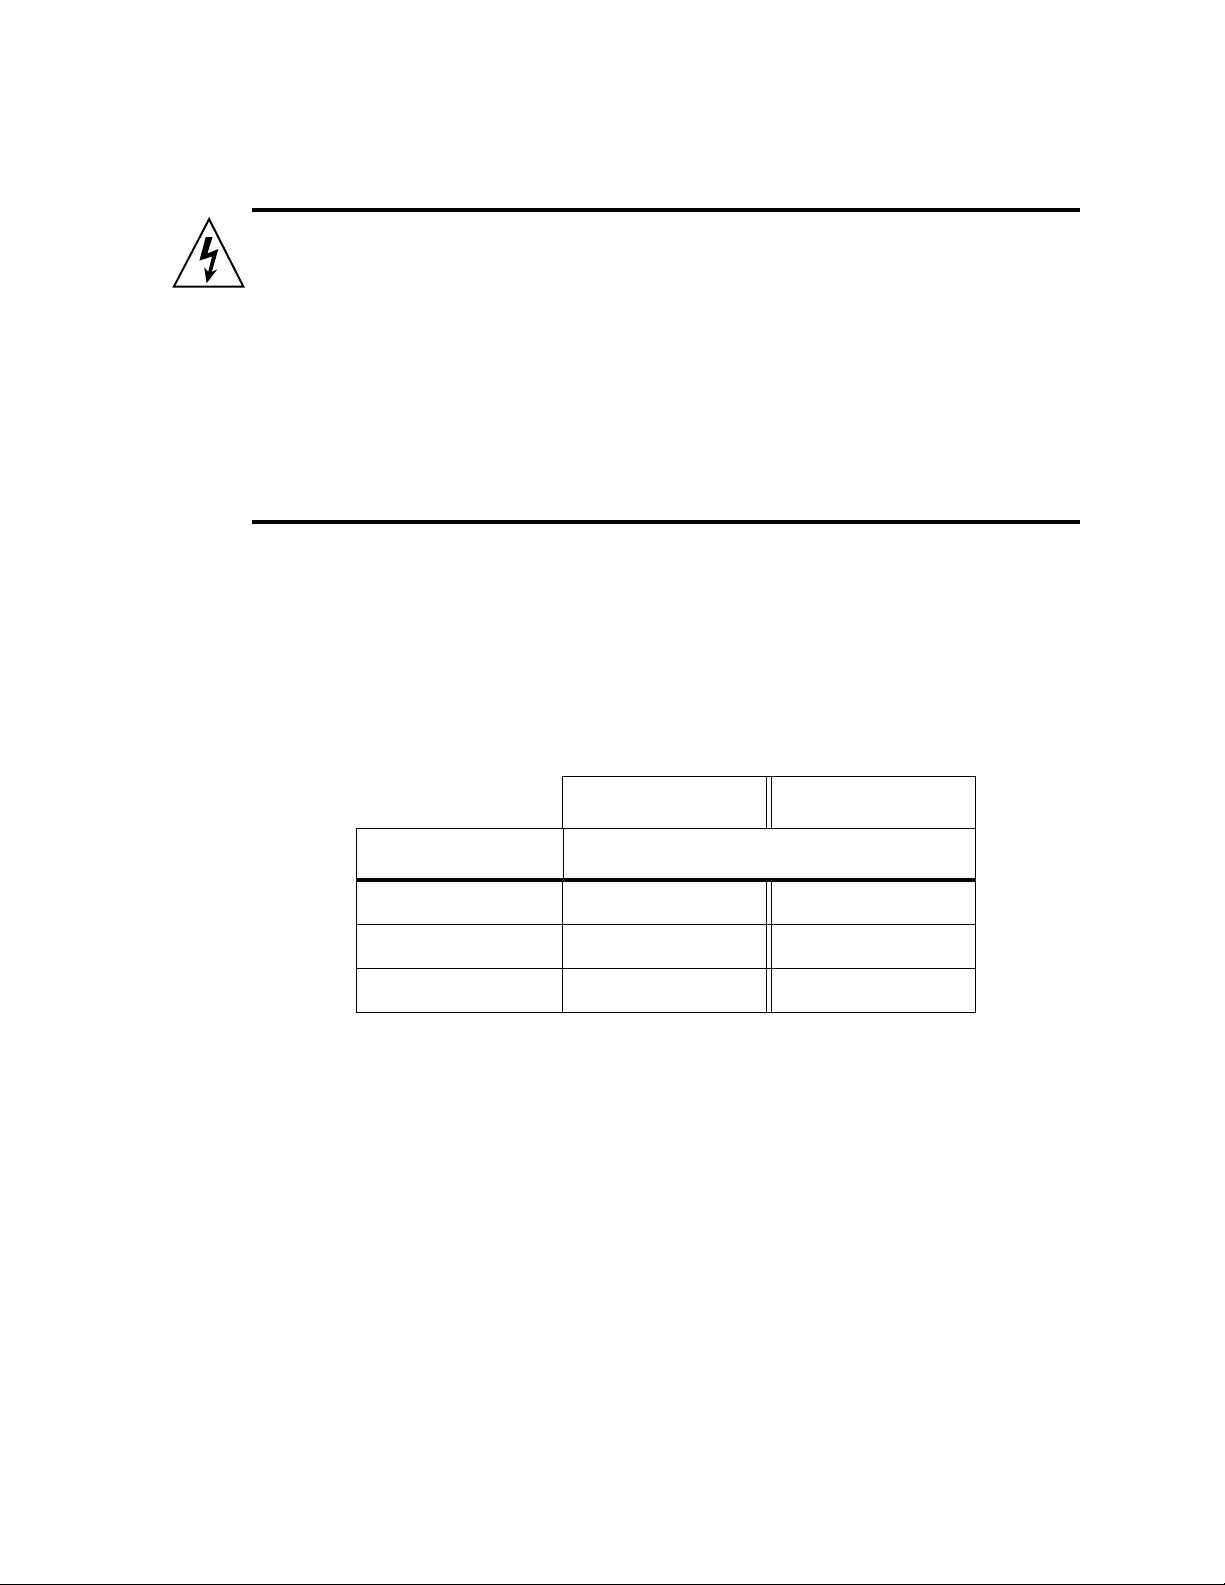
Table 1.1: Breaker Requirements
575-S 575-M
Voltage Number of Fixtures per 20 A Breaker
110 3 n/a
208 5 3
230 6 4
Note: do not use magnetic type circuit breakers.
1-4 Studio Color User’s Manual
Page 31

Line Cord Cap Construction
Studio Color is shipped without a line cord cap attached. Secure the line cord to
a line cord cap in accordance with the following code:
• green and yellow– earth
• blue– neutral
• brown– live
In the United States, use an integral cord grip that is rated either at 125 V 20 A
(NEMA 5-20) or 250 V 20 A (NEMA 6-20), depending on the available
supply.
In the United Kingdom, as the colours of the cores in the mains lead of this
equipment may not correspond with the coloured markings identifying the
terminals in your plug, proceed as follows:
• The core which is coloured green and yellow must be connected to the terminal in
the plug which is marked with the letter
green or green and yellow.
• The core which is coloured blue must be connected to the terminal which is
marked with the letter
• The core which is coloured brown must be connected to the terminal which is
marked with the letter
N or coloured black.
L or coloured red.
E or by the earth symbol, or coloured
1
Introduction
Installation and
Setup
WARNING: Class I equipment. This equipment must be earthed.
Data Cable Construction
Studio Color uses standard three-pin XLR connectors. You should construct
data cables using shielded, two conductor cable with male three-pin XLR
connectors at one end and a female three-pin XLR connectors on the other end.
You can use microphone cables if the pin connections are correct. Test each
cable with a volt-ohm meter for correct polarity and ensure that the negative
and positive pins are not grounded or shorted to the shield. Ensure that pin 1 is
shielded. Refer to
If your DMX controller uses five-pin data cables, you will need to construct or
purchase a five-pin to three-pin adapter.
Figure 1.3.
Figure 1.3. Data Cable Construction
Chapter 1 Installation and Setup 1-5
Page 32

Terminator Construction
DMX-512 protocol recommends terminating resistors be used on the last
fixture on the link. You will need the following items to construct a
terminator:
• Male three-pin XLR connector
• 120 Ω resistor (¼ watt minimum)
To construct a terminator, complete the following procedure:
1. Disassemble the male XLR connector.
2. Solder a 120 Ω resistor, minimum of ¼ watt, between pins 2 and 3.
Ω
0
2
1
2
1
3
Figure 1.4. Terminator Construction
3. Reassemble the XLR connector.
1-6 Studio Color User’s Manual
Page 33

Lamp Installation
You will need the following items to install or replace the lamp:
¼
inch hex wrench
•
• Philips MSR 575/2, MSD 575, or factory approved lamp
• Protective gloves
• Protective goggles
Note: do not mix lamp types! The MSR 575/2 and the MSD 575 have different color
temperatures and characteristics.
To install or replace the lamp, complete the following procedure:
1. Remove power from fixture. If the fixture has been in operation, allow it to
cool for at least five minutes before continuing.
2. Using the ¼-inch hex wrench, loosen the hex screws located at the rear of the
fixture and remove the lamp access cover. Refer to Figure 1.5.
1
Introduction
Installation and
Setup
Studio Color
Figure 1.5. Removing the Lamp Access Cap
3. Holding the lamp by its base, align the lamp leads to their female slots and
carefully push the lamp into the socket. Refer to
Warning: Do not touch the lamp with bare fingers. If the lamp is accidentally
touched, clean it immediately with a soft cloth and isopropyl alcohol
(C
O). An alcohol cloth is provided with each lamp.
3H8
Figure 1.6.
Chapter 1 Installation and Setup 1-7
Page 34

Figure 1.6. Installing the Lamp
4. Place lamp assembly back into the housing and tighten the hex screws.
Caution: Do not overtighten the hex screws.
Note: when a lamp is replaced, remember to reset the lamp hours as outlined in
“Resetting Lamp Hours” on page 3-7. If you are using a 575-M, reset the
fixture hours as outlined in “Resetting Fixture Hours” on page 3-7.
1-8 Studio Color User’s Manual
Page 35

Fixture Mounting
)
Studio Color may be mounted on the ground or at any angle on a truss.
Complete the instructions in the following subsections to mount the fixture
properly.
Caution: Keep flammable items at least 1 M away from fixture.
Floor Mounting
Complete the following procedure to mount a fixture on the floor:
1. Check to ensure that the rubber feet are installed on the base of the fixture
and place it on a flat surface. Refer to
Caution: Do not place the unit on a flat surface without the rubber feet installed.
Figure 1.7.
1
Introduction
Installation and
Setup
Studio Color
rubber feet (4
Figure 1.7. Floor Installation
Chapter 1 Installation and Setup 1-9
Page 36

Truss Mounting
To mount the fixture on a truss, you will need the following equipment:
• (2) Safety cables
• (2) Cheeseborough clamps (recommended) or other mounting hardware
Complete the following procedure to mount the fixture to a truss:
1. Lay the fixture on its side and attach the mounting hardware to the
center holes on the base. Refer to
Figure 1.8
center holes
Figure 1.8. Attaching Mounting Hardware
2. Install the fixture on the truss and secure the mounting hardware.
3. Loop the safety cables through an outer hole on the base of the unit,
around the handle, and out the other outer hole. Refer to
Figure 1.9.
Figure 1.9. Safety Cable Installation
Caution: Do not place safety cables through the lower plate that connects to the
1-10 Studio Color User’s Manual
fixture yoke. Doing so may cause interference with the fixture’s pan
movement.
Page 37

Data Cabling
To connect the data cables, complete the following procedure:
1. Connect the data cable from the controller to the Data In connector on the side
of the fixture. Refer to
Figure 1.10.
Figure 1.10. Data In and Data Out Connectors
2. Daisy chain additional fixtures by connecting the Data Out connector to the
Data In connectors on subsequent fixtures. Refer to Figure 1.11.
1
Introduction
Installation and
Setup
DMX controller
to additional
fixtures
N
I
A
T
D
A
T
U
O
A
T
A
D
E
R
W
P
O
S
t
u
d
i
o
C
o
l
o
r
DATA INDATA OUT
POWER
S
t
u
d
i
o
C
o
l
o
r
DATA OUT
DATA IN
DATA LINK
OUT
MIDI
IN OUT
SERIAL PORT
PERSONALITY
RS-232
A
POWER
S
t
u
d
i
o
C
o
l
o
r
B
1 2 3 4
1 2 3 4 5 6 7 8
L
R
ANALOG INPUTS
STEREO
CAUTION
1-6
7-12
AUDIO
SLAVEMASTER
FUSE
INPUT
REMOTE
1.6 amp
ENABLE
Figure 1.11. Daisy Chaining Fixtures
3. Install a terminator in the Data Out connector of the last fixture on each DMX
link.
4. Connect AC mains (power) and turn on the breaker located next to the power
cord on the side of each fixture. Refer to
Figure 1.10.
5. The fixture(s) will home and run through a built in self-test.
Note: if any error messages are present on the display, refer to Troubleshooting in
Appendix A.
voltage
select
115
Chapter 1 Installation and Setup 1-11
Page 38

DMX Starting Channel
Use the following subsections to set the fixture DMX starting channel. Starting
channels may be set by fixture number (1-32) or DMX channel number (1-512). Either
way, each fixture uses 16 DMX channels.
Setting the Starting Channel by Fixture Number
To set the starting channel by fixture number, complete the following procedure:
1. Apply power to the fixture.
Note: to skip the homing process, simultaneously hold down the <MENU> and
ENTER> buttons immediately after applying power to the fixture.
<
2. Observe the display on the front of the fixture. Initially, it will display the
software version (
3. Press and hold the <MENU> button until the display changes to the AddR
field. Press the <ENTER> button to manipulate the address field. Refer to
Figure 1.12.
V xxx) and then the fixture number (F 01).
4. Using the up and down arrow keys on the front of the unit, set the desired
5. Press the <ENTER> key to store the appropriate fixture number. The
Note: if the <ENTER> key is not pressed, the unit will not store the starting
6. Press the <MENU> button to exit the menu.
1-12 Studio Color User’s Manual
Figure 1.12. Using the Front Panel
fixture number (
F 01 to F 32). The display will flash when it is moved
from the stored value.
display will stop flashing.
channel.
Page 39

Setting the Starting Channel by DMX Channel Number
To set the starting channel by DMX channel number, complete the following
procedure:
Caution: if an incorrect starting channel is given, channels could overlap and produce
unexpected results.
1. Apply power to the fixture.
2. Observe the display on the front of the fixture. Initially, it will display the
software version (
3. Press and hold the <MENU> button until the display changes to AddR.
Refer to
4. Use the up and down keys to move to the SET field. Press <ENTER> to
enter the
5. Use the up and down keys to move to the CHNL field. Press <ENTER> to
enter the CHNL field.
6. Use the up and down keys to move to the DMX field. Press <ENTER> to
enable the fixture to accept addressing by DMX channel.
7. Press the <MENU> key to back out to the AddR (address) field.
8. Using the up and down keys on the front of the unit, set an the starting
channel from (
channels per fixture. Refer to Table 1.2 “DMX Starting Channel” on page
1-14 for assistance. The display will flash when it is moved from the stored
value.
Figure 1.12.
SET field.
Vxxx) and then the fixture number (F 01).
C 001 to C512). Studio Color fixtures require 16 DMX
1
Introduction
Installation and
Setup
9. Press the <ENTER> key to store the appropriate starting channel. The
display will stop flashing. The fixture address is stored in ROM and retains
its value until the value is changed.
Note: if <ENTER> is not pressed, the unit will not store the starting channel.
10. Press and hold the <MENU> button to exit the menu.
Chapter 1 Installation and Setup 1-13
Page 40

Patching DMX Controllers
Use the following table to patch (set the correct starting address) DMX controllers.
If your starting channels are assigned by DMX channel number, set each starting
address by adding multiples of 16.
Table 1.2: DMX Starting Channel
Fixture
Number
1 1 9 129 17 257 25 385
2 17 10 145 18 273 26 401
3 33 11 161 19 289 27 417
4 49 12 177 20 305 28 433
5 65 13 193 21 321 29 449
6 81 14 209 22 337 30 465
7 97 15 225 23 353 31 481
8 113 16 241 24 369 32 497
DMX
Starting
Channel
Fixture
Number
DMX
Starting
Channel
Fixture
Number
DMX
Starting
Channel
Fixture
Number
DMX
Starting
Channel
1-14 Studio Color User’s Manual
Page 41

DMX Control of Functions
Studio Color may be controlled by either by 8- or 16-bit DMX controllers.
Chapter 2 discusses all Studio Color functions in detail. Use the following
table to control Studio Color functions via DMX.
Table 1.3: DMX Control
DMX
Chan.
1 Pan MSB coarse positioning, 8 bit;
2 Pan LSB fine positioning 0-255 0-100 00-ffh
3 Tilt MSB coarse positioning, 8 bit;
4 Tilt LSB fine positioning 0-255 0-100 00-ffh
Function Description Decimal
0-255 0-100 00-ffh
8-bit controllers use only high
byte
0-255 0-100 00-ffh
8-bit controllers use only high
byte
Fader
percent
Hex
1
Introduction
Installation and
Setup
Chapter 1 Installation and Setup 1-15
Page 42

Table 1.3: DMX Control
DMX
Chan.
5 Color
Function Description Decimal
functions
default- color wheel continuous
F1- allows the color mixing
wheels to make two com
plete rotations
F2- locks dim, color, and effect
systems to MSpeed
F3- enables forward color spins
on the fixed color wheel or
synchronized color mix
sequences
F4- enables reverse color spins
on the fixed color wheel or
random color mix cycling
from the subtractive color
wheels
F5- color wheel color lock and
quickest path
default
F3
F4
F5
F1
F1 and F3
F1 and F4
F1 and F5
F2
F2 and F3
F2 and F4
F2 and F5
F1 and F2
F1, F2, and F3
F1, F2, and F4
F1, F2, and F5
-
0
16
32
48
64
80
96
112
128
144
160
176
192
208
224
240
Fader
percent
0
8
14
20
26
33
39
45
51
58
64
70
76
83
89
95
Hex
00
10h
20h
30h
40h
50h
60h
70h
80h
90h
a0h
b0h
c0h
d0h
e0h
f0h
1-16 Studio Color User’s Manual
Page 43

Table 1.3: DMX Control
DMX
Chan.
6 Color
Function Description Decimal
wheel
default- continuously variable
pos 0 - open
pos 1 - CTO
pos 2 - pink
pos 3 - magenta
pos 4 - red
pos 5 - aqua
F3- variable forward spins/synchronized color mix sequences
spin stop
spin forward slowest
spin forward fastest
color mix sequence slowest
color mix sequence fastest
F4- variable reverse spins /random color mix cycling
spin stop
spin reverse slowest
spin reverse fastest
color mix cycle slowest
color mix cycle fastest
0 & 255
44
86
128
170
213
0-3
4
127
128
255
0-3
4
127
128
255
Fader
percent
0 & 100
17
34
50
66
83
0-1
2
48
50
100
0-1
2
48
50
100
Hex
00 & ffh
2ch
56h
80h
aah
d5h
00-03h
04h
7fh
80h
ffh
00-03h
04h
7fh
80h
ffh
1
Introduction
Installation and
Setup
F5- color lock and quickest path
pos 0 - open
pos 1 - CTO
pos 2 - pink
pos 3 - magenta
pos 4 - red
pos 5 - aqua
7 Cyan mix red subtractive
cyan in
cyan out
8 Magenta
mix
9 Yellow
mix
green subtractive
magenta in
magenta out
blue subtractive
yellow in
yellow out
0-43
44-85
86-127
128-169
170-212
213-255
0
255
0
255
0
255
0-17
18-33
34-50
51-66
67-83
84-100
0
100
0
100
0
100
0-2bh
2ch-55h
56h-79h
80h-a9h
aah-d4h
d5h-ffh
00h
ffh
00h
ffh
00h
ffh
Chapter 1 Installation and Setup 1-17
Page 44

Table 1.3: DMX Control
DMX
Chan.
10 Lens
11 Frost
12 Shutter closed
Function Description Decimal
full rotation, continuously vari-
wheel
(effects
wheel 1)
wheel
(effects
wheel 2)
able
open
wide angle filter
narrow horizontal shaping center
axis
wide vertical shaping center axis
full rotation, continuously
variable
open
frost
narrow vertical shaping center
axis
wide horizontal shaping center
axis
strobe slowest
strobe fastest
random strobe-low saturation
random strobe-high saturation
open
0 & 255
64
128
192
Fader
percent
0 & 100
25
50
75
Hex
00 & ffh
40h
80h
c0h
0 & 255
64
128
192
0-7
8
127
128
247
248-255
0 & 100
25
50
75
0-2
3
49
50
96
97-100
00 & ffh
40h
80h
c0h
00h-07h
08h
7fh
80h
f7h
f8h-ffh
13 Dimmer iris
closed
open
14 MSpeed movement speed
controller cross fade
slowest
fastest
15 Control¹ safe
home
shutdown²
16 Check-
sum
set to default value (00) 00 0 00h
0
255
0-3
4
255
0
64
128
0
100
0-1
2
100
0
25
50
0h
ffh
00-03h
04h
ffh
0h
40h
80h
¹ Note: the shutter must be closed to access control channel. The fixture must receive
the value for 0.5 second before it instigates a Control function.
² Note: only available on the 575-S.
1-18 Studio Color User’s Manual
Page 45

Chapter 2 Operation
In this chapter you will learn how to use:
S MSpeed (2-1)
S pan and tilt (2-2)
S dim (2-3)
S strobe (2-3)
S color mixing (2-3)
S color functions (2-4)
S beam shaping (2-5)
S remote fixture shut down (2-5)
S remote homing (2-5)
Overview
This chapter explains the capabilities of Studio Color in detail and provides
helpful programming tips.
2
Introduction
Operation
MSpeed
MSpeed (motor speed) is the time required to complete motor movement from
one position to another. MSpeed provides a means for all motors to reach their
target position at the same time. The following functions can use MSpeed:
• pan
• tilt
• dim
• fixed color wheel
• cyan color wheel
• magenta color wheel
• yellow color wheel
• effects wheel 1
• effects wheel 2
Note: to attach MSpeed to dim, color systems, and the effects wheels, refer to "Color
Functions" on page 2-4.
MSpeed is not linearly scaled, it is exponentially scaled. Refer to Figure 2.1.
Chapter 2 Operation 2-1
Page 46

270
255
240
225
210
195
180
165
150
135
120
105
90
time in seconds
75
60
45
30
15
0
0 32 64 96 128 160 192 224 256
DMX value
Figure 2.1. MSpeed Values
Note: the darker region in the above figure indicates DMX values 0-3 which disable
MSpeed and allow the controller to crossfade the fixture.
For a MSpeed conversion chart, refer to "Converting DMX Values to MSpeed
Times" on page C-5.
Pan and Tilt
Studio Color has the capability of 370° pan and 240° tilt movement. When
programming pan and tilt sequences, consider MSpeed as a new position may be given
before the last position was reached (MSpeed greater than delay). Studio Color
supports both 8-bit and 16-bit DMX controllers. Channels 1 and 3 provide coarse
positioning of approximately 1° while Channels 2 and 4 provide fine positioning
between the 1° steps. Studio Color provides 16-bit internal processing of pan and tilt
movement. If you are using an 8-bit DMX controller, we recommend using MSpeed to
provide smooth and natural motion between programmed positions.
Studio Color 575-S includes optical encoders which instantly correct the pan
and tilt positions if the fixture is heavily jarred. The fixture will attempt to
correct the positions numerous times before it times out.
2-2 Studio Color User’s Manual
Page 47

Dimming
Studio Color has full dimming capability without changing the color
temperature. This is accomplished through a dimming iris. Dimming is linearly
scaled with 256 values to provide smooth and accurate motion. When dim is
set to 0, the shutter will close. To control dimming, use DMX channel 13 and a
value from 0 (closed) to 255 (full).
Strobe Effects
Studio Color produces strobe effects through the use of a mechanical shutter.
120 random strobe functions and 120 continuously variable strobe effects are
provided. Additionally, the shutter can be used as a gate for instantaneous
blackout. Strobe effects are accessed though DMX channel 12.
Color Mixing
Studio Color can achieve over 100 million colors through the use of its fixed
color wheel and subtractive color mixing system. Appendix C contains a chart of
common gel colors and the values to acquire them from the color mixing systems.
2
Introduction
Operation
Fixed Color Wheel
The fixed color wheel is controlled through DMX channel 6. The factory fixed
color wheel contains the following primary colors:
• Position 1-white (open)
• Position 2- ¾ CTO¹ (color temperature orange)
• Position 3-pink
• Position 4-magenta
• Position 5-red
• Position 6-aqua
¹Note: the stock ¾ CTO is easily replaced with optional ½ or full CTOs.
Subtractive Color Wheels
The subtractive color mixing system uses the following color wheels and DMX
channels:
• cyan- DMX channel 7
• magenta- DMX channel 8
• yellow- DMX channel 9
The subtractive color wheels uses a proprietary gradiated pattern for even color
mixing.
Chapter 2 Operation 2-3
Page 48

Color Functions
Studio Color offers five color functions. Color functions are accessed through
DMX channel 5. Multiple color functions can be combined for additional
flexibility. The following subsections discuss the individual color functions.
Double Rotation of Color Mixing Wheels
Function 1 enables the color mixing wheels to make two complete rotations. This
provides quicker color selection if the color is located on the saturated side of the
color mixing wheel. This also allows movement over the edges of the wheel for
special effects (saturated color and open for partial colors).
Enable MSpeed On Color Functions
Function 2 allows the dim, color mixing system, fixed color wheel, and effects
wheels to attach to MSpeed. When this function is enabled, the motors will reach
their programmed setting at the MSpeed time. When this function is not used, the
motors are crossfaded by the controller.
Forward Color Spins and Synchronized Color Mix Sequences
Function 3 allows the fixed color wheel to spin forward or allows synchronized
color mix sequences with the color mixing wheels. The forward color spin
provides 123 variable speeds.
The synchronized color mix sequences provide color chases with 127 variable
speeds.
Reverse Color Spins and Random Color Mix Cycling
Function 4 allows the fixed color wheel to spin in reverse or allows random color
mix cycling of the color mixing wheels. The spin control provides 123 variable
speeds.
The random color mix cycling provides color chases with 127 variable speeds.
Color Lock and Quickest Path
Function 5 allows the fixed color wheel to snap on whole colors. It also rotates the
wheel in the quickest path for the desired color. For example, if you are on open
(1) and need to reach color 6, the wheel rotates directly to 6 instead of through four
additional colors. If Function 5 is not enabled, the fixture defaults to continuous
motion of the fixed color wheel. This allows varying degrees of the color and
partial colors. In the default mode, the fixed color wheel can spin one complete
rotation.
2-4 Studio Color User’s Manual
Page 49

Beam Shaping
Studio Color utilizes lenticular, frost, and convex lenses to refract light
without decreasing light output. This allows for a wide variety of beam
shaping effects beyond the possible combinations from mechanical systems.
The system uses two independent effect wheels to accomplish this task. The
following options are available on their respective wheels:
Effects Wheel 1:Beam Shaping (DMX channel 10)
• Variable wide angle lens
• Variable narrow horizontal to wide vertical beam shaping
2
Introduction
Effects Wheel 2: Beam Shaping (DMX channel 11)
• Variable frost lens
• Variable narrow vertical to wide horizontal beam shaping
Remote Shutdown
Studio Color 575-S can be remotely shutdown through DMX. To shutdown a
fixture, complete the following procedure:
1. Set DMX Channel 12 (Shutter) to a value of 0 on the appropriate fixture(s).
This will unlock Channel 15 (Control channel).
2. Set DMX Channel 15 (Control) to a value of 128 (50%) on the appropriate
fixture(s). The value must be sent for 0.5 seconds before the fixture(s) will
shutdown. The fixture(s) will close the gate and iris, turn off all motors, and
extinguish the lamp.
Remote Homing and Lamp Restrike
To home Studio Color and restrike the lamp from a DMX console, complete
the following procedure:
Operation
1. Set DMX Channel 12 (Shutter) to a value of 0 on the appropriate fixture(s).
This will unlock Channel 15 (Control channel).
2. Set DMX Channel 15 (Control) to a value of 64 (25%) on the appropriate
fixture(s). The value must be sent for 0.5 seconds before the fixture homes.
The display will indicate
process.
RST (reset), strike the lamp, and HOME during the
Chapter 2 Operation 2-5
Page 50

2-6 Studio Color User’s Manual
Page 51

Chapter 3 Menu System
In this chapter you will:
S be provided with a menu map (3-2)
S use the address menu (3-5)
S use the information menu (3-6)
S use the test menu (3-11)
S use the mode menu (3-13)
S use the set menu (3-14)
Overview
The built-in menu system offers a number of features from setting the starting
channel to viewing DMX data.
3
Introduction
Menu System
Figure 3.1. Fixture Menu
Use the keys on the front panel to perform the following functions:
• up and down arrow keys- scroll through data fields
• <MENU>-brings up the menu system and backs out of current field
• <ENTER>- enters the current field
Chapter 3 Menu System 3-1
Page 52

Menu Map
The following information is a complete map of the menu system.
AddR-fixture address
INFO
L/HR- lamp hours†
L/ST- lamp strikes†
VER- software version
L/RS- resets lamp hours and lamp strikes†
F/HR- fixture hours
F/RS- resets fixture hours
TEMP
CURR- current internal temperature
MINT- minimum internal temperature
MAXT- maximum internal temperature
RST- reset temperature
DMX
FIXT
ERRS- DMX errors
CSUM- checksum
CNTL- control value
MSPd- MSpeed value
dIM- dim value
SHUT- shutter value
FRST- frost wheel value
LENS- lens wheel value
CYAN- cyan wheel value
YELW- yellow wheel value
MAGN- magenta wheel value
CLR- color value
CLRF- color function value
3-2 Studio Color User’s Manual
TILT- tilt value
PAN- pan value
Page 53

COdE
STRT- start code
CE- checksum errors
OV- overrun errors
FE- framing errors
dATA
C001- C512- shows DMX data on the selected channel
SENP- pan sensor
TPOS- tilt position
PPOS- pan position
dUTY- encoder duty cycle
PCOR- pan or tilt corrections†
TEST
TIME- main loop time
SVCC- sensor power
SEN2- sensor 2
SEN1- sensor 1
SENT- tilt sensor
HOME- homes the fixture
S/UP- places the fixture in setup mode
SELF
ALL- runs through all self tests
dIM- test
SHUT- test
FRST- test
LENS- test
CYAN- test
3
Introduction
Menu System
YELW- test
MAGN- test
COLR- test
TILT- test
PAN- test
Chapter 3 Menu System 3-3
Page 54

MOdE
SET
FUNC
F1- reserved
F2- reserved
F3- reserved
bOOT- stores the new boot code into the Flash ROM
LAMP
STAT- lamp status†
LOFF- turns lamp off†
L ON- turns lamp on†
M1- reserved
M2- reserved
XLd- cross-loads fixture code
FACT- sets factory defaults
CHNL
dMX- set the starting channel by DMX channel number
AddR- set the starting channel by fixture number
dSPL
ON- turns the display on
OFF- turns the display off
dIM- dims the display
P/IN- pan invert
T/IN- tilt invert
SWAP- swap pan and tilt
S/dN
5 MN- sets shutdown time for 5 minutes
10MN- sets shutdown time for 10 minutes
LAMP
575W- 575 watt setting
250W- 250 watt setting†
PCAL- pan calibration ±20 in .4° increments
TCAL- tilt calibration ±20 in .4° increments
†Note: 575-S model only.
3-4 Studio Color User’s Manual
Page 55

Address Menu
Use the following subsection to manipulate the AddR functions for setting the
starting channel.
Setting the Starting Channel
The starting channel can be set by fixture number or DMX channel address. To
change the way the starting channel is set,
DMX Channel or by Fixture Number” on page 3-14. To set the starting address by
fixture number, complete the following procedure:
1. Observe the display. Initially, it will display the software version (Vxxx)
and then the fixture number (
2. Press and hold the <MENU> button until the display changes to AddR.
3. Press the <ENTER> button to edit the AddR field.
4. Using the up and down buttons on the front of the unit, set the address. The
display will flash when it is moved from the previous value.
5. Press the <ENTER> key to accept the appropriate channel. The display will
stop flashing.
Note: if the <ENTER> key is not pressed, the fixture will not store the starting
channel.
refer to “Setting the Starting Channel by
F 01).
3
Introduction
Menu System
Chapter 3 Menu System 3-5
Page 56

Information Menu
Use the following subsections to perform the functions contained within the
INFO menu.
Viewing Lamp Hours
To view the number of lamp hours, complete the following procedure:
1. Hold the <MENU> button until the display changes to AddR.
2. Using the up and down buttons, scroll down to the INFO field and press
the <
ENTER> button. The display will indicate L/HR.
3. Press the <ENTER> button to enter the field and display the lamp hours.
Note: this feature is only available on the 575-S.
Viewing Lamp Strikes
To view the number of times the lamp has attempted to strike, complete the
following procedure:
1. Hold the <MENU> button until the display changes to AddR.
2. Using the up and down buttons, scroll down to the INFO field and press
the <ENTER> button.
3. Using the up and down buttons, scroll down to the L/ST field and press
<
ENTER>. The fixture will display the number of times the lamp has
attempted to strike.
Notes: lamp strikes are automatically reset when the lamp hours are reset. Refer to
“Resetting Lamp Hours” on page 3-7. This feature is only available on the
575-S.
Viewing System Version Number
To view the system version number (software revision level), complete the
following procedure:
1. Hold the <MENU> button until the display changes to AddR.
2. Using the up and down buttons, scroll down to the INFO field and press
the <
ENTER> button.
3. Using the up and down buttons, scroll down to the VER field and press
<
ENTER>. The fixture will display the current system version.
3-6 Studio Color User’s Manual
Page 57

Resetting Lamp Hours
To reset lamp hours and lamp strikes, complete the following procedure:
1. Hold the <MENU> button until the display changes to AddR.
2. Using the up and down buttons, scroll down to the INFO field and press
the <
ENTER> button.
3. Using the up and down buttons, scroll down to the L/RSfield and hold
down <
Note: this feature is only available on the 575-S.
Viewing Total Fixture Hours
Fixture hours are provided as an extra timing function. To view total fixture hours
(total hours the fixture has spent on), complete the following procedure:
1. Hold the <MENU> button until the display changes to AddR.
2. Using the up and down buttons, scroll down to the INFO field and press
the <
3. Using the up and down buttons, scroll down to the F/HRfield and press
<ENTER>. The fixture will display the lamp hours.
ENTER> until the fixture resets the lamp hours to 0000.
ENTER> button.
3
Introduction
Menu System
Note: fixture hours can be used to determine lamp hours for the 575-M.
Resetting Fixture Hours
To reset the fixture hours, complete the following procedure:
1. Hold the <MENU> button until the display changes to AddR.
2. Using the up and down buttons, scroll down to the INFO field and press
the <ENTER> button.
3. Using the up and down buttons, scroll down to the F/RSfield and hold
down <
Viewing the Current Internal Temperature
To view the fixture’s internal temperature, complete the following procedure:
1. Hold the <MENU> button until the display changes to AddR.
2. Using the up and down buttons, scroll down to the INFO field and press
the <ENTER> button.
3. Using the up and down buttons, scroll down to the TEMP field and press
the <
4. Using the up and down buttons, scroll down to the CURR field and press
the <ENTER> button.
ENTER> until the fixture resets the fixture hours to 0000.
ENTER> button.
5. The fixture will display the internal temperature followed by C (degrees
centigrade).
Chapter 3 Menu System 3-7
Page 58

Viewing the Minimum Internal Temperature
To view the fixture’s minimum internal temperature (lowest ambient at power on),
complete the following procedure:
1. Hold the <MENU> button until the display changes to AddR.
2. Using the up and down buttons, scroll down to the INFO field and press
ENTER> button.
the <
3. Using the up and down buttons, scroll down to the TEMP field and press
the <
ENTER> button.
4. Using the up and down buttons, scroll down to the MINT field and press
the <
ENTER> button.
5. The fixture will display the minimum internal temperature followed by C
(degrees centigrade).
Viewing the Maximum Internal Temperature
To view the fixture’s maximum internal temperature (since the last reset),
complete the following procedure:
1. Hold the <MENU> button until the display changes to AddR.
2. Using the up and down buttons, scroll down to the INFO field and press
the <
ENTER> button.
3. Using the up and down buttons, scroll down to the TEMP field and press
the <ENTER> button.
4. Using the up and down buttons, scroll down to the MAXT field and press
the <
ENTER> button.
5. The fixture will display the maximum internal temperature followed by C
(degrees centigrade).
Resetting Temperature Readings
To reset the minimum and maximum temperature readings, complete the
following procedure:
1. Hold the <MENU> button until the display changes to AddR.
2. Using the up and down buttons, scroll down to the INFO field and press
the <
ENTER> button.
3. Using the up and down buttons, scroll down to the TEMP field and press
the <
ENTER> button.
4. Using the up and down buttons, scroll down to the RST field and press the
<
ENTER> button.
3-8 Studio Color User’s Manual
Page 59

Viewing DMX Errors and Function Values
DMX errors and individual function values can be viewed. This feature is provided
for advanced users and troubleshooting fixtures. The following values and errors
can be viewed:
• ERRS- DMX errors
• CSUM- checksum
• CNTL- control channel
• MSPd- MSpeed
• dIM- dim
• SHUT- shutter
• FRST- effects wheel 1 position
• LENS- effects wheel 2 position
• CYAN- cyan wheel position
• YELW- yellow wheel position
• MAGN- magenta wheel position
• CLR- fixed color wheel position
• CLRF- color function
• TILT- tilt position
• PAN- pan position
• STRT- start code
• CE- checksum errors
• OV- overrun errors
• FE- framing errors
To view any item listed above, complete the following procedure:
3
Introduction
Menu System
1. Hold the <MENU> button until the display changes to AddR.
2. Using the up and down buttons, scroll down to the INFO field and press
the <ENTER> button.
3. Using the up and down buttons, scroll down to the VIEW field and press
the <
ENTER> button.
4. Using the up and down buttons, scroll down to the dMX field and press the
<ENTER> button.
5. Using the up and down buttons, scroll down to the FIXT field and press
the <
ENTER> button.
6. Using the up and down buttons, scroll to desired field listed above and
press the <
ENTER> button to view the DMX value.
Chapter 3 Menu System 3-9
Page 60

Viewing DMX Data by Channel Number
Studio Color provides a built-in DMX viewer. To view DMX data by channel,
complete the following procedure:
1. Hold the <MENU> button until the display changes to AddR.
2. Using the up and down buttons, scroll down to the INFO field and press
the <
ENTER> button.
3. Using the up and down buttons, scroll down to the VIEW field and press
the <
ENTER> button.
4. Using the up and down buttons, scroll down to the dMX field and press the
ENTER> button.
<
5. Using the up and down buttons, scroll down to the dATA field and press
the <
ENTER> button.
6. Using the up and down buttons, scroll to desired channel (C001-C512)
and press the <
ENTER> button to view the DMX value.
Viewing Supplemental Fixture Data
Supplemental fixture data is provided for advanced users and troubleshooting. The
following items can be viewed:
• SENP- checks for pan homing tab on the sensor (homed)
• TPOS- checks the tilt position from the encoder
• PPOS- checks the pan position from the encoder
• dUTY- encoder duty cycle and phase angle
• SENT- checks for tilt homing tab on the sensor (homed)
• PCOR- number of pan and tilt corrections
• TIME- additional internal timer for the main loop
• SVCC- checks sensor power on all sensors
• SEN2- checks for effects wheel 2 homing tab on the sensor (homed)
• SEN1- checks for effects wheel 1 homing tab on the sensor (homed)
• SENT- checks for tilt homing tab on the sensor (homed)
To view supplemental fixture data, complete the following procedure:
1. Hold the <MENU> button until the display changes to AddR.
2. Using the up and down buttons, scroll down to the INFO field and press
the <ENTER> button.
3. Using the up and down buttons, scroll down to the VIEW field and press
the <
ENTER> button.
4. Using the up and down buttons, scroll down to the COdE field and press
the <ENTER> button.
5. Using the up and down buttons, scroll to desired field listed above and
3-10 Studio Color User’s Manual
press the <
ENTER> button to view the DMX function.
Page 61

Test Menu
Use the following subsections to perform the functions contained within the
TEST menu.
Manually Homing the Fixture
To manually home the fixture, complete the following procedure:
1. Hold the <MENU> button until the display changes to AddR.
2. Using the up and down buttons, scroll down to the TEST field and press
the <
ENTER> button. The screen will display HOME.
3. Press the <ENTER> button to home the fixture. The display will indicate
RST (reset) and HOME during the process. The fixture will
automatically reset the display when the process is complete.
Moving the Fixture to Setup Position
Caution: The setup position is used only by service personnel before maintenance
routines.
To place the fixture in setup position before service, complete the following
procedure:
1. Hold the <MENU> button until the display changes to AddR.
2. Using the up and down buttons, scroll down to the TEST field and press
the <
ENTER> button.
3. Using the up and down buttons, scroll down to the S/UP field and press
the <ENTER> button. The display will indicate SET NOW while the
motors are electronically locked into place.
4. Perform the appropriate maintenance procedures.
5. Press the <MENU> button to reset and home the fixture.
3
Introduction
Menu System
Chapter 3 Menu System 3-11
Page 62

Self Tests
Studio Color has the following self tests to check the following functions:
• ALL- runs through each self test twice
• dIM- dimming iris moves from closed to full open
• SHUT- moves through all strobe functions
• FRST- rotates the effects wheel 2 from 0 to 255 and back to 0 (dim at full)
• LENS-rotates effects wheel 1 through 4 positions (dim at full)
• CYAN- rotates the cyan color wheel from 0 to 255 and back to 0 (dim at full)
• YELW- rotates the yellow color wheel from 0 to 255 and back to 0 (dim at
full)
• MAGN- rotates the magenta color wheel from 0 to 255 and back to 0 (dim at
full)
• COLR- rotates from position 1 to 6 (dim at full)
• TILT- moves the tilt motor from 0º to 370º
• PAN- moves the pan from 0º to 240º
To begin the self-test function, complete the following procedure:
1. Hold the <MENU> button until the display changes to AddR.
2. Using the up and down buttons, scroll down to the TEST field and
press the <
ENTER> button.
3. Using the up and down buttons, scroll down to the desired test from the
choices above and press <ENTER>. The fixture will perform the
desired test.
4. To exit the test in progress, press the <MENU> button.
Changing Functions
The function modes are reserved for future use.
Changing Boot Codes
When Studio Color is uploaded, occasionally it is necessary to include a new boot
code with the new software. This is apparent when bOOT dIff appears in the
display. To accept and store the new boot code, complete the following procedure:
1. Hold the <MENU> button until the display changes to AddR.
2. Using the up and down buttons, scroll down to the TEST field and press
the <
ENTER> button.
3. Using the up and down buttons, scroll down to the bOOT field and press
the <ENTER> button. The fixture will display DONE, RST, and home.
Caution: Do not remove power from the fixture during the above procedure.
3-12 Studio Color User’s Manual
Page 63

Mode Menu
Use the following subsections to perform the functions contained within the
MOdE menu.
Selecting Operational Mode 1
Reserved for future use.
Selecting Operational Mode 2
Reserved for future use.
Cross-Loading Fixtures
Studio Color can cross-load software from one fixture to all other fixtures on the
same link (32 fixtures per link). To cross-load software, complete the following
procedure:
1. Disconnect the data cable between controller and the first fixture.
2. Hold the <MENU> button on the master fixture until the display changes to
AddR.
3. Using the up and down buttons, scroll down to the MOdE field and press
the <
ENTER> button.
4. Using the up and down buttons, scroll down to the XLd field and press
the <ENTER> button. The master fixture will upload its software to all
connected fixtures on the link. The slave fixtures will display
during the process.
Notes: if the fixture(s) take longer than one minute to reset after an upload, turn off
the fixture(s) and repeat the procedure. Cross-loading can also be
instigated by holding down both arrow keys on the master fixture when it is
turned on.
UPLd
3
Introduction
Menu System
Chapter 3 Menu System 3-13
Page 64

Set Menu
Use the following subsections to perform the functions contained within the
SET menu.
Turning On and Off Factory Presets
To revert fixture settings back to factory presets, complete the following
procedure:
1. Hold the <MENU> button until the display changes to AddR.
2. Using the up and down buttons, scroll down to the SET field and press the
<
ENTER> button. The display will indicate FACT.
3. Press the <ENTER> button again to enter the field.
4. Using the up and down buttons, turn the factory presets to ON or OFF
and press the <ENTER> button.
Setting the Starting Channel by DMX Channel or by Fixture Number
To change the addressing to DMX channel or to fixture number, complete the
following procedure:
Note: the factory preset is by fixture number.
1. Hold the <MENU> button until the display changes to AddR.
2. Using the up and down buttons, scroll down to the SET field and press the
<ENTER> button.
3. Using the up and down buttons, scroll down to the CHNL field and press
the <
ENTER> button.
4. Using the up and down buttons, select either AddR (fixture number) or
dMx (DMX channel) and press the <ENTER> button.
5. Press the <MENU> button twice to return the display to normal operation.
Setting Display Output
To set the display’s output, complete the following procedure:
1. Hold the <MENU> button until the display changes to AddR.
2. Using the up and down buttons, scroll down to the SET field and press the
<
ENTER> button.
3. Using the up and down buttons, scroll down to the dSPL field and press
the <ENTER> button.
4. Using the up and down buttons, select either ON, OFF, or dIM and
3-14 Studio Color User’s Manual
press the <ENTER> button.
Page 65

Inverting Pan
When fixtures are mounted backwards (display away in back), Studio Color can
invert the pan motion. To internally invert pan, complete the following procedure:
1. Hold the <MENU> button until the display changes to AddR.
2. Using the up and down buttons, scroll down to the SET field and press the
ENTER> button.
<
3. Using the up and down buttons, scroll down to the P/IN field and press
the <
ENTER> button.
4. Using the up and down buttons, select either ON or OFF and press the
<
ENTER> button.
Inverting Tilt
When fixtures are mounted on the floor (upside down) Studio Color can invert tilt
movement. To invert tilt, complete the following procedure:
1. Hold the <MENU> button until the display changes to AddR.
2. Using the up and down buttons, scroll down to the SET field and press the
<
ENTER> button.
3. Using the up and down buttons, scroll down to the T/IN field and press
the <
ENTER> button.
4. Using the up and down buttons, select either ON or OFF and press the
<ENTER> button.
Swapping Pan and Tilt
When fixtures are mounted sideways, Studio Color can swap the pan and tilt
functions. To swap the pan and tilt functions, complete the following procedure:
1. Hold the <MENU> button until the display changes to AddR.
2. Using the up and down buttons, scroll down to the SET field and press the
<
ENTER> button.
3. Using the up and down buttons, scroll down to the SWAP field and press
the <ENTER> button.
4. Using the up and down buttons, select either ON or OFF and press the
<
ENTER> button.
3
Introduction
Menu System
Chapter 3 Menu System 3-15
Page 66

Setting Fixture Shutdown Time
Studio Color can automatically shut itself down when controller is turned off or
the link is unplugged (no DMX data is present). To set the shutdown time,
complete the following procedure:
1. Hold the <MENU> button until the display changes to AddR.
2. Using the up and down buttons, scroll down to the SET field and press the
<
ENTER> button.
3. Using the up and down buttons, scroll down to the S/dN field and press
the <
ENTER> button.
4. Using the up and down buttons, set the shutdown time in minutes at 5
5MN) or 10 minutes (10MN) and press the <ENTER> button.
(
Setting the Lamp Power
For special applications, the lamp in the Studio Color 575-S can be set to 250
watts. This feature decreases light output, decreases heat, and saves power.
Notes: do not mix fixtures that have different lamp power settings. The light output
is different.
Warning: Never install a 250 watt lamp into a Studio Color fixture. The lamp may
explode and will malfunction.
To set the lamp power, complete the following procedure:
1. Hold the <MENU> button until the display changes to AddR.
2. Using the up and down buttons, scroll down to the SET field and press the
<
ENTER> button.
3. Using the up and down buttons, scroll down to the LAMP field and press
the <
ENTER> button.
4. Using the up and down buttons, set the lamp power to either 575W or
250W and press the <ENTER> button. After a time delay, the fixture will
adjust the lamp to appropriate new power level.
Notes: if you are using the 250 watt setting, the lamp will initially power up to 575
watts (warm up) for the first ten minutes of operation and then change to
250 watts. If you revert to the factory default settings, the lamp power
setting will remain unaffected.
3-16 Studio Color User’s Manual
Page 67

Calibrating Pan
Pan position is easily calibrated for precise preset positions. Pan can be adjusted in
.4° increments up to 8°. To calibrate pan, complete the following procedure:
1. Hold the <MENU> button until the display changes to AddR.
2. Using the up and down buttons, scroll down to the SET field and press the
ENTER> button.
<
3. Using the up and down buttons, scroll down to the PCAL field and press
the <
ENTER> button.
4. Using the up and down buttons, set the pan calibration from (-020to
+020) and press the <ENTER> button.
5. Check the calibration by homing the fixture. Repeat the procedure as
necessary.
Calibrating Tilt
Tilt position is easily calibrated for precise preset positions. Tilt can be adjusted in
.4° increments up to 8°. To calibrate tilt, complete the following procedure:
3
Introduction
1. Hold the <MENU> button until the display changes to AddR.
2. Using the up and down buttons, scroll down to the SET field and press the
<
ENTER> button.
3. Using the up and down buttons, scroll down to the TCAL field and press
the <ENTER> button.
4. Using the up and down buttons, set the tilt calibration from (-020to
+020) and press the <ENTER> button.
5. Check the calibration by homing the fixture. Repeat the procedure as
necessary.
Menu System
Chapter 3 Menu System 3-17
Page 68

3-18 Studio Color User’s Manual
Page 69

Appendix A Troubleshooting and Maintenance
In this appendix you will:
S fill out a technical support checklist (A-1)
S contact High End Systems (A-2)
S troubleshoot problems (A-2)
S perform maintenance (A-11)
S upload software (A-13)
Overview
This appendix provides directions for troubleshooting problems that may be
preventing you from installing or operating your Studio Color properly. Before
calling for technical assistance, follow the recommended procedures in this appendix
to diagnose and solve many potential hardware and software problems.
If the procedures in this appendix do not solve your problem and you need to call for
assistance, please provide the support technician with the information outlined in the
"Support Checklist" provided in this appendix.
Before You Begin
Caution: Before you perform any troubleshooting procedures read the following personal
and equipment safety precautions.
1. Wear hand and eye protection.
2. Wait at least five minutes before handling fixture after operation.
Support Checklist
Technical support can provide you with faster service if you can provide the
following information when you call:
S Customer name
S Country, if other than U.S.A.
S Phone number and facsimile number
S Fixture serial number
S Error messages on your Studio Color display
S Description of your problem and the troubleshooting procedures that you have performed
so far to diagnose and resolve your problem
S Software version
A
Introduction
Troubleshooting
and Maintenance
Appendix A Troubleshooting and Maintenance A-1
Page 70

Acquiring Help
If can not resolve a problem with this appendix, contact your authorized High End Systems
dealer or contact High End Systems Technical Service through the following numbers:
U.S. and Canada From 8 a.m. to 6 p.m. (U.S. Central time) Monday through
Friday: (800) 890-8989
FAX: (512) 834-9195
Voice mail: (512) 837-3063 or (800) 890-8989
California Office From 8 a.m. to 6 p.m. (U.S. Pacific time) Monday through Friday:
(818) 947-0550
FAX: (818) 908-8975
24-hour World Wide Web Site http://www.highend.com
Service Web Site http://info.highend.com/service/service.html
FTP Site ftp.highend.com
Europe Voice: +49 8122 9903-0
FAX: +49 8122 9903-33
Singapore Voice: +65 742 8266
FAX: +65 743 9322
Troubleshooting
This section provides information on diagnosing and solving operational problems. If
a solution to your problem cannot be found in the following subsections, contact your
authorized dealer or High End Systems Technical Support. Please note that nearly every
possible problem is documented to speed troubleshooting, but most are extremely unlikely to
ever occur.
The following troubleshooting topics are covered in their subsections:
• "Display Error Messages" on page A-3
• "General Troubleshooting" on page A-7
• "Upload Troubleshooting" on page A-9
• "Onboard Self-Tests" on page A-10
• "Testing DMX Data" on page A-10
A-2 Studio Color User’s Manual
Page 71

Display Error Messages
Studio Color contains an elaborate and comprehensive set of tests and messaging. Use the
following table to identify and report errors to a qualified service technician.
Table A.1:Display Error Messages
Display
Message
AddR
LOST
AddR
OVER
bOOT
dIFF
ERR
COOL
EMEM
ERR
Problem Explanation Solution
EEPROM address
was unreadable
• fixture was unable to
recover fixture
• refer to qualified
address
stored address
value stored is out
of range
boot code differences
• new logic board without a stored address
• EEPROM was erased
• current boot code
does not match new
• set the starting
• refer to “Changing
boot code
the lamp is too hot
to strike
EEPROM error • data is not readable
• lamp must cool
before it can restrike
from
PINV,
TINV, dSPL,
CHNL, SWAP,
LSTA, LPLV,
MODE, S/dN,
LHRS, FHRS,
L/ST, or LSTA
• the fixture will
• refer to qualified
service personnel
channel
Boot Codes” on
page 3-12
restrike the lamp as
soon as it cools
service personnel
A
Introduction
Troubleshooting
and Maintenance
ERSE
FLSH
FMEM
ERR
FPGA
ERR
ID ERR
cannot erase the
flash ROM
• bad comm board
• bad data bus
flash ROM error • read/write error from
flash ROM
FPGA error • read/write error from
the Field Programmable Gate Array
ID or unique number error
• error reading ID
• error reading unique
fixture ID
Appendix A Troubleshooting and Maintenance A-3
• refer to qualified
service personnel
• refer to qualified
service personnel
• refer to qualified
service personnel
• refer to qualified
service personnel
Page 72

Table A.1:Display Error Messages
Display
Message
LAMP
OUT ERR
LAMP
TOUT
ERR
LINK
BUSY
Problem Explanation Solution
lamp has extinguished during
operation
lamp time-out error • lamp too hot to
• dead lamp
• power supply failure
restrike
• replace lamp, refer
• refer to qualified
• allow time for the
• dead lamp
• replace lamp, refer
other data present
on the link during a
• ignitor error
• controller is still connected to the link
• refer to qualified
• disconnect control-
cross load
to
"Replacing the
Lamp" on page A11
service personnel
lamp to cool, and
home the fixture to
restrike the lamp
to
"Replacing the
Lamp" on page A11
service personnel
ler
LINK
ERR
OVER
OVER
TEMP
link error • bad cable(s)
• no data
• bad data
• output from previous
fixture is bad
• bad comm board
value counter is out
of range
• lamp strikes, lamp
hours, or fixture hours
have rolled over 9999
fixture is over temperature
• temperature is too
high
• test and replace
cable(s) as necessary
• test data line
• test data line
• test by bypassing
previous fixture
• refer to qualified
service personnel
• reset the out of
range item
• fixture is too close
to a major heat
source
• check and reduce
ambient tempera
-
ture
A-4 Studio Color User’s Manual
Page 73

Table A.1:Display Error Messages
Display
Message
PAN DRV
ERR
PAN
CONN
PAN
ENCD
PAN ERR
Problem Explanation Solution
pan driver error • motor wire shorted to
ground
• driver chip bad
• bad motor
pan connector is
disconnected
pan encoder failure • external obstruction
pan homing error • loose pinion gear
• pan connector is disconnected at the logic
board or at the sensor
• bad connector
• loose motor cable
• incorrect cabling to
pan input
• bad sensor
• refer to qualified
• refer to qualified
• remove obstruction
• refer to qualified
• run self-test and
service personnel
service personnel
service personnel
refer to qualified
service personnel
PRGM
TIME
SVCC
ERR
SENS
TOUT
• bad motor
program time has
expired during an
upload
sensor power error • bad board
sensor time-out • fixture attempted to
• bad board • refer to qualified
• loose cable
correct pan/tilt posi
tion without success
due to a physical
obstruction
• bad sensor 1 or 2
service personnel
• refer to qualified
service personnel
• remove the
-
obstruction and
reset the fixture
• refer to qualified
service personnel
A
Introduction
Troubleshooting
and Maintenance
Appendix A Troubleshooting and Maintenance A-5
Page 74

Table A.1:Display Error Messages
Display
Message
SEN1
ERR
SEN2
ERR
Problem Explanation Solution
cyan color mixing,
fixed color wheel,
or effects wheel 1
• problem with cyan
wheel tab, sensor, or
motor
• run self-test on
• refer to qualified
• problem with fixed
color wheel tab, sen
-
sor, or motor
• problem with effects
wheel 1 tab, sensor,
or motor
• bad sensor 1
magenta, yellow, or
effects wheel 2
• problem with
magenta wheel tab,
sensor, or motor
• run self-test on
• refer to qualified
• problem with yellow
wheel tab, sensor, or
motor
sensor 1
service personnel
sensor 2
service personnel
TILT
CONN
TILT DRV
ERR
TILT
ENCD
TILT
ERR
• problem with effects
wheel 2 tab, sensor,
or motor
• bad sensor 2
tilt connector is disconnected
• tilt connector is disconnected at the logic
board or at the sensor
tilt driver error • motor wire shorted to
ground
• bad driver chip
• bad motor
tilt encoder failure • external obstruction
• bad connector
tilt homing error • loose pinion gear
• loose motor cable
• incorrect cabling to
tilt input
• refer to qualified
service personnel
• refer to qualified
service personnel
• remove obstruction
• refer to qualified
service personnel
• run self-test and
refer to qualified
service personnel
A-6 Studio Color User’s Manual
• bad sensor
• bad motor
Page 75

General Troubleshooting
Use the following table to troubleshoot problems that may not be indicated by the menu
system.
Table A.2. General Troubleshooting
Problem Probable Cause Solution
Unit will not turn on • no power
• breaker is turned off
• power connectors
• power line filter
Unit functions but
lamp does not strike
Lamp is dimmer than
other units
• bad lamp
• incorrect voltage on
the 575-M version
• lamp is too hot from
operation (unit turned
off and on)
• bad ballast
• ignitor connection is
loose
• lamp is set for 250
watts
• wrong voltage on
575-M version
• connect power
• turn breaker on
• refer to qualified technician
• refer to qualified technician
• replace lamp
• provide correct power source
or refer to qualified service
technician to move power tap
• leave the unit turned on, when
the lamp’s temperature drops,
it will restrike
• refer to qualified technician
• refer to qualified technician
• set the lamp to 575 watts as
outlined in “Setting the Lamp
Power” on page 3-16
• provide correct power source
or refer to qualified service
technician to move power tap
A
Introduction
Troubleshooting
and Maintenance
Unit will not home
properly
Color system is not
producing the correct
color
Pan or tilt position is
off
• bad lamp
• different type of lamp
• belt(s) is loose
• bad sensor(s)
• unit is not homed
properly
• unit is not homed
properly
• belt tension too loose
• replace lamp
• replace lamp with identical
type
• tighten belt(s)
• refer to qualified technician
• home the unit
• home the unit
• tighten belt(s)
Appendix A Troubleshooting and Maintenance A-7
Page 76

Table A.2. General Troubleshooting
Problem Probable Cause Solution
Unit is not responding to controller
Unit is producing
unexpected results
Display is not
functioning
Cracks have developed in the color
mixing wheels“stress relieving fis
sures”
• wrong fixture DMX
address
• bad data cable(s)
• link not terminated
• incorrect DMX starting address on the
controller
• last fixture is not terminated
• display is turned off
• power connectors are
loose
• bad logic board
• heat and natural
expansion of the glass
-
• set the address as outlined in
“Address Menu” on page 3-5
• check and replace data cables
as needed
• terminate link as outlined in
"Data Cabling" on page 1-11
• Refer to "DMX Starting Channel" on page 1-12
• terminate fixture
• Refer to “Setting Display Output” on page 3-14
• refer to qualified technician
• refer to qualified technician
• stress relieving fissures are
normal and do not in any way
degrade the functionality or the
performance of the fixture
A-8 Studio Color User’s Manual
Page 77

Upload Troubleshooting
This subsection provides information for troubleshooting upload problems.
Table A.3: Upload Troubleshooting
Problem Probable Cause Solution
Not all fixtures on
link are receiving
download
Status Cue displays:
Fixture could not
erase flashrom
Status Cue displays:
WARNING: No
response from Fix
ture xx (Link xx
Address xx)
Fixture displays
bOOT dIFF
• unit(s) turned off
• bad cable(s)
• cable(s) disconnected
• the XLR cable(s) was
disconnected
• bad cable(s)
• the fixture's electrical
circuitry is damaged
• Status Cue was configured with a Studio
-
Color at that address
but no fixtures were
found there
• fixture(s) using RS422 is physically connected before Studio
Color fixtures
• new software also
included boot code
(normal)
• turn on unit(s)
• test and replace cable(s) as
necessary
• reconnect cable(s)
• reconnect XLR cable(s)
• replace cable(s)
• refer to qualified service
personnel
• if there is not a fixture at that
address, nothing is wrong
• check connections
• check to ensure fixture is
turned on
• remove the fixture(s) from the
data link or move them after
Studio Color fixtures
• refer to “Changing Boot
Codes” on page 3-12
A
Introduction
Troubleshooting
and Maintenance
Fixtures are not
cross-loading
• a controller is
connected to the link
• fixture(s) using RS422 is physically
connected before Studio Color fixtures
• disconnect the controller and
attempt the upload again
• remove the fixture(s) from the
data link or move them after
Studio Color fixtures
Appendix A Troubleshooting and Maintenance A-9
Page 78

Onboard Self-Tests
Studio Color has on-board self-tests to diagnose problems. If you are experiencing
problems that you suspect are mechanical, perform the tests outlined in
“Self Tests” on
page 3-12.
Testing DMX Data
Studio Color has the ability to view any of the 512 DMX channels on its link. This is a
very useful feature to ensure Studio Color and other fixtures are receiving the correct data
from your DMX controller. To test individual DMX data by channel, perform the
procedures outlined in
“Viewing DMX Data by Channel Number” on page 3-10. To view
DMX errors, overrun errors, framing errors, and start code errors refer to the procedures
outlined in
“Viewing DMX Errors and Function Values” on page 3-9.
A-10 Studio Color User’s Manual
Page 79

Maintenance
This section provides information for basic maintenance. Studio Color does not
require regular maintenance besides lamp changes and cleaning. If other maintenance
is required, refer servicing to a qualified technician.
Replacing the Lamp
To replace the lamp, follow the procedures outlined in "Lamp Installation" on page 1-7.
Cleaning
You should clean your Studio Color on a regular basis. Dust, dirt, and smoke (cigarette
and oil-based fog fluid) can accumulate and cause malfunctions.
Warnings: Do not submerse in liquid. There are no user serviceable parts inside.
Servicing should only be conducted by a qualified technician. If any liquid
(soda, beer, etc.) has been spilled on or into the Studio Color, contact High
End Systems technical support before attempting to service the fixture.
Disconnect the fixture from power before cleaning. Exterior surfaces can
reach 140° C. Wait five minutes before touching any surface.
Exterior
To clean the exterior surfaces:
• Wipe with a soft damp cloth or tissue, or use a small vacuum to remove any builtup dust and dirt. Do not use a blower, as this will force dirt into the fixture.
• For stubborn substances (grime and serious build up), use Industrial Strength
Green 409™ cleaner (sparingly) and a soft cloth.
A
Introduction
Troubleshooting
and Maintenance
Appendix A Troubleshooting and Maintenance A-11
Page 80

Lens Interior
To clean the interior of the lens, perform the following procedure:
1. Disconnect power from the unit. If the unit has been in operation, allow it to
cool for at least five minutes.
2. Unlatch the latches on the top and bottom of the bezel. Refer to Figure A.1.
latch latch
Studio Color
3. Detach the safety cable from the bezel and pull the bezel off unit.
4. Wipe with a soft damp cloth or tissue, or use a small vacuum to remove the
built-up dust and dirt.
5. Replace the bezel and safety cable.
6. Relatch the bezel.
A-12 Studio Color User’s Manual
Figure A.1. Removing the Bezel
Page 81

Software Updates
Studio Color software is easily upgradeable through the following means:
• Status Cue
• Upload Dongle
• another Studio Color
To acquire the latest software version, refer to "Acquiring Help" on page A-2.
Status Cue
To update Studio Color software through Status Cue, complete the following
procedure:
1. Copy the latest Studio.s19 file to the Status Cue directory (if necessary).
2. Select Device upload... from the File drop-down menu. This brings up the
Device Code Upload dialogue box. Refer to Figure A.2.
Figure A.2. Device Code Upload Dialogue Box
3. Select Studio Color check box from the list of available devices.
4. Select the appropriate check box for the fixture(s) to upload.
5. Click the OK button to start uploading. This brings up the Device Upload
Status
display will quickly flicker and display UPLd to indicate it is uploading. The
Device Upload Status dialogue box indicates the number of fixtures that are
being uploaded and the progress of the upload.
information box. Refer to Figure A.3. During the upload, the fixture’s
A
Introduction
Troubleshooting
and Maintenance
Appendix A Troubleshooting and Maintenance A-13
Page 82

Figure A.3. Device Upload Status Inf ormation Window
6. When the update has successfully completed, the Process field will indicate
Finished! Click the OK button to complete the procedure.
Note: Status Cue provides upload communication with Studio Color fixtures. If any error
messages are received, refer to
"Upload Troubleshooting" on page A-9.
A-14 Studio Color User’s Manual
Page 83

Upload Dongle
To use the upload dongle, you will need the following items:
• High End Systems parallel-to-DMX dongle (p/n 99190009)
• 386-based or faster PC
• MS DOS® v3.3 or later
• 1 MB free disk space
• dongle software
• latest Studio Color binary file (studioxx.bin)
Connect the dongle to the computer and install its software as outlined in the
instructions provided with the dongle. To upload software from the dongle, complete
the following procedure:
1. In DOS, enter the Studio Color upload directory by typing cd scupload at
the
c:\ prompt.
2. Copy the latest studioxx.bin file into the upload directory.
3. Type upload to start the program.
4. The program will cause the fixtures to strobe for 30 seconds and then it starts
the upload. Optionally, you may press <R> to instantly run the upload or <Q>
to quit the program.
5. The display will indicate the fixtures and the status of the upload.
Notes: the dongle software provides bi-directional upload communication with Studio
Color fixtures. If any error messages are received, refer to
Troubleshooting" on page A-9.
Another Studio Color
This procedure is covered in “Cross-Loading Fixtures” on page 3-13.
"Upload
A
Introduction
Troubleshooting
and Maintenance
Appendix A Troubleshooting and Maintenance A-15
Page 84

A-16 Studio Color User’s Manual
Page 85

Appendix B Accessory Installation
In this chapter you will:
S install accessory dichroic glass (B-2)
S install an accessory lens (B-7)
S install a light snoot (B-8)
Overview
This appendix provides information on accessory installation. A list of
approved accessories is provided in the “Introduction” on page I-12.
Caution: Do not install accessories that are not specified by High End Systems. Doing
so may damage the fixture and void the warranty.
Warning: Before performing any procedure in this Appendix, adhere to the following
safety precautions:
• disconnect the unit from power
• allow the unit to cool for a minimum of 10 minutes
B
Introduction
Installation
Accessory
Appendix B Accessory Installation B-1
Page 86

Dichroic Glass Installation
You will need the following items to install dichroic glass into your Studio Color:
• phillips-head screw driver
• accessory dichroic glass
Note: Studio Color uses the same dichroic glass catalogue as Cyberlight® and
Cyberlight CX.
To install dichroic glass, complete the following procedure:
1. Remove power from the fixture and place it on a flat surface.
2. Remove the bezel by releasing the two latches located in the middle of the
fixture head. Refer to
Figure B.1.
latch latch
Studio Color
Figure B.1. Removing the Bezel
3. Remove the safety cable from its latch and set the bezel aside.
4. Disconnect the stepper motor drive cable from its connector. Refer to Figure
B.2.
B-2 Studio Color User’s Manual
Page 87

heat plate
stepper motor
drive cable
screw 1 of 4
Figure B.2. Stepper Drive Cable Removal
5. Using a phillips-head screw driver, remove the four screws holding the optical
assembly to the heat plate and remove the assembly.
6. Turn the optical assembly over so that the stepper motors are resting on the
table.
7. Remove the six screws holding the strobe plate to its standoffs. Refer to Figure
B.3.
B
Introduction
Installation
Accessory
Appendix B Accessory Installation B-3
Page 88

remove these
screws (4)
o
r
t
s
y
l
b
m
e
s
s
a
e
b
remove these
screws (4)
Figure B.3. Removing the Strobe Plate
8. Remove the two screws securing the L-brackets to the sides of the optical
assembly. Refer to
Figure B.3.
9. Lift the strobe assembly straight up and away from the remaining optical
assembly. Refer to
Figure B.4.
color wheel
B-4 Studio Color User’s Manual
Figure B.4. Locating the Color Wheel
Page 89

10. Take special note of the index positions on the color wheel. Refer to Figure
B.5.
2
¾ CTO
4
Magenta
index tab
Pink
3
5
Red
6
Aqua
1
Open
Figure B.5. Color Wheel and Factory Index Positions
11. Gently push the glass towards the spindle in the center of the color wheel (A),
lift the edge away from the spindle (B), and remove the glass. Refer to
Figure
B.6.
A. B.
5
Red
5
Red
Figure B.6. Removing the Dichroic Glass
Caution: Do not bend or lift the inner tabs up, as you could damage them.
12. Using the above steps in reverse, install the new dichroic into the color wheel
with the coated side down (towards the lamp).
Appendix B Accessory Installation B-5
B
Introduction
Installation
Accessory
Page 90

13. Take note of the new positions on the color wheel.
14. Reinstall the strobe assembly by replacing the eight screws removed in Step 7
and Step 8.
15. Place the optical assembly back into the head and replace the four screws
removed in
Step 5.
16. Reconnect the stepper motor power cable.
17. Replace the bezel, secure the safety cable to its clamp, and relatch the bezel.
Note: the bezel can only be replaced one way to ensure the safety cable can connect to
its bracket.
B-6 Studio Color User’s Manual
Page 91

Accessory Lens Installation
To complete this procedure, you will need the following items:
• accessory lens
• phillips screw driver
Complete the following procedure to install an accessory lens:
1. Remove power from the fixture and place it on a flat surface.
2. Remove the bezel by releasing the two latches located in the middle of the
head. Refer to
3. Remove the safety cable from its latch and set the bezel on a flat surface.
4. Using a phillips-head screw driver, loosen the four screws securing the clips to
the lens and rotate the clips 90°. Refer to
Figure B.1.
Figure B.7.
remove these
screws (4)
Figure B.7. Lens Removal
5. Remove the old lens and install the new lens in its place.
6. Rotate the clips back in place and tighten the four screws. Check to ensure the
lens is secure by attempting to rotate it.
7. Reinstall the bezel, attach the safety clip, and relatch the bezel.
Note: the bezel can only be correctly replaced one way to allow the use of the safety
cable.
Appendix B Accessory Installation B-7
B
Introduction
Installation
Accessory
Page 92

Light Snoot
Studio Color has an optional light snoot which can be installed to eliminate the
light leak common with Fresnel lenses.
To complete this procedure, you will need the following items:
• light snoot
• phillips screw driver
Complete the following procedure to install the light snoot:
1. Remove power from the fixture and place it on a flat surface.
2. Remove the bezel by releasing the two latches located in the middle of the
head. Refer to
3. Remove the safety cable from its latch and set the bezel on a flat surface.
4. Using a phillips-head screw driver, loosen the four screws securing the clips to
the lens and rotate the clips 90°. Refer to Figure B.7.
5. Remove the lens and set it aside.
6. Place the light snoot under the four securing clips with the lip pointing
outwards and replace the lens. Refer to Figure B.8.
Figure B.1.
B-8 Studio Color User’s Manual
Figure B.8. Installing the Light Snoot (Exploded View)
Page 93

7. Rotate the clips back in place and tighten the four screws. Refer to Figure B.9.
Check to ensure the lens is secure by attempting to rotate it.
Figure B.9. Installed Light Snoot
8. Reinstall the bezel, attach the safety clip, and relatch the bezel.
Note: the bezel can only be correctly replaced one way to allow the use of the safety
cable.
Warning: when the fixture is in operation, the light snoot will become very hot.
Take heed to not burn yourself.
B
Introduction
Installation
Accessory
Appendix B Accessory Installation B-9
Page 94

B-10 Studio Color User’s Manual
Page 95

C
Introduction
Supplemental
Information
Appendix C Supplemental Information
In this appendix you will:
S match common gel colors (C-1)
S convert DMX values to MSpeed times (C-5)
Color Matching
This appendix provides the DMX values and fader percentages to
approximately match common gel colors with Studio Color. Additional color
matches are available on the High End Systems web site. The color matches
were created at full intensity with Studio Color and PAR 64 fixtures. The
reference PAR 64 fixtures used 1000-watt tungsten lamps. Due to fixture
variations and lamps, minor adjustments may be required.
Use the following table match common gel colors. R depicts a Rosco® gel
color, L depicts a Lee® gel, and LHT depicts a high temperature Lee gel.
Table C.1: Color Matching
Fixed
Color
Name
No Color
Blue
Mist Blue R61 0 0% 255 100% 196 77% 168 66%
Booster
Blue
Pale Blue R63 0 0% 255 100% 223 87% 189 74%
Light
Steel Blue
Daylight
Blue
Cool Blue R66 0 0% 255 100% 221 87% 166 65%
Color
#
R60 0 0% 255 100% 189 74% 166 65%
R62 0 0% 255 100% 255 100% 201 79%
R64 0 0% 171 67% 223 87% 255 100%
R65 0 0% 158 62% 255 100% 209 82%
Color
Wheel
DMX
Va lue
Fixed
Color
Wheel
%
Red
DMX
Va lue
Red
%
Green
DMX
Va l ue
Green
%
Blue
DMX
Va l ue
Blue
%
Light Sky
Blue
R67 0 0% 135 53% 222 87% 255 100%
Appendix C Supplemental Information C-1
Page 96

Table C.1: Color Matching
Color
Name
Color
#
Fixed
Color
Wheel
DMX
Va l ue
Fixed
Color
Wheel
%
Red
DMX
Va l ue
Red
%
Green
DMX
Va l ue
Green
%
Blue
DMX
Va l ue
Blue
%
Sky Blue R68 0 0% 30 9% 161 63% 255 100%
Brilliant
R69 0 0% 36 14% 255 100% 199 78%
Blue
Nile Blue R70 0 0% 166 65% 255 100% 163 64%
Sea Blue R71 0 0% 110 43% 255 100% 171 67%
Azure
R72 0 0% 115 45% 255 100% 176 69%
Blue
Peacock
R73 0 0% 84 33% 255 100% 148 58%
Blue
Light
R76 0 0% 0 0% 255 100% 194 76%
Green
Blue
Green
R77 0 0% 17 7% 181 71% 255 100%
Blue
Trudy
R78 0 0% 158 62% 168 66% 255 100%
Blue
Green
R80 0 0% 5 2% 122 48% 255 100%
Blue
Urban
R81 0 0% 56 22% 150 58% 255 100%
Blue
Clearwater R360 0 0% 255 100% 189 74% 166 65%
Tipton
R362 0 0% 255 100% 222 87% 207 81%
Blue
Aquama-
R363 0 0% 255 100% 240 94% 176 69%
rine
Blue Bell R364 0 0% 181 71% 191 75% 255 100%
Tharon
R365 0 0% 217 85% 201 79% 255 100%
Delft Blue
C-2 Studio Color User’s Manual
Page 97

Table C.1: Color Matching
C
Introduction
Supplemental
Information
Fixed
Color
Name
Bermuda
Blue
Alice Blue R378 0 0% 150 59% 132 52% 255 100%
Medium
Yellow
Medium
Amber
Gold
Amber
Scarlet L024 0 0% 255 100% 34 13% 49 19%
Bright
Red
Color
#
R376 0 0% 105 41% 255 100% 181 71%
L010 0 0% 255 100% 158 62% 15 6%
L020 0 0% 255 100% 84 33% 18 7%
L021 0 0% 255 100% 18 7% 41 16%
L026 0 0% 255 100% 255 100% 0 0%
Color
Wheel
DMX
Va lue
Fixed
Color
Wheel
%
Red
DMX
Va lue
Red
%
Green
DMX
Va l ue
Green
%
Blue
DMX
Va l ue
Blue
%
Medium
Red
Light Pink L035 0 0% 255 100% 115 45% 112 44%
Medium
Pink
Dark
Magenta
Light Lavender
Lavender L058 0 0% 153 60% 94 37% 255 100%
Deep
Amber
Orange LHT
Magenta L113 0 0% 255 100% 0 0% 38 15%
Peacock
Blue
LHT
027
L036 0 0% 255 100% 84 33% 112 44%
L046 0 0% 255 100% 0 0% 71 28%
L052 0 0% 255 100% 128 50% 148 58%
L104 0 0% 255 100% 115 45% 15 6%
105
L115 0 0% 43 17% 255 100% 110 43%
0 0% 255 100% 255 100% 33 13%
0 0% 255 100% 99 39% 0 0%
Appendix C Supplemental Information C-3
Page 98

Table C.1: Color Matching
Color
Name
Color
#
Fixed
Color
Wheel
DMX
Va l ue
Fixed
Color
Wheel
%
Red
DMX
Va l ue
Red
%
Green
DMX
Va l ue
Green
%
Blue
DMX
Va l ue
Blue
%
Light Blue L118 0 0% 46 18% 255 100% 186 73%
Dark
L124 0 0% 26 10% 255 100% 38 15%
Green
Mauve L126 0 0% 255 100% 0 0% 158 62%
Medium
L132 0 0% 0 0% 166 65% 255 100%
Blue
Primary
L139 0 0% 0 0% 255 100% 0 0%
Green
Deep
L158 0 0% 227 89% 36 14% 0 0%
Orange
Chrome
L179 0 0% 255 100% 87 34% 0 0%
Orange
Dark Lavender
L180 0 0% 102 40% 79 31% 255 100%
C-4 Studio Color User’s Manual
Page 99

Converting DMX Values to MSpeed Times
Use the following table to convert DMX values and fader percentages to the
desired MSpeed time.
Table C.2: DMX Values to MSpeed Times
C
Introduction
Supplemental
Information
MSpeed
DMX Value Fader %
1 0.4 0.15 23 9 215.9
2 0.8 0.15 24 9.4 214
3 1.2 0.15 25 9.8 212.2
4 1.6 252.7 26 10.2 210.4
5 2 250.7 27 10.6 208.5
6 2.4 248.7 28 11 206.7
7 2.7 246.7 29 11.4 204.9
8 3.1 244.7 30 11.8 203.1
9 3.5 242.7 31 12.2 201.3
10 3.9 240.8 32 12.5 199.5
11 4.3 238.8 33 12.9 197.7
Time in
Seconds
DMX Value Fader %
MSpeed
Time in
Seconds
12 4.7 236.8 34 13.3 195.9
13 5.1 234.9 35 13.7 194.2
14 5.5 233 36 14.1 192.4
15 5.9 231 37 14.5 190.6
16 6.3 229.1 38 14.9 188.9
17 6.7 227.2 39 15.3 187.2
18 7.1 225.3 40 15.7 185.4
19 7.5 223.4 41 16.1 183.7
20 7.8 221.5 42 16.5 182
21 8.2 219.6 43 16.9 180.3
22 8.6 217.8 44 17.3 178.6
Appendix C Supplemental Information C-5
Page 100

Table C.2: DMX Values to MSpeed Times
MSpeed
DMX Value Fader %
Time in
DMX Value Fader %
Seconds
45 17.6 176.9 71 27.8 135.9
46 18 175.2 72 28.2 134.4
47 18.4 173.6 73 28.6 132.9
48 18.8 171.9 74 29 131.5
49 19.2 170.4 75 29.4 130
50 19.6 168.6 76 29.8 128.6
51 20 167 77 30.2 127.2
52 20.4 165.3 78 30.6 125.7
53 20.8 163.7 79 31 124.3
54 21.2 162.1 80 31.4 122.9
55 21.6 160.5 81 31.8 121.5
MSpeed
Time in
Seconds
56 22 159.9 82 32.2 120.1
57 22.4 157.5 83 32.5 118.7
58 22.7 155.7 84 32.9 117.4
59 23.1 154.1 85 33.3 116
60 23.5 152.6 86 33.7 114.6
61 23.9 151 87 34.1 113.3
62 24.3 149.5 88 34.5 111.9
63 24.7 147.9 89 34.9 110.6
64 25.1 146.4 90 35.3 109.3
65 25.5 144.9 91 35.7 108
66 25.9 143.3 92 36.1 106.6
67 26.3 141.8 93 36.5 105.3
68 26.7 140.3 94 36.9 104.1
69 27.1 138.8 95 37.3 102.8
70 27.5 137.3 96 37.6 101.5
C-6 Studio Color User’s Manual
 Loading...