

Page 1

SolaWash 19 LED
User Manual
© High End Systems Inc., 2017, All Rights Reserved
Information and specifications in this document are subject to change without notice. High End Systems
assumes no responsibility or liability for any errors or inaccuracies that may appear in this manual.
Trademarks used in this text:
High End Systems is a registered trademark. Wholehog, intellaspot, Internal Effects, the High End Systems
globe logo, and the Hog logo are trademarks of High End Systems, Belden is a registered trademark of
Belden, Inc.
Other trademarks and trade names may be used in this document to refer to either the entities claiming the
marks and names or their products. High End Systems disclaims any proprietary interest in trademarks and
trade names owned by others.
SolaWash 19 LED User Manual
Version 1.0.2
July, 2015
Page 2

Contact Information
U.S. and the Americas
Sales Department High End Systems
2105 Gracy Farms Lane
Austin, TX 78758 USA
voice: 512.836.2242
fax: 512.837.5290
Toll Free: 800.890.8989
Customer Service High End Systems
2105 Gracy Farms Lane
Austin, TX 78758 USA
voice: 800.890.8989
fax: 512.834.9195
toll free: 800.890.8989
World Wide Web: http://www.highend.com
ii SolaWash 19 LED User Manual
Page 3

Product Modification Warning
High End Systems products are designed and manufactured to meet the requirements of United States and
International safety regulations. Modifications to the product could affect safety and render the product noncompliant to relevant safety standards.
Mise En Garde Contre La Modification Du Produit
Les produits High End Systems sont conçus et fabriqués conformément aux exigences des règlements
internationaux de sécurité. Toute modification du produit peut entraîner sa non conformité aux normes de
sécurité en vigueur.
Produktmodifikationswarnung
Design und Herstellung von High End Systems entsprechen den Anforderungen der U.S. Amerikanischen und
internationalen Sicherheitsvorschriften. Abänderungen dieses Produktes können dessen Sicherheit
beeinträchtigen und unter Umständen gegen die diesbezüglichen Sicherheitsnormen verstoßen.
Avvertenza Sulla Modifica Del Prodotto
I prodotti di High End Systems sono stati progettati e fabbricati per soddisfare i requisiti delle normative di
sicurezza statunitensi ed internazionali. Qualsiasi modifica al prodotto potrebbe pregiudicare la sicurezza e
rendere il prodotto non conforme agli standard di sicurezza pertinenti.
Advertencia De Modificación Del Producto
Los productos de High End Systems están diseñados y fabricados para cumplir los requisitos de las
reglamentaciones de seguridad de los Estados Unidos e internacionales. Las modificaciones al producto podrían
afectar la seguridad y dejar al producto fuera de conformidad con las normas de seguridad relevantes.
SolaWash 19 LED User Manual iii
Page 4
Important Safety Information
Instructions pertaining to continued protection against fire, electric shock, and injury to persons are found
throughout this manual. Please read all instructions prior to assembling, mounting, and operating this
equipment.
The following international caution and warning symbols appear in margins throughout this manual to highlight
messages.
This symbol appears adjacent to Caution messages. Not
heeding these messages could result in personal injury and/or
damage to equipment.
This symbol appears adjacent to high voltage warning
messages. Not heeding these messages could result in serious
personal injury.
This symbol cautions against mounting the fixture on or near a
flammable surface.
This symbol indicates that, while operating, equipment
surfaces may reach very high temperatures. Allow the fixture
to cool before handling.
iv SolaWash 19 LED User Manual
Page 5

Warranty Information
Limited Warranty
Unless otherwise stated, your product is covered by a one year parts and labor limited warranty. Dichroic filters
and LithoPatterns
is the owner’s responsibility to furnish receipts or invoices for verification of purchase, date, and dealer or
distributor. If purchase date cannot be provided, date of manufacture will be used to determine warranty period.
Returning an Item Under Warranty for Repair
It is necessary to obtain a Return Material Authorization (RMA) number from your dealer or point of purchase
BEFORE any units are returned for repair. The manufacturer will make the final determination as to whether or
not the unit is covered by warranty.
A fixture must be returned in its original packaging. Any other parts returned to High End Systems must be
packaged in a suitable manner to ensure the protection of s uch product unit or parts, and such package shall be
clearly and prominently marked to indicate that the package contains returned Product units or parts and with
an RMA number. Accompany all returned Product units or parts with a written explanation of the alleged problem
or malfunction. Ship returned Product units or parts to: 2105 Gracy Farms Lane, Austin, TX 78758 USA.
Note: Freight Damage Claims are invalid for fixtures shipped in non-factory
Freight
All shipping will be paid by the purchaser. Items under warranty shall have return shipping paid by the
manufacturer only in the Continental United States. Under no circumstances will freight collect shipments be
accepted. Prepaid shipping does not include rush expediting such as air freight. Air freight can be sent customer
collect in the Continental United States.
®
high resolution glass gobos are not guaranteed against breakage or scratches to coating. It
boxes and packing materials.
REPAIR OR REPLACEMENT AS PROVIDED FOR UNDER THIS WARRANTY IS THE EXCLUSIVE REMEDY OF THE
CONSUMER. HIGH END SYSTEMS, INC. MAKES NO WARRANTIES, EXPRESS OR IMPLIED, WITH RESPECT TO
ANY PRODUCT, AND HIGH END SPECIFICALLY DISCLAIMS ANY WARRANTY OF MERCHANTABILITY OR FITNESS
FOR A PARTICULAR PURPOSE. HIGH END SHALL NOT BE LIABLE FOR ANY INDIRECT, INCIDENTAL OR
CONSEQUENTIAL DAMAGE, INCLUDING LOST PROFITS, SUSTAINED OR INCURRED IN CONNECTION WITH ANY
PRODUCT OR CAUSED BY PRODUCT DEFECTS OR THE PARTIAL OR TOTAL FAILURE OF ANY PRODUCT
REGARDLESS OF THE FORM OF ACTION, WHETHER IN CONTRACT, TORT (INCLUDING NEGLIGENCE), STRICT
LIABILITY OR OTHERWISE, AND WHETHER OR NOT SUCH DAMAGE WAS FORESEEN OR UNFORESEEN.
Warranty is void if the product is misused, damaged, modified in any way, or for unauthorized repairs or parts.
This warranty gives you specific legal rights, and you may also have other rights which vary from state to state.
SolaWash 19 LED User Manual v
Page 6

Patents
This product may use one or more of the following patents: US 4,392,187; US 4,602,321; US 4,688,161;
US 4,701,833; US 4,709,311; US 4,779,176; US 4,800,474; US 4,962,687; US 4,972,306; US 4,980,806;
US 5,010,459; US 5,031,078; US 5,073,847; US 5,078,039; US 5,186,536; US 5,209,560; US 5,278,742;
US 5,282,121; US 5,307,295; US 5,329,431; US 5,331,822; US 5,367,444; US 5,402,326; US 5,414,328;
US 5,426,576; US 5,430,629; US 5,432,691; US 5,454,477; US 5,455,748; US 5,502,627; US 5,506,762;
US 5,515,254; US 5,537,303; US 5,545,951; US 5,588,021; US 5,590,954; US 5,590,955; US 5,640,061;
US 5,647,662; US 5,691,886; US 5,702,082; US 5,728,994; US 5,758,955; US 5,758,956; US 5,769,527;
US 5,769,531; US 5,774,273; US 5,788,365; US 5,794,881; US 5,795,058; US 5,798,619; US 5,806,951;
US 5,812,596; US 5,823,661; US 5,825,548; US 5,828,485; US 5,829,868; US 5,857,768; US 5,882,107;
US 5,921,659; US 5,934,794; US 5,940,204; US 5,945,786; US 5,953,151; US 5,953,152; US 5,969,485;
US 5,980,066; US 5,983,280; US 5,984,248; US 5,986,201; US 6,011,662; US 6,029,122; US 6,048,080;
US 6,048,081; US 6,054,816; US 6,057,958; US 6,062,706; US 6,079,853; US 6,126,288; US 6,142,652;
US 6,142,653; US 6,172,822; US 6,175,771; US 6,188,933; US 6,208,087; US 6,219,093; US 6,220,730;
US 6,241,366; US 6,249,091; US 6,255,787; US 6,256,136; US 6,261,636; US 6,278,542; US 6,278,545;
US 6,278,563; US 6,288,828; US 6,326,741; US 6,327,103; US 6,331,756; US 6,346,783; US 6,421,165;
US 6,430,934; US 6,459,217; US 6,466,357; US 6,502,961; US 6,515,435; US 6,523,353; US 6,536,922;
US 6,538,797; US 6,545,586; US 6,549,324; US 6,549,326; US 6,563,520; US 6,565,941; US 6,570,348;
US 6,575,577; US 6,578,991; US 6,588,944; US 6,592,480; US 6,597,132; US 6,600,270; US 6,601,974;
US 6,605,907; US 6,617,792; US 6,621,239; US 6,622,053; US 6,635,999; US 6,648,286; US 6,664,745;
US 6,682,031; US 6,693,392; US 6,696,101; US 6,719,433; US 6,736,528; US 6,771,411; US 6,775,991;
US 6,783,251; US 6,801,353; US 6,812,653; US 6,823,119; US 6,865,008; US 6,866,390; US 6,866,402;
US 6,866,451; US 6,869,193; US 6,891,656; US 6,894,443; US 6,919,916; US 6,930,456; US 6,934,071;
US 6,937,338; US 6,955,435; US 6,969,960; US 6,971,764; US 6,982,529; US 6,988,805; US 6,988,807;
US 6,988,817; US 7,000,417; US 7,011,429; US 7,018,047; US 7,020,370; US 7,033,028; US 7,048,838;
US 7,055,963; US 7,055,964; US 7,057,797; US 7,073,910; US 7,078,869; US 7,092,098; US 7,119,902;
US 7,161,562; US 7,175,317; US 7,181,112; US 7,206,023; US 7,210,798; US D347,113; US D350,408;
US D359,574; US D360,404; US D365,165; US D366,712; US D370,080; US D372,550; US D374,439;
US D377,338; US D381,740; US D409,771; AT E169413; CA 2142619; CA 2145508; CA 2245842;
DE 22588.4-08; DE 621495; DE 655144; DE 69320175.4; DE 69322401.0; DE 69331145.2; DE 69525856.7;
DE 69734744.3; DE 797503; DK 0655144; DK 1447702; EP 0475082; EP 0621495; EP 0655144; EP 0662275;
EP 0767398; EP 0797503; EP 0969247; EP 1447702; ES 0621495; FR 0621495; FR 0655144; FR 0662275;
FR 1447702; GB 2043769B; GB 2055842B; GB 2283808B; GB 22 90 13 4B; GB 2291814B; GB 2292530B;
GB 2292896B; GB 2294909B; GB 2295058B; GB 2303203B; GB 2306887B; GB 2307036B; GB 2316477B;
IE 0621495; IT 034244BE; 2005; IT 0621495; IT 0655144; JP 3495373; JP 3793577; NL 0621495;
NL 0797503; NL 0969247; UK 0621495; UK 0655144; UK 0662275; UK 0797503; UK 0969247; UK 1447702;
vi SolaWash 19 LED User Manual
Page 7

Table of Contents
SolaWash 19 LED User Manual ...................................................................... i
Contact Information ................ .............................................. ....................... ii
Product Modification Warning .......................................................... .............. iii
Important Safety Information ... .. ... ............................................................... iv
Warranty Information ........... ........................................................................ v
Limited Warranty .................................................. ... .................................. v
Returning an Item Under Warranty for Repair ................................................ v
Freight ..................................................................................................... v
Patents .................... ...................................................... ............................ vi
Chapter 1: Product Overview
This chapter describes the features and spec ifications of the SolaWa sh 19 LED
fixture along with a list of related products and accessories.
Features ...................................................................................................... 1
Operation ......................... .............. ........... ............. .............. ............. ......... 1
Effects ................................................................ ....................................... 2
Construction ........................... ...................................... .............................. 2
Specifications .............................................................................................. 3
Mechanical Specifications .............................. ............................................... 3
Electrical Specifications ....................................... ......................................... 4
Environmental Specifications ........................................................................ 4
Cables and Connectors ................................................................................. 4
Fixture Components .................................................................................... 5
Related Products and Accessories ............................................................... 6
Chapter 2: SolaWash 19 LED Setup and Configuration
Installation of your SolaWash 19 LED fixture includes mounting, connecting to
power, DMX linking and configuration.
Unpacking the Fixture ................................................................................. 7
Installing a Power Cord Cap ........................................................................ 8
Installing a Line Cord Cap - U.K. Only ........... .. ............................................... 8
Vatic Fitter Heads Information - Danmark ... ... ................................................. 8
Mounting the Fixture ................................................................................... 9
Mounting the Fixture Upright ........................................................................ 9
Truss Mounting ........................................................................................... 9
SolaWash 19 LED User Manual vii
Page 8

Linking SolaWash 19 LED Fixtures ............................................................. 11
Cable Connectors ................. ... .. ............................................ .. ... ............... 11
Connecting to the Link ............................................................................... 12
Configuring SolaWash 19 LED for DMX Control .......................................... 13
Setting a Start Channel in Battery Mode ....................................................... 14
Powering On the Fixture ............................................................................ 15
Shutting Down the Fixture ......................................................................... 15
Chapter 3: Menu System
This chapter shows you how to access and navigate the onboard Menu system
and the options available for each menu with examples.
Menu System Overview .............................................................................. 17
Navigation Basics .................................... ........................................... ... ... . 18
Battery Operation ...................... ... .............................................. ............... 18
Exiting Battery Mode................................................................................ 18
SolaWash 19 LED Menu Map ...................................................................... 19
Menu System Options ................................................................................ 22
Address Menu ........................................................................................... 22
Setting a Start Channel.......... .. .............................................. ... ............... 22
Determining DMX Start Channel Assignment ............................................... 23
Information Menu ............. ........................................................................ 24
Time Info ............................................................................................... 24
Values Display .............................. .. ............................................ ... ......... 25
Head Temperature................. ........................................... ... .................... 25
Software Version..................................................................................... 25
Set Menu ................................. ... ........................................... .................. 26
Status Options.. ...................................................................................... 26
Service Setting ....................................................................................... 27
Display Setting ....................................................................................... 28
Temp C/F............................................................................................... 28
Reset Default.......................................................................................... 28
Test Options Menu ..................................................................................... 29
Homing the Fixture.................................................................................. 29
Calibration.............................................................................................. 29
User Mode Menu ........................................................................................ 30
Preset Menu ............................................................................................. 31
Battery Menu .................................... ............................................ ... ......... 31
viii SolaWash 19 LED User Manual
Page 9

Chapter 4: Preset Programming
SolaWash 19 LED fixtures can be programmed through the onboard menu
system using Preset Programming. This section describes how to program your
fixtures for stand-alone operation using the on-board memory in each fixture to
create and store scenes.
Preset Programming Overview .................................................................. 33
Navigating to the Preset Menu ............................. ........................................ 33
Master and Slave ....................................................................... ... ... .......... 34
Preset Menu .............................................................................................. 35
Playback Settings .............................. ... ............................................ .......... 35
Automatic Program Run ...................... ... ... ................................................ 35
Set to Slave ........ ............................................ .. ... ................................... 35
DMX Control................................. .. ......................................................... 35
Music Control .......................................................................................... 35
Edit Scenes ........ ... ............................................ ........................................ 36
Edit Scene Parameters........................ ... ........................................... ... ... .. 36
Edit Scene Time............................ ........................................... ... ............. 36
Set Fade Time ..... ............................................ .. ... ................................... 36
Set Input by Out...................................................................................... 37
Edit Program .................................... ............................................ ............. 37
Select Program .......................................................................................... 38
Scenes Input ............................................................................................. 38
Chapter 5: DMX Programming
Multiple DMX protocol options let you program SolaWash 19 LED fixtures as a
general wash light or with added pixel and pattern control. This chapter describes
DMX programming options and SolaWash 19 LED DMX parameters.
DMX Programming Overview ..................................................................... 39
Full Speed verses MSpeed Control .......... ... ........................................... ... ... .. 39
16-bit Functionality ......................... .. ............................................... .......... 39
DMX Programming Options ................. ............................................... .......... 39
Programming with a DMX Console ................................................................ 39
SolaWash 19 LED DMX Protocol Options .................................................... 40
Standard Protocol ....................................................................................... 40
Zones Protocol ...................................................................... .. ................... 41
Reduced Protocol ....................................................................................... 41
Mapping Protocol ................................................................ ... .. ................... 42
SolaWash 19 LED User Manual ix
Page 10

Parameter Descriptions ............................................................................. 43
Color Correction Parameter ......................................................................... 43
Color Mixing Parameters ............................................................................. 43
Standard and Reduced Protocol Color Function Options................................. 43
Zones Protocol Color Function ....................................................... ... ......... 44
Control Parameter ..................................................................................... 45
Dim Parameter .......................................................................................... 45
Image Parameters ...................................... ........................................... ... . 46
Indigo Highlighter Parameters ..................................................................... 46
MSpeed (Motor Speed) ............................. ... .. ............................................ . 47
Pan and Tilt Parameters ............. ................................................................ 47
Strobe Parameter .................................................................. .. .................. 47
Zoom Parameter ................................................................ ... .................... 48
Chapter 6: General Maintenance and Troubleshooting
This chapter outlines safety and maintenance procedures as well as
troubleshooting error messages.
Safety Considerations ................................................................................ 49
Maintenance .............................................................................................. 49
Troubleshooting Error Messages ................................................................ 49
PAN- movement Er .................................................................................... 49
TILT- movement Er .................................................................................... 50
Appendix A: MSpeed Conversion Table.................................................... 52
x SolaWash 19 LED User Manual
Page 11

CHAPTER 1
Product Overview
Chapter 1:
Product Overview
This chapter describes the features and specifications of the SolaWash 19 LED
fixture along with a list of related products and accessories.
SolaWash 19 LED and SolaWash 37 LED are high brightness moving wash light components of the
High End Systems LED line of fixtures.
The SolaWash 19 LED features nineteen 15-watt RGBW LEDs. Sixteen Indigo Highlighter LEDs add
another ring of color with independent control. As with all the LED fixtures, the SolaWash 19 offers
extremely long life of and low power consumption with no color degradation. A Color Temperature
control channel allows you to match the SolaWash output to other conventional light fixtures for a
given show.
Multiple user options provide a wide range of DMX control from basic color mixing and “lenses” to
controlling color of in different pattern zones or independent color control for each individual LED
“pixel”.
Operational features include smooth 16-bit Pan and Tilt, fast zoom control from 12 to 65 degrees
with tight beam control and excellent definition, and a full color LCD graphic display with touch
control.
Features
• Nineteen 15-watt RGBW LEDs
• Sixteen Indigo Highlighter LEDs
• 100,000 LED component life
• 9000 lumen output
• Rechargeable battery backup for display
Operation
• Pan range: 540° with optional 630°
• Tilt range: 265°
• Red, Green, Blue and White color mixing control
• Onboard menu system for configuration and preset programming
• Linear Zoom: 12°-65°
• Dimmer intensity from 0% to 100%
• General dimming and blackout for individual colors (Red, Green, Blue and White)
SolaWash 19 LED User Manual 1
Page 12

CHAPTER 1
Product Overview
• Seven user-programmable factory defined macros
• Four User modes for DMX control
Standard (21 channels)
Reduced (19 channels)
Zones (31 channels)
Mapping (90 channels)
Effects
• LED Strobe with 18 flashes per second and pulse effe ct
• Image lenses and dynamic patterns with speed control (Standard user mode)
• Independent color mixing control for individual zones in 32 pre-programmed patterns (Zones
user mode)
• I ndependent color mixing control for each LED (Mapping user mode)
• Virtual CTO on White
Construction
• High resolution micro-stepping motor control for smooth motion at all speeds
• Fast, smooth, and quiet yoke movement
• Color LCD menu with battery operation
• 3-pin and 5-pin XLR/RDM connectors
• Dual Road Case included
• ETL/UL and CE compliance
2 SolaWash 19 LED User Manual
Page 13
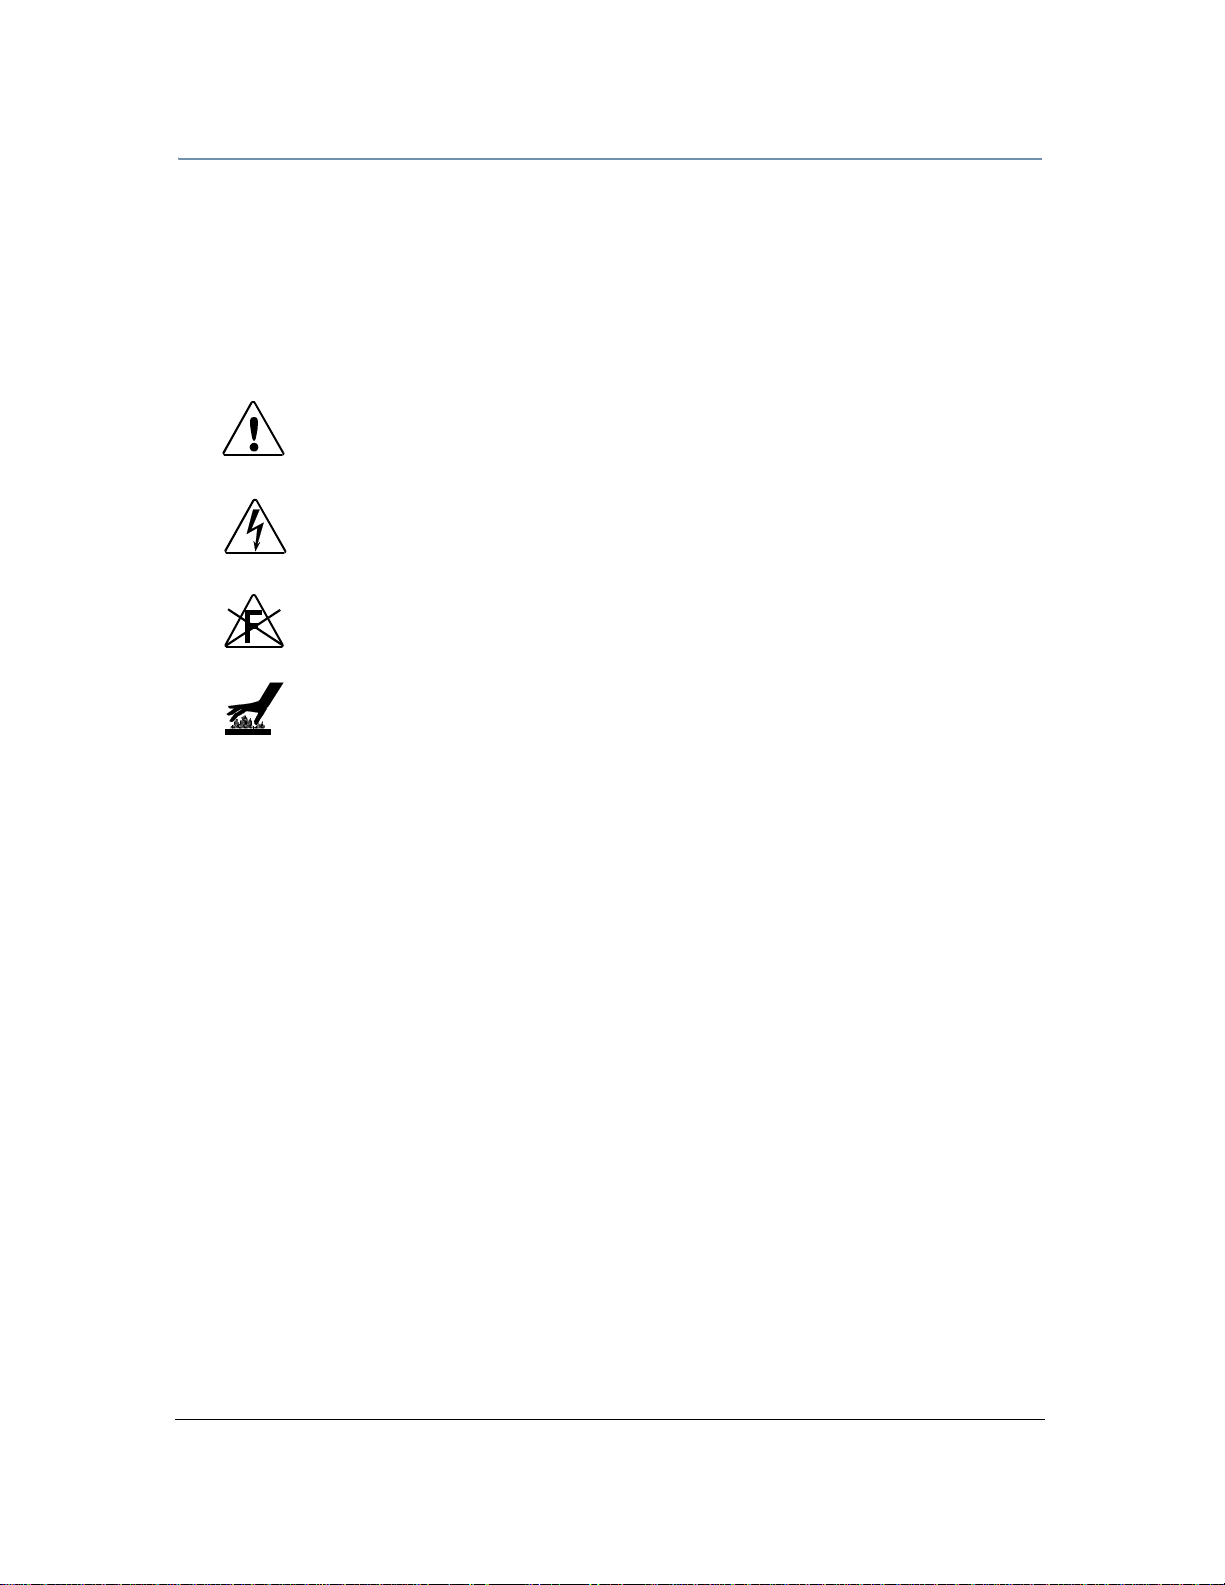
Specifications
180 mm
7.1 in
180 mm
7.1 in
390 mm
15.4 in
377 mm
14.8 in
384 mm
15.1 in
320 mm
12.6 in
126 mm
4.9 in
176 mm
6.9 in
464 mm
18.2 in
Mechanical Specifications
Fixture Dimensions: 390 mm x 320 mm x 464 mm (15.4 in x 12.6 in x 18.3 in)
Roadcase Dimensions: 875 mm x 600 mm x 780 mm (34.4 in x 24 in x 31 in)
Fixture Weight: 15.5 kg (34.2 lbs)
Shipping Weight: 78.9 kg (174 lbs)
CHAPTER 1
Product Overview
SolaWash 19 LED User Manual 3
Page 14
CHAPTER 1
Product Overview
Electrical Specifications
Fixture Rated Power: 380 W
Power consumption: AC 100V–240V; 50Hz/60Hz; 3.8-1.6A
Warning: Class I equipment - For continued protection
against electric shock connect this equipment to an
earthed (grounded) power source only.
This equipment for connection to branch circuit
having a maximum overload protection of 20 A.
Environmental Specifications
Maximum ambient temperature: 45° C (113° F)
Maximum exterior surface temperature: 110° C (230° F)
Minimum distance to lighted object: .5 m (1.6 ft)
Minimum distance to flammable objects: .5 m (1.6 ft)
Caution: Do not mount on a flammable surface.
Not for residential use.
Use in dry locations only.
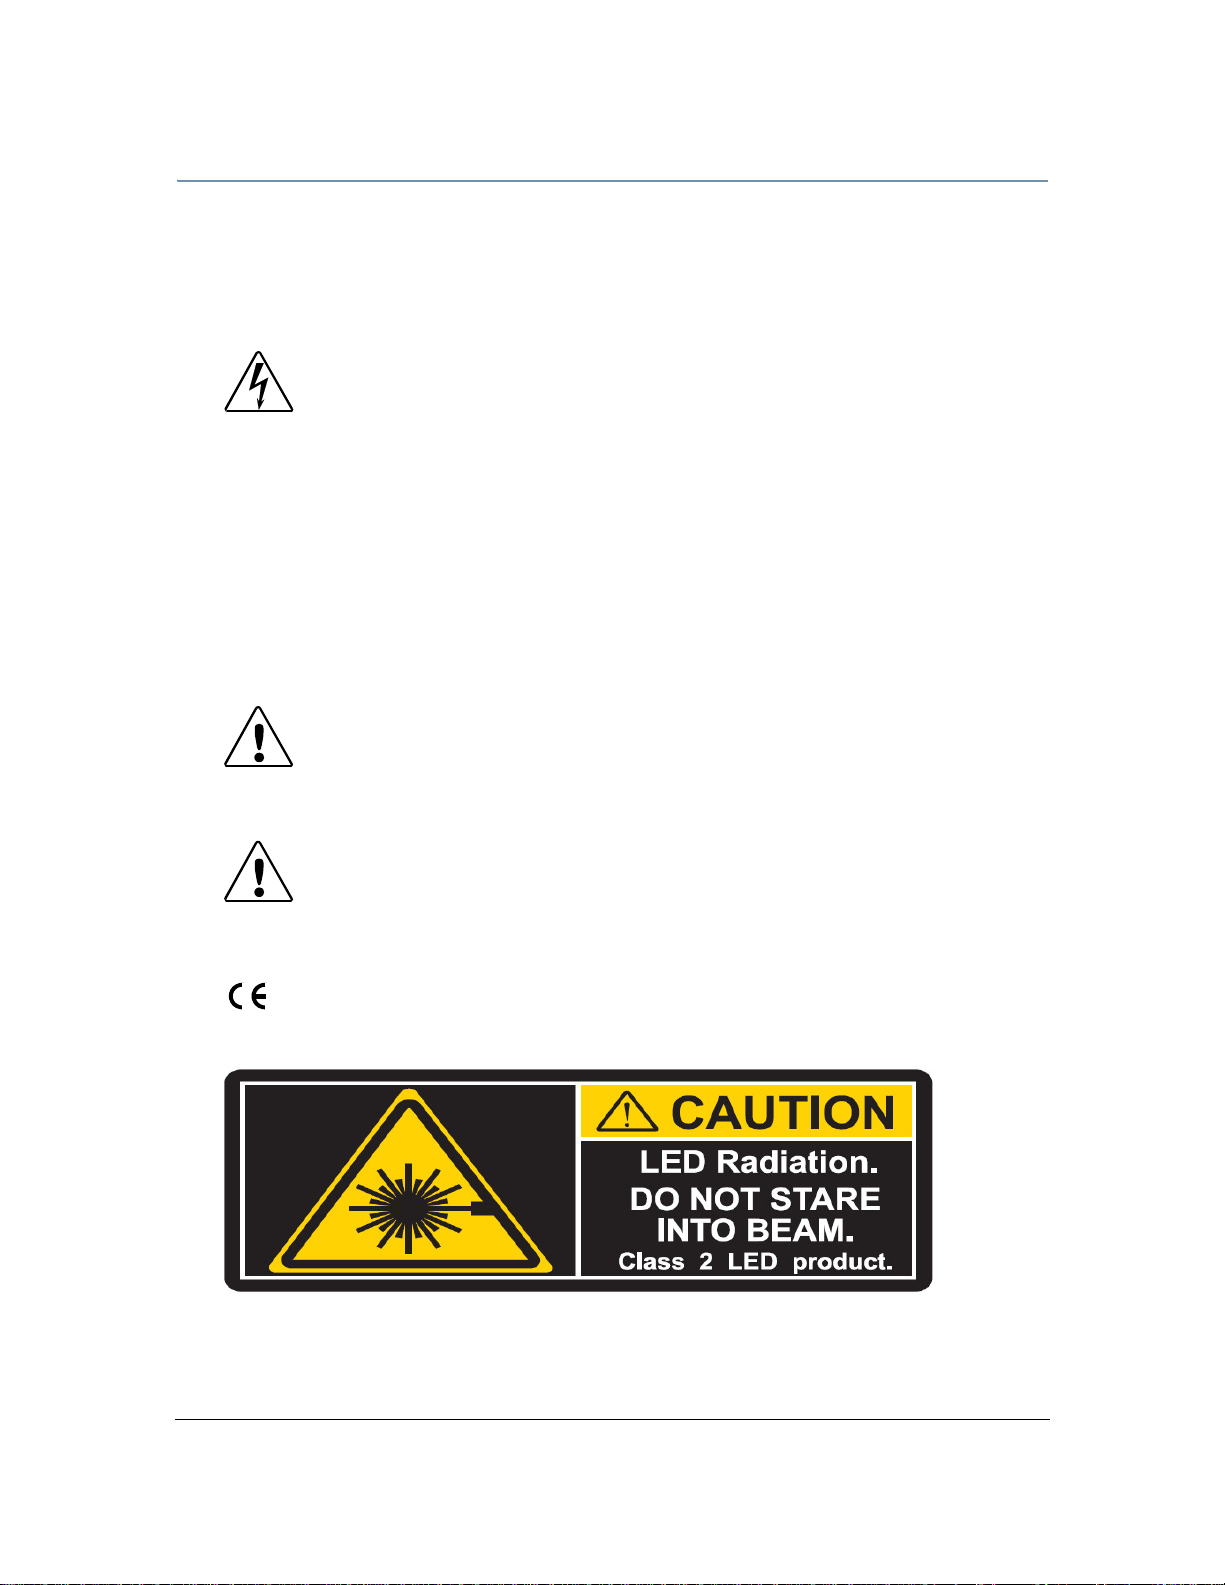
Caution: Class 2 LED product. LED Radiation. Do not stare into
beam.
Caution: The fixture should be positioned so that prolonged
staring into the fixture at a distance closer than 3
meters is not expected.
4 SolaWash 19 LED User Manual
Page 15

CHAPTER 1
Product Overview
Cables and Connectors
Belden® 3107A or equivalent (meets specifications for EIA RS-485 applications) with the following
characteristics:
• T wo tw isted pairs plus a shield
• maximum capacitance between conductors - 30 pF/ft.
• maximum capacitance between conductor and shield - 55 pF/ft.
• maximum resistance of 20 / 1000 ft.
• nominal impedance 100-140
SolaWash 19 LED User Manual 5
Page 16
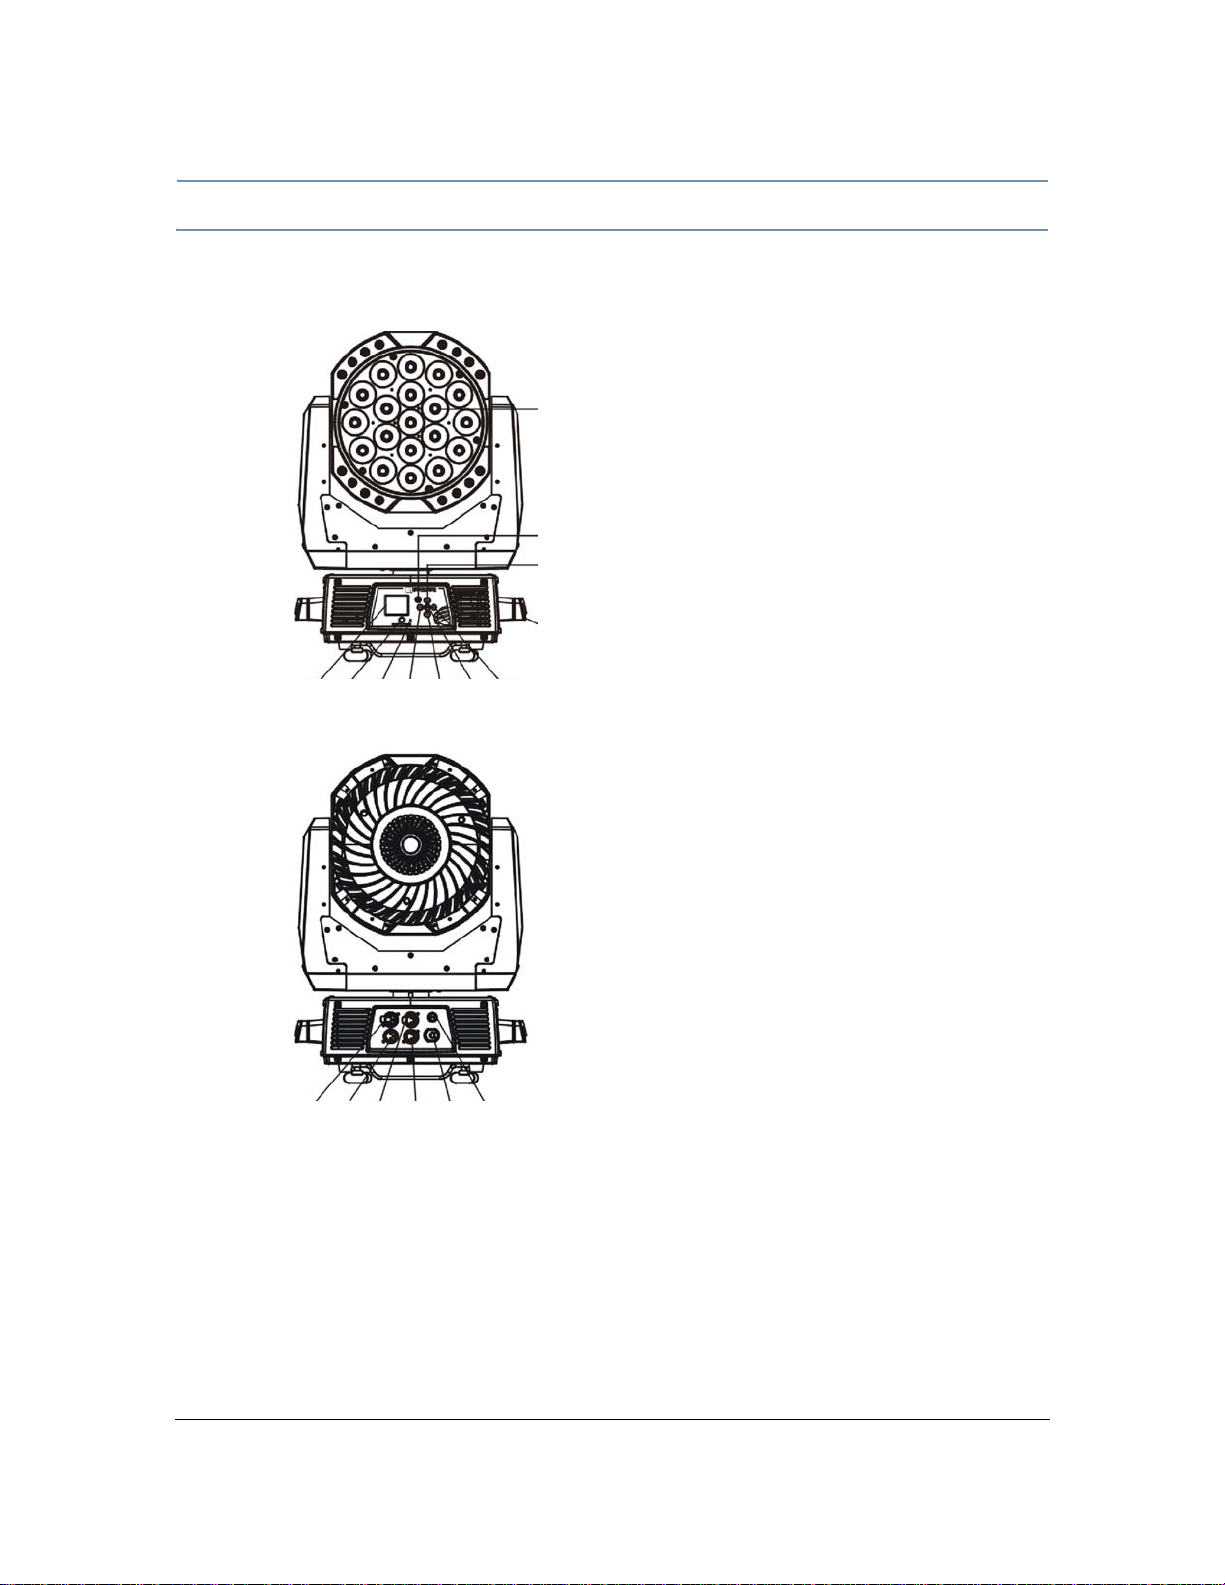
CHAPTER 1
1. Lens
2. Display
3. DC Switch
4. Microphone
5. Left-button
6. Down-button
7. ENTER-button
8. Right-button
9. Mode/Esc
10.Up-button
11. Handle
12.5-pin DMX out
13.5-pin DMX in
14. 3-pin DMX out
15.3-pin DMX in
16.Power supply
17.Fuse
12 13 16 1714 15
23456718
9
10
11
Product Overview
Fixture Components
6 SolaWash 19 LED User Manual
Page 17
Related Products and Accessories
Name Part Number
Heavy duty 5-pin XLR cable (10’)
CHAPTER 1
Product Overview
55050017
Heavy duty 5-pin XLR cable (25’)
Heavy duty 5-pin XLR cable (50’)
Heavy duty 5-pin XLR cable (100’)
Galvanized safety cable
55050018
55050019
55050020
12040001
SolaWash 19 LED User Manual 7
Page 18

CHAPTER 1
Product Overview
8 SolaWash 19 LED User Manual
Page 19

Chapter 2: SolaWash 19 LED
Setup and Configuration
Installation of your SolaWash 19 LED fixture includes mounting, connecting
to power, DMX linking and configuration.
Use the following steps to set up and configure your fixture:
1. Unpack the fixture.
2. Install power cord cap for your location.
3. Mount the fixture upright or suspended from a standard truss.
4. Connect the fixture to a DMX controller via DMX cabling.
5. Configure the fixture for DMX control.
Unpacking the Fixture
The SolaWash 19 LED fixture ships in packaging specifically designed to protect the product
during transport. When unpacking, inspect the fixture for physical damage to components. High
End Systems
a product for repair in its original packaging.
®
assumes no responsibility for products that are damaged during transport. Return
Before sending anything to the factory, call your High End Systems dealer/distributor
for a Return Material Authorization (RMA) number. The factory cannot accept any goods
shipped without an RMA number.
SolaWash 19 LED User Manual 7
Page 20
CHAPTER 2
eller
SolaWash 19 LED Setup and Configuration
Installing a Power Cord Cap
The power cord for SolaWash 19 LED fixtures ships without a power cord cap. Use the information
in this section to install the correct power cord cap for your location.
Because of the variety of power cord caps used worldwide, High End Systems, Inc. cannot make
specific recommendations for the power cord cap. Contact a local authority for the type of power
cord cap needed. When installing the power cord cap, note that the cores in the mains lead are
colored according to the following code:
• green and yellow = earth
• white = neutral
• black = live
Installing a Line Cord Cap - U.K. Only
In the United Kingdom, core colours in the mains lead of this equipment may not correspond with
the colored markings identifying the terminals in the fixture’s plug. In that case, instal l a li ne co rd
cap in accordance with the following code:
• Connect the green and yellow core to the plug terminal marked with the letter “E,” or by the
earth symbol
or coloured green, or green and yellow.
• Connect the white core to the terminal marked with the letter “N” or coloured black.
• Connect the black core to the terminal marked with the letter “L” or coloured red.
WARNING:
Class 1 equipment - This equipment must be earthed.
Vatic Fitter Heads Information - Danmark
Advarsel: Beskyttelse mod elektrisk chock.
Vigtigt!
Lederne med gul/groen isolation maa kun tilsluttes en klemme maerket
8 SolaWash 19 LED User Manual
Page 21

CHAPTER 2
SolaWash 19 LED Setup and Configuration
Mounting the Fixture
A SolaWash 19 LED fixture can be side-mounted or suspended from a support system (such as a
truss) or freestanding on its base.
WARNING!
Equipment suitable for dry locations only. Do not expose this
equipment to rain or moisture.
CAUTION!
SolaWash 19 LED fixtures must be installed and operated by trained
personnel only.
Always use a secondary safety cable when mounting this fixture.
Ambient temperature for this fixture is -10°C to 45°C. In extreme
temperature environments, ensure that the fixture is within a safe
operating temperature range before turning on to avoid condensation
damage.
Do not mount within .5 meters (1.6 feet) of a flammable object.
Note: Due to the wide variety of possible lighting designs, High End Systems
cannot make specific mounting recommendations. Consider the following
procedures as suggested guidelines only.
SolaWash 19 LED User Manual 9
Page 22

CHAPTER 2
4
3
/4 turn
C
D
B
A
SolaWash 19 LED Setup and Configuration
Mounting the Fixture Upright
CAUTION!
Do not mount the fixture upright without the four rubber feet attached.
To mount the fixture upright, place the fixture on a sturdy, stable non-flammable surface that will
support more than the
above floor height, use safety cables to secure the fixture to the surface.
15.5 kg (34.2 lb) weight of the SolaWash 19 LED fixture. If the surface is
Truss Mounting
When mounting the fixture on a truss or another type of support:
• Verify the truss or support will handle the combined weight of all the devices on the truss.
Each SolaWash 19 LED fixture weighs 15.5 kg (34.2 lb).
• Always mount a SolaWash 19 L ED fixture using the mounting bracket assembly that shipped
with your fixture and a safety cable attached to the fixture’s base.
WARNING!
Before mounting, disconnect power to the fixture.
CAUTION!
Only experienced lighting personnel should attempt to hang a lighting fixture
to an appropriate theatrical truss.
WARNING!
In all cases a safety cable should also be fixed between the safety cable
mounting holes located at the bottom of the fixture base housing and the truss.
Failure to use a safety cable could result in injury or death. High End Systems
supplies the proper safety cables and may be contacted for replacements if
necessary. For more information go to: www.highend.com/trusshang
To mount a SolaWash 19 LED fixture
on a standard truss:
1. Fix the clamp (A) on the bracket
by tightening the M12 screw on
the bracket to the hole in the
center of the bracket.
2. Insert the quick-lock fasteners (B)
of the first Omega holder (C) into
the respective holes on the bottom
of the fixture. Tighten the quicklock fasteners fully clockwise.
3. Ins ta ll the se cond Omega holder.
4. Secure the fixture to the truss
with a safety cable at attach point
(D).
10 SolaWash 19 LED User Manual
Page 23

CHAPTER 2
1
12
2
3
3
XLR Shell
grounding lug
(inside XLR shell)
grounding lug
(inside XLR shell)
negative
common
(cable shield)
common
(cable shield)
positive
positive
(data true)*
negative
(data
complement)*
Common
(cable shield)
2
1
3
Male XLR Connector
Female XLR Connector
positive
(data true)
negative
(data
complement)
XLR shell
Common
(cable shield)
1
2
3
4
5
5
4
positive
(data true)*
negative
(data complement)*
negative
(data
complement)
positive
(data true)
*This data line is not used by the fixture, but allows data to pass through the fixture.
Grounding lug (inside XLR shell)
SolaWash 19 LED Setup and Configuration
Linking SolaWash 19 LED Fixtures
The SolaWash 19 LED fixture operates on standard DMX512 link controlled by a DMX console. The
number of fixtures on a link will be determined by the combined number of channels required by
all the fixtures. A SolaWash 19 LED fixture in Standard User mode requires a 21 channel footprint
on a standard DMX512 link.
Attach the fixture to the link using data-grade cable and 5-pin or 3-pin XLR cable connectors.
Cable Connectors
The SolaWash 19 LED fixture accepts both 3-pin and 5-pin XLR cable connectors. Cabling must
have a male XLR connector on one end of the cable and a female XLR connector on the other end.
Note: Pins four and five of a 5-pin cable connector are not used, but they
allow a secondary data link to pass through the fixture.
SolaWash 19 LED User Manual 11
Page 24

CHAPTER 2
DMX Controller
SolaWash 19 LED Setup and Configuration
Test each cable with a voltage/ohm meter (VOM) to verify correct polarity and to make sure that
the negative and positive pins are not grounded or shorted to the shield or to each other.
CAUTION!
Do not connect anything to the ground lug on the XLR connectors. Do
not connect or allow contact between the common (cable shield) and
the fixture’s chassis ground. Grounding the common could cause a
ground loop and/or erratic behavior.
Connecting to the Link
To link one or more fixtures to a DMX controller:
1. Connect the male XLR connector of a DMX Data cable to the controller’s DMX Data Out
connector.
2. Connect the Data cable’s female XLR connector to the Data In connector of the first (or next)
fixture on the DMX link.
3. Continue linking the remaining fixtures connecting a cable from the Data Out connector of
each fixture to the Data In connector of the next fixture on the link.
For installations where the DMX cable has to run a long distance or is in an electrically noisy
environment, a DMX terminator on the last fixture of the link prevents data reflection, which can
corrupt the data communication on the link.
12 SolaWash 19 LED User Manual
Page 25

CHAPTER 2
SolaWash 19 LED Setup and Configuration
Terminate the link by installing a 120 ohm, 1/4 watt
(minimum) terminator in the fixture’s Data Out
(female) cable connector in the last fixture on each
DMX link.
To construct a terminator:
1. Dis a sse mb le a mal e 3-pin or 5-pin XLR connector.
2. Solder a 120 ohm resistor, minimum of 1/4 watt, between Pin 2 and Pin 3.
3. Reassemble the XLR connector.
Configuring SolaWash 19 LED for DMX Control
Each SolaWash 19 LED fixture running standard protocol requires a block of 21 consecutive
channels on a standard DMX512 link. Up to 24 standard SolaWash 19 LED fixtures can be
assigned to a single link. For more information on Start Channels, see Determining DMX Start
Channel Assignment on page 23. Address your fixture by setting the first channel of the channel
range you want to assign this fixture on the link.
Note: SolaWash 19 LED fixtures ship set in Standard User Mode. Other
protocol options are available and require a different number of
consecutive channels. The protocol selection is made in the Menu
System. For information on setting a fixture to a different protocol
option, see
Addressing is done for each unit using the fixture’s menu system. You can access the menu
system in battery mode to Address the fixture before you mount it or apply power.
User Mode Menu on page 30.
SolaWash 19 LED User Manual 13
Page 26
CHAPTER 2
Function: DMX Receive
Address:
001
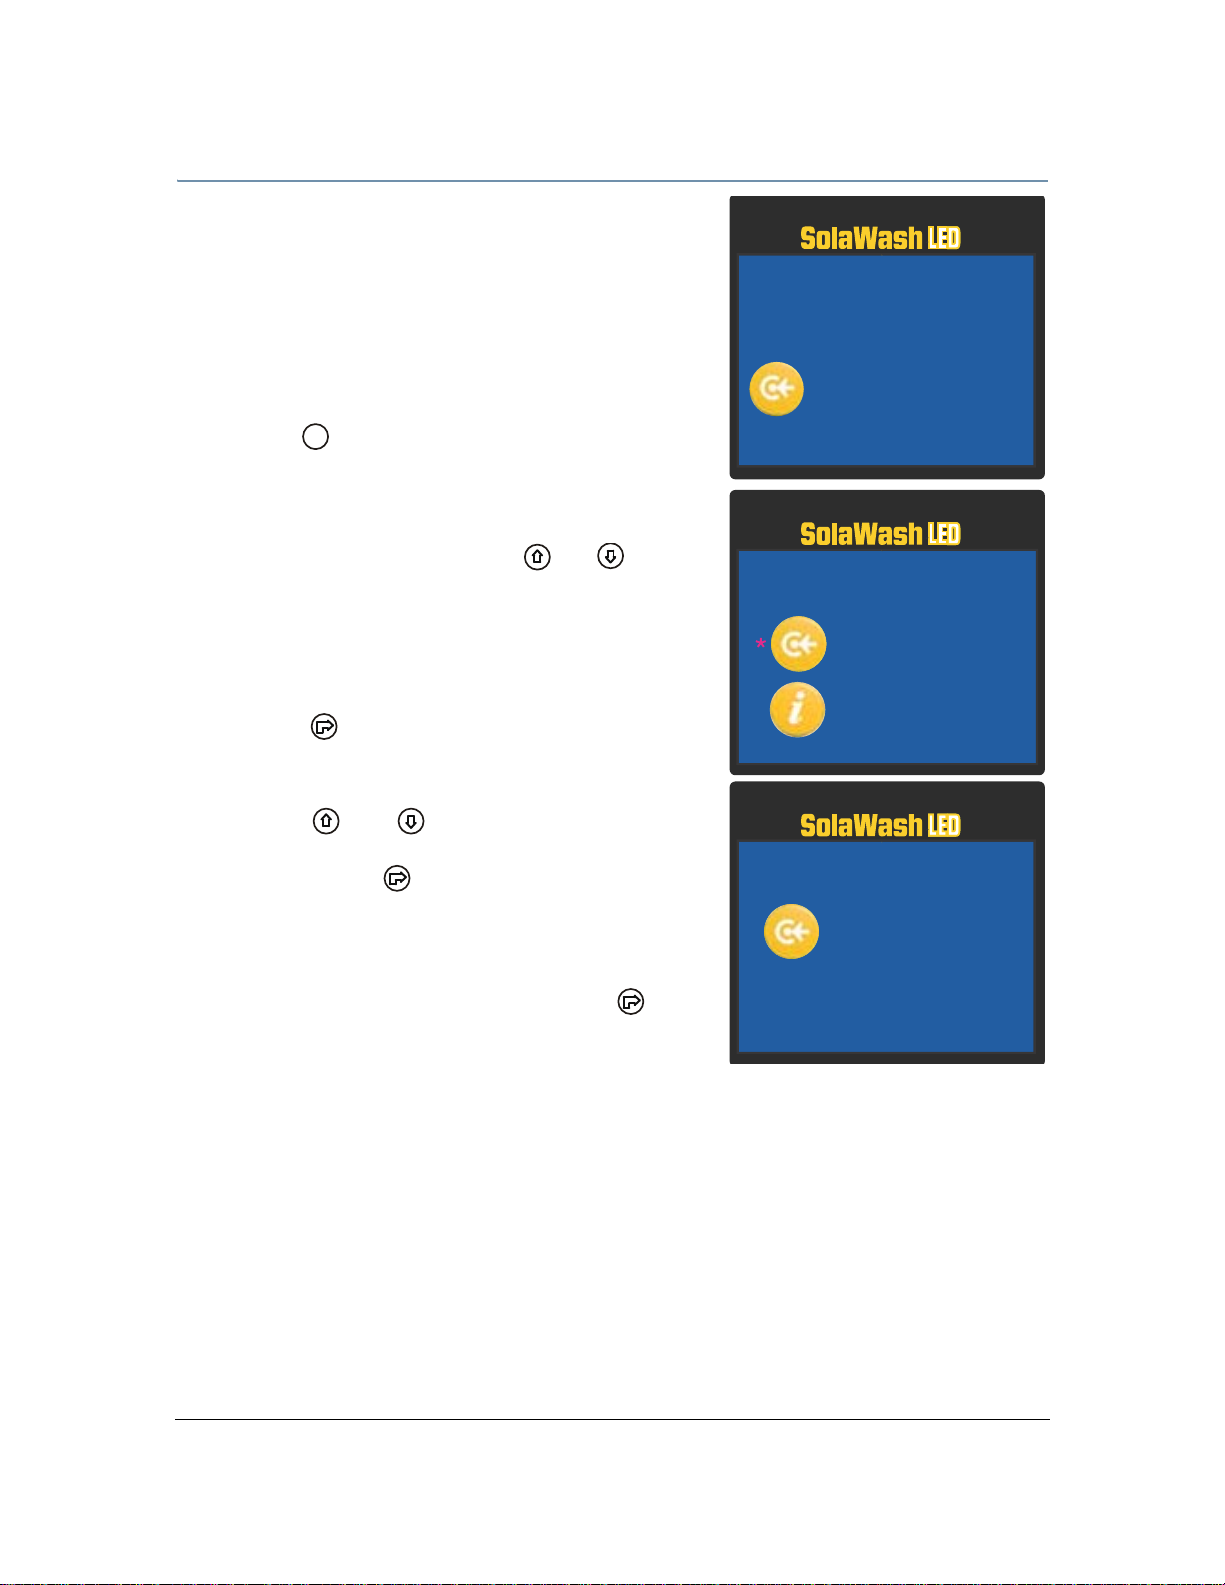
Menu: Press <Mode>
073F
Address:
01
Info
Address
01-01
001
MODE
/ ESC
SolaWash 19 LED Setup and Configuration
Setting a Start Channel in Battery Mode
To address a SolaWash 19 LED fixture in battery mode:
1. Turn on the menu system by pressing and holding the
Battery button for two seconds. The display will show
the current Function and the Start Channel currently
assigned to the fixture.
2. Press the MODE/ESC button to enter the first level
of the menu system. The display will show Address and
Info as the first two options in the top menu level.
The red star * indicates the option you are on as you
scroll through the levels using the and buttons.
The number at the bottom left of the display indicates
the Menu Level you are on. Address is the first option
on the first level.
3. Press the Enter button to choose Address. The
currently selected Start Channel is displayed in white.
4. Using the and buttons, scroll through other
available values (displayed in red) to the desired start
channel and press to select. The newly selected
value will now appear in white the next time you enter
the menu.
5. The new address will not be stored until the Enter
button is pressed.
Note: Fo r a detail ed de sc riptio n of the entire menu system, see Chapter 3: Menu
System on page 17.
14 SolaWash 19 LED User Manual
Page 27

CHAPTER 2
SolaWash 19 LED Setup and Configuration
Powering On the Fixture
WARNING:
This equipment is designed for connection to a branch circuit having
a maximum overload protection of 20 A.
CAUTION:
Do not power on the fixture until verifying that the line cord cap is
suitable for the power source in your location. For more information,
see Installing a Power Cord Cap on page 8.
Do not unplug motor harnesses while unit is powered.
To power on the SolaWash 19 LED fixture, simply connect it to a 100V-240V AC power source.
Once the SolaWash 19 LED fixture is connected to a power source, it automatically begins a
homing procedure to verify that fixture components are functioning.
Shutting Down the Fixture
A DMX controller can shut down the fixture remotely with the Shutdown option in the Control
Channel or you can simply disconnect from power. The SolaWash 19 LED fixture automatically
shuts down in the event of DMX data loss longer than five minutes.
SolaWash 19 LED User Manual 15
Page 28

CHAPTER 2
SolaWash 19 LED Setup and Configuration
16 SolaWash 19 LED User Manual
Page 29

Chapter 3:
Function: DMX Receive
Address:
001
Menu: Press <Mode>
073F
Menu system buttons
Menu display
Menu System
This chapter shows you how to access and navigate the onboard Menu
system and the options available for each menu with examples.
Menu System Overview
The front panel on SolaWash 19 LED fixtures has a full color LCD screen and navigation buttons to
display and operate the onboard menu system. You can use the Menu system to perform the
following functions at the fixture level:
• As sig n a DMX sta rt channe l
• Acces s and set fi xture options
• View fixture status
• Create preset programs
SolaWash 19 LED User Manual 17
Page 30

CHAPTER 3
MODE
/ ESC
MODE
/ ESC
MODE
/ ESC
MODE
/ ESC
Menu System
Navigation Basics
1. Enter the Menu system by pressing the Mode/Esc button for a few seconds until the
menu appears.
2. The current option is displayed. Use the and buttons to scroll through menu options at
the current level. The red star
Note: At the option or setting level of the menu, the currently selected option
is displayed in white. Other options are displayed in red.
3. Stop at the desired menu and press the Enter button to select. If there is another level of
menu choices repeat Steps 2 and 3.
Note: The new option will not be stored unless the Enter button is pressed.
4. Stop at the desired option and press the button to select or press the button to return
to the previous menu level without changing the value of an option.
Note: The currently selected option displays as white. Unselected options
display in red.
5. Continue pressing the button to move back up levels until exiting the Menu system.
Note: Some option changes do not take effect until you fully exit the menu system.
* indicates the current menu.
Battery Operation
The SolaWash 19 LED fixture has an internal rechargeable battery that allows menu operation
without power being applied to the fixture.
To access the display menu in this mode, press the Battery button for two seconds.
Note: The Battery button will not respond if the fixture is receiving power.
Exiting Battery Mode
The battery mode of the Menu will automatically switch off one minute after the last button press
to conserve battery power.
To manually exit the Battery Mode:
1. Push the Mode/Esc button once.
2. Use the button to scroll to Battery and press the button to select. Exit Battery will
display in red (not currently selected).
3. Pr es s the button to select. The display will turn off.
18 SolaWash 19 LED User Manual
Page 31

SolaWash 19 LED Menu Map
Menu Level 2 Level 3 Option/Setting Description/Notes
Address
Set DMX: ### 1-484
Sets the first value of a unique 28
channel range on DMX link.
CHAPTER 3
Menu System
Info
Set
Current Time ####h
Ttl Life Hrs ####h
Time Info.
Last Run Hrs ####h
Timer PIN XXX
Clr Last Run
None
Value Display
All XXX
Head Temp XXX°C/°F
Software Ver VerX.XXXX
No DMX Mode
Pan Reverse
Tilt Reverse
Status
Pan Degree 630/540
Encoders
Pan/Tilt Spd Speed 1-4
Mic Sens 0-99
Hibernation
Service PIN Password = ###
Service PIN
RDM PID #####
CloseShutter
Hold
Auto Program
Music Ctrl
On
Off
On
Off
On
Off
Off
01M-99M
15M
Power On running time in hours
Fixture running time in hours
Hours at last run time reset
Sets a Timer Password
Resets last run time to 0
No DMX values are displayed
Displays each parameter’s current
DMX value
Displays head temperature in
celsius and Fahrenheit
Displays software version
Turns LEDs off when DMX is
removed
Holds the current Scene
Reverts to Auto Program
Reverts to Music Control
Inverts Pan movement
Default
Inverts Tilt movement
Default
Manually sets Pan value in
degrees
Encoders On
No encoder feedback
Selects Movement Mode
Sets microphone sensitivity as a
percentage
No hibernation
Set time until hibernation in
minutes
Default Standby Mode
Service Password Default = 050
Displays RDM PID
SolaWash 19 LED User Manual 19
Page 32

CHAPTER 3
Menu System
Menu Level 2 Level 3 Option/Setting Description/Notes
Shutoff Time 02m-60m
On
Time until auto shutoff in minutes
Rotates display 180°
Flip Display
Disp. Setting
Off
On
Default display orientation
Locks key
Key Lock
Set
Off
Allows key operation
Celsius
Temp. C/F
Selects T emperature Scale
Fahrenheit
On
Resets factory defaults
Reset Default
Off
All
Maintains changes
Reset all motors
Test
UserMode
Home
Calibration
Standard
Zones
Reduced
Mapping
Password
0-255
Others
Pan & Tilt
Reset other motors
Reset Pan/Tilt motors
Set to 050 before calibration
Fine tunes homing position for
individual motors
Sets 21 DMX channels that
include control of factory defined
image patterns
Sets 31 DMX channels that
include pattern control for seven
defined zones.
Sets 19 DMX channels for basic
color wash functions only.
Sets 90 DMX channels that
includes color control for
individual LEDs
20 SolaWash 19 LED User Manual
Page 33

CHAPTER 3
Menu System
Menu Level 2 Level 3 Option/Setting Description/Notes
DMX Control
Reverts to playback via console
Slave 1
Assigns slave setting
Assigns auto program mode
Assigns music control mode
Playback
Set to Slave
Auto Program
Music Control
Slave 2
Slave 3
Master
Alone
Master
Alone
Program 1
Prog.Part 1
…
Program 10
Program 1
Select Prog
Prog.Part 2
…
Selects program to be run in the
Program part.
Program 10
Program 1
…
Program 10
Program Test
Step 01=SCxxx
…
Step 64=SCxxx
End
Pan
...
Indigo Dim
Fade Time
Scene Time
Input by Out
Runs the program as edited
Chooses a scene for each step in
the selected program
Save and exit
Allows you to set a DMX value for
any of the 21 parameters. (see
DMX Programming on page 39)
Lets you set a fade time value
from 000–255
Lets you set a scene time from
00.2s–99.9s
Allows you to capture DMX values
for all parameters into a scene
Preset
Edit Program
Edit Scenes
Prog.Part 3
Program 1
…
Program 10
Edit Scene
001
…
Edit Scene
250
Scenes Input x x - x x
Battery
Note: This menu only appears when you are in battery mode.
SolaWash 19 LED User Manual 21
Exit Battery
Automated scene recording
Exits the battery mode and shuts
off the display.
Page 34

CHAPTER 3
Function: DMX Receive
Address:
001
Menu: Press <Mode>
073F
Address:
01
Info
Address
01-01
001
MODE
/ ESC
Menu System
Menu System Options
The following sections describe and give examples for selecting and/or setting available fixture
configuration options.
Address Menu
Address is the top level menu selection used to set the fixture’s DMX start channel. You can
address the fixture before applying power in the battery mode or in normal mode after you power
up the fixture.
A SolaWash 19 LED fixture requires a 21-channel range when set to run Standard protocol. The
last valid Start channel for standard user mode is 492 (512–21+1).
Other protocol options are available and require a different
number of consecutive channels. The protocol selection is set
in the Menu System. For information on setting a fixture to a
different protocol option, see User Mode Menu on page 30.
Setting a Start Channel
1. Turn on the menu system by pressing and holding the
Battery button for two seconds. The display will show
the current Function and Start Channel assigned to the
fixture.
2. Press the MODE/ESC button to enter the first level of
the menu system. The display will show Address and
Info as the first two options in the top menu level.
3. Pres s the Enter button to choose Address. The
4. Use the buttons to scroll to the desired start
22 SolaWash 19 LED User Manual
The red star
through the level using the buttons.
* indicates the current menu as you scroll
The number at the bottom left of the display indicates
the Menu Level you are on. Address is the first option on
the first level.
currently selected Start Channel is displayed in white.
channel and press to select.
Page 35

CHAPTER 3
Menu System
Determining DMX Start Channel Assignment
There are 512 available channels on each DMX link divided among all the devices in a particular
link. A fixture must have a unique Start channel number in order to respond independently to
controller commands.
To determine each fixture’s DMX start channel in a link, identify the channel range of every fixture
on the link. Channel range is the number of consecutive channels a fixture requires. Each
SolaWash 19 LED fixture running Standard Protocol requires a block of 21 consecutive channels
on a 512-Channel DMX link. The Start channel is the first number of a fixture’s channel range.
When setting the Start channel on a fixture, remember:
• A fixture’s physical location on the link does not have to coincide with the order of channel
range assignments in the link.
• The fixture’s channel range must not overlap any other device’s channel range on the link.
When two devices on the same DMX link have overlapping channel ranges, one or both
devices will be disabled or behave erratically. The single exception would be if two or more
fixtures need to respond to controller commands in exactly the same way. In that case, those
fixtures must be the same type (for example two SolaWash 19 LED fixtures) with the same
User Mode setting and must share the entire channel range.
The notes in the following table show the various considerations in determining valid Start
Channels for fixtures on a 512 DMX link.
Fixture
Rig
Position
First
Third
Second Technospot 37 channels C079 79-116
Fourth Studio Spot 18 channels C121 121-138
Fixture
Type
SolaWash 19
LED in Standard
User Mode
SolaWash 19
LED in Reduced
User Mode
DMX
Channel
Footprint
21 channels C001 1-21
19 channels C029 29-47
DMX
Start
Channel
Channel
Range
Notes
The Start channel is the first channel
in a consecutive block of channels
assigned to a fixture.
Fixture can be assigned the second
block of DMX channels without being
the second fixture on the rig.
Avoid overlapping channels with other
fixtures
Every channel in the link does not need
to be assigned.
SolaWash 19 LED User Manual 23
Page 36

CHAPTER 3
MODE
/ ESC
MODE
/ ESC
Menu System
Information Menu
The Information menu displays current fixture information such as internal temperature, total
fixture hours, software version, and DMX values for each of the fixture’s parameters. Fixture hours
resets are also executed in the Information Menu.
To enter the Information Menu:
1. Pr es s the MODE/ESC button to enter the first level of the menu system. The display will
show Address and Info as the first two options in the top menu level.
2. Using the buttons, scroll to Info.
3. Pr es s the button to select.
Time Info
The Time Info menu displays or resets the following time functions.
Current Time: Power On running time in hours
Ttl Life Hrs: Fixture running time in hours
Last Run Hrs: Hours at last run time reset
Timer PIN: Use buttons to set a Timer Password (Default PIN = 038)
Clr Last Run: OFF is the default value. Select ON to reset run time to 0
Use this Menu option to trace total fixture hours and set run times for individual shows.
For example, to reset run time to 0:
1. Navigate to and select Info menu as shown above. Time Info is the first option you will view.
Press the button to select.
2. Usi ng the buttons, scroll to Clr Last Run and press the button to select.
3. Use the buttons to scroll to ON and press the button to select.
4. Press the button to reset the run time to 0 or to return to previous menu level.
24 SolaWash 19 LED User Manual
Page 37

CHAPTER 3
Menu System
Values Display
This menu option lets you view the current DMX value for each of the fixture’s parameters.
To view DMX values by Parameter:
1. Navigate to and select the Info menu as shown on page 24.
2. Using the buttons, scroll to Values Display and press the button to select.
3. Using the buttons, scroll to any of the DMX parameters in the SolaWas h 19 LED
protocol and press the button to view its current DMX decimal value.
Note: The parameter number and name will vary depending on the DMX protocol
options being used. See Chapter 5: SolaWash 19 LED DMX Protocol Options
on page 40 and User Mode Menu on page 30.
Head Temperature
The SolaWash 19 LED fixture contains temperature sensors that monitor the air temperature
inside the housing near the display board.
To view temperature:
1. Navigate to and select the Info menu as shown on page 24.
2. Using the buttons, scroll to Head Temp and press the button to select.
The temperature will be displayed in degrees Celsius or Fahrenheit depending on which scale
is currently selected in the Set menu, see Temp C/F on page 28.
Software Version
This Info menu option displays the current fixture software loaded on the unit. Software versions
can vary even between units purchased at the same time.
To view fixture:
1. Navigate to and select the Info menu as shown on page 24.
2. Us ing the buttons, scroll to Software Ver and press the button to select.
Software version will be displayed in the form VX.XXXX
SolaWash 19 LED User Manual 25
Page 38

CHAPTER 3
MODE
/ ESC
Menu System
Set Menu
The Set Parameters menu lets you configure your fixture’s motion, display, and data source
settings.
To enter the Set menu:
1. Pr es s the MODE/ESC button to enter the first level of the menu system. The display will
show Address and Info as the first two options in the top menu level.
The red star * indicates the current option.
2. Usi ng the buttons, scroll to Set.
3. Pr es s the button to select.
Status Options
This menu lets you configure the fixture functions listed below.
No DMX Mode
This option determines the fixture state after the DMX signal is removed. The Default setting is
Hold. You can choose from the following options:
CloseShutter: Shuts LEDs off when DMX is removed
Hold: Holds the current values for all parameters
Auto Program: Reverts to Auto Program Playback
Music Ctrl: Reverts to Music Control Playback
Pan Reverse
This menu option inverts the direction of the pan motor to coordinate movements between
fixtures mounted opposite each other horizontally.The default setting is Off. On inverts the
fixture’s Pan motion.
Tilt Reverse
This menu option inverts the direction of the tilt motor to coordinate movements between fixtures
on a link facing each other vertically. The default setting is Off. On inverts the fixture’s Tilt
motion.
Pan Degree
The standard pan range of a SolaWash 19 LED fixture is 0–540°. This option lets you expand the
pan range to an upper limit of 630°. To expand the pan range, scroll from the default option of
540 to 630 and press the button to select.
Encoders
Encoders maintain the Pan and Tilt position of the fixture, but may need to be disabled to perform
certain test and maintenance procedures. The default setting is On. To disable encoders, select
the Off option.
26 SolaWash 19 LED User Manual
Page 39

CHAPTER 3
MODE
/ ESC
Menu System
Pan/Tilt Speed
This options adjusts the maximum movement speed of the pan and tilt parameters. The Speed 1
option is the default normal movement speed. Speed 2, Speed 3, and Speed 4 options are
progressively slower maximum movement speeds.
Mic Sensitivity
You can adjust the input level for the internal microphone by setting this option from 0% –99%.
The Default value is 70%.
Hibernation
This menu option determines when the fixture shuts down after DMX data loss. You can choose
any time between 1 minute and 99 minutes after data loss to shutdown. The default setting is
15M. Selecting Off will shutdown the fixture immediately upon loss of DMX signal.
For example, to change the Hibernation time from the default setting:
1. Navigate to and select the Set menu as shown above.
2. Using the buttons, scroll to Status and press the button to select.
3. Us ing the buttons, scroll to Hibernation and press the button to select. The
default setting of 15M will be displayed.
4. Using the buttons, scroll to a number of minutes between 1 and 99 and press to
select or to return to the last menu level.
Service Setting
Two options for service setting allow you to set a Service Password or a RDM PID code.
To change the Service Password:
1. Navigate to and select the Set menu as shown on page 26.
2. Us ing the buttons, scroll to Status and press the button to select.
3. Us ing the buttons, scroll to Service PIN and press the button to select. The
current password will be displayed. The default is Password = 050.
4. Using the buttons, scroll to a 3-digit number and press the button to select as the
new service password.
Note: A service password must be set before you can enter a six digit RDM PID
number.
SolaWash 19 LED User Manual 27
Page 40

CHAPTER 3
MODE
/ ESC
MODE
/ ESC
Menu System
Display Setting
The following Display options let you control how the display functions.
Shutoff Time
This option lets you determines when the display automatically shuts off after the last button
push. You can choose a delay from 02 – 60 minutes. The default delay setting is 05 minutes.
Flip Display
Use this option to rotate the display 180° when that orientation is easier to view. Off is the default
setting. Select On to flip the display. Note that this option only takes affect once you exit the
menu system by pressing the MODE/ESC button.
Key Lock
This display setting lets you activate a key lock. Off is the default. Select On to activate the key
lock and then press and hold the MODE/ESC button for 2 seconds when you want to unlock
the menu. When this function is activated, the keys will lock automatically after exiting the edit
mode for 15 seconds.
For example, to change the Shutoff Time:
1. Navigate to and select the Set menu as shown on page 26.
2. Using the buttons, scroll to Display Setting and press the button to select.
3. Using the buttons, scroll to Shutoff Time and press the button to select.
4. Using the buttons, scroll to a time between 2 and 60 minutes and press the button
to select.
Temp C/F
This options sets the temperature scale to Celsius or Fahrenheit. Ce lsius is the default se tting.
Reset Default
This Set option lets you return all factory options. The default setting is Off. SolaWash 19 LED
fixtures ships with the following factory default settings:
Pan Reverse = Off Encoders = On Flip display = Off
Tilt Reverse = Off No DMX Mode = Hold Keylock = Off
Hibernation = 15 minutes Temp C/F = Celsius Microphone Sensitivity = 70%
Movement Speed = Speed 1 Shutoff Time = 5 minutes User Mode = Standard
Pan Degree = 540 Service Password = 050 Time Info = Off
To reset the unit to factory defaults:
1. Navigate to and select the Set menu as shown on page 26.
2. Using the buttons, scroll to Reset Defaults and press the button to select.
3. Using the buttons, scroll to On and press the button to select.
28 SolaWash 19 LED User Manual
Page 41

CHAPTER 3
MODE
/ ESC
Menu System
Test Options Menu
This menu lets you manually Home the fixture and change DMX values for parameters.
To Enter the Test Options Menu:
1. Pr es s the MODE/ESC button to enter the first level of the menu system. The display will
show Address and Info as the first two options in the top menu level.
The red star * indicates the current option.
2. Using the buttons, scroll to Test.
3. Pr es s the button to select.
Homing the Fixture
The SolaWash 19 LED fixture automatically homes whenever it is connected to power. The
following options are available to let you manually home all the fixture motors or motors for
specific functions:
All: Reset all motors
Others: Reset other motors
Pan & Tilt: Reset Pan/Tilt motors
For example, to manually home the pan and tilt motors:
1. Navigate to and select the Test menu as shown above.
2. Us ing the buttons, scroll to Home and press the button to select.
3. Using the buttons, scroll to Pan & Tilt and press the button to select. The fixture
automatically begins homing the Pan and Tilt motors.
Calibration
This Test menu option lets you fine tune the home position for Pan and Tilt motors.
For example, to calibrate Pan motor after homing:
1. Navigate to and select the Test menu as shown above.
2. Us ing the buttons, scroll to Calibration and press the button to select.
3. Using the buttons, scroll to Pan and press the button to select.
4. Us ing the buttons, adjust the Gobo Wheel 1 offset value and press the button to
store the calibration adjustment.
SolaWash 19 LED User Manual 29
Page 42

CHAPTER 3
MODE
/ ESC
Menu System
User Mode Menu
Use this menu to select the Protocol option you want to use for DMX control. The SolaWash 19 LED
has four user mode options each with different control features and channel requirements:
Protocol Option Control Features
DMX Control Features
Pan
Standard
(21 Channels)
XXXX
Zones
(31 Channels)
Reduced
(19 Channels)
Mapping
(90 Channels)
Tilt
RGBW Color
CMYW Color
Cycle Color
Random Color
Zone Pattern Selection
Color Mixing by Zone
Individual LED Color Mixing
Color Correction
Zoom
Strobe
Dim
Image Select and Play Spee d
MSpeed
Control
Indigo Highlighter Function/Dim
The factory default is Standard User Mode. See Chapter 5: DMX Programming on page 39 for a
detailed description of parameter options offered in each User Mode.
XXXX
XXXX
XXX
XXX
XXX
X
X
X
XXXX
XXXX
XXXX
XXXX
X
XXXX
XXXX
XXXX
To Enter the User Mode Menu:
1. Press the MODE/ESC button to enter the first level of the menu system. The display will
show Address and Info as the first two options in the top menu level.
The red star * indicates the current option.
2. Using the buttons, scroll to User Mode and press the button to select.
To select a User Mode:
3. Using the buttons, scroll to the protocol option you want (Standard, Reduced,
Zones, Mapping) and press the button to select.
30 SolaWash 19 LED User Manual
Page 43

CHAPTER 3
MODE
/ ESC
Menu System
Preset Menu
The preset menu allows you to program scenes directly to the fixture. The options for designing
and playing back presets are described in Chapter 4: Preset Programming on page 33.
Battery Menu
This menu is only available when you are currently operating in Battery Mode. Use the following
steps to return to normal power mode:
1. Push the Mode/Esc button.
2. Use the button to scroll to Battery and press the button to select. Exit Battery will
display in red (not currently selected).
3. Pr es s the button to select. The display will turn off.
SolaWash 19 LED User Manual 31
Page 44

CHAPTER 3
Menu System
32 SolaWash 19 LED User Manual
Page 45

CHAPTER 4
MODE
/ ESC
Preset Programming
Chapter 4:
Preset Programming
SolaWash 19 LED fixtures can be programmed through the onboard menu
system using Preset Programming. This section describes how to program
your fixtures for stand-alone operation using the on -b oard me mory in e a ch
fixture to create and store scenes.
Preset Programming Overview
Presets are built from combining scenes into programs and then assigning the programs to
Program Partitions for playback by a fixture designated as the Master and, if desired, groups of
slave fixtures assigned to a Program Partition. SolaWash 19 LED fixtures ship with factory
programmed scenes and programs ready for you to use or edit.
Creating presets consists of performi ng the following steps:
• Designating a fixture as the Master
• Selecting/Editing Scenes
• Sequencing Scenes into Programs
• Sequencing Programs into Program Partitions
• Configuring slave fixtures on the link to playback a Program Partition from the
master
Navigating to the Preset Menu
To enter the Preset Menu:
1. Press the
show Address and Info as the first two options in the top menu level.
The red star
2. Using the buttons, scroll to Preset.
3. Press the button to select.
MODE/ESC button to enter the first level of the menu system. The display will
* indicates the current menu.
SolaWash 19 LED User Manual 33
Page 46

CHAPTER 4
Scene 4 Scene 5 Scene 6 Scene 7
Program 1
Scene 10
Scene 11
Scene 12 Scene 13
Program 2
Scene 14
Scene 15
Scene 16 Scene 17
Program 3
Scene 8
Scene 9
Scene 10
Program 4
Scene 20
Scene 21
Scene 22 Scene 23
Program 5
Scene 12
Scene 13
Scene 14 Scene 15
Program 6
Scene 20
Part 1
Part 2
Part 3
Preset Programming
Master and Slave
The following example shows the relationship between scenes, programs and partitions
programmed on the Master and how slave groups are assigned.
• Groups of scenes are edited into Programs 1– 6 on the fixture designated as Master
• Progr am 2 is assigned to Part 1
• Progr am 4 is assigned to Part 2
• Progr am 6 is assigned to Part 3
• Fixtures assigned as Slave 1 playback Part 1
• Fixtures assigned as Slave 2 playback Part 2
• Fixtures assigned as Slave 3 playback Part 3
34 SolaWash 19 LED User Manual
Page 47

CHAPTER 4
Preset Programming
Preset Menu
Playback Settings
Preset programming requires one fixture to act as the Master. All other SolaWash 19 LED fixtures
on the link running the same user mode can then be set as slaves to playback the Master presets.
Slave fixtures receive all their preset parameter and timing information from the master fixture.
Playback settings designate a fixture as a master or a slave and also allow you to revert from Auto
Programming to DMX control from a console or set a fixture in Master or standalone mode for
audio control.
Automatic Program Run
This Playback option lets you designate a fixture to playback in Standalone mode or as a Master.
Alone is the default setting.
To designate a fixture as a Master:
1. Navigate to and select the Preset menu as shown on page 35.
2. Use the buttons to scroll to Playback me nu and press to select.
3. Use the buttons to scroll to Auto Program menu and press to select.
4. Use the buttons to scroll to Master and press to select. Your choice will be
shown in the display.
Set to Slave
After a preset program is defined on a Master fixture, other SolaWash 19 LED fixtures on the
same DMX link can be designated slaves to playback Program Part 1, 2 or 3 as defined on the
Master fixture, see Select Program on page 38.
To designate a fixture as a Slave:
1. Navigate to and select the Preset menu as shown on page 35.
2. Use the buttons to scroll to Playback menu and press to select.
3. Use the buttons to scroll to Set To Slave menu and press to select.
4. Use the buttons to scroll to Slave1, Slave2, or Slave3 option and press to
select. Your choice will be shown in the display.
DMX Control
Selecting this option reverts the function from Auto Program (Preset Progra mming) to DMX
Receive (console control). Selecting this option will take you back to the menu startup screen
where DMX Receive will be displayed as the currently selected function.
Music Control
This Playback option lets you designate a fixture to playback scenes based on audio triggers
detected by the internal microphone in stand alone or as a Master. Alone is the default setting.
SolaWash 19 LED User Manual 35
Page 48

CHAPTER 4
MODE
/ ESC
Preset Programming
Edit Scenes
A parameter is a fixture attribute that can be controlled to modify the light beam in terms of color,
beam quality and pattern, intensity, or focus (position). DMX programming assigns a DMX value to
each of the fixture’s parameters. A scene is one combination of parameter settings.
SolaWash 19 LED fixtures provide 250 pre-programmed scenes you can use or edit to build a
preset program. The first 64 scenes have factory created settings which can be edited as desired.
Edit Scene Parameters
The Edit Scenes option lets you select a DMX value for any of the 28 parameters in the SolaWash
19 LED DMX protocol.
To edit the DMX parameters in a scene:
1. Navigate to and select the Preset menu as shown on page 35.
2. Use the buttons to scroll to the Edit Scenes option and press to select.
3. Use the buttons to scroll to the Scene number you wish to build on from 1-250 and
press to select.
4. Use the buttons to scroll to the parameter you wish to edit (Pan, Tilt, MSpeed,
Color Wheel, etc.) and press to select.
5. Use the buttons to scroll to a new DMX value for the parameter you have selected
and press to select.
This takes you back to parameter options. Continue through all parameters until your desired
look is complete. See Chapter 5: DMX Programming on page 39 to find parameter values for
the option you want to assign.
6. When you are finished selecting all par am eter value s for a partic ular Sc ene, press the
button to return to the Preset level menu.
Edit Scene Time
This Scene Edit option lets you set the scene time in seconds from 00.2s–99.9s. The default
value is 00.3s. This values determines how long the scene will play before the next scene is
triggered.
Set Fade Time
This Scene Edit option lets you set a fade time value from 000–255. This values determines the
crossfade time applied to parameters once the scene is triggered.
36 SolaWash 19 LED User Manual
Page 49

CHAPTER 4
Preset Programming
Set Input by Out
This Scene Edit option allows you to capture the parameter values for a scene from DMX input into
the fixture. Once you create a look from a DMX console do the following:
1. Navigate to and select the Preset menu as shown on page 35.
2. Use the buttons to scroll to th e Edit Scenes option and press to select.
3. Use the buttons to scroll to the Scene number you wish to build on from 1-250 and
press to select.
4. Use the button to scroll to the Input by Out and press to select.
5. The sc ene will r ecor d the current par a me te r values being input via DMX.
6. When you are finished capturing DMX into a scene, press to return to the main menu.
Edit Program
This preset menu option lets you select from 10 factory set programs to edit. You can set up to 64
Scenes in a sequence of Steps for each program. You can also test the program at any time by
selecting Program Test to playback the program as it is currently defined.
To edit a program:
1. Navigate to and select the Preset menu as shown on page 35.
2. Use the buttons to scroll to Edit Prog. menu and press to select.
3. Use the buttons to scroll to a program from Program 1–Program 10 and press
to select.
4. Use the buttons to scroll to the Step in the program you want to edit from Step 1 to
Step 64 and press to select. The display will show which scene is currently assigned to
that step.
5. Use the buttons to scroll to the scroll to the scene you want to assign to the step and
press to select.
6. When you have a ssi gned all the step s you want, sele ct End and press to save the
program.
SolaWash 19 LED User Manual 37
Page 50

CHAPTER 4
MODE
/ ESC
Preset Programming
Select Program
This preset option lets you assign a Preset Program to one of three Program Partitions. A fixture
assigned as a Slave can playback any Program Partition defined by the Master fixture.
Note: The Master fixture can only playback Program Partition 1
To assign a program to each Program Partition:
1. Navigate to and select the Preset menu as shown on page 35.
2. Use the buttons to scroll to Select Prog menu and press to select. Each
Program Part, has 10 preset programs.
3. Use the buttons to scroll to Prog. Part 1 and press to select.
4. Use the buttons to scroll to a program from Program 1–Program 10 and press
to select the program you want to include in the Program Part.
5. Use the buttons to scroll to Prog. Part 2 and press to select.
6. Use the buttons to scroll to a program from Program 1–Program 10 and press
to select the program you want to include in the Program Part.
7. Use the buttons to scroll to Prog. Part 3 and press to select.
8. Use the buttons to scroll to a program from Program 1–Program 10 and press
to select the program you want to include in the Program Part.
9. Press the
button to return to the main menu.
Scenes Input
This function allows you to capture multiple scenes from DMX values input to the fixture. You first
define the number of scenes to capture and then each time a DMX value changes, a different
scene will be captured.
1. Navigate to and select the Preset menu as shown on page 49.
2. Use the buttons to scroll to the Scenes Input option and press to select.
3. Use the buttons to set the starting scene number.
4. Use the buttons to set the ending scene number. With each change of any DMX value,
the capturing scene will advance to the next one in the range.
5. When all scenes have been recorded, the scenes input menu will automatically exit.
Note: During Scenes Input recording, the SolaWash 19 LED does not playback
the DMX input, it only captures it. You must edit or playback the scenes
after recording to see the results. It is best to prepare the scenes on a
DMX controller with a zero crossfade for all parameters between each
step. Remember any change of a DMX value will advance to the next
scene to capture.
38 SolaWash 19 LED User Manual
Page 51

CHAPTER 5
DMX Programming
Chapter 5:
DMX Programming
Multiple DMX protocol options let you program SolaWash 19 LED fixtures as
a general wash light or with added pixel and pattern control. This chapter
describes DMX programming options and SolaWash 19 LED DMX
parameters.
DMX Programming Overview
A parameter is a fixture attribute that can be controlled to modify the light beam in terms of color,
beam quality and pattern, intensity, or focus (position). DMX programming assigns a DMX value
to each of the fixture’s parameters. A scene is one combination of parameter settings. Scenes are
the building blocks for show creation.
Full Speed verses MSpeed Control
Some parameters can be set to operate at full speed or MSpeed (motor speed). Full speed
operations are completed in the shortest length of time after the motor starts moving. With
MSpeed control, change occurs smoothly over the entire MSpeed time value selected. For
example, if you select an MSpeed time of 30 seconds, the motor will gradually change position
until it reaches its new destination at the end of 30 seconds. SolaWash 19 LED fixtures allow
optional MSpeed control for pan and tilt movement parameters.
16-bit Functionality
Several parameters use two channels to provide 16-bit control for very fine adjustment.
DMX Programming Options
Using a DMX controller, you can program an unlimited number of looks and retain direct control
over the SolaWash 19 LED fixture at all times. SolaWash 19 LED fixtures also allow Preset
programming through the fixture menu system, see Chapter 5: Preset Programming on page 47.
Programming with a DMX Console
Hog® 4, Road Hog® 4, HedgeHog 4, and Full Boar 4 lighting consoles; and Hog® 4PC software are
available from High End Systems to control SolaWash 19 LED fixtures. For information on whether
your DMX controller supports SolaWash 19 LED fixtures, contact the controller’s vendor. For
information on operating your fixture with a controller (or control device such as DMX control
software), consult the documentation provided with the controller.
SolaWash 19 LED User Manual 39
Page 52

CHAPTER 5
DMX Programming
SolaWash 19 LED DMX Protocol Options
Four protocol options are available for SolaWash 19 LED fixtures. All provide full color mixing and
color correction as well as Zoom, Strobe, Dim, MSpeed and Indigo Highlighter functions.
• Standard Protocol uses 21 DMX channels. In addition to basic fixture functions, it includes
control of factory defined static images and image animations.
• Zones Protocol uses 31 DMX channels to include color control for up to 4 zones in seven
defined patterns.
• Reduc ed Protocol de fine s 19 DMX cha nnels for basi c color wash light functions.
• Mapping Protocol uses 90 DMX channels to let you color mix each of the fixture array’s 19
LEDs independently. Indigo highlighter LED are still controled sep arately.
You select the protocol for an individual fixture in the display menu system (see User Mode Menu
on page 30.
Standard Protocol
Channel Function Channel Function
1
212
3
414
5 Color Function 15
6 Red 16 Image
7 Green 17 Image Play Speed
8Blue 18MSpeed
9 White 19 Control
10 Color Correction 20 Indigo Highlighter Function
Pan
Tilt
11
13 Strobe
21 Indigo Highlighter Dim
Zoom
Dim
40 SolaWash 19 LED User Manual
Page 53

DMX Programming
Zones Protocol
Channel Function Channel Function
1
Pan
2 17 White (Zone 1)
3
Tilt
4 19 Green (Zone 2)
5 Color Correction 20 Blue (Zone 2)
6
Zoom
7 22 Red (Zone 3)
8 Strobe 23 Green (Zone 3)
9
Dim
10 25 White (Zone 3)
11 MSpeed 26 Red (Zone 4)
12 Control 27 Green (Zone 4)
13 Color Function 28 Blue (Zone 4)
14 Red (Zone 1) 30 White (Zone 4)
15 Green (Zone 1) 30 Indigo Highlighter Function
16 Blue (Zone 1)
18 Red (Zone 2)
21 White (Zone 2)
24 Blue (Zone 3)
31 Indigo Highlighter Dim
CHAPTER 5
Reduced Protocol
Channel Function Channel Function
1
212
3
414
5 Color Function 15
6 Red 16 MSpeed
7 Green 17 Control
8 Blue 18 Indigo Highlighter Function
9 White 19 Indigo Highlighter Dim
10 Color Correction
Pan
Tilt
11
13 Strobe
Zoom
Dim
SolaWash 19 LED User Manual 41
Page 54

CHAPTER 5
DMX Programming
Mapping Protocol
Chan. Function Chan. Function Chan. Function
1
Pan
2 32 LED 5 White 62 L ED 13 Green
3
Tilt
4 34 LED 6 Green 64 L ED 13 White
5 C olor Correction 35 LED 6 Blue 65 LED 14 Red
6
Zoom
7 37 LED 7 Red 67 LED 14 Blue
8 Strobe 38 LED 7 Green 68 LED 14 White
9
Dim
10 40 LED 7 White 70 LED 15 Green
11 MSpeed 41 LED 8 Red 71 LED 15 Blue
12 Control 42 LED 8 Green 72 LED 15 White
13 LED 1 Red 43 LED 8 Blue 73 LED 16 Red
14 LED 1 Green 44 LED 8 Whi te 74 LED 16 Green
15 LED 1 Blue 45 LED 9 Red 75 LED 16 Blue
16 LED 1 White 46 LED 9 Gre en 76 LED 16 White
17 LED 2 Red 47 LED 9 Blue 77 LED 17 Red
18 LED 2 Green 48 LED 9 Whi te 78 LED 17 Green
19 LED 2 Blue 49 LED 10 Red 79 LED 17 Blue
20 LED 2 White 50 LED 10 Green 80 LED 17 White
21 LED 3 Red 51 LED 10 Blue 81 LED 18 Red
22 LED 3 Green 52 LED 10 White 82 LED 18 Green
23 LED 3 Blue 53 LED 11 Red 83 LED 18 Blue
24 LED 3 White 54 LED 11 Green 84 LED 18 White
25 LED 4 Red 55 LED 11 Blue 85 LED 19 Red
26 LED 4 Green 56 LED 11 White 86 LED 19 Green
27 LED 4 Blue 57 LED 12 Red 87 LED 19 Blue
28 LED 4 White 58 LED 12 Green 88 LED 19 White
29 LED 5 Red 59 LED 12 Blue 89 Indigo Highlighter Function
30 LED 5 Green 60 LED 12 White 90 Indigo Highlighter Dim
31 LED 5 Blue 61 LED 13 Red
33 LED 6 Red 69 LED 13 Blue
36 LED 6 White 66 LED 14 Green
39 LED 7 Blue 69 LED 15 Red
42 SolaWash 19 LED User Manual
Page 55

CHAPTER 5
DMX Programming
Parameter Descriptions
In the following sections. parameters are listed alphabetically and their functions are described in
detail.
Note: All DMX values indicated in the detailed parameter descriptions are in
decimal units.
Color Correction Parameter
The Color Correction parameter adjusts the color temperature appearance of the LED output
from low at a DMX value of 1 to normal at a DMX value of 128. This parameter is part of each
protocol option. The default for Color Correction is Off when the DMX value = 0.
Color Mixing Parameters
The Red, Green, Blue and White parameter channels control the saturation (brightness level) of
each color for color mixing. Values for each color parameter range from Off when the
DMX value = 0 to fully On when the DMX value = 255.
In Standard and Reduced Protocol, four color channels mix color for all array LEDs. Zones protocol
assigns four color parameter channels for each zone. Mapping Protocol assigne four channels to
each LED in the array.
The Color Function parameter offers multiple options for controlling the LED color mixing and
output.
Note: The Color Function parameter is not included in the Mapping Protocol
options.
Standard and Reduced Protocol Color Function Options
Color Function
RGB 0-23 Mixes Red, Green and Blue and White
CMY 24-47 Mixes inverse of RGB pl us White. Red = Cyan, Green = Magenta, Blue = Yellow
Cycle 48-79 Cycles through all the colors. Red channel con tro ls cycle speed from slow to fast
Random 80-127 Randomly selects color. Red channel controls intervals from slow to fast.
DMX
Value
Description
SolaWash 19 LED User Manual 43
Page 56

CHAPTER 5
Zone Pattern Options
Zone 1
Zone 2
Zone 3
Zone 4
Zone Pattern 1 Zone Pattern 2 Zone Pattern 3
Zone Pattern 4
Zone Pattern 5 Zone Pattern 6 Zone Pattern 7
DMX Programming
Zones Protocol Color Function
In addition to the standard Color Function options, Zone protocol provides additional color
channels to control color mixing in each zone of seven patterns. Values for each color parameter
range from Off when the DMX value = 0 to fully on when the DMX value = 255.
Color
Function
RGB 0-23 Mixes Red, Green and Blue plus White
CMY 24-47 Mixes inverse of RGB plus White. Red = Cyan, Green = Magenta, Blue = Yellow
Cycle 48-79 Cycles through all the colors. Red channel controls cycle speed from slow to fast
Random 80-127 Randomly selects color. Red channel controls intervals from slow to fast.
All Zones 200-255 Treats all LEDs as a single zone for color mixing
Pattern 1 128-137
Pattern 2 138-147
Pattern 3 148-157
Pattern 4 158-167
Pattern 5 168-177
Pattern 6 178-187
Pattern 7 188-197
DMX
Value
Description
All LEDs Control - Mix colors using DMX channels 14-17
Zone LED Control - Mix colors using DMX channels 14-29
For each pattern, color mix Zone 1 LEDs with Color channels 14-17, Zone 2 LEDs
with Color channels 18-21, Zone 3 LEDs with Color channels 22-25 and Zone 4
LEDs with Color channels 26-29.
Note: Color channels 26-29 are inactive for Zone Pattern 1 since only three
zones are used to create the pattern.
44 SolaWash 19 LED User Manual
Page 57

CHAPTER 5
DMX Programming
Control Parameter
The Control parameter allows remote control of Display, Homing, Lamp and Shutdown.
Control Setting DMX Value Description
Safe 0-9 Disables all Control settings for normal operation
Display Off 20-28 Turns display off
Display On 29-48 Turns display on
Home All 49-68 Remotely homes all the fixture componen ts
Remotely shuts down the fixture. When a fixture is shut down, the LEDs
Shutdown 69-130
are off and power to the motors is disabled. If a fixture is in shutdown
mode, the fixture must be homed to bring it back into operation.
Pan and Tilt Home 131-140
Other Motor Home 141-150
Audio Sync 151-160 Synchronizes audio playback
Internal Program 1 161-171
Internal Program 1 172-182
Internal Program 1 183-193
Internal Program 1 194-204
Internal Program 1 205-215
Internal Program 1 216-226
Internal Program 1 227-237
Homes the driver motors for specific fixture components.
Selects one of the sev en factory -progra mmed 8- step sc enes to play as a
macro
Dim Parameter
SolaWash 19 LED fixtures provide 16-bit brightness control utilizing the Dim Coarse and Dim Fine
parameter without changing the color temperature or the beam shape. The dim values range from
Off when the DMX value = 0 to fully on when the DMX value = 255.
SolaWash 19 LED User Manual 45
Page 58

CHAPTER 5
DMX Programming
Image Parameters
Note: Image Parameters are found only in the Standard User mode protocol
The Image parameter lets you select from an array of static patterns and groups of patterns that
can be played together to create unique animations. A selected image or animation pattern can be
color mixed using the Color parameters.
Image Options
Solid 0 All LEDs are on
Static Images 101-102 Isolates a group of LEDs in patterns that can be colorized
Animations 103-254
Solid 248-255 All LEDs are on
The Image Play Speed parameter provides variable control of the animation speed from slow
when the DMX value = 0 to fast when the DMX value = 255.
DMX
Value
Description
Static images play to create an animation. Color is static and cannot be
changed.
Indigo Highlighter Parameters
Indigo Highlighter system consists of 16 hi ghlighters each of which contains four 1-watt indigo
LEDs. Two parameters define the Indigo Highlighter operation.
The Indigo Highlighter Function parameter lets you choose between continuous or strobed
output and whether to have the Indigo Highlighter system function independently from fixture
dimming or track it.
Indigo Highlighter
Function
Continuous 0-15 Tracks the fixture dimming with continuous output
DMX
Value
Description
Periodic Strobe 16-41 Tracks the fixture dimming with periodic strobing from slowest to fastest
Continuous 128-143 Continuous output independent from fixture dimming
Periodic Strobe 144-169 Strobing output independent from fixture dimming from slowest to fastest
The Indigo Highlighter Dim parameter adjusts the Indigo Highlighter LEDs from Off when the
DMX value = 0 to fully On when the DMX value = 255.
46 SolaWash 19 LED User Manual
Page 59
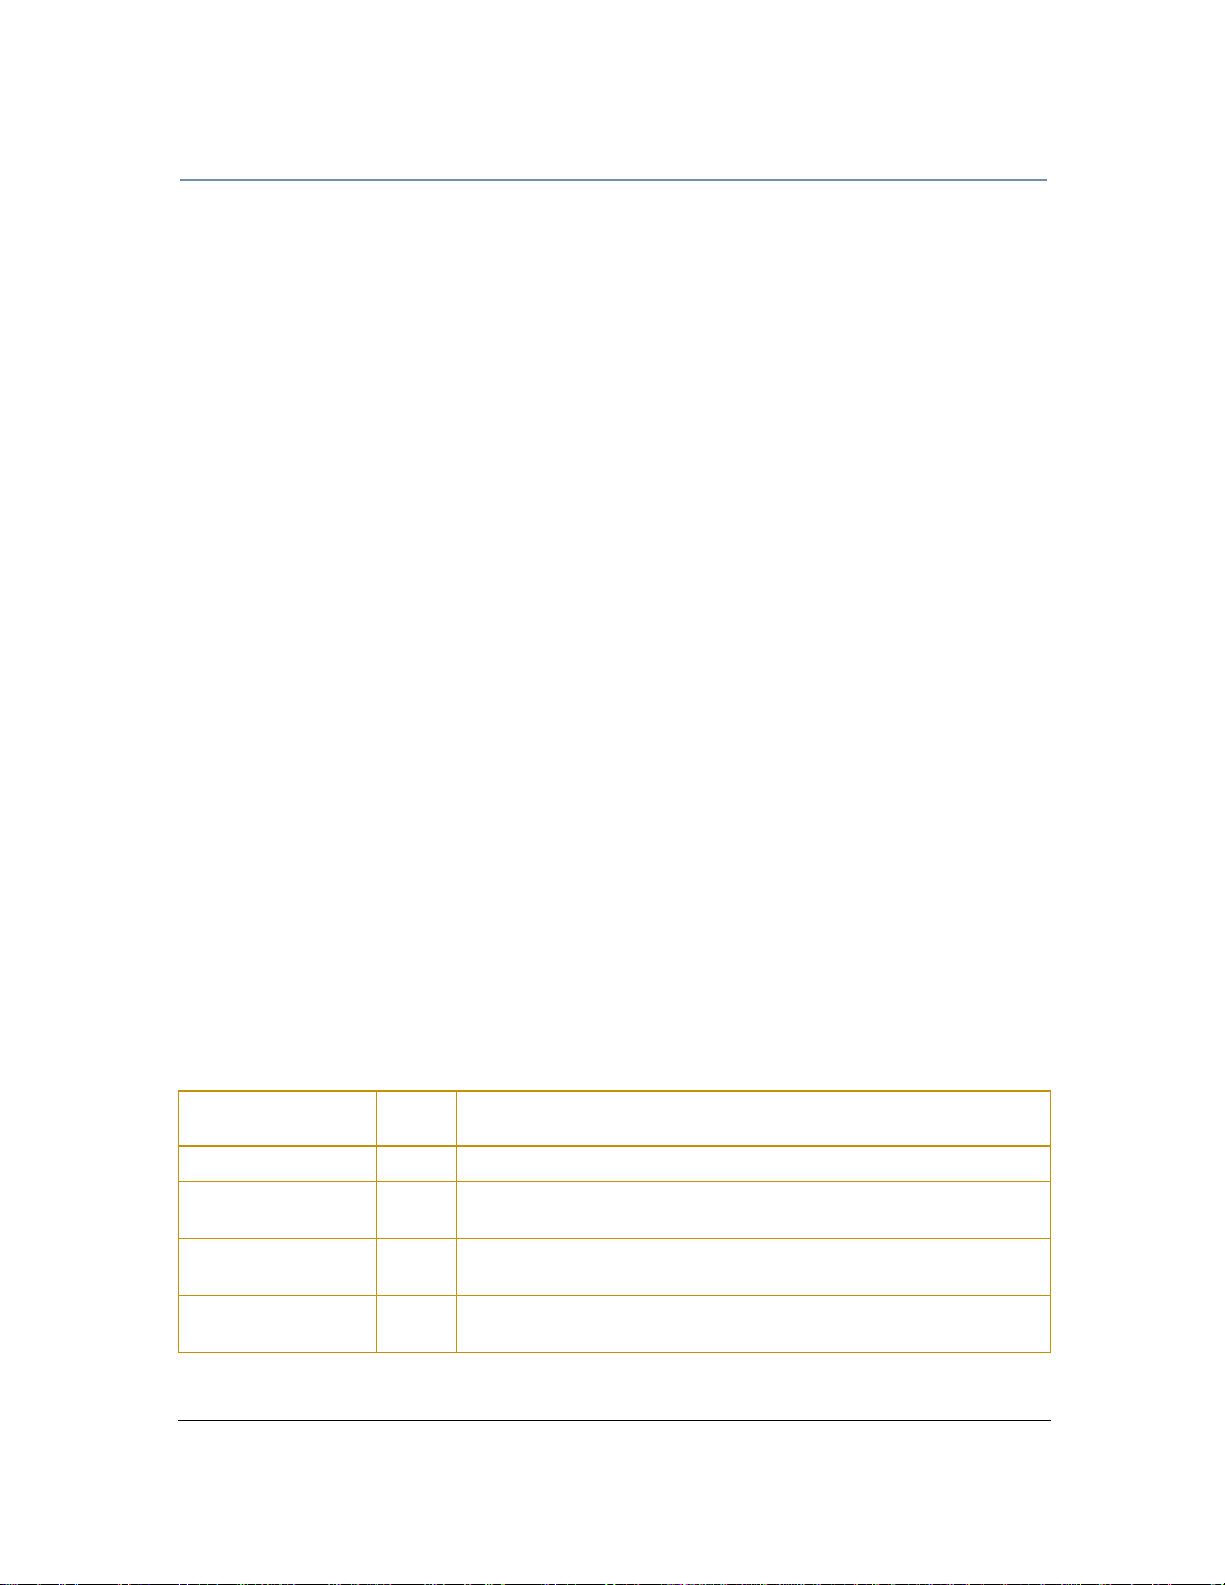
CHAPTER 5
DMX Programming
MSpeed (Motor Speed)
MSpeed is the time required for a motor to complete movement when changing from one position
to another. In SolaWash 19 LED fixtures, MSpeed provides a means for Pan and Tilt motors to
reach their target position at the same time, even though each motor may have different
distances to travel. MSpeed movement is extrem el y sm ooth becaus e the fixture controls
movements independent of DMX refresh rates.
MSpeed times vary from 0.15 seconds to 252.7 seconds. However, when MSpeed is applie d to a
parameter, the delay value (length of time allowed for the entire scene) needs to be longer than
the MSpeed value to allow the motors to complete their movement before the end of the scene.
An MSpeed value that is longer than the delay value could produce an undesirab le result; for
example, no light output during the scene. For a listing of exact MSpeed times, see Chapter A:
MSpeed Conversion Table on page 57.
Pan and Tilt Parameters
The SolaWash 19 LED fixture has a 540° pan range and a 265° tilt range. Two DMX channels
provide 16-bit adjustment to a fraction of a degree for pan and tilt posi tion. SolaWash fixtures
also have an option for a 630° pan range that you can select in the Info section of the Menu
system, (see Pan Degree on page 26).
An MSpeed function is available for Pan and Tilt parameters when the MSpeed parameter. For
information on implementing MSpeed, see MSpeed (Motor Speed) above.
Note: Optical encoders for pan and tilt instantly correct the fixture’s position if the
fixture is jarred from its programmed position. If a physical obstruction
prevents the fixture from correcting its position, the fixture “times out” to
prevent wear on the motors. If the fixture has timed out, remove the
obstruction and home the fixture to return it to normal operation.
Strobe Parameter
LEDs can be turned on and off to create different strobe effects set in the Strobe parameter. Off
is the default when the DMX value = 0.
Strobe Options
Synchronous strobe 1-100 Strobes the output at equal intervals from slow to fast
Random Random
Strobe
Synchronous Random
Strobe
Off
DMX
Value
101-177 Strobes at random intervals
178-254
0 and
255
Synchronizes random strobing for all SolaSpot 19 LED fixture s using the
same DMX controller
Discontinues strobing
Description
SolaWash 19 LED User Manual 47
Page 60

CHAPTER 5
DMX Programming
Zoom Parameter
The SolaWash 19 LED fixture has a continuous zoom ranging from 12° to 65°. The Zoom Coarse
and Zoom Fine parameters provide 16-bit continuous control for smooth and precision zoom
function from narrow when the DMX value = 0 to wide when the DMX value = 255.
48 SolaWash 19 LED User Manual
Page 61

Chapter 6:
General Maintenance and Troubleshooting
This chapter outlines safety and maintenance procedures as well as trouble shooting
error messages.
Safety Considerations
CAUTION: The information in this chapter is intended to assist qualified
personnel only.
WARNING: Disconnect power before servicing. Replace fuses with the
specified type and rating only.
Maintenance
There are no serviceable parts inside the device. The following points have to be considered when
inspecting the fixture for maintenance:
• All screws for installing the devices or parts of the device have to be tightly connected and
must not be corroded.
• Mechanically moved parts must not show any traces of wearing and must not rotate with
unbalances.
• The electric powe r supp ly cables must not show any damage, material fatigue or sediments.
Troubleshooting Error Messages
When you turn on the fixture, it will make a reset at first. The display may show “Err channel is
XX” while there are problems with one or more channels. “XX” stands for channel that has the
testing sensor for positioning. For example, when the display shows “Err channel is Pan
movement”, it means there is some error in channel 1. If there are some errors on channel 1 and
channel 3 at the same time, you may see the e rror m essage “E rr chan nel is Pan moveme nt”, “E rr
channel is Tilt movement” flash twice, and then the fixture will generate a second reset. If the
fixture is still not functioning properly, contact High End Systems customer service for assistance.
PAN- movement Er
(PAN-yoke movement error) This message will appear after the reset of the fixture if the yoke's
magnetic-indexing circuit malfunction (sensor failed or magnet missing) or the stepping-motor is
defective (or its driving IC on the main PCB). The PAN- movement is not located in the default
position after the reset.
SolaWash 19 LED User Manual 49
Page 62

CHAPTER 6
General Maintenance and Troubleshooting
TILT- movement Er
(TILT-head movement error) This message will appear after the reset of the fixture if the head's
magnetic-indexing circuit malfunctions (sensor failed or magnet missing) or the stepping-motor is
defective (or its driving IC on the main PCB). The TILT- movement is not located in the default
position after the reset.
50 SolaWash 19 LED User Manual
Page 63

Time
Appendix A:
MSpeed Conversion Table
The following table lists the MSpeed (motor) movement times and their corresponding DMX
controller values. If you have a numeric-type controller, use the Value Decimal (dec.) column. I
you have a fader-type controller, use the Value Percentage (%) column. If your controller
allows you to program hex values, use the Value (hex) column.
(sec.)
0.15 255 100 FF
0.15 254 100 FE
0.17 253 99 FD
0.19 252 99 FC
0.21 251 98 FB
0.25 250 98 FA
0.29 249 98 F9
0.35 248 97 F8
0.41 247 97 F7
0.47 246 96 F6
0.55 245 96 F5
0.63 244 96 F4
0.73 243 95 F3
0.83 242 95 F2
0.94 241 95 F1
1.05 240 94 F0
1.18 239 94 EF
1.31 238 93 EE
1.45 237 93 ED
1.60 236 93 EC
1.75 235 92 EB
1.92 234 92 EA
2.09 233 91 E9
2.27 232 91 E8
2.46 231 91 E7
2.66 230 90 E6
2.86 229 90 E5
3.07 228 89 E4
3.29 227 89 E3
3.52 226 89 E2
3.76 225 88 E1
4.00 224 88 E0
4.25 223 87 DF
4.52 222 87 DE
4.78 221 87 DD
5.06 220 86 DC
5.34 219 86 DB
5.64 218 85 DA
Value
(dec.)
Value
(%)
Value
(hex)
Time
(sec.)
5.94 217 85 D9
6.25 216 85 D8
6.56 215 84 D7
6.89 214 84 D6
7.22 213 84 D5
7.56 212 83 D4
7.91 211 83 D3
8.27 210 82 D2
8.63 209 82 D1
9.00 208 82 D0
9.39 207 81 CF
9.77 206 81 CE
10.17 205 80 CD
10.58 204 80 CC
10.99 203 80 CB
11.41 202 79 CA
11.84 201 79 C9
12.28 200 78 C8
12.72 199 78 C7
13.17 198 78 C6
13.63 197 77 C5
14.10 196 77 C4
14.58 195 76 C3
15.07 194 76 C2
15.56 193 76 C1
16.06 192 75 C0
16.57 191 75 BF
17.09 190 75 BE
17.61 189 74 BD
18.14 188 74 BC
18.68 187 73 BB
19.23 186 73 BA
19.79 185 73 B9
20.36 184 72 B8
20.93 183 72 B7
21.51 182 71 B6
22.10 181 71 B5
22.70 180 71 B4
Value
(dec.)
Value
(%)
Value
(hex)
Time
(sec.)
23.30 179 70 B3
23.92 178 70 B2
24.54 177 69 B1
25.17 176 69 B0
25.80 175 69 AF
26.45 174 68 AE
27.10 173 68 AD
27.76 172 67 AC
28.43 171 67 AB
29.11 170 67 AA
29.80 169 66 A9
30.49 168 66 A8
31.19 167 65 A7
31.90 166 65 A6
32.62 165 65 A5
33.34 164 64 A4
34.08 163 64 A3
34.82 162 64 A2
35.57 161 63 A1
36.33 160 63 A0
37.09 159 62 9F
37.87 158 62 9E
38.65 157 62 9D
39.44 156 61 9C
39.44v 156 61 9C
40.23 155 61 9B
41.04 154 60 9A
41.85 153 60 99
42.68 152 60 98
43.50 151 59 97
44.34 150 59 96
45.19 149 58 95
46.04 148 58 94
46.90 147 58 93
47.77 146 57 92
48.65 145 57 91
49.54 144 56 90
50.43 143 56 8F
Value
(dec.)
Value
(%)
Value
(hex)
SolaWash 19 LED User Manual 51
Page 64

Appendix A
MSpeed Conversion Table
Time
(sec.)
Value
(dec.)
Value
(%)
Value
(hex)
51.33 142 56 8E
52.24 141 55 8D
53.16 140 55 8C
54.09 139 55 8H
55.02 138 54 8A
55.96v 137 54 89
56.91 136 53 88
57.87 135 53 87
58.84 134 53 86
59.81 133 52 85
60.79 132 52 84
61.78 131 51 83
62.78 130 51 82
63.79 129 51 81
64.80 128 50 80
65.82 127 50 7F
66.85 126 49 7E
67.89 125 49 7D
68.94 124 49 7C
69.99 123 48 7B
71.05 122 48 7A
72.13 121 47 79
73.20 120 47 78
74.29 119 47 77
75.38 118 46 76
76.49 117 46 75
77.60 116 45 74
78.71 115 45 73
79.84 114 45 72
80.98 113 44 71
82.12 112 44 70
83.27 111 44 6F
84.43 110 43 6E
85.59 109 43 6D
86.77 108 42 6C
87.95 107 42 6B
89.14 106 42 6A
90.34 105 41 69
91.55 104 41 68
92.76 103 40 67
93.98 102 40 66
95.21 101 40 65
96.45 100 39 64
97.70 99 39 63
98.95 98 38 62
100.22 97 38 61
101.49 96 38 60
Time
(sec.)
Value
(dec.)
Value
(%)
Value
(hex)
102.77 95 37 5F
104.05 94 37 5E
105.35 93 36 5D
106.65 92 36 5C
107.96 91 36 5B
109.28 90 35 5A
110.61 89 35 59
111.94 88 35 58
113.28 87 34 57
114.63 86 34 56
115.99 85 33 55
117.36 84 33 54
118.73 83 33 53
120.12 82 32 52
121.5v 81 32 51
122.91 80 31 50
124.31 79 31 4F
125.73 78 31 4E
127.15 77 30 4D
128.58 76 30 4C
130.02 75 29 4B
134.39 72 28 48
135.86 71 28 47
137.34 70 27 46
138.82 69 27 45
140.32 68 27 44
141.82 67 26 43
143.33 66 26 42
144.85 65 25 41
146.38 64 25 40
147.92 63 25 3F
149.46 62 24 3E
151.01 61 24 3D
152.57 60 24 3C
154.14 59 23 3B
155.71 58 23 3A
157.30 57 22 39
158.89 56 22 38
160.49 55 22 37
162.09 54 21 36
163.71 53 21 35
165.33 52 20 34
166.96 51 20 33
168.60 50 20 32
170.25 49 19 31
171.91 48 19 30
173.57 47 18 2F
Time
(sec.)
Value
(dec.)
Value
(%)
Value
(hex)
175.24 46 18 2E
176.92 45 18 2D
178.61 44 17 2C
180.30 43 17 2B
182.01 42 16 2A
183.72 41 16 29
185.44 40 16 28
187.17 39 15 27
188.90 38 15 26
190.65 37 15 25
192.40 36 14 24
194.16 35 14 23
195.92 34 13 22
197.70 33 13 21
199.48 32 13 20
201.28 31 12 1F
203.08 30 12 1E
204.88 29 11 1D
206.70 28 11 1C
208.52 27 11 1B
210.36 26 10 1A
212.19 25 10 19
214.04 24 9 18
215.90 23 9 17
217.76 22 9 16
219.63 21 8 15
221.51 20 8 14
223.40 19 7 13
225.30 18 7 12
227.20 17 7 11
229.11 16 6 10
231.03 15 6 0F
232.96 14 5 0E
234.90 13 5 0D
236.84 12 5 0C
238.79 11 4 0B
240.75 10 4 0A
242.72 9 4 09
244.70 8 3 08
246.68 7 3 07
248.68 6 2 06
250.68 5 2 05
246.68 7 3 07
248.68 6 2 06
250.68 5 2 05
252.68 4 2 04
52 SolaWash 19 LED User Manual
 Loading...