

Page 1
Mini Controller
for the
Xenon Strobe Fixture
User’s Manual
TM
High End Systems Inc.
2217 West Braker Lane
S Y S T E M S
.
Austin, Texas U.S.A.
®
Page 2

© High End Systems, I nc. 1995, All Rights Reserved
Informati on and Specification s in th is document are subject to change without notice. High End Systems, Inc.
assumes no responsibility or li ability for any errors or inaccuracies that may appear in this manual.
Unlawful reproduction or distribution in any manner without the written permission of High End Systems is strictly
forbidden.
.
Tradem arks used in this te xt:
trademarks; and
Other trademarks and trade nam es may be u sed in this document to ref er to either t he entities claim ing the marks
and names or thei r produc ts . High En d System s discl aims an y pr opriet ary interest in tr ademarks and t r ade names
other than its own.
February, 1997
High End Systems
DATAFLASH, Lightwave Research
and the High End Systems Logo are trademarks of High End Systems Inc.
, and the
Lightwave Research logo
are registered
Mini Controller for the D ATAFLASH AF1000 Xenon Strobe Fixture User’s Manual
P/N 60600045 Rev. A1
Printed in the U.S.A.
M.D. T.
.
Page 3

Ta ble of Contents
Introduction....................................................................................Intro-1
About This Manual....................................................................................... Intro-1
Text Style...................................................................................................... Intro-1
Caution and Warning Symbols ................................................................ Intro-1
Safety Instructions ........................................................................................ Intro-2
Overview....................................................................................................... Intro-2
Features......................................................................................................... Intro-2
Specifications................................................................................................. Intro-2
Getting Help................................................................................................... Intro-3
Mini Controller Reference ............................................................................. Intro-4
Chapter 1
Installation and Setup.......................................................................... 1-1
Unpacking........................................................................................................... 1-1
Save the Shipping Materials .......................................................................... 1-1
Inspect the Contents....................................................................................... 1-1
Before You Begin............................................................................................... 1-2
System Configuration and Set Up ...................................................................... 1-2
AF1000 Switch Settings ................................................................................ 1-2
Mini Controller Switch Settings .................................................................... 1-4
System Set Up and Cabling ........................................................................... 1-4
Chapter 2
Mini Controller Operation.................................................................. 2-1
Overview............................................................................................................. 2-1
Operating Process ............................................................................................... 2-1
Standby Mode....................................... .... .......... .......... .......... .......... .......... ........ 2-2
Flash Mode ......................................................................................................... 2-2
Program Mode .................................................................................................... 2-2
Program Hold................................................................................................. 2-3
Program Select Return ................................................................................... 2-3
Standa rd P ro g rams................ ........ ............... ........ .............. ........ .............. ...... 2 -3
Random Function Programs.......................................................................... 2-4
Advance P ro g r a m s...... .............. ......... .............. ........ ........ .............. ........ ........ 2-4
Lightning Programs ....................................................................................... 2-4
Intensity .............................................................................................................. 2-5
Incremental .................................................................................................... 2-5
Program Function .......................................................................................... 2-5
Function A d v a n ce ......... .............. ......... .............. ........ ........ .............. ........ ...... 2-5
Rate ..................................................................................................................... 2-6
Incremental .................................................................................................... 2-6
Program Function .......................................................................................... 2-6
Function A d v a n ce ......... .............. ......... .............. ........ ........ .............. ........ ...... 2-6
Table of Contents
TOC-1
Page 4

Audio Mode ........................................................................................................ 2-7
Audio Parameters........................................................................................... 2-7
Audio Rate or Intensity Manipulation ........................................................... 2-8
Appendix A
Troubleshooting and Maintenance.................................................... A-1
Support Checklist............................................................................................... A-1
Possible Problems and Solutions ....................................................................... A-2
Mini Controller Reset ........................................................................................ A-3
Mini Controller ROM Version Number ............................................................ A-3
General Maintenance and Cleaning................................................................... A-3
Appendix B
Warranty Information ........................................................................B-1
Addendum.................................................................................... ADM-1
Program Mode ............................................................................................. ADM-1
Standa rd P ro g rams................ ........ ............... ........ .............. ........ .............ADM-1
Random Function Programs.................................................................ADM-13
Advance P ro g r a m s...... .............. ......... .............. ........ ........ .............. .......ADM-13
Lighting Programs ................................................................................ADM-13
Intensity Parameters................................................................................... ADM-14
Rate Parameters .......... .............. ........ ......... .............. ........ .............. ........ .... ADM-14
Audio Parameters....................................................................................... ADM-15
Figures
Figure 1. Front and Rear Panels of the MiniController ................................ Intro-4
Figure 1 .1 D IP Switch Loc ation . ........ ............... ........ .............. ........ .............. ...... 1 -4
Figure 1.2 XLR Pin Configuration. ..................................................................... 1-4
Figure 1.3 System Cabling .................................................................................. 1-5
Figure 1.4 Audio Cabling ................................................................................... 1-5
Figure 1.5 Connecting the Audio Cable ..............................................................1-6
Figure 2.1 Mini Controller Operation Process..................................................... 2-2
Figure 2.2 Audio Parameter Display ................................................................... 2-7
Tables
Table 1.1 Intensity/Duty Cycle Settings.............................................................. 1-2
Table 1.2 DMX Address Switch Setting ............................................................. 1-3
Table 2.1 Standard Programs Per Channel .........................................................2-3
Table 2.2 Intensity Program Functions ...............................................................2-5
Table 2.3 Rate Program Functions ...................................................................... 2-6
Table 2.4 Audio Rate or Intensity Manipulation Functions ............................... 2-8
Table A.1 Trouble Shooting Solutions ............................................................... A-2
Table ADM.1 Available Programs for One Fixture .....................................ADM-1
Table ADM.2 Available Programs for Two Fixtures ...................................ADM-2
Table ADM.3 Available Programs for Three Fixtures.................................ADM-3
TOC-2
Mini Controller User’s Manual
Page 5

Table ADM.4 Available Programs for Four Fixtures...................................ADM-4
Table ADM.5 Available Programs for Five Fixtures....................................ADM-5
Table ADM.6 Available Programs for Six Fixtures .....................................ADM-6
Table ADM.7 Available Programs for Seven Fixtures.................................ADM-7
Table ADM.8 Available Programs for Eight Fixtures ..................................ADM-8
Table ADM.9 Available Programs for Nine Fixtures...................................ADM-9
Table ADM.10 Available Programs for Ten Fixtures................................ADM-10
Table ADM.11 Available Programs for Eleven Fixtures............................ADM-11
Table ADM.12 Available Programs for Twelve Fixtures...........................ADM-12
Table ADM.13 Advance Programs.............................................................ADM-13
Table ADM.14 Lightning Programs ...........................................................ADM-13
Table ADM.15 Random Functions.............................................................ADM-13
Table ADM.16 Intensity Parameters...........................................................ADM-14
Table ADM.17 Rate Parameters .................................................................ADM-14
Table ADM.18 Audio Parameters...............................................................ADM-15
Table of Contents
TOC-3
Page 6

TOC-4
Mini Controller User’s Manual
Page 7

Introduction
Congratulations and thanks for selecting the Mini Controller for the
DATAFLASH® AF1000 Xenon Strobe Fixture from Lightwave Research®.
About This Manual
This manual provides the means to setup and operate Mini Controller. This
manual is organized in the following sections:
Introduction—introduces you to this manual, the Mini Controller, provides
hardware specifications, and technical support information.
Chapter 1 Installation and Setup—explains how to install the Min i
Controller.
Chapter 2 Operation—explains how to configure, program, and play back
data.
Appendix A Troubleshooting and Maintenance—provides directions for
troubleshooting problems and general maintenance of your controller.
Appendix B Warranty Information—provides information on the
DATAFLASH® AF1000 Mini Controller warranty.
Adde nd um – provides the contents of the existing programs.
Text Style
Throughout this manual, different types of text will be used to refer to its
corresponding item:
AA
STANDBY
> button
• a reference to specific key will look like: push the <
• a reference to a DIP switch will look like: DIP switch <1>
• a reference to the LED display will look like:
Caution and Warni ng Symbols
The following international symbols appear in margins throughout this manual to
highlight caution and warning messages.
Caution: This symbol appears adjacent to Caution messages. Ignoring
these messages could result damage to equipment.
Warning: This symbol appears adj acent to High Voltage Warning
messages. Ignoring these messages could result in serious personal injury.
Introduction
Intro-1
Page 8

Safety Instructions
• Heed all caution and warning messages throughout this manual and the
documentation that accompanies your AF1000 strobes.
• Servicing must be conducted by the manufacturer or other qualified service
personnel. There are no user serviceable parts inside.
Overview
The Mini Controller for the DATAFLASH AF1000 s trobes is a powerful
compact device that can control up to 12 channels of AF1000 strobes through
24 channels of USITT DMX-512 protocol. The intensity levels of the
applicable channels are conveniently displayed by 12 LEDs. All programs can
be edited for live control of the AF1000 strobes.
Features
• Up to 45 programs per channel
• Controls up to 12 channels of
• 64 intensity steps
• 99 rate steps
• 7 Lightning effect programs
• 30 Audio synchronization and triggering parameters
• Program Hold Mode
• Two year warranty
AF1000
strobes
Intro-2
Specifications
Height : 8.9 cm (3.5 i n.)
Width: 48.2 cm (18.97 in.)
Depth: 6 cm (2.36 in.)
Weight: 1.9 Kg (4.18 lbs.)
Power Consumption: 13 W (100 mA) at 120 VAC (60 Hz.)
Audio Input: 100 mV to a maximum of 1 V peak to peak
Mini Controller User’s Manual
16 W (50 mA) at 240 VAC (50 Hz.)
Page 9

Getting Help
High End Systems Service pr ovides a help line should you encounter any
problems during your installation or initial operation. Currently, service hours
are 9 a.m. to 6 p. m. (Central), M onday through Friday. The numbers are:
Voice lines: (512) 837-3063 or (800) 890-8989
Fax line: (512) 834-9195
Introduction
Intro-3
Page 10
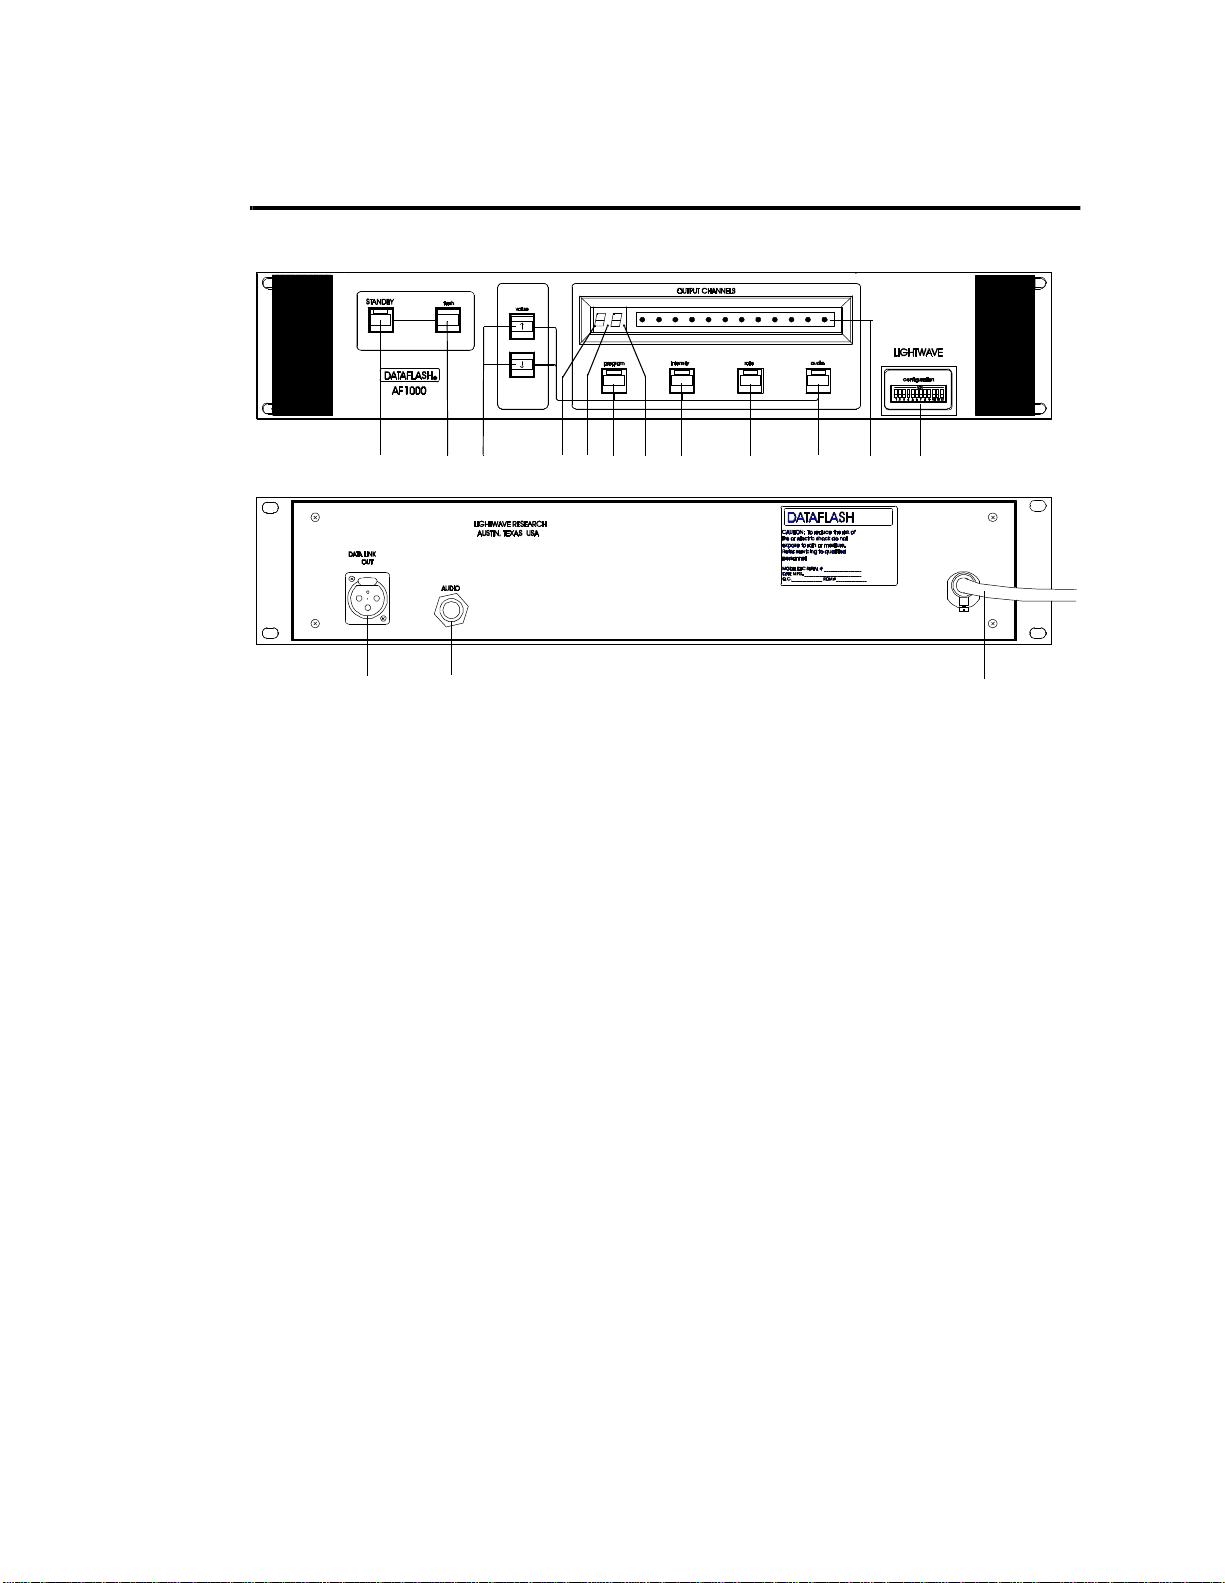
Mini Co ntroller Reference
Figure 1. Front and Rear Panels of the Mini Controller
13
1
389
2
56
104
14
11
7
12
15
Intro-4
Mini Controller User’s Manual
Page 11

STANDBY
1. <
2. <
flash
> disables controller output of programs
> when held down, causes all connected
strobes to flash at full intensity for .15
seconds at 50 Hz. and .125 seconds at 60
Hz.
3. Up/down arrow keys increments values up/down
program
4. <
> provides access to current program,
Program Advance Mode, and Program
Hold Mode
rate
5. <
6. <
> provides access to the Rate paramet er s
intensity
> pr ovides acce ss t o the I nte nsi ty
parameters
audio
7. <
> provides access to the audio parameters
8. Value display displays the current value or mode via
two 7-segment LEDs
9. Program hold indicator LED when lit, Program Hold Mode is in use
10. Audio beat indicator LED indicates that an audio signal is present,
the rate of the beat, and the strength of
the audio signal
11. Output channel display LEDs indicates the intensity and operation of
the applicable channels
12. Configuration DIP switches selects the number of output channels
13. Data Link Out 3-pin female XLR connector that
provides serial DMX data to the
strobes
14. Audio Input 1/4-i nch stereo input jack
15. Line cord Mini Controller AC power cable
Introduction
Intro-5
Page 12

Intro-6
Mini Controller User’s Manual
Page 13

Chapter 1 Installati on and Setup
In this chapter you will:
❑ unpack the Mini Controll er
❑ configure AF1000 strobes
❑ configure Mini Controller
❑ install the contr oller’s cables
1
Unpacking
In this section you unpack your M ini Controller and verify that it arrived
complete and without any damage.
Save the Shipping Materials
Do not discard the shipping cartons and packing materials. These cartons and
packing materials are specifically designed to protect the controller during
transport.
If you ever need to ship this product for repair or maintenance, please return it in
its original shipping carton and packing materials. You will be billed for a new
shipping carton and new packing materials if you return your controlle r in a nonfactory shipping carton with non-factory packing materials.
Note: Before returning anything to the factory, be sure to call your High End
Inspect the Contents
The Mini Controller arriv e s in one carton, which contains the controller and this
manual. If the controller was damaged in shipping, you must notify both the
shipping agent and your sales agent immediately.
Systems Dealer/Distributor for a Return Authorization Number . The factory
cannot accept any goods shipped without an RA number.
Chapter 1 Installation and Setup
1-1
Page 14
Before You Begin
Caution: Before you begin the installation read the following safety precautions.
1. Read all warnings, precautions, and safety instructions listed in AF1000 User
Manual.
2. Check the label on the back of the controller to ensure that the voltage is
correct for your location.
3. Do not place the Mini Controller on the same circuit with the AF1000 str o b e s,
as doing so may result in erratic actions by the controller.
4. Do not use DATAFLASH strobes with this controller. This controller is
designed to operate DATAFLASH AF1000 strobes only. Protocol differences
will result in erratic fixture behavior and possible component damage.
5. Do not mix the operational modes of the AF1000 strobes. Refer to the AF1000
User Manual for further informa tio n.
System Configuration and Set Up
This section covers the Configuration of the Mini Controller. Take careful
consideration for the placement of the strobes. The programs were specifically
designed for linear (1,2,3, etc.) (left to right, right to left) operation.
AF1000 Switch Settings
For the Mini Controller to properly operate the AF1000 strobes, the Personality
and Address DIP switches on the AF1000 strobes must set. For information on
accessing these switches, refer to your AF1000 User Manual. The Personality
switches on each strobe must be set for the same intensity/duty cycle. Refer to
Table 1.1.
Table 1.1: Intensity /Duty Cycle Settings
Setting
Standard None
Architectural 6
Special Effect 7
Note: while mixed operational modes will work together, the fixtures will respond
at different intensities, causing the programs look differently then they were
designed.
Personality
Switch On
1-2
Mini Controller User’s Manual
Page 15

Next, each strobe must be set for two channel DMX mode. This is accomplished
by setting Personality switches <3> and <4> to the On position (switch <5> must
be in the off position).
Finally, set the fixture address switches to 1–23 (depending upon how many
fixtures you have). Refer to Table 1.2 for the appropriate settings.
Table 1.2: DMX Address Switch Setting
Fixture
Number
1 1 none
232
353
4 7 2, 3
594
6112, 4
7133, 4
8 15 2, 3, 4
9175
10 19 2, 5
11 21 3, 5
12 23 2, 3, 5
DMX
Channel
Address
Switches
On
1
Notes: if a DMX channel is accidentally set for an even channel number, the
Intensity and Rate functions will be reversed causing the strobe to behave
erratically. The Mini Controller can control more than twelve strobes, but
additional AF1000 strobes must be set at duplicate addresses with other
existing strobes.
Chapter 1 Installation and Setup
1-3
Page 16

Mini Controller Switch Settings
The DIP switches on the Mini Controller must be properly set so the controller can
send the correct data packets to the number of available fixtures. If power has
already been applied to the controller, the sev e n-s egme nt LEDs will blink CF
(configure) until a DIP switch is set. The DIP switches are located on the front
panel of the Mini Controller in the lowe r righ t-hand corner. Refer to Figure 1.1.
Figure 1.1. DIP Switch Location
DIP switches
To set the DIP switches, simply turn on the switch that corresponds to the number
of available A F 1000 strobes. For example, if you have eight strobes, set switch
<8> to the On position and leave all other switches in the Off position.
Note: if two or more DIP switches are accidentally set to the On position, the
highest number DIP switch will take precedence.
System Set Up and Cabling
Secure your Mini Contro ller in a standard 19-inch rack or place it on a flat surface.
If you are unsure about how your XLR cables are constructed, use Figure 1.2 and a
Volt Ohm Meter to verify correct installation. Using the Volt Ohm Meter, place
the terminals on each pair of corresponding pins to ensure that there is extremely
little or no resistance in the line.
Figure 1.2. XLR Pin Configuration
1-4
Mini Controller User’s Manual
Page 17

Connect an XLR cable to the rear of the Mini Controller and run it to the first
AF1000. Daisy chain the desired number of fixtures together. Refer to Figure 1.3.
Note: fixture termination is not required.
Figure 1.3. System Cabling
OUT
AF1000
12
IN
AF1000
AF1000
12
INOUT
OUT
IN
Mini
Controller
If you intend on using the audio synchronization, connect a 1/4-inch mono male
(tip, ring) phone connector or 1/4-inch stereo male (tip, ring, sleeve) phone
connector to the Audio input jack on the rear of the connector. Refer to Figure 1.4
for correct cable wiring.
Figure 1.4. Audio Cabling
1
Chapter 1 Installation and Setup
1-5
Page 18

Connect the other end of the cable to an unused audio mixer output. Refer to
Figure 1.5.
Figure 1.5. Connecting the Audio Cable
Caution: Never connect a speaker level signal (cable from an amplifier output) to
the Audio input on the Mini Contr oller . Component damage will occur
and this action will void your Warranty! The line level should be from
100 mV to a maximum of 1 V peak to peak.
Note: a built in summing circuit combines the left and right signals together.
Apply power to the Mini Controller and AF1000 strobes. Installation and setup is
now complete. If you are experiencing any problems, refer to Appendix A for
possible solutions. If you can not r esolve the problem yourself, contact High End
Systems Technical Support.
1-6
Mini Controller User’s Manual
Page 19

Chapter 2 Mini Controller Operation
In this chapter you will:
❑ learn to operate the Mini Controller
❑ learn how to select the desired program
❑ learn about the Mini Controller’s special features
❑ learn how to change the Rate, Intensity, and Audio programs to cater to your needs
Overview
This Chapter covers the operation of the Mini Controller and the f unctions of the
keys. There are four groups of pr ograms installed on the EPROM in the Mini
Controller: Standard Programs, Random Function Programs, Advance Programs,
and Lightning Programs. Each program’s Rate and Intensity may be manipulated
to cater to individual needs. Also, audio synchronization functions ar e available
to trigger the ignition of the AF1000 strobes. Complete program layout a nd
explanations are included at the end of this manual in the Addendum. The
Addendum will take precedence over program information contained in this
Chapter.
Note: any changes made to the Intensity , Rate, and Audio parameters are applied
globally to all programs. If you turn the Intensity down to 15, that Intensity will
effect all programs when they are run.
2
Operatin g Pro ce ss
The operating process of the Mini Controller is based upon Programs. The
Progr am s cons ist of steps. A step an instruction sent to the strobes which tells which
strobe(s) to illuminate, the duration of the illumination, and the Intensity of the
illumination. A group of steps forms a sequence. The time it takes for one step to
advance to another step is Rate. Refer to Figure 2.1.
Chapter 2 Mini Controller Operation
2-1
Page 20

Figure 2.1. Mini Controller Operation Process
When a Program is run, it is run from the first step to the last step. Then the
Program will loop back to the first step and begin this process again.
Standby Mode
When power is first applied to the unit or when the unit is reset, Standby Mode
is automatically engaged. The Mini Controller is in Standby Mode when the
LED above the <
the desired program to be located without starting a ny other program. Af ter
you have reached the desired Program (re fer to the Program topic found later
in this Chapter), press the <
the desired program. When you wish to stop the current pr ogram, press the
STANDBY
<
> key again.
STANDBY
> key is illuminated. Standby mode is used to allow
STANDBY
> key to disable Standby Mode and start
2-2
Mini Controller User’s Manual
Flash Mode
A special feature of the Mini Controller is Flash Mode. Hold the <
down to ignite all AF1000 strobes at full Intensity for .125 seconds (60 Hz) or
.15 seconds (50 Hz). The <
flash
> key may be pressed repeatedly or until the
strobe(s) time out, at which point the LEDs will continue to flash, but the
strobes will not respond until they have finished their cooling cycle . Flash
Mode will override any program that is currently being run, with the exception
of the Lightning Programs. Refer to Lightning Programs later in this Chapter.
flash
> key
Program Mode
Press the <
Program Mode). Program Mode is engaged when the LED above the <
is illuminated. The <
Standard Programs, Random Function Programs, Advance Programs, and Lightning
Programs.
program
> key to enable Program Mode (the Mini Controller defaults to
program
program
> key and the up/down arrow keys allow access to the
> key
Page 21

Program Hold
Program Hold allows another program to be selected without affecting the
current program being run. Program Hold is initiated by holding down the
program
<
> key and using the arrow keys to pre-select another program. The
Program Hold Indicator (LED between the 7-segment LEDs in the value
display) will illuminate to confirm this mode is active. The next program
will not begin until the <
program
> key is released.
Program Select Return
Twelve seconds after adjusting the Rate, Intensity, or Audio setting, the controller
will return to Program Mode. Any changes made to the above settings will be in
effect.
Standard Pr og ram s
The number of Standard Programs the Mini Controller can use depends on the
number of channels that are set up. Refer to Table 2.1.
Table 2.1 : S ta ndard Program s Per Chan nel
2
Number of
Channels
16
212
324
423
527
627
727
827
927
10 27
11 27
12 27
Number of
Programs
Chapter 2 Mini Controller Operation
2-3
Page 22

Random Function Programs
Immediately following the Standard Programs are three Random Function
Programs. This set of programs is not dependant upon the number of assigned
channels. Random Function Programs are annotated by F1, F2, and
F3
on the
value display. This set of programs perform the following actions:
F1
•
–multiple fixtures will f lash in a random pattern, but only one fixture will
flash at maximum Intensity at a time.
F2
•
–single fixtures will flash in a random pattern and randomly go to full
Intensity.
F3
•
–all fixtures will flash in a random pattern, one fixture at a time
(sequentially) at random intensities.
Advance Programs
Follo wing the Random Function Programs are the Advance Programs. The
Advance Programs are annotated by A1 through A8 on the display. Advance
Programs will randomly select from the available Standard Programs (refer to
Table 2.1 for the available programs per channels). A1 is the fastest Rate of
program advancement and A8 is the slowest Rate of program advancement.
Lightning Programs
The final set of programs are the Lightning Programs. These programs were
specifically designed to emulate ground to cloud and inner cloud lighting at
various distances. They are annotated by L1 through L7 on the display. The
Lightning Programs operate differently from the pre vious programs. You may start
and stop a Lighting Program three ways:
• hold the <
flash
> key down to begin the program and release the key to stop the
program.
• press th e <
STANDBY
> key (take the Mini Controller of f Standby Mode) to
begin the program and press the key again to tur n Standby Mode on again and
stop the program.
• by using Audio parameter 9 and an audio signal to trigger the start of the
Lightning Program. Refer Audio Mode found later in this Chapter for further
clarification.
Refer to the Addendum for the descriptions of the Lightning programs.
2-4
Mini Controller User’s Manual
Page 23

Intensity
The <
intensity
> key changes the brightness of the AF1000 strobes. There are
three sets of Intensity parameters: Incremental, Program Functions, and
Function Advance.
Incremental
There are 64 Incremental Intensity parameters. These parameters are annotated on
the display by 1 through 64, with 1 being the dimmest and
64
being the
brightest.
Program Function
Following the Incremental parameters, there are seven Program Function
parameters. Refer to Table 2.2 and the Addendum for the effect of each Program
Function.
Table 2.2 : Int ensity Progra m Fu nc t ions
Program
Function
F1
F2
Manipulation of Intensity
Ramp down
Ramp up
2
F3
F4
F5
F6
F7
Maximum Intensity f or one run of
Maximum Intensity f or tw o steps,
Maximum Intensity for one step,
Ramp up and down
Random –c hanges every time a
program is run
the program , then minimum
Intensity for the next run of a
program
then minimum Intensity for the
next two ste ps
then mini mu m In te ns it y for one
step
Function Advance
The last Intensity parameter is Function Advance. Function Advance is annotated
by FA on the display. When this parameter is selected, a Program Function (F1–
F7
) is used at random and an Intensity of
64
is used fifty percent of the time.
Chapter 2 Mini Controller Operation
2-5
Page 24

Rate
rate
The <
within every program. There are three sets of R ate parameter s: I ncremental,
Program Functions, Function Advance.
Incrementa l
There are 99 Incremental parameters for Rate. These parameters are annotated on
the display by 1 through 99, with 1 being the slowest Rate and 99 being the
fastest Rate.
Program Function
Following the Incremental parameters, there are seven Program Function
parameters. Refer to Table 1.2 and the Addendum for the result of each Program
Function.
> key allows access to the Rate at which the controller advances steps
Table 2.3: R at e Program Func t ions
Program
Function
F1
F2
F3
F4
F5
F6
F7
Manipulation of Rate
Ramp down
Ramp up
Ramp up an d dow n
Fast for two programs , then
slow for one program s
Fast for twelve steps, then slow
for four steps
One step fast, next step slow
Small pause every five steps
Function Advance
The last Rate parameter is Function Advance. Function Advance is annotated by
FA
on the display. When this parameter is selected a Program Function (F1–F7)
is used at random or a Rate of 99 is used fifty percent of the time.
2-6
Mini Controller User’s Manual
Page 25

Audio Mode
The Audio feature allows audio triggering and synchronization control of the
AF1000 strobes. Press the <
through the audio parameters.
Note: if any of the following parameters are selecte d, Audio Mode will disable
itself (--) so it will not to conflict with any actions of these parameters:
• Advance Programs (A1 through A8) in Program Mode.
• Program Function in Rate Mode and Intensity Mode.
• Function Advance in Rate or Intensity Mode.
Audio Parameters
There are five sets of audio parameters. Refer to Figure 2.1 and the Addendum for
clarification of Audio parameters.
Audio disabled (off)
audio
> key and use the arrow keys to maneuver
Figure 2.1. Audio Parameter Display
2
through 9 depicts the
No program
advancement
1
manipulation of Rate of
Intensity function
Program advancement
every four beats
through
0
depicts the
9
manipulation of Rate of
Program advancement
Intensity function
every beat
Audio Advance
The audio settings are:
• Two side by side horizontal bars– the Audio Mode is disabled and Audio Rate
or Intensity functions are not ava ilable (default).
• One horizontal bar– no program adva ncement, but the audio rate or intensity
manipulation functions are available ( refer to the following section).
• Two horizontal bars– programs will advance randomly with every four beats.
• Three horizontal bars– programs will advance randomly with every beat.
• Audio Advance (
Mode every eight seconds.
AA
)– programs will randomly advance to a different Audio
Chapter 2 Mini Controller Operation
2-7
Page 26

Audio Rate or Intensity Manipulation
Within each audio parameter, there are nine functions for Program, Rate
an d In t e n s it y m a ni p u l a t io n . These functions ar e annotated as 0 through 9 on
the display. Refer to Table 2.3 and the Addendum for the purpose of these
functions.
Table 2.4: Audio R ate or Intens ity M anipulat ion Functions
Function
Number
0
1
2
3
4
5
6
7
8
Manipulation of Rate or Intensity
no manipulation
frame advancing on beat
four frames advanc e per beat
beat causes maximum Rate, otherwise Rate
equals m edium
beat causes maximum Rate, otherwise Rate
taper down
maximum Intensity on beat, then Intensity
tapers down
minimu m In te ns it y on beat, then In te ns it y
tapers up
Intensity f lips between max im um and medium
on beat
maximum Int ens ity on beat, otherw is e m edium
Intensity
2-8
Mini Controller User’s Manual
9
resets program to first step on beat
Note: Audio Function 9 will override Standby Mode when used with a Lightning
Program.
Page 27

Appendix A Troubleshooting and Maintenance
This Appendix provides directions for troubleshooting problems that may have
occurred from improper setup or configuration of the Mini Controller and the AF1000
strobes. Before calling for technical assistance, follow the r ecommended procedures
in this Appendix to solve many of the common possible problems.
If the procedures in this Appendix do not solve your problem and you need to call for
assistance, please provide the support technician with the information outlined in the
Support Checklist provided in this Appendix.
Support Checklist
Technica l support c an provide you with faster s ervice if you can give the technician
the following information when you call.
❑ Customer name
❑ Country, if other than U.S.A.
❑ Phone number and Fax number
❑ The Mini Controller’s ROM version (procedure found later in this Appendix under Mini
Contr olle r’s ROM Version)
❑ A description of your problem and the troubleshooting procedures that you have already
performed to resolve your problem
❑ The type of XLR cables that you are using? Were they purchased or built?
A
Appendix A Troubleshooting and
Maintenance
A-1
Page 28

Possible Problems and Solutions
Use the following Table to solve most problems.
Table A.1: Trouble Shooting Solutions
Problem Probable Cause Solution
LEDs will not turn on no power to controller apply power
LEDs will not turn on internal fuse blown call High End Systems
Technical Support for
service instructions
Some fixtures not responding to Controller
Fixtures not responding to
Controller
Fixtures not responding to
Controller
Fixtures not responding to
Controller
Fixtures not responding to
Controller
Controller displays
CF
configuration DIP
switches not s et for corr ect
number of fixtures
reset controller to the
correct number of DIP
switches
internal fuse(s) blown call High End Systems
Technical Support for
service instructions
no power to fixtures apply power to fixtures
bad XLR cable(s) check all XLR cables with
a Volt Ohm meter by placing leads on each pin at
both cable ends and check
for resistance– replace
cables as needed
Fixture addresses have not
been set
Refer to T able 1.2 in Chapter 1 to properly set fixture
addresses
configuration DIP
switches not set
reset controller to the
correct number of DIP
switches
Fixture’ s Intensity and
Rate settings are swapped
When the <
used, the fixture’s
duration lasts for well ov er
the correct time (about 2
seconds)
Some fixture(s) behave
differently than others
A-2
Mini Controller User’s Manual
flash
> key is
Fixture is set to an even
DMX channel
fixture is set for 3-channel
DMX mode
some fixtures are set for 3channel DMX mode
Reset fixture to correct
DMX channel
reset Personality switches
<3> and <4> to the On
position, leave <5> off
reset Personality switches
<3> and <4> to the On
position, leave <5> Off
Page 29

Table A.1: Trouble Shooting Soluti ons
Problem Probable Cause Solution
Audio indicator does not
light up
Audio indicator does not
light up
Audio indicator does not
light up
Audio indicator
constantly stays on
weak or no audio signal check to ensure cable is
bad audio cable check the tip, ring, and
a speaker level signal has
been sent to the audio
connector
audio signal is too strong reduce audio signal
Mini Controller Reset
The Mini Controller may be reset two different ways:
•press the <
program
>, <
intensity
>, <
rate
>, and <
audio
properly connected, boost
audio signal (between 20
Hz to 100 Hz)
sleeve resistance with a
Volt Ohm meter–replace
or repair cable
A
contact High End Systems
Technical Support
> keys simultaneously
• turn the configuration DIP switch to the Off position and return it to the On position
Note: when the Mini Controller is reset, all default v alues will be in effect and Standby Mode
will be engaged.
Mini Controller ROM Version Number
To view the ROM version number, turn the Configuration Dip switch to the Off
position and press any key. The ROM version number will appear on the display.
General Maintenance and Cleaning
You should clean your Mini Controller on a regular basis. Dust and dirt can
accumulate and cause malfunctions. As a precautionary step , unplug the Mini
Controller before cle aning. To clean the outer surfaces:
• Wipe with a soft cloth or tissue, or use a small vacuum to r emove the built-up dust and
dirt. Do not use a blower, as this will force dirt into the controller.
Warnings: Do not submerse in liquid. There are no user serviceable parts inside. Servicing
should only be conducted by a qualified technician.
Appendix A Troubleshooting and
Maintenance
A-3
Page 30

A-4
Mini Controller User’s Manual
Page 31

Appendix B Warranty Information
Limited Warranty
Unless otherwise stated, your product is covered by a one year part s and labor
limited warranty. If the warranty registration form provided with this
equipment is filled out and faxed or mailed to High End Systems, I nc., and
received within 60 days of invoice date, the one year parts and labor limited
warranty will be extended one additional year, for a total of two years.
Dichroic filters and Lithopatterns™ are not guaranteed against breakage or
scratches to coating. It is the owner's responsibility to furnish receipts or
invoices for verification of purchase, date, and dealer or distributor. If
purchase date cannot be provided, date of manufacture will be used to
determine warranty period.
Returning an Item Under Warranty for Repair
It is necessary to obtain a Return Authorization Number (RA#) from your
dealer/point of purchase BEFORE any units are returned f or repair. The
manufacturer will make the final determination as to whether or not the unit is
covered by warranty. Lamps ar e covered by the lamp manufacturer's warranty.
B
Any Product unit or parts returned to High End Systems must be packaged in a
suitable manner to ensure the protection of such Product unit or parts, and such
package shall be clearly and prominently marked to indicate that the package
contains returned Product units or parts and with a Returned Authorization
(RA#) number. Accompany all returned Product units or parts with a written
explanation of the alleged problem or malfunction.
Please note: Freight Damage Claims are inva lid for fixtures shipped in nonfactory boxes and packing materials.
Freight
All shipping will be paid by the purchaser. Items under warranty shall have
return shipping paid by the manufacturer only in the Continental United States.
Under no circumstances will fr eight collect shipments be accepted. Prepaid
shipping does not include rush expediting such as airfreight. Airfreight can be
sent customer collect in the Continental United States .
REPAIR OR R EPLACEMENT AS P ROV IDED F OR UNDE R THI S
WARRANTY IS THE EXCLUSIVE REMEDY OF THE CONSUMER. HIGH
END SYSTEMS, INC. MAKES NO WARRANTIES, EXPRESSED OR
IMPLIED, WITH RESPECT TO ANY PRODUCT, AND HIGH END
SPECIFICALLY DI SCLAIMS ANY WARRANT Y OF MERC HANTABILITY
OR FITNESS FOR A PARTICULAR PURPOSE. HIGH END SHALL NOT
BE LIABLE FOR ANY INDIRECT, INCIDENTAL , OR CONSE QUENTIAL
DAMAGE, INCL UDING LOST P ROFITS, SUSTAINED OR INCURR ED IN
Appendix B Warranty I nformatio n
B-1
Page 32

CONNECTION WITH ANY PRODUCT OR CAUS ED BY PRODUCT
DEFECTS OR THE PARTIAL OR TOTAL FAILURE OF ANY PRODUCT
REGARDLESS OF THE FORM OF ACTION, WHETHER IN CONTRACT,
TORT, (INCLUDI NG NEGL IGENCE), S TRI CT LIAB ILITY, OR
OTHERWISE, AND W HETHER OR NOT SUCH DAMAGE WAS
FORESEEN OR UNFORESEEN .
Warranty is void if the product is mis used, damaged, modified in any way, or
for unauthorized repairs or parts. This warranty gives you specific legal r ights,
and you may also have other rights which vary from state to state.
B-2
Mini Controller User’s Manual
Page 33

Addendum
This A ddendum provides you with a listing of the current pr ograms that ar e pre-
installed on your Mini Controller. This Addendum will take precedence over any
program information provided in the User’s Manual. Use the ta bles in the following
sections for the description, location of available programs, and parameters of the
Mini Controller.
Program Mode
This section provides reference tables to view the number of available programs you
have available based upon the number of connected A F1000 luminaires.
Standard Pr og ram s
Table ADM.1: Available Programs for One Fixture
Display Steps Description
1
2
3
4
5
6
1 flash minimum duration
2 flash maximum duration
2 pop and drop
2 ramp up and do w n, Intensity increments by 1
2 ramp up and do w n, Intensity increments by 2
1 full on
ADM
Addendum
ADM-1
Page 34

Table ADM.2: Available Programs for Two Fixtures
Display Steps Description
1
2
3
4
5
6
7
8
9
10
11
12
1
2
2
2
4
4
2
4
3
4
2
1
all flash minimum duration
all flash maximum duration
single fixture chase minimum duration
single fixture chase maximum duration
individual ramp up and down wit h Intensity
incrementing by 4
individual ramp up and down wit h Intensity
incrementing by 2
crossfade between fixtures
pop and drop
fixture overlap with maximu m duration
individual ramp up and down
ramp up and down with Intensity increments of 1
full on
ADM-2
Mini Controller User’s Manual
Page 35

Table ADM.3: Available Programs for Three Fixtures
Display Steps Description
1
2
3
4
5
6
7
8
9
10
11
12
13
1
2
3
3
3
3
6
6
6
6
3
3
2
all flash mi nimum durat ion
all flash maximum dura tion
single fixture chase minimum dur ation
single fixture chase minimum dur ation, reverse direction
single fixture chase maximum duration
single fixture chase maximum duration, reverse direction
individual ramp up and down with Intensit y
incrementing by 4
individual ramp up and down with Intensit y
incrementing by 4, reverse direction
individual ramp up and down with Intensit y
incrementing by 2
individual ramp up and down with Intensit y
incrementing by 2, reverse direction
crossfade
crossfade, re verse direction
two to one fixture crossfade
ADM
14
15
16
17
18
19
20
21
22
23
24
6
6
3
3
6
6
2
4
3
3
1
pop and drop
inverted pop and drop
two fixtures overlap, maximum duration
two fixt ure overl a p, maxim u m du r a tion, reverse
direction
individual ramp up and down with background
inverted ind ividual ramp up and down w ith background
all ramp up and down with Intensity increments of 1
single fixture bounce
two fixture bou nce and latch, maxim um Rate, maximum
Intensity
two fixture bounce , slightly slower Rate (than 23),
maximum Intensity
full on
Addendum
ADM-3
Page 36

Table ADM.4: Available Programs for Four Fixtures
Display Steps Description
1
2
3
4
5
6
7
8
9
10
11
12
13
1
2
4
4
4
4
8
8
8
6
4
8
8
all flash minimum duration
all flash maximum duration
single fixture chase minimum duration
single fixture chase minimu m duration, reverse direction
single fixture chase maximum duration
single fixture chase maximum duration, reverse di rection
individual ramp up and down wit h Intensity
incrementing of 4
individual ramp up and down wit h Intensity
incrementing by 4, reverse direct ion
individual ramp up and down wit h Intensity
incrementing by 2
individual ramp up and down wit h Intensity
incrementing by 2, reverse direct ion
crossfade
two fi xture crossfade
pop and drop
14
15
16
17
18
19
20
21
22
23
4
4
8
6
6
2
4
3
3
1
pop and drop, reverse direction
two fi xture overlap, maximum duration
two fi xture overlap, maximum duration, reverse
direct ion
individual ramp up and down with background
inv erted individual ramp up and down with background
ramp up and down with Intensity increments of 1
single fixture bounce
bounce maximum rate, maximum Intensity
bounce slower Rate (than 23), maximum Intensity
full on
ADM-4
Mini Controller User’s Manual
Page 37

Table ADM.5: Available Programs for Five Fixtures
Display Steps Description
1
2
3
4
5
6
7
8
9
10
11
12
13
10
10
10
10
10
1
2
5
4
5
5
5
3
all flash mi nimum durat ion
all flash maximum dura tion
single fixture chase minimum dur ation
single fixture chase minimum dur ation, reverse direction
single fixture chase maximum duration
single fixture chase maximum duration, reverse direction
individual ramp up and down with Intensit y
incrementing of 4
individual ramp up and down with Intensit y
incrementing by 4, reverse direction
multiple fixtures ramp up and down, with Intensi ty
incrementing by 2
ramp up and dow n, with Intensity incrementing by 2, in
reverse direction
crossfade
two fixture crossfade
pop and drop
ADM
14
15
16
17
18
19
20
21
22
23
24
25
26
10
10
pop and drop, reverse directio n
5
5
3
3
2
4
3
3
4
1
5
two fixture overlap, ma ximum du ration
two fixt ure overl a p, maxim u m du r a tion, reverse
direction
two fixture chase at two fixture stager, maximum
duration
two fixture chase at two fixture stager, maximum
duration , reverse direction
individual ramp up and down with background
individual ramp up and down with background, reverse
direction
all ramp up and down
single fixture bounce
two fixture bounce and latch, maximum rate, maximum
Intensity
two fixture bounce slightly, slower rate (than 23)
full on
rock et
27
4
rocket, reverse direction
Addendum
ADM-5
Page 38

Table ADM.6: Available Programs for Six Fixtures
Display Steps Description
11
22
36
46
56
66
712
812
912
10 10
11 5
12 3
13 12
14 12
15 6
all flash minimum duration
all flash maximum duration
single fixture chase minimum duration
single fixture chase minimu m duration, reverse direction
single fixture chase maximum duration
single fixture chase maximum duration, reverse di rection
individual ramp up and down
individual ramp up and down, reverse direction
ramp up and down, with Intensity incrementing by 2
multiple fixtures ramp up and down, Intensity
incrementing by 2, reverse direct ion
crossfade
multiple fixture crossfade
pop and drop
pop and drop, reverse direction
two fi xture overlap, maximum duration
16 6
17 3
18 3
19 12
20 12
21 2
22 10
23 3
24 3
25 1
26 6
27 4
two fi xture overlap, maximum duration, reverse
direct ion
two fixture chase, two fixture stager, maximum duration
two fixture chase, two fixture stager, maximum duration
reverse direction
individual ramp up and down with background
individual ramp up and down with background, r everse
direct ion
all ramp up and down
single fixture bounce
two fi xture bounce and latch, maximum rate, m aximum
Intensity
two fi xture slightly slow er rate (than 23), maximum
Intensity
full on
rocket
rocket , reverse direction
ADM-6
Mini Controller User’s Manual
Page 39

Table ADM.7: Available Programs for Seven Fixtures
Display Steps Description
1
2
3
4
5
6
7
8
9
10
11
12
13
14
15
14
14
14
14
14
14
1
2
7
7
7
7
7
4
7
all flash mi nimum durat ion
all flash maximum dura tion
single fixture chase minimum dur ation
single fixture chase minimum dur ation, reverse direction
single fixture chase maximum duration
single fixture chase maximum duration, reverse direction
individual ramp up and down
individual ramp up and down, re verse direction
individual ramp up and down, Int ensity incrementing by
2
individual ramp up and down, wit h Intensity increment-
ing by 2 individual ramp up and down, reverse direction
crossfade
multiple fixture crossfade
pop and drop
pop and drop, reversed
two fixture overlap, ma ximum du ration
ADM
16
17
18
19
20
21
23
23
24
25
26
27
14
14
12
7
4
4
2
5
5
1
7
7
two fixt ure overl a p, maxim u m du r a tion, reverse
direction
two fixture chase , two fixt ure stager, maximum duration
two fix ture ch ase , t wo fi xt ur e stage r , m axim um dur atio n,
reverse direction
individual ramp up and down with background
individual ramp up and down with background, reverse
directi o n
all ramp up and down
single fixture bounce
two fixture bounce and latch maximum rate, maxi m um
Intensity
two fixture slightly slower Rate (tha n 23), maximum
Intensity
full on
rock et
rocket, reverse direction
Addendum
ADM-7
Page 40

Table ADM.8: Available Programs for Eight Fixtures
Display Steps Description
1
2
3
4
5
6
7
8
9
10
11
12
13
14
15
16
16
16
10
16
16
1
2
8
8
8
8
5
4
8
all flash minimum duration
all flash maximum duration
single fixture chase minimum duration
single fixture chase minimu m duration, reverse direction
single fixture chase maximum duration
single fixture chase maximum duration, reverse di rection
individual ramp up and down
individual ramp up and down, reverse direction
individual ramp up and down, In tensity
incrementing by 2
individual fixtures ra mp u p and down, Intensity
incrementing by 2, reverse direct ion
crossfade
multiple fixture crossfade
pop and drop
pop and drop, reversed
two fi xture overlap, maximum duration
16
17
18
19
20
21
22
23
24
25
26
27
16
16
14
8
3
3
2
1
5
2
8
8
two fi xture overlap, maximum duration, reverse
direct ion
three fixture chase, two fixture stager, maximum
duration
three fixture chase, two fixture stager, maximum
dura tio n , reverse dire ction
individual ramp up and down with background
individual ramp up and down with background, r everse
direct ion
all ramp up and down
single fixture bounce
two fi xture bounce and latch, maximum rate, m aximum
intensity
two fi xture bounce, slightly slower rate (than 23) ,
maximum intensity
full on
rocket
rocket , reverse direction
ADM-8
Mini Controller User’s Manual
Page 41

Table ADM.9: Available Programs for Nine Fixtures
Display Steps Description
1
2
3
4
5
6
7
8
9
10
11
12
13
14
18
18
18
18
18
18
1
2
9
9
9
9
9
5
all flash mi nimum durat ion
all flash maximum dura tion
single fixture chase minimum dur ation
single fixture chase minimum dur ation, reverse direction
single fixture chase maximum duration
single fixture chase maximum duration, reverse direction
individual ramp up and down
individual ramp up and down, re verse direction
multiple fixtures ramp up and down, Intensity
incrementing by 2
multiple fixtures ramp up and down, ignite twice with
Intensity incrementing by 2 individual ramp up and
down, reverse direction
crossfade
multiple fixture crossfade
pop and drop
pop and drop, reversed
ADM
15
16
17
18
19
20
21
22
23
24
25
26
27
16
16
16
10
10
9
9
3
3
2
5
5
1
two fixture overlap, ma ximum du ration
two fixt ure overl a p, maxim u m du r a tion, reverse
direction
three fixture chase, two fixture stager, maximum
duration
three fixture chase, two fixture stager maximum
duration , reverse direction
individual ramp up and down with background
individual ramp up and down with background, reverse
directi o n
all ramp up and down
single fixture bounce
two fixture maximum Rate, maximum Intensity
two fixture slightly slower Rate (tha n 23), maximum
Intensity
full on
rock et
rocket, reverse direction
Addendum
ADM-9
Page 42

Table ADM.10: Available Programs for Ten Fixtures
Display Steps Description
1
2
3
4
5
6
7
8
9
10
11
12
13
14
15
10
10
10
10
20
20
20
20
10
20
20
10
1
2
5
all flash minimum duration
all flash maximum duration
single fixture chase minimum duration
single fixture chase minimu m duration, reverse direction
single fixture chase maximum duration
single fixture chase maximum duration, reverse di rection
individual ramp up and down
individual ramp up and down, reverse direction
individual ramp up and down, In tensity
incrementing by 2
individual ramp up and down, In tensity
incrementing by 2, in reverse dire ction
crossfade
multiple fixture crossfade
pop and drop
pop and drop, reverse direction
two fi xture overlap, maximum duration
16
17
18
19
20
21
22
23
24
25
26
27
10
10
20
20
18
10
10
two fi xture overlap, maximum duration, reverse
direct ion
four fixture chase maximum duration
3
2
5
5
1
four fixture chase, maximum duration, reverse di rection
individual ramp up and down with background
individual ramp up and down with background, r everse
direct ion
all ramp up and down
single fixture bounce
two f ixture bounce and lat ch, maximum Rate, maximum
Intensity
two fi xture bounce, slightly slower rate (than 23) ,
maximum Intensity
full on
rocket
rocket , reverse direction
ADM-10
Mini Controller User’ s Manual
Page 43

Table ADM.11: Available Programs for Eleven Fixtures
Display Steps Description
1
2
3
4
5
6
7
8
9
10
11
12
13
14
15
11
11
11
11
22
22
22
22
11
22
22
11
1
2
6
all flash mi nimum durat ion
all flash maximum dura tion
single fixture chase minimum dur ation
single fixture chase minimum dur ation, reverse direction
single fixture chase maximum duration
single fixture chase maximum duration, reverse direction
individual ramp up and down
individual ramp up and down, re verse direction
individual ramp up and down, Int ensity incrementing by
2
individual ramp up and down, Int ensity incrementing by
2, reverse direction
crossfade
multiple fixture crossfade
pop and drop
pop and drop, reversed
two fixture overlap, ma ximum du ration
ADM
16
17
18
19
20
21
22
23
24
25
26
27
11
22
20
20
12
12
two fixt ure overl a p, maxim u m du r a tion, reverse
direction
3
3
2
5
5
1
three step chase
three step chase, in reverse directio n
individual ramp up and down with background
individual ramp up and down with background, reverse
directi o n
all ramp up and down
single fixture bounce
two fixture bou nce and latch, maxim um Rate, maximum
Intensity
two fixture bounce slightly slower Rate (than 23),
maximum Intensity
full on
rock et
rocket, reverse direction
Addendum
ADM-11
Page 44

Table ADM.12: Available Programs for Twelve Fixtures
Display Steps Description
1
2
3
4
5
6
7
8
9
10
11
12
13
14
15
12
12
12
12
24
24
24
24
12
24
24
12
1
2
6
all flash minimum duration
all flash maximum duration
single fixture chase minimum duration
single fixture chase minimu m duration, reverse direction
single fixture chase maximum duration
single fixture chase maximum duration, reverse di rection
individual ramp up and down
individual ramp up and down, reverse direction
individual ramp up and down, Intensity incrementing by
2
individual ramp up and down, Intensity incrementing by
2, rev erse direction
crossfade
multiple fixture crossfade
pop and drop
pop and drop, reversed
two fi xture overlap, maximum duration
16
17
18
19
20
21
22
23
24
25
26
27
12
24
24
22
12
12
two fi xture overlap, maximum duration, reverse
direct ion
3
3
2
6
6
1
three st ep chase
three st ep chase, in re verse direction
individual ramp up and down with background
individual ramp up and down with background, r everse
direct ion
all ramp up and down
single fixture bounce
two f ixture bounce and lat ch, maximum Rate, maximum
Intensity
two fi xture bounce slightly slower Rat e (than 2 3 ),
maximum Intensity
full on
rocket
rocket , reverse direction
ADM-12
Mini Controller User’ s Manual
Page 45

Random Functi on Programs
Table ADM.13: Random Functions
Display Description
F 1 multiple fixtures will flash in a random pattern, but only one
fixture will flash at maximum Intensity at a time
F 2 single fi xtur es wi l l fla sh i n a ran dom pa tt er n an d rando mly go
to full Intensity
F 3 all fixt ures wil l flash in a r and om pa tter n, one fi xtu re at a t ime
(sequentially) at random intensities
Advance Programs
Table ADM.14: Advance Programs
Display Description
A 1 - A 8 Standard Programs are randomly selected. A1 is the fastest
Lightning Programs
Display Steps Description
L1
L2
L3
L4
L5
L6
L7
rate that the progra ms will advance and A 8 is the slowest
rate that the programs will advance.
Table ADM.15: Lightning Programs
26
29
25
25
17
48
25
clap–initial big bolt at top, flickers out at end
heat–low to moderate inner clo ud lightning
peal–grou nd to cloud lightning, high acti vity, energy
focused in three main channels
close strike–storm overhead, moderate to high activity
near–moder at e ac ti v it y , t wo ch annel li gh tn ing , fl ic ke rs i n
distance
distant–moderate activity, constant flickering cloud
lightning
pearl–big flash foll owed by back to back fla shes of
moderate intensity
ADM
Addendum
ADM-13
Page 46

Intensity Parameters
Use the following table for the descriptions of the parameter s available through the
intensity
<
> key.
Table ADM.16: Intensity Parameters
Display Description
1–64 1 is the dimmest intensity and 64 is the brightest .
F1 ramp down
F2 ramp down
F 3 ramp up and down
F 4 random–changes ever y time a program is run
F 5 maximum Intensity for one sequence, then minimum
Intensity for the next program run
F 6 maximum Intensity for two steps, then
minimum I n tensity for the next two steps
F 7 maximum intensity for one step, then minimum Intensity for
one step
F A randomly selects F 1 –F 7 and ran dom ly uses a value of 6 4
fifty percent of the time
Rate Parameters
Use the following table for the descriptions available through the <
Table ADM.17: Rate Parameters
Display Description
1 - 9 9 1 is the slowes t Rate and 9 9 is th e fastest ra te
F1 ramp down
F2 ramp up
F 3 ramp up and down
F 4 fast for two program programs, then slow for one program
F 5 fast for tw elve steps, then slow for four steps
F 6 one step fast, next step slow
F 7 small pause every five st eps
rate
> key.
ADM-14
F A randomly se lect s F 1 –F 7 and randomly us es a v al ue of 9 9
fifty percent of the time
Mini Controller User’ s Manual
Page 47

Audio Parameters
Use the following table for the description of the parameters available through the
audio
<
> key.
Table ADM.18: Audio Parameters
Display Description
– – Audio mode is disabled
_ 1 no program advancement, step advancing on beat
_ 2 no program advancement, four steps advanced per beat
_ 3 no program advancement, beat causes maximum Rate,
otherwise Rate is medium
_ 4 no program adv ancement, beat causes maximum Rate, tape rs
down after beat
_ 5 no program advancement, beat causes maximum Intensity,
tapers down after beat
_ 6 no program advancement, no program advancement, beat
causes minimum Intensity, tapers up after beat
_ 7 no program adva ncement, Intensity flips between maximum
and m e dium on be a t
ADM
_ 8 no program advancement, beat causes maximum intensity,
otherwise intensity is medium
_ 9 no program adv ancement, beat causes program to reset to the
first step
= 0 program advancement every four beats
= 1 program advancement every four beats, step advancing on
beat
= 2 program advancement every four beats, four steps advanced
per beat
= 3 program advancement every four beats, beat causes
maximum Rate, otherwise Rat e is medium
= 4 program advancement every four beats, no program
advancement, beat causes maximum Rate, tapers down after
beat
= 5 program advancement every four beats, no program
advancement, beat causes maximum Intensity, tapers down
after bea t
= 6 program adv anc emen t e v ery f our beat s, bea t cau ses mi nimu m
Intens ity, tapers up after be at
= 7 program advancement every four beats, Intensity flips
between maximum and medium on bea t
= 8 program advancement every four beats, beat causes
maximum Int ensity, otherwise Intensity is medium
Addendum
ADM-15
Page 48

Display Description
=
9 program advancement ever y four beats, beat causes program
to reset to the first step
≡
0
≡
1 program advancement every beat, step ad vancing on beat
≡
2 program advancement every beat, four st eps advanced per
≡
3 program advancement every beat, beat ca uses maximum
≡
4 program advancement every beat, no progr am advancement,
≡
5 program advancement every beat, beat ca uses maximum
≡
6 program advancement every beat, beat ca uses minimum
≡
7 program advancement every beat, Inten sity flips between
≡
8 program advancement every beat, beat ca uses maximum
≡
9 program advancement every beat, beat ca uses program to
A A a di fferent Audio Mode is randomly selected every eight
program advancement every beat
beat
Rate, otherwise Rate is medium
beat causes maximum Rate, tapers down after beat
Intensity, taper s down after beat
Intens ity, tapers up after beat
maxi m u m and medi um on beat
intens ity, otherwise intensity is medium
reset t o the first step
seconds
ADM-16
Mini Controller User’ s Manual
 Loading...