

Hi-Flame HF-917 UA, HF-917 UB, HF-917 UC, HF-917 UD Installation And Operation Instructions Manual
1
375-S-03-2
Installa
for
US
tion and Operation Instruc
A only.
tions
Tested to UL 1482-2010
Models – HF-917 UA, UB, UC, UD Series
Safety Notice: If this solid fuel room heater is not properly installed, a house fire may result. For
your safety and to reduce the risk of fire, follow the installation directions. Contact local
building, fire officials or the authority having jurisdiction about restrictions and installation
inspection requirements in your area, including the need to obtain a permit. Kindly save these
instructions for future reference.
VERY IMPORTANT
PLEASE READ THIS ENTIRE MANUAL BEFORE YOU INSTALL AND USE YOUR NEW ROOM
HEATER. FAILURE TO FOLLOW INSTRUCTIONS MAY RESULT IN PROPERTY DAMAGE, BODILY
INJURY, OR EVEN DEATH. FAILURE TO READ AND FOLLOW THESE INSTRUCTIONS BEFORE
YOU PROCEED MAY RESULT IN DAMAGE, VOIDING YOUR WARRANTY!
HOT WHILE IN OPERATION. KEEP CHILDREN, CLOTHING, AND FURNITURE AWAY. CONTACT
MAY CAUSE SKIN BURNS.
Please contact the dealer in your area if you
have any questions about your stove that are not covered
in this manual.

2
Introduction
Congratulations on purchasing a genuine Henan Hi-Flame® Stove. When cared for properly,
the high quality, finely crafted cast iron stoves and fireplaces will offer many years of reliable
performance. This instruction manual has been developed to ensure optimum performance from
the Henan Hi-Flame® stove and fireplace range. It's very important that you thoroughly read
and understand all instructions before using your new stove or fireplace.
Table of Contents
Page
VERY IMPORTANT .................................................................................................................. 1
Introduction ............................................................................................................................. 2
Stove Safety ............................................................................................................................ 3
Before installing your stove ................................................................................................... 4
Adequate provision air ................................................................................................ .............. 4
Installation ............................................................................................................................... 5
The floor protection ................................................................................................................... 6
Installation clearances ............................................................................................................... 7
Well sealed flue system ............................................................................................................ 8
Chimney connection .................................................................................................................. 8
Chimney .................................................................................................................................... 9
Factory Built Chimney .............................................................................................................. 10
Masonry Chimney .................................................................................................................... 11
Combustible Wall Chimney Connector Pass-Throughs ............................................................ 12
Operating Your Stove ........................................................................................................... 13
Fuel ......................................................................................................................................... 13
First operation of stove ............................................................................................................ 13
Air controls .............................................................................................................................. 13
Refueling .................................................................................................................................. 14
Ash removal ............................................................................................................................ 14
Stove Maintenance ................................................................................................................ 15
Care of glass ........................................................................................................................... 15
Replacement of glass .............................................................................................................. 16
Replacement parts .................................................................................................................. 16
HF-917UA Part list .................................................................................................................... 16
HF-917UB Part list .................................................................................................................... 18
HF-917UC Part list .................................................................................................................... 19
HF-917UD Part list .................................................................................................................... 20
Surface finish .......................................................................................................................... 21
Trouble Shooting .................................................................................................................. 21
Fire not burning ....................................................................................................................... 21
Glass blackens ........................................................................................................................ 21
Smoke in room ................................ ........................................................................................ 21
Fire burning too quickly ........................................................................................................... 21
Chimney fire ............................................................................................................................ 22
Specifications ........................................................................................................................ 22
Henan Hi-Flame Warranty ..................................................................................................... 23
Warranty Policy & Procedures ................................................................ ................................. 23

3
Stove Safety
When properly maintained and operated your stove should give you many years of service. However there
are important safety aspects of these products that you need to be aware of when operating a wood stove.
1. Only use solid wood fuel. DO NOT USE CHEMICALS TO START THE FIRE. Never use gasoline,
gasoline-type lantern fuel, kerosene, charcoal, lighter fluid, naphtha, engine oil, or similar liquids to
start or „freshen up‟ a fire in this heater. Keep all such liquids well away from the stove while it is in
use. Do not burn garbage in the stove.
2. The burning of wood gives off gases which can be extremely dangerous. The stove is designed that
under normal operating circumstances these gases pass up the flue chimney system and cannot
escape into your home, however it is important that your flue system is properly installed and that
you check all joints regularly to ensure that there are no cracks or gaps, check the door sealing rope
and replace when damaged. We recommend a smoke alarm be fitted in rooms where stoves are
installed. Do not use stove in a room where negative pressure conditions may occur, such as
through the use of extraction fans unless an adequate air supply into the room is ensured, as this
may draw air through the stove and cause products of combustion to escape into the room.
3. Creosote and soot may accumulate in your flue pipe and chimney. This may ignite, causing a
chimney fire. If you suspect a chimney fire evacuate people from the building, close down the air
controls on the stove and call the Fire Department. To prevent the accumulation of soot or creosote,
check flue and chimney regularly and clean as necessary. Good burning, hot stoves will generally
cause a lot less build-up than slow burning stoves. Likewise dry wood will cause less build-up than
wet wood. We recommend a fire extinguisher be available where stoves are in operation. In the
event of a chimney fire do not re-light the stove until it and the flue chimney system have been
thoroughly checked and repaired as necessary.
4. Stoves get extremely hot and should not be touched when lit. When young children are in the area,
we recommend the use of a suitable fire guard around the stove. Always wear protective gloves
when reloading stove.
5. Never over-fire your stove. If external parts of your stove are glowing red then the stove is over-firing
and your draft settings should be reduced. Never interfere with the draft mechanisms or adjust your
air settings outside those limits set when the stove is manufactured. Never use a fan to supply air to
the stove or to extract air from it.
6. All users of the stove should be aware of the contents of this manual. Please leave this manual
where it is accessible to stove users and do not allow anyone to use the stove that is unfamiliar with
its correct operation.
7. Never use the stove if any parts are missing or damaged, only use genuine parts as replacements.
Never modify your stove.
8. DO NOT INSTALL IN A MOBILE HOME.
We hope you have many years of warmth and comfort from
your stove but please do so safely.

4
Check Building Codes
When installing, operating and maintaining your stove, follow the guidelines presented in these
instructions, and make them available to anyone using or servicing the stove.
Your city, town, county or province may require a building permit to install a solid-fuel burning appliance.
In the U.S., the National Fire Protection Association‟s Code, NFPA 211, Standards for Chimneys,
Fireplaces, Vents and Solid Fuel Burning Appliances, or similar regulations, may apply to the installation
of a solid fuel burning appliance in your area.
Always consult your local building inspector or authority having jurisdiction to determine what regulations
apply in your area.
Before installing your stove
You need to consider the following to ensure the safe operation of your stove.
• Provision of adequate air to support efficient combustion of the fuel.
• A well sealed flue/chimney system, herein after referred to as the “flue system.”
• The protection of combustible materials in proximity of the stove.
Adequate provision air
It is essential for the safe and efficient use of your stove that you provide an adequate air supply
to your stove. This may mean the provision of an outside air supply to the room, especially if
there are extraction units such as cooker hoods or clothes dryers in the vicinity. Failure to do so
will mean that fuel is burned inefficiently causing smoke and blackening the glass and may also
cause smoke to come back into the room. As a simple check for this open a door or window in
the room and check if the stove burns more efficiently.

5
Installation
Unpacking and preparing your stove for installation.
1. Remove your stove from the outer packaging and place on floor. Please inspect stove
and check that it is not damaged in any way. Never attempt to use a stove that has been
damaged.
2. If you are installing the stove yourself, proceed as follows. However, if you are unsure
about any aspect of stove installation, please contact your dealer and he will discuss
installation with you or put you in touch with an experienced stove installer.
3. Open fire door. Remove and check the following contents.
Instruction book
Flue spigot
Ash pan
2 Spare glass clips
Operating tool
Spare screws
4. Move stove into position. Do not drag stove as this may damage the legs, screws or
base.
5. Connect flue pipe to stove. Seal all joints with ceramic rope and/or approved fire
cement. Follow manufacturer‟s instructions for flue pipes.

6
16” - USA
8”
8”
8”
8”
8”
The floor protection
If the stove is to be installed on a combustible floor, it must be placed on a non-combustible
hearth pad. In the USA, the floor protector must extend 8” beyond each side of the fuel
loading door and 16” to the front. (See fig. 4)
Fig. 4
In a rear vent installation the floor protection must also extend under the stovepipe a minimum
of 2” beyond either side of the pipe.
7
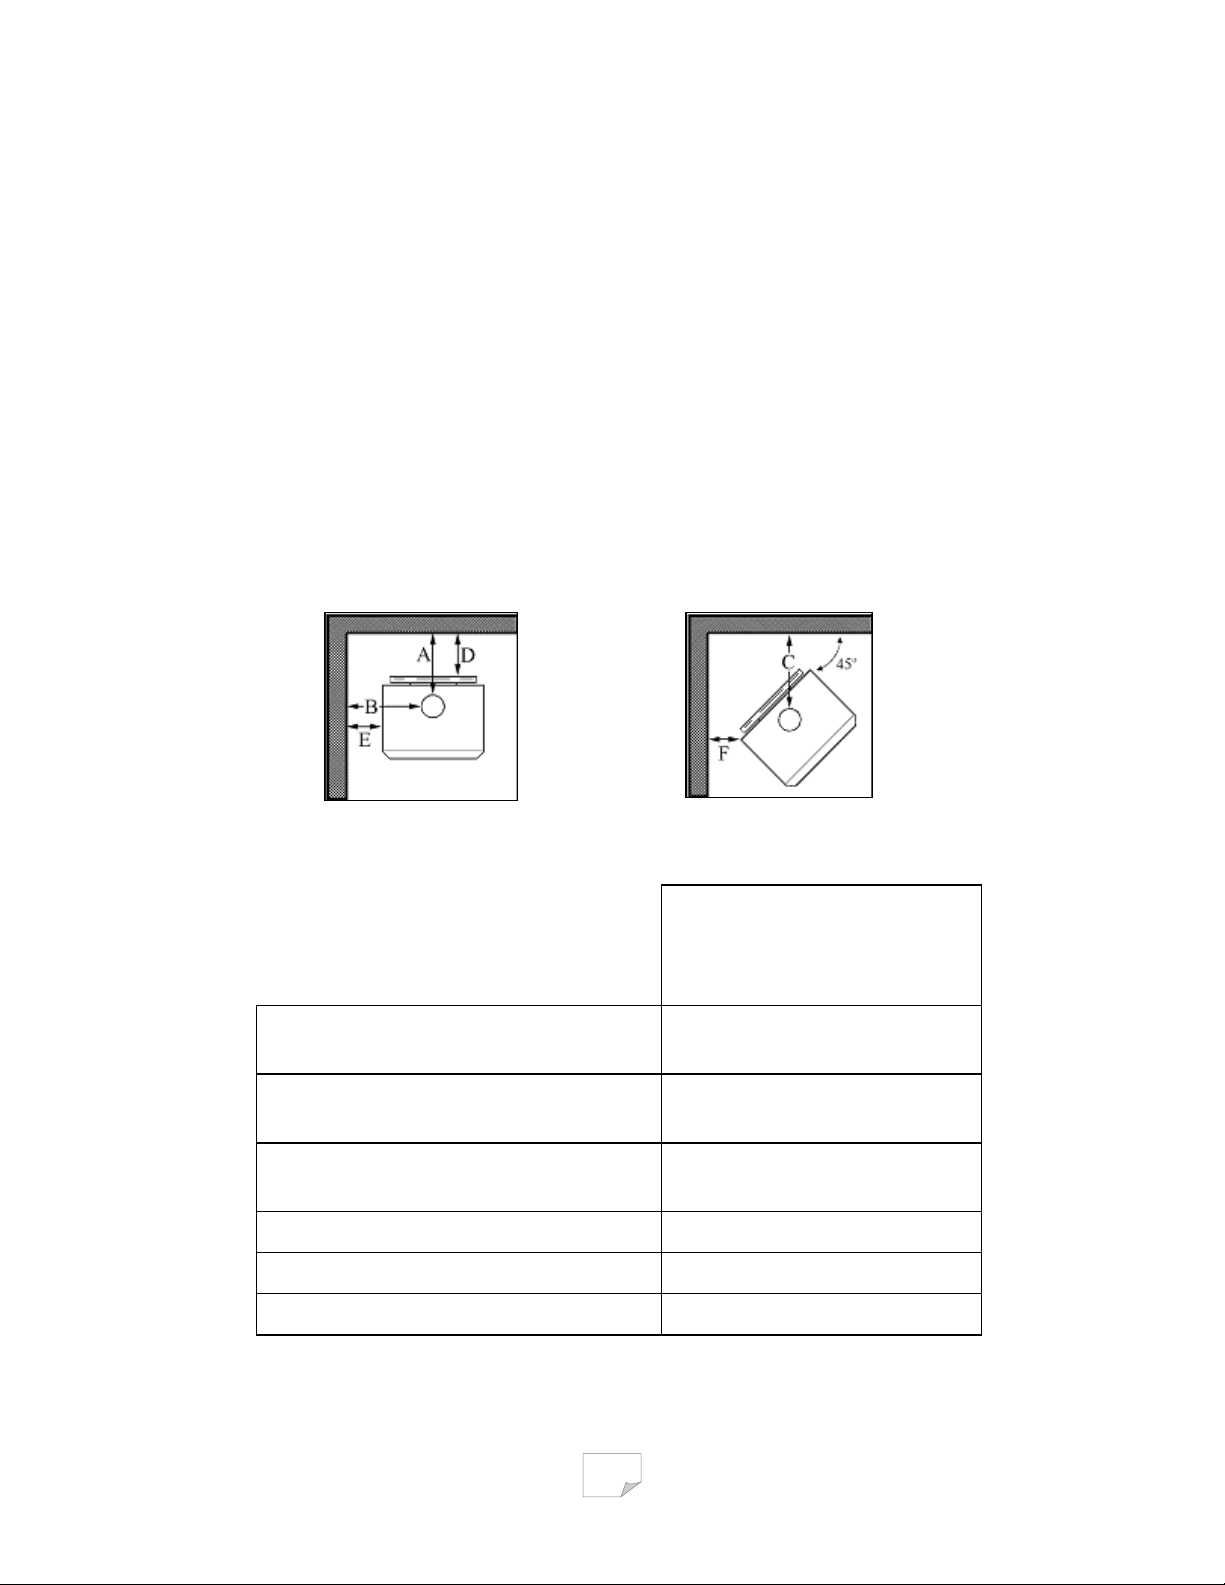
HF-917
Single wall
connector pipe
A – Chimney Connector to back
wall
21.5”
B – Chimney Connector to
sidewall
29”
C – Chimney Connector to corner
wall
21.5”
D – Unit to back wall
17”
E – Unit to sidewall
20”
F – Unit to corner wall
11.5”
Installation Clearances
It is extremely important that you respect required installation distances and that you respect
local installation regulations. This is for your safety! The manufacturer is not responsible for the
product, if it is not installed following these recommendations. These clearances may only be
reduced by means approved by the regulatory authority.
One necessary precautions when installing a wood stove is to leave sufficient space between
the stove (top, sides, back, front, and under stove pipes) and any other material that can catch
fire. The clearance from the top of the unit to the ceiling is 41". All other clearances are found in
the table below.
A combustible surface is anything that can burn (i.e. sheet rock, wall paper, wood, fabrics etc.)
These surfaces are not limited to those that are visible and also include materials that are
behind non-combustible materials. If you are not sure of the combustible nature of a material,
consult your local fire officials.
Parallel Installation Corner Installation
8
Well sealed flue system
Only materials and items approved for solid fuel stoves should be used for your stove. Under
no circumstances should you use aluminum or galvanized steel pipes for your stove flue.
Always fit pipes with the narrow side down, this allow any creosote to run down the inside of the
pipe and not to come out and cause an unsightly mess and possible fire hazard. All joints in the
flue system should be sealed with fire cement and/or an appropriate fire resistant rope or gasket.
Pipe bends should be kept to a minimum and we do not recommend using more than 2 bends
on any installation. Flues must not pass through ceilings, floors, attics, roofs, or combustible
walls without adequate and approved insulation being provided to protect combustible materials.
The chimney and flue provide a means of taking combusted fuel from the stove, as well as a
draft to enable the stove to work. It is essential that the flue system is kept in good condition and
there are no breaks or cracks allowing contact with any other combustible materials of the
house. It is also essential that the flue system is kept clean and seals are maintained to ensure
the draft is not lost.
The open end of the flue system must be above the height of the apex of the building and any
other obstructions, such as trees, which are within 3 meters (10ft) of the flue system. Failure to
do this will affect the efficiency of the stove and may cause down drafts which will mean
dangerous products of combustion are emitted into room.
Under no circumstances should the flue pipe be less than 6” internal diameter.
Chimney connection
The chimney connector is a single walled pipe used to connect the stove to the chimney. For
use with the appliance the chimney connector MUST be 6” in diameter, with a minimum
thickness of 24 gauge black steel or 26 gauge blued steel.
Aluminum and galvanized steel pipe is not acceptable for use with the appliance. These
materials cannot withstand the extreme temperatures of a wood fire and can give off toxic fumes
when heated.
Do not use the connector pipe as a chimney.
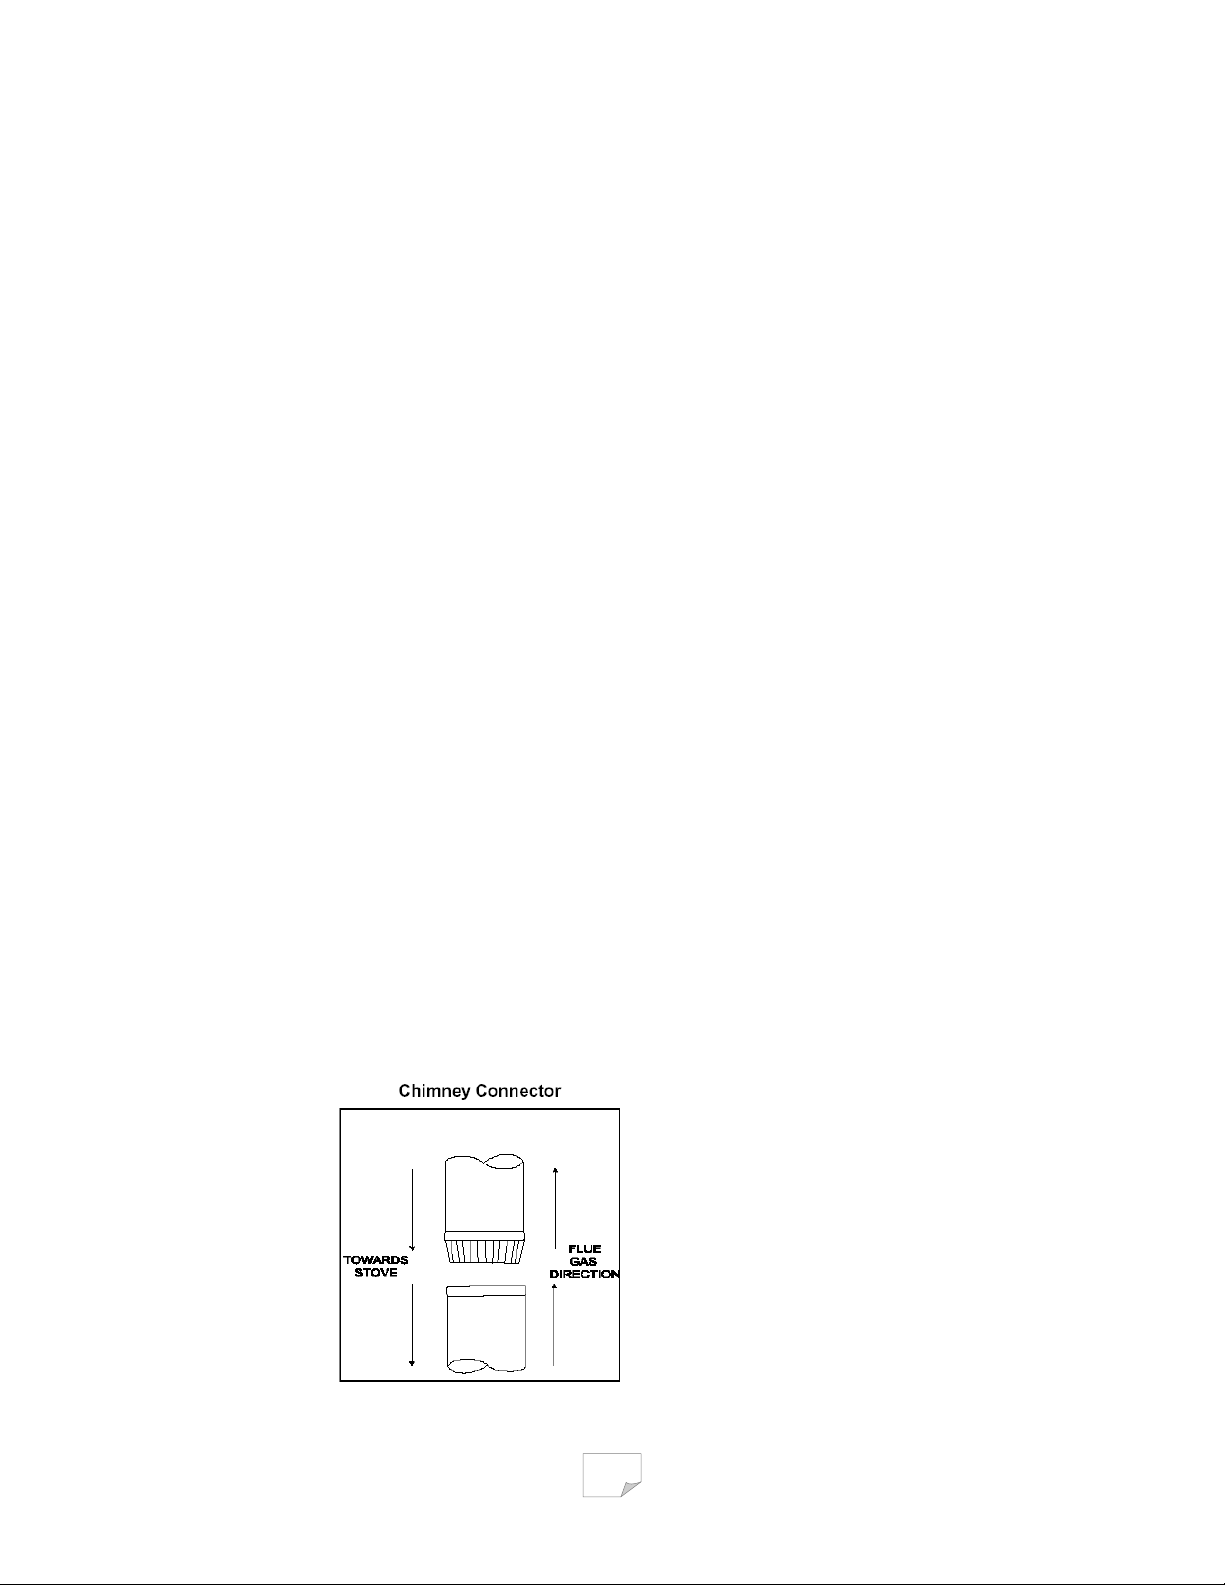
Each chimney connector or stovepipe section must be installed to the stove flue collar and to
each other with the male (crimped) end toward the stove. See fig 5.
Fig. 5
 Loading...