

Page 1
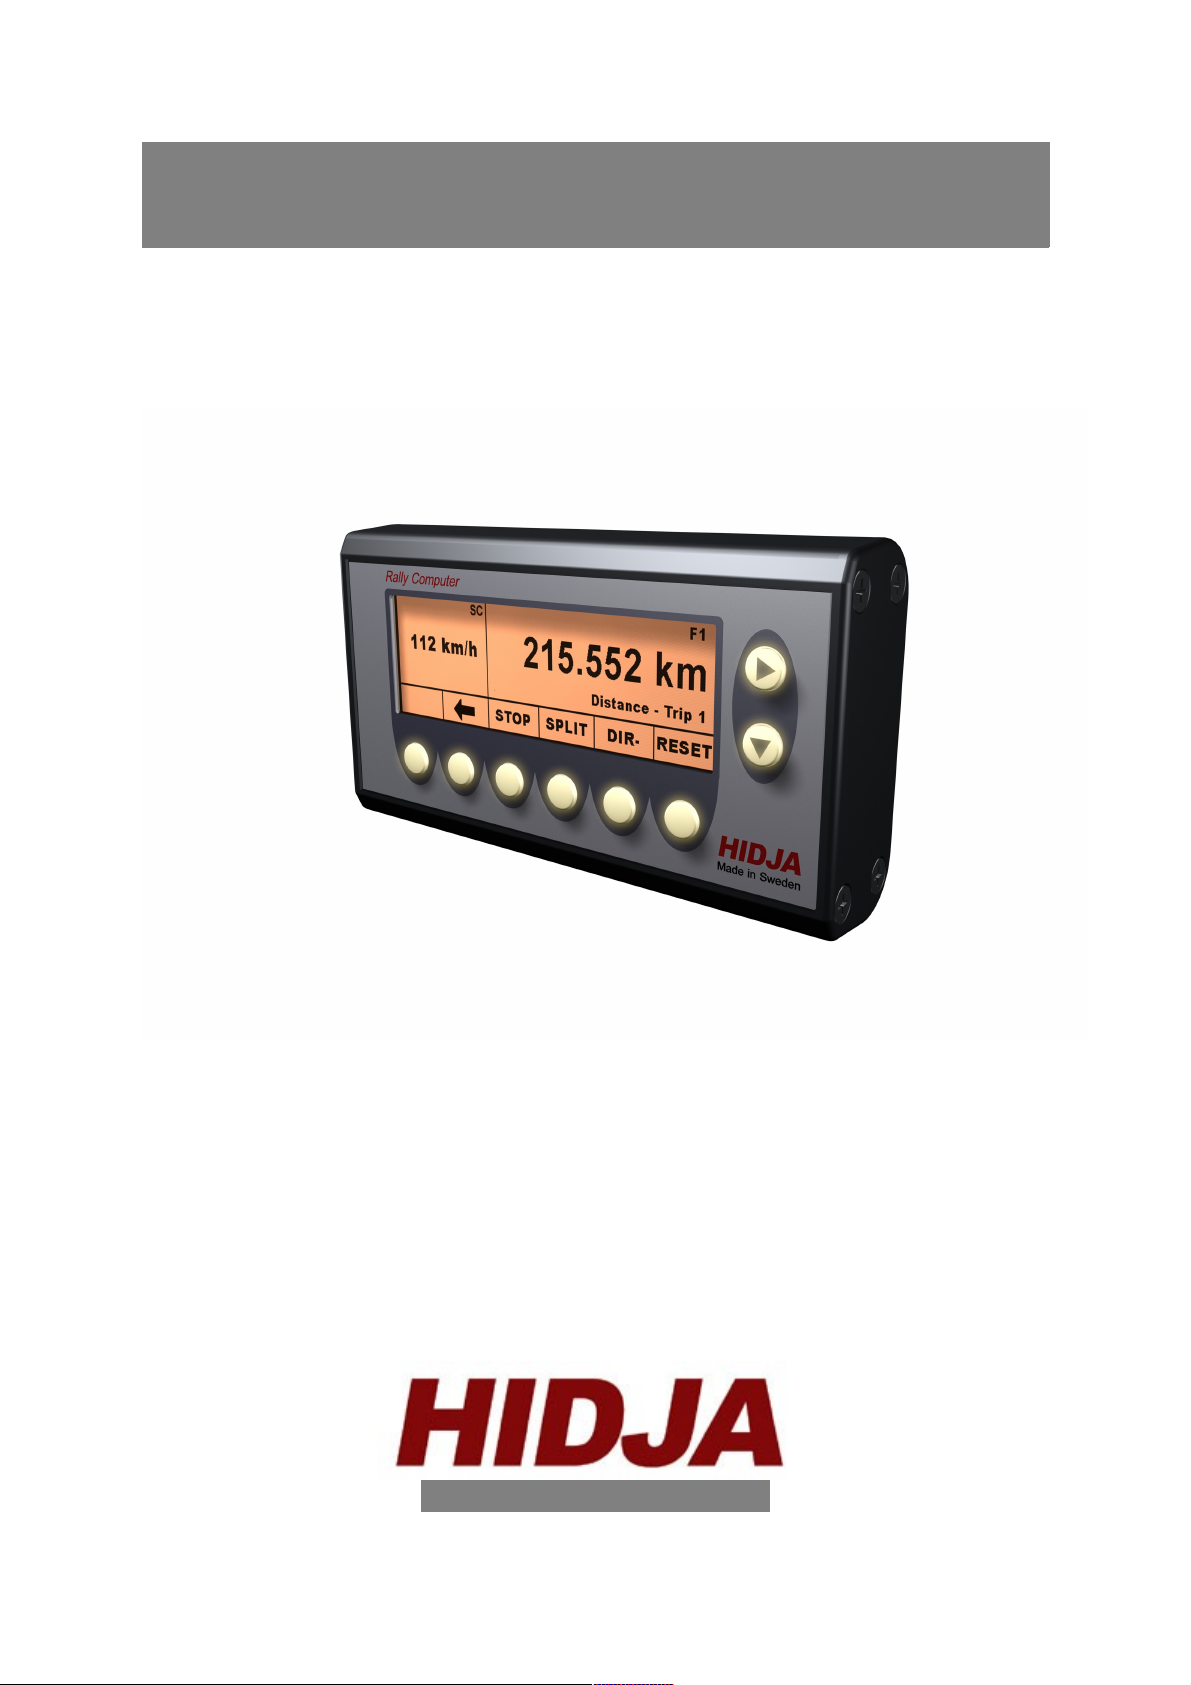
HIDJA RallyComp 200
User manual
w w w . h i d j a . s e
Page 2

Page 3

Table of contents
1 Important about safety 5
2 Description 5
3 Installation 5
3.1 Connections 6
3.2 Option parts and spares 6
4 Functions 6
4.1 Shut down / Sleep mode 7
4.2 Remote control 7
4.3 Extern reset 7
4.4 Function summary 7
5 Menus and buttons 8
5.1 Program menu 8
5.2 Browsing through the menu 9
5.3 Buttons and labels 9
5.4 Preset of values 10
5.5 Copy records from main window to smaller windows 11
5.6 Special functions for the buttons 12
5.6.1 SPLIT 12
5.6.2 DIR- 12
5.6.3 STOP 13
5.6.4 RESET 13
6 Description of the functions 13
6.1 Show favourites 13
6.2 Distance 14
6.3 Speed 14
6.4 Time 14
7 Using the functions 15
7.1 Tripmeter 15
7.1.1 Trip1 15
7.1.1.1 Trip 1 Pre-set / Set to 0 15
7.1.1.2 Automatic time measuring on special stages 15
7.1.1.3 Correction to roadbook 16
7.1.2 Trip2 16
7.1.3 Odometer 17
7.1.4 ETA Dist 17
7.2 Time 17
7.2.1 Clock 17
7.2.2 SS Time 17
7.2.3 Setting SS-Time to 0 17
7.2.4 ETA Time 18
7.3 Speed 1 8
Page 4

7.3.1 Current 18
7.3.2 Average Speed 18
7.3.3 Pilot 18
7.3.3.1 Setting of Pilot-speed 19
8 Calibration and installation 19
8.1 Calibration of tripmeter 20
8.1.1 Calibration while driving 20
8.1.2 Manual setting of calibration value 21
8.2 Set clock 21
8.3 Adjust the contrast level of the display 21
8.4 Adjust the backlight of the display 22
8.5 Defining favourites 22
8.6 Inverting the display 23
8.7 Change distance unit 23
8.8 Remote control 24
9 Error message 24
10 Technical data 24
10.1 Physical data 24
11 Environment 25
12 Contact and support 25
Page 5

1 Important about safety
All installation of HIDJA trip-product should be done by authorized
personnel. All installation and use are done at ones own risk and HIDJA
AB's responsibility are limited to the prestanda of the product. The owner
alone is responsible for the installation of HIDJA Trip-product and that it
is used accordingly to any law. HIDJA AB is not responsible for injury to
persons or materiel when using HIDJA Trip-product. Measured values
displayed in HIDJA Trip-product can vary from many reasons and should
be seen as guidance and not exact truth. HIJDA AB is not resoponsible
for the correctiveness in the measured values presented in HIDJA Tripproduct. This manual represents HIDJA Tripproduct at the time of
printing, HIDJA AB have the right to make any adjustment without further
notice.
2 Description
HIDJA RallyComp200 is an instrument for measurement of distance,
time and speed in cars intended for rallying. HIDJA AB has combined
technology know-how with many years of experience in production of
electronic to bring you a high quality product that is easy to use and will
last for long time. The integral graphic display provides clear and sharp
information and can be adjusted for good visibility. The display have a
soft amber backlight to fit in different weather conditions and measures
103x30mm.
The RallyComp has been developed through collaboration with
experienced co-drivers in order to meet the most rigorous demands
under the toughest conditions. Distance calibration is easy to do and can
be executed on the fly.
3 Installation
The RallyComp can easily be installed with mounting angles that comes
with the meter or with some of the accessories like an attachment detail.
Please observe that the installation must follow several certain
regulations.
5
Page 6

3.1 Connections
Connect the cables accordingly to this :
• Red
Is connected to +12V to battery, fuse is not needed.
• Brown
Ground. Is connected to negative pole at battery.
• Orange
Extern reset of trip2. Activated by +12V signal. Can be connected
to extern switch or connected to ground if not in use.
• Yellow
Reverse indication. Is connected to the reversing light, are
activated at +12V signal.
• Green
Distance indication. Is connected to the incoming pulse signal.
• Blue
Remote control. Is connected to a switch who gives a +12V signal
when activated.
• Grey
Shield. Is connected to chassis.
3.2 Option parts and spares
HIDJA offers spares and accessories for your convenience. Please visit
www.hidja.se, or contact us and we will help you.
4 Functions
RallyComp has got two windows that independently from each other
show value by choice. The main window shows all installations in the
menu and how you navigate to find them while the smaller windows
show values chosen by the user. This value can in some situations be
shown in a lower resolution than the main window. The buttons' functions
are also shown as labels and changes depending on what is shown in
the main window. The intentions with RallyComp is that the buttons'
functions only affect the particular program that is chosen in the main
menu.
6
Page 7
4.1 Shut down / Sleep mode
If the RallyComp not is beeing used for five minutes or more it goes into
a sleep mode. RallyComp automatically starts when the car starts
moving or when a button is pressed in. The sleep function is shut down
when user are in setup mode.
4.2 Remote control
Remote control for function SPLIT or STOP. See chapter 3.1 for
installation and 8.9 for setup.
4.3 Extern reset
The RallyComp allows extern reset of trip2 by a switch. This function is
activated with a +12V signal.
4.4 Function summary
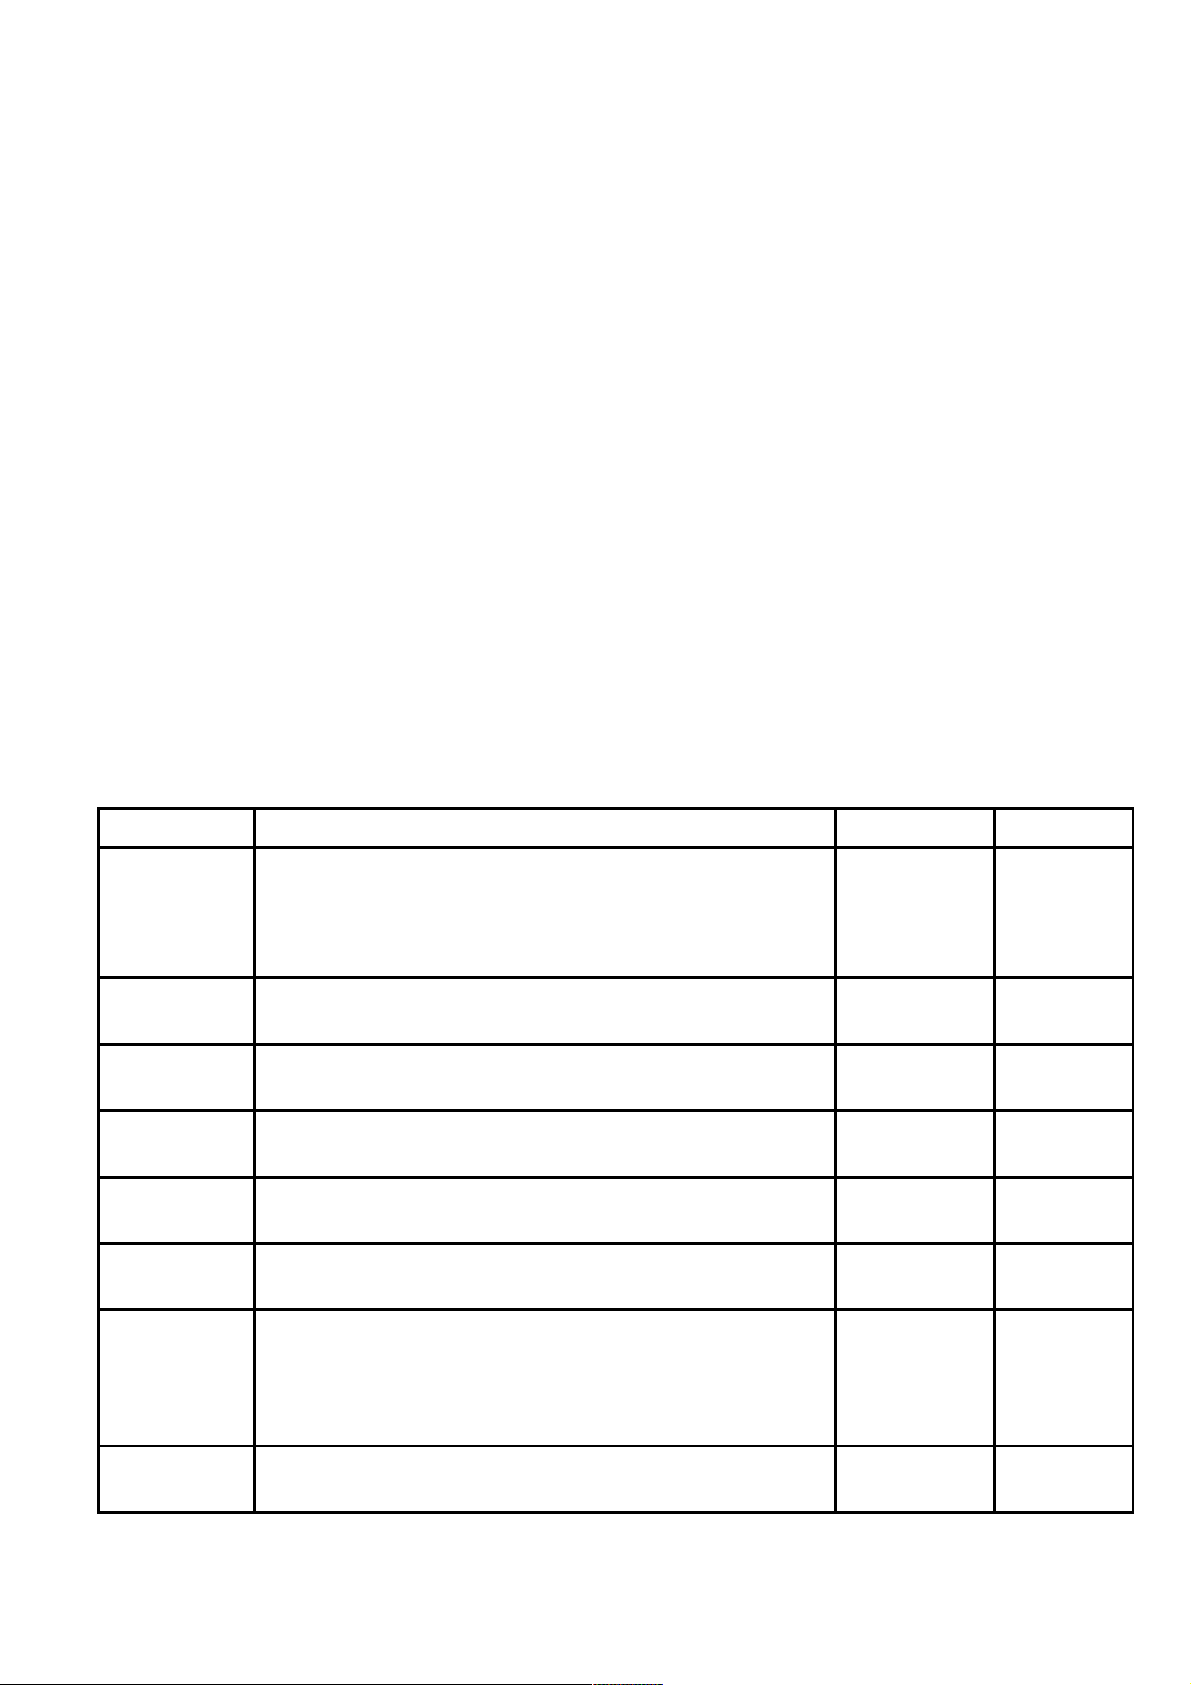
RallyComp contains the following functions:
Functions Description In display Chapter
Trip1
Tripmeter with a resolution of 1m. Pilot, ETA,
average speed and the stop clock are all
based on this tripmeter. Resolution in smaller
window is 10m.
xxxx.xxx
km (mi) 7.1.1
Trip2,
Trip3
Tripmeter with a resolution of 1m. Resolution
in smaller window is 10m.
xxxx.xxx
km (mi) 7.1.2
Odo
Shows the total stage from the time when the
tripmeter was installed.
xxx.x km
(mi) 7.1.3
ETA Dist
Stage which the user has chosen for
calculation of the ETA.
xxxx.xxx
km (mi) 7.1.4
Clock Time of day.
hh:mm:ss
24h 7.2.1
SS Time
Stoppage time for special stage with
resolution 1/10 s. hh:mm:ss.t 7.2.2
ETA Time
Estimated time of arrival if the stage is
registered in ETA Dist. The calculation starts
from the time when Trip1 is set to 0.
Is calculated from average speed.
xxxx.xxx
km (mi) 7.2.4
Page 8
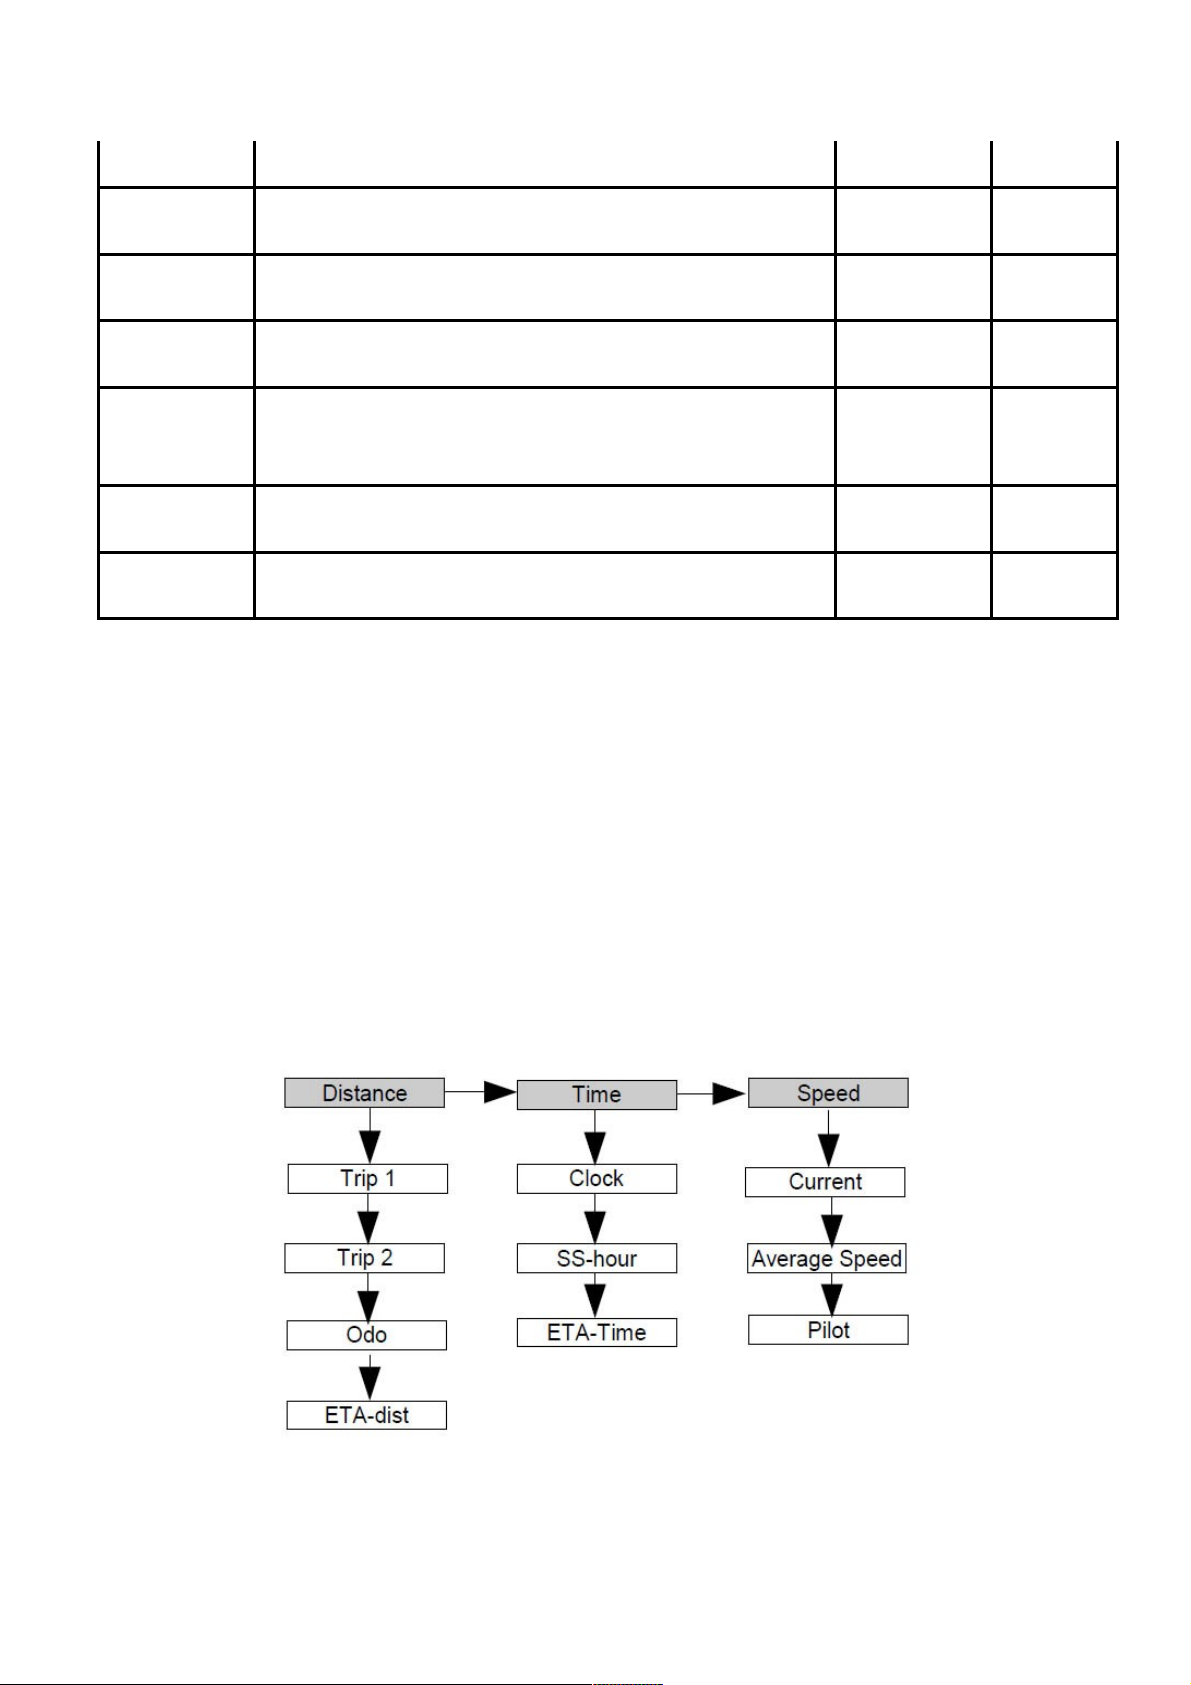
Functions Description In display Chapter
Speed Current speed
xxx km/h
(mph) 7.3.1
Average
Speed
Average speed from the time Trip1 was set to 0. xxx.xx
km/h (mph) 7.3.2
Max
Maximum speed on the stage since Trip1
was set to 0.
xxx km/h
(mph) 7.3.3
Limit
Speed control; HIDJA RallyComp's backlight
flashes if the chosen value is beeing
exceeded.
xxx km/h
(mph) 7.3.4
Pilot
Show your time compared to the average
speed.
+hh:mm:ss 7.3.5
Fuel Remaining amount of fuel in the tank.
Xxx L
(Ga). 7.4.1
5 Menus and buttons
The usage of RallyComp's menu is done by repeated pressings on the
arrow signed buttons on the meters right side. These buttons are always
available for navigation through the menu. When values are chosen for
the RallyComp, such as, set time or trip adjustment, the buttons change
function.
5.1 Program menu
The construction of the main menu is illustrated by the following
schedule:
8
Page 9
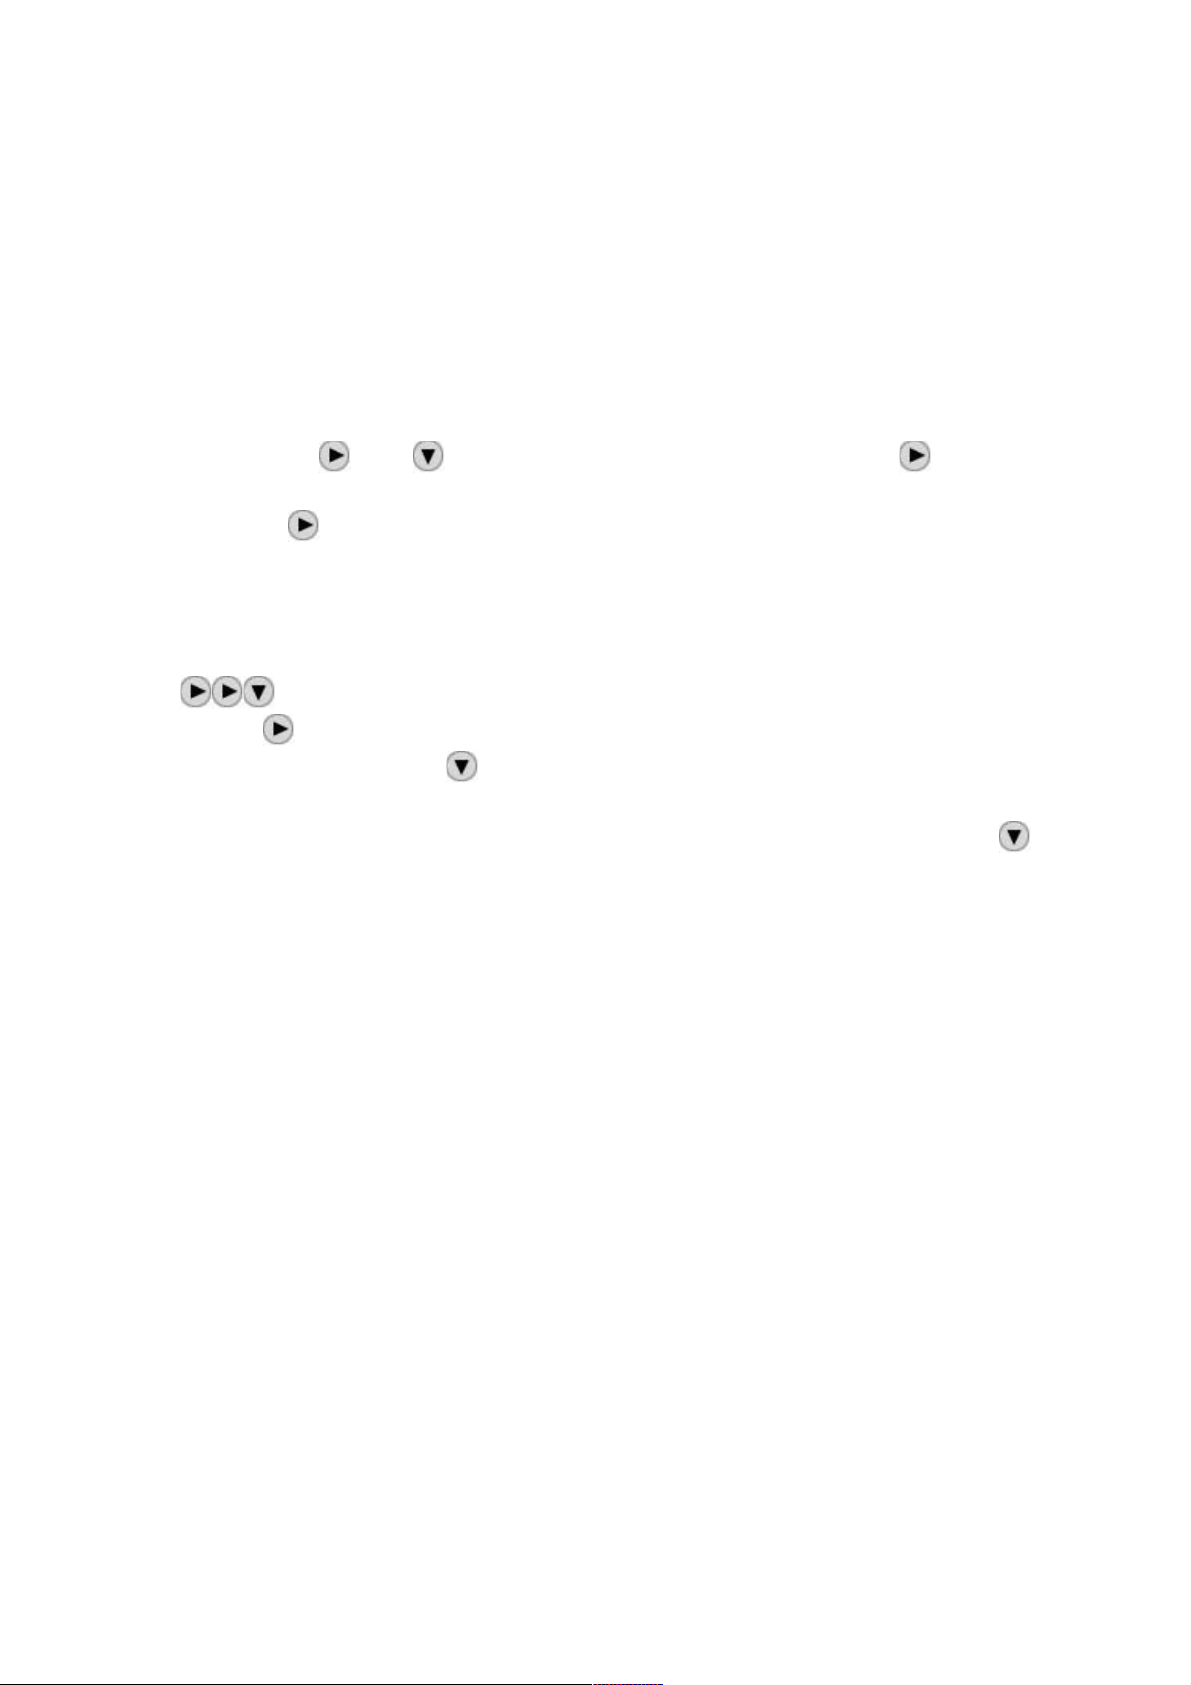
The menu consists of one main menu and several sub menus. The main
menu consists of: Distance, Time, Speed. There are a number of
different sub menus below every main menu alternative. You can for
instance find average speed and speed limit as sub menus to Speed etc.
5.2 Browsing through the menu
All browsing takes place in the main display and you can at all times read
on the display where exactly you are in the menu. To browse through the
menu, use the and buttons on RallyComp's right side. is used
to move right in the main menu, that is between Distance, Time, Speed.
By pressing the first choice of the next main menu's sub category is
shown.
For instance: If Distance – ETA Dist is shown in the main display and
you want to go to Speed – Average Speed the pressing sequence would
be . If the last category (Speed) in the main menu is shown and
you press you will automatically be moved back to the first category
(Distance). By pressing the next sub menu category will be shown.
If the last of the categories in the sub menus is shown and you press
you will automatically be moved back to the first menu category in the
chosen menu. This means that you can move both to the right and also
down in the menu without getting lost.
5.3 Buttons and labels
The buttons present functions are shown at the bottom of the display just
above the buttons. The buttons' functions change depending on what is
shown in the main window. Certain buttons' labels are inverted with the
intention of clearly showing which of the functions that is activated. The
different categories where this function can be activated are SPLIT, DIR-
and STOP. The buttons that are used to copy the information from the
big window to the smaller windows never change function though.
The buttons that are used to copy the information from the big window to
the smaller windows never change function though.
9
Page 10
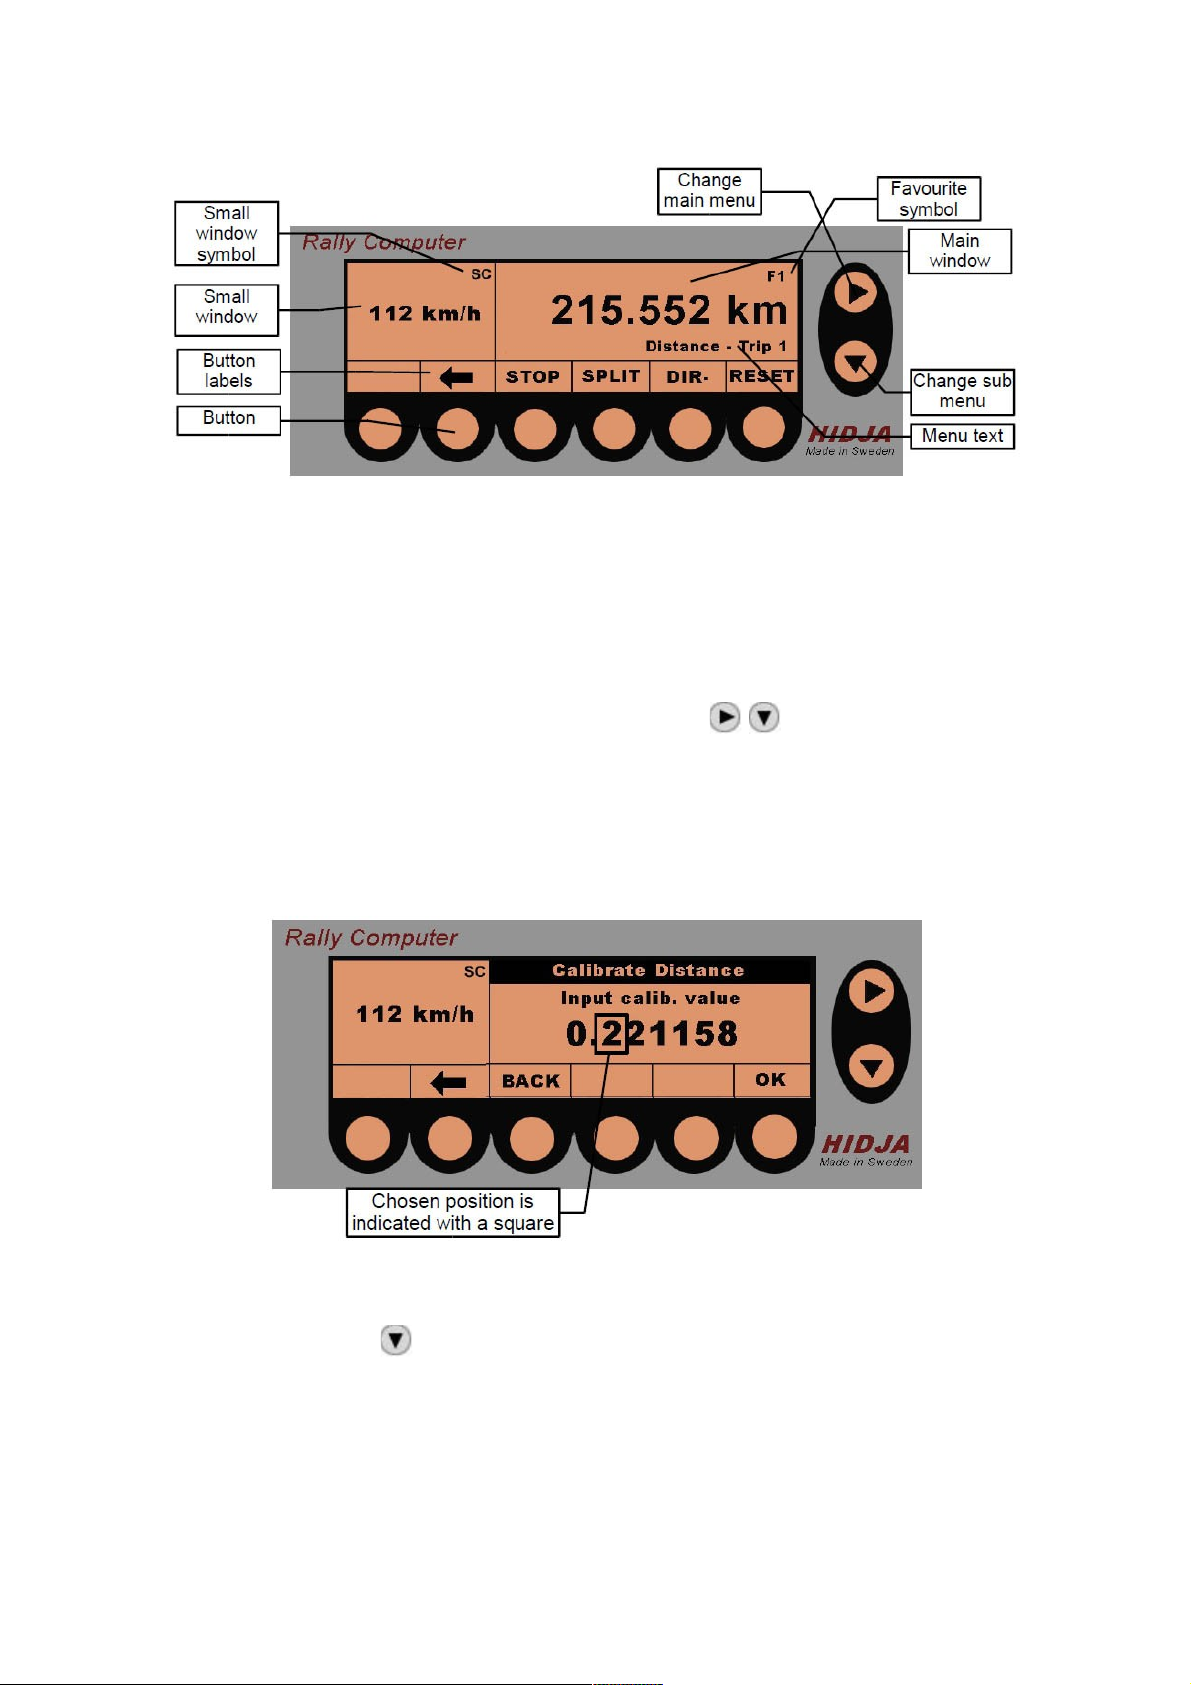
5.4 Pre-setting of values
Many of RallyComp's functions have the possibility of pre-setting a value
which can be setting the tripmeter, set time, pre-setting of calibration
value for tripmeters etc. All presetting of values in the tripmeter is done
by pressing the buttons on the right of the unit that are the same
buttons that you use when you are navigating through the menu. When
setting the meter the display may look like the picture below. The
information and functions where pre-setting of value is possible will be
explained in detail in chapters to come.
To set a value the procedure is as follows:
1. One press on increases the current number, that is marked with
a black square,with 1 until it is 9. One more press on the same
button will result in the value starting over on 1.
10
Page 11
2. When the chosen number has been set the marker will move with
and setting of a new number can then be done.
3. When the setting is finished, press OK.
If incorrect values have been set, for instance, for the calibration of
the tripmeters, the instrument will notify you with a error message
and the calibration has to be done again.
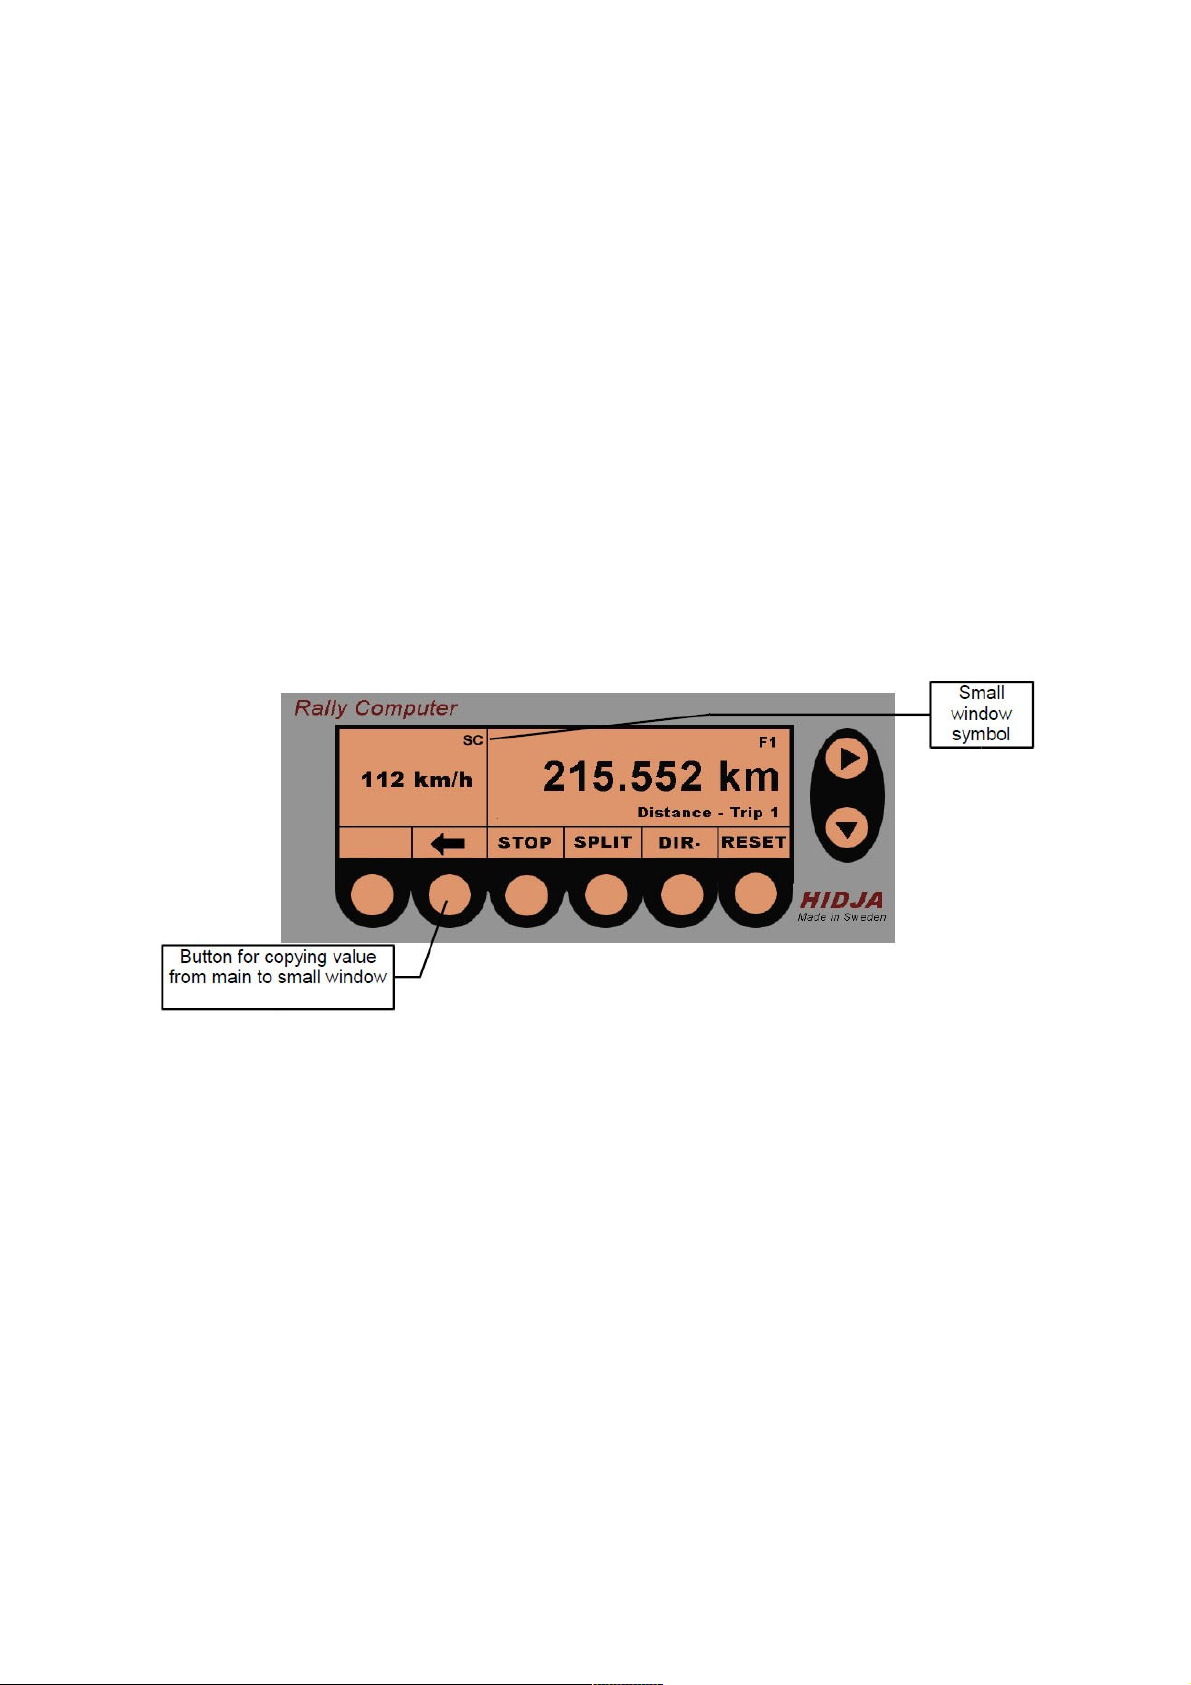
5.5 Copy records from main window to smaller window
The smaller windows on the left can show all the records that the main
window can show. The resolution is slightly lower for some of the
records. To copy the records from the main window to the smaller
window use the buttons to the left that are marked on the picture below.
One press on the arrow button copies the current records from the main
window to the smaller window. When a record have been copied from
the main window to a smaller, an explanation symbol will appear to the
right of the smaller window.
These buttons can be used at any time while driving. When the
RallyComp is in the setup menu these buttons does not have a function
and records can not be copied. The meaning of the symbol is shown in
the list on the next page.
11
Page 12

Symbol - Register
T1 - Trip1
T2 - Trip2
OD - Odometer
CK - Clock
SS - SS. Hour
SC - Speed Current
SA - Speed Average
ET - ETA-Time
ED - ETA-Dist
SP - Pilot
5.6 Special functions for the buttons
When the RallyComp is in the main menu and not the setup menu, there
are a number of buttons with special features. These buttons are:
5.6.1 SPLIT
One press on SPLIT freezes all the records on the display so you can
easily browse through and write down all the measures. The tripmeters
and the stoppage time does not stop but continues counting in the
background. One more press on SPLIT unlocks the freeze function and
the counting continues. All values that were counted while SPLIT was
activated will be added and no values will be lost. This means that you
can press SPLIT at any time on a stage without being afraid to loose any
information.
5.6.2 DIR-
When Trip1 or Trip2 are shown in the main window one press on DIR-
results in that the current tripmeter starts counting backwards. The
button then gets inverted so you easily can notice when the function is
activated for the current tripmeter. One more press on DIR- and the
meter starts to count normally again.
If any other records than the tripmeters are shown in the main window,
this button does not have a function.
12
Page 13
5.6.3 STOP
When Trip1 or Trip2 are shown in the main menu pressing the button
STOP results in the current tripmeter stopping and the button then gets
inverted so you easily can see that the function is active for the current
tripmeter. One more press on STOP and the current tripmeter starts
counting all again. If any other records than the tripmeters are shown in
the main menu this button does not have a function.
5.6.4 RESET
The RESET button's main function is to correct value for some of the
records. Further
information can be found in the chapters below.
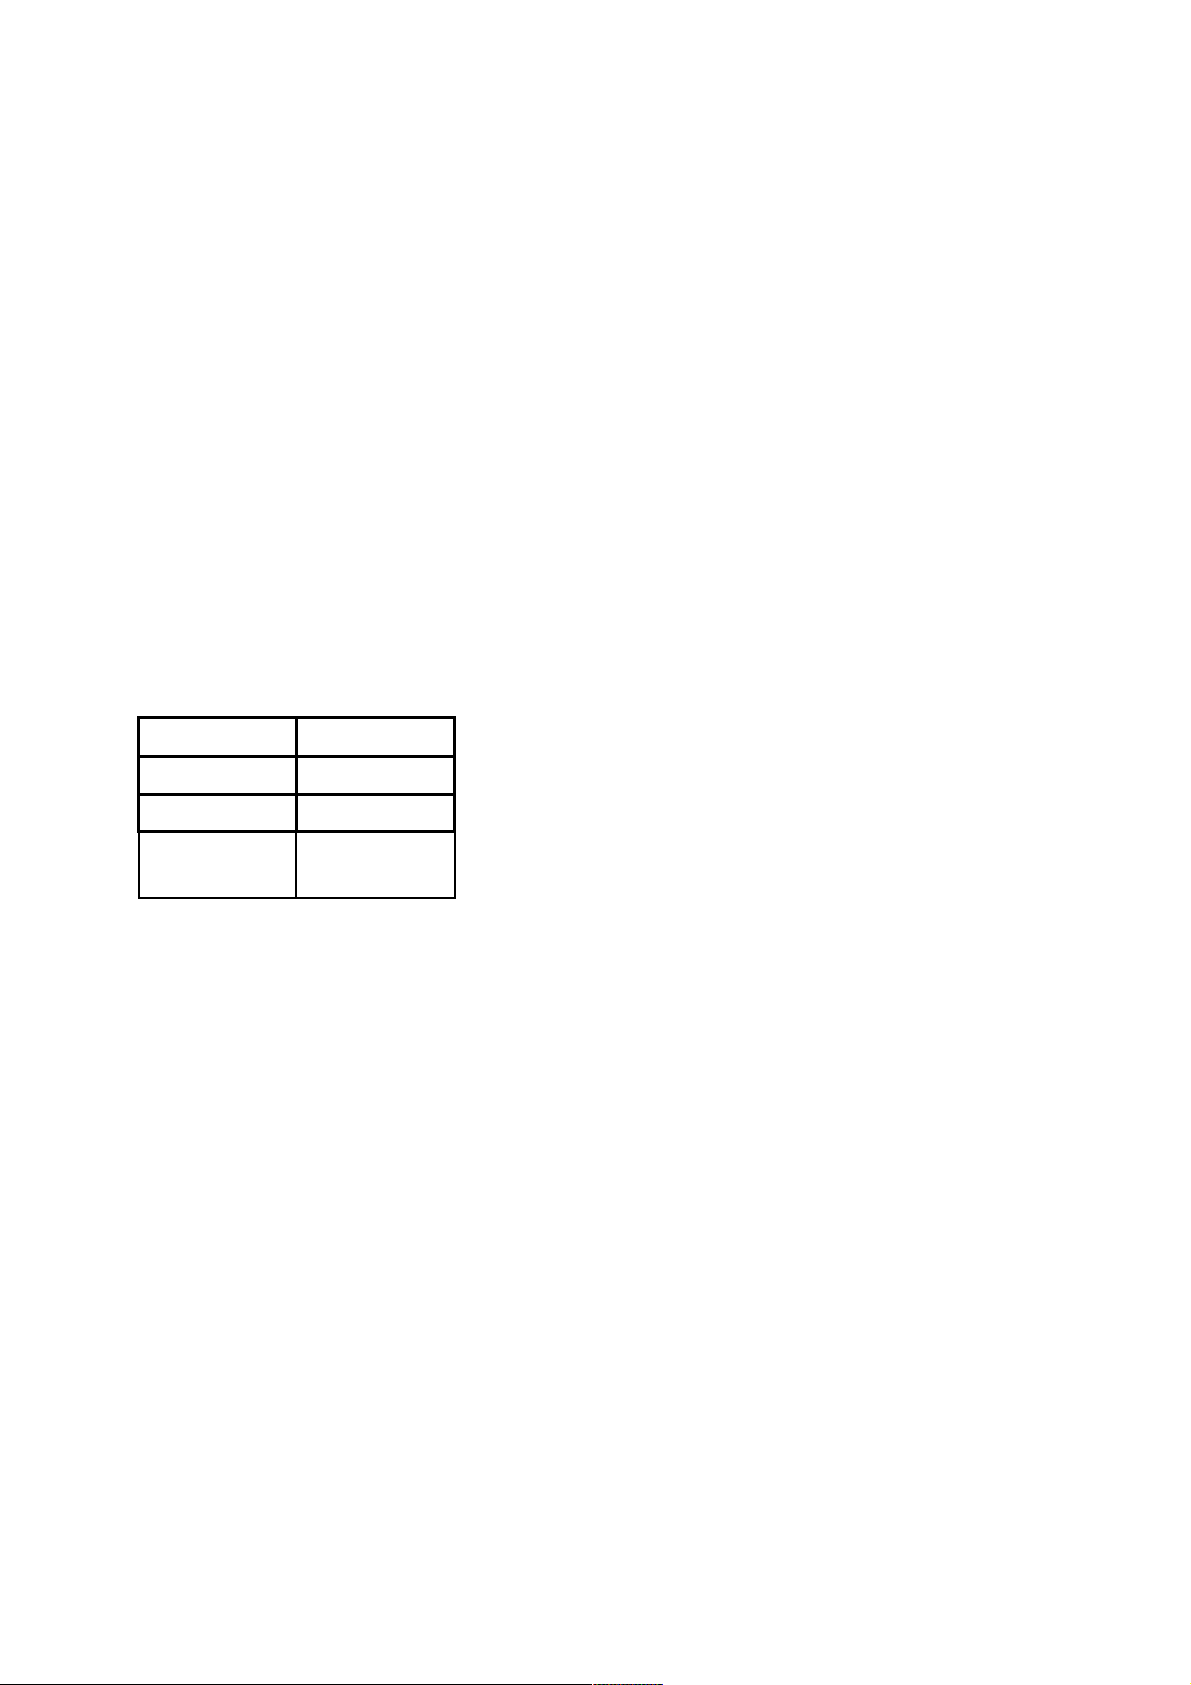
Affected functions:
Funktion Kapitel
Trip1,2 7.1
SS Time 7.2.2
Averege
Speed
7.3.2
If any other record is shown in the main window RESET does not have
any function.
6 Description of functions
RallyComp offers several functions. The special functions SS Time and
Average Speed are based on Trip1. This means that when you set Trip1
to 0 all mentioned values are also set to 0 in order to make sure that all
values are updated at all times. The described records can be presented
in different units. Unit change see chapter 8.8.
6.1 Show favourites
RallyComp has two different records for favourites (F1, F2) which means
that you easily can go between the two records by pressing the two
13
Page 14
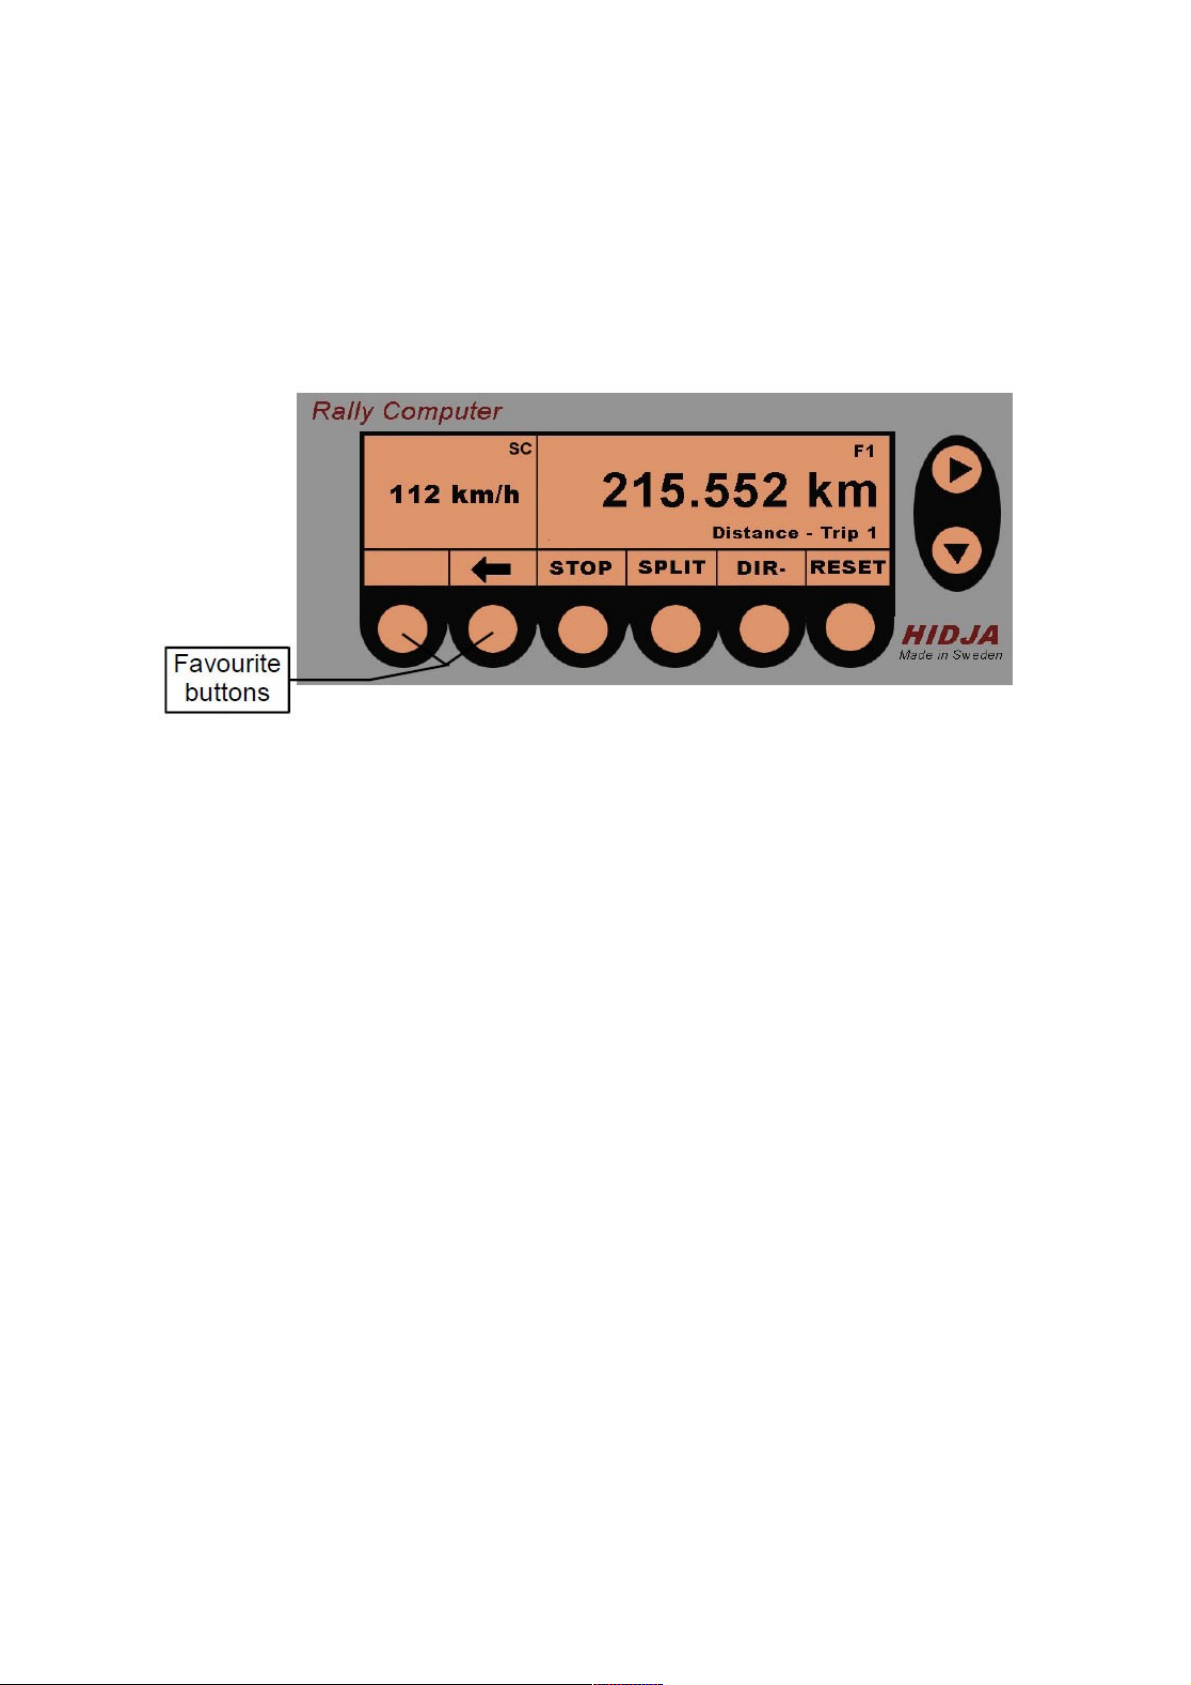
buttons that copies from the big window to the smaller windows.
These buttons are marked on the picture below. One press on the
button results in that the first favourite (F1) is shown in the display. One
more press on the button shows the second record (F2). To switch
between the two favourites keep pressing the same button.
Define favourites see chapter 8.5
6.2 Distance
There are two tripmeters that can measure distance - Trip1 and Trip2.
These tripmeters are independent from each other and can be set to 0 or
be set to any other value while driving. The reason to this is that you can
correct the tripmeters so it matches the roadbook. The resolution of the
tripmeters is 1m and can show up to 999.999 km. The tripmeters can be
used to count both backwards and forwards in case you missed a turn
etc. The total stage that the vehicle has driven is shown with a odometer
with a resolution of 100m.
6.3 Speed
The different functions that can measure speed is current speed
(Current) and average speed (A.Speed). The speed indicator can be
shown in km/h or miles/h.
6.4 Time
The instrument has a 24h clock that can be used to measure time and
shows the time of the day. The time is shown in the format hh:mm:ss.
14
Page 15

The co-driver can use the stopwatch for automatic measuring on the
stages which can make things easier since he/she does not need to
press any button to get it started. If Trip1 is set to 0, the stopwatch is also
set to 0 and starts counting when the vehicle starts moving. When the
stopwatch is stopped, the result is shown in the format hh:mm:ss.t.
7 Using the functions
7.1 Tripmeter
The Roadcomp has got two different records for distance measuring and
those are Trip1 and Trip2. The only function that Trip2 has is to measure
parts of stages and no other records are connected to Trip2. Trip1 on the
other hand is connected to several different records such as SS Time
and Average Speed. These records are based on Trip1 and in order to
get the correct values Trip1 should be reset to 0 when you want to use
these records. Trip1 and Trip2 can be set to 0 individually or set to
chosen value. The tripmeters can also count backwards if you need to
adjust a missed turn etc. Do not forget that if you set Trip1 to 0 or a new
value, the records that are connected to Trip1 will also be affected.
7.1.1 Trip1
Trip1 is the main tripmeter of the Roadcomp and is used to measure
stages. Trip1 can preferably be used for automatic measuring of special
stages. When Trip1 is resetted all records that are connected to Trip1 is
affected. The connected records are average speed and SS Time.
7.1.1.1 Trip1 Pre-set/Set to 0
To set Trip1 to 0 press RESET when Trip1 is shown in the main window.
The functions of the buttons change between showing CLEAR and SET.
If CLEAR is pressed in, Trip1 is set to 0 and if you press SET you have
the possibility to set a value for Trip1. To set a value go to chapter 5.4
Pre-setting a value. When a value has been chosen press OK to
continue using the chosen values.
7.1.1.2 Automatic time measuring on special stages
To use Trip1 for automatic measuring on a special stage it is only
necessary that the meter is set when the vehicle is standing still at the
15
Page 16

start of the special stage. All connected records are also set to 0 at that
time. When the vehicle starts moving Trip1 also starts automatically and
SS Time starts counting from 0. At the finish line press SPLIT. The
button then gets inverted so you easily can see that the function is
activated. This results in that all the records are frozen in the display and
you can calmly browse through all values that were registered on that
particular stage. The measuring does not stop but keeps counting in the
background. One more press on SPLIT results in that the functions stops
and the records in the display are updated. SPLIT can be pressed at any
time when any of the different menus are shown – except the setup
menu.
7.1.1.3 Correction to roadbook
When using the roadbook for rally it might be necessary to match the
meter to the roadbook if they do not already match. The correction can
be done while driving and the part of the stage that already has been
driven while the correction was taking place will be added to the
registered value.
Example:
At a intersection the roadbook shows 54.44 km and the Trip1 shows
53.34 km.
Press RESET and then SET, begin the setting according to chapter 5.4.
Set the value to 54.44 km and then press OK. Trip1 has now been
corrected according to the roadbook. The stage that was driven while the
correction was taking place will be added to the registered value and the
correct value is then shown in Trip1. This results in that no stage will be
missed while correcting a value.
STOP stops the measuring with Trip1 when this is shown in the main
window.
7.1.2 Trip2
Measuring distance with Trip2 is not different from Trip1 apart from that
there are no other records connected to Trip2. Correction of roadbook,
set to 0 etc. is done in the same way as for Trip1. It is not possible to
measure automatically with Trip2.
It is not possible to measure automatically with Trip2 or Trip3.
16
Page 17

7.1.3 Odometer
The odometer is a meter that measures distance and it shows the total
stage that the vehicle has been driven from the time that the RallyComp
was installed. It is not possible to set the odometer to 0 or to correct its
value.
7.1.4 ETA-Dist
ETA-Dist is used to calculate ETA Time (Estimated Time of Arrival).
ETA-Dist is set at the same way as Trip1 and Trip2. When a stage is set
in the ETA-Dist, the estimated time of arrival is calculated continuously
and is shown in the menu ETA Time.
7.2 Time
To measure time there is a clock that shows the time of the day and a
stopwatch (SS Time) for special stages .
7.2.1 Clock
Shows the time of day in a 24-hour format. To set the clock, see 8.3.
7.2.2 SS Time
SS Time is a stopwatch that is used on special stages and is strongly
connected to Trip1. It shows hours, minutes, seconds, and tenth of
seconds when it is stopped. When Trip1 is set to 0, the SS Time is also
set to 0 and automatic measuring can be made, see 7.1.1.
7.2.3 Setting SS Time to 0
When SS Time is shown in the main window you can at any time set it to
0 by pressing RESET which means that it starts counting from
00:00:00.0. If the vehicle is standing still SS Time will not start counting
until the vehicle starts moving. When setting the SS Time to 0 this does
not affect any other record but the Average Speed Pilot. Those two might
show incorrect values since those are based on SS Time. In order to get
the correct values of these records Trip1 should be set to 0.
17
Page 18

7.2.4 ETA Time
ETA Time or Estimated Time of Arrival shows the calculated time of
arrival. This is based on that the clock is set correctly, that a stage is
registered in ETA Dist and that Trip1 was set to 0 when the process
started.
To calculate ETA Time the procedure is as follows:
1. Set Trip1 to 0 see 7.1.1.
2. Go to Distance – ETA Dist in the menu.
3. Press RESET.
4. Press SET.
5. Register the distance to your destination.
6. Press OK.
7. Go to ETA Time in the menu.
Your estimated time of arrival is now showing continuously. When the
clock and ETA Time
shows the same time, you should have arrived at your destination.
7.3 Speed
7.3.1 Current
A speed indicator that shows momentary speed.
7.3.2 Average Speed
Average speed on a particular stage or a certain time which is calculated
on Trip1 and SS Time. To get the correct value Trip1 should be set to 0
at the beginning of the
measuring. Average Speed has a possibility to set a new value to
Average Speed Pilot, see 7.3.3.1. The upper right corner shows the set
value in the Pilot record.
7.3.3 Pilot
The pilot shows how you are driving compared to the average speed that
is pre-set in the Pilot record. Setting of the Pilot value takes place in
Average Speed in the Speed record.
18
Page 19
7.3.3.1 Setting of Pilot - speed
To set Pilot – Speed follow these steps:
1. Go to Speed – A.Speed in the main menu.
2. Press RESET.
3. Set the chosen value for speed in the Pilot record, to set see.
Chapter 5.4.
4. Press OK.
5. Go to Speed – Pilot in the menu.
It is now calculated how much time has passed compared to the average
speed that was set in the Pilot record. The estimated time is shown in the
format +- hh:mm:ss.
8 Calibration and installation
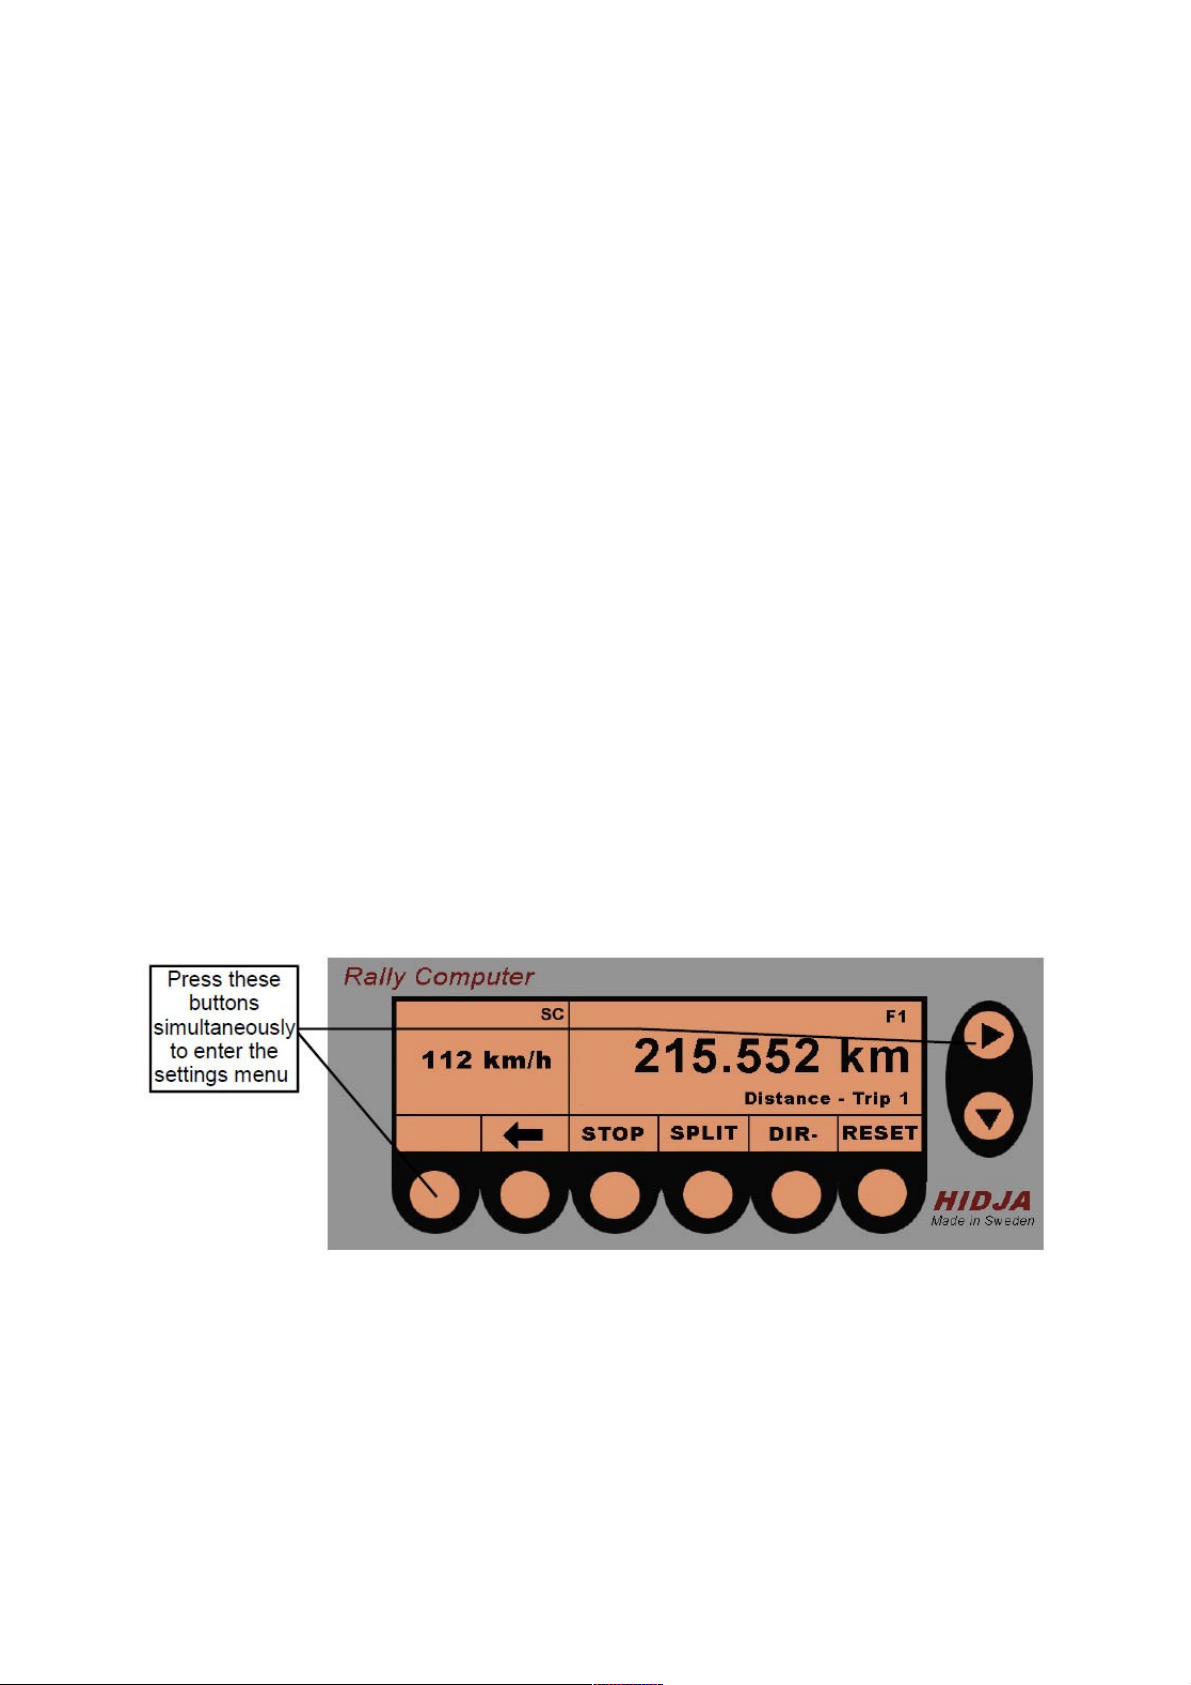
All installations take place in the setup menu which is accessible by
pressing the two buttons that are marked on the picture below at the
same time. When you are in the menu you can find all installations and
calibrations functions' that are needed to work with RallyComp in a
simple way. How these installations and calibrations are carried through
is explained in detail below.
All calibrations and installations can be interrupted by pressing BACK.
Some functions in the smaller windows does not get updated when the
setup menu is active.
19
Page 20

8.1 Calibration of tripmeter
In order for the RallyComp to show correct values for the tripmeters, the
meter has to be calibrated. The meter should be calibrated if it is
installed in another vehicle or when the vehicle's qualities are changed,
for instance when changing to a different wheel size. You can choose to
calibrate while driving an already known stage and then set the length of
the stage. The RallyComp then calculate a calibration value based on
that data and presents it in the display. The calibration value is based on
several factors and should be written down in case you might need to
calibrate again. Calibration can be made at any time while driving and
you do not need to stop.
You can also set a calibration value manually that you received from a
previous calibration while driving.
8.1.1 Calibration while driving
To calibrate the meters while driving follow these steps:
1. Start the calibration by going to the setup menu, see chapter 8.
2. Go with until 1.Calibrate Distance is shown in the display.
3. Press OK.
4. When you get to the start of the stage you want to measure - press
START. Roadcomp then
shows: ---- DRIVE ---- and the current calibration value.
5. When you get to the finish of the chosen stage immediately press
LENGTH.
6. The Roadcomp then shows 0000.000 and it is now time to set the
length on the stage you
drove, see Setting of values chapter 5.4.
7. When the lenght has been set press OK.
8. The new calibration value is now shown in the display. Press OK.
9. Exit the setup menu by pressing BACK.
The tripmeters have now been calibrated and you should check its
accuracy by driving the calibration stage and check if the length of the
stage is exact. Even if the power is cut the calibration value stays in the
meters memory. Calibration should be made again if the tires are
changed for instance.
20
Page 21

8.1.2 Manual setting of calibration value
The calibration value can be set manually into the RallyComp.
The procedure is as follows:
1. Start the calibration by entering the setup menu, see chapter 8.
2. Go with until 1.Calibrate Distance is showing in the display.
3. Press OK.
4. Press SET.
5. Set the new calibration value, see Setting of values chapter 5.4.
6. Press OK.
7. The new calibration value is now shown in the display.
8. Press OK.
9. Exit the setup menu by pressing BACK.
The new calibration value is now saved in the memory and will be saved
when the power is cut.
8.2 Set clock
To set the clock follow these steps:
1. Start the installation by entering the setup menu, see chapter 8.
2. Go with until 2.Set Clock is showing in the display.
3. The installation of the clock is done by a regular setting, see setting
of values chapter 5.4.
4. Press OK.
5. Exit the setup menu by pressing BACK.
The clock has now been set and will be remembered in the installation
even if the power is cut.
8.3 Adjusting the contrast level of the display
1. Start the installation by entering the setup menu, see chapter 8.
2. Go with until 6.Set Screen Contrast is showing in the display.
3. Press OK.
4. Increase the contrast by repeated pressing the + button.
Decreaset he contrast by repeated pressing the – button.
21
Page 22

5. When chosen contrast has been achieved press OK.
6. Exit the setup menu by pressing BACK.
The contrast has now been set and will be saved in memory.
8.4 Adjusting the backlight of the display
The display's backlight is adjusted by the following procedure:
1. Start the installation by entering the setup menu, see chapter8.
2. Go with until 7. Backlight is showing in the display.
3. Press OK.
4. Increase the intensity by repeated pressing the + button. Decrease
the intensity by repeated pressing the – button.
5. When chosen intensity is achieved press OK.
6. Exit the setup menu by pressing BACK.
The backlight's intensity has now been set and will be saved in memory
even if the power is cut.
8.5 Defining favorites
To Define favorites follow this procedure:
1. Choose the records that you want as your favorites in the main
window and in the smaller windows. See, copy records from main
window to smaller windows, chapter 5.
2. Enter the setup menu, see chapter 8.
3. Go with until 3.Set Favorites is showing in the display.
4. Press OK.
5. Press either FAV1 or FAV2.
6. A message that the chosen favorite has been set is shown in the
display.
7. Press OK.
8. Exit the setup menu by pressing BACK.
The chosen favorite has been saved in memory and will be saved even if
the power is cut. To set the second favorite repeat steps 1-8.
22
Page 23

8.6 Inverting the display
To invert the display follow the procedure:
1. Start the installation by entering the setup menu, see chapter 8.
2. Go with until 4.Set Screen Mode is showing in the display.
3. Press OK to invert the display, press OK once more to invert the
display again.
4. Exit the setup menu by pressing BACK.
The display's installation is now saved and will be saved in memory
8.7 Change distance unit
The RallyComp can be set to show either Distance kilometer / miles ,
volume Litre / gallon.
To change units follow this procedure:
1. Start the setting by entering the setup menu, see chapter 8.
2. Go with until 4.Change Units is showing in the display.
3. Press OK.
4. Press Dist to change distance unit, press Volume to change
volume unit.
5. Press OK when you have chosen the unit that you want.
6. Exit the setup menu by pressing BACK.
Chosen unit will be saved in memory and will be saved even if the power
is cut. You do not need to calibrate the tripmeters again if you change
unit. To receive correct values it is important that you change unit before
you calibrate the tripmeters.
When delivered the Rallycomp will be set on kilometre / litre.
23
Page 24
8.8 Remote Control
To change the function of the blue wire when it is active.
Start the installation by entering the setup menu, see chapter 8.
1. Go with until 8. Remote Control is showing in the display.
2. Press OK.
3. Press the function you would like to connect to remote control.
4. Your remote control choice is showing as; ”Current: Split”
5. Press OK .
Chosen function will be saved in memory and activated when the blue
wire is active. You can choose the function to be; STOP, SPLIT or NONE
(No function).
9 Error message
”Const. can not be 0, Value not
changed”
Calibration is not approved, incorrect
setting of calibration stage.
”Calibration error, Value not
changed”
Calibration is not approved, the meter has
not registered pulses to count the
distance. Control the function of the pulse
sensor.
10 Technical data
10.1 Physical data
Weight: 370 g
Length: 150 mm
Width: 75 mm
Depth: 30 mm
Material: Black eloxal aluminum
The product has been tested accordingly to CE standard and is CE certified.
Power consumption: 100mA.
Power consumption sleep mode: 20mA.
24
Page 25

11 Environment
RallyComp contains a Lithium-battery which has to be removed and left
to recycling when the product's lifecycle has ended. The lifecycle of the
battery is estimated to 10 years. Other parts are left as electronics.
12 Contact and support
Adress:
Hidja AB
Älvåkersgatan 1
65349 Karlstad
Sweden
Phone nr: +46 (0)70 520 49 73
Please remember that you can visit the Hidja website for tips and trix
how to use the HIDJA RallyComp, or tell us what you think !
Notes
__________________________________________________________
__________________________________________________________
__________________________________________________________
__________________________________________________________
__________________________________________________________
__________________________________________________________
__________________________________________________________
__________________________________________________________
__________________________________________________________
__________________________________________________________
Version 20091120 25
Page 26

Page 27

 Loading...