

Page 1

www.tuv.com
Report No.14015800 001
Appendix 10
User Manual
FCCID:
Q9PTS35-C
Page 2

Thermo-Hygro Sensor
(TS35C)
USER MANUAL
Page 3
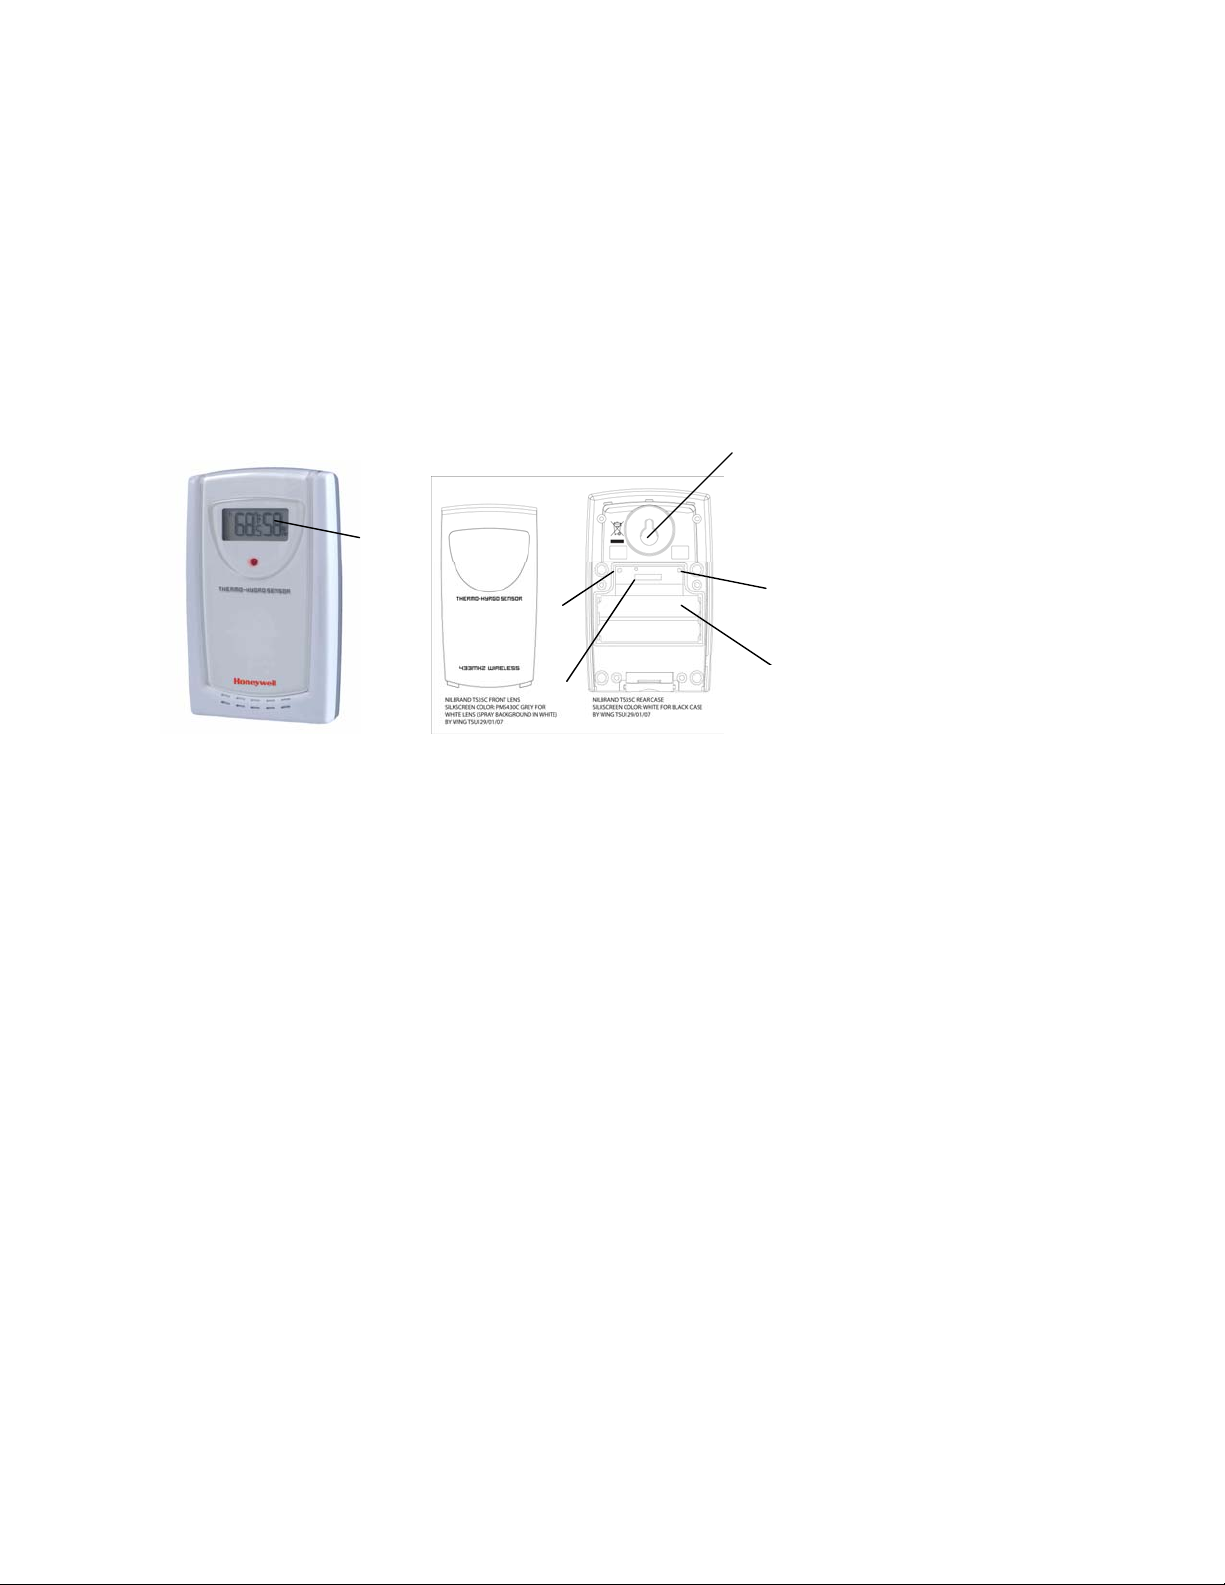
REMOTE SENSOR
FEATURES
• Double-tool design
• Remote temperature and humidity transmission to the main unit via 433 MHz frequency
• Case can be wall mounted using built-in hanger
• Selection of the temperature display in Celsius or Fahrenheit
• Three channel selection
• LCD displays temperature, humidity and channel
E
A
C
D
A. LED INDICATOR
• Flashes once when the remote sensor transmits a reading to the main unit.
• Flashes twice when battery power is low.
B. BATTERY COMPARTMENT
• Holds two AAA-size batteries
C. RESET
• Resets all previous settings
D. CHANNEL SWITCH
• Selects the desired channel -1, 2 or 3
E. WALL-MOUNT RECESSED OPENING
• Keeps the remote sensor on the wall
F. °C/ °F SWITCH
F
B
• Selects the temperature display in Celsius or Fahrenheit
2
Page 4

BEFORE YOU BEGIN
• We recommend using alkaline batteries for the remote sensor and main unit when temperatures are above
0°C (32°F). We recommend using lithium batteries for the remote sensor when temperatures are below
0°C (32°F).
• Avoid using rechargeable batteries. (Rechargeable batteries cannot maintain correct power requirements).
• ALWAYS install batteries in the remote sensor before the main unit.
• Insert batteries before first use, matching the polarity in the battery compartment
• Press RESET after each battery change with a paper clip or similar tool.
• Remove protective plastic screen from LCD display (if any).
• During an initial setup, place the main unit close to the remote sensor.
• After reception is established (the remote temperature and humidity will appear on the main unit’s display),
position the remote sensor and the main unit within the effective transmission range of 328 feet (100
meters).
• The remote sensor can be placed indoors or outdoors, depending on the area where the temperature
and humidity are intended to be measured. If you intend measuring outdoor elements, place remote
sensor outdoors
• The main unit must be placed indoors.
NOTE
:
1. Avoid pressing any buttons on the main unit before the remote readings are displayed.
2. The effective operating range may be influenced by the surrounding building materials and how the receiver and
transmitter are positioned.
3. Place the remote sensor so that it faces the main unit (receiver), minimizing obstructions such as doors, walls,
and furniture.
4. Though the remote sensors are weather-resistant, they should be placed away from direct sunlight, rain or snow.
The best suggested location for the remote sensor for outdoors is under the eave on the north side of the building.
NOTE:
When the temperature falls below freezing, the batteries in the outdoor remote sensor may have
reduced voltage supply and a shorter effective range. We recommend using lithium batteries at
temperatures of 0°C (32°F) and below.
3
Page 5

BATTERY INSTALLATION
REMOTE SENSOR
NOTE: Install the batteries; select the channel and temperature in °C or °F before mounting the remote
sensor.
• Remove the screws from the battery compartment with a small screwdriver.
• Set the channel. The switch is located in the battery compartment. Channel 1 is typically selected if only
one remote sensor is being used.
• Install 2 “AAA” size alkaline batteries (not included) matching the polarities shown in the battery
compartment.
• Replace the battery compartment door and secure the screws.
• Secure the remote sensor in the desired location.
SPECIFICATIONS
Remote Sensor
Remote Temperature
Proposed operating range with alkaline batteries:
-20°C to + 70°C (-4°F to + 158°F)
Temperature resolution: 0.1°C/0.2°F
RF Transmission Frequency: 433 MHz
RF range: 30 meters
Temperature & humidity transmission cycle: approximately 45 seconds
Low battery indicator
Wall-mount of Table stand
Power
Remote Sensor: 2 AAA size 1.5V batteries (not included)
Dimensions
Remote sensor: 2.35(L) x 3.77(H) x 0.86(D) inches
4
Page 6

FCC STATEMENT
This device complies with Part 15 of the FCC Rules. Operation is subject to the following two conditions: (1) This
device may not cause harmful interference, and (2) This device must accept any interference received, including
interference that may cause undesired operation.
Warning: Changes or modification to this unit not expressly approved by the party responsible for compliance could
void the user’s authority to operate the equipment.
NOTE: This equipment had been tested and found to comply with the limits for a Class B Digital device, pursuant to
Part 15 of the FCC Rules. These limits are designed to provide reasonable protection against harmful interference
in a residential installation. This equipment, installed and used in accordance with the instructions, may cause
harmful interference to radio communications.
There is no guarantee that interference will not occur in a particular installation. If this equipment does cause
harmful interference to radio or television reception, which can be determined by turning the equipment off and on,
the user is encouraged to improve or correct turning the interference by one or more of the following measures:
Reorient or relocate the receiving antenna
Increase the separation between the equipment and receiver.
Connect the equipment to an outlet on a circuit different from that to which the receiver is connected.
Consult the dealer or an experienced radio / TV technician for help.
5
Page 7

EC-Declaration of conformity
Product: TS35C
This product contains the approved transmitter and complies with the essential requirements of Article 3 of the
R&TTE 1999/5/EC Directive, if used for its intended use and that the following standard(s) has/have been applied:
Efficient use of radio frequency spectrum
(Article 3.2 of the R&TTE Directive)
Applied standard(s) EN 300 220-2 V2.1.1:2006
Electromagnetic compatibility
(Article 3.1.b of the R&TTE Directive)
Applied standard(s) EN 301 489-3 V1.4.1:2002
EN 301 489-1 V1.6.1:2005
Low voltage directive
Applied standard(s) EN 60950-1:2006
Additional information:
The product is therefore conform with the Low Voltage Directive 73/23/EC, the EMC Directive 89/336/EC and
R&TTE Directive 1995/5/EC (appendix II) and carries the respective CE marking.
RTTE Compliant Countries:
ALL EU countries, Switzerland and Norway
6
 Loading...