

Page 1

Unit 1, Bluewater Estate, Bell Close, Plympton, Devon, PL7 4JH
SwingAway Horizontal Wall Bed Assembly Instructions
Issued 20/07/10, Hideaway Beds Ltd
Updated: 3/5/11, 2/3/12, 19/05/16, 13/07/17
By using this guide, you hereby agree to the following:
Our own patent internationally protects all manufactured items. Your statutory rights as a consumer
are not affected. Please note that we practice a policy of continual review and reserve the right to
change the above guide at any time without notice. E&OE Hideaway Beds Ltd July 2017.
Page 2

2 | P a g e
Introduction
The SwingAway (CEHNT) systems are vertically and horizontally mounted wall beds that stand alone on
their own sub-frame, which must be fixed to the floor and wall. The bed can be mounted in a recess or
cabinet using bi-folding doors/similar or concealed using a curtain etc. or left on view. NOTE: Doors
cannot be fixed to the base of a SwingAway Bed. The counter balanced mechanism is suitable for use
with most sized standard mattresses. The maximum mattress depth is 8”.
Note: it is essential that the bed assembly is securely fixed to floor and wall with correct fixings (not
supplied). Do not try to pull the bed down into the horizontal position unless it is fixed and by using
the pull handle.
IMPORTANT: If packaging is damaged check bed frame for any damages and all components are present.
If any items are missing contact you retailer immediately.
Component List
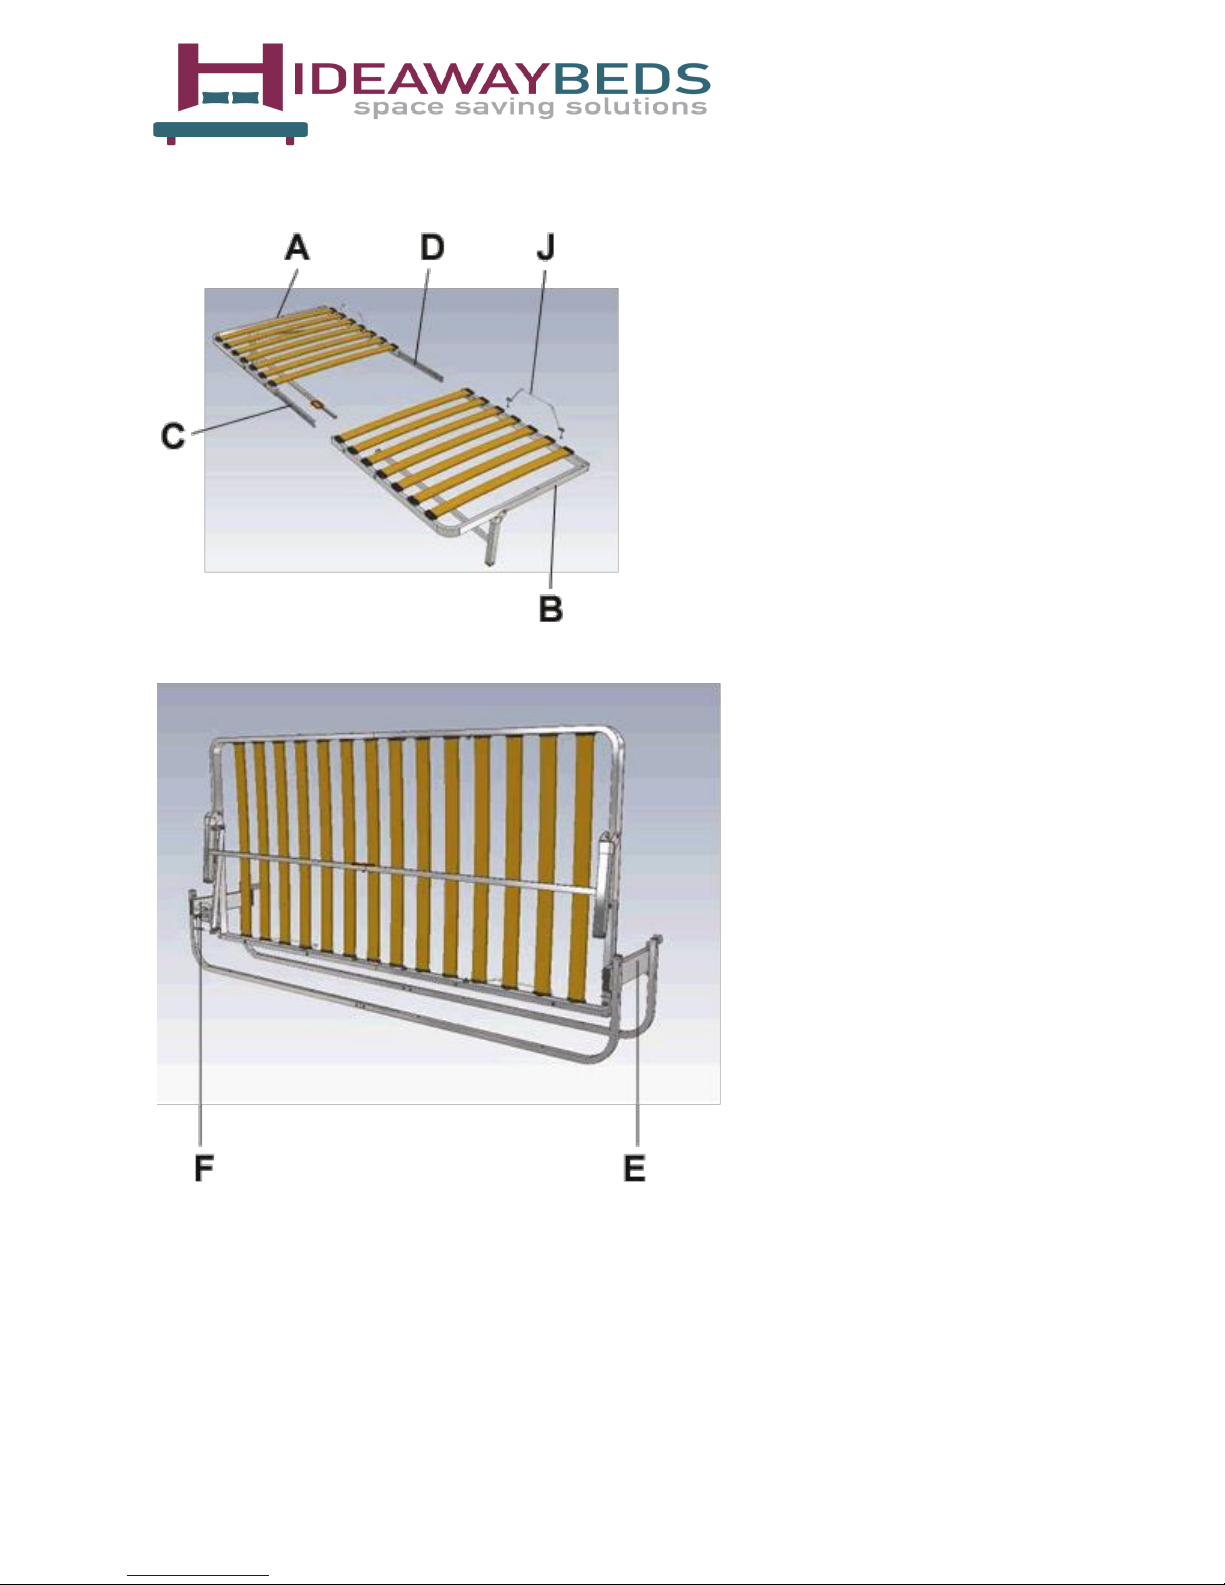
1 X BED FRAME (IN 2 PIECES) ‘A’ & ‘B’
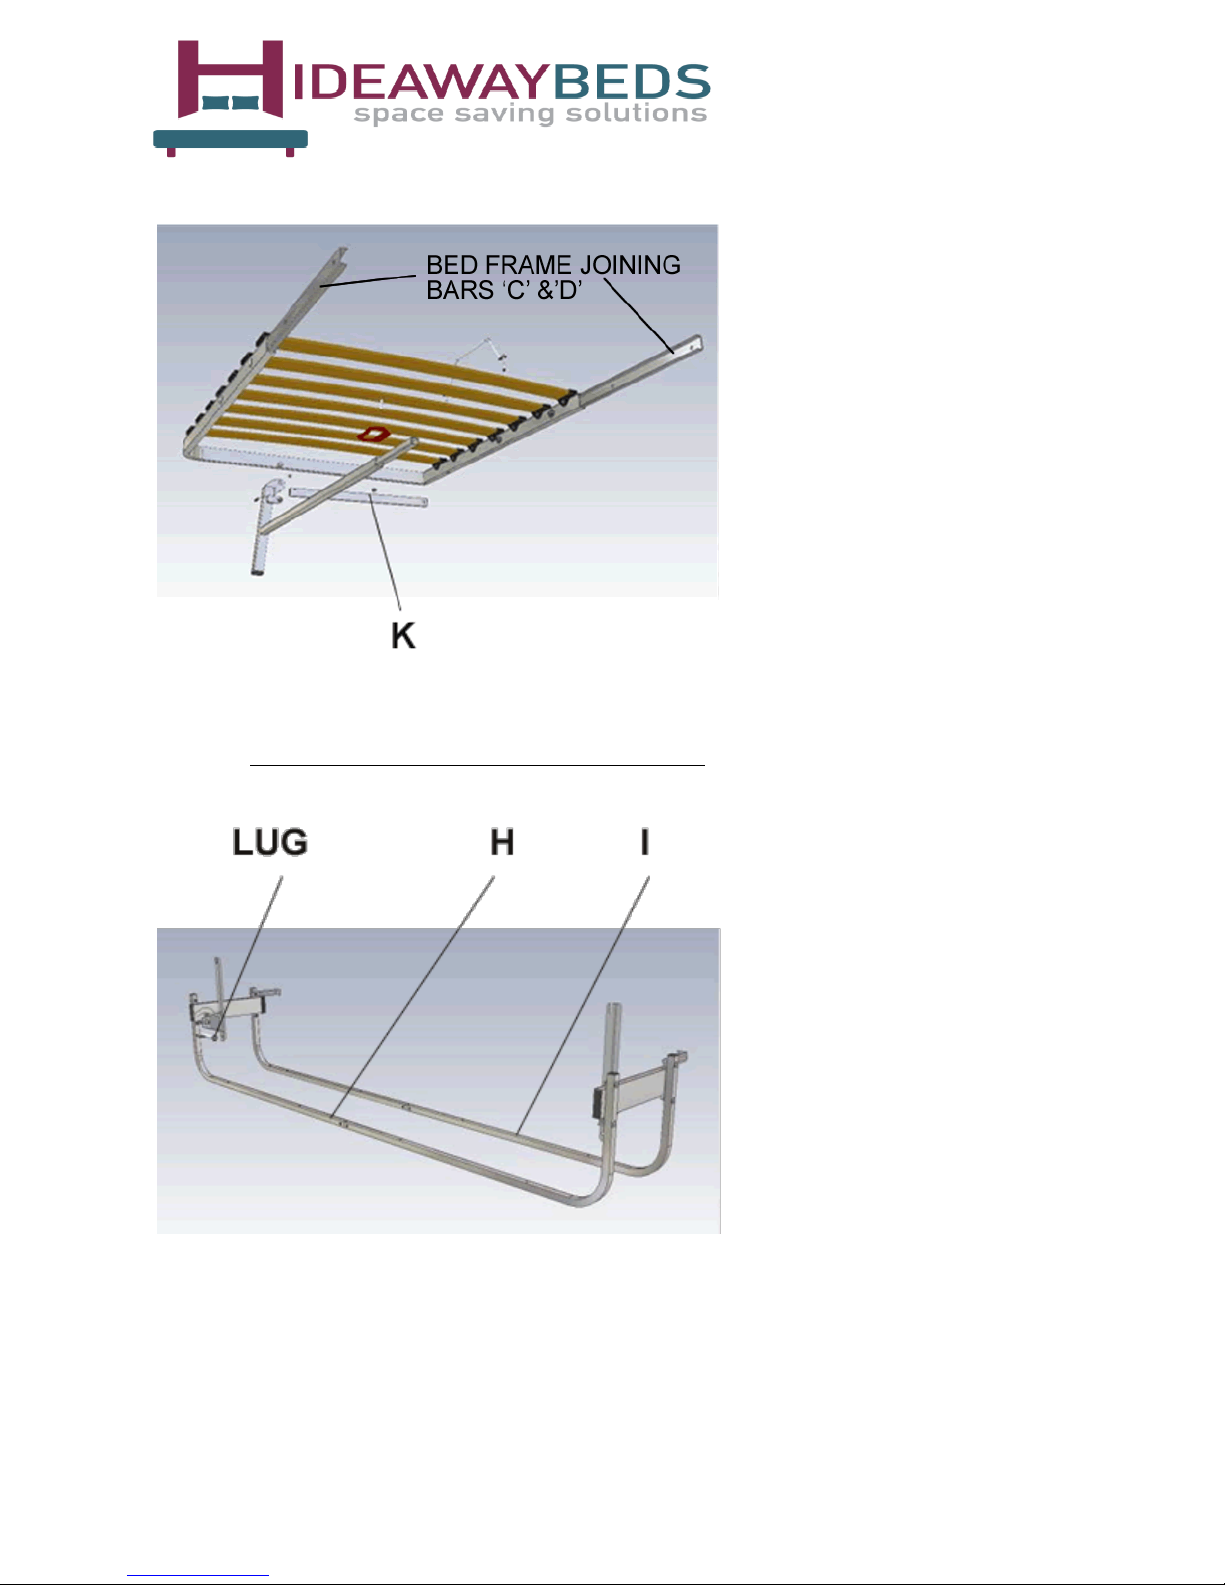
2 X BED FRAME JOINING BARS ‘C’ &’D’
2 X SPRUNG COUNTERBALANCED UNITS ‘E’ & ‘F’
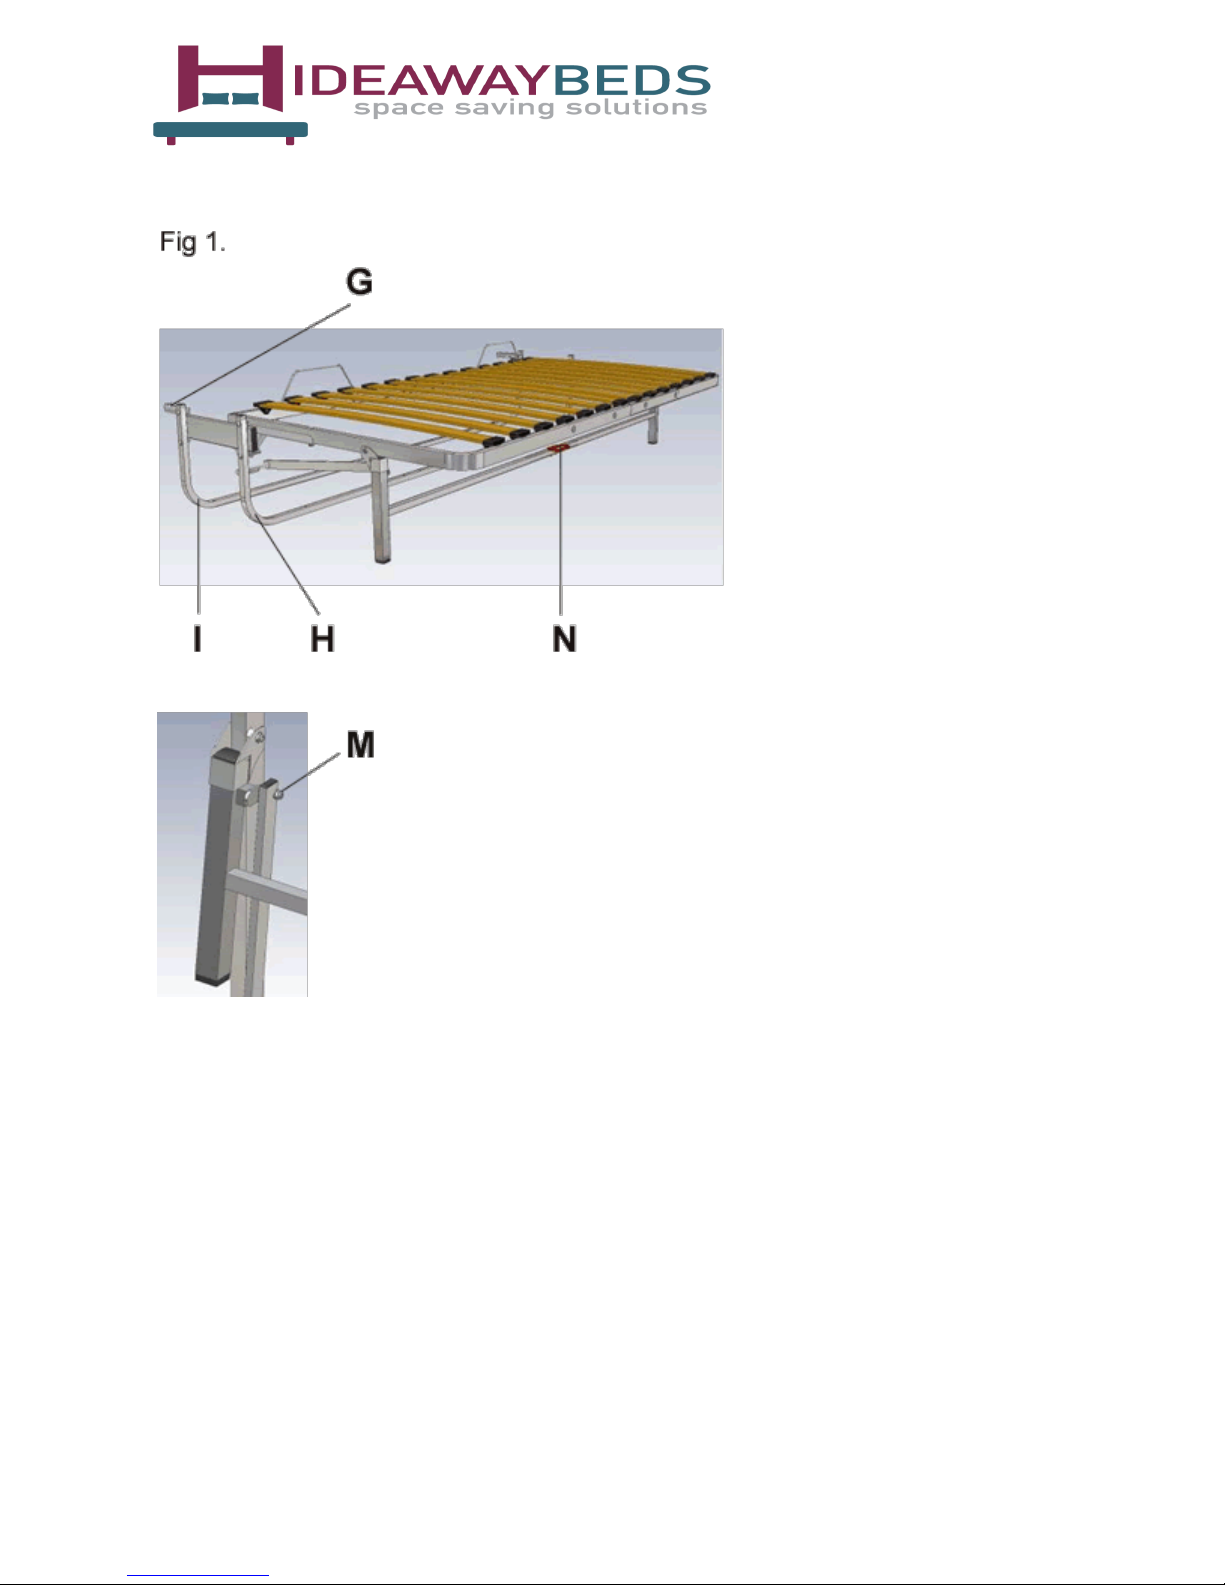
2 X WALL BRACKETS ‘G’
2 X SUB-FRAMES ‘H’ & ‘I’
1 X MATTRESS SUPPORT BAR ‘J’
1 X AUTOMATIC LEG BAR (IN 2 PIECES) ‘K’ & ‘L’
1 X PULL HANDLE ‘N’
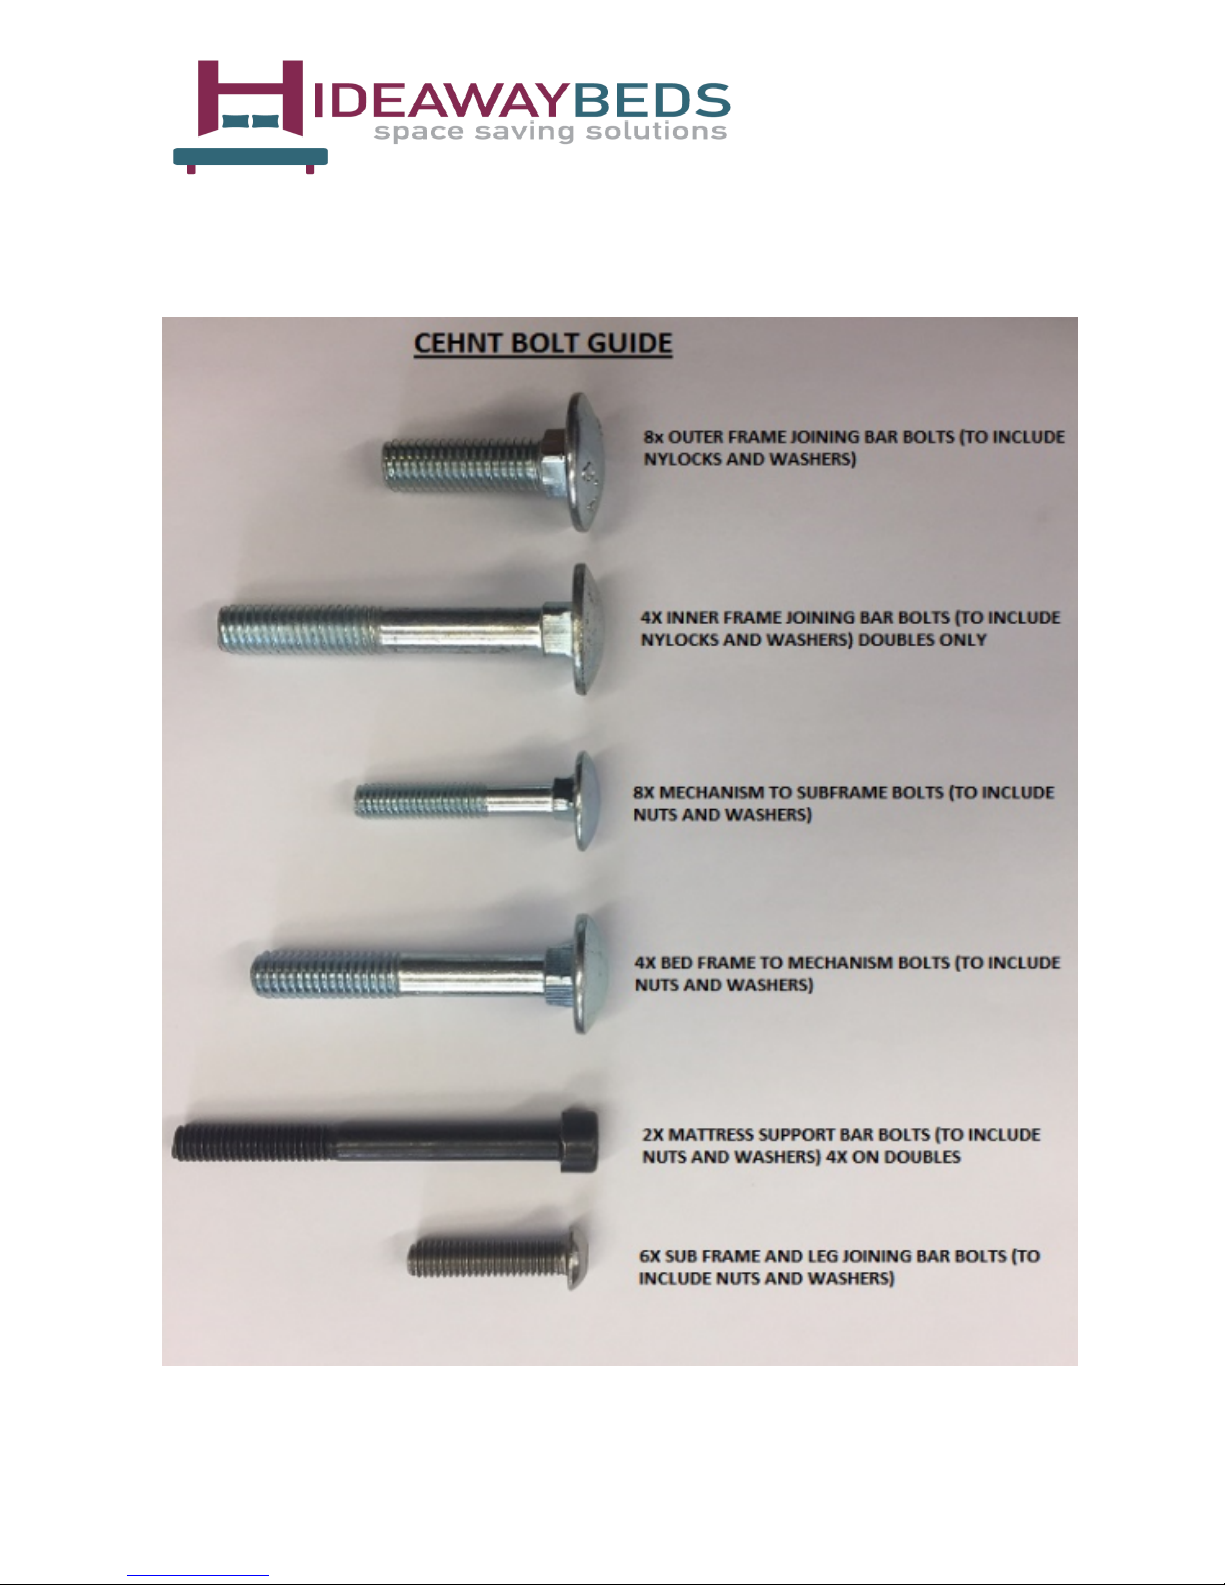
1 X PACK OF NUTS, BOLTS AND WASHERS
2 X BEDDING STRAPS
N.B. The bolts used have square shoulders, which are designed to pull into the frame when tight.
All rights reserved. O&OE. © Hideaway Beds 2017.
Page 3

3 | P a g e
Instructions
1. Join the 2 x part bed frame ‘A’ & ‘B’ together using ‘C’ & ‘D’. (fig 2)
2. Bolt the counterbalanced units ‘E’ & ‘F’ to the sub-frames ‘H’ & ‘I’ ensuring that ‘H’ is located
at the front and that the lug is on the left hand side. (fig 1)
3. Before tightening the nuts, connect the angled wall brackets ‘G’ to the top rear bolts on the sub-
frame ‘I’. The brackets have two holes; the ones to be used are determined by the thickness of
the mattress i.e. the distance of the bed frame from the wall.
4. Bolt the mattress support ‘J’ to the bed frame.
5. Bolt the bed frame to the pivot arms of the counterbalanced units. (‘E’&’F’)
6. Join together the automatic leg bar ‘K’& ’L’ then attach to leg ‘M’ and the lug on frame ‘H’ using
the washer and split pin.
7. Screw pull handle ’N’ to the crossbar of the legs.
8. Place the assembled bed and sub-frame in the preferred position in the room and mark out the
holes to be drilled in the wall and floor. Fix as appropriate.
9. Fix the sub-frame securely to the wall using the correct fixings to suit the wall and floor material.
10. With the bed in the horizontal position, place the mattress onto the frame and secure with
bedding straps. N.B. without the weight of the mattress the bed will try to return to its upright
position, so it is suggested to get somebody to hold the bed whilst you put the mattress on.
Important Safety Factors:
Due to the extremely reactive springs it is important that you always manually control the bed
by maintaining hand contact whilst in the ascent and decent position.
Do not remove the mattress whilst in the horizontal position unless the frame is being held by
another person.
If you are relocating the bed do not remove any of the fixings unless the bed is in the vertical
position.
Children are discouraged from being in the vicinity when being assembled, fitted and from
playing with the model either in the sleeping or stored position.
Care must be taken care when operating the bed, never lift the bed with anyone on the bed.
All wall beds and cabinets must be securely fixed to the wall and fixations regularly checked.
All rights reserved. O&OE. © Hideaway Beds 2017.
Page 4
4 | P a g e
All rights reserved. O&OE. © Hideaway Beds 2017.
Page 5
5 | P a g e
Important note: Please ensure joining bars ‘C’ & ‘D’ are correctly oriented with the flat section facing
outwards. Failure to do so may cause weakness in the frame.
All rights reserved. O&OE. © Hideaway Beds 2017.
Page 6
6 | P a g e
All rights reserved. O&OE. © Hideaway Beds 2017.
Page 7
7 | P a g e
All rights reserved. O&OE. © Hideaway Beds 2017.
Page 8

8 | P a g e
Important Safety Factors
Do not attempt to operate the bed prior to securely fixing in place.
Due to the extremely reactive springs, it is important that you always manually control the bed
by maintaining hand contact whilst in the ascent and decent position.
Do not remove the mattress whilst in the horizontal position unless the frame is being held by
another person.
If you are relocating the bed do not remove any of the fixings unless the bed is in the vertical
position.
Children are discouraged from being in the vicinity when being assembled, fitted and from
playing with the model either in the sleeping or stored position.
Care must be taken when operating the bed, never lift the bed with anyone on the bed.
All wall beds and cabinets must be securely fixed to the wall and fixations regularly checked.
All rights reserved. O&OE. © Hideaway Beds 2017.
 Loading...