

Page 1

Universal Table/Desk for
All Sizes of Panel Wall Beds
Assembly Instructions
** 5 YEAR WARRANTY **
Designed to Exceed International ISO 9002
Standards for Residential Specifications
- Patent Pending -
Page 2
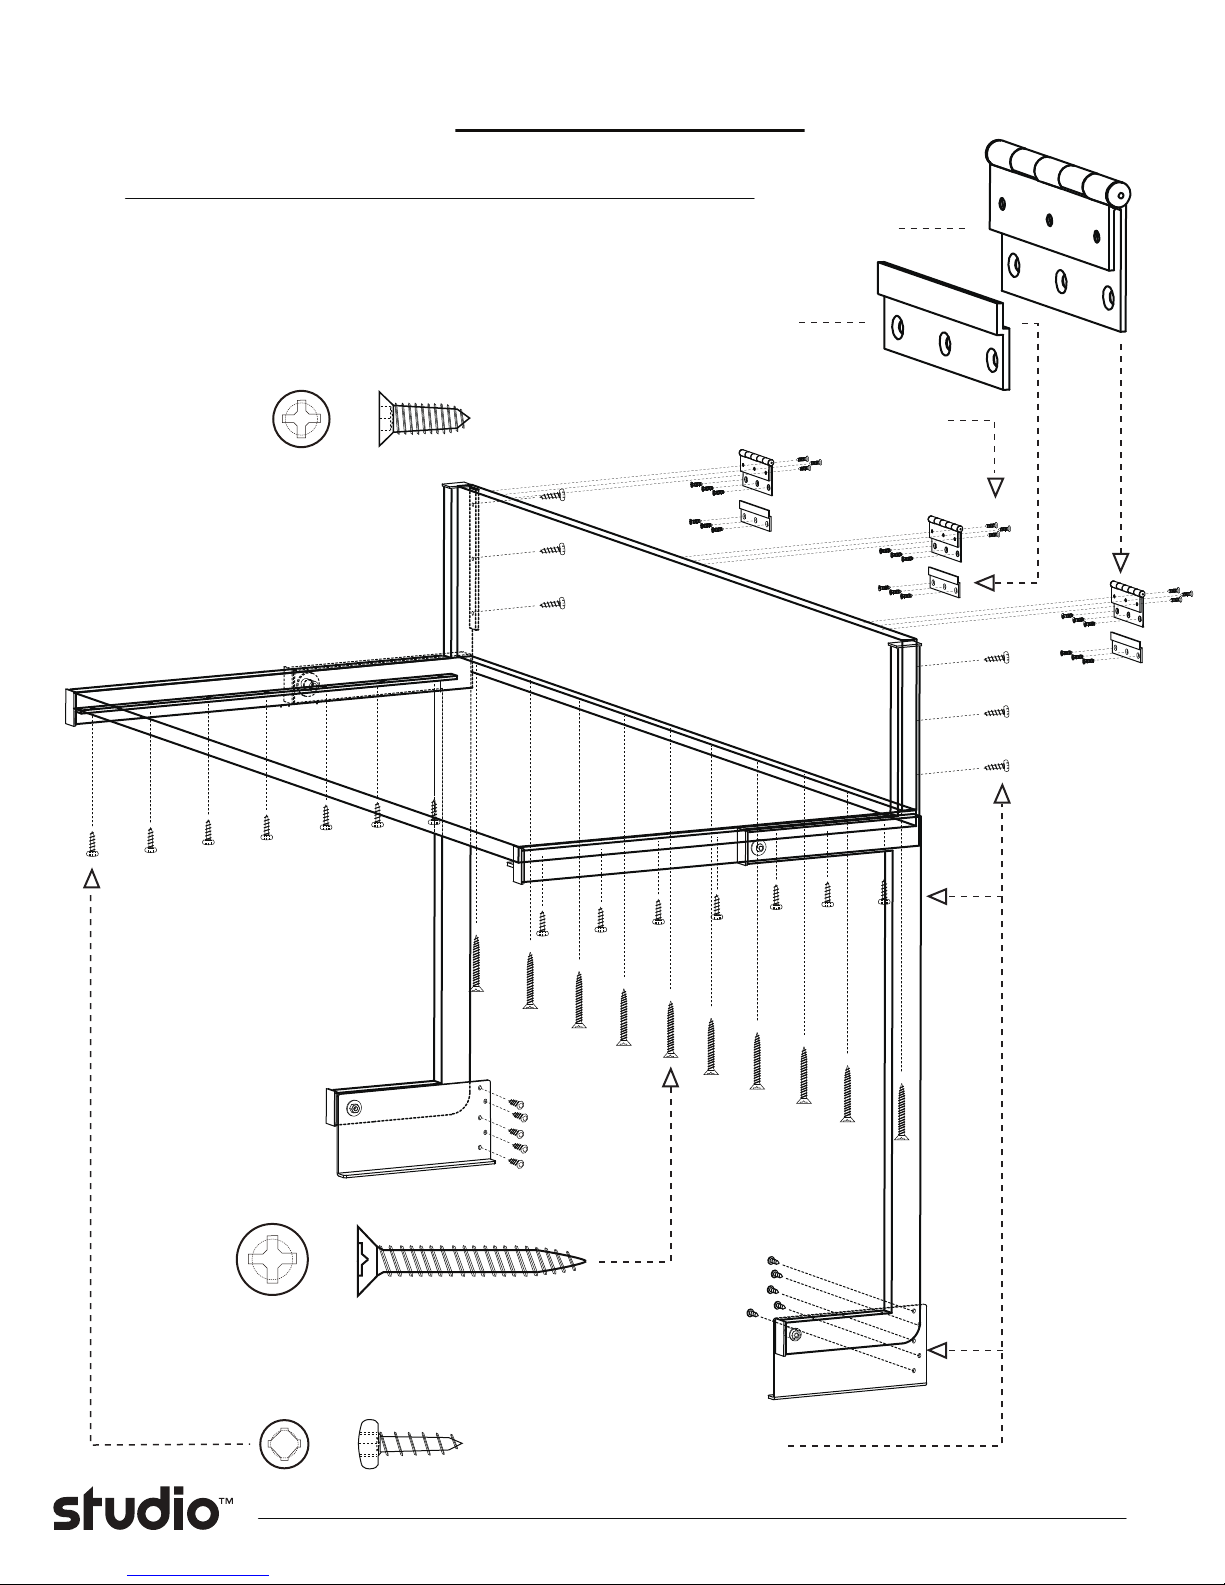
Exploded Assembly
Hinges and Hinge Clips to Riser and Bed Face Panel
(3pc) 2”x3”Black Hinge
(3pc) Hinge Clips
(27pcs) Flat Head Self tapping Screw#5x16mm
(10pc) #8x1.5” (40mm) Wood Screws
Pivot Brackets to Cabinet Panels & Riser and Desk/Table to Upper Brackets
(30pcs) 19mm Self tapping Screw
2.
Page 3
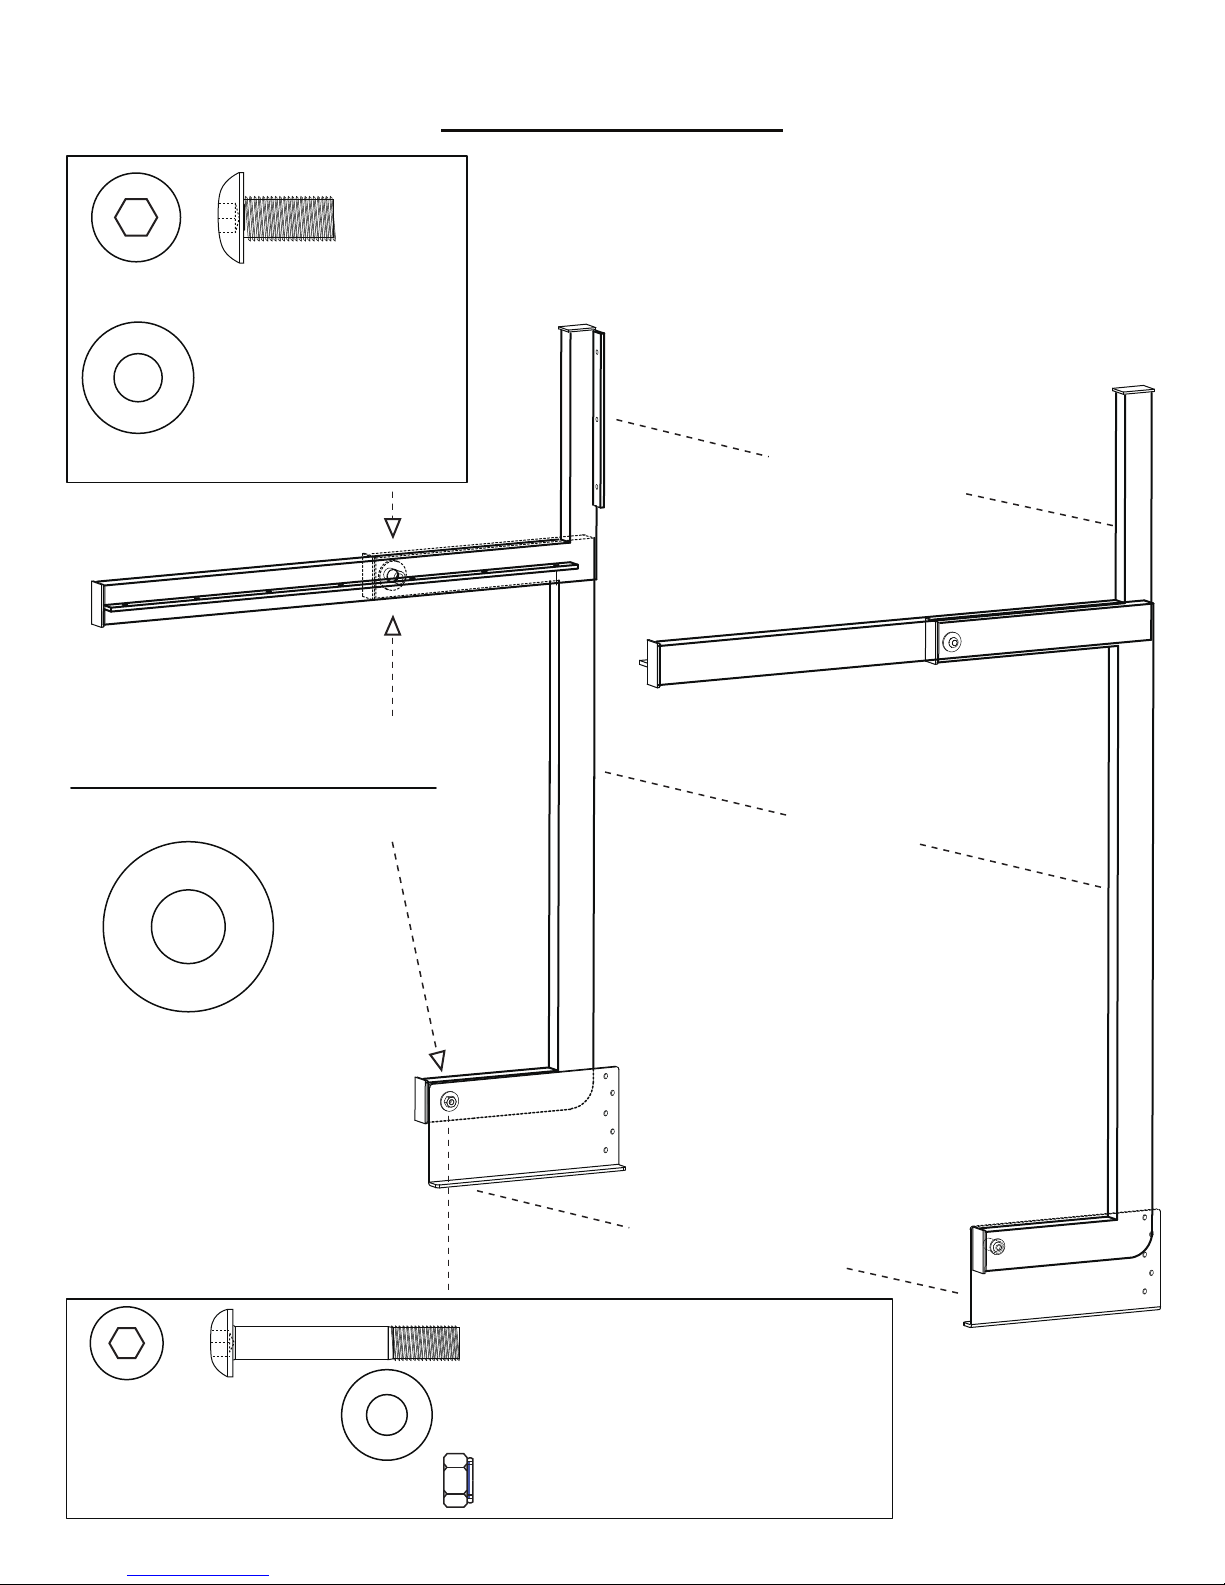
(2pc) M8x16mm Bolt
Pre Assembled KIT
(2pc) Black Steel Washer Ø8.5xØ20mm
Legs to Upper Brackets
Washers stop friction between
Legs, Upper and Lower Brackets
(4pc) Black Nylon Washer Ø13xØ30mm
Upper Bracket
(Left and Right)
Leg (2)
Legs to Pivot Brackets
Pivot Bracket
(Left and Right)
(2pc) M6x40mm Bolt
(4pcs) Black Steel Washer Ø7.0xØ16.0mm
(2pcs) M6 Nylock Nut
3.
Page 4

Project Start-Up
Familiarize yourself with all of the components in the Studio Desk/Table mechanism cartons, as well
1.
as thoroughly study this manual so you may plan the steps required to complete this project.
Study all illustrations and plan drawings. Make sure that the space available in the room is adequate
2.
for the specified dimensions in both the open and closed positions.
NOTE:
Cabinet Panels may be constructed of Ply Core or Particle Board.
Steps to Complete the Project
STEP 1: Prepare Desk Top and Riser (Wood or Laminate)
Determine the length of your desk.
1.
NOTES: • All Desks are 22” in Depth (560mm).
• All Risers are 8.5” in Height (216mm).
• Length of Desk and Riser assembly is always 1.5” less than the measured distance
between the vertical Cabinet side walls.
E.g. The ALPHA bed Queen cabinet is 64” (1625mm) between the vertical
cabinet side walls therefore the Desk and Riser will be 62.5” (1587mm) long.
Edge-band the two long edges of both the Desk and Riser.
2.
NOTE: If the Panel Bed is slightly too heavy too open and close without the Studio Desk/Table
mounted, you should add one Spring to the right and to the left to assist in balance. An
odd number of Springs right and left may be used to get balance
STEP 2: Assemble Desk/Table with Upper Brackets.
Assemble the Desk/Table with the Upper Brackets as shown in Drawing #1.
1.
Screw the Desk Top first to the Left and Right Brackets. This provides a seat for the Riser.
2.
Attach the Riser to the Brackets. Be sure of alignment and then screw the Desk and Riser together
3.
from the bottom side with the #8x1.5” (40mm) Screws provided.
Mount the Hinges to the Riser as shown in Drawing #2.
4.
4.
Page 5
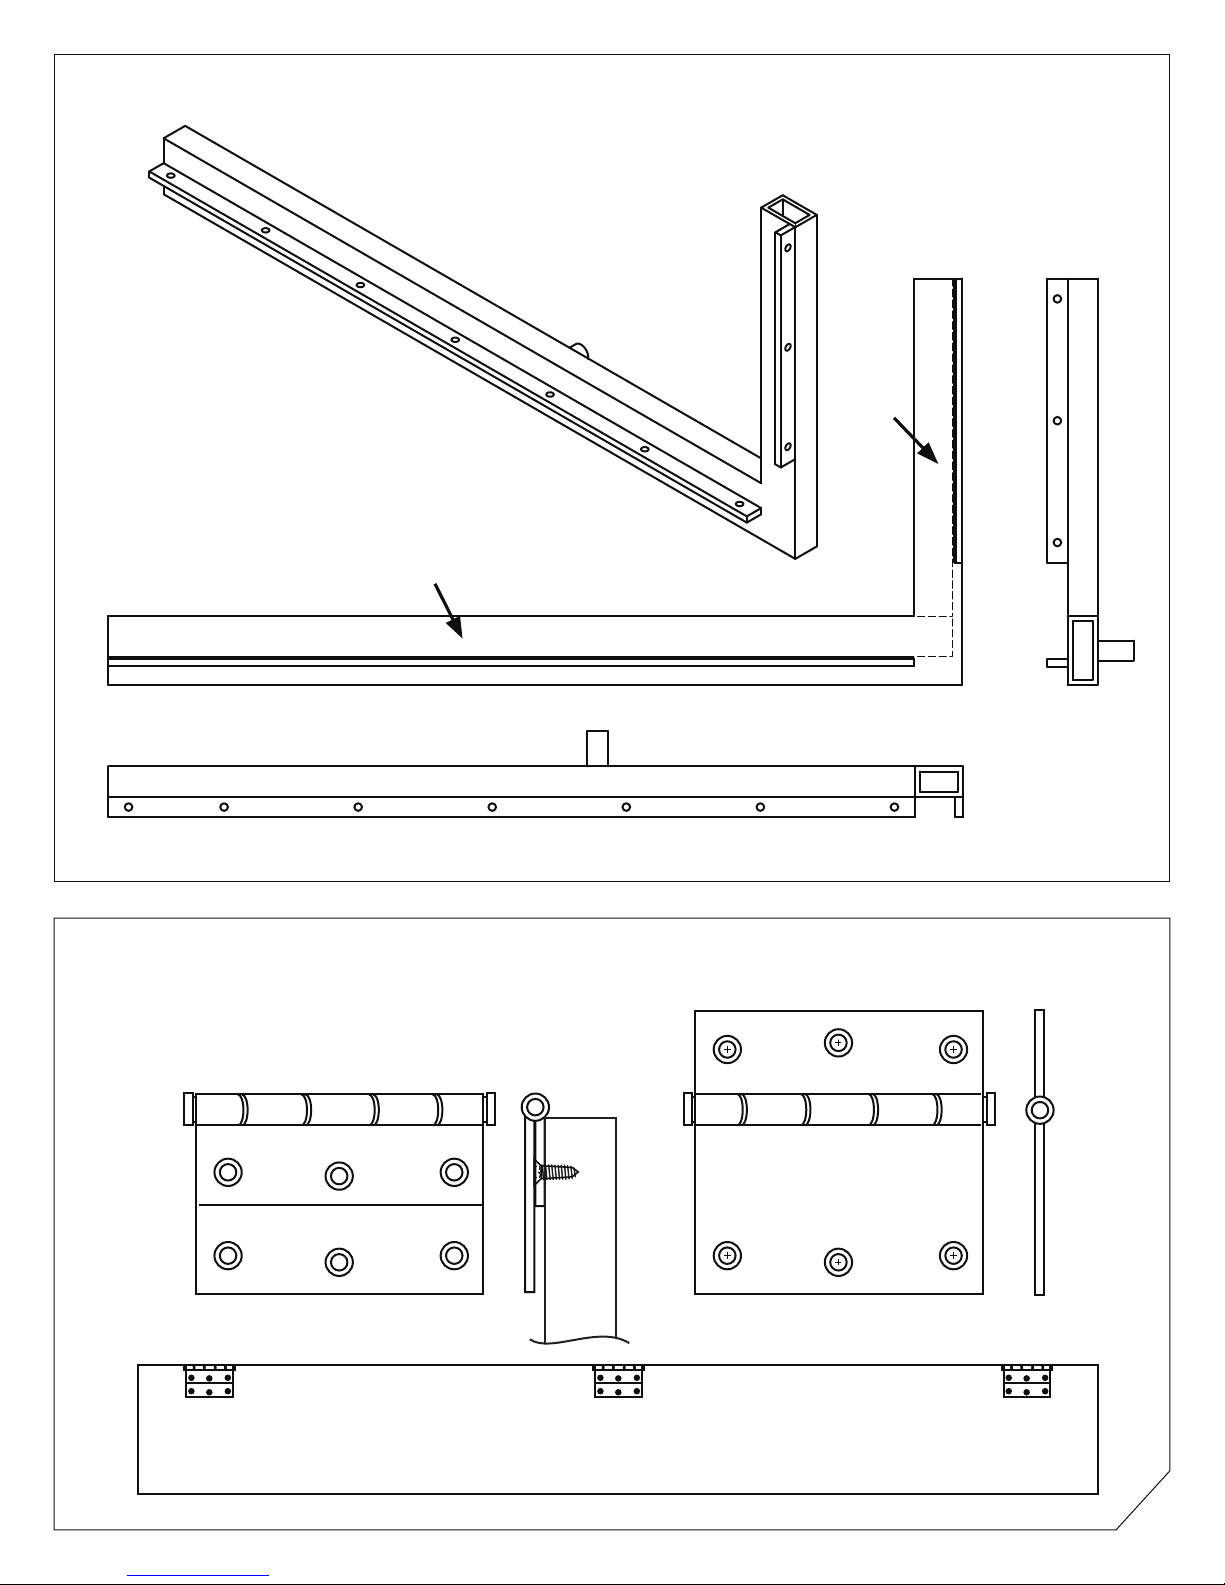
Drawing #1: Upper Bracket
Desk/Table Top
Riser
Drawing #2: Hinges to Riser
The short Hinge leaf attaches to the Riser,
the long Hinge leaf attaches to the Bed Face
Riser
Riser
5.
Page 6
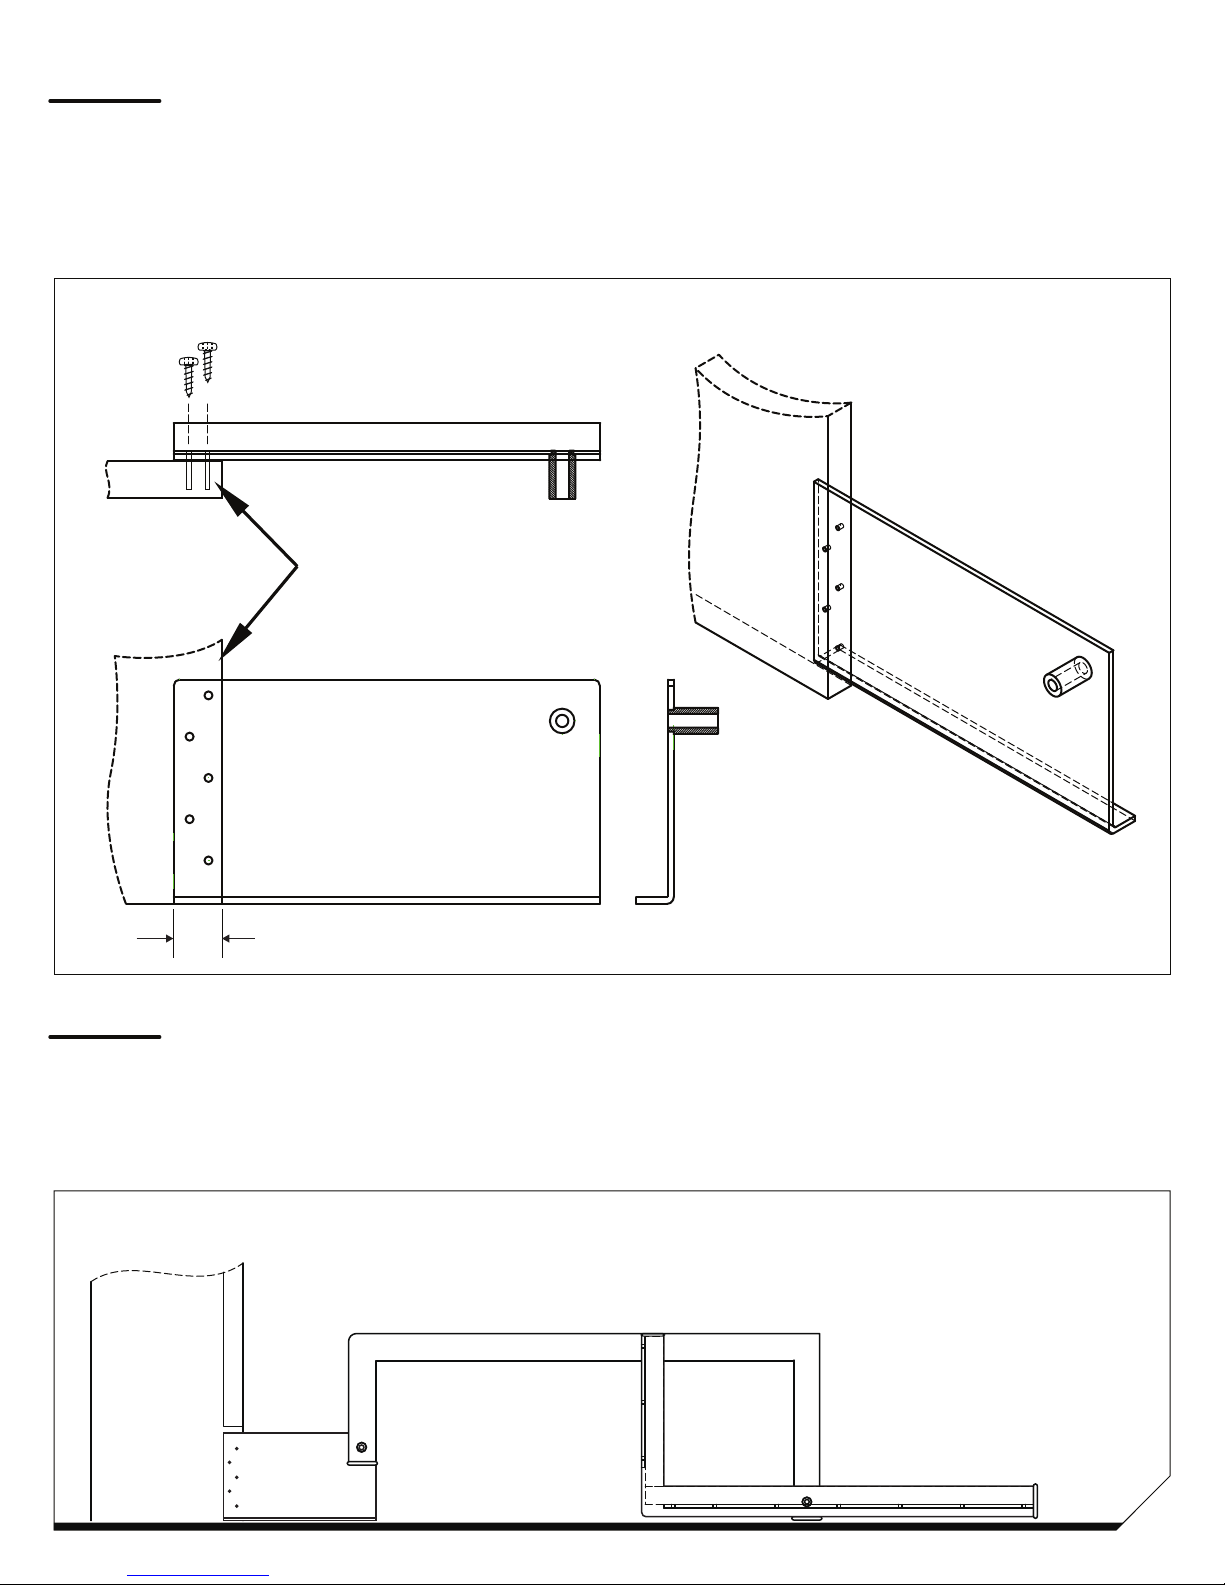
STEP 3: Install Pivot Brackets
Install the left and right Pivot Brackets as shown in Drawing #3.
1.
Mount the Brackets exactly 1.0” (25mm) inside of the Cabinet vertical. The pivot point (standoff) must
2.
face outward to allow the Leg to line up with the vertical edge of the Panel.
Drawing #3: Pivot Brackets
Cabinet
1.0”
Cabinet
STEP 4: Assemble Desk/Table to Bed Face
Assemble the Desk/Table on the floor where it will be located when it is in use (Drawing #4).
1.
Hand tighten the Bolts so the Leg may later be detached to mount the Desk to the Bed Face.
2.
Drawing #4: Desk/Table on floor (Side View)
Cabinet
Pivot
Bracket
Leg
Upper Bracket
6.
Page 7
STEP 5: Install Desk/Table to Bed Face Panel
Raise the Desk and hold it in the UP position (where it will be when mounted to the Bed Face).
1.
Hold the Desk against the Bed Face, making sure that the Desk is level both front to back and end to
2.
end.
Using a pencil, lightly mark the Hinge locations and heights on the Bed Face Panel. Mark the height
3.
of the top edge of the Riser.
Lower the Desk to the floor and detach the Legs from the Pivot Brackets.
4.
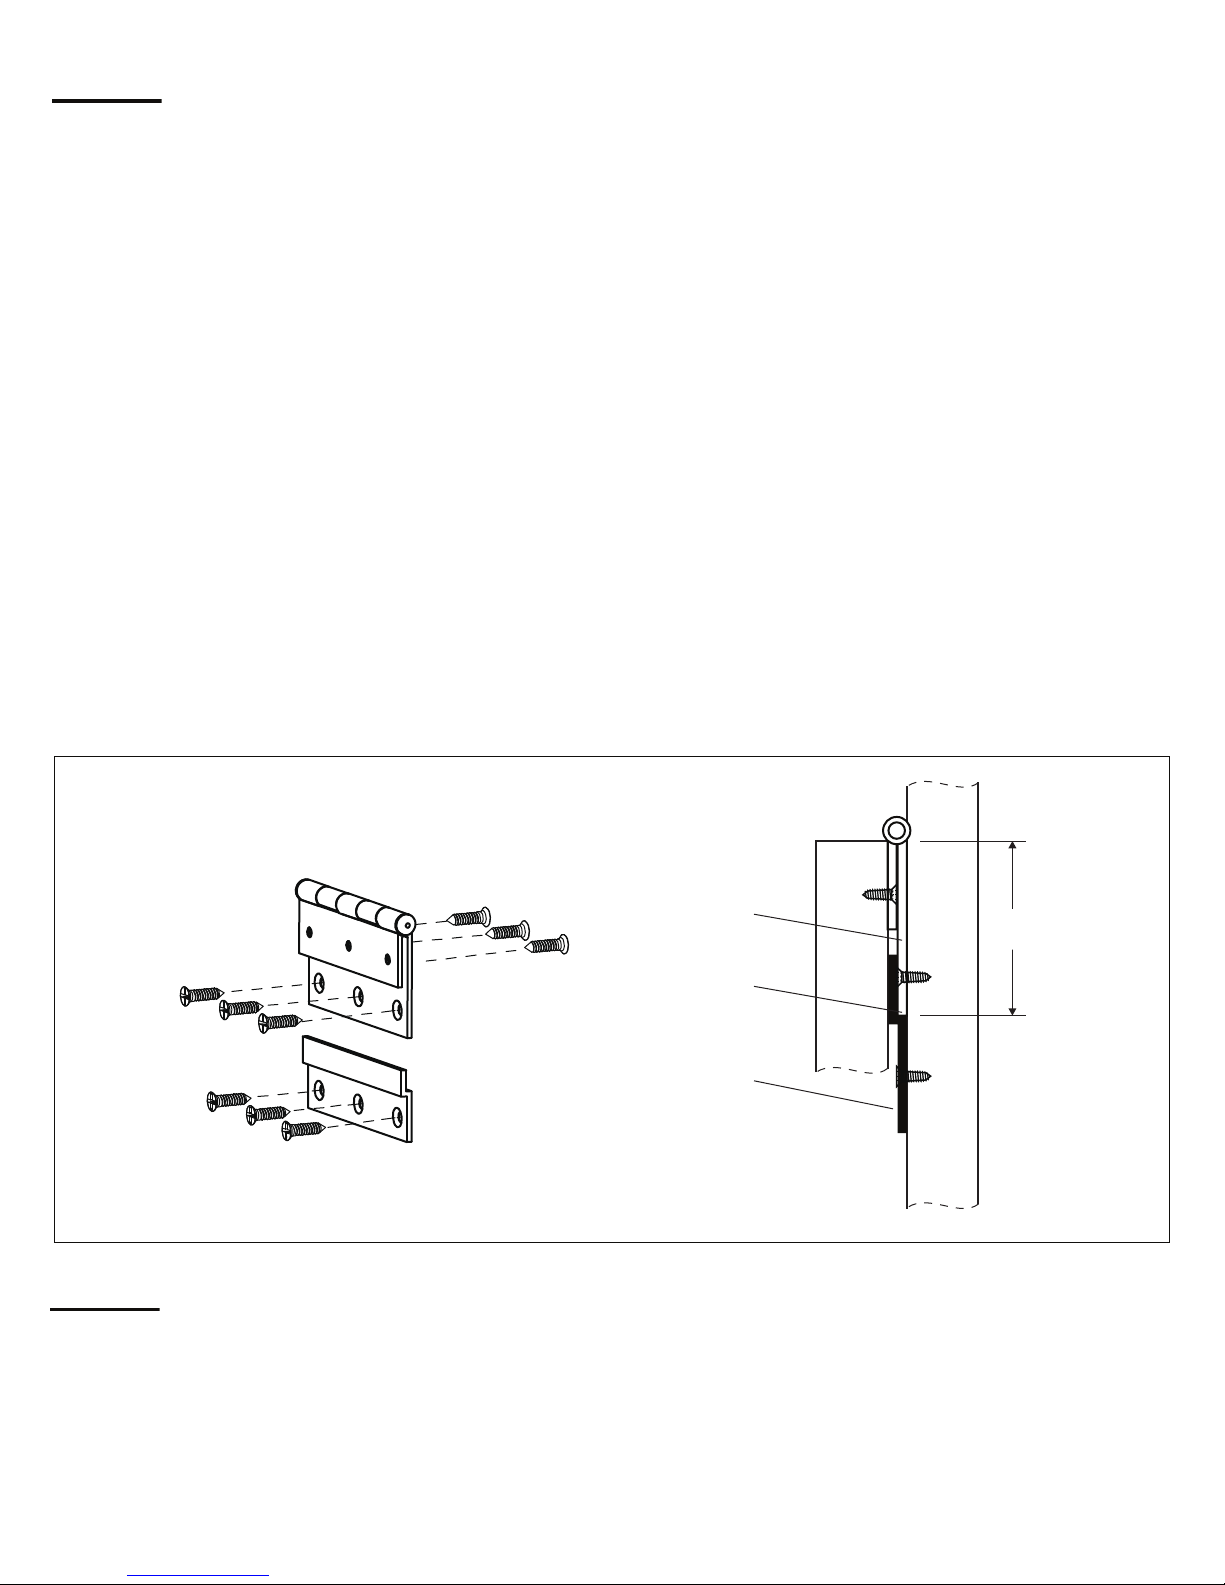
Mount the Hinge Mate Clips to the Bed Face to assist in mounting and leveling the desk. Attach the
5.
Clips so the clip shelves are 1.5” (38mm) below the pencil mark of the top edge of the Riser. Check
the level line between all three Clips to ensure that the desk will be level. Secure all three Hinge
Clips. See Drawing #5.
Bring the Studio Desk/Table back up to the Bed Face and seat the long Hinge leaves in the Hinge
6.
Clips. Screw the long leaves of the Hinges to the Bed Face. Recheck levelness in all directions.
Re-attach the Legs and snug up both upper and lower pivots. It is not necessary to remove Hinge
7.
Clips as they are out of sight after the installation.
Drawing #5: Hinge Clips
Long Hinge
Hinge
Hinge Clip
Leaf
Clip Shelf
Riser
Hinge Clip
Bed
Face
1.5”
38mm
STEP 6: Test
Operate the Desk/Table slowly.
1.
Double check the levels.
2.
Make sure that all End Caps are installed.
3.
7.
 Loading...