

Page 1
KRYPTODISK 2
USER PRIMARY AND USER DATA RESTORE
QUICK
INSTALLATION GUIDE
General information
Disclaimer
Hiddn’s advantage
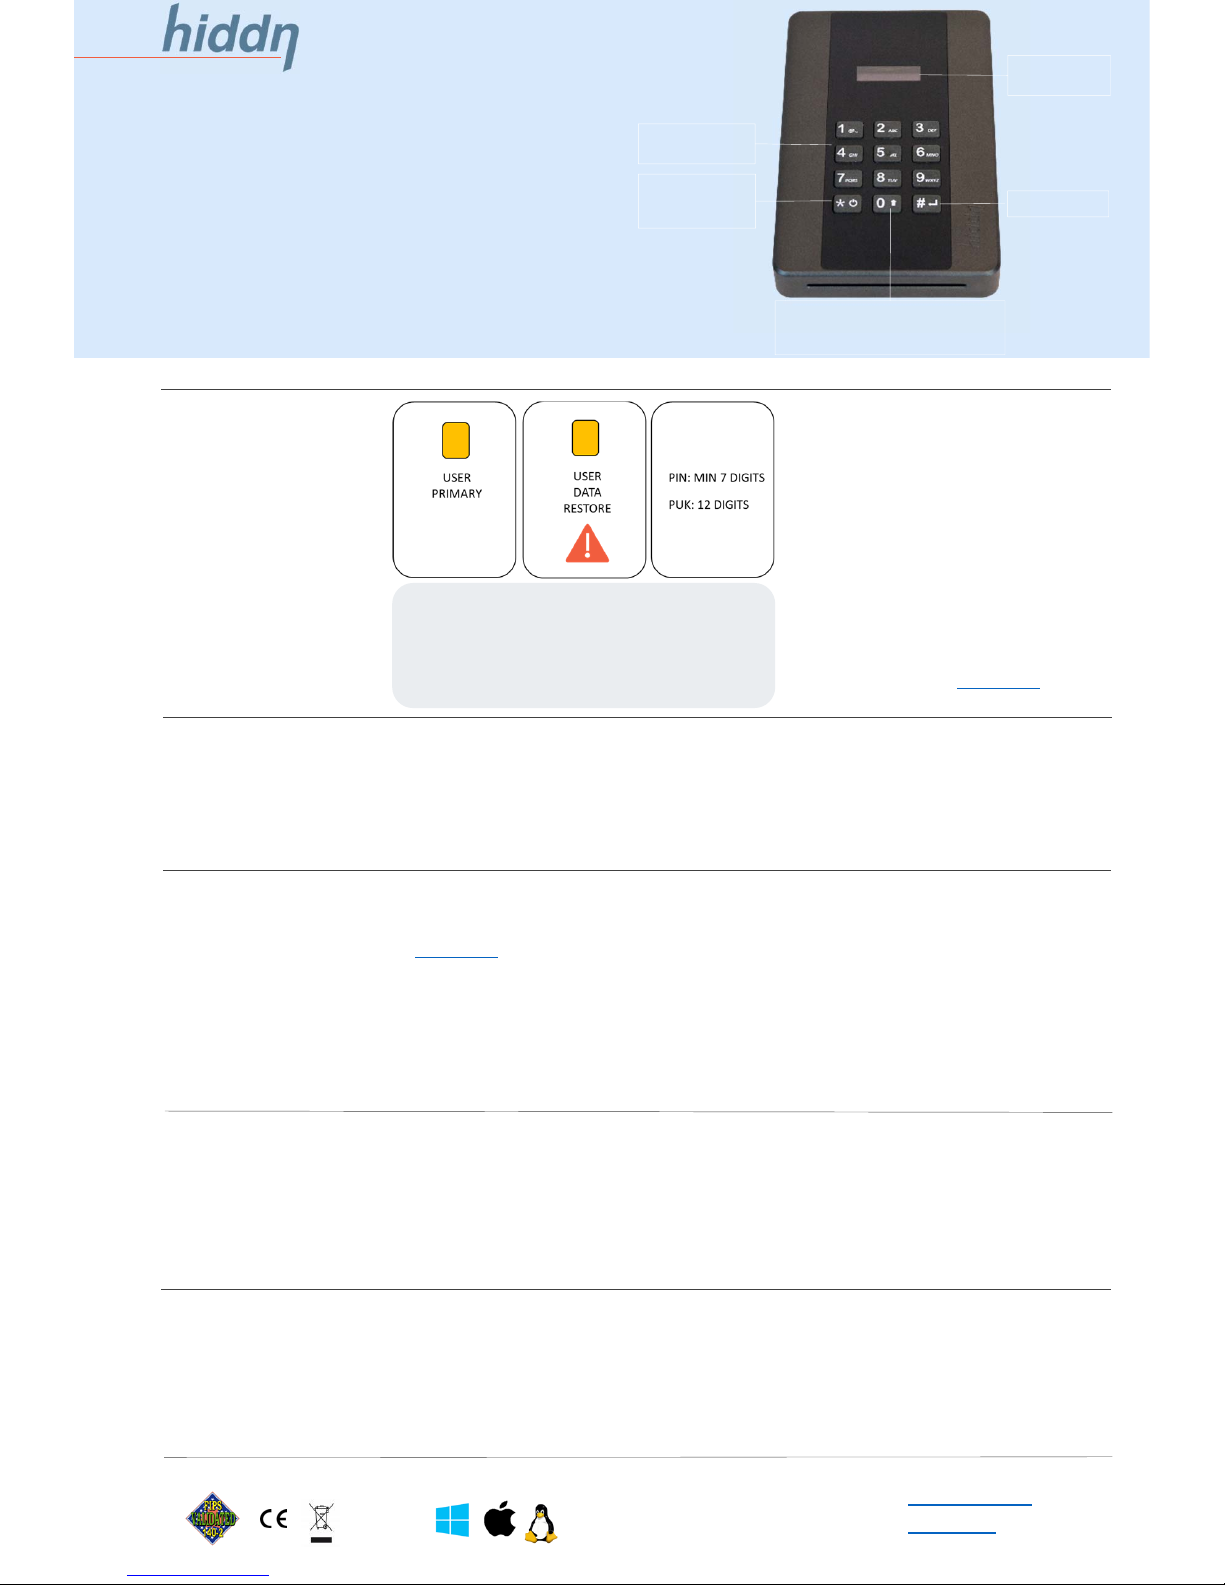
* ON/OFF
* BACK
* BACKSPACE
Step 1. Initialise
Plug the KryptoDisk into a USB port
and follow instructions on the display.
You will be asked to restart your
KryptoDisk. Restart the KryptoDisk by
unplugging it from the USB port and
then plugging it back.
Step 2. PIN code
Insert the primary user card and enter
the PIN printed on the PIN/PUK card.
The PIN can be changed later from
the admin menu.
0: OPENS ADMIN MODE
USE ‘0’ KEY TO NAVIGATE IN THE
ADMIN MENU
OLED
DISPLAY
ALPHANUMERIC
KEYBOARD
Support
www.hiddn.no/support
www.hiddn.no
Designed, produced and assembled in Norway
Security information
All trademarks and brand names are the property of their respective owners
Step 3. Formatting the disk
Please use Disk Management
(Windows) or Disk Utility (macOS) to
initialise and format your KryptoDisk.
You will find a guide on the next page.
After formatting the disk drive your
KryptoDisk is ready for use.
Introduction
Please read through this guide
thoroughly before powering up your
KryptoDisk.
IMPORTANT:
Incorrect use may lead to loss of
data. Read the security information
section before first time use.
Hiddn accepts no liability for any consequential, incidental, direct or indirect damage (including but not limited to loss of productivity, loss of business profits, business
interruption, loss of business information and similar events causing losses to business or other consequential economic loss) arising from any action and/or inaction based on
information contained in this document. Hiddn accepts no liability for any loss of data and/or company and/or personal information that may result from any action and/or inaction
based on information contained in this document. Users are instructed to have backups of all data prior to installation of any device or products described herein. Users are
recommended to have separate backup of all data. All Hiddn KryptoDisk parts are Hiddn parts, and Hiddn does not accept any liability for any direct or indirect loss related to the
handling and/or mishandling of any of the parts and/or combination of the parts provided in this package. Hiddn reserve the rights to at any time and without notification change
its offer and/or price and/or availability of parts.
Rev. no 1.03.KD-SHE-15.02.18.
First time use
Zeroize
Zeroize wipes all settings and
invalidates the smart card in addition
to restoring the device back to factory
default settings.
The user data restore card will
recover data from an invalidated
primary user card and zeroized
device. If you invalidate the data
restore card, your data is lost.
Important security functions from the admin menu
Other admin features
The admin menu provides detailed
system information, enables you to
change PIN and set the device name.
SECURITY FIRST
As any type of storage device may
unexpectedly fail we strongly
recommend that you store and backup
any valuable or critical data. Consult
your IT-department for guidelines or
consider using at least two independent
storage devices for critical data
Admin menu
To enter the Admin menu, press and
hold the ‘0’ key while powering on the
device.
Use the ‘0’ key to navigate in the
Admin menu.
Remove the protection shield
from the display before use.
If the KryptoDisk is new and
uninitialised or has been zeroized,
you will need to prepare it for first
time use, see section “First time
use”.
Full user guide available at
hiddn.no/support
New set of cards
If you activate the user data restore
card, please order new set of cards
as soon as possible from your
reseller, distributor or
Procedure with new set of cards
1. Zeroize unit from the Admin
menu.
2. Follow procedure for “First time
use”.
3. Restore data from your backup.
Admin menu
Use of primary and restore card
PLEASE REMEMBER TO KEEP THE USER DATA RESTORE
CARD AND THE CARD WITH PIN AND PUK INFORMATION IN
A SECURE PLACE.
IF YOU USE YOUR USER DATA RESTORE CARD WE
STRONGLY RECOMMEND A BACK-UP OF ALL DATA
STORED ON YOUR DEVICE.
PACKAGE INCLUDES
KyptoDisk 2 and case
USB Cable
User primary and user data restore card
PIN/PUK card
The Zeroize function is used for
invalidating user primary card and
resetting the device to factory settings.
Please note that invalidating of both user
primary and user data restore card will
require new set of cards. A new set of
cards will not restore data.
Please note that PIN, PUK and
other security parameters are not
stored by Hiddn and cannot be
recovered if lost.
# ENTER
Security recommendation
To ensure the best security for your
device and protection of your data we
recommend that you keep the key
card and KryptoDisk separated when
not in use.
If your primary card is lost, stolen or
broken please invalidate the primary
card as soon as possible. See section
“procedure for lost user primary card”.
User primary card
This is your primary keycard with a preset PIN found on your PIN/PUK card.
PIN can later be changed from the
Admin menu.
User data restore card
The user data restore card is your back
up if you have lost or invalidated your
primary user card.
Use of data restore card will require
that you have the original PIN from the
PIN/PUK card available.
PIN Recovery
The PUK code can be used to restore
access to a device that has been
locked due to too many incorrect PIN
attempts.
A PUK can reopen the smart card
and set a new PIN.
The PUK cannot be changed.
New set of user cards
If you use the user data restore card,
please order new set of user cards as
soon as possible from your reseller,
distributor or [email protected].
Procedure for lost user primary card
1. Zeroize your device to invalidate your
primary card.
2. Insert user data restore card. Enter
PIN from the PIN/PUK card.
3. Follow instructions in the display
4. When device is initialised and restore
data card activated you will have
access to your data again.
5. Make a back-up of your data and
order a new set of cards.
6. Follow procedure for new set of
cards.
Page 2
Formatting a hard drive in Windows (please note that this procedure requires admin access).
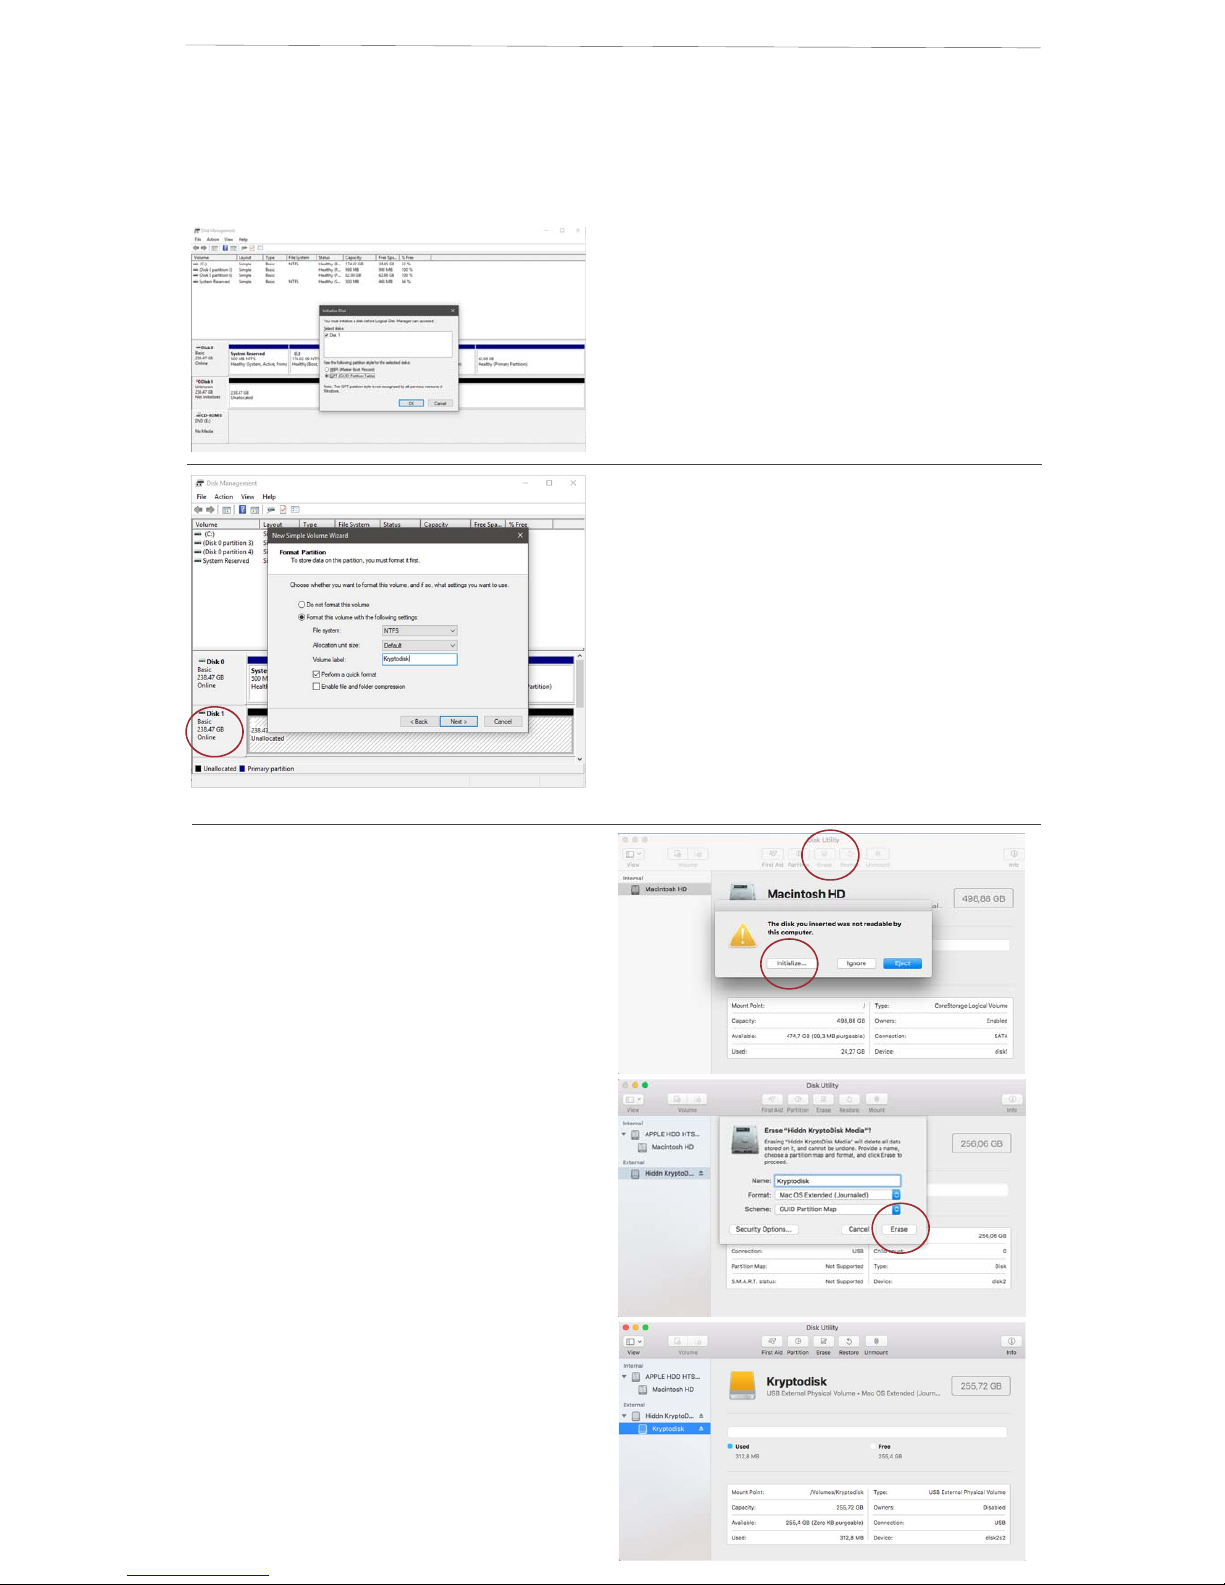
1. Open Disk Management
The first thing you need to do is open Disk Management, the tool that's
used to manage drives in Windows. Opening Disk Management can be
done a number of ways depending on your version of Windows, but the
easiest way is to hold the “windows” key and press “R”. This command will
open the dialog box where you can enter diskmgmt.msc . Disk
management will now open and you can start formatting the disk.
2. Initialise disk
Disk initialisation will most likely pop up automatically. If not please right click on the icon and a wizard will take you further.
3.
Partitionandformatdisk
Once Disk Management opens, which might take several seconds, look for
the new drive from the list.
Important: KryptoDisk is a new hard drive that needs to be partitioned
before use. In Windows, partitioning needs to be done before a hard drive
can be formatted. The KryptoDisk will probably be on a dedicated row
labelled Disk 1 (or 2, etc.) and will say Unallocated.
Tap-and-hold or right-click anywhere on it and choose New Simple Volume.
Tap or click Next > on the New Simple Volume Wizard window that
appears.
Tap or click Next > on the Specify Volume Size step to confirm the size of
the drive you're creating.
Tap or click Next > on the Assign Drive Letter or Path step
Windows will now partition the drive, a process that will only take a few
seconds on most computers. In Windows 10, Windows 8, and Windows 7
you will be asked to format the disk.
NTFS is the most recent file system available for windows systems, and
recommended if you only intend to use your disk with Windows computers. If
you want to move data between computers with different operating systems,
e.g. Mac or Linux computers, select exFAT.
In the Allocation unit size: textbox, choose Default.
Next is the perform a quick format checkbox. Windows will check this box by
default, suggesting that you do a "quick format“.
The final format option is the enable file and folder compression setting that
we recommend to keep unchecked.
Volume label: [label of your choosing]
File system: NTFS
Allocation unit size: Default
Perform a quick format
Enable file and folder compression - keep unchecked
Formatting a hard drive on Mac.
Launch Disk Utility, located in /Applications/Utilities.
1. Initialise disk
Disk initialisation will most likely pop up automatically. If not please click on the
disk icon and a wizard will take you further.
2. Partition and format disk
From the left-hand pane, which contains a list of drives and volumes connected
to your Mac, select the drive you wish to format. Click the Erase button at the
top of the Disk Utility window, or select Erase from the Edit menu.
A panel will drop down, warning you that erasing the selected drive will destroy
all data on the drive. It will also allow you to name the new volume you're about
to create. Select the format type and partition map scheme to use
In the Erase panel, enter the new name for the volume you're about to create.
In the Erase panel, use the drop-down Format field and select the following:
MAC OS X Extended (Journaled)
MAC OS X Extended (Journaled) is the default macOS file system, and thus
recommended if you only intend to use your disk with Mac computers. If you
want to move data between computers with different operating systems, e.g.
Windows or Linux computers, select exFAT.
In the Erase panel, use the drop-down Scheme field to select the partition map
type:
GUID Partition Map
Master Boot Record
Apple Partition Map
GUID Partition Map is the default selection and will work for all Macs using
Intel processors. The other two choices are for specific needs that, once again,
we won’t be going into at this time. Make your selection.
In the Erase panel, after you have made all of your selections, click the Erase
button.
Disk Utility will erase and format the selected drive, resulting in a single volume
being created and mounted on your Mac’s desktop.
Click the Done button.
 Loading...