

Page 1
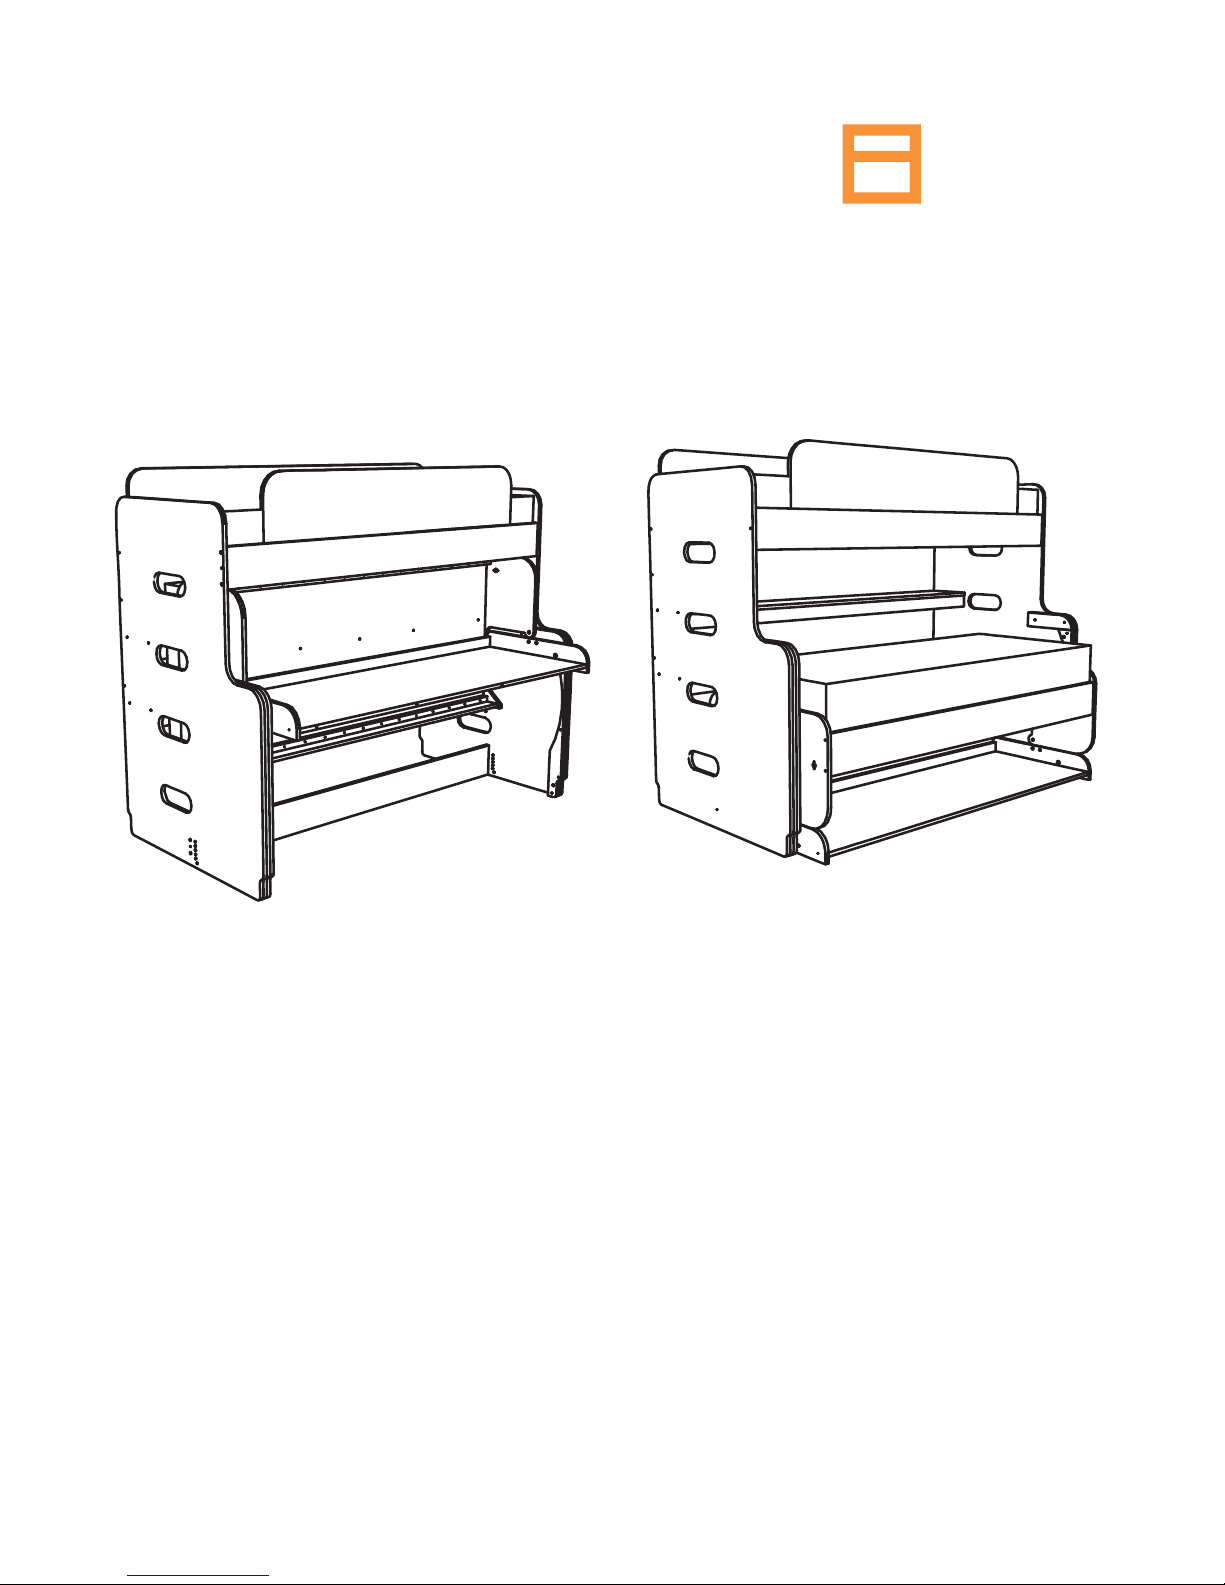
Hiddenbed
TM
ASSEMBLY INSTRUCTIONS
MODEL DOUBLE DECKER
www.hiddenbed.com
Page 2

CONGRATULATIONS!
YOU ARE A PROUD OWNER OF
HIDDENBED
The ultimate furniture that Doubles your Space
Please read carefully the Assembly Instructions.
Should you have any questions
please contact our authorized dealer:
For further information please check
www.hiddenbed.com
3
Hiddenbed
TM
Page 3
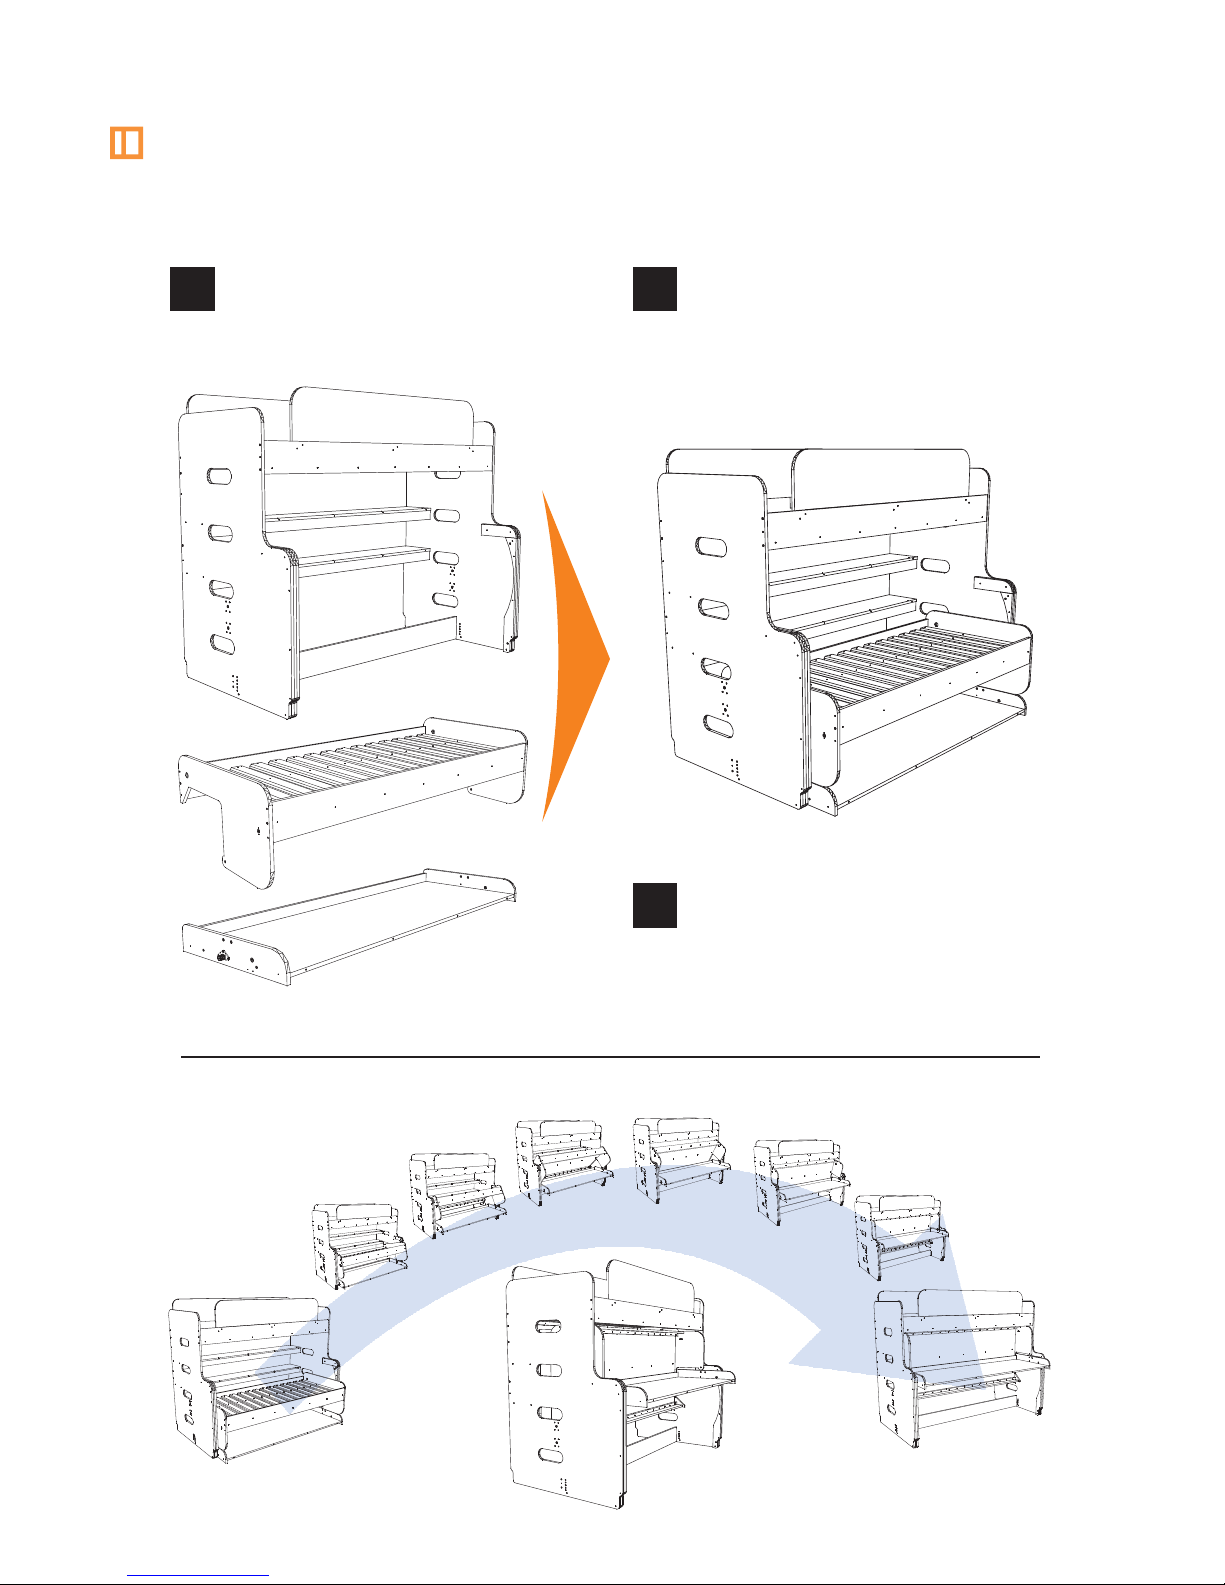
Follow these simple steps
to assemble your Hiddenbed
Put them together
Put the mattress in its place.
Assemble the 3 main parts
1 2
3
LOOK, YOUR HIDDENBED IS READY!
Hiddenbed
TM
4
Page 4
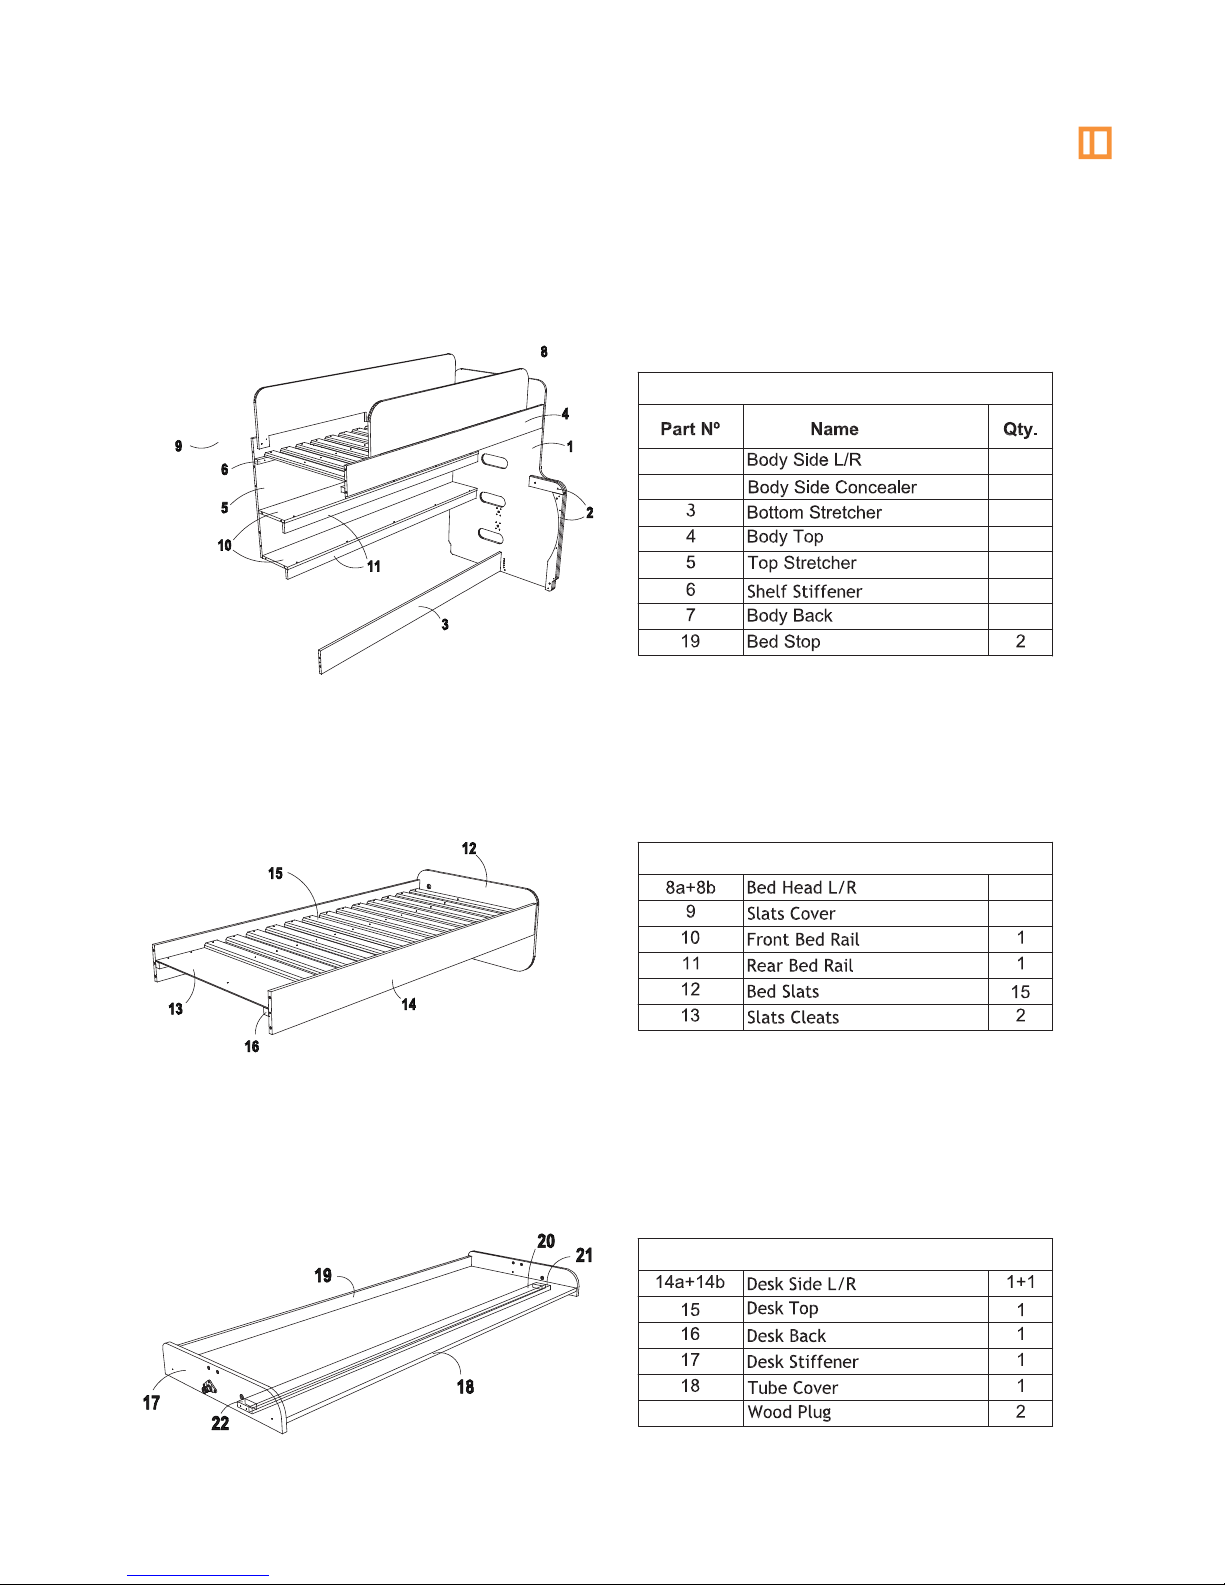
BODY PARTS
BED PARTS
DESK PARTS
MAIN PARTS &CARPENTRY LIST
COMPONENTS
COMPONENTS
2
1+1
1
1
1
1
1
1a+1b
2a+2b
COMPONENTS
1+1
1
5
Hiddenbed
TM
Page 5
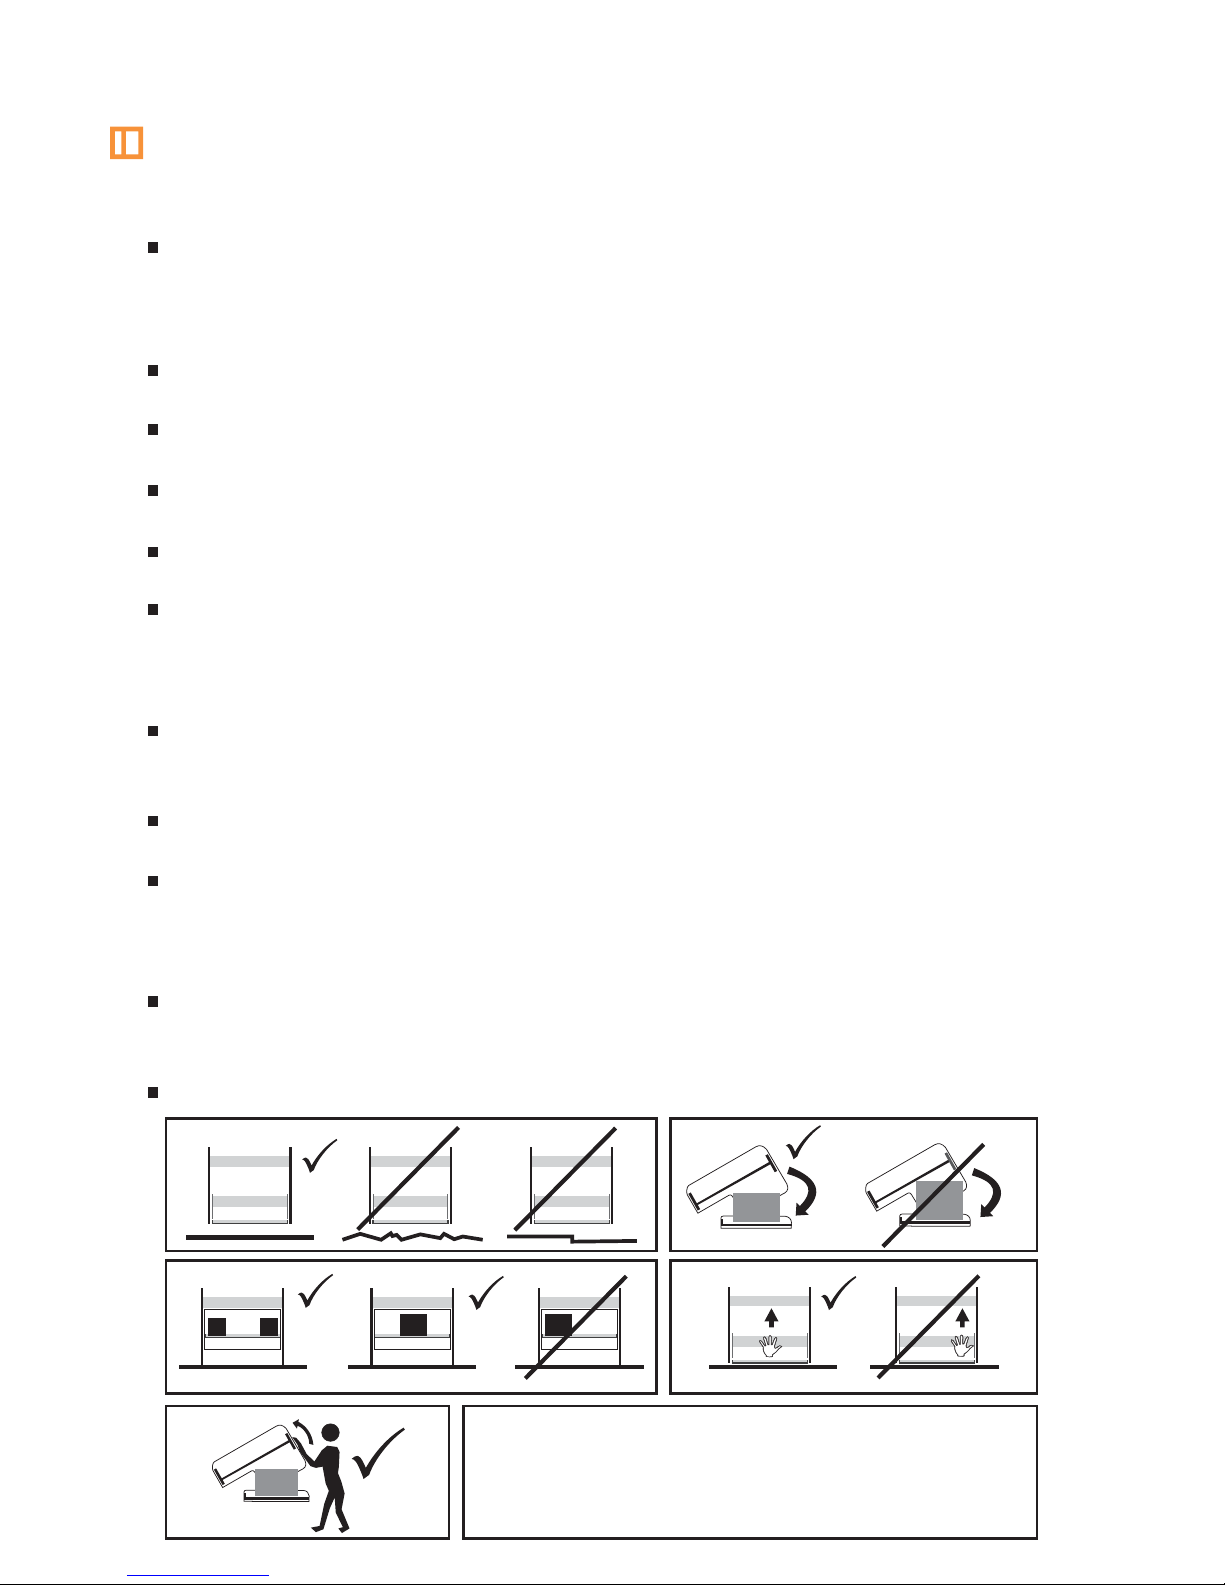
Make sure that:
Side pannels bears on the floor at the same level. A carpet can be placed
beneath both said adjacent bearing sides, but not place carpet or any
shim beneath on side desk or body side alone.
Stand at the middle of the furniture to make the transformation.
Use a mattress of ............. of a maximum height of 10 inches.
Total weight added on the moving parts, best around 40 lb.
Avoid excessive or too asymmetric loads on desk.
While lowering, please verify that bed bottom does not touch things left
on the desk.Things left on the desk canot exceed 18 inches height. Next
to the rear of the desk there is less height available.
As with a door or a rocking chair, take good care not to trap fingers
between closing parts.
If power or signal cables are to be installed, consult a qualified person.
If the bed does not stay down by it, add more weight on the desk.
if the situation continues have the position point of action changed to a
lower strength position.
Remember a force equivalent to lift a CRT monitor is needed to transform
the bed into desk.
Ask your retailer for more details.
TO OBTAIN A SAFE A RELIABLE PERFORMANCE
(!)Like a sliding door or a car door or a bike, you have to
do certain things to enjoy Hiddenbed Safely and
reliably. Pay attention to theses recommendations!
WARNINGS
Hiddenbed
TM
6
Page 6
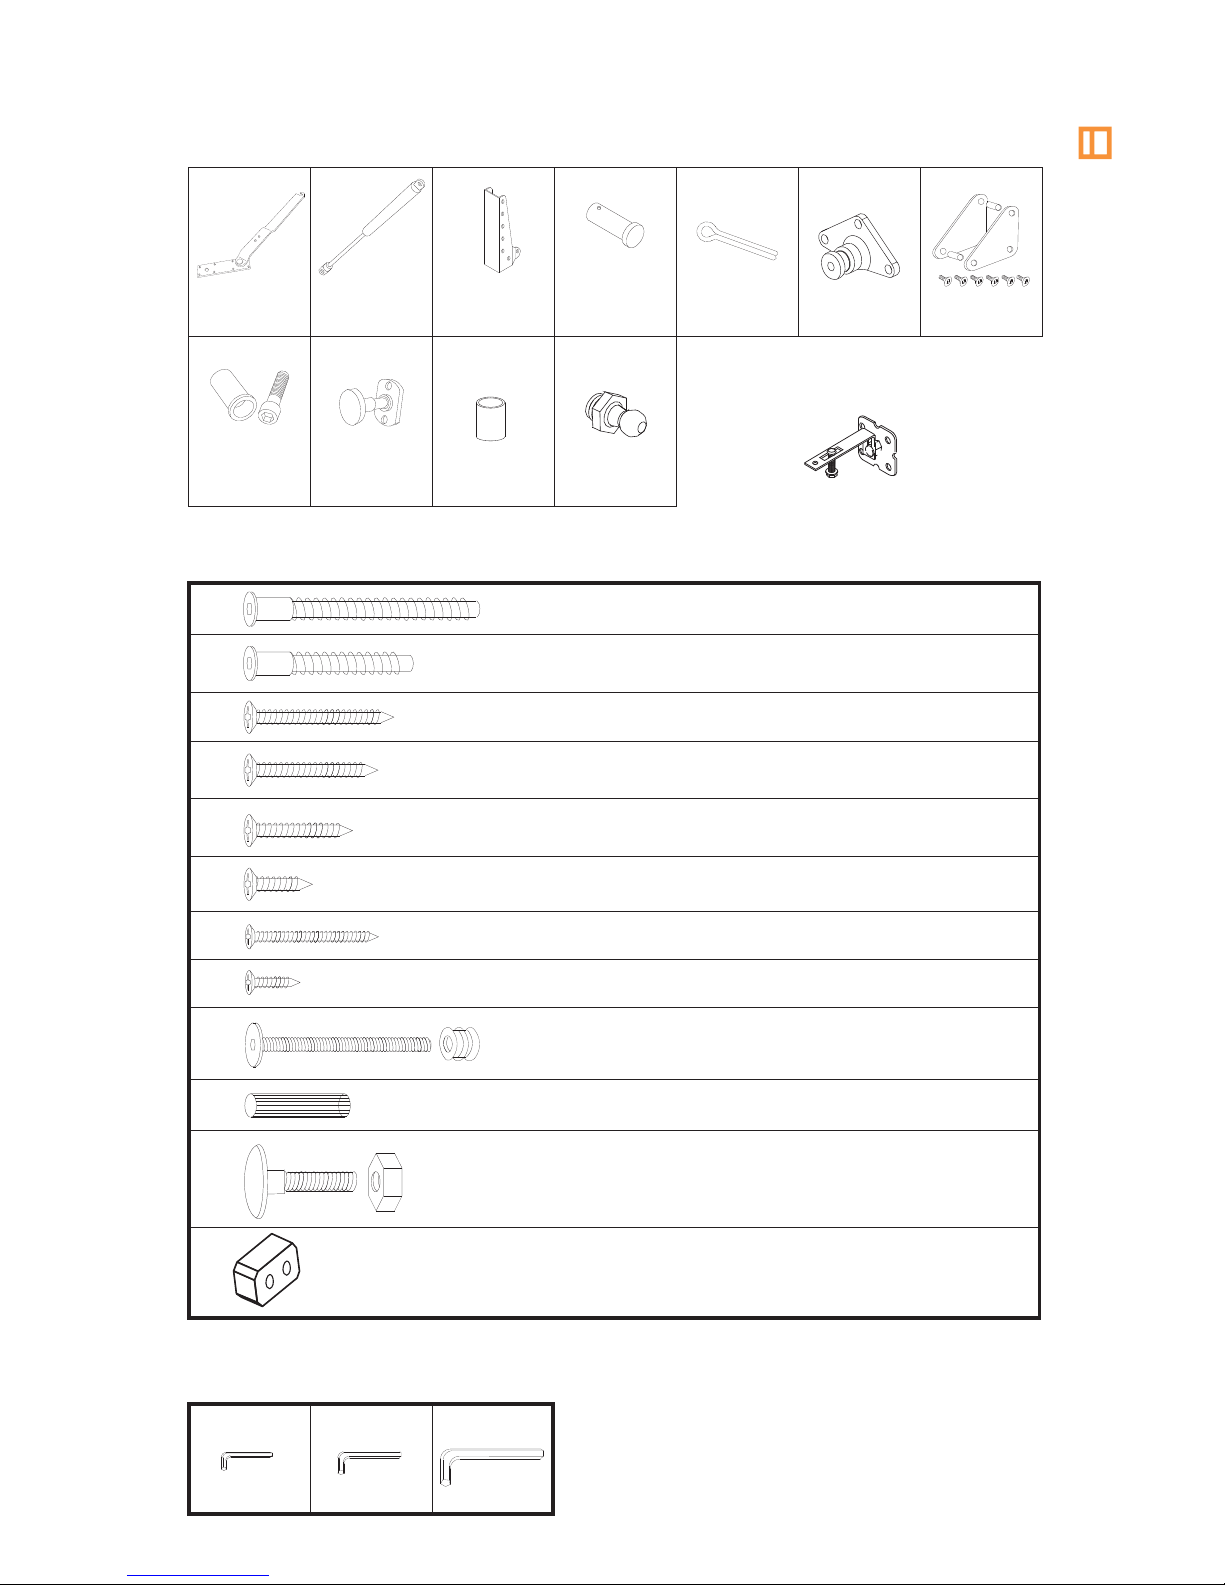
MECHANISM KIT BOX A
HARDWARE KIT
Confirmat, H2, 7x70
Confirmat, H12, 7x50
Screw, Ph head,H10, 4.5x45
Screw, Ph head, H14, 4.5x35
Screw, Ph head, H20, 4.5x30
Screw, Ph head, H9, 4.5x20
Screw, Ph head, H13, 3.5x40
Screw, Ph head, H4, 3.5x16
Flat Head Allen & bushing, H6, 6x60
Dowell, 10x30
Bolt & nut, H3,1/4 x 1 1/4
Wood plug, WP
Hiddenbed
TM
7
EXTRA TOOLS (not supplied)
T1 T2 T3
M4 L - KEY
1 Pc
M5 L - KEY
1 Pc
M10 L - KEY
1 Pc
Extra tools needed:
Phillips Head Screwdriver to put
screw (H10, H14, H20, H9, H13, H4)
and bend cotter pins.
Antiwear lubricant.
PIN BALL
2 Pcs
A1
A2 A3 A4 A5 A6
A7
A8
A9 A10 A11
MECH ARM
PLATE
2 Pcs
GAS SPRING
2 Pcs
1100N/1300N
LOWER
SUPPORT
2 Pcs
LOWER
SUPPORT
PIN
2 Pcs
COTTER
PIN
2 Pcs
BEARER
2 Pcs
LINK PIVOT
2 Sets
TRUNNION
BUSHING &
SCREW
2 Sets
LOCK
2 Pcs
SAFETY BRACKET
HAFELE 271.98.100
2 Pcs
LOCK BUSHING
4 Pcs
ADITIONAL SAFETY DEVICE
Page 7
A1
H3
H3
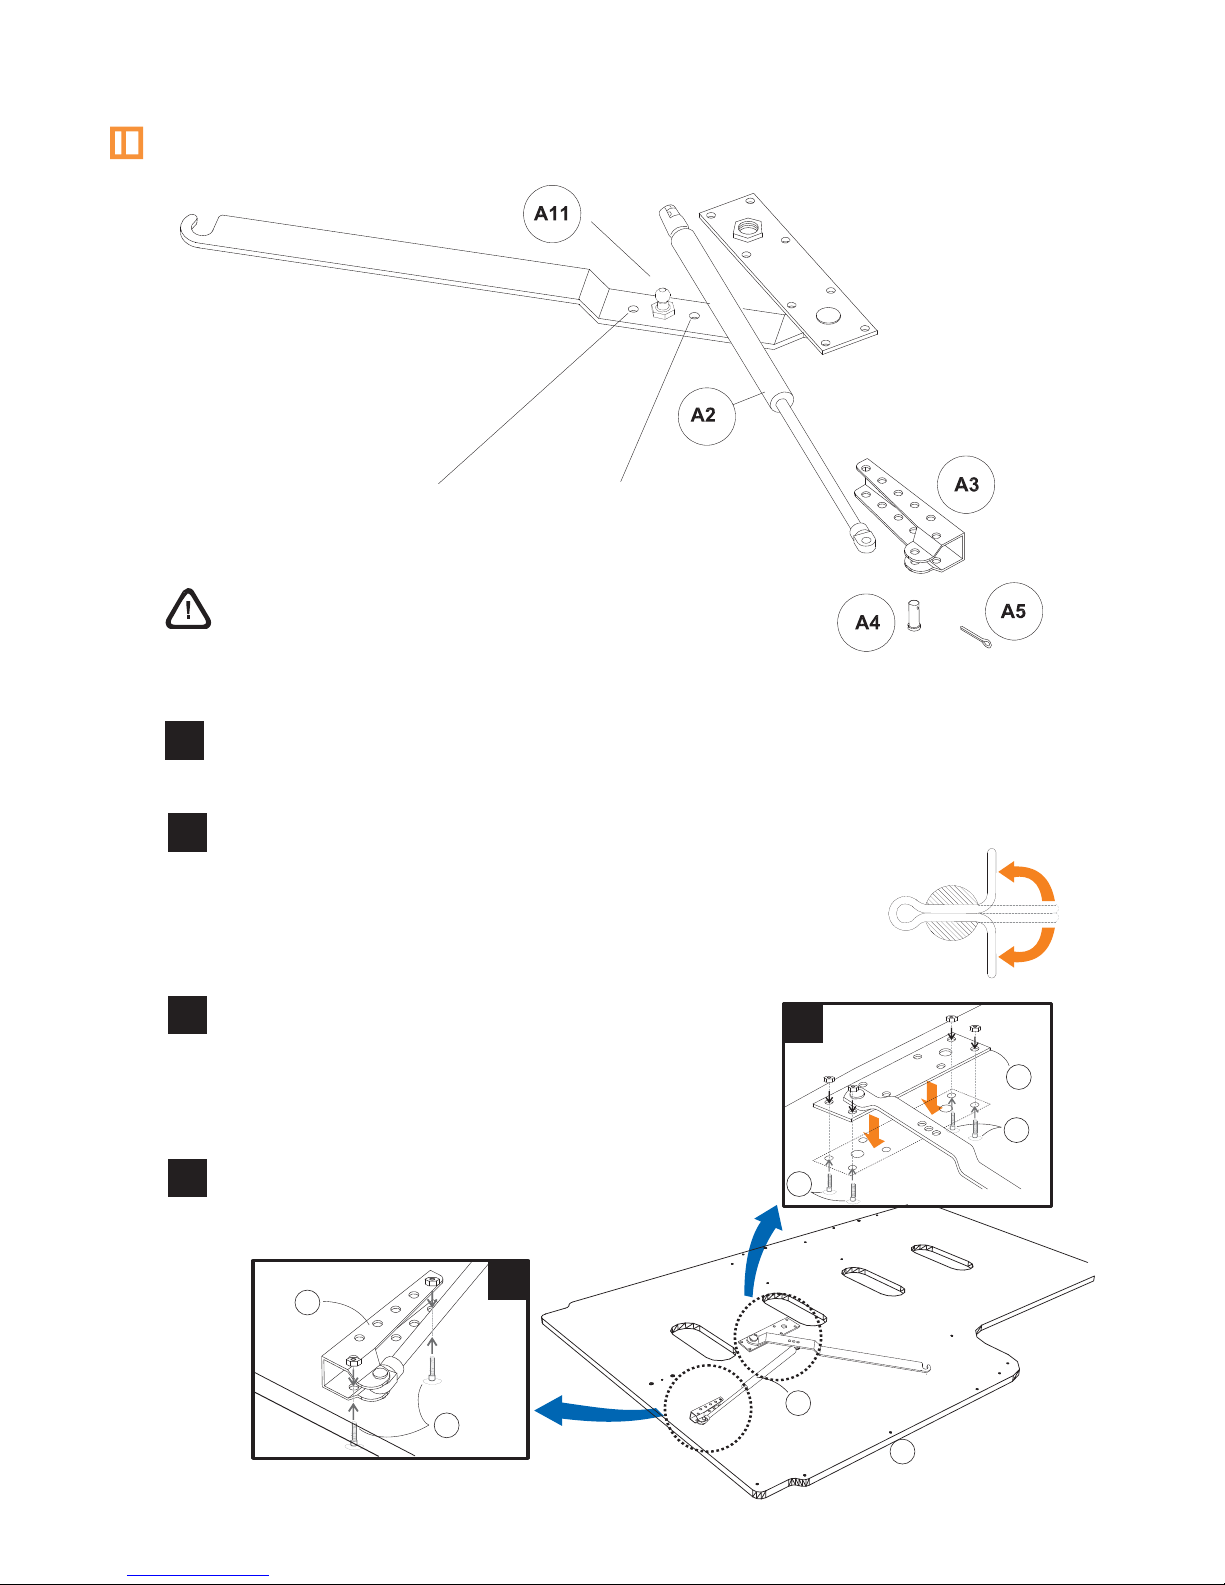
BODY ASSEMBLY
H3
4
Attach lower Support (A3) to Body (1)
but do not overtighten.
A2
1
A3
4
3
Hiddenbed
TM
8
Arm pin outer
position for more
load on table
Arm pin inner
position for less
load on table
RIGHT SIDE SHOWN
Do the same with left side symmetrically
Attach the Gas Spring end to pin ball (A11).
1
2
Attach the Gas Spring (A2) to lower suport (A3)
using Lower Support Pin(A4), insert cotter pin
(A5) and bend ends.
Cotter pin
3
Attach plate (A1) to body side (1).
Make sure the hook on the arms is
facing upwards.
Page 8
7
5
6
H10
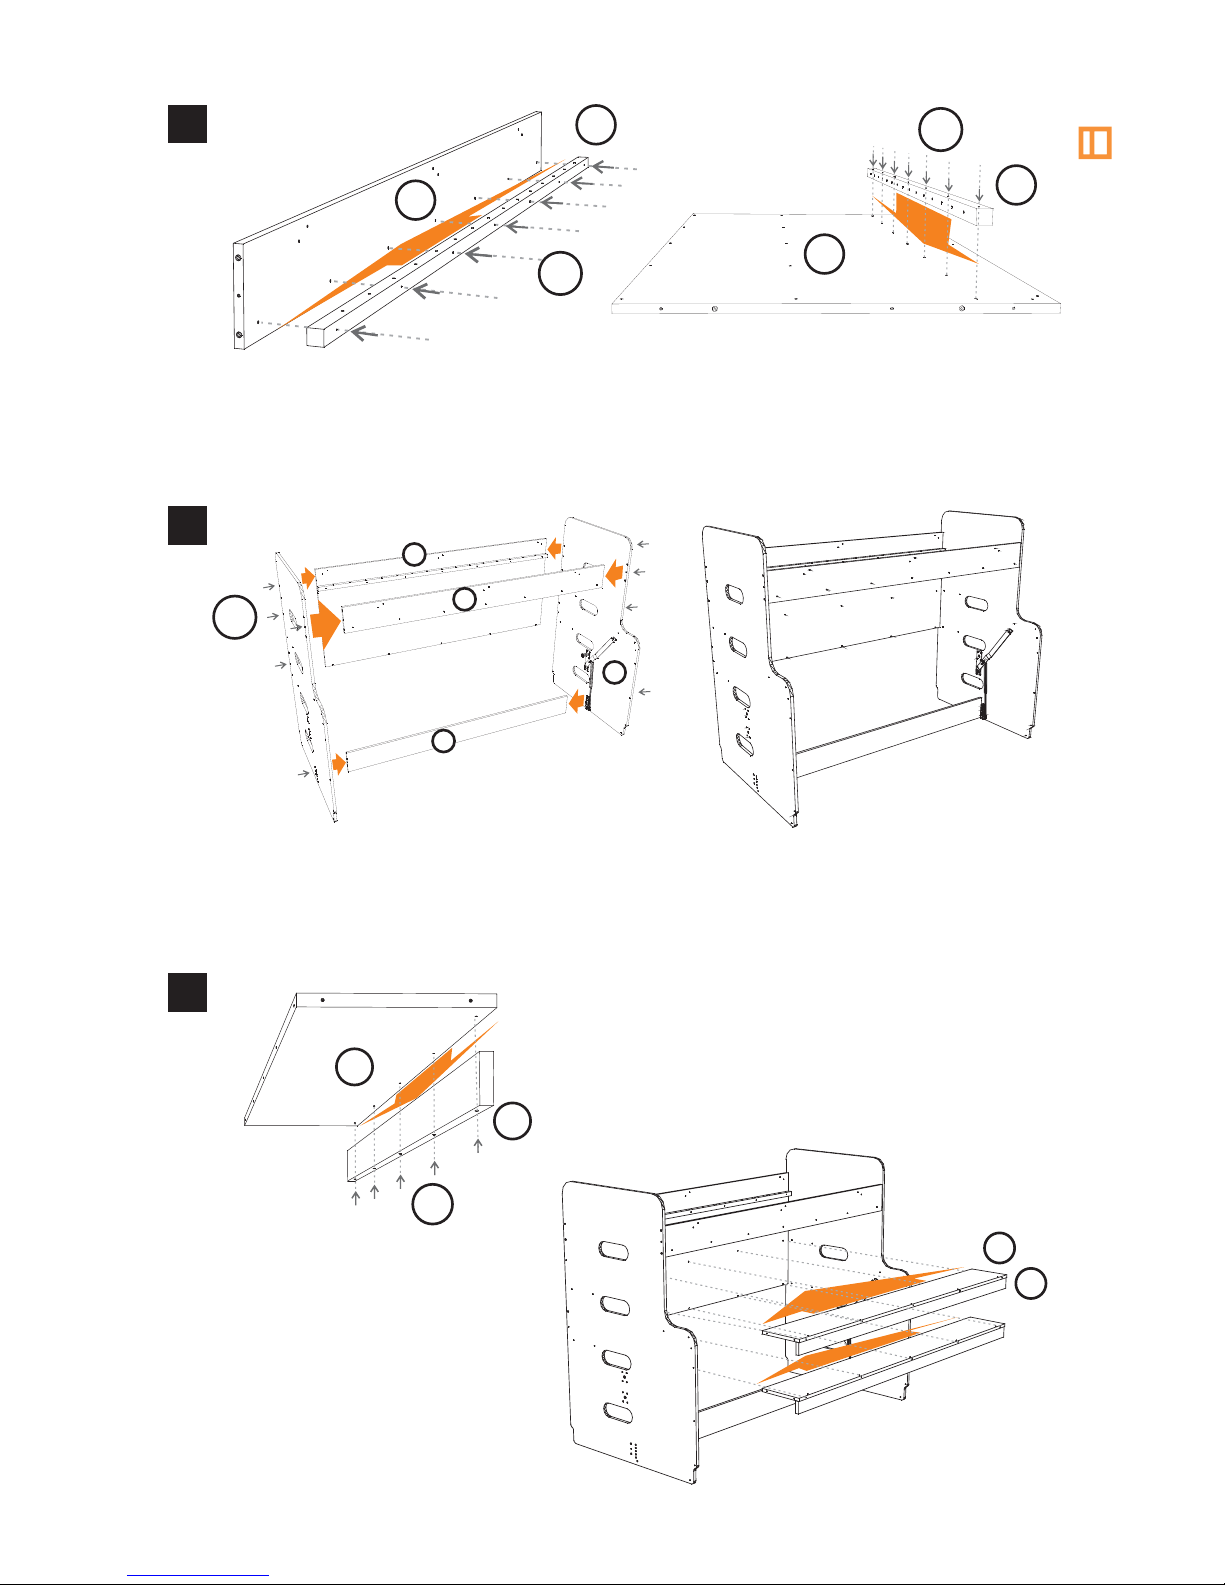
Attach Bunk Bed Slat Cleat (6) to Bunk Bed Side (4) and
Body Back (5) using screw H10.
Attach Body Sides (1) to Bottom Strectcher (2), Bunk Bed Side
(4)and Body Back (5) fixed using dowels and screws H2.
Attach Shelf Stretcher (11) to Shelf (10)
using screws H14.
Attach Shelf to Body
Back and screws H10,
also attach Shelf to
Body Side using
screws H2.
H10
5
4
6
6
H12
1
2
4
5
11
10
H14
11
10
Hiddenbed
TM
9
Page 9
8
8
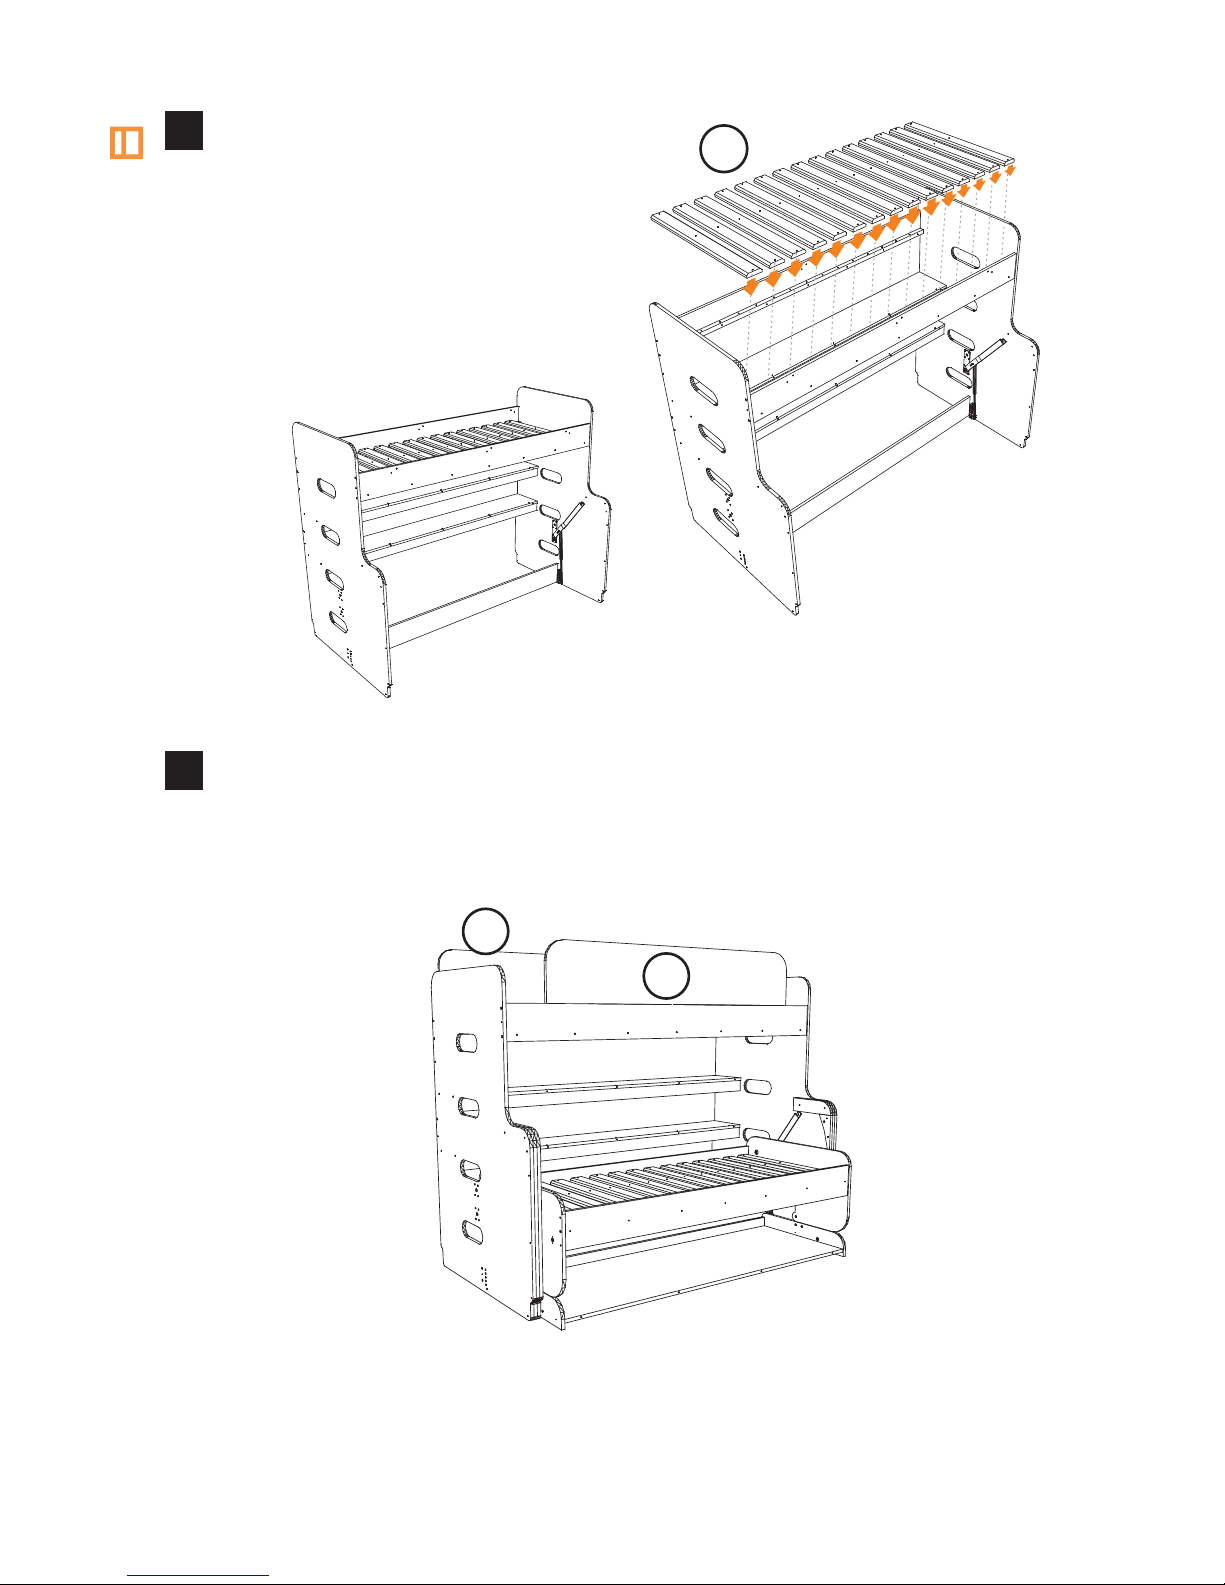
Attach Bed Slats (15) to
Bunk Bed Slats cleats using
screws H10.
Attach Guard Rails (7 y 8) to Bunk Bed Side and Body Back
using screws H20 .
15
7
8
Hiddenbed
TM
10
Page 10
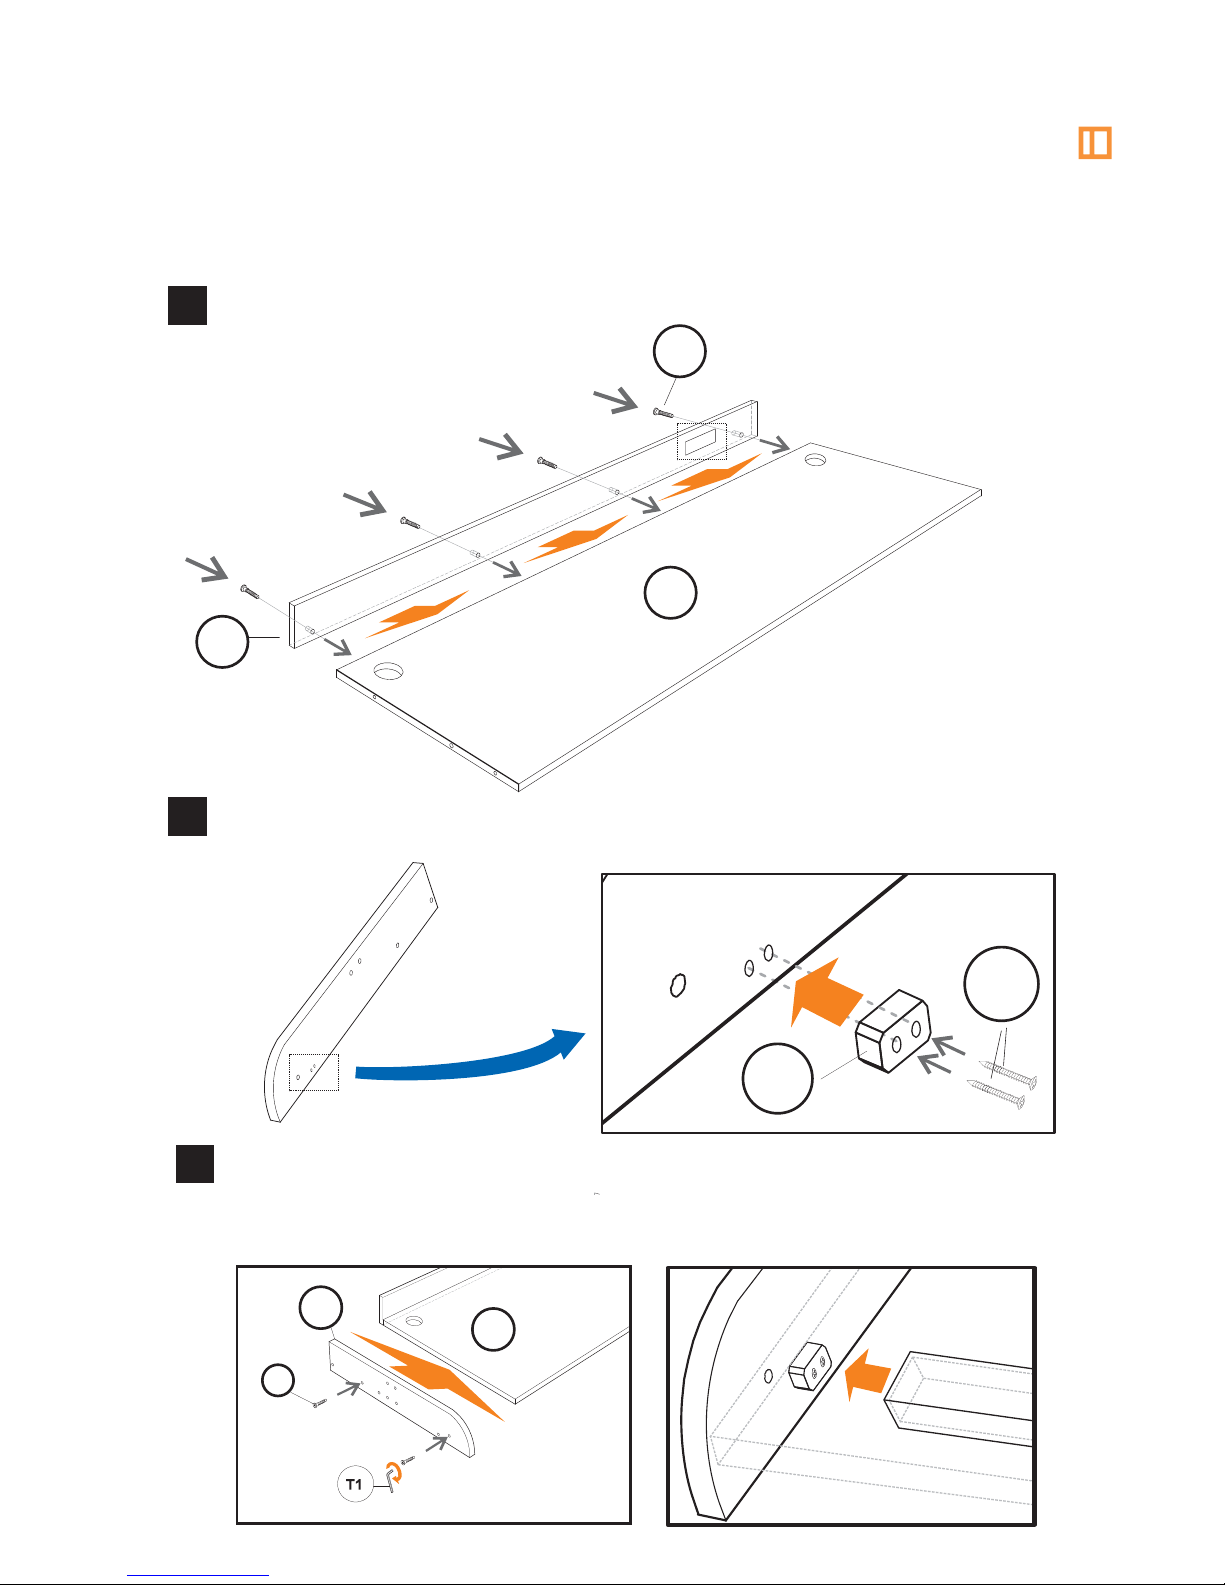
DESK ASSEMBLY
1
2
Attach Desk Back (9) to Desk Top (7) with Screws H2.
H2
7
9
3
Screw Wood Plugs (WP) to inner side of Desk Sides(8).
WP
H14
Hiddenbed
TM
11
Attach one of the Desk Sides(8) to the Desk Top(7) using
dowels and screws H2. Then insert Wood Plug into the
Desk Stiffener.
7
8
H2
Page 11
4
5
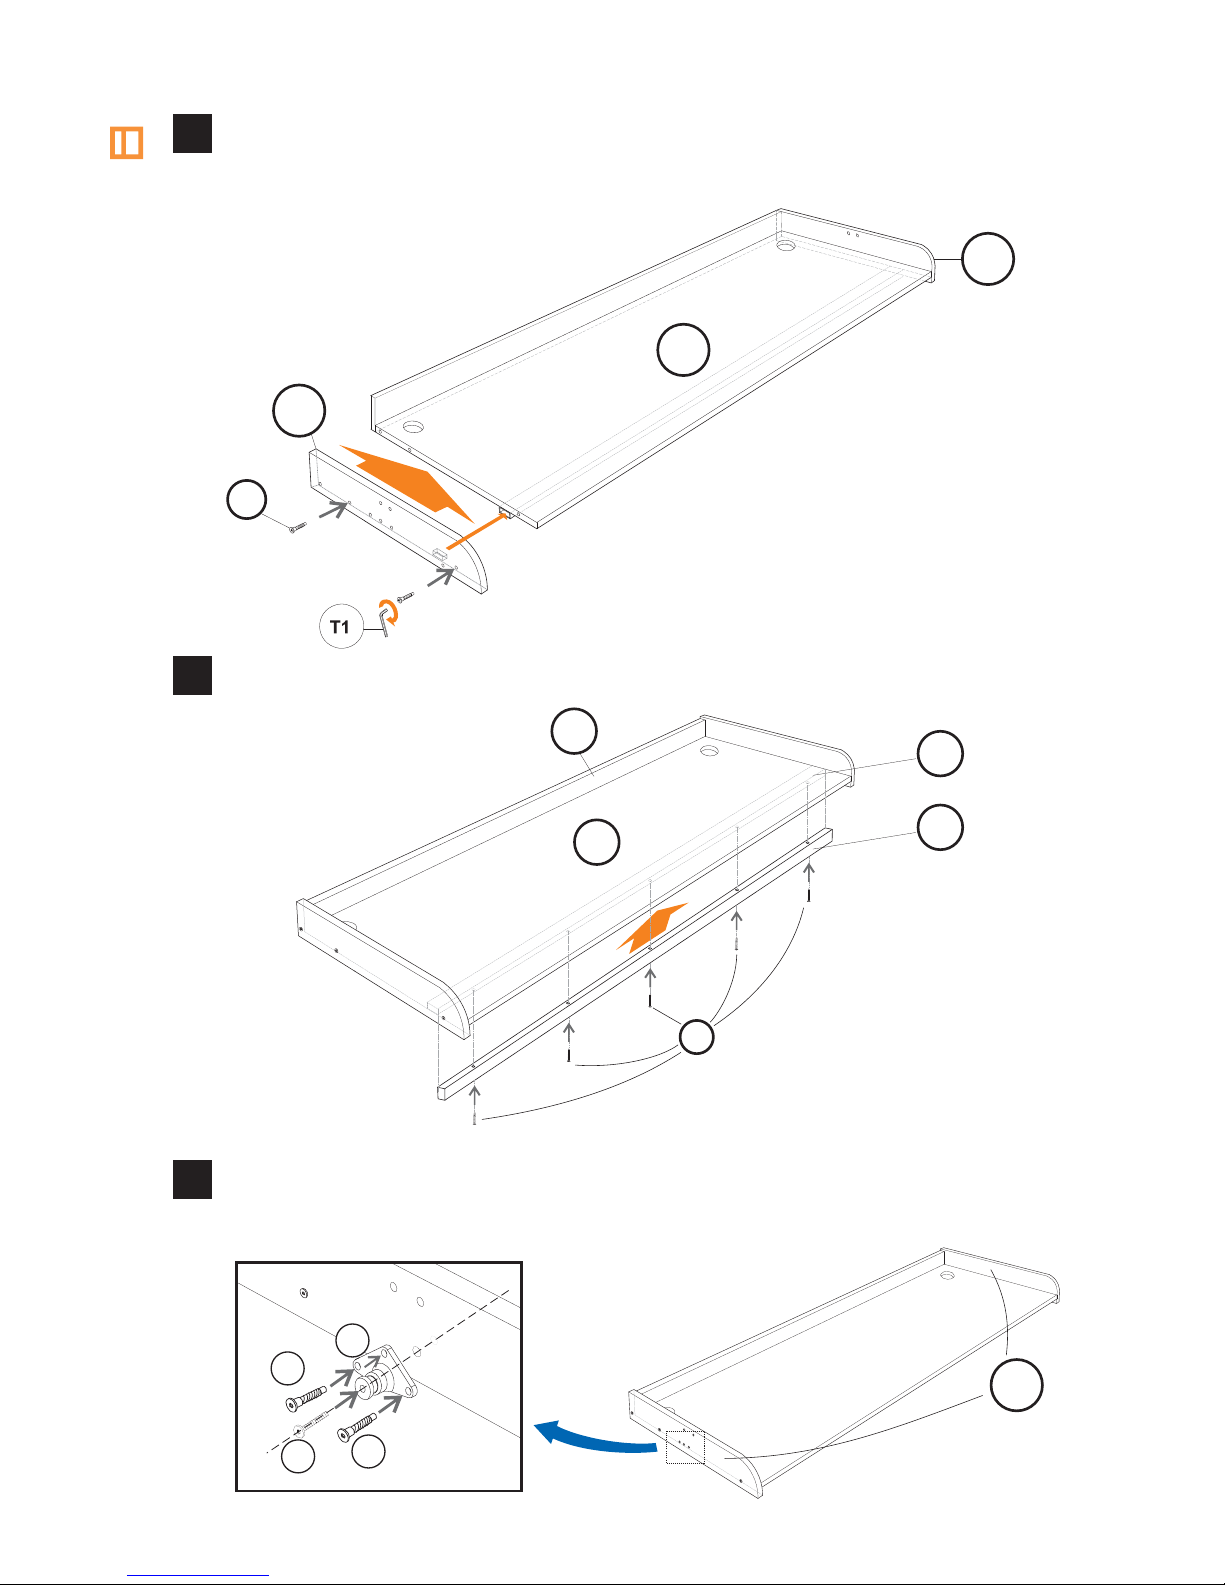
Attach the other Desk Side to the Desk Top using dowels
and screws H2 and inserting the Wood Plug into the Desk
Stiffener.
8
7
8
H2
6
Attach Tube Cover(18) to Desk Top(7) using screws H13.
9
7
17
H13
18
Hiddenbed
TM
12
Attach the Tribearer(A6) to the Desk Sides(8) using screw
H6, H2 and H9.
8
H2
H2
H6
H9
Page 12
8
Hiddenbed
TM
13
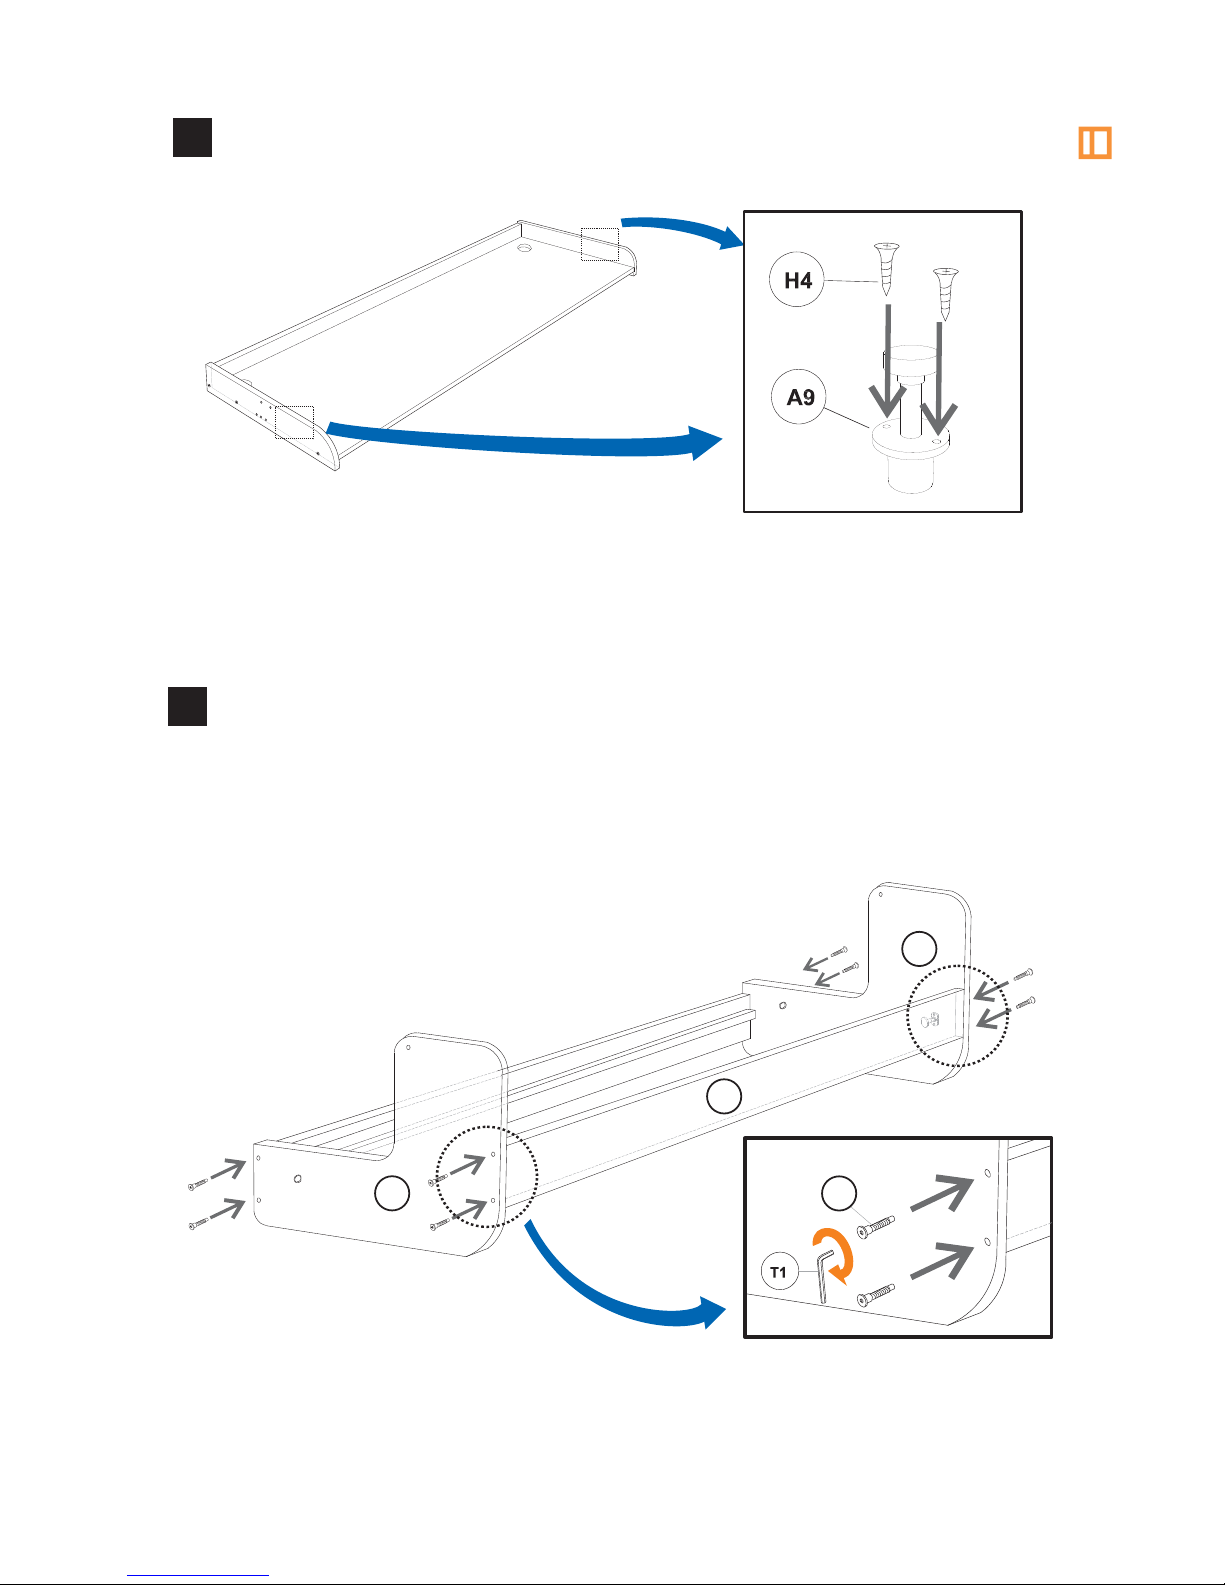
Insert locks into the Desk Sides.
BED ASSEMBLY
1
Attach Front Rail (10) and Rear Rail (11) to Bed Heads (8)
with dowels and screws (H2).
Be careful, put cleats inside. Perforations for Slats should be
pointing bed up. (Down in sketch position!!)
8
10
8
Slats and salt cover must be attached to the bed after the bed
was attached to the body side.
H2
Page 13
FINAL ASSEMBLY
1
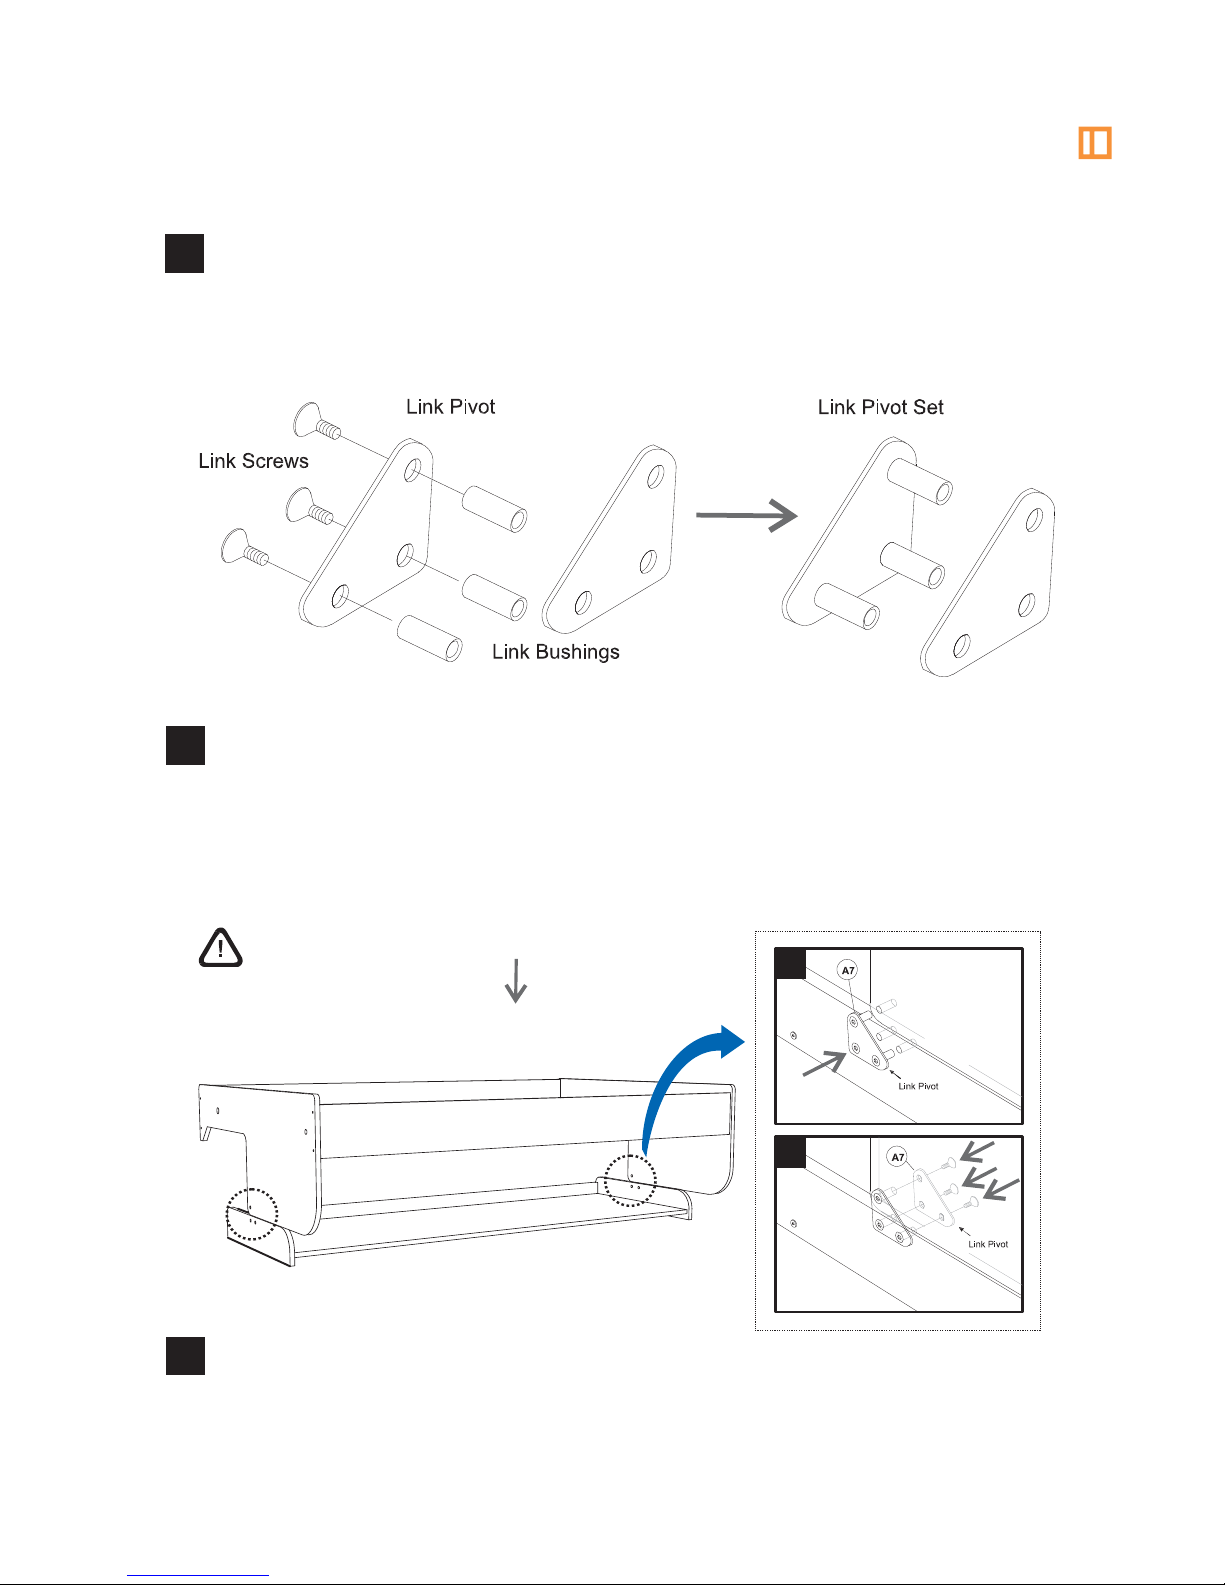
Assemble two Links Pivot Sets attaching three link Bushings
to one triangle plate (outer cones to bushing) using Link
Screws.
2
3
Put bed heads bearing on desk sides carefully, aligning holes
(see detail in sketch STEP 2) provided for Link bushings. In
both sides in turn, place place from outside the Link Pivot Set
into link holes as shown. Slighty displacing or rising the bed
as required to push the Link in place.
Fix the remaining Triangle plates (A7) with Link Screws to
Link Pivot. Tighten screws, re-check tightening all screws.
2
3
SLIGHTLY HEAVY - BE CAREFUL
Hiddenbed
TM
14
Page 14
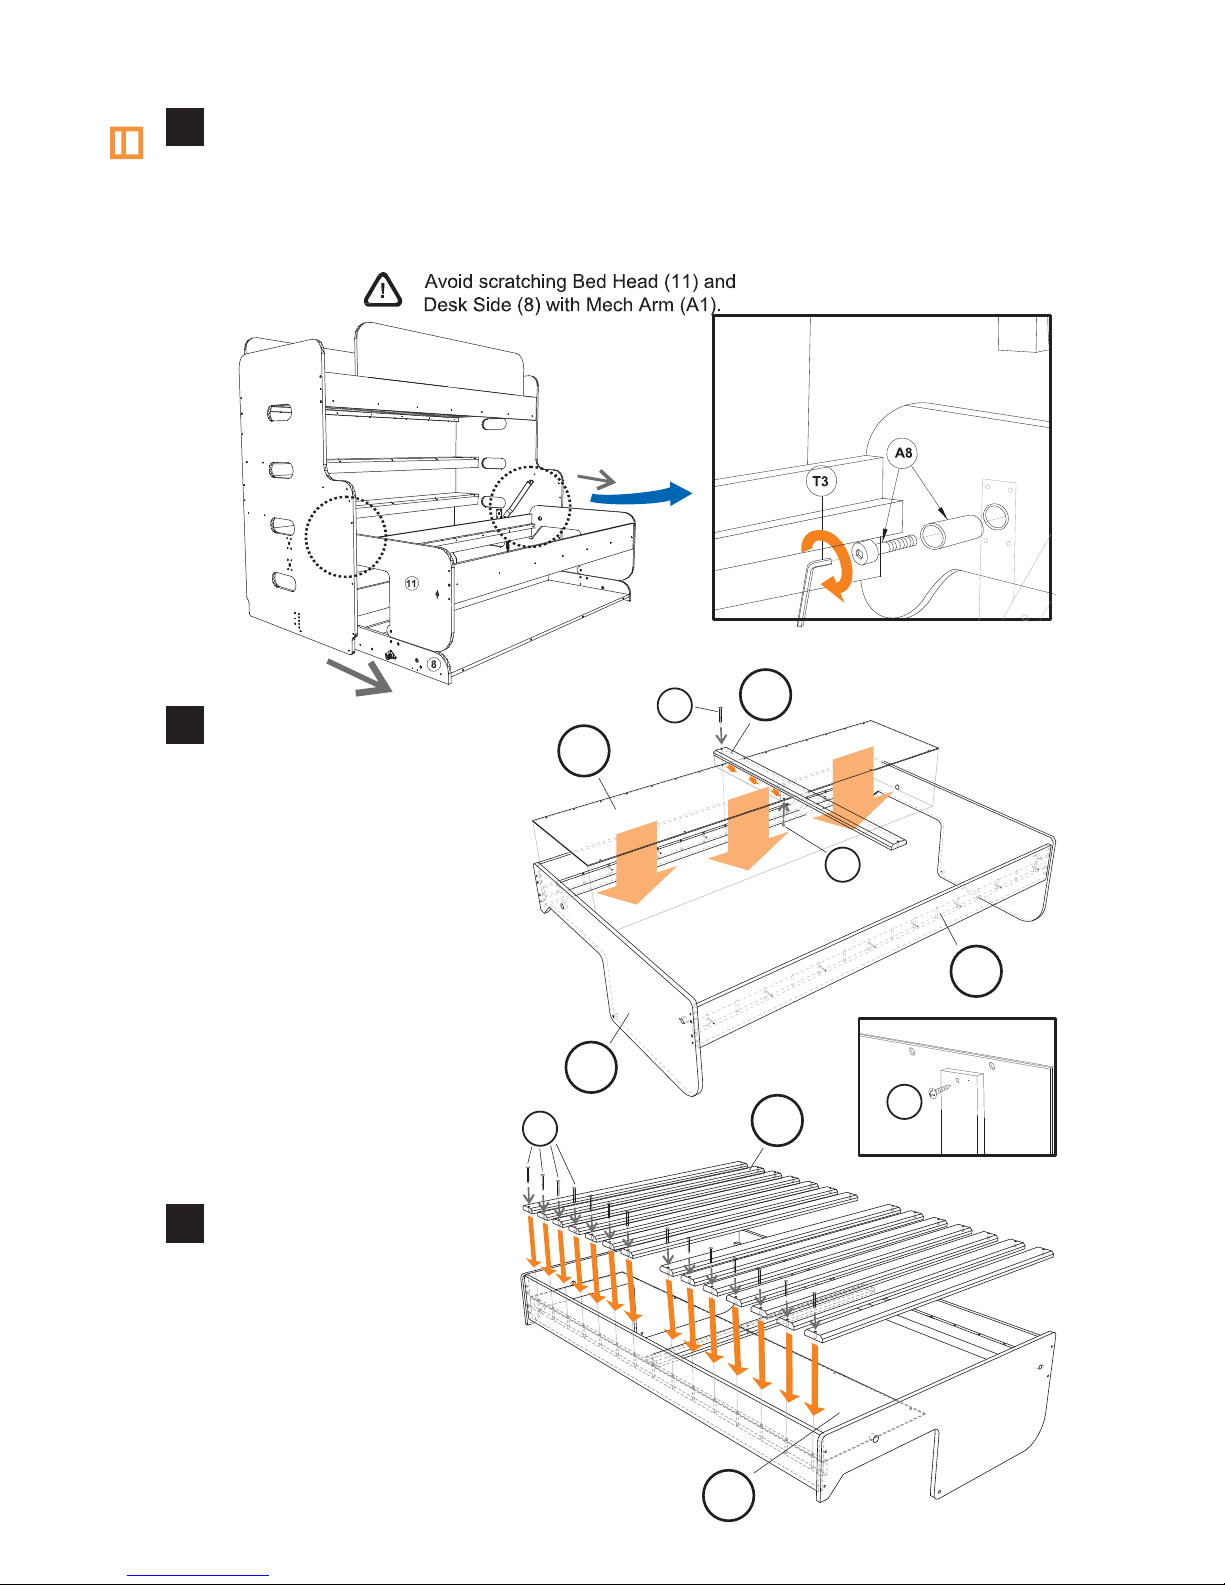
4
Slide Body carefully in order to align plates with bed head
holes. Then standing at rear side of Body, introduce
Trunnion Bushing (A8) with screw. Screw in a few turns, and
let loose. Repeat at the other side. Tighten screws (A8)
strongly.
5
Attach from behind
the bed´s center
slat (12) to the
smaller bed cover
(9a) with screw H14
with a few turns
and let loose. These
screws will be
removed in step 7.
Then attach the bed
cover and the slat to
the rear cleat with
screw H10.
6
Pull all screws (H10)
through the Bed
Slats (12) and
through Narrow
Bed Cover (9a) to
Screw in Rear Rail
Claet.
BODY
9a
12
10
8
12
9a
H10
H10
H14
H10
Hiddenbed
TM
15
Page 15
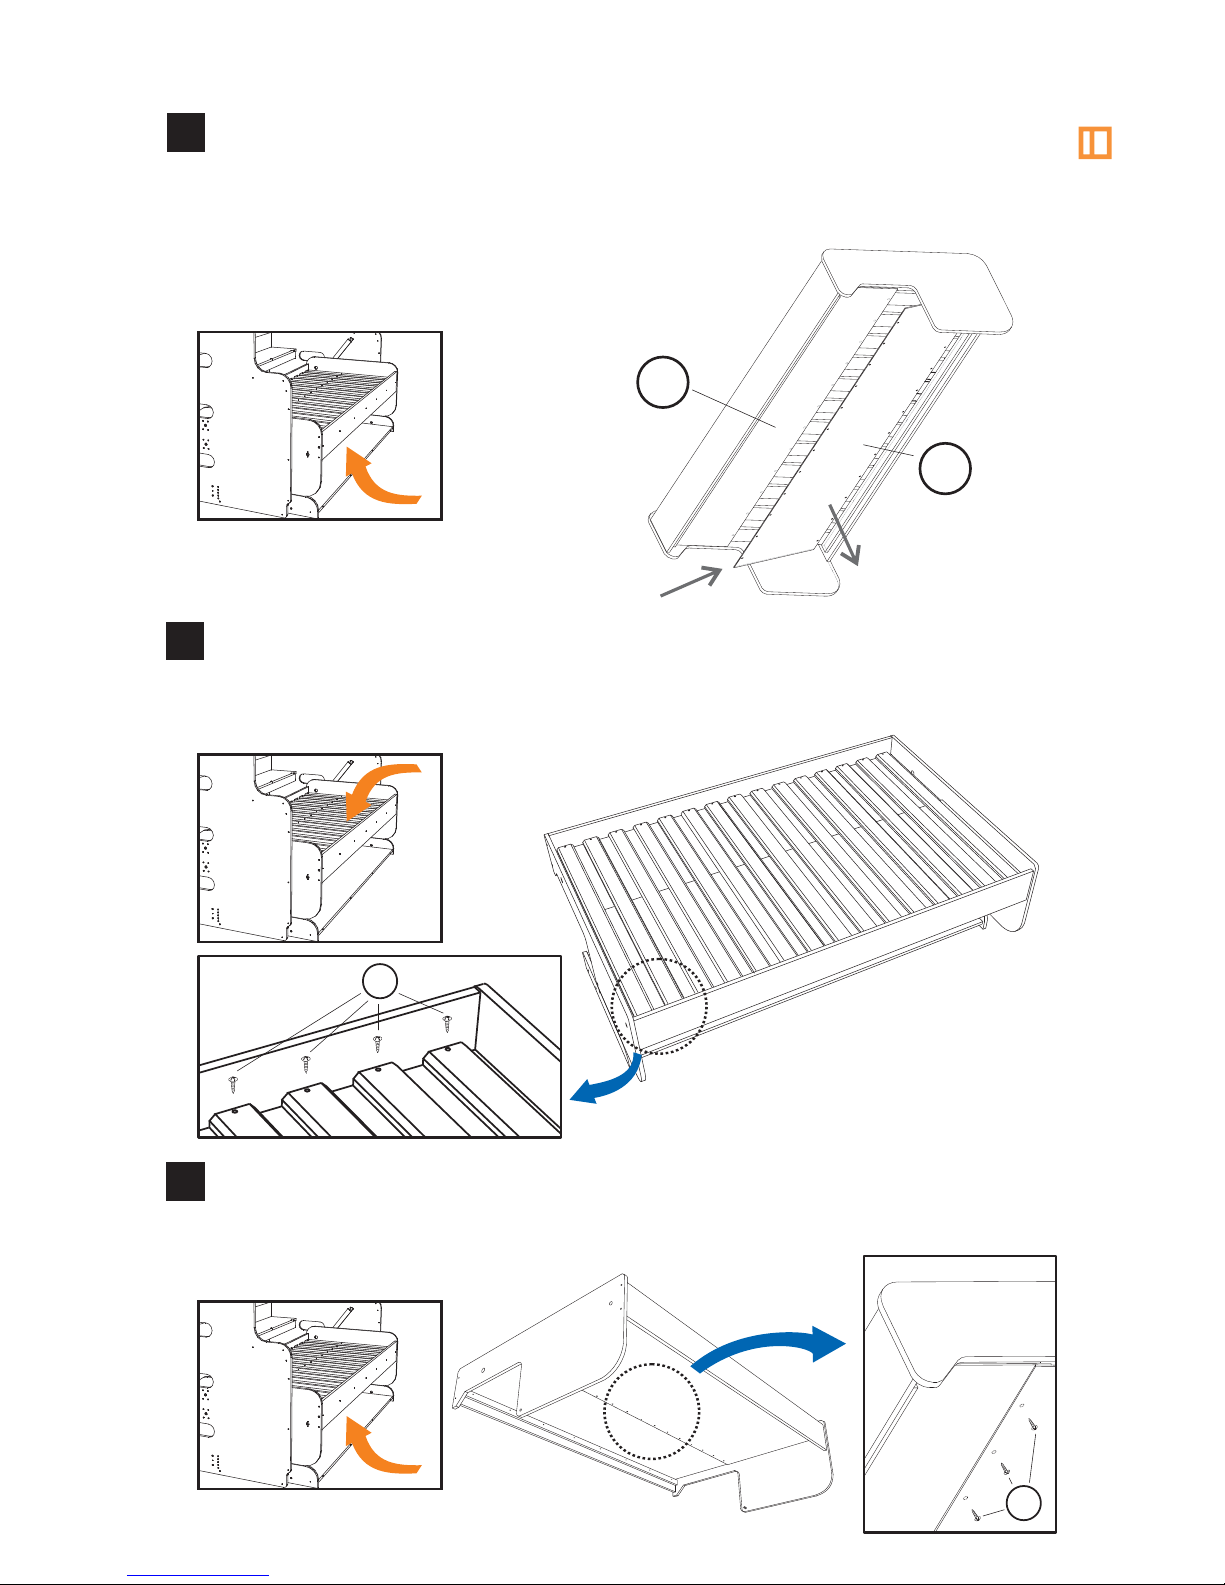
7
From under the bed. Take out the screw of step 5. Between
the Cleat of Front Rail (10) and Bed Slats (12), put edge of
Wide Bed Cover (9b). Use one screw H14 to Fix Wide and
Narrow Cover to one of the center slats.
8
With the bed as shown in sketch pull all screws (H14)
through the Bed Slats (12) and through Wide Bed Cover
(9b) to screw in Front Rail Claet.
9
From under the bed. Pull screws H14 through the remaing
holes fixing the narrow and wide covers with the slats. The
wide cover must overlap the narrow.
H10
H14
9a
9b
Hiddenbed
TM
16
Page 16
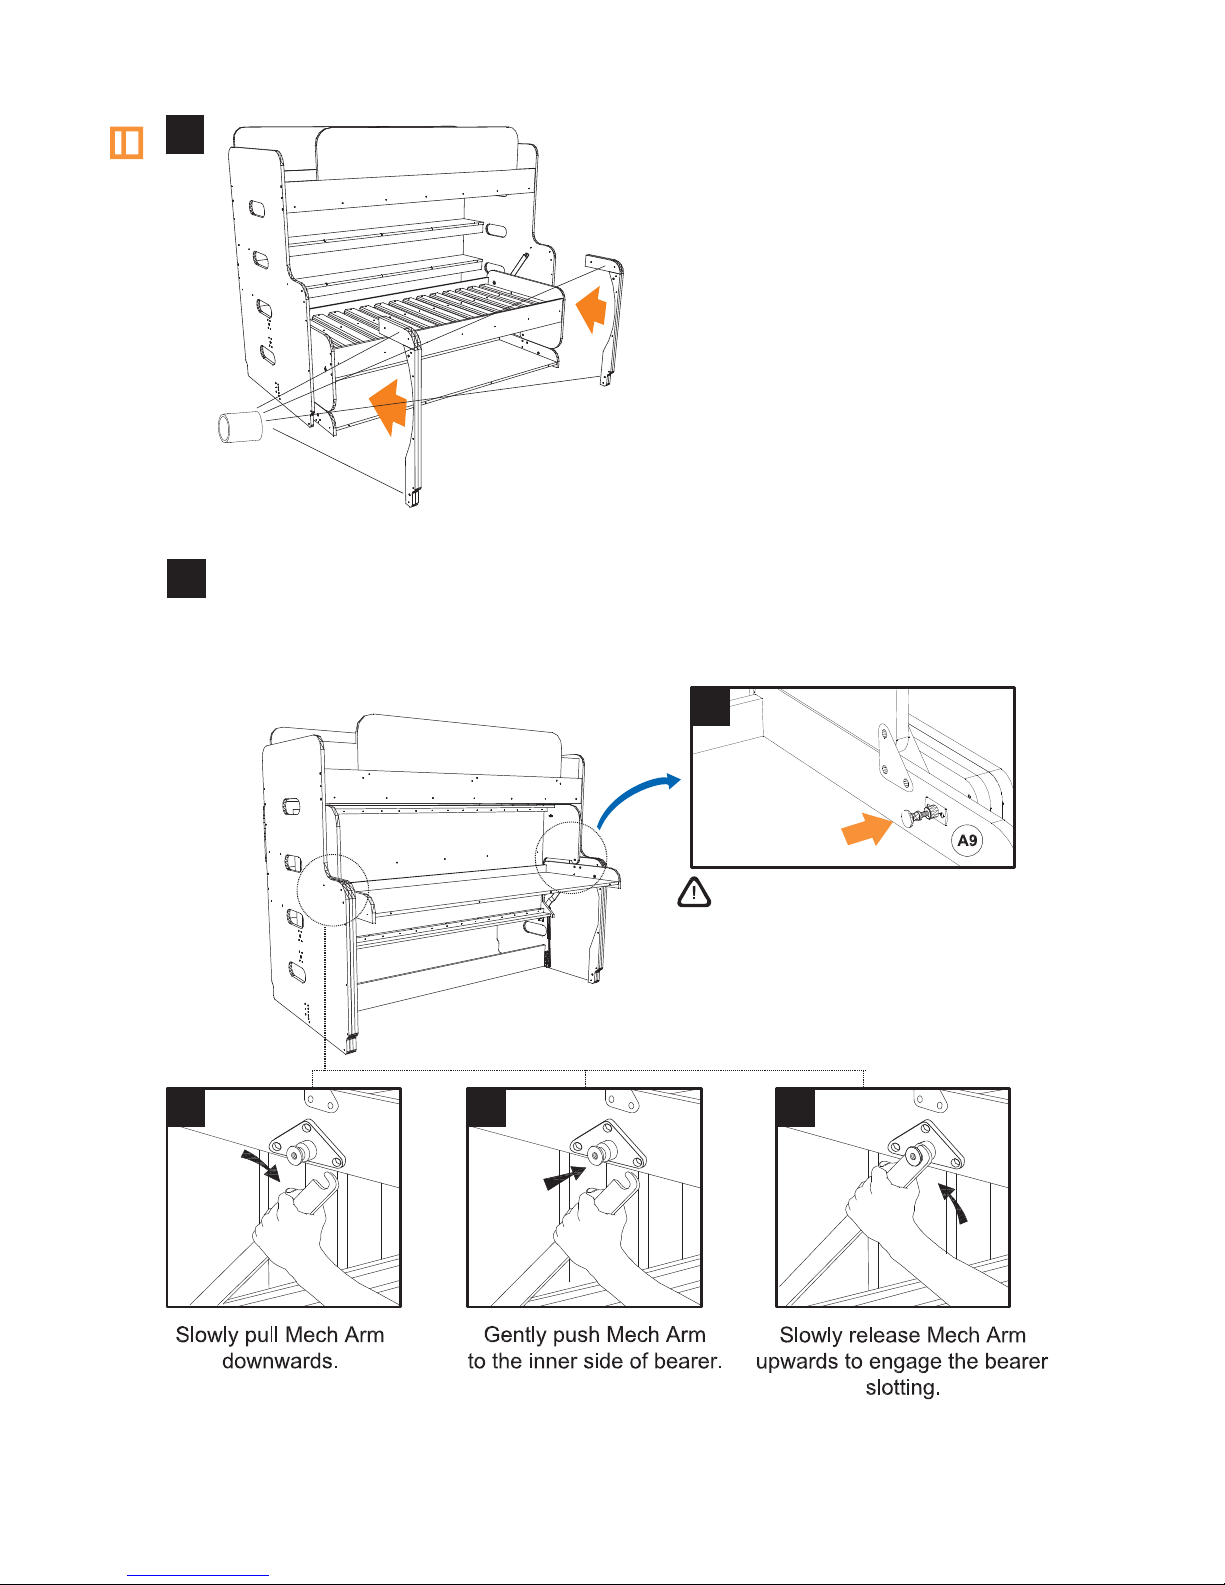
11
Lift the bed slowly, talking care of keeping the desk in
horizontal position. Once in upper position, lock the bed by
pushing in the Lock at both sides.
13a 13b
13c
CAUTION!
1- EXTRA STRENGHT REQUIRED
We recommend to sit on the floor
and pull strongly
2- TAKE CARE OF YOUR FINGERS
Do not put fingers in the hook.
Hold the arm as shown.
10
Attach Concealers to Body
Sides Using screw H10. Wait
until setp 10 is done to screw
the bottom part of the
concealers.. Place the plastic
bushing (A10) in the
concealer perforations for
the locks.
Hiddenbed
TM
17
PUSH IN
TO LOCK
12
Page 17

ASSEMBLY HAS FINISHED
For Normal Use:
Check that the floor is clear to lower the bed.
Unlock to change from desk to bed position.
Stand at the middle ofthe furniture to pull from bed beam and push down
desk to make the transformation.
The mechanism is already calibrated to work with the mattress on and a
weight simiilar to 35/40 lbs. on the desk.
If the bed doesn´t stay down by itself, add more weight on the desk.
Hiddenbed
TM
18
Page 18
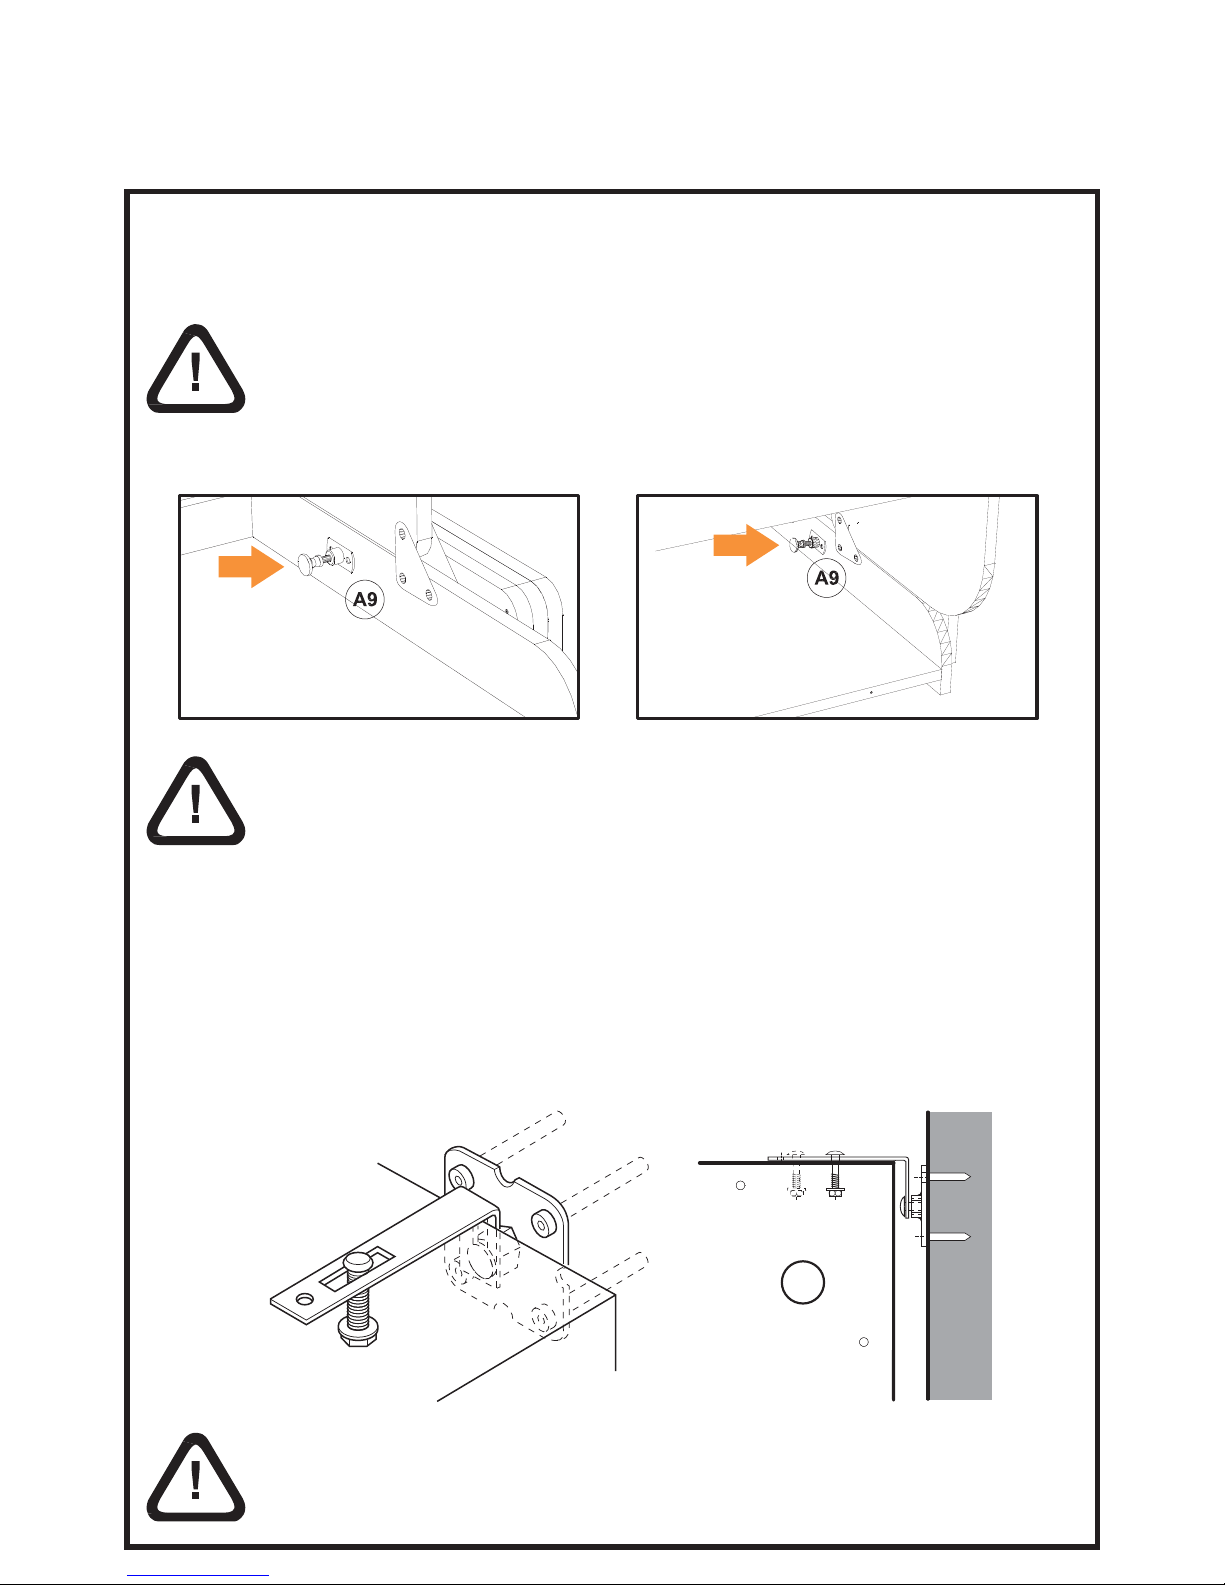
WALL
1
Use the lock placed at the desk side to
safe use in bed and desk position.
PUSH IN
TO LOCK
PUSH IN
TO LOCK
DESK POSITION BED POSITION
SAFETY PRECAUTIONS
Attach the Hiddenbed´s body to the wall using
the brackets and proper wall anchors.
A QUALIFIED PERSON SHOULD FIX THE HIDDENBED TO THE
WALL. THE FLOOR (LEVELING AND RESISTANCE) , THE WALL
(LEVELING AND RESISTANCE) AND THE FIXING (SCREWS AND
ANCHORS ACCORDING TO THE WALL MATERIAL) MUST BE
VERIFIED IN ORDER TO GET A SECURE FIXATION.
NO PROPER FIXATION CAN CAUSE
UNDESIRED MOVEMENT
 Loading...