

Page 1
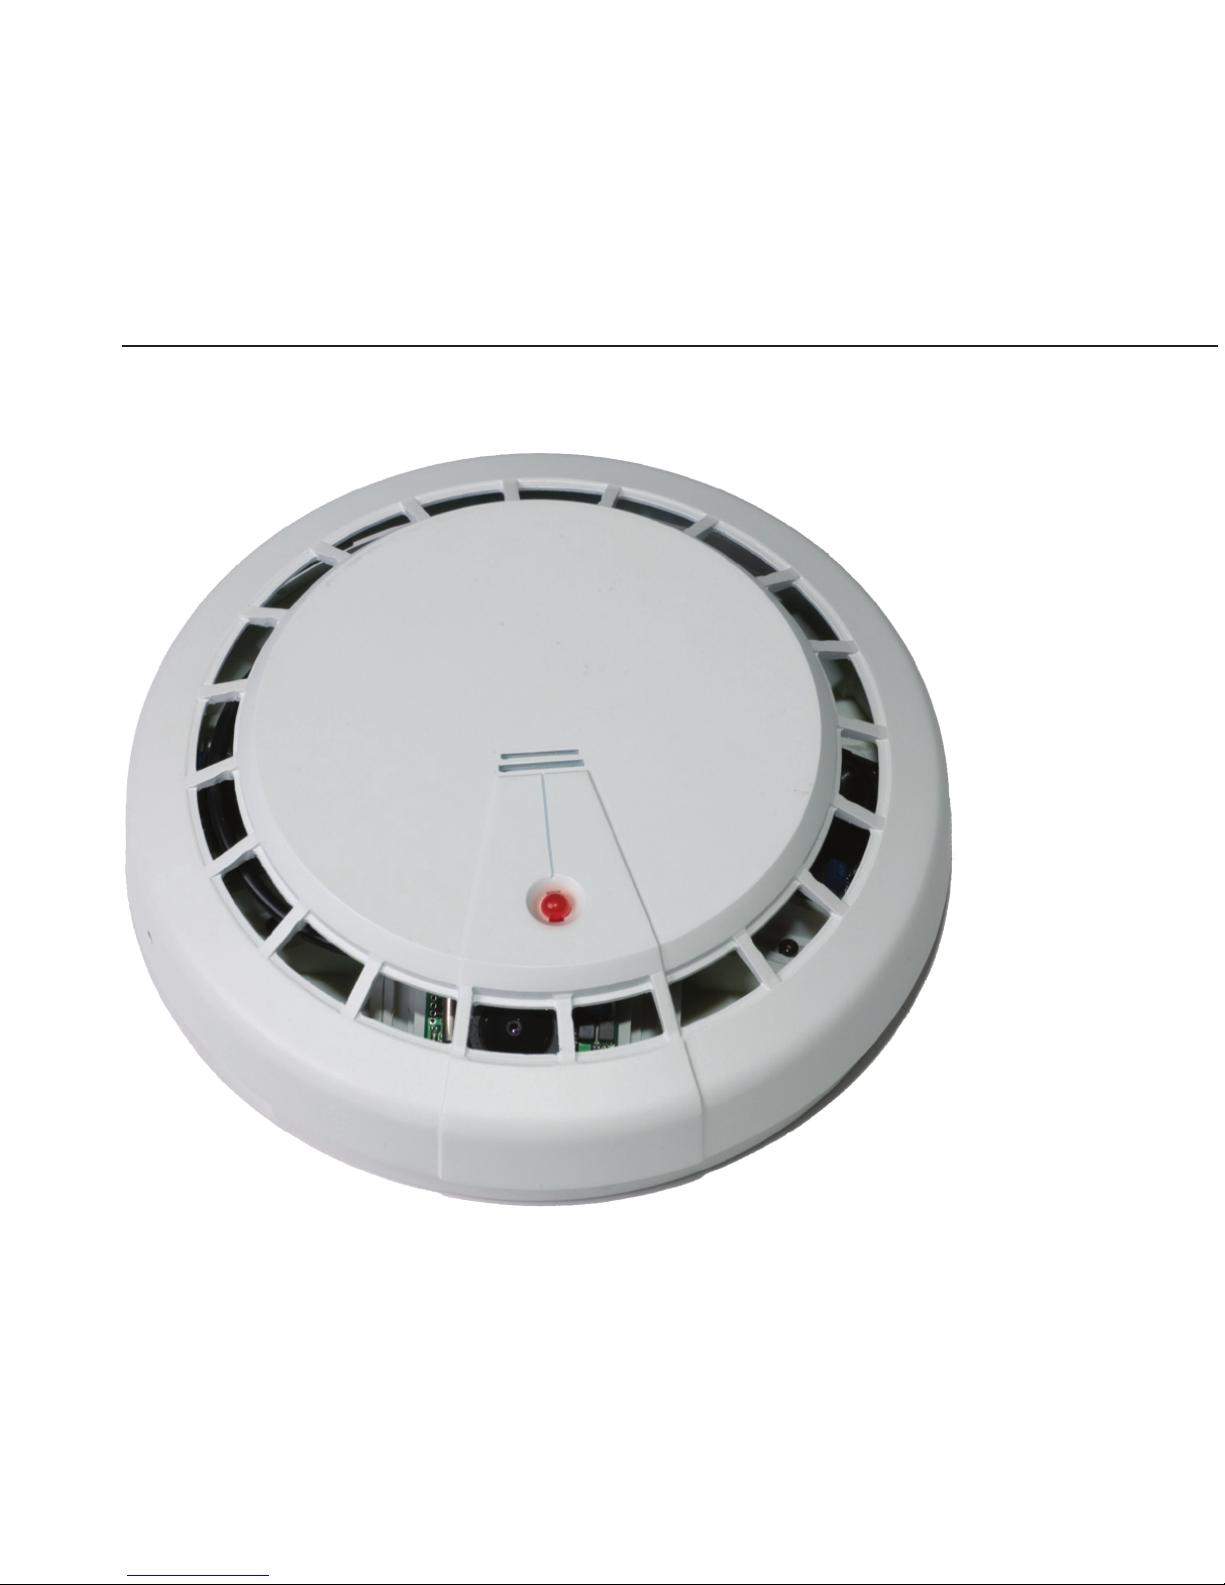
Day/Night Smoke Detector
Camera with DVR
User Manual
Product: COVSMDVR
Please read this manual before installing and using this camera and always follow instructions for proper use.
Save this manual for future reference.
COVSMDVR_SM
Page 2

ii
PRECAUTIONS
Precautions
• Do not install the camera where the temperature or humidity is not
within the specied operating range.
• Do not install the camera under unstable lighting.
• Do not use the camera close to an gas or oil leak.
• Do not disassemble the camera.
• Do not drop the camera; protect it from strong shock.
• Never point the camera directly at intense light.
• Do not expose the camera to rain or spill beverage on it.
Page 3

iii
Day/Night Smoke Detector Camera with DVR
TABLE OF CONTENTS
Table of Contents
SECTION 1 Features . . . . . . . . . . . . . . . . . . . . . . . . . . . . . . . . . . . . . . . . . . . . . . . . . 1
1.1 System options. . . . . . . . . . . . . . . . . . . . . . . . . . . . . . . . . . . . . . . . . . .3
SECTION 2 Installation . . . . . . . . . . . . . . . . . . . . . . . . . . . . . . . . . . . . . . . . . . . . . . 5
2.1 What’s in the box . . . . . . . . . . . . . . . . . . . . . . . . . . . . . . . . . . . . . . . . .5
2.2 What you need. . . . . . . . . . . . . . . . . . . . . . . . . . . . . . . . . . . . . . . . . . .5
2.3 Installing the camera . . . . . . . . . . . . . . . . . . . . . . . . . . . . . . . . . . . . .5
SECTION 3 DVR Setup and Usage . . . . . . . . . . . . . . . . . . . . . . . . . . . . . . . . . . . . . . 8
3.1 Initial DVR setup for recording . . . . . . . . . . . . . . . . . . . . . . . . . . . . . .9
3.2 Reinstall the cover . . . . . . . . . . . . . . . . . . . . . . . . . . . . . . . . . . . . . 14
3.3 Playing back recorded video. . . . . . . . . . . . . . . . . . . . . . . . . . . . . . 15
SECTION 4 Cleaning . . . . . . . . . . . . . . . . . . . . . . . . . . . . . . . . . . . . . . . . . . . . . . . . 17
SECTION 5 Specications . . . . . . . . . . . . . . . . . . . . . . . . . . . . . . . . . . . . . . . . . . . 18
APPENDIX A Troubleshooting . . . . . . . . . . . . . . . . . . . . . . . . . . . . . . . . . . . . . . . . . 20
Page 4

iv
NOTES
Page 5
1
Day/Night Smoke Detector Camera with DVR
SECTION 1: FEATURES
SECTION1 Features
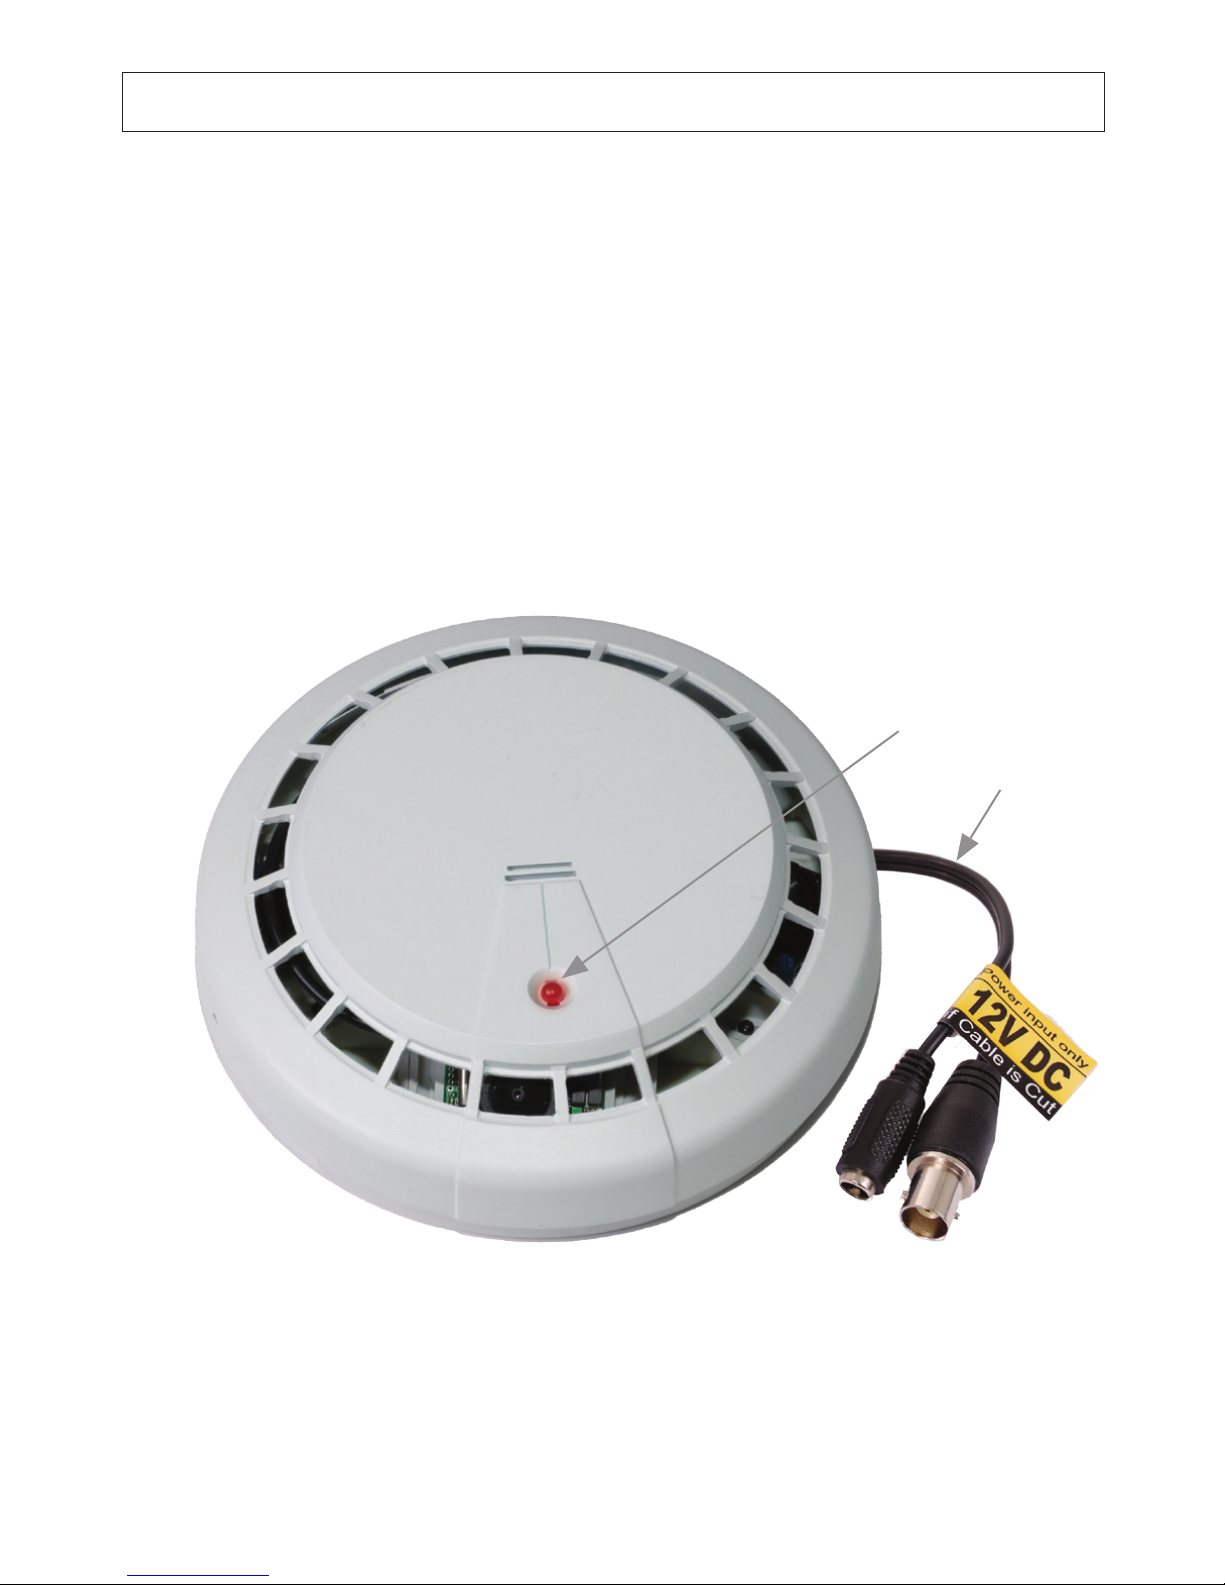
• Covert camera
• 600 lines resolution
• 0.5 lux low light rating
• 12 VDC powering
• AVI digital video recorder (DVR) with SD card storage
• Remote control
Power LED
Drop Cable
Video BNC
Connector
12 VDC
Power
Connector
NOTE: This device does not directly detect smoke.
Page 6
2
SECTION 1: FEATURES
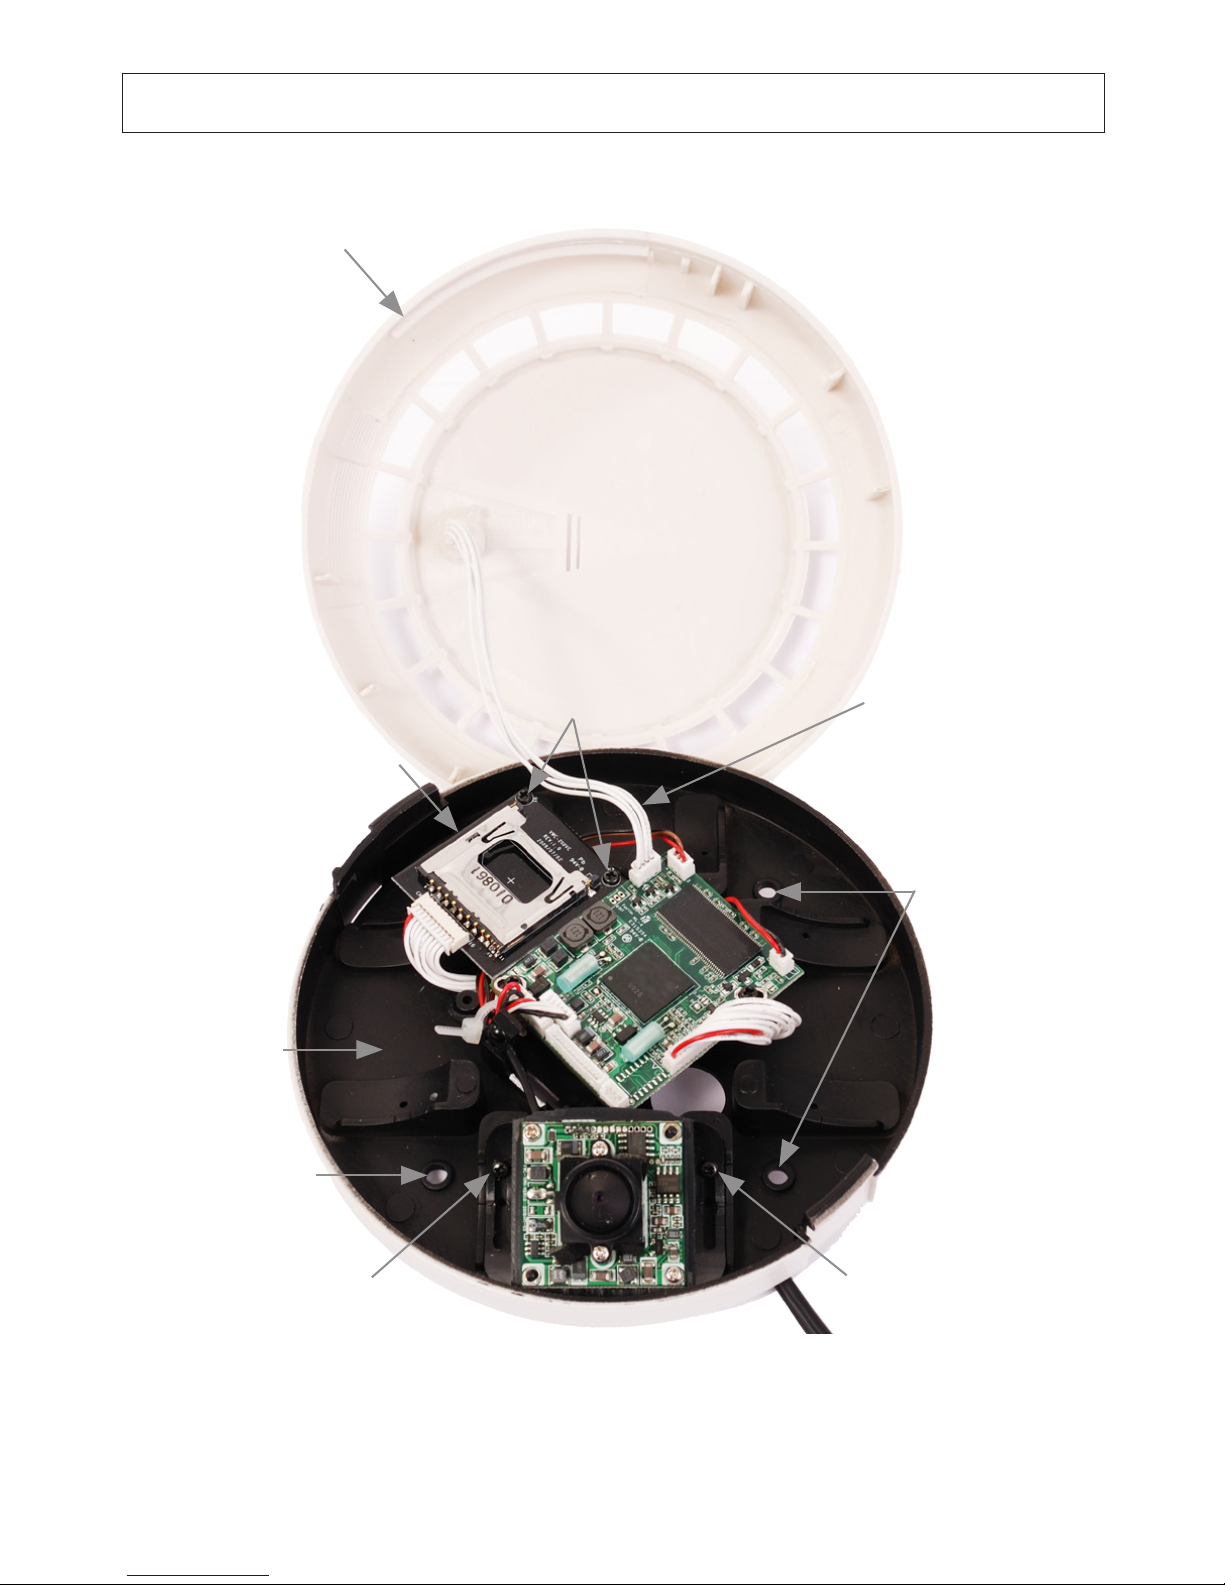
SD Card
Writer/Reader
Module
LED Cable
Cover
Mounting
Screw Hole
(1 of 3)
Camera Mounting
Screw (1 of 2)
Camera Mounting
Screw (1 of 2)
SD Module
Mounting
Screws (2)
Base
Assembly
Mounting
Screw Holes
(2 of 3)
Camera Module
COVSMDVR with cover removed
Page 7
3
Day/Night Smoke Detector Camera with DVR
SECTION 1: FEATURES
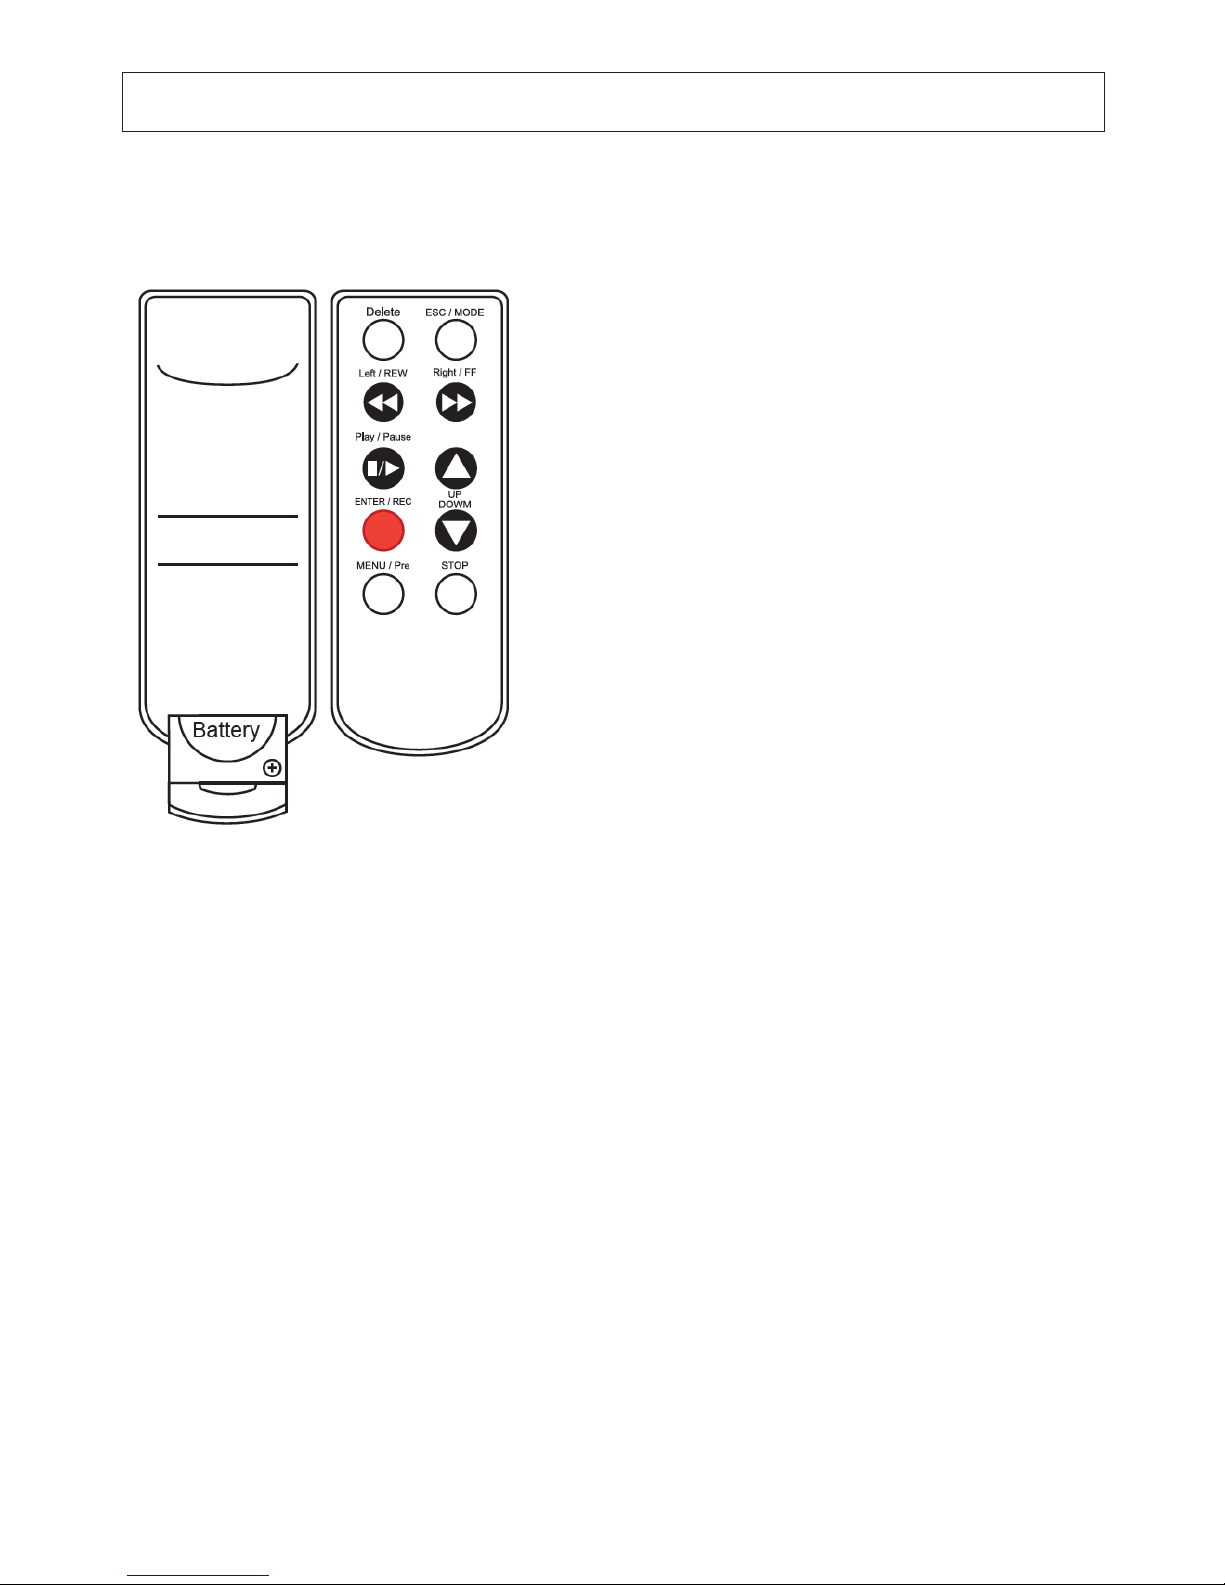
Remote Control
Delete Press to delete the le selected in the
recordings list.
ESC / MODE Press to return to the previous menu, and
quick playback.
Left / REW Press to move left in the mask area, and 4
levels of fast backward playback.
Right / FF Press to move right in the mask area, and
4 levels of fast forward playback.
Play / Pause Press to play or pause playback.
UP and DOWN Press to select an item and to increase or
decrease the volume during the playback.
ENTER / REC Press to conrm, and start recording.
MENU / Pre Press to enter and exit a menu.
STOP Press to stop recording.
1.1 System options
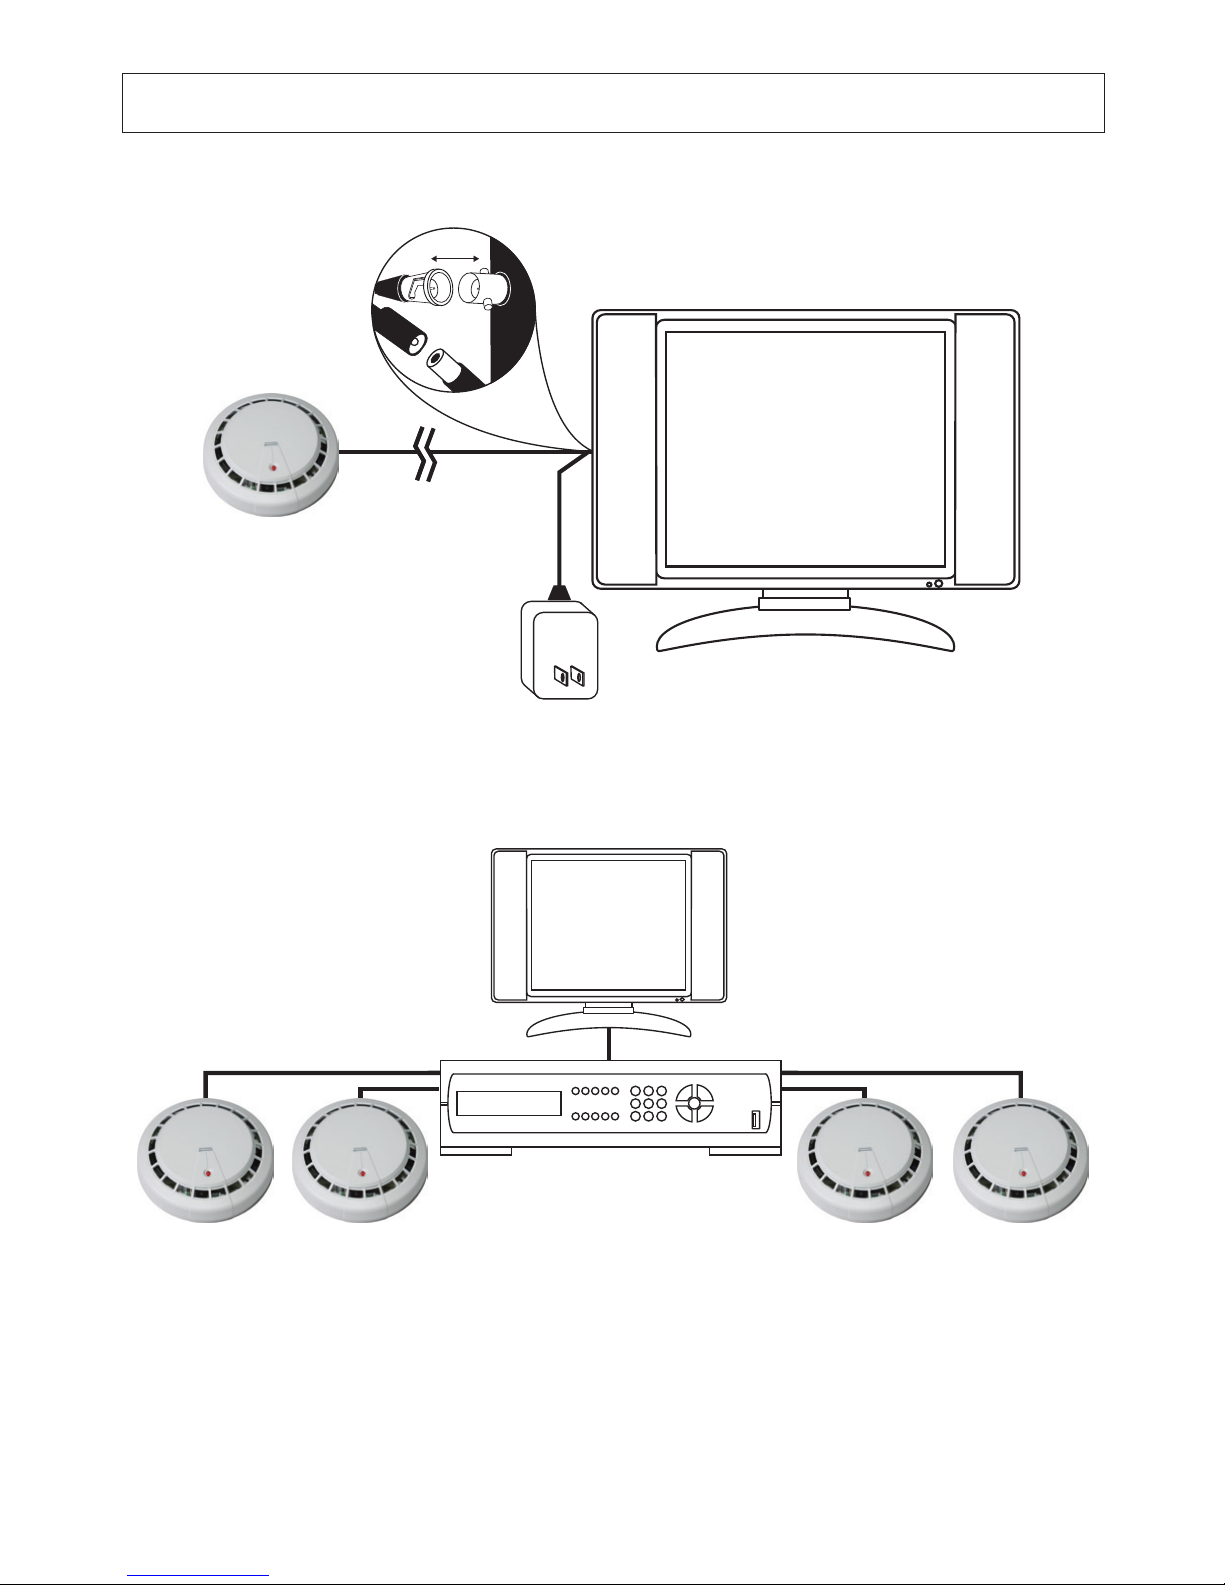
The camera can connect directly to a CCTV monitor or to a DVR.
Page 8
4
SECTION 1: FEATURES
Connect
Single camera/DVR network with monitor
Multiple camera/DVR network with system DVR and monitor
Page 9

5
Day/Night Smoke Detector Camera with DVR
SECTION 2: INSTALLATION
SECTION2 Installation
2.1 What’s in the box
The camera package contains:
• Camera/DVR assembly
• Mounting screws and wall anchors
• Remote control
• User manual (this document)
2.2 What you need
To install the camera, you will need:
• Hardware and tools to attach the camera to the mounting surface
• Video and power extension cable
• 12 VDC power adapter with 200 mA capacity
2.3 Installing the camera
1. Separate the COVSMDVR cover from the base. Rotate the cover about 1/8 turn
counterclockwise, then carefully lift it o the base. CAUTION: After separating the
cover from the base, it is still connected by the LED cable. Carefully unplug the LED
cable from the base assembly, then set the cover aside.
Page 10
6
SECTION 2: INSTALLATION
2. Position the camera base assembly in the mounting location with the camera lens
pointing at your surveillance target. Mark the location of the holes for the mounting
screws and drop cable.
NOTE
One mounting screw hole is covered by the SD card module. If necessary, remove the two
screws that secure SD module, then mark the location of the mounting screw hole.
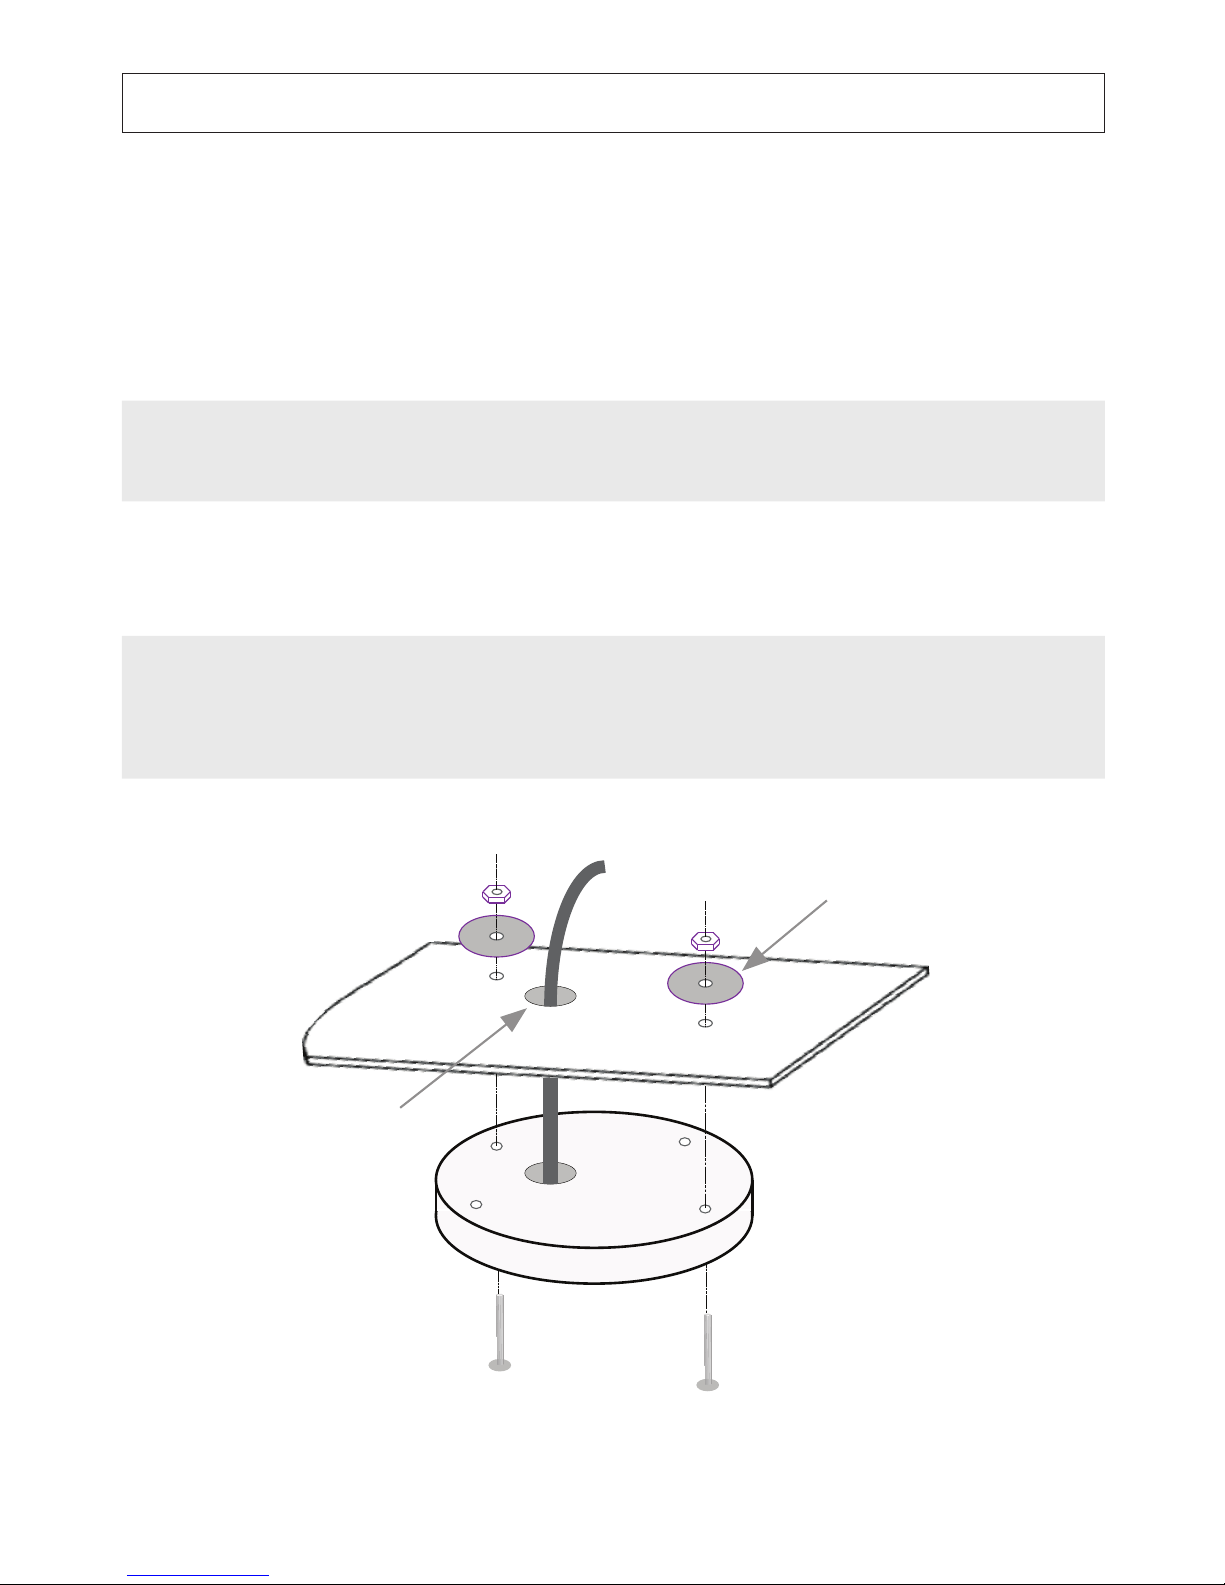
3. Obtain the best fasteners for securing the camera to the mounting surface.
NOTE
Four screws and anchors, appropriate for many surface types, are provided with the
camera. Soft surfaces, such as acoustic ceiling tile, require bolts with backing washers.
See the drawing below.
Bolts/Screws
Drop Cable
Hole for
Drop Cable
Camera Base
Assembly
Backing
Washer for
Soft Surface
Page 11

7
Day/Night Smoke Detector Camera with DVR
SECTION 2: INSTALLATION
4. Drill holes into the mounting surface for the fasteners you will use.
5. Drill a ¾" hole through the mounting surface for the camera drop cable.
6. Route the drop cable through the ¾" hole, then secure the camera base assembly to
the surface with the fasteners.
7. Attach a video/power extension cable to the camera drop cable, then attach the other
end to a power 12 VDC (200 mA) power adapter and to a video monitor or DVR.
8. Power on the camera.
9. Loosen (do not remove) the camera mounting screws. While observing video from
the camera, move the camera module to produce the best view of your surveillance
target.
10. Carefully tighten the camera mounting screws to hold the camera in place.
11. Before reattaching the cover, complete the DVR setup procedures in Section 3 of this
manual.
Page 12
8
SECTION 3: DVR SETUP AND USAGE
SECTION3 DVR Setup and Usage
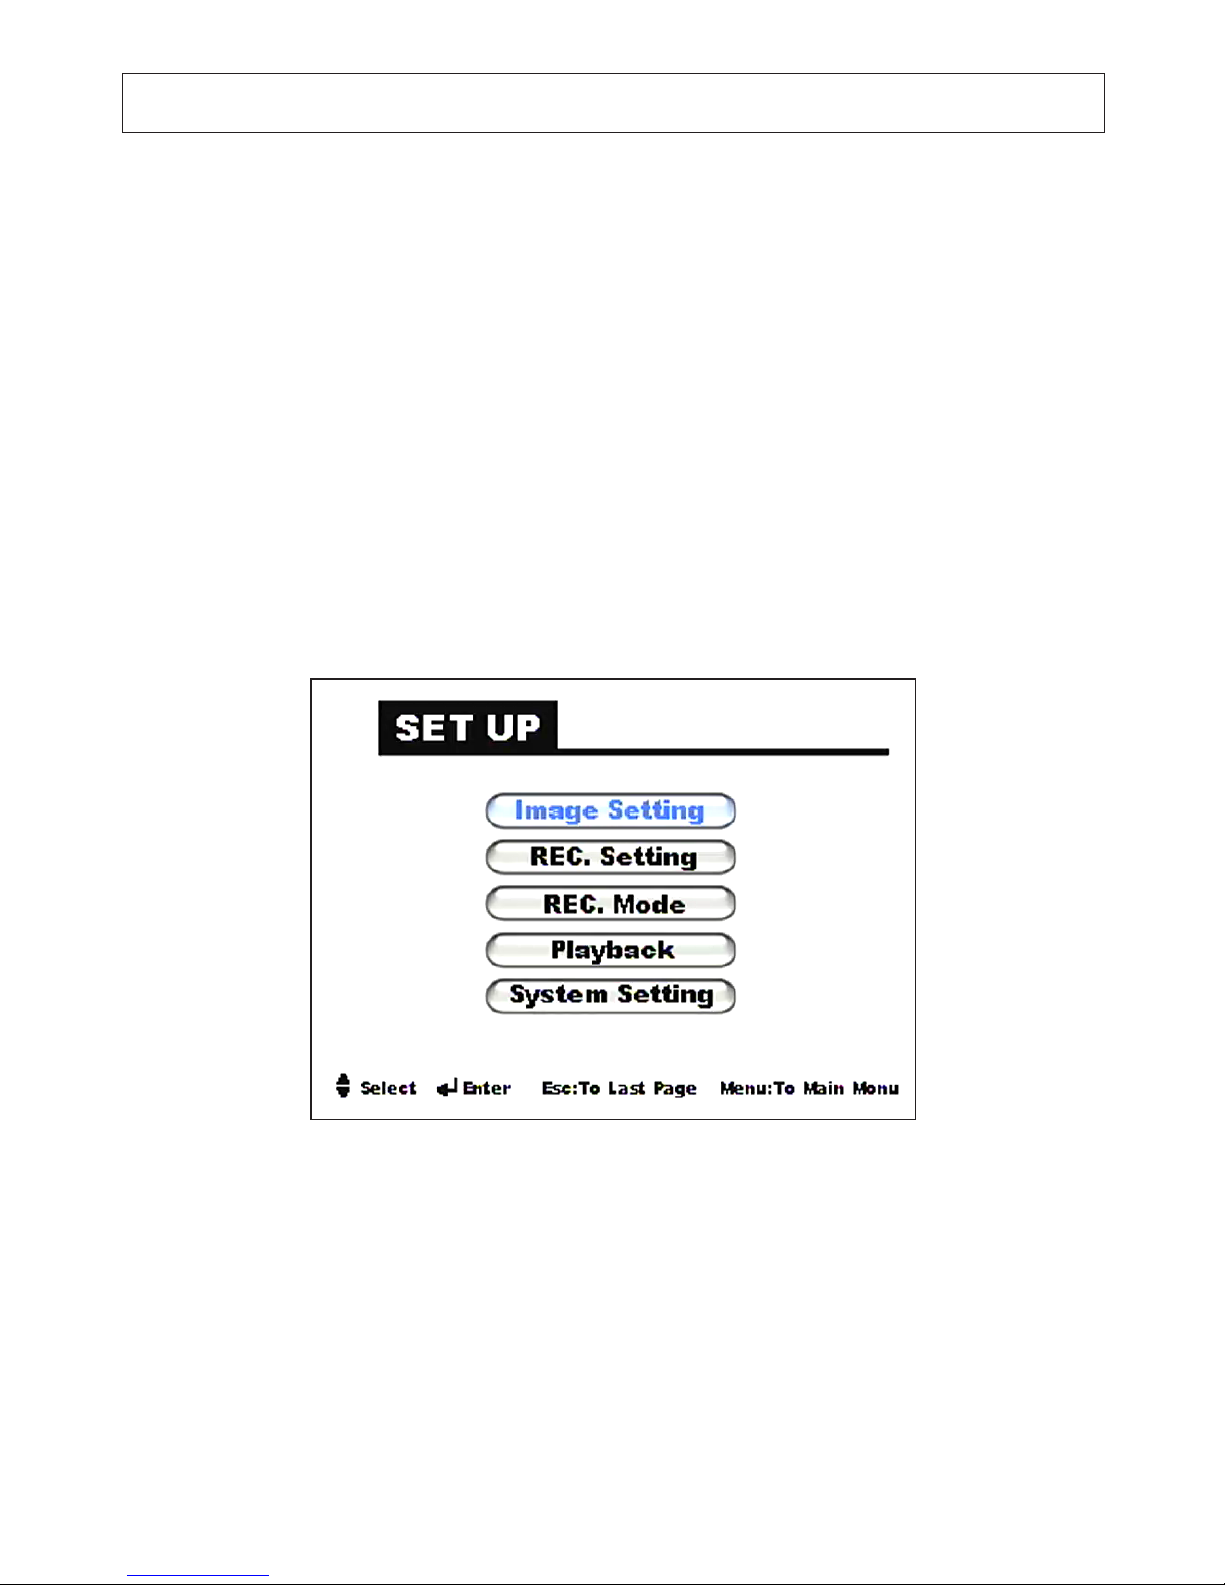
The DVR control interface appears as an OSD with a SET UP menu that includes:
• Image Settings
• Record Settings
• Record Modess
• Playback
• System Settings
The remote control provided with your camera is used to control DVR. Before using the
remote control, you may need to install the battery (CR2025) or remove the pull tab.
Page 13
9
Day/Night Smoke Detector Camera with DVR
SECTION 3: DVR SETUP AND USAGE
3.1 Initial DVR setup for recording
To setup your DVR for recording video, congure the system settings, image settings and
record settings, then choose a record mode.
System Setting
1. Insert an SD, MMC, or SDHC card (up to 32GB) into the card slot on the back of the
camera. See the Specications section of this manual for more information.
2. While observing the video image from the camera, point the remote control at the
front of the camera and press the MENU button. The SET UP will appear.
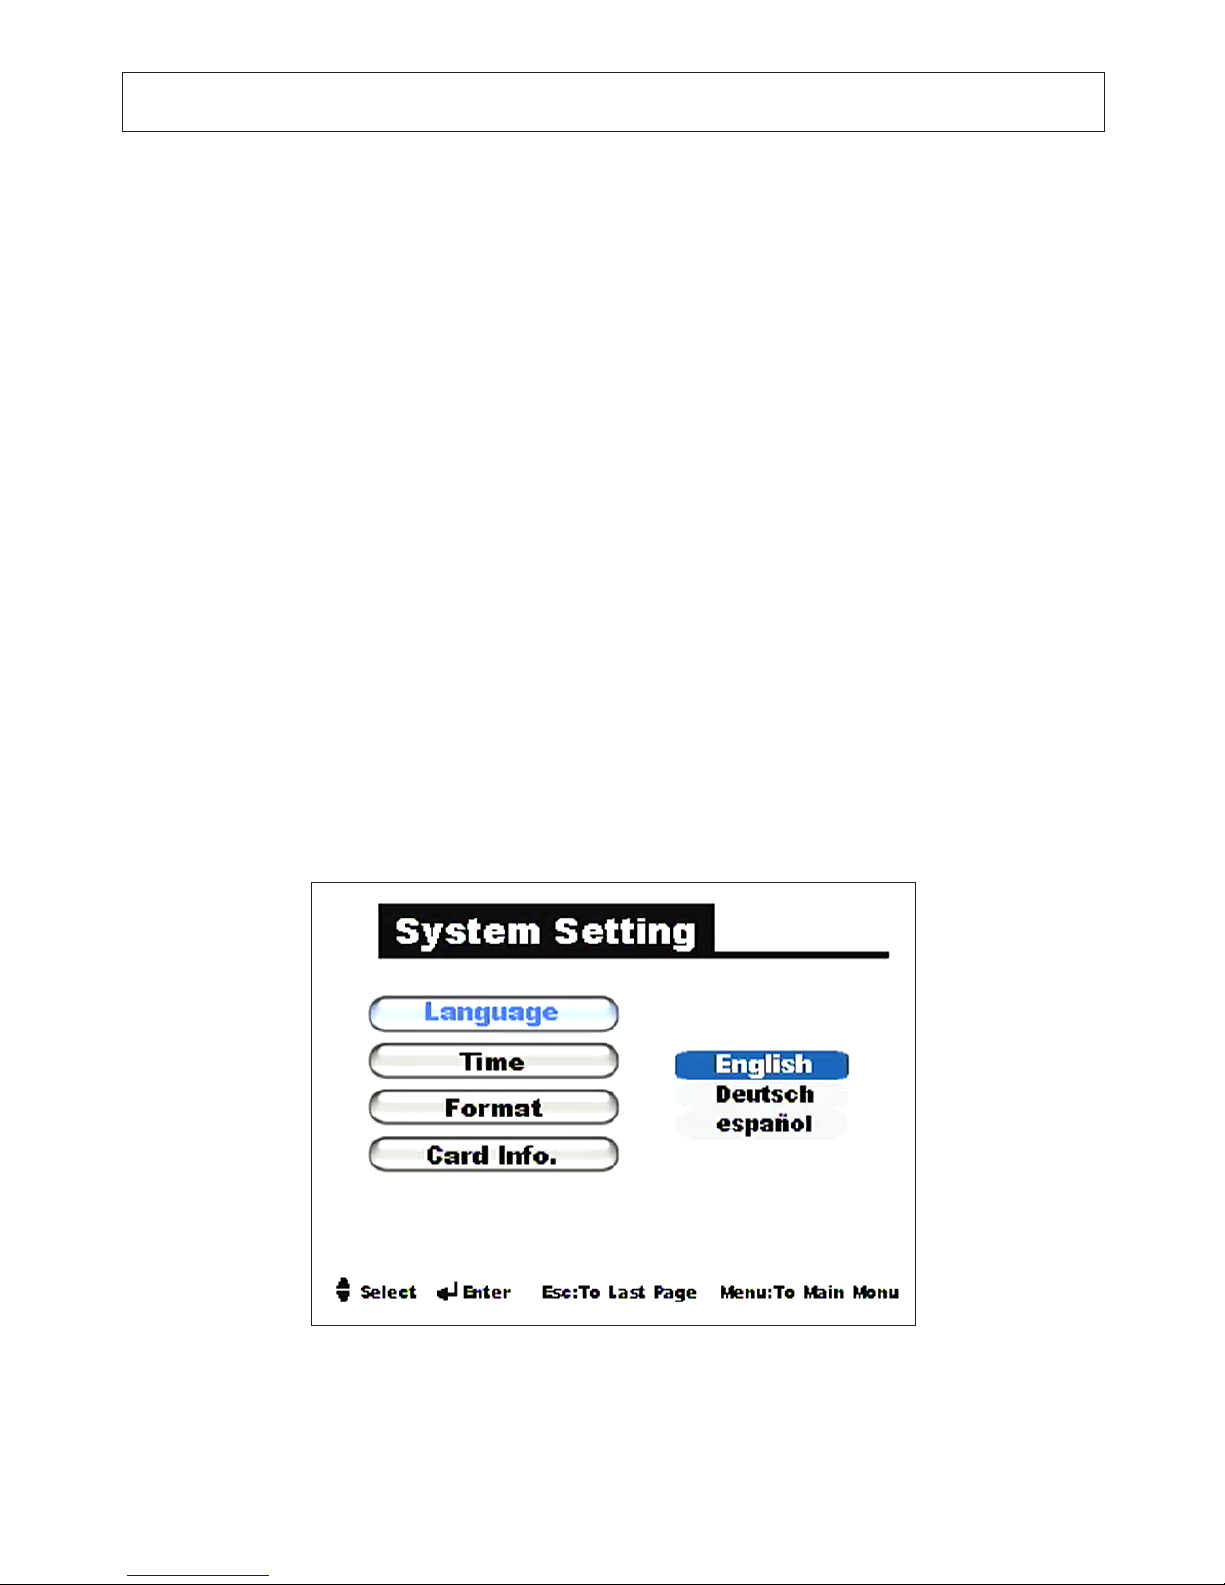
3. Press the UP button to highlight System Setting, then press ENTER.
Page 14

10
SECTION 3: DVR SETUP AND USAGE
4. In the System Setting menu, use the UP or DOWN button to highlight Language,
then press ENTER. Highlight the screen language you prefer, then press ENTER again.
Options: English, German, Spanish.
5. Use the UP or DOWN button to highlight Time, then press ENTER. In the Time
screen, use the UP and DOWN buttons to change the value of the year, if necessary,
the press the Right button to move to the next eld (month). Adjust the value in
each eld until the current date and time is displayed, then press ENTER to conrm
the setting and return to the System Setting screen.
6. Use the UP or DOWN button to highlight Card Info., then press ENTER. Verify that
the information displayed for the memory card is correct, then press ENTER.
7. Format your memory card. Use the UP or DOWN button to highlight Format, then
press ENTER. Press the UP button to select YES, then press ENTER again. Allow the
format operation to complete before continuing.
Image Setting
1. If not at the SET UP menu screen, press the ESC button repeatedly until the SET UP
screen appears.
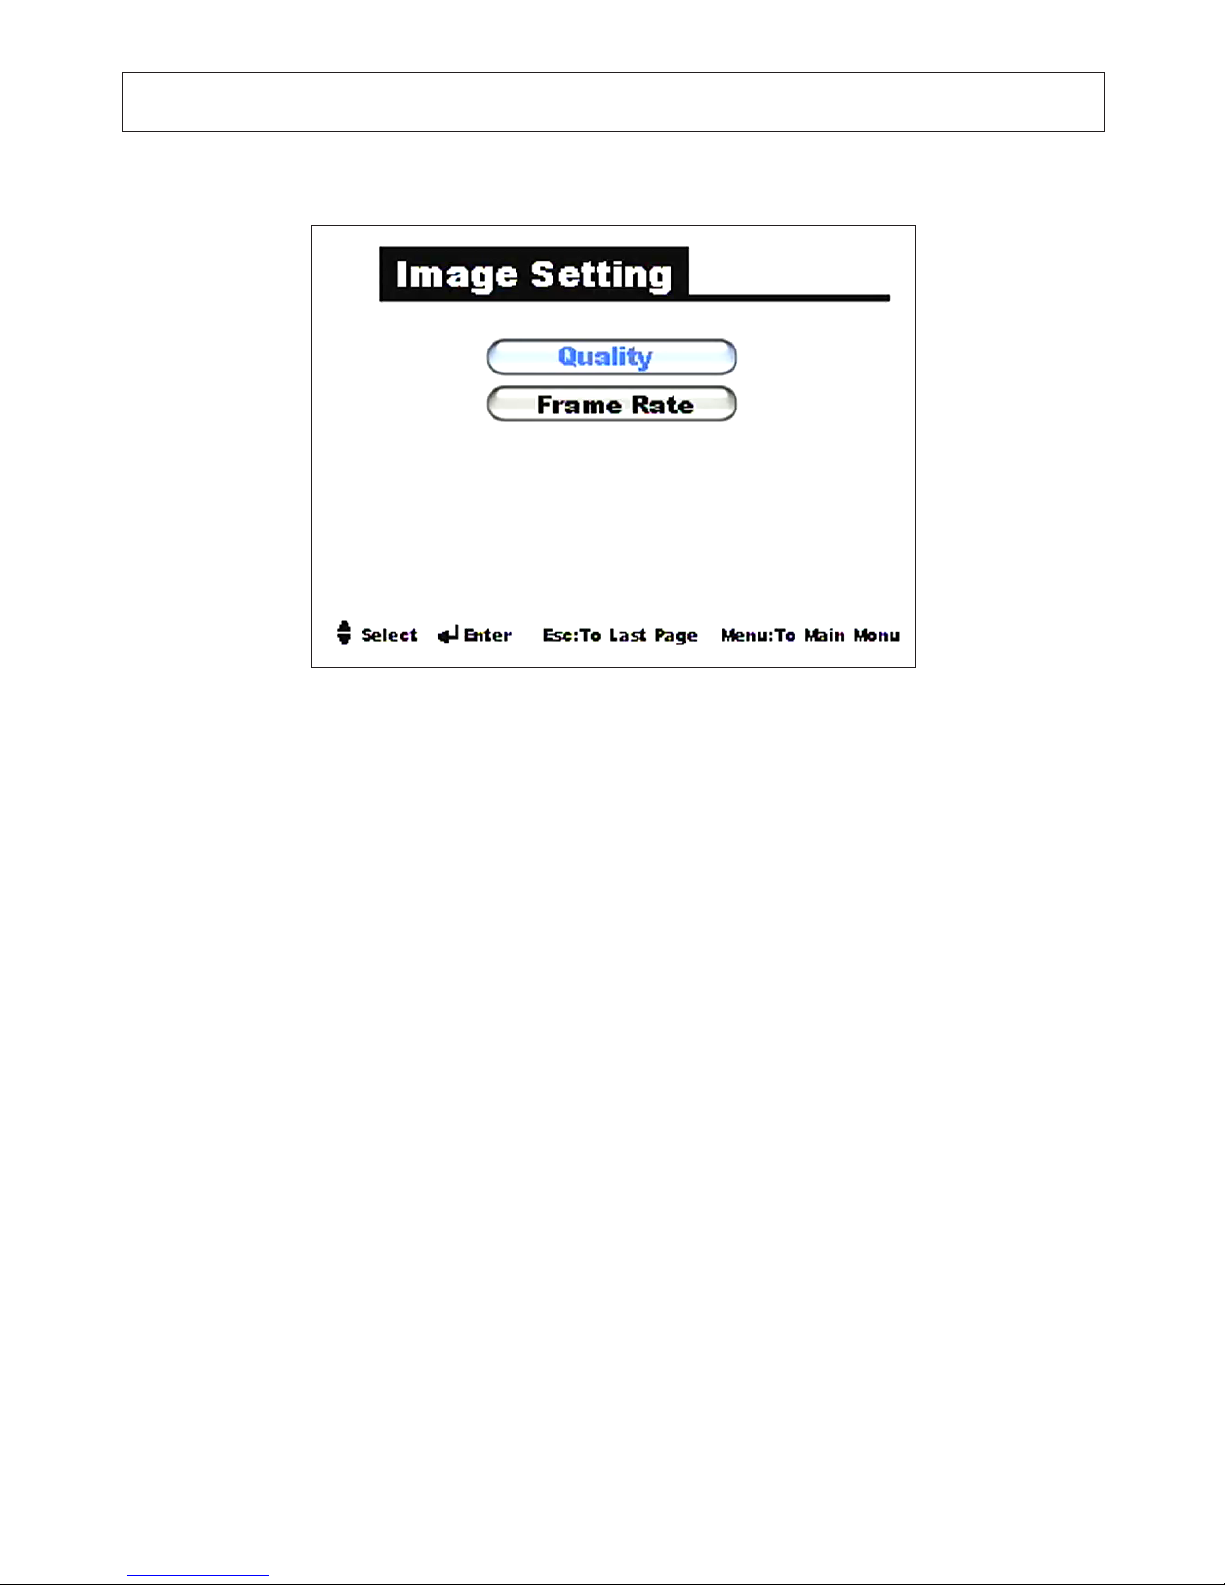
2. Use the UP or DOWN button to highlight Image Setting, then press ENTER.
Page 15
11
Day/Night Smoke Detector Camera with DVR
SECTION 3: DVR SETUP AND USAGE
3. Use the UP or DOWN button to highlight (recording) Quality, then press ENTER.
In the Quality submenu, use the UP or DOWN button to highlight H (high), M
(medium), or L (low), then press ENTER again. (NOTE: Refer to the Specications
section for information on how these settings aect recording capacity.)
4. Press the DOWN button to highlight (recording) Frame Rate, then press ENTER. In
the Frame Rate submenu, use the UP or DOWN button to highlight 30 fps, 15 fps,
or 5 fps, then press ENTER again.
5. Press ESC to return to the SET UP menu.
REC. Setting
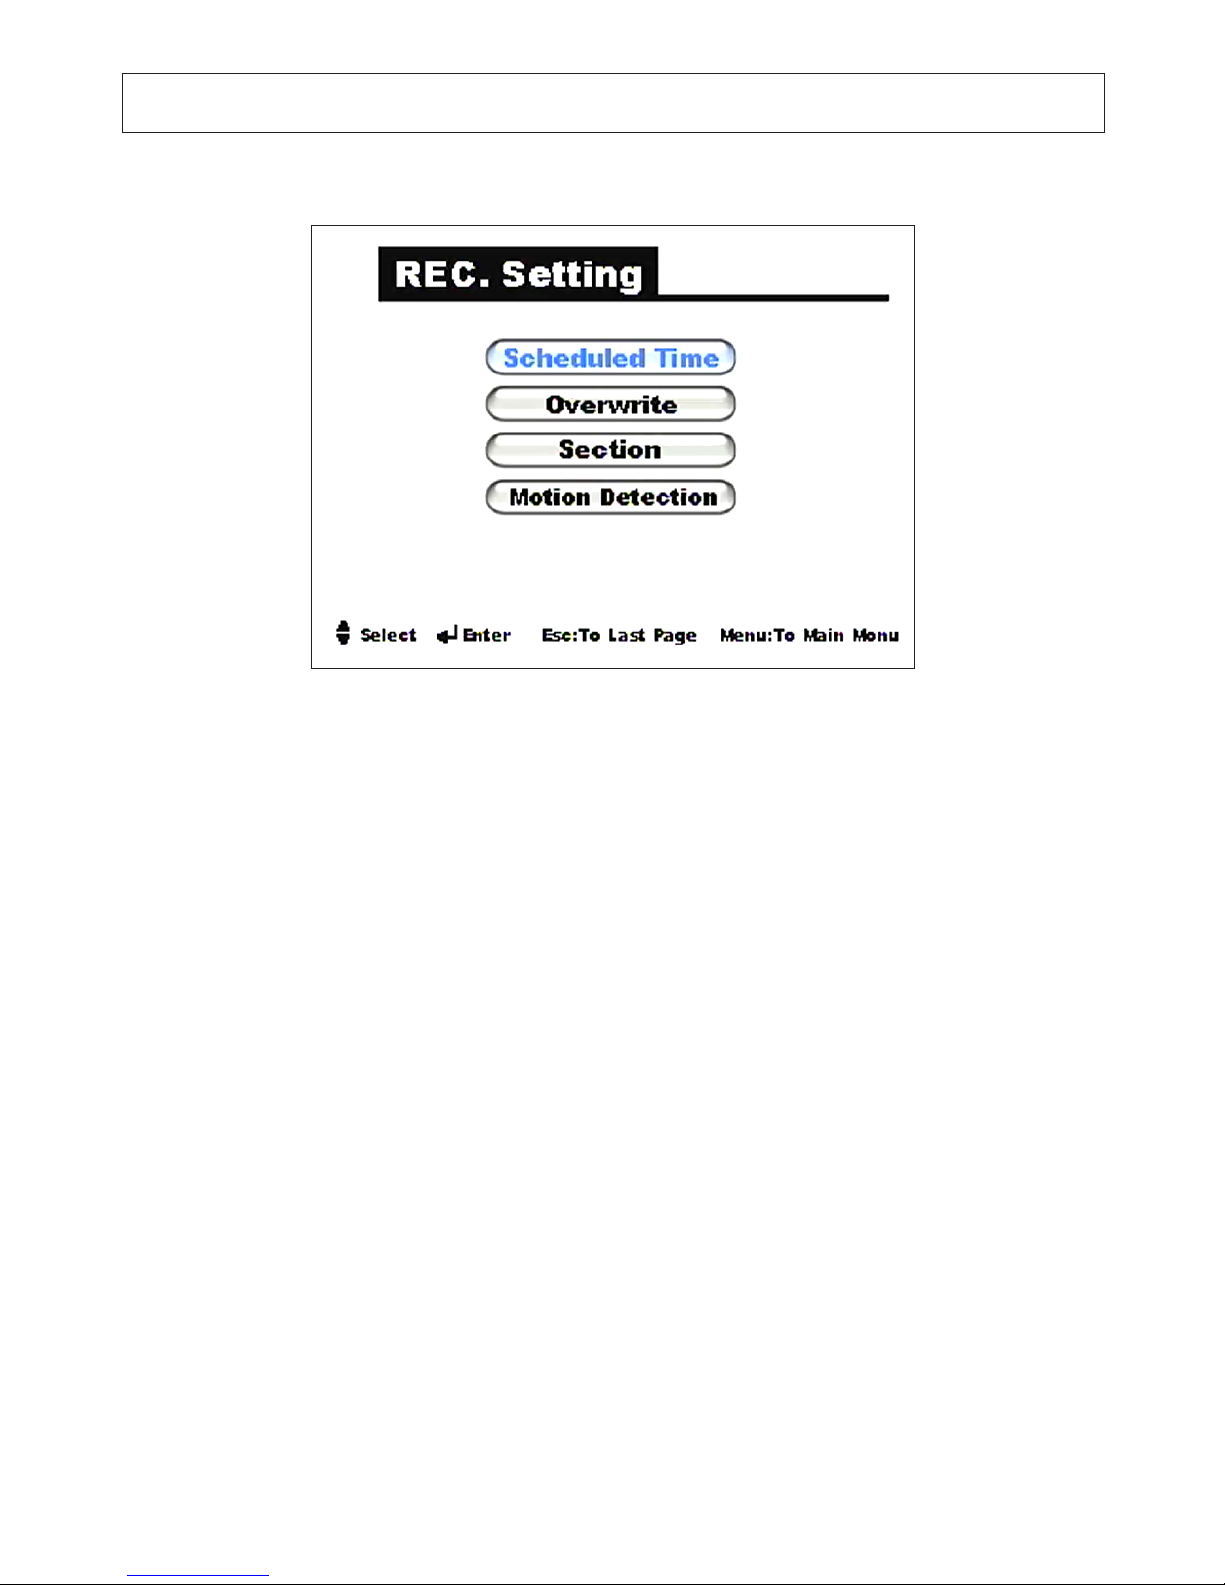
1. In the SET UP menu screen, press the UP or DOWN button to highlight REC.
Setting, then press ENTER.
Page 16
12
SECTION 3: DVR SETUP AND USAGE
2. To setup a schedule for recording video, use the UP and DOWN buttons to highlight
Scheduled Time, then press ENTER. In the Scheduled Time screen, the recording
start time is displayed at the top in the format YYYY/MM/DD HH:MM; the end time
is displayed below. Use the UP and DOWN buttons to change the value of the year, if
necessary, the press the Right button to move to the next eld. Adjust the value of
each eld until the desired start time and end time is displayed, then press ENTER to
conrm the setting and return to the REC. Setting screen.
3. To set the media overwrite option, press the DOWN button to highlight Overwrite,
then press ENTER. If enabling the overwrite option, the DVR will write over old data
to save newer data after the memory card becomes full. In the Overwrite submenu,
select Yes (to overwrite old data) or No, then press ENTER to close the submenu.
4. To set the Section value, press the DOWN button to highlight Section, then press
ENTER. The Section feature allows you to set the maximum size of recorded les
Page 17
13
Day/Night Smoke Detector Camera with DVR
SECTION 3: DVR SETUP AND USAGE
by time length. In the Section submenu, select 15min, 30min, or 1hr, then press
ENTER to return to close the submenu.
5. To setup motion detection recording, press the DOWN button to highlight Motion
Detection, then press ENTER.
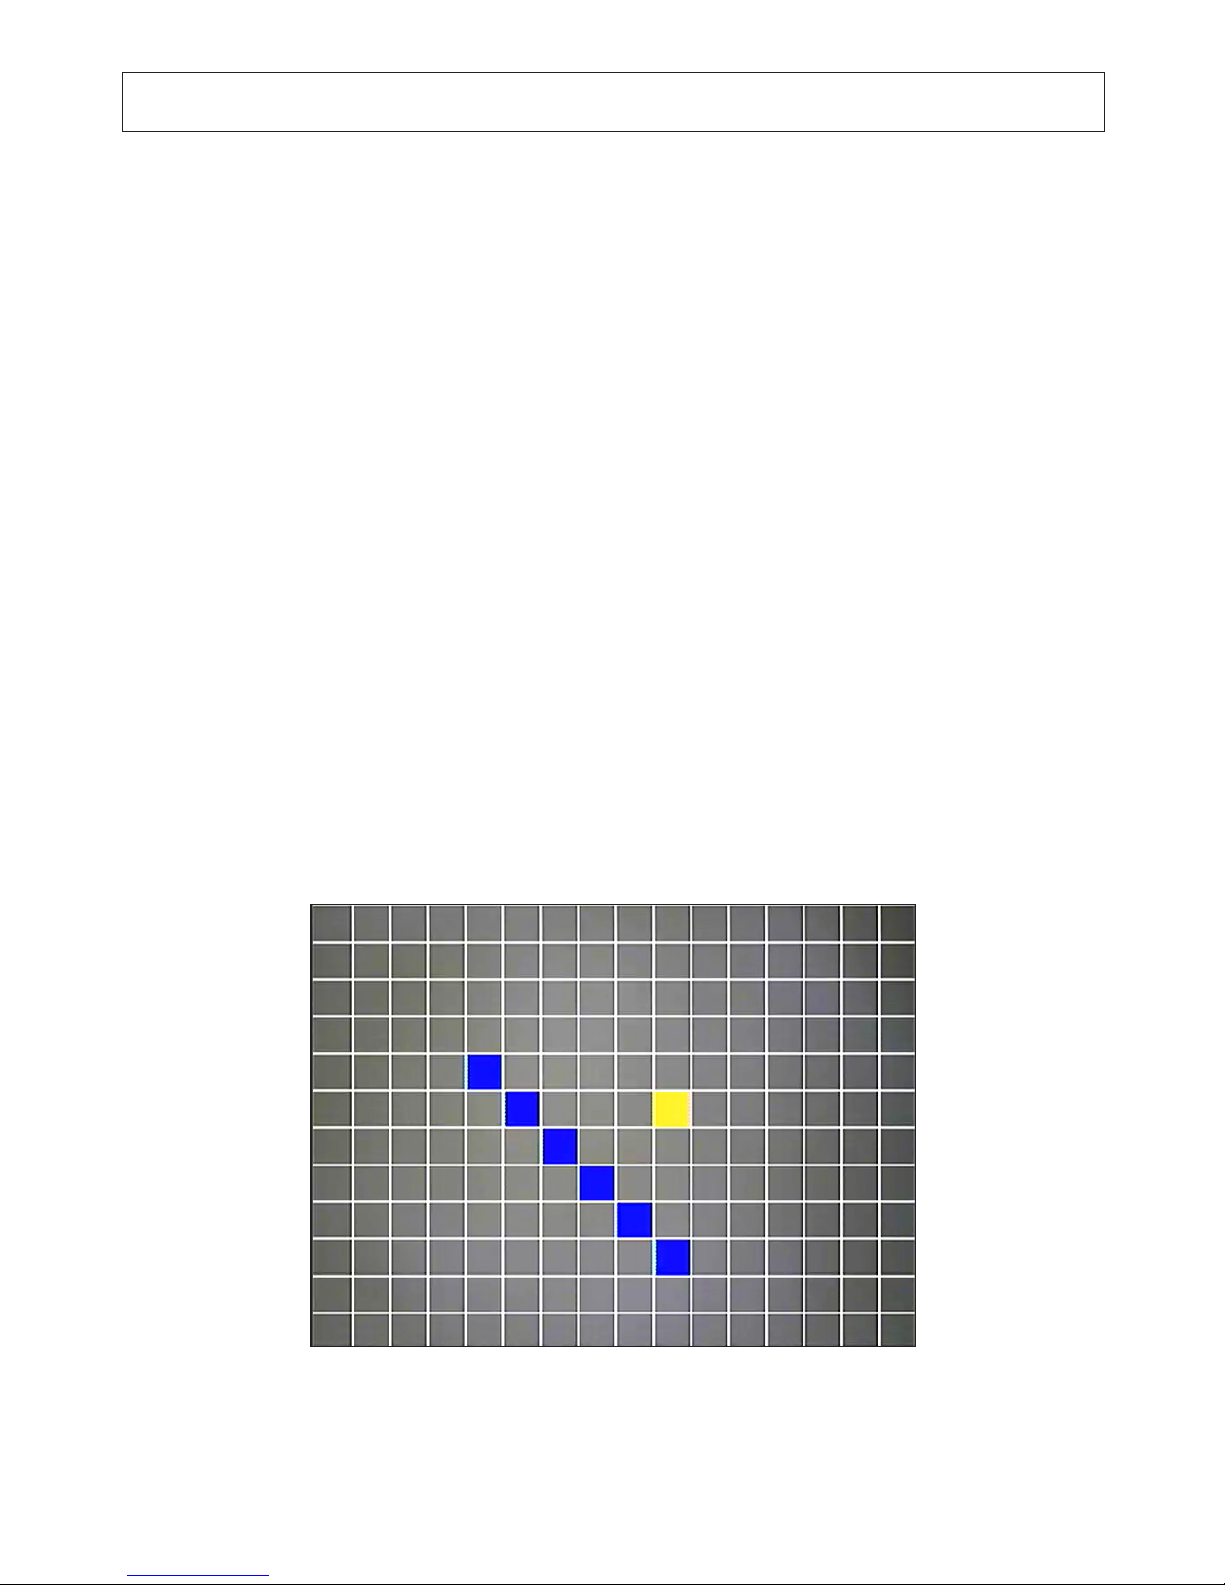
a. Press ENTER again to open the Mask Area screen. The mask feature divides the
video image into a grid of blocks, where each block area is selected to either sense
for motion or be ignored. Blocks selected for motion detection are highlighted
blue, and the cursor position is highlighted yellew. To select a block area or
deselect a selected block area, use the UP, DOWN, RIGHT, and LEFT buttons to
move the cursor to the block, then press ENTER. Use this method to dene only
the areas of the image where motion should be sensed. When nished, press ESC
to return to the Motion Detection screen.
Page 18

14
SECTION 3: DVR SETUP AND USAGE
b. In the Motion Detection screen, press DOWN to highlight Sensitivity, then
press ENTER. In the Sensitivity submenu, select H (high), M (medium), or L
(low), then press ENTER to return to close the submenu. (NOTE: Try dierent
Sensitivity settings to produce the best performance for your surveillance target.)
6. Press ESC twice to return to the SET UP menu, then press REC to initiate motion
detection recording.
REC. Mode
1. In the SET UP menu screen, press the DOWN button to highlight REC. Mode, then
press ENTER.
2. In the submenu, use the UP or DOWN button to highlight the method for triggering
recording: Manual, Scheduled, or by Motion Detection, then press ENTER.
3. Press MENU to close the SET UP menu and return to a live view from the camera.
3.2 Reinstall the cover
To reinstall the cover:
1. Plug the LED cable into the mating connector in the base assembly. Note that this
connector is keyed.
2. Place the cover onto the base assembly, aligning the side tabs of the base with the
slots inside the cover.
Page 19
15
Day/Night Smoke Detector Camera with DVR
SECTION 3: DVR SETUP AND USAGE
3. Rotate the cover about 1/8 turn clockwise until it locks into place.
3.3 Playing back recorded video
Video recorded by your camera can be played back either by the DVR or by an external
device such as a computer.
Playback with the DVR
1. From the live camera view screen, press the MENU button to open the SET UP menu.
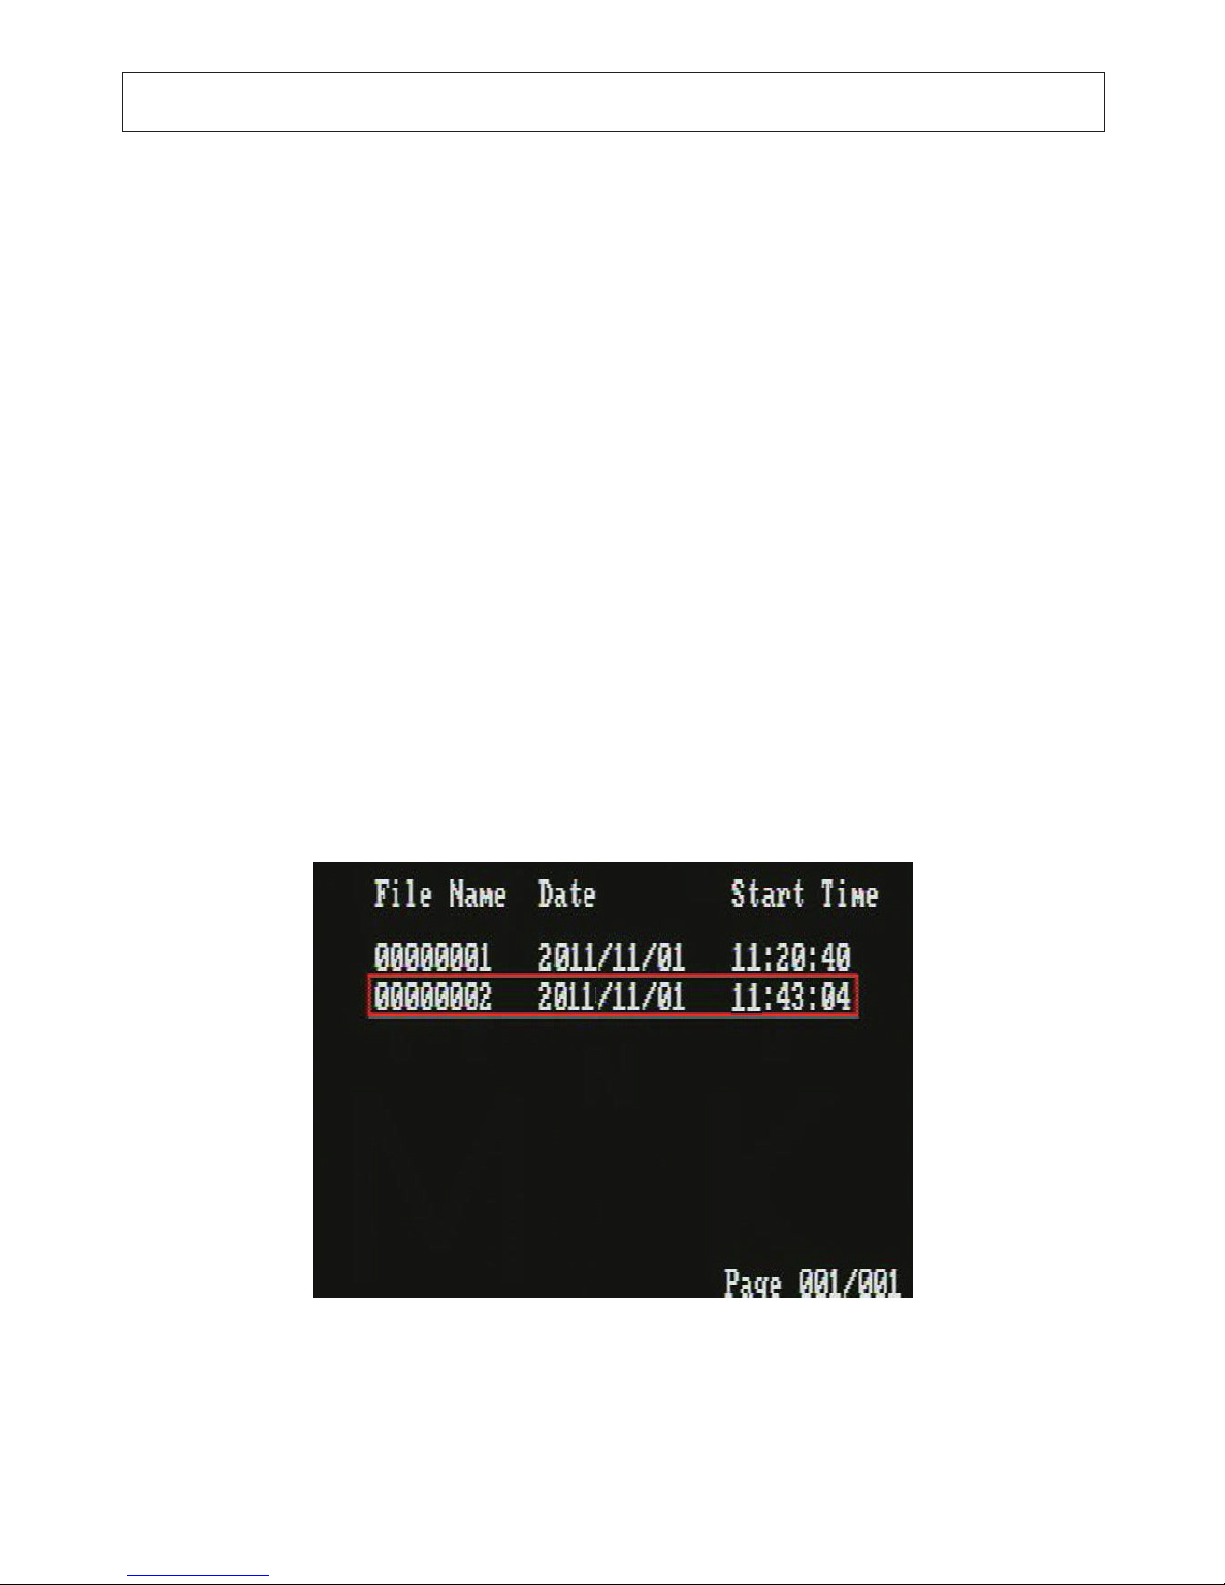
2. Press the DOWN button to highlight Playback, then press ENTER. The camera will
read and display information from the les on the memory card.
Page 20

16
SECTION 3: DVR SETUP AND USAGE
3. In the le list screen, use the UP and DOWN buttons to select a le to play, press
ENTER to conrm your selection, then press PLAY to watch the le. You can control
playback as follows:
— Press the Left/REW button to rewind the le. Press repeatedly to rewind faster.
— Press Right/FF to fast forward. Press repeatedly to forward faster.
— Press Play/Pause to pause and resume playback.
— To delete a le from the list, use the UP and DOWN buttons to select a le, press
ENTER to conrm your selection, then press Delete.
— To exit playback mode and return to the camera live view , press ESC, then press
ENTER.
Playback with a computer
To playback recorded video les on a computer, remove the memory card from the
camera and connect it to a computer. Files recorded by the camera are AVI les with ASF
format, which will play with Windows® Media Player, VLC Media Player (available as a free
download from the internet), and other AVI video player software.
Page 21
17
Day/Night Smoke Detector Camera with DVR
SECTION 4: CLEANING
SECTION4 Cleaning
Clean the camera housing with a mild cleaning solution and a lint free cloth.
• Remove all foreign particles, such as plastic or rubber materials, attached to the
camera housing. These may cause damage to the surface over time.
• Dust can be removed from the unit by wiping it with a soft damp cloth. To remove
stains, gently rub the surface with a soft cloth moistened with a mild detergent
solution, then rinse and dry it with a soft cloth.
CAUTION
Do not use benzene, thinner or other chemical products on the camera
assembly; these may dissolve the paint and promote damage of the surfaces.
Before using any chemical product, read the accompanying instructions
carefully.
Page 22

18
SECTION 5: SPECIFICATIONS
SECTION5 Specications
Item Specication
Image sensor 1/3” CCD sensor
Total pixels 768 (H) x 494 (V)
Horizontal resolution 600 TV Lines
Scanning system 2:1 interlace
Sensitivity 0.5 LUX / F 2.0
Lens type Pinhole 3.7 mm
S/N Ratio > 48 dB
Gamma correction 0.45
Gain control Auto
Back light compensation Auto
Auto exposure Auto
White balance ATW with MCT (Multi-Color Temperature) Technology
D/N auto Not supported
Audio None
Video compression MPEG4 (ASF format)
Resolution for video 640 x 480
Frame rate 5 / 15 / 30 FPS at 640 x 480
Image quality mode High Middle Low
Recording size / 1 hr 1.3 ~ 1 GB 900 ~ 700 MB 700 ~ 500 MB
Video modes Manual, Scheduled, and Motion Detection
Playback mode Search by time
Rewrite Auto or o
Storage media SD / MMC card (SDHC up to 32 GB)
Operating Temperature 14°F ~ 113°F (-10°C ~ 45°C)
Power Supply 12 VDC
Page 23
19
Day/Night Smoke Detector Camera with DVR
SECTION 5: SPECIFICATIONS
Item Specication
Power Consumption 200 mA ± 10% @ 12 VDC
Dimensions (L x W x H) 5.59” (dia.) x 1.63” (H) (142 mm (dia.) x 41.5 mm (H))
Weight 5.33 oz ± 0.11 oz (151 g ± 3 g)
Page 24
20
APPENDIX A: TROUBLESHOOTING
APPENDIXA Troubleshooting
Before sending the camera for repair, please follow the suggestions listed below and make
sure that the camera is installed correctly. If it still does not perform adequately, please
consult your supplier or contact your vendor.
1. No picture on the monitor screen.
a. Check that all connected devices are powered on.
b. Conrm that the voltage is correct.
c. Conrm that the power supply provides enough current to power the camera.
d. Check that all video cables are correctly connected.
2. The picture is not clear.
a. Check that your monitor is correctly adjusted.
b. Conrm that the lens is not covered with dust, dirt, etc. To clean the glass use a
soft, dry and non-abrasive cloth or a commercially available lens cleaning set.
3. The picture has interference.
a. The camera may be close to a high voltage source, such as a power generator.
b. The BNC cable may not be terminated properly.
c. Video cables are not connected properly.
CAUTION
This camera is a precision instrument and when treated with care, will
provide years of satisfactory performance. If a problem does occur, do
not attempt to make repairs. Servicing should always be referred to your
supplier.
 Loading...