

Page 1

hidglobal.com
ACTIVID® APPLIANCE AND
®
MICROSOFT
SAML 2.0 Channel Integration Handbook
AD FS
ActivID Appliance 7.2 | July 2013 | Released Document Version 1.0
Page 2

ActivID Appliance 7.2 and AD FS | integration H an dboo k | AD FS
External Release | © 2013 HID Global Corporation/ASSA ABLOY AB. All rights reserved.
Page 2
Table of Co ntents
1.0 Introduction ....................................................................................................................................................3
1.1 Scope of Document ......................................................................................................................................3
2.0 Context and Basic Workflow ........................................................................................................................4
3.0 Microsoft AD FS Configuration ....................................................................................................................5
3.1 Procedure 1: Exporting ActivID Appliance IDP Metadat a ............................................................................5
3.2 Procedure 2: Create A Claims Provider Trust Using Federation Metadata .................................................8
3.3 Procedure 3: Create A Rule to Transform An Incoming Claim ................................................................. 12
3.4 Procedure 4: Configure Claims Provider Trust Properties (Using the 'Advanced' Tab) ........................... 14
3.5 Procedure 5: Configure the Relying Party Trust (Your Web Application) ................................................. 15
3.6 Procedure 6: Export ADFS Micros of t Metadat a ........................................................................................ 17
3.7 Procedure 7: Modify ADFS Microsof t Metadat a ........................................................................................ 18
4.0 ActivID Appliance Configuration............................................................................................................... 18
4.1 Procedure 1: Create SAML Channel ........................................................................................................ 19
4.2 Procedure 2: Import AD FS Metadata ....................................................................................................... 21
4.3 Procedure 3: Authorize the SAML Channel (Authentication Policies) ...................................................... 24
4.4 Procedure 4: Configure the Identity Provider ............................................................................................ 25
4.5 Procedure 5: Adding A New Authentication Policies Mapping ................................................................. 26
5.0 SAML Channel Authentication: An Overview .......................................................................................... 27
5.1 Prerequisite: User Activates Web Soft Token ........................................................................................... 27
5.2 User Accesses Web Application ............................................................................................................... 29
Copyright ................................................................................................................................................................ 30
Trademarks ............................................................................................................................................................ 30
Revision History .................................................................................................................................................... 30
Technical Support ................................................................................................................................................. 30
Page 3

ActivID Appliance 7.2 and AD FS | integration H an dboo k | AD FS
External Release | © 2013 HID Global Corporation/ASSA ABLOY AB. All rights reserved.
Page 3
1.0 Introduction
Microsoft® Active Directory Federation Services AD FS is an identity access solution that provides browser-based
clients (internal or external to your network) with seamless, "one prompt" access to one or more protected
Internet-facing applications, even when the user accounts and applications are located in completely different
networks or organizations.
The process of authenticating to one network while accessing resources in another network—without the burden
of repeated logon actions by users—is known as single sign-on (SSO). AD FS provides a Web-based, SSO
solution that authenticates users to multiple Web applications over the life of a single browser session.
Providing secure “one prompt” access via a web application over existing Internet connections requires strong,
two-factor authentication to protect resources.
The ActivID® Applianc e wo rk s with the Microsoft AD FS solution to provide versatile, strong authentication that is
flexible, scalable, and simple to manage.
1.1 Scope of Document
This document explains how to configure ActivID Appliance and Microsoft AD FS using Security Assertion Markup
Language (SAML). SAML 2.0 enables Web-based authentication and authorization and can be used by Microsoft
AD FS to delegate user authentication to the ActivID® Appliance.
This option is simple and allows users to authenticate to the ActivID® Appliance authentication portal which has
multiple authentication mechanisms working out of the box, including one-time password (OTP), Web soft token
OTP, and Public Key Infrastructure (PKI) methods.
Page 4

ActivID Appliance 7.2 and AD FS | integration H an dboo k | AD FS
External Release | © 2013 HID Global Corporation/ASSA ABLOY AB. All rights reserved.
Page 4
2.0 Context and Basic Workflow
In the context of the ActivID Appliance, ADFS is a Service Provider (SP) and ActivID® Appliance is an Identity
Provider (IDP) using SAMLv2.0.
For complete details, please have the ActivID Appliance Identity Provider Solution Guide handy for quick
reference.
Consider the following typical (generic) scenario. Please refer to the following diagram.
• Steps 1 and 2: The user’s web browser tries to access the web server and is redirected to the AD FS-R
(proxy) server to authenticate the user.
• Steps 3 and 4: At the AD FS-R server, after figuring out which identity partner the user should access,
redirects the browser to the ActivID Appl ianc e IDP.
• Steps 5 and 6: At the ActivID Appliance, the user is authenticated and given an SAML token and redirected
back to the ADFS-R server.
• Steps 7 and 8: Once back at the ADFS-R server, the SAML token is exchanged for a token that the web
server understands and then the user is redirected back to the web server.
• Steps 9 and 10: Finally, once the user’s web browser presents the appropriate token (cookie), the web server
allows the user access to the content.
Page 5

ActivID Appliance 7.2 and AD FS | integration H an dboo k | AD FS
External Release | © 2013 HID Global Corporation/ASSA ABLOY AB. All rights reserved.
Page 5
3.0 Microsoft A D FS Configuration
This chapter describes how to manage Microsoft AD FS.
When an application is in one network and user accounts are in another network (managed by an ActivID
Appliance), it is typical for users to encounter prompts for secondary credentials when they attempt to access the
application. These secondary credentials represent the identity of the users in the realm where the application
resides. The web server that hosts the application usually requires these credentials so that it can make the most
appropriate authorization decision.
AD FS makes secondary accounts and their credentials unnecessary by providing trust relationships that you can
use to project a user's digital identity and access rights to trusted partners (stored in the ActivID Appliance or
linked to the ActivID Appliance). In a federated environment, each organization continues to manage its own
identities, but each organization can also securely project and accept identities from other organizations.
When a user signs into a web application linked in AD FS, the user specifies a URL, which is associated with a
specific identity partner (realm). The web application and AD FS forwards the user to the IDP ActivID Appliance
authentication server to verify the user’s identity before providing a web SSO.
3.1 Procedure 1: Exporting Acti vID Appliance IDP Metadata
To configure the ActivID Appliance as an IDP, you must provide the metadata information to the Service Provider
(AD FS). The first procedure is to create a trust between the SP (AD FS) and the IDP (ActivID Appliance), that is
the Metadata exchange.
The ActivID Appliance IDP metadata is not stored as it is in the appliance database, but instead is generated
when there is a request for an export through the ActivID Appliance Management Console. This request is based
on the following data:
• ActivID Appliance IDP host name
• ActivID Appliance IDP port number—This is an optional attribute.
• ActivID Appliance Security Domain—The Security Domain name is part of the URIs defined in the metadata.
• Flag indicating if the ActivID Appliance IDP accepts only signed requests—This is an optional attribute that
indicates a requirement for the <samlp:AuthnRequest> messages received by this IDP to be signed. If
omitted, then the value is assumed to be false.
• Alias of the ActivID Appliance IDP certificates (signing and encryption) stored in the Hard w are Sec urity
Module (HSM) keystore.
Page 6

ActivID Appliance 7.2 and AD FS | integration H an dboo k | AD FS
External Release | © 2013 HID Global Corporation/ASSA ABLOY AB. All rights reserved.
Page 6
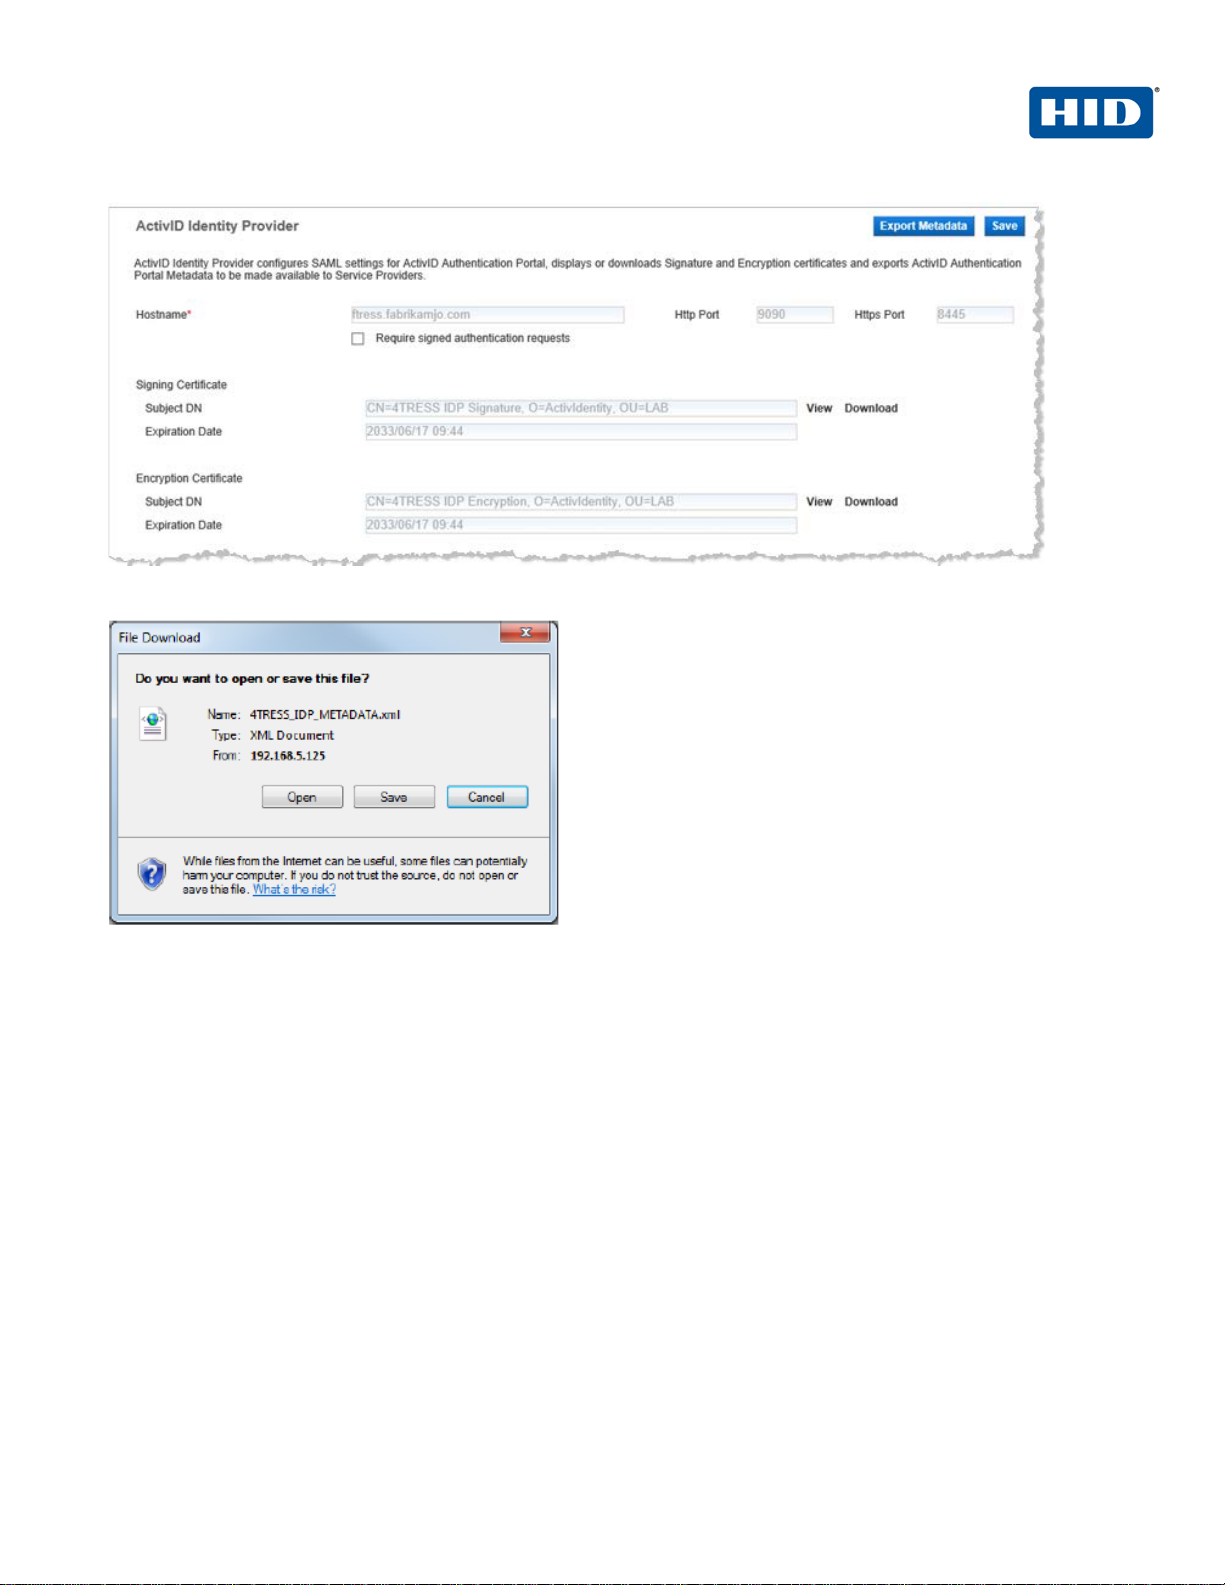
1. Log on to the ActivID Appliance Management Console as an administrator.
2. When prompted, enter your User name and Password, and then click Submit.
3. Select the Configuration tab.
4. Under the Policies > S AML menu, click Appliance Identity Provider.
Page 7
ActivID Appliance 7.2 and AD FS | integration H an dboo k | AD FS
External Release | © 2013 HID Global Corporation/ASSA ABLOY AB. All rights reserved.
Page 7
5. Click Export Metadata.
6. When prompted, click Open, and then save the IDP METADATA file to a desired location.
Page 8

ActivID Appliance 7.2 and AD FS | integration H an dboo k | AD FS
External Release | © 2013 HID Global Corporation/ASSA ABLOY AB. All rights reserved.
Page 8
3.2 Procedure 2: Create A Claims Pro vider Trust Using
Federation Metadata
1. In your AD FS, click Start, point to Programs >Administrative Tools, and then click AD FS 2.0.
2. Point to AD FS 2.0 > Trust Rela tionships, right-click Claims Provider Trusts, and then click Add Claims
Provider Trust to open the Add Claims Provider Trust Wizard.
3. On the Welcome page, click Start.
Page 9

ActivID Appliance 7.2 and AD FS | integration H an dboo k | AD FS
External Release | © 2013 HID Global Corporation/ASSA ABLOY AB. All rights reserved.
Page 9
4. On the Select Data Source page, select the option, Import data about the claims provider from a file.
5. For Federation metadata file location, click Browse to locate the file path to the ActivID Appliance
metadata, and then click Next.
6. When prompted by the warning, click OK.
Page 10

ActivID Appliance 7.2 and AD FS | integration H an dboo k | AD FS
External Release | © 2013 HID Global Corporation/ASSA ABLOY AB. All rights reserved.
Page 10
7. On the Specify Display Name page, type a meaningful Display name, and then optionally in the Notes box,
type a description for this claims provider trust.
8. Click Next.
9. On the Ready to Add Trust page, click Next to save your claims provider trust information.
Page 11

ActivID Appliance 7.2 and AD FS | integration H an dboo k | AD FS
External Release | © 2013 HID Global Corporation/ASSA ABLOY AB. All rights reserved.
Page 11
Important: If trusted certificate stores have been modified previously on this computer, then verify that
10. On the Finish page, deselect the option prov id ed to open the Edit Claim Rules dialog, and then click Close.
the SSL certificate that is used to secure the federation metadata retrieval is trusted by the service
account that is assigned to this Federation Service.
If the service account does not trust the SSL certificate of this claims provider, then monitoring of the
trust will fail.
To prevent this failure, make sure that the issuer of the claims provider’s SSL certificate is in the Local
Computer Trusted Root Certification Authorities certificate store on each federation server in the farm.
Page 12

ActivID Appliance 7.2 and AD FS | integration H an dboo k | AD FS
External Release | © 2013 HID Global Corporation/ASSA ABLOY AB. All rights reserved.
Page 12
3.3 Procedure 3: Create A Rule to Trans form An Incoming Claim
1. Right-click the selected trust, and then click Edit Claim Rule.
2. In the Edit Claim Rules dialog, click Add Rule.
Page 13

ActivID Appliance 7.2 and AD FS | integration H an dboo k | AD FS
External Release | © 2013 HID Global Corporation/ASSA ABLOY AB. All rights reserved.
Page 13
3. On the Select Rule Template page, from the Claim rule template drop-down list, select Send Claims Using
a Custom Rule, and then click Next.
4. On the Configure Rule page, for Claim rule name type the display name for this rule.
5. For Custom rule, type or paste the desired claim rule language syntax for this rule (as illustrated above). For
example:
c: [ ]
=> issue(claim = c);
6. Click Finish.
7. Back in the Edit Claim Rules dialog, click OK to save the rule.
Page 14

ActivID Appliance 7.2 and AD FS | integration H an dboo k | AD FS
External Release | © 2013 HID Global Corporation/ASSA ABLOY AB. All rights reserved.
Page 14
3.4 Procedure 4: Configure Clai ms Provider Trust Properties
(Using the 'Advanced' Tab)
1. Right-click the selected trust, and then click Edit Claim Rules.
2. Select the Advanced tab, and then specify the secure hash algorithm to use with the claims provider trust.
Select the SHA-1 option from the drop-down list, and then click OK.
Page 15

ActivID Appliance 7.2 and AD FS | integration H an dboo k | AD FS
External Release | © 2013 HID Global Corporation/ASSA ABLOY AB. All rights reserved.
Page 15
3.5 Procedure 5: Configure the Rel ying Party Trust (Your Web
Application)
1. Navigate to AD FS 2.0 > Trust Relationships, right-click Relying Party Trusts, and then edit your
application (Claimapp in the example provided).
2. On the Issuance Transform Rules tab, click Add Rule (this will be a new rule for the relying party).
Page 16

ActivID Appliance 7.2 and AD FS | integration H an dboo k | AD FS
External Release | © 2013 HID Global Corporation/ASSA ABLOY AB. All rights reserved.
Page 16
3. On the Edit Rule dialog, for Claim rule name e nter a dis pla y nam e.
4. For Custom rule, enter or paste the desired claim rule language syntax for this rule (as illustrated). Note that
this is the same syntax as the previous rule, but not the same claim rule. One is the Issuance transform rule
and one is the Acceptance transform rule. (See the step on page 13.)
c: [ ]
=> issue(claim = c);
Page 17

ActivID Appliance 7.2 and AD FS | integration H an dboo k | AD FS
External Release | © 2013 HID Global Corporation/ASSA ABLOY AB. All rights reserved.
Page 17
3.6 Procedure 6: Export ADFS Micro soft Metadata
1. Go to the URL of your AD FS server and open the federationmetadata.xml file, for example:
https://<<SERVERNAME>>/FederationMetadata/2007-06/federationmetadata.xml
2. Use your browser to save the file as an XML file.
Page 18

ActivID Appliance 7.2 and AD FS | integration H an dboo k | AD FS
External Release | © 2013 HID Global Corporation/ASSA ABLOY AB. All rights reserved.
Page 18
Note: The ActivID Appliance IDP only returns the configured attribute values within the assertion if
Important: You will use the ActivID Appliance Management Console and the ActivID Appliance
3.7 Procedure 7: Modify ADFS Microsoft Metadata
AD FS must be able to attribute values within the response to an authentication request before it can authorize
access via the Internet. You can configure these attributes for the ActivID Applianc e.
the AD FS SAML Authentication request contains a reference to the index. That is why it is necessary
to add this attribute (
isDefault=”true”) in the AD FS Microsoft metadata.
The following snippets are examples for the attributes '
<AttributeConsumingService index="0" isDefault="true">
<ServiceName xml:lang="en">Sample Service</ServiceName>
<ServiceDescription xml:lang="en">An example service that requires a human-readable identifier and
optional name and e-mail address.</ServiceDescription>
<RequestedAttribute FriendlyName="mail"
Name="http://schemas.xmlsoap.org/ws/2005/05/identity/claims/emailaddress"
NameFormat="urn:oasis:names:tc:SAML:2.0:attrname-format:uri" />
<RequestedAttribute FriendlyName="FirstName"
Name="http://schemas.xmlsoap.org/ws/2005/05/identity/claims/name"
NameFormat="urn:oasis:names:tc:SAML:2.0:attrname-format:uri" />
</AttributeConsumingService>
mail', and 'firstname':
4.0 ActivID Appliance Configuration
This chapter describes how to configure the ActivID Appliance.
Configurer to perform these procedures. This chapter only provides a summary of steps. For complete
details, please have the following technical documents on hand for easy reference:
• ActivID Appliance Identity Provider Solution Guide
• ActivID Appliance Administrator Guide: Managem ent Cons ole
• ActivID Appliance Administrator Guide: Configurer Portal
Page 19

ActivID Appliance 7.2 and AD FS | integration H an dboo k | AD FS
External Release | © 2013 HID Global Corporation/ASSA ABLOY AB. All rights reserved.
Page 19
4.1 Procedure 1: Create SAML Channel
1. Launch the ActivID Appliance Management Console.
2. When prompted, enter your User name and Password, and then click Submit.
Page 20

ActivID Appliance 7.2 and AD FS | integration H an dboo k | AD FS
External Release | © 2013 HID Global Corporation/ASSA ABLOY AB. All rights reserved.
Page 20
3. In the pane to the left under Policies, click Channels.
4. Click Add.
5. Specify a meaningful Name and Description, and then from the Type drop-down list, select SAML Service
Provider.
Page 21

ActivID Appliance 7.2 and AD FS | integration H an dboo k | AD FS
External Release | © 2013 HID Global Corporation/ASSA ABLOY AB. All rights reserved.
Page 21
4.2 Procedure 2: Import AD FS Metadata
1. Navigate to the AD FS Microsoft SAML Details page (Configuration > Policies > Channels > Add
Channel).
2. In the SAML Assertion Configuration section of the page, deselect the option, Enable OneTimeUse
condition.
3. Click File Import.
4. Click Browse to locate the federation metadata file path of the ADFS metadata (XML file previously
downloaded) and select the file.
Page 22

ActivID Appliance 7.2 and AD FS | integration H an dboo k | AD FS
External Release | © 2013 HID Global Corporation/ASSA ABLOY AB. All rights reserved.
Page 22
5. Click Upload to add values available to be returned in SAML assertion.
6. Click Add.
Page 23

ActivID Appliance 7.2 and AD FS | integration H an dboo k | AD FS
External Release | © 2013 HID Global Corporation/ASSA ABLOY AB. All rights reserved.
Page 23
7. From the Select an Assertion attribute drop-down list, select an attribute, such as mail, and then from the
Select the value type drop-down list, select one of the following options: Static value, User Attribute (in the
case of mail, for example), or Predefined Attribute.
8. Select the value (such as E-Mail Address), and then click OK.
You should see a success message, as illustrated next. Continue with the next procedure (authorize the
channel).
Note: To edit the channel, on the SAML Assertion Configuration page, you can view the list of values to be
returned in the SAML assertion, as illustrate next, and make edits.
Page 24

ActivID Appliance 7.2 and AD FS | integration H an dboo k | AD FS
External Release | © 2013 HID Global Corporation/ASSA ABLOY AB. All rights reserved.
Page 24
4.3 Procedure 3: Authorize the SAML Channel (Authentication
Policies)
1. Connect to the ActivID Appliance Configurer.
2. When prompted, enter your Password, and then click Log in.
3. Select the Authentication Policies tab.
4. From the list of Authentication Policies, select the AT_EMPOTP policy, and then click Edit.
5. In the Available Channels box, select and move ADFS Microsoft to the Selected Channels box, and then
click Update.
6. When returned to the Authentication Polici es page, select the AT_EMPPWD policy, and then click Edit.
7. In the Available Channels box, select and move ADFS Microsoft to the Selected Channels box, and then
click Update.
8. Return to the Management Console to view the allowed Authentication Policies (expand the Allowed
Authentication Policies section).
Page 25

ActivID Appliance 7.2 and AD FS | integration H an dboo k | AD FS
External Release | © 2013 HID Global Corporation/ASSA ABLOY AB. All rights reserved.
Page 25
4.4 Procedure 4: Configure the Identi ty Provider
1. Log in to the ActivID Appliance Management Console.
2. In the pane to the left under Policies, expand SAML, and then click ActivID Identity Provider.
3. Deselect the option, Require signed authentication requests.
4. Add the corresponding authentication policies and GUI template ID. Select the following options, and then
continue with the next procedures.
urn:oasis:names:tc:SAML:2.0:ac:classes:Password
urn:oasis:names:tc:SAML:2.0:ac:classes:PasswordProtectedPassword
Page 26

ActivID Appliance 7.2 and AD FS | integration H an dboo k | AD FS
External Release | © 2013 HID Global Corporation/ASSA ABLOY AB. All rights reserved.
Page 26
4.5 Procedure 5: Adding A New Authentic ation Policies Mapping
1. Click Add to create new authenticat ion po lici es mapping.
2. Enter the SAML Authentication Class.
3. From the drop-down list, select the ActivID Appliance Authentication Policy.
4. From the drop-down list, select the GUI Template.
5. Click Next.
6. To validate the new authentication policies mapping, click OK.
The authentication policies mapping is created.
7. Click Save. It takes a few minutes to save the configuration changes.
Page 27

ActivID Appliance 7.2 and AD FS | integration H an dboo k | AD FS
External Release | © 2013 HID Global Corporation/ASSA ABLOY AB. All rights reserved.
Page 27
5.0 SAML Channel Authentication: An Ov erview
5.1 Prerequisite: User Activates Web Soft Token
To use a web token in the SAML context, users must enroll their laptops. This section explains how a user
accomplishes this task.
1. The User logs in to the Self Service Portal.
2. The user clicks Activate my device.
Page 28

ActivID Appliance 7.2 and AD FS | integration H an dboo k | AD FS
External Release | © 2013 HID Global Corporation/ASSA ABLOY AB. All rights reserved.
Page 28
3. The user clicks the link, A web soft token on my web browser.
If soft token configuration has been configured to use a web soft token with a PIN, then the user will be prompted
to enter a PIN.
4. The user clicks Activate.
Page 29

ActivID Appliance 7.2 and AD FS | integration H an dboo k | AD FS
External Release | © 2013 HID Global Corporation/ASSA ABLOY AB. All rights reserved.
Page 29
When the proper credentials have been accepted, the following message is displayed.
5. The User clicks Done.
5.2 User Accesses Web Application
1. The user opens a browser and enters the URL that the administrator has defined in the web application.
2. The user selects the authentication realm that matches his/her IDP Acti vID Ap pl ia n ce
3. The user is redirected to the ActivID Appliance authentication portal, and then authenticates as an ActivID
Appliance user.
When authenticated, the user is redirected to the web app licat ions pag e.
Page 30

ActivID Appliance 7.2 and AD FS | integration H an dboo k | AD FS
External Release | © 2013 HID Global Corporation/ASSA ABLOY AB. All rights reserved.
Page 30
Document
July 2013
Eco-System Workgroup
Initial release
A.0
Copyright
© 2013 HID Global Corporatio n/A S SA A BLO Y AB. All rights reserved.
Trademarks
HID GLOBAL, HID, the HID logo, ActivID® Appliance, HID Identity Assurance and ActivID are the trademarks or
registered trademarks of HID Global Corporation, or its licensors, in the U.S. and other countries.
The absence of a mark, product, service name or logo from this list does not constitute a waiver of the HID Global
trademark or other intellectual property rights concerning that name or logo. The names of actual companies,
trademarks, trade names, service marks, images and/or products mentioned herein are the trademarks of their
respective owners. An y rights not express l y granted h er ein are reserved.
Revision His tory
Date Author Description
Version
Technical Support
If you purchased your product from a third party, then please contact that third party for Technical Support. For
products purchased directly from HID Global, please use the following Technical Support address:
http://www.hidglobal.com/support
Page 31

ActivID Appliance 7.2 and AD FS | integration H an dboo k | AD FS
External Release | © 2013 HID Global Corporation/ASSA ABLOY AB. All rights reserved.
Page 31
Americas
US Federal
Europe
Asia Pacific
Web
+1 510.574.0100
+1 571.522.1000
+33 (0) 1.42.04.84.00
+61 (0) 3.9809.2892
http://www.hidglobal.com/identity-assurance
Corporate Headquarters
15370 Barranca Parkway
Irvine, CA 92618
www.hidglobal.com
+1 949.732.2000
 Loading...