

Page 1

hidglobal.com
4TRESS™ FT2011
Out-of-Band Authentication
and Juniper
RADIUS Channel Integration Handbook
®
Secure Access
Document Version 2.2 | Released | May 2013
Page 2

4TRESS FT2011 Out-of-Band Authentication and Juniper Secure Access | RADIUS Channel Integration Handbook
External Release | © 2012
2
Table of Contents
List of Figures ............................................................................................................................................................. 3
1.0 Introduction ....................................................................................................................................................... 4
1.1 Scope of Document .................................................................................................................................... 4
1.2 Prerequisites .............................................................................................................................................. 4
2.0 Juniper Secure Access Configuration ............................................................................................................... 5
2.1 Procedure 1: Create New LDAP Server Instance ...................................................................................... 5
2.2 Procedure 2: Create New RADIUS Authentication Server ........................................................................ 7
2.3 Procedure 3: Define Juniper User Role(s) ............................................................................................... 10
2.4 Procedure 4: Define Juniper Authentication Realm ................................................................................. 10
2.5 Procedure 5: Configure New Juniper Sign-In Page ................................................................................. 13
2.5.1 Examples of Custom Sign-In Pages ............................................................................................... 15
2.6 Procedure 6: Juniper Sign-in Policies ...................................................................................................... 16
3.0 4TRESS AS Configuration .............................................................................................................................. 17
3.1 Configure RADIUS Channel ..................................................................................................................... 17
3.2 Create User Repository ............................................................................................................................ 20
3.3 Configure Administration Groups, User Types, User Reposit ories, and Authentication Policies ............ 22
3.4 Create OOB Delivery Gateway ................................................................................................................ 23
3.5 Assign An Out-of-Band Delivery Gateway ............................................................................................... 25
3.6 Assign An Out-of-Band Delivery Credential to An Existing Authentication Policy ................................... 26
4.0 Assign SMS Token(s) ..................................................................................................................................... 26
4.1 Prerequisite: Assign An SMS Token ........................................................................................................ 26
5.0 Sample Authentication Using Out-of-Band Aut hentication ............................................................................. 27
-2013 HID Global Corporation/ASSA ABLOY AB. All rights reserved. Page |
Page 3

4TRESS FT2011 Out-of-Band Authentication and Juniper Secure Access | RADIUS Channel Integration Handbook
External Release | © 2012
3
List of Figures
FIGURE 1: Sample Juniper Sign-In Page Before Customization ........................................................................ 15
FIGURE 2: Sample Juniper Sign-In Page After Custo m i zati on ........................................................................... 15
-2013 HID Global Corporation/ASSA ABLOY AB. All rights reserved. Page |
Page 4

4TRESS FT2011 Out-of-Band Authentication and Juniper Secure Access | RADIUS Channel Integration Handbook
External Release | © 2012
4
Note: Using Juniper double authentication (an LDAP password pl us an out-of-band, one-time
1.0 Introduction
The Juniper® Networks SA Series SSL VPN Applian ces enable remote and mobile employees, customers, and
partners to gain secure access to corporate Virtual Private Network resources and applications. Providing secure
access via a VPN over existing Internet connections requires strong, two-factor authentication to protect
resources. The HID Global Identity Assurance™ solutions that work with Juniper Networks incorporate SSL VPN
solutions with versatile, strong authenticat ion that is flexible, scalable, and simple to manage. HID Global Identity
Assurance offers two solutions:
• 4TRESS™ AAA Server for Remote Access—Addresses the security risks associated with a mobile
workforce remotely accessing systems and data.
• 4TRESS Authentication Server (AS)—Offers support f or mul t i ple aut hentication methods that are
useful for diverse audiences across a variety of service channels (SAML, RADIUS, etc.), including
user name and password, mobile and PC soft tokens, one-time passwords, and transparent Web soft
tokens.
1.1 Scope of Document
This document explains how to set up 4TRESS FT2011 RADIUS out-of-band (OOB) authentication with the
Juniper Networks Secure Access (SA) Series of applianc es. Use this handbook to enable authentication via OOB
short message service (SMS) and Email for use with a Juniper VPN.
1.2 Prerequisites
• 4TRESS FT2011.
• User phone numbers and Email addresses are stored in the LDAP server.
• Juniper SA version 7.1.x installed and configured.
• Users have static LDAP passwords.
• There is an existing Short Message Peer-to-Peer Protocol / Simple Mail Transfer Protocol
(SMPP/SMTP) gateway to send one-time-password OOB codes to users.
• The Juniper login page has been customized.
• Ability to manage double authentication (LDAP, RADIUS) sequentially from the same sign-in page on
the Juniper network.
password) is optional. You can configure the sign-in page so that users do not hav e t o use static
LDAP passwords.
-2013 HID Global Corporation/ASSA ABLOY AB. All rights reserved. Page |
Page 5
4TRESS FT2011 Out-of-Band Authentication and Juniper Secure Access | RADIUS Channel Integration Handbook
External Release | © 2012
5
2.0 Juniper Secure Access Configuration
This chapter describes how to manage Juniper Secure A c ce ss. When a user signs into a Juniper SA Series
appliance, the user specifies an authentication r ealm , which is associated with a specific authentication server.
The Juniper SA Series appliance forwards the user’s credentials to this authentication server to verify the user’s
identity.
You will create two authentication servers:
• LDAP Server to validate network passwords, and
• 4TRESS AAA RADIUS Server to validate one-time-passwords and the SM S act iv ation code.
2.1 Procedure 1: Create New LDAP Server Instance
To define the LDAP Server instance, perform the following st eps (this will create a new LDAP server instance on
the SA Series SSL VPN appliance).
Getting Started
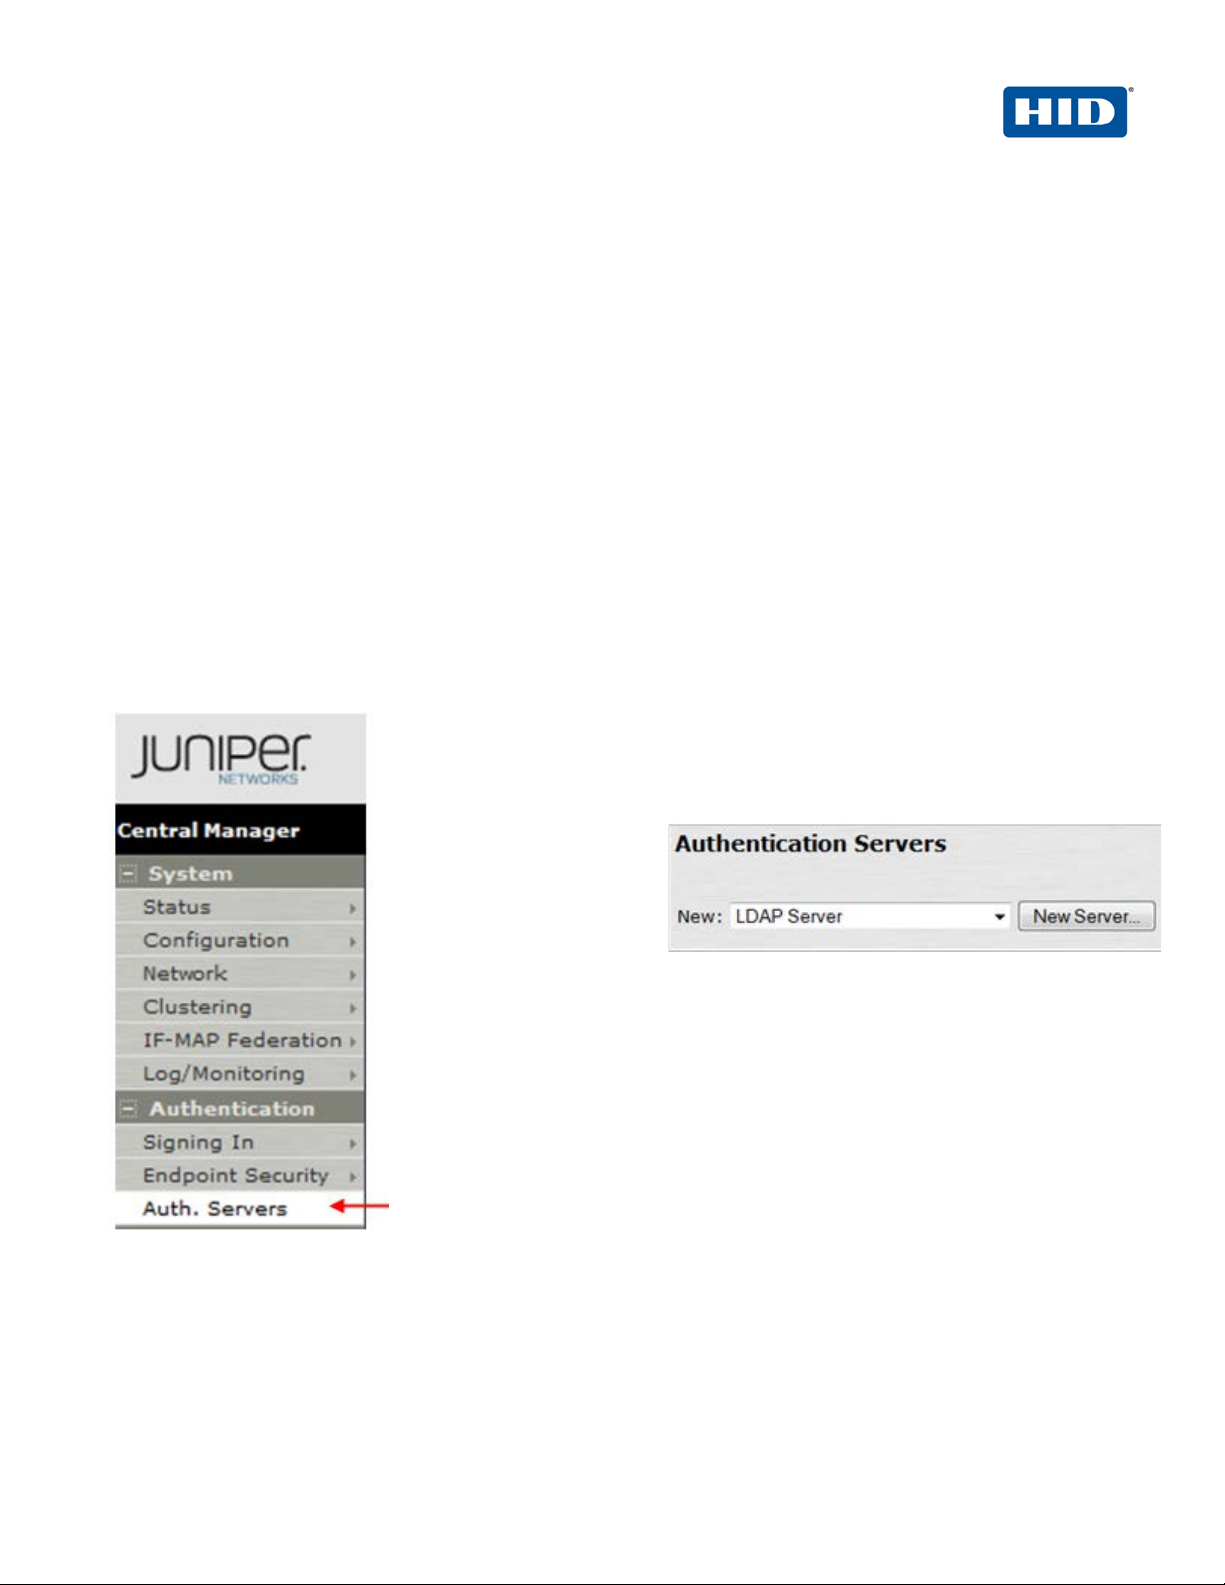
1. In the Admin
console, expand the
Authentication
menu, and then
click Auth. Servers.
2. From the New drop-down list, select LDAP
Server, and then click New Server.
The following dialog is displayed.
-2013 HID Global Corporation/ASSA ABLOY AB. All rights reserved. Page |
Page 6
4TRESS FT2011 Out-of-Band Authentication and Juniper Secure Access | RADIUS Channel Integration Handbook
External Release | © 2012
6
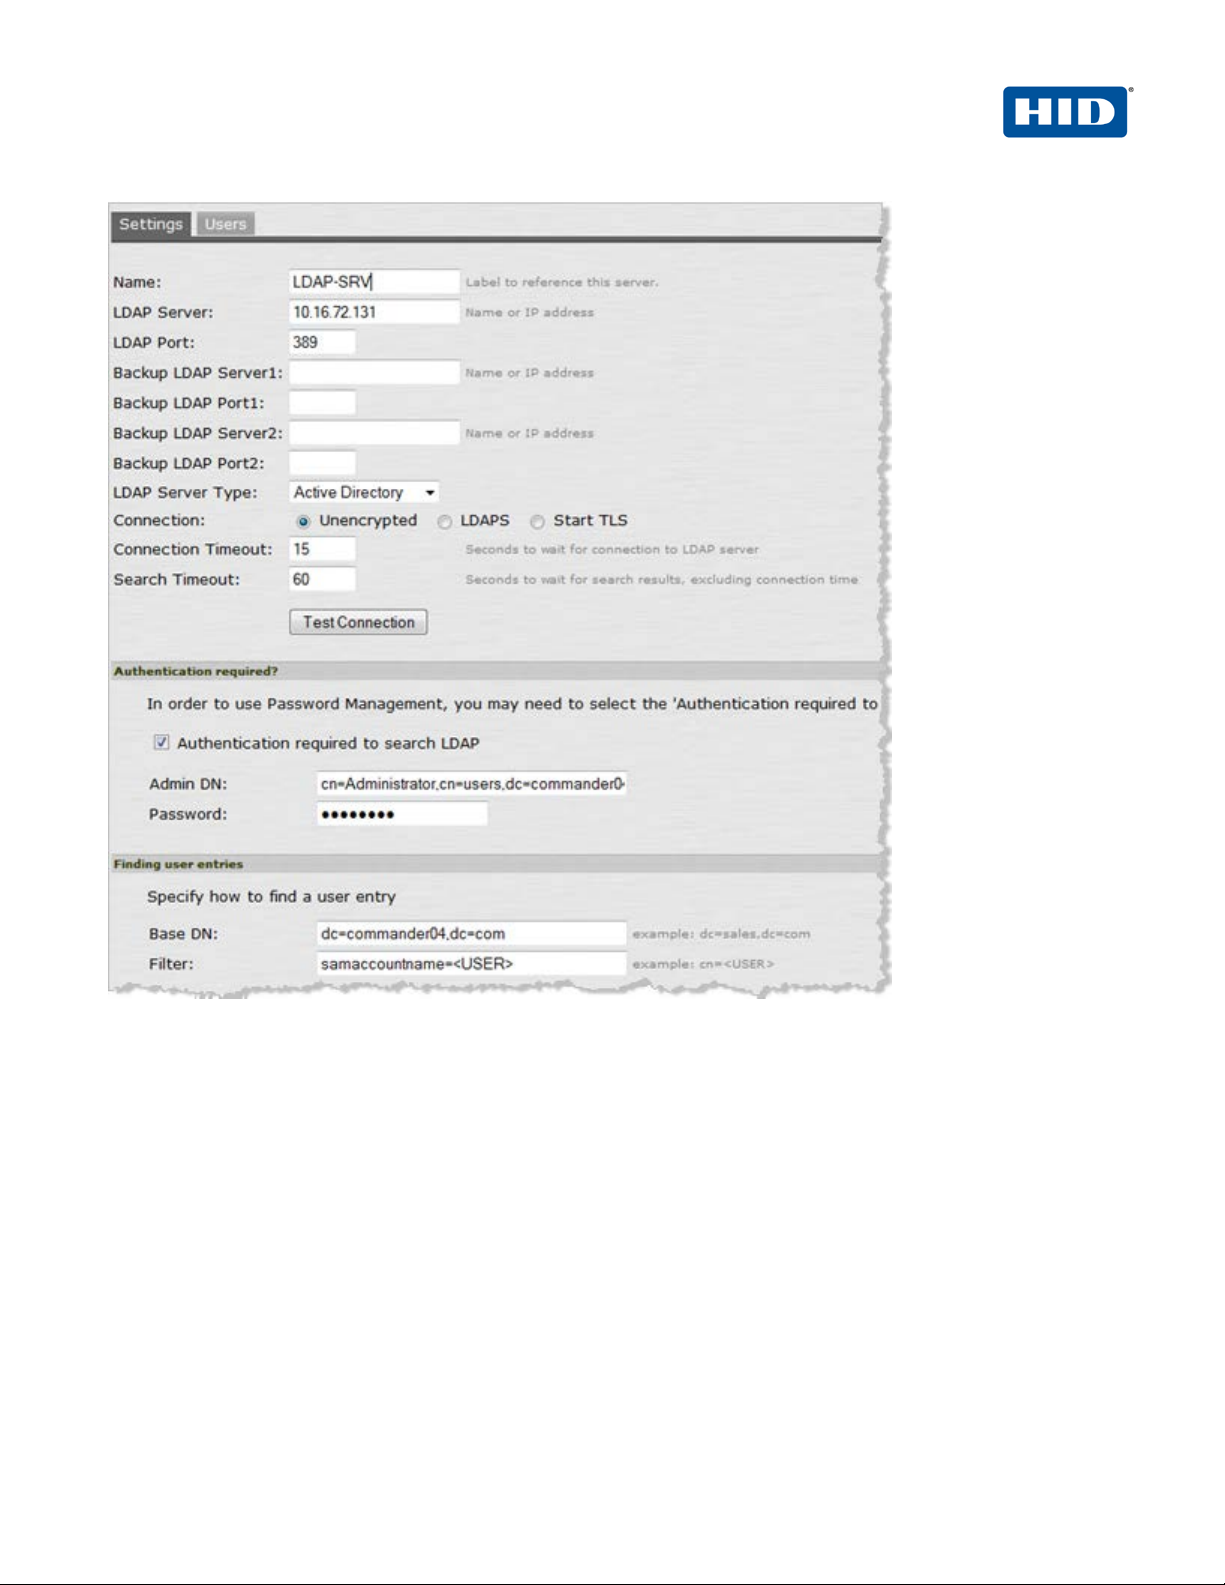
3. Click Test Connection to verify the connection between the SA S eries S SL VPN appliance and the specified
LDAP server(s).
4. Select the option, Authentication required to search LDAP, and enter the appropriate Admin DN and
Password.
• Name—Specify a name to identify the server instance.
• LDAP Server—Specify the name or IP address of the LDAP server that t he S A Series SSL
VPN Appliance uses to validate your users.
• LDAP Port—Specify the port on which the LDAP server listens.
• Backup servers and ports—OPTIONAL—Specify parameters f or backup LDAP servers.
• LDAP Server Type—Specify the type of LDAP server against which y ou want to authenticate
users.
• Connection, Connection Timeout, Search Timeout—Accept the defaults.
-2013 HID Global Corporation/ASSA ABLOY AB. All rights reserved. Page |
Page 7
4TRESS FT2011 Out-of-Band Authentication and Juniper Secure Access | RADIUS Channel Integration Handbook
External Release | © 2012
7
5. In the Finding user entries section, specify a Base DN from which to begin searching for user entries, and
make sure that the Filter is correct (for example: samaccountname=<USER>).
6. At the bottom of the dialog, click Save Changes (not illustrated).
2.2 Procedure 2: Create New RADIUS Authentication Server
When using an external RADIUS server to authenti cate Juniper SA users, you must configure the server to
recognize the Juniper SA as a client and specify a shared sec ret for the RADIUS server to use to authenticate the
client request. To configure a connection t o t he RA DI US se rv er on an SA Series SSL VPN appliance, perform the
following steps.
Getting Started
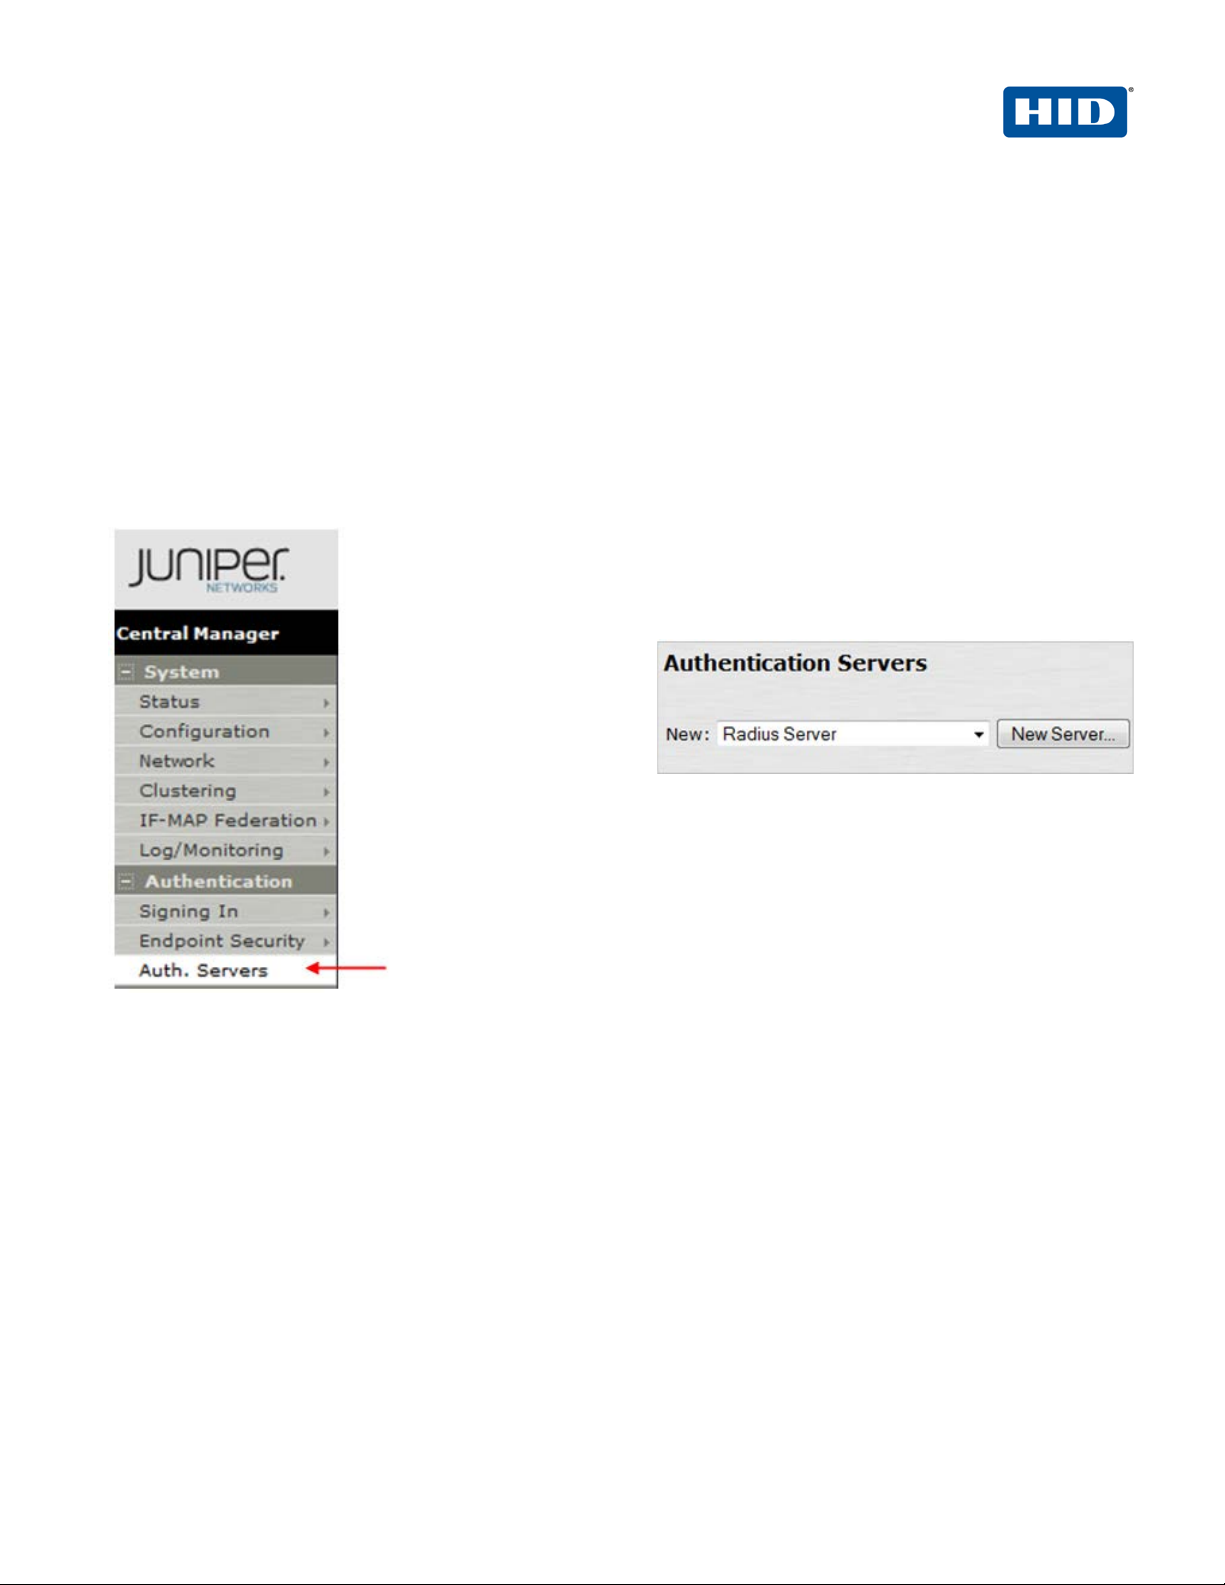
1. In the Admin
console, expand the
Authentication
menu, and then
click Auth. Servers.
2. From the New drop-down list, select Radius Server,
and then click New Server.
The following dialog is displayed.
-2013 HID Global Corporation/ASSA ABLOY AB. All rights reserved. Page |
Page 8
4TRESS FT2011 Out-of-Band Authentication and Juniper Secure Access | RADIUS Channel Integration Handbook
External Release | © 2012
8
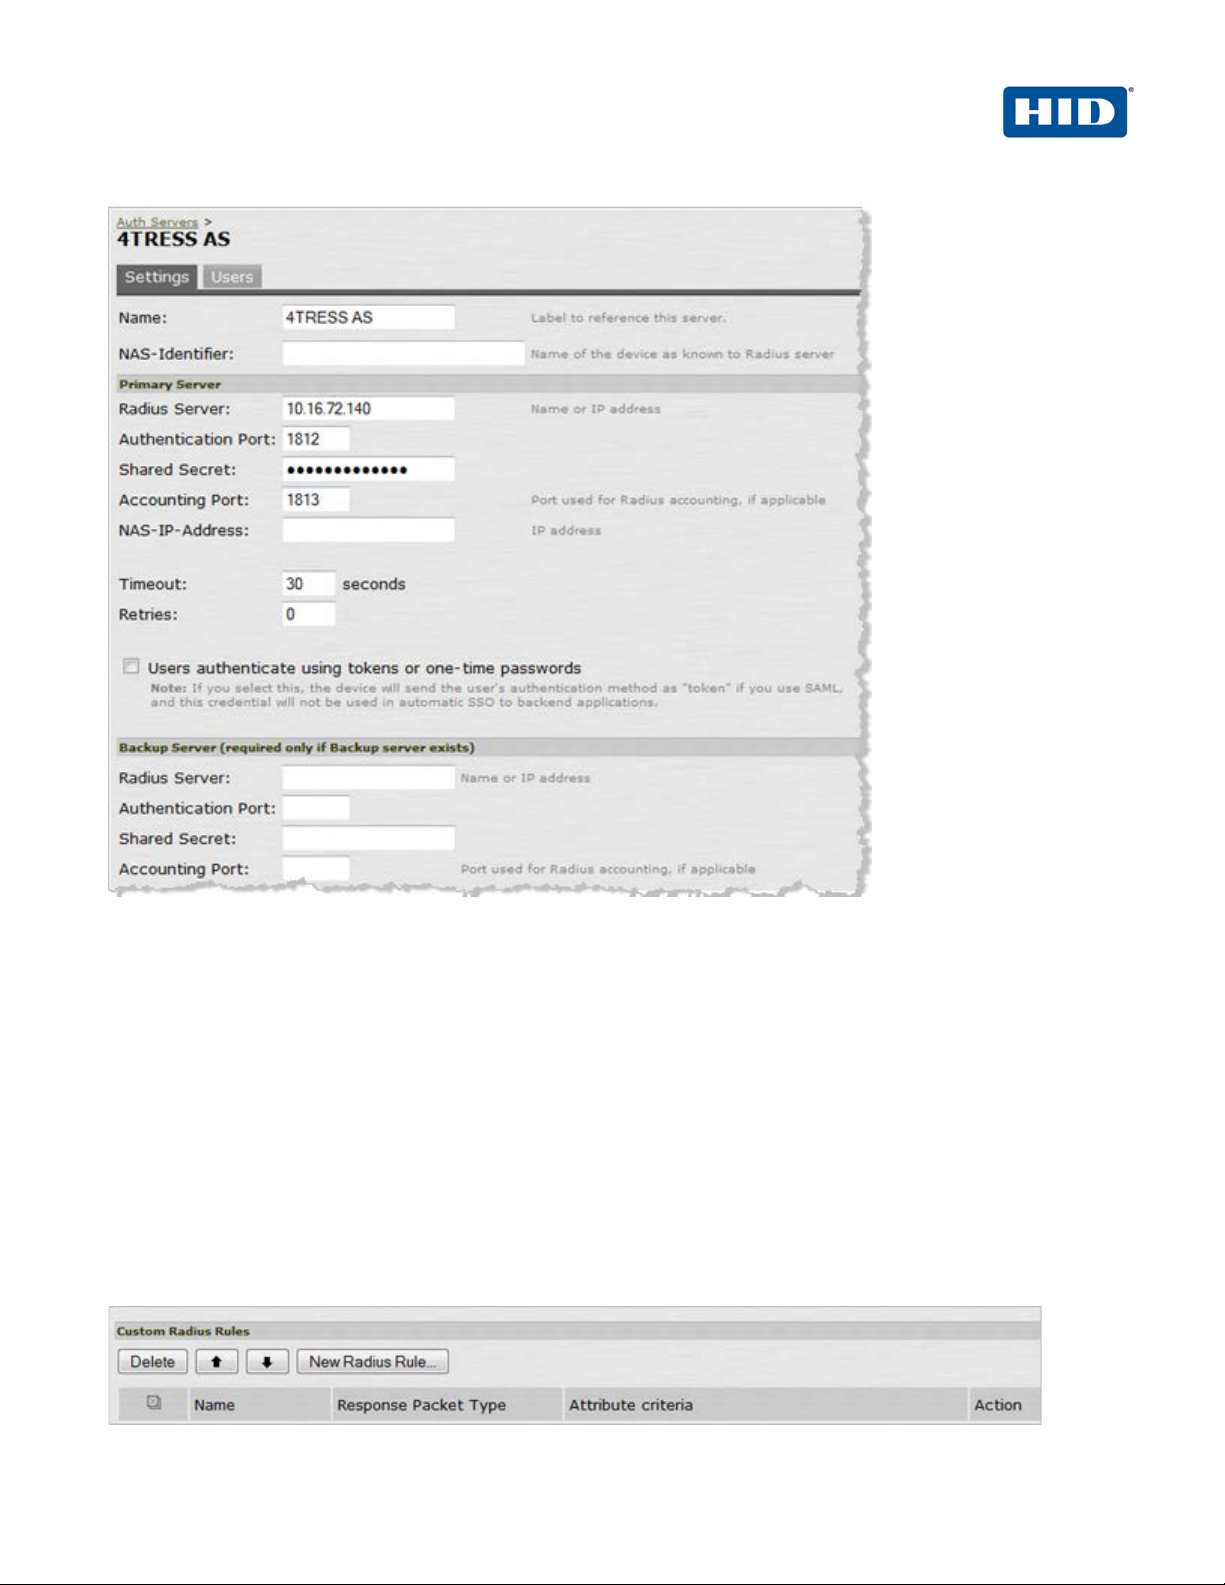
3. On the Settings tab, enter the following attributes.
• Name—Specify a name to identify the server instance.
• Radius Server—Specify the name or IP address.
• Authentication Port—Enter the authentication port v alue for the RADIUS server. Typically,
this port is 1812.
• Shared Secret—Enter a string. You will also enter this string when configuring the RADIUS
server to recognize the SA Series SSL VPN appliance as a client.
• Accounting Port—Accept the default,1813.
• Timeout—Accept the default, 30 seconds.
• Retries—Accept the default, 0 seconds.
-2013 HID Global Corporation/ASSA ABLOY AB. All rights reserved. Page |
Page 9
4TRESS FT2011 Out-of-Band Authentication and Juniper Secure Access | RADIUS Channel Integration Handbook
External Release | © 2012
9
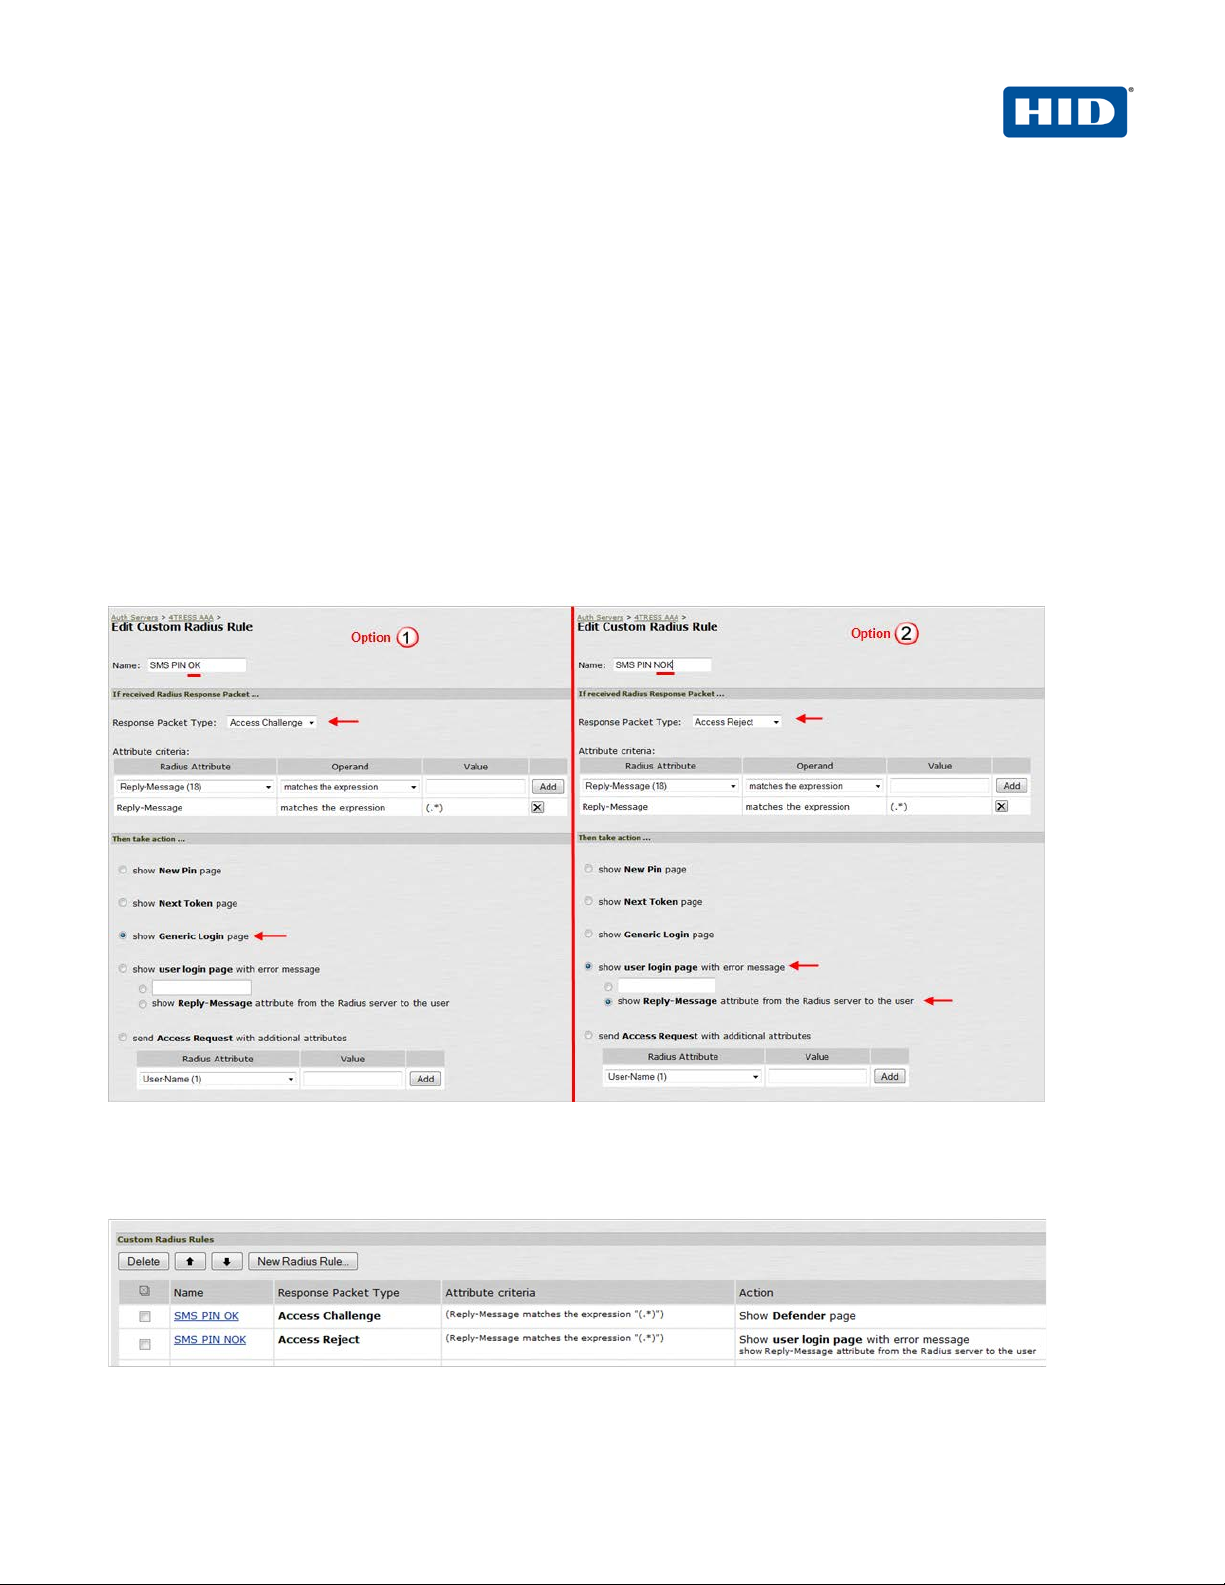
4. In the Custom Radius Rules section, click New Radius Rule. When a p erson enters a username and
password, the initial authorization request is sent to the server. The server may respond with either a Challenge
or Reject packet.
5. In the Add (or Edit) Custom RADIUS Challenge Rule window, select the packet type (Challenge or Reject),
and then specify what action to take (used for OOB authent i c ation and emergency access—4TRESS sends an
SMS if a correct SMS PIN is entered = access-challenge).
6. To create a custom challenge rule, select the Response Pac ket Type:
• Access Challenge—sent by the RADIUS server requesting more information in order to allow
access.
• Access Reject—sent by the RADIUS server rejecting access.
The following image illustrates two sample options.
7. Click Save.
Once you have saved your custom rule, it appears in t he Custom RADIUS Authentication Rule section (illustrated
next).
Note: To delete a rule, select the checkbox next to the rule, and then click Delete.
-2013 HID Global Corporation/ASSA ABLOY AB. All rights reserved. Page |
Page 10

4TRESS FT2011 Out-of-Band Authentication and Juniper Secure Access | RADIUS Channel Integration Handbook
External Release | © 2012
10
2.3 Procedure 3: Define Juniper User Role(s)
A user role is an entity that defines user session param et ers, personalization settings, and enabled access
features.
1. From the Admin console, expand the Users menu, p oi nt t o User Roles, and t hen click New User Role.
2. Configure the new user role according to your requir ements.
2.4 Procedure 4: Define Juniper Authentication Realm
An authentication realm specifies the conditions that users must meet in order to sign in to the SA Series
appliance. A realm consists of a grouping of authenti ca t i on res ources.
1. From the Admin console, expand the Users menu, p oi nt t o User Realms, and then click New User Realm.
-2013 HID Global Corporation/ASSA ABLOY AB. All rights reserved. Page |
Page 11
4TRESS FT2011 Out-of-Band Authentication and Juniper Secure Access | RADIUS Channel Integration Handbook
External Release | © 2012
11
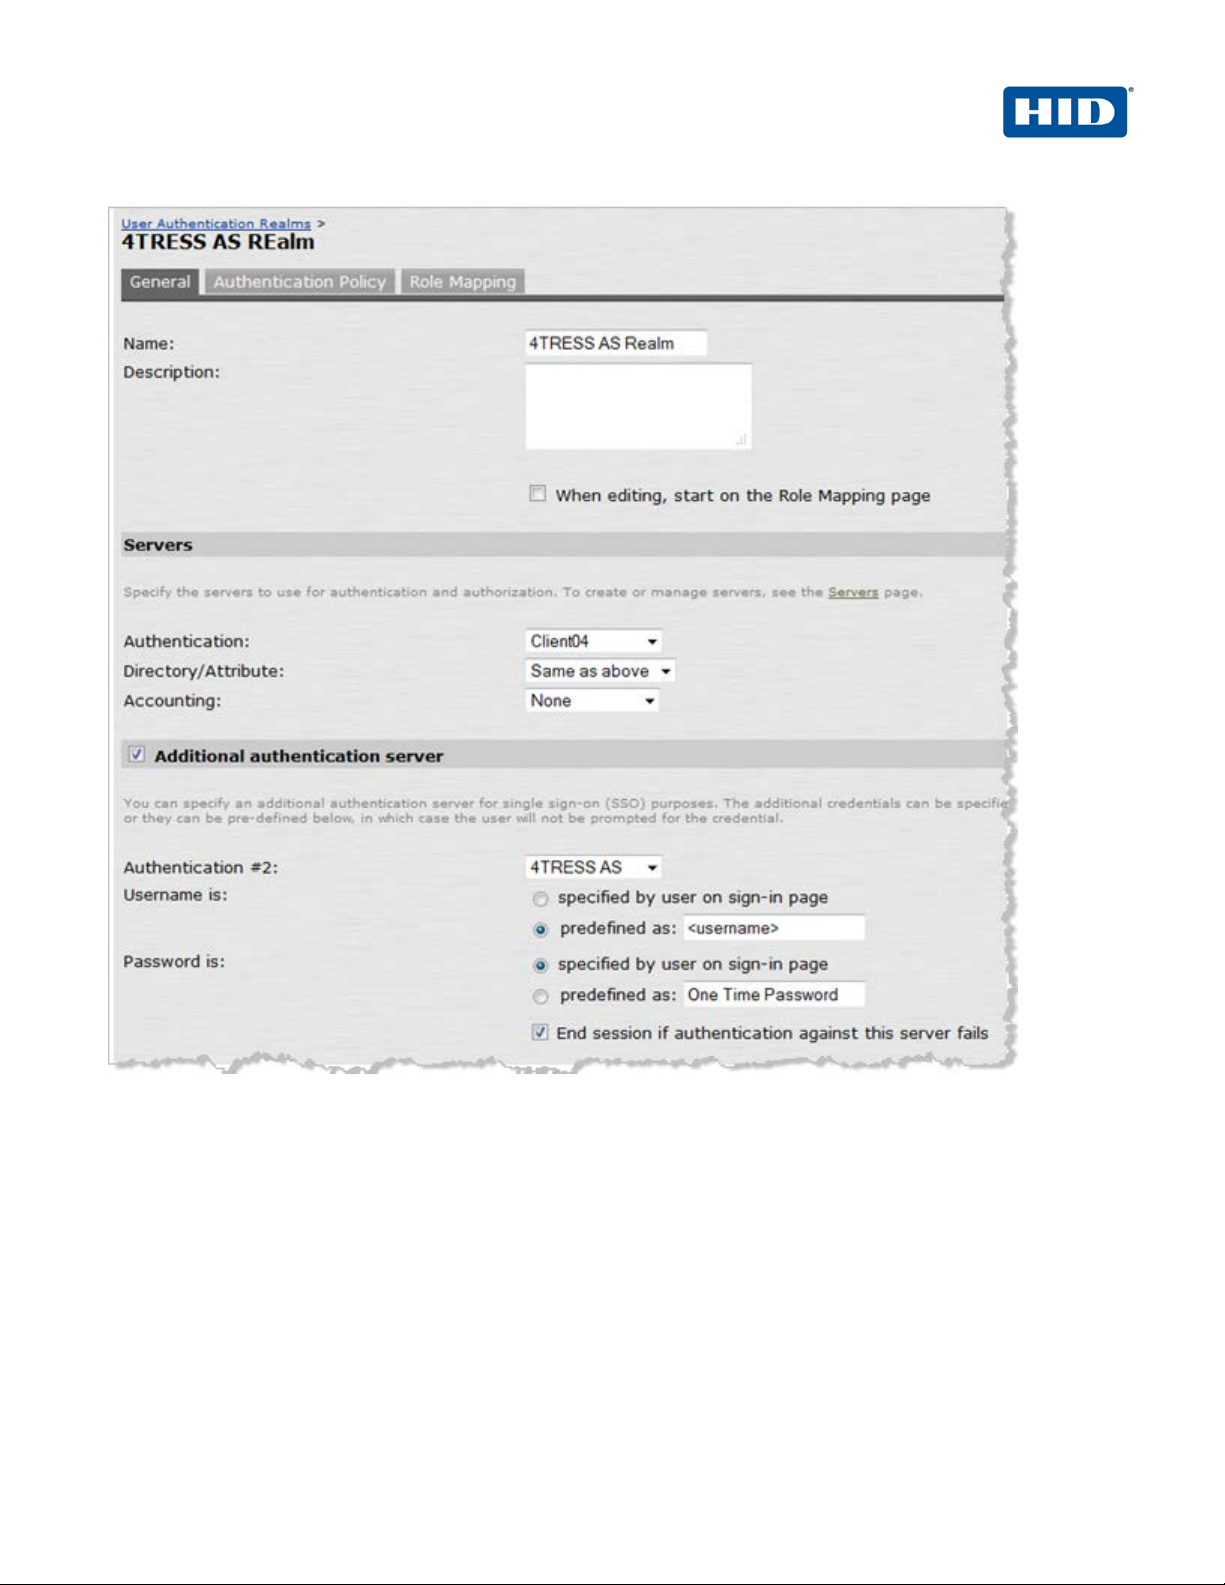
2. On the General tab, enter the following attributes and select the following options.
• Name—Enter a name to label this realm.
• Description—Enter a meaningful description.
• In the Servers section:
• Select an option from the Authentication drop-down list to specify an authentication
server to use for authenticating users who sign in to th i s real m (for example, the LDAP
server).
• Accept the default for Directory/Attribute (Same as above).
• Accounting—Accept the default, None.
-2013 HID Global Corporation/ASSA ABLOY AB. All rights reserved. Page |
Page 12

4TRESS FT2011 Out-of-Band Authentication and Juniper Secure Access | RADIUS Channel Integration Handbook
External Release | © 2012
12
• To submit secondary user credentials to enable two-factor authentication to access the
Secure Access device, select the option, Additional authentication server.
• Authentication #2—Select 4TRESS AS from the drop-down list (the name of the
authentication server might be different).
• By default, Secure Access submits the <username> session variable that holds the same
username used to sign in to the primary authenti cat ion server. To automatically submit a
username to the secondary server, select the opt ion, predefined as.
• If you want to prompt the user to manually submit a passw ord t o t he secondary server
during the Secure Access sign-in process, then select the opti on, P assword is specified
by user on sign-in page.
• Select the option, End session if authentication against this se rver fails.
3. At the bottom of the page, click Save Changes.
4. To configure one or more role mapping rules (based on the role defined previously), select the Role Mapping
tab.
-2013 HID Global Corporation/ASSA ABLOY AB. All rights reserved. Page |
Page 13

4TRESS FT2011 Out-of-Band Authentication and Juniper Secure Access | RADIUS Channel Integration Handbook
External Release | © 2012
13
2.5 Procedure 5: Configure New Juniper Sign-In Page
1. From the Admin console, expand the Authentication menu, point to Signing In, and then click Sign-in
Pages.
2. On the Custom text page, enter the following attributes.
3. Accept the defaults for all other attributes.
• Welcome message—Enter an appropriate salutation, such as Welcome to the.
• Portal name—Enter a meaningful name. This will be what com es after Welcome to the.
• Submit button—Customize as desired.
• Instructions—Enter the text you want the user to see on the sign-i n page.
• Username—This is used by the realm to mask the secondary use rname on the sign-in page.
-2013 HID Global Corporation/ASSA ABLOY AB. All rights reserved. Page |
Page 14

4TRESS FT2011 Out-of-Band Authentication and Juniper Secure Access | RADIUS Channel Integration Handbook
External Release | © 2012
14
4. Optional: You can modify Juniper custom sign-in pag es t o hi de t he SMS PIN (the activation code). If you do
this, then all the users will use the same activation code. For det ai ls, call your HID Global Identity Assurance
technical contact to obtain a sample page. Af t er y ou obt ai n a cu st om file, you can upload it directly using the
Sign-in Pages tab (illustrated next).
5. On the Signing In page, select the Sign-in Pages tab, and then click Upload Custom Pag es.
6. Enter an appropriate Name, select the Access option for Page Type, and then click the Browse button.
-2013 HID Global Corporation/ASSA ABLOY AB. All rights reserved. Page |
Page 15
4TRESS FT2011 Out-of-Band Authentication and Juniper Secure Access | RADIUS Channel Integration Handbook
External Release | © 2012
15
2.5.1 Examples of Custom Sign-In Pages
FIGURE 1: Sample Juniper Sign-In Page Before Customization
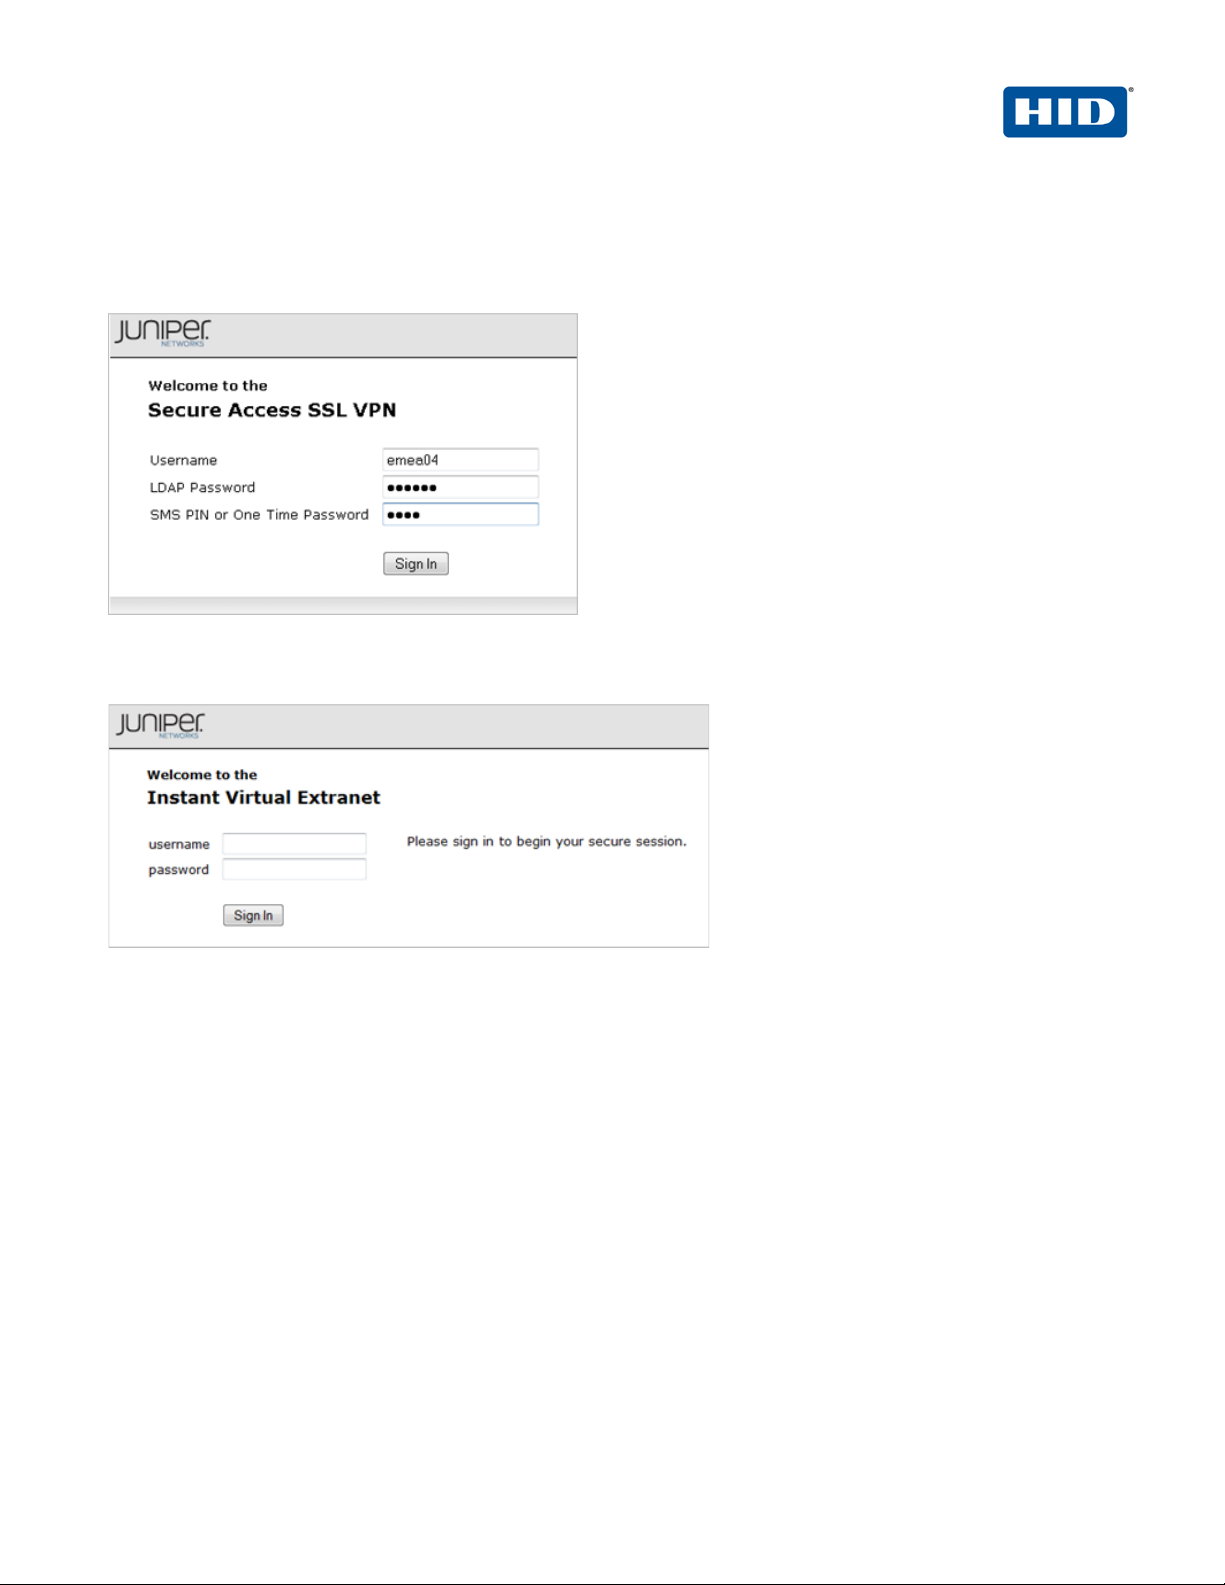
FIGURE 2: Sample Juniper Sign-In Page After Customization
-2013 HID Global Corporation/ASSA ABLOY AB. All rights reserved. Page |
Page 16
4TRESS FT2011 Out-of-Band Authentication and Juniper Secure Access | RADIUS Channel Integration Handbook
External Release | © 2012
16
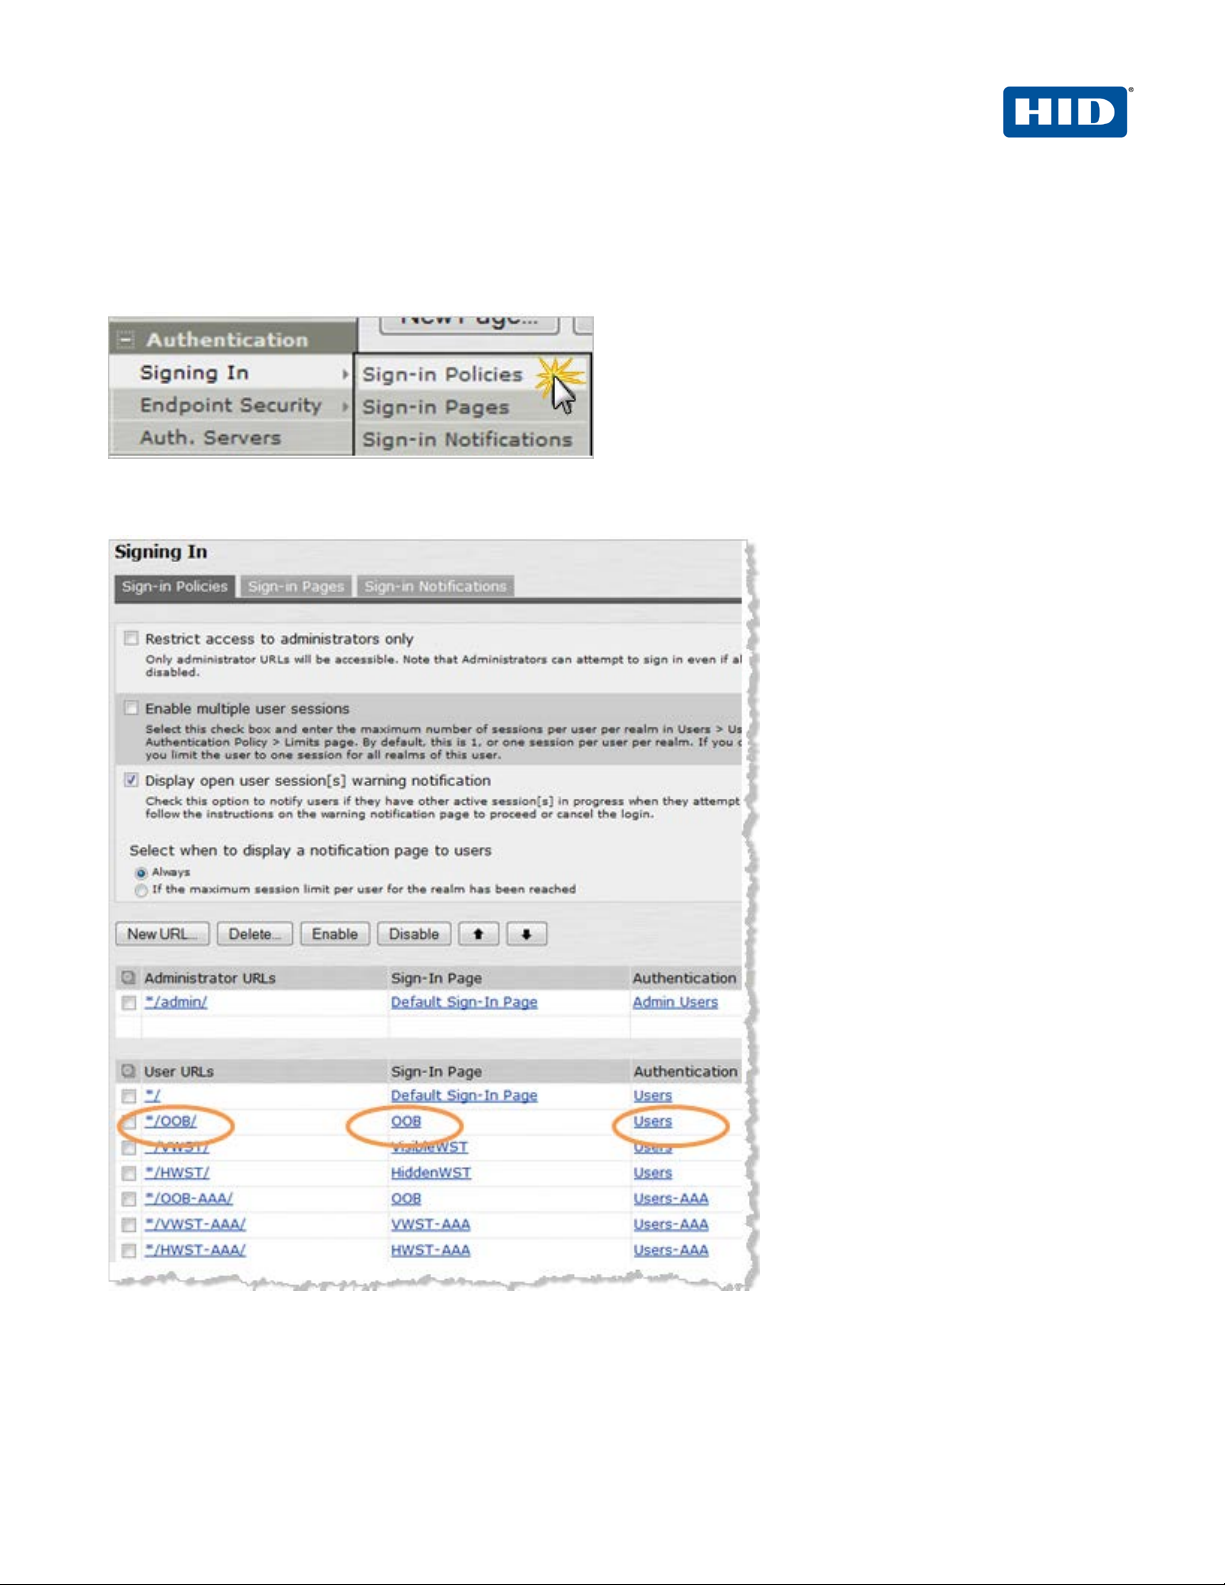
2.6 Procedure 6: Juniper Sign-in Policies
User sign-in policies also determine the realm( s ) t hat users can access.
1. To create or configure user sign-in policies, in the Admin console, expand the Authentication menu, point to
Signing In, and then click Sign-in Policies.
2. To create a new sign-in policy, click New URL.
3. In the Sign-in URL field displayed, enter the URL that you want to associate with the policy. Use the format
<host>/<path>, where <host> is the host name of the Secure Access device and <path> is any string
you want users to enter.
-2013 HID Global Corporation/ASSA ABLOY AB. All rights reserved. Page |
Page 17
4TRESS FT2011 Out-of-Band Authentication and Juniper Secure Access | RADIUS Channel Integration Handbook
External Release | © 2012
17
4. For Sign-in Page, select the sign-in page that you want to associate with the policy.
5. For Authentication realm, specify which realm(s) map to the policy, and how users should pick from
amongst realms.
6. Click Save Changes.
3.0 4TRESS AS Configuration
This chapter describes the procedures required t o co nf i gure 4TRESS Authentication Appliance supp ort for a
RADIUS Front End (RFE) component installed on an Appliance.
You will perform these steps using the 4TRESS Mana gem ent Console. Be sure you have the ActivIdentity
4TRESS Authentication Appliance Administration Guide: Management Console technical publication on hand.
This chapter does not provide all the details.
3.1 Configure RADIUS Channel
A RADIUS channel for the RFE deployment defines a grou p of access controllers and specifies how to handle
authentication requests.
Using a policy configured for the channel, you will f i lter the requests according to the IP address or hostname of
the access controllers.
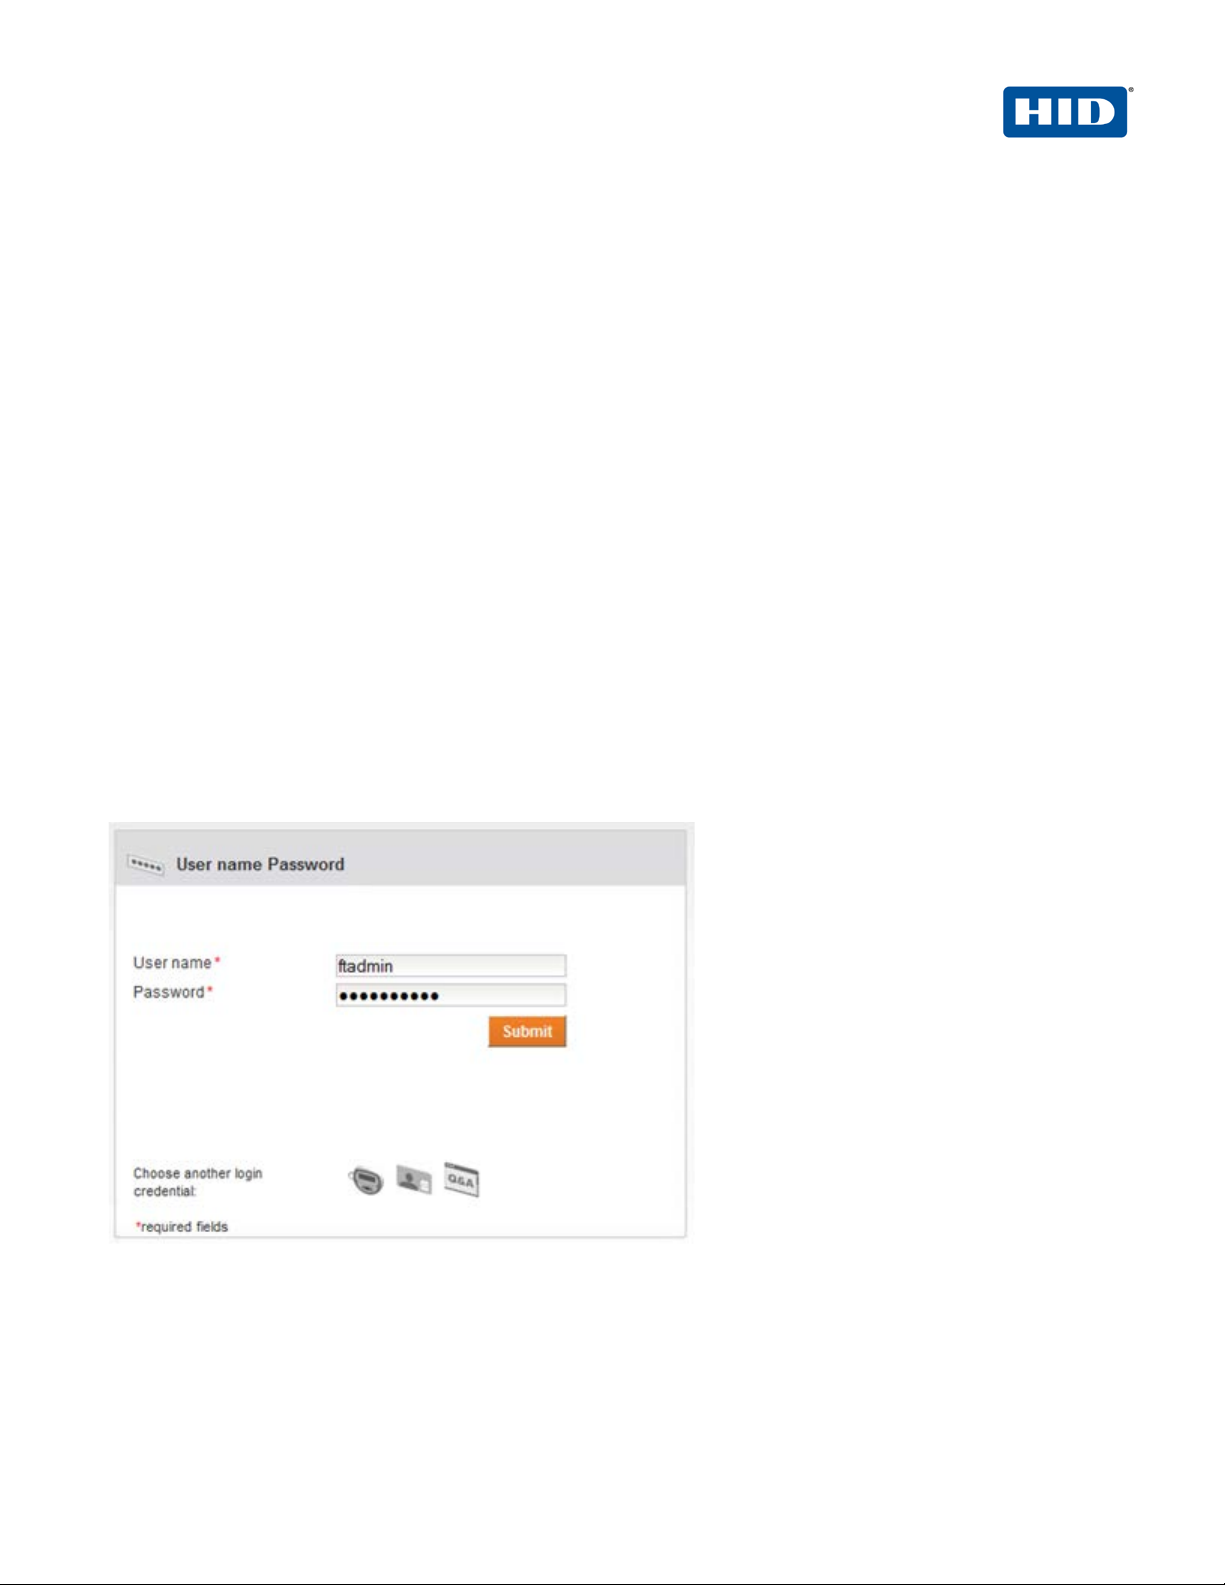
1. Launch the 4TRESS Management Console.
2. When prompted, enter your User name and Password, and then click Submit.
-2013 HID Global Corporation/ASSA ABLOY AB. All rights reserved. Page |
Page 18
4TRESS FT2011 Out-of-Band Authentication and Juniper Secure Access | RADIUS Channel Integration Handbook
External Release | © 2012
18
Important: To configure the RADIUS channel policy, y ou can eit her create a new channel using the
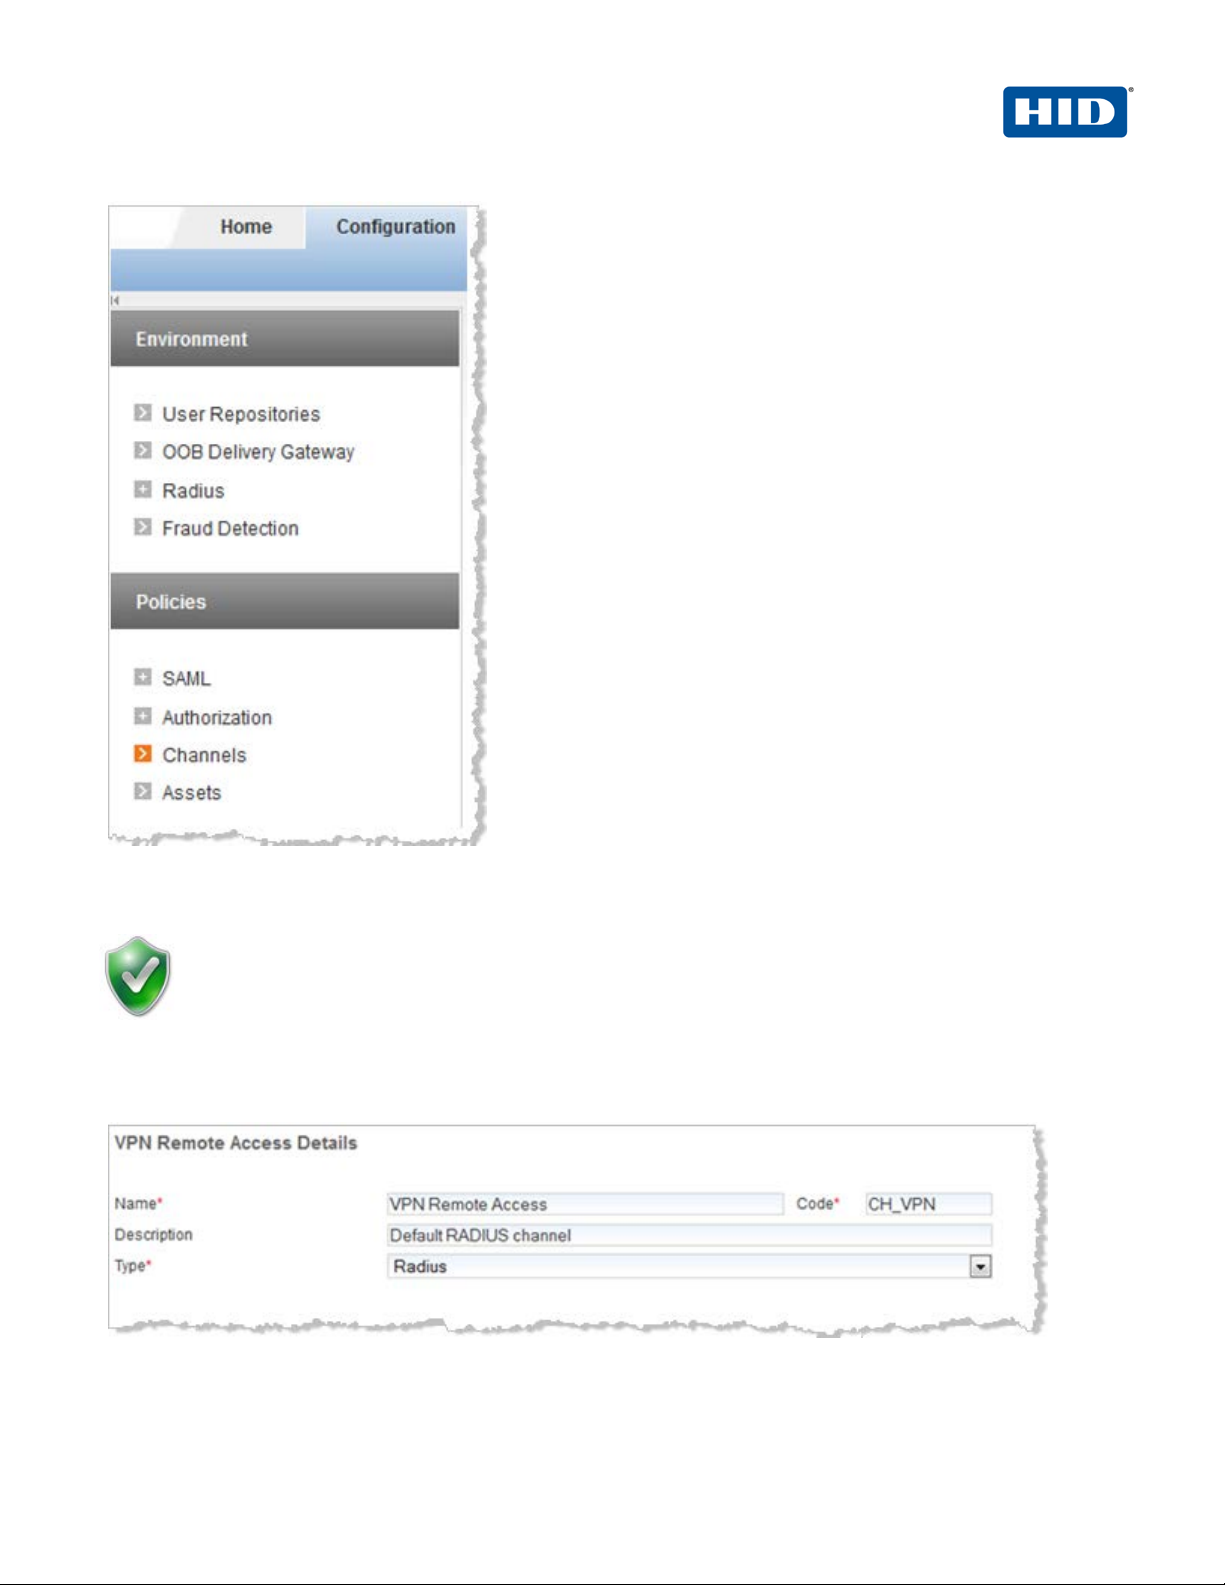
3. Select the Configuration tab, and then in the pane to the left under Policies, click Channels.
Add or Copy options, or edit an existing channel by clicking the c hannel name in the list displayed to
the right of the page. HID Global Identity Assuran ce recom mends that you use the Remote Access
channel—this is the pre-defined RADIUS channel.
4. In the list displayed to the right when you click Channels, click the VPN Remote Access channel.
5. In the VPN Remote Access Details section displayed, acc ept the default for Description, or change it. Make
sure the Name, Type, and Code are correct.
-2013 HID Global Corporation/ASSA ABLOY AB. All rights reserved. Page |
Page 19

4TRESS FT2011 Out-of-Band Authentication and Juniper Secure Access | RADIUS Channel Integration Handbook
External Release | © 2012
19
Important: You can select either a host name—and then ente r the name of t he m achine hosting
Important: Make sure that each access controller is configured with the shared secret you
6. Click Channel Policy to expand the section and display the configuration options.
7. Enter and confirm the Shared secret.
The Shared secret encrypts the information exchanges b et ween the appliance(s) and the access controllers.
The secret must be the same for each controller conf igured in the channel policy. The secret must not exceed
40 characters. By default, the secret for a pre-defined gate is ActivIdentity.
8. Click Add.
The Add Authorized IP addresses or host names list is displayed. Use these settings to configure the
access controllers that are authorized to use the gate for authentication.
the access controller—or you can enter an IP address, and then e nt er an address and range of
the access controller. HID Global Identity Assurance recom m ends that you use an IP address
rather than a host name. If the DNS cannot translate the host name, then the RFE will not restart.
9. For an IP address, enter the valid network range (for ex ampl e, 192.168.0.0/24).
10. Click Save.
The access controller is displayed in the Channel page. No w, i t i s aut horized to use the gate for
authentication requests.
specified above. If necessary, repeat the steps to authorize access for additional controllers.
-2013 HID Global Corporation/ASSA ABLOY AB. All rights reserved. Page |
Page 20

4TRESS FT2011 Out-of-Band Authentication and Juniper Secure Access | RADIUS Channel Integration Handbook
External Release | © 2012
20
3.2 Create User Repository
The “User Repositories” function of t he 4TRESS Management Console defines parameters for using LDAP
servers as the source of user data for the appliance system . B y conf iguring the appliance to communicate with
your LDAP directory server, you enable access to u se r dat a f or authentication purposes.
1. Logged into the 4TRESS Management Console, sele ct t he Configuration tab.
2. In the pane to the left, under Environment, click User Repositories.
3. In the page displayed to the right, click Add.
-2013 HID Global Corporation/ASSA ABLOY AB. All rights reserved. Page |
Page 21

4TRESS FT2011 Out-of-Band Authentication and Juniper Secure Access | RADIUS Channel Integration Handbook
External Release | © 2012
1
4. Name—Enter a meaningful name.
5. Adapter—Select the adapter from the drop-down list t hat corresponds to your directory type (either Novell®
eDirectory or Microsoft® Active Directory).
6. Host—Enter the IP address or hostname of the server where your LDAP directory resides.
7. Port—Enter the Port (the LDAP directory server’s listening port).
8. In the Configure connection login credentials section of the page, ent er t he user credentials that the
appliance will use to access the LDAP database. Then, enter and confirm the user’s Password. You MUST
indicate the full User DN.
9. Expand the Attributes section, and then ex pand the Available section.
-2013 HID Global Corporation/ASSA ABLOY AB. All rights reserved. Page | 2
Page 22

4TRESS FT2011 Out-of-Band Authentication and Juniper Secure Access | RADIUS Channel Integration Handbook
External Release | © 2012
22
Have the ActivIdentity 4TRESS Authentication Appliance Administration Guide:
10. In the Attributes section, select the Enabled options next to the appliance attributes to be mapped to the
LDAP attributes.
11. Click Save. A success message appears.
3.3 Configure Administration Groups, User Types, User Rep ositories, and Authentication
Policies
Management Console technical document at i on on hand. This section summarizes the
remaining procedures to perform before Web Soft T ok ens can be activated. It does not
provide the step-by-step instructions that are explaine d already in the core documentation.
1. Use the 4TRESS Management Console to create and update administration groups within user types. Then,
you can add users to the administration groups.
User types define categories of users. A hierarchy of adm i nistration groups exists for each user type.
For each user type, you can define:
• User repositories relating to the user type,
• Authentication policies accessible to users of t his t y pe, and
• User attributes for users of this type.
There are default user types. Installing the 4TRESS Appliance Server automat i ca l ly set s up a n um ber of user
types. For each user type, there are pre-defined syste m use rs. Collectively, these sample users have all the
required privileges to administer the system . Y ou can use the base data set as provided, or modify it to meet
your specific requirements.
2. Map the user repository to a user type.
3. Assign an authentication policy to a user type.
4. Map the user repository to an administrati on grou p.
-2013 HID Global Corporation/ASSA ABLOY AB. All rights reserved. Page |
Page 23

4TRESS FT2011 Out-of-Band Authentication and Juniper Secure Access | RADIUS Channel Integration Handbook
External Release | © 2012
23
Administration groups provide a way to organize (p artition) users for administrative purposes, as well as a
way to assign permissions to users through member sh i p of adm i nistration groups.
3.4 Create OOB Delivery Gateway
4TRESS supports two OOB authentication types: SM S (P hone) and Email. The actual SMS/Email OTP is a
random number generated by the appliance and sent to the end user by SMS or Email through a delivery
gateway.
1. Logged into the 4TRESS Management Console, sele ct t he Configuration tab.
2. In the pane to the left under Environment, click OOB Delivery Gateway.
-2013 HID Global Corporation/ASSA ABLOY AB. All rights reserved. Page |
Page 24

4TRESS FT2011 Out-of-Band Authentication and Juniper Secure Access | RADIUS Channel Integration Handbook
External Release | © 2012
24
3. Enter a Name and Description.
4. Select SMS SMPP Delivery Provider from the Delivery Provider drop-down list.
5. Click Next to display the set of the fields on the page.
• SMPP hostname—Hostname or IP address of the SMPP provider.
• SMPP port—Port number of the SMPP provider.
• SMSC system ID—ID of the SMS Center.
• Password for SMSC server—Password of the S MS Cente r.
• Source TON—Obtain this value from your SMPP prov ider.
• Source NPI— Obtain this value from your SMPP provider.
• ESME address range— Obtain this value from your SMP P prov ider.
• User Attribute that stores the phone number—User attribute for the phone number of the
user registered.
• Name of template for Credential messages—By default, it is pre-populated with
credentialemail. Enter credential-sms.
• Name of template for Challenge messages—Enter challenge-sms.
6. Click Save.
-2013 HID Global Corporation/ASSA ABLOY AB. All rights reserved. Page |
Page 25

4TRESS FT2011 Out-of-Band Authentication and Juniper Secure Access | RADIUS Channel Integration Handbook
External Release | © 2012
25
3.5 Assign An Out-of-Band Delivery Gateway
Have the main ActivIdentity 4TRESS Authentication Appliance Administrator Guide: Configurer Portal technical
documentation handy for easy reference. This is a summary s ect ion only.
1. Launch the 4TRESS Configurer, log in, and then select the Authentication Policies tab.
2. Edit the AT_CUSTOTP Customer One Time Password authentication policy.
3. Add the new delivery gateway (for example, Local_ S M P P ) t hat you just c reat ed in the previous section of this
document to the Selected Delivery Gate ways box.
4. Update the authentication policy.
-2013 HID Global Corporation/ASSA ABLOY AB. All rights reserved. Page |
Page 26

4TRESS FT2011 Out-of-Band Authentication and Juniper Secure Access | RADIUS Channel Integration Handbook
External Release | © 2012
26
3.6 Assign An Out-of-Band Delivery Credential to An Existing Authentication Policy
Have the main ActivIdentity 4TRESS Authentication Appliance Administrator Guide: Configurer Portal technical
documentation handy for easy reference. This is a su m m ary s ect ion only.
1. Launch the 4TRESS Configurer, log in, and then select t he Aut he nti ca tion P ol i ci es tab.
2. Edit the AT_CUSTOTP Customer One Time Password authentication policy by assigning the following
credential types.
3. Assign the CT_ACODE and CT_OOB credential types to the Selected Cre d ential Types box.
4. Update the authentication policy.
4.0 Assign SMS Token(s)
4.1 Prerequisite: Assign An SMS Token
1. Logged into the 4TRESS Management Console, sea rch for the user.
2. To create an OOB record, click the Register Out of Band link.
3. Select Customer One Time Password from the Authentication Policy drop-down list.
-2013 HID Global Corporation/ASSA ABLOY AB. All rights reserved. Page |
Page 27

4TRESS FT2011 Out-of-Band Authentication and Juniper Secure Access | RADIUS Channel Integration Handbook
External Release | © 2012
27
4. Select the Set Activation Code option, and then enter and confirm an Activation Code.
5. Click Next.
6. Check the Set Policy Settings dialog, and match it to the one illustrated.
7. Click Save. A success message is displayed (Out of Band created successfully).
5.0 Sample Authentication Using Out-of-Band Authentication
1. The user authenticates to the Juniper Activation Realm with an OOB device (and optionally with an LDAP
password). This depends on Juniper configuratio n.
If you modify this page (the Juniper Custom sign-in page) to hide the SMS PIN (activation code), then all
users will use the same activation code. Contact your HID Global I dentity Assurance technical contact to
obtain a sample page. For example:
-2013 HID Global Corporation/ASSA ABLOY AB. All rights reserved. Page |
Page 28

4TRESS FT2011 Out-of-Band Authentication and Juniper Secure Access | RADIUS Channel Integration Handbook
External Release | © 2012
28
After the user enters his/her credentials, s/he receives a one-time password via telephone or email message.
2. The user enters the password in the Response box, and then clicks Sign In.
-2013 HID Global Corporation/ASSA ABLOY AB. All rights reserved. Page |
Page 29
4TRESS FT2011 Out-of-Band Authentication and Juniper Secure Access | RADIUS Channel Integration Handbook
External Release | © 2012
29
Document
May 2012
Eco-System Workgroup
Initial release
2.0
Rebranded for HID Global and changed copyright from
2.1
Updated copyright statement, rebranding to HID Global TP
2.2
Copyright
© 2012-2013 HID Global Corporation/ASSA ABLOY AB. All rights reserved.
Trademarks
HID, the HID logo, ActivID, 4TRESS and/or other HID Global products or marks referenced herein are registered
trademarks or trademarks of HID Global Corporation in the United States and/or other countries.
The absence of a mark, product, service name or logo from this list does not constitute a waiver of the HID Global
trademark or other intellectual property right s c oncerning that name or logo. The names of actual companies,
trademarks, trade names, service marks, images and/or products mentioned herein are the trademarks of their
respective owners. Any rights not expressly granted herein are reserved.
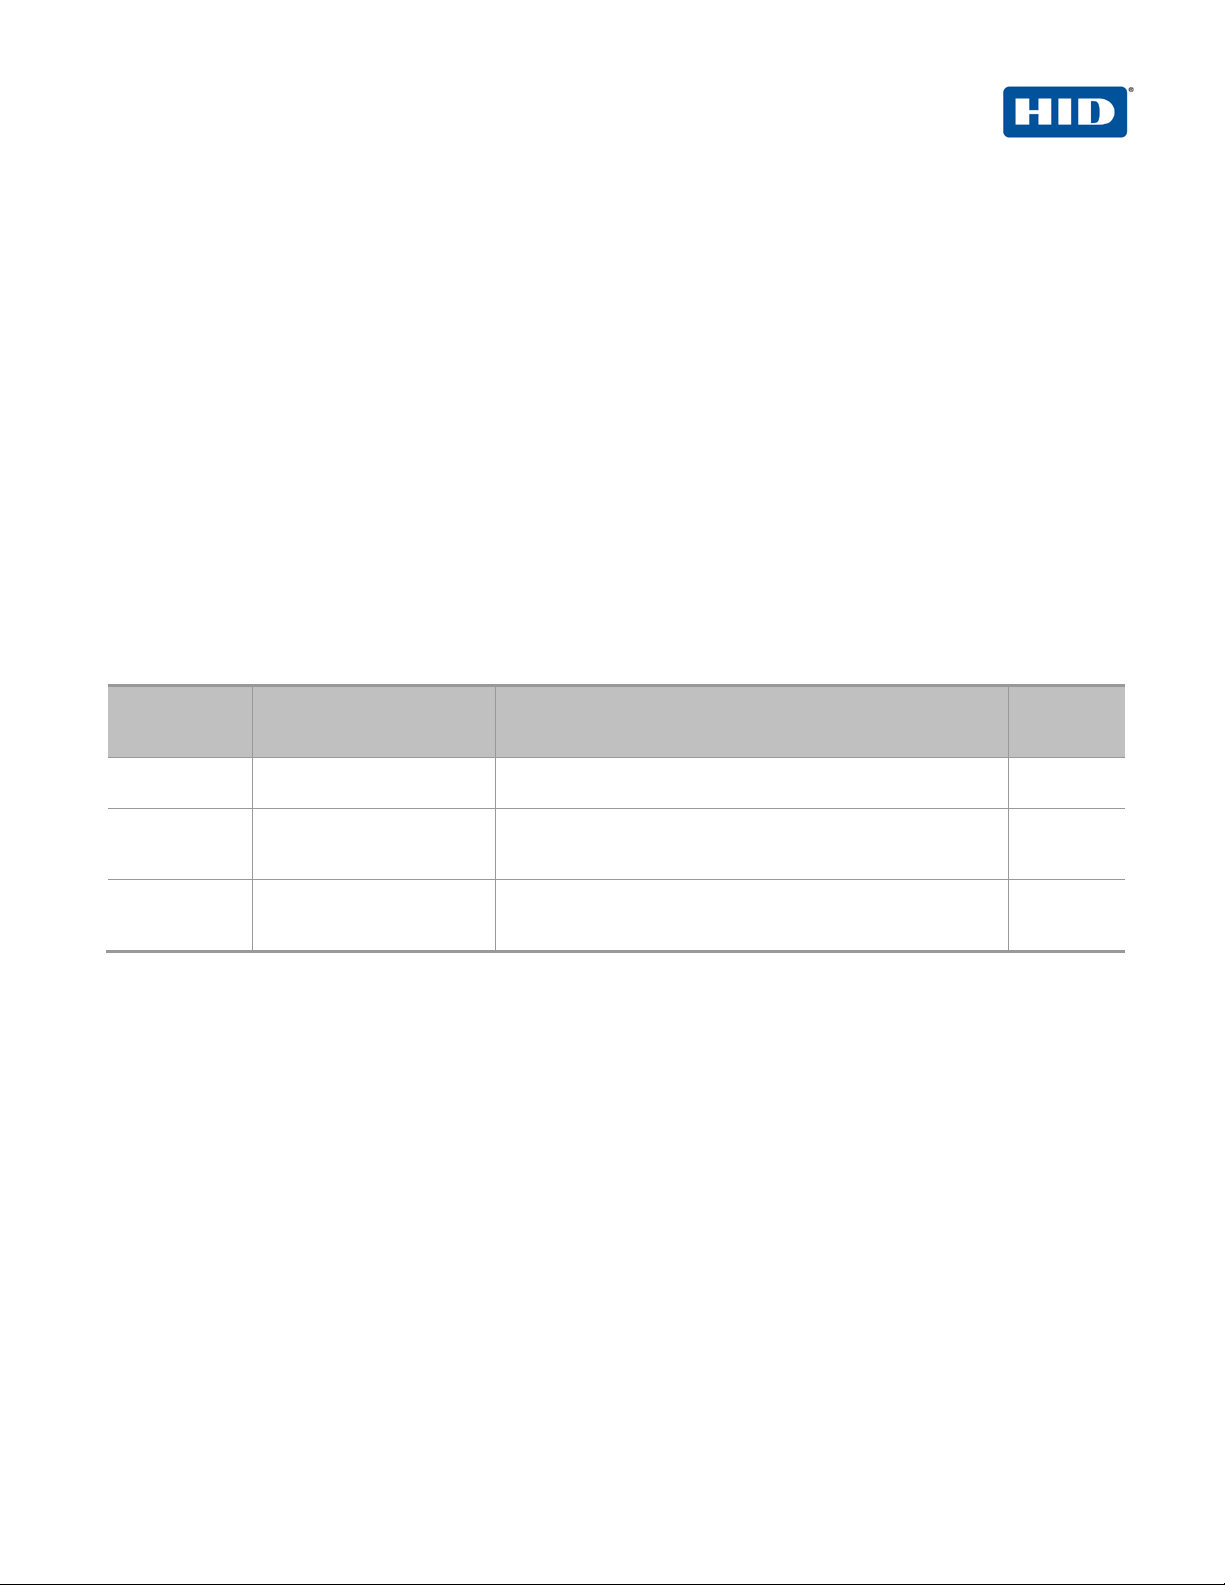
Revision History
Date Author Description
February 2013 Eco-System Workgroup
May 2013 Eco-System Workgroup
ActivIdentity to HID Global
template
Version
-2013 HID Global Corporation/ASSA ABLOY AB. All rights reserved. Page |
Page 30

4TRESS FT2011 Out-of-Band Authentication and Juniper Secure Access | RADIUS Channel Integration Handbook
External Release | © 2012
30
Americas
US Federal
Europe
Asia Pacific
Web
+1 510.574.0100
+1 571.522.1000
+33 (0) 1.42.04.84.00
+61 (0) 3.9809.2892
http://www.hidglobal.com/identity-assurance
Corporate Headquarters
15370 Barranca Parkway
Irvine, CA 92618
www.hidglobal.com
+1 949.732.2000
-2013 HID Global Corporation/ASSA ABLOY AB. All rights reserved. Page |
 Loading...