

Page 1

iCLASS SE CP1000 Encoder
User Guide
PLT-01067
Version: A.3
April 2014
hidglobal.com
Page 2

Copyright
© 2014 HID Global Corporation/ASSA ABLOY AB. All rights reserved.
This document may not be reproduced, disseminated or republished in any form without the prior
written permission of HID Global Corporation.
Trademarks
HID GLOBAL, HID, the HID logo, iCLASS, iCLASS SE, OMNIKEY, and Seos are the trademarks or
registered trademarks of HID Global Corporation, or its licensors, in the U.S. and other countries.
MIFARE, MIFARE DESFire and MIFARE DESFire EV1 are registered trademarks of NXP B.V. and are
used under license.
Revision History
Date Description Version
03/01/2014 Software Release 2.4 (SP1) A.3
09/13/2013 Software Release 2.3.6 (Prox update) A.2
08/22/2013 First Release A.1
07/08/2013 Beta A.0
Contacts
For additional offices around the world, see www.hidglobal.com corporate offices.
North America Asia Pacific
611 Center Ridge Drive
Austin, TX 78753
USA
Phone: 800 237 7769
Fax: 949 732 2120
19/F 625 King’s Road
North Point, Island East
Hong Kong
Phone: 852 3160 9800
Fax: 852 3160 4809
Europe, Middle East and Africa (EMEA)
Haverhill Business Park Phoenix Road
Haverhill, Suffolk CB9 7AE
England
Phone: 44 (0) 1440 714 850
Fax: 44 (0) 1440 714 840
HID Global Customer Support: support.hidglobal.com
PLT-01067, Version: A.3 April 2014
Page 3

Contents
Chapter 1: Overview . . . . . . . . . . . . . . . . . . . . . . . . . . . . . . . . . . . . . . . . . . . . . . . . . . . . . . . . . . . . . . . . . . . . . .1-1
1.1 Main Concepts . . . . . . . . . . . . . . . . . . . . . . . . . . . . . . . . . . . . . . . . . . . . . . . . . . . . . . . . . . . . . . . . . . . 1-2
1.1.1 Key Management . . . . . . . . . . . . . . . . . . . . . . . . . . . . . . . . . . . . . . . . . . . . . . . . . . . . . . . . . . .1-2
1.1.2 Administration Keys . . . . . . . . . . . . . . . . . . . . . . . . . . . . . . . . . . . . . . . . . . . . . . . . . . . . . . . . .1-2
1.1.3 Media Keys . . . . . . . . . . . . . . . . . . . . . . . . . . . . . . . . . . . . . . . . . . . . . . . . . . . . . . . . . . . . . . .1-3
1.1.4 Secure Object Keys . . . . . . . . . . . . . . . . . . . . . . . . . . . . . . . . . . . . . . . . . . . . . . . . . . . . . . . . .1-4
1.1.5 Secure Channel Key . . . . . . . . . . . . . . . . . . . . . . . . . . . . . . . . . . . . . . . . . . . . . . . . . . . . . . . .1-4
1.1.6 Credential Credit Management . . . . . . . . . . . . . . . . . . . . . . . . . . . . . . . . . . . . . . . . . . . . . . . .1-5
1.1.7 Formats . . . . . . . . . . . . . . . . . . . . . . . . . . . . . . . . . . . . . . . . . . . . . . . . . . . . . . . . . . . . . . . . . .1-5
1.1.8 Plugin Architecture . . . . . . . . . . . . . . . . . . . . . . . . . . . . . . . . . . . . . . . . . . . . . . . . . . . . . . . . . .1-6
1.1.9 Work Orders . . . . . . . . . . . . . . . . . . . . . . . . . . . . . . . . . . . . . . . . . . . . . . . . . . . . . . . . . . . . . .1-6
1.1.10 Work Instructions . . . . . . . . . . . . . . . . . . . . . . . . . . . . . . . . . . . . . . . . . . . . . . . . . . . . . . . . . . .1-6
1.1.11 Custom Applications . . . . . . . . . . . . . . . . . . . . . . . . . . . . . . . . . . . . . . . . . . . . . . . . . . . . . . . .1-6
1.1.12 Custom Host Applications (Transparent Mode) . . . . . . . . . . . . . . . . . . . . . . . . . . . . . . . . . . . .1-7
1.1.13 Data Mapper Applications (HF Migration) . . . . . . . . . . . . . . . . . . . . . . . . . . . . . . . . . . . . . . . .1-7
Chapter 2: Application Navigation . . . . . . . . . . . . . . . . . . . . . . . . . . . . . . . . . . . . . . . . . . . . . . . . . . . . . . . . . .2-1
2.1 File Tab. . . . . . . . . . . . . . . . . . . . . . . . . . . . . . . . . . . . . . . . . . . . . . . . . . . . . . . . . . . . . . . . . . . . . . . . . 2-1
2.1.1 Install Plugin Package . . . . . . . . . . . . . . . . . . . . . . . . . . . . . . . . . . . . . . . . . . . . . . . . . . . . . . .2-1
2.1.2 Install Format . . . . . . . . . . . . . . . . . . . . . . . . . . . . . . . . . . . . . . . . . . . . . . . . . . . . . . . . . . . . . .2-1
2.1.3 Upload Encoder Configuration Package . . . . . . . . . . . . . . . . . . . . . . . . . . . . . . . . . . . . . . . . .2-1
2.1.4 Upload Credential Credits . . . . . . . . . . . . . . . . . . . . . . . . . . . . . . . . . . . . . . . . . . . . . . . . . . . .2-1
2.1.5 Load HID Keys to Encoder . . . . . . . . . . . . . . . . . . . . . . . . . . . . . . . . . . . . . . . . . . . . . . . . . . .2-1
2.1.6 Log Out / Switch User . . . . . . . . . . . . . . . . . . . . . . . . . . . . . . . . . . . . . . . . . . . . . . . . . . . . . . .2-2
2.1.7 Recent . . . . . . . . . . . . . . . . . . . . . . . . . . . . . . . . . . . . . . . . . . . . . . . . . . . . . . . . . . . . . . . . . . .2-2
2.1.8 Plugins / Users . . . . . . . . . . . . . . . . . . . . . . . . . . . . . . . . . . . . . . . . . . . . . . . . . . . . . . . . . . . . .2-3
2.1.9 Formats . . . . . . . . . . . . . . . . . . . . . . . . . . . . . . . . . . . . . . . . . . . . . . . . . . . . . . . . . . . . . . . . . .2-4
2.1.10 Options . . . . . . . . . . . . . . . . . . . . . . . . . . . . . . . . . . . . . . . . . . . . . . . . . . . . . . . . . . . . . . . . . .2-5
2.1.11 Actions . . . . . . . . . . . . . . . . . . . . . . . . . . . . . . . . . . . . . . . . . . . . . . . . . . . . . . . . . . . . . . . . . . .2-6
2.1.12 Database . . . . . . . . . . . . . . . . . . . . . . . . . . . . . . . . . . . . . . . . . . . . . . . . . . . . . . . . . . . . . . . . .2-7
2.1.13 Help . . . . . . . . . . . . . . . . . . . . . . . . . . . . . . . . . . . . . . . . . . . . . . . . . . . . . . . . . . . . . . . . . . . . .2-8
2.2 Home Tab. . . . . . . . . . . . . . . . . . . . . . . . . . . . . . . . . . . . . . . . . . . . . . . . . . . . . . . . . . . . . . . . . . . . . . . 2-9
2.2.1 Work Order Manager . . . . . . . . . . . . . . . . . . . . . . . . . . . . . . . . . . . . . . . . . . . . . . . . . . . . . . .2-9
2.2.2 Key Manager . . . . . . . . . . . . . . . . . . . . . . . . . . . . . . . . . . . . . . . . . . . . . . . . . . . . . . . . . . . . .2-10
2.2.3 Reader Configuration . . . . . . . . . . . . . . . . . . . . . . . . . . . . . . . . . . . . . . . . . . . . . . . . . . . . . . .2-11
Chapter 3: Setup and Configuration . . . . . . . . . . . . . . . . . . . . . . . . . . . . . . . . . . . . . . . . . . . . . . . . . . . . . . . . .3-1
3.1 System Requirements. . . . . . . . . . . . . . . . . . . . . . . . . . . . . . . . . . . . . . . . . . . . . . . . . . . . . . . . . . . . . . 3-1
3.2 General Workflow . . . . . . . . . . . . . . . . . . . . . . . . . . . . . . . . . . . . . . . . . . . . . . . . . . . . . . . . . . . . . . . . . 3-1
3.3 Installing the iCLASS SE Encoder Software. . . . . . . . . . . . . . . . . . . . . . . . . . . . . . . . . . . . . . . . . . . . . 3-2
3.4 Set Administrative Keys . . . . . . . . . . . . . . . . . . . . . . . . . . . . . . . . . . . . . . . . . . . . . . . . . . . . . . . . . . . . 3-6
April 2014 PLT-01067, Version: A.3
Page 4

Page iv
3.5 Change Default Admin Password. . . . . . . . . . . . . . . . . . . . . . . . . . . . . . . . . . . . . . . . . . . . . . . . . . . . . 3-6
3.6 Add System Users . . . . . . . . . . . . . . . . . . . . . . . . . . . . . . . . . . . . . . . . . . . . . . . . . . . . . . . . . . . . . . . . 3-6
Chapter 4: Initial Configuration (Startup) . . . . . . . . . . . . . . . . . . . . . . . . . . . . . . . . . . . . . . . . . . . . . . . . . . . . 4-1
4.1 Install Plugin Package. . . . . . . . . . . . . . . . . . . . . . . . . . . . . . . . . . . . . . . . . . . . . . . . . . . . . . . . . . . . . . 4-1
4.2 Install Format . . . . . . . . . . . . . . . . . . . . . . . . . . . . . . . . . . . . . . . . . . . . . . . . . . . . . . . . . . . . . . . . . . . . 4-3
4.3 Upload Encoder Configuration Package. . . . . . . . . . . . . . . . . . . . . . . . . . . . . . . . . . . . . . . . . . . . . . . . 4-5
4.4 Upload (Top Up) Credential Credits . . . . . . . . . . . . . . . . . . . . . . . . . . . . . . . . . . . . . . . . . . . . . . . . . . . 4-9
4.5 Load HID Keys to Encoder . . . . . . . . . . . . . . . . . . . . . . . . . . . . . . . . . . . . . . . . . . . . . . . . . . . . . . . . . 4-12
4.6 Create Custom Keys. . . . . . . . . . . . . . . . . . . . . . . . . . . . . . . . . . . . . . . . . . . . . . . . . . . . . . . . . . . . . . 4-16
Chapter 5: Work Order Manager . . . . . . . . . . . . . . . . . . . . . . . . . . . . . . . . . . . . . . . . . . . . . . . . . . . . . . . . . . . 5-1
5.1 Card Information . . . . . . . . . . . . . . . . . . . . . . . . . . . . . . . . . . . . . . . . . . . . . . . . . . . . . . . . . . . . . . . . . . 5-1
5.2 Create a Work Order. . . . . . . . . . . . . . . . . . . . . . . . . . . . . . . . . . . . . . . . . . . . . . . . . . . . . . . . . . . . . . . 5-2
5.3 Add a Work Instruction to a Work Order. . . . . . . . . . . . . . . . . . . . . . . . . . . . . . . . . . . . . . . . . . . . . . . . 5-5
5.4 Edit a Work Instruction . . . . . . . . . . . . . . . . . . . . . . . . . . . . . . . . . . . . . . . . . . . . . . . . . . . . . . . . . . . . . 5-8
5.5 Remove a Work Instruction . . . . . . . . . . . . . . . . . . . . . . . . . . . . . . . . . . . . . . . . . . . . . . . . . . . . . . . . . 5-9
5.6 Work Instruction Wizard . . . . . . . . . . . . . . . . . . . . . . . . . . . . . . . . . . . . . . . . . . . . . . . . . . . . . . . . . . . 5-10
5.6.1 iCLASS Work Instruction: HID Access Application . . . . . . . . . . . . . . . . . . . . . . . . . . . . . . . 5-10
5.6.2 iCLASS Work Instruction: Custom Encoding . . . . . . . . . . . . . . . . . . . . . . . . . . . . . . . . . . . . 5-15
5.6.3 MIFARE Classic Work Instruction: HID Access Application . . . . . . . . . . . . . . . . . . . . . . . . 5-19
5.6.4 MIFARE Classic Work Instruction: Custom Encoding . . . . . . . . . . . . . . . . . . . . . . . . . . . . . 5-23
5.6.5 MIFARE DESFire EV1 Work Instruction: HID Access Application . . . . . . . . . . . . . . . . . . . 5-27
5.6.6 MIFARE DESFire EV1 Work Instruction: Custom Encoding . . . . . . . . . . . . . . . . . . . . . . . . 5-32
5.6.7 Prox Work Instruction: HID Access Application . . . . . . . . . . . . . . . . . . . . . . . . . . . . . . . . . . 5-37
5.6.8 Seos Work Instruction: HID Access Application . . . . . . . . . . . . . . . . . . . . . . . . . . . . . . . . . 5-41
5.6.9 Work Instruction: Roll Card Authentication Key . . . . . . . . . . . . . . . . . . . . . . . . . . . . . . . . . . 5-45
5.6.10 Work Instruction: Move Genuine SO Sector . . . . . . . . . . . . . . . . . . . . . . . . . . . . . . . . . . . . 5-51
5.7 Work Order Execution. . . . . . . . . . . . . . . . . . . . . . . . . . . . . . . . . . . . . . . . . . . . . . . . . . . . . . . . . . . . . 5-54
5.7.1 To Add a Credential Record . . . . . . . . . . . . . . . . . . . . . . . . . . . . . . . . . . . . . . . . . . . . . . . . 5-54
5.7.2 To Add a Batch of Credential Records . . . . . . . . . . . . . . . . . . . . . . . . . . . . . . . . . . . . . . . . 5-56
5.7.3 To Remove Records . . . . . . . . . . . . . . . . . . . . . . . . . . . . . . . . . . . . . . . . . . . . . . . . . . . . . . 5-58
5.7.4 Execute Work Order on Selected Credential Records . . . . . . . . . . . . . . . . . . . . . . . . . . . . 5-60
5.7.5 Execute a Work Order on All Credential Records . . . . . . . . . . . . . . . . . . . . . . . . . . . . . . . . 5-62
5.7.6 Read Back . . . . . . . . . . . . . . . . . . . . . . . . . . . . . . . . . . . . . . . . . . . . . . . . . . . . . . . . . . . . . . 5-63
5.7.7 Printing a Work Order . . . . . . . . . . . . . . . . . . . . . . . . . . . . . . . . . . . . . . . . . . . . . . . . . . . . . 5-64
5.7.8 File Save As a Work Order . . . . . . . . . . . . . . . . . . . . . . . . . . . . . . . . . . . . . . . . . . . . . . . . . 5-64
5.7.9 Export a Work Order to a CSV File . . . . . . . . . . . . . . . . . . . . . . . . . . . . . . . . . . . . . . . . . . . 5-65
5.7.10 Export a Work Order to a PDF File . . . . . . . . . . . . . . . . . . . . . . . . . . . . . . . . . . . . . . . . . . . 5-66
5.7.11 Open a Work Order . . . . . . . . . . . . . . . . . . . . . . . . . . . . . . . . . . . . . . . . . . . . . . . . . . . . . . . 5-67
5.7.12 Close a Work Order . . . . . . . . . . . . . . . . . . . . . . . . . . . . . . . . . . . . . . . . . . . . . . . . . . . . . . . 5-68
5.7.13 Rename a Work Order . . . . . . . . . . . . . . . . . . . . . . . . . . . . . . . . . . . . . . . . . . . . . . . . . . . . . 5-69
5.7.14 Delete a Work Order . . . . . . . . . . . . . . . . . . . . . . . . . . . . . . . . . . . . . . . . . . . . . . . . . . . . . . 5-70
Chapter 6: Key Manager . . . . . . . . . . . . . . . . . . . . . . . . . . . . . . . . . . . . . . . . . . . . . . . . . . . . . . . . . . . . . . . . . 6-1
6.1 Create Key . . . . . . . . . . . . . . . . . . . . . . . . . . . . . . . . . . . . . . . . . . . . . . . . . . . . . . . . . . . . . . . . . . . . . . 6-2
6.2 Remove Selected Key . . . . . . . . . . . . . . . . . . . . . . . . . . . . . . . . . . . . . . . . . . . . . . . . . . . . . . . . . . . . . 6-5
PLT-01067, Version: A.3 April 2014
Page 5

Page v
6.3 Import Keys. . . . . . . . . . . . . . . . . . . . . . . . . . . . . . . . . . . . . . . . . . . . . . . . . . . . . . . . . . . . . . . . . . . . . . 6-7
6.4 Export Keys. . . . . . . . . . . . . . . . . . . . . . . . . . . . . . . . . . . . . . . . . . . . . . . . . . . . . . . . . . . . . . . . . . . . . . 6-9
6.5 Authenticate . . . . . . . . . . . . . . . . . . . . . . . . . . . . . . . . . . . . . . . . . . . . . . . . . . . . . . . . . . . . . . . . . . . . 6-12
6.6 Load HID Key(s) . . . . . . . . . . . . . . . . . . . . . . . . . . . . . . . . . . . . . . . . . . . . . . . . . . . . . . . . . . . . . . . . . 6-14
6.7 Remove HID Key(s) . . . . . . . . . . . . . . . . . . . . . . . . . . . . . . . . . . . . . . . . . . . . . . . . . . . . . . . . . . . . . . 6-15
6.8 Change Admin Keys . . . . . . . . . . . . . . . . . . . . . . . . . . . . . . . . . . . . . . . . . . . . . . . . . . . . . . . . . . . . . . 6-17
6.9 Add Key Set . . . . . . . . . . . . . . . . . . . . . . . . . . . . . . . . . . . . . . . . . . . . . . . . . . . . . . . . . . . . . . . . . . . . 6-18
6.10 Edit Key Set . . . . . . . . . . . . . . . . . . . . . . . . . . . . . . . . . . . . . . . . . . . . . . . . . . . . . . . . . . . . . . . . . . . . 6-20
6.11 Delete Key Set . . . . . . . . . . . . . . . . . . . . . . . . . . . . . . . . . . . . . . . . . . . . . . . . . . . . . . . . . . . . . . . . . . 6-22
6.12 Revoke HID Key(s) . . . . . . . . . . . . . . . . . . . . . . . . . . . . . . . . . . . . . . . . . . . . . . . . . . . . . . . . . . . . . . . 6-24
Chapter 7: Reader Configuration . . . . . . . . . . . . . . . . . . . . . . . . . . . . . . . . . . . . . . . . . . . . . . . . . . . . . . . . . . 7-1
7.1 Data Mapper . . . . . . . . . . . . . . . . . . . . . . . . . . . . . . . . . . . . . . . . . . . . . . . . . . . . . . . . . . . . . . . . . . . . . 7-3
7.2 Data Mapper Wizard. . . . . . . . . . . . . . . . . . . . . . . . . . . . . . . . . . . . . . . . . . . . . . . . . . . . . . . . . . . . . . . 7-4
7.3 Elite Prep Card . . . . . . . . . . . . . . . . . . . . . . . . . . . . . . . . . . . . . . . . . . . . . . . . . . . . . . . . . . . . . . . . . . 7-12
7.4 iCLASS Legacy Config Card. . . . . . . . . . . . . . . . . . . . . . . . . . . . . . . . . . . . . . . . . . . . . . . . . . . . . . . . 7-14
7.5 Load HID Application Keys . . . . . . . . . . . . . . . . . . . . . . . . . . . . . . . . . . . . . . . . . . . . . . . . . . . . . . . . . 7-16
Chapter 8: Administrative . . . . . . . . . . . . . . . . . . . . . . . . . . . . . . . . . . . . . . . . . . . . . . . . . . . . . . . . . . . . . . . . 8-1
8.1 Admin Keys. . . . . . . . . . . . . . . . . . . . . . . . . . . . . . . . . . . . . . . . . . . . . . . . . . . . . . . . . . . . . . . . . . . . . . 8-1
8.1.1 Change Administrative Keys . . . . . . . . . . . . . . . . . . . . . . . . . . . . . . . . . . . . . . . . . . . . . . . . . 8-1
8.1.2 Save Admin Keys . . . . . . . . . . . . . . . . . . . . . . . . . . . . . . . . . . . . . . . . . . . . . . . . . . . . . . . . . 8-1
8.1.3 Retrieve Saved Admin Keys . . . . . . . . . . . . . . . . . . . . . . . . . . . . . . . . . . . . . . . . . . . . . . . . . 8-3
8.2 Manage Users. . . . . . . . . . . . . . . . . . . . . . . . . . . . . . . . . . . . . . . . . . . . . . . . . . . . . . . . . . . . . . . . . . . . 8-5
8.2.1 Add a New User . . . . . . . . . . . . . . . . . . . . . . . . . . . . . . . . . . . . . . . . . . . . . . . . . . . . . . . . . . . 8-5
8.2.2 Edit a User . . . . . . . . . . . . . . . . . . . . . . . . . . . . . . . . . . . . . . . . . . . . . . . . . . . . . . . . . . . . . . . 8-8
8.2.3 Change Password . . . . . . . . . . . . . . . . . . . . . . . . . . . . . . . . . . . . . . . . . . . . . . . . . . . . . . . . 8-10
8.2.4 Delete a User . . . . . . . . . . . . . . . . . . . . . . . . . . . . . . . . . . . . . . . . . . . . . . . . . . . . . . . . . . . . 8-11
Chapter 9: Troubleshooting . . . . . . . . . . . . . . . . . . . . . . . . . . . . . . . . . . . . . . . . . . . . . . . . . . . . . . . . . . . . . . 9-1
9.1 Backup and Recovery. . . . . . . . . . . . . . . . . . . . . . . . . . . . . . . . . . . . . . . . . . . . . . . . . . . . . . . . . . . . . . 9-1
9.2 Log Files . . . . . . . . . . . . . . . . . . . . . . . . . . . . . . . . . . . . . . . . . . . . . . . . . . . . . . . . . . . . . . . . . . . . . . . . 9-2
9.3 Database. . . . . . . . . . . . . . . . . . . . . . . . . . . . . . . . . . . . . . . . . . . . . . . . . . . . . . . . . . . . . . . . . . . . . . . . 9-4
9.3.1 Synchronize Database to Encoder . . . . . . . . . . . . . . . . . . . . . . . . . . . . . . . . . . . . . . . . . . . . 9-4
9.4 Exceptions and Error Codes. . . . . . . . . . . . . . . . . . . . . . . . . . . . . . . . . . . . . . . . . . . . . . . . . . . . . . . . . 9-8
Glossary
April 2014 PLT-01067, Version: A.3
Page 6

Page vi
This page intentionally left blank.
PLT-01067, Version: A.3 April 2014
Page 7

Overview
The CP1000 iCLASS SE Encoder is a smart card provisioning product that consolidates most of HID’s
existing encoding products including the CP400 iCLASS Programmer, CP600 DESFire Encoder,
iCL-ELITE programmer, and 1050 ProxProgrammer.
Included are the following features:
• Encode HID Access Control Application with Standard, Elite, and custom Security on to iCLASS
and MIFARE® cards and tokens
• Encode HID Secure Identity Objects with Elite Security on iCLASS, MIFARE, MIFARE DESFire
EV1®, and Seos
• Encode HID Access Control Application on to HID Prox cards and tokens
• Encode Custom Data Objects on iCLASS, MIFARE, MIFARE DESFire EV1, and Seos
• Roll keys on existing card populations from a revoked key set to a new active key set
• Migrate existing iCLASS and MIFARE Standard Security (applications) card populations to SE
Security
• Configure encoders for various Security models and Custom Data model interpreters
Chapter 1
®
®
Other Features and Use Cases:
• Create and manage custom media and application keys
• Export and Import custom keys
• Import keys from HID Secure Key Management Platform (SDI)
• Port custom Elite keys imported from CP400 iCLASS Programmer
• Configure blank iCLASS cards and tokens
• Manage all card and reader transactions through work orders scripted from instruction sets
April 2014 PLT-01067, Version: A.3
Page 8

Overview Page 1-2
1.1 Main Concepts
To get the most out of the CP1000 iCLASS SE Encoder, there are several concepts that should be
understood.
• Key Management
• Credential Credit Management
• Formats
• Plugin Architecture
• Work Orders
• Work Instructions
• Creating Custom Applications
1.1.1 Key Management
iCLASS SE Encoder is an HID Global product that provides solution to encode user credentials and
reader configuration data. In order to provide a high level of security the encoder device uses a
smart card chip (an ISO 7816 compliant device) to perform the key management as well run the
encoding applications. This component of the encoder device is called Secure Access Module
(SAM).
A typical encoding operation requires knowledge of default/transport keys of the card, the user
credential or reader configuration data and the new keys to be used to protect the credential. The
keys that are involved in encoding operation could be ones that are managed by HID or the ones
created by the customer and provisioned in SAM.
In order to do a secure key management we follow state of the art security practices and use
cryptographic algorithms and practices that have been validated by industry to provide secure
solutions for us and our customers. The rest of the document will describe different types of keys
and their management.
1.1.2 Administration Keys
In order to load, update and delete configuration data and keys used during encoding operation we
use Simple Network Management Protocol (SNMP) version 3. SNMP is an internet-standard protocol
for managing devices on IP networks and defined by RFC 3411-RFC 3418. Though the protocol is
intended for IP devices we make use of it over other transport and application protocols such as ISO
7816-3 (APDU) for PC/SC readers.
A typical SNMP message is encrypted and signed using 16 byte keys and also contains metadata
about the cryptographic mechanism used to protect the message. The message defines its actions
using set of verbs, such as GET, SET etc. The key that is used for encryption is called SNMP
encryption/privacy key and key used for signing is called SNMP signing/authentication key.
A device or a software application implementing the SNMP standard is called an SNMP endpoint or
engine and is identified using one or more engineId/username pairs.
The encoder SAM is an SNMP endpoint that has two identities. The first identity is that of HID Admin
and other is that for OEM Admin. Each identity is recognized using an engineId and username pair
as described in the SNMP standard, and with each identity are two associated keys (SNMP
encryption and signing keys).
PLT-01067, Version: A.3 April 2014
Page 9

Page 1-3 Overview
Purpose of HID Admin identity is to manage the keys and configuration data that originate from HID
Vault where as the OEM Admin identity can be used to create custom keys and perform operations
that do not require high level of security.
When a customer receives an encoder it has OEM Admin SNMP keys that are set to default/public
values. When the host application is started the first time it prompts the user to change them to the
ones managed by the user. The host application then stores the changed OEM Admin keys in the
local database and the keys are encrypted using the password of the user of the desktop
application.
1.1.3 Media Keys
The keys that are used to authenticate to a card to perform read/write operations are called media
keys. For example, the debit and credit keys for a page in PicoPass (iCLASS) cards will be the media
keys. In case of MIFARE Classic, the Key A and Key B of a sector are the media keys and for DESFire
the application keys as well as PICC master key will be the examples of media keys.
The lengths of these types of keys as well as the cryptographic algorithms such as authentication
algorithm that make use of these keys are dependent upon the card/media technology.
A typical encoding operation will use the default/known media key to first authenticate to the blank
card, create the application, write the credential and change the value of the key to the one
specified by the user. It is important to make a note that the new value will be a diversified key so as
to reduce the surface area of attack. In other words, all the cards/media will have different values of
the media keys. For the newer and more secure credentials (for example: Secure Objects) we make
use of NIST 108 key diversification algorithm whereas the older/legacy credentials make use of
proprietary key diversification algorithms invented by HID and/or chip vendor such as NXP.
For all the card/media, the keys could fall in one of these categories:
• HID Managed Standard Media Keys: These keys are managed securely in the HID vault and are
intended for general customer base.
• HID Managed Elite Media Keys: These keys are managed securely in the HID vault and are
specific to customers who participate in the Elite program. For example an Elite customer
identified using an ICE 0120 will have a different set of media keys than the one identified using
ICE0133.
• Customer Generated and Managed Keys: These keys are either generated using encoder
solution and/or entered by the customer. The keys reside in the encoder SAM, and can be
exported in encrypted form to be archived. Once created, knowledge of the plain text key is the
responsibility of the administrator. Custom Keys are not archived in the HID vault.
All the HID managed keys are delivered in the form of static SNMP messages targeted to the
encoder, for which they were requested. Typically, the customer will read the engineId of the
encoder device using the host application and request HID for the appropriate key set (for example:
standard, ICEXXX etc.). The keys are delivered in the form of a file that will contain the static
messages, and the host application provides necessary user interface to load them in the encoder
SAM.
Custom keys can be exported from the encoder device. The export format is again an SNMP
message that is protected using OEM Admin keys.
April 2014 PLT-01067, Version: A.3
Page 10

Overview Page 1-4
1.1.4 Secure Object Keys
The newer and more secure credentials used by HID readers are based on the Secure Object (SO)
technology. While it is outside the scope of this document to describe SO technology in detail, in
simple words, a SO is a structured credential that is based on state of the art industry standards to
ensure extensibility of credential structure and use industry validated and approved security
algorithms and mechanisms. The most important aspect of a SO is that it provides an additional
security for the credential and therefore we do not only rely on the security mechanisms of the
chip/media silicon vendor.
Very much like an SNMP message a SO also has a notion of encryption and signature. In order to
reduce the size of a secure object credential we make use of an Authenticated Encryption with
Associated Data (AEAD) algorithm called EAX’ (read as EAX prime). In simple words, EAX’ one key
can be used to perform both encryption and signing of the SO credential. This key is called SO
encryption key. Please note it is called an encryption key but it also performs signature verification.
The SO encryption key could be managed by HID as a standard key and/or an Elite key, which is
similar to the management of Media keys described earlier. We also provide the support to create a
customer managed SO encryption key, however a SO credential that is protected using such a key is
not managed via the HID vault and will also have an additional signature using HID’s license key.
More information about secure objects can be requested from HID.
1.1.5 Secure Channel Key
The messages that are exchanged between a host application and the encoder device are
transferred over a mandatory secure channel5. The secure channel ensures the confidentiality and
authenticity of the messages between the host application and the encoder device.
The encoder comes with a default value of the secure channel key, and very much like the OEM
Admin keys, the host application prompts the user to provide the new value of the secure channel
key. This secure channel key is stored in the local database, which is managed by host application,
and is encrypted using the user’s password.
The secure channel mechanism is based on a slightly modified Global platform SCP 03 secure
channel protocol. You can request more information about the secure channel from HID.
Reference:
1
ISO/IEC 7816: http://en.wikipedia.org/wiki/ISO/IEC_7816
2
SAM: http://en.wikipedia.org/wiki/Secure_access_module
3
SNMP: http://tools.ietf.org/html/rfc3411
4
SIO: Secure Identity Objects; request information from HID
5
HID Secure Channel version 0.87
PLT-01067, Version: A.3 April 2014
Page 11

Page 1-5 Overview
1.1.6 Credential Credit Management
All transactions with smart cards are enabled by credential credits. These are discrete tokens that
are consumed after every transaction until none remain or until additional credits are ordered
(topped up).
The following attributes, are the building blocks to define a transaction which is enabled by a
Credential Credit Token.
Technology Application Security Media
iCLASS HID Standard Genuine HID
MIFARE Classic SIO Elite Third Party
MIFARE DESFire EV1 Custom Custom
Prox
Seos
For example: To encode iCLASS with HID Access Control application and Standard keys, this
transaction would require a different credential credit token than the same transaction using Elite
keys.
Things to know about credential credits:
• Each credit token type is managed by its respective credit counter.
• Credit top up messages are delivered in a secure SNMP message that is targeted for a specific
device by diversifying the keys with the device UID.
• Credit top up messages can be loaded only once.
• A cap (100 credits) is placed on the number of credits that can be ordered at a time. This is to
limit the monetary value that can be loaded into a single encoder device which can be lost or
destroyed.
1.1.7 Formats
The CP1000 includes a format interpreter capable of parsing all open and custom formats
developed and maintained by HID.
Format fields are presented to the user in the desktop UI for the purpose of assigning data to each
field.
Formats must be ordered from Customer Service. Most formats are custom to a specific OEM and
end users, and are not freely distributed.
The H10301 is the default format delivered with the desktop application.
April 2014 PLT-01067, Version: A.3
Page 12

Overview Page 1-6
1.1.8 Plugin Architecture
The CP1000 includes a plugin architecture which makes it highly configurable with minimal
maintenance and few releases. There are two types of plugins:
• Technology
• Configuration
Technology plugins are a packaged bundle that includes an applet which is loaded to the encoder
device and a UI plugin for the desktop application that is customized for the associated applet.
• Applets are small C# applications designed to run on the .NET framework that is native to the
encoder device. These applets manage the interface to the smart card and provide an API to the
desktop application. Applets can be tailored for a specific use case.
• The UI plugin manages the interface to the encoder device and provides the user with inputs
and information specific to the applet loaded on the device. For example, each technology
applet comes with a unique set of wizard pages gathering user input for work order creation.
Configuration plugins expose a UI for gathering inputs and creating reader configuration cards.
Reader configuration plugins are released as groups that organize parameters.
Things to know about plugins:
• Each plugin is digitally signed by a key managed by HID and known by all encoder devices
(global key). This identifies the applet as Genuine HID. Only Genuine HID plugins are recognized
by the encoder device.
• Initially, one applet/plugin is created for each of the four supported technologies (iCLASS,
MIFARE Classic, MIFARE DESFire EV1, Prox, and Seos).
• Custom plugins can be created on a CPO basis.
1.1.9 Work Orders
All credential encoding activity is managed through Work Orders. Each Work Order includes a set of
Work Instructions to be executed on every card or token presented to the encoder.
• Work orders execute a work flow that you design
• Work Orders are technology independent
• Work Orders can be limited in scope or open-ended
1.1.10 Work Instructions
Each Work Instruction represents one step of an overall work flow that is executed on every card or
token presented to the encoder.
• Work Instructions are analogous to scripts
• Work Instructions are technology specific
• Work Instructions are wholly independent operations
1.1.11 Custom Applications
Custom Applications can be written to cards. The iCLASS SE Encoder supports two types of custom
application; Custom Host and Data Mapper.
PLT-01067, Version: A.3 April 2014
Page 13

Page 1-7 Overview
1.1.12 Custom Host Applications (Transparent Mode)
• Access to the card application data is managed from the host versus autonomously by the
reader (OK5427UE Desktop Encoder).
• Host sends APDU serial commands through the reader to communicate to the card.
• Host loads authentication keys and sends read commands
1.1.13 Data Mapper Applications (HF Migration)
• Reader accesses custom card application data autonomously and reports data on
communications ports
• Reader is configured with necessary authentication and encryption keys to access the raw card
data
• Reader is configured with instructions for manipulating the raw data into a format that can be
managed by the host or access control system
April 2014 PLT-01067, Version: A.3
Page 14

Overview Page 1-8
This page intentionally left blank.
PLT-01067, Version: A.3 April 2014
Page 15
Application Navigation
The CP1000 iCLASS SE Encoder consists of two main tabs with multiple options along the left pane.
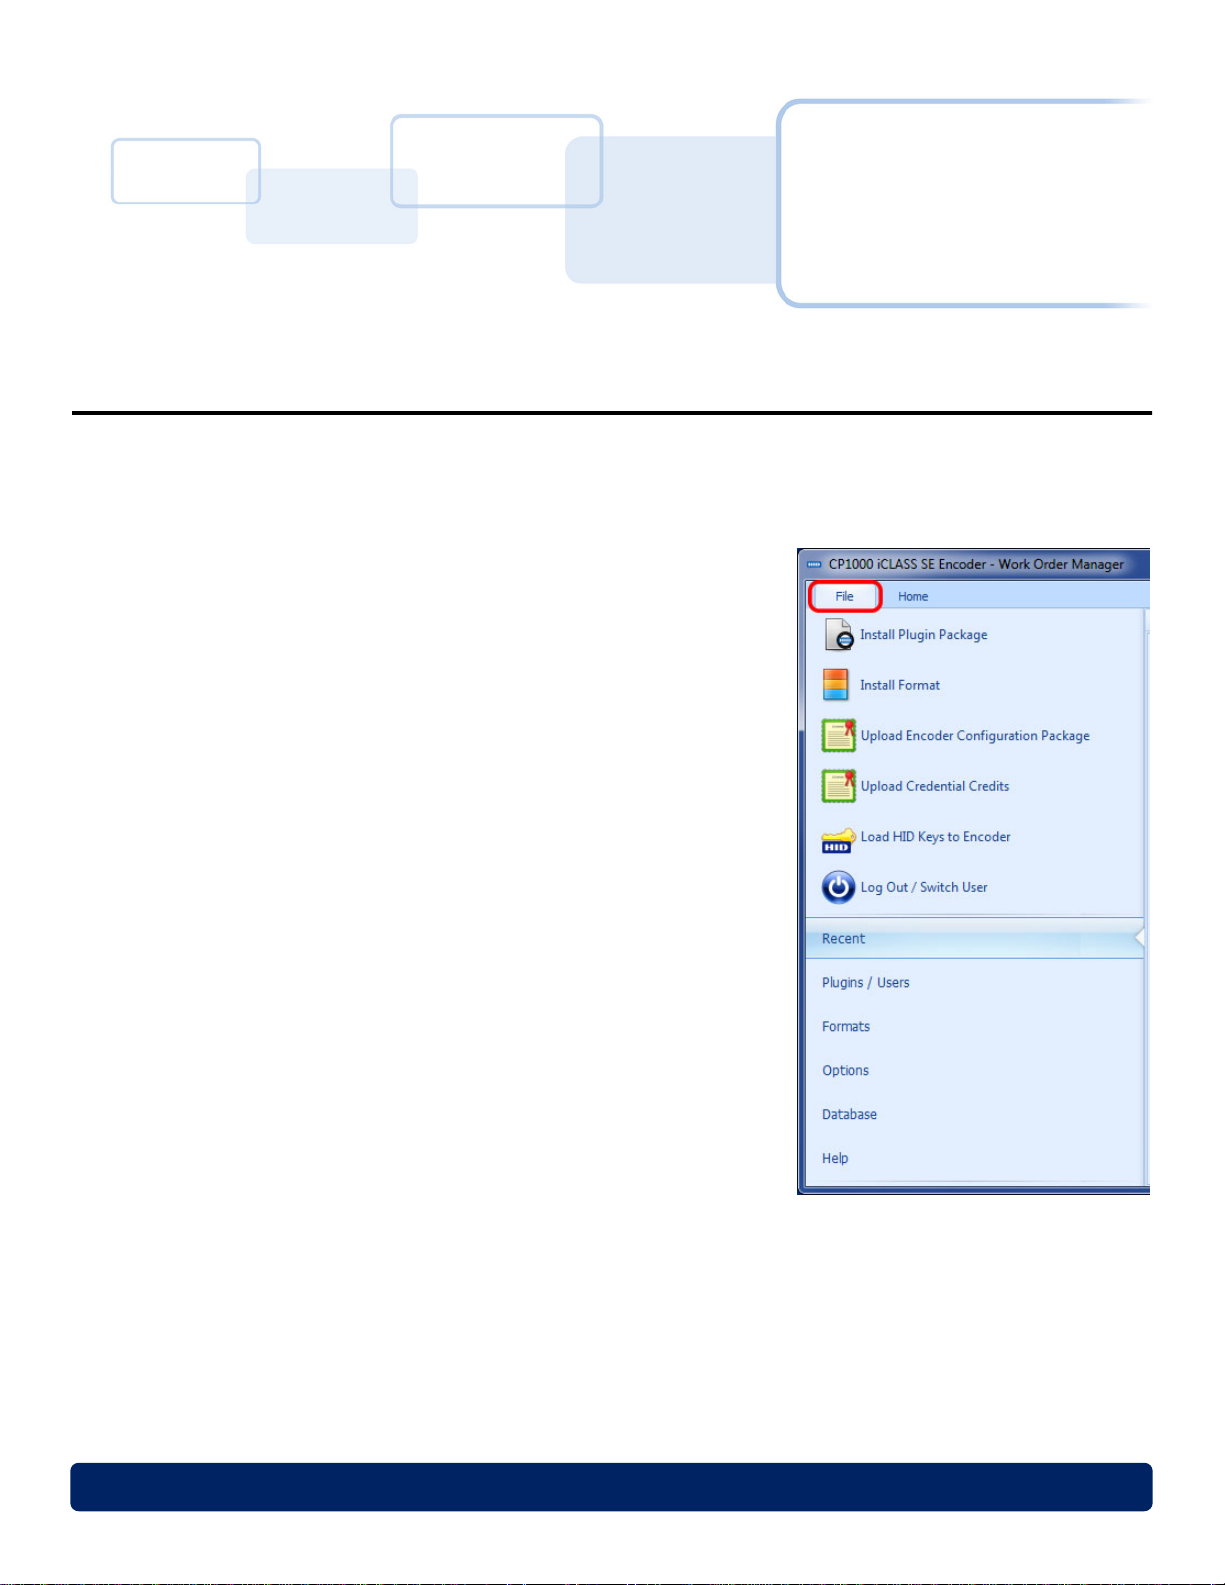
2.1 File Tab
The File tab contains all the Administrative, UI configuration,
and management functions.
2.1.1 Install Plugin Package
The Install Plugin Package installs all necessary plugins for a
particular technology. Technologies include iCLASS, MIFARE
Classic, MIFARE DESFire EV1, Seos, and Prox.
2.1.2 Install Format
Chapter 2
The Install Format imports an encrypted file determining how
a PACS credential is formatted.
2.1.3 Upload Encoder Configuration Package
The Upload Encoder Configuration Package uploads a
combination of counters and keys.
2.1.4 Upload Credential Credits
The Upload Credential Credits uploads individual credit files.
2.1.5 Load HID Keys to Encoder
The Load HID Keys to Encoder uploads keys managed by HID
to the iCLASS SE Encoder.
April 2014 PLT-01067, Version: A.3
Page 16

Application Navigation Page 2-2
2.1.6 Log Out / Switch User
The Log Out / Switch User logs out the current user and displays the User Login window for a user
to log in.
2.1.7 Recent
The Recent option on the File tab, displays the Recent Work Orders, for quick reference. Work
Orders can quickly be opened by double-clicking on a Work Order listed.
PLT-01067, Version: A.3 April 2014
Page 17
Page 2-3 Application Navigation
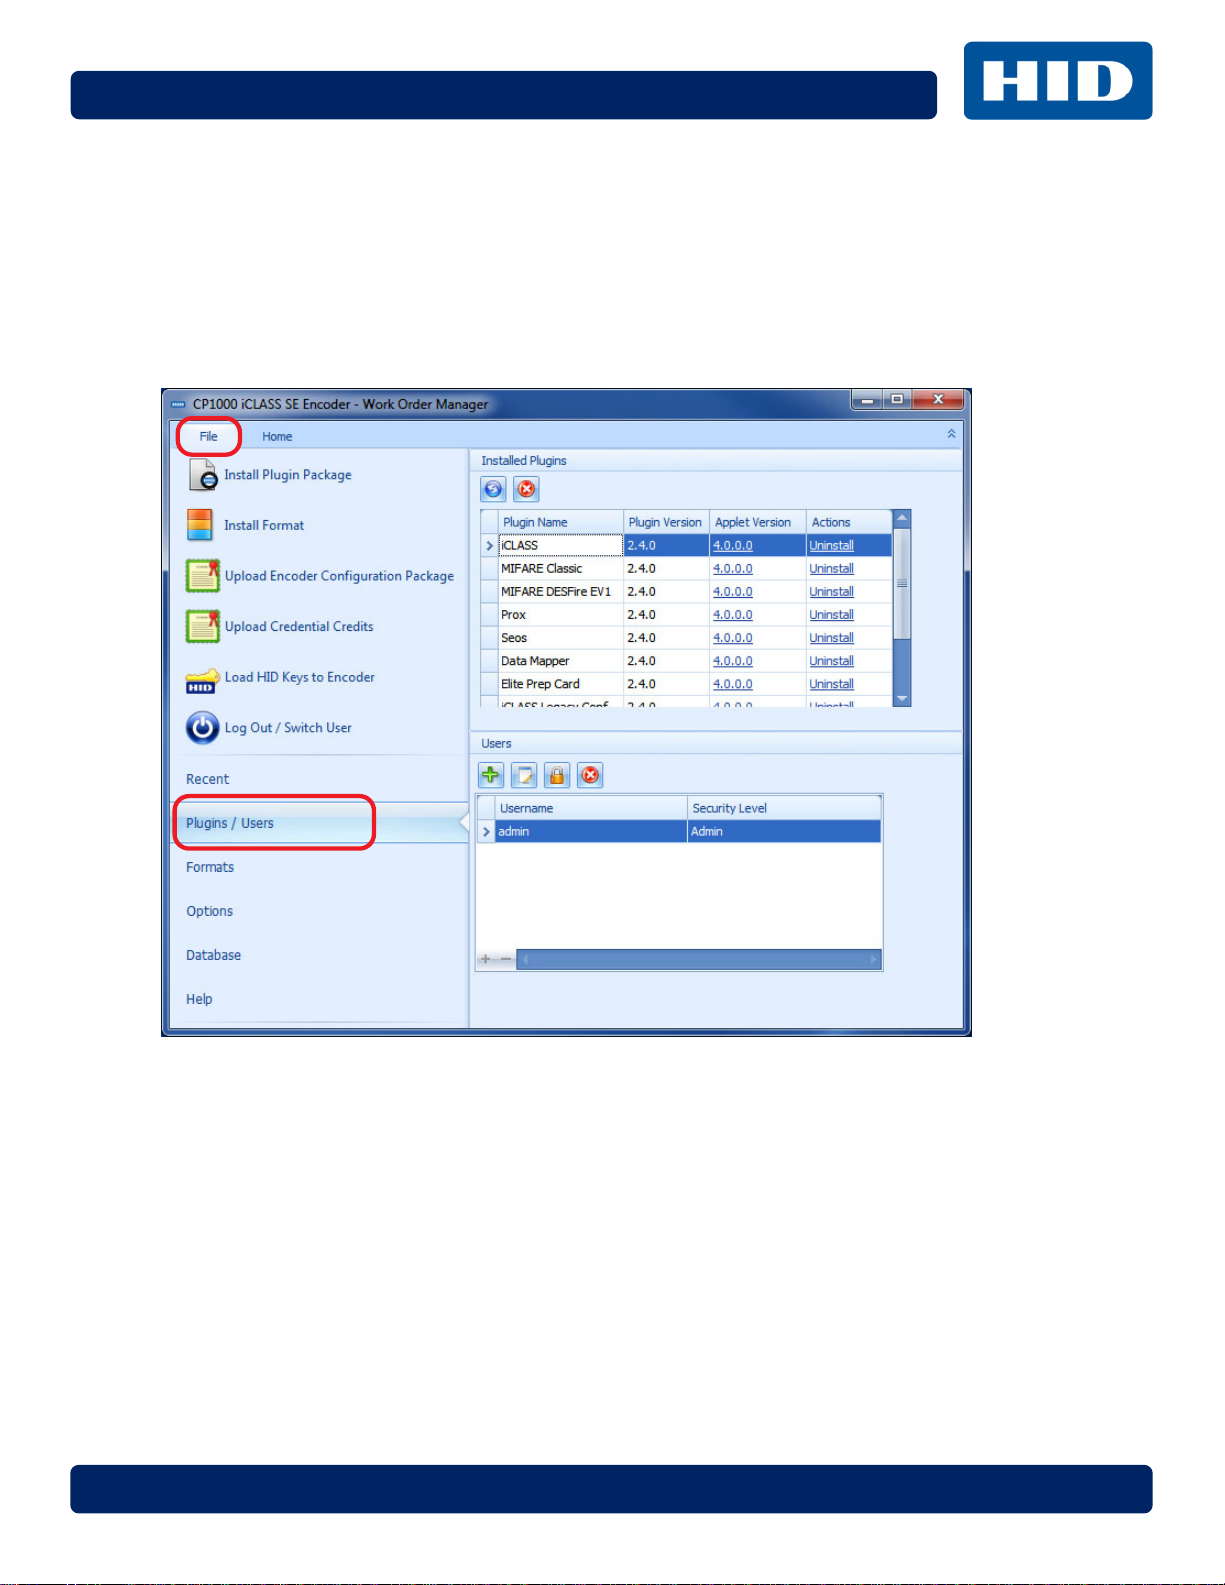
2.1.8 Plugins / Users
This window contains the two following areas:
Installed Plugins - Displays the plugins installed, and allows the user to uninstall and refresh the list
from this location.
Users - The Users management allows viewing, creating, deleting of users, and the modification of
passwords. For more detailed information on Users, see Chapter 8: Administrative.
April 2014 PLT-01067, Version: A.3
Page 18
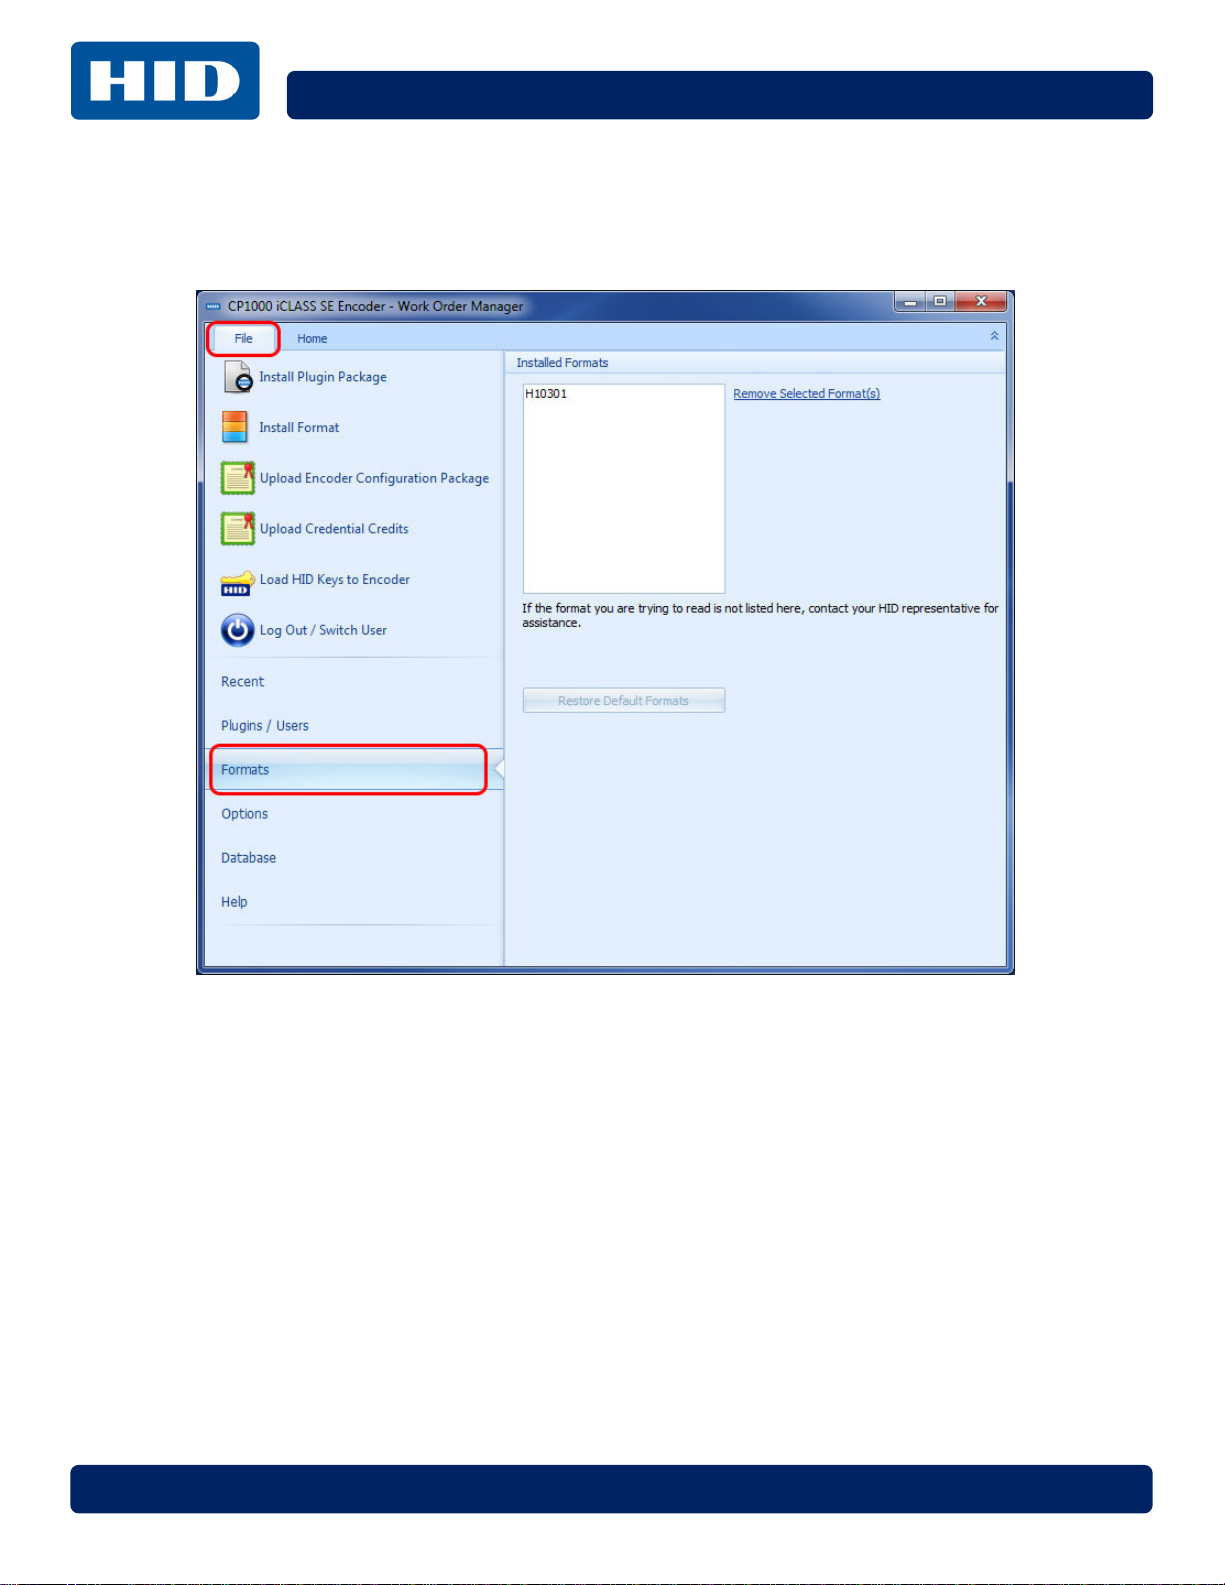
2.1.9 Formats
The Formats window displays all the formats currently loaded, and allows the selection, deletion,
and restoral of formats provided to the customer from HID Global.
Application Navigation Page 2-4
PLT-01067, Version: A.3 April 2014
Page 19
Page 2-5 Application Navigation
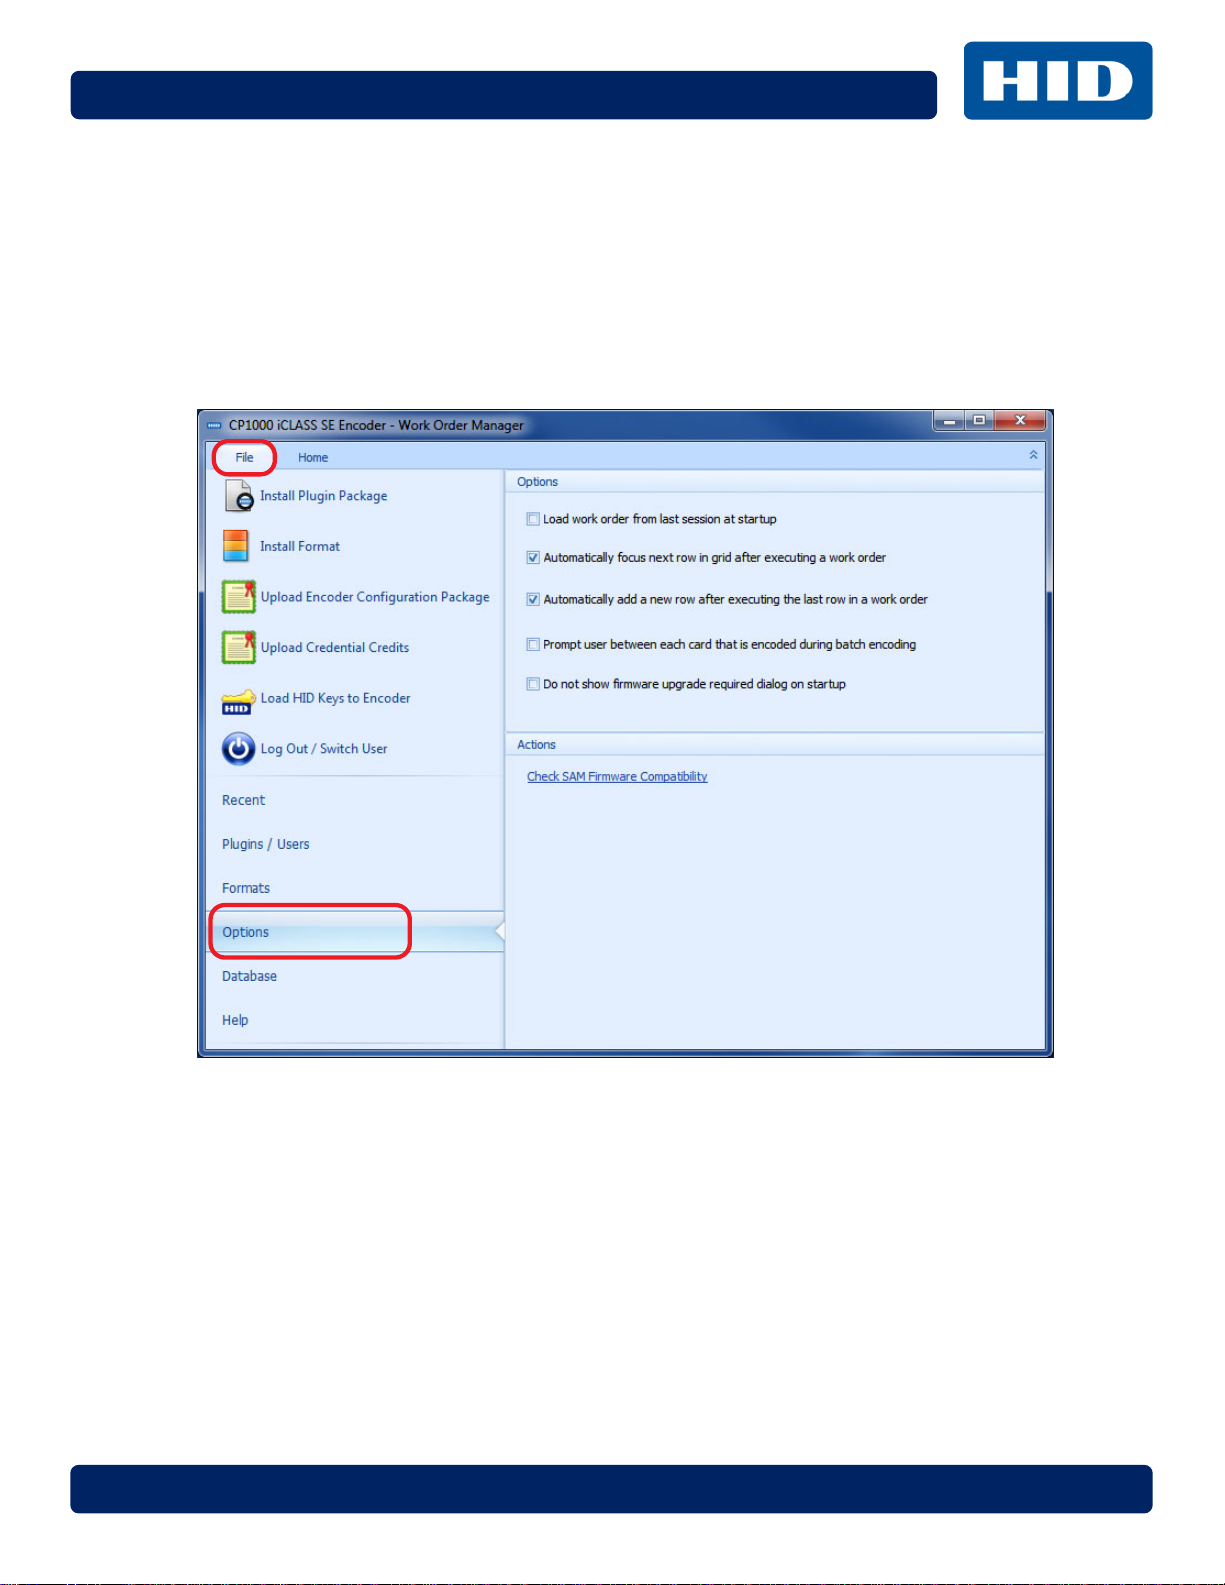
2.1.10 Options
The Options window allows the user to set a few preferences, regarding Work Orders.
• Load work order from last session at startup
• Automatically focus next row in grid after executing the last row in a work order
• Automatically add a new row after executing the last row in a work order
• Prompt user between each card that is encoded during batch encoding
April 2014 PLT-01067, Version: A.3
Page 20
2.1.11 Actions
The Check SAM Firmware Compatibility feature allows the user to check and upgrade the SAM
firmware version.
When the desktop application is launched, it checks for the current SDK version of the encoder
device. If there is a mismatch, higher or lower, the desktop application will boot load the version of
the SDK that is built into the assembly file to ensure compatibility.
The SAM SIO Firmware Version can be checked on the File tab > Help window.
Application Navigation Page 2-6
PLT-01067, Version: A.3 April 2014
Page 21
Page 2-7 Application Navigation
2.1.12 Database
The Database window allows a user to see the location of the database, as well as view/clear the
following items:
• Database Location - Displays the path to iCLASS SE Encoder database.
• Sync to Encoder - This will launch a form that will analyze and synchronize to the current
iCLASS SE Encoder.
Note: See Section 9.3.1: Synchronize Database to Encoder for more information.
• Secured Encoder/User Records - Lists the number of secure devices and users connected to
this application.
Warning: If you clear the Encoders, it will be necessary to enter the generated Admin Keys to
reconnect to the iCLASS SE Encoder with the loaded keys/credits.
• Known HID Keys - Lists the number of HID Keys loaded on the database.
• Custom Keys - Lists the number of custom keys that are on the database.
• Key Set Type Fields - Lists the number of Key Set Type fields
Note: Clearing the database items, does not clear this data from the iCLASS SE Encoder. A future
release will include database syncing to allow multiple databases to be managed with the iCLASS
SE Encoder devices.
April 2014 PLT-01067, Version: A.3
Page 22
2.1.13 Help
The Help window displays the current software/firmware information. Also from this location the
user can view the log file, for troubleshooting information.
Application Navigation Page 2-8
Log File
PLT-01067, Version: A.3 April 2014
Page 23
Page 2-9 Application Navigation
2.2 Home Tab
The Home tab contains all the configuration and implementation of Work Orders, Work Instructions,
Key Management and Reader Configuration.
2.2.1 Work Order Manager
The Work Order Manager allows you to define and save an encoding profile for your credential
deployment. Each work order defines the number of data fields encoded, as well as the data type
and field size. These data fields are concatenated into a single data stream and encoded into an
application, and are defined by the selected format.
April 2014 PLT-01067, Version: A.3
Page 24
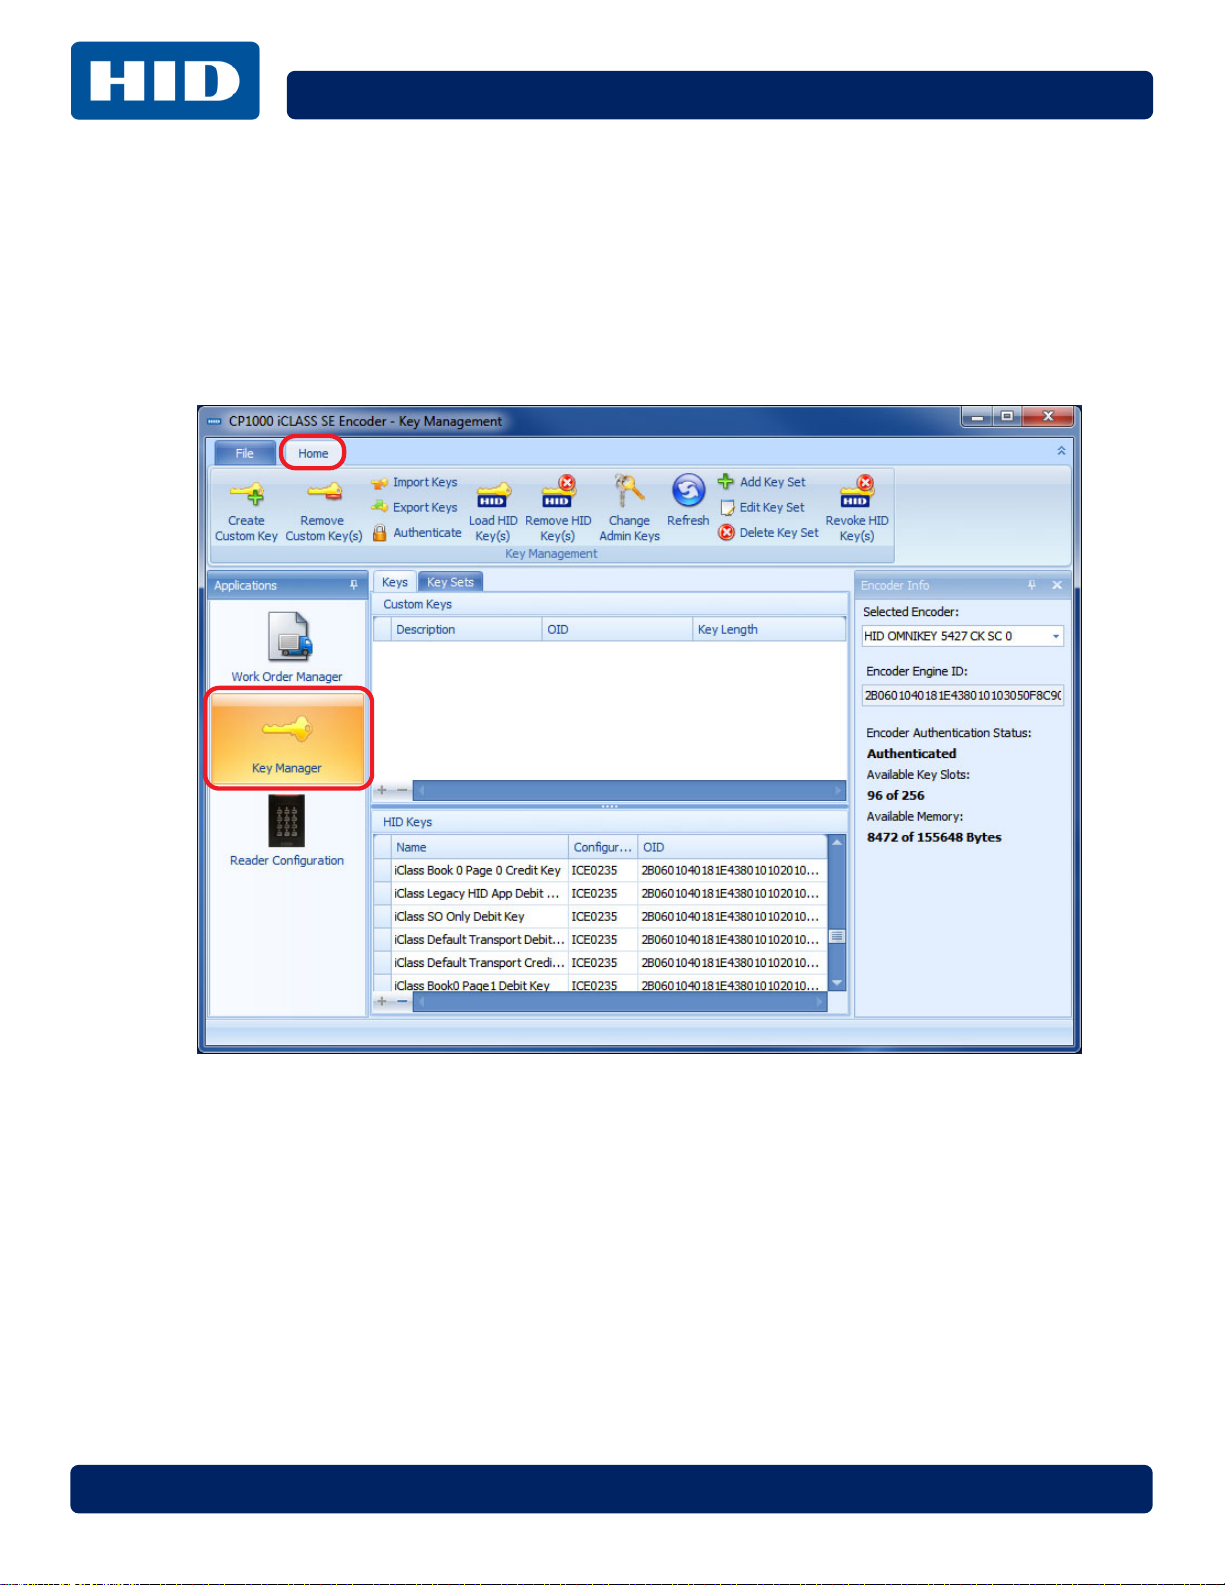
2.2.2 Key Manager
The Key Manager window has multiple options for managing HID and Custom keys.
• Manage keys for the HID access control application and SIOs
• Manage user defined keys for Custom Applications
• Import/export Custom keys
• Load keys to the iCLASS SE Encoder
Application Navigation Page 2-10
PLT-01067, Version: A.3 April 2014
Page 25
Application Navigation Page 2-11
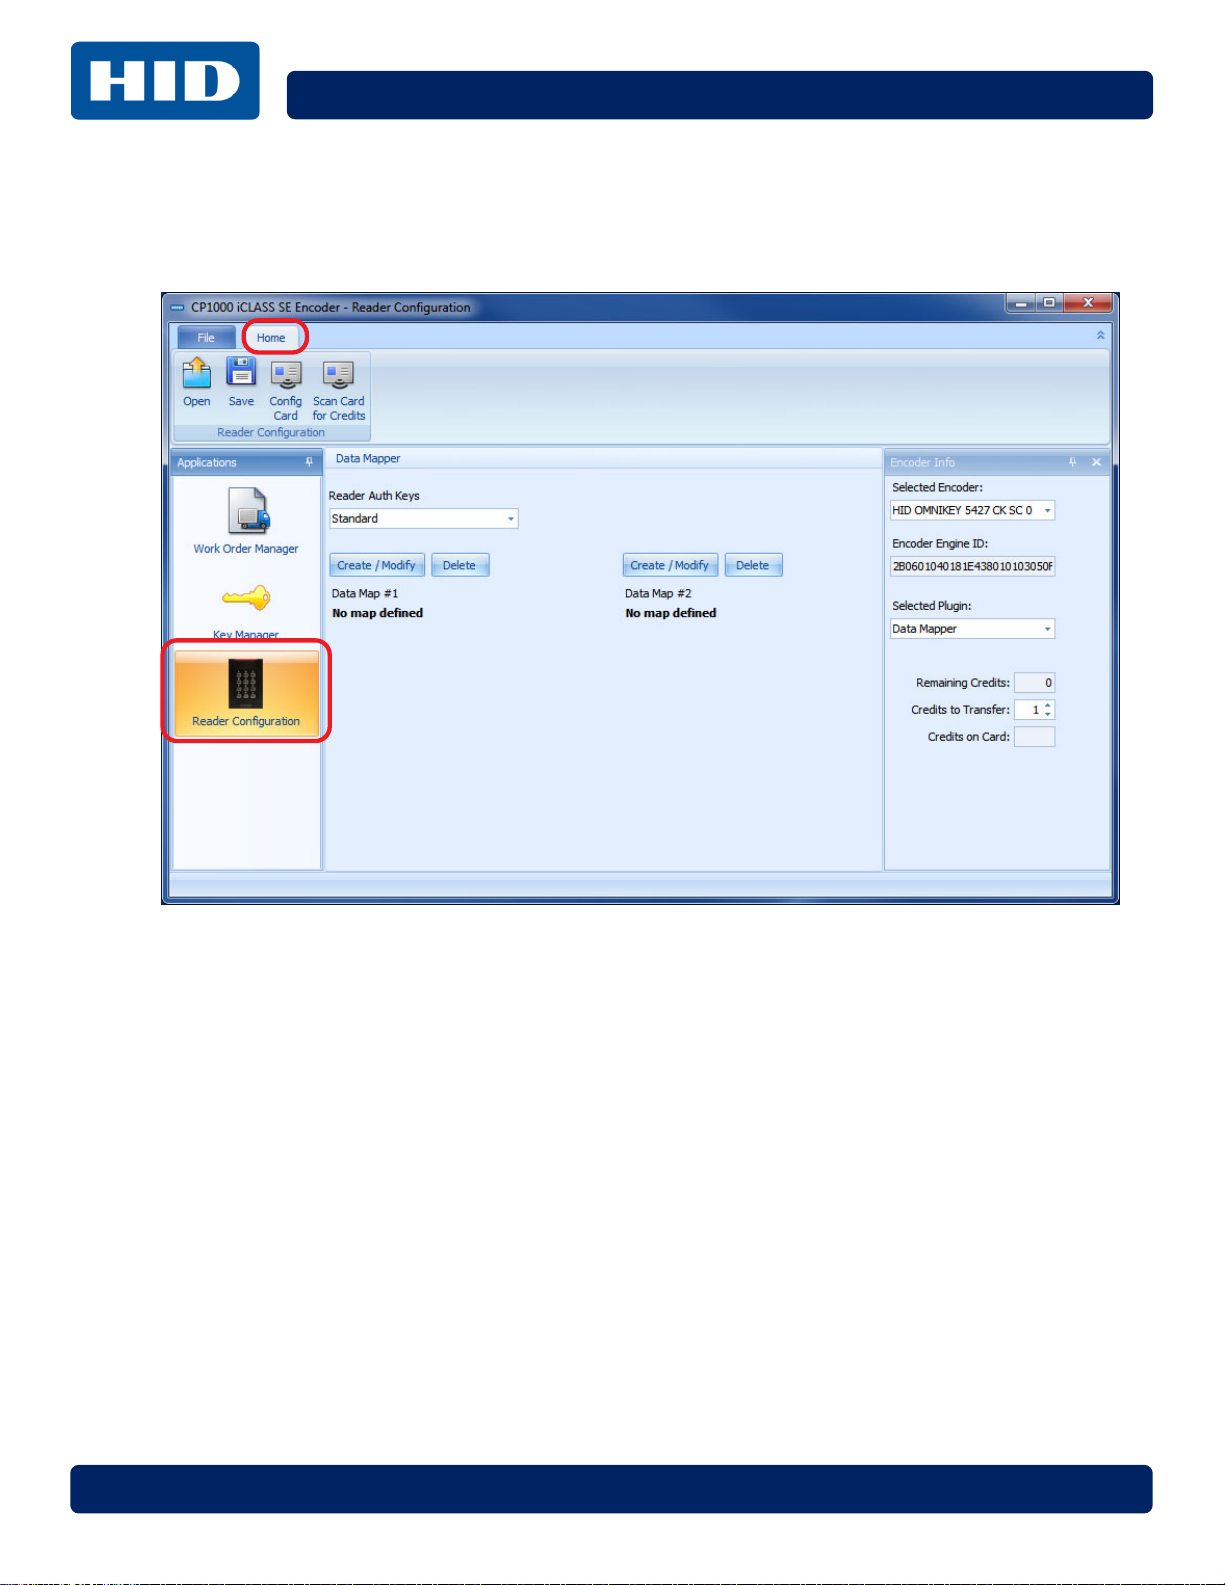
2.2.3 Reader Configuration
The Reader Configuration window is used to create the Reader Data configuration cards (for both
keys and reader limited settings).
This page intentionally left blank.
PLT-01067, Version: A.3 April 2014
Page 26

Application Navigation Page 2-12
This page intentionally left blank.
PLT-01067, Version: A.3 April 2014
Page 27

Setup and Configuration
3.1 System Requirements
Chapter 3
Type
Computer/Processor
Memory
Hard Disk
Display
Software Environment
3.2 General Workflow
The following is the general workflow for setting up the iCLASS SE Encoder:
• Plug the iCLASS SE Encoder device to your PC.
• Plug the USB Flash Drive from iCLASS SE Encoder Kit to your PC.
• Install the iCLASS SE Encoder application and follow the wizard installation instructions.
• Launch the iCLASS SE Encoder application.
• Change the Default Administration keys from the factory when prompted (save plain text key
values in a secure archive).
• Install the Technology Plugins files when prompted.
• Install Formats, if required.
• Upload the Configuration file to install Credits (credentials).
• Load HID Keys to the iCLASS SE Encoder using the Key Manager.
• Create Custom keys (if desired)
• The iCLASS SE Encoder is now ready to start creating and executing Work Orders, and
configuring SE iCLASS readers.
Windows
300 MHz or higher Pentium-compatible CPU
USB Ports
1 GB of RAM or higher
500 MB free space
BGA or higher resolution monitor
Latest Operating System service pack
®
April 2014 PLT-01067, Version: A.3
Page 28
Setup and Configuration Page 3-2
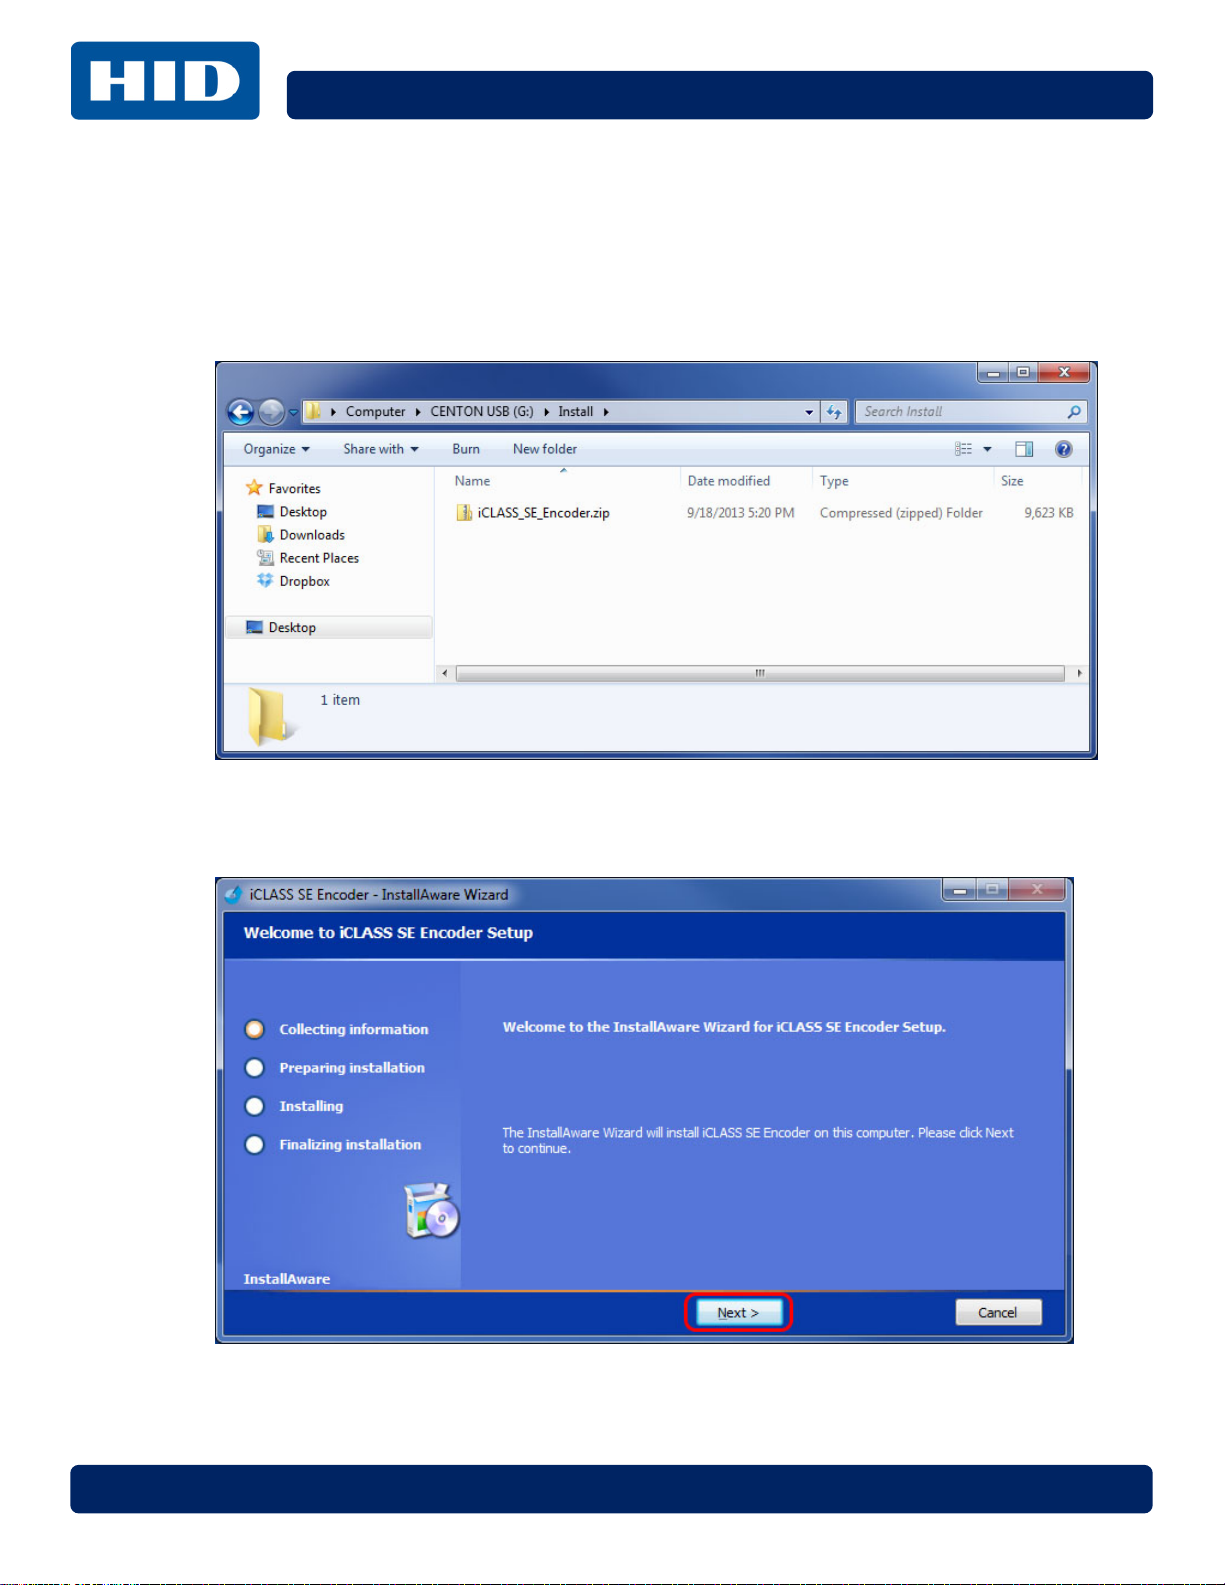
3.3 Installing the iCLASS SE Encoder Software
1. Plug the iCLASS SE Encoder device into a USB port on a PC.
2. Wait for the correct Windows USB drivers to install, if necessary.
3. Plug the HID USB flash drive into a second USB port on the PC.
4. Locate and launch the iCLASS SE Encoder zip file on the USB flash drive.
5. Unzip the file and double-click on the executable file to launch the installation.
6. On the installation wizard click Next to begin the installation.
PLT-01067, Version: A.3 April 2014
Page 29
Page 3-3 Setup and Configuration
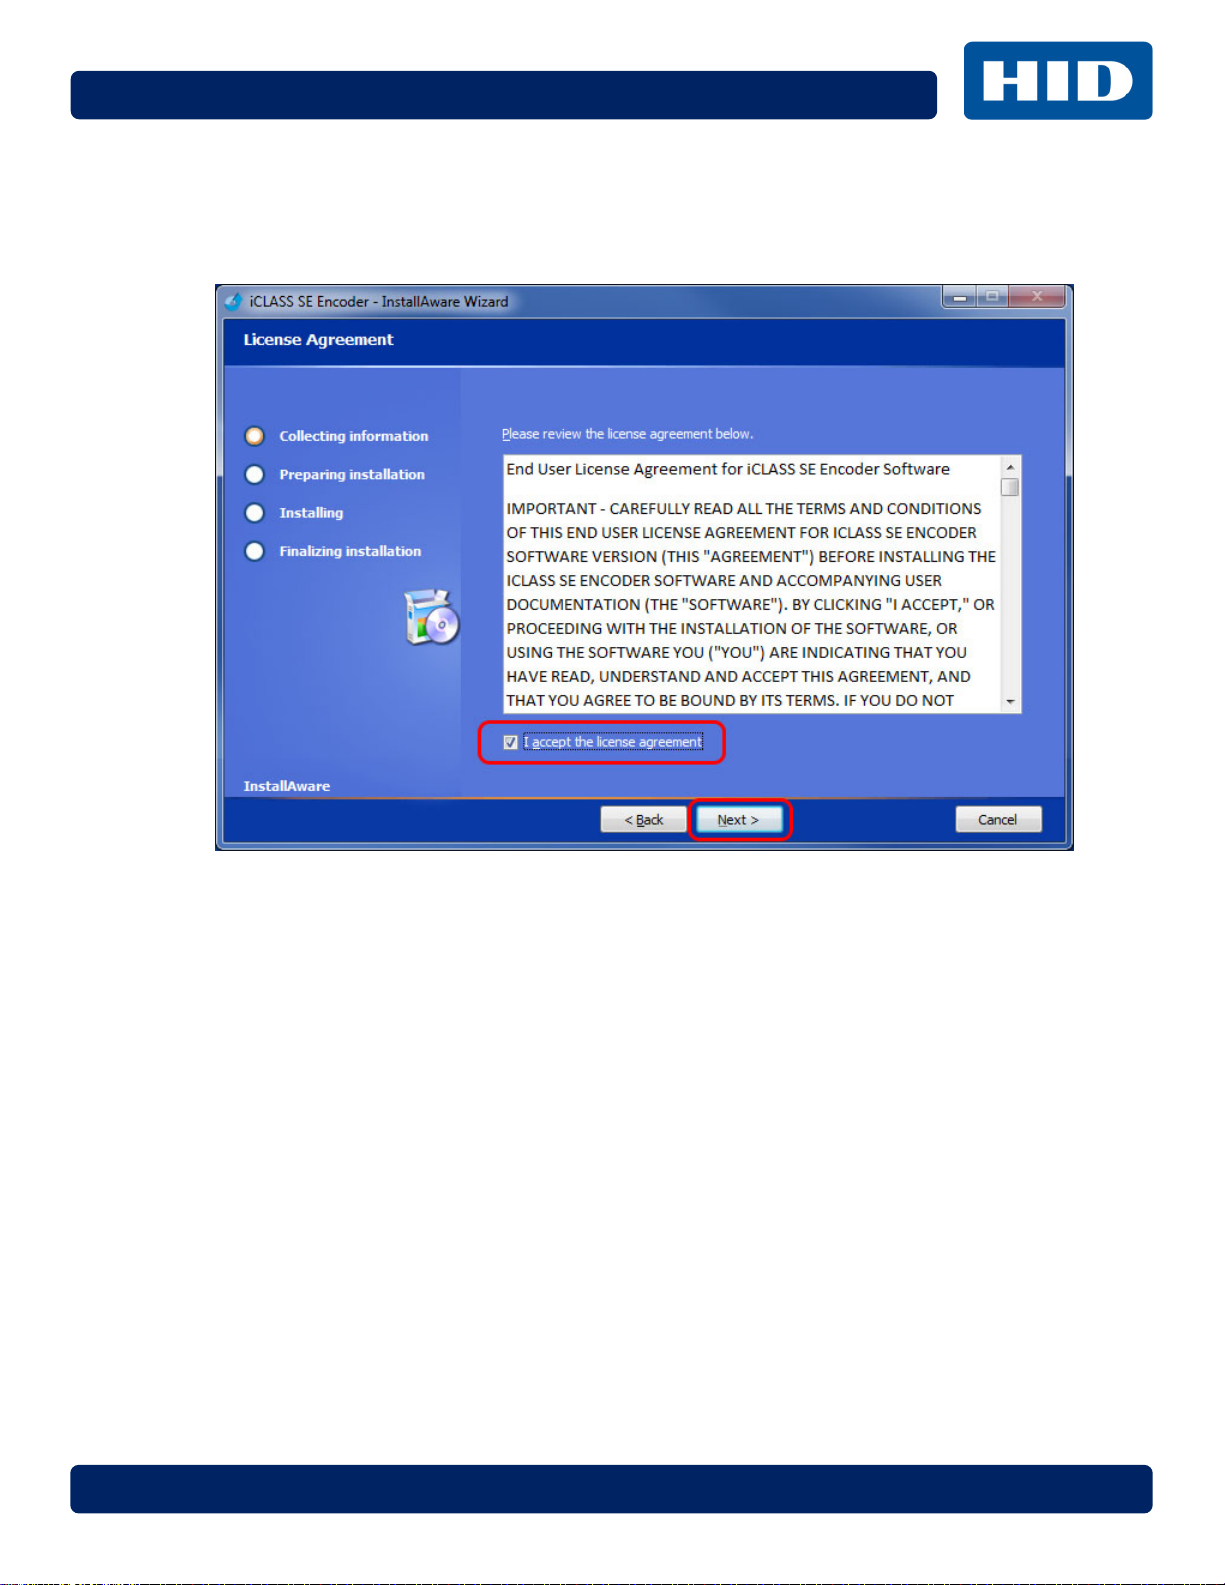
7. On the License Agreement Window, read the license agreement, and if you agree, select the I
accept the license agreement box.
8. Click Next.
April 2014 PLT-01067, Version: A.3
Page 30
Setup and Configuration Page 3-4
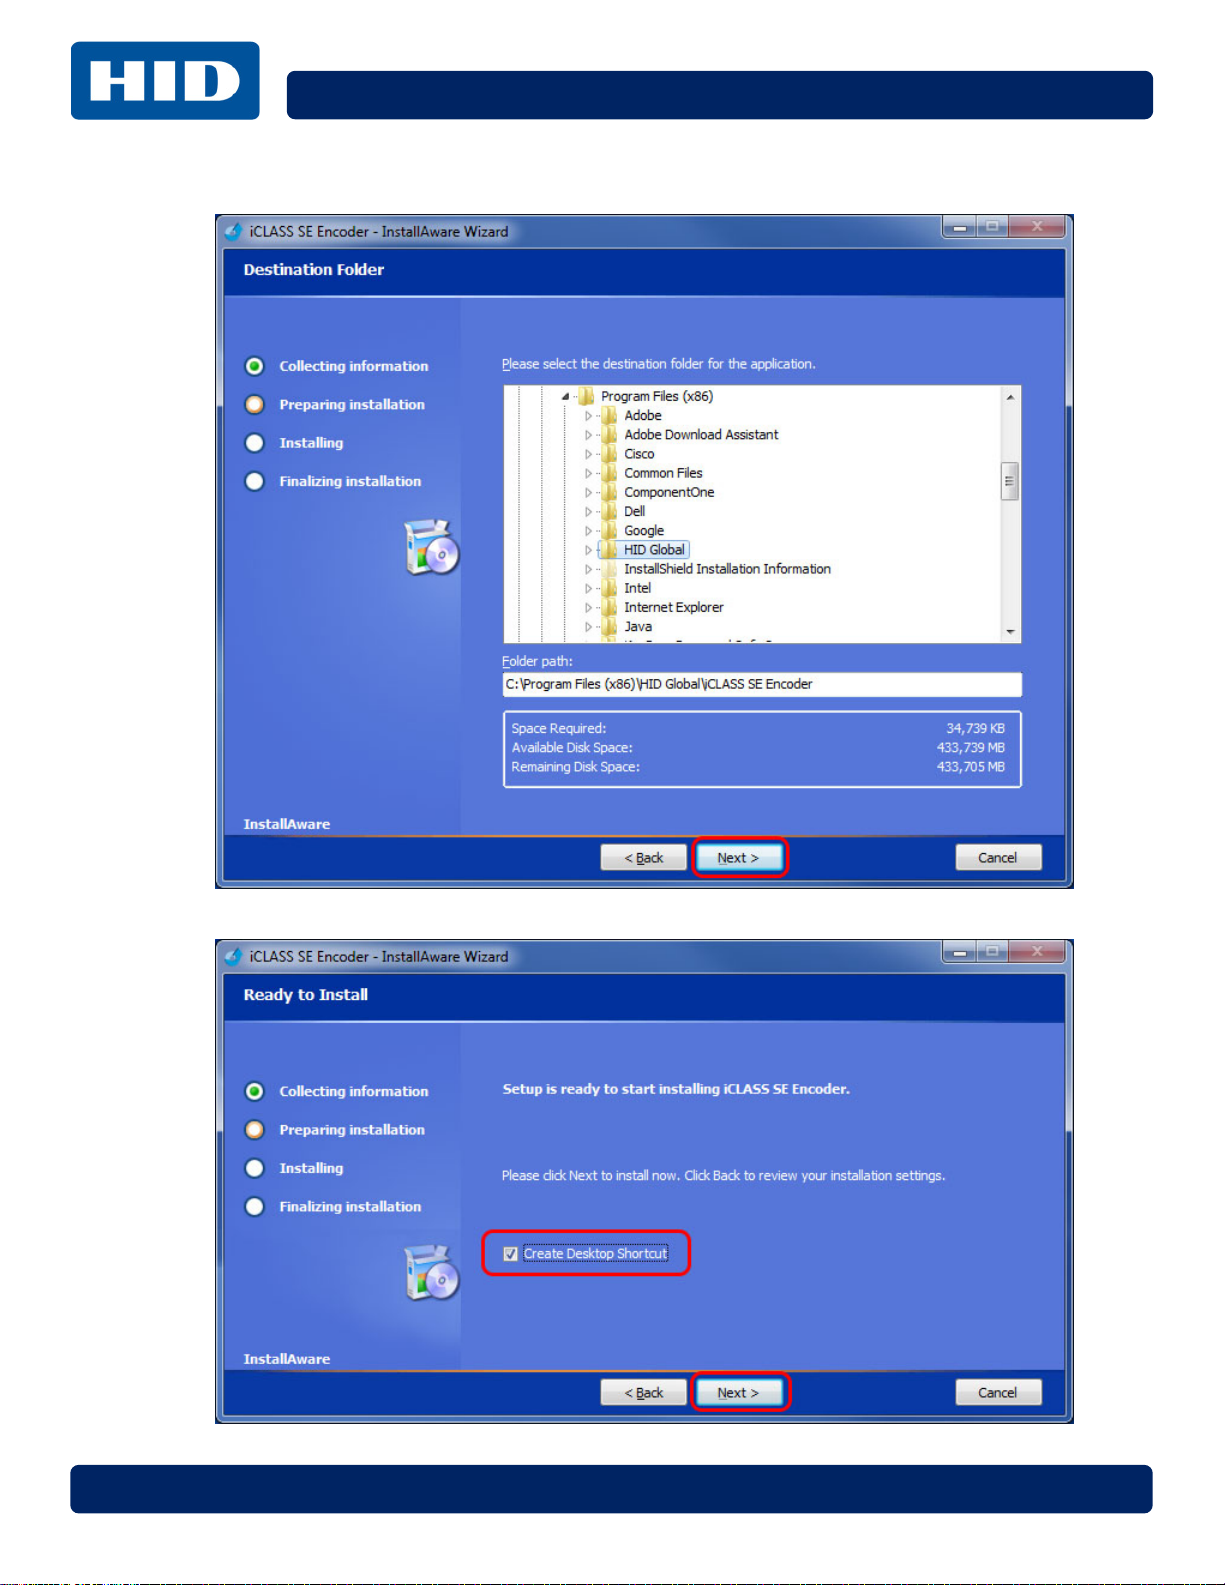
9. Modify the destination installation Folder path, modify if required. Click Next.
10. Select Create Desktop Shortcut, if needed. Click Next.
PLT-01067, Version: A.3 April 2014
Page 31

Page 3-5 Setup and Configuration
11. The option Run iCLASS SE Encoder now is selected by default, uncheck if needed.
12. Click Finish.
13. If the option to Run iCLASS SE Encoder now is selected, the application will open and prompt
you to log in.
14. Login to the Application. Default settings are: Username: admin, Password: admin.
15. Click OK.
April 2014 PLT-01067, Version: A.3
Page 32

Setup and Configuration Page 3-6
3.4 Set Administrative Keys
On the initial installation the following message will appear to change the Administrative Keys. This is
important, for security reasons, and should be taken care of at this time.
1. Click OK.
2. Enter the Admin Keys. This can be done by entering keys that have been saved earlier, or click
Generate Random Keys. Click OK.
Warning: If the PC hosting the application fails, you will lose access to ALL Credential Credits. The
Credential Credits are only recoverable with the Admin Keys, therefore it is important that you
record these keys in a secure location for future reference. See Section 8.1.2: Save Admin Keys for
detailed directions.
3.5 Change Default Admin Password
The Admin password must be modified from the default values immediately (Username: admin,
Password: admin). For security reasons, this access should not be left on the application.
See Section 8.2.3: Change Password for detailed information on modifying the default Admin password.
Warning: When creating, a new Admin user, or changing an Admin password, it is important that
this password is saved in a secure location. At this time there is no password reset feature in place.
3.6 Add System Users
See Section 8.2: Manage Users for detailed information on adding Users.
Warning: When creating, a new Admin user, or changing an Admin password, it is important that
this password is saved in a secure location. At this time there is no password reset feature in place.
PLT-01067, Version: A.3 April 2014
Page 33

Chapter 4
Initial Configuration (Startup)
The following sections cover the initial configuration of the iCLASS SE Encoder.
4.1 Install Plugin Package
A plugin package configures both the iCLASS SE desktop software and the encoder for the type of
technology being used (for example iCLASS). This installation package may also contain all the
counters, configuration, format and key files necessary to execute work orders for a single technology.
By default, the iCLASS SE Encoder Kit ships with Standard keys for iCLASS and Seos, and a small
number of credits to get started.
1. When initially launching the software, the user is prompted to install plugins, if they have not
been installed. Click Yes to begin the installation process.
Note: If you select No, simply go to step 3 and start the process manually.
2. On the HID USB flash drive, locate (browse) the Technology Plugins folder. Double-click the
first Plugin file in the list to install.
Note: Plugin version numbers listed above may vary.
April 2014 PLT-01067, Version: A.3
Page 34

Initial Configuration (Startup) Page 4-2
3. To load the next Plugin, select File menu > Install Plugin Package.
4. Double-click the next Plugin file from the list to load.
5. Repeat the process (step 3 and 4) for all the plugins in the folder.
6. When complete, all the installed plugins are displayed on the File tab > Plugins/Users window.
PLT-01067, Version: A.3 April 2014
Page 35

Page 4-3 Initial Configuration (Startup)
4.2 Install Format
HID programs thousands of formats used in the Security business. Every format has a name and a
number. A format describes how a credential is to be constructed and deciphered (for example: the
number of data fields, size, legal value ranges, and how they are constructed when written to a card).
The application is provided with a default format of H10301. If you require an additional/different
format, you must contact your HID representative for assistance. Therefore this step will not be
required unless you need to load an additional format.
1. Select the File tab > Install Format.
April 2014 PLT-01067, Version: A.3
Page 36

Initial Configuration (Startup) Page 4-4
2. On the HID USB flash drive locate the Format folder. Double-click the Format file to install.
3. When complete, all installed Formats are displayed on the File tab > Formats. All of the
Format information is listed in this window.
Note: By default the UI has the H10301 format loaded.
PLT-01067, Version: A.3 April 2014
Page 37

Page 4-5 Initial Configuration (Startup)
4.3 Upload Encoder Configuration Package
Normally the customer will receive the Credential Credits and Keys in this form (Configuration
Package).
Note: If the Credential Credits and/or Keys are received individually, see Section 4.4: Upload (Top Up)
Credential Credits and Section 4.5: Load HID Keys to Encoder.
1. Select the File tab > Upload Encoder Configuration Package.
April 2014 PLT-01067, Version: A.3
Page 38

Initial Configuration (Startup) Page 4-6
2. Browse to the Configuration Package ordered from HID. Double-click the file to be loaded.
3. A progress bar will display as the keys and credits are loaded.
PLT-01067, Version: A.3 April 2014
Page 39

Page 4-7 Initial Configuration (Startup)
4. When the package has been successfully loaded, a Ready message will appear at the bottom
of the window.
April 2014 PLT-01067, Version: A.3
Page 40

Initial Configuration (Startup) Page 4-8
5. After the upload is complete, the installed package contents are displayed.
PLT-01067, Version: A.3 April 2014
Page 41

Page 4-9 Initial Configuration (Startup)
4.4 Upload (Top Up) Credential Credits
Note: If you have already loaded the Credential Package (Section 4.3), then skip to Section 4.6:
Create Custom Keys.
The term Credential Credit, refers to the tokens purchased from HID that enable all card
transactions. The iCLASS SE Encoder is enabled until the authorized credentials have been
exhausted. The user must then request additional credentials.
The management of these credentials can be conceptually understood as a counter. When a
customer orders “X” credentials, the counter is increased by “X” and the encoder is enabled until the
counter is decremented to 0, or until more credentials are requested.
When loading individual credit files:
1. Select the File tab > Upload Credential Credits.
Note: Credential credits are ordered for specific iCLASS SE Encoder devices and can only be uploaded
once.
April 2014 PLT-01067, Version: A.3
Page 42

Initial Configuration (Startup) Page 4-10
2. Browse to the Credits (counters) ordered from HID. Select the desired file(s) to be loaded.
Note: Credit files can be used only once and are bound to a specific device UID.
3. Click Open.
PLT-01067, Version: A.3 April 2014
Page 43

Page 4-11 Initial Configuration (Startup)
4. To verify the Credential Credits have been loaded properly, go to the Home tab. The Credential
Credits are listed on the right, on the Configuration panel.
Note: To display specific Technology Credits, select the technology type from the Selected
Technology pull-down menu, they will display below.
Credential Credits are
listed by the Technology
selected above.
April 2014 PLT-01067, Version: A.3
Page 44

Initial Configuration (Startup) Page 4-12
4.5 Load HID Keys to Encoder
Note: If you have already loaded the Credential Package (Section 4.3), then skip to Section 4.6: Create
Custom Keys.
The following process will load the HID managed keys to the iCLASS SE Encoder.
1. Select the File tab > Load HID Keys to Encoder.
Note: The Load HID Managed Keys to Encoder action can also be found on the Home tab >
Key Manager window.
PLT-01067, Version: A.3 April 2014
Page 45

Page 4-13 Initial Configuration (Startup)
2. Browse to the Keys ordered from HID. Select the desired file(s) to be loaded.
3. Click Open.
4. A progress bar will display as keys are loaded.
April 2014 PLT-01067, Version: A.3
Page 46

Initial Configuration (Startup) Page 4-14
5. When the Keys are successfully loaded, a message will appear at the bottom of the window.
PLT-01067, Version: A.3 April 2014
Page 47

Page 4-15 Initial Configuration (Startup)
6. After the upload is complete, the installed Keys are displayed on the Key Manager window.
April 2014 PLT-01067, Version: A.3
Page 48

Initial Configuration (Startup) Page 4-16
4.6 Create Custom Keys
To Create Custom Keys, see Section 6.1: Create Key.
PLT-01067, Version: A.3 April 2014
Page 49

Work Order Manager
5.1 Card Information
The Card Info button on the menu bar, will read the UID and memory configuration of the card
presented to the iCLASS SE Encoder.
1. Place a card on the iCLASS SE Encoder.
2. Select Home tab > Work Order Manager.
3. From the Selected Technology field, select the card type from the drop-down menu.
4. The Card information will display.
Note: Not all cards display the same information. In general the information will be:
CSN - Card Serial Number
Card Type (for example, SO Only)
Chapter 5
April 2014 PLT-01067, Version: A.3
Page 50

Work Order Manager Page 5-2
5.2 Create a Work Order
A Work Order is comprised of one or many Work Instructions.
A Work Instruction is a single command issued during Work Order execution. The single Work
Instruction can either read or write to a specific memory location.
1. Select Home tab > Work Order Manager.
2. Select New
3. Select the required technology, and click OK.
4. See Section 5.6: Work Instruction Wizard, for details on each technology wizard. When you have
completed the wizard, return to the following step.
PLT-01067, Version: A.3 April 2014
Page 51

Page 5-3 Work Order Manager
5. Select Yes to save the Work Order.
6. Enter a descriptive name for the Work Order, and click OK
April 2014 PLT-01067, Version: A.3
Page 52

Work Order Manager Page 5-4
7. The Work Order will now be listed on the Work Order Manager Page, and the Work Order
name will display across the top of the window.
PLT-01067, Version: A.3 April 2014
Page 53

Page 5-5 Work Order Manager
5.3 Add a Work Instruction to a Work Order
A Work Instruction is a single routine issued during Work Order execution. The single Work Instruction
can either read or write to a specific memory location.
Note: This example is of a Custom Configuration.
1. Open a Work Order.
2. Double-click to open a Work Order from the list.
April 2014 PLT-01067, Version: A.3
Page 54

Work Order Manager Page 5-6
3. The Work Order information is displayed on the Work Order Manager window.
Select Add Work Instruction
4. Select the required technology, and click OK.
5. See Section 5.6: Work Instruction Wizard, for details on each technology wizard. When you have
completed the wizard, return to the following step.
6. Select Yes to save the Work Order.
PLT-01067, Version: A.3 April 2014
Page 55

Page 5-7 Work Order Manager
7. The Work Instruction will now be listed on the Work Order Manager Page.
April 2014 PLT-01067, Version: A.3
Page 56

Work Order Manager Page 5-8
5.4 Edit a Work Instruction
The following describes the simple process of editing an existing Work Instruction.
1. Open a Work Order.
2. The Work Instruction will now be displayed on the Work Order Manager Page.
3. Click Edit, in the Work Instructions section of the menu bar.
4. Double-click the Work Instruction to edit, from the list.
5. The Work Order Instruction wizard is opened. See Section 5.6: Work Instruction Wizard for details
on each technology wizard.
6. When the changes are saved, the Work Instruction selected is modified.
PLT-01067, Version: A.3 April 2014
Page 57

Page 5-9 Work Order Manager
5.5 Remove a Work Instruction
The following describes the simple process of removing an existing Work Instruction.
1. Open a Work Order.
2. The Work Instruction will now be displayed on the Work Order Manager Page.
3. Click Remove, in the Work Instructions section of the menu bar.
4. Double-click the Work Instruction to remove, from the list.
5. When the changes are save, the Work Instruction will be removed.
April 2014 PLT-01067, Version: A.3
Page 58

Work Order Manager Page 5-10
5.6 Work Instruction Wizard
The Work Instruction Wizard appears any time you:
• Create a New Work Order
• Add a Work Instruction to a Work Order
• Edit a Work Instruction
There are currently five (5) technology types available, with a corresponding Work Instruction wizard.
• iCLASS
• MIFARE Classic
• MIFARE DESFire EV1
• Prox
• Seos
See the following for detailed information on each wizard.
5.6.1 iCLASS Work Instruction: HID Access Application
This section covers the Work Instruction wizard for iCLASS, with the HID Access Application
encoding.
1. Select the iCLASS technology type, and click OK.
2. The Work Instruction Wizard will open to allow the user to configure the Work Instruction for
iCLASS. Click Next.
PLT-01067, Version: A.3 April 2014
Page 59

Page 5-11 Work Order Manager
3. Select Data Format: The user can make selections from the following. When complete click
Next.
Field Description
Instruction Type Read, Write, or Roll Card Authentication Key
Data Type HID Access Application, or Custom
Overwrite Existing Credential: Allows the iCLASS SE Encoder to write over
Options
Credential Type
an application that has already been recorded in the Work Order database.
Enable User PIN Entry (available with SR (HID Access Application and SO)
only)
SE (SO only), SR (HID Access Application and SO), or HID Access
Application.
Format: Select a Format from the list.
Note: For this example we are selecting a Write/HID Application/SE configuration.
April 2014 PLT-01067, Version: A.3
Page 60

Work Order Manager Page 5-12
4. Define Format Parameters: The user selects then customizes each parameter defined for the
selected format. Simply select the line to modify, each parameter is editable with text or from a
drop-down menu.
Field Description
Name
Parameter Type
Enforce Unique
Numbers
Default Value The default Static value is used when auto-creating a new Credential record.
Increment Step The step value used to increment Auto Number sequences.
Auto Numbers
The name is read from the Format file. It is recommended to not change this
name unless necessary.
This can be Auto Increment, Static, or Manual User Entry.
Note: Type is typically determined by the Format file.
Check this box for a runtime check of manual value entered by user to
guarantee uniqueness, prior to executing the Work Order.
This field sets the Auto Number Sequences for the Work Instruction. The ranges
are set by selecting the ellipses (…) and entering the ranges (see following
graphic).
Auto Number Sequences window
Simply select Add Range and set the range in the editable fields. Click OK.
5. Click Next to continue with the Wizard.
PLT-01067, Version: A.3 April 2014
Page 61

Page 5-13 Work Order Manager
6. Memory Map Selection: Select card configuration and location where the data will be written.
Click Next.
Field Description
Expected Card Type
Card Configuration
Configured or Unconfigured. Note: If Unconfigured is selected, the Card
Configuration field below must be set.
Select the memory configuration from the drop-down list.
Options are: 2K, 16k2, 16k16, 16k2+16k1, 16k16+16k1, 2K (SO Only), 16k2 (SO Only),
16k16 (SO Only), 16k2+16k1 (SO Only), 16k16+16k1 (SO Only)
Default is 2K.
Note: Memory Map will be grayed out with the Data Type set to HID Access Application, as the
HID Access Application is always encoded in the same place. However, if the Data Type is set
to Custom, the Memory Map will be active.
Expected Card Type: Configured
Expected Card Type: Unconfigured
April 2014 PLT-01067, Version: A.3
Page 62

Work Order Manager Page 5-14
7. Key Selection: Select a key to lock the AppArea after the data is written, and click Next.
Field Description
Card Authentication Keys Custom or HID defined Key Sets may be selected.
SO Encryption Key Custom or HID defined SO Encryption Key Sets may be selected.
8. You have completed the wizard. Click Finish.
9. Return to Section 5.2: Create a Work Order, step 5 to save the Work Order.
PLT-01067, Version: A.3 April 2014
Page 63

Page 5-15 Work Order Manager
5.6.2 iCLASS Work Instruction: Custom Encoding
This section covers the Work Instruction wizard for iCLASS, with Custom Encoding.
1. Select the iCLASS technology type, and click OK.
2. The Work Instruction Wizard will open to allow the user to configure the Work Instruction for
iCLASS. Click Next.
April 2014 PLT-01067, Version: A.3
Page 64

Work Order Manager Page 5-16
3. Select Data Format: The user can make selections from the following. When complete click
Next.
Field Description
Instruction Type Read, Write, or Roll Card Authentication Key
Data Type For this example Custom must be selected.
Options Not available with Custom
Custom Data Plugin Type: ASCII Text, Hexadecimal Data, Unicode Text
Name: Modify the Name, if needed. Note: Name field constitutes column in
Work Order data view.
Note: For this example we are selecting a Write/Custom/ASCII Text/Custom_Field.
PLT-01067, Version: A.3 April 2014
Page 65

Page 5-17 Work Order Manager
4. Memory Map Selection: Select card configuration and location where the data will be written.
Click Next.
Field Description
Expected Card Type Configured or Unconfigured.
Select the memory configuration from the drop-down list.
Card Configuration
Memory Map Define (select) the AppArea/Block.
Options are: 2K, 16k2, 16k16, 16k2+16k1, 16k16+16k1, 2K (SO Only), 16k2 (SO Only),
16k16 (SO Only), 16k2+16k1 (SO Only), 16k16+16k1 (SO Only)
Default is 2K.
Note: This is a scrollable field.
April 2014 PLT-01067, Version: A.3
Page 66

Work Order Manager Page 5-18
5. Key Selection: Select a key to lock the AppArea after the data is written, and click Next.
Field Description
Card Authentication Key: Custom or HID defined Key Sets may be selected.
Keys
Encryption
SO Encryption Key: Custom or Standard Key Sets may be selected.
New Card Authentication Key: None or Custom Key Sets may be selected.
Encryption Type: None, or 3DES
Encryption Key: This field appears with the 3DES selection above. Select the
Encryption Keys loaded.
6. You have completed the wizard. Click Finish.
7. Return to Section 5.2: Create a Work Order step 5 to save the Work Order.
PLT-01067, Version: A.3 April 2014
Page 67

Page 5-19 Work Order Manager
5.6.3 MIFARE Classic Work Instruction: HID Access Application
This section covers the Work Instruction wizard for MIFARE Classic, with the HID Access Application
encoding.
1. Select the MIFARE Classic technology type, and click OK.
2. The Work Instruction Wizard will open to allow the user to configure the Work Instruction for
MIFARE Classic. Click Next.
April 2014 PLT-01067, Version: A.3
Page 68

Work Order Manager Page 5-20
3. Select Data Format: The user can make selections from the following. When complete click
Next.
Field Description
Instruction Type Read, Write, Roll Card Authentication Key, or Move Genuine SO Sector
Data Type HID Access Application, or Custom
Overwrite Existing Credential: Allows the iCLASS SE Encoder to write over an
Options
application that has already been recorded in the Work Order database.
Enable User PIN Entry (available with SR (HID Access Application and SO) only)
Credential Type
SE (SO only), SR (HID Access Application and SO), or HID Access Application.
Format: Select a Format from the list.
Note: For this example we are selecting a Write/HID Application/SE configuration.
PLT-01067, Version: A.3 April 2014
Page 69

Page 5-21 Work Order Manager
4. Define Format Parameters: The user selects then customizes each parameter defined for the
selected format. Simply select the line to modify, each parameter is editable with text or from a
drop-down menu.
Field Description
Name
Parameter Type This can be Auto Increment, Static, or Manual User Entry.
Enforce Unique
Numbers
Default Value The default Static value for Static and Manual parameters.
Increment Step The step value used to increment Auto Number sequences.
Auto Numbers
The name is read from the Format file. It is recommended to not change this
name unless necessary.
Check this box for a runtime check of manual value entered by user to
guarantee uniqueness, prior to executing the Work Order.
This field sets the Auto Number Sequences for the Work Instruction. The ranges
are set by selecting the ellipses (…) and entering the ranges (see following
graphic).
Auto Number Sequences window
Simply select Add Range and set the range in the editable fields. Click OK.
5. Click Next to continue with the Wizard.
April 2014 PLT-01067, Version: A.3
Page 70

Work Order Manager Page 5-22
6. Key Selection: Select a key to lock the AppArea after the data is written, and click Next.
Field Description
Key Set: Standard, Custom or HID defined Key Sets may be selected.
Authentication Keys are the keys currently used to protect the Sector.
Select Default if working with a blank card or Sector.
Keys
Authentication Key A: Select an option from the drop-down menu.
Authentication Key B: Select an option from the drop-down menu.
SO Encryption Key: Select an option from the drop-down menu.
MAD Write Key B: Select an option from the drop-down menu.
7. You have completed the wizard. Click Finish.
8. Return to Section 5.2: Create a Work Order, step 5 to save the Work Order.
PLT-01067, Version: A.3 April 2014
Page 71

Page 5-23 Work Order Manager
5.6.4 MIFARE Classic Work Instruction: Custom Encoding
This section covers the Work Instruction wizard for MIFARE Classic, with Custom Encoding.
1. Select the MIFARE Classic technology type, and click OK.
2. The Work Instruction Wizard will open to allow the user to configure the Work Instruction for
MIFARE Classic. Click Next.
April 2014 PLT-01067, Version: A.3
Page 72

Work Order Manager Page 5-24
3. Select Data Format: The user can make selections from the following. When complete click
Next.
Field Description
Instruction Type Read, Write, Roll Card Authentication Key, or Roll Card Authentication Key.
Data Type For this example Custom must be selected.
Options Not available with Custom.
Plugin Type: ASCII Text, Hexadecimal Data, Unicode Text
Custom Data
Name: Modify the Name, if needed. Note: Name field constitutes column in
Work Order data view.
Note: For this example we are selecting a Write/Custom/ASCII Text/Custom_Field.
PLT-01067, Version: A.3 April 2014
Page 73

Page 5-25 Work Order Manager
4. Memory Map Selection: Select card configuration and location where the data will be written.
Click Next.
Field Description
Configuration
Update MAD
Change access
conditions
Memory Map
Card Type: 1K, or 4K
Sector Trailer Authentication Key: Key A, or Key B
Select the check box to update the MIFARE Application Directory (MAD).
Note: This is an optional parameter (sector 0 is always reserved for this
purpose).
Application ID: Enter the Application ID your company has registered with NXP
to update.
Select the check box to Change access conditions
Sector Trailer Access: Select an option from the drop-down menu.
Note: See the NXP Datasheet for more detail on Sector Trailer.
Block Access: Select an option from the drop-down menu.
Define (select) the MIFARE Sector/Block (scrollable field).
Note: The legacy HID application can be encoded on Sector 1. This is a fixed
location. The HID SIO application can be encoded in Sector 4 generally, but can
be moved.
April 2014 PLT-01067, Version: A.3
Page 74

Work Order Manager Page 5-26
5. Key Selection: Select a key to lock the AppArea after the data is written, and click Next.
Field Description
Key Set: Not an option.
Authentication Keys are the keys currently used to protect the Sector.
Select Default if working with a blank card or Sector.
Keys
Authentication Key A: Select an option from the drop-down menu.
Authentication Key B: Select an option from the drop-down menu.
SO Encryption Key: Not available with the Custom option.
MAD Write Key B: Select an option from the drop-down menu.
6. You have completed the wizard. Click Finish.
7. Return to Section 5.2: Create a Work Order, step 5 to save the Work Order.
PLT-01067, Version: A.3 April 2014
Page 75

Page 5-27 Work Order Manager
5.6.5 MIFARE DESFire EV1 Work Instruction: HID Access Application
This section covers the Work Instruction wizard for MIFARE DESFire EV1, with the HID Access
Application encoding.
1. Select the MIFARE DESFire EV1 technology type, and click OK.
2. The Work Instruction Wizard will open to allow the user to configure the Work Instruction for
MIFARE DESFire EV1. Click Next.
April 2014 PLT-01067, Version: A.3
Page 76

Work Order Manager Page 5-28
3. Select Data Format: The user can make selections from the following. When complete click
Next.
Field Description
Instruction Type Read, Write, or Roll Card Authentication Key
Data Type HID Access Application, or Custom
Overwrite Existing Credential: Allows the iCLASS SE Encoder to write over an
Options
application that has already been recorded in the Work Order database.
Enable User PIN Entry (available with SR (HID Access Application and SO) only)
Credential Type
SE (SO only), SR (HID Access Application and SO), or HID Access Application.
Format: Select a Format from the list.
Note: For this example we are selecting a Write/HID Access Application configuration.
PLT-01067, Version: A.3 April 2014
Page 77

Page 5-29 Work Order Manager
4. Define Format Parameters: The user selects then customizes each parameter defined for the
selected format. Simply select the line to modify, each parameter is editable with text or from a
drop-down menu.
Field Description
Name
Parameter Type This can be Auto Increment, Static, or Manual User Entry.
Enforce Unique
Numbers
Default Value The default Static value for Static and Manual parameters.
Increment Step The step value used to increment Auto Number sequences.
Auto Numbers
The name is read from the Format file. It is recommended to not change this
name unless necessary.
Check this box for a runtime check of manual value entered by user to
guarantee uniqueness, prior to executing the Work Order.
This field sets the Auto Number Sequences for the Work Instruction. The ranges
are set by selecting the ellipses (…) and entering the ranges (see following
graphic).
Auto Number Sequences window
Simply select Add Range and set the range in the editable fields. Click OK.
5. Click Next to continue with the Wizard.
April 2014 PLT-01067, Version: A.3
Page 78

Work Order Manager Page 5-30
6. Key Selection: Select a key to lock the AppArea after the data is written, and click Next.
Field Description
Key Set
Application Keys
Key Type Displays the Key type.
Crypto Method Triple DES, AES, or 3 Key Triple DES (24 byte keys)
Key Diversifier Algorithm
Auth Key
Key Set: Custom or HID defined Key Sets may be selected
Change Key Set: Standard (No option).
None, NIST SENC HMAC, NXP AV1 1 Key Triple DES, or NXP AV1 2 Key
Triple DES
None, NXP Default Transport Key, or HID SO PICC Master Key. Also
custom Auth Key will be listed.
PLT-01067, Version: A.3 April 2014
Page 79

Page 5-31 Work Order Manager
7. You have completed the wizard. Click Finish.
8. Return to see Section 5.2: Create a Work Order, step 5 to save the Work Order.
April 2014 PLT-01067, Version: A.3
Page 80

Work Order Manager Page 5-32
5.6.6 MIFARE DESFire EV1 Work Instruction: Custom Encoding
This section covers the Work Instruction wizard for MIFARE DESFire EV1, with Custom Encoding.
1. Select the MIFARE DESFire EV1 technology type, and click OK.
2. The Work Instruction Wizard will open to allow the user to configure the Work Instruction for
MIFARE DESFire EV1. Click Next.
PLT-01067, Version: A.3 April 2014
Page 81

Page 5-33 Work Order Manager
3. Select Data Format: The user can make selections from the following. When complete click
Next.
Field Description
Instruction Type Read, Write, Roll Card Authentication Key, or Move Genuine SO Sector
Data Type For this example Custom must be selected.
Options Not available with Custom.
Plugin Type: ASCII Text, Hexadecimal Data, Unicode Text
Custom Data
Name: Modify the Name, if needed. Note: Name field constitutes column in
Work Order data view.
Note: For this example we are selecting a Write/Custom/ASCII Text/Custom_Field.
April 2014 PLT-01067, Version: A.3
Page 82

Work Order Manager Page 5-34
4. Memory Map Selection: Select card configuration and location where the data will be written.
Click Next.
Field Description
Application ID
File Number Select the file number (Range 0-31).
File Type Standard Data File is the only supported option.
File Size (bytes) Select the file size in bytes. Default is 16 bytes.
File Communication
Settings
Key Change Mode
PICC Master Key
Properties
Application Master
Key Properties
Enter the 3-byte Application ID your company has registered with NXP, in
hexadecimal form.
Ciphered is the only supported option.
To change a key, requires authentication with the following: Master Key, Key 1-13,
Authenticate with key to be changed, or Do not allow keys to be changed
Select the PICC Master Properties from the list.
Note: These options can only be managed when working with a blank card.
Select the Application Properties from the list.
PLT-01067, Version: A.3 April 2014
Page 83

Page 5-35 Work Order Manager
5. Key Selection: Set the Application Key options in accordance with the NXP datasheets, and
click Next. All options can be set from the associated drop-down menu.
Note: Selections must abide by the rules you set up for the card.
Field Description
Application Keys
Key Type Displays the Key type.
Crypto Method Triple DES, AES, or 3 Key Triple DES (24 byte keys)
Key Diversifier Algorithm None, NXP AV1 1 Key Triple DES, or NXP AV1 2 Key Triple DES
None, or NXP Default Transport Key.
Auth Key
Change Key
File Keys (Note keys selected in the following must be configured in the Application Keys section
above)
Read Key Select Read Key number (Range 1-13)
Note: Only applicable if you selected any options to Overwrite or
Delete existing applications /files.
None, or NXP Default Transport Key.
Note: Only applicable if you selected any options to Overwrite or
Delete existing applications /files.
Write Key Select Write Key number (Range 1-13)
Read/Write Key Select Read/Write Key number (Range 1-13)
April 2014 PLT-01067, Version: A.3
Page 84

Work Order Manager Page 5-36
6. You have completed the wizard. Click Finish.
7. Return to see Section 5.2: Create a Work Order, step 5 to save the Work Order.
PLT-01067, Version: A.3 April 2014
Page 85

Page 5-37 Work Order Manager
5.6.7 Prox Work Instruction: HID Access Application
This section covers the Work Instruction wizard for Prox, with the HID Access Application encoding.
1. Select the Prox technology type, and click OK.
2. The Work Instruction Wizard will open to allow the user to configure the Work Instruction for
Prox. Click Next.
April 2014 PLT-01067, Version: A.3
Page 86

Work Order Manager Page 5-38
3. Select Data Format: The user can make selections from the following. When complete click
Next.
Field Description
Instruction Type Read, or Write.
Options
Credential Type Format: Select a Format from the list.
Overwrite Existing Credential: Allows the iCLASS SE Encoder to write over
an application that has already been recorded in the Work Order database.
Note: For this example we are selecting a Read/Format: H10301.
PLT-01067, Version: A.3 April 2014
Page 87

Page 5-39 Work Order Manager
4. Define Format Parameters: The user selects then customizes each parameter defined for the
selected format. Simply select the line to modify, each parameter is editable with text or from a
drop-down menu.
Field Description
Name
Parameter Type
Enforce Unique
Numbers
Default Value The default Static value for Static and Manual parameters.
Increment Step The step value used to increment Auto Number sequences.
Auto Numbers
The name is read from the Format file. It is recommended to not change this
name unless necessary.
This can be Auto Increment, Static, or Manual User Entry.
Note: Type is typically determined by the Format file.
Check this box for a runtime check of manual value entered by user to
guarantee uniqueness, prior to executing the Work Order.
This field sets the Auto Number Sequences for the Work Instruction. The ranges
are set by selecting the ellipses (…) and entering the ranges (see following
graphic).
Auto Number Sequences window
Simply select Add Range and set the range in the editable fields. Click OK.
5. Click Next to continue with the Wizard.
April 2014 PLT-01067, Version: A.3
Page 88

Work Order Manager Page 5-40
6. You have completed the wizard. Click Finish.
7. Return to see Section 5.2: Create a Work Order, step 5 to save the Work Order.
PLT-01067, Version: A.3 April 2014
Page 89

Page 5-41 Work Order Manager
5.6.8 Seos Work Instruction: HID Access Application
This section covers the Work Instruction wizard for Seos, with the HID Access Application encoding.
1. Select the Seos technology type, and click OK.
2. The Work Instruction Wizard will open to allow the user to configure the Work Instruction for
Prox. Click Next.
April 2014 PLT-01067, Version: A.3
Page 90

Work Order Manager Page 5-42
3. Select Data Format: The user can make selections from the following. When complete click
Next.
Field Description
Instruction Type Read, Write, or Roll Card Authentication Key
Data Type
Options
Credential Type Format: Select a Format from the list.
HID Access Application, or Custom (Custom apps are not supported at this
time).
Overwrite Existing Credential: Allows the iCLASS SE Encoder to write over
an application that has already been recorded in the Work Order database.
Note: For this example we are selecting a Write/HID Application configuration.
PLT-01067, Version: A.3 April 2014
Page 91

Page 5-43 Work Order Manager
4. Define Format Parameters: The user selects then customizes each parameter defined for the
selected format. Simply select the line to modify, each parameter is editable with text or from a
drop-down menu.
Field Description
Name
Parameter Type
Enforce Unique
Numbers
Default Value The default Static value for Static and Manual parameters.
Increment Step The step value used to increment Auto Number sequences.
Auto Numbers
The name is read from the Format file. It is recommended to not change this
name unless necessary.
This can be Auto Increment, Static, or Manual User Entry.
Note: Type is typically determined by the Format file.
Check this box for a runtime check of manual value entered by user to
guarantee uniqueness, prior to executing the Work Order.
This field sets the Auto Number Sequences for the Work Instruction. The ranges
are set by selecting the ellipses (…) and entering the ranges (see following
graphic).
Auto Number Sequences window
Simply select Add Range and set the range in the editable fields. Click OK.
5. Click Next to continue with the Wizard.
April 2014 PLT-01067, Version: A.3
Page 92

Work Order Manager Page 5-44
6. Key Selection: Select a key to lock the AppArea after the data is written, and click Next. .
Field Description
Key Sets Auth Key Set: Standard, Custom or HID defined Key Sets may be
selected
Change Key Set: Not applicable.
Encryption Keys SO Encryption Key: Standard, Custom or HID defined Key Sets may be
selected
7. You have completed the wizard. Click Finish.
8. Return to see Section 5.2: Create a Work Order, step 5 to save the Work Order.
PLT-01067, Version: A.3 April 2014
Page 93

Page 5-45 Work Order Manager
5.6.9 Work Instruction: Roll Card Authentication Key
This section covers the Work Instruction wizard for Roll Card Authentication Key Encoding.
1. Select the technology type, and click OK.
2. The Work Instruction Wizard will open to allow the user to configure the Work Instruction for
Prox. Click Next.
April 2014 PLT-01067, Version: A.3
Page 94

Work Order Manager Page 5-46
3. Select Data Format: The user can make selections from the following. When complete click
Next.
Field Description
Instruction Type Roll Card Authentication Key
Data Type Not available
Credential Type Not available
Note: For this example we are selecting a Roll Card Authentication Key configuration.
PLT-01067, Version: A.3 April 2014
Page 95

Page 5-47 Work Order Manager
4. Key Selection: Select a key to lock the AppArea after the data is written, and click Next.
iCLASS Key Selection
The following section is the Key Selection window for iCLASS Encoding.
Field Description
Key Card Authentication Key: Standard, or HID defined Key Sets may be
selected
New Card Authentication Key: Standard, or HID defined Key Sets may
be selected
SO Encryption Key: Standard, or HID defined Key Sets may be
selected
April 2014 PLT-01067, Version: A.3
Page 96

Work Order Manager Page 5-48
MIFARE Classic Key Selection
The following section is the Key Selection window for MIFARE Classic Encoding.
Field Description
Keys Key Set: Custom, Standard, or HID defined Key Sets may be selected.
Roll Key Set: Custom or HID defined Key Sets may be selected.
Authentication Key A: Select an option from the drop-down menu.
Change Key A: Select an option from the drop-down menu.
Authentication Key B: Select an option from the drop-down menu.
Change Key B: Select an option from the drop-down menu.
SO Encryption Key: Select an option from the drop-down menu.
Change SO Encryption Key: Select an option from the drop-down menu.
MAD Write Key A: Select an option from the drop-down menu.
MAD Write Key B: Select an option from the drop-down menu.
PLT-01067, Version: A.3 April 2014
Page 97

Page 5-49 Work Order Manager
MIFARE DESFire EV1 Key Selection
The following section is the Key Selection window for MIFARE DESFire EV1 Encoding.
Field Description
Keys Key Set: Standard or HID defined Key Sets may be selected.
Change Key Set: Standard or HID defined Key Sets may be selected.
Custom PICC Master Key: Select to open the Application Keys section for
configuration (see section circled below).
April 2014 PLT-01067, Version: A.3
Page 98

Work Order Manager Page 5-50
Seos Key Selection
The following section is the Key Selection window for Seos Encoding.
Field Description
Key Sets
Encryption Keys SO Encryption Key: Standard or HID Standard Key Sets may be selected.
Auth Key Set: Standard or HID defined Key Sets may be selected.
Change Key Set: Standard or Custom Key Sets may be selected.
5. You have completed the wizard. Click Finish.
6. Return to Section 5.2: Create a Work Order, step 5 to save the Work Order.
PLT-01067, Version: A.3 April 2014
Page 99

Page 5-51 Work Order Manager
5.6.10 Work Instruction: Move Genuine SO Sector
This section covers the Work Instruction wizard for Move Genuine SO Sector process.
1. Select the MIFARE Classic technology type, and click OK.
2. The Work Instruction Wizard will open to allow the user to configure the Work Instruction for
Prox. Click Next.
April 2014 PLT-01067, Version: A.3
Page 100

Work Order Manager Page 5-52
3. Select Data Format: Select the following. When complete click Next.
Field Description
Instruction Type Move Genuine SO Sector
PLT-01067, Version: A.3 April 2014
 Loading...