

Page 1

Dolphin® 7900 Mobile Computer
Windows Mobile™ 2003 Second Edition Software for Pocket PCs
™
User’s Guide - Prelim. Draft Rev (a)
Page 2

Disclaimer
Hand Held Products, Inc. d/b/a HHP (“HHP”) reserves the right to make changes in specifications and other information contained
in this document without prior notice, and the reader should in all cases consult HHP to determine whether any such changes
have been made. The information in this publication does not represent a commitment on the part of HHP.
HHP shall not be liable for technical or editorial errors or omissions contained herein; nor for incidental or consequential damages
resulting from the furnishing, performance, or use of this material.
This document contains proprietary information that is protected by copyright. All rights are reserved. No part of this document
may be photocopied, reproduced, or translated into another language without the prior written consent of HHP.
© 2004 Hand Held Products, Inc. All rights reserved.
Web Address: www.hhp.com
Trademarks
Dolphin, HomeBase, Mobile Base, and QuadCharger are trademarks or registered trademarks of Hand Held Products, Inc.
Windows Mobile, Windows, Windows NT, Windows 2000, Windows ME, Windows XP, ActiveSync, Outlook, and the Windows
logo are trademarks or registered trademarks of Microsoft Corporation.
Intel is a registered trademark of Intel Corporation.
Chapter 9 (pages 9-1–9-11) contains copyrighted information from SyChip, Inc.
Chapter 9 (pages 9-12–9-25) contains copyrighted information from Meetinghouse Corporation. Meetinghouse, the
Meetinghouse logo, and all other Meetinghouse trademarks/service marks contained herein are trademarks or registered
trademarks of Meetinghouse.
Chapter 10 is copyrighted information used by permission from Bluetooth SIG, Inc.
The Bluetooth trademarks are owned by Bluetooth SIG, Inc., U.S.A. and licensed to HHP.
Chapter 11 (11-3–11-15 and 11-17–11-22) contains information with permission from INTRINSYC Software, Inc.
Other product names mentioned in this manual may be trademarks or registered trademarks of their respective companies and
are hereby acknowledged.
Page 3

Table of Contents
Chapter 1 - Introduction
Required Safety Labels....................................................................................................................... 1-2
Location........................................................................................................................................ 1-2
Regulatory and Safety Approvals for all Dolphin 7900 Terminals ................................................... 1-3
Dolphin 7900 WLAN or WPAN Radio....................................................................................... 1-4
Dolphin 7900 WWAN Radio....................................................................................................... 1-5
FCC Compliance................................................................................................................................. 1-6
Dolphin 7900 Batch Terminal...................................................................................................... 1-6
Dolphin 7900 RF Terminal with 802.11b, Bluetooth, and/or GSM Radios ................................ 1-6
RF, Regulatory, and Safety Agency Approvals for 802.11b and Bluetooth ............................... 1-7
RF, Regulatory, and Safety Agency Approvals for GSM ........................................................... 1-7
Dolphin 7900 802.11b and/or Bluetooth R&TTE Compliance Statement .................................. 1-7
Dolphin 7900 GSM R&TTE Compliance Statement................................................................... 1-8
Pacemakers, Hearing Aids and Other Electrically Powered Devices.......................................... 1-8
Microwaves.................................................................................................................................. 1-8
Care and Cleaning of the Dolphin 7900 ............................................................................................. 1-8
Chapter 2 - Getting Started
Overview............................................................................................................................................. 2-1
Dolphin 7900 Models ......................................................................................................................... 2-2
Dolphin 7900 Peripherals ................................................................................................................... 2-3
Dolphin 7900 Accessories .................................................................................................................. 2-4
Using the Dolphin 7900 for the First Time......................................................................................... 2-5
Resetting the Terminal...................................................................................................................... 2-11
Soft Reset (Warm Boot)............................................................................................................. 2-11
Hard Reset (Cold Boot).............................................................................................................. 2-11
Suspend Mode................................................................................................................................... 2-11
Chapter 3 - Dolphin 7900 Hardware Overview
System Features.................................................................................................................................. 3-1
Front Panel Features ........................................................................................................................... 3-2
Back Panel Features............................................................................................................................ 3-4
Side Panel Features............................................................................................................................. 3-6
Bottom Panel Features........................................................................................................................ 3-7
Mechanical Connector.................................................................................................................. 3-7
Battery Power...................................................................................................................................... 3-8
Dolphin 7900 Technical Specifications............................................................................................ 3-11
Chapter 4 - Using the Dolphin 7900
Overview............................................................................................................................................. 4-1
Using the Touch Screen ............................................................................................................... 4-1
Today Screen ...................................................................................................................................... 4-2
Navigation Bar.................................................................................................................................... 4-3
Command Bar............................................................................................................................... 4-3
Dolphin® 7900 Mobile Computer User’s Guide - Prelim. Draft Rev (a) iii
Page 4

Pop-Up Menus .................................................................................................................................... 4-4
Selecting Programs ............................................................................................................................. 4-5
Adjusting the Backlight ..................................................................................................................... 4-6
Communication Media Options.......................................................................................................... 4-7
Software Communication Programs ............................................................................................ 4-7
Radio Options ..................................................................................................................................... 4-8
The Radio Manager...................................................................................................................... 4-8
Powering Up Radios..................................................................................................................... 4-9
Powering Down Radios................................................................................................................4-9
Using the Soft Input Panel (SIP)....................................................................................................... 4-10
Input Panel Options.................................................................................................................... 4-12
Writing on the Screen ....................................................................................................................... 4-13
Drawing on the Screen...................................................................................................................... 4-14
Status Icons....................................................................................................................................... 4-15
Notifications...................................................................................................................................... 4-15
Finding and Organizing Information ................................................................................................ 4-16
Chapter 5 - Using the Image Engine
Overview............................................................................................................................................. 5-1
Image Engine Options......................................................................................................................... 5-1
Bar Code Symbologies Supported ............................................................................................... 5-1
Activating the Engine ......................................................................................................................... 5-2
Demos ................................................................................................................................................. 5-2
Decoding............................................................................................................................................. 5-3
To Decode a Bar Code ................................................................................................................. 5-3
Scanning Position Options ........................................................................................................... 5-3
Sample Bar Codes ........................................................................................................................ 5-4
Capturing Images................................................................................................................................ 5-5
Taking an Image........................................................................................................................... 5-5
Uploading Images......................................................................................................................... 5-5
Chapter 6 - Using Dolphin 7900 Keyboards
Overview............................................................................................................................................. 6-1
Using the Function Keys..................................................................................................................... 6-2
Using the Navigation Keys................................................................................................................. 6-3
Using the Modifier Keys..................................................................................................................... 6-4
25-Key Numeric-Alpha Keyboard...................................................................................................... 6-5
Blue Key Combinations ............................................................................................................... 6-6
Red Key Combinations ............................................................................................................... 6-6
36-Key Alpha-Numeric Keyboard...................................................................................................... 6-8
Blue Key Combinations .............................................................................................................. 6-9
Red Key Combinations ............................................................................................................... 6-9
NUM Key Combinations.............................................................................................................. 6-9
Chapter 7 - Settings
Overview............................................................................................................................................. 7-1
iv Dolphin® 7900 Mobile Computer User’s Guide - Prelim. Draft Rev (a)
Page 5

Personal Tab........................................................................................................................................ 7-2
Adding a Program to the Start Menu............................................................................................ 7-3
Headset Control............................................................................................................................ 7-5
System Tab.......................................................................................................................................... 7-6
About............................................................................................................................................ 7-6
Backlight ...................................................................................................................................... 7-7
Certificates.................................................................................................................................... 7-7
ClearType Tuner........................................................................................................................... 7-7
Clock & Alarms............................................................................................................................ 7-7
CPU Speed ................................................................................................................................... 7-7
Memory ........................................................................................................................................ 7-8
Power..........................................................................................................................................7-11
Regional Settings........................................................................................................................ 7-14
Remove Programs ...................................................................................................................... 7-15
Screen......................................................................................................................................... 7-17
uPhone Settings.......................................................................................................................... 7-19
Connections Tab ............................................................................................................................... 7-20
Server-Assigned IP Addresses ................................................................................................... 7-21
Zero-Config Wi-Fi ..................................................................................................................... 7-21
Com Port Assignment Table ...................................................................................................... 7-21
Opening the Connections Manager............................................................................................ 7-22
Creating an External Modem Connection to an ISP .................................................................. 7-23
Creating an External Modem Connection to Your Work........................................................... 7-27
Establishing Dialing Rules......................................................................................................... 7-33
Creating a Wireless Network Connection.................................................................................. 7-35
Network Cards............................................................................................................................ 7-35
Chapter 8 - Communications
Overview............................................................................................................................................. 8-1
Help on Connecting...................................................................................................................... 8-1
Installing Additional Software ..................................................................................................... 8-1
Using ActiveSync ............................................................................................................................... 8-2
Synchronizing from Your Desktop Computer ............................................................................. 8-2
Synchronizing from the Terminal ................................................................................................ 8-3
Exploring the Terminal from the Desktop Computer .................................................................. 8-4
Adding Programs to the Terminal Using ActiveSync..................................................................8-4
Using Infrared..................................................................................................................................... 8-6
Verify That the IrDA Port is Enabled .......................................................................................... 8-6
IrDA Port Location on the Terminal............................................................................................ 8-6
Verify That Beam Settings Are Set to Receive............................................................................ 8-7
Sending and Receiving Information.............................................................................................8-8
Troubleshooting............................................................................................................................ 8-9
Using an ISP ..................................................................................................................................... 8-10
Adding Programs Directly from the Internet ............................................................................. 8-10
Chapter 9 - Wireless LAN Communications with 802.11b
Dolphin® 7900 Mobile Computer User’s Guide - Prelim. Draft Rev (a) v
Page 6

Overview............................................................................................................................................. 9-1
Powering Up the 802.11b Radio Driver....................................................................................... 9-1
Configuration Utilities.................................................................................................................. 9-1
802.11b Settings.................................................................................................................................. 9-2
Status Tab..................................................................................................................................... 9-3
Config Tab.................................................................................................................................... 9-5
Advanced Tab .........................................................................................................................................9-10
About Tab................................................................................................................................... 9-11
The Status Icon .......................................................................................................................... 9-12
802.11b Wireless Security Supplement............................................................................................9-13
Required Network Configuration Information Worksheets....................................................... 9-14
Opening the Client...................................................................................................................... 9-18
The Main Screen ........................................................................................................................ 9-19
Configuring the Client................................................................................................................ 9-25
Logging ...................................................................................................................................... 9-39
Installing Certificates with CertAdd........................................................................................... 9-41
Advice and Workarounds........................................................................................................... 9-42
How 802.1X Works .......................................................................................................................... 9-44
Benefits of 802.1X........................................................................................................................... 9-46
Chapter 10 - Wireless PAN Communications with Bluetooth
Overview........................................................................................................................................... 10-1
Powering Up the Bluetooth Radio Driver.................................................................................. 10-1
Setting Up Your Bluetooth Card................................................................................................ 10-1
Assign COM Ports............................................................................................................................ 10-2
Discover Bluetooth Device(s)........................................................................................................... 10-3
Bond With Discovered Device(s)............................................................................................... 10-3
View Device Properties.............................................................................................................. 10-5
Set Up Your Favorite Device..................................................................................................... 10-6
Change Views............................................................................................................................. 10-6
Delete a Device From the Folder ............................................................................................... 10-7
Turn Radio Transmitter ON/OFF ..................................................................................................... 10-8
Bluetooth ActiveSync....................................................................................................................... 10-9
Bluetooth LAN Access ................................................................................................................... 10-11
OBEX.............................................................................................................................................. 10-14
Enable File Sharing .................................................................................................................. 10-23
Using the Dialer.............................................................................................................................. 10-24
Get Connected Wizard.................................................................................................................... 10-26
Dial Up to Your Network ............................................................................................................... 10-29
Chapter 11 - Wireless WAN Communications with GSM/GPRS
Overview........................................................................................................................................... 11-1
Powering Up the GSM/GPRS Radio Driver.............................................................................. 11-1
Tri-Band Antenna....................................................................................................................... 11-1
Requirements.............................................................................................................................. 11-1
Capabilities................................................................................................................................. 11-1
vi Dolphin® 7900 Mobile Computer User’s Guide - Prelim. Draft Rev (a)
Page 7

SIM Card Installation........................................................................................................................ 11-2
Requirements.............................................................................................................................. 11-2
To Install a SIM Card:................................................................................................................11-2
Using uPhone.................................................................................................................................... 11-3
Accessing uPhone....................................................................................................................... 11-3
Navigation Bar ........................................................................................................................... 11-3
Using the Dialler............................................................................................................................... 11-6
Making a Call............................................................................................................................. 11-6
Receiving a Call ......................................................................................................................... 11-7
Ending a Call.............................................................................................................................. 11-8
Keyboard Combinations for Calls.............................................................................................. 11-8
Call Waiting ............................................................................................................................... 11-8
Making Conference Calls........................................................................................................... 11-9
Touchtones ................................................................................................................................. 11-9
Volume Control.......................................................................................................................... 11-9
Phonebook................................................................................................................................ 11-10
Tools Menu............................................................................................................................... 11-11
Settings Menu........................................................................................................................... 11-11
Audio Modes................................................................................................................................... 11-12
Handset..................................................................................................................................... 11-12
Headset..................................................................................................................................... 11-12
Hands-Free ............................................................................................................................... 11-12
Ringtone Configuration .................................................................................................................. 11-13
Accessing Ringtone Configuration .......................................................................................... 11-13
WAV Files................................................................................................................................ 11-13
Previewing Tones..................................................................................................................... 11-13
Call Log .......................................................................................................................................... 11-14
Call Log Options ...................................................................................................................... 11-14
Opening the Call Log ............................................................................................................... 11-14
Tools Menu............................................................................................................................... 11-15
SMS Manager ................................................................................................................................. 11-16
Opening the SMS Manager...................................................................................................... 11-16
Sending an SMS Message........................................................................................................ 11-18
Icons at the Top of the Screen.................................................................................................. 11-18
Online Help..................................................................................................................................... 11-19
uPhone Configuration..................................................................................................................... 11-20
Accessing.................................................................................................................................. 11-20
Requirements............................................................................................................................ 11-20
General Tab.............................................................................................................................. 11-21
Network Tab............................................................................................................................. 11-22
Divert Tab................................................................................................................................. 11-23
Bar Tab..................................................................................................................................... 11-24
GPRS Settings................................................................................................................................. 11-26
To Select Pre-Configured GPRS Settings................................................................................ 11-26
To Add a GPRS Setting............................................................................................................ 11-27
GPRS Connection..................................................................................................................... 11-28
Chapter 12 - Applications
Dolphin® 7900 Mobile Computer User’s Guide - Prelim. Draft Rev (a) vii
Page 8

Calendar............................................................................................................................................ 12-1
Contacts............................................................................................................................................. 12-4
Tasks ................................................................................................................................................. 12-7
Notes ............................................................................................................................................... 12-10
Messaging ....................................................................................................................................... 12-11
Pocket Internet Explorer ................................................................................................................. 12-15
Pocket Word.................................................................................................................................... 12-19
Pocket Excel.................................................................................................................................... 12-21
Windows Media Player for Pocket PC ........................................................................................... 12-22
MSN Messenger.............................................................................................................................. 12-24
Pictures............................................................................................................................................ 12-26
Chapter 13 - Dolphin 7900 HomeBase
Overview........................................................................................................................................... 13-1
Dolphin 7900 HomeBase Parts and Functions ................................................................................. 13-2
Front Panel ................................................................................................................................ 13-2
Rear Panel .................................................................................................................................. 13-4
Powering the HomeBase................................................................................................................... 13-5
HomeBase Serial Connector............................................................................................................. 13-6
Charging the Main Battery................................................................................................................ 13-7
Communications ............................................................................................................................... 13-8
Setting up the HomeBase for USB Communication.................................................................. 13-8
Setting up the HomeBase for RS-232 Communications.......................................................... 13-11
Communicating with the Dolphin 7900 Terminal ................................................................... 13-12
Mounting the HomeBase ................................................................................................................ 13-15
Desk Mounting......................................................................................................................... 13-15
Wall Mounting ......................................................................................................................... 13-15
Chapter 14 - Dolphin 7900 Mobile Base
Overview........................................................................................................................................... 14-1
Mobile Base Parts and Functions...................................................................................................... 14-2
Front Panel ................................................................................................................................. 14-2
Bottom Panel.............................................................................................................................. 14-3
Powering the Dolphin Terminal........................................................................................................ 14-4
Charging the Dolphin Terminal ................................................................................................. 14-4
Installing the Dolphin Mobile Base.................................................................................................. 14-5
Mounting the Mobile Base......................................................................................................... 14-5
Powering the Dolphin Mobile Base ........................................................................................... 14-6
Setting Up the Mobile Base for Communications............................................................................ 14-7
Connecting the Cables................................................................................................................ 14-7
Mobile Base Serial Connector.................................................................................................... 14-8
Configuring the Terminal for ActiveSync Communications ..................................................... 14-9
Chapter 15 - Dolphin 7900 ChargeBase
Overview........................................................................................................................................... 15-1
viii Dolphin® 7900 Mobile Computer User’s Guide - Prelim. Draft Rev (a)
Page 9

Dolphin ChargeBase Parts and Functions......................................................................................... 15-2
Front Panel ................................................................................................................................ 15-2
Back Panel.................................................................................................................................. 15-2
Power Supply ............................................................................................................................. 15-3
Supplying Power to the ChargeBase................................................................................................. 15-3
Inserting and Removing Terminals................................................................................................... 15-4
Charging Terminals in the ChargeBase............................................................................................ 15-5
Mounting the ChargeBase................................................................................................................. 15-6
Bottom Panel.............................................................................................................................. 15-6
Using the DIN Rail..................................................................................................................... 15-6
Using the Mounting Brackets..................................................................................................... 15-8
Chapter 16 - Dolphin 7900 QuadCharger
Overview........................................................................................................................................... 16-1
Dolphin QuadCharger Parts and Functions ...................................................................................... 16-1
Front Panel ................................................................................................................................ 16-1
Rear Panel................................................................................................................................... 16-2
Supplying Power to the QuadCharger .............................................................................................. 16-3
Inserting and Removing Battery Packs............................................................................................. 16-3
Storing Batteries......................................................................................................................... 16-3
Charging Batteries in the QuadCharger............................................................................................ 16-3
Using the Battery Analyzer............................................................................................................... 16-4
Mounting the QuadCharger .............................................................................................................. 16-5
Using the DIN Rail..................................................................................................................... 16-5
Troubleshooting................................................................................................................................ 16-6
Chapter 17 - Warranty, Service, and Support
Limited Warranty.............................................................................................................................. 17-1
Return Information............................................................................................................................ 17-2
Calling for an RMA Number...................................................................................................... 17-2
Service and Repair Locations..................................................................................................... 17-2
Technical Assistance......................................................................................................................... 17-3
Dolphin® 7900 Mobile Computer User’s Guide - Prelim. Draft Rev (a) ix
Page 10

x Dolphin® 7900 Mobile Computer User’s Guide - Prelim. Draft Rev (a)
Page 11

1
Introduction
Congratulations on the purchase of the Dolphin 7900 mobile computer! You have made a wise choice in selecting the Dolphin,
a device known worldwide for its ergonomic form factor, light-weight, rugged design and single-handed data collection
capabilities.
Ergonomics
The patented shape of the Dolphin 7900 fits into either hand comfortably with major function keys that are easy to access. The
adjustable hand strap on the back panel ensures a secure grip on the terminal for solid one-handed operation in mobile
environments.
Rugged Design
Dolphin 7900 terminals are the most durable mobile computers on the market. Their rugged design can withstand repeated fivefoot drops onto a concrete floor, extreme temperatures, as well as high humidity, moisture, and dust conditions. The terminals
are independently tested to meet IP64 specifications.
Mobile Computing Features
• A low-power, high-resolution digital image engine for omni-directional and auto-discrimination decoding of most bar code
symbologies;
• Wireless Full Area Networking™ (WFAN) technology supports integrated LAN, PAN, and WAN wireless networks
• An Intel® X-Scale 400MHz RISC microprocessor for fast processing
• Microsoft Windows Mobile 2003 Second Edition Software for Pocket PCs
• 64 MB RAM and 64 MB synchronous Flash memory configuration for ample and secure data storage
• A mini-Secure Digital (SD) memory interface that enables memory expansion
see Bar Code Symbologies Supported on page 5-1.
Additional Features
• Long-lasting Lithium Ion (Li-ion) batteries
• 3.8”, easy-to-read 1/4 VGA (240 x 320) backlit TFT color display with touch screen
• Two keyboard options: 25-key numeric-alpha, and 36-key full alpha-numeric
• Industrial-grade mechanical connector that supports serial and USB communications, as well as power in and out
• Full suite of compatible peripheral devices
• Decoding of stacked linear and matrix codes with Optical Character Recognition (OCR) functionality
• Scan button on both side panels for fast, easy one-hand scanni ng with either hand
• Digital picture capability
• Audio jack for headset use
• Speaker and microphone on the front panel
Application Development Tools
• HHP Dolphin SDK Add-on for Pocket PC 2003 - supports Embedded Visual C++ 4.0
• HHP Dolphin .NET SDK for Pocket PC 2002 and 2003 - supports Visual Studio.NET 2003 (VB.NET and C#.NET)
• HHP Dolphin GSM/GPRS SDK Add-on for Pocket PC 2003 - supports Embedded Visual C++ 4.0 and Visual Studio.NET 2003
This User’s Guide
The Dolphin 7900 Mobile Computer User’s Guide provides you with the information you need to make the most of your Dolphin
terminal.
Dolphin® 7900 Mobile Computer User’s Guide - Prelim. Draft Rev (a) 1 - 1
Page 12
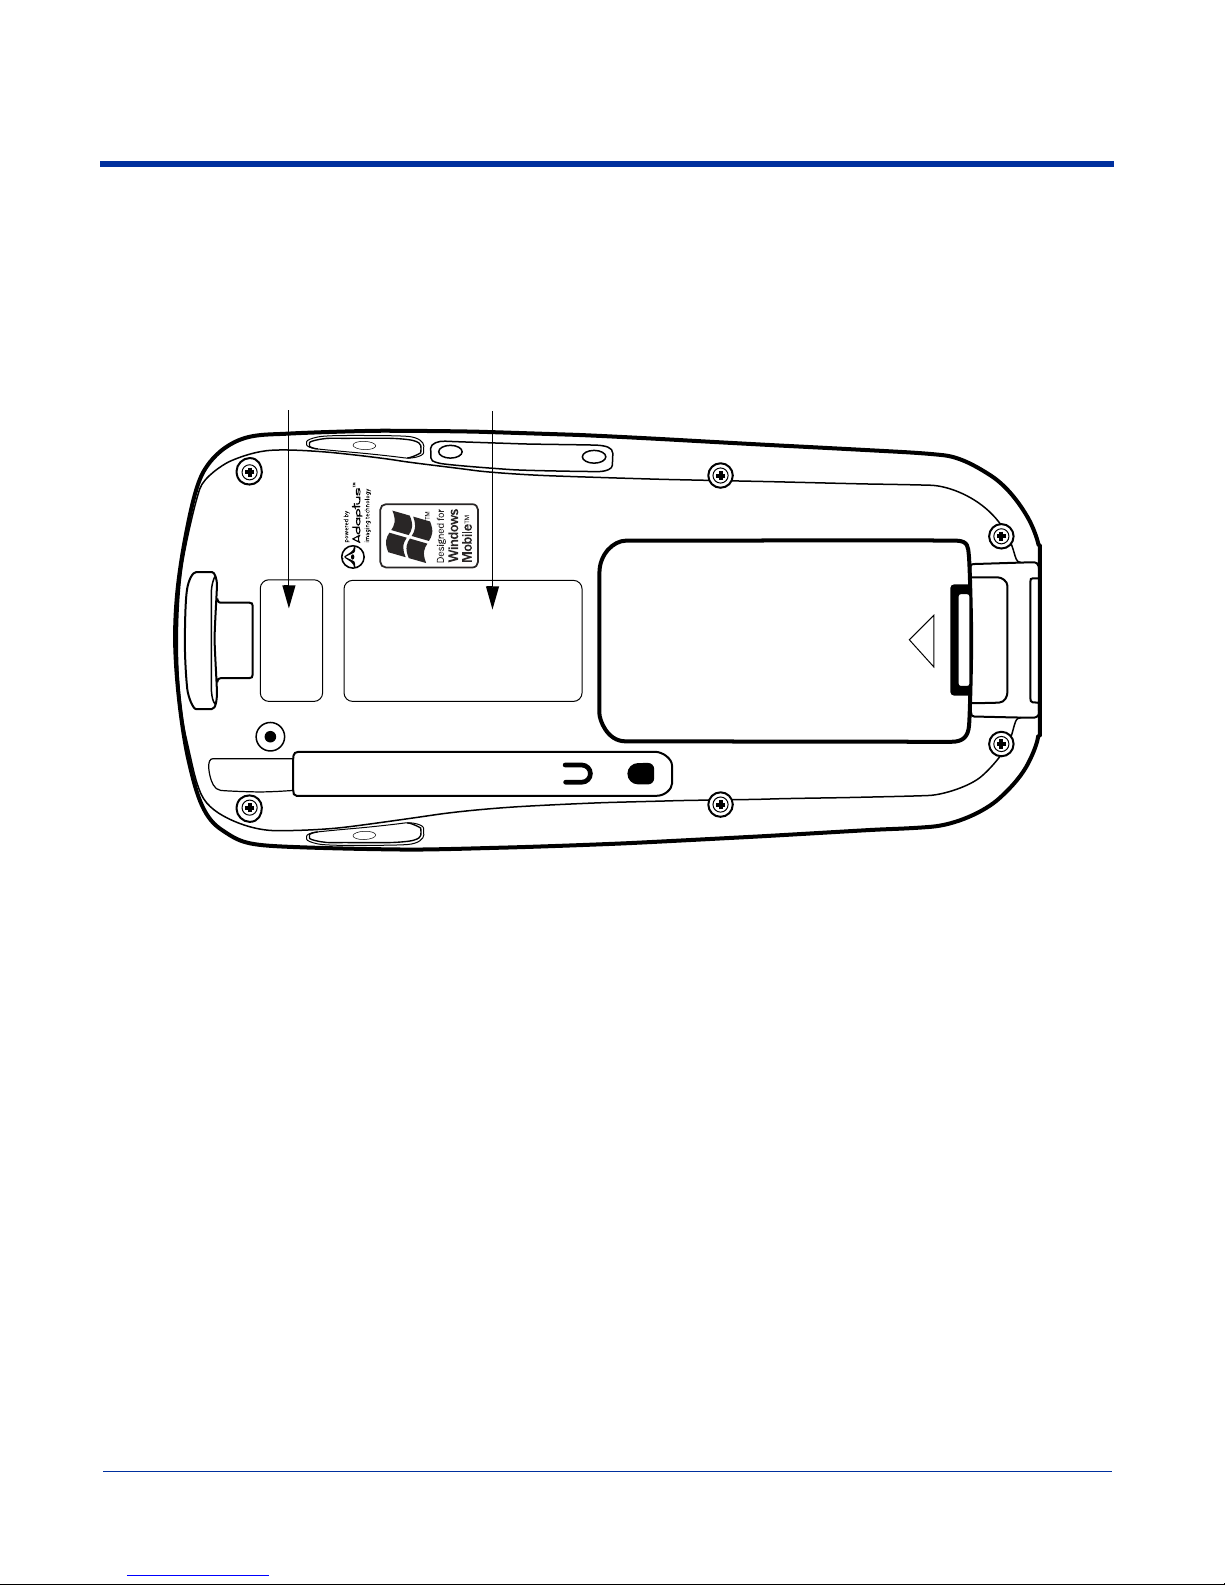
Required Safety Labels
Dolphin 7900 mobile computers meet or exceed the requirements of all applicable standards organizations for safe operation.
However, as with any electrical equipment, the best way to ensure safe operation is to operate them according to the agency
guidelines that follow. Please read these guidelines carefully before using your Dolphin mobile computer.
Location
Safety labels appear in these locations.
1 - 2 Dolphin® 7900 Mobile Computer User’s Guide - Prelim. Draft Rev (a)
Page 13

Regulatory and Safety Approvals for all Dolphin 7900 Terminals
Parameter Specification
U.S.A
Canada
European Community
The CE Mark on the product indicates that the system has been tested to and conforms with the provisions noted within
the 89/336/EEC Electromagnetic Compatibility Directive and the 73/23/EEC Low Voltage Directive.
For further information, please contact:
Hand Held Products, Inc.
Nijverheidsweg 9
5627 BT Eindhoven
The Netherlands
HHP shall not be liable for use of our product with equipment (i.e., power supplies, personal computers, etc.) that is not CE
marked and does not comply with the Low Voltage Directive.
FCC Part 15, Class B
ICES-003
EN 55022 (CISPR 22) Class B
EN60950
EN60825-1
EN55024:1998
Dolphin® 7900 Mobile Computer User’s Guide - Prelim. Draft Rev (a) 1 - 3
Page 14

Dolphin 7900 WLAN or WPAN Radio
Dolphin 7900 RF terminals are designed to comply with the most current applicable standards on safe levels of RF energy
developed by the Institute of Electrical and Electronics Engineers (IEEE) and the American National Standards Institute (ANSI)
and has been recommended for adoption by the Federal Communications Commission (FCC).
802.11b
The following is the required safety label that appears on the back panel of Dolphin 7900 terminals equipped with an 802.11b
radio:
Bluetooth
The following is the required safety label that appears on the back panel of Dolphin 7900 terminals equipped with a Bluetooth
radio:
802.11b and Bluetooth
The following is the required safety label that appears on the back panel of the Dolphin 7900 terminals equipped with an 802.11b
and a Bluetooth radio combination:
1 - 4 Dolphin® 7900 Mobile Computer User’s Guide - Prelim. Draft Rev (a)
Page 15

Dolphin 7900 WWAN Radio
Dolphin 7900 RF terminals are designed to comply with the most current applicable standards on safe levels of RF energy
developed by the Institute of Electrical and Electronics Engineers (IEEE) and the American National Standards Institute (ANSI)
and has been recommended for adoption by the Federal Communications Commission (FCC).
GSM
The following is the required safety label that appears on the back panel of Dolphin 7900 terminals equipped with a GSM radio:
GSM and 802.11b
The following is the required safety label that appears on the back panel of Dolphin 7900 terminals equipped with a GSM and
802.11b radio combination:
GSM and Bluetooth
The following is the required safety label that appears on the back panel of Dolphin 7900 terminals equipped with a GSM and
Bluetooth radio combination:
GSM, Bluetooth, and 802.11b
The following is the required safety label that appears on the back panel of Dolphin 7900 terminals equipped with a GSM,
Bluetooth, and 802.11b radio combination:
Dolphin® 7900 Mobile Computer User’s Guide - Prelim. Draft Rev (a) 1 - 5
Page 16

FCC Compliance
Dolphin mobile computers meet or exceed all applicable standards and have been manufactured to the highest level of quality.
Dolphin 7900 Batch Terminal
Dolphin 7900 Batch terminals comply with part 15 of the FCC rules. Operation is subject to the following two conditions:
1. This device may not cause harmful interference.
2. This device must accept any interference received, including interference that may cause undesired operation.
Dolphin 7900 RF Terminal with 802.11b, Bluetooth, and/or GSM Radios
This device complies with Part 15 of the FCC Rules. Operation is subject to the following two conditions:
1. This device may not cause harmful interference.
2. This device must accept any interference received, including interference that may cause undesired operation.
This equipment has been tested and found to comply with the limits for a Class B digital device pursuant to Part 15 of the FCC
Rules. These limits are designed to provide reasonable protection against harmful interference in a residential installation. This
equipment generates, uses, and can radiate radio frequency energy and, if not installed and used in accordance with the
instructions, may cause harmful interference to radio communications. If this equipment does cause harmful interference to radio
or television reception, which can be determined by turning the equipment off and on, the user is encouraged to try to correct the
interference by one or more of the following measures:
• Reorient or relocate the receiving antenna.
• Increase the separation between the equipment and receiver.
• Connect the equipment into an outlet on a circuit different from that to which the receiver is connected.
• Consult the dealer or an experienced radio/TV technician for help.
If necessary, the user should consult the dealer or an experienced radio/television technician for additional suggestions. The user
may find the following booklet helpful: “Something About Interference.” This is available at FCC local regional offices. Our
company is not responsible for any radio or television interference caused by unauthorized modifications of this equipment or the
substitution or attachment of connecting cables and equipment other than those specified by our company. The correction is the
responsibility of the user. Use only shielded data cables with this system.
In accordance with FCC 15.21, changes or modifications not expressly approved by the party responsible for compliance could
void the user’s authority to operate the equipment.
This device and its antenna must not be co-located or operating in conjunction with any other antenna or
transmitter. To maintain compliance with FCC RF exposure guidelines for body-worn operation, do not use
!
accessories that contain metallic components and ensure that the antenna is at least 15mm (0.6 inches) from
the body.
Canadian Compliance
This Class B digital apparatus complies with Canadian ICES-003. Operation is subject to the following two conditions:
1. This device may not cause harmful interference.
2. This device must accept any interference received, including interference that may cause undesired operation.
To prevent radio interference to the licensed service, this device is intended to be operated indoors and away from windows to
provide maximum shielding. Equipment (or its transmit antenna) that is installed outdoors is subject to licensing.
Cet appareil numérique de la Classe B est conforme à la norme NMB-003 du Canada.
1 - 6 Dolphin® 7900 Mobile Computer User’s Guide - Prelim. Draft Rev (a)
Page 17
RF, Regulatory, and Safety Agency Approvals for 802.11b and Bluetooth
Parameter Specification
RF Approvals
U.S.A
Canada
FCC Part 15.247
RSS 210
RF, Regulatory, and Safety Agency Approvals for GSM
Parameter Specification
RF Approvals
U.S.A
Canada
FCC Part 24
RSS 133
Dolphin 7900 802.11b and/or Bluetooth R&TTE Compliance Statement
Dolphin 7900 RF terminals are in conformity with all essential requirements of the R&TTE Directive (1999/5/EC). This equipment
has been assessed to the following standards:
Parameter Specification
R&TTE EN 300 328-2:2000
EN 301 489-1 (2002-08)
EN 301 489-17 (2002-08)
EN 60950:2000
EN 50361:2001
This product is marked with in accordance with the Class II product requirements specified in the R&TTE
Directive, 1999/5/EC.
The equipment is intended for use throughout the European Community. Its authorization for use in France is restricted as
follows:
PAN European Frequency Range: 2.402 - 2.480 GHz
Restrictions in France are as follows:
• Indoor use - Maximum power (EIRP*) of 100 mW for the entire 2400-2483.5 MHz
• Outdoor use - Maximum power (EIRP*) of 100 mW for the 2400-2454 MHz band and maximum power (EIRP*) of 10 mW for
the 2454-2483 MHz band.
Dolphin® 7900 Mobile Computer User’s Guide - Prelim. Draft Rev (a) 1 - 7
Page 18

Dolphin 7900 GSM R&TTE Compliance Statement
Dolphin 7900 terminals are in conformity with all essential requirements of the R&TTE Directive (1999/5/EC). This equipment
has been assessed to the following standards:
Parameter Specification
R&TTE EN 301 5 11: 200 0
EN 30 1 4 89 - 1 ( 20 02 -0 8 )
EN 301 489-7 (2002-08)
EN 60950:2000
EN 50361:2001
Pacemakers, Hearing Aids and Other Electrically Powered Devices
Most manufacturers of medical devices adhere to the IEC 601-1-2 standard. This standard requires devices to operate properly
in an EM Field with a strength of 3V/m over a frequency range of 26 to 1000MHz.
The maximum allowable field strength emitted by the Dolphin is 0.3V/m according to Subpart B of Part 1 of the FCC rules.
Therefore, the Dolphin RF has no effect on medical devices that meet the IEC specification.
Microwaves
The radio in the Dolphin RF terminal operates on the same frequency band as a microwave oven. Therefore, if you use a
microwave within range of the Dolphin RF terminal you may notice performance degradation in your wireless network. However,
both your microwave and your wireless network will continue to function.
The Dolphin Batch terminal does not contain a radio, and therefore, is not affected by microwave ovens.
Care and Cleaning of the Dolphin 7900
When needed, clean the image engine window and the LCD display with a clean, non-abrasive, lint-free cloth. The terminal can
be cleaned with a damp cloth.
1 - 8 Dolphin® 7900 Mobile Computer User’s Guide - Prelim. Draft Rev (a)
Page 19

2
Getting Started
Overview
The Dolphin 7900 combines the latest in multi-functional wireless data and voice communications technology with a unique,
compact form factor, which makes it an ideal solution for today’s in-transit applications.
Data Input
The Dolphin 7900 mobile computer features a PDA design with a larger display and smaller recessed keyboards. The display
area is 3.8 inches with a 240 X 320 VGA display in TFT color that is backlit for maximum viewability, then covered with an
industrial touch screen for maximum durability. There are two keyboard options - 25-key numeric-alpha and 36-key alphanumeric.
Imaging
The Dolphin 7900 contains an integrated imager that can take digital images of damaged packages and recipient signatures in
addition to decoding standard 1D and 2D symbologies. For the greatest ease-of-use when operating the imager, both side
panels feature a scan button that initiates a scan with the touch of a thumb or forefinger.
Memory
The Dolphin 7900 is a Windows Mobile computer with 64 MB RAM and 64 MB non-volatile synchronous Flash memory.
Communications
Communications via the industrial, mechanical connector supports 115 Kbps using serial RS-232 and 12 Mbps using USB.
The Dolphin 7900 Series
The Dolphin 7900 terminal comprises one element of an enterprise data collection system that includes various models,
peripherals, and accessories that you can combine to suit your exact needs.
Dolphin® 7900 Mobile Computer User’s Guide - Prelim. Draft Rev (a) 2 - 1
Page 20

Dolphin 7900 Models
Dolphin 7900 terminals are available in numerous radio configurations.
Dolphin 7900 WLAN (802.11b)
These terminals integrate the basic functionality of the Batch terminals with an integrated, IEEE 802.11b direct sequence radio
that enable communication with a host computer through a wireless local area network (WLAN).
Dolphin 7900 WPAN (Bluetooth)
This terminal allows Bluetooth communications to Bluetooth enabled devices such as printers, mobile phones, access points,
Bluetooth-enabled PCs, etc.
Dolphin 7900 WWAN (GSM/GPRS)
This terminal features all the benefits of the Dolphin 7900 with the additional capabilities of GSM/GPRS technology.
Dolphin 7900 WLAN and WPAN (802.11b and Bluetooth)
This terminal features co-located 802.11b and Bluetooth radios, which means that your terminal contains the capabilities of both
radios. You can operate the radios simultaneously or switch between them.
Dolphin 7900 WWAN and WLAN (GSM/GPRS and 802.11b)
This terminal features the functionality of both GSM/GPRS and 802.11b radio and network technologies.
Dolphin 7900 WWAN and WPAN (GSM/GPRS and Bluetooth)
This terminal features the functionality of both GSM/GPRS and Bluetooth radio and network technologies.
Dolphin 7900 WWAN, WLAN, and WPAN (GSM/GPRS, 802.11b, and Bluetooth)
This terminal features the functionality of GSM/GPRS, 802.11b, and Bluetooth radio and network technologies.
2 - 2 Dolphin® 7900 Mobile Computer User’s Guide - Prelim. Draft Rev (a)
Page 21

Dolphin 7900 Peripherals
Each of the following items is sold separately to enhance your Dolphin 7900 terminal’s capabilities.
Dolphin HomeBase™
The Dolphin HomeBase charging and communication cradle supports both RS-232 and USB communications, which
enable it to interface with the majority of PC-based enterprise systems. When a terminal is seated in the HomeBase, its
main battery pack charges in less that four hours. In addition, the HomeBase contains an auxiliary battery well that
charges a spare Li-ion battery.
For more information, see Dolphin 7900 HomeBase on page 13-1.
Dolphin Mobile Base
The Dolphin Mobile Base charging and communication cradle is designed specifically for in-premise and in-transit data
collection applications. It features a flexible mounting bracket, a cigarette lighter adapter or power cable to adapt it to
your environment.
When a terminal is seated in the Mobile Base, its main battery pack charges in less that four hours. The serial connector
supports RS-232 communication and power out to peripheral devices, such as hand held scanners.
For more information, see Dolphin 7900 Mobile Base on page 14-1.
Dolphin ChargeBase
The Dolphin ChargeBase is a four-slot charging cradle that holds, powers, and charges a terminal in each slot.
For more information, see Dolphin 7900 ChargeBase on page 15-1.
Dolphin Net Base
The Dolphin Net Base is a four-slot charging/communication cradle that holds, powers, charges, and communicates
with the terminal in each slot. Ethernet communication occurs via statically and dynamically-assigned IP addresses.
For more information about the Dolphin Net Base, please consult the Dolphin 7900 Net Base Quick Start Guide.
Dolphin QuadCharger™
The Dolphin QuadCharger is a four-slot charging station for Dolphin Li-ion battery packs that can charge each battery
in less than four hours. The fourth slot features a battery analyzer that completely resets and re-calibrates a battery,
then displays remaining capacity.
For more information, see Dolphin 7900 QuadCharger on page 16-1.
Dolphin® 7900 Mobile Computer User’s Guide - Prelim. Draft Rev (a) 2 - 3
Page 22

Dolphin 7900 Accessories
Each of the following items is sold separately to enhance your Dolphin 7900 terminal’s capabilities.
Charging/Communication Cables
USB and serial cables connect the Dolphin 7900 terminal directly to both a peripheral device for communication and a
power source for charging.
Dolphin Mobile Charger
This charging cable plugs the terminal directly into a vehicle cigarette lighter/power port to power the terminal and
charge the battery pack. This accessory converts the 12 Volts out of the vehicle to the 9 Volts required by the terminal.
Protective Enclosure
This enclosure wraps around the terminal to protect it from wear and tear.
Protective Holster
The protective holster secures the terminal for mobile use.
Dolphin Mobile Mount
The Dolphin Mobile Mount solution secures Dolphin 7900 in the cab of any vehicle. Used in conjunction with the Mobile
Charger, Dolphin terminals can be adapted to almost any in-transit environment.
Li-ion Battery Pack
The 7.4v, 14.8 watt hour Li-ion rechargeable battery pack provides the main power supply for Dolphin 7900 terminals.
2 - 4 Dolphin® 7900 Mobile Computer User’s Guide - Prelim. Draft Rev (a)
Page 23
Using the Dolphin 7900 for the First Time
Handstrap
Step 1. Unpack the Carton and Verify its Contents
Verify that the carton contains the following items:
• Dolphin 7900 mobile computer (the terminal)
• Main battery pack (7.4v Li-ion)
• Microsoft Companion CD
• Dolphin 7900 Quick Start Guide
Be sure to keep the original packaging in the event that the Dolphin terminal should need to be returned for service. For details,
see Return Information on page 17-2.
Each order includes a Dolphin Software Development Kit and User’s Guide CD; verify that you received this CD with your order.
If you ordered accessories for your terminals, verify that they are also included with the order.
The Dolphin 7900 Handstrap
The Dolphin 7900 ships with the handstrap installed and fastened with a clip on the top
panel. To install the battery pack, you must detach the handstrap.
1. Push the clip of the handstrap down and away from the terminal.
2. Move the strap up and away from the top panel.
Note: To re-attach the handstrap, slide the clip back into place on the top panel.
Step 2. Install the Main Battery Pack
Clip
Use only the Li-ion battery packs provided by HHP. The use of any battery
pack not sold/manufactured by HHP in a Dolphin terminal will void your
!
warranty and may result in damage to the Dolphin terminal or battery.
1. Unpack the Li-ion battery pack.
2. Hold the terminal with the front panel (keyboard) facing down and detach the
handstrap.
3. Take the battery and insert the end without the locking tab into the top of the battery
well and push down with a hinging motion until the locking tab snaps.
4. Re-attach the handstrap.
To Remove the Main Battery Pack
1. Detach the handstrap.
2. Press the locking tab on the battery pack away from the bottom panel.
3. Pull the battery pack up with a hinging motion.
Dolphin® 7900 Mobile Computer User’s Guide - Prelim. Draft Rev (a) 2 - 5
Page 24

Step 3. Charge the Main and Backup Batteries
C
The power supply for the Dolphin mobile computer consists of two types of battery power: the main battery pack installed on the
back panel and the backup battery that resides inside the terminal.
The main battery powers the terminal. The internal backup battery charges off the main battery and maintains the application
data stored in RAM and the system clock for up to 30 minutes when the terminal’s main battery pack is completely discharged
or removed.
Before initial use - Because the terminals are shipped with both batteries discharged of all power, charge the main battery pack
for a minimum of four hours before initial use.
When installed in the terminal, the battery pack can be charged in the HomeBase, Mobile Base, or with the appropriate charging
cable. When not installed in the terminal, battery packs can be charged in the QuadCharger or the auxiliary well of the
HomeBase.
Time to Charge - Four hours for the main battery pack, eight hours for the internal backup battery the first time.
Use only Dolphin 7900 series peripherals, power cables, and power adapters. Use of peripherals, cables, or power
adapters not sold/manufactured by HHP will void the warranty and may damage the terminal.
!
Using the Dolphin HomeBase
1. Connect the HomeBase to the power supply provided by HHP.
2. Slide the terminal (with installed battery pack) into the terminal well until the Dock LED
lights solid green to indicate that the terminal is properly seated.
3. The battery pack begins charging.
harging a Spare Battery Pack
The HomeBase features an auxiliary battery
well. Insert a spare battery pack into this well
and the battery charges in four hours. The
auxiliary battery well charges batteries
independently of the terminal well.
Using the Mobile Base
1. Connect the Mobile Base to the appropriate power source using an HHP cable.
2. Slide the terminal (with installed battery pack) into the terminal well until the Dock LED
lights solid green to indicate that the terminal is properly seated.
3. The battery pack begins charging.
Other Charging Options
When the Li-ion battery is installed in the terminal, connect a charging and/or
communication cable, such as the Mobile Charger, to the mechanical connector and plug
the cable into a power outlet.
When the Li-ion battery is not installed in the terminal, place the battery pack in the Dolphin
QuadCharger.
2 - 6 Dolphin® 7900 Mobile Computer User’s Guide - Prelim. Draft Rev (a)
Page 25
Step 4. Initialize the Mobile Computer
1. Power on the terminal. The decode LED lights and the scan LED blinks for approximately three seconds. Do NOT press any
keys while the terminal is booting up.
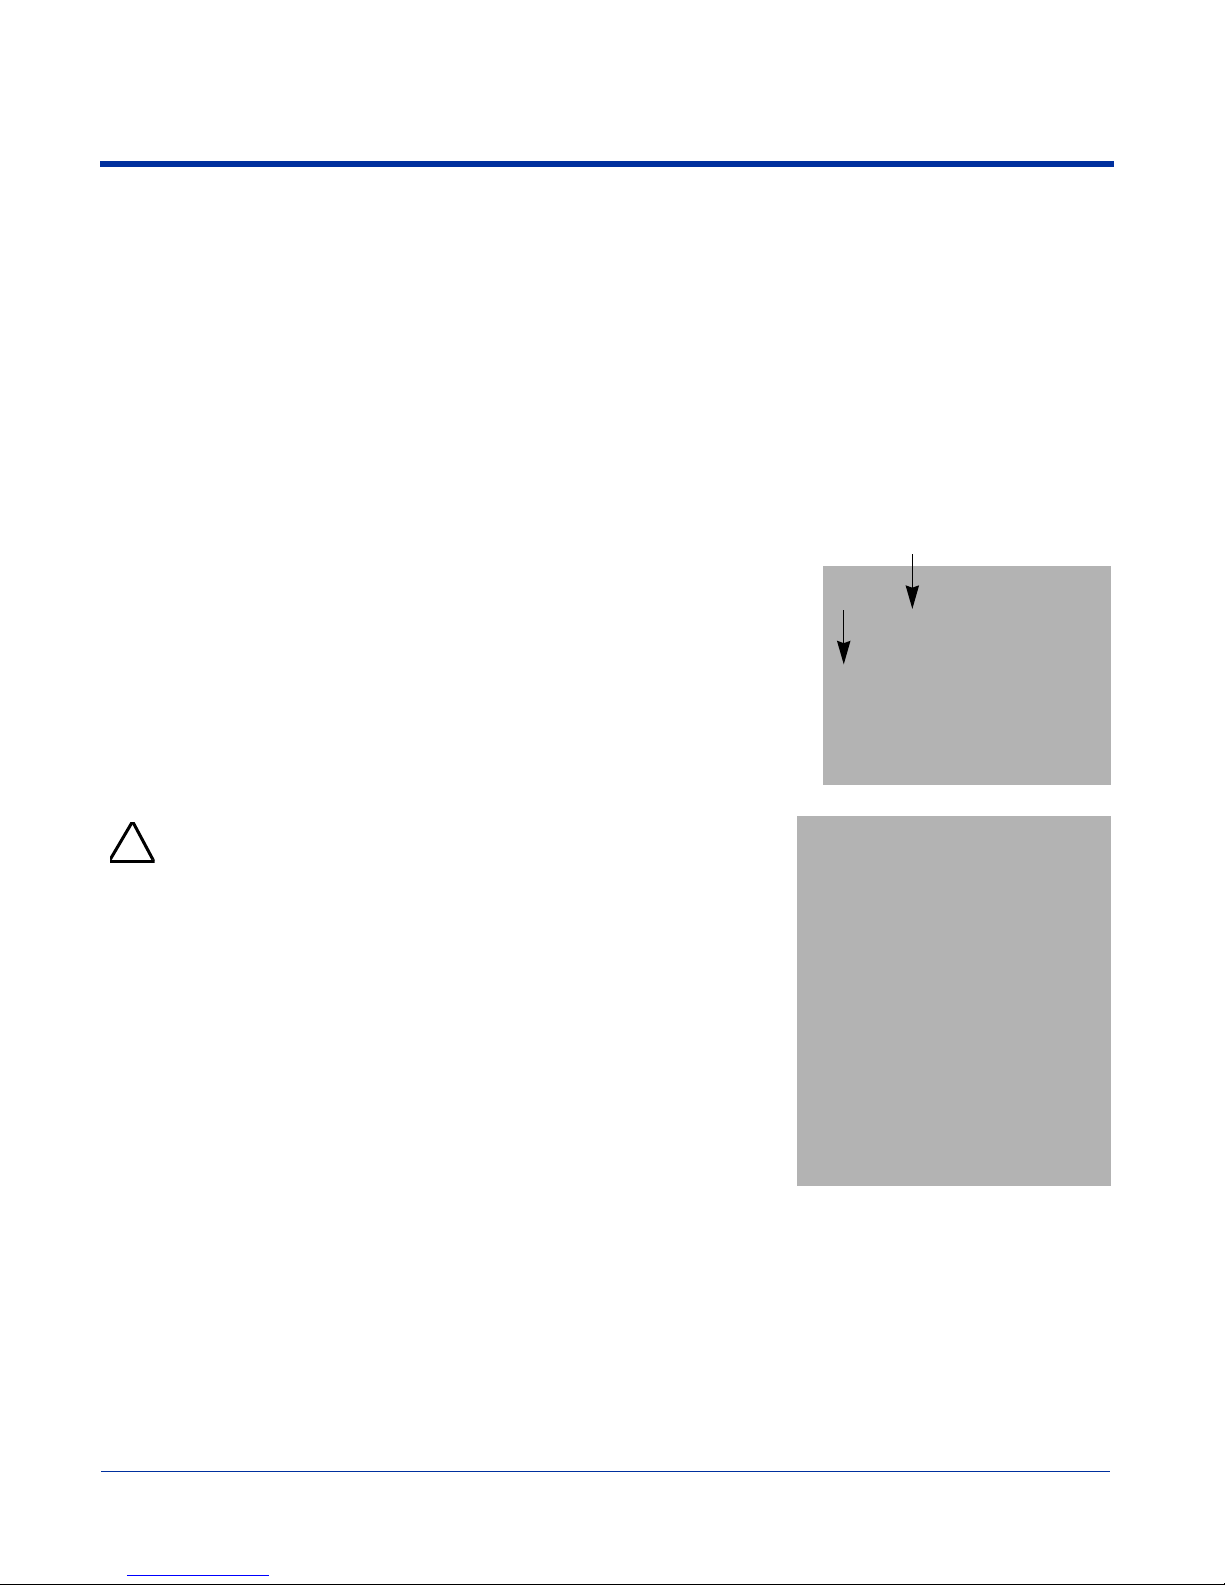
2. The terminal initializes and the HHP splash screen displays for a few seconds. The Build numbers indicate the software
version numbers.
7.XX 7.XX 7.XX
Bootloader
3. The system performs a hard reset. When the display activates again, follow the instructions that appear.
Kernel
Keyboard
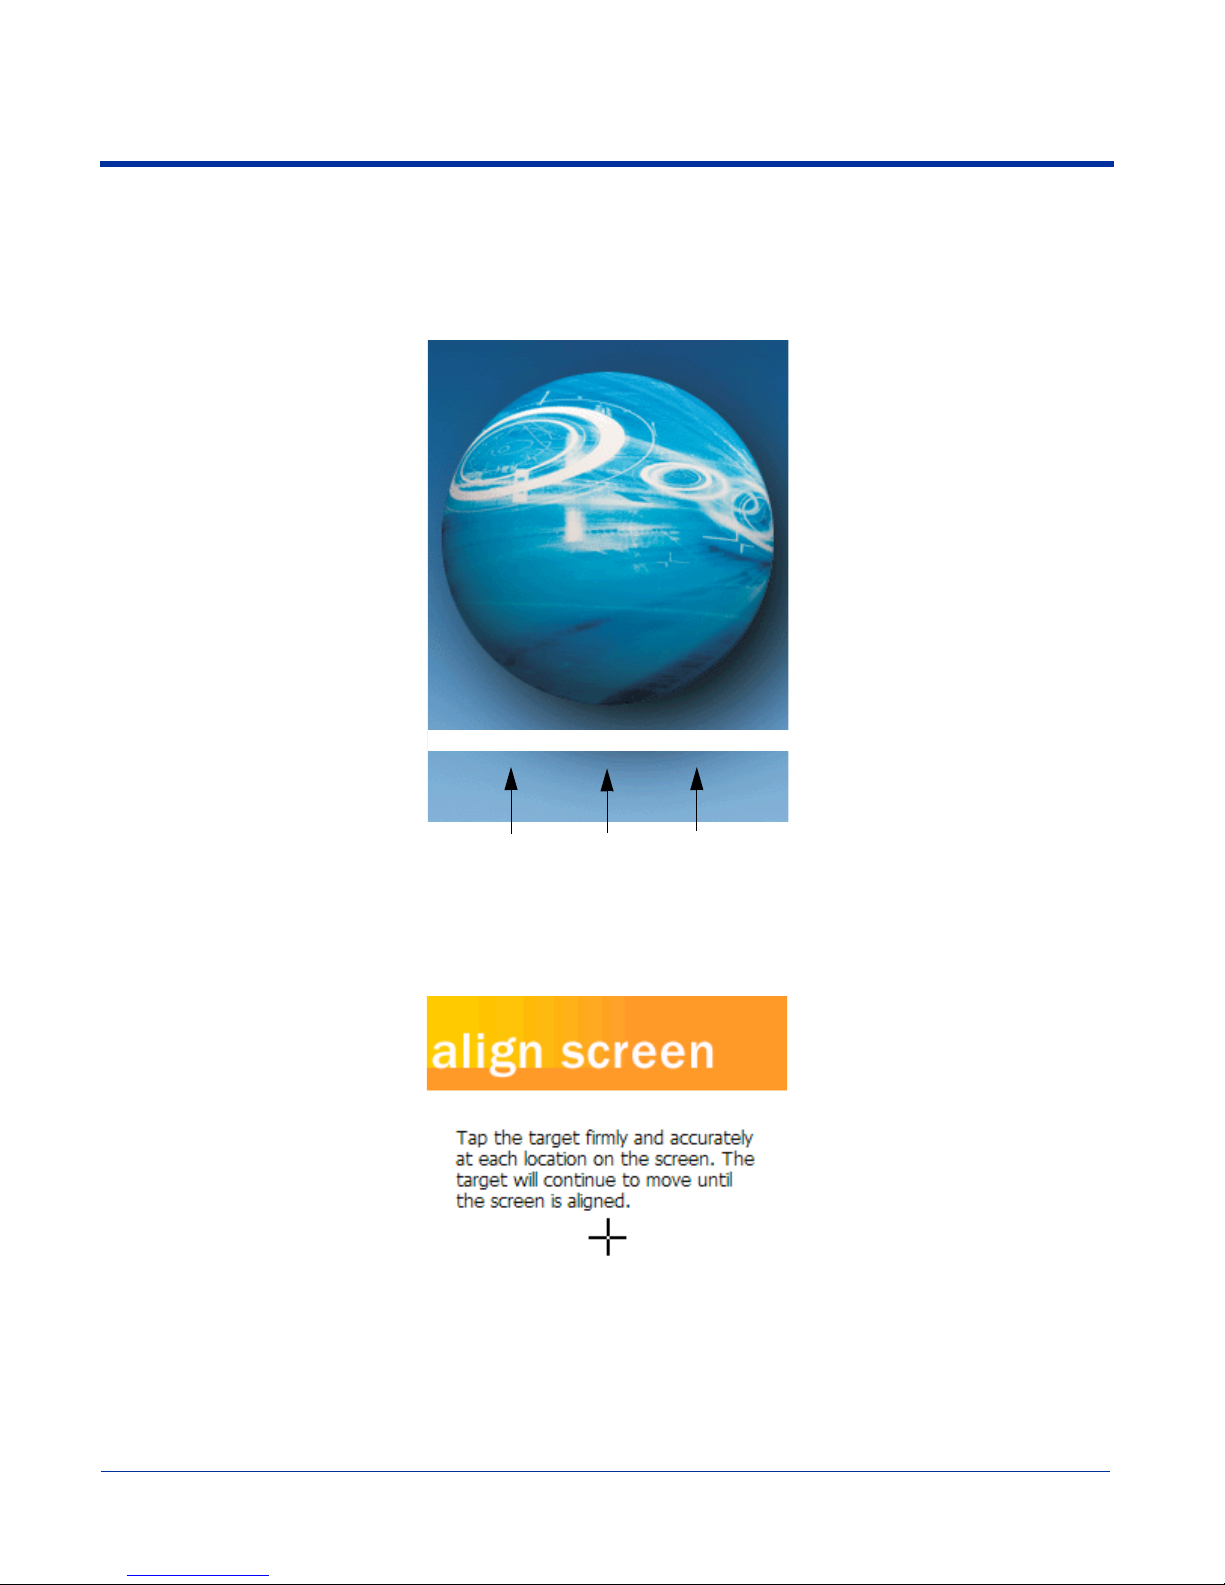
Step 5. Align the Screen
You are prompted to align the screen by tapping the target five times. Use the stylus provided by HHP.
• Alignment should always be performed with a stylus designed for touch screen applications. The small point is required for
accurate calibration.
• Press the stylus firmly into the center of the cross-hair target once and release. Do not “double-tap” the target.
• You can re-align the screen at any time by going to Start > Settings > System tab > Screen.
Dolphin® 7900 Mobile Computer User’s Guide - Prelim. Draft Rev (a) 2 - 7
Page 26
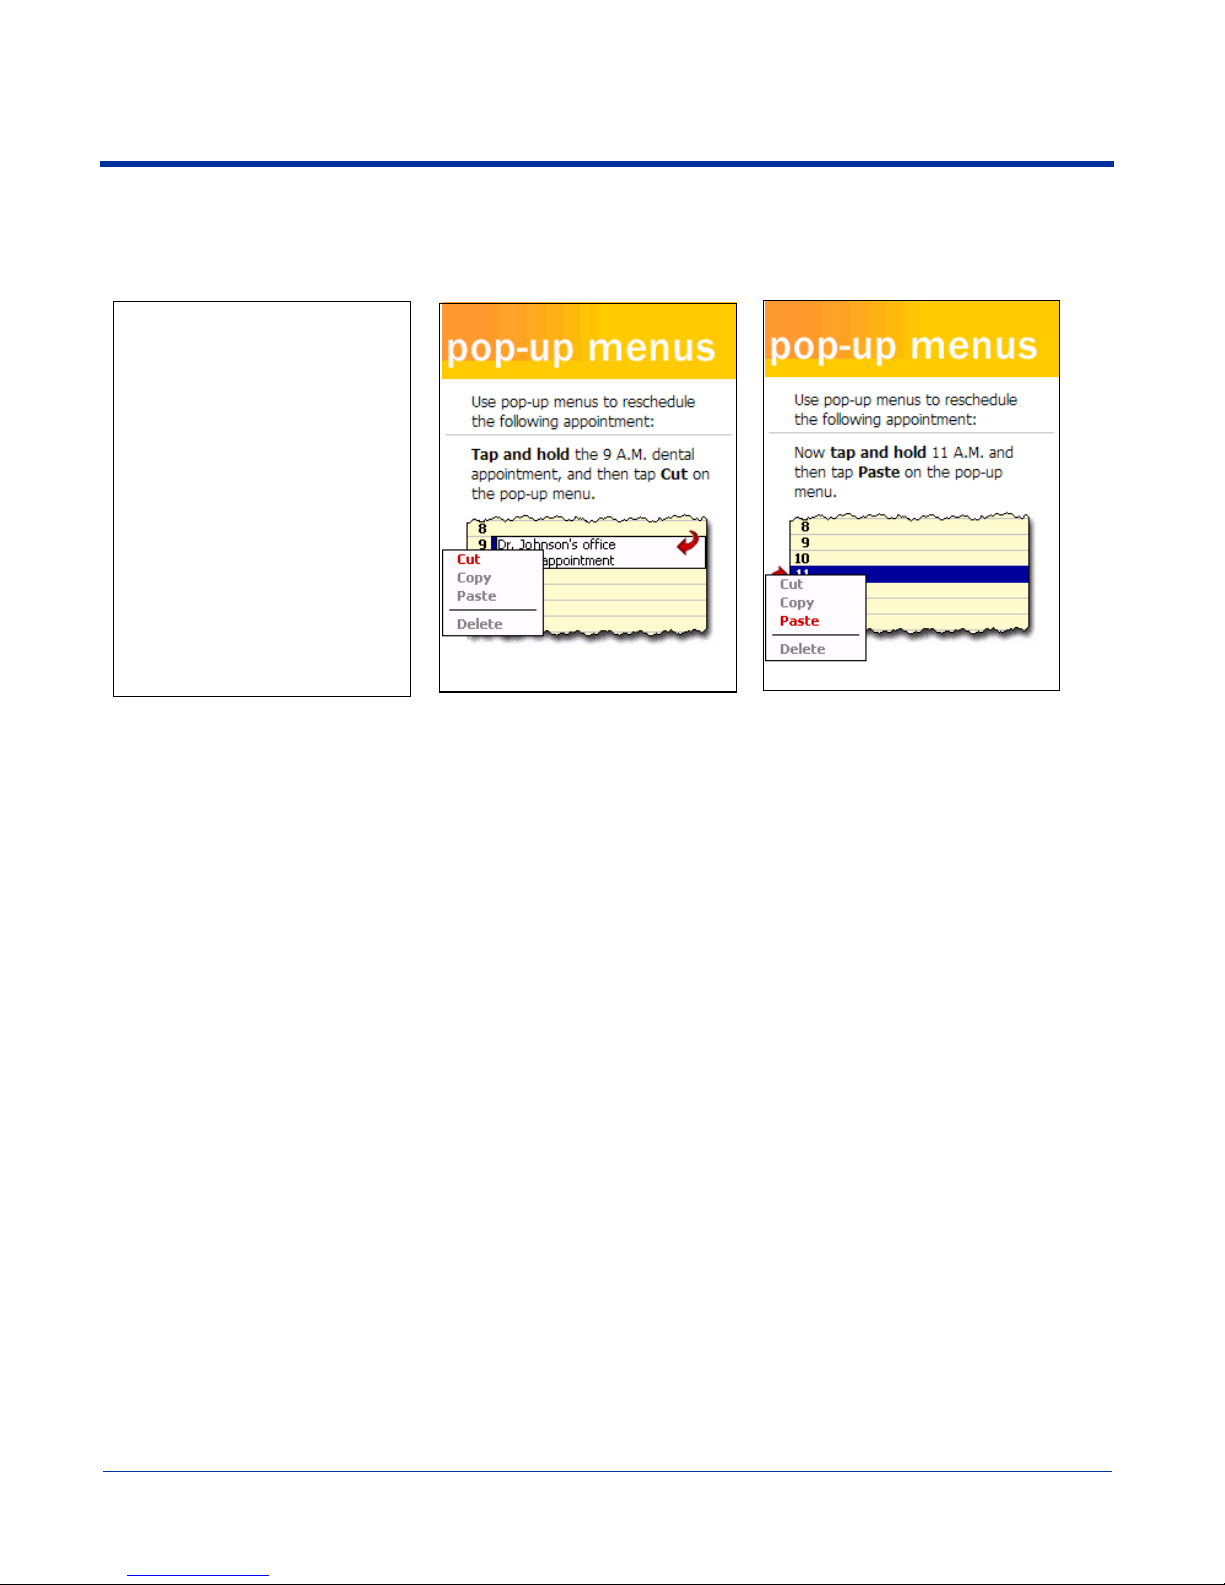
Step 6. Complete the Screens
After aligning the screen, follow the directions on the screen which take you through a simple exercise showing how to use the
stylus and pop-up menus.
Note: HHP recommends using screen protectors for Dolphin 7900 terminals; especially for those terminals used within
applications that require high-volume interaction with the touch screen. Screen protectors help prevent damage to the
touch screen, are easily installed, and can be purchased at any major computer retail store or directly from HHP, Inc.
Please contact HHP directly for part numbers and pricing.
Step 7. Set the Time Zone
Use the drop-down list to select your time zone, and tap Next. This does not necessarily set the correct time; only the time zone.
You set the time and date manually. For details,
After setting the time zone, you are finished with the initial setup. The system begins autoinstalling.
see Setting the Time and Date on page 2-9.
2 - 8 Dolphin® 7900 Mobile Computer User’s Guide - Prelim. Draft Rev (a)
Page 27
Step 8. Autoinstall
For each program that loads, a status bar indicates that the program is loading. Autoinstall occurs after each hard reset. Do NOT
touch the keyboard or the screen while programs are loading.
All configurations of the Dolphin 7900 terminal install HHP Demos and HHP Utilities. If the terminal is configured with a wireless
radio, the appropriate radio drivers and utilities for each radio install.
After Autoinstall is complete, the terminal performs a soft reset automatically. When it finishes booting up after the soft reset, the
Today screen appears;
see Today Screen on page 4-2.
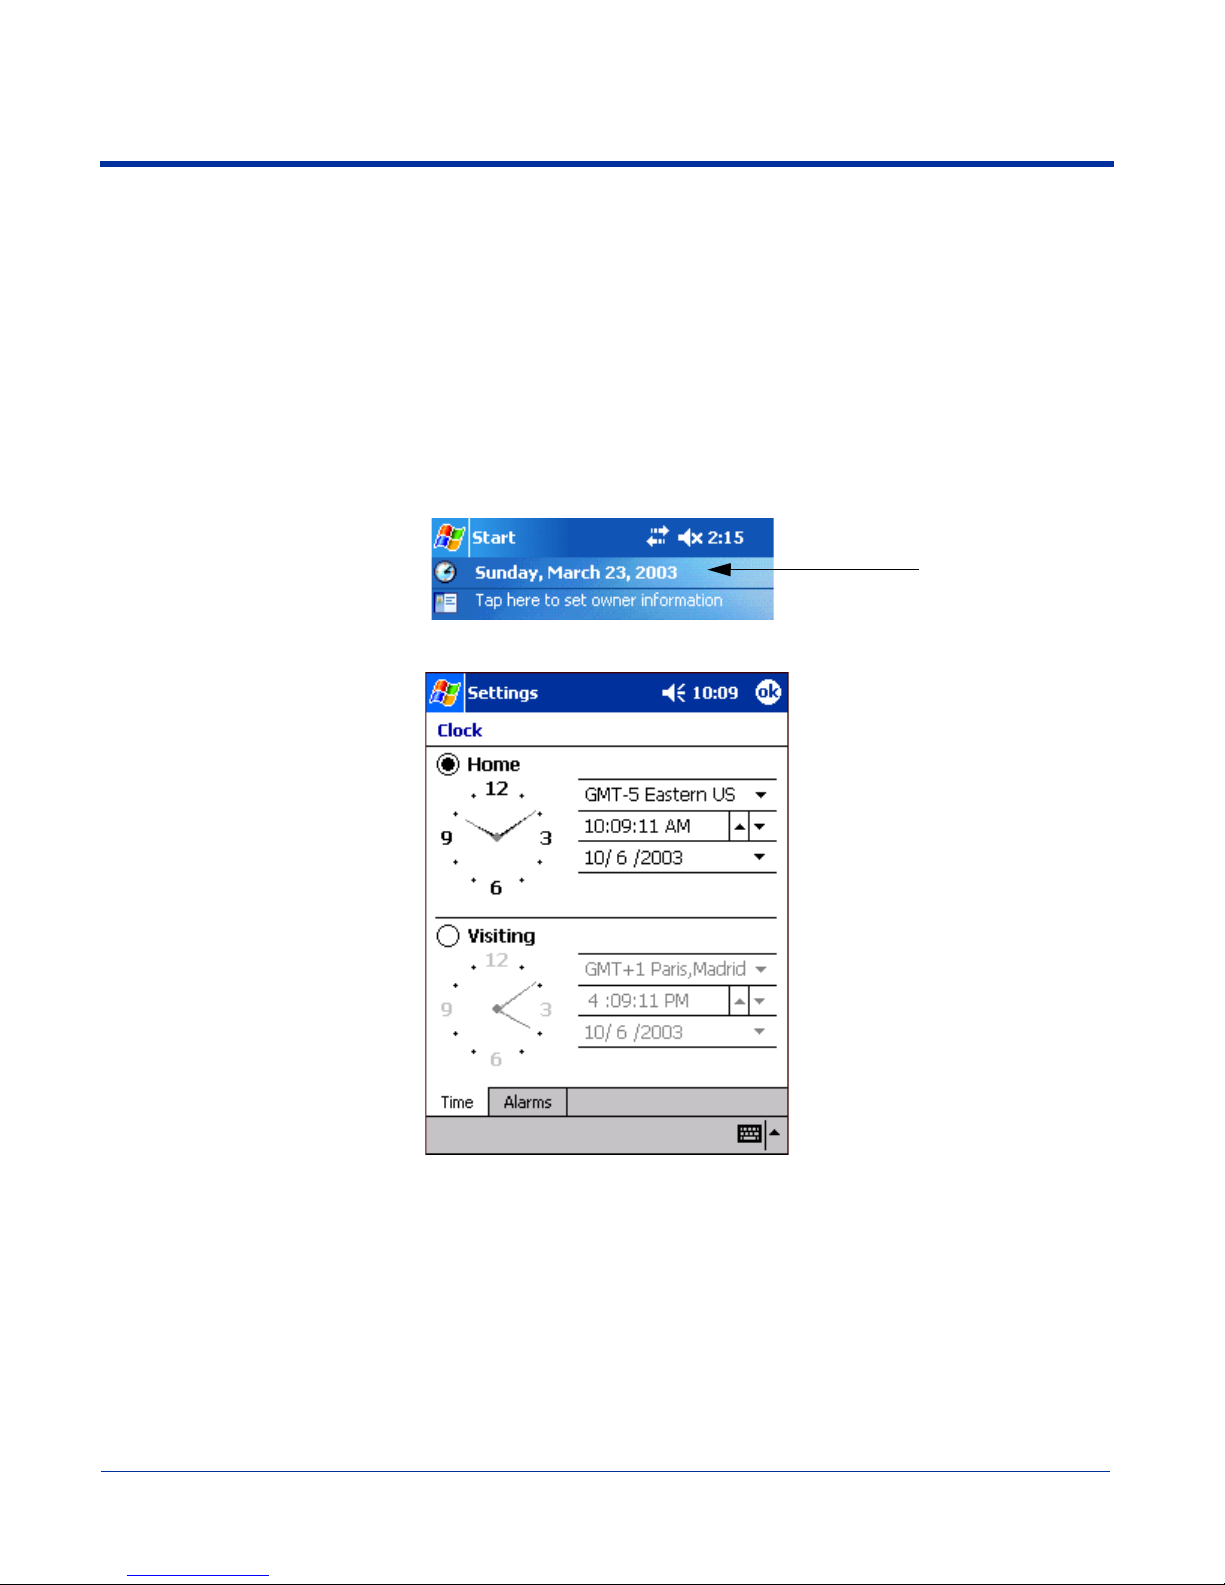
Setting the Time and Date
You need to re-set the time and date after every hard reset of the terminal. It is a good idea to set the time and date now before
you begin using the device.
On the Today screen, tap the line that displays the time and date,
The Clock Settings screen appears.
Dolphin® 7900 Mobile Computer User’s Guide - Prelim. Draft Rev (a) 2 - 9
Page 28
Step 9. Verifying Operations with HHP Demos
The Dolphin 7900 mobile computer comes loaded with HHP Demos you can use to verify imaging and decoding.
Verify Imaging
The Image Demo enables you to use the imager to capture an image.
1. Go to Start > HHP Demos > Image Demo. The image demo opens.
2. Point the terminal at an object and press the SCAN key on the keyboard or the Scan button on the side panel.
A preview of the object appears on the terminal screen.
3. Release the SCAN key. The image is captured. By default, the image saves to the My Device folder as “imagedemo.jpg.” To
save to a different location, go to File > Save As and select a new location.
4. Press the ESC key to close the demo.
For more information about taking an image, see Using the Image Engine on page 5-1.
Verify Decoding
The Scan Demo enables you to decode a sample bar code.
1. Go to Start > HHP Demos > Scan Demo.
2. Aim the terminal at a bar code and press the SCAN key on the keyboard or the Scan button on the side panel.
The scan LED lights red, and a green aimer beam projects out from the scanner.
3. When a good scan is obtained, the decode LED lights solid green and the terminal beeps.
The bar code readout appears on the screen.
4. Press the ESC key to close the demo.
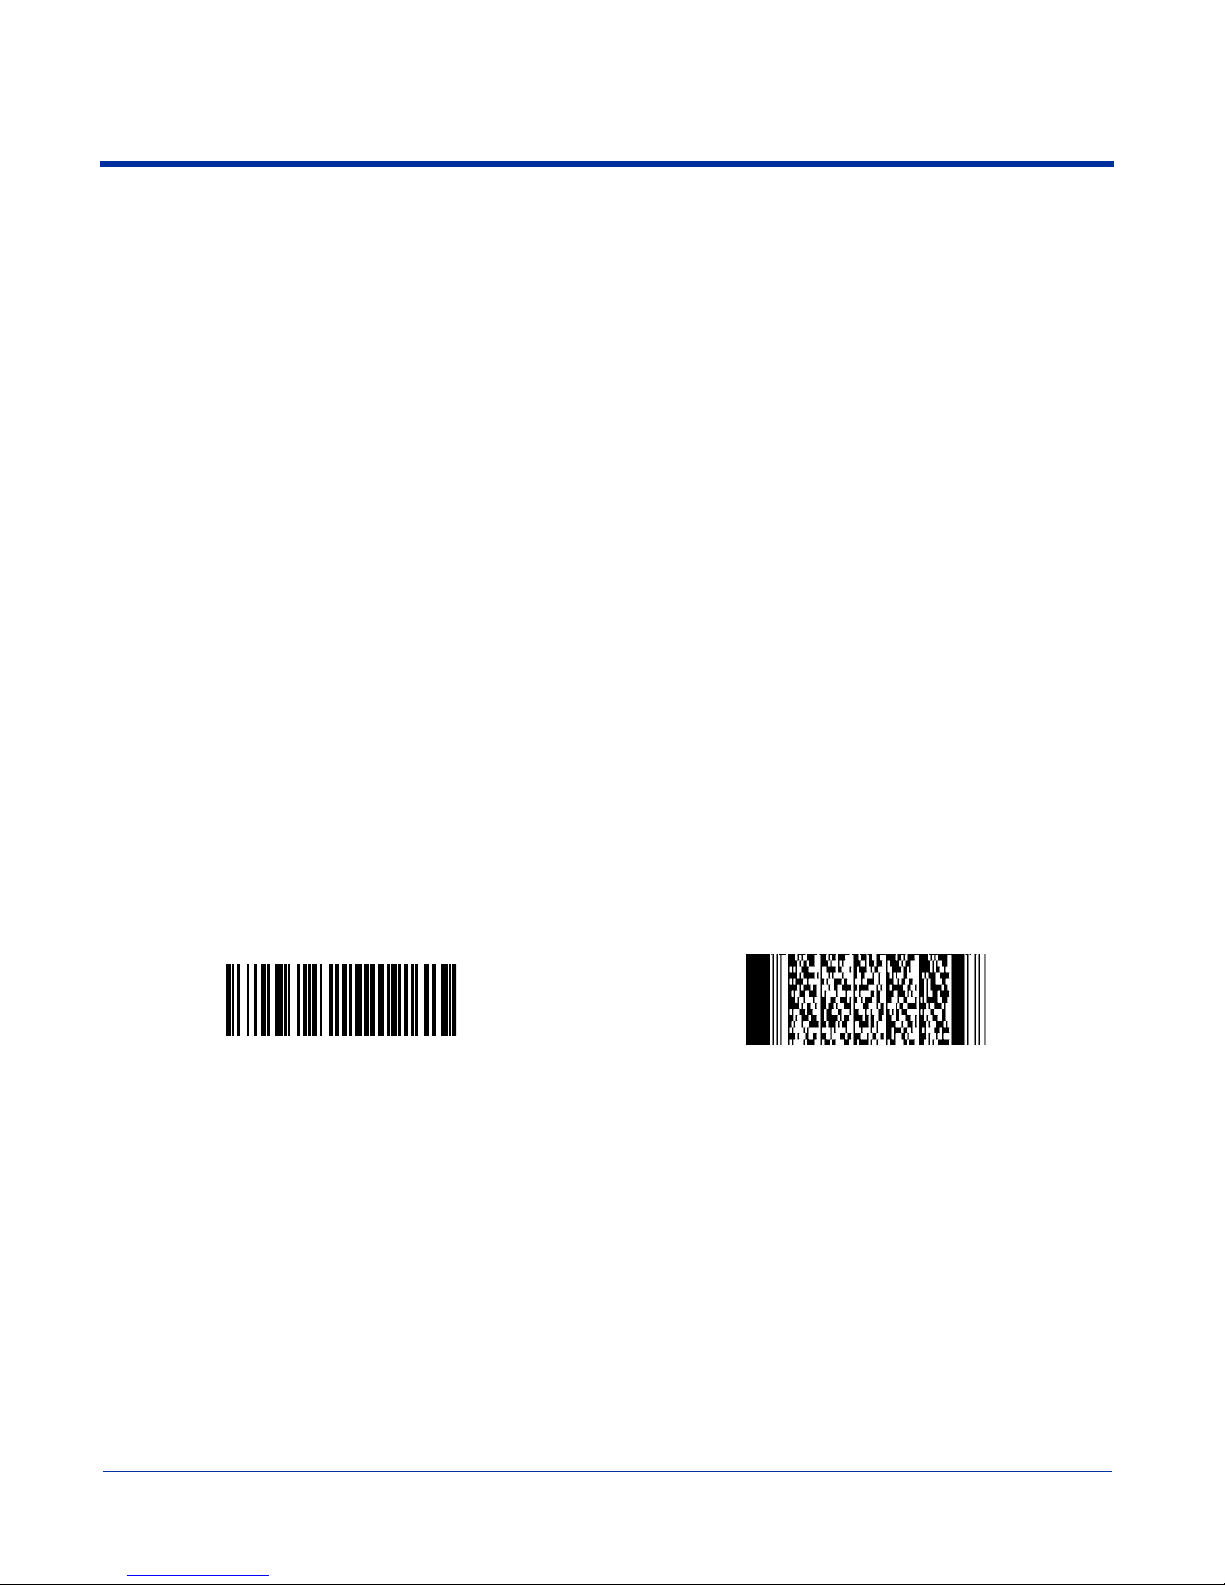
Sample Bar Codes
You can use the following bar codes to verify decoding:
Sample 128 Sample PDF417
Code 128 PDF417 Test Message
For more information, see Decoding on page 5-3.
2 - 10 Dolphin® 7900 Mobile Computer User’s Guide - Prelim. Draft Rev (a)
Page 29

Resetting the Terminal
There are two ways to reset the terminal: a soft and a hard reset.
Soft Reset (Warm Boot)
A soft reset re-boots the device without losing RAM data. You would perform a soft reset when
• the terminal fails to respond.
• after installing some software applications.
• after making changes to certain system settings, such as network cards.
1. Press and hold the Red + ESC keys for approximately five seconds.
2. The decode and scan LEDs flash for approximately three seconds as the terminal resets.
3. When the reset is complete, the Today screen displays.
Hard Reset (Cold Boot)
A hard reset resets the operating system, restores the terminal back to factory defaults, and resets the terminal after a bootloader,
keyboard, and kernel upgrade.
A hard reset erases all of the data stored in RAM memory and all RAM installed applications.
!
1. Press and hold the Red + TAB keys for approximately five seconds.
2. The decode and scan LEDs light for approximately three seconds.
3. The terminal re-initializes; see Initialize the Mobile Computer on page 2-7.
Suspend Mode
To put the Dolphin terminal into suspend mode manually, press and hold the POWER key. The terminal goes into suspend mode
automatically when the terminal is inactive for a programmed period of time. For more information,
To wake the Dolphin terminal from suspend mode, press the SCAN key.
The Dolphin terminal also goes into suspend mode if you remove the main battery pack while the terminal is powered on. After
you install a new battery, press the SCAN key to wake the terminal.
If the main battery and back-up battery are ever fully discharged of power , the terminal performs a hard reset when power
is restored. The terminal will be restored to its original state. All data stored in RAM memory will be lost.
!
see Power on page 7-11.
Dolphin® 7900 Mobile Computer User’s Guide - Prelim. Draft Rev (a) 2 - 11
Page 30

2 - 12 Dolphin® 7900 Mobile Computer User’s Guide - Prelim. Draft Rev (a)
Page 31

3
Dolphin 7900 Hardware Overview
System Features
Processor
The Dolphin 7900 terminal is equipped with an Intel X-Scale 400MHz RISC microprocessor that runs on a 100 MHz RAM BUS,
making it one of the most powerful mobile computers on the market.
Operating System
Windows Mobile 2003 Second Edition software provides a compact, highly efficient, scalable operating system. Its open
architecture facilitates the development of applications for energy-efficient data collection devices such as the Dolphin 7900
terminal.
Memory
Main Board/IPSM – The standard memory configuration is 64 MB RAM and 64 MB non-volatile synchronous Flash.
Mini Secure Digital Card (SD) – Dolphin 7900 terminals contain a mini-SD memory interface to support memory expansion. You
can order memory upgrades up to 128 MB or 256 MB. The SD access door on the left, side panel makes the SD memory useraccessible. However, when that access door is fastened securely and properly, the terminal’s environmental rating is preserved.
For more information about each kind of memory, see Memory on page 7-8.
Wireless Radio Options
For more information, see Radio Options on page 4-8.
Dolphin® 7900 Mobile Computer User’s Guide - Prelim. Draft Rev (a) 3 - 1
Page 32
Front Panel Features
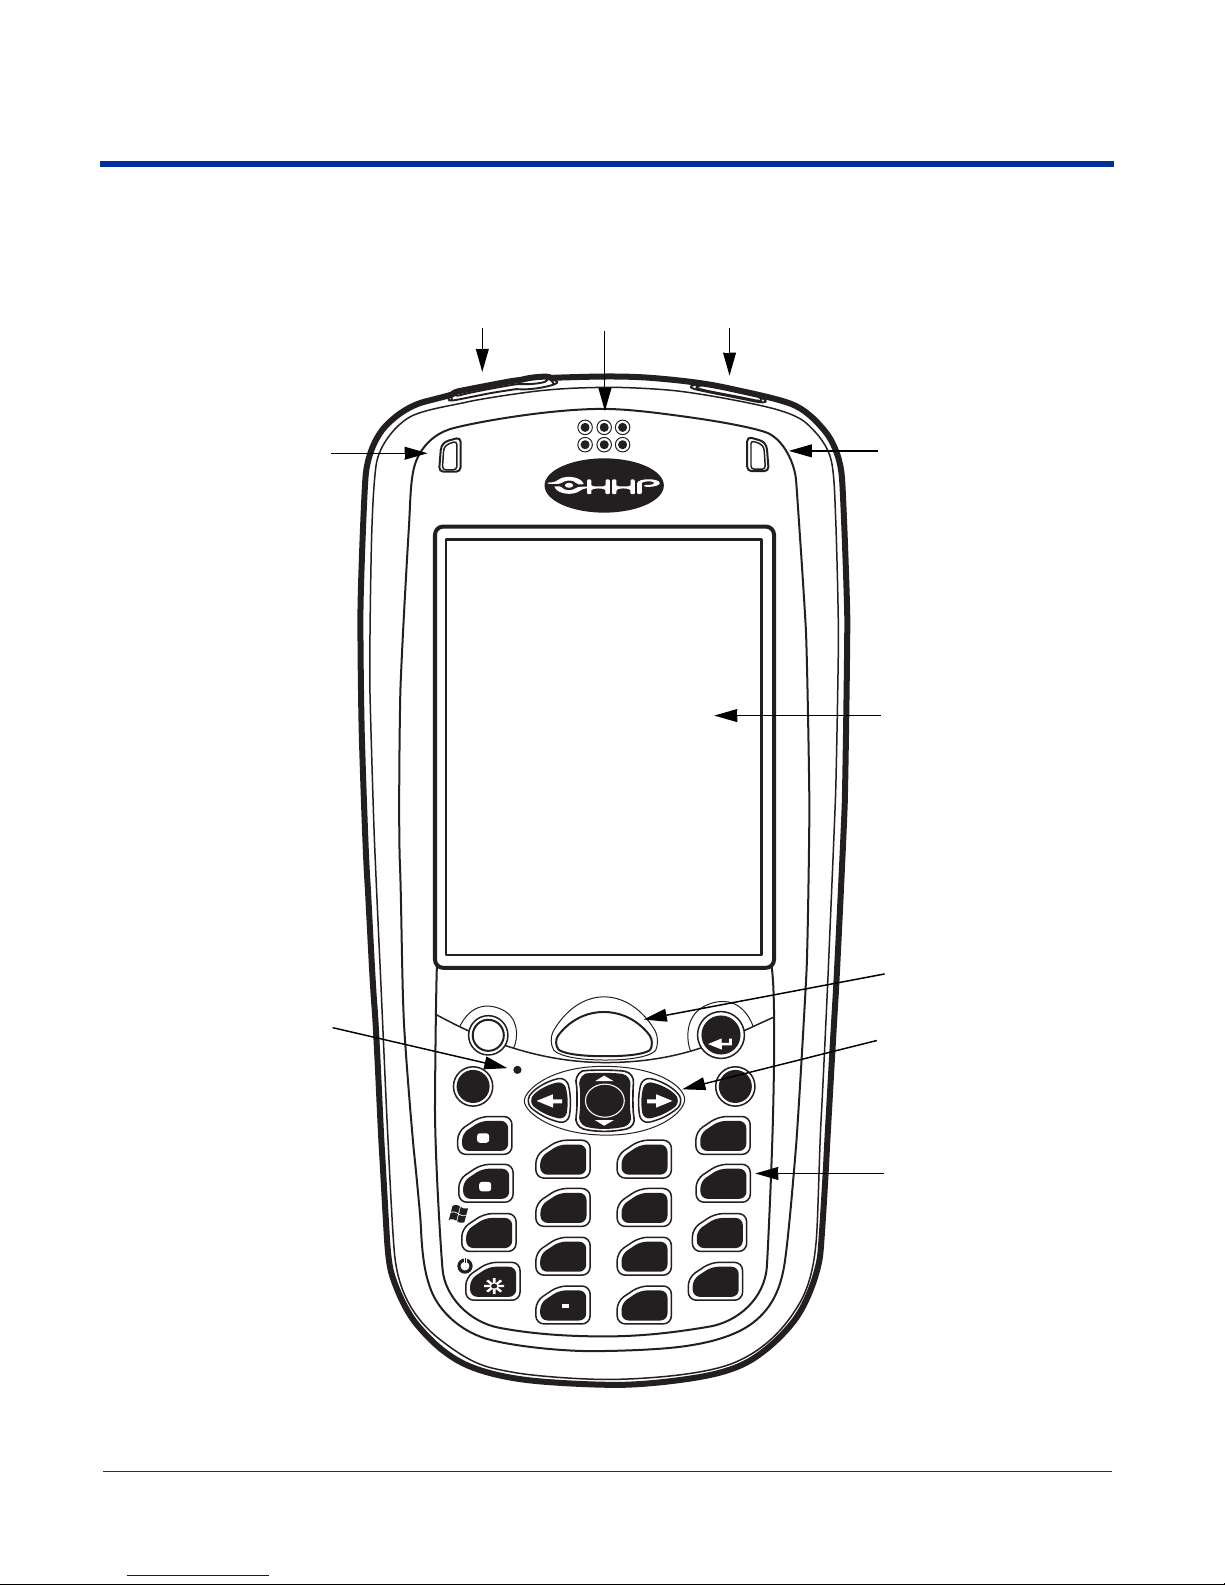
This section describes features on the front panel of the Dolphin 7900 terminal. (The following graphic shows a Dolphin 7900
with a 25-key keyboard.)
Decode LED
Speaker
IrDa PortAudio Jack
Scan LED
Display
SCAN key
Navigation keys
Recessed Keyboard
Microphone
3RFNHW3&
(6&
$/7
67$57
6&$1
%.63 63
92/
3*
6(1'
) )
)
*+,
)
3456
)
)
)
$%&
-./
789
(1'
2.
7$%
)
'()
)
012
)
:;<=
#"
3 - 2 Dolphin® 7900 Mobile Computer User’s Guide - Prelim. Draft Rev (a)
Page 33

Audio Jack
Dolphin 7900 terminals contain a 2.5mm audio jack supports both speaker (stereo) and microphone (mono) headsets.
Microphone is available only on Dolphin 7900 terminals configured with GSM/GPRS radios. In both cases, you must
use a 2.5mm plug. For more information about GSM/GPRS radios,
GPRS on page 11-1.
Speaker
The Dolphin 7900 terminal has an integrated speaker that sounds audio signals as you scan bar code labels and enter
data. The operating frequency range is 500Hz at 71 dB up to 80 dB. The speaker can also be used for playing sounds
(e.g., WAV or MP3 files).
When used in conjunction with the microphone on the keyboard, the speaker can also be used for two-way voice
communications. Both speaker and microphone are located on the front panel for voice communication that is fully
integrated with terminal operation.
IrDA Port
The Infrared Data Association or IrDA port communicates with IrDA-enabled devices such as PC’s, printers, modems,
or other Dolphin 7900 terminals. The maximum speed is 115kbps.
LEDs
The two light emitting diodes (LEDs) located at the top of the LCD display flash and illuminate during resets and
scanning/imaging. Both can be programmed by various software applications.
Scan LED - Located in the upper right corner, this LED lights red when you press the SCAN key.
Decode LED - Located in the upper left corner, this LED lights green when a scanned bar code is successfully decoded.
Display
see Wireless WAN Communications with GSM/
Dolphin 7900 terminals feature a 3.8” liquid crystal display (LCD) that is covered with an industrial, protective touch
screen lens. The video graphic array (VGA) resolution is 1/4 (240 X 320 pixel). The touch screen is activated with the
stylus (included with the terminal) or a finger.
The color LCD is 16 bits/pixel and uses active display or thin film transistor (TFT) technology. The backlight for the
display illuminates when the screen is touched.
For more information about the Backlight, see Adjusting the Backlight on page 4-6.
SCAN Key
The SCAN key is centrally located for easy access with the right or left hand. When pressed, the SCAN key activates
the scanner/imager. The SCAN key also functions as an on or system wakeup control for the terminal.
Navigation Keys
The centrally-located navigation keys enable you to move and position the cursor through software programs. The up
and down arrows are programmed to perform specific functions when pressed in combination with the Blue and Red
modifier keys.
Keyboard
The Dolphin 7900 series features two keyboard options: 25-key numeric-alpha and 36-key full alpha/numeric keyboard.
Both keyboards are recessed under the overlay for maximum durability and backlit for easy viewing in various lighting
conditions. Keyboard overlays are color-coded to indicate the functions performed or characters typed when the colorcoded key is pressed immediately after the Red or Blue Modifier key.
For a complete overview of each keyboard, see Using Dolphin 7900 Keyboards on page 6-1.
Microphone
Dolphin 7900 terminals feature an integrated microphone that provides audio input to the terminal. Both microphone
and speaker are located on the front panel for voice communication that is fully integrated with terminal operation.
Dolphin® 7900 Mobile Computer User’s Guide - Prelim. Draft Rev (a) 3 - 3
Page 34
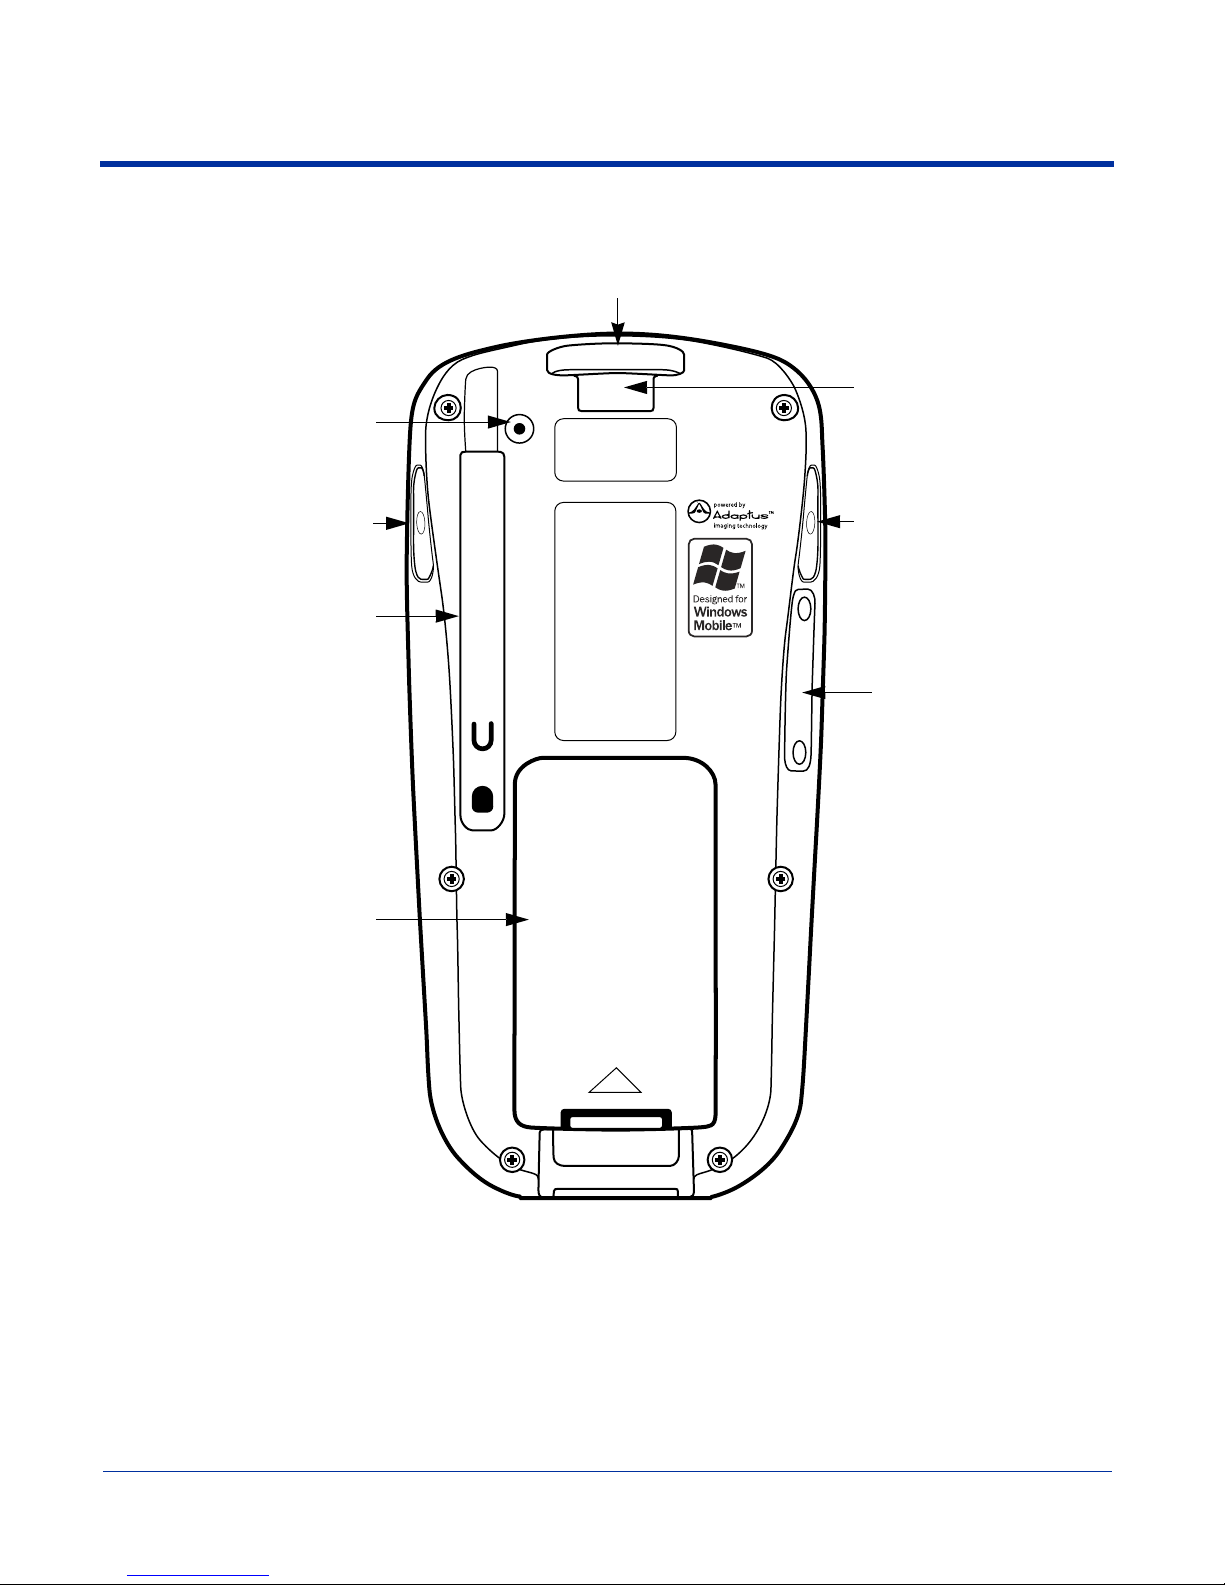
Back Panel Features
The following graphic describes features on the back panel of the Dolphin 7900 terminal.
Image Engine Window
Stylus Fastener
Stylus (in slot)
Hand Strap Clip
Scan ButtonScan Button
Access Door
Battery
3 - 4 Dolphin® 7900 Mobile Computer User’s Guide - Prelim. Draft Rev (a)
Page 35

Image Engine Window
Dolphin 7900 terminals have an optional image engine that reads and decodes linear, stacked linear (PDF417), and 2D
matrix bar code symbologies. With the latest CMOS-based technology, the engine works like a digital camera and
enables digital image capture, signature capture, and reading of OCR characters.
The engine points out the top panel at a slight downward angle so that the terminal needs to be positioned slightly above
the image or bar code when using the engine.
Hand Strap Clip
The Dolphin 7900 has an adjustable, elastic hand strap attached to the terminal with a clip on the top of the back panel.
You can detach the handstrap from this clip when you need access to the battery or other item on the back panel.
Scan Button
See Scan Button on page 3-6.
Access Door
See Access Door on page 3-6.
Battery
The Battery well is a recessed area on the back of the Dolphin that holds the Li-Ion battery pack.
For more information, see Battery Power on page 3-8.
Stylus and Fastener
The stylus is used to operate the touch screen. The back panel features this storage slot to hold the stylus when not in
use. There is also a fastener on the back panel to which you can attach stylus tethers. A stylus tether is a coiled elastic
cord with one end to attach to the stylus and another to attach fasten to the back panel.
Dolphin® 7900 Mobile Computer User’s Guide - Prelim. Draft Rev (a) 3 - 5
Page 36
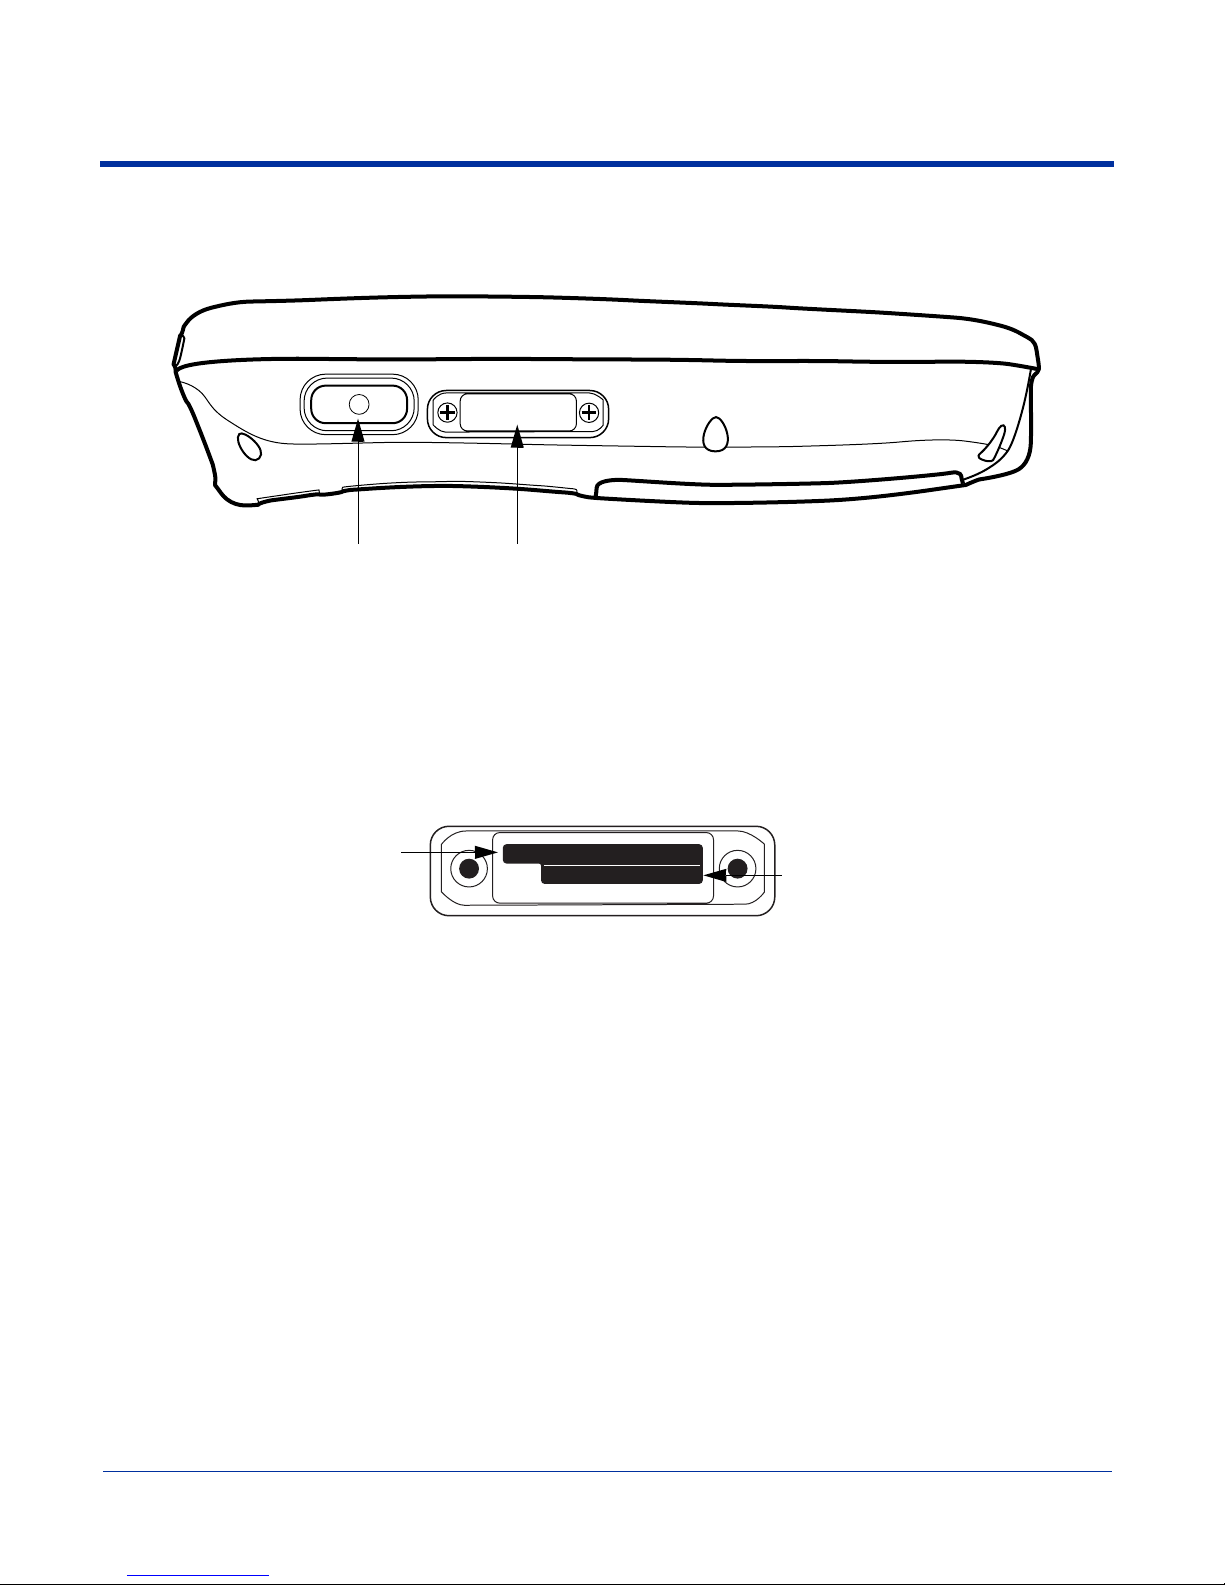
Side Panel Features
The following graphic shows the left, side panel.
Scan Button Access Door
Scan Button
Scan buttons are located on both side panels. The Scan buttons initiate the image engine and can serve as a more
ergonomic alternative to pressing the Scan key on the keyboard.
Access Door
When open, the access door on the Dolphin 7900 contains the mini-SD memory interface and the SIM card slot.
Mini-SD Interface
SIM Card Slot
Mini-SD Interface You can install a mini-SD card to expand the terminal’s memory capacity up to
128MB or 256MB. After memory expansion is complete, this door should be closed
and sealed. (The mini-SD memory interface does not support SDIO.)
SIM Card SIM cards are required when using a GSM radio. For more information about GSM
and SIM cards,
When closed, the access door seals the memory interface and SIM card from moisture and particle intrusion providing
secure storage for read/write data.
Note: This door is not removable by the user in the field. The door can only be removed using a special Torx T8 tool from HHP.
This tool is HHP part number 100001024.
see SIM Card Installation on page 11-2.
3 - 6 Dolphin® 7900 Mobile Computer User’s Guide - Prelim. Draft Rev (a)
Page 37
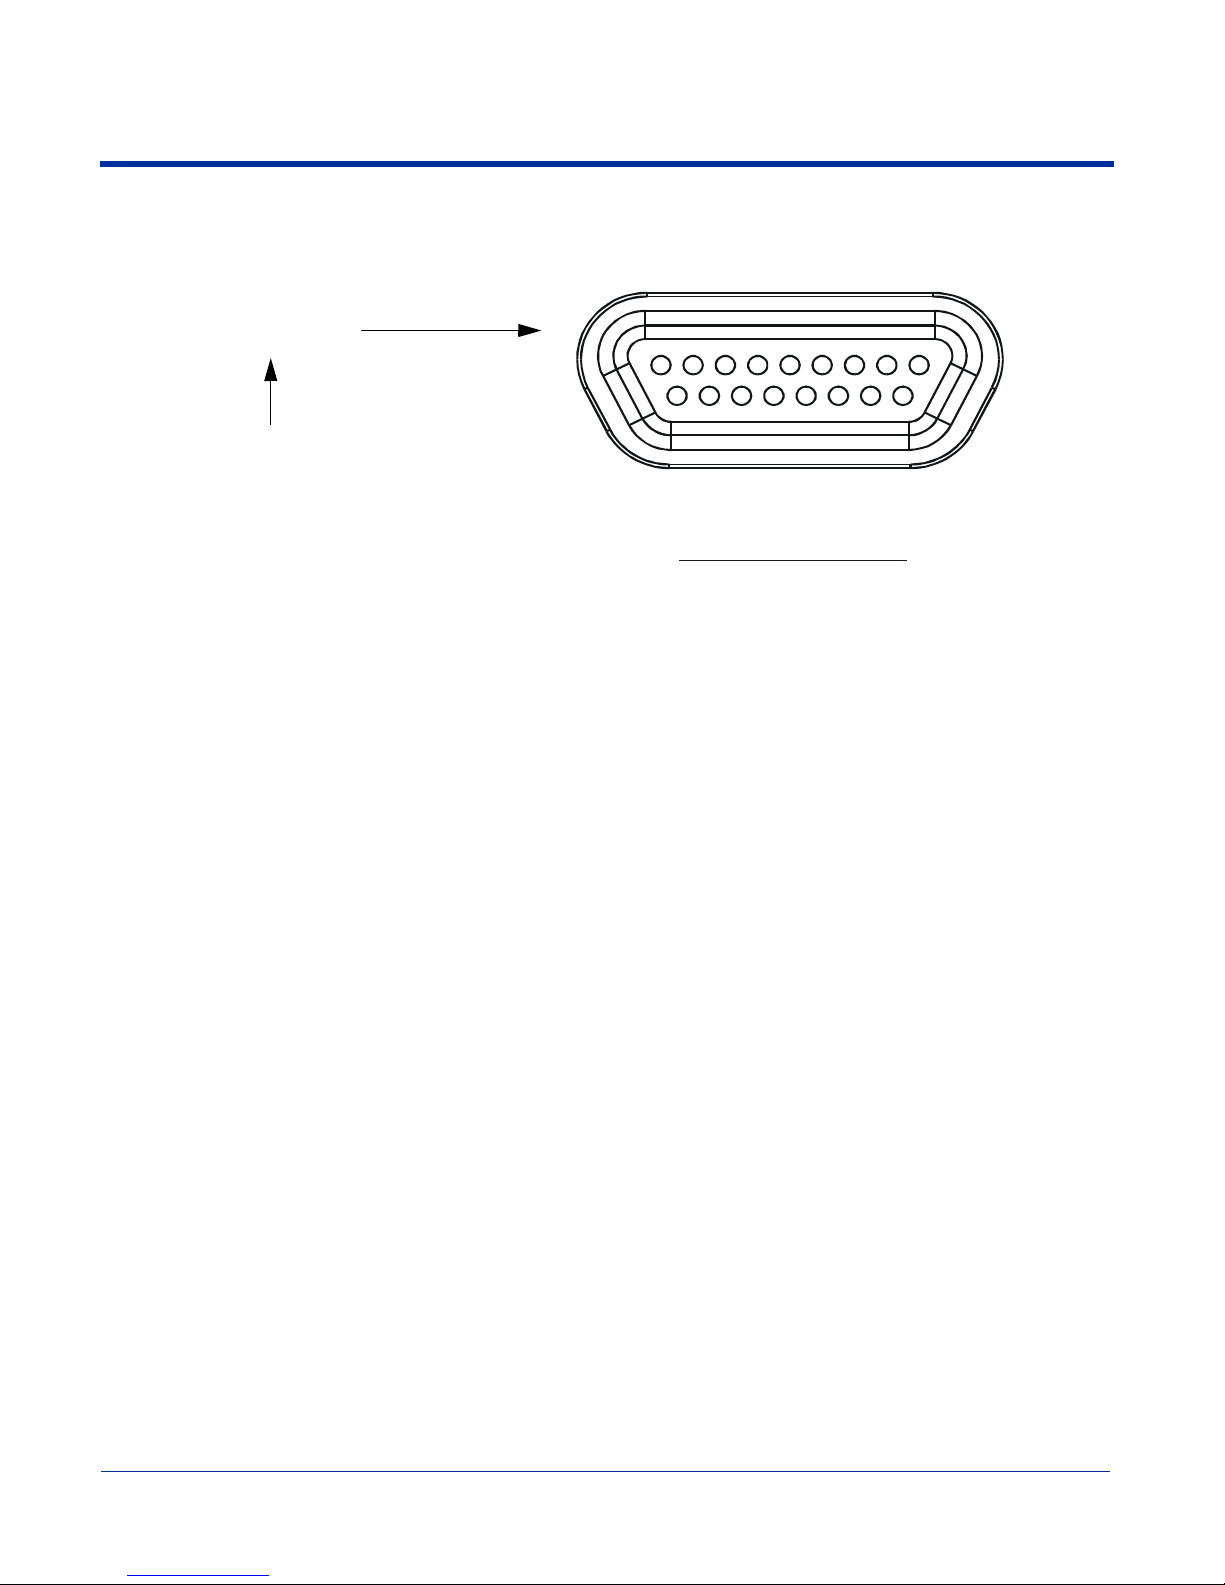
Bottom Panel Features
N
This following graphics describe the bottom panel of the Dolphin 7900.
Mechanical Connector
ote: Signals referenced are for a DTE device.
1102
3
4135146157168179
12
11
Pin # Description
1 +USB
2 PWR
3 N / C
4 N / C
5 N / C
6 N / C
7 GND
8 5V OUT
9 DTR
10 -USB
11 USB DET
12 RI
13 DSR
14 RXD
15 RTS
16 TXD
17 CTS
Mechanical Connector
The bottom panel of the Dolphin 7900 features a custom, industrial-grade connector with 17 pins. When seated in a Dolphin 7900
series peripheral, the terminal is powered, the main battery charged, and communication occurs via this connector. All Dolphin
7900 series peripherals are designed to work exclusively with this connector.
The 17-pin connector can communicate with Dolphin 7900 series peripherals via RS-232 or USB. For RS-232, the maximum
communication speed is 115 Kbps with seven baud rate settings. For USB, the communication speed is up to 12 Mbps. If the
peripheral unit is connected to a PC, this connector also transmits data.
The mechanical connector also provides power out (to peripheral devices) 5V at 500mA. This means that, with the proper HHP
cable, the terminal can power another device.
Dolphin® 7900 Mobile Computer User’s Guide - Prelim. Draft Rev (a) 3 - 7
Page 38

Battery Power
The Dolphin 7900 features intelligent battery technology with two types of battery power: the main battery pack installed in the
back panel and the backup battery located inside the terminal. Both batteries work together to prevent data loss when the terminal
is used over long periods of time. Both batteries must also be charged to full capacity before using the Dolphin 7900 for the first
time.
Main Battery Pack
Use only the Li-ion battery packs provided by HHP. The use of any battery pack not sold/manufactured by HHP in a
Dolphin terminal will void your warranty and may result in damage to the Dolphin terminal or battery.
!
The 7.4V, 14.8 watt hour Li-Ion battery pack is the primary power source for the Dolphin. The Li-Ion battery is designed to operate
in a temperature range of -10 to 50° C (14 to 122° F). For the location of the Li-Ion battery on the terminal,
Charging Options
When the Li-ion battery is installed in the terminal:
• Place the terminal in a HomeBase (page 13-7) or Mobile Base (page 14-4) that is connected to an appropriate power supply.
• Connect a charging/communication cable to the mechanical connector, plug the cable into the AC adapter, and plug the
adapter cable into a power outlet.
• Connect the terminal to the Mobile Charger and vehicle power port.
When the Li-ion battery is not installed in the terminal:
• Place the battery pack in the Dolphin QuadCharger - see Charging Batteries in the QuadCharger on page 16-3.
• Place the battery pack in the auxiliary battery well of the HomeBase - see page 13-7.
Charging Time
see Battery on page 3-5.
The Li-ion battery pack requires four hours to charge to full capacity.
Internal Backup Battery
Located inside the terminal, the backup battery is a 3.6 Volt nickel metal hydride (NiMH) battery.
Purpose
The internal backup battery prevents the terminal from being reset if you need to remove and replace the main battery pack. It
retains RAM data and allows the real-time clock to remain operational for up to 30 minutes when the main battery pack is
removed. If the terminal is left without the main battery pack for more than 30 minutes, the internal backup battery needs to be
recharged to function according to its specifications.
Note: Data and programs stored in Flash memory are not lost even if the internal backup battery fails. However, you must reset
the real-time clock; see Setting the Time and Date on page 2-9.
Charging
The internal backup battery is powered by the main battery pack. Therefore, charging the internal backup battery requires that
the main battery pack be installed in the terminal and the terminal be connected to a charging device.
The internal backup battery must be fully charged before using the terminal for the first time. The initial charge cycle takes
approximately eight hours. After that, if the internal backup battery becomes fully discharged of power, it requires a minimum of
10 hours of charging time to function normally.
Guidelines
Follow these guidelines to maximize the life of the Dolphin’s internal backup battery:
• Keep a charged Li-Ion battery pack in the Dolphin terminal. The internal battery prematurely discharges if there is not at least
a partially charged battery in the terminal.
• Keep the Dolphin terminal connected to power when the terminal is not in use.
3 - 8 Dolphin® 7900 Mobile Computer User’s Guide - Prelim. Draft Rev (a)
Page 39
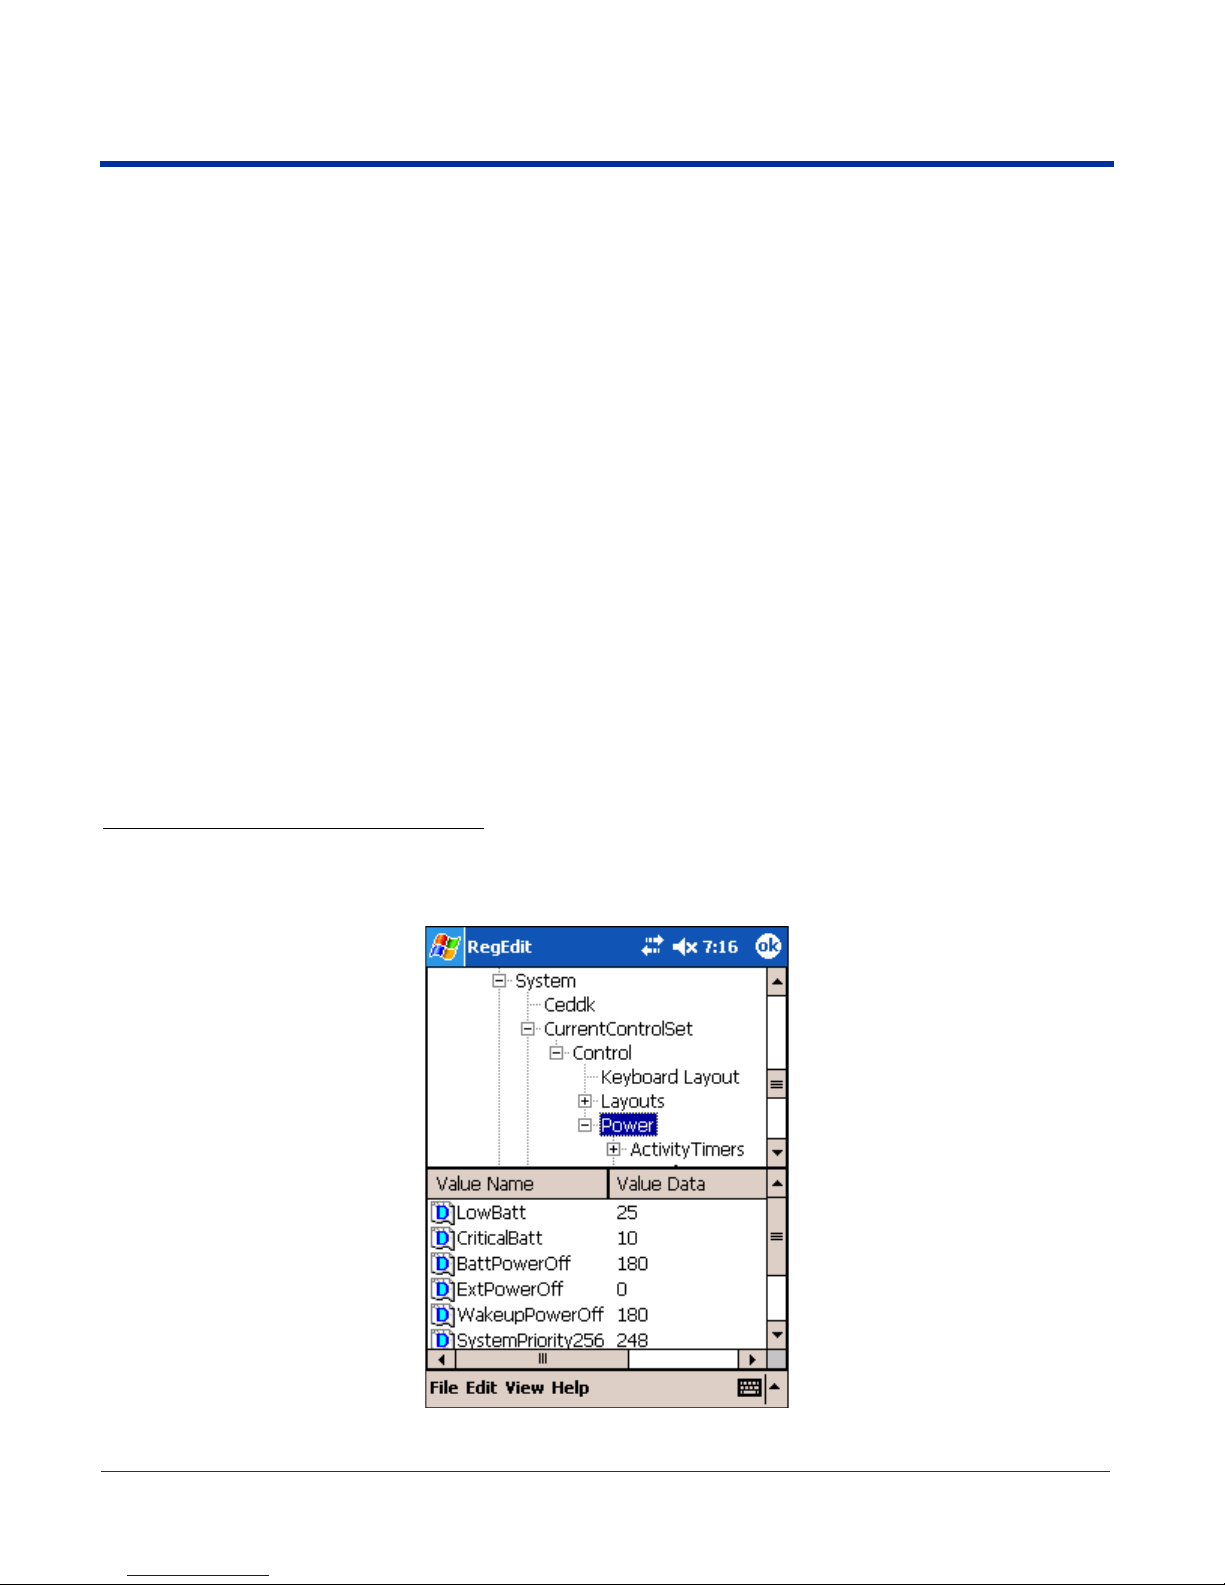
Managing Battery Power
Data and files saved on the Dolphin 7900 terminal may be stored in RAM; therefore, maintain a continuous power supply to the
terminal to help prevent data loss. Letting the backup battery become fully discharged causes the terminal to lose all data in RAM.
The internal battery discharges prematurely if there is not at least a partially charged battery in the terminal. When you remove
a battery pack, insert another charged battery pack in the Dolphin.
If the main battery is low and the terminal is in suspend mode, pressing the SCAN or Power button will not wake the Dolphin
7900 terminal; you must replace the discharged battery with a fully charged battery.
Default Low and Critical Battery Points
The navigation bar at the top of the screen displays battery warning icons when the main battery reaches a low and critical battery
points. For details about these warning icons,
icon, then the battery is adequately charged.
The Dolphin 7900 ships with default low and critical battery points already programmed in the registry. The registry contains two
DWORD settings in the [HKEY_LOCAL_MACHINE\System\CurrentControlSet\Control\Power] entry:
“LowBatt”=19 (25%)
This sets the Low battery point to 25 percent (19 hex = 25 decimal). The low battery setting is the point at which the user is notified
that the battery is low. The user is notified only once for a low battery.
“CriticalBatt”=a (10%)
This sets the Critical Battery point to 10 percent (a hex = 10 decimal). The critical battery setting is the point at which the customer
is warned that the battery charge is very low. This warning is posted every 3 minutes until the situation is corrected.
Note: Warnings do not appear when the terminal is on external power.
see Status Icons on page 4-15. If the navigation bar does not contain a warning
Setting Critical and Low Battery Points
Developers can re-reset the default battery points in the RegEdit utility under HHP Utils.
Tap Start > HHP Utils > RegEdit. In the RegEdit utility, drill-down to HKEY_LOCAL_MACHINE > System > CurrentControlSet
> Control > Power. The Battery Points appear in the list.
Tap the Value Name to change the Value Data. You can reset the Value Data from 0 (no warning) to 99 (would nearly always
warn). Tap OK to save changes.
Dolphin® 7900 Mobile Computer User’s Guide - Prelim. Draft Rev (a) 3 - 9
Page 40
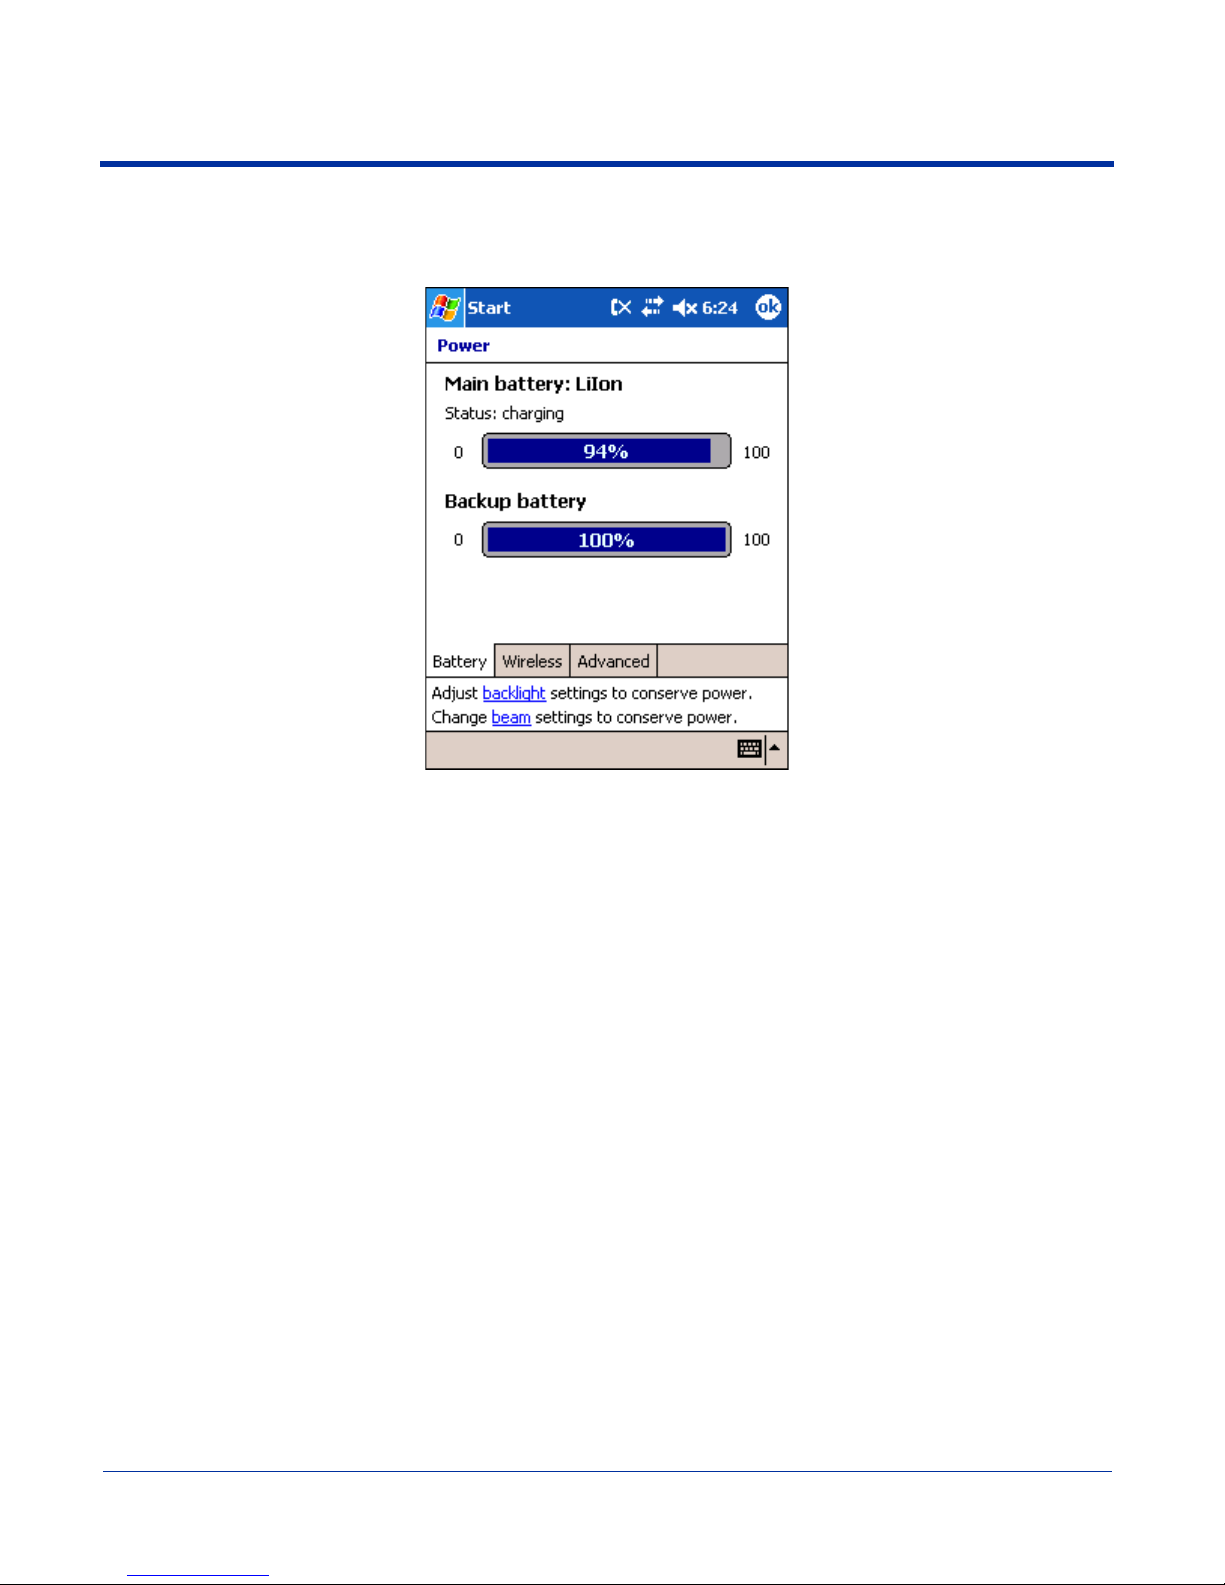
Checking Battery Power
Tap Start > Settings > System tab > Power. The Battery tab opens displaying the charge status of both the installed Li-ion
battery pack and the NiMH backup battery inside the terminal.
Power system settings contains three tabs: Battery, Wireless, and Advanced. For more information, see Power on page 7-11.
Storing Batteries
To maintain optimal battery performance, follow these storage guidelines:
• Avoid storing batteries outside the specified range of -4 to 104° F (-20 to 40°C) or in extremely high humidity.
• For prolonged storage, do not keep batteries stored in a charger that is connected to a power source.
Guidelines for Battery Use and Disposal
The following are general guidelines for the safe use and disposal of batteries:
• Use only the battery supplied, recommended, or approved by HHP.
• Replace defective batteries immediately; using a defective battery could damage the Dolphin terminal.
• Never throw a used battery in the trash. It contains heavy metals and should be recycled according to local guidelines.
• Don’t short-circuit a battery or throw it into a fire. It can explode and cause severe personal injury.
• Excessive discharge damages a battery. Recharge the battery when your terminal indicates low battery power.
• Although your battery can be recharged many times, it will eventually be depleted. Replace it after the battery is unable to
hold an adequate charge.
• If you are not sure the battery or charger is working properly, please send it to HHP or an authorized HHP service center for
inspection.
3 - 10 Dolphin® 7900 Mobile Computer User’s Guide - Prelim. Draft Rev (a)
Page 41
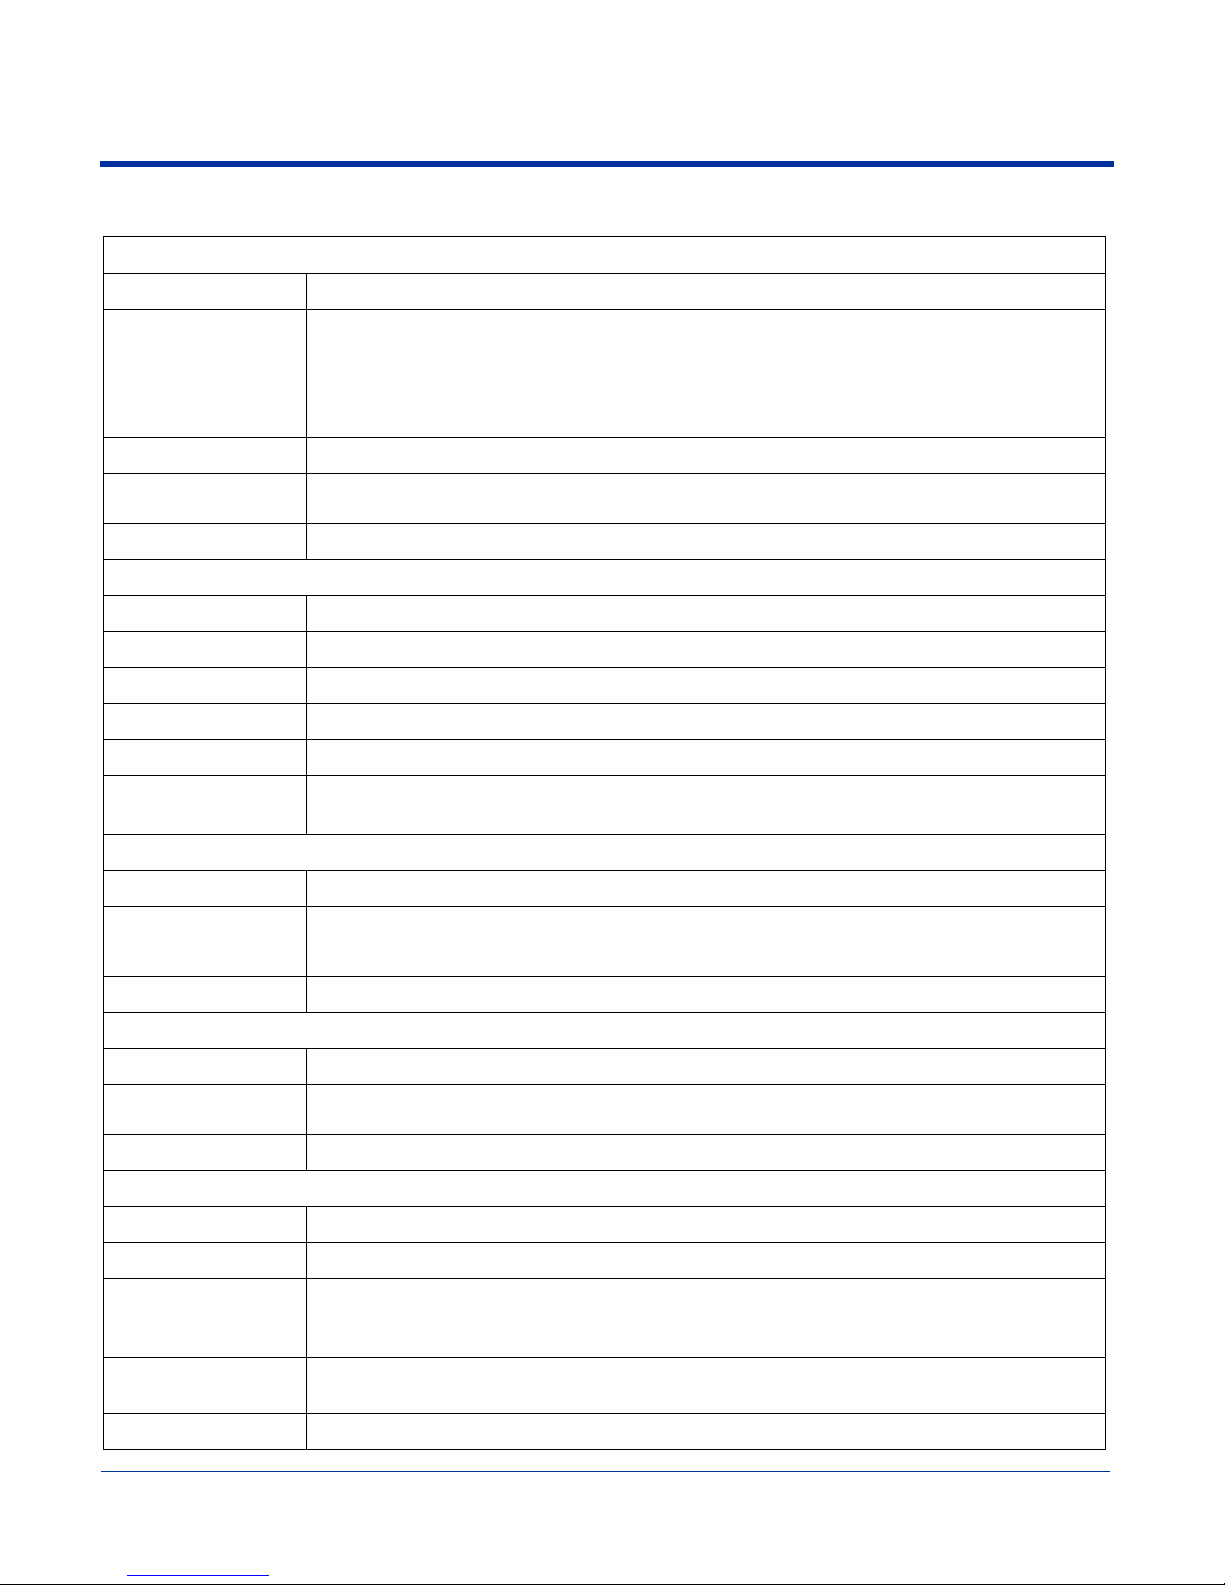
Dolphin 7900 Technical Specifications
System Architecture
Processor:
Development
Environment:
Operating Platform:
Third-Party Software:
Memory:
Data Inputs
Imager/Scanner:
1D Symbologies:
2D Symbologies:
Composite Codes
OCR Fonts:
Three Keyboard
Options:
Data Outputs
Intel X-Scale PXA255 400MHz
HHP Dolphin SDK Add-on for Pocket PC 2003 - supports Embedded Visual C++ 4.0
HHP Dolphin .NET SDK for Pocket PC 2002 and 2003 - supports Visual Studio.NET 2003 (VB.NET
and C#.NET)
HHP Dolphin GSM/GPRS SDK Add-on for Pocket PC 2003 - supports Embedded Visual C++ 4.0
and Visual Studio.NET 2003
Windows Mobile 2003 Second Edition Software for Pocket PCs - Professional Edition
Support for Connect Terminal Emulation software (TNVT, 3270, 5250) and Java Virtual Machine
(JVM) runtime, ITScriptNet Batch and Omni, MCL, and App Forge
64MB RAM x 64MB non-volatile synchronous Flash standard; 128MB RAM high memory optional
See Image Engine Options on page 5-1.
See 1D Symbologies on page 5-1.
See 2D Symbologies on page 5-1.
See Composite Codes on page 5-1.
See OCR Codes on page 5-1.
Two backlit keyboard options: 25-key numeric-shifted alpha, 36-key alpha-shifted numeric
See Using Dolphin 7900 Keyboards on page 6-1.
Display:
I/O Ports:
Mass Storage:
Wireless Radio Options
WLAN:
WWAN
WPAN:
Physical
Dimensions:
Weight:
Operating
Temperature:
Storage
Temperature:
Humidity:
See Display on page 3-3.
Industrial-grade mechanical connector supports communications-USB at 12Mbps, serial RS-232
up to 115Kbps- and charging via cradles or AC adapter cables, IrDA port-Integrated, SpeakerIntegrated, Microphone-Integrated, Headset jack
User-accessible Mini Secure Digital (Mini-SD) memory interface
IEEE 802.11b DSSS Authentication Methodologies: LEAP, MD5, TLS, TTLS, PEAP, and WEP
GSM/GPRS Tri-band (900, 1800, 1900 MHz) or (850, 1800, 1900 MHz) radio with accessible SIM
card interface
Bluetooth radio
7.3"L x 3. 5"W x 1.7"D max (185 x 89 x 43 mm), 3.2"W x 1.5"D at grip (81 x 38 mm)
WLAN: 17.3 oz. (490 gm), WPAN: 17.1 oz. (484 gm), WLAN/WPAN: 17.4 oz. (493 gm)
14 to 122°F (-10°C to 55°C)
The terminal can operate in temperatures lower than -20°C with potential degradation in
performance depending on the application
-22 to 176°F (-30°C to 80°C)
95% humidity, non-condensing
Dolphin® 7900 Mobile Computer User’s Guide - Prelim. Draft Rev (a) 3 - 11
Page 42
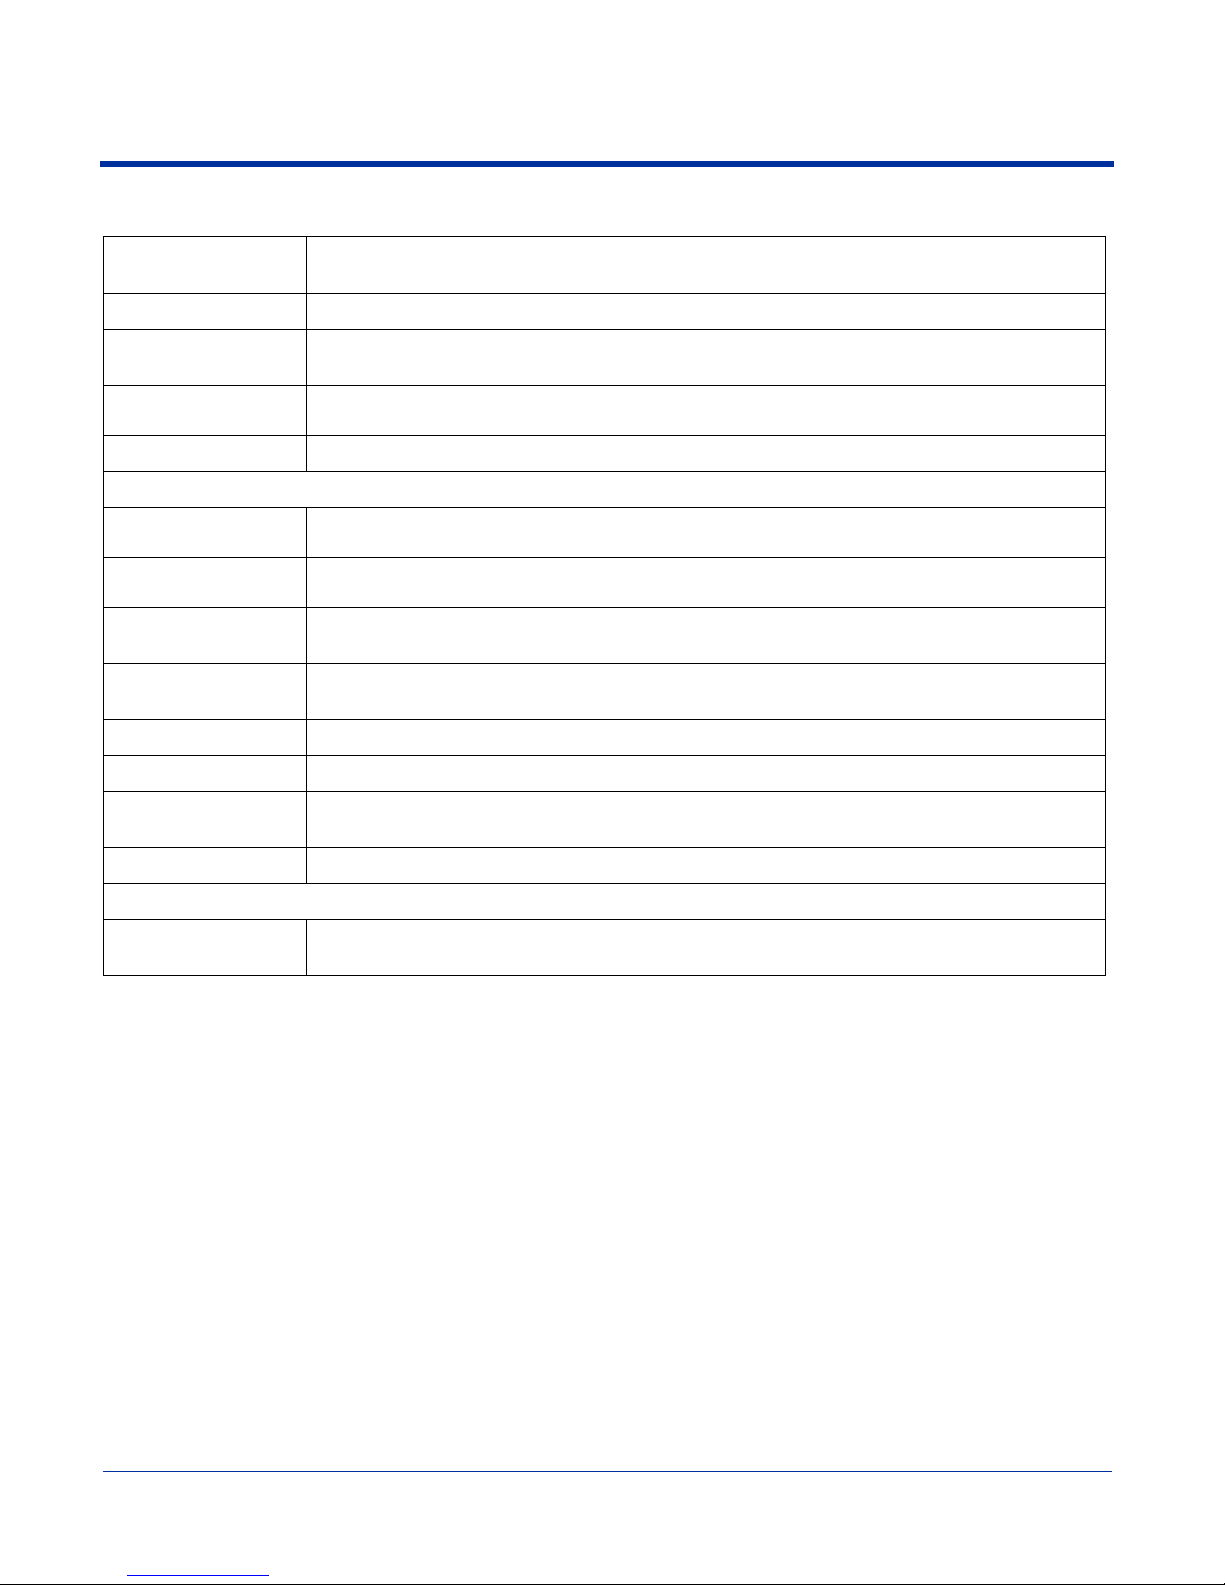
Dolphin 7900 Technical Specifications
Electrical Static
Discharge:
Impact Resistance:
Environmental
Resistance:
Power:
Other:
Peripherals/Accessories
Dolphin HomeBase
Dolphin Mobile Base
Dolphin
QuadCharger
Dolphin Mobile
Charger
Dolphin Net Base
Dolphin ChargeBase
Charging/Comm
Cables
15 kv on all surfaces
Withstands multiple 5ft. (1.5m) drops onto concrete
Independently certified to meet IP64 standards for moisture and particle resistance
Lithium-Ion battery technology – 7.4V, 14.8 watt-hour main battery with hot-swappable design for
fast replacement in the field
Integrated stylus with optional tether and adjustable, removable hand strap
Charging/communications cradle with auxiliary battery well. Data transfer via RS-232 serial or USB
ports.
Mobile charging/communication cradle. Data transfer via RS-232 serial. Power out 5 volts for
peripheral devices.
Four-slot battery charger that charges four batteries in under four hours. One slot doubles as a
battery analyzer.
Charges a Dolphin terminal by plugging into a vehicle cigarette lighter/power port.
Four-slot charging/communication cradle designed for Ethernet-based communications.
Four-slot charging cradle that holds, powers, and charges a terminal in each slot.
USB or serial cables that charge and communicate with the terminal directly–without a cradle.
Li-Ion Battery Pack
Regulatory Approvals
FCC-CE-Radio
Country:
7.4V, 14.8 watt hour Li-ion rechargeable main battery for the Dolphin.
US/Canada, R&TTE
3 - 12 Dolphin® 7900 Mobile Computer User’s Guide - Prelim. Draft Rev (a)
Page 43

4
Using the Dolphin 7900
Overview
This chapter provides the basic instructions you need to operate the Dolphin 7900.
Using the Touch Screen
HHP recommends using screen protectors to protect the touch screen; especially when used with applications that require highvolume interfacing with the touch screen. Screen protectors help prevent damage to the touch screen display and are easily
installed. Screen protectors can be purchased at any major computer retail store or directly from HHP.
For touch screen input, use the included stylus or your finger. The method you choose depends on which one is
!
appropriate for your application. While there is a great deal of variation in different applications, for buttons or icons that
are close together, you generally achieve greater accuracy with the stylus. Use of other objects, such as paper clips,
pencils, or ink pens can damage the input panel and will void the warranty.
Dolphin® 7900 Mobile Computer User’s Guide - Prelim. Draft Rev (a) 4 - 1
Page 44

Today Screen
When the terminal powers one for the first time, you see the Today screen. You can also display it by tapping Start and then
Today. On the Today screen, you can see at a glance important information for the day.
Tap to adjust the volume
Tap to change the date and time
Tap to open to change owner information
Your email messages
Your active tasks
4 - 2 Dolphin® 7900 Mobile Computer User’s Guide - Prelim. Draft Rev (a)
Page 45
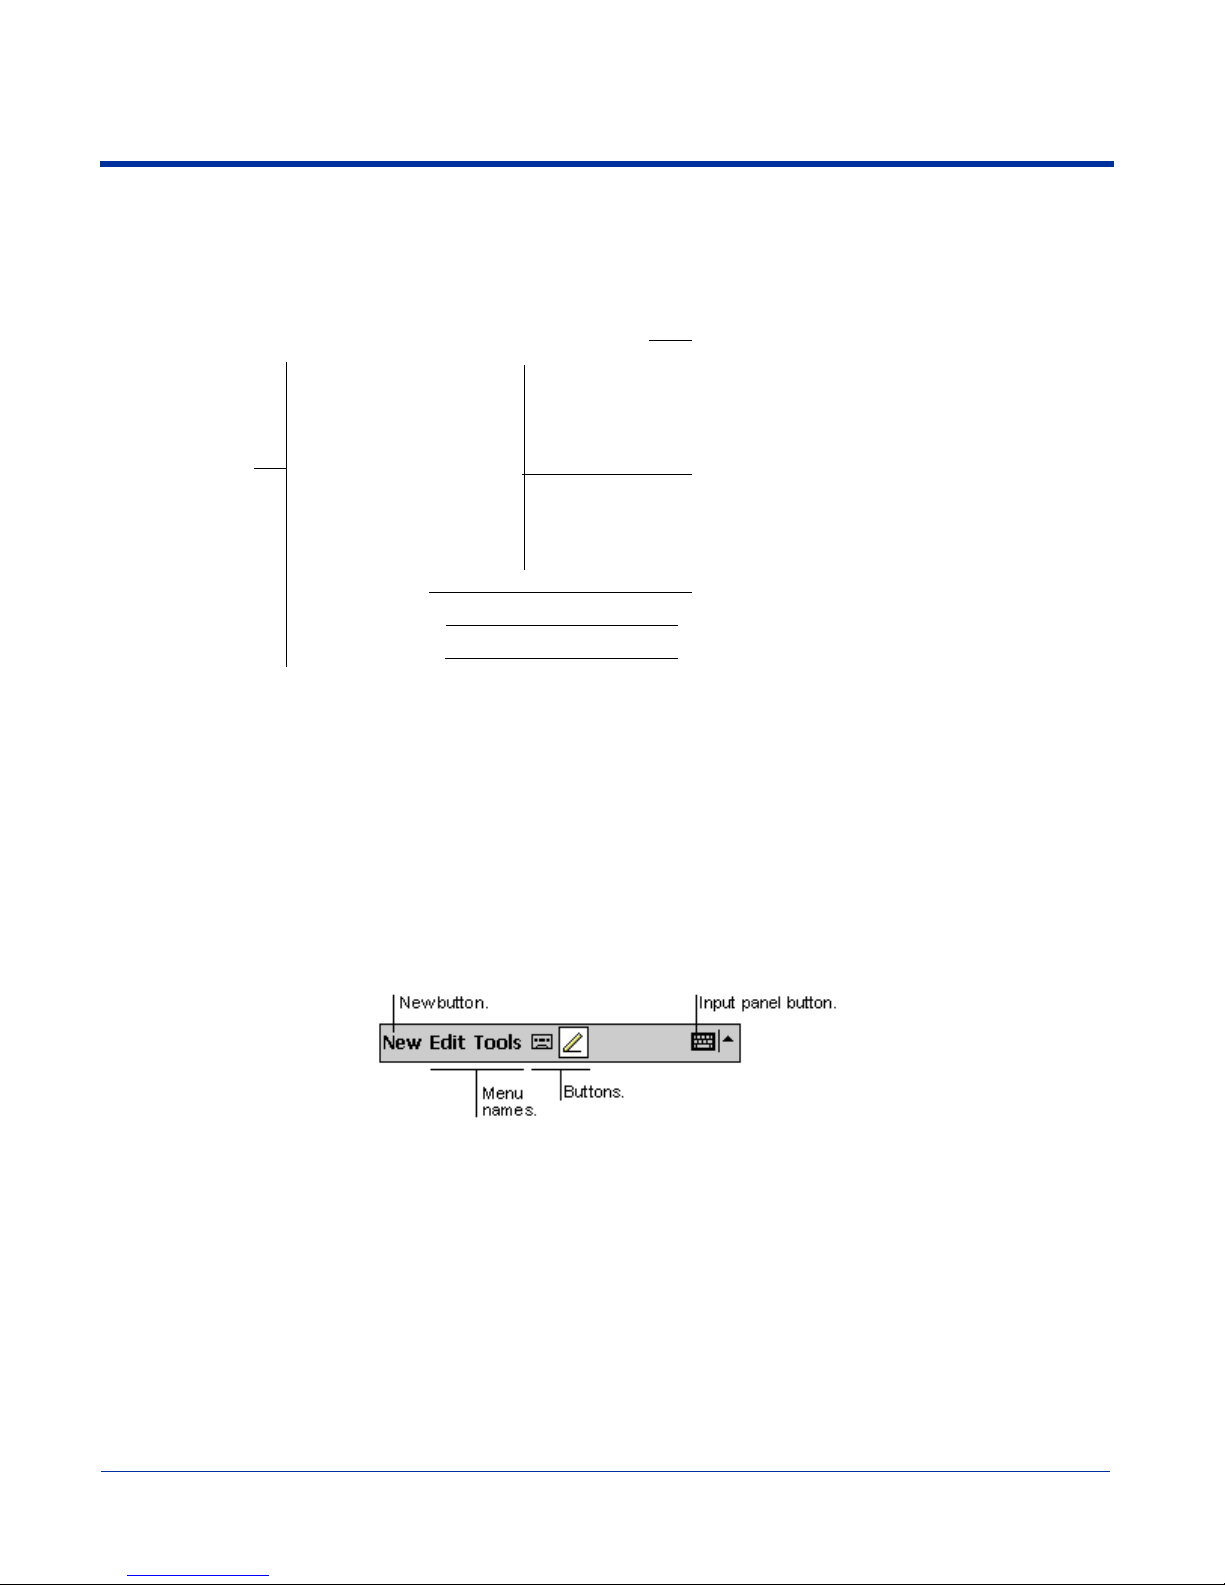
Navigation Bar
The navigation bar is located at the top of the screen and displays the active program and current time, and allows you to switch
to programs and close screens.
Navigation bar
Start menu
Tap to open a program
Tap to open a program you have recently used
Tap to see additional programs
Tap to see to customize your terminal
Command Bar
Use the command bar at the bottom of the screen to perform tasks in programs. The command bar includes menu names,
buttons, and the Input Panel button. To create a new item in the current program, tap New. To see the name of a button, tap and
hold the stylus on the button. Drag the stylus off the button so that the command is not carried out.
Dolphin® 7900 Mobile Computer User’s Guide - Prelim. Draft Rev (a) 4 - 3
Page 46
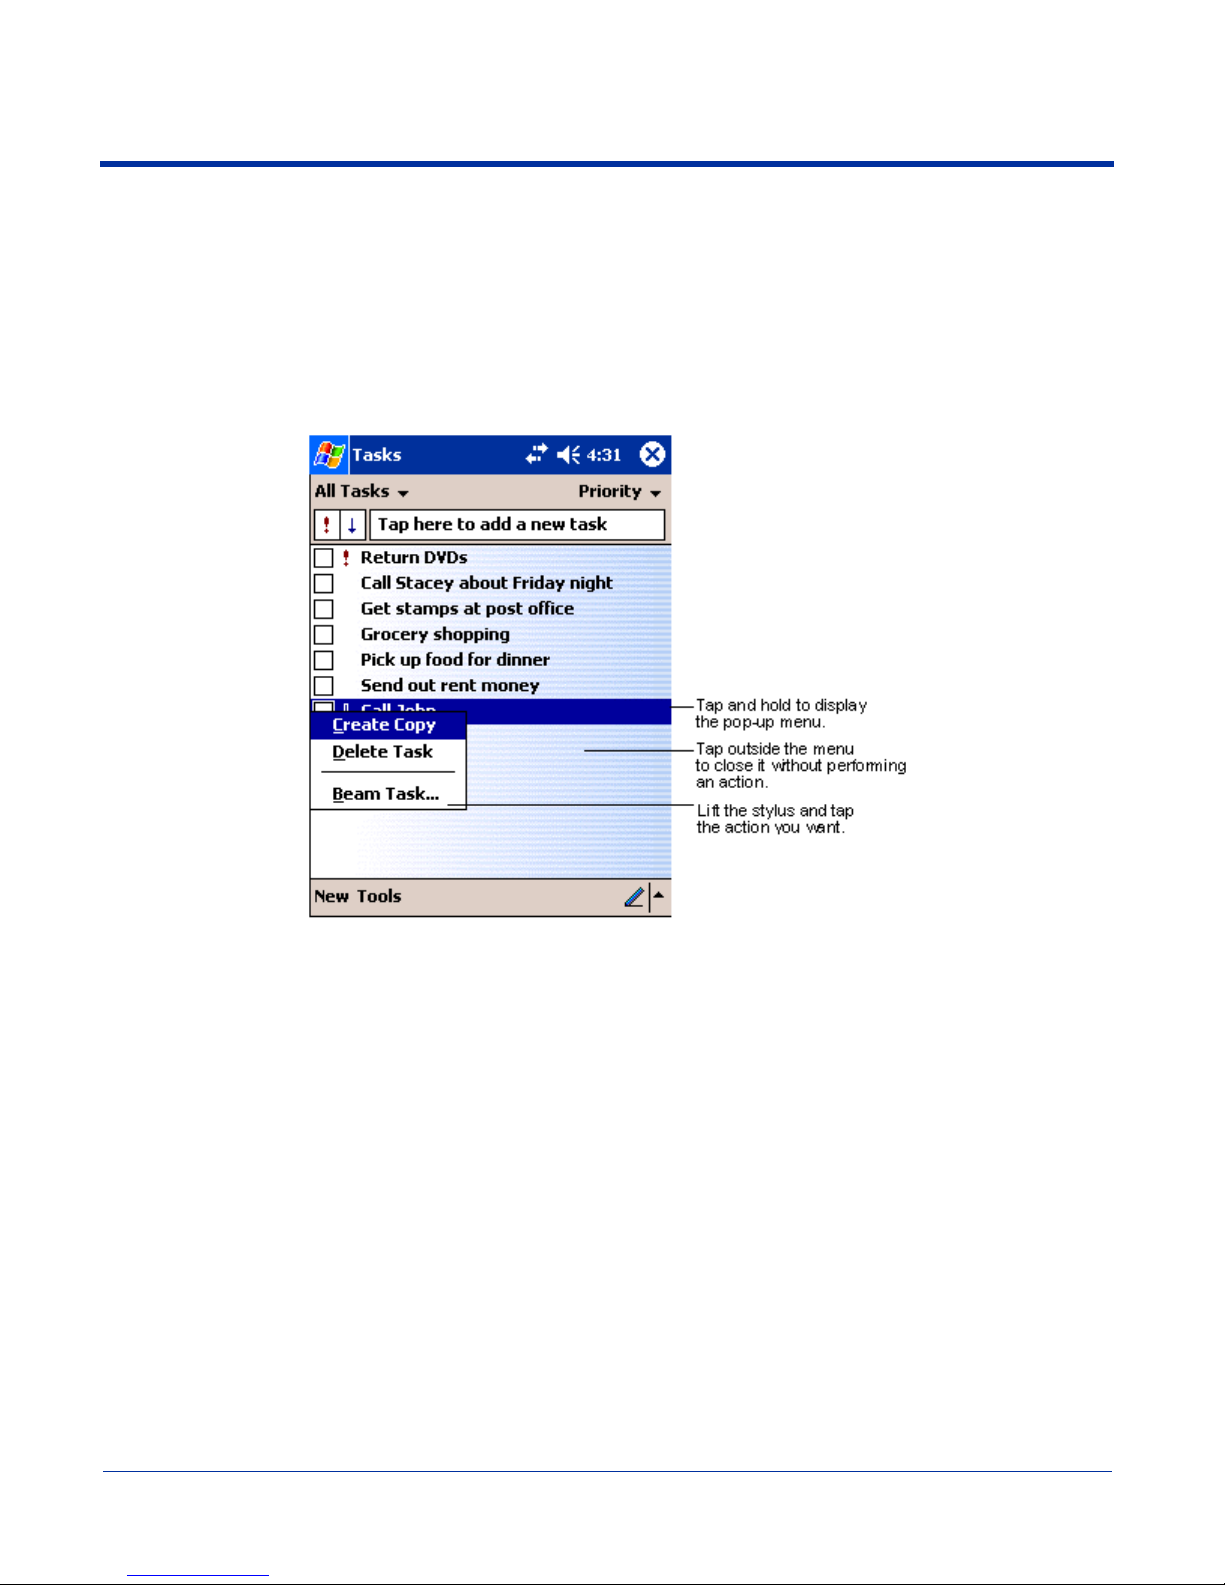
Pop-Up Menus
With pop-up menus, you can quickly choose an action for an item. For example, you can use the pop-up menu in the contact list
to quickly delete a contact, make a copy of a contact, or send an e-mail message to a contact. The actions in the pop-up menus
vary from program to program.
To access a pop-up menu,
1. Tap and hold the stylus on the item name. The pop-up menu appears.
2. Lift the stylus, and tap the action you want to perform.
Note: To close the menu without performing an action, tap the screen anywhere outside the menu.
4 - 4 Dolphin® 7900 Mobile Computer User’s Guide - Prelim. Draft Rev (a)
Page 47

Selecting Programs
To see additional programs loaded on your terminal, tap Start > Programs. The Programs screen displays the programs that
are not listed on the Start menu. To open a program, tap once on the icon.
Note: Some programs have abbreviated labels underneath the icon. To see the full spelling of an abbreviated label, tap and hold
the stylus on the label. Drag the stylus off the label so that the command is not carried out.
Dolphin® 7900 Mobile Computer User’s Guide - Prelim. Draft Rev (a) 4 - 5
Page 48
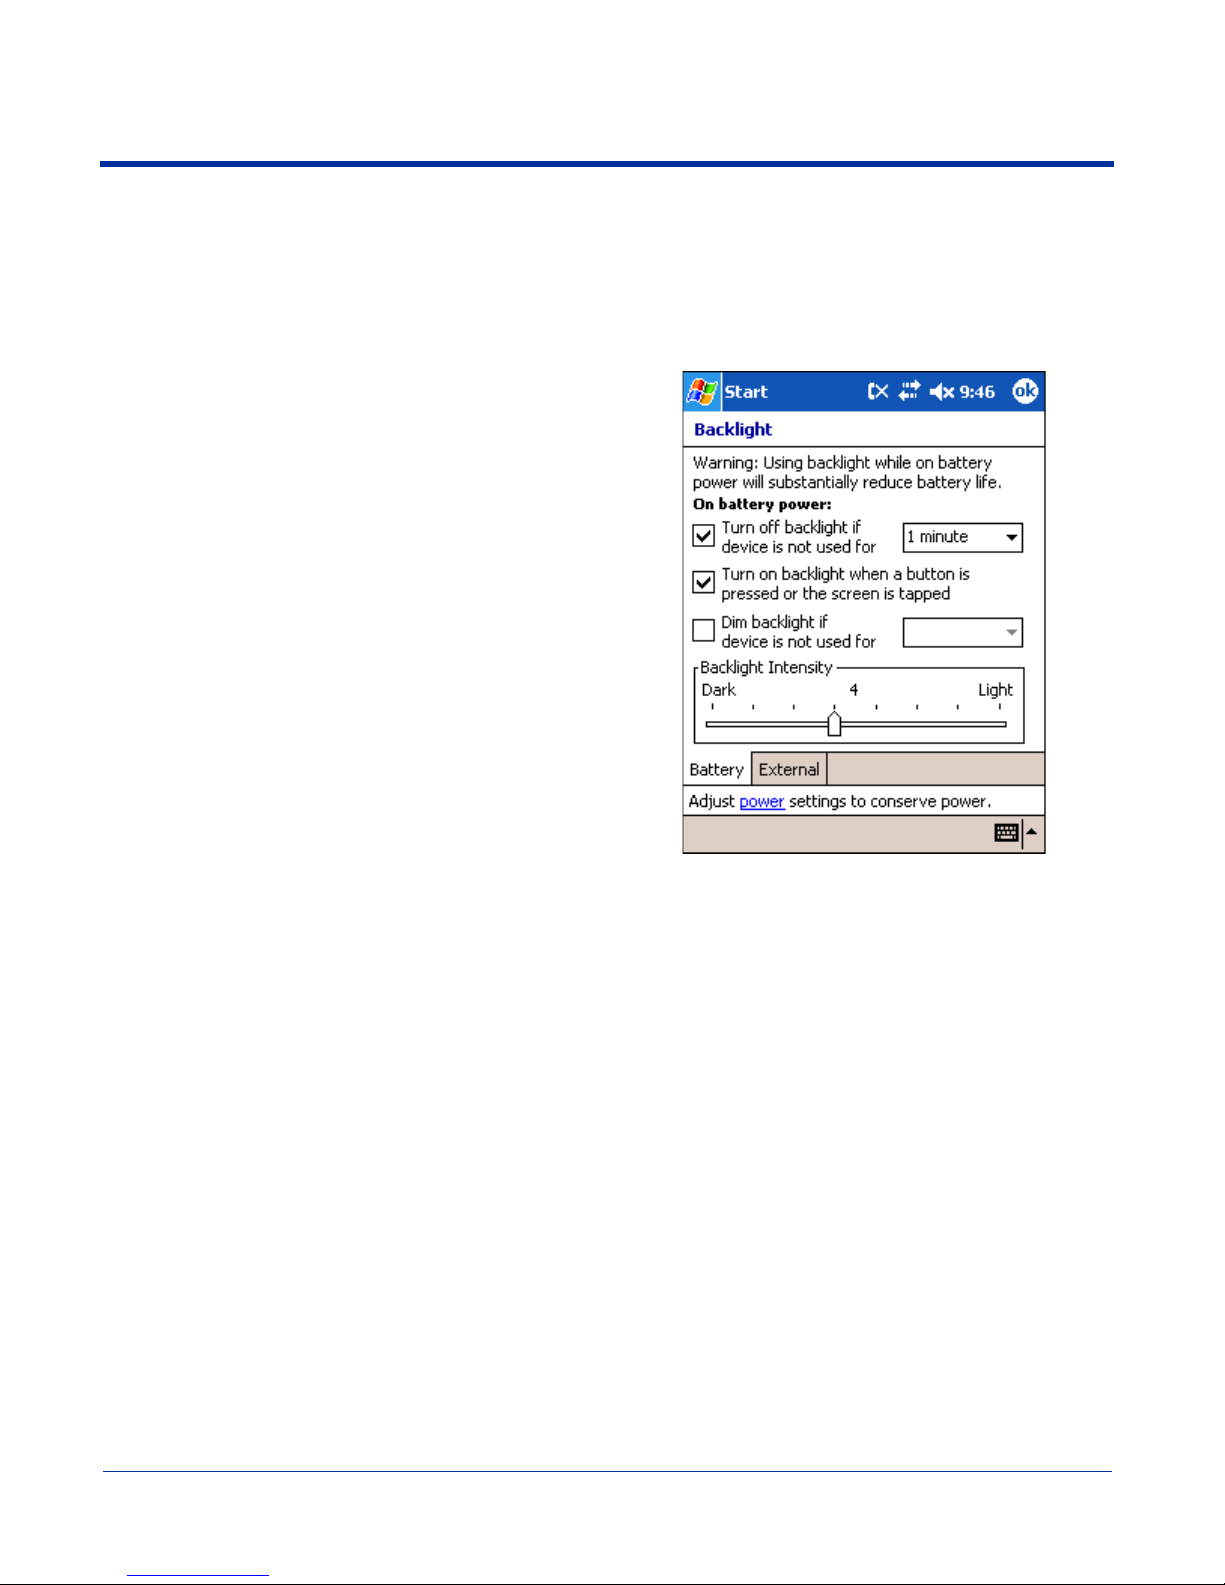
Adjusting the Backlight
The backlight for the color display is user-defined. There are two tabs - one for Battery and the other for External power. The
options on each tab are the same. Go to Start > Settings > System tab > Backlight. Backlight settings open displaying the
Battery tab.
The graphic on the right displays the default backlight settings
for color display terminals on battery power.
From the T urn off backlight… drop-down list, select how many
minutes you want to elapse before the backlight automatically
turns off.
Select the Turn on backlight… option if you want the display
backlight to turn on when the a button is pressed or the touch
screen is tapped.
From the Dim backlight if… drop-down list, select how many
minutes you want to elapse before the backlight dims.
Move the Backlight Intensity slider to set the intensity of the
backlight.
Tap OK to save settings.
The display backlight functions according to the settings saved
here.
Note: The External tab contains the same options for external
power.
4 - 6 Dolphin® 7900 Mobile Computer User’s Guide - Prelim. Draft Rev (a)
Page 49

Communication Media Options
Mechanical Connector
The 17-pin, industrial-grade, mechanical connector on the bottom panel is designed to work only with HHP sold/manufactured
communication and charging peripherals. Via these peripherals, the connector supports USB and RS-232 communications,
enabling the user to connect the Dolphin 7900 terminal to external devices such as scanners and printers.
For more information about the connector, see Mechanical Connector on page 3-7.
IrDA Port
The IrDA port enables the Dolphin 7900 to transmit data via pulses of light to and from other IrDA-compliant devices, such as
printers and PCs or to other Dolphin 7900 terminals.
For more information, see Using Infrared on page 8-6.
802.11b Radio
The Dolphin 7900 may be equipped with a WiFi®-compliant, interoperable 2.4 GHz 802.11b direct sequence spread spectrum
wireless local area network (WLAN) radio.
For more information, see Wireless LAN Communications with 802.11b on page 9-1.
Bluetooth Radio
The Dolphin 7900 may be equipped with a Bluetooth wireless personal area network (WPAN) radio.
For more information, see Wireless PAN Communications with Bluetooth on page 10-1.
GSM/GPRS Radio
The Dolphin 7900 may be equipped with a GSM/GPRS wireless wide area network (WWAN) radio.
For more information, see Wireless WAN Communications with GSM/GPRS on page 11-1.
Software Communication Programs
Microsoft ActiveSync v3.7 or Higher
Microsoft ActiveSync is a tool that enables mobile computing devices, such as the Dolphin 7900, to exchange and synchronize
application data with a desktop computer.
For more information, see Using ActiveSync on page 8-2.
RAS
Short for Remote Access Services, RAS is a feature built into Windows NT that enables users to log into an NT-based LAN using
a modem, X.25 connection or WAN link. RAS is fully supported and allows the use of PPP or SLIP connections for network
connectivity.
Dolphin® 7900 Mobile Computer User’s Guide - Prelim. Draft Rev (a) 4 - 7
Page 50

Radio Options
Dolphin 7900 terminals can be configured with one or a combination of the following radios:
• 802.11b
• Bluetooth
• GSM/GPRS
Available Radio Combinations
Dolphin 7900 terminals can be configured with more than one radio.
Co-located Radios
Some radio combinations are co-located, which means that you can use only one radio at a time. In this case, you can have both
radios installed but need to power one up and the other down before operation.
• 802.11b and GSM/GPRS
Co-operational Radios
Some combinations are co-operational, which means that you can power up and operate both radios simultaneously.
• Bluetooth and 802.11b
• Bluetooth and GSM/GPRS
Radio Driver Installation
Radio drivers install during the autoinstall whenever the mobile computer is initialized; when first turned on or after a hard reset.
Only the appropriate drivers for your terminal’s radio configuration install. For example, if your terminal is configured only with an
802.11b radio, only the driver for that radio installs. For more information,
When a single radio installs, its radio driver is powered up automatically after initialization is complete. In general, when more
than one radio installs, the terminal powers up the 802.11b radio. However, if a GSM radio is installed, the terminal powers up
the GSM radio.
see Autoinstall on page 2-9.
The Radio Manager
The Radio Manager is a control panel applet through which the radio power driver controls the radio state. It enables you to
choose which radios on the terminal are powered up. When powered up, the radio is transmitting, when powered down, the radio
is not transmitting.
Single Radio Configuration
If your terminal contains a single radio module and its associated driver is installed, operates by itself without any special
configuration made to the device.
Multiple Radio Configuration
Configuration of simultaneous radio operation is done during the manufacturing process according to FCC regulations. If multiple
radio modules are installed in your terminal, simultaneous operation must be configured on the device before the radio power
driver allows it. In other words, verify which radio or radios are powered up or down.
Multiple Radio Operation
GSM and 802.11b are mutually exclusive. While they may both be present, they cannot be allowed to operate simultaneously. If
you have modules and drivers for both radios installed on your terminal, you must ensure that one radio is powered down before
using the other.
The Bluetooth radio is allowed to operate by itself or simultaneously with either of the GSM or 802.11b radios.
4 - 8 Dolphin® 7900 Mobile Computer User’s Guide - Prelim. Draft Rev (a)
Page 51
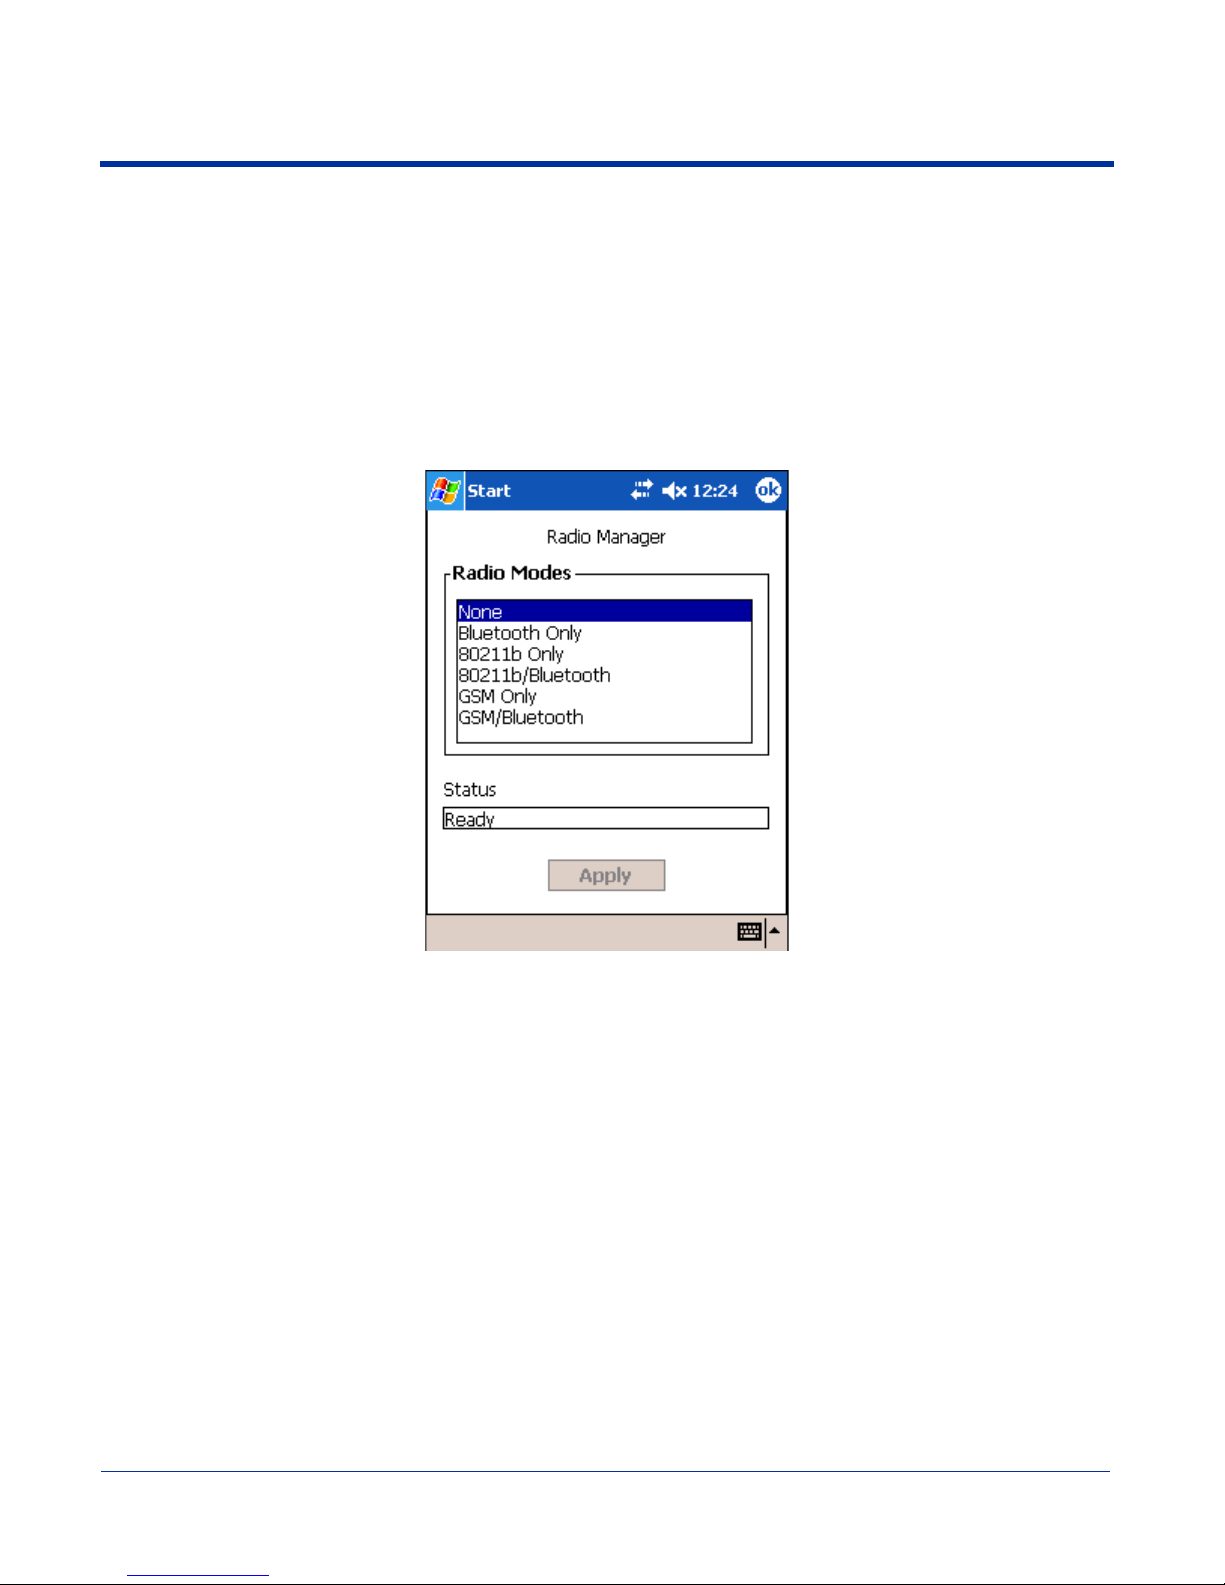
Powering Up Radios
Requirements
To successfully power up a radio, both the hardware module and the software driver must be installed on the terminal. If the
module is present, the radio appears in the Radio Manager. However if the driver is not installed, you cannot successfully power
up the radio. Attempting to do so produces an error in the Status field that tells you that the driver is not installed.
To Power Up a Radio or Radio Combination
1. Open the Radio Manager by going to Start > Settings > Connections tab > Radio Manager. The Radio Manager appears
identifying which radio modules are installed. The highlighted entry is the radio mode that is currently enabled; its Status
should be Ready.
2. Select the radio in the Radio Modes list and tap Apply.
The radio drivers are powered down and powered up in the proper sequence. For example, if the radio powered up is Bluetooth
Only and you try to switch to 802.11b Only, after Apply is tapped, the Radio Manager powers down the Bluetooth radio first, then
powers up the 802.11b radio.
If an error occurs during this process, the radio mode change is abandoned. The resulting radio state is the status of the radios
at the time the error occurred.
Radio Modes The Radio Modes section displays the radio hardware modules currently installed on the terminal. For
example, if a working Bluetooth module is installed, the box contains the line Bluetooth Only whether
or not that radio is currently powered up.
Status field The Status field provides feedback on the state of the radio. When it reads “Ready,” the radio selected
in the Radio Modes box is powered up. The Status field displays error messages when a radio cannot
be enabled.
Powering Down Radios
Radio drivers are automatically powered down if the radio or radio combination that is currently powered up requires it. To power
down all radios, select None and tap Apply.
For more information about 802.11b radios, see Wireless LAN Communications with 802.11b on page 9-1.
For more information about Bluetooth radios, see Wireless PAN Communications with Bluetooth on page 10-1.
For more information about GSM/GPRS radios, see Wireless WAN Communications with GSM/GPRS on page 11-1.
Dolphin® 7900 Mobile Computer User’s Guide - Prelim. Draft Rev (a) 4 - 9
Page 52
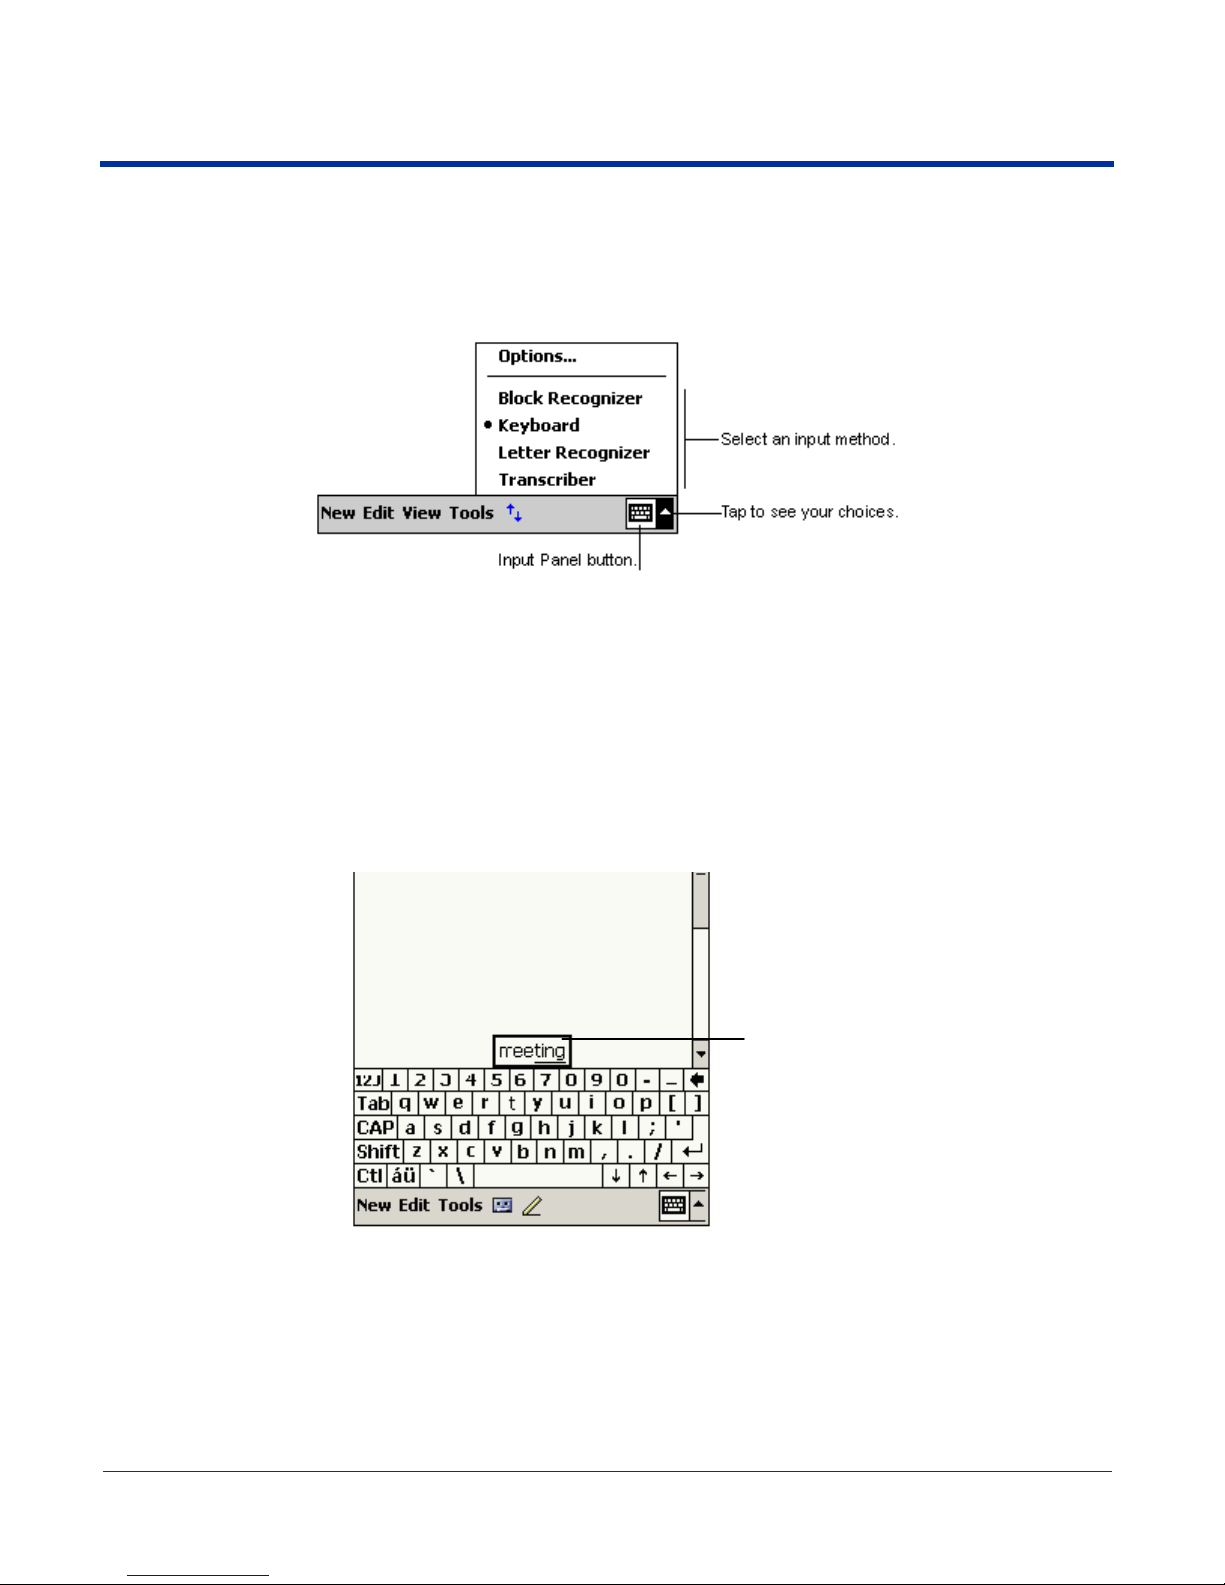
Using the Soft Input Panel (SIP)
is
d.
Use the SIP to enter information in any program on the Dolphin terminal. You can either type on the soft keyboard or write on the
touch screen using Letter Recognizer or Block Recognizer. In either case, the characters appear as typed text on the screen.
To show or hide the SIP, tap the Input Panel button. Tap the arrow next to the Input Panel button to see your choices.
When you use the SIP, your terminal anticipates the word you are typing or writing and displays it above the input panel. When
you tap the displayed word, it is inserted into your text at the insertion point. The more you use your Dolphin 7900 terminal, the
more words it learns to anticipate.
To change word suggestion options, such as the number of words suggested at one time, tap Start > Settings > Personal tab
> Input > Word Completion tab.
Using the SIP Keyboard
1. Tap the arrow next to the Input Panel button and select Keyboard.
2. On the soft keyboard that is displayed, tap the keys with your stylus.
Tap here if th
is theright wor
Using the Letter Recognizer
With Letter Recognizer you can write letters using the stylus just as you would on paper.
1. Tap the arrow next to the Input Panel button and then Letter Recognizer.
4 - 10 Dolphin® 7900 Mobile Computer User’s Guide - Prelim. Draft Rev (a)
Page 53
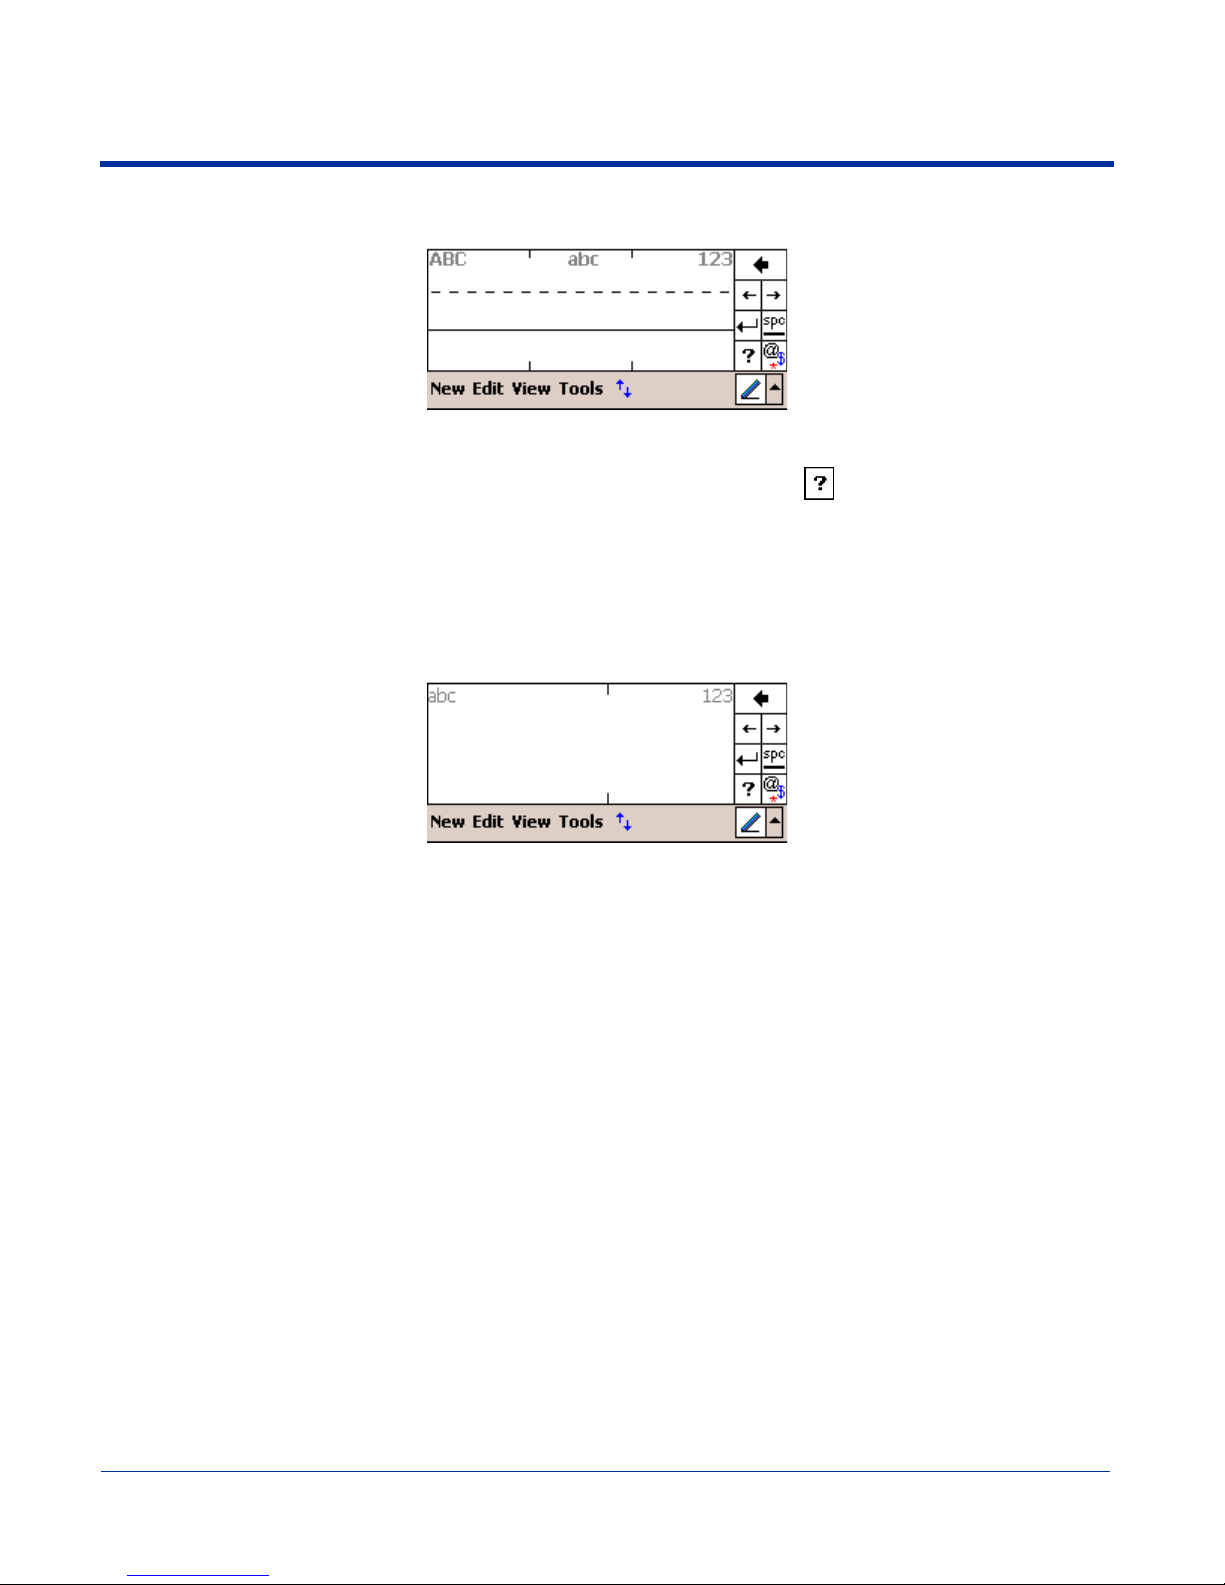
2. Write a letter in the box.
When you write a letter, it is converted to typed text that appears on the screen. For specific instructions on using Letter
Recognizer, with Letter Recognizer open, tap the question mark next to the writing area
.
Using the Block Recognizer
With Block Recognizer you can input character strokes using the stylus.
1. Tap the arrow next to the Input Panel button and then Block Recognizer.
2. Write a letter in the box.
When you write a letter, it is converted to typed text that appears on the screen. For specific instructions on using Block
Recognizer, with Block Recognizer open, tap the question mark next to the writing area.
Selecting Text
To edit or format typed text, select it by dragging the stylus across the text. Then, use the commands on the pop-up menu to cut,
copy, and paste the selected text.
Dolphin® 7900 Mobile Computer User’s Guide - Prelim. Draft Rev (a) 4 - 11
Page 54
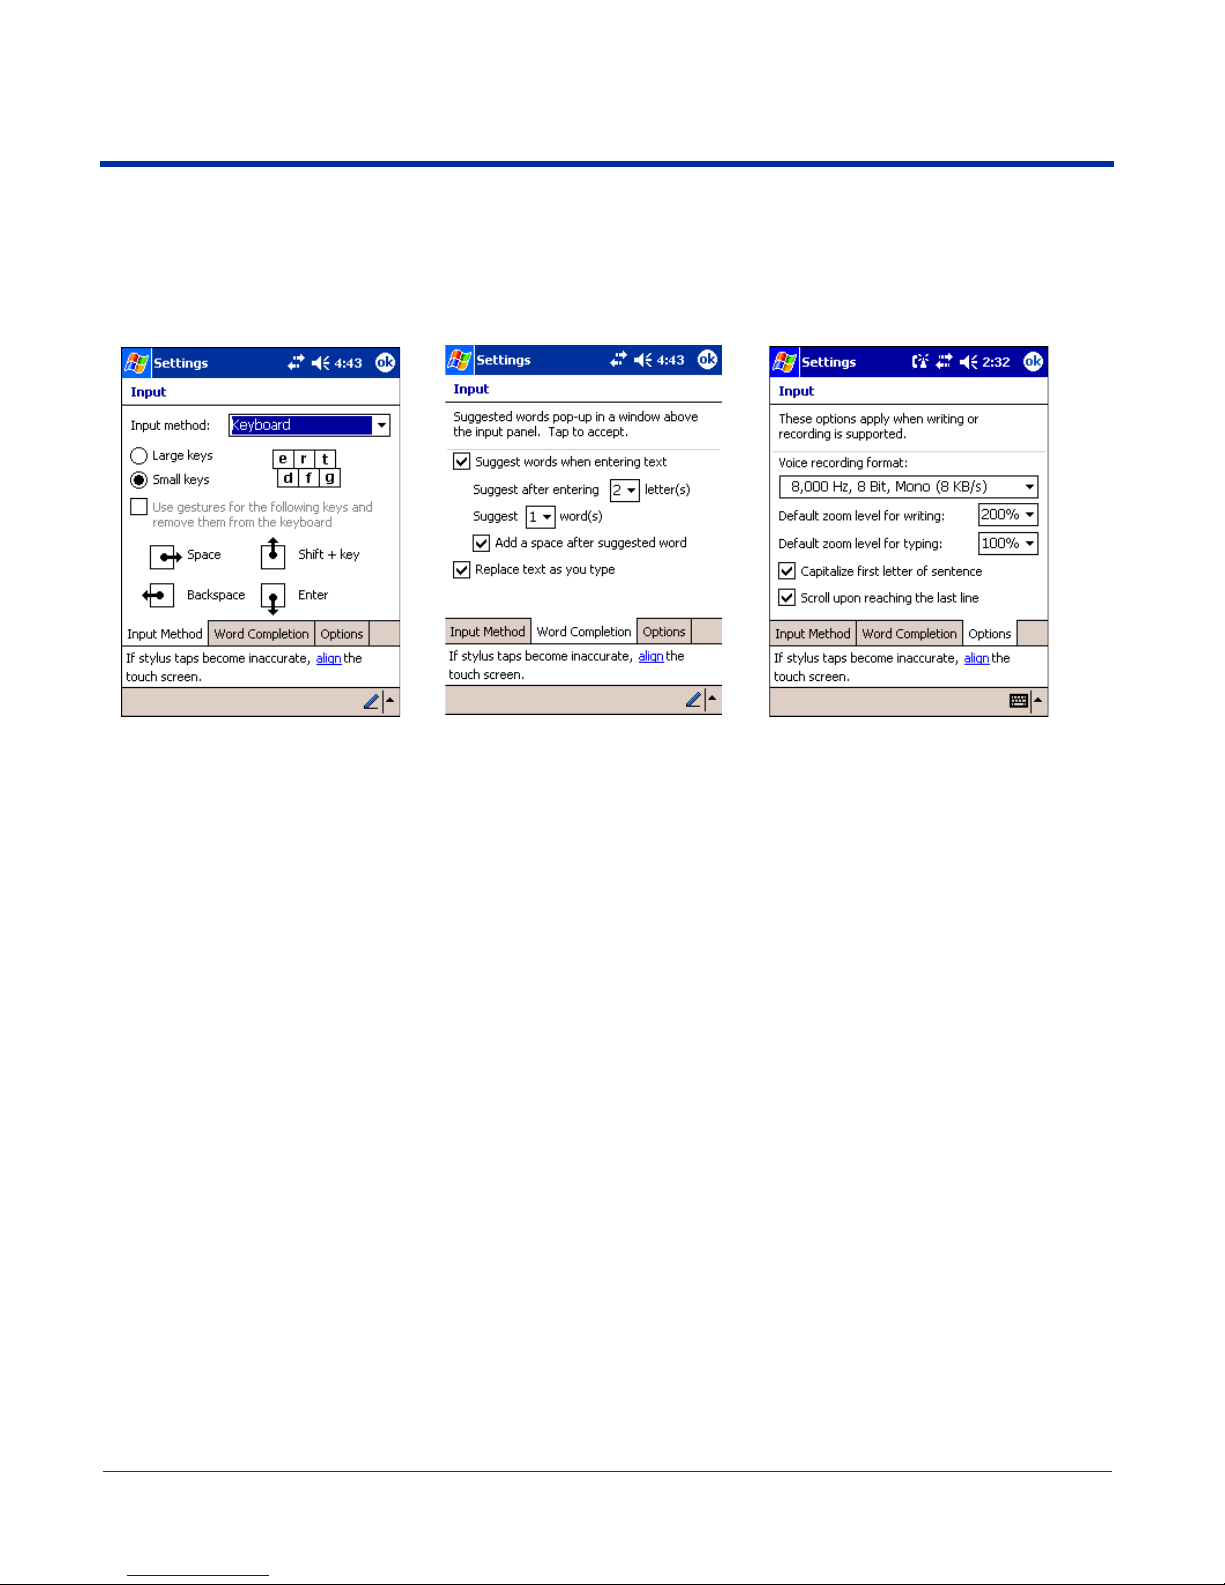
Input Panel Options
You can set input options by going to Start > Settings > Personal tab > Input.The following graphics are the tab windows where
you can customize the input panel to your preferences:
Input Method tab
Word Completion tab
Options tab
4 - 12 Dolphin® 7900 Mobile Computer User’s Guide - Prelim. Draft Rev (a)
Page 55
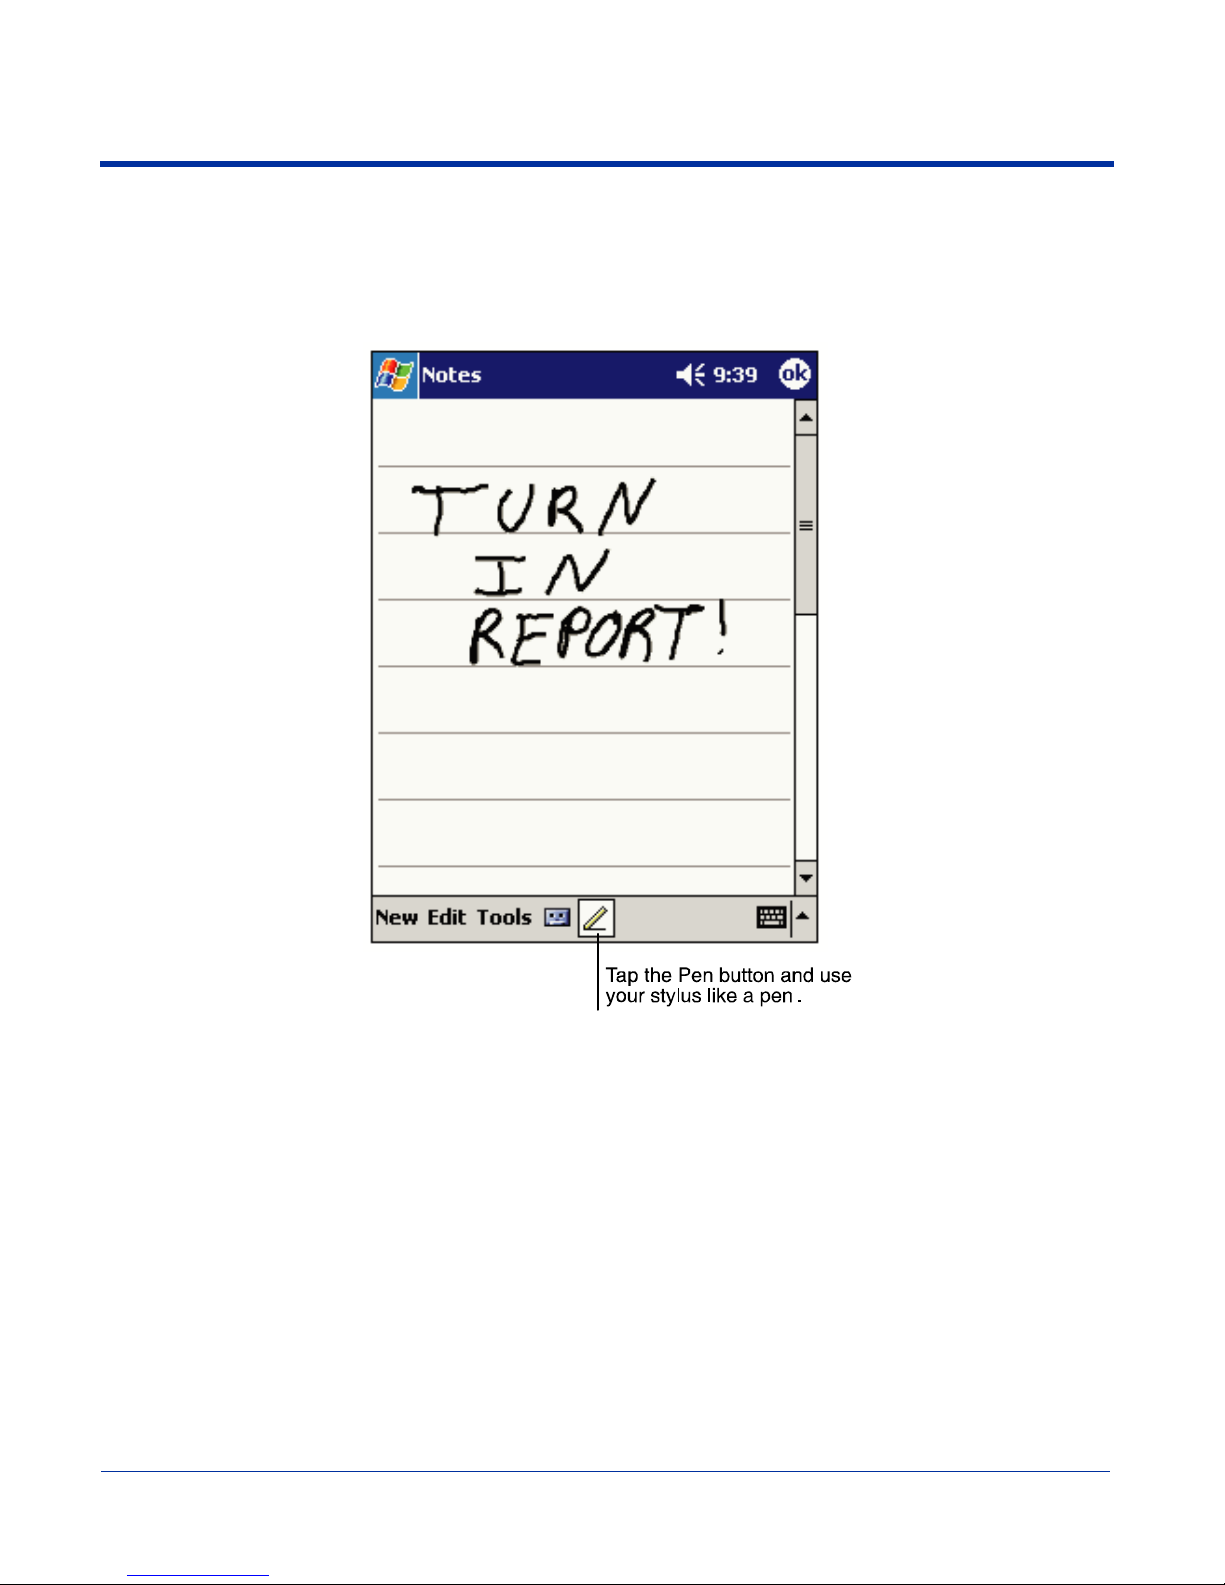
Writing on the Screen
In any program that accepts writing, such as the Notes program, and in the Notes tab in Calendar, Contacts, and Tasks, you can
use your stylus to write directly on the screen as you would on paper.
To write on the screen, tap the Pen button to switch to writing mode. This action displays lines on the screen to help you write.
Note: Some programs that accept writing may not have the Pen button. See the documentation for that program to find out how
to switch to writing mode.
To Select Writing
If you want to edit or format writing, you must select it first.
1. Tap and hold the stylus next to the text you want to select until the insertion point appears.
2. Without lifting, drag the stylus across the text you want to select.
If you accidentally write on the screen, tap Tools, then Undo and try again. You can also select text by tapping the Pen button
to deselect it and then dragging the stylus across the screen.
You can cut, copy, and paste written text in the same way you work with typed text: tap and hold the selected words and then
tap an editing command on the pop-up menu, or tap the command on the Edit menu.
Dolphin® 7900 Mobile Computer User’s Guide - Prelim. Draft Rev (a) 4 - 13
Page 56
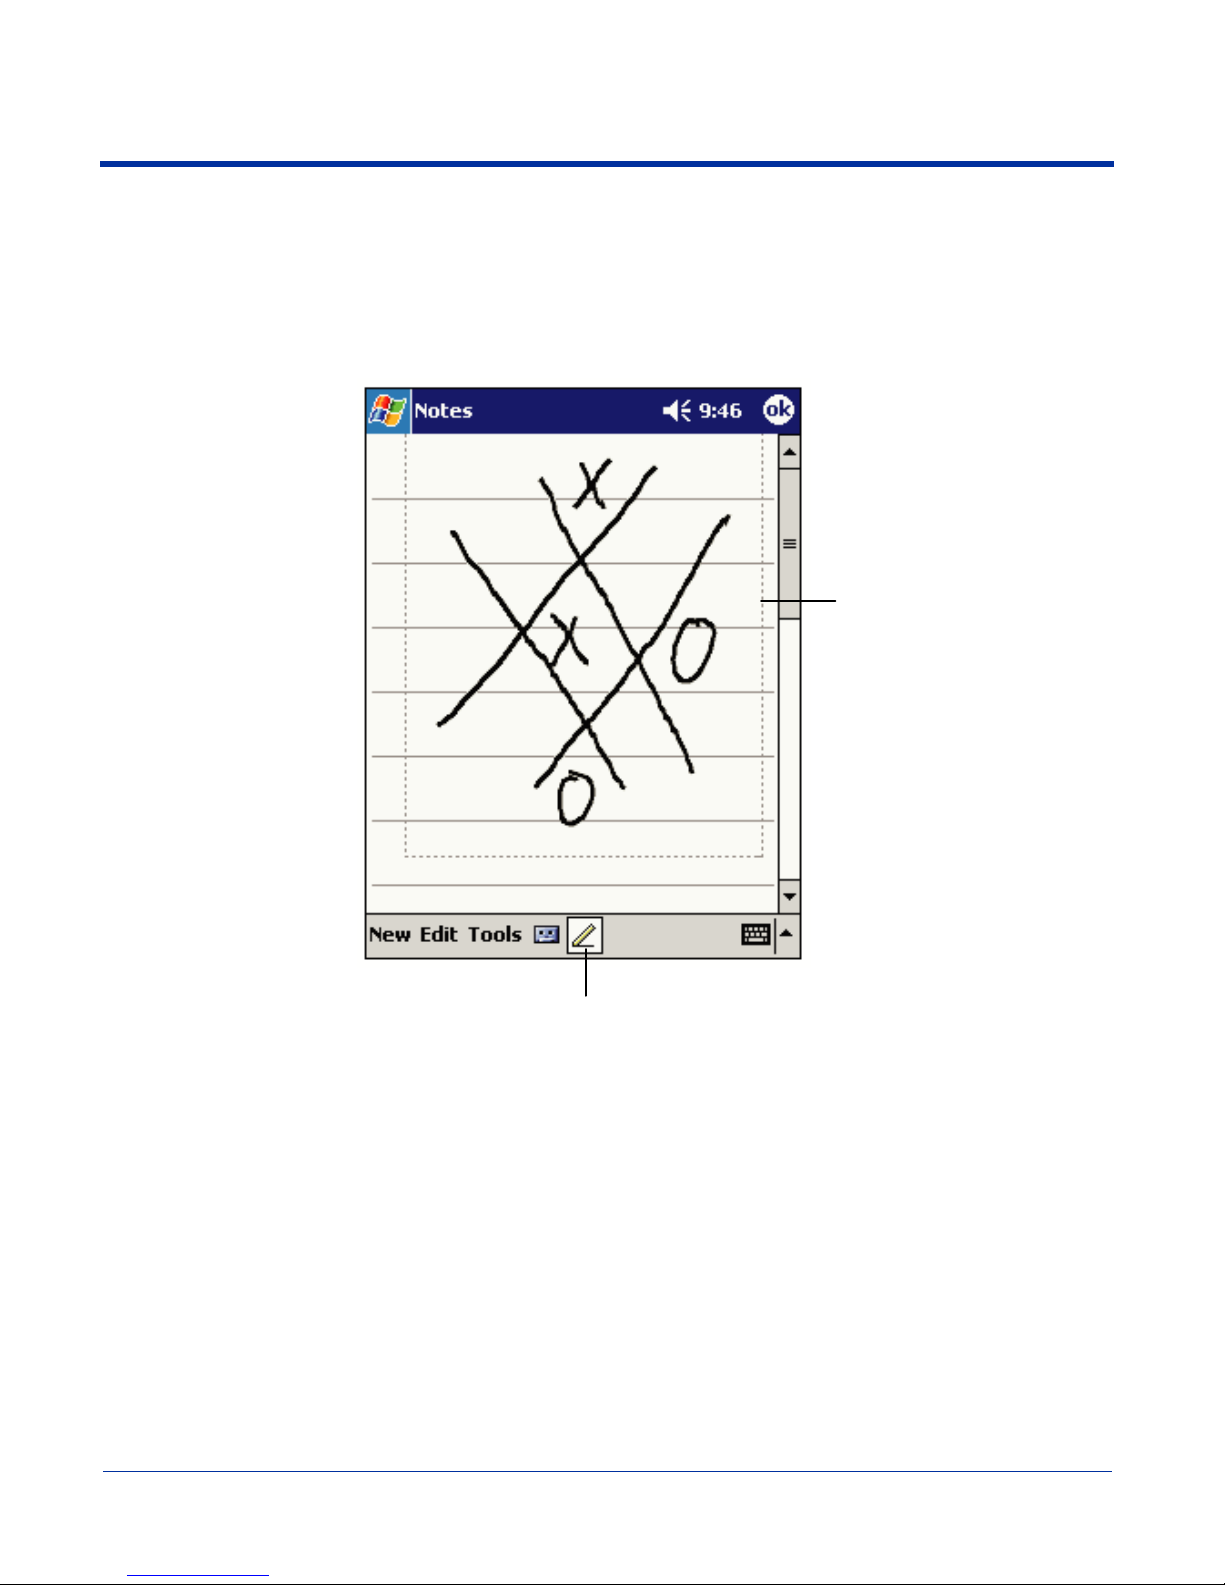
Drawing on the Screen
g.
Pen button.
Drawing on the screen is similar to writing on the screen. The difference between writing and drawing on the screen is how you
select items and how they can be edited. To create a drawing, cross three ruled lines on your first stroke. A drawing box appears.
Subsequent strokes in or touching the drawing box become part of the drawing. Drawings that do not cross three ruled lines will
be treated as writing.
For example, selected drawings can be resized, while writing cannot.
The drawing box indicates
the boundaries of the drawin
Note: You may want to change the zoom level so that you can more easily work on or view your drawing. Tap Tools and then
a zoom level.
Selecting a Drawing
To edit or format a drawing, tap and hold the stylus on the drawing until the selection handle appears. To select multiple drawings,
deselect the Pen button and then drag to select the drawings you want.
You can cut, copy, and paste selected drawings by tapping and holding the selected drawing and then tapping an editing
command on the pop-up menu, or by tapping the command on the Edit menu. To resize a drawing, make sure the Pen button
is not selected, and drag a selection handle.
4 - 14 Dolphin® 7900 Mobile Computer User’s Guide - Prelim. Draft Rev (a)
Page 57
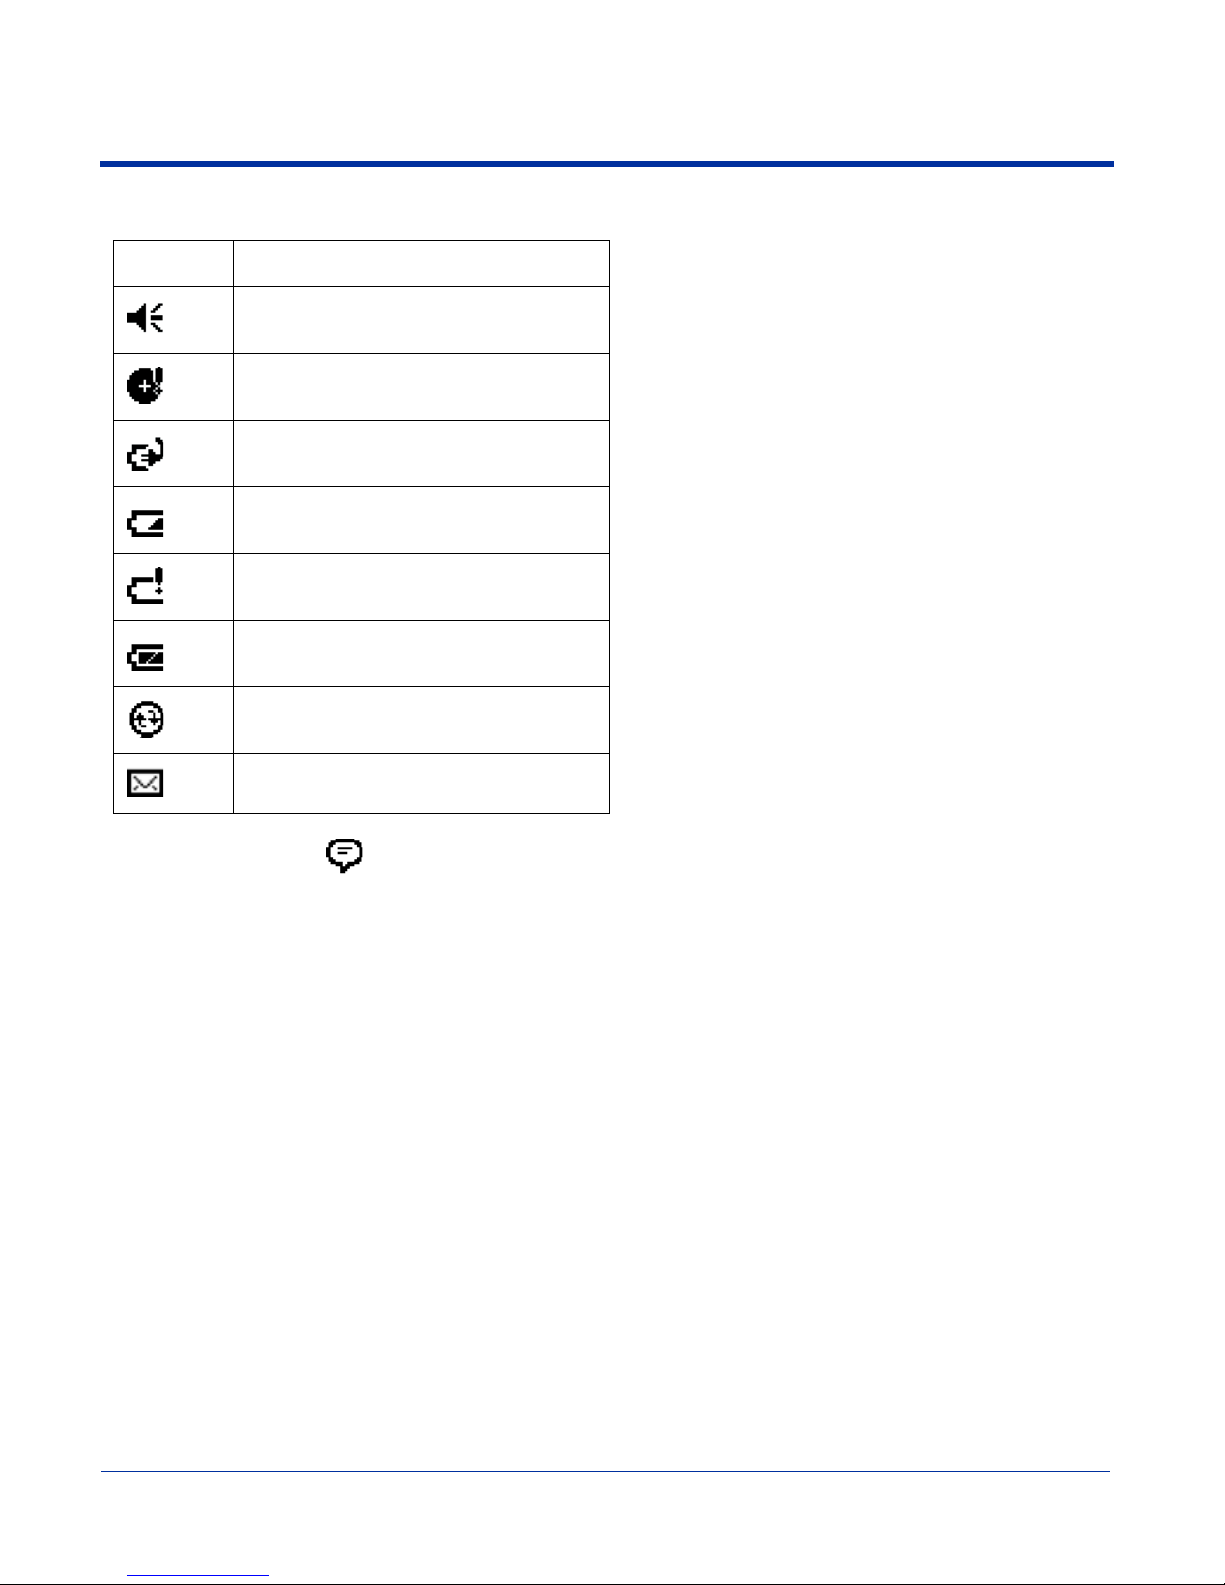
Status Icons
Status Icon Meaning
Turns all sounds on and off
Backup battery is low
Main batteries are charging
Main batteries are low
Main batteries are very low
Main batteries are full
Synchronization is beginning or ending
Notification that one or more e-mail
messages were received
Note: The Notification icon displays if more notification icons need to be displayed than there is room to display them. Tap
the icon to view all notification icons.
Notifications
Notifications remind you when you have something to do. For example, if you’ve set up an appointment in Calendar, a task with
a due date in Tasks, or an alarm in Clock, you’ll be notified in any of the following ways:
• A message box appears on the screen.
• A sound, which you can specify, is played.
To choose reminder types and sounds, tap Start > Settings > Personal tab > Sounds & Notifications (see Personal Tab on
page 7-2). The options you choose here apply throughout the terminal.
Dolphin® 7900 Mobile Computer User’s Guide - Prelim. Draft Rev (a) 4 - 15
Page 58
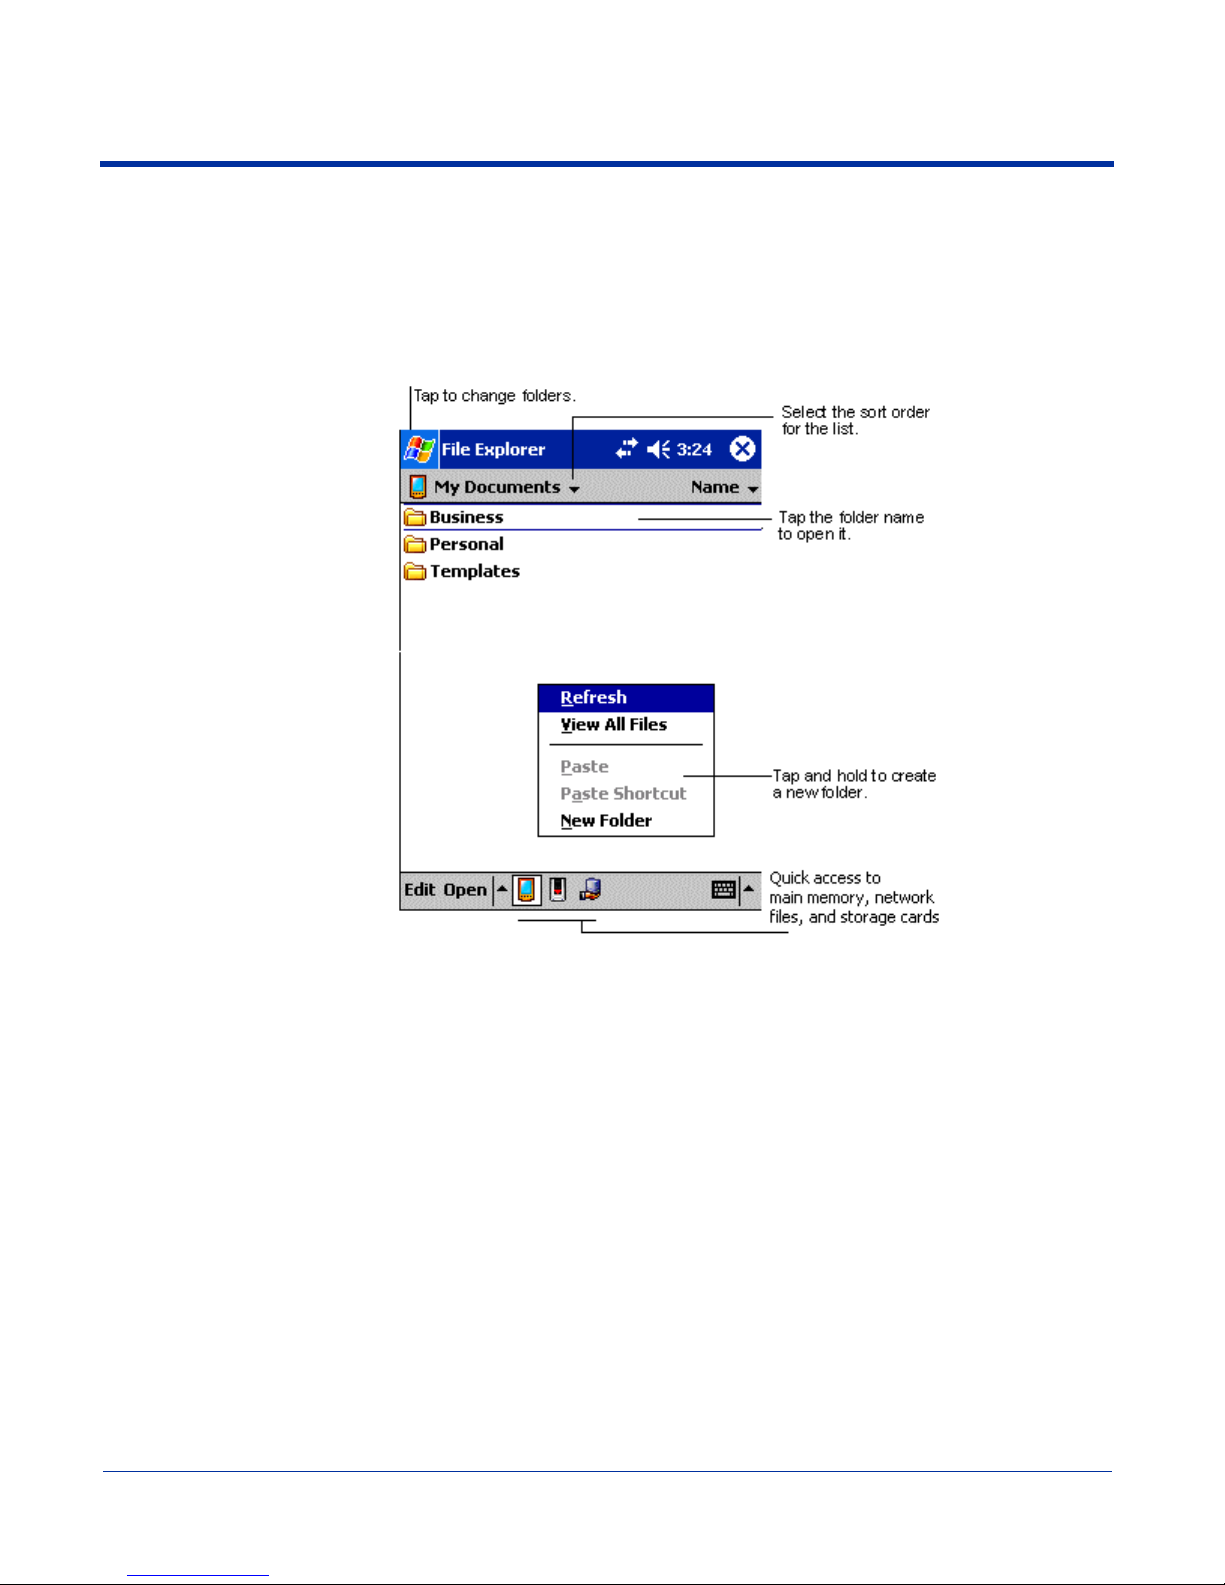
Finding and Organizing Information
The Find feature on your Dolphin mobile computer helps you quickly locate information. On the Start menu, tap Find. Enter the
text you want to find, select a data type, and then tap Go to start the search.
To quickly find information that is taking up storage space, select Larger than 64 KB in Type.
You can also use the File Explorer to find files and organize these files into folders. On the Start menu, tap Programs, and then
File Explorer.
You can move files in File Explorer by tapping and holding the item you want to move, and then tapping Cut or Copy and Paste
on the pop-up menu.
4 - 16 Dolphin® 7900 Mobile Computer User’s Guide - Prelim. Draft Rev (a)
Page 59

5
Using the Image Engine
Overview
The Dolphin 7900 terminal houses a compact image engine that instantly reads all popular 1D and 2D bar codes and supports
omni-directional aiming and decoding for greater flexibility in real-world settings. The image engine can also capture digital
images, such as signatures and pictures of damaged inventory. Images are saved in industry-standard file formats.
Image Engine Options
Dolphin 7900 terminals may be equipped with one of the following image engines:
• IMAGETEAM™ 4100SR with green aimer, decodes from 2.5 to 12.5 in. (6.3 to 32 cm.)
• IMAGETEAM™ 4100SF with green aimer, decodes from 2.1 to 8.9 in. (5 to 22.6 cm.)
• IMAGETEAM™ 4100HD with green aimer, decodes from 2.2 to 6.5 in. (5.6 to 16.5 cm)
Note: Specifications are for 100% UPC Code.
Bar Code Symbologies Supported
The Dolphin 7900 supports the following bar code symbologies:
Symbology type Symbologies supported
1D Symbologies
2D Symbologies
Composite Codes
OCR Codes
Codabar
Code 3 of 9
Code 11
Code 32 Pharmaceutical (PARAF)
Code 93
Code 128
EAN with Add-On and EAN with Extended Coupon Code
EAN-13
Interleaved 2 or 5
Matrix 2 of 5
Plessey
PosiCode
RSS
Straight 2 of 5 IATA
Straight 2 of 5 Industrial
Telepen
Trioptic Code
UCC/EAN-128
UPC and UPC-A
Aztec
Code 16K
Composite
Data Matrix
MaxiCode
OCR
PDF417
QR Code
RSS
Aztec Mesa
Codablock F
EAN·UCC
RSS-14
OCR-A and OCR-B
Dolphin® 7900 Mobile Computer User’s Guide - Prelim. Draft Rev (a) 5 - 1
Page 60

Postal Codes
Postnet and most international 4 state codes
Australian Post
British Post
Canadian Post
China Post
Japanese Post
KIX (Netherlands) Post
Korea Post
Planet Code
Activating the Engine
The Dolphin 7900 offers the following options to activate the engine:
• The Scan key located in the center of both keyboards for easy access from either hand - see SCAN key on page 6-5.
• The Scan buttons located on both side panels for easy one-hand scanning - see Scan Button on page 3-6.
Demos
All Dolphin 7900 terminals contain Demos that enable you to test and verify the image engine. To access these demos, go to
Start > Demos,
• Select Image Demo to verify imaging, or
• Select Scan Demo to verify decoding.
5 - 2 Dolphin® 7900 Mobile Computer User’s Guide - Prelim. Draft Rev (a)
Page 61
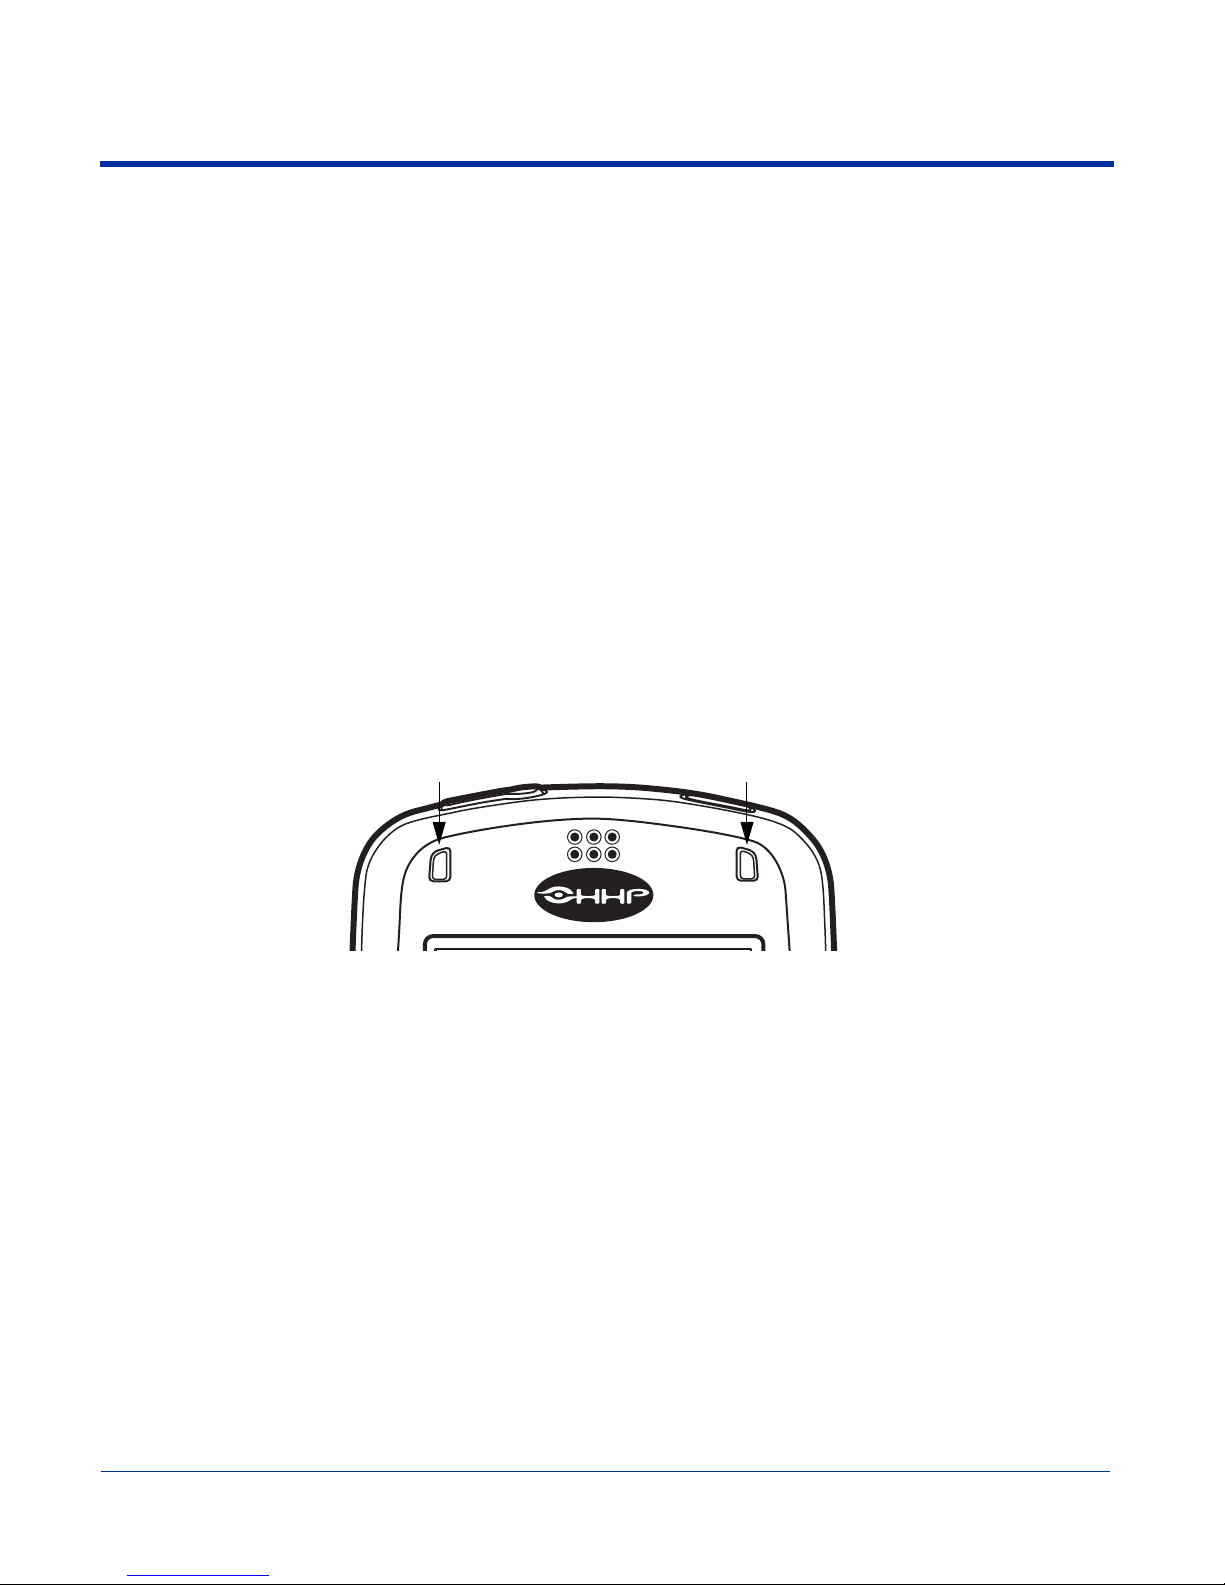
Decoding
The Dolphin 7900 terminal supports two types of image decoding for use in various bar code reading and imaging applications:
full-area imaging and Advanced Linear Decoding (ALD).
Full-area Imaging
Full-area imaging provides omni-directional reading of linear and non-linear 1D and 2D bar codes, OCR, signature capture, and
picture taking. When reading all bar code types using full-area imaging, a positive read can be obtained from many positions;
see Scanning Position Options on page 5-3. To achieve the best read, the aiming beam should be centered horizontally across
the bar code.
ALD
ALD provides fast reading of linear and stacked linear bar codes. To achieve a positive read when reading linear 1D and PDF417
bar codes, the green aiming beam should be centered horizontally across the bar code. When ALD is enabled, the reader does
not read matrix or postal codes.
To Decode a Bar Code
1. Position the Dolphin 7900 terminal over the bar code. The imager has a slight downward angle.
A range of 4-10 inches (10-25 cm) from the bar code is recommended.
2. Project the imager’s aiming beam by pressi ng and holding the SCAN key or the Scan button.
3. The scan LED lights red.
Decode LED
Scan LED
4. Center the aiming beam over the bar code. The aiming beam should be oriented in line with the bar code to achieve optimal
decoding
5. Release the Scan key or Scan button.
6. When the bar code is successfully decoded, the decode LED lights green and the terminal beeps.
7. The bar code information is entered into the application in use.
(see Scanning Position Options on page 5-3).
Scanning Position Options
The aiming beam is smaller when the terminal is held closer to the code and larger when it is farther from the code. Symbologies
with smaller bars or elements (mil size) should be read closer to the unit. Symbologies with larger bars or elements (mil size)
should be read farther from the unit.
Dolphin® 7900 Mobile Computer User’s Guide - Prelim. Draft Rev (a) 5 - 3
Page 62
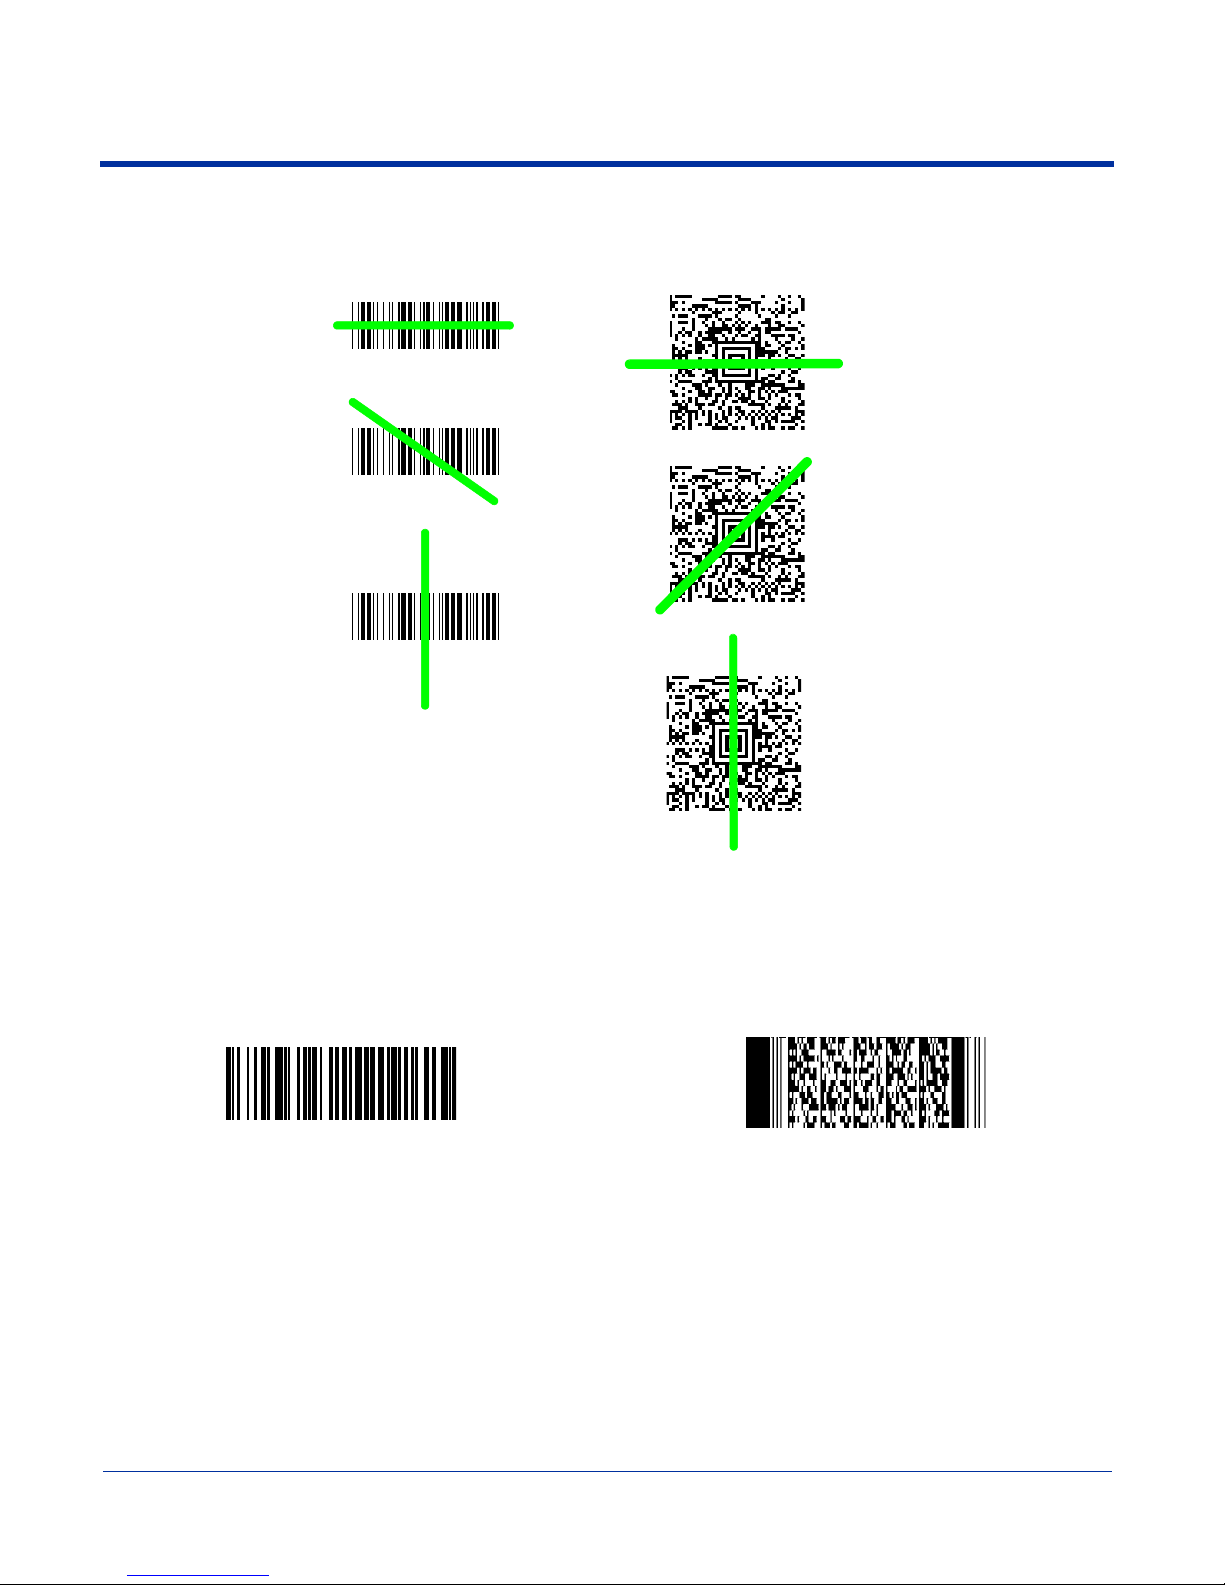
The following chart displays the imager’s aiming positions:
Linear Bar Code
2D Matrix Symbol
Sample Bar Codes
You can use the following bar codes to verify decoding:
Sample 128 Sample PDF417
Code 128 PDF417 Test Message
5 - 4 Dolphin® 7900 Mobile Computer User’s Guide - Prelim. Draft Rev (a)
Page 63
Capturing Images
The image-capture process is an intuitive, split-second operation for experienced users. By following the basic guidelines, new
users can easily develop their own technique and, with practice, quickly learn to adapt it to different application environments.
Image Preview
When the imaging process is initiated, the Dolphin 7900 touch screen displays a preview of the object. This is a live video image
of what the imager is currently viewing and has a slightly degraded appearance compared to the captured image. This is normal.
Image Files
The terminal is capable of saving images in a number of industry-standard file formats such as *.bmp, *.jpg and *.png. The default
file format for images is a grayscale *.jpg. To obtain the highest quality images, take grayscale images.
Digital images have a maximum image size of 640 x 480 pixels and may have up to a 256 grayscale image definition. The image
quality and related file size are determined by the data compression method used by the software application used to take
images. The average size of the image file is approximately 4-8K. However, the size of the image depends on the content of the
image - the more complex the content, the larger the file size.
Taking an Image
The following steps are basic guidelines for taking images:
1. Point the Dolphin 7900 terminal at the object. The imager has a slight downward angle.
2. To preview the image before capturing, press and hold the SCAN key or the Scan button.
3. The touch screen displays a preview of the object, and the decode and scan LEDs light red.
4. Adjust the terminal’s position until the object appears on the screen the way you want it to appear in the image.
5. Hold the terminal still and release the SCAN key or Scan button.
The scan and decode LEDs flash red, the touch screen flashes, and the captured image appears on the screen.
6. Unless otherwise specified by the application in use, the image is saved to the My Device folder (Start > Programs > File
Explorer > My Device).
Uploading Images
Image files can be uploaded to a host PC via
• Microsoft ActiveSync and a Dolphin communication peripheral, or
• Over your wireless radio network.
Dolphin® 7900 Mobile Computer User’s Guide - Prelim. Draft Rev (a) 5 - 5
Page 64

5 - 6 Dolphin® 7900 Mobile Computer User’s Guide - Prelim. Draft Rev (a)
Page 65
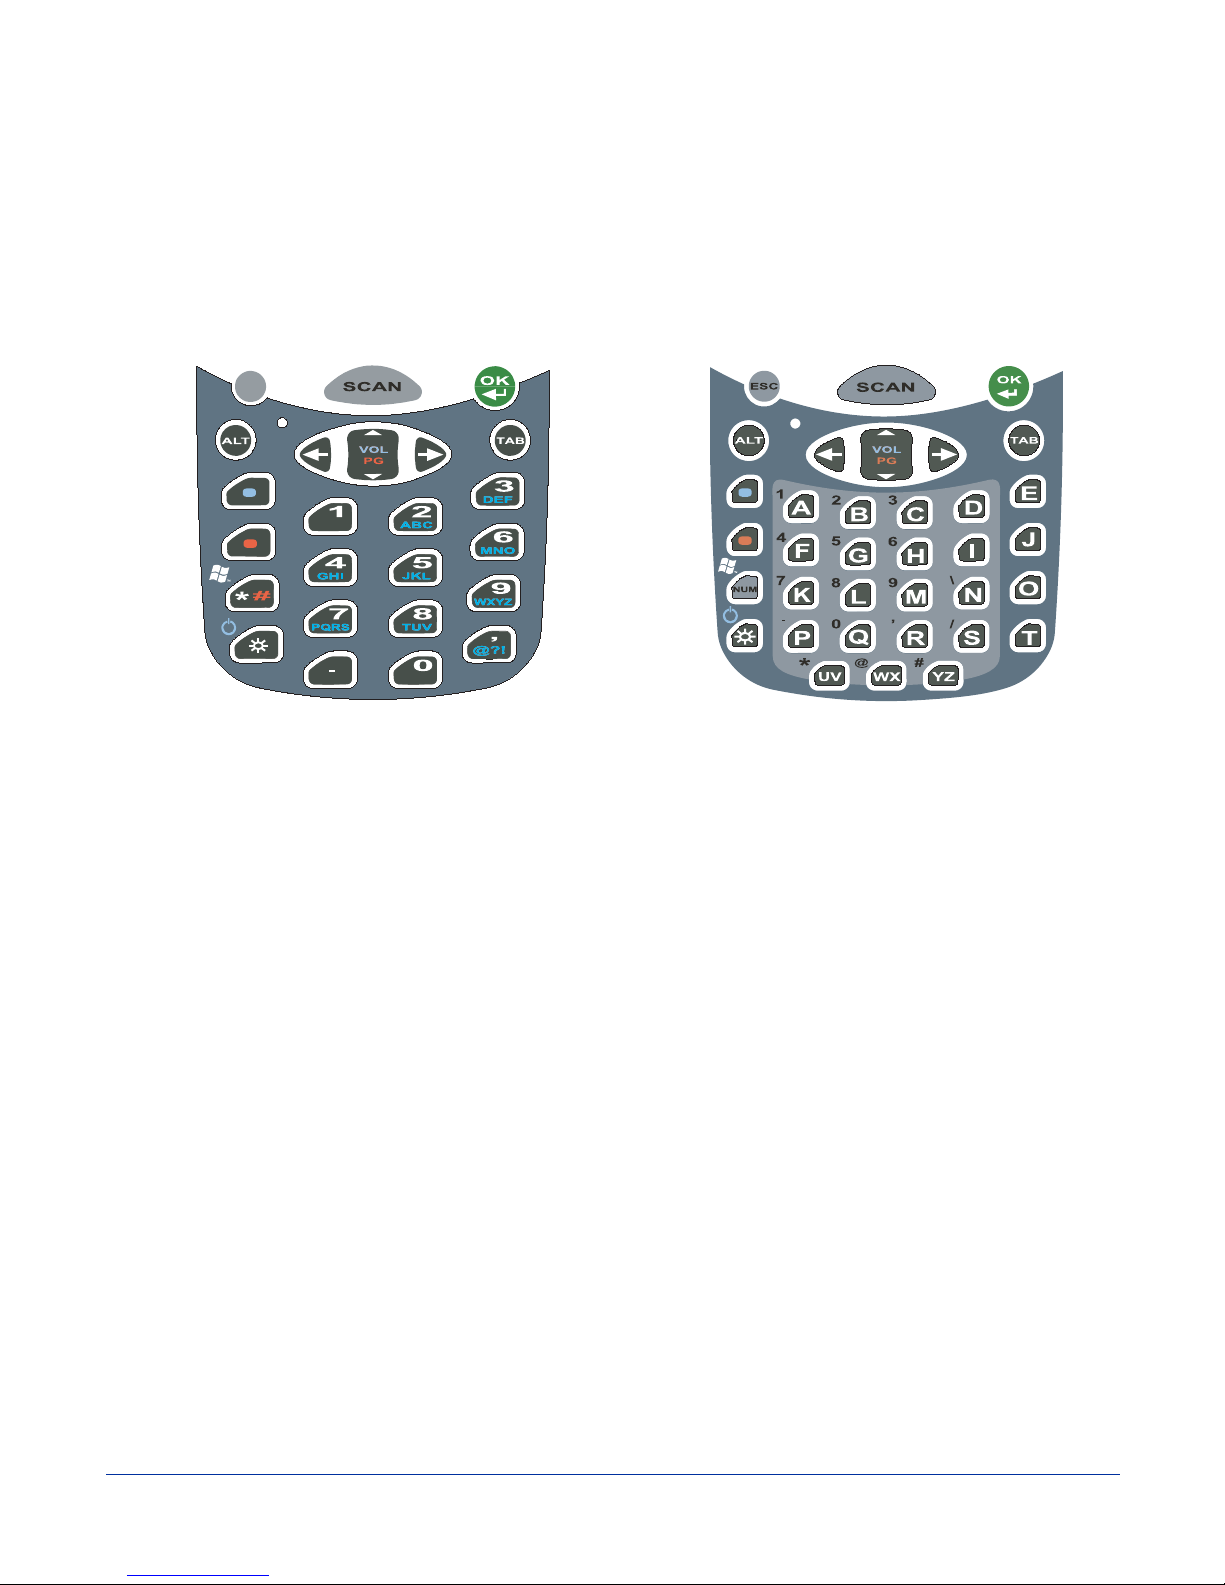
6
ST ART
Aa
+
-
BKSP
SP
SEND
END
F1
F2
F3
F4
Using Dolphin 7900 Keyboards
Overview
The Dolphin 7900 series features two keyboard options: 25-key numeric-alpha keyboard and 36-key alpha-numeric keyboard.
25-key Numeric-Alpha Keyboard 36-key Alpha-Numeric Keyboard
ESC
BKSP SP
END
F3
F6
F9
START
SEND
F1
F4
F7
F2
F5
F8
F10
Both keyboards are recessed under the overlay for maximum durability and backlit for maximum viewability in various lighting
conditions. Keyboard overlays are color-coded to indicate the functions performed or characters typed when the color-coded key
is pressed immediately after the Red or Blue Modifier key.
In addition to the standard number and letter keys, both keyboards contains three types of keys:
1. Function Keys
2. Navigation Keys
3. Modifier Keys
Dolphin® 7900 Mobile Computer User’s Guide - Prelim. Draft Rev (a) 6 - 1
Page 66
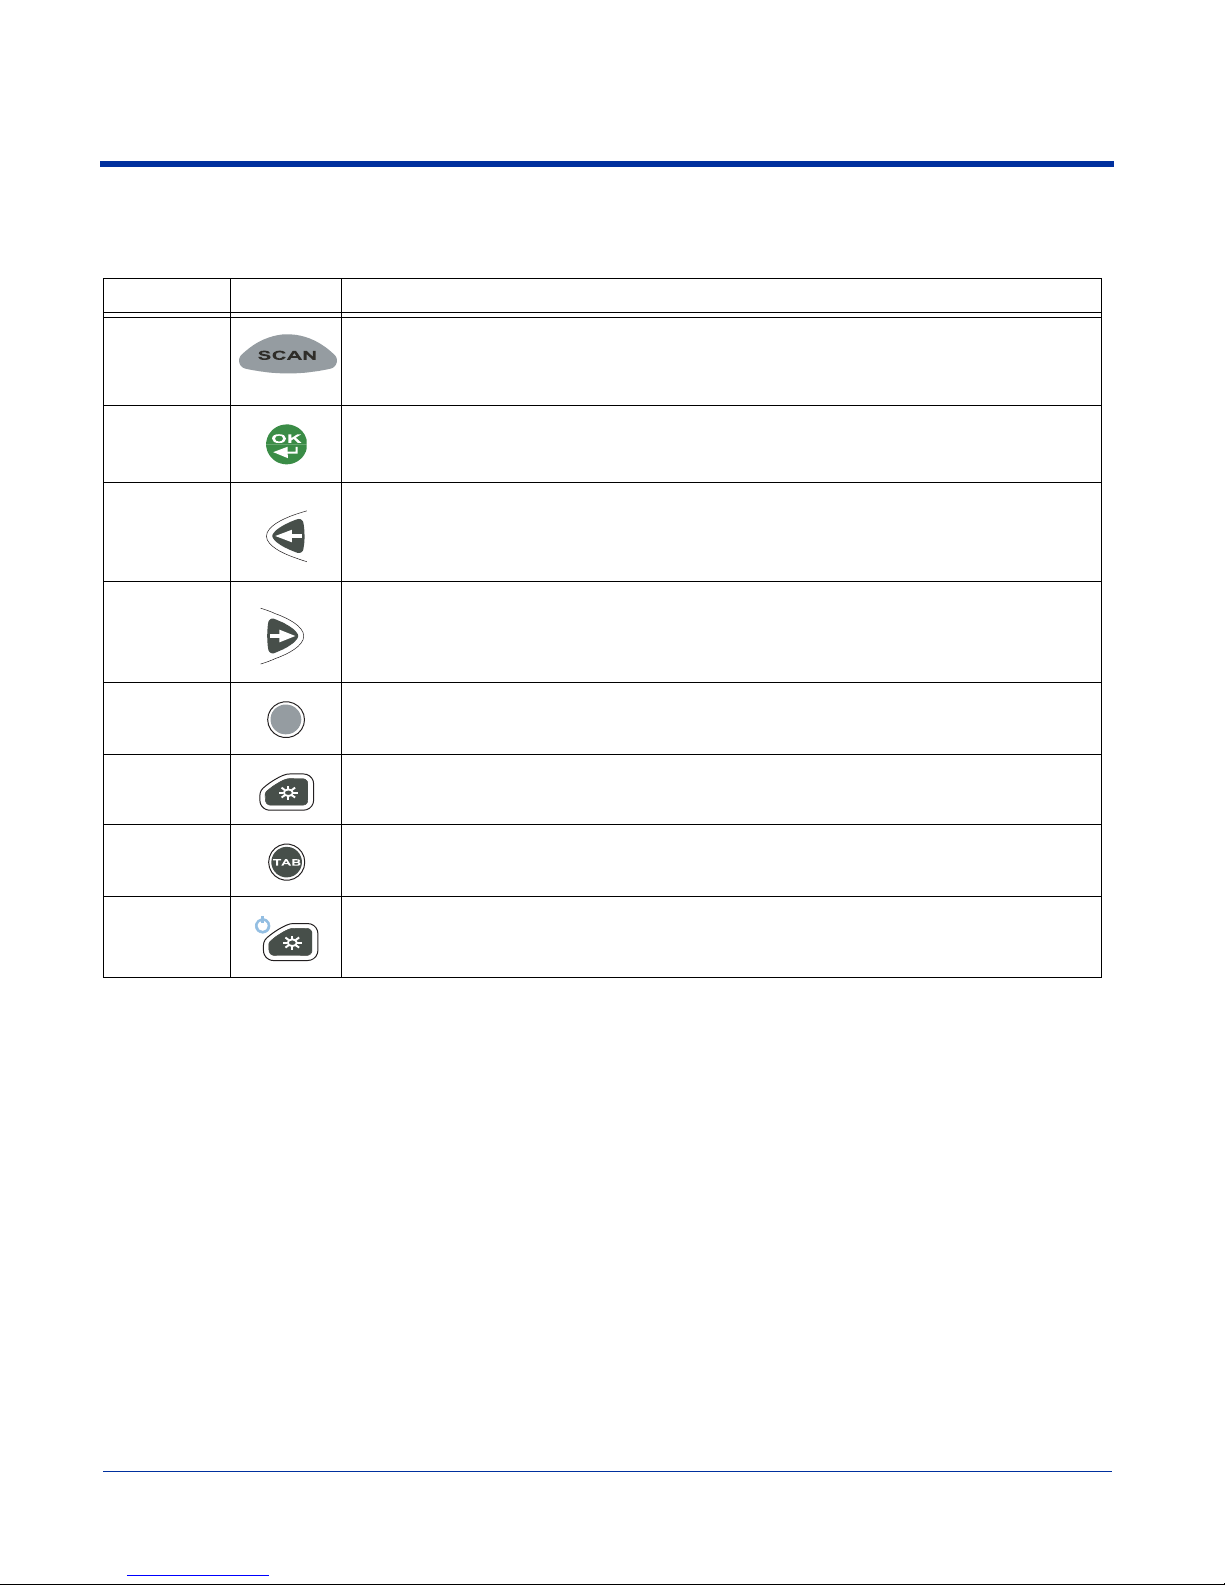
Using the Function Keys
Function keys are those keys that perform specific functions and usually have the name of the function they perform.
Name Key Function
SCAN
OK
Backspace
(BKSP)
Space (SP)
Escape
(ESC)
Backlight
Tab
BKSP
SP
ESC
The SCAN key activates the scan and wakes the terminals from suspend mode. Its position allows
convenient one-handed image-taking and/or bar code decoding.
The OK key confirms data entry and functions as an Enter key. Pressing the OK key also wakes the
terminal from suspend mode.
The Backspace function is performed by pressing the Red modifier key + the left arrow.
Backspace moves the cursor back one space and deletes each time the key combination is pressed. If
you are typing text, a character is deleted each time you backspace.
The Space function is performed by pressing the Red modifier key + right arrow.
The Space key moves the cursor one space forward. If you are typing text, it moves the text one space
forward as well.
The Escape key performs a cancel action.
The Backlight key turns the keyboard backlight on and off.
The Tab key moves the cursor to the next tab stop or the next control (on a form).
Power
The Pow er function is performed by pressing the Blue modifier key + the Backlight key.
Pressing this key combination powers on the terminal and puts a terminal already on in suspend mode.
6 - 2 Dolphin® 7900 Mobile Computer User’s Guide - Prelim. Draft Rev (a)
Page 67
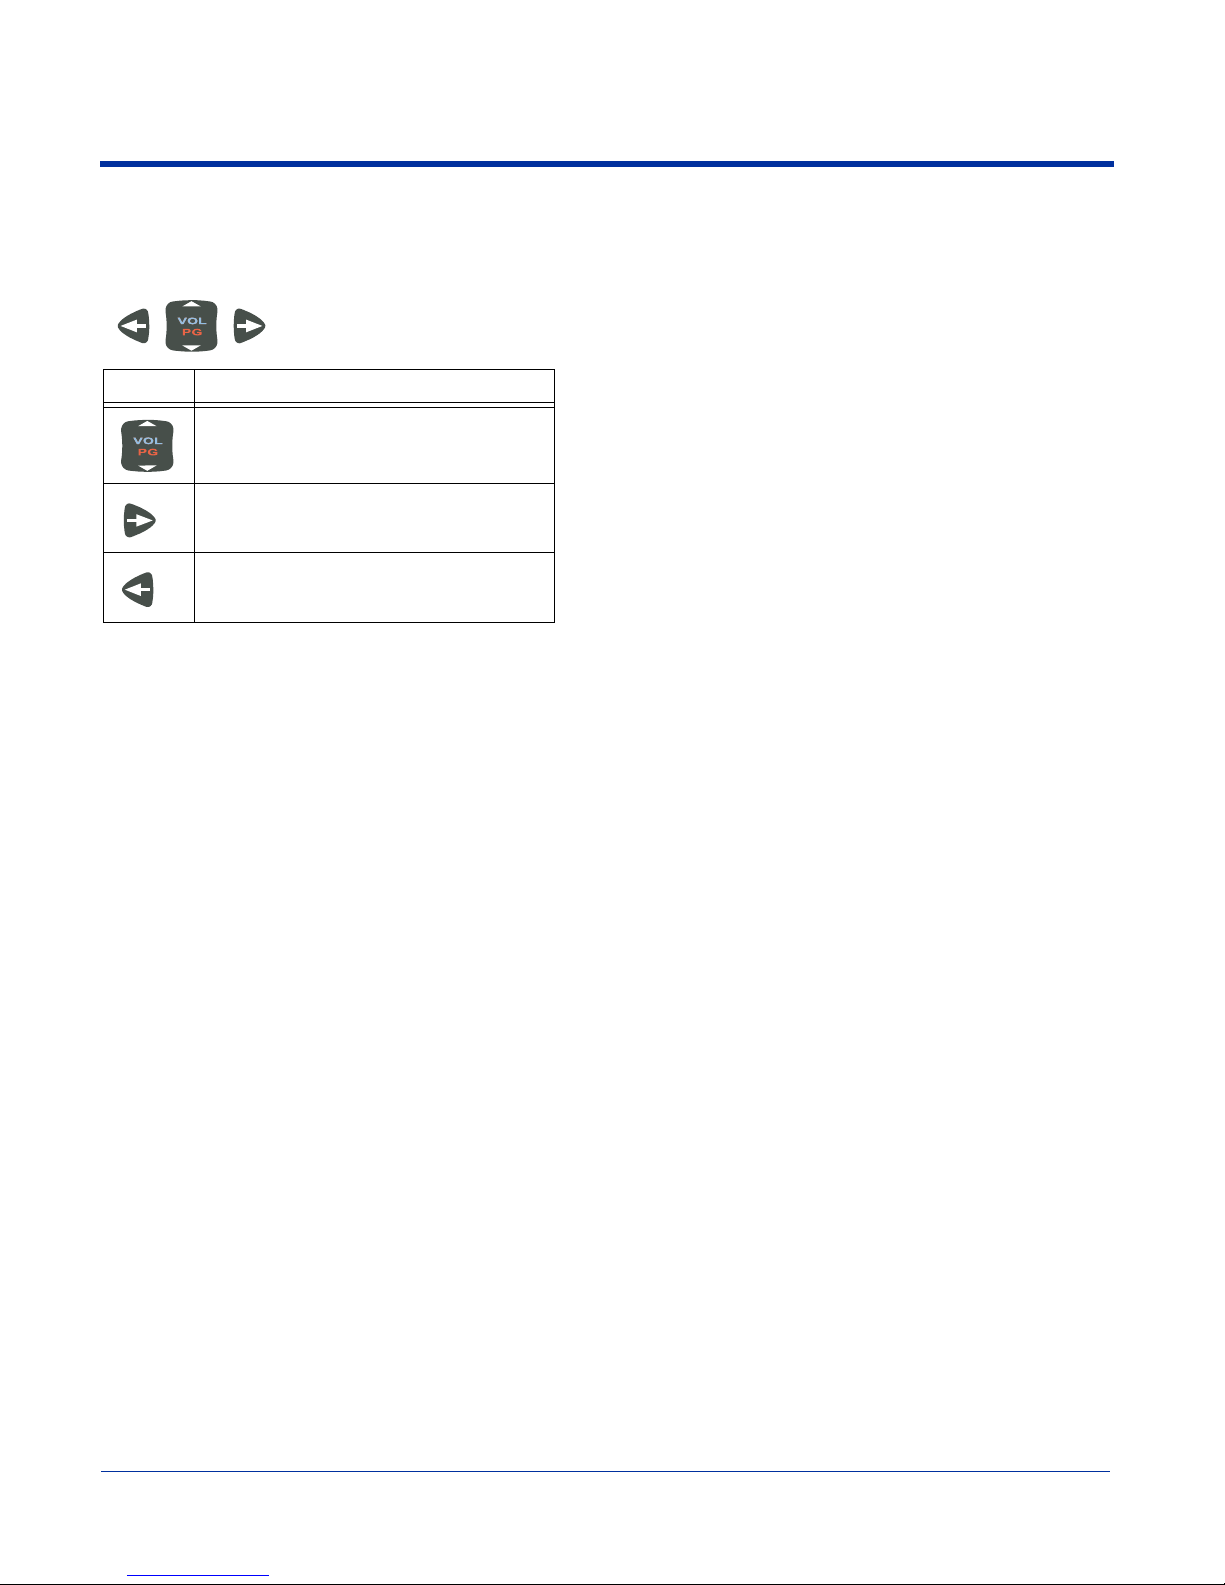
Using the Navigation Keys
Located in the center of each keyboard for easy access with either hand, the navigation keys enable you to navigate the cursor
through an application screen.
Press To …
Move the cursor up one row or line.
Move the cursor down one row or line.
Move the cursor one character to the right.
Move the cursor one character to the left.
The up and down arrows can be used for
• Volume up and down commands when pressed in combination with the blue modifier key, or
• Page up and page down commands when pressed in combination with the red modifier key.
Other functionality varies according to the application in use.
Dolphin® 7900 Mobile Computer User’s Guide - Prelim. Draft Rev (a) 6 - 3
Page 68
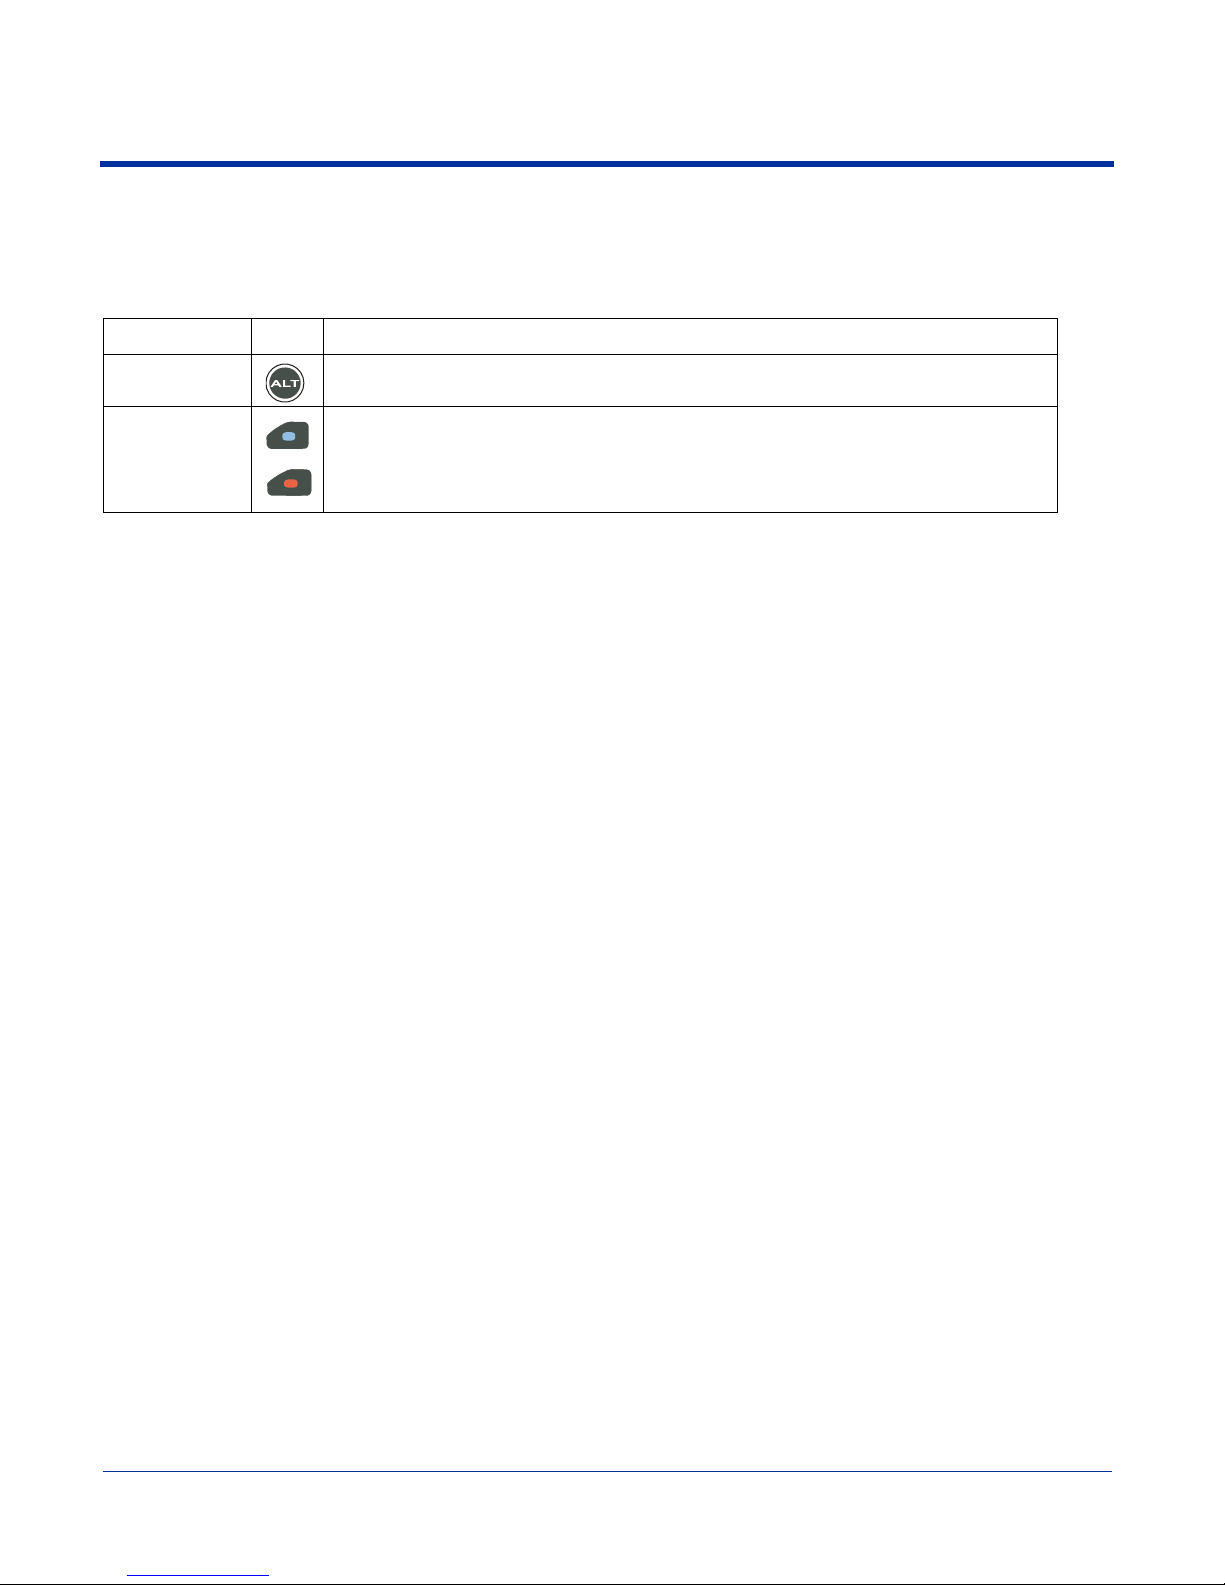
Using the Modifier Keys
Modifier keys are those keys that modify the next key pressed. They are used on combination with the keys that follow to perform
functions or type special characters. In addition to the standard ALT key, the Dolphin 7900 terminal features Blue and Red
modifier keys and a color-coded overlay.
Name Key Function
ALT
Blue
Red
The function of the ALT key depends on the software application in use and the keys combination
pressed.
The blue and red keys are used in combination with other k eys to type special characters and perform
system functions. Each key modifies only the next key pressed.
The overlay of each keyboard is color-coded to indicate the character typed or function performed
when specific keys are pressed immediately after the blue or red modifier k ey.
6 - 4 Dolphin® 7900 Mobile Computer User’s Guide - Prelim. Draft Rev (a)
Page 69
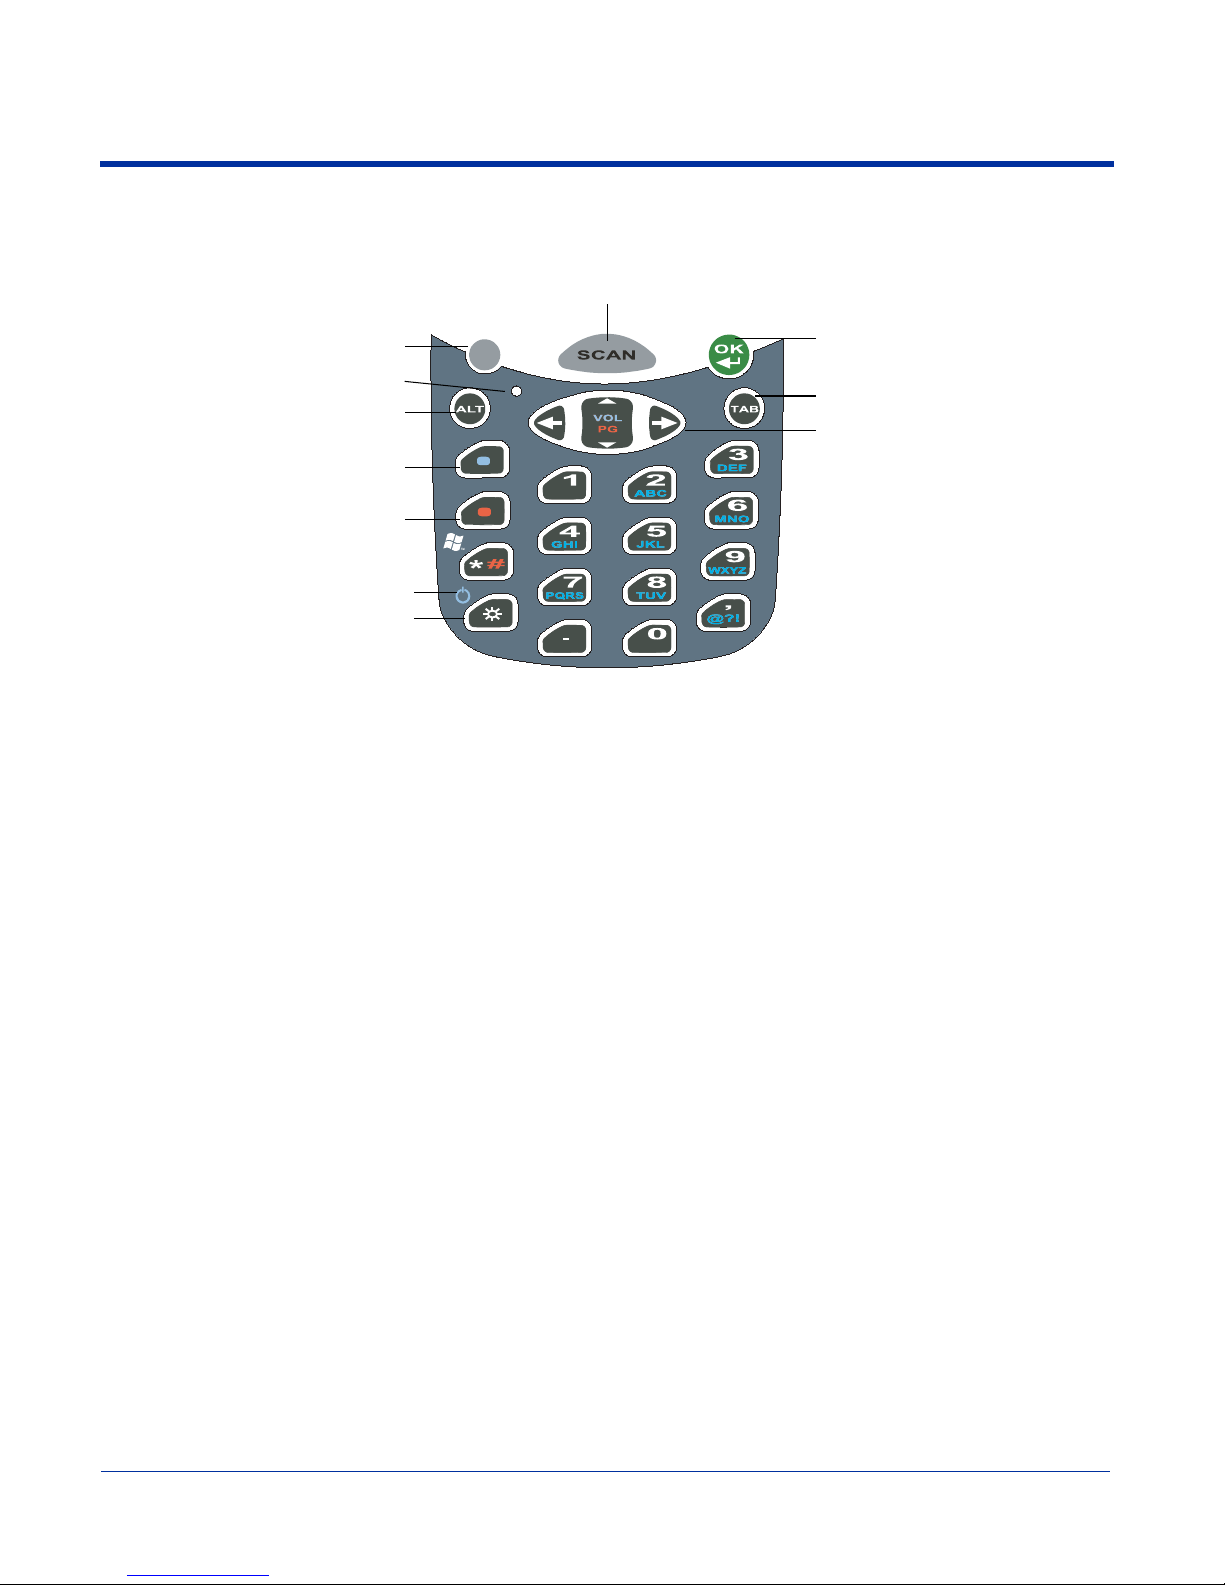
25-Key Numeric-Alpha Keyboard
The following graphic displays the 25-key numeric/alpha keyboard.
SCAN key
Escape key
Microphone
ALT
Blue
Red
Modifier keys
ESC
START
BKSP SP
SEND
F1
F4
F7
F2
F5
F8
END
F3
F6
F9
OK key
Tab key
Navigation keys
Power key
Backlight key
F10
Alpha Mode Functionality
The 25-key keyboard defaults to numeric mode. Numeric mode is when you type numbers with the number keys. Alpha mode is
when you type letters with number keys. On the number keys, there are alpha indicators that specify the letter(s) that will be typed
when you press that key in combination with the Blue modifier key.
Please note that when typing in alpha mode, you must use the same multi-press method you would use when typing letters on
a phone keypad. Each key press will type the next letter in the sequence as displayed in the alpha indicator.
Note: On the 25-key keyboard, alpha mode is achieved using Blue Modifier key combinations.
Dolphin® 7900 Mobile Computer User’s Guide - Prelim. Draft Rev (a) 6 - 5
Page 70
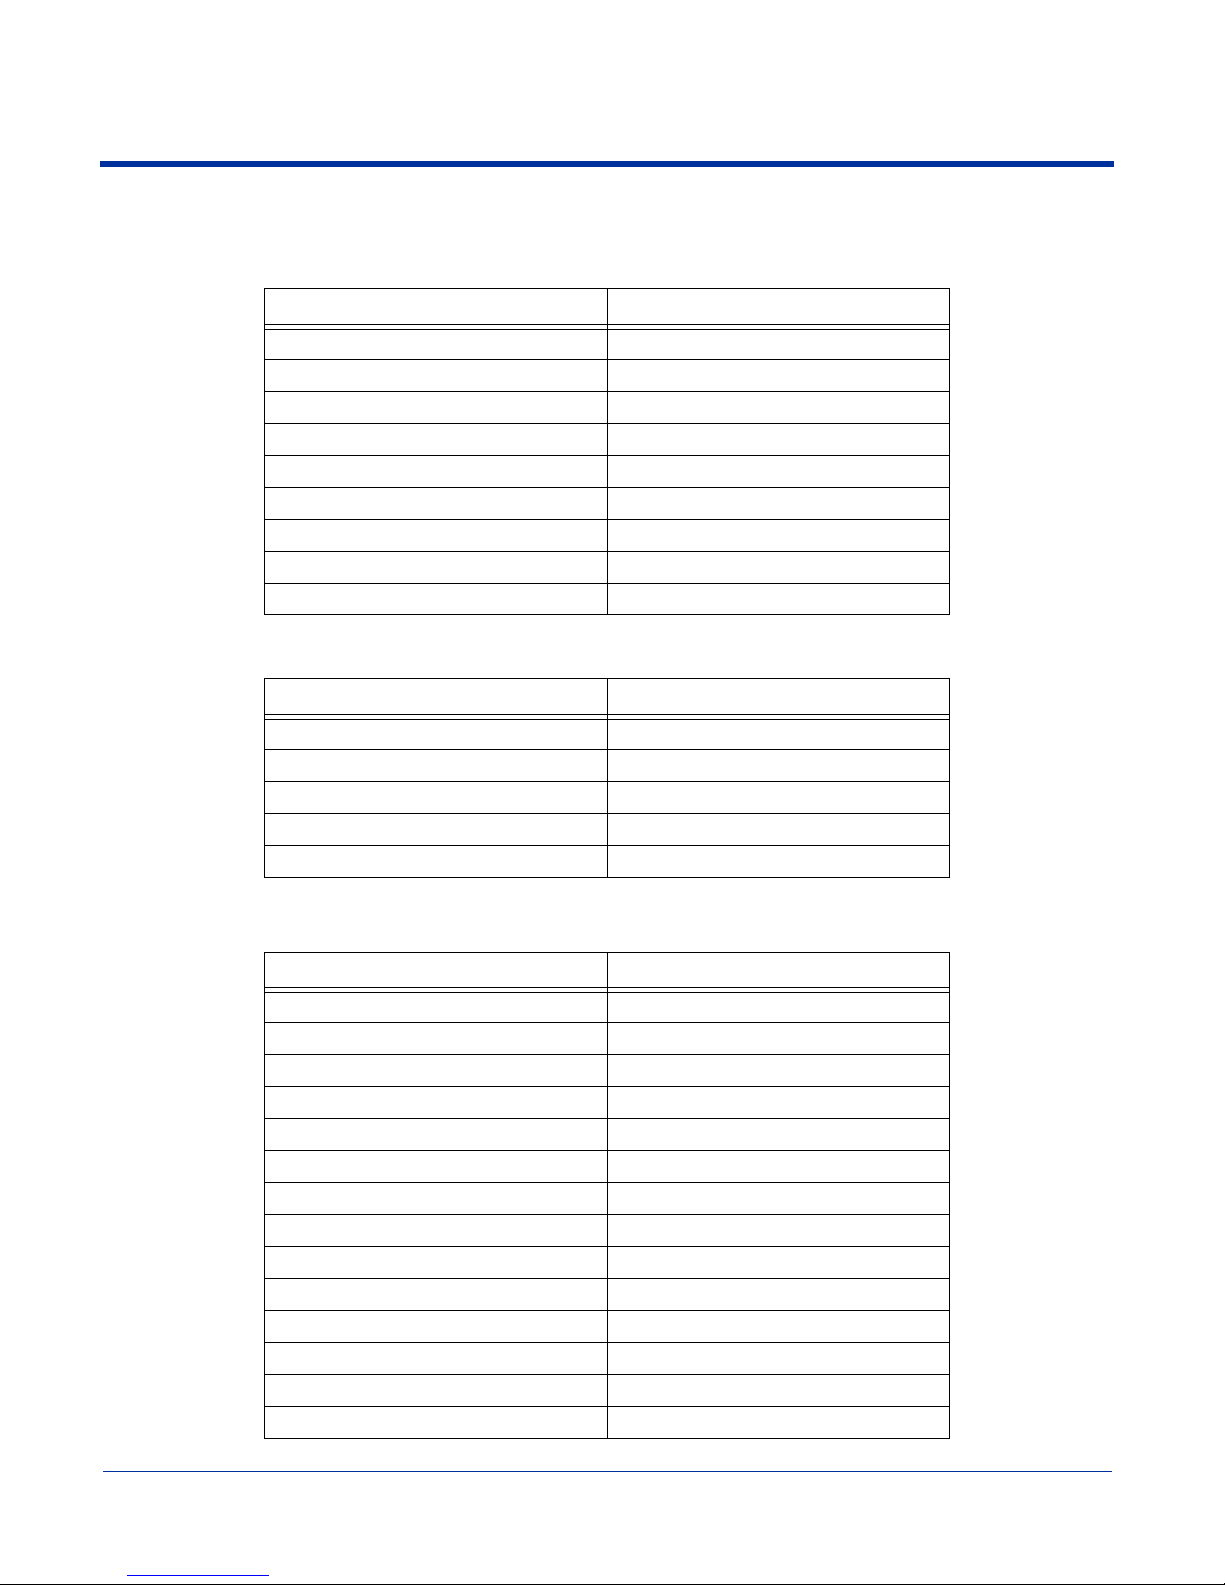
Blue Key Combinations
Characters
Functions
Key Combination Character
Blue + 2 ABC
Blue + 3 DEF
Blue + 4 GHI
Blue + 5 JKL
Blue + 6 MNO
Blue + 7 PQRS
Blue + 8 TUV
Blue + 9 WXYZ
Blue + , @ ? !
Key Combination Function
Blue + Backlight Power
Blue + Left Arrow Send
Blue + Right Arrow End
Blue + Up Arrow Volume up
Blue + Down Arrow Volume down
Red Key Combinations
Key Combination Function/Special Character
Red + Left Arrow Backspace
Red + Right Arrow Space
Red + Up Arrow Page up
Red + Down Arrow Page Down
Red + ESC Soft reset (warm boot)
Red + TAB Hard reset (cold boot)
Red + 1 F1
Red + 2 F2
Red + 3 F3
Red + 4 F4
Red + 5 F5
Red + 6 F6
Red + 7 F7
Red + 8 F8
6 - 6 Dolphin® 7900 Mobile Computer User’s Guide - Prelim. Draft Rev (a)
Page 71

Key Combination Function/Special Character
Red + 9 F9
Red + * #
Dolphin® 7900 Mobile Computer User’s Guide - Prelim. Draft Rev (a) 6 - 7
Page 72
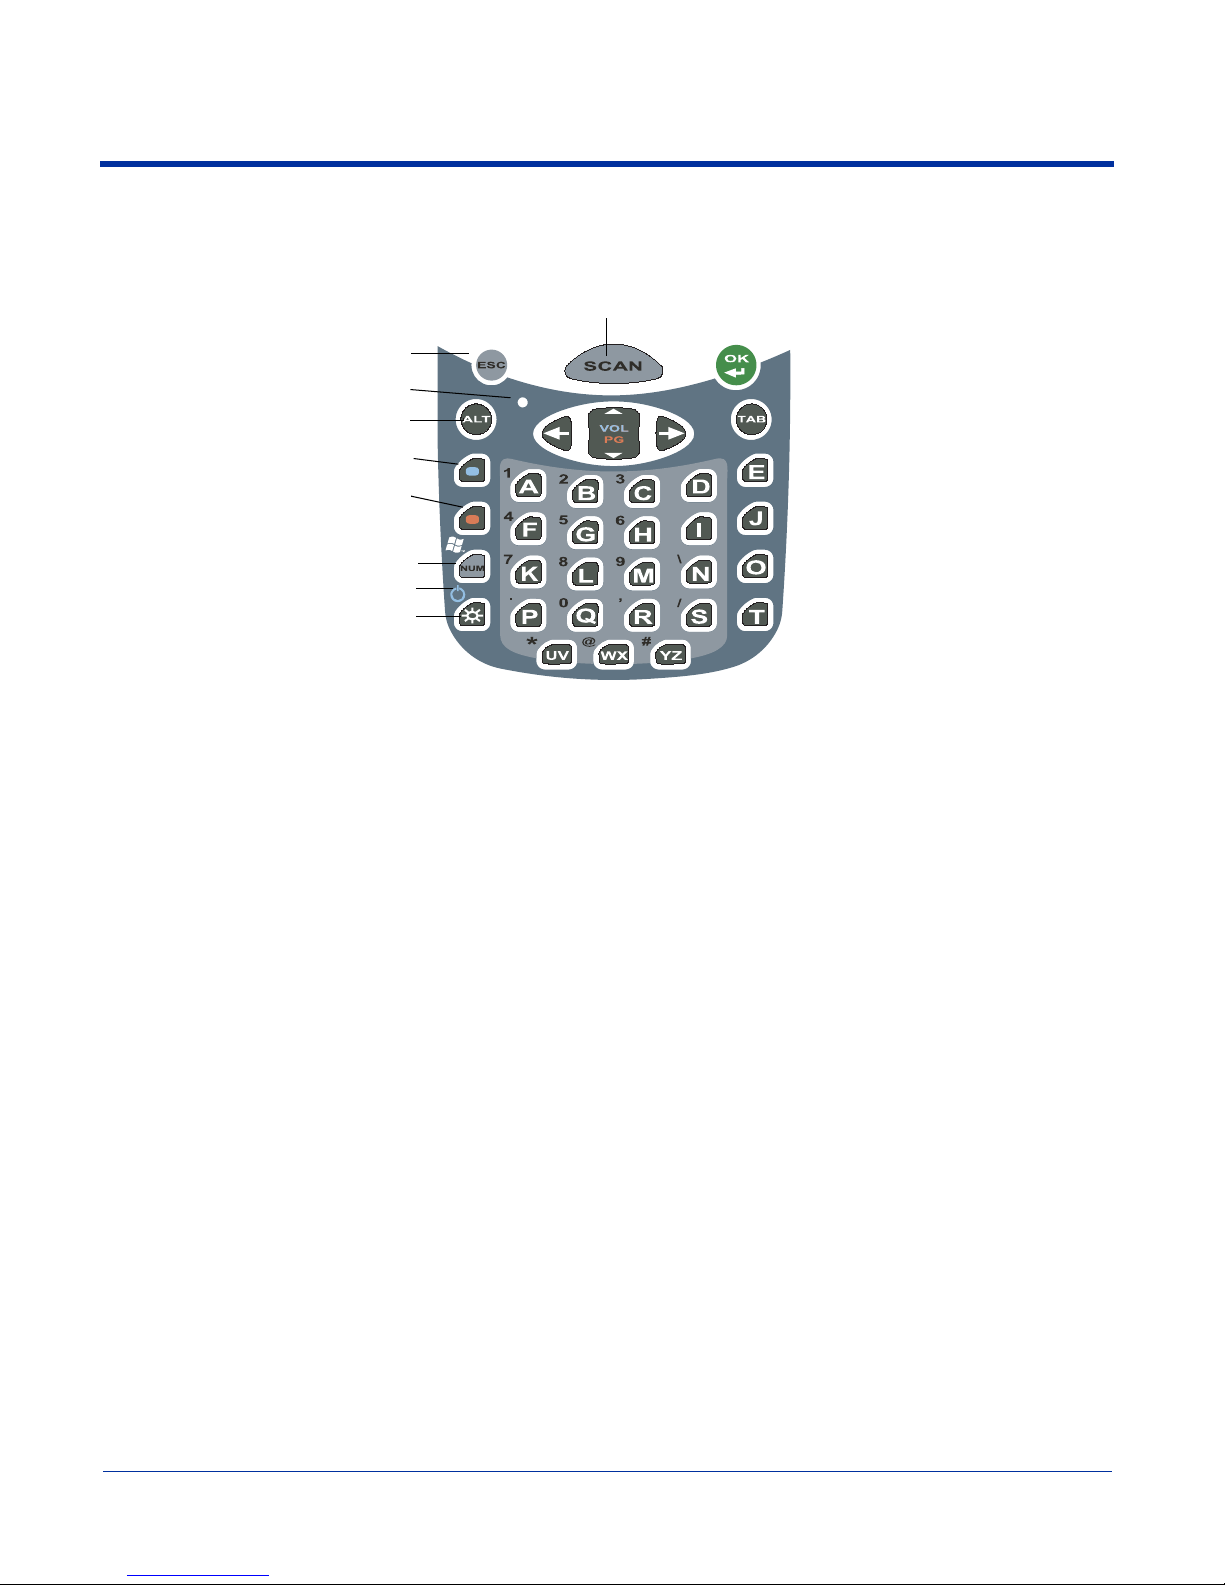
36-Key Alpha-Numeric Keyboard
The following graphic displays the 35-key alpha/numeric keyboard.
SCAN key
Escape key
Microphone
Aa
BKSP
SEND
ALT
Blue
Red
Modifier keys
ST ART
Number Lock key
Power key
Backlight key
Number Mode Functionality
The 35-key keyboard defaults to alpha mode. Alpha mode is when you type letters with the letter keys. Numeric mode is when
you type numbers with letter keys. On the alpha keys, there are numeric indicators that specify the number that will be typed
when you press that key in combination with the Blue modifier key.
Please note that when typing in numeric mode, you must use the same multi-press method you would use when typing letters
on a phone keypad. Each key press will type the next letter in the sequence as displayed in the alpha indicator.
SP
F1
END
-
F2
+
F3
F4
6 - 8 Dolphin® 7900 Mobile Computer User’s Guide - Prelim. Draft Rev (a)
Page 73

Blue Key Combinations
Red Key Combinations
Key Combination Function/Special Character
Blue + Backlight Power
Blue + Left Arrow Send
Blue + Right Arrow End
Blue + Up Arrow Volume up
Blue + Down Arrow Volume down
Key Combination Function/Special Character
Red + Left Arrow Backspace
Red + Right Arrow Space
Red + ESC Soft reset (warm boot)
Red + TAB Hard reset (cold boot)
Red + E F1
Red + J F2
Red + O F3
Red + T F4
NUM Key Combinations
Pressing the NUM lock key switches the keyboard to numeric mode where you can type numbers and special characters with
the letter keys. You do NOT need to press and hold the NUM key when pressing the next key.
Key Combination Function/Special Character
NUM + A 1
NUM + B 2
NUM + C 3
NUM + D NUM + F 4
NUM + G 5
NUM + H 6
NUM + I +
NUM + K 7
NUM + L 8
NUM + M 9
NUM + N \
NUM + P .
NUM + Q 0
NUM + R ,
Dolphin® 7900 Mobile Computer User’s Guide - Prelim. Draft Rev (a) 6 - 9
Page 74

Key Combination Function/Special Character
NUM + S /
NUM + UV *
NUM + WX @
NUM + YZ #
6 - 10 Dolphin® 7900 Mobile Computer User’s Guide - Prelim. Draft Rev (a)
Page 75

7
P
Settings
Overview
Customized settings are available on the Start menu. Go to Start > Settings and settings screen opens displaying the Personal
tab. Settings consists of three tabs: Personal, System, and Connections.
ersonal Tab System Tab Connections Tab
Tab This tab enables you to …
Personal Customize buttons, set SIP options, and adjust headset settings; see Personal Tab on page 7-2.
System Adjust system settings; see System Tab on page 7-6.
Connections Establish network connections settings; see Connections Tab on page 7-20.
Dolphin® 7900 Mobile Computer User’s Guide - Prelim. Draft Rev (a) 7 - 1
Page 76

Personal Tab
To access the Personal tab, go to Start > Settings. The screen opens displaying the Personal tab.
Icon Tapping this icon enables you to …
Buttons Customize buttons to perform functions.
To use this setting, the HotKeys HHP Utility must be initialized. Tap Start > Utils > HotKeys (the icon
is the same). The HotKeys utility initializes. Return to the Personal tab and tap Buttons.
Headset Adjust audio settings for headset use; see Headset Control on page 7-5.
Input Customize the SIP. For details, see Input Panel Options on page 4-12.
Menus Customize what appears on the Start and New menus; see Adding a Program to the Start Menu on
Owner Information Enter your contact information. This information will appear on the Today screen.
Password Password protect the terminal to limit access to your device.
Sounds & Notifications Set the sound volume, enable and disable sounds for specific actions, and set sound parameters for
Today Customize the look and the information that is displayed on the Today screen
Note: Personal settings are stored in RAM memory. They are replaced by system defaults after each hard reset. For more
information about resets,
page 7-3.
system notifications.
see Soft Reset (Warm Boot) on page 2-11.
7 - 2 Dolphin® 7900 Mobile Computer User’s Guide - Prelim. Draft Rev (a)
Page 77
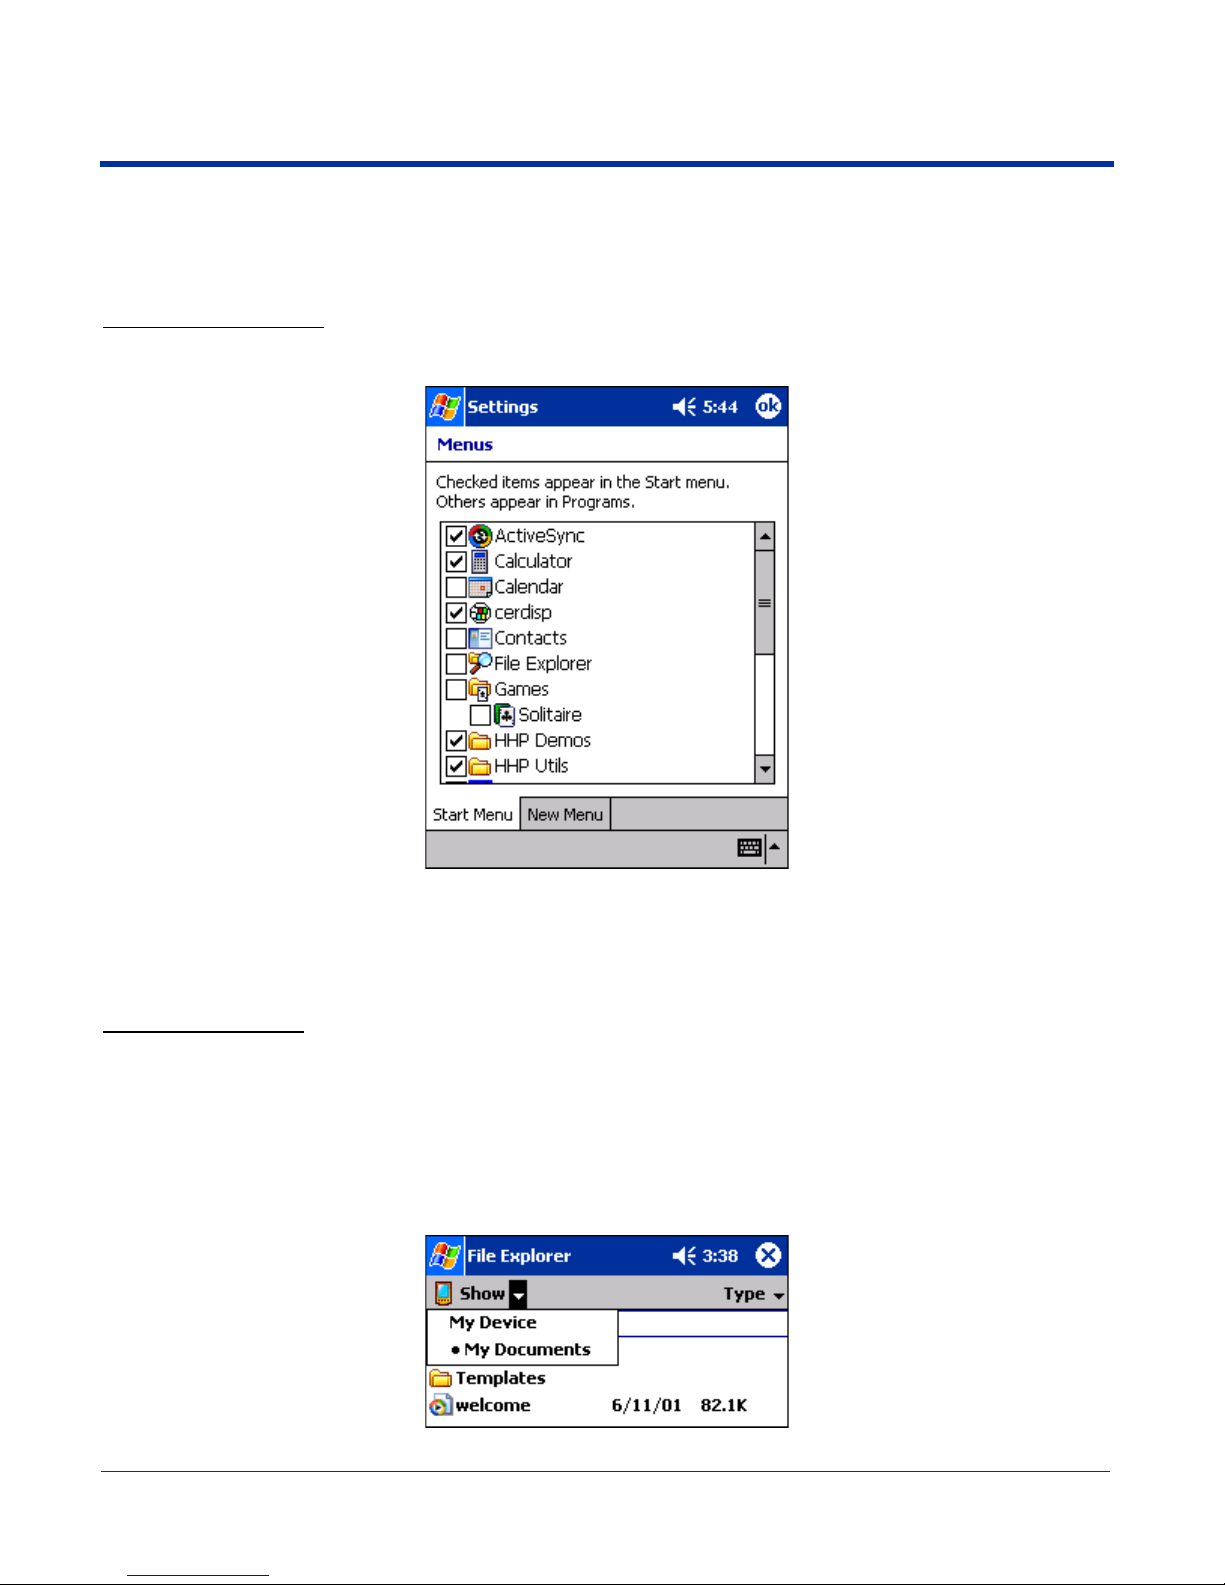
Adding a Program to the Start Menu
You can add existing programs you use often, such as File Explorer, to the Start menu for faster access. You are not installing
the program, just re-routing access to it.
Using System Settings
1. Tap Start > Settings > Personal tab > Menus > Start Menu tab.
2. Tap the check box for the program you want to add and tap OK to save.
3. Tap the Start menu.
4. Verify that the program appears.
Using File Explorer
If you do not see the program listed, you can either use File Explorer to move the program or ActiveSync on the desktop computer
to create a shortcut to the program and place the shortcut in the Start Menu folder.
Note: We recommend that you Copy and Paste Shortcut so that you do not alter your program configurations by accident. Using
Copy and Paste Shortcut (as opposed to Cut and Paste) ensures that the program files remain where they need to be for
the system to find them to perform system functions.
1. Tap Start > Programs > File Explorer, and navigate to the program.
File Explorer opens to My Documents by default; to see a list of all folders, tap the folder name and then My Device.
Dolphin® 7900 Mobile Computer User’s Guide - Prelim. Draft Rev (a) 7 - 3
Page 78
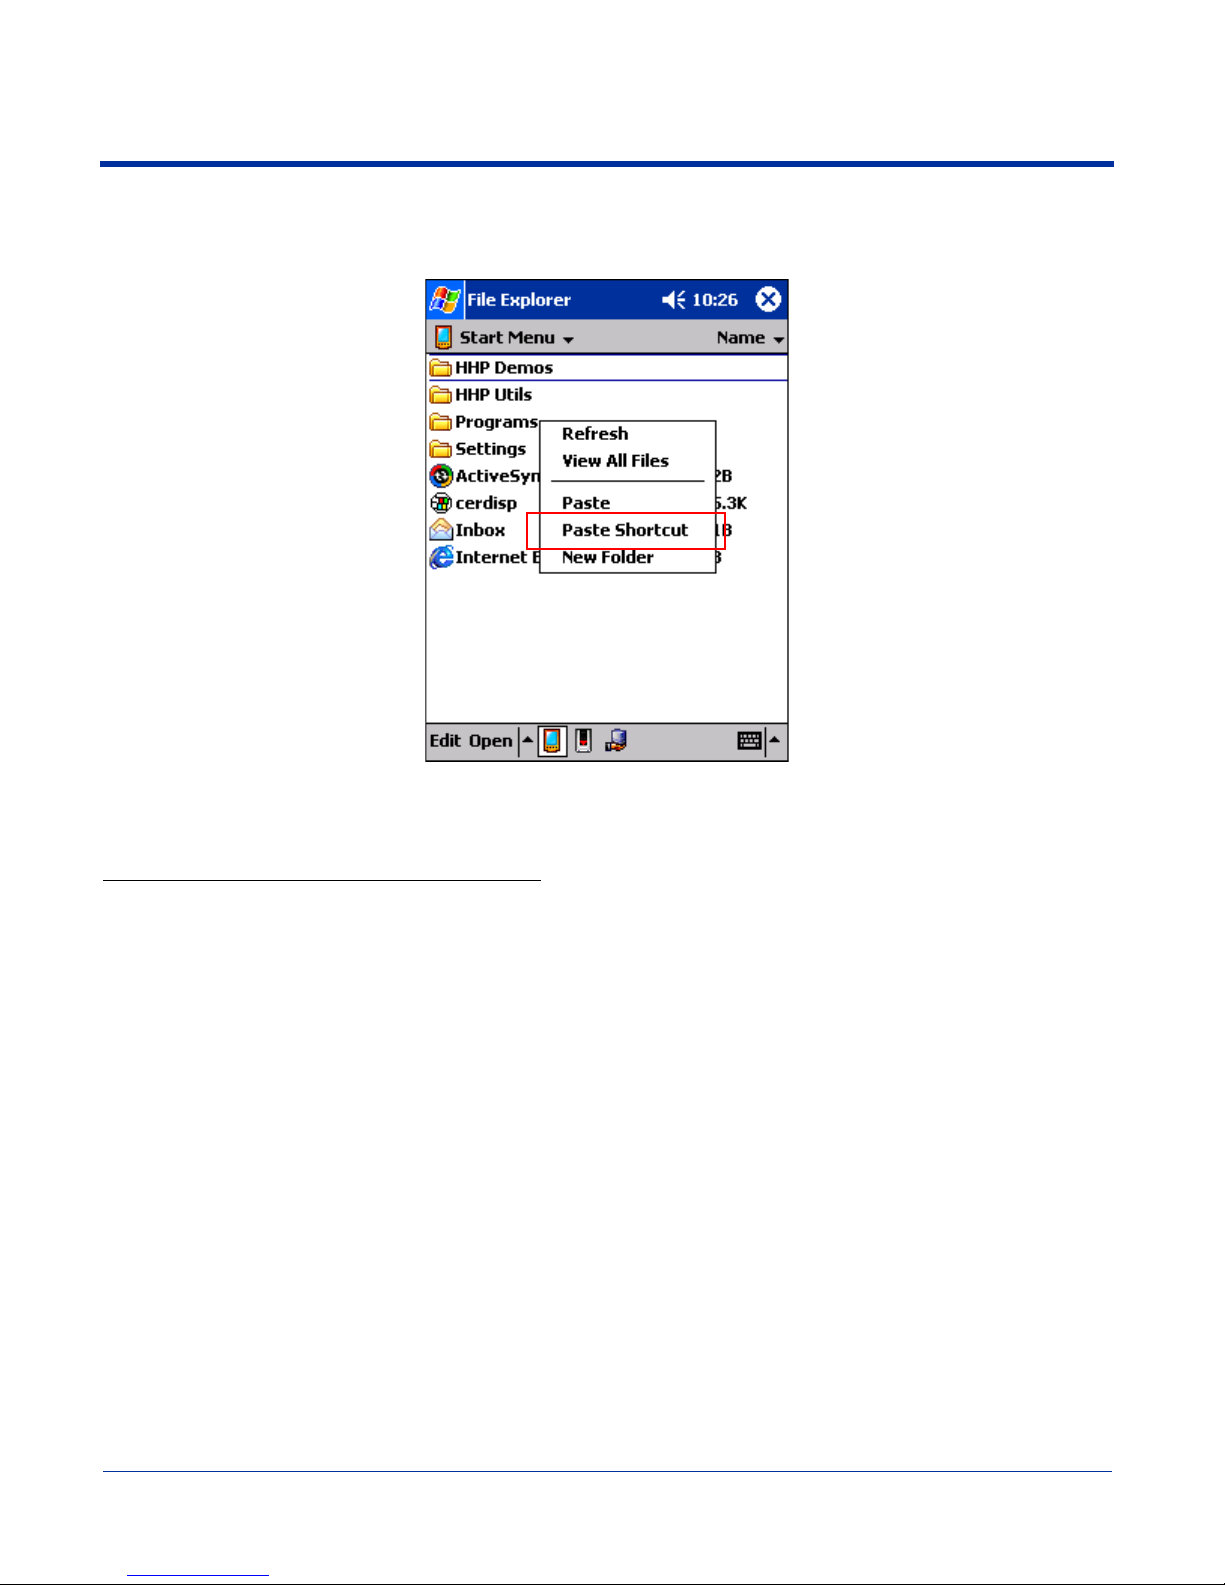
2. Tap and hold on the program, then tap Copy on the pop-up menu.
3. Navigate to the Windows folder and open the Start Menu (My Device > Windows > Start Menu), tap and hold a blank area
of the window, and tap Paste Shortcut on the pop-up menu.
4. Tap the Start menu.
5. Verify that the program now appears.
Using ActiveSync on the Desktop Computer
Here, you are performing the same basic process as on the terminal, except that you are using the Explore (Windows Explorer)
utility to cut and paste.
1. Open ActiveSync > Explore.
2. Navigate to the program.
3. Right-click on the program and select Create Shortcut.
4. Select the shortcut, right-click, and select Cut.
5. Navigate to the Start Menu folder (Windows > Start Menu).
6. Right-click on an empty area and select Paste.
7. On the terminal, tap the Start menu.
8. Verify that program appears.
For more information, see ActiveSync Help.
7 - 4 Dolphin® 7900 Mobile Computer User’s Guide - Prelim. Draft Rev (a)
Page 79
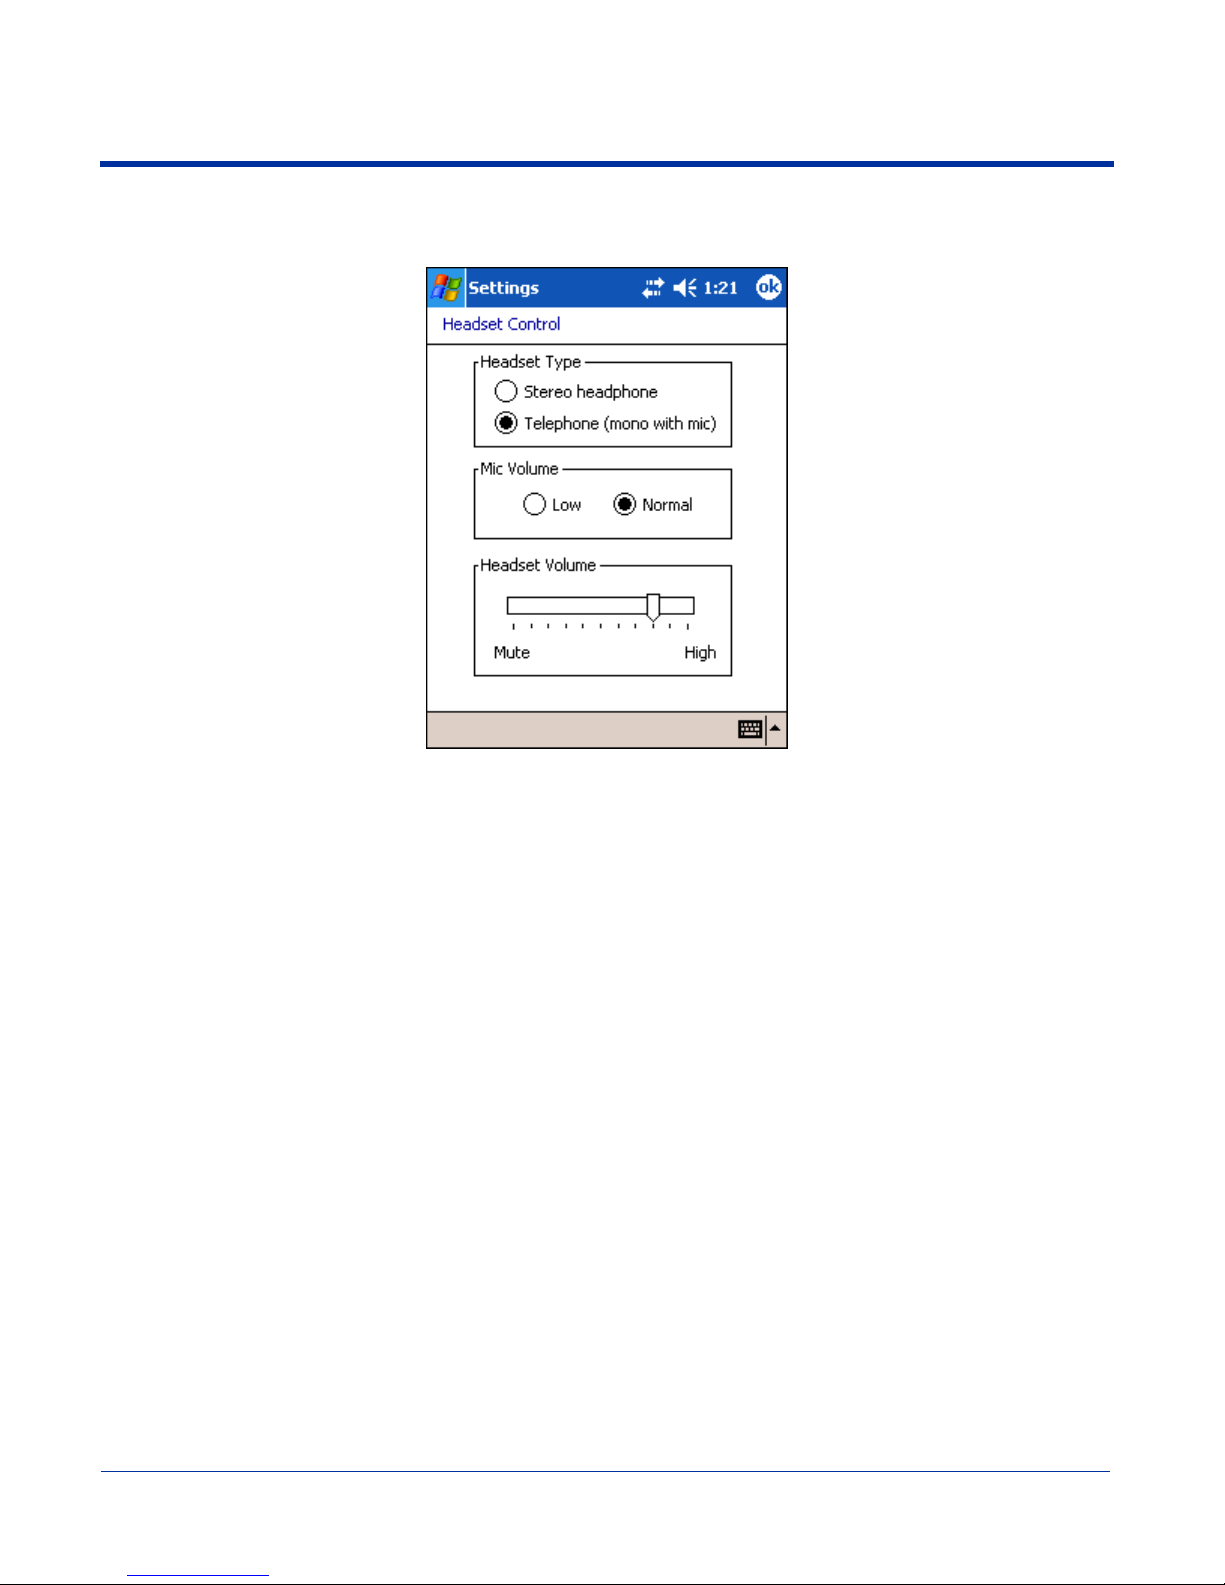
Headset Control
The Headset Control setting enables you to adjust audio settings while using a headset.
Headset Type
Stereo headphone Select this option if you are using a headset for audio output only. In this case, you need to use the
microphone on the terminal (
speak into the microphone. These types of headsets usually contain two earpieces for stereo sound.
Tap OK to save your selection.
Telephone (mono with mic)
Select this option if you are using a headset that also contains a microphone. When this option is
selected, you speak into the microphone on the headset and not the microphone on the terminal.
These types of headsets usually have one earpiece for mono audio.
Tap OK to save your selection.
Microphone, page 3-2) for audio input; i.e., listen via the headset and
Mic Volume
These options enable you to adjust the audio level of the microphone. Normal is the default setting.
If this is too loud for the listener, you can change the setting to Low.
These settings apply to the selected Headset Type. When you select Stereo headphone, the volume
on the terminal’s microphone (
with mic), the volume on the headset’s microphone adjusts.
This Mic Volume setting does not work if you are using a GSM radio for two-way voice
communication. For more information about microphone volume with GSM,
page 11-11.
Tap OK to save your selection.
Microphone, page 3-2) adjusts. When you select Telephone (mono
see Settings Menu on
Headset Volume
This slider enables you to adjust the speaker volume (audio output) of the headset. Move the slider
from Mute to High depending on your preference. The volume adjusts automatically as you move the
slider. These headset volume settings apply to both Headset Types.
Dolphin® 7900 Mobile Computer User’s Guide - Prelim. Draft Rev (a) 7 - 5
Page 80
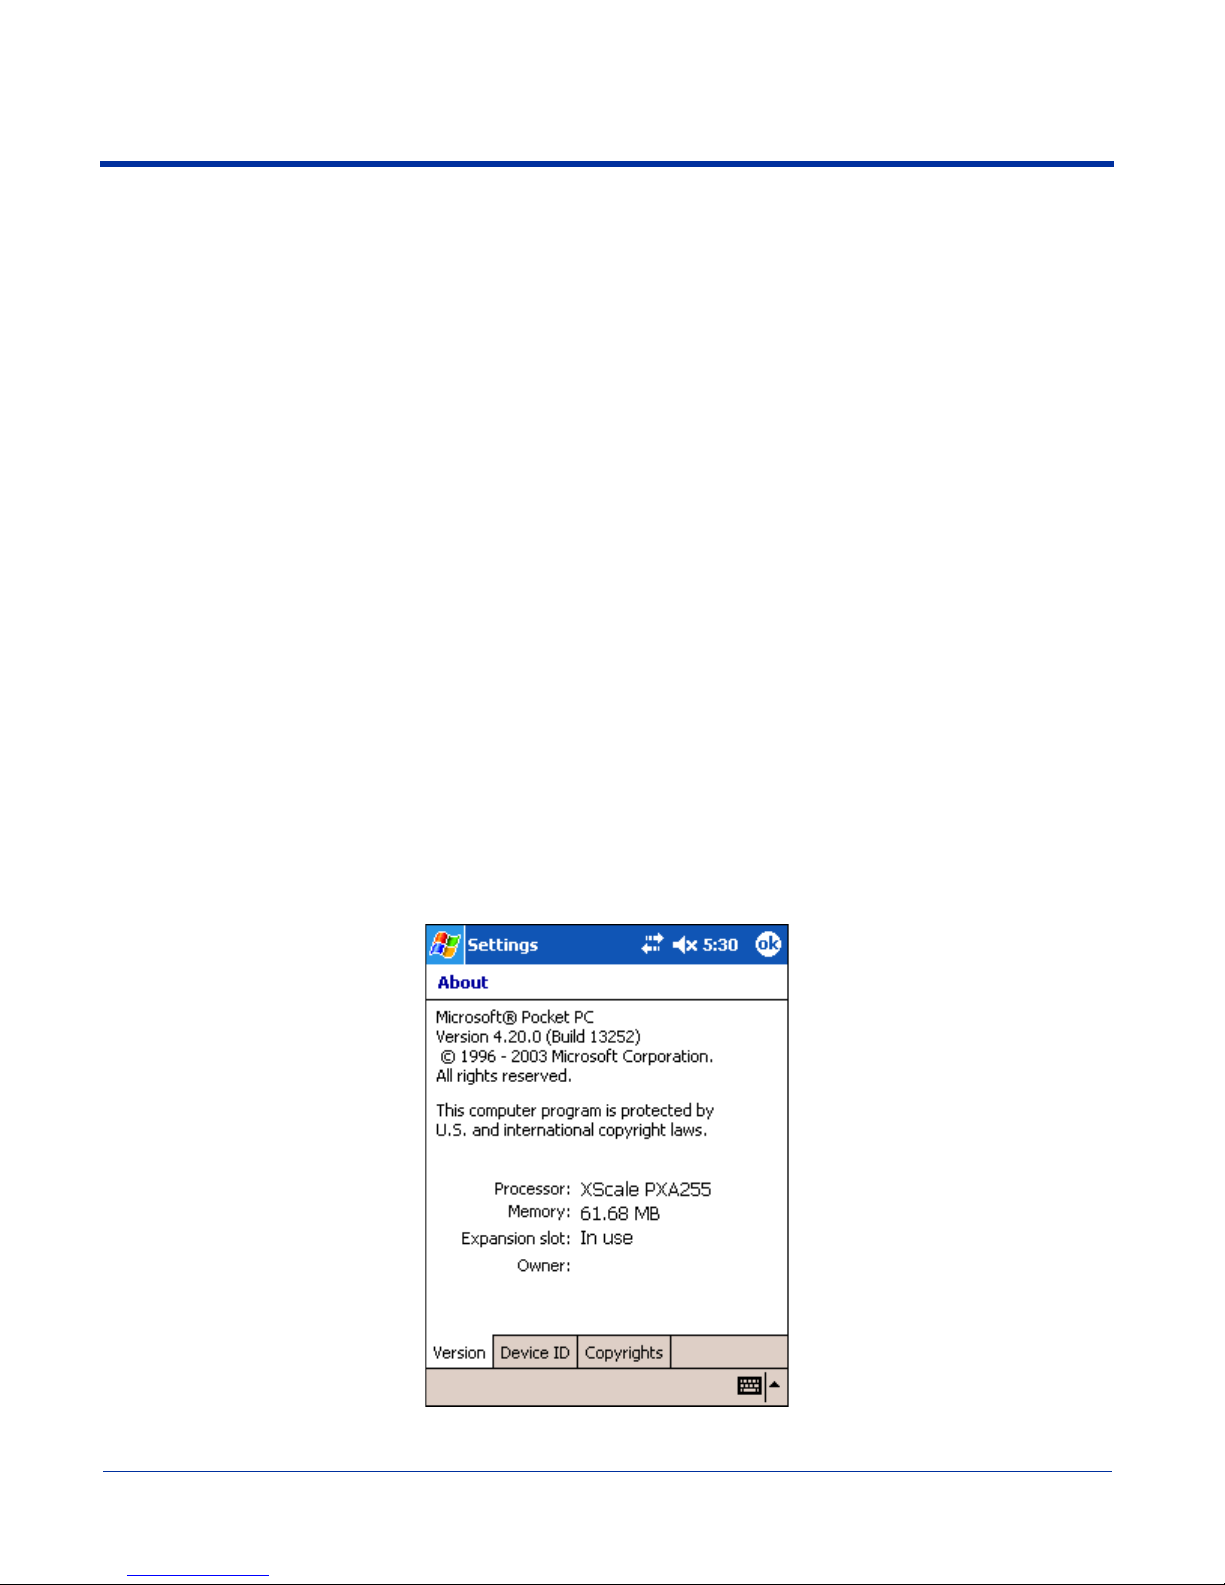
System Tab
The System tab enables you to verify and sometimes alter system parameters. To access the System tab, go to Start > Settings
> System tab. Tap the appropriate icon to open that system setting.
About
The About system setting displays specific information about what is loaded on the terminal. It contains three tabs:
Version tab Displays the information about the software, operating system, and processor of the terminal.
Device ID tab Displays the information the terminal uses to identify itself to other devices. It can be important to
7 - 6 Dolphin® 7900 Mobile Computer User’s Guide - Prelim. Draft Rev (a)
know this information if the Dolphin terminal is going to be part of a networked system of devices.
Page 81
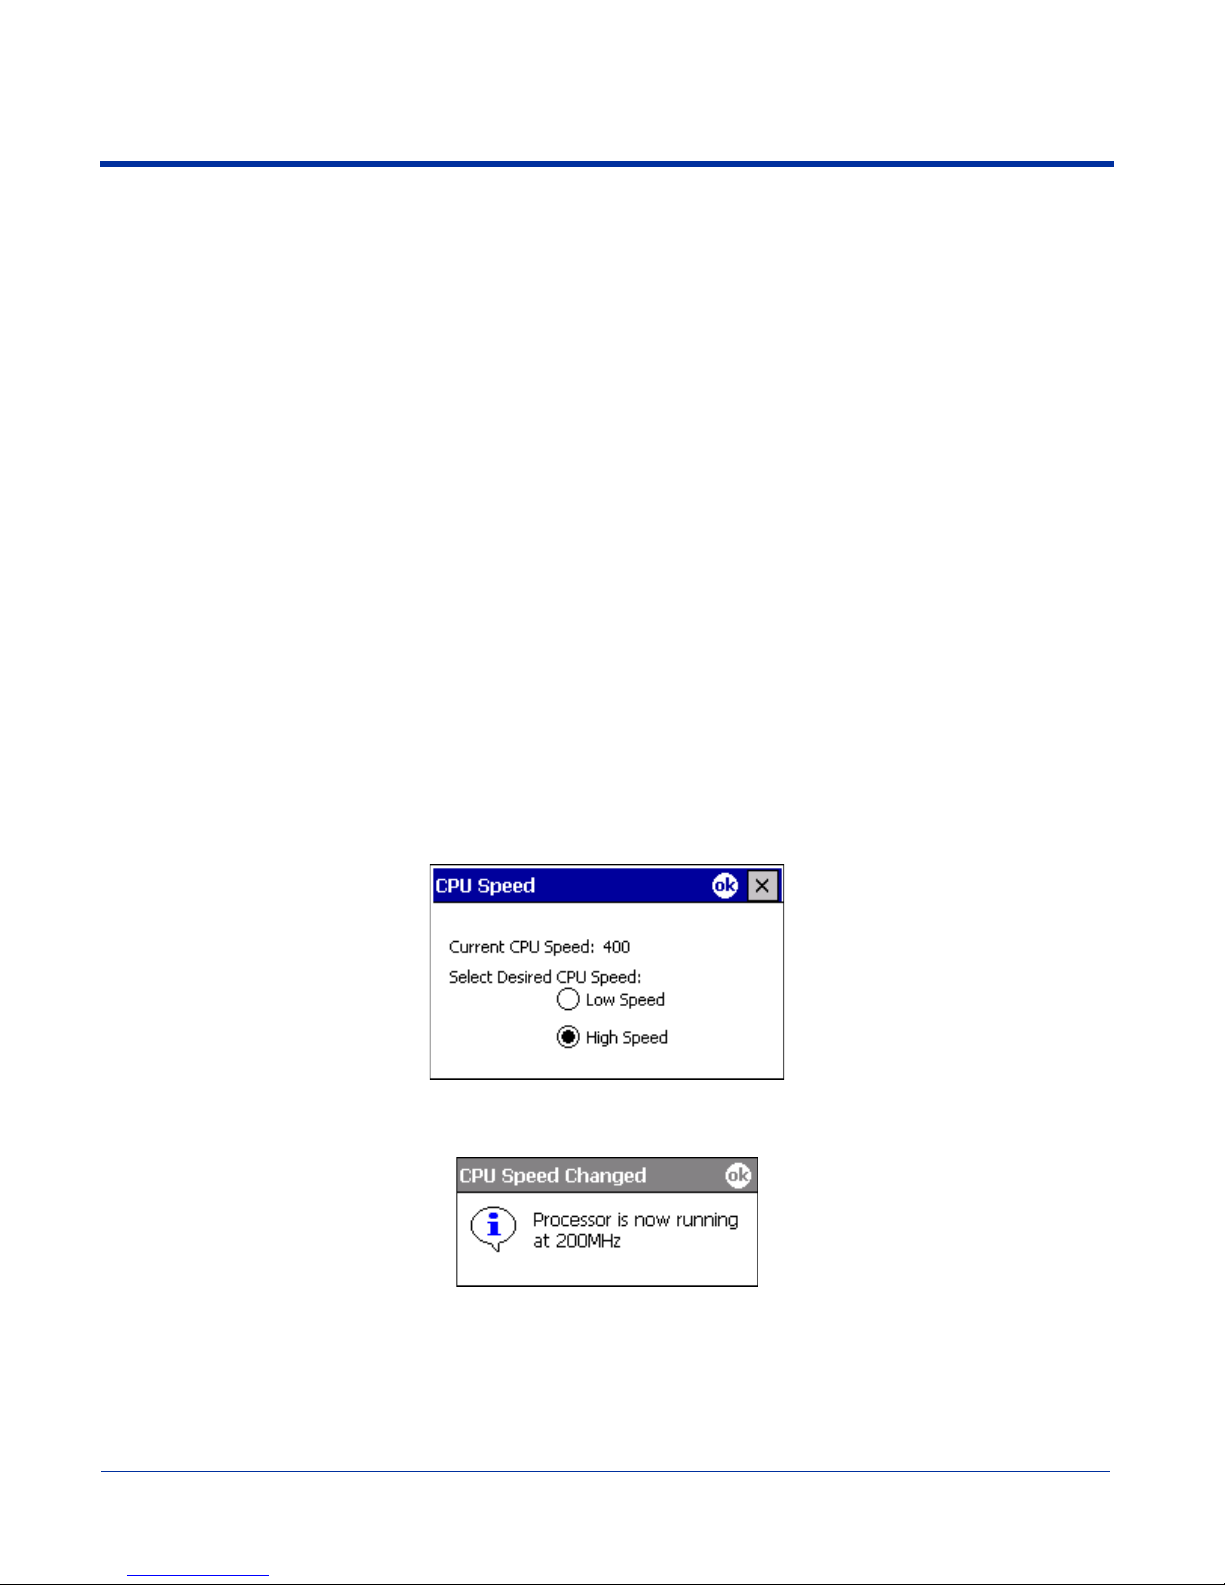
Device name: Displays the system’s default name. This is the name used by ActiveSync.
Description: Displays the description of the device ID.
Copyrights tab Displays important copyright information.
Backlight
The Backlight system setting enables you to customize backlight functionality for the display. For more information, see Adjusting
the Backlight on page 4-6.
Certificates
This system setting is designed to manage certificates for 802.11b networks. However, on Dolphin terminals, you manage
certificates through Meetinghouse;
see Installing Certificates with CertAdd on page 9-41.
ClearType Tuner
This system setting enables you to adjust the level ClearType font rendering by moving a slider. The sample text displays the
setting results immediately. Of course, you must first enable ClearType font rendering to change the appearance of fonts on the
screen;
see ClearType Tab on page 7-18.
Clock & Alarms
This setting sets the system clock. Appointments, scheduled events, and any function on a schedule runs off this setting. You
need to set the time zone and time after each hard reset;
see Setting the Time and Date on page 2-9.
CPU Speed
This system setting enables you to see and change the current speed of the Central Processing Unit (CPU).
The default is High Speed at 400MHz. Low Speed is 200MHz. To change the default, select Low Speed and tap OK. A message
appear confirming the changed and now current CPU speed.
Tap OK to save the change.
Dolphin® 7900 Mobile Computer User’s Guide - Prelim. Draft Rev (a) 7 - 7
Page 82
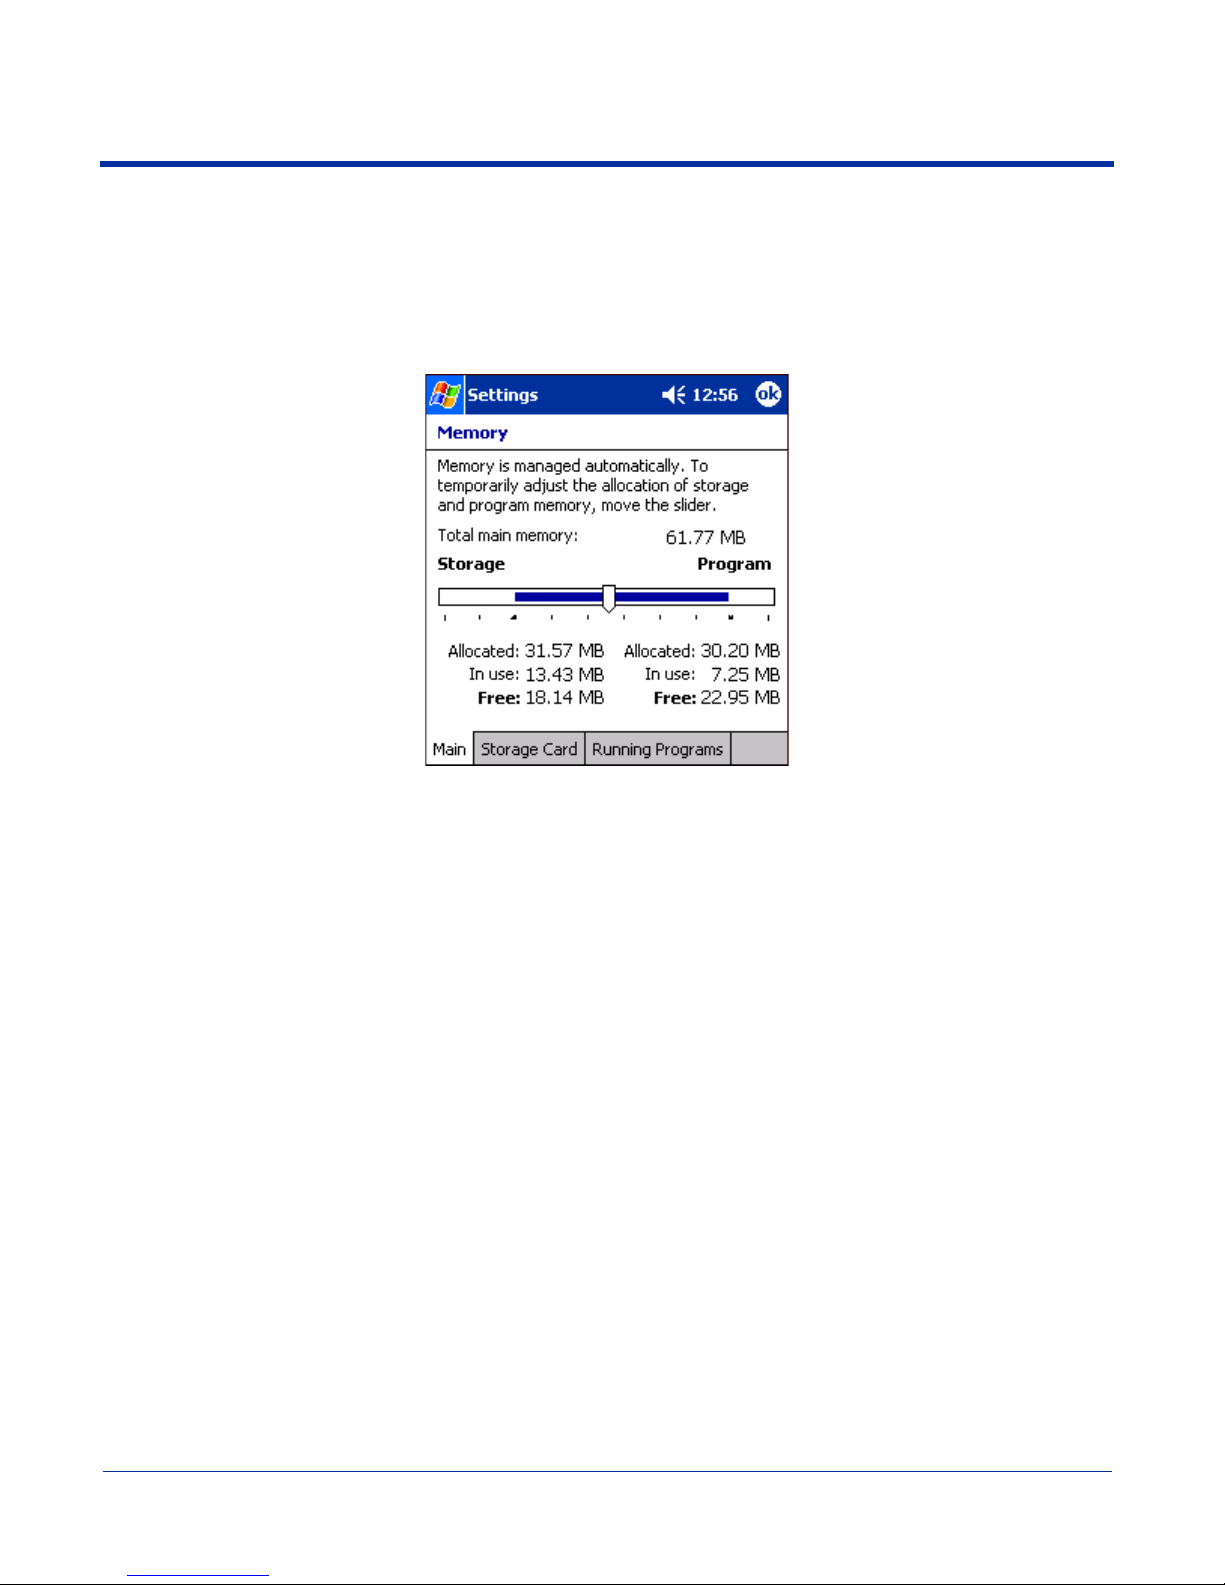
Memory
The Memory system setting enables you to review and manage both RAM (volatile) and IPSM/Storage Card (non-volatile)
memory. Access this system setting whenever you receive system messages about memory.
There are three tabs: Main, Storage Card, and Running Programs.
Main tab This tab displays current capacity and usage of the 64MB of on-board, volatile RAM memory. This is
Field Description
Total main memory The total memory capacity of current RAM memory.
Storage The part of RAM memory used for storing programs and program data.
Program The part of RAM memory used to run programs.
Fields Under Storage and Program
Allocated Displays the current MB of memory allocated for Storage and Program use.
In use Displays the total MB of that allocated memory being used in Storage and Program memory
Free Displays the total MB of memory available for Storage and Programs use.
the memory used for running and storing programs as well as storing program data.
functions.
To Increase/Decrease RAM Memory
To increase Program or Storage memory, tap, hold, and drag the slider towards the kind of memory you want to increase. The
three fields adjust automatically; Program memory decrease when you increase Storage memory and vice versa.
7 - 8 Dolphin® 7900 Mobile Computer User’s Guide - Prelim. Draft Rev (a)
Page 83
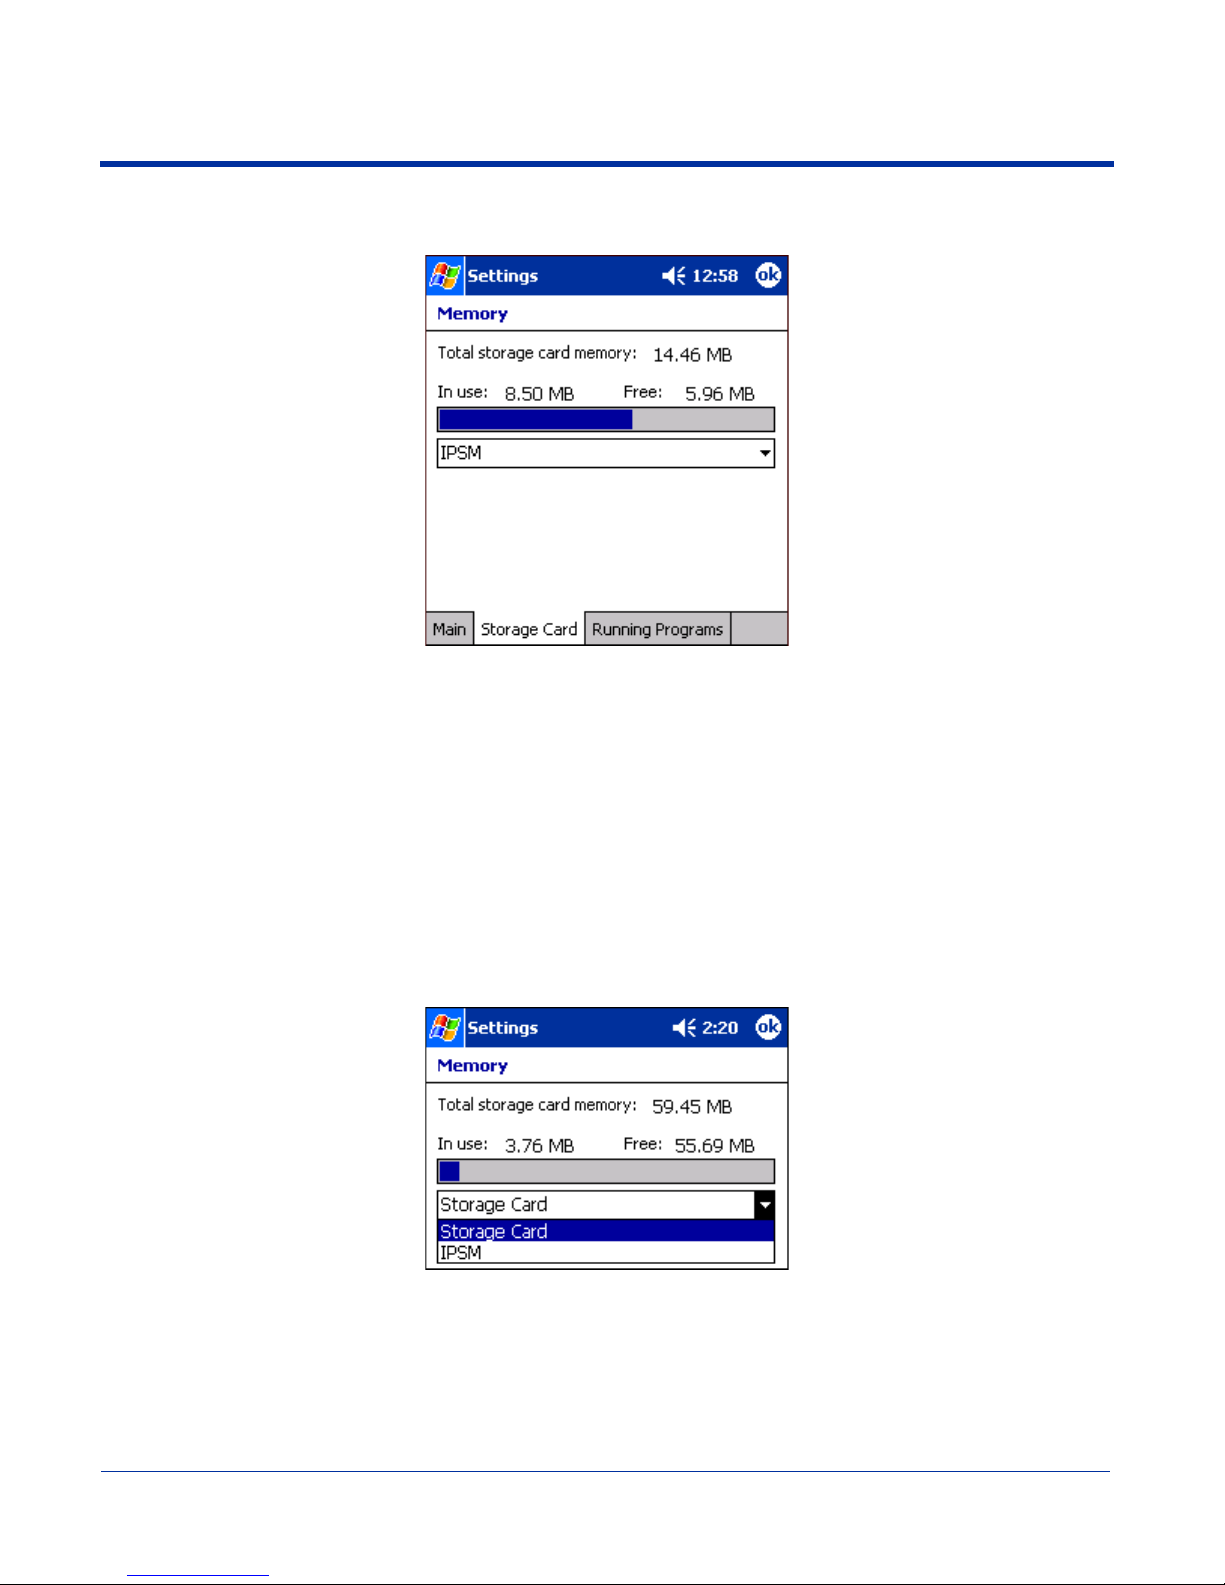
Storage Card tab This tab displays the current capacity and usage statistics of the selected memory type; IPSM or
Storage Card. Select the memory type from the drop-down list. IPSM is selected by default.
Total storage card
The total MB of memory capacity of the selected memory.
memory
In use The MB currently being used.
Free The MB that is still available for use.
IPSM Short for Intel Persistent Storage Manager, this is14MB of on-board Flash memory that is non-
volatile. Because this memory is non-volatile, data or programs stored in IPSM are not affected when
power is removed. Autoinstall programs, for example, are stored in IPSM so that they are always
installed at cold-boot startup.
When IPSM is selected in the drop-down list, the Storage Card tab displays the IPSM memory
capacity and usage statistics.
Storage Card You can install additional memory in Dolphin terminals - see Access Door on page 3-5. If a storage
card is installed in the terminal, a Storage Card entry appears in the drop-down list.
Select Storage Card and the Storage Card tab displays the current capacity and usage statistics of
the installed storage card.
Dolphin® 7900 Mobile Computer User’s Guide - Prelim. Draft Rev (a) 7 - 9
Page 84
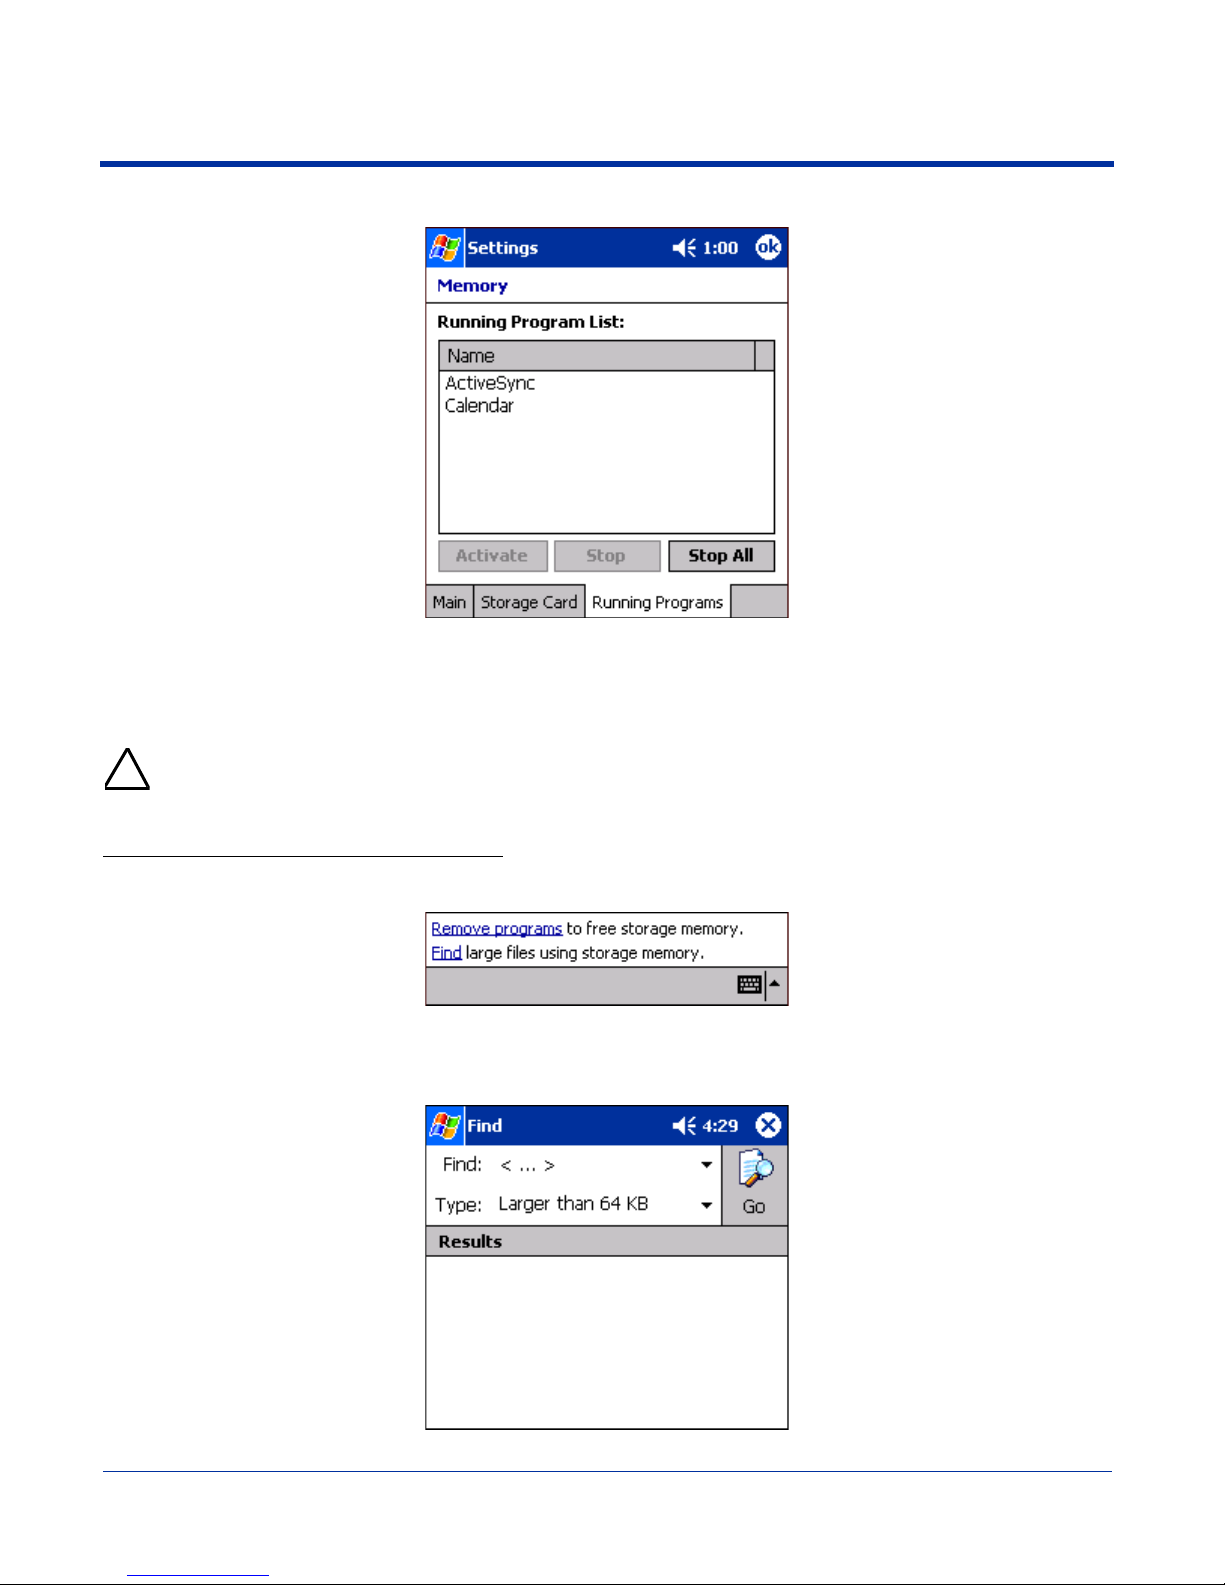
Running Programs tab Displays the software programs currently using Storage memory.
Check this tab when you are receiving out of memory errors or when the mobile computer is running slowly. You can
• Select a program in the list and tap Stop to stop it from running (and therefore from using memory), or
• Tap Stop All to automatically stop all running programs.
Anytime you stop a running program, it frees up RAM memory. Be advised that, when you stop a program here, any
unsaved data in that program is lost. To free up memory without risking data loss, return to the running program, save
!
your data, and close the application.
Links at the Bottom of the Memory Tabs
At the bottom of all three Memory tabs are two links:
Remove programs Opens the Remove Programs system setting. For details, see Remove Programs on page 7-15.
Find Enables you to search for large files using storage memory. It opens the Find screen with Larger than
64KB already selected in the Type field.
7 - 10 Dolphin® 7900 Mobile Computer User’s Guide - Prelim. Draft Rev (a)
Page 85
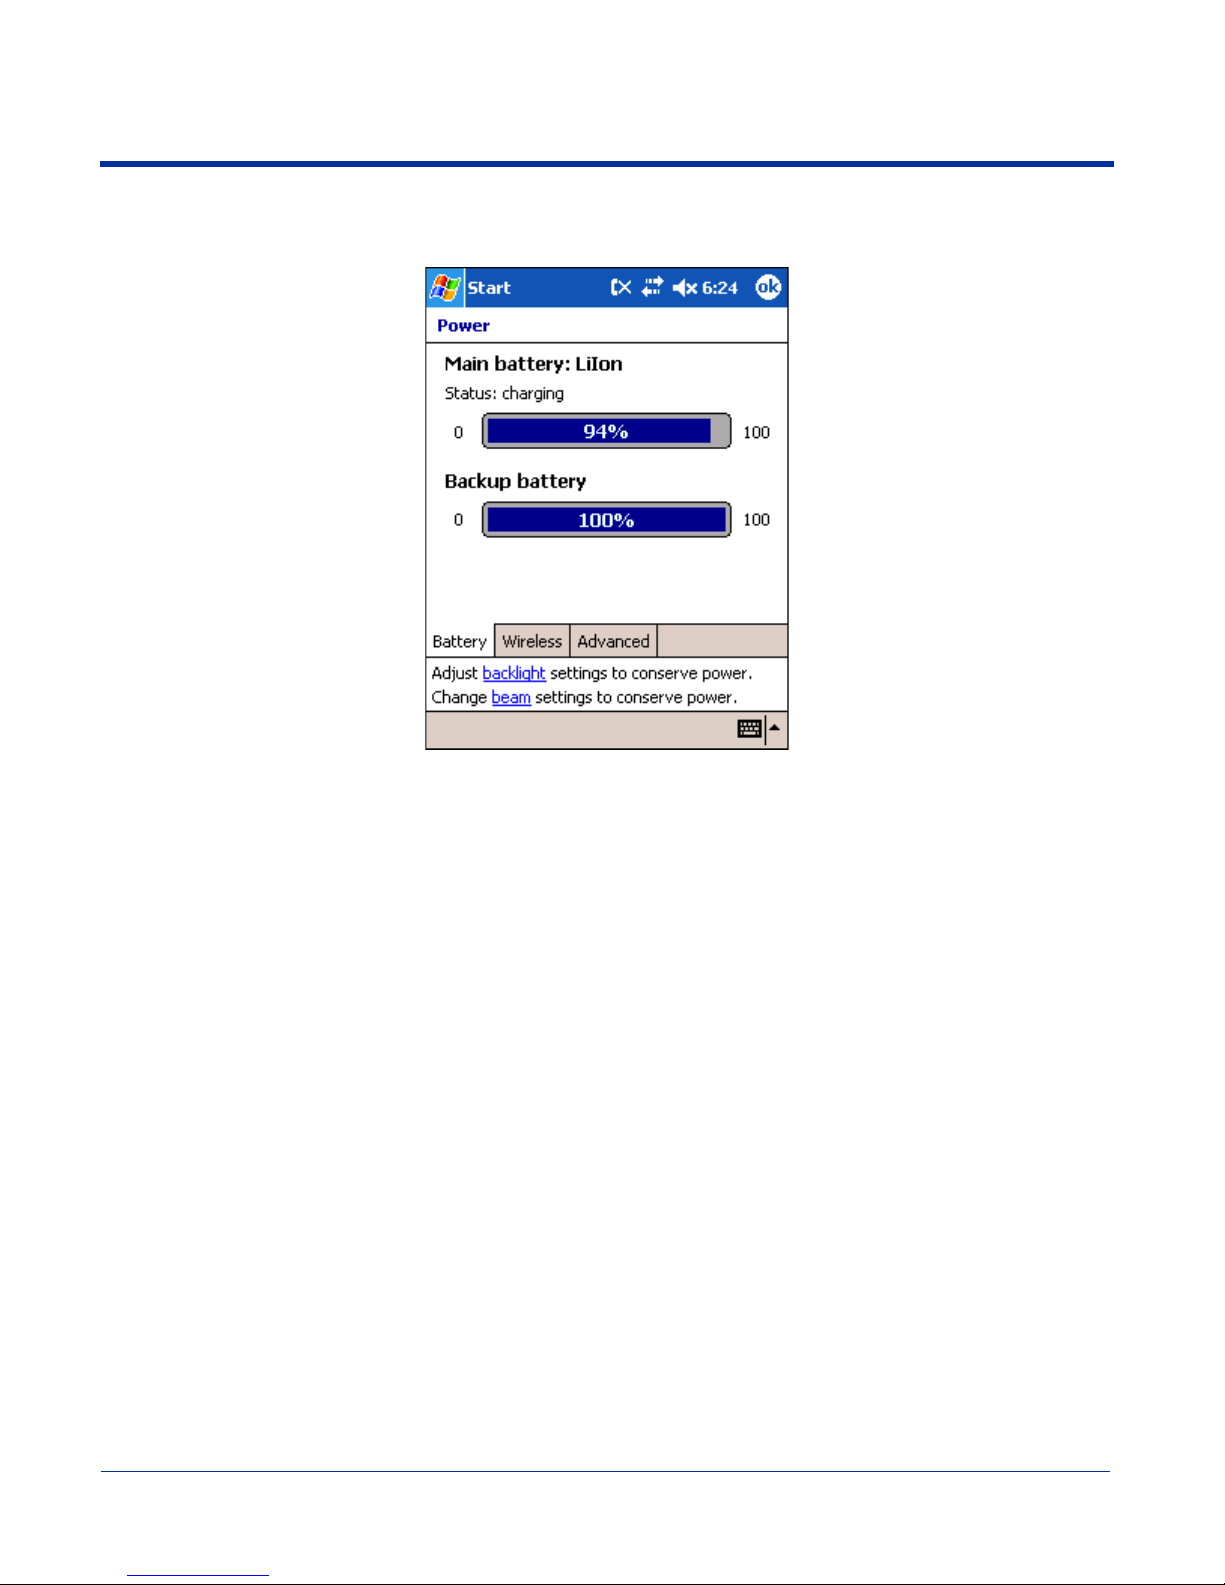
Power
Power system settings contains three tabs: Battery, Wireless, and Advanced.
Tab This tab enables you to …
Battery Tab
Check the remaining charge of both the main and backup batteries. For more
information about the terminal’s batteries,
see Battery Power on page 3-8.
Dolphin® 7900 Mobile Computer User’s Guide - Prelim. Draft Rev (a) 7 - 11
Page 86

Tab This tab enables you to …
Wireless Tab
Determine the power settings for your wireless connection.
Select Wireless signals off… when you don’t want to use system power to power up
the radio(s).
Select Wireless signals on when you want the radio to use system power to transmit.
This is the default settings. The list contains the radio firmware installed in the
terminal. The items in the list with a check in the checkbox are the items using system
power.
7 - 12 Dolphin® 7900 Mobile Computer User’s Guide - Prelim. Draft Rev (a)
Page 87
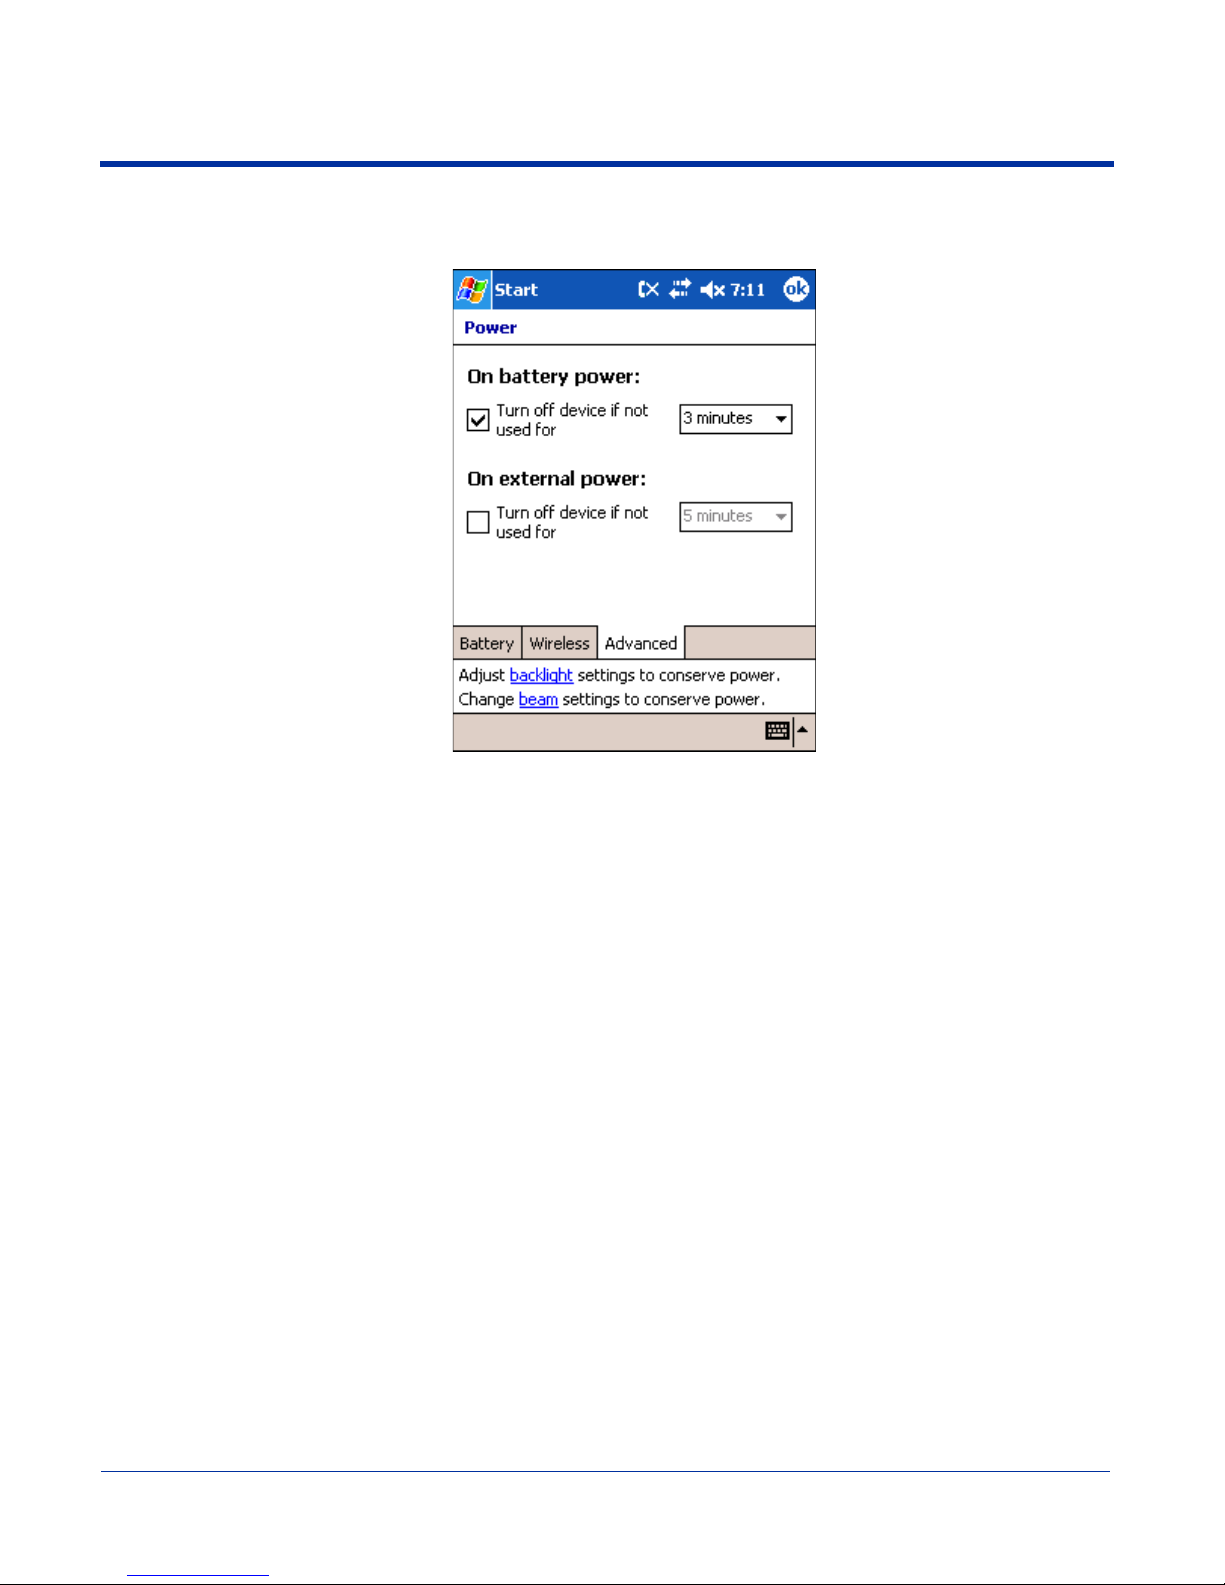
Tab This tab enables you to …
Advanced Tab
Determine power time-outs.
For On battery power, select from the drop-down list, the number of minutes of
inactivity you want to pass before the terminal powers off when running on battery
power.
For On external power, select from the drop-down list, the number of minutes of
inactivity you want to pass before the terminal powers off when running on external
power.
Options below the
tabs
Adjust backlight… opens the Backlight settings so that you can make adjustments
to conserve power usage;
Change beam… opens beam settings so that you can make adjustments to conserve
power usage;
see Using Infrared on page 8-6. (You would turn off receiving
capabilities to conserve power.)
see Backlight on page 7-7.
You can also set automatic turn-off times for the terminal to conserve power. When the device is “turned off,” that means that it
goes into suspend mode. For more information on suspend mode,
Dolphin® 7900 Mobile Computer User’s Guide - Prelim. Draft Rev (a) 7 - 13
see Suspend Mode on page 2-11.
Page 88
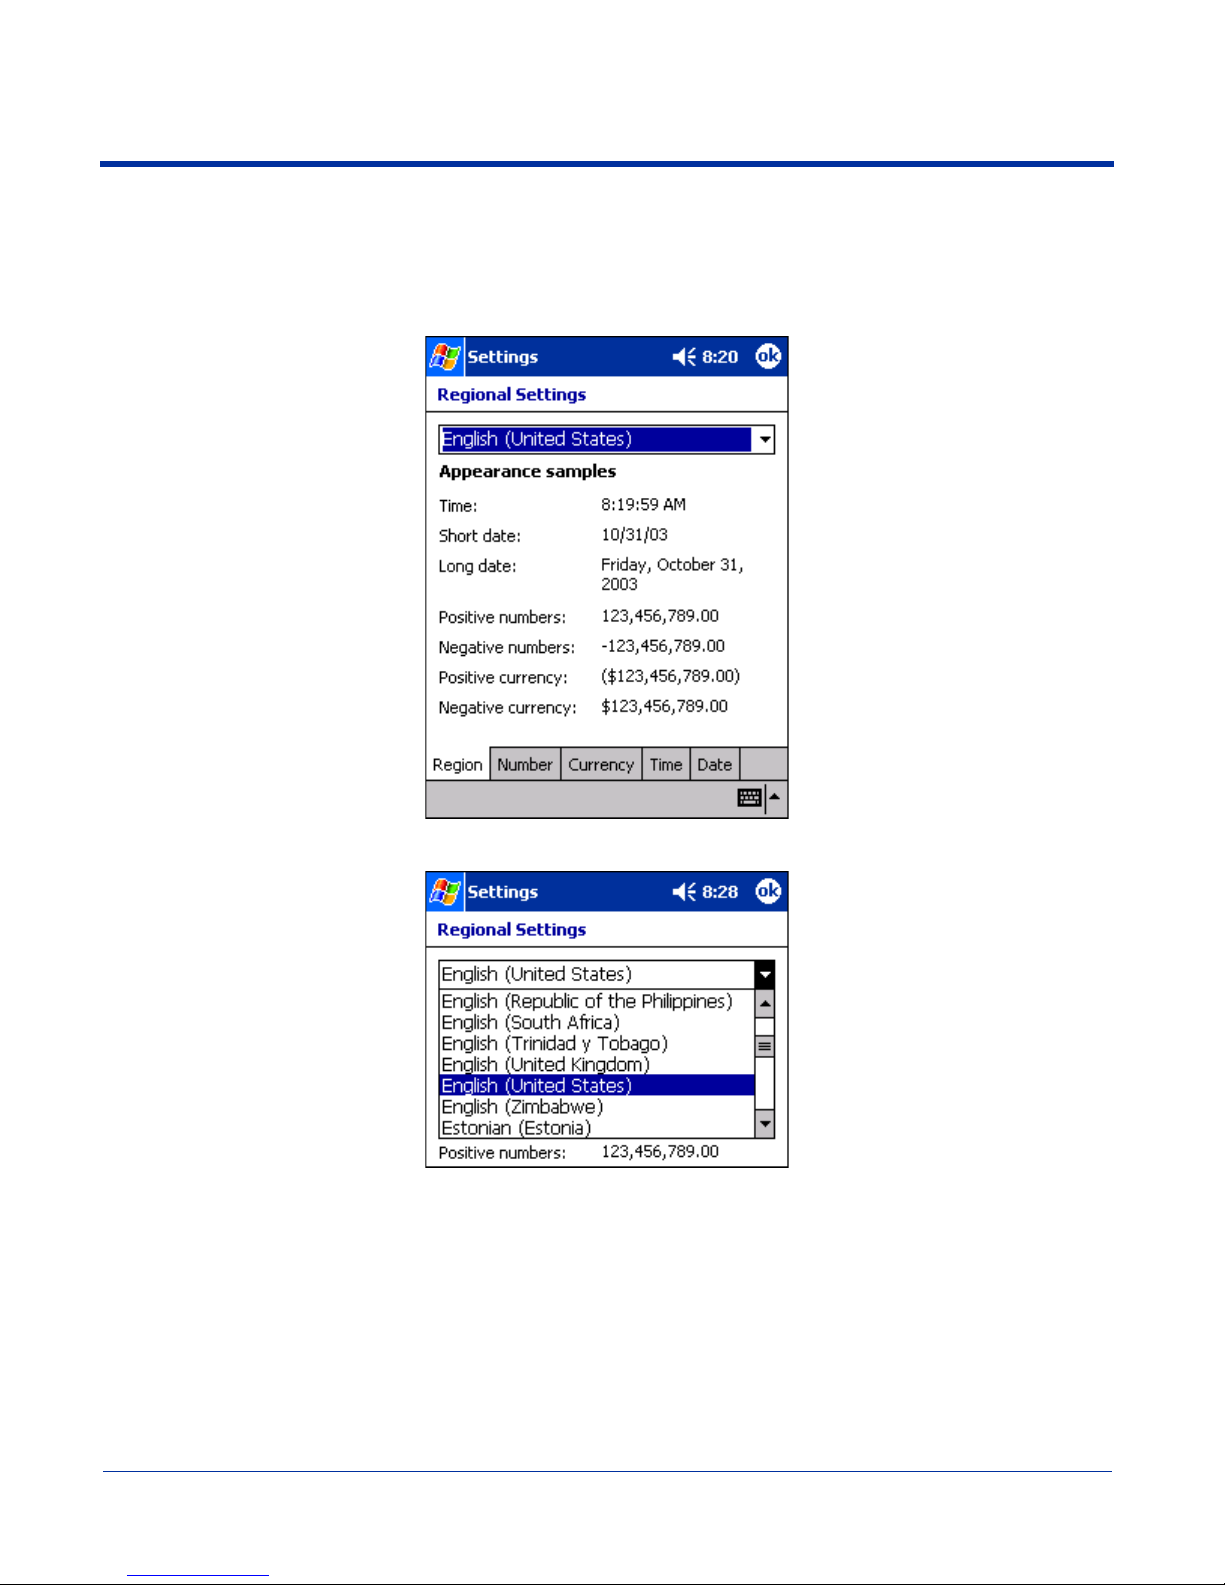
Regional Settings
Regional Settings enables you to customize the appearance and formatting to your geographic region. Specifically, you can
customize numbers (number of decimal places allowed, for example), currency (using the $ or € symbol, for example), time, and
date. These specifications apply to all screens, including the Today screen.
The Region tab displays an overview of the region selected in the drop-down list at the top.
The terminal is loaded with a number of pre-programmed regional settings. Select one from the list.
7 - 14 Dolphin® 7900 Mobile Computer User’s Guide - Prelim. Draft Rev (a)
Page 89
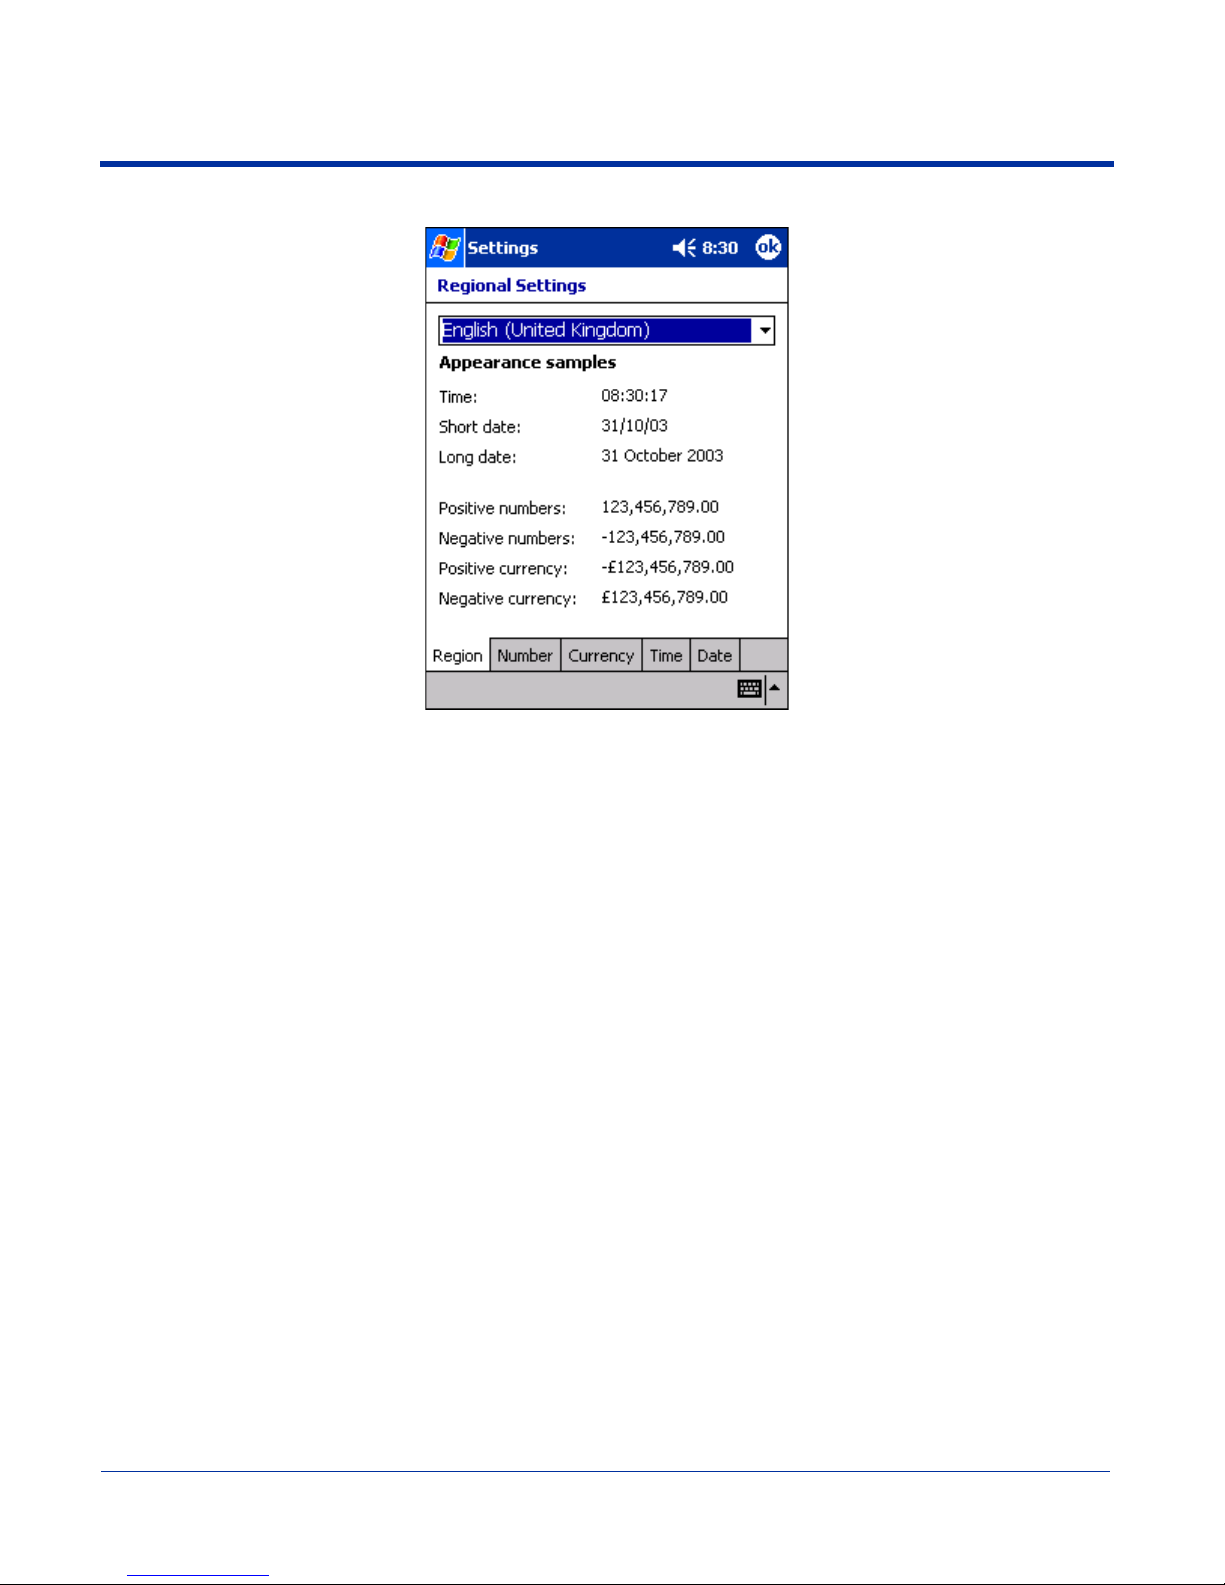
The results appear below.
To see specific settings or change a specific setting, tap on one of the tabs, make the change and tap OK to save it.
Remove Programs
The Remove Programs settings enables you to remove programs installed on the terminal. Use this setting to troubleshoot when
you receive messages that the device is out of memory. The programs removed are removed from RAM memory. Any program
(usually *.cab or *.dll files) stored in the Autoinstall folder (My Device > IPSM > Autoinstall) will re-install after the next hard reset.
For information about the Autoinstall process, see Autoinstall on page 2-9.
For information about the hard reset process, see Hard Reset (Cold Boot) on page 2-11.
Dolphin® 7900 Mobile Computer User’s Guide - Prelim. Draft Rev (a) 7 - 15
Page 90
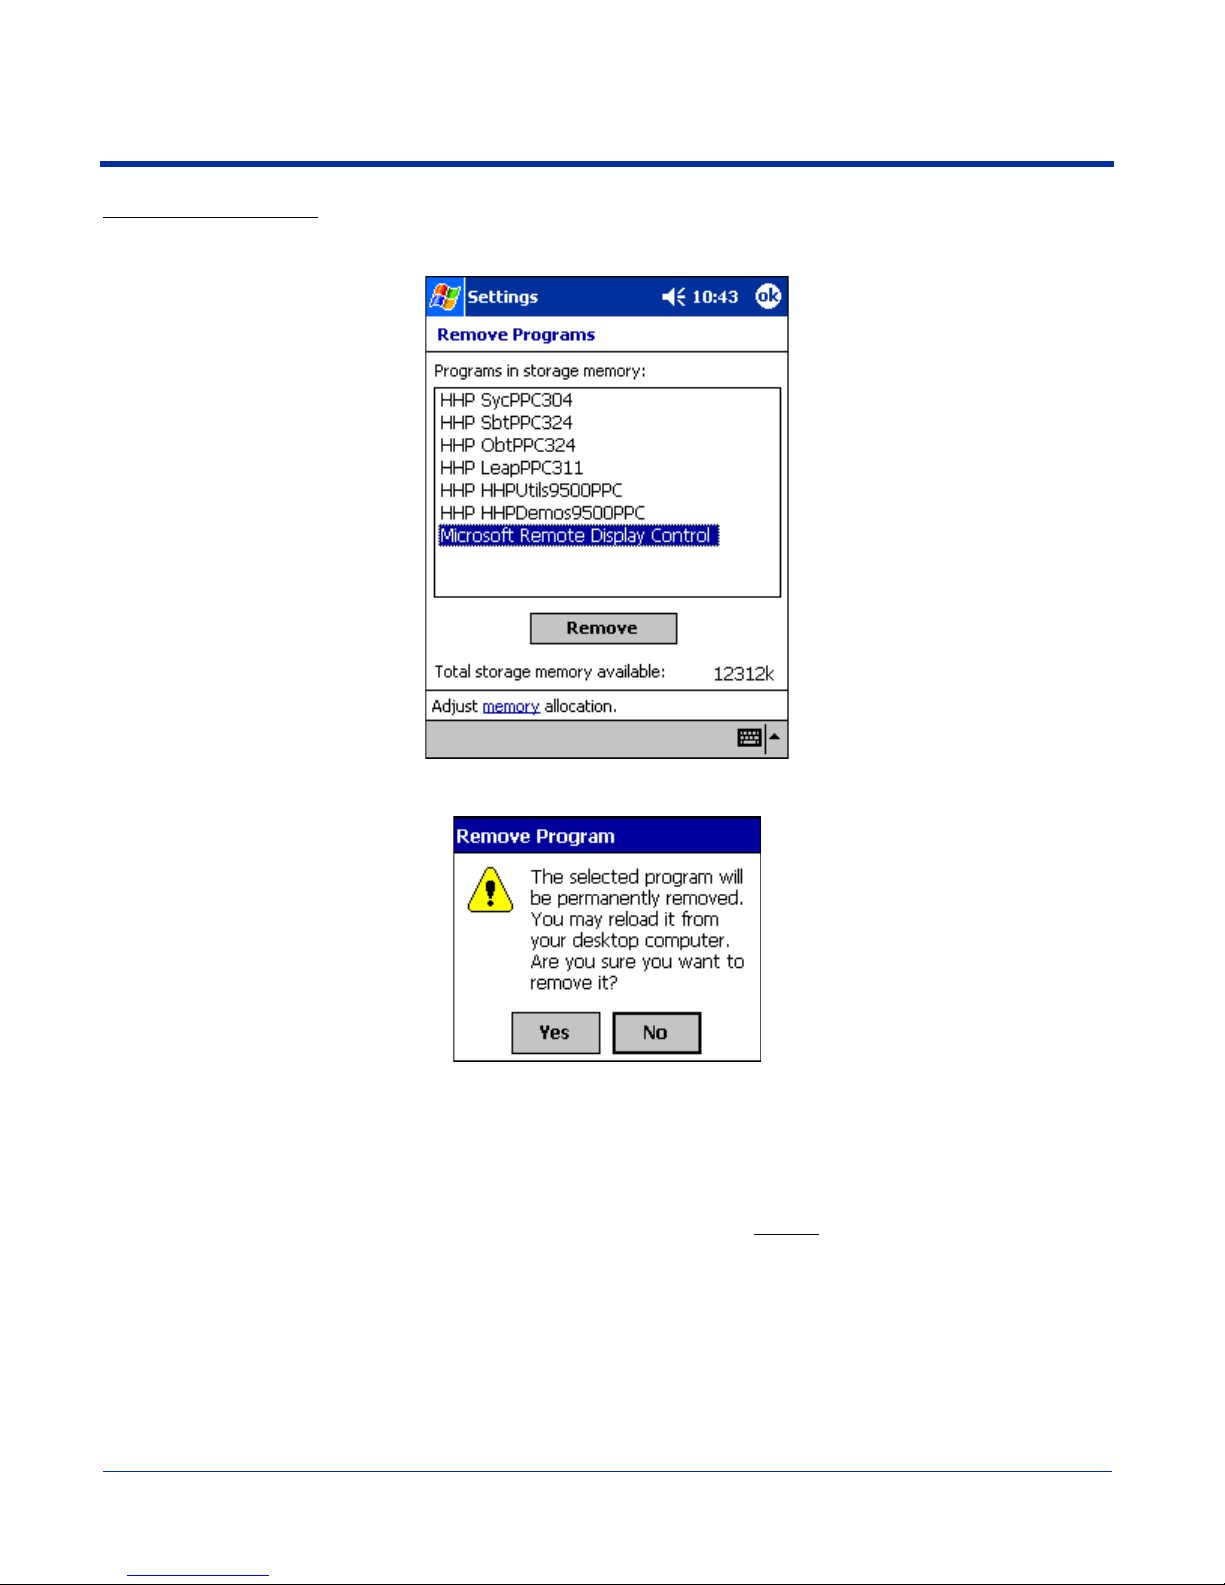
To Remove Programs
1. Tap Remove Programs. In the list, select the program you want to remove.
2. Tap Remove. The following message appears:
3. Tap Yes. Wait while the program is removed.
4. Verify that the program no longer appears in the list.
Memory
The Remove Programs screen displays the total storage memory available. It adjusts automatically when a program is removed
for quick reference. For more detailed memory information, tap memory of “Adjust
It opens the Memory system setting. For information about memory settings,
memory allocation” along the bottom margin.
see Memory on page 7-8.
7 - 16 Dolphin® 7900 Mobile Computer User’s Guide - Prelim. Draft Rev (a)
Page 91
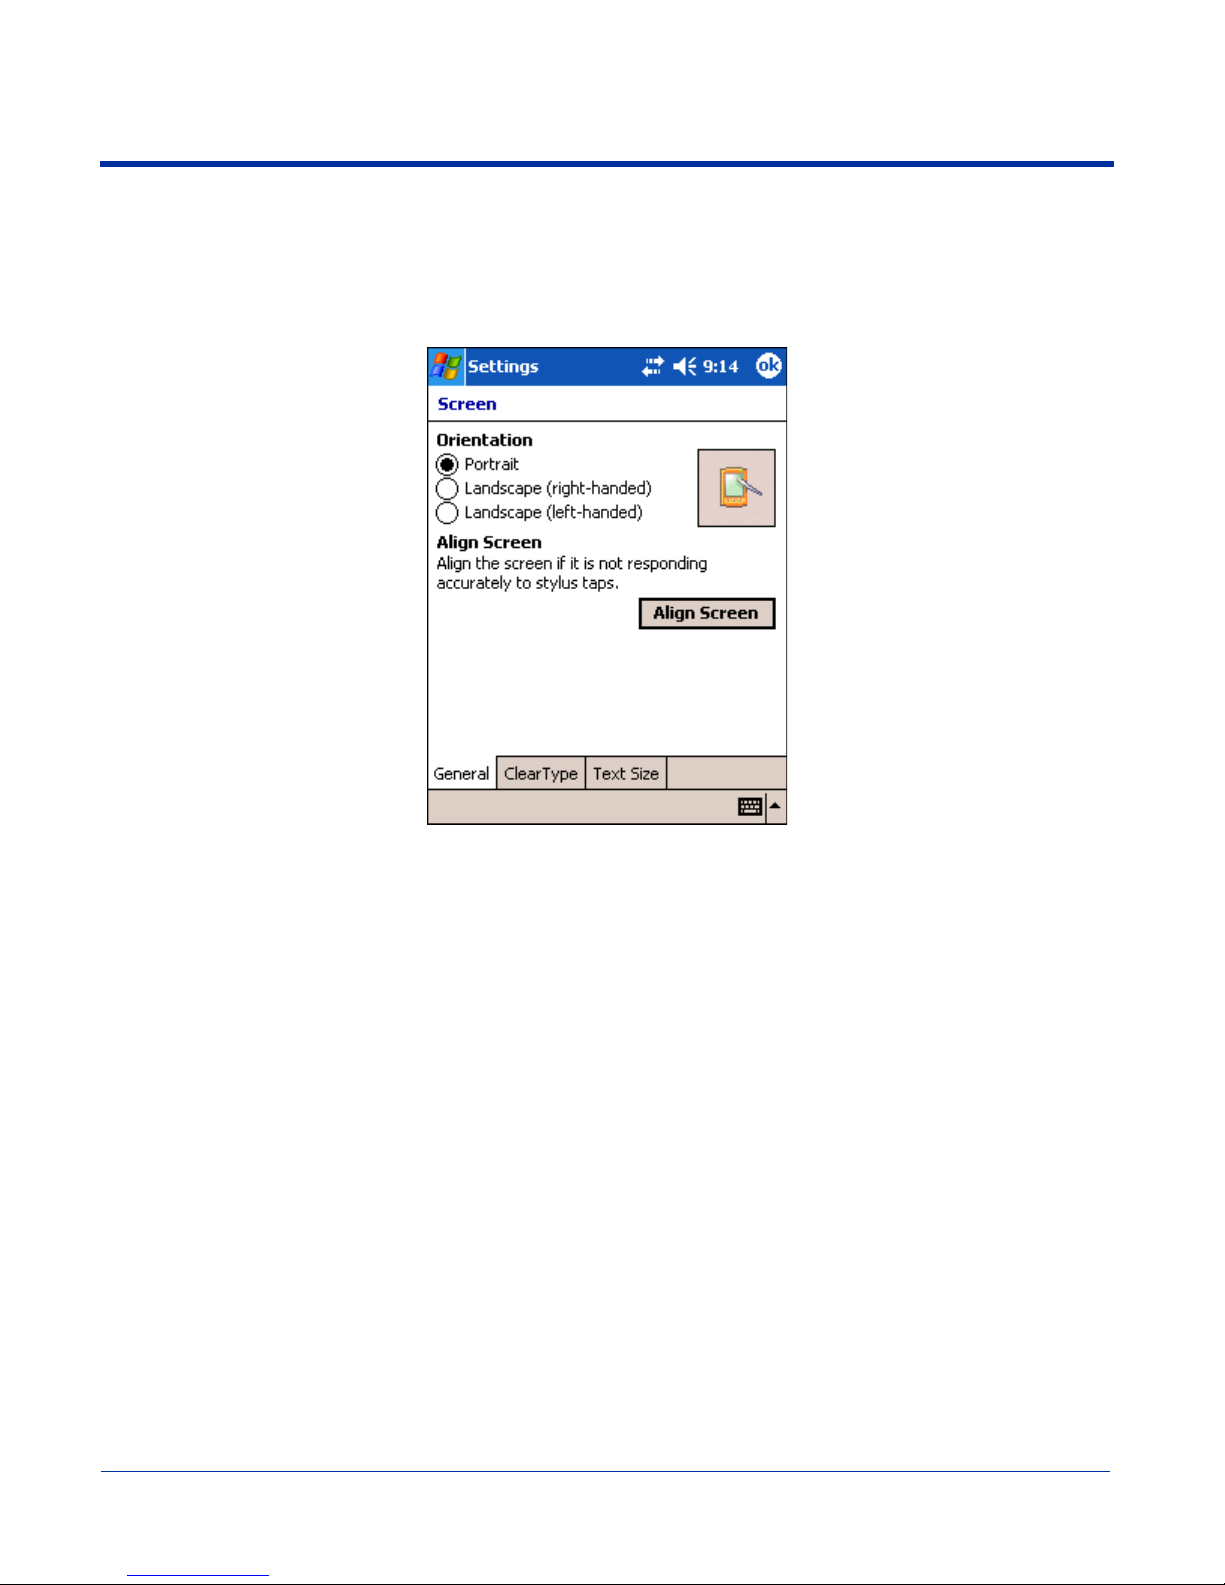
Screen
The Screen system setting contains three tabs: General, Clear Type, and Text Size.
General tab
The Screen system setting opens to the General tab. On this tab, you can changes the screen orientation and align the screen.
The default screen orientation is Portrait. You can change the orientation to Landscape (right-handed) or Landscape (left-
handed) depending on which hand you tend to hold the terminal.
Portrait Orientation Landscape Orientation - NEED GRAPHIC
Dolphin® 7900 Mobile Computer User’s Guide - Prelim. Draft Rev (a) 7 - 17
Page 92
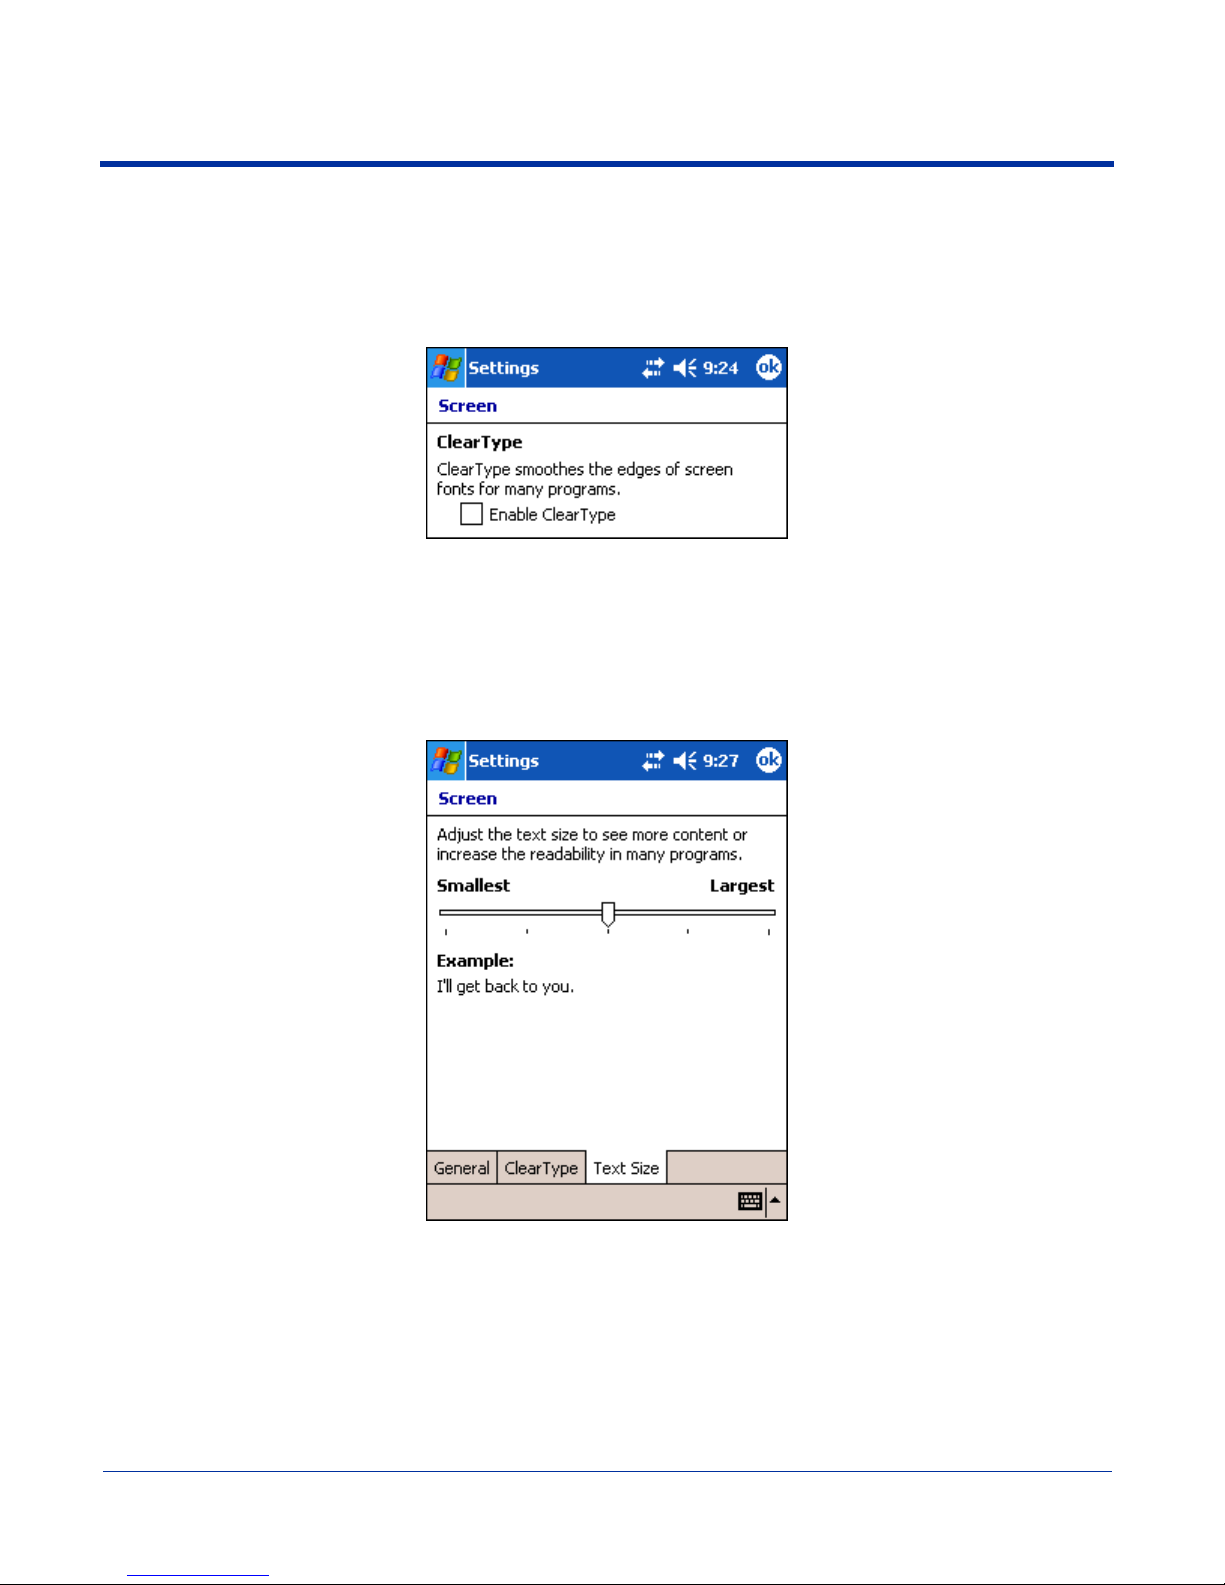
To align the screen, tap Align Screen, and follow the instructions. See Align the Screen on page 2-7.
You would need to re-align the screen if tapping buttons or icons with the stylus no longer seems to work appropriately.
ClearType Tab
The Dolphin 7900 displays support ClearType font rendering. ClearType is a Microsoft technology that dramatically increases
the readability of text on LCD displays. To enable ClearType font rendering, select Enable ClearType and tap OK.
To adjust the level of ClearType font rendering, use the ClearType Tuner; see ClearType Tuner on page 7-7.
For more information about ClearType font rendering, visit: www.microsoft.com/typography/cleartype/
what.htm?fname=%20&fsize=
Text Size Tab
The Text Size tab enables you to perform font scaling within certain views of the Today screen, Contacts, Calendar, Messaging,
and Tasks. This means that you can increase or decrease the point size of the font on application windows.
This is the default font size setting.
To change the font size, move the slider toward Smallest or Largest. The Example text changes to reflect the font change. Tap
OK to save the new font size setting.
7 - 18 Dolphin® 7900 Mobile Computer User’s Guide - Prelim. Draft Rev (a)
Page 93

Default Font Size Largest Font Size
uPhone Settings
If you have a GSM/GPRS radio installed on your terminal the uPhone Settings icon appears on the System tab. For details, see
uPhone Configuration on page 11-20.
Dolphin® 7900 Mobile Computer User’s Guide - Prelim. Draft Rev (a) 7 - 19
Page 94

Connections Tab
The Connections tab enables you to manage your network connections.
Icon Tapping this icon…
Beam Enables you to verify and adjust the infrared settings of the IrDA port; see Using Infrared on page 8-6.
Connections Enables you to configure network connections.
Radio Manager Enables you to power up and power down the radios installed on the terminal;
Network Cards Enables you to access the Wireless and Network Adapters tabs; see Network Cards on page 7-35
Other Icons on the Connections Tab
Other icons appear on this window if your terminal is configured with specific network software, protocols, and/or radios.
HHP WLAN Settings This icon appears only if an 802.11b radio is installed on the terminal.
IrDA This icon appears only if a Bluetooth radio is installed on the terminal.
uPhone GPRS This icon appears only if a GSM/GPRS radio is installed on the terminal.
This is the connections manager; see Connections Tab on page 7-20.
see The Radio Manager on page 4-8.
Tapping this icon enables you to configure your 802.11b radio; see Wireless LAN Communications
with 802.11b on page 9-1.
Tapping this icon enables you to disable or enable the IrDA port; see Verify That the IrDA Port is
Enabled on page 8-6.
Tapping this icon opens GPRS settings; see GPRS Settings on page 11-26.
7 - 20 Dolphin® 7900 Mobile Computer User’s Guide - Prelim. Draft Rev (a)
Page 95

Server-Assigned IP Addresses
Please note that all server-assigned IP addresses use Dynamic Host Configuration Protocol (DHCP).
Zero-Config Wi-Fi
Please note that the zero-config Wi-Fi feature of Windows Mobile is disabled on Dolphin 7900 series mobile computers.
Com Port Assignment Table
The Dolphin 7900 terminal ships with the Com ports assigned as follows:
Com Port Assignment
Com Port 1
Com Port 2
Com Port 3 Raw Infrared
Com Port 4 Unassigned
Com Port 5 USB virtual serial port
Com Port 6
Com Ports 7, 8, 9
Serial port; this is the 17-pin connector on the bottom panel.
See Mechanical Connector on page 3-7.
Bluetooth Module
If there is no Bluetooth hardware installed on the terminal, this com port is unassigned.
IrDA, if IrDA is enabled. If IrDA is disabled, this com port becomes available.
See Verify That the IrDA Port is Enabled on page 8-6.
Unassigned; these are virtual com ports that are available for selection only when
connecting to devices that use virtual com ports, such as Bluetooth.
Dolphin® 7900 Mobile Computer User’s Guide - Prelim. Draft Rev (a) 7 - 21
Page 96
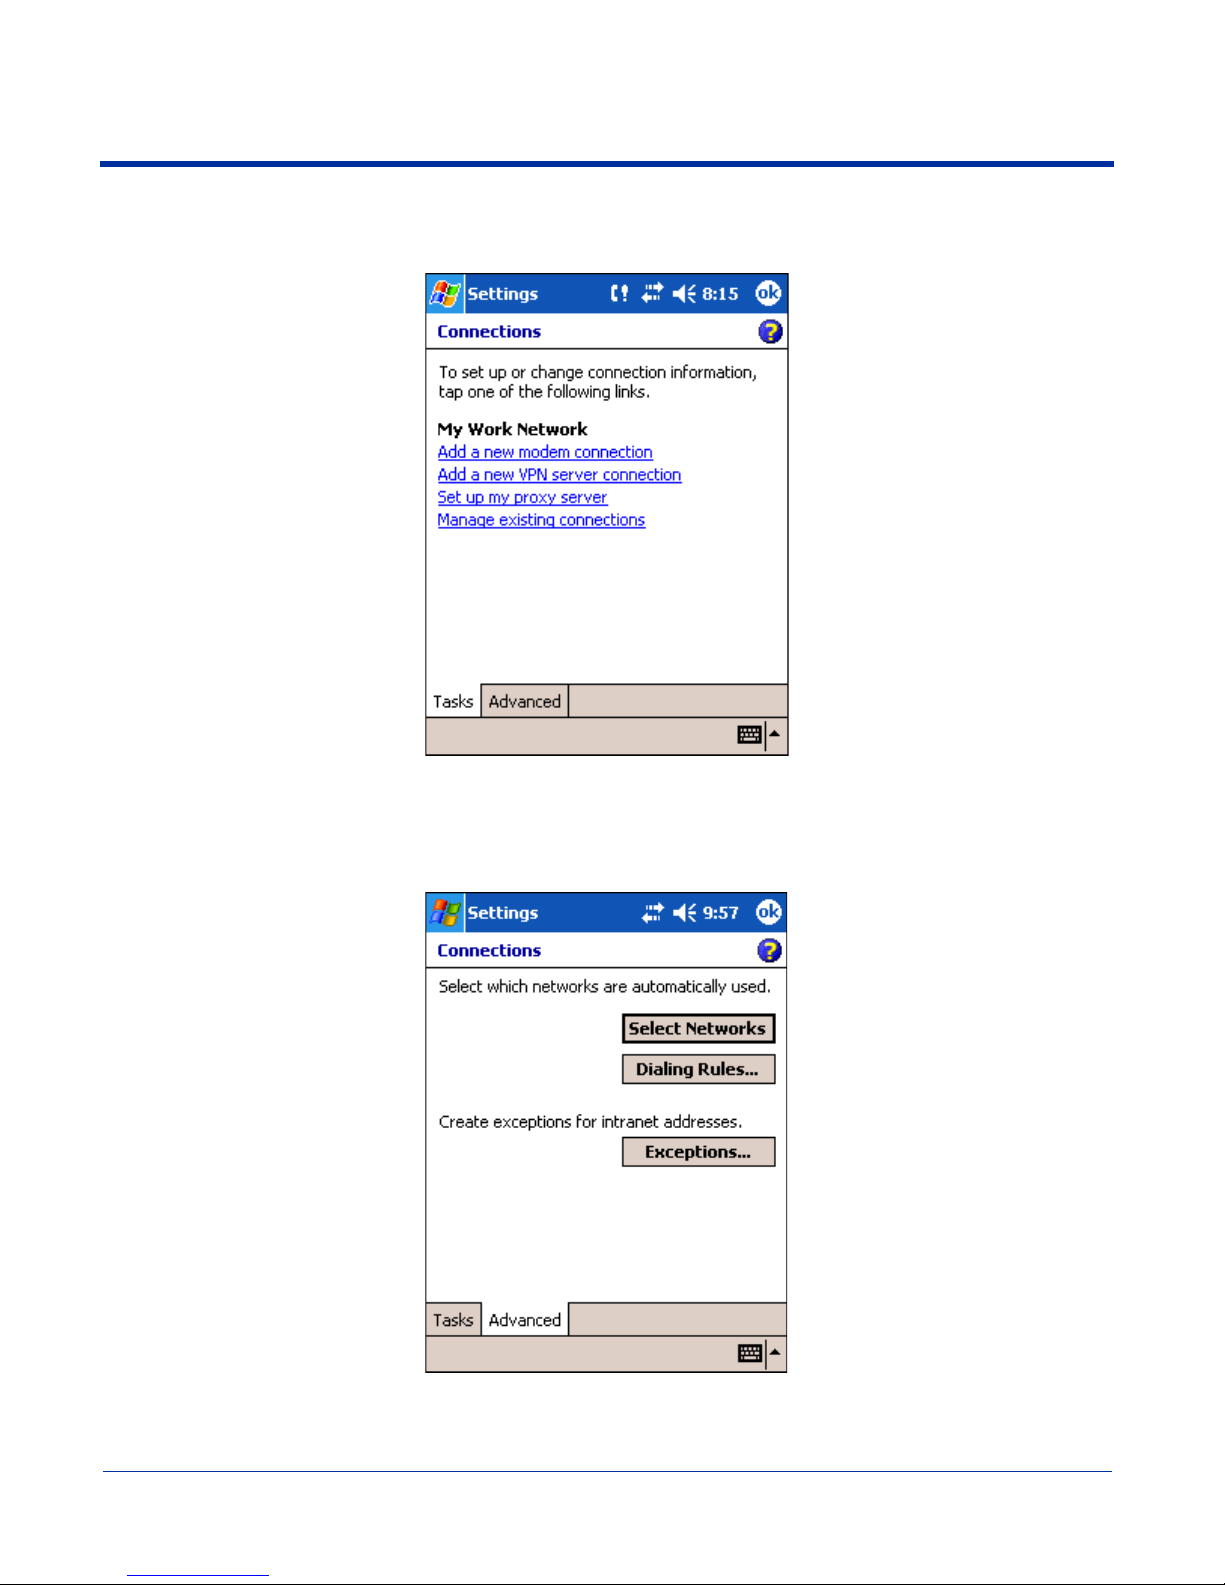
Opening the Connections Manager
To open the connections manager, tap Connections. The connection manager opens displaying the Tasks tab.
The connections manager consists of two tabs: Tasks and Advanced
Task tab The Task tab enables you to configure and manage your My Work Network settings. Click on the link
Advanced tab The Advanced tab enables you to configure and manage network parameters as well as your network
to setup or manage existing network accounts.
cards.
7 - 22 Dolphin® 7900 Mobile Computer User’s Guide - Prelim. Draft Rev (a)
Page 97
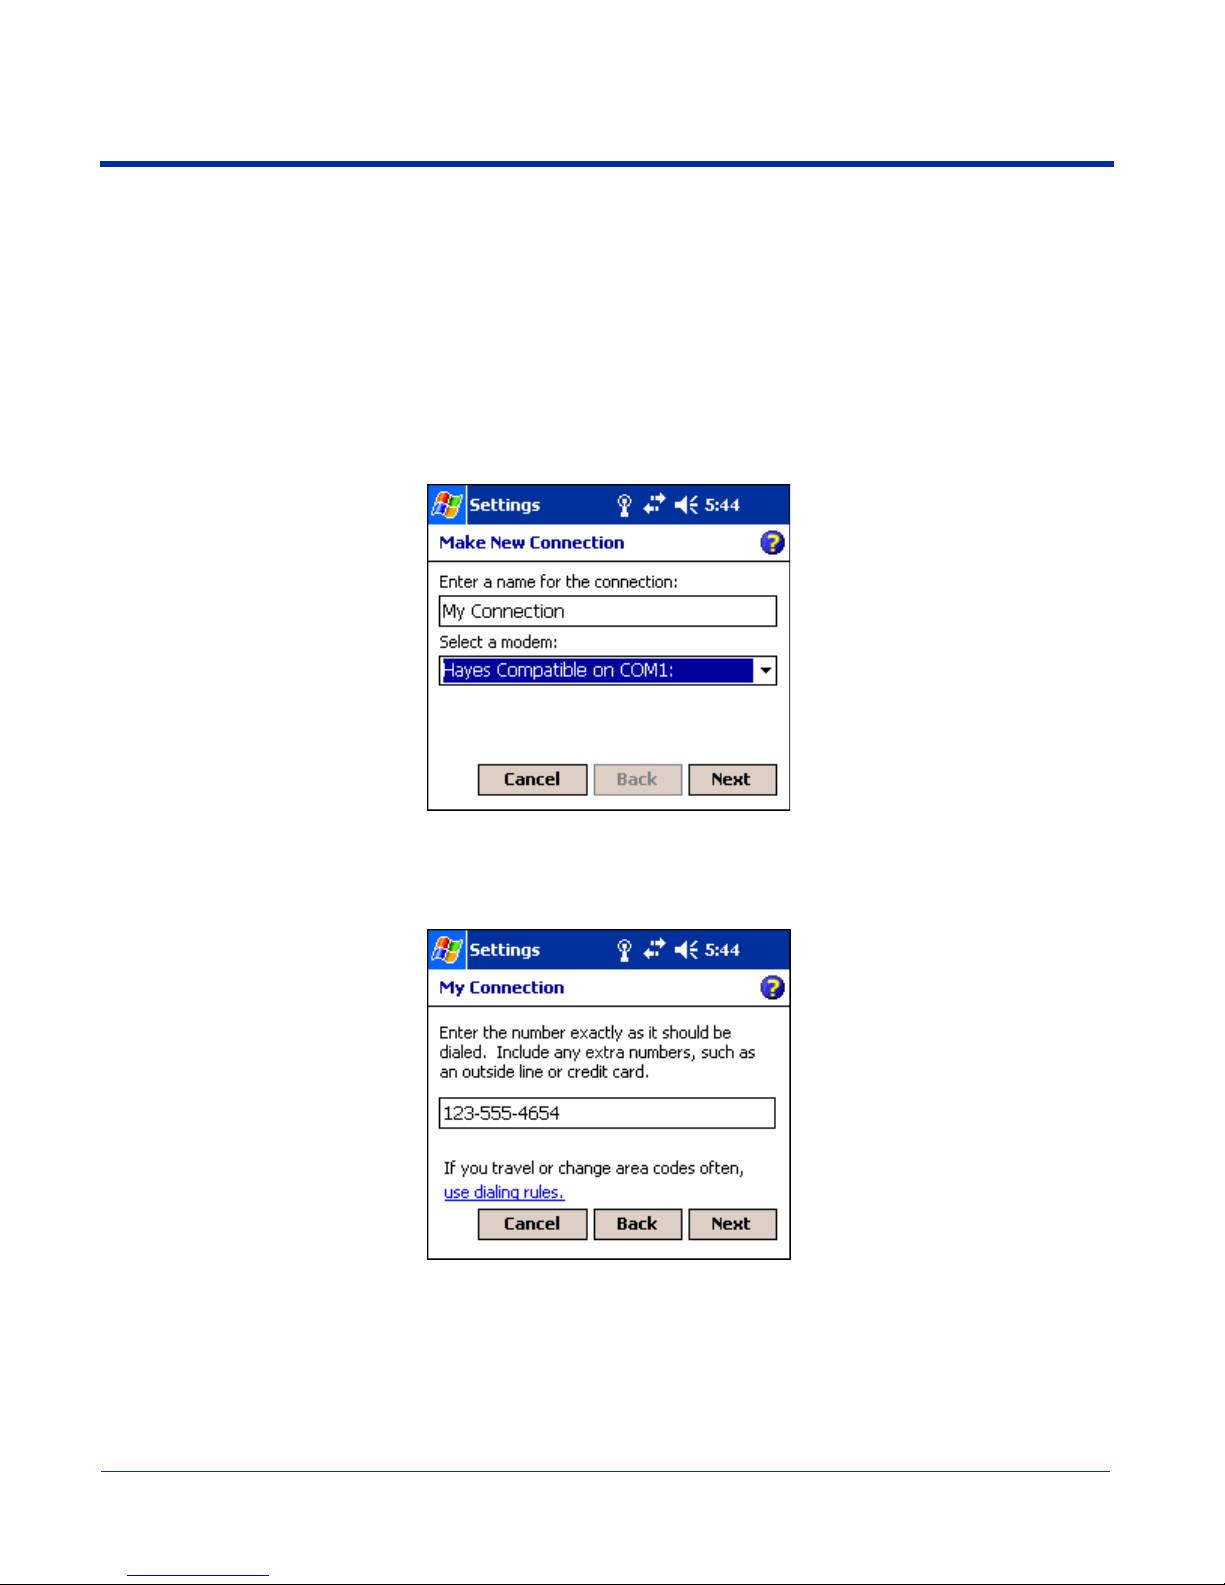
Creating an External Modem Connection to an ISP
1. Obtain the following information from your ISP:
• ISP dial-up access telephone number,
• user name,
• password, and
• TCP/IP settings.
2. Use a NULL modem cable to connect to an external modem.
3. Tap Start > Settings > Connections tab > Connections > Task tab.
4. Tap Add a new modem connection . The Make New Connection screen appears.
5. Enter a name for the connection, such as "My Connection."
6. In the Select a modem list, select the external modem by selecting Hayes Compatible on COM1.
7. Tap Next. The My Connection screen appears.
Dolphin® 7900 Mobile Computer User’s Guide - Prelim. Draft Rev (a) 7 - 23
Page 98
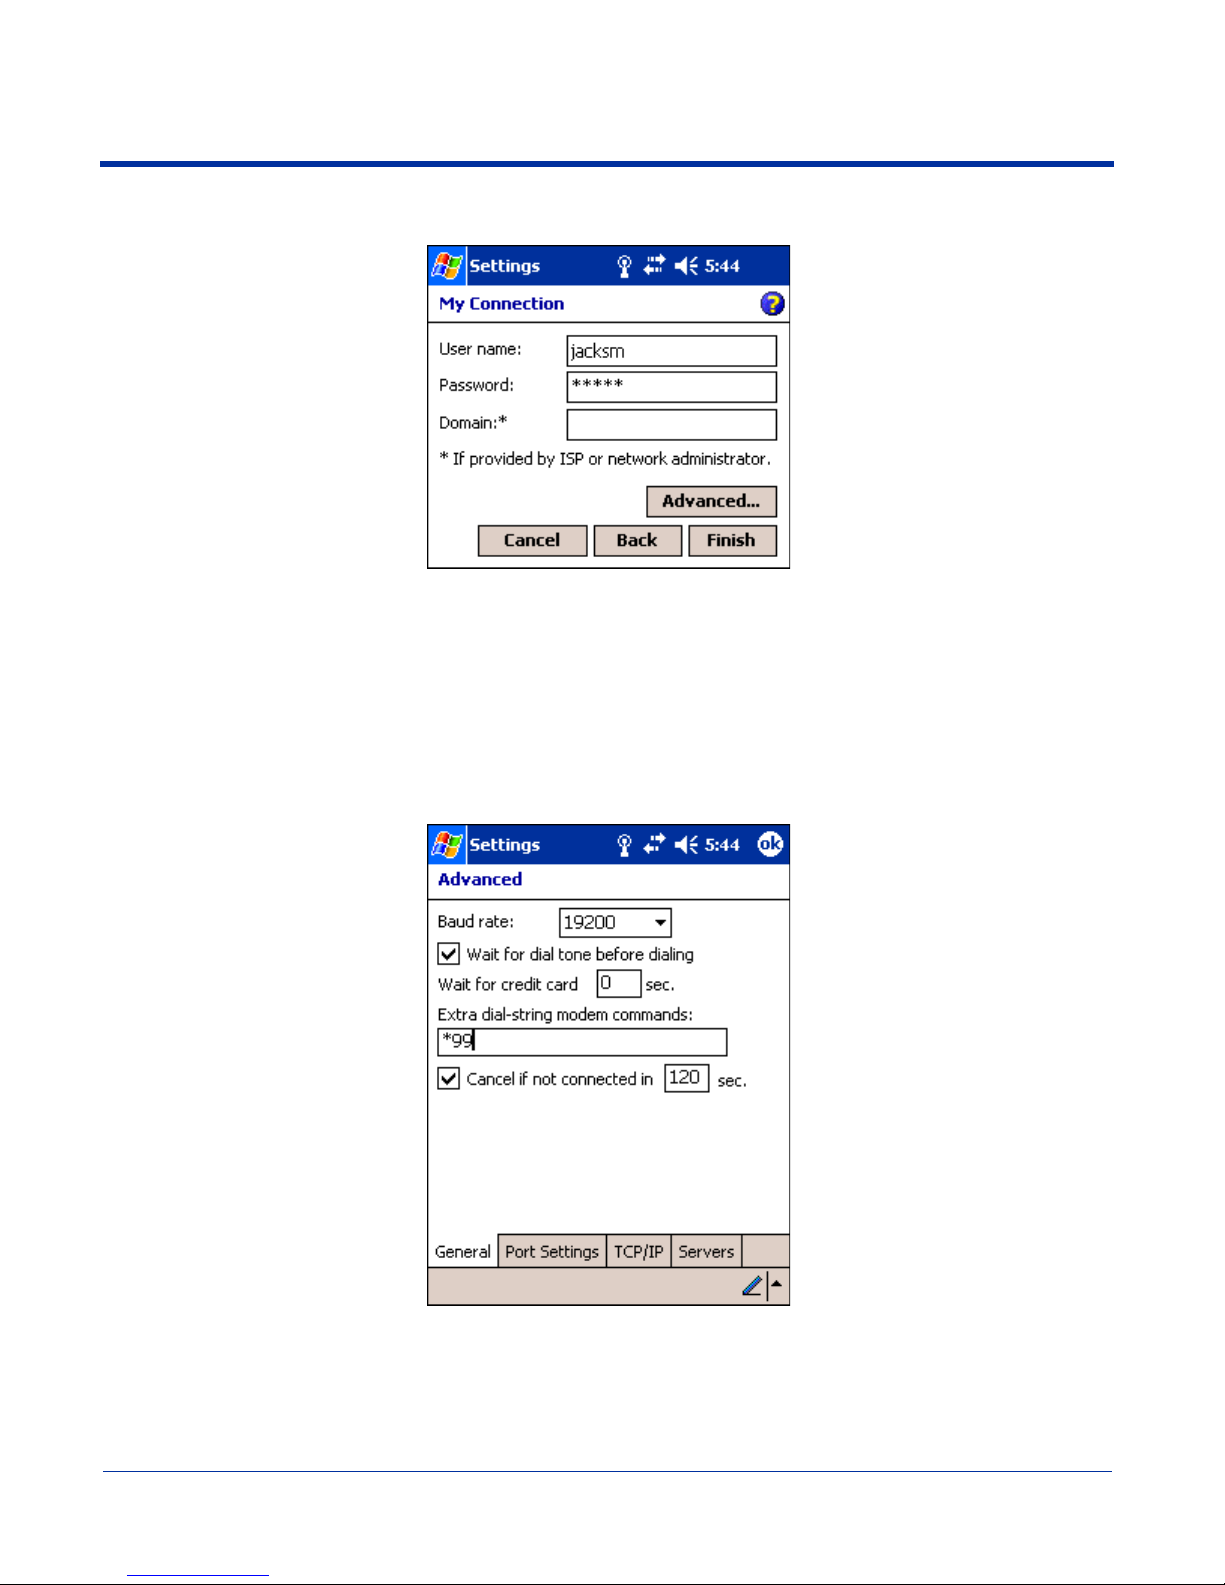
8. Enter the number that should be dialed when connecting to your ISP. Include any special digits such as "*" or "#" (see
Establishing Dialing Rules on page 7-33). Tap Next.
9. Now enter any authentication information your ISP requests.
10.You should not need to change any settings in Advanced because most ISPs now use a dynamically-assigned addresses.
See Advanced Settings on page 7-24.
11.Tap Finish to complete this wizard.
Advanced Settings
General Tab Use the General tab to change the connection speed of your connection. Wait for dial tone before
dialing, then wait for credit card, add dial-string modem commands, or cancel call after a set number
of seconds.
7 - 24 Dolphin® 7900 Mobile Computer User’s Guide - Prelim. Draft Rev (a)
Page 99
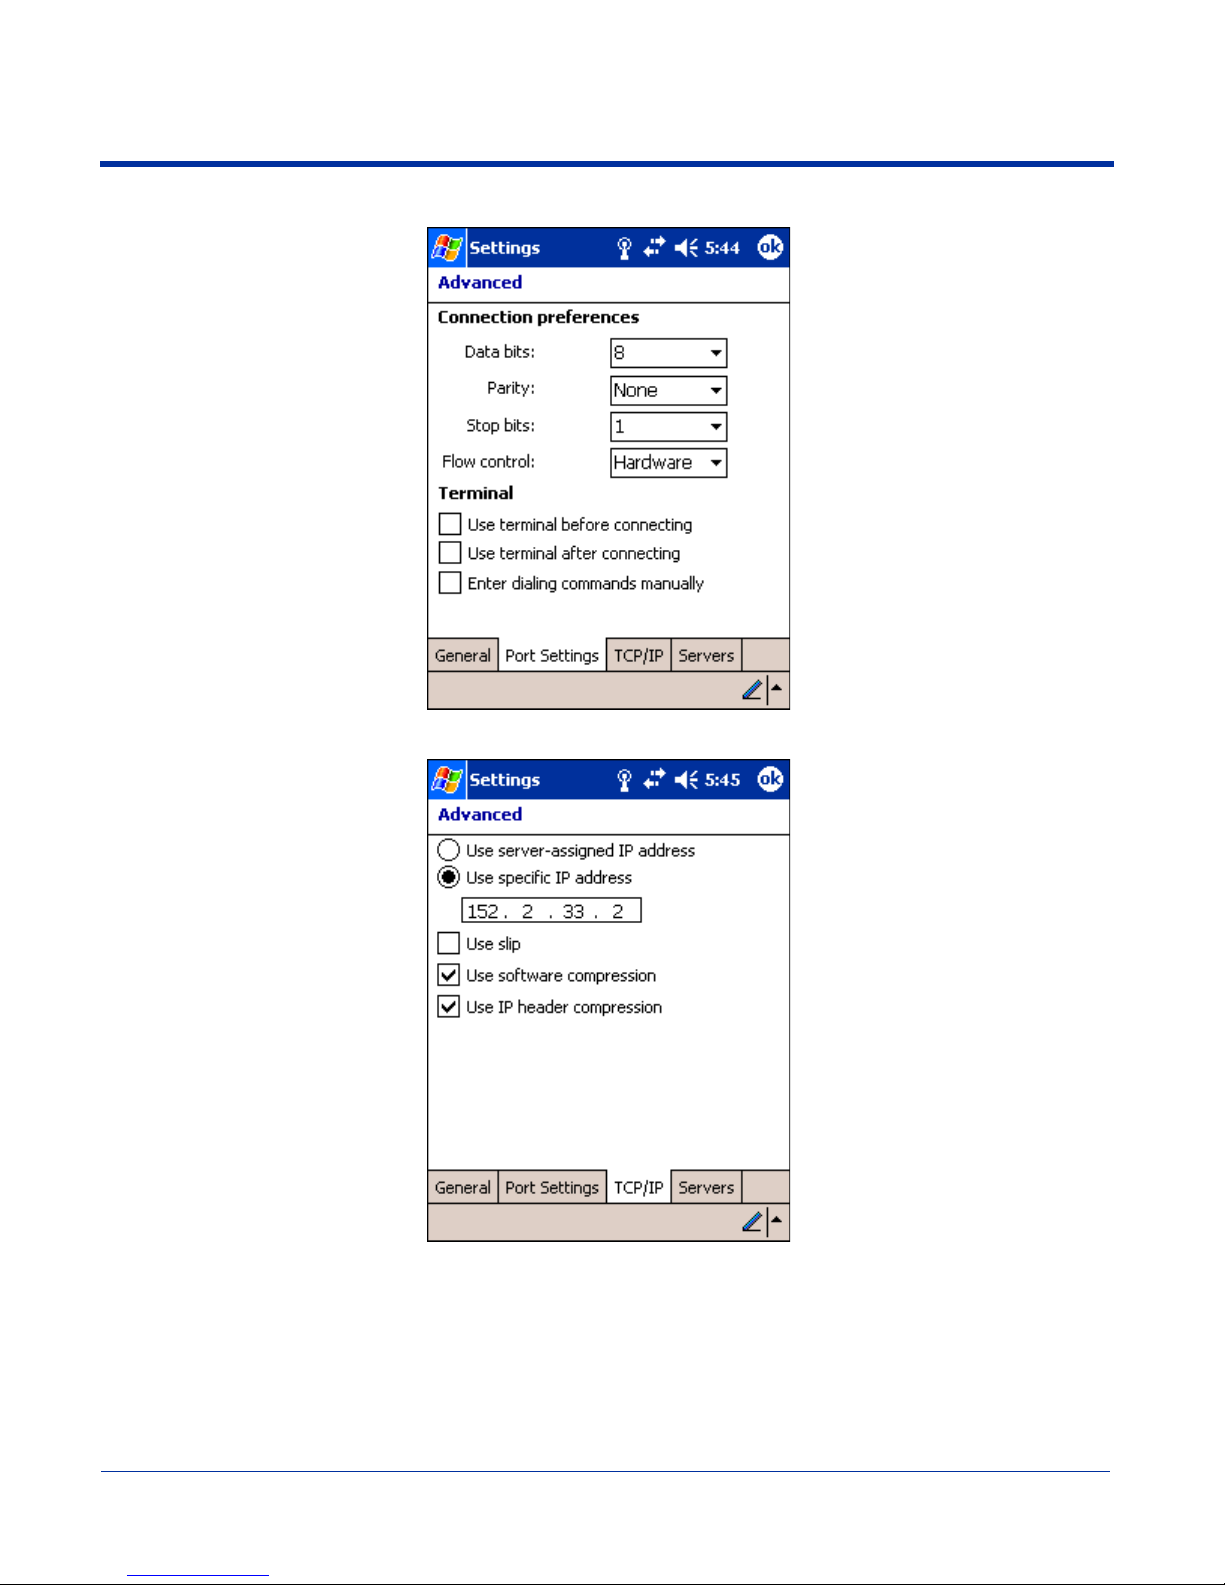
Port Settings Tab The Port Settings tab has options that should be left alone unless indicated otherwise by your ISP.
TCP/IP Tab If your ISP does not use a dynamically-assigned address, enter that information into the TCP/IP tab.
Dolphin® 7900 Mobile Computer User’s Guide - Prelim. Draft Rev (a) 7 - 25
Page 100
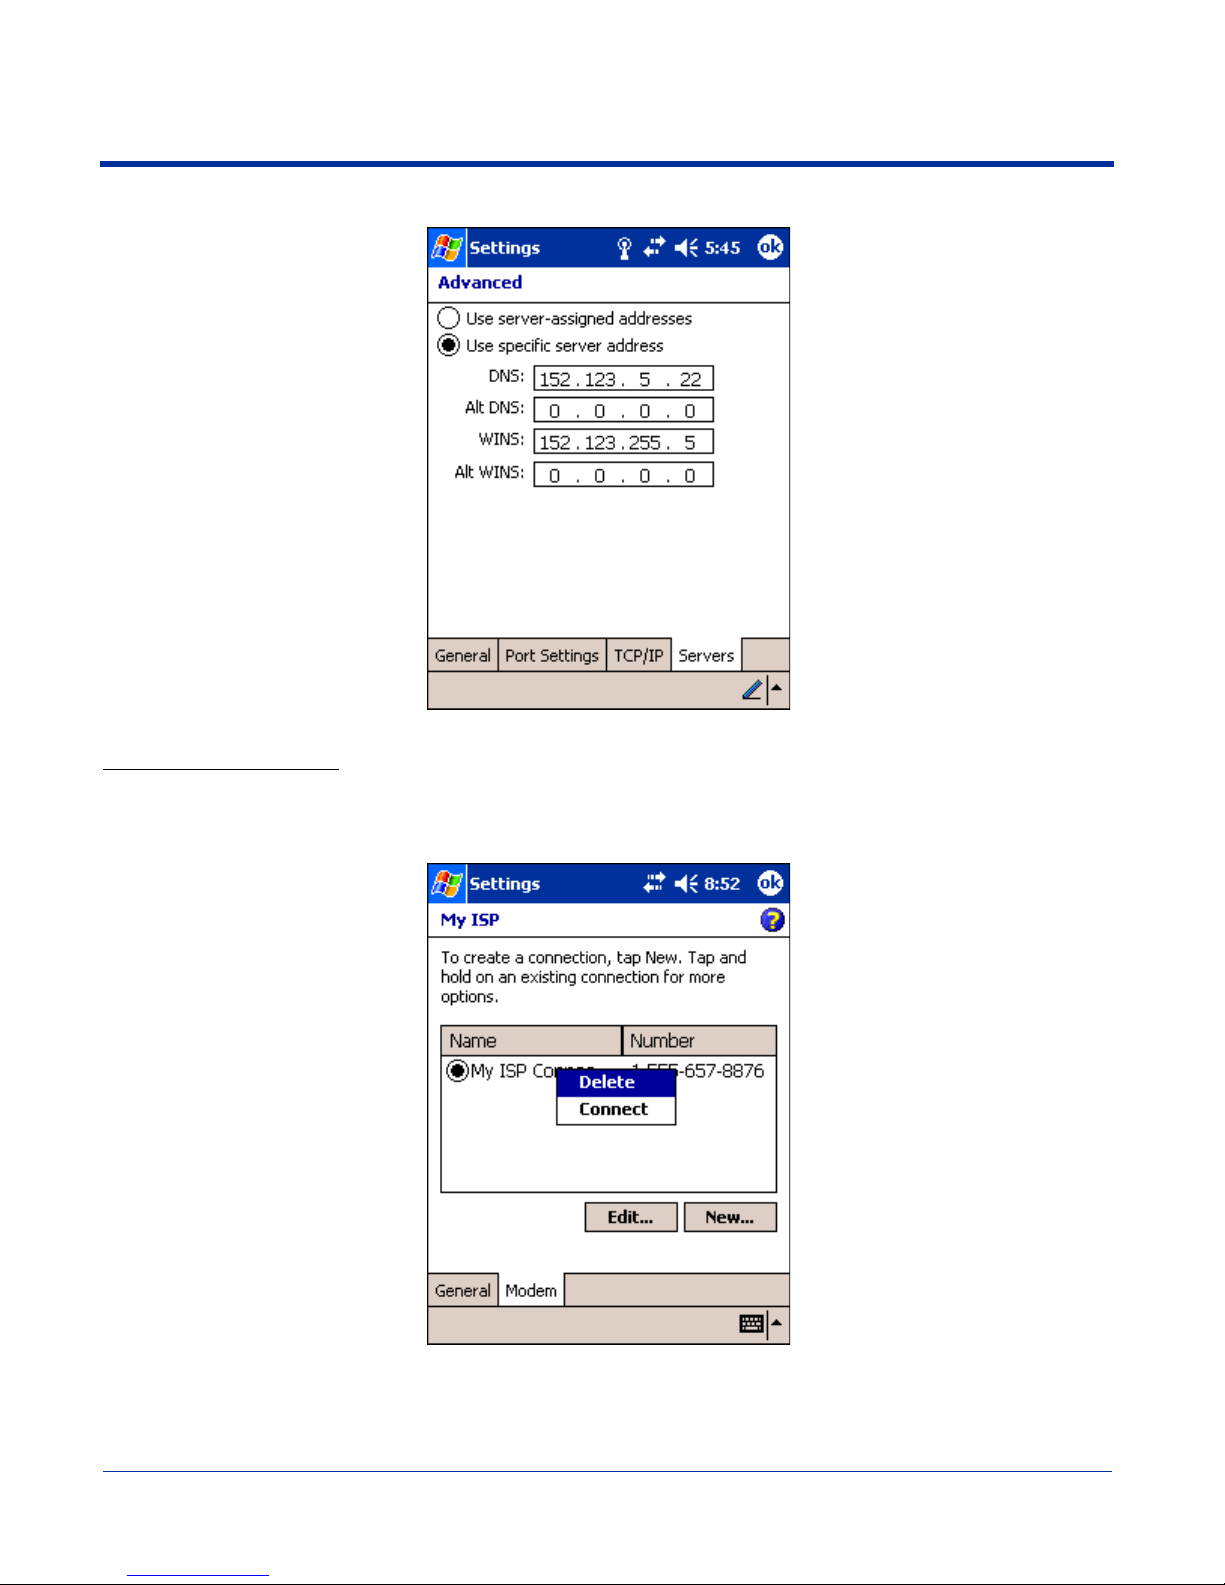
Servers Tab Finally, if your ISP requires special DNS or WINS information, enter it into the Servers tab.
Connecting to Your ISP
1. Tap Start > Settings > Connections tab > Connections to open the connections manager.
2. Tap Manage existing connections.
3. Tap and hold on the applicable dial-up settings and select Connect.
(You can delete the connection by selecting Delete.)
4. Your modem will dial-out and attempt to create the connection.
7 - 26 Dolphin® 7900 Mobile Computer User’s Guide - Prelim. Draft Rev (a)
 Loading...