

Page 1
UDP-89
PROFESSIONAL UNIVERSAL
DVD/CD PLAYER
USER MANUAL
Page 2
UDP-89
UDP-89
PROFESSIONAL UNIVERSAL DVD/CD PLAYER
La versión en español del manual de operaciones la encontrará en la web de HHB: www.hhb.co.uk
La version française de ce manual d’utilisation est disponsible sur le site web de HHB: www.hhb.co.uk
Eine deutsch Version dieser Bedienungsangleitung ist im Internet unter der Adresse: www.hhb.co.uk erhältlich.
UDP-89 User Manual Version 2.0 www.hhb.co.uk
1
Page 3

Statutory Notifications
Important Safety Instructions
1 Read these instructions.
2 Keep these instructions.
3 Heed all warnings.
4 Follow all instructions.
5 Do not use this apparatus near water.
6 Clean only with dry cloth.
7 Do not block any ventilation openings. Install in accordance
with the manufacturer’s instructions.
8 Do not install near any heat sources such as radiators, heat
registers, stoves, or other apparatus (including amplifiers)
that produce heat.
9 Do not defeat the safety purpose of the polarized or
grounding-type plug. A polarized plug has two blades with
one wider than the other. A grounding type plug has two
blades and a third grounding prong. The wide blade or the
third prong are provided for your safety. If the provided
plug does not fit into your outlet, consult an electrician for
replacement of the obsolete outlet.
10 Protect the power cord from being walked on or pinched
particularly at plugs, convenience receptacles, and the point
where they exit from the apparatus.
11 Only use attachments/accessories specified by the
manufacturer.
12 Use only with the cart, stand, tripod, bracket, or table
specified by the manufacturer, or sold with the apparatus.
WARNING: To reduce the risk of fire or electric shock, do not
expose this apparatus to rain or moisture.
It is important that the apparatus shall not be exposed to
dripping or splashing and that no objects filled with liquids, such
as vases shall be placed on the apparatus.
Do not expose this apparatus to drips or splashes.•
Do not place any objects filled with liquids, such as vases, on •
the apparatus.
Do not install this apparatus in a confined space such as a •
book case or similar unit.
Slots and openings in the cabinet are provided for ventilation •
and to ensure reliable operation of the product and to protect
it from overheating. Please ensure adequate space around the
apparatus for sufficient ventilation. Ventilation should not be
impeded by covering the ventilation openings with items, such
as newspapers, tablecloths curtains etc.
The apparatus draws nominal non-operating power from the •
AC outlet when in STANDBY mode.
The apparatus should be located close enough to the AC •
outlet so that you can easily grasp the power cord plug at any
time.
An apparatus with Class I construction shall be connected to •
an AC outlet with a protective grounding connection.
The MAINS plug or the appliance coupler is used as the •
disconnect device. Either device shall remain readily operable
when the apparatus is installed for use.
13 Unplug this apparatus during lightning storms or when
unused for long periods of time.
14. Refer all servicing to qualified service personnel. Servicing is
required when the apparatus has been damaged in any way,
such as power-supply cord or plug is damaged, liquid has
been spilled or objects have fallen into the apparatus, the
apparatus has been exposed to rain or moisture, does not
operate normally, or has been dropped.
15. This apparatus is supplied with a remote control unit which
contains replaceable non-rechargeable batteries. The
remote control unit and the batteries must not be exposed
to excessive heat such as sunshine, fire or the like. The
disposal of used batteries should be in accordance with local
re-cycling and waste disposal regulations. Never dispose
of batteries in a fire because they may explode and cause
injury.
No naked flames, such as lighted candles, should be placed on •
the apparatus.
WARNING: excessive sound pressure levels from earphones
and headphones can cause hearing loss.
2
UDP-89 User Manual Version 2.0www.hhb.co.uk
Page 4
Statutory Notifications
Important Safety Precautions
CAUTION: TO REDUCE THE RISK OF ELECTRIC SHOCK, DO NOT
REMOVE COVER (OR BACK). NO USER-SERVICEABLE PARTS
INSIDE. REFER SERVICING TO QUALIFIED SERVICE PERSONNEL.
The lightning flash with arrowhead symbol, within equilateral
triangle, is intended to alert the user to the presence of
uninsulated “dangerous voltage” within the product’s enclosure
that may be of sufficient magnitude to constitute a risk of electric
shock to persons.
The exclamation point within an equilateral triangle is intended
to alert the user to the presence of important operating
and maintenance (servicing) instructions in the literature
accompanying the appliance.
WARNING: TO PREVENT FIRE OR SHOCK HAZARD, DO NOT EXPOSE
THIS APPLIANCE TO RAIN OR MOISTURE.
For U.S.A.
TO THE USER
This device complies with Part 15 of the FCC rules. Operation
is subject to the following two conditions: (1) This device may
not cause harmful interference . And (2) This device must
accept any interference received including interference that
may cause undesired operation.
CAUTION:
This product satisfies FCC regulations when shielded cables
and connectors are used to connect the unit to other
equipment. To prevent electromagnetic interference with
electric appliances such as radios and televisions, use
shielded cables and connectors for connections.
Safety Information
This product has been designed and manufactured according to
FDA regulations “title 21, CFR, chapter 1, subchapter J, based
on the Radiation Control for Health and Safety Act of 1968”, and
is classified as a class 1 laser product. There is no hazardous
invisible laser radiation during operation because invisible laser
radiation emitted inside of this product is completely confined in
the protective housings.
For Canada
TO THE USER
This Class B digital apparatus complies with Canadian ICES003
Cet appareil numerique de la Classe B est conforme a la
norme NMB-003 du Canada
This appliance has a serial number located on the rear panel.
Please record the model number and serial number and
retain them for your records.
Model Number: .............................................
Serial Number: .............................................
CAUTION
DO NOT REMOVE THE PROTECTIVE HOUSING USING A •
SCREWDRIVER.
USE OF CONTROLS OR ADJUSTMENTS OR PERFORMANCE OF •
PROCEDURES OTHER THAN THOSE SPECIFIED HEREIN MAY
RESULT IN HAZARDOUS RADIATION EXPOSURE.
CAUTION
THIS PRODUCT UTILIZES A LASER. USE OF CONTROLS OR
ADJUSTMENTS OR PERFORMANCE OF PROCEDURES OTHER
THAN THOSE SPECIFIED HEREIN MAY RESULT IN HAZARDOUS
RADIATION EXPOSURE.
This unit contains a semiconductor laser system and is classified
as a “CLASS 1 LASER PRODUCT”. So, to use this model
properly, read this Instruction Manual carefully. In case of any
trouble, please contact the store where you purchased the unit.
To prevent being exposed to the laser beam, do not try to open
the enclosure.
UDP-89 User Manual Version 2.0 www.hhb.co.uk
DANGER
1) This label on the top panel states: CLASS 1 LASER PRODUCT.
The unit employs a laser inside the cabinet;
2) To prevent the laser from being exposed, do not remove the
cover. Refer servicing to qualified personnel.
IF THIS PRODUCT DEVELOPS TROUBLE, CONTACT YOUR •
NEAREST QUALIFIED SERVICE PERSONNEL, AND DO NOT USE
THE PRODUCT IN ITS DAMAGED STATE.
VISIBLE LASER AND INVISIBLE RADIATION WHEN OPEN •
AND INTERLOCK FAILED OR DEFEATED. DO NOT STARE INTO
BEAM.
3
Page 5

4
UDP-89 User Manual Version 2.0www.hhb.co.uk
Contents
Contents
Important Safety Instructions ........................................ 2
Important Safety Precautions ........................................ 3
Safety Information ........................................................ 3
Contents...................................................................... 4
Introduction ................................................................. 6
What’s in the box ........................................................6
Unpacking ............................................................ 6
UDP-89 Primary Features .............................................7
Cautions and guidance on installation ..............................7
Safety Guidelines ...................................................7
Installation ............................................................ 7
Care & cleaning ....................................................8
Installing the Remote Control batteries .....................8
Using the RC-89 Remote Control handset ................. 9
Compatible disc types ............................................9
Compatible audio and video formats .........................9
Connectivity ............................................................... 10
Analogue Audio Outputs .............................................. 10
Digital Audio Outputs .................................................. 10
Analogue Video Outputs .............................................. 10
Digital Video Output ....................................................10
Other Connectors ...................................................... 10
Connector Details ......................................................10
Front Panel Features .................................................. 12
Description of Front Panel Features ..............................12
Alphanumeric Display ................................................. 14
On-Screen Displays ....................................................14
RC-89 Remote Control ................................................ 14
Quick Start ................................................................ 16
Connecting for video...................................................16
Connecting for audio .................................................. 17
Playing DVD Video discs .............................................17
Playing CDs ..............................................................18
Basic Operation .......................................................... 19
Powering the UDP-89 ................................................19
Loading and Ejecting Discs ..........................................19
Disc Nomenclature .................................................... 19
Audio Level ............................................................... 20
Playing Audio Discs ....................................................20
Transport Controls ..............................................20
Track Selection....................................................20
Time Displays...................................................... 21
Other Audio Disc Types .........................................21
SACDs (Super Audio Compact Discs) ...................... 21
DVD-As (DVD-Audio discs) ..................................... 22
CD-ROMs and DVD-ROMs containing audio files .......23
Playing discs with video content ...................................23
Transport Controls ..............................................23
Accessing the Disc Menus .................................... 24
Chapter Selection ...................................................... 24
Using the Direct Access Keys ................................ 24
Using the Title Menu ............................................ 24
Time & Other Displays ................................................ 25
Other video disc types ................................................25
DVD-RandDVD-RW ............................................ 25
Video CDs and SuperVCDs ....................................25
CD-ROMs and DVD-ROMs containing video files ........ 25
CD-ROMs and DVD-ROMs containing
JPEG image files .................................................25
Additional Features ..................................................... 26
Search ..................................................................... 26
Locating to a CD Track or DVD Title or Chapter .......26
Locating to a time point ........................................ 26
Storing and Cueing to a Marker Point .....................27
Auto-Pause ............................................................... 27
Slow-motion playback..................................................28
Program Play ............................................................ 28
Programming tracks on audio CDs (and
CD/DVD-ROMs containing MP3, jpg or avi files) .......28
Programming chapters on DVD-Video and
DVD-Audio, and tracks on SACD ............................ 29
Repeat Play ..............................................................30
Repeat 1 ............................................................ 30
Repeat All ..........................................................31
Selection of Repeat functions from the OSD .............31
Shuffle Mode ............................................................32
Shuffle Mode – DVDs ...........................................32
SHUFFLE Mode - CDs ........................................... 32
Music Intro Mode ...................................................... 32
Audio configuration .................................................... 32
Stereo and multi-channel audio .............................. 32
The AUDIO button ...................................................... 33
Dolby Digital .............................................................. 33
DTS ......................................................................... 33
Multichannel bass management ................................... 34
Audio level and delay adjustment ..................................34
Audio Volume ...................................................... 34
Multichannel level trims ........................................34
Pink Noise calibration ........................................... 35
Multichannel delays .............................................. 35
Video configuration ....................................................35
NTSC/PAL .........................................................35
Progressive and interlaced scan ............................35
Replay of 16:9 format video .................................. 35
HDMI formats ..................................................... 36
The HI-DEF button................................................36
RGB-to-SCART connections ................................... 36
Angle selection .................................................... 36
Zoom ................................................................37
Subtitles.............................................................37
SCMS Compliance .....................................................37
Eject Lock .................................................................37
Setup Menu .............................................................. 38
Menu Navigation .................................................38
Language Settings ...............................................38
Video settings .....................................................38
Audio settings ..................................................... 40
Rating Settings ...................................................40
Misc. submenu .........................................................41
Timer Mode .............................................................. 41
Remote Control – Parallel Port ....................................41
Parallel Port Setup Menu ............................................42
Remote Control – Serial Port ....................................... 42
Page 6

Contents
5
UDP-89 User Manual Version 2.0 www.hhb.co.uk
Appendix 1 - Connector Pinouts .................................... 44
Analogue Outputs (Balanced) .......................................44
Balanced Multichannel Outputs .................................... 44
AES/EBU Output ....................................................... 44
HDMI Digital Video Output ........................................... 44
RS232 Serial Control Port .......................................... 44
Parallel Remote Control Input ...................................... 44
Electrical characteristics ....................................... 45
Appendix 2 - Firmware Updates .................................... 46
Software version checks ....................................... 46
Appendix 3 - Factory Default Settings ........................... 47
Appendix 4 - UDP-89 Specifications .............................. 48
Page 7

Introduction
6
UDP-89 User Manual Version 2.0www.hhb.co.uk
Introduction
Thank you for buying this HHB Professional product.
The UDP-89 Universal DVD/CD Player is designed to play most
variants of CD and DVD digital discs in common professional
use, and to provide high-quality audio and/or video playback
from the various encoding methods and file types currently in
use with CDs and DVDs.
We recommend that you read this instruction manual at least
as far as the Basic Operation section, to familiarise yourself with
the unit’s layout, controls and operating system. The Additional
Features section can then be referred to separately when the
need arises, such as playing the less common CD and DVD
variants and using the remote control functions.
Please keep this manual in a safe place once you are sufficiently
familiar with the UDP-89 to use it without referral. You will
probably need it in the future, such is the UDP-89’s versatility.
Important — Please register your UDP-89 with HHB
Communications on-line at http://www.hhb.co.uk Registering
your machine will help us in providing you with after-sales service
should the need arise, and may also be of assistance in the
event of the unit being stolen.
Environment — The UDP-89’s range of operating temperature
and relative humidity (RH) are as follows:
o
Temperature: +5
RH: less than 85%
C to +35oC (41oF to 95oF)
What’s in the box
Unpacking
Unpack the UDP-89 and its accessories with care. It is always
a good idea to store all packaging (if practical), in case you ever
need to return the unit to your HHB dealer for any reason.
The shipping carton should contain the items listed below.
Please contact your HHB dealer immediately if any of them are
missing or damaged.
UDP-89 Universal DVD/CD player•
Instruction manual•
IEC mains cable (power cord), with a AC connector •
appropriate to your region
Infra-red remote control handset•
2 x AAA batteries•
Do not use the UDP-89 in a location where it is in direct sunlight
or strong artificial light.
Page 8

Introduction
7
UDP-89 User Manual Version 2.0 www.hhb.co.uk
UDP-89 Primary Features
Plays CD, Video CD, Super Audio CD (SACD), DVD Video •
(DVD-V) and DVD Audio (DVD-A) discs
Supports .mp3 and MPEG4 .avi files•
Dolby™ Digital* and DTS decoding**•
2 x 11-character alphanumeric vacuum-fluorescent display, •
plus on-screen displays
Balanced (+4dBu) and unbalanced (-10dBu) analogue audio •
outputs
24-bit 192kHz Wolfson D/A conversion•
AES/EBU digital audio output•
S/PDIF digital audio outputs (coaxial and optical); Dolby & •
DTS bitstreams available
Per-channel and master volume control•
Simultaneous 5.1 and stereo downmix audio outputs •
available
14-bit 165MHz video D/A conversion•
HDMI, component (RGB/YP•
composite video outputs
NTSC and PAL discs supported with outputs to either •
standard
480p, 576p, 720p and 1080i output as component video •
and HDMI
Professional cueing functions•
RS232 and parallel remote control ports•
1U 19” rack mounting chassis•
Universal power supply•
No on-screen display of transport condition, ideal for •
professional display
Notes:
*ManufacturedunderlicensefromDolbyLaboratories.•
“Dolby”, “MLP Lossless” and the double-D symbol are
trademarks of Dolby Laboratories.
**ManufacturedunderlicenseunderU.S.Patent#’s:•
5,451,942; 5,956,674; 5,974,380; 5,978,762;
6,487,535 & other U.S. and worldwide patents issued
& pending. DTS and DTS Digital Surround are registered
trademarks and the DTS logos and Symbol are trademarks
of DTS, Inc. © 1996-2008 DTS, Inc. All Rights Reserved.
HDMI,theHDMIlogoandHigh-DefinitionMultimedia•
Interface are trademarks or registered trademarks of HDMI
Licensing LLC.
switchable), S-video and
bPr
Cautions and guidance on installation
Safety Guidelines
Operate only on a secure and level surface or securely •
fastened into a rack, noting the precautions below.
This equipment must be earthed (grounded).•
This equipment must be powered from a polarised AC •
supply.
Only suitably trained personnel should service this •
equipment.
Please read and take note of all warning and informative •
labels.
Before starting any servicing operation, this equipment •
must be isolated from the AC supply (mains) by removing
the incoming IEC mains connector.
Fuses should only be replaced with ones of the same type •
and rating as that indicated.
Operate only in a clean, dry and pollutant-free environment.•
Do not operate in an explosive atmosphere.•
Do not allow any liquid or solid objects to enter the •
equipment. Should this accidentally occur then immediately
switch off the unit and contact your service agent.
Installation
Although the UDP-89 does not generate a significant degree
of heat, it should never be installed immediately above or
below another piece of equipment that does, such as a power
amplifier. It is good practice in any case to fit vent blanks of at
least 1U above and below such equipment in a rack (unless they
short-circuit that equipments’ own fan-cooling, in which case
plain blanks should be fitted).
Care with ventilation should similarly be taken if the unit is freestanding; never stack it on top of or underneath another piece of
equipment which generates a significant amount of heat.
Take care when routing cables around the unit; never drape
cables across the front panel of the UDP-89 as they may
obstruct the disc tray eject mechanism.
Do not install or use the UDP-89 in a position where it is in
direct sunlight or high-intensity artificial light. Never attempt to
move the unit while it is in operation.
DVDisatrademarkofDVDFormat/LogoLicensing•
Corporation.
Itisforbiddenbylawtocopy,broadcast,show,broadcast•
on cable, play in public, and rent copyrighted material
without permission. DVD videos are copy protected, and
any recordings made from these discs will be distorted.
This product incorporates copyright protection technology
that is protected by U.S. patents and other intellectual
property rights. Use of this copyright protection technology
must be authorized by Macrovision, and is intended for
home and other limited viewing uses only unless otherwise
authorized by Macrovision. Reverse engineering or
disassembly is prohibited.
Page 9

Introduction
8
UDP-89 User Manual Version 2.0www.hhb.co.uk
Care & cleaning
Always switch off and disconnect the unit from the mains before
cleaning. The outside surfaces of the unit may be cleaned with a
soft dry cloth. For stubborn marks (such as from liquid spillage),
a soft damp cloth may be used in conjunction with a mild
detergent solution (dilute a household detergent cleaner 5:1 with
water). Wipe thoroughly dry with a dry cloth after. NEVER use
solvent cleaners of any kind.
Always switch the unit off and disconnect it from the AC supply
before moving it. NEVER move the unit while it is in use, as this
may permanently damage the disc.
CDs and DVDs should ALWAYS be handled with care. Hold
discs only by the edge or the centre hole. Never put discs “face
down” on any surface as they can scratch easily. Smudges
and fingerprints may be removed from a disc’s playing surface
by wiping it gently with a soft, lint-free cloth “across” the disc
radius. Never rub circumferentially. Stubborn marks can be
removed by applying a small amount of isopropyl alcohol (distilled
water is often as effective), again with a soft, lint-free cloth.
Alternatively, use a commercially available CD cleaning kit.
NEVER use solvent cleaners of any kind.
Installing the Remote Control batteries
To insert the batteries in the infra-red remote control handset:
Slide off the battery compartment lid on the rear of the •
handset
Insert two AAA batteries, taking care to orientate them •
the correct way (refer to markings within the battery
compartment)
Slide battery compartment lid back on•
Important! Please observe the following guidelines when
replacing batteries:
Always change both batteries at the same time.•
Always use two batteries of the same brand and type.•
Dispose of the old batteries in a responsible manner – •
always observe local environmental guidelines.
Page 10

Introduction
9
UDP-89 User Manual Version 2.0 www.hhb.co.uk
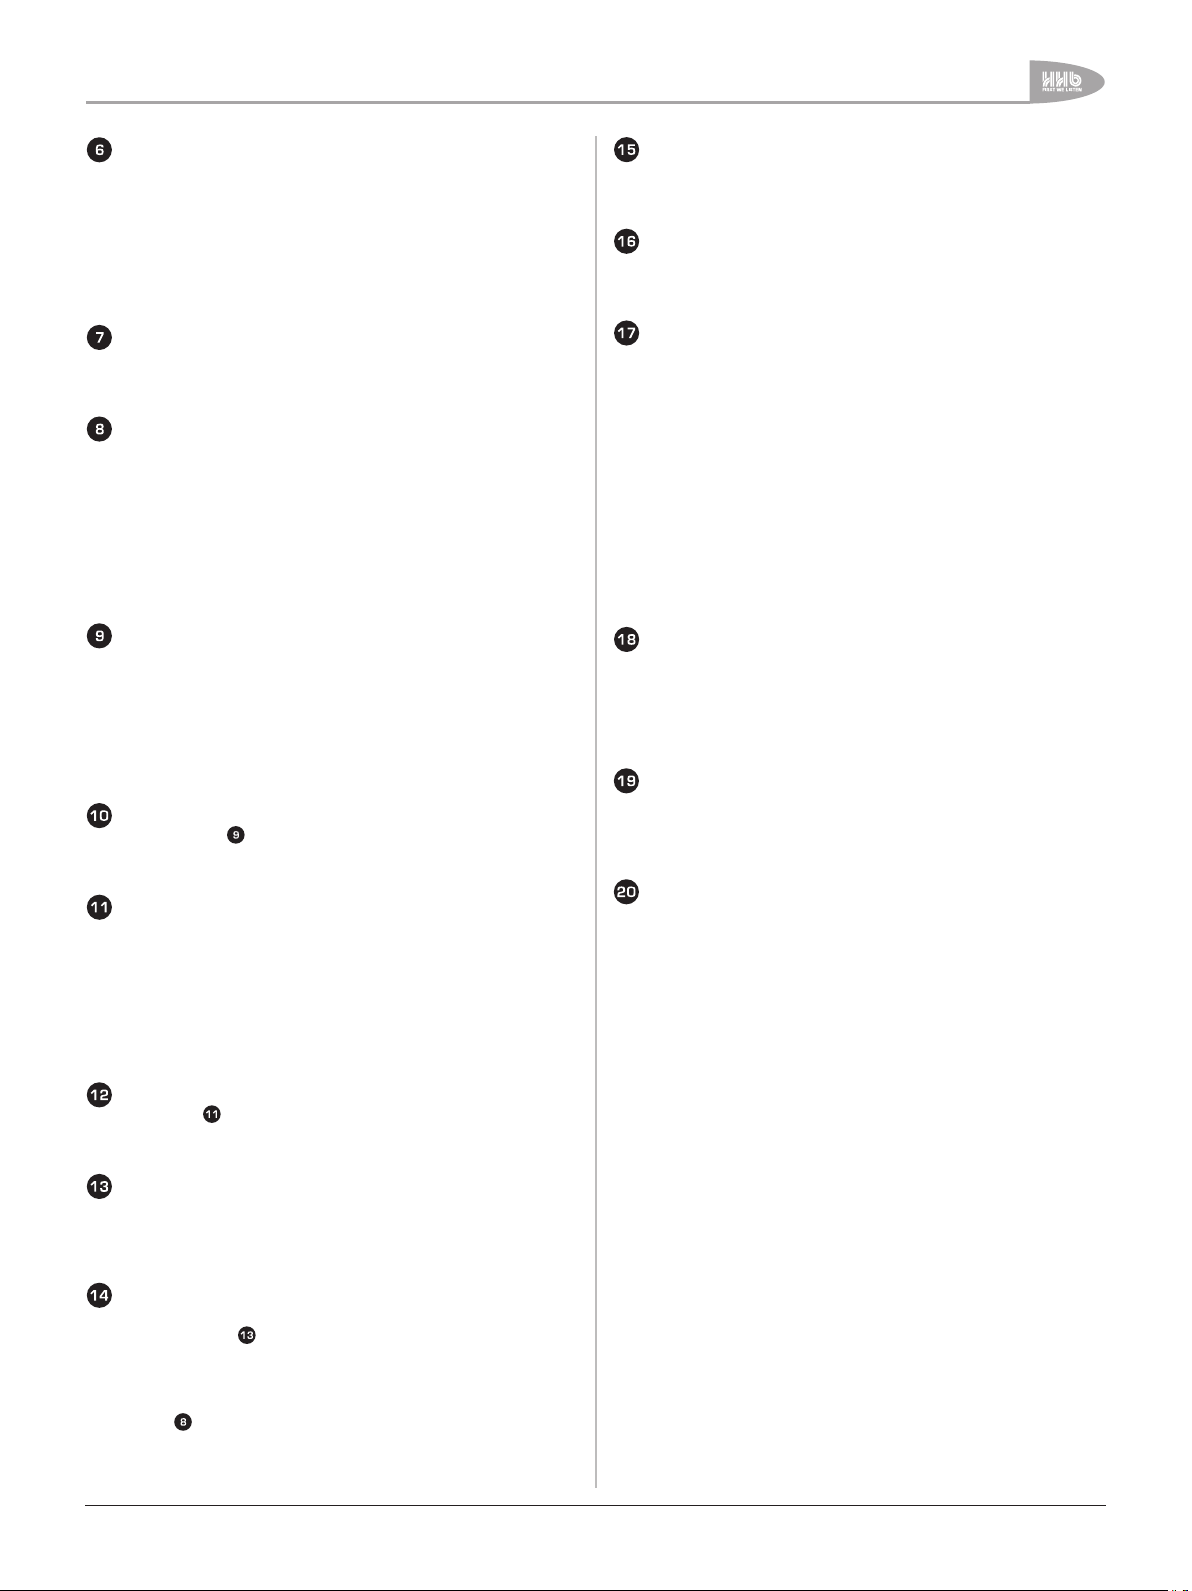
Using the RC-89 Remote Control handset
Make sure there are no obstacles between the handset •
and the unit.
The handset should work reliably within 7m of the unit, and •
within 30° of the direct line between the handset and the
unit.
Strong sunlight or fluorescent lighting may make remote •
control operation less reliable.
Remote control handsets for different equipment •
sometimes interact. If the UDP-89 is installed adjacent
to other infra-red-controlled equipment, you should satisfy
yourself that the UDP-89’s handset is not affecting the
other equipment, or vice-versa. One or more items may
need to be moved if interaction is observed.
A falling-off of the operating range of the handset will •
generally indicate that it is time to change the batteries.
Compatible disc types
The UDP-89 supports the following types of media: CD, CD-R,
CD-RW, DVD-V, DVD-A, DVD+R, DVD+RW, DVD-R, DVD-RW,
SACD.
Compatible audio and video formats
Numerous encoding schemes for both audio and video data have
been implemented since the initial introduction of the CD and
DVD media formats. Most - but not all - schemes are defined
for one particular type of media. The number of combination
of media types and encoding schemes is now quite large, and
it is a fundamental purpose of the UDP-89 to replay audio
and/or video from as many of the disc types currently in use as
possible.
CD-R/RW and DVD-R/RW discs containing audio and/or •
video files recorded with the following schemes
MPEG1andMPEG2filescontainingonlyaudioobjects•
in Layer 3 (i.e. MP3 files) including fixed or variable bit
rates at f
MPEG1andMPEG2filescontainingbothaudioand•
video objects
MPEG4ASP-codedvideofiles(e.g.*.avifiles)•
containing embedded MPEG, Dolby Digital or PCM
audio
*.jpgpicturefiles•
More detailed descriptions of the various disc types will be found
throughout the manual.
=44.1 kHz or 48 kHz
s
The UDP-89 is able to replay the following disc types:
Standard red-book-compliant • audio CDs
Standard DVD• video discs (DVD-V) including decoding of
Dolby Digital, DTS and MPEG audio bitstreams, or PCM
audio up to 24-bit at f
Scarlet book 2.0-compliant • Super Audio CDs (SACD),
including single, dual and hybrid layer versions
DVD-Audio• discs (DVD-A) containing audio in various
formats, including 16-bit stereo at fs=44.1 or 48 kHz,
24-bit 6-channel at fs=88.2 or 96 kHz, and 24-bit stereo
at fs=176.4 or 192 kHz
White book-compliant • Video CDs (VCD) containing MPEG1
video with MPEG Layer 2 stereo audio at f
Super Video CDs• (SVCD) containing MPEG2 video with
either one or two MPEG Layer 2 stereo audio tracks at
=44.1 kHz, or MPEG2 5.1 audio
f
s
=96 kHz
s
=44.1 kHz
s
Page 11

Connectivity
10
UDP-89 User Manual Version 2.0www.hhb.co.uk
Connectivity
All electrical connections to the UDP-89 (apart from
headphones) are made via the rear panel.
Analogue Audio Outputs
Electronically-balanced main stereo Left and Right out
(2 x XLR3M)
Unbalanced main stereo Left & Right out ( 2 x phono/RCA)
Unbalanced 5.1 surround out – L, C & R Front, L & R
surround, LFE ( 6 x phono/RCA)
Electronically-balanced main stereo out L & R, plus
5.1 surround out (D25F)
Digital Audio Outputs
AES/EBU main stereo Left & Right out (XLR3M)
S/PDIF PCM/bitstream out (phono/RCA)
S/PDIF PCM/bitstream out (optical TOSlink connector)
Analogue Video Outputs
Component video out, RGB/YPbPr switchable
(3 x phono/RCA)
RGB switching output (2.5 mm 2-pole jack)
S-Video out (4-pin mini-DIN)
Connector Details
Analogue Audio Outputs:
Main L & R outputs. These are electronically-balanced,
and have a nominal level of +4 dBu. The output circuits
can drive a maximum output level of >+22 dBu. They are
calibrated internally to produce +22 dBu from a PCM signal
of 0 dBFS. Pinouts of these and all rear panel connectors
can be found in the manual Appendix.
The format of the audio available at these connectors will
depend on the type of disc being played. Discs with only
stereo audio data will reproduce normal L & R stereo.
Discs with multichannel audio data will generally reproduce
an internally-generated downmix of the multichannel audio,
though this will vary with disc type and encoding system.
See later manual sections on individual disc types and
encoding systems for more information.
Unbalanced L & R analogue outputs. These carry
the same audio signal as the main outputs above, but
in unbalanced form on phono connectors (RCA jacks) at a
nominal level of -10 dBv. Output level is calibrated internally
to produce +8 dBv from a PCM signal of 0 dBFS.
Unbalanced multichannel outputs. These are
a set of six phono connectors (RCA jacks) providing the
components of a 5.1.surround sound recording when a
suitably-encoded disc is played. The electrical characteristics
of these outputs are the same as those of the unbalanced
L & R connectors described in above.
Composite video out (phono/RCA)
Composite video out (BNC)
Digital Video Output
HDMI out (19-pin Type A HDMI connector). Note this
connector also carries digital audio.
Other Connectors
RS232 remote control port (D9M)
Parallel remote control, function-programmable (D9F)
AC mains input (IEC)
Unbalanced multichannel analogue outputs.
The format of the audio available at these connectors
will depend on the type of disc being played. Discs with
multichannel audio data will reproduce the six (5.1) channels
individually. Discs with only stereo audio data will duplicate
the normal L & R stereo at the LF and RF connectors, the
other outputs being muted.
Page 12
Connectivity
11
UDP-89 User Manual Version 2.0 www.hhb.co.uk
Balanced multichannel outputs. This is a
25-pin female Dsub connector carrying electronicallybalanced versions of both the main L & R outputs and the
multichannel outputs. The signals at this connector will
always be the same as those at the unbalanced connectors
and . The electrical characteristics are the same as
those of the balanced L & R connectors described in
Digital Audio Outputs:
AES/EBU out. This provides a two-channel
AES/EBU digital output conforming to AES3-1992 (r1997)
amendment 4-1999.
The format of the audio available at this connector will
depend on the type of disc being played. In the case of
discs with only stereo audio data, normal L & R stereo will
be output. When multichannel audio discs are played, an
internally-generated downmix of the multichannel audio will
be carried. Onward transmission of the AES/EBU output will
be restricted with certain encoding systems. See page 33
on individual disc types and encoding systems for more
information.
S/PDIF out (coaxial). A two-channel “consumer”
digital output conforming to IEC60958-4 is available at this
connector. The signal will generally be the same programme
as at the AES/EBU connector , but may vary with some
types of discs and encoding schemes. When decoding Dolby
Digital, DTS or MPEG-1 Layer 2 bitstreams, the output at
the S/PDIF connector may be selected to be either the
2-channel PCM signal, or the raw bitstream for external
decoding.
Digital video output:
HDMI out. Digital video plus digital audio is available
at the 19-pin Type-A High Definition Multimedia Interface
(HDMI) connector. Pre-made cables are normally used for
this interface, but the pinout may be found in Appendix 1
.
(see page 44).
Other:
RS232 serial remote control connector. The
UDP-89 can be fully controlled remotely via RS232 serial
commands, e.g. from an external control system (Crestron,
AMX, etc.) Port parameters and an abridged command
set protocol can be found on page 42. The connector is
a D9M. Please refer to the website to download the full
protocol and a Windows test application.
Parallel remote control connector. The UDP-89’s
basic transport commands can also be implemented by voltfree contact closure at the pins of this connector (a D9F).
Five of the pins are designated as inputs, three as outputs
(tallies). The functions controlled by each of the inputs are
user-definable via the menu system. The source of the tally
outputs is similarly definable. Full information is available on
page 41.
AC mains input. The UDP-89 is powered via a standard
European IEC connector. The UDP-89’s design includes a
universal power supply and will accept all AC mains voltages
from 100 to 240 V, 50/60 Hz.
S/PDIF out (optical). Standard TOSlink connector
carrying the same signal as above, in optical form. Use a
standard optical TOSlink cable of not more than 3 m length.
Analogue video outputs:
Component video out. Component video is available
at these three connectors in either RGB or YPbPr (YUV)
format. The default format is YPbPr. Output impedance is
75ohms.Outputformatselectionisviathemenusystem
(see page 39). In RGB mode, the composite video output at
connector or may be used as the video sync source.
RGB Switching connector. The RGB output is
compatible with the SCART RGB input of European TV sets.
The rear-panel RGB Switching connector should be wired to
pin 16 of the SCART. See page 36 for more details.
S-video out. Standard 4-pin mini-DIN connector carrying
separated baseband luminance (Y) and chrominance (C)
videosignals.Outputimpedanceis75ohms.
Composite Video (CV) out. A phono connector (RCA
jack) carrying baseband composite video. Output impedance
is75ohms;willdrive1Vp-pwhencorrectlyterminated.
The composite video signal can be PAL or NTSC interlaced
standard, selected via the menu system (page 39). The
signal at this connector is also used as the S (sync) signal
for RGB component video.
Composite video (CVBS) out. An identical signal
to that at above is also available on a BNC connector,
independently buffered.
Page 13
Front Panel Features
12
UDP-89 User Manual Version 2.0www.hhb.co.uk
17
19
20
18
17
19
20
18
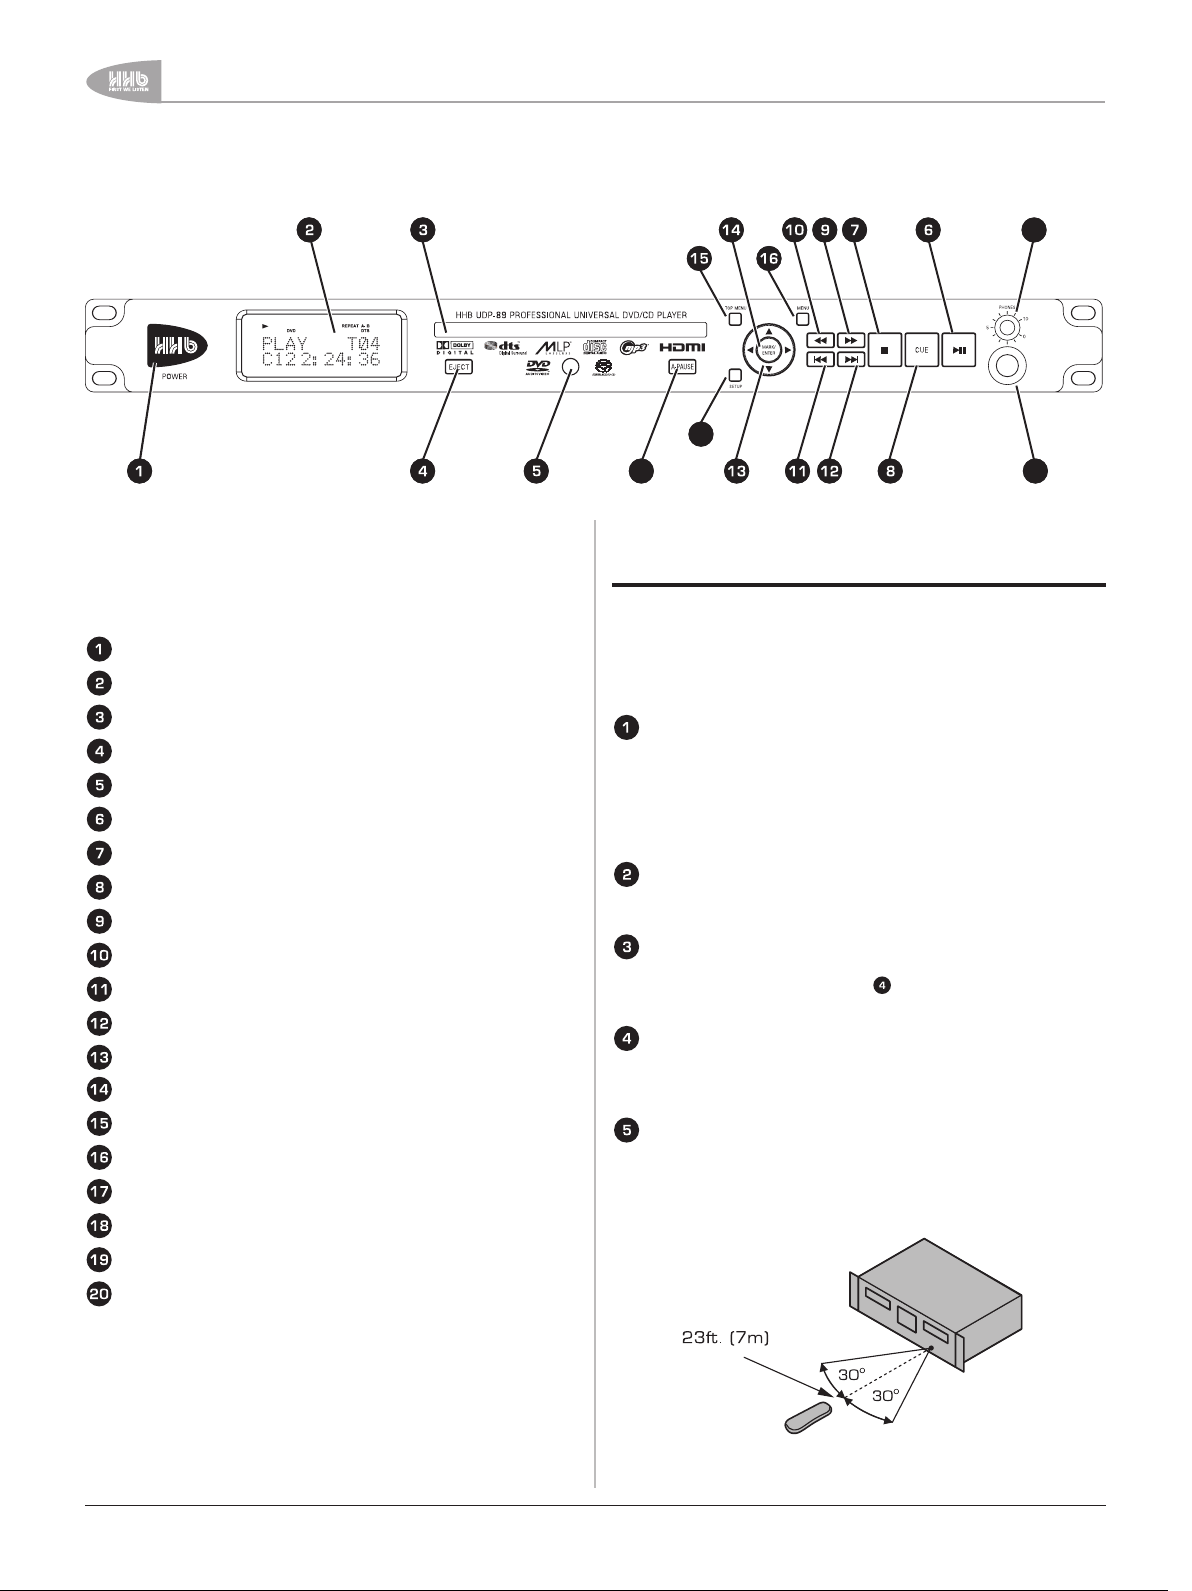
Front Panel Features
All the UDP-89’s controls are on the front panel. Note that
many of the unit’s functions and setup options are controlled and
selected through the menu system, using the multi-character
vacuum-fluorescent display, which is shown enlarged on
page 14.
AC power switch.
Alphanumeric vacuum-fluorescent display
Disc drawer
EJECT button
Infra-red remote control sensor
PLAY/PAUSE button
STOP button
CUE button
FFWD button
FREW button
PREVIOUS button
NEXT button
UP/DOWN & LEFT/RIGHT cursor controls
MARK/ENTER button
TOP MENU button
MENU button
SETUP button
A.PAUSE button
Description of Front Panel Features
NOTE: The exact functionality of some of the front panel controls
may vary slightly according to the type of disc being played, and
the following is general description only. Greater detail can be
found in the sections of the manual describing the various disc
types.
AC power switch. The large HHB logo at the left-hand
of the front-panel is the push-button on/off switch, and is
illuminated when the unit is on.
On power-up, the display shows Welcome HHB UDP-89 and
then No Disc if there is no disc in the drive, or Loading if
there is.
Alphanumeric display. The 2 row x 11-character
vacuum-fluorescent display is described in detail on
page 14.
Disc drawer. The disc drive accepts one disc at a time.
The drawer is motorised and can be manually opened and
closed with the EJECT button . When the drawer is open,
the display shows Open.
EJECT button. This button operates the disc drawer. Its
action can be disabled by setting Disable Eject via the menu
system (see page 37). After an EJECT command to close
the drawer, the display shows Close.
Remote control sensor. The infra-red sensor receives
commands from the remote control handset. Keep the
sensor unobstructed to ensure correct functioning. The
range of reliable operation of the handset is shown in the
diagram below.
Headphone socket
Headphone level control
Page 14
Front Panel Features
13
UDP-89 User Manual Version 2.0 www.hhb.co.uk
PLAY/PAUSE button. Pressing this button starts or
resumes playback of the inserted disc if the disc is stopped
or paused, or pauses playback if pressed when the disc is
already playing. Pressing PLAY/PAUSE from Stop Mode
restarts the disc from the beginning, whereas pressing
it from Resume Mode continues playback from the last
location. The front panel display will either indicate Play
Mode with the word Play and the H symbol, or Pause Mode
with the word Pause and the B symbol.
STOP button. Pressing this button stops the disc from
all transport modes. The display either will show the word
Resume, following a single press of STOP, or Stop after a
second press.
CUE button. This accesses the player’s bookmark or cue-
point locating feature. Pressing CUE in Play or Pause modes
allows a cue-marker point to be stored with the MARK/
ENTER button. Once a marker point has been stored, a
second press on the MARK/ENTER button will locate to
the stored location and exit the bookmarking feature. In
addition, the stored cue-marker may be cleared using the
CLR button on the remote control, or the LEFT or RIGHT
cursor buttons on the front panel. Pressing CUE a second
time will exit the function. See page 27 for full details.
FFWD button. Pressing this button from Play or Pause
Modes puts the unit into a Search function, causing the disc
to be scanned at 2x normal speed in a forward direction.
Further presses of FFWD double the previous search
speed, up to a maximum of 16x normal speed. Audio is
muted in Search.
FWD Search is indicated by FFWD and the speed multiple in
the front panel display.
FREW button. This button has the same function as the
FFWD button above, except that the search direction
is reversed. REW Search is indicated by FREW in the front
panel display.
PREVIOUS button. The function of PREVIOUS varies
slightly with disc type. With CDs or SACDs, if pressed in
Play or Pause mode during the first 5 seconds of a track,
PREVIOUS causes the disk to jump to the start of the
previous track. If pressed after the first 5 seconds of a
track, it will jump to the start of the current track. In either
case, playback commences from the new location. With
DVDs, PREVIOUS will always jump back to the start of the
current chapter.
TOP MENU button. With DVDs, cancels current
transport mode and displays disc’s main Disc Menu. (NB
this will generally be the Title Menu on discs with only a
single Title)
MENU button. With DVDs, cancels current transport
mode and displays the Title Menu for the currently-selected
Title. The MENU button also enables PBC navigation with
VCD (Video CD) and Super VCD discs.
SETUP button. The SETUP button has two functions,
depending whether a disc is loaded when it is pressed.
With a disc loaded, pressing SETUP enters the UDP-89’s
internal menu system, which provides a range of userselectable options and additional operating modes. These
are described in detail later in the manual (see page 38).
The drive enters Resume Mode if a disc is playing. A second
press of SETUP from anywhere in the menu structure
exits the menu system; disc playback will resume from the
previous location.
A long press on SETUP (more than ½ second) without a
disc being loaded allows re-assignment of the UDP-89’s
Parallel remote control connector. See page 42 for full
details.
AUTO-PAUSE (A-PAUSE) button. This button
selects Auto-Pause Mode. The A.PAUSE flag illuminates in
the display.
Auto-Pause Mode modifies the operation of the CUE, NEXT
and PREVIOUS functions; these are described in greater
detail later in the manual (see page 27)
HEADPHONE SOCKET. A ¼” 3-pole jack socket for
the connection of headphones for monitoring purposes.
The signal available at this connector is the main L+R
stereooutput.Headphoneswithanimpedanceof32ohms
upwards may be used.
HEADPHONE LEVEL control. This is a conventional
analogue volume control for the headphone output.
NEXT button. This button works in a similar way to
PREVIOUS above, except that the track/chapter jumped
to is the one following that currently playing. Pressing NEXT
while playing the last track has no effect.
CURSOR controls. The normal UP, DOWN, LEFT
and RIGHT cursor controls are provided for navigating
the various on-screen menus generated by the player or
authored onto video discs. LEFT and RIGHT cursor controls
also provide front panel cue-point CLEAR functionality.
MARK/ENTER button. This button has several
functions. When navigating on-screen menus using the
cursor buttons above, the button acts as an ENTER key,
to confirm a selected menu option or track selection.
The button is also used to mark a point in programme
material for subsequent location in conjunction with the CUE
button
MARK/ENTER also initiates disk playback from STOP mode.
.
Page 15
Front Panel Features
28
29
30
31
32
33
34
hb
MP3 WMAA.PAUSE SHUFFLEREPEAT1 ALL MARK
DVD- AVCD SACDA.CUE PROGRAM HDMI
DTS
00000000000
00000000000
24 /96
00:02:15/00:02:45
1/8 / Track01.CDA
Track01
Track02
Track03
Track04
Track05
Track06
Track07
Track08
Filter
Repeat : Off
Mode : Normal
Music Playing
Alphanumeric Display
The front-panel vacuum-fluorescent display has two rows of 11
large matrix characters and a set of dedicated ‘flags’ at the top
of the display which indicate the selection of various transport
modes, disc types and encoding systems.
In general, the upper row of the alphanumeric display indicates
transport modes (Play, Stop, Pause, etc.) while the lower row
shows the number of the currently-selected track or chapter and
a time display in minutes and seconds.
e.g. for CDs: T06 1:11:13.
More details of the disc time information available on the display
is to be found on page 25.
On-Screen Displays
RC-89 Remote Control
The UDP-89 generates various on-screen menus; these include
the SETUP menu and CD track lists. Navigation through the
menus is achieved with the usual Up/Down/Left/Right cursor
keys , plus an ENTER key , which are found on both the
UDP-89’s front panel and the RC-89 remote control.
14
RC-89 Remote Control
UDP-89 User Manual Version 2.0www.hhb.co.uk
Page 16

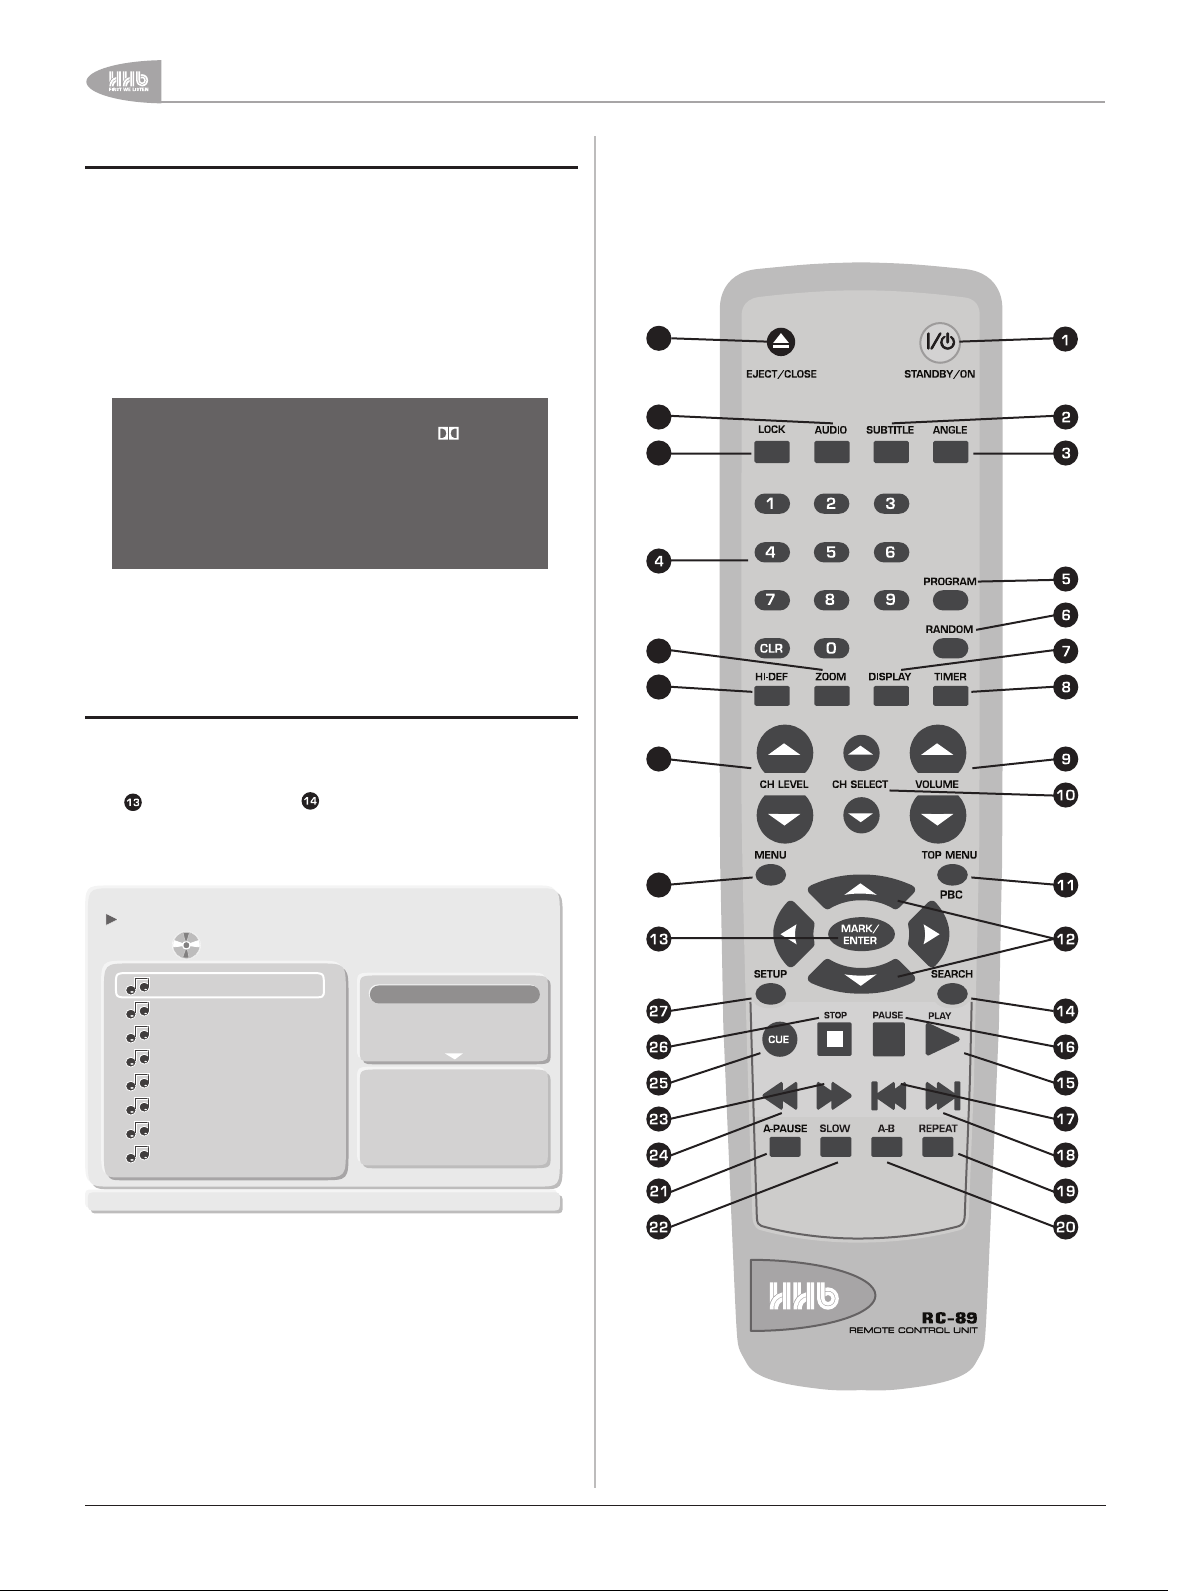
RC-89 Remote Control
The RC-89 Remote Control Unit (infra-red handset) supplied
with the UDP-89 duplicates most of the front panel buttons
in both function and operation. Numerous additional keys are
also provided: a set of 0-9 numeric keys for direct access to
individual disc tracks/chapters, and several sets of buttons
permitting alteration of various settings such as ZOOM, ANGLE,
VOLUME, etc. The operation of some of the buttons may be
dependent on disc content or type.
Note: Where a button description includes a number in square
brackets, the number refers to the front panel diagram on
page 12.
STANDBY/ON – toggles the unit’s power between ON and
STANDBY modes. The UDP-89’s main AC power switch [1]
must be on activated from the remote control.
SUBTITLE – enables on-screen subtitles (disc permitting)
ANGLE – allows selection alternative scene viewpoints (disc
permitting)
Direct Access keys – allows selection of individual tracks/
titles/chapters (disc-dependent)
PROGRAM – allows specific tracks/chapters to be played in
a user-defined sequence
RANDOM – sets tracks/chapters to be played in a random
sequence
DISPLAY – enables/disables on-screen disc information
display (superimposed on video image)
FREW - equivalent to [10] on front panel
CUE – equivalent to [8] on front panel
STOP – equivalent to [7] on front panel
SETUP - equivalent to [17] on front panel
MENU – equivalent to [16] on front panel
CHANNEL LEVEL – adjusts the level of the audio channel
selected with the CHANNEL SELECT buttons
HI-DEF – selects different video output resolutions
ZOOM – selects one of three video zoom levels
AUDIO – selects different audio tracks on a DVD-V, or
stereo mode on a CD
LOCK – engages EJECT LOCK function
EJECT/CLOSE – equivalent to [4] on front panel
TIMER – enables the unit’s auto power-on/off functions
VOLUME + (K) & - (J) – permit adjustment of audio volume
CHANNEL SELECT – used with multi-channel audio; selects
an audio output channel for individual level adjustment
TOP MENU/PBC – equivalent to [15] on front panel
CURSOR ‘UP’ (K), ‘DOWN (J), ‘LEFT’ (I) & ‘RIGHT (H) keys–
equivalent to [13] on front panel
MARK/ENTER - equivalent to [14] on front panel
SEARCH – allows location to a specific track/chapter, or
disc time. The options available depend on disc type
PLAY – equivalent to the PLAY function of [6] on front panel
PAUSE – equivalent to the PAUSE function of [6] on front
panel
PREVIOUS – equivalent to [11] on front panel
NEXT – equivalent to [12] on front panel
REPEAT – allows the entire disc or current track/chapter to
be repeated automatically
A-B – defines a segment of programme within a track/
chapter which is repeated continuously
A.PAUSE– equivalent to [18] on front panel
SLOW – engages DVD slow-motion playback; several speeds
available
FFWD – equivalent to [9] on front panel
UDP-89 User Manual Version 2.0 www.hhb.co.uk
15
Page 17

Quick Start
Highest Quality
HDMI
COMPONENT (YUV)
COMPONENT (RGB)
S-VIDEO
COMPOSITE
Lowest Quality
HDMI Connection
to PLASA/LCD
Component YUV
to Projector
Composite to
Television
Optical To slink to
Surround Reciever
Mains Power
Multichannel audio
outputs to amplifier
Quick Start
Quick Start
This section is to enable you put the UDP-89 to use as quickly
as possible, and provides a simple step-by-step guide to the
basic procedure for replaying audio and video from the two most
common types of disc: standard audio CDs and commerciallyproduced DVD-Vs.
Connecting for video
The UDP-89 has a range of video outputs to facilitate connection
to a wide variety of professional and consumer display devices,
including CRT monitors, LCD and plasma flat-screen displays
and video/data projectors of all types. Any or all of the outputs
may be used simultaneously, if required. Check which inputs are
provided on the displays to be connected, and use that which
provides the highest quality wherever possible.
Note: It is recommended that a video monitor is connected
to the UDP-89 even when in use with audio-only discs, as the
OSDs (On-Screen Displays) provide a range of additional useful
information not available from the front panel display alone.
REF Video Output CONNECT TO (EXAMPLE)
High-quality video monitor
with RGB or YP
8 Component Video
10 S-Video
11 Composite Video (phono)
12 Composite Video (BNC)
13 HDMI
Note: REF column numbers denote rear panel callouts on
page 10
component inputs. Use the
CV output (9) as sync when
set to RGB format.
Other semi-pro or domestic
video recording equipment or
monitors
Other semi-pro or domestic
video recording equipment or
monitors. Usually only one
of these two connectors will
need to be used.
High-quality widescreen
displays with HDMI
input, with built in-audio
reproduction if required
bPr
Example of a simple
configuration.
16
www.hhb.co.uk
UDP-89 User Manual Version 2.0www.hhb.co.uk
Page 18

Quick Start
Connecting for audio
Stereo and multichannel audio outputs are available at the rear
of the UDP-89 in a variety of analogue and digital formats, for
connection to audio amplifiers, powered loudspeakers, D-A
converters or audio inputs on video display devices such as
monitors, TVs or projectors. Any or all of the outputs may be
used simultaneously, if required.
REF Audio Output CONNECT TO (EXAMPLE)
1 Balanced L & R audio
2 Unbalanced L & R audio
3 Unbalanced 5.1 audio
4 Balanced 5.1 audio
5 AES/EBU audio
6 S/PDIF (electrical)
7 S/PDIF (optical)
Note: REF column numbers denote rear panel callouts on
page 10
Note: Multichannel output from SACD and DVD-Audio discs is
only available from the multichannel analogue outputs
Professional mixer or other
mastering equipment with
balanced inputs
Hi-fi monitoring amp or other
stereo consumer equipment
Multichannel amplifier for
surround monitoring
Professional multichannel
monitoring controller or
mixing console with balanced
inputs
Other professional recording
or mastering equipment
Semi-pro or consumer digital
audio equipment; stereo hi-fi
amp with built-in DAC (digitalto-analogue conversion).
Usually only one of these two
connectors will need to be
used.
Playing DVD Video discs
Note: The following instructions refer to the front panel controls
only; unless otherwise stated, the corresponding buttons on the
RC-89 Remote Control Unit may be used if preferred.
With the UDP-89 suitably connected for video and audio •
as above, switch the unit on with the power button
If it is already in Standby Mode (with the power button
illuminated), the STANDBY/ON button on the Remote
Control Unit may be used to turn the unit on.
Open the disc tray with the EJECT button •
DVD-V disc; the tray will close with a light push on the tray
front or a second press of EJECT.
The disc will start playing automatically and the •
programme will proceed to the disc’s main Title Menu,
where it will pause. (Note: This is not the same state as
Pause Mode)
Play Mode can now be entered by pressing PLAY on the •
remote control, or navigating the highlighted selection
in the Title Menu to the “Play Film” option (or equivalent
- wording is likely to vary) with the cursor buttons [
or remote control], then confirming the selection with
MARK/ENTER [
panel PLAY/PAUSE button does not initiate playback
from the Title Menu.
Note that with commercially produced DVD-V discs, the •
transport controls will generally not be functional until the
Title Menu is displayed. This is due to copyright issues.
Most DVD-Vs are subdivided into Chapters, and the •
Title Menu will normally include an option to commence
playback at the start of an individual Chapter. The cursor
keys and MARK/ENTER may be used to select an
alternative play location to Chapter 1. Pressing MENU
at any time will return to the Title Menu.
The disc may be paused during playback at any time by •
pressing PLAY/PAUSE; a further press resumes playback.
The remote control has separate PLAY and PAUSE
buttons.
The programme may be scanned (searched) at high speed •
with the FWD
increases with additional presses. Audio is muted when
scanning a DVD-V disc at high speed.
It is possible to “jump” the play location to the start of the •
next Chapter at any time with the NEXT button
Pressing the PREVIOUS button will jump back to the
start of the current Chapter; a second press then jumps
to the start of the previous Chapter.
Pressing STOP [•
Play Mode and output a blank screen. Pressing PLAY on
the remote control from this state will resume playback
from the point at which it was stopped. However, a
second press of STOP will delete this point “memory”,
so that the next time PLAY/PAUSE is pressed, playback
recommences from the beginning of the disc.
The disc may be removed at any time by pressing EJECT. •
(Note: It is possible to “lock” the EJECT mechanism so that
a disc cannot be inadvertently removed – see page 37.)
or remote control]. Note that the front
and FREW buttons; the search speed
or remote control] once will cancel
; insert the
.
.
UDP-89 User Manual Version 2.0 www.hhb.co.uk
17
Page 19

Quick Start
Playing CDs
Note: The following instructions refer to the front panel controls
only; unless otherwise stated, the corresponding buttons on the
RC-89 Remote Control Unit may be used if preferred.
With the UDP-89 suitably connected for video and audio •
as above, switch the unit on with the power button
If it is already in Standby Mode (with the power button
illuminated), the STANDBY/ON button on the Remote
Control Unit may be used to turn the unit on.
Open the disc tray with the EJECT button •
CD; the tray will close with a light push on the tray front or
a second press of EJECT.
After a short delay, the transport will enter Stop Mode, •
with the playback location at the start of Track 1. The
number of tracks and the total disc playing time will be
shown in the front panel display, while the individual tracks
are listed in the on-screen display.
Play Mode can now be entered by pressing PLAY/PAUSE [•
or Remote Control], or MARK/ENTER [ or Remote
Control]. Playback commences at Track 1.
Playback may be started from an alternative track by •
moving the highlighted track in the on-screen display to
that required with the cursor buttons [
Control], then confirming the selection with MARK/ENTER
[ or Remote Control].
The disc may be paused during playback at any time by •
pressing PLAY/PAUSE; a further press resumes playback.
The remote control has separate PLAY and PAUSE
buttons.
The disc may be scanned (searched) at high speed with •
the FWD
increases with additional presses. Audio is muted during
search.
It is possible to “jump” the play location to the start of the •
next track at any time with the NEXT button
the PREVIOUS button will “jump” back to the start of
the previous Track if pressed during the first 5 seconds of
a track; if pressed later than 5 seconds after the start of
a track, it will jump back to the start of the current track.
Pressing STOP •
from the beginning of Track 1 if PLAY is pressed again.
The disc may be removed at any time by pressing EJECT. •
(Note: It is possible to “lock” the EJECT mechanism so that
a disc cannot be inadvertently removed – see page 37.)
and FREW buttons; the search speed
cancels Play Mode, playback will restart
; insert the
or Remote
.
. Pressing
18
UDP-89 User Manual Version 2.0www.hhb.co.uk
Page 20

Basic Operation
HHB UDP-89
Welcome
No Disc
Loading
Open
Close
Basic Operation
Powering the UDP-89
The front panel POWER switch turns the unit on and off.
Note that this switch is mechanically-latching, and isolates the
unit from the AC mains when off. The UDP-89 is also equipped
with a Standby Mode, which is activated with the STANDBY/
ON button on the RC-89 Remote Control Unit. The unit may be
powered on and off from this state using the remote control
alone.
With no disc already in the tray, the front panel display will
indicate as shown below:
followed by:
If a disc is already present on power-up, the welcome message
changes to:
Loading and Ejecting Discs
Press the EJECT button to open the disc tray. The displays
will show:
Insert a disc, and close the tray either by pressing the front
gently, or by pressing EJECT again. The displays now show:
followed by further displays dependent on the disc type in use
(see Disc Nomenclature below).
Unless the Disable Eject function has been activated (see “Eject
Lock” on page 37), the disc tray can be opened from any
operating mode by pressing EJECT. The audio and video outputs
mute, the display shows ‘Open’ as above, and the tray opens
after a short delay.
Disc Nomenclature
followed by further displays dependent on the disc type in use
(see Disc Nomenclature).
Whereas CDs are divided simply into tracks, programme
material recorded on DVDs is divided in a two-level hierarchy, the
actual terminology being used varying with disc type. The table
below, which also includes Video CDs, summarises the terms
used.
CD/SACD DVD-V DVD-A VCD/SVCD
Higher Level
Division
Lower Level
Division
- Title Group -
Track Chapter Track Track
UDP-89 User Manual Version 2.0 www.hhb.co.uk
19
Page 21

Basic Operation
20
UDP-89 User Manual Version 2.0www.hhb.co.uk
T15 1:18:46
Stop
CD
1/8 / Track01.CDA
Track01
Track02
Track03
Track04
Track05
Track06
Track07
Track08
Filter
Repeat : Off
Mode : Normal
JPEG Preview
Audio Level
With all types of discs, the volume of the audio can be adjusted
from the UDP-89 itself, using the VOLUME up-and-down buttons
on the RC-89 remote control unit. Note that this adjustment
applies to all analogue audio outputs in use, both stereo and
multichannel.
The UDP-89 also permits level adjustment of the individual audio
channels of the analogue multitrack output, via the CH SELECT
and CH LEVEL up-and-down buttons on the RC-89. See “Audio
level and delay adjustment” on page 34 for full details.
Playing Audio Discs
The UDP-89 plays audio-only discs of most types, including
standard commercial Red Book audio CDs, audio CD-Rs and
audio CD-RWs, SACDs (Super Audio Compact Discs), DVD-A
discs (DVD-Audio) and data discs – either CD-R/RW or
DVD-R/RW–containingaudiofilesofvarioustypes.Thissection
initially describes the UDP-89’s operation with a standard audio
CD (CD-DA), with any differences being summarised separately.
Discs containing video programme material (including CD-Rs with
.avi or JPEG files) are covered in the next section, “Playing Video
Discs”.
The next track to be played (1 in the case of a newly-inserted
disc) and the total number of tracks is confirmed, e.g.: 1/6.
The Disc Title will be shown as CDA (Compact Disc Audio) and
the tracks will be listed as Tracknn.
Pressing PLAY/PAUSE
playback from Track 1. Playback may be paused and re-started
at any time by further presses of PLAY/PAUSE. Pressing STOP
once cancels playback and the unit enters Resume Mode;
playback will continue from the last location when playback is
restarted. A second press of STOP (i.e., from Resume Mode)
puts the unit in Stop Mode; playback then restarts from
Track 1 when PLAY/PAUSE is next pressed. For CDs and other
audio discs, Resume and Pause Modes are effectively the same.
Play and Pause Modes are confirmed in the front panel display.
From Play Mode, the NEXT
move the play location to the start of the next or previous track
respectively, the exception being that if PREVIOUS is pressed
when the track time of the track currently playing exceeds 5
seconds, the play location returns to the start of the current
track. A single press of the FFWD and FREW buttons
searches the disc – forwards or backwards respectively - at
twice the normal speed, with audio output muted. Further
presses redouble the search speed to a maximum of 16x
normal speed; a further press then reverts to normal play
speed.
from Stop Mode will always start disc
and PREVIOUS buttons will
Track Selection
In addition to the use of the NEXT and PREVIOUS buttons
described above, playback from the start of a specific track may
also be selected with the cursor keys and/or the direct access
keys on the remote control, or the front panel cursor keys, in
conjunction with the on-screen display.
Transport Controls
On loading a standard CD, a display similar to that below can be
seen after the disc has been loaded and read:
The front panel display indicates the number of tracks on the
CD (Tnn) and the total disc playing time (in the form h:mm:ss).
If a video monitor is connected, the CD tracklist screen is also
available as an OSD (On-Screen Display):
Using the front panel buttons:
The UP/DOWN cursor keys may be used to select the track
to be played. The “selected” track is indicated in the OSD track
list by a yellow border*, and it will start playing the selected
track from Stop or Play Modes when MARK/ENTER is
pressed.
Using the remote control:
The UP, DOWN and MARK/ENTER buttons on the remote
control may be used in the manner described above, with the
difference that the PLAY button can be used to initiate playback
of the selected track from Play Mode.
The remote control’s Direct Access Keys will also select a
track by number, and can be used from Play, Resume and
Stop Modes. Tracks 1 to 9 can be selected by a single button
press, followed by MARK/ENTER. Tracks 10 and above can be
selected by pressing the two digits of the track number, i.e. to
select Track 15, press ‘1’ followed by ‘5’. Confirmation of track
selection is confirmed by the on-screen display first by showing
the “current track” field at the top of the display*, then after a
few seconds by the yellow border moving to the chosen track.
An incorrect button press may be corrected with the CLR button
while the track selection is displayed only on the current track
field.
*Note that the front panel display does not alter when the UP/DOWN cursor keys
are used.
Page 22

Basic Operation
21
UDP-89 User Manual Version 2.0 www.hhb.co.uk
00:02:08/00:00:58
7/8 / Track07.CDA
Track01
Track02
Track03
Track04
Track05
Track06
Track07
Track08
Filter
Repeat : Off
Mode : Normal
Music Playing
00:00:02/00:03:27
7/8 / Track07.CDA
Track01
Track02
Track03
Track04
Track05
Track06
Track07
Track08
Filter
Repeat : Off
Mode : Normal
Music Playing
T01 0:00:32
Play
h
CD
00:02:15/00:02:45
1/8 / Track01.CDA
Secret Garden
Beauty
Blues for me
Time moves on
Sessions
The fix
Signs of life
The end is near
CD Layer
HD-Area: Two-CH
HD-Area: Multi-CH
Active SACD Layer
CD Layer
HD-Area: Two-CH
HD-Area: Multi-CH
For example, if Track 1 is playing, and Direct Access Key 7 is
pressed, the on-screen display first shows:
After a few seconds this changes to:
Other Audio Disc Types
CD-R and CD-RW
The UDP-89 will play CD-Rs and CD-RWs recorded as audio
discs to the Red Book standard. This includes discs recorded in
consumer and professional CD recorders (the HHB
CDR-882 and CDR-830 are examples of the latter) as well as
discs recorded in computer disc drives using audio disc-burning
software such as Nero or Roxio.
The UDP-89 will NOT play unfinalised discs.
The front panel and on-screen displays are as for commercial
audio CDs.
SACDs (Super Audio Compact Discs)
The UDP-89 supports Super Audio CDs recorded to the Scarlet
Book standard SACD2.0. SACDs may be single-layer, dual-layer
or hybrid, as follows:
Single layer disc carrying a surround mix or stereo mix, or •
both, in high-definition DSD (Direct Stream Digital) format
Dual layer disc carrying a surround mix or stereo mix, or •
both, in high-definition DSD (Direct Stream Digital) format
Hybrid disc, with one high-definition layer carrying a •
surround mix or stereo mix, or both, in high-definition DSD
(Direct Stream Digital) format, and a second red-book CD
layer carrying a stereo PCM mix
The CD layer or either area of the HD layer may be selected
for replay via the OSD. On loading an SACD, the UDP-89 initially
selects the multi-channel HD layer. The layers/areas are
displayed in a separate pane on the OSD, and a different layer/
area may be selected by navigating the yellow “highlight” border
from the tracklist with the Cursor Right key, and then performing
the selection with the Cursor Up/Down keys
ENTER key .
and MARK/
Playback of the selected track may be started by pressing either
PLAY or MARK/ENTER.
Time Displays
When first loaded, a CD’s total playing time is indicated on the
front panel LCD in the format h:mm:ss, together with total the
number of tracks on the disc. Once playing, the elapsed time of
the track playing is displayed:
Both Elapsed and Remaining Times of the current Track are also
available on the On-Screen Display.
SACD OSD: Multi-Channel
Highlight and select HD-Area : Two-CH to make it the active layer.
Page 23

Basic Operation
22
UDP-89 User Manual Version 2.0www.hhb.co.uk
CD Layer
HD-Area: Multi-CH
HD-Area: Two-CH
1/8
Track01
Track02
Track03
Track04
Track05
Track06
Track07
Track08
Filter
Add to program
HD Layer
JPEG Preview
1/12 00:00:56
DISC: Secret Garden Tr ack: Secret Garden Artist: Annie Jones A
Secret Garden
Beauty
Blues for me
Time moves on
Sessions
The fix
Signs of life
The end is near
CD Layer
HD-Area: Two-CH
HD-Area: Multi-CH
T01 0:00:32
Play
h
SACD
T01 0:00:32
Play
G01
h
DVD- A
DTS
T01 0:00:32
Dolby
D
h
DVD- A
Highlight and select CD Layer to make it the active layer
Changing the disc layer from HD to CD will allow the SACD to be
played as if were a normal audio CD, and the standard CD OSD
will be displayed on a video monitor (see page 20). The HD layer
may be selected from this screen in a similar manner; the HD
layer button is within the ‘Filter’ pane, and navigating the yellow
highlight border to this pane and scrolling down will reveal it.
DVD-As (DVD-Audio discs)
The UDP-89 supports DVD-Audio discs recorded in accordance
to the recommendations of DVD Forum WG-4. DVD-A discs
store multi-channel audio up to 96 kHz, 24-bit, or stereo up
to 192 kHz, 24-bit using Meridian Lossless Packing (MLP)
compression.
DVD-A discs will normally offer a choice of disc areas, each
carrying the audio programme material encoded in a different
way. DVD-A discs are authored in a similar way to DVD-V discs,
with a Title Menu page requiring user input. (Disc navigation
for this type of disc is described in the next manual sub-section
“Playing discs with video content” on page 23.)
Although referred to as “audio” discs, DVD-A discs will frequently
include video material as well.
See “Stereo and multi-channel audio” on page 32 for further
information regarding stereo and multichannel audio options.
The disc type is confirmed by the front panel display and the onscreen display lists the tracks by name:
NotethatDTS-orDolbyDigital-encodedprogrammeonthedisc
will be correctly decoded, and its presence confirmed by DTS or
Dolby D indications in the front panel display as shown above.
See “Stereo and multi-channel audio” on page 32 for more
information regarding multi-channel audio formats. As with other
types of DVD, the OSDs are entirely dependent on the authoring
process.
Each item, i.e., main high-resolution audio, alternate audio
formats, videos or extras, on a DVD-A disc is called a Group,
and each Group is divided into Tracks. Groups are displayed
on the top line of the front panel display as Gxx, and the track
number displayed as Txx on the bottom line as shown
The NEXT
alternative tracks in the normal way; other tracks may also be
selected using the OSD tracklist and the Cursor and MARK/
ENTER keys.
and PREVIOUS buttons may be used to select
Note also that the OSD includes a right-to-left scrolling banner
text below the track list, confirming the disc Title and Artist,
and the Name of the currently-selected track. Banner text is not
displayed when the player is in STOP mode.
The operation of the other main transport controls is as for
standard CD-DA discs.
Page 24

Basic Operation
23
UDP-89 User Manual Version 2.0 www.hhb.co.uk
00:00:05/00:04:03
6/8 / Track06.MP3
Name: Cross to Bear Artist: Idoltribe Album: Night Chant Year: 2008
Remember You
Now I Know
Evangelina
Fool’s Gold
Wait a While
Cross to Bear
Night Chant
Party
Filter
Repeat : Off
Mode : Normal
Music Playing
T06 0:00:05
Play
h
MP3
C01 0:00:00
Play
T01
h
DVD- V
Play
Extras
Web Link
Chapters
Language
Audio
Cursor buttons change
highlighted option.
Mark/Enter selects.
CD-ROMs and DVD-ROMs containing audio files
The UDP-89 will replay MP3 files (MPEG1/2 Layer 3) on any of
thesupportedmedia(CD-R/RW,DVDR/RW).
Playing MP3 files
After loading, a disc containing MP3 files will produce the front
panel and on-screen displays shown below:
Playing discs with video content
The UDP-89 plays most types of discs with video content,
including standard commercial DVD-Video discs (commonly
referred to simply as “DVDs”), Video CDs, Super VCDs and
CD-R/RWsorDVD-R/RWscontainingvideofilesofvarious
types, including JPEG picture files. This section initially describes
the UDP-89’s operation with a standard DVD-V, with any
differences being summarised separately.
Transport Controls
On loading a standard DVD-V, the following displays are typical of
those presented after the disc has been loaded and read:
Depending on how a DVD-Video disc is authored, the Main Title
Menu will be displayed first, or some introductory material will be
played, or the main feature will be played without displaying any
menu screen.
Navigation of the disc and any menu screens is achieved using
the up/down and left/right cursor keys and the MARK/ENTER
button on the remote control or front panel.
The track names are the filenames of the MP3 files; note that
they are truncated to 15 characters. The OSD also includes
scrolling banner text (below the track list) containing further
information about the track, including fields for track Name,
Album Title, Artist, etc. Whether any or all of these fields
contain textual data depends on how the MP3 disc was created
and the PC disc-burning software employed. The data inserted
will be obtained, if available, from the information appended to
the MP3 file at source. Note that banner text is not displayed
when the player is in Stop Mode.
The NEXT and PREVIOUS buttons may be used to select
alternative tracks in the normal way; other tracks may also be
selected using the OSD tracklist and the Cursor and MARK/
ENTER keys. The FFWD and FREW buttons allow the play
location to be moved at high speed in the normal way, but like
audio CDs, the audio is muted during the process.
Note that, unlike CD and SACD, pressing Play from STOP will not
always restart playback from the first track (i.e., MP3 file) on
the disc or in the folder. Instead, the most recently played track
will be replayed from the beginning.
If a disc contains folders as well as files, it is recommended to
connect a video monitor to aid disc navigation.
To start the disc playing, either press PLAY/PAUSE , or
MARK/ENTER
screen menu option is highlighted (which will generally be the
default case).
while the “Play Disc” (wording may vary) on-
Page 25

Basic Operation
24
UDP-89 User Manual Version 2.0www.hhb.co.uk
C04 0:01:15
Pause
T01
hb
DVD- V
Resume
DVD- V
PLAY
Normal Speed
x2
x4
x8
x16
Pressing PLAY/PAUSE from Play Mode will freeze the video
and mute the audio (Pause Mode); a second press resumes Play
Mode. (Note the RC-89 Remote Control Unit has separate Play
and Pause buttons.)
Pressing STOP from Play Mode puts the transport into
Resume Mode; video and audio stop and a blank screen will be
displayed:
Pressing PLAY/PAUSE from this state resumes playback of
the disc from the point at which it was stopped. Pressing STOP
a second time puts the player into Stop Mode.
From Stop Mode, playback will re-commence at a point
determined at the disc authoring stage; this may be the start
of Chapter 1, the Title Menu, or main Disc Menu in the case of
multi-Title discs, or the start of the disc itself.
The programme may be scanned (searched) at high speed
by pressing the FFWD
buttons. A single press initiates scanning at 2x normal play
speed; subsequent presses double the speed to a maximum of
16x normal, when one more press returns to 2x. PLAY/PAUSE
may be pressed at any time to resume normal playback.
Audio is muted during search.
(Forward) or FREW (Reverse)
Accessing the Disc Menus
The Titles on a DVD-V will generally consist of several Chapters.
Although some commercial DVD-V discs consist of a single Title,
it is possible for a disc to contain more than one, each Title
being further subdivided into Chapters. Further, copyright and
other information may be recorded as one or more separate
Titles, but access to them is restricted, and thus the disc only
has a single Title from the user’s point of view. These matters
are determined at the disc authoring stage.
Pressing MENU
the disc to the Root Menu for the currently-selected Title,
allowing selection of its Chapters. A multi-Title disc will possess
a further menu, allowing individual Titles on the disc to be
selected. This menu is accessed with the TOP MENU button
(or its remote control equivalent).
Note that on discs containing a single Title, MENU and TOP
MENU will generally both access the Root Menu for the single
Title.
(or its remote control equivalent) will locate
Chapter Selection
In addition to the use of the NEXT and PREVIOUS buttons
described above, playback from the start of a specific chapter
can also be selected by using the remote control unit’s Direct
Access Keys. It will normally (though dependent on how the disc
is authored) be possible to jump to a specific chapter from the
Title Menu.
Using the Direct Access Keys
The remote control’s Direct Access Keys will select a chapter
by number, and can be used from Play, Resume and Stop
Modes. Chapters 1 to 9 can be selected by a single button
press, Chapters 10 and above can be selected by pressing
the ‘+10’ button first, once for 10-19, twice for 20-29, etc ,
e.g., to select Chapter 15, press ‘+10’ followed by ‘5’. It is not
necessary to press MARK/ENTER.
From PLAY mode, the NEXT and PREVIOUS buttons
will move the play location to the start of the next or previous
chapter respectively.
Using the Title Menu
Most DVDs’ Title Menus will include an option to select an
individual chapter for playback. The wording and style used is
under the control of the disc author and thus varies widely, but
the word ‘scene’ is normally used instead of ‘chapter’ in longformat programme such as feature films. (The list of available
scenes is often illustrated with the first frame of the chapter.)
The cursor keys are used to select the chapter to be played.
The “selected” track will be indicated in the chapter list by some
form of “highlighting”, and it will start playing when either PLAY/
PAUSE or MARK/ENTER is pressed.
Page 26

Basic Operation
25
UDP-89 User Manual Version 2.0 www.hhb.co.uk
DVD Video 00:25:28 01:04:27
Chapter 2/6:
Bitrate 4.755Mbps
Title 1/2
Audio 1/1 Dolby D 2 Ch Eng
Subtitle Off
Angle 1/1
Time & Other Displays
The UDP-89’s front panel display shows the elapsed time of the
currently-selected Title (in the form h:mm:ss). “Zero” time will
generally be the start of Chapter 1.
Pressing DISPLAY on the RC-89 Remote Control Unit while
a DVD-V is loaded generates an on-screen text banner
superimposed on the video image. A typical example is shown
below:
Along with other information, the banner confirms current unit
settings for audio track and viewing angle selection and enabling
of subtitles. These settings are described in a later section of
the manual. As they are not confirmed elsewhere, it is always
useful to use the Display function when changing them. A
second press of DISPLAY cancels the banner.
Other video disc types
DVD-R and DVD-RW
As with audio CDs recorded in a computer, the UDP-89 will play
DVD-Video material prepared on recordable and rewriteable
blank DVDs in computers using DVD-Video authoring software.
Discs recorded in consumer and professional DVD recorders
are also compatible.
Operation of the UDP-89 with VCDs and SVCDs is broadly similar
to playing audio CDs. There is no menu or other data available
on-screen. Disc content is arranged as Tracks, and the main
transport buttons, including STOP, PLAY, PAUSE, FFWD, FREW,
NEXT and PREVIOUS, function normally.
Pressing the TOP MENU button with a VCD or SVCD loaded
activates Playback Control (PBC), which provides a system of
basic disc navigation. The front panel display will indicate
PBC On, and the disc will re-locate to a disc menu prepared at
the disc authoring stage listing the available tracks on the disc.
Track selection is made with the 0-9 numeric keys, and playback
commences from the start of the selected track.
CD-ROMs and DVD-ROMs containing video files
The UDP-89 permits replay of certain video file types recorded
on CD-ROM or DVD-ROM discs formatted to either ISO9660 or
UDF v1.02. Compatible formats include MPEG1 and MPEG 2
video files (*.mpg files), and MPEG4 ASP coded video files (*.avi
files) with embedded MPEG, PCM or Dolby Digital audio.
CD-ROMs and DVD-ROMs containing JPEG image files
The UDP-89 will replay JPEG picture files (*.jpg) recorded on CDROM or DVD-ROM discs and can display them in high-definition
– 720p or 1080i.
After loading, the OSD displays a list of *.jpg image files available
for viewing.
There are several types of recordable/rewriteable DVD media
in common use, and not all DVD drives can record to all types.
The UDP-89 is able to accept all types of disc currently in use;
these include:
DVD-R•
DVD-RW•
DVD+R•
DVD+RW•
Both standard 4.7GB and dual-layer 8.5GB versions of the
above media types are supported.
The UDP-89 will NOT play unfinalised discs.
Note: DVD-RAM discs are NOT supported.
The front panel and on-screen displays are as for commercial
DVD-V discs.
Video CDs and SuperVCDs
Video CD (VCD) is an older digital video format using CD-ROM
discs. MPEG1 video coding with Layer 2 stereo audio coding is
employed to record up to 80 minutes of programme material on
a 700MB disc. Playback of discs recorded to the White Book
VCD2.0 standard (1995) is supported by the UDP-89.
The later Super Video CD (SVCD) format uses the higher bitrate
MPEG2 coding system on the same media type to achieve
higher resolution video and improved audio (including additional
tracks). Playback of discs recorded to the SVCD standard set by
the China National Committee of Standards is supported by the
UDP-89.
Page 27

Additional Features
26
UDP-89 User Manual Version 2.0www.hhb.co.uk
Search
Title ---
Chapter ---
Time --:--:--
Search
Track ---
Time --:--:--
Disc Time --:--:--
Search
Track ---
Disc Time --:--:--
Additional Features
Search
The UDP-89’s Search function provides a method of quickly
locating to any point on the disc and commencing playback from
there. The location point is entered in standard hh:mm:ss
format (hours, minutes and seconds) and may be either the
track/chapter time or the disc time.
The Search function is entered
with the SEARCH button on the
remote control unit. (Note there
is no alternative front panel
control for this function.)
A pop-up window appears on the on-screen display,
superimposed on the current image. This contains various data
fields into which track numbers or times may be entered using
the 0-9 numeric keys. The fields offered depend on disc type and
also transport mode.
Locating to a CD Track or DVD Title or Chapter
Move the yellow border to the Track field (CDs) or Title* or
Chapter field (DVDs) with the UP/DOWN cursor keys. Enter the
number of the Track, Title or Chapter using the 0-9 numeric
keys on the remote control unit and press MARK/ENTER .
The disc will locate to the start of the selected Track, Title or
Chapter and playback will immediately commence from there.
The Search window closes.
Note: Many commercial DVD-Vs only contain one Title
constituting the main programme material.
Locating to a time point
Move the yellow border to the Time (CDs or DVDs) or Disc Time
(CDs only) field. Enter the locate time in hours, minutes and
seconds using the 0-9 numeric keys on the remote control unit
and press MARK/ENTER. The disc will locate to this time point
and playback will immediately commence from there.
The Time field displayed for DVDs and the Disc Time field
displayed for CDs both refer to the total Title or disc time, and
thus the time point located to using these fields will be relative to
“time zero” at the start of the disc’s programme material.
The Time field displayed for CDs when a track is in Play or Pause
Modes refers to the duration of the currently selected track
only. A time entered in this field will be relative to the start of the
current track.
a) DVD Search
b) CD Search in Play and Pause
c) CD Search in Stop
Above are shown the Search mode on-screen windows with (a)
DVDs, (b) CDs in Play and Pause Modes and (c) CDs in Stop
Mode. The field at the top of the list will be selected, indicated
by a yellow border. Data can be entered into this field by using
the numeric keys. Alternative fields can be selected by using the
UP and DOWN cursor keys on the remote control unit (or front
panel ).
If the time of the required locate point is less than one hour
(01:00:00), only minutes and seconds need to be entered;
similarly for locate points less than one minute (00:01:00), only
the seconds need to be entered. However, trailing zeroes must
be entered when the locate time is an exact number of minutes
(or indeed, hours).
Examples:
LOCATE TIME (hh:mm:ss) KEYSTROKES
00:02:35 2, 3, 5, MARK/ENTER
00:04:00 4, 0, 0, MARK/ENTER
01:15:36 1, 1, 5, 3, 6, MARK/ENTER
01:00:00 1, 0, 0, 0, 0, MARK/ENTER
00:00:20 2, 0, MARK/ENTER
Search may be exited at any time with a second press of
SEARCH.
Page 28

Additional Features
27
UDP-89 User Manual Version 2.0 www.hhb.co.uk
C03 0:01:15
Cue
DVD- V
Bookmark --:--:--
C03 0:02:08
Cue
0:01:18
C03 0:02:08
Cue
Chap 03
Bookmark 00:01:18
Storing and Cueing to a Marker Point
The UDP-89 has a “scratchpad” location memory, which can be
used to store a marker point in programme material “on-the-fly”.
The marker point can easily be recalled and located to at a later
time.
The feature is entered by
pressing the CUE button (either
on the front panel
remote control unit) while a disc
is playing, which causes the
front panel display and the popup window below to be shown.
or the
Locating to the Marker point:
Press CUE to open the Cue pop-up window, and press MARK/
ENTER. The disc will immediately locate to the Cue point and
play from there (unless Auto-Pause Mode is enabled; see next
section). The pop-up window closes.
Note: The time loaded into the memory includes the track
number (in the case of CDs) as well as the Track Time, though
only the Track Time is displayed. The CUE feature may be
used to re-locate to a point within a different CD track to that
currently playing. In the case of DVDs, the overall disc time is
stored.
Clearing the memory:
Pressing CLR (on the remote control unit) or either the LEFT
or RIGHT front-panel cursor keys while the Cue window is
on-screen will clear the contents of the memory. The front panel
display shows Cue Cleared in confirmation and the MARK flag
extinguishes. Unless cleared, a Marker point remains stored
until the disc is removed from the unit.
Auto-Pause
The UDP-89’s Auto-Pause Mode allows accurate cueing to the
start of a track (CDs) or chapter (DVDs). The transport enters
Pause Mode at the start of the track/chapter, awaiting a PLAY
command.
Auto-Pause Mode is enabled by
pressing the A-PAUSE button on
the front panel
control unit. The selection is
confirmed by the A.PAUSE flag
in the front-panel display.
or remote
Initially, the Cue memory is empty. Note that the wording in the
pop-up window changes slightly with other disc types.
Storing a Marker point:
Pressing MARK/ENTER while the Cue memory is displayed
will store the playback location at that instant into the memory.
This is confirmed by the MARK flag in the front panel display.
The time saved into memory is displayed both on-screen and on
the front panel, see above. Note that the track/chapter number
is also displayed on the front panel with an alternating display.
The current play point can only be stored if the memory is
empty. Pressing it when the memory already contains a valid
time will cause the disc to locate to that point (see next section).
Thus marking a point during audition and then subsequently
relocating back to it requires only two keystrokes.
A further press of the CUE button cancels the displays; the
contents of the memory remains saved as long as the disc
remains loaded.
When Auto-Pause Mode is enabled, the unit will enter Pause
Mode automatically after a re-location to a different disc location
has been commanded by any method, including:
usingtheNEXTorPREVIOUSkeystostepthroughdisk•
tracks/chapters
useoftheUP/DOWNcursorkeyswithCDstostep•
through the on-screen track list display
locationtoadifferenttrack/chapterwiththeremote•
control unit’s 0-9 keys
useoftheSearchfunction•
useoftheCue(Bookmark)function•
Hint: If held in Pause Mode at the start of a track or chapter,
playback may restart more accurately if the ENTER button is
used instead of PLAY. If the GUI is being used, the cursor must
be positioned on the relevant track.
Page 29

Additional Features
28
UDP-89 User Manual Version 2.0www.hhb.co.uk
C01 0:00:32
SlowFwd
1/2
h
DVD- V
00:02:15/00:02:45
1/8
Track01
Track02
Track03
Track04
Track05
Track06
Track07
Track08
Edit mode
Program view
Add to program
Music Playing
SLOW
FWD
1/2
FWD
1/4
FWD
1/6
FWD
1/8
RWD
1/2
RWD
1/4
RWD
1/6
RWD
1/8
Slow-motion playback
The UDP-89 has a Slow Mode, which permits the replay of the
video content of DVD-Video discs and VCD/SVCD discs in slowmotion.
Slow-motion
replay is
enabled by
pressing the
SLOW button
on the remote
control unit.
Note that it is not possible to enable Slow
Mode from the UDP-89’s front panel.
Slow Mode may be entered from Play, Pause,
FFWD or FREW Modes. A single press of
SLOW causes the video output to replay at
approx. 1/2x normal speed; further presses
reduce the replay speed further in steps
until the motion reverses to half normal play
speed. Further presses then reduce the
reverse speed further.
Pressing PLAY exits Slow Mode and returns
the disc to normal play speed; FFWD and
FREW Modes can also be selected directly
from Slow Mode.
Slow Mode is confirmed in the front panel display as in the
example shown below.
Program Play
Sometimes it necessary to play individual items of programme
material on a disc in an order other than that in which they are
recorded. The UDP-89’s Program function permits the user to
program the order in which tracks (CD, SACD or DVD-A) or
chapters (DVD) are replayed. Up to 30 CD tracks or 12 DVD
chapters (or SACD tracks) may be sequenced in this way. The
programming method differs slightly for audio and video disc
types.
For DVDs and SACDs, the Program function is enabled by
pressing the PROGRAM button on the remote control unit. For
CDs, it is enabled via the OSD.
Note: It is not possible to enable the DVD/SACD Program
function from the UDP-89’s front panel.
Programming tracks on audio CDs (and CD/DVD-ROMs containing MP3, jpg or avi files)
Note: Track programming is performed using the on-screen
display, so a video monitor must be connected to the UDP-89 for
the Program function to be used.
The Program function can be selected from Stop or Play Modes.
Use the cursor keys to highlight the selections available on the
right of the screen
The video may be frozen while in Slow Mode by pressing the
PAUSE button on the remote control unit, and Slow Mode
resumed by a further press of SLOW. However, note that
pressing the front panel PLAY/PAUSE button from Slow
Mode will cause the unit to re-enter normal Play Mode, not
Pause.
With discrete video files (*.mpg or *.avi), the front panel display
shows the slow speed sub-multiple. Slow Mode is not available in
reverse with these file types.
The audio output from the disc is muted during Slow Mode.
Slow Mode is inoperative with CDs.
Program Edit Mode
Note that Edit mode is selected, indicated by the yellow border.
Press MARK/ENTER
to confirm the selection. Navigate the
yellow border back to the tracklist with the cursor keys ,
and select the tracks to be played in the order that they are
required, pressing MARK/ENTER to select each one in turn;
a tick appears alongside each of the selected tracks. Navigate
the yellow border back to Add to Program, and press MARK/
ENTER. The tick marks next to the tracks will disappear.
By selecting the Program view option in a similar way, only
the tracks selected to be played will be displayed in the main
browser window, in the correct order. The Program view button
changes its legend to Browser view, and will toggle between the
two views.
Page 30

Additional Features
29
UDP-89 User Manual Version 2.0 www.hhb.co.uk
00:02:15/00:02:45
-/3
Track02
Track05
Track01
Edit mode
Browser view
Clear program
Music Playing
PROGRAM VIEW mode
Play Mode
Mode : Program
Repeat: Off
h Play
1 --- ---
2 --- ---
3 --- ---
JJ
Play Mode
Mode : Program
Repeat: Off
h Play
2 T04 C05
3 T04 C03
4 --- ---
J
J
J
Play Mode
Repeat: Off
Clear Program
h
Play
1 T03 C06
2 T04 C05
3 T04 C03
J
When in Program view, the Add to program button changes
to Clear program (see above). To delete tracks from the
programmed list, select the tracks to delete, pressing MARK/
ENTER on each in turn, then select Clear program. Track
deletion can only be conducted while the unit is in Stop Mode.
To play the programmed playlist, press PLAY. Note that the
tracks may be added to playlist even whilst it is playing. The track
number displayed on the front panel shows the track position in
the playlist, rather than the actual track number on disc.
Programming chapters on DVD-Video
and DVD-Audio, and tracks on SACD
Using the Program function with video discs generates a popup window on the video image. Program can be selected from
STOP. Before programming a sequence of chapters, check the
programme material and make a note of the Title and Chapter
numbers required.
c) Program Clear
Navigate the yellow border to the first pair of blank fields on the
right and enter the Title No. and Chapter No. of the disc item
which should be the first to be replayed (For SACD, only track
numbers need be entered; for DVD-A Group and Track numbers
are required). The subsequent items can be added in turn by
moving the yellow border down with the cursor keys and
entering the Title and Chapter (or track) numbers of each. Up
to 12 selections can be made, cursoring down from the lowest
visible will reveal further blank fields (see (b) above for example).
When the sequence has been programmed, playback can be
started by navigating the yellow border to Play, and pressing
MARK/ENTER.
The programmed sequence may be cleared by navigating to Play
and scrolling down when Clear program will be revealed. Press
MARK/ENTER to clear (see (c) above).
It is not possible to edit the program list during PLAY. Also, the
front panel will show the Title, Chapter, Group or track number
as they are on the disc, not with respect to their position in the
list.
Pressing PROGRAM produces the on-screen display shown at (a)
below:
a) Program Screen
b) Enter Details
Page 31

Additional Features
30
UDP-89 User Manual Version 2.0www.hhb.co.uk
REPEAT
REPEAT
OFF
REPEAT
1
REPEAT
FOLDER
(IF AVAILABLE)
REPEAT
ALL
T01 0:49:29
Repeat
One
REPEAT1
CD
T01 0:49:29
Repeat
OFF
CD
Repeat Play
The UDP-89 Repeat functions allow the UDP-89 to be used for
continuous playback, with a user-defined section of programme
material being played in a loop until the function is cancelled.
There are four Repeat functions:
FUNCTION ACTION SELECTION VIA:
BUTTON BROWSER
REPEAT 1 Current track/chapter is
REPEAT FOLDER Files in currently-selected
REPEAT ALL All programme material
REPEAT A-B Repeats programme
* only applicable to CD-ROMs, etc., containing MP3 or jpg, etc. files
With discs generating an on-screen browser window, the
browser can be also used to enable Repeat; an additional
function, Repeat Folder, is available for discs such as CD-ROMs
containing MP3 files. (See “Selection of Repeat functions from
the OSD” on page 31)
With CDs (and other disc types generating an on-screen
broswer page), the Repeat 1 and Repeat All functions may also
be enabled via the on-screen display and the cursor keys, from
the front panel only if wished. It is not possible to enable the
Repeat functions with a DVD from the unit’s front panel.
repeated
folder are repeated*
on disc is repeated
material between defined
start and end times
With CDs, DVDs, etc., the
REPEAT button on the remote
control unit can be used to
enable the Repeat 1 and Repeat
All functions; the A-B button
(also on the remote) enables the
Repeat A-B function.
REPEAT SINGLE
REPEAT FOLDER
REPEAT ALL
A-B n/a
Repeat 1
The Repeat 1 function can be selected from any transport mode
(except Resume or Stop with DVDs and SACDs) by a single
press of REPEAT. The top line of the front panel display confirms
selection for a few seconds as shown:
The REPEAT 1 flag also illuminates (except in Stop Mode).
At the end of the currently-selected CD track or DVD chapter,
playback will immediately restart from the start of the same
track or chapter. With CDs and SACDs, Repeat 1 can be
cancelled at any time by pressing STOP, which is confirmed as
shown:
Note: When playing DVDs, pressing STOP does not cancel
Repeat unless it is pressed a second time to cancel Resume
Mode; alternatively, the function may be cancelled by cycling
through the options to Repeat Off.
Pause, FFWD and FREW transport modes can still be used
while Repeat 1 is set. However, it is not possible to re-locate
past the end or start of the current track/chapter; attempting
to do so will re-play the current track from its start when the
track boundary is reached.
Pressing the REPEAT button several times selects Repeat 1,
Repeat Folder and Repeat All in sequence:
Page 32

Additional Features
31
UDP-89 User Manual Version 2.0 www.hhb.co.uk
T01 0:49:29
Repeat
All
REPEATALL
CD
00:02:15/00:02:45
1/8 / Track01.CDA
Track01
Track02
Track03
Track04
Track05
Track06
Track07
Track08
Filter
Repeat : Off
Mode : Normal
Options:
Off
Single
Folder
All
JPEG Preview
T03 0:01:10
Repeat
A
REPEAT
CD
T03 0:01:39
Repeat
A-B
REPEAT
CD
T03 0:01:39
Rpt
A-B OFF
CD
Repeat All
This operates in a very similar way to Repeat 1. Further presses
of REPEAT from any transport mode (except Stop with DVDs or
SACDs) will enable Repeat All, confirmed by:
The REPEAT ALL flag also illuminates (except in Stop Mode).
At the end of the disc, playback will immediately restart from the
start of the disc’s programme material (or in the case of DVDs,
the current Title). With CDs, Repeat All can be cancelled at any
time by pressing STOP. Note that when playing DVDs, pressing
STOP does not cancel Repeat unless it is pressed a second
time to cancel Resume Mode; alternatively, the function may be
cancelled by cycling through the options to Repeat Off.
Pause, FFWD and FREW transport modes can still be used
while Repeat All is set. Repeat All remains active even if the
play location is advanced/retarded through track/chapter
boundaries.
Selection of Repeat functions from the OSD
With CDs and other disc types generating an on-screen browser
page (e.g. CD-ROMs containing MP3 files) - but not SACDs - the
cursor keys may be used to enable Repeat 1 and Repeat All.
Repeat Folder
A further Repeat option, Repeat Folder, is available for discs
containing files of type such as MP3 or jpg. Selection of Repeat
Folder will cause the disc to play all the files in the currentlyselected folder repeatedly, but will ignore files in other folders,
including any nested within the currently-selected one.
Note: The on-screen display and the front panel display both
confirm Repeat status, regardless of the selection method.
Repeat A-B
The UDP-89 will continuously replay a segment of material
whose start and end points have been user-defined. Both start
and end points must be within the same track (or chapter); it is
not possible to define a loop across a track/chapter boundary.
Repeat A-B is enabled with the A-B button on the remote control
unit. The start and end points of the section to be repeated
are captured “on the fly”, with the unit in Play Mode. As the
programme material is playing, press the A-B button once at
the start of the section to be repeated. The display confirms the
selection for a few seconds as shown:
At the end of the segment to be repeated, press the A–B a
second time; the display again confirms briefly:
The cursor keys can be used to navigate the yellow border from
the tracklist pane to the Filter pane and the Repeat field.
Pressing MARK/ENTER with the Repeat field selected will cycle
the parameter through Off to Single, Folder, All and back to Off.
Setting the parameter to Single is equivalent to Repeat 1, as
described above; similarly, setting it to All is equivalent to
Repeat All.
The playback location immediately jumps back to the point
defined as ‘A’, and the section of programme between points
‘A’ and ‘B’ will now be played repeatedly. Repeat A-B will remain
active until STOP is pressed, at which time, the display will
confirm cancellation of the Repeat mode:
Page 33

Additional Features
32
UDP-89 User Manual Version 2.0www.hhb.co.uk
C03 0:00:45
Play
T01
SHUFFLE
DVD- V
00:02:15/00:02:45
1/8 / Track01.CDA
Track01
Track02
Track03
Track04
Track05
Track06
Track07
Filter
Repeat : Off
Mode : Normal
Options:
Normal
Shuffle
Music Intro
JPEG Preview
Shuffle Mode
Shuffle Mode allows the tracks on a CD or chapters on a DVD
to be played in a random order. The method of enabling Shuffle
Mode is different for the two disc types.
Shuffle Mode – DVDs
With DVDs, it is selected by pressing the RANDOM button on
the remote control unit while the disc is playing; selection is
confirmed by the SHUFFLE flag on the front panel display.
Music Intro Mode
Music Intro is a useful method of identifying tracks on a CD-A or
a disc containing MP3 audio files. When selected, only the first
10 seconds of each track or file on the disc is played.
It is enabled in the same way described above for Shuffle Mode;
a second press of MARK/ENTER with the mode field highlighted
will select Music Intro. Confirmation of the mode is also given
in the front panel display, which displays the text Intro Scan for
approximately 2 seconds.
Music Intro may be combined with Repeat Mode if wished. To
cancel Music Intro Mode, set the mode parameter to Off.
Audio configuration
Stereo and multi-channel audio
The UDP-89 is equipped with both stereo and multichannel
analogue audio outputs; additionally, S/PDIF and AES/EBU
digital outputs are provided. Not all outputs are available
simultaneously, and which outputs carry what information is
determined both by user selection and disc type.
Normal stereo audio will be available at both the main L/R
outputs and the L
discs carrying only 2-channel audio programme material, such
as standard CDs.
front
and R
analogue outputs when playing
front
Once selected, the disc continues to play normally, except that
the chapters will be played in random order without repetition
until they have all been played. To cancel Shuffle Mode, press
RANDOM a second time.
SHUFFLE Mode - CDs
With CDs, Shuffle Mode is enabled via the on-screen browser
page. Using the cursor keys, navigate the yellow border from
the tracklist pane to the Filter pane, and select the mode field.
Repeated presses of MARK/ENTER cycles the mode parameter
through Normal, Shuffle, Music Intro and back to Normal.
Select Shuffle to enable the random play feature.
As with DVDs, Shuffle Mode is confirmed by the SHUFFLE flag
in the front panel display. To cancel Shuffle Mode, set the mode
parameter to Off.
Note: The first track to be played in Shuffle Mode will always be
track 1.
When playing disc types offering a choice of audio formats
(stereo or multichannel), the choice of which to play is made
by the user. The method of selection varies with disc type, as
summarised below:
DISC TYPE SELECT VIA REFER TO
DVD-V
DVD-A Playing DVD-Audio discs
SACD
AUDIO button/DISPLAY function (or
Disc Menu)
Layer/area selection in browser
screen
Below (next manual
section)
on page 20
Playing SACDs on
page 21.
When multichannel audio programme (e.g. 5.1 ‘surround’) is
selected, full multichannel audio is available from both sets of
analogue multichannel rear connectors ( & on the rear
panel, see page 10.) The main L & R outputs ( & on
the rear panel, see page 10) will generally carry an internallygenerated stereo downmix of the multichannel audio, or produce
a Lt/Rt matrix output for suitable for decoding in a matrix
surrounddecoderofatypesuchasDolbyPro-Logic.Withsome
discs, the main outputs may be muted.
The format of the multi-channel downmix carried by the main
L & R stereo outputs (which includes all digital outputs – HDMI
and S/PDIF when not set to bitstream, and AES/EBU) is
determined by the surround speaker setting in the Audio section
of the SETUP menu. With both formats, the centre channel C is
mixed equally into the main left and right channels.
If the Surround Speakers are set to Large/Small, then •
the main L & R stereo outputs will be in a L
format, compatible with external Dolby Pro-Logic decoding.
t/Rt
matrix
In this format, the rear channels (Ls and Rs) are mixed
together and added out-of-phase into the main left and
right channels.
L
R
= L + (0.707 x C) + (-0.707 x Ls) + (-0.707 x Rs)
t
= R + (0.707 x C) + (0.707 x Ls) + (0.707 x Rs)
t
Page 34

Additional Features
33
UDP-89 User Manual Version 2.0 www.hhb.co.uk
If the Surround Speaker are set to None, then the main L •
& R stereo outputs will be standard stereo. In this format,
the left rear channel is added to the main left channel, and
the right rear channel is added to the main right channel.
Left = L + (0.707 x C) + (0.707 x L
)
s
Right = R + (0.707 x C) + (0.707 x Rs)
Digital audio data in various formats is available at the two
S/PDIF connectors (optical
and coaxial ), the AES/EBU
output and also the dedicated HDMI connector . (See rear
panel connections on page 10.) The data available will depend
on disc type and, in the case of the S/PDIF outputs, also on
the setting of the Digital Output parameter in the Audio tab of
the Setup Menu. The table below summarises the digital audio
outputs for various disc types:
DISC TYPE AUDIO FORMAT S/PDIF and HDMI AES/EBU
Downmix Bitstream
CD 44.1kHz PCM audio PCM PCM PCM
DTS
MUSIC
DISC
SACD
DVD-Video
DVD-Audio
Video CD MPEG PCM PCM PCM
1 The SACD format restricts the output quality of any downmixed output. Therefore, the Lt/Rt Stereo outputs are limited to 16-bit PCM resolution
when playing SACDs, including the SACD-stereo track. This applies to all digital outputs (S/PDIF, AES/EBU and HDMI), and the stereo analogue
outputs. Therefore when working in stereo, improved analogue quality will be available from the front L/R outputs.
2 May be downsampled to 48kHz if 96kHz digital output is prohibited by the disc.
3 May be prohibited by the disc
DTS bitstream PCM DTS PCM
1
PCM
176.4kHz
(S/PDIF
muted)
PCM
44.1kHz
PCM
96kHz
PCM
44.1kHz –
96kHz
PCM
44.1kHz –
96kHz
DSD
+ Downsampling ON
Dolby Digital PCM Dolby Digital PCM
DTS PCM DTS PCM
MPEG PCM PCM PCM
PCM (48kHz) PCM PCM PCM
PCM (96kHz)
+ Downsampling ON PCM 48kHz PCM 48kHz PCM 48kHz
PCM/MLP
3
+ Downsampling ON
PCM
176.4kHz
(S/PDIF
muted)
PCM
44.1kHz
PCM
2
96kHz
PCM
44.1kHz –
96kHz
PCM
44.1kHz –
96kHz
2
PCM
176.4kHz
PCM 88.2kHz
PCM 96kHz
PCM
44.1kHz –
192kHz
PCM
44.1kHz –
96kHz
2
The AUDIO button
The RC-89’s AUDIO button may be used to select alternative
audio programmes on DVD-V and DVD-A discs that offer them.
Pressing AUDIO scrolls through the available programmes,
which may include different audio encoding systems such as
DolbyDigital®orDTS®,alternativelanguagesora“director’s
commentary”. The inclusion of any alternative audio programme
is determined at the disc authoring stage; many commercial
DVD-V discs do not offer it.
No visual confirmation of which audio programme is currently
selected is given, unless DISPLAY is enabled (see “Time & Other
Displays” on page 25). The data in the Audio field changes
as AUDIO is pressed, indicating the number of the audio
programme, and (typically) the encoding system employed,
number of audio channels available and language.
Dolby Digital
TheUDP-89isequippedtodecodeDolbyDigital®audiofrom
DVD-V and DVD-A discs containing programme material thus
encoded.WhenDolbyDigitalprogrammeisselected,upto5.1
multichannel audio will be available at both sets of multichannel
analogue audio outputs, and a downmix of this at the main L/R
analogue outputs and the AES/EBU digital output. The output
at the S/PDIF and HDMI digital outputs can be either the same
downmix, or the raw Dolby Digital bitstream; this is determined
by the setting of Digital Output in the audio Setup menu. The
front panel display will show Dolby D when a Dolby audio track is
playing.
DTS
TheUDP-89candecodeDTS®-encodedaudiofromDVD-V,
DVD-A and DTS Music Discs containing such programme
material.WhenaDTSaudiotrackisselected,upto5.1
multichannel audio will be available at both sets of multichannel
analogue audio outputs, and a downmix of this at both the main
L/R analogue outputs and the AES/EBU digital output. The
output at the S/PDIF and HDMI digital outputs can be either the
same downmix, or the raw DTS bitstream; this is determined
by the setting of Digital Output in the audio Setup menu. A DTS
flag will illuminate in the front panel display when a DTS audio
track is playing.
It can be seen from the table that the S/PDIF outputs will
produce either a downmix of the multichannel audio, or a raw
bitstream for external decoding. This is determined by the
Digital Output setting in the audio submenu; setting this to PCM
will generate the downmix, setting it to Bitstream will generate
the raw encoded audio data alternative. (See page 40 for
further information.)
Page 35

Additional Features
34
UDP-89 User Manual Version 2.0www.hhb.co.uk
FL +05dB
SACD
CH SELECT
CH SELECT ‘UP’
CH SELECT ‘DOWN’
FRONT
LEFT (FL)
FRONT
RIGHT (FR)
REAR
LEFT (RL)
REAR
RIGHT (RR)
CENTER
(CEN)
LFE
CHANNEL
(SW)
Multichannel bass management
Practical surround sound loudspeaker systems frequently have
smaller units in the rear and centre positions, and these may
not offer an extended LF response compared with the main
left and right front speakers. Other systems may not include a
centre speaker at all, or no dedicated sub-woofer. The UDP-89
includes a set of user-selectable options for re-directing some
or the entire frequency spectrum in some channels to different
speakers, to ensure that all programme material in all channels
is reproduced in such systems.
The various options are set in the Audio tab of the Setup menu.
See “Audio settings” on page 40 for more details. The table
below summarises the possibilities available:
SPEAKER SETTING
Bass Management
Front Speakers
Center Speaker
Surround Speakers
Sub-woofer
OPTIONS
Off
On
Large Full frequency range is sent to front channels
Small
Large Full frequency range is sent to centre channel
Small
Off
Large Full frequency range is sent to rear channels
Small
Off
None
Present LFE channel routed to sub-woofer (normal)
Full frequency range is sent to centre and rear
channels
LF (<100 Hz) in centre and rear channels is
routed to front L & R speakers
LF (<100 Hz) in front channels is routed to
sub-woofer
LF (<100 Hz) in centre channel is routed to
front L & R speakers
All centre channel programme is routed to
front L & R speakers
LF (<100 Hz) in rear channels is routed to
front L & R channels
All rear channel programme is routed to front
L & R speakers
All LFE channel programme is routed to front
L & R speakers
EFFECT
Multichannel level trims
It is also possible to adjust the levels of the individual channels of
the analogue multichannel (surround) outputs. This is typically
desirable when different models of speakers are being used in
the rear and/or centre positions from the main front L/R
speakers, and permits the differing sensitivities of the speakers
to be allowed for.
Multichannel level trim is
adjusted from the RC-89 remote
control unit. Pressing either of
the CH SELECT buttons allows
adjustment of the Front Left
channel, the front panel display
showing:
Adjustment of the level in the front left channel is made with the
CH LEVEL up-and-down buttons. Other channels may be adjusted
in turn by further presses of the CH SELECT buttons, which will
select the other channels in turn:
Note: The settings of the surround speakers will also affect the
downmix format used for the main left and right outputs.
Audio level and delay adjustment
Audio Volume
Adjustment of overall audio level is available in the UDP-89 via
the VOLUME buttons on the RC-89 remote control unit. The
front panel display confirms the level setting when the buttons
are pressed. The range of level adjustment available is from
-90 dB to 0 dB, in 1 dB increments. If the Vol Down button
continues to be pressed beyond -90 dB, the audio is muted and
the front panel display indicates MUTE.
When the audio output level is set to 0 dB, the balanced
analogue audio outputs are calibrated to produce a maximum
level of +22 dBu. The following table shows some “national
standard” settings in common use in some countries.
VOLUME CONTROL
SETTING
0dB +22dBu USA, Canada
-4dB +18dBu UK (BBC Standard)
-7dB +15dBu Germany
-10dB +12dBu Germany & elsewhere
MAX OUTPUT LEVEL USED IN
The function and display time out after approx. 5 secs. if no
button is pressed, and the unit reverts to normal operation.
Note: When the main volume control is set to 0 dB, the output
level for each channel is at its maximum. Therefore, to apply
positive gain to each channel level, it is necessary to first turn
down the master volume control by the same amount, i.e.,
to boost the surround channels by 3 dB relative to the other
channels, the master volume must be adjusted by at least -3dB.
Page 36

Additional Features
35
UDP-89 User Manual Version 2.0 www.hhb.co.uk
Pink Noise calibration
The optimum setting is for the audio level from all the speakers
in a multichannel system-up to be the same. This can be difficult
to achieve with many types of programme material and to
facilitate adjustment the UDP-89 provides an internal pink noise
source to generate a known audio level, which can be applied to
each channel in turn. The listener can then adjust the audio level
in each channel so that the perceived sound level at the listening
position is equal for all speakers.
The noise source is enabled and routed as required via the
Audio tab of the Setup Menu. See page 40 for full details.
Exiting the menu will automatically turn the source off.
Multichannel delays
Depending on the size of the room, the acoustic path length
between the listening position and the centre and/or rear
speakers may be sufficiently different from that between the
listening position and the main front L/R speakers for sound
from multiple speakers to be heard at slightly different times.
The UDP-89 allows delays to be introduced into the main front
L/R channels to time-align them with the centre and/or rear
channels.
The delays are adjusted via the Audio tab of the Setup Menu.
Separate adjustment for the centre and rear channels is
provided. See page 40 for full details.
Video configuration
NTSC/PAL
The UDP-89 is able to play DVD Video discs recorded to either
NTSC or PAL TV System standards. Most modern monitors,
TVs, projectors, etc. are capable of resolving both NTSC and
PAL standard video signals.
The TV standard available at the composite and S-video
outputs is determined in the Setup Menu, by the setting of the
TV System item in the Video submenu. See page 39 for full
details. The factory default setting is Auto; the output video
signal will follow the TV standard of the signal recorded on the
disc. This should be satisfactory with most modern display
devices.
The TV standards are summarised below. The two standards
also differ in their methods of encoding chroma information.
TV SYSTEM
NTSC 525 60 Hz 480 29.97 fps
PAL 625 50 Hz 576 25 fps
NOTIONAL STANDARD
Lines Vertical Rate Visible Lines Frame Rate
The action of setting the TV System menu item to NTSC, PAL or
Auto with different disc types is summarised in the table below:
DISC PLAYER SETTING
TYPE DISC STANDARD NTSC PAL AUTO
DVD, Video CD,
Super VCD
CD, SACD - NTSC PAL
NTSC NTSC PAL NTSC
PAL NTSC PAL PAL
STANDARD RESOLUTION
(SD)
NTSC or
PAL
Progressive and interlaced scan
The UDP-89 supports both interlaced and progressive scan
standard definition (SD) video formats as well as certain high
definition (HD) formats.
Progressive scan is only available from the component YUV and
HDMI outputs. SD resolutions of 480p (NTSC) or 576p (PAL),
and HD resolutions of 720p and 1080i may be selected via the
HD Resolution item in the Video submenu. See page 39 for full
details.
Replay of 16:9 format video
Playback of both standard 4:3 aspect ratio and widescreen
16:9 material is supported by the UDP-89.
The Aspect Ratio item in the Video tab of the Setup menu
determines how widescreen (16:9) material should be
reproduced; this menu item should be set according to the type
of display device in use. See page 38 for full details of how to set
this.
Additionally, the UDP-89 will signal the presence of widescreen
material via WSS (WideScreen Switching) when playing PAL
video discs (or NTSC video discs converted to PAL). This system
utilises Line 23 of the PAL video signal, and the signalisation
will be recognised by most widescreen monitors. On receipt of
the widescreen “flag”, the external monitor should automatically
switch to widescreen mode.
Page 37

Additional Features
36
UDP-89 User Manual Version 2.0www.hhb.co.uk
YUV 576i/50 (PAL)
YUV 480i/60 (NTSC)
576p/50 (PAL)
480p/60 (NTSC)
720p/50 (PAL)
720p/60 (NTSC)
1080i/50 (PAL)
1080i/60 (NTSC)
RGB
(DEFAULT )
Auto (HDMI)
1
10
8
6
4
11
9
7
5
3
2
20
18
16
14
12
19
17
15
13
Y/G
Pb/B
Pr/R
CVBS
RGB SWITCHING
R (sig)
R (gnd)
G (sig)
G (gnd)
B (sig)
B (gnd)
CVBS (sig)
CVBS (gnd)
RGB switch control
0v ref
Signalling of the widescreen format is also possible with
NTSC and 480p/576p progressive scan video signals. The
UDP-89 outputs the appropriate widescreen “flags”, however
not all display devices may be able to correctly interpret the
signalisation.
HDMI formats
The rear panel HDMI connector carries both High Definition
(HD) digital video and multichannel digital audio, for connection
to suitable HD display devices. The HD video formats are also
available (with some restrictions) at the analogue component
video outputs. The audio may also be obtained independently of
the HDMI connector at the S/PDIF digital audio outputs.
The HDMI output will only be active if the Video out item on the
Video tab of the Setup menu is set to Progressive YUV or HD
YUV/HDMI. Selection of 480i & 576i video formats disables
the output.
SD resolutions of 480p (NTSC) and, 576p (PAL), plus HD
resolutions of 720p and 1080i are supported. The HDMI output
may automatically set itself to the resolution of the display device
(this will also affect all analogue video outputs), but each of these
resolutions may be “forced” by the player, by altering the setting
of the HD Resolution item in the Video tab of the Setup menu.
See page 39 for more details.
The HI-DEF button
Output video format is normally set via the Setup menu (see
page 39); in many situations, once it is set it rarely needs to be
changed.
RGB-to-SCART connections
Display devices equipped with suitable SCART connectors
(so-called SCART 1 type) may be able to receive RGB component
video to produce a picture of significantly higher quality than
composite video. Check with the display device’s manual to
ensure that the SCART connector is suitably equipped.
This type of connection should be implemented instead of
composite video wherever possible. However note that it is also
necessary to connect the rear panel CVBS and RGB Switching
outputs. A SCART connector wired as per the diagram below
should work in most cases.
This is particularly useful if the format has been left at an
HD resolution and the unit then subsequently connected to a
monitor or TV that either doesn’t support the higher resolutions,
or via the composite or S-video outputs.
The diagram below shows what options are available via the
HI-DEF button
The HI-DEF button on the IR
remote control allows selection
of the output video format at any
time without having to access
the menu.
Angle selection
Some DVD Video discs include one or more alternative video
tracks, often shot with different camera angles.
These tracks may be viewed, if
available, by pressing the ANGLE
button on the remote control
unit, which will step through the
alternatives available.
To check whether a DVD Video disc contains any alternative
“Angles”, press the DISPLAY button on the remote control unit
to reveal the on-screen banner (see page 25). The ANGLE
information is displayed in the form Angle m/n, where n is the
number of alternative tracks available on the disc, and m is the
number of the currently-selected track.
Note: The inclusion of alternative audio tracks is at the
discretion of the disc authoring stage.
Page 38

Additional Features
37
UDP-89 User Manual Version 2.0 www.hhb.co.uk
Ej-Lock ON
CD
Eject Lock!
CD
Ej-Lock OFF
CD
Zoom
The UDP-89’s Zoom feature lets you zoom in on the central area
of the displayed video image. Zoom is activated with the ZOOM
button on the remote control unit.
There are three levels of Zoom;
successive presses of the
ZOOM button step through the
magnifications, the front panel
display confirming ZOOM 1,
ZOOM 2 and ZOOM 3 in turn. A
further press returns the image
to normal.
ZOOM 3 is approximately equivalent to 2x magnification. The
Zoom feature is operative in all transport modes including Pause
and Slow. However, it is cancelled by Resume or Stop Modes.
Subtitles
If subtitles are available on a disc, they can be enabled by
pressing the SUBTITLE button the remote control unit.
Confirmation that subtitles are
enabled can be obtained by
pressing the DISPLAY button on
the remote control unit.
The Subtitle field on the banner will either indicate the selected
subtitle (e.g. 1/1 Eng, but there may be more than one) or
Off. If multiple subtitles are available, successive presses of
SUBTITLE will step through them.
Eject Lock
The UDP-89’s disc drawer can be locked to prevent inadvertent
opening. This is a useful feature when the player is installed in an
exhibition or display situation, for example. When Eject Lock is
enabled, the disc drawer can only be opened when the drive is in
Stop Mode (note that it remains locked in Resume Mode).
Eject Lock is enabled with the LOCK button
on the RC-89 remote control. Pressing
LOCK generates the front panel display
shown at (a) below for a few seconds, after
which the EJECT buttons on the front panel
and remote control will be inoperative.
Attempting to open the disc drawer will cause the display at (b)
below to be shown. Eject Lock can be cancelled at any time with
a second press of LOCK, the cancelling being confirmed by the
display at (c) below.
a) Eject Lock ON
SCMS Compliance
The SCMS (Serial Copy Management System) was developed to
restrict the number of copies which could be made from a digital
audio recording via the digital domain. The system has been
incorporated into all consumer digital audio equipment for many
years. With commercially-produced CDs, it limits the number of
copies which can be made by using an S/PDIF interconnection
to one.
The UDP-89 is SCMS-compliant in playback; the SCMS bits
in the S/PDIF digital outputs are set according to the copy
protection status of the disc being played. SCMS does not apply
to the AES/EBU digital output.
b) Eject is Locked
c) Eject Lock OFF
Page 39

Additional Features
38
UDP-89 User Manual Version 2.0www.hhb.co.uk
Setup Menu
CD
Language
OSD language : English
Subtitle : Off
Audio : English
DVD menu : English
Video
Audio
Rating
Misc
Setup Menu
Many of the UDP-89’s settings and options are controlled via the
Setup Menu, which is accessed with the SETUP button on either
the front panel or the RC-89 remote control unit. The front
panel confirms Setup with the message:
The Setup Menu appears on-screen, and is arranged as five
tabbed submenus.
Menu Navigation
Navigation through the menu system is with the front panel
cursor controls , or via the remote control; the currentlyselected menu item is always highlighted with a yellow border.
The menu system is always entered at the first submenu
(Language); use the DOWN cursor key to select the other
submenus in turn, selecting the one required by pressing the
RIGHT cursor key. The first item in that menu is then highlighted.
To change the setting of any submenu item, press the MARK/
ENTER button , when a pop-up list of the available settings for
the item will appear. The currently-selected one will be ticked,
and if an different setting is required, it can be selected by
moving the yellow border with the UP or DOWN cursor keys.
Selection is made by pressing MARK/ENTER. An example is
shown below.
Use the LEFT cursor key to exit a submenu back to the tabs,
when another submenu can be selected, or the Setup Menu can
be exited by pressing SETUP again.
Language Settings
The Language submenu permits a choice of language for various
unit and disc functions. Six languages are available in the
UDP-89:
English•
French•
Spanish•
German•
Italian•
Japanese•
OSD language – sets the language used in the UDP-89’s onscreen menus and pop-up windows. Note that Japanese is not
available.
Subtitle – sets the language for subtitles. Note that subtitles will
only be displayed in the selected language if they are available
on the disc. Further, some discs may override this setting and
others may require the subtitle language choice to be made
from a disc menu. In addition to the six languages, this menu
also offers Off and Auto as options. Note that Italian is not
available.
Audio – Sets the preferred language for the soundtrack on a
DVD-Video disc, if that language is available. Note that Italian is
not available.
DVD menu - Sets the preferred language for the menu screens
on a DVD-Video disc, if that language is available. Most discs
will only contain menus in one language. Note that Italian is not
available.
Video settings
Aspect Ratio — sets how video programme material recorded
in 16:9 widescreen format is reproduced. Aspect Ratio should
be set correctly for the type of monitor in use. The available
settings are:
Some of the items in the Video and Audio submenus generate
a temporary confirmation message on the front panel display as
the settings are changed; this can be useful if no video monitor
is connected.
Setup Menu
• 4:3Letterbox: Anamorphic widescreen material is
displayed on a 4:3 screen with black bars at the top
and bottom. Use this setting if you have a conventional
4:3 monitor (or other display device) and prefer to view
widescreen material in letterbox format.
• 4:3Pan&Scan: Anamorphic widescreen material is
cropped at the sides and will pan left/right (according to
information on the disc) so as to occupy the full height of a
4:3 monitor. This mode needs to supported by the disc; if
it is not, the video will be displayed as 4:3 Letterbox.
• 16:9Widescreen: Widescreen material is displayed in
the correct aspect ratio for a widescreen display device.
Select this setting if you have a widescreen monitor.
Note: Anamorphic compression is an optical technique to precompress wide pictures into a narrower frame, for example
16:9 material into a standard 720 pixel 4:3 picture format. The
picture is “squashed” in at the sides so that when it is stretched
across the wider 16:9 screen of a widescreen display, the
correct aspect ratio is restored.
Also note that non-widescreen material is not affected by the
Aspect ratio setting.
Page 40

Additional Features
39
UDP-89 User Manual Version 2.0 www.hhb.co.uk
TV System — this should be set according to the prevailing
video standard in your territory. The options are:
• Auto — this is the factory default setting. With TV
System set to Auto, the video output follows the standard
recorded on the disc. This is the best setting if your
display device is able to auto-select between NTSC and
PAL formats. When no disc is playing, the standard used
is that of the last video disc or file played.
• NTSC — video outputs will be to the NTSC standard.
Select this setting if your display device is NTSC-only. Note
that PAL video discs will be converted to NTSC, but this
may cause a reduction in the quality of the displayed video.
If your display device can auto-select NTSC or PAL, Auto
will generally be a better setting for playing PAL discs.
• PAL — video outputs will be to the PAL standard. Select
this setting if your display device is PAL-only. Note that
NTSC video discs will be converted to PAL, but this may
cause a reduction in the quality of the displayed video. If
your display device can auto-select NTSC or PAL, Auto will
generally be a better setting for playing NTSC discs.
See also “NTSC/PAL” on page 35 for additional information
regarding NTSC/PAL compatibility with various disc types.
Video out — this setting determines the video format available
at the rear panel Component video outputs
HDMI output . The first three options are for Standard
Definition (SD) displays; select HD YUV/HDMI when using an
HD-capable display connected to the digital HDMI output or
analogue component outputs:
• RGB — this sets the analogue component outputs to RGB
format, at an interlaced resolution of 480i (NTSC) or 576i
(PAL). The HDMI output is off.
InterlaceYUV• — this sets the analogue component
outputs to YUV format, at an interlaced resolution of 480i
(NTSC) or 576i (PAL). The HDMI output is off.
• Progressive YUV — this sets the analogue component
and HDMI outputs to YUV format, at a progressive
resolution of 480p (NTSC) or 576p (PAL).
HDYUV/HDMI• — this sets the analogue component
and HDMI outputs to YUV format, at a High Definition
(HD) resolution of 720p or 1080i, as selected by the HD
Resolution setting (see next menu item). The progressive
SD formats of 480p and 576p are also repeated.
When the video output format is changed, additional pop-up
dialogue boxes will request confirmation that the change should
take place, as changing the format when an unsuitable display
device is connected will result in a scrambled image.
and the digital
HD Resolution — This setting determines the video resolution of
HD video outputs at the HDMI connector
video connectors , if available. This setting is only adjustable if
Video out is set to HD YUV/HDMI, otherwise HD Resolution is
set to AUTO HDMI. The options are:
• AUTO HDMI — This is the default setting; the video
resolution of the HDMI and component outputs is set
automatically to the “preferred” format of any HDMI display
connected to it, and no user interaction is required.
Note that this auto-mode may not be supported and the
resolution will default to 480p/576p. In this case, the
higher resolutions of 720p and 1080i may be manually
selected below.
• 480p/576p — This sets the HD outputs to progressive
scan versions of SD NTSC or PAL resolutions – 480p
(NTSC) or 576p (PAL).
• 720p — sets to HD progressive resolution, 720 x 1280
• 1080i — sets to HD interlaced resolution, 1080 x 1920
Note: Not all display devices will correctly display the 1080i
output from PAL discs (1080i/50) when connected to the
component outputs of the UDP-89. If HDMI is available, this
should be used instead.
Also note that the composite and S-video outputs are only active
at the SD 480/576 resolutions.
When the HD resolution is changed, additional pop-up dialogue
boxes will request confirmation that the change should take
place, as changing the resolution when an unsuitable display
device is connected will result in a scrambled image.
The front panel display also briefly confirms each new video
resolution as it is selected.
Brightness — allows adjustment of the overall picture brightness
in 16 increments
Sharpness — allows adjustment of the picture sharpness in 16
increments
HD Jpeg mode — When this item is set to On, JPEG files can
be displayed in full HD resolution (either 720p or 1080i) on a
suitable HD monitor.
and the component
The video output format may also be changed with the HI-DEF
button on the RC-89 Remote Control Unit. See HD Resolution
for more information.
The front panel display also briefly confirms each new video
format as it is selected.
Page 41

Additional Features
40
UDP-89 User Manual Version 2.0www.hhb.co.uk
Audio settings
Refer to Multichannel bass management on page 34 and Audio
level and delay adjustment on page 34. The crossover frequency
of the bass management is 100Hz.
Bass management — When set to On, low frequencies below
100 Hz in the centre and rear channels (when set to Small) are
sent to the front channels. Setting this item to Off (the default)
cancels this filtering, and the centre and rear channels receive
the full frequency range.
Front speakers — The default setting is Large, which routes
the full frequency response in the front channels to the front
speakers as normal. Selecting Small re-routes the LF content
(<100 Hz) in these channels to the LFE channel (sub-woofer).
Note that it is not possible to select Small if there is no subwoofer in the system (see below), nor is it possible if Bass
management is selected Off.
Center speaker — The default setting is Large, which routes
the full frequency response in the centre channel to the centre
speaker. Selecting Small re-routes the LF content in this channel
(<100 Hz) to the front L & R speakers. Note that it is not
possible to select Small if Bass management is selected Off. A
third option, Off, should be selected if there is no centre speaker
in the system. In this case, information in the centre channel is
routed at equal level to the front left and right speakers, creating
a “phantom” centre image.
Subwoofer — The default setting is Present, which routes the
LFE channel to the sub-woofer speaker. If the system does not
have a sub-woofer, this item should be set to None, when the
content of the LFE channel is routed equally to the front L and R
channels.
Test Tones — This item activates the internal white noise
generator, which can be routed to each of six multichannel
outputs in turn to allow accurate balancing of the volume from
each speaker in the system. Default setting is Off; exiting this
menu item automatically selects Off.
Center delay — Setting this item to a value other than Off
inserts a finite delay in the centre channel. As the centre
speaker is the closest to the listening position, the delay timealigns the channel with the front L and R channels. Calibration is
in 0.3 m steps, from 0.3 m (1 ft.) to 1.7 m (5 ft.), this distance
representing the distance from the listener to the centre
speaker. Select the value closest to that applicable to your room.
Surr. Delay — This operates in a similar way to the centre delay.
The distances available in the settings are greater, 1 m (3 ft.)
to 5.1 m (approx. 16 ft.), reflecting the fact that rear surround
speakers are generally much further away from the listening
position than the front speakers. Select the value closest to your
room.
Digital output — See “Stereo and multi-channel audio” on page
32. The setting of this item determines the nature of the digital
audio data at the S/PDIF and HDMI outputs.
• Off — the S/PDIF digital outputs (and HDMI audio) are
muted.
• AUTO HDMI — the type of digital audio format available is
determined by the HDMI display device.
• PCM — the S/PDIF and HDMI outputs carry a 2ch.
downmix of the multichannel audio programme (excluding
SACDs via S/PDIF with downsampling not enabled - see
below, in which case the outputs are muted). Refer to the
table in “Stereo and multi-channel audio” on page 32.
• Bitstream — the S/PDIF and HDMI outputs carry the raw
digital data from the disc for external decoding. Refer to
the table in “Stereo and multi-channel audio” on page 32.
Night Mode — Setting Night Mode on applies dynamic range
compression to the analogue (and PCM downmix) of Dolby Digital
soundtracks, according to the metadata contained in the Dolby
Digital bitstream. This makes it easier to set a comfortable lowlevel, or night-time listening volume.
Down sampling — Downsampling should be enabled when
playing discs recorded with a sample rate higher than 48 kHz if
the equipment connected to the digital outputs (S/PDIF, HDMI
and AES/EBU) does not support these higher sample rates.
The table below summarises the sample rate changes available
at each digital output for various disc types with downsampling
turned On.
DISC TYPE
CD 44.1 kHz 44.1 kHz 44.1 kHz
SACD 176.4 kHz 44.1 kHz 88.2 kHz
DVD-Video 48 kHz 48 kHz 48 kHz 48 kHz
DVD-Video 96 kHz 96 kHz 48 kHz 48 kHz
NATIVE SAMPLE
RATE
SAMPLE RATE AVAILABLE AT
S/PDIF OUTPUT
AES/EBU
OUTPUT
Note: Downsampling is not applied in the case of CDs or DVD
Video discs recorded at 48 kHz, even if it is set On. In these
cases, the native sample rate is unaltered.
Rating Settings
Parental Control: This item shows the lowest restriction
category of DVD-Video disc which the unit will currently play.
Discs with this a higher level of restriction will not be playable.
In order to alter the parental control category, press MARK/
ENTER with this item highlighted; you will then be asked to enter
a 4-digit password. (The default password can be found in the
list of factory default settings in Appendix 3, see page 47). Enter
the password, followed by MARK/ENTER. It is now possible to
enter the list of parental control categories using the RIGHT
CURSOR key:
LEVEL RESTRICTED TO
1 Kid Safe
2 G
3 PG
4 PG-13
5 PG-R
6 R
7 NC-17
8 Adult
The default setting is 8: Adult, which implies there are no
restrictions on discs to be played. Use the cursor keys and
MARK/ENTER to select a lower level.
Set Password: This menu item permits an alternative password
to be set. It is necessary to enter the currently-set password to
set a new one.
Page 42

Additional Features
41
UDP-89 User Manual Version 2.0 www.hhb.co.uk
T02 0:03:26
Timer ON
CD
T02 0:03:26
Timer OFF
CD
Misc. submenu
Restore defaults — Selecting Restore defaults resets all the
items in the Setup Menu to their original factory settings. A full
list of these can be found in Appendix 3 (page 47) at the end of
this manual.
Note: To restore Parallel Port and volume control defaults,
press TOP MENU and MENU at the same time from the front
panel with no disc is inserted
DVD Priority — All DVD-Audio discs also contain a DVD-Video
folder to ensure compatibility with all DVD-Video players. The
setting of this item determines how the disc will be played by
default – either as a DVD-Video disc or DVD-Audio disc. As
a DVD-Audio disc, the user may have access to all the DVDVideo material, depending on how the disc is authored. As a
DVD-Video disc, the user will have no access to the DVD-Audio
material.
Screen Saver — when set On, the HHB logo will appear as a
screen saver after a few minutes of non-user intervention.
Timer Mode
The UDP-89 has a Timer Mode which permits a pre-loaded CD/
SACD to automatically commence playing when power is applied
to the unit. Timer Mode is enabled by pressing the TIMER button
on the remote control; the front panel responds with the text
Timer ON.
Remote Control – Parallel Port
The rear panel Parallel Remote Input permits control of five
transport functions, and provides tallies for three functions. The
five active commands may be selected from a set of eleven (plus
NOT USED), the tallies are a fixed set of three (plus NOT USED).
These are shown in the table below.
INPUTS
(COMMANDS)
PLAY Input 1 PLAY Output 1
PAUSE Input 2 PAUSE Output 2
STOP Input 3 NO DISC Output 3
NEXT Input 4 NOT USED -
PREVIOUS Input 5
PLAY/PAUSE -
FFWD -
FREW -
VOLUME UP -
VOLUME DOWN -
EJECT -
NOT USED -
The commands and tallies listed in bold are the factory
defaults. If a different command set is preferred, an alternative
combination comprising any five (or less) of the thirteen available
commands may be reassigned to the inputs via the menu
system.
DEFAULT OUTPUTS
(TALLIES)
DEFAULT
When Timer Mode is enabled, the unit may be turned off either
with the front panel power button or with the STANDBY button
on the remote control unit. As long as a CD/SACD is loaded,
it will start playing automatically when the power is reapplied.
Timer Mode may be cancelled by a second press of TIMER;
cancellation is again confirmed by the front panel display:
The Parallel Remote Input is suitable for basic of control of the
UDP-89 from a dedicated set of hardware switches or similar.
It is also possible to connect an external control system (e.g.
Crestron, AMX) to the Parallel Remote Input, using the relays or
opto-coupled inputs and outputs within such systems.
Note that the commands available perform exactly the same
functions as their front panel and/or remote control unit
equivalents. Note also that the separate PLAY and PAUSE
commands (part of the default preset assignment) mimic the
corresponding remote control unit buttons, but the PLAY/
PAUSE commands (re-assignable) mimics the front panel PLAY/
PAUSE button.
See Appendix 1 on page 44 for details of the pinout and
electrical characteristics of the Parallel Port connector.
Note that Timer Mode only functions with CDs and SACDs
not discs containing MP3 files. A pre-loaded DVD-Video disc
will commence playing automatically on re-powering the unit
according to how the disc was authored, whatever the setting of
Timer Mode.
Page 43

Additional Features
42
UDP-89 User Manual Version 2.0www.hhb.co.uk
Preset
Parallel
Profile 1
Parallel
Profile 2
Parallel
SETUP
RIGHT CURSOR
LEFT CURSOR
PRESET
(DEFAULT )
PROFILE 1
PROFILE 2
Not Used
P. Input 1
Parallel Port Setup Menu
The Parallel Port Setup menu is accessed by pressing the
SETUP button on the front panel for longer than 0.5 second
while no disc is loaded (the front panel display should show
No Disc.) The front panel display will then show Parallel Preset.
The Parallel Port outputs (tallies) may be assigned in the same
way; Output 1’s assignment will be displayed by a RIGHT cursor
key press from Input 5.
The default command set in the Preset memory may be
inspected in the same way, but the UP/DOWN cursor keys are
non-functional.
The Parallel Port Setup menu will automatically time-out if no
button is pressed for approx. 10 seconds; any changes to the
Profile memories will be saved at this time. Furthermore, the
UDP-89 will always “wake up” after a power-down with the lastused Profile in use.
Remote Control – Serial Port
The rear panel RS232 Port provides serial control of virtually
every machine function, parameter and setting.
This section of the manual provides details of the port
parameters and an abridged serial command list, which includes
the main machine functions. The full RS232 protocol is beyond
the scope of this manual, but can be referenced or downloaded
as a .pdf file at www.hhb.co.uk.
Pinout
The rear panel connector is a D9M. The pinout is shown in the
table:
The Parallel Port provides for one factory default assignment
“memory” called Preset (see table on page 41), and two userdefinable assignable memories, Profile 1 and Profile 2. Preset
is not alterable. Pressing the LEFT or RIGHT cursor keys
step through the three memories.
Initially, the two Profile memories are empty. To assign
commands to the inputs, press MARK/ENTER ; the front
panel will display then show the current assignment to Input 1
(initially Not Used).
will
PIN FUNCTION
1 Not used
2 Data receive
3 Data tramsmit
4 +5 v
5 0 v
6 Not used
7 RTS
8 CTS
9 Not used
Port parameters
PARAMETER VALUE/SETTING
Data type RS232C serial, 3-wire, half-duplex
Data speed 9600 baud
Word length 8 bits
Parity None
Stop bits One
The command to be assigned to Input 1 can be selected from
those available (see the first column in the Parallel Control
table on page 41) by stepping through the list with the UP or
DOWN cursor keys. It is not necessary to press MARK/ENTER
to confirm the assignment; when the required command is
displayed, the next input/output may be selected with the LEFT
or RIGHT cursor keys.
Page 44

Additional Features
43
UDP-89 User Manual Version 2.0 www.hhb.co.uk
Abridged command set
The commands listed in the below will perform the same
function as their equivalent front panel buttons. For all other
commands, data requests and responses, please refer to the
UDP-89’s full RS232 protocol specification.
Note: All commands are shown here in hex format.
COMMAND DATA STRING (HEX)
ENABLE REMOTE MODE (see note 1) 7E 08 05 62 01 01 01 FF
DISABLE REMOTE MODE (see note 1) 7E 08 05 62 01 01 00 FF
STANDBY MODE ON 7E 08 05 62 01 02 01 FF
STANDBY MODE OFF 7E 08 05 62 01 02 00 FF
PLAY/PAUSE 7E 07 05 62 02 01 FF
STOP 7E 07 05 62 02 02 FF
PREVIOUS TRACK 7E 07 05 62 02 06 FF
NEXT TRACK 7E 07 05 62 02 07 FF
FFWD 7E 07 05 62 02 04 FF
FREW 7E 07 05 62 02 03 FF
EJECT 7E 07 05 62 02 08 FF
MENU 7E 08 05 62 14 03 00 FF
CURSOR LEFT
CURSOR RIGHT
CURSOR UP
CURSOR DOWN
MARK/ENTER 7E 07 05 62 14 02 FF
VOLUME ADJUSTMENT:
e.g. SET VOLUME TO 0dB
(see note 2)
INDIVIDUAL CHANNEL TRIM:
e.g. SET LEFT CHANNEL TO 0dB
(see note 3)
Note 1: The UDP-89’s RS232 port must be enabled by the REMOTE ON command
before any further RS232 commands will be accepted. Once REMOTE MODE has
been enabled, neither the front panel controls nor the RC-89 handset will operate and
operation of the UDP-89 can only be controlled with the RS232 Port or the Parallel
Port. REMOTE MODE must be disabled before the front panel controls and handset
will function again.
Note 2: Volume adjustment is possible via the RS232 port over the full range of
control, from -90 dB to 0 dB, in 1 dB steps. Byte 7 sets the actual volume, and
should be in the hex range 01(-90 dB) to 5B (0 dB, max. volume). Setting the byte to
00 mutes the audio.
7E 0B 05 62 14 01 00 00 00
01 FF
7E 0B 05 62 14 01 00 01 00
00 FF
7E 0B 05 62 14 01 01 00 00
00 FF
7E 0B 05 62 14 01 00 00 01
00 FF
7E 08 05 62 13 01 5B FF
7E 0D 05 62 13 02 00 00 0B
00 00 00 FF
Note 3: Level trim adjustment of the individual audio channels is possible via the
RS232 port over the full range of control, from -10 dB to +10 dB, in 1 dB steps. The
value of one of the bytes 7 to 12 should be in the range 01 (-10 dB) to 15 (+10 dB)
to effect a level change. The byte (7 to 12) with the non-zero value determines the
channel to be adjusted. The valid codes are summarised in the following two tables:
BYTE CHANNEL
7 Centre
8 Sub-woofer
9 Front Left
10 Front Right
11 Surround Left
12 Surround Right
BYTE VALUE LEVEL (dB) BYTE VALUE LEVEL (dB)
01 -10 0C +1
02 -9 0D +2
03 -8 0E +3
04 -7 0F +4
05 -6 10 +5
06 -5 11 +6
07 -4 12 +7
08 -3 13 +8
09 -2 14 +9
0A -1 15 +10
0B 0
Setting one of the bytes 7 to 12 to 00 mutes the corresponding channel.
Page 45

Appendix 1 - Connector Pinouts
HDMI
1
13
25 14
D25F
Appendix 1 - Connector Pinouts
Note: Numbers refer to the rear panel diagram in “Connectivity”
on page 10. All connector views are looking at the rear of the
UDP-89. Phono and BNC connectors are omitted.
Analogue Outputs (Balanced)
Connector: XLR3M
FUNCTION
PIN
Screen
1
Signal ‘hot’ (phase)
2
Signal ‘cold’ (anti-phase)
3
Balanced Multichannel Outputs
Connector: D25F
FUNCTION
PIN
R (stereo) - ‘hot’
1
R (stereo) - screen
2
L (stereo) - ‘cold’
3
Sub-woofer - ‘hot’
4
Sub-woofer - screen
5
Centre - ‘cold’
6
Surround R – ‘hot’
7
Surround R – screen
8
Surround L – ‘cold’
9
R (front) – ‘hot’
10
R (front) – screen
11
L (front) – ‘cold’
12
-
13
FUNCTION
PIN
R (stereo) – ‘cold’
14
L (stereo) – ‘hot’
15
L (stereo) – screen
16
Sub-woofer – ‘cold’
17
Centre – ‘hot’
18
Centre – screen
19
Surround R – ‘cold’
20
Surround L – ‘hot’
21
Surround L – screen
22
R (front) – ‘cold’
23
L (front) – ‘hot’
24
L (front) - screen
25
Note: The main L/R stereo outputs are duplicated on this
connector (shown in bold in the table).
AES/EBU Output
Connector: XLR3M
FUNCTION
PIN
Screen
1
Data ‘hot’ (phase)
2
Data ‘cold’ (anti-phase)
3
HDMI Digital Video Output
Connector: HDMI Type-A
FUNCTION
PIN
TMDS Data 2 +
1
TMDS Data 2 Shield
2
TMDS Data 2 -
3
TMDS Data 1 +
4
TMDS Data 1 Shield
5
TMDS Data 1 -
6
TMDS Data 0 +
7
TMDS Data 0 Shield
8
TMDS Data 0 -
9
TMDS Clock +
10
RS232 Serial Control Port
PIN
1
2
3
4
5
6
7
8
9
Parallel Remote Control Input
PIN
1
2
3
4
5
6
7
8
9
The DEFAULT column shows the factory assignment of the
connector. It is possible to change this assignment by recalling
one of two user-definable memories, via the Parallel Port Setup
menu. See page 41 for full details.
FUNCTION
PIN
TMDS Clock Shield
11
TMDS Clock -
12
CEC
13
-
14
DDC Clock
15
DDC Data
16
Ground
17
+5V
18
Hot Plug Detect
19
Shell (Screen)
20
Connector: D9F
FUNCTION
n/u
Data transmit
Data receive
+5v
0v
n/u
CTS
RTS
n/u
Connector: D9F
FUNCTION DEFAULT
Input 1 PLAY
Input 2 PAUSE
Input 3 STOP
Input 4 NEXT
Input 5 PREVIOUS
0v -
Output 1 PLAY
Output 2 PAUSE
Output 3 NO DISC
44
UDP-89 User Manual Version 2.0www.hhb.co.uk
Page 46

Appendix 1 - Connector Pinouts
Electrical characteristics
Both inputs and outputs are internally opto-isolated. The inputs
are protected against over-voltages.
Inputs
The inputs simply require a short-to-ground for activation.
Outputs
The outputs are open-collector, and go low when activated.
Loads such as LEDs may be connected externally with a suitable
series resistor, and returned to the +ve terminal of an external
PSU. The maximum current deliverable by the opto-isolator’s
transistor is 50 mA. (The –ve side of the external voltage supply
should be referenced back to the UDP-89’s 0 v on pin 6.)
UDP-89 User Manual Version 2.0 www.hhb.co.uk
45
Page 47

Appendix 2 - Firmware Updates
Appendix 2 - Firmware Updates
As a responsible manufacturer, HHB adopts a policy of
continuous product development. As with all software-based
products, it may be desirable from time to time to update the
firmware in your UDP-89 with a more recent version. You can
contact your HHB dealer or distributor, or visit the HHB website
at www.hhb.co.uk for details.
Firmware updates are downloadable from the HHB website,
or if you prefer, from your local dealer/distributor on a CD.
Alternatively, if you are uncertain about performing a firmware
update yourself, take your UDP-89 to your HHB dealer, who will
be happy to do it for you.
Performing a firmware update restores all menu settings to
their original factory defaults. If you are used to using your
UDP-89 for one particular type of work, it may be worthwhile
checking through the menus and noting the current settings so
that they can be easily restored after the update.
Updating the firmware requires a PC or Mac fitted with a CD(or DVD-) writer drive, and a CD-writing software application.
We recommend you read through the instructions below before
performing an update for the first time.
To perform a firmware update, proceed as follows:
Downloadthenewfirmwarefilefromwww.hhb.co.uk.Save•
it to a suitable location.
UsingtheCDburningapplicationyouhaveonyour•
computer (such as Roxio, Nero etc.), create a CD
containing the update files BUILD.IMG and UPDATE.VER.
The CD must be a data CD, not an audio CD, and the
update files must be the only ones on the CD.
TurnontheUDP-89,puttheburntupdatediscintothe•
drive and close the tray. After the disc has been read, a
dialogue screen will be displayed asking for confirmation to
update the firmware. Select START using the cursor and
MARK/ENTER keys.
Thefirmwareupdatewillnowproceedautomatically.After•
a short while, the disc will eject. Remove the disc from the
tray and then leave the unit alone. Do not close the disc
drawer.
Duringtheupdateprocedure,itisessentialthatthepower•
supply to the CDR-882 is not interrupted. Should this
occur, the unit will be rendered unusable and will require
factory re-initialisation.
TheUDP-89willrebootautomaticallyoncetheupdate•
procedure is complete. This may take up to 5 minutes.
IftheUDP-89hasnotrebootedautomaticallyafter15•
minutes or so, please re-power manually using the front
panel power switch.
Software version checks
It may be useful to check which version of firmware is installed in
the UDP-89. This procedure can be carried out after a firmware
update to confirm that the update has been correctly loaded.
The checks below will only be performed if there is no disc in the
disc drawer – i.e., the front panel display must show No Disc.
TochecktheversionofthemainCPU,enterthe4-digit•
number 1234, using the remote control unit. The
firmware version is shown in the front panel display.
To check the version of the separate MPEG processor, •
enter the 3-digit number 164 using the remote control
unit. The version number is shown in the front panel
display.
46
UDP-89 User Manual Version 2.0www.hhb.co.uk
Page 48

Appendix 3 - Factory Default Settings
Appendix 3 - Factory Default Settings
The table below lists all the menu options and their default settings.
SUBMENU MENU ITEM DEFAULT SETTING
Language OSD English
Subtitle English
Audio English
DVD Menu English
Video Aspect Ratio 16:9 Widescreen
TV System Auto
Video Out Interlace YUV
HD Resolution Auto HDMI
Brightness 8
Sharpness 8
HD JPEG mode On
Audio Bass management Off
Front speakers Large
Center speaker Large
Surround speakers Large
Subwoofer Present
Test Tones Off
Center delay Off
Surround delay Off
Digital out Auto HDMI
Night mode Off
Downsampling Off
Rating Parental control 8. Adult
Set Password 8888
Misc. DVD Priority DVD-Audio
Screen Saver Off
UDP-89 User Manual Version 2.0 www.hhb.co.uk
47
Page 49

Appendix 4 - UDP-89 Specifications
Appendix 4 - UDP-89 Specifications
FUNCTIONS SPECIFICATIONS
Video Outputs:
Formats PAL: 1080i, 720p, 576p, 576i
Composite Video 1 V p-p, 75 Ω
S-Video DVD Menu
Video Y: 1 V p-p, 75 Ω
Digital Video HDMI
Audio Performance:
Frequency Response 10 Hz – 22 kHz ±0.5 dB (48 kHz)
S/N Ratio 100 dB
THD+N 0.005 %
Channel Separation >90 dB
Max output level (0 dBFS) 22 dBu (XLR)
Output Impedance <50Ω
Headphone Output 1/4” stereo jack
Digital Output AES/EBU 110 Ω XLR
General:
Remote Control Infra-red
Display Languages English, French, Spanish, German, Italian, Japanese
Power Supply 100-240 V 50/60 Hz
Power Consumption 25 W
Supplied Accessories RC89 Remote control
Weights and Dimensions:
Weight (Excluding Packaging) 4.3 kg/9.4 lbs
Dimensions Height: 44 mm (1.75 inches)
NTSC: 1080i, 720p, 480p, 480i
C: 0.3 V p-p, 75 Ω
10 Hz – 44 kHz ±0.5 dB (96 kHz)
10 Hz – 65 kHz ±0.5 dB (192 kHz)
8 dBV (RCA/Phono)
S/PDIF RCA/Phono coaxial 0.5 V p-p, 75 Ω
S/PDIF TOSlink optical
RS232
9-pin opto-isolated parallel
2 x AAA batteries
Power cord
Operating instructions
Depth incl. connectors: 343 mm (13.5 inches)
Width: 482 mm (19 inches)
48
UDP-89 User Manual Version 2.0www.hhb.co.uk
Page 50

HHB Communications Ltd
73-75 Scrubs Lane, London NW10 6QU, UK
T +44 (0)20 8962 5000 E sales@hhb.co.uk W www.hhb.co.uk
In the USA, Central & South America: Sennheiser Electronic Corporation
T 860 434 9190 E HHB-Sales@sennheiserusa.com W www.hhbusa.com
In Canada: HHB Communications Canada Ltd
T 416 867 9000 E sales@hhbcanada.com W www.hhbcanada.com
www.hhb.co.uk
Version 1.0 - November 2008
 Loading...