

Page 1
CDR-882
DUAL DRIVE CD RECORDER
USER MANUAL
Page 2
CDR-882
La versión en español del manual de operaciones la encontrará en la web de HHB: www.hhb.co.uk
La version française de ce manual d’utilisation est disponsible sur le site web de HHB: www.hhb.co.uk
Eine deutsch Version dieser Bedienungsangleitung ist im Internet unter der Adresse: www.hhb.co.uk erhältlich.
CDR-882 User Manual Version 1.0 www.hhb.co.uk
1
Page 3
Statutory Notifications
Important Safety Instructions
1 Read these instructions.
2 Keep these instructions.
3 Heed all warnings.
4 Follow all instructions.
5 Do not use this apparatus near water.
6 Clean only with dry cloth.
7 Do not block any ventilation openings. Install in accordance
with the manufacturer’s instructions.
8 Do not install near any heat sources such as radiators, heat
registers, stoves, or other apparatus (including amplifiers)
that produce heat.
9 Do not defeat the safety purpose of the polarized or
grounding-type plug. A polarized plug has two blades with
one wider than the other. A grounding type plug has two
blades and a third grounding prong. The wide blade or the
third prong are provided for your safety. If the provided
plug does not fit into your outlet, consult an electrician for
replacement of the obsolete outlet.
10 Protect the power cord from being walked on or pinched
particularly at plugs, convenience receptacles, and the point
where they exit from the apparatus.
11 Only use attachments/accessories specified by the
manufacturer.
12 Use only with the cart, stand, tripod, bracket, or table
specified by the manufacturer, or sold with the apparatus.
When a cart is used, use caution when moving the cart/
apparatus combination to avoid injury from tip-over.
WARNING: To reduce the risk of fire or electric shock, do not
expose this apparatus to rain or moisture.
It is important that the apparatus shall not be exposed to
dripping or splashing and that no objects filled with liquids, such
as vases shall be placed on the apparatus.
•
Do not expose this apparatus to drips or splashes.
•
Do not place any objects filled with liquids, such as vases, on
the apparatus.
•
Do not install this apparatus in a confined space such as a
book case or similar unit.
•
Slots and openings in the cabinet are provided for ventilation
and to ensure reliable operation of the product and to protect
it from overheating. Please ensure adequate space around the
apparatus for sufficient ventilation. Ventilation should not be
impeded by covering the ventilation openings with items, such
as newspapers, tablecloths curtains etc.
•
The apparatus draws nominal non-operating power from the
AC outlet with its POWER switch in the off position.
•
The apparatus should be located close enough to the AC
outlet so that you can easily grasp the power cord plug at any
time.
•
An apparatus with Class I construction shall be connected to
an AC outlet with a protective grounding connection.
•
The MAINS plug or the appliance coupler is used as the
disconnect device. Either device shall remain readily operable
when the apparatus is installed for use.
•
No naked flames, such as lighted candles, should be placed on
the apparatus.
13 Unplug this apparatus during lightning storms or when
unused for long periods of time.
14. Refer all servicing to qualified service personnel. Servicing is
required when the apparatus has been damaged in any way,
such as power-supply cord or plug is damaged, liquid has
been spilled or objects have fallen into the apparatus, the
apparatus has been exposed to rain or moisture, does not
operate normally, or has been dropped.
15. This apparatus is supplied with a remote control unit which
contains replaceable non-rechargeable batteries. The
remote control unit and the batteries must not be exposed
to excessive heat such as sunshine, fire or the like. The
disposal of used batteries should be in accordance with local
re-cycling and waste disposal regulations. Never dispose
of batteries in a fire because they may explode and cause
injury.
2
WARNING: excessive sound pressure levels from earphones
and headphones can cause hearing loss.
CDR-882 User Manual Version 1.0www.hhb.co.uk
Page 4
Statutory Notifications
Important Safety Precautions
CAUTION: TO REDUCE THE RISK OF ELECTRIC SHOCK, DO NOT
REMOVE COVER (OR BACK). NO USER-SERVICEABLE PARTS
INSIDE. REFER SERVICING TO QUALIFIED SERVICE PERSONNEL.
The lightning flash with arrowhead symbol, within equilateral
triangle, is intended to alert the user to the presence of
uninsulated “dangerous voltage” within the product’s enclosure
that may be of sufficient magnitude to constitute a risk of electric
shock to persons.
The exclamation point within an equilateral triangle is intended
to alert the user to the presence of important operating
and maintenance (servicing) instructions in the literature
accompanying the appliance.
WARNING: TO PREVENT FIRE OR SHOCK HAZARD, DO NOT EXPOSE
THIS APPLIANCE TO RAIN OR MOISTURE.
For U.S.A.
TO THE USER
This device complies with Part 15 of the FCC rules. Operation
is subject to the following two conditions: (1) This device may
not cause harmful interference . And (2) This device must
accept any interference received including interference that
may cause undesired operation.
CAUTION:
This product satisfies FCC regulations when shielded cables
and connectors are used to connect the unit to other
equipment. To prevent electromagnetic interference with
electric appliances such as radios and televisions, use
shielded cables and connectors for connections.
Safety Information
This product has been designed and manufactured according to
FDA regulations “title 21, CFR, chapter 1, subchapter J, based
on the Radiation Control for Health and Safety Act of 1968”, and
is classified as a class 1 laser product. There is no hazardous
invisible laser radiation during operation because invisible laser
radiation emitted inside of this product is completely confined in
the protective housings.
For Canada
TO THE USER
This Class B digital apparatus complies with Canadian ICES003
Cet appareil numerique de la Classe B est conforme a la
norme NMB-003 du Canada
This appliance has a serial number located on the rear panel.
Please record the model number and serial number and
retain them for your records.
Model Number: .............................................
Serial Number: .............................................
CAUTION
DO NOT REMOVE THE PROTECTIVE HOUSING USING A
•
SCREWDRIVER.
USE OF CONTROLS OR ADJUSTMENTS OR PERFORMANCE OF
•
PROCEDURES OTHER THAN THOSE SPECIFIED HEREIN MAY
RESULT IN HAZARDOUS RADIATION EXPOSURE.
•
CDR-882 User Manual Version 1.0 www.hhb.co.uk
IF THIS PRODUCT DEVELOPS TROUBLE, CONTACT YOUR
NEAREST QUALIFIED SERVICE PERSONNEL, AND DO NOT USE
THE PRODUCT IN ITS DAMAGED STATE.
3
Page 5

Contents
Contents
Important Safety Instructions ........................................ 2
Important Safety Precautions ........................................ 3
Safety Information ........................................................ 3
Contents...................................................................... 4
Introduction ................................................................. 6
What’s in the box ........................................................6
Unpacking ............................................................ 6
CDR-882 Primary Features ........................................... 7
Cautions and guidance on installation ..............................7
Safety Guidelines ................................................... 7
Installation ............................................................7
Care & cleaning ....................................................8
Installing the remote control batteries ......................8
Using the RC-882 Remote Control handset ...............9
Compatible disc types ............................................9
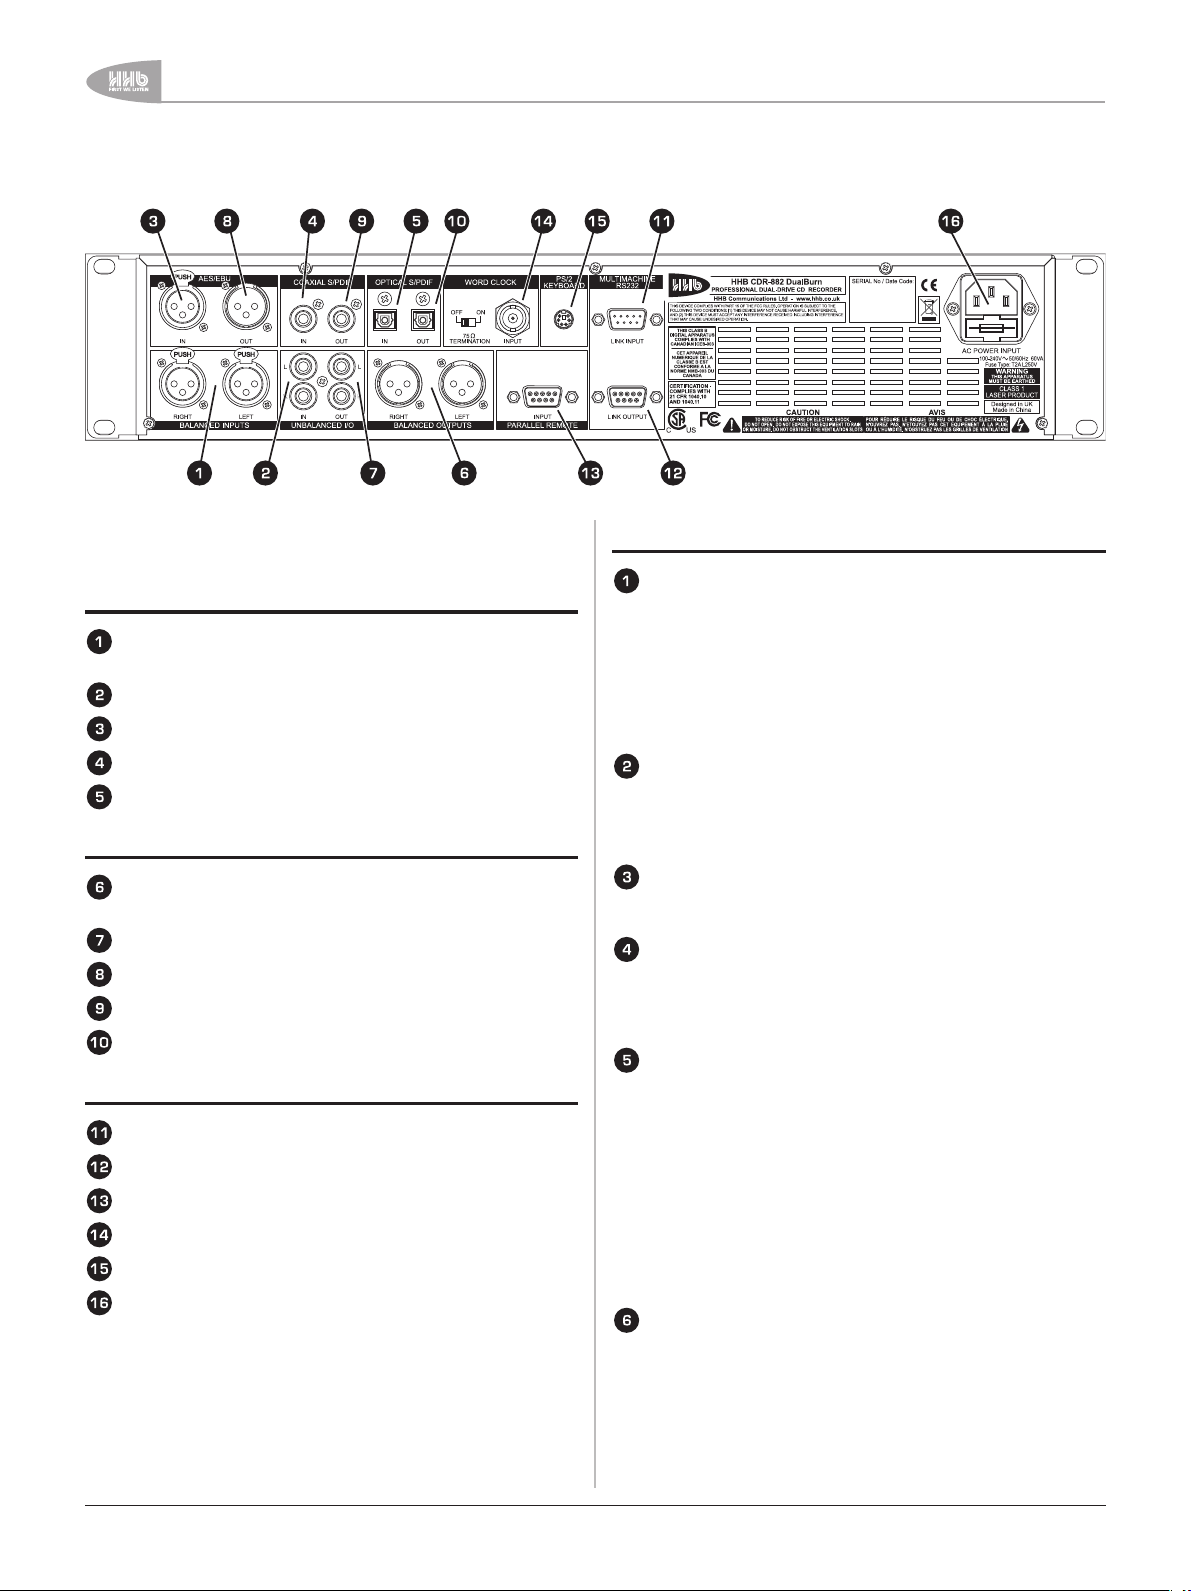
Connectivity ............................................................... 10
Audio Inputs ..............................................................10
Audio Outputs ........................................................... 10
Other Connectors ...................................................... 10
Connector Details ......................................................10
Front Panel Features .................................................. 12
Alphanumeric Display ................................................. 15
RC-882 Remote Control .............................................. 16
Direct Access keys ....................................................16
Record keys ..............................................................16
Quick Start Guide ....................................................... 17
Recording a CD from an analogue source......................17
Recording a CD from a digital source............................17
Playing a CD ............................................................. 18
Playing one disc while recording another ....................... 18
Reference List of the CDR-882’s other main functions ....19
Basic Operation .......................................................... 20
Disc insertion and removal .......................................... 20
Drive selection ..........................................................20
Transport Controls ....................................................20
Play/Pause ........................................................ 20
Stop ..................................................................20
FFWD & FREW ................................................... 20
Manual Record .........................................................21
Selecting a track (AMS) ..............................................21
Fader .......................................................................21
Selecting an input ...................................................... 22
Time displays ............................................................ 22
Monitoring ................................................................23
CDR-882 Monitoring system ....................................... 23
Main Outputs ...................................................... 23
Headphone Outputs ............................................. 23
Recording .................................................................24
Synchronised Recording .......................................24
Record one track ................................................24
Record multiple tracks .........................................24
Finalisation in Synchronised Recording ....................25
Time Interval track ID generation ...........................25
Automatic and Manual track IDs .................................. 25
Finalising .................................................................. 25
Recording on CD-RWs ................................................26
Disc types ................................................................26
Digital Recording restrictions .......................................26
Menu System ............................................................. 27
Menu Navigation .......................................................27
Example ................................................................... 28
The Submenus .......................................................... 28
Audio Submenu .........................................................29
Digital Input Level ................................................29
Input Balance .....................................................29
Fade-out Time .....................................................29
Input Dither ........................................................ 30
Phones Mix ........................................................30
Output Mix .........................................................30
Clock Submenu .........................................................31
Clock Source ......................................................31
Display Submenu ....................................................... 31
Contrast ............................................................31
Invert .................................................................31
Edit Marker Submenu .................................................32
Direct Mark ........................................................ 32
Auto-Cue Threshold .............................................32
DiscSpan Submenu .................................................... 32
Multi-Machine ..................................................... 32
Master/Slave ..................................................... 32
Fade-in Time .......................................................32
Fade-out Time .....................................................33
Overlap Time.......................................................33
Record Submenu ....................................................... 33
Record Sync .......................................................33
S/PDIF-i/p REC Start Trigger ................................33
Auto Track ID Trigger ...........................................34
Audio Threshold .................................................. 34
Track Length ......................................................34
Auto Finalize ....................................................... 34
Digital Output Format ........................................... 35
SCMS ................................................................ 35
Copy Speed ........................................................35
Parallel Port .............................................................36
Preset ............................................................... 36
Inputs 1 to 5 ...................................................... 36
Outputs 1 to 3 .................................................... 36
General Submenu ...................................................... 37
Timer ................................................................37
Eject Block .........................................................37
Firmware Submenu ....................................................37
4
CDR-882 User Manual Version 1.0www.hhb.co.uk
Page 6

Contents
Advanced Features & Operation ................................... 38
Internal & External Clocks ........................................... 38
Clock Source display ............................................38
Recording Features....................................................39
Single CD ........................................................... 39
Dual Disc Modes and functions ..............................39
DualBurn Record .................................................39
DiscSpan Mode ................................................... 39
Track IDs In DiscSpan Mode .................................40
Identing Discs In DiscSpan Mode ...........................40
Playback in DiscSpan Mode ...................................41
Disc Copy ........................................................... 41
Multi-Machine Operation .............................................42
Multi-Machine + DualBurn Operation.......................42
Multi-Machine + DiscSpan Operation ......................43
Replay Of Discs Recorded In Multi-DiscSpan Mode ....43
Program Play ............................................................ 44
Program Copy ........................................................... 44
CD Text ....................................................................45
Displaying CD Text ...............................................45
Entering CD Text ................................................. 45
Cueing ..................................................................... 46
Manual Cueing ....................................................46
Editing Marker Points ........................................... 46
Auto-Cue ............................................................ 46
Auto-Pause .........................................................46
Pre-selecting a track before loading a disc .....................47
Disc End Review ........................................................ 47
Erasing and Unfinalising discs ...................................... 47
Erasing/Initialising a single CD-RW ...............................48
Erasing/Initialising two CD-RWs ...................................48
SCMS ......................................................................48
Remote Control .......................................................... 49
Parallel Remote Control Port ....................................... 49
Pinout ................................................................49
Electrical characteristics .......................................49
RS232 LINK INPUT ...................................................50
Pinout ................................................................50
Port parameters ................................................. 50
Abridged command set ........................................ 50
Appendix 1 - Connector Pinouts .................................... 51
Analogue Inputs (Balanced) (1) ....................................51
AES/EBU Input (3) .....................................................51
Analogue Outputs (Balanced) (6) .................................. 51
AES/EBU Output (8) .................................................. 51
Multi-Machine RS232 Link Input (male) (11) .................. 51
Multi-Machine RS232 Link Output (female) (4) ...............51
Parallel Remote Input (female) (13) ..............................51
PS/2 Keyboard (15) ..................................................51
Appendix 2 - Menu Flow Diagrams ................................ 52
Submenus ................................................................ 52
Audio ....................................................................... 53
Clock ....................................................................... 54
Display ..................................................................... 54
Edit Marker ..............................................................54
DiscSpan ..................................................................55
Record.....................................................................56
Parallel Port .............................................................57
General .................................................................... 58
Appendix 3 - Firmware Updates .................................... 59
Appendix 4 - Factory Defaults ...................................... 60
Appendix 5 - Specifications .......................................... 61
Notes ........................................................................ 62
CDR-882 User Manual Version 1.0 www.hhb.co.uk
5
Page 7

Introduction
Introduction
Thank you for buying this HHB Professional product. The
CDR-882 DualBurn CD Recorder is designed to record and
replay audio CDs in a broadcast or other professional audio
environment, and incorporates a number of features and
facilities that may be unfamiliar to users. In particular, the CDR882 permits the recording of programme material of longer
duration than could normally be accommodated on one CD
by recording across two or more separate discs, with userprogrammable intelligent cross-fading between consecutive
discs. It also permits two discs to be burnt simultaneously with
the same programme.
We recommend that you read this instruction manual at least
as far as the Basic Operation section, to familiarise yourself with
the unit’s layout, controls and operating system before use. The
Advanced Operation covers the more specialised features of
the CDR-882 and can be referred to as required once you are
familiar with the unit’s basic functions.
Please keep this manual in a safe place once you are sufficiently
familiar with the CDR-882 to use it without referral. You may
need it in the future.
Important - Please register your CDR-882 with HHB
Communications at http://www.hhb.co.uk. Registering your
machine will help us in providing you with after-sales service
should the need arise, and may also be of assistance in the
event of the unit being stolen.
Environment - The CDR-882’s range of operating temperature
and relative humidity (RH) are as follows:
What’s in the box
Unpacking
Unpack the CDR-882 and its accessories with care. It is always
a good idea to store all packaging (if practical), in case you ever
need to return the unit to your HHB dealer for any reason.
The shipping carton should contain the items listed below.
Please contact your HHB dealer immediately if any of them are
missing or damaged.
CDR-882 Dual-drive CD recorder
•
Instruction manual
•
IEC-to-UK/EU/US power cable, as appropriate
•
Infra-red remote control handset
•
2 x AA batteries
•
2 x HHB CDR80HS CD-R discs
•
Temperature: +5oC to +35oC (41oF to 95oF)
RH: less than 85%
Altitude: 2000m (operational), 15000m (non-operational)
Do not use the CDR-882 in a location where:
•
its ventilation apertures are blocked
•
it is in direct sunlight or strong artificial light
6
CDR-882 User Manual Version 1.0www.hhb.co.uk
Page 8

Introduction
CDR-882 Primary Features
Two shock-mounted recordable disc drives
•
64x128 pixel backlit dot matrix LCD display
•
11-segment dual LED bargraph meters with PPM
•
characteristics
Separate LED indication of drive status and headphone
•
source
Balanced (+4dBu) and unbalanced (-10dBu) analogue
•
inputs and outputs
24-bit A/D conversion with dither on recording
•
S/PDIF digital input and output (coaxial and optical
•
TOSlink), with full DAT track ID and PQ-code recognition/
transmission, and SCMS defeat
AES/EBU digital input and output
•
Switchable dither on digital inputs
•
Word clock input
•
Built-in sample-rate conversion (32-96kHz) on inputs
•
DiscSpan mode - continuous recording across two or
•
more discs, with automatic fade-in/fade-out and definable
overlap period and track ID point on each disc
Manual change-over operation available with DiscSpan
•
DualBurn mode - simultaneous recording onto both drives
•
Multi-Machine modes for longer unattended recording time
•
and/or multiple disc (>2) recording
CD copy function with track editing option
•
Fast auto-finalise modes - one disc finalises while other
•
disc records
Parallel remote control port with user-defined functionality
•
2 x RS232 serial remote control ports (for master and
•
slave operation)
10 second RAM shock buffer
•
Accepts all blank CD-R media (HHB CDR80HS
•
recommended)
Analogue and digital input level controls
•
Front panel headphone output with level control
•
Comprehensive infra-red remote control handset (RC-882)
•
Full SCMS control on recordings
•
CD Text support
•
Front and rear PS/2 keyboard inputs (for text input)
•
2U 19” rack mount chassis
•
Universal power supply
•
Cautions and guidance on
installation
Safety Guidelines
•
Operate only on a secure and level surface or securely
fastened into a rack, noting the precautions below
•
This equipment must be earthed (grounded)
•
This equipment must be powered from a polarised AC
supply
•
Only suitably trained personnel should service this
equipment
•
Please read and take note of all warning and informative
labels
•
Before starting any servicing operation, this equipment
must be isolated from the AC supply (mains) by removing
the incoming IEC mains connector
•
Fuses should only be replaced with ones of the same type
and rating as that indicated
•
Operate only in a clean, dry and pollutant-free environment
•
Do not operate in an explosive atmosphere
•
Do not allow any liquid or solid objects to enter the
equipment. Should this accidentally occur then immediately
switch off the unit and contact your service agent
Installation
If the CDR-882 is being installed in a rack, care should be taken
not to block the ventilation slots on the rear, top and left-hand
side. Although the CDR-882 itself does not generate a significant
degree of heat, it should never be installed immediately above or
below another piece of equipment that does, such as a power
amplifier. It is good practice in any case to fit vent blanks of at
least 1U above and below such equipment in a rack (unless they
short-circuit that equipments’ own fan-cooling, in which case
plain blanks should be fitted).
Care with ventilation should similarly be taken if the unit is freestanding; never stack it on top of or underneath another piece of
equipment which generates a significant amount of heat.
Take care when routing cables around the unit; never drape
cables across the front panel of the CDR-882 as they may
obstruct the disc tray eject mechanisms.
Do not install or use the CDR-882 in a position where it is in
direct sunlight or high-intensity artificial light. Never attempt to
move the unit while it is in operation.
CDR-882 User Manual Version 1.0 www.hhb.co.uk
7
Page 9

Introduction
Care & cleaning
Always switch off and disconnect the unit from the mains before
cleaning. The outside surfaces of the unit may be cleaned with
a soft dry cloth. For stubborn marks (such as from a liquid
spillage), a soft damp cloth may be used in conjunction with a
mild detergent solution (dilute a household detergent cleaner 5:1
with water). Wipe thoroughly dry with a dry cloth after. NEVER
use solvent cleaners of any kind.
Always switch the unit off and disconnect it from the AC supply
before moving it. NEVER move the unit while it is in use, as
this may permanently damage the disc(s) and/or the laser
mechanisms.
CDs should ALWAYS be handled with care. Hold discs only by
the edge or the centre hole. Never put discs “face down” on any
surface as they can scratch easily. Smudges and fingerprints
may be removed from a disc’s playing surface by wiping it gently
with a soft, lint-free cloth “across” the disc radius. Never rub
circumferentially. Stubborn marks can be removed by applying
a small amount of isopropyl alcohol (distilled water is often as
effective), again with a soft, lint-free cloth. Alternatively, use
a commercially available CD cleaning kit. NEVER use solvent
cleaners of any kind.
Installing the Remote Control batteries
To insert the batteries in the infra-red remote control handset:
•
Slide off the battery compartment lid on the rear of the
handset
•
Insert two AA batteries, taking care to orientate them
the correct way (refer to markings within the battery
compartment)
•
Slide battery compartment lid back on
Important! Please observe the following guidelines when
replacing batteries:
•
Always change both batteries at the same time
•
Always use two batteries of the same brand and type
•
Dispose of the old batteries in a responsible manner
– always observe local environmental guidelines
8
CDR-882 User Manual Version 1.0www.hhb.co.uk
Page 10

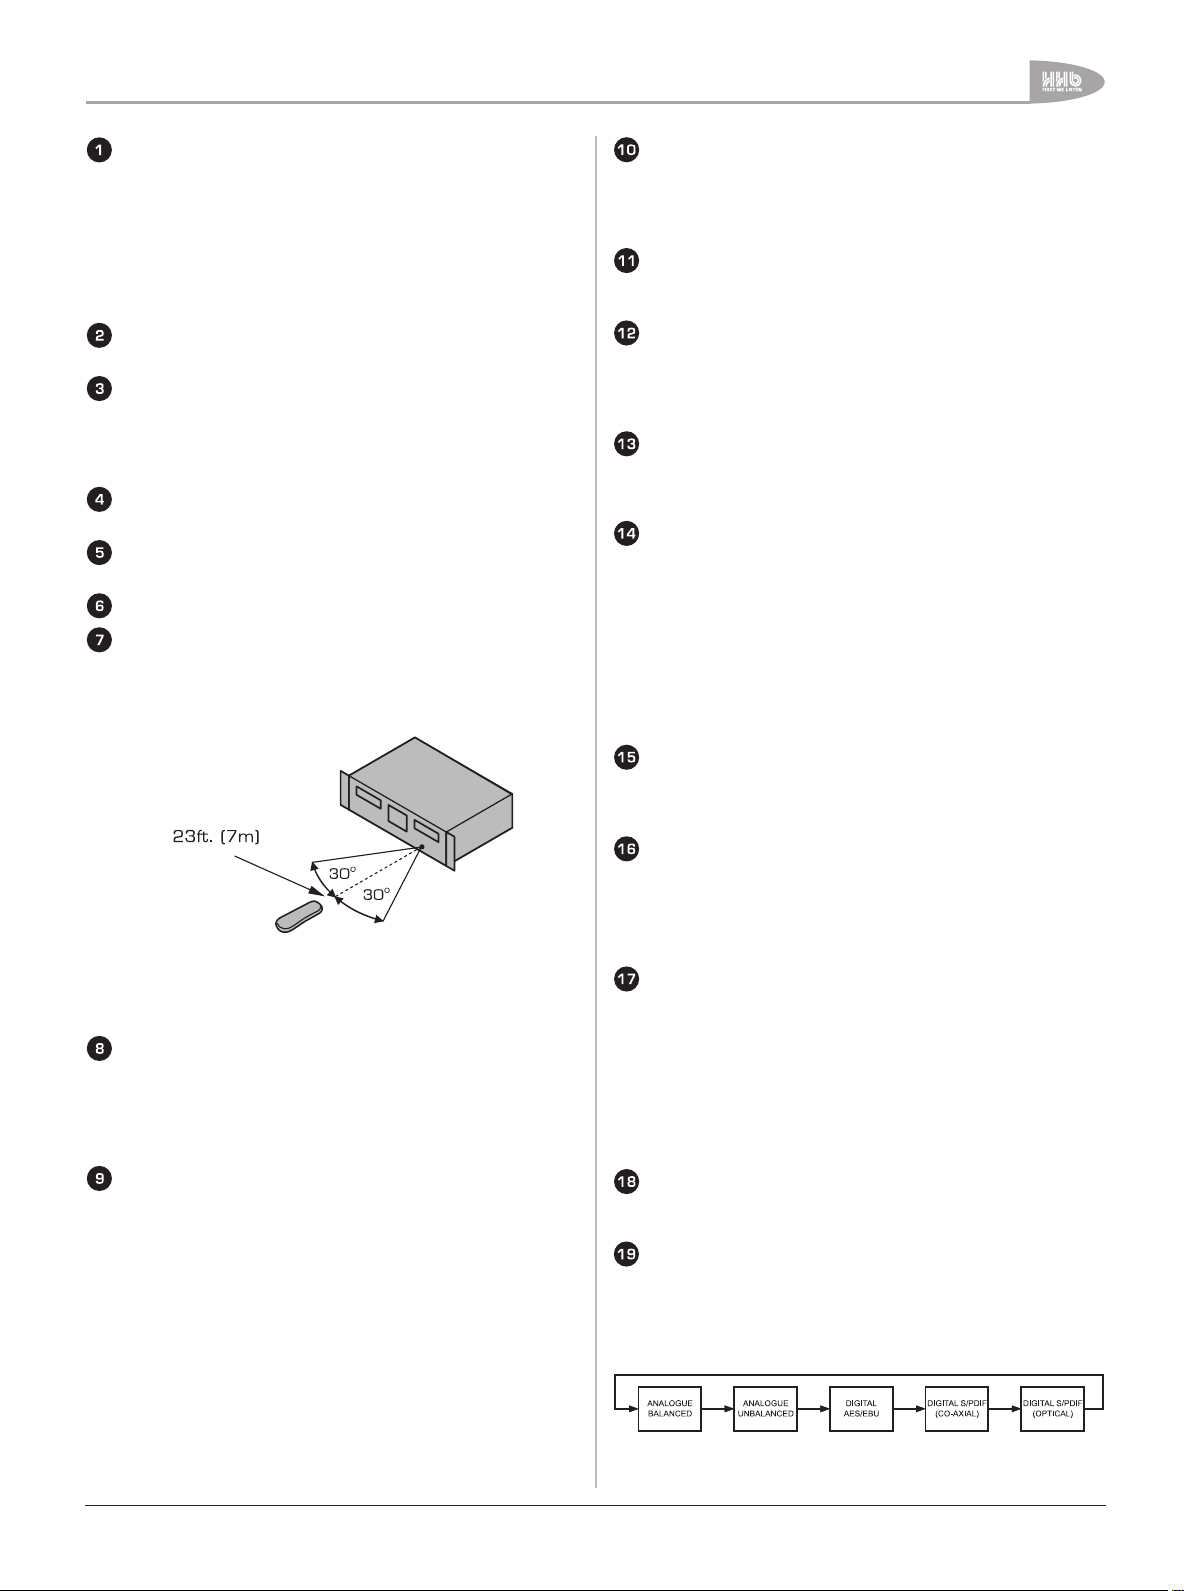
Using the RC-882 Remote Control
handset
•
Make sure there are no obstacles between the handset
and the unit
•
The handset should work reliably within 7m of the unit, and
within 30° of the direct line between the handset and the
unit
•
Strong sunlight or fluorescent lighting may make remote
control operation less reliable
•
Remote control handsets for different equipment
sometimes interact. If the CDR-882 is installed adjacent
to other infra-red-controlled equipment, you should satisfy
yourself that the CDR-882’s handset is not affecting the
other equipment, or vice-versa. One or more items may
need to be moved if interaction is observed
•
A falling-off of the operating range of the handset will
generally indicate that it is time to change the batteries
Compatible disc types
The CDR-882 supports various CD types:
•
Red Book standard pressed audio CDs (play)
•
Red Book (CD-DA) audio on data or “audio” CD-R discs
(play and record), including unfinalised discs
•
Red Book (CD-DA) audio on data or “audio” CD-RW discs
(play and record), including unfinalised discs
NOTE: The CDR-882 does not play or record audio in the form
of data files (such as .wav or .mp3) on any disc format.
Introduction
CDR-882 User Manual Version 1.0 www.hhb.co.uk
9
Page 11
Connectivity
Connectivity
All electrical connections to the CDR-882 (apart from
headphones and/or keyboard) are made via the rear panel.
Audio Inputs
Electronically-balanced analogue Left and Right in
(2 x XLR3F)
Unbalanced analogue Left and Right in ( 2 x phono/RCA)
AES/EBU input (XLR3F)
S/PDIF input (phono/RCA)
S/PDIF input (optical TOSlink connector)
Audio Outputs
Electronically-balanced Left and Right analogue out
(2 x XLR3M)
Unbalanced Left and Right analogue out ( 2 x phono/RCA)
AES/EBU output (XLR3M)
S/PDIF output (phono/RCA)
S/PDIF output (optical TOSlink connector)
Other Connectors
RS232 remote control port (D9M)
RS232 link connector (D9F)
Parallel remote control, function-programmable (D9F)
Word clock input (BNC)
QWERTY keyboard connector (PS/2)*
AC mains input (IEC)
*The keyboard connector is duplicated on the front panel.
Connector Details
Balanced L & R analogue inputs. These are electronicallybalanced on XLR3F connectors and can accept audio levels
of up to +24dBu without clipping. Nominal input sensitivity
is set at +4dBu for a digital level of -18dBFS. Nominal input
impedance is 10kΩ. The pinout for this (and all other inputs
and outputs) can be found at page 51.
Note that the CDR-882 has one set of audio inputs only;
internally, the input signals are routed to both disc drives.
Unbalanced L & R analogue inputs. Unbalanced analogue
inputs on phono connectors (RCA jacks) are also provided.
Nominal input sensitivity is -10dBu for a digital level of
-18dBFS. Maximum input level at these connectors is
+10dBu. Input impedance is 10kΩ.
AES/EBU digital input. Professional 2-channel digital audio
input conforming to AES3-1992 (r1997) amendment 4-
1999. Connector is an XLR3F, input impedance is 110Ω.
S/PDIF Coaxial digital input. Semi-pro/consumer 2channel digital audio input on a phono connector (RCA jack),
conforming to IEC60958-4. DAT track ID and PQ-code
recognition are enabled at this input and the SCMS flag is
under operator control. (See page 48).
S/PDIF Optical digital input. An S/PDIF digital audio input
can alternatively be applied via the optical TOSlink connector
using a suitable fibre-optic cable (less than 3m in length
recommended).
All digital inputs can accept data at a sample rate of between 32
& 96kHz. The signal is sample-rate converted internally to the
CD standard of 44.1kHz.
Note that recordings on the CDR-882 will only be made using
one of the input connectors (1) to (5) above at any one time.
The active input is set via the front panel I/P SELECT button.
(See page 13).
Balanced L & R analogue outputs. These are electronicallybalanced on XLR3M connectors, and will drive a maximum
audio level of +22dBu for 0dBFS. Nominal output level is
set at +4dBu for a digital level of -18dBFS. Nominal output
impedance is less than 100Ω.
10
CDR-882 User Manual Version 1.0www.hhb.co.uk
Page 12
Connectivity
Unbalanced L & R analogue outputs. These carry the
same audio signal as the main outputs (1) above, but in
unbalanced form on phono connectors (RCA jacks) at a
nominal level of -10dBu. Output level is calibrated internally
to be +8dBu from a maximum (digital clip) PCM signal level
of 0dBFS. Output impedance is 47Ω.
AES/EBU out. This provides a two-channel AES/EBU digital
output conforming to AES3-2003. The connector is an
XLR3M, output impedance 110Ω.
S/PDIF Coaxial digital output. A 2-channel “semi-pro”
digital output conforming to the IEC60958-4 is available at
this connector. Transmission of CD PQ codes and CD Text
data are enabled in the S/PDIF data stream; the signal
is otherwise the same as that available at the AES/EBU
connector (8).
Note that the channel status bits denoting whether the
digital outputs are “Pro” or “Consumer” may be set via the
menu system (Record > Digital Output Format), and that
this setting applies to both the AES/EBU and S/PDIF digital
outputs.
Also note that the S/PDIF output is used in Multi-Machine
modes to pass audio, clock and CD Text data between units.
S/PDIF Optical digital output. Standard TOSlink connector
carrying the same signal as (9) above, in optical form. Use a
standard optical TOSlink cable of not more than 3m. length.
RS232 Link Input connector. The CDR-882 can be fully
controlled remotely via RS232 serial commands. Pinout,
port parameters and an abridged command set can be
found at page 13. This port permits one or more (see
(12) below) CDR-882s to be controlled from a dedicated
computer with appropriate software, or by a proprietary
external control system (Crestron, AMX, etc.). A “crossed”
cable (i.e., one with transmit and receive pins crossconnected) should be used when controlling the CDR-882
from an external control system. A D9M connector is used.
Word Clock input. An input for an external 44.1kHz digital
audio word clock is provided on a BNC socket. The input
impedance is either 75Ω or high-impedance, set by the
termination switch adjacent to the connector.
Word clock selection and routing is done via the menu
system; see sections page 21 & page 31.
Keyboard input. A PS/2 connector is available on both
front and rear panels for the connection of a standard
QWERTY keyboard. The CDR-882 supports CD Text with
audio CDs in both record and replay modes, and connection
of a standard keyboard provides a rapid means of entering
textual data to be displayed on the front of suitably-equipped
CD players (including the CDR-882).
AC mains input. The CDR-882 is powered via a standard
IEC connector. The CDR-882’s design includes a universal
power supply and will accept all AC mains voltages from
100 to 240V, 50 to 60Hz.
RS232 Link Output connector. This allows control
information to be passed from Master to Slave units in
Multi-Machine mode. It also allows multiple CDR-882s to be
controlled from a single RS232 controller.
The link connector is a D9F. The pinout is the same as the
RS232 input, except that the Data transmit and receive
pins (2 & 3) are reversed. Thus when “daisy-chaining”
CDR-882s, “straight” cables must be used, in which all
connections between machines are “pin-to-pin”. Note that
in multi-machine modes, the “master” CDR-882 generates
control data for the connected “slave” units.
Note that the RS232 link connector only passes control
data, not audio. In multi-machine modes, the audio signals
need to be distributed to multiple CDR-882s separately
using S/PDIF interconnections. See page 42 for full details
of Multi-Machine operation.
Parallel remote control connector. The CDR-882’s basic
transport commands can also be implemented by volt-free
contact closure at the pins of this connector (a D9F). Five
of the pins are designated as inputs, three as outputs
(tallies). The functions controlled by each of the inputs are
user-definable via the menu system. The source of the tally
outputs is similarly definable. Full information, including
pinout, is available at page 51. Assignment of inputs and
outputs is performed via the menu system; see page 36 for
full details.
CDR-882 User Manual Version 1.0 www.hhb.co.uk
11
Page 13
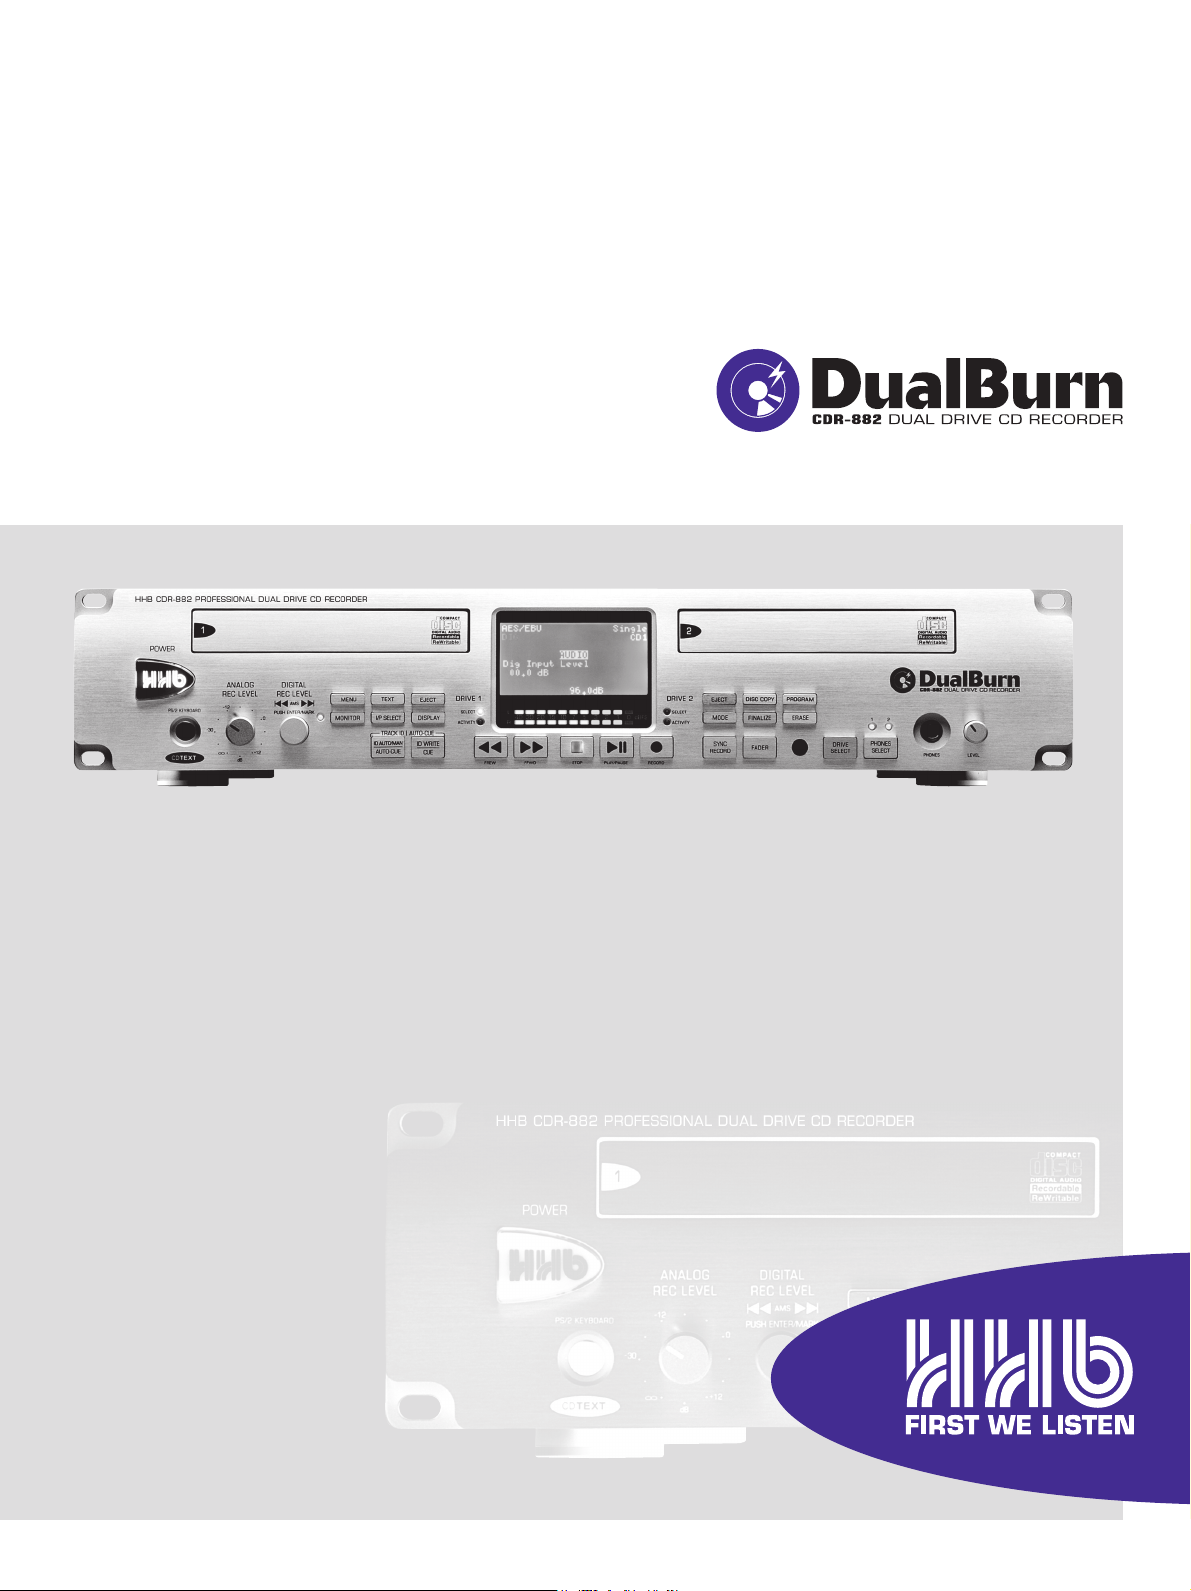
Front Panel Features
Front Panel Features
All the CDR-882’s controls are on the front panel. Note that
many of the unit’s functions and setup options are controlled and
selected through the menu system, using the multi-character
LED matrix display, which is shown enlarged on page 15.
AC power switch.
Alphanumeric LED dot matrix display
Disc tray (Drive 1)
Disc tray (Drive 2)
EJECT button (Drive 1)
EJECT button (Drive 2)
Infra-red remote control sensor
PLAY/PAUSE button
STOP button
FFWD button
FREW button
RECORD button
SYNC RECORD button
AMS/Digital record level control, with ENTER/MARK push
function
Analogue record level control
MENU button
TEXT button
MONITOR button
I/P SELECT button
DISPLAY button
ID AUTO/MAN | AUTO-CUE button
ID WRITE | CUE button
DISC COPY button
PROGRAM button
MODE button
FINALIZE button
ERASE button
DRIVE SELECT button
PHONES SELECT button
FADER button
Keyboard socket
Headphone socket
Headphone level control
Drive select LEDs
Drive activity LEDs
Bargraph meter
12
CDR-882 User Manual Version 1.0www.hhb.co.uk
Page 14
Front Panel Features
AC power switch. The large HHB logo at the left-hand of
the front-panel is the push-button on/off switch, and is
illuminated when the unit is on.
On power-up, the display shows the HHB and DualBurn
logos, followed by No Disc if there is no disc in a drive, or
Reading if there is. Note that for most CDR-882 functions,
the upper main line of the display shows the status of Drive
1, the lower that of Drive 2.
Alphanumeric display. The multi-character LED dot matrix
display is described in detail on page 15.
Disc tray (Drive 1). The disc drive accepts one disc at a
time. The drawer is motorised and can be manually opened
and closed with the EJECT button (5). When the drawer is
open, the display shows Open. (NOTE: If open with the unit
unpowered, the drawer closes automatically on power-up.)
Disc tray (Drive 2). As (3). The drawer can be operated
with the EJECT button (6).
EJECT button (Drive 1). Opens and closes Drive 1’s disc
tray. See page 20 for full details.
EJECT button (Drive 2). Operation as (5).
Remote control sensor. The infra-red sensor
receives commands from the remote control
handset. Keep the sensor unobstructed to ensure
correct functioning. The range of reliable operation
of the handset is shown in the diagram below.
FFWD button. Press and hold from PLAY to scan (search)
forward through the current track at increased speed, with
audio. Search speed increases the longer the button is
pressed. PLAY resumes when the button is released. See
page 20 for more details.
FREW button. This button has exactly the same function
as the FFWD button (10) above, except that the search
direction is reversed.
RECORD button. Press to prepare the drive for recording.
After checking disc type, etc., the drive enters RECORD
PAUSE mode. Recording is started by pressing the PLAY/
PAUSE button, which “releases” the paused state. See
page 21 for more details.
SYNC RECORD button. Press to start recording on
detection of a start trigger (e.g. a Track ID code or audio
level). SYNC RECORD also invokes Track ID marking. See
page 24 for full details.
AMS/Digital Rec Level control. Multi-purpose rotary
control with “press” function. As a rotary control, it
performs Automatic Music Search (AMS) to locate to a
particular track. It also provides the means of navigating the
menu system when in MENU mode.
The “press” function acts as an ENTER button in menu
navigation to select submenus and options. In PLAY mode,
it is used as a MARK button, to store the current play
position so it can be easily re-located to. See page 24
(AMS) and page 27 (Menu Navigation) for more details.
NOTE: The CDR-882’s main transport controls (8) to (12)
normally only operate on one drive at a time, depending on the
drive selected with the DRIVE SELECT button (28).
PLAY/PAUSE button. Press from STOP to start playback.
If pressed during PLAY, playback will pause, and resume on
a further press. The display indicates PLAY mode with the H
symbol, or PAUSE mode with the B symbol. The green H B
in the button illuminates, steadily in PLAY mode and flashing
in PAUSE mode. See page 20 for more details.
STOP button. Pressing this button stops the disc from all
transport modes. The display shows the symbol A and the
yellow A symbol in the button illuminates.
Analogue Rec Level control. This is a conventional record
level control for use when either of the analogue inputs are
selected as the input source. Record level is displayed on
the bargraph meters.
MENU button. Pressing this button puts the CDR-882
into MENU mode. A variety of unit parameters and settings
may be adjusted and selected via the menu system. These
include word clock source selection, setting of the various
multi-drive recording modes, parallel remote control port
setup, etc. See page 27.
TEXT button. Selecting TEXT mode allows CD Text data to
be entered, using a PS/2 QWERTY keyboard connected to
either of the keyboard sockets. The text data can be seen
on the LED display as it is entered.
CD Text can be entered during or after recording, but must
be done so prior to finalising the disc.
More information on using CD Text can be found at
page 45.
MONITOR button. Press to monitor the selected input
source. The adjacent LED illuminates when MONITOR is
enabled. See page 23.
I/P SELECT button. This determines which of the CDR882’s five sets of inputs is to be used as a recording source
(only one input at a time may be selected). The selected
source is indicated in the display. Pressing the I/P SELECT
button repeatedly scrolls through the options, which are (in
sequence):
CDR-882 User Manual Version 1.0 www.hhb.co.uk
See page 22 for more information about input selection.
13
Page 15
Front Panel Features
DISPLAY button. This button changes the time display
option for the selected drive. The options available will
depend on the drive’s current Status (e.g. STOP, PLAY,
etc.). See page 22 for full details.
ID AUTO/MAN | AUTO-CUE button. This button has
two distinct functions, depending whether a disc is being
recorded or not:
a) Auto/manual Track ID selection: Switches between
automatic and manual track numbering when recording a
disc. See page 13 for more information.
b) Auto-Cue mode selection: Allows selection of Auto-Cue
and Auto-Pause modes when not recording. See page 46
for more information.
ID WRITE | CUE button. This button also has two distinct
functions, depending whether a disc is being recorded or
not:
a) ID Write: Pressing this button during RECORD, when
TRACK ID MANUAL mode has been selected with
[21] above, writes a track ID to the CD in the selected
drive(s).
As an ID is written, ID Write illuminates briefly in the
bottom left-hand corner of the display, and the track
number in the time display increments by one.
b) Cue button: When the CDR-882 is not in RECORD
mode, the button acts as a CUE button. Pressing CUE
will immediately locate to a previously-stored MARK point
(see page 13), entering PLAY mode at the cue point.
If AUTO-CUE or AUTO-PAUSE mode is active, or if the
drive is already in PAUSE mode, the drive enters PAUSE
at the cue point. When a MARK point is stored, drive
number is included, thus CUE can be used to locate to a
point on the other drive if wished. See page 46 for more
information.
MODE button. This button is used to define the basic
record/playback mode of the CDR-882 when both drives
are in use. Pressing MODE repeatedly scrolls through
the options; the display indicates the selected option. The
options are (in sequence):
MODE ACTION DISPLAY
Single CD Records or plays from one drive
DualBurn Records an external input on
DiscSpan Records to or plays from each
only; select Drive 1 or 2 with
DRIVE SELECT button
both drives simultaneously
drive alternately (for as long as
appropriate CDs are loaded)
Single CD1 or Single CD2
DualBurn or DualBurn
CD1 CD2
DiscSpan or DiscSpan
CD1 CD2
The various twin-disc modes are described in more detail in
section page 39.
FINALIZE button. Press to manually start disc finalisation
(to make the CD playable in a standard audio CD player).
Auto finalisation is set via the menu system, see page 34.
ERASE button. Press to erase the whole disc, a range of
tracks or to carry out a full initialisation of the disc. It is also
possible to do a full erase or initialisation of discs in both
drives simultaneously. Applicable to CD-RW discs only
Press the ENTER button [14] to start the process.
See section page 47 for more information about erasing
discs.
DRIVE SELECT button. This button is used to select which
drive is currently being controlled by the CDR-882’s main
transport buttons and other front panel controls.
The “active” drive is indicated by inverse video in the main
display area. Additional indication is provided in the top
right-hand corner of the display by CD1 or CD2, and the
blue Drive Select LEDs (34).
DISC COPY button. This selects the CDR-882’s DISC
COPY function, which allows the user to make a copy of an
existing CD, CD-R or CD-RW from one drive to the other at
high-speed (with certain restrictions). A full description of
the DISC COPY function can be found at page 41.
PROGRAM button. The PROGRAM function, activated by
pressing PROGRAM, is used for two different purposes:
a) PROGRAM PLAY mode - permits tracks to be replayed in
a non-sequential order
b) PROGRAM COPY mode - allows a copy to be made of a
CD, but with individually selected tracks, sequenced in
any order on the copy.
The PROGRAM functions are described in detail
at page 44 (PROGRAM PLAY mode) and page 44
(PROGRAM COPY mode).
PHONES SELECT button. This button selects which drive
is to be the source for the headphone monitor output [32].
Pressing the button scrolls between the three available
options, which are: Drive 1, Drive 2, or a mix of audio from
both Drive 1 and Drive 2. In the case of the last option,
the precise nature of the mix heard is determined by the
Phones Mix settings in the Audio sub-menu. See page 30
for further details.
The two green LEDs immediately above the button indicate
the option selected.
14
CDR-882 User Manual Version 1.0www.hhb.co.uk
Page 16
Front Panel Features
FADER button. The CDR-882’s FADER function allows
playback or recording to start or end with a smooth fade-in
or fade-out as appropriate. The fade-in and fade-out times
used are set via the Audio sub-menu of the menu system.
See page 29 for more details.
The actual operation of the FADER function will depend on
the CDR-882’s status when the button is pressed.
STATUS ACTION ON PRESSING FADER
STOP mode Playback starts from track 1 with fade-in
PLAY mode Audio fades out, drive enters PAUSE mode
PAUSE mode Playback resumes, with fade-in
RECORD PAUSE
mode
RECORD mode Record level fades down, unit enters RECORD PAUSE
Recording starts from paused location, record level
fades up
mode
Fade-in and fade-out are confirmed on the display by the
flashing legend FADE-IN or FADE-OUT.
Keyboard socket. This PS/2 socket is a duplicate of that
on the unit’s rear and is for the connection of a QWERTY
keyboard for CD Text data entry.
Headphone socket. Connect a pair of stereo headphones
via the ¼” jack socket monitoring for private listening. The
stereo signal available at this connector is determined by
the setting of the MONITOR and PHONES SELECT buttons
[18] and [29] respectively, and also the Phones Mix option
in the Audio submenu. Headphones with a minimum
impedance of 32Ω should be used.
Headphone level control. This is a conventional analogue
volume control for the headphone output.
Drive select LEDs. Each drive has a blue SELECT LED (each
side of the main display).
One SELECT LED will always be illuminated, according to the
selection made with the DRIVE SELECT button (27). (Note
that if one drive already has a disc inserted at power-up, it
will be selected as the active drive automatically.)
Drive activity LEDs. Each drive has a tricolour ACTIVITY
LED (each side of the main display).
The LED indicates the current status of each drive.
LED INDICATION STATUS
Off No disc in drive
Amber Disc loaded, drive in STOP mode
Green (blinking) Drive in PLAY mode
Green (flashing) Drive in PAUSE mode
Green (steady) Drive is source in COPY mode
Red Drive in Record Mode
Bargraph meter. This 11-segment stereo bargraph meter
provides indication of record or playback level, depending on
the MONITOR button [18] and Output Mix settings in the
Audio submenu.
The meter has digital scaling, from -40dBFS to 0dBFS.
Alphanumeric Display
The front-panel transreflexive 128 x 64 pixel LCD gives disc
timing information and transport mode for each drive in
large text and symbols, plus additional textual information
such as currently selected input, media type in use,
operational mode, ‘active’ drive, etc. in a smaller font at the
top of the display.
Currently selected input -
Balanced, Unbal, AES/EBU, Coax, Optical
Word clock source -
Internal, DIG, WCLK
Track number and time display for Drive 1
Track number and time display for Drive 2
Media type in Drive 1 - CD, CD-R, CD-RW
Time display option for Drive 1 - TRACK, REMAIN, TOTAL,
TOTREM
Record/Playback mode - Single, DualBurn, DiscSpan
Currently ‘active’ drive - CD1 or CD2
Time display option for Drive 2 - TRACK, REMAIN, TOTAL,
TOTREM
Media type in Drive 2 - CD, CD-R, CD-RW
Peak signal level indication. *
* Provides a numeric indication, in dBs, of peak signal level
relative to clip. (Clip is taken as 0dB, thus all indications
are negative). Only displayed during RECORD, or when
input monitoring is selected.
CDR-882 User Manual Version 1.0 www.hhb.co.uk
15
Page 17
RC-882 Remote Control
RC-882 Remote Control
The RC-882 Remote Control Unit (infra-red handset) supplied
with the CDR-882 duplicates many of the front panel buttons
in both function and operation. Some additional keys are
also provided: a set of 0-9 numeric keys for direct access to
individual CD tracks, dedicated NEXT and PREVIOUS keys and a
RECORD safety key.
Note: “see (*)” refers to associated front panel features.
Direct Access keys – see note below.
DISPLAY – see (20)
INPUT SELECT– see (19)
INPUT MONITOR – see (18)
TRACK ID AUTO/MAN and AUTO-CUE – see (21)
TRACK ID WRITE and CUE – see (22)
PROGRAM – see (24)
DISC COPY – see (23)
FINALIZE – see (26)
ERASE – see (27)
PHONES SELECT– see (29)
TEXT – see (17)
FADER – see (30)
MODE – see (25)
MENU ON/OFF – see (16)
ENTER/MARK – equivalent to “push” function of AMS
control (14)
“+” key – equivalent to rotating AMS control (14) clockwise
when in MENU mode
“-” key – equivalent to rotating AMS control (14)
anticlockwise when in MENU mode
DRIVE SELECT – see (28)
STOP – see (9)
PLAY/PAUSE – see (8)
FREW – see (11)
FFWD – see (10)
NEXT – equivalent to rotating AMS control (14) clockwise
when not in MENU mode
PREVIOUS – equivalent to rotating AMS control (14)
anticlockwise when not in MENU mode
SYNC RECORD – see (13)
RECORD (two buttons) - see (12 and note below)
Direct Access keys
These operate in the following way:
To start playback at tracks 1 to 9, press the
•
corresponding 1 to 9 key
To start playback at track 10, press the 10/0 key
•
To start playback at a track numbered 11 or higher, press
•
the >10 key, followed by the separate digits of the track
number. Thus to select track 15, press >10, 1 and 5 in
order
16
Record keys
Two red record keys are provided on the handset; to activate the
CDR-882’s Record mode, press both buttons simultaneously.
CDR-882 User Manual Version 1.0www.hhb.co.uk
Page 18

Quick Start Guide
Quick Start Guide
This section is intended to get you going quickly with the CDR882’s most basic functions when you use it for the first time.
It also tells you where to look in the manual to get additional
information about many aspects of the CDR-882’s operation.
NOTE: The numbers following the various controls and
connectors in the instructions below refer to the front and rear
diagrams on page 12 and page 10 respectively.
Recording a CD from an analogue
source
This describes the simplest method of recording a CD in Drive 1
from an analogue source, entering track markers manually.
1. Connect the analogue audio source to either the balanced
inputs (XLRs [1]) or unbalanced inputs (phonos [2]).
2. Open Drive 1’s disc tray with the EJECT button [5], insert a
blank CD-R, and close the tray.
3. Press the I/P SELECT button [19] until the display shows
Balanced or Unbal, depending which inputs you connected
to in Step 1.
4. Connect a suitable pair of headphones to the front panel
headphones socket [32], and press the PHONES SELECT
button [29] so that the 1 LED above is illuminated.
5. Press the RECORD button [12]; the display will show
Record Setup and then enter RECORD PAUSE mode
(indicated by a steady red symbol in the RECORD button
and a flashing green symbol in the PLAY/PAUSE button
[8]). The green MONITOR LED (adjacent to [18]) will also be
illuminated.
6. Play a sample of the source programme, and adjust
the ANALOG REC LEVEL control [15] to obtain a meter
indication that only causes the amber segments to
illuminate on the loudest sections of the programme. If
necessary, adjust the output level of the source device as
well. Use the headphones to ensure that the sound is not
clipping or otherwise distorting.
7. Stop the source and re-locate the programme to its start.
Press the PLAY/PAUSE button [8] to start the recording,
and play the source programme. Track 1 is now being
recorded.
8. To create a new track (at a suitable point in the
programme), press the ID WRITE | CUE button [22]. The
track number will increment to 02.
9. The recording can be stopped by pressing the STOP button
[9]. Further tracks may be added by repeating the above
from Step 5.
10. When you have recorded all the tracks needed, press the
FINALIZE button [26], and then press the ENTER button
[14] in answer to the question Finalize? to complete the
record process. The disc may now be removed from the
drive by pressing the EJECT button [5].
Recording a CD from a digital
source
This describes the simplest method of recording a CD in Drive 1
from an digital source, entering track markers manually.
1. Connect the digital audio source to the AES/EBU (XLR [3])
or S/PDIF input (phono [4] or TOSlink [5]).
2. Open Drive 1’s disc tray with the EJECT button [5], insert a
blank CD-R, and close the tray.
3. Press the I/P SELECT button [19] until the display shows
AES/EBU, Coax or Optical, depending which input you
connected to in Step 1.
4. Connect a suitable pair of headphones to the front panel
headphones socket [32], and press the PHONES SELECT
button [29] so that the 1 LED above is illuminated.
5. Press the RECORD button [12]; the display will show Record
Setup and then enter RECORD PAUSE mode (indicated by
a steady red symbol in the RECORD button and a flashing
green symbol in the PLAY/PAUSE button [8]). The green
MONITOR LED (adjacent to [18]) will also be illuminated.
6. Play a sample of the source programme, and check the
meter indication. It should only cause the amber segments
to illuminate on the loudest sections of the programme.
If the level appears satisfactory, proceed to Step 8;
if adjustment is required, go to Step 7 first. Use the
headphones to ensure that the sound is not clipping or
otherwise distorting.
7. The digital recording level may be adjusted by pressing the
MENU button [16], selecting the Audio submenu (the first)
with the AMS control [14], then selecting the Dig Input
Level option (the first) in the submenu – press the ENTER
button [14] to select at each menu level. The recording level
can then be adjusted with the AMS control. Exit the menu
system by pressing the MENU button three times.
8. Stop the source and re-locate the programme to its start.
Press the PLAY/PAUSE button [8] to start the recording,
and play the source programme. Track 1 is now being
recorded.
9. To create a new track (at a suitable point in the
programme), press the ID WRITE | CUE button [22]. The
track number will increment to 02.
10. The recording can be stopped by pressing the STOP button
[9]. Further tracks may be added by repeating the above
from Step 5.
11. When you have recorded all the tracks needed, press the
FINALIZE button [26], and then press the ENTER button
[14] in answer to the question Finalize? to complete the
record process. The disc may now be removed from the
drive by pressing the EJECT button [5].
CDR-882 User Manual Version 1.0 www.hhb.co.uk
17
Page 19

Quick Start Guide
18
CDR-882 User Manual Version 1.0www.hhb.co.uk
Playing a CD
1. Connect a stereo audio amplifier (and speakers) to either
the balanced outputs [XLRs [6] ) or unbalanced outputs
(phonos [7] ).
2. Open Drive 1’s disc tray with the EJECT button [5], insert
the CD to be played, and close the tray.
3. When the disc’s TOC has been read, the number of tracks
and the disc’s total playing time is displayed. To start
playback at Track 1, press the PLAY/PAUSE button [8].
The display confirms the track number (01), and the time
changes from Total to Track.*
4. To start playback from any other track, rotate the AMS
control [14] clockwise until the number of the required track
is shown, then press either ENTER or PLAY/PAUSE.
5. Playback may be paused at any time by pressing PLAY/
PAUSE, and resumed by pressing PLAY/PAUSE again.
Playback may be stopped by pressing the STOP button [9].
*If the CD contains CD Text, the CD Title will be displayed
instead when it is loaded. Press TEXT [17] to display the Artist
Name. After PLAY/PAUSE is pressed, the display shows
the Track Title. DISPLAY [20] may be pressed at any time to
resume the track number/elapsed time display.
Playing one disc while recording
another
The dual drive capability of the CDR-882 allows one CD to be
played while another is recorded, in the same machine. This
feature will be useful when seminars, conferences or Houses of
Worship services, etc., are being recorded, with the intention
of providing attendees with CDs of the event very soon after it
finishes.
7. So that the rear output connectors carry the playback audio
from Drive 1, navigate to the Output Mix option in the
Audio Submenu and set it to Priority CD1; exit the menu
system by pressing MENU again until the normal display
appears.
8. If recording from an analogue source, perform Steps 5 and
6 of “Recording a CD from an Analogue Source” above. If
recording from a digital source, perform Steps 5 and 6 (and
7 if necessary) of “Recording a CD from a Digital Source”
above. In either case, the source programme can be
monitored via the speakers instead of the headphones.
9. Recording may now be started in Drive 2 by pressing the
PLAY/PAUSE button [8].
10. Press the DRIVE SELECT button [28] to select Drive 1.
11. The green LED adjacent to the MONITOR button [18] will
now flash.
12. The disc in Drive 1 may now be played by pressing
the PLAY/PAUSE button [8]. Playback will be heard,
commencing with Track 1; the AMS control [14] may be
used to select a different track (see Step 4 of “Playing a CD”
above).
13. The audio output may be monitored in the headphones and
switched between Drive 1 (playback) and Drive 2 (signal
being recorded) with the PHONES SELECT button [29].
(The “Mix” setting - with both LEDs on - will select Drive 1’s
playback because Priority CD1 was selected in Step 6.)
14. The transport controls may be switched – by pressing
DRIVE SELECT – between the disc being played in Drive
1 and the disc being recorded in Drive 2, to suit the
operator’s needs. The disc being recorded will need to be
finalised as normal when recording is complete.
Assume that we wish to record on Drive 2 while playing another
CD in Drive 1.
1. Connect a stereo audio amplifier (and speakers) to either
the balanced outputs [XLRs [6]) or unbalanced outputs
(phonos [7]).
2. Connect the source to be recorded to the appropriate set of
inputs – analogue [1] or [2] or digital [3], [4] or [5].
3. Open Drive 1’s disc tray with the EJECT button [5] and
insert the CD to be played; open Drive 2’s disc tray with the
EJECT button [6] and insert a blank CD-R. Close both trays.
4. When the discs have been read, and the display is showing
the contents of the disc in Drive 1, select Drive 2 by
pressing the DRIVE SELECT button [28]. Drive 2’s track
information (zero if the disc was blank) will be in reverse
video.
5. Press the I/P SELECT button [19] until the display shows
the name of the input being used (the inputs you connected (the inputs you connected
to in Step 2).
6. Press the MENU button [16], with the AMS control/
ENTER button [14], navigate to the Phones Mix option in
the Audio submenu. Set this to Priority CD1.
Page 20
Reference List of the CDR-882’s
other main functions
TO DO THIS REFER TO SECTION ON PAGE
Start and end a CD recording automatically
from DAT/MD subcodes or audio level
detection
Search through a disc at high speed FFWD & FREW page 20
Fade-in and/or fade-out of a track, in either
playback or record
Change the disc time information being
displayed
Insert Track IDs automatically while
recording
Finalise a disc automatically when recording
has finished.
Override automatic Word Clock selection Internal & External
Store and locate to a marker point Manual Cueing page 46
Record two discs at once DualBurn Record page 39
Make a recording spanning two or more
discs
Make a high-speed copy of a disc Disc Copy page 41
Make simultaneous or sequential
recordings on multiple CDR-882s.
Play a sequence of specific tracks on a disc Program Play page 44
Copy selected tracks from one disc to
another
Use CD Text CD Text page 45
Cue up to a track accurately Auto-Cue page 46
Erase some or all tracks from a disc Erasing Discs page 47
Control the copy-protection setting on a
disc
Control the CDR-882 remotely Remote Control page 49
Synchronised
Recording
Fader page 21
Time Displays page 22
Tracks IDs page 25
Finalising page 25
Clocks
DiscSpan Mode page 39
Multi-Machine
Operation
Program Copy page 44
SCMS Considerations page 48
page 24
page 38
page 42
Quick Start Guide
CDR-882 User Manual Version 1.0 www.hhb.co.uk
19
Page 21

Basic Operation
Basic Operation
Disc insertion and removal
The disc drive trays may be opened with the EJECT buttons [5 &
6] and closed either with a second press of EJECT, or by gently
pushing the front of the tray.
When placing a disc in the tray, ensure that it is located
correctly in the recess before attempting to close the tray to
avoid jamming the mechanism or damaging the disc. Note that
there is a second inner recess to accommodate discs of 8cm
diameter.
The display reads Open while the tray is open, and Close while
it is closing. When an empty tray is fully retracted, the display
reads No Disc.
If the tray is closed with a disc inserted, the display shows
Reading while the disc’s TOC (if any) is read; once this is
completed, the drive enters STOP mode, with the display either
indicating the number of tracks on the discs and the CD’s total
playing time, or any CD Text information on the disc.
The EJECT buttons are always disabled when the relevant drive
is in RECORD or RECORD PAUSE mode. Additionally, they can be
disabled in all transport modes other than STOP via the menu
system (see page 37).
Drive selection
The CDR-882’s two disc drives are functionally identical. Either
may be used for playback or recording. In the various dualdisc modes supported by the CDR-882, disc copying from
one drive to another in either direction and recording on both
drives simultaneously are both possible. (See page 39 for more
information regarding dual disc modes).
The unit’s main transport buttons [8 -12] only control one drive
at a time; the DRIVE SELECT button [28] selects which drive is
“active” for control functions, and toggles between them. The
selected drive is indicated by the two blue SELECT LEDs [34],
and the drive’s display will be shown in reverse video. In addition,
either CD1 or CD2 will be indicated in the upper right-hand area;
these remain visible in Menu Mode.
Transport Controls
A standard set of five CD drive buttons is provided, which
operate on the currently-selected drive. The transport buttons
are illuminated and colour-coded, and their functions are
duplicated on the RC-882 remote control. Additional track
locating functions are available with the AMS control.
Play/Pause
The function of the PLAY/PAUSE button depends on the drive’s
current mode:
If the drive is in STOP when PLAY/PAUSE is pressed,
•
the drive enters PLAY mode and playback commences at
Track 1*. PLAY mode is indicated by a steady LED in the
PLAY/PAUSE button and a H symbol in the display
If PLAY/PAUSE is pressed while the drive is already in
•
PLAY mode, the drive enters PAUSE mode, playback stops
and the disc is paused at the current location. PAUSE
mode is indicated by a flashing PLAY/PAUSE button LED,
and a B symbol in the display and a flashing Drive Activity
LED
Pressing PLAY/PAUSE when the drive is in PAUSE mode
•
puts the drive back into PLAY mode and playback resumes
from the paused location
* An exception to this is if Program Play is active and the first
programmed track is not Track 1.
The PLAY/PAUSE button is also used to begin recording. See
RECORD below.
Stop
Pressing STOP while the drive is in PLAY mode stops the drive
and playback ceases. The display returns to the ‘initial loading’
state, showing the number of tracks and total time. Re-selecting
PLAY will always start playback with Track 1 (unless Program
Play is active and the first programmed track is not Track
1). STOP mode is indicated by the STOP button LED and a A
symbol in the display.
FFWD & FREW
Pressing these buttons in PLAY mode engage SEARCH. The
track is scanned at increased speed, either forwards (FFWD)
or backwards (FREW). Audio continues to be replayed during
search, but at a lower output level. Search speed is dependent
on how long the button is pressed; holding the button down
for longer increases the search speed incrementally up to a
maximum of 20x normal speed. SEARCH mode is cancelled
when the button is released.
Certain rules apply regarding automatic drive selection at powerup:
Drive 1 is selected by default if neither drive contains a
•
disc
If Drive 2 already has a disc inserted, it is selected after
•
initialisation and disc reading
If both drives contain discs, Drive 1 is selected after
•
initialisation and disc reading
20
Pressing FFWD or FREW from PAUSE mode scans the disc in
the same manner, but audio remains muted.
SEARCH modes are indicated by the symbols D or C in the
display, and the buttons’ internal green symbols also illuminate.
CDR-882 User Manual Version 1.0www.hhb.co.uk
Page 22

Basic Operation
Manual Record
The RECORD button is only enabled if certain conditions are
met. These are that i) there is a blank recordable disc in the
selected drive and ii) that if the currently-selected input is one
of the three digital inputs, there is a valid signal (AES/EBU or
S/PDIF) at the input connector (even though it may have zero
audio content).
If the conditions are met, pressing the RECORD button initialises
the blank disc. The LCD display flashes Record Setup for the
drive being used, and the G symbol in the RECORD button and
the drive activity LED both flash red.
Initialisation takes a few seconds, after which the drive enters
RECORD PAUSE mode. This is confirmed by a steady RECORD
button LED, a flashing G symbol in the display and a flashing
green LED in the PLAY/PAUSE button.
Recording may be started by pressing the PLAY/PAUSE button,
which puts the drive into RECORD mode. The symbol G in the
display and the LED in the PLAY/PAUSE button stops flashing.
Selecting a track (AMS)
NEXT and PREVIOUS functions are performed with the rotary
AMS control. Rotating it ‘one click’ clockwise will advance the
cue point of the currently-selected drive to the start of the next
track. Similarly, one anticlockwise click moves the cue point to
the start of the current track, two anticlockwise clicks to the
start of the previous track.
Any track on a disc may be selected for playback by rotating the
AMS control more than one ‘click’.
While re-locating, the display temporarily shows the symbol E
or F as appropriate.
Other factors concerning the operation of the AMS control are:
Fader
The FADER button can be used instead of the PLAY/PAUSE
button to start and stop playback from (and recording to) the
currently-selected drive, but with a controlled fade-in and/or
fade-out of the audio. Fade-in and fade-out times are userdefinable.
In disc playback the FADER function operates as follows:
•
When the drive is in STOP mode, pressing the FADER
button cues it to Track 1 and enters PLAY mode. The
playback audio level fades up from zero to maximum over
the time period defined as the Fade-in Time
•
Pressing FADER while a disc is already playing (i.e. the
drive is in PLAY mode) reduces the audio level from
maximum to zero over the time period defined as the
Fade-Out Time, and then puts the drive into PAUSE mode
•
From PAUSE mode, a further press of FADER puts the
drive back into PLAY, with the audio level fading up again
In disc recording modes, the FADER function operates as
follows:
•
Pressing the FADER button from RECORD PAUSE mode
(see RECORD above) puts the drive into RECORD mode in
the normal manner; recording starts, but the audio level
fades up from zero to maximum over the Fade-in Time
•
Once in RECORD mode, a further press of FADER reduces
the audio level back to zero over the Fade-Out Time, and
then puts the drive into RECORD PAUSE mode
The Fade-In and Fade-Out Times can each be set from 1 to 10
seconds (in 1 second increments) via the Menu system. See
page 29 for full details.
Activation of the FADER function is indicated on the display by
the flashing text FADE-IN or FADE-OUT while the fade is actually
taking place.
•
From STOP, as a track is selected, the length of the track
is displayed and the beginning of the track is cued and preloaded into memory for Instant Start. Playback is started
by pressing either PLAY/PAUSE or ENTER. Press STOP
to cancel this cue mode
•
Rotating counter-clockwise from the first track will select
the last track; rotating clockwise past the last track will
select the first track
•
If the drive is already in PLAY mode when the AMS control
is rotated, playback of the new track will begin immediately
•
From PAUSE, playback will be held in PAUSE at the start of
the new track. Press PLAY/PAUSE to begin playback
The NEXT and PREVIOUS functions performed by the AMS
control are also available from the RC-882 remote control with
the E and F buttons.
Note that the AMS knob is a multi-function control and it has
several other uses, including menu navigation and MARK writing.
CDR-882 User Manual Version 1.0 www.hhb.co.uk
21
Page 23

Basic Operation
Selecting an input
The CDR-882 is equipped with five stereo audio inputs, in
various formats. Only one may be active at any one time, and
provides the real-time recording or monitor source. In the case
of DualBurn Record Mode (see page 39), the selected input is
the source for both drives.
The currently selected input is indicated at the top left of the
display at all times. The I/P SELECT button determines which
input is to be used; pressing it scrolls through the five options in
sequence, which are:
INPUT DISPLAY
Balanced analogue (XLRs)
Unbalanced analogue (phonos)
AES/EBU digital
S/PDIF (phonos)
S/PDIF (TOSlink)
See page 10 for details of the various rear panel connectors,
pinouts and details of the inputs’ capabilities.
Note that changing from one digital input type to another may
require the selection to be confirmed with the ENTER button,
which may affect the Clock Source. See page 38 for further
details.
Balanced
Unbal
AES/EBU
Coax
Optical
Time displays
The track or disc time information shown on the front panel
display is determined both by the drive’s current status and the
selected DISPLAY option.
•
When a disc is first loaded, the time display shows
the total time of all the tracks on the disc (once disc
initialisation is complete) – TOTAL
•
When a disc has been cued to the start of a track (i.e.
with the AMS knob), but is waiting in STOP or PAUSE
modes, the duration of that track is displayed – TRACK
•
While a track is playing, any of the four options listed
below may be selected with the DISPLAY button
Pressing the DISPLAY button In PLAY mode scrolls through the
options, which are (in sequence):
INPUT DISPLAY
Elapsed time – track (+ track number)
Elapsed time – whole disc
Remaining time – track (+ track number)
Remaining time – whole disc
Note (1): The DISPLAY button only alters the time display option
for the drive currently selected by the DRIVE SELECT button
(28).
Note (2): If PROGRAM PLAY mode is selected (see page 44),
the times displayed in TOTAL and TOTREM modes are those for
the programmed playlist, not the total of the disc.
TRACK
TOTAL
REMAIN
TOTREM
The display indicates which method is currently selected (for
each drive) to the right of the time display itself.
If a disc containing CD Text data is loaded, the display will
automatically show the CD Text. Track number and time
information may be displayed instead by pressing DISPLAY.
22
CDR-882 User Manual Version 1.0www.hhb.co.uk
Page 24

Basic Operation
Monitoring
The CDR-882 is equipped with a comprehensive audio
monitoring system, which includes the capability to monitor
playback from one drive while recording from an external
source on the other. (See page 18 for more information on
simultaneous record and playback.)
The diagram below is a simplified depiction of the CDR-882’s
monitoring system.
CDR-882 Monitoring system
The operation of the monitoring system depends on the status
of the two drives. The two input monitor switches in the
diagram above are “virtual” switches, not direct representations
of physical switches. Both are normally in “Off”, passing the
playback signal from the two drives to the Output and Phones
Mixers. Input Monitor 1 will switch “On” when Drive 1 is put in
RECORD, or if the front panel MONITOR function is selected.
Similarly, Input Monitor 2 will switch “On” when Drive 2 is put
in RECORD, or again, if the front panel MONITOR function is
selected.
In the diagram, Input Monitor 1 is shown “Off” and Input Monitor
2 “On”. This is the situation that would occur when Drive 1 is
playing and Drive 2 is simultaneously recording from an external
source. In this case, the two signals which are available to the
Phones and Output Mixers are the playback signal from Drive 1
and the currently-selected input signal. These two signals may
be selected individually by each Mixer, or a mix of both may be
selected.
Main Outputs
The signal available at the CDR-882’s rear output connectors
may be the playback signal from, or the input signal to either
drive, or a mix of these.
The output is determined by settings in the Output Mix
submenu. Options are available here to audition either drive,
whether in playback or record, or to hear a mix of the signals
from both drives; see page 18 for full details. The default setting
is As Phones, wherein the output selection is determined by the
setting of the Phones Mix menu option (see below).
The CDR-882’s input signal (as selected by the I/P SELECT
button) may be routed to the outputs by pressing the MONITOR
button*. Note that this selection will also affect the headphones
output (see below).
Headphone Outputs
A front panel headphone socket is provided, whose monitoring
source may be selected independently of the main outputs. As
with the main outputs, the headphones may carry the playback
signal from either drive, the input signal, or a mix of these.
The playback signal heard at the headphones socket is primarily
determined by the PHONES SELECT button, which scrolls
through the three available options as follows:
Note that if a drive is in PLAY, it latches the Input Monitor for
that drive to OFF so that the playback audio is heard. Also, Input
Monitor cannot be re-enabled whilst the drive is in PLAY.
The MONITOR LED indicates the status of the Input Monitor
switches. If it is OFF, neither Input Monitor switches are active;
if it is ON, then the Input Monitor for the currently selected drive
(using DRIVE SELECT) is active; if it is flashing, then the Input
Monitor for the other drive (i.e., the drive NOT selected using
DRIVE SELECT) is active.
The selected setting is indicated by the illumination of one or
both LEDs above the PHONES SELECT button. In the case of
the Mix option, what is heard in the headphones is determined
by the option selected in the Phones Mix submenu. See page 30
for full details of the options available.
The CDR-882’s input signal (as selected by the INPUT SEL
button) may be routed the to the headphone socket by pressing
the MONITOR button*. Note that this selection will also affect
the main output (see above).
* Note that this function is also available from the RC-882
remote control, with the INPUT MONITOR button.
CDR-822 Monitoring System
CDR-882 User Manual Version 1.0 www.hhb.co.uk
23
Page 25

Basic Operation
Recording
In the CDR-882, CD recording may be carried out in either drive.
To record a single CD from an external source, insert a blank
CD-R or CD-RW into a drive, selecting that drive if necessary
with the DRIVE SELECT button. Ensure that the input being used
is that selected by I/P SELECT. The MONITOR button may be
used to audition the input signal.
Analogue inputs: using the bargraph meters, set the
•
record level with the ANALOG REC LEVEL control
Digital inputs: additional record level adjustment is
•
available via the menu system (see page 29)
Pressing RECORD will initialize the drive, with the display reading
Rec Setup while this is taking place. The drive will then enter
RECORD PAUSE mode, with the PLAY/PAUSE button flashing.
The record process is then started by pressing PLAY/PAUSE.
Synchronised Recording
Using the SYNC RECORD button, it is possible to synchronise
the start of a recording to an external trigger.
The source of the Start Trigger is selected via the menu system,
at Record > S/PDIF-i/p REC Start Trigger. With S/PDIF
subcode selected, a DAT or MD Start ID, or a CD track PQ
code in the S/PDIF input bitstream will provide the trigger. This
setting can only be used with an S/PDIF input.
With Audio Threshold selected, the trigger is generated by the
audio level rising above a threshold also set in the menu system,
at Record > Audio Threshold. This setting must be selected for
all inputs other than S/PDIF (and is optional with S/PDIF).
Track ID Triggers cause a new track to be created on the disc.
Their source is defined in a similar way to Start Triggers, at
Record > Auto Track ID Trigger; in addition to S/PDIF subcode
and Audio Threshold, there is a third option, Time Interval.
Synchronised Recording may be used to record just one track,
or multiple tracks.
Note that it is possible to override Synchronised Recording by
pressing PLAY/PAUSE at any time.
Record one track
To sync-record just one track at a time from an external source:
1. Set the Record Sync option in the Record submenu to Rec
Start/Stop.
2. Ensure that the S/PDIF-i/p REC Start Trigger option is set
according to the input being used, as described above.
3. Press the SYNC RECORD button. After a short setup
period, the recorder will enter RECORD PAUSE mode, and
wait for a Start Trigger of the type selected. The display will
show Sync-1.
4. On receipt of a trigger, the CDR-882 will start recording.
5. On receipt of a second trigger, the recording will enter
RECORD PAUSE mode. This second trigger may be another
DAT/MD Start ID, a CD track or End PQ code or 5 seconds
of digital silence (in the case of S/PDIF subcode), or, if
Audio Threshold was set, the input signal level dropping
below the preset threshold for 5 seconds.
6. Press STOP to end the recording (the display will show
Close Track). If you wish to sync record additional tracks,
press SYNC RECORD again; the process will repeat from
Step 3.
7. Note that if the disc becomes full, no further recording is
possible and recording will stop.
Record multiple tracks
To sync-record multiple tracks from an external source:
1. Set the Record Sync option in the Record submenu to Rec
Start/Stop + Track.
2. Set the Track ID trigger to be either S/PDIF subcode or
Audio Threshold as described above. Note that the Track
ID trigger source can be different from the selected Start
Trigger.
3. Press SYNC RECORD. After a short setup period, the
recorder will enter RECORD PAUSE, and wait for a Start
Trigger. The display will show Sync-All, or Sync-F if AutoFinalise is enabled (see below).
4. On receipt of a trigger, the CDR-882 will start recording.
5. On receipt of a second and subsequent triggers, a new
track will be created, the track number shown on the
display will increment by one and the track time will reset to
00:00.
6. The recording will re-enter RECORD PAUSE if either of the
following conditions is detected:
a) A period of digital silence lasting 5 seconds.
b) The audio input level drops below the audio threshold for
5 seconds (when Audio Threshold is set as the selected
Track ID trigger source).
7. Note that if the recorder detects a subsequent external
trigger, the recording will re-start, with a new track being
created.
8. If S/PDIF subcode is set as the Track ID Trigger source,
the recording will end and the drive will enter STOP mode
on receipt of a CD End PQ code. Finalisation will then start
immediately if Auto-Finalise is set to On (see below)
9. Press STOP to end the recording manually.
10. Note that if the disc is full, no further recording is possible
and recording will STOP.
24
CDR-882 User Manual Version 1.0www.hhb.co.uk
Page 26

Basic Operation
Finalisation in Synchronised Recording
1. IF Auto Finalise is set to On, then at the end of a
Synchronised Recording, the disc will be finalised
automatically, after which no further recording will be
possible.
2. This process will start one minute after the recording has
entered RECORD PAUSE if there is no further detection of
an external trigger.
3. If the trigger to end the recording was a CD End PQ code,
the finalisation process will not wait for one minute, but will
start immediately (see Step 8 above).
4. If the recording ended because the disc was full, then AutoFinalisation will begin immediately
5. Auto-Finalise does not function at the end of recordings
where automatic Track ID insertion did not take place (i.e.,
the example “Record one track” above), except where the
disc was full.
Time Interval track ID generation
If Time Interval is selected as the Auto Track ID Trigger source,
Synchronised Recording will continue as if Record Sync was set
to Rec Start/Stop only. New tracks are created at regular time
intervals, as set at Record > Track Length.
Automatic and Manual track IDs
During recording, Track IDs may be set either manually or
automatically; AUTO or MANUAL operation is selected with
the ID AUTO/MAN | AUTO-CUE button [21]. The selection is
confirmed on the bottom line of the display by ID:MANUAL or
ID:AUTO. Note that the ID AUTO/MAN | AUTO-CUE button only
performs this function in RECORD mode; in all other drive modes
it acts as the AUTO-CUE button.
In MANUAL mode, Track IDs are inserted manually during
recording by pressing the ID WRITE | CUE button (22). As
the Track ID is written, the ID:MANUAL flag in the display
flashes. Note that the minimum permissible length of a track is
4 seconds; it is not possible to have Track IDs closer together
than this. Note that the ID WRITE | CUE button only operates
in RECORD mode; in all other drive modes it acts as the CUE
button.
Finalising
After recording, a CD-R or CD-RW must be finalised for it
to be playable on a normal CD player. (However, note that
not all CD players will play CD-RWs). The finalisation process
writes the TOC (Table of Contents) to the disc, and after this
point, no further tracks can be added to a CD-R, nor can any
further editing of CD Text be made. However, a CD-RW can
be “unfinalised” subsequently to permit deletion and/or further
tracks to be added.
It is possible to remove the disc and record further tracks on it
at a later time, finalisation being carried out when all tracks have
been recorded. It is also possible to replay an unfinalised CD-R
or CD-RW disc in the CDR-882, even though such discs will not
play in a standard CD player.
Note that if the disc is ejected before finalisation, any CD Text
entered will be lost.
The CDR-882 finalises discs either manually or automatically.
Selection of manual or automatic finalisation is made via the
menu system; see page 34.
If manual finalisation is selected (the default), the FINALIZE
button should be pressed at the end of recording to initiate
the finalisation process. The display will show Finalize? in the
line for the drive being used; to start finalisation, press the
ENTER button (the AMS rotary control). The display changes to
Finalizing.
If automatic finalisation is selected, the disc will be finalised after
recording stops, with no further user intervention required. Note
that it is not necessary to select automatic finalisation when
DiscSpan modes are in use; a disc is automatically ejected in a
ready-to-play state during sequential recording.
Note that the time taken for finalisation is variable, and
dependent upon the speed of the media.
Once a CD-R has been finalised, the disc type indication in the
display will change from CD-R to CD, confirming that no further
recordings can be made on the disc. This is not the case with
CD-RWs, as they can always be rewritten.
WARNING: Never switch off the CDR-882 while finalisation is
in progress, as the disc may become unusable.
In AUTO mode, Track IDs are inserted automatically under the
conditions outlined in the previous manual section.
NOTE: that Red Book limitations limit the number of tracks that
a CD may have to 99. This number is reduced slightly when
DiscSpan mode is in use.
CDR-882 User Manual Version 1.0 www.hhb.co.uk
25
Page 27

Basic Operation
Recording on CD-RWs
A CD-R can have additional tracks added after recording has
finished, but before finalisation. It is not possible to delete tracks
from a CD-R, once recorded; neither is it possible to add any
further tracks to a CD-R after finalisation.
On a CD-RW, tracks may be overwritten. The CDR-882 provides
the means to delete certain tracks from a CD-RW (there are
restrictions – see page 47). Like a CD-R, further tracks can be
added to a CD-RW before finalisation, but unlike a CD-R, a CDRW may also be “unfinalised” after finalisation has taken place,
and tracks deleted and/or added.
The basic process of recording a single CD-RW is essentially no
different from recording a CD-R. The display will confirm that
the disc is a CD-RW once a disc is inserted. If there is already
programme material on the disc, the number of tracks will
be displayed; once RECORD is pressed and the drive enters
RECORD PAUSE mode, the track counter will increment by one,
ready for the addition of the new track(s).
Disc types
CDs are recorded to CD-DA Red Book standard in the CDR-882
DualBurn Recorder using either CD-R (write once) or CD-RW
(rewriteable) blank discs. Blank discs optimised for audio use are
recommended for professional use, though the CDR-882 will
accept standard “data” CD-Rs and CD-RWs as well.
HHB blank recordable media is recommended for high quality
audio, as it is manufactured specifically for professional audio
applications. The CDR80HS 52x disc is particularly suited to the
high-speed drives in the CDR-882.
Digital Recording restrictions
Almost all commercial digital source material is protected by
copyright laws, and many CDs use copy control flags to limit
digital recording of a source to one generation only. However, as
the CDR-882 is a professional recorder the status of the copy
control flag is ignored, and the status of the flag written to disc
is adjustable.
This facility is only for professional use and must never be
used to enable infringement of copyright.
The maximum number of tracks which can be recorded to a CD
is 99.
The minimum allowable length of a individual track is 4 seconds.
Track numbers are automatically recorded to a CD along with
the audio data, and incremented at the start of each track. The
CDR-882 is able to create new tracks in several ways, based on
IDs in the incoming digital audio (S/PDIF only), audio threshold,
fixed time increments (useful when recording a long single
programme), or manually. See page 33 for more details on how
selection of the various options is made.
If recording digitally from a DAT machine some problems may
be encountered as to the location of track numbers relative to
the start of a track. In some cases, the start of a track may
not be recorded, or the beginning of the subsequent track
may be recorded on the end of a track. These anomalies are
inherent in the DAT system and are a consequence of the
accuracy achievable for inserting IDs into the DAT format using
a DAT recorder’s Auto ID function. To avoid these problems, we
recommend that Start IDs are inserted manually on the DAT
tape whenever possible.
The CDR-882 is also able to play and record audio CDs with
“encoded” formats such as Dolby Digital or DTS. No audio
decoding for these formats is provided on replay, however the
Dolby Digital or DTS bitstream is available in full at the digital
outputs. Recording of such formats is possible either by using
DISC COPY mode, or by connecting a Dolby Digital, DTS, etc.,
digital input signal externally. (Sample rate must be 44.1kHz and
Input Dither should be disabled with such signals; see page 30
for more information about setting Input Dither.)
It may be possible to play discs which include non-audio content
as well as audio; an example is CD+graphics. However, if the
CDR-882 is used in DISC COPY mode with such discs, only the
audio content of the source disc will be copied. Discs with CD
Text content are fully supported by the CDR-882, however.
The CDR-882 only plays and records audio discs; other CD
formats, for example computer CD-ROMs, cannot be played
or recorded. No support is provided on playback or record for
MP3, WMA, AAC, etc. files
26
CDR-882 User Manual Version 1.0www.hhb.co.uk
Page 28

Menu System
Menu System
The CDR-882 has been designed to enable most of its basic
functions and features to be actioned from dedicated front
panel controls, without recourse to the display-based menu
system. However, numerous additional settings and features are
available from the system’s submenus.
The menu system follows a conventional “tree” structure, with
various submenus being available from the “top” level of the
menu “tree”.
Note that several of the CDR-882’s front panel buttons are
inoperative while the unit is in menu mode. These are:
TEXT
•
DISPLAY
•
DISC COPY
•
PROGRAM
•
FINALIZE
•
ERASE
•
TRACK ID AUTO/MAN
•
SYNC REC
•
All other front panel controls remain operative in menu mode.
Menu Navigation
The menu system is entered by pressing the front panel MENU
button [16]. The display changes to show the submenu selected.
If the menu system has not been previously accessed since the
unit’s last power-down, the first submenu, AUDIO is selected;
otherwise the menu tree is “entered” at the last selected
location.
The name of the submenu is highlighted; alternative submenus
may now be selected by rotating the AMS control. Pressing
ENTER (the AMS knob) selects the one required. The highlight
then moves to the name of the setting or parameter for
adjustment. A further press selects the parameter value itself,
and rotating the AMS knob alters the value. In most cases, the
displayed value flashes when the value is changed to indicate
that it differs from the currently set value. Pressing ENTER at
this point sets the new value, which is now displayed steadily.
The CDR-882 stores all menu settings in non-volatile memory
(unless otherwise stated below), thus they retain their values
when the unit is powered off.
Note that there is only one “level” of parameters within each
submenu.
MENU may be pressed at any time to return “back up” the
menu tree, thus from parameter adjustment level, three presses
are required to exit the menu system and return the display to
normal operation.
NOTE: Menu navigation may also be performed from the
remote control handset. The four buttons in the MENU/DIGITAL
RECORD LEVEL area of the handset are used as follows:
•
The ON/OFF button is equivalent to the front panel MENU
button
•
The ENTER button is equivalent to the press function of
the AMS control
•
The + and – buttons are equivalent to rotating the AMS
control clockwise and anticlockwise respectively
CDR-882 User Manual Version 1.0 www.hhb.co.uk
27
Page 29

Menu System
28
CDR-882 User Manual Version 1.0www.hhb.co.uk
Example
An example will illustrate the method of navigation. Suppose we
want to adjust the sensitivity of audio threshold detection. (This
determines the level above which the audio input signal must
rise for synchronous recording to start and below which it must
drop for a new track ID to be written – assuming the option is
selected otherwise). We will assume this is the first time the
menu system has been accessed since the last power-down.
Audio threshold adjustment is made from within the RECORD
submenu.
•
From the normal operating mode, press MENU. The
display changes to the entry point of the first submenu,
AUDIO
•
Rotate the AMS control clockwise to show the other
submenus until RECORD is displayed (highlighted). Press
ENTER to select it
The Submenus
The CDR-882 menu system has eight submenus. These are as
follows:
Submenu Permits adjustment of
AUDIO Input levels, fade times, input and output dither and
CLOCK Clock source selection
DISPLAY Display contrast and backlight
EDIT MARKER Marker positions, Auto-Cue threshold
DISCSPAN Multi-machine operating options
RECORD Record Sync & S/PDIF subcode options, Audio Threshold
PARALLEL PORT Allocation of parallel port connector to various CDR-882
GENERAL Timer and Eject inhibit options
FIRMWARE Displays current firmware information
The options available within each submenu are described below.
monitoring options
level, other record options
functions
•
Rotate the AMS control clockwise until the required
parameter, Audio Threshold, is displayed (highlighted).
Press ENTER to select it
•
The AMS control may now be used to change the Audio
Threshold level from -72dBFS (the factory default value) to
a new level. The parameter value starts flashing as soon
as the AMS control is moved to indicate that the value has
been changed from the previous value
•
Press ENTER again to select the new value
•
Press MENU once to select a different parameter for
adjustment within the RECORD submenu, twice to select a
different submenu or three times to exit the menu system
altogether
Page 30

Menu System
Audio Submenu
There are seven parameters/settings for adjustment within the
AUDIO submenu. They are in turn:
Digital Input Level
This permits adjustment of input level for the digital inputs, so
that digital input signals with particularly high or low levels can
be trimmed.
The digital input level can be set independently for each digital
input type, AES/EBU, S/PDIF (Coax) and S/PDIF (Optical).
The adjustment applies to the currently-selected input, and is
saved for that input on exiting the menu. Note that I/P SELECT
remains operative while menu mode is selected.
If an analogue input is selected, no adjustment is possible and
the display shows 00.0 dB.
Fade-in Time
This parameter sets the fade-in time applied when the frontpanel FADER button is used to fade the playback or record levels
up from zero. Adjustment is available in 1 second increments
from 1 to 10 seconds.
The factory default setting is 4 seconds.
See page 15 for more details about the CDR-882’s FADER
function.
Fade-out Time
It is adjusted in steps of 0.5dB between -12 and +12dB, and in
larger steps outside of this range. The factory default value is
0dB for all three digital inputs.
Input Balance
This allows adjustment of the relative levels of the left and right
inputs.
Input balance can be set independently for each of the five
inputs. Balance between channels is achieved by reducing the
level of one channel rather than adding gain to the other. The
range of adjustment is 0 to -10dB for each channel, i.e. from L
at 10dB below R through to R being 10dB below L. Note that
this is a balance adjustment rather than a pan control – it is not
possible to turn either channel right down to zero.
This parameter sets the fade-out time applied when the frontpanel FADER button is used to fade the playback or record levels
down to zero. Adjustment is available in 1 second increments
from 1 to 10 seconds.
The factory default setting is 4 seconds.
See page 15 for more details about the CDR-882’s FADER
function.
CDR-882 User Manual Version 1.0 www.hhb.co.uk
29
Page 31

Menu System
30
CDR-882 User Manual Version 1.0www.hhb.co.uk
Input Dither
The CDR-882 adds dither to some input signals to produce 16bit samples suitable for recording onto a CD.
Analogue inputs always have dither added to the 24-bit output
from the A-D converters.
If an AES/EBU or S/PDIF input signal has its channel status bits
set to indicate a true 16-bit signal, dither will not be applied, and
the Input Dither option will not be selectable. However, dither
may be applied to 20-bit or 24-bit digital input signals at the
user’s discretion.
The two settings for the Input Dither option are Auto and Off.
The default setting is Auto, thus dither will be automatically
applied to digital input signals with more than 16 bits.
Note that the Input Dither setting cannot be changed while the
CDR-882 is in RECORD mode.
Note also that no dither should be added to encoded bitstreams
such as DTS, Dolby E, Dolby Digital or HDCD as it would destroy
their data formats. Detection of such bitstreams will, in most
cases, be automatic and will ensure that Input Dither is selected
Off. However, there may be situations where the formats are
not automatically detected; in these cases, the user should set
Input Dither to Off manually.
Phones Mix
The Phones Mix menu option allows the user to define how the
headphone monitoring operates when the front panel PHONES
SELECT button is set to “Drive 1 + Drive 2” (see page 14).
Priority can be assigned to one or other of the drives. The signal
from a drive will be the playback audio if the drive is in PLAY
mode, or the currently-selected input signal if the drive is in
RECORD mode, or if the front panel MONITOR button [18] is
pressed.
Four options are available:
Option Phones operation
Priority CD1 If both drives have an active signal, only that from Drive 1
Priority CD2 If both drives have an active signal, only that from Drive 2
1+2 The signals from both drives are mixed together
1+2 (-6dB) The signals from the two drives are mixed together, but
is heard
is heard
reduced in level by 6dB
The factory default setting is 1+2.
Output Mix
The Output Mix menu option allows the user to set the output
mix routed to the rear panel audio outputs. Priority can be
assigned to one or other of the drives. The signal from a drive
will be the playback audio if the drive is in PLAY mode, or the
currently-selected input signal if the drive is in RECORD mode, or
if the front panel MONITOR button [18] is pressed.
Five options are available:
Option Phones operation
Priority CD1 If both drives have an active signal, only that from Drive 1
Priority CD2
1+2 The signals from both drives are mixed together
1+2 (-6dB) The signals from the two drives are mixed together, but
As Phones The output sockets will carry the same signal as that at
is heard
If both drives have an active signal, only that from Drive 2
is heard
reduced in level by 6dB
the front panel headphones socket, as determined by the
PHONES SELECT button and Phones Mix menu setting
The factory default setting is As Phones.
Page 32

Menu System
Clock Submenu
The Clock submenu has only one option for adjustment.
Clock Source
By default, selection of word clock source is automatic, the
preferred source being dictated by the input source selected.
However, it is possible to “force” the selection of a particular
clock source.
Four options exist in the menu for Clock Source:
Option Clock Source
Auto Clock source is selected automatically depending on input
Internal Selects the internal clock; if a non-synchronous digital input
Word Clock Selects the external Word clock input (see page 11). Also
Digital Input Uses the selected digital input as clock source; if an
Note that it is not possible to select the Clock Source menu
option while the recorder is in RECORD mode.
signal type. This is the default setting.
is used, it will be sample rate converted to the internal
clock frequency.
see note below.
analogue input is currently selected, the last-selected digital
input is used. Also see note below.
Display Submenu
Two parameters of the LCD display itself are available for
adjustment in the Display submenu.
Contrast
A wide range of display contrast adjustment is provided (30
increments), to suit various ambient light levels and viewing
angles.
Invert
Under some extreme conditions a better display image may be
obtained with the video reversed (i.e blue on a white background
instead of white on blue). The Invert setting can be set to On to
achieve this.
CDR-882 User Manual Version 1.0 www.hhb.co.uk
31
Page 33

Menu System
32
CDR-882 User Manual Version 1.0www.hhb.co.uk
Edit Marker Submenu
The Edit Marker submenu allows adjustment of two parameters.
Direct Mark
It is not always possible to capture a cue point with the
necessary accuracy. Once a Marker point has been created (by
pressing ENTER during PLAY mode), its position may be edited
with frame accuracy.
The Direct Mark option in the Edit Marker submenu displays
the stored location of the cue point, as in the example above.
The first digit is the drive number (1 or 2) and the next three
characters (nnt) the track number. The remainder of the data is
the track time in minutes, seconds and frames.
Pressing ENTER to select the displayed location (the bottom
row of the menu display) first highlights the drive number;
subsequent presses highlight the track number, minutes,
seconds and frames in turn. At each step, the AMS control
may be rotated to alter the selected element of the cue point
location.
Audio preview is available from within this menu option by
pressing the front-panel CUE button; this enables the edited cue
position to be auditioned without exiting the menu.
DiscSpan Submenu
The DiscSpan submenu has five parameters for adjustment.
Multi-Machine
This option simply allows activation of the CDR-882’s multimachine mode, and has two options, On and Off. The factory
default setting is Off. This option needs to be set to On if
additional CDR-882’s are connected to the unit’s RS232 Link
Output port to increase recording capacity.
Note that this submenu will not be available if no additional
machines are connected.
Master/Slave
Auto-Cue Threshold
Cueing to a track start point with the AMS control is often
insufficiently accurate, as a period of silence may be present on
the disc before the programme material begins. The CDR-882’s
Auto-Cue function can be used to cue more accurately; it
effectively removes any period of silence that might be present
at the start of the track.
With AUTO-CUE selected on the front panel, the cue point is
advanced beyond the notional track start point to the point at
which the audio level rises above a preset threshold, ensuring
that programme plays immediately on pressing the PLAY/
PAUSE button.
The audio level which defines the Auto-Cue point can be set in
the Auto-Cue Threshold menu option. It is adjustable from
-72dBFS to -24dBFS in 6dB increments.
In a multi-machine set-up, only one machine can be designated
the Master, and this controls any other machines connected to
it - the Slaves - through the RS232 Link Output port.
Whether a particular unit is the Master or a Slave is set at the
Master/Slave menu option. The two settings are simply Master
or Slave. The factory default setting is Master.
Note that this submenu will not be available if no additional
machines are connected.
Fade-in Time
In DiscSpan modes, the audio record level for each disc is faded
up at the start of the disc, as recording is “handed over” from
one drive to the other. The length of this fade-in is adjusted in
this menu option, and can be from 1 to 10 seconds, adjustable
in 1 second increments. The factory default value is 4 seconds.
Page 34

Menu System
Fade-out Time
This is the corresponding fade-out time, which sets the duration
of the fade down at the end of one disc, as recording passes to
the other drive. The length of fade-out can be from 1 to 10
seconds, adjustable in 1 second increments. The factory default
value is 4 seconds.
Overlap Time
In DiscSpan modes, the input signal feeds both the CDR-882’s
drives; a few seconds before recording stops on one disc, the
other starts recording so that for a short time both drives are
recording. Thus there are a few seconds of audio duplicated, at
the end of one disc and at the start of the next. This allows
recordings to be seamlessly re-assembled on playback in the
CDR-882 or on a workstation editor.
Record Submenu
The Record submenu has nine parameters available for
adjustment.
Record Sync
This option determines whether the CDR-882 increments the
track counter on receipt of Track IDs. The two settings are Rec
Start/Stop and Rec Start/Stop + Track.
If Rec Start/Stop is selected, reception of a track trigger (subcode or audio threshold) starts recording. Recording stops when
either a DAT End ID or other stop ID is received via S/PDIF, or
after 10 seconds of digital silence.
If Rec Start/Stop + Track is selected, in addition to the above,
a new track marker is written to the disc every time a new track
trigger is received, and the track counter increments by one.
(This is the default setting)
S/PDIF-i/p REC Start Trigger
The CDR-882 is able to replay discs which have been recorded
sequentially in this way “seamlessly”, using the overlap period
to fade from one drive to the other so the audio output is
continuous. See page 39 for more information on DiscSpan
operation.
The duration of the overlap is adjustable from 4 seconds to 5
minutes. The increments are 5 seconds for durations of up to
30 seconds, and 30 second increments thereafter. The factory
default value is 1 minute.
This option is used to determine the source of record start
triggers. The two settings are S/PDIF subcode or Audio
Threshold.
With S/PDIF subcode selected, record start triggers are
derived from DAT/MD Start IDs or CD PQ codes within the
S/PDIF input bitstream. Note that the S/PDIF input must be
selected as the active input for S/PDIF subcode to be a valid
selection.
With Audio Threshold selected, a record start trigger is
generated when the input signal level rises above a preset
threshold (see page 34) for the first time after the selected
drive has been placed in RECORD PAUSE mode. This setting is
only one that can be used with any input other than S/PDIF, and
is the factory default.
CDR-882 User Manual Version 1.0 www.hhb.co.uk
33
Page 35

Menu System
34
CDR-882 User Manual Version 1.0www.hhb.co.uk
Auto Track ID Trigger
This option is used to determine the source of track ID triggers,
i.e. what defines that a new track should commence on the disc
being recorded. There are three possible settings: S/PDIF
subcode, Audio Threshold or Time Interval.
If S/PDIF subcode is selected, a new track is created when a
DAT/MD Track ID or CD PQ code is received in the incoming
S/PDIF input. If this option is selected when an input other
than S/PDIF is that currently selected, the Track ID source will
change to Audio Threshold (see below).
With Audio Threshold selected, a new track is created when the
level of the audio input signal drops below the level set as the
Audio Threshold for more than 2 seconds.
If Time Interval is selected, a new track is created at fixed time
intervals, regardless of the input signal. The length of the interval
(and hence the track length) is set in the Track Length menu
option (see below). This setting may be useful if the CDR-882
is being used to record lengthy programme material without
obvious breaks (such as a speech or conference).
Audio Threshold
Track Length
This sets the length of tracks when Time Interval is selected in
the Auto Track ID Trigger menu option. A new track is created
regardless of input signal at the time interval specified in this
option. The track length is adjustable in 1 minute increments
from 1 minute to 10 minutes.
Auto Finalize
This menu option determines whether disc finalisation is
performed automatically when all tracks have been recorded, or
needs to be initiated manually (using the front panel FINALIZE
button). Auto Finalize may be set Off or On.
Automatic finalisation is also dependent on the use of the
CDR-882’s SYNC RECORD function. With Auto Finalize set
On and SYNC RECORD selected, finalisation will be carried out
automatically at the completion of a sync recording.
This menu option sets the audio threshold level used to create
Rec Start or Track IDs, if Audio Threshold has been set as the
source for Record Start Triggers (above) or Auto Track ID
Triggers (also above). The threshold is adjustable in 6dB
increments from -78dBFS to -24dBFS. The factory default value
is -60dBFS.
If SYNC RECORD is not selected, automatic finalisation will only
be performed when the disc is full.
With Auto Finalize set Off, the user must press the front panel
FINALIZE button to start the finalisation process.
Note that Auto Finalize is selected automatically in DISCSPAN
mode in order that ready-to-play discs are available immediately
recording is complete. With the DISC COPY function, discs are
always finalised, so this submenu setting is not relevant. See
page 39 and page 41 for more information on these modes).
Page 36

Menu System
Digital Output Format
This sets the format of the channel status block in the digital
output bitstream to be “professional” or “consumer”.
With the professional setting, the digital output bitstream
conforms to AES3-1992 (r1997) amendment 4-1999 (generally
referred to as AES/EBU). With the consumer setting, the
output bitstream conforms to IEC60958 (generally referred to
as S/PDIF). The factory default setting is Consumer.
It is important to appreciate that in the CDR-882 a bitstream
conforming to either AES/EBU and S/PDIF standards is
available simultaneously at all digital outputs, i.e., all three digital
outputs carry the same format at all times.
Setting the Digital Output Format menu option to Professional
or Consumer merely changes the channel status block format
between “professional” and “consumer”, as might be required by
other equipment. There is no difference in the audio part of the
bitstream at the outputs. However, note that only the S/PDIF
consumer format carries CD Text data and Track IDs.
Copy Speed
The CDR-882’s DISC COPY function permits CDs to be copied at
high speed. Different media have different optimum write
speeds. This menu option lets the user set a copy speed to
optimise the performance for the disc type in use.
One of three copy speeds may be set, Low, Medium or High.
The factory default setting is Low.
Broadly, Low corresponds to up-to-8x normal speed; Medium
to 12x to 16x normal speed and High to 24x to 52x normal
speed. The precise copy speed will be determined by the speeds
supported by the media and the drives.
Note that if the destination disc is a CD-RW, the setting of this
menu is ignored since CD-RWs have very specific write speed
requirements, which are set automatically.
The Copy Speed setting only applies to DISC COPY mode, not
other recording modes.
SCMS
The SCMS (Serial Copy Management System) menu option
determines how the SCMS copyright flag is set on the disc being
recorded. There are three settings available for the SCMS flag,
Prohibit Copy, Copy Once or Permit Copies.
With the SCMS set to Prohibit Copy, it will not be possible for
any further digital copies of the disc to be made.
If the option is set to Copy Once, a digital copy of the disc can
be made, but it will not be possible to make any further digital
copies from that copy.
With Permit Copies set, there are no restrictions on making
digital copies of the disc.
Note that it is not possible to change the SCMS setting while
the CDR-882 is in RECORD mode. See page 48 for further
information on SCMS.
CDR-882 User Manual Version 1.0 www.hhb.co.uk
35
Page 37

Menu System
36
CDR-882 User Manual Version 1.0www.hhb.co.uk
Parallel Port
The Parallel Port submenu permits the user to reprogram
the pin assignment of the rear panel parallel control port, with
the constraint that the port always provides five inputs and
three outputs (tallies). The CDR-882 has a factory default pin
assignment, full details of which can be found at page 49. This
default assignment can be reinstated at any time with the first
submenu option, Preset.
There are a total of nine menu options within the Parallel Port
submenu, one to select the default (or not), and one for each of
the eight control inputs/tallies.
Preset
This menu option has two settings, Default and User, which
may be considered as two memories. Default always contains
the factory assigned pinout (see page 49), selecting Default
assigns this to the Parallel Port connector. If User is selected,
the pinout applied is that which has been set up in the remaining
submenu options listed below. The factory default contents of
the User memory is the same as that of the Default memory.
User must be selected to reassign any (or all) of the inputs and/
or outputs.
Inputs 1 to 5
To assign a different transport commands to one of the inputs,
rotate the AMS control to display the input (Input 1 to Input 5),
press ENTER to select it. The transport function may then be
selected from the list now viewable on the bottom row of the
display by rotating the AMS control. Press the ENTER button
again to make the assignment.
The Preset submenu option above must be set to User before
any of the Input menu options can be selected.
Outputs 1 to 3
The remaining three submenu options allow the functions of the
three Parallel Port outputs (pins 7-9) to be reassigned. The
three options are identical in operation.
There is a “menu” of six transport tallies (including OFF – i.e. no
assignment), from which any three may be programmed onto
the three output pins of the Parallel Port connector. These are
as follows:
Function Default Assignment
PLAY Output 1
PAUSE Output 2
RECORD Output 3
NO DISC Not assigned
CHANGE OVER* Not assigned
OFF Not assigned
* In DiscSpan mode, CHANGE OVER indicates a new disc may
be inserted.
The next five submenu options allow the functions of the five
Parallel Port inputs (pins 1-5) to be reassigned. The five options
are identical in operation.
There is a “menu” of nine transport commands (including OFF
– i.e. no assignment), from which any five may be programmed
onto the five input pins of the Parallel Port connector. These are
as follows:
Function Default Assignment
PLAY/PAUSE Input 1
RECORD Input 2
STOP Input 3
AMS + Input 4
AMS - Input 5
FFWD Not assigned
FREW Not assigned
EJECT Not assigned
OFF Not assigned
To assign a different tally to one of the outputs, rotate the
AMS control to display the output (Output 1 to Output 3), press
ENTER to select it. The transport function may then be selected
from the list now viewable on the bottom row of the display by
rotating the AMS control. Press the ENTER button again to
make the assignment.
The Preset submenu option (above) must be set to User before
any of the Output menu options can be selected.
Page 38

Menu System
General Submenu
The General submenu has two settings available for adjustment.
Timer
The CDR-882 has a Timer function which, when enabled, causes
the CDR-882 to enter PLAY mode when the power is applied.
Thus, by leaving the (mechanically-latching) power switch ON, the
CDR-882 can be used to start playing a pre-loaded disc (or
discs) when external power is applied via a time-controlled switch
of some description.
The submenu option can simply be set to On or Off. The factory
default setting is Off.
With the Timer function enabled, the CDR-882 first goes
through its usual power-up diagnostic routines when power is
applied. The drive containing an audio disc then enters PLAY
mode; if both drives have discs, that in Drive 1 will be played.
The CDR-882 also restores its MODE setting at the last powerdown - i.e. Single, DualBurn or DiscSpan. Thus if DiscSpan mode
is set, discs in the two drives will play in sequence.
Firmware Submenu
The Firmware submenu displays the version numbers of the
various firmware files within the CDR-882. The user need not
concern him/herself with these, but they may be useful to
HHB’s Technical Support engineers should a problem arise with
the unit.
No adjustments are available within this submenu.
CDR882 Firmware Version
Displays the version number of the CDR-882’s main operating
system, and date.
Drive 1 Firmware Version
Displays the version number of Drive 1’s internal firmware.
Drive 2 Firmware Version
Displays the version number of Drive 2’s internal firmware.
CPLD Firmware Version
Displays the version number of the CDR-882’s Complex
Programmable Logic Device.
Eject Block
The EJECT function is disabled if the selected drive is in either
RECORD or RECORD PAUSE mode, to prevent inadvertent disc
ejection and consequent recording abort. It is possible to
additionally disable EJECT from all modes other than STOP,
thereby guarding against the possibility of a disc being ejected
while it is playing.
The submenu option can simply be set to On or Off. With the
option set to Off, EJECT is only disabled in RECORD and RECORD
PAUSE modes. When On, the selected drive must be in STOP
mode for the EJECT function to work. The factory default setting
is Off.
CDR-882 User Manual Version 1.0 www.hhb.co.uk
37
Page 39

Advanced Features & Operation
38
CDR-882 User Manual Version 1.0www.hhb.co.uk
Advanced Features & Operation
Internal & External Clocks
Word clock in the CDR-882 can be obtained from several
sources. An internal crystal oscillator is provided, which is the
preferred source for use with analogue input signals. When
digital input signals are used, the word clock may be extracted
from the AES/EBU or S/PDIF bitstreams themselves. A further
option is to use a separate external clock signal.
In many professional digital audio systems, a separate external
master clock is used to synchronise all digital audio equipment
in the system; the CDR-882 is provided with an external word
clock input for use in such a situation.
Clock selection in the CDR-882 is normally automatic, the
source being selected to suit the audio input being used. The
following rules apply to the automatic selection system:
If an analogue input (Balanced or Unbal) is selected, the
•
CDR-882’s own internal clock will be used
If a digital input (AES/EBU, S/PDIF Coax or Optical) is
•
selected, the signal itself will be used as the clock source,
as long as it is within the acceptable frequency range,
namely 44.1kHz +/-100ppm
If a digital input is outside this range the internal clock will
•
be used, and the input signal sample rate converted to the
internal clock frequency
The choice of the internal clock for analogue inputs or the
embedded word clock for digital inputs will give perfectly
satisfactory results in most recording situations. However, it is
possible to override the automatic selection described above and
use a different word clock source.
The Clock submenu is used to select a different word clock
source from that chosen automatically. See page 31 for full
details.
Overriding the automatic selection allows the user to:
Use either an external master studio clock or a digital
•
audio signal (AES/EBU or S/PDIF) as word clock source
when using analogue inputs. This may be desirable for all
but the simplest digital audio systems as it ensures that
the clocks of all interconnected equipment are in exact
synchronisation
The external clock may be derived from a dedicated
•
generator, in which case it will be applied to the rear
BNC connector and Wordclock selected as the source
in the menu. Alternatively, “digital silence” can be used
in the form of an AES/EBU or S/PDIF signal without
audio content; in this case, Digital Input is selected as
the source and the appropriate input connector used.
Whichever inputs are being used, an external word clock
input must meet the CDR-882’s frequency requirements of
44.1kHz ± 100ppm
Use an external master studio clock as the word clock
•
source when using the CDR-882’s digital inputs. Again,
this will be connected at the Word Clock input and
Wordclock selected as the source. In this case, the word
clock connected to the CDR-882 must also be connected
as an external clock to the source of digital audio
•
Clock Source Display
The front panel LCD always indicates the currently-selected
word clock source, whether the selection has been made
automatically or manually.
•
•
•
If external word clock is selected, and the applied clock signal
has a frequency outside the range 44.1kHz +/-100ppm,
synchronisation is not possible and the WCLK indication will
flash. Similarly, if Digital Input is selected, and the applied signal
has a clock frequency outside this same range, synchronisation
will not be possible and DIG will flash. In these cases, the
problem will need to be resolved before a recording can be
made, either by correcting the clock frequency of the external
source or by selecting Internal or Auto instead.
Use the CDR-882’s internal clock source with digital
inputs. This situation will occur when the CDR-882 is the
clock master in a system. A typical scenario would be
where the digital output of a semi-professional PC sound
card is feeding S/PDIF to the corresponding inputs of
the CDR-882. In such a case, it is likely that the CDR882’s internal clock’s stability will be better than that of
the sound card’s. The CDR-882’s digital outputs can be
connected to the inputs of the sound card, to be used
as its clock. The CDR-882 thus acts as the master clock
source
Internal - the internal master clock
DIG - an AES/EBU or S/PDIF digital audio signal at the
appropriate rear connector
WCLK - a word clock signal applied at the rear BNC
connector
Page 40

Advanced Features & Operation
Recording Features
Single CD
The CDR-882’s basic recording operations are described on
page page 24. While recording on one drive, it is possible
to play another disc in the other drive and route that drive’s
output to the CDR-822’s main and/or headphone outputs. See
page 18.
Dual Disc Modes and functions
By virtue of its Dual Drive record capability, the CDR-882
supports a number of useful operating modes not found on
single CD recorders, or indeed other dual-drive machines.
DualBurn Record
DUALBURN mode allows two discs – one in each drive – to be
recorded simultaneously with the same programme material.
It is selected with the front panel MODE button [25]. Note that
the button scrolls between three modes, SINGLE, DUALBURN
and DISCSPAN.
Recording two CDs simultaneously in DUALBURN mode is
essentially no different from recording a single CD; once blank
discs are loaded and DUALBURN mode selected, the RECORD
and PLAY/PAUSE buttons can be used in the normal way, both
drives responding to the commands.
Note that the DRIVE SELECT button still operates in DUALBURN
mode. This is not of relevance in RECORD mode, but the user
still needs to decide which drive will respond to transport
commands in other modes – i.e., PLAY. The audio sent to the
main and headphones outputs is determined by DRIVE SELECT
and PHONES SELECT, in conjunction with the Output Mix and
Phones Mix menu options, as normal.
DUALBURN mode will operate regardless of the maximum
duration of the discs, though ideally, two discs of the same
length should be used. Unfinalised CD-Rs or CD-RWs are also
permissible, even if they contain a different audio programme. If
discs of different duration are used, it may be that one disc will
become full while the other is still recording. In this case, the
shorter-length disc will auto-finalise (if Auto-Finalize is set On),
its drive will enter STOP mode. The disc can then be ejected.
If Auto-Finalize is set Off, the usual Finalize? message will be
displayed first.
Sync Start/Stop and automatic track incrementing will operate
as normal in DUALBURN mode if these functions are enabled.
DUALBURN mode may be combined with MULTI-MACHINE
OPERATION mode to enable two copies of programme material
greater than the duration of a single disc. In this case, the first
part of the programme is recorded on the two drives of the
Master machine, the remainder on the two drives of the Slave
machine. This principle may be extended to more than machines
if necessary. See page 42 for more information on MultiMachine modes.
DiscSpan Mode
DISCSPAN mode allows the recording of programme material of
longer duration than would fit onto a single CD. Examples might
be live concerts, rehearsals, seminars, speeches, conferences,
etc.
It is selected with the front panel MODE button [25]. Note that
the button scrolls between three modes, SINGLE, DUALBURN
and DISCSPAN.
In DISCSPAN mode, blank discs are loaded into both drives;
Record Start ID and Track ID options may be selected in the
normal way, the CDR-882 placed into RECORD PAUSE mode,
and then recording started either manually, or automatically with
the SYNC REC function.
As the first disc approaches its maximum capacity, recording is
transferred to the other drive, the first disc being automatically
finalised and ejected, ready for removal. If the programme being
recorded is longer than can be accommodated on two CDs, a
third blank disc may be inserted in the first drive, and the drive
closed. As the disc in the second drive approaches its maximum
capacity, recording is handed back to the first drive, and the
disc in the second drive finalised and ejected. This process may
be repeated as many times as necessary, up to a maximum of
99 discs.
If a non-blank disc is inadvertently inserted into a drive in
DISCSPAN mode, it will not be accepted and will auto-eject
as soon as it has been identified; recording will continue
uninterrupted in the other drive.
CDR-882 DiscSpan Mode
CDR-882 User Manual Version 1.0 www.hhb.co.uk
39
Page 41

Advanced Features & Operation
40
CDR-882 User Manual Version 1.0www.hhb.co.uk
As one disc approaches its maximum capacity, the other drive
begins recording, so that for a period, both drives are recording
the same programme. The precise sequence of events is as
follows:
•
The record level on the second drive is ramped up from
zero (to the preset level), over the period set as the Fade-
In Time in the DiscSpan submenu
•
Both drives continue in record at full level for the period
set as the Overlap Time in the DiscSpan submenu
•
Finally, as the first drive reaches its maximum capacity,
its record level ramps down to zero over the period
defined as the Fade-Out Time in the DiscSpan submenu.
Recording now continues as normal on the second drive
This is illustrated below.
Track IDs are recorded on the two discs as shown, to allow the
CDR-882 to synchronise the two discs on playback. Although
the fade-in and fade-out times can be set as low as 1 second,
the track length for the fade will never be less than 4 seconds to
adhere to the Red Book standard. The minimum time for overlap
is 4 seconds.
It is also possible to initiate the change-over from one drive to
another manually if wished, to take advantage of natural pauses
or breaks in the programme being recorded. To force a drive
change-over in this way, press the DRIVE SELECT button. A
confirmation message appears on the display:
Switch drive?
Track IDs in DiscSpan Mode
The maximum number of tracks which can be recorded on a
single CD is 99. This is a limitation laid down in the Red Book
specification. However, DiscSpan operation requires 3 Track
IDs to be recorded at the start and end of each disc in the
sequence, except for the first, which only requires 3 at the end.
As a consequence, the maximum number of tracks that can be
recorded on a CD in DiscSpan mode is 96 in the case of the
first disc in the sequence and 93 on the second and subsequent
discs.
Identing discs in DiscSpan Mode
Each of the series of discs recorded sequentially in DISCSPAN
mode has a numeric identifier to indicate its number in the
sequence. This is appended to the CD Text Title field. The default
Title is “Multi”, so the Title fields of a series of discs recorded in
DISCSPAN mode will be:
Multi-01 > Multi-02 > Multi-03 > etc.
If the user enters his/her own Title for the sequence of
recordings via the CDR-882’s CD Text facility, Multi-xx will
always occupy the last eight characters of the Title field. (See
page 45 for more information about CD Text.)
Enter – Yes
Press the ENTER button (the AMS knob) to perform the changeover, or press DRIVE SELECT a second time to cancel. The
“next” drive will now begin recording almost immediately, the
fade-in time being reduced automatically to 100ms. In this
special case, the next Track ID is still recorded 4 seconds after
the start of the fade-in, to maintain Red Book compliance. The
overlap and fade-out of the first drive then continue as with
automatic change-over.
CDR-882 DiscSpan Mode
Page 42

Advanced Features & Operation
Playback in DiscSpan Mode
Discs which have been recorded on a CDR-882 in DiscSpan
mode may be replayed on a CDR-882 without any gap in
programme. The first disc in the sequence may be loaded
into either drive, with the second in the other. Note that audio
routing is set automatically to be correct for seamless playback;
it is not necessary to make any particular setting of Output Mix
and/or Phones Mix.
DISCSPAN mode is automatically set when two DiscSpanrecorded discs are inserted. The PLAY/PAUSE button may
be pressed to start playback from the drive containing the first
disc. At the end of the first disc, the IDs that were generated
during recording will be recognised by the operating system and
the second disc will commence playing at the predetermined
time as it has been previously been cued up accurately to do so.
Its output level will ramp up due to the fade-in that was active
during recording, but it will not be heard at this point. During the
subsequent overlap period, however, the monitoring cross-fades
from the first drive to the second. The audio level from the first
disc then fades down due to the recording fade-out, and the
programme continues from the second drive.
At this point, the first disc may be ejected and removed and
replaced with the third disc (if there is one). At the end of the
second disc, the same process is followed, and monitoring
passes back to the first drive, allowing seamless playback of the
sequential programme.
Disc Copy
The CDR-882 is equipped with a simple-to-operate DISC COPY
function, which enables a copy to be made of a CD at high
speed. One drive is used for the “source” disc, and a blank CDR or CD-RW is inserted in the other. Either drive may be used
for the “source” disc, recording of the copy taking place in the
other.
The DISC COPY function can only be used if appropriate discs
of the correct type are loaded. One drive must contain a CD,
CD-R or CD-RW with programme material; in the case of a CDR or CD-RW, the disc may be unfinalised. The other drive must
contain a completely blank CD-R or CD-RW (partly-recorded,
unfinalised discs will not work). If the CDR-882 detects that
neither drive contains a blank disc, the following message will be
displayed:
Copy error
When the discs to be used have been loaded, DISC COPY is
activated by pressing the DISC COPY button (see page 14).
The display will confirm the “direction” of copy and the total
programme time on the source disc, thus:
Copy CD1-CD2
Remain 47:52
or
Copy CD2-CD1
Remain 47:52
depending on which drive contains the source disc. The Disc
Copy function is also confirmed by a Disc Copy flag at the top of
the display. DISC COPY can only be selected when both drives
are in STOP.
Copying may be started by pressing the ENTER button (the AMS
knob), or aborted by pressing STOP. While copying is under
way, the Remain time display counts down to indicate progress.
During copying, STOP may be pressed at any time to abort the
process; a confirmation message will be displayed:
Abort Copy?
Enter-Y Stop-N
Pressing ENTER will abort the copy, STOP will cancel and
copying will continue.
When the disc has been copied, the display confirms this:
Copy
Complete
The copy is always a completed, finalised disc, regardless of the
Auto-Finalize setting in the menu. This applies even if the source
disc was itself unfinalised.
NOTE: DISC COPY is a high-speed copying function which
transfers programme material directly from one drive to the
other by using the internal IDE data bus. Thus it is limited to
copying between the drives in a single CDR-882. DISC COPY
cannot be used in any Multi-Machine modes, i.e. to make highspeed copies between different CDR-882s.
No blank CD
or if a non-blank CD-RW is detected, the following message:
Copy Error
Erase CDRW
CDR-882 User Manual Version 1.0 www.hhb.co.uk
41
Page 43

Advanced Features & Operation
42
CDR-882 User Manual Version 1.0www.hhb.co.uk
Multi-Machine Operation
The CDR-882’s recording capacity may be expanded by the
connection of up to three further CDR-882 units. The operating
system supports a number of Multi Machine modes to facilitate
such an expansion.
In such a system, one CDR-882 is designated the Master
machine and the others are assigned Slave status. Units are
connected together via their RS232 serial remote control
connectors to permit the transmission of control commands,
tallies and other data between Master and Slave recorders.
A CDR-882 will assume Master status by default. Altering a
unit’s status to Slave is done through the menu system, at
DiscSpan > Master/Slave. The default setting is MASTER,
changing it to SLAVE assigns the unit as a SLAVE. Additionally,
all machines interconnected to form a multi-Machine system
must have Multi-Machine mode enabled; this is done at
DiscSpan > Multi-Machine, which should be changed from the
default setting MASTER to SLAVE. (See page 39 for full details.)
The control interconnection between Master and (the first) Slave
should be made via a “straight” cable between the LINK OUTPUT
RS232 connector of the Master machine and the LINK INPUT
RS232 connector of the first Slave machine. A second Slave
machine should have its LINK INPUT connected in a “daisy-chain”
manner to the LINK OUTPUT of the first Slave, and so on for as
many machines are being used.
The serial cable for control interconnection will need to be maleto-female, with pins 2, 3 and 5 on each connector connected
directly together thus:
Note that interconnecting multiple CDR-882’s in this way only
transfers control data between machines, not audio. In MultiMachine modes, the recommended method of distributing audio
to each machine is to interconnect them via S/PDIF. By doing
so, not only is audio transferred in the digital domain, but the
embedded word clock within the S/PDIF bitstream ensures that
all machines will be sample-locked. Additionally, Track ID and CD
Text information is also transferred.
The audio source to the Master machine may be of any type,
analogue or digital. Connect the first machine’s S/PDIF output
(coaxial or optical) to the second machine’s corresponding
S/PDIF input, and continue to “daisy-chain” the machines via
S/PDIF in this way to interconnect all the machines being used.
The default I/P SELECT setting for the second and subsequent
machines is S/PDIF coaxial, and the Clock Source will default to
Digital Input.
Monitoring of individual CDR-882’s in a permanent or semipermanent multi-machine system may necessitate wiring the
analogue or digital outputs (as appropriate) of each CDR-882 to
an external switching arrangement of some description. This will
enable the operator to use any machine in the chain for playback
(as recording permits), or to monitor the record signal at any
point in the chain with the MONITOR buttons.
Multi-Machine + DualBurn Operation
DUALBURN mode may be selected whilst Multi-Machine
operation is enabled. This permits up to eight discs to be
recorded simultaneously.
As with Single-Machine DualBurn mode, all blank discs should
ideally be of equal length. The Master machine’s transport
buttons will control all Slave machines as well as itself. Having
loaded all drives with blank discs, press the RECORD button on
the Master machine; this will put all the machines in the system
into RECORD PAUSE mode.
Depending on the options selected for Start ID, recording
will commence on all drives simultaneously either when an
ID is received or when the PLAY/PAUSE button is pressed
if recording is being started manually. Manual or automatic
insertion of Track IDs will be passed from Master to Slaves in
the same manner, and actioned on all discs being recorded.
CDR-882 Simplified 3-Machine Analogue System
Page 44

Advanced Features & Operation
Multi-Machine + DiscSpan Operation
DISCSPAN mode may be used in conjunction with Multi-Machine
mode to make a recording of a very long programme across up
to eight blank discs, each in a different drive, across four CDR882s. This may be useful where unattended recording has to
be performed. Blank discs may be loaded into both drives of all
machines in the system, recording initiated (perhaps with the
Time Interval option for Track ID selected) and the system then
left.
This mode is set by selecting DiscSpan on the Master machine,
which automatically selects DiscSpan on the Slaves. It is
recommended that audio is cascaded between machines via an
S/PDIF link, to ensure frame-accurate synchronisation between
discs in different machines. The S/PDIF link also passes CD Text
and Track ID data for identing the discs in a sequence and locks
the audio clocks in different machines together.
Recording in the Master machine will proceed as per the
Single-Machine DiscSpan operation described at page 39, with
the first-selected drive “handing over” to the other when its
disc becomes full. As the disc in the other drive approaches
maximum capacity, recording will now pass to the first-selected
drive in the second machine, with fade-in, overlap and fade-out
all being observed correctly as if the third disc was in the first
machine. At the end of the third disc, recording passes to the
other drive of the second machine.
This process will continue until the system runs out of machines
and/or blank discs, or is stopped by the operator. At the end of
the second disc in the last machine, the system will look at the
first drive in the first machine. If this has been reloaded with a
blank disc, the recording will continue in that drive. If not, the
recording will end.
Replay of discs recorded in MultiDiscSpan Mode
Playback of a sequence of discs recorded on multiple machines
in DiscSpan mode makes use of the S/PDIF digital audio link
between machines. The discs should be loaded into the drives
in the same order in which they were recorded. Audio from the
Master machine is passed to the next machine in the chain
via the S/PDIF interconnection, where it is “mixed” with the
contribution from that machine at the appropriate time. This
mix is passed in turn to the next machine, and so on, until the
full sequence of seamless audio may be obtained from the last
machine in the chain. Fade-out, Overlap and Fade-In are all
observed correctly as in Single Machine DiscSpan playback.
There is no restriction to replaying a sequence of 2+ discs
recorded in Multi-Machine DiscSpan mode on just one machine.
The only requirement is that the discs are loaded into the two
drives of the one machine in the correct order, as would be the
case with Single Machine DiscSpan playback.
CDR-882 Multi-Machine & DiscSpan Operation
CDR-882 User Manual Version 1.0 www.hhb.co.uk
43
Page 45

Advanced Features & Operation
44
CDR-882 User Manual Version 1.0www.hhb.co.uk
Program Play
The CDR-882’s AMS control may be used to quickly locate
playback to a particular track on a disc, or to commence
playback of a series of consecutive tracks from the first of them.
However, it is sometimes necessary to play a series of tracks
on a disc in a specific order. Program Play allows the user to
create a playlist of tracks in any order.
Program Play mode is allied with Program Copy mode, which is
described in detail in the next section of the manual.
The principle of Program Play extends across both drives on the
CDR-882; i.e. tracks from two different discs may be assembled
into a Program Play sequence.
Program Mode can only be entered from STOP mode. When
selected with the PROGRAM button, the display initially shows
the Track Entry screen:
CD1 Track 01
00 00:00
Tracks may be added to the playlist by using the AMS control
to increment the track number to that of a required track, and
selecting it with the ENTER button. The time display below,
initially zero, will show the number of tracks selected (the first
two digits) and their total combined playing time. If two discs
are being used to compile a track list, the tracks on the second
disc will be displayed by scrolling “past” the last track on the first
disc; these may be added in the same way.
Program Copy
Program Copy mode may be considered to be a combination
of Program Play and Disc Copy modes (but see note below
regarding finalisation). A playlist is created in the same manner
as for Program Play mode; whereas Disc Copy will copy the
entire contents of a disc to a blank disc in the other drive,
in Program Copy only the tracks in the playlist are copied.
However, they are copied in the order in which they were
programmed into the playlist.
As one drive must contain a blank disc, Program Copy mode
does not allow the option of programming tracks from two
different discs.
Programming of tracks is performed in almost the same way
as in Program Play. If one of the drives contains a blank CD,
pressing the front panel PROGRAM button will bring up the
display as shown below :
Program Play
Program Copy
One of the options will be in reverse video (highlighted). The
AMS rotary control may be used to select Program Copy, and
the ENTER button (the AMS knob) selects it. The screen shown
below will be displayed:
Track 01
00 00:00
At any time, PLAY/PAUSE may be pressed to audition the
selection; the display changes to the “normal” screen, except
that Program Play mode is confirmed by text at the screen
top right. In Program Play, the AMS control may be used to
advance and retard through the tracks in the playlist, in the
correct play order. FREW and FFWD will still operate in the
normal way, but will not transfer the current play location
beyond the current track. Pressing PROGRAM again returns
the display to the Track Entry screen. To clear the playlist, press
STOP while the Track Enter screen is being displayed. Pressing
PROGRAM from the Track Enter screen while in STOP will
cancel Program Play mode and return the CDR-882’s operating
mode to that last selected with the MODE button. However,
the playlist contents remains stored until cleared or the disc(s)
are removed. Pressing STOP while in Stop Mode will clear the
playlist contents.
Tracks are now added to the playlist with the AMS control as
with Program Play mode. The display will show the number of
tracks in the playlist and the playlist’s total time. When the list
is complete, pressing PROGRAM again displays the following
screen:
Start Copy?
Enter-Y Stop-N
Pressing ENTER (the AMS knob) will start the copy process;
pressing STOP will cancel.
IMPORTANT: Unlike Disc Copy mode, finalisation is not
implicit in Program Copy mode. Finalisation will be performed
automatically if the Auto-Finalization option has been set to On
in the RECORD submenu, but not otherwise (see page 34).
When all the tracks from a source disc have been copied to the
destination disc, the source disc may be changed for a different
one, so that a CD can be assembled from tracks from several
source discs, in any order.
When the copy is complete, finalisation should be performed
manually (see page 25).
Page 46

Advanced Features & Operation
CD Text
The CDR-882 is CD Text-compatible. Any CD Text data on CDs
being played will be displayed on the front panel LCD by default.
CDs being recorded on the CDR-882 can have CD Text data
added using a standard QWERTY keyboard plugged into either of
the PS/2 ports (on the front and rear panels, see page 15 and
page 11).
CD Text is formatted into 3 fields, named Title, Artist and Track.
Title and Artist are per-disc fields and Track is per-track. The
text strings may contain any characters found on a standard
keyboard.
Displaying CD Text
When a CD containing CD Text data is played, the time display
for the drive containing the disc changes, the mm:ss digits, the
CD type (CD, CD-R, etc.) and the time display option (TOTAL,
TOTREM, etc.) are replaced by the contents of the CD Text Title
field. The track number and transport mode symbol are still
displayed. When first displayed, the text will scroll automatically
from right to left to reveal all the characters of a long title.
Entering CD Text
CD Text can only be added to unfinalised discs. Text entry may
be made either while the drive is in RECORD mode, or after
recording has finished - but before the disc has been finalised.
For this reason, Auto-finalization should be set to ‘Off’ when CD
Text is to be entered.
To enter CD Text data, connect a QWERTY keyboard to
whichever of the CDR-882’s two PS/2 sockets is more
convenient. Press the TEXT button once, twice or three times
to select the field for which data is to be entered, Title, Artist
or Track. The display will initially show No CD Title, No Artist or
No Track Name as appropriate. Entering text via the keyboard
will overwrite this, and the text will be visible on the display as
it is keyed in. Note that the initial keystroke is ignored. The
BACKSPACE key will delete from the last character entered in
the normal way. Conclude each text entry with the RETURN key
to store the text in memory.
In the case of Track Name, the entered text will be applied to
the track currently selected with the AMS knob. If track names
are to be entered while each track is being recorded, this will
obviously be the correct track, but if track names are being
entered after recording (pre-finalisation), care must be taken to
advance the track selection with the AMS knob to the correct
track, in turn.
Successive presses of the TEXT button (see page 13) will alter
the CD Text display to show the Artist and Track fields (if a track
is currently selected) in a similar manner. A final press will
return the display to the Title field; this sequence is illustrated
below:
The legends TITLE, ARTIST or TRACK is displayed in the top
right-hand corner of the display screen to confirm which field is
being displayed.
Pressing the DISPLAY button will revert the display to show the
“normal” time information; pressing TEXT again returns to CD
Text mode.
CDR-882 User Manual Version 1.0 www.hhb.co.uk
45
Page 47

Advanced Features & Operation
46
CDR-882 User Manual Version 1.0www.hhb.co.uk
Cueing
Manual Cueing
The CDR-882 has a simple single-memory locator function,
which allows the user to accurately cue a disc at a previouslystored location.
Note that all the Cue functions are only operative in PLAY or
PAUSE modes.
Storage of a cue point is made with the “press” function of the
AMS knob, which in PLAY and PAUSE modes acts as a MARK
button. To store the present disc location, press MARK, either
while the disc is playing, or the drive is paused at the required
location. Confirmation that a cue point has been written is
given by the word MARK in the bottom right-hand corner of the
display. Any subsequent press of the MARK button will overwrite
with new data; the MARK memory always contains the location
at the last press of MARK.
The disc may be relocated to a stored cue point at any time by
pressing the ID WRITE | CUE button, which in PLAY and PAUSE
modes acts as a CUE button. Playback will recommence from
the cue point, unless AUTO-CUE or AUTO-PAUSE modes have
been selected (see below), or the disc was already in PAUSE.
In these cases, playback will locate to the cue point but be
held in PAUSE mode. If no cue point has been stored, the CUE
command will be ignored.
The MARK memory is CD-frame-accurate (i.e. to approx. 13ms),
and includes track and drive number, so it is possible to locate
to a cue point on the other drive from that currently selected.
The last-stored cue point will remain in the MARK memory until
the disc is ejected.
Selection of AUTO-CUE mode is confirmed by the text AUTO-CUE
in the bottom left-hand corner of the display.
With AUTO-CUE selected, the drive will automatically enter
PAUSE at the start of the audio at the beginning of a track,
whether it has been located to it with the AMS control, or
because the previous track was played. The drive will then
enter PAUSE mode at the point where the audio level rises
above the level which has been set in the menu system at
Edit Marker > Auto-Cue Threshold (see page 32). This
condition is indicated on the front panel by both the green
LED in the PLAY/PAUSE button and the AUTO-CUE onscreen text flashing. Playback, with “instant” audio, will
begin when the PLAY/PAUSE button is pressed again.
The audio threshold level determining the point at which the
drive enters PAUSE mode is adjustable in the menu from
-78dBFS to -24dBFS
If the CUE button is used to locate to a previously-stored MARK
point, the disc will enter PAUSE mode at the cue point if AUTOCUE is enabled, instead of immediately resuming playback.
At the end of the track, the disc will enter PAUSE mode at the
audio threshold point of the next track.
Editing Marker Points
The position of the cue point stored with the MARK function may
be modified to improve its accuracy, or simply to alter its value
without having to play the disc through that point to capture the
time. The position of the cue point may be altered with frame
accuracy.
Editing of the MARK point is done in the menu system, at Edit
Marker > Direct Mark. Drive number and track number are
modifiable as well as the time (in mm:ss:ff). See page 32 for a
full description of the Edit Marker process.
Auto-Cue
This function is particularly useful when the CDR-882 is being
used to play out spot SFXs, or similar applications. It locates a
disc to the point at the start of a track where the audio actually
begins, thereby eliminating the short (but variable) period of
silence which often precedes the audio.
Auto-Cue mode is enabled by pressing the ID AUTO/MAN/
AUTO-CUE button, which in PLAY and PAUSE modes acts as an
AUTO-CUE mode selector. The button cycles through AUTO-CUE
and AUTO-PAUSE modes before returning to OFF:
Auto-Pause
This mode is useful for ensuring that no audio from the track
following the one required on a disc is played out inadvertently.
AUTO-PAUSE mode is selected by pressing the ID AUTO/MAN/
AUTO-CUE button until AUTO-PAUSE is displayed in the bottom
left-hand corner of the screen.
With AUTO-PAUSE selected, the drive will automatically enter
PAUSE mode at the start of a track, whether it has been located
to it with the AMS knob or because the previous track was
played. When in PAUSE at the track start, both the green LED in
the PLAY/PAUSE button and the AUTO-PAUSE on-screen text
will flash.
Page 48

Advanced Features & Operation
Pre-selecting a track before
loading a disc
This feature allows the user to select a particular track on a
disc for playback before it is loaded in the machine, thereby
minimising the number of button presses required.
To make use of this feature, press EJECT to open the tray of the
drive to be used, and insert the disc. Ensure that DRIVE SELECT
is set to the drive being used. The AMS control can now be
used to pre-select a track; as the control is rotated, track
numbers are displayed in the normal way. With the number of
the required track showing, either PLAY/PAUSE or ENTER may
now be pressed. The tray closes, the disc is read, and playback
commences from the start of the selected track.
TRACK PRE-SELECT is even simpler when commanded from
the RC-882 remote control. Pressing the numeric keys (0 to 9,
10/0 and >10) will immediately initiate the playback sequence,
starting with the selected track.
Because the CDR-882 cannot know how many tracks are on
the disc before it has been loaded and read, it is possible to preselect a track with a number greater than that of the number of
tracks on the disc. Should this occur, playback commences from
the last track on the disc.
Disc End Review
The CDR-882 permits tracks to be added to a CD-R or CD-RW
at will – a disc does not have to be fully recorded in a single
pass. The DISC END REVIEW function allows the user to review
a partly-recorded disc “to date” by checking the last recorded
track.
Erasing and Unfinalising discs
It may be necessary (or desired) to erase some or all the tracks
already recorded on a CD-RW prior to recording new tracks
on it. The CDR-882 includes a simple-to-use ERASE function
which can be used to either erase tracks from a CD-RW, or to
completely re-initialise it.
The first process in erasing a disc is unfinalisation, where just
the disc’s TOC is erased. It is then possible to add more tracks
to those already on the disc, or to erase the existing tracks.
Initialising a CD-RW completely removes all previously recorded
material and returns the disc to a “virgin” state where all
its space may be re-used. Initialisation is a different physical
process which takes much longer than erasure.
Because of the physical way that tracks are written on a CDRW, there is a constraint on which tracks can be erased.
Tracks can only be erased from the last track “backwards”. It is
not possible to erase a track “in the middle” of a CD-RW, leaving
higher-numbered tracks on the disc as well.
Example – if a CD-RW contains 10 tracks, the following tracks
may be erased:
track 10 alone (i.e. the last track)
•
tracks 9 and 10 (i.e. the last two tracks)
•
tracks 8 to 10 (i.e. the last three tracks)
•
and so on, up to:
tracks 2 to10 (all the tracks on the disc)
•
Erase Disc is the same as Erase tracks 1 to 10
•
When a partly-recorded CD-R or CD-RW is placed in a drive
for further recording, RECORD PAUSE mode is entered in the
normal way by pressing the RECORD button. If the FREW button
is now pressed and held, the drive scans backwards through
the last recorded track(s), with audio. The FREW button may
be released at any point, which causes the drive to enter PLAY
mode at that point, play the disc until the end of the last track,
and then enter RECORD PAUSE again. Recording can now be
commenced in the normal way.
Note that the FFWD and FREW buttons are available to perform
their normal functions of scanning the recorded material (with
audio) in either direction from PLAY mode.
If the RECORD button is pressed while the disc is playing in DISC
END REVIEW mode, the drive jumps forward to the end of the
last track, and enters RECORD PAUSE. Recording can now be
commenced in the normal way.
CDR-882 User Manual Version 1.0 www.hhb.co.uk
47
Page 49

Advanced Features & Operation
Erasing/Initialising a single
CD-RW
Insert the CD-RW into a drive, and if necessary, select the drive
with the DRIVE SELECT button. When the drive has completed
the reading process and the track information is displayed,
press the ERASE button. The display will change to
Erase nn-nn (where nn is the total number of tracks on the
disc).
This first erase option is to erase only the last track on the disc.
The remaining erase options may be viewed by rotating the AMS
control clockwise, one click at a time. Each click decrements the
first of the two numbers by one. Thus if there are 5 tracks on
the disc, the initial display will be:
Erase 05-05
and then, in turn:
Erase 04-05, Erase 03-05, Erase 02-05, Erase Disc, Init Disc
(after which Erase 05-05 is displayed again.)
Erase Disc means that all the tracks on the disc will be erased;
Init Disc means that the disc will be completely re-initialised.
When the required selection of tracks to be erased, or the
full erasure option is displayed, the erase process is initiated
by pressing ENTER (the AMS control). Alternatively, the erase
function may be aborted by pressing ERASE a second time.
As erasure commences, the display will show:
Erase 0%
and the percentage indication will then show the progress.
As stated above, initialisation is a much slower process than
track erasure. After erasure/initialisation is complete, the
drive returns to STOP, and the number of tracks remaining is
confirmed by the display.
SCMS
The SCMS (Serial Copy Management System) was developed
to restrict the number of copies which could be made from a
digital recording via the digital domain. The system has been
incorporated into all consumer digital audio equipment for many
years. With commercially-produced CDs, it limits the number of
copies which can be made by using an S/PDIF interconnection
to one.
In the simplest terms, SCMS functions by setting certain bits
in the digital bitstream. These are inspected by an SCMSequipped recorder and a recording is only permitted if the “firstgeneration-only” criterion is met.
The restrictions imposed by SCMS are generally too limiting
for professional use. As a professional product, the CDR-882
provides full control over SCMS operation in two ways.
Firstly, the digital input bitstream is not checked for copy
protection bit validity. The CDR-882 will record from any digital
source. This applies to all digital inputs.
Secondly, the copy protection bits can be set as required
for the discs being recorded. This setting is made via the
Record submenu of the menu system, at the SCMS option.
Three settings are available: Prohibit Copies, Copy Once and
Permit Copies, corresponding to none, one or unlimited copies
respectively. (See page 35 for full details.)
Discs recorded in the CDR-882 subsequently played on
consumer CD players will cause the copy protection bits at the
S/PDIF outputs of those players to be set according to how the
SCMS menu setting on the CDR-882 was set at the time the
discs were recorded. The source of the programme material
at the time of recording is of no relevance; this includes discs
recorded using the CDR-882’s high-speed DISC COPY function.
The CDR-882 is SCMS-compliant in playback; the SCMS bits in
the digital outputs are set only according to the copy protection
status of the disc being played.
Erasing/Initialising two CD-RWs
If both drives contain CD-RWs, the user has the option to
erase selected tracks from in each in turn as described above,
switching between drives with DRIVE SELECT. However, the
range of erase options offered is extended to include erasing or
initialising on both drives simultaneously.
Rotating the AMS control one click clockwise past Init Disc will
offer the options
Erase Discs
followed by
Init Discs
Selecting one of these options (by pressing ENTER) will initiate
erasure or initialisation on discs in both drives simultaneously.
48
CDR-882 User Manual Version 1.0www.hhb.co.uk
Page 50

Remote Control
Remote Control
In some installations, it may be desirable to control the CDR-882
from an external control system of some kind. Two rear panel
connectors are provided for this purpose, the Parallel Remote
Input and the RS232 Link Input. The Parallel Remote Input
provides the main transport commands only, while the RS232
Link Input allows control of virtually every machine function,
parameter and setting.
Parallel Remote Control Port
The rear panel Parallel Remote Input permits control of five
transport functions, and provides tallies for three functions. The
five active commands may be selected from a set of eight, and
the three active tallies from a set of five. These are shown in the
table below.
INPUTS
(COMMANDS)
PLAY/PAUSE Input 1 PLAY Output 7
RECORD Input 2 PAUSE Output 8
STOP Input 3 RECORD Output 9
AMS + Input 4 NO DISC -
AMS - Input 5 CHANGE OVER -
FFWD -
FRWD -
EJECT -
Default
The commands and tallies listed in bold are the factory
defaults. If a different command set is preferred, an alternative
combination comprising any five (or less) of the eight available
commands, and any three (or less) of the five available tallies
may be reassigned to the inputs and outputs respectively via
the menu system. See page 36 for full details of changing the
default assignment.
OUTPUTS
(TALLIES)
Default
Electrical characteristics
Both inputs and outputs are internally opto-isolated, and include
a series inductor for EMC purposes.
The inputs simply require a short-to-ground for activation.
The outputs are open-collector, and go low when activated.
Loads such as LEDs may be connected externally with a suitable
series resistor, and returned to the +ve terminal of an external
PSU. The maximum current deliverable by the opto-isolator’s
transistor is 50mA. (The –ve side of the external voltage supply
should be referenced back to the CDR-882’s 0v on pin 6.)
The Parallel Remote Input is suitable for basic control of the
CDR-882 from a dedicated set of hardware switches or similar.
It is also possible to connect an external control system (e.g.
Crestron, AMX) to the Parallel Remote Input, using relays or
opto-coupled inputs and outputs within such systems.
Pinout
The connector is a D9F. The pinout is shown in the table:
PIN FUNCTION
Input 1
1
Input 2
2
Input 3
3
Input 4
4
Input 5
5
0v
6
Output 1
7
Output 2
8
Output 3
9
CDR-882 User Manual Version 1.0 www.hhb.co.uk
49
Page 51

Remote Control
RS232 LINK INPUT
The rear panel RS232 Link Input provides serial control of
virtually every machine function, parameter and setting.
This connector will also be used by the Slave machines in a
Multi-Machine set-up; the Master machine in such a set-up
interchanges control data with the Slaves through its RS232
Link Output connector. Thus RS232 control from an external
control system is still possible with multiple machines, as it is
only the Master machine which needs to communicate with the
external control system. See page 42 for details regarding MultiMachine interconnections.
This section of the manual provides details of the port
parameters and an abridged serial command list, which includes
the main machine functions. The full RS232 protocol is beyond
the scope of this manual, but can be referenced or downloaded
as a .pdf file at www.hhb.co.uk.
Pinout
The rear panel connector is a D9M. The pinout is shown in the
table:
PIN FUNCTION
n/u
1
Data receive
2
Data transmit
3
+5v
4
0v
5
n/u
6
RTS
7
CTS
8
n/u
9
Abridged command set
The commands listed in the below will perform the same
function as their equivalent front panel buttons. For all other
commands, data requests and responses, please refer to the
CDR-882’s full RS232 protocol specification.
COMMAND DATA STRING (HEX)
ENABLE REMOTE MODE (see note 1) 7E 07 05 61 10 01 FF
DISABLE REMOTE MODE (see note 1) 7E 07 05 61 10 02 FF
SELECT DRIVE 1 7E 08 05 61 02 DC 00 FF
SELECT DRIVE 2 7E 08 05 61 02 DC 01 FF
EJECT DRIVE 1 7E 08 05 61 02 40 00 FF
EJECT DRIVE 2 7E 08 05 61 02 40 01 FF
PLAY/PAUSE 7E 07 05 61 02 05 FF
STOP 7E 07 05 61 02 02 FF
PREVIOUS TRACK 7E 07 05 61 02 15 FF
NEXT TRACK 7E 07 05 61 02 16 FF
FFWD (see note 2) 7E 07 05 61 02 14 FF
FREW (see note 2) 7E 07 05 61 02 13 FF
RECORD ON 7E 07 05 61 02 08 FF
SYNC RECORD 7E 07 05 61 08 07 FF
MARK 7E 07 05 61 02 90 FF
CUE 7E 07 05 61 02 91 FF
KEY OFF (see note 2) 7E 07 05 61 00 00 FF
NOTE 1: The CDR-882’s RS232 port must be enabled by the
REMOTE ON command before any further RS232 commands will
be accepted. Once REMOTE MODE has been enabled, neither
the front panel controls nor the RC-882 handset will operate,
and operation of the CDR-882 can only be controlled with the
RS232 Link Input or the Parallel Remote Input. REMOTE MODE
must be disabled before the front panel controls and handset will
function again.
Port parameters
PARAMETER VALUE/SETTING
Data type:
Data speed
Word length
Parity
Stop bits
RS232C serial, 3-wire, half-duplex
9600 baud
8 bits
None
One
The ENABLE REMOTE MODE command causes both drives to
enter STOP mode if they are not already in it.
NOTE 2: KEY OFF cancels the FFWD and FREW commands.
50
CDR-882 User Manual Version 1.0www.hhb.co.uk
Page 52

Appendix 1 - Connector Pinouts
Appendix 1 - Connector Pinouts
NOTE: Numbers refer to the rear panel diagram on page 10. All
connector views are looking at the rear of the CDR-882.
Analogue Inputs (Balanced) (1)
Connector: XLR3F
USE
PIN
Screen
1
Signal ‘hot’ (phase)
2
Signal ‘cold’ (anti-phase)
3
AES/EBU Input (3)
Connector: XLR3F
FUNCTION
PIN
Screen
1
Data ‘hot’ (phase)
2
Data ‘cold’ (anti-phase)
3
Analogue Outputs (Balanced) (6)
Connector: XLR3M
FUNCTION
PIN
Screen
1
Signal ‘hot’ (phase)
2
Signal ‘cold’ (anti-phase)
3
AES/EBU Output (8)
Connector: XLR3M
FUNCTION
PIN
Screen
1
Data ‘hot’ (phase)
2
Data ‘cold’ (anti-phase)
3
Multi-Machine RS232 Link Input
(male) (11)
Connector: D9M
FUNCTION
PIN
n/u
1
Data receive
2
Data transmit
3
+5v
4
0v
5
n/u
6
RTS
7
CTS
8
n/u
9
Multi-Machine RS232 Link Output
(female) (4)
Connector: D9F
FUNCTION
PIN
n/u
1
Data transmit
2
Data receive
3
+5v
4
0v
5
n/u
6
CTS
7
RTS
8
n/u
9
Parallel Remote Input
(female) (13)
Connector: D9F
FUNCTION
PIN
Input 1
1
Input 2
2
Input 3
3
Input 4
4
Input 5
5
0v
6
Output 1
7
Output 2
8
Output 3
9
PS/2 Keyboard (15)
CDR-882 User Manual Version 1.0 www.hhb.co.uk
Connector: PS/2 socket
FUNCTION
PIN
Clock
1
Gnd
2
Data
3
n/c
4
Vcc
5
n/c
6
51
Page 53

52
CDR-882 User Manual Version 1.0www.hhb.co.uk
Appendix 2 - Menu Flow Diagrams
Appendix 2 - Menu Flow Diagrams
Submenus
Page 54

Audio
Appendix 2 - Menu Flow Diagrams
CDR-882 User Manual Version 1.0 www.hhb.co.uk
53
Page 55

54
CDR-882 User Manual Version 1.0www.hhb.co.uk
Appendix 2 - Menu Flow Diagrams
Clock
Display
Edit Marker
Page 56

DiscSpan
Appendix 2 - Menu Flow Diagrams
CDR-882 User Manual Version 1.0 www.hhb.co.uk
55
Page 57

56
CDR-882 User Manual Version 1.0www.hhb.co.uk
Appendix 2 - Menu Flow Diagrams
Record
Page 58

Parallel Port
Appendix 2 - Menu Flow Diagrams
CDR-882 User Manual Version 1.0 www.hhb.co.uk
57
Page 59

Appendix 2 - Menu Flow Diagrams
General
58
CDR-882 User Manual Version 1.0www.hhb.co.uk
Page 60

Appendix 3 - Firmware Updates
Appendix 3 - Firmware Updates
As a responsible manufacturer, HHB adopts a policy of
continuous product development. As with all software-based
products, it may be desirable from time to time to update the
firmware in your CDR-882 with a more recent version. You can
contact your HHB dealer or distributor, or visit the HHB website
at www.hhb.co.uk for details.
Firmware updates are downloadable from the HHB website,
or if you prefer, from your local dealer/distributor on a CD.
Alternatively, if you are uncertain about performing a firmware
update yourself, take your CDR-882 to your HHB dealer, who will
be happy to do it for you.
Performing a firmware update restores all menu settings to
their original factory defaults. If you are used to using your
CDR-882 for one particular type of work, it may be worthwhile
checking through the menus and noting the current settings so
that they can be easily restored after the update.
Updating the firmware requires a PC or Mac fitted with a CD(or DVD-) writer drive, and a CD-writing software application.
We recommend you read through the instructions below before
performing an update for the first time.
To perform a firmware update, proceed as follows:
•
Download the new firmware from www.hhb.co.uk. It will
be in the form of a .wav file. Save it to a suitable location
•
Using the CD burning application you have on your
computer (such as Nero or Roxio), create a CD containing
the .wav file. The CD must be an audio CD, not a data CD,
and the .wav file must be the only track on the CD
•
Turn on the CDR-882, put the burnt disc into Drive1 and
close the tray. Note that the update CD must be the first
CD loaded after power is applied to the unit; if there is
already a disc in Drive 1, remove it first and reboot the
CDR-882 (turn it off and then back on) before loading the
update CD
•
After the disc has been read, a dialogue screen will be
displayed asking for confirmation to update the firmware.
Press RECORD to continue or STOP to abort
•
The firmware update will now proceed automatically. The
progress of the update procedure is displayed by the L
bargraph meter. Also, the display will show a succession
of messages:
!!! Updating OS !!!
When the disc has been read, the drive tray opens
•
automatically; the disc may now be removed. The disc tray
will not close automatically; this is normal
Reboot the unit by powering off, then back on. Further
•
internal file re-writing now takes place; while this is in
progress, the front panel may appear to be completely
dead. This step may take up to 30 seconds; do not press
any buttons while it is proceeding
When the update process is complete, the unit will boot
•
up in the normal way
NOTE: We cannot guarantee that all CD-writing applications will
create a compatible audio CD.
Do not disturb power
Erasing flash completed
Writing flash completed
!!! Reboot !!!
•
During the update procedure, it is essential that the power
supply to the CDR-882 is not interrupted. Should this
occur, the unit will be rendered unusable and will require
factory re-initialisation
CDR-882 User Manual Version 1.0 www.hhb.co.uk
59
Page 61

Appendix 4 - Factory Defaults
Appendix 4 - Factory Defaults
The table below lists all the menu options and their default
factory settings.
MENU OPTION SETTING
AUDIO Digital Input Level 0dB
Input Balance Centred (L=0dB, R=0dB)
Fade-in Time 4 seconds
Fade-out time 4 seconds
Input Dither Auto
Phones Mix 1 + 2
Output Mix As phones
CLOCK Clock Source Auto
DISPLAY Contrast 18
Invert Off
EDIT MARKER Direct Mark (all fields empty)
Auto-Cue Threshold -46dBFS
DISCSPAN Multi-Machine Off
Master/Slave Master
Fade-in Time 4 seconds
Fade-out time 4 seconds
Overlap Time 4 seconds
RECORD Record Sync Record Start/Stop + Track
S/PDIF REC Start Trigger S/PDIF Subcode
Auto Track ID Trigger S/PDIF subcode
Audio Threshold -72dBFS
Track Length 1 minute
Auto Finalize Off
Digital Output Format Consumer
SCMS Permit Copies
Copy Speed Low
PARALLEL PORT Preset Default
Input 1 Play/Pause
Input 2 Record
Input 3 Stop
Input 4 AMS +
Input 5 AMS -
Output 1 Play
Output 2 Pause
Output 3 Record
GENERAL Timer Off
Eject Block Off
60
CDR-882 User Manual Version 1.0www.hhb.co.uk
Page 62

Appendix 5 - Specifications
Functions Specifications
Frequency Response 5-20kHz ±0.5dB
S/N Ratio 96dB (16-bit limit)
THD+N 0.002% (16-bit limit)
Channel Separation >90dB
Max Input Level
Output level
Input Impedance
Output Impedance <50Ω
Headphone Output 1/4” stereo jack
Digital I/O
Word Clock Input 44.1kHz - 75Ω BNC with switchable termination
Digital Input 32-96kHz via sample-rate converter
Remote Control
Format CD audio recordable
Compatible Media CD (playback); CD-R; CD-RW
Power Supply 100-240V 50/60Hz
Power Consumption 25W
Weight (Ex Packaging) 6.7kg/14.7lbs
Height with feet 95mm (3.75 inches)
Height without feet 88mm (3.5 inches)
Depth 322mm (12.5 inches) – excluding connectors
Width 482mm (19 inches)
Supplied Accessories
24dBu (XLR)
10dBu (RCA/Phono)
(0dBFS) 20dBu (XLR)
6dBu (RCA/Phono)
>10kΩ (balanced)
>5kΩ (unbalanced)
AES/EBU 110Ω XLR
S/PDIF 75Ω RCA/Phono coaxial
S/PDIF TOSlink optical
Infra-red
RS232
9-pin opto-isolated parallel
Remote control
2 x AA batteries
Power cord
Operating instructions
2 x HHB CDR80HS recordable CD
Appendix 5 - Specifications
CDR-882 User Manual Version 1.0 www.hhb.co.uk
61
Page 63

62
CDR-882 User Manual Version 1.0www.hhb.co.uk
Notes
Notes
Page 64

Notes
CDR-882 User Manual Version 1.0 www.hhb.co.uk
63
Page 65

Notes
64
CDR-882 User Manual Version 1.0www.hhb.co.uk
Page 66

HHB Communications Ltd
73-75 Scrubs Lane, London NW10 6QU, UK
T +44 (0)20 8962 5000 E sales@hhb.co.uk W www.hhb.co.uk
In the USA, Central & South America: Sennheiser Electronic Corporation
T 860 434 9190 E HHB-Sales@sennheiserusa.com W www.hhbusa.com
In Canada: HHB Communications Canada Ltd
T 416 867 9000 E sales@hhbcanada.com W www.hhbcanada.com
www.hhb.co.uk
Version 1.0 - December 2007
 Loading...