

Page 1
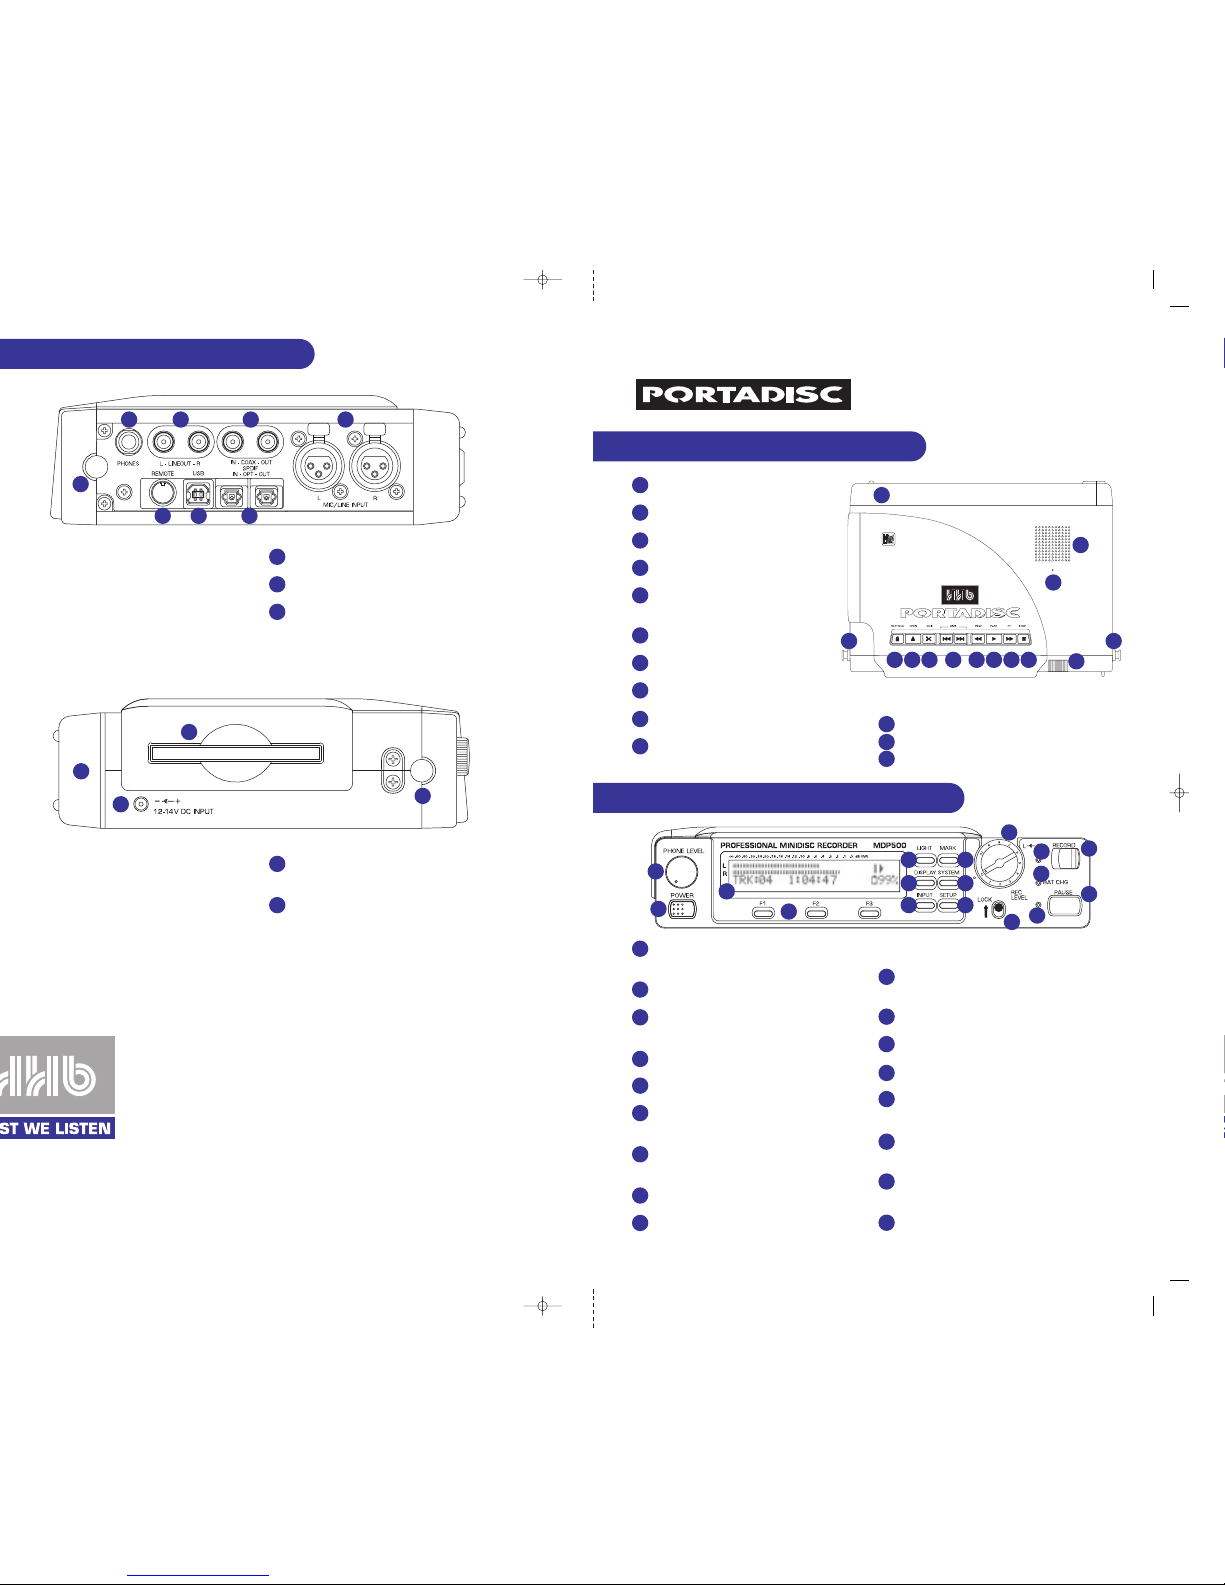
35 REMOTE CONNECTOR
Parallel remote control connector.
36 USB CONNECTOR
USB interface port for a compatible computer.
37 OPTICAL I/O CONNECTORS
(TOSlink.) SPDIF digital optical connectors.
40 MINIDISC SLOT
The disc must be inserted with the arrow on the disc
casing facing into the recorder.
41 SHOULDER STRAP ATTACHMENT POINTS
MDP500 MINIDISC RECORDER
QUICK REFERENCE GUIDE
TOP PANEL FUNCTIONS
FRONT PANEL FUNCTIONS
14 PHONE LEVEL
Adjusts the volume level for the headphones
and monitor speaker.
15 POWER
Powers the PORTADISC on and off.
16 LCD DISPLAY
Shows level metering, disc information, timing
information and menu displays.
17 F1, F2, F3
Parameter selection buttons.
18 LIGHT
Illuminates the display back light.
19 DISPLAY
Changes the display menu through disc time,
level margin, time and date.
20 INPUT
Changes input related settings for mic, line,
digital and internal mic inputs.
21 MARK
Marks the track number manually.
22 SYSTEM
Changes system settings, including record
mode, track-increment, threshold level,
auto-start, pre-record and auto power down.
23 SETUP
Saves and recalls user setups, recording
presets and date / time setups.
24 REC LEVEL
Adjusts analog recording levels.
25 REC LEVEL LOCK
Locks the REC LEVEL control position.
26 RECORD
Starts recording.
27 REC INDICATOR
Lights during recording and blinks during
record pause.
28 BAT CHG INDICATOR
Lights when charging the NiMH rechargeable
batteries.
29 PAUSE BUTTON
Pauses the recording or playback operation and
puts the PORTADISC into record pause mode.
30 PAUSE INDICATOR
Lights during pause mode.
1 BATTERY COMPARTMENT
Holds 8 x AA batteries.
2 KEYHOLD
Prevents accidental button operation.
3 OPEN
Ejects the MD disc.
4 EDIT
Name, erase, divide, combine or move tracks.
5 AMS
Decrease or increase the track number.
Also used in editing and naming.
6 REWIND
Rewinds the disc.
7 PLAY
Starts track playback.
8 FAST FORWARD
Fast forwards the disc.
9 STOP
Stops playback or recording.
10 RECORD VOLUME CONTROL
Independent left and right level adjustment.
11 INTERNAL MONO MICROPHONE
12 MONITOR SPEAKER
13 SHOULDER STRAP ATTACHMENT POINTS
31
35 36 37
32 33 34
1
5 6 7 82 3 4 9
10
12
11
13 13
14
15
16
17
18
19
20
21
24
25
26
27
28
29
30
22
23
40
38
39
41
41
Page 2

HHB MDP500 PORTABLE MINIDISC RECORDER
INPUT button once, then press F1 and F3 to select ‘MIC’ for each input. Press F2 to set
REC LEVEL control for the desired recording
F2 to set selection.
INPUT again to select ‘BASSCUT’, then use F1 and F3 to select the bass cut from ‘OFF’,
F2 to set selection.
INPUT again to select ‘LIMITER’, then use F1 and F3 to select limiter from ‘ON’, ‘OFF’,
F2 to set selection. If one channel is set to ‘GANGED’ or
F1 and F3 before setting this with the F2 button.
INPUT again to select ‘PHANTOM’, then use F1 and F3 to switch phantom power ‘ON’ or
F2 to set selection and F3 to exit.
INPUT button once, then press F1 and F3 to select ‘LINE’ for each input. Press F2 to set
INPUT again to select ‘LIMITER’, then use F1 and F3 to select limiter from ‘ON’, ‘OFF’,
F2 to set selection and F3 to exit.
REC LEVEL control for the desired recording level - this is not active if the ‘LIMITER’ mode
INPUT button once, then press F1 or F3 to select ‘DIGITAL’ for either input. Press F2 to
INPUT again, then select the correct digital input using F1 from ‘COAXIAL’, ‘OPTICAL’ or ‘USB’.
F2 to set selection and F3 to exit.
F2 to set selection and F3 to exit.
REC LEVEL control is not active with the internal microphone – an automatic gain control (AGC)
RECORD button to the right. To begin from record pause mode, press
PLAY button. Pressing PAUSE will pause playback.
AMS
The EDIT button on the top of the PORTADISC enables tracks to be erased, divided, combined or moved.
It can also be used to name a track or a disc.
NAME A TRACK OR A DISC
• Press EDIT once to display ‘NAME INPUT?’.
• Press
F1
to select the track to be named or, to name the disc itself, press
F1
until ‘DISC’ is displayed.
Press
F2
to confirm selection.
• Use the
AMS buttons to scroll through alpha-numeric characters for the first letter of the track or disc
name. Use
F3 or the FF and REW buttons to move on to the next character along the display. Once you
have completed the name, press
F2
to set.
• Once name information has been written to disc, p
ressing F1 will show the disc name and F2 displays
the track name.
ERASE A TRACK
• Press EDIT twice to display ‘ERASE ?’.
• Press
F1
to select the track to be erased. Press
F2
to confirm selection.
• ‘ERASE ???’ will be displayed. Press
F2
to confirm erase or F3 to exit without erasing.
ERASE ALL TRACKS
• Press EDIT three times to display ‘ALL ERASE ?’.
• Press
F2
to confirm.
• ‘ALL ERASE ???’ will be displayed. Press
F2
to confirm erase or F3 to exit without erasing.
COMBINE TRACKS
• Press EDIT four times to display ‘COMBINE ?’.
• Press
F1
to select the track to be combined with its following track. Press
F2
to start rehearsal.
• Press
F2
to accept the combine operation.
• ‘Complete!’ will be displayed. Press
F2
to confirm erase or F3 to exit without erasing.
MOVE TRACKS
• Press EDIT five times to display ‘MOVE >> ?’.
• Press
F1
to select the track to be moved, then press F3 to select its new destination track number.
Press
F2
to confirm the move.
DIVIDE TRACKS
• During playback of the track you wish to divide, press PAUSE at the approximate point where you want the
track to be divided.
• Press
EDIT once to display ‘DIVIDE ?’.
• Press
F2
to begin auditioning the divide point. The PORTADISC will play the audio from the divide point.
• Adjust this point (if necessary) using the
FF and REW buttons. Then press
F2
to confirm divide.
HOW TO EDIT A MINIDISC
The INPUT, SETUP, and SYSTEM buttons configure many of the PORTADISC’s settings.
INPUT BUTTON
Press INPUT to select your input source, from ‘MIC’, ‘LINE, ‘DIGITAL’, ‘INTMIC’ and ‘OFF’. Once the input
source has been set, pressing
INPUT again enables more advanced features to be set, including ‘MIC-Att’,
‘BASSCUT’, ‘LIMITER’ and ‘PHANTOM’ if the input is set to a mic source, ‘LIMITER’ for a line source and
‘COAXIAL’, ‘OPTICAL’ or “USB’ for a digital source.
SETUP BUTTON
The SETUP button is used to save and recall five user settings, ‘USER1’ to ‘USER5’, and three recording
presets, ‘MIC REC’, ‘LINE REC’ and ‘DIGI REC’. It is also used to set ‘CLOCK/DATE SETUP?’, ‘DATE
FORMAT’, ‘PEAK HOLD METER?’ and ‘DISPLAY CONTRAST’.
SYSTEM BUTTON
Press the SYSTEM button to set system functions, from ‘REC MODE?’, ‘TRACK-INCREMENT?’, THRESHOLD
LEVEL’, ‘AUTO-START/CUT?’, ‘AUTO-PAUSE?’, ‘PRE-RECORD?’, ‘HEADPHONE MONITOR’, ‘OVERWRITE MODE?’,
‘REPEAT MODE?’, ‘DIGITAL OUTPUT?’ and ‘AUTO POWER DOWN?’.
DISPLAY BUTTON
The DISPLAY button scrolls through different displays during stop, play and record modes. The display
may show total number of tracks and total playback time, MD time remaining, playback or recording track
and time, level margin and the current or stamped time and date.
SYSTEM CONFIGURATION
▲
▲
❙
▲
❙
 Loading...