

Page 1

FlashMic
DRM85
DIGITAL RECORDING MICROPHONE
USER MANUAL
Page 2

Introduction
Thank you for purchasing this HHB FlashMic.
This manual provides all the information you should need to use your FlashMic easily
and effectively. We recommend you read through the manual carefully before using your
FlashMic for the first time, and to keep it in a safe place for future reference.
ENGLISH
Product Details
Owner:
Company:
Date of Purchase:
Serial Number:
En.1
Page 3

Safety Information
While the HHB FlashMic has been designed to be robust in normal use, always remember
that it is both a high-quality professional microphone and a delicate electronic instrument.
As such, a degree of care should be exercised in its handling.
Take care not to subject the FlashMic to mechanical impact, e.g. dropping
•
it or knocking it on hard surfaces.
Use care when opening the battery compartment. This operation is
•
designed to be performed by hand; do not use sharp tools of any kind.
Use the connectors and jogswitch control on the base of the FlashMic with
•
care. Ensure that any cables connected are not subject to strain.
ENGLISH
Only dispose of used batteries in accordance with local environmental
•
and/or recycling guidelines.
Only clean the FlashMic with a damp cloth. Do not use solvent or abrasive
•
cleaners of any kind.
What’s in the box
Please check the list below against the contents of the packaging. If any items are missing
or damaged, contact the HHB dealer or distributor that you purchased the unit from at
once.
DRM85 FlashMic Microphone
•
Microphone pouch
•
Mic clip with standard thread (5/8” 27TPI), plus 3/8” adaptor
•
(16TPI BSW)
1.5m. USB cable, Type A to 5-pin Mini-B
•
2 x AA alkaline batteries
•
CD-ROM with FlashMic Manager software (both Windows™ and Mac™
•
versions)
En.2
Page 4

Contents
Introduction 1
Safety Information 2
What’s in the box 2
FlashMic Features 4
FlashMic Description 5
FlashMic Display Window 6
Batteries 7
Inserting Batteries 7
Battery Management 7
Battery Status Indicator 7
Using the FlashMic 8
Jogswitch Description 8
Switching The FlashMic On 9
Making a Recording 10
PreRecord Buffer (Introduction) 10
Record Lock 11
Monitoring 11
Adjusting Record Level 11
Replaying Tracks 12
Markers 12
Deleting a Track 12
File Transfer 13
Transfer Using FlashMic Manager 13
Direct Transfer to a Computer 14
Connecting a FlashMic with low batteries to a computer. 15
FlashMic Menu System 16
Using the Menus 16
Preset Menu 17
Recording Mode Menu 18
Recording Level Menu 19
Hi-pass Filter Menu 20
Battery Type Menu 20
Delete Menu 21
Clock Set Menu 22
ENGLISH
FlashMic Manager 23
FlashMic File Names 35
Reformatting the Memory 36
Firmware Updates 37
Specifications 38
Notification 40
Notes 41
Installing FlashMic Manager on a PC (Initial Installation) 23
Installing FlashMic Manager on a Mac 24
FlashMic Manager Updates 24
Using FlashMic Manager 25
Configuration Files and Presets 26
Using the Default Configuration 26
FlashMic Manager Window - Features 27
Preset Information 27
Other Features and Functions 29
Connecting the FlashMic 32
Creating a New Configuration File 33
Modifying an Existing Configuration File 33
Creating a Personalised Defaults File 33
Uploading a Configuration File to the FlashMic 34
PreRecord Buffer 34
Filename Structure 35
Polar Diagram and Frequency Response Curve of Microphone Head 39
FlashMic User Manual Version 4. September ‘06
En.3
Page 5

FlashMic Features
Your FlashMic combines a professional-quality, omni-directional condenser microphone with
an internal digital audio recorder in a single self-contained, self-powered unit. An extremely
simple set of controls make it suitable for completely non-technical users; alternatively,
more experienced recordists can access a wide range of additional functionality through
menu-based pages on the FlashMic’s LCD display.
Retrieval of recordings is via the FlashMic’s USB port; the stored sound files are transferred
to a computer as .wav files in either linear or compressed (MPEG 2 Layer 1) formats.
Transfer is either by using the supplied FlashMic Manager software, or by standard dragand-drop file handling.
Think of your FlashMic as the audio equivalent of a digital camera. Just as you use a
digital camera to quickly and conveniently record high-quality visual images for subsequent
transfer to a computer, so you can use FlashMic to capture sound. Just as pictures can be
subsequently edited, stored, e-mailed, deleted, or whatever – so you can now manipulate
recorded audio in the same ways.
ENGLISH
The FlashMic is ideal for use by journalists and reporters for news-gathering and interviews,
by business organisations, public institutions – any situation where a quick and convenient
method of voice recording is required.
Some of the main features of the FlashMic are as follows:
•
Linear or compressed (using MPEG 1 Layer 2 compression) digital
audio recordings as .wav files.
•
Recording time up to 18hrs (file format and sample rate dependent).
•
Built-in headphone amplifier for monitoring, with adjustable level.
•
Uses 2 x AA cells – either alkaline or rechargeable.
•
Modes of operation to suit both technical and non-technical users.
•
Adjustable pre-record buffer of up to 10 seconds.
•
Rapid file transfer via USB to PC or Mac.
•
9 internal presets for storing different FlashMic configurations.
•
Adjustable recording level or fixed AGC mode, with bargraph display.
•
Remaining Time display.
•
Replay of last or an earlier recording via monitor output.
•
Markers (cue points) can be added to recordings in both Record and
Playback.
•
File recovery system allowing recovery of most audio data in the event of
power loss or other failure.
En.4
Page 6
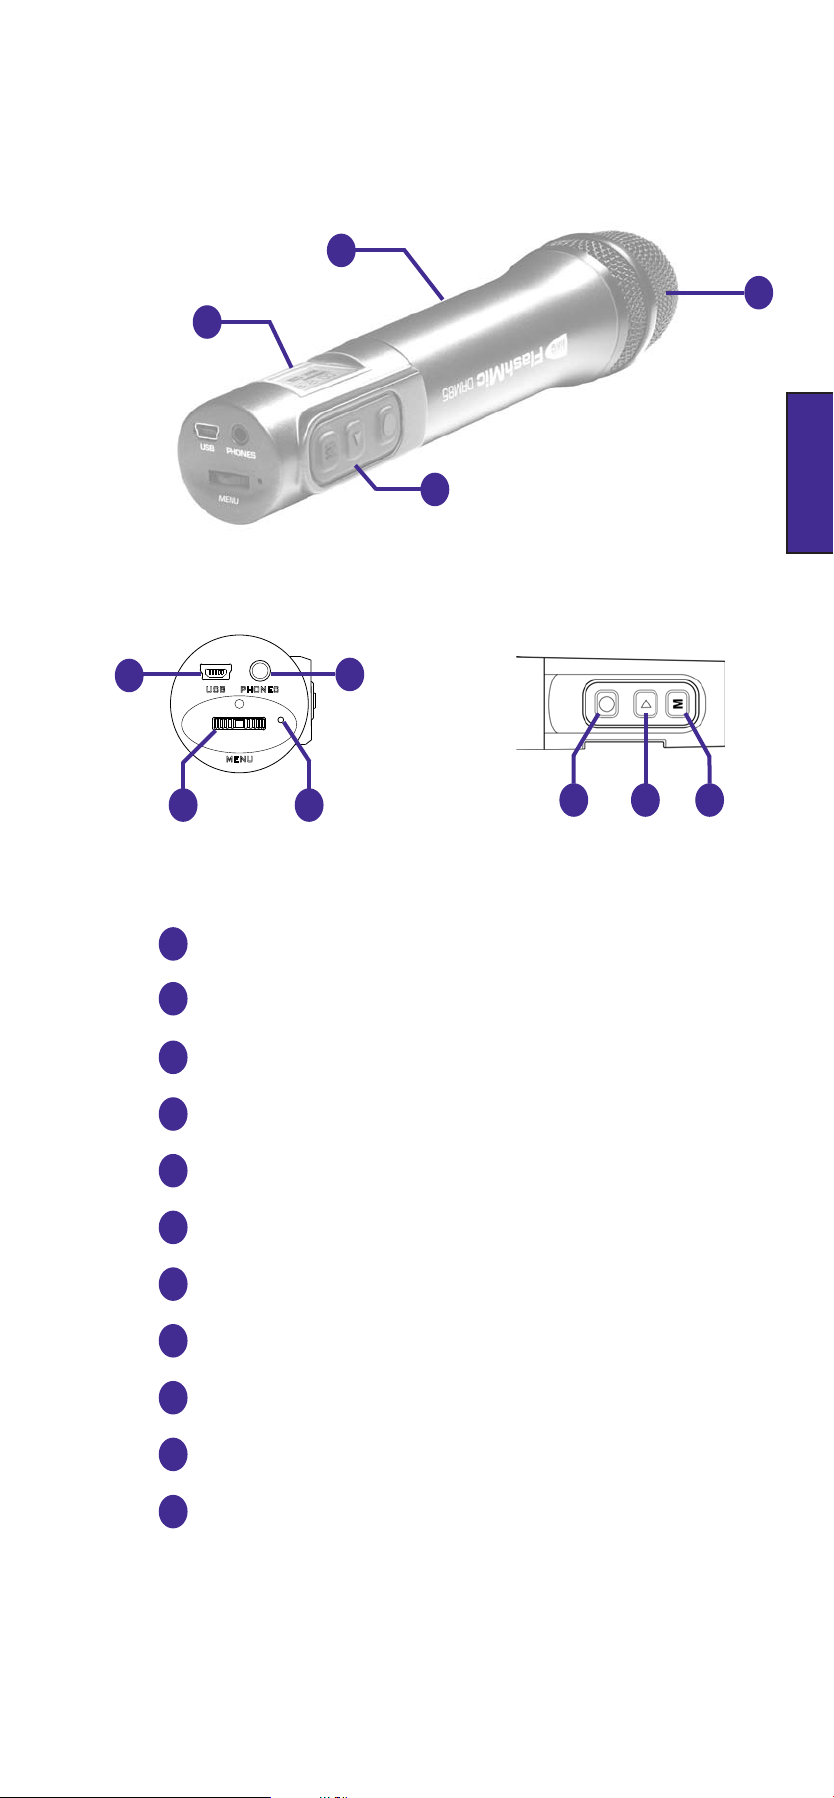
FlashMic Description
USB
MENU
PHONES
2
3
4
1
ENGLISH
10
11
98
Protective basket (windshield) over mic capsule
1
2
FlashMic body
LCD display – see FlashMic Display Window
3
Main operating control section
4
REC button (G)
5
PLAY button (H)
6
5 76
MENU/STOP button (M)
7
8
Multi-function jogswitch control - see Jogswitch Description
9
Record mode LED (REC LED)
10
USB connector (5 pin Mini-B)
11
PHONES: monitor output (3.5mm 3-pole jack socket)
En.5
Page 7
00:12:12
Rec
Play
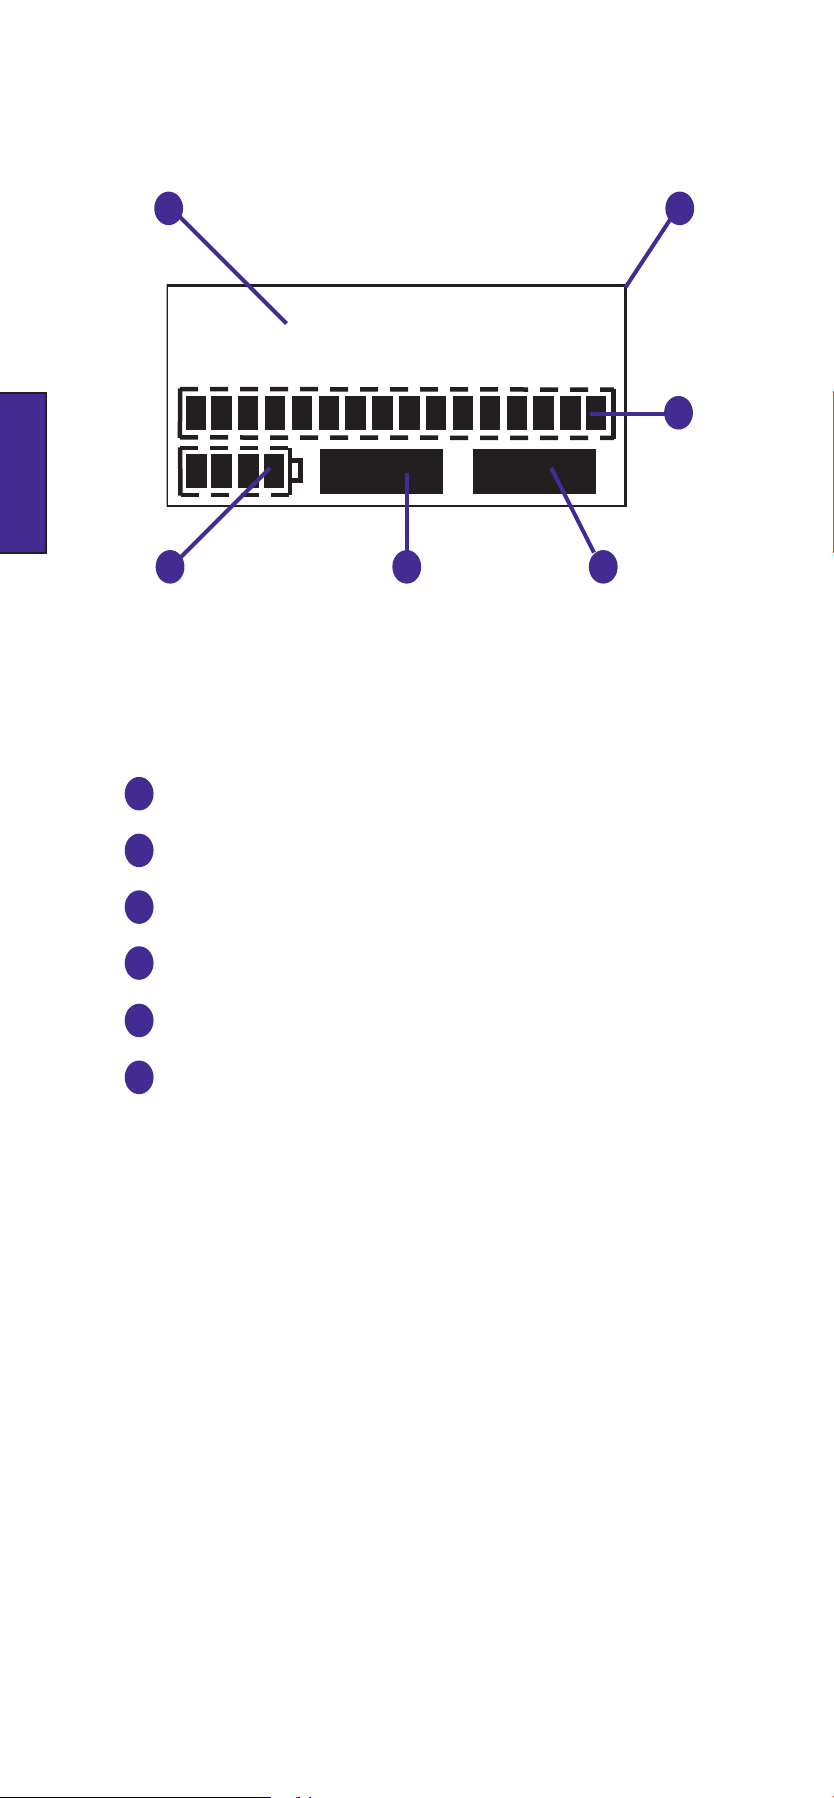
FlashMic Display Window
ENGLISH
12
13 14 15
17
16
6-character alphanumeric display
12
4-segment battery status indicator
13
REC flag – indicates FlashMic is in record mode.
14
15
PLAY flag – indicates FlashMic is in replay mode.
16-segment bargraph meter – provides an indication of recording and
16
playback level.
17
Display backlight
En.6
Page 8

Batteries
The FlashMic requires two AA-size batteries. Either 1.5v alkaline or 1.2v NiMH (nickel metal
hydride) rechargeable batteries may be used.
Batteries of at least 1500mAh capacity are recommended.
!
Do not use zinc chloride batteries.
Inserting Batteries
Hold the FlashMic in one hand and unscrew the rear
section (the section with the display and operating
controls) with the other.
Slide the rear section back as far as it will go.
ENGLISH
Open the hinged plastic battery compartment cover.
Insert the two batteries oriented as shown on the
compartment cover.
!
The two batteries must point the same way.
!
Always change both batteries at the same time, and always use two batteries of the same
brand and type. NEVER mix alkaline and rechargeable batteries.
Close the cover, push the rear section back over the compartment, and screw up tight.
Note: If changing alkaline batteries, dispose of the old ones in a responsible manner –
always observe local environmental guidelines.
Battery Management
Battery life will be maximised if the FlashMic is switched off when not in use, as the power
consumed in IDLE mode is virtually the same as in REC mode.
The internal clock settings are protected within FlashMic for approximately 1 minute after
the batteries are removed. Recorded sound files and configuration settings are not affected
by battery removal.
Remove any batteries from the FlashMic if it is to be unused for an extended period (more
than a month).
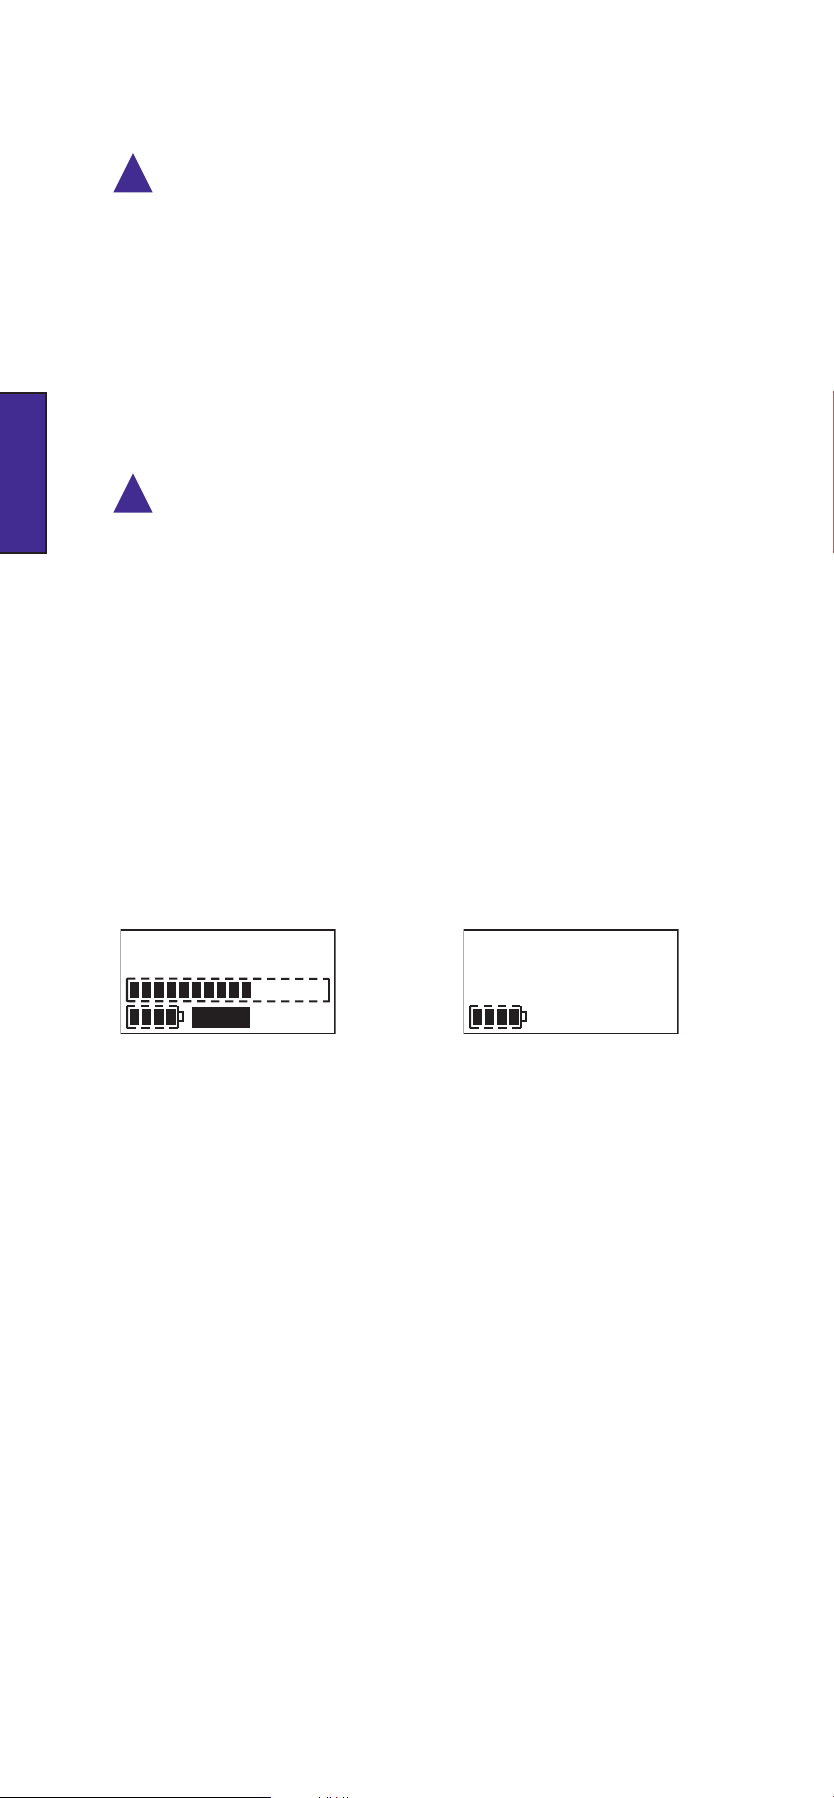
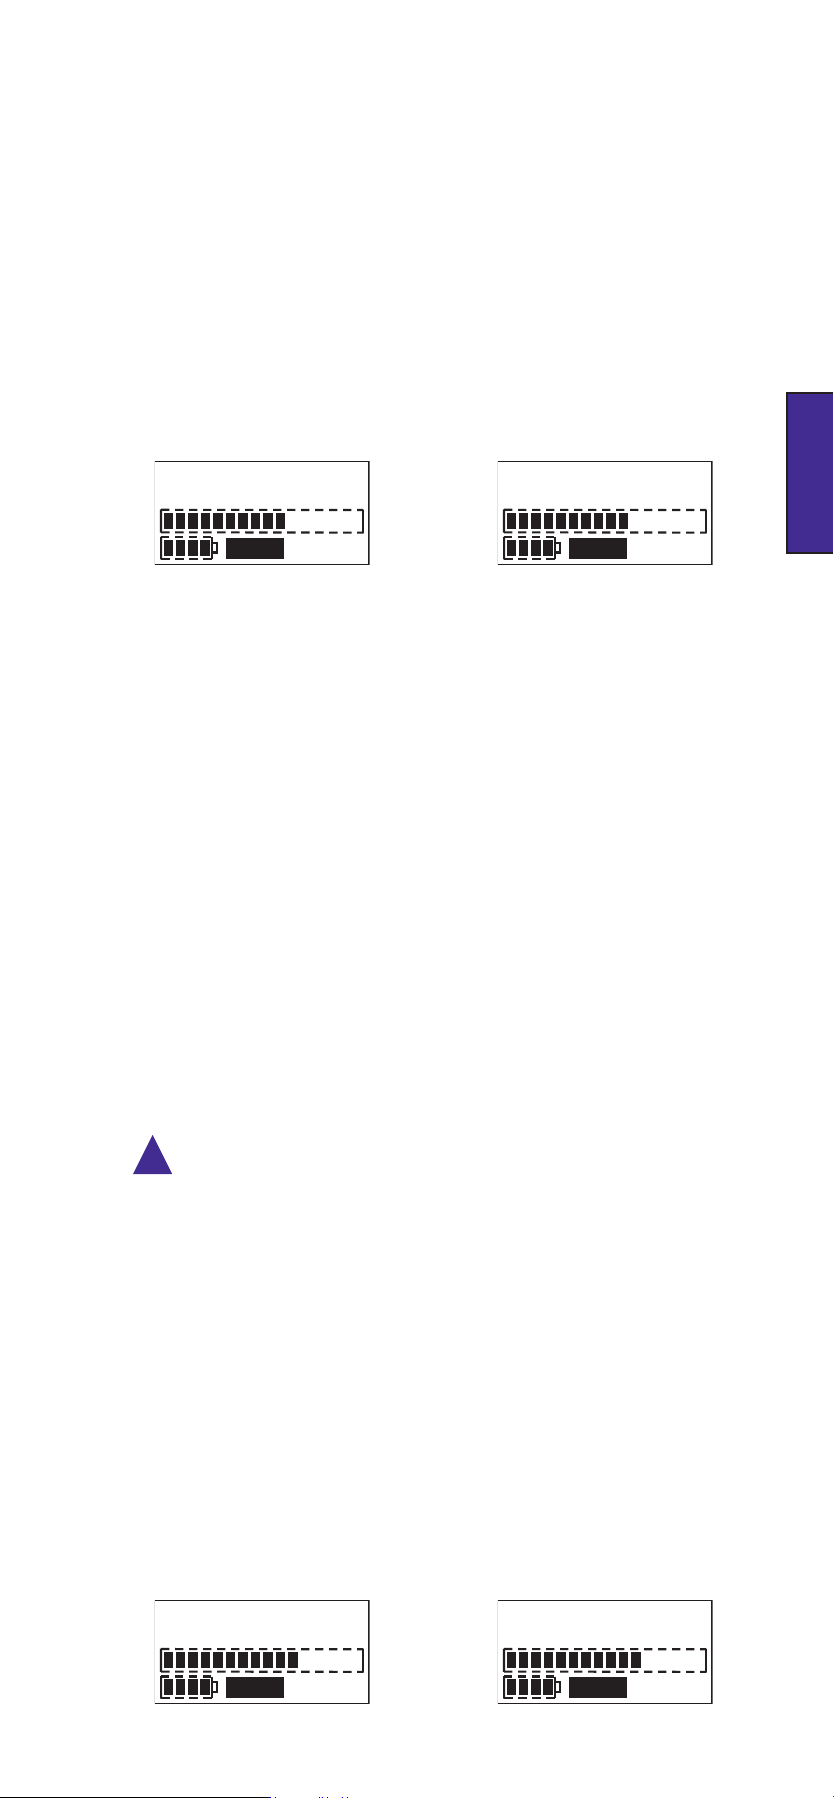
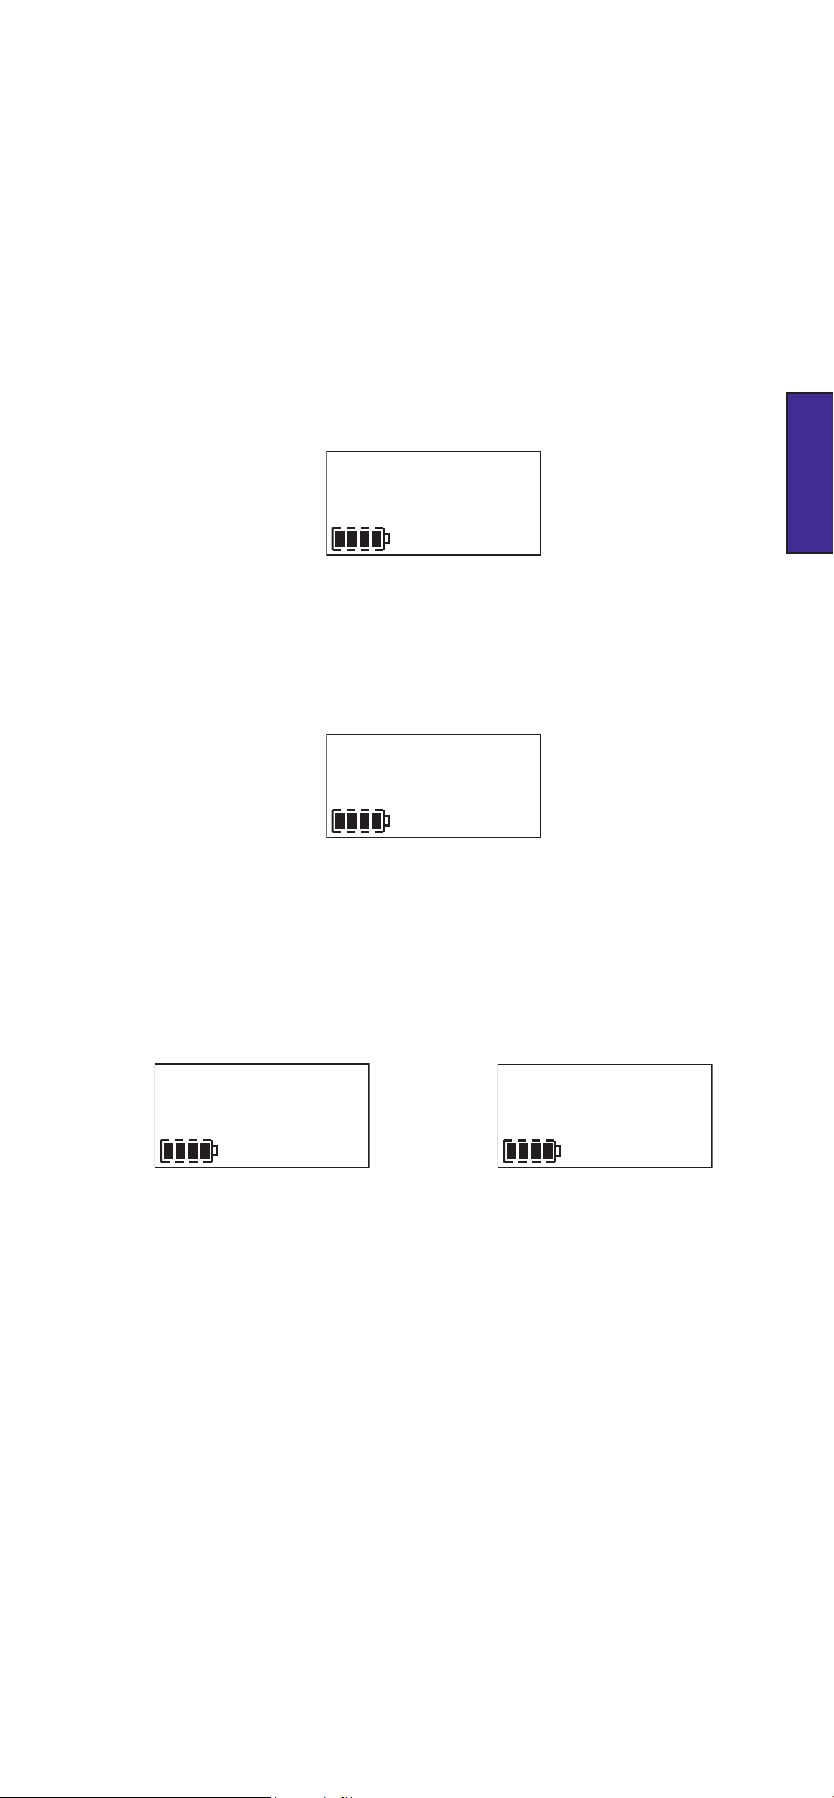
Battery Status Indicator
A 4-segment battery status indicator is provided on the LCD display.
The number of segments displayed is proportional to the battery power remaining. The rate
of change of the display can be altered (via the menu system or via the FlashMic Manager
software) to reflect the different discharge characteristics of alkaline or rechargeable
batteries.
The display backlight, the record LED on the FlashMic base and the battery indicator will all
flash when the remaining battery life approaches zero. If the FlashMic is recording when the
batteries are nearly exhausted, the recording will be stopped after the flashing warning.
En.7
Page 9

Using the FlashMic
Jogswitch Description
Many of the FlashMic’s operating functions are accessed via the jogswitch on the bottom
panel. These include power on/off, navigation through the various internal menus,
adjustment of levels, and track selection for replay.
Operation of the jogswitch for each specific FlashMic function is described in detail in the
section of the manual covering the function. However, because the jogswitch has several
physical movements associated with it, an overview is given here.
The jogswitch is a small wheel protruding from the base of the FlashMic. It is effectively three
momentary-acting pushbuttons in one; it can be pressed inwards (from its rest position),
or rotated in either direction. The actions are all spring-loaded so that the jogswitch always
returns to its rest position. Each of the three possible movements can be either ‘long’ or
ENGLISH
‘short’, giving a total of six possible actions. The FlashMic’s firmware determines a ‘long’
press to be one of greater than 2 seconds. duration, and as ‘short’ press to be one of less
than 2 seconds.
The diagram below summarises the possible movements.
Elsewhere in this manual, the following notations are used to denote the various types of
jogswitch action. It is assumed that the FlashMic is orientated with the LCD display facing
the user.
NOTATION ACTION
SHORT PRESS Press the centre protrusion inwards and release
LONG PRESS
SHORT DOWN TURN Move the wheel downwards and release
LONG DOWN TURN
SHORT UP TURN Move the wheel upwards and release
LONG UP TURN
Press the centre protrusion inwards for a least 2
seconds
Move the wheel downwards and hold for at least 2
seconds
Move the wheel upwards and hold for at least 2
seconds
En.8
Page 10

03:14:35
Switching The FlashMic On
The FlashMic is switched on by a SHORT PRESS on the jogswitch, and switched off by a
LONG PRESS until the text OFF appears in the display. The FlashMic will turn off when the
jogswitch is released.
Note that it is not possible to turn the FlashMic off while it is connected to a computer via
its USB cable.
On switching the FlashMic on, the LCD panel displays in sequence:
DRM85
ê
Firmware version
ê
Microphone name
ê
Active preset.
Note that the factory default microphone name is DRM_85 and the factory default preset
is PSET_1.
After this sequence, the FlashMic is in its standby state – referred to in this manual as IDLE
mode - and the displays are as shown below.
ENGLISH
FlashMic IDLE Mode Displays
In IDLE mode – i.e. when the FlashMic is powered but not otherwise being operated – the
main display alternates between the number of the last recording (
within the FlashMic are referred to as ‘tracks’) and the remaining recording time.
An exception to this is when no recordings have been made since the FlashMic was last
reconfigured, when the message NOFILE appears instead of TRKnnn.
The FlashMic is fitted with an internal calendar/clock. Before using the FlashMic for the
first time it is recommended that this is set correctly, as this information is included in the
audio file header as their time/date. See Clock Set Menu, page 22 for details of how to
do this.
TRKnnn
- recorded files
En.9
Page 11
03:24:04
Rec
SAVING
Making a Recording
!
The file format created within the FlashMic includes a record of the date and time at which
the recording was made, together with textual information – entered via FlashMic Manager
software – to aid later identification of recordings. Nevertheless, it is good recording
practice to keep a separate written or electronic recording log during a recording session in
the field, as many similar-sounding files may often be created.
Keeping such a log is recommended. It will frequently ease the task of identifying your
recordings after they have been transferred into a computer for further editing.
To initiate a new recording, press the red REC button (G). The REC flag in the display and
the REC LED on the FlashMic’s rear panel both illuminate.
ENGLISH
The record LED can be turned off, if for example, the FlashMic is in camera shot. To do this,
!
press and hold the PLAY button while the FlashMic is in REC Mode; the display will show
LEDOFF. The LED can be re-enabled by repeating this action while still in REC Mode. Note that
the LED will always illuminate initially when REC Mode is selected.
The bargraph meter in the display provides an indication of the audio level, in both Idle mode
and Record mode.
The main display indicates the remaining recording time, and counts down.
When there are 10mins. of record time remaining, the display backlight, the record LED
on the FlashMic base and the REC flag in the display will all flash. The FlashMic will stop
recording when there is 1min. of recording time remaining; this is to allow for data error
correction.
To stop the recording, press the M/STOP button (M). The text
SAVING appears in the display, and after a brief pause, the IDLE display resumes, with the
track number being indicated.
Recording Display Saving Recorded Track
Factory settings:
Settings of recording format, record level, etc., will generally be made via the system
of configuration files and presets within the FlashMic Manager software. However, the
FlashMic comes with a set of factory parameters enabling it to be used “out of the box”,
without any recourse to FlashMic Manager. See Using the Default Configuration, page 26
for a list of these parameter values.
PreRecord Buffer (Introduction)
In a busy journalistic schedule, it is sometimes difficult - or impossible - to get to the record
button quickly enough. The result is a recording that starts a few seconds after the vital bit
of information that was needed. The FlashMic incorporates a pre-record buffer of up to 10
seconds (adjustable), which avoids this situation.
When the recording is replayed, it will be found that it begins with the few seconds of audio
captured immediately prior to the REC button being pressed.
See PreRecord Buffer, page 34 for more details.
En.10
Page 12
Record Lock
UNLOCK
Rec
LOCKED
Rec
RVOL35
Rec
RV AGC
Rec
The FlashMic is equipped with a REC LOCK function to prevent the accidental cancelling of
REC mode during a recording.
Once in REC mode, press the REC button a second time, holding it down for at least 2
seconds, until the LCD screen displays the text LOCKED.
Pressing the M/STOP button will now have no effect (other than to display the text
LOCKED).
To disable REC LOCK mode, press and hold the REC button until the LOCKED display changes
to UNLOCK.
Now the recording can be stopped in the normal manner by pressing M/STOP.
REC LOCKED/UNLOCK Displays
ENGLISH
Monitoring
A pair of headphones may be connected to the FlashMic for monitoring purposes.
Headphones of 32 ohms impedance or higher should be used. Connect the headphones via
the 3.5mm 3-pole jack marked PHONES on the FlashMic bottom panel. The mono signal
from the FlashMic will be heard in both earpieces. Headphone monitoring of live audio is
active in both IDLE and REC modes.
The monitor output may be used to drive external equipment for monitoring or recording
if desired.
The monitor level is adjusted with the jogswitch; a SHORT PRESS shows the text PHONnn on
the LCD display, where nn = the current level. (The units are arbitrary; 00 = off, 50 = max.)
A SHORT UP TURN or DOWN TURN will respectively increase or decrease the monitor
level. Note that the monitor level always resets to a factory preset level when the FlashMic
is switched on. The level can be adjusted during REC, PLAY or IDLE modes.
The LCD display will return automatically to the REC or IDLE displays after a timeout period
of approx. 2 seconds.
Adjusting Record Level
Adjustment of Record level is only possible if the FlashMic has been set (via the FlashMic
!
Manager software) to permit configuration changes by the user. See the section on FlashMic
Manager for more information.
The recording level is adjusted with the jogswitch. A SHORT UP TURN or DOWN TURN
while in REC mode displays the text RVOLnn, where nn = the current level. (Unlike monitor
level, the units are not arbitrary, being increments of approximately 1dB; 01 = min, 40 =
max.) Further SHORT UP or DOWN TURNS will nudge the record level up or down.
When the record level is reduced to minimum, the AGC system is selected and the display
shows RV AGC. In this mode, FlashMic automatically adjusts recording level according to the
sound level. In most situations, this ensures that a recording of usable level will be made,
but as with all automatic gain systems, a degree of background noise “pumping” may be
audible on the recording.
It is also possible to adjust the FlashMic’s recording level from IDLE mode, using the menu
system. See FlashMic Menu System, page 16.
Note that the record level always resets to the last value used when the FlashMic is
switched on, and not to the value set as part of the preset by FlashMic Manager. (See
section on FlashMic Manager for more information on presets.)
Setting Recording Levels
En.11
Page 13

00:00:01
Play
TRK005
Replaying Tracks
A recorded track may be replayed for auditioning purposes.
To replay the last track recorded, press the PLAY button (H). The PLAY flag on the LCD
display illuminates. After a brief pause, the display shows the elapsed time of the track.
The bargraph meter will show the level of the track being replayed. The playback may be
monitored via the PHONES connector. At the end of the track, the FlashMic will resume
IDLE mode. Pressing the M/STOP button during replay will also return the FlashMic to IDLE
mode. To pause playback during play, press PLAY again. The LCD display will show PAUSE.
Play can be resumed by pressing PLAY again, or stop mode can be entered by pressing
‘MENU/STOP.
A LONG UP TURN on the jogswitch will “fast-forward” the track (FFW mode), to enable a
particular section of the track to be located. Similarly, a LONG DOWN TURN “rewinds” the
track (REW mode). The time display continues to show the track time during these ‘fast’
modes.
ENGLISH
Note, if marker points have been added to the track, jogswitch turns will instead ‘jump’ the
replay to the next or previous marker point (depending on jogswitch direction). (See the
following section on ‘Markers’ for more information.)
To select and replay a track other than the last recorded, decrement the track number
with SHORT DOWN TURNs on the jogswitch. (A LONG DOWN TURN will decrement faster.)
UP TURNs will similarly increment the track number. When the required track number is
displayed, press the PLAY button to replay the track.
It is also possible to select a different track while remaining in PLAY mode; SHORT TURNs of
the jogswitch will skip to the next or previous track, depending on the direction of rotation.
Be careful not to make LONG TURNs, as the FlashMic will instead enter FFW or REW
mode, as described above.
Select Track Display
Track Replay Display
Markers
It is often useful to mark one (or more) points in a recording for ease of reference during
later production and editing. You can add markers to FlashMic recordings in both REC and
PLAYBACK modes..
The markers are ‘data flags’, which are embedded in the sound file at the appropriate point.
They will appear as onscreen markers when the downloaded sound files are later loaded
into a sound editing package. The markers are written to the sound file with both linear and
compressed recording formats.
FlashMic markers are recognised by a number of professional editing applications, including
Cool Edit Pro, Adobe Audition, Sound Forge V4 and above. Note however, that editors can
currently only read markers in sound files recorded using the linear recording modes.
A marker is added whilst recording or during playback by a short press on the REC button.
(Note that a long press activates the REC LOCK function in REC mode). The LCD display
briefly displays MARKED. As the marker is purely a data flag within the sound file, no further
indication of its presence will be apparent until the resulting file is loaded into an editor
(although the marker points can be used as locators during playback).
Deleting a Track
If an erroneous or otherwise unwanted or unusable recording is made, it may be deleted
from the FlashMic’s memory to save memory space.
Deletion of tracks is performed via the FlashMic menu system. See Delete Menu, page 21
for full details on how to delete a track.
En.12
Page 14
File Transfer
Typically, you will use your FlashMic ‘in the field’ to capture a number of different recordings.
The resulting sound files will need to be downloaded from the FlashMic into a computer at
some point for further evaluation, editing, deletion, or other treatment before they can be
broadcast or otherwise made useful.
In many organisations, the process of file transfer may be performed by someone other
than the person who made the recordings. It is possible that a FlashMic may have been
used by more than one recordist. Or it may happen that one recordist may use more than
one FlashMic during a day of field recording. Thus is it important that any log that has been
kept during the recording should be referenced during the transfer process so that files can
be correctly identified and attributed.
There are two methods for transferring sound files from FlashMic to a computer.
• Via the FlashMic Manager software supplied with FlashMic.
• Direct transfer.
Transfer Using FlashMic Manager
This assumes FlashMic Manager has already been installed on a computer. See section
Installing FlashMic Manager, page 23 if this is not the case.
ENGLISH
•
First determine the location in the computer’s directory structure where
the sound files should be transferred to. This may necessitate creating and
naming new folders for the purpose.
•
Open the FlashMic Manager application. (Note the window which opens is
not maximisable.)
•
Switch the microphone on.
•
Connect the FlashMic to a spare USB port on the computer, using the cable
supplied.
•
The FlashMic LCD display will show USB, and the large red indicator in
the FlashMic Manager window will turn green. There should also be some
audible and/or visual confirmation on the computer that the FlashMic has
been ‘recognised’. (Exactly what form this confirmation takes may vary
slightly from computer to computer. Ignore any window called DRM85 that
may open.)
•
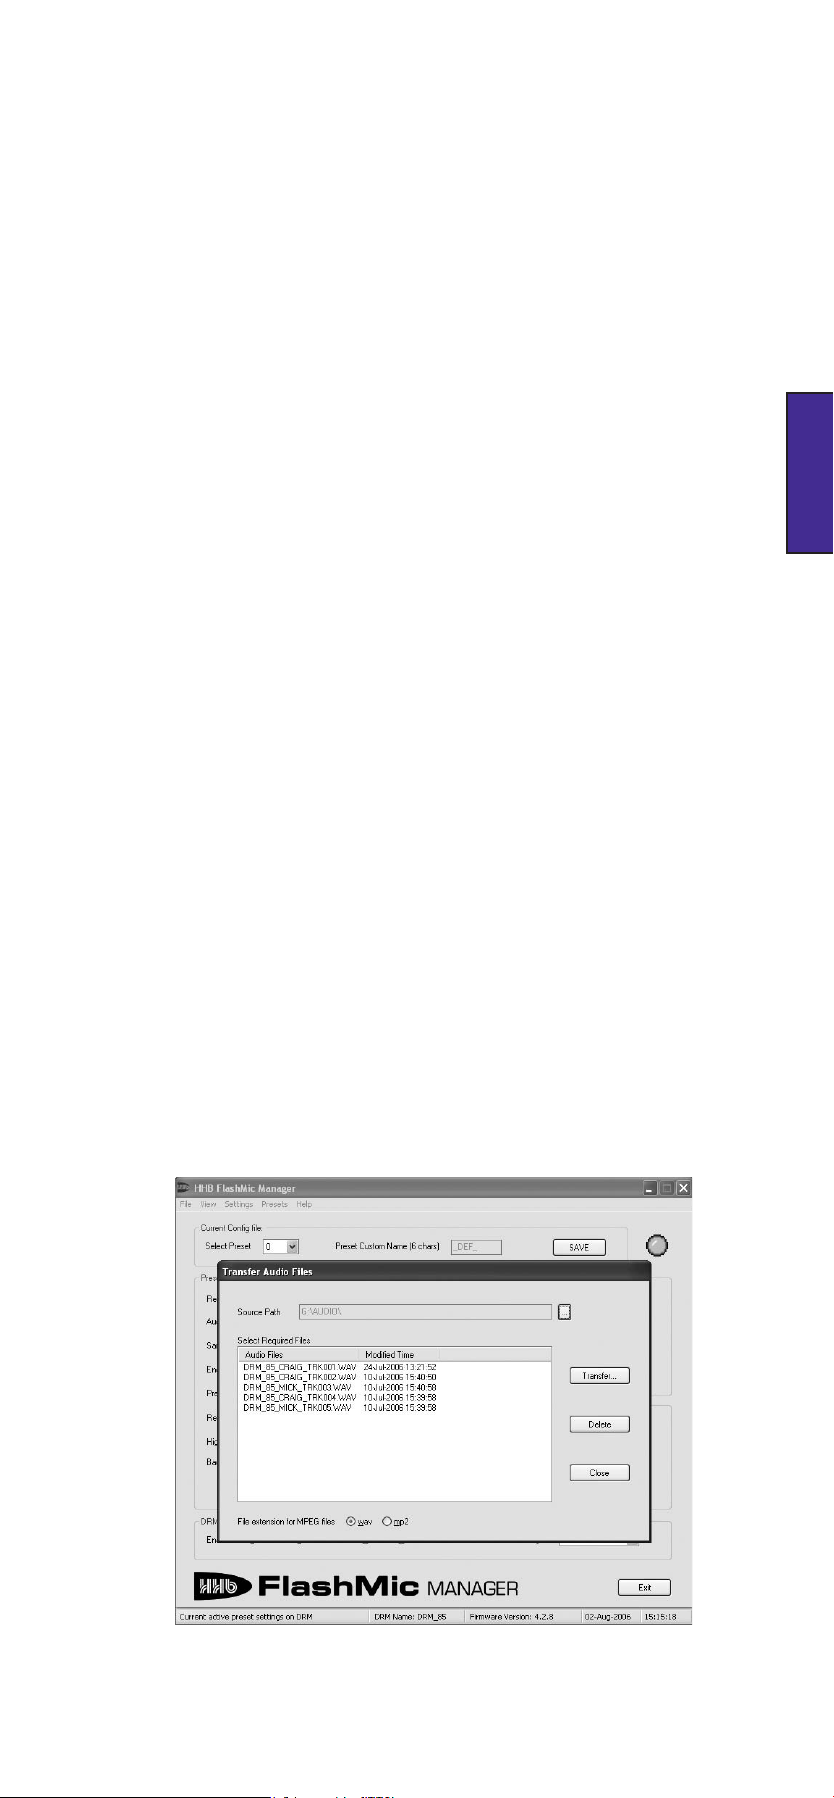
In the area USB Connection, click the button Download Audio Data from
DRM… The Transfer Audio Files dialogue box opens.
The tick boxes wav and mp2 allow the file extensions of any selected MPEG
•
audio files to be changed. This only applies to MPEG recordings and not Linear
recordings.
En.13
Page 15

The sound files in the FlashMic will be listed. Select those to be transferred
•
by highlighting them with a single click. (Normal Windows/MAC
conventions re multiple file selection apply.)
Click the Transfer… button. The Browse For Folder dialogue box opens.
•
Navigate to the folder into which the sound files are to be transferred. Click
•
OK.
The file(s) are transferred. Depending on the number and length of sound
•
recordings, and the spec of the computer, this may take from a few
seconds to some minutes, during which time a progress indication is
ENGLISH
provided. When the files have been transferred successfully, a confirmation
box appears. Dismiss this, and the transfer is complete.
Unmount the FlashMic. This action is performed by double-clicking the USB
•
device icon in the status bar. This will open the Safely Remove Hardware
dialogue box, in which external hardware connected to the PC’s USB ports will be
listed. Select the DRM-85 by clicking on it, then click STOP. This step will ensure
that no data is lost by simply disconnecting the mic.
It is now safe to disconnect the FlashMic. After disconnection, it can be
•
switched off.
Direct Transfer to a Computer
As the FlashMic is a generic USB mass storage device, files can be transferred from it to a
Mac or PC in the same way as from any other USB mass storage device.
Do not attempt to format the FlashMic from Mac or PC as the internal file system will be
!
corrupted and any recordings will be lost.
Do not use the Chkdsk command from a PC as this may corrupt the FlashMic file system.
Note the example given below applies to a PC running Windows™ XP. Other operating
systems differ slightly, if you are unsure about this procedure, please consult your HHB
dealer.
Switch the microphone on.
•
Connect the FlashMic to a spare USB port on the PC, using the cable
•
supplied. The FlashMic’s display will show USB.
You can audition the sound files recorded in the FlashMic before transferring them, if
wished. To do so:
If a “DRM-85 (d:)” window opens (d = drive letter, will vary with PC) listing
•
options for playing music files, you can select any audio file application
offered (such as Windows™ Media Player) to audition the sound files within
the FlashMic. The options available will depend on which software
applications are installed on the PC.
If the drive folder above does not open, you can still audition the files by
•
opening any audio application available on the PC, and selecting File>Open. Then
navigate first to the DRM-85 device, which will be listed among the drives, then to
the AUDIO folder within it. The sound files are all in this folder.
If you do not wish to audition the files first, or have already done so, perform the transfer
as follows:
First determine the location in the PC’s directory structure that the files
•
should be transferred to. This may necessitate creating and naming new
folders for the purpose.
Using Windows™ Explorer, navigate to the DRM-85 drive in the ‘Folders’
•
pane, and open the folder called ‘AUDIO’. The recorded sound files will be
listed in the main pane. Do not delete any files in any of the other folders.
En.14
Page 16
Drag-and-drop the required sound files to their new location in the normal
•
way.
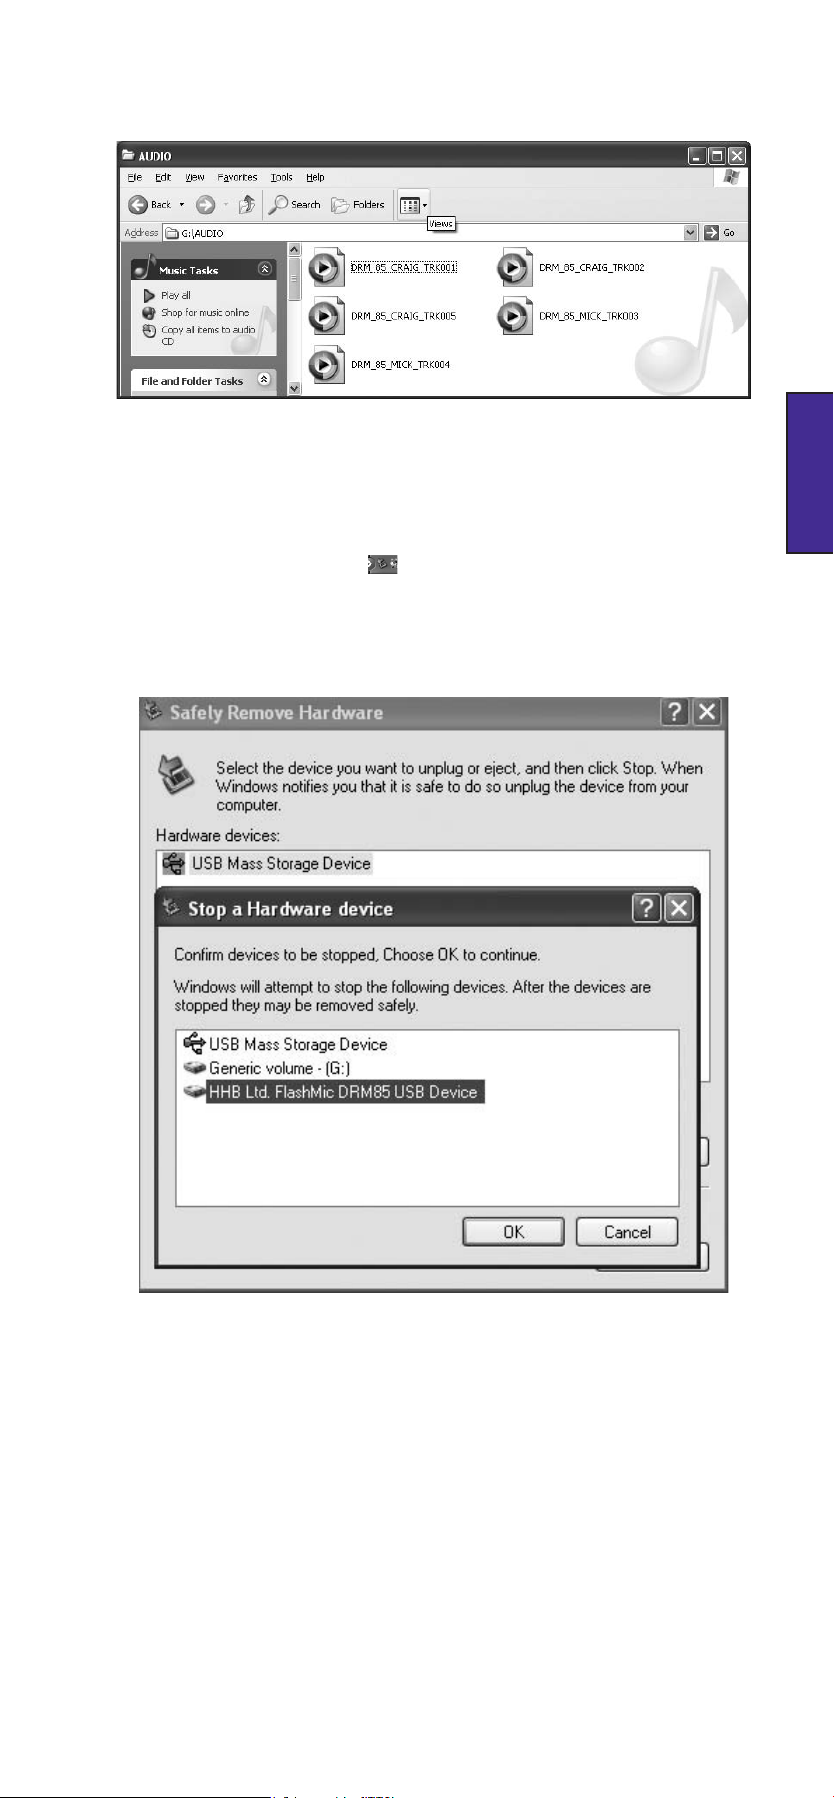
Unmount the FlashMic. This action is performed by double-clicking the USB
•
device icon in the status bar. This will open the Safely Remove Hardware
dialogue box, in which external hardware connected to the PC’s USB ports will
be listed. Select USB Mass Storage Device by clicking on it, then click STOP.
Select the DRM-85 and click OK. This step will ensure that no data is lost by
simply disconnecting the mic.
ENGLISH
It is now safe to disconnect the FlashMic. After disconnection, it can be switched
•
off.
Connecting a FlashMic with low batteries to a computer.
It is generally recommended that the FlashMic should not be connected to a computer if
the batteries are running low. If the batteries do go flat during data transfer, the FlashMic
will continue to perform the transfer, as it will also be powered via the USB connection.
However, in this condition data loss may occur if the USB cable is unplugged without the
FlashMic first being unmounted from the computer. Therefore unmounting the FlashMic (as
described in the transfer procedures above) is recommended at all times, but is essential
if the batteries are low.
En.15
Page 17

MENU
FlashMic Menu System
The FlashMic’s menu system allows you to adjust internal settings and select various options
to suit your specific recording needs.
Basic recording, playback and file transfer do not require use of the menu system.
Note that some of the menus will only be available to the user if access to them was enabled
in the FlashMic Manager software at the time of configuration file definition. These menus
are clearly indicated in the descriptions that follow and are marked with an asterisk (*) in
the table below. Please see the manual section on FlashMic Manager for more information
about configuration files and enabling or disabling user access.
Using the Menus
ENGLISH
The menu system is entered by pressing the M/STOP button while the FlashMic is in IDLE
mode. The word MENU appears in the display.
Note that pressing M/STOP while the FlashMic is in REC or PLAY modes cancels REC or
PLAY.
Entering the Menu System
This is the ‘header’ of the menu option list. A SHORT DOWN TURN of the jogswitch will
now bring up the first of the menus, PRESET. Subsequent SHORT DOWN TURNs bring up
the others in turn. When the menu that you want to check or modify is reached, it may be
selected by a SHORT PRESS of the jogswitch.
The menu options are:
MENU DISPLAY USE
Preset Menu
*Recording Mode Menu
*Recording Level Menu
*Hi-pass Filter Menu
*Battery Type Menu
Delete Menu
PRESET
R MODE
RECLEV
HIPASS
BATTYP
DELTRK
Allows selection of a different configuration
preset
Allows selection of audio file format
Adjustment of recording level
Hi-pass filter in/out
Set for battery type in use
Deletes selected recording
Clock Set Menu
Pressing M/STOP a second time (from anywhere within the menu structure) will return the
FlashMic to IDLE mode.
A SHORT PRESS on the jogswitch from within a menu option (i.e., after a menu option has
been selected) returns the FlashMic to the opening screen of that menu option. The display
will briefly show OK to confirm that the required change has been made.
TIMDAT
Sets internal calendar and clock
En.16
Page 18

PRESET
PSET 1
EMPTY
Preset Menu
The Preset Menu allows the user to select which preset from the FlashMic’s current
configuration file is to be used.
The FlashMic’s configuration file can have up to 9 presets. The configuration file is loaded
into the FlashMic from a computer, using the supplied FlashMic Manager software. Each
preset determines the value of various FlashMic parameters, including recording level
and mode, pre-record buffer duration and the file name. (The file name will appear in the
header of the audio files.) The parameters are all defined within FlashMic Manager; see
Configuration Files and Presets, page 26 for a full description.
To enter the Preset Menu, enter MENU mode by pressing the M/STOP button, and then
make one SHORT DOWN TURN of the jogswitch. The display will show PRESET. Select this
with a SHORT PRESS, and the name of the currently selected preset will be displayed. To
select a different preset, make SHORT UP or DOWN TURNs of the jogswitch. The display
will show the names of the alternative presets, as they were defined in FlashMic Manager.
When the name of the required preset is displayed, a SHORT PRESS on the jogswitch will
select it and load it into the FlashMic. The display will then show OK to confirm.
Preset Menu Display
ENGLISH
Note that not all 9 presets available in a configuration file need to be defined in FlashMic
Manager. Those not defined will be displayed as PSET N, where N is a number between 1
and 9, as PSET N is the default preset name used in FlashMic Manager. (However, note that
PSET N will still be displayed for a preset that has been defined if the default name is not
altered!) If selection of an undefined preset is attempted, the message EMPTY is displayed,
indicating that this preset location cannot be used.
Preset Name
Note that when the FlashMic is first used “out of the box”, all nine presets are empty.
Preset Empty
En.17
Page 19

R MODE
Recording Mode Menu
This menu will not be available if ‘Enable Configuration changes in DRM’ was set to ‘No’
when the configuration file was defined in FlashMic Manager.
The Recording Mode menu permits selection of an alternative digital recording format to
that determined by the currently selected preset.
A total of six recording formats are available within FlashMic; two file formats at each of
three sample rates. The formats are:
FILE TYPE
ENGLISH
BWF files (uncompressed) 48kHz
BWF files (uncompressed) 44.1kHz
BWF files (uncompressed) 32kHz
MPEG1 (Layer 2) files 48kHz
MPEG1 (Layer 2) files 44.1kHz
MPEG1 (Layer 2) files 32kHz
The choice of recording mode will usually be determined by the onward programme
production chain.
To enter the Recording Mode Menu, enter MENU mode by pressing the M/STOP button,
and then make SHORT DOWN TURNs of the jogswitch until the display shows R MODE.
Select this with a SHORT PRESS, and the display will show the name of the currently selected
recording mode, as listed above. To select a different recording mode, make SHORT UP or
DOWN TURNs. The display will show the names of the alternative modes.
SAMPLE
RATE
DISPLAY
LIN48K
LIN44K
LIN32K
MP48K
MP44K
MP32K
MAXIMUM
RECORDING TIME
3hr
3hr 15min
4hr 30min
12hr 15min
14hr 40min
18hr 25min
When the required recording mode is displayed, a SHORT PRESS on the jogswitch will
select it. The display will then show OK to confirm.
Record Mode Menu Display
The recording mode selected will be that used for subsequent recordings until a different
recording mode or preset is selected.
Note that any recordings already in the FlashMic’s memory will remain at whatever mode
was applicable when they were made.
En.18
Page 20

RECLEV
RVOL34
RV AGC
Recording Level Menu
This menu will not be available if ‘Enable Configuration changes in DRM’ was set to ‘No’
when the configuration file was defined in FlashMic Manager.
The audio level used during recording will be that defined within FlashMic Manager for the
preset being used. The Recording Level menu permits this level to be altered.
To enter the Recording Level Menu, enter MENU mode by pressing the M/STOP button,
and then make SHORT DOWN TURNs of the jogswitch until the display shows RECLEV.
Record Level Menu Display
Select this with a SHORT PRESS, and the display shows either RVOLnn - where nn = the
current level – or RV AGC if automatic adjustment of recording level was defined for the
current preset.
The recording level can now be adjusted with SHORT UP or DOWN TURNS. A SHORT
PRESS selects the new level.
ENGLISH
Record Level Setting
The units used are in dBs; 01 = min, 40 = max.
When the record level is reduced to ‘zero’, the AGC system is selected.
In this mode, FlashMic automatically adjusts recording level according to the sound level.
In most situations, this ensures that a recording of usable level will be made, but as with
all automatic gain systems, a degree of background noise “pumping” may be audible on the
recording.
Record Level Set To AGC
It is also possible to adjust the FlashMic’s recording level whilst recording. See Adjusting
Record Level on page 11.
Note that the record level always resets to the last value used when the FlashMic is
switched on, and not to the value set as part of the preset.
En.19
Page 21

HIPASS
BATTYP
Hi-pass Filter Menu
This menu will not be available if ‘Enable Configuration changes in DRM’ was set to ‘No’
when the configuration file was defined in FlashMic Manager.
The FlashMic’s analogue circuitry includes a hi-pass filter, to assist in the rejection of
extraneous low-frequency background noises, such as air-conditioning noise or traffic
rumble. The filter has a slope of 12dB/oct. and a turnover frequency of 100Hz.
The filter is set to be in or out of circuit in the FlashMic Manager software for each preset,
and is loaded into the FlashMic with the configuration file. However, the filter may be
switched in and out of the recording chain via the menus.
To enter the Hi-pass filter Menu, enter MENU mode by pressing the M/STOP button, and
then make SHORT DOWN TURNs of the jogswitch until the display shows HIPASS.
ENGLISH
Hi-pass Filter Menu Display
Select this with a SHORT PRESS, and the display shows either HP ON or HP OFF. The filter
can be switched in or out with SHORT TURNs of the jogswitch. A SHORT PRESS selects the
setting. The display will then show OK to confirm.
Battery Type Menu
This menu will not be available if ‘Enable Configuration changes in DRM’ was set to ‘No’
when the configuration file was defined in FlashMic Manager.
The FlashMic may be powered by rechargeable or alkaline batteries. The two types of battery
have different discharge characteristics, and for the battery status symbol in the LCD
display to reflect the battery’s remaining charge as accurately as possible, it is necessary
to set the battery type menu parameter to match the batteries being used.
The battery type is set in FlashMic Manager as a ‘global’ setting, which is applicable to all
presets in one configuration file, and is not selectable to the different types for different
presets. The setting may be overridden via the Battery Type Menu.
To enter the Battery Type Menu, enter MENU mode by pressing the M/STOP button, and
then make SHORT DOWN TURNs of the jogswitch until the display shows BATTYP.
Select this with a SHORT PRESS, and the display shows either ALKLIN (alkaline) or RECBLE
(rechargeable). The battery type can be changed with SHORT TURNs of the jogswitch. A
SHORT PRESS selects the setting. The display will then show OK to confirm.
En.20
Battery Type Menu Display
Page 22
DELTRK
TRK005
SURE N
SURE Y
Delete Menu
It is often desirable to delete unwanted recordings (tracks) from the FlashMic’s memory,
particularly if they have been made erroneously or are otherwise unusable. The Delete
Menu permits the user to do this.
Note that any track deleted in this way is deleted permanently and irrecoverably.
As tracks are only referred to by their track number on the FlashMic’s LCD display, before
deleting a track always ensure you know which one you are trying to delete. The importance
of maintaining an accurate recording log is again emphasised. If you have any doubt about
the track number, replay it first to ensure you have the correct one.
To enter the Delete Menu, enter Menu mode by pressing the M/STOP button, and then
make SHORT DOWN TURNs of the jogswitch until the display shows DELTRK.
Delete Track Menu
Select this with a SHORT PRESS, and the display shows the currently selected track number,
which will normally be that of the last track recorded.
ENGLISH
Select Track for Deletion
If it is required to delete a different track, SHORT TURNs of the jogswitch will alter the track
number either up or down. When the number of the correct track is displayed, a SHORT
PRESS selects it. The text SURE N is now displayed. If you are sure you have selected the
correct track, a SHORT DOWN TURN will change the display to SURE Y.
Cancel Track Deletion
Another SHORT PRESS will now delete the track. Note that the track numbers of subsequent
recordings are not altered. The display will then show OK to confirm.
If the jogswitch is pressed in while SURE N is displayed, nothing is deleted, and the FlashMic
returns to the head of the menu option, with DELTRK being displayed.
Confirm Track Deletion
En.21
Page 23

TIMDAT
Clock Set Menu
The FlashMic contains a real-time calendar/clock, which allows a date and time ‘stamp’ to
be embedded in the audio file headers. This is a great aid to later accurate identification of
what may be many similar-sounding recordings made in the field.
The clock runs continuously whilst batteries are fitted. It continues to run for approx. 1
minute after the batteries are removed, allowing time for a change of batteries. If the
batteries are removed for a longer period, or before the FlashMic is used for the first time,
the clock will need to be set to the correct date and time of day.
Note that the FlashMic is perfectly usable without the clock being set accurately; the
only consequence is that the file date/time information will be incorrect (though intervals
between file creation times will be accurate).
To enter the Clock Set Menu, enter MENU mode by pressing the M/STOP button, and then
make SHORT DOWN TURNs of the jogswitch until the display shows TIMDAT.
ENGLISH
Clock Set Menu Display
Select this with a SHORT PRESS, and the display shows Y yyyy, where yyyy is the year.
This can be altered up or down with SHORT TURNs of the jogswitch. A SHORT PRESS
selects the setting, and the display will now show in turn MON mm, where mm is the number
of the month of the year; DAY dd, where dd is the day of the month; HH hh, where hh is the
hour of the day (note that FlashMic uses a 24-hr. clock); MM mm for minutes, and SEC ss
for seconds. Each of these can be altered in the same way as the year. The full sequence
is show below.
TIMDAT
ê
Y 2006
Set Year
ê
MON 04
Set Month
ê
DAY 06
Set Day
ê
HH 23
Set Hour
ê
MM 00
Set Minutes
ê
SS 25
Set Seconds
After setting all the date and time parameters, the LCD display returns to the opening
TIMDAT screen after briefly displaying OK; the menu system can then either be exited by
pressing M/STOP, or another menu option can be selected with the jogswitch.
En.22
Page 24
FlashMic Manager
FlashMic Manager is the software application supplied with FlashMic. The CD-ROM that
came supplied contains both PC and Mac versions.
While it is perfectly possible to use FlashMic without using FlashMic Manager, you will not
be using it to its full effectiveness, and will not be accessing the full range of features and
functions that FlashMic offers.
Using FlashMic Manager gives three main advantages:
You will be able to alter the internal configuration of your FlashMic, to
•
determine which file formats and sample rates are used, and to change other
FlashMic parameters.
You will be able to change the default filename prefixes to something more
•
meaningful to the particular job, adding, for example, a reporter’s name.
FlashMic Manager provides a very simple method of downloading recorded
•
files to the computer.
The installation instructions given assume that the user is familiar with basic Windows™/
Mac™ operations for file handling, navigation, etc. If you are unsure how to install the
software, please consult your organisation’s IT department, or your HHB dealer.
ENGLISH
Installing FlashMic Manager on a PC (Initial Installation)
PC REQUIREMENTS FOR FLASHMIC MANAGER
Any PC satisfactorily running Windows™ XP or 2000 should support FlashMic Manager
software without any difficulty. One spare USB port on the PC is required, for connection
of the FlashMic.
Insert the FlashMic CD-ROM into the CD/DVD drive of the PC. The CD should
•
autostart, and the the InstallShield Wizard will activate. Click Next and the
following window will appear. See the Manual Installation instructions on Page 24 if
autostart does not run.
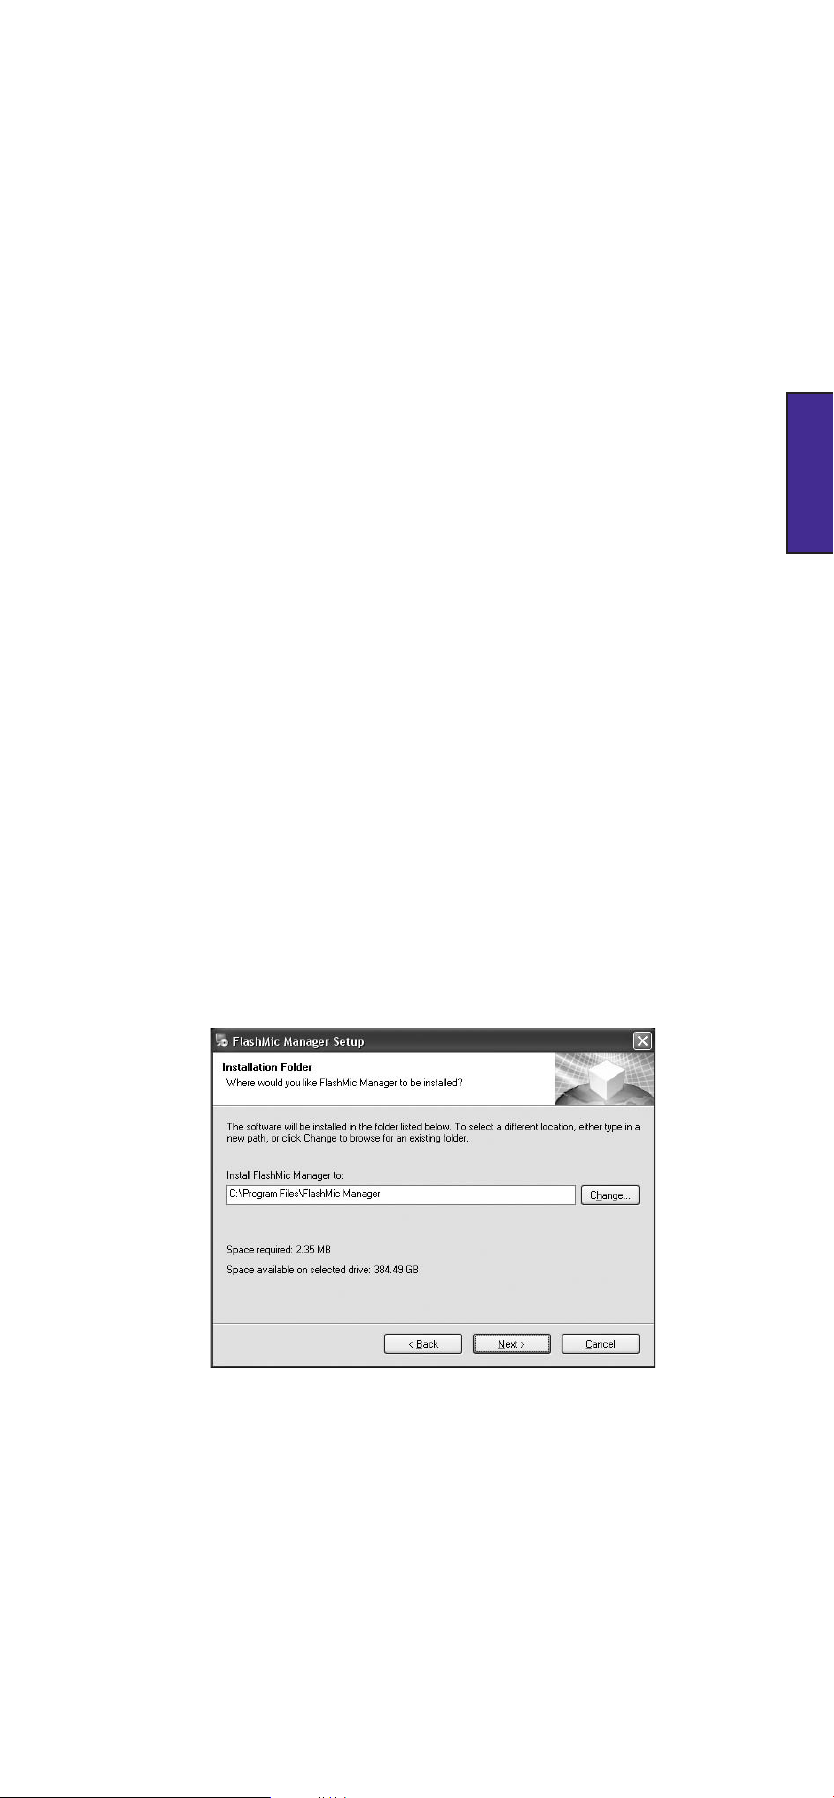
A default destination directory will be provided: C:\Program Files\FlashMic
•
Manager. Alternatively, a directory of your choice may be selected; use the
Change button to navigate to a suitable location in the normal Windows
manner.
Click Next. A confirmation screen will be displayed.
•
Click Next to proceed and install the FlashMic Manager software.
•
Click Finish upon completion.
•
En.23
Page 25

Manual Installation instructions.
If, for any reason, the CD does not autostart, open My Computer, and double-click
•
the CD, which will be called FlashMic.
Find the folder titled FMM_Win and copy it to a suitable location on the hard drive.
•
C:\Program Files is a recommended location.
Within this folder is a file named Setup.exe. Double click this file and the FlashMic
•
Manager install wizard will launch.
ENGLISH
Installing FlashMic Manager on a Mac
MAC REQUIREMENTS FOR FLASHMIC MANAGER
Any Mac running OSX (Version 10.4.x or later) should support FlashMic Manager software
without any difficulty. One spare USB port on the Mac is required, for connection of the
FlashMic.
Insert the FlashMic CD-ROM into the CD/DVD drive of the Mac. A CD Icon called
•
FlashMic Manager will appear on the desktop.
Open the folder ‘FMM_MacOSX’ located on the CD and double-click the installation
•
program FMMInstall. This installs FlashMic Manager into the Applications folder on
the main hard drive. A program alias is also copied onto the desktop.
To launch the FlashMic Manager, double click the FlashMic Manager icon on the
•
desktop.
FlashMic Manager Updates
As a responsible manufacturer, HHB adopts a policy of continuous product development.
As with all software-based products, it may be desirable from time to time to update
the FlashMic Manager software with a more recent version. You can contact your HHB
dealer or distributor, or visit the FlashMic website at http://www.flashmic.info for details
of software updates.
The current version will be displayed on the website along with details of how to download
new software.
Always be sure to delete any existing version of FlashMic Manager before installing a later
version. This can be done by simply moving the single file FlashMicManager.exe to the
Recycle Bin (PC) or Trash (Mac)
En.24
Page 26
Using FlashMic Manager
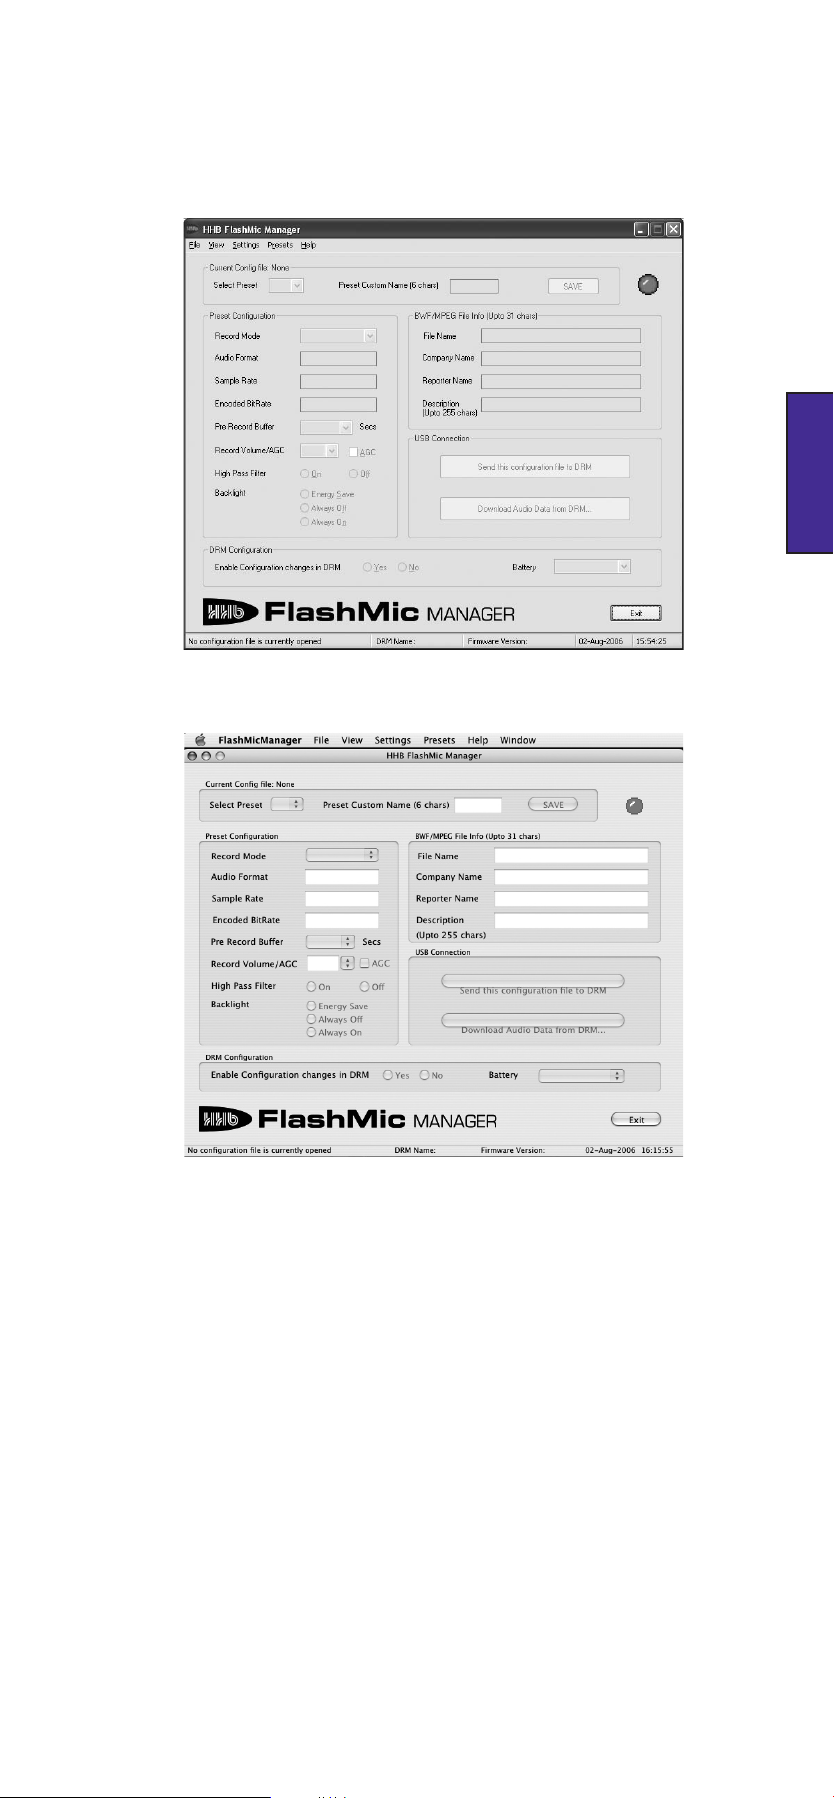
The user interface of FlashMic Manager opens as shown below:
ENGLISH
FlashMic interface running on a PC
FlashMic interface running on a Mac
En.25
Page 27

Configuration Files and Presets
Before you start exploring the features of FlashMic Manager, it is important to understand
some basic terminology and the concepts behind the use of presets.
Various parameters of the FlashMic’s operation can be changed with FlashMic Manager.
A set of parameters is called a preset, and the FlashMic can hold up to 9 presets at any
time.
The FlashMic user can select whichever is appropriate for the recording application using
the menus.
A set of 9 presets is saved as a configuration file within the computer, and you may create
and name as many configuration files as you need. Configuration files are saved with a .cfg
filename extension. The entire configuration file will then be uploaded into the FlashMic,
giving it its 9 presets.
The FlashMic parameters which can be defined in a preset by FlashMic Manager are the
ENGLISH
following:
PARAMETER VALUES USER ALTERABLE*
Preset Name 6-character text string No
Record Mode File type & sample rate Yes
Pre-record Buffer 0 to 10 seconds. No
Record Level 8 steps from 5dB to 40dB Yes
High-pass Filter In/Out Yes
Backlight 3 options No
Filename 31-character text string No
Battery Display
Characteristic
* Parameters marked ‘Yes’ can be subsequently changed within the FlashMic by the user,
provided that Configuration Changes were enabled in FlashMic Manager at the time of
configuration file creation.
Alkaline or rechargeable Yes
Using the Default Configuration
The first time FlashMic Manager is run, a file Defaults.cfg will be created. It will be found
in the same folder containing the FlashMic Manager executable file (FlashMicManager.
exe). This file differs from other *.cfg files in that its purpose is to provide a convenient set
of default parameter values to aid the user in setting up his/her own personalised default
configuration file.
The parameter values provided by this default are:
En.26
PARAMETER VALUES
Record Mode Linear, 48kHz sample rate
Pre-record Buffer Off
Record Level AGC on
High-pass Filter On
Backlight Energy saving mode
Filename TRACK
Battery Display Characteristic Alkaline
Page 28
These are the settings that will be found in the FlashMic when used for the first time “out
of the box”.
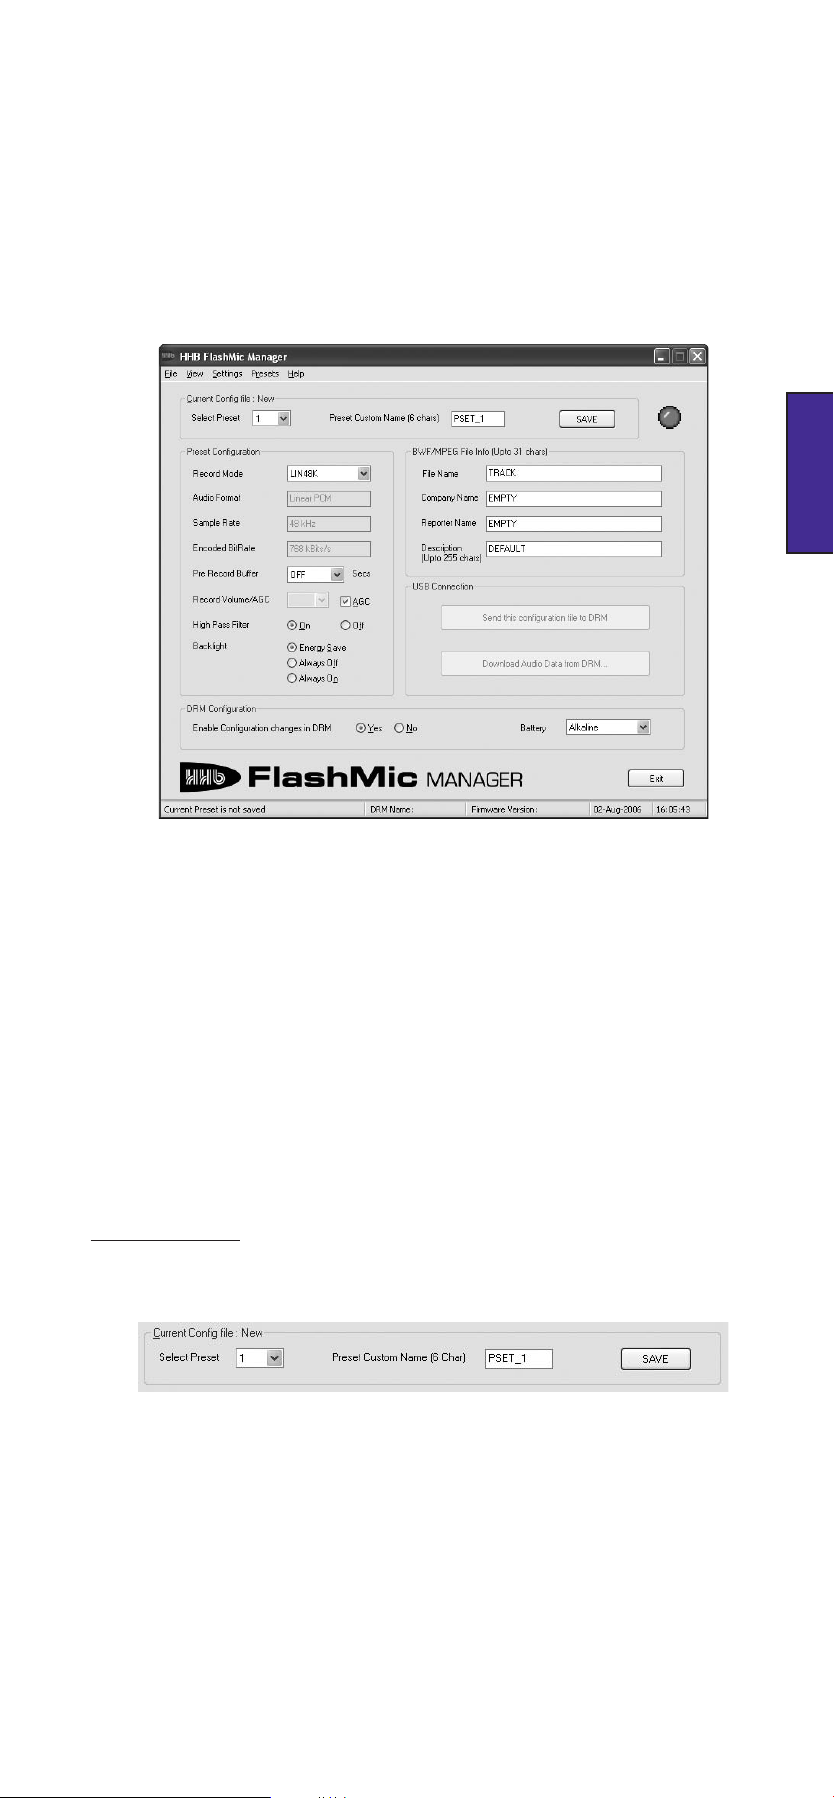
To see these parameters displayed in FlashMic Manager, click File>New (or hit CTRL+N).
This will remove the greyed-out fields ready for data entry. Then click Presets>Set Default
Values (or hit CTL + D). This loads the parameter values listed above into the data fields for
the currently selected Preset number, as shown in the Select Preset box (in this instance,
1). The FlashMic Manager window should now look like this:
ENGLISH
Note that it is possible to modify Defaults.cfg to suit the requirements of your own
organisation (for example to include your company name). See Creating a Personalised
Defaults File, page 33.
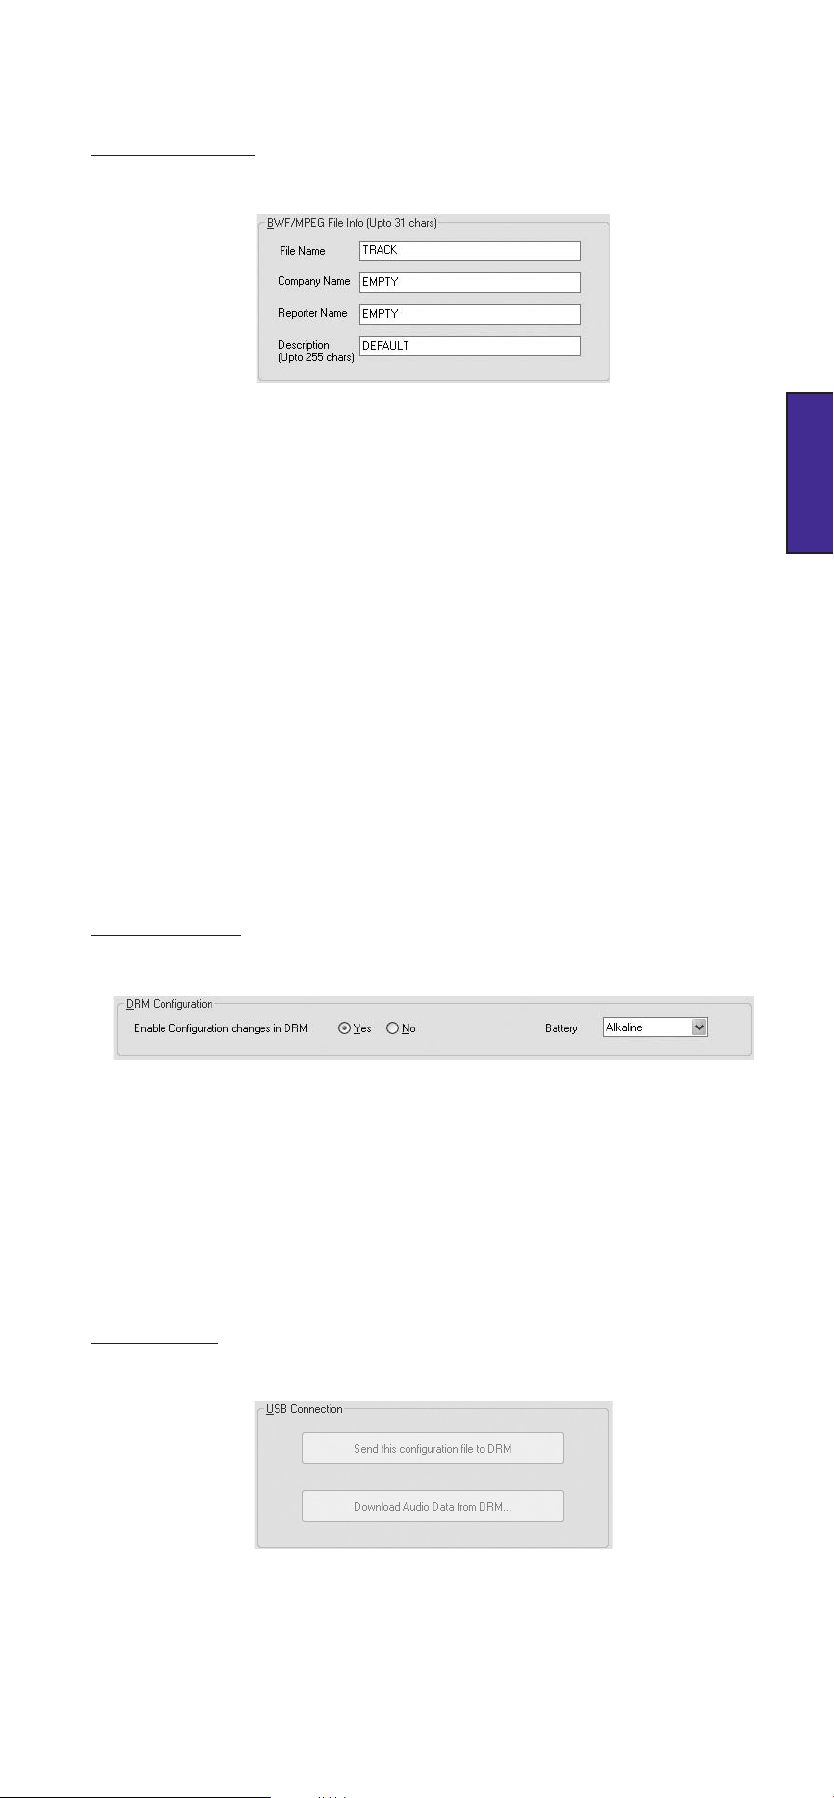
FlashMic Manager Window - Features
Preset Information
Using the default parameter set loaded previously as an example (PSET_1), examine the
various items of information now displayed in the window.
Items marked ‡ are those uploaded to the FlashMic as part of the preset.
Current Config file:
The filename displayed here will be that of the currently loaded configuration file. In this
case, ‘New’ is displayed because the file has not yet been saved.
Select Preset – drop-down box permitting selection of one of the 9 presets making up the
configuration file.
Preset Custom Name ‡ – text box for the name of the preset. This will be displayed in the
FlashMic during power-up (if the preset was the last used before power-down).
Note that underscore characters are used to insert spaces in the example preset name,
PSET_1.
SAVE
Clicking this button saves the configuration file currently loaded in FlashMic Manager to
the same filename it had when it was opened. If the file has been created from new (as in
the example case), a standard Save File As window for a new filename will be opened first.
The default name offered is Presets.cfg, but the user may substitute any other filename
preferred. Clicking the SAVE button is equivalent to selecting File>Save, or using the
keyboard shortcut CTRL + S.
En.27
Page 29

Preset Configuration
ENGLISH
Record Mode ‡ – this drop-down box lets you determine the file type and sample rate from
6 options:
RECORD
MODE
LIN48K BWF files (uncompressed) 48kHz 3hr
LIN44K BWF files (uncompressed) 44.1kHz 3hr 15min
LIN32K BWF files (uncompressed) 32kHz 4hr 30min
MP48K MPEG1 (Layer 2) files 48kHz 12hr 15min
MP44K MPEG1 (Layer 2) files 44.1kHz 14hr 40min
LIN32K MPEG1 (Layer 2) files 32kHz 18hr 25min
Audio Format – confirms selected audio algorithm
Sample Rate – confirms selected sample rate
Encoded BitRate – confirms effective bitrate of data being written into memory
PreRecord Buffer ‡ – drop-down box for setting the duration of the FlashMic’s pre-record
buffer in 1 second increments from zero (off) to 10 seconds. (Set to OFF in example) See
section on PreRecord Buffer, page 34 for more information.
Record Volume/AGC ‡ – If the AGC box is checked (as in this case), the Record Volume
drop down box will be greyed-out. With this setting, the AGC circuit is turned on, and no
fixed record level is set.
If the AGC box is unchecked, the Record Volume drop-down box permits setting of the
record level in 5dB increments from 5dB to 40dB.
FILE TYPE
SAMPLE
RATE
MAXIMUM
RECORDING TIME
See Adjusting Record Level, page 11 for more information.
High Pass Filter ‡ – FlashMic includes a 100Hz 12dB/octave high-pass filter which can
be switched in and out.
Backlight ‡ – the display panel backlight in FlashMic can be set to be permanently on
or off, or to “Energy-Save mode”, where the backlight illuminates for a short period when
a button is pressed. The battery life will be noticeably shortened if the backlight is set to
“Always On”.
En.28
Page 30
BWF/MPEG File Info
File Name ‡ - The text in this field (default text ‘TRACK’ in the example) will form part of
the header of all sound files recorded in the FlashMic with this preset. This is to assist later
identification. Note the file name can be different for each preset in the configuration file.
The name can have up to 31 characters.
See File Name Structure, page 35 for more information.
Note: The data in the next three fields is written into the BEXT data chunk of the .wav file,
and can be read by any compatible editing system.
Company Name – This field is optional and can be used for reference and housekeeping
purposes. Max. length is 31 characters.
Reporter Name - This field is optional and can be used for reference and housekeeping
purposes. Max. length is 31 characters.
ENGLISH
Description - This field is optional and can be used for reference and housekeeping purposes.
Max. length is 255 characters.
Other Features and Functions
DRM Configuration
Enable Configuration Changes in DRM – Setting this to “No” restricts the range of menu
options available in the FlashMic itself. Refer to the table within Using the Menus, page
16 to see which parameters will not be alterable by the user. Setting this option to “Yes”
enables the full range of menu options.
Battery – this drop-down box is for setting the type of batteries being used. It changes the
characteristic of the battery status display on the FlashMic to reflect the different discharge
rates of the two types.
USB Connection
Send this configuration file to DRM
Clicking this button initiates the upload of the configuration file currently loaded in FlashMic
Manager into the FlashMic.
Download Audio Data from DRM
Clicking this button initiates the download of the sound files currently in the FlashMic to the
computer (see section Transfer Using FlashMic Manager, page 13 for more details).
En.29
Page 31

Connection Status
The large “LED” indicator at the top right of the window indicates
whether a FlashMic is connected to the computer. It is red when
a FlashMic is not connected, and turns green when a successful
connection is established.
Menu Bar
Many of the options available in the menu bar are standard to all Windows™ applications
and need little explanation:
File>
New: clears all parameter fields, allows creation of new configuration file. (Keyboard
shortcut: CTRL + N)
ENGLISH
Open: opens “Select file to Open/Load” dialogue box to permit selection of existing
configuration file to load. (Keyboard shortcut: CTRL + O)
Save: Saves currently-loaded configuration file as existing filename, unless it is a new file
being saved for the first time, in which case the “Save File As” dialogue box opens, for file
naming. (Keyboard shortcut: CTRL + S)
Save As: opens “Save File As” dialogue box to permit file naming before saving. (Keyboard
shortcut: none)
File Repair: opens a routine to allow a FlashMic audio file that has become corrupted (due to
power failure etc.) to be recovered. This routine scans the FlashMic’s memory and checks
for correct file lengths and EOF markers, and applies fixes where necessary and possible. A
report is provided identifying fixed and lost files. (This functions in the PC version only.)
Exit: closes FlashMic Manager. (Keyboard shortcut: CTRL + E)
Settings>
Set Date and Time: opens “Set Date and Time” dialogue box, permitting the FlashMic’s
internal clock to be reset. This clock is used to time-stamp recorded audio files. (Keyboard
shortcut: CTRL + T)
Note this menu option is unavailable unless a FlashMic is connected to the computer and
turned on.
Set Date and Time Window
Set DRM Name: opens “Set DRM Name” dialogue box, allowing the name of the FlashMic
currently connected to be changed (maximum 6 characters). The factory default name is
DRM85. This name forms part of the file header of each recorded sound file, so renaming
the FlashMic to a unique name (e.g., that of the user) is of great assistance when multiple
FlashMics are employed. (Keyboard shortcut: CTRL + R.) See FlashMic File Names, page
35 for more information.
Note this menu option is unavailable unless a FlashMic is connected to the computer and
turned on.
Set DRM Name Window
En.30
Page 32

Presets>
Set Default Values: resets all parameter fields of the FlashMic Manager window to the
factory default values determined by the file Defaults.cfg, for the currently selected preset
(1 – 9). Any existing set of preset values is overwritten, but the configuration file to which
they belong is unchanged. The configuration within the FlashMic also remains unchanged
until a file upload is performed. This menu option is unavailable unless a configuration file
has already been loaded into FlashMic Manager. (Keyboard shortcut: CTRL + D)
Clear Preset Values: simply clears all parameter windows; the loaded configuration file and
the FlashMic itself are unchanged. (Keyboard shortcut: CTRL + L)
Help>
Help: opens the Help file. (Keyboard shortcut: F1)
About: displays the FlashMic Manager software version number.
Status Bar
A set of useful additional information is displayed in FlashMic Manager’s status bar: This
consists of (left to right across the status bar):
FlashMicconnectionstatus
Nameofcurrently-connectedFlashMic
VersionNo.currently-connectedFlashMic’sfirmware
CurrentDateandTime(asderivedfromthecomputer)
Status Bar
ENGLISH
En.31
Page 33

Connecting the FlashMic
When connecting the FlashMic to the computer running FlashMic Manager, always ensure
the FlashMic is powered and in IDLE mode first.
Connect to the computer with the USB cable supplied.
If the FlashMic is in Record mode the USB connection will be ignored, and will time out.
In this case, the connector will need to be removed and reconnected after recording has
finished for the USB connection to be made successfully.
When the FlashMic is “recognised”, the FlashMic Manager window will display the parameter
values of the currently-selected preset in the FlashMic itself*. The Current Config file:
filename will show “File in DRM is ‘xxx.cfg’”, where ‘xxx’ is the name of the configuration
currently loaded into the FlashMic, and the Select Preset box will be set to zero. The status
bar will confirm that FlashMic Manager is now displaying the FlashMic’s internal settings
with the message “Current active preset settings on DRM”.
ENGLISH
*On connecting the FlashMic, a standard USB connection window (titled ‘DRM’ in this case)
may open offering various options; click Cancel to dismiss this window.
Note that connecting the FlashMic to the computer will always attempt to ‘force’ FlashMic
Manager to display the FlashMic’s internal settings, and that this operation will overwrite
any other data. If unsaved preset data is already displayed, a prompt message to Save the
current data will be displayed on connecting the FlashMic.
Hint: Saving the settings held in the FlashMic to a new configuration file allows you to copy
one FlashMic’s settings to other FlashMic’s, or to a different computer.
En.32
Page 34

Creating a New Configuration File
To create a different preset (or presets), you must first create a new configuration file.
Click File>New (or enter CTL + N). This clears all the data entry fields and
•
enters ‘New’ as the Current Configuration file name.
Enter data for the first preset (Preset 1) in all data entry boxes in the Current
•
Config file, Preset Configuration and DRM Configuration areas of the window. Note
that all these fields are mandatory. The File Name in the BWF/MPEG File Info area
is also mandatory, but Company Name, Reporter Name and Description are
optional and may be left empty if wished. Note that only the characters A-Z and 0-9
are allowed in the File Name field.
Click the SAVE button (or click File>Save, or enter CTL + S). The Save File
•
As dialogue box opens. Enter a name for the configuration file in the File name box
and click Save. The dialogue box dismisses. In the FlashMic Manager window, note
the Current Configuration file name is now the name just entered.
If you want to create further presets within this configuration file, select a new
•
number in the Select Preset drop-down box (it is normal, though not essential, to
work in numerical order!), which clears all the data entry boxes. Enter the data for
the new presets in turn, as before. Note that two options in the DRM Configuration
area of the window - Battery and Enable Configuration changes in DRM – retain
the selection that was made when creating the initial preset. This is because these
two parameters are ‘global’, and apply to all the presets in the configuration file.
ENGLISH
On SAVEing, the configuration file already created will be updated with the
•
additional presets. It is then possible to upload this configuration file. See
Uploading a Configuration File to the FlashMic.
Modifying an Existing Configuration File
You may wish to change an existing configuration file in some way, or possibly use an
existing file as a starting point for a different one. Any parameters in one or more presets
may be changed.
Click File>Open (or enter CTL + O). The Select file to Open/Load dialogue box
•
opens.
The available configuration files (*.cfg) will be listed. Select the file to be used, and
•
click Open. This dismisses the dialogue box, and FlashMic Manager will now be
loaded with the file. The filename appears as the Current Configuration file in the
window’s top area.
The data for Preset 1 is displayed. Either modify the parameters for this preset, or
•
select a different preset for modification.
After all necessary changes have been made to the chosen preset, click SAVE
•
if you don’t want to keep the original set of preset parameters (i.e. in the
configuration file you opened). The set of presets will be saved as a configuration
file with the same name. If you want to create a new configuration file from the
altered presets, click File>Save As, and enter a new name in the Save File As
dialogue box which opens. Click Save.
If you attempt to open a different preset before saving the changes to the current
•
one a warning will open, prompting you to save the changes first.
Creating a Personalised Defaults File
You may wish to modify the Defaults.cfg file to include parameter values specific to your
operation. In this way, when Presets>Set Default Values is selected, your own personalised
settings are loaded into the FlashMic Manager data fields.
Refer to Modifying an Existing Configuration File and open Defaults.cfg.
Modify the data as desired in Preset 1, then Save to the existing Defaults.cfg file name.
!
When modifying Defaults.cfg do not change the Preset Custom Name from PSET_1.
En.33
Page 35

Uploading a Configuration File to the FlashMic
After modifying or creating a configuration file, you will want to load it into the FlashMic. This
can be carried out immediately after editing the configuration file.
Launch FlashMic Manager, if not already open.
•
Switch the FlashMic on.
•
When the FlashMic is in IDLE mode, connect it to the computer with the
•
USB cable supplied.
The LCD display will show USB, and the large red indicator in the FlashMic Manager
•
window will turn green. There should also be some audible and/or visual
confirmation on the computer that the FlashMic has been ‘recognised’. (Exactly
ENGLISH
what form this confirmation takes may vary slightly from computer to
computer. Ignore any window called DRM85 that may open.) FlashMic Manager
will display the parameter values of the FlashMic’s currently selected preset.
On FlashMic Manager, click File>Open (or enter CTL + O), and select the
•
configuration file that you wish to load into the FlashMic.
Click the button Send this configuration file to DRM. A message window will open
•
after a short delay, confirming that the configuration file has been transferred.
Unmount the FlashMic and unplug the USB connector. The FlashMic reverts to
•
IDLE mode. Any of the new presets making up the configuration file just loaded may
now be used by recalling it using the Preset Menu. See Preset Menu, page 17 for
more details.
Do not edit the .cfg files in any text editor on a PC or MAC as the text capitalisation or the
!
syntax may be corrupted, and the preset files will not work correctly.
PreRecord Buffer
The FlashMic incorporates a pre-record buffer of up to 10 seconds (adjustable).
When enabled, audio collected by the microphone is constantly being written into a buffer
memory – separate from the main memory – at all times as long as the FlashMic is powered.
Thus the last few seconds of audio are always already stored inside the FlashMic. When the
REC button is pressed, the contents of the buffer is written into the main memory, while the
‘live’ audio continues to be written into the buffer. When the M/STOP button is pressed, the
contents of the buffer continues to be written to the sound file, so nothing is lost.
When the recording is replayed, it will be found that it begins with a few seconds of audio
immediately before the REC button was pressed.
There are no controls on the FlashMic itself for the pre-record buffer; it is enabled and has
its duration set from the FlashMic Manager software, as part of a preset configuration. The
pre-record buffer can be set from 0 to 10 seconds, in one second increments.
Setting Pre-record Buffer Time
It should be clear that if all sound files are created with 10 seconds of pre-record buffer
enabled, available memory will be used up more rapidly. A degree of experiment may be
necessary to find an optimum setting for the length of the pre-record buffer.
It is recommended that the buffer is deselected (by setting the duration to ‘OFF’ in FlashMic
Manager) for recording situations where it is unlikely to bring any benefit.
En.34
Page 36

FlashMic File Names
Frequently, the number of sound files to be downloaded from a FlashMic may be quite large.
Furthermore, the FlashMic may have been used in several different locations, and/or by
different journalists/recordists. Thus it is important to identify sound files at the time of
recording so that their identity and origin can be correctly attributed.
A written (or electronic) recording log is recommended elsewhere in this manual, and it is
good professional practice to maintain such a log. FlashMic Manager additionally provides
the user with the scope for considerable extra assistance in file identification in the form of
definable file header information.
Filename Structure
The sound files recorded in FlashMic are .wav files, with filenames made up of three
concatenated components separated by underscore characters as follows:
MIC NAME_BWF FILE NAME_TRACK NUMBER.wav
The three components of the filename are specified in FlashMic Manager as part of a
preset definition. After the configuration file containing the preset parameters is uploaded
to the FlashMic, some of the textual data that was entered in FlashMic Manager is used to
form part of the filename.
The three components of the filename are derived as follows:
MIC NAME – this is the name set in FlashMic Manager at Settings>Set DRM
•
Name. This name applies to all presets defined for a particular configuration file.
In an organisation using mulitple FlashMics, it allows each to be given an individual
name, which might be MIC_nn, for example, or possibly a recordist’s name (if
recordists always use the same FlashMic). The maximum length of the Mic Name
is 6 characters (upper case alphanumeric only).
BWF FILE NAME – this is the name entered in the File Name field (in the BWF/
•
MPEG File Info area) of FlashMic Manager. This field can be set differently for each
preset in a configuration file. This field can be utilised in a variety of ways depending
how the FlashMic is to be used; one possibility might be to create presets which
differ only in the file name, relating textually to different interviews that the
FlashMic is to be used for on a particular day. The maximum length of the File
Name is 31 characters (alphanumeric only and spaces not allowed – use
underscore).
TRACK NUMBER – this part of the filename is generated within the FlashMic
•
itself, and is simply the number of the recording, which automatically
increments by one every time a new recording is made. It is displayed as TRKnnn
in the FlashMic LCD. The format of the track number is also TRKnnn, where
nnn is the track number. Note that the track number does not reset to
zero when a different preset is selected in the FlashMic, when a new configuration
file is uploaded, nor when the sound files are downloaded. Reformatting the
memory (see section Reformatting the Memory for more information) does
reset the track number counter.
ENGLISH
Some examples of sound file filenames are shown below.
Filename structure within FlashMic
En.35
Page 37

In the example, several files are in the FlashMic’s AUDIO folder. The first of these is named
FORMAT
MIC_01_JOHN_TRK001.wav.
In this filename, MIC_01 is the FlashMic name that was set in FlashMic Manager for the
configuration file loaded into the FlashMic.
JOHN – possibly the recordist’s name - is the BWF/MPEG File Name set in FlashMic
Manager for one of the presets. We do not know from the .wav filename which preset
number this was, but ‘John’ would have had this information, and would have selected this
preset.
TRK001 is the track number – the first recording of the day, perhaps.
ENGLISH
Looking at the other filenames in the folder, it can be seen that they all begin with MIC_01,
which would be the case if the FlashMic name (DRM Name) was not changed during the
course of the recording period, by uploading a new configuration file with a different DRM
Name. Some of the files differ in the BWF/MPEG File Name component; this is where the
FlashMic was used by – in our example – different recordists, who each selected a different
preset. Note finally, that no track number is repeated. Further recording identification can
of course be obtained from the date/time file information, which will be accurate as long as
the internal clock was set correctly beforehand.
How you will use the file naming system will greatly depend on the type of organisation using
the FlashMic(s), how many are in use, how many people are using each FlashMic, the kind
of recordings being made, etc. In the simplest of single-mic/single-owner situations, all the
default settings can be used with little chance for confusion.
Reformatting the Memory
The FlashMic’s 1GB flash memory can be reformatted if wished. This is desirable after a
firmware update, and is essential if the FlashMic is formatted via USB from a computer. It
is also a convenient method of clearing all sound files from the memory.
!
IMPORTANT: Reformatting the flash memory will permanently delete any sound files and
Preset data still in the FlashMic, so ensure that all your sound files have been downloaded to
a computer before proceeding.
To reformat the internal memory, proceed as follows:
With the FlashMic turned off, hold down all three side panel buttons -
•
REC (G), PLAY (H) & M/STOP (M) – simultaneously.
With the three buttons depressed, turn the FlashMic on. The LCD
•
display will show FMT N. If you are sure you want to proceed, using the
jogwheel make a SHORT DOWN TURN to change the display to FMT Y, then
a SHORT PUSH to accept this.
The display will now show FORMAT. Reformatting takes about 35 seconds to
•
complete. The FlashMic then returns to IDLE mode.
En.36
FlashMic LCD Display During Format.
Page 38

Firmware Updates
As a responsible manufacturer, HHB adopts a policy of continuous product development.
As with all software-based products, it may be desirable from time to time to update the
firmware in your FlashMic with a more recent version. You can contact your HHB dealer
or distributor, or visit the FlashMic website at http://www.flashmic.info for details of
firmware updates.
Firmware updates are downloadable from the FlashMic website, or if you prefer, from your
local dealer/distributor on a CD-ROM. Alternatively, if you are uncertain about performing
a firmware update yourself, take your FlashMic to your HHB dealer, who will be happy to
do it for you.
It is recommended that the internal memory is reformatted after a firmware update. See
Reformatting the Memory for further details.
For certain updates the new firmware may force a reformat, so it is most important to ensure
you have all audio and preset data saved before commencing the firmware upgrade.
To perform a firmware update, proceed as follows:
First locate the firmware folder and file. Whether you have downloaded the
•
firmware from the FlashMic website or have it on a CD-ROM, it will always be in a
folder called FW VER xx-xx-xx, where xx-xx-xx is the firmware version number. This
folder will contain a file called DRM85.bin, which is the firmware file itself.
Note that the firmware filename does not identify which version it is, therefore it is important
to keep it in the folder it ‘arrived in’ for identification.
Ensure that the batteries in your FlashMic are adequately charged, and change
•
them if there is any doubt. NEVER start a firmware update with low batteries, as
the FlashMic may be rendered unusable if the batteries run out midway during the
update procedure.
Turn the FlashMic on, and connect it to the computer with the USB cable. The
•
LCD display will change to USB, and the computer will signify its recognition of the
FlashMic in the usual way.
The FlashMic will be identified in the directory tree as an additional drive (the drive
•
letter will vary from machine to machine).
Drag-and-drop the DRM85.bin file to the FlashMic root (not into any of the three
•
folders AUDIO, CONFIG or FIRMWARE it contains).
When the file transfer is complete, unplug the FlashMic’s USB cable and switch
•
the FlashMic off.
ENGLISH
Switch the FlashMic back on again; the LCD display will now show the message
•
UPDATE. The bargraph meter indication will start to move from left to right.
The update will continue and complete automatically. When the bargraph indication
•
is full, the FlashMic will either return to IDLE mode, or enter the Reformat routine
(see below).
The new firmware is now installed. Depending on the precise nature of firmware
•
changes in the new version, the FlashMic may now automatically enter the
Reformat routine. In this case, the display will now read FMT N. It is suggested
that the FlashMic memory is now reformatted. See Reformatting the Memory
for further details. It is recommended that a memory format is always performed
following a firmware update in any case, so if Reformat is not forced by the
upgrade procedure, please perform a Reformat manually.
En.37
Page 39

Specifications
Sampling Frequency 48kHz, 44.1kHz and 32kHz. Selection by FlashMic Manager or on DRM85.
Bit Resolution (Linear) 16 Bit
Audio Formats Linear PCM or MPEG 1 Layer 2. Selection by FlashMic Manager software or on DRM85.
6 mode settings.
Bit rates (MPEG) 192, 160, 128 kbps
Electronics Frequency 20 Hz - 20 kHz ± 1dB @ 48 kHz FS Linear PCM
Response
THD + N < 0.1% (20 Hz - 20 kHz) @ 48 kHz FS Linear PCM
Number of Channels 1 (Mono)
Microphone Capsule Omni-directional
Record Level Automatic or Manual Gain Control
ENGLISH
High Pass Filter Switchable on/off, 12 dB/octave @ 100Hz
Data Storage System Fixed internal memory, capacity 1 GB.
Date / Time Internal real-time clock, running as long as power supply is available. Back-up supply for 1
minute to allow battery change. Set/synchronized by host computer application according to
host computer clock. Manual setting on DRM85 by menu item.
File Format Linear PCM: .wav, Broadcast Wave File (.wav). Or compressed MPEG 1 Layer 2 .wav
Date / Time stamp is stored in file header. Filename generated automatically by DRM85,
basic text string provided from PC software.
File System FAT. Mounts as a removable drive via USB mass storage device protocol. File transfer is
possible with the FlashMic Manager software or through Windows Explorer and Mac OS
Finder.
Headphone Output 3.5mm stereo socket, mono signal to both channels. Manual volume control by rotary switch.
Output may be used for analog audio recording. Drive capability for 32 ohm headphone, short
circuit protection.
Included accessories Stand Clamp, Batteries (x2), USB cable, Pouch, CDROM, Manual.
Optional Accessories Windshield (DRMWS), table stand (DRMTS).
Weight 366 grams / 13 ounces (excluding batteries).
Dimensions Length 244mm / 9.6 inches. Diameter at widest point (mic capsule) 50mm, 2 inches.
En.38
Page 40

Hz
100
100
1.000
1.000
10.000
10.000
dBV
-20
-30
-40
-50
-60
-70
50 100 200 500 1k 2k 5k 10k 20k
0°
30°
60°
90°
120°
150°
180°
210°
240°
270°
300°
330°
Polar Diagram and Frequency Response Curve of Microphone Head
FlashMic Frequency Response Curve
2kHz
5dB
10dB
15dB
20dB
25dB
4kHz
ENGLISH
1kHz and below
8kHz
16kHz
FlashMic Polar Diagram
En.39
Page 41

Notification
PRODUCT REGISTRATION
Please register ownership of your FlashMic now at http://www.flashmic.info. Registration
will enable you to receive software updates and other important FlashMic product news.
EC DECLARATION OF CONFORMITY
This equipment conforms to the requirements of the EMC Directive (89/336/EEC)
relating to electromagnetic compatibility by the application of:- EN55013:2001 and
EN55020:2002.
FCC COMPLIANCE
NOTE: This equipment has been tested and found to comply with the limits for a Class B
digital device, pursuant to Part 15 of the FCC Rules. These limits are designed to provide
reasonable protection against harmful interference in a residential installation. This equipment
generates, uses and can radiate radio frequency energy and, if not installed and used in
accordance with the instructions, may cause harmful interference to radio communications.
ENGLISH
However, there is no guarantee that interference will not occur in a particular installation. If
this equipment does cause harmful interference to radio or television reception, which can
be determined by turning the equipment off and on, the user is encouraged to try to correct
the interference by one or more of the following measures:
-- Reorient or relocate the receiving antenna.
-- Increase the separation between the equipment and receiver.
-- Connect the equipment into an outlet on a circuit different from that to which the
receiver is connected.
-- Consult the dealer or an experienced radio/TV technician for help.
WEEE DECLARATION
FlashMic was developed and manufactured with high quality materials
and components, which can be recycled and/or reused. This symbol
indicates that electrical and electronic equipment must be disposed
of separately from normal waste at the end of its operational lifetime.
Please dispose of this product by taking it to your local collection point
or recycling centre for such equipment. This will help to protect the
environment in which we all live.
LIMITED SOFTWARE WARRANTY POLICY
All the software provided with, or purchased especially for, HHB products has been tested for
functionality. HHB Communications Ltd will make all reasonable efforts to correct reported
software defects for future releases subject to technical and economic practicality. HHB
Communications Ltd makes no warranty or representation either express or implied with
respect to the system’s performance or fitness for a particular purpose.
In no circumstances will HHB Communications Ltd be liable for direct or indirect damages
arising from any defect in the software or its documentation. Further, HHB Communications
Ltd will not be liable for any loss of or damage to programs, sounds, audio recording,
sequences or data stored in or used with HHB products, including the cost of recovery.
The disclaimers above are exclusive and take precedence over all others, oral or written,
express or implied, to the extent permitted by law in the geographical area of the product’s
sale. No employee of HHB Communications Ltd, agent, distributor or employee of an agent
or distributor is authorised to offer any variation.
TRADEMARKS
All trademark, product and company names are the property of their respective owners.
En.40
http://www.flashmic.info
Page 42

Notes
ENGLISH
En.41
Page 43

Notes
ENGLISH
En.42
Page 44

Introduction
Merci d’avoir choisi le FlashMic HHB.
Ce manuel fournit toutes les informations dont vous avez besoin pour un emploi facile et
efficace du FlashMic. Nous vous recommandons de lire attentivement la totalité du manuel
avant d’utiliser votre FlashMic pour la première fois, et de le garder en lieu sûr pour vous
y référer ultérieurement.
FRANÇAIS
Informations sur le produit
Propriétaire:
Société:
Date d’achat:
Numéro de série:
Fr.1
Page 45

Informations de sécurité
Bien que le FlashMic HHB ait été conçu pour s’avérer robuste en utilisation normale,
n’oubliez jamais que c’est à la fois un microphone professionnel de haute qualité et un
instrument électronique délicat. Pour cette raison, il doit être manipulé avec soin.
Veillez à ne pas faire subir de choc mécanique au FlashMic, par ex. en le laissant
•
tomber ou en le heurtant contre des surfaces dures.
Faites attention quand vous ouvrez le compartiment des piles. Cette opération est
•
prévue pour être effectuée à la main; n’employez aucun objet pointu quel qu’il soit.
Utilisez avec soin les connecteurs et la molette à la base du FlashMic. Assurez-
•
vous qu’aucun câble connecté n’est soumis à une contrainte.
Ne jetez les piles usagées qu’en accord avec la réglementation et/ou les
•
instructions de recyclage en vigueur dans votre pays.
Ne nettoyez le FlashMic qu’avec un chiffon humide. N’utilisez pas de solvant ou de
•
nettoyant abrasif d’aucune sorte.
FRANÇAIS
Contenu de l’emballage
Veuille comparer la liste ci-dessous avec le contenu de l’emballage. Si un élément est
manquant ou endommagé, contactez le revendeur ou distributeur HHB auprès duquel vous
avez effectué l’achat.
Microphone FlashMic DRM85
•
Etui de microphone
•
Pince de micro à filetage standard 16 mm (5/8”), plus adaptateur 9 mm (3/8”)
•
Câble USB 1,5 m, Type A vers Mini-B 5 broches
•
2 piles alcalines AA
•
CD-ROM avec logiciel FlashMic Manager (versions Windows™ et Mac™)
•
Fr.2
Page 46

Sommaire
Introduction
1
Informations de sécurité 2
Contenu de l’emballage 2
Caractéristiques du FlashMic 4
Description du FlashMic 5
Afficheur du FlashMic 6
Piles 7
Insertion des piles 7
Gestion des piles 7
Témoin de piles 7
Emploi du FlashMic 8
Description de la molette 8
Mise sous tension du FlashMic 9
Enregistrement 10
Mémoire tampon pré-enregistrement (Introduction) 10
Verrouillage d’enregistrement 11
Ecoute de contrôle 11
Réglage du niveau d’enregistrement 11
Relecture des pistes 12
Marqueurs 12
Suppression d’une piste 12
Transfert de fichier 13
Transfert à l’aide du FlashMic Manager 13
Transfert direct dans un ordinateur 14
Connecter le Flashmic avec des batteries
presque à plat sur l’ordinateur. 15
Système de menus du FlashMic 16
Emploi des menus 16
Menu Preset 17
Menu mode d’enregistrement 18
Menu niveau d’enregistrement 19
Menu filtre passe-haut 20
Menu batteries/piles 20
Menu suppression 21
Menu réglage d’horloge 22
FRANÇAIS
FlashMic Manager 23
Noms de fichiers du FlashMic 35
Reformatage de la mémoire 36
Mises à jour du micrologiciel (“Firmware”) 37
Caractéristiques techniques 38
Notification 40
Notes 41
Installation de FlashMic Manager sur PC 23
(Installation initiale) 23
Installation de FlashMic Manager sur Mac 24
FlashMic Manager Mise à jour 24
Emploi de FlashMic Manager 25
Fichiers de configuration et presets 26
Emploi de la configuration par défaut 26
Fenêtre FlashMic Manager - Caractéristiques 27
Informations sur le preset 27
Autres caractéristiques et fonctions 29
Connexion du FlashMic 32
Création d’un nouveau fichier de configuration 32
Modification d’un fichier de configuration existant 33
Création d’un fichier Defaults personnalisé 33
Transfert d’un fichier de configuration au FlashMic 34
PreRecord Buffer (Mémoire tampon pré-enregistrement) 34
Structure des noms de fichier 35
Diagramme polaire et courbe de réponse en fréquence du microphone 39
FlashMic manuel d’utilisation Version 4. septembre ‘06
Fr.3
Page 47

Caractéristiques du FlashMic
Votre FlashMic réunit un microphone à condensateur omnidirectionnel de qualité
professionnelle et un enregistreur audio numérique interne en une seule unité autoalimentée. Un jeu de commandes extrêmement simples le rend utilisable par des non
techniciens; sinon, les plus expérimentés en matière d’enregistrement peuvent accéder
à un grand éventail de fonctionnalités supplémentaires au travers des pages de menu
affichées sur l’écran à cristaux liquides (LCD) du FlashMic.
La récupération des enregistrements se fait via le port USB du FlashMic; les fichiers audio
conservés sont transférés à un ordinateur sous forme de fichiers .wav au format linéaire ou
compressé (MPEG 1 Layer 2). Le transfert se fait soit à l’aide du logiciel FlashMic Manager
fourni, soit par glisser-déposer standard de fichier.
Considérez le FlashMic comme l’équivalent audio d’un appareil photo numérique. Comme
vous utilisez un appareil photo numérique pour enregistrer de façon rapide et pratique des
images de haute qualité afin d’ensuite les transférer à un ordinateur, vous pouvez ainsi
utiliser le FlashMic, mais pour capturer des sons. Comme des images qui peuvent ensuite
être modifiées, stockées, envoyées par e-mail, supprimées ou bien d’autres choses encore
– vous pouvez maintenant manipuler de la même façon de l’audio enregistré.
Le FlashMic est d’un emploi idéal pour les journalistes et reporters lors des reportages
et interviews, pour les entreprises, les institutions publiques – enfin toute situation où une
méthode d’enregistrement de voix rapide et pratique est nécessaire.
Voici quelques-unes des caractéristiques majeures du FlashMic :
•
Enregistrements audio numériques linéaires ou compressés (avec compression
MPEG 1 Layer 2) sous forme de fichiers .wav.
FRANÇAIS
•
Durée d’enregistrement atteignant 18 h (selon le format de fichier et la fréquence
d’échantillonnage).
•
Amplificateur intégré pour casque d’écoute, avec niveau réglable.
•
Utilise 2 piles AA alcalines ou des batteries rechargeables.
•
Modes de fonctionnement adaptés aux techniciens et non techniciens.
•
Mémoire tampon pré-enregistrement réglable jusqu’à 10 secondes.
•
Transfert rapide de fichiers vers PC ou Mac via USB.
•
9 programmations ou “presets” internes pour conserver différentes configurations
du FlashMic.
•
Niveau d’enregistrement réglable ou fixe avec contrôle de gain automatique (AGC),
bargraph de contrôle.
•
Affichage du temps restant.
•
Relecture du dernier enregistrement ou d’un enregistrement antérieur via la sortie
d’écoute de contrôle.
•
Des markers (point de cue) peuvent être ajoutés pendant la Lecture ou
L’enregistrement.
•
Un système de sauvegarde permet la plupart du temps de récupérer les données
audio suite à une coupure de courant ou à une autre panne.
Fr.4
Page 48

Description du FlashMic
USB
MENU
PHONES
2
3
4
1
10
11
98
Grille de protection (bonnette) de la capsule du micro
1
2
Corps du FlashMic
Ecran à cristaux liquides (LCD) – voir Afficheur du FlashMic
3
Section des commandes principales
4
Bouton ENREGISTREMENT (G)
5
Bouton LECTURE (H)
6
5 76
FRANÇAIS
Bouton MENU/STOP (M)
7
8
Molette multifonction - voir Description de la molette
9
Diode (DEL) de mode d’enregistrement
10
Connecteur USB (Mini-B 5 broches)
11
Prise PHONES : sortie d’écoute de contrôle (jack 3,5 mm 3 points)
Fr.5
Page 49

00:12:12
Rec
Play
Afficheur du FlashMic
FRANÇAIS
12
13 14 15
17
16
Affichage alphanumérique à 6 caractères
12
Témoin de piles à 4 segments
13
Indicateur REC – indique que le FlashMic est en mode d’enregistrement.
14
15
Indicateur PLAY– indique que le FlashMic est en mode de relecture.
Bargraph 16 segments – fournit une indication sur le niveau de lecture et
16
d’enregistrement.
17
Rétro-éclairage de l’afficheur
Fr.6
Page 50

Piles
Le FlashMic nécessite deux piles AA. Des piles alcalines 1,5 V ou des batteries rechargeables
1,2 V NiMH (nickel-métal-hydrure) peuvent être utilisées.
Une capacité d’au moins 1500 mAh est recommandée.
!
N’utilisez pas de piles au chlorure de zinc.
Insertion des piles
Tenez le FlashMic d’une main et dévissez sa partie
arrière (la section portant l’afficheur et les commandes)
de l’autre.
Faites glisser cette section aussi loin que possible en
arrière.
Ouvrez le capot plastique articulé du compartiment des
piles.
Insérez les deux piles dans le sens indiqué sur le capot
du compartiment.
!
Les deux piles doivent pointer dans la même direction.
!
Changez toujours les deux piles en même temps, et utilisez toujours deux piles de la
même marque et du même type. Ne mélangez JAMAIS une pile alcaline avec une batterie
rechargeable.
Refermez le capot, ramenez la section arrière sur le compartiment et vissez fermement.
Note: Si vous remplacez des piles alcalines, jetez-les de façon responsable – respectez
toujours les directives environnementales locales.
Gestion des piles
L’autonomie des piles sera maximisée si le FlashMic est éteint quand on ne l’emploie pas,
car l’énergie consommée au repos est virtuellement la même qu’en enregistrement.
FRANÇAIS
Les réglages de l’horloge interne sont sauvegardés dans le FlashMic durant environ 1 minute
après le retrait des piles. Les fichiers audio enregistrés et les réglages de configuration ne
sont pas affectés par le retrait des piles.
Retirez les piles du FlashMic si celui-ci doit rester inemployé durant une période prolongée
(plus d’un mois).
Témoin de piles
Un témoin de piles à 4 segments apparaît dans l’afficheur LCD.
Le nombre de segments affichés est proportionnel à la charge des piles.
La vitesse d’évolution du témoin de piles peut être modifiée (via le système de menus ou via
le logiciel FlashMic Manager) pour refléter les caractéristiques de décharge différentes des
piles alcalines et des batteries rechargeables.
Le rétro-éclairage de l’afficheur, la diode d’enregistrement à la base du FlashMic et le témoin
de piles clignoteront tous si l’autonomie des piles approche de zéro. Si les piles du FlashMic
sont pratiquement vides un avertissement indique que l’enregistrement va s’arrêter.
Fr.7
Page 51

Emploi du FlashMic
Description de la molette
De nombreuses fonctions d’utilisation du FlashMic sont accessibles via la molette du
panneau inférieur. Cela comprend l’interrupteur d’alimentation on/off, la navigation dans les
divers menus internes, le réglage des niveaux et la sélection des pistes pour la relecture.
L’action de la molette pour chaque fonction spécifique du FlashMic est décrite en détail
dans la section de manuel couvrant la fonction en question. Toutefois, comme la molette
peut effectuer plusieurs mouvements physiques, en voici un aperçu.
La molette est une petite roue dépassant de la base du FlashMic. C’est en réalité trois
boutons-poussoirs fugitifs (“momentanés”) en un ; elle peut être pressée vers l’intérieur
(depuis sa position de repos), ou tournée dans l’une ou l’autre des directions. Les actions
sont toutes à rappel par ressort ce qui ramène toujours la molette à sa position de repos.
Chacun des trois mouvements possibles peut être soit “long”, soit “court”, ce qui donne un
total de six actions possibles. Le micrologiciel (“Firmware”) du FlashMic considère comme
pression “longue” une pression de plus de 2 secondes et comme pression “courte” une
pression de moins de 2 secondes.
Le schéma ci-dessous résume les mouvements possibles.
FRANÇAIS
Ailleurs dans ce manuel, les notations suivantes sont employées pour distinguer les divers
types d’action sur la molette. Il est considéré que le FlashMic est orienté avec l’afficheur
LCD face à l’utilisateur.
NOTATION ACTION
PRESSION COURTE
PRESSION LONGUE
ROTATION COURTE EN BAS Tournez la molette vers le bas et relâchez
ROTATION LONGUE EN BAS
ROTATION COURTE EN HAUT Tournez la molette vers le haut et relâchez
Appuyez au centre de la molette vers l’intérieur du micro
et relâchez
Appuyez au centre de la molette vers l’intérieur du micro
durant au moins 2 secondes
Tournez la molette vers le bas et maintenez-la au moins
2 secondes
ROTATION LONGUE EN HAUT
Fr.8
Tournez la molette vers le haut et maintenez-la au moins
2 secondes
Page 52

03:14:35
Mise sous tension du FlashMic
Le FlashMic se met sous tension par une PRESSION COURTE de la molette, et s’éteint par
une PRESSION LONGUE jusqu’à l’affichage du texte OFF dans l’écran. Le FlashMic s’éteindra
au relâchement de la molette.
Notez qu’il n’est pas possible d’éteindre le FlashMic tant qu’il est connecté à un ordinateur
via son câble USB.
A la mise sous tension du FlashMic, l’écran LCD affiche à la suite:
DRM85
Version du micrologiciel (“Firmware”)
Nom du microphone
Notez que le nom donné par défaut en usine au microphone est DRM_85 et que le preset
d’usine par défaut est le PSET_1.
Après cette séquence, le FlashMic entre en mode de veille et son affichage est le suivant.
ê
ê
ê
Preset actif.
Affichages du FlashMic en mode de veille
En mode de veille – c’est-à-dire quand le FlashMic est alimenté mais pas en fonction – l’affichage
alterne entre le numéro du dernier enregistrement (
dans le FlashMic sont appelés des pistes ou “tracks”) et le temps d’enregistrement encore
disponible.
L’exception à cela, c’est quand aucun enregistrement n’a été fait depuis la dernière
reconfiguration du FlashMic, auquel cas le message NOFILE (“pas de fichier”) apparaît à la
place de TRKnnn.
Le FlashMic est équipé d’un calendrier/horloge interne. Avant d’utiliser le FlashMic pour la
première fois, il est recommandé de le régler correctement. Cette date est enregistrée dans
l’en-tête du fichier audio comme date et heure de création. Voir Menu réglage d’horloge,
page 22 pour des détails sur la façon de faire.
TRKnnn
- les fichiers enregistrés
FRANÇAIS
Fr.9
Page 53

03:24:04
Rec
SAVING
Enregistrement
!
Le format de fichier créé avec le FlashMic comprend la date et l’heure auxquelles
l’enregistrement a été fait, ainsi que des informations textuelles – saisies via le logiciel
FlashMic Manager – pour faciliter l’identification ultérieure des enregistrements. Néanmoins,
c’est une bonne habitude que de conserver un journal manuscrit ou électronique durant une
session d’enregistrement sur le terrain, car de nombreux fichiers à sonorités similaires
peuvent souvent être créés.
Conserver un tel journal est recommandé. Cela facilitera fréquemment le travail d’identification
de vos enregistrements après leur transfert dans un ordinateur pour y être édités.
Pour initier un nouvel enregistrement, appuyez sur le bouton ENREGISTREMENT rouge (G).
L’indicateur REC de l’afficheur et la diode témoin d’enregistrement à l’arrière du FlashMic
s’allumeront tous deux.
La diode d’enregistrement peut être coupée si, par exemple, le FlashMic est dans le champ
!
de la caméra. Pour cela, pressez et maintenez le bouton LECTURE alors que le FlashMic est
en mode d’enregistrement; l’écran affichera LEDOFF. La diode (“LED”) peut être réactivée en
répétant cette action tout en étant toujours en mode d’enregistrement. Notez que la diode
s’allumera toujours initialement lors de la sélection du mode d’enregistrement.
Le bargraph de l’afficheur fournit une indication sur le niveau du signal audio en mode de
veille et en mode d’enregistrement.
L’affichage principal donne le temps d’enregistrement encore disponible et le décompte.
FRANÇAIS
Quand il ne reste que 10 mn disponibles pour l’enregistrement, le rétro-éclairage de l’écran,
la diode d’enregistrement à la base du FlashMic et l’indicateur REC de l’écran clignotent
tous. Le FlashMic arrêtera d’enregistrer quand la durée d’enregistrement disponible ne
sera plus que de 1mn ; cela permet les corrections d’erreur de données.
Pour stopper l’enregistrement, appuyez sur le bouton M/STOP (M). Le texte SAVING
(“sauvegarde”) apparaît dans l’afficheur, et après une brève pause, l’affichage de veille
revient, avec présentation du numéro de piste.
Affichage d’enregistrement Sauvegarde de la piste enregistrée
Réglages d’usine:
Les réglages de format d’enregistrement, niveau d’enregistrement, etc., se font
généralement via le système de fichiers de configuration et de presets dans le logiciel
FlashMic Manager. Toutefois, le FlashMic est livré avec un jeu de paramètres d’usine
lui permettant d’être utilisé “dès sa sortie de la boîte”, sans aucun recours au FlashMic
Manager. Voir Emploi de la configuration par défaut, page 26 pour une liste des valeurs
de ces paramètres.
Mémoire tampon pré-enregistrement (Introduction)
Dans une foule de journalistes, il est parfois difficile - voire impossible – d’accéder assez
vite au bouton d’enregistrement. Le résultat est un enregistrement qui démarre quelques
secondes après les informations vitales dont vous aviez besoin. Le FlashMic possède une
mémoire tampon pré-enregistrement (réglable) pouvant atteindre 10 secondes, ce qui évite
cette situation.
Quand l’enregistrement est relu, vous constatez qu’il a commencé quelques secondes
immédiatement avant que le bouton ENREGISTREMENT n’ait été pressé.
Voir PreRecord Buffer (Mémoire tampon pré-enregistrement), page 34 pour plus de
détails.
Fr.10
Page 54

Verrouillage d’enregistrement
UNLOCK
Rec
LOCKED
Rec
RVOL35
Rec
RV AGC
Rec
Le FlashMic est équipé d’une fonction de verrouillage d’enregistrement (“REC LOCK”) empêchant
l’annulation accidentelle du mode enregistrement au cours d’un enregistrement.
Une fois en mode d’enregistrement, appuyez sur le bouton ENREGISTREMENT une seconde
fois, en le maintenant pressé au moins 2 secondes, jusqu’à ce que s’affiche le texte LOCKED
(“verrouillé”) dans l’écran..
Appuyer sur le bouton M/STOP n’aura maintenant plus d’effet (si ce n’est d’afficher le texte
LOCKED).
Pour désactiver ce verrouillage, pressez et maintenez le bouton ENREGISTREMENT jusqu’à
ce que l’affichage LOCKED se change en UNLOCK (“déverrouillé”).
L’enregistrement peut maintenant être stoppé de façon normale en appuyant sur M/
STOP.
Affichages d’enregistrement verrouillé (LOCKED)/déverrouillé (UNLOCK)
Ecoute de contrôle
Un casque ou une paire d’écouteurs peuvent être connectés au FlashMic pour une écoute
de contrôle. Un casque de 32 ohms ou plus d’impédance doit être employé. Branchez le
casque via la prise mini-jack 3 points de 3,5mm marquée PHONES en bas du FlashMic.
Le signal mono du FlashMic sera entendu dans les deux oreillettes. L’écoute au casque de
l’audio “live” est active en veille et en enregistrement.
La sortie d’écoute peut servir de source à un équipement externe d’écoute ou d’enregistrement
si désiré.
Le niveau d’écoute se règle avec la molette; une PRESSION COURTE fait s’afficher le texte
PHONnn dans l’écran LCD, où nn = le niveau actuel (les unités sont arbitraires; 00 = off, 50
= max.). Une ROTATION COURTE EN HAUT ou EN BAS fera respectivement augmenter ou
diminuer le niveau d’écoute. Notez que le niveau d’écoute revient toujours au niveau de l’usine
à la mise sous tension du FlashMic. Le niveau peut être réglé en mode d’enregistrement,
de lecture ou de veille.
L’écran LCD retournera automatiquement à l’affichage d’enregistrement ou de veille après
une temporisation d’environ 2 secondes.
Réglage du niveau d’enregistrement
Le réglage du niveau d’enregistrement n’est possible que si le FlashMic a été réglé (via le
!
logiciel FlashMic Manager) pour permettre les changements de configuration par l’utilisateur.
Voir la section sur le FlashMic Manager pour plus d’informations.
Le niveau d’enregistrement se règle avec la molette. Une ROTATION COURTE EN HAUT ou
EN BAS, alors que vous êtes en mode d’enregistrement, fait s’afficher le texte RVOLnn, où
nn = le niveau actuel (contrairement au niveau d’écoute, les unités ne sont pas arbitraires,
mais correspondent à des augmentations d’environ 1dB; 01 = min, 40 = max.). D’autres
ROTATIONS COURTES EN HAUT ou EN BAS décaleront le niveau d’enregistrement vers le
haut ou le bas.
FRANÇAIS
Quand le niveau d’enregistrement est réduit au minimum, le système de contrôle
automatique du gain (AGC) est activé et l’écran affiche RV AGC. Dans ce mode, le FlashMic
ajuste automatiquement le niveau d’enregistrement en fonction du niveau sonore. Dans la
plupart des situations, cela assurera la réalisation d’un enregistrement de niveau utilisable,
mais comme avec tous les systèmes de gain automatique, un certain effet de “pompage”
du bruit de fond peut être audible dans l’enregistrement.
Il est aussi possible d’ajuster le niveau d’enregistrement du FlashMic depuis le mode de
veille, grâce au système de menus. Voir le système de menus du FlashMic, page 16.
Notez que le niveau d’enregistrement revient toujours à la dernière valeur utilisée quand le
FlashMic est rallumé, et pas à la valeur réglée dans le preset par le FlashMic Manager (voir
cette section dans FlashMic Manager pour plus d’informations sur les presets)
Réglage du niveau d’enregistrement
Fr.11
Page 55

Relecture des pistes
00:00:01
Play
TRK005
Une piste enregistrée peut être relue à titre de vérification.
Pour relire la dernière piste enregistrée, appuyez sur le bouton LECTURE (H). L’indicateur
PLAY s’allume dans l’écran LCD. Après une brève pause, l’écran affiche le temps écoulé
sur la piste. Le bargraph indique le niveau audio de la piste et peut être contrôlé via la prise
PHONES (“casque”). A la fin de la piste, le FlashMic retourne en mode de veille. Appuyer sur
le bouton M/STOP durant la relecture ramène aussi le FlashMic au mode de veille. Pour
mettre la lecture en pause, appuyez à nouveau sur LECTURE. L’écran LCD affichera PAUSE.
La lecture peut être reprise en appuyant à nouveau sur LECTURE, ou vous pouvez passer
en mode stop (“arrêt”) en appuyant sur MENU/STOP.
Une ROTATION LONGUE VERS LE HAUT de la molette entraînera une “avance rapide” dans
la piste, afin de repérer rapidement une section particulière de la piste. De même, une
ROTATION LONGUE VERS LE BAS entraînera un “retour rapide” dans la piste. L’affichage
temporel continue de donner la position temporelle de la piste durant ces modes de
déplacement “rapide”.
Note: si un marqueur a été ajouté à la piste, la molette permet de sauter d’un marqueur à
l’autre (en avant ou en arrière cela dépend du sens dans lequel on déplace la molette). (Voir
le chapitre concernant les ‘Marqueurs’ pour plus d’information.)
Pour sélectionner et relire une piste autre que la dernière enregistrée, accédez au numéro
de piste inférieur par ROTATION COURTE VERS LE BAS de la molette (une ROTATION
LONGUE vers le bas donne une diminution plus rapide). Des ROTATIONS VERS LE HAUT
augmenteront de la même façon le numéro de piste. Quand le numéro de piste voulu est
affiché, appuyez sur le bouton LECTURE pour relire la piste.
Il est aussi possible de sélectionner une autre piste tout en restant en mode de LECTURE;
des ROTATIONS COURTES de la molette feront sauter à la piste précédente ou suivante,
FRANÇAIS
selon le sens de la rotation. Veillez à ne pas faire de ROTATION LONGUE, car le FlashMic
passerait alors en mode d’avance ou de retour rapides, comme décrit ci-dessus.
Affichage de relecture de pisteAffichage de sélection de piste
Marqueurs
Il est souvent utile de marquer un ou plusieurs points dans un enregistrement afin de
faciliter le repérage pour la production et le montage ultérieurs. Vous pouvez ajouter des
marqueurs aux enregistrements du FlashMic en mode d’enregistrement ou lecture.
Les marqueurs sont des “balises de données” qui sont incorporées au fichier audio à
l’instant approprié. Ils apparaîtront comme des marqueurs d’écran une fois les fichiers
audio téléchargés et chargés dans un logiciel d’édition audio. Les marqueurs sont inscrits
dans le fichier audio, aussi bien au format linéaire qu’au format compressé.
Les marqueurs du FlashMic sont reconnus par un grand nombre d’applications d’édition
professionnelles, dont Cool Edit Pro, Adobe Audition, Sound Forge V4 et ultérieur. Notez
toutefois que les éditeurs ne peuvent actuellement lire que les marqueurs de fichiers audio
enregistrés sans compression.
Un marqueur s’ajoute au cours de l’enregistrement ou lecture par une courte pression sur
le bouton ENREGISTREMENT (notez qu’une pression longue active la fonction de verrouillage
du mode enregistrement). L’écran LCD affiche brièvement MARKED. Comme le marqueur n’est
qu’une balise de donnée interne au fichier audio, aucune autre indication de sa présence ne
sera donnée jusqu’au chargement du fichier obtenu dans un éditeur (les marqueurs peuvent
server de locators pendant la lecture).
Suppression d’une piste
Si un enregistrement erroné, indésirable ou inutilisable a été fait, il peut être supprimé de
la mémoire du FlashMic pour récupérer de l’espace mémoire.
La suppression de pistes s’effectue via le système de menus du FlashMic. Voir Menu
suppression, page 21 pour des détails complets sur la façon de supprimer une piste.
Fr.12
Page 56

Transfert de fichier
Généralement, vous emploierez votre FlashMic “sur le terrain” pour faire un certain
nombre d’enregistrements différents. Les fichiers audio qui en résulteront devront être
téléchargés du FlashMic dans un ordinateur à un moment ou un autre pour évaluation,
édition, suppression ou pour d’autres traitements avant de pouvoir être diffusés ou utilisés
autrement.
Dans de nombreuses organisations, le processus de transfert de fichier est accompli par
une personne autre que celle ayant fait les enregistrements. Il est possible qu’un FlashMic
ait pu être utilisé par plusieurs personnes ayant fait des enregistrements. Ou il peut arriver
qu’une personne ait utilisé plusieurs FlashMic durant une journée d’enregistrement sur le
terrain. Il est donc important de pouvoir se référer, au cours du processus de transfert à
tout journal tenu durant l’enregistrement, afin que les fichiers puissent être correctement
identifiés et attribués.
Il existe deux méthodes pour transférer les fichiers audio du FlashMic à un ordinateur.
• Via le logiciel FlashMic Manager fourni avec le FlashMic.
• Transfert direct.
Transfert à l’aide du FlashMic Manager
Nous considérerons que le FlashMic Manager a déjà été installé sur un ordinateur. Voir la
section Installation de FlashMic Manager, page 23 si ce n’est pas le cas.
•
Déterminez d’abord l’emplacement où doivent être transférés les fichiers audio
dans la structure des dossiers de l’ordinateur. Cela peut nécessiter de créer
et de nommer de nouveaux dossiers dans ce but.
•
Ouvrez l’application FlashMic Manager (notez que la fenêtre qui s’ouvre ne peut pas
être agrandie).
•
Allumez le microphone.
•
Branchez le FlashMic à un port USB de l’ordinateur, à l’aide du câble fourni.
•
L’écran LCD du FlashMic affiche USB, et le grand indicateur rouge de la fenêtre
du FlashMic Manager devient vert. Il peut aussi y avoir une confirmation sonore
et/ou visuelle de la “reconnaissance” du FlashMic par l’ordinateur (la forme exacte
prise par cette confirmation peut légèrement varier d’un ordinateur à l’autre.
Ignorez toute fenêtre intitulée DRM85 qui pourrait s’ouvrir).
•
Dans la zone intitulée USB Connection, cliquez sur le bouton Download Audio Data
from DRM… (télécharger les données audio depuis le DRM). La boîte de dialogue
Transfer Audio Files (transfert des fichiers audio) s’ouvre.
FRANÇAIS
Vous pouvez modifier l’extension du nom de fichier entre “.wav” et “.mpg” pour les
•
fichiers compressés. Cocher la case correspondant.
Fr.13
Page 57

Les fichiers audio du FlashMic s’afficheront sous forme de liste. Sélectionnez
•
ceux à transférer en les surlignant d’un simple clic (les conventions normales de
sélection multiple pour Windows/Mac s’appliquent.)
Cliquez sur le bouton Transfer…. La boîte de dialogue Browse For Folder (parcourir
•
pour trouver le dossier) s’ouvre.
Naviguez jusqu’au dossier dans lequel doivent être transférés les fichiers audio.
•
Cliquez sur OK.
Les fichiers sont transférés. Selon leur nombre et leur longueur, et selon les
•
caractéristiques de l’ordinateur, cela peut prendre de quelques secondes à
quelques minutes, durant lesquelles une barre de progression est affichée. Quand
les fichiers ont été transférés avec succès, une fenêtre de confirmation apparaît.
Fermez-la, le transfert est terminé.
Pour déconnecter le FlashMic du port USB, il faut double cliquer sur l’icone des
•
périphériques USB situé dans la barre de statut (prés de l’horloge). Cela ouvre une
fenêtre où l’on peut arrêter un périphérique USB. Il faut sélectionner le DRM-85
et cliquer sur arrêter. Cette procédure permet de s’assurer que des données
ne seront pas perdues lors de la déconnection du FlashMic de l’ordinateur.
Vous pouvez maintenant retirer le FlashMic en toute sécurité. Après déconnexion,
•
le FlashMic peut être éteint.
FRANÇAIS
Transfert direct dans un ordinateur
Comme le FlashMic est une unité de stockage de masse USB générique, ses fichiers
peuvent être transférés dans un Mac ou PC comme depuis toute autre unité de stockage
de masse USB (clé, disque dur etc).
N’essayez pas de formater le FlashMic depuis le Mac ou le PC car le système de fichiers
!
interne serait alors endommagé et tout enregistrement serait perdu.
Ne pas utiliser la commande chkdsk depuis un pc cela corromprai le système d’exploitation
du FlashMic.
Notez que l’exemple donné ci-dessous s’applique à un PC sous Windows™ XP. Les autres
systèmes d’exploitation diffèrent légèrement, aussi en cas d’inquiétude sur la procédure à
suivre, veuillez consulter votre revendeur HHB.
Allumez le microphone.
•
Branchez le FlashMic à un port USB de l’ordinateur, à l’aide du câble fourni.
•
L’écran LCD du FlashMic affiche USB.
Vous pouvez écouter les fichiers audio enregistrés dans le FlashMic avant de les transférer,
si vous le désirez. Pour cela :
Si une fenêtre “DRM-85 (d:)” s’ouvre (d = lettre d’identification du lecteur, variant
•
selon l’équipement du PC), référençant les options de lecture de fichiers musicaux,
vous pouvez sélectionner n’importe quelle application de lecture de fichier audio
offerte (comme Windows™ Media Player) pour écouter les fichiers audio présents
dans le FlashMic. Les options disponibles dépendront des applications logicielles
installées sur le PC.
Si le dossier correspondant au disque ne s’ouvre pas comme ci-dessus, vous
•
pouvez quand même écouter les fichiers en ouvrant n’importe quelle application
de lecture audio disponible sur le PC et en sélectionnant Fichier>Ouvrir. Ensuite,
commencez par naviguer jusqu’au périphérique DRM-85, qui apparaîtra dans la
liste des lecteurs et disques, puis jusqu’au dossier AUDIO qu’il contient. Les fichiers
audio s’y trouvent tous.
Si vous ne désirez pas écouter les fichiers au préalable, ou si vous l’avez déjà fait, effectuez
le transfert comme suit:
Déterminez d’abord l’emplacement où doivent être transférés les fichiers audio
•
dans la structure des dossiers de l’ordinateur. Cela peut nécessiter de créer et de
nommer de nouveaux dossiers dans ce but.
Avec l’explorateur Windows™, naviguez jusqu’au “disque” DRM-85 dans
•
le panneau “Dossiers”, et ouvrez le dossier intitulé “AUDIO”. Les fichiers audio
enregistrés apparaîtront dans le panneau principal de la fenêtre. Ne supprimez
aucun fichier dans les autres dossiers.
Fr.14
Page 58

Faites glisser et déposez les fichiers audio requis sur leur nouveau dossier, de
•
façon normale.
Pour déconnecter le FlashMic du port USB il faut double cliquer sur l’icone
•
des périphériques USB située dans la barre de statut (près de l’horloge). Cela
ouvre une fenêtre où l’on peut arrêter un périphérique USB. Il faut sélectionner
le DRM-85 et cliquer sur arrêter. Cette procédure permet de s’assurer que des
donnés ne seront pas perdues lors de la déconnection du FlashMic de l’ordinateur.
FRANÇAIS
Vous pouvez maintenant retirer le FlashMic en toute sécurité. Après déconnexion,
•
le FlashMic peut être éteint.
Connecter le Flashmic avec des batteries presque à plat sur l’ordinateur.
Il n’est généralement pas recommandé de connecter le FlashMic à l’ordinateur si les
batteries sont presque à plat. Si les batteries viennent à tomber à plat pendant un transfert
de données, le FlashMic continu à transférer des données si il peut prélever du courant
sur la prise USB, dans ce cas de figure si le câble du FlashMic est débranché avant que le
FlashMic ait finit de transférer ses données il y a de fortes chances de perdre des données
surtout si le FlashMic n’a pas été déconnecté de l’ordinateur proprement voir la procédure
ci-dessus…
Il est important de déconnecter le FlashMic du port USB de l’ordinateur suivant la procédure
ci-dessus, mais cela est indispensable si les batteries sont presque à plat.
Fr.15
Page 59

MENU
Système de menus du FlashMic
Le système de menus du FlashMic vous permet de faire les réglages internes et de
sélectionner diverses options correspondant à vos besoins d’enregistrement spécifiques.
Les fonctions basiques de l’enregistrement, de la lecture et du transfert de fichiers ne
nécessitent pas le recours au système de menus.
Notez que certains menus ne seront accessibles à l’utilisateur que si leur accès a été
autorisé dans le logiciel FlashMic Manager lors de la définition du fichier de configuration.
Ces menus sont clairement indiqués dans les descriptions qui suivent et sont marqués d’un
astérisque (*) dans le tableau ci-dessous. Veuillez lire la section du manuel sur le FlashMic
Manager pour plus d’informations sur les fichiers de configuration et l’autorisation ou le
refus d’accès à l’utilisateur.
Emploi des menus
On pénètre dans le système de menus en appuyant sur le bouton M/STOP alors que le
FlashMic est en mode de veille. Le mot MENU apparaît dans l’afficheur.
Notez qu’appuyer sur M/STOP alors que le FlashMic est en mode d’enregistrement ou de
lecture annule l’enregistrement ou la lecture.
FRANÇAIS
Entrée dans le système de menus
C’est “l’en-tête” de la liste des menus. Une ROTATION COURTE VERS LE BAS de la molette
affichera le premier des menus, PRESET. Les ROTATIONS COURTES VERS LE BAS suivantes
afficheront tour à tour les autres menus. Quand le menu que vous désirez contrôler ou
modifier est atteint, il peut être sélectionné par une PRESSION COURTE de la molette.
Les choix de menus sont:
MENU AFFICHAGE EMPLOI
Menu preset
* Menu mode
d’enregistrement
*Menu niveau
d’enregistrement
*Menu filtre passe-haut
*Menu batteries/piles
PRESET
R MODE
RECLEV
HIPASS
BATTYP
Permet la sélection d’un preset de
configuration différent
Permet la sélection du format de fichier audio
Réglage de niveau d’enregistrement
Activation/désactivation du filtre passe-haut
Réglage du type d’alimentation utilisé
(batteries ou piles)
Menu suppression
Menu réglage d’horloge
Appuyer une seconde fois sur M/STOP (n’importe où dans la structure de menus) ramènera
le FlashMic en mode de veille.
Une PRESSION COURTE de la molette depuis une option de menu (c’est-à-dire après qu’une
option de menu ait été sélectionnée) ramène le FlashMic à l’écran d’accueil de cette option
de menu. L’affichage inscrit brièvement “OK” pour confirmer que le changement à été pris
en compte.
DELTRK
TIMDAT
Supprime l’enregistrement sélectionné
Règle le calendrier et l’horloge interne
Fr.16
Page 60

PRESET
PSET 1
EMPTY
Menu Preset
Le menu Preset permet à l’utilisateur de sélectionner quel preset du fichier de configuration
actuel du FlashMic doit être utilisé.
Le fichier de configuration du FlashMic peut contenir jusqu’à 9 presets. Le fichier de
configuration se charge dans le FlashMic depuis un ordinateur, à l’aide du logiciel FlashMic
Manager fourni. Chaque preset détermine la valeur de divers paramètres du FlashMic, dont
le niveau et le mode d’enregistrement, la durée de mémoire tampon pré-enregistrement et
le nom du fichier (celui qui apparaîtra dans l’en-tête des fichiers audio). Les paramètres sont
tous définis dans le FlashMic Manager; voir Fichiers de configuration et presets, page 26
pour une description complète.
Pour entrer dans le menu preset, passez en mode MENU en appuyant sur le bouton M/
STOP, puis faites une ROTATION COURTE VERS LE BAS de la molette. L’écran affichera
PRESET. Sélectionnez ce paramètre avec une PRESSION COURTE et le nom du preset
actuellement sélectionné sera affiché. Pour sélectionner un autre preset, faites des
ROTATIONS COURTES VERS LE HAUT ou LE BAS de la molette. L’écran affichera le nom des
autres presets, tels que définis dans le FlashMic Manager. Quand le nom du preset voulu
est affiché, une PRESSION COURTE sur la molette sélectionnera ce preset et le chargera
dans le FlashMic. L’affichage inscrit OK pour confirmation.
Affichage du menu Preset
Notez que les 9 presets disponibles dans un fichier de configuration n’ont pas tous à être
définis dans le FlashMic Manager. Les presets non définis s’afficheront comme PSET N,
où N est un numéro entre 1 et 9, car PSET N est le nom par défaut des presets dans le
FlashMic Manager (toutefois, notez que PSET N restera affiché pour un preset, même
défini, si son nom par défaut n’a pas été changé !). Si vous essayez de sélectionner un
preset non défini, le message EMPTY (“vide”) s’affiche, indiquant que ce preset ne peut pas
être employé.
Nom du Preset
Notez que quand le FlashMic est utilisé pour la toute première fois, les neuf presets sont
vides.
Preset vide
FRANÇAIS
Fr.17
Page 61

R MODE
Menu mode d’enregistrement
Ce menu n’est pas disponible si “Enable Configuration changes in DRM” (autorisation de
changement de configuration depuis le DRM) a été réglé sur “No” (“non”) lors de la définition
du fichier de configuration dans le FlashMic Manager.
Ce menu permet de sélectionner un autre format d’enregistrement numérique que celui
déterminé par le preset actuellement sélectionné.
Le FlashMic propose un total de six formats d’enregistrement : deux formats de fichier,
chacun à trois fréquences d’échantillonnage différentes. Ce sont:
TYPE DE FICHIER
Fichiers BWF
(non compressés)
Fichiers BWF
(non compressés)
Fichiers BWF
(non compressés)
Fichiers MPEG1 (Layer 2) 48kHz
FREQUENCE
D’ECHANTILLONNAGE
48kHz
44.1kHz
32kHz
DISPLAY
LIN48K
LIN44K
LIN32K
MP48K
MAXIMUM
RECORDING TIME
3hr
3hr 15min
4hr 30min
12hr 15min
FRANÇAIS
Fichiers MPEG1 (Layer 2) 44.1kHz
Fichiers MPEG1 (Layer 2) 32kHz
Le choix du mode d’enregistrement sera généralement déterminé par la chaîne de production
du programme qui vient ensuite.
Pour passer en menu mode d’enregistrement, passez en mode MENU en appuyant sur le
bouton M/STOP, puis faites des ROTATIONS COURTES VERS LE BAS de la molette jusqu’à
ce que l’écran affiche R MODE.
MP44K
MP32K
14hr 40min
18hr 25min
Sélectionnez ce paramètre avec une PRESSION COURTE et le nom du mode d’enregistrement
actuellement sélectionné sera affiché. Pour sélectionner un autre mode d’enregistrement,
faites des ROTATIONS COURTES VERS LE HAUT ou LE BAS de la molette. L’écran affichera
le nom des autres modes.
Quand le nom du mode d’enregistrement voulu est affiché, une PRESSION COURTE sur la
molette le sélectionnera. L’affichage inscrit OK pour confirmation.
Affichage du menu mode d’enregistrement
Le mode d’enregistrement sélectionné sera utilisé pour les enregistrements ultérieurs
jusqu’à ce qu’un autre mode d’enregistrement ou preset soit sélectionné.
Notez que tout enregistrement déjà fait dans la mémoire du FlashMic demeurera dans le
mode en vigueur lors de sa réalisation.
Fr.18
Page 62

RECLEV
RVOL34
RV AGC
Menu niveau d’enregistrement
Ce menu n’est pas disponible si “Enable Configuration changes in DRM” (autorisation de
changement de configuration depuis le DRM) a été réglé sur “No” (“non”) lors de la définition
du fichier de configuration dans le FlashMic Manager.
Le niveau audio utilisé durant l’enregistrement sera celui défini dans le FlashMic Manager
pour le preset utilisé. Le menu niveau d’enregistrement permet de modifier ce niveau.
Pour passer en menu niveau d’enregistrement, passez en mode MENU en appuyant sur le
bouton M/STOP, puis faites des ROTATIONS COURTES VERS LE BAS de la molette jusqu’à
ce que l’écran affiche RECLEV.
Affichage du menu niveau d’enregistrement
Sélectionnez ce paramètre avec une PRESSION COURTE et l’écran affichera soit RVOLnn - où
nn = le niveau actuel – soit RV AGC si le réglage automatique de niveau d’enregistrement a
été demandé pour le preset actuel.
Le niveau d’enregistrement peut maintenant être réglé avec des ROTATIONS COURTES
VERS LE HAUT ou LE BAS. Une PRESSION COURTE sélectionnera le nouveau niveau.
Réglage de niveau d’enregistrement
Les unités utilisées sont en dB ; 01 = min, 40 = max.
Quand le niveau d’enregistrement est réduit à “zéro”, le système de réglage automatique
(AGC) est sélectionné.
Dans ce mode, le FlashMic ajuste automatiquement le niveau d’enregistrement en
fonction du niveau sonore. Dans la plupart des situations, cela assurera la réalisation
d’un enregistrement de niveau utilisable, mais comme avec tous les systèmes de gain
automatique, un certain effet de “pompage” du bruit de fond peut être audible dans
l’enregistrement.
Niveau d’enregistrement réglé sur AGC
Il est aussi possible d’ajuster le niveau d’enregistrement du FlashMic pendant l’enregistrement.
Voir Réglage du niveau d’enregistrement en page 11.
Notez que le niveau d’enregistrement revient toujours à la dernière valeur utilisée quand le
FlashMic est rallumé, et pas à la valeur réglée dans le preset.
FRANÇAIS
Fr.19
Page 63

HIPASS
BATTYP
Menu filtre passe-haut
Ce menu n’est pas disponible si “Enable Configuration changes in DRM” (autorisation de
changement de configuration depuis le DRM) a été réglé sur “No” (“non”) lors de la définition
du fichier de configuration dans le FlashMic Manager.
Le circuit analogique du FlashMic possède un filtre passe-haut pour aider au rejet des bruits
de fond extérieurs de basse fréquence, tels que les bruits de climatisation ou de trafic. Le
filtre a une pente de 12 dB/oct. et une fréquence de coupure de 100 Hz.
Le filtre est réglé dans le FlashMic Manager pour être en ou hors service pour chaque
preset, et ce réglage est chargé dans le FlashMic avec le fichier de configuration. Toutefois,
le filtre peut être inséré/retiré de la chaîne d’enregistrement grâce aux menus.
Pour passer en menu filtre passe-haut, passez en mode MENU en appuyant sur le bouton
M/STOP, puis faites des ROTATIONS COURTES VERS LE BAS de la molette jusqu’à ce que
l’écran affiche HIPASS.
Affichage du menu filtre passe-haut
Sélectionnez ce paramètre avec une PRESSION COURTE et l’écran affichera soit HP ON soit
HP OFF.
Le filtre peut être activé (ON) ou désactivé (OFF) avec des ROTATIONS COURTES de la molette.
FRANÇAIS
Une PRESSION COURTE validera le réglage. L’affichage inscrit OK pour confirmation.
Menu batteries/piles
Ce menu n’est pas disponible si “Enable Configuration changes in DRM” (autorisation de
changement de configuration depuis le DRM) a été réglé sur “No” (“non”) lors de la définition
du fichier de configuration dans le FlashMic Manager.
Le FlashMic peut être alimenté par des batteries rechargeables ou des piles alcalines. Ces
deux types ont des caractéristiques de décharge différentes, et pour que le symbole de pile
de l’écran LCD reflète la charge restante aussi fidèlement que possible, il est nécessaire de
régler le menu batteries/piles en fonction de l’emploi de batteries ou de piles.
Ce type se règle dans le FlashMic Manager de façon “globale”, c’est-à-dire qu’il est applicable
à tous les presets d’un fichier de configuration, et ne peut donc pas être sélectionné
différemment pour les divers presets. Le réglage peut cependant être supplanté par le
menu batteries/piles.
Pour passer en menu batteries/piles, passez en mode MENU en appuyant sur le bouton
M/STOP, puis faites des ROTATIONS COURTES VERS LE BAS de la molette jusqu’à ce que
l’écran affiche BATTYP.
Sélectionnez ce paramètre avec une PRESSION COURTE et l’écran affichera soit ALKLIN
(piles alcalines) soit RECBLE (batteries rechargeables). Le type peut être changé avec des
ROTATIONS COURTES de la molette. Une PRESSION COURTE validera le réglage. L’affichage
inscrit OK pour confirmation.
Fr.20
Affichage du menu batteries/piles
Page 64

DELTRK
TRK005
SURE N
SURE Y
Menu suppression
Il est souvent souhaitable de supprimer des enregistrements (pistes) non nécessaires
de la mémoire du FlashMic, particulièrement s’ils ont été faits par erreur ou s’ils sont
inutilisables.
Le menu suppression permet à l’utilisateur de le faire.
Notez que tout piste ainsi supprimée l’est définitivement et ne peut plus être récupérée.
Comme l’écran LCD du FlashMic ne référence les pistes que par leur numéro, avant de
supprimer une piste, vérifiez que c’est bien celle que vous désirez effacer. Une fois encore
cela montre l’importance de la tenue d’un journal précis des enregistrements. Si vous
avez un doute quelconque sur le numéro de la piste à effacer, relisez-la d’abord pour vous
assurer que c’est bien celle-ci.
Pour passer en menu suppression, passez en mode MENU en appuyant sur le bouton
M/STOP, puis faites des ROTATIONS COURTES VERS LE BAS de la molette jusqu’à ce que
l’écran affiche DELTRK.
Menu suppression de piste
Sélectionnez ce paramètre avec une PRESSION COURTE et l’écran affichera le numéro
de la piste actuellement sélectionnée, qui sera normalement celui de la dernière piste
enregistrée.
Sélection de la piste à supprimer
S’il est nécessaire de supprimer une autre piste, des ROTATIONS COURTES de la molette
changeront le numéro de piste, dans un sens ou dans l’autre. Quand le bon numéro de piste
est affiché, une PRESSION COURTE le sélectionne. Le texte SURE N s’affiche alors. Si vous
êtes sûr d’avoir sélectionné la bonne piste, une ROTATION COURTE VERS LE BAS changera
l’affichage en SURE Y.
Interruption de la suppression de piste
Confirmation de la suppression de piste
FRANÇAIS
Une autre PRESSION COURTE supprimera la piste. Notez que les numéros des pistes
(enregistrements) suivantes ne changent pas. L’affichage inscrit OK pour confirmation.
Si vous pressez la molette quand SURE N est affiché, rien n’est supprimé, et le FlashMic
retourne au choix des menus, avec DELTRK affiché.
Fr.21
Page 65

TIMDAT
Menu réglage d’horloge
Le FlashMic contient un calendrier/horloge en temps réel, qui permet d’horodater les entêtes de fichier audio. C’est une aide remarquable pour ensuite permettre l’identification
précise d’enregistrements de terrain qui peuvent sembler similaires.
L’horloge tourne continuellement tant qu’il y a des piles. Elle continue de fonctionner environ
1 minute après le retrait des piles, afin de laisser le temps de changer de piles. Si les
piles sont retirées pour une plus longue période, ou encore avant que le FlashMic ne soit
utilisé pour la première fois, l’horloge doit être réglée à la bonne date et à la bonne heure
du jour.
Notez que le FlashMic peut parfaitement être employé sans un réglage précis de l’horloge;
la seule conséquence est que les informations de date/heure du fichier seront incorrectes
(bien que les intervalles entre heures de création des fichiers soient eux corrects).
Pour passer en menu réglage d’horloge, passez en mode MENU en appuyant sur le bouton
M/STOP, puis faites des ROTATIONS COURTES VERS LE BAS de la molette jusqu’à ce que
l’écran affiche TIMDAT.
Affichage du menu réglage d’horloge
Sélectionnez ce paramètre avec une PRESSION COURTE et l’écran affichera Y yyyy, où yyyy
FRANÇAIS
est l’année. Cette valeur peut être changée avec des ROTATIONS COURTES de la molette.
Une PRESSION COURTE validera le réglage, et l’écran affichera ensuite MON mm, où mm est
le numéro du mois de l’année; DAY dd, où dd est le jour du mois; HH hh, où hh est l’heure
du jour (notez que le FlashMic utilise une horloge à 24 heures); MM mm pour les minutes, et
SEC ss pour les secondes. Chacune de ces valeurs peut être modifiée de la même façon
que l’année. La séquence complète est donnée ci-dessous.
TIMDAT
ê
Y 2006
Réglage de l’année
ê
MON 04
Réglage du mois
ê
DAY 06
Réglage du jour
ê
HH 23
Réglage de l’heure
ê
MM 00
Réglage des minutes
ê
SS 25
Réglage des secondes
Après réglage des paramètres de date et d’heure, l’écran LCD retourne à l’affichage d’accueil
TIMDAT après avoir inscrit OK brièvement; le système de menus peut alors être quitté en
appuyant sur M/STOP, ou un autre choix de menu peut être fait avec la molette.
Fr.22
Page 66

FlashMic Manager
Le FlashMic Manager est l’application logicielle fournie avec le FlashMic. Le CD-ROM livré
contient à la fois la version PC et la version Mac.
Bien qu’il soit parfaitement possible d’employer le FlashMic sans le FlashMic Manager, cela
ne permettrait pas d’exploiter tout son potentiel et ne vous donnerait pas accès à l’éventail
complet de caractéristiques qu’offre le FlashMic.
L’emploi de FlashMic Manager procure trois avantages majeurs:
Vous pourrez modifier la configuration interne de votre FlashMic, pour déterminer
•
quels formats de fichier et fréquences d’échantillonnage seront utilisés, et pour
changer d’autres paramètres du FlashMic.
Vous pourrez changer les préfixes de nom de fichier par défaut en quelque chose
•
de plus significatif et de plus parlant en fonction d’un travail particulier, en ajoutant
par exemple un nom de reporter.
Le FlashMic Manager fournit une méthode très simple pour télécharger dans
•
l’ordinateur les fichiers enregistrés.
Les instructions d’installation données considèrent que l’utilisateur est familiarisé avec
les opérations basiques sous Windows™/Mac™ concernant la manipulation de fichiers,
la navigation, etc. Si vous n’êtes pas sûr de savoir comment installer le logiciel, veuillez
consultez le service informatique de votre organisation ou votre revendeur HHB.
Installation de FlashMic Manager sur PC
(Installation initiale)
CONFIGURATION INFORMATIQUE REQUISE POUR FLASHMIC MANAGER (PC)
Tout PC faisant fonctionner de façon satisfaisante Windows™ XP ou 2000 doit supporter
le logiciel FlashMic Manager sans aucune difficulté. Un port USB libre est requis sur le PC,
pour la connexion du FlashMic.
Insérez le CD-ROM FlashMic dans le lecteur de CD/DVD du PC. Le CD doit
•
démarrer automatiquement, et la fenêtre suivante apparaîtra. Voir les instructions
d’installation manuelle, page 24, si le démarrage automatique ne fonctionne pas.
FRANÇAIS
Un dossier par défaut est créé ; c:\Program Files\FlashMic Manager, ou vous
•
pouvez sélectionnez un dossier de destination de votre choix. Utilisez le bouton
« Change » (“Parcourir”) pour naviguer de façon traditionnelle sous Windows
jusqu’à un emplacement convenable.
Cliquez « Next », une fenêtre de confirmation s’apparaitre.
•
Cliquez « Next » pour démarrer l’installation du FlashMic Manager.
•
Cliquez sur « Finish » pour terminer l’installation.
•
Fr.23
Page 67

Instructions d’installation manuelle.
Si pour une raison quelconque, le CD ne s’ouvre pas automatiquement, ouvrez
•
Poste de travail et double-cliquez sur le CD, qui se nomme FlashMic.
Trouvez le dossier intitulé FMM_Win et copiez-le à un emplacement convenable du
•
disque dur. C:\Program Files est l’emplacement recommandé.
Dans ce dossier se trouve un fichier nommé FlashMicManager.exe. Double-cliquez
•
sur ce fichier pour lancer l’installation.
Installation de FlashMic Manager sur Mac
CONFIGURATION INFORMATIQUE REQUISE POUR FLASHMIC MANAGER (Mac)
Tout Mac sous OSX (version 10.4x ou plus) doit supporter le logiciel FlashMic Manager
sans aucune difficulté. Un port USB libre est requis sur le Mac, pour la connexion du
FlashMic.
Insérez le CD-ROM FlashMic dans le lecteur de CD/DVD du Mac. Un Cd nommé
•
Flashmic Manager monte sur le bureau.
FRANÇAIS
Ouvrez le dossier intitulé « FMM_MacOSX » situé sur le Cd et double cliquer sur
•
le programme d’installation FMMInstall. Le programme va être installé dans le
dossier Applications sur le disque du principal. Un Alias su programme est
également copié sur le Bureau.
Pour lancer le FlashMic Manager, double cliquez sur l’icône FlashMic Manager
•
situé sur le Bureau.
FlashMic Manager Mise à jour
Comme tout fabricant responsable, HHB a adopté une politique de développement de ses
produits. Comme tout produit comportant un software, le Flashmic devrait comporter au fur
et à mesure des mises à jour. Vous pourrez contacter votre revendeur ou distributeur HHB,
ou, visiter le site web Flashmic http://www.flashmic.info pour les dernières informations.
La dernière version sera alors disponible sur le site web ainsi que les instructions concernant
le téléchargement.
Vous devrez toujours effacer l’ancienne version du FlashMic Manager avant d’installer la
version la plus récente. Il suffit de glisser déplacer le fichier FlashMicManager.exe dans la
poubelle de Windows.
Fr.24
Page 68

Emploi de FlashMic Manager
L’interface utilisateur de FlashMic Manager s’ouvre comme représenté ci-dessous:
Interface FlashMic sur PC
Interface FlashMic sur Mac
FRANÇAIS
Fr.25
Page 69

Fichiers de configuration et presets
Avant que vous ne commenciez à explorer les fonctions du FlashMic Manager, il est important
de comprendre la terminologie et les concepts de base pour l’emploi des presets.
Divers paramètres de fonctionnement du FlashMic peuvent être changés avec le FlashMic
Manager. Un jeu de paramètres est appelé un preset, et le FlashMic peut contenir jusqu’à
9 presets à la fois.
L’utilisateur de FlashMic peut sélectionner celui approprié à son application d’enregistrement
à l’aide des menus.
Un jeu de 9 presets se sauvegarde sous la forme d’un fichier de configuration dans
l’ordinateur, et vous pouvez créer et nommer autant de fichiers de configuration que vous
en avez besoin. Le nom des fichiers de configuration porte une extension .cfg. La totalité
du fichier de configuration sera ensuite chargée dans le FlashMic, lui apportant ses 9
presets.
Les paramètres du FlashMic qui peuvent être définis dans un preset par le FlashMic
Manager sont les suivants:
PARAMETRE VALEURS
Nom du preset Chaîne de 6 caractères Non
Mode d’enregistrement
Mémoire tampon préenregistrement
FRANÇAIS
Niveau d’enregistrement 8 paliers de 5 à 40 dB Oui
Filtre passe-haut Activé/désactivé Oui
Rétro-éclairage 3 options Non
Nom de fichier Chaîne de 31 caractères Non
Caractéristiques d’affichage
d’autonomie
* Les paramètres marqués d’un “Oui” peuvent par la suite être modifiés par l’utilisateur
directement sur le FlashMic, à condition que les Changements de configuration aient été
autorisés dans le FlashMic Manager lors de la création du fichier de configuration.
Type de fichier & fréquence
d’échantillonnage
0 à 10 secondes Non
Piles alcalines ou batteries
rechargeables
MODIFIABLE PAR
L’UTILISATEUR*
Oui
Oui
Emploi de la configuration par défaut
Au premier lancement de FlashMic Manager, un fichier nommé Defaults.cfg est créé.
Il se trouve dans le même dossier que le fichier exécutable de FlashMic Manager
(FlashMicManager.exe). Il diffère des autres fichiers *.cfg car son but est de fournir un jeu
pratique de valeurs par défaut pour les paramètres afin d’aider l’utilisateur à établir son
propre fichier personnalisé de configuration par défaut.
Les valeurs de paramètre fournies par ce fichier sont:
Fr.26
PARAMETRE VALEUR
Record mode (Mode
d’enregistrement)
Pre-Record Buffer (Mémoire
tampon pré-enregistrement)
Record Level (Niveau
d’enregistrement)
High-Pass Filter (Filtre passe-haut) Activé
Backlight (Rétro-éclairage) Mode d’économie d’énergie
File Name (Nom de fichier) TRACK
Battery (Caractéristiques
d’affichage d’autonomie)
Linéaire, fréquence
d’échantillonnage de 48 kHz
Désactivée
Contrôle de gain automatique
(AGC) activé
Piles alcalines
Page 70

Ce sont les réglages du FlashMic quand il est utilisé pour la première fois, “à la sortie de
sa boîte”.
Pour voir ces paramètres affichés dans le FlashMic Manager, cliquez sur File>New (ou
tapez CTRL+N). Cela supprimera les champs grisés prêts à la saisie de données. Puis
cliquez sur Presets>Set Default Values (ou tapez CTL + D). Cela charge les valeurs de
paramètre référencées ci-dessus dans les champs de données du preset actuellement
sélectionné, indiqué dans la case Select Preset (dans cet exemple, 1). La fenêtre FlashMic
Manager doit alors ressembler à ceci :
Notez qu’il est possible de modifier le fichier Defaults.cfg pour répondre aux besoins de
votre propre organisation (par exemple pour inclure le nom de votre société). Voir Création
d’un fichier Defaults personnalisé, page 33.
Fenêtre FlashMic Manager - Caractéristiques
Informations sur le preset
En utilisant le jeu de paramètres par défaut chargé précédemment à titre d’exemple (PSET_
1), examinez les différentes informations affichées maintenant dans la fenêtre.
Les paramètres marqués d’un ‡ sont ceux qui sont transférés au FlashMic en tant que
partie du preset.
Current Config file (“fichier de configuration actuel”):
Le nom de fichier affiché ici est celui du fichier de configuration actuellement chargé. Dans
ce cas, “New” (nouveau) est affiché puisque le fichier n’a pas encore été sauvegardé.
FRANÇAIS
Select Preset (preset sélectionné) – menu déroulant permettant la sélection d’un des 9
presets constituant le fichier de configuration.
Preset Custom Name ‡ (Nom personnalisé du preset) – champ de texte pour le nom du
preset. Ce nom s’affichera sur le FlashMic durant la mise sous tension (si ce preset a été
le dernier utilisé avant l’extinction).
Notez que des traits de soulignement (“underscore”) servent à insérer des espaces dans le
nom du preset de l’exemple, PSET_1.
SAVE (SAUVEGARDE)
Cliquer sur ce bouton sauvegarde le fichier de configuration actuellement chargé dans le
FlashMic Manager à la place du fichier qui été ouvert. Si le fichier a été créé sans partir
de rien (comme dans notre exemple), une fenêtre standard Save File As (“sauvegarder
sous”) s’ouvrira d’abord pour saisir un nouveau nom de fichier. Le nom proposé par défaut
est Presets.cfg, mais l’utilisateur peut le remplacer par le nom de son choix. Cliquer sur le
bouton SAVE revient à sélectionner File>Save, ou à utiliser le raccourci clavier CTRL + S.
Fr.27
Page 71

Preset Configuration (Configuration du preset)
Mode d’enregistrement ‡ (“Record Mode”) – ce menu déroulant vous permet de déterminer
le type et la fréquence d’échantillonnage du fichier parmi 6 options:
FRANÇAIS
MODE
D’ENREGISTREMENT
LIN48K
LIN44K
LIN32K
MP48K
MP44K
LIN32K
Audio Format (format audio) – confirme l’algorithme audio sélectionné
Sample Rate (fréquence d’échantillonnage) – confirme la fréquence d’échantillonnage
sélectionnée
Encoded BitRate (débit numérique) – confirme le débit numérique effectif des données
inscrites en mémoire
PreRecord Buffer ‡‡ (mémoire tampon pré-enregistrement) – menu déroulant pour régler
la durée de la mémoire tampon pré-enregistrement du FlashMic par paliers de 1 seconde
allant de zéro (off) à 10 secondes (réglée sur OFF dans l’exemple). Voir la section PreRecord
Buffer (Mémoire tampon pré-enregistrement), page 34 pour plus d’informations.
TYPE DE FICHIER
Fichiers BWF (non
compressés)
Fichiers BWF (non
compressés)
Fichiers BWF (non
compressés)
Fichiers MPEG1
(Layer 2)
Fichiers MPEG1
(Layer 2)
Fichiers MPEG1
(Layer 2)
FREQUENCE
D’ECHANTILLONNAGE
48kHz 3hr
44.1kHz 3hr 15min
32kHz 4hr 30min
48kHz 12hr 15min
44.1kHz 14hr 40min
32kHz 18hr 25min
DUREE MAXIMALE
D’ENREGISTREMENT
Record Volume/AGC ‡ (volume d’enregistrement/AGC) – Si la case AGC est cochée
(comme dans ce cas), le menu déroulant Record Volume est grisé. Avec ce réglage, le
circuit de contrôle automatique du gain (AGC) est activé, et aucun niveau d’enregistrement
fixe n’est réglé.
Si la case AGC n’est pas cochée, le menu déroulant Record Volume permet de régler le
niveau d’enregistrement par paliers de 5 dB de 5 à 40 dB.
Voir Réglage du niveau d’enregistrement, page 11 pour plus d’informations.
High Pass Filter ‡ (filtre passe-haut) – Le FlashMic possède un filtre passe-haut de 12 dB/
octave à 100 Hz qui peut être activé (“Yes”) ou désactivé (“No”).
Backlight ‡ (rétro-éclairage) – Le rétro-éclairage de l’afficheur du FlashMic peut être réglé
pour être de façon permanente allumé (“Always On”), éteint (“Always Off”), ou en mode
d’économie d’énergie (“Energy Save”), dans lequel il fonctionne un court instant quand un
bouton est pressé. L’autonomie sera notablement réduite si le rétro-éclairage est permanent
(“Always On”).
Fr.28
Page 72

BWF/MPEG File Info (informations sur le fichier BWF/MPEG)
File Name ‡ (nom du fichier) - Le texte de ce champ (par défaut “TRACK’” dans cet exemple)
fera partie de l’en-tête de tous les fichiers audio enregistrés par le FlashMic avec ce preset.
Cela sert à vous aider lors de l’identification ultérieure. Notez que le nom de fichier peut
être différent pour chaque preset d’un même fichier de configuration. Le nom peut contenir
jusqu’à 31 caractères.
Voir Structure des noms de fichier, page 35 pour plus d’informations.
Note: les données des trois champs suivants sont inscrites dans le segment de données
BEXT du fichier .wav et peuvent être lues par tout système d’édition compatible.
Company Name (nom de la société) – Ce champ est optionnel et peut être employé à titre
de référence et pour la gestion. Sa longueur maximale est de 31 caractères.
Reporter Name (nom du reporter) - Ce champ est optionnel et peut être employé à titre de
référence et pour la gestion. Sa longueur maximale est de 31 caractères.
Description - Ce champ est optionnel et peut être employé à titre de référence et pour la
gestion. Sa longueur maximale est de 255 caractères.
Autres caractéristiques et fonctions
DRM Configuration (Configuration depuis le DRM)
Enable Configuration Changes in DRM (autoriser les changements de configuration depuis
le DRM) – Régler ce paramètre sur “No” restreint la gamme d’options de menu disponibles
dans le FlashMic lui-même. Référez-vous au tableau de Emploi des menus, page 16 pour
voir quels paramètres ne seront pas modifiables par l’utilisateur
Battery (caractéristiques d’autonomie) – Ce menu déroulant sert à régler le type d’alimentation
(batteries ou piles) utilisé. Il change les caractéristiques de l’affichage d’autonomie sur le
FlashMic pour refléter les valeurs de décharge différentes des deux types.
USB Connection (Connexion USB)
FRANÇAIS
Send this configuration file to DRM (envoyer ce fichier de configuration au DRM)
Cliquer sur ce bouton initie le transfert dans le FlashMic du fichier de configuration
actuellement chargé dans le FlashMic Manager.
Download Audio Data from DRM (télécharger les données audio depuis le DRM)
Cliquer sur ce bouton initie le téléchargement dans l’ordinateur des fichiers audio
actuellement dans le FlashMic (voir section Transfert à l’aide du FlashMic Manager, page
13 pour plus de détails).
Fr.29
Page 73

Etat de la connexion
La grande “diode” (“DEL”) en haut à droite de la fenêtre indique si
un FlashMic est connecté à l’ordinateur. Elle est rouge si aucun
FlashMic n’est connecté, et vire au vert quand une connexion est
établie.
Barre de menus
De nombreuses options disponibles dans la barre de menus sont des choix communs à
toutes les applications Windows™ et nécessitent peu d’explications:
File> (Fichier>)
New (nouveau): efface tous les champs de paramètre, permet la création d’un nouveau
fichier de configuration (raccourci clavier : CTRL + N).
Open (Ouvrir): ouvre une boîte de dialogue pour la sélection de fichier à ouvrir/charger, afin
de permettre la sélection d’un fichier de configuration existant à charger (raccourci clavier
: CTRL + O).
Save (Sauvegarder): sauvegarde le fichier de configuration actuellement chargé sous le
même nom, sauf s’il s’agit d’un fichier nouvellement créé, auquel cas la boîte de dialogue
“Save File As” (“Sauvegarder fichier sous”) s’ouvre pour nommer le fichier (raccourci clavier
: CTRL + S).
Save As (Sauvegarder sous): ouvre la boîte de dialogue “Save File As” (“Sauvegarder
fichier sous”) pour permettre de nommer le fichier avant la sauvegarde (raccourci clavier
: aucun).
File Repair (réparation du fichier) : ouvrir un outil qui donne la possibilité de réparer un
FRANÇAIS
fichier audio du FlashMic qui a été endommagé (à cause d’une coupure d’alimentation,
etc.…) et de le récupérer. L’outil fera un scan de la mémoire du FlashMic, effectuera le
contrôle de la taille des fichiers et des « markers » EOF et corrigera, si possible, les erreurs
au fur et à mesure. Un rapport sera créé identifiant les réparations et les fichiers perdus.
(Cette fonction n’est disponible que pour les versions Pc)
Exit (Quitter): ferme le FlashMic Manager (raccourci clavier : CTRL + E).
Settings> (Réglages>)
Set Date and Time (Réglage de la date et de l’heure): ouvre la boîte de dialogue “Set Date
and Time” permettant le réglage de l’horloge interne du FlashMic. Cette horloge sert à
horodater les fichiers audio enregistrés (Raccourci clavier : CTRL + T).
Notez que cette option de menu n’est pas disponible si aucun FlashMic n’est connecté à
l’ordinateur et allumé.
Fenêtre de réglage de la date et de l’heure
Set DRM Name (Réglage du nom du DRM): ouvre la boîte de dialogue “Set DRM Name”
servant à changer le nom du FlashMic actuellement connecté (maximum 6 caractères). Le
nom d’usine par défaut est DRM85. Ce nom fait partie de l’en-tête de chaque fichier audio
enregistré, aussi doter le FlashMic d’un nom unique (par ex. celui de l’utilisateur) est d’une
grande aide quand plusieurs FlashMics sont employés (Raccourci clavier : CTRL + R). Voir
Noms de fichiers du FlashMic, page 35 pour plus d’informations.
Notez que cette option de menu n’est pas disponible si aucun FlashMic n’est connecté à
l’ordinateur et allumé.
Fenêtre de réglage du nom de DRM
Fr.30
Page 74

Presets>
Set Default Values (Retour aux valeurs par défaut): ramène tous les champs de paramètre
de la fenêtre FlashMic Manager aux valeurs d’usine par défaut déterminées par le fichier
Defaults.cfg, pour le preset actuellement sélectionné (1 – 9). Tout jeu existant de valeurs
du preset est remplacé, mais le fichier de configuration auquel il appartient reste inchangé.
La configuration reste aussi inchangée dans le FlashMic jusqu’à ce qu’un transfert de fichier
soit effectué. Cette option de menu n’est pas disponible tant qu’un fichier de configuration
n’a pas été chargé dans le FlashMic Manager (Raccourci clavier : CTRL + D).
Clear Preset Values (Effacement des valeurs du preset): efface simplement tous les
champs de paramètre; le fichier de configuration chargé et le FlashMic lui-même restent
inchangés (Raccourci clavier : CTRL + L).
Help> (Aide>)
Help (Aide en ligne): ouvre le fichier d’aide en ligne (Raccourci clavier : F1).
About (A propos de): affiche le numéro de version du logiciel FlashMic Manager.
Barre d’état
Un ensemble d’informations supplémentaires utiles est affiché dans la barre d’état du
FlashMic Manager. Il comprend (de gauche à droite dans la barre d’état):
L’étatdelaconnexionduFlashMic
Le nom du FlashMic connecté
Le numéro de version de micrologiciel (“firmware”) du FlashMic connecté
La date et l’heure actuelles (tirées de l’ordinateur)
Barre d’état
FRANÇAIS
Fr.31
Page 75

Connexion du FlashMic
Quand vous branchez le FlashMic à l’ordinateur sur lequel fonctionne FlashMic Manager,
vérifiez toujours au préalable que le FlashMic est sous tension et en mode de veille.
Branchez-le à l’ordinateur à l’aide du câble USB fourni.
NOTE : Si le Flashmic est en mode « record », la connexion USB sera ignorée et interrompue.
Dans ce cas, le connecteur doit être enlevé et reconnecté après la fin de l’enregistrement
afin que la connexion USB soit rétablie.
Quand le FlashMic est “reconnu”, la fenêtre FlashMic Manager affiche les valeurs de
paramètre du preset actuellement sélectionné dans le FlashMic lui-même*. Current Config
file: affiche “File in DRM is ‘xxx.cfg’”, où “xxx” est le nom de la configuration actuellement
chargée dans le FlashMic, et le champ Select Preset est ramené à zéro. La barre d’état
confirmera avec le message “Current active preset settings on DRM” que le FlashMic
Manager affiche maintenant les réglages internes du FlashMic.
*A la connexion du FlashMic, une fenêtre de connexion USB standard (intitulée dans ce cas
“DRM”) peut s’ouvrir, offrant diverses options; cliquer sur Cancel (Annuler) pour écarter
cette fenêtre.
Notez que connecter le FlashMic à l’ordinateur “forcera” le FlashMic Manager à afficher les
réglages internes du FlashMic et que cette opération supplantera toute autre donnée. Si des
données de preset non sauvegardées sont actuellement affichées, un message demandant
de sauvegarder les données actuelles s’affichera lors de la connexion du FlashMic.
FRANÇAIS
Astuce : Sauvegarder dans un nouveau fichier de configuration les réglages contenus dans
le FlashMic vous permet de copier les réglages d’un FlashMic dans un autre FlashMic ou
dans un autre ordinateur.
Création d’un nouveau fichier de configuration
Pour créer un ou plusieurs autres presets, vous devez d’abord créer un nouveau fichier de
configuration.
Cliquez sur File>New (ou tapez CTL + N). Cela efface tous les champs de saisie de
•
donnée et affiche “New” (nouveau) comme nom de fichier de configuration actuel
(Current Config file).
Saisissez les données pour le premier preset (Preset 1) dans tous les champs
•
des zones Current Config file, Preset Configuration et DRM Configuration de la
fenêtre. Notez que la saisie de tous ces champs est obligatoire. Le nom de fichier
(File Name) dans la zone BWF/MPEG File Info est aussi obligatoire, mais les
champs Company Name, Reporter Name et Description sont optionnels et peuvent
être laissés vierges si désiré. Notez que seuls les caractères A-Z et 0-9 sont
autorisés dans le champ File Name.
Fr.32
Page 76

Cliquez sur le bouton SAVE (ou sur File>Save, ou tapez CTL + S). La boîte de
•
dialogue Save File As (Sauvegarder le fichier sous) s’ouvre. Saisissez un nom
pour le fichier de configuration dans le champ File (Fichier) et cliquez sur Save
(Sauvegarder). La boîte de dialogue disparaît. Dans la fenêtre FlashMic Manager,
notez que le nom du fichier de configuration actuel (Current Config file) est
maintenant le nom saisi.
Si vous voulez créer d’autres presets dans ce fichier de configuration, sélectionnez
•
un nouveau numéro dans le menu déroulant Select Preset (il est normal,
bien que non essentiel, de travailler en ordre numérique !), ce qui efface tous
les champs de saisie de données. Saisissez les données pour le nouveau preset,
comme précédemment. Notez que deux options de la zone DRM Configuration
- Battery et Enable Configuration changes in DRM – conservent la sélection
faite lors de la création du preset initial. C’est normal puisque ces deux paramètres
s’appliquent à l’ensemble des presets d’un même fichier de configuration.
Lors de la sauvegarde (SAVE), le fichier de configuration déjà créé sera actualisé avec
•
les presets supplémentaires. Il est ensuite possible de transférer ce fichier de configuration.
Voir Transfert d’un fichier de configuration au FlashMic.
Modification d’un fichier de configuration existant
Vous pouvez changer un fichier de configuration existant, ou éventuellement vous servir d’un
fichier existant comme point de départ pour en créer un autre. N’importe quel paramètre
d’un ou de plusieurs presets peut être changé.
Cliquez sur File>Open (ou tapez CTL + O). La boîte de dialogue pour la sélection de
•
fichier à ouvrir/charger s’ouvre.
Les fichiers de configuration disponibles (*.cfg) apparaîtront. Sélectionnez
•
le fichier à utiliser, et cliquez sur Open (Ouvrir). Cela ferme la boîte de dialogue et
le FlashMic Manager a maintenant chargé le fichier. Le nom de fichier apparaît
comme fichier de configuration actuel (Current Config file) dans la zone du haut de
la fenêtre.
Les données du preset 1 sont affichées. Modifiez les paramètres de ce preset, ou
•
sélectionnez un autre preset à modifier.
Une fois tous les changements nécessaires apportés au preset choisi, cliquez
•
sur SAVE si vous désirez remplacer les paramètres d’origine du preset
(c’est-à-dire dans le fichier de configuration que vous avez ouvert). Le jeu
de presets sera sauvegardé dans le fichier de configuration de même nom.
Si vous désirez au contraire créer un nouveau fichier de configuration basé sur
les presets modifiés, cliquez sur File>Save As, et saisissez un nouveau nom dans
la boîte de dialogue Save File As (Sauvegarder fichier sous) qui s’ouvre. Cliquez sur
Save (Sauvegarder).
Si vous essayez d’ouvrir un autre preset avant d’avoir sauvegardé les changements
•
apportés à celui ouvert, un message d’alerte apparaîtra, vous demandant de
sauvegarder d’abord les changements.
Création d’un fichier Defaults personnalisé
FRANÇAIS
Vous pouvez modifier le fichier Defaults.cfg pour y inclure des valeurs de paramètre propres
à votre utilisation. Ainsi, quand Presets>Set Default Values sera sélectionné, vos réglages
personnalisés seront chargés dans les champs de données de FlashMic Manager.
Référez-vous à Modification d’un fichier de configuration existant et ouvrez Defaults.cfg.
Modifiez les données selon vos besoins, puis sauvegardez (Save) dans le fichier
Defaults.cfg existant.
!
Quand vous modifiez Defaults.cfg, ne changez pas le nom de preset PSET_1.
Fr.33
Page 77

Transfert d’un fichier de configuration au FlashMic
Après avoir modifié ou créé un fichier de configuration, vous pouvez le charger dans
le FlashMic. Cela peut se faire immédiatement après la modification du fichier de
configuration.
Lancez FlashMic Manager.
•
Allumez le FlashMic.
•
Avec le FlashMic en mode de veille, branchez-le à l’ordinateur grâce au câble USB
•
fourni.
L’écran LCD affichera USB, et le grand indicateur rouge du FlashMic
•
Manager passe au vert. Il peut aussi y avoir une confirmation sonore et/ou
visuelle de la “reconnaissance” du FlashMic par l’ordinateur (la forme exacte prise
par cette confirmation peut légèrement varier d’un ordinateur à l’autre. Ignorez
toute fenêtre intitulée DRM85 qui pourrait s’ouvrir). Le FlashMic Manager affichera
les valeurs de paramètre du preset actuellement sélectionné dans le FlashMic.
Dans le FlashMic Manager, cliquez sur File>Open (ou tapez CTL + O), et
•
sélectionnez le fichier de configuration que vous voulez charger dans le FlashMic.
Cliquez sur le bouton Send this configuration file to DRM (envoyer cette
•
configuration au DRM). Une fenêtre de message s’ouvrira après un court instant,
confirmant que le fichier de configuration a été transféré.
FRANÇAIS
Démonter »le FlashMic des connexions USB et enlever le du port USB. La
•
retourne a son mode fonctionnement initial. Toutes les combinaisons de presets
ou de configuration peuvent maintenant être utilisé et les rappelant via le Menu
Preset. Voir Menu Preset, page 17 pour plus de détails.
Ne modifier pas les fichiers .cfg dans un logiciel PC ou Mac car cela risque d’entraîner des
!
disfonctionnement.
PreRecord Buffer (Mémoire tampon préenregistrement)
Le FlashMic possède une mémoire tampon pré-enregistrement pouvant atteindre 10
secondes (réglable).
Quand elle est activée, l’audio capté par le microphone est constamment enregistré dans
une mémoire tampon – indépendante de la mémoire principale – aussi longtemps que
le FlashMic est alimenté. Par conséquent, les dernières secondes d’audio sont toujours
conservées dans le FlashMic. Quand on appuie sur le bouton ENREGISTREMENT, le contenu
de cette mémoire tampon est transféré en mémoire principale tandis que l’audio “live”
continue d’entrer dans la mémoire tampon. Quand on appuie sur le bouton M/STOP, le
contenu de la mémoire tampon continue d’être transféré dans le fichier audio, ainsi rien
n’est perdu.
Quand l’enregistrement est relu, vous constatez que l’audio commence quelques secondes
avant le moment auquel le bouton ENREGISTREMENT a été pressé.
Le FlashMic n’a pas lui-même de commandes pour la mémoire tampon de pré-enregistrement;
celle-ci est activée et sa durée est réglée depuis le logiciel FlashMic Manager, dans la
configuration de preset. La mémoire tampon pré-enregistrement peut être réglée de 0 à
10 secondes, par pas d’une seconde.
Réglage de la durée de pré-enregistrement
Il faut savoir que si tous les fichiers audio sont créés avec 10 secondes de mémoire
tampon pré-enregistrement, la mémoire disponible sera plus rapidement consommée. Un
peu d’expérimentation peut être nécessaire pour trouver un réglage optimal de la durée de
pré-enregistrement.
Il est recommandé de désélectionner cette mémoire tampon (en réglant sa durée sur “OFF”
dans le FlashMic Manager) pour les enregistrements où elle n’apporte rien.
Fr.34
Page 78

Noms de fichiers du FlashMic
Fréquemment, le nombre de fichiers audio à télécharger depuis un FlashMic peut être assez
important. Plus encore, le FlashMic peut avoir été utilisé à plusieurs endroits différents,
et/ou par différents journalistes/ingénieurs du son. Il est donc important d’identifier les
fichiers audio dès l’enregistrement pour que leur identité et leur origine soient correctement
attribuées.
Un journal écrit (ou électronique) des enregistrements est recommandé par ailleurs dans
ce manuel, et c’est une bonne habitude professionnelle que d’en tenir un. Le FlashMic
Manager apporte en plus à l’utilisateur une assistance supplémentaire considérable pour
l’identification de fichier sous la forme d’informations d’en-tête de fichier définissables.
Structure des noms de fichier
Les fichiers audio enregistrés dans le FlashMic sont des fichiers .wav, avec des noms de
fichier constitués de trois composantes mises bout à bout et séparées par des traits de
soulignement (“underscore”) comme suit:
NOM DU MICRO_NOM DE FICHIER BWF _NUMERO DE PISTE.wav
Les trois composantes du nom de fichier sont spécifiées dans le FlashMic Manager dans la
définition d’un preset. Après transfert dans le FlashMic du fichier de configuration contenant
les paramètres de preset, certaines des données de texte saisies dans le FlashMic Manager
servent à former une partie du nom de fichier.
Les trois composantes du nom de fichier sont formées comme suit:
NOM DU MICRO – C’est le nom saisi dans le FlashMic Manager avec
•
Settings>Set DRM Name. Ce nom s’applique à tous les presets définis pour un
fichier de configuration particulier. Dans une organisation utilisant plusieurs
FlashMic, cela permet de doter chacun d’un nom spécifique, qui peut être par
exemple MIC_nn, ou le nom de l’ingénieur du son (s’il utilise toujours le même
FlashMic). La longueur maximale du nom de micro est de 6 caractères
(alphanumériques majuscules seulement).
NOM DU FICHIER BWF – C’est le nom saisi dans le champ File Name
•
(en zone BWF/MPEG File Info) du FlashMic Manager. Ce champ peut être réglé
différemment pour chaque preset dans un fichier de configuration. Ce champ
peut être utilisé de diverses façons selon l’emploi du FlashMic ; une possibilité peut
être de créer des presets qui ne diffèrent que par le nom de fichier, le texte
rappelant les différentes interviews pour lesquelles le FlashMic doit être utilisé
durant une journée. La longueur maximale du nom de fichier est de 31 caractères
(alphanumériques seulement, sans espaces - utiliser l’underscore).
NUMERO DE PISTE – Cette partie du nom de fichier est produite par le
•
FlashMic lui-même, et c’est simplement le numéro de l’enregistrement, qui
augmente automatiquement d’une unité à chaque nouvel enregistrement. Il
s’affiche sous la forme TRKnnn dans l’écran LCD du FlashMic. Le
format du numéro de piste est aussi TRKnnn, où nnn est le numéro de piste.
Notez que le numéro de piste ne revient pas à zéro quand on change de preset
sur le FlashMic, quand un nouveau fichier de configuration est chargé ni quand
les fichiers audio sont téléchargés. Il faut reformater la mémoire (voir section
Reformatage de la mémoire pour plus d’informations) pour remettre à zéro le
compteur de pistes.
Ci-dessous se trouvent quelques exemples de noms de fichiers audio.
FRANÇAIS
Structure des noms de fichiers dans FlashMic
Fr.35
Page 79

Dans cet exemple, plusieurs fichiers se trouvent dans le dossier AUDIO du FlashMic. Le
FORMAT
premier d’entre eux se nomme MIC_01_JOHN_TRK001.wav.
Dans ce nom de fichier, MIC_01 est le nom du FlashMic réglé dans le FlashMic Manager
pour le fichier de configuration chargé dans le FlashMic.
JOHN – vraisemblablement le nom de l’ingénieur du son – est le nom de fichier BWF/MPEG
réglé dans le FlashMic Manager pour un des presets. Nous ne pouvons pas savoir de quel
numéro de preset il s’agit rien qu’avec le nom de fichier .wav, mais “John” doit avoir cette
information, puisqu’il a sélectionné ce preset.
TRK001 est le numéro de piste – sans doute le premier enregistrement de la journée.
En regardant les autres noms de fichier du dossier, on constate qu’ils commencent tous par
MIC_01, ce qui sera le cas si le nom du FlashMic (DRM Name) n’a pas été changé durant la
période des enregistrements par chargement d’un nouveau fichier de configuration portant
un nom de micro différent. Certains fichiers ont une composante de nom de fichier BWF/
MPEG différente; cela signifie – dans notre exemple – que le FlashMic a été employé par
des ingénieurs du son différents, qui ont chacun sélectionné un preset différent. Notez
enfin qu’aucun numéro de piste n’existe en double. D’autres moyens d’identification des
enregistrements peuvent bien sûr être obtenus à partir des informations de date/heure
du fichier, qui seront précises à condition que l’horloge interne ait été correctement réglée
au préalable.
La façon dont vous utiliserez le système d’appellation de fichier dépendra grandement du
type d’organisation utilisant le(s) FlashMic, du nombre d’unités employées, du nombre de
personnes utilisant chaque FlashMic, des types d’enregistrement effectués, etc. Dans
les situations les plus simples mono-micro/mono-utilisateur, tous les réglages par défaut
FRANÇAIS
peuvent être utilisés sans risque de confusion.
Reformatage de la mémoire
La mémoire flash de 1 Go du FlashMic peut être reformatée si vous le désirez. C’est
souhaitable après une mise à jour du micrologiciel (“firmware”), et c’est essentiel si le
FlashMic a été formaté via USB depuis un ordinateur. C’est aussi une méthode pratique
pour effacer tous les fichiers audio de la mémoire.
!
IMPORTANT: Reformater la mémoire flash supprimera définitivement tous les fichiers audio
et les données de preset présents dans le FlashMic, aussi vérifiez que tous vos fichiers audio
ont bien été téléchargés dans un ordinateur avant d’effectuer cette procédure.
Pour reformater la mémoire interne, procédez comme suit:
Avec le FlashMic éteint, maintenez enfoncés les trois boutons latéraux -
•
ENREGISTREMENT (G), LECTURE (H) & M/STOP (M) – simultanément.
En maintenant ces trois boutons enfoncés, allumez le FlashMic. L’écran LCD
•
affichera FMT N. Si vous êtes sûr de vouloir formater, faites une ROTATION
COURTE VERS LE BAS de la molette pour confirmer et changer l’affichage en
FMT Y, puis une COURTE PRESSION pour valider.
L’écran affiche maintenant FORMAT. Le reformatage prend environ 35 secondes.
•
Le FlashMic retourne ensuite en mode de veille.
Fr.36
Ecran LCD du FlashMic durant le formatage.
Page 80

Mises à jour du micrologiciel (“Firmware”)
Fabricant responsable, HHB adopte une politique de développement continu de ses produits.
Comme avec tous les produits à base logicielle, il peut être souhaitable d’actualiser de
temps à autre le micrologiciel ou “firmware” présent dans votre FlashMic. Vous pouvez
contacter votre revendeur ou distributeur HHB, ou visiter le site web de FlashMic à http://
www.flashmic.info pour des détails sur les mises à jour de firmware.
Les mises à jour de firmware sont téléchargeables depuis le site web FlashMic ou, si vous
préférez un CD-ROM, auprès de votre revendeur/distributeur local. Sinon, si vous ne vous
sentez pas de faire vous-même la mise à jour du firmware, apportez votre FlashMic à votre
revendeur HHB qui sera heureux de la faire pour vous.
Il est recommandé de reformater la mémoire interne après une mise à jour du firmware.
Voir Reformatage de la mémoire pour plus de détails.
Certaines mises à jour de firmware forceraient un reformatage. Il est donc très important
de s’assurer que la sauvegarde de tous les fichiers audio et data aient été effectuée avant
de commencer les mises à jour.
Pour mettre à jour le firmware, procédez comme suit:
Repérez d’abord le dossier et le fichier du firmware. Que vous ayez téléchargé le
•
firmware depuis le site web FlashMic ou qu’il soit sur CD-ROM, il se trouve toujours
dans un dossier intitulé FW VER xx-xx-xx, où xx-xx-xx est le numéro de version du
firmware. Ce dossier contiendra un fichier nommé DRM85.bin, qui est le véritable
fichier de firmware.
Notez que le nom de fichier de firmware n’identifie pas sa version, et il est donc important
de le conserver dans le dossier dans lequel il est “arrivé” pour facilement l’identifier.
Vérifiez que les piles/batteries de votre FlashMic sont bien chargées, et changez-
•
les en cas de doute. Ne lancez JAMAIS une mise à jour de firmware avec des
piles/batteries faibles, car le FlashMic pourrait être rendu inutilisable en cas de
panne d’alimentation en cours de la procédure de mise à jour.
Allumez le FlashMic et branchez-le à l’ordinateur à l’aide du câble USB. L’écran
•
LCD se changera en USB, et l’ordinateur signifiera qu’il a reconnu le FlashMic de la
façon habituelle.
Le FlashMic sera identifié dans la structure des répertoires comme un disque
•
supplémentaire (dont la lettre d’identification variera d’une machine à l’autre).
Faites glisser et déposez le fichier DRM85.bin à la racine du FlashMic (pas dans un
•
des trois dossiers AUDIO, CONFIG ou FIRMWARE qu’il contient).
Quand le transfert de fichier est terminé, débranchez le câble USB du FlashMic et
•
éteignez ce dernier.
Rallumez le FlashMic; l’écran LCD affichera maintenant le message UPDATE. Le
•
bargraph commencera à bouger de gauche à droite.
La mise à jour va continuer et aboutir automatiquement. Quand le bargraph indique
•
est au maximum, le FlashMic retournera en mode de veille ou entrera dans le
mode de reformatage.
FRANÇAIS
Rallumez le FlashMic et la mise à jour continuera automatiquement. Quand le
•
bargraph est plein, le FlashMic retourne au mode de veille.
Le nouveau firmware est maintenant installé. Selon la nature spécifique de
•
changement de firmware, le Flashmic pourrait être reformaté automatiquement.
Dans ce cas, l’écran devra afficher FMT N. Il est conseillé, cependant, de formater
systématiquement la mémoire après chaque mise à jour. Voir Reformatage de la
mémoire pour plus de détails.
Fr.37
Page 81

Caractéristiques techniques
Fréquence 48 kHz, 44,1 kHz et 32 kHz. Sélection par le FlashMic Manager ou sur le DRM85.
d’échantillonnage
Résolution (linéaire) 16 Bits
Formats audio PCM linéaire ou MPEG 1 Layer 2. Sélection par le FlashMic Manager ou sur le DRM85. 6
modes de réglage.
Débits numériques 192, 160, 128 kb/s
(MPEG)
Réponse en fréquence 20 Hz - 20 kHz ± 1dB à 48 kHz FS (PCM linéaire)
électronique
DHT + B < 0,1 % (20 Hz - 20 kHz) à 48 kHz FS (PCM linéaire)
Nombre de canaux 1 (Mono)
Capsule du microphone Omnidirectionnelle
Niveau Commande de gain manuelle ou automatique
d’enregistrement
Filtre passe-haut Commutable on/off, 12 dB/octave à 100 Hz
Système de stockage Mémoire interne fixe, capacité 1 Go.
de données
Date / Heure Horloge interne en temps réel, fonctionnant tant qu’il y a une alimentation. Alimentation
de sauvegarde durant 1 minute pour permettre le changement de piles. Réglage/
synchronisation par l’application de l’ordinateur hôte à partir de l’horloge de celui-ci. Réglage
manuel par menu sur le DRM85.
Format de fichier PCM linéaire : .wav, Fichier Wave Broadcast ou “BWV” (.wav). Ou .wav compressé (MPEG 1
Layer 2)
Horodatage date/heure stocké dans l’en-tête de fichier. Nom de fichier produit
automatiquement par le DRM85, chaîne de caractères de base fournie par le logiciel sur PC.
FRANÇAIS
Système de fichiers FAT. Monte comme un disque amovible par protocole de périphérique USB de stockage de
masse. Le transfert de fichier est possible avec le logiciel FlashMic Manager ou grâce à
l’explorateur Windows et au Finder de Mac OS.
Sortie casque Prise stéréo 3,5 mm, signal mono envoyé aux deux canaux. Commande manuelle de volume
par bouton rotatif. Cette sortie peut servir pour un enregistrement audio analogique. Capacité
pour casque de 32 ohms, protection contre les courts-circuits.
Accessoires fournis Pince de pied, piles (x2), câble USB, étui, CD-ROM, manuel.
Accessoires optionnels Bonnette (DRMWS), pied de table (DRMTS).
Poids 366 grammes / 13 onces (sans les piles).
Dimensions Longueur 244 mm / 9,6 pouces. Plus grand diamètre (capsule du micro) 50 mm, 2 pouces.
Fr.38
Page 82

Hz
100
100
1.000
1.000
10.000
10.000
dBV
-20
-30
-40
-50
-60
-70
50 100 200 500 1k 2k 5k 10k 20k
0°
30°
60°
90°
120°
150°
180°
210°
240°
270°
300°
330°
Diagramme polaire et courbe de réponse en fréquence du microphone
Courbe de réponse en fréquence du FlashMic
2kHz
5dB
10dB
15dB
20dB
25dB
4kHz
FRANÇAIS
1 kHz et en dessous
8kHz
16kHz
Diagramme polaire du FlashMic
Fr.39
Page 83

Notification
ENREGISTREMENT DU PRODUIT
Veuillez vous enregistrer comme propriétaire de votre FlashMic sur http://www.flashmic.
info. L’enregistrement vous permettra de recevoir des mises à jour de logiciel et d’autres
informations importantes sur le FlashMic.
DECLARATION DE CONFORMITE CE
Cet équipement satisfait les directives EMC (89/336/EEC) relatives à la compatibilité
électromagnétique par l’application des avis: EN55013:2001 et EN55020:2002.
DECLARATION SUR LES DECHETS D’EQUIPEMENTS ELECTRIQUES ET
ELECTRONIQUES
Le FlashMic a été développé et fabriqué avec des matériaux et
composants de haute qualité, qui peuvent être recyclés et/ou
réutilisés. Ce symbole indique qu’un équipement électrique et
électronique doit être mis au rebut séparément des déchets
normaux quand sa durée de vie opérationnelle est écoulée.
Veuillez jeter ce produit en l’apportant à votre point de collecte
ou centre de recyclage local pour un tel équipement. Cela aidera à
protéger l’environnement dans lequel nous vivons tous.
GARANTIE LIMITEE DU LOGICIEL
Les fonctionnalités de tout logiciel fourni avec, ou acquis spécifiquement pour, les produits
HHB ont été testées. HHB Communications Ltd fera tous les efforts raisonnables pour
corriger les défauts de logiciel qui lui seront rapportés dans des versions futures, en fonction
des contraintes techniques et économiques. HHB Communications Ltd n’apporte aucune
garantie expresse ou implicite quant aux performances du système ou à son adéquation
pour un besoin particulier.
En aucun cas HHB Communications Ltd ne pourra être tenu pour responsable de
dommages directs ou indirects causés par des défauts du logiciel ou de sa documentation.
FRANÇAIS
De plus, HHB Communications Ltd ne pourra être tenu pour responsable d’aucune perte ou
altération de programmes, sons, enregistrements audio, séquences ou données conservés
dans les produits HHB ou utilisés avec eux, ni du coût de restauration.
Les exclusions de garantie ci-dessus sont exclusives et remplacent toute autre, orale ou
écrite, expresse ou implicite, dans les limites permises par la loi du pays où a été vendu le
produit. Aucun employé de HHB Communications Ltd, agent, distributeur ou employé d’un
agent ou distributeur n’est autorisé à offrir une quelconque variation de cette garantie.
MARQUES COMMERCIALE
Toutes les marques commerciales, tous les noms de produit et de société sont la propriété
de leurs propriétaires respectifs
Fr.40
http://www.flashmic.info
Page 84

Notes
FRANÇAIS
Fr.41
Page 85

Notes
FRANÇAIS
Fr.42
Page 86

Einleitung
Herzlichen Glückwunsch zum Kauf Ihres HHB FlashMics.
In diesem Handbuch finden Sie alle Informationen, die Sie für den Einsatz Ihres FlashMics
brauchen.
Bitte lesen Sie das Handbuch vor Nutzung des FlashMics aufmerksam durch und bewahren
Sie es für zukünftige Fragen gut auf.
Produktdetails
Eigentümer:
Firma:
Kaufdatum:
DEUTSCH
Seriennummer:
De.1
Page 87

Sicherheitsinformationen
Das HHB FlashMic ist bei normalem Gebrauch ein robustes Werkzeug. Zugleich ist es
aber auch ein qualitativ hochwertiges, professionelles Mikrophon und ein empfindliches
elektronisches Gerät. Ein gewisses Maß an Vorsicht im Umgang ist also immer geboten.
Setzen Sie das Mikrophon niemals mechanischen Belastungen aus; lassen Sie
•
es also nicht fallen und stoßen Sie an keine harten Oberflächen.
Öffnen Sie das Batteriefach immer mit Vorsicht. Öffnen Sie es mit den Händen und
•
keinesfalls mit Hilfe scharfer Werkzeuge.
Üben Sie keine großen Kräfte auf die Anschlüsse oder die Schalter auf der
•
Unterseite des Mikrophons aus. Angeschlossene Kabel sollten niemals mechanisch
gespannt sein.
Entsorgen Sie leere Batterien bitte immer nach Maßgabe der Gesetzte und
•
Vorschriften Ihres Landes.
Reinigen Sie das FlashMic nur mit einem leicht angefeuchteten Tuch. Benutzen Sie
•
zur Reinigung niemals Lösungsmittel oder Scheuermittel.
Lieferumfang
Bitte vergleichen Sie folgende Liste mit dem Lieferumfang. Sollte etwas fehlen oder
beschädigt sein, wenden Sie sich umgehend an Ihren HHB-Händler oder an den HHBVertrieb.
DRM85 FlashMic Mikrophon
•
Mikrophontasche
•
DEUTSCH
Mikrophonhalter mit Standardgewinde (5/8” 27TPI), und 3/8”-Adapter (16TPI
•
BSW)
1,5 m. USB-Kabel, Typ A auf 5-Pin Mini-B
•
2 x AA Batterien
•
CD-ROM mit FlashMic Manager Software (Versionen für Windows™ und Mac™)
•
De.2
Page 88

Inhaltsverzeichnis
Einleitung
1
Sicherheitsinformationen 2
Lieferumfang 2
FlashMic Features 4
Überblick über das FlashMic 5
Batterien 7
Einsatz des FlashMics 8
FlashMic Menu System 16
Das FlashMic Display 6
Einsetzen der Batterien 7
Batterie-Management 7
Batterie-Statusanzeige 7
Der Jogswitch 8
Einschalten des FlashMics 9
Die erste Aufnahme 10
Aufnahmepuffer (Übersicht) 10
AufnahmesperrungAufnahmesperrung 11
(REC LOCK) 11
Mithören (Monitoring) 11
Einstellung des Aufnahmepegels 11
Wiedergabe von Tracks 12
Markierungen 12
Löschen eines Tracks 12
Dateien Übertragen 13
Transfer mit dem FlashMic Manager 13
Direkter Transfer zum Rechner 14
Anschluss eines FlashMics mit fast leeren Batterien an den Rechner 15
Nutzung der Menüs 16
Presetmenü 17
Das Menü für den Aufnahmemodus 18
Das Menü für den Aufnahmepegel 19
Das Hochpass-Filter-Menü 20
Das Batterietyp-Menü 20
Das Lösch-Menü 21
Uhrzeit und Datum 22
FlashMic Manager 23
Installation des FlashMic Managers auf einem PC (Erstinstallation) 23
Installation des FlashMic Managers auf einem Mac 24
Update des FlashMic Managers 24
Die Nutzung des FlashMic Managers 25
Konfigurationsdateien und Presets 26
Die Arbeit mit den Grundeinstellungen 26
FlashMic Manager - Funktionen 27
Presets 27
Andere Funktionen 29
Anschluss des FlashMics 32
Erstellung einer neuen Konfigurationsdatei 32
Modifikation einer Konfigurationsdatei 33
Erstellung persönlicher Grundeinstellungen 33
Hochladen einer Konfigurationsdatei in das FlashMic 34
Der Aufnahmepuffer 34
FlashMic Dateinamen 35
Die Struktur der Dateinamen 35
Formatierung des Speichers 36
Update der Firmware 37
Spezifikationen 38
Polardiagramm und Frequenzgang der Mikrophonkapsel 39
Mitteilung 40
Notizen 41
DEUTSCH
Bedienungsanleitung Version 4. September ‘06
De.3
Page 89

FlashMic Features
Das FlashMic verbindet ein professionelles, omnidirektionales Kondensatormikrophon mit
einem integrierten, digitalen Audio-Rekorder zu einer Einheit. Die äußerst einfache Bedienung
ermöglicht auch technisch weniger interessierten Nutzern problemlose Arbeit. Erfahrene
Toningenieure hingegen werden die umfangreichen Zusatzfunktionen zu schätzen wissen,
die sie bequem mit den Menüs des FlashMics bedienen können.
Über die USB-Schnittstelle des FlashMics haben Sie Zugriff auf Ihre Aufnahmen. Die
gespeicherten Audio-Dateien werden als .wav Dateien in linearem oder komprimiertem
Format (MPEG 2 Layer 1) auf den Computer übertragen. Dies kann entweder über die
mitgelieferte FlashMic Manager Software geschehen oder durch einfaches kopieren der
Dateien im Dateisystem des Rechners.
Sie können Ihr FlashMic als das Audio-Äquivalent zu einer digitalen Kamera betrachten.
Genau so wie Sie die Kamera nutzen, um hochwertiges, digitales Bildmaterial aufzunehmen
und auf Ihren Rechner zu übertragen, machen Sie es auch mit dem FlashMic – nur eben mit
Audiomaterial. Der Klang kann genau wie die Bilder der Digitalkamera nach der Aufnahme
manipuliert, gespeichert oder per Email verschickt werden.
Das FlashMic eignet sich hervorragend für Journalisten bei Pressekonferenzen und
Interviews, für Firmen, öffentliche Einrichtungen – für jegliche Situation bei der eine schnelle
und bequeme Möglichkeit zur hochwertigen Aufnahme von Sprache benötigt wird.
Im Folgenden finden Sie einige Hauptfunktionen des FlashMics:
•
Lineare oder komprimierte (MPEG 2 Layer 1), digitale Aufnahme als .wav Dateien.
•
Bis zu 18 Stunden Aufnahmezeit, abhängig vom Dateiformat und der Abtastrate.
•
Integrierter Kopfhörerverstärker mit einstellbarem Pegel.
•
Energieversorgung über zwei Batterien oder Akkus vom Typ AA.
•
Betriebsmodi für Experten oder technische Laien.
•
Bis zu 10 Sekunden Aufnahmepuffer.
•
Schneller Dateitransfer über USB zu Mac oder PC.
•
9 interne Presets zur Speicherung der Konfiguration des FlashMics.
•
DEUTSCH
Einstellbarer Aufnahmepegel oder automatische Aussteuerung mit Pegelanzeige.
•
Anzeige der verbleibenden Aufnahmezeit.
•
Wiedergabe der letzten oder auch früherer Aufnahmen über den Monitor-Ausgang.
•
Bei Aufnahme und Wiedergabe von Tracks können Markierungen eingefügt werden.
•
Eine Funktion zur Dateiwiederherstellung rettet Ihre Daten im Falle eines
Stromausfalls oder anderer Defekte.
De.4
Page 90

Überblick über das FlashMic
USB
MENU
PHONES
2
3
4
1
10
11
98
Schutzkorb (Windschutz) über der Mikrophonkapsel
1
2
FlashMic-Korpus
LCD Display – siehe FlashMic Display
3
Hauptbedienelemente
4
Aufnahmetaste (G)
5
Wiedergabetaste (H)
6
5 76
DEUTSCH
Menü/Stop-Taste (M)
7
8
Multifunktions-Jogswitch – siehe separate Beschreibung
9
Aufnahmemodus-LED (REC LED)
10
USB-Anschluss (5-Pol Mini-B)
11
Phones: Monitorausgang (3,5mm 3-Pol Buchse)
De.5
Page 91

00:12:12
Rec
Play
Das FlashMic Display
12
13 14 15
17
16
DEUTSCH
Alphanumerisches Display mit sechs Zeichen
12
4-Segment-Batterieanzeige
13
REC-Anzeige – zeigt eine laufende Aufnahme an.
14
15
PLAY-Anzeige – zeigt die laufende Wiedergabe an.
16-Segment-Anzeige – zeigt den Aufnahme- und Wiedergabepegel an.
16
17
Displaybeleuchtung
De.6
Page 92

Batterien
Das FlashMic arbeitet mit zwei Batterien des Typs AA. Sie können hier entweder 1.5V
Alkali-Batterien oder NiMH-Akkus (Nickel-Metallhydrid) nutzen.
Wir empfehlen den Einsatz von Batterien mit einer Kapazität von mindestens 1500mAh.
!
Verwenden Sie niemals Zink- Chlorid-Batterien.
Einsetzen der Batterien
Halten Sie das FlashMic in einer Hand und schrauben
Sie mit der anderen Hand den hinteren Teil des
Gehäuses ab (den Abschnitt mit dem Display und den
Bedienelementen).
Schieben Sie den hinteren Gehäuseabschnitt soweit wie
möglich zurück.
Öffnen Sie das Batteriefach.
Setzen Sie die Batterien so ein, wie es auf der
Abdeckung des Batteriefaches abgebildet ist.
!
Die beiden Batterien müssen in die gleiche Richtung zeigen.
!
Tauschen Sie immer beide Batterien zusammen aus und nutzen Sie immer zwei Batterien
des gleichen Typs und vom gleichen Hersteller. Kombinieren Sie NIEMALS Alkali-Batterien
mit Akkus.
Schließen Sie den Deckel, schieben Sie das Gehäuse zurück und schrauben Sie es fest zu.
Anmerkung: Nach dem Austausch von Alkalibatterien, entsorgen Sie sie bitte auf
verantwortungsvolle Weise und beachten Sie die Umweltrichtlinien in Ihrem Land.
Batterie-Management
Die Lebensdauer der Batterien ist am längsten, wenn Sie das FlashMic bei Nichtgebrauch
ausschalten. Der Energieverbrauch ist im IDLE-Modus und im REC-Modus praktisch
identisch.
Die Einstellungen der internen Uhr bleiben nach Entnahme der Batterien für ungefähr eine
Minute erhalten. Bestehende Aufnahmen und die Konfigurations-Einstellungen bleiben vom
Batteriewechsel unbeeinflusst.
Sollte das FlashMic für längere Zeit nicht benutzt werden (länger als ein Monat) entfernen
Sie bitte die Batterien.
DEUTSCH
Batterie-Statusanzeige
Auf dem LCD-Display finden Sie eine 4-Segment-Statusanzeige für die Batterie.
Die Anzahl der angezeigten Segmente ist proportional zur verbleibenden Batteriekapazität.
Sie können diese Anzeige über das Menüsystem oder über die FlashMic Manager Software
an die verschiedenen Entladeeigensc haften von Alkali-Batterien und Akkus anpassen.
Wenn die Batteriekapazität zur Neige geht, fangen die Batterieanzeige und die AufnahmeLED auf der Unterseite des FlashMics an zu blinken. Sollte bei Leerlauf der Batterien gerade
eine Aufnahme laufen, wird diese automatisch gestoppt.
De.7
Page 93

Einsatz des FlashMics
Der Jogswitch
Viele Funktionen des FlashMics werden über den Jogswitch auf der Unterseite bedient.
Unter anderem sind dies Ein- und Ausschalten, die Navigation durch das Menüsystem, die
Pegeleinstellungen und die Anwahl von Tracks zur Wiedergabe.
Die Handhabung des Jogswitches für die einzelnen Funktionen wird in den jeweiligen
Abschnitten dieses Handbuchs beschrieben. Da der Jogswitch über verschiedene
Bewegungsmöglichkeiten verfügt, wollen wir ihn hier kurz näher betrachten.
Der Jogswitch ist ein kleines Rad, das aus der Unterseite des FlashMics herausragt. Es
stellt praktisch drei Druckknöpfe in einem dar; es kann einfach gedrückt werden (aus seiner
Ruheposition heraus) oder in eine der beiden Richtungen gedreht werden. Die Freiheitsgrade
sind alle mit Federn ausgestattet, so dass der Jogswitch nach dem Loslassen automatisch
in seine Ausgangsposition zurückspringt. Jede der drei Bewegungsmöglichkeiten kann
entweder ‘lang’ oder ‘kurz’ ausgeführt werden, was sechs unterschiedliche Aktionen
ermöglicht. Die Software im FlashMic erkennt einen Druck, der länger als 2 Sekunden
dauert als ‘lang’ und alles unter 2 Sekunden als ‘kurz’.
Das folgende Diagramm zeigt Ihnen die verschiedenen Bewegungsmöglichkeiten.
In diesem Handbuch werden die verschiedenen Jogswitch-Aktionen durch folgende
Kennzeichnungen dargestellt. Dabei wird angenommen, dass der Benutzer das FlashMic
so hält, dass er auf das Display schaut.
DEUTSCH
Kennzeichnung Aktion
SHORT PRESS Mittig nach untern drücken und loslassen
LONG PRESS Für zwei Sekunden mittig nach unten drücken
SHORT DOWN TURN Das Rad nach unten drehen und loslassen
LONG DOWN TURN
SHORT UP TURN Das Rad nach oben drehen und loslassen
LONG UP TURN
Das Rad nach unten drehen und für mindestens zwei
Sekunden halten
Das Rad nach oben drehen und für mindestens zwei
Sekunden halten
De.8
Page 94

03:14:35
Einschalten des FlashMics
Das FlashMic wird mit einem SHORT PRESS auf den Jogswitch eingeschaltet und mit einem
LONG PRESS bis zum Erscheinen des Texts OFF im Display ausgeschaltet. Das FlashMic
schaltet dann beim Loslassen des Jogswitches ab.
Anmerkung: Es ist nicht möglich das FlashMic auszuschalten, wenn es per USB an einen
Computer angeschlossen ist.
Beim Anschalten zeigt das FlashMic in Folge an:
DRM85
Version der Firmware
Name des Mikrophons
Im Lieferzustand ist der Mikrophonname DRM_85 das aktive Preset beim Einschalten ist
PSET_1.
Nach dieser Einschaltsequenz befindet sich das FlashMic im Standby-Modus – den wir in
diesem Handbuch als IDLE-Modus bezeichnen werden – und das Display sieht folgendermaßen
aus:
ê
ê
ê
Aktives Preset
Anzeigen im IDLE Modus
Im IDLE-Modus – das heißt, wenn das FlashMic zwar eingeschaltet ist, aber ansonsten nicht
benutzt wird – springt das Display zwischen der Nummer der letzten Aufnahme ( TRKnnn –
aufgenommene Dateien werden im FlashMic als „Tracks“ bezeichnet) und der verbleibenden
Aufnahmezeit hin und her.
Wenn seit der letzten Konfigurationsänderung keinerlei Aufnahme gemacht wurde, erscheint
anstatt TRKnnn die Nachricht NOFILE im Display.
Das FlashMic besitzt einen internen Kalender mit Uhr. Vor der ersten Nutzung des
FlashMic sollten Sie die dafür nötigen Einstellungen machen, da diese in den Header der
erzeugten Audiodateien eingetragen werden und auch zum Vermerk von Aufnahmezeit und
Aufnahmedatum verwendet werden. Bitte schauen Sie sich das entsprechende Kapitel in
diesem Handbuch an.
DEUTSCH
De.9
Page 95

03:24:04
Rec
SAVING
Die erste Aufnahme
!
Um die spätere Identifizierung von Aufnahmen zu erleichtern, enthält das im FlashMic
erzeugte Dateiformat das Aufnahmedatum und die Aufnahmezeit, sowie Texteingaben, die
Sie mit der FlashMic Manager Software erstellen können. Sie sollten sich aber auf jeden
Fall zusätzlich ein Aufnahmeprotokoll auf Papier oder in elektronischer Form machen, da bei
Aufnahme-Sitzungen sehr schnell viele, ähnliche Dateien entstehen können.
Ein solches Log-Buch wird also wärmstens empfohlen. Es wird Ihnen die Identifizierung Ihrer
Aufnahmen, nachdem sie zur weiteren Bearbeitung auf den Computer übertragen wurden,
stark erleichtern.
Drücken Sie den Aufnahmetaste (G) um eine neue Aufnahme starten. Das Display zeigt
REC an und die Aufnahme-LED auf der Unterseite leuchtet.
Die Aufnahme-LED kann auch deaktiviert werden - zum Beispiel wenn das FlashMic gefilmt
!
werden muss. Drücken Sie dazu währen der Aufnahme den Wiedergabeknopf und halten
ihn bis das Display LED OFF anzeigt. Die LED kann durch die Wiederholung dieser Aktion im
Aufnahmemodus wieder aktiviert werden. Bitte beachten Sie, dass die LED beim Start einer
Aufnahme zunächst immer aktiv ist.
Die Mehrsegment-Anzeige im Display zeigt bei der Aufnahme und im IDLE-Modus den
Eingangspegel an.
Auf der Hauptanzeige sehen Sie, wie die verbleibende Aufnahmezeit geringer wird.
Wenn nur noch 10 Minuten Aufnahmezeit verfügbar ist, fangen die DisplayHintergrundbeleuchtung, die Aufnahme-LED auf der Unterseite des FlashMics und die REC
Anzeige im Display an zu blinken. Das FlashMic beendet die Aufnahme, wenn nur noch
eine Minute Aufnahmezeit übrig ist; dies geschieht, damit eine Fehlerkorrektur der Daten
möglich bleibt.
Drücken Sie den M/STOP-Taste (M), um die Aufnahme zu beenden. Der Text SAVING
erscheint im Display und nach einer kurzen Pause springt die Anzeige wieder in den IDLEModus und zeigt die Nummer des Tracks an.
DEUTSCH
Anzeige bei der Aufnahme Speichern des aufgenommenen Tracks
Grundeinstellungen:
Normalerweise werden Sie die Einstellungen für das Aufnahmeformat, den Aufnahmepegel,
usw. über das System an Konfigurationsdateien und Presets der FlashMic Manager Software
vornehmen. Das FlashMic kommt allerdings mit einem Satz an Parametereinstellungen,
der es Ihnen ermöglicht mit der Arbeit zu beginnen, ohne sich um die FlashMic Manager
Software zu kümmern. Schauen Sie sich bitte das Kapitel über die Grundeinstellungen des
FlashMic Managers an, um mehr zu erfahren.
Aufnahmepuffer (Übersicht)
In hektischen Situationen ist es manchmal schwierig - wenn nicht unmöglich – rechtzeitig
die Aufnahmetaste zu drücken. Dies führt dann zu Aufnahmen, die einige Sekunden nach
der wichtigen Schlüsselinformation anfangen. Das FlashMic hat einen frei einstellbaren
Pufferspeicher mit bis zu 10 Sekunden, um solche Situationen zu vermeiden.
Bei Wiedergabe der Aufnahme hören Sie, dass sie einige Sekunden vor der Betätigung der
Aufnahmetaste beginnt. Schauen Sie sich das Kapitel über den Aufnahmepuffer an, um
Mehr zu erfahren.
De.10
Page 96

Aufnahmesperrung
UNLOCK
Rec
LOCKED
Rec
RVOL35
Rec
RV AGC
Rec
(REC LOCK)
Das FlashMic ist mit einer Aufnahmesperrung versehen, die das versehentliche stoppen
einer laufenden Aufnahme verhindert.
Wenn Sie sich im REC Modus befinden (also eine Aufnahme läuft) drücken Sie zur Aktivierung
der Sperre für mindestens zwei Sekunden die Aufnahmetaste. Dann erscheint im Display
der Text „LOCKED“.
Wenn Sie nun den M/STOP-Taste drücken, hat das keinerlei Effekt (außer der Anzeige des
Textes „LOCKED“) und die Aufnahme läuft weiter.
Um die Sperre wieder aufzuheben, drücken Sie den Aufnahmetaste so lange, bis im Display
der Text „UNLOCKED“ erscheint.
Jetzt können Sie die Aufnahme ganz normal mit der M/STOP-Taste beenden.
Anzeige beim Sperren und Entsperren der Aufnahme
Mithören (Monitoring)
Sie können zum Mithören einen Kopfhörer an das FlashMic anschließen. Nehmen Sie
einen Kopfhörer mit mindestens 32 Ohm Impedanz. Schließen Sie ihn an die 3,5 mm
Klinkenbuchse auf der Unterseite des FlashMics an (beschriftet mit PHONES). Das
Monosignal des FlashMics liegt an beiden Ohren an und das Signal wird sowohl im IDLEModus als auch während einer Aufnahme wiedergegeben.
Wenn Sie möchten, können Sie den Kopfhörerausgang auch an externe Geräte anschließen,
um diese für Aufnahmen oder zum Mithören zu nutzen.
Der Pegel des Signals kann mit dem Jogswitch eingestellt werden. Ein SHORT PRESS führt
zur Anzeige von PHONnn auf dem LCD Display, wobei nn für den aktuellen Pegel steht (die
Einheit ist dabei willkürlich gewählt; 00 = aus, 50 = Maximum). Ein SHORT UP TURN
oder DOWN TURN erhöht, beziehungsweise erniedrigt den Pegel. Beim Anschalten des
FlashMics springt der Mithörpegel immer automatisch auf die Grundeinstellung. Sie können
den Pegel im REC-, PLAY- und IDLE-Modus einstellen.
Nach zwei Sekunden springt das LCD Display automatisch in den REC-, beziehungsweise in
den IDLE-Modus zurück.
Einstellung des Aufnahmepegels
Die Änderung des Aufnahmepegels ist nur möglich, wenn Sie in der FlashMic Manager
!
Software das Ändern der Konfiguration durch den Nutzer erlaubt haben. Schauen Sie für
nähere Informationen bitte in das Kapitel über den FlashMic Manager.
Der Aufnahmepegel wird mit dem Jogswitch verändert. Ein SHORT UP TURN oder DOWN
TURN im REC Modus führt zur Anzeige von RVOLnn, wobei nn der aktuelle Pegel ist.
Im Gegensatz zum Mithörpegel ist die Einheit hier dB (01 dB = Minimum und 40 dB =
Maximum). Durch erneute SHORT UP TURNS oder DOWN TURNS verändern Sie den Pegel
nach oben oder unten.
Wenn der Aufnahmepegel auf den Minimalwert reduziert wird, wird das AGC-System
(Automatic Gain Correction) aktiviert und es erscheint der Text „RV AGC“ im Display. In diesem
Modus passt das FlashMic den Aufnahmepegel automatisch an. In den meisten Fällen führt
dies zu ordentlich ausgesteuerten Aufnahmen. Es lässt sich jedoch nicht vermeiden, dass
manchmal ein gewisses „Pumpen“ des Hintergrundrauschens zu hören ist.
Über das Menüsystem können Sie den Aufnahmepegel auch im IDLE-Modus einstellen. Bitte
lesen Sie hierzu das entsprechende Kapitel in diesem Handbuch.
DEUTSCH
Bitte beachten Sie, dass beim Anschalten des FlashMics immer der zuletzt eingestellte
Aufnahmepegel aktiv ist und nicht das Preset aus der FlashMic Manager Software.
Einstellung des Aufnahmepegels
De.11
Page 97

00:00:01
Play
TRK005
Wiedergabe von Tracks
Ein aufgenommener Track kann jederzeit wieder angehört werden.
Um den zuletzt aufgenommen Track zu hören, drücken Sie auf die PLAY-Taste (H). Die PLAY
Anzeige im Display geht an und nach kurzer Pause wird die abgelaufene Zeit des Tracks
angezeigt. Außerdem zeigt die Mehrsegmentanzeige jetzt den Pegel des Tracks an. Sie
können den Track jetzt über die Kopfhörerbuchse hören. Um die Wiedergabe zu pausieren,
drücken Sie erneut die PLAY-Taste. Ein erneuter Druck auf die PLAY-Taste setzt dann die
Wiedergabe fort. Am Ende des Tracks springt das FlashMic in den IDLE-Modus zurück.
Ein Druck auf die M/STOP Taste führt ebenfalls zum Anhalten der Wiedergabe und zur
Rückkehr in den IDLE-Modus.
Ein LONG UP TURN mit dem Jogswitch „spult“ mit erhöhter Geschwindigkeit vorwärts durch
den Track (FFW Modus = Fast Forward). Nutzen Sie diese Funktion, um schnell bestimmte
Stellen im Track zu finden. Ein LONG DOWN TURN „spult“ rückwärts. Sie können dabei
immer die aktuelle Position im Track vom Display ablesen.
Notiz: Sollte der Track mit Markierungen versehen worden sein, führen Jogswitch-Turns zu
Sprüngen zur nächsten bzw. vorherigen Markierung (je nach Jogswitch-Richtung). Lesen
Sie dazu auch den nächsten Abschnitt über Markierungen.
Um einen anderen Track zu hören, als den zuletzt aufgenommenen, schalten Sie mit SHORT
DOWN TURNS durch die Tracknummern (ein LONG DOWN TURN führt zu schnellerem
Durchschalten). UP TURNS zählen aufwärts durch die Tracknummern. Wenn der
gewünschte Track erreicht ist, drücken Sie die PLAY-Taste, um ihn zu hören.
Sie können auch während der Wiedergabe die Tracks umschalten. SHORT TURNS führen,
je nach Richtung, zum Umschalten auf den nächsten oder vorherigen Track. Achten Sie
dabei darauf nicht zu lange auf dem Jogswitch zu bleiben, da das FlashMic sonst anfängt
durch den Track zu „spulen“.
Anwahl des Tracks
Markierungen
DEUTSCH
Es kann sehr nützlich sein bestimmte Stellen in einem Track zu markieren, um sie dann
später schnell wieder zu finden. Sie können solche Markierungen im FlashMic jederzeit
während der Aufnahme oder Wiedergabe einfügen.
Die Markierungen werden an den jeweiligen Stellen in die Datei eingebettet und erscheinen
später auf dem Bildschirm, wenn Sie die Datei in einer Editor-Software bearbeiten. Das
Dateiformat spielt dabei keine Rolle, Markierungen werden sowohl bei linearen als auch mit
komprimierten Aufnahmen eingefügt.
Die Markierungen des FlashMics werden von einer Reihe professioneller Programme zur
Klangbearbeitung erkannt. Dazu gehören Cool Edit Pro, Adobe Audition, sowie Sound Forge
V4 und aufwärts. Momentan werden von diesen Programmen jedoch nur die Markierungen
in linear aufgenommenen Dateien erkannt.
Markierungen werden während der Aufnahme oder Wiedergabe durch kurzen Druck auf
die Aufnahmetaste eingefügt (Bitte beachten Sie, dass ein langer Druck auf diese Taste
zur Auslösung der Aufnahmesperre führt). Das Display zeigt kurz den Text MARKED an. Im
FlashMic selbst können die Markierungen als Sprungmarken bei der Wiedergabe genutzt
werden (SHORT TURNS).
Wiedergabe eines Tracks
Löschen eines Tracks
Fehlerhafte oder unerwünschte Aufnahmen können aus dem Speicher des FlashMics
gelöscht werden, um Speicherplatz frei zu machen.
Dies geschieht über das Menüsystem des FlashMics. Bitte schauen Sie in das entsprechende
Kapitel für weitere Informationen.
De.12
Page 98

Dateien Übertragen
Sie werden Ihr FlashMic meist unterwegs für die unterschiedlichsten Aufnahmen nutzen.
Die resultierenden Dateien müssen dann natürlich zur Auswertung und Bearbeitung in
einen Computer geladen werden, bevor sie gesendet oder anderweitig verwendet werden
können.
In vielen Organisationen wird diese Arbeit von einer anderen Person gemacht als die
Aufnahme. Daher ist es leicht möglich, dass ein FlashMic von mehreren Personen für
Aufnahmen genutzt wurde. Oder jemand hat über den Tag verschiedene FlashMics für
seine Takes benutzt. Achten Sie also immer penibel darauf, dass sämtliche Notizen und
Protokolle zu den Aufnahmen nach der Übertragung auf den Rechner immer noch eindeutig
den verschiedenen Dateien zugeordnet werden können.
Es gibt zwei Wege, um Dateien vom FlashMic in den Computer zu laden
• Mit der FlashMic Manager Software
• Per direktem Transfer.
Transfer mit dem FlashMic Manager
Dieser Abschnitt setzt voraus, dass auf dem Rechner ein FlashMic Manager installiert ist.
Sollte dies nicht der Fall sein, lesen sie bitte das entsprechende Kapitel über die Installation
weiter oben im Handbuch.
•
Zuerst entscheiden Sie sich für einen Ort im Dateisystem des Rechners, an
dem die Dateien gespeichert werden sollen. Es kann also nötig sein
neue Ordner anzulegen und sie mit aussagekräftigen Namen zu versehen.
•
Starten Sie die Manager-Software (Beachten Sie bitte, dass das
Programmfenster nicht vergrößert werden kann)
•
Schalten Sie das Mikrophon an.
•
Verbinden Sie das FlashMic über das mitgelieferte Kabel mit einem freien USB Anschluss Ihres Rechners.
• Das LCD Display des FlashMics zeigt jetzt „USB“ an und die rote Anzeige
im FlashMic Manager wird grün. Es gibt auch eine visuelle oder akustische
Bestätigung der gelungenen Verbindung (Wie diese genau aussieht hängt vom
Betriebssystem des Rechners ab. Ignorieren Sie bitte etwaige sich öffnende
Fenster mit dem Namen DRM85.)
•
Im Abschnitt USB Connection klicken Sie auf „Download Audio Data from DRM...“.
Es öffnet sich der „Transfer Audio Files“ Dialog.
DEUTSCH
Die beiden Schalter „wav“ und „mp2“ erlaubt die Veränderung der Datei-Endung
•
von ausgewählten MPEG-Dateien. Diese Funktion arbeitet nur bei Aufnahmen im
MPEG-Format.
De.13
Page 99

• Sie sehen jetzt eine Liste der Dateien auf dem FlashMic. Wählen Sie die
Einträge, die Sie auf den Rechner übertragen möchten mit einem einfachen
Mausklick an (Mehrere Dateien können Sie nach der üblichen Vorgehensweise
Ihres Betriebssystems markieren.)
Klicken Sie auf „Transfer...“ und der Dialog zur Auswahl des Speicherortes
•
erscheint.
Navigieren Sie in den Ordner, in den Sie die Dateien übertragen möchten und
•
klicken Sie „OK“
Die Dateien werden nun übertragen. Je nach Anzahl und Größe der
•
Aufnahmen kann das zwischen einigen Sekunden und mehreren Minuten dauern.
Während der Übertragung erscheint eine Fortschrittsanzeige und nach Abschluss
der Übertragung sehen Sie eine Bestätigungsnachricht. Schließen Sie diese, um
den Vorgang abzuschließen.
Entfernen Sie das FlashMic nun aus dem Dateisystem. Dies tun Sie am besten
•
durch einen Doppelklick auf das entsprechende Gerätesymbol in der Statuszeile
von Windows. Der Dialog zur sicheren Entfernung von Hardware erscheint, der
eine Liste der über USB angeschlossene Hardware anzeigt. Wählen Sie das DRM 85 mit einem Klick an und klicken Sie dann STOP. Dieser Schritt verhindert etwaige
Datenverluste beim Abziehen des Mikrophons.
Jetzt können Sie die Kabelverbindung zum FlashMic unbesorgt lösen. Sie können
•
das Mikrophon danach ausschalten.
Direkter Transfer zum Rechner
Das FlashMic ist ein generischer USB-Massenspeicher. Daher können Dateien wie von
jedem anderen USB-Speicher auf PCs oder Macs übertragen werden.
Versuchen Sie auf keinen Fall das FlashMic mit dem Mac oder PC zu formatieren. Dies führt
!
zur Zerstörung des internen Dateisystems und zum Verlust Ihrer Aufnahmen. Nutzen Sie
keinesfalls den Chkdsk Befehl eines PCs, da dieser ebenfalls das Dateisystem des FlashMics
unbrauchbar machen kann.
Bitte beachten Sie, dass das folgende Beispiel sich auf einen PC mit Windows™ XP bezieht.
DEUTSCH
Auf anderen Betriebssystemen funktioniert der Vorgang etwas anders. Bitte setzen Sie sich
bei Problemen mit dieser Prozedur mit Ihrem HHB-Händler in Verbindung.
Schalten Sie das Mikrophon ein.
•
Verbinden Sie das FlashMic über das mitgelieferte Kabel mit einem freien USB-
•
Anschluss Ihres Rechners. Auf dem FlashMic wird nun „USB“ angezeigt.
Sie können sich die Dateien auf dem FlashMic vor der Übertragung anhören. Tun Sie
folgendes, wenn dies erwünscht sein sollte:
• Wenn ein Fenster mit dem Namen „DRM-85 (D:)“ erscheint („D:“ ist der
Laufwerksbuchstabe; je nach PC kann dies ein anderer sein), welches
verschiedene Wege anbietet die Dateien auf dem FlashMic zu öffnen (wie z.B. mit
dem Windows™ Media Player) machen Sie davon Gebrauch und wählen die
Dateien, die Sie anhören möchten aus.
Sollte oben genanntes Fenster nicht erscheinen, können Sie trotzdem jede
•
beliebige Audio-Anwendung auf dem PC starten und die Dateien über „Datei-
>Öffnen“ laden. Navigieren Sie dazu im Datei->Öffnen Dialog der Software zum
DRM-85. Es ist als Laufwerk in das Dateisystem Ihres Rechners eingehängt.
Unter „DRM-85“ öffnen Sie den Ordner namens „AUDIO“. Dort befinden sich
sämtliche Aufnahmen.
Der eigentliche Transfer der Dateien geschieht folgendermaßen:
Zuerst entscheiden Sie sich für einen Ort im Dateisystem des Rechners an dem die
•
Dateien gespeichert werden sollen. Es kann also nötig sein neue Ordner anzulegen
und sie mit aussagekräftigen Namen zu versehen.
Nutzen Sie den Windows™ Explorer, um auf dem Laufwerk „DRM-85“
•
den Ordner „AUDIO“ zu öffnen. Die aufgenommenen Dateien werden im
Dateibrowser angezeigt. Löschen Sie keinesfalls irgendwelche Dateien in anderen
Ordnern des Laufwerks „DRM-85“.
De.14
Page 100

Ziehen Sie die gewünschten Dateien mit der Maus in den Ordner Ihrer Wahl.
•
Entfernen Sie das FlashMic nun aus dem Dateisystem. Dies tun Sie am besten
•
durch einen Doppelklick auf das entsprechende Gerätesymbol in der Statuszeile
von Windows. Der Dialog zur sicheren Entfernung von Hardware erscheint,
der eine Liste der über USB angeschlossene Hardware anzeigt. Wählen Sie das
DRM-85 mit einem Klick an und klicken Sie dann STOP. Dieser Schritt verhindert
etwaige Datenverluste beim Abziehen des Mikrophons.
Lösen Sie die Kabelverbindung zum FlashMic. Sie können das Mikrophon jetzt
•
ausschalten.
Anschluss eines FlashMics mit fast leeren Batterien an den Rechner
Wenn die Batterien des FlashMics zur Neige gehen, sollten Sie es nicht an einen Rechner
anschließen. Wenn die Batterien sich während des Dateitransfers komplett leeren, wird
der Transfer fortgesetzt, weil das Mikrophon über die USB-Schnittstelle mit Strom versorgt
wird. Es kann allerdings trotzdem zu Datenverlusten kommen, wenn das USB-Kabel vom
Rechner oder DRM-85 getrennt wird, ohne das DRM-85 vorher aus dem Dateisystems
des Rechners zu entfernen. Die explizite Entfernung aus dem Dateisystem (wie oben
beschrieben) ist also auf jeden Fall empfehlenswert, insbesondere, wenn die Batterien zur
Neige gehen.
DEUTSCH
De.15
 Loading...