

Page 1
If you record an unwanted track on your CD-R, it's not possible to erase it, but you can program skip IDs which instruct the machine to
ignore that track and skip to the next one. When the disc is then finalized, the skip ID information is saved and will be recognised by all
suitably equipped CD players.
SETTING SKIP IDs
1 Press SKIP PLAY ON/OFF to ensure that SKIP ON does not appear in the display. If this key appears to have no function, it's because
there are no skip IDs set on this disc.
2 Play the track you wish to skip.
3 During the problem track, press SKIP SET. SKIP and SET? appear alternatively on the display. Press SKIP SET again to confirm the
skip ID.
4 To activate the skip ID on playback, press SKIP PLAY ON/OFF. SKIP ON then highlights in the display.
CLEARING SKIP IDs
1 Press SKIP PLAY ON/OFF to ensure that SKIP ON does not appear in the display. If this key appears to have no function, it's because
there are no skip IDs set on this disc.
2 Play the track which has the skip ID set that you wish to cancel.
3 During playback of the problem track, press SKIP CLEAR. SKIP and CLEAR? appear alternatively on the display. Press SKIP CLEAR
again to confirm the deletion of the skip ID.
4 If other skip IDs exist on the disc which you wish to retain, press SKIP PLAY ON/OFF such that SKIP ON highlights in the display.
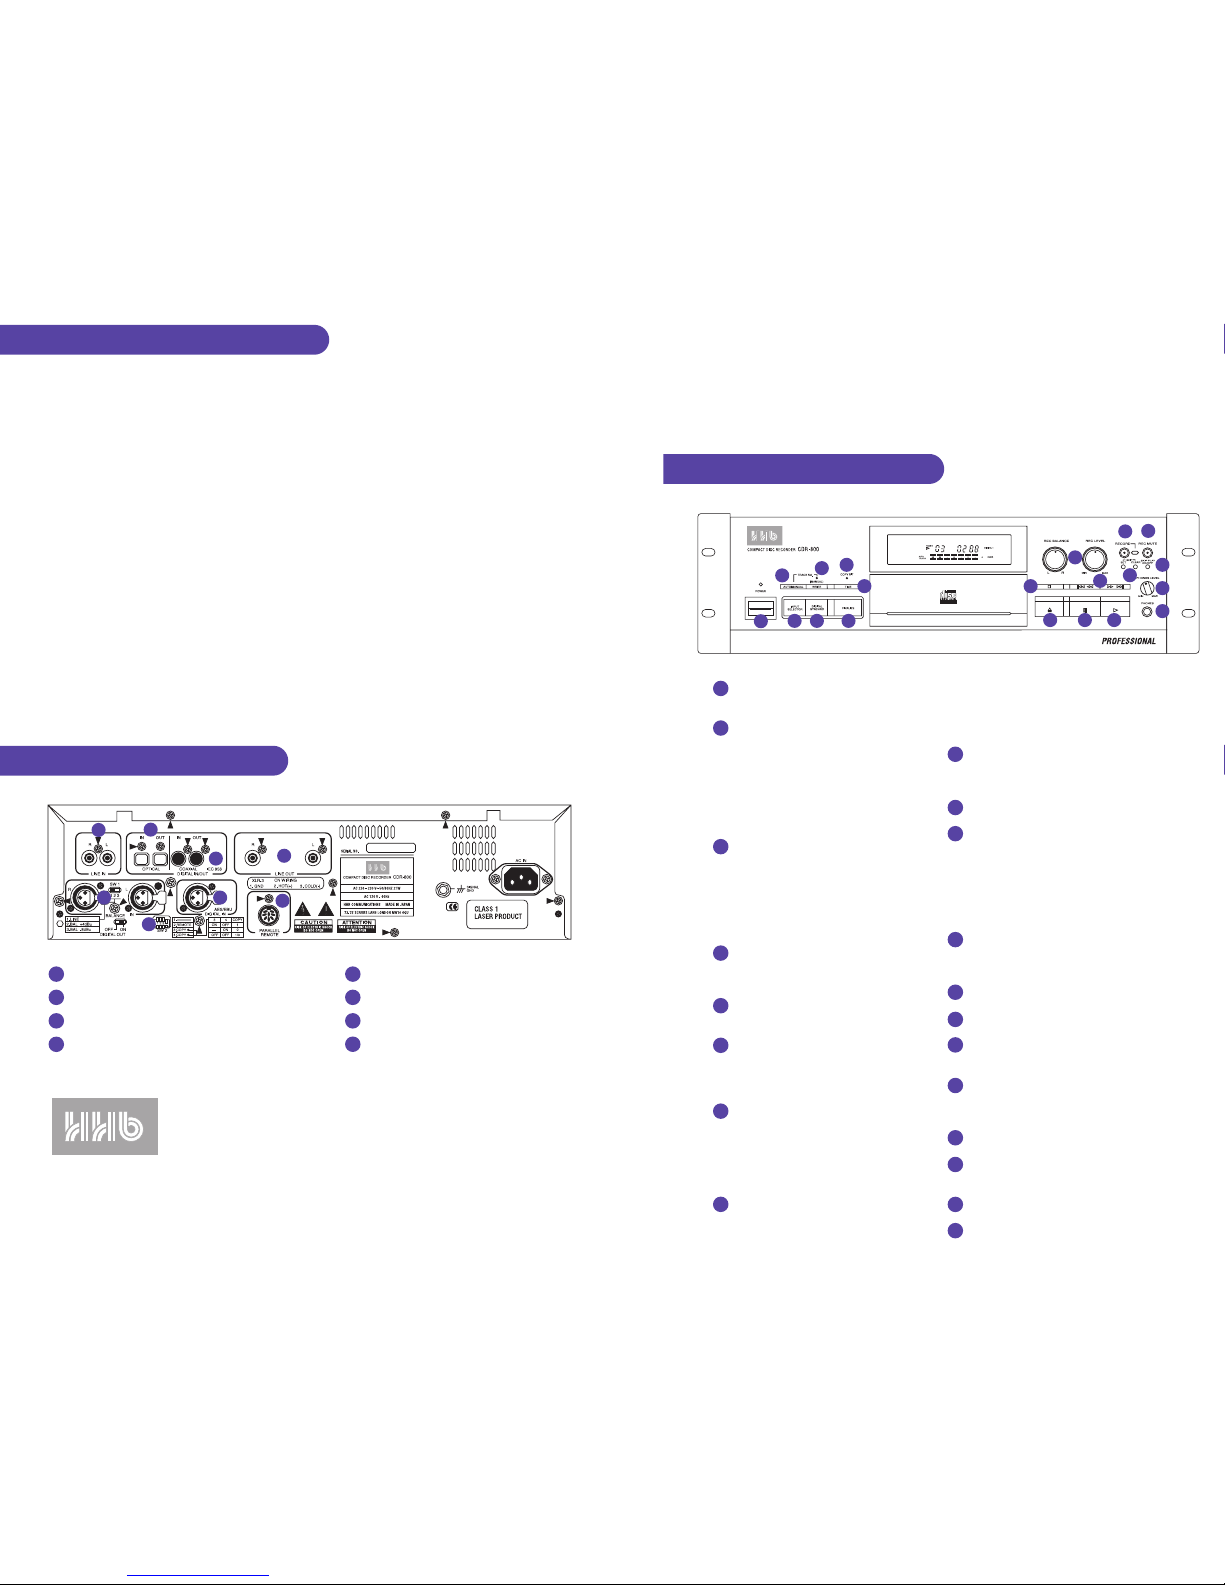
1 POWER switch. Adjacent LED indicates
machine's ON/OFF status.
2 INPUT SELECTOR switches the signal input
between AES/EBU digital, SPDIF co-axial digital,
optical digital, and analogue. When set to
analogue, dip switch SW1 on the rear panel
toggles between unbalanced line level via RCA
phonos (setting 1), balanced +4dBu via XLRs
(setting 2) and unbalanced –8dBu via XLRs
(setting 3).
3 DIGITAL SYNCHRO key. Activates recording
modes 1 to 3, which can be used to
automatically start recording from an incoming
digital signal or start/track ID. When in stop
mode, this key will change the threshold for
automatic ID writing in six 10dB stages from
-40dB to - .
4 FINALIZE key. Closes the table of contents on a
CD-R disc to make it playable on standard audio
CD players.
5 TRACK NO. AUTO/MANUAL. Toggles the AUTO
TRACK function on or off.
6 TRACK NO. WRITE. When AUTO TRACK is
switched off, the adjacent LED lights and this key
can then be used to manually place track start
IDs within the recording.
7 TIME key. When machine is playing, this key
toggles between elapsed time on current track,
remaining time on current track, remaining time
on CD, and total time recorded on CD. In
rec/pause, this key can be used to display the
time on the CD yet to be used.
8 COPY BIT indicator. Reflects the setting of
switches 3 and 4 of SW2 on the rear panel,
which sets the copy protection encryption. A lit
indicator means that subsequent digital cloning
will be allowed (3 on, 4 off); blinking means it
will be allowed once only (3 off, 4 off); and unlit
means it will be denied (3 on or off, 4 on).
9 REC BALANCE and REC LEVEL controls. Used
where the signal is derived from the analogue
inputs.
STOP key.
TRACK SKIP and TRACK SEARCH keys. When
pressed and released, these keys will cause the
CDR800 to skip to the next track or return to the
start of the current track, depending on the
direction of the key pressed. When pressed and
held, they allow manual searching, at high speed,
within the current track.
OPEN/CLOSE key. Opens and closes the loading
tray. Discs should be inserted upside down
(recording surface facing upwards).
PAUSE key.
PLAY key.
RECORD key. Places the unit in rec/pause;
pressing PLAY will set the unit recording.
REC MUTE key. During record, this key causes
a silence of 3 seconds to be recorded, after
which the unit returns to rec/pause.
SKIP ID SET/CLEAR.
SKIP PLAY ON/OFF key. Enables and disables
the players response to skip IDs.
PHONES LEVEL control.
PHONES socket. 1/4" stereo jack.
QUICK REFERENCE GUIDE
COMPACT DISC RECORDER CDR800
SETTING AND CLEARING SKIP IDs
BACK PANEL CONNECTIONS
10
11
12 13 14
15
16
17
18
19
20
1
2 3 4
5
6
7
8
9
FRONT PANEL FUNCTIONS
1
5 7
8
6
2
3
4
HHB Communications Ltd · 73-75 Scrubs Lane, London NW10 6QU, UK
Tel: 0181 962 5000 · Fax: 0181 962 5050 · E-Mail: sales@hhb.co.uk
HHB Communications USA LLC · 626 Santa Monica Boulevard, Suite 110, Santa Monica, California 90401, USA
Tel: 310 319 1111 · Fax: 310 319 1311 · E-Mail: sales@hhbusa.com
HHB Communications Canada Ltd · 260 King Street East, Toronto, Ontario M5A 4L5, Canada
Tel: 416 867 9000 · Fax: 416 867 1080 · E-mail: sales@hhbcanada.com
Visit HHB on-line at: http://www.hhb.co.uk
10
11
12
13
14
15
16
17
18
19
20
1 Line inputs, unbalanced, RCA phono.
2 Optical digital I/O connectors.
3 Coaxial digital (SPDIF) I/O connectors, RCA phono.
4 Line outputs, unbalanced, RCA phono.
5 Line inputs, balanced, XLR.
6 Switches enabling copy protection.
7 AES/EBU digital input, XLR.
8 Parallel remote port.
v2. 09/98
Page 2

OVERVIEW
The CDR800 has five modes of operation for recording a CD. The mode you choose will depend on the format
of the input signal, and the way you wish to control the CD’s track starts. Modes 1 to 3 are Digital Synchro
modes, which trigger recording from the incoming audio signal or start/track ID information, thus ensuring a
neat start. However, with the AES/EBU protocol, start/track IDs are not transferable.
MODE 1: 1-Track Digital Synchro
The CDR800 records one single track, and returns to record ready. Ideal for making compilation CDs.
MODE 2: All-Track Digital Synchro
Records incoming tracks in sequence, stopping automatically after the last track.
MODE 3: ID-Sync Digital Synchro
Creates new tracks according to start/track ID information in the incoming datastream. Ideal for making an
identical digital clone. Remember that this only applies via the SPDIF co-axial and optical protocol.
MODE 4: Manual Digital
Recording is controlled by the ‘cassette deck’ style transport keys.
MODE 5: Manual Analogue
Analogue source recording, controlled by the transport keys, as well as the recording balance and level
controls.
NOTE: Exactly how these modes write track starts in your recording will depend on the setting of the
AUTO TRACK function. See the following page of this quick start guide for details.
HOW TO RECORD A CD
NOTE: Insert a blank disc onto the CD tray with the label side down and the shiny recording surface facing
upwards. This is contrary to normal audio CD players.
MODES 1, 2 and 3 – Digital Synchro
1 Use INPUT SELECTOR to set the digital input format: AES/EBU (display shows DIGITAL 1, IDs not trans-
ferable with this protocol), SPDIF (display shows DIGITAL 2), or optical (display shows DIGITAL 1 & 2).
2 Ensure that your source player (the unit you are recording from) is not playing (ideally place it in
play/pause). The CDR800 cannot enter DIGITAL SYNCHRO mode if the source machine is playing.
3 Press DIGITAL SYNCHRO: once to engage Mode 1 (1-Track), twice to engage Mode 2 (All-Track) and three
times to engage Mode 3 (ID-Sync).
4 The word SYNC will appear in the display in red, after SETUP is displayed, and will flash to indicate that
the CDR800 is waiting for audio.
5 On receipt of audio, or a start/track ID, the CDR800 will start recording automatically. As this is SYNCHRO
mode, recording will stop automatically. However, recording can of course be stopped at any time by
pressing STOP. Note that if the digital input has a sampling rate of 48kHz, the CDR800 automatically
converts this to 44.1kHz using the built-in sample rate converter.
MODES 4 & 5 – Manual Digital / Manual Analogue
1 Use INPUT SELECTOR to set the format of signal to be recorded: AES/EBU digital (display shows
DIGITAL 1, IDs are not transferable with this protocol), SPDIF co-axial digital (display shows DIGITAL 2),
optical digital (display shows DIGITAL 1 and DIGITAL 2), or analogue (display shows ANALOGUE).
2 Press RECORD. The CDR800 will enter rec/pause mode, allowing you to monitor signal throughput, both
audibly and visibly on the display meters.
3 If you are recording an analogue signal (Mode 5) set the REC LEVEL so that the 0 indicator at the right of
the display occasionally lights. The red OVER indicator must never light; this will result in distortion.
4 At the appropriate moment, press PLAY to start the CDR800 recording. As this is manual mode, recording
will continue until manually stopped.
5 To stop recording, press REC MUTE. A four second silence will be recorded, after which the CDR800 will
enter rec/pause. If you do not want to record this silence between tracks, simply press STOP or PAUSE.
CONTROLLING TRACK START INFORMATION
One of the most difficult aspects of CD Recording is controlling the placement of track starts, because once
a recording is made it cannot be altered. Each of the five CDR800 modes work slightly differently in this
regard, and are further influenced by the setting of the AUTO TRACK function. Again, only the SPDIF digital
interface carries information about start/track IDs. Here is a breakdown of exactly how each mode behaves
in either setting:
MODE 1 - DIGITAL SYNCHRO 1-TRACK
Recording starts on audio or start/track ID only • AUTO TRACK ON: Subsequent IDs cause the machine to
go into rec/pause • AUTO TRACK OFF: Subsequent IDs are ignored • Silence of 10 seconds causes the
machine to go into rec/pause • When audio starts again, machine does not start recording again
MODE 2 - DIGITAL SYNCHRO ALL-TRACK
Recording starts on audio or start/track ID only • AUTO TRACK ON: Subsequent IDs cause a new track start
to be written • AUTO TRACK OFF: Subsequent IDs are ignored • Silence of 10 seconds causes the machine
to go back into AL-SYNC and wait for next audio • When audio starts again, machine goes back into record
with a new track
MODE 3 - DIGITAL SYNCHRO ID-SYNC
Recording starts on ID only, audio does not cause the machine to start recording • AUTO TRACK ON:
Subsequent IDs cause a new track start to be written • AUTO TRACK OFF: Subsequent IDs are ignored •
Silence of 10 seconds causes the machine to go back into ID-SYNC and wait for next audio • When audio
starts again, machine does not go back into record • The next ID causes the machine to start recording again
MODE 4 - MANUAL DIGITAL
When in record pause mode, pressing PLAY activates record • Mode 4 does not enable track starts to be
triggered by incoming audio • AUTO TRACK ON: Subsequent IDs will cause a new track start • AUTO TRACK
OFF: IDs are ignored • Silence of 30 seconds causes machine to go into rec/pause
MODE 5 - MANUAL ANALOGUE
Recording starts with new track on pressing of play button to activate record • AUTO TRACK ON: Audio
levels do not cause a new track start to be written first time, thereafter they do • AUTO TRACK OFF: Audio
levels do not cause a new track ever
FINALIZING CDs FOR PLAYBACK ON STANDARD CD PLAYERS
In order for a CD-R disc to be playable on audio CD players, it has to be closed to the standard CD audio
format. This process is known as finalization. Note that once a disc has been finalized, it cannot be recorded
on again.
1 Insert the disc that you want to finalize.
2 Press FINALIZE.
3 After a few seconds, you will see the time that the finalization process will take (approximately four
minutes) appear on the display.
4 If you're sure about finalizing the disc, press PAUSE.
5 The display counts down to indicate the progress of finalization. During this time, all the CDR800's
functions are suspended.
HHB CDR800 Compact Disc Recorder
 Loading...