

Page 1
www.hh.com.hk
e = [email protected]
t = 852.24813068
f = 852.24813727
Room 1117, 11/F, Asia Trade Centre, 79 Lei Muk Road, Kwai Chung, N.T., Hong Kong
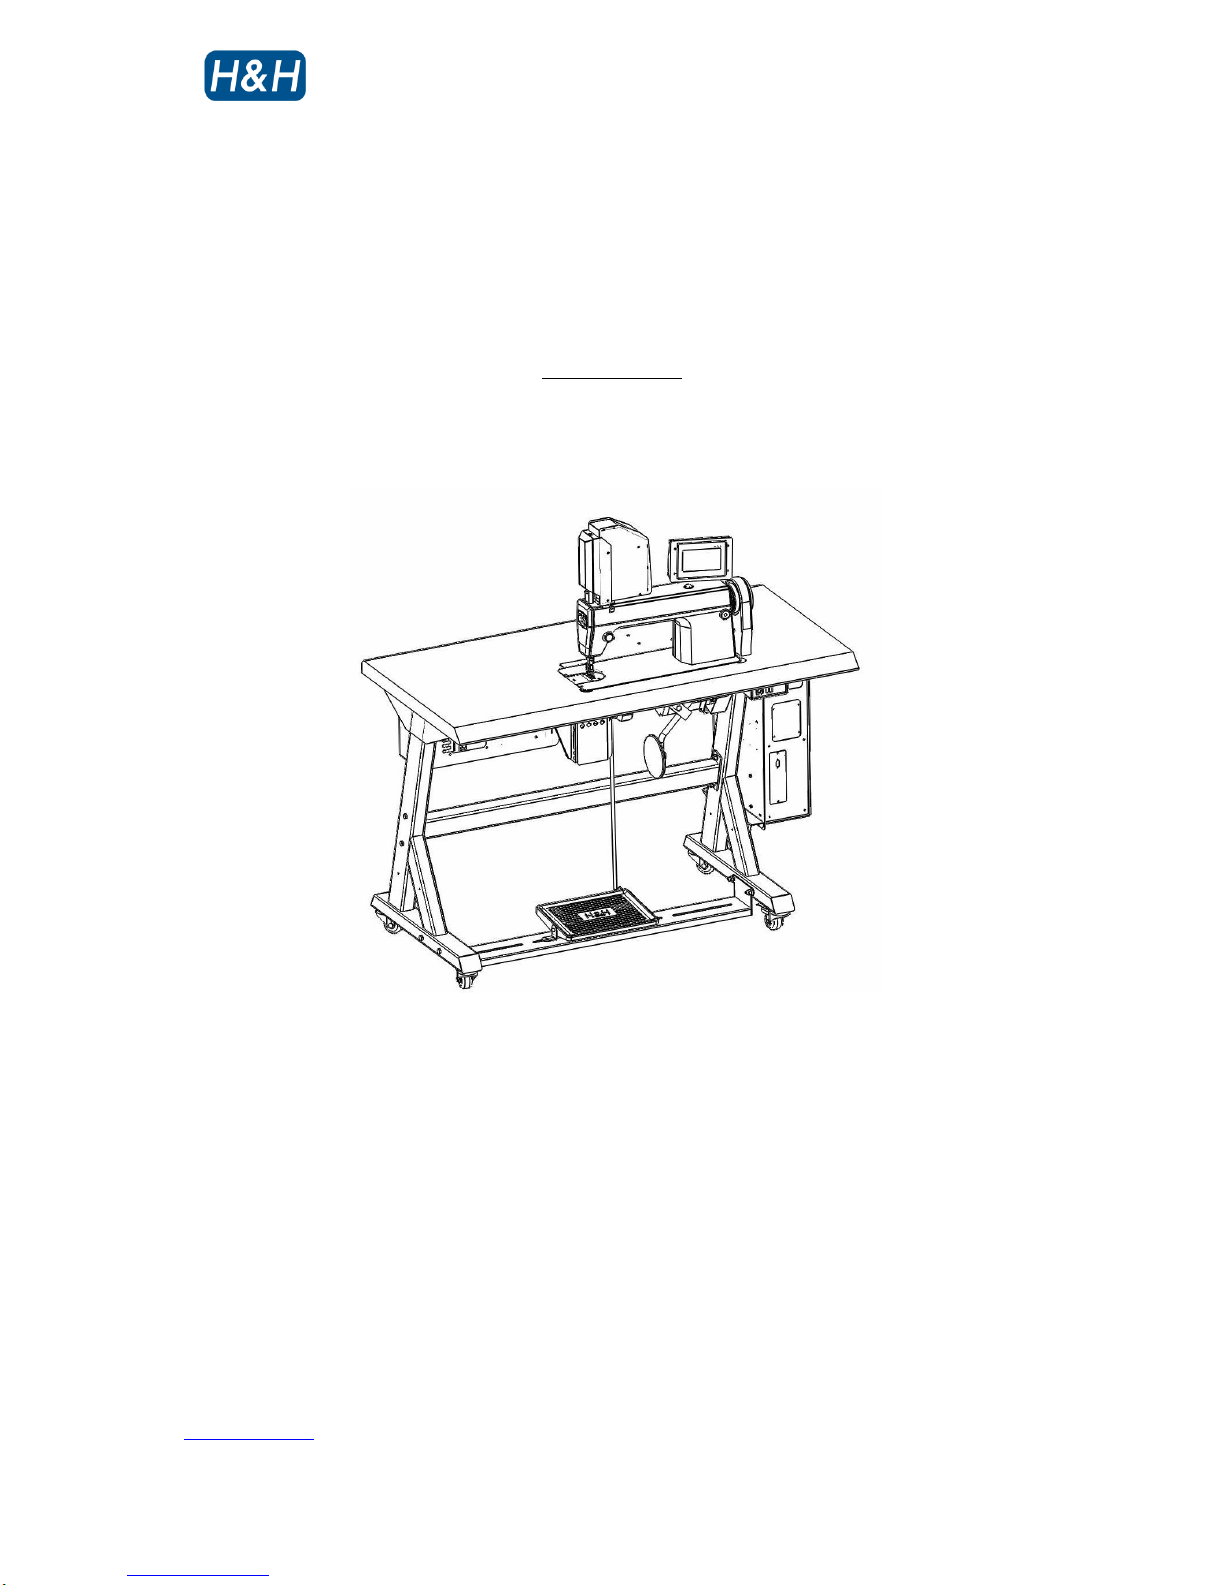
US-501 Sewfree Ultrasonic Multi-Purpose Welder
Operation Manual
is powered by
H&H Asia Group Limited
Page 2

US-501 operation manual
US-501 R02 13.07.09 Display version 4, PLC version 4 P. 1 of 31
Table of Contents
Precautions Regarding to Safety
Name Plate
Introduction
Specifications
Features
Identification of Components
Front View
Rear View
Power ON/OFF Switch
Welding Head Assembly
Principle of Ultrasonic Welding
Preparation for Installation
Control Method
Touch Screen Control Panel
Foot Switch
Knee Switch
Control Menu Navigation
Start Up And Shut Down Procedures
Start Up Procedures
Shut Down Procedures
Basic Operation
Control Panel Main page
Pattern Cutting
Cutter Pressure Adjustment
Signal Feedback Monitoring
Alarm Page
Program Version
Procedures of Basic Cutting
Page 3

US-501 operation manual
US-501 R02 13.07.09 Display version 4, PLC version 4 P. 2 of 31
Table of Contents (cont.)
Maintenance
Preventative
Procedures for Replacing Parts
Cutter Self Calibration
Power Meter
Trouble Shooting
Page 4
US-501 operation manual
US-501 R02 13.07.09 Display version 4, PLC version 4 P. 3 of 31
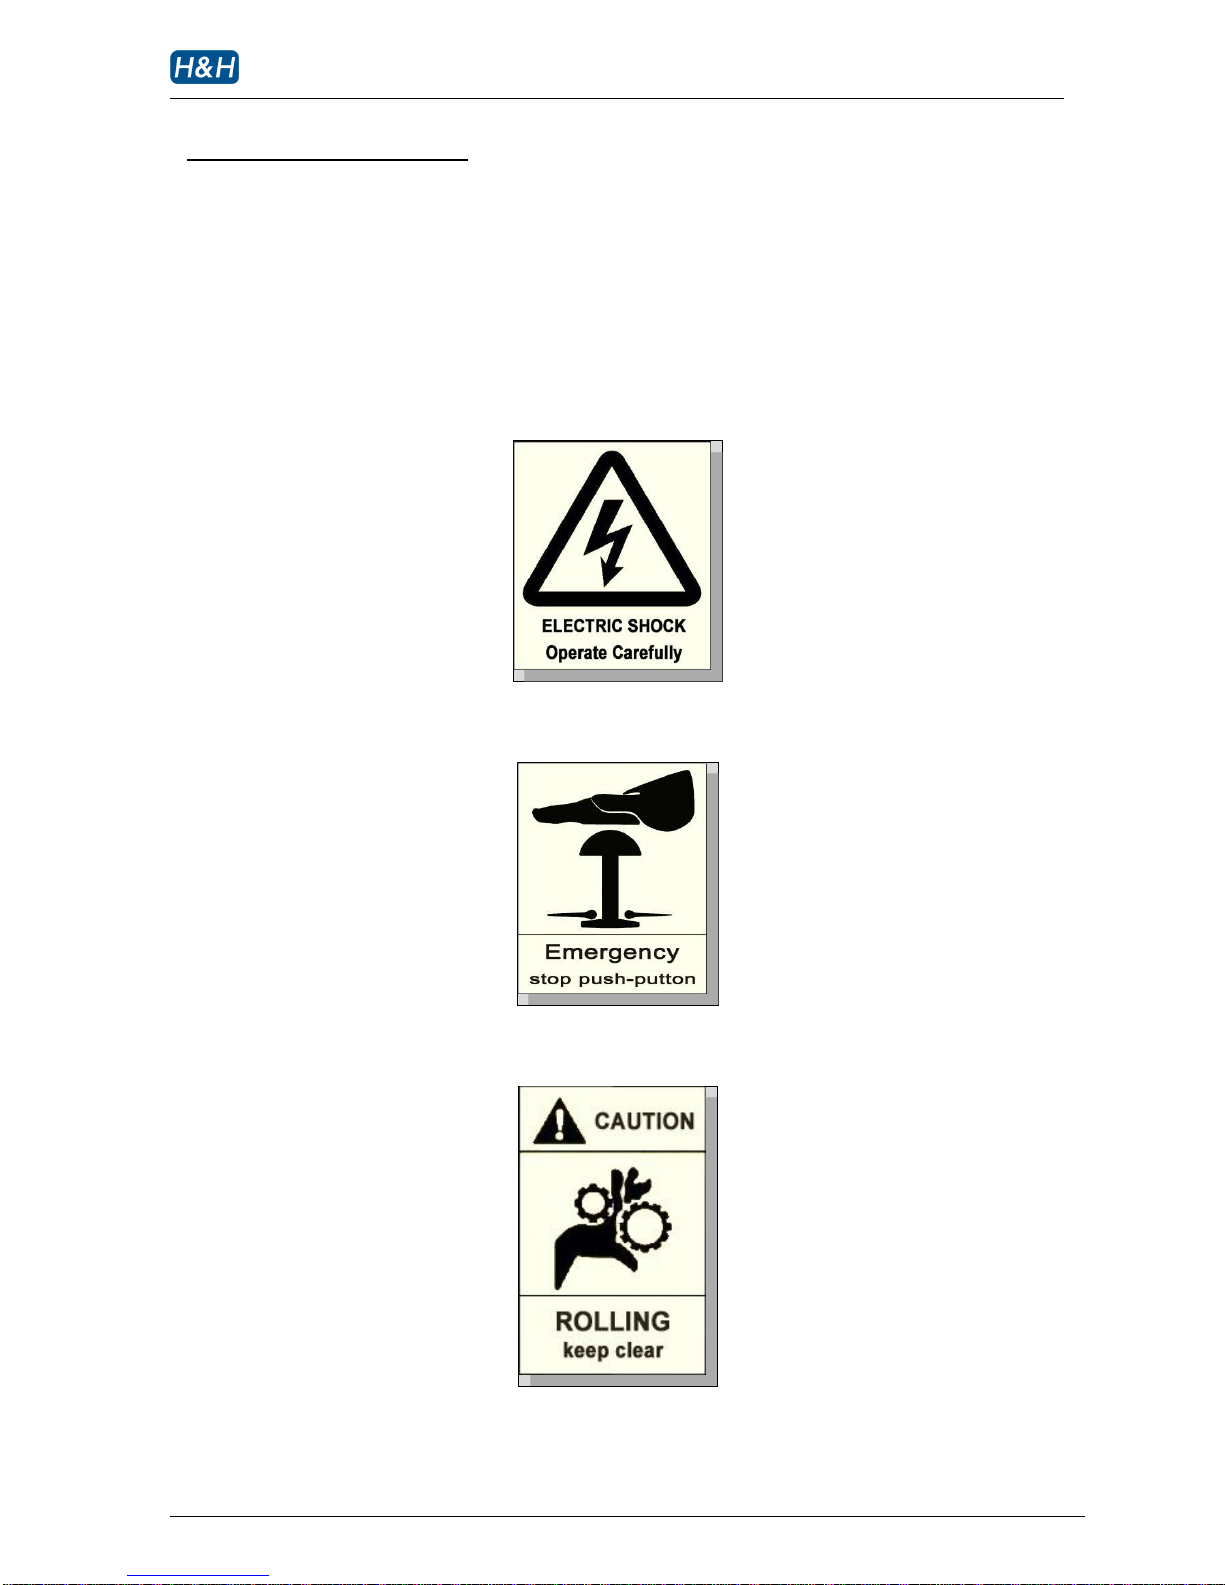
> Precautions Regarding to Safety
Please observe these safety tips for a safe, efficient, and injury free operation of your equipment.
By strictly following all instructions contained in this manual you will certainly obtain an excellent
performance from the use of this equipment for many years.
Page 5

US-501 operation manual
US-501 R02 13.07.09 Display version 4, PLC version 4 P. 4 of 31
Page 6
US-501 operation manual
US-501 R02 13.07.09 Display version 4, PLC version 4 P. 5 of 31
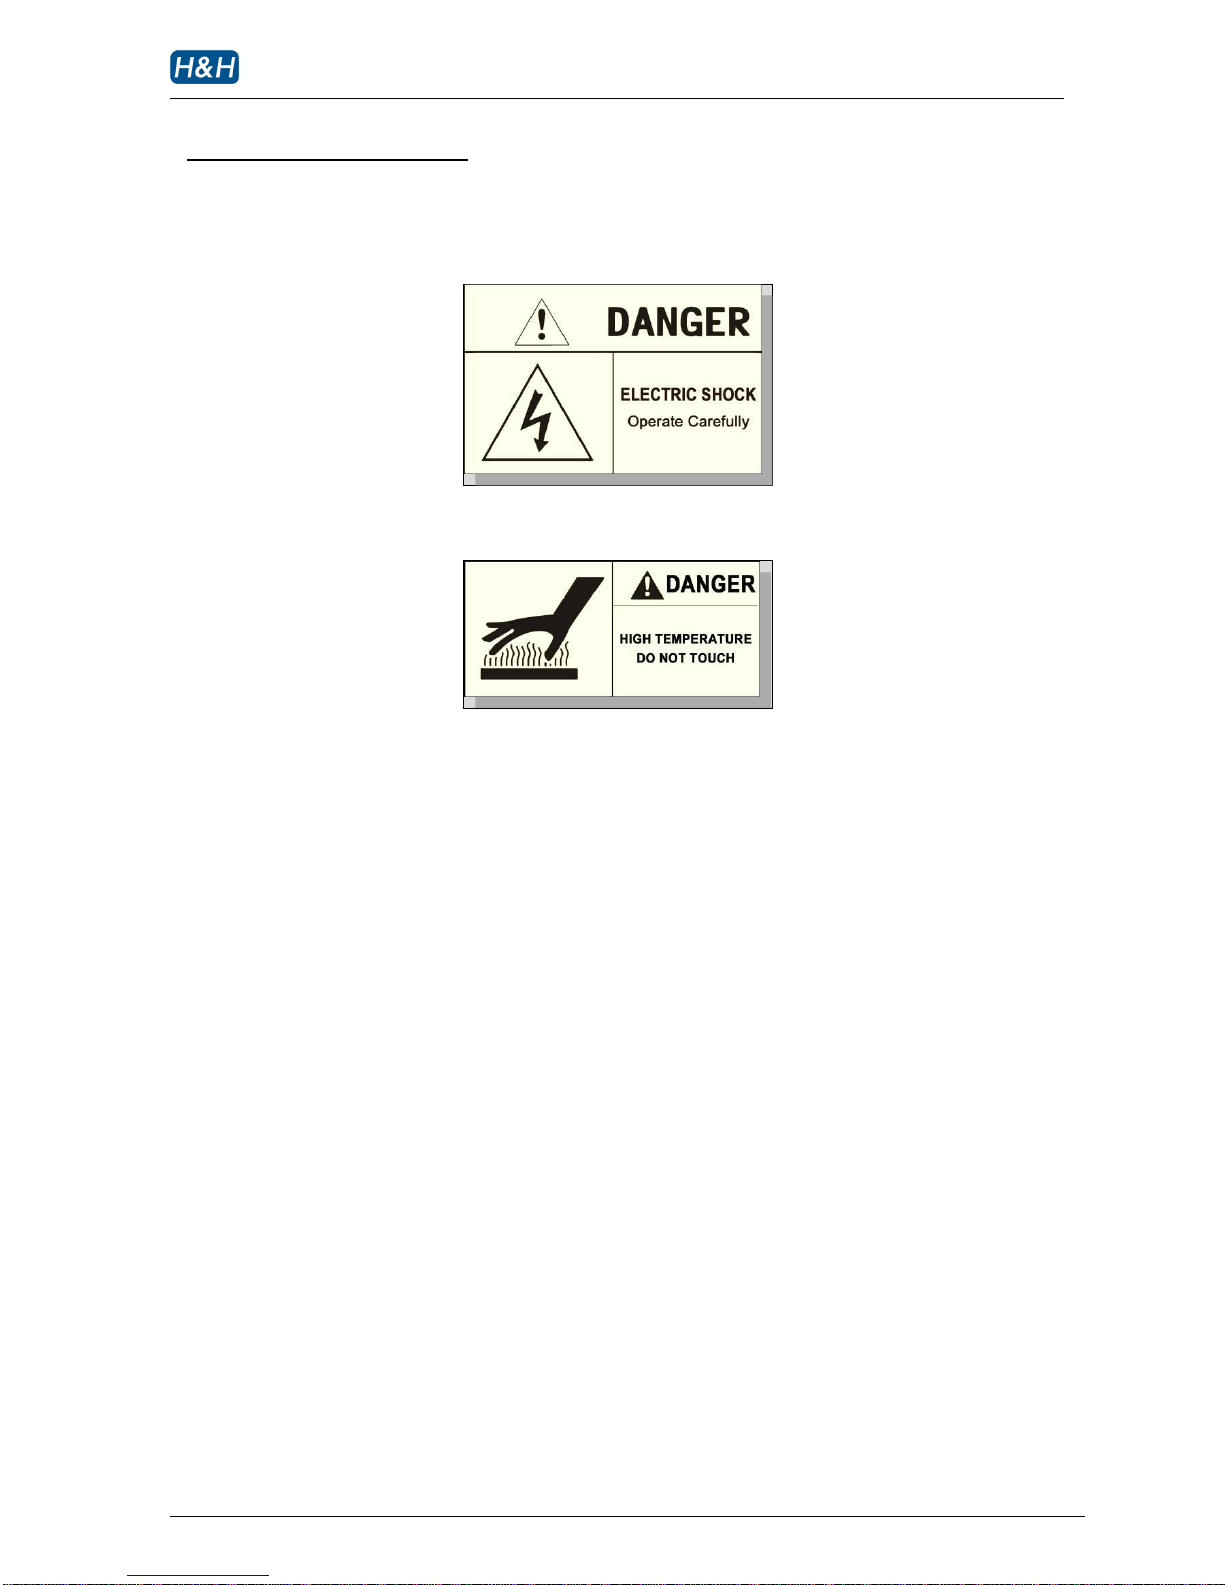
> Precautions Regarding to Safety (cont.)
Page 7
US-501 operation manual
US-501 R02 13.07.09 Display version 4, PLC version 4 P. 6 of 31
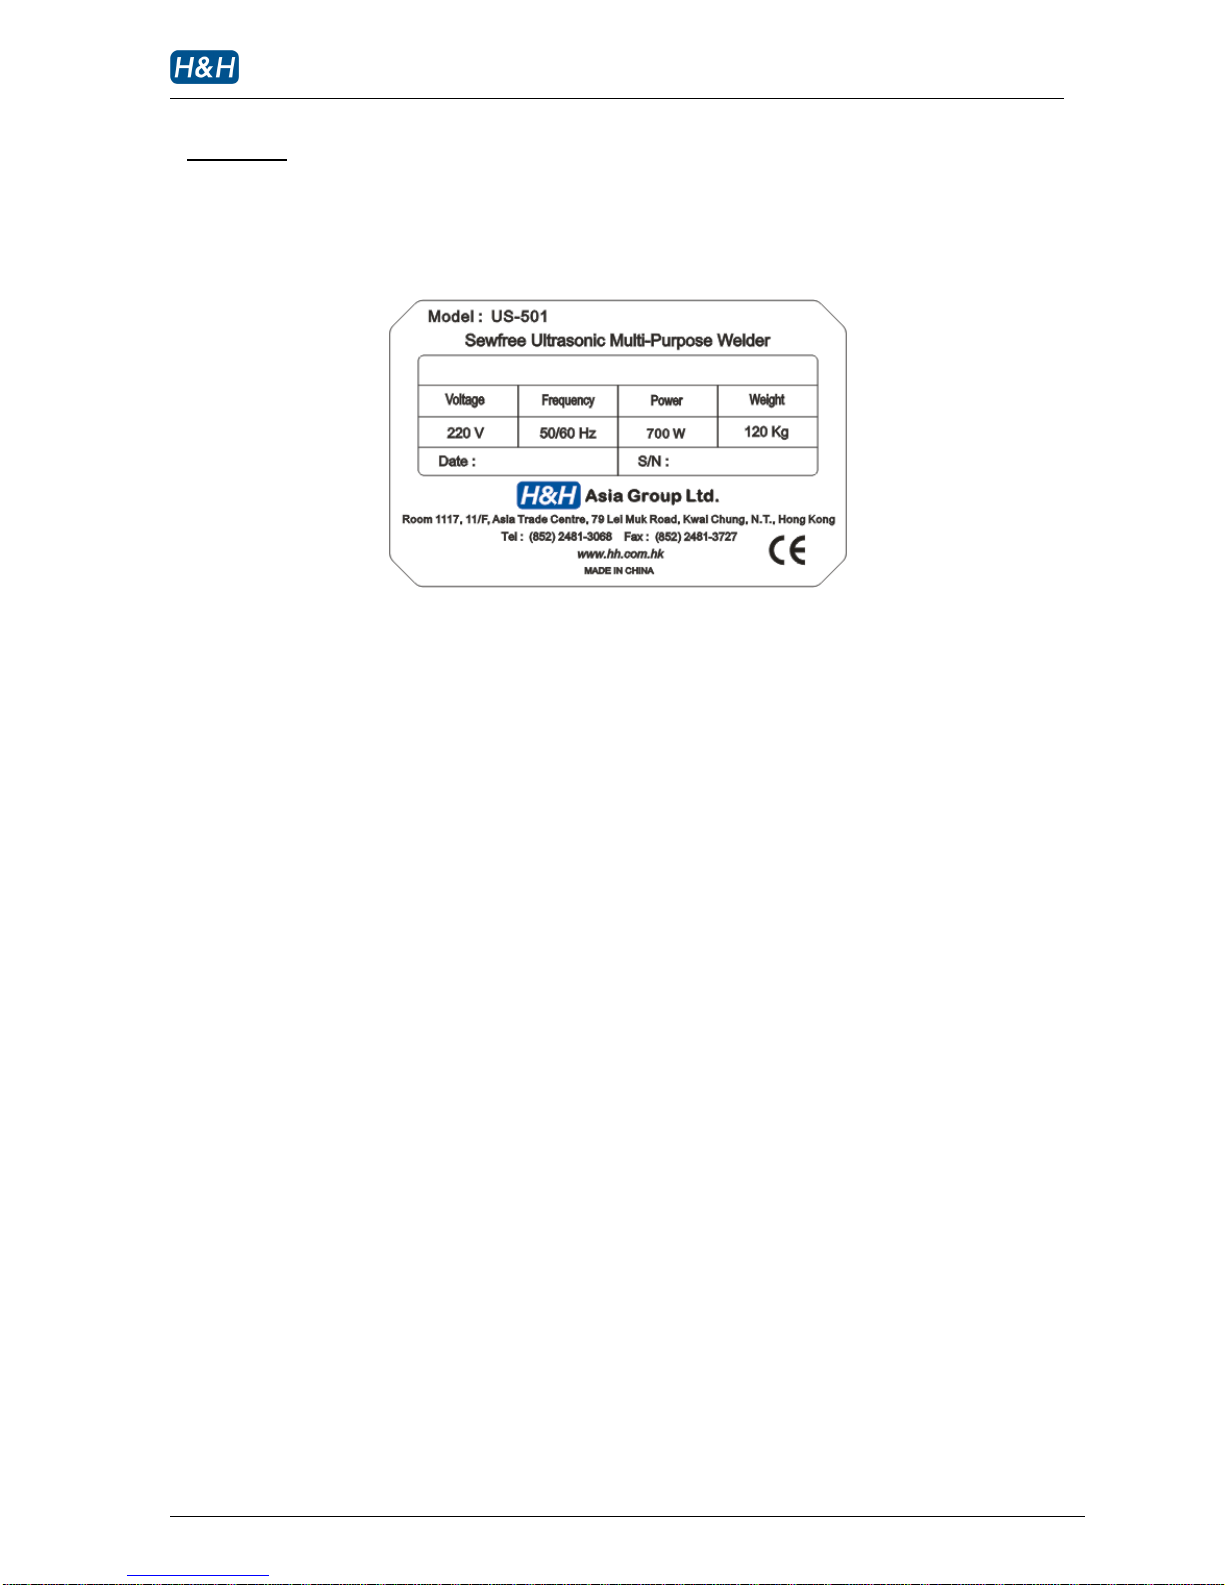
> Name Plate
Page 8

US-501 operation manual
US-501 R02 13.07.09 Display version 4, PLC version 4 P. 7 of 31
> Introduction
Thank you for choosing US-501 sewfree ultrasonic machine by H&H.
The US-501 Sewfree Ultrasonic Multi-purpose Welder was specially designed for cutting and welding
different type of fabric. Various operations such as ‘line bonding’, anti-fray cutting, button hole
opening can be carried out using US-501.
In order to fully understand how to use this machine properly, and avoid damage to both the machine
and operating personnel, please read this manual carefully and keep it safe for future reference.
Page 9

US-501 operation manual
US-501 R02 13.07.09 Display version 4, PLC version 4 P. 8 of 31
> Specifications
Model : US-501
Voltage : AC 220 V, single phase
Frequency : 50/60 Hz
Power Consumption : 700 W
Cutting Frequency : 1-25 stroke/sec
Sonic Frequency : 40 kHz
Horn Width : 3 mm
Overall Dimensions : 1.1 m (L) x 0.5 m (W) x 1.2 m (H)
Overall Weight : 120 kg
Note : due to continuous improvement, specifications are subjected to change without prior notification
Page 10

US-501 operation manual
US-501 R02 13.07.09 Display version 4, PLC version 4 P. 9 of 31
> Features
Quiet Ultrasonic System
Microprocessor control with large panel touch screen operator interface
Unique welding technique ensuring consistent welding energy control.
Precise timing control resulted in no marking, over welding and skip welding during start and
stop operation.
Excellent control in constructing curved seams due to variable speed welding.
3D seam construction.
Variable speed welding on the same seam without affecting welding quality
Easy to adopt sewing machine platform
Memory functions to store and recall operating parameters.
Page 11
US-501 operation manual
US-501 R02 13.07.09 Display version 4, PLC version 4 P. 10 of 31
> Identification of Components
>> Front View
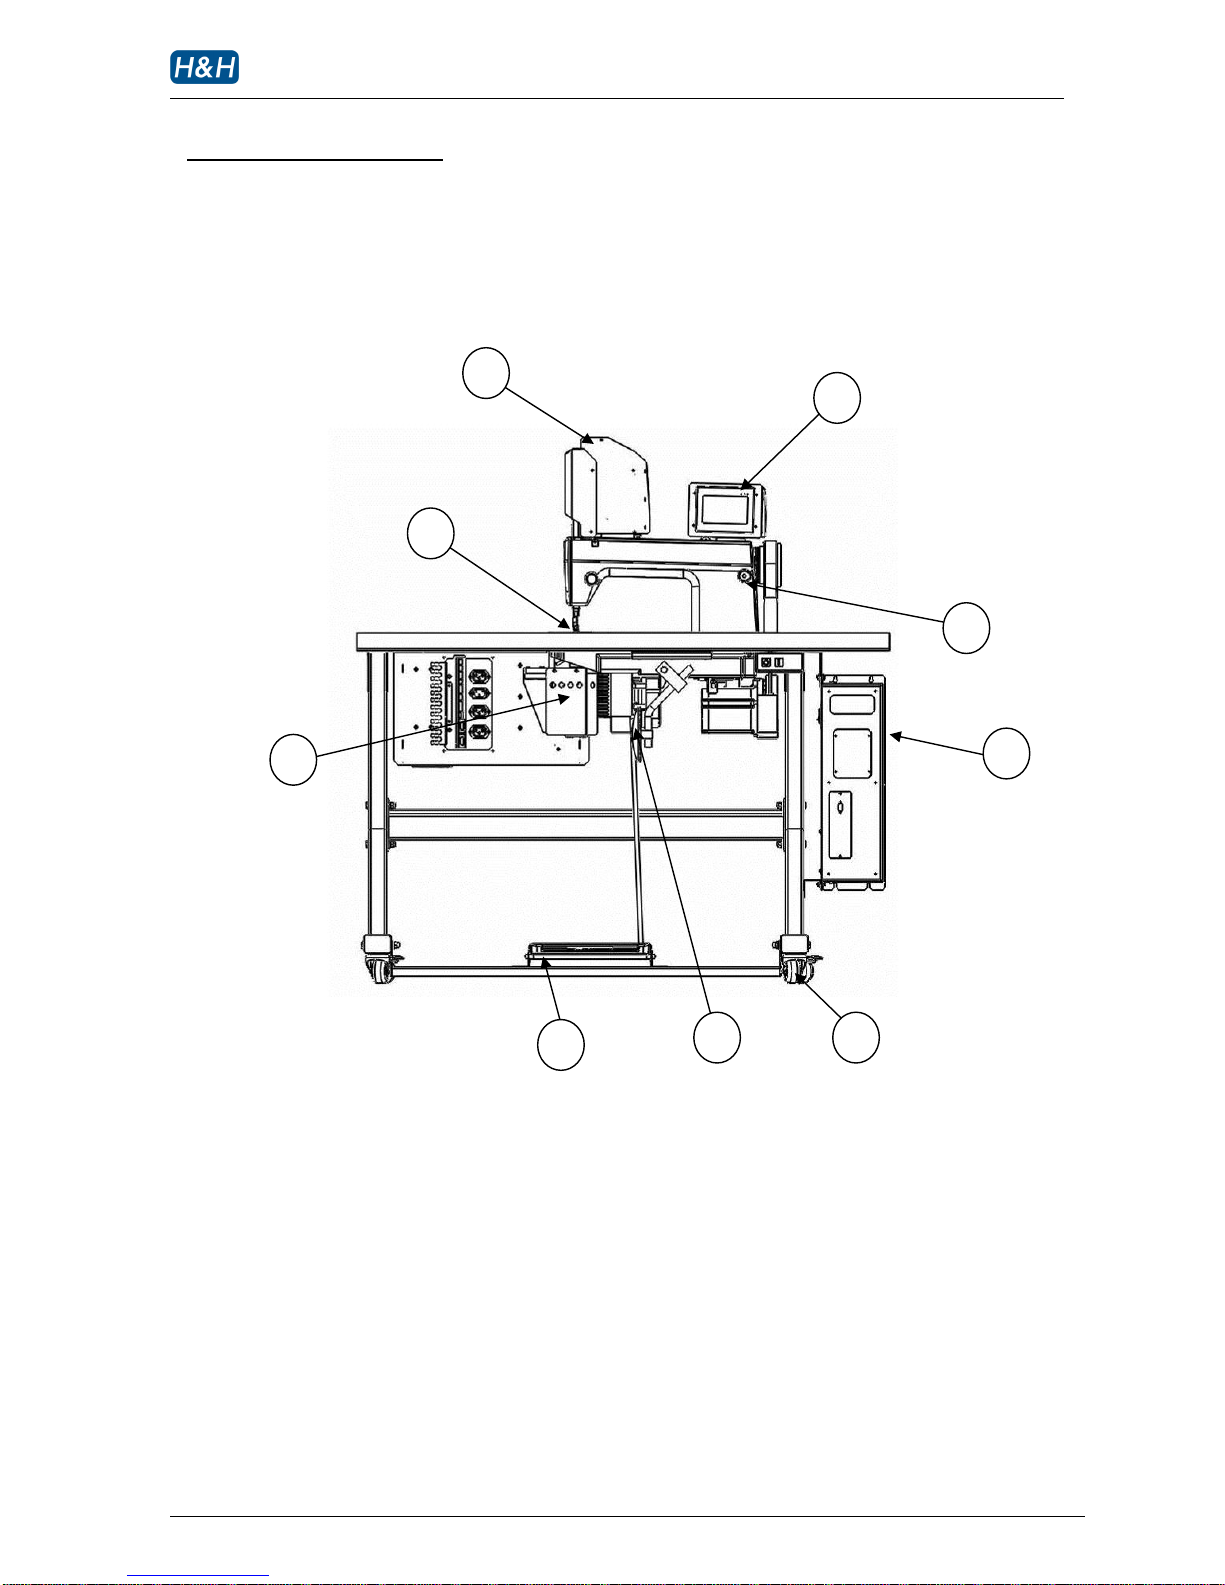
1. touch screen panel
2. welding head assembly
3. ultrasonic stack cover
4. foot pedal
5. knee switch
6. transporting castor
7. ultrasonic power supply
8. electronic actuator
9. sewing machine feed pitch adjusting knob
Page 12
US-501 operation manual
US-501 R02 13.07.09 Display version 4, PLC version 4 P. 11 of 31
> Identification of Components (cont.)
>> Rear View
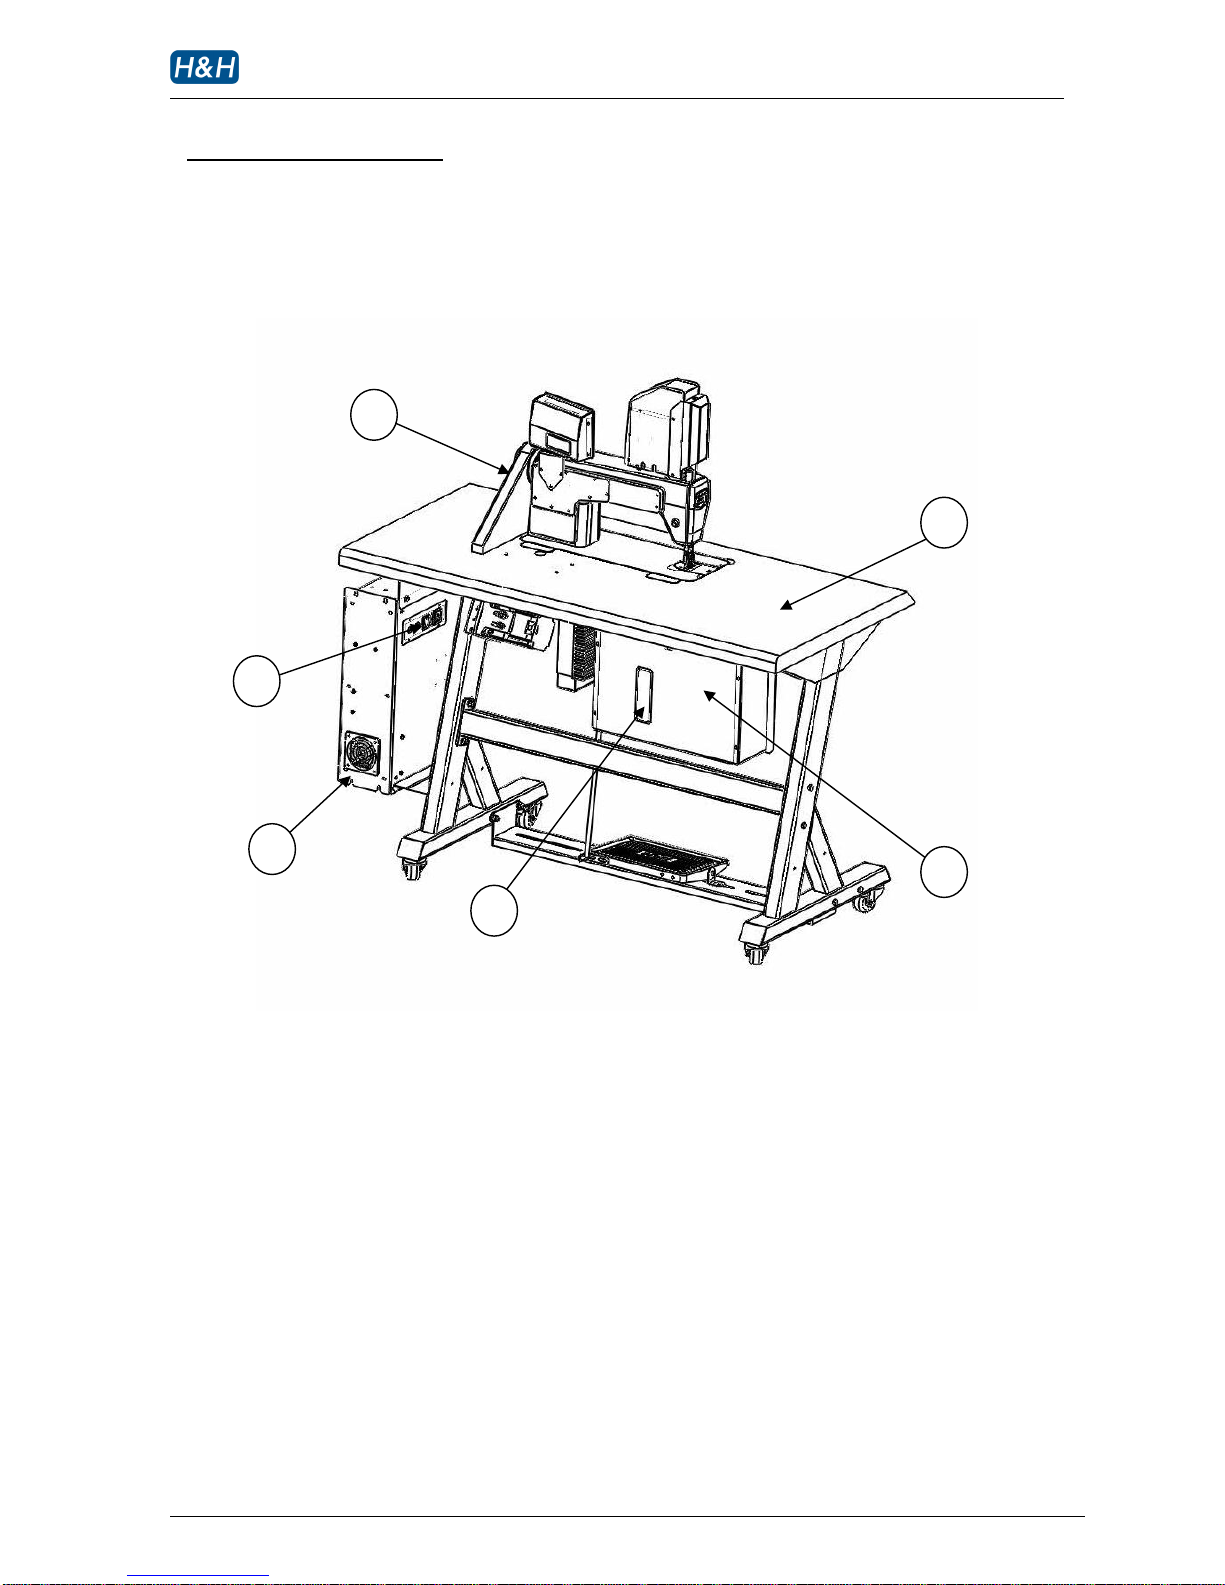
1. belt shroud
2. ultrasonic power supply access panel
3. cooling fan inlet
4. circuit breaker reset access hole
5. main electrical box
6. table top
Page 13
US-501 operation manual
US-501 R02 13.07.09 Display version 4, PLC version 4 P. 12 of 31
> Identification of Components (cont.)
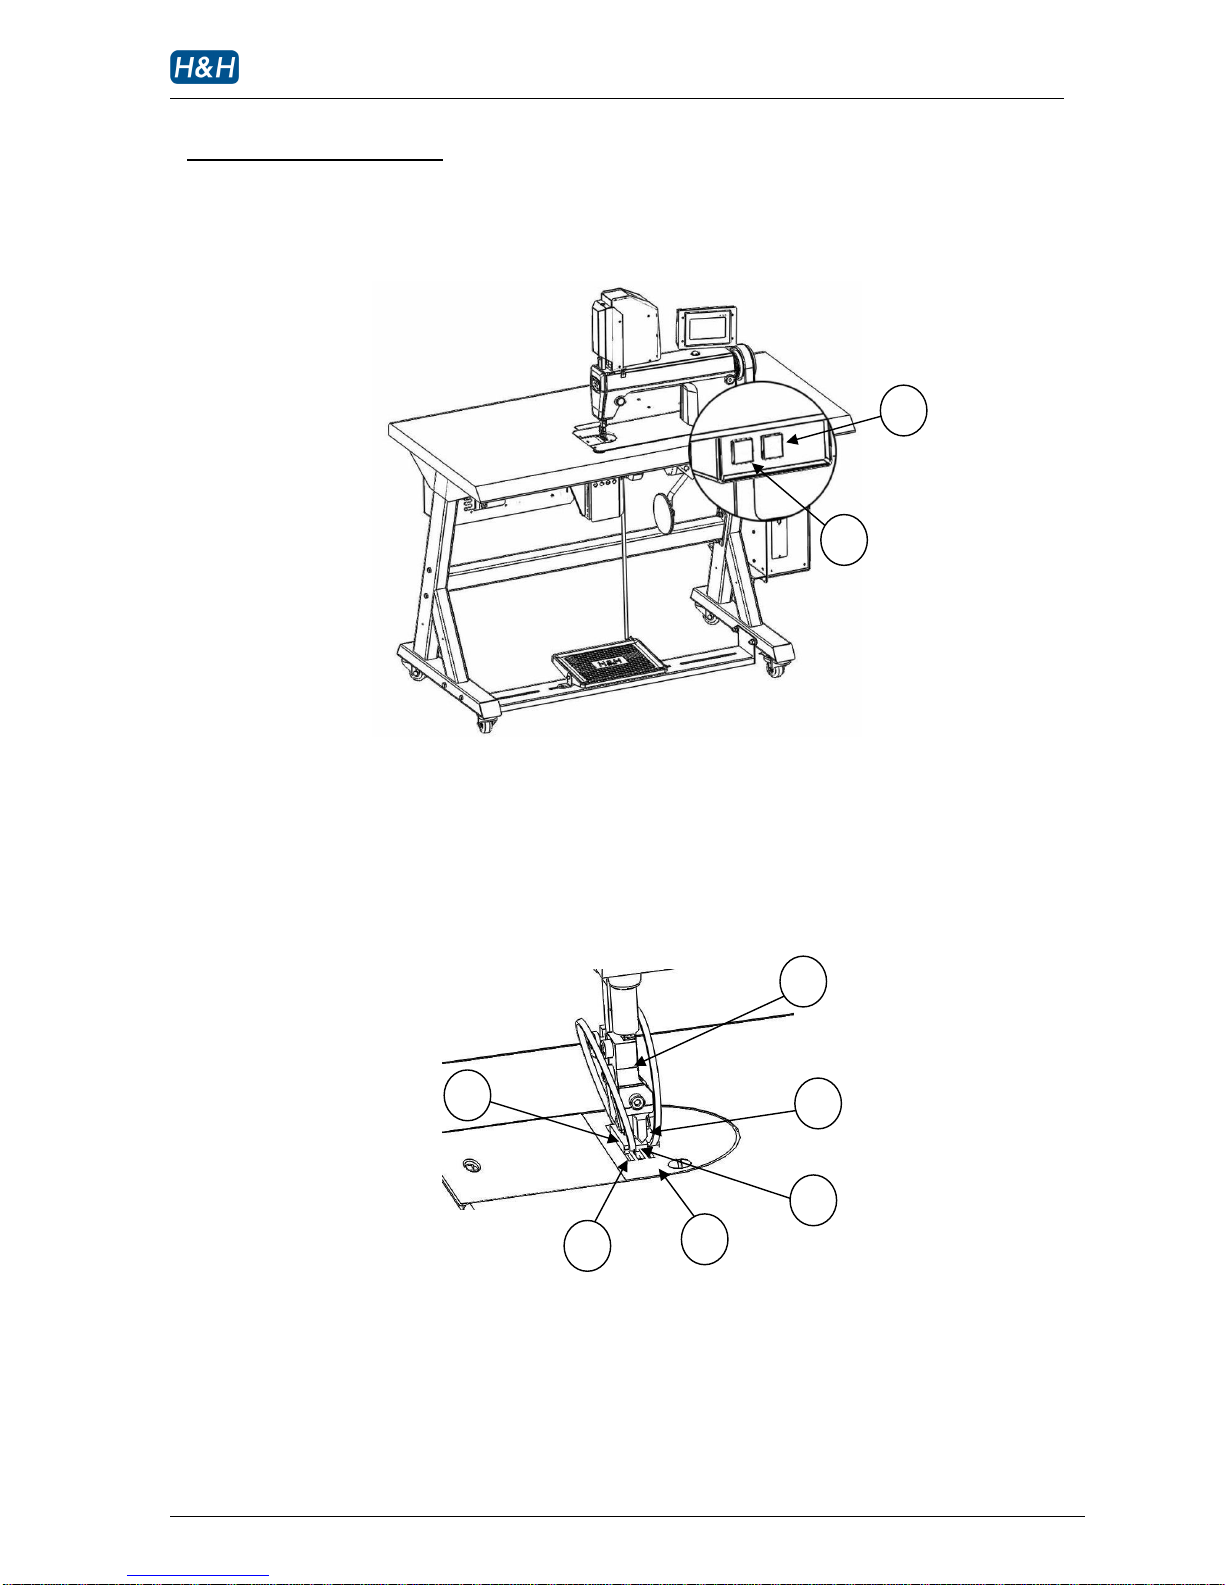
>> Power ON/OFF switch
1. power ON button
2. power OFF button
>> Welding Head Assembly
1. press foot
2. feed dog
3. bottom utility plate
4. ultrasonic horn
5. cutter bit
6. cutter mount
Page 14

US-501 operation manual
US-501 R02 13.07.09 Display version 4, PLC version 4 P. 13 of 31
> Principle of Ultrasonic Welding
Ultrasonic energy is a form of physical vibration. The commonly used vibration frequencies are 20
kHz, 30 kHz, 35 kHz and 40 kHz. Different materials exhibit different behaviors under ultrasonic
vibration. Synthetic material generates internal heat under ultrasonic vibration. The US-501
machine generates vibration on the surface of the horn. Fabric with at least 50% synthetic material
is placed on the surface of the horn. A special tool called cutter bit is press against the horn so that
fabric between the horn and the cutter bit is exposed to vibration. The heat generated in the fabric
portion under pressure is heated up instantly and the temperature is high enough to melt the fabric,
hence resulting in an ultrasonic cut.
US-501 is engineered to careful manage this vibrating energy in order to slice fabric consistently in
single layer or multi-layer application.
During single layer operation, fabric is melted and separated resulting in a fray free edge. While
during multi-layer operation, layers of fabrics are cut but at the same time the edges of the fabric
are melted and fused together resulting in a ‘weld’. This process is sometimes referred as a ‘cut and
seal’ or ‘line bonding’ operation.
Page 15

US-501 operation manual
US-501 R02 13.07.09 Display version 4, PLC version 4 P. 14 of 31
> Preparation for Installation
Installation must be carried out by authorized personnel. Follow the steps below:
1. Position the machine on a flat surface and allow at least 50cm clearance on both sides as well as
the back side, this is essential to allow enough room for carrying out necessary service and
maintenance
2. Cut loose all packing cable ties and materials in order to free up all machine movements.
3. Connect the power plug to a suitable outlet with at least 15A capacity.
4. Make sure there is enough lubricate oil in the sewing machine. Oil may be drained at the time of
shipping.
5. Prepare some fabric for testing
6. The machine is now ready for operation.
Page 16
US-501 operation manual
US-501 R02 13.07.09 Display version 4, PLC version 4 P. 15 of 31
> Control Method
>> Touch Screen Control Panel
Almost all setting and timing control of the machines can be input from the touch screen control
panel. Use you fingertip to touch the parameter to be modified. Switch to different pages to
modify other parameters (refer to section on control menu navigation). The screen has a
protective cover to prevent the surface from damage and scratch, however, avoid using
excessive force when touching the panel. You can also change the contrast of the display so as to
obtain the best picture when viewing at a different angle.
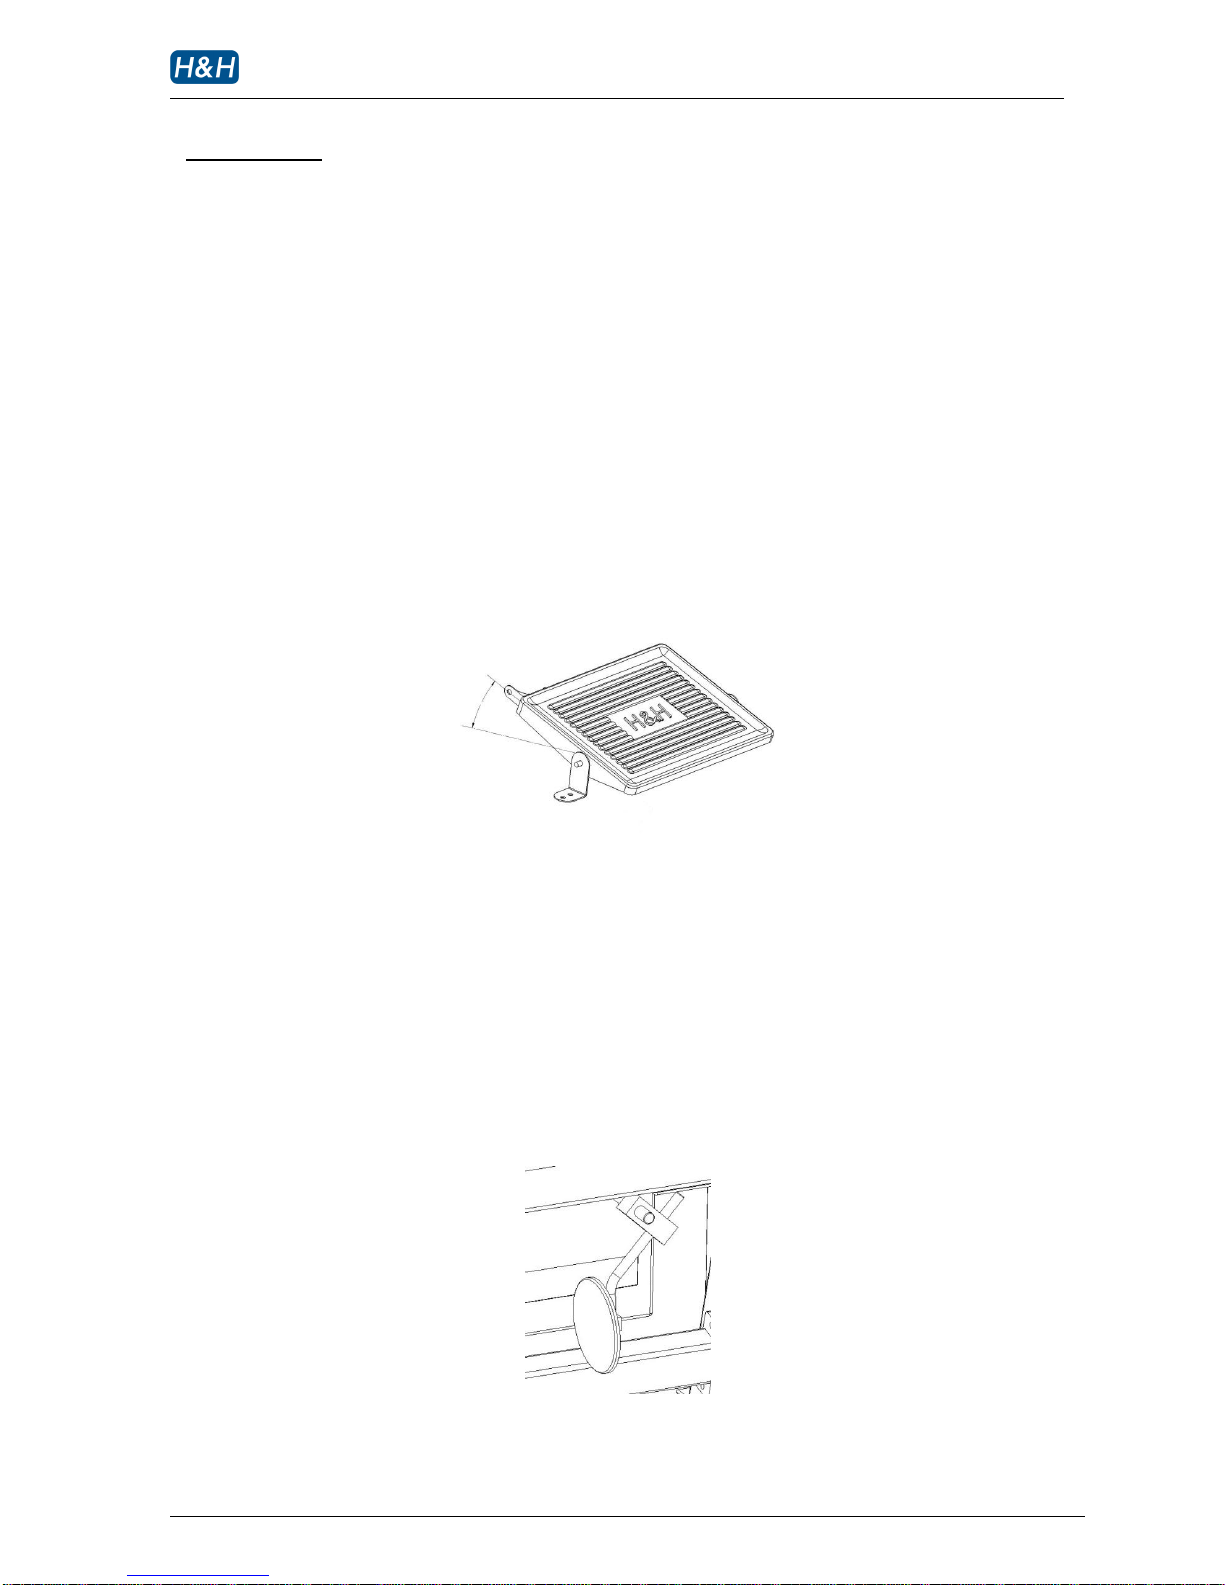
>> Foot Switch
The foot pedal is to control the speed of the sewing machine head. Use it as the same way as an
ordinary sewing machine.
To start cutter - press forward.
To change the speed of cutting – ease back slightly from the forward position. The speed of
cutting is proportional to the pedal position in the forward
direction.
>> Knee Switch
The knee switch is to lift the press foot and stamp. When press foot is needed to be raised, apply
pressure to the knee switch. The pressure foot is lifted mechanically while the stamp is lifted up
electronically. Release the knee switch to lower the press foot and the stamp.
Page 17
US-501 operation manual
US-501 R02 13.07.09 Display version 4, PLC version 4 P. 16 of 31
> Control Method (cont.)
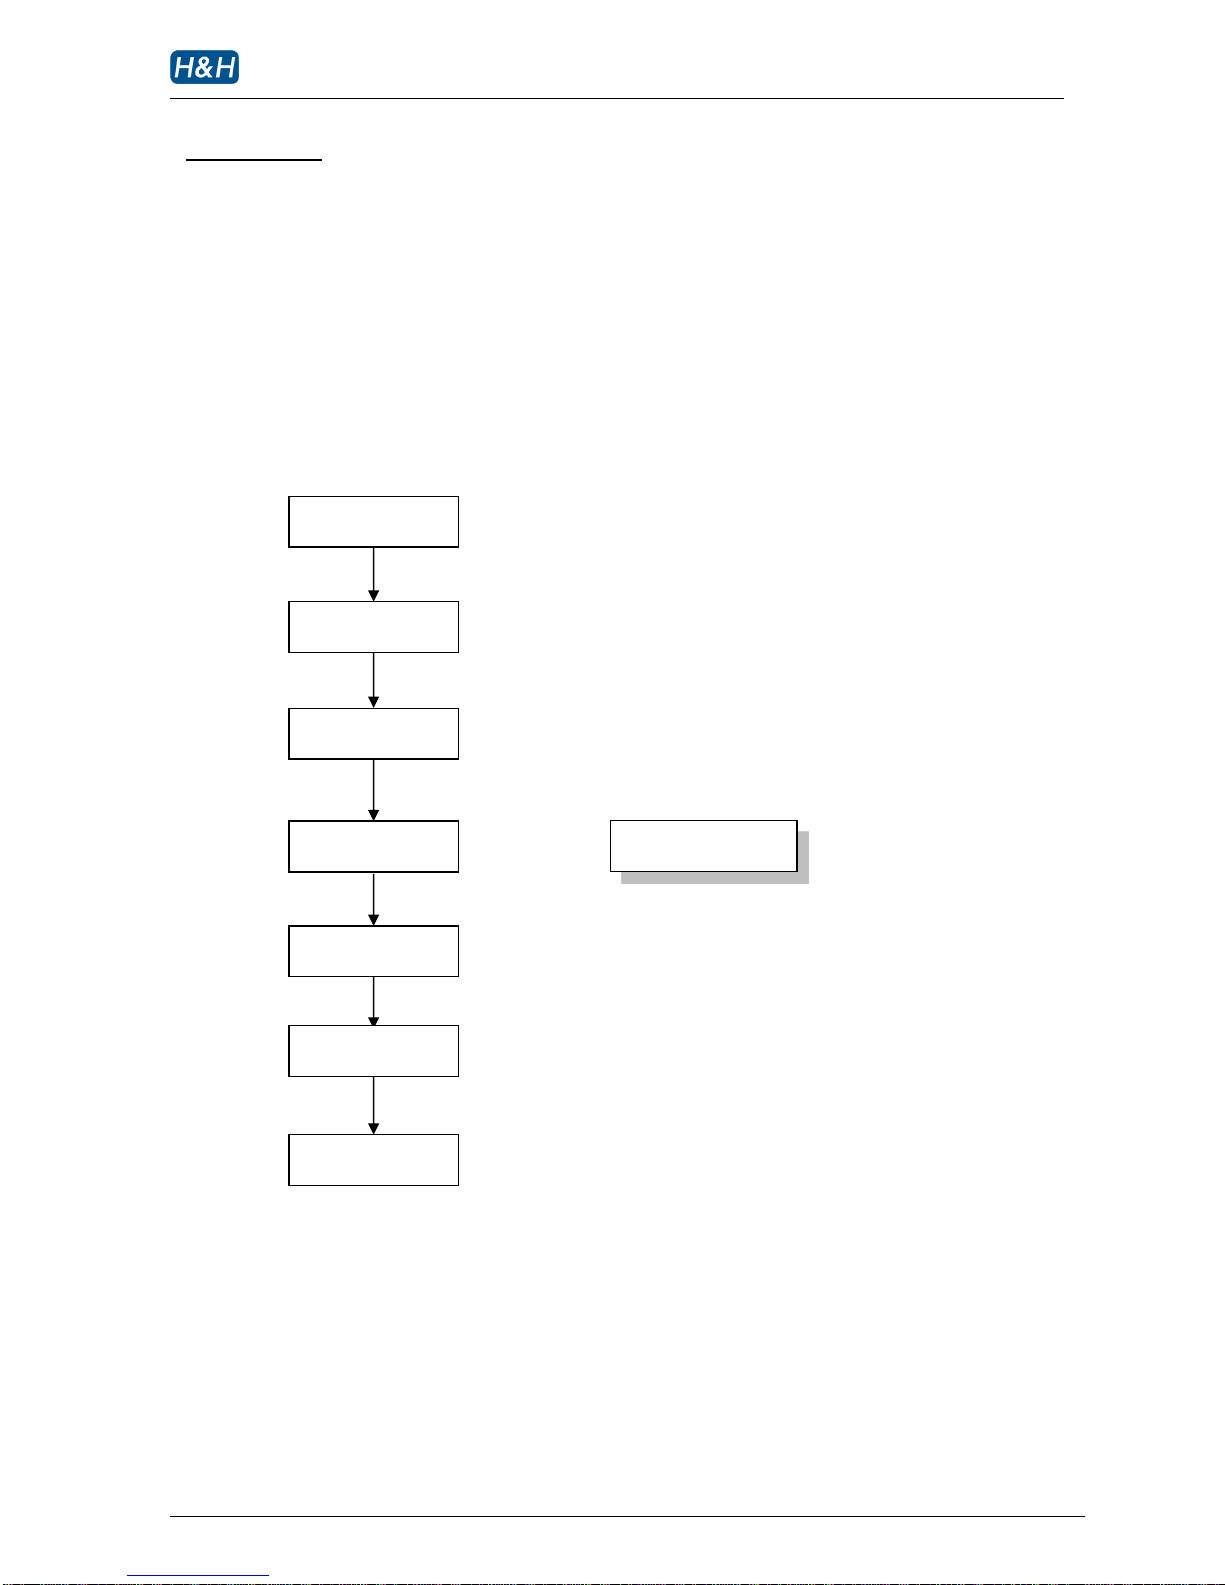
>> Control Menu Navigation
The US-501 has a number of parameters that can be adjusted according to the operational
situations. These parameters are arranged in different menu pages on the touch screen control
panel according to their functionality. The structure of the menu page arrangement is
represented in the following diagram.
US-501 Menu Structure
H&H
main
cutter calibration
monitor
alarm
program version
pattern
Page 18
US-501 operation manual
US-501 R02 13.07.09 Display version 4, PLC version 4 P. 17 of 31
> Start Up and Shut Down Procedures
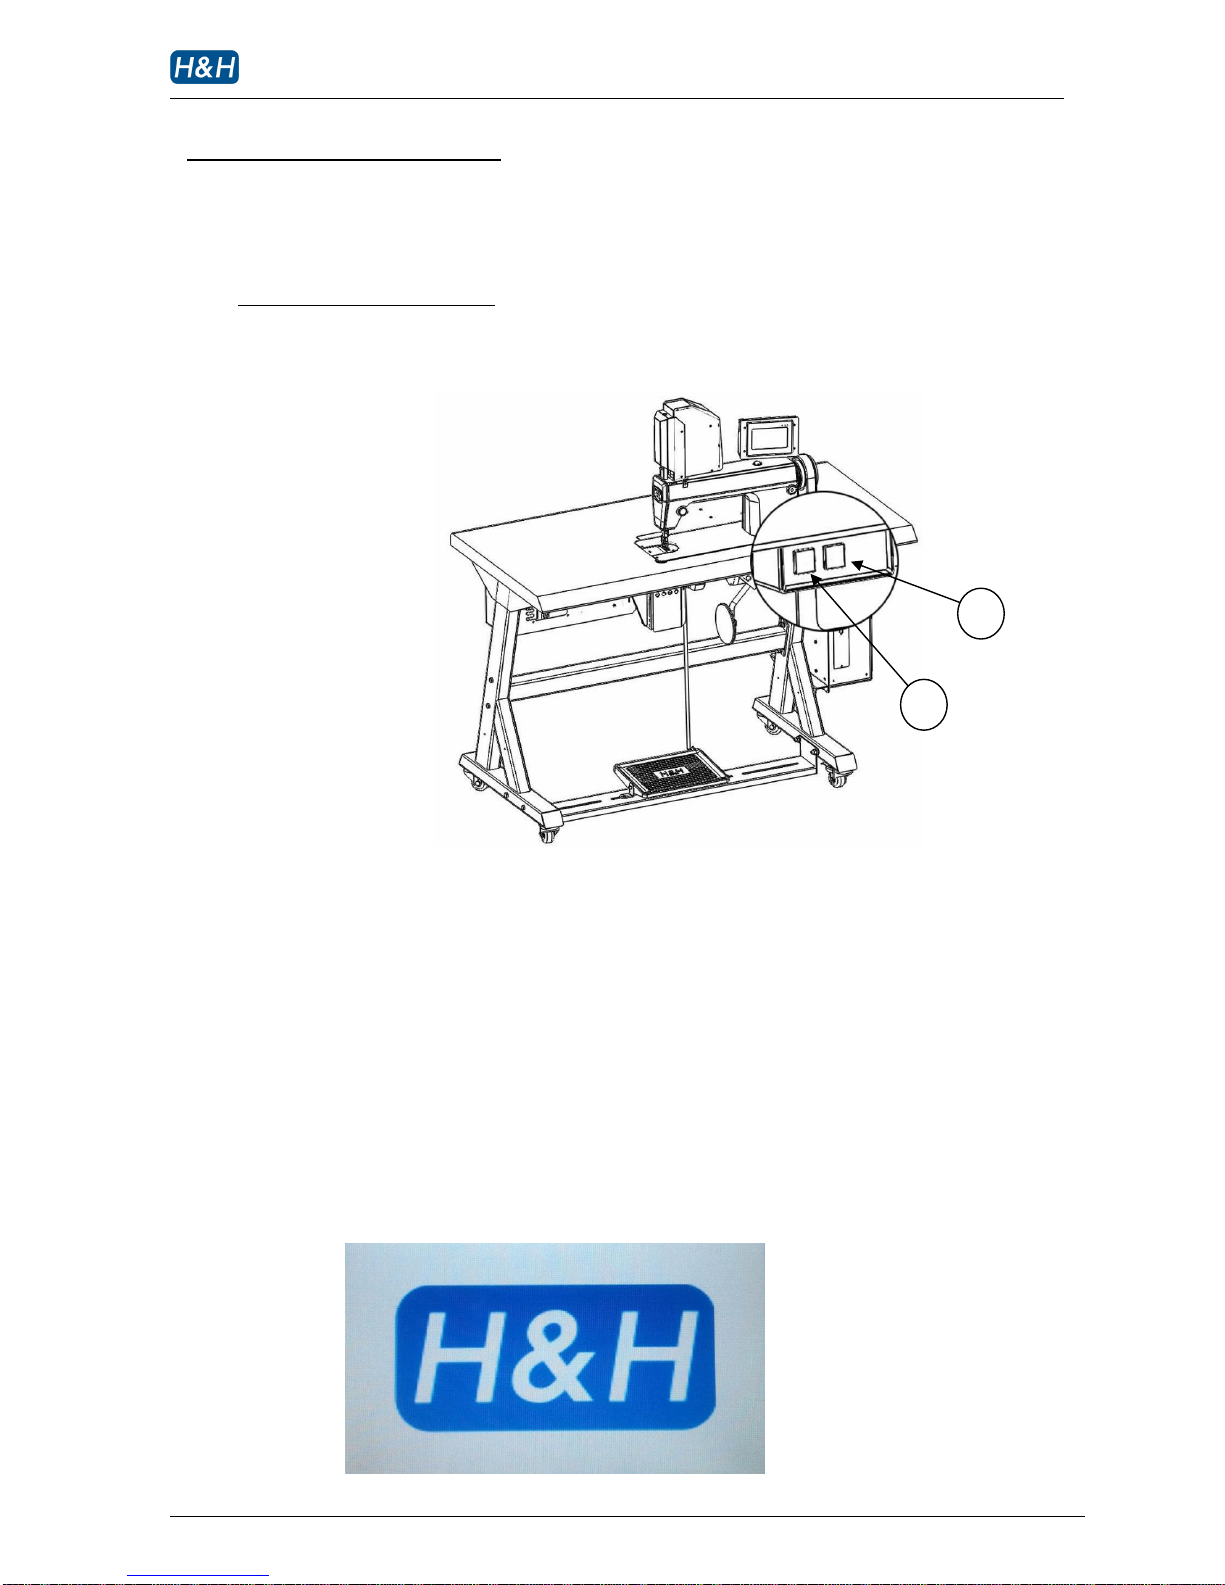
Please take steps to follow the procedures described below:
Location of power ON/OFF switch
1 power ON button
2 power OFF button
>> Start up Procedures
Turn on the machine by pressing the green power ON button
The 1st page is welcome note will show once the machine is powered on.
Page 19

US-501 operation manual
US-501 R02 13.07.09 Display version 4, PLC version 4 P. 18 of 31
> Start Up and Shut Down Procedures (cont.)
>> Start up Procedures (cont.)
The 2nd page is program loading page, it will process for several seconds and carry to the main
page.
Briefly after the power is turned on, the electronic positioning system will direct the stamp to
predefined position called home position. The stamp will use this position as a reference for all
future movement. At the home position, the positioning system has a coordinate equal to ‘0’.
During the homing process, do not interfere with the motion of the stamp as the machine may
pick up incorrect data resulting in incorrect position in the subsequence operation.
>> Shut down Procedures
WARNING !
Please follow the shut down procedures strictly to avoid damage to the ultrasonic
system.
1 Always allow at least 5 seconds idle before turning off the power.
2 Always allow at least 5 seconds after the shut down before turning on the machine again.
3 Turn off the machine by pressing the red power OFF button
Page 20

US-501 operation manual
US-501 R02 13.07.09 Display version 4, PLC version 4 P. 19 of 31
> Basic Operation
>> Control Panel Main page
Going into the operation main page. Basic parameters are needed to be set before operating the
machine. Refer to the corresponding sections for detail explanation.
1 cutter assembly
2 cutter pressure regulator (the number is the real time pressure, selecting range is -10 to +5)
3 sonic on/off switch, ready is sonic power on while off is sonic power off
4 cloth thickness selector (the number is the real time relevant speed, selecting range is 0 to 4) R1
5 sonic on/off switch, ready is sonic power on while off is sonic power off
6 sonic frequency
7 sonic power regulator (the number is the real time power, selecting range is 1 to 10)
8 sonic cooling fan speed
9 cutter operation mode indicator (continuous working mode or pattern on processing mode)
10 to next page
11 sonic power consumption indicator
R1: Thicker cloth will be more difficult to cut, a slower speed will be more appropriate; conversely,
thinner cloth will be easier to cut, can apply with a faster speed
Page 21
US-501 operation manual
US-501 R02 13.07.09 Display version 4, PLC version 4 P. 20 of 31
> Basic Operation (cont.)
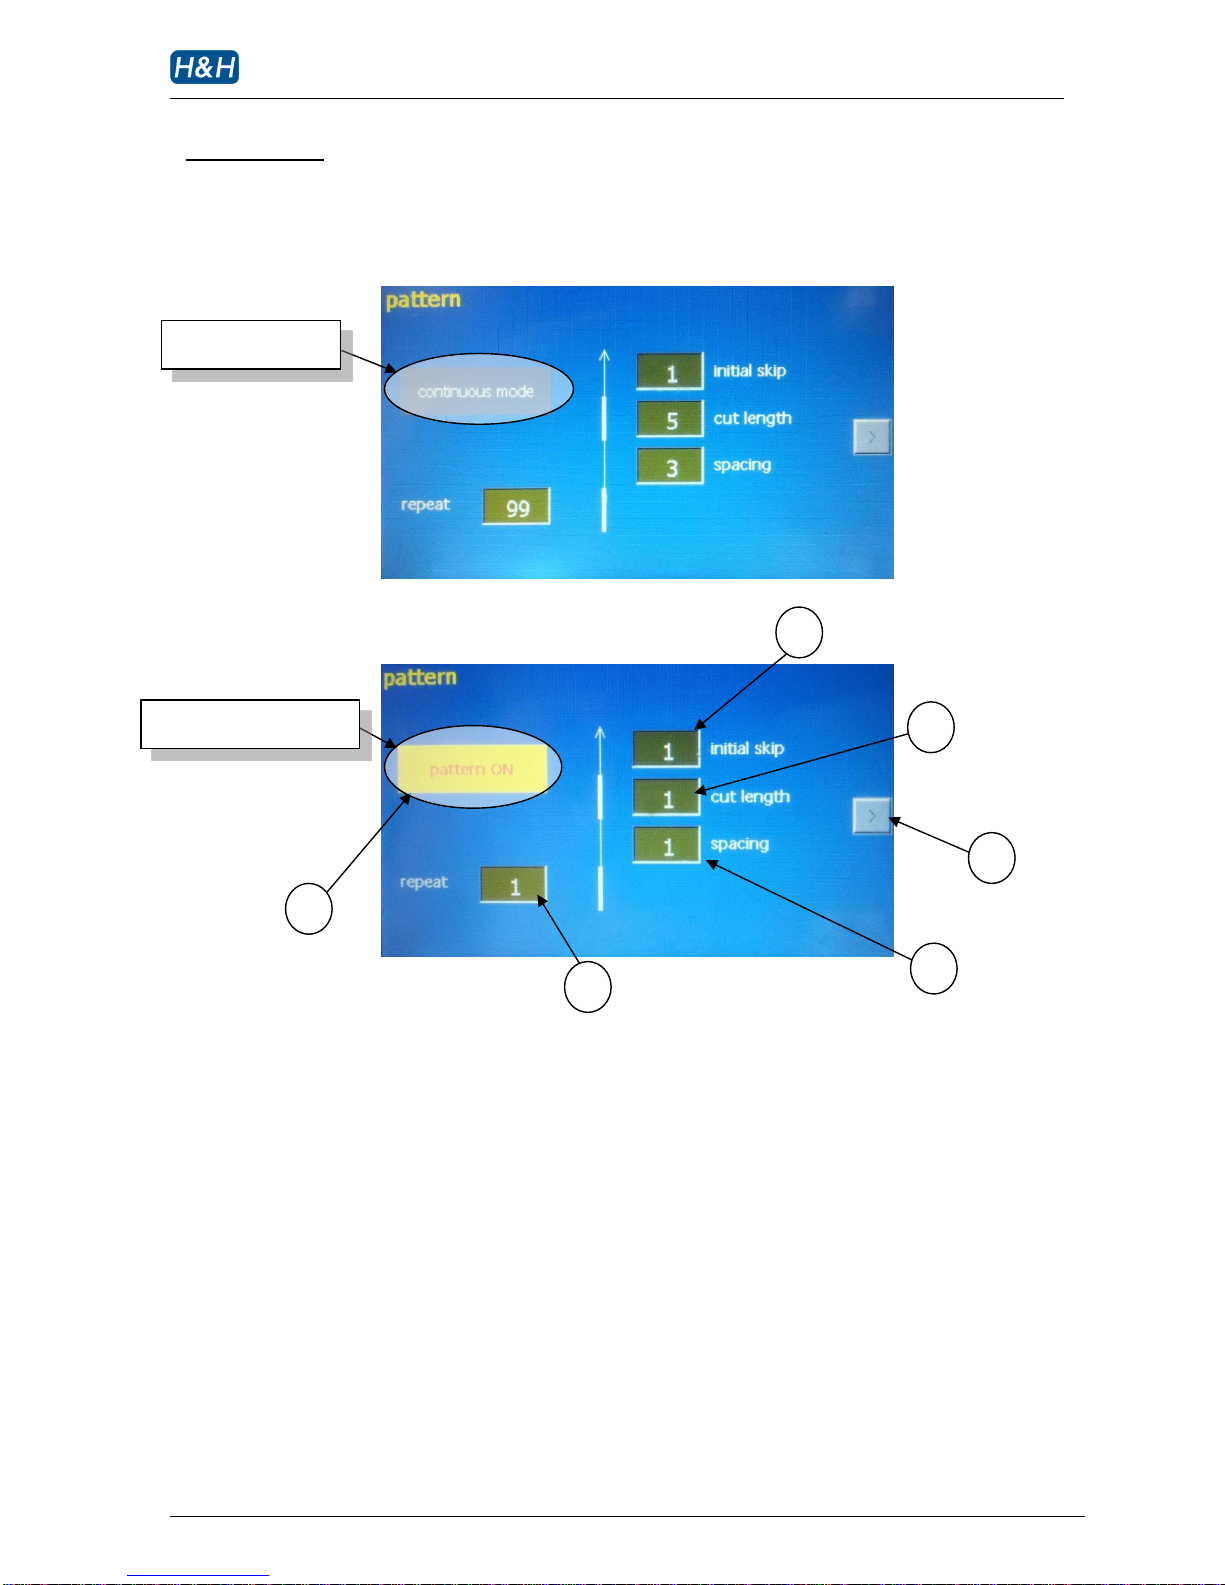
>> Pattern Cutting
1 press here to select the machine for normal or pattern cutting mode (default for continuous cutting) R2
2 it is for setting the pattern cut repetition times (1=1 needle pitch, range 1 to 100)
3 it is for setting the initial spacing skip steps prior for the first cut (1=1 needle pitch, range 1 to 100)
4 setting the pattern cutting length steps (1=1 needle pitch, range 1 to 100)
5 setting the pattern cut slot spacing steps (1=1 needle pitch, range 1 to 100)
6 to next page
Using different pattern cutter to achieve different pattern (standard pattern cannot bigger than
3mm x 2mm). Adjusting the pressure between the cutter & the sonic horn can also achieve
different welding & cutting point. Application for pattern cutting including decoration and
sewfree button holes.
R2: When the machine is selected to the pattern cutting mode, it will stop when the set cycles are finished
and ready for the next cycle start up.
Continuous Mode
Pattern Cutting Mode
Page 22
US-501 operation manual
US-501 R02 13.07.09 Display version 4, PLC version 4 P. 21 of 31
> Basic Operation (cont.)
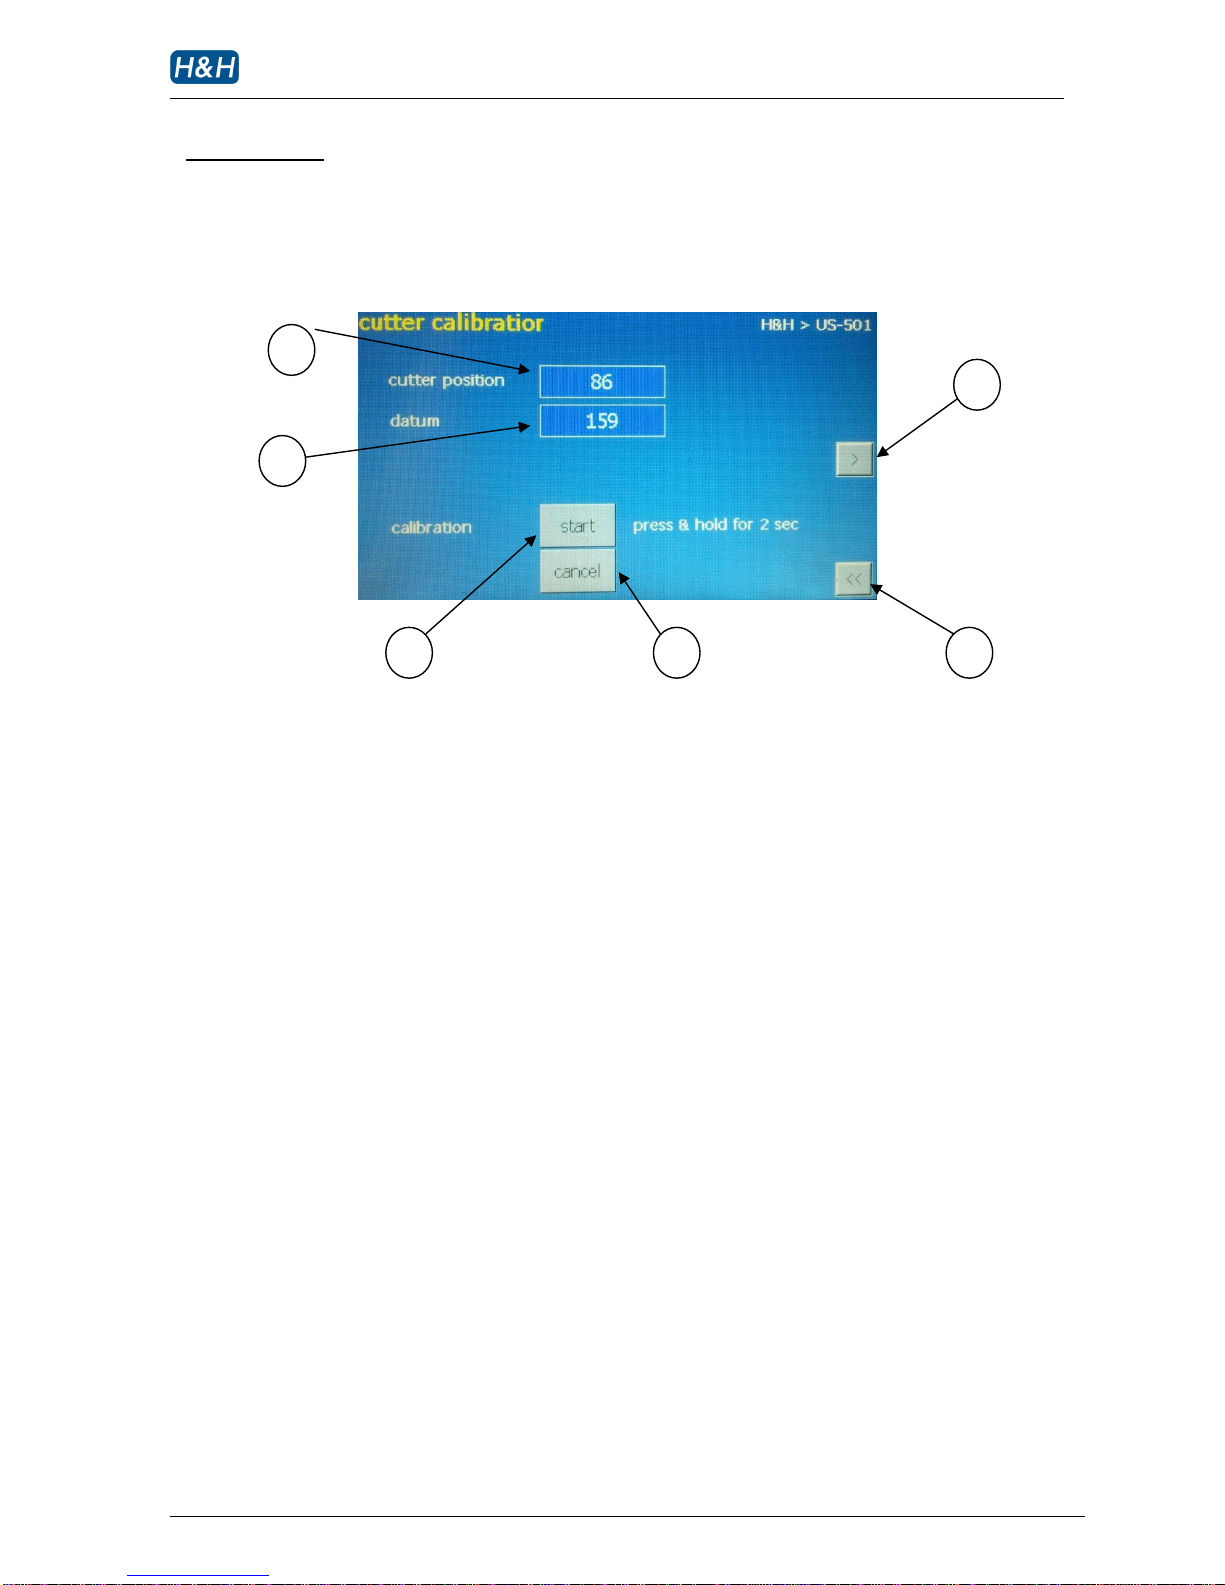
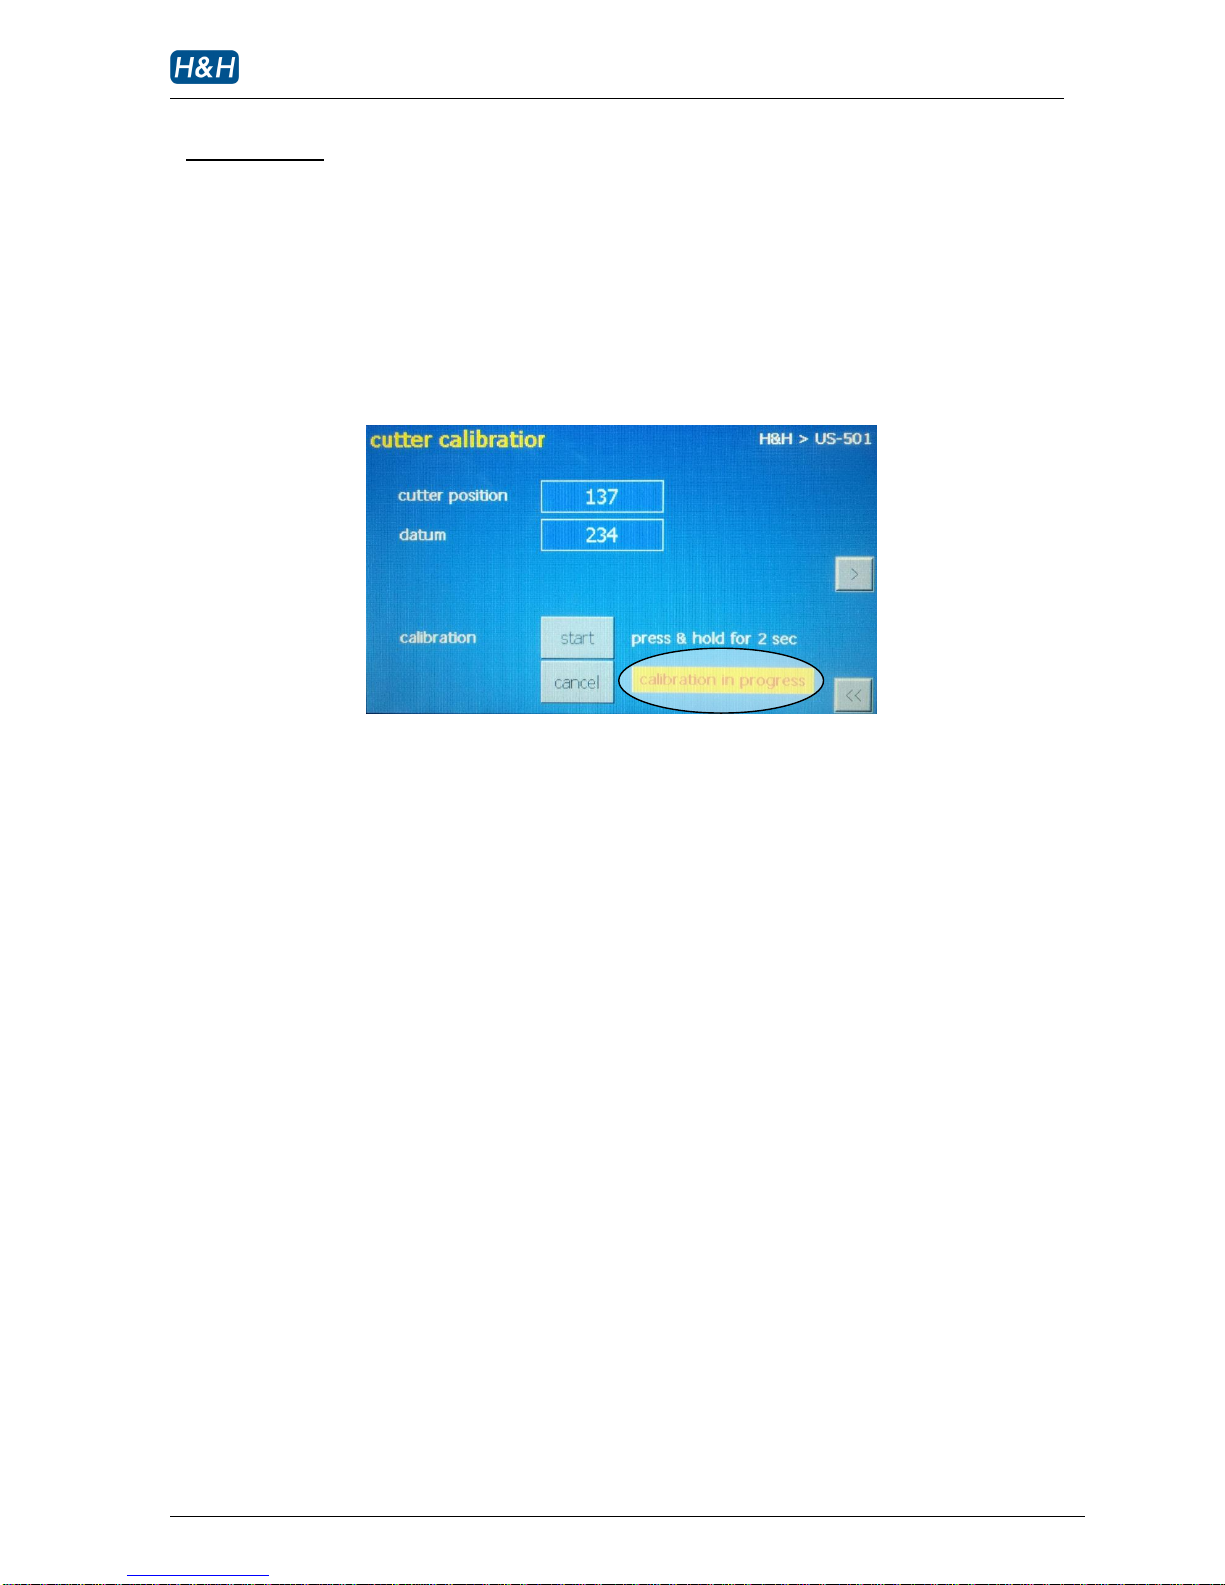
>> Cutter Calibration
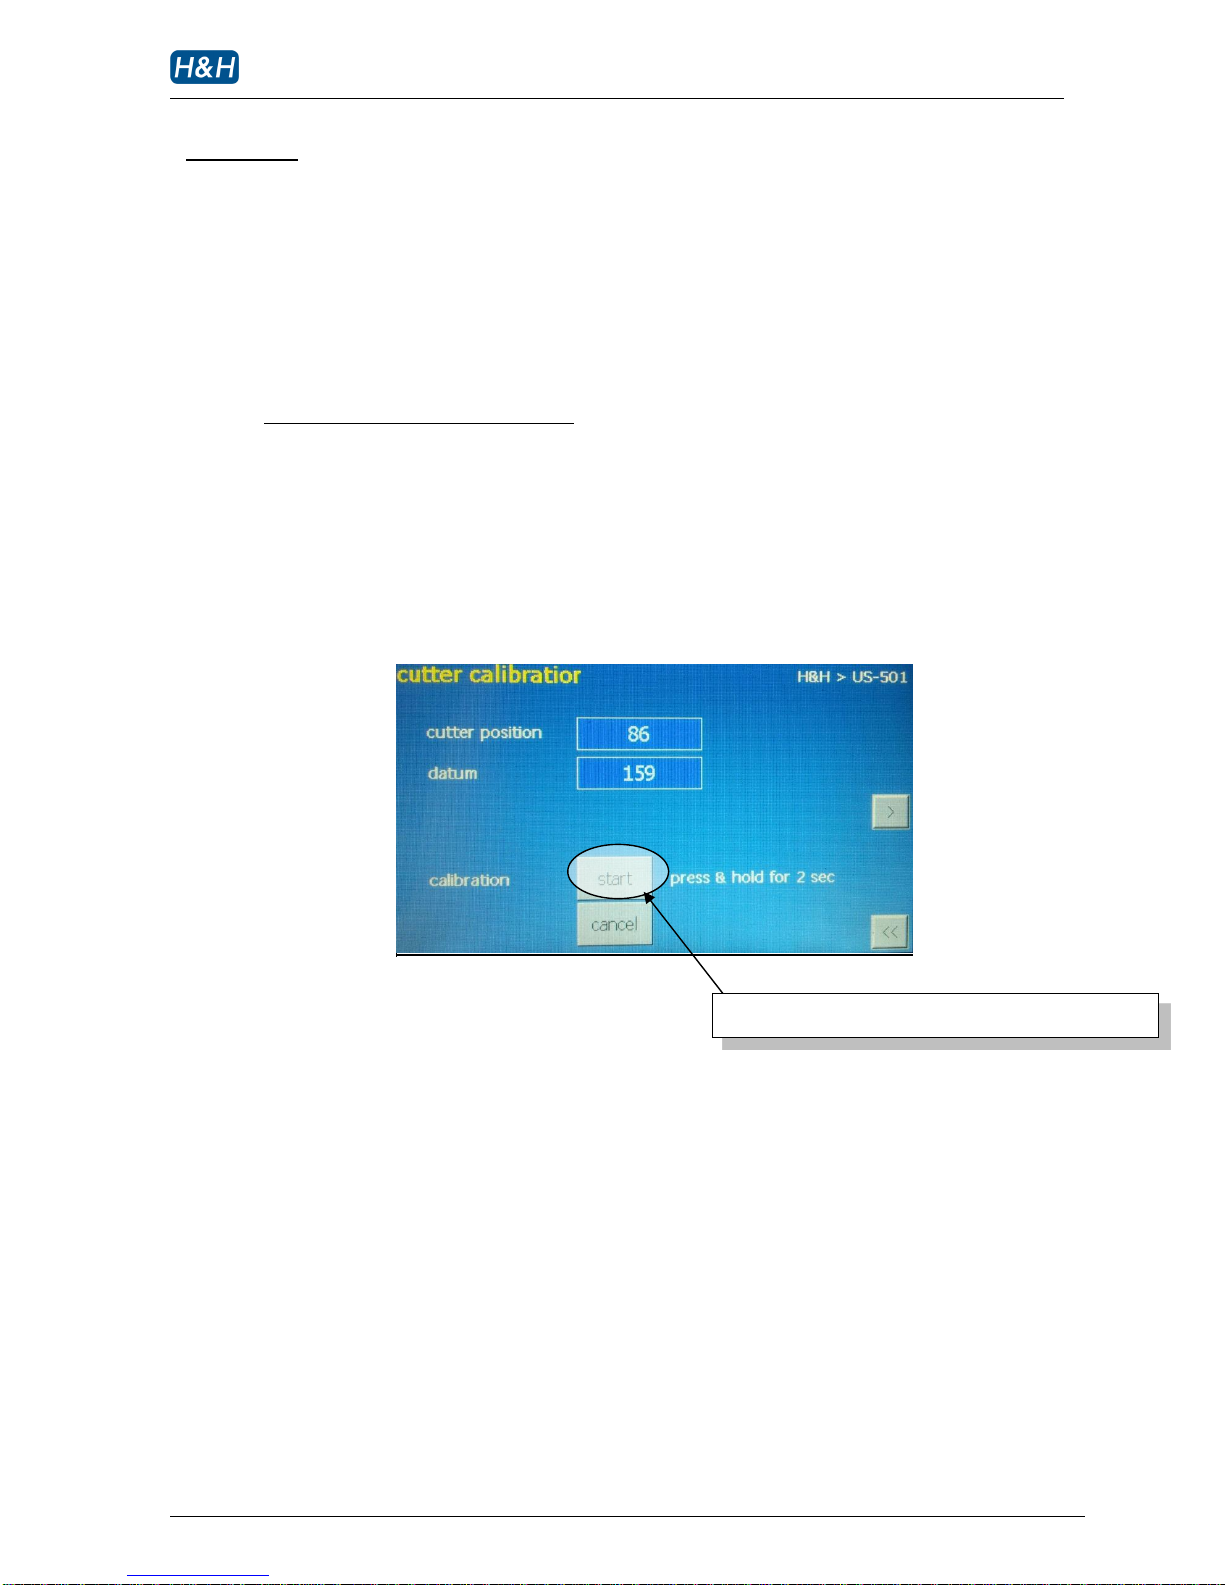
1 cutter real position
2 cutter position regulator
3 cutter auto calibration switch R3
4 cutter auto calibration cancel R3
5 back to “main” page
6 to next page
R3: After operating with a period of time, the cutter will wear, the gap between the cutter and the sonic
horn will need to readjust.
R4: If there is any problem when it is going through the self-calibration process, you can press the “cancel”
button to cancel the self-calibration process and readjusting the position of the cutter again.
Page 23
US-501 operation manual
US-501 R02 13.07.09 Display version 4, PLC version 4 P. 22 of 31
> Basic Operation (cont.)
>> Cutter Calibration (cont.)
After press the #3 button and hold for 2 seconds, the machine itself will go through a
“self-calibration” process and an alarm of “calibration in process” will flashing. Keep clear
around the horn & cutter.
After the alarm of “calibration in process” is disappeared, the self-calibration process is
completed and the machine will get back to the home ready position.
Page 24
US-501 operation manual
US-501 R02 13.07.09 Display version 4, PLC version 4 P. 23 of 31
> Basic Operation (cont.)
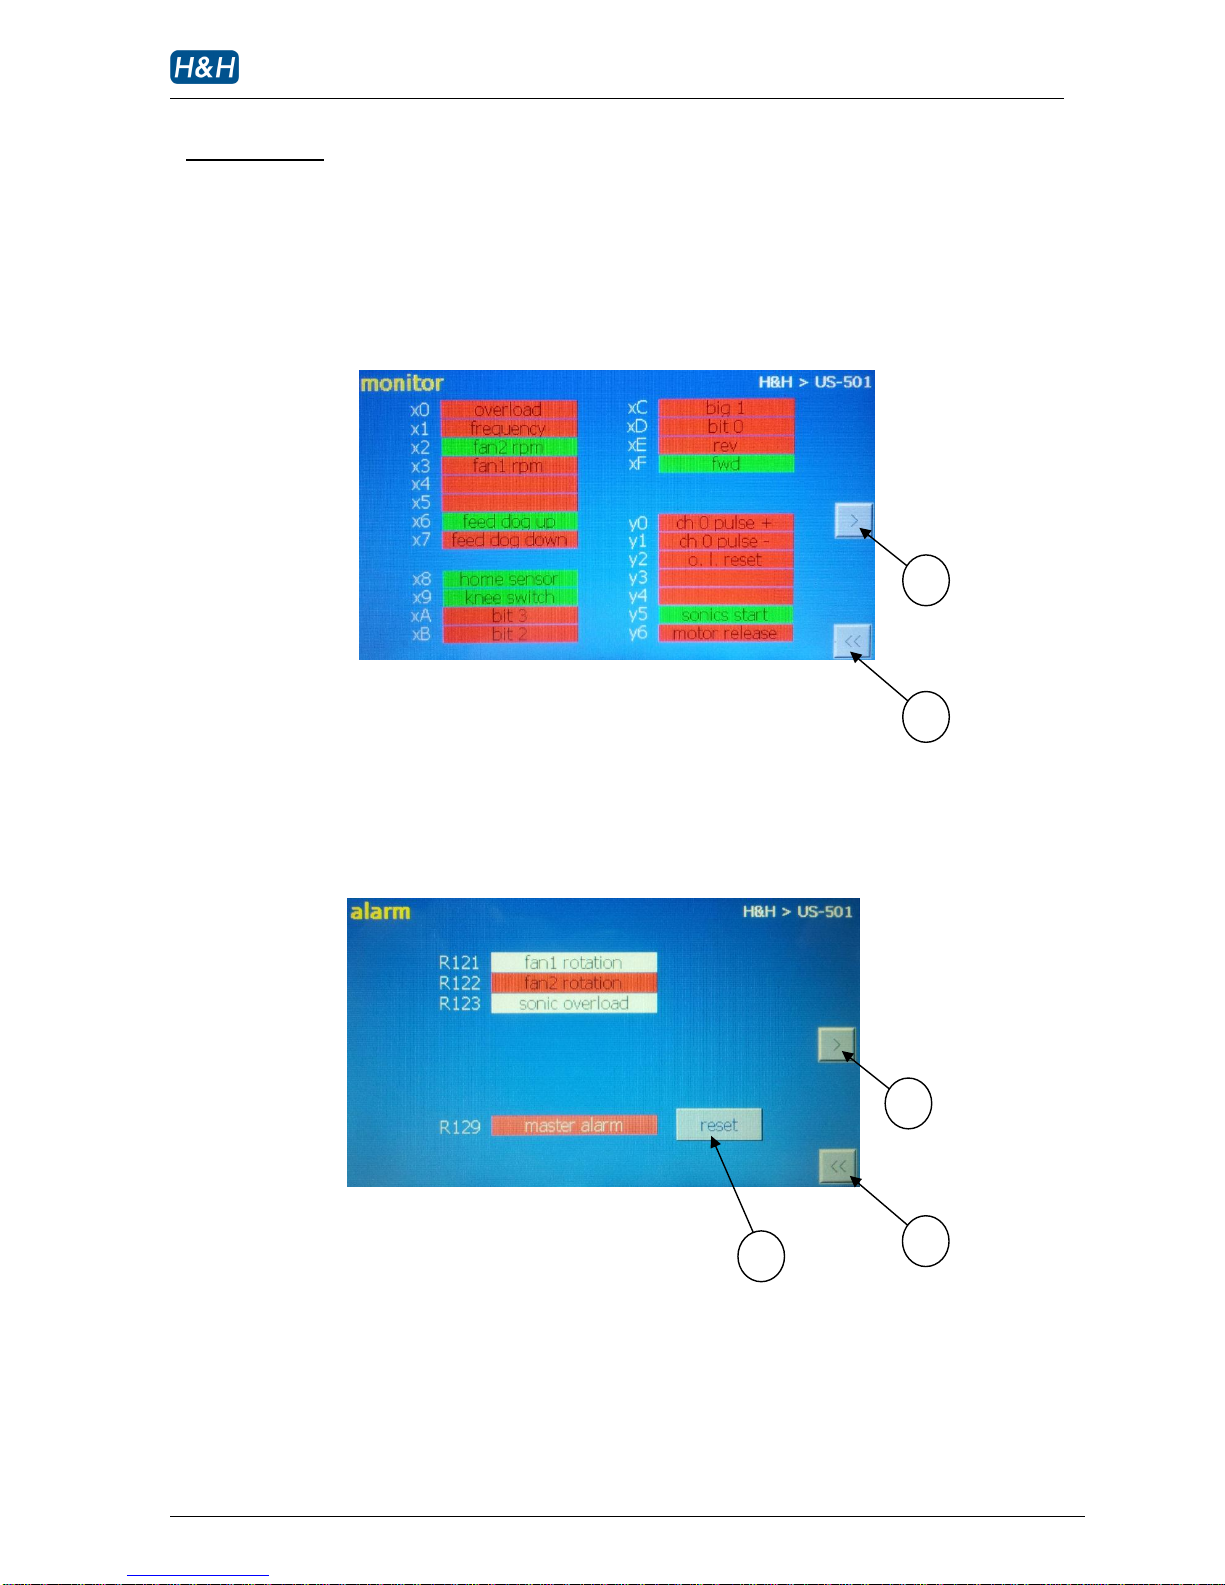
>>Signal Feedback Monitoring
It is listed all the feedback information of the sensors in this page
1 to next page
2 back to “main” page
>> Alarm Page
1 to next page
2 back to “main” page
3 reset the alarm
If either fan of the sonic assembly or the sonic power overload is at fault, an alarm regards to that will goes
red at the “alarm” page. You can reset the alarm if the problem is fixed.
Page 25
US-501 operation manual
US-501 R02 13.07.09 Display version 4, PLC version 4 P. 24 of 31
> Basic Operation (cont.)
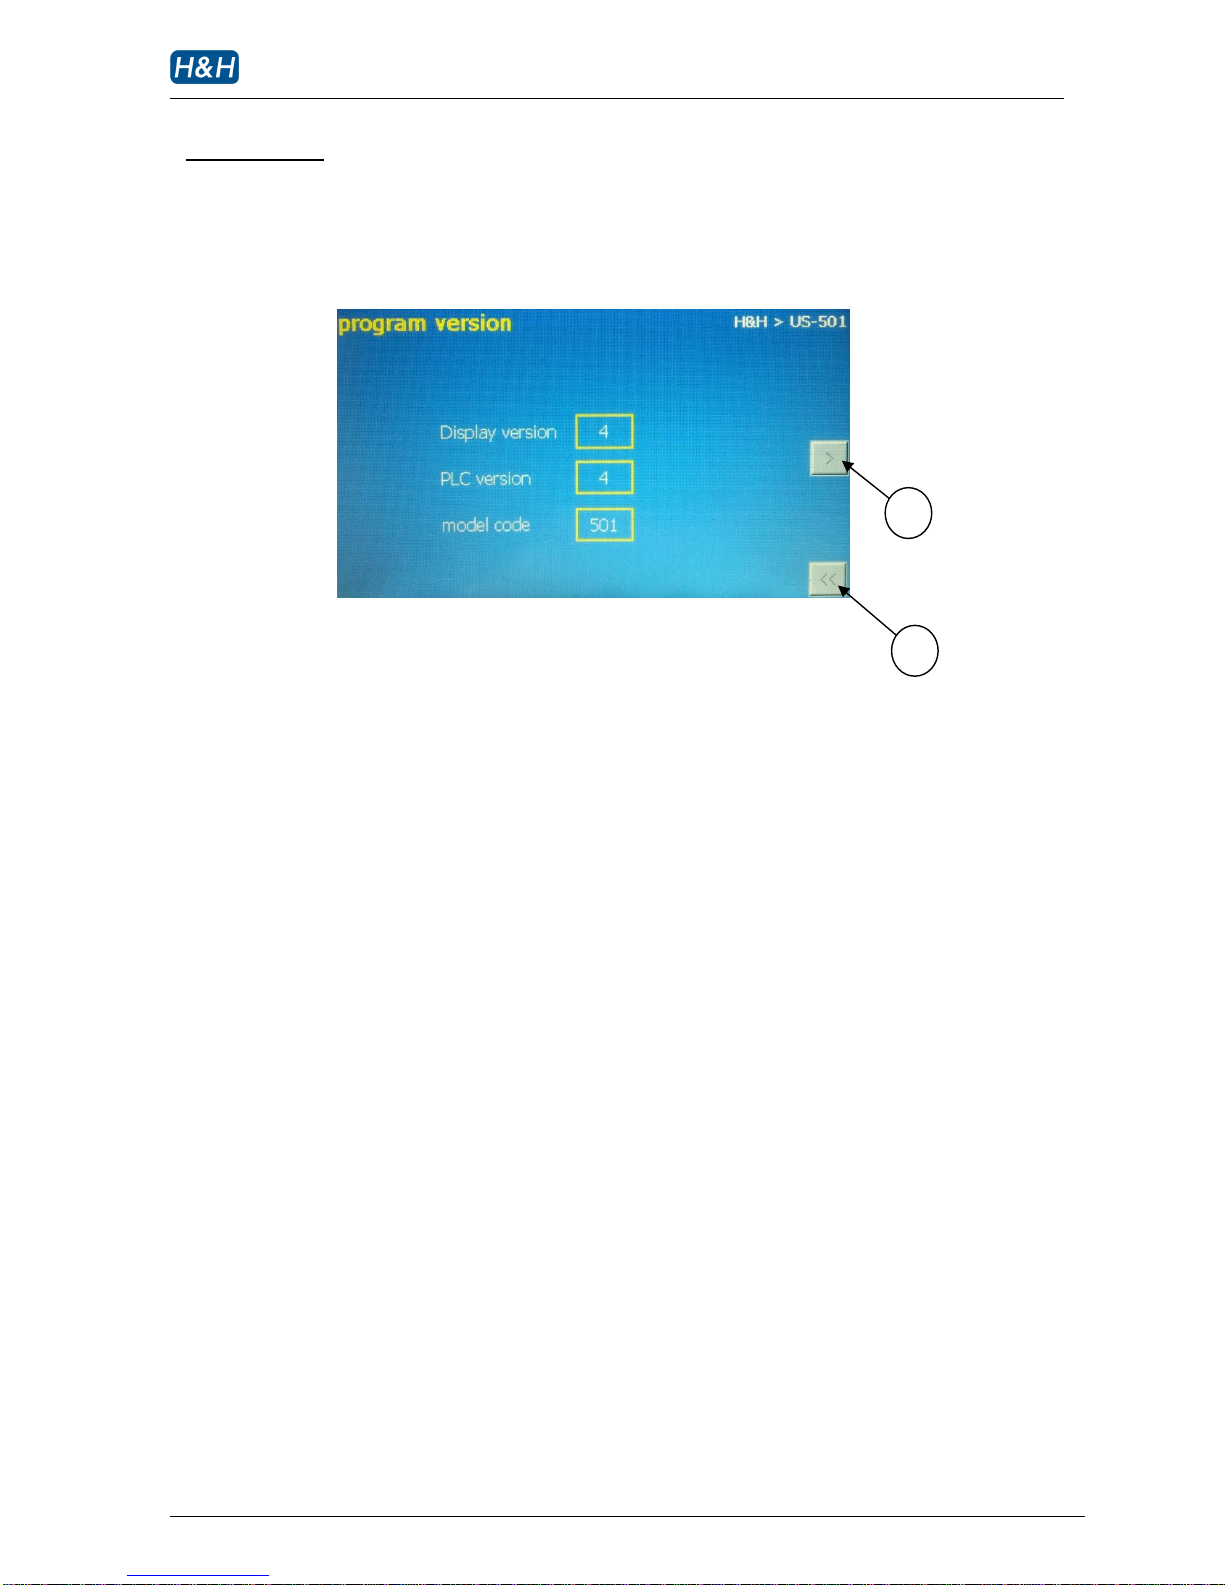
>>Program Version
1. to next page
2. back to “main” page
It is the end of this software version, press #1 or #2 button will back to the main page.
Page 26

US-501 operation manual
US-501 R02 13.07.09 Display version 4, PLC version 4 P. 25 of 31
> Basic Operation (cont.)
>> Procedures of Basic Cutting
1 Set the sonic power to setting ‘8’, pressure to ‘2’. This should be a fair setting to start with.
2 Raise the press foot by pressing on the knee switch and hold.
3 Position a piece of fabric so that the edge of the fabric is just under the cutter bit
4 Lower the press foot to secure the fabrics by releasing the knee switch.
5 Step on the foot pedal to start cutting, the fabric will be fed according to position of the
foot pedal and the feed pitch setting of the sewing machine. While cutting, avoid sudden
change of foot pedal position and avoid shifting the fabric side way or otherwise there may
not have a continuous cut.
6 During cutting, steers the fabric gently to make curves. At the end of the cut, release the
foot pedal.
7 Raise the press foot by pressing on the knee switch.
8 The first ultrasonic cut is finished.
9 Resume operation with the above procedures for the next cut.
WARNING !
Avoid operating the machine without the fabric in order to minimize the wearing to the
cutter bit and the horn face.
Page 27

US-501 operation manual
US-501 R02 13.07.09 Display version 4, PLC version 4 P. 26 of 31
> Maintenance
>> Preventative
In order to keep the machine in top running condition, regular maintenance is important for
trouble free operation. This will minimize possible down time and to prolong machine life.
Daily
Check the motion of the machine for smoothness and strange noise, especially high
pitch noise from the ultrasonic system
Check all cooling fans are running especially the cooling fans of the ultrasonic horn.
Check the oil inspection window to make sure that lubrication to the sewing machine
is adequate, add oil if needed.
Observe the power meter for exceptionally high reading
Weekly
Check the horn face for unusual groove or excessive wearing
Visually inspect all the electrical and mechanical parts for abnormal burns and
looseness.
In Case
If unusual rough edges or repeat pattern appear on the cut edge, check the cutting bit
for damage.
If the cutting edge is perforated, check for stamp alignment
Page 28
US-501 operation manual
US-501 R02 13.07.09 Display version 4, PLC version 4 P. 27 of 31
> Maintenance (cont.)
>> Procedures for Replacing Parts
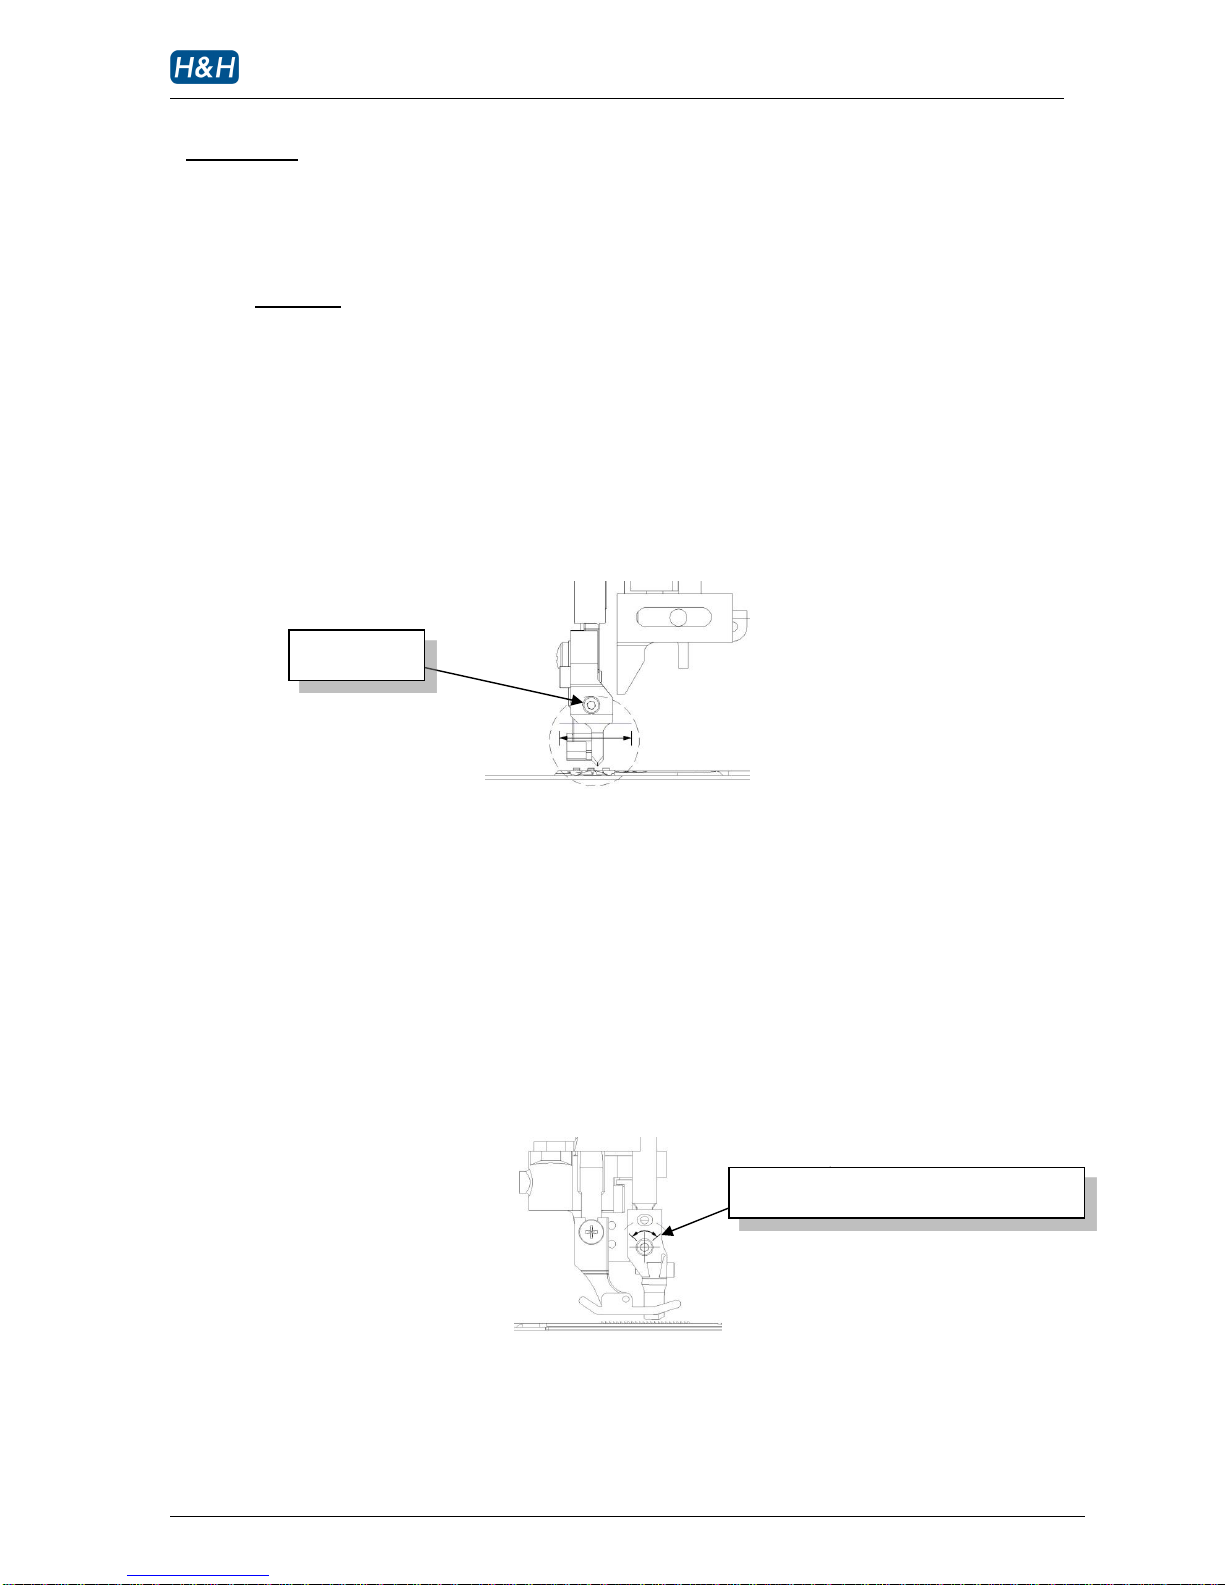
Cutter bit
Turn off the machine. Unscrew the securing screw and tap out the cutter bit from the side.
Replace another cutter bit. The bit is designed to be able to move from left to right in a
range of about 5 mm. Adjust the position of the cutter bit so that the bit will land on the
proper position of the horn face. You can manually push the cutter down to touch the
surface of the horn in order to check the position. Tighten the securing screw. Recheck the
cutter bit so that the contact portion all lands within the center part of the horn face, away
from the edge of the horn. This is essential to avoid excessive wear to the horn.
After replaced a new bit, always check the alignment between the cutting edge of the bit
and the horn face. The entire cutting edge should be in full contact with the horn face when
observed from the side, this is extreme important for the machine to cut properly. You will
need to manually push down the cutter so that the cutting edge and horn face is just in
contact. A torch can be placed on the opposite side of the cutter so that the line of contact
can be inspected.
When you replace the bit only, normally you do not need to re-adjust the angle of alignment
provided that the cutter bit mount was previously adjusted correctly and did not come loose.
However, if the line of contact is not even, then re-adjusting this angle is necessary.
Securing screw
Check and adjust the angle of cutter bit mounting
Page 29

US-501 operation manual
US-501 R02 13.07.09 Display version 4, PLC version 4 P. 28 of 31
> Maintenance (cont.)
>> Procedures for Replacing Parts (cont.)
Cutter bit (cont.)
Loose the 2 securing screws slightly so that the mount can be pivoted. Push the cutter down
so that the cutting edge will be in contact with the horn face. Pivot the mount slightly so
that the contacting area will be a line rather than a point. Tighten the securing screws.
Recheck the contacting area again so that the mount did not move during tightening.
After the cutter bit is replaced, the self calibration (described in the next section) MUST be
performed before operating the machine.
WARNING !
Failure to calibrate the cutter may cause damage to the horn face and/or cutter bit.
Ultrasonic component
All ultrasonic components are calibrated to match each other as the correct frequency is
critical to the proper machine operation. There are no user serviceable parts in the system
including the power board and the ultrasonic stack, horns, etc. All parts replacement should
be done by authorized technician or send back to the factory. Do not attempt to hammer,
dismantle or unscrew the parts with consulting H&H as the ultrasonic stack contains fragile
component that could be damaged easily.
Page 30
US-501 operation manual
US-501 R02 13.07.09 Display version 4, PLC version 4 P. 29 of 31
> Maintenance (cont.)
>> Cutter Self Calibration
Whenever a new cutter bit is installed or other related parts are serviced, due to slight
dimensional variation, the depth of the cutting may have changed. Hence, the machine must
be re-calibrated before the machine can be operated properly.
Check list before the self calibration
1. The ultrasonic system is in the ‘ready’ status
2. The cutter bit is securely installed
3. The cutting edge is aligned properly with the surface of the horn
4. There is no foreign material such as fabric between the horn face and the cutting bit
Press and hold for 2 seconds to enter the self calibration mode
Page 31
US-501 operation manual
US-501 R02 13.07.09 Display version 4, PLC version 4 P. 30 of 31
> Maintenance (cont.)
>> Cutter Self Calibration (cont.)
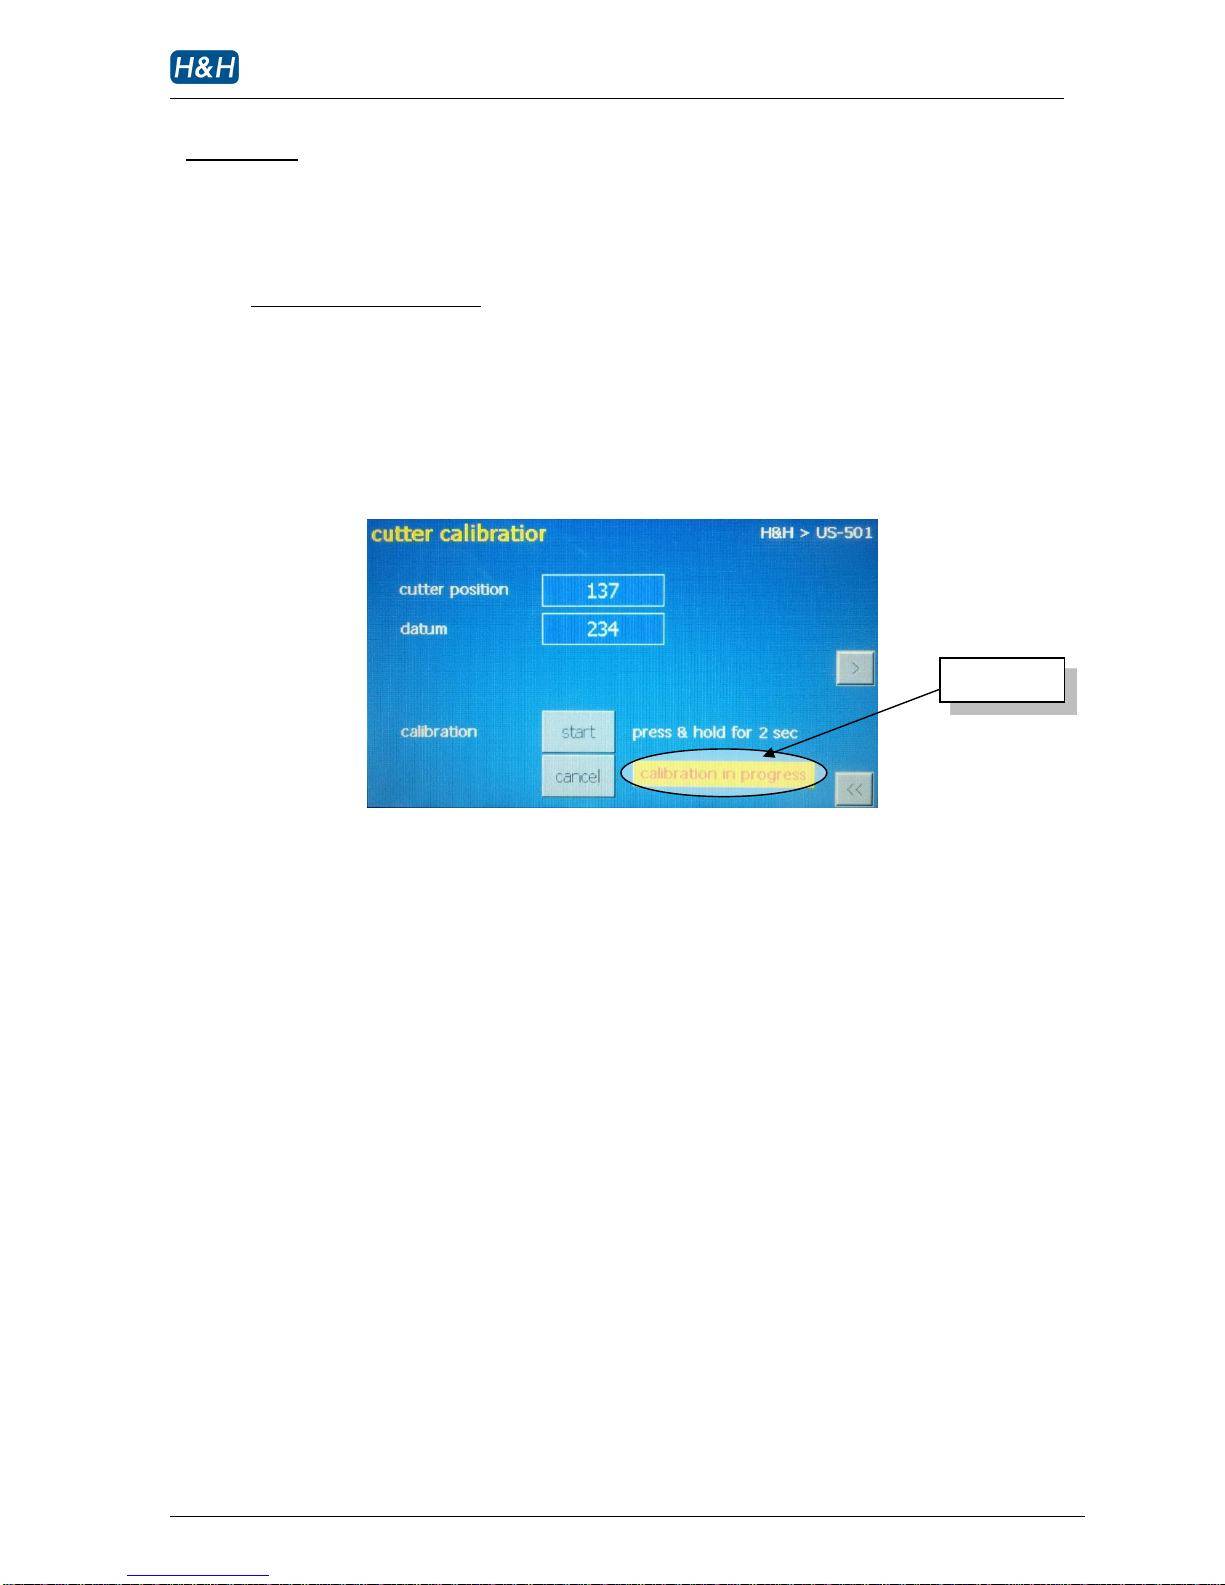
To initialize self calibration
1. Press and hold the self calibration button for 2 seconds to initialize the self calibration
sequence.
2. The actuator system will slowly move the cutter toward the horn face.
3. At the same time, a pop up screen will appear indicating the status of the self
checking
4. Do not interfere with the machine during this time including touch screen, switches,
etc.
5. A noise may appear briefly when the cutter is touching the horn face, this is normal
6. When the calibration is finished, the pop up screen will disappear and the calibration
is finished. The cutter bit will be retracted to the standby position.
self calibration
Page 32
US-501 operation manual
US-501 R02 13.07.09 Display version 4, PLC version 4 P. 31 of 31
> Maintenance (cont.)
>> Power Meter
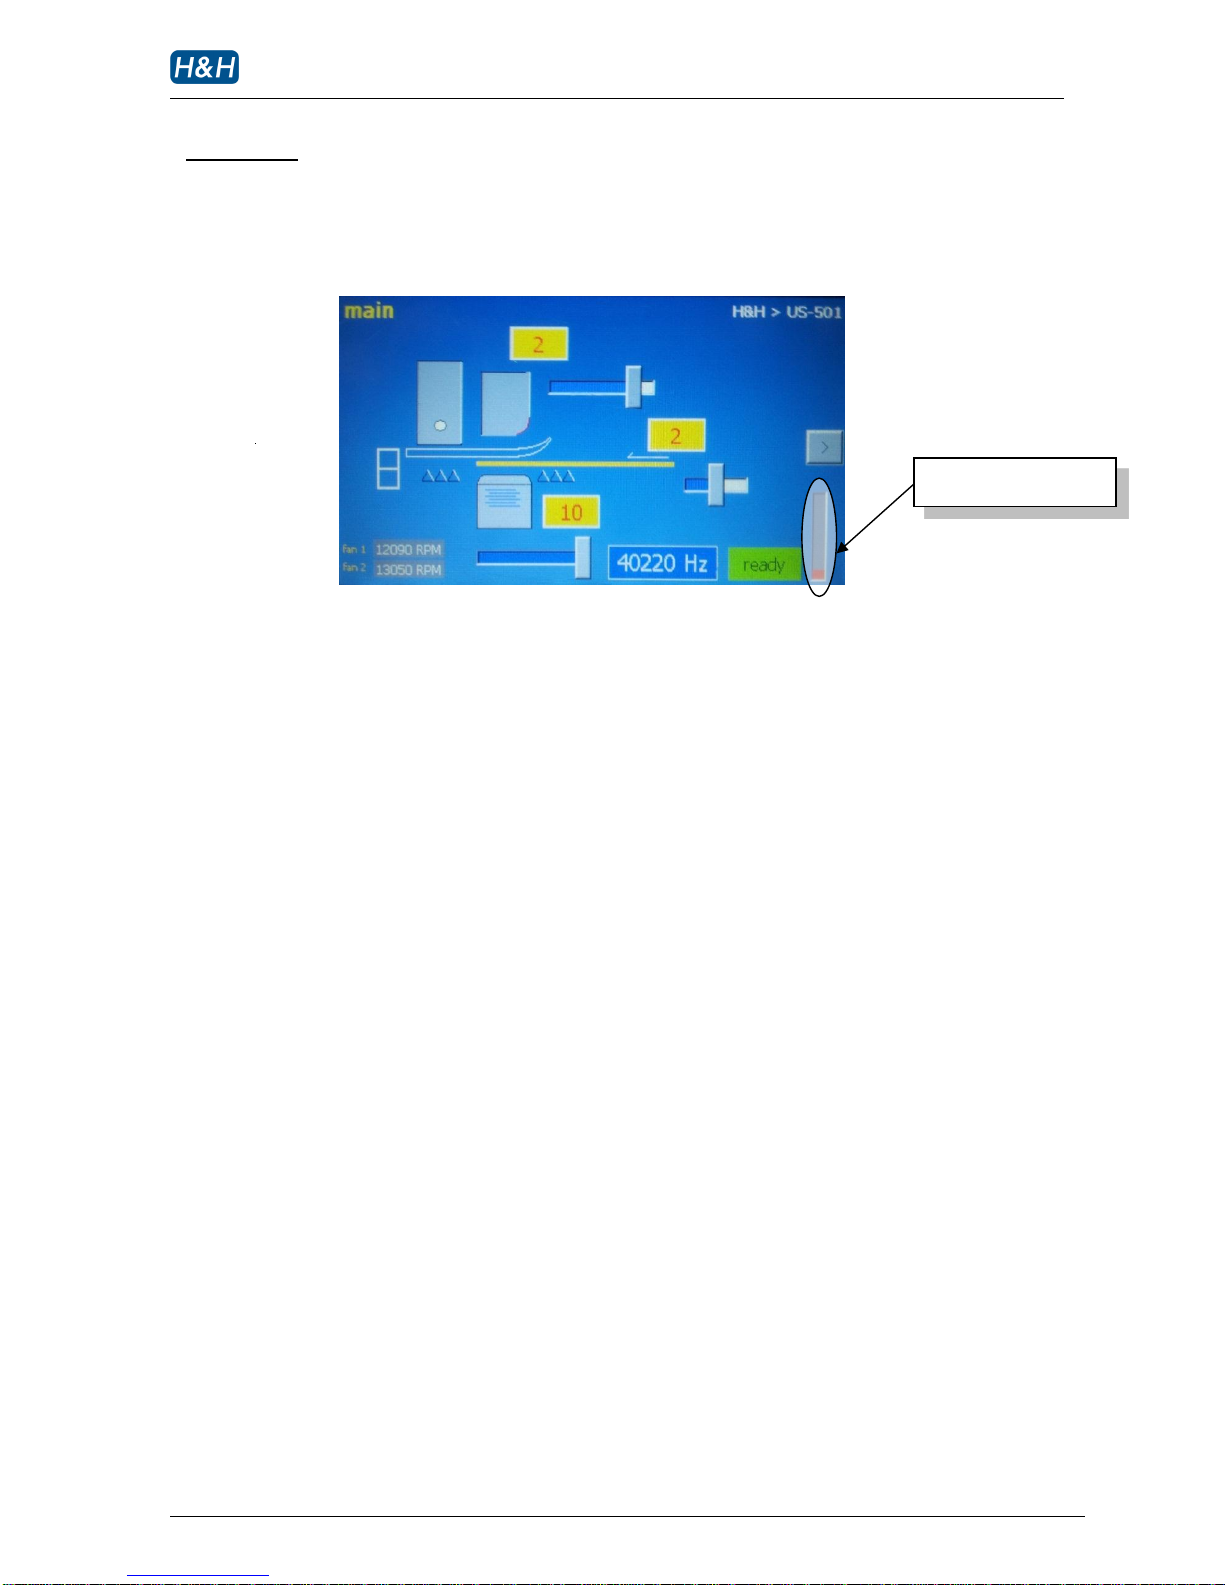
There is a power meter on the page ‘main’ to monitor the ultrasonic power consumed by the
system. The pointer inside will move up and down according to the power reading. The upper
the pointer, the higher of the power is consuming.
During idle, this pointer should stay low as the system is not consuming significant power at this
time. When the machine start to cut, the pointer will be floating somewhere in the middle to
reflect the power consumption using for the cutting. Power consumption is depending on the
power setting, the cutter force and the fabric thickness, therefore, the pointer will float to
different height from time to time.
Always pay attention to this meter during operation. An ultrasonic problem can be spotted
earlier if the level of the pointer is located higher than the normal position compares with the
past.
Ultrasonic power meter
Page 33

US-501 operation manual
US-501 R02 13.07.09 Display version 4, PLC version 4 P. 32 of 31
> Trouble Shooting
Problem
cause
Solution
No power in some places
Power cable or plug faulty
Check the power supply connection
Circuit breaker tripped
Reset circuit breaker and investigate the cause
Main power switch not turned on
Press the power ON button (start)
Bad connection
Check all wires for loose connection
Faulty transformer
Check the voltage of switching power supply
Fabric not feeding
Press foot is in the UP position
Press and release the knee switch to lower the
press foot
Sonics status is not in READY mode
Turn OFF the power and then ON to reset
Sonics is turned off
Press the sonic enable button to ON
Weld strength is poor
Sonics power is too low
Increase power slightly and try
Improper cutting bit used
Refer to H&H for proper cutter bit for
particular fabric
Feed step is too large
Decrease feed pitch of the sewing machine
Stamp pressure is too low
Increase the stamp force slightly at a time
Sonic overload
Horn is cracked
Replace horn
Screw in horn is broken
Replace with a new screw
Faulty ultrasonic power supply
Inspect by an authorized personnel
High pitch noise is heard
Horn touching neighboring component
Re-adjust position to isolated horn
Ultrasonic mounting loose
Re-tighten all screws
 Loading...