

Page 1
HFX zonee
The HFX zonee is a universal UPNP based network player (client). It will be connected with USB DACs
and USB Amps and replaces Laptops and PCs. This way you have a small tiny powersaving player.
It has also analog mini jack output and S/PDIF output, which can be used. With HDMI you can also
monitor on your TV, what is actually playing in which zone.
You only need to connect the HFX zonee to your LAN network. With a webbrowser you can then give
each zone an individual name and you can also assign, which output (analog, S/PDIF, USB1-4) is used
for this zone. That's all! Once done, you can take any iPAD, Android Pad or Phone and start playing in
each zone, whatever you want.
What do you need for a UPNP system?
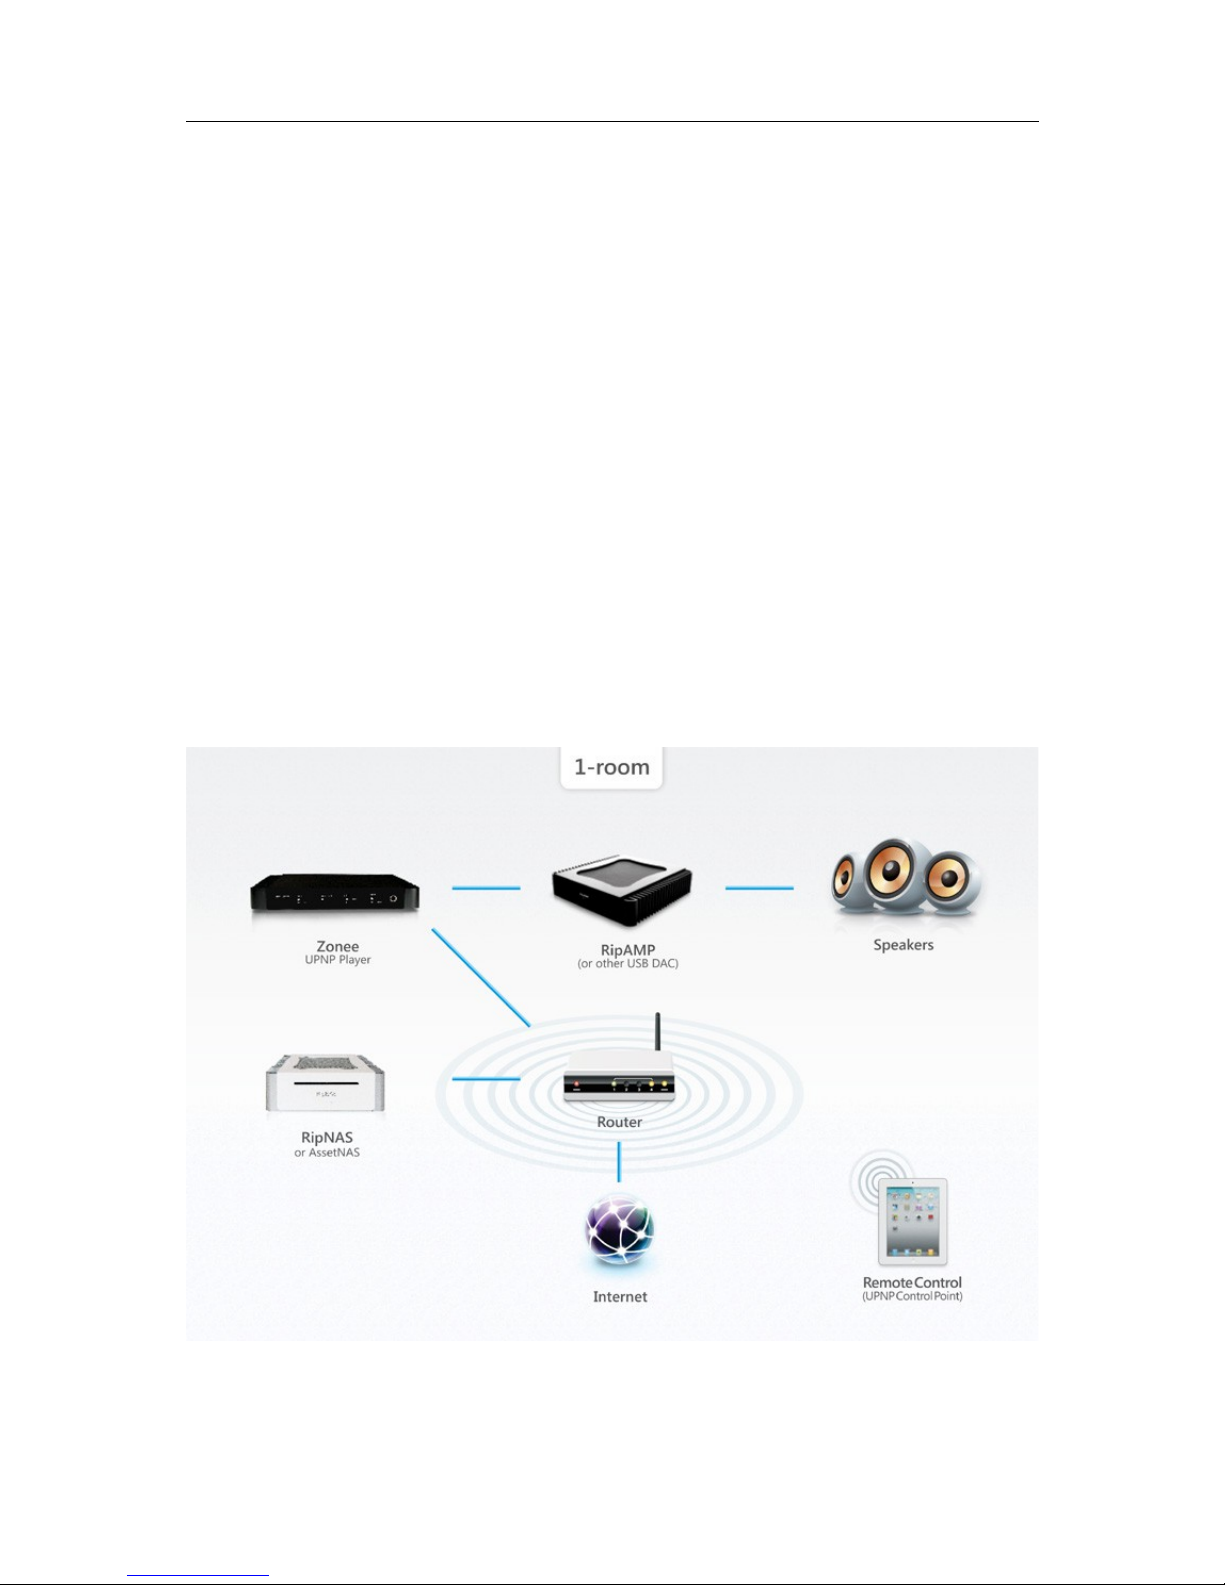
1. Network with Router, if you want to use internet radio, you also need internet access
2. UPNP-Server: with your music collection and internet radio like the RipNAS
3. UPNP-Clients: like the HFX zonee. You can have a zonee in each room or use only one
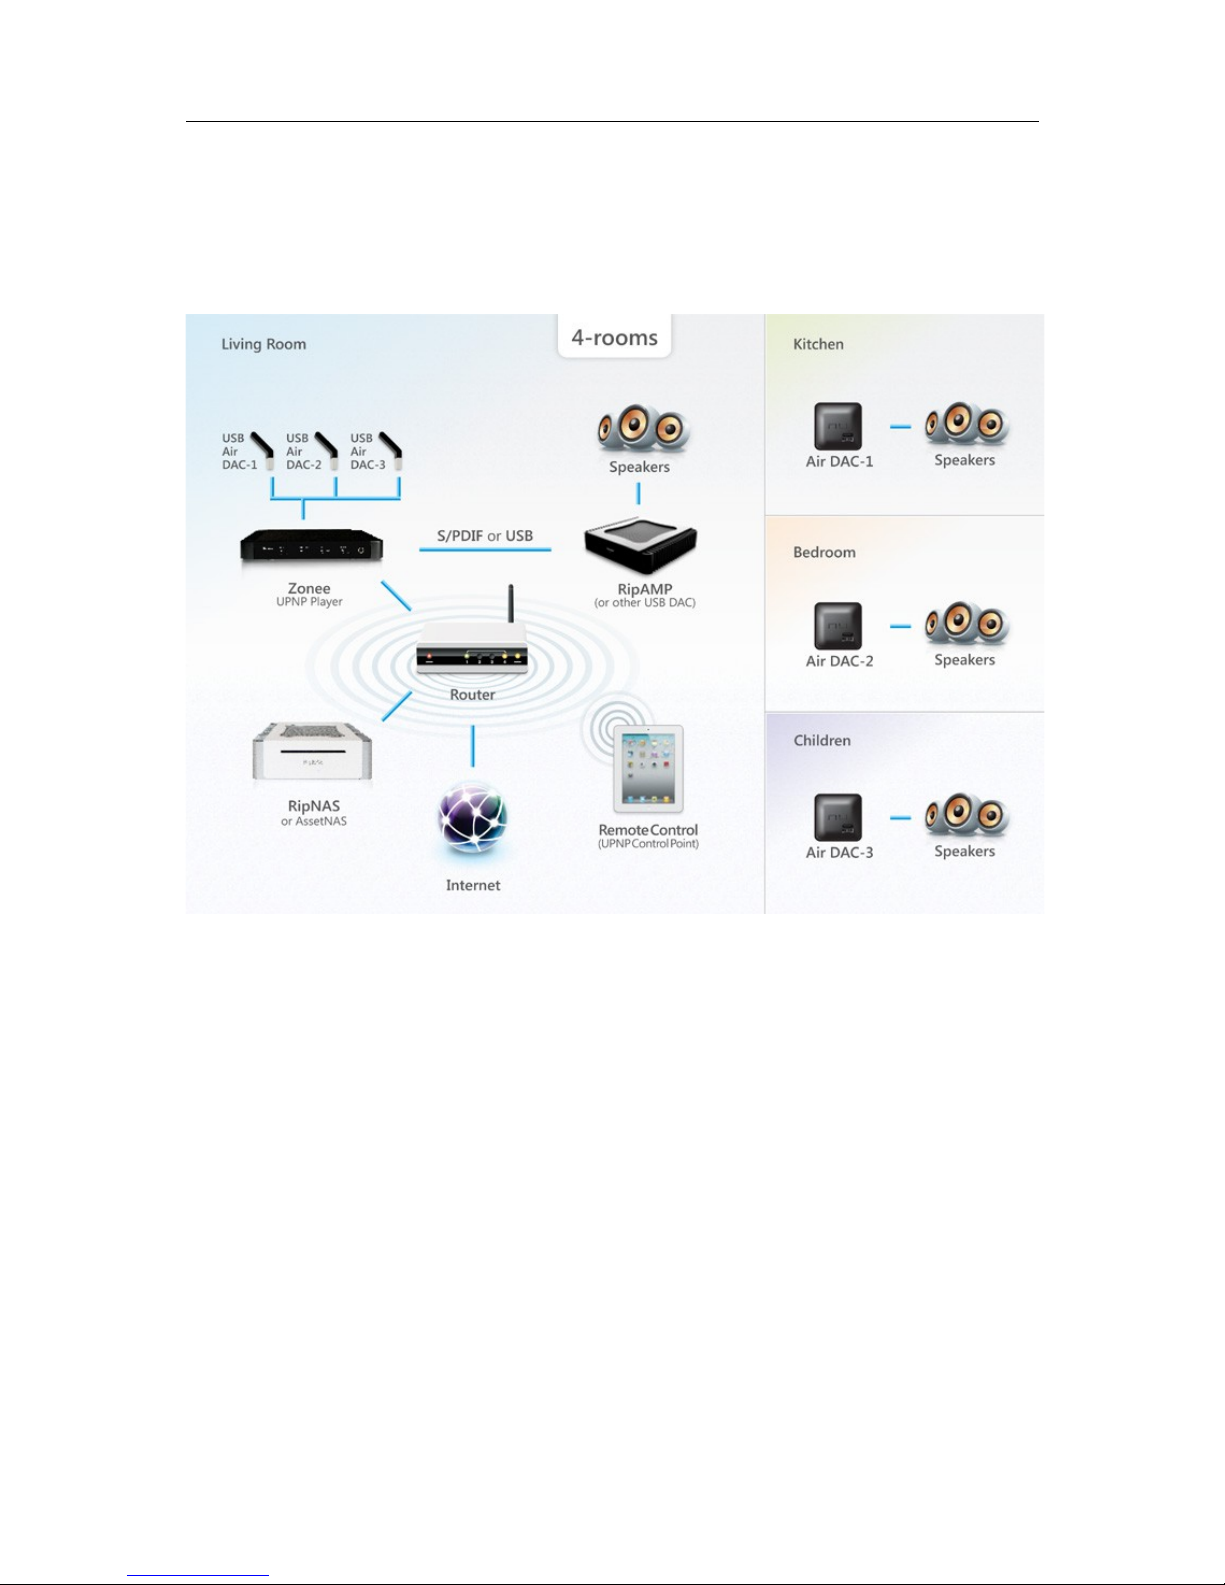
zonee and connect all rooms with USB Air DACs to 1 zonee centrally.
4. ControlPoint: use any Android or Apple device as a remote control, there are many
free UPNP apps in the market
this picture shows how to connect all components in a UPNP system in 1-room
Manual V1.0 © by HFX Austria 1/8
Page 2
HFX zonee
How to setup multiple zones?
The HFX Zonee can handle more than one zone. Second zone could be another pair of speakers or
just the headphones. But other zones can also be other rooms, if you are using USB Air DACs, which
can transmit digital sound wireless.
How to start
1. Connect the Zonee to Ethernet LAN
2. Connect your AMP or DAC to the Zonee
3. Connect the Zonee to Power
4. Optional: connect your TV with HDMI
After connecting the Zonee to Power, the logo „HFX zonee“ is lighted. If the logo is flickering, the
Zonee gets its IP address. When finishing with start, all configured zones show up in the display.
Attention: if you remove or add USB devices during operation, you need to restart the Zonee to get
the devices detected. You also need to configure the zones then.
To Restart: please push the power button as long as the LEDs gets off.
DO NOT FORGET TO TURN THE MASTER VOLUME HIGH!
Manual V1.0 © by HFX Austria 2/8
Page 3
HFX zonee
Configuration
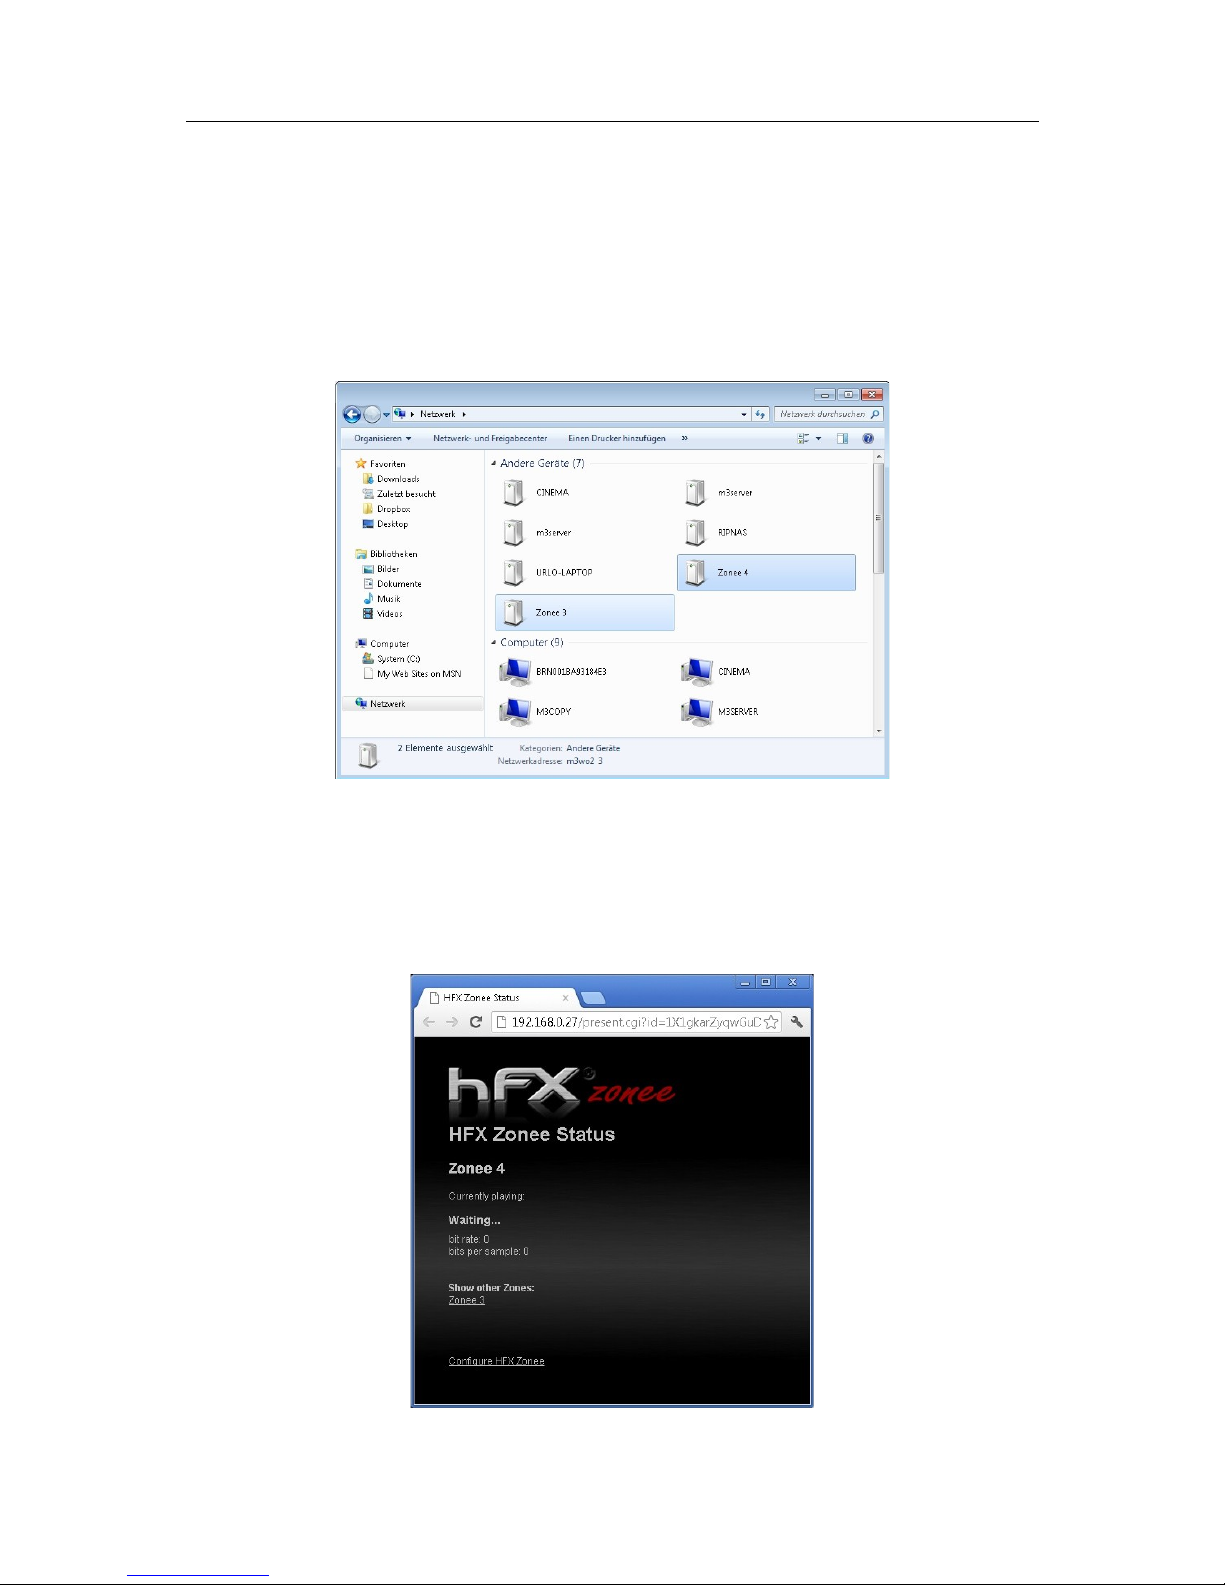
If the Zonee is finished with Starting (about 40 seconds), then you can see all active zones in the
network. You can find it with Apple Finder or Microsoft Explorer.
Only zones show up, where a usb device is connected. Double-click on one of them.
If you double-click on them, you get the status of the current zone, but you can also get to the
configuration menue „Configuring HFX Zonee“.
Manual V1.0 © by HFX Austria 3/8
Page 4
HFX zonee
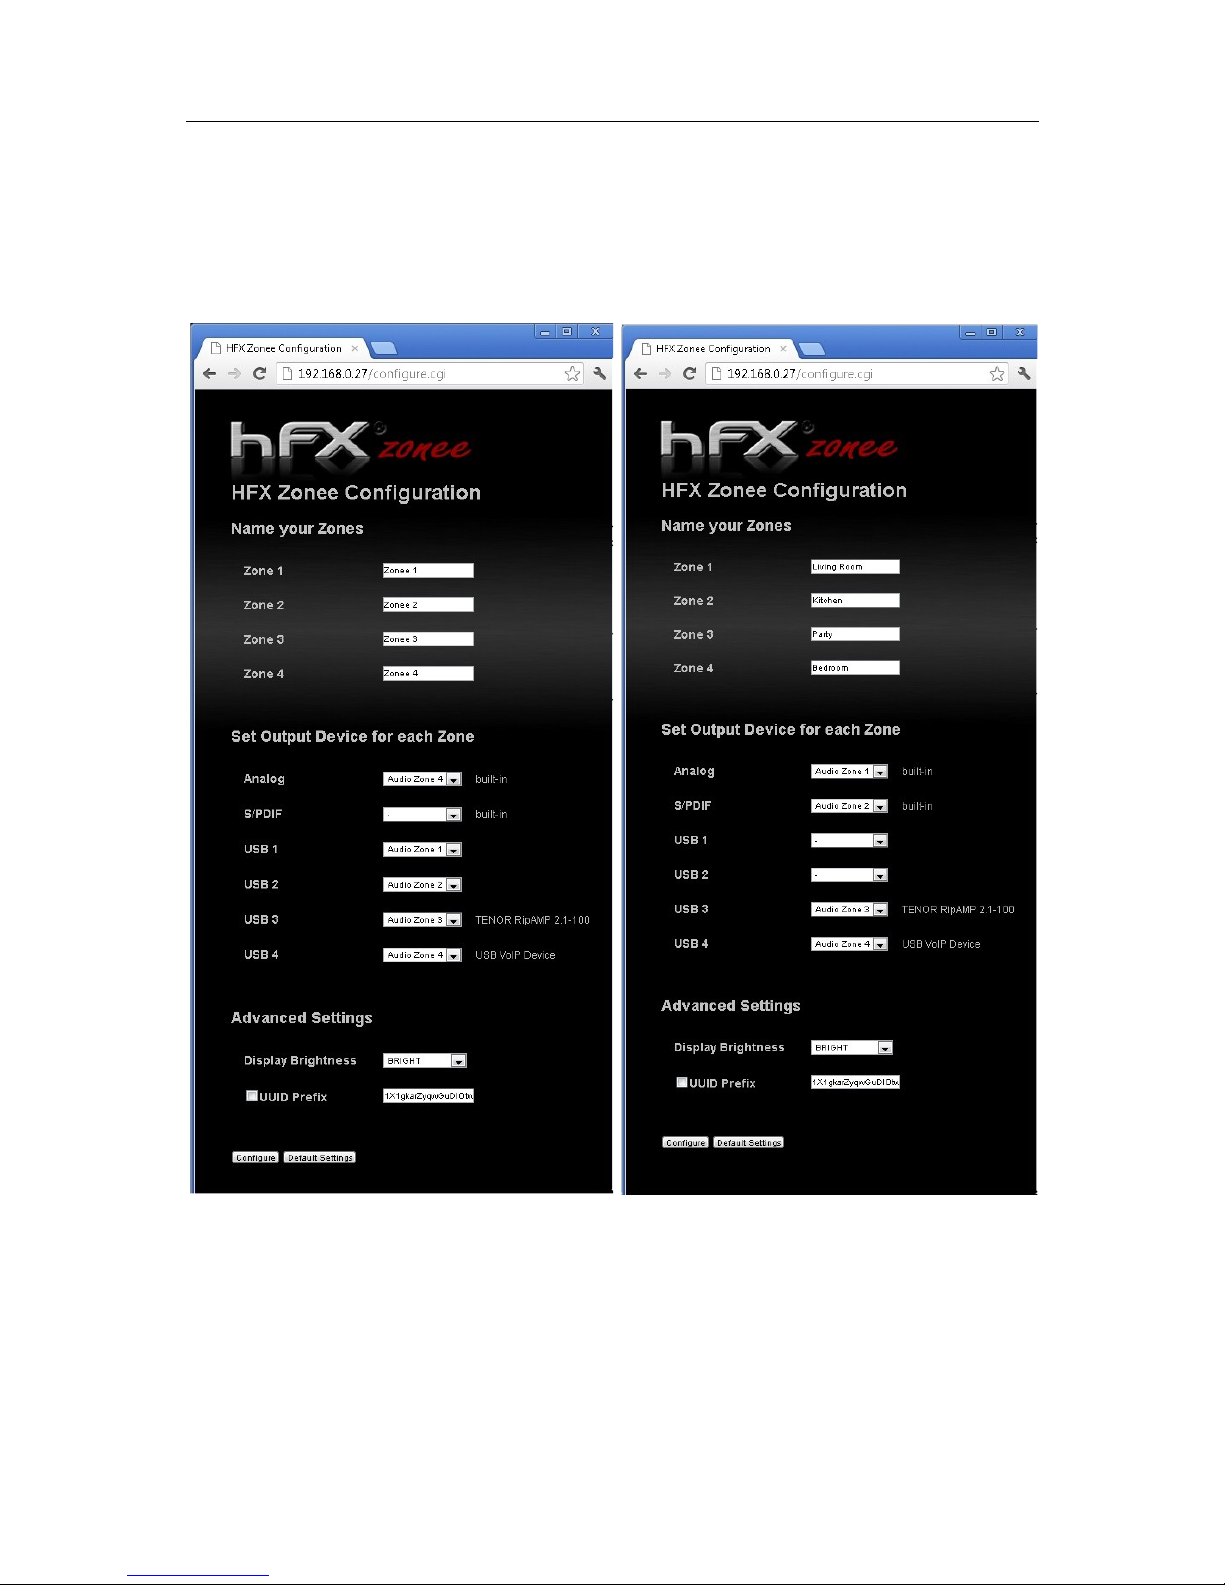
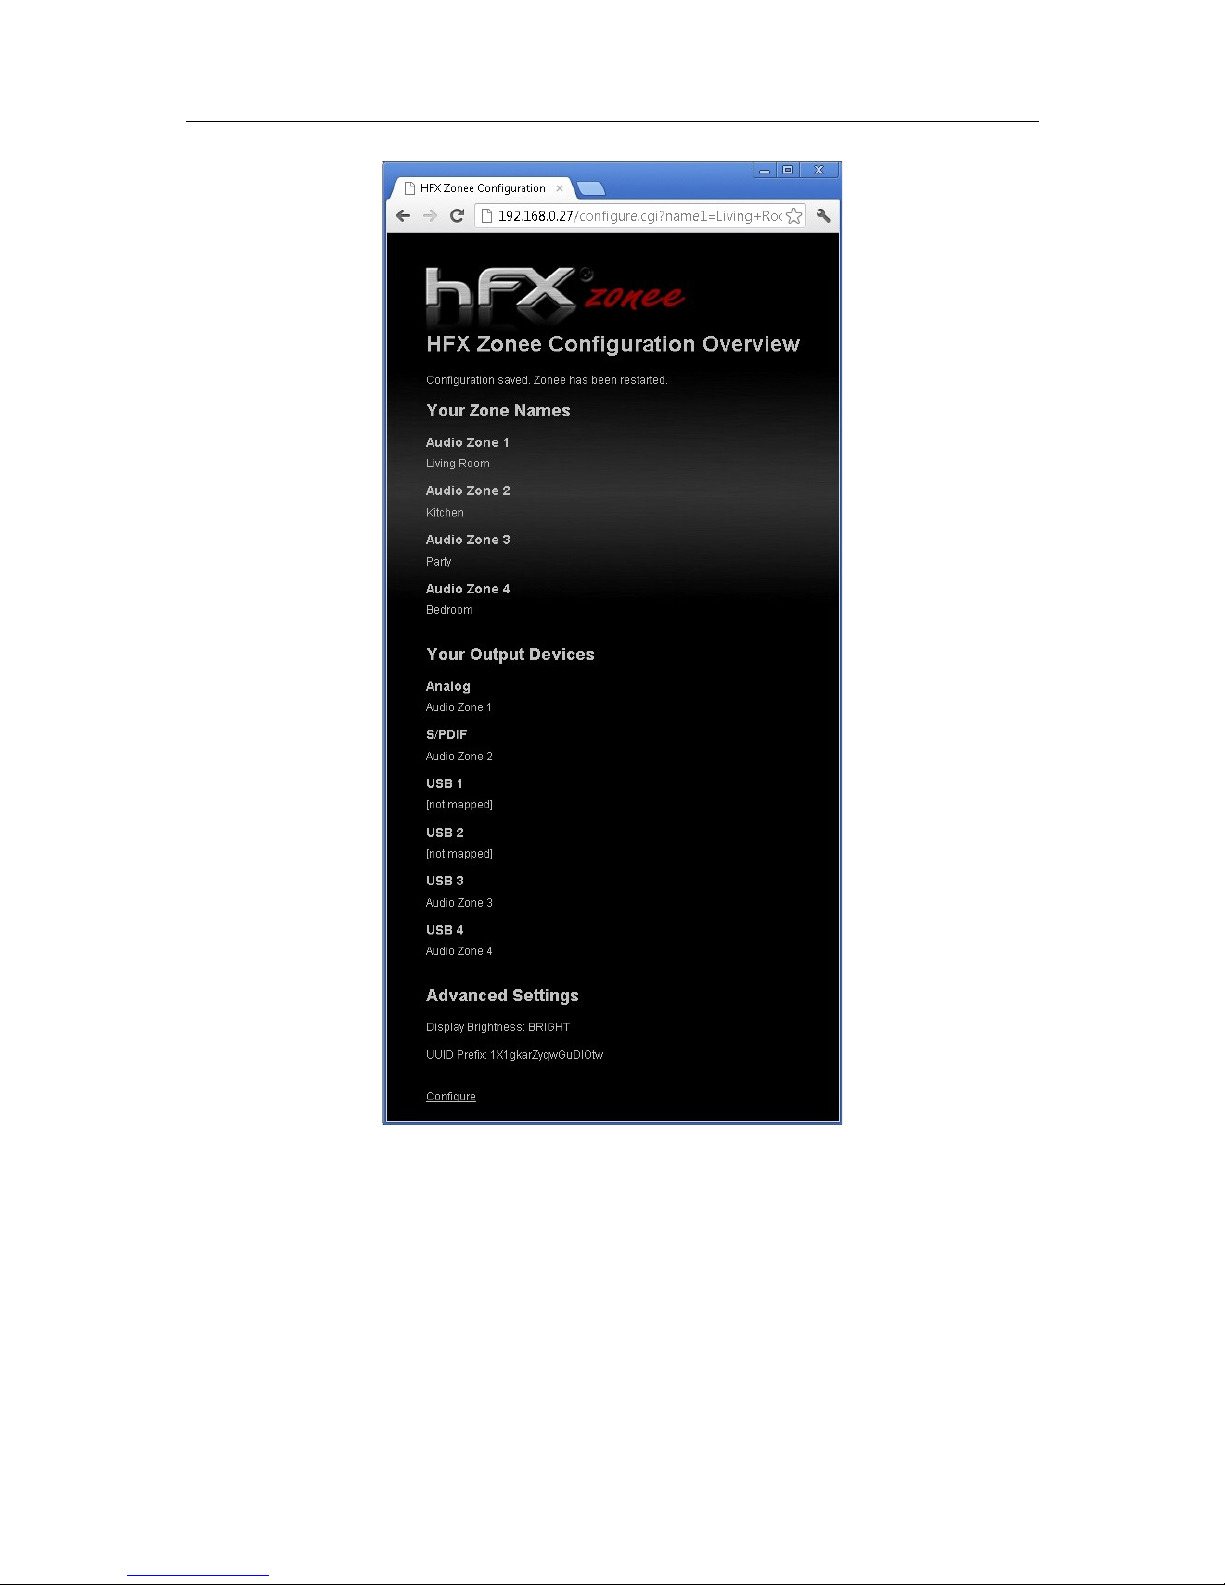
In the configuration menue you can give each zone a special name, like „kitchen“ or „living room“.
But you can also give these zones more technical names like „RipAMP“ or „nuForce Air DAC“.
You can save the new names by pressing the button „configure“. After you while you also see the new
names in the network neighborhood.
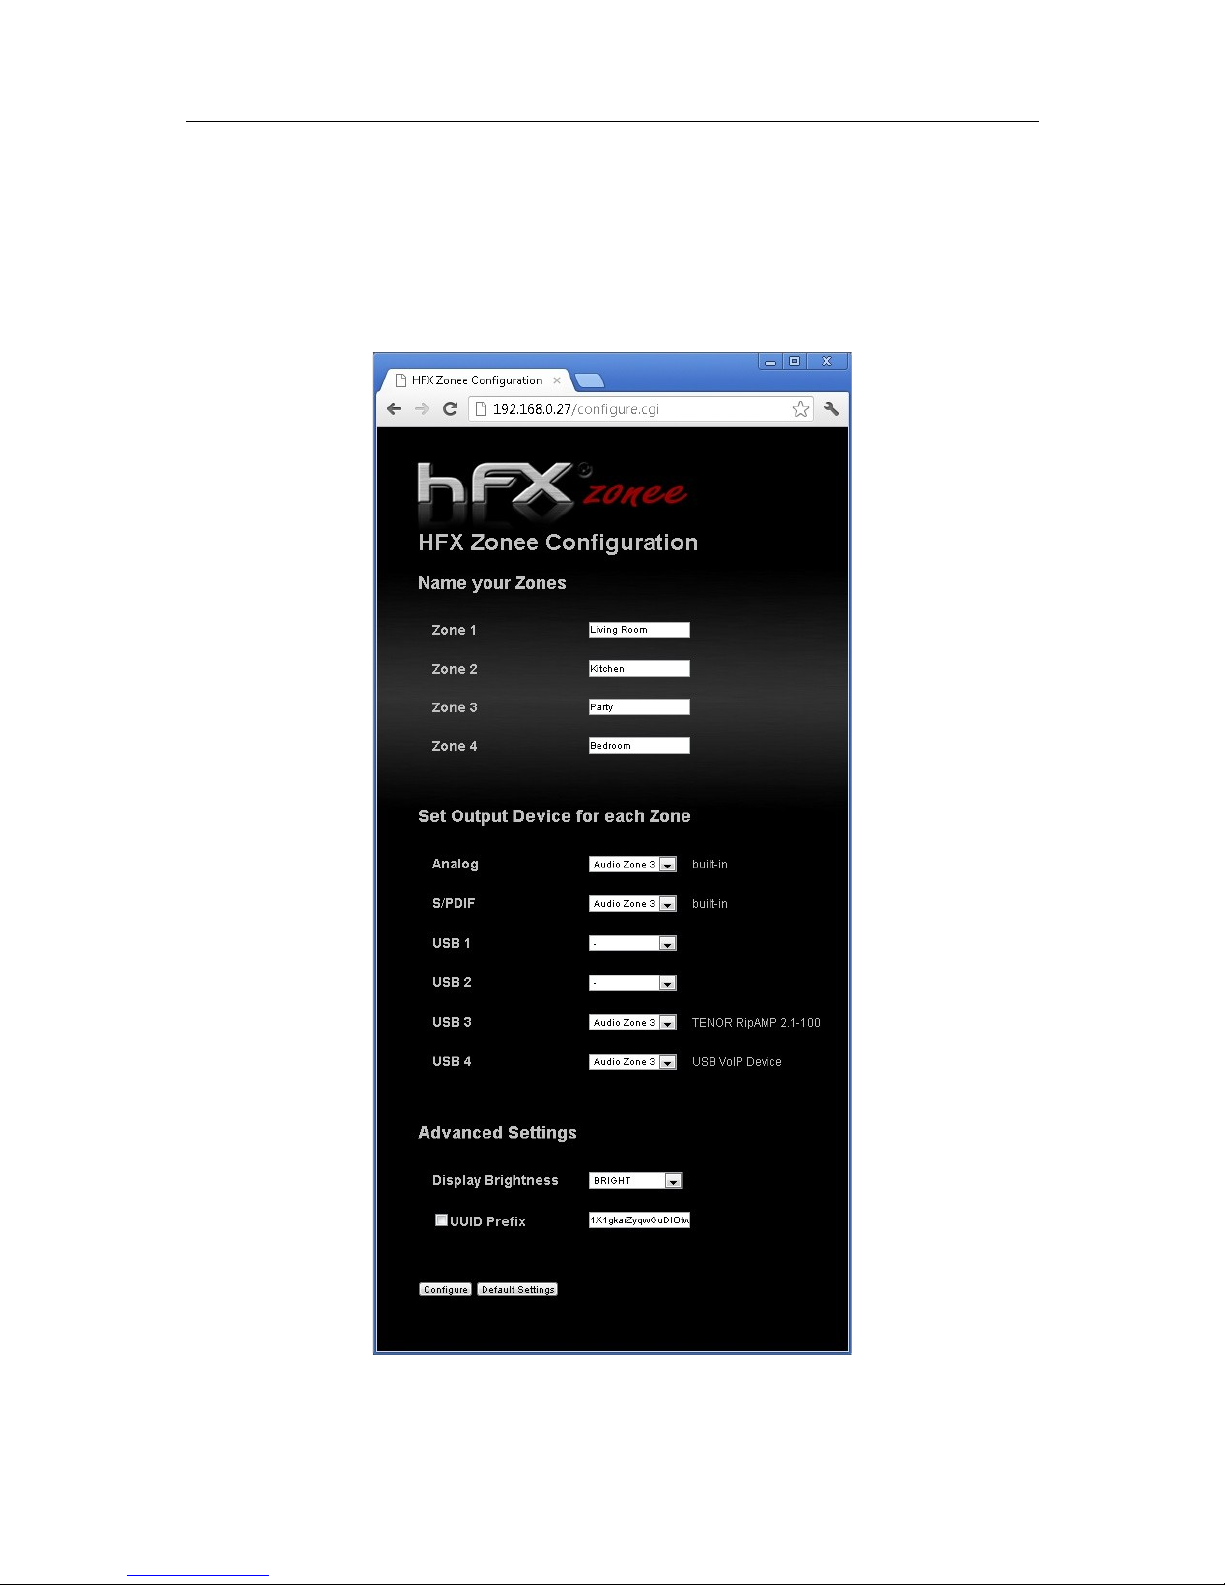
In the next step you need to say, which audio output is connected with which zone. You can also
assign more than one output to you zones. If you do that, then 2 outputs will deliver the same music
(which is good for parallel headphone use or for party mode, where all audio outputs deliver the
same music).
Please do not forget to save your changes with „Configure“ button.
Manual V1.0 © by HFX Austria 4/8
Page 5
HFX zonee
Attention: if a zone has no audio output connect, then it will not show up in the network
neighborhood.
Using more than one HFX zonee in the home network
If you are using more than one HFX zonee within one home network, just please change the UUID
Prefix.
Display Brightness
If the display is too bright, you can change it here and make it a little bit darker.
Manual V1.0 © by HFX Austria 5/8
Page 6
HFX zonee
Party Mode
If you want to hear the same music with all connected audio devices, please do the following steps:
1. rename one zone in „Party“
2. Assign all audio outputs to this zone
Manual V1.0 © by HFX Austria 6/8
Page 7
HFX zonee
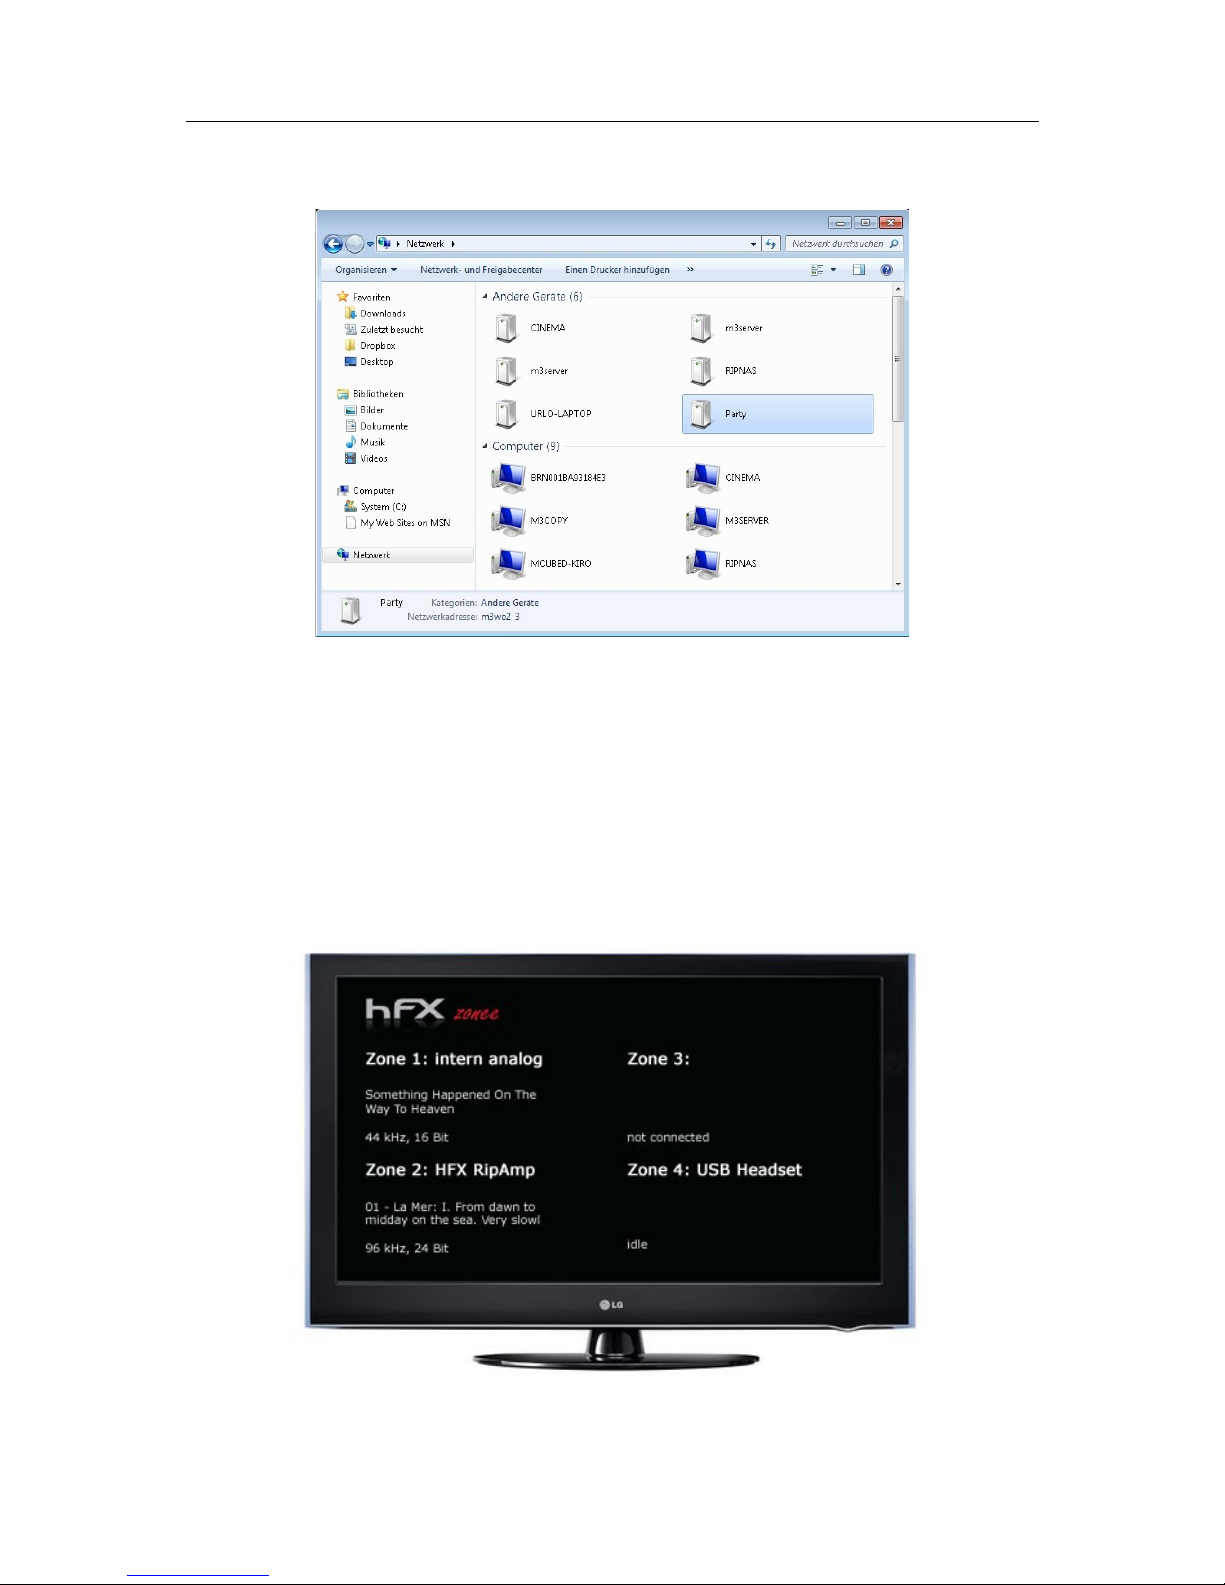
In the network neighborhood you will see only the „Party“ zone then.
Connecting your TV
If you connect your TV with HDMI to the HFX zonee, than you can see, what is actually playing in
which zone, and also with which quality.
Advantage: here you do not see the quality of the source files, but you see the final quality of the
audio device. For example, if the source has 192khz, but the USB DAC can only handle 96kHz, then
the HFX zonee resamples on the fly the quality and sends the right quality to the DAC.
Attention: You need to restart the HFX zonee, when you connect a TV.
Manual V1.0 © by HFX Austria 7/8
Page 8
HFX zonee
UPNP ControlPoint
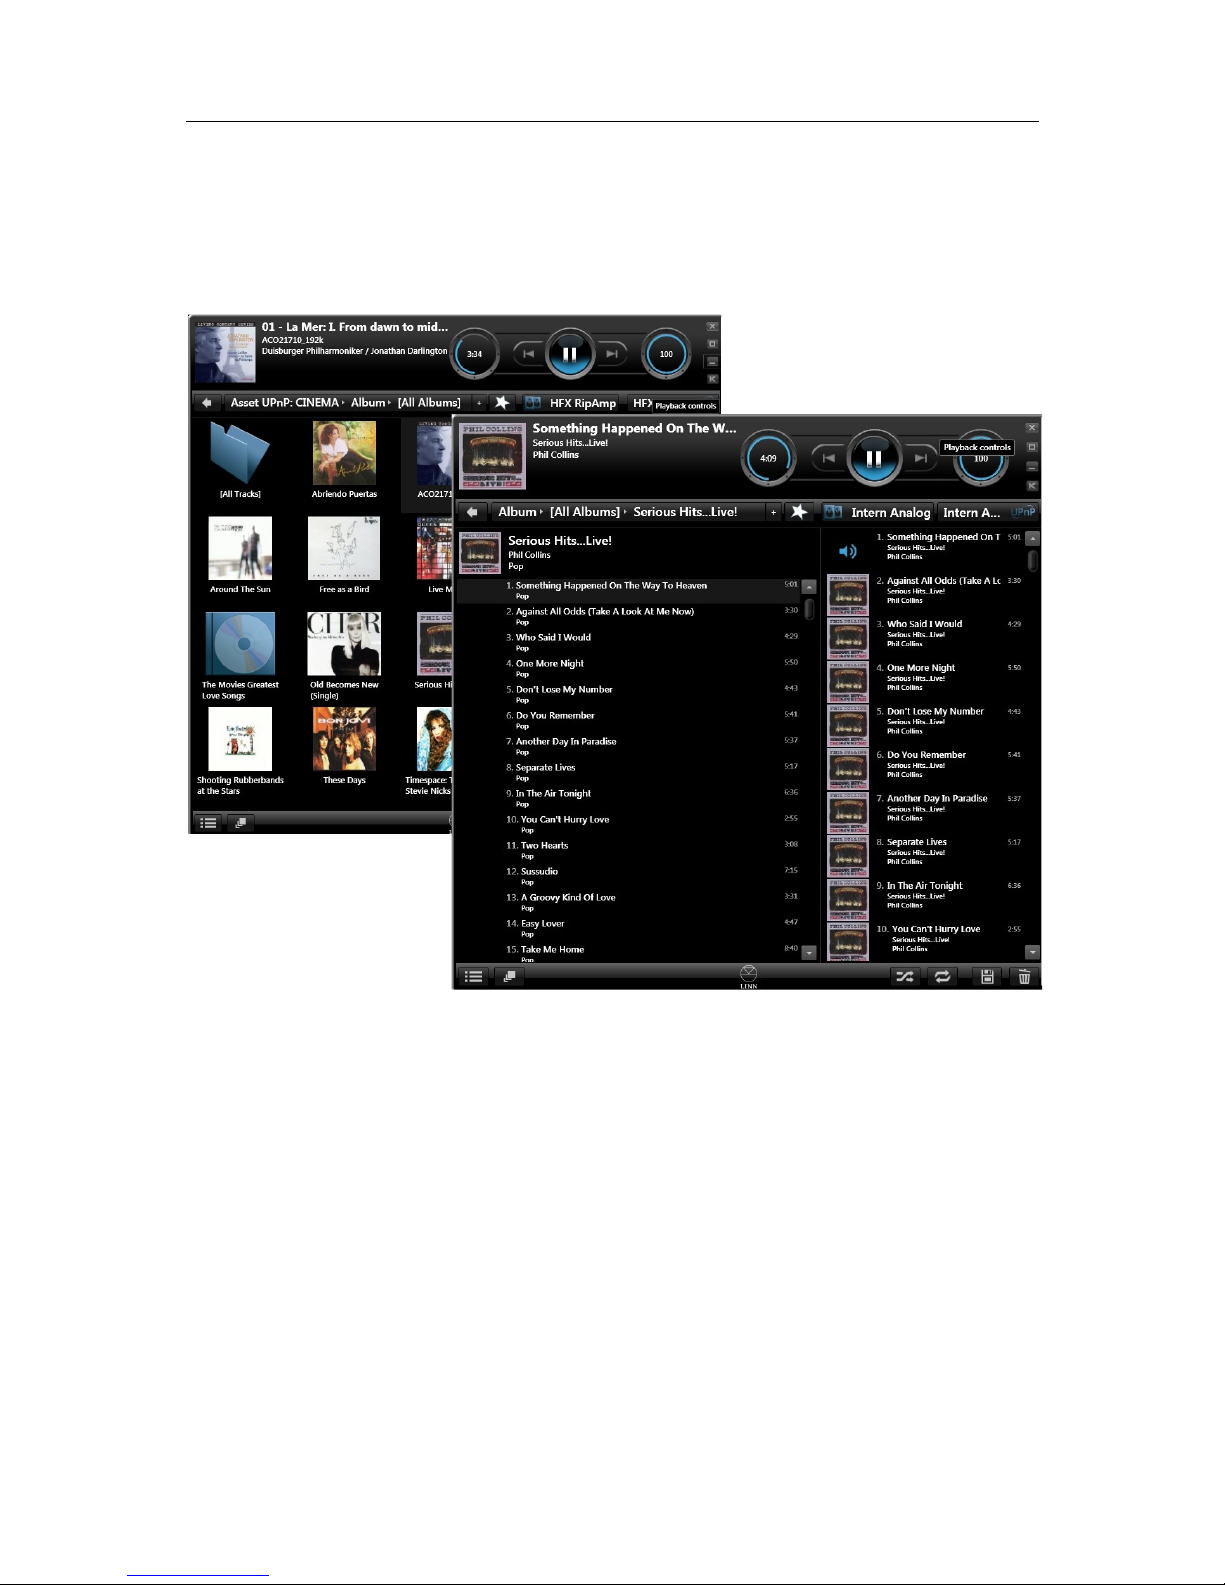
Most preferred remote control is the iPAD or Android Pad, but you can also use a smaller device like
the iPod or iPhone or Android phone. Just look for UPNP in your app store and install the app. We
prefer to use Kinsky Desktop.
With a UPNP ControlPoints you have to select first the source like the RipNAS or Cinema. RipNAS has
also Internet Radio included.
Then you need to select the audio device (that means your zone of the HFX zonee).
Now you can move the music with a finger tip to your zone or also create playlists.
Attention: if you close the ControlPoint the music will stop playing.
Attention: if you use more than 2 ControlPoints like 2 iPads, then one person in one room might
choose the same zone like the other person. Then of course both will interfer. Each control point
control each zone.
DO NOT FORGET TO TURN THE MASTER VOLUME HIGH!
Manual V1.0 © by HFX Austria 8/8
 Loading...