

Page 1

OWNERS MANUAL
HF Oil Content Monitor
(OCM)
HF scientific inc.
3170 Metro Parkway
Ft. Myers, Fl 33916
Phone (239) 337-2116
Fax (239) 332-7643
Email: info@hfscientif ic.com
Catalog No. 22543 (1/03)
Rev. 3.9
Page 2

Page 3

Declaration of Conformity
Application of Council D irective
Standard to which Confor mity is Declared:
Product Safety – Tested and Pas sed CE EN61010-1: 1990 + A1: 1992 (73/32 EEC)
Immunity and Em issions – Tested and Passed EN61326: 1998, Class A
Manufacturer’s Name: HF scientific, inc.
Manufacturer’s Address: 3170 Metro Parkway, Fort Myers, Florida 33916-7597
Importer’s Name:
Importer ’s Addres s:
Type of Equipment: Oil Content Monitor
Model No: OCM 20075
I, the undersigned, hereby declare that the equipment specified above conforms to the above
Directive and Standard
Place: Fort Myers, Florida USA
(Signature)
Robert J. Maley, President
__________________________
OCM Rev 3.9 (1/03) i
Page 4

Page 5

Table of Contents
Declaration of Conformity...........................................................................................................i
Specifications................................................................................................................................1
1.0 Using this Instruction Manual .........................................................................................2
2.0 Unpacking the Instrument................................................................................................2
2.1 Packing List of Contents ............................................................................................. 2
2.2 Unpacking and Inspection of the Instrument and Accessories.................................2
3.0 Installation ........................................................................................................................ 3
3.1 Mounting and Site Selection .......................................................................................3
3.2 Plumbing ......................................................................................................................3
3.3 Electrical Connections.................................................................................................3
3.3.1 Power Source............................................................................................................4
3.3.2 Relay Connections....................................................................................................4
3.3.3 4-20 mA Output ....................................................................................................... 4
3.3.4 Unused Terminals....................................................................................................4
3.3.5 Cabinet Integrity......................................................................................................4
4.0 Becoming Familiar with the Instrument........................................................................5
4.1 The Touch Pad.............................................................................................................5
4.2 The Display................................................................................................................... 5
5.0 Routine Operation.............................................................................................................6
5.1 Routine Measurement ................................................................................................. 6
5.2 Security Access Feature..............................................................................................6
6.0 Instrument Configuration (SETUP mode).......................................................................7
6.1 Configuring the Alarms............................................................................................... 7
6.1.1 Alarm 1 .................................................................................................................... 7
6.1.2 Alarm 2 ................................................................................................................... 8
6.2 Setting 4-20mA Output ............................................................................................... 9
6.3 Security Code Access Option ...................................................................................... 9
7.0 Calibration Procedures...................................................................................................11
7.1 Standard Calibration Procedure ..............................................................................11
7.1.1 Clear Water (0 PPM) Calibration ........................................................................11
7.1.2 15 PPM Calibration...............................................................................................12
7.2 Zero Adjust Calibration............................................................................................13
8.0 Self-Diagnostics: System Troubleshooting................................................................... 15
8.1 System Warning Message(s) ..................................................................................... 15
OCM Rev. 3.9 (1/03) ii
Page 6

8.2 System Failure Error................................................................................................. 15
9.0 Routine Maintenance ..................................................................................................... 16
9.1 Cleaning the Optical Chamber (Sample Tube).......................................................16
9.2 Replacing the Desiccant Cartridge...........................................................................16
9.3 Replacing the Source Lamp ...................................................................................... 16
10.0 Technical Assistance, Replacement Parts and Warranty Claims..............................17
11.0 Warranty .........................................................................................................................18
12.0 Figures ............................................................................................................................19
13.0 Approvals ........................................................................................................................... 26
OCM Rev. 3.9 (1/03) iii
Page 7

Specifications
Measurement Range
0-30 PPM, Trending 30-50 PPM
Accuracy Less than ±5 PPM
Resolution
1 PPM
Response Time Less than 20 seconds
Power Requirements 90-250 VAC, 47-90Hz, 6 VA
Display Liquid Crystal Display
Two User Settable Alar ms 120-240VAC 2A Form C Relay with s uppressors, or
120-240VAC 1A Form A Ze ro –crossing Solid State Relay
Analog Output Signals 4 - 20 mA
Water Pressure 0.1 - 8 bar ( 1-116 psi.)
Flow Rate 1 Liter/min. regulated (.26 Gal/min)
Operating Temperature Range
0°C – 50°C (34°F – 122°F)
Sample Temperature Range 1°C – 50°C (34°F – 122°F)
Year 2000 Compliance
Statement
Regulatory/Measurement
This instrument is fully Year 2000 (Y2K) compliant; it doe s not
use the date for ope ration in any form.
I.M.O. resolution MEPC. 60(33)
Compliance
Certifications See appendix for a pprovals
Approximate Dimensions
Shipping Weight
175mm W x 310mm H x 225mm D ( 6⅞” W x 12 ¼” H x 8•” D)
2.5 kg (5.5 lbs.)
Warranty 1 Year from date of shipment
OCM Rev. 3.9 (1/03) 1
Page 8

1.0 Using this Instruction Manual
Congratulations on your pur chase of a new HF scientif ic inc. oil content monitor (OCM).
This instrum ent has been designed f or simple and e asy measur ement of bilge oil in wa ter
and conforms to the requirements of I.M.O . resolution MEPC. 60(33).
This manual contains simple steps to follow to ensure that your instrument operates
properly. The following sections describe how to use and care for your new OCM. In
certain instances NOTES, or reminders, have been added to give further clarification to
the instructions. Refer to the Table of Contents to easily find specific topics.
2.0 Unpacking the Instrument
2.1 Packing List of Contents
Item Part# Quantity
OCM Bilge Alar m 19601 1
Instruction Manual (this
manual)
Male Quick Connectors 22519 2
Calibration Kit 19611 1
Black Nylon Tubing 22740 3 meters ( 10 ft.)
Desiccant Tubing 19610 1
2.2 Unpacking a nd Inspection of the Instrument and Accessories
Remove the instrument from the packing carton. Carefully inspect all items to ensure
that no visible damage has occurred during shipment. If the items you received do not
match your order, please immediately contact your local distributor or the HF scientific,
inc. Customer Service department.
22543 1
OCM Rev. 3.9 (1/03) 2
Page 9

3.0 Installation
3.1 Mounting and Site Sele ction
The OCM is designed for wall mounting. If wall mounting is not practical, the
instrument can be mounted on any suitable surface. Choose a location that is easily
accessible for operation and service and ensure that the front display rests at eye level.
The overall mounting dimensions of the instrument are shown in Figure 1. For ease of
service there should be about 45cm (18”) free area above the OCM. This will ensure
enough room for calibrations and for cleaning the optical well. The recommended
mounting screws (four required) are M6 (or ¼”).
It is important that the OCM be mounted within 18 meters of the oily water separator to
comply with the IMO requirement for a respons e time of 40 seconds.
3.2 Plumbing
The recommended plumbing for the instrument is shown in Figure 4. The OCM is
designed with an integral flow regulator which limits the flow to between 0.8 – 1.3
liters/minute depending on the system backpressure. Ensure that you supply the OCM
with a process flow capable of sustaining thes e levels. Quick- connect fittings are s upplied
on the inlet and outlet of the OCM. These f ittings help speed up calibration procedures.
The OCM is designed for use with semi-rigid tubing (¼” OD X .170” ID). Opaque
tubing is recommended if the tubing will be exposed to sunlight. Using this semi-rigid
tubing, the ins trument should be installed within 18 me ters of the sample line to com ply
with the IMO r equirement for a respons e time of 40 seconds. A valve is supplied at the
inlet side of the instrument to ease the calibration and cleaning procedures.
Note: The quick-connect fittings are designed with a special shut-off feature to prevent
flow of the process through the OCM when the line is disconnected.
The optional clean water supply must be oil-free. The clean water connection, along with
the optional drain connection, allows the OCM to be easily calibrated for the clean water
condition. If your clean water supply is seawater, the OCM can be zero adjusted with the
local seawater.
3.3 Electrical Connections
All of the electrical connections to the OC M a re made at the fie ld te rminal box located on
the lower sec tion of the instrument. Wiring should be run in through the grommet closest
to the connection terminal bloc k. The cable diameter for these gr ommets is rate d for 4.3 –
11.9 mm (0.170 –0.470”).
To make connections, insert a 3mm(1/8”) flat blade screwdrive r into the top slot of the
terminal block. Pivoting the handle of the screwdriver up c a uses the clamp to lowe r. You
can now insert the wire. Releasing the tension raises the clamp and tightens the
connection. Please note that these terminal blocks will accept wire gauges A WG 24-14.
As you read the following sections, ple a se refer to Figure 3 for c la rification of the
electrical connections.
Please follow all local and government recommendations and methods for insta lla tion of
electrical connec tions to and between the instrument and peripher a l de vic e s.
OCM Rev. 3.9 (1/03) 3
Page 10

3.3.1 Power Source
The power source re quired is 90 – 250VAC, 47- 90Hz. The power cons umption is 6VA.
Connections are made at the far right ha nd te rminals.
Please observe safe wiring practices. It is recommended that a circuit breaker or switch
be placed prior to the power connection to the OCM to allow for service.
Note: Only qualified electricians should be allowed to perform the installation of the
instrument as it involves a line voltage that could endanger life.
3.3.2 Relay Connections
Relay connections for Alarm 1 and Alarm 2 are located next to the power connection.
These relays are rated at 120-240VAC 2A for the mechanical. The optional solid state
relays are rated at 120-240VAC 1A.
The Sensor Alarm connection is located to the left of Ala rm 1. This rela y is rated for up
to 30VDC 2A.
3.3.3 4-20 mA Output
A 4-20 mA s ignal is pr ovided. This output is re fe renc ed to the sc ale of 0-30 P P M as s et at
the factor y but m ay be set to any por tion of the sc ale of 0-50 P PM. Connections f or the 420 mA are located next to the Sensor Alarm.
3.3.4 Unused Terminals
Located next to the 4-20mA outputs are some terminals that are not used in this
instrument. T he se terminals are not connected inside the ins trument and cannot be used.
3.4.5 Cabinet Integrity
To maintain the seal of the field terminal box, it is important to use suitable size cable
through the compression f ittings. If suitable size cable is not available, use vinyl tubing or
electrical tape to make up the differ ence. Tighten all compr ession fittings by hand. Do not
remove the plastic dowel plugs in unused fittings as these serve to complete the cabinet
seal. When clos ing the lid, ensure that no wires a re pinched and that the o-r ing is in good
condition. Tighten the four corner screws firmly.
OCM Rev. 3.9 (1/03) 4
Page 11

4.0 Becoming Familiar with the Instrument
The user interface of the OCM has been designed with a 4 key Touch Pad and a digital
user display with two rows of display information.
4.1 The Touch Pad
The MODE key is used to cycle between the four modes of the OCM: AUTO
(measurement) mode, CAL 0 ADJ (Zero Adjust Calibration) mode, SETUP
(Instrument Configuration) mode, and CAL (Calibration) mode. The
the option (or mode) that is highlighted or chosen. The
through lists and to increase or decrease settings. Please refer to the Menu Flow Chart
(Figure 8) while becoming familiar w ith the operation of the OCM.
Note: 1.While in the CAL or SETUP modes the relays are set in the alarm condition.
2. The instrument has an integral time-out feature that automatically returns the
system operation to the AUTO mode from either the CAL or SETUP modes when
more than 5 minutes have passed with no keypad activity.
4.2 The Display
Figure 4 illustrates all the graphics on the user display. The upper row of the display (1)
is used for reporting the oil concentr ation (in PPM) and to provide user guidance in the
customer settings routine. The lower row of the display (2) is used to communicate error
messages and a lso to provide us er guidance. The display ha s several status indicators (3),
which indicate the current operation mode of the instrument. Finally, several indicators
around the screen provide guidance w hen the customer setting routine is being used and
when the calibration routine is being used. Please note that not all of the indications on
this screen will be used at any one tim e.
andu arrows are used to scroll
t
key enters
↵↵↵↵
OCM Rev. 3.9 (1/03) 5
Page 12
5.0 Routine Operation
The OCM is designed to m easur e and display the concentr ation of oil (in PPM by weight)
in the bilge water according to I.M.O. resolution MEPC. 60(33). Readings above 50
PPM are outsi de of the range of this instrument.
5.1 Routine Measurement
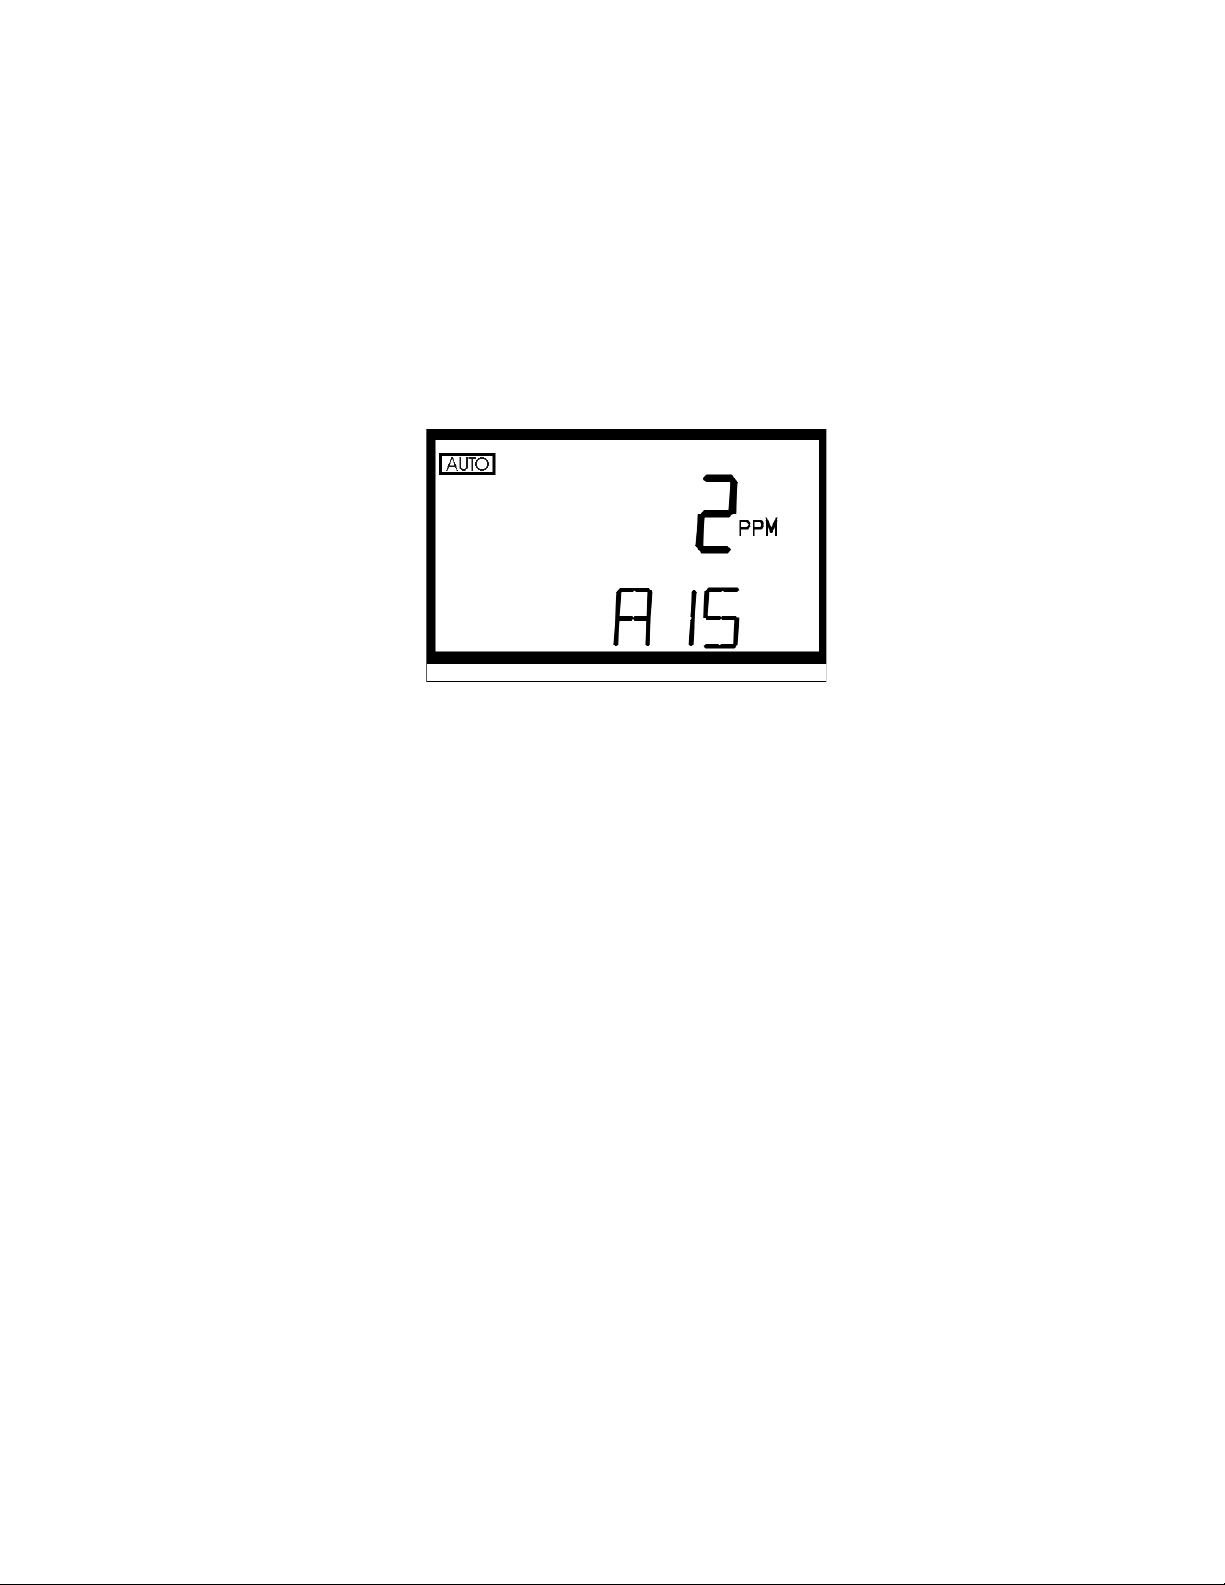
During normal oper ation, the instrument will have the AUTO block highlighted with the
current scal e displayed on the r ight side of the display, the m easure d reading on the upper
row of the display, and the current alarm level on the lower row of the display (see
illustration below).
The following steps describe how to measure the oil content of a sample using the
OCM:
1. Turn power on to the OCM. The instrument will be in the AUTO (measurement)
mode (the “AUTO” block should be illuminated). Allow instrument to w arm up for
at least 45 minutes.
2. When a continuous process stre am is flowing through the instrum ent, the instrument
will report the oil content of the sample by displaying it on the LCD screen.
3. Pressing the MODE button will allow you to sequentially access the calibration
routine (s ee section 6 for mor e information) and the configur ation/setup routine (see
section 7 for more information).
5.2 Security Access Feature
The OCM is equipped with a security access code feature that can be turned on or off
when configuring the instrument. Three access codes are used in the instrument: one for
instrument calibration (333), one for instrument configuration (444), and one to zero
adjust the instrument (222). These codes are not changeable and are required as input
whenever the customer presses the MODE button to access either the calibration routine
or the setup routine if the security feature is enabled.
If the security feature is enabled, the scr een shown in Figure 5 will be shown w hen you
press the MODE button. The security code has three numbers that are selectable one at a
time. Use the
key to accept the number. Then repeat the process for the next two numbers in the access
code. If you have selected a valid code the OCM will be directed to either the
calibration, the zero adjust, or the user setup mode depending on the access code that was
provided to the instrument. If the wrong access code is selected, the instrument will
return to the AUTO mode.
tu arrows to select the f irst number in the code and then press the
↵↵↵↵
OCM Rev. 3.9 (1/03) 6
Page 13

6.0 Instrument Configuration (SETUP mode)
The OCM provides you the ability to custom ize your instrument according to your needs
at any time during norm al operation. T his section descr ibes how you can customize your
instrument.
NOTE: To skip the selection of the SETUP mode, simply press the MODE key.
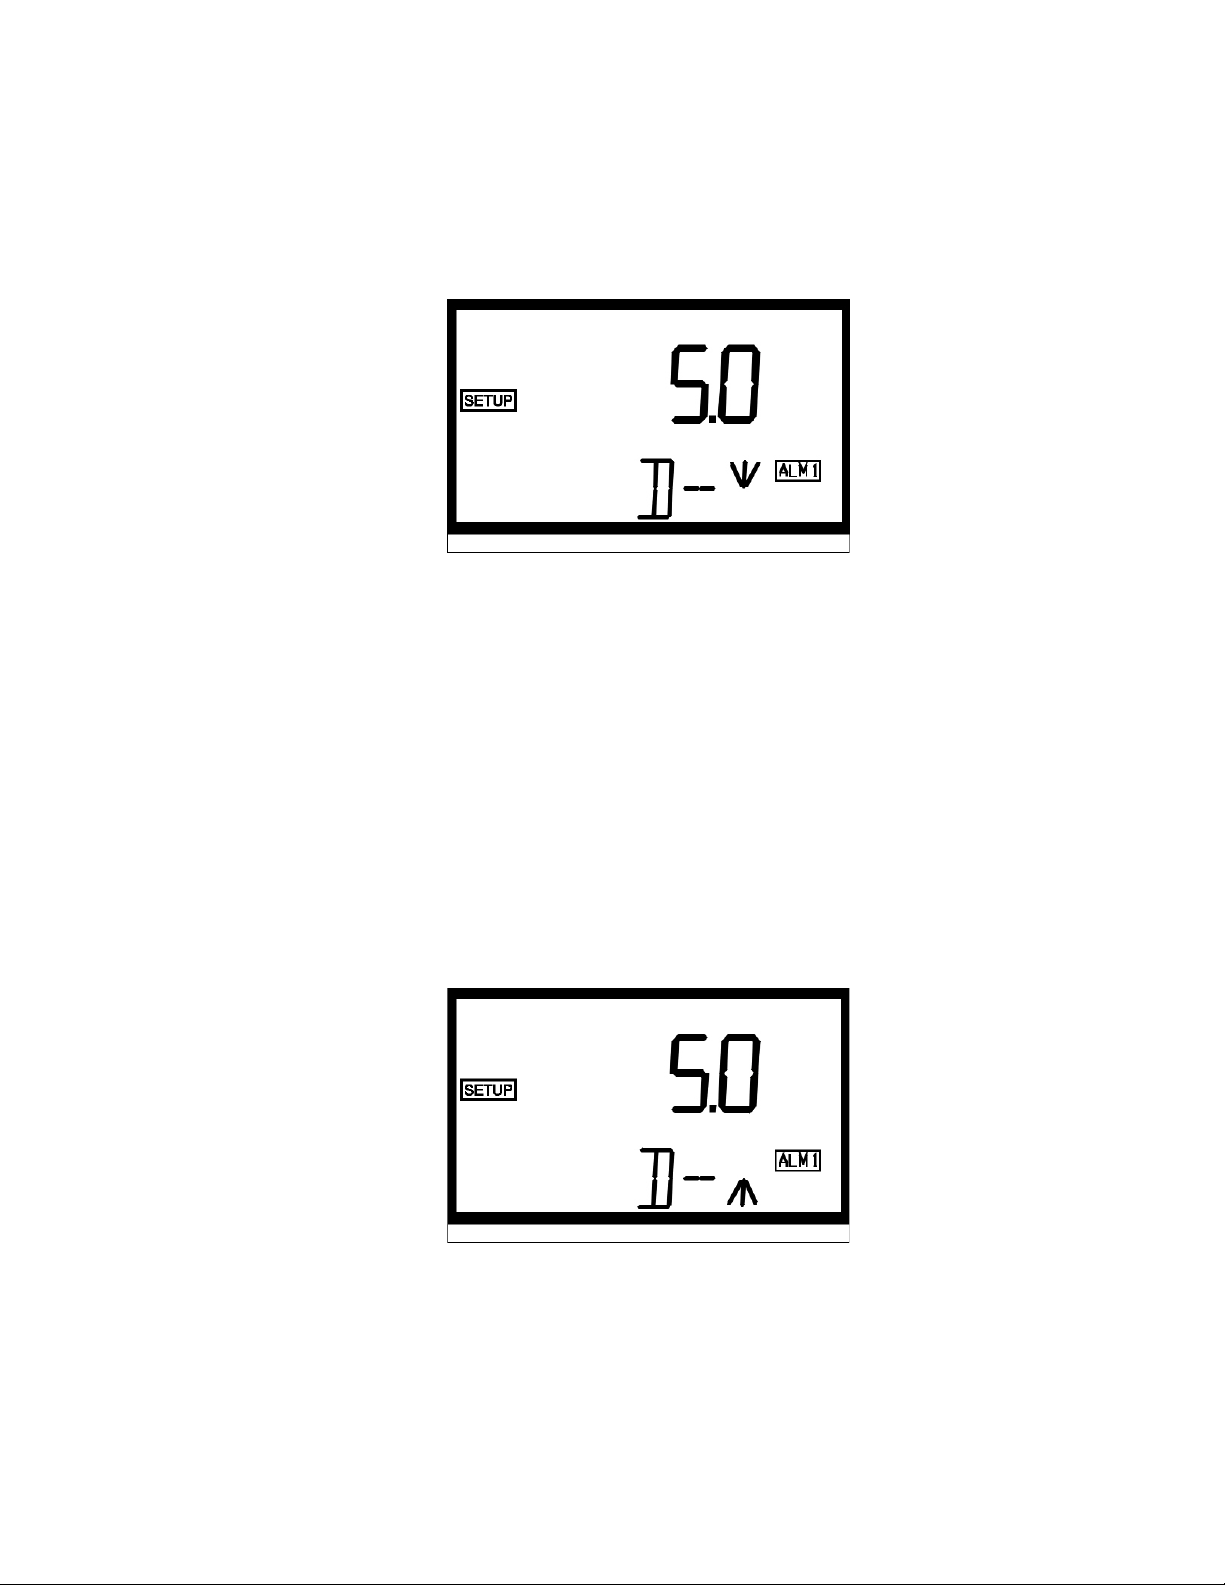
6.1 Conf iguring the Al a rms
Enter the SETUP mode of the OCM by pressing the MODE key until SETUP is
illuminated. The level at which the alarm(s) will activate is called the set point. On the
OCM, the set point (S/P) can be set to either 5 or 15 ppm. The display will now indicate
that the set point (S/P) for both alarm 1 and alarm 2 are set to 15 PPM. Use the
keys to select a set point of 5 or 15 ppm. Press the ↵ key to accept each selection and to
tu
proceed to the next selection. Press
You may set delay times for initiating and disabling the alarm . The delay times are used
to prevent relay chatter close to the alarm limit. T he delay times are set at 0 se conds at
the factory. T he operations of the delays are:
Delay On: Once an alarm condition is met, the process must remain in alarm
condition for at least the time selected for the Delay On time level. If the
delay on time level is set at 15 seconds and the alarm condition is met
continuously for only 10 seconds, the alar m will not be initiated. H owever, if
the alarm condition is met continuously f or 15 seconds or more, the OCM will
indicate an alarm condition.
Delay Off: Likewise, once the process water leaves the alarm condition levels
it must remain out of the alarm condition for at least the time selected for the
Delay off time level. If the delay off time level is set to 10 seconds and the
process has exited out of the alar m condition, the alarm will be r e set only if
the process is out of the alarm condition for a continuous 10 seconds.
Otherwise, the OCM will still signal an alarm condition.
6.1.1 Programming Alarm 1
Alarm 1 Function: Alarm 1 is alw ays active . This is the alarm that should be connected
to the re-circulation apparatus. This alarm will activate when the oil concentration
exceeds the set point longer than the “Delay On” tim e.
Alarm 1 Delay Times: Delay On: The following display will appear to allow you to
select the number of seconds currently set for the “de l a y on” time.
now to set up the alar ms.
↵
OCM Rev. 3.9 (1/03) 7
Page 14
The current selected number of seconds will be shown. You can select the desired
number of seconds for the “del ay on” time for this alarm using the
Once you have set the de sired delay time, press the
Delay Off: Next, the following display w ill appear to allow you to select the number of
seconds curr e ntly set for the “delay off” time.
The current selected number of s econds will be shown. You can se lect the desired delay
on time for this alarm using the
button to accept it.
time, press the
6.1.2 Programming Alarm 2
Alarm 2 Function: Alarm 2 may be tur ned on, or of f . T his ala rm could, for exam ple, be
wired into the c ontrol room as an ear ly warning system f or the oil levels in your pr ocess
stream. You can use the
↵
toru
t
u
and
buttons to cycle through and select the desired function.
buttons. O nce you have s et the desir ed delay
button to accept it.
↵
t and
u
buttons.
Press the
If you selected to turn the alarm OFF, you will be immediately prompted to set up the
analog output f or the ins trument. If , on the other hand, you selected to tur n the alarm on
you will be prompted to set the delay times.
Alarm 2 Delay Times: Delay On: The following display will appear to allow you to
select the number of seconds currently set for the “de l a y on” time.
The current selected number of seconds will be shown. You can select the desired
number of seconds for the “del ay on” time for this alarm using the
Once you have set the de sired delay time, press the
Delay Off: Next, the following display w ill appear to allow you to select the number of
seconds curr e ntly set for the “delay off” time.
button to accept your selection.
↵↵↵↵
button to accept it.
↵
t
and
u
buttons.
OCM Rev. 3.9 (1/03) 8
Page 15

The current selected number of s econds will be shown. You can se lect the desired delay
u
and
on time for this alarm using the
button to accept it.
time, press the
Note: A system alarm will activate when an internal system failure occurs. Please note
that the user settable relays are failsafe in that they will activate if an internal
system failure or power loss occurs.
6.2 Setting 4-20mA Output
The output (O/P) selection allows you to turn the 4 – 20 mA analog output on, or off.
You can select the de sired analog output operation using the t and u keys . Once you
have set the desir e d ope ration, press the ↵ key to accept it.
If you selected to turn the 4- 20 mA output on, you will be prompted to set the upper and
lower oil content levels corresponding to the 4 mA and 20 m A output levels. First, you
will be prompted with the oil content level assigned to the 4 mA output level (OLV on
the lower row of the LCD displa y). Select the oil content level you wish to as sign to the
OLV using the t a nd u keys. Once you have set the desir ed level, press the ↵ key to
accept it.
↵
t
buttons. O nce you have s et the desir ed delay
Next, you will be prom pted with the oil content level assigned to the 20 mA output level
(OHV on the lower row of the LCD display). Select the oil content level you wish to
assign to the OHV using the t and u keys. Once you have set the de sired level, pre ss
the ↵ key to accept it. At this point you w ill be prompted to set up the security access
6.3 Selecting the Security Access Option
The OCM is equipped with a security access option. If this option is turned on, the user
must be able to input the correct access code for feature. The security key will be
highlighted on this display at this time and the lower row the mode they wish to enter .
OCM Rev. 3.9 (1/03) 9
Page 16

The three access codes us ed in the instrument: code 333 w ill provide access to ins trument
calibration, code 444 will provide access to instrument configuration, and 222 will
provide access to the zero adjust calibration. See section 5.2 for more information on this
security feature. T he security key will be highlighted on this display at this time and the
lower r ow of the display will indicate the opera tional status of the security access option
(on or off). You can change the operational status of this option using the
key to accept it. Pressing the ↵ key will
Once you have set the de sired s tatus, pres s the
forward you to the calibration mode of the instrument.
You have now completed the customer selectable parameters section of the instrument.
You can enter this menu at any time to re-set, or change, any of the parameters.
↵
and ukeys.
t
OCM Rev. 3.9 (1/03) 10
Page 17

7.0 Calibration Procedures
The OCM has been factory-calibrated at HF scientific, inc.. It is possible to use the
instrument directly out of the box. However, re-calibration of the instrument using oilfree water and the supplied 15 PPM calibration standard is recommended to allow the
user to become familiar with the operation of the instrument and the calibration
procedures
7.1 Standard Calibration Procedure
Two calibr ation points are re quired for complete calibra tion of the OCM; oil-free w ater,
and a 15 PPM calibration standard (available only from HF scientific, inc.). To ensure
the accuracy of the instrument, please follow the instructions detailed in the following
section.
7.1.1 Clear Water (0 PPM) Calibration
1. Shut off flow to the OCM.
2. Disconnect the source tubing.
3. Remove the cleanout plug on the O C M.
4. Open the drain valve to remove the seawater from the sample tube.
5. Close the drain.
6. Pour enough oil-free water in to the sample tube to fill it. De-ionized or
distilled water is r ecommended.
7. Open the drain.
8. Repeat steps 5 and 6 and then clean the sample tube using the cleaning brush
supplied with the instrument.
9. Open the drain.
10. Repeat steps 8 and 9 two more times to completely clean the sample tube.
11. Close the drain and fill the sample tube with the oil-free water.
12. Replace cleanout plug.
13. Press the MODE key three times to enter the calibration mode. The “CAL”
block will be illuminated and the display will read ”0 PPM” (see diagram).
14. P ress the
will appear on the upper row of the display and the word NO will appear on
OCM Rev. 3.9 (1/03) 11
key to initiate the calibration on 0 PPM water . The word CAL
↵↵↵↵
Page 18

the lower row of the LCD display.
15. This is the fina l step for calibra tion a t the 0 PPM level; if you wis h to skip this
step without calibrating the 0 PPM, simply press the
you are satisf ie d a nd wish to complete calibration on the 0 PPM level use the
arrows to select the word YES on the lowe r row of the display and then
tu
button to initiate calibration.
press the
↵↵↵↵
button. However, if
↵↵↵↵
16. Both the CAL and STORE blocks will flash during the operation. When the
calibration procedur e for the 0 PPM level is complete the CAL and STORE
blocks will stop flashing. Next you will proceed on to the 15 P PM Calibration.
7.1.2 15 PPM Calibration
1. Remove the cleanout plug on the O C M.
2. Open the drain valve to remove the w a ter from the sample tube.
3. Close the drain.
4. Pour the 15 PPM calibra tion standard into the well.
OCM Rev. 3.9 (1/03) 12
Page 19

5. Replace the cleanout plug.
6. Press the
will appear on the upper row of the LCD dis play and the word NO w ill appear
on the lower row of the LCD display.
7. This is the final step for calibration at the 15 PPM level; if you wish to exit
without calibrating simply press the
and wish to complete calibration on the 15 PP M level use the
select the word YES on the lower row of the display and then press the
button to initiate calibration.
key to initiate the calibration on 15 PPM w ater. The word CAL
↵↵↵↵
button. However, if you are satisfied
↵↵↵↵
tu arrows to
↵↵↵↵
button will complete calibration. The system w ill automatically
8. Press ing the
return to the AUTO mode
Notes: If you wish to exit the calibration mode you may do so at any time, prior to
initiating a calibration, by simply pressing the MODE key.
It i s no rmal fo r the sy ste m to c ount up to and dis play 13 -17 PPM, in the AU TO
mode, immediately following the 15 PPM calibration as the calibration solution is
still in the s ample tube.
7.2 Zero Adjust (0 ADJ) Calibration
In certain instances, the oil f ree w ater (seaw ater) leaving the bilge has different scattering
characteristics than the clear water used f or calibration. The OCM has been designed to
allow for you to account for this variation by adjusting the zero calibration with your oil
free water. Follow the steps below for this calibration procedur e:
1. Ensure that there is a good flow of oil-free sample to the OCM.
2. Press the MODE key once to enter the zero adjust calibration mode. The “CAL”
block will be illuminated on the display with “0 ADJ” shown on the display (see
OCM Rev. 3.9 (1/03) 13
↵↵↵↵
Page 20

below)
key to initiate the zero adjust calibration on your oil-free sample. The
Press the
word CAL will appear on the upper row of the L CD display and the word NO will
appear on the lower row of the LCD display.
↵↵↵↵
This is the final ste p for calibration f or the zero adjust; if you wish to exit without
calibrating simply press the
complete calibration on the zero adjust use the
on the lower row of the display and then pr e ss the
Both the CAL and STORE blocks will flash during the operation. When the
calibration procedure for the zero adjust is complete the CAL and STORE blocks
will stop flashing. T he program will return you to the automatic measurement mode.
button. However, if you are satisfied and wis h to
↵↵↵↵
arrows to select the word YES
tu
button to initiate calibration.
↵↵↵↵
OCM Rev. 3.9 (1/03) 14
Page 21

8.0 Self-Diagnostics: System Troubleshooting
8.1 System Warning Message(s)
Automatic warning messages are generated by the OCM to provide you with specific
diagnostic information about the instrument. These are only messages and they do not
indicate failure of any component in the instrument. The following table lists the warning
messages and their associated meanings:
WARNING ASSOCIATED MEANING TYPICAL CAUSE
W01
W02 Calibration Failure
W03 Analog Loop Failure
W05
O-r Sample Over-Range
WNG
Water used for 0 ADJ is too
Multiple Warning conditions
Lamp Failure
cloudy
are met
Lamp has too low an output. The lamp
must be replaced followed by a
calibration.
The wrong standard was used or there
is an internal failure.
The 4-20mA is activated and the loop
is open.
The 0 ADJ water was determined to
be too cloudy for the instrument to
operate properly. Replace water and
calibrate again.
The sample presented to the OCM is
over 50 PPM.
A combination of the above warning
conditions has been met.
If any of the above conditions occurs, the sensor relay will automatically be set to the
alarm position.
8.2 S yst em F ailu re Error
The instrument is indic ating an error when “SFE ” is displayed on the lower row of the
display. This is a gene ral system failure. W hen this message is obse rved, contact the HF
scientific, inc. Technical S ervices department to determine a resolution to the problem.
If any of the above conditions occurs, the sensor relay will automatically be set to the
alarm position.
OCM Rev. 3.9 (1/03) 15
Page 22

9.0 Routine Maintenance
9.1 Cleaning the Optical Chamber (Sample Tube)
Proper me asurement of the oil content of sam ple water requires that the sa mple tube be
free of debris. Cleaning the sample tube is accomplished by first purging the system:
1. Stop the flow of sample water to the OCM.
2. Run oil free water for several minutes through the instrument and then shut off the
flow to the instrument (ensure that the sample tube re mains full with clean water).
3. Remove the cleanout plug and then clean the interior of the sample with the brush
provided. If necessary, you may use any common non-abrasive detergent to help in
the removal of a ny residual buildup on the sample tube .
4. Empty the sample cham ber to drain and then r e-attach the flow of sam ple water to the
OCM.
Once cleaned, the OCM can be put back into operation.
9.2 Replacing the Desiccant Cartridge
Proper use of the supplied desiccant cartridge is essential in maintaining the performance
of the instrument. The desiccant cartridge has been designed to have a long life. The
desiccant cartridge should be replaced when the color of the desiccant (as viewed through
the sight glass) has turned pink.
To remove the old desiccant cartridge, simply unscrew the cartridge from the front of the
case by rotating the cartridge counter-clockwise (see Figure 6). Once removed, place the
new cartridge into the instrument with the reverse movements. Then continue using the
instrument as normally instructed.
9.3 Replacing the Source Lamp
Periodically the source lamp will require replacement. Please note that a failed lamp will
indicate a W01 on the LCD screen.
To replace the lamp:
Note: Refer to Figure 7 when following these steps.
1. Open the sensor portion of the OCM by unscrewing the four sensor cover screws.
These screws should remain captive in the sensor cover even when fully loosened.
2. Pull the electronics module out enough to reach the lamp setscrew on the optic ring. If
you pull the module out too far, simply realign the board with the marked slots and
push back in.
3. Use a .050” Allen wrench to loosen the lamp setscrew on the right side of the large
optic ring. Do NOT loosen the setscrew on the lamp collar.
4. Pull the lamp and collar out.
5. Undo the lamp terminal connections by flipping up the terminal block levers.
6. Discard the lamp.
7. Insert the new lamp. Note that the collar controls the alignment of the replacement
lamp. The lamp will only fit in place when the pin of the collar fits into the hole of the
optic ring. Tighten the lamp setscrew.
8. Attach the leads to the terminal block (lamp is not polarity sensitive). Lock the levers
down firmly.
9. Ensure that the lamp is on. Light should be shining into the optic ring.
OCM Rev. 3.9 (1/03) 16
Page 23

10. Push the electronics module back in and tighten the four sensor cover screws.
Please note that the OCM will require a complete calibration as described in sections
6.1.1 and 6.1.2.
10.0 Technical Assistance, Replacement Parts and Warranty Claims
Accessory or Replacement Part HF scientific Part Number
Calibration Kit 19611
White Light Sourc e 19940
Desiccant cartridge
OCM Electronic s and Touch pad 19612
If for any reason you need technica l assistance re ga rding this instrument ple a se do not
hesitate to contact the HF Technical Services Department:
HF scientific, inc.
3170 Metro Parkway
Fort Myers, Florida 33916-7597
Phone: (239) 337-2116 Fax: (239) 332- 7643
Email: info@hfscientif ic.com
19610
OCM Rev. 3.9 (1/03) 17
Page 24

11.0 Warranty
HF scientific, inc., as manufacturer, warrants to the original purchaser of this instrument
that it will be free of defects in material and workmanship, in normal use and service, for
a period of one year from date of delivery to the original purchaser. HF scientific, inc.’s,
obligation under this warranty is limited to replacing, at its factory, the instrument or any
part thereof. Parts, which by their nature normally require periodic replacement,
consistent with normal maintenance, specifically lamps (including the LCD backlight),
calibration standards, desiccant, sensors, are excluded. Also excluded are accessories and
supply type items.
Original purchaser is responsible for return of the instruments, or parts thereof, to HF
scientific, inc.’s factory. This includes all freight charges incurred in shipping to and
from HF scientific, inc.’s factory.
HF scientific, inc. is not responsible for damage to the instrument, or parts thereof,
resulting from misuse, negligence or accident, or defects resulting from repairs,
alterations or installation made by any person or company not authorized by HF
scientific, inc.
HF scientific, inc. assumes no liability for consequential damage of any kind, and the
original purchaser, by placement of any order for the instrument, or parts thereof, shall be
deemed liable for any and all damages incurred by the use or misuse of the instruments,
or parts thereof, by the purchaser, its employees, or others, following receipt thereof.
Carefully inspect this product for shipping damage, if damaged, immediately notify the
shipping company and arrange an on-site inspection. HF scientific, inc. cannot be
responsible for damage in shipment and cannot assist with claims without an on-site
inspection of the damage.
This warranty is given expressly and in lieu of all other warranties, expressed or implied.
Purchaser agrees that there is no warranty on merchantability and that there are no other
warranties, expressed or implied. No agent is authorized to assume for HF scientific, inc.
any liability except as set forth above.
HF scientific, inc.
3170 Metro Parkway
Fort Myers, Florida 33916-7597
Phone: (239) 337-2116
Fax: (239) 332-7643
OCM Rev. 3.9 (1/03) 18
Page 25

12.0 Figures
Figure 1: Mounting Dim e nsions for the instrument [inches (mm)]
OCM Rev. 3.9 (1/03) 19
Page 26

Figure 2: Recomm ended Plumbing for the instrument.
OCM Rev. 3.9 (1/03) 20
Page 27

Figure 3: Electrical connections for the instrument.
OCM Rev. 3.9 (1/03) 21
Page 28

f
(3)
Figure 4: Graphics of the LCD Display. The upper row o
the display is identified as item (1). The lower row of the
display is identified as item (2). Several status indicators are
identified as item (3). Several other indicators are shown as
item (4). Finally, the prompt for the security access code is
shown as item (5).
Figure 5: The LCD Display shown when the security code is to be
entered. The prompt for the security access code is shown as item
(1). The three digits that are modified to the correct access code are
shown as item (2). The code that is to be modified will flash until
you accept the value you select.
(1)
(1)
(5)
(2)
(4)
(2)
OCM Rev. 3.9 (1/03) 22
Page 29

Figure 6: Location and removal of the desiccant cartridge on the instrument.
OCM Rev. 3.9 (1/03) 23
Page 30

Figure 7: Lamp Replacement.
OCM Rev. 3.9 (1/03) 24
Page 31

Figure 8: Menu Flow Chart
OCM Rev. 3.9 (1/03) 25
Page 32

13.0 Approvals
OCM Rev. 3.9 (1/03) 26
Page 33

OCM Rev. 3.9 (1/03) 27
Page 34

OCM Rev. 3.9 (1/03) 28
Page 35

OCM Rev. 3.9 (1/03) 29
Page 36

OCM Rev. 3.9 (1/03) 30
Page 37

OCM Rev. 3.9 (1/03) 31
 Loading...