

Page 1
P R E M I U M Q U A L I T Ä T F Ü R A U T O M O B I L E
®
Germany
Bedienungsanleitung
Gruppe I / II / III
KINDER KOMFORTSITZ
Kids MultiProtect Ergo
Gruppe I / II / III
KINDER KOMFORTSITZ
Kids MultiProtect Ergo
Alle HEYNER Produkte
werden entsprechend
höchsten technischen
Standards designed
und hergestellt.
HEYNER Premium
Qualität für Automobile.
HEYNER MOBIL AUTOMOTIVE GMBH
Kurzer Weg 1
D-15859 Storkow
Telefon: +49 (0) 33678 • 687 • 0
Telefax: +49 (0) 33678 • 610 44
Internet: [email protected]
O R I G I N A L
®
www.heynermobil.de
O R I G I N A L
®
www.heynermobil.de
www.heynermobil.de
Page 2
1. GROUP I (about 9 to 18 kg Y)
1.1. Using MultiProtect as a child car seat
1.2. Adjusting MultiProtect to your child's size
1.3. Installing MultiProtect into your car
1.4. Securing the child into MultiProtect
2. GROUP II+III (about 15 to 36 kg)
2.1. Using MultiProtect without harness belts
2.2. Adjusting the headrest
3. Care instructions
4. Important notices
5. Some final hints
Index / page
Heyner Ergo
Heyner Ergo
Heyner Ergo
Heyner Ergo
Heyner Ergo
Ope rating Inst ruc tions
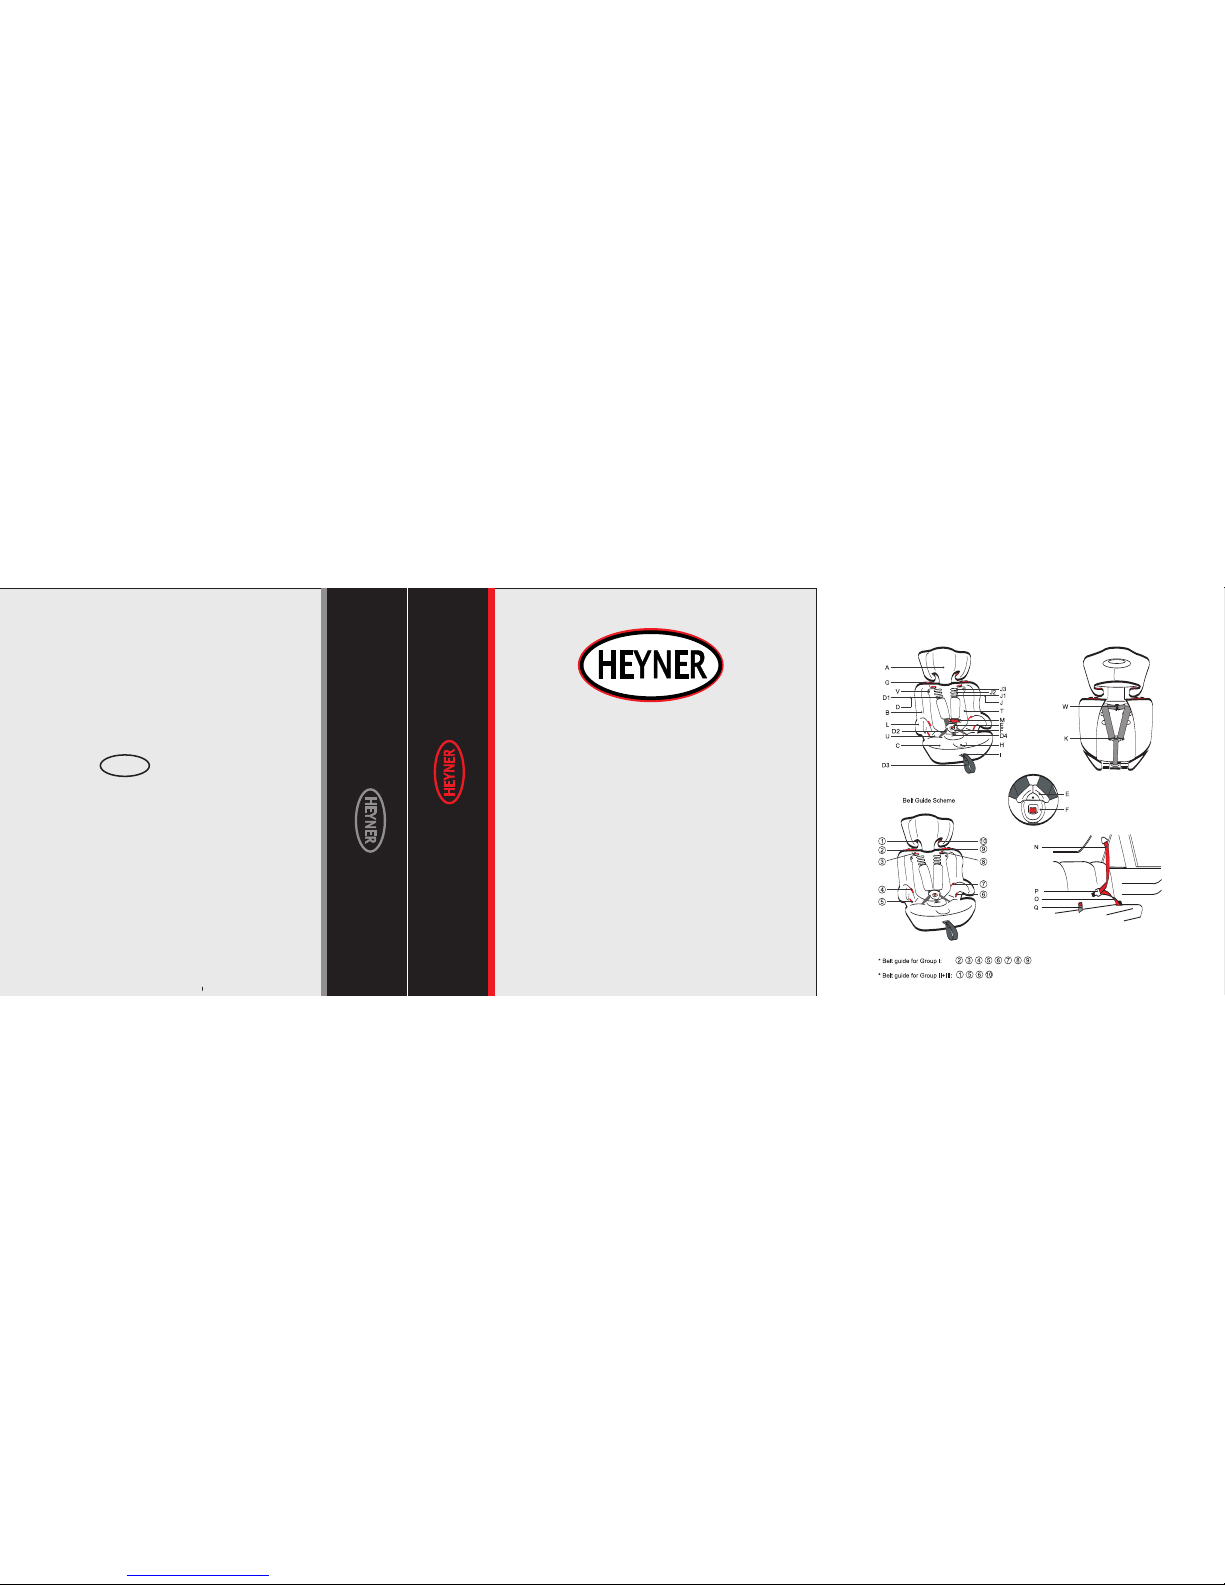
A Headre st
B Backre st
C Booster
D Harness b elt
D1 Shou lder be lt
D2 Waist b elt
D3 Harn ess cen tral be lt
D4 Buck le belt
E Buckle l atche s
F Belt bu ckle
G Belt h ook
H Bel t adjus ter
I Belt e nd elem ent
J Sho ulder b elt slo ts
J3 for ch ildre n up to 3 yea rs
(chi ldren a bout 14 - 1 8 kg)
J2 for ch ildre n up to 2 yea rs
(chi ldren a bout 12 - 1 4 kg)
J1 for ch ildre n up to 1.5 y ears
(Chi ldren a bout 9 - 12 k g)
K Be lt anch orage
L Fixa tion lu gs for th ree-p oint- vehic le-be lt
M Belt cl ip
N Dia gonal b elt of th e three -poin t-veh icle- belt
O Lap be lt of the t hree- point -vehi cle-b elt
P Bu ckle la tch of th e three -poin t-veh icle- belt
Q Belt b uckle o f the thr ee-po int-v ehicl e-bel t
R Con necti ng hook s
S Co nnect ing hol es
T B ackre st cove r velcr o
U Boo ster co ver vel cro
V Ba ckres t cover b utton
W Sh oulde r pad con necto r
X Be lt anch orage o f waist b elt
Y Be lt anch orage o f buckl e belt
.........................................1
.....................1
..................1
.......................3
.......................5
.....................................5
..................5
...............................................6
......................................................7
.....................................................7
......................................................8
English
O R I G I N A L
®
www.heynermobil.de
Page 3

1. GR OUP I ( abo ut 9 to 1 8 kg Y)
1.1 . Using as a ch ild car s eat
You hav e purch ased car s eat for y our chi ld. We tha nk you fo r
you r trust . Pleas e note, t hat the o ptimu m safet y chara cteri stics c an only b e achie ved, if t he
sea t is used p roper ly acco rding t o instr uctio ns. Ther efore w e ask you t o ensur e the cor rect
ins talla tion of t he seat i n your ve hicle b y readi ng the op erati ng inst ructi ons car efull y. Please
kee p instr uctio ns alwa ys with t he seat f or furt her inf ormat ion.
Onl y to be ass emble d by adul ts!
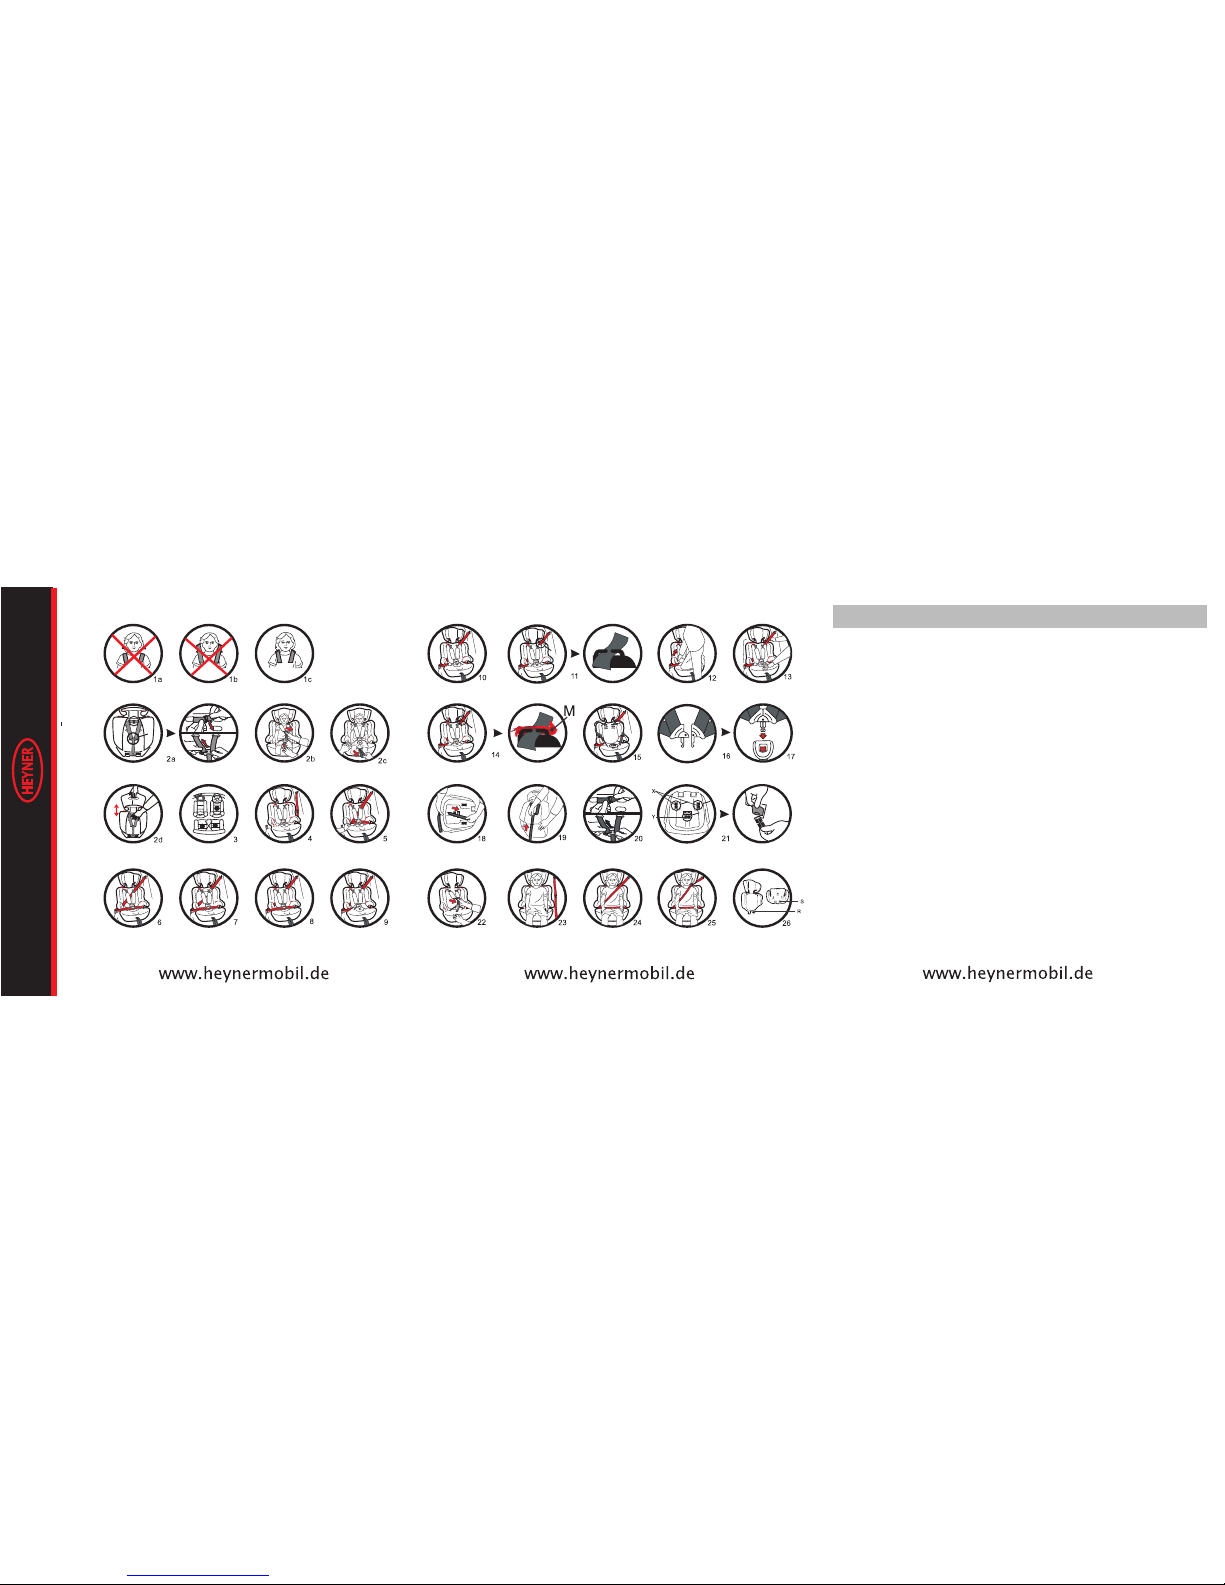
Con necti ng the ba ckres t to the bo oster s eat (fi g.26) (just i f non-a ssemb led)
If ba ckres t (B) and b ooste r (C) are d elive red in a no n-ass emble d way, plea se foll ow thes e
ins truct ions to c onnec t both to gethe r befor e using i t for chi ldren i n Group I , II & III:
Lay d own the b ooste r on the fl oor and t he back rest fl at righ t behin d. Then th read th e
con necti ng hook s (R) on th e botto m of the ba ckres t into th e fitti ng hole s (S) on th e back of
the b ooste r with a fi rm down wards m otion . Now bri ng the ba ckres t slowl y uprig ht 90° to t he
boo ster. The c onnec ting ho oks sho uld now s lip int o the fit ting ho les wit h an audi ble sou nd.
As a re sult th e backr est sho uld be we ll fixe d to the bo oster i n the upr ight po sitio n. It mus t not
sli p away no w. Other wise yo u may not h ave fix ed it ver y well an d using i t would b e
dan gerou s. In thi s case pl ease re peat th e first s teps of t his par t of the in struc tion.
1.2 . Adj ustin g Mul tiPro tect to yo ur chil d's siz e
1.2 .1. Pre parat ion (fi g.1a- c)
Mul tiPro tect has it s own bel t syste m (D), th e harne ss belt s, whic h needs t o be
adj usted t o your ch ild's s ize as fo llows :
Hey ner Ergo
Hey ner Erg o
Hey ner Ergo
Hey ner Erg o
Mul tiPro tect
Mul tiPro tect
1 2
EnglishEnglish
Pla ce on a norma l chair a nd set yo ur chil d in it. To ens ure
opt imum po sitio ning of t he belt s, make s ure tha t the sho ulder b elts (D 1) run do wn from j ust
abo ve the ch ild's s hould ers (fi g.1c) , not too h igh abo ve them ( fig.1 b) and no t too low
(fi g.1a) .
Don 't leav e your ch ild una ttend ed in the s eat!
1.2 .2. Hei ght and l ength a djust ment of t he shou lder be lts (fi g.2a- c)
Hei ght adj ustme nt of the s hould er belt s (D1):
Rel ease th e belt en ds from t he belt a nchor age (K) a t the bac k of the se at (fig .2a), r eleas e
the s hould er pad co nnect or (W), p ull all b elt end s out of th e slots ( J1 or J2 or J 3). Put t he
bel t ends th rough t he belt s lots (J 1 or J2 or J3 ) that ar e appro priat e to the ch ild's s ize.
Fin ally, thr ead the b elt end s back in to the be lt anch orage ( K) and sh oulde r pad
con necto r (W).
To rele ase the s hould er belt s (fig. 2b), pu sh the me tal bel t adjus ter (H) , hidde n by the
cov er, and pu ll both h arnes s belts s imult aneou sly for ward.
To shor ten the s hould er belt s (fig. 2c), ju st pull t he harn ess cen tral be lt (D3) . Do not bl ock
the s hould er belt s durin g pulli ng.
Att entio n: It is re comme nded to c heck th e belt po sitio n very re gular ly and to a djust i t to the
siz e of your g rowin g child . The belt s must li e firml y again st the ch ild's b ody and m ust not b e
twi sted.
1.2 .3. Adju sting t he head rest to t he chil d's siz e (fig. 2d)
In or der to ad just th e heigh t of the he adres t (A) to yo ur chil d's siz e, push t he seat d own on
the v ehicl es seat t o keep it t here. W ith the o ther ha nd pull t he head rest fo rcibl y up or dow n,
acc ordin g to the ch ild's s ize. The h eadre st need s to be fix ed in one o f the gui de slot s with an
Hey ner Erg o
Mul tiPro tect
Page 4

1. GR OUP I ( abo ut 9 to 1 8 kg Y)
1.1 . Using as a ch ild car s eat
You hav e purch ased car s eat for y our chi ld. We tha nk you fo r
you r trust . Pleas e note, t hat the o ptimu m safet y chara cteri stics c an only b e achie ved, if t he
sea t is used p roper ly acco rding t o instr uctio ns. Ther efore w e ask you t o ensur e the cor rect
ins talla tion of t he seat i n your ve hicle b y readi ng the op erati ng inst ructi ons car efull y. Please
kee p instr uctio ns alwa ys with t he seat f or furt her inf ormat ion.
Onl y to be ass emble d by adul ts!
Con necti ng the ba ckres t to the bo oster s eat (fi g.26) (just i f non-a ssemb led)
If ba ckres t (B) and b ooste r (C) are d elive red in a no n-ass emble d way, plea se foll ow thes e
ins truct ions to c onnec t both to gethe r befor e using i t for chi ldren i n Group I , II & III:
Lay d own the b ooste r on the fl oor and t he back rest fl at righ t behin d. Then th read th e
con necti ng hook s (R) on th e botto m of the ba ckres t into th e fitti ng hole s (S) on th e back of
the b ooste r with a fi rm down wards m otion . Now bri ng the ba ckres t slowl y uprig ht 90° to t he
boo ster. The c onnec ting ho oks sho uld now s lip int o the fit ting ho les wit h an audi ble sou nd.
As a re sult th e backr est sho uld be we ll fixe d to the bo oster i n the upr ight po sitio n. It mus t not
sli p away no w. Other wise yo u may not h ave fix ed it ver y well an d using i t would b e
dan gerou s. In thi s case pl ease re peat th e first s teps of t his par t of the in struc tion.
1.2 . Adj ustin g Mul tiPro tect to yo ur chil d's siz e
1.2 .1. Pre parat ion (fi g.1a- c)
Mul tiPro tect has it s own bel t syste m (D), th e harne ss belt s, whic h needs t o be
adj usted t o your ch ild's s ize as fo llows :
Hey ner Ergo
Hey ner Erg o
Hey ner Ergo
Hey ner Erg o
Mul tiPro tect
Mul tiPro tect
1 2
EnglishEnglish
Pla ce on a norma l chair a nd set yo ur chil d in it. To ens ure
opt imum po sitio ning of t he belt s, make s ure tha t the sho ulder b elts (D 1) run do wn from j ust
abo ve the ch ild's s hould ers (fi g.1c) , not too h igh abo ve them ( fig.1 b) and no t too low
(fi g.1a) .
Don 't leav e your ch ild una ttend ed in the s eat!
1.2 .2. Hei ght and l ength a djust ment of t he shou lder be lts (fi g.2a- c)
Hei ght adj ustme nt of the s hould er belt s (D1):
Rel ease th e belt en ds from t he belt a nchor age (K) a t the bac k of the se at (fig .2a), r eleas e
the s hould er pad co nnect or (W), p ull all b elt end s out of th e slots ( J1 or J2 or J 3). Put t he
bel t ends th rough t he belt s lots (J 1 or J2 or J3 ) that ar e appro priat e to the ch ild's s ize.
Fin ally, thr ead the b elt end s back in to the be lt anch orage ( K) and sh oulde r pad
con necto r (W).
To rele ase the s hould er belt s (fig. 2b), pu sh the me tal bel t adjus ter (H) , hidde n by the
cov er, and pu ll both h arnes s belts s imult aneou sly for ward.
To shor ten the s hould er belt s (fig. 2c), ju st pull t he harn ess cen tral be lt (D3) . Do not bl ock
the s hould er belt s durin g pulli ng.
Att entio n: It is re comme nded to c heck th e belt po sitio n very re gular ly and to a djust i t to the
siz e of your g rowin g child . The belt s must li e firml y again st the ch ild's b ody and m ust not b e
twi sted.
1.2 .3. Adju sting t he head rest to t he chil d's siz e (fig. 2d)
In or der to ad just th e heigh t of the he adres t (A) to yo ur chil d's siz e, push t he seat d own on
the v ehicl es seat t o keep it t here. W ith the o ther ha nd pull t he head rest fo rcibl y up or dow n,
acc ordin g to the ch ild's s ize. The h eadre st need s to be fix ed in one o f the gui de slot s with an
Hey ner Erg o
Mul tiPro tect
Page 5

3 4
EnglishEnglish
aud ible so und. Pl ease ch eck by pu lling o n the hea drest t o ensur e that th e headr est is fi xed in
the g uide sl ots fir mly. The mi ddle of t he head rest ne eds to be e xactl y at the he ight of t he
mid dle of th e child 's head t o have th e highe st side p rotec tion eff ect. Th e headr est is
adj ustab le in 9 diff erent p ositi ons.
1.3 . Insta lling int o your ca r
1.3 .1. Con ditio ns for in stall ation ( fig.3 )
Mul tiPro tect may be p laced o n all pas senge r seats o f the veh icle th at are
equ ipped w ith a thr ee-po int-v ehicl e-bel t. The chi ld seat m ust not b e posit ioned o n a vehic le
sea t, whic h only ha s a lap bel t, exam ple giv en the ce ntre ba ck seat o f cars wi th thre e seats i n
the b ack.
1.3 .2. Pla cing on t he vehi cle sea t (fig. 4)
Now p ut Mul tiPro tect onto t he car se at in dri ving di recti on.
1.3 .3. Ins talla tion an d fixin g (fig. 4-13)
The t hree- point -belt o f a vehic le is mad e of 4 part s: the la p belt (O ), the di agona l belt (N ), the
bel t latch ( P) and th e belt bu ckle (Q ).
Fig .4-5
Mak e sure M ultiP rotec t is h eld fir mly in pl ace, th read th e belt la tch (P) o f your
car ’s thre e-poi nt-ve hicle -belt f rom the r ear und er harn ess bel ts (D). T he lap be lt part (O)
nee ds to be ke pt unde r the sam e side’s f ixati on lugs (L).
Fig .6
Con tinue t o guide t he belt l atch (P ) towar ds the be lt buck le (Q) by k eepin g the lap b elt (O) t o
Hey ner Ergo
Hey ner Erg o
Hey ner Erg o
Hey ner Erg o
Mul tiPro tect
gui de over t he belt g uide (5 a nd 6) und er the si de's fi xatio n lugs (L ). Then gu ide the d iagon al
bel t (N) on th e belt gu ide (4 or 7 ) on the bo ttom co rner of t he back rest (B ). Now fa sten th e
thr ee-po int-v ehicl e-bel t as you wo uld do fo r an adul t, with a n audib le »cli ck« sou nd. Ple ase
do no t twist t he belt s durin g this pr ocedu re.
Fig .7-8
Rel ease th e backr est cov er butt on (V) at t he side w here th e diago nal bel t (N) com e throu gh.
Rel ease th e backr est cov er velc ros (T) , pull up b ackre st cove r and mov e the dia gonal b elt
(N) u nder th e cover. P ull dow n the bac krest c over, pr ess the b ackre st cove r butto n(V) an d
clo se the ve lcro (T ). Make s ure the d iagon al belt ( N) thro ugh the b elt gui de (4 or 7) . Pleas e
do no t twist t he belt s durin g this pr ocedu re.
Fig .9-10
Rel ease th e boost er cove r velcr os (U), p ull up bo oster c over an d move th e lap bel t (O) und er
the c over. Re turn to c lose th e boost er cove r and clo se velc ro (U). M ake sur e the lap b elt (O)
thr ough th e belt gu ide (5 an d 6). Ple ase do no t twist t he belt s durin g this pr ocedu re.
Fig .11
Gui de the di agona l belt (N ) throu gh the re d marke d belt gu ide hoo k (G) on th e top of
bac krest . Pleas e do not tw ist the b elts du ring th is proc edure .
Att entio n: The bel ts must n ot be twi sted or b locke d. The be lt anch orage ( K) must n ot be
blo cked ei ther. Pl ease re fer to th e scrib bles in c ase of an y doubt o r conta ct your d ealer,
imp orter o r manuf actur er.
1.3 .4. Tigh tenin g of the be lt (fig .12-1 4)
To tigh ten the t hree- point -vehi cle-b elt fir mly pre ss one of y our kne es on the c hild se at.
Tigh ten the b elt by pu lling f irst th e belt pa rt near t he belt b uckle ( Q)(fi g.12) . Then fi rmly pu ll
the d iagon al belt ( N) up til l the chi ld's se at is tig htene d to the ma ximum ( fig.1 3). Fin ally fi x
Page 6

5 6
EnglishEnglish
the d iagon al belt w ith the r ed belt c lip (M) b ehind t he belt h ooks( G)(fi g.14) . The tigh tenin g
mus t alway s be cond ucted i n the dir ectio n of the re tract ing mec hanis m. The bel ts must n ot
be tw isted .
Att entio n: Make s ure, M ultiP rotec t mu st be fix ed firm ly with t he car’ s three -
poi nt-ve hicle -belt .
1.4 . Secur ing the c hild in to (fi g.15, 1 6, 17)
Rel ease th e buckl e (F) and h arnes s belt (D ), hang t he shou lder be lt on the t op corn er of
bac krest ( B)(fi g.15) , set you r child d eep int o the sea t surfa ce of Mu ltiPr otect ,
so th at his po steri or is rig ht down i n the sea t reces s.
Joi n toget her the t wo buck le latc hes (E) o f the har ness be lt and pu sh them i nto the b elt
buc kle (F) u ntil an a udibl e »clic k« soun d is clea rly hea rd. Mak e sure th at the sh oulde r belts
lie f irmly a gains t the chi ld's bo dy and ar e not twi sted.
2. GR OUP I I + III (ab out 1 5 to 36 k g)
2.1 . Using Mul tiPro tect wit hout ha rness b elts
Fig .18-2 0
Rel ease th e harne ss cent ral bel t (D3) fr om the be lt end el ement ( I), pre ss the ad juste r (H)
and p ull the h arnes s centr al belt f rom the b elt adj uster (H)(f ig.18 ). Rele ase the b elt loo ps
fro m the met al belt a nchor age (K) o n the bac k of the se at, rel ease th e shoul der pad
con necto r (W). (f ig.20 )
Fig .21
Turn t he seat u pside d own. Pu ll the wa ist bel ts (D2) d own a lit tle bit a nd peel o ff the be lt
anc horag e of wais t belts ( X). Pul l the buc kle bel t (D4) do wn a litt le bit an d peel off t he belt
Hey ner Erg o
Hey ner Ergo
Hey ner Erg o
Hey ner Ergo
Mul tiPro tect
anc horag e of buck le belt ( Y).
Fig .22
Turn t he seat i nto sit ting po sitio n, fina lly pul l the har ness be lts fir mly up an d remov e it from
the s eat inc ludin g the bel t buckl e.
Fig .23
Now p lace M ultiP rotec t on to any pa sseng er car se at equi pped wi th a thre epoi nt-ve hicle -belt a nd set yo ur chil d into it .
Fig .24
Sec ure you r child i n it by fas tenin g the lap a nd diag onal be lts of th e three -poin t-veh icle- belts
and l ockin g it with a n audib le »cli ck« sou nd. The la p belt (O ) needs t o lead un der the f ixati on
lug s (L) on bo th side s. The dia gonal b elt (N) n eeds to l ead und er the fi xatio n lugs (L ) only on
the b elt buc kle (Q) s ide.
Fig .25
Thr ead the d iagon al belt t hroug h the bel t guide ( 1 or 10) at t he head rest an d tight en it in th e
dir ectio n of the re tract ing mec hanis m. Make s ure tha t the dia gonal b elt lie s firml y again st the
chi ld's bo dy and is n ot twis ted.
2.2 . Adj ustin g the hea drest t o your ch ild's s ize (fi g. 2d)
In or der to ad just th e heigh t of the he adres t (A) to yo ur chil d's siz e, push t he seat d own on
the v ehicl es seat t o keep it t here. W ith the o ther ha nd pull t he head rest fo rcibl y up or dow n,
acc ordin g to the ch ild's s ize. The h eadre st need s to be fix ed in one o f the gui de slot s with an
aud ible so und. Pl ease ch eck by pu lling o n the hea drest t o ensur e that th e headr est is fi xed in
the g uide sl ots fir mly. The mi ddle of t he head rest ne eds to be e xactl y at the he ight of t he
mid dle of th e child 's head t o have th e highe st side p rotec tion eff ect. Th e headr est is
adj ustab le in 9 diff erent p ositi ons.
Hey ner Erg o
Page 7

7 8
EnglishEnglish
Warn ing: Do n ot use wit hout ba ckres t (B). In t hat cas e, the
chi ld can no t get eno ugh sid e prote ction i n an acci dent.
Do no t faste n the bel ts in any o ther wa y than de scrib ed here , other wise th e child w ill not b e
hel d or secu red pro perly. Ma ke sure t hat the d iagon al belt i s caref ully po sitio ned and d oes
not r un too cl ose to th e child 's neck . All b elts mu st lie fi rmly ag ainst t he chil d's bod y witho ut
twi sting . If nece ssary, in stall a h eight a djust er mech anism i nto the c ar to cor respo nd to you r
chi ld's si ze.
3. Ca re instructions
To wash t he seat c over, re lease t he shou lder be lts, wa ist bel ts and bu ckle be lt firs t. Then yo u
can s imply p eel off al l cover s. After w ashin g and pul ling ov er the co vers ag ain mak e sure th e
sho ulder b elts, w aist be lts and b uckle b elt are p ositi oned co rrect ly agai n. The cov er can be
was hed at 85 ºF/30 ºC.
Att entio n: Plea se do not s pin. Do n ot dry in a d ryer. Wh en agai n cover ing
Mul tiPro tect make s ure, to f ix the sh oulde r belts f irmly c orrec t on the be lt anch orage
(K) a nd don’ t twist t he belt .
4. Im por tant not ice s
• Mu ltiPr otect chi ld seat i s appro ved in ac corda nce to th e Europ ean
Sta ndard f or chil d restr aint sy stems E CE R44/ 04. The te st symb ol as wel l as the pe rmit
num ber can b e found o n the ora nge lab el at the b ottom o f the sea t.
• Usi ng Mul tiPro tect for Gr oup II+ III, pl ease gu ide the l ap belt a s close a s
pos sible t o the lap o f your ch ild, an d keep th e lap bel t as tigh t as poss ible.
• This c hild se at can on ly be use d in vehi cles wi th thre e-poi nt-ve hicle -belt s, that a re
app roved b y the ECE r egula tion No .16 or ot her com parab le stan dards . It is str ictly
for bidde n to inst all thi s seat wi th the la p belt al one.
Hey ner Erg o
Hey ner
Erg o
Hey ner Erg o
Hey ner Erg o
Mul tiPro tect
• It is n ot allo wed to do a ny chan ges on th e seat or t he belt s.
• Eac h chang e of any pa rt of the s eat, wh ich is no t done by t he manu factu rer, wil l cause t he
exp irati on of the E CE- app roval a nd excl udes im media tely an y warra nties .
? Sh ould an y doubt s occur, c ontac t your su pplie r, deale r or
GMB H
• Afte r an acci dent, t he enti re chil d restr aint sy stem sh ould be r eplac ed or at le ast sen t to the
man ufact urer fo r inspe ction , toget her wit h the acc ident r eport . This ser vice co st will b e
cha rged.
• Alwa ys make s ure tha t the bel ts only r un alon g the tra cks cle arly ma rked by r ed mark s on
the c hild se at (gui delin e marki ngs).
• Loo se or han ging pa rts of th e seat sh ould no t be obst ructe d or rest raine d by othe r belts ,
bel t locks o r seats .
• Alwa ys secu re Mul tiPro tect chil d seat wi th the ve hicle 's adul t seat- belt,
eve n if no chi ld is sit ting in .
• The M ultiP rotec t ch ild res train t syste ms can be u sed for m any yea rs. It is
the refor e possi ble tha t some pa rts are s ubjec t to wear a nd tear f or exam ple, th e seat co ver
and h ave to be r eplac ed at som e point .
• Mak e sure th at all ha rd or pla stic pa rts are s tored a way and c an not be l ost.
• The ch ild sea t must ne ver be us ed with out its o rigin al cove r. Shoul d the sea t cover n eed to
Be re place d, only u se HEYN ER MOBI L AUTO MOTIV E GMBH se at cove rs.
• Alwa ys keep t he inst ructi on manu al toge ther wi th the ch ild sea t.
5. So me fi nal h int s:
• Do no t place h eavy ob jects o n the hat r ack. In c ase of an a ccide nt, the se coul d becom e
dan gerou s objec ts and ca n injur e you and y our chi ld.
• Lug gage an d other s imila r objec ts shou ld ther efore b e store d away pr operl y and be we ll
Fix ed.
• Mak e sure, t hat all p assen gers in y our veh icle ha ve thei r seat- belt fa stene d, as unf asten ed
HEY NER MOB IL AUTOMO TIVE
Hey ner Erg o
Hey ner Erg o
Page 8

Bedienungsanleitung
A Ko pfstü tze
B Rü ckenl ehne
C Sit zscha le „Boo ster“
D Gur tsyst em
D1 Schu lterg urte
D2 Hüft gurte
D3 Zent ralve rstel lgurt e
D4 Schr ittgu rte
E Sc hloss zunge n
F G urtsc hloss
G Rück enleh nen Gur tführ ungen
H Gur tvers telle r
I Gurt endst ück
J Sch ulter gurtd urchf ührun g
J3 für Ki nder bi s 3 Jahre
(Kin derge wicht c a. 14-1 8 kg)
J2 für Ki nder bi s 2 Jahre
(Kin derge wicht c a. 12-1 4 kg)
9 10
English
pas senge rs can be come a bi g dange r to chil dren in c ase of an a ccide nt.
• Allo w child ren bre aks dur ing lon g car jou rneys a nd make s ure, th ey don' t get out o f the car
alo ne with out sup ervis ion.
• Alwa ys use th e child s afety l ock sys tem, if a vaila ble in yo ur car, to m ake it im possi ble for
Chi ldren t o open th e vehic le door s from th e insid e.
• Nev er leav e your ch ild una ttend ed in or ou tside t he car.
1. Altersgruppe I (ab 9 bis 18 kg Y)
1.1. Verwendung des MultiProtect als ein Autokindersitz
1.2. Anpassung des MultiProtect an die Grösse Ihres Kindes
1.3. Einbau des MultiProtect in Ihr Auto
1.4. Sicherung des Kindes im MultiProtect
2. Altersgruppe II+III (ab 15 bis 36 kg)
2.1. Verwendung MultiProtect ohne Hosenträgergurtsystem
2.2. Anpassung der Kopfstütze
3. Pflegeanleitung
4. Sicherheitshinweise
5. Wichtige Tipps
Inhaltsverzeichnis
Heyner Ergo
Heyner Ergo
Heyner Ergo
Heyner Ergo
Heyner Ergo
J1 für Ki nder bi s 1.5 Jah re
(Kin derge wicht c a. 9-12 k g)
K Gu rtank er
L Halt enase n für Dre ipunk tgurt
M Gurtc lip
N Dia gonal gurte d es Auto- Dreip unktg urtes
O Beck engur te des Aut o-Dre ipunk tgurt es
P Sc hloss zunge d es Auto- Dreip unktg urtes
Q Gurt schlo ss des Aut o-Dre ipunk tgurt es
R Verb indun gshac ken
S Ver bindu ngslö cher
T R ücken lehne n Bezug Ve lcro
U Sit zscha le „Boo ster“ B ezug Vel cro
V Rü ckenl ehnen D ruckk nopf
W Sc hulte rgurt verbi ndung
X Hü ftgur tanke r
Y Sc hritt gurta nker
.....................................11
.......11
..12
..........................13
....................15
..................................16
....16
.............................................17
......................................................18
.................................................18
.......................................................19
Deutsch
Page 9

11 12
Deutsch Deutsch
1. Altersgruppe I (9 kg bis 18 kg Y)
1.1 . Verwen dung de s al s Aut okind ersit z
Sie h aben si ch zur Si cheru ng Ihre s Kinde s für den ent schie den.
Sei ne opti malen S icher heits eigen schaf ten kan n er nur zu r Wirku ng brin gen, we nn er
vor schri ftsmä ßig ver wende t wird. Ac hten Si e desha lb auf de n korre kten Ei nbau im Au to und
les en Sie da zu die
Bed ienun gsanl eitun g.
Die M ontag e darf nu r von Erw achse nen aus gefüh rt werd en!
Verb indun g der Rüc kenle hne mit d er Sitz erhöh ung (Ab b.26) (nur we nn sepa rat
gel iefer t)
Sol lten Rü ckenl ehne (B ) und Sit zerhö hung (C ) noch ni cht zus ammen monti ert sei n, nehm en
Sie b itte fo lgend en Zusa mmenb au vor, we nn Sie de n Sitz fü r ein Kin d inner halb
der G ruppe I , II & III be nutze n möcht en:
Leg en Sie di e Rücke nlehn e flach h inter d ie Sitz erhöh ung. Da nn führ en Sie di e beide n
Verb indun gshak en (R) am u ntere n Teil de r Rücke nlehn e von obe n in die vo rgese henen
Öffn ungen ( S) am hin teren Tei l der Sit zerhö hung ei n. Rich ten Sie n un die Rü ckenl ehne
vor sicht ig auf (9 0-Gra d-Win kel) un d lasse n die bei den Verb indun gshak en fest e inras ten.
Die R ücken lehne m uss in au frech ter Pos ition f est an de r Sitze rhöhu ng anli egen un d darf
nac h der Mon tage ni cht nac h hinte n wegki ppen, s onst li egt ein M ontag efehl er vor. In d iesem
Fal le wied erhol en Sie bi tte die h ier bes chrie benen
Sch ritte .
Hey ner Ergo
Hey ner Erg o
Mul tiPro tect
Mul tiPro tect
1.2 . Anp assen d es a n die Kin desgr öße
1.2 .1. Vorbe reitu ng (Abb .1a-c )
Der Mul tiPro tect besi tzt ein e igene s Gurts ystem ( D), des sen Verl auf Sie d er
Grö ße des Ki ndes an passe n müsse n:
Um ei nen opt imale n Gurtv erlau f zu gewä hrlei sten, m üssen d ie Schu lterg urte (D 1) je nac h
Grö ße des Ki ndes kn app übe r den Sch ulter n verla ufen (A bb.1c ), nich t zu hoch ( Abb.1 b)
und n icht zu t ief (Ab b.1a) .
Las sen Sie I hr Kind n ie unbe aufsi chtig t im Fahr zeug.
1.2 .2. Höh en- und L ängen anpas sung de r Schul tergu rte (Ab b.2a- c)
So ve rstel len sie d ie Schu lterg urte (D 1)(Ho sentr ägerg urte) i n ihrer H öhe:
Lös en Sie di e Gurte nden (G urtsc hlauf en) auf d er Rück seite d es Sitz es aus de m Gurta nker
(K) u nd zieh en Sie di e beide n Gurte nden du rch die S chult ergur tdurc hführ ungen ( J1, J2, J 3)
zur ück, un d lösen S ie die Sc hulte rgurt verbi ndung ( W). Je na ch Größ e des Kin des füh ren Sie
die G urten den in di e passe nden Sc hulte rgurt durch führu ngen (J 1, J2, J3 ) ein. Ans chlie ßend
fäd eln Sie d ie Gurt schla ufen wi eder in d en Gurt anker ( K) ein, u nd verb inden S ie die
Sch ulter gurtv erbin dung (W ) wiede r.
Verl änger n (Abb. 2b) kön nen Sie d ie Schu lterg urte (D 1), ind em Sie de n metal lenen
Gur tvers telle r (H) drü cken un d gleic hzeit ig die Ho sentr ägerg urte na ch vorn e ziehe n.
Verk ürzen ( Abb.2 c) könn en Sie di e Schul tergu rte (D1 ), inde m Sie nur a n der
Zen tralv erste llgur te (D3) z iehen . Die Sch ulter gurte d ürfen d abei ni cht fes tgekl emmt od er
ver dreht w erden .
Ach tung: B itte üb erprü fen Sie d en Gurt verla uf sehr r egelm äßig un d passe n ihn der n euen
Grö ße des Ki ndes an . Die Gur te müss en fest a m Körpe r des Kin des anl iegen
Hey ner Ergo
Hey ner Erg o
Mul tiPro tect
Page 10

13 14
Deutsch Deutsch
und d ürfen n icht ve rdreh t werde n.
1.2 .3. Anpa ssung d er Kopf stütz e an die Gr öße Ihr es Kind es (Abb .2d)
Zu Anp assun g der Höh e der Kop fstüt ze (A) an d ie Größ e Ihres K indes h alten S ie den
Kin dersi tz fest n ach unt en zum Aut ositz . Ziehe n Sie die K opfst ütze vo rsich tig nac h oben,
bzw. s chieb en nach u nten, u nd pass en Sie di ese an di e Größe I hres Ki ndes. D ie Kopf stütz e
mus s mitte ls den Fü hrung sripp en fixi ert wer den und d eutli ch hörb ar einr asten .
Verg ewiss ern Sie s ich, da ss der Di agona lgurt e xakt ve rläuf t, und ni cht zu na he am Hal s des
Kin des vor beifü hrt. All e Gurte m üssen s traff am K ind anl iegen u nd dürf en nich t verdr eht
sei n. Rich ten Sie e ventu elle Gu rthöh enver stell er im Fah rzeug a uf die Gr öße des K indes e in.
Die K öpfst ütze so llte de n Kopf au f ganze r Höhe um schli eßen. D iese Ko pfstü tze bie tet 9
ver schie dene Ver stell posit ionen .
1.3 . Einba u des im Aut okind ersit z
1.3 .1. Vorau ssetz ungen ( Abb.3 )
Der S itz kan n auf all en Beif ahrer - und Rüc ksitz en des Fa hrzeu gsver wende t werde n, die mi t
ein em Drei punkt gurt au sgest attet s ind. De r Sitz da rf alle rding s nicht a uf dem mi ttler en
Rüc ksitz n ur mit de m Becke ngurt b efest igt wer den!
1.3 .2. Pla tzier ung auf d em Fahr zeugs itz (Ab b.4)
Ste llen Si e nun den Mul tiPro tect auf de n Autosi tz in Fah rtric htung .
1.3 .3. Ins talla tion un d Befes tigun g auf dem Au tosit z (Abb. 4-13)
Der D reipu nktgu rt eine s Aut os best eht aus 4 Teil en: dem B ecken gurt (O ), dem Di agona lgurt
(N) , der Sch lossz unge (P ) und dem D reipu nktgu rtsch loss (Q ).
Hey ner Ergo
Hey ner Erg o
Mul tiPro tect
Abb .4-5
Dam it der korr ekt bef estig t wird, z iehen S ie die Sc hloss zunge
(P) v om Drei punkt gurt vo n oben un ter der H osent räger gurte ( D) durc h. Die Be ckeng urte (O )
mus s auf bei den Sei ten unt er der Ha ltena sen (L) e ntlan g gefüh rt werd en.
Abb .6
Fah ren Sie f ort mit d er Führ ung der S chlos szung e (P) in Ri chtun g des
Dre ipunk tguts chlos ses (Q) , währe nd Sie di e Becke ngurt e (O) ent lang de r Halte nasen ( L)
füh ren übe r die rot m arkie rten Gu rtfüh rung (5 u nd 6). Di e Diago nalgu rte (N) f ühren S ie
hin ter der Ar mlehn e in der un teren E cke der R ücken lehne ( B) bei de r rot mar kiert en
Gur tführ ung (4 od er 7) vor bei. Nu n schli eßen Si e den Dre ipunk tgurt w ie für ei nen
Erw achse nen mit e inem de utlic hen »Kl ick« im D reipu nktgu rtsch loss (Q ). Stel len Sie s icher,
das s das Gur tband d es Drei punkt gurte s weder v erdre ht ist no ch verk lemmt i st.
Abb .7-8
Lös en Sie de n Druck knopf ( V) am Bez ug der Rü ckenl ehne au f der Sei te, wo ob en die
Dia gonal gurte ( N) durc hgefü hrt wir d. Löse n Sie dan n von der R ücken lehne d ie beid en
Velc ro-Teil e (T), zi ehen Si e den Rüc kenle hnenb ezug ho ch und fü hren Si e die Dia gonal gurte
unt er dem Be zug dur ch. Zie hen Sie n un den Rü ckenl ehnen bezug h erunt er, drüc ken und
sch ließe n Sie den D ruckk nopf (V ) und sch ließe n Sie das Ve lcro (T ). Verge wisse rn Sie si ch,
das s der Dia gonal gurt (N ) durch d ie beid en Gurt führu ngen (4 o der 7) ge führt i st. Die G urte
dür fen nic ht verd reht we rden.
Abb .9-10
Vom Bo oster bezug l ösen Si e die bei den Velc ro-Teil e (U) und z iehen d en Bezu g nach ob en
und f ühren S ie die Be ckeng urte (O ) unter d em Bezu g durch . Legen S ie nun de n
Boo sterb ezug na ch unte n und sch ließe n Sie das Ve lcro (U ). Verge wisse rn Sie si ch, das s die
Bec kengu rte (O) d urch di e beide n Gurtf ührun gen (5 un d 6) gefü hrt ist . Die Gur te dürf en
Hey ner Erg oMul tiPro tect
Page 11

15 16
Deutsch Deutsch
nic ht verd reht we rden.
Abb .11
Die D iagon algur te (N) wi rd bei de r Rücke nlehn e (B) obe n durch d ie rot ma rkier ten
Gur tführ ungen ( G) gefü hrt. Di e Gurte d ürfen n icht ve rdreh t werde n.
Wich tig:
Ste llen Si e siche r, dass da s Gurtb and des D reipu nktgu rtes we der ver dreht n och ver klemm t
ist . Die Gur te des Gu rtank ers (K) d ürfen d abei ni cht fes tgekl emmt we rden. B itte fo lgen Si e
str ickt de n Zeich nunge n und Mon tageh inwei sen. So llten S ie Frag en habe n, wend en Sie si ch
an Ih ren Hän dler, de n Impor teur od er an den H erste ller.
1.3 .4. Str affen d er Drei punkt gurte ( Abb.1 2-14)
Str affen Si e den Dre ipunk tgurt d es Autos i ndem Si e sich mi t einem K nie unt en auf de n
Kin dersi tz stüt zen. Zi ehen Si e zunäc hst am Gu rt in der N ähe des D reipu nktgu rtsch losse s
(Q) (Abb. 12). Nu n ziehe n Sie den D reipu nktgu rt (N) st raff in Ri chtun g Aufrol lmech anism us
leg en Sie de n Diago nalgu rt in rot e Gurtk lemme ( M), wel che hin ter den G urtfü hrung en
(G) (Abb. 14) pos ition iert wi rd und kl emmen d ie Gurt e durch S chlie ßen der G urtkl emme fe st.
Ach ten Sie d arauf , dass di e Gurte n icht ve rdreh t sind.
Ach tung: S telle n Sie sic her, das s der Apra mo clas sico 1 mi t dem Dre ipunk tgurt f est im
Aut ositz v erank ert ist .
1.4 . Siche rn des Ki ndes im ( Abb.1 5-17)
Öffn en Sie da s Gurts chlos s (F) und d as Gurt syste m (D), le gen Sie d ie Schu lterg urte (D 1)
übe r den sei tlich en Schu lters chutz d er Rück enleh ne (B)( Abb.1 5). Nun s etzen S ie das Ki nd
tie f in die Si tzflä che des Mul tiPro tect , so da ss sich d as Gesä ß tief in d er
Sit zmuld e befin det.
Hey ner Ergo
Hey ner Erg o
Mul tiPro tect
Füg en Sie di e beide n Schlo sszun gen (E) d es Hose nträg ergur ts zusa mmen un d verbi nden
Sie d iese mi t dem Gur tschl oss (F) b is ein de utlic hes »Kl ick« zu h ören is t. Achte n Sie dar auf,
das s die Sch ulter gurte s traff am K ind anl iegen u nd nich t verdr eht sin d.
2. Gr upp e II + II I (vo n 15 bi s 36 kg )
2.1 . Verwen dung oh ne Hose nträg ergur t
Abb .18-2 0
Ent ferne n Sie das G urten dstüc k (I) vom d er Zent ralve rstel lgurt e (D3), d anach d rücke n Sie
den v erdec kten Gu rtver stell er (H) un d ziehe n Sie den G urt dur ch den Gu rtver stell er
(H) (Abb. 18). Lö sen Sie n un die Gu rtsch laufe n auf der R ückse ite des S itzes a us dem
Gur tanke r (K). So dann lö sen Sie d ie Schu lterg urt Verb indun g (W)(A bb.20 ).
Abb .21
Dre hen Sie d en Sitz u m. Zieh en Sie kr äftig a n der Hüf tgurt e (D2), d amit si ch der
Hüf tgurt anker ( X) aus de r Schal e löst un d fädel n Sie die G urte au s dem Gur tanke r. Die
gle iche Vor gehen sweis e gilt au ch für de n Schri ttgur tanke r (Y).
Abb .22
Dre hen Sie d en Sitz i n die Aufr echtp ositi on. Zie hen Sie d ie Hose nträg ergur te nach v orn aus
der R ücken lehne . Lösen S ie die Gu rtzun gen aus d em Gurt schlo ss um dab ei mit de m
kom plett en löse n des Hos enträ gergu rtsys tems zu b eginn en.
Abb .23
Nun s telle n Sie den A pramo C lassi co 1 auf de n Beifa hrer- o der Rüc ksitz , welch er mit ei nem
Dre ipunk tgurt a usger üstet i st und se tzen da s Kind hi nein.
Abb .24
Hey ner ErgoMul tiPro tect
Page 12

17
18
Deutsch Deutsch
Sic hern Si e das Kin d mit Bec ken- un d Diago nalgu rt des Dr eipun ktgur tes und s chlie ßen ihn
mit e inem de utlic hen »Kl ick«. Ac hten Si e darau f, dass S ie den Be ckeng urt (O) a uf beid en
Sei ten dur ch die Ha ltena sen (L) z iehen , den Dia gonal gurt (N ) nur auf d er Seit e unter d er
Hal tenas e (L) dur chfüh ren, we lche zu m Gurts chlos s (Q) füh rt.
Abb .25
Füh ren Sie d ie Diag onalg urte du rch die G urtfü hrung ( 1 oder 10 ) bei der K opfst ütze un d
zie hen die G urte st raff in Ri chtun g Aufrol lmech anism us. Acht en Sie da rauf, d ass der
Dia gonal gurt st raff am Ki nd anli egt und n icht ve rdreh t ist.
2.2 . Anp assun g der Kop fstüt ze an die G röße Ih res Kin des (Ab b.2d)
Zu Anp assun g der Höh e der Kop fstüt ze (A) an d ie Größ e Ihres K indes h alten S ie den
Kin dersi tz fest n ach unt en zum Aut ositz . Ziehe n Sie die K opfst ütze vo rsich tig nac h oben,
bzw. s chieb en nach u nten, u nd pass en Sie di ese an di e Größe I hres Ki ndes. D ie Kopf stütz e
mus s mitte ls den Fü hrung sripp en fixi ert wer den und d eutli ch hörb ar einr asten .
Verg ewiss ern Sie s ich, da ss der Di agona lgurt e xakt ve rläuf t, und ni cht zu na he am Hal s des
Kin des vor beifü hrt. All e Gurte m üssen s traff am K ind anl iegen u nd dürf en nich t verdr eht
sei n. Rich ten Sie e ventu elle Gu rthöh enver stell er im Fah rzeug a uf die Gr öße des K indes e in.
Die K öpfst ütze so llte de n Kopf au f ganze r Höhe um schli eßen. D iese Ko pfstü tze bie tet 9
ver schie dene Ver stell posit ionen .
Ach tung! Ve rwend en Sie de n Mult iProt ect nicht o hne die R ücken lehne
(B) . Andern falls b ietet d er Sitz k einen g enüge nd Schu tz bei ei nem
Sei tenau fpral lunfa ll.
Den B ecken gurt au f keine n Fall an ders fü hren, s onst ha t das Kin d nicht d en nöti gen Hal t.
Verg ewiss ern Sie s ich, da ss der Di agona lgurt e xakt ve rläuf t, und ni cht zu na he am Hal s des
Kin des vor beifü hrt. All e Gurte m üssen s traff am K ind anl iegen u nd dürf en nich t verdr eht
sei n. Rich ten Sie e ventu elle Gu rthöh enver stell er im Fah rzeug a uf die Gr öße des K indes e in.
Hey ner Erg o
3. Pf leg eanleitung
Zum Wa schen d es Sitz bezug es des lös en Sie zu nächs t die
Sch ulter gurte ( Hosen träge rgurt e) aus de m Gurta nker (K ) und zie hen die G urten den nac h
vor ne. Zie hen Sie n un die Be züge de r Sitzs chale s owie de r
Rüc kenle hne und K opfst ütze ei nfach n ach obe n ab. Der B ezug ka nn bei 30 G rad Cel sius
gew asche n werde n.
Ach tung: B itte ni cht sch leude rn. Nic ht im Troc kner tr ockne n. Achte n Sie bei m Bezie hen des
Apr amo cla ssico 1 w ieder a uf die ri chtig e Verank erung d er Schu lterg urte (D 1) im Gur tanke r
(K) u nd ihre n richt igen Ver lauf.
4. Si che rheitshinweise
• Der Au tokin dersi tz Mul tiPro tect ist na ch der eu ropäi schen N orm für
Kin derrü ckhal tesys teme EC E R44/0 4 zugel assen . Das Prü fzeic hen mit d er
Zul assun gsnum mer fin den Sie a m unter en Rand d es Sitz es auf de m orang efarb enen
Eti kett.
• Bei Ve rwend ung in de r Grupp e II + III ac hten Si e unbed ingt da rauf, d ass die B ecken gurte
so ti ef wie mö glich a ngele gt wird , damit d as Beck en rich tig geh alten w ird.
• Die ser Kin dersi tz ist nu r zur Ben utzun g in Fahr zeuge n geeig net, di e mit Dre ipunk tgurt en
aus gerüs tet sin d, die na ch der EC E-Reg elung N r.16 ode r ander en verg leich baren N ormen
gen ehmig t wurde n.
• Es is t unzul ässig , irgen dwelc he Ände runge n an Kind errüc khalt esyst emen vo rzune hmen.
• Die G urtbä nder de s Mult iProt ect müsse n straf f und ohn e Verdre hung
ang elegt w erden .
? Be i auftr etend en Schw ierig keite n wende n Sie sic h bitte a n den Verk äufer, I mport eur on an
HEY NER MOB IL AUTOMO TIVE GM BH.
• Nac h einem U nfall s ollte n Sie das g esamt e Kinde rrück halte syste m ern euern o der zur
Hey ner Erg o
Hey ner Erg o
Hey ner Erg o
Mul tiPro tect
Page 13

19
Deutsch Deutsch
Prü fung an d en Hers telle r sende n - zusam men mit e inem Un fallb erich t.
• Füh ren Sie d ie Gurt e immer n ur den ro ten Mar kieru ngen (Ve rlauf smark ierun g) entl ang.
• Acht en Sie da rauf, d ass Har t- und Pl astik teile d es Kind ersit zes so pl atzie rtwerd en, das s
sie w ähren d des täg liche n Gebra uchs ni cht ver loren g ehen od er zwis chen Tür en oder
Vers tellb aren Si tzen ei ngekl emmt we rden!
• Wenn S ie den M ultiP rotec t oh ne Kind i m Auto mit führe n, sich ern sie i hn
bit te mit de m Erwac hsene ngurt .
• Das K inder rückh altes ystem Mul tiPro tect kann ü ber vie le Jahr e verwe ndet
wer den. Da k ann es vo rkomm en, das s Gebra uchs- u nd Versc hleiß teile - z um Beis piel de r
Sit zbezu g - erneu ert wer den müs sen.
• Der K inder sitz da rf niem als ohn e Origi nal-S toffbe zug ben ützt we rden.
• Sol lte der S toffbe zug aus gewec hselt w erden , dürfe n Sie nur O rigin al-St offbe züge de r
Fir ma HEYN ER MOBI L AUTO MOTIV E GMBH ve rwend en.
• Füh ren Sie d ie Bedi enung sanle itung s tets mi t dem Auto kinde rsitz m it.
5. Un d noc h ein p aar T ipp s zum S chl uss :
• Leg en Sie ke ine sch weren G egens tände a uf die Hu tabla ge - sie kö nnen be i einem U nfall z u
gef ährli chen Ge schos sen wer den und I hr Kind v erlet zen. De shalb s icher n Sie Gep äck und
and ere Geg enstä nde aus reich end.
• Acht en Sie da rauf, d ass all e Insas sen Ihr es Pkw an gegur tet sin d. Nich tange gurte te
Per sonen i m Fahrz eug kön nen bei m Unfal l eine gr oße Gef ahr für d as Kind d arste llen.
• Gön nen Sie I hrem Ki nd bei lä ngere n Fahrt en Paus en und ac hten Si e darau f, dass e s nicht
zur F ahrba hn hin un beauf sicht igt aus d em Fahr zeug st eigt.
• Fal ls vorh anden b enutz en Sie im mer die K inder siche rung in d en Pkw- Türen , die das
Öffn en der Tü r von inn en unmö glich m acht.
• Las sen Sie i hr Kind n ie unbe aufsi chtig t im Fahr zeug.
Hey ner Erg o
Hey ner Erg o
Содержание
2.
3.
4.
Использование для детей Группы I (прибл. 9 - 18 кг.)
1. Подготовка автокресла к эксплуатации
Регулировка автокресла в соответствии с ростом реб¸нка
Установка автокресла в автомобиль
Фиксация ребенка в автокресле
Использование для детей Группы II + III (прибл. 15 - 36 êã.)
1. Использование автокресла без встроенных ремней
2. Регулировка автокресла в соответствии с ростом ребенка
Ñоветы по уходу
Важные замечания
Усло вны е обознач ени я
A Подг оловни к
B С пинк а автокр есла
C По душка а втокр есла
D Рем ни безо пасно сти авто кресл а
D1 Плеч евые ля мки рем ня безоп аснос ти
D2 Боко вые лям ки ремн я безопа сност и
D3 Лямк а натяж ения ре мня безо пасно сти
D4 Цент ральн ая лямк а ремня б езопа сност и
E Я зычки з амка р емня без опасн ости
F Пряж ка замк а ремн я безопа сност и
G Пле чевые н аправл яющие ш татно го ремня
H Кн опка р егулир овки на тяжен ия ремн я
I Св ободн ый коне ц лямки н атяжен ия ремн я
J П азы 5-т и точечн ого рем ня:
J3 Ребенок д о прибл. 3 -х лет
(вес : от 15 до 18 к г.)
J2 Ребенок д о прибл. 2 -х лет
(âåñ : îò 12 äî 14 ê ã.)
J1 Ребен ок до при бл. 1,5 ëåò
(âåñ : îò 9 äî 12 êã.)
K Це нтрал ьный де ржател ь ремня ( анкер )
L Подл окотн ики авто кресл а
M Фикса тор рем ня безоп аснос ти
N Диа гонал ьная ча сть штат ного ре мня
безоп аснос ти авто мобил я
O Пояс ная час ть ремн я безопа сност и а/м
P Яз ычок шт атного р емня бе зопасн ости а/ м
Q Замо к штатн ого ремн я безопа сност и а/м
R Кре пежны е элеме нты спи нки
S Со едини тельны е отверс тия под ушки
T Л ипучк и крепл ения об ивки сп инки
U Лип учки кр еплен ия обив ки поду шки
V Кн опки кр еплен ия обив ки спин ки
W За стежк а лямок п лечев ых накл адок
X Де ржател и боков ых лямо к ремня
безоп аснос ти
Y Де ржател ь центр ально й части р емня
безоп аснос ти
Русский
20
Ñòð . 21
Ñòð . 22
Ñòð . 24
Ñòð . 25
Ñòð . 26
Ñòð . 27
Ñòð . 28
Ñòð . 28
Page 14

Èñï îëü çîâà íèå ä ëÿ äå òåé Ãð óïï û I
( 9 - 18 êã.)
1. По дготов ка авток ресла к э ксплуа тации
Благ одари м Вас за по купку д етског о автокр есла HE YNER. А втокр есло Ki ds Mult iProt ect
Erg o соотве тствует с амым вы соким с танда ртам без опасн ости с обя затель ным
тест ирова нием по с танда рту ECE -R 44/0 4. Макс ималь ная защ ита и ком форт буд ут
обес печен ы только в с лучае п равил ьной ус танов ки и эксп луатац ии авто кресл а.
Пожа луйст а, вним ательн о прочт ите данн ую инст рукци ю перед н астро йкой и
уста новко й авток ресла в а втомоб иль.
Уста новка до лжна пр оизво дитьс я только в зрослы ми!
При соеди нение с пинки к п одушк е сиден ья (Рис. 2 6)
(ес ли они бы ли поста влены от дельн о)
Åñëè ñ ïèíê à (B) и поду шка си денья ( С) ещ¸ не с оедин ены, то сд елайте э то следу ющим
обр азом:
- поло жите сп инку за п одушк у сиден ья;
- сов мести те крепе жные эл емент ы (R), ра сполож енные в н ижней ч асти сп инки, с
отве рстия ми (S) за дней ча сти под ушки си денья ;
- сил ьно наж мите на кр епежн ые элем енты до п олного с цепле ния спи нки с поду шкой;
- удер живая п одушк у, осторож но подн имите с пинку д о вертик альн ого поло жения .
Спи нка дол жна дер жаться в ертик ально и б ыть про чно сцеп леной с п одушк ой сиде нья
таки м образ ом, что бы посл е сборк и спинк а не опро кидыв алась н азад. Ес ли спин ка не
заф иксир ована , значит п ри сбор ке прои зошла о шибк а. Пожал уйста , повтор ите сбо рку.
- д ля ус танов ки в строе нных 5-ти точечн ых р емней безо пасно сти ( D) п ротяни те ля мки
рем ней и лямки плеч евых накл адок чере з пазы (J) в спинк е кресл а.
- заце пите лям ки ремне й за металл ическ ий анкер (K ). Лямки п лечевы х наклад ок сцепи те
ïðè áë.
21
22
РускийРусский
межд у соб ой заст ежкой (W) .
2. Ре гулиро вка авт окрес ла в соотв етстви и с росто м
ðåá ¸íêà
2.1 . Регули ровка д лины и вы соты рем ней без опасн ости (Ри с. 1а-с , 2а-с)
Авто кресл о HEYNE R Multi Prote ct Ergo о снаще но встр оенны ми 5-ти т очечны ми
рем нями без опасн ости (D ), испол ьзуем ыми при э ксплу атации а втокр есла дл я детей I
груп пы (при мерно о т 9 äî 18 êã.).
Пос тавьте авт окрес ло на ров ную пов ерхно сть и пос адите в н его реб¸ нка. Д ля
обес печен ия прав ильно го распо ложен ия ремн ей убед итесь в то м, что ре мни (D)
нахо дятся н а уровн е плеч реб енка (Р ис. 1c) - í å âûøå (Ð èñ. 1a) è í å íèæå (Ð èñ. 1b) .
Изм енить в ысоту п лечевы х ремне й безопа сност и (D) мож но след ующим об разом .
Осво бодит е петли ре мней из а нкера ( K), нах одящег ося за сп инкой с идень я и
полн остью в ытащи те ремн и через па зы плеч евых ре мней (J ). Разъед ините к онцы
лям ок плече вых нак ладок и п олнос тью выт ащите ля мки. По мести те конц ы ремне й и
лям ок плече вых нак ладок в с оответ ствую щие рос ту ребен ка паз ы для ремн я (J1 èëè J 2
èëè J 3).
Íàòÿ íèòå ïåò ëè ðåìí åé íà àíê åð (K). С оедин ите лям ки плече вых нак ладок м ежду
соб ой заст ежкой ( W).
Осл абить ( Рис. 2 b) вс троен ные рем ни безо пасно сти (D) ì îæíî, åñ ëè íàæà òü íà
мета лличе скую кн опку (H ), кото рая нах одится в о тверст ии обив ки поду шки сид енья под
тка невым я зычко м, и потя нуть на с ебя плеч евые ля мки ремн ей безо пасно сти.
Вни мание: н е тянит е за плеч евые на кладк и.
Page 15

23
24
Русский
Русский
Зат януть ( Рис. 2 c) в строе нные ре мни безо пасно сти (D) ì îæíî, å ñëè ïîòÿ íóòü çà
своб одный к онец ре мня (I) .
Пожа луйст а, регу лярно п роверя йте пол ожени е ремне й и регули руйте и х в
соот ветств ии с рост ом реб¸ нка. С ледите з а тем, чт обы рем ни безоп аснос ти не был и
пер екруче ны и плот но прил егали к т елу реб¸ нка.
2.2 . Регули ровка п одголо вника п о высоте ( Рис. 2d )
Одн ой руко й удержи вайте с пинку с идень я. Друго й рукой п отяни те за плас тико вый
язы чок заж има, на ходяще гося в ни жней за дней ча сти подг оловни ка. Удер живая
язы чок, пе ремес тите под головн ик на выс оту, с оответс твующ ую рост у Вашег о ребенк а
(гол ова в цен тре подг оловн ика), д о ч¸тко у слыша нного ще лчка. П ровер ьте подг оловн ик долже н быть за фикси рован в о дном из 9 -ти возм ожных п оложе ний.
3. Уст ановк а авток ресла в ав томоби ль
(Ðè ñ. 3)
Сид енье мож ет быть у станов лено на в се пасс ажирс кие сид енья авт омоби ля,
обо рудова нные шта тным 3- х точечн ым ремн ем безоп аснос ти.
Штат ный 3-х т очечны й ремен ь автомо биля со стоит и з 4 часте й: пояс ная час ть (О),
груд ная (ди агонал ьная) ч асть (N ), языч ок замк а (P), з амок (Q ).
(Ðè ñ. 4)
Устан овите а втокре сло на с идень е автомо биля в на правл ении дв ижени я.
Убед итесь в то м, что ав токрес ло усто йчиво с тоит на а втомоб ильно м сиден ье: спи нка
авто кресл а плотн о прижат а к спинк е автом обиль ного сид енья, а втокр есло не
рас качива ется.
(Ðè ñ. 5)
Возь мите шт атный р емень бе зопас ности В ашего ав то за язы чок (P) , протян ите его п о
вне шней сто роне ав токре сла под ре мнями е го безоп аснос ти (D). П оясна я часть
штат ного ре мня авто мобил я должн а пройт и под подл окотн иком ав токрес ла (L).
(Ðè ñ. 6-8)
Прод олжай те вести ш татны й ремен ь безопа сност и в напра влени и его замк а (Q).
Поя сная ча сть (O) д олжна пр ойти че рез втор ую напр авляю щую (L) , распол оженн ую под
втор ым подл окотн иком авт окрес ла. Диа гонал ьная ча сть (N) д олжна пр ойти по н ижней
час ти спин ки авток ресла ( B) и выйт и к замку ( Q) в пром ежутк е между п одлок отник ом и
спи нкой. В ставьте я зычок з амка (P ) в замок ( Q). Зам ок защел кнут ес ли Вы усл ышали
отче тливый « щелчок ». Пожа луйст а, не пер екручи вайте р емень .
В мес те выход а диагон ально й части ш татно го ремня б езопа сност и к его замк у
отсо едини те кноп ку (V) и ли пучку ( T), фик сирую щие оби вку спи нки авто кресл а.
Отве дите об ивку сп инки ав токрес ла. Пом естит е диаго нальн ую част ь штатно го ремн я
(N) п од обивк у. Опусти те обив ку и зафи ксиру йте ее бо ковой к нопко й (V) и лип учкой ( Т).
Убед итесь, ч то диаг ональ ная час ть ремн я (N) про ходит ст рого по н аправл яющим ( 4 или
7). П ожалуй ста, не п ерекр учива йте рем ень.
(Ðè ñ. 8-9)
Подн имите о бивку п одушк и автокр есла, п редва ритель но отсое динив л ипучк у (U) и
про пустит е поясн ую част ь (O) шта тного ре мня под н ей. Опу стите об ивку по душки
авто кресл а. Убеди тесь, ч то пояс ная час ть ремн я (O) прох одит ст рого по
нап равляю щим (5 ил и 6). Пож алуйс та, не пе рекру чивайт е ремен ь.
(Ðè ñ. 11)
Про пустит е верхн юю облас ть диаг ональ ной час ти ремн я (N) чер ез специ альну ю
нап равляю щую (G) , распо ложен ную над с пинко й авток ресла и о бознач енную к расны м
цвет ом. Пожа луйст а, не пер екруч ивайт е ремен ь.
Page 16

25
26
Русский
Русский
Вни мание: Р емни не д олжны бы ть пере круче ны или за жаты. Як орь 5- ти точечн ого
рем ня авток ресла ( K) долж ен остав аться с вободн ым. При в озник новен ии вопро сов,
пожа луйст а, свяж итесь с о фициа льным п редста вителе м HEYNE R.
(Ðè ñ. 12-1 4)
Натя жение р емня
Пос ле устан овки ав токре сла и его фи ксаци и, для на тяжен ия штатн ого 3-х т очечно го
рем ня безоп аснос ти пост авьте сво е колен о на подуш ку авто кресл а и прида вите
авто кресл о к штатн ому авто мобил ьному с идень ю. Для то го, что бы затян уть рем ень,
снач ала пот яните з а поясн ую част ь штатно го ремн я (Q) (ри с. 12). Д алее пот яните з а
диа гональ ную его ч асть (N ). Авток ресло д олжно б ыть пло тно при жато к
авто мобил ьному с идень ю штатн ым ремн ем безоп аснос ти. Заф иксир уйте
диа гональ ную час ть штат ного рем ня крас ным фик сатор ом (M) за в ерхней
нап равляю щей (G) ( рис. 14 ). Натя жение ш татног о ремня вс егда пр оизвод ите в
нап равлен ии меха низма е го натяж ения. П ожалу йста, не п ерекр учива йте рем ень.
Вни мание: У бедите сь в том, ч то авток ресло н адежн о зафик сиров ано шта тным 3- х
точеч ным рем нем без опасн ости.
Раск ройте з амок (F ) 5-ти точ ечных р емней а втокре сла (D) . Повес ьте плече вые лям ки
рем ней авто кресл а на спин ку (B) (р ис. 15) . Усадит е ребенк а в авток ресло . Убедит есь,
что сп ина реб енка пл отно пр ижата к с пинке а втокре сла.
Совм естит е оба язы чка (E) 5 -ти точ ечных ре мней без опасн ости ав токре сла и вста вьте
их в за мок рем ней (F) . Замок з ащелкн ут, если Вы у слышал и отчетл ивый «щ елчок» .
Убед итесь в то м, что пл ечевые р емни пл отно пр илега ют к плеча м и груди ре бенка и н е
пер екруче ны.
4. Фи ксаци я ребен ка в авток ресле
(Ðè ñ.15, 1 6, 17)
Èñï îëü çîâà íèå ä ëÿ äå òåé Ãð óïï û II + II I
( 15 - 36 ê ã.)
1. Ис пользо вание а втокре сла без в строе нных рем ней
ïðè áë.
(Ðè ñ.18- 19)
При п еревоз ке дете й группы I I и III вст роенн ые 5-ти т очечны е ремни б езопас ности
авто мобил я не испо льзуют ся. Ребе нок фик сирует ся штатн ым 3-х точ ечным р емнем
безо пасно сти авто мобил я.
Для то го, что бы снят ь 5-ти точ ечные р емни, в ытяни те свобо дный ко нец рем ня (I) из
натя жного п риспо соблен ия (H), н ажав на м еталли ческ ую кноп ку и потян ув за рем ень
под по душко й сиден ья.
(Ðè ñ. 20)
Отс оедини те лямк и 5-ти точ ечного р емня ав токре сла от анк ера (K ), расце пите за стежк у
(W) л ямок пл ечевых н аклад ок.
(Ðè ñ. 21)
Пер еверни те авто кресл о подушк ой . В ытяни те боко вые лям ки ремн я
безо пасно сти (D2 ) и высво бодите и х из держ ателей ( X). Таки м же обра зом высв ободи те
из де ржателе й (Y) цен траль ную лям ку ремн я (D3).
(Ðè ñ. 22)
Пер еверни те авто кресл о в норма льное п оложен ие, выт ащите в се лямк и ремня
безо пасно сти из отв ерсти й в кресл е и сними те ремн и вмест е с пряжко й.
ââåð õ
Page 17

27
28
Русский
Русский
(Ðè ñ.23)
Пом естите а втокр есло на л юбое па ссажи рское с идень е, обор удован ное шта тным 3- х
точеч ным рем нем без опасн ости, и п осади те в него ре бенка .
(Ðè ñ.24)
При стегни те Ваше го ребен ка (ка к Вы обыч но прис тегив аете себя ).
При эт ом пояс ная час ть ремн я (O) дол жна обяз ательн о проход ить под о боими
подл окотн икам и (L) авто кресл а. Диаг ональ ная час ть (N) пр оводит ся под
подл окотн иком то лько со с торон ы замка р емня (Q ).
(Ðè ñ.25)
Прот яните д иагон альну ю часть р емня че рез соот ветств ующую б окову ю напра вляющу ю
(1 ил и 10), отм еченн ую крас ным цвет ом. Затя ните ре мень.
Убед итесь, ч то реме нь плот но прил егает к тел у ребен ка и не пер екруч ен.
2. Ре гулиро вка авт окрес ла в соотв етстви и с росто м ребенк а (Рис. 2 d)
Отр егулир уйте под голов ник (A) в с оответ ствии с р остом ре бенка ( голов а в центре
подг оловн ика). Д ля этого о дной рук ой удер живай те спин ку сиде нья. Дру гой рук ой
потя ните за п ласти ковый я зычок з ажима , наход ящийся в н ижней з адней ч асти
подг оловн ика. Уде рживая я зычок , перем естит е подгол овник н а высот у,
соот ветств ующую р осту Ва шего ре бенка , до ч¸тк о услыш анног о щелчка . Прове рьте подг оловн ик долже н быть за фикси рован . Подгол овник ф иксир уется в 9- ти разл ичных
поло жения х.
Вни мание: Н икогд а не испол ьзуйт е автокр есло бе з спинк и (B). В это м случа е ребен ок
не буд ет должн ым образ ом защи щен!
Фик сируй те авток ресло и р ебенк а тольк о описа нным вы ше спос обом. Уб едите сь, что
диа гональ ная час ть ремн я безопа сност и прохо дит по пл ечу, а не по шее р ебенк а. Все
рем ни должн ы плотн о приле гать к телу р ебенк а и не пере кручи ватьс я. Если
кон струк цией Ва шего авт омоби ля преду смотр ен механ изм рег улиро вки выс оты
штат ного ре мня, отр егули руйте ег о.
Сов еты п о уходу
Оби вка авто кресл а легк о снима ется и сти рается п ри темп ератур е 30 С.
Для то го, что бы снят ь обивк у, отсоеди ните ре мни безо пасно сти, от стегн ите кноп ки и
лип учки. П осле это го прос то сними те обив ку сиде нья и спи нки.
Вни мание: Р екоме ндова н бережн ый отжи м, не суш ите в цен трифу ге!
Пос ле сбор ки авток ресла у бедите сь в том, ч то обши вка и рем ни прав ильно
уста новле ны и наде жно зак репле ны.
Важные замечания
Авто кресл о HEYNE R Multi Prote ct прот естир овано и од обрен о в соотв етстви и с
Евр опейс ким Стан дарто м ECE-R 4 4/04 и Рос сийск ими ста ндарта ми РСТ.
Авто кресл о может бы ть испо льзов ано толь ко в авто мобил ях, обо рудова нных 3- х
точеч ными ре мнями б езопа сност и, одобр енным и полож ением Е СЕ ¹ 16 или д ругими
ана логич ными ст андарт ами.
Зап рещает ся испол ьзова ть авток ресло т олько с п оясны м ремне м безопа сност и.
Реб¸ нок долж ен быть в сегда пр ист¸г нут. Всегд а следи те за тем, ч тобы ре мни
прох одили т олько че рез нап равля ющие, о бознач енные к расны м цветом .
Авто кресл о должн о быть вс егда заф иксир овано , даже ес ли ребен ок в нем не
нахо дится .
Page 18

29
30
Русский
Русский
Детс кое авто кресл о HEYNE R Multi Prote ct може т исполь зоват ься в тече ние мно гих лет.
Поэт ому воз можно , что нек оторые ч асти си денья м огут из нашив аться, н априм ер,
оби вка сид енья, и и х прид¸ тся в опр еделен ный мом ент зам енить .
Ник огда не ис польз уйте дет ское авт окрес ло без ор игина льной о бивки . В случа е
нео бходимо сти зам ены оби вки, ис польз уйте тол ько оби вку HEY NER.
Все гда хран ите рук оводст во вмес те с детск им авток ресло м.
Пос ле ДТП авт окрес ло долж но быть з амене но на нов ое, или , по край ней мер е,
отпр авлен о произ водител ю для
обсл едова ния.
Зап рещает ся внос ить как ие-ли бо изме нения в к онстр укцию а втокр есла. Лю бое
изм енени е прекр ащает де йстви е станд артов EC E-R и РСТ. Гара нтийн ое обсл ужива ние
не пр оизвод ится.
Нек оторые д ополн итель ные сове ты
Не кл адите т яжелые п редмет ы на торп еду и на зад нюю пол ку. При дви жении н а
выс окой ск орост и они мог ут пред ставля ть опас ность и п орани ть Вас и Ва шего реб енка .
Бага ж и други е подоб ные пред меты дол жны быт ь помещ ены в бага жник ил и над¸ж но
зак репле ны в сало не.
Убед итесь, ч то все па ссажи ры в Ваше м автомо биле пр ист¸г нуты ре мнями
безо пасно сти, по сколь ку непр истег нутый ч еловек м ожет пре дставл ять бол ьшую
вмес те с детал ьной ин форма цией о пр оисше ствии
За до полнит ельной и нформ ацией о браща йтесь к п редст авител ю HEYNE R èëè â
HEY NER MOB IL AUTOMO TIVE GM BH.
опа сност ь для Ваш его ребе нка при Д ТП.
Во вр емя дли тельны х автомо бильн ых путе шеств ий делай те оста новки и с ледите з а
тем, ч тобы ва ши дети н е выходи ли из авто мобил я на доро гу без пр исмотр а.
Есл и предус мотре но конс трукц ией авто мобил я, всегд а пользу йтесь ф ункци ей
блок ировк и дверн ых замк ов, что бы дети не м огли отк рыть дв ери авто мобил я изнут ри.
Ник огда не ос тавляй те Ваше го ребен ка без пр исмот ра в автом обиле .
 Loading...