

H-GERMANY.DE
Germany
HEYNER
®
C
a
p
s
u
l
a
3
D
-
P
r
o
t
e
c
t
i
o
n
BT
A
A1
FG
SG
A2
B
G
G1
G2
C
D
K
IR
SF
HEYNER MOBIL AUTOMOTIVE GMBH
Kurzer Weg 1-5, D-15859 Storkow
MultiFix TWIST
Bedienanleitung
phone: +49 (0) 33678 687 72
fax: +49 (0) 33678 610 44
info@h-germany.de
Alter: Geburt bis ca. 4 Jahre
Kindergewicht: Geburt bis 18 kg
Körpergröße: 40 cm - 105 cm
H
DT
E
GV
PG
AT
S
SA
IA
IK
IT
IM
IH
U
V
W
X
G3
G4
G5
IA
Premium Qualitäts-Kindersitze Premium Qualitäts-Kindersitze
click
press
Press
Pull
H-GERMANY.DE
CHECK
L+R
CHECK
Verwendungsart Installation Körpergröße des
Kindes
Rückwärtsgerichter
Modus
Vorwär tsgerichter
Modus
<18 kg
40cm - 105cm
9-18 kg
83cm-105cm
WICHTIG: Bitte bewahren Sie diese
Bedienanleitung immer zusammen mit
dem Sitz auf.
Referenzalter
ab der Gebur t
bis 4 Jahre
ab ca. 1 Jahr bis
4 Jahre
HEYNER® MultiFix TWIST
Alter : von Gebur t - ca. 4 Jahre, K indergew icht: Geb urt bis 18 kg, K örpergr öße: 40 cm - 105 c m
Bedienanleitung
Instruction Manual GB
Инструкция по обслуживанию
RUS
Guide d’utilisation F
Sahipleri kılavuzu
Návod na obsluhu
Instrukcja obsługi PL
Üzemeltetési utasítások
Bruksanvisningen NO
1. Sicherheitshinweise .......................................................................................................................................................................S. 11
2. Platzierung im Fahrzeug. .............................................................................................................................................................S. 13
3. Verwendungsmöglichkeiten des HEYNER® MultiFix TWIST .......................................................................................S. 14
4. Installation .........................................................................................................................................................................................S. 15
4.1.
Einba u des HEYNER M ultiFix TW IST in das Fahrzeug
4.2.
Platzierung auf dem Fahrzeugsitz
4.3.
Höhen anpassung d er Kopfstü tze (A) und der S chulterg urte an die Gr öße Ihres K indes
4.4.
Ansc hnallen de s Kindes
4.5.
Sitz- u nd Liegepo sitionen de s Kindes
4.6.
Drehfunktion
4.7.
Ausbauen des Kindersitzes
5.
Pfl ege und Reini gung
5.1.
Abziehen des Bezuges ................................................................................................................................................................
5.2.
Wiederanbringen des Bezuges
5.3.
Verhalten nach einem Unfall
5.4.
Produktinformation .....................................................................................................................................................................
5.5.
Entsorgung
6.
Und noc h ein paar Tipp s zum Schlus s:
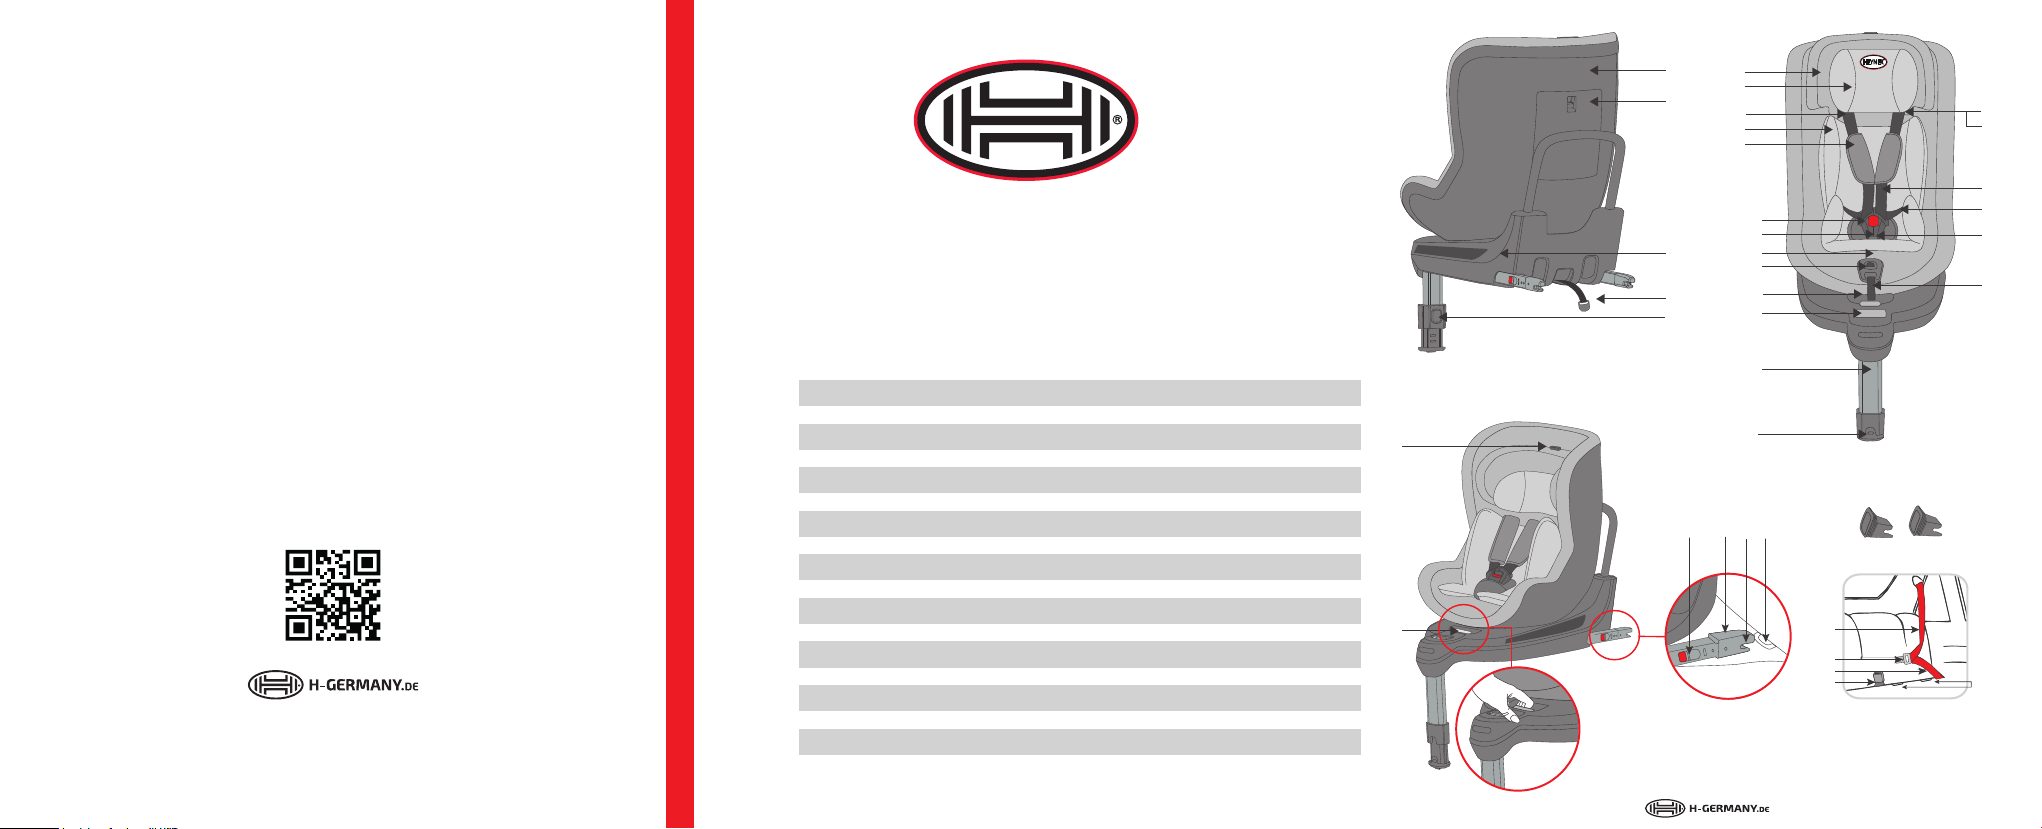
A - Kopfs tütze
A1 - Kopfk issen
A2 - Reduzierkissen
B - Schulterpolster
BT - Basis teil
C - Schlosszungen
D - Gurts chloss
DT - Drehta ste
E - Sit zbezug
FG - Fach Gebrauchsanweisung
G - 5-Punk t-Gurts ystem
G1 - Schultergurtdurchführung
G2 - Hose nträgerg urte
G3 - Hüf tgurt
G4 - Schrit tgurt
.....................................................................................................................................................................................S. 18
.....................................................................................................................................................................S. 19
.........................................................................................................................................................................................S. 20
..........................................................................................................................................S. 15
..............................................................................................................................................................S. 17
....................................................................................................................................S. 18
........................................................................................................................................................S. 19
.................................................................................................................................................S. 20
......................................................................................................................................................S. 20
...................................................................................................................................S. 21
G5 - Zentralverstellgurt
GV - Gurtversteller
H - V erstellh ebel Kopfs tütze
PG - Posit ionsgri
K - Installationsaufkleber
SG - Schulterpolstergurte
U - Diagonal gurt des
Auto- Dreipunktgur tes
V - Schlo sszunge de s
Auto- Dreipunktgur tes
W - Bec kengurt d es
Auto- Dreipunktgur tes
X - Gurt schloss de s
Auto- Dreipunktgur tes
....................................................................................................S. 15
...............................S. 16
S. 19
S. 20
AT - ISOFIX-Arretierungstaste
IA - ISOFIX-An ker
IH - ISOFIX-Einbauhilfen
IK - ISOFIX-Konnektoren
IM - IS OFIX-Arme
IR - ISOFIX-Schlaufe
IT - ISOFIX-Entriegelungs tasten
S - Stan dfuß
SA - Standfuß-Anzeige
SF - Standfuß-Freigabeknopf
D
TR
SK
HU
Deutsch Deutsch
Vielen Dank, dass Sie sich für diesen HEYNER® Kindersitz entschieden haben.
Bei der Entwicklung unserer Kindersitze stehen Sicherheit, Komfort und Bedienfreundlichkeit
immer im Vordergrund. Die Herstellung erfolg t unter strenger Qualitätsüber wachung und
erfüllt höchste Sicherheitsanforderungen.
Bitte nehmen Sie sich ausreichend Zeit für das Lesen und Verstehen dieser Einbauanleitung.
Die maximale Sicherheit und den Komfort kann der Sitz nur bei einem korrekten Einbau
gewährleisten.
Bitte bewahren Sie die Einbauanleitung immer im Auf bewahrung sfach (FG) an der Rückseite des
Sit zes au f.
HINWEIS:
Durch länderspezifische Anforderungen können Produktmerkmale abweichen.
Die Empfehlungen des Fahrzeughers tellers sind unbedingt zu befolgen.
1. Sicherheitshinweise
Der Autokindersit z HEYNER® MultiFix TWIS T ist nach der europäischen Norm für Kinderrückhaltesysteme ECE 44/04 geprüft und zugelassen. Das Prüfzeichen E mit der Zulassungsnummer finden Sie auf der Rückseite des Sitzes auf dem orangefarbenen Etikett.
Diese Zulassung verliert Ihre Gültigkeit, wenn Sie Änderungen am Sitz vornehmen, sie können die Sicherheit reduzieren oder gänzlich nehmen.
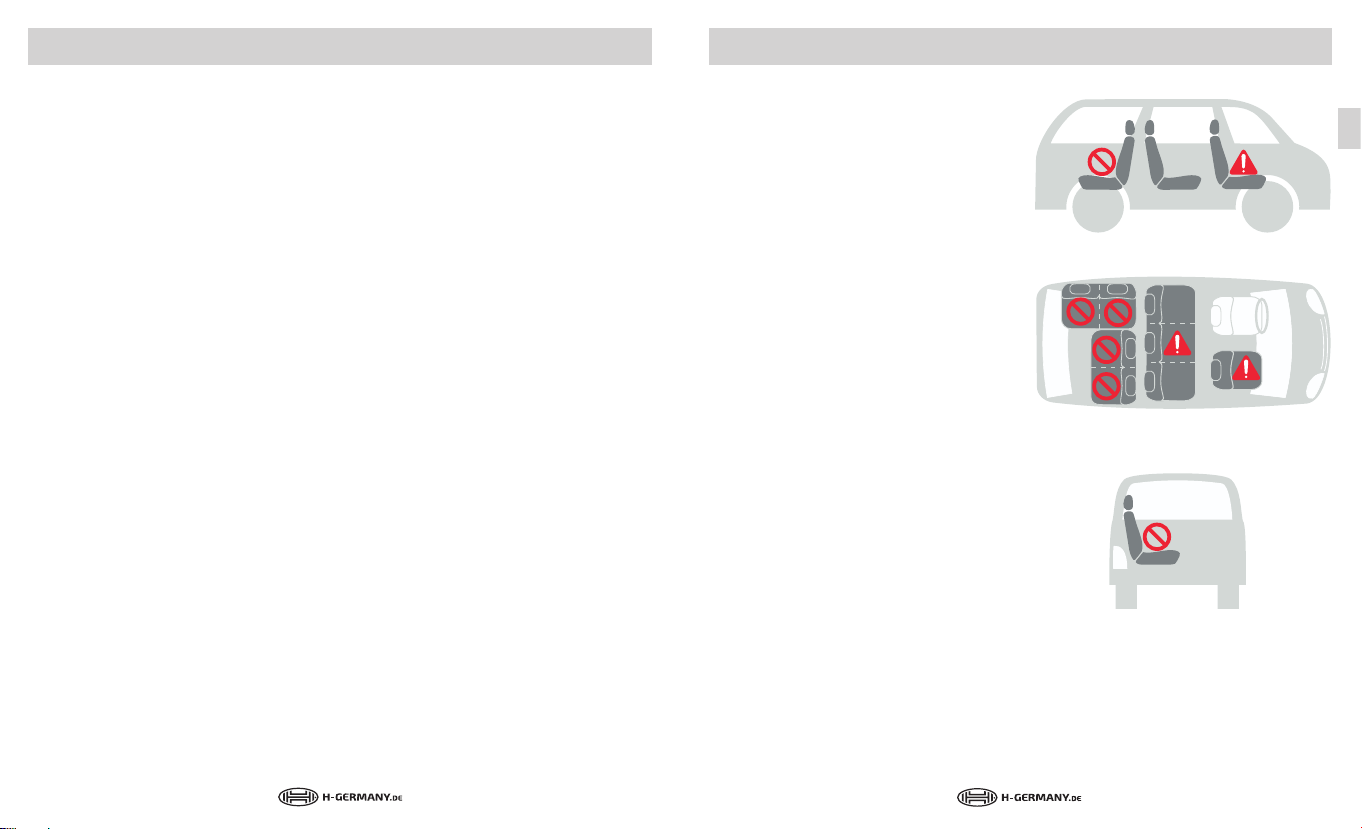
Bitte prüfen Sie vor dem Gebrauch, ob der Sitz für Ihr Auto zugelassen ist! Installieren Sie
dieses Kinderrückhaltesystem nicht auf einem Fahrzeugsit z mit eingeschaltetem Airbag.
Der HEYNER® MultiFix TWIST darf nicht als Sitz oder Spielzeug im Haushalt verwendet werden.
Bei anderweitiger Nutzung besteht Verletzungsgefahr.
Bitte nehmen Sie sich ausreichend Zeit um den Sitz wie beschrieben in Ihrem Auto zu
installieren.
Verwenden Sie den Kindersitz NICHT wenn er beschädigt ist oder Teile fehlen. Nutzen Sie keine
gebrauchten Produkte, deren Vergangenheit Sie nicht kennen. Einige Teile könnten fehlen oder
beschädigt sein.
Achten Sie darauf, dass sämtliche Teile des Kindersitzes so platzier t werden, dass sie während
des täglichen Gebrauchs nicht verloren gehen oder zwischen Türen oder verstellbaren Sitzen
eingeklemmt werden!
Sichern Sie den Kindersitz im Auto auch wenn sich kein Kind im Sitz befinde t.
Solange der Kindersitz unbenutzt ist, schüt zen Sie den Kindersitz gegen intensive und direkte
Sonneneinstrahlung (z.B. durch ein weißes Tuch).
Es ist möglich, dass er sich durch intensive Sonneneinstrahlung sehr stark erwärmt. Vor allem
das Gurtschloss kann unangenehm heiß werden.
Nach einem Unfall sollten Sie das gesamte Kinderrückhaltesystem erneuern oder zur Prüfung
an den Hersteller senden - zusammen mit einem Unfallbericht.
Der Kindersitz darf niemals ohne Original-Stobezug benutzt werden.
Sollte der Sto bezug ausgewechselt werden, dürfen Sie nur Original-Bezüge der Firma
HEYNER MOBIL AUTOMOTIVE GMBH verwenden.
Bei Schwierigkeiten wenden Sie sich bitte an Ihren Verkäufer oder den Hersteller.
1.1. Zur Verwendung des HEYNER MultiFix TWIST beachten Sie bitte folgende
Voraussetzungen:
GEGEN die Fahrtrichtung:
Körpergröße: 40-105cm
Gewicht: Geburt - 18 kg
Alter: Gebur t - ca. 4 Jahre
Bitte beachten Sie bei der rückwärtsgerichteten Verwendung ausschließlich Stufe 4 der
Liegeposition zu verwenden!
IN Fahrtrichtung:
Körpergröße 83-105 cm
Gewicht: 9-18kg
Alter: mind. 15 Monate - ca. 4 Jahre
Kinder unter 15 Monate dürfen NICHT in Fahrtrichtung gesetzt werden. Lassen Sie Ihr Kind so
lange wie mögl ich rückwärts f ahren, da dies in der Regel die sicherste Sitzposition ist.
Platzieren Sie keine Gegenstände im Standbeinbereich vor Ihrer Basis.
Untersuchen Sie die Isofix-Führungen regelmäßig auf Verschmutzungen und reinigen Sie diese
bei Bedarf. Die Zuverl ässigkeit des Systems kann durch Eindringen von Schmutz, Staub,
Lebensmittelresten usw. beeinträchtigt werden.
D
11
12
Deutsch Deutsch
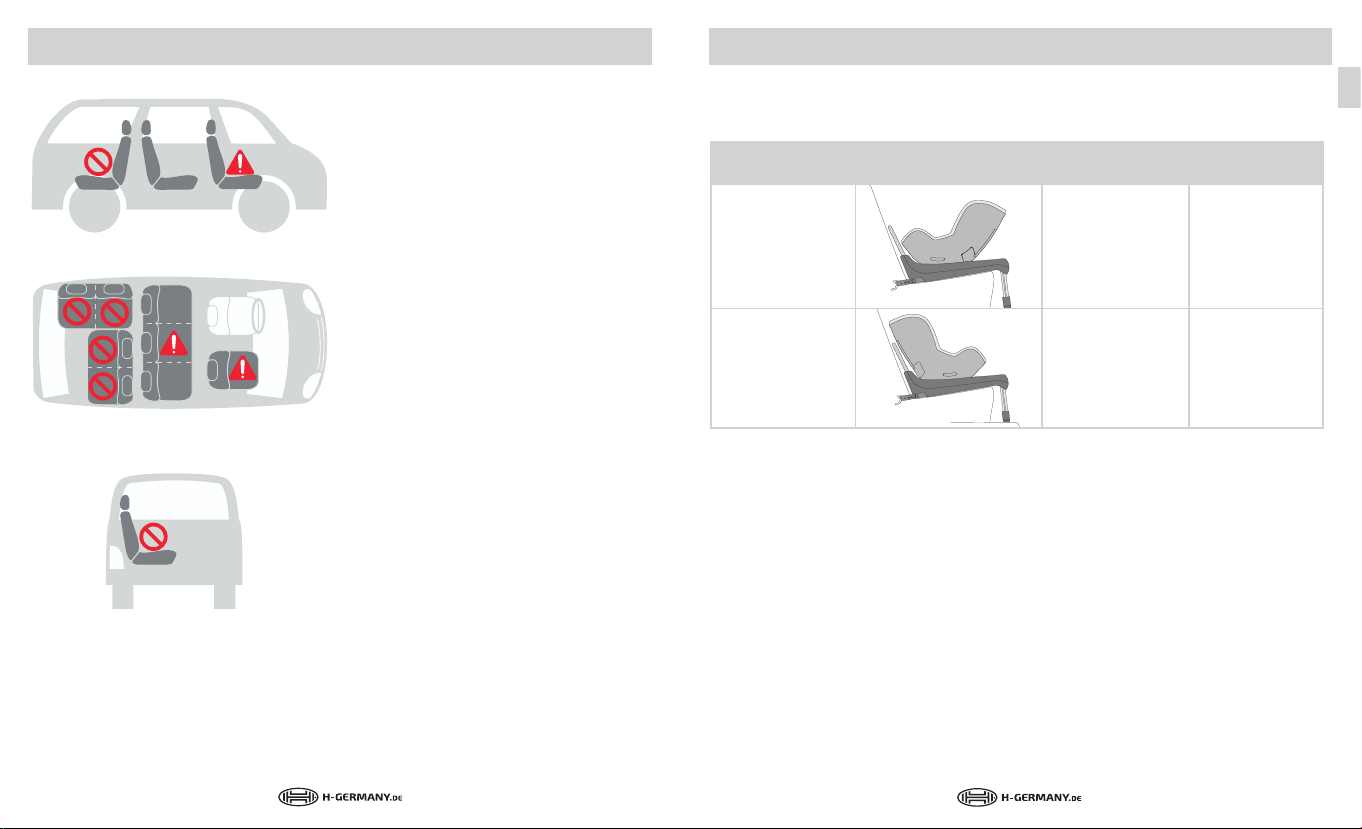
2. Platzierung im Fahrzeug
Das HEYNER® MultiFix TWIST Kinderrückhaltesystem ist ausgelegt und geprüf t gemäß der
europäischen Anforderung für Kindersicherheitsausstattung (ECE R 44/04). Es ist nach der
ECE-Regelung R4 4/04 für die Verwendung in
„ISOFIX Klasse D/B1 “ kompatiblen Fahrzeugsitzpositionen zugelassen, die gemäß den Angaben
des Fahrzeugherstellers im Fahrzeughandbuch
für ISOFIX-Rückhaltesysteme geeignet sind.
Für die Befestigung mit ISOFIX und Standfuß (S)
besteht eine „Semi Universale“ Genehmigung.
Daher können Sie diesen Sitz nur in bestimmten
Fahrzeugen nutzen. Die zugelassenen Fahrzeuge
prüfen Sie bit te mithilfe der Typenliste. Eine aktuelle Liste finden Sie unter www.h-germany.de
Wird der Sitz auf dem Beifahrersitz genutzt,
schieben Sie diesen bitte so weit wie möglich
nach hinten und beachten die Hinweise im Fahrzeug-Handbuch. Deaktivieren Sie den Beifahrerairbag! Sollte dies nicht möglich sein, ist eine
Nutzung auf der Beifahrerseite verboten.
Prüfen Sie anhand der Fahrzeugliste Ihres Fahrzeugherstellers, welche Fahrzeugsitze für
Kindersitze geeignet sind.
Dieser Sitz ist NICHT für die Verwendung mit
einem normalen Fahrzeuggur t geeignet.
Auf Fahr zeugplätzen, die quer oder rückwärt s zur Fahrtrichtung angeordnet sind, ist die
Verwendung des Kindersitzes nicht zulässig.
Sichern Sie Gepäck und lose Gegenstände! Sie können bei einem Unfall zu gefährlichen
Geschossen werden und Ihr Kind verletzen.
3. Verwendungsmöglichkeiten des HEYNER® MultiFix TWIST
Verwendungsart Installation Körpergröße des
Rückwärtsgerichtet
Vorwär tsgerichtet
Abhängig von Körpergröße und Gewicht kann der Kindersitz vor wärts gerichtet und rückwärtsgerichtet verwendet werden.
WARNUNG:
Der HEYNER MultiFix TWIST muss rückwärts gerichtet genutzt werden, bis Ihr Kind mindestens
9 kg wiegt, mindestens 15 Monate bzw. größer als 83 cm ist.
3.1. Nutzung des Kleinkindeinsatzes
Der Kleinkindeinsatz beinhaltet ein Körper- und ein Kopfkissen sowie ein Keilkissen.
Der Kleinkindeinsatz ist für den besonderen Schutz von kleinen Kindern mit einem Gewicht bis
18 kg vorgesehen. Wir empfehlen, diesen so lange wie möglich zu nutzen.
Nutzen Sie das mitgeliefer t Keilkissen bis Ihr Kind 13 kg wiegt. Es unter stützt, die von
Orthopäden empfohlene, flache Liegeposition.
Kindes
<18 kg
40cm - 105cm
9-18 kg
83cm-105cm
Referenzalter
ca. < 4 Jahre
15 Monate bis
4 Jahre
D
13
14
Deutsch Deutsch
click
press
HINWEIS:
Bis zu einer Körpergröße von mindestens 83 cm und bis Ihr Kind mindestens 15 Monate alt ist,
MUSS es rückwärtsgerichtet transportiert werden. Unfallstatistiken belegen, dass ein
rückwärtsgerichte ter Transport Ihres Kindes ist in der Regel am sichersten ist. Deshalb
empfehlen wir Ihnen, den Kindersitz so lange wie möglich rückwärts zu nutzen.
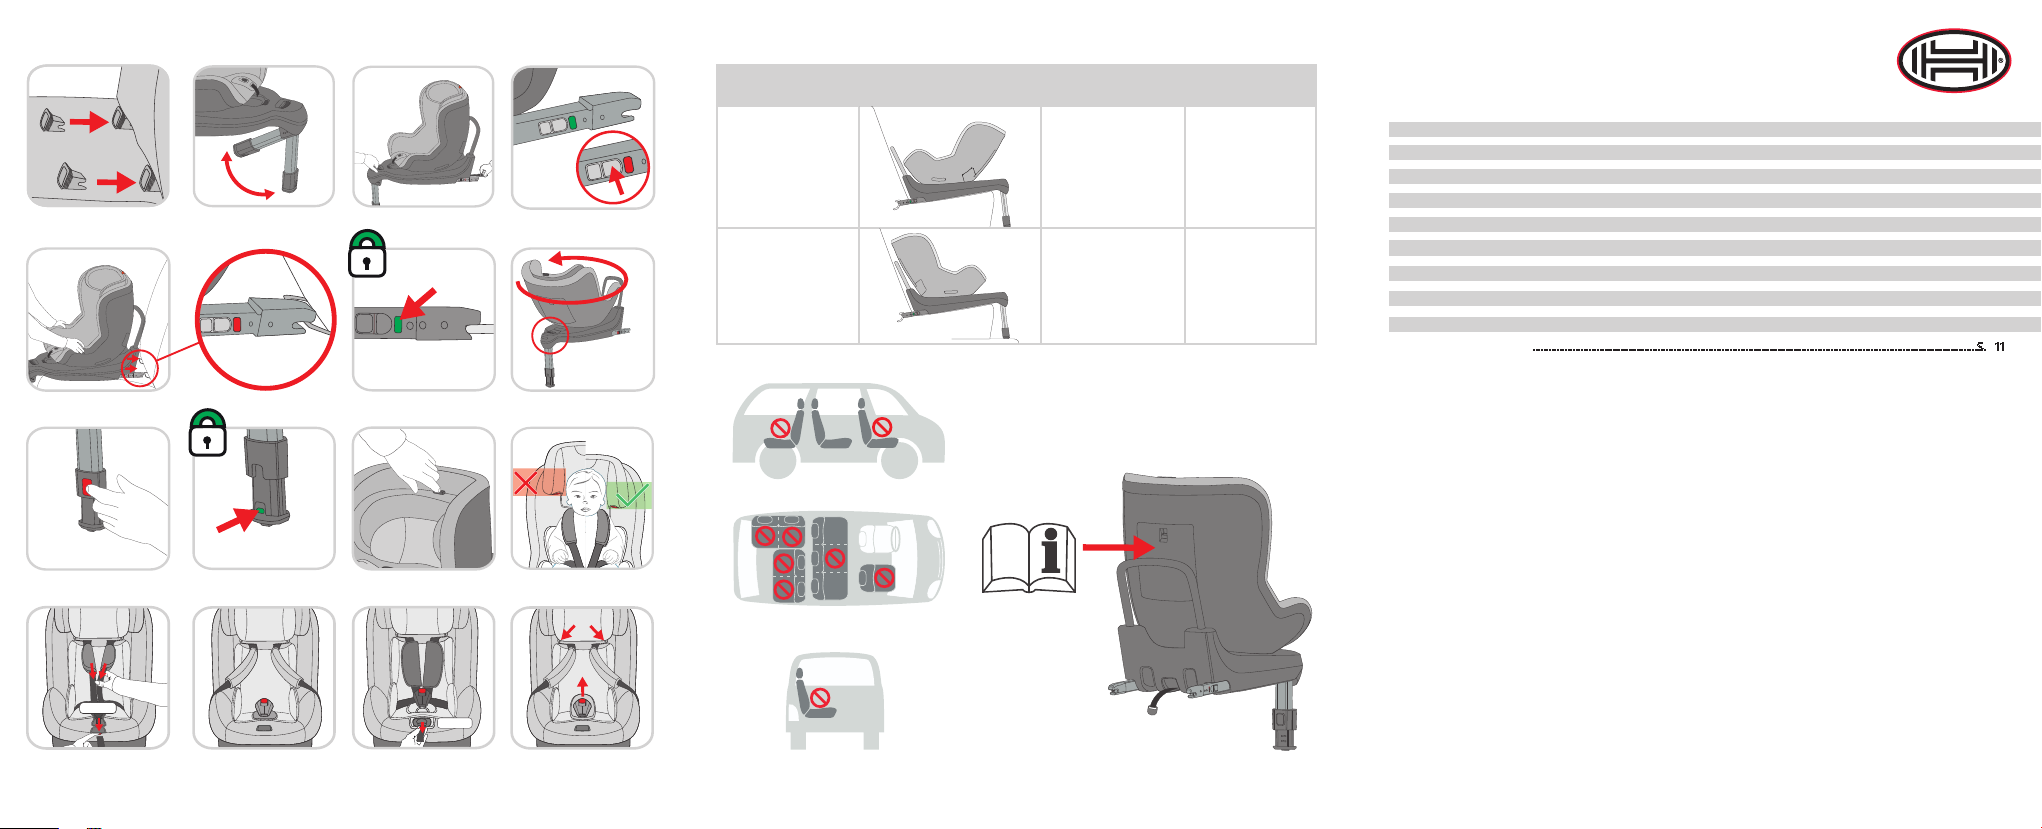
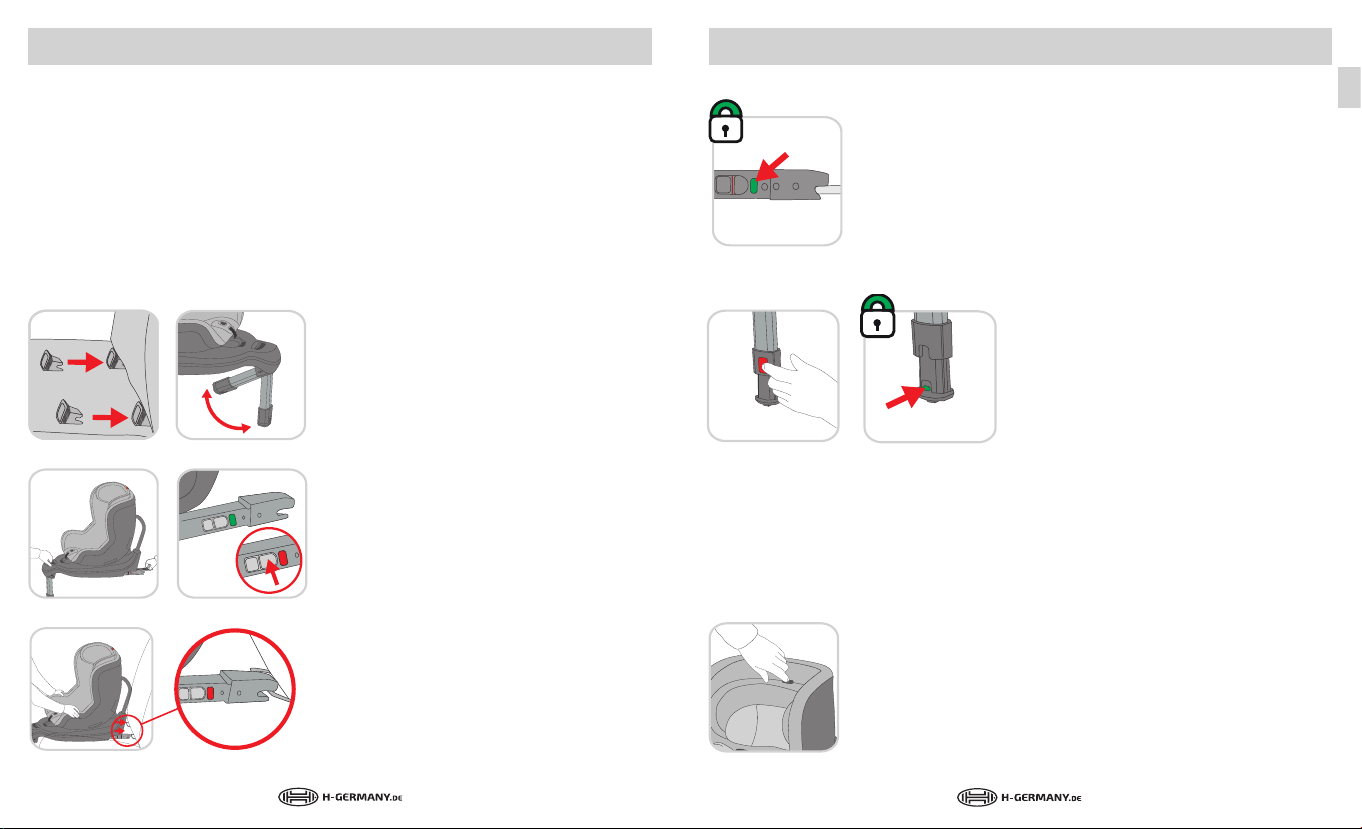
4.1. Einbau des HEYNER MultiFix TWIST in das Fahrzeug
Die zugelassenen Fahrzeuge prüfen Sie bitte mithilfe der Typenliste. Die aktuelle Version finden
Sie auf www.h-germany.de.
4.2. Platzierung auf dem Fahrzeugsitz
Bevor Sie den HEYNER® MultiFix TWIST auf dem
Autositz platzieren, befestigen Sie bei Bedarf die
zwei mitgeliefer ten Einbauhilfen (IH) an den ISOFIX-Anker (IA) in Ihrem Auto.
Die ISOFIX-Anker finden Sie zwischen der Sitzfläche
und der Rückenlehne des Autositzes.
Klappen Sie immer den Standfuß aus, bis er vorn
einrastet.
HINWEIS:
Stellen Sie keine Gegenstände in den
Fußraum vor dem Kindersitz.
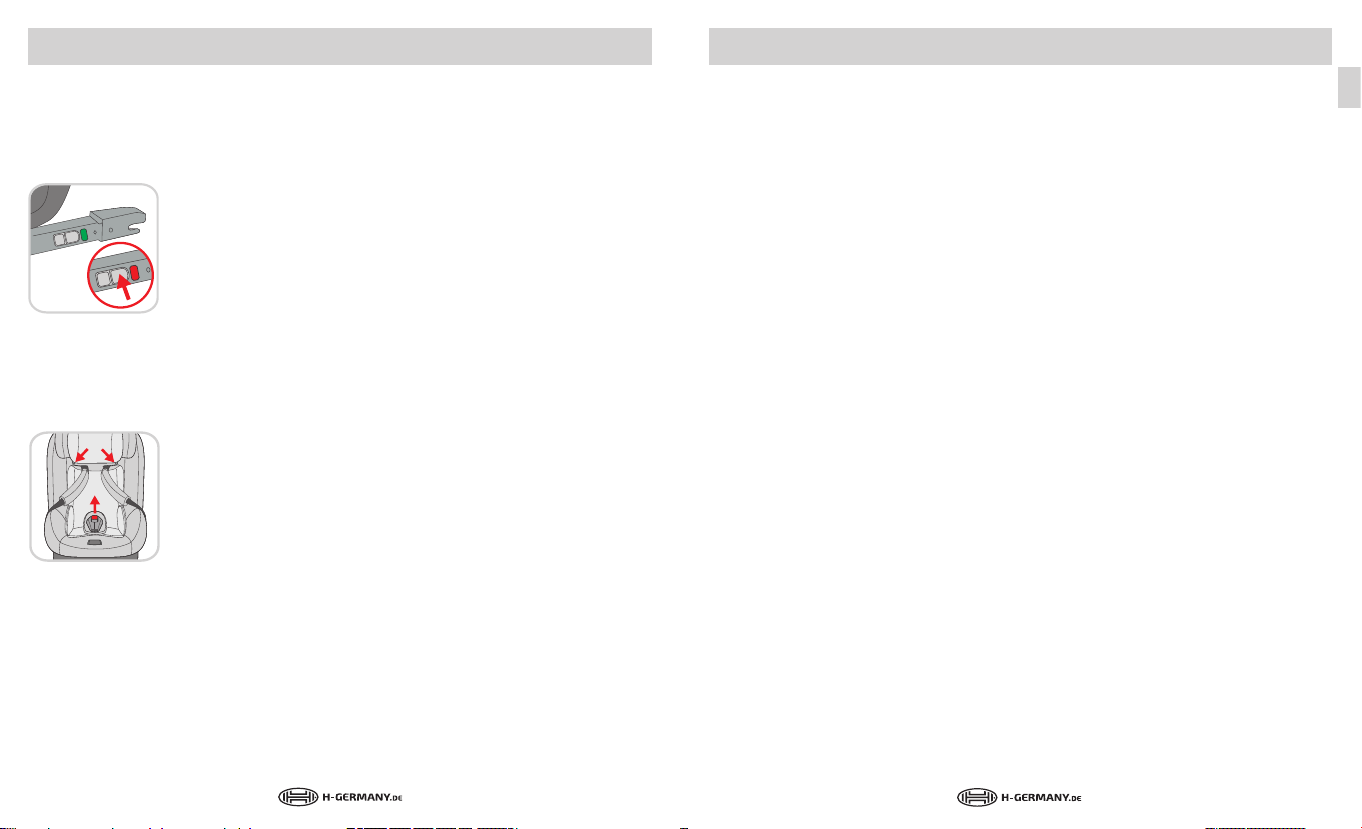
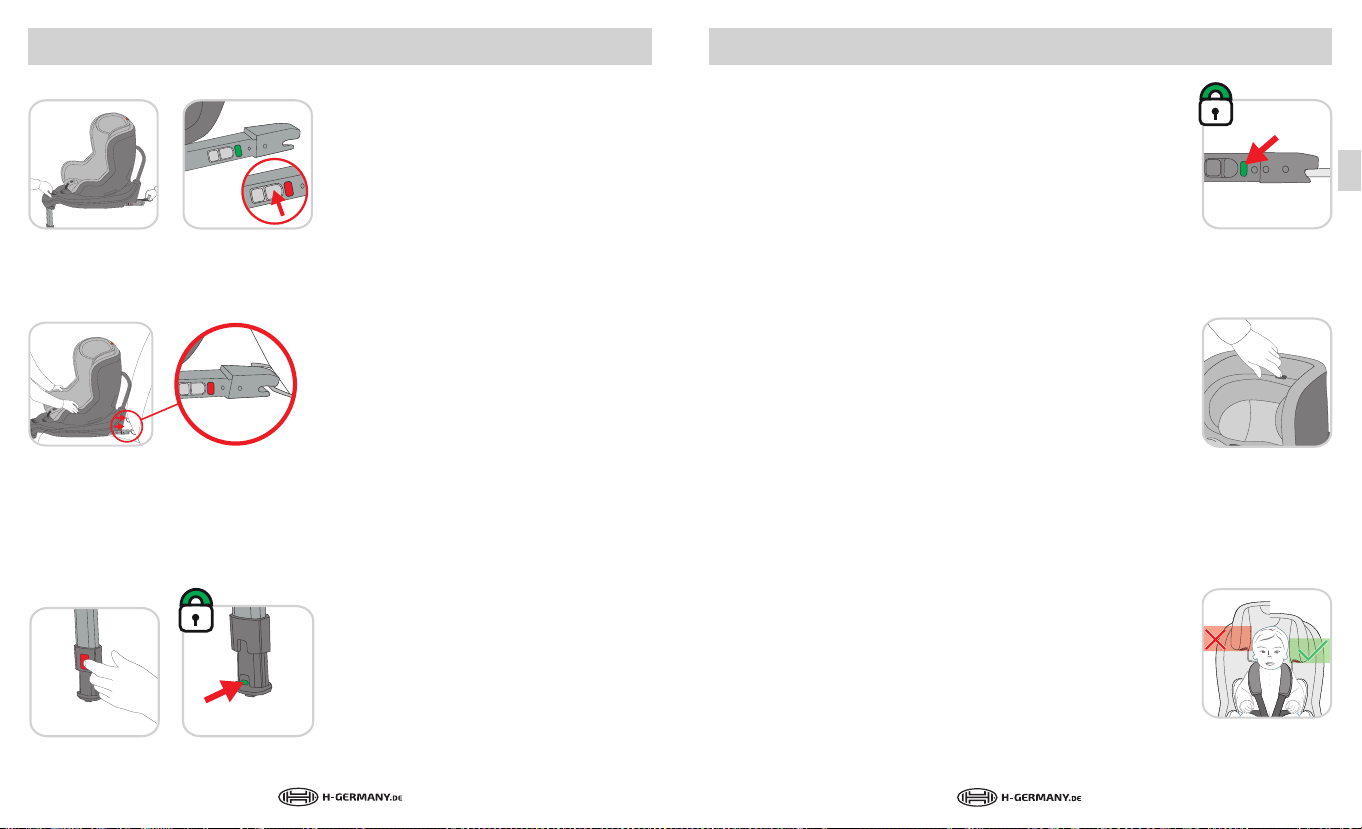
Lösen Sie die Arretierung der ISOFIX-Konnektoren
(IK), indem Sie gleichzeitig die Arretierungstaste
(AT)drücken und mit der ISOFIX-Rückholschlaufe
beide Verriegelungsarme (IM) herausziehen.
Überprüfen Sie, vor dem Einbau, die Sicherheitsindikatoren (IT). Diese müssen beide ROT sein. Sind die
Sicherheitsindikatoren nicht ROT, drücken Sie die
Entriegelungstasten, bis sie ein deutliches >>click<<
hören.
4. Installation
L+R
CHECK
WARNUNG:
Der Standfuß darf nicht in der Luft hängen oder mit Gegenständ unterleg t sein. Achten Sie
immer darauf, dass die Standfußanzeige grün ist.
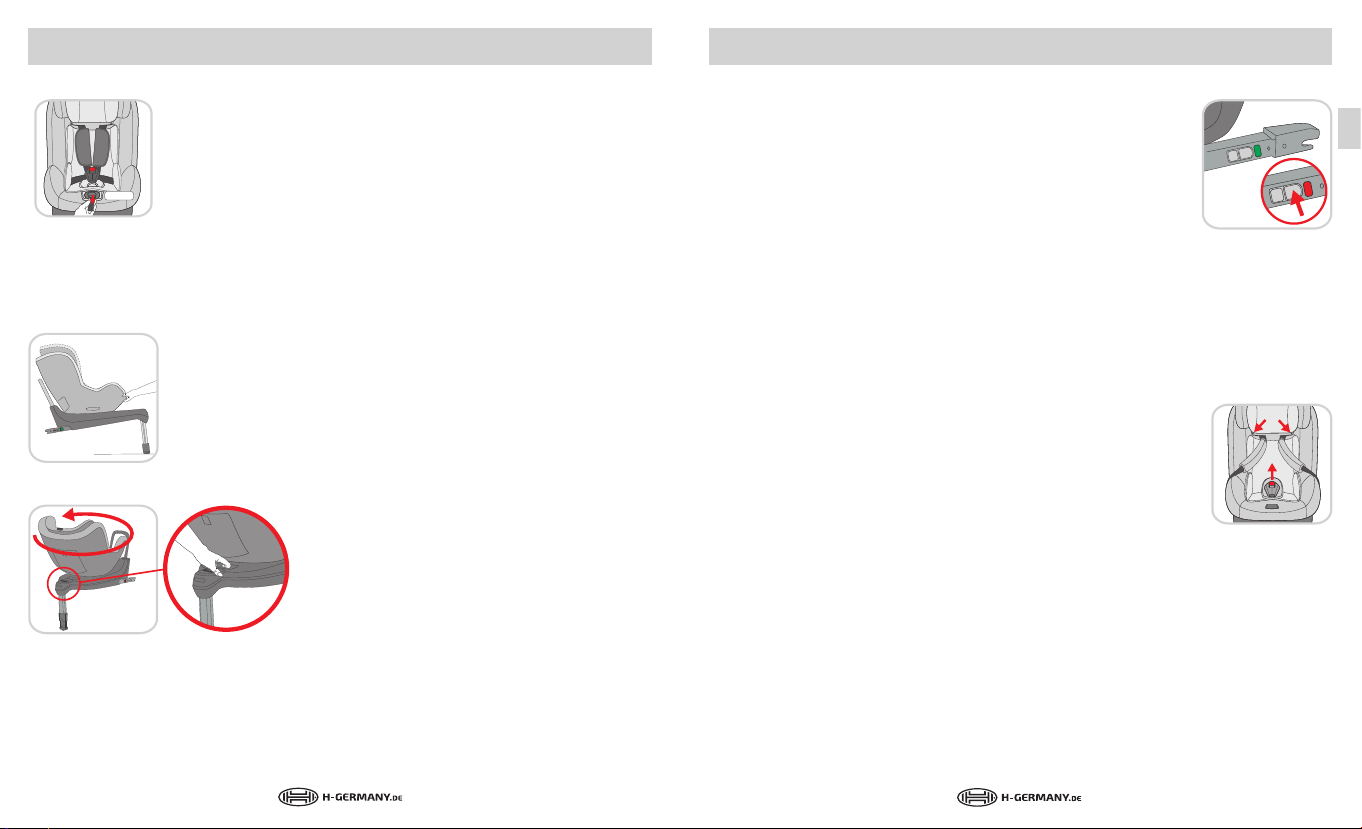
Bitte prüfen Sie noch einmal , ob der Kindersitz fest auf dem Sitz befes tigt ist.
Nur wenn der HEYNER® MultiFix T WIST mit den ISOFIX-Konnektoren (IK) und dem Standfuß (S)
vorschrif tsmäßig im Autositz eingebaut ist , kann der Sitz Ihr Kind optimal schützen.
Greifen Sie den Kindersitz mit beiden Händen und schieben Sie die zwei
ISOFIX-Konnektoren (IK) fest in die Einschiebeführungen, bis diese an die
ISOFIX-Anker (IA) einrasten.
Sie hören ein deutliches >>click<< .
Beide Sicherheitsindikatoren müssen jetzt GRÜN anzeigen. Bitte prüfen
Sie anhand der Sicherheitsindikatoren an BEIDEN SEITEN, ob der Sitz richtig mit beiden ISOFIX-Anker (IA) des Autos verbunden ist .
Nur eine korrekte Befestigung BEIDER ISOFIX-Konnektoren (IK) gewährleistet den vorgesehenen Halt des Sitzes und die Sicherung Ihres Kindes
im Fahrzeug!!!
Der Standfuß (S) kann in 18 Positionen eingestellt
werden. Drücken Sie den Standfuß-Freigabeknopf
(SF) und ziehen Sie den Standfuß bis zum Boden
aus. Steht der Standfuß (S)sicher auf dem Boden,
erscheint die Standfußanzeige (SA) vollständig
CHECK
4.3. Höhenanpassung der Kopfstütze (A) und der Schultergurte (SG) an
die Größe Ihres Kindes
Zur Anpassung der Höhe der Kopfstütze (A) drücken Sie den Verstellhebel
(H) an der Kopf stütze nach unten. Nun können Sie, je nach Größ e Ihres
Kindes, die Kopfstütze (A) in die gewünschte Höhe verstellen.
Sobald Sie die richtige Höhe erreicht haben, lassen Sie den Verstellhebel
grün. Ist die Anzeige rot, wiederholen Sie den
Vorgang.
D
15
16
Deutsch Deutsch
L
Press
Pull
(H) los und die Kopfstütze (A) rastet in der gewünschten Höhe ein.
Nur eine optimal eingestellte Kopfstütze gewährleistet maximale
Sicherheit. Die Kopfstütze sollte so eingestellt sein, dass das integrierte
5-Punkt-Gur tsystem (G) auf Schulterhöhe des Kindes verläuf t.
Die Kopfstütze kann in 7 verschiedenen Positionen eingestellt werden.
Das Gur tsystem wird mit der Höhe der Kopfstütze eingestellt.
Die Schultergurte (SG) sind mit der Kopfstütze fest verbunden und
müssen nicht separat eingestellt werden.
Das Gur tsystem (G) passen Sie an Ihr Kind an, indem Sie die Kopfstütze (A) verstellen.
Die Kopf stütze muss so eingestellt sein, dass der Abstand zwischen den Schultern des Kindes
und der Kopfstütze ca. 3 cm (ca. 2 Fingerbreit) nicht überschreitet.
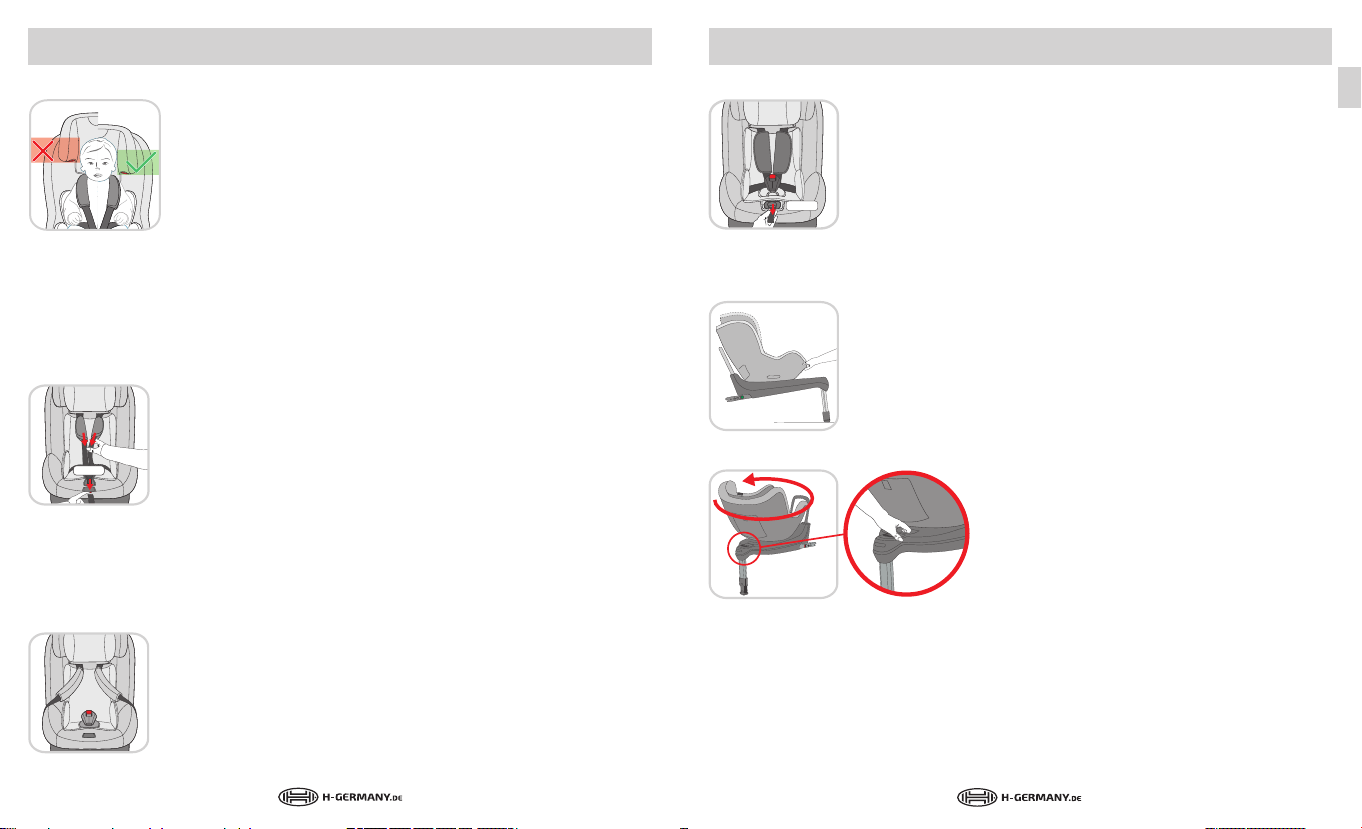
4.4 Anschnallen des Kindes
Achten Sie darauf, dass die Kopfstütze eingerastet ist, bevor Sie das Kind
hineinsetzen.
Lockern Sie die Schultergur te durch Drücken des Gurtverstellers (GV) und
ziehen Sie die Hosenträgergurte (G2) zu sich hin.
HINWEIS: Ziehen Sie nicht an den Schulterpolstern.
Ö nen Sie das Gurtschloss (D) und das Gur tsystem (G).
Legen Sie die Hosenträgergurte (G2) nach links und rechts zu den Seiten. Nun setzen Sie das
Kind so in die Sitzfl äche des HEYNER® MultiFix TWIST, dass sich das Gesäß tie f in der Sitzmulde
b e fi n d e t .
Fügen Sie die beiden Schlosszungen (C) des Hosenträgergurts (G2)
zusammen und ver binden Sie diese mit dem Gurtschloss (D) bis ein
deutliches »click« zu hören ist.
Ziehen Sie am Zentralverstellgurt (G5), bis die Hosenträgergurte (G2) fl ach
am Kind anliegen. Achten Sie darauf, dass die Gurte nicht verdreht sind.
Vermeiden Sie vor allem im Winter zu dicke Kleidung unter dem Gurt.
WARNUNG:
Achten Sie darauf, dass das Gurt schloss frei von Verunreinigungen ist. Nur
saubere Gurtschlösser rasten Hörbar und sicher ein.
WARNUNG:
Stellen Sie sicher, dass die Gurtbänder weder verdreht noch verklemmt
sind. Prüfen Sie ebenfalls die Beckengurte. Diese sollten so niedrig wie
möglich über der Hüfte des Kindes verlaufen.
WARNUNG: Zwischen Körper und Gurte darf nicht mehr al s eine Fingerbreite Spielraum
vorhanden sein.
4.5. Sitz- und Liegepositionen des Kindes
Dieser Kindersitze ist mit einer Liegeposition ausgestattet. Die Bedienung
erfolgt einfach und schnell mit nur einer Hand. Durch Betätigen des
Positionsgri es (PG) bringen Sie die den Sitz in die gewünschte Position
für Ihr Kind.
4.6 Drehfunktion
Der Kindersitz verfügt über eine 360° Drehfunktion.
Das Ein- und Aussteigen wird damit erheblich erleichtert . Es kann auch schnell von einer rückwärts- zu
einer vorwärts gerichteten Verwendungsart
gewechselt werden.
Um die Sitzschale drehen zu können, müssen sie die
Drehtaste drücken und den Sitz gleichzeitig drehen.
Der Sitz rastet mit einem deutlichen >>click<< ein.
WARNUNG:
Bitte beachten Sie immer die Hinweise zur rückwärts- bzw. vorwärts gerichteten
Verwendungsart.
D
17
18
Deutsch Deutsch
WARNUNG:
Stellen Sie vor Fahrtantrit t stets sicher, dass der drehbare Teil des Kindersitzes in die vorwärts
oder rückwärts gerichtete Position eingerastet ist. Zur Überprüfung versuchen Sie die Sitzschale zu drehen ohne die Sicherheitstaste zu drücken.
HINWEIS:
Achten Sie darauf, dass kein Schmutz zwischen Sitz und Basis gel angt.
Dies kann auf Dauer die Leichtigkeit der Drehfunktion beeinträchtigen.
4.7. Ausbauen des Kindersitzes
Drücken Sie die Entsicherungstaste an den ISOFIX Connectoren und lösen
Sie so die ISOFIX Verankerung.
Schieben Sie die ISOFIX Verriegelungsarme zurück in die Sitzschale.
Entfernen Sie nun den Kindersitz aus dem Fahrzeug.
HINWEIS: Der Kindersitz darf niemals im Auto transportiert werden, wenn er nicht richtig be-
festigt ist.
5. Pflege und Reinigung
5.1. Abziehen des Bezuges
Für den späteren korrekten Einbau empfehlen wir, das Abnehmen des
Bezuges mit Fotos zu dokumentieren.
Ziehen Sie den Schutz des Gurtschlosses vorsichtig nach oben ab.
Önen Sie die Druckknöpfe z wischen dem Bezug des Sitzteils und des
Kopfteils.
Greifen Sie unter den Bezug am unteren Rand des Sitzes und ziehen sie diesen leicht nach vorn
und nach oben. Ziehen Sie den Bezug über das Gurtschloss.
Sie können den Bezug mit einem milden Waschmittel im Feinwaschprogramm (30° C) waschen,
Bitte beachten Sie die Hinweise auf dem Waschetiket t.
Bitte benutzen Sie niemals chemische Reinigung- oder Bleichmittel.
Die Kunststoteile können mit lauwarmen Wasser und einem milden Reinigungsmittel gereinig t
werden. Verwenden Sie keine scharfen Reinigungsmittel (wie Lösungsmittel).
WARNUNG:
Entfernen Sie niemals die Schlosszunge von den Gurten oder das Gurtschloss. Verwenden Sie
ausschließlich HEYNER Sitzbezüge. Verwenden Sie den Kindersitz niemals ohne Sitzbezug.
5.2. Wiederanbringen des Bezuges
Führen Sie die vorherigen Schritte in umgekehrter Reihenfolge durch.
Verbinden Sie den Bezug des Kopfteils und des Siz teils mit Hilfe der Druckknöpfe.
Befestigen Sie die Schulterpolster ebenfalls wieder an den Schultergurten. Achten Sie darauf
das die Gurte nicht verdreht sind.
WARNUNG:
Nutzen Sie den Kindersitz niemals ohne korrekt angebrachte Schulterpolster.
5.3. Verhalten nach einem Unfall
Nach einem Unfall sollten Sie das gesamte Kinderrückhaltesystem erneuern oder zur Prüfung
an den Hersteller senden - zusammen mit einem Unfallbericht.
5.4. Produktinformation
Bei Fragen wenden Sie sich bitte zuerst an Ihren Händler.
Folgene Angaben sollten Sie zur Hand haben:
Seriennummer (Siehe Aufkleber)
Marke und Typ des Autos
Gewicht, Alter und Größe des Kindes
Weitere Informationen und weiterführende Sitze finden Sie auch unter www.h-germany.de
5.5. Entsorgung
Bitte beachten Sie die in Ihrem Land geltenden Entsorgungsvorschriften.
Aus Umweltschutzgründen bitten wir Sie die Verpackung und am Ende die Produktteile zu
trennen und zu entsorgen.
D
19
20
Deutsch Deutsch
WARNUNG:
Bewahren Sie Verpackungsmaterialien aus Kunssto außer Reichweite Ihres Kindes auf,
da Erstickungsgefahr besteht.
6. Und noch ein paar Tipps zum Schluss:
Legen Sie keine schweren Gegens tände auf die Hutablage - sie können bei einem Unfall zu gefährlichen Geschossen werden und Ihr Kind verletzen. Deshalb sichern Sie Gepäck und andere
Gegenstände ausreichend.
Achten Sie darauf, dass alle Insassen Ihres Pkw angegurtet sind. Nichtangegur tete Personen
im Fahrzeug können beim Unfall eine große Gefahr für das Kind darstellen.
Gönnen Sie Ihrem Kind bei längeren Fahrten Pausen und achten Sie darauf, dass es nicht
zur Fahrbahn hin oder unbeaufsichtig t aus dem Fahrzeug steig t.
Falls vorhanden benutzen Sie immer die Kindersicherung in den Pkw-Türen, die das Önen der
Tür von innen unmöglich macht.
Lassen Sie ihr Kind nie unbeaufsichtigt im oder am Fahrzeug.
D
21
22
English English
1.
Impor tant Safety notices
..............................................................................................................................S. 24
2. Placing it onto the vehicle seat. ................................................................................................................... S. 26
3. Uses of the HEYNER® MultiFix TWIST ....................................................................................................... S. 27
4. Installation ........................................................................................................................................................... S. 28
Installation of the HEYNER MultiFix TWIST in the vehicle
4.1.
Positioning on the vehicle seat
4.2.
Height adjustment of the headrest (A) and the harness straps (SG)
4.3.
to the size of your child.
Fastening your child‘s seatbelt
4.4.
Sitting and reclining positions of the child
4.5.
Rotation
4.6.
4.7.
5.
5.1.
5.2.
5.3.
5.4.
5.5.
6.
A - Headre st
A1 - Head cus hion
A2 - Redu ction cushi on
B - Shoulder pads
BT - Base p art
C - Buck le latche s
D - Buckle
DT - Rotati ng button
E - Sea t cover
FG - Instal lation manual storage
G - Belt sy stem
G1 - Belt slo ts
G2 - Harn ess belts
G3 - Wais t belt
G4 - Buckle b elt
G5 - Cen tral harne ss belt
.................................................................................................................................................................S. 31
Removing the child car seat
Care and cleaning
..............................................................................................................................................S. 32
Removing the cover ........................................................................................................................................
Reattaching the cover
After an accident
...............................................................................................................................................S. 33
Product information .......................................................................................................................................
Disposal
.................................................................................................................................................................S. 33
Some final hints:
................................................................................................................................................S. 34
...................................................................................................................S. 28
..................................................................................................................................S. 29
..................................................................................................................S. 30
............................................................................................S. 31
.........................................................................................................................S. 32
.....................................................................................................................................S. 33
GV - Harnes s adjuster
H - P ositionin g handle head rest
PG - Posit ioning handl e
K - Inst allation s ticker
SG - Conn ector belt s
U - Diagonal b elt of the thre e-point
vehicle-belt
V - Buckl e latch of th e three-poi nt
vehicle-belt
W - La p belt of the thr ee-point
vehicle-belt
X - belt buc kle of the thr ee-point
vehicle-belt
..............................................................S. 28
S. 32
S. 33
AT - ISOFI X-Button
IA - ISOFIX-anchors
IH - ISOFIX-installati on aids
IK - ISOFIX-connec tor
IM - ISOFIX-arms
IR - ISOFIX ret ract loop
IT - ISOFIX-r elease but tons
S - Supp ort leg
SA - Supp ort leg indi cator
SF - S upport le g adjustmen t button
Thank you for choosing this HEY NER® child car seat. When developing our child car seats,
safety, comfort and user-friendliness are most important to us. The manufacturing takes place
under strict quality controls and meets the highest safety requirements.
Please take sucient time to read and understand these instructions carefully. Only if the seat
is correctly installed, maximum safet y and comfort can be achieved.
Please always keep the instruction manual in the storage compartment at the back of the seat.
NOTE: Because of country-specific requirements the produc t features may dier.
The recommendation of the vehicle manufacturer must be followed.
1. Important Safety notices
The HE YNER® MultiFix TWIST chil d car seat is tested and approved under the European Standard
for Child Restraint Systems ECE 44/04. You will find the cer tification mark with the registration
number on the back of the seat, see orange label .
The approval loses its validity, if you make any changes to the seat. This could reduce the safety
or totally take it away.
Please check whether the seat is approved for your car before using it! Never install this child
restraint s ystem on a vehicle seat were the airbag is activated!
The HEYNER® MultiFix TWIST must neither be used as a seat nor as a toy in your household.
In case of any other usage there is a danger of injury.
Please take sucient time to install the seat in your car, as it is described in this manual.
DO NOT use the child seat if it is damaged or if parts are missing. Do not use second hand
products, were it‘s history is unknown to you. Some seat parts may be missing or might be
damaged.
Make sure that all part s of the child car seat are securely stored away, so that they don’t go
missing during daily use or will be jammed bet ween doors or adjust able seats!
The HEYNER® MultiFix TWIST should always be secured in the car, even when not in use by your
child.
GB
23
24
English English
As long as the child car seat is not in use, protect it against intensive and direct sunlight. It can
become very hot if exposed to direc t sunlight. Especially, the belt buckle heats up quickly.
After an accident it is required to repl ace the whole child restraint sys tem or to send it to the
manufacturer for inspection - together with the accident report.
The child car seat should never be used without the original cover.
Should the seat cover need to be replaced, only use original HEYNER MOBIL AUTOMOTIVE GMBH
seat covers.
In case of diculties, please contac t your dealer or the manuf acturer.
1.1. To use the HEYNER MultiFix TWIST, please take note of the following requirements:
rear facing:
Body size: 40-105cm
Weight: 0 - 18 kg
Age: Birth - min. 15 months
Please note: To use the seat rear facing you must exclusively use level 4 (reclining position)!
front facing:
Body size 83-105 cm
Weight: 9-18kg
Age: at least 15 months - ca. 4 years
Children under 15 months must NOT be seated front facing. Le t your child drive back wards for as
long as possible, as this is the safest position.
Do not pl ace any objects in the leg area in front of the seat base.
Check the Isofix guides regularly and clean away any dirt, dust or food particles as they may
eec t the safet y of the system.
2. Placing it onto the vehicle seat
The HEYNER® MultiFix TWIST car seat res traint
systems is designed and tested to meet the
European Child Safety Equipment Requirement
(ECE R 44/04). The system is approved for usage
in „ISOFIX“ compatible vehicle seating positions
in accordance with ECE Regulation R44 / 04 that
are suitable for ISOFIX restraint systems as specified by the vehicle manufacturer in the vehicle
owner‘s manual.
For securing the child car seat with ISOFIX
and support leg there is a
“semi universal” approval. For this reason, these
seats can only be used in certain cars.
Please check the approved vehicles based on the
vehicle type list. A current list can be found at
www.h-germany.de
If the front passenger seat is in use, please push
it back as far as possible and follow the instructions in your vehicle manual. Disable the front
passenger airbag! If this is not possible, the usage
of a child car seat on this seat is not permitted.
Use the vehicle t ype list of your manufacturer to
check which vehicle seats are suitable for child
car seats.
This seat is not suitable for the usage with a
normal vehicle belt.
Do not use vehicle seats, which are arranged to travel backwards or sideways.
These seats are not permitted to use for child car seats.
Luggage and other similar objects should be stored away and properly secured! In case of an
accident, these could become hazards and can injure you and your child.
GB
25
26
English English
3. Uses of the HEYNER® MultiFix Twist
type of use installation height of the child age reference
rear facing
forwards facing
Depending on the height and weight of your child, the child car seat can be used facing forw ards
and backwards.
WARNING:
The HEYNER MultiFix TWIS T must be used rear facing: until your child is at least 15 months old or
more than 83 cm tall.
3.1. Usage of the infant pad
The infant insert includes a head cushion and an infant wedge-shaped pillow.
The cushions are intended for the special protection of small children with a weight of
9 kg - 18 kg. We recommend removing these only when the child is too big for them, at least if
the child weighs 18 kg.
Use the provided wedge-shaped pillow until your child weighs 13kg. It supports the fl at reclining
position recommended by orthopaedist.
<18 kg
40cm - 105cm
9-18 kg
83cm-105cm
ca <4 years
15 months
up to 4 years
4. Installation
NOTE:
Up to a height of at least 83 cm and until your child is at least 15 months old, they MUST be
transported rear facing. Accident statistics show that your child‘s rear facing transportation is
the safest. Therefore, we recommend that you use the child seat as long as possible backwards.
4.1. Installation of the HE YNER MultiFix TWIST in the vehicle
The current version can be found at ww w.heyner-germany.de.
Please also read the operating instructions of the vehicle manufacturer.
4.2. Positioning on the vehicle seat
Before placing the HEYNER® MultiFix TWIST on the car seat, fasten if necessary the two
provided installation aids (IH) to the ISOFIX mounting points (IA) in your car.
The ISOFIX mounting points are located between
the seat and the backrest of the car seat.
Always unfold the support device until it snaps into
place at the front.
NOTE: Do not pl ace objects in the leg area in front
of the child car seat.Release the lock of the ISOFIX
connectors (IK) by simultaneously pressing the
locking button and pulling out both locking arms
out of the ISOFIX retr act loop.
Check the safety indicators (IT). These must both
be RED. If the safety indicators (red) are not visible,
press the green release tabs until you hear an
audible << click >>.
Hold the child seat with both hands and push the
two ISOFIX-Connectors (IK) firmly in the slide-in
guides until the two ISOFIX-locking arms (IA) engage. You hear a clear >> click <<sound.
GB
27
28

English English
click
press
L
Press
L+R
CHECK
Please check with the help of the safe ty indicators
on BOTH SIDES, if the seat is properly connected with
the two ISOFIX anchors (IA) of the car. Both safet y
indicators must now be green.
Only a proper fi xing of BOTH ISOFIX connectors (IK)
ensures that the seat is secured properly and o ers
full protection to your child in the car!!!
The supporting device (S) can be adjusted in 18 positions. Press the pedal
release button (SF) and pull the pedestal to the fl oor. If the pedestal
stands securely on the fl oor, the stand display will be completely green.
If the indicator is red, repeat the procedure.
WARNING: The supporting device must not be suspended in the air or be
covered with any objec ts. Always make sure that the stand indicator is
green.
Please check once more, if the child car seat is
securely fi xed onto the seat.
Only if the HEYNER® MultiFix T WIST with the
ISOFIX anchors (IA) and the supporting device (S)
are properly installed in the car the children‘s car
seat can achieve optimal safe ty for your child.
CHECK
4.3. Height adjustment of the headres t (A) and the harness straps (SG)
to the size of your child.
To adjust the height of the headrest (A) to the size of your child touch the
back of the headrest and pull the adjusting lever (H) up. Now you can,
depending on the size of your child, adjust the headrest (A) to it‘s desired
height.
As soon you have reached the correct height, release the adjusting lever
(H) and the headrest (A) snaps into the desired height. Only a well
adjusted headrest ensures maximum safety. The headres t should be adjusted so that the integrated 5-point harness system (G) runs at shoulder
height of the child.
The headrest can be adjusted in 7 di erent positions.
The harness system is adjusted with the height of the headrest.
The shoulder straps are fi rmly attached to the headrest and do not need
to be adjusted separately.
Adjust the size of the harness system (G) to your child by adjusting the headrest (A).
The headrest must be adjusted so that the distance be tween the shoulder s
of the child and the headrest does not exceed 3 cm (about 2 fi nger widths).
4.4. Fastening your child‘s seatbelt
Make sure that the headrest is locked in place before seating your child.
Loosen the shoulder straps by pressing the belt adjuster (GV) and pull the
harness straps (G2) towards you.
Attention:
Do not pull on the shoulder pads.
Open the seat belt buckle (D) and the belt system (G).
Place the harness straps (G2) to the left and to the right side. Now place the
child into the seat of the HEYNER® MultiFix TWIST so that the buttocks
press deeply into seat.
Inser t the two buckle tongues (C) of the harness strap (G2)
and connect it to the belt buckle (D) until you hear a clear „click“ sound.
By pulling on the central adjus ting belt (G5) make
sure that the harness belts touch the child fi rmly and are not twisted.
GB
29
30
English English
Pull
Avoid thick clothing under the belt especially in the winter.
WARNING: Make sure that the belt buckle is free from any dirt. Only clean
belt locks engage audibly and safely.
IMP ORTANT:
Make sure that the straps are neither twisted nor jammed. Al so check the
lap belts. These mus t not be twisted and should be as low as possible
above the child‘s hip.
WARNING: There should be no more than a finger‘s width bet ween the
body and straps.
4.5. Sitting and reclining positions of the child
This children´s car seat is equipped with a reclining position. The operation
is quick and easy with just one hand. By pressing the positioning handle
(PG), you are able to bring the seat in the desired position for your child.
4.6. Rotation
The child car seat has a 360 ° rotation function.
Seating and taking your child out of the seat becomes
much easier. It can be changed quickly from a rear to a
forward facing car seat.
To turn the seat, you must press the rotate button and
turn the seat at the same time.
The seat engages with a clear >> click << sound.
WARNING: Always follow the instruc tions for rear or forward facing use.
WARNING: Always ensure that the revolving par t of the child car seat is
locked in the forward or rear facing position before driving o. To check,
try turning the seat without pressing the safet y button.
NOTE:
Make sure no dirt is jammed between the seat and the base. This can permanently aect the ease of the rotation.
4.7. Removing the child car seat
Press the release but tons on the ISOFIX connectors to release the ISOFIX anchorage.
Slide the ISOFIX locking arms back into the seat shell.
Now remove the child car seat from the vehicle.
NOTE:
The child car seat must never be transported in the car unless it is properly secured.
5. Care and cleaning
5.1. Removing the cover
For the later correct installation we recommend to document the removal
of the cover with photos.
Carefully pull the protection of the buckle upwards.
Open the pushbuttons between the cover of the seat base and the head
rest.
Reach under the cover at the bottom of the seat and pull it slightly forw ard and upwards.
Now pull the cover over the buckle.
You can wash the cover with a mild detergent in the machine (30 ° C). Please note the
instructions on the washing label .
Please never use chemicals or bleaching agents.
The plastic parts can be cleaned with lukewarm w ater and a mild detergent. Do not use sharp
detergents (such as solvents).
GB
31
32
English English
CAUTION:
Never remove the buckle tongues from the straps or the buckle. Only use HEYNER seat covers.
Never use the child car seat without a cover.
5.2. Reattaching the cover
Perform the previous steps in reverse order.
Connect the upholstery of the headrest and the seat using the pushbuttons.
Attach the shoulder pads again to the shoulder straps and make sure that the straps are not
twisted.
WARNING:
Never use the child seat without properly securing the shoulder pads .
5.3. Af ter an accident
After an accident it is required to repl ace the whole child restraint sys tem or to send it to the
manufacturer for inspection - together with the accident report.
5.4. Product information
If you have any questions, please contact your dealer first.
You should have the following information at hand:
Serial number (see sticker)
Make and model of your car
The child‘s weight, age and height.
Further information and additional car seats for older children can be found at
www.h-germany.de
5.5. Disposal
Please obser ve the disposal regulations applicable to your countr y.
For environmental reasons, we ask you to recycle all packaging materials as well as all product
parts at the end of its usage.
CAUTION:
Keep plastic packaging materials out of reach of your child as they may suocate.
6. Some final hints:
Do not pl ace heavy items on the hat rack. In case of an accident, these could become hazards
and can injure you and your child. Luggage and other similar objects should therefore be stored
away and properly secured.
Make sure that all passengers in your vehicle have their seat-belt fastened, as unfastened
passengers can become a big danger to children in case of an accident.
Allow your child breaks during long car journeys and make sure, they don‘t get out of the car
to the drive way side as well exit the car on their own without super vision.
If available, always use the child safety lock system, which makes it impossible for children
to open the vehicle doors from the inside.
You must never leave the child unattended, even outside the car!
GB
33
34
Русский Русский
1.
Важные замечания по безопасности
...................................................................................................S. 36
2. Размещение автокресла в автомобиле. ............................................................................................. S. 38
3. Использование HEYNER® MultiFix Twist ...............................................................................................S. 39
4. Установка ............................................................................................................................................................S. 40
Установка HEYNER MultiFix TWIST в автомобиле
4.1.
Размещение на сидении автомобиля
4.2.
Регулировка высо ты подголовника (A) и
4.3.
..................................................................................................S. 41
плечевых ремней (SG) по рост у Вашего ребенка.
Фиксация ребенка в автокресле ремнями безопасности
4.4.
автокресла
Положение ребенка сидя и лежа ..........................................................................................................
4.5.
Вращение сидения
4.6.
Снятие автокресла с креплений ISOFIX
4.7.
Уход и чистка
5.
Снятие обивки .................................................................................................................................................
5.1.
Установка обивки
5.2.
Порядок действий после аварии
5.3.
Информация о продукте ............................................................................................................................
5.4.
Утилизация
5.5.
И еще несколько полезных советов:
6.
A Подголовник
A1 По душка по д голову
A2 Ко мфорт пак ет
B Плечевые накладки
BT Корпус автокресла
C Язычки з амка ремн ей
автокресла
D Замок ремней автокресла
DT Кнопка фиксации вращения
сидения автокресла
E Обивка
FG О тделение д ля хран ения
инструкции по эксплуатации
G Ремни безопасности
автокресла
G1 Направляющие плечевых
лямок ремней безопасности
автокресла
G2 Плечевые лямки ремней
безопасности автокресла
G3 По ясные лям ки ремней
безопасности автокресла
G4 Лямка замка ремней
безопасности автокресла
G5 Центральная лямка ремней
безопасности автокресла
GV Кнопка регулировки длины
ремней безопасности
автокресла
35
........................................................................................................................................................S. 43
.........................................................................................................................................S. 44
...............................................................................................S. 45
.....................................................................................................................................................S. 46
...........................................................................................................................................S. 46
............................................................................................................S. 47
.........................................................................................................................................................S. 47
....................................................................................................S. 47
H Ручка регулировки
подголовника
PG Направляющая ручка
K Наклейка с установочными
инструкциями
SG Плечевые накладки
U Диагональная часть 3-х
точечно го ремня
безопасности автомобиля
V Яз ычок замк а 3-х точечн ого
ремня безопасности
автомобиля
W Поясн ая часть 3 -х точечно го
ремня безопасности
автомобиля
X За мок 3-х точе чного рем ня
безопасности автомобиля
AT Кн опка Isofix
IA Точка к реплени я Isofix на
сидении автомобиля
IH Направляющие,
облегчающие установку
креплений ISOFIX
IK З амок сист емы ISOFI X
IM Ножка си стемы ISO FIX
IR Лямка для выдвижения
ножек ISOFI X из крес ла
IT Кнопка раскрытия замка
системы I SOFIX
..........................................................................S. 40
.........................................................................S. 42
S. 44
S. 46
S. 47
S Опорная стойка
SA Цветовой индикатор
опорной стойки
SF кнопку разблокировки
опоры
Благодарим Вас за выбор детского автокресла HEYNER®. При разработке наших
автокресел безопасность, комфорт и удобство использования стоят всегда на первом
месте. Производство ведется при строгом контроле качества и отвечает высочайшим
требованиям стандартов безопасности.
Пожалуйста, уделите достаточно времени для того, что ознакомиться с этой инструкцией.
Максимальную надежность и комфорт автокресло может обеспечить только при
корректной установке.
Пожалуйс та, всегда храните инструк цию по эксплуатации в отсеке д ля хранения на
спинке кресла.
ПРИМЕЧАНИЕ:
Из-за различий в требованиях к автокреслам в разных с транах, некоторые
характеристики этого автокресла могут отличаться.
Обязательно соблюдайте рекомендации производителя автомобиля.
1. Важные замечания по безопасности
Детское автокресло HEYNER® MultiFix TWIST испытано и допущено к эксплуатации
в соответствии с европейским стандартом ECE 44/04 д ля детских удерживающих
устройств. Отметку о сер тификации с регистрационным номером Вы найде те на спинке
сидения на этикетке оранжевого цвета.
Допуск к эксп луатации теряет свою силу, если Вы внесли изменения в конструкцию
детского автокресла. Изменение конструкции может снизить уровень безопасности или
даже полностью лишить автокресло его защитных функций.
Пожалуйста, перед использованием проверьте, что автокресло допущено для
использования в Вашем автомобиле! Никогда не используйте это автокресло на переднем
сидении автомобиля с неотключаемой подушкой безопасности.
Детское автокресло HEYNER® MultiFix T WIST нель зя использовать в качестве стульчика
или игрушки. При использовании автокресла не по его прямому назначению существует
опасность получения травмы.
Пожалуйс та, выделите доста точно времени для установки детского автокрес ла в
автомобиле в соответствии с указаниями этой инструкции.
НЕ ИСПОЛЬЗУЙТЕ детское автокрес ло, если оно повре ждено или если отсу тствуют какиелибо его части. Не исполь зуйте бывшие в упо треблении автокрес ла, если Вы не уверены в
истории их эксплуатации до Вас. Некоторые детали автокресла могут отсутствовать или
иметь скрытые повреждения.
RUS
36
Русский Русский
Убедитесь, что все час ти детского автокресла размещены так, что при пос тоянном его
использовании они не потеряю тся и не будут защемлены дверьми автомобиля или при
регулировке его сидений!
Детское автокресло HEYNER® MultiFix T WIST должно находиться в автомобиле в
закрепленном положении, даже если ребенок не находится в автокресле.
Если детское автокресло не используется, то старайтесь не оставлять его под
воздействием прямых солнечных лучей. Сидение может сильно нагреться. Особенно
подвержен солнечному нагреву замок ремней безопасности. Перед эксплуатацией
удостоверьтесь, что он не горячий.
После аварии требуется заменит ь автокресло или отправить его вместе с описанием
случившегося производителю для проверки.
Никогда не используйте детское автокресло без оригинальной обивки производителя.
При необходимости замены обивки детског о автокресла, используйте только
оригинальные комплектующие компании HEYNER MOBIL AUTOMOTIVE GMBH.
При возникновении вопросов, пожалуйста, обратитесь к продавцу или производителю
детского автокресла.
1.1. При использовании HEYNER MultiFix TWIST соблюдайте следующие требования:
против хода движения автомобиля:
Рост ребенка: 40 - 105 см
Вес: 0 - 18 к г
Возраст: с рождения до 4 лет
При установке против направления движения, пожалу йста используйте только уровень 4
лежачего положения !
по ходу движения автомобиля:
Рост ребенка 83 - 105 cм
Вес: 9 - 18 к г
Возраст: мин. от 16 мес. до примерно 4 лет
Для детей в возрасте до 15 месяцев
НЕ ДОПУСКАЕТСЯ установка автокрес ла по ходу движения автомобиля. Используйте
установк у автокресла против хода движения как можно дольше, так как это самое
безопасное положение для Вашего ребенка.
Убедитесь, что пол автомобильного салона в месте установки автокрес ла свободен.
Наличие посторонних предметов может повлиять на безопасность автокресла.
Регулярно проверяйте направляющие ISOFIX на наличие загрязнений. При необходимости
37
очищайте их. Грязь, пыль, остатки пищи и
пр. могут негативно влиять на надежность
системы крепления автокресла.
2. Размещение автокресла в
автомобиле
Детское автокресло HEYNER® MultiFix T WIST
разработано и испытано в соответ ствии с
европейскими нормами для оборудования,
обеспечивающего безопасность детей (ECE
R44/04). Эта система безопасности одобрена
для эксплуатации на автомобильных
сидениях, совместимых с системой ISOFIX,
на местах, соответствующих стандартам
ECE R44/04, предназначенных для фиксации
автокресел с помощью системы ISOFIX, в
соответствии с руководством по эксплуатации
автомобиля.
На установку автокресла с помощью системы
ISOFIX и опорной стойки (S) действует так
называемое „универсальное“ разрешение
(Univer sal Approval). Автокресла с д анным
типом разрешения могут быть использованы
только в определенных автомобилях.
Утвержденные для использования
транспортные средства можно посмотреть на
сайте www.h-germany.de.
При использовании детского автокресла
на переднем пассажирском сидении
автомобиля, максимально от одвиньте пассажирское сидение назад и следуйте указаниям
руководства по эксплуатации автомобиля. Отключите подушку безопасности пассажира.
Не используйте автокресло при неотключаемой подушке безопасности.
Проверьте с помощью списка производителя Вашего автомобиля, какие из сидений
автомобиля подходят для установки детского автокресла.
Это место не подходит для использования со штатным ремнем безопасности автомобиля.
На сидениях автомобиля, установленных поперек или против хода движения автомобиля,
использование детского автокресла запрещено.
RUS
38
Русский Русский
Всегда убирайте багаж и другие предметы в багажник или закрепляйте их в салоне!
При аварийной сит уации незакрепленные в салоне предме ты могут причинить вред
Вам и Вашему ребенк у.
3. Использование HEYNER® MultiFix Twist
Вид использования Установка
Установка против
хода движения
Установка по
ходу движения
В зависимос ти от рост а и веса ребенка детское автокрес ло может использоваться с
установкой по ход у или против хода движения автомобиля.
ПРЕДУПРЕЖДЕНИЕ:
Устанавливайт е HEYNER MultiFix T WIST только против хода движения, пока возраст
Вашего ребенок не достигнет как мин. 15 месяцев, и ли его рост не будет больше 83 см.
3.1 Использование вкладыша для новорожденного
Комплект вкладышей включает в себя под ушку для тела, поду шку для головы и
клиновидную подушку.
Эти подушки предназначены для специальной защиты младенцев весом до 18 кг.
Мы рекомендуем их использовать как можно дольше, пока это возможно.
Вес и рост
ребенка
<18 кг
40см – 105см
9-18 кг
83см-105см
Соответствующий
возраст
прим. < 4 лет
15 месяцев до
4 лет
Используйте входящ ую в комплек т клиновидную подушку до достижения ребенком веса
13 кг. Она обеспечивает правильное положение тела ребенка, рекомендованное детскими
ортопедами.
4. Установка
ВНИМАНИЕ:
Пока рост Вашего ребенка не дос тиг как минимум 83 cм и пока Ваш ребенок младше как
минимум 15 мес яцев, его тр анспортировка должна производиться только против хода
движения. Аварийная статистика показывает, что перевозка против хода движения
являетс я самой безопасной для ребенка. Поэтому мы рекомендуем как можно дольше
использовать детское авт окресло в положении против хода движения.
4.1. Установка HE YNER MultiFix TWIST в автомобиле
Перед установкой проверьте, входит ли Ваш автомобиль в список одобренных д ля
установки автокресел с универсальным типом крепления ISOFIX. Актуальную версию
списка Вы найдете на сайте ww w.heyner-germany.de.
4.2. Размещение на сидении автомобиля
Перед установкой HEYNER® MultiFix T WIST на сидение ав томобиля д ля облегчения
установки автокрес ла при необходимости сначала закрепит е две входящие в комплект
поставки направляющие (IH) на точки крепления ISOFIX (IA) в Вашем автомобиле.
Точки крепления ISOFI X расположены меж ду
поду шкой и спинкой штат ного сидения
автомобиля. Перед установкой автокресла
переведите опору ISOFIX в вертикальное
положение.
ВНИМАНИЕ:
не размещайте посторонние предметы
в прос транстве для ног перед детским
автокреслом.
Освободите замки соединительных элементов ISOFIX (IK). Д ля этого, удерживая кнопку
разблокировки ISOFIX, вытяните ножки ISOFIX из основания автокрес ла.
RUS
39
40
Русский Русский
click
press
Проверьте индикаторы раскрытия/блокировки
замков ISOFIX автокресла (IT). Оба индикатора
должны быть окрашены в кр асный цвет. Если
красная индикация не видна, понажимайте
на зеленые кнопки разблокировки замков до
четко слышимого „щелчка“.
Возьмитесь за детское автокресло обеими
руками и вдавите его в сидение ав томобиля
на ножках ISOFIX (IM), защелкнулись на местах кр епления ISOFIX сидения автомобиля
(IA).Четкие „щелчки“ замков ISOFIX в момент их фиксации говоря т о том, что замки ISOFIX
надежно зафиксированы.
Опорная стойка (S) регулируется в 18 положениях. Нажмите кнопку разблокировки
опоры (SF) и вытяните с тержень стойки до самого пола. Если опорная стойка надежно
закреплена по полу, то индикатор положения опорной стойки будет окрашен в зеленый
цвет. Если индикатор окрашен в красный цвет, то повторите процедуру установки опорной
стойки сначала.
CHECK
автомобиля.
41
прочно зафиксировано на штатном сидении
так, чтобы замки ISOFIX (IK), расположенные
Оба индикатора фиксации замков ISOFIX должны
быть окрашены в зеленый цвет. Пожалуйста,
проверьте по индикаторам с ДВУХ СТОРОН, что
детское автокресло корректно зафиксировано на
обеих точках (IA) креплений ISOFIX в автомобиле.
Только правильное крепление замков ISOFIX (IK)
с КА ЖДОЙ СТОРОНЫ гар антирует корректную
фиксацию детского автокресла в автомобиле и
обеспечивает безопасность ребенка!!!
ПРЕДУПРЕЖДЕНИЕ:
опорная стойка не должна висеть в
пространстве, не касаясь пола, и не должна
опираться на какие-либо посторонние
предметы, кроме пола автомобиля.
Внимательно следите, чтобы индикатор
опорной стойки всегда был окрашен в зеленый
цвет.
Еще раз убедитесь, что детское автокресло
Детское автокресло HEYNER® MultiFix T WIST может обеспечить
максимальную защит у ребенка, только если оно правильно
установлено на ш татном сидении автомобиля на ОБЕИХ точках
креплений ISOFIX (IA) и С ПОМОЩЬЮ ремня Top Tether (TT).
4.3.Регулировка высоты подголовника (A) и плечевых ремней (SG)
по росту Вашего ребенка
Для регулировки высоты подголовника (A) по росту Вашего ребенка
возьмитесь за подголовник с зади и потяните вверх ру чку его рег улировки (H).
В зависимос ти от рост а ребенка переведите подголовник (A) на ну жную высоту.
Как только необходимая высота достигнута, отпустите ручку
регулировки (H). Подголовник (A) зафиксируется в нужном
положении.
Только оптимально отрегулированный подголовник обеспечивает
максимальную безопасность. Подголовник должен быть установлен
так, чтобы плечевые лямки 5-точечных ремней безопасности
автокрес ла (G) проходили на уровне плечей ребенка, не выше и не
ниже.
Подголовник рег улируется по высоте в 7 положениях.
Ремни безопасности регулируются вместе с регулировкой высоты подголовника.
Плечевые лямки ремней надежно соединены с подголовником и нет необходимости в их
дополнительной регулировке.
Регулировка размера ремней безопасности автокресла (G)
производится при помощи перестановки высоты подголовника (A).
Подголовник должен быть отрегулирован так, чтобы расстояние
между плечами ребенка и подголовником не превышало 3 см
(примерно ширина 2-х пальцев взрослого).
L+R
CHECK
RUS
42

Русский Русский
Pull
L
Press
4.4 Фиксация ребенка в автокресле ремнями безопасности автокресла
Перед тем как усадить ребенка в автокресло убедитесь, что
подголовник зафиксирован.
Ослабьте плечевые лямки ремней, одновременно нажав на кнопку
регулировки длины ремней безопасности автокрес ла (GV) и потянув
плечевые лямки (G2) на себя.
ВНИМАНИЕ:
Не тяните за плечевые накладки.
Расстегните замок (D) ремней безопасности автокресла (G).
Разведите плечевые лямки ремней безопасности автокресла (G2) по сторонам
автокрес ла, налево и направо. Глубоко усадите ребенка в автокрес ло HEYNER® MultiFix
TWIST так, чтобы попа ребенка была плотно прижата к подушке
сидения автокресла и к нижней части спинки автокресла.
Совме стите язычки замка (C) обеих плечевых лямок (G2) ремней
безопасности автокрес ла и вставьте и х в замок (D). Если замок
защелкнулся, то вы услышите отчетливый „щелчок“.
Убедитесь, что при затягивании центральной регулировочной лямки
(G5), грудные лямки ремней (G2) крепко фиксируют ребенка и не
перекручены.
Избегайте многослойной одежды ребенка под ремнями безопасности автокресла,
особенно зимой.
ПРЕДУПРЕЖДЕНИЕ:
Убедитесь, что замок ремней безопасности автокресла не имеет
загрязнений. Только чистые пряжки ремня фиксируют ремень с отчетливым щелчком и
надежно.
ВАЖНО:
Убедитесь, что плечевые лямки ремней не перекручены и не
защемлены. Также проверьте поясные лямки ремней. Они не должны
быть перекручены и должны проходить как можно ниже над бе драми
ребенка.
ПРЕДУПРЕЖДЕНИЕ:
Расстояние между ремнями безопасности и телом ребенка не должно
превышать ширины пальца взрослого (1 см).
43
4.5. По ложение реб енка сидя и ле жа
Детское автокресло HEYNER® оснащено регулировочным
механизмом. Рег улировка производится про сто и быстро только
одной рукой. Через управление ручкой (PG) детское автокресло
приводится в необходимое ребенку положение.
4.6 Вращение сидения
Данное дет ское автокресло обладае т функцией поворота сидения на 360°. Это облегчает
посадку и высадку ребенка. С помощью данной функции можно также быстро изменить
положение сидения автокресла из направления противоположного движению
автомобиля на направление по ходу движения
автомобиля.
Чтобы привести в действие функцию вращения,
необходимо одновременно нажать на кнопку
фиксации и повернуть сидение в нужное
направление.
Механизм вращения сидения фиксируется с
отчетливым „щелчком“.
ВНИМАНИЕ:
Всегда строго следуйте указаниям по использованию ав токресла для установки по ходу
движения или против хода движения автомобиля.
ПРЕДУПРЕЖДЕНИЕ:
Перед началом пое здки убедитесь, что вращающаяся часть автокрес ла четко
зафиксирована в одной из позиций: по ход у или против хода движения. Для проверки
фиксации попробуйте вр ащать сидение без нажатия на кнопк у фиксации положения
сидения.
ЗАМЕЧАНИЕ:
Следите за тем, чтобы в промежуток между вращающейся час тью и основанием сидения
не попадали грязь и другие посторонние пр едметы. Э то может нег ативно сказаться на
легкости вращения или полностью вывести механизм вращения из строя.
RUS
44

Русский Русский
4.7. Снятие автокресла с креплений ISOFIX
Для того чтобы раскрыть замки ISOFIX нажмите кнопки
разблокировки замков ISOFIX, расположенные на ножках ISOFIX.
Задвиньте ножки ISOFIX в базу автокресла.
Теперь детское авток ресло можно снять с сидения ав томобиля.
ВНИМАНИЕ:
Не перевозите детское автокресло в авт омобиле без его надлежащей фиксации, даже
если в автокресле не сидит ребенок. ВСЕГДА фиксируйте автокресло в автомобиле.
5. Уход и чистка
5.1. Снятие обивки
Для того чтобы не забыть как надеть обивку на автокре сло, мы
рекомендуем фотографировать каждый этап снят ия обивки с
автокресла.
Осторожно отведите в стороны часть обивки, обрамляющей замок
ремней безопасности автокресла.
Расстегните кнопки, фиксирующие обивку автокресла и обивку
подголовника между собой.
Возьмитесь за край обивки под нижней передней частью сидения и легко оттяните ее
снача ла от сидения, а затем вверх. Вытяните обивку над пряжкой ремня.
Постирать обивку можно мягкими моющими средств ами вручную или в с тиральной
машине в режиме деликатной стирки (30° C). Пожалуйста, следуйте указаниям на
этикетке.
Не используйте химические вещества или отбеливатели.
Пластиковые детали можно очистить теплой водой с мягким моющим средством. Никогда
не используйте жесткие моющие средства (такие как растворители).
ВНИМАНИЕ:
Никогда не отсоединяйте язычки замка от ремней или замка ремня. Используйте то лько
оригинальную обивку HEYNER. НЕ используйте детское автокрес ло без обивки.
45
5.2. Установка обивки
Выполните предыдущие шаги по снятию обивки в обратном порядке.
Соедините с помощью кнопок обивку подголовника с обивкой самого сидения.
Прикрепите плечевые накладки обратно к плечевым ремням. Следите за тем, чтобы ремни
не перекручивались.
ВНИМАНИЕ:
Никогда не используйте детское автокресло без правильно установленных плечевых
накладок.
5.3. Порядок действий после аварии
После аварии необходимо заменить автокресло целиком или отправить автокресло
производителю на диагностику в сопровождении с пояснительной запиской,
описывающей происшествие.
5.4. Информация о продукте
При возникновении вопросов, пожалуйста, обратитесь к продавцу Вашего автокрес ла.
При обращении, пожалуйста, сообщите следующую информацию:
Серийный номер автокресла (смотрите на этикетке)
Марка и тип автомобиля
Вес, возраст и рост ребенка
Дополнительную информацию, а также наш полный ассортимент можно найти на сайте
h-germany.de
5.5. Утилизация
Пожалуйс та, соблюдайте правила утилизации, дейс твующие в Вашей стране.
Для поддержания чистоты окружающей среды, мы просим Вас сдать в утилизацию
упаковку и другие части автокресла, если Вы собираетесь их выбросить.
ВНИМАНИЕ:
Храните упаковочные материалы из пластика в недос тупном д ля детей месте, чтобы
избежать опасности удушения.
RUS
46

Русский Русский
6. И еще несколько полезных советов:
Не кладите тяжелые предме ты на полку под заднее стекло автомобиля. При аварии
эти предметы могут травмировать находящихся в автомобиле пассажиров. Всегда
фиксируйте багаж и друг ие перевозимые в салоне предметы.
Следите за тем, чтобы все пассажиры в автомоби ле были прис тегнуты ремнями
безопасности. В случае аварии не пристегнутые пассажиры могу т травмировать
себя и ребенка.
В длительных поездках делайте частые перерывы для того, чт обы Ваш ребенок мог
отдохнуть.
Не высаживайте детей в с торону проезжей части. Не допускайте высадки детей из
автомобиля без сопровождения взрослых.
Если предусмотрено конструкцией автомобиля, для безопасности ребенка всегда
используйте защитную блокировку дверных замков, предотвращающую открытие
дверей изнутри.
Не оставляйте ребенка без присмотра в автомобиле или
около автомобиля.
RUS
47
48

français français
1.
Consignes de sécurité
2. Positionnement dans le véhicule. ............................................................................................................... S. 52
3. Possibilités d‘utilisation du HEYNER® MultiFix Twist ........................................................................S. 53
4. Installation ........................................................................................................................................................... S. 54
Montage du HEYNER MultiFix TWIST dans le véhicule
4.1.
Installation sur le siège du véhicule
4.2.
Réglages hauteur de repose-tête (A) e t des sangles d‘épaule selon
4.3.
la taille de votre enfant.
Attacher la ceinture de votre enfant
4.4.
Positions d‘assise et allongé de l‘enfant
4.5.
Fonction de rotation
4.6.
Comment démonter le siège pour enfants
4.7.
Entretien et nettoyage
5.
Enlever la housse du siège...........................................................................................................................
5.1.
Fixer à nouveau l a housse du siège
5.2.
Après un accident
5.3.
Informations sur le produit .........................................................................................................................
5.4.
E limination du produit
5.5.
Quelques conseils supplémentaires pour terminer:
6.
A Appui-tête
A1 Oreiller
A2 Coussin de réduction
B Rembourrage d‘épaule
BT Pièce de ba se
C Languet tes de verrouillage
D Boucle d e ceinture
DT B outon pour t ourner le siè ge
E Ho usse du siège
FG Compartiment pour manuel
d‘utilisation
G Systè me de harnais 5 p oints
G1 Fente de c einture d‘épa ule
G2 Sang les de harnais
G3 Cein ture abdominale
G4 C einture de fix ation
entrejambe
G5 Ceinture de réglage centrale
GV D ispositif d e réglage d e
.....................................................................................................................................S. 50
.....................................................................S. 54
.........................................................................................................S. 54
.................................................................................................................................S. 55
........................................................................................................S. 56
.................................................................................................S. 57
........................................................................................................................................S. 57
............................................................................................S. 58
...................................................................................................................................S. 58
S. 58
...........................................................................................................S. 59
..............................................................................................................................................S. 59
S. 59
....................................................................................................................................S. 60
.........................................................................S. 60
ceinture
H Levier d e réglage p our
appui-tête
PG Poignée d e positionn ement
K Etiquette d‘installation
SG C eintures d e rembourr age
d‘épaule
U Ceintur e diagonale d e la
ceinture à tr ois points d e
voiture
V Lang uette de v errouill age
de la ceintu re à trois poin ts
de voiture
W Ceinture sous-abdominale
de la ceintu re à trois poin ts
du véhicule
X Bouc le de ceintur e de la
ceinture à tr ois points d u
véhicule
AT Bouton d‘ arrêt
IA Ancre s ISOFIX
IH Ai des à montag e ISOFIX
IK Conn ecteurs ISOFIX
IM Bras I SOFIX
IR Passan t ISOFIX
IT Bou tons de déverrouillage
ISOFIX
S Pie d support
SA Indica tion de pied su pport
SF bouton de déverrouillage
Nous vous remercions d‘avoir choisi ce siège enfant HEYNER® pour sécuriser votre enfant en
voiture. Pendant le développement de nos sièges la sécurité, le confort et la facilité d‘utilisation
sont toujours au premier plan. La production s‘eectue sous un strict contrôle de qualité et
remplit les plus hautes exigences de sécurité.
Veuillez vous assurer de prendre susamment de temps pour le bon fonctionnement.
La sécurité e t le confort du siège ne sont garantis que s‘il es t installé correctement.
Veuillez garder le manuel d‘installation toujours dans le compartiment pour celui-ci (FG)
qui se trouve à l‘arrière du siège.
ATTENTION:
A cause des exigences spécifiques des pays, les caractéristiques du produit peuvent diérer.
Il faut absolument suivre les recommandations du fabricant de véhicule.
1. Consignes de sécurité
Le siège-auto pour enfants HEYNER® MultiFix TWIST est testé et homologué selon la norme
européenne ECE 44/04 relative aux dispositifs de re tenue pour enfants. La marque d‘essai E
avec le numéro d‘homologation se trouve au dos du siège sur l‘étiquette orange.
Cette autorisation expirera si vous apportez des modifications au siège. Celles-ci peuvent
réduire ou éliminer la sécurité.
Veuillez vérifier si le siège est approuvé pour votre voiture avant utilisation!
Il ne faut pas utiliser le HEYNER® MultiFix T WIST comme siège ou jouet dans la maison.
Veuillez prendre le temps d‘utiliser le siège comme décrit dans votre voiture.
N‘utilisez pas le siège, s‘il est endommagé ou si des pièces manquent. N‘utilisez pas de produits
de seconde main dont vous ne connaissez pas le passé. Des pièces pourraient manquer ou être
endommagées.
Veillez à ce que toutes les parties du siège d‘enfant soient positionnées de manière à ne pas
être perdues lors de l‘utilisation quotidienne ou coincées entre les por tes ou entre les sièges
réglables.
Le siège HEYNER® MultiFix T WIST doit toujours rester fixé dans la voiture, même si l‘enfant ne
l‘occupe pas.
F
49
50

français français
Quand le siège enfant n‘est pas utilisé, veuillez le protéger contre les rayons du soleil intenses
et directs. Il est possible qu‘il se réchaue beaucoup à cause de l‘ensoleillement intense. La
boucle de ceinture en particulier peut devenir très chaude.
Après un accident, vous devez remplacer tout le dispositif de retenue pour enfants ou l‘envoyer
au fabricant pour inspection avec un r apport d‘accident.
Le siège enfant ne doit jamais être utilisé sans la housse d‘origine.
En cas de remplacement de la housse en tissu, vous devez utiliser que des housses d‘origine
HEYNER MOBIL AUTOMOTIVE GMBH.
En cas de dicultés, veuillez contacter votre vendeur ou le fabricant.
1.1. Veuillez respecter les conditions préalables suivantes pour l‘util isation du
HEYNER MultiFix TWIST:
CONTRE le sens du déplacement:
Taille: 40-105cm
Poids: naissaince - 18kg
Age: naissance - 4 ans
Veuillez utiliser seulement le niveau 4 de la position allongée
quand le siège es t utilisé en position dirigée vers l’arrière.
DANS le sens du déplacement:
Taille: 83-105cm
Poids: 9-18kg
Age: au moins 15 mois- environ 4 ans
Des enfants de moins de 15 mois NE DOIVENT PAS être placés dans le sens du déplacement.
Laissez votre enfant conduire contre le sens du déplacement aussi longtemps que possible,
car c‘est en général la position d‘assise la plus sûre.
Ne placez pas d‘objets dans la zone du pied suppor t devant de la base.
Vérifiez régul ièrement, si les guides ISOFIX sont encrassés. Nettoyez-les si nécessaire.
La fiabilité du s ystème peut être entravée par l‘infiltration de saleté, de poussière, de restes
alimentaires etc.
2. Positionnement dans le véhicule
Le dispositif de retenue pour enfant s HEYNER®
MultiFix TWIST est approuvé et conçu conformément à la norme européenne pour l‘équipement de sécurité pour enfant s (ECE R 44/04).
Conformément à la réglementation ECE R44/04,
il est autorisé pour l‘utilisation dans des positions
de véhicule compatibles à la „classe ISOFIX D/B1“,
qui sont appropriés à des systèmes de retenue
ISOFIX selon les indications du fabricant du véhicule dans le manuel du véhicule.
Pour le montage avec ISOFIX et Pied support, il
existe une homologation „semi universelle“. Le
siège ne peut donc être utilisé que dans certains
véhicules. Veuillez vous référer à la liste des
types de véhicules approuvés.
Si le siège est utilisé sur le siège passager,
poussez celui-ci le plus possible vers l‘arrière
et suivez les instructions dans le manuel du
véhicule. Désactivez l‘airbag du passager! Si ce
n‘est pas possible, une utilisation du siège au côté
passager est interdite.
Vérifiez avec la liste de véhicule de votre fabricant quels sièges de voiture sont appropriés à
l‘utilisation de sièges auto pour enfants.
Ce siège N‘EST PAS approprié à l‘utilisation d‘une
ceinture de sécurité de voiture normale.
L‘utilisation du siège sur les places voitures fais ant face vers le côté ou vers l‘arrière par rapport
à la direction de déplacement n‘est pas autorisée.
Sécurisez vos bagages et des objet s non fixés! En cas d‘un accident, ils risquent de se
transformer en dangereux projectiles et de blesser votre enfant.
F
51
52

français français
3. Possibilités d‘utilisation du HEYNER® MultiFix Twist
manière d‘utilisation installation taille de l‘enfant âge de référence
dirigé vers l‘avant
dirigé vers l’arrière
Dépendant de la taille et du poids, le siège peut être utilisé faisant face vers l‘avant et vers
l‘arrière.
IM POR TAN T:
Il faut utiliser le siège HEYNER® MultiFix Twist faisant face vers l‘arrière jusqu‘à ce que votre
enfant ait atteint un poids d‘au moins 9kg, un âge d‘au moins 15 mois respectivement une taille
supérieure à 83cm.
3. 1. Utilisation du coussin de réduction
Le coussin de réduction comprend un oreiller, un coussin pour le corps e t un traversin.
Les coussins sont conçus pour la protection spéciale des tout-petits de 9k g à 18kg. Nous vous
recommandons de ne pas les retirer avant que l‘enfant ne soit trop grand pour cela, au plus t ard
lorsque l‘enfant pèse 18 kg.
Utilisez le traversin fourni jusqu‘à ce que votre enfant pèse 13 kg. Il suppor te la position allongée
plus plate qui est aussi recommandée par les orthopédistes.
< 18 kg
40-105 cm
9-18kg
83-105 cm
environ <4 ans
de 15 mois
à 4 ans
4. Installation
ATTENTION:
Il FAUT transporter l‘enfant faisant face vers l‘arrière jusqu‘à une taille d‘au moins 83 cm et
jusqu‘à un âge d‘au moins 15 mois. Les statistiques d‘accidents prouvent qu‘un transport de
votre enfant dirigé vers l‘arrière est en génér al le plus sûr. Pour cela, nous vous recommandons
d‘utiliser le siège en étant dirigé vers l‘arrière aussi
longtemps que possible.
4.1. Montage du HEY NER MultiFix TWIST dans le véhicule
Consultez la liste des types de véhicules homologués. Vous trou verez la version actuelle sur
www.h-germany.de.
4.2. Installation sur le siège du véhicule
Avant de placer le HEYNER® MultiFix T WIST sur le siège auto, fixez les deux aides montage (IH)
fournies aux ancres ISOFIX (IA) de votre voiture.
Les points de fixation ISOFIX sont situés entre le
siège et le dossier du siège auto.
Dépliez le pied suppor t toujours jusqu‘ce qu‘il
s‘enclenche à l‘avant.
ATTENTION:
Ne placez pas d‘objets dans l‘espace réservé aux
pieds devant le siège pour enfants.
Débloquez l‘arrêt des connec teurs ISOFIX (IK), en pressant en même temps le bouton d‘arrêt
(AT) et en sortant les deux bras de verrouillage (IM) avec le passant ISOFIX.
Vérifiez les indicateurs de sécurité. Ces deux
éléments doivent être ROUGE. Si les indicateurs de
sécurité (ROUGE) ne sont pas visibles, appuyez sur
les boutons de déverrouillage jusqu‘ à ce que vous
entendiez un >>clic<<.
F
53
54

français français
click
press
L
Press
L+R
CHECK
Saisissez le siège avec vos deux mains et poussez
les deux connecteurs ISOFIX (IK) fermement dans les
guides d‘inser tion, jusqu‘à ce que les bras ISOFIX (IM)
s‘enclenchent.
Vous entendez un „click“ audible.
Veuillez vérifi er avec les indicateur s de sécurité des
DEUX CÔTÉS si le siège est correctement connecté
aux ancres ISOFIX (IA) de la voiture.
Seule une fi xation correcte des deux pinces garantit le maintien souhaité
du siège e t la sécurité de votre enfant dans le véhicule!
Le pied suppor t (S) est réglable en 18 positions. Pressez le bouton de déverrouillage (SF) au pied de support et rallongez le pied support jusqu‘au
sol. Si le pied est dans une position stable, l‘indication de pied suppor t (SA)
est complètement verte. Si l‘indication est rouge, répétez le processus.
IMPORTANT:
Le pied suppor t ne doit pas être suspendu en l‘air ni
des objets doivent être placés sous le pied suppor t.
CHECK
optimale à votre enfant.
4.3. Réglages hauteur de repose-têt e (A) et des sangles d‘épaule selon
la taille de votre enfant
Pour régler la hauteur du repose-tête (A) en fonction de la taille de votre
enfant, saisissez le repose-tête par l‘arrière et tirez le levier de réglage
(H) vers le haut. Selon la taille de votre enfant, vous pouvez maintenant
Veillez à ce que l‘indication de pied support soit
verte.
Vérifi ez une fois de plus que le siège enfant est bien
fi xé au siège.
Ce n‘est que si la fi xation HEYNER® MultiFix TWIST
avec les ancrages ISOFIX (IA) et l‘ancrage supérieure (TT) est correctement installée dans le siège
auto que le siège peut o rir une protec tion
régler le repose-tête (A) à la hauteur souhaitée. Dès que vous avez atteint
la bonne hauteur, relâchez le levier de réglage (H) et le repose-tête (A) se
verrouille à la hauteur souhaitée. Seul un repose-tê te à réglage optimal
garantit une sécurité maximale. Le repose-tête doit être réglé de manière
à ce que le système de harnais 5 points intégré (G) soit aligné au niveau
des épaules de l‘enfant.
Le repose-tête peut être ajusté à 7 hauteurs di érentes.
Le système de ceinture est ajusté avec la hauteur du repose-tête. Les ceintures d‘épaule (SG)
sont reliées fermement ave le repose-tête et elles ne doivent pas ê tre ajustées séparément.
La taille du sy stème de harnais peut être adaptée à votre enfant en ajustant le repose-tête (A).
Le repose-tête doit être ajusté de façon à ce qu‘il y ait un espace d‘environ 3 cm
(environ 2 largeurs de doigts) entre les épaules de l‘enfant et le repose-tête.
4.4. Attacher la ceinture de votre enfant
Veillez à ce que le repose-tête soit enclenché avant de mettre votre enfant
dans le siège.
Desserrez les sangles d‘épaule en appuyant sur le bouton de réglage de
courroie (GV) et tirez les sangles de har nais (G2) vers vous.
ATTENTION
Ne tirez pas sur les épaulettes.
Ouvrez la boucle de harnais (D) et le système de harnais 5 points (G).
Placez les sangles de harnais (G2) à gauche e t à droite vers les côtés.
Placez ensuite l‘enfant dans le siège HEYNER® MultiFix TWIST de manière à
ce que les fesses soient bien enfoncées dans la cavité du siège.
Joignez les deux languettes de verrouillage (C) des sangles de harnais (G2)
ensemble et connectez-les avec la boucle (D) jusqu‘ à ce qu‘un „clic“ cl air
se fasse entendre.
F
55
56

français français
Pull
Assurez-vous que les sangles du harnais (G2) sont plates et proches de
l‘enfant en tirant sur la sangle de réglage centrale (G5) et qu‘elles ne sont
pas torsadées. Évitez de porter des vêtement s trop épais sous la ceinture,
surtout en hiver.
IMP ORTANT:
Veillez à ce que la boucle de ceinture soit exempte d‘impuretés. Seulement
des boucles de ceinture propres s‘enclenchent fermement et d‘une façon
audible.
IMP ORTANT:
Veillez à ce que la courroie de la ceinture trois points ne soit ni tor sadée ni
coincée. Vérifiez également les ceintures sous-abdominales. Elles ne doivent pas être tordues et doivent courir le plus bas possible sur la hanche
de l‘en fant.
IM POR TAN T: L‘espace entre le corps e t les ceintures ne doit pas dépasser
la lar geur d‘un doigt.
4. 5. Positions d‘assise e t allongé de l‘enfant
Les sièges enfants HEYNER® sont équipés d‘un mécanisme de réglage. L‘opération est simple et
rapide d‘une seule main. En actionnant l a poignée de position (PG), vous amenez le siège dans la
position désirée pour votre enfant.
4. 6. Fonc tion de rotation
Le siège pour enf ants dispose d‘une fonction de rotation de 360°. Cela vous facilite d‘asseoir votre enfant sur le siège et de le sor tir du siège. De plus, on peut changer le siège rapidement d‘un
siège dirigé ver s l‘arrière à un siège dirigé vers l‘avant.
Pour pouvoir tourner le siège, vous devez presser le
bouton pour tourner le siège et tourner le siège en
même temps.
Le siège s‘enclenche avec un „click“ audible.
ATTENTION:
Suivez toujours les instructions pour la manière d‘utilisation d‘un siège dirigé vers l‘arrière ou
bien vers l‘avant.
ATTENTION:
Veillez à ce que la partie rotative du siège pour enfants soit enclenchée dans la position dirigé
vers l‘avant ou vers l‘arrière avant le départ.
INDICATION:
Veillez à ce que des impuretés ne pénètrent pas entre le siège et la base. Cela peut à la longue
compromettre la facilité de rotation.
4. 7. Comment démonter le siège pour enfants
Appuyez sur le bouton de déver rouillage aux connecteurs ISOFIX et détachez comme cela l‘ancrage ISOFIX.
Repoussez les bras de verrouillage ISOFIX dans l‘assise.
Otez maintenant le siège du véhicule.
INDICATION:
Il ne faut jamais transporter le siège dans la voiture, s‘il n‘est pas fixé correctement.
5. Entretien et nettoyage
5. 1. Enlever la housse du siège
Nous recommandons de documenter l‘enlèvement de la housse avec des
photos pour l‘installation ultérieure correcte.
Enlevez la protection de la boucle de ceinture vers le haut d‘une manière
précautionneuse.
Ouvrez les boutons poussoirs entre la housse de la pièce de base et l a pièce de tête.
Saisissez sous la housse au bord inférieur du siège et tirez-la légèrement ver s l‘avant et vers le
haut. T irez la housse par-dessus la boucle de ceinture.
Vous pouvez laver la housse avec un détergent doux dans le programme „l inge délicat s“ (30°C).
Veuillez respecter les indications sur l‘étiquette de lavage.
F
57
58

français français
N‘utilisez jamais des nettoyant s chimiques ni des agents de blanchiment.
Des pièces en plastique peuvent être lavées avec de l‘eau tiède et avec un détergent doux.
N‘utilisez pas de détergents agressifs (comme par e xemple des dissolvants).
ATTENTION:
N‘ôtez jamais la languette de verrouillage des ceintures ni le boucle de ceinture. N‘utilisez que
des housses HEYNER. N‘utilisez le siège jamais sans housse.
5. 2. Fixer à nouveau la housse du siège
Eectuez les étapes précédentes dans l‘ordre inverse.
Connectez la housse de la pièce de tête avec celui de la pièce de base à l‘aide des boutons poussoirs.
Attachez les rembourrages d‘épaule de nouveau aux ceintures d‘épaule. Veillez à ce que les
ceintures ne soient pas torsadées.
IMP ORTANT:
N‘utilisez le siège jamais sans rembourrages d‘épaule correctement fixés.
Après un accident, vous devez remplacer tout le dispositif de retenue pour enfants ou l‘envoyer
au fabricant pour inspection avec un r apport d‘accident.
5.4 Informations sur le produit
Si vous avez des questions, contactez d‘abord votre commerçant.
Vous devriez avoir les données suivantes sous la main:
Numéro de série (voir étiquette)
Marque et type de voiture
Poids, âge et taille de l‘enfant
Vous trouvez plus d‘informations et des sièges additionnel s
sur le site h-germany.de.
5.5. Elimination du produit
Veuillez suivre les prescriptions de mise au rebut valables dans votre pays.
Pour des raisons de protection de l‘environnement, nous vous prions de trier
et de mettre au rebut l‘emballage et les parties du produit à l a fin de leur utilisation.
IM POR TAN T:
Gardez les matériaux d‘emballage de matière plastique hors de la portée de votre enfant, pour
éviter tout risque de suocation.
6. Quelques conseils supplémentaires pour terminer:
Ne placez pas d‘objets lourds sur la plage arrière - ces derniers pourraient devenir des projectiles dangereux en cas d‘accident et blesser votre enfant. C‘est pourquoi vous devez sécuriser vos
bagages et autres objets.
Assurez-vous que tous les occupants de votre voiture sont at tachés avec des ceintures de sécurité. Les personnes non ceinturées dans le véhicule peuvent présenter un risque majeur pour
l‘enfant en cas d‘accident.
Accordez à votre enfant des pauses pendant les long s trajets et assurez-vous qu‘il ne sorte pas
du véhicule en direction de la route ou sans surveillance.
Dans la mesure du possible, utilisez toujour s la sécurité enfant des por tières de la voiture,
rendant l‘ouver ture de la por te de l‘intérieur impossible.
Ne laissez jamais votre enfant sans sur veillance à l‘intérieur ou autour du véhicule.
F
59
60

Türkçe Türkçe
1.
Önemi Bilgilendirme
2. Ar aç koltuğuna yerleş tirmek. .......................................................................................................................S. 64
3. HE YNER® MultiFix Twist‘in kullanımı. ....................................................................................................... S. 65
4. Kurulum .................................................................................................................................................................S. 66
Araç ta HEYNER MultiFix TWIST kurulumu
4.1.
Araç koltuğuna konumlandırma
4.2.
Kafalık (A) ve emniyet kemeri kayışlarının (SG)
4.3.
çocuğunuzun boyutuna göre yükseklik ayarı..
Çocuğunuzun emniyet kemerini takma
4.4.
Koltuk yatış pozisyonu
4.5.
rotasyon
4.6.
4.7.
5.
5.1.
5.2.
5.3.
5.4.
5.5.
6.
A Başlık
A1 Başlık pedi
A2 Oturma Pedi
B Omuz kemer k ılıfı
BT Ana kasa
C Kemer takma uçları
D Kemer tokası
DT Döndğrme Dügmesi
E Kılıf
FG Kullanım kılavuzu b
ölümü
G 5 nokta emniyet kemeri
G1 Kemer geçme yeri
G2 Omuz kemeri
G3 Yanlardan gelen
kemerler
................................................................................................................................................................S. 69
Isofi x ‚ın Çıkar tılması
Bakım ve temizlik
Kılıfın çıkarılması .............................................................................................................................................
Kılıfın tekrar takılması
Kaza sonrası davranış
Ürün Bil gisi .........................................................................................................................................................
yok etme
................................................................................................................................................................S. 71
birkaç Bilgi
............................................................................................................................................................S. 72
.........................................................................................................................................S. 62
.................................................................................................................S. 66
....................................................................................................................................S. 69
.......................................................................................................................................S. 70
..............................................................................................................................................S. 70
....................................................................................................................................S. 71
.....................................................................................................................................S. 71
G4 Toka kemeri
G5 Kemer çıkıntısı
GV Kemer uzunluk ayarı
H Başlık Ayar Mandalı
PG Yatış pozisyonu ayar
mandalı
K Montaj Talimatı
SG Omuz kemeri
U Araç üst kemer
V A raç kemer takma ucu
W Araç alt kemer
X Araç kemer tokası
AT İsofix Kilit Dügmesi
IA Isofix bağlantı kancaları
IH Isofix takma kılavuzları
.............................................................................................S. 66
.....................................................................................S. 67
...................................................................................................S. 68
S. 70
S. 71
IK Isofix bağlan tı çubukları
ucu
IM Isofix bağlantı çubukları
IR İsofix Açma Kayışı
IT Isofix kilit açma yeri /
Isofix ayar dügmesi
S Destek Cihazı
SA Destek Cihazı
Göstergesi
SF bırakma düğmesine
Heyner çocuk oto koltuğunu seçtiğiniz için teşekkür ederiz. Oto koltuğ u yeniliklerimizde
konfor,güvenlik ve kull anım kolaylığı ön pl andadır. Üretici her zaman yüksek kalite ve yüksek
güvenlik standartlarını ön planda tutar.
Lütfen doğru montaj için yeterl i zaman ayırın. Maksimum güvenlik ve konfor sadece doğru
montaj ile sağlanmaktadır.
Lütfen kullanma kılavuzunu (FG) kılavuz yerinde bulundurunuz.
NOT: Ülkeye özgü gereksinimler nedeniyle ürün özellikleri farklılık gösterebilir.
Otomobil üreticisinin tavsiyelierini mutlaka uygulayınız
1. Önemi Bilgilendirme
HEYNER® MultiFix T WIST ECE R44/04 sertifikasına sahiptir. Etiket port akal renkte koltuğun
arka tarafında bulunmaktadır.
Koltukta herhangi bir değişiklik yaparsanız, onay geçerliliğini kaybeder. Bu güvenliği azaltabilir
veya tamamen ortadan kaldırabilir.
Lütfen kullanmadan önce oto koltuğunun aracınız için uygun olup olmadığını kontrol ediniz.
Der HEYNER® MultiFix TWIST ev eşyası olarak kullanılamaz ki yaralanmalar söz konusu olabilir.
Lütfen sadece aracınızda kullanınız.
Lütfen bu kılavuzda açıklandığı gibi, koltuğunuzu arabanıza yerleştirmek için yeterli zaman
ayırın.
Çocuk koltuğunu hasarlıysa veya parçalar eksikse KULLANMAYIN. İkinci el ürünleri kullanmayın,
çünkü tarihi bilinmiyor. Bazı koltuk parçaları eksik olabilir veya hasar görebilir.
Dikkat ediniz ki ana kucağının plastik kısımları sıkışmalarda veya
darbelerde kırılabilir!
HEYNER® MultiFix T WIST oto koltuğu kullanmadığı zamanda araçta bağlanmalıdır.
Koltuğu kullanmadığınız sürece direkt güneş ışığından koruyunuz. Aşırı sıcak tan kemerler çok
ısınabilir.
TR
61
62

Türkçe Türkçe
Kazadan sonra ana kucağı yenisi ile değiştirilmeli veya üretici firmaya test içi gönderilmelidir.
Testler ücretlidir.
hiçbir zaman kendi orijinal kılıfı olamadan kullanılamaz
Kılıfı değiştirmek isterseniz Heyner firmasının temsilcisi ile
iletişime geçiniz.
Oluşabilecek problemlerde satıcıya veya HE YNER MOBIL AUTOMOTIVE GMBH ya başvurunuz
1.1. HEYNER MultiFix TWIST‘i kullanmak için lütfen aşağıdaki gereksinimleri dikkate alın:
arkaya bakan:
Gövde boyutu: 40-105cm
Ağırlık: 0 - 18 kg
Yaş: Doğum - min. 15 ay
n cephe:
Vücut boyutu 83-105 cm
Ağırlık: 9-18kg
Yaş: en az 16 ay - ca. 4 yıl
15 aydan küçük çocuklar ön tarafa oturtulmamalıdır. Çocuğunuzun mümkün olduğu kadar geriye
doğru oturtun, çünkü bu en güvenli konumdur.
Bacak bölgesine herhangi bir nesne koymayın.
koltuk tabanının önünde.
Isofix k ılavuzlarını düzenli olarak kontrol edin ve sistemin güvenliğini etkileyebilecek kir, toz
veya gıda parçacıklarını temizleyin.
2. Araç koltuğuna yerleştirmek
HEYNER® MultiFix T WIST oto koltukları
avrupa güvenlik sertifikası ECE R44/04 e göre
üretilmiştir ve koltuktaki herhangi bir değşiklikte
bu özell iğini kaybeder. Isofix / Destek Cihazı
‚‘Semi Universal‘‘ izinlere tabidir,bunun için
koltuğu yalnızca uygun araçlarda kullanmalısınız.
Lütfen aracınızın tipini bunun için kontrol ediniz.
Ön yolcu koltuğu kullanılıyorsa, lütfen mümkün olduğunca arkay a doğru itin ve araç
kılavuzundaki talimatları izleyin. Ön yolcu hava
yastığını devre dışı bırakın! Bu mümkün değilse,
bu koltukta çocuk oto koltuğunun kullanılmasına
izin verilmez.
Hangi araç koltuklarının çocuk oto koltuklarına
uygun olduğunu kontrol etmek için üreticinizin
araç tipi listesini kullanın. Bu koltuk, normal bir
araç kemeri ile kullanıma uygun değildir.
Arkaya veya yanlara doğru hareket edecek şekilde düzenlenmiş araç koltuklarını
kullanmayın. Bu koltukların çocuk oto koltukları
için kullanılmasına izin verilmez.
Valiz,oyuncak veya benzeri nesneler uygun
şekilde emniyete alınmalıdır! Kaza durumunda
bunlar tehlikeli olabilir ve sizi ve çocuğunuzu
yaralayabilir.
TR
63
64

Türkçe Türkçe
3. HEYNER® MultiFix Twist‘in kullanımı.
kullanım tesisat Çocuğun yüksekliği referans Yaş
arkaya bakan
n cephe
Çocuğunuzun boyuna ve ağırlığına bağlı olarak, çocuk oto koltuğu öne ve arkaya dönük olarak
kullanılabilir.
UYA RI: U YARI:
Çocuğunuz en az 15 aylık veya en fazla 83 cm ye kadar,HE YNER MultiFix TWIST arkaya dönük
olmalıdır:
3.1. Bebek pedi kullanımı
Bebek gömleği bir baş yastığı ve bir bebek kama şeklindeki yastığı içerir.
Pedler özellikle 9-18kg ağırlığında olan küçük çocukların korunması için kull anılmalıdır. Eğer
çocuğunuz oturma veya Başl ık pedi ile koltuğa sığmıyorsa bu pedleri çıkaetmanız gerekmektedir.
Çocuğunuz 13 kg ağırlığındaki kama şeklindeki yastığı kullanın. Ortopedist tarafından önerilen
yassı uzanma pozisyonunu destekler.
Ağırlık: < 18 kg
40-105 cm
Ağırlık: 9-18kg
Vücut boyutu
83-105 cm
ca. < 4 yıl
Yaş: en az 15 ay
- ca. 4 yıl
4. Kurulum
NOT: En az 83 cm yüksekliğe kadar ve çocuğunuz en az 15 aylık olana kadar, arkaya doğru
taşınmalıdır. Kaza istatistikleri çocuğunuzun arkaya bakan ulaşımının en güvenli olduğunu
göstermektedir. Bu nedenle, çocuk koltuğunu mümkün olduğunca geriye doğru kullanmanızı
tavsiye ederiz.
4.1. Araçta HEY NER MultiFix TWIST kurulumu
Güncel versiyon www.heyner-germany.de adresinde bulunabilir.
Lütfen araç üreticisinin kullanma kılavuzunu da okuyun.
4.2. A raç koltuğuna konumlandırma
HEYNER® MultiFix TWIST‘i araba koltuğuna yerleştirmeden önce,
gerekirse iki adet kurulum yardımını (IH) arabanızdaki ISOFIX montaj nok talarına (IA) bağlayın.
ISOFIX montaj noktaları, koltuk oturma yeri ile koltuk sırt dayama
kesişimi arasında bulunur.
Her zaman destek cihazını öndeki yerine oturuncaya kadar açınız.
NOT: Çocuk oto koltuğunun önündeki bacak bölgesine eşya koymayın.
ISOFIX konnek törlerinin (IK) kilidiniaçın ve aynı
anda kilitleme düğmesine basarak (AT) ve her iki
kilitleme kolunu (IM) ISOFIX geri çekme döngüsünden
dışarı çekerek serbest bırakın.
Güvenlik göstergelerini (IT) montajdan önce
kontrol edin. Bunların ikisi de KIRMIZI olmalı.
Duyulabilir bir ‚‘Klik‘‘ses duyana kadar ve (IT) yeşil
olana kadar koltuğu isofix yerlerine yerleştirin.
Çocuk koltuğunu iki elinizle tutun ve iki ISOFIX-kilitleme kolu (IA) devreye girene kadar iki
ISOFIX-Konektörünü (IK)sıkıca itin.
TR
65
66

Türkçe Türkçe
click
press
L
Press
L+R
CHECK
Açıkca bir ‚‘Klik ‘‘ sesi duyul malı
Lütfen bağlantı yaptıktan sonra aracın isofi x
kancalarına takılıp takılmadığını kontrol edin.
Sadece doğru montaj çocuğunuzun
güvenliğini sağlamaktadır.
Destekleyici cihaz (S) 18 pozisyonda ayarlanabilir.
Pedal serbest bırakma düğmesine (SF) basın ve
zeminde duruyorsa, stand ekranı tamamen yeşil olacaktır. Gösterge
kırmızı ise, prosedürü tekrarlayın.
UYA RI: Destekleyici cihaz havada asılı tutulmamalıdır veya herhangi bir
nesne ile kaplanmamalıdır. Daima stand göstergesinin yeşil olduğundan
emin olun.
Lütfen bir kere daha koltuğun sabit ve monteli olduğunu kontrol ediniz.
Yalnızca HEYNER® MultiFix T WIST isofi x bağlantı
kancaları ve Top tether ile kurallara uygun
bağlanır ve çocuğunuzu korur.
CHECK
lirsiniz.
Yakında doğru yüksekliğe ulaştığınız zaman, ayar kolunu (H) serbest
bırakın ve koltuk başlığı (A) istenen yüksekliğe oturur.
Sadece iyi ayarlanmış bir baş desteği maksimum
Emniyet. Kafalık, böylece
kaideyi zemine doğru çekin. Kaide sağlam bir şekilde
4.3. Kafalık (A) ve emniyet kemeri kayışlarının
(SG) çocuğunuzun boyutuna göre yükseklik
ayarı.
Koltuk başlığının (A) yüksekliğini çocuğunuzun
boyutuna ayarlamak için koltuk başlığının arkasına
dokunun ve ayarlama kolunu (H) yukarı çekin.
Şimdi, çocuğunuzun boyutuna bağlı olarak, koltuk
başlığını (A) istenen yüksekliğe göre ayarlayabi
Entegre 5-nokta demeti sistemi (G) çocuğun omuz yüksekliğinde çalışır.
Koltuk başlığı 7 farklı pozisyonda ayarlanabilir.
Kemer sistemi, koltuk başlığının yüksekliği ile ayarlanır. Omuz askılar ı koltuk başlığına sıkıca tutturulur ve ayrı ayrı ayarlanması gerekmez.
Koltuk başlığını (A) ayarlayarak çocuk emniyet kemeri sisteminin (G) boyutunu çocuğunuza göre ayarlayın.
Koltuk başlığ ı, çocuğun omuzları ile koltuk başlığı arasındaki mesafe 3
cm‘yi (yaklaşık 2 parmak genişliği) aşmayacak şekilde ayarlanmalıdır.
4.4. Çocuğunuzun emniyet kemerini takma
Çocuğunuzu oturtmadan önce koltuk başlığının yerine oturduğundan emin olun.
Kemer ayar yerine (GV) basarak omuz kemerlerini (G2) kendinize doğru çekin.
DİK KAT:
Lütfen omuz kemer kıl ıfını çekmeyiniz bilakis omuz kemerlerini
çekmelisiniz.
Emniyet kemerini (D) ve (G) açınız.
Omuz kemerlerini (G2) sağa ve sola koyunuz.
Şimdi çocuğunuzu HEYNER® MultiFix TWIST koltuğuna oturtunuz.
Omuz kemerindeki kemer takma uçlarını ( C ) birleştiriniz ve kemer tokasına (D) klik sesi duyana
kadar takınız.
Kemerlerin dönmemiş ve gergin
olduundan emn olunuz. Kemerin altında kışın kalın elbise giydirmekten kaçınınız.
TR
67
68

Türkçe Türkçe
Pull
UYA RI:
Kemer tokasının herhangi bir kirden arınmış olduğundan emin olun. Sadece
temiz kemer kilitleri duyul abilir ve güvenli bir şekilde takılır.
ÖNEMLİ:
Lütfen 3 nota emniye t kemerinin dönmemiş ve sıkışmamış olduğundan
emin olunuz.
UYA RI: Vücut ve kayışlar arasında bir parmak ucundan daha fazla
olmamalıdır.
4.5. Koltuk yatış pozisyonu
HEYNER® çocuk oto koltuğu koltuk yatış ayar mekanizması ile donatılmıştır.
Yatış pozisyonu ayar mandalı (PG) ile koltuğunuzu yatış pozisyonuna ge tirebilirsiniz.
4.6. rotasyon
Çocuk oto koltuğu 360 ° dönme fonksiyonuna sahiptir.
Çocuğunuzu oturma ve koltuktan çıkartmak çok daha
kolaylaşır. Arkadan öne bakan bir araba koltuğuna
hızlıca değiştirilebilir.
Koltuğu döndürmek için, döndürme düğmesine basmalı
ve koltuğu aynı anda çevirmelisiniz.
Koltuk duyulabilir bir ses ile oturur.
UYA RI:
Her zaman arkaya veya öne dönük kullanım talimatlarına uyunuz.
UYA RI:
Çocuk oto koltuğunun döner parçasının, sürüşten önce öne veya arkaya bakan konumda
kilitlendiğinden daima emin olun. Kontrol etmek için, güvenlik düğmesine basmadan koltuğu
çevirmeyi deneyin.
NOT:
Koltuk ve taban arasında kir bulunmadığından emin olun. Bu rotasyonun kolaylığını kalıcı olarak
etkileyebilir.
4.7. Isofix ‚ın Çıkartılması
ISOFIX ankrajını serbest bırakmak için ISOFIX konektörlerindeki serbest
bırakma düğmelerine basın.
ISOFIX kilitleme kollarını koltuk kılıfına geri kaydırın.
Şimdi çocuk oto koltuğunu araçtan çıkarın.
NOT: Çocuk oto koltuğ u, emniyete alınmadıkça asl a araçta taşınmamalıdır.
TR
5. Bakım ve temizlik
5.1. Kılıfın çıkarılması
Daha sonra doğru kurulum için, kılıfı çıkartmadan önce resimlerini çekmenizi tavsiyed ederiz.
Emniyet tokasının korumasını dikkatlice yukarı doğru çek
Koltuk tabanının kapağı ile baş dayanağı arasındaki düğmelerini açın.
Koltuğun altındaki kapağın altına ul aşın ve hafifçe yukarı doğru çekin. Şimdi kapağı tokanın
üzerine doğru çekin.
Kapağ ı makinede hafif bir deterjanla (30 ° C) yıkayabilirsiniz. Lütfen yıkama etiketindeki
talimatlara dikkat edin.
Lütfen asla kimyasal maddeler veya ağartıcı maddeler kullanmayın.
Plastik parçalar ılık su ve yumuşak bir deterjanl a temizlenebilir. Keskin deterjan (çözücü gibi)
kullanmayın.
DİK KAT: Toka dillerini asla kayışlardan veya tokadan çıkarmayın. Sadece HEYNER koltuk
kılıflarını kullanın. Çocuk araba koltuğunu asla kapaksız kullanmayın.
69
70

Türkçe Türkçe
5.2. K ılıfın tekrar takılması
Önceki adımları ters sırada gerçekleştirin.
Koltuk başlığını ve koltuğu döşemeyi basma düğmelerini kullanarak bağlayın.
Omuz pedlerini omuz kayışlarına tekrar takın ve kayışl arın bükülmediğinden emin olun.
UYA RI:
Çocuk koltuklarını asla omuz pedlerini sağlam bir şekilde emniyete almadan kullanmayın.
5.3. Kaza sonrası davranış
Kazadan sonra ana kucağı yenisi ile değiştirilmeli veya üretici
firmaya test içi gönderilmelidir. Testler ücretlidir.
5.4. Ürün Bilgisi
Herhangi bir sorunuz varsa, lütfen önce satıcınıza başvurun. Aşağıdaki bilgilere sahip
olmalısınız: Seri numarası (etikete bakınız) Aracınızın markası ve modeli
Çocuğun ağır lığı, yaşı ve boyu.
Daha büyük çocuklar için daha fazla bilgi ve ilave araba koltukları www.h-germany.de adresinde
bulunabilir.
5.5. yok etme
Lütfen ülkeniz için geçerli olan imha yönetmeliklerine uyun.
Çevresel sebeplerden ötürü, kul lanımın sonunda tüm ambalaj malzemelerinin yanı sıra tüm ürün
parçalarını geri dönüştürmenizi rica ediyoruz.
DİK KAT: Plastik ambalaj malzemelerini çocuğunuzun erişemeyeceği yerlerde tutmayın.
6. birkaç Bilgi
Ağır olan malzemeleri araçta fırlayacak yerlere koymayınız ki bir kaza anında tehlike
oluşturabilirler.
Araçta emniyet kemeri takmayan yolcu kaza anında çocuğunuz için
bir tehlike oluşturabilir.
Seyehatda ve özellikle uzun seyehatlarda çocuğunuz ile ilgilenin ve
göz kulak olun.
Araç kapıların çocuk kilidini mutlaka aktif duruma getirin ki çocuk içerden aracın kapısını
açamasın.
Çocuğunuzu araçta asla gözetimsiz bırakmayınız.
TR
71
72

Slovenčina Slovenčina
1.
Bezpečnostné upozornenia
..........................................................................................................................S. 74
2. Umiestnenie vo vozidle. .................................................................................................................................. S. 76
3. Možnosti použitia detskej autosedačky HEYNER® MultiFix Twist ............................................... S. 77
4. Inštalácia .............................................................................................................................................................. S. 78
Zabudovanie autosedačk y HEYNER MultiFix T WIST do vozidl a
4.1.
Umiestnenie na sedadle vozidla
4.2.
Nastavenie výšky opierky hlavy (A) a ramenných popruhov
4.3.
(G) podľa veľkosti Vášho dieťaťa
Zaistenie dieťaťa popruhom
4.4.
Polohy sedu a ležania dieťaťa
4.5.
Funkcia otáčania
4.6.
Demontáž detskej autosedačky
4.7.
Staros tlivosť a údržba
5.
Demontáž poťahu ............................................................................................................................................
5.1.
Opätovné namontovanie poťahu
5.2.
Správanie po nehode
5.3.
Informácie o produkte ...................................................................................................................................
5.4.
Likvidácia
5.5.
A ešte pár rád na záver:
6.
A - Opierk a hlavy
A1 - Hlavov ý vankúš
A2 - Redu kčný vankúš
B - Čalún enie ramien
BT - Zákl adový diel
C - Jazýčky zámky
D - Zámka pásu
DT - Tlači dlo otáčan ia
E - Poť ah sedačk y
FG - Pri ehradka na ná vod na použit ie
G - 5-bodo vý syst ém popruhu
G1 - Priechodky ramenného pásu
G2 - Trakové pásy
G3 - Bedr ový pás
G4 - Rozkro kový pás
G5 - Centrálny nastavovací pás
................................................................................................................................................S. 81
.......................................................................................................................................S. 83
..............................................................................................................................................................S. 83
.................................................................................................................S. 78
.................................................................................................................S. 79
.........................................................................................................................S. 80
......................................................................................................................S. 81
.................................................................................................................S. 82
....................................................................................................................................S. 82
...............................................................................................................S. 83
..................................................................................................................................S. 84
GV - Nastavovanie pásu
H - N astavov acia páčka op ierky hla vy
PG - Poloh ovacia ruko väť
K - Inšt alačná nál epka
SG - Rame nné čalúnen é popruhy
U - Diagonálna časť trojbodového
bezpečnostného pásu vozidla
V - Jazýček zámky trojbodového
bezpečnostného pásu vozidla
W - Panvová časť trojbodového
bezpečnostného pásu vozidla
X - Zámka trojbodového
bezpečnostného pásu vozidla
...................................................S. 78
S. 82
S. 83
AT - Are tačné tla čidlo ISOFI X
IA - Kotvy IS OFIX
IH - Mo ntážne pom ôcky pre ISO FIX
IK - Konekto ry ISOFIX
IM - Ramená ISOFIX
IR - Slučka ISO FIX
IT - Odblokov acie tlač idlá ISOFI X
S - Opo rná noha
SA - Ukazovateľ opornej nohy
SF - Uvoľňovacie tlačidlo opornej nohy
Ďakujeme vám, že ste sa rozhodl i pre detskú autosedačku HEYNER®. Pri v ývoji našich
autosedačiek sú prioritou bezpečnosť, komfort a jednoduchosť ovládania. Vý roba sa
uskutočňuje za prísnych podmienok kontroly kvality a spĺňa najvyššie nároky na bezpečnosť.
Rezer vujte si, prosím, dos tatok času na prečítanie tohto návodu na použitie. Maximálnu
bezpečnosť a komfort môže autosedačka poskytnúť len pri správnom zabudovaní.
Návod na použitie vždy uschovajte do priečinku (FG) určeného na uschovanie návodu na
použitie, ktorý sa nachádza na zadnej strane sedačky.
UPOZORNENIE:
Znaky produk tu sa môžu líšiť v závislosti od národných predpisov.
Bezpodmienečne je potrebné rešpektovať pokyny výrobcu vozidla.
1. Bezpečnostné upozornenia
Detská autosedačka HEYNER® MultiFix TWIST je testovaná a schválená podľa európskej normy
pre detské zádržné systémy ECE 44/04. Testovacia pečať E a číslo schv álenia sa nachádzajú na
zadnej strane autosedačky na oranžovej etikete.
Toto schválenie stráca platnosť, ak boli na autosedačke v ykonané akékoľvek zmeny, tieto môžu
znížiť alebo úplne narušiť bezpečnosť .
Pred použitím, prosím, prekontrolujte, či je autosedačka schválená na používanie vo Vašom vozidle. Tento detský zádržný systém neinštalujte na sedadlách vozidla so zapnutým airbagom.
Autosedačka HEY NER® MultiFix TWIS T nesmie byť použitá ako sedadlo alebo hračka v domácnosti. Pri inom ako určenom použití vzniká nebezpečenstvo poranenia.
Rezer vujte si, prosím, dos tatok času, aby ste správne - ako je popísané - upevnili autosedačku
vo Vašom vozidle.
NEPOUŽÍVAJTE detskú sedačku, ak bola poškodená alebo chýbajú jej časti. Nepoužívajte žiadne
použité produkty, pri ktorých nepoznáte ich minulosť. Niek toré diely môžu chýbať alebo môžu
byť poškodené.
Dbajte na to, aby v šetky diely autosedačk y boli umiestnené tak, aby sa počas každodenného
používania nestratili alebo nedošlo k ich zovretiu v dverách alebo medzi nastaviteľnými sedadlami!
SK
73
74

Slovenčina Slovenčina
Detskú autosedačku vo vozidle vždy zaistite, aj keď sa v nej nenachádza žiadne dieťa.
Ak sa autosedačka nepoužíva, chr áňte ju pred intenzív nym a priamym slnečným žiarením
(napríklad bielou handričkou). Je možné, že sa autosedačka vplyvom intenzívneho slnečného
žiarenia veľmi silno zohreje. Predovšetk ým zámka popruhu môže byť nepríjemne horúca.
Po nehode je vždy potrebné vymeniť celý zádržný systém alebo ho zaslať spolu s protokolom o
nehode výrobcovi za účelom kontroly.
Nikdy nepoužívajte autosedačku bez originálneho látkového poťahu.
Ak je potrebné látkový poťah vy meniť, smú by ť použité len originálne poťahy od firmy HEYNER
MOBIL AUTOMOTIVE GMBH.
V prípade výskytu ťažkostí sa, prosím, obráťte na Vášho predajcu alebo v ýrobcu.
1.1. Pri použití autosedačky HE YNER MultiFix T WIST rešpektujte, prosím, nasledujúce predpoklady:
PROTI smeru jazdy vozidla:
Telesná výška: 40-105 cm
Hmotnosť: od narodenia - 18 kg
Vek: od narodenia - min. 15 mesiacov
Pri použití proti smeru jazdy dbajte na to, že smie byť použitý v ýlučne stupeň 4 polohy ležmo!
V smere jazdy vozidla:
Telesná výška 83-105 cm
Hmotnosť: 9-18 kg
Vek: min. 15 mesiacov do cca. 4 rokov
Deti staršie ako 15 mesiacov NESMÚ byť prepr avované v smere jazdy. Prepravujte die ťa proti
smeru jazdy tak dlho, ako je to možné, pretože toto je spravidla najbezpečnejšia poloha.
Nikdy do okolia opornej nohy pred základňou neodkladajte žiadne predmety.
Pravidelne kontrolujte Isofix, či nevykazuje znečistenie, a v prípade potreby ho očistite.
Spoľahlivosť systému môže by ť ohrozená vnik nutím znečistenia, prachu, zvyškov potravín atď.
vozidla.
Na sedadlách vozidla, ktoré sa nachádzajú bokom alebo proti smeru jazdy, nie je použitie
autosedačky povolené.
Zaistite batožinu a voľné predmet y! V prípade nehody môžu byť vymrštené a zraniť Vaše dieťa.
2. Umiestnenie vo vozidle
Detský zádržný s ystém MultiFix TWIST je
dimenzovaný a testovaný zodpovedajúc požiadavkám európskej normy pre detské zádržné
systémy (ECE R 44/04). Podľa normy ECE R44/04
je schválený na použitie v polohách sedadla
vozidla, ktoré sú kompatibilné s triedou „ISOFIX
D/B1“ a ktoré sú podľa údajov výrobcu vozidla
uvedených v príručke vozidla vhodné pre det ské
zádržné systémy ISOFIX.
Pre zabezpečenie pomocou ISOFIX a opornou
nohou je k dispozícii „polo-univerzálne“ schválenie. Preto môžete túto autosedačku použiť len v
určitých vozidlách. Schválené vozidlá prekontrolujte, prosím, na základe zoznamu typov.
Aktuálnu verziu zoznamu nájdete na stránke
www.h-germany.de.
Ak sa autosedačka používa na sedadle spolujazdca, posuňte ho, prosím, čo najďalej dozadu a
rešpektujte pok yny v príručke obsluhy vozidl a.
Deaktivujte airbag sedadla spolujazdca! Ak toto
nie je možné, je použitie na sedadle spolujazdca
zakázané.
Na zákl ade zoznamu typu výrobcu Vášho vozidla
prekontrolujte, ktoré sedadlá vozidla sú vhodné
na umies tnenie detskej autosedačky.
Táto autosedačka NIE JE vhodná na použitie s
bežným trojbodovým bezpečnostným pásom
SK
75
76

Slovenčina Slovenčina
click
3. Možnosti použitia detskej autosedačky HEYNER® MultiFix Twist
Spôsob použitia Inštalácia Telesná výška
Orientácia proti
smeru jazdy
Orientácia v smere
jazdy
V závislosti od telesnej výšky a hmotnosti sa detská autosedačka používa s orientáciou v smere
jazdy a proti smeru jazdy.
VÝSTRAHA:
Autosedačka HEY NER MultiFix T WIST musí byť použitá s orientáciou proti smeru jazdy do doby,
keď Vaše dieťa bude vážiť aspoň 9 kg, prípadne k ým bude vyššie ako 83 cm.
3.1. Použitie vložky pre najmenšie deti
Vložka pre najmenšie deti obsahuje telový a hlavový vankúš ako aj klinov ý vankúš.
Vložka pre najmenšie deti je určená na osobitnú ochranu malých detí s hmotnos ťou do 18 kg.
Odporúčame ju používať čo najdlhšie.
Dodaný klinový vankúš odporúčame používať do hmotnosti dieťaťa 13 kg. Podporuje plochú
polohu ležmo, ktorá je odporúčaná ortopédmi.
dieťaťa
<18 kg
40cm - 105cm
9-18 kg
83cm-105cm
Referenčný vek
cca. < 4 roky
15 mesiacov až
cca. 4 roky
4. Inštalácia
UPOZORNENIE:
Do dosiahnutia telesnej výšky minimálne 83 cm a veku Vášho die ťaťa minimál ne 15 mesiacov
MUSÍ by ť dieťa prepr avované s orientáciou proti smeru jazdy. Úrazové štatistiky dokazujú, že
preprava s orientáciou proti smeru jazdy je pre Vaše dieťa spravidla najbezpečnejšia. Preto Vám
odporúčame použív ať detskú sedačku s orientáciou proti smeru jazdy čo najdl hšie.
4.1. Zabudovanie autosedačky HEYNER MultiFix TWIS T do vozidla
Schválené vozidlá prekontrolujte, prosím, na základe zoznamu typov. Aktuálnu verziu zoznamu
nájdete na stránke www.h-germany.de
4.2. Umiestnenie na sedadle vozidla
Pred umiestnením autosedačky HEYNER® MultiFix
TWIST na sedadle vozidla, namontujte v prípade
potreby dve dodávané montážne pomôcky (IH) na
kotv y (IA) ISOFIX vo Vašom vozidle.
Body ukotvenia ISOFIX sa nachádzajú medzi sedacou plochou a operadlom sedadla vozidla.
Opornú nohu vždy vyklopte tak, až kým vpredu
zapadne.
UPOZORNENIE:
Nikdy neodkladajte do oblasti nôh pred
autosedačkou žiadne predmety.
Uvoľnite aretáciu konektorov (IK) ISOFIX tak, že
súčasne stlačíte aretačné tlačidlá (AT) a pomocou
zádržných slučiek ISOFIX vytiahnete blokovacie
ramená (IM).
Pred zabudovaním prekontrolujte bezpečnostné
indikátory (IT). Tieto obidva musia signalizovať
ČERVENÚ. Ak bezpečnostné indikátory nie sú v
ČERVENEJ polohe, potiahnite odblokovacie tlačidlá,
až kým budete počuť výrazné kliknutie.
Uchopte detskú autosedačku obidvomi rukami a
SK
77
78

Slovenčina Slovenčina
press
CHECK
L
Press
nasuňte obidva konek tory ISOFIX (IK) pev ne do násuvných vedení, až kým
L+R
CHECK
VÝSTRAHA:
Oporná noha nesmie visieť vo vzduchu ani byť podložená predmetmi. Vždy dbajte na to, aby
indikácia opornej nohy bola zelená.
Znova skontrolujte, či je detská autosedačka pevne upevnená k sedadlu.
Iba vtedy, keď je autosedačka HEYNER® MultiFix T WIST správne upevnená kot vami (IA) ISOFIX a
opornou nohou (S), môže autosedačka optimálne chrániť Vaše dieťa.
tieto zapadnú do kotiev ISOFIX (IA).
Počujete zreteľné kliknutie.
Obidva bezpečnostné indikátor y teraz musia byť na zelenej polohe. Na
základe bezpečnostných indikátorov na OBIDVOCH STRANÁCH prekontrolujte, či je autosedačka správne pr ipojená k obidvom kotvám (IA) ISOFIX.
Len správne upevnenie OBIDVOCH KONEKTOROV (OK) zabezpečuje korek tné upevnenie autosedačky a bezpečnosť Vášho dieťaťa vo vozidle!!!
Opornú nohu (S) je možné nastaviť do 18 polôh.
Zatlačte uvoľňovacie tlačidlo (SF) opornej nohy a
roztiahnite opornú nohu až po podlahu. Ak stojí
oporná noha (S) bezpečne na podlahe, indikuje
ukazov ateľ (SA) opornej nohy úplne zelenú. Ak je
indikácia červená, postup zopakujte.
4.3. Nastavenie výšky opierky hlavy (A) a ramenných popr uhov (G)
podľa veľkosti Vášho dieťaťa
Na prispôsobenie výšky opierk y hlavy (A) zatlač te nastavovaciu páčku (H)
na opierke hlav y nadol. V závislosti od veľ kosti Vášho dieťať a teraz môžete
nastaviť opierku (A) hlavy do požadovanej výšky.
Akonáhle dosiahnete správnu výšku, uvoľnite nastavovaciu páčku (H) a
opierka hlav y (A) sa uzamkne v požadovanej v ýške.
Systém popruhu (G) sa prispôsobí Vášmu dieťaťu nastavením opierky hlavy (A).
Opierka hlav y musí byť nas tavená tak, aby vzdialenos ť medzi ramenami dieťaťa a opierkou
hlav y neprekročila cca. 3 cm ( šírka na dva prst y).
4.4 Zaistenie dieťaťa popruhom
Odlož te pásy trakového popruhu (G2) doľ ava a doprava na strany. Teraz posaďte dieťa na sedaciu plochu det skej sedačky HEYNER® MultiFix T WIST tak, aby sa zadoček nachádzal čo najhlbšie
v sedacej priehlbine.
Len optimálne nastavená opierka hl avy zaručuje maximálnu bezpečnosť.
Opierka hlavy by mala byť nastavená tak, aby sa integrovaný 5-bodov ý
systém popruhov (G) rozprestieral vo v ýške ramien.
Opierku hlav y je možné nastaviť do 7 rôznych polôh.
Systém popruhov sa nastavuje s výškou opierky hlavy. Ramenné pásy (SG)
sú pevne spojené s opierkou hlavy a nemusia byť samos tatne nastavované.
Dbajte na to, aby opierka hlav y zapadla skôr, ako posadíte dieťa do
autosedačky.
Uvoľnite ramenné pásy zatlačením nastavovania (GV) popruhu a potiahnutím trakových pásov (G2) k sebe.
UPOZORNENIE: Neťahajte za ramenné vypchávky.
Otvorte zámku (D) popr uhu a systém (G) popruhov.
Spojte obidva jazýčky (C) zámky trakových pásov (G2) spolu a spojte ich so
zámkou (D) popruhu tak, aby bolo počuť hlasné klik nutie.
Potiahnite za pás (G5) centrálneho nastavovania tak, aby pásy (G2) trakového popruhu plocho dosadali na dieťa. Dbajte, prosím, na to, aby pásy
neboli pretočené.
Zamedzte predovšetkým v zime tomu, aby malo dieťa pod popruhom
oblečený hrubý odev.
SK
79
80

Slovenčina Slovenčina
Pull
VÝSTRAHA:
Dbajte na to, aby zámka pásu nebola znečistená. Len čistá zámka pásu
zapadne zreteľne a bezpečne.
VÝSTRAHA:
Uistite sa, že jednotlivé časti pásu nie sú ani pretočené ani zovreté. Rovnako prekontrolujte bedrové pasy popruhu. Tieto by sa mali rozprestierať čo
najnižšie cez bedrá die ťaťa.
VÝSTRAHA: Medzi telom a pásmi by nemal byť voľný priestor väčší ako na šírku prsta.
4.5. Polohy sedu a ležania dieťaťa
Táto detská autosedačka je vybavená polohou na ležanie. Ovládanie je
jednoduché a vykonáva sa jednou rukou. Zatlačením polohovacej rukoväte
(PG) nahor nastavíte autosedačku do polohy požadovanej pre Vaše dieťa.
4.6 Funkcia otáčania
Detská autosedačka disponuje funkciou otáčania o
360°. Toto výrazne uľahčuje nastupovanie a vystupovanie. Tiež je umožnená rýchla zmena orientácia
autosedačky z polohy proti smeru jazdy do polohy v
sme re jazd y.
Na otočenie škrupiny autosedačk y je potrebné zatlačiť
tlačidlo otáčania a súčasne sedačku otočiť.
Sedačka zapadne so zreteľným kliknutím.
VÝSTRAHA:
Rešpektujte, prosím, pokyny pre spôsob použitia proti smeru jazdy a v smere jazdy.
VÝSTRAHA:
Pred jazdou sa vždy uistite, že otočná časť sedačky zapadla do polohy v orientácii proti smeru
jazdy a v smere jazdy. Na kontrolu skúste sedačku otočiť bez stl ačenia bezpečnostného tlačidla.
UPOZORNENIE:
Dbajte na to, aby medzi sedačkou a základňou neboli žiadne nečistot y. Toto
môže tr valo negatívne ovplyvniť ľahkosť otáčania.
4.7. Demontáž detskej autosedačky
Stlač te odblokovacie tlačidlo na konek toroch ISOFIX a uvoľnite kotvy
ISOFIX.
Zasuňte blokovacie ramená ISOFIX späť do autosedačky.
Teraz vyberte autosedačku z vozidla.
UPOZORNENIE: Detská autosedačka nikdy nesmie by ť prepravov aná vo vozidle v nezaistenom
stave.
5. Starostlivosť a údržba
5.1. Demontáž poťahu
Pre účely neskoršieho správneho nasadenia Vám odporúčame dokumentovanie demontáže poťahu fotografiami.
Ochranu zámky popruhu opatrne vytiahnite smerom nahor.
Otvorte patentky medzi poťahom sedacej časti a hlavovej časti.
Uchopte poťah na spodnom okraji sedačky a potiahnite ho mierne dopredu a nahor.
Pretiahnite poťah cez zámku popruhu.
Poťah je možné prať jemným pracím prostriedkom v programe na jemnú bielizeň (30 °C).
Rešpektujte, prosím, pokyny pre pranie uvedené na etikete.
Nikdy nepoužívajte chemické pracie prostriedky a bielidlá.
Ramenné vypchávk y je možné očistiť vl ažnou vodou s jemným čis tiacim prostriedkom. Nepoužívajte žiadne abrazívne alebo agresívne čistiace prostriedky (ako rozpúšťadlá).
SK
81
82

Slovenčina Slovenčina
VÝSTRAHA:
Nikdy nedemontujte jazýčky zámky z popruhov ani zámku popruhu. Používajte výlučne poťahy
sedačky od firmy HEYNER. Nikdy nepoužívajte detskú autosedačku bez poťahu.
5.2. Opätovné namontovanie poťahu
Vykonajte vyššie uvedené kroky v opačnom poradí.
Spojte poťah hlavovej časti a sedacej časti pomocou patentiek .
Taktiež opätovne upevnite ramenné v ypchávky na ramenné popruhy. Dbajte, prosím, na to, aby
pásy neboli pretočené.
VÝSTRAHA:
Nikdy nepoužívajte autosedačku bez správne nasadených ramenných vypcháviek.
5.3. Správanie po nehode
Po nehode je vždy potrebné vymeniť celý zádržný systém alebo zaslať ho spolu s protokolom o
nehode výrobcovi za účelom kontroly.
5.4. Informácie o produkte
V prípade otázok sa, prosím, najskôr obráťte na Vášho predajcu.
Mali by ste si pripraviť nasledujúce údaje:
sériové číslo (pozrite nálepku)
značku a typ vozidla
hmotnosť, vek a výšku dieťaťa
Ďalšie informácie a následne používané autosedačky nájdete na stránke ww w.h-germany.de
5.5. Likvidácia
Rešpektujte, prosím, predpisy k l ikvidácii platné vo Vašej krajine.
Z dôvodov ochrany životného prostredia Vás prosím o separáciu obalov a na konci častí
sedačky a ich riadnu likvidáciu.
VÝSTRAHA:
Obaly z pl astov uschovajte mimo dosahu Vášho dieťaťa, pre tože predstavujú riziko udusenia.
6. A ešte pár rád na záver:
Neodkladajte žiadne ťažké predmety na prekrytie batožinového priestoru / zadnú odkladaciu plochu - v prípade nehody sa z nich môžu stať nebezpečné strely a zraniť die ťa. Preto
dostatočne zabezpečte batožinu a ostatné predmety.
Dbajte na to, aby boli všetci pasažieri zaistení bezpečnostnými pásmi. Pásom nezaistené osoby
vo vozidle môžu v prípade nehody predstavovať veľké nebezpečenstvo pre dieťa.
Poskytnite Vášmu dieťaťu počas dlhšej jazdy prest ávky a dbajte na to, aby z vozidla nevy stupovalo do vozovk y alebo bez dohľadu.
Ak je v dverách vozidla prítomná detská pois tka, vždy ju používajte, pretože potom nie je možné
otvorenie dverí zvnútra.
Nikdy nenechávajte dieťa vo vozidle bez dohľadu.
SK
83
84

Polski Polski
1.
Instrukcja bezpieczeńst wa
Umieszczenie w samochodzie
2.
Możliwości zastosowania HEYNER° MultiFix Twist
3.
Instalacja
4.
Zamątowanie HEYNER MultiFix TWIST w samochodzie
4.1.
Zamatowanie na siedzeniu samochodu
4.2.
Dopasowanie wysokości zagłówka (A) i pasów ramiennych (SG)
4.3.
..............................................................................................................................................................S. 90
do wzros tu pańskiego dzecka..
Zapięcie dziecka pasami
4.4.
Pozycja siedząca i leżąca dziecka
4.5.
Funkcja obrotowa
4.6.
Odmątowanie siedzonka dziecinnego
4.7.
Pielęgnacja i czyszczenie
5.
Sciągnięcie ochraniacza ...............................................................................................................................
5.1.
Ponowne założenie pokrowca
5.2.
Zachowanie ostrożności w razie wypadku
5.3.
Informacja o produkcie ..................................................................................................................................
5.4.
Usuwanie opakowań i towarów
5.5.
I jeszcze parę rad na koniec:
6.
A - zagłó wek
A1 - podusz ka
A2 - podu szka reduk ujca
B - podkładki ramieniowe
BT - częś ć podstaw owa
C - jęz yki zamkni ęć
D - zamknię cie pasa
DT - przyc isk obraca nia
E - och raniacz pow ierzchni f otelika
FG - miejsce na in strukcj ę obsługi
G - 5-cio pu nktowy s ystem pas ów
G1 - miejsc a w których p rzechodz ą
pasy ramienne
G2 - pasy n osicieli sp odni
G3 - pas bi odrowy
G4 - pas kroc zowy
...........................................................................................................................S. 86
.....................................................................................................................S. 88
..........................................................................S. 90
..................................................................S. 90
..................................................................................................S. 90
...................................................................................................................S. 92
................................................................................................................................S. 93
..............................................................................................................S. 94
.............................................................................................................................................S. 94
.....................................................................................................S. 95
..............................................................................................................................S. 95
S. 95
....................................................................................................................S. 96
...........................................................................................S. 96
S. 96
.................................................................................................................S. 96
.........................................................................................................................S. 97
G5 - cen tralny pas r egulowan ia
GV - miejsce g dzie przec hodzi pas
H - u chwyt do p rzestaw ienia
zagłówka
PG - uchw yt zmian poz ycji
K - naklejka instrukcji zamatowania
SG - pasy z podkładkami ramiennymi
U - diagonal ny pas samoc hodu pasa trzypunktowego
V - języ k zamknięc ia samochod u -
pasa trzypunktowego
W - pas m iednicow y samochodu -
pasa trzypunktowego
X - pas zam knięcia sam ochodu -
pasa trzypunktowego
AT - ISOFI X - przycis k blokując y
IA - ISOFIX - zako twiczen ie
IH - IH – IS OFIX – pomo c przy
mątowaniu
IK - ISOFIX – za kleszcze nie
IM - IS OFIX – ramio n
IR - ISOFIX - szl ufka
IT - ISOFIX – pr zycisk odb lokowując y
S - wsp arcie stop y
SA - wspa rcie stopy - w skaźnik
SF - P rzycisk r egulacji dl a nóżek
wsporczych
Dziękujemy bardzo, że zdecydowaliście się państ wo na HEYNER* siedzonko dziecinne.
Przy projektowaniu naszego siedzonka - fotelika dziecinnego, stoją bezpieczeństwo, komfort
i łatwość obsługi na pierwszym miejscu. Produkcja naszego towaru odbywa sie pod scisłą i
wysoką kontrolą jakości i bezpieczeństwa.
Proszę sobie wsiąść dużo czasu na odpowiednie zamątowanie i obsługę. Maksymalne
Bezpieczeństwo jak również komfort siedzenia w foteliku, może być ty lko osiągnię te w wypadku prawidłowego zamątowania. Montaż fotelika powinien być przeprowadzony tylko na
podstawie instrukcji obsługi.
Proszę przechowywać instrukcję obsługi w odpowiednim do tego przeznaczonym miejscu (FG)
na tylniej stronie siedzonka.
WSKAZÓWKA:
Przez typowe charakterystyczne wy magania odpowiednie dla każdego kr aju, mogą niek tóre
produkty się lekko różnić od pozostałych.
Wymagania produzenta samochodu muszą być koniec znie spełnione.
1. Instrukcja bezpieczeństwa
Dziecinne siedzonko samochodowe HEYNER* MultiFix TWIST jest dopuszczone i sprawdzone
odnośnie urządzeń przytrzymujących, europejskich wymagań bezpiczeństwa i wyposażenia
dziecka ECE 44/04. Znak kontroli E z numerem kontrolnym znajduje się na odwrocie siedzonka
dziecinnego na pomarańczowej etykietce.
Zezwolenie jest nieważne: z chwilą kiedy użytkownik przy foteliku dziecinnym wprowadził
zmiany, które mogą doprowadzić do redukcji lub calkowitej utraty bezpieczeńs twa.
Proszę sprawdzić przed użyciem, czy państwa samochód do tego fotelika jest dopuszczalny! Nie instalować dziecinnego urządzenia przy trzymującego w samochodzie z wi łączoną
poduszką powietrza (Airbag).
Siedzonko samochodowe HEYNER° MultiFix AERO+ nie może być używane jako możliwość siedzenia lub zabawka w mieszkaniu. Przy innej możliwości używania, może wystąpić możliwość
skaleczenia.
Proszę wziąść sobie wystarczająco dużo czasu na odpowiednie i prawidlowe, jak w opisie
PL
85
86

Polski Polski
zamątowanie fotelika dziecinnego w samochodzie.
Nie używać fotelika kiedy jest uszkodzony lub kiedy br akują w nim części. Nie stosować
używanych produktów, których przeszlości nie znamy. Nektóre części mogą brakować lub być
uszkodzone.
Proszę zwrócić uwagę, aby w szystkie części fotelika dziecinnego byly tak zabezpieczone, aby
podczas codziennego użytku nie zostaly z gubione lub pomiędz y drzwiami czy też przesuwanym
siedzonku nie byly przytrzaśnięte!
Fotelik dziecinny powinien być w samochodzie zawsze zabezpieczony, umocowany nawet jeśli
w foteliku dziecinnym nie znajduje się żadne dziecko.
Tak długo jak siedzonko dziecinne nie jest przez dziecko uży wane, proszę je chronić przed intensywnym i bezpośrednim promieniowaniem słonecznym. Jest to możliwe, że przez intensywne
nagżanie przez promienie słoneczne, dochodzić może do mocnego nagżania fotelika. Przedewszyskim pas z zamknięciami metalowymi może być nieprzyjemnie goriący i niebezpieczny dla
dziecka
W razie wypadku, powinniście państwo całkowity dziecinny system przytrzymujący odnowić
lub też przesłać do kontroli do producenta, razem z opisem przebiegu wypadku.
Fotelik dziecinny, nie może być nigdy uży wany bez orginalnego pokrowca siedzenia.
Powinien być pokrowiec siedzenia wymieniony, powinien być do tego celu użyty tylko orginalny
pokrowiec firmy HEYNER MOBIL AUTOMOTIVE GMBH.
Przy wystąpieniu problemów, proszę zwrócić się do spr zedawcy lub poducenta.
1.1. Do zastosowania HEYNER MultiFixTWIST zwrócić proszę uwagę na odpowiednie
wymagania:
PRZECIWNY:
kierunek jazdy: wysokość dziecka: 40 - 105 cm,
ciężar: od urodzenia - 18 k g,
wiek: od urodzenia - co najmniej 15 miesięcy
W kierunku jazdy: wy sokść dziecka 83 -105 cm,
ciężar: 9 -18 kg,
wiek: minimum 15 miesięcy - okolo 4 lata
Dzieci poniżej 15 miesięcy NIE mogą być posadzone przodem w kierunku jazd y. Tak długo jak to
jest możliwe proszę pozostawić dziecko plecami w kierunku jazdy, bo jest to z reguł y najbezpieczniejsza pozycja jazdy dla dziecka.
Proszę nie klaść żadnych rzeczy w miejscu obszar u nóg.
Proszę sprawdzać regularnie Isofix - prow adnicę odnośnie zabrudzeń, w razie potrzeby należy
je oczyszczać. Niezawodność systemu może być
przez zabrudzenia: kurzem, brudem, resztkami art ykułów spożywczych itd. nie całkowicie
sprawna.
2. Umieszczenie w samochodzie
Dziecinne siedzonko samochodowe HEYNER*
MultiFix TWIST urządzeń przytrzymujących jest
dopuszczone i sprawdzone odnośnie europejskich w ymagań bezpiczeństwa i wyposażenia
dziecka (ECE 44/04). Jest to uję te w ECE- kontroli
R44/04 dla uży tku w „ISOFIX Klas y D/B1“ zgodnych i dopuszczonych pozycji siedzenia w samochodzie, które to zgodnie z danymi producenta
samochodu, ujęte jest w podreęczniku pojazdu
dla ISOFIX- urządzeń podtrzymujących
Dla umocowania przy pomoc y ISOFIX i wsparcia
stopy (S) istnieje t zw. „Semi Uniwersalne“ zezwolenie. Dlatego możecie państwo te siedzonko
tylko w odpowiednich do tego samochodach
zastosować. Dopuszczone do tego samochody
proszę sprawdzić za pomocą listy. Aktualną liste
znajdziemy pod adresem: www.h-germany.de
PL
87
88

Polski Polski
Ma być siedzonko dziecinne zamątowane z przodu obok kierowcy, proszę przesunąć siedzenie
samochodu jak najdalej du tylu i zwócić uwagę na wskazówki podręcznika samochodu.
Airbeg ! znajdujacy sie obok kierowcy na przednim siedzeniu gdzie montujemy siedzonko, musi
być wylączony. Jest to niemożliwe, montowanie siedzonka jest zabronione.
Proszę sprawdzić na podstawie listy samochodów pańskiego producenta samochodu, które
siedzenia samochodowe są dopuszczone do zamątowania fotelików dziecinnych.
Te siedzonko dziecinne NIE MOŻE być montowane przy użytkowaniu pr zez normalny pas samocho dowy.
Na miejscach siedzących w samochodzie, gdzie zalecane jest montowanie siedzonka dziecinnego w popr zek lub w odwrotnym kierunku jazdy, stosowanie fotelika jest niedopuszczalne.
Umocować bagaż i luzem położone rzeczy! Mogą być one dla dziecka w razie w ypadku bardzo
niebezpieczne i być powodem ciężkich obrażeń.
3. Możliwości zastosowania HEYNER° MultiFix Twist
rodzaj użytkowania instalacja wzrost dziecka odniesienie do
tyłem do
kierunku jazdy
do przodu
Zależnie od wzrostu i wagi może być siedzonko zarówno do przodu jak i do t yłu zamątowane.
<18 kg
40cm - 105cm
9-18 kg
83cm-105cm
wieku
ca <4 lat
15 miesięcy
aż do 4 lat
HEYNER MultiFix TWIST musi być zamątowany w przeciwną stronę jazdy, do momentu kiedy
dziecko mniej jak 9 k g waży, mniej ma jak 15 miesięcy i jest mniejs ze jak 83 cm.
3.1. Zastosowanie wkładki dla ma łych dzieci
Wkładka dla malych dzieci zawiera: poduszkę głowy i ciala, jak również zagłówek.
Wkladka dla małych dzieci jest zalecana ze względu na specjalną ochronę małych dzieci z wagą
do 18 kg. Zalecam jej użycie jak długo to mżliwe.
Proszę używać dostarczony zagłówek do czasu kiedy dziecko osiagnie 13 kg. Podgłówek wspomaga w ygodną i bezpieczną pozycję leżacą zalecaną przez or topedę.
4. Instalacja
WSKAZÓWKA: Do wzrostu minimum 83 cm i minimum 15 miesięcy, MUSI być dziecko w samo-
chodzie transportowane w przeciwnym k ierunku do jazd y . Statyst yki wypadków pokazują,
że jest to z reguły najbezpieczniejsza pozycja jazdy dla dziecka.Tak długo jak jest to możliwe
proszę pozostawić dziecko plecami w kierunku jazdy.
4.1. Zamątowanie HEYNER MultiFix TWIS T w samochodzie
Dopuszczalne do tego celu samochody, proszę sprawdzić za pomocą listy samochodów do tego
celu dopuszczonych. Aktualną wersję znajdziecie państwo pod adresem: www.h-germany.de
4.2. Zamatowanie na siedzeniu samochodu
Przed zamątowaniem HEYNER° MultiFix T WIST na siedzeniu samochodu, proszę umocować w
razie potrzeby dwie dostarczone pomoce instalacji
(IH) na punktach umocowań (A) w pańskim samochodzie.
Te ISOFIX- punkty umocowań znajdziecie państwo,
pomiędzy powierzchnią siedzenia a oparciem pleców siedzenia samochodu.
Proszę zawsze złoż yć wspomaganie stóp, do momentu kiedy on z przodu zaskoczy.
PL
OSTRZEŻENIE:
89
90

Polski Polski
click
press
WSKAZÓWKA:
Nie kłaść żadnych przedmiotów w miejscu stóp dziecka przed siedzonkiem dziecinnym.
Poluźnić zablokowanie ISOFIX- zakleszczeń (IK),
przez jednoczesne naciśnięcie tasty zablokowania
(AT) i ISOFIX wyciągnięcie petli powrotnej z obydwu ramion blokujących (IM).
Sprawdzić przed zamątowaniem, wskaźniki
bezpieczeństwa (IT). Obydwa muszą być CZERWONE. Nie są wskaźniki bezpieczeńst wa czerwone,
pocijągnąć przyciski odblokowujące, do momentu
kiedy usłyszymy wyrażny >>klik<< .
Złapać siedzonko dwoma rękoma i wsunąć dwa
ISOFIX- zakleszczenia (IK) mocno do otworów
prowadnic, do momentu w którym ISOFIX punkty
zabezpieczające (A) zaskoczą.
Slyszycie państwo dokładnie >>klik<<.
Obydwa indykator y bezpieczeństwa muszą być zielone. Proszę sprawdzić
L+R
CHECK
na podstawie indykatorów bezpieczeństwa na OBYDWÓCH STRONACH,
czy siedzonko dziecinne jest odpowiednio z dwoma ISOFIX- zakotwiczeniami (IA) samochodu połączone.
Tylko odpowiednie i poprawne umocowanie OBYDWÓCH ISOFIXzakleszczeń (IK) zapewni wymagane umocowanie i bezpieczeństwo
pańskiego dziecka w samochodzie!!!
Wsparcie stop (S) może być pr zestawione na 18
pozycji. Nacisnąć proszę pr zycisk guzika (SF)
wsparcia stop i pociągnać go w kierunku podłogi.
Stoi wsparcie stop (S) pewnie na podłodze,
pokazuje sęi nam całkowicie zielony wskaźnik
(SA). Pokazuje się nam wskaźnik czerwony, proszę
CHECK
powtóżyć przebieg czynnosci powtórnie.
OSTRZEŻENIE:
Wsparcie stóp nie powinno wisieć w powietrzu lub też być obłożone różnego rodzaju r zeczemi.
Proszę zwrócić uwagę na to aby, wsparcie stóp pokazywało zawsze zielony wskaźnik.
Proszę sprawdzić jeszcze raz, czy siedzonko dziecinne jest poprawnie umocowane na siedzeniu
samochodu.
Tylko wtedy kiedy HEYNER° MultiFix TWIST z ISIFIX- zakleszczeniem (IA) i wspomaganiem stóp
(S) odpowiednio i prawidłowo w samochodzie na siedzeniu zamątowane jest, tylko wtedy może
siedzonko dzecinne państwa dziecko optymalnie chronić.
4.3. Dopasowanie wy sokości zagłówka (A) i pasów ramiennych (SG) do wzrostu pańskiego
dzecka.
Aby dopasować wysokość zaglówka (A) nacisnąć na hebel pr zestawien (H)
przy zaglówku na dól. Teraz możemy odnośnie wzrostu państwa dziecka,
zaglówek przestawić na życzoną prze nas wysokość. Z chwil a kiedy
osiągniecie państwo odpowiednią wysokość, proszę pozostawić hebel
przestawień (H), a zagłówek (A) zaskocz y na życzona przez nas wysokość.
Tylko odpowiednie i poprawne umocowanie załówka zapewni
wymagane bezpiec zeństwo. Zagłówek musi być tak ustawiony, aby
integrowany 5-cio punktowy system pasów (G) przebiegał dokładnie
na wysokości ramion.
Załówek może być przestawiony na 7-em rożnych pozycji.
System pasów powinien być dopasowany do wysokości zagłówka.
Pasy ramienne (SG) są z zaglówkiem mocno połączone i nie muszą być
osobno dopasowywane.
System pasów (G) proszę dopasować indywidualnie do pańskiego dziecka, przez dostosowanie,
przestawienie zaglówka (A).
Zagłówek musi być tak dopasowany, aby odstęp pomiędzy ramionami dziecka a zagłówkiem nie
przek raczał w przybliżeniu 3 cm (okolo szerokości dwóch palców).
PL
91
92

Polski Polski
L
Press
Pull
4.4 Zapięcie dziecka pasami
Zwrócić uwagę aby, podgłówek zaskocz ył, przed posadzeniem dziecka w
siedzonku. Polużnić pasy ramienne przez naciśnięcie przestawienia pasów
(GV) i pociągnąć pasy nosiciela spodni (G“) do siebie.
WSKAZÓWKA:
Proszę nie ciąg nąć za poduszki ramienne. Otwożyć pas zapięcia (D) i pas
sy stemu (G).
Położyć pasy nosiciela spodni (G“) na lewą i na prawą stronę. Teraz proszę posadzić dziecko
na powierzchnię siedzonka HE YNER° MultiFix TWIST, tak aby dziecko siedziało, znajdowało sie
gleboko w siedzonku
Dopasować obydwa języki zapięcia (C) pasa nosiciel a spodni (G2) razem i
połączyć je z zapięciem pasów (D) do momentu kiedy usłyszymy wyrażnie
>> klik<<.
Pociągnąć za zentralne przestawienie pasa (G5), do momentu kiedy pasy
nosiciela spodni (G2) płasko prz y dziecku prz ylegają. Zwrócić uwagę, aby
pasy nie były przek ręcone. Unikać przedewszyskim za gróbej odzieży w
okresie zimow ym pod pasami.
OSTRZEŻENIE:
Zwrócić uwagę na to, aby zamknięcie pasów było wolne od zanieczyszczen. Tylko czyste zamknięcie pasów zaskakuje bezpiecznie i słyszalnie.
OSTRZEŻENIE:
Proszę upewnić się, czy przechodzące pasy nie sa przekręcone lub
też przytrzasnięte. Sprawdzić również pasy biodrowe. Powinny one
przebiegać jak najniżej przez biodro dziecka.
OSTRZEŻENIE:
Pomiędzy pas ami a ciałem dziecka powinien mieć miejsce nie więcej jak t ylko palec (grubosć
pal ca).
4.5. Pozycja siedząca i leżąca dziecka
Te siedzonko dziecinne jest w yposażone w pozycję leżącą. Obsługa
przebiega łatwo i szybko. Można ją przeprowadzić tylko jedną ręka. Przez
uruchomienie gry fu pozycji (PG) można ustawić siedzonko dziecinne do
pozycji życzonej dl a naszego dziecka.
4.6. Funkcja obrotowa
Siedzonko dziecinne posiada funkcję pozwalającą
obrócić je o 360°. Wsiadanie do siedzonka jak rownież
wysiadanie z niego jest przez to w dużym stopniu
ułat wione. Szybko może być zmieniona pozycja kierunku jazdy dziecka w siedzonku, zarówno do przodu
jak i do tyłu.
Aby siedzonko dziecinne przekręcić, musicie państwo
guzik umożliwiający obracanie nacisnąć i jednoczesnie siedzonko obracać.
Siedzonko zaskakuje z wyrażnym >>klik<<
OSTRZEŻENIE:
Proszę zwrócić uwagę na wskazówki dotyczące jazdy dziecka, kiedy siedzonko dziecinne jest
mątowane do pr zodu lub też do t yłu.
OSTRZEŻENIE:
Proszę upewnić się przed rozpoczęciem jazdy, czy częsć siedzonka dziecinnego ktor a się obraca do przodu lub do ty łu zaskoczyła. Aby to dodatkowo sprawdzić, proszę spróbować siedzonko przekręcić nie naciskając
przycisku bezpieczeństwa.
WSKAZÓWKA:
Zwrócić proszę uwagę, aby żadne zanieczyszczenie nie dostało się
pomiędzy siedzonko dziecinne a częsć siedzenia samochodu. To moglo by
być na dluższy czas powodem zakłucającym łat wosć funkcji przekręcania.
PL
93
94

Polski Polski
4.7. Odmątowanie siedzonka dziecinnego
Nacisnąć prz ycisk zwalniający ISOFIX zlącza i uwol nić je w ten sposob z ISOFIX zakot wiczenia.
Przesunąć ISOFIX poręcze przesuwające z powrotem do siedzonka dziecinnego.
Teraz możemy usunąć siedzonko z samochodu.
WSKAZÓWKA:
Siedzonko nie powino być w samochodzie transportowane jeśli fotelik dziecinny nie jest odpowiednio umocowany.
5.Pielęgnacja i czyszczenie
5.1. Sciągnięcie ochraniacza
Do pożniejszego, prawidlowego zalożenia, zamątowania ochraniacza, proponujemy przed sciągnięciem ochraniacza udokumentować to zrobieniem
paru zdjęć.
Pociągnać ostrożnie ochraniacz zamknięcia pasa do gór y.
Otwożyć proszę guziki pr zycisków, pomiędzy ochraniaczem części siedzenia fotelika a częścią
głowy.
Proszę złapać za dolny brzeg siedzenia pod pokrowcem i pociągnać lekko do przodu i do góry.
Następnie pociągnać pokrowiec przez pas zamknięcia.
Pokrowiec może być wyprany w 30°C, w łagodnym środku do prania (w delikatnym progr amie
w pralce). Proszę zwrócić uwagę na zasady prania znajdujące się na etykietce odnośnie zasad
prania.
Proszę nie używać nigdy środków chemicznie czy szczących i wybielających.
Części plastikowe mogą być czyszczone letnią wodą z dodatkiem łagodnego środka do prania.
Nie używać ostr ych środków cz yszczących jak rozpuszczalnik.
OSTRZEŻENIE:
Niegdy nie usuwać jezyka zapięcia od pasów lub też zapięcia pasów. Uż ywać proszę tylko
HEYNER pokrowca. Fotelik dziecinny, nie może być nigdy używany bez orginalnego pokrowca
siedzenia.
5.2. Ponowne założenie pokrowca
Przeprowadzić poprzednie kroki w odwrotnej kolejności.
Połączyć pokrowiec części głowy z częścią siedzącą za pomoc ą guzików przyciskow ych.
Umocować proszę podkładki na ramiona ponownie przy pasach ramiennych. Zwrócić uwagę
aby pasy nie były przekręcone.
OSTRZEŻENIE:
Nie używać nigdy siedzonka dziecinnego bez poprawnego założenia podkladek na ramiona.
5.3. Zachowanie ostrożności w razie w ypadku
W razie wypadku, powinniście państwo całkowity dziecinny system przytrzymujący odnowić
lub też przesłać do kontroli do producenta, razem z opisem przebiegu wypadku.
5.4. Informacja o produkcie
Odnośnie pytań proszę zwrócić się najpierw do sprzedawcy. Odpowiednie informacje
powinniście mieć panś two pod ręka: numer serii (proszę zobacz yć na naklejce), markę i typ auta,
ciężar, wiek i wysokść dziecka.
Dalsze infor macje i dalsze produk ty odnośnie siedzonek dziecinnych, znajdziecie panśtwo pod
adresem www.h-germany.de
5.5 Usuwanie opakowań i towarów
Proszę przestszegać obowiazujacych w państwa kraju zasad lik widacji towarów.
Ze wzgledu na ochronę środowiska, prosimy opakowanie a na końcu zużyte produkty odpowiednio dzielić i usuwać.
PL
95
96

Polski Polski
OSTRZEZENIE:
Proszę przechowywać material opakowania poza zasięgiem dziecka ze względu na
niebezpieczeństwo zadławienia, uduszenia.
6. I jeszcze parę rad na koniec:
Nie kłaść nigdy cieżkich rzeczy na tylnią pół ke samochodową, mogą być one dla dziecka w
razie wypadku bardzo niebezpieczne i być powodem cieżkich obrażen. Dlatego ubezpieczyć
dokładnie bag aż i inne żeczy w samochodzie.
Zwrócić uwagę, aby wszyscy pasażerowie w samochodzie byli zabezpieczeni pasami
bezpieczeństwa.
Osoby niezabezpiczone pasami znajdujące sie w samochodzie, mogą byc dużym
niebezpieczeństwem dla dziecka w razie wypadu.
Udostepnić dziecku przer wy w czasie podróży, uważać aby dziecko samo nie wysiadało z samochodu na ruchliwą ulicę, autostradę.
Jesli jest to potrzebne zastosować w samochodzie dziecinne zabezpieczenie drzwi,
uniemożliwiające dziecku samoczynne wyjście od wewnatrz z samochodu.
Nie pozostawiać dziecka nigdy samego bez opieki w samochodzie lub pr zy samochodzie.
PL
97
98

Magyar Magyar
1.
Biztonsági utasítások
Elhelyezés a gépjárműben
2.
A Heyner® MultiFix Twist használata
3.
Beszerelés
4.
HEYNER MultiFix TWIST beszerelése a gépjárműbe
4.1.
Az ülés elhelyezése
4.2.
A fejtámla és a vállövek méretre igazítása..
4.3.
Gyermek bekötése
4.4.
A gyermek ülő-és fekvőpozíciói
4.5.
Tengely körüli forgatás
4.6.
Gyerekülés eltávolítása
4.7.
Ápolás és tisztítás
5.
Üléshuzat eltávolítása ..................................................................................................................................
5.1.
Az üléshuzat újrahúzása
5.2.
Baleset utáni teendők
5.3.
Termékkel kapcsolatos információk .......................................................................................................
5.4.
Hulladékszállítás
5.5.
Végül pár jótanács:
6.
A - Fejtám la
A1 - Fejpár na
A2 - Fejs zűkítő
B - Vállp árnácska
BT - Bázis r ész
C - Zár nyelv
D - Övcsat
DT - Forgó go mb
E - Üléshuzat
FG - Fiók a használati utasításnak
G - 5 ponto s övrendsze r
G1 - Vállöv á tfűzésé re szolgál ó
nyílások
G2 - Nadrágtartó övek
G3 - Csíp őnél halad ó öv
G4 - Ágyékheveder
............................................................................................................................................................S .104
......................................................................................................................................S .100
............................................................................................................................S .102
......................................................................................................S .103
.........................................................................S.104
..........................................................................................................................................S.104
.........................................................................................S .105
............................................................................................................................................S .105
.................................................................................................................S .107
..................................................................................................................................S .107
.................................................................................................................................S .108
............................................................................................................................................S .108
...............................................................................................................................S .109
.....................................................................................................................................S .109
..............................................................................................................................................S. 110
...........................................................................................................................................S. 110
G5 - Központi övszabályozó
GV - Öváll ító
H - fejtámla szabályozókar
PG - Pozíci ó állító fog antyú
K - Inst allációs m atrica
SG - Vállpárnácska övek
U - Az autó hárompontos harántir á
nyban húzódó öve
V - Az autó hárompontos övének
zárnyelve
W - Az a utó hárompo ntos meden cénél
húzódó öve
X - Az autó hárompontos övének zára
AT - ISOFI X - Lezáró go mb
IA - ISOFIX - kap ocs
IH - ISOFIX beszerelési segédeszköz
IK - ISOFIX cs atlakozó k
IM - IS OFIX- karok
IR - ISOFIX-hur ok
IT - ISOFIX - zá rkioldó go mbok
S - Kitámasztóláb
SA - Kitámasztóláb - kijelző
SF - Tá mogat láb be állítás go mb
S.10 8
S.10 9
Köszönjük, hogy a HE YNER® gyermekülést válasz totta .
Gyermeküléseink fejlesz tésénél a biztonság, a kényelem valamint a könnyű kezelhetőség mindig elsődleges szempont. A gyár tás szigorú minőségi felügyelet mellett folyik, és a legmagasabb biztonsági követelményknek is megfelel.
Kérjük , fordítson elég időt a beszerelési tmutató elolvasásár és megértésére.
Termékünk csak akkor tudja nyújtani a meg felelő biztonságot és kényelmet , ha az előírásoknak
megfelelően van beszerelve.
A használati utasítást őrizze meg az annak szánt tasakban, az ülés hátoldalán.
FIGYELEM:
Az országonkánt eltérő követelményeknek köszönhetően a termék jellemzői eltérhetnek.
A gépjármű gyártójának javaslatait feltétlenül szem előtt kell tartani.
1. Biztonsági utasítások
A HEYNER® MultiFix T WIST gyermekülés a ECE 44/04 számú gyermekbiztonsági rendszerekről
szóló európai előírások szerint engedélyezett . Az E jel és az engedélyszám az ülé s hátulján
narancssárga színű cimkén található.
A garancia elveszíti érvényességét, ha Ön az ülésen változtatásokat hajt végre, a biztonság
csökkenhet, vagy teljesen megszűnhet.
Győződjön meg róla, hogy az ülés használata az Ön autójában engedélyezett-e. Ne tegye a
gyermekülést olyan helyre, ahol a légzsák kinyílásának lehetősége fennáll.
A HEYNER® MultiFix TWIST nem használható egyéb ülőalkalmatosságnak a háztartásban, illetve játéknak sem. Nem rendeltetésszerű használat esetén fennáll a sérülés veszélye.
Kérem, fordítson elegendő időt az ülés előírásszerű beszerelésére!
NE használja a gyermekülést, ha bizonyos alkatrészek hiányoznak , vag y sérült. Ne használjon
olyan terméket, melynek múltja az Ön számára ismeretlen! Eg yes részek hiányozhatnak, vagy
sérültek lehetnek.
HU
99
100

Magyar Magyar
Figyeljen arra, hogy a gyerekülés minden részeúgy legyen elhelyezve,hogy a napi használat
soránne vesszenek el , vagy ne szoruljon be az ajtók és az áll ítható ülések közé!
Mindig biztosítsa ki a gyerekülést, abban az esetben is, ha épp nem ül benne gyermek!
Amíg a g yerekülés nincs használatban, védje az erős, köz vetlen napsugárzástól (pl. egy fehér
kendővel) . Lehetséges, hog y intenzív napsütés hatására túlságosan felmelegszik . Mindenek
előtt az övcsat válhat kifejezetten forróvá.
Egy baleset után ajánlot t az egész berendezést cserélni, vagy gyártó ált al végrehajtott ellenőrzésre küldeni - a baleseti jeg yzőkönyvvel együtt.
A gyerekülés nem kerülhet használ atba az erede ti üléshuzat nélkül!
Amennyiben az üléshuzat cserére szorul,csak az eredeti HEYNER MOBIL AUTOMOTIVE GMBH
üléshuzatokat szabad használnia.
Probléma ese tén forduljon bizalommal az eladóhoz, vag y a gyártóhoz!
1.1. A HEYNER MultiFix Twist használata esetén kérem, vegye figyelembe az alábbi
feltételeket:
Haladási iránnyal ellentétesen:
testhossz:40-105 cm
súly: 0-18 kg
kor: 0- min. 15 hónap
Haladási iránnyal megegyezően:
testhossz: 83-105 cm
súly: 9-18 kg
kor: min. 16 hónap - 4 év
15 hónapos kor alatti g yermeket NE ültessen haladási iránnyal megegyezően az autóba! Ameddig csak lehet, fordítsa haladási iránynak háttal, mert általában ez a legbiztonságosabb pozíció.
Ne helyezzen semmit a lábrészre, a bázis elé!
Olvassa el az ISOFIX utasításokat rendszeresen, és igény szerint tisztítsa meg az ülést a
szennyeződésektől! A szennyeződés, por és ételmaradékok befolyásolhatják a berendezés
megbízhatóságát!
2. Elhelyezés a gépjárműben
HEYNER® MultiFix TWIST gyermekbiztonsági rendszert az európai gyermekbiztonsági
felszerelésekről szóló követelményeknek (ECE
R 44/04) meg felelően ellenőrizték. Az (ECE R
44/04) szabályozás értelmében azon „ISOFIX
D/B1 osztály“nak meg felelő gépjármű ülésein
engedélyezett a használat, mely a gépjármű g yártója által kiadot t kézikönyvben leír tak szerint
ISOFIX-gyermekbiztonsági rendszer használatára alkalmas.
A gyerekülés ISOFIX és kitámasz tólábbal (S)
történő rög zítésére a ‚Semi universal‘ engedély
vonatkozik, ezért ezt az ülést csak bizonyos
gépkocsikban lehet használni. Az engedélyezett gépjárműveket a típuslista segít ségével
ellenőrizheti. Az aktuális lista megtal álható a
www.h-germany.de oldalon.
Amennyiben az első jobb oldali ülés használatban van, kérem, tolja hátra, amennyire csak
lehetséges és kövesse a használati utasítást!
Deaktivál ja a jobb oldali légzsákot! A mennyiben
ez nem lehetséges, a gyerekülés használata az
első ülésen nem megengedett.
A gyártó gépjárműlistája segítségével ellenőrizze, mely ülések megfelelőek ehhez a g yermeküléshez.
Ezen ülés hagyományos biztonsági övvel nem
használható!
HU
101
102

Magyar Magyar
Az olyan üléseken melyek a haladási irányhoz képest keresztben, vagy annak háttal vannak
elhelyezve, a gyerekülés haználata nem megengedett.
Rögzítse a csomagokat és a különböző tárg yakat! Baleset esetén sérülést okozhatnak gyermekének.
3. A Heyner® MultiFix Twist használata
használat telepítés A gyermek
Irányított hátrafelé
Továbbítva irányítva
A gyermek súlyától és magasságától függően a gyermekülés használható haladási iránnyal
megegyezően, és azzal ellentétes irányban.
FIGYELMEZTETÉS:
A HEYNER MultiFixTwist gyermekülést haladási iránnyal ellentétesen kell behelyezni, ha: gyermeke még nem töltötte be a 15 hónapos kort , vagy nem éri el a 83 cm magasságot.
3.1. Gyerekülés használata
A gyerekülés fej- és testpárnát, valamint ék al akú párnát tartalmaz.
magassága
<18 kg
40cm - 105cm
9-18 kg
83cm-105cm
referencia Age
ca. < 4 év
15 Hónapokig
4 év
A gyermekülés a 18 kg alatti gyerekek különleges védelmére lett tervezve. Javasoljuk, hogy az
ülést használja addig ameddig csak lehetséges.
Használja ki az üléshez tartozó ék alakú párnát mindaddig, míg a gyermek el nem éri a 13 kg-ot!
Ez elősegíti az ortopédusok által ajánlott fek vőhelyzetet.
4.Beszerelés
FIGYELMEZTETÉS:
Míg gyermeke a 15 hónapos kort, vagy 83 cm magasságot nem éri el, a haladási iránynakháttal
kell szálltani! Baleseti statisztikák igazolják, hogy a g yermek ilyen módon tör ténő szállítása a
legbiztonságosabb. Ezért javasoljuk a gyerekülés haladási iránynak háttal történő használatát,
amíg lehetséges.
4.1. HEYNER MultiFix TWIST beszerelése a gépjárműbe
Kérem, ellenőrizze gépjárművét a típuslista segítségével, melynek jelenlegi verziója megtalálható itt: www.h-germany.de oldalon.
4.2. A z ülés elhelyezése
Mielőtt a HEYNER® MultiFix TWIST gyerekülést
behelyezné, olvassa el az ISOFIX-kapocs mellékelt
beszerelési útmutatóját!
Az ISOFIX- rög zítő pontok az ülőfelület és az autóülés háttámlája közt találhatók.
Mindig addig tolja ki a kit ámasztólábat, míg az elöl
be nem kattan.
MEGJEGYZÉS:
Ne helyezzen tárgyakat a gyermekülés alatti üres
lábrészre.
Oldja fel az ISOFIX- csatlakozók (IK) zárját, azáltal
hogy megnyomja a zárógombot (AT) és az ISOFIXhurokkal húzza ki mindkét zárókart!
HU
103
104

Magyar Magyar
click
press
L
Press
A beszerelés előtt ellenőrizze abiztonsági jelzőket!
Mindkettőnek PIROS színűnek kell lenni. Ha nem
piros, akkor húzza meg a kioldó gombokat, amíg
nem hall egy kattanó hangot.
Fogja meg a gyermekülést két kézzel és nyomja az
ISOFIX- csatlakozókat (IK) a helyére, amíg be nem
kattannak az ISOFIX-rögzítő pontokba (IA).
Egyértelmű kattanó hangot hall.
L+R
CHECK
Most mindkét biztonsági jelzőnek zöldnek kell lennie. Kérem ellenőrizze
a biztonsági jelzőket MINDKÉT OLDALON, hogy az ülés az autó mindkét
ISOFIX- kapcsával helyesen legyen csatlakoztatva.
A gyermekülés csak az ISOFIX- csatlakozók alapos rögzítése után
garantálja az ülés megfelelő tartását és nyújt teljes biztonságot a
gépjárműben!!!
Az állvány (S) 18 pozícióba állítható. Nyomja
meg az állvány-k ioldó gombját (SF) és húzza az
állványt a padlóig. A mennyiban az állvány (S)
biztonságosan áll a földön, az állvány kijel zője
(SA) teljesen zöld. Ha piros, akkor ismételje meg a
folyamatot.
CHECK
FIGYELMEZTETÉS:
Az állvány nem lóghat a levegőben és nem lehet tárg yakkal alátámasztani. Kérjük, fi gyeljen
arra, hogy a kijelző zöld-e.
Ellenőrizze mégeg yszer, hogy a gyerekülés rögzít ve van-e az üléshez.
A HEYNER® MultiFix T WIST ülés ISOFIX-csatlakozókkal (IA) és állvánnyal (S) csak akkor tud optimális védelmet nyújtani gyermekének, ha az előírásoknak megfelelően kerül beszerelésre.
A fejtámla (A) igazításával állítsa gyermekére az övrendszert (G).
A fejtámlát úgy állítsa be, hogy a gyermek válla és a fejtámla közti rés ne haladja meg a kb. 3
cm-t. (kb. 2 ujjnyi)
Nyissa meg az övcsatot (D) és az ötpontos övrendszert (G).
Fektesse a nadrágtartó öveket (G2) bal és jobb oldalra. Ültesse be g yermekét a HE YNER® MultiFix TWIST g yermekülésbe úgy, hogy a feneke az ülőteknőbe kerüljön.
4.3. A fejtámla és a vállövek méretre igazítás a
A fejtámla méretre illesztéséhez nyomja meg a fejtáml aszabályozó kart
lefelé. Így gyermekének megfelelő méretre tudja szabni a fejtámla magasságát. Amint a megfelelő magass ágot elérte, engedje el a fejtámlaszabályozó kar t, és a fejtámla beáll a kívánt magasságra.
Csak egy optimálisan beállított fejtámla garantálja a teljes biztonságot .
A fejtámlát úgy állítsa be, hogy az 5 pontos övrendszer a gyermek vállmagasságában fusson.
A fejtámlát 7 különböző pozícióba lehet állítani.
Az övrendszert a fejtámla magasságával lehet beállítani. A vállövek
(SG) szorosan össze vannak kötve a fejtámlával, és nem lehet külön
beállítani.
4.4. Gyermek bekötése
A gyermek beültetése előtt fi gyeljen arra, hogy a fejtámla a helyén legyen.
Lazítsa meg a v állöveket az övállító (GV) segítségével, és húzza maga felé
a nadrágtartó öveket (G2).
FIGYELEM:
Ne húzza meg a vállpárnácskákat!
HU
105
106

Magyar Magyar
Pull
Illessze össze a nadrágtartó övek(G2) két zárnyelvét (c) és helyezze bele
az övcsatba (D), amíg nem hallja a kattanás t.
Húzza a központi övszabályozót (G5) addig, amíg a nadrágtartó övek (G2) a
gyermekre rá nem simulnak. Figyeljen arra, hogy az öv ne legyen meg tekeredve. Kerülje el vastag öltözet viselését az övek alatt, leg főképp télen.
FIGYELMEZTETÉS:
Figyeljen az övcsat tisztaságára! Csak tiszta övcsatokkattannak a helyükre hallhatóan és biztonságosan.
FONTOS:
Győződjön meg arról, hogy az övek nincsenek megtekered ve, vagy
beragadva. Ellenőrizze a medence öveket. Ezeknek az öveknek gyermek
csípőmagasságában kell elhelyezkedni a lehető legalacsonyabban.
FIGYELMEZTETÉS:
Az öv és a test között maximum 1 ujjnyi távolság megengedett.
4.5. A g yermek ülő-és fekvőpozíciói
Ez a gyerekülés fekvőpozíció funkcióval is bír. Ennek kezelése egyszerű,
akár eg y kézzel is végrehajtható. A pozícióváltozató fogantyú (PG) segít a
tetszőleges pozíció beállításában.
4.6. Tengely kör üli forgatás
A gyermekülésnek 360°-os forgató funkciója is van.A
be- és kiszállás ezáltal sokkal könnyebb. Gyorsan
lehet váltani menetiránynak meg felelő és azzal ellentétes irányok között.
Az ülés forgatásához nyomja meg a forgató gombot
és ezzel egyidejűleg forg assa el az ülést.
Az ülés egy egyér telmű <<klikk>> hanggal áll be
pozíciójába.
FIGYELMEZTETÉS:
mindig kövesse az utasításokat menetiránynak megegyező, vagy azzal ellenkező pozíció alkalmazásánál.
FIGYELMEZTETÉS:
Utazás előt t győződjön meg arról, hog y a gyermekülés forgatható része menetiránynak megegyező, vag y azzal ellenkező irányban lett rögzít ve. Ellenőrzésképp próbálja meg elforgatni az
ülést a gombok megnyomása nélkül.
MEGJEGYZÉS:
FIGYELMEZTETÉS:
A gyerekülés nem szállítható a gépjárműben anél kül, hogy ne lenne rögzít ve.
Figyeljen arra, hogy ne legyen szennyeződés az ülőke és az alap között. Ez
megakadályozhatja, vagy megnehezítheti a forgató funkció működését.
4.7. Gyerekülés eltávolítása
Nyomja meg a kioldó gombot az ISOFIX-csatlakozókon és oldja ki az ISOFIX-kapcsot.
Tolja vissza az ISOFIX-zárókarokat az ülésbe.
Távolít sa el a gyerekülést a gépjárműből!
5. Ápolás és tisztítás
5.1. Üléshuzat eltávolítása
A későbbi helyesbeszereléshez ajánljuk, hogy az üléshuzat levételét fényképezze le és dokument álja.
Húzza az övcsatvédőt óvatosan felfelé.
Nyissa ki a nyomógombokat a fej- és ülőrész üléshuzata között.
Fogja meg a huzat alatt az ülés alsó peremét, majd könnyedén húzza előre, majd felfelé.
Húzza át az üléshuzatot az övcsaton.
HU
107
108

Magyar Magyar
A huzatot kímélő mosószerrel 30° C-on mossa! Kérem, olvassa el az üléshuzat mosócédulájának
utasításait!
Ne használjon vegyi tisztítót vagy fehérítőszert!
A műanyag részeket langyos vízzel és kímélő mosószerrel tisztítsa! Ne használjon erős tisztítószereket (mint pl oldószer)!
FIGYELMEZTETÉS:
Soha ne távolítsa el az öv zárnyelveit vagy az övcsatot! Csak HEYNER üléshuzatot használjon!
Soha NE használja a gyerekülést üléshuzat nélkül!
5.2. A z üléshuzat újrahúzása
Az előző lépéseket végezze ellenkező sorrendben.
Az fej- és ülőrész üléshuzatát nyomógombok segítségével rögzítse.
Rögzítse a vállpárnácskákat a vállövekkel. Ügyeljen rá, hogy az övek ne legyenek megcsavarodva.
FIGYELMEZTETÉS:
Soha ne használja a gyermekülést helyesen elhelyezett vállpárnácskák nélkül!
5.3. Baleset utáni teendők
Egy baleset után ajánlot t az egész berendezést cserélni, vagy gyártó ált al végrehajtott ellenőrzésre küldeni -a baleseti jegyzőköny vvel együtt.
5.4. Termékkel kapcsolatos információk
Amennyiben kérdése lenne, első sorban forduljon kereskedőjéhez. A következő információkat
kellett kézhez kapnia: sorozatszám (lásd a matricán), az autó márkája és típusa, g yermek súlya,
kora és magassága.
További információkat és gyereküléseket a www.h-germany.de oldalon talál.
5.5. Hulladékszállítás
Kérem, vegye figyelembe az országában érvényes hulladékszállítással kapcsolatos előírásokat!
Környezetvédelmi okokból kérjük a csomagolást szelektíven szétválasztani, majd elszállítani.
FIGYELMEZTETÉS:
Tartsa a műanyag csomagolást távol a gyermektől, fennáll a fulladás veszélye.
6. Végül pár jótanács:
NE helyez zen nehéz tárgyakat a kalaptar tóra! Baleset során megsebesíthetik a gyermeke t . A
csomagokat és egyéb tárg yakat rögzítse megfelelően!
Győződjön meg róla, hogy minden utas biztonsági öve be van-e csatolva! Amennyiben ez nem
történik meg, baleset során az utasok sérülés veszélyt jelenthetnek a g yermekek számára!
Hosszabb utazás sor án tartson szünetet, valamint győződjön meg arról, hogy gyermeke nem
autóútra száll ki.
Amennyiben lehetséges, használja az ajtólzáró funkciót gépjármű vében, hogy a jármű ajtajai ne
legyenek nyithatóak mozgó állapotban!
Sose hagyja gyermekét felügyelet nélkül a járműben vag y a jármű körül!
HU
109
110

Norsk Norsk
1.
Viktige sikkerhetsbemerkninger
lassering på bilens sete
2.
Bruk av HEYNER MultiFix TWIST
3.
Installasjon
4.
Installasjon av HEYNER MultiFix TWIST i bilen
4.1.
Plassering på bilens sete
4.2.
Høydejustering av nakkestøtten (A)
4.3.
...........................................................................................................................................................S.116
og selebåndene (SG) til størrelsen på barnet dit t...
Festing av barnets sikkerhetsbelte
4.4.
Sittende og liggende stillinger hos barnet
4.5.
Rotasjon
4.6.
4.7.
5.
5.1.
5.2.
5.3.
5.4.
5.5.
6.
A - Nakkes tøtte
A1 - Hodepu te
A2 - Redu ksjonsput e
B - Skuld erputer
BT - Basis del
C - Låsespenner
D - Spenne
DT - Rotere nde knapp
E - Se tetrekk
FG - Manualoppbevaring
G - Beltes ystem
G1 - Beltes por
G2 - Sele tøybelte r
G3 - Hof tebelte
G4 - Spenneb elte
G5 - Sen tralt seltø ysbelte
................................................................................................................................................................. S.119
Fjerne barnesetet
.............................................................................................................................................S .120
Vedlikehold og rengjøring
Fjerne trekket ....................................................................................................................................................
Sette på trekket igjen
Etter en ulykke
.......................................................................................................................................S.121
.....................................................................................................................................................S.121
Produktinformasjon .......................................................................................................................................
Kasting
....................................................................................................................................................................S.121
Noen siste tips:
.................................................................................................................................................... S.122
.................................................................................................................S.112
...................................................................................................................................S.114
..................................................................................................................S.115
.....................................................................................S.11 6
................................................................................................................................S.11 6
............................................................................S.117
...........................................................................................................S.118
............................................................................................. S.119
..............................................................................................................................S .120
S.120
.S.121
GV - Seletøyjustering
H - N akkestø tte
posisjoneringshåndtak
PG - Posisjoneringshåndtak
K - Installasjonsmerke
SG - Forbindelsesbelter
U - Diagonalt b elte på trep unktsbel tet
V - Spenn elås på trep unktsbel tet
W - Hof tebelte p å trepunkt sbeltet
X - Belte spenne på tre punktsb eltet
AT - ISOFIX-knapp
IA - ISOFIX-ank ring
IH - ISOFIX-installasjonshjelp
IK - ISOFIX-ko pling
IM - ISOFIX-armer
IR - ISOFIX-tilbaketrekkssløyfe
IT - ISOFI X-utløserknapper
S - Støt teben
SA - Støttebensindkator
SF - Pedalutløseknapp
Takk for at du valgte ett HEYNER® barnese te.
Når vi ut vikler våre barneseter er sikkerhet, komfor t og brukervennlighet viktigst for oss. Produksjonen foregår under streng kvalitetskontroll og oppfyller de høyeste sikkerhetskravene.
Husk å ta tid til å lese og forstå disse instruksjonene nøye. Bare hvis se tet er riktig installert
oppnås maksimal sikkerhet og komfort.
Husk å oppbevare bruksanvisningen i oppbevaringsrommet på baksiden av setet.
NOTE:
På grunn av landsspesifikke krav kan produk tfunksjonene variere.
Anbefalinger fra kjøretøyprodusenten må følges.
1. Viktige sikkerhetsbemerkninger
HEYNER® MultiFix T WIST barnesete er testet og godkjent i henhold til European Standard for
Child Restraint Systems ECE 44/04. Du finner sertifiseringsmerket med registreringsnummeret
på baksiden av setet, se etter oransje etikett.
Godkjenningen mister sin gyldighet hvis du gjør noen endringer på setet. Dette kan redusere
sikkerheten eller fullstendig fjerne den.
Vennlig st sjekk om setet er godkjent for bilen din før du bruker det! Ikke installer det te barnesikring ssysteme t på et bilsete hvor air baggen er aktiver t!
HEYNER® MultiFix T WIST må ikke brukes som sete eller leketøy hjemme. Brukt på andre måter
er det fare for skade.
Bruk god tid på å installere setet i bilen, slik det er beskrevet i håndboken.
IKKE bruk barnesetet hvis det er skadet eller hvis det mangler deler. Ikke bruk brukte produkter
hvor du ikke kjenner forhistorien. Noen setedeler kan mangle eller være skadet.
Sørg for at alle delene til barnesetet er forsvarlig stuet, slik at de ikke mangler i dag lig bruk,
eller blir fastklemt mellom dører eller justerbare seter!
HEYNER® MultiFix T WIST skal alltid være fastgjort i bilen, selv når det ikke brukes av barnet.
NO
111
112

Norsk Norsk
Når barnesetet ikke er i bruk, bør du besky tte det mot intensivt og direkte sollys. Setet kan bli
veldig varmt hvis det blir utsatt for direkte sollys. Spesielt beltespennen kan bli veldig varm.
Etter en ulykke er det nødvendig å bytte hele barnesikringssystemet eller sende det til produsenten for inspeksjon - sammen med ulykkesrapporten.
Hvis trekket trenger å byttes ut, må det kun brukes originale HE YNER MOBIL AUTOMOTIVE GMBH
setetrekk.
Ta kontakt med forhandleren eller produsenten ved vanskeligheter.
1.1. For å bruke HEYNER MultiFix TWIST, vær oppmerksom på følgende krav:
bakovervendt: Kroppsstørrelse: 40-105 cm
Vekt: 0 - 18 kg
Alder : Fødsel - min. 15 måneder
Bemerk: For å bruke setet bakovervendt må du utelukkende benytte nivå 4 (liggende stilling)!
forovervendt: Kroppsstørrelse 83-105 cm
Vek t: 9-1 8kg
Alder : minimum 16 måneder - ca. 4 år
Barn under 15 måneder må IKKE sitte forovervendt. La barnet kjøre bakovervendt så lenge som
mulig, dette er den sikreste posisjonen.
Ikke plasser gjenstander i benområdet foran setebunnen.
Kontroller Isofix-støttene regelmessig og rengjør eventuell smuss, støv eller matpartikler, da
de kan påvirke systemets sikkerhet.
2. Plassering på bilens sete
HEYNER® MultiFix T WIST bilse tesystemer er
konstruert og testet for å oppfylle kravene til
europeisk sikkerhet sutstyr (ECE R 44/04). Systemet er godkjent for bruk i „ISOFIX“ -kompatible
kjøretøysseter i henhold til ECE-forskrift R44 /
04 som er egnet for ISOFIX-sikkerhet ssystemer
som spesifisert av kjøretøyprodusenten i bilens
eierhåndbok.
For å sikre barnesete med ISOFIX er det en
«semi-universal» godkjenning. Derfor kan disse
setene bare brukes i enkelte biler. Vennligst sjekk
godkjente biler basert på kjøretøytype listen. En
gjeldende liste finner du på www.h-germany.de
Hvis passasjersetet for an er i bruk, skyv det så
lang t tilbake som mulig og følg instruksjonene i
bilhåndboken. Deaktiver passasjersidens airbag!
Hvis de tte ikke er mulig, er ikke bruk av barnesete
på dette setet tillatt.
Bruk kjøretøytype listen over merket ditt å sjekke
hvilke bilseter som passer til barneseter.
Dette setet er ikke egnet for bruk med et vanlig
bilbelte.
Ikke bruk bilseter som er innre ttet til å gå bevege
seg bakover eller sideveis. Disse setene er ikke
tillatt å bruke til barneseter.
Bagasje og andre lignende gjenstander skal l agres vekk og sikre ordentlig! Ved en ulykke kan
disse bli farer og kan skade deg og barnet ditt.
NO
113
114

Norsk Norsk
3. Bruk av HEYNER MultiFix TWIST
type bruk installasjon høyde på barnet aldersreferanse
bakovervendt
forovervendt
Avhengig av høyden og vekten på barnet ditt, kan barnesete set tes fast vendt fremover og
bakover.
ADVARSEL:
HEYNER MultiFix TWIST må brukes bakover vendt inntil barnet ditt er minst 15 måneder eller
over 83 cm.
3.1. Bruk av spedbarnsputen
Spedbarns setet inneholder en hodepute og en kileformet pute.
Putene er beregnet for spesiell beskyttel se av små barn med vekt på 9 - 18 kg. Vi anbefaler at du
bare fjerner disse når barnet er for stort til dem, men senest når barnet veier 18 kg.
Bruk den medfølgende kileformede puten til barnet ditt veier 13 kg. Den støt ter den flate hvilende stillingen som anbefales av ortopeder.
<18 kg
40cm - 105cm
9-18 kg
83cm-105cm
ca <4 år
15 måneder
opp til 4 år
4. Installasjon
NOTE: Hvis barnet ditt er minst 15 måneder eller over 83 cm, SKAL de transpor teres bakovervendt. Ulykkesstatistikk viser at bakovervendt transpor t er den sikres te for barnet. Derfor
anbef aler vi at du bruker barnesetet så lenge som mulig bakovervendt.
4.1. Installasjon av HEYNER MultiFix TWIST i bilen
En gjeldende liste finner du på www.heyner-germany.de. Vennligst les også bruksanvisningen
til bilprodusenten.
4.2. Plassering på bilens sete
Før du monterer HEYNER® MultiFix TWIST på bilse tet, fest om nødvendig de to medføl gende
installasjonshjelpemidlene (IH) til ISOFIX-monteringspunktene (IA) i bilen.
ISOFIX-monteringspunktene er pl assert mellom setet og r yggstøt ten til bilsetet.
Bret t alltid støt teanordningen til den klikker på
plass på forsiden.
NOTE:
Ikke plasser gjenstander i benområdet.
Løsne l åsene til ISOFIX-kontaktene (IK) ved å tryk ke
på låseknappen samtidig trekke ut begge låsearmene ut av ISOFIX-tilbakeslag sløkken.
Kontroller sikkerhetsindikatorene (IT). Disse må
begge være RØDE. Hvis sikkerhetsindikatorene
(røde) ikke er synlige, trykker du på de grønne frigivelsestappene til du hører e t hørbart
<< klikk >>.
Hold barnesetet med begge hender og sky v de to
ISOFIX-kontaktene (IK) fast i skyveguidene til de to
ISOFIX-låsearmene (IM) kobles inn. Du hører en >>
klikk << lyd.
NO
115
116

Norsk Norsk
click
press
L
Press
L+R
CHECK
Sjekk ved hjelp av sikkerhetsindikatorene på begge
sider at setet er riktig koblet til bilens to ISOFIX-ankere (IA). Begge sikkerhetsindikatorene må nå være
grønne.
Bare en riktig festing av begge ISOFIX-kont aktene
(IK) sikrer at setet er festet ordentlig og gir full
beskyttelse til barnet dit t i bilen!
Støtteinnretningen (S) kan justeres i 18 stillinger. Trykk på pedalutløserknappen (SF) og trekk sokkelen til gulvet. Hvis sok kelen står forsvarlig på
gulvet, blir displayet helt grønt. Hvis indikatoren er rød, gjenta prosedyren.
ADVARSEL:
Støtteinnretningen må ikke henges opp i luften eller dekkes av gjenstander. Kontroller alltid at indikatoren er grønn.
Sjekk en ekstra gang at barnesetet er fast festet
på setet.
Kun hvis HEYNER® MultiFix TWIST med ISOFIX-ank rene (IA) og støtteanordningen (S) er
riktig installer t i bilen, kan barnets bilsete oppnå
CHECK
4.3. Høydejustering av nakkestøtten (A) og selebåndene (SG) til størrelsen på barnet ditt.
For å justere høyden på nak kestøtten (A) til størrel sen på barnet ditt,
berører du baksiden av nakkestøtten og trekker jus teringsspaken (H) opp.
Nå kan du, avhengig av størrelsen på barnet, justere nakkestøtten (A) til
ønsket høyde. Så snart du har nådd riktig høyde, løsner du justeringsspaken (H) og nakkestøtten (A) klikker inn i ønsket høyde.
optimal sikkerhet.
Bare en godt justert nakkestøtte sikrer maksimal
sikkerhet. Nakkestøtten skal justeres slik at
integrert 5-punk ts sele system (G) kjører på skulderhøyde av bar net.
Nakkestøtten kan justeres i 7 forskjellige stillinger.
Selen justeres med høyden på nakkestøtten. Skulderbeltene er godt
festet til nakkestøtten og trenger ikke å justeres separat.
Juster størrelsen på selen (G) til barnet ditt ved å justere nakkestøtten (A).
Nakkestøtten må justeres slik at avstanden mellom barnets skuldre og nakkestøtten ikke overstiger 3 cm (ca. 2 fi ngerbredder).
4.4. Festing av barnets sikkerhetsbelte
Pass på at nakkestøtten er låst på pl ass før du plasserer barnet ditt.
Løsne skulderstroppene ved å trykke på beltejusteringen (GV) og trekk
selestroppene (G2) mot deg.
Advarsel:
Ikke trekk i skulderputene.
Åpne setebeltet spennen (D) og beltesysteme t (G).
Legg selebåndene (G2) til venstre og til høyre. Plasser barnet i HEYNER® MultiFix TWIST-setet,
slik at baken presser seg dypt inn i sete t.
Sett de to spennefeltene (C) på selebåndet (G2) og koble den til beltespennne (D) til du hører en „klikk“ lyd.
Ved å trekke på det sentrale justering sbeltet (G5) sørg for at seletøyet
berører barnet fast og ikke er vridd.
Unngå t ykke klær under beltet, spesielt om vinteren.
NO
117
118

Norsk Norsk
Pull
ADVARSEL:
Pass på at beltespennen er fri for smuss. Kun rene beltelåser klikker i
hørbart og trygt.
VIKTIG:
Pass på at stroppene ikke er vridd eller fastk jørt. Kontroller også
hoftebeltene. Disse må ikke være vridd og bør være så lave som mulig over
barnets hofte.
ADVARSEL:
Det bør ikke være mer enn en fingerbredde mellom kroppen og stroppene.
4.5. Sittende og liggende stillinger hos barnet
Dette barnebilsete er utstyrt med en lig gende stilling. Operasjonen er
enkel og rask med bare en hånd. Ved å trykke på posisjonshåndtaket (PG)
kan du justere setet i ønsket stilling til barnet dit t.
4.6. Rotasjon
Barne setet har en 360 ° rotasjonsfunksjon. Plassering
og frigjørelse av barnet ditt blir mye lettere. Det kan
endres raskt fra et bakover vendt til et fremadvendt
bilsete.
For å snu se tet må du trykke på roteringsknappen og
snu setet samtidig.
Setet klikker i med en klar >> klikk << lyd.
ADVARSEL:
Følg alltid instruksjonene for bakovervendt og fremadvendt bilsete.
ADVARSEL:
Sørg alltid for at den svingende delen av barnesete er låst i frem- eller
bakovervendt stilling før du kjører. For å sjekke, prøv å snu setet uten å
trykke på sikkerhetsknappen.
NOTE:
Pass på at det ikke er noe smuss mellom setet og bunnen. Dette kan permanent påvirke rotasjonsfriheten.
4.7. Fjerne barnesetet
Trykk utløser knappene på ISOFIX-kontak tene for å slippe ISOFI X-forankringen. Skyv ISOFIX
låsearmene tilbake i seteskallet.
Fjern nå barnesete t fra bilen.
NOTE:
Barne setet må aldri transporteres i bilen, med mindre det er ordentlig sikret.
5. Vedlikehold og rengjøring
5.1. Fjerne trekket
For senere korrekte installasjonen anbefaler vi å dokumentere fjerningen
av dekselet med bilder.
Trekk forsiktig beskyttelsen fra spennen oppover.
Åpne trykknappene mellom trekket på setebunnen og hodestøtten.
Ta tak under trekket på bunnen av sete t og dra det lit t fremover og oppover. Trekk nå trekket
over spennen.
Du kan vaske trekket med et mildt vaskemiddel på (30° C). Vær oppmerk som på instruksjonene
på vaskeetiketten.
Bruk aldri kjemikalier eller blekemidler.
Plastdelene kan rengjøres med lunkent vann og et mildt rengjøringsmiddel. Ikke bruk kraftige
rengjøringsmidler (som løsemidler).
FORSIKTIG:
Fjern aldri spennetungene fra stroppene eller spennen. Bruk kun HEYNER setetrekk. Bruk aldri
barnesete uten trekk.
NO
119
120

Norsk Norsk
5.2. S ette på trekket igjen
Utfør de forrige trinnene i omvendt rekkefølge.
Koble stoet på nakkestøtten og setet med tr ykknappene.
Fest skulderputer til skulderstroppene og sørg for at stroppene ikke er vridd.
ADVARSEL:
Bruk aldri barnesetet uten å sikre skulderputene riktig.
5.3. Et ter en ulykke
Etter en ulykke er det nødvendig å bytte hele barnesikringssystemet eller sende det til produsenten for inspeksjon - sammen med ulykkesrapporten.
5.4. Produktinformasjon
Hvis du har spørsmål, kontak t din forhandler førs t.
Du bør ha følgende informasjon tilgjengel ig: Serienummer (se etikett) Merke og modell på bilen
din Barnets vekt, alder og høyde.
Ytterligere informasjon og ekstra bilseter for eldre barn finnes på w ww.h-germany.de
5.5. Kasting
Vær oppmerksom på de forskrifter som gjelder for ditt land.
Av miljømessige årsaker ber vi deg om å resirkulere alt emballasjemateriale, samt alle produktdeler ved slut ten av bruken.
FORSIKTIG:
Hold emballasjematerialer utilgjengelige for barnet ditt, kvelningsfare.
6. Noen siste tips:
Ikke plasser tunge gjenstander på hattehyllen. Ved en ulykke kan disse bli farer og kan skade
deg og barnet ditt. Bagasje og andre lignende gjens tander bør der for lagres vekk og sikres
forsvarlig.
Pass på at alle passasjerer i bilen har sit t belte feste t, da ikke-sikrede passasjerer kan bli en stor
fare for barn i tilfelle av en ulykke.
Tillat at barnet ditt får pauser under lange bilreiser, og sørg for at de ikke stiger ut av bilen på
veibanesiden og ikke forlater bilen uten tilsyn.
Hvis de t er tilgjengelig, bruk alltid barnesikringslåsesystemet, noe som gjør det umulig for barn
å åpne dørene fra innsiden.
Du må aldri forl ate barnet uten tilsyn, selv utenfor bilen!
NO
121
122

Ansprechpartner · Contact
HEYNER MOBIL AUTOMOTIVE GMBH
Kurzer Weg 1-5, D-15859 Storkow
phone: +49 (0) 33678 687 72
fax: +49 (0) 33678 610 44
info@h-germany.de
123
124
 Loading...