

In store "130" you
can find and buy almost all necessary goods for your auto
in
Kyiv and other cities, delivery by ground and postal services. Our experienced
consultants will provide you with exhaustive information and help you to chose
the very particular thing. We are waiting for you at the address
http://130.com.ua
PHONES
(044) 360-7-130
(050) 336-0-130
(063) 788-0-130
(067) 233-0-130
(068) 282
-0-
130
Internet store of
autogoods
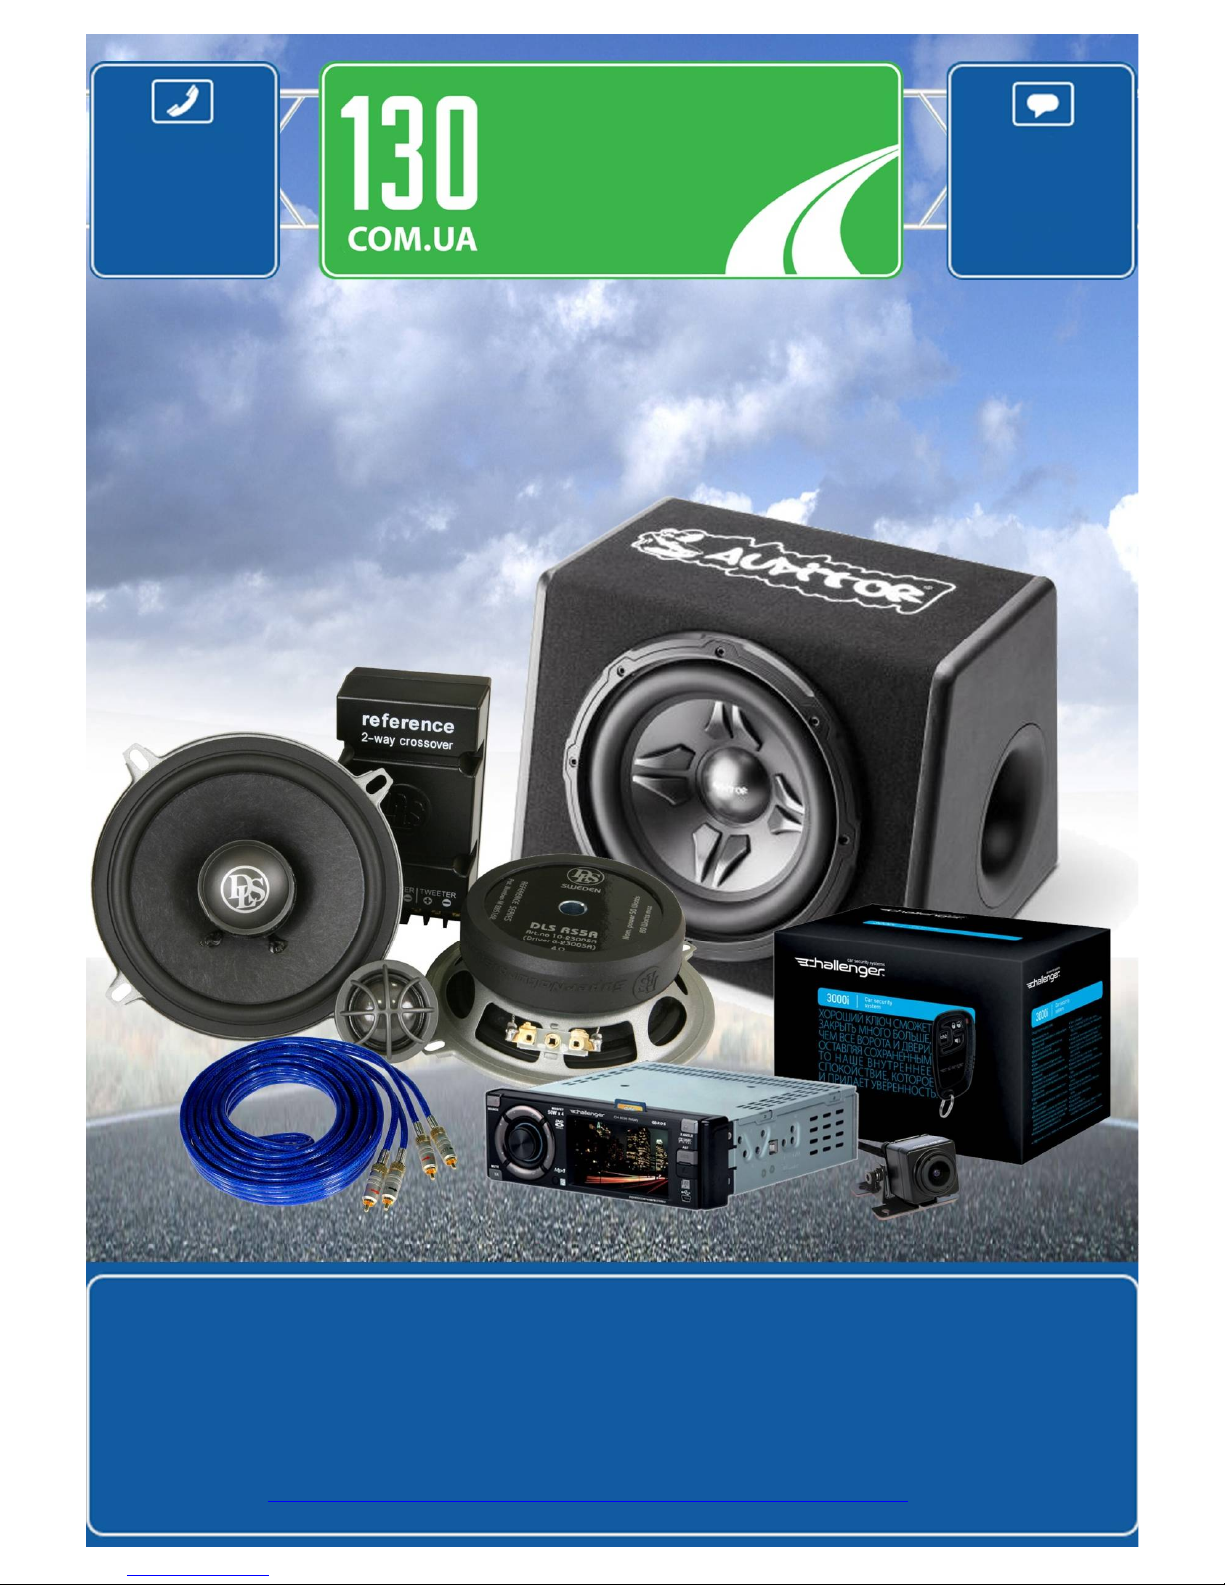
CAR RECEIVERS — Receivers • Media receivers and stations • Native receivers • CD/DVD changers • FM-modulators/USB adapters • Flash memory • Facia plates and adapters • Antennas • Accessories |
CAR AUDIO — Car audio speakers • Amplifiers • Subwoofers • Processors • Crossovers • Headphones • Accessories | TRIP COMPUTERS — Universal computers • Model computers • Accessories |
GPS NAVIGATORS — Portable GPS • Built-in GPS • GPS modules • GPS trackers • Antennas for GPS navigators • Accessories | VIDEO — DVR • TV sets and monitors • Car TV tuners • Cameras • Videomodules
• Transcoders • Car TV antennas • Accessories | SECURITY SYSTEMS — Car alarms • Bike alarms • Mechanical blockers • Immobilizers • Sensors • Accessories | OPTIC AND LIGHT — Xenon • Bixenon • Lamps
• LED • Stroboscopes • Optic and Headlights • Washers • Light, rain sensors • Accessories | PARKTRONICS AND MIRRORS — Rear parktronics • Front parktronics • Combined parktronics • Rear-view mirrors
• Accessories | HEATING AND COOLING — Seat heaters • Mirrors heaters • Screen-wipers heaters • Engine heaters • Auto-refrigerators • Air conditioning units • Accessories | TUNING — Vibro-isolation
• Noise-isolation • Tint films • Accessories | ACCESSORIES — Radar-detectors • Handsfree, Bluetooth • Windowlifters • Compressors • Beeps, loudspeakers • Measuring instruments • Cleaners • Carsits
• Miscellaneous | MOUNTING — Installation kits • Upholstery • Grilles • Tubes • Cable and wire • Tools • Miscellaneous | POWER — Batteries • Converters • Start-charging equipment • Capacitors
• Accessories | MARINE AUDIO AND ELECTRONICS — Marine receivers • Marine audio speakers • Marine subwoofers • Marine amplifiers • Accessories | CAR CARE PRODUCTS — Additives • Washer fluid •
Care accessories • Car polish • Flavors • Adhesives and sealants | LIQUID AND OIL — Motor oil • Transmission oil • Brake fluid • Antifreeze • Technical lubricant
ICQ
294-0-130
597-0-130
SKYPE
km-130
Germany
Germany
HEYNER
HEYNER
®
Bedienungsanleitung
O R I G I N A L
HEYNER
HEYNER
®
www.heyner-germany.de
www.heyner-germany.de
O R I G I N A L
HEYNER
HEYNER
®
www.heyner-germany.de
www.heyner-germany.de
HEYNER MOBIL AUTOM
HEYNER MOBIL AUTOM
OTIVE GMB
OTIVE GMBH
Kurzer Weg 1-5
Kurzer Weg 1-5
D-15859 Storkow
D-15859 Storkow
DEUTSCHLAND
DEUTSCHLAND
Telefon: +49 (0) 33678 • 687 • 37
Telefon: +49 (0) 33678 • 687 • 37
Telefax: +49 (0) 33678 • 610 44
Telefax: +49 (0) 33678 • 610 44
Internet: info@heyner-germany.de
Internet: info@heyner-germany.de
www.heyner-germany.de
www.heyner-germany.de
PREMIUM QUALITÄT
P R E M I U M Q U A L I T Ä T
FÜR AUTOMOBILE
F Ü R A U T O M O B I L E
PREMIUM QUALITÄT
P R E M I U M Q U A L I T Ä T
FÜR AUTOMOBILE
F Ü R A U T O M O B I L E
Kleinkind
Gr.
für Kinder von 9-18 kg, (9 Monate bis 4 Jahre)
für Kinder von 9-18 kg, (9 Monate bis 4 Jahre)
www.heyner-germany.de
www.heyner-germany.de
CapsulaProtect
3D
HEYNER
HEYNER
C
a
p
s
u
l
a
3
D
-
P
r
o
t
e
c
t
i
o
n
C
a
p
s
u
l
a
3
D
-
P
r
o
t
e
c
t
i
o
n
A1
G
G1
G2
G3
G4
G5
PG
I
BL
VH
A2
B
C
D
O
P
ST
R
S
BT
GK
L
GN
N
SB
HEYNER
HEYNER
®
SR
GR
E
F
Germany
Ger
many
HEYNER
HEYNER
®
Capsula
Protect
3D
Gruppe I (9-18 kg)
Grup
pe
I (
9-18
kg
)
HE
YN
ERH
E
YN
E
R
C
a
p
s
u
l
a
C
a
p
s
u
l
a
O.2
O.2
C
a
p
s
u
l
a
C.2
C
.
2
OPEN
OPEN
CLOSE
CL
OSE
F2. pull
F
2.
p
ull
F3. clip
F3. clip
C.1
C.1
F1. click
F
1.
cl
ick
click
cl
ick
F3a
F3a
F3b
F3
b
clip
clip
SG
GR
130.com.ua
Autogood products «130»
Germany
Germany
HEYNER
HEYNER
®
O R I G I N A L
HEYNER
HEYNER
®
www.heyner-germany.de
www.heyner-germany.de
P R E M I U M Q U A L I T Ä T
F Ü R A U T O M O B I L E
P R E M I U M Q U A L I T Ä T
F Ü R A U T O M O B I L E
PREMIUM QUALITÄT FÜR AUTOMOBILE
P R E M I U M Q U A L I T Ä T F Ü R A U T O M O B I L E
www.heyner-germany.de
Gruppe I (Alter ca. 9 Monate bis 4 Jahre, Kindergewicht 9 bis 18 kg)
Bedienungsanleitung
D
Instruction Manual
GB
RUS
Инструкция по обслуживанию
Inhaltsverzeichnis
1. Altersgruppe I (ab 9 bis 18 kg Y)
1.1. Verwendung des HEYNER® CapsulaProtect 3D
HEYNER® CapsulaProtect 3D
als Autokindersitz
1.2. Anpassung des HEYNER® CapsulaProtect 3D
HEYNER® CapsulaProtect 3D
an die Größe Ihres Kindes
1.3. Einbau des HEYNER® CapsulaProtect 3D
HEYNER® CapsulaProtect 3D
in Ihr Auto
1.4. Das Kind im HEYNER® CapsulaProtect 3D
HEYNER® CapsulaProtect 3D
2. Pflegeanleitung
3. Sicherheitshinweise
4. Wichtige Tipps
A1
A2
B
BL
BT
C
D
E
F
G
G1
G2
G3
G4
G5
GK
GN
I
L
N
O
P
PG
R
S
SB
SG
SR
ST
U
V
VH
W
X
www.heyner-germany.de
– Kopfkissen
– Reduzierkissen
– Schulterpolster
– Basislöcher
– Basisteil
– Schlosszungen
– Gurtschloss
– Sitzbezug
– Einstellerabdeckung
– Gurtsystem
– Schultergurtdurchführung
– Hosenträgergurte
– Hüftgurt
– Schrittgurt
– Zentralverstellgurte
– Gurtklemme
– Gurtnasen
– Gurtversteller
– Fach für Gebrauchsanweisung
– Rückenlehne
– Stoffbezug
– Shock minimizer
– Positionsgriff
– Gurtanker
– Installationsaufkleber
– Sicherungsbolzen
– Schulterpolstergurte
– Sicherungsriegel
– Sitzteil
– Diagonalgurt des Auto-Dreipunktgurtes
– Schlosszunge des Auto-Dreipunktgurtes
– Verbindungshaken
– Beckengurt des Auto-Dreipunktgurtes
– Gurtschloss des Auto-Dreipunktgurtes
CapsulaProtect
3D
S. 1
S. 1
S. 1
S. 3
S. 6
S. 7
S. 9
S. 10
1a
1a
1b
1b
1c
1c
2
HEYNER
HEYNER
C
a
p
s
u
l
a
3
D
-
P
r
o
t
e
c
t
i
o
n
C
a
p
s
u
l
a
3
D
-
P
r
o
t
e
c
t
i
o
n
VH
R
NERHEYNER
C
a
p
s
u
l
a
3
D
-
P
r
o
t
e
c
t
i
o
n
C
a
p
s
u
l
a
3
D
-
P
r
o
t
e
c
t
i
o
n
2a
2a
2b
2b
HEYNER
®
HEYNER
®
2c
2c
2d
2d
HEYNER
H
EYNER
C
a
p
s
u
l
a
3
D
-
P
r
o
t
e
c
t
i
o
n
C
a
p
s
u
l
a
3
D
-
P
r
o
t
e
c
t
i
o
n
3
4
U
V
W
X
5
HEYNER
H
EYNER
C
a
p
s
u
l
a
3
D
-
P
r
o
t
e
c
t
i
o
n
C
a
p
s
u
l
a
3
D
-
P
r
o
t
e
c
t
i
o
n
7
7
8
HEYNER
HEYNER
C
a
p
s
u
l
a
3
D
-
P
r
o
t
e
c
t
i
o
n
C
a
p
s
u
l
a
3
D
-
P
r
o
t
e
c
t
i
o
n
9
click
click
11
11
HEYNERHEYNER
®
12
12
HEYNERHEYNER
C
a
p
s
u
l
a
3
D
-
P
r
o
t
e
c
t
i
o
n
C
a
p
s
u
l
a
3
D
-
P
r
o
t
e
c
t
i
o
n
HEYNER
HEYNER
C
a
p
s
u
l
a
3
D
-
P
r
o
t
e
c
t
i
o
n
C
a
p
s
u
l
a
3
D
-
P
r
o
t
e
c
t
i
o
n
13
13
14
14
1.
1.
1.
1.
2.
2.
2.
2.
15
15
HEYNER
®
PressPress
16
16
Press
Press
17
17
HEYNER
HEYNER
®
18
18
click
click
19
19
HEYNER
HEY
NE
R
C
a
p
s
u
l
a
3
D
-
P
r
o
t
e
c
t
i
o
n
C
a
p
s
u
l
a
3
D
-
P
r
o
t
e
c
t
i
o
n
1
2
3
4
5
20
20
HEYNER
HE
YNE
R
C
a
p
s
u
l
a
3
D
-
P
r
o
t
e
c
t
i
o
n
C
a
p
s
u
l
a
3
D
-
P
r
o
t
e
c
t
i
o
n
1.
1.
2.
2.
21
21
HEYNERHEYNER
C
a
p
s
u
l
a
3
D
-
P
r
o
t
e
c
t
i
o
n
C
a
p
s
u
l
a
3
D
-
P
r
o
t
e
c
t
i
o
n
22
22
HEYNER
HEY
NER
C
a
p
s
u
l
a
3
D
-
P
r
o
t
e
c
t
i
o
n
C
a
p
s
u
l
a
3
D
-
P
r
o
t
e
c
t
i
o
n
24
24
HEYNER
C
a
p
s
u
l
a
C
a
p
s
u
l
a
10
10
1.
1.
2.
2.
VH
R
NERHEYNER
C
a
p
s
u
l
a
3
D
-
P
r
o
t
e
c
t
i
o
n
C
a
p
s
u
l
a
3
D
-
P
r
o
t
e
c
t
i
o
n
23
23
Germany
Germany
HEYNER
HEYNER
®
HEYNER
®
HEYNERHEYNER
C
a
p
s
u
l
a
3
D
-
P
r
o
t
e
c
t
i
o
n
C
a
p
s
u
l
a
3
D
-
P
r
o
t
e
c
t
i
o
n
1.
1.
2.
2.
1.
1.
2.
2.
6
HEYNERHEYNER
C
a
p
s
u
l
a
3
D
-
P
r
o
t
e
c
t
i
o
n
C
a
p
s
u
l
a
3
D
-
P
r
o
t
e
c
t
i
o
n
Open
Open
130.com.ua
Autogood products «130»

D
Deutsch
Deutsch
1
2
www.heyner-germany.de www.heyner-germany.de
1. Altersgruppe I (9 kg bis 18 kg Y)
1. Altersgruppe I (9 kg bis 18 kg Y)
1.1. Verwendung des HEYNER® CapsulaProtect 3D als
1.1. Verwendung des HEYNER® CapsulaProtect 3D als
Autokindersitz
Autokindersitz
Vielen Dank, dass Sie sich zur Sicherung Ihres Kindes im
Fahrzeug für den HEYNER® CapsulaProtect 3D
HEYNER® CapsulaProtect 3D
Kindersitz
entschieden haben. Seine optimalen Sicherheitseigenschaften
kann er nur zur Wirkung bringen, wenn er vorschriftsmäßig
verwendet wird. Achten Sie deshalb auf den korrekten Einbau
im Auto und lesen Sie dazu die Bedienungsanleitung. Die
Montage darf nur von Erwachsenen ausgeführt werden!
1.2. Anpassen des HEYNER® CapsulaProtect 3D an die
1.2. Anpassen des HEYNER® CapsulaProtect 3D an die
Kindesgröße
Kindesgröße
1.2.1. Vorbereitung
1.2.1. Vorbereitung
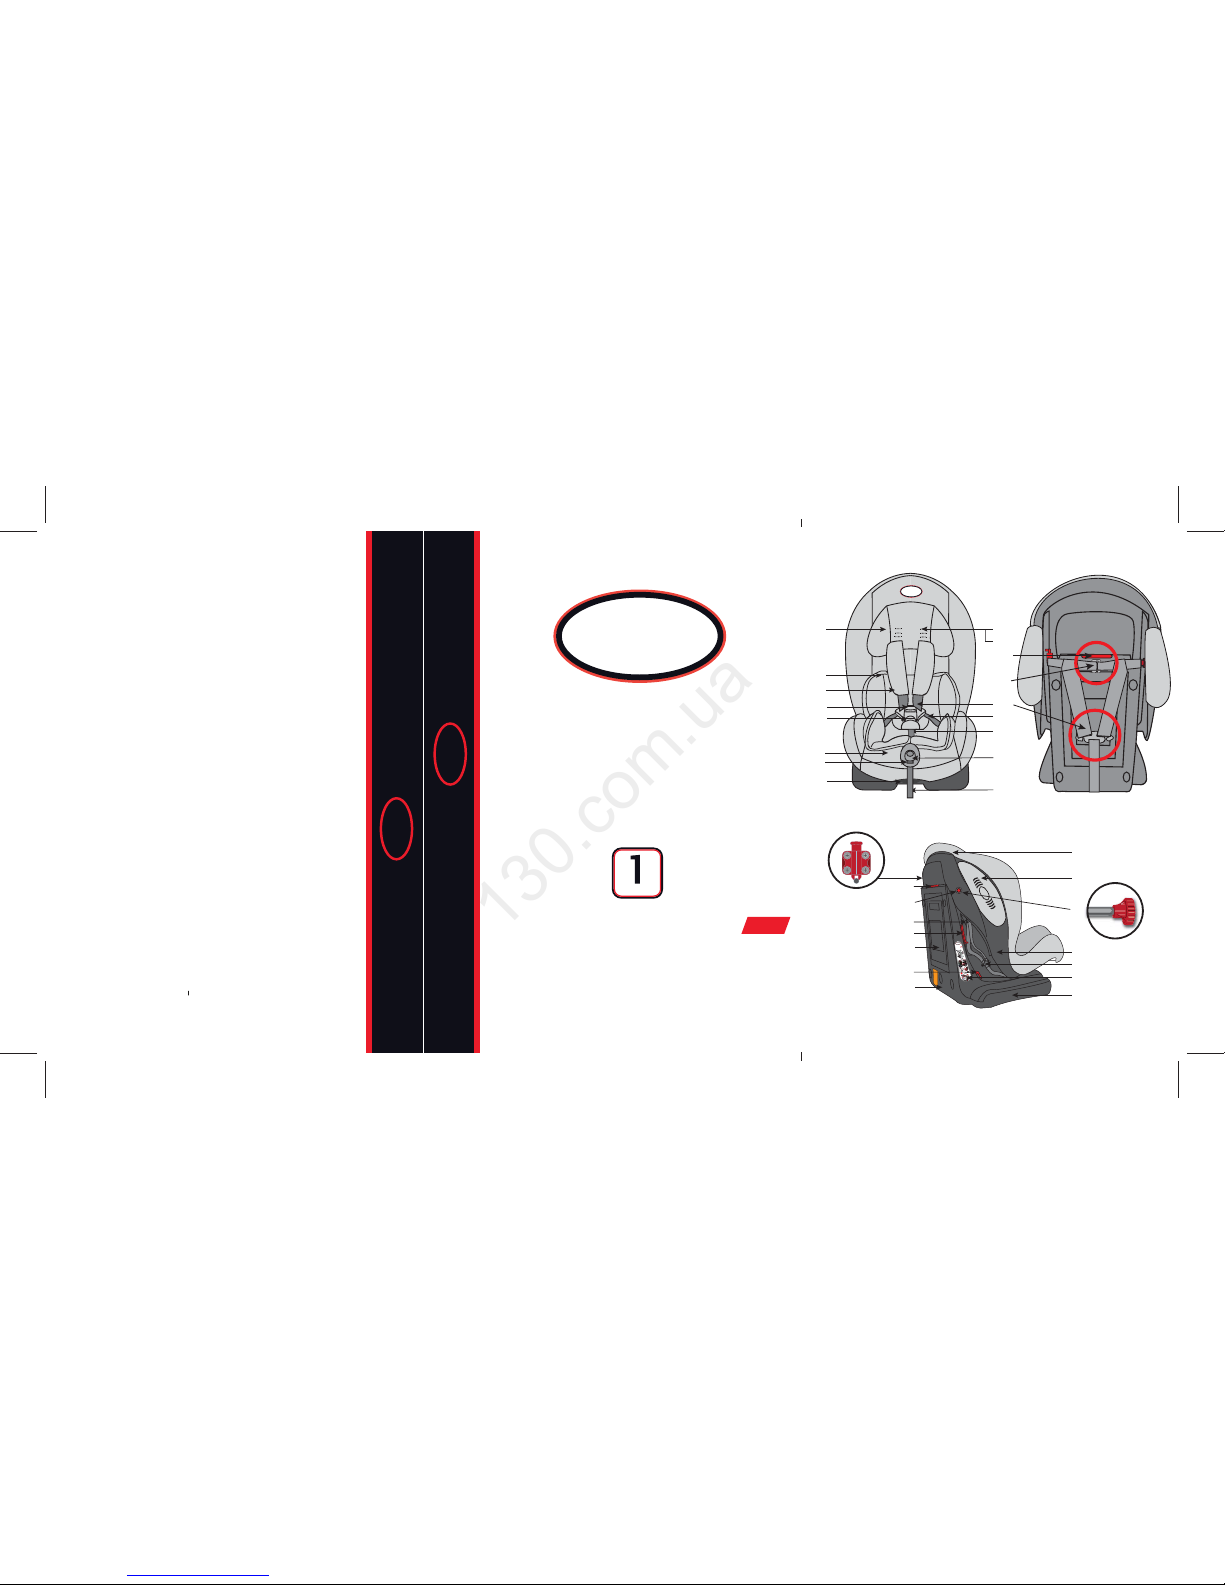
Abb. 1a-c
Abb. 1a-c
• Der HEYNER® CapsulaProtect 3D
HEYNER® CapsulaProtect 3D
ist mit einem
Kopfkissen (A1) und einem Reduzierkissen (A2) ausgestattet.
Diese sind für den besonderen Schutz von kleinen Kindern
mit einem Gewicht von 9kg – 18kg vorgesehen.
Wir empfehlen, diese erst zu entfernen, wenn das Kind dafür
zu groß ist, spätestens wenn das Kind 18 kg wiegt.
• Der HEYNER® CapsulaProtect 3D
HEYNER® CapsulaProtect 3D
besitzt ein eigenes
Gurtsystem (G), dessen Verlauf Sie der Größe des Kindes
anpassen müssen:
• Stellen Sie den HEYNER® CapsulaProtect 3D
HEYNER® CapsulaProtect 3D
auf einen
normalen Stuhl und setzen Sie das Kind hinein. Um einen
optimalen Gurtverlauf zu gewährleisten, müssen die
Abb.2b
Abb.2c
Abb.2d
Achtung
Achtung
Wichtig:
1.3. Einbau des HEYNER® CapsulaProtect 3D in Ihr Auto
1.3.1. Voraussetzungen
Abb. 3
Schulterpolstergurte (SG) je nach Größe des Kindes direkt
über den Schultern verlaufen (Abb.1a), nicht zu hoch
(Abb.1b) und nicht zu tief (Abb.1c).
1.2.2. Höhen- und Längenanpassung der Schultergurte
1.2.2. Höhen- und Längenanpassung der Schultergurte
So verstellen Sie die Hosenträgergurte (G2) in ihrer Höhe:
• Der HEYNER® CapsulaProtect 3D
HEYNER® CapsulaProtect 3D
besteht aus einem
Sitzteil (ST) und einem Basisteil (BT), die durch einen
Sicherungsbolzen (SB) miteinander verbunden sind.
Abb. 2
Abb. 2
•Entriegeln Sie den Sicherungsriegel (SR) des Sicherungs
bolzens oben an der Rückseite des Basisteils (BT) und
ziehen den Sicherungsbolzen (SB) seitwärts aus den
Basislöchern (BL) heraus. Jetzt ist der Sitzteil (ST)
entriegelt und kann nach vorn geklappt werden.
Abb. 2a
Abb. 2a
• Lösen Sie beide Gurtenden des Hosenträgergurts (G2) auf
der Rückseite des Sitzteils (ST) aus dem Gurtanker (R)
und ziehen Sie die beiden Gurtenden aus den
Schultergurtdurchführungen (G1) heraus.
• Dann haken Sie die Schulterpolstergurte (SG) aus dem
Verbindungshaken (VH) aus.
• Je nach Größe des Kindes führen Sie die Gurtenden des
Hosenträgergurts (G2) in die für das Kind passenden
Schultergurtdurchführungen (G1) ein fädeln sie wieder in
den Gurtanker (R) ein.
• Abschließend fädeln Sie die Schulterpolstergurte (SG)
unter die Hosenträgergurte (G2) in dieselben Schulter gurtdurchführungen (G1) und haken sie wieder in den
Verbindungshaken (VH) ein.
130.com.ua
Autogood products «130»

Deutsch
3 www.heyner-germany.de
Abb.2b
Abb.2b
• Verlängern Sie Gurte, indem Sie den
Gurtversteller (I) drücken und gleichzeitig die
Hosenträgergurte (G2) nach vorn ziehen.
Abb.2c
Abb.2c
• Verkürzen (Abb.2c) Sie die Gurte, indem Sie nur an dem
Zentralverstellgurt (G5) ziehen.
Abb.2d
Abb.2d
• Jetzt klappen Sie den Sitzteil (ST) zurück. Führen Sie den
Sicherungsbolzen (SB) seitwärts in die Basislöcher (BL) hinein.
Verriegeln Sie abschließend den Sicherungsriegel (SR) des
Sicherungsbolzens oben an der Rückseite des Basisteils (BT).
• Achtung
Achtung
: der Sicherungsbolzen (SB) muss vor dem Einbau
des Sitzes ins Fahrzeug wieder vollständig mit Sitzteil (ST)
und Basisteil (BT) verriegelt sein.
• Achtung
Achtung
: Bitte überprüfen Sie den Gurtverlauf sehr
regelmäßig und passen ihn gegebenenfalls der neuen Größe
des Kindes an. Die Gurte müssen fest am Körper des Kindes
anliegen und dürfen nicht verdreht werden.
Wichtig:
Wichtig:
• Die Gurte dürfen weder verdreht noch festgeklemmt werden.
Bitte folgen Sie strickt den Zeichnungen und Montage-
hinweisen. Sollten Sie Fragen haben, wenden Sie sich an
Ihren Händler, den Importeur oder an den Hersteller.
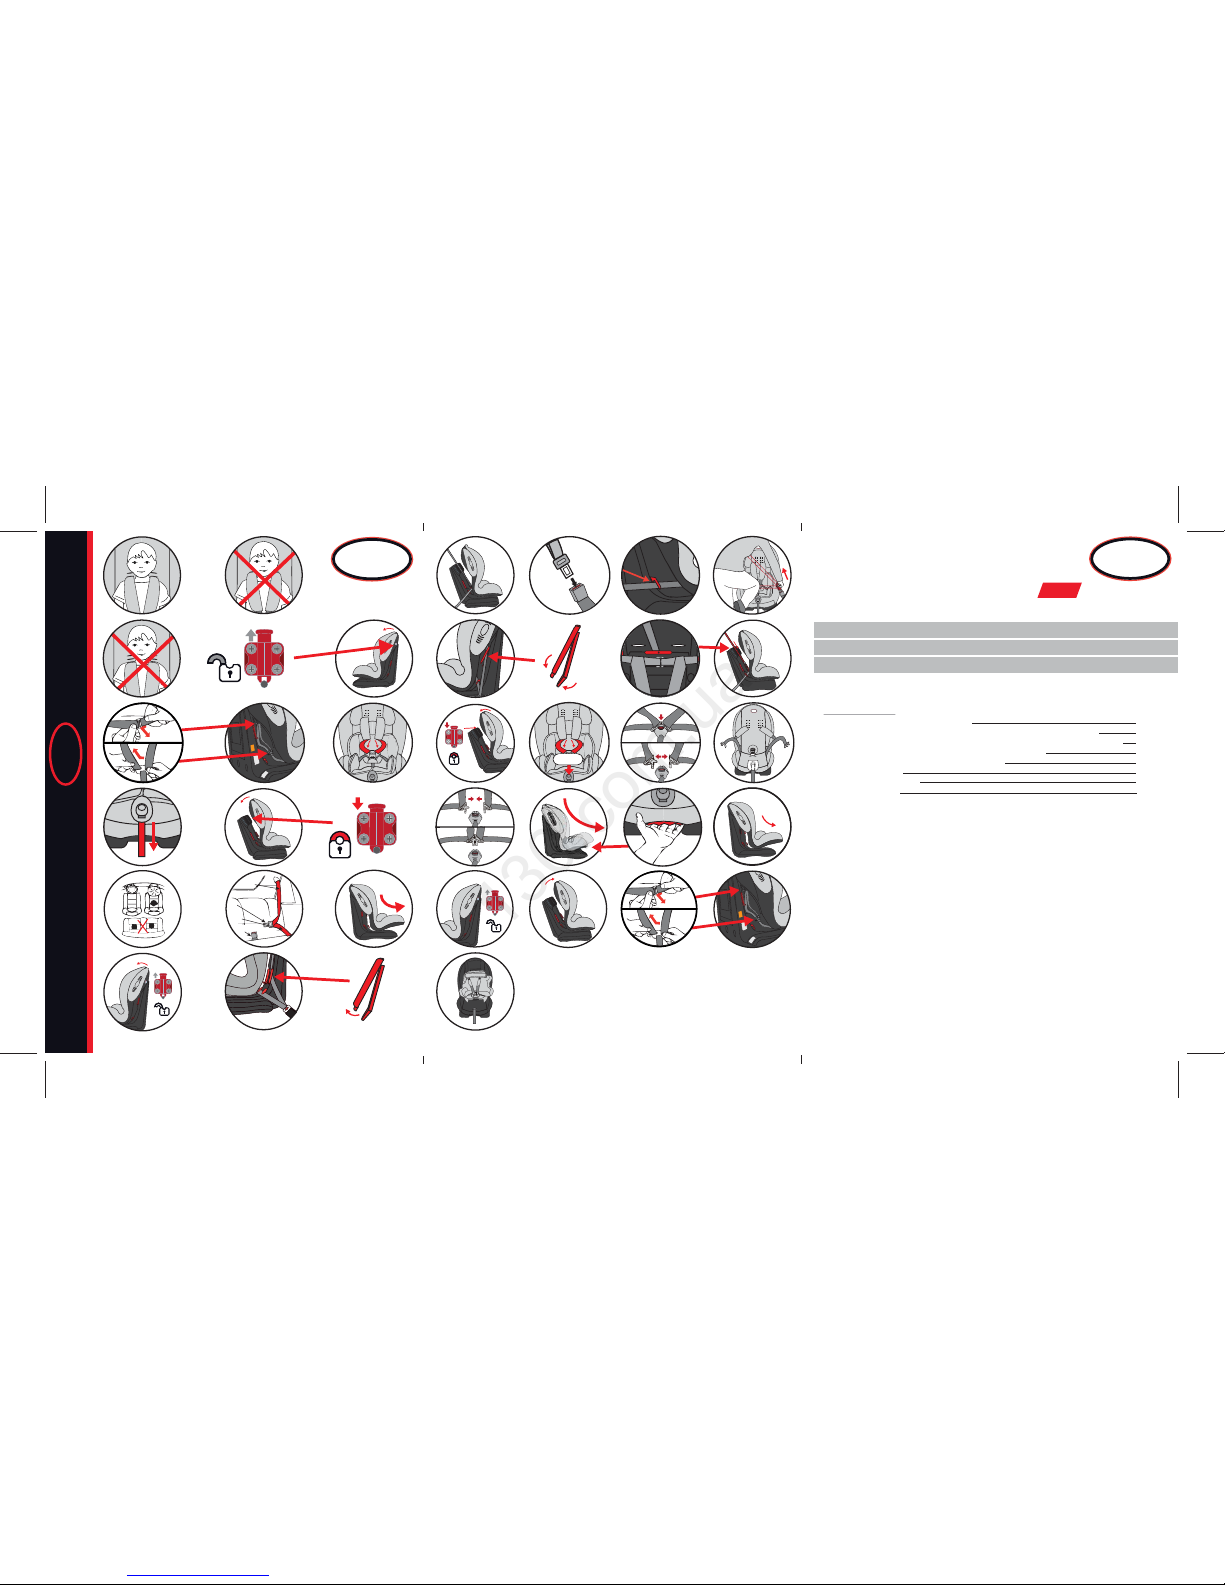
1.3. Einbau des HEYNER® CapsulaProtect 3D in Ihr Auto
1.3. Einbau des HEYNER® CapsulaProtect 3D in Ihr Auto
1.3.1. Voraussetzungen
1.3.1. Voraussetzungen
Abb. 3
Abb. 3
Der Sitz kann auf allen Beifahrer- und Rücksitzen des
Fahrzeugs verwendet werden, die mit einem Dreipunktgurt
D
Deutsch
4
www.heyner-germany.de
ausgestattet sind. Der Sitz darf NICHT auf dem mittleren
Rücksitz nur mit dem Beckengurt befestigt werden!
1.3.2. Platzierung auf dem Fahrzeugsitz
1.3.2. Platzierung auf dem Fahrzeugsitz
Stellen Sie nun den HEYNER® CapsulaProtect 3D
HEYNER® CapsulaProtect 3D
auf den
Autositz in Fahrtrichtung.
1.3.3. Installation und Befestigung auf dem Autositz
1.3.3. Installation und Befestigung auf dem Autositz
Abb. 4
Abb. 4
Der Dreipunktgurt eines Autos besteht aus 4 Teilen: dem
Beckengurt (W), dem Diagonalgurt (U), der Schlosszunge (V)
und dem Dreipunktgurtschloss (X).
• Spannen Sie den Zentralverstellgurt (G5), damit die Gurte
des Kindersitzes nicht herunterhängen.
Abb. 5
Abb. 5
• Schieben Sie den Sitzteil (ST) durch betätigen des
Positionsgriffs (PG), der sich unter dem
Zentralverstellgurt (G5) befindet in die am weitesten
zurückgelehnte Position (Liegeposition).
Abb. 6
Abb. 6
• Entriegeln Sie den Sicherungsriegel (SR) des Sicherungs
bolzens oben an der Rückseite des Basisteils (BT) und
ziehen den Sicherungsbolzen (SB) seitwärts aus den
Basislöchern (BL) heraus. Jetzt ist der Sitzteil (ST)
entriegelt und wird nach vorn geklappt.
Abb. 7
Abb. 7
• Öffnen Sie die rote Gurtklemme (GK) auf dem
Basisteil (BT), die dem Fahrzeug-Dreipunktgurtschlosses
(X) des Fahrzeug-Diagonalgurts am nächsten ist.
Abb. 8
HEYNER® CapsulaProtect 3D
Abb. 9
Abb. 10
Wichtig:
1.3.4. Straffen des Dreipunktgurtes
Abb. 11
HEYNER® CapsulaProtect 3D
Abb. 12
Abb. 13
Abb. 14
Achtung:
Achtung:
1.4. Das Kind im HEYNER® CapsulaProtect 3D
1.4.1 Sichern des Kindes
Abb. 15
130.com.ua
Autogood products «130»

Deutsch
5 www.heyner-germany.de
D
Deutsch
6
www.heyner-germany.de
Abb. 8
Abb. 8
• Damit der HEYNER® CapsulaProtect 3D
HEYNER® CapsulaProtect 3D
korrekt befestigt
wird, ziehen Sie die Schlosszunge (V) vom Dreipunktgurt
des Fahrzeugs zwischen dem Sitzteil (ST) und dem
Basisteil (BT) hindurch in Richtung des Fahrzeug Dreipunktgurtschlosses (X).
Abb. 9
Abb. 9
• Rasten Sie die Schlosszunge (V) vom Dreipunktgurt des
Fahrzeugs in das Dreipunktgurtschloss (X) mit einem
hörbaren „CLICK“ ein. Bitte achten Sie darauf, dass der Gurt
nicht verdreht ist.
Abb. 10
Abb. 10
• Den Beckengurt (W) führen Sie nun waagerecht unter die
roten Gurtnasen (GN).
Wichtig:
Wichtig:
Stellen Sie sicher, dass das Gurtband des Dreipunktgurtes
weder verdreht noch verklemmt ist. Die Gurte des Gurtankers
(R) dürfen dabei nicht festgeklemmt werden. Bitte folgen Sie
strickt den Zeichnungen und Montagehinweisen. Sollten Sie
Fragen haben, wenden Sie sich an Ihren Händler, den Importeur oder an den Hersteller.
1.3.4. Straffen des Dreipunktgurtes
1.3.4. Straffen des Dreipunktgurtes
Abb. 11
Abb. 11
• Drücken Sie den HEYNER® CapsulaProtect 3D
HEYNER® CapsulaProtect 3D
Kindersitz so
stark wie möglich in das Polster des Fahrzeugsitzes (z.B. mit
einem Knie). Ziehen Sie zunächst am Gurt in der Nähe des
Dreipunktgurtschlosses (X)
• Nun ziehen Sie den Diagonalgurt (U) straff in Richtung
Aufrollmechanismus.
Abb. 12
Abb. 12
• Legen Sie den Diagonalgurt in die vorher geöffnete rote
Gurtklemme (GK) und klemmen Sie den Gurt durch
Schließen und Verriegeln der Gurtklemme (K) fest.
Abb. 13
Abb. 13
• Führen Sie den Fahrzeug-Diagonalgurt (U) über die rot
markierte Gurtführung (GR) am Rücken des Basisteils.
Abb. 14
Abb. 14
• Jetzt klappen Sie den Sitzteil (ST) zurück und führen Sie
den Sicherungsbolzen (SB) seitwärts in die Basislöcher (BL)
hinein. Verriegeln Sie abschließend den Sicherungsriegel
(SR) des Sicherungsbolzens oben an der Rückseite des
Basisteils (BT).
Achtung:
Achtung:
der Sicherungsbolzen (SB) muss nach dem
Einbau des Sitzes ins Fahrzeug wieder vollständig mit
Sitzteil (ST) und Basisteil (BT) verriegelt sein.
Achtung:
Achtung:
Nur wenn der HEYNER® CapsulaProtect 3D
HEYNER® CapsulaProtect 3D
mit dem
Dreipunktgurt fest im Autositz eingebaut ist, kann der
Sitz Ihr Kind optimal schützen. Stellen Sie sicher, dass das
Gurtband des Dreipunktgurtes weder verdreht noch
verklemmt ist.
1.4. Das Kind im HEYNER® CapsulaProtect 3D
1.4. Das Kind im HEYNER® CapsulaProtect 3D
1.4.1 Sichern des Kindes
1.4.1 Sichern des Kindes
Abb. 15
Abb. 15
• Lockern Sie die Schultergurte durch drücken des Gurtver stellers (I) und ziehen Sie die Hosenträgergurte (G2) zu
sich hin.
Abb. 16-17
HEYNER® CapsulaProtect 3D
Abb. 18
1.4.2 Sitz- und Liegepositionen des Kindes
Abb. 19
HEYNER® CapsulaProtect 3D
2. Pflegeanleitung
Abb. 20
HEYNER® CapsulaProtect 3D
130.com.ua
Autogood products «130»

Deutsch
7 www.heyner-germany.de
D
Deutsch
8
www.heyner-germany.de
Abb. 16-17
Abb. 16-17
• Öffnen Sie das Gurtschloss (D) und das Gurtsystem (G),
legen Sie die Hosenträgergurte (G2) nach links und rechts
zu den Seiten.
• Nun setzen Sie das Kind tief in die Sitzfläche des
HEYNER® CapsulaProtect 3D
HEYNER® CapsulaProtect 3D
, so dass sich das Gesäß tief
in der Sitzmulde befindet.
Abb. 18
Abb. 18
• Fügen Sie die beiden Schlosszungen (C) des
Hosenträgergurts (G2) zusammen und verbinden Sie diese
mit dem Gurtschloss (D) bis ein deutliches »Click« zu
hören ist. Vergewissern Sie sich durch ziehen am Zentral verstellgurt (G5), dass die Hosenträgergurte straff am
Kind anliegen und nicht verdreht sind.
1.4.2 Sitz- und Liegepositionen des Kindes
1.4.2 Sitz- und Liegepositionen des Kindes
Abb. 19
Abb. 19
• Der HEYNER® CapsulaProtect 3D
HEYNER® CapsulaProtect 3D
ist mit einem 5-stufig
verstellbaren Sitzmechanismus ausgestattet.
• Die Bedienung erfolgt einfach und schnell mit nur
einer Hand.
• Durch Drücken des Positioniergriffs (PG) nach oben bringen
Sie den Sitzteil (ST) in die gewünschte Position für Ihr Kind.
Bei längeren Fahrten empfehlen Orthopäden eine möglichst
horizontale Liegeposition.
2. Pflegeanleitung
2. Pflegeanleitung
Abb. 20
Abb. 20
• Zum Waschen des Bezuges Ihres
HEYNER® CapsulaProtect 3D
HEYNER® CapsulaProtect 3D
schieben Sie den Sitzteil (ST)
durch betätigen des Positionsgriffs (PG), der sich unter
dem Zentralverstellgurt (G5) befindet in die am
weitesten zurückgelehnte Position (Liegeposition).
Abb. 21-22
Abb. 21-22
• Entriegeln Sie den Sicherungsriegel (SR) des
Sicherungsbolzens (SB) oben an der Rückseite des
Basisteils (BT) und ziehen den Sicherungsbolzen (SB)
seitwärts aus den Basislöchern (BL) heraus. Jetzt ist der
Sitzteil (ST) entriegelt und kann nach vorn geklappt
werden.
Abb. 23
Abb. 23
• Lösen Sie die Gurtenden des Hosenträgergurts (G2) auf
der Rückseite des Sitzteils (ST) aus dem Gurtanker (R)
und ziehen Sie die beiden Gurtenden durch die
Schultergurtdurchführungen (G1) heraus.
• Dann haken Sie die Schulterpolstergurte (SG) aus dem
Verbindungshaken (VH) aus.
• Den Schrittgurt (G4) lösen Sie, indem Sie Sitz „auf den
Kopf“ stellen und die Metallplatte vom Gurtende
entfernen.
Abb. 24
Abb. 24
• Entfernen Sie alle Gurte. Der Bezug kann nun abgezogen
und bei 30°C gewaschen werden.
Achtung:
Achtung:
Bitte nicht schleudern. Nicht im Trockner trocknen. Achten
Sie beim Beziehen des HEYNER® CapsulaProtect 3D wieder
auf die richtige Verankerung der Hosenträgergurte (G2) im
Gurtanker (R) sowie der Schulterpolstergurte (SG) im
Verbindungshaken (VH). Sichern Sie den richtigen Verlauf
aller Gurte. Falls Sie sich unsicher fühlen machen Sie sich
VOR dem Abnehmen der Teile einige Fotos.
3. Sicherheitshinweise
HEYNER® CapsulaProtect 3D
ECE R44/04
HEYNER® CapsulaProtect 3D
HEYNER® CapsulaProtect 3D
HEYNER MOBIL AUTOMOTIVE GMBH
4. Und noch ein paar Tipps zum Schluss:
130.com.ua
Autogood products «130»

Deutsch
9 www.heyner-germany.de
D
Deutsch
10
www.heyner-germany.de
3. Sicherheitshinweise
3. Sicherheitshinweise
• Der Autokindersitz HEYNER® CapsulaProtect 3D
HEYNER® CapsulaProtect 3D
ist nach
der europäischen Norm für Kinderrückhaltesysteme
ECE R44/04
ECE R44/04
zugelassen. Das Prüfzeichen mit der
Zulassungsnummer finden Sie auf der Rückseite des
Sitzes auf dem orangefarbenen Etikett.
• Dieser Kindersitz ist nur zur Benutzung in Fahrzeugen
geeignet, die mit Dreipunktgurten ausgerüstet sind, die
nach der ECE-Regelung Nr.16 oder anderen
vergleichbaren Normen genehmigt wurden.
• Die Gurtbänder des HEYNER® CapsulaProtect 3D
HEYNER® CapsulaProtect 3D
müssen
straff und ohne Verdrehung angelegt werden.
• Es ist unzulässig, irgendwelche Änderungen an
Kinderrückhaltesystemen vorzunehmen.
• Achten Sie darauf, dass sämtliche Teile des Kindersitzes
so platziert werden, dass sie während des täglichen
Gebrauchs nicht verloren gehen oder zwischen Türen oder
verstellbaren Sitzen eingeklemmt werden!
• Bei auftretenden Schwierigkeiten wenden Sie sich bitte an
Ihren Verkäufer oder den Hersteller.
• Nach einem Unfall sollten Sie das gesamte
Kinderrückhaltesystem erneuern!
• Führen Sie die Gurte immer nur den roten Markierungen
(Verlaufsmarkierung) entlang.
• Das Kinderrückhaltesystem HEYNER® CapsulaProtect 3D
HEYNER® CapsulaProtect 3D
kann über viele Jahre verwendet werden. Da kann es
vorkommen, dass Gebrauchs- und Verschleißteile - zum
Beispiel der Sitzbezug - erneuert werden müssen.
• Der Kindersitz darf niemals ohne Original-Stoffbezug
benützt werden.
• Sollte der Stoffbezug ausgewechselt werden, dürfen Sie
nur Original-Stoffbezüge der Firma
HEYNER MOBIL AUTOMOTIVE GMBH
HEYNER MOBIL AUTOMOTIVE GMBH
verwenden.
• Führen Sie die Bedienungsanleitung stets mit dem
Autokindersitz mit.
4. Und noch ein paar Tipps zum Schluss:
4. Und noch ein paar Tipps zum Schluss:
• Legen Sie keine schweren Gegenstände auf die Hutablage
sie können bei einem Unfall zu gefährlichen Geschossen
werden und Ihr Kind verletzen. Deshalb sichern Sie
Gepäck und andere Gegenstände ausreichend.
• Achten Sie darauf, dass alle Insassen Ihres Pkw
angegurtet sind. Nichtangegurtete Personen im Fahrzeug
können beim Unfall eine große Gefahr für das Kind
darstellen.
• Gönnen Sie Ihrem Kind bei längeren Fahrten Pausen und
achten Sie darauf, dass es nicht zur Fahrbahn hin oder
unbeaufsichtigt aus dem Fahrzeug steigt.
• Falls vorhanden benutzen Sie immer die Kindersicherung
in den Pkw-Türen, die das Öffnen der Tür von innen
unmöglich macht.
• Lassen Sie ihr Kind nie unbeaufsichtigt im oder am
Fahrzeug.
130.com.ua
Autogood products «130»

A1
A2
B
BL
BT
C
D
E
F
G
G1
G2
G3
G4
G5
GK
GN
I
L
N
O
P
PG
R
S
SB
SG
SR
ST
U
V
VH
W
X
GB
English
English
11
12
www.heyner-germany.de www.heyner-germany.de
Index / page
1. GROUP I (about 9 to 18 kg Y)
1.1. Using HEYNER® CapsulaProtect 3D
HEYNER® CapsulaProtect 3D
as a child car seat
1.2. Adjusting HEYNER® CapsulaProtect 3D
HEYNER® CapsulaProtect 3D
to your child's size
1.3. Installing HEYNER® CapsulaProtect 3D
HEYNER® CapsulaProtect 3D
into your car
1.4. Travelling with the HEYNER® CapsulaProtect 3D
HEYNER® CapsulaProtect 3D
2. Care instructions
3. Important notices
4. Some final hints
– Head cushion
– Reduction cushion
– Shoulder pads
– Base holes
– Base part
– Buckle latches
– Buckle
– Seat cover
– Adjuster cover
– Belt system
– Belt slots
– Harness belts
– Waist belt
– Buckle belt
– Central harness belt
– Belt clip
– Belt lugs
– Belt adjuster
– Installation manual storage
– Backrest
– Fabric Cover
– Shock minimizer
– Positioning handle
– Belt anchorage
– Installation sticker
– Safety bolt
– Connector belts
– Safety lock
– Seat part
– Diagonal belt of the
– Buckle latch of the
– Conntecting hook
– Lap belt of the
– Belt buckle of the three-
three-point-vehicle-belt
three-point-vehicle-belt
three-point-vehicle-belt
point-vehicle-belt
1. GROUP I (about 9 to 18 kg Y)
1. GROUP I (about 9 to 18 kg Y)
1.1. Using HEYNER® CapsulaProtect 3D as a child car seat
1.1. Using HEYNER® CapsulaProtect 3D as a child car seat
You have purchased HEYNER® CapsulaProtect 3D
HEYNER® CapsulaProtect 3D
car seat
for your child. We thank you for your trust. Please note, that
the optimum safety characteristics can only be achieved, if
the seat is used properly according to instructions. Therefore we ask you to ensure the correct installation of the seat
in your vehicle by reading the operating instructions
carefully. Please keep instructions always with the seat for
further information. Only to be assembled and mounted by
adults!
1.2. Adjusting HEYNER® CapsulaProtect 3D to your child's
1.2. Adjusting HEYNER® CapsulaProtect 3D to your child's
size
size
1.2.1. Preparation
1.2.1. Preparation
fig.1a-c
fig.1a-c
• HEYNER® CapsulaProtect 3D
HEYNER® CapsulaProtect 3D
carries a head cushion (A1)
and a reduction cushion (A2), to assure special protection
of small children starting from about 9kg - 18kg.
• We recommend removing the reduction cushion only,
when the child has become too big for it, latest when the
child weight is over 18 kg.
• The HEYNER® CapsulaProtect 3D
HEYNER® CapsulaProtect 3D
seat is equipped with its
own belt system (G) - the harness belts - which needs to
be adjusted to your child's size as follows:
• Place HEYNER® CapsulaProtect 3D
HEYNER® CapsulaProtect 3D
on a normal chair and
set your child in it. To ensure optimum positioning of the
1.2.2. Height and length adjustment of the shoulder belts
HEYNER® CapsulaProtect 3D
fig.2
fig.2a
fig.2b
fig.2c
fig.2d
Important:
S. 12
S. 12
S. 12
S. 14
S. 17
S. 18
S. 19
S. 20
130.com.ua
Autogood products «130»

GB
English
English
13
14
www.heyner-germany.de www.heyner-germany.de
belts, make sure that the shoulder belts (SG) run down
from just above the child's shoulders (fig.1a), not too high
above them (fig.1b) and not too low (fig.1c).
1.2.2. Height and length adjustment of the shoulder belts
1.2.2. Height and length adjustment of the shoulder belts
Height adjustment of the harness belts (G2):
• The HEYNER® CapsulaProtect 3D
HEYNER® CapsulaProtect 3D
consists of a seat part (ST)
and a base part (BT), which are connected by a
safety bolt (SB).
fig.2
fig.2
• De-block the safety lock (SR) of the safety bolt at the rear
side of the base part (BT) and slide out the safety bolt (SB)
sideward’s out of the base holes (BL). Now the
seat part (ST) is de-blocked and can be flapped forward.
fig.2a
fig.2a
• Release both belt ends of the harness belts (G2) from the
belt anchorage (R) at the back of the seat part (ST),
and pull the belt ends out of the slots (G1).
• Then release the shoulder pad connector belts (SG) from the
connecting hook (VH).
• Put that are appropriate to the child's size and thread them
back into the belt anchorage (R).
• Finally put the pad connector belts (SG) under the
harness belt ends (G2) through the same belt slots (G1) and
hook them back into the connecting hook (VH).
fig.2b
fig.2b
• To release the belts (fig.2b), push the belt adjuster (I),
hidden by the cover, and pull both harness belts (G2)
simultaneously forward.
fig.2c
fig.2c
• To shorten the shoulder belts, just pull the central
harness belt (G5). Do not block the shoulder belts during
pulling.
fig.2d
fig.2d
• Now flap back the seat part (ST). Slide back the
safety bolt (SB) sideward’s into the base holes (BL). Block
the safety lock (SR) of the safety bolt at the rear side of
the base part (BT).
• Attention
Attention
: The safety bolt (SB) shall has to be fixed
correctly to both seat part (ST) and base part (BT) before
the seat is placed into the car for installation.
• Attention
Attention
: It is recommended to check the belt position
very regularly and to adjust it to the size of your growing
child. The belts must lie firmly against the child's body
and must not be twisted.
Important:
Important:
• The belts must not be twisted or blocked. Please refer to
the drawing. in case of any doubt or contact your seller
or dealer, importer or manufacturer.
1.3. Installing HEYNER® CapsulaProtect 3D into your car
1.3.1. Conditions for installation
fig.3
HEYNER® CapsulaProtect 3D
1.3.2. Placing on the vehicle seat
HEYNER® CapsulaProtect 3D
1.3.3. Installation and fixing
fig.4
fig.5
fig.6
130.com.ua
Autogood products «130»

GB
English
English
15
16
www.heyner-germany.de www.heyner-germany.de
1.3. Installing HEYNER® CapsulaProtect 3D into your car
1.3. Installing HEYNER® CapsulaProtect 3D into your car
1.3.1. Conditions for installation
1.3.1. Conditions for installation
fig.3
fig.3
HEYNER® CapsulaProtect 3D
HEYNER® CapsulaProtect 3D
may be placed on all passenger
seats of the vehicle that are equipped with a three-pointvehicle-belt. The child seat must NOT be positioned on a
vehicle seat, which only has a lap belt,
example given the centre back seat of cars with three seats in
the back!
1.3.2. Placing on the vehicle seat
1.3.2. Placing on the vehicle seat
Now put HEYNER® CapsulaProtect 3D
HEYNER® CapsulaProtect 3D
onto the car seat in
driving direction.
1.3.3. Installation and fixing
1.3.3. Installation and fixing
fig.4
fig.4
The three-point-belt of a vehicle is made of 4 parts: the lap
belt (W), the diagonal belt (U), the
belt latch (V) and the belt buckle (X).
• Pull the central belt adjuster (G5), to make sure, that the
belts of the child car seat are not hanging loose.
fig.5
fig.5
• Push the seat part (ST) into the most laid back position
(sleeping position) by using the positioning handle (PG)
under the central harness belt (G5).
fig.6
fig.6
• De-block the safety lock (SR) of the safety bolt at the rear
side of the base part (BT) and slide out the safety bolt (SB)
sideward’s out of the base holes (BL). Now the
seat part (ST) is de-blocked and should be flapped
forward.
fig.7
fig.7
• Open the red belt clip (GK) on the base part (BT), which is
nearest to the car-belt-buckle (X).
fig.8
fig.8
• In order to correctly install the
HEYNER® CapsulaProtect 3D
HEYNER® CapsulaProtect 3D
seat, thread the belt latch (V)
of your car’s three-point-vehicle-belt between
seat part (ST) and base part (BT) towards the car-belt buckle (X).
fig.9
fig.9
• Push the belt latch (V) into the car-belt-buckle (X) with an
audible “click”. Please do not twist the belts during this
procedure.
fig.10
fig.10
• Now put the lap belt (W) horizontally underneath the
red belt lugs (GN).
Attention
Attention
:
Make sure that the belts are neither twisted nor blocked.
The belt anchorage (R) must not be blocked either. Please
strictly refer to the scribbles. In case of any doubt or
contact your seller or manufacturer.
1.3.4. Tightening of the cars belt
1.3.4. Tightening of the cars belt
fig.11
fig.11
• Press the HEYNER® CapsulaProtect 3D
HEYNER® CapsulaProtect 3D
child car seat as
strongly as possible into the car seat
fig.12
fig.13
fig.14
Attention
Attention HEYNER® CapsulaProtect 3D
1.4. Travelling with the HEYNER® CapsulaProtect 3D
1.4.1 Securing the child
fig. 15
fig. 16-17
fig. 18
1.4.2 Sitting and Laying position of your child
fig. 19
130.com.ua
Autogood products «130»

GB
English
English
17
18
www.heyner-germany.de www.heyner-germany.de
(e.g. with one of your knees). Tighten the belt by pulling first
the belt part near the belt buckle (X).
• Then firmly pull the cars diagonal belt (U) up towards the
roll-up mechanism.
fig.12
fig.12
• Fit the diagonal belt into the previously opened
belt clip (GK) and block it by closing and locking the clip
with the red belt clip (K).
fig.13
fig.13
• Place the cars diagonal belt (U) on to the red marked belt
guide (GR) at the back of the base part.
fig.14
fig.14
• Now flap back the seat part (ST). Slide back the
safety bolt (SB) sideward’s into the base holes (BL). Block
the safety lock (SR) of the safety bolt at the rear side of
the base part (BT).
Attention
Attention
: The safety bolt (SB) has to be fixed correctly to both
seat parts (ST) and base part (BT) after the seat is placed
into the car for installation.
Attention
Attention
: The HEYNER® CapsulaProtect 3D
HEYNER® CapsulaProtect 3D
can only offer
optimum protection of your child if it is fixed firmly to the
car´s seat with the car’s three-point-vehicle-belt. The belts
must not be twisted.
1.4. Travelling with the HEYNER® CapsulaProtect 3D
1.4. Travelling with the HEYNER® CapsulaProtect 3D
1.4.1 Securing the child
1.4.1 Securing the child
fig. 15
fig. 15
• Release the shoulder belts by pushing the
central adjuster (I) and pull the harness belts (G2)
towards you.
fig. 16-17
fig. 16-17
• Open the buckle (D) and belts (G), place the
harness belts (G2) to the left and right sides.
• Now place your child deep into the seat of your
HEYNER® CapsulaProtect 3D
HEYNER® CapsulaProtect 3D
, so that his posterior is right
down in the seat recess.
fig. 18
fig. 18
• Join the two buckle latches (C) of the harness belt and
push them together into the belt buckle (D) until an
audible »click« sound is clearly heard.
• Make sure that the shoulder belts lie firmly against the
child's body and are not twisted.
1.4.2 Sitting and Laying position of your child
1.4.2 Sitting and Laying position of your child
fig. 19
fig. 19
• The HEYNER® CapsulaProtect 3D
HEYNER® CapsulaProtect 3D
is equipped with a
5-step-adjustable seating mechanism.
• The adjusting is easy and fast with only one hand.
• Adjust the seat part (ST) by pushing the
positioning handle (PG) upwards, to achieve the most
comfortable position for your child.
For long rides orthopedist recommend preferably
horizontal position.
2. Care instructions
fig. 20
HEYNER® CapsulaProtect 3D
fig. 21-22
fig. 23
fig. 24
Attention
Attention
HEYNER® CapsulaProtect 3D
130.com.ua
Autogood products «130»

GB
English
English
19
20
www.heyner-germany.de www.heyner-germany.de
2. Care instructions
2. Care instructions
fig. 20
fig. 20
• To wash the seat cover of your
HEYNER® CapsulaProtect 3D
HEYNER® CapsulaProtect 3D
, push the seat part (ST) into
the most laid back position (sleeping position) by using
the positioning handle (PG) under the
central harness belt (G5).
fig. 21-22
fig. 21-22
• De-block the safety lock (SR) of the safety bolt at the rear
side of the base part (BT) and slide out the safety bolt (SB)
sideward’s out of the base holes (HL). Now the
seat part (ST) is de-blocked and can be flapped forward.
fig. 23
fig. 23
• Release both harness belt ends (G2) from the belt
anchorage (R) at the back of the seat part (ST) (fig.2a),
and pull the belt ends out of the slots (G1).
• Then release the shoulder pad connector belts (SG) from
the connecting hook (VH).
• To loosen the central lap belt place the seat upside down
and remove the metal plate from the belts end.
fig. 24
fig. 24
• Release the shoulder belts, waist belts and buckle belt.
The cover can be taken off and washed at 85ºF/30ºC.
• Attention
Attention
: Please do not spin. Do not dry in a dryer.
• Attention
Attention
: when again covering
HEYNER® CapsulaProtect 3D
HEYNER® CapsulaProtect 3D
make sure, to fix the harness
belts (G2) correctly to the belt anchorage (R) and the
shoulder pad connector belts (SG) to the
connecting hook (VH). Do not twist or block any of the
belts. If you feel insecure, take some photos BEFORE
removing the parts.
3. Important notices
3. Important notices
• HEYNER® CapsulaProtect 3D
HEYNER® CapsulaProtect 3D
child seat is approved in
accordance to the European Standard for child restraint
systems ECE R44/04
ECE R44/04
. The test symbol as well as the
permit number can be found on the orange label on the
back of the seat.
• This child seat can only be used in vehicles with
three-point-vehicle-belts that are approved by the ECE
regulation No. 16 or other comparable standards.
It is strictly forbidden to install this seat with the lap belt
alone.
• It is not allowed to do any changes on the seat or the
belts.
• Each change of any part of the seat, which is not done by
the manufacturer, will cause the expiration of the
ECE-approval
and excludes immediately any warranties.
• Should any doubts occur, contact your seller or
manufacturer. After an accident, the entire child restraint
system should be replaced or at least sent to the
manufacturer for inspection, together with the accident
report. This service cost will be charged.
• Always make sure that the belts only run along the tracks
clearly marked by red marks on the child seat
(guideline markings).
• Loose or hanging parts of the seat should not be
HEYNER® CapsulaProtect 3D
HEYNER MOBIL AUTOMOTIVE GMBH
4. Some final hints:
130.com.ua
Autogood products «130»

GB
English
English
21
22
www.heyner-germany.de www.heyner-germany.de
obstructed or restrained by other belts, belt locks or
seats.
• Always secure HEYNER® CapsulaProtect 3D
HEYNER® CapsulaProtect 3D
child seat with
the vehicle's adult seat-belt, even if no child is sitting in.
• The HEYNER child restraint systems can be used for many
years. It is therefore possible that some parts are subject
to wear and tear for example, the seat cover and have to
be replaced at some point.
• Make sure that all parts are stored away and cannot be
lost.
• The child seat must never be used without its original
cover. Should the seat cover need to be replaced, only use
HEYNER MOBIL AUTOMOTIVE GMBH
HEYNER MOBIL AUTOMOTIVE GMBH
seat covers.
• Always keep the instruction manual together with the
child seat.
4. Some final hints:
4. Some final hints:
• Do not place heavy objects on the hat rack. In case of an
accident, these could become dangerous objects and can
injure you and your child. Luggage and other similar
objects should therefore be stored away properly and be
well fixed.
• Make sure, that all passengers in your vehicle have their
seat-belt fastened, as unfastened passengers can become
a big danger to children in case of an accident.
• Allow children breaks during long car journeys and make
sure, they don't get out of the car alone without
supervision.
• Always use the child safety lock system, if available in
your car, to make it impossible for
children to open the vehicle doors from the inside.
• Never leave your child unattended in or outside the car.
130.com.ua
Autogood products «130»

RUS
23
24
www.heyner-germany.de www.heyner-germany.de
A1
A2
B
BL
BT
C
D
E
F
G
G1
G2
G3
G4
G5
GK
GN
I
L
N
O
P
PG
R
S
SB
SG
SR
ST
U
V
VH
W
X
– Head cushion
– Reduction cushion
– Shoulder pads
– Base holes
– Base part
– Buckle latches
– Buckle
– Seat cover
– Adjuster cover
– Belt system
– Belt slots
– Harness belts
– Waist belt
– Buckle belt
– Central harness belt
– Belt clip
– Belt lugs
– Belt adjuster
– Installation manual storage
– Backrest
– Fabric Cover
– Shock minimizer
– Positioning handle
– Belt anchorage
– Installation sticker
– Safety bolt
– Connector belts
– Safety lock
– Seat part
– Diagonal belt of the
– Buckle latch of the
– Conntecting hook
– Lap belt of the
– Belt buckle of the three-
three-point-vehicle-belt
three-point-vehicle-belt
three-point-vehicle-belt
point-vehicle-belt
Русский Русский
1. Использование для детей группы I
1. Использование для детей группы I
(от 9 до 18 кг.)
(от 9 до 18 кг.)
1.1. Подготовка детского автокресла HEYNER® CapsulaP
1.1. Подготовка детского автокресла HEYNER® CapsulaP-
rotect 3D к эксплуатации
rotect 3D к эксплуатации
Благодарим Вас, что Вы решили для безопастности
Вашего ребёнка в автомобиле купить детское автокресло
HEYNER® CapsulaProtect 3D
HEYNER® CapsulaProtect 3D
. Максимальная защита и
комфорт будут обеспечены только в случае правильной
настройки, установки и эксплуатации автокресла.
Пожалуйста, перед настройкой и установкой автокресла в
автомобиль внимательно ознакомьтесь с данной
инструкцией. Напоминаем, любая настройка и установка
данного автокресла должна производиться только
взрослыми!
1.2. Настройка автокресла HEYNER® CapsulaProtect 3D в
1.2. Настройка автокресла HEYNER® CapsulaProtect 3D в
соответствии с ростом и весом ребенка
соответствии с ростом и весом ребенка
1.2.1. Подготовка
1.2.1. Подготовка
Рис.
Рис.
1a-c
1a-c
HEYNER® CapsulaProtect 3D
HEYNER® CapsulaProtect 3D
укомплектовано
«комфорт-пакетом», состоящим из мягкой подушки под
голову (A1) и мягких вкладок (А2) для дополнительной
защиты и комфорта маленьких пассажиров от 9 до 18 кг.
Мы рекомендуем полностью снимать «комфорт-пакет»
только когда ребенок из него вырастет (или весит 18 кг) .
HEYNER® CapsulaProtect 3D
1.2.2. Настройка высоты и длины ремней безопасности
автокресла
Рис. 2a-c
HEYNER® CapsulaProtect 3D
Рис.2
Рис.2а
Рис. 2b
Рис. 2с
Рис. 2d
Внимание:
Index / page
1. Использование для детей группы I (от 9 до 18 кг.)
1.1. Подготовка детского автокресла
HEYNER® CapsulaProtect 3D
HEYNER® CapsulaProtect 3D
к эксплуатации
1.2. Настройка автокресла HEYNER® CapsulaProtect 3D
HEYNER® CapsulaProtect 3D
в соответствии с ростом и весом ребенка
1.3. Установка автокресла HEYNER® CapsulaProtect 3D
HEYNER® CapsulaProtect 3D
в автомобиле
1.4. Поездка с ребенком в автокресле
HEYNER® CapsulaProtect 3D
HEYNER® CapsulaProtect 3D
2. Советы по уходу
3. Важные замечания
4. Дополнительная информация
S. 24
S. 24
S. 24
S. 27
S. 31
S. 32
S. 34
S. 36
130.com.ua
Autogood products «130»

RUS
25
26
www.heyner-germany.de www.heyner-germany.de
Русский Русский
Автокресло HEYNER® CapsulaProtect 3D
HEYNER® CapsulaProtect 3D
оснащено
встроенными ремнями безопасности (G). Регулировка
ремней безопасности автокресла в соответствии с ростом
ребенка производится следующим образом:
Поставьте автокресло на ровную устойчивую поверхность,
например на стул и посадите в него ребенка. Убедитесь, что
ремни плечевых лямок (SG) ремней безопасности автокресла
находятся чуть выше плеч ребенка (рис. 1а) – не сильно
выше (рис. 1b) и не ниже (рис. 1с).
1.2.2. Настройка высоты и длины ремней безопасности
1.2.2. Настройка высоты и длины ремней безопасности
автокресла
автокресла
Рис.
Рис.
2a-c
2a-c
Так Вы можете регулировать плечевые лямки (G2) по высоте:
Автокресло HEYNER® CapsulaProtect 3D
HEYNER® CapsulaProtect 3D
состоит из 2-х
частей: сидение (ST) и база (BT). Обе части автокресла
надежно соединены между собой. В верхней части
соединение усилено стальным стержнем безопасности (SB).
Рис.2
Рис.2
Разблокируйте замок (SR) стержня безопасности. Замок
находится на противоположной (ручке стержня) боковине
базы (BT). Вытяните стержень безопасности (SB) из
направляющих (BL). Теперь сидение (ST) автокресла
разблокировано, и его можно откинуть вперед.
Рис.2а
Рис.2а
• Для того, чтобы изменить высоту встроенных ремней
безопасности плечевых лямок(G2), освободите петли
ремней безопасности из анкера(R), который находится за
спинкой (ST) автокресла и вытяните ремни из
направляющих отверстий (G1).
• Отсоедините концы лямок плечевых накладок (SG) от
удерживающего их кронштейна (VH)
• Протяните ремни и лямки плечевых направляющих(G2)
• через соответствующие росту ребенка
отверстия-направляющие (G1). Соедините концы
ремней с анкером (R).
• В заключении протяните ремни плечевых лямок (SG) •
под лямки плечевых направляющих(G2) через тоже
отверстие направляющих (G1)и закрепите на
удерживающем их кронштейне (VH).
Рис. 2b
Рис. 2b
Для того, чтобы ослабить ремни, нажмите на кнопку (I),
которая находится под язычком на передней части
подушки сидения, и одновременно потяните к себе за
обе плечевые лямки (G2) ремня. Внимание: не тяните за
плечевые накладки!
Рис. 2с
Рис. 2с
Для того, чтобы затянуть ремни безопасности, потяните
за их свободный конец (G5). Не блокируйте ремни
безопасности во время их натяжения.
Рис. 2d
Рис. 2d
После того, как ремни настроены, прижмите сидение
(ST) автокресла к его базе и вставьте стержень
безопасности (SB) в его направляющую (BL).
Зафиксируйте стержень замком (SR).
Внимание:
Внимание:
перед тем, как установить автокресло на
сидение автомобиля, убедитесь, что стержень
безопасности (SB) установлен правильно. Сидение
Внимание:
Важно:
1.3. Установка автокресла HEYNER® CapsulaProtect 3D в
автомобиле
1.3.1. Подготовка к установке
Рис. 3
130.com.ua
Autogood products «130»

RUS
27
28
www.heyner-germany.de www.heyner-germany.de
Русский Русский
автокресла (ST) и его база (BT) должны быть соединены
между собой стержнем безопасности (SB). Замок (SR)
стержня должен быть закрыт.
Внимание:
Внимание:
регулярно проверяйте положение ремней и
регулируйте их в соответствии с ростом ребенка. Следите
за тем, чтобы ремни безопасности не были перекручены и
плотно прилегали к телу ребенка.
Важно:
Важно:
Ремни не должны быть перекручены или зажаты.
Обязательно, используйте при монтаже рисунки и
инструкцию по эксплуатации.
При возникновении сомнений в правильности настроек и
установки автокресла в автомобиле свяжитесь с продавцом,
представителем производителя в Вашей стране или
напрямую с производителем.
1.3. Установка автокресла HEYNER® CapsulaProtect 3D в
1.3. Установка автокресла HEYNER® CapsulaProtect 3D в
автомобиле
автомобиле
1.3.1. Подготовка к установке
1.3.1. Подготовка к установке
Рис. 3
Рис. 3
Автокресло может быть установлено на любое пассажирское
сидение автомобиля, оборудованное штатным 3-х точечным
ремнем безопасности. Детское автокресло НЕЛЬЗЯ
устанавливать на сидение, оборудованное только поясным
ремнем безопасности.
1.3.2. Установка автокресла в автомобиле
1.3.2. Установка автокресла в автомобиле
Поставьте HEYNER® CapsulaProtect 3D
HEYNER® CapsulaProtect 3D
на подходящее
для установки детского автокресла сидение автомобиля
по ходу движения машины.
1.3.3. Фиксация автокресла
1.3.3. Фиксация автокресла
Рис. 4
Рис. 4
Штатный 3-х точечный ремень безопасности автомобиля
состоит из 4 частей: поясная часть (W), грудная часть (U),
язычок замка (V) и замок (X).
Убедитесь, что ремни безопасности автокресла не
болтаются. Для этого затяните ремни, потянув за их
свободный конец (G5).
Рис. 5
Рис. 5
Переведите спинку автокресла (ST) в максимально
горизонтальное положение. Для этого воспользуйтесь
ручкой механизма фиксации (PG) угла наклона спинки
автокресла, который находится под свободным концом
центрального регулируемого ремня(G5).
Рис. 6
Рис. 6
Разблокируйте замок (SR) стержня безопасности. Замок
находится на противоположной (ручке стержня)
боковине базы (BT). Вытяните стержень безопасности (SB)
из направляющих (BL). Теперь сидение (ST) автокресла
разблокировано, и его можно откинуть вперед.
Рис. 7
Рис. 7
Расщелкните красный фиксатор (GK) натяжения штатного
ремня безопасности автомобиля, который находится на
Рис. 8
HEYNER® CapsulaProtect 3D
Рис. 9
Рис. 10
Важно:
1.3.4. Натяжение штатного ремня безопасности
автомобиля
Рис. 11
Рис. 12
Рис. 13
Рис.14
130.com.ua
Autogood products «130»

RUS
29
30
www.heyner-germany.de www.heyner-germany.de
Русский Русский
базе (BT) автокресла: между базой (BT) и сидением (ST) со
стороны замка (X) штатного ремня безопасности
автомобиля.
Рис. 8
Рис. 8
Для того, чтобы правильно зафиксировать автокресло
HEYNER® CapsulaProtect 3D
HEYNER® CapsulaProtect 3D
в автомобиле, проденьте язычок
штатного ремня безопасности автомобиля (V) между
спинкой (ST) автокресла и его базой (BT) в направлении
замка (X) ремня безопасности автомобиля.
Рис. 9
Рис. 9
Вставьте язычок (V) штатного ремня автомобиля в замок
штатного ремня безопасности автомобиля(X). Если Вы
услышали ЩЕЛЧОК, то все сделано правильно и замок
закрыт. Пожалуйста, не перекручивайте лямки штатного
ремня безопасности автомобиля.
Рис. 10
Рис. 10
Поясной ремень безопасности (W) ведите горизонтально
под красными носиками ремня (GN)
Важно:
Важно:
Ремни не должны быть перекручены или зажаты.
Якорь 5-ти точечного ремня автокресла (R) должен быть
свободен. Обязательно, используйте при монтаже рисунки и
инструкцию по эксплуатации. При возникновении вопросов
свяжитесь с продавцом, представителем производителя в
Вашей стране или напрямую с производителем.
1.3.4. Натяжение штатного ремня безопасности
1.3.4. Натяжение штатного ремня безопасности
автомобиля
автомобиля
Рис. 11
Рис. 11
После установки автокресла HEYNER® CapsulaProtect 3D
HEYNER® CapsulaProtect 3D
и его фиксации проведите натяжение штатного ремня
безопасности. Для этого:2
• Сильно вдавите автокресло в сидение автомобиля
(например, с помощью своего колена).
• Сначала натяните поясную часть штатного ремня
безопасности автомобиля, потянув за нее около
замка (X) ремня безопасности.
• Продолжайте затягивать ремень, потянув вверх за
грудную часть (U) штатного ремня безопасности в
направлении механизма его натяжения (катушка).
Рис. 12
Рис. 12
• После того, как Вы убедились, что автокресло надежно
прижато к сидению, пропустите диагональную
часть (U) штатного ремня через фиксатор (GK).
Зажмите ремень фиксатором, закройте фиксатор.
Рис. 13
Рис. 13
• Проведите диагональную часть(U) ремня безопасности
автомобиля через красную направляющую (GR),
расположенную на задней части базы автокресла.
Рис.14
Рис.14
• После того, как ремни затянуты, прижмите сидение
(ST) автокресла к его базе и вставьте стержень
безопасности (SB) в его направляющую (BL).
Зафиксируйте стержень замком (SR), который
находится в вверхней части базы (BT) .
Внимание:
Внимание:
HEYNER® CapsulaProtect 3D
1.4. Поездка с ребенком в автокресле
HEYNER® CapsulaProtect 3D
1.4.1. Фиксация ребенка в автокресле
Рис.15
Рис.16-17
HEYNER® CapsulaProtect 3D
130.com.ua
Autogood products «130»

RUS
31
32
www.heyner-germany.de www.heyner-germany.de
Русский Русский
Внимание:
Внимание:
Убедитесь, что стержень безопасности (SB) установлен
правильно: сидение автокресла (ST) и его база (BT) должны
быть соединены между собой стержнем безопасности.
Замок стержня (SR)должен быть полностью закрыт.
Внимание:
Внимание:
убедитесь, что автокресло
HEYNER® CapsulaProtect 3D
HEYNER® CapsulaProtect 3D
надежно установлено на
сидении Вашего автомобиля и плотно зафиксировано
штатным ремнем безопасности, только тогда автокресло
сможет защитить Вашего ребёнка. Ремни не должны быть
перекручены или зажаты.
1.4. Поездка с ребенком в автокресле
1.4. Поездка с ребенком в автокресле
HEYNER® CapsulaProtect 3D
HEYNER® CapsulaProtect 3D
1.4.1. Фиксация ребенка в автокресле
1.4.1. Фиксация ребенка в автокресле
Рис.15
Рис.15
Ослабьте натяжение ремней безопасности автокресла. Для
этого, нажмите на кнопку (I) фиксации натяжения ремней
безопасности автокресла и вытяните ремни (G2) автокресла
на себя.
Рис.16-17
Рис.16-17
• Раскройте замок (D) ремней безопасности автокресла.
Отведите плечевые лямки (G2) ремней автокресла
влево и вправо.
• Усадите в автокресло HEYNER® CapsulaProtect 3D
HEYNER® CapsulaProtect 3D
ребенка. Убедитесь, что ребенок сидит прямо и его
спина плотно и равномерно прижата к спинке
автокресла.
Рис.18
Рис.18
• Совместите оба язычка (C) ремней безопасности
автокресла (G2) и вставьте их в замок (D) ремней
безопасности автокресла. Если Вы услышали
отчетливый щелчок – замок защелкнут. Убедитесь,
что ремни не перекручены и плотно прилегают к телу
ребенка.
1.4.2. Положение сидения автокресла для отдыха и сна
1.4.2. Положение сидения автокресла для отдыха и сна
Рис.19
Рис.19
• Детское автокресло HEYNER® CapsulaProtect 3D
HEYNER® CapsulaProtect 3D
оснащено 5-ступенчатым механизмом изменения
положения угла наклона сидения.
• Изменение положения угла наклона осуществляется
одной рукой.
• Для изменения положения сидения потяните ручку (PG)
механизма фиксации угла наклона на себя и
переведите сидение автокресла в одно из 5-ти
желаемых положений. Во время длительных поездок
детские ортопеды рекомендуют использовать самое
горизонтальное положение сидения автокресла.
2. Советы по уходу
2. Советы по уходу
Рис.20
Рис.20
Для того, чтобы постирать обивку автокресла
HEYNER® CapsulaProtect 3D
HEYNER® CapsulaProtect 3D
, снимите ее. Для этого:
Переведите спинку автокресла (ST) в максимально
горизонтальное положение. Для этого воспользуйтесь
Рис.21-22
Рис.23
Рис.24
Внимание:
HEYNER® CapsulaProtect 3D
3. Важные замечания
HEYNER® CapsulaProtect 3D
130.com.ua
Autogood products «130»

RUS
33
34
www.heyner-germany.de www.heyner-germany.de
Русский Русский
ручкой механизма фиксации (PG) угла наклона спинки
автокресла, который находится под свободным концом
центрального регулируемого ремня(G5).
Рис.21-22
Рис.21-22
Разблокируйте фиксатор (SR) стержня безопасности на
задней части базы автокресла (BT) и вытяните металлический
стержень (SB) из направляющих (ВL). Теперь сидение (ST)
автокресла разблокировано, и его можно откинуть вперед.
Рис.23
Рис.23
• Освободите петли ремней (G2) из анкера (R), который
находится за спинкой (ST) автокресла, и вытяните ремни
из направляющих отверстий (G1).
• Отсоедините концы лямок плечевых накладок (SG) от
удерживающего их кронштейна (VH).
• Для того, чтобы отстегнуть центральную часть ремней
безопасности (замок G4), переверните автокресло и
вытащите металлический якорь из петли лямки ремня
безопасности, на которой закреплен замок.
Рис.24
Рис.24
• Если все ремни сняты, то снимите обивку. Обивка
автокресла стирается при температуре 30ºC.
Внимание:
Внимание:
не отжимайте в центрифуге, не сушите в
«сушилке». Во время установки обивки на автокресло
HEYNER® CapsulaProtect 3D
HEYNER® CapsulaProtect 3D
после стирки убедитесь,
что плечевые лямки (G2) ремней безопасности
автокресла закреплены на якоре (R) и не перекручены,
а плечевые накладки (SG) зафиксированы за спинкой
сидения с помощью специальной скобы (VH).
Совет: ПЕРЕД снятием обивки Вы можете сделать несколько
фотографий для того, чтобы зафиксировать важные для
последующей установки обивки на место детали.
3. Важные замечания
3. Важные замечания
• Детское автокресло HEYNER® CapsulaProtect 3D
HEYNER® CapsulaProtect 3D
соответствует ECE R44/04
ECE R44/04
– Европейскому стандарту
безопасности для детских удерживающих устройств.
Эмблема соответствия вместе с номером разрешения
находятся на оранжевой наклейке на задней части
спинки автокресла.
• Данное автокресло может быть установлено в
автомобилях, оборудованных 3-х точечными ремнями
безопасности, одобренными положением ECE №16 или
другими схожими стандартами.
• Строго воспрещается фиксация автокресла только
поясным ремнем безопасности.
Любые изменения автокресла
HEYNER® CapsulaProtect 3D
HEYNER® CapsulaProtect 3D
и/или ремней безопасности
воспрещаются.
• Модификация любой части автокресла, сделанная не
его производителем, влечет за собой прекращение
действия стандартов ECE и гарантийных обязательств
производителя.
• При возникновении вопросов свяжитесь с продавцом
данного автокресла, региональным дилером или с
производителем.
4. Дополнительная информация
130.com.ua
Autogood products «130»

RUS
35
36
www.heyner-germany.de www.heyner-germany.de
Русский Русский
• После аварии автокресло должно быть заменено на
новое или направлено на проверку производителю. К
автокреслу необходимо приложить описание
происшествия.
Обращаем Ваше внимание на то, что проверка платная.
• При установке автокресла и фиксации в нем ребенка
штатный автомобильный ремень безопасности всегда
должен проходить только по специальным
направляющим, обозначенным красным цветом.
• Свободные, незакрепленные части автокресла не должны
быть зажаты другими ремнями, фиксаторами или
предметами, находящимися рядом.
• Всегда фиксируйте HEYNER® CapsulaProtect 3D штатным
автомобильным ремнем безопасности, даже если в нем не
сидит ребенок.
• Автокресло HEYNER® CapsulaProtect 3D предназначено
для многолетней эксплуатации. Поэтому, возможно, что
некоторые его части могут выйти из строя или износиться
как, например, обивка автокресла.
• При длительном хранении автокресла убедитесь в том,
что все детали автокресла убраны и упакованы так, чтобы
не потеряться.
• Правильная эксплуатация данного автокресла возможна
только с оригинальной обивкой фирмы HEYNER MOBIL
AUTOMOTIVE GMBH. Если обивка автокресла требует
замены, используйте только оригинальные
комплектующие. Для заказа оригинальной обивки
свяжитесь с дилером.
• Всегда храните инструкцию вместе с автокреслом.
4. Дополнительная информация
4. Дополнительная информация
• Не кладите тяжелые предметы на заднюю полку или
торпеду. В случае аварии они могут представлять
серьезную опасность для Вас и Вашего ребенка.
• Багаж и другие подобные предметы должны быть
закреплены в багажнике.
• Перед началом движения убедитесь, что водитель и все
пассажиры пристегнуты, т.к. в случае аварии
непристегнутый человек представляет повышенную
опасность для Вас и Вашего ребенка.
• Во время длительного путешествия делайте частые
остановки. Всегда следите за тем, чтобы дети не
находились за пределами автомобиля без Вашего
присмотра.
• Всегда используйте блокировку дверных замков, чтобы
дети самостоятельно не смогли открыть двери автомобиля
изнутри.
• Никогда не оставляйте ребенка без присмотра внутри или
снаружи автомобиля.
130.com.ua
Autogood products «130»
 Loading...