

Page 1
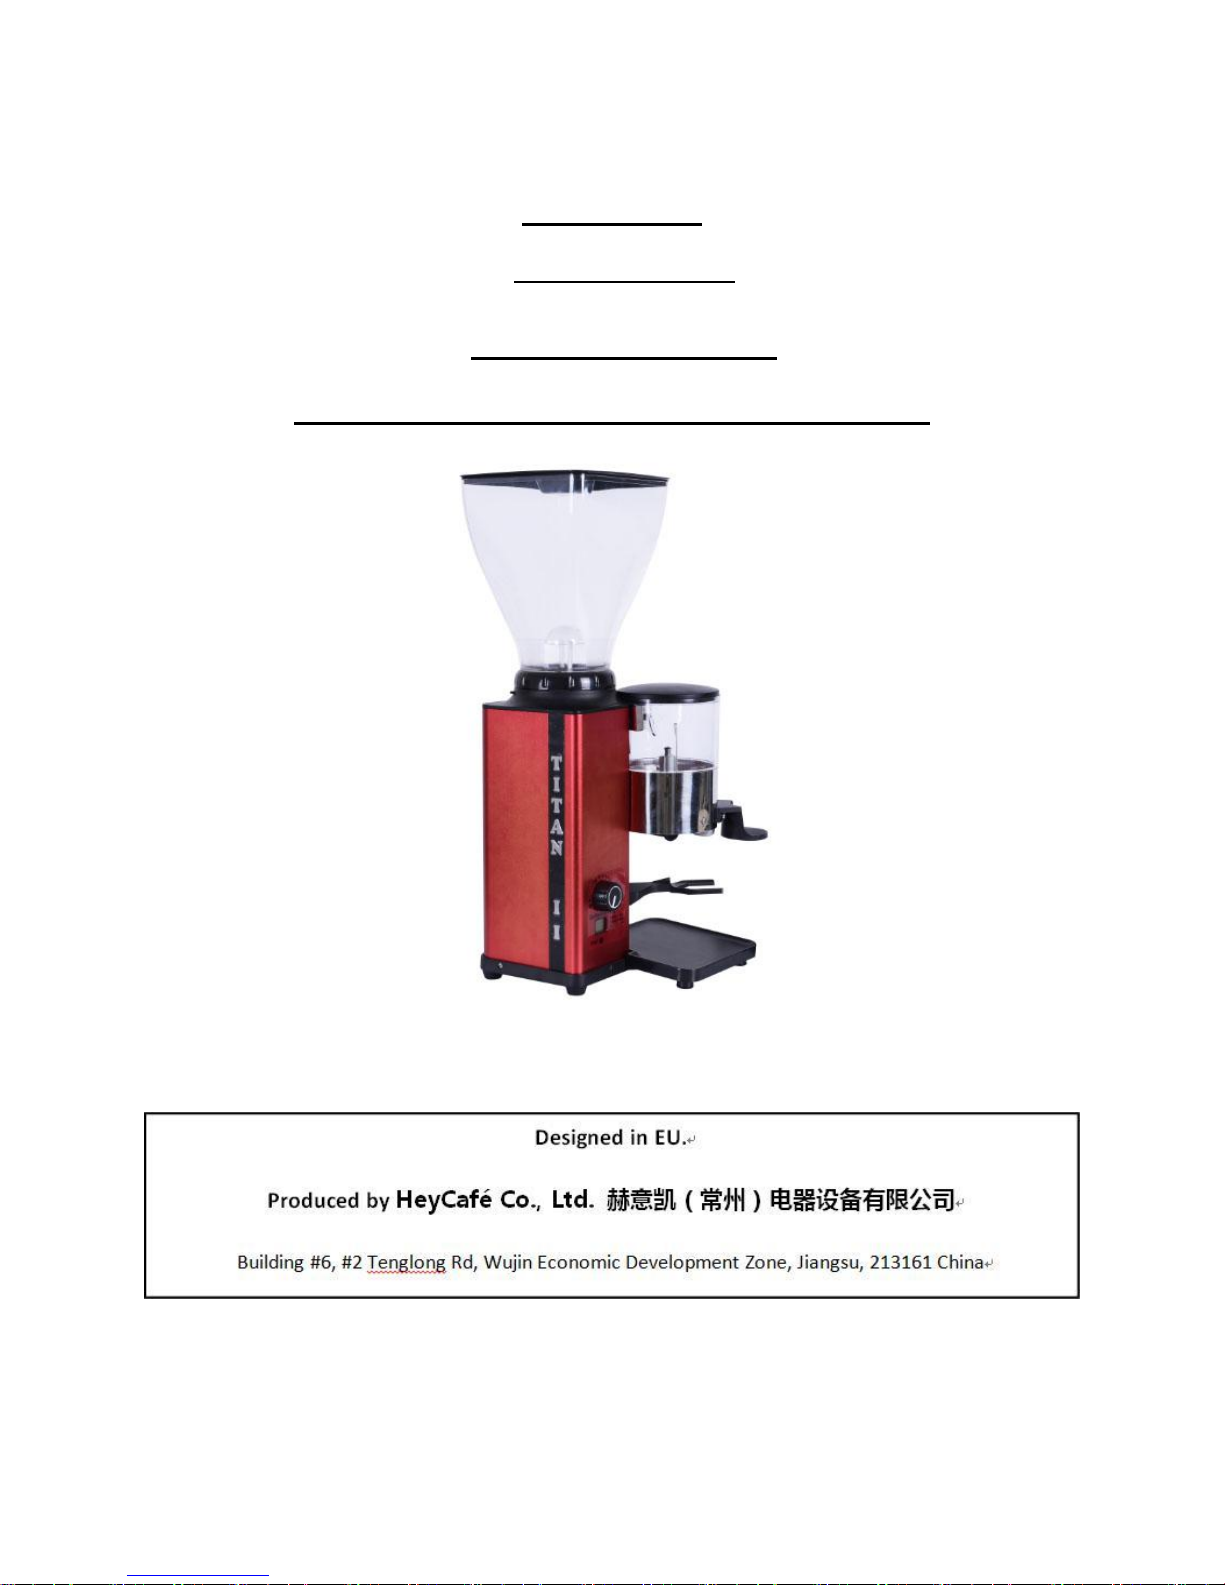
TITAN II
(HC-608)
Models S, T, AD
DISPENSER COFFEE GRINDER
© HeyCafé Co., Ltd.
Version 5.0, June 2017
1
Page 2
WARNINGS
1 This appliance is not intended for use by persons (including children) with reduced physical, sensory or
mental capabilities, or lack of experience and knowledge, unless they have been given supervision or instruction
concerning use of the appliance by a person responsible for their safety.
2 Children should be supervised to ensure that they do not play with the appliance.
3 Care is needed when handling cutting grindstones during cleaning.
4 If the supply cord is damaged, it must be replaced by the manufacturer or its service agent or a similarly
qualified person in order to avoid a hazard.
Correct Disposal of this product
This marking indicates that this product should not be disposed with other household wastes throughout the EU.
To prevent possible harm to the environment or human health from uncontrolled waste disposal, recycle it
responsibly to promote the sustainable reuse of material resources. To return your used device, please use the
return and collection systems or contact the retailer where the product was purchased. They can take this product
for environmental safe recycling.
Warranty Information
The manufacturer provides warranty in accordance with the legislation of the customer's own country of residence,
with a minimum of 1 year (Germany: 2 years), starting from the date on which the appliance is sold to the end
user.
The warranty only covers defects in material or workmanship.
The repairs under warranty may only be carried out by an authorized service centre. When making a claim under
the warranty, the original bill of purchase (with purchase date) must be submitted.
The warranty will not apply in cases of:
Normal wear and tear and/or incorrect use, e.g. overloading of the appliance or grinding any substance other than
coffee beans Usage of non-approved accessories or non-original spare parts Use of force, damage caused by
external influences Damage caused by nonobservance of the user manual, e.g. connection to a non-suitable
mains supply or non-compliance with the installation instructions Partially or completely dismantled appliances
© HeyCafé Co., Ltd.
Version 5.0, June 2017
2
Page 3

TABLE of CONTENTS
1) Preface……………………………………………………………………………………………….4.
2) Technical Specifications …….………………………………………………………………4.
3) General Description ……………………………………………………………………..……4.
4) Unpacking and installation ………………………………………………………………..5.
5) Operation……………………………………………………………………………………………7.
6) Safety devices…………………………………………………………………………………….9.
7) Safety instructions………………………………………………………………………….….10.
8) Maintenance and service…………………………………….……….…………………….10.
9) Cleaning…………………….…………………………………………………….……………….10.
10) Remarks and important details………………….…………………….……………….13.
© HeyCafé Co., Ltd.
Version 5.0, June 2017
3
Page 4

Dimensions:
Height: 600mm
Width: 210mm
Length: 330mm
Weight: 11.5Kg
Burrs diameter: 64mm
Hopper capacity: 1200gr of coffee beans
Optional hoper: 600 gr
Electrical Specifications:
Voltage: 110V/230V 50Hz/60Hz
Power: 350w
Duty Cycle: 50%
Grinding capacities: 1.5-2.5 gr/sec
Beans hopper crown
Dispenser lid
Dosing adjusting screw
Coffee tamper
Grinding dial
Porta filter handle support
Residue tray
Bean hopper lid
Bean hopper
Bean hopper door
Run indication lamp
Grinder body
Main switch
1) Preface
Congratulations for purchasing the Titan II dispenser grinder. The Titan II is a commercial appliance to be used in
coffee shops, espresso bars, hotels, restaurants, etc. The Titan II will grind whole been coffee into variable, user selectable (from super fine to course) coffee powder and will dose It to your espresso machine Porta Filter. Read
this manual from cover to cover before using the appliance as it contains important instructions for the safety,
operation, and maintenance of the appliance. Keep the manual in a safe place for future use and reference. The
manufacturer reserves the right to modify from time to time the appliance and the manual accordingly.
2) Technical specifications Titan II
3) General description
© HeyCafé Co., Ltd.
Version 5.0, June 2017
4
Page 5
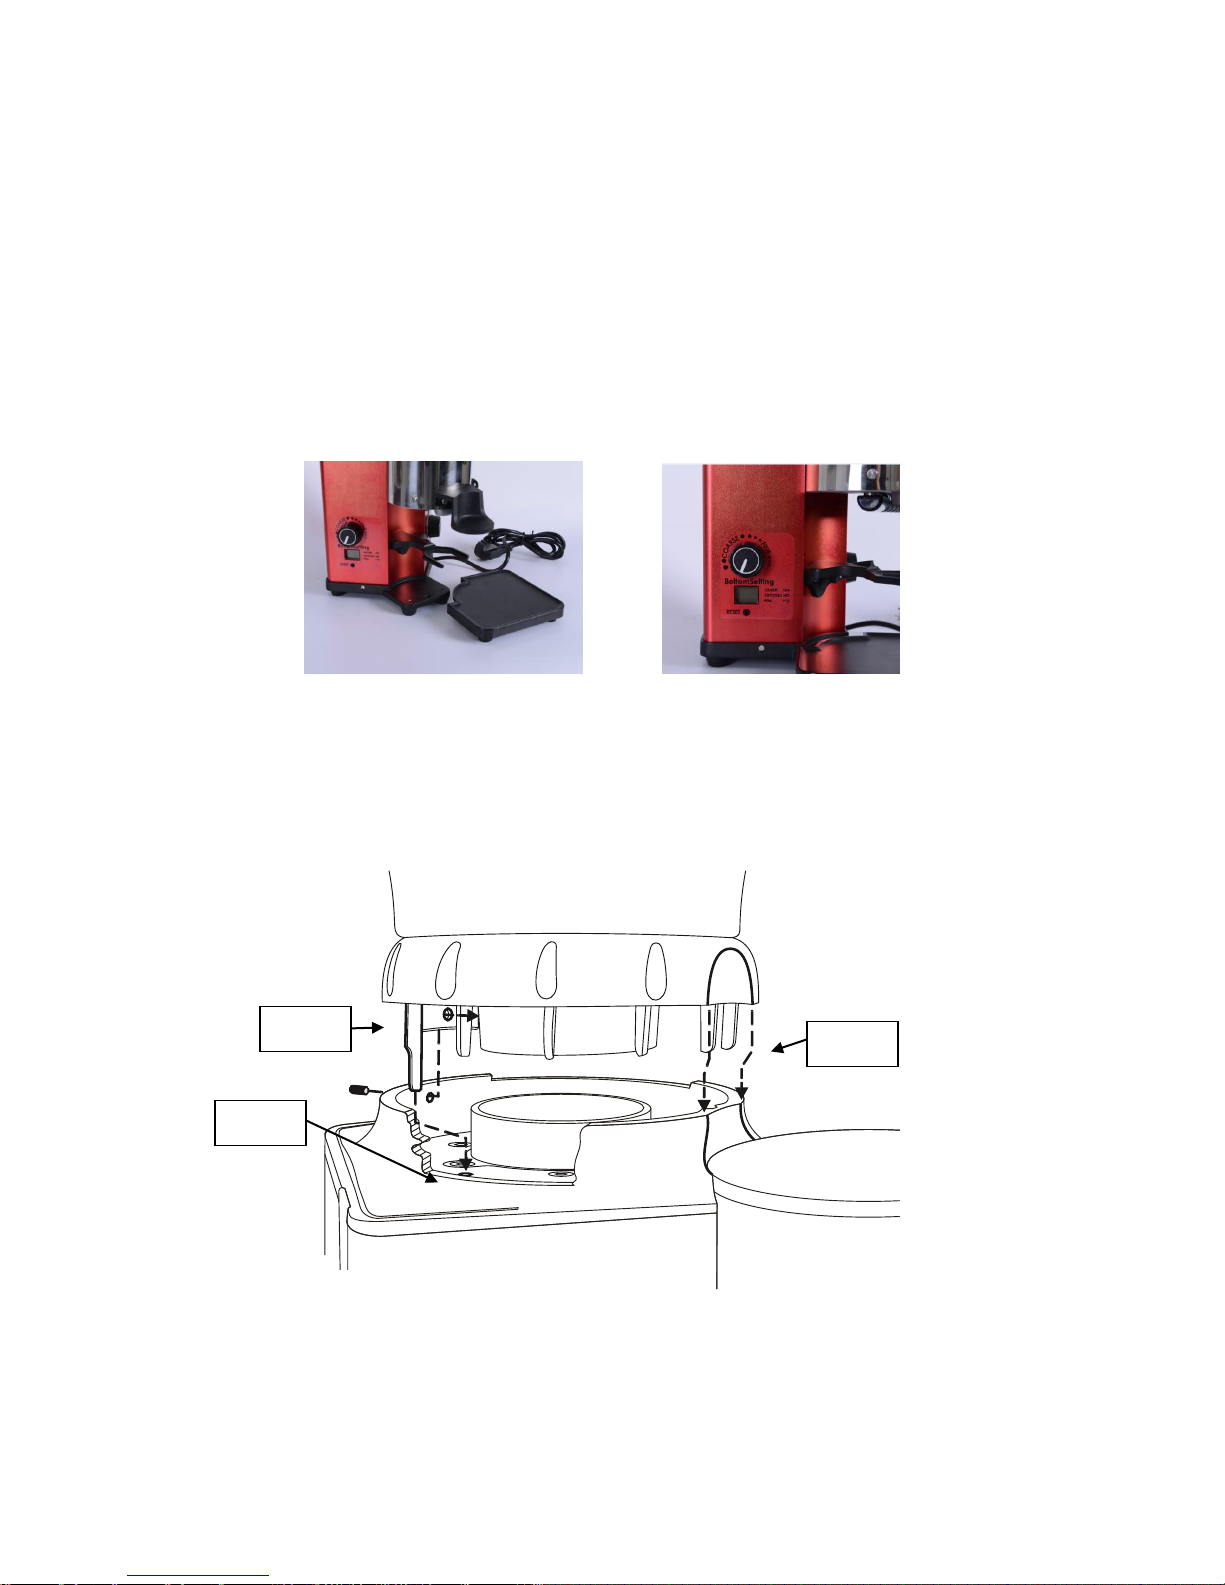
Fig 4.4
Fig 4.2
Fig 4.3
4) Unpacking and installation:
Warning: All appliances’ technical handling operations such as installation, maintenance, or service
should be performed by certified personnel or by your local dealer.
After opening the box, make sure that the appliance is intact and that there is no visible damage. If there is
any doubt, DONOT use the appliance and call your local dealer for further assistance.
Unpack the carton box carefully. For your convenience we suggest storing all packaging materials where they
can be used in the future, whenever the appliance’s transportation is necessary.
Place the grinder on a stable flat counter in a dry area away from water or water splashes.
Fit the coffee residue tray into its specially designed housing in front of the appliance (fig 4.1).
Before installing the beans hopper, please take few seconds to identify the different parts of the beans hopper
crown and its relative position inside the grinding house structure. There is only one position for the hopper to
be assembled correctly on top of the grinder
o Figure 4.2 safety switch hole and safety switch pin
o Figure 4.3 back hopper fixing screw and hopper fixing hole
o Figure 4.4 positioning front slot and front rib
Fig 4.1
© HeyCafé Co., Ltd.
Version 5.0, June 2017
Fig 4.2-4.4
5
Page 6
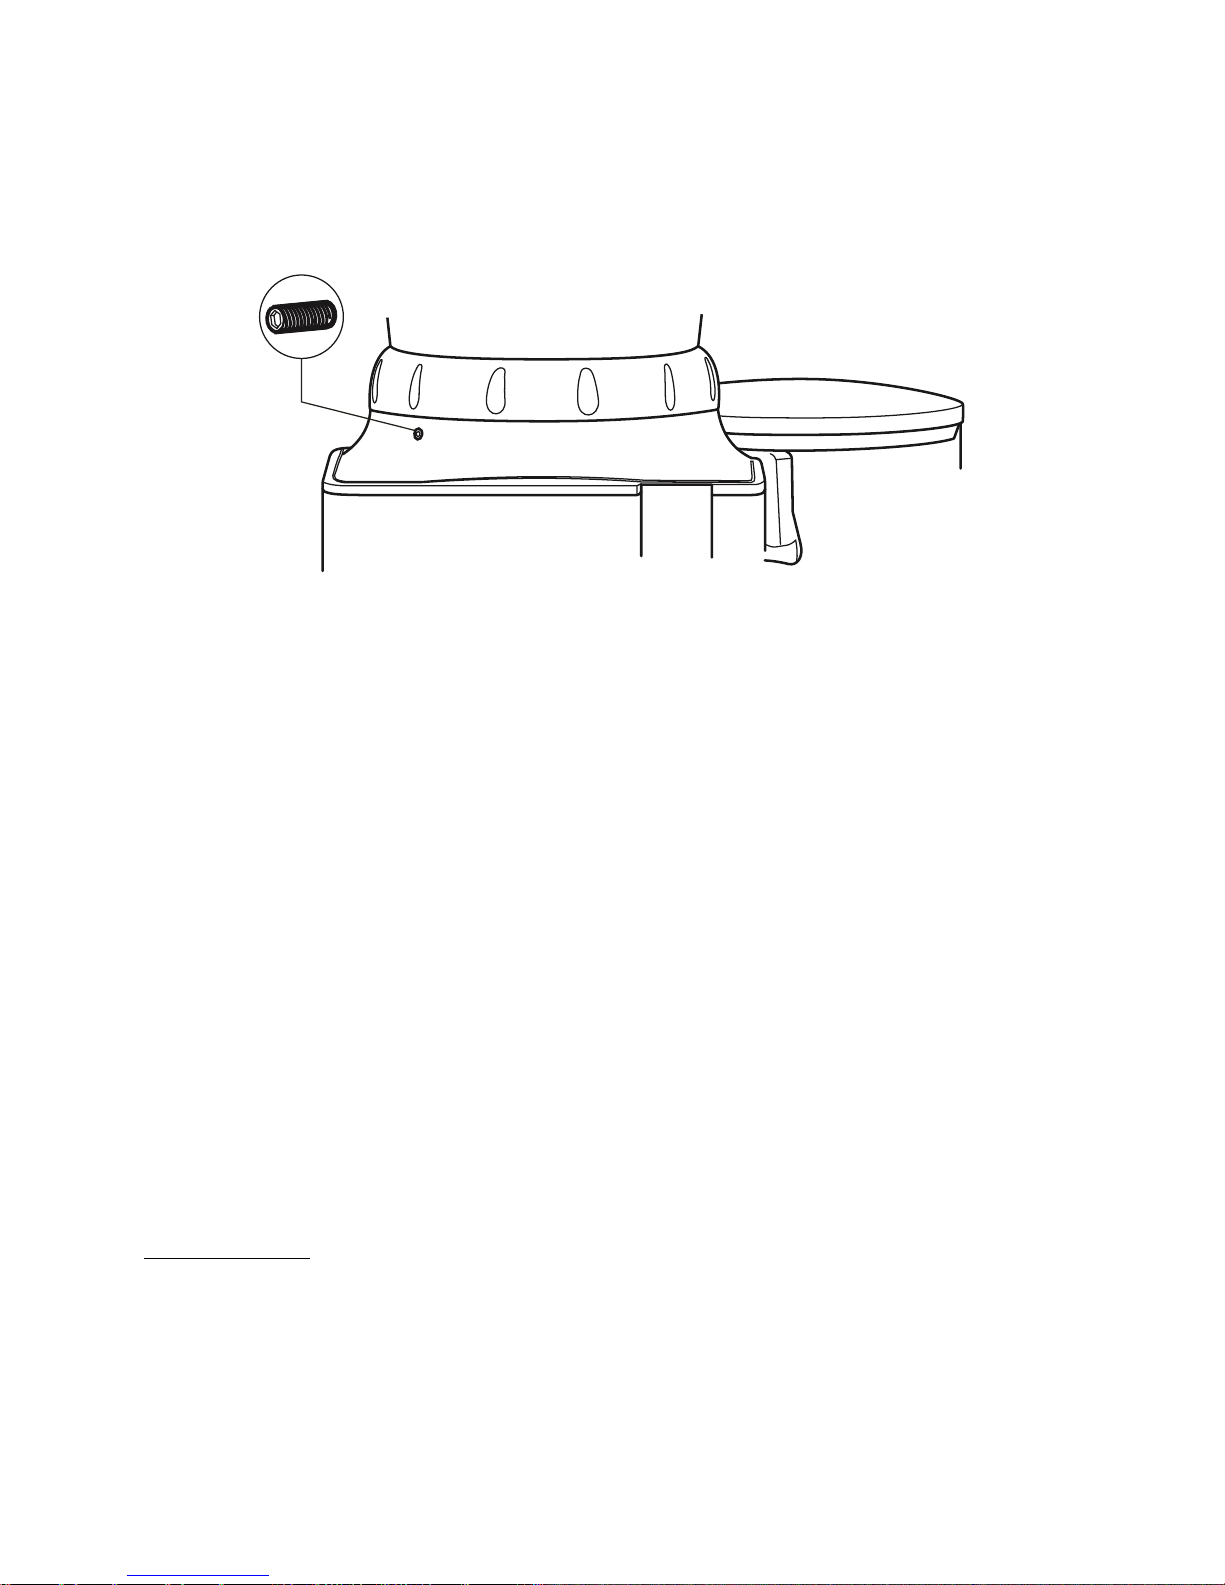
Install the beans hopper firmly into its position on top of the body inside the top grindstone holder.
Fasten the hopper to the appliance body by means of the supplied 2mm Allen screw and key. (fig.4.5) Make
sure that the screw is inserted completely through the back hole on the hopper’s crown.
Fig4.5
The TITAN II is equipped with a safety switch (figure 4.2) that is preventing the possibility to operate the
grinder without the beans hopper is fully inserted and secured to its position.
Never bypass the safety-switch or insert foreign objects into the safety-hole to imitate hopper’s crown pin.
Never try to operate the grinder if the beans’ hopper is not fully secured in its position.
Before plugging in the electrical cord, make sure:
o The appliance voltage and frequency rating (according to the bottom cover label) is the same as the
supply mains.
o The wall socket is fitted with an efficient ground contact. DONOT plug the appliance into the supply
mains if the ground system was not positively checked to be in compliance with current safety rules.
IT IS COMPULSORY TO EARTH THE APPLIANCE. The manufacturer can not be held responsible in the event
that this regulation is not complied with.
o The power/current consumption of the appliance (according to the backside label) is consistent with
the capacity of the relevant main socket.
o The main socket is protected against short outs and power surges.
o Do not use extension cables, plug adapters for multiple sockets, or make shift connections.
Plug in the appliance.
Upon first time operation, and before placing beans in to the hopper, VISUALLY check that the grindstone
rotation direction is clockwise by switching the appliance ON for a few seconds.
Should the rotation direction be wrong, do not use the appliance and contact your local dealer for further
instructions.
5) OPERATION
Grinding coffee with Titan II grinder:
S Model (Manual):
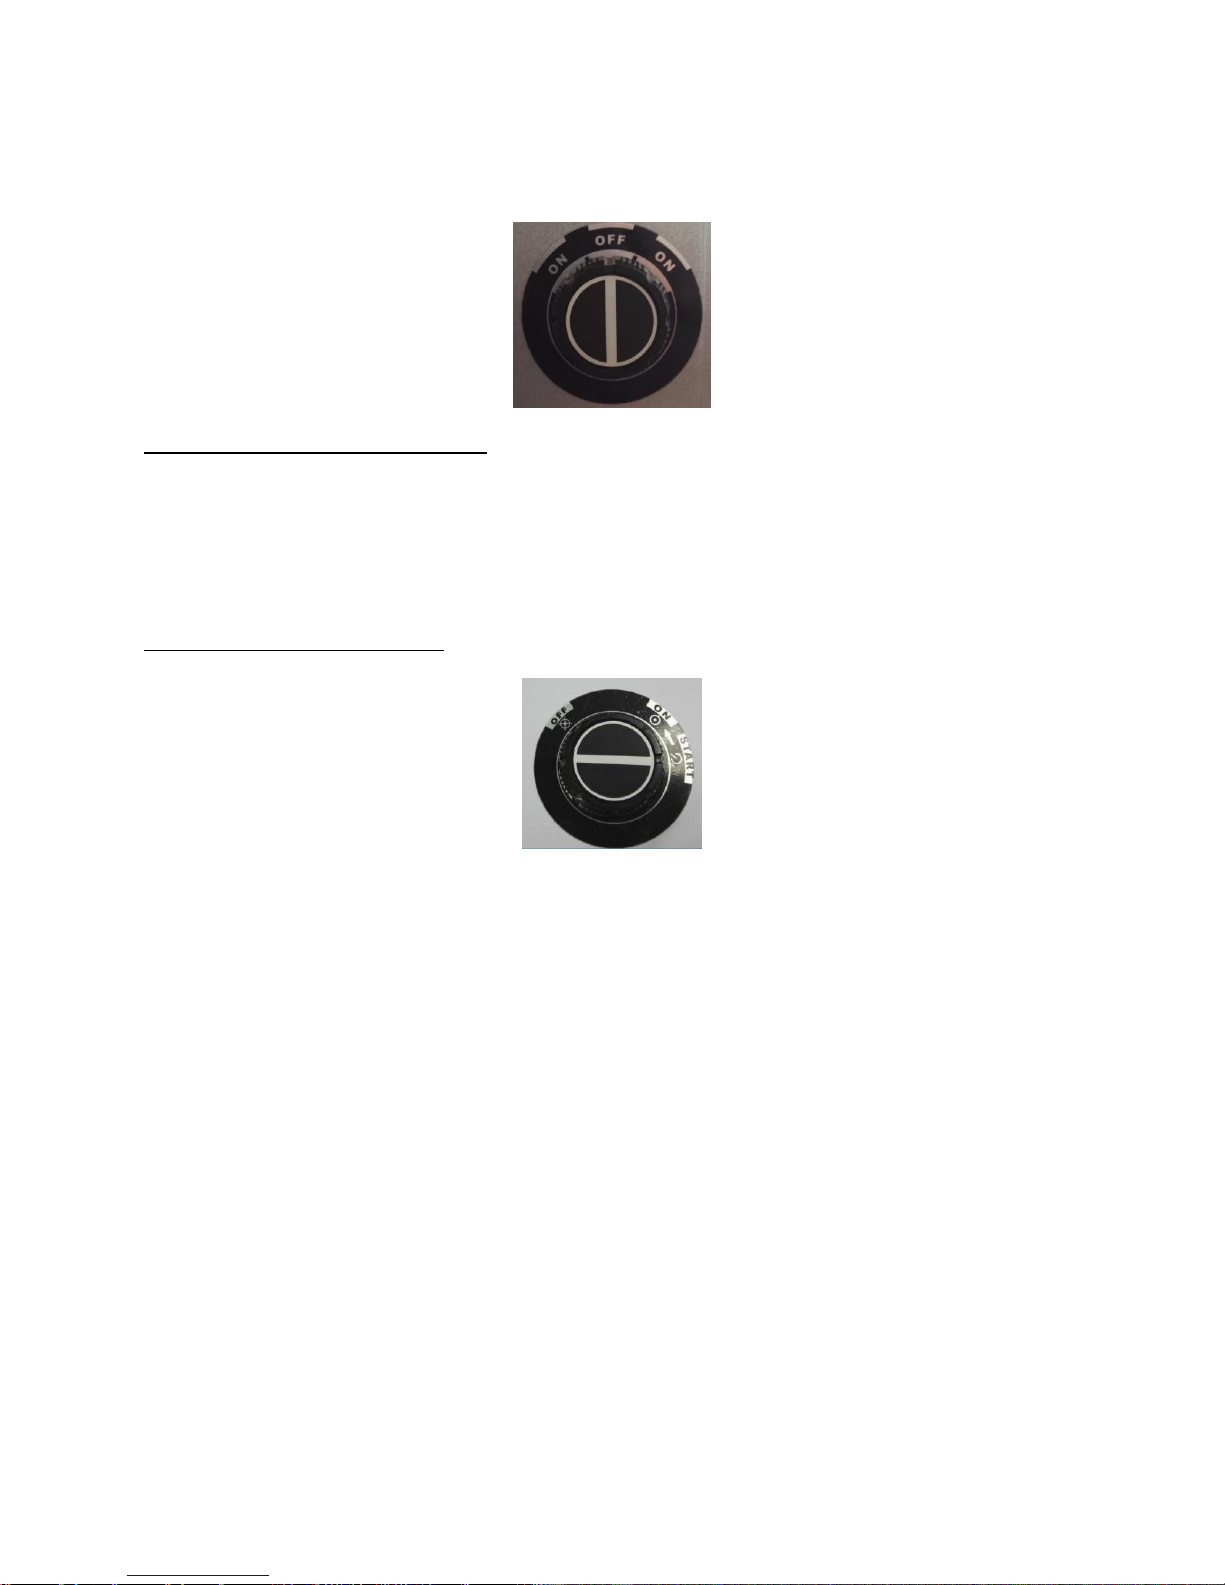
The appliance is equipped with a 3 state operational switch ON-OFF-ON. (Fig 5.1A).
Switch ON the appliance by turning the timer knob either clockwise or counter clockwise from Off position to ON
position.
Switch OFF the appliance by turning the knob back to point the OFF sign.
6
© HeyCafé Co., Ltd.
Version 5.0, June 2017
Page 7
While on grinding state, never let the grinder run un-attendant in order to avoid over filling of the dispenser
which may cause powders’ flow blockage inside the grinding house.
Fig 5.1A
T Model (Semi-Automatic operation):
The appliance is equipped with a 5 minute timer.
Switch ON the appliance by turning the timer knob clockwise to the desired time of operation.
The appliance will switch OFF automatically when the preset time is over, alternatively it can be switched OFF
by turning the timer knob all the way counterclockwise manually.
Remark: full dispenser capacity is 250gr. In normal operation it will take about 2 minutes to completely fill the
dispenser from empty. Never grind to over-fill the dispenser.
AD Model (Automatic operation)
The appliance is equipped with a 3- state main switch: OFF, ON, RUN. (Fig 5.1B)
Fig 5.1B
There are two possible ways to operate the grinder:
o Grinding limited quantities: In order to start grinding turn the main switch knob clockwise from OFF
position to ON position, then toggle to RUN position and release (the knob will return by itself to ON
position). The grinder will start running. In order to stop the grinder, turn the main switch knob back
(counterclockwise) to OFF position.
o Automatic grinding mode: To start the grinding operation repeat same procedure as described in
previous clause. Keep the grinder’s main-switch in ON position. The grinder will grind coffee beans
until the coffee grind in the dispenser will reach the full level. Once the coffee powders’ level inside
the dispenser reached its full level the grinder will stop grinding. The grinder will keep resting until
the powder’s level is low and also few portions of coffee were disposed. Then the grinder will resume
grinding automatically until powders’ level is reaching its full level again. In order to shut off the
grinding operation turn main switch knob into the OFF position.
On Automatic grinding mode, always make sure to have sufficient amount of coffee beans inside the beans
hopper to avoid grinder’s empty-running which may resulting possible over-heating.
The Automatic model is designed for automatic operations; if you are intending to grind only limited
quantities don’t keep the switch on “ON” position. As this may result undesired operation of the grinder.
© HeyCafé Co., Ltd.
Version 5.0, June 2017
7
Page 8
Operating intervals:
In order to avoid over heating of grindstones and grinding chamber (resulting unnecessary heating of the
coffee) the manufacturer is recommending using the appliance continuously for short intervals of a few
minutes each. Never exceed 10 minutes of continues grinding (or more than 1.5 kg of coffee beans).
Adjusting coffee grinding
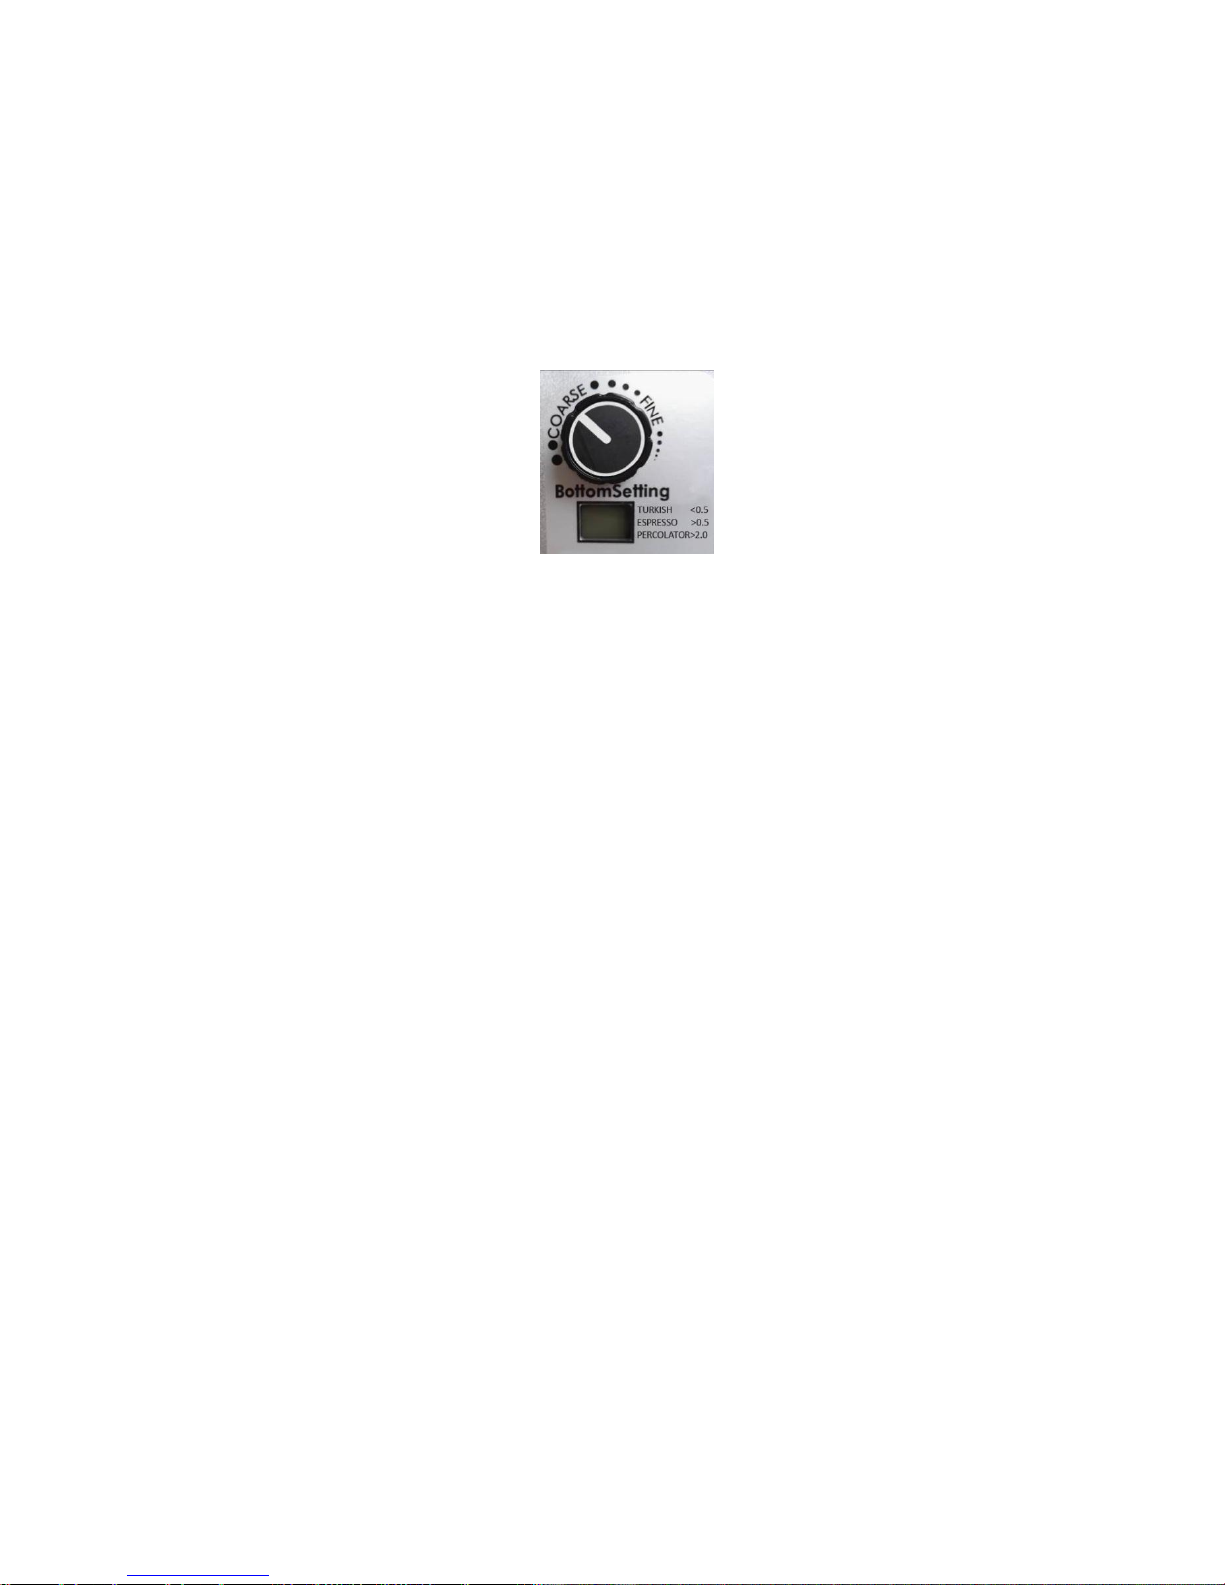
The Titan grinders’ family (Titan I, II) are equipped with the revolutionary patented Bottom-Setting©®™
mechanism with LCD to read the grinding position accurately and constantly. The position of the grinding
setting knob and LCD are on the left side bottom part of the body (see fig. 5.2).
The grinding grindstones’ distance was factory pre adjusted to satisfy different common coffee grinds from
fine Turkish coffee powder to coarse filter brewing. This clearance span can be achieved by turning the
grinding setting knob for 12 full turns. Turning the grinding setting knob incrementally counterclockwise (CCW)
will make the grind coarser and turning it clockwise (CW) will make the grind finer. Practically we recommend
making grind changes by turning the knob ¼ turn at a time.
The coarseness setting and accordingly the LCD reading should be performed only when grinder is plugged
to power.
In course of normal usage (and especially if changing setting of the grinder while grinder is unplugged) there
might be a need to recalibrate the digital display to match the actual grinder’s setting
The digital system is including a self-homing (automatic reset). There are 2 possible cases for recalibration.
o Case 1: The display is showing a finer digit than the actual grinding
o Case 2: the display is showing coarser digit than the actual grinding
In both cases start the recalibration by empty the coffee beans from grinding chamber by closing the hopper’s
door and grinding till grind it is empty.
In both cases the recalibration is starting by setting the grinder to finest grinding coarseness by turning the
knob clockwise.
Case 1:
o While setting, note that the display will show ‘- - ‘ which is below 0.1, continue to turn the knob till it
cannot be turned any more. Then by turning back the knob counter clockwise the grinder already is
recalibrated and ready for use.
Case 2:
o While reaching the point where the knob cannot be turned any more and the display still showing a
number which is greater than ‘0.1‘
o Disconnect the power plug, turn the knob counterclockwise few turns (5-10),
o Complete the recalibration as in Case 1 above.
Test the recalibration by having the grinder plugged to the power, and make few turns coarser and back to
finer make sure that every time at most fine (where the knob cannot be turned any finer) the display is
showing ‘0.1’
Adjusting coffee dosing
The dispenser is equipped with a portion volume controlling knob. Normally can set the dispenser to dispense
5-9.5gr of coffee powder
Fig 5.2
© HeyCafé Co., Ltd.
Version 5.0, June 2017
8
Page 9
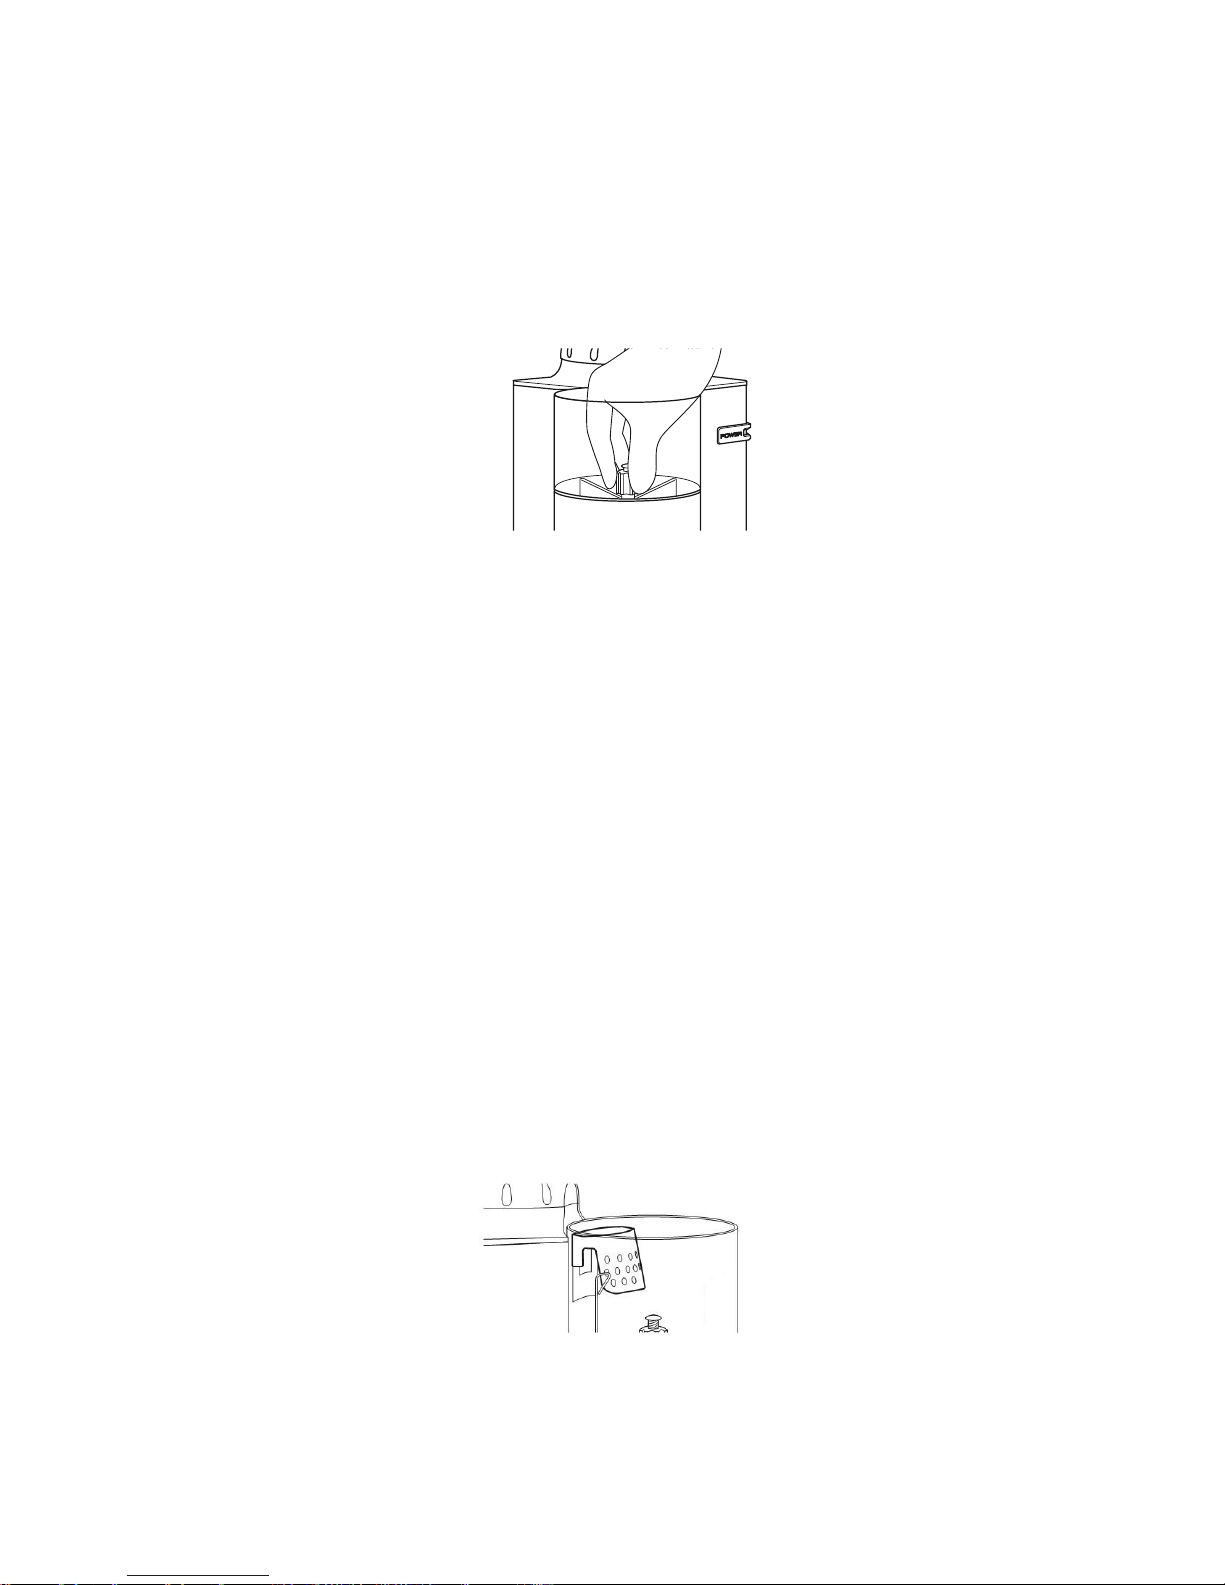
In order to increase the amount of single dose, turn the adjusting knob counterclockwise and vice versa
(Fig5.3)
Test the portioned amounts by using a kitchen scale or simply by dosing single or double dose into your
espresso machine’s filter-handle (not supplied) and visually match the dosed portion with your standard.
In order to achieve repeatable and consistent portioned amounts:
o Make sure that the feeding star shaped mechanism is always overfilled with coffee powder.
o Always retract the dosing lever all the way to the end of its stroke
Fig5.3
Tamping
Place your Espresso machine’s 58mm filter-handle against the underside of the tamping device and push
it upwards.
6) SAFETY DEVICES
A) Thermal overload protection
In order to eliminate the risk of fire, the motor is equipped with an overheat protection device which will cutoff
the motor’s power supply should it reach a high temperature.
In the event that the thermal protection is tripped as a result of malfunction (e.g.: jammed grindstones, worn
out bearings, foreign object in grinding chamber, etc.) the appliance main switch should be turned off
immediately and the main power plug must be disconnected. For further handling of the device contact your
local service provider, and allow the appliance to cool down before any further maintenance.
In the event that the thermal protection is tripped as a result of a long continuous operation (read section 5,
for operating intervals) allow the appliance to cool down and reset the thermal cutoff protection by
unplugging the main cable from the socket. On the first operation after resetting a tripped overheat
protection device observe the grinding quality and noise level, and if there are any irregularities shut down the
appliance and call a certified technician for a complete analysis of the appliance.
B) Grinding chamber safety switch and hopper fixing screw
The grinding chamber is a hazardous area if the proper precautions aren’t observed. In order to avoid any hand
contact with running grindstones grinding chamber is equipped with a safety switch that can be activated only by a
matching pin on the hopper’s crown (Fig. 4.2) Do not attempt to operate the grinder without the hopper is fully
placed and fixed in its position by hopper’s fixing screw (Fig 4.3).
C) Coffee outlet guard
The coffee outlet guard (fig6.1) must always be fixed to the dispenser. On normal operation never remove the
coffee outlet guard (unless when cleaning the dispenser, please refer to Chapter 9 Cleaning).
© HeyCafé Co., Ltd.
Version 5.0, June 2017
Fig6.1
9
Page 10

7) SAFETY INSTRUCTIONS
NEVER OPERATE THE GRINDER IF THE BEAN HOPPER IS NOT FULLY SECURED TO THE TOP GRINDSTONE
HOLDER. BEFORE REMOVING THE HOPPER FOR ANY REASON MAKE SURE TO DISCONNECT THE POWER
SUPPLY.
AVOID CLEARING FOREIGN OBJECTS FROM THE GRINDING CHAMBER OR HOPPER WHEN THE APPLIANCE IS
PLUGGED INTO A POWER SOCKET.
Never attempt to insert your fingers or any foreign objects into the grinding chamber or grindstones.
Be aware that grindstones continue rotating for a short while even after the grinding operation has ended.
BEFORE ANY MAINTENANCE, EVEN FOR CLEANING, ALWAYS DISCONNECT THE POWER SUPPLY.
In the event that the appliance has a malfunction or the grindstones need to be replaced, do not attempt to
service the appliance by yourself.
Do not change or tamper with the appliance.
Do not use the appliance barefoot or if your hands or feet are damp.
Do not use the cable wire to pull and disconnect the power plug.
Always keep the appliance dry (internally and externally).
Never put grinded coffee into the hopper or try to grind twice coffee powder.
Never attempt grinding anything else other than coffee beans.
8) MAINTENANCE AND SERVICE
Warning: All appliances’ technical handling operations, such as installation, maintenance, or service
should be performed by certified personnel or by your local dealer.
Check the state of the grindstones periodically (approximately every 50kg of grinded coffee) Good condition
grindstones will result in a high quality grind and prevent the appliances over heating. Replace grindstones every
400KG of grinded coffee (when using original replacement parts)
Be aware of the appliance’s noise level. In case the noise level is higher than normal or irregular noises are coming
from within the appliance, get certified personnel to perform an overall check of the appliance.
9) CLEANING
BEFORE ANY CLEANING ROUTINE DISCONNECT THE APPLIANCE POWER SUPPLY. NEVER USE RUNNING WATER TO
CLEAN THE MAIN BODY AND DISPENSER. USE ONLY PERFECTLY CLEAN CLOTHS OR BRUSHES TO CLEAN THE
APPLIANCE. DO NOT USE ABRASIVE CLEANING PRODUCTS AS THEY MAY WEAR OUT THE APPLIANCE COATING.
Cleaning the bean hopper
Take off the bean hopper (by releasing Bean Hopper safety screw, Fig.4-3) and rinse it thoroughly with water and
soap. As the bean hopper is made of clear polymer, use only liquid detergent (free of abrasive components) and
soft sponge. Before reinstalling the beans hopper back to its position, make sure it is dried thoroughly. To ensure
great coffee taste, clean the bean hopper periodically.
© HeyCafé Co., Ltd.
Version 5.0, June 2017
10
Page 11
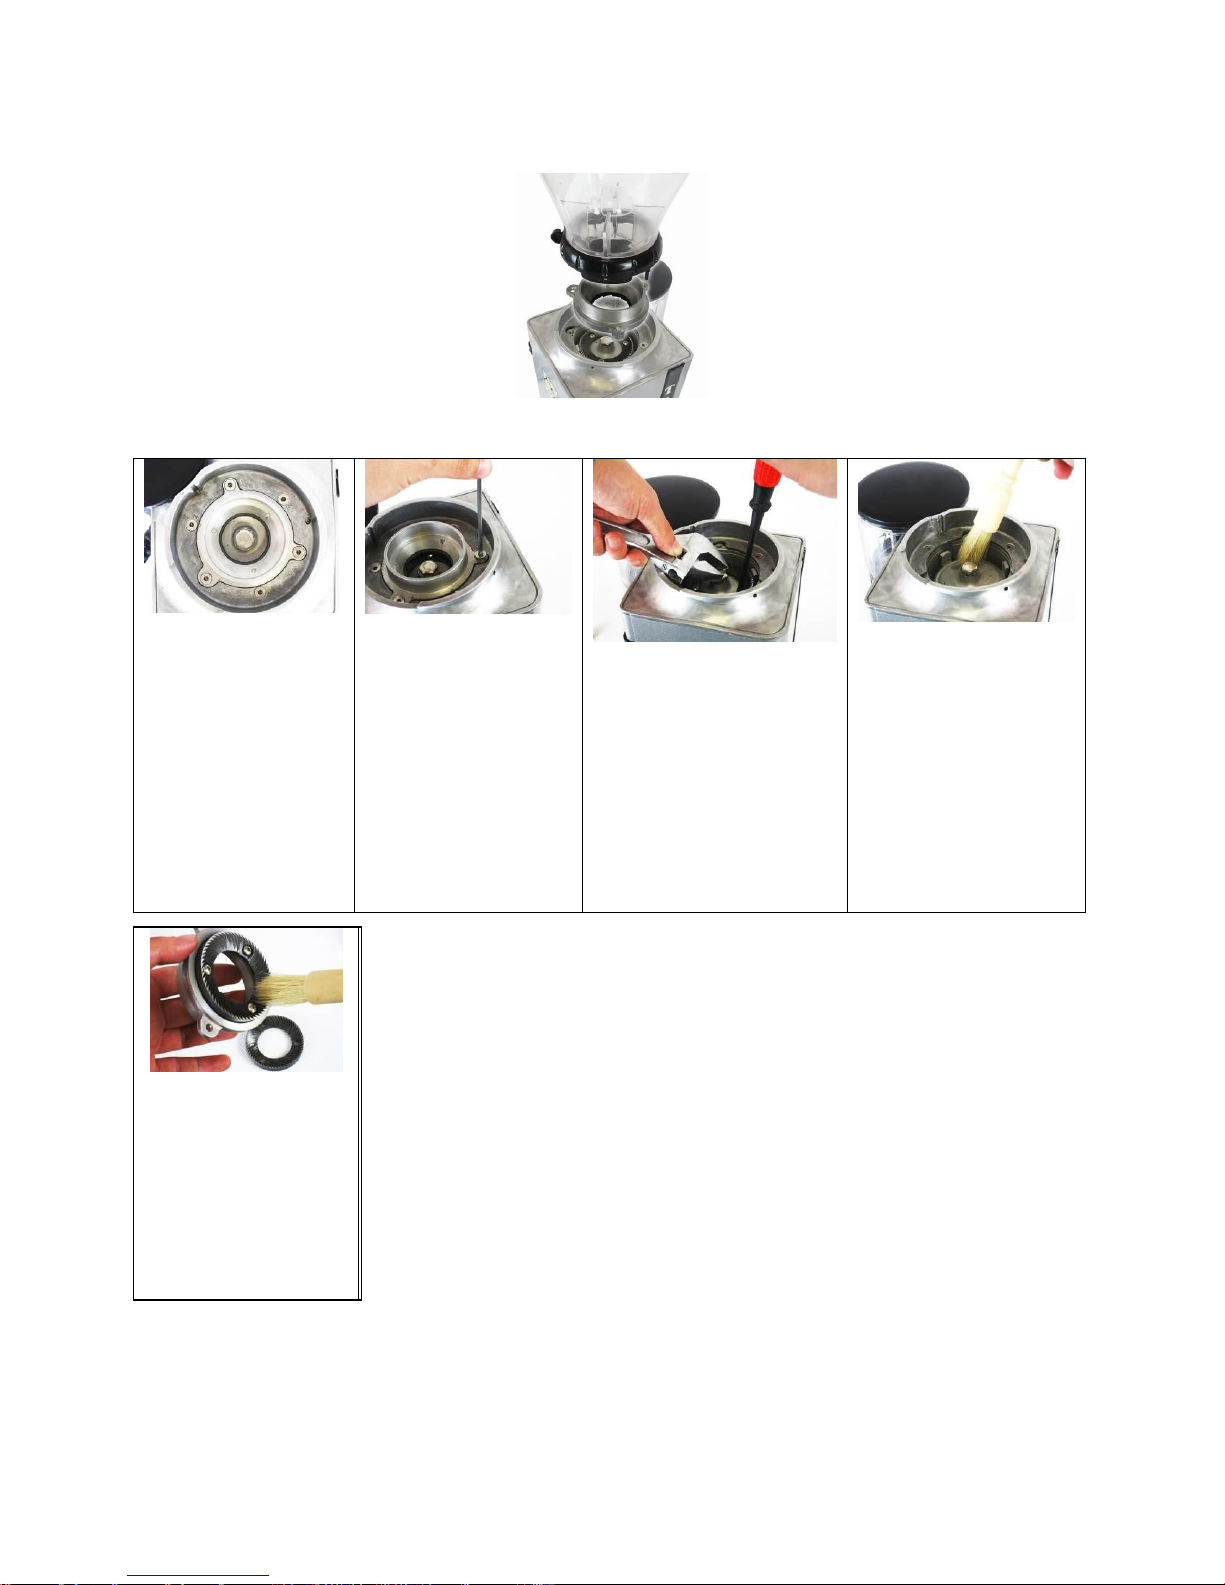
STEP1
After removing the
hopper and before start
disconnecting screws
first identify the 3 top
grind-stone holder’s
screws (marked with
the number 1 on the
grinders’ cover)
STEP2
Disconnect the top
grindstone holder screws
(3 screws) using the
supplied 3mm Allen key.
Pull out the upper
grindstone holder
STEP3
(Step 3 should be performed
by certified technician only!)
Use a screw driver and nuts
spanner to release the
bottom knife holder. Pull out
the knife holder. Discover the
grinding house
STEP4
Use a brush, a dry cloth,
and a vacuum cleaner to
clean the grinding
chamber thoroughly.
STEP 5
Use a brush, a dry cloth,
and a vacuum cleaner to
clean the upper and
lower grindstone
thoroughly.
Cleaning the grinding chamber and grinding parts
Follow the instruction below for grinding chamber and grinding parts cleaning:
© HeyCafé Co., Ltd.
Version 5.0, June 2017
11
Page 12
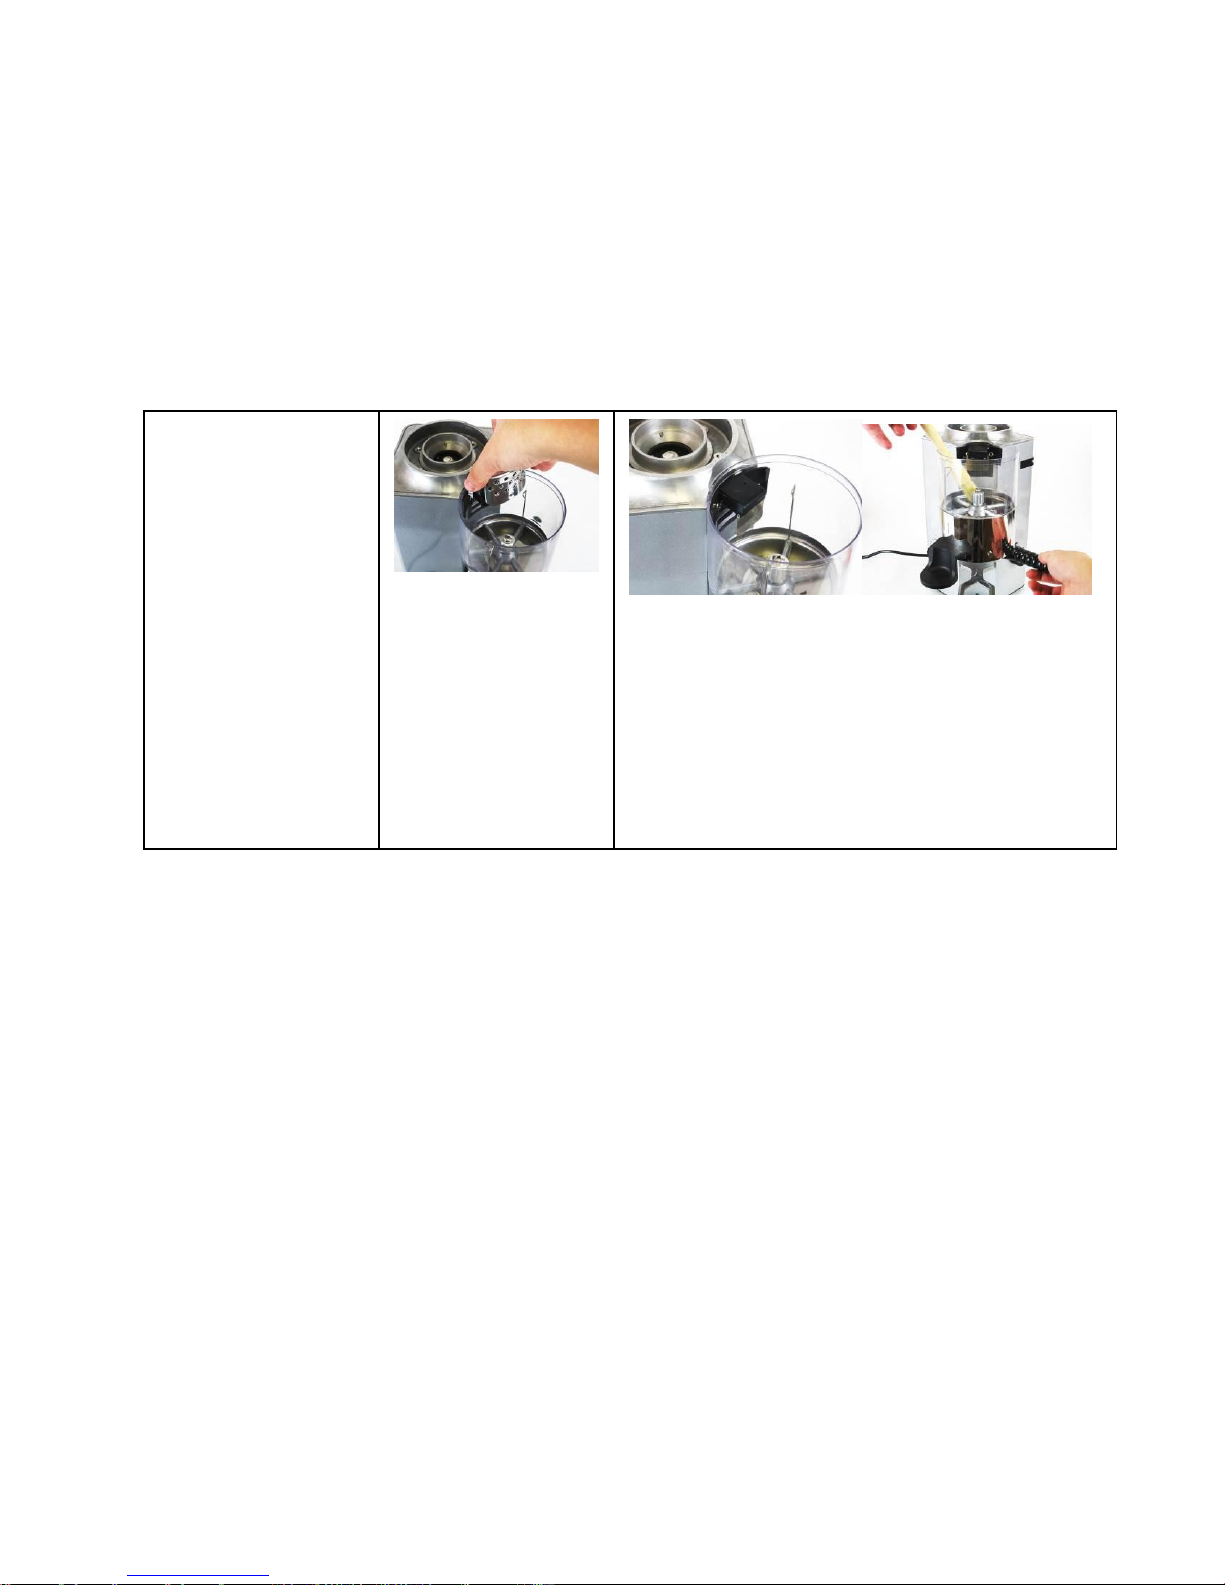
STEP1
Discharge all grinded
coffee out of the
dispenser into a dry
container by operating
the discharge handle.
STEP2
Release the powder
outlet guard by pulling it
upward. The outlet
guard is fixed by 2 rails
and 2 snaps.
STEP3
Use a clean brush to clean the coffee powder outlet,
automatic switch housing, Brush the dosing chambers
one by one while rotating the dispenser with the
discharge handle. Use a dry cloth to remove oil stains and
other marks from dispenser’s clear window.
Do not use sharp objects to scrape coffee residue off of the grindstones.
Examine both of the grindstones’ condition and replace them if necessary.
The replacement and assembly of a new set of grindstones is a delicate task.
Only skilled technical personnel should be allowed to perform grindstone removal and assembly.
After all cleaning and replacing tasks are through make sure to assemble all of the parts and safety screws the
same way as they were disconnected. If anything does not fit back together or there are some leftover parts, do
not attempt to operate the appliance, call for the assistance of your technician.
Cleaning the dispenser
If a more thorough clean is required, then the operation must be performed by skilled technician.
After dispenser is thoroughly cleaned and empty secure the powder outlet guard back to its original position
by sliding it back until the snap clicks are heard.
To ensure long lasting grinder and great fresh taste of coffee, the cleaning procedure
as described above should be repeated routinely and at least once per month or as necessary
according the grinder’s usage and quality of beans.
© HeyCafé Co., Ltd.
Version 5.0, June 2017
END
12
Page 13

#
Date
Event
Remark
Purchasing
Add your remarks here
Important details and telephone numbers:
Local dealer
Address: ________________________________________________________________
Telephone number: ____________________Fax number:_______________________
Technician mobile number: ____________________name: __________________
Coffee beans supplier details:_________________________________________________________________
Telephone number: ____________________Fax number:_______________________
13
© HeyCafé Co., Ltd.
Version 5.0, June 2017
Page 14
Page 15
Page 16
 Loading...