

HEX GS-911wifi Quick Start Guide
Diagnostic Tool for BMW Motorcycles
Quick Start Guide
Introduction
Thank you for buying a GS-911wifi.
Now let’s register & configure it to get started!
The GS-911wifi by HEX Microsystems is Windows PC
based diagnostic tool for BMW motorcycles and is well
suited to both owners and workshops. It communicates
with the control units of your motorcycle and empowers
you to do various maintenance and diagnostic tasks. It
allows you to read and clear fault codes, see real-time
sensor values, reset service reminders, do component
function tests, calibrations and much more.
The GS-911wifi is the second generation of the GS-911 tool
which uses wifi to connect to your phone, tablet or computer.
Emergency and Cloud Functionality is supported on iOS,
Android, Mac and other platforms.
Illustration 1: The GS-911wifi
Power/Status LED
USB Socket
Wifi Device-to-Device (D2D) Status LED
1. Get our GS-911wifi PC/Mac Utility
Wifi Infrastructure Status LED:
Wifi Mode Switch
Illustration 2: The Flashing Lights
Power/Status LED
Device is booting
Normal operation
Low power mode
Boot failure
Wifi infrastructure status LED
Scanning for wifi networks
Connecting to wifi network
Connected & waiting for IP
Successfully connected to Wifi
Wifi Device-to-Device (D2D) status LED
Device-to-Device mode activated
Device-to-Device mode ready
2. Register your GS-911wifi
Green flashing at 5Hz
Green flashing at 2Hz
Green flashing at 0,5Hz
Continuous red
Flashing red
Continuous red
Flashing green
Continuous green
Single red flash
Continuous green
Illustration 3: How do I plug it into my bike?
A: Make sure your interface is the correct
side up with the white arrow visible on top
& the connector ring twisted as far left as
possible.
B: Align the receptacle (bike connector)
correctly (with the red tab at the bottom), &
insert.
C: After insertion, twist the connector ring
as far right as possible, to lock it in place.
See our FAQ on www.hexcode.co.za to find
the connector on your model.
A
C
B
3. Configure your GS-911wifi
Go to www.hexcode.co.za & proceed to
the Downloads page. Download and
install either the PC or Mac GS-911wifi
Utility application. The PC & Mac utilities
can register, download software updates
and setup your wifi connection.
We also have GS-911wifi Launcher apps
for iOS and Android on the App Store &
Google Play. You can find the mobile apps
by searching for "GS-911wifi" on the App
Store & Google Play respectively.
Download it here:
www.hexcode.co.za/downloads
Ready-to-Configure Checklist
To register, and to configure the wifi of your GS-911wifi
device, ensure you have the following:
GS-911wifi device, connected to your PC or Mac using the supplied USB cable.
The life of every GS-911wifi device starts with Registration. This activates your
device, and links you to your GS-911wifi for support and warranty purposes. This step
requires your PC or Mac to have Internet access.
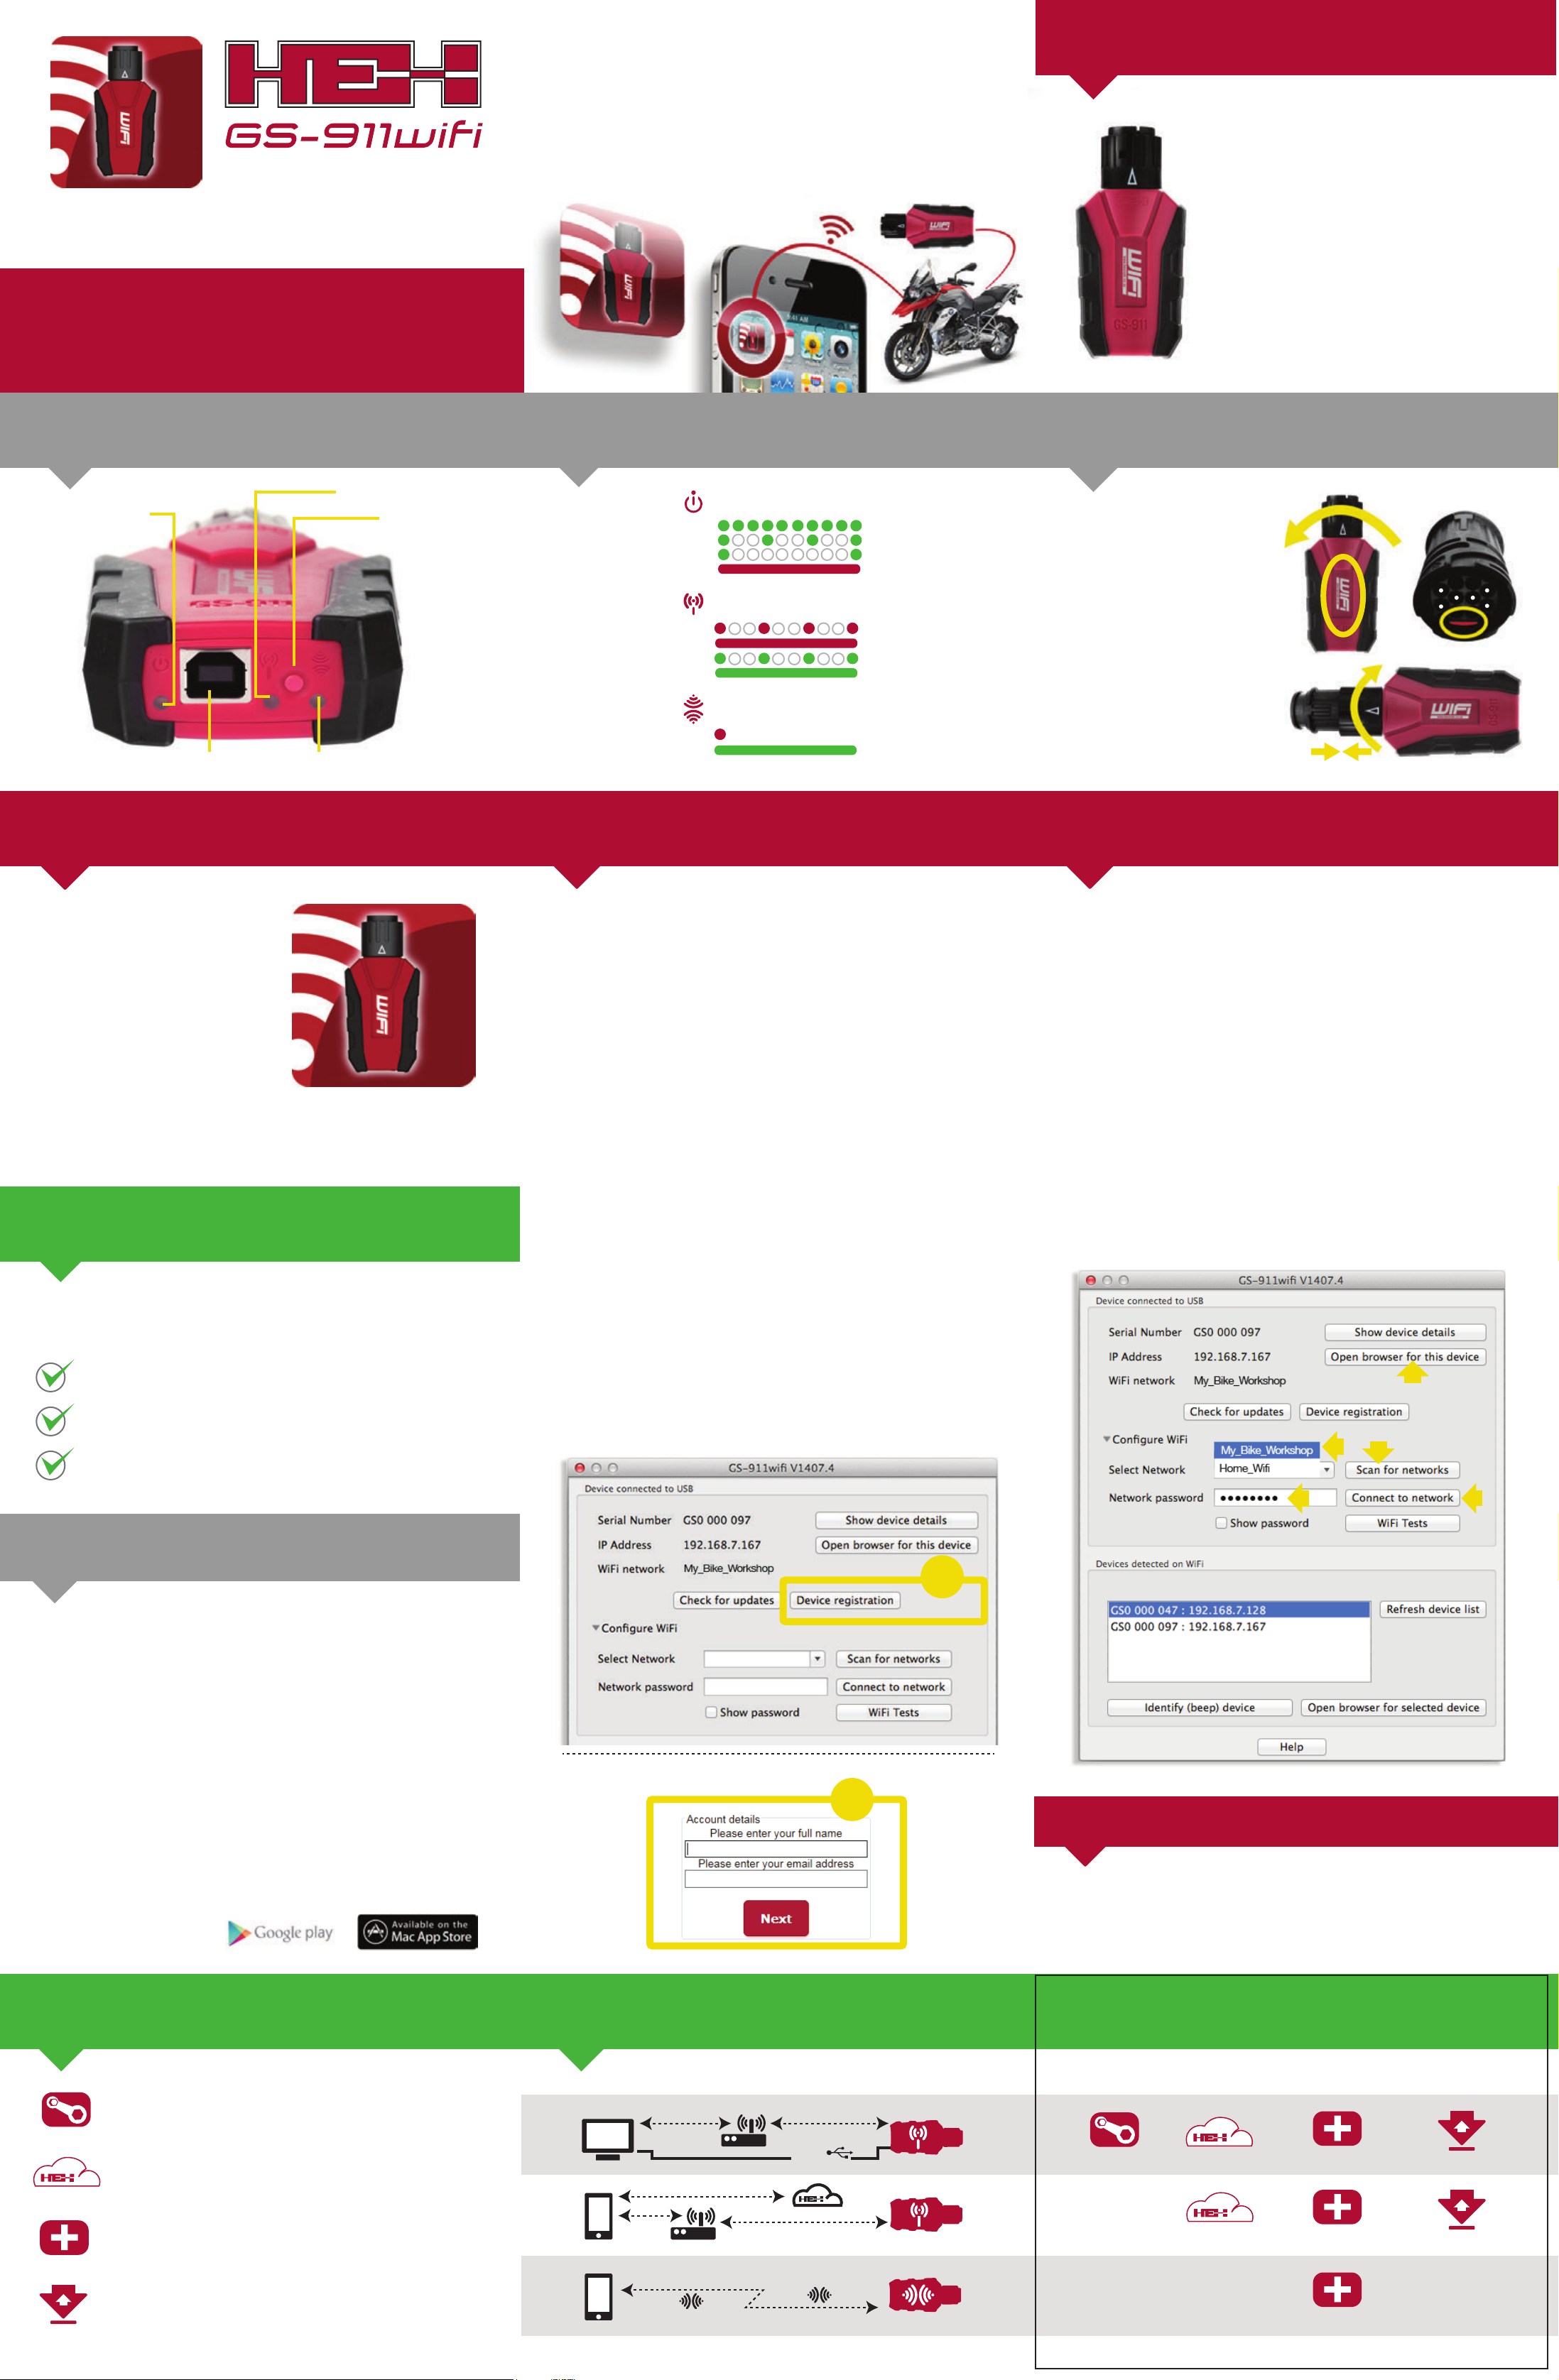
Step 1. After you have installed your PC or Mac GS-911wifi Utility, open this
application. Now connect your GS-911wifi device to any open USB port on your PC
or Mac. This will power your GS-911wifi device and the utility app should find it
shortly, showing its Serial number. Now proceed to click the [Device registration]
button.
Step 2. Submit your full name and email address. These details are required for
support and warranty purposes. Please ensure you use a valid email address as a
confirmation email will be sent to complete the registration process.
Step 3. Check your email inbox, once you receive your GS-911wifi Registration Email,
click on the validation link in the body of the email.
Note: It may take several minutes to an hour to receive the validation email. This is out
of our control and depends on your email server and Spam settings. If you still do not
receive your validation email, please check your Spam folder and settings. Re-attempt
the registration process and check that your email address is correct. If you still do not
receive an email, please contact us at support@hexcode.co.za
Make sure your GS-911wifi is connected to an open USB port on your PC or Mac. In
the GS-911wifi Utility app, expand the Configure WIFI section.
Click on the [Scan for networks] button. It will list all the wifi networks that have been
found in range of your GS-911wifi device. Select your network SSID and enter the
WiFi network password and click the [Connect to network] button to join this network.
The top section of your PC or Mac GS-911wifi Utility will show you what wifi network
your GS-911wifi is connected to.
Note: The Devices detected on WIFI section, shown below, will show the Serial and
IP numbers of all the GS-911wifi devices that are found on the network that your PC
or Mac is connected too. Click the [Refresh device list] button to see an updated list.
See the screenshot below for easy reference.
5
The GS-911wifi Utility application, downloaded, installed and running.
Your Mac or PC is connected to the Internet.
NOTE: Android, iOS & Manual Registration
For advanced users: Your new GS-911wifi can also be set up and
registered without a PC or Mac. This requires a basic understanding of networking.
The detailed instructions are on www.hexcode.co.za, the basic steps are as follows:
1. Power the GS-911wifi device (USB or motorcycle connection)
2. Select D2D mode using the wifi mode button
3. Using your mobile device scan and connect to an open wifi network starting with
"GS-911"
4. Using the Android or iOS Launcher apps, launch a browser to the device or open
a browser and browse to 10.0.0.1
5. In the browser configure the GS-911wifi network settings and join a network that
has Internet access
6. Switch your client device to the same network your GS-911wifi has joined
7. Again, using your iOS or Android Launcher apps open a browser to the device
8. Register your device!
See the screenshots below for easy reference.
1
2
2
3
1
4
4. Explore your GS-911wifi
• See www.hexcode.co.za for more product details
• Search for “GS-911wifi” on Google Play or App Store
• Join our forum at forum.hexcode.co.za/forum
Functionality Modes & Updates Functionality & Infrastructure
SERVICE FUNCTIONALITY includes the ability to reset Service Reminders,
do output Function Tests, Calibrations, ABS Bleed Tests, Clear & Relearn
Adaptations & much more. Available with the GS-911 Windows PC app.
CLOUD FUNCTIONALITY is introduced in a staged manner, aiming to provide
the same Service Functionality that is found within the GS-911 Windows PC
app, on any platform - MAC, LINUX, iOS & Android etc.
EMERGENCY FUNCTIONALITY is embedded in the GS-911wifi unit. It lets the
user view ECU information, Read & Clear Fault Codes on ALL control units &
view Real-time Live sensor data for ALL engine control units.
SOFTWARE UPDATES are done via the Internet & include regular
functionality, new motorcycle models & the latest Fault Code database
updates.
PC
USB
?
?
Service Cloud Emergency Updates
Windows GS-911 PC app + wifi infrastructure or USB + Internet
--
Any device with browser + wifi infrastructure + Internet
-- -- --
Any device with wifi & browser, i.e. phones & tablets
 Loading...