

Page 1

Quick Start Guide
3Com OfficeConnect®
Wireless 54 Mbps 11g Access Point
3CRWE454G75 / WL-524
Guide de mise en route…7
Guida introduttiva…13
Kurzanleitung…19
Guía de inicio rápido…27
Français
Italiano
Deutsch
Español
Guia Rápido de Inicialização…33
Portuguese
Snabbreferensguide…39
Svenska
Copyright © 2006 3Com Corporation. All rights reserved. 3Com and the 3Com logo are registered
trademarks of 3Com Corporation. All other company and product names may be trademarks of the
respective companies with which they are associated.
Part Number 10014994 Rev. AA
Published March 2006
Page 2

Page 3

Quick Start Guide
3Com OfficeConnect®
Wireless 54 Mbps 11g Access Point
3CRWE454G75 / WL-524
The 3Com OfficeConnect® Wireless 54 Mbps 11g Access Point is IEEE 802.11g compatible,
IEEE
802.11b interoperable, and supports both 11b and 11g clients simultaneously. Additionally,
this 3Com OfficeConnect Wireless Access Point offers highly-secure wireless connectivity to your
wired network with IEEE 802.1x WEP and WPA/WPA2 data encryption and MAC-address filtering.
This Quick Start Guide describes the basic steps necessary to install and configure your 3Com
OfficeConnect Wireless Access Point (3CRWE454G75
OfficeConnect Wireless 54
Mbps 11g Access Point is simply referred to as the Access Point.
About This Guide
This guide describes the basic installation of the Access Point. It covers the following topics:
• 3Com OfficeConnect 54 Mbps 11g Access Point Features
• Observing Safety Precautions
• Step 1: Unpacking the Access Point
• Step 2: Preparing for Installation
• Step 3: Attaching the Antenna
• Step 4: Mounting the Access Point
• Step 5: Checking the LED Indicators
• Step 6: Configuring the Access Point
• Troubleshooting
/ WL-524). Throughout this guide the
Page 4
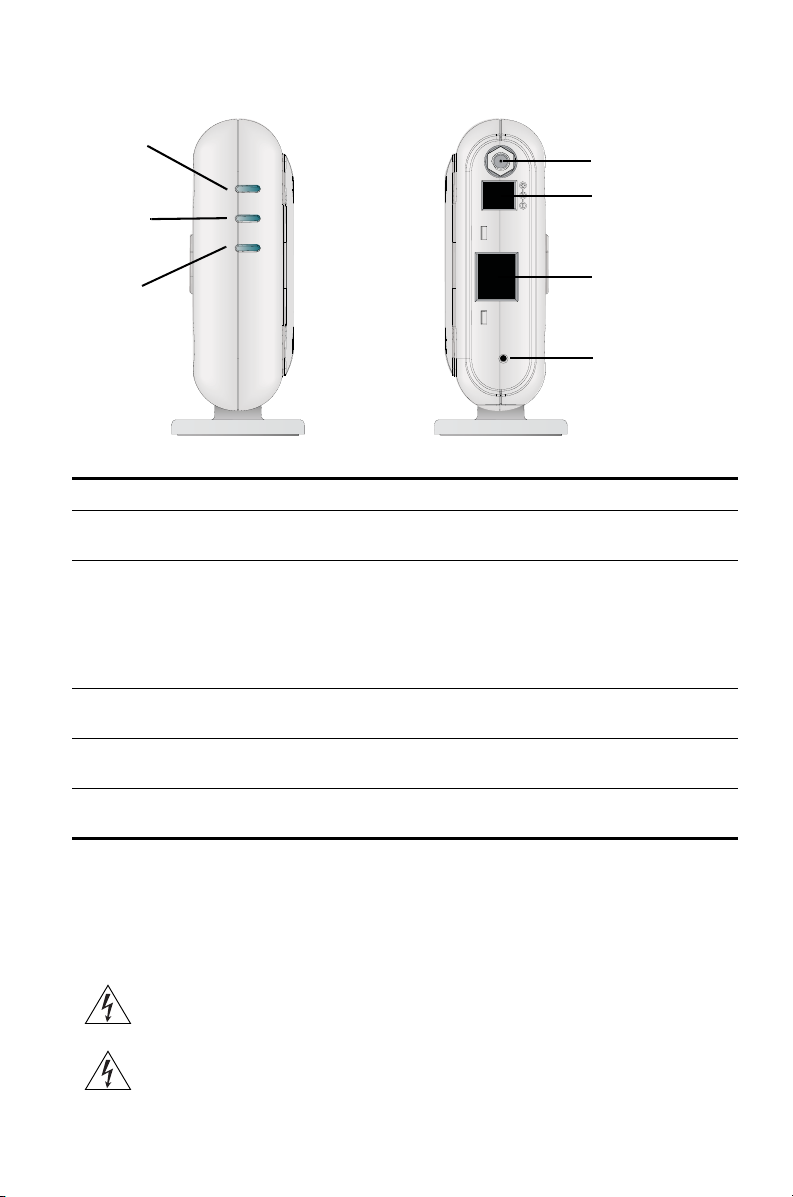
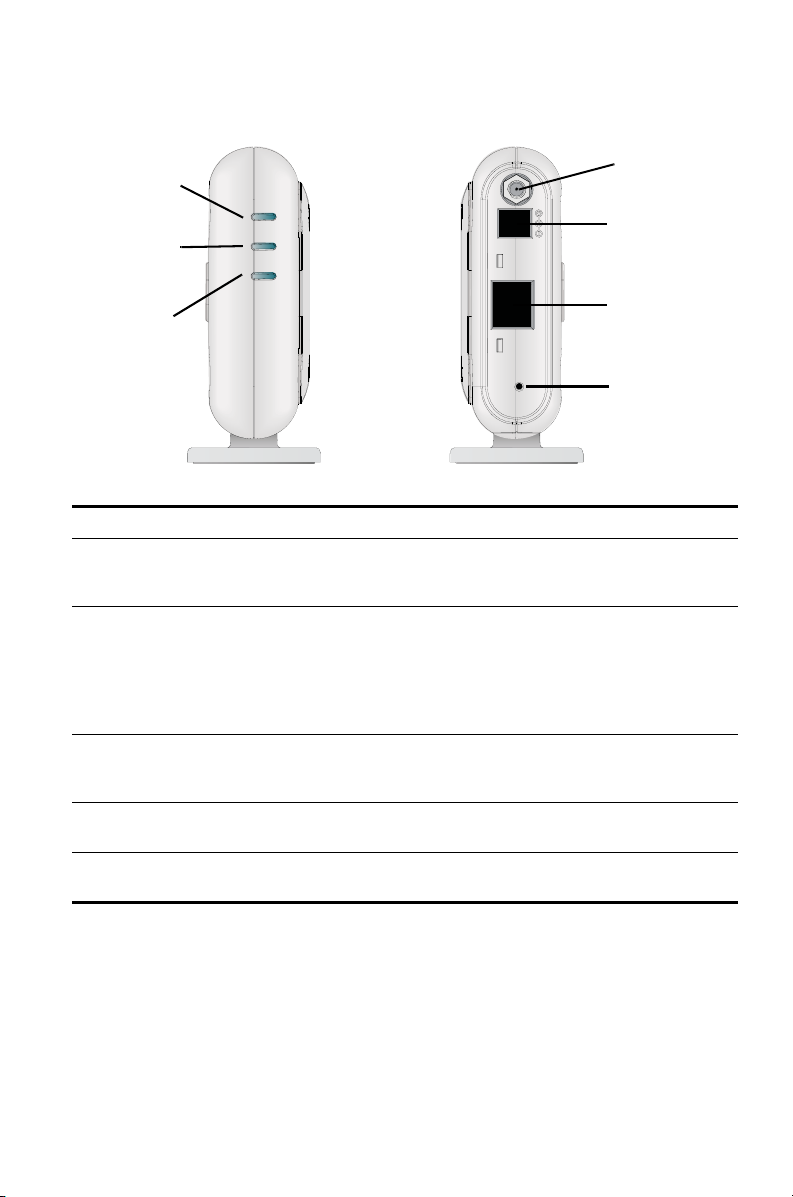
OfficeConnect 54 Mbps 11g Access Point Features
Power
LED
Antenna Connector
WLAN
LED
LAN
LED
Feature Description
Power Port The power port connects to the external power supply. Use only the 3Com
Ethernet Port The Ethernet port provides a 10/100BASE-TX Ethernet connection to a
LEDs The LEDs indicate power and network activity. See “Checking the LED
Antenna Connector One RSMA antenna connector allows you to connect an antenna that
Reset Button The Reset button is accessible on the rear of the access point. Push the reset
external power supply included in this package to power the Access
3Com Wireless LAN switch. Use a suitable RJ45 cable to connect your
Access
Point to a computer or other equipment that has an Ethernet port
(such as a hub or a switch).
This port has an automatic MDI/MDIX feature, which allows you to use
either a straight-through or a crossover cable.
Indicators” on page 5 for details.
operates in the 2.4
button to restore the access point to its factory default settings.
GHz band.
NETWORK
RESET
Power Port
Ethernet Port
Reset Button
Point.
Observing Safety Precautions
This equipment must be installed in compliance with local and national building codes, regulatory
restrictions, and FCC rules. For the safety of people and equipment, only professional network
personnel should install the Access
WARNING: To comply with FCC radio frequency (RF) exposure limits, a minimum
body-to-antenna distance of 20 cm (8 in.) must be maintained when the Access
operational.
WARNING: To avoid possible injury or damage to equipment, you must use power supply
equipment that is safety certified according to UL, CSA, IEC, or other applicable national or
international safety requirements for the country of use. All references to power supply in this
document refer to equipment meeting these requirements.
Point.
Point is
2
Page 5

1. Unpacking the Access Point
Make sure that you have the following items, which are included with the Access Point:
• One OfficeConnect Wireless 54 Mbps 11g Access Point
• One 3Com power adapter for use with the Access Point
• One cradle for vertical tabletop mounting
• Wall-mounting hardware: includes two threaded screws
• One CD-ROM containing the Setup Wizard software and
copies of this manual in additional languages
• One Warranty Flyer
2. Preparing for Installation
It is advisable to connect the power and check the Ethernet cables and LEDs before installing the
Access
Point in a hard-to-reach location. Additionally, observe the following items before
mounting or connecting the Access
Installation Item Description
Hub or Switch To connect your wireless network to your wired network you will need an
Cabling Make sure that standard Ethernet cable is installed at the site before you
Power
Requirements
MAC Address Record the Access Point MAC address in a safe place before the
additional hub or switch connected to the Access
install the Access
Power can only be supplied using 3Com Power Adaptor which is included
with the Access
Make sure the power outlet is accessible. The power supply plug is the only
means of disconnecting the Access
Access
The MAC address is printed on the back of the Access Point.
Point:
Point’s Ethernet port.
Point.
Point.
Point from power.
Point is installed in a hard-to-reach location.
3. Attaching the Antenna
Carefully unpack the standard detachable antenna that came included with your Access Point.
Screw the antenna on to the antenna connector on the Access
network startup, you may need to adjust the antenna to fine-tune coverage in your area.
For best results, adjust the antenna so that it is perpendicular to the floor and ceiling.
CAUTION: Do not handle the antenna tips, especially after they are connected to the
Access
Point. This could lead to electrostatic discharge (ESD), which could damage the
equipment.
3
Point and hand-tighten it. After
Page 6
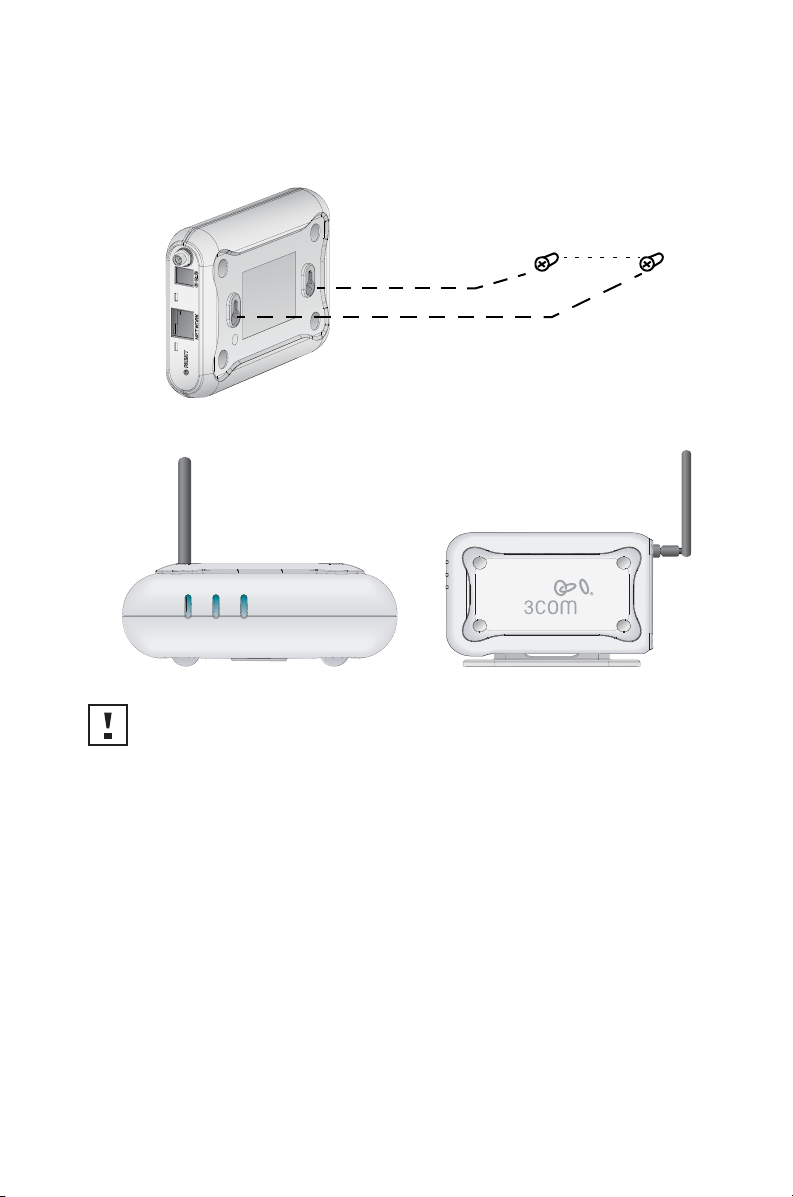
4. Mounting the Access Point
The Access Point can be mounted using the following methods:
• Wall mounting
• Tabletop mounting (horizontally, or vertically using the supplied cradle)
Wall Mount
Tabletop Mount (horizontal) Tabletop Mount (vertical)
85mm
.
CAUTION: The Access Point is intended for indoor use only. Do not install the
Access
Point outdoors unless you install it in an appropriate outdoor enclosure.
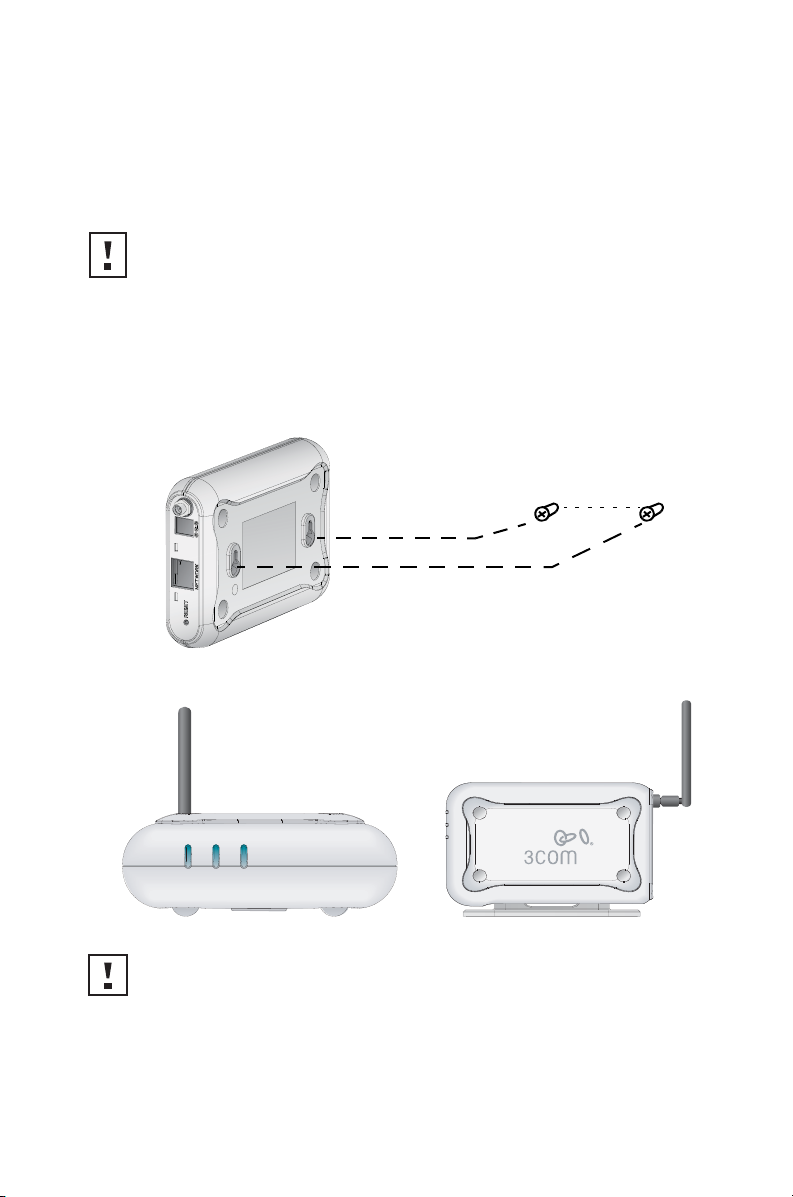
Wall Mounting
To mount the Access Point to a wall:
1 Locate a position on the wall which is free of obstructions.
2 Screw two mounting screws into the wall 85 mm apart.
3 Connect the Ethernet cable and power cable to the ports on the side of the Access Point.
4 Align the holes on the back of the Access Point with the screws and hang the Access Point
on the screws.
.
4
Page 7
Tabletop Mounting
To install the Access Point on a flat surface such as a table or desktop:
CAUTION: Do not place the Access Point on any type of metal surface. Select a location
that is clear of obstructions and provides good reception.
1 If you want to mount the Access Point vertically, secure the cradle to the bottom of the
Access
Point. If you want to mount the Access Point horizontally, simply leave off the cradle.
2 Place the Access Point on the table or other flat surface.
3 Connect the Ethernet cable and power cable to the ports on the side of the Access Point.
5. Checking the LED Indicators
When the Access Point is connected to power, LEDs indicate activity as described in the following
table. A steady lit LED indicates connection; a blinking LED indicates activity.
LED Color Indicates
Power
WLAN
LAN
Power Green The Access Point is powered up and
Off The Access Point is not receiving power
WLAN Green If the LED is on it indicates that wireless
Off No wireless link is present.
LAN Green If the LED is on, the Ethernet link
Off No Ethernet link is present.
operating normally.
or there is a fault with the power supply.
networking is enabled. If the LED is
flashing, the link is OK and data is being
transmitted or received.
between the port and the next piece of
network equipment is OK. If the LED is
flashing, the link is OK and data is being
transmitted or received.
5
Page 8

6. Configuring the Access Point
The CD shipped with your Access Point includes software to help you setup and administer the
Access
Point. Perform the following steps to configure your Access Point for the first time:
1 Insert the 3Com Access Point CD into your PC's CD-ROM drive. Your PC must be on your
wired network to set up the Access
Point.
2 Run the Set-up Wizard.
If the Set-up Wizard does not start automatically, launch the program by typing
autorun.exe.
3 Follow the Set-up Wizard’s instructions on the screen.
4 (Optional) Change the default settings.
The Access Point is preconfigured with a set of common default parameters. However, if you
would like to change these settings, the Access
browser with the Web-based interface.
The default wireless settings for the Access Point are:
Password: admin
SSID: 3Com
Channel: 11-2.462GHz
Point can be configured through your web
7. Troubleshooting
For troubleshooting information please refer to your User's Guide or visit 3Com’s World Wide
Web site:
http://www.3com.com.
6
Page 9

Guide de mise en route
3Com OfficeConnect®
Wireless 54 Mbps 11g Access Point
3CRWE454G75 / WL-524
Le point d’accès sans fil 3Com OfficeConnect® Wireless 54 Mbps 11g Access Point répondant aux
normes IEEE 802.11g et IEEE
clients 11b et 11g. En outre, ce point d’accès permet d’établir une connexion sans fil hautement
sécurisée à votre réseau câblé grâce aux chiffrements WEP et WPA/WPA2 (norme IEEE 802.1x) et
au filtrage des adresses MAC.
Le présent guide de mise en route indique la procédure à suivre pour installer et configurer votre
point d’accès 3Com OfficeConnect (3CRWE454G75
d’accès OfficeConnect Wireless 54
guide.
À propos de ce guide
Le présent guide décrit les étapes d’installation du point d’accès. Il comprend les sections suivantes:
• Présentation du point d’accès 11g 54 Mbit/s OfficeConnect
• Précautions relatives à la sécurité
• Étape 1 : Contenu du coffret
• Étape 2 : Préparation de l’installation
• Étape 3 : Raccordement de l’antenne
• Étape 4 : Fixation du point d’accès
• Étape 5 : Vérification des voyants lumineux
• Étape 6 : Configuration du point d’accès
• Dépannage
802.11b (compatibilité ascendante), il prend en charge à la fois les
/ WL-524). Par souci de clarté, le point
Mbps 11g Access Point est désigné par point d’accès dans ce
Page 10
Présentation du point d’accès 11g 54 Mbit/s
OfficeConnect
Marche
(voyant)
Réseau local
sans fil
(voyant)
Réseau local
(voyant)
Fonction Description
Connecteur
d’alimentation
Port Ethernet Ce port permet d’établir une connexion Ethernet 10/100BASE-TX à un
Voyants Les voyant lumineux s’allument lorsque le point d’accès est sous tension et
Connecteur
d’antenne
Bouton de
réinitialisation
Ce connecteur permet de raccorder le transformateur électrique. Utilisez
exclusivement le transformateur 3Com inclus dans le coffret pour alimenter
le point
d’accès.
commutateur ethernet 3Com. Utilisez un câble RJ45 pour connecter votre
point
d’accès à un ordinateur ou un autre équipement doté d’un port
Ethernet (concentrateur ou commutateur, par exemple).
Ce port proposant une fonction MDI/MDIX automatique, vous pouvez
utiliser soit un câble droit, soit un câble croisé.
lorsque des activités sont en cours sur le réseau. Voir la section
des voyants lumineux” on page 11 pour plus de détails.
Ce connecteur RSMA permet de brancher une antenne fonctionnant sur la
bande de fréquence 2,4
Ce bouton est placé sur le côté du point d’accès. Appuyez sur ce bouton
pour rétablir les paramètres par défaut du point d’accès.
GHz.
NETWORK
RESET
Connecteur
d’antenne
Connecteur
d’alimentation
Port Ethernet
Bouton de
réinitialisation
“Vérification
8
Page 11

Précautions relatives à la sécurité
Cet équipement doit être installé conformément aux normes de construction locales et nationales,
aux restrictions réglementaires et au règlement du FCC. Pour garantir la sécurité des personnes et
des équipements, seul le personnel chargé de la gestion du réseau est autorisé à procéder à
l’installation du point
AVERTISSEMENT : Conformément aux dispositions relatives à l’exposition aux
radiofréquences du règlement du FCC, il convient de se tenir à une distance minimale
de 20 cm de l’antenne lorsque le point
AVERTISSEMENT : Pour éviter tout risque de blessure ou d’endommagement de
l’équipement, vos installations électriques doivent impérativement répondre aux normes UL,
CSA, IEC ou à toute autre norme nationale ou internationale en vigueur dans le pays
d’utilisation. Toutes les références aux installations électriques mentionnées dans ce document
s’appliquent aux installations satisfaisant à ces exigences.
d’accès.
d’accès est en fonctionnement.
1. Contenu du coffret
Vérifiez que vous disposez des éléments suivants, fournis avec le point d’accès :
• Point d’accès sans fil 11g 54 Mbit/s OfficeConnect
• Transformateur 3Com à utiliser avec le point d’accès
• Socle pour la fixation verticale sur table
• 2 vis pour la fixation murale
• CD-ROM contenant l’Assistant d’installation et des
copies du présent guide en différentes langues
• Certificat de garantie
2. Préparation de l’installation
Il est recommandé de mettre l’équipement sous tension, de vérifier le branchement des câbles
Ethernet et de s’assurer que les voyants s’allument avant d’installer le point
emplacement difficile d’accès. Vérifiez également les points suivants avant de fixer ou de
connecter le point
d’accès :
d’accès à un
Vérification avant
l’installation
Concentrateur ou
commutateur
Câblage Vérifiez que le site est équipé d’un câble Ethernet standard avant d’installer
Installation
électrique
Adresse MAC Notez l’adresse MAC du point d’accès pour référence ultérieure avant
Description
Pour relier votre réseau sans fil à votre réseau câblé, vous devez connecter
un concentrateur ou un commutateur supplémentaire au port Ethernet du
point
d’accès.
le point
d’accès.
Le point d’accès ne peut être alimenté que par le biais du transformateur
3Com fourni.
Assurez-vous que la prise de courant est accessible. En effet, le seul moyen
de mettre le point
de la prise secteur.
d’installer le point
Cette adresse MAC est imprimée à l’arrière du point d’accès.
d’accès hors tension est de débrancher le transformateur
d’accès à un emplacement difficile d’accès.
9
Page 12
3. Raccordement de l’antenne
Déballez soigneusement l’antenne amovible standard fournie avec le point d’accès. Insérez
l’antenne dans le connecteur du point
vous faut régler l’antenne pour optimiser la zone de couverture.
Pour des résultats satisfaisants, orientez l’antenne de façon qu’elle soit perpendiculaire au sol et
au plafond.
ATTENTION : Veillez à ne pas toucher aux extrémités de l’antenne, particulièrement
lorsque celle-ci est raccordée au point
décharge électrostatique, ce qui peut endommager l’équipement.
d’accès et redressez-la. Après le démarrage du réseau, il
d’accès. Cela peut en effet entraîner une
4. Fixation du point d’accès
Vous avez la possibilité d’installer le point d’accès à plusieurs emplacements :
• Fixation murale
• Fixation sur table (en position horizontale, ou verticale grâce au socle fourni)
Fixation murale
85mm
Fixation horizontale sur table Fixation verticale sur table
.
ATTENTION : Le point d’accès est destiné à un usage en intérieur exclusivement.
N’installez pas le point
un boîtier adapté.
d’accès à l’extérieur à moins de l’avoir placé au préalable dans
10
Page 13

Fixation murale
Pour fixer le point d’accès sur un mur :
1 Choisissez un emplacement dégagé.
2 Fixez les deux vis de montage au mur, à 85 mm d’intervalle.
3 Insérez le câble Ethernet et le cordon d’alimentation dans les ports placés sur le côté du
point
d’accès.
4 Placez les deux encoches situées sur la face arrière du point d’accès dans l’alignement des vis
fixées au mur, et suspendez le point
.
d’accès.
Fixation sur table
Pour installer le point d’accès sur une surface plane, comme une table ou un bureau :
ATTENTION : Ne placez en aucun cas le point d’accès sur une surface métallique.
Choisissez un emplacement dégagé pour assurer une bonne réception.
1 Si vous souhaitez installer le point d’accès en position verticale, placez-le sur le socle fourni.
Si vous souhaitez installer le point
d’accès à l’horizontale, il vous suffit de retirer le socle.
2 Posez le point d’accès sur la table ou toute autre surface plane.
3 Insérez le câble Ethernet et le cordon d’alimentation dans les ports placés sur le côté du
point
d’accès.
5. Vérification des voyants lumineux
Lorsque le point d’accès est sous tension, differents voyants s’allument pour indiquer les activités
en cours, répertoriées dans le tableau suivant. Un voyant fixe indique la connexion, et un voyant
clignotant une activité.
11
Page 14

Voyant Couleur Indication
Power
WLAN
LAN
Power Vert Le point d’accès est sous tension et
Éteint Le point d’accès est hors tension ou
WLAN Vert Lorsque le voyant est fixe, cela indique
Éteint Aucune connexion sans fil.
LAN Vert Lorsque le voyant est fixe, cela indique
Éteint Aucune connexion Ethernet.
fonctionne normalement.
l’alimentation électrique est défaillante.
que la connexion au réseau sans fil est
en cours. Lorsque le voyant clignote, la
connexion est établie, et des données
sont actuellement transmises ou reçues.
que la connexion Ethernet à
l’équipement de réseau est en cours.
Lorsque le voyant clignote, la connexion
est établie, et des données sont
actuellement transmises ou reçues.
6. Configuration du point d’accès
Le CD-ROM fourni avec le point d’accès comprend un logiciel vous permettant de configurer et
gérer le point
1 Insérez le CD-ROM du point d’accès 3Com dans le lecteur de votre PC. Pour pouvoir
2 Exécutez l’Assistant d’installation.
3 Suivez les instructions de l’Assistant qui s’affichent à l’écran.
4 (Facultatif) Modifiez les paramètres par défaut.
d’accès. Suivez la procédure ci-dessous pour configurer votre point d’accès :
configurer le point
Si l’Assistant d’installation ne démarre pas automatiquement, lancez le programme en tapant
la commande autorun.exe.
Le point d’accès est préconfiguré avec un ensemble de paramètres communs. Mais si vous
souhaitez modifier ces paramètres, vous pouvez configurer le point
l’interface Web, dans votre navigateur.
Paramètres par défaut du point d’accès :
Mot de passe : admin
Code SSID : 3Com
Canal : 11-2,462 GHz
d’accès, votre PC doit être relié à un réseau câblé.
d’accès par le biais de
7. Dépannage
Pour obtenir des informations relatives au dépannage, reportez-vous au guide de l’utilisateur ou
visitez le site Web de 3Com, à l’adresse :
http://www.3com.com.
12
Page 15

Guida introduttiva
3Com OfficeConnect®
Access Point Wireless 54 Mbps 11g
3CRWE454G75 / WL-524
L'Access Point Wireless 54 Mbps 11g OfficeConnect® 3Com è compatibile con il protocollo IEEE
802.11g, è interoperabile con tutti i dispositivi IEEE
entrambi i client 11b e 11g. Questo Access Point Wireless OfficeConnect 3Com offre inoltre una
connettività wireless alla rete cablata altamente sicura con autenticazione IEEE 802.1x, crittografia
dei dati WEP e WPA/WPA2 e filtro dell'indirizzo MAC.
Questa Guida introduttiva descrive le operazioni di base necessarie per installare e configurare
l'Access Point Wireless OfficeConnect 3Com (3CRWE454G75
guida, l'Access Point Wireless 54
"access
point" per brevità.
Mbps 11g OfficeConnect verrà indicato semplicemente come
Informazioni su questa guida
Questa guida descrive la procedura di installazione di base dell'access point. Saranno trattati i
seguenti argomenti:
• Caratteristiche dell'Access Point 54 Mbps 11g OfficeConnect 3Com
• Precauzioni sulla sicurezza
• Passaggio 1: Apertura della confezione dell'access point
• Passaggio 2: Preparazione per l'installazione
• Passaggio 3: Collegamento dell'antenna
• Passaggio 4: Montaggio dell'access point
• Passaggio 5: Controllo degli indicatori LED
• Passaggio 6: Configurazione dell'access point
• Risoluzione dei problemi
802.11b e supporta simultaneamente
/ WL-524). Nel corso di questa
Page 16

Caratteristiche dell'Access Point 54 Mbps 11g
OfficeConnect
LED
Alimentazione
LED
WLAN
LED
LAN
Caratteristica Descrizione
Porta di
alimentazione
Porta Ethernet La porta Ethernet fornisce un'interfaccia Ethernet 10/100BASE-TX a uno
LED I LED indicano lo stato dell'alimentazione e l'attività di rete. Vedere la
Connettore
antenna
Pulsante Reset Il pulsante Reset è accessibile sulla parte posteriore dell'access point.
La porta di alimentazione si collega all'alimentatore esterno. Utilizzare solo
l'alimentatore esterno 3Com incluso in questa confezione per alimentare
l'access
point.
switch wireless LAN 3Com. Utilizzare un cavo RJ45 adatto per collegare
l'access
point a un computer o a un altro dispositivo dotato di una porta
Ethernet (come un hub o uno switch).
Questa porta dispone di una funzione MDI/MDIX automatica che consente
di utilizzare un cavo "straight-through" oppure "cross-over".
sezione
“Controllo degli indicatori LED” on page 17 per ulteriori
informazioni.
Un connettore di antenna RSMA consente di collegare un'antenna operante
alla banda di frequenza 2,4
Premere il pulsante Reset per ripristinare l'access point alle impostazioni
predefinite in fabbrica.
GHz.
NETWORK
RESET
Connettore
antenna
Porta di
alimentazione
Porta Ethernet
Pulsante Reset
14
Page 17

Precauzioni sulla sicurezza
Questa apparecchiatura deve essere installata in conformità con le norme sull'edilizia locali e
nazionali, le restrizioni normative e le norme FCC. Per la sicurezza delle persone e delle
apparecchiature, l'installazione dell'access
tecnico professionista di rete.
AVVERTENZA: Per rispettare la conformità ai limiti di esposizione alle radiofrequenze
(RF) stabiliti dalla FCC, mantenere una distanza minima tra le persone e l'antenna di 20
cm (8 pollici) durante il funzionamento dell'access
AVVERTENZA: Per evitare possibili danni alla persona o all'apparecchiatura, utilizzare
dispositivi di alimentazione elettrica dotati di certificazione di sicurezza UL, CSA, IEC o altri
requisiti di sicurezza nazionali o internazionali in vigore nel paese di utilizzo. Tutti i riferimenti
all'alimentazione elettrica citati in questo documento si riferiscono a dispositivi che rispondono
a questi requisiti.
point deve essere eseguita esclusivamente da un
point.
1. Apertura della confezione dell'access point
Assicurarsi che la confezione dell'access point contenga i seguenti componenti:
• Un Access Point Wireless 54 Mbps 11g OfficeConnect
• Un adattatore di alimentazione 3Com per l'uso con l'access point
• Un supporto per il montaggio su tavolo in verticale
• Accessori per il montaggio a parete: 2 viti filettate
• Un CD-ROM contenente il programma di configurazione guidata e
copie di questo manuale in altre lingue
• Un volantino di sicurezza
2. Preparazione per l'installazione
Si consiglia di collegare l'adattatore di alimentazione e di controllare i cavi Ethernet e i LED prima
di installare l'access
attenzione ai seguenti elementi prima di montare o collegare l'access
point in una posizione non facilmente raggiungibile. Prestare inoltre
point:
Elemento di
installazione
Hub o switch Per collegare la rete wireless alla rete cablata è necessario collegare un hub
Cavi Assicurarsi che i cavi Ethernet standard siano installati sul sito prima di
Requisiti di
alimentazione
Indirizzo MAC Annotare l'indirizzo MAC dell'access point e conservarlo in un luogo sicuro
Descrizione
o uno switch aggiuntivo alla porta Ethernet dell'access
installare l'access
L'alimentazione elettrica deve essere fornita utilizzando esclusivamente
l'adattatore di alimentazione 3Com fornito con l'access
Assicurarsi che la presa elettrica sia facilmente accessibile. La spina del cavo
di alimentazione è l'unico modo in cui è possibile scollegare l'access
dall'alimentazione.
prima di installare l'access
raggiungibile.
L'indirizzo MAC è stampato sul retro dell'access point.
point.
point in una posizione non facilmente
15
point.
point.
point
Page 18

3. Collegamento dell'antenna
Disimballare attentamente l'antenna staccabile standard fornita con l'access point. Avvitare
l'antenna al connettore dell'antenna sull'access
rete, potrebbe essere necessario regolare l'antenna per sintonizzare con precisione l'access point
in base alla copertura nella propria area.
Per risultati ottimali, regolare l'antenna in modo che sia perpendicolare al pavimento e al
soffitto.
ATTENZIONE: Non toccare la punta dell'antenna, in particolare dopo che è stata
collegata all'access
danneggiare l'apparecchiatura.
point. Ciò può provocare scariche elettrostatiche (ESD) che possono
point e stringerla manualmente. Dopo l'avvio della
4. Montaggio dell'access point
L'access point può essere montato utilizzando i seguenti metodi:
• Montaggio a parete
• Montaggio su tavolo (in orizzontale o in verticale utilizzando il supporto fornito)
Montaggio a parete
85mm
Montaggio su tavolo (orizzontale) Montaggio su tavolo (verticale)
.
ATTENZIONE: Questo access point è destinato esclusivamente all'utilizzo in ambienti
interni. Non installare l'access
da esterno appropriato.
point in ambienti esterni se non all'interno di un cabinet
16
Page 19

Montaggio a parete
Per montare l'access point su una parete:
1 Individuare una posizione sulla parete priva di ostacoli.
2 Avvitare le due viti di montaggio nella parete a 85 mm di distanza l'una dall'altra
3 Collegare il cavo Ethernet e il cavo di alimentazione alle porte sul lato dell'access point.
4 Allineare i fori sul retro dell'access point alle viti e appendere l'access point alle viti.
.
Montaggio su tavolo
Per installare l'access point su una superficie liscia, come un ripiano o una scrivania:
ATTENZIONE: Non collocare l'access point su alcun tipo di superficie metallica. Scegliere
una posizione libera da ostacoli e che fornisca una buona ricezione.
1 Se si desidera montare l'access point in verticale, fissare il supporto al fondo
dell'access
supporto.
point. Per montare l'access point in orizzontale, è sufficiente non installare il
2 Collocare l'access point su un tavolo o su un'altra superficie liscia.
3 Collegare il cavo Ethernet e il cavo di alimentazione alle porte sul lato dell'access point.
5. Controllo degli indicatori LED
Quando l'access point è collegato all'alimentazione elettrica, i LED indicano l'attività, come
descritto nella seguente tabella. Un LED acceso in modo fisso indica connessione; un LED
lampeggiante indica attività.
Power
WLAN
LAN
LED Colore Significato
Power Verde L'access point è acceso e funziona
normalmente.
Spento L'access point non riceve alimentazione
o vi è un guasto dell'alimentatore.
WLAN Verde Se il LED è acceso, la rete wireless è
abilitata. Se il LED lampeggia, il link è
presente ed è in corso la trasmissione o
la ricezione di dati.
Spento Non è presente alcun link wireless.
LAN Verde Se il LED è acceso, il link Ethernet tra la
porta e il successivo dispositivo di rete è
presente. Se il LED lampeggia, il link è
presente ed è in corso la trasmissione o
la ricezione di dati.
Spento Non è presente alcun link Ethernet.
17
Page 20

6. Configurazione dell'access point
Il CD fornito con l'access point include il software di configurazione e amministrazione
dell'access
point. Eseguire le seguenti operazioni per configurare l'access point per la prima volta:
1 Inserire il CD dell'access point 3Com nell'unità CD-ROM del PC. Per poter configurare
l'access
point il PC deve essere connesso alla rete cablata.
2 Eseguire il programma di configurazione guidata.
Se il programma di configurazione guidata non si avvia automaticamente, eseguire il
programma digitando autorun.exe.
3 Seguire le istruzioni del programma di configurazione guidata visualizzate sullo schermo.
4 (Facoltativo) Modificare le impostazioni predefinite.
L'access point è preconfigurato con un set di parametri comuni predefiniti. Se si desidera
modificare queste impostazioni, è possibile configurare l'access
Web con l'interfaccia Web.
Le impostazioni wireless predefinite dell'access point sono:
Password: admin
SSID: 3Com
Canale: 11-2,462 GHz
point tramite un browser
7. Risoluzione dei problemi
Per informazioni sulla risoluzione dei problemi, consultare la Guida per l'utente o visitare il sito
Web di 3Com:
http://www.3com.com.
18
Page 21

Kurzanleitung
3Com OfficeConnect®
Wireless 54 Mbps 11g Access Point
3CRWE454G75 / WL-524
Der 3Com OfficeConnect® Wireless 54 MBit/s 11g Access Point entspricht der Norm IEEE
802.11g. Gemäß IEEE
unterstützt 11b- und 11g-Clients gleichzeitig. Außerdem bietet dieser 3Com OfficeConnect
Wireless Access Point eine extrem sichere Funkverbindung zu ihrem verkabelten Netzwerk mit IEEE
802.1x WEP und WPA/WPA2 Datenverschlüsselung und Filterung der MAC-Adresse.
Diese Kurzanleitung beschreibt die wesentlichen Schritte für die Installation und Konfigurierung
ihres 3Com OfficeConnect Wireless Access Point (3CRWE454G75
wird der OfficeConnect Wireless 54
Über dieses Handbuch
Dieses Handbuch beschreibt die grundlegenden Schritte der Installation des Access Point. Es
beinhaltet die folgenden Themen:
• 3Com OfficeConnect 54 MBit/s 11g Funktionen des Access Point
• Beachtung der Sicherheitshinweise
• Schritt 1: Auspacken des Access Point
• Schritt 2: Vorbereitung der Installation
• Schritt 3: Anschließen der Antenne
• Schritt 4: Montage des Access Point
• Schritt 5: Überprüfen der Leuchtdiodenanzeigen
• Schritt 6: Konfigurierung des Access Point
• Fehlersuche
802.11b kann er mit anderen Systemen direkt kommunizieren, und
/ WL-524). In diesem Handbuch
MBit/s 11g Access Point kurz mit Access Point bezeichnet.
Page 22

OfficeConnect 54 MBit/s 11g Funktionen des
Access Point
Kontroll-
Leuchtdiode
WLAN
Leuchtdiode
Antennenanschluss
Stromanschluss
LAN
Leuchtdiode
RESET
Funktion Beschreibung
Stromanschluss Der Stromanschluss ist mit der externen Stromversorgung verbunden.
EthernetSchnittstelle
Leuchtdioden Die Leuchtdioden zeigen an, ob das Gerät betriebsbereit und das Netzwerk
Antennenanschluss Ein RSMA-Antennenanschluss ermöglicht den Anschluss einer Antenne im
Taste zum
Neustarten
Verwenden Sie ausschließlich den mitgelieferten 3Com externen Anschluss,
um die Netzverbindung zum Access
Die Ethernet-Schnittstelle bietet eine 10/100BASE-TX Ethernet-Verbindung
zu einem 3Com Wireless LAN-Schalter. Verwenden Sie ein geeignetes RJ45Kabel, um Ihren Access
Gerät, das über eine Ethernet-Schnittstelle (z.B. ein Hub oder einen Schalter)
verfügt, zu verbinden.
Diese Schnittstelle hat eine automatische MDI/MDIX-Funktion, die den
Einsatz entweder eines geraden oder gekreuzten Kabels ermöglicht.
aktiv ist. Genaueres siehe
page 24.
Funkbereich 2,4
Die Taste zum Neustarten befindet sich auf der Rückseite des Access Points.
Die Taste zum Neustarten drücken, um die Werkseinstellungen des Access
Point wieder herzustellen.
Point mit einem Computer oder einem anderen
“Überprüfen der Leuchtdiodenanzeigen” on
GHz.
Point herzustellen.
Ethernet-Schnittstelle
NETWORK
Taste zum Neustarten
20
Page 23

Beachtung der Sicherheitshinweise
Die Ausstattung muss gemäß den örtlichen und national geltenden Baunormen, behördlichen
Beschränkungen und den Bestimmungen der US-Behörde FCC (Federal Communications
Commission) installiert werden. Zum Schutz von Personen und Ausrüstung darf der Access
nur von Netzwerkspezialisten installiert werden.
ACHTUNG: Gemäß den FCC-Beschränkungen bezüglich Funkwellen muss bei Betrieb
des Access
ACHTUNG: Um Verletzungen oder Schäden an der Ausrüstung zu vermeiden, dürfen nur
nach UL, CSA, IEC oder anderen nationalen oder internationalen Bestimmungen des
Einsatzlandes sicherheitsgeprüfte elektrische Geräte verwendet werden. Bei Bezug auf
Stromversorgung in dieser Anleitung gilt dies ausschließlich für Ausrüstung, die diese
Anforderungen erfüllt.
Point die Mindestentfernung der Antenne zu einer Person 20 cm betragen.
Point
1. Auspacken des Access Point
Stellen Sie sicher, dass Sie die folgenden Komponenten mit dem Access Point mitgeliefert wurden:
• Ein OfficeConnect Wireless 54 MBit/s 11g Access Point
• Ein 3Com-Netzadapater zum Einsatz mit dem Access Point
• Eine Halterung zum senkrechten Einbau auf der Tischplatte
• Vorrichtung zur Wandmontage: einschließlich zwei Schrauben
• Eine CD-ROM mit der Wizard-Installations-Software und
Exemplare dieses Handbuchs in weiteren Sprachen
• Ein Garantieschein
2. Vorbereitung der Installation
Es ist empfehlenswert, den Access Point an das Stromnetz anzuschließen und die Ethernet-Kabel
zu überprüfen, bevor Sie das Gerät an einem schlecht zugänglichen Ort installieren. Beachten Sie
außerdem vor Montage und Anschluss des Access
Point Folgendes:
Installationsanforderungen
Hub oder Schalter Um Ihr Funknetzwerks in Ihr verdrahtetes Netzwerk einzubinden, benötigen
Verkabelung Stellen Sie sicher, dass das standardmäßige Ethernet-Kabel vor Ort
Stromversorgung Der Anschluss des Access Point an die Stromversorgung ist nur mit dem
MAC-Addresse Die MAC-Addresse des Access Point an einem sicheren Ort aufbewahren,
Beschreibung
Sie einen Ethernet-Anschluß zu einem Hub oder Switch.
angeschlossen ist, bevor Sie den Access
mitgelieferten 3Com-Netzadapter möglich.
Stellen Sie sicher, dass die Steckdose leicht zugänglich ist. Die
Stromversorgung des Access
unterbrochen werden.
bevor der Access
Die MAC-Addresse befindet sich auf der Rückseite des Access Point.
Point an einem schwer zugänglichen Ort installiert wird.
Point kann ausschließlich mit dem Netzstecker
21
Point installieren.
Page 24

3. Anschließen der Antenne
Vorsichtig die mit dem Access Point separat mitgelieferte Standardantenne auspacken. Die
Antenne am Antennenanschluss des Access
Netzwerkinbetriebnahme kann es sein, dass die Antenne ausgerichtet werden muss, um ihre
gesamte Reichweite abzudecken.
Sie erreichen die besten Ergebnisse, wenn Sie die Antenne senkrecht zum Boden ausrichten.
VORSICHT: Die Antennenspitzen nicht berühren. Dies gilt insbesondere nach dem
Anschluss an den Access
dadurch zur Beschädigung der Ausrüstung führen.
Point von Hand festschrauben. Nach der
Point. Dies kann zu elektrostrostatischer Entladung und
4. Montage des Access Point
Der Access Point kann auf folgende Weise montiert werden:
• Wandmontage:
• Montage an der Tischplatte (horizontal oder vertikal mit der mitgelieferten Halterung)
Wandmontage:
85mm
Montage an der Tischplatte (horizontal) Montage an der Tischplatte (vertikal)
.
VORSICHT: Der Access Point ist nur für den Einsatz im Innenbereich geeignet. Den
Access
Point nicht im Außenbereich montieren, es sei denn er verfügt über ein
geeignetes Gehäuse für den Außenbereich.
22
Page 25

Wandmontage:
Um den Access Point an einer Wand zu montieren:
1 Wählen Sie eine geeignete ebene Stelle an der Wand.
2 Zwei Montageschrauben in einem Abstand von 85 mm in die Wand schrauben.
3 Schließen Sie das Ethernet- und das Stromkabel an die Anschlüsse an der Seite des
Access
Point an.
4 Bringen Sie die Öffnungen auf der Rückseite des Access Point auf eine Höhe mit den
Schrauben und hängen Sie den Access
.
Point ein.
Montage an der Tischplatte:
So montieren Sie den Access Point an einer glatten Oberfläche wie z.B. einem Tisch:
VORSICHT: Den Access Point nicht auf einer mettallischen Oberfläche platzieren.
Wählen Sie einen Ort, der frei von Unebenheiten ist und guten Empfang bietet.
1 Wenn Sie den Access Point vertikal montieren wollen, bringen Sie die Halterung an der
Unterseite des Access
keine Halterung erforderlich.
2 Den Access Point auf einem Tisch oder einer anderen Oberfläche platzieren.
3 Schließen Sie das Ethernet- und das Stromkabel an die Anschlüsse an der Seite des
Access
Point an.
Point an. Wenn Sie den Access Point horizontal montieren wollen, ist
23
Page 26

5. Überprüfen der Leuchtdiodenanzeigen
Wenn der Access Point an den Strom angeschlossen ist, zeigen die Leuchtdioden den Betrieb, wie
in der folgenden Tabelle beschrieben, an. Eine ständig leuchtende Leuchtdiode zeigt die
Verbindung an; eine blinkende Leuchtdiode zeigt den Betrieb an.
Power
WLAN
LAN
Leuchtdi
ode
Power Grün Der Access Point ist angeschlossen und
WLAN Grün Das Leuchten der Leuchtdiode bedeutet,
LAN Grün Das Leuchten der Leuchtdiode bedeutet,
Farbe Bedeutung
funktioniert einwandfrei.
Aus Der Access Point empfängt keinen
Strom oder es gibt ein Problem bei der
Stromversorgung.
dass das Funknetzwerk aktiv ist. Eine
blinkende Leuchtdiode bedeutet, dass
die Verbindung besteht und Daten
übertragen werden.
Aus Keine Funkverbindung vorhanden.
dass die Ethernet-Verbindung zwischen
der Schnittstelle und der nächsten
Netzwerkkomponente besteht. Eine
blinkende Leuchtdiode bedeutet, dass
die Verbindung besteht und Daten
übertragen werden.
Aus Keine Ethernet-Verbindung vorhanden.
24
Page 27

6. Konfigurierung des Access Point
Die mit dem Access Point mitgelieferte CD enthält Software, die Sie bei der Installation und
Verwaltung des Access
folgenden Schritte durchzuführen:
Point unterstützt. Bei der Erstkonfigurierung des Access Point sind die
1 Legen Sie die CD des 3Com-Access Point in das CD-ROM-Laufwerk Ihres PCs ein. Ihr PC
muss an das Funknetzwerk angeschlossen sein, um den Access
Point zu installieren.
2 Den Installations-Wizard starten.
Wenn der Installations-Wizard nicht automatisch startet, das Programm durch Eingabe von
autorun.exe starten.
3 Befolgen Sie die Befehle des Installations-Wizards auf dem Bildschirm.
4 (Optional) Ändern der Standardeinstellungen.
Der Access Point ist mit einer Auswahl gängiger Standardparameter-Voreinstellungen
ausgestattet. Wenn Sie diese Einstellungen ändern wollen, kann der Access
Web-Browser, der eine web-basierte Schnittstelle hat, konfiguriert werden.
Die Funkstandardeinstellungen für den Access Point sind:
Passwort: admin
SSID: 3Com
Kanal: 11-2.462GHz
Point mit Ihrem
7. Fehlersuche
Informationen zur Fehlersuche finden Sie im Benutzerhandbuch oder auf der 3Com-Webseite:
http://www.3com.com.
25
Page 28

26
Page 29

Guía de inicio rápido
3Com OfficeConnect
®
Punto de acceso inalámbrico 11g a 54 Mbps
3CRWE454G75 / WL-524
El Punto de acceso inalámbrico OfficeConnect® 11g a 54 Mbps de 3Com es compatible con IEEE
802.11g, interoperable con IEEE
este Punto de acceso inalámbrico OfficeConnect de 3Com W ofrece conectividad inalámbrica
altamente asegurada a su red alámbrica con cifrado de datos IEEE 802.1x WEP y WPA/WPA2 y
filtrado de direcciones MAC.
Esta Guía de inicio rápido describe los pasos básicos necesarios para instalar y configurar el Punto
de acceso inalámbrico OfficeConnect de 3Com (3CRWE454G75
guía se hace referencia al Punto de acceso inalámbrico OfficeConnect 11g a 54
simplemente como Punto de
Acerca de esta Guía
Esta guía describe la instalación básica del Punto de acceso. Cubre los siguientes temas:
• 3Com Características del Punto de acceso inalámbrico OfficeConnect 11g a 54 Mbps
• Precauciones de seguridad
• Paso 1: Lista de accesorios incluidos con el punto de acceso
• Paso 2: Preparación de la instalación
• Paso 3: Instalación de la antena
• Paso 4: Montaje del Punto de acceso
• Paso 5: Revisión de los indicadores LED
• Paso 6: Configuración del Punto de acceso
• Solución de problemas
802.11b y admite clientes 11b y 11g simultáneamente. Además,
/ WL-524). A lo largo de esta
Mbps
acceso.
Page 30

Características del Punto de acceso inalámbrico
OfficeConnect 11g a 54
LED de
alimentación
LED de
WLAN
Mbps
Conector
de la antena
Puerto
de alimentación
LED de
LAN
Característica Descripción
Puerto de
alimentación
Puerto Ethernet El puerto Ethernet proporciona una conexión 10/100BASE-TX Ethernet a un
LEDs Los LEDs indican la alimentación y actividad de la red. Para conocer mayores
Conector de antena Un conector de antena RSMA le permite conectar una antena que opera en
Botón de reinicio Se puede acceder al botón de reinicio en la parte trasera del punto de
Puerto de alimentación que conecta al suministro eléctrico externo. Use sólo
el suministro eléctrico externo 3Com que viene en este paquete para
alimentar el Punto de
conmutador de LAN inalámbrica 3Com. Use un cable RJ45 adecuado para
conectar el Punto de
un puerto Ethernet (como un concentrador o un conmutador).
Este puerto tiene una función de MDI/MDIX automática que le permite
utilizar un cable directo o un cable cruzado.
detalles, consulte
la banda de 2,4
acceso. Para restaurar el punto de acceso a la configuración predeterminada
en fábrica, presione el botón de reinicio.
acceso.
acceso a una computadora u otro equipo que tenga
“Revisión de los indicadores LED” on page 31.
GHz.
NETWORK
RESET
Puerto Ethernet
Botón de reinicio
28
Page 31

Precauciones de seguridad
Este equipo se debe instalar conforme a los códigos de construcción y las restricciones regulatorias
locales y nacionales, así como conforme a las reglas de la FCC. Para la seguridad de personas y
equipos, el Punto de
ADVERTENCIA: para cumplir los límites de exposición a radiofrecuencia (RF) de la
FCC, se debe mantener una distancia mínima de 20 centímetros (8 pulg.) entre el
cuerpo y la antena cuando el Punto de
ADVERTENCIA: para evitar posibles lesiones o daños al equipo, usted debe utilizar un
equipo de suministro eléctrico cuya seguridad esté certificada según UL, CSA, IEC u otros
requisitos de seguridad nacionales o internacionales aplicable para el país de uso. Todas las
referencias al suministro eléctrico en este documento se refieren a equipos que cumplen con
estos requisitos.
acceso sólo debe ser instalado por personal profesional de redes.
acceso está en funcionamiento.
1. Lista de accesorios incluidos con el punto de acceso
Asegúrese de tener los siguientes artículos, que vienen con el Punto de acceso:
• Un Punto de acceso OfficeConnect 11g a 54 Mbps
• Un adaptador de alimentación 3Com para uso con el Punto de acceso
• Una base para montaje de sobremesa vertical
• Herrajes para montaje en pared: incluye dos tornillos con rosca
• Un CD-ROM que contiene el software Setup Wizard (Asistente de configuración) y
copias de este manual en otros idiomas
• Un volante de garantía
2. Preparación de la instalación
Se aconseja conectar la alimentación y revisar los LEDs y cables Ethernet antes de instalar el Punto
de
acceso en una ubicación de acceso difícil. Además, observe los siguientes elementos antes de
montar o conectar el Punto de
Elemento de
instalación
Concentrador o
conmutador
Cableado Antes de instalar el Punto de acceso, asegúrese de que el cable Ethernet
Requisitos de
alimentación
Dirección MAC Registre la dirección MAC del Punto de acceso antes de instalar el Punto
Descripción
Para conectar la red inalámbrica a la red alámbrica usted necesitará otro
concentrador o conmutador conectado al puerto Ethernet del Punto
de
estándar se encuentre instalado en el sitio.
La alimentación sólo se puede suministrar usando el adaptador de
alimentación 3Com que viene incluido con el Punto de
Asegúrese de que la toma de alimentación esté accesible. El enchufe del
suministro de alimentación es el único medio de desconectar al Punto
de
de
La dirección MAC está impresa en la parte de atrás del Punto de acceso.
acceso:
acceso.
acceso.
acceso de la alimentación.
acceso en una ubicación de acceso difícil.
29
Page 32

3. Instalación de la antena
Desempaque cuidadosamente la antena desmontable estándar que viene con el Punto de acceso.
Atornille la antena en el conector de antena del Punto de
iniciar la red, puede que deba ajustar la antena para mejorar la cobertura en su área.
Para obtener los mejores resultados, ajuste la antena para que quede perpendicular al piso y al
techo.
PRECAUCIÓN: no toque las puntas de la antena, especialmente después de
conectarlas al Punto de
lo que puede dañar el equipo.
acceso. Esto podría producir una descarga electrostática (ESD),
acceso y apriétela a mano. Después de
4. Montaje del Punto de acceso
El Punto de acceso se puede montar con los siguientes métodos:
• Montaje en pared
• Montaje de sobremesa (horizontal o verticalmente utilizando la base que se proporciona)
Montaje en pared
85mm
Montaje de sobremesa (horizontal) Montaje de sobremesa (vertical)
.
PRECAUCIÓN: el Punto de acceso sólo está destinado a su uso en interiores. No
instale el Punto de
libre.
acceso en exteriores a menos que sea en un recinto apropiado al aire
30
Page 33

Montaje en una pared
Para montar el Punto de acceso en una pared:
1 Ubique una posición en la pared que esté libre de obstrucciones.
2 Atornille dos tornillos de montaje en la pared a 85 mm de distancia.
3 Conecte el cable Ethernet y el cable de alimentación a los puertos en el lado del Punto
de
acceso.
4 Alinee los orificios en la parte de atrás del Punto de acceso con los tornillos y cuelgue el
.
Punto de
acceso de los tornillos.
Montaje de sobremesa
Para instalar el Punto de acceso sobre una superficie plana como una mesa o escritorio:
PRECAUCIÓN: no coloque el Punto de acceso sobre ningún tipo de superficie metálica.
Seleccione una ubicación que esté libre de obstrucciones y ofrezca buena recepción.
1 Si desea montar el Punto de acceso verticalmente, sujete la base a la parte inferior del Punto
de
acceso. Si desea montar el Punto de acceso horizontalmente, simplemente deje fuera la
base.
2 Coloque el Punto de acceso sobre la mesa u otra superficie plana.
3 Conecte el cable Ethernet y cable de alimentación a los puertos en el lado del Punto
de
acceso.
5. Revisión de los indicadores LED
Al conectar elPunto de acceso a la alimentación, los LEDs indican actividad según se describe en la
siguiente tabla. Un LED encendido en forma constante indica conexión; un LED que parpadea
indica actividad.
31
Page 34

LED Color Indica
Power
WLAN
LAN
Power Verde El Punto de acceso está alimentado y
Apagado El Punto de acceso no está recibiendo
WLAN Verde Si el LED está encendido, indica que la
Apagado No hay un enlace inalámbrico presente.
LAN Verde Si el LED está encendido, el enlace
Apagado No hay un enlace Ethernet presente.
operando normalmente.
alimentación o hay una falla en el
suministro de alimentación.
red inalámbrica está habilitada. Si el LED
está destellando, el enlace es correcto y
se están transmitiendo o recibiendo
datos.
Ethernet entre el puerto y el siguiente
equipo en la red es correcto. Si el LED
está destellando, el enlace es correcto y
se están transmitiendo o recibiendo
datos.
6. Configuración del Punto de acceso
El CD que viene con el Punto de acceso incluye software para ayudarle a configurar y administrar
el Punto de
acceso. Dé los siguientes pasos para configurar el Punto de acceso por primera vez:
1 Inserte el CD 3Com Punto de acceso en la unidad de CD-ROM de la PC. La PC debe estar en
la red alámbrica para configurar el Punto de
acceso.
2 Ejecute Setup Wizard.
Si Setup Wizard no se inicia automáticamente, corra el programa escribiendo
autorun.exe.
3 Siga las instrucciones de Setup Wizard en pantalla.
4 (Opcional). Cambie la configuración predeterminada.
El Punto de acceso está preconfigurado con un conjunto de parámetros predeterminados
comunes. Sin embargo, si desea cambiar esta configuración, puede configurar el Punto
de
acceso a través de su explorador Web con la interfaz basada en la Web.
La configuración inalámbrica predeterminada para el Punto de acceso es:
Contraseña: admin
SSID: 3Com
Channel: 11-2.462GHz
7. Solución de problemas
Para obtener información de solución de problemas, consulte la Guía del usuario o visite el sitio
World Wide Web de 3Com:
http://www.3com.com.
32
Page 35

Guia Rápido de Inicialização
3Com OfficeConnect®
Wireless 54 Mbps 11g Access Point
3CRWE454G75 / WL-524
O OfficeConnect® Wireless 54 Mbps 11g Access Point 3Com é compatível com IEEE 802.11g,
interoperável com IEEE
OfficeConnect Wireless Access Point 3Com oferece conectividade sem fio de alta segurança para
redes interligadas por cabos criptografia de dados IEEE 802.1x WEP e WPA/WPA2, e filtragem de
endereços MAC.
Este Guia de Início Rápido descreve as etapas básicas necessárias para instalar e configurar o
OfficeConnect Wireless Access Point 3Com (3CRWE454G75
OfficeConnect Wireless 54
Sobre este Guia
Este guia descreve a instalação básica do Access Point. Os seguintes tópicos são apresentados:
• Recursos do OfficeConnect 54 Mbps 11g Access Point 3Com
• Precauções de Segurança
• Etapa 1: Componentes do Pacote do Access Point
• Etapa 2: Preparação da Instalação
• Etapa 3: Conexão da Antena
• Etapa 4: Instalação do Access Point
• Etapa 5: Verificação dos LEDs Indicadores
• Etapa 6: Configuração do Access Point
• Diagnóstico de Problemas
802.11b e suporta clientes 11b e 11g simultaneamente. Além disso, o
/ WL-524). Neste Guia, o
Mbps 11g Access Point será chamado de Access Point.
Page 36

Recursos do OfficeConnect 54 Mbps
11g Access Point
LED de
Alimentação
LED
WLAN
LED
LAN
Recurso Descrição
Porta de
Alimentação
Porta Ethernet A porta Ethernet oferece uma conexão 10/100BASE-TX Ethernet para um
LEDs Os LEDs indicam a atividade de rede e alimentação. Consulte “Verificação
Conector da Antena Um conector RSMA permite a conexão de uma antena que opera na banda
Botão de
Reinicialização
A porta de alimentação conecta-se à fonte de alimentação externa. Use
somente a fonte de alimentação externa 3Com fornecida com o
Access
Point.
switch LAN 3Com. Use um cabo RJ45 apropriado para conectar o
Access
Point a um computador ou outro equipamento que tenha uma porta
Ethernet (por exemplo, um hub ou switch).
Essa porta tem um recurso MDI/MDIX automático que permite a utilização
de cabo direto ou invertido.
dos LEDs Indicadores” na página 37 para obter mais detalhes.
de 2.4
GHz.
O botão de Reinicialização fica na parte traseira do Access Point. Aperte o
botão de reinicialização do Access Point para restaurar os parâmetros
predefinidos em fábrica.
NETWORK
RESET
Conector
da Antena
Porta de
Alimentação
Porta
Ethernet
Botão de
Reinicialização
34
Page 37

Precauções de Segurança
Este equipamento deve ser instalado em conformidade com códigos, restrições regulamentares e
regras de FCC específicas ao local e ao país. Para garantir a segurança das pessoas e dos
equipamentos, o Access
rede.
ADVERTÊNCIA: Para atender aos limites de exposição a freqüência de rádio (RF) do
FCC, deve-se observar uma distância mínima de 20 cm (8 pol) entre a antena e as
pessoas quando o Access
ADVERTÊNCIA: Para evitar possíveis danos a pessoas ou equipamentos, deve ser usada
uma fonte de alimentação com certificado de segurança UL, CSA, IEC ou em conformidade
com outras normas e regulamentos de segurança nacionais ou internacionais aplicáveis no
país. Todos os equipamentos de alimentação mencionados neste documento atendem a
esses requisitos.
Point só deve ser instalado por técnicos profissionais especializados em
Point estiver em operação.
1. Componentes do Pacote do Access Point
Ao desembalar o Access Point, verifique se os seguintes componentes estão presentes:
• Um OfficeConnect Wireless 54 Mbps 11g Access Point
• Um adaptador de alimentação 3Com para o Access Point
• Uma base para instalação vertical em mesa
• Ferragens para instalação em parede: dois parafusos com rosca
• Um CD-ROM com o programa Setup Wizard e
cópias deste manual em outros idiomas
• Um Folheto de Garantia
2. Preparação da Instalação
Convém verificar a disponibilidade de energia elétrica e o funcionamento dos cabos de Ethernet e
LEDs antes de instalar o Access
devem ser observados antes de montar ou conectar o Access
Item de Instalação Descrição
Hub ou Switch Para conectar a rede sem fio à rede com fio, é necessário conectar um hub
Cabeamento Garanta que um cabo Ethernet padrão já esteja instalado no local antes de
Requisitos de
Alimentação
Endereço MAC Registre o endereço do Access Point em um local seguro antes de instalá-lo
ou switch adicional à porta Ethernet do Access
instalar o Access
A fonte de alimentação só pode ser conectada a um Adaptador de
Alimentação 3Com, fornecido com o Access
Verifique se há uma tomada elétrica disponível. O conector da fonte de
alimentação é a única maneira para desconectar o Access
eletricidade.
em um local de difícil acesso.
O endereço MAC está impresso na parte traseira do Access Point.
Point em um local de difícil acesso. Além disso, os seguintes itens
Point:
Point.
Point.
Point.
Point da
35
Page 38

3. Conexão da Antena
Desembale cuidadosamente a antena destacável padrão fornecida com o Access Point. Parafuse a
antena no conector da antena do Access
inicializada, pode ser necessário fazer o ajuste fino da antena para a cobertura da área.
Para obter os melhores resultados, ajuste a antena numa posição perpendicular ao piso e ao
teto.
CUIDADO: Não manuseie a antena pelas extremidades, especialmente após ser
conectada ao Access
danificar o equipamento.
Point. Isto pode resultar em descarga eletrostática (ESD) e
Point até que ela fique firme. Após a rede ser
4. Instalação do Access Point
O Access Point pode ser instalado das seguintes maneiras:
• Instalação em parede
• Instalação em mesa (horizontal ou vertical, com a base fornecida)
Instalação em Parede
85mm
Instalação em Mesa (horizontal) Instalação em Mesa (vertical)
.
CUIDADO: O Access Point só deve ser instalado em ambientes internos. Não instale o
Access
Point em ambientes externos a menos que seja utilizado um recipiente
apropriado para ambientes externos.
36
Page 39

Instalação em Parede
Para instalar o Access Point em uma parede:
1 Escolha um local na parede livre de obstruções.
2 Fixe os dois parafusos de instalação na parede separados um do outro por 85 mm.
3 Conecte o cabo Ethernet e o cabo de alimentação nas portas laterais do Access Point.
4 Alinhe os orifícios na parte traseira do Access Point com os parafusos e pendure o
Access
.
Point.
Instalação em Mesa
Para instalar o Access Point em uma superfície plana:
CUIDADO: Não coloque o Access Point em superfícies metálicas. Escolha um local livre
de obstruções e que proporcione boa recepção.
1 Para fazer a instalação vertical, fixe a base à parte inferior do Access Point. Para a instalação
horizontal, basta deixar o Access
Point fora da base.
2 Posicione o Access Point em uma mesa ou outra superfície plana.
3 Conecte o cabo Ethernet e o cabo de alimentação nas portas laterais do Access Point.
5. Verificação dos LEDs Indicadores
Quando o Access Point for conectado à eletricidade, os LEDs indicarão a atividade de acordo com
a seguinte tabela. Um LED permanentemente aceso indica conexão; um LED piscando indica
atividade.
37
Page 40

LED Cor Indica
Power
WLAN
LAN
Power Verde O Access Point está conectado à
Apagado O Access Point não está recebendo
WLAN Verde Se o LED estiver aceso, indica que a
Apagado Não há conexão wireless presente.
LAN Verde Se o LED estiver aceso, a conexão
Apagado Não há conexão Ethernet presente.
eletricidade e operando normalmente.
eletricidade ou ocorreu um problema
com a fonte de alimentação.
interconexão wireless está ativada. Se o
LED estiver piscando, a conexão está
funcionando e dados estão sendo
transmitidos ou recebidos.
Ethernet entre a porta e o equipamento
de rede adjacente está funcionando. Se
o LED estiver piscando, a conexão está
funcionando e dados estão sendo
transmitidos ou recebidos.
6. Configuração do Access Point
O CD fornecido com o Access Point inclui o software de instalação e administração. Execute as
etapas a seguir para configurar o Access
1 Insira o CD do Access Point na unidade de CD-ROM do PC. O PC deve estar conectado à
rede com fio para a instalação do Access
2 Execute o Assistente de Instalação.
Se o Assistente de Instalação não for acionado automaticamente, execute o programa
digitando autorun.exe.
3 Siga as instruções do Set-up Wizard (Assistente de Instalação) exibidas na tela.
4 (Opcional) Altere a configuração padrão.
O Access Point já é fornecido pré-configurado com parâmetros padrão. No entanto, é
possível alterar a configuração do Access
As configurações padrão sem fio do Access Point são:
Senha: admin
SSID: 3Com
Canal: 11-2.462GHz
Point pela primeira vez:
Point.
Point através da interface do navegador da Web.
7. Diagnóstico de Problemas
Para obter informações sobre diagnóstico de problemas, consulte o Guia do Usuário ou visite o
website da 3Com:
http://www.3Com.com.
38
Page 41

Snabbreferensguide
3Com OfficeConnect®
Trådlös 54 Mbps 11g-accesspunkt
3CRWE454G75 / WL-524
OfficeConnect® Trådlös 54 Mbps 11g-accesspunkt från 3Com är IEEE 802.11g-kompatibel, kan
användas med IEEE
Dessutom erbjuder denna 3Com OfficeConnect trådlösa accesspunkt mycket säker trådlös
anslutning till ditt kabeldragna nätverk med IEEE 802.1x WEP- och WPA/WPA2-datakryptering och
filtrering av MAC-adresser.
Denna Snabbreferensguide beskriver de grundläggande steg som behövs för att installera och
konfigurera 3Com OfficeConnect trådlös accesspunkt (3CRWE454G75
handbok använder vi genomgående accesspunkt för att hänvisa till OfficeConnect Wireless
54
Mbps 11g-accesspunkt.
Om denna handbok
Den här handboken beskriver grundläggande installation av denna accesspunkt. Den innehåller
följande ämnen:
• 3Com Funktioner i OfficeConnect 54 Mbps 11g-accesspunkt
• Iaktta säkerhetsåtgärder
• Steg 1: Packa upp accesspunkten
• Steg 2: Förbereda för installation
• Steg 3: Sätta fast antennen
• Steg 4: Montera accesspunkten
• Steg 5: Kontrollera lysdiodindikeringarna
• Steg 6: Konfigurera accesspunkt
• Felsökning
802.11b och erbjuder stöd för både 11b- och 11g-klienter samtidigt.
/ WL-524). I denna
Page 42

Funktioner i OfficeConnect 54 Mbps 11g-
p
accesspunkt
Ström
Lysdiod
Antennkontakt
WLAN
Lysdiod
alt nätverk (LAN)
Lysdiod
Funktion Beskrivning
Strömport Strömporten ansluts till den externa strömförsörjningsenheten. Använd
Ethernet-port Ethernet-porten tillhandahåller en 10/100BASE-TX Ethernet-anslutning till
Lysdioder Lysdioderna indikerar ström- och nätverksaktivitet. Se “Kontrollera
Antennkontakt Det finns en RSMA-antennkontakt med vilken du kan ansluta en antenn
Återställningsknapp Återställningsknappen finns tillgänglig på baksidan på accesspunkten. Tryck
endast den externa strömförsörjningsenhet som ingår i detta paket för att
driva denna accesspunkt.
en 3Com-switch för trådlöst LAN. Använd passande RJ45-kabel när du
ansluter din accesspunkt till en dator eller annan utrustning som har en
Ethernet-port (såsom ett nav eller en switch).
Den här porten har en automatisk MDI/MDIX-funktion som ger dig
möjlighet att använda antingen en kabel som går rakt igenom eller en
överkorsningskabel.
lysdiodindikeringarna” on page 43 för information.
som används i 2,4
in återställningsknappen för att återställa accesspunkten till
fabriksinställningarna.
GHz-bandet.
NETWORK
RESET
Strömport
Ethernet-port
Återställningskna
40
Page 43

Iaktta säkerhetsåtgärder
Den här utrustningen måste installeras i enlighet med lokala och nationella byggnadskoder,
reglerande begränsningar och de amerikanska FCC-reglerna. Med tanke på säkerheten för
människor och utrustning, skall endast yrkeskunnig nätverkspersonal installera denna
accesspunkt.
VARNING: I syfte att följa FCC:s exponeringsgränser för radiofrekvens (RF) måste ett
minimalt avstånd mellan kropp och antenn på 20 cm upprätthållas när denna
accesspunkt är i drift.
VARNING: I syfte att undvika möjlig personskada eller skada på utrustningen måste du
använda strömförsörjningsutrustning som är säkerhetscertifierad i enlighet med UL-, CSA-,
IEC- och/eller andra gällande nationella eller internationella säkerhetskrav för landet där
utrustningen används. Alla hänvisningar till strömförsörjning i det här dokumentet avser
utrustning som uppfyller dessa krav.
1. Packa upp accesspunkten
Försäkra dig om att du har följande artiklar som inkluderas med denna accesspunkt:
• En OfficeConnect Wireless 54 Mbps 11g-accesspunkt
• En 3Com-strömadapter för användning med denna accesspunkt
• En vagga för lodrätt montering på bordsytan
• Hårdvara för väggmontering: inkluderar två gängade skruvar
• En CD-ROM som innehåller programvaran för Setup Wizard (installationsguiden) och
exemplar av denna handbok på ytterligare språk
• En garantibroschyr
2. Förbereda för installation
Innan du installerar denna accesspunkt på en plats som är svår att nå är det tillrådligt att ansluta
strömmen och kontrollera Ethernet-kablarna och lysdioderna. Dessutom ska du iaktta följande
innan du monterar eller ansluter denna accesspunkt:
Installationsobjekt Beskrivning
Nav eller switch Innan du ansluter ditt trådlösa nätverk till det kabeldragna nätverket
Kablage Innan du installerar denna accesspunkt ska du försäkra dig om att
Strömkrav Ström kan bara tillhandahållas med den 3Com-strömadapter som
MAC-adress Innan du installerar denna accesspunkt på en plats som är svår att nå ska
behöver du ha ytterligare ett nav eller ytterligare en switch som är
ansluten till Ethernet-porten på denna accesspunkt.
standard-Ethernet-kabeln är installerad på platsen.
medföljer denna accesspunkt.
Se till att strömuttaget är lätt att nå. Strömkontakten är det enda sättet
att frånkoppla denna accesspunkt från strömmen.
du skriva ner MAC-adressen för denna accesspunkt på ett säkert ställe.
MAC-adressen finns på baksidan av denna accesspunkt.
41
Page 44

3. Sätta fast antennen
Packa försiktigt upp den standard avtagbara antenn som medföljde din accesspunkt. Skruva fast
antennen på antennkontakten på denna accesspunkt och dra åt för hand. När du har startat
nätverket kan du behöva justera antennen för att finjustera täckningen i ditt område.
För bästa resultat ska du justera antennen så att den är vinkelrätt mot golvet och innertaket.
VAR FÖRSIKTIG: Hantera inte antennspetsarna, speciellt inte efter det att de anslutits
till denna accesspunkt. Detta kan leda till elektrostatisk urladdning vilket kan skada
utrustningen.
4. Montera accesspunkten
Du kan montera denna accesspunkt på följande sätt:
• Väggmontering
• Montering på bordsskiva (horisontellt, eller vertikalt med den vagga som medföljer)
Väggmontering
85mm
Montering på bordsskiva (horisontell) Montering på bordsskiva (vertikal)
.
VAR FÖRSIKTIG: Denna accesspunkt är endast avsedd för inomhusbruk. Du ska inte
installera denna accesspunkt utomhus om du inte installerar den i ett lämpligt skyddat
område utomhus.
42
Page 45

Väggmontering
Montera denna accesspunkt på en vägg:
1 Identifiera en plats på väggen utan hinder.
2 Skruva in två monteringsskruvar i väggen med ett avstånd på 85 mm.
3 Anslut Ethernet-kabeln och strömkabeln till portarna på sidan av denna accesspunkt.
4 Rikta in hålen på baksidan av denna accesspunkt med skruvarna och häng denna
accesspunkt på skruvarna.
.
Montering på bordsskiva
Installera denna accesspunkt på en plan yta så som ett bord eller skrivbord:
VAR FÖRSIKTIG: Du ska inte placera denna accesspunkt på någon typ av metallyta. Välj
en plats utan hinder och som ger god mottagning.
1 Om du vill montera denna accesspunkt vertikalt ska du sätta fast vaggan på undersidan av
denna accesspunkt. Använd inte vaggan om du vill montera denna accesspunkt horisontellt.
2 Placera denna accesspunkt på bordet eller annan plan yta.
3 Anslut Ethernet-kabeln och strömkabeln till portarna på sidan av denna accesspunkt.
5. Kontrollera lysdiodindikeringarna
När denna accesspunkt är ansluten till ström indikerar lysdioderna aktivitet enligt beskrivningen i
följande tabell. En lysdiod som är tänd hela tiden indikerar anslutning, en lysdiod som blinkar
indikerar aktivitet.
43
Page 46

Lysdiod Färg Indikerar
Power
WLAN
LAN
Power Grön Denna accesspunkt är påslagen och
Av Denna accesspunkt mottar ingen ström
WLAN Grön Om lysdioden är på indikerar det att den
Av Det finns ingen trådlös länk.
LAN
(Lokalt
nätverk)
Grön Om lysdioden är på, fungerar Ethernet-
Av Det finns ingen Ethernet-länk.
fungerar normalt.
eller så finns det ett fel i
strömförsörjningen.
trådlösa nätverksanslutningen är
aktiverad. Om lysdioden blinkar är
länken OK och data överförs eller tas
emot.
länken mellan porten och nästa del av
nätverksanslutningen. Om lysdioden
blinkar är länken OK och data överförs
eller tas emot.
6. Konfigurera accesspunkt
Den CD som levereras med din accesspunkt innefattar programvara som hjälper dig att installera
och administrera denna accesspunkt. Utför följande steg för att konfigurera din accesspunkt för
första gången:
1 Sätt i 3Com CD:n för din accesspunkt i datorns CD-ROM-enhet. Innan du kan installera
denna accesspunkt måste datorn finnas i ditt kabeldragna nätverk.
2 Kör Set-up Wizard (installationsguiden).
Om Set-up Wizard (installationsguiden) inte startar automatiskt, starta programmet genom
att skriva autorun.exe.
3 Följ anvisningarna som visas på skärmen i Set-up Wizard (installationsguiden).
4 (Valfritt) Ändra standardinställningarna.
Denna accesspunkt är förkonfigurerad med en uppsättning vanliga standardparametrar. Men
om du vill ändra dessa inställningar går det att konfigurera denna accesspunkt genom
webbläsaren med det webbaserade gränssnittet.
Standardinställningarna för trådlös anslutning för denna accesspunkt är:
Lösenord: admin
SSID: 3Com
Kanal: 11-2,462 GHz
7. Felsökning
För felsökningsinformation, se användarhandboken eller gå till webbplatsen för 3Com: http://
www.3com.com.
44
Page 47

REGULATORY INFORMATION
US, Canada- RADIO FREQUENCY REQUIREMENTS
3Com declares that WL-524 ( FCC ID: O9C-WL524 ) is limited in CH1~CH11 for 2.4 GHz by specified firmware controlled in
U.S.A.
The 3Com OfficeConnect Wireless 54 Mbps 11g Access Point (WL-524) must be installed and used in strict
accordance with the manufacturer’s instructions as described in the user documentation that comes with the
product.
This
prod
uct con
Li
cense.
i
This product does not contain any user serviceable components. Any unauthorized product changes or
modifications will invalidate 3Com’s warranty and all applicable regulatory certifications and approvals.
This product can only be used with the supplied antenna(s). The use of external amplifiers or non-3Com
antennas may invalidate regulatory certifications and approvals.
tains encrypti
CAUTION: EXPOSURE TO RADIO FREQUENCY RADIATION
This device generates and radiates radio-frequency energy. In order to comply with FCC radio-frequency
exposure guidelines for an uncontrolled environment, this equipment must be installed and operated while
maintaining a minimum body to antenna distance of 20 cm (approximately 8 in.).
The installer of this radio equipment must ensure that the antenna is located or pointed such that it does not
emit RF field in excess of Health Canada limits for the general population; consult Safety Code 6, obtainable
from Health Canada’s website www.hc-sc.gc.ca/rpb.
This product must maintain a minimum body to antenna distance of 20 cm. Under these conditions this product
will meet the Basic Restriction limits of 1999/519/EC [Council Recommendation of 12 July 1999 on the limitation
of exposure of the general public to electromagnetic fields (0 Hz to 300 GHz)].
US — RADIO FREQUENCY REQUIREMENTS
This device must not be co-located or operated in conjunction with any other antenna or transmitter.
USA—FEDERAL COMMUNICATIONS COMMISSION (FCC)
This device complies with part 15 of the FCC Rules. Operation is subject to the following two conditions: (1) This
device may not cause harmful interference, and (2) this device must accept any interference received, including
interference that may cause undesired operation.
This equipment has been tested and found to comply with the limits for a Class B digital device, pursuant to Part
15 of FCC Rules. These limits are designed to provide reasonable protection against harmful interference in a
residential installation. This equipment generates, uses, and can radiate radio frequency energy. If not installed
and used in accordance with the instructions, it may cause harmful interference to radio communications.
However, there is no guarantee that interference will not occur in a particular installation. If this equipment does
cause harmful interference to radio or television reception, which can be determined by tuning the equipment
off and on, the user is encouraged to try and correct the interference by one or more of the following measures:
• Reorient or relocate the receiving antenna
• Increase the distance between the equipment and the receiver
• Connect the equipment to outlet on a circuit different from that to which the receiver is connected
• Consult the dealer or an experienced radio/TV technician for help
The user may find the following booklet prepared by the Federal Communications Commission helpful:
Interference Handb
This booklet is available from the U.S. Government Printing Office, Washington, D.C. 20402. Stock No. 004000-0034504.
3Com is not responsible for any radio or television interference caused by unauthorized modification of the
devices included with this 3Com OfficeConnect Wireless 54 Mbps 11g Access Point (WL-524), or the
substitution or attachment of connecting cables and equipment other than specified by 3Com.
The correction of interference caused by such unauthorized modification, substitution or attachment will be the
responsibility of the user.
Changes or modifications not expressly approved by 3Com could void the user’s authority to operate this
equipment.
ook
on. It is
unlawful to export out of the U.S. without obtaining a U.S. Export
The
45
Page 48

MANUFACTURER’S DECLARATION OF CONFORMITY
This device has been designed to operate with an antenna having a maximum gain of 2.02 dBi. Antenna
having a higher gain is strictly prohibited per regulations of Industry Canada. The required antenna
impedance is 50 ohms.
3C
om Corp
oration
35
0 Campus Dr
Marlborough,
(
800)
527-8677
Date: 24 March 2006
Declares that the Product:
Brand Name: 3Com Corporation
Model Number: WL-524
Equipment Type: 3Com OfficeConnect Wireless 54 Mbps 11g Access Point
Co
mplies with Part 15 of
caus
e har
caus
e undesired operation.
ive
MA 017
mful interferen
52-3064,
USA
the F
CC rules.
ce, and (2) this
Operation is subject to th
device must accept any interference received,
3Com OfficeConnect Wireless 54 Mbps 11g Access Point
Model WL-524
e foll
owi
ng two co
nditi
inclu
ons: (
1) this device may not
ding in
terference that may
CANADA—INDUSTRY CANADA (IC)
This device complies with RSS 210 of Industry Canada.
Operation is subject to the following two conditions: (1) this device may not cause interference, and (2) this
device must accept any interference, including interference that may cause undesired operation of this device.”
L ‘ utilisation de ce dispositif est autorisée seulement aux conditions suivantes: (1) il ne doit pas produire de
brouillage et (2) l’ utilisateur du dispositif doit étre prêt à accepter tout brouillage radioélectrique reçu, même si
ce brouillage est susceptible de compromettre le fonctionnement du dispositif.
The term "IC" before the equipment certification number only signifies that the Industry Canada technical
specifications were met.
To reduce potential radio interference to other users, the antenna type and its gain should be so chosen that the
equivalent isotropically radiated power (EIRP) is not more than that required for successful communication. To
prevent radio interference to the licensed service, this device is intended to be operated indoors and away from
windows to provide maximum shielding. Equipment (or its transmit antenna) that is installed outdoors is subject
to licensing.
Pour empecher que cet appareil cause du brouillage au service faisant l'objet d'une licence, il doit etre utilize a
l'interieur et devrait etre place loin des fenetres afin de Fournier un ecram de blindage maximal. Si le matriel
(ou son antenne d'emission) est installe a l'exterieur, il doit faire l'objet d'une licence.
INDUSTRY CANADA (IC) EMISSIONS COMPLIANCE STATEMENT
This Class B digital apparatus complies with Canadian ICES-003.
AVIS DE CONFORMITÉ À LA RÉGLEMENTATION D’INDUSTRIE CANADA
Cet appareil numérique de la classe B est conform à la norme NMB-003 du Canada.
SAFETY COMPLIANCE NOTICE
This device has been tested and certified according to the following safety standards and is intended for use only
in Information Technology Equipment which has been tested to these or other equivalent standards:
• UL Standard 60950-1
• CAN/CSA C22.2 No. 60950-1
• IEC 60950-1
• EN 60950-1
46
Page 49

EUROPE – EU DECLARATION OF CONFORMITY
AT BE CY CZ DK EE FI FR
DE GR HU IE IT LV LT LU
MT NL PL PT SK SI ES SE
GB IS LI NO CH BG RO TR
This equipment may be operated in
Intended use: IEEE 802.11g/b radio LAN device
NOTE: To ensure product operation is in compliance with local regulations, select the country in which the
product is installed. Refer to 3Com OfficeConnect Wireless 54 Mbps 11g Access Point (WL-524) User Guide.
EUROPE — DECLARATION OF CONFORMITY IN LANGUAGES OF THE EUROPEAN COMMUNITY
Česky [Czech] 3Com Coporation tímto prohlašuje, že tento RLAN device je ve shodě se
Dansk [Danish] Undertegnede 3Com Corporation erklærer herved, at følgende udstyr RLAN
Deutsch [German] Hiermit erklärt 3Com Corporation, dass sich das Gerät RLAN device in Übere-
Eesti [Estonian] Käesolevaga kinnitab 3Com Corporation seadme RLAN device vastavust
English Hereby, 3Com Corporation, declares that this RLAN device is in compliance
Español [Spanish] Por medio de la presente 3Com Corporation declara que el RLAN device cum-
Ελληνική [Greek] ΜΕ ΤΗΝ ΠΑΡΟΥΣΑ 3Com Corporation ΔΗΛΩΝΕΙ ΟΤΙ RLAN device
Français [French] Par la présente 3Com Corporation déclare que l'appareil RLAN device est con-
Italiano [Italian] Con la presente 3Com Corporation dichiara che questo RLAN device è con-
Latviski [Latvian] Ar šo 3Com Corporation deklarē, ka RLAN device atbilst Direktīvas 1999/5/EK
Lietuvių [Lithuanian] Šiuo 3Com Corporation deklaruoja, kad šis RLAN device atitinka esminius
Nederlands [Dutch] Hierbij verklaart 3Com Corporation dat het toestel RLAN device in overeen-
Malti [Maltese] Hawnhekk, 3Com Corporation, jiddikjara li dan RLAN device jikkonforma mal-
základními požadavky a dalšími příslušnými ustanoveními směrnice 1999/5/
ES.
device overholder de væsentlige krav og øvrige relevante krav i direktiv 1999/5/
EF.
instimmung mit den grundlegenden Anforderungen und den übrigen einschlägigen Bestimmungen der Richtlinie 1999/5/EG befindet.
direktiivi 1999/5/EÜ põhinõuetele ja nimetatud direktiivist tulenevatele teistele
asjakohastele sätetele.
with the essential requirements and other relevant provisions of Directive 1999/
5/EC.
ple con los requisitos esenciales y cualesquiera otras disposiciones aplicables
o exigibles de la Directiva 1999/5/CE.
ΣΥΜΜΟΡΦΩΝΕΤΑΙ ΠΡΟΣ ΤΙΣ ΟΥΣΙΩΔΕΙΣ ΑΠΑΙΤΗΣΕΙΣ ΚΑΙ ΤΙΣ ΛΟΙΠΕΣ
ΣΧΕΤΙΚΕΣ ΔΙΑΤΑΞΕΙΣ ΤΗΣ ΟΔΗΓΙΑΣ 1999/5/ΕΚ.
forme aux exigences essentielles et aux autres dispositions pertinentes de la
directive 1999/5/CE.
forme ai requisiti essenziali ed alle altre disposizioni pertinenti stabilite dalla
direttiva 1999/5/CE.
būtiskajām prasībām un citiem ar to saistītajiem noteikumiem.
reikalavimus ir kitas 1999/5/EB Direktyvos nuostatas.
stemming is met de essentiële eisen en de andere relevante bepalingen van
richtlijn 1999/5/EG.
htigijiet essenzjali u ma provvedimenti ohrajn relevanti li hemm fid-Dirrettiva
1999/5/EC.
47
Page 50

Magyar [Hungarian] Alulírott, 3Com Corporation nyilatkozom, hogy a RLAN device megfelel a
Polski [Polish] Niniejszym 3Com Corporation oświadcza, że RLAN device jest zgodny z zasa-
Português [Portuguese] 3Com Corporation declara que este RLAN device está conforme com os requi-
Slovensko [Slovenian] 3Com Corporation izjavlja, da je ta RLAN device v skladu z bistvenimi zahte-
Slovensky [Slovak] 3Com Corporation týmto vyhlasuje, že RLAN device spĺňa základné
Suomi [Finnish] 3Com Corporation vakuuttaa täten että RLAN device tyyppinen laite on direkti-
Svenska [Swedish] Härmed intygar 3Com Corporation att denna RLAN device står I överensstäm-
Íslenska [Icelandic] Hér með lýsir 3Com Corporation yfir því að RLAN device er í samræmi við
Norsk [Norwegian] 3Com Corporation erklærer herved at utstyret RLAN device er i samsvar med
A copy of the signed Declaration of Conformity can be downloaded from the Product Support web page for the
3CRWE454G75 (WL-524) at http://www.3com.com.
Also available at http://support.3com.com/doc/WL-524_EU_DOC.pdf
vonatkozó alapvetõ követelményeknek és az 1999/5/EC irányelv egyéb elõírá
sainak.
dniczymi wymogami oraz pozostałymi stosownymi postanowieniami Dyrektywy
1999/5/EC.
sitos essenciais e outras disposições da Directiva 1999/5/CE.
vami in ostalimi relevantnimi določili direktive 1999/5/ES.
požiadavky a všetky príslušné ustanovenia Smernice 1999/5/ES.
ivin 1999/5/EY oleellisten vaatimusten ja sitä koskevien direktiivin muiden
ehtojen mukainen.
melse med de väsentliga egenskapskrav och övriga relevanta bestämmelser
som framgår av direktiv 1999/5/EG.
grunnkröfur og aðrar kröfur, sem gerðar eru í tilskipun 1999/5/EC.
de grunnleggende krav og øvrige relevante krav i direktiv 1999/5/EF.
EUROPE – RESTRICTIONS FOR USE OF 2.4GHZ FREQUENCIES IN EUROPEAN COMMUNITY COUNTRIES
• This device may be operated indoors or outdoors in all countries of the European Community using the
2.4GHz band: Channels 1 – 13, except where noted below.
•In Italy the end-user must apply for a license from the national spectrum authority to operate this device
outdoors.
•In Belgium outdoor operation is only permitted using the 2.46 – 2.4835 GHz band: Channel 13.
•In France outdoor operation is only permitted using the 2.4 – 2.454 GHz band: Channels 1 – 7.
-
BRAZIL RF COMPLIANCE
Este equipamento opera em caráter secundário, isto é, no tem direito a proteço contra interferncia prejudicial,
mesmo de estaçes do mesmo tipo, e no causar interferncia a sistema operando em caráter primá
48
 Loading...