

Page 1
3Com 3108 Wireless
Telephone Guide
3C10408A
WL-108
NBX® Networked Telephony Solutions
System Release 6.0
Part Number 900-0338-01 Rev AB
Published August 2006
http://www.3com.com/
Page 2

3Com Corporation
350 Campus Drive
Marlborough, MA
01752-3064
Copyright © 1998–2006, 3Com Corporation. All Rights Reserved. No part of this documentation may be
reproduced in any form or by any means or used to make any derivative work (such as translation,
transformation, or adaptation) without written permission from 3Com Corporation.
3Com Corporation reserves the right to revise this documentation and to make changes in content from
time to time without obligation on the part of 3Com Corporation to provide notification of such revision
or change.
3Com Corporation provides this documentation without warranty, term, or condition of any kind, either
implied or expressed, including, but not limited to, the implied warranties, terms, or conditions of
merchantability, satisfactory quality, and fitness for a particular purpose. 3Com may make improvements
or changes in the product(s) and/or the program(s) described in this documentation at any time.
If there is any software on removable media described in this documentation, it is furnished under a
license agreement included with the product as a separate document, in the hardcopy documentation, or
on the removable media in a directory file named LICENSE.TXT or !LICENSE.TXT. If you are unable to
locate a copy, please contact 3Com and a copy will be provided to you.
UNITED STATES GOVERNMENT LEGENDS:
If you are a United States government agency, then this documentation and the software described herein
are provided to you subject to the following:
United States Government Legend: All technical data and computer software is commercial in nature
and developed solely at private expense. Software is delivered as Commercial Computer Software as
defined in DFARS 252.227-7014 (June 1995) or as a commercial item as defined in FAR
such is provided with only such rights as are provided in 3Com’s standard commercial license for the
Software. Technical data is provided with limited rights only as provided in DFAR 252.227-7015 (Nov
1995) or FAR
portion of any legend provided on any licensed program or documentation contained in, or delivered to
you in conjunction with guide.
Unless otherwise indicated, 3Com registered trademarks are registered in the United States and may or
may not be registered in other countries.
3Com, the 3Com logo, and NBX are registered trademarks of 3Com Corporation. NBX NetSet and pcXset
are trademarks of 3Com Corporation.
Other brand and product names may be registered trademarks or trademarks of their respective holders.
52.227-14 (June 1987), whichever is applicable. You agree not to remove or deface any
2.101(a) and as
Page 3

CONTENTS
ABOUT THIS GUIDE
Conventions 8
Documentation 8
Comments on the Documentation 9
GETTING STARTED
Package Contents 11
Powering the Phone On and Off 12
About Power-Saving Mode 12
Care and Maintenance 12
3COM 3108 WIRELESS TELEPHONE
WLAN Operation – Placing a Call via a SIP Proxy Server 13
3108 Wireless Telephone Physical Description 14
Built-in Features 15
Expanded Feature Support 16
Product Specifications 16
LEARNING TO USE YOUR PHONE
Checking Connection Status 19
Making a Call 20
Answering a Call 20
Adjusting the Volume 20
Using the Keypad Lock Feature 21
Using the Icons 21
Using the Keypad 22
Numeric Mode 22
Tex t M od e 22
Using LED Status Indicators 24
Page 4

4
Storing Names and Numbers in Your Phonebook 24
INITIAL HANDSET CONFIGURATION
Configuration Overview 25
Entering the Network Profile Settings 26
Entering the SIP Account Settings 28
Activating a Network Profile 30
PERSONALIZING YOUR PHONE
Setting the Time and Date 31
Setting the Ring Mode and Ring Tone 33
Setting a Wallpaper Image 34
Adjusting the Backlight 35
CALLING FEATURES
Viewing Recent Calls 37
Returning an Unanswered Call 37
Transferring a Call 38
Using the Call Mute 38
Using Call Waiting 39
Using Call Forwarding 39
MENUS
Phonebook 41
Call Log 42
E-mail 43
Speed Dial 46
Profile 46
Settings 47
To ol s 53
WEB CONFIGURATION
Accessing the Web Configuration Utility 56
Page 5

Checking Wireless Network Status 56
Editing Names and Numbers in Your Phone Book 56
Wireless Network Settings 57
SIP Settings 58
Phone Settings 59
E-mail Settings 60
Upgrade Software 60
Upgrade Bootcode 61
Debug Statistics 61
Reboot Phone 62
Password 62
Logout 62
TROUBLESHOOTING
Unable to Connect to the Network 63
Unable To Register With The SIP Server 63
5
REGULATORY INFORMATION
Caution: Exposure to Radio Frequency Radiation 65
US – Radio Frequency Requirements 66
USA-Federal Communications Commission (FCC) 66
Manufacturer’s Declaration of Conformity 67
Canada – Industry Canada (IC) 67
Industry Canada (IC) Emissions Compliance Statement 68
Safety Compliance Notice 68
Europe – EU Declaration of Conformity 68
Europe - Declaration of Conformity in Languages of the European
Conformity 69
Europe - Restrictions for Use of 2.4 GHz Frequencies in European
Community Countries 70
Brazil RF Compliance 70
Korea RF Compliance 71
INDEX
Page 6

6
Page 7

ABOUT THIS GUIDE
This guide is intended for anyone using the 3Com 3108 Wireless
Telephone. It describes how to unpack, set up and operate the Wireless
Telephone. It also includes information for the Wireless Telephone
installer or network administrator on how to configure the initial handset
parameters required for connection to the network and wireless, Session
Initiation Protocol (SIP), VoIP operation.
This book covers these topics:
■ Chapter 1: Getting Started
■ Chapter 2: 3Com 3108 Wireless Telephone
■ Chapter 3: Learning to Use Your Phone
■ Chapter 4: Initial Handset Configuration
■ Chapter 5: Personalizing Your Phone
■ Chapter 6: Calling Features
■ Chapter 7: Menus
■ Chapter 8: Web Configuration
■ Chapter 9: Troubleshooting
■ Appendix A: Regulatory Information
Page 8
8 ABOUT THIS GUIDE
Conventions Ta bl e 1 defines some commonly used words and phrases in this guide.
Ta bl e 1 Common Terms
Term Definition
Auto Attendant The set of voice prompts that answers incoming calls and
describes actions that a caller or user can take to access
individual services.
Administrator The person who is responsible for maintaining your
Receptionist The person who answers the majority of incoming
User A person who has a single telephone.
Ta bl e 2 lists conventions that are used throughout this guide.
Ta bl e 2 Icons
Icon Type Description
Information note Information that describes important features
Caution Information that alerts you to potential loss of
Warning Information that alerts you to potential
telephone system.
telephone calls. In some business environments, this
person may be a switchboard operator.
or instructions.
data or potential damage to an application,
system, device, or network.
personal injury.
Documentation When using the 3Com 3108 Wireless Telephone with the 3Com NBX
Network Telephony System, the following additional documents are
helpful:
■ 3Com NBX Feature Codes Guide for SIP Telephones. This guide
describes the NBX features that are accessible on VoIP telephones
connected to the NBX system running in SIP mode.
■ 3Com NBX Administrator's Guide. This guide describes how to
configure and manage NBX systems.
The NBX Resource Pack DVD contains many guides to the NBX products
and their related 3Com applications.
Page 9

Documentation 9
Comments on the
Documentation
Your suggestions are important to us. They help us to make the 3Com
documentation more useful to you.
Please send your e-mail comments about this guide or any of the
NBX documentation and Help systems to:
3Com
Voice_TechComm_Comments@3com.com
Include the following information with your comments:
■ Document title
■ Document part number (found on the front or back page)
■ Page number
As always, please address all questions regarding NBX hardware and
software to your 3Com NBX Voice-Authorized Partner.
Page 10

10 ABOUT THIS GUIDE
Page 11

1
GETTING STARTED
As soon as you receive your 3Com 3108 Wireless Telephone package, you
can unpack the contents, install the battery, and plug in the AC power
adapter to begin charging the battery. This chapter describes these steps
and the basic care and operation of your phone. It covers these topics:
■ Package Contents
■ Installing and Charging the Battery
■ Powering the Phone On and Off
■ About Power-Saving Mode
■ Care and Maintenance
The initial handset parameters and network service must be configured
before you can use your Wireless Phone to make or receive any calls. For
details, see
Chapter 4: Initial Handset Configuration.
Package Contents The 3Com 3108 Wireless Telephone ships with the following contents:
■ One 802.11b/g WLAN, VoIP handset
■ One CD-ROM with user’s manual
■ One Li-ion battery
■ One AC power adapter
Installing and Charging the Battery
The new battery in your Wireless Telephone is shipped partially charged.
Before you can use your phone, you need to install and charge the
battery.
Page 12

12 CHAPTER 1: GETTING STARTED
To install and charge the battery:
1 Remove the rear cover on the handset (See Figure 1 on page page 14.)
2 Insert the battery in the compartment so that the metal contacts on the
battery and handset are aligned.
3 Replace the rear cover of the handset.
4 Plug the AC power adapter into the USB Data Cable slot on the bottom
of the handset. (See
5 Plug the other end of the power adapter into the appropriate AC outlet.
For first time usage, you should charge the battery for at least 8 hours.
While the phone is charging, you can still do phone operations according
the instructions in this guide. The battery charging status is accurate only
after uninterrupted charging/ discharging. The battery can get warm
during charging. This is not a malfunction. If the battery is completely
exhausted, you need to charge the battery for approximately three hours
(with the phone powered off) to reach full capacity.
Figure 2 on page page 15.)
Powering the Phone On and Off
About Power-Saving Mode
Care and Maintenance
You use the same key to power the phone on and off.
To power On the phone — press and hold the Power key.
To power OFF the phone — press and hold the Power key.
To minimize power consumption, the LCD display automatically goes dim
after 15 seconds (default setting) without any operations. You can
change this setting to 30 Seconds or Always On. For details, see LCD
Off Time in the
“Settings” menu described on page 47.
To reactivate the LCD display, press any key.
Note the following tips to keep your phone in proper operating
condition:
■ Keep your phone and accessories away from dusty, wet or dirty areas.
■ Do not put your phone or accessories in extremely hot or cold areas.
■ Do not use harsh chemicals, cleaning solvents, or strong detergents to
clean your phone or accessories.
Page 13

3COM 3108 WIRELESS
2
WLAN Operation –
Placing a Call via a
SIP Proxy Server
T
ELEPHONE
This chapter describes the basic operating principles, controls, features,
and specifications of the 3Com 3108 Wireless Telephone. It covers these
topics:
■ 3108 Wireless Telephone Physical Description
■ Built-in Features
■ Expanded Feature Support
■ Product Specifications
The 3Com 3108 Wireless Telephone is a Session Initiation Protocol
(SIP)-based wireless Voice over Internet Protocol (VoIP) telephone. SIP is
an internationally recognized standard (IETF RFC 3261) for implementing
VoIP. You can make and receive VoIP calls as long as your Wireless
Telephone is registered with a SIP proxy server and you are operating it
within range of an IEEE 802.11b/g enabled wireless network (WLAN). The
SIP proxy server can belong to a wireless Internet Telephony Service
Provider (ITSP) or corporate VoIP PBX system, such as the 3Com NBX
System.
®
When using your 3108 Wireless telephone to make and receive VoIP
telephone calls, you do not need to know if the recipient’s connection
type is an IP, cellular, or land line based service. Your Wireless phone can
call any land line or mobile telephone that a traditional PSTN telephone
can connect to as well as the IP telephone network. Calls received from
VoIP telephones work exactly as you would expect from the traditional
telephone service.
The initial handset parameters and network service must be configured
before you can use your Wireless Phone to make or receive any calls. For
details, see
Chapter 4: Initial Handset Configuration.
Page 14
14 CHAPTER 2: 3COM 3108 WIRELESS TELEPHONE
3108 Wireless
Telephone Physical
Description
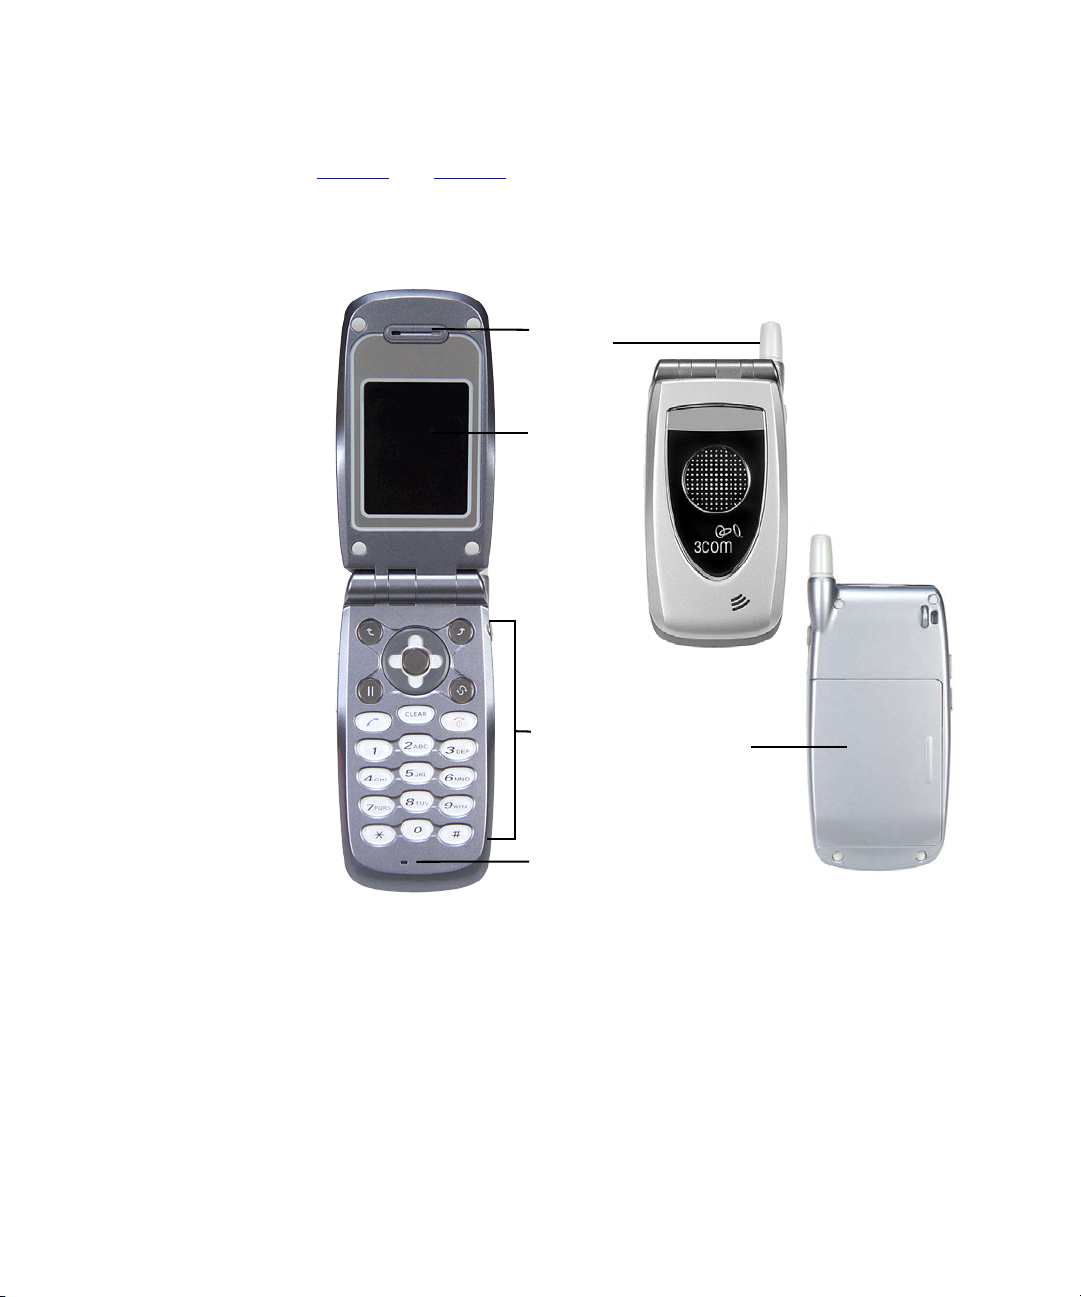
Figure 1 and Figure 2 show the location of buttons, controls, and other
key components of the 3108 Wireless Telephone.
Figure 1 3108 Wireless Telephone — Open, Front, and Back Views
1
5
2
3
6
4
1. Speaker 3. Keypads 5. Antenna
2. Display 4. Microphone 6. Battery Compartment
Page 15
WLAN Operation – Placing a Call via a SIP Proxy Server 15
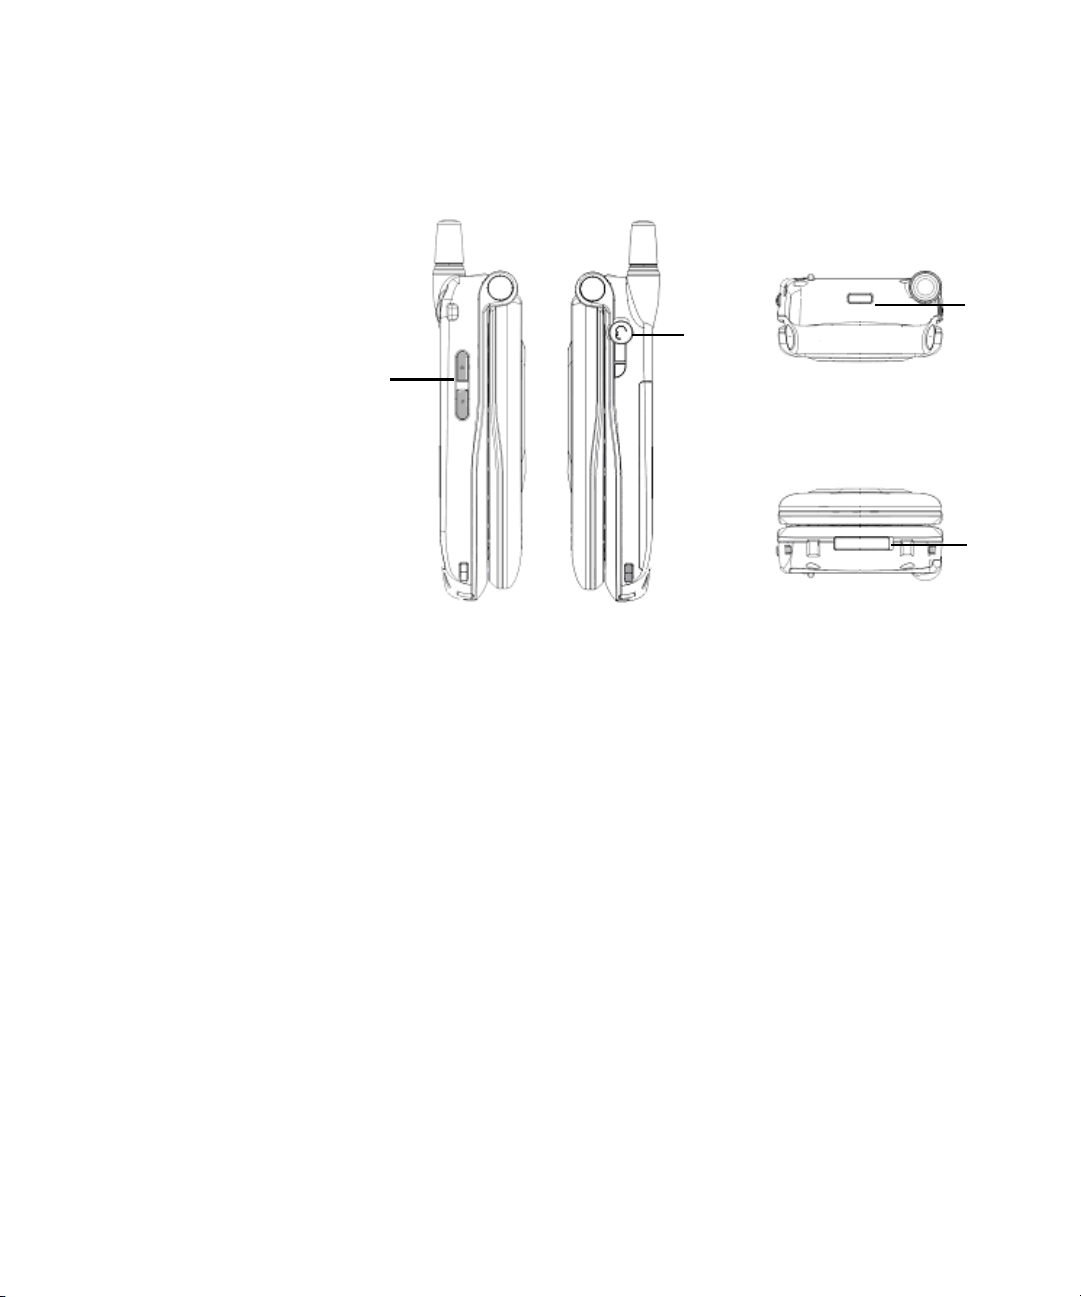
Figure 2 3108 Wireless Telephone — Side, Top, and Bottom Views
8
7
7. Volume adjustment keys 9. Strap eyelet
3
3
8. Earphone jack 10. USB Data cable slot
Built-in Features The 3Com 3108 Wireless Telephone has the following built-in features:
■ Pixel-based display - Intuitive access to calling features
■ Nine configurable speed dials
■ Comfort noise generation (CNG), voice activity detection (VAD) and
adaptive jitter buffer
■ RF and battery level indication
■ Local phone book
■ External 2.4GHz antenna
■ USB charger interface
■ Multi-chords melody
■ ABS+PC plastic housing
■ Color LCD with backlight
■ Simple keypad with backlight
■ Remote firmware (FW) upgrading via Wi-Fi
Page 16

16 CHAPTER 2: 3COM 3108 WIRELESS TELEPHONE
■ Special keypads: Redial, Hold & Volume control
■ SIP v2 signaling protocol, RFC-3261
■ POP3/SMTP E-mail access
■ SMS (optional, by system default)
■ Enhanced security based on WEP/WPA/WPA2
■ Support WMM for QoS operation
■ Embedded Site-Survey to ease WLAN search
Expanded Feature
Support
Product
Specifications
Because it is based on standard SIP VoIP protocols, your 3108 Wireless
Telephone can support additional features offered through the wireless
Internet Telephony Service Provider (ITSP) or corporate VoIP PBX system to
which it subscribes. For example, when used with the 3Com NBX system,
the 3108 Wireless Telephone supports additional features such as, call
pickup and do not disturb, through feature codes. The NBX Feature
Codes Guide for SIP Telephones describes how the 3108 Wireless
Telephone and generic IP telephones interact with the NBX system. This
guide is available through the NBX NetSet utility.
The 3Com 3108 Wireless Telephone specifications are listed in Ta bl e 3.
Ta bl e 3 3Com 3108 Wireless Telephone Specifications
Item Description
CPU BCM1160
Flash Memory NOR 16MB
SRAM Memory 12MB
Wireless LAN Standard
Compliance
Wireless Frequency Range Approx. 2.400~2.497GHz
Output Power Max. 13dBm @802.11g
Data Transmission Rate 1, 2, 5.5, 11Mbps up to 54Mbps
WLAN Network
Architecture Type
Operation Distance Indoor: 20~50m
IEEE802.11b/g 2.4GHz
Max. 17dBm @802.11b
Infrastructure
Outdoor: ~250m (@11Mbps, in line of sight area)
Page 17

WLAN Operation – Placing a Call via a SIP Proxy Server 17
Table 3 3Com 3108 Wireless Telephone Specifications (continued)
Item Description
Channel Support Japan:
802.11b 14 (1~13 or 14th)
Modulation Technology DSSS
OFDM
LCD 1.8î Color LCD, 128x160 pixel, 65k colors
Antenna Type External antenna
Battery Li-ion 1000 mAh
Dimension 112.9mm (L) x 48.7mm (W) x 27.3mm (H)
Weight Approx. 106g
Page 18

18 CHAPTER 2: 3COM 3108 WIRELESS TELEPHONE
Page 19
3
LEARNING TO USE YOUR PHONE
This chapter describes how to use the basic features of your 3Com 3108
Wireless Telephone. It covers these topics:
■ Checking Connection Status
■ Making a Call
■ Answering a Call
■ Answering a Call
■ Using the Keypad Lock Feature
■ Using the Icons
■ Using the Keypad
■ Using LED Status Indicators
■ Storing Names and Numbers in Your Phonebook
Checking Connection Status
The initial handset parameters and network service must be configured
before you can use your Wireless Phone to make or receive any calls. For
details, see
Chapter 4: Initial Handset Configuration.
The connection status lets you check if your handset is within range of
the WLAN network and is properly registered with the SIP proxy server for
VoIP operation.
When your Wireless phone is powered on, you can check your phone’s
connection status by pressing
.
For Wireless Status you can view the following information:
■ BSSID
■ IP Address
■ MAC Address
Page 20
20 CHAPTER 3: LEARNING TO USE YOUR PHONE
For SIP Status you see the following information:
■ SIP Server
■ User Agent
■ Status
Making a Call There are two ways to make a call when your phone is in standby:
■ Dial the number for the extension you want and press .
■ Or, press to display your Phonebook.
Press to search for the desired Phonebook entry and press .
Answering a Call When you receive a call, your phone rings and/or vibrates and displays an
incoming call message.
Ta bl e 4 Answering a Call
Buttons Description
or
Accept and pick up the phone call.
Adjusting the Volume
or
Reject the incoming phone call.
To increase or decrease the handset volume, press the volume adjustment
keys located on the left-side of the handset (up or down).
The volume adjustment
level is indicated on the
display.
Page 21
Using the Keypad Lock Feature 21
Using the Keypad Lock Feature
You can use the Keypad lock feature to avoid unintentional pressing of
keys. There are two ways to activate the keypad lock function:
■ In Standby, press and hold .
■ Or, select Menu and go to Settings > Keypad > Key Lock.
■ Select OK to activate Key Lock.
To release the keypad lock, press and hold .
Using the Icons The Wireless phone’s display uses different icons to inform you of various
capabilities, features, and calling status. These icons are described in
Ta bl e 5.
Ta bl e 5 3108 Wireless Telephone Display Icons
Icon Description
Signal Strength — Indicates the received wireless signal strength. The
greater the number of bars, the stronger the signal
Message — Indicates when you have received new messages.
In Call / Call Forward — Appears when you are on a call/forwarding the
call.
Network Encryption — Indicates when network encryption is set.
SIP Registered/ Not Registered — Indicates when you are
registered/unregistered to SIP server.
Ring Mode — Appears for Silent, Ring, Vibrate, and Ring+Vibrate.
For details, see “Setting the Ring Mode and Ring Tone” on page 33.
Alarm — Pops up when you set an alarm to ring at a specified time.
Battery Level — Indicates the level of the battery charge. The more bars
you see, the more power you have remaining.
Page 22

22 CHAPTER 3: LEARNING TO USE YOUR PHONE
Using the Keypad The Wireless phone’s keypad allows you to dial phone extensions and
enter characters for messages and Phonebook names. You can use the
keypad to enter any combination of numbers and text (letters and special
symbols, including punctuation marks).
The procedures for entering numbers and text are described in the
following sections.
Numeric Mode Numeric mode enables you to enter the digits, * and # characters
indicated on the keys to dial or save as a character string, such as a phone
number entry in your Phonebook. Simply press the keys according to the
digits/characters you want.
To delete digits/characters, press the key.
Text Mode Text mode is indicated by the appearance of ABC in the lower left corner
of your phone’s display. When entering text, start by pressing the key
labeled with the character you prefer:
■ Once for the first character;
■ Twice for the second character and so on.
This method is called multi-tap typing.
For example, you have to press the 5 key twice to display the character
“K,” the 3 key five times to display the character “e,” and the 6 key five
times again to display “n.”
The cursor moves to the right each time you press a key. When entering
the same letter twice or a different letter, wait momentarily for the cursor
to move to the right, and then enter the next character.
You can insert a space between words/letters by pressing the 0 key.
To delete characters, press the key.
The keys you press for the available characters are described in Ta bl e 6.
Page 23

Using the Keypad 23
Ta bl e 6 Available Characters in Text Mode
Key Characters in the Order Displayed
0 space
1 " ' [ ] < >( ) { }
2 ABCabc
3 DEFdef
4 GHIghi
5 JKLjkl
6 MNOmno
7 PQRSpqrs
8 TUVtuv
9 WXYZwxyz
* * . + - / , : ; = ? !
# # @ $ % & \ ^ _ ` | ~
Switching Between Numeric and Text Mode
When the Wireless phone is initially powered up and operating in
standby, the keypad is in numeric mode. At other times, such as when
entering information in Phonebook, you can press
to toggle between Numeric mode, indicated by the appearance of 0-9,
0-9*# or IP in the lower left corner of the display, and Text mode,
indicated by ABC. To type a character string that contains both digits and
letters, you enter the digits or letters by manually switching to either Text
or Numeric input modes before pressing the appropriate key.
Page 24

24 CHAPTER 3: LEARNING TO USE YOUR PHONE
Using LED Status Indicators
You can view phone status by determining the color and pattern of the
LED indicators located on the front of the 3108 handset.
These LED indicators and their status are described in Tab le 7.
Ta bl e 7 LED Status Indicators
LED Indicator Status Description
Lighting seven colors Continuously
rotating
Blue Blinking When there is an unanswered call
Red Blinking When the phone is powered on and the
Solid When the phone is powered off and the
Green Blinking When the phone is powered on and the
Solid When the phone is powered off and the
Magenta Blinking Acts as a warning message, indicating
When receiving an incoming call
When a new e-mail is received
battery is charging
battery is charging
battery is fully charged
battery is fully charged
that the battery is in low level
Storing Names and Numbers in Your Phonebook
You can store up to 200 entries of name and phone number information
in your Phonebook.
To add a Phonebook entry:
1 Select Menu and go to Phonebook > Option > New.
2 Press to enter the appropriate Name, Number, E-mail, and Ring
Tone, and to optionally set the Speed Dial.
Press to switch between Numeric and Text input modes as needed.
The selected text input method indicator shows at the bottom left of the
screen. (Text mode: ABC or Numeric mode: 0-9*#).
3 After completing your entry, press OK to confirm your settings:
Page 25

4
INITIAL HANDSET CONFIGURATION
This chapter is intended to assist the Wireless Telephone Installer or
person responsible for adding VoIP devices to the network.
Before you can operate the 3Com 3108 Wireless Telephone, you must
configure the parameters in the handset that allow the telephone to
communicate with the wireless network (WLAN) and SIP proxy server.
These settings require detailed information about the network to which
this handset is assigned. At a minimum, you will need to enter the IP
address and SIP registration settings for the handset. You may also need
to modify other settings in the handset that are required by the WLAN.
Additionally, the network administrator will need to configure the device
settings that are required by the wireless Internet Telephony Service
Provider (ITSP) or a corporate VoIP PBX system, such as the 3Com NBX®
System.
Configuration Overview
This chapter covers the following topics:
■ Configuration Overview
■ Entering the Network Profile Settings
■ Entering the SIP Account Settings
■ Activating a Network Profile
The 3108 Wireless Telephone’s Profile menu allows you to view and
modify the handset parameters through the handset’s built-in menu
interface. Menu selections are displayed on the handset’s LCD display.
Before you can use your phone, you will need to enter the profile menu
and create a network profile. You can create up to six different network
profiles, although you can activate only one profile at a time.
Page 26

26 CHAPTER 4: INITIAL HANDSET CONFIGURATION
First Step: You are required to set a password for the profile menu. A
pop-up message displays on the screen “No Password! Please Create a
New Password.” After the profile menu’s password is set, you need to
enter the configured password to enter the profile menu.
The next step after creating a network profile is to specify the parameters
for the SIP account that you will associate with this network profile. You
can create up to six different SIP Accounts. To complete your profile
configuration, you must activate the network profile. These tasks are
described in the remaining sections of this chapter.
Entering the Network Profile Settings
To configure a network profile:
1 Press Menu and then press to select Profile.
2 Enter the Profile menu’s password.
3 Press to select the Network Profile menu option and then select
the profile you want to edit from the list.
If you are setting up a new profile, select an unused profile from the list (for
example, <profile>). Press and select Rename to give an
appropriate name to the profile.
4 To edit the settings for the selected network profile, press and select
edit. The Network Profile settings are located in the submenus for
Wireless, IP, Account Choice, Hotspot Choice, and NAT.
5 Edit your Wireless Settings as necessary. Ta bl e 8 describes the available
options.
Ta bl e 8 Wireless Settings
Setting Description
ESSID Stands for Extended Service Set Identifier. Specifying the ESSID is
how you make sure that you connect to your wireless network
instead of your neighbor’s network by mistake. You can either
manually input the New ESSID or select Site Survey to check
all available networks. For example: Default.
Data Rate Select a specific data rate 1 Mb/s, 2 Mb/s, 5.5 Mb/s, 6 Mb/s, 9
Mb/s, 11 Mb/s or set as Auto.
Page 27

Table 8 Wireless Settings (continued)
Entering the Network Profile Settings 27
Security Acts as your usage permission passport. This is an effective way
to achieve data security. Your network provider should inform
you about the authentication types for the access point
encryption modes. Options include:
Open (no security)
■ WEP (select WEP-64 or WEP-128 bit) (Network dependent)
Setting WEP as Security, you can define the WEP Key Index
from One to Four in Key Index.
You can set the WEP key to ensure data transmission from
wireless access points in Key.
■ WPA-PSK (select either WPA-PSK TKIP, which
automatically changes the keys at a preset time interval,
making it much more difficult for hackers to find and exploit
them, or WPA-PSK AES as advanced encryption standard)
(Network dependent).
You can set the key to ensure data transmission from wireless
access points in Key.
■ WPA2-PSK (select WPA2-PSK TKIP or WPA2-PSK AES )
(Network dependent).
You can set key to ensure data transmission from wireless
access points in Key.
■ WPA (select WPA TKIP or WPA AES ) (Network dependent).
■ WPA2 (select WPA2 TKIP or WPA2 AES ) (Network
dependent).
You can set the key to EAP (MD5, GTC, MSCHAPv2, LEAP,
TLS or TTLS), Identity, User Name, Password, CA Cert.,
User Cert. and Private.
6 Edit your IP Settings as necessary. Ta bl e 9 lists the available options.
Ta bl e 9 IP Settings
Setting Description
Fixed IP Enter your IP Address, IP Netmask, IP Gateway, Primary DNS and
Secondary DNS.
DHCP The default setting; to confirm, press .
PPPoE Enter User Name and Password.
7 Edit your Account Choice as necessary. Press to set the associated
SIP Account.
Page 28

28 CHAPTER 4: INITIAL HANDSET CONFIGURATION
If you have not yet set up your SIP account, before you can activate this
network profile, you will need to return to the Account Choice menu
option and specify the particular SIP account you want to associate with
this profile.
8 Edit your Hotspot Choice as necessary. To select the specific Hotspot or
Off, press
9 Edit your NAT Settings as necessary. Contact your network service
provider for details.
Ta bl e 10 NAT Settings
Setting Description
NAT Solution Press to select Disable, SIP PING or STUN.
NAT Timer You can set from 0 to 65535 sec.
STUN
Address
STUN Port See your network service provider.
.
Ta bl e 10 shows the available options.
See your network service provider.
Entering the SIP Account Settings
The SIP account parameters enable your Wireless phone to register with
the designated SIP proxy server for VoIP operation. To enter your SIP
account parameters:
1 Press , select SIP Account, and then press Select.
2 Press and select the SIP account you want to edit.
If you are setting up a new SIP account, select an unused account from
the list (for example, <SIP Account>). Press and select Rename to
give an appropriate name to the account.
3 Press Option to Edit.
4 Edit the following settings as necessary:
■ Phone Number: Numbers are given by the network provider. For
example: 2005.
Page 29

Entering the SIP Account Settings 29
■ Auth. ID: Enter your authorized user ID, for example: 0233.
■ Auth. Password: Enter your authorized password.
■ SIP Domain: Enter the Session Initiation Protocol domain name for
the phone.
■ Proxy Address: Enter the address of SIP server, for example:
192.168.0.1.
To enter the decimal character (.) for the IP address, press the * key while
in Text mode.
■ Advanced: Ta bl e 11 lists the Advanced settings you can configure.
Ta bl e 11 Advanced SIP Parameters
Setting Description
Proxy Port: The port number of SIP server.
Outbound
Address:
Outbound Port: Outbound proxy port.
Local Port: Local port number.
Reg. Timer
(sec):
Codec: Compressed audio format.
Pkt Time (ms): Audio transmitting interval.
OutBand DTMF: The working of out-of-band dual-tone multifrequency.
Outbound proxy address.
Registration refreshing interval.
5 Press to confirm your settings.
After defining the SIP Account settings, you must associate the SIP
account with a particular network profile in order for the Wireless phone
to use these settings. To do this, you name the specific SIP account in the
Account Choice menu option of the active Network Profile. For details,
see “Entering the Network Profile Settings” earlier in this chapter.
Page 30

30 CHAPTER 4: INITIAL HANDSET CONFIGURATION
Activating a Network Profile
Your Wireless Telephone can have up to six different network profiles
defined to support connections to different WLANs and/or SIP proxy
servers.
Only one network profile in your Wireless telephone can be active at a
time.
Follow these steps to activate the network profile you require for
operating your Wireless Telephone:
1 Press Menu and then press to select the Profile.
2 Enter the profile’s password.
3 Select Network Profile to display the list of network profiles
4 Select the Network Profile you want to make active.
5 Press Select and ensure that Auto Detect is set to On.
6 Select Move and press to move the profile you want active to the
top of the list.
7 Press Back and then select Network Profile again. The active
profile in the list is indicated by check mark next to it. (If the profile has
Auto Detect set to Off the displayed icon will be indicated as
.)
Return to Menu and go to Tools > Restart. Press OK to restart the
phone.
Page 31

5
PERSONALIZING YOUR PHONE
This chapter covers the following topics:
■ Setting the Time and Date
■ Setting the Ring Mode and Ring Tone
■ Setting a Wallpaper Image
■ Adjusting the Backlight
Setting the Time and Date
You must set the time and date to fully use your phone features.
Set the time:
1 Select Menu and go to Settings > Clock > Time.
2 Set the time as described in Ta bl e 12.
Ta bl e 12 Setting the Time
Press To
0-9 Enter the time directly
Scroll right or left to change hours/minutes/seconds
Scroll up or down to change the time and to choose AM or PM if time
format is set to 12 hour.
Confirm your time setting
Page 32

32 CHAPTER 5: PERSONALIZING YOUR PHONE
Set the Time Format
1 Select Menu and go to Settings > Clock > Time Format.
2 Set the time format as described in Ta bl e 13.
Table 13 Setting the Time Format
Press To
Set the Date
1 Select Menu and go to Settings > Clock > Date.
2 Set the date as described in Tab l e 14.
Scroll up or down to choose
12-Hour or 24-Hour
Confirm your time format setting
Ta bl e 14 Setting the Date
Press To
0-9 Enter the date directly
Scroll right or left to change years/months/days
Scroll up or down to increase or decrease the date
Confirm your date setting
Set the Date Format
1 Select Menu and go to Settings > Clock > Date Format.
2 Set the date format as described in Ta bl e 15.
Page 33

Ta bl e 15 Setting the Date Format
Press To
Scroll up or down to choose
YY/MM/DD or MM/DD/YY
Confirm your date format setting
Setting the Ring Mode and Ring Tone 33
Setting the Ring Mode and Ring Tone
Your phone rings or vibrates to alert you of an incoming call or other
event. The Ring Mode and Ring Tone settings allow you to personalize
this alert.
Set the Ring Mode
1 Select Menu and go to Settings > Sound Settings > Ring Mode.
Choose from the following options:
■ Silent — Neither rings nor vibrates.
■ Ring — Rings using the selected ring melody.
■ Vibrate — Vibrates but does not ring.
■ Ring + Vibrate — First rings and then starts to vibrate.
2 Press to confirm your setting.
Set the Ring Tone
1 Select Menu and go to Settings > Sound Settings > Ring Tone.
You can select from 17 different melodies.
2 Press to set the Ring Tone melody as described in Ta bl e 16.
Page 34

34 CHAPTER 5: PERSONALIZING YOUR PHONE
Ta bl e 16 Setting Ring Tone Melody
Press To
Scroll up or down to select a ring melody from the list
Play the selected melody
Set your ring tone melody
Setting a Wallpaper Image
You can set a picture as a background image or wallpaper in your phone’s
standby display.
There are five built-in pictures for you to select from for the background
image.
1 Select Menu and go to Settings > Display Setting > Wallpaper.
2 Select a background image and set the Wallpaper as described in
Ta bl e 17.
Table 17 Setting the Wallpaper
Press To
Scroll up or down to different wallpaper
View the selected background image
Set your wallpaper
Page 35

Adjusting the Backlight 35
Adjusting the Backlight
You can adjust the brightness of the display for different lighting
conditions.
1 Select Menu and go to Settings > Display Settings > LCD Brightness.
2 Set the brightness as described in Ta b le 18.
Table 18 Setting the LCD Brightness
Press To
Increase or decrease the LCD lighting level
Set your display lighting level
Page 36

36 CHAPTER 5: PERSONALIZING YOUR PHONE
Page 37

6
CALLING FEATURES
This chapter covers the following topics:
■ Viewing Recent Calls
■ Returning an Unanswered Call
■ Transferring a Call
■ Using the Call Mute
■ Using Call Waiting
■ Using Call Forwarding
Viewing Recent Calls
Returning an Unanswered Call
Your phone keeps track of the calls you recently received and dialed, even
if the calls did not connect.
View recent calls:
1 Select Menu and go to Call Log > Missed Calls/Dialed Calls/Received
Calls.
2 Press to view the name and/or the numbers, if available, with the
time and date when the call was received.
When viewing the Call Log, you can also redial the number by pressing
this key:
This feature provides an indication about the last phone call(s) you
received, but did not answer, so that you may return the call(s).
Your phone keeps a record of your missed calls, and displays:
■ The (missed call) indicator
■ X Missed Calls, where X is the number of unanswered calls
Page 38

38 CHAPTER 6: CALLING FEATURES
To return a missed call:
1 Select and go to Call Log > Missed Calls.
2 Press to view the name and the numbers, if available, with the time and
date when the call was received. You can also redial the number by
pressing the
key.
Transferring a Call When you are on a call, you can transfer this call (either announced or
unannounced) to another party.
Ta bl e 19 shows the sequence of steps involved in a call transfer.
Ta bl e 19 Transferring a Call
Press To
Put the active call on Hold.
Keypad keys and Dial the third-party’s number and place a new call.
Complete the transfer.
While third-party
is connected
Using the Call Mute While you are on a call, you can turn off your microphone so that the
peer party does not hear your voice.
Ta bl e 20 Using the Mute Control
Press To
Toggle mute on and off to block or allow sound to be heard
through your phone’s microphone.
Page 39

Using Call Waiting 39
Using Call Waiting Call Waiting provides an alert tone when you are on an active call and
you receive a second incoming call.
To activate Call Waiting:
1 Select Menu and go to Settings > Call Settings > Call Waiting.
2
Press to select On and then press to activate
Ta bl e 21 describes how to use Call Waiting when you are on an active call.
Ta bl e 21 Using Call Waiting
Press To
Answer the new call
Toggle between the calls
(again)
End the call on talk
Call Waitin
g.
Using Call Forwarding
If Call Waiting is set to Off, there is no alert tone, and the second
incoming call will be rejected.
You can forward a call to another extension based on different
conditions:
■ Forward Number — Transfers the call to the designated extension
under specified conditions.
■ Forward All — Transfers all calls to the designated extension under
any conditions.
■ No Answer — Diverts the call to the designated extension after 18
seconds when the call is unanswered.
■ Busy — Transfers the call to the designated extension when your line
is busy or the call is rejected.
When Call Forwarding is active, an icon appears on the screen.
Page 40

40 CHAPTER 6: CALLING FEATURES
To activate any of the call forwarding functions:
1 Select Menu and go to Settings > Call Settings > Call Forward.
2
Press to select On and then press to activate
To deactivate Call Forward, press
3 Press to return to menu.
To deactivate the set of Call Forward functions, go to Settings > Call
Setting > Call Forward. Choose Cancel All and press Select.
Call Forward.
to select Off.
Page 41

MENUS
7
This chapter describes each of the functions you can access through the
Wireless phone’s built-in menu interface. It covers the following topics:
■ Phonebook
■ Call Log
■ E-mail
■ Speed Dial
■ Profile
■ Settings
■ To ol s
Phonebook This section describes how to manage the information stored in your
Phonebook.
After storing entries in your Phonebook (see “Storing Names and Numbers in Your
Phonebook” on page 24), you can search for a particular entry and view its details.
The entries are listed in alphabetical order. After finding the appropriate name,
press
Table 22 describes each of the menu options you have for Phonebook entries.
to view the details.
Page 42

42 CHAPTER 7: MENUS
Table 22 Using Your Phonebook
Feature Description
Search Phonebook > Search
Press to Search and press Select.
You are asked to enter the name.
Press OK to find the requested entry.
Edit Phonebook > Edit
Press to scroll the list and then press Edit.
You can modify the Name, Number, E-mail, Ring Tone, and
Speed Dial settings for the selected entry.
Press OK to confirm your settings.
Delete Phonebook > Delete
Press to scroll the list and then press to Delete.
A pop-up message “Delete?” appears on the screen. Press OK
or Back to cancel the deletion and return to the menu.
New Phonebook > New
Press Edit and enter the desired Name, Number, E-mail, Ring
Tone, and Speed Dial settings for the new entry.
Call Log Call Log allows you to view and manage the entries for missed, dialed,
and received calls.
Table 23 describes each of the menu options you have for managing Call Log
entries.
Page 43

Table 23 Using the Call Log
Feature Description
Missed Calls Call Log > Missed Calls
Press to Save, Delete Record or Delete All Received calls.
You can also redial the number by pressing the key.
Dialed Calls Call Log > Dialed Calls
Press to Save, Delete Record or Delete All Dialed calls.
You can also redial the number by pressing the key.
Received Calls Call Log > Received Calls
Press to Save, Delete Record or Delete All Received calls.
You can also redial the number by pressing the key.
Delete All Call Log > Delete All
You can remove all records (missed, dialed and received) from the
Call Log.
A pop-up message “Delete All?” appears on the screen. Press OK
or Back to cancel the deletion and return to the menu.
E-mail 43
E-mail Using the E-Mail feature, you can receive or send text messages through
an established e-mail account.
Receiving or sending e-mail is based on POP3 and SMTP system design. To use
this feature, you must have an e-mail account (a specific username and password)
from your e-mail service provider. The maximum storage size is 500 total
messages for Inbox, Outbox and Draft combined.
To limit power consumption, the phone does not automatically scan mail in
mailboxes.
To configure an e-mail account, go to the E-mail menu and enter the information
requested for setting up an account using the Account Settings selection. Ta bl e 24
describes the account setting entries and how to use your phone’s e-mail
capabilities.
Ta bl e 24 Setting Up and Using E-mail
Feature Description
Page 44

44 CHAPTER 7: MENUS
Table 24 Setting Up and Using E-mail (continued)
Account
Settings
From Account Settings, the following options are available:
■ Account Name: enter a name for the activated account.
■ Your Name: enter the name to be displayed as the sender
name.
■ Mail Address: enter your e-mail address.
■ POP3 Address: enter your e-mail address.
■ POP3 User ID: enter your e-mail ID.
■ POP3 Password: enter your e-mail password of 1 to 20
characters.
■ SMTP Address: enter your SMTP address.
■ SMTP User ID: enter your SMTP user ID.
■ SMTP Password: enter your SMTP password of 1 to 20
characters.
Advanced:
■ Reply Address: can be either in English or IP address.
■ POP3 Port: provided by your network service provider. (default:
110)
■ SMTP Port: provided by your network service provider. (default:
25)
■ Signature: enter your signature according to your preference.
■ Reserve Mail: you can store your mails on the server
Write New Writing new mail, you can Preview the subject, recipients and
content; fill in the Subject, add the Recipients (either Input
Address directly or Add By the Phonebook), write the Content,
and then you can either Save To Draft or Send the Mail.
While editing, press to switch the input method (ABC or 0-9).
Receive A pop-up message “Receive Mail?” on the screen indicates you
have mail waiting.
Press OK to receive new mail.
Page 45

Table 24 Setting Up and Using E-mail (continued)
E-mail 45
Inbox Allows you to access your e-mail Inbox and read the e-mail
messages you’ve received.
Press to select the mail you want to read and then
press View.
Details (From, Date, Recipients, Subject and Content) are indicated.
You can also press Option to Reply, Reply with Log (reply
with the original content), Forward, Preview the detail, read the
Subject, set the Recipients, write the Content, Save To Draft,
Send Mail, Delete the mail, or Clear all mail in the Inbox.
Outbox Allows you to view a list of the e-mail messages you’ve sent.
Press to select the mail you want to read and then
press View.
Details (From, Date, Recipients and Subject) are indicated.
From the outbox, you can also Forward mail, Preview the detail,
read the Subject, set the Recipients, write the Content, Save To
Draft, Send Mail, Delete mail, or Clear all mail in the Outbox.
Draft Allows you to retrieve e-mail messages you previously saved as
drafts. When you select this menu option, the list of all e-mail
messages you saved as a draft appears.
Press to select the mail you want to read and then
press View.
Details (From, Date, Recipients and Contents) are indicated.
You can also Edit (either Preview the detail, read the Subject, set
the Recipients, write the Content, Save To Draft or Send Mail)
or Delete the mail or Clear all mail in the Draft box.
Page 46

46 CHAPTER 7: MENUS
Speed Dial You can assign up to nine Speed Dials for single-key dialing of commonly
used numbers. You can assign an entry you saved in your Phonebook a
unique speed dial number (1-9) in phone memory.
two ways to assign a Speed Dial, either through the Phonebook or by
directly assigning a key to a Speed Dial.
Ta bl e 25 Assigning Speed Dials
Feature Description
Phonebook Select the entry to which you want to assign the speed dialing
number.
Press Option to set the key from the
Phonebook > Edit > Speed Dial.
Set the speed dial key from the 1 to 9 key, and press
Speed Dial Select the key to which you want to assign the speed dialing
number. Press Option and select an entry you want to
assign from the Phonebook.
Set.
Ta bl e 25 shows the
Press Set to set the speed dial key to the number you
selected.
Profile Ta bl e 26 shows the options you have for Profile settings.
Table 26 Profile Settings
Feature Description
Network Profile For details, refer to “Entering the Network Profile Settings” on
page 26.
SIP Account For details, refer to “Entering the SIP Account Settings” on
Roaming Profile > Roaming
page 28.
■ Roam Metric (you can set from 0 to -99).
■ Roam Delta (you can set from 0 to 99).
■ Nprobes (you can set from 100 to 1).
■ Active Time (you can set from 1000 to 1).
■ Home Time (you can set from 1000 to 1).
Page 47

Settings 47
Table 26 Profile Settings
Profile Password Profile > Profile Password
You can change your profile password. First enter the “Old
Password” and then enter the “New Password.”
Press OK to set the new password.
Hotspot Profile > Hotspot
Press to select one of five hotspots and then press
Set to enter the hotspot name and password.
Secure Setup Profile > Secure Setup
Press Yes to activate SES (security easy setup) or
Back to menu.
Settings Table 27 describes each of the phone features you can access through the
Settings menu.
Ta bl e 27 Phone Settings
Feature Description
Language Settings > Language
You can set the display language, for example: English or Japanese.
Press Set to confirm your setting or press Back to
return to the previous menu.
Page 48

48 CHAPTER 7: MENUS
Table 27 Phone Settings (continued)
Clock Settings > Clock
There are six options included in Clock menu:
Settings > Clock > Time
This option enables you to adjust the current time.
Press and enter the appropriate time with numeric keys.
Press OK to confirm your setting or press Back to
menu.
Settings > Clock > Date
This option enables you to adjust the current date.
Press and enter the appropriate date with numeric keys.
Press OK confirm your setting or press Back to
menu.
Settings > Clock > Time Format
You can set the desired display format (12-Hour or 24-Hour) for
the time.
If 12-Hour is set as Time Format, the correspondent format
(AM/PM) appears on the screen.
Settings > Clock > Date Format
You can set the display format (YY/MM/DD or MM/DD/YY).
Settings > Clock > Time Zone
You can set the time zone of your location to count the time
difference when you travel around the world.
Settings > Clock > Daylight Savings
You can set Off or On if the daylight saving time is needed.
Settings > Clock > Network Time
You can set Off or On for Network Time.
If the network time is set On, then select a Time Server from the
list displayed.
Page 49

Table 27 Phone Settings (continued)
Alarm Clock Settings > Alarm Clock
This option enables you to set the alarm to ring at a specific time.
Alarm Time:
Press and enter the appropriate time with numeric keys.
Press OK to confirm your setting.
Mode:
Press and to activate the alarm Once, Daily or Weekly
and then press Set to confirm your setting.
To cancel the alarm clock, select Off and then press Set
to confirm your setting.
Settings 49
Page 50

50 CHAPTER 7: MENUS
Table 27 Phone Settings (continued)
Call Settings Settings > Call Settings
Three options are included in Call Settings:
Settings > Call Settings > Call Waiting
For details, refer to Using Call Waiting on page 36.
Settings > Call Settings > Call Forward
For details, refer to Using Call Forwarding on page 37.
Settings > Call Settings > Block Caller ID
This feature allows you to hide your phone number to the calling
party.
Press to select On or Off.
Settings > Call Settings > Refuse Private
This feature allows you to refuse calls that have caller ID blocked.
Press to select On or Off to activate/deactivate.
Settings > Call Settings > Beep Notification
This feature allows you to set Off or On for beep awareness at the
50 seconds for every 1 minute interval.
Press Set to confirm your setting. Or press Back to the
menu.
Settings > Call Settings > Hold Transfer
This feature allows you to transfer your call via SIP server or DTMF
Flash.
Press to select SIP or DTMF Flash.
Settings > Call Settings > Regional Tone
This feature enables you to set a specific call progressing tone.
Press to select North America or Japan.
Page 51

Table 27 Phone Settings (continued)
Speed Dial Settings > Speed Dial
There are three options for you to choose:
Disable: Deactivate the speed dial function.
Ask: Press and hold the numeric key (for example, 1) the screen will
display the numbers and then press
Dial: Press and hold the numeric key (for example, 1) to make the
call directly.
Sound
Settings
Settings > Sound Settings
Four options are included in Sound Settings:
Settings > Sound Settings > Speaker Volume
You can adjust the speaker volume through the menu or by using
the 5-way navigation key.
To increase the volume, either press or .
To decrease the volume, press either or .
Settings 51
to make the call.
Press OK to confirm your setting and then press Back
to menu.
Settings > Sound Settings > Ring Tone
Settings > Sound Settings > Ring Mode
You can select the preferred Melody and/or set the Ring Volume
and Ring Mode in the Ring Tone menu.
For details, refer to“Setting the Ring Mode and Ring Tone” on
page 33.
Settings > Sound Settings > Warning Tone
You can either turn On or Off the warning tone. Press Set
to confirm your setting.
Page 52

52 CHAPTER 7: MENUS
Table 27 Phone Settings (continued)
Display
Settings
Keypad Settings > Keypad
Settings > Display Settings
Settings > Display Settings > Wallpaper
For details, refer to“Setting a Wallpaper Image” on page 34.
Settings > Display Settings > Greeting
This option enables you to set welcome words as greeting and to be
displayed when the phone is powered on.
Settings > Display Settings > LCD Off Time
You can select the period of time the LCD is on. The backlight turns
on when you press a key and turns off when there is no activity for
the specified time period. You can either select LCD off time as
Always On, 15 Seconds or 30 Seconds.
Settings > Display Settings > LCD Brightness
For details, refer to “Adjusting the Backlight” on page 35.
Settings > Display Settings > Config. Tip
This feature allows you to view all the settings you’ve set. When
scrolling over a setting, a small window indicates the value.
Press to select On or Off to activate/deactivate.
Three options included in Keypad:
Settings > Display Settings > Keypad Lock
Key lock is used to prevent unintentional pressing of keys.
Press OK to process the action or press Back to the menu.
Settings > Display Settings > Key Tones
You can activate the tone that the phone sounds when you press a
key.
To activate the key tone, press to select Click Tone.
To deactivate the key tone, select Tone Off.
Settings > Display Settings > Key Backlight
You can activate (set as On) the key backlight when you press a key.
Tools Table 28 describes each of the options you have through the Tools menu.
Page 53

Ta bl e 28 Tools Options
Feature Description
Signal
Quality
Site Survey Tools > Site Survey
Statistics Tools > Statistics
Battery Tools > Battery
Ping Tools > Ping
Version Tools > Version
Back to
Default
Tools > Signal Quality
Displays the status of current wireless connection, including ESSID,
BSSID, Channel, Rate, RSSI, Noise and Security.
Lists all available networks.
You can see all listed networks (sites) information.
Press Renew to rescan the networks. Press Detail to
check the details.
You can check the following information: IP Statistics, RTP/RTCP,
Encoding and Decoding.
To refresh the information, press to Renew.
You can see Charger Status and Voltage level.
You can test connectivity with a network host.
You can view information for Bootcode, Firmware, Build Time and
RAM Size.
Tools > Back to Default
You can either Clear the original data recorded in Phonebook,
E-mail or Others. You can also remove All settings on your phone
and reset factory defaults.
A confirmation message appears on the screen before the change.
Tools 53
Press OK to proceed or Back to exit to the menu.
Restart Tools > Restart
A confirmation message appears. Press OK to power your
phone off and on, or press Back to return to the menu.
Page 54

54 CHAPTER 7: MENUS
Page 55

8
WEB CONFIGURATION
The 3108 Wireless Telephone includes a built-in Web Configuration utility
that allows you to easily view and edit your telephone settings from your
PC.
This chapter covers the following topics:
■ Accessing the Web Configuration Utility
■ Checking Wireless Network Status
■ Editing Names and Numbers in Your Phone Book
■ Wireless Network Settings
■ SIP Settings
■ Phone Settings
■ E-mail Settings
■ Upgrade Software
■ Upgrade Bootcode
■ Debug Statistics
■ Reboot Phone
■ Password
■ Logout
Page 56

56 CHAPTER 8: WEB CONFIGURATION
Accessing the Web Configuration Utility
Checking Wireless Network Status
To access the Web Configuration utility, your Wireless phone must have
an IP address and WLAN connection. The PC used to view the Web
Configuration utility must be connected to this same network.
1 In Standby, press Status to view your Phone Status - IP Address. A
connected IP address is indicated (for example,172.16.140.174).
2 Enter the phone’s IP address in your PC’s Web browser (for example,
http://172.16.140.174).
3 Enter the Logon ID and password to access the Web Configuration utility.
(The initial default settings for logon ID and password are: admin and
admin, respectively.)
By selecting Current Status, you can view your phone’s ESSID, BSSID, IP
address and MAC address settings for the wireless network.
Editing Names and Numbers in Your Phone Book
Using Phone Book in Web Configuration, you can add, store, edit or
remove all recorded entries.
To create a new entry:
1 Select New and then enter the Name (20 characters as max. length),
E-mail, Ring Tone, Number and/or set the Speed Dial (1 to 9).
2 Select Save to add the new entry to your Phonebook.
Page 57

Wireless Network Settings 57
To edit an existing entry:
1 In the Name column, double-click the entry you want to edit.
2 Make any changes you need.
3 After editing an entry, you can Save, Delete, Cancel or Reset the entry.
You can delete all the recorded entries by pressing Clear All. A
confirmation message appears on the screen. Press OK to confirm your
setting. All entries are then removed from the Phone Book.
Wireless Network Settings
Select Wireless Network Settings to display your Network Profile List.
From this list you can Configure or Remove a network profile.
To configure a network profile:
1 Select the profile entry and click Configure to enter the sub-menu.
Ta bl e 29 describes the settings that you can configure for a Network
Profile.
Page 58

58 CHAPTER 8: WEB CONFIGURATION
Ta bl e 29 Network Profile Settings
Setting Description
Network Profile
Name:
ESSID: Stands for Extended Service Set Identifier. Specifying the ESSID
Data Rate: It can be set as Auto, 1Mbp/s, 2Mbp/s, 5.5Mbp/s, 6Mbp/s,
Security: Options include: OPEN, WEP-64, WEP-128, WPA-PSK TKP,
IP Setting: Select one of the following: DHCP, Fixed IP or PPPOE.
NAT Setting: Select one of the following: Disable, SIP PING or STUN. You
2 Select Save to confirm your settings. Alternatively, you can select Cancel
to leave the settings unchanged, or Reset to remove the settings.
Enter the network profile name.
is how you make sure that you connect to your wireless
network instead of your neighbor’s network by mistake. You
can either manually input the New ESSID or select Site
Survey to check all available networks. For example: Default.
9Mbp/s, 11Mbp/s, 12Mbp/s, 18Mbp/s, 24Mbp/s, 36Mbp/s,
48Mbp/s or 54Mbp/s.
WPA, PSK AES, WPA2-PSK TKP, WPA2-PSK AES, WPA TKIP,
WPA AES, WPA2 TKIP, WPA2 AES
can also set NAT timer.
3 Edit the Certification settings (CA Cert./ User Cert./ Private Key) as
needed.
4 Edit your SIP Account Choice setting as needed.
SIP Settings Select SIP Account Settings to display the SIP Account List. From this list
you can Configure or Remove a SIP Account.
Page 59

Phone Settings 59
To configure a SIP Account:
1 Select the account entry and click Configure to enter the sub-menu.
2 Edit the following SIP Account settings as needed: SIP Account Name,
Phone Number, Authentication ID, Authentication Password, SIP Domain,
Proxy Address, Outbound Address, Local Port, Register Timer(sec), Codec
(Auto/G.711u/G.711a/ G129A), Pkt Time(ms)(Default,
20,30,40,50,60,70,80), OutofBand DTMF (Off/On).
3 Select Save to confirm your settings. Alternatively, you can select Cancel
to leave the settings unchanged or Reset to remove the settings.
Phone Settings This section describes the phone settings you can view or edit. Ta bl e 30
describes the settings that you can configure for a Network Profile.
Ta bl e 30 Phone Settings
Setting Description
Clock: Three options can be set: Time Zone, Daylight Savings and Network
time.
Call Settings: You can set Call Waiting, Forward Number, No Answer, Block Caller
ID, Beep Notification, Hold Transfer, Forward All, Busy, Refuse
Private and Regional Tone in Call Settings.
Sound
Settings:
Display
Settings:
You can set Speaker Volume, Ring Volume, Warning Tone, Melody
and Ring Mode in Sound Settings.
You can set LCD Off Time or Wallpaper in Display Settings.
Page 60

60 CHAPTER 8: WEB CONFIGURATION
E-mail Settings This section helps you to manage your e-mail account.
1 To adjust your e-mail account, click Configure to enter the sub-menu.
2 The following options are listed: Account Name, Your Name, Mail
Address, POP3 Address, POP3 User ID, POP3 Password, POP3 Port, SMTP
Address, SMTP User ID, SMTP Password, SMTP Port, Reply Address and
Signature.
3 You can also Remove or Activate one of up to five e-mail accounts.
Upgrade Software This option enables you to upgrade your phone’s software. The 3108
Wireless Telephone is shipped with firmware already installed. To upgrade
your firmware:
1 Click Browse and find the new firmware image on your network or on a
CD.
2 Click Upgrade. Be sure to wait at least 3 minutes for the upgrade
process to complete.
Page 61

Upgrade Bootcode 61
Upgrade Bootcode This option enables you to upgrade your phone’s bootcode (starting
system).
CAUTION: Do not interrupt a boot code upgrade operation.
Debug Statistics Detailed information about Debug Statistics is listed.
Information includes: Wireless Network Status (ESSID, BSSID, IP
address, MAC address), WL Info (rssi is, noise is, No scan in progress,
current mac channel, target channel, Receive, Transmit), RTP Stats
(igrRtpPkt, igrRtpByte, egrRtpByte, egrRtpCumLostPkt,
egrRtpNoProfDiscPkt, igrRtpPkt, egrRptJitter, igrRtpLatency), PVE Stats
(peakHoldingTime, packetCount, addTailCount, reorderCount,
overrunCount, duplicateCount, outOfRangeCount, tooLateCount,
cantDecodeCount, ajcUnderrunCount, ajcDeleteCount, ajcRepeatCount,
ajcResyncCount, ajcPhaseJitterCount, inactiveFrameCount,
activeFrameCount, sidFrameCount, toneRelayCount) and PVE State
(timer, expectedTimestamp, lastArrivalTime, lastArrTimeStamp,
lastReleaseTimestamp, actualHoldTime, currentHoldTime,
minHoldTimeTracker, masHoldTimeTracker, releaseBump,
underrunDuration, actionPendingTimer, currentDec, timerLastArrival,
currentEnc, currentEncPktTime, currentEncPktSize).
Page 62

62 CHAPTER 8: WEB CONFIGURATION
Reboot Phone After upgrading software, you need to reboot the phone (power off and
on) to activate all new settings.
Password You can change the current password for the Web Configuration utility
by using this feature.
Logout To exit the web configuration, select Logout.
Page 63

9
TROUBLESHOOTING
This appendix contains troubleshooting suggestions for identifying and
solving common network connection and SIP registration problems. For
additional assistance, see your network administrator.
Unable to Connect to the Network
Unable To Register With The SIP Server
If upon power up, your phone displays the message “No Network,”
check the following:
■ Check the signal strength on your phone’s display. Make sure that you
are within range of the WLAN signal transmitter.
■ Select Status and check to see if your phone’s wireless settings
are correct. If your phone is configured to obtain its IP address from a
DHCP server, check that it has received its IP address. If you need to
modify your phone’s wireless settings, see “
Profile Settings” on page 26.
■ If you have multiple network profiles configured for your phone, verify
that the correct network profile is active. See
Profile” on page 30.
If upon power up, your Wireless phone shows a network connection, but
displays the message “No Service,” check the following:
■ Select Status and check to see if your phone’s SIP settings are
correct. If you need to modify any of these settings, see “Entering the
SIP Account Settings” on page 28.
■ If you have multiple network profiles configured for your phone, verify
that the correct network profile is active. See
Profile” on page 30.
Entering the Network
“Activating a Network
“Activating a Network
■ Make sure the SIP account is properly defined and that this SIP
account name appears in the Account Choice option of the active
Page 64

64 CHAPTER 9: TROUBLESHOOTING
network profile. See “Entering the Network Profile Settings” on
page 26.
Page 65

A
Caution: Exposure to
Radio Frequency
Radiation
REGULATORY INFORMATION
The 3Com 3108 Wireless Telephone, (3C10408A, WL-108) must be
installed and used in strict accordance with the manufacturer’s
instructions as described in the user documentation that comes with the
product. This device complies with the following radio frequency and
safety standards.
This product contains encryption. It is unlawful to export out of the U.S.
without obtaining a U.S. Export License.
This product does not contain any user serviceable components. Any
unauthorized product changes or modifications will invalidate 3Com’s
warranty and all applicable regulatory certifications and approvals.
This device has been designed to operate with the antennas listed below,
and having a maximum gain of [3.41] dB. Antennas not included in this list or
having a gain greater than [3.41] dB are strictly prohibited for use with this
device. The required antenna impedance is [50] ohms.
The highest SAR value for this model WL-108 was tested by DASY4,
considering handset use in contact with the body, and is in compliance
with FCC SAR limits.
This equipment doesn't include any accessories and complies with
FCC radiation exposure limits set forth for an uncontrolled environment.
This equipment should be carried with a minimum distance 1.5cm (1 inch)
between the antenna and your body,when handset is not in use.
The installer of this radio equipment must ensure that the antenna is located
or pointed such that it does not emit RF field in excess of Health Canada
limits for the general population; consult Safety Code 6, obtainable from
Health Canada’s website www.hc-sc.gc.ca/rpb.
This product has been tested and complied with the standard EN50360
and EN50361.
Page 66

Page 67

Page 68

68 APPENDIX A: REGULATORY INFORMATION
Caution: NO! Country Code selection feature to be disabled for products marketed to the US/CANADA.
provide maximum shielding. Equipment (or its transmit antenna) that is
installed outdoors is subject to licensing.
Pour empecher que cet appareil cause du brouillage au service faisant
l'objet d'une licence, il doit etre utilize a l'interieur et devrait etre place
loin des fenetres afin de Fournier un ecram de blindage maximal. Si le
matriel (ou son antenne d'emission) est installe a l'exterieur, il doit faire
l'objet d'une licence.
Industry Canada (IC)
Emissions Compliance
Statement
Safety Compliance
Notice
Europe – EU
Declaration of
Conformity
This Class B digital apparatus complies with Canadian ICES-003.
AVIS DE CONFORMITÉ À LA RÉGLEMENTATION D’INDUSTRIE CANADA
Cet appareil numérique de la classe B est conform à la norme NMB-003
du Canada.
This device has been tested and certified according to the following
safety standards and is intended for use only in Information Technology
Equipment which has been tested to these or other equivalent standards:
■ UL Standard 60950-1
■ CAN/CSA C22.2 No. 60950-1
■ IEC 60950-1
■ EN 60950-1
EU Declaration of Conformity
This equipment may be operated in
AT BE CY CZ DK EE FI FR
DE GR HU IE IT LV LT LU
MT NL PL PT SK SI ES SE
GB IS LI NO CH BG RO TR
Page 69

69
Intended use: IEEE 802.11b/g radio device
To ensure product operation is in compliance with local regulations, select
the country in which the product is installed. Refer to 3Com 3108
Wireless Telephone Guide (3C10408A, WL-108).
Europe - Declaration
of Conformity in
Languages of the
European Conformity
Declaration of Conformity in Languages of the European Conformity
Česky
[Czech]
Dansk
[Danish]
Deutsch
[German]
Eesti
[Estonian]
English Hereby, 3Com Corporation, declares that this RLAN device is in compliance with
Español
[Spanish]
Ελληνική
[Greek]
Français
[French]
Italiano
[Italian]
Latviski
[Latvian]
Lietuvių
[Lithuanian]
Nederlands
[Dutch]
Malti
[Maltese]
Magyar
[Hungarian]
3Com Coporation tímto prohlašuje, tímto prohlašuje, že tento RLAN device je ve
shodě se základními požadavky a dalšími příslušnými ustanoveními směrnice
1999/5/ES..
Undertegnede 3Com Corporation erklærer herved, at følgende udstyr RLAN device
overholder de væsentlige krav og øvrige relevante krav i direktiv 1999/5/EF.
Hiermit erklärt 3Com Corporation, dass sich das Gerät RLAN device in
Übereinstimmung mit den grundlegenden Anforderungen und den übrigen
einschlägigen Bestimmungen der Richtlinie 1999/5/EG befindet.
Käesolevaga kinnitab 3Com Corporation seadme RLAN device vastavust direktiivi
1999/5/EÜ põhinõuetele ja nimetatud direktiivist tulenevatele teistele asjakohastele
sätetele.
the essential requirements and other relevant provisions of Directive 1999/5/EC.
Por medio de la presente 3Com Corporation declara que el RLAN device cumple
con los requisitos esenciales y cualesquiera otras disposiciones aplicables o
exigibles de la Directiva 1999/5/CE.
ΜΕ ΤΗΝ ΠΑΡΟΥΣΑ 3Com Corporation ΔΗΛΩΝΕΙ ΟΤΙ RLAN device
ΣΥΜΜΟΡΦΩΝΕΤΑΙ ΠΡΟΣ ΤΙΣ ΟΥΣΙΩΔΕΙΣ ΑΠΑΙΤΗΣΕΙΣ ΚΑΙ ΤΙΣ ΛΟΙΠΕΣ
ΣΧΕΤΙΚΕΣ ΔΙΑΤΑΞΕΙΣ ΤΗΣ ΟΔΗΓΙΑΣ 1999/5/ΕΚ.
Par la présente 3Com Corporation déclare que l'appareil RLAN device est conforme
aux exigences essentielles et aux autres dispositions pertinentes de la directive
1999/5/CE.
Con la presente 3Com Corporation dichiara che questo RLAN device è conforme ai
requisiti essenziali ed alle altre disposizioni pertinenti stabilite dalla direttiva
1999/5/CE.
Ar šo 3Com Corporation deklarē, ka RLAN device atbilst Direktīvas 1999/5/EK
būtiskajām prasībām un citiem ar to saistītajiem noteikumiem.
Šiuo 3Com Corporation deklaruoja, kad šis RLAN device atitinka esminius
reikalavimus ir kitas 1999/5/EB Direktyvos nuostatas.
Hierbij verklaart 3Com Corporation dat het toestel RLAN device in overeenstemming is met de essentiële eisen en de andere relevante bepalingen van richtlijn
1999/5/EG.
Hawnhekk, 3Com Corporation, jiddikjara li dan RLAN device jikkonforma
mal-htigijiet essenzjali u ma provvedimenti ohrajn relevanti li hemm fid-Dirrettiva
1999/5/EC.
Alulírott, 3Com Corporation nyilatkozom, hogy a RLAN device megfelel a vonatkozó
alapvetõ követelményeknek és az 1999/5/EC irányelv egyéb elõírásainak.
Page 70

70 APPENDIX A: REGULATORY INFORMATION
Europe - Restrictions
for Use of 2.4 GHz
Frequencies in
European Community
Countries
Polski
[Polish]
Português
[Portuguese]
Slovensko
[Slovenian]
Slovensky
[Slovak]
Suomi
[Finnish]
Niniejszym 3Com Corporation oświadcza, że RLAN device jest zgodny z
zasadniczymi wymogami oraz pozostałymi stosownymi postanowieniami Dyrektywy
1999/5/EC.
3Com Corporation declara que este RLAN device está conforme com os requisitos
essenciais e outras disposições da Directiva 1999/5/CE.
3Com Corporation izjavlja, da je ta RLAN device v skladu z bistvenimi zahtevami in
ostalimi relevantnimi določili direktive 1999/5/ES.
3Com Corporation týmto vyhlasuje, že RLAN device spĺňa základné požiadavky a
všetky príslušné ustanovenia Smernice 1999/5/ES.
3Com Corporation vakuuttaa täten että RLAN device tyyppinen laite on direktiivin
1999/5/EY oleellisten vaatimusten ja sitä koskevien direktiivin muiden ehtojen
mukainen.
A copy of the signed Declaration of Conformity can be downloaded from
the Product Support web page for the 3C10408A at
http://www.3com.com.
Also available at http://support.3com.com/doc/WL-108_EU_DOC.pdf
■ This device may be operated indoors or outdoors in all countries of the
European Community using the 2.4GHz band: Channels 1 – 13,
except where noted below.
■ In Italy the end-user must apply for a license from the national
spectrum authority to operate this device outdoors.
■ In Belgium outdoor operation is only permitted using the 2.46 –
2.4835 GHz band: Channel 13.
■ In France outdoor operation is only permitted using the 2.4 – 2.454
GHz band: Channels 1 – 7.
Brazil RF Compliance Este produto está homologado pela ANATEL, de acordo com os
procedimentos regulamentados pela Resolução 242/2000, e atende aos
requisitos técnicos aplicados.
Opera em caráter secundário, isto é, não tem direito a proteção contra
interferência prejudicial, mesmo de estações do mesmo tipo, e não pode
causar interferência a sistemas operando em caráter primário.
Para maiores informações, consulte o site da ANATEL –
www.anatel.gov.br
Page 71

71
Korea RF Compliance This device may cause radio interference during its operation. Therefore
service in relation to human life security is not available.
Page 72

72 APPENDIX A: REGULATORY INFORMATION
Page 73

INDEX
Numbers
3108 Wireless Telephone
display icons 21
graphic showing open, front, and back
views 14
graphic showing side, top, and bottom
views 15
initial configuration of 25
VoIP operation 13
3Com NBX System 25
A
Account Choice 27
administrator, definition 8
Auto Attendant, definition 8
Auto Detect 30
available characters in text mode 23
B
battery
charging 11
compartment for 14
installing 11
level indicator 21
type of 17
C
call forwarding 39
call log 37
menu 42
call mute 38
call transfer 38
call waiting 39
connection status 19
conventions, documentation 8
D
date setting 32
debug statistics 61
deleting characters 22
E
earphone jack
location of 15
E-Mail menu 43
e-mail settings 60
encryptionSee security 27
entering digits, *, and # characters 22
entering letters and special characters 22
Extended Service Set Identifier (ESSID) 26
H
Hotspot Choice 28
I
icons
3108 Wireless Telephone display 21
Internet Telephony Service Provider (ITSP) 25
IP settings 27
K
keypad lock 21
L
LCD brightness setting 35
LED indicators 24
logging out 62
N
NAT Settings 28
network profile 57, 59
activating 30
configuring 26
renaming 26
Network Profile menu 26
no network messageSee unable to connect to the
network 63
Page 74

74 INDEX
no service messageSee unable to register with the
SIP server 63
numeric modeSee entering digits, *, and #
characters 22
P
password
for Profile menu 26
phone settings 59
phonebook
accessing from the Web Configuration utility 56
menu 41
storing entries in 24
using to make a call 20
power key 12
Profile menu 25, 46
R
rebooting phone 62
receptionist
definition 8
ring mode setting 33
ring tone setting 33
S
security 27
Session Initiation Protocol 13
Settings menu 47
SIP account 28, 58
associating with network profile 28
configuring 28
renaming 28, 29
SIPSee Session Initiation Protocol 13
Site Survey 26
speed dial
assigning an entry to 46
Speed Dial menu 46
switching between text and numeric modes 23
upgrading bootcode 61
upgrading software 60
USB Data Cable slot
location of 15
plugging AC power adapter into 12
user, definition 8
V
VoIP 13, 28
volume adjustment keys
location of 15
use of 20
W
wallpaper setting 34
Web Configuration utility
accessing 56
changing password for 62
using to view current status 56
wireless network settings 57
T
text modeSee entering letters and special
characters 22
time setting 31
Tools menu 53
U
unable to connect to the network 63
unable to register with the SIP server 63
 Loading...