

Page 1
Aruba Central
Switch Configuration
User Guide
Page 2

Copyright Information
© Copyright 2017 Hewlett Packard Enterprise Development LP.
Open Source Code
This product includes code licensed under the GNU General Public License, the GNU Lesser General Public
License, and/or certain other open source licenses. A complete machine-readable copy of the source code
corresponding to such code is available upon request. This offer is valid to anyone in receipt of this information
and shall expire three years following the date of the final distribution of this product version by Hewlett
Packard Enterprise Company. To obtain such source code, send a check or money order in the amount of US
$10.00 to:
Hewlett Packard Enterprise Company
Attn: General Counsel
3000 Hanover Street
Palo Alto, CA 94304
USA
Revision 01 | September 2017 Aruba Central | User Guide
Page 3
Contents
Contents 3
Contacting Support 4
Switch Configuration 5
Aruba Switches 5
Supported Switch Platforms 5
Configuring Switch Parameters 6
Configuring Ports 6
Configuring VLANs 8
Adding VLANDetails 8
Editing the VLANDetails 8
Deleting VLANDetails 9
Configuring Access Policies 9
Configuring DHCP Pools 9
Adding a New DHCP Pool 10
Adding CLI Snippets 10
Adding CLI Snippets for Template Groups 10
Adding CLI Snippets to Switches Provisioned in Other Groups 11
Configuring System Parameters for a Switch 11
Configuring Administrator Credentials for Mobility Access Switch 11
Configuring Administrator and Operator Credentials for Other Aruba Switches 11
Configuring a Name Server 12
Aruba Central | User Guide Contents | 3
Page 4
Contacting Support
Table 1: Contact Information
Main Site arubanetworks.com
Support Site support.arubanetworks.com
Airheads Social Forums and Knowledge
Base
North American Telephone 1-800-943-4526 (Toll Free)
International Telephone arubanetworks.com/support-services/contact-support/
Software Licensing Site hpe.com/networking/support
End-of-life Information arubanetworks.com/support-services/end-of-life/
Security Incident Response Team Site: arubanetworks.com/support-services/security-bulletins/
community.arubanetworks.com
1-408-754-1200
Email: sirt@arubanetworks.com
4 | Contents Aruba Central | User Guide
Page 5

Chapter 2
Switch Configuration
This chapter describes the procedure for configuring Switches. For more information on Switch configuration,
see the following topics:
n Aruba Switches on page 5
n Configuring Switch Parameters on page 6
n Configuring Ports on page 6
n Configuring Access Policies on page 9
n Configuring VLANs on page 8
n Configuring DHCP Pools on page 9
n Adding CLI Snippets on page 10
n Configuring System Parameters for a Switch on page 11
Aruba Switches
The Aruba Switches enable secure, role-based network access for wired users and devices, independent of their
location or application.
The Switch operates as a wired access point when deployed with an Aruba Mobility Controller. As a wired access
point, users and their devices are authenticated and assigned a unique role by the Mobility Controller. These
roles are applied irrespective of whether the user is a Wi-Fi client, or is connected to a port on the Switch. The
use of Switch allows an enterprise workforce to have consistent and secure access to network resources based
on the type of users, client devices, and connection method used.
Supported Switch Platforms
Central supports the following Aruba Switch platforms:
Switch Platform Supported Software Versions on Central
Aruba 2930M Switch Series WC.16.04.0004 or later
Aruba 2920 Switch Series WB.16.02.0012 or later
Aruba 2930F Switch Series WC.16.02.0012 or later
Aruba 3810 Switch Series KB 16.03.0003 or later
Aruba 2530 Switch Series YA/YB 16.04.0008 or later
Aruba 2540 Switch Series YC.16.02.0012 or later
Legacy Aruba Switch Platforms
Central also supports the following legacy Switch models:
n S1500-12P
Aruba Central | User Guide Switch Configuration | 5
Page 6
n S1500-24P
n S2500-24P
n S3500-24T
Central supports the following ArubaOS software versions on the legacy Switch platforms:
n 7.3.2.6
n 7.4.0.3
n 7.4.0.4
Configuring Switch Parameters
You can export configurations from an existing Switch to a new Switch within the same group. In this case, the
new configuration of the Switch overwrites the existing configuration (including the device override).
You can configure parameters of a Switch through the UI. By default, these parameters have the values
configured using the Switch.
If the switch inherits the group configuration, the configuration parameters are already defined. However, if
required, you can edit these parameters.
To view the configuration parameters for the Switch, complete the following steps:
1. Click Configuration.
n To configure a legacy Aruba Switch, click Switch-MAS.
n To configure other Aruba Switches, click Switch-Aruba.
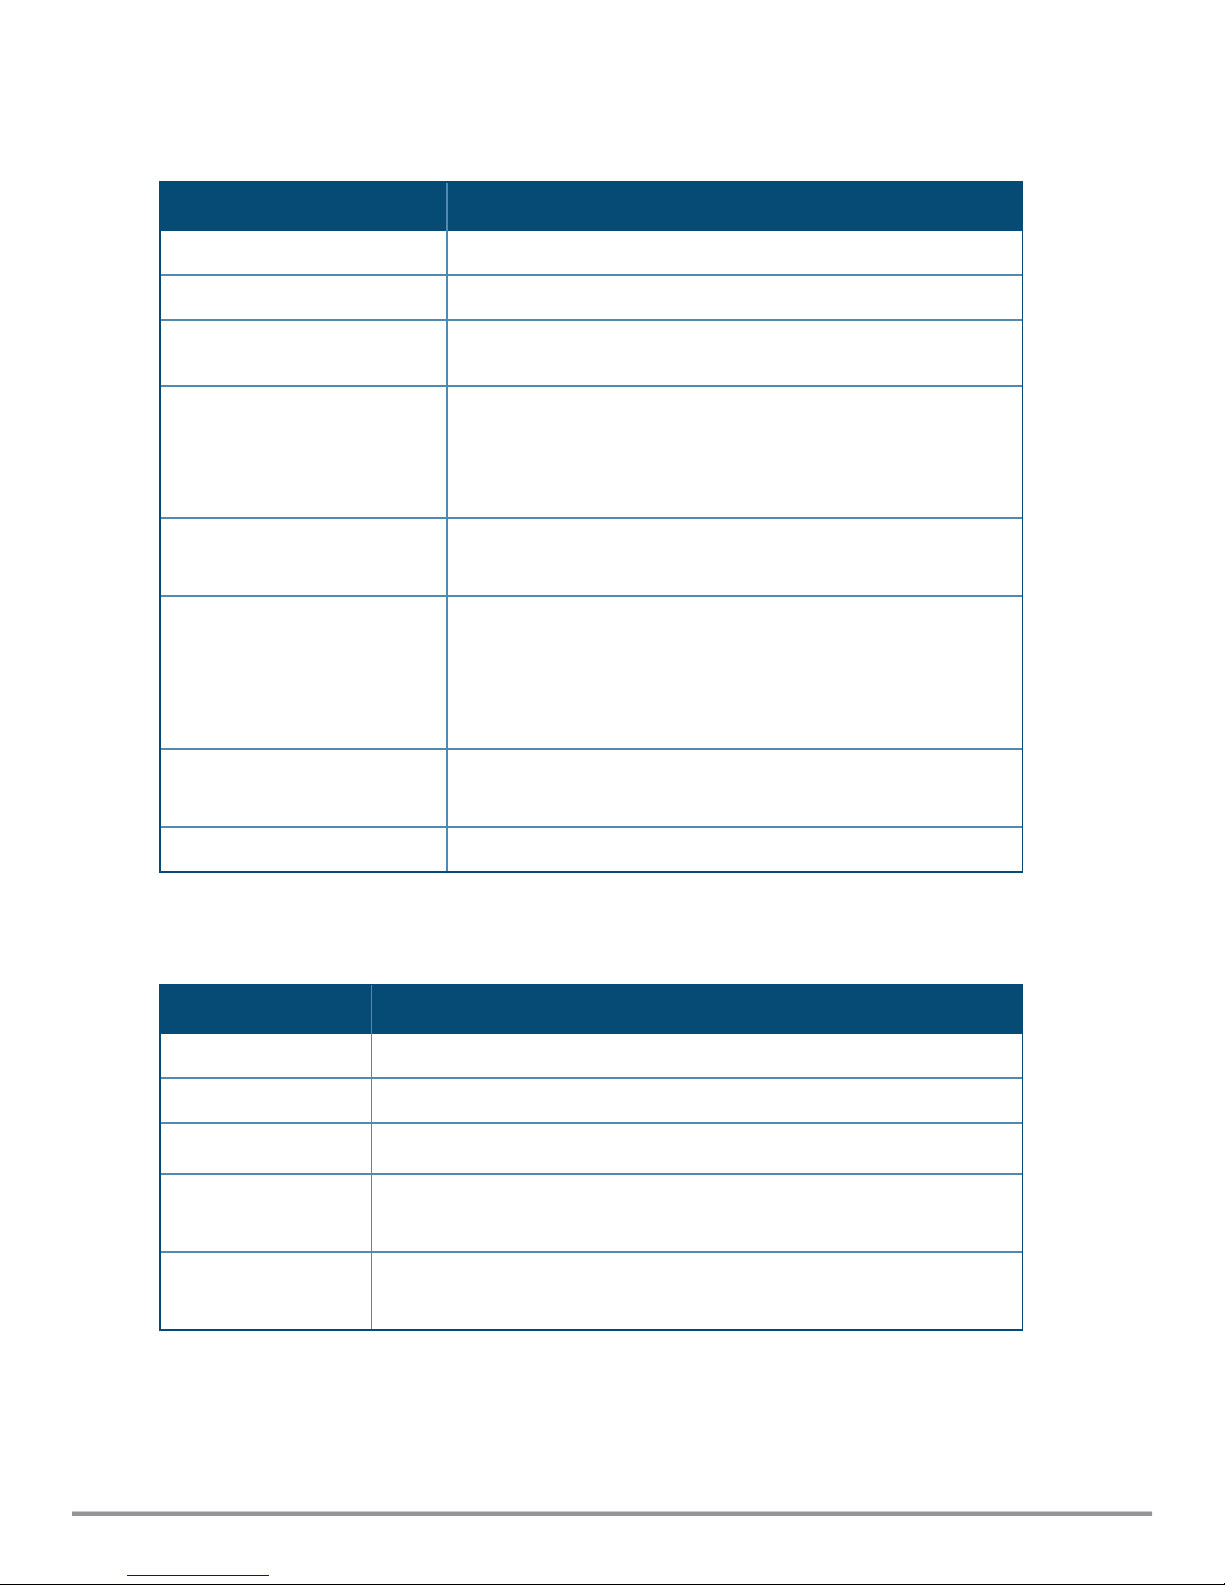
2. Click Switches. The Switches page displays information described in the following table.
Table 2: Switches Pane
Name Description
MAC Address MAC address of the Switch
Hostname Name of the host.
IP Assignment Method of IP assignment as Static or DHCP.
IP Address IP address for static IP assignment.
Netmask Netmask for static IP assignment.
Default Gateway Default gateway for static IP assignment.
3. To view the details of the switch, click the MAC address of the switch.
4. To edit the switch configuration parameters, click the edit icon.
Configuring Ports
To view the port details of a switch, complete the following steps:
1. Click Configuration.
n To configure a legacy Aruba switch , click Switch-MAS.
n To configure other Aruba switches, click Switch-Aruba.
2. Click Ports. The Ports page displays the list of ports configured on the switch.
6 | Switch Configuration Aruba Central | User Guide
Page 7
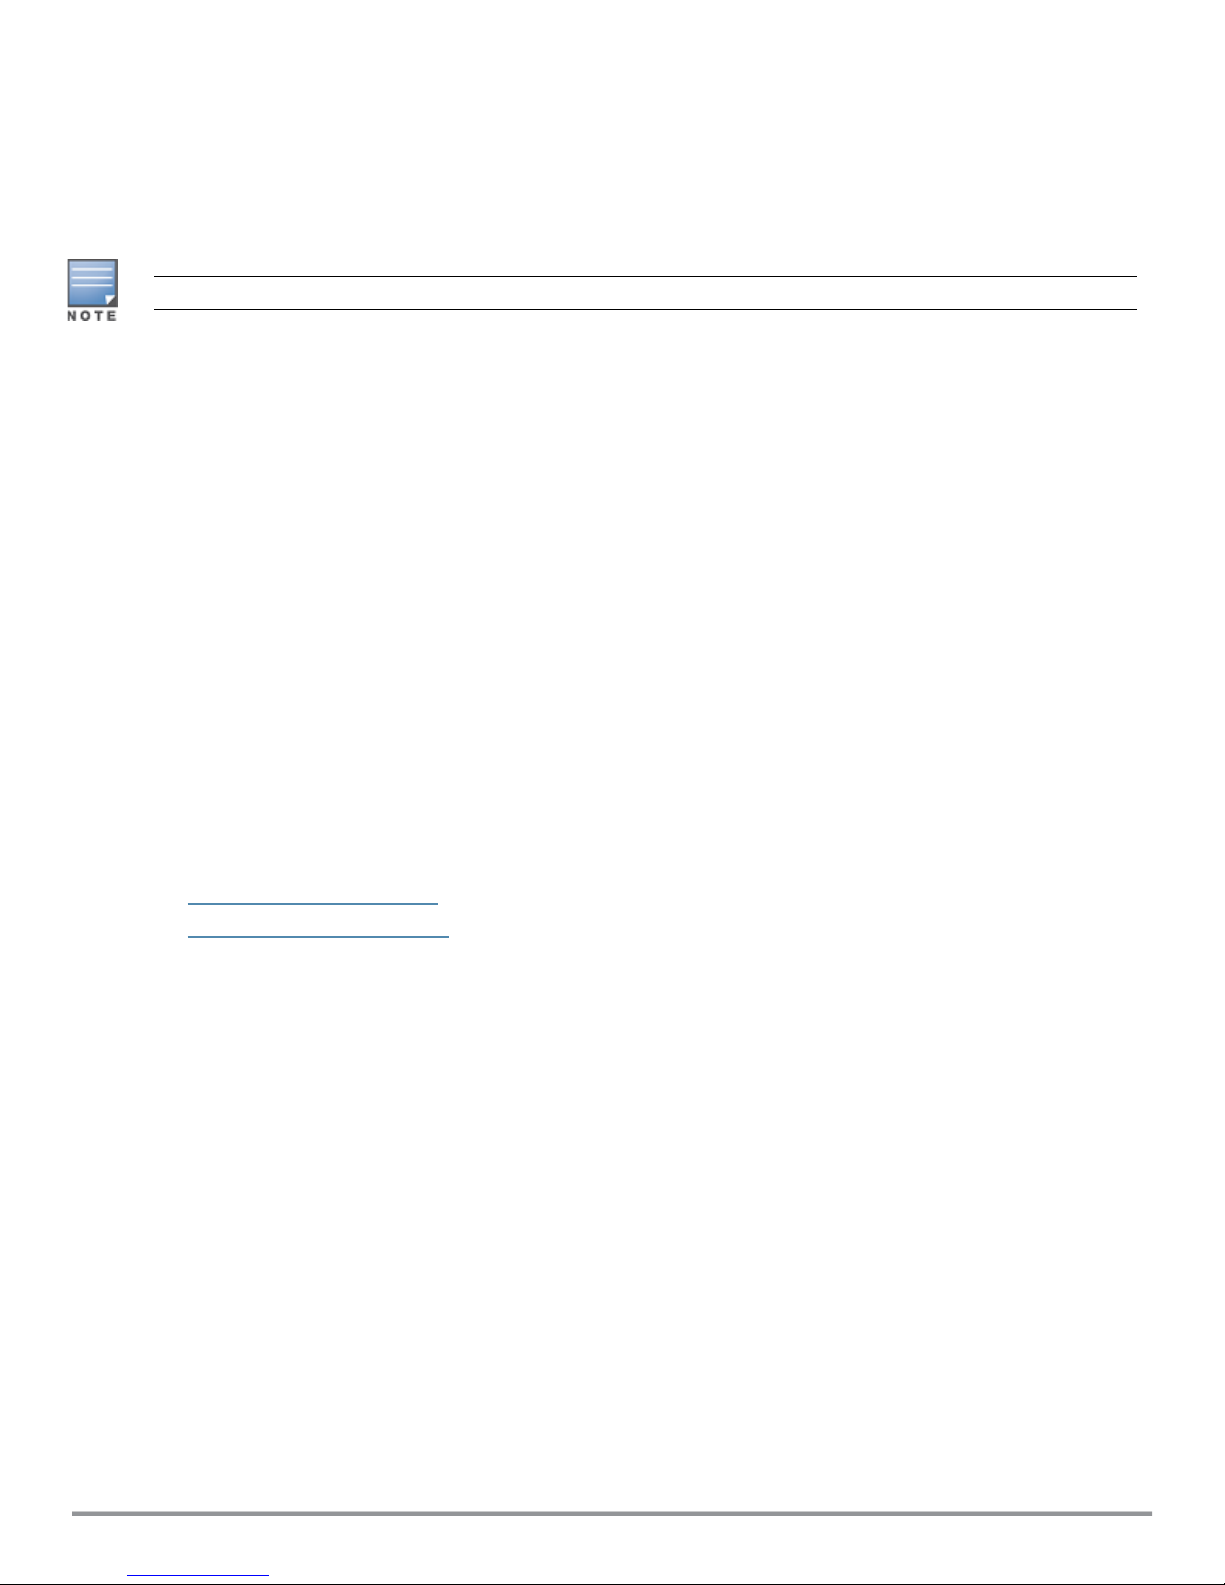
For the legacy switches, the Ports page displays the following information:
Table 3: Contents of the Ports Page for Legacy Switches
Name Description
Port Number Indicates the number assigned to the switch port.
Admin Status Indicates the operational status of the port.
Port Mode Indicates the mode of operation. The port can be configured to
function in Trunk or Access mode.
VLAN Shows the VLAN to which the port is assigned. Based on the port
mode, you can assign different types of VLAN.
n For Access mode, an Access VLAN can be specified.
n For Trunk mode, the Native VLAN and Allowed VLAN can be
configured.
Power over Ethernet
Displays the enabled or disabled status of Power over Ethernet
(PoE).
Auto Negotiation Indicates the status of the Auto Negotiation.
n If auto negotiation is enabled, the Speed and Duplex fields are
automatically set to Auto.
n If auto negotiation is disabled, the speed can be set to 10
Mbps, 100 Mbps, or 1 Gbps and the duplex mode can be set to
half or full.
Speed/Duplex
Displays the speed and duplex configuration settings for the client
traffic.
Trusted Indicates if the port is trusted.
For the other Aruba switches, the Ports page displays the following information:
Table 4: Contents of the Ports Page for Other Aruba Switches
Name Description
Port Number Indicates the number assigned to the switch port.
Admin Status Indicates the operational status of the port.
Power over Ethernet
Displays the enabled or disabled status of Power over Ethernet (PoE).
Access Policy (In) Allows you to apply an existing access policy for the inbound traffic on the
port.
Access Policy (Out) Allows you to apply an existing access policy for the outbound traffic on the
port.
3. To edit port details, click Edit and configure the port parameters.
4. Click Save.
Aruba Central | User Guide Switch Configuration | 7
Page 8

Configuring VLANs
The Aruba switches support the following types of VLANs:
n Port-based VLANs — In the case of trusted interfaces, all untagged traffic is assigned a VLAN based on the
incoming port.
n Tag-based VLANs — In the caseof trusted interfaces, all tagged traffic is assigned a VLAN based on the
incoming tag.
The Aruba legacy switches such as the Mobility Access Switch also support the following types of VLANs.
n Voice VLANs — You can use voice VLANs to separate voice traffic from data traffic when the voice and data
traffic are carried over the same Ethernet link.
n MAC-based VLANs — In the case of untrusted interfaces, you can associate a client to a VLAN based on the
source MAC of the packet. Based on the MAC, you can assign a role to the user after authentication.
Adding VLANDetails
By default, all the ports in the Switches are assigned to VLAN 1. However, if the ports are assigned to different
VLANs, the VLANs page displays these details.
To add a VLAN, complete the following steps:
1. Click Configuration.
n To configure a legacy Aruba switch , click Switch-MAS.
n To configure other Aruba switches, click Switch-Aruba.
2. Click VLANs. The VLANs page is displayed.
3. Click + add a VLAN and configure the following parameters:
n ID—The VLAN ID.
n Description—A short description for VLAN.
n IP Address—IP address of the VLAN interface.
n Netmask—Netmask of the IP address of the VLAN interface.
n DHCP— Slider for enabling DHCP pool associated with the VLAN.
n Access Policy (In)—Access policy assignment to VLAN for the inbound traffic (vlan-in). The VLAN-
INrule is applied for the bridged and routed inbound packets on a VLAN.
n VLAN Port Mode—Port mode to apply on the VLAN. To apply a port, complete the following steps:
a. Select the port number.
b. Select any of the following port modes:
o
Tagged Ports—Tagged ports if any. A tagged port will normally carry traffic for multiple VLANs from
the switch to other network devices such as an upstream router or an edge switch.
o
Untagged Ports—Untagged ports if any. In case of untagged ports, the Ethernet frames are not
VLAN tagged.
c. Click Apply.
4. Click OK.
Editing the VLANDetails
To edit the VLANdetails, select the VLANrow and click the edit icon.
8 | Switch Configuration Aruba Central | User Guide
Page 9
Deleting VLANDetails
To delete the VLAN details, complete the following steps:
1. Ensure that the VLANs are not tagged to any ports.
2. Click the delete icon for the VLAN you want to delete.
VLAN 1 is the primary VLAN and cannot be deleted.
Configuring Access Policies
To restrict certain types of traffic on physical ports of ArubaSwitches, you can configure ACLs from the Central
UI.
To create an access policy, complete the following steps:
1. Click Configuration > Switch-Aruba.
2. Click +. The New Access Policy pop-up opens.
3. Enter a name for the policy.
4. To add a rule to the access policy, click + under Rules, and configure the following parameters:
a. Source—Select a source of the traffic for which you want to an access rule.
b. Destination—Select a destination port.
c. Protocol—Select the type of network port or protocol.
d. Action—Allow or deny access as required.
5. Click Ok.
The access policies must be applied to a Switch port and the VLANassigned to a port. For more information on,
access policy assignment to ports and VLANs, see the following topics:
n Configuring Ports on page 6
n Configuring VLANs on page 8
Configuring DHCP Pools
To configure a new DHCP pool on a switch, complete the following steps:
1. To configurea DHCP pool on a Mobility Access Switch, click Configuration> Switch-MAS > DHCP Pools.
To configure a DHCP pool on other Aruba switches, click Configuration > Switch-Aruba > DHCP Pools.
DHCPis supported only on Aruba Switches running the following versions:
n Aruba 2920 Switch Series—WB.16.02.0012 or later
n Aruba 2930F Switch Series—WC.16.02.0012 or later
n Aruba 2540 Switch Series—YC.16.02.0012 or later
If any of the devices is running a lower version, a warning message is displayed, and the DHCP configuration
changes are pushed only to the devices that support the DHCP. If the devices are upgraded to a supported
version or moved out of the group, the warning message will not be displayed.
2. To activate the DHCP service, select the Enable DHCP service check box. The DHCP service can be
enabled only if there is a valid DHCP pool.
3. To edit the DHCP pool details, click the edit icon.
Aruba Central | User Guide Switch Configuration | 9
Page 10

4. To delete a DHCP pool, click the delete icon. When the Do you want to delete <DHCP Pool Name>?
pop-up window prompts you, click Yes.
Adding a New DHCP Pool
1. To add a new DHCP pool, click New and configure the following parameters:
n Name—Name of the pool.
n Network—A valid network IP address to assigned to the DHCP pool.
n Netmask—Netmask of the DHCP pool.
n Lease Time—The lease time for the DHCP pool in days-hours-minutes format. You can set a maximum
value of 365 days 23 hours and 59 minutes in the DD-HH-MM format.
n Default Router—IP address of the default router in the subnet. You can add up to 8 IP addresses.
n DNS Server—Address of the DNS server. To add multiple DNSservers, click +. You can add up to 8 DNS
servers.
n WINS Server—Address of the WINS server. The WINSserver address is required for legacy Aruba
switches only. To add multiple WINS servers, click +.
n Netbios server—Address of the Netbios server. The Netbios server address configuration is not
required for legacy Aruba switches. To add multiple WINS servers, click +. You can add up to 8 Netbios
servers.
n IP address Range—IP address range within the network and network mask combination.
n Exclude Address Range—IP address range to exclude. This field is available for legacy Aruba Switches
such as Mobility Access Switches. To add multiple excluded address range, click +.
n Option—The code and type of the DHCP option to configure. A value within the range of 2-254 with
type as hexadecimal and ASCII is valid.
n Value—The valueto assign to the DHCP option. To add multiple values, click +.
2. Click Add.
Adding CLI Snippets
Central allows you to apply configuration commands from a CLI snippet to the Aruba Switches provisioned in
your network. You can use the CLI snippets to modify the configuration of an individual Switch, Switches
provisioned in a group, or the Switches configured using a template group.
If you want to add new configuration changes to a Switch or to a device group consisting of Switches, you can
use the Configuration > Switches - Aruba > Advanced Settings menu. However, if you want to add new
configuration or modify the existing configuration of Switches provisioned using template group, select the
template group and use the Configuration > Advanced Settings menu.
Central supports variable definitions in CLI snippets only for the Switches provisioned in a template group. You
can also use the CLI snippets to override the variable definitions for each device in a template group. For more
information on template groups, see Configuring Devices Using Template Groups.
Adding CLI Snippets for Template Groups
To add a CLI snippet to devices in a template group, complete the following steps:
1. Select the template group from the Groups menu.
2. Click Configuration > Advanced Settings.
3. To apply the configuration changes to a specific Switch model or firmware version, select the desired
values for Model and Version.
10 | Switch Configuration Aruba Central | User Guide
Page 11

4. To apply the configuration changes to all Switches provisioned in the template group, select All for
Model and Version.
5. Paste the CLI snippet. The configuration in the CLI snippet is applied to the devices matching the selected
criteria. The variables in the CLI snippet are applied for template groups.
Adding CLI Snippets to Switches Provisioned in Other Groups
You can apply a CLI snippet to a Switch both at the group and device levels.
To add a CLI snippet to the Switch configuration, complete the following steps:
1. Select the group from the Groups menu.
2. Click Configuration > Switches - Aruba > Advanced Settings.
3. To apply the configuration to all the switches provisioned in the group, select All for Model and Version.
4. To apply the configuration to a specific Switch model and the firmware version, select the desired values
for Model and Version.
5. Paste the CLI snippet. Ensure that the CLI snippet does not include variable definitions. The configuration
changes are added to the devices matching the selected criteria.
Configuring System Parameters for a Switch
The System menu under Switch-MAS and Switch-Aruba allows you to configure administrator credentials
and enable modeon a switch.
Configuring Administrator Credentials for Mobility Access Switch
To configure administrator credentials for a Mobility Access Switch, complete the following steps:
1. Click the Configuration>Switch-MAS > System. The System page opens.
2. Enter the password for admin in the Admin Passwordtext box and confirm the administrator
password.
3. Enter the password for enable mode in the Enable Mode Passwordtext box and confirm the password.
4. Click Save Settings.
Configuring Administrator and Operator Credentials for Other Aruba Switches
To configure administrator credentials for other Aruba switches, complete the following steps:
1. Click the Configuration > Switch-Aruba > System. The System page opens.
2. Enter the username for the administrator user.
3. Enter the password for admin in the Admin Passwordtext box and confirm the administrator
password.
4. Enter the password for enable mode in the Enable Mode Passwordtext box and confirm the password.
5. To configurethe operator user credentials, complete the following steps:
6. Select the Set Operator Username check box.
7. Enter a username and password for the operator user.
8. Confirm the password.
9. Click Save Settings.
Aruba Central | User Guide Switch Configuration | 11
Page 12

Configuring a Name Server
To set a static IP switches, you must configure a name server. To configure a name server, complete the
following steps:
1. Click Configuration.
n To configure a legacy Aruba switch , click Switch-MAS.
n To configure other Aruba switches, click Switch-Aruba.
2. Enter the IP address of the name server obtained from the DNS server in the NameServer text box.
3. Click Save Settings.
12 | Switch Configuration Aruba Central | User Guide
 Loading...