

Page 1

HP V5061u / V5061Au
Digital Camcorder
User Manual
Page 2

Contents
Preface..................................................................... 5
About this Manual................................................... 5
Copyright................................................................. 5
Declaration of Conformity...................................... 6
Trademark Recognition.......................................... 6
Safety and Handling Precautions.......................... 6
Camcorder & Battery Recycle Notice................... 8
Photography Terms and Definitions ..................... 9
1 0000BBBBIntroduction ....................................... 11
1.1 11
11BBBBAccessories ................................................. 11
1111
1.2 Exterior Views ............................................. 12
1.3 13
13BBBBAdjusting LCD Display................................ 13
1313
2 1111BBBBGetting Started .................................. 14
2.1 14
14BBBBInserting SD Card........................................ 14
1414
2.2 Charging the Battery................................... 15
2.3 15
15BBBBLoading the Battery .................................... 16
1515
2.4 17
17BBBBUsing the Touch Screen ............................. 18
1717
2.4.1 40BSingle Touch........................................ 18
2.4.2 41BSlide..................................................... 18
2.4.3 42BRotate .................................................. 19
2.5 18
18BBBBButtons & Functions................................... 20
1818
2.6 19
19BBBBAbout LED Indicators ................................. 22
1919
2.7 20
20BBBBInitial Settings Before Use.......................... 22
2020
2.7.1 43BSetting Date and Time......................... 22
1
Page 3

3 2222BBBBLCD Display Information................... 24
3.1 21
21BBBBVideo Mode .................................................. 24
2121
3.2 Photo Mode................................................. 26
3.3 22
22BBBBAudio Mode.................................................. 28
2222
4 3333BBBBUsing the Camcorder........................ 29
4.1 24
24BBBBVideo Recording.......................................... 29
2424
4.2 Shooting / Playback Photos....................... 32
4.2.1 44BTaking a Picture ................................... 32
4.2.2 45BPhoto Playback.................................... 33
4.3 26
26BBBBAudio Recording ......................................... 35
2626
4.4 27
27BBBBVideo / Audio Clip Playback ....................... 36
2727
5 4444BBBBLCD Display Information................... 39
5.1 29
29BBBBVideo Playback Mode.................................. 39
2929
5.2 30
30BBBB31
31BBBB Photo Playback Mode ................................ 41
3030
3131
5.3 Audio Playback Mode ................................. 42
6 5555BBBBMenu Options ....................................44
6.1 32
32BBBBMenu Options in Video Mode ..................... 44
3232
6.1.1 46BVideo Resolution.................................. 44
6.1.2 47BWhite Balance ..................................... 45
6.1.3 48BApply Artistic Effects ............................ 46
6.1.4 49BMetering............................................... 47
6.1.5 50BBacklight .............................................. 49
6.1.6 51BNight Mode .......................................... 49
6.1.7 52BMotion Detection.................................. 50
6.1.8 Burst .................................................... 51
6.1.9 53BEV Compensation................................ 51
2
Page 4

6.2 33
33BBBBMenu Options in Video Playback Mode..... 53
3333
6.2.1 55BDelete .................................................. 53
6.2.2 56BProtect ................................................. 54
6.2.3 56BDate Ranking....................................... 56
6.3 34
34BBBBMenu Options in Photo Mode..................... 57
3434
6.3.1 57BPhoto Resolution ................................. 57
6.3.2 58BWhite Balance ..................................... 58
6.3.3 59BApply Artistic Effects ............................ 59
6.3.4 60BMetering............................................... 60
6.3.5 61BBacklight .............................................. 60
6.3.6 62BNight Mode .......................................... 62
6.3.7 63BSelf-Timer ............................................ 62
6.3.8 64BBurst .................................................... 64
6.3.9 65BEV compensation ................................ 65
6.4 35
35BBBBMenu Options in Photo Playback Mode .... 66
3535
6.4.1 66BDelete .................................................. 66
6.4.2 67BProtect ................................................. 68
6.4.3 Date Ranking....................................... 69
6.4.4 Autoplay............................................... 70
6.4.5 69BRotate .................................................. 71
6.4.6 70BDPOF................................................... 72
6.5 36
36BBBBSetup Menu.................................................. 73
3636
6.5.1 71BInformation........................................... 73
6.5.2 72BDate & Time......................................... 74
6.5.3 73BSound .................................................. 74
6.5.4 74BDefault ................................................. 75
6.5.5 75BTV standard ......................................... 76
6.5.6 76BAuto Power Off .................................... 77
6.5.7 77BFrequency............................................ 78
3
Page 5

6.5.8 78BLanguage............................................. 79
6.5.9 79BFormat ................................................. 80
6.5.10 80BFile Numbering .................................... 81
6.5.11 81BLCD Brightness ................................... 82
6.5.12 82BInstant Review ..................................... 83
6.5.13 82BMemory................................................ 84
6.5.14 83BStart-up LOGO..................................... 85
7 6666BBBBPC and TV Connection...................... 86
7.1 37
37BBBBConnecting to the Computer...................... 86
3737
7.2 38
38BBBBConnecting to a Standard TV ..................... 87
3838
7.3 39
39BBBBConnecting to a HD TV ............................... 88
3939
8 7777BBBBInstalling the Software ......................89
9 8888BBBBEditing Software................................90
10 9999BBBBAppendix............................................91
Troubleshooting.................................................... 91
11 10
10BBBBGetting Help.......................................93
1010
4
Page 6

Preface
About this Manual
This manual is designed to assist you in using your new digital
camcorder. All information presented is as accurate as possible but
is subject to change without notice.
For the latest revision, please visit www.hp.com/support.
Copyright
This manual contains proprietary information protected by copyright.
All rights are reserved. No part of this manual may be reproduced by
any mechanical, electronic or other means, in any form, without prior
written permission of the manufacturer. © Copyright 2010
Federal Communications Commission (FCC) Compliance
This equipment has been tested and found to comply with the limits
for a Class B digital device, pursuant to Part 15 of the FCC Rules.
These limits are designed to provide reasonable protection against
harmful interference in a residential installation. This equipment
generates, uses, and can radiate radio frequency energy and, if not
installed and used in accordance with the instructions, may cause
harmful interference to radio communications. However, there is no
guarantee that interference will not occur in a particular installation.
If this equipment does cause harmful interference to radio or
television reception, which can be determined by turning the
equipment off and on, the user is encouraged to try to correct the
interference by one or more of the following measures:
Reorient or relocate the receiving antenna.
Increase the distance between the equipment and the
receiver.
Connect the equipment to an outlet on a circuit different from
that to which the receiver is connected.
Consult the dealer or an experienced radio/TV technician for
help.
5
Page 7

Warning: A shielded type power cord is required in order to meet FCC
emission limits and to prevent interference to radio and television
reception. Use only shielded cable to connect I/O devices to this
equipment. Any changes or modifications not expressly approved by the
manufacturer may void your warranty and service agreement.
Declaration of Conformity
This device complies with Part 15 of the FCC rules. Operation is
subject to the following conditions:
This device may not cause harmful interference.
This device must accept any interference received, including
interference that may cause undesired operation.
Trademark Recognition
Windows 2000/XP/Vista/7 are registered trademarks of Microsoft
Corporation in the United States and/or other countries. Macintosh
and Mac OS are registered trademarks of Apple Inc. In addition, all
other companies or product names are trademarks or registered
trademarks of their respective companies.
Safety and Handling Precautions
General precautions
Do not try to disassemble the product by yourself. This may
damage the product or cause electric shock.
Keep the Digital Camcorder away from the reach of children
or animals to prevent them from swallowing the batteries or
small accessories.
Stop using the Digital Camcorder if any kind of liquid or
foreign object enters the Digital Camcorder. Should this occur,
power off the Digital Camcorder and contact your dealer for
help.
Do not operate the Digital Camcorder with wet hands, as this
may cause electric shock.
The Digital Camcorder may be damaged in high temperature.
This Digital Camcorder is designed for use in temperatures
between 0°C and 40°C (32°F and 104°F).
6
Page 8

Do not use or store the product in dusty, dirty, or sandy areas
or any area that is close to an air conditioner or heater.
It is normal that the temperature of the Digital Camcorder
body rises if the Digital Camcorder is on for a long period of
time.
Do not open the battery cover while the Digital Camcorder is
recording. Doing so will not only make storage of the current
image impossible, it can also corrupt other image data
already stored.
Before using this Digital Camcorder for important occasions,
be sure to test this Digital Camcorder in order to ensure
proper operation of the product.
Power Supply
Be sure to use the type of battery or battery charger provided
with this Digital Camcorder. Using any other type of battery or
battery charger might damage the equipment and may void
any warranty.
Make sure the battery pack or batteries are placed in the
correct position. Error in the orientation of battery might
damage this product.
Please remove the battery to avoid leaking of battery fluid if
the Digital Camcorder is not to be used for a long period of
time.
This Digital Camcorder can use the NP-40 lithium-ion
(provided in the product packaging) or 2 Photo Lithium AA
batteries or Alkaline. DO NOT use NiMH AA batteries.
Battery Information
If battery is already installed, make sure to power off the
Digital Camcorder before removing and inserting new battery.
When using a battery in this product, ensure that it is inserted
correctly. Inserting the battery upside down can cause
damage to the product and possibly cause an explosion.
7
Page 9

Battery Safety Notice
If the battery pack is mishandled, the battery pack can burst, cause a
fire or chemical burns. Observe the following cautions.
Do not disassemble.
Do not crush or expose the battery to any shock or excessive
force such as hammering or dropping.
Do not short circuit and do not allow metal objects to come
into contact with the battery terminals.
Do not expose to direct sunlight or to temperatures above
45*C (113*F).
Do not incinerate or dispose of in a fire.
Do not handle damaged or leaking lithium ion batteries.
Be sure to charge the battery pack using the appropriate
device for this battery pack.
Keep the battery pack out of the reach of small children.
Replace the battery with the specified type only.
Lithium-ion Battery Warning
Caution: Danger of explosion if battery is incorrectly replaced.
Replace only with the same or equivalent type recommended by the
manufacturer. Dispose of used batteries according to the
manufacturer’s instructions.
Camcorder & Battery Recycle Notice
In the European Union, do not discard this product and
battery as unsorted municipal waste. Contact local
authorities for recycling program information.
8
Page 10

Photography Terms and Definitions
Terms Definitions
Auto focus refers to a camcorder lens’ ability to
adjust its configuration in order to focus properly on
Auto Focus
(AF)
White
Balance
Auto White
Balance
(AWB)
Digital Print
Order
Format
(DPOF)
Exif/JPEG
JPEG
a subject regardless of whether it is near or far from
the camcorder. Auto focus lenses generally provide
vastly superior image quality than do their fixed
focus cousins since they do not have to rely on their
depth of field. Also known as: “AF”, “auto-focus”.
The adjustment of electronic still picture color
channel gains or image processing so that radiation
with relative spectral power distribution equal to that
of the scene illumination source is rendered as a
visual neutral.
With auto white balance, the camcorder attempts to
determine the color temperature of the light and
automatically adjust for that color temperature.
Many people just leave the camcorder set to auto
white balance all the time.
A standardized ASCII file created in a digital
camcorder and stored on removable media along
with the image files that indicate how many copies
of which images should be printed. It also allows
index prints, cropping, and text overlays to be
specified.
A compressed file format for digital camcorder in
which the images are compressed using the
baseline JPEG standard, described in ISO 12234-2,
and metadata and thumbnail images are stored
using TIFF tags within an application segment at
the beginning of the JPEG file.
Joint Photographic Experts Group. An image
compression method defined in ISO/IEC 10918-1.
9
Page 11

Terms Definitions
A numerical value that is inversely proportional to
Exposure
Value
ISO Speed
USB
the exposure provided to an image sensor to obtain
an image. Images obtained from a camcorder using
a range of exposure index values will normally
provide a range of image quality levels.
A numerical value calculated from the exposure
provided at the focal plane of an electronic c
camcorder to produce specified camcorder output
signal characteristics using the methods described
in the referenced standard. The ISO speed should
correlate with the highest exposure index value that
provides peak image quality for normal scenes.
Universal serial bus, a digital interface for
connecting up to 64 devices in a tiered-star
topology. See http://www.usb.org.
10
Page 12
1 0BIntroduction
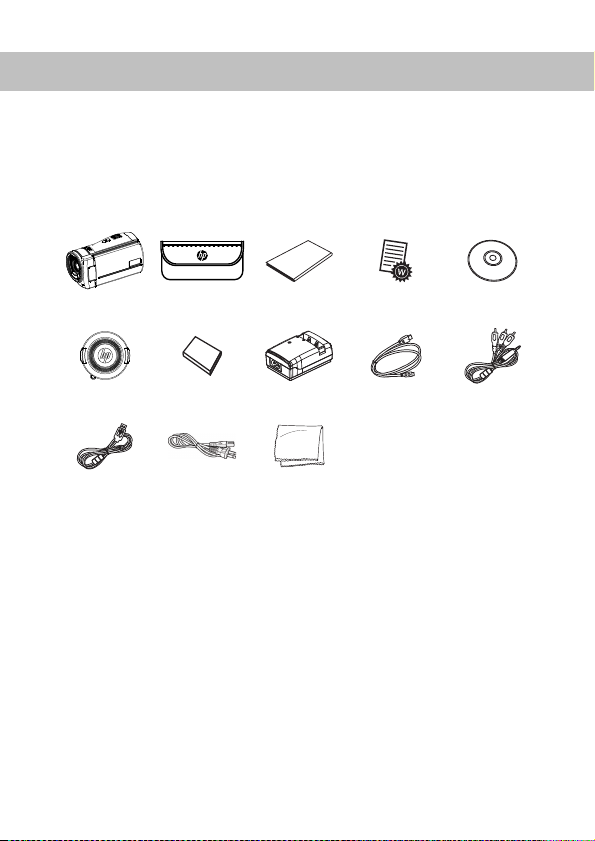
1.1 11BAccessories
This package should contain the following items.
1 Dig ital
Camcorder
2 Po uch 3 Q uick guide 4 Warranty card 5 User Manual
and Software
installation
6 L ens Cap 7 Lithium battery 8 Battery charger 9 HDMI cable a AV cable
b USB cable c Power cord d Cleaning cloth
11
Page 13
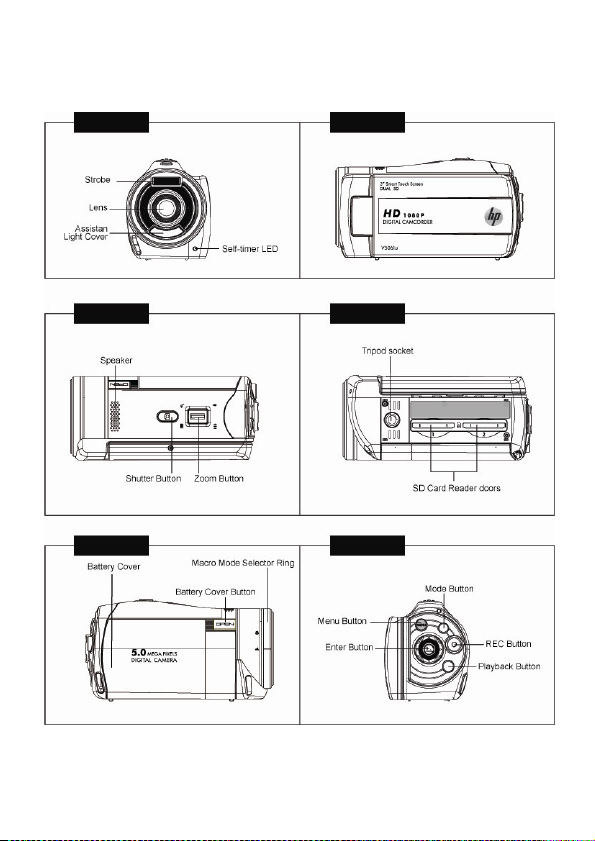
1.2 Exterior Views
Front View Right View
Top View Bottom View
Left View Rear View
Front View Right view
12
Page 14

1.3 13
13B
BAdjusting LCD Display
1313
BB
To begin capturing photos and videos, open the LCD display panel
as illustrated below.
13
Page 15

2 1BGetting Started
2.1 14BInserting SD Card
1. Open the Insert an SD card and make sure facing the
touching face downward.
Note:
Please be careful to insert the SD card(s) as illustrated above so that
damage to the SD card(s) and camcorder does not occur.
To avoid damaging photos and video files, do not remove or insert the
SD card while the camcorder is powered on.
14
Page 16
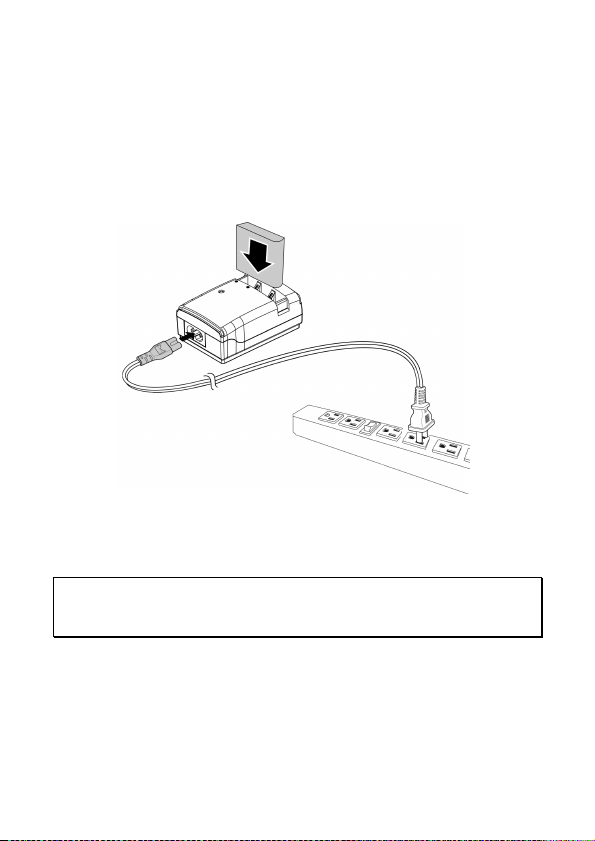
2.2 Charging the Battery
It is recommended that the NP-40 Lithium Battery be fully charged
before use. First, connect the external battery charger to the AC
power source (wall outlet or power strip). Next, plug the battery into
the external charger as illustrated below. The battery may take up
to 2 1/2 hours to charge. When the light on the charger turns green,
remove the battery and use when ready.
Note:
Do not leave the battery in the charger for extended periods of time after
it has been fully charged.
15
Page 17
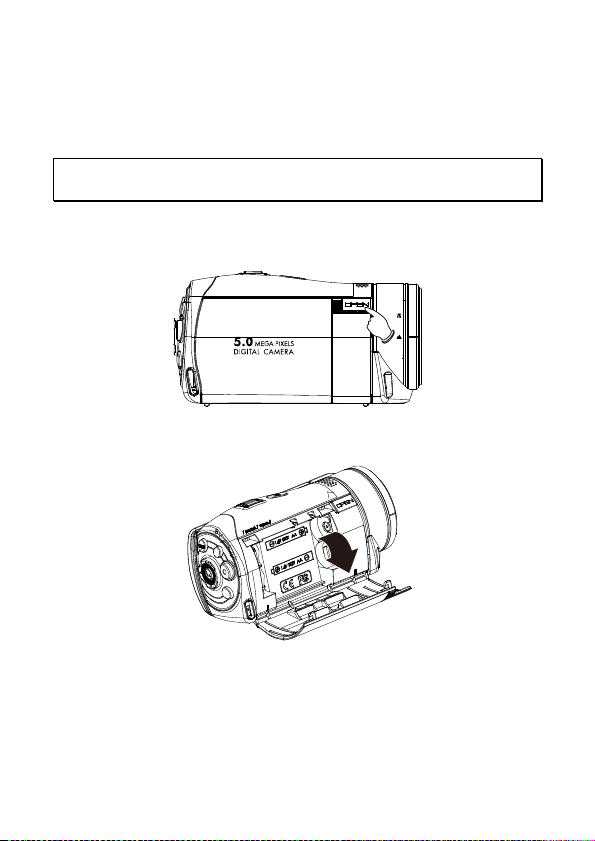
2.3 15BLoading the Battery
Please use only the battery provided or recommended by the
manufacturer or dealer.
Note:
Incorrectly inserting the batteries could result in non-repairable damage.
1. Open battery cover.
16
Page 18

2. Insert the battery according to the illustration. The
electrode is inside of the camcorder.
* DO NOT use NiMH AA batteries.
3. Close the battery cover.
16
16B
B
1616
BB
17
Page 19
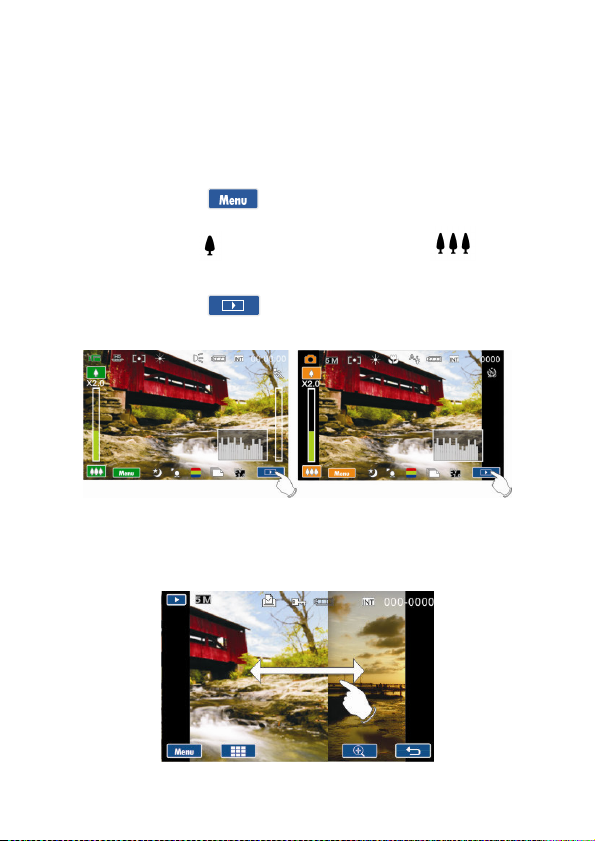
2.4 17BUsing the Touch Screen
2.4.1 40BSingle Touch
Single touch to activate hotkeys on LCD screen.
Example, in Video/ Still Mode:
1. Touch the icon to enter the Setup menu.
2. Touch the icon to zoom in and touch the icon to
zoom out.
3. Touch the icon to set the camcorder in playback
mode.
2.4.2 41BSlide
While in Playback mode, touch and slide right or left to view the
previous or next Video/Photo.
18
Page 20

2.4.3 42BRotate
While in Playback mode, touch the photo and slide in a half circle
motion (as illustrated below) to rotate 90 with each motion.
19
Page 21
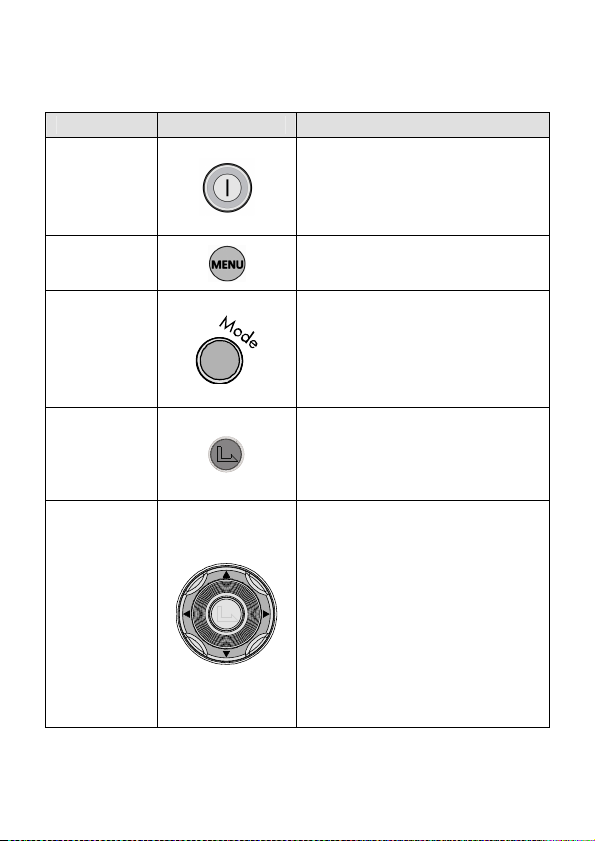
2.5 18BButtons & Functions
Description
Power
button
Menu button
MODE
button
Button Function
Press the power button to turn
the Digital Camcorder ON/OFF.
Opening and closing the LCD
panel will also power ON/OFF as
well.
Press the button to display the
main menu.
There are three operating
modes for the Digital
Camcorder: Video mode, Photo
mode, and Audio mode. Press
the Mode switch to cycle through
the different modes.
SET button
4-Way
Direction
button
Confirmation for various setting
of functions
Press the 4-Way Direction
Button UP to change the flash
options: off, auto, fill-in in Photo
mode Press DOWN to delete a
photo or video in Playback
mode. You can pull in the
focusing distance to 10 cm.
(Normal focus range: 0.8M ~
infinity) Press RIGHT and LEFT
to make adjustments to the
Exposure Value (EV)
compensation.
20
Page 22

Description
Zoom toggle
Button Function
This Digital Camcorder has 4X
Digital zoom (in Video mode of
HD1080p resolution only has 2X
digital zoom).
Move the Zoom toggle to the
right ( ) to zoom in, or move to
the left ( ) to zoom out.
Shutter
button
Recording
button
Playback
button
Macro mode
selector
Press the button to capture a
photo.
Press the button to record a
video in Video mode and
activate audio recording in Audio
mode.
Press the Playback button to
enter Playback mode and
playback the last file recorded.
The Macro function is used to
capture Photos and Videos at
very close distances. Rotate the
lens ring to select Macro mode
( ) to focus on objects about
20 cm (8 inches) from the
camcorder.The icon " " will
be displayed on the LCD screen
when the Macro mode is
selected.Normal mode (
used to focus on objects more
than 1.2 m (4 feet) away.
21
) is
Page 23
2.6 19BAbout LED Indicators
The table below describes the different modes of the camcorder
LED indicator and Self-timer indicator.
Indicator
LED Indicator
Self-timer
Indicator
Power
Recording
Self-timer
Indicator
Color
Green The power is on
Red blinking
Red blinking
Red blinking Start of Self-timer
Definition
The flash is
charging
Recording
2.7 20BInitial Settings Before Use
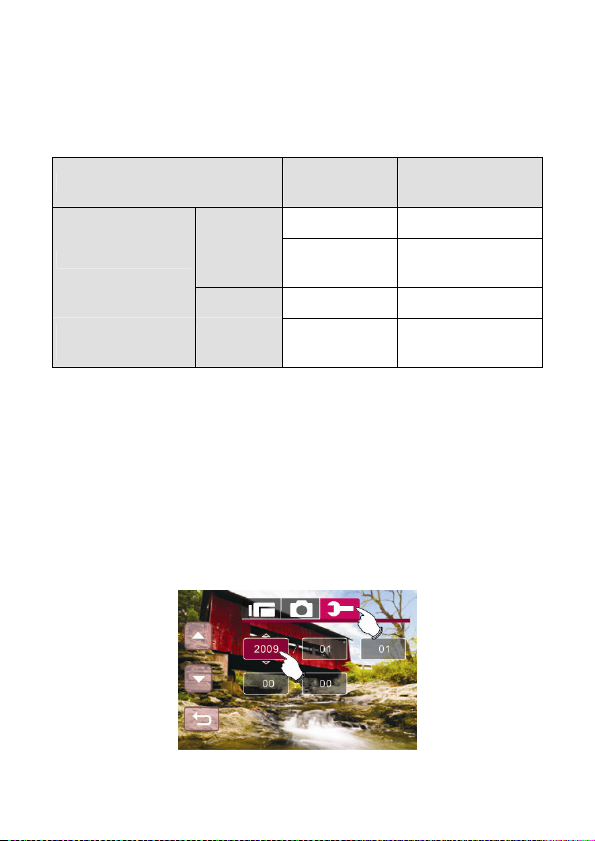
2.7.1 43BSetting Date and Time
1. The initial power up of this camcorder should display the
Date and Time setup menu as shown below.
22
Page 24

2. Touch the desired field on the LCD panel or press
LEFT/RIGHT on the 4-Way Direction button to navigate
through the date and time field.
3. Touch the up/down icons on the LCD panel or press the
4-Way Direction Button Up/Down to adjust the value.
Press the Set button or touch the Return icon ( ) to
store the value you have changed.
23
Page 25

1.0
3 2BLCD Display Information
3.1 21BVideo Mode
The following table describes all the icons that are displayed when
the Digital Camcorder is in Video mode ( ).
1
2
3
4
5
6
Video mode
Motion Detection mode
Night mode indicator
Exposure Compensation indicator
Artistic Effect indicator
Metering mode
24
Page 26
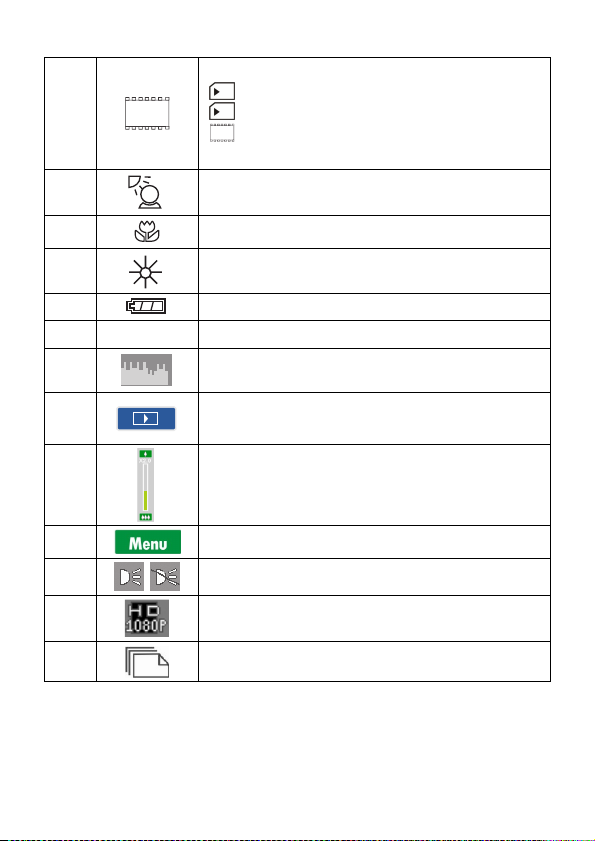
INT
Memory Status indicator
: SD card 1 indicator
7
INT
: SD card 2 indicator
: Internal memory indicator (displayed
when there is no SD card in camcorder)
10
11
12
13
14
15
16
17
18
19
8
9
00:00:00
Backlight indicator
Macro Focus indicator
White Balance indicator
Battery status indicator
Remaining recording time indicator
Histogram indicator
Enter Playback mode touch icon
Zoom ratio bar indicator
Enter Menu touch icon
Assist LED light button (On, Off)
Resolution indicator
Burst mode
25
Page 27
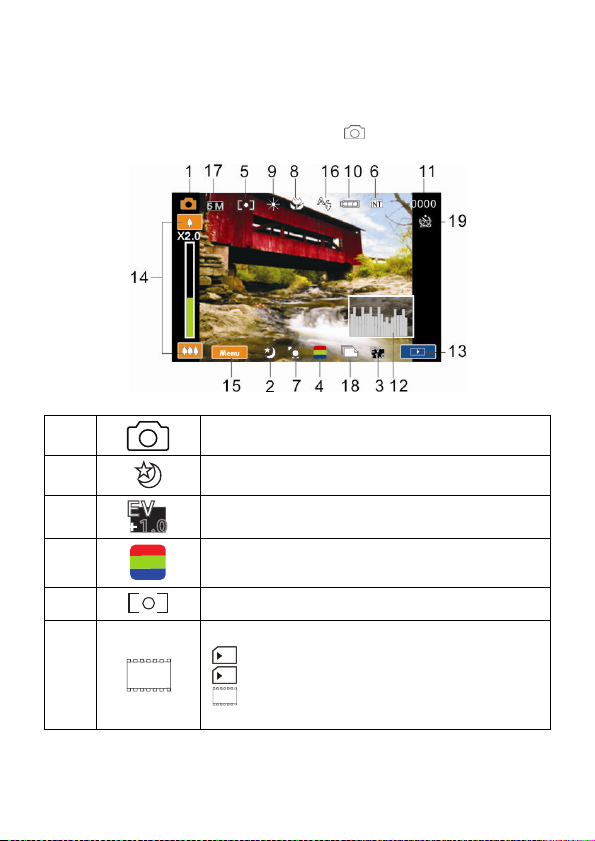
1.0
INT
3.2 Photo Mode
The following table describes all the icons that are displayed when
the Digital Camcorder is in Photo mode ( ).
1
2
3
4
5
6
INT
Photo mode indicator
Night mode indicator
EV Compensation indicator
Artistic Effect indicator
Metering mode
Memory Status indicator
: SD card 1 indicator
: SD card 2 indicator
: Internal memory indicator (displayed
when there is no SD card in camcorder)
26
Page 28
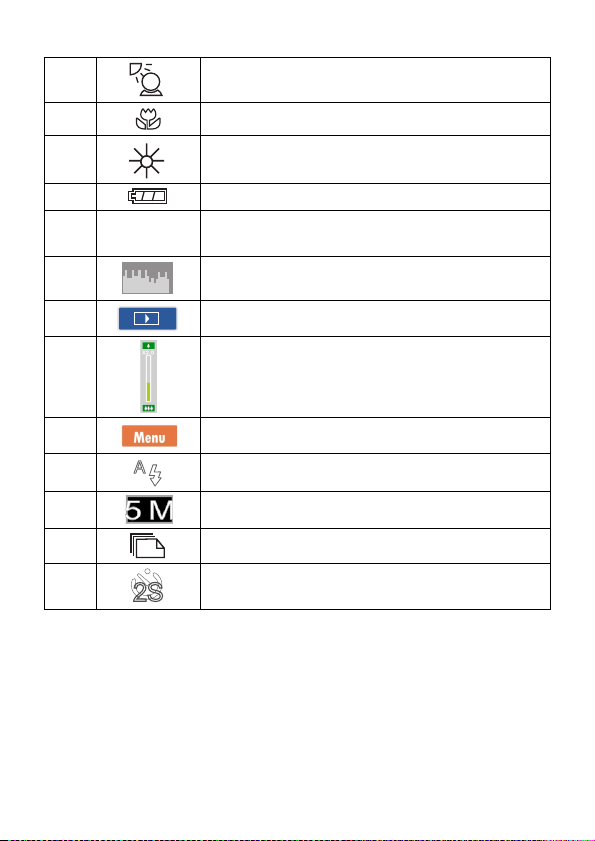
A
2S
10
11
12
13
14
15
16
17
18
19
7
8
9
0000
Backlight indicator
Macro Focus indicator
White Balance indicator
Battery status indicator
Shots remaining, indicates the remaining
shots available.
Histogram indicator
Enter Playback mode touch icon
Zoom ratio bar indicator
Enter Menu touch icon
Flash mode selection (off, auto, fill-in)
Resolution indicator
Burst mode
Self-timer indicator
27
Page 29

INT
3.3 22BAudio Mode
The following table describes all the icons that are shown when the
Digital Camcorder is in Audio mode ( ).
1
Audio mode
Memory Status indicator
: SD card 1 indicator
2
INT
: SD card 2 indicator
: Internal memory indicator (displayed
when there is no SD card in camcorder)
3
00:00:00
4
5
6
23
23B
B
2323
BB
Battery status indicator
Remaining recording time indicator
Enter Playback mode touch icon
Enter Menu touch icon
28
Page 30

4 3BUsing the Camcorder
4.1 24BVideo Recording
1. By default, this camcorder will power up to Video mode
( ). If the camcorder is not in Video mode, press the
until this mode is selected.
2. Press the button to start or stop video recording.
3. The Digital Camcorder will store the movie clip
automatically on the SD card when the recording stopped.
Video mode Indicator
29
Page 31

4. The displayed LCD screen ratio varies depending on the
setting of the movie clip resolution. Please refer to the
table shown below:
Video Recorded
Resolution
Preview
16:9 ratio
HD1080p (1440 x 1080)
HD (1280 x 720)
WVGA (848 x 480)
4:3 ratio
QVGA (320 x 240)
Note:
If 2 SD cards are inserted into the camcorder and if recording capacity
fills the first SD card, use the configuration menu to select the 2nd SD
card (if inserted) for additional storage.
30
Page 32

HD
25
25B
BVideo Live View Frame Capturing
2525
BB
There is a convenient design for the user to press the Shutter button
at Video mode to capture the Video Live View (unable for HD 1080p
resolution) or Playback frame as photo.
In Video mode, you can directly press the Shutter button at anytime
either at Live View or in recording or in video clip playback to capture
the video frame to save as a Still image.
Video Recorded Resolution
HD1080p
HD
WVGA
QVGA
1440 x 1080
1280 x 720
848 x 480
320 x 240
Note:
The video clip size is fixed depending on the quality of the video clip.
1. When setting to HD1080p, HD or WVGA resolution, the LCD display
aspect ratio is 16:9.
2. When setting to QVGA video resolution, the LCD display aspect ratio
is 4:3.
31
Page 33

4.2 Shooting / Playback Photos
4.2.1 44BTaking a Picture
1. Power up the camcorder and press the button to
select Photo mode .
2. Press the Shutter button to capture a photo.
Photo Mode
Indicator
32
Page 34

Playback
4.2.2 45BPhoto Playback
1. In the Photo Mode, press Playback button or the Playback
touch icon on screen to enter Photo Playback mode, the
screen displays the thumbnail images in storage.
2. Use the 4-Way Direction Button to navigate the stored
photos. Press the Set Button or touch the thumbnail
image selected for single view on LCD display.
Enter Playback touch icon
33
Page 35

3. Touch the magnification or minification icon (
) to magnify or minify the image. When the image is
magnified, touch the up/down or left/right icons to move
the image.
4. Press the Return icon ( ) on screen or the Shutter
button to return to whole picture view screen after the
picture has been magnified.
or
34
Page 36

4.3 26BAudio Recording
1. Power up the camcorder and press the until the
Audio Mode is selected.
2. Press the button to start or stop audio recording.
Audio Mode
35
Page 37

4.4 27BVideo / Audio Clip Playback
1. In the Video/Audio mode, press the Playback button or the
Playback touch icon on screen to enter Video/Audio
Playback mode, the screen displays stored Video/Audio
files.
Playback
Enter Playback mode touch icon
Enter Playback mode touch icon
36
Page 38

2. Touch the Left or right arrows at the bottom of the LCD
screen or use the 4-Way Direction buttons to browse the
stored files
3. To play/pause the playback, press the Recording button
or touch the screen icon (
4. Press the Return icon ( ) to return previous screen, in
Playback thumbnail view mode to press Playback button
or Return icon on screen can return to Video/Audio mode.
/
).
37
Page 39

SS
SS
SS
5. Adjust the playback the playback speed of the Video by
touching the screen icon (
).
The available playback speed
options (when Slow Motion is set to
“OFF”) are listed below:
Rewind
Rewind
Rewind
Rewind
28
28B
B
2828
BB
2X play
4X play
8X play
16X play
Forward
Forward
Forward
Forward
The available playback speed options
(when Slow Motion is set to “On”) are
listed below:
Rewind
Rewind
Rewind
Rewind
1/2X play
1/4X play
1/8X play
1/16X play
Forward
Forward
Forward
Forward
38
Page 40

INT
5 4BLCD Display Information
5.1 29BVideo Playback Mode
Please refer to the following table regarding the description of each
icon and symbol in video playback.
1
2
3
4
5
6
000-0000
00:00:00/00:00:00
INT
Playback mode icon
Folder and file number
File Protect indicator
Memory Status indicator
: SD card 1 indicator
: SD card 2 indicator
: Internal memory indicator
(displayed when there is no SD card
in camcorder)
Battery status indicator
Playback progress length / file total
length
39
Page 41

SS
7
8
9
10
11
12
13
14
/
Sound volume touch icons
Return touch icon
Fast forward Playback touch icon
Playback/Pause touch icon
Fast Rewind Playback touch icon
Enter Menu touch icon
Resolution indicator
Slow Motion Playback touch icon
40
Page 42

SS
INT
5.2 30B31B Photo Playback Mode
Please refer to the following table for descriptions of the icons and
symbols in photo playback.
1
2
3
4
5
6
7
INT
000-0000
Playback mode icon
DPOF (Digital Print Order Format) indicator
File Protect indicator
Memory Status indicator
: SD card 1 indicator
: SD card 2 indicator
: Internal memory indicator (displayed
when there is no SD card in camcorder)
White Balance indicator
Battery status indicator
Folder and file number
41
Page 43

8
9
10
11
12
Return touch icon
Magnification indicator touch icon
Minification indicator touch icon
Enter Menu touch icon
Resolution indicator
5.3 Audio Playback Mode
Please refer to the following table regarding the description of each
icon and symbol in audio playback.
1
2
3
Playback mode icon
File Protect indicator
Battery status indicator
42
Page 44

INT
4
5
00:00:00/00:00:00
6
7
8
9
INT
000-0000
/
Memory Status indicator
: SD card 1 indicator
: SD card 2 indicator
: Internal memory indicator
(displayed when there is no SD card
in camcorder)
Folder and file number
Playback progress length / file total
length
Return touch icon
Fast forward Playback touch icon
Playback/Pause touch icon
10
11
12
Fast Rewind Playback touch icon
Enter Menu touch icon
Sound (Volume adjustment) touch
icon
43
Page 45

6 5BMenu Options
Enter the menu options by pressing the button or the Menu icon
on screen in Live View mode. When the menu appears on the LCD
display, use the 4-Way Direction button to navigate the menu items.
(or to touch the up/down icons on the LCD panel to jump to the next
page of the menu items)
Use the button or touch the icon on the screen to select a menu
item. Return to previous screen from options menu by pressing
button or the Return icon on screen.
6.1 32BMenu Options in Video Mode
6.1.1 46BVideo Resolution
1. Turn on the Digital Camcorder and make sure it is in the
Video mode.
2. Press the button and press the 4-Way Direction
Button to highlight Resolution. Press the button or
touch the icon on the screen to display the submenu.
3. Press the 4-Way Direction Button to select HD1080p, HD,
WVGA or QVGA. Press the button or touch the icon
on the screen to select the item.
44
Page 46

HD
ICON Option Video Recorded Resolution
Notes:
1. When setting to HD1080p, HD or WVGA resolution, the LCD display
aspect ratio is 16:9.
2. When setting to QVGA video resolution, the LCD display aspect ratio
is 4:3.
6.1.2 47BWhite Balance
HD1080p
HD 1280 x 720
WVGA 848 x 480
QVGA 320 x 240
1. Turn on the Digital Camcorder and make sure it is in the
Video mode.
2. Press the button and move the 4-Way Direction
Button to highlight White Balance. Press the button
or touch the icon on the screen to display the submenu.
3. Press the 4-Way Direction Button to select Auto, Daylight,
Cloudy, Fluorescent or Tungsten. Press the button or
touch the icon on the screen to select the item.
1440 x 1080
45
Page 47

A
Auto
Daylight
Cloudy
Fluorescent
Tungsten
6.1.3 48BApply Artistic Effects
1. Turn on the Digital Camcorder and make sure it is in the
Video mode.
2. Press the button and press the 4-Way Direction
Button to highlight Apply Artistic Effects. Press the
button or touch the icon on the screen to display the
submenu.
3. Press the 4-Way Direction Button to select Normal, B/W or
Sepia. Press the button or touch the icon on the
screen to select the item.
The Digital Camcorder
automatically adjusts the white
balance.
The setting is suitable for outdoor
recording in daylight.
The setting is suitable for
recording in cloudy or shady
environments.
The setting is suitable for indoor
with fluorescent lamp lighting, or
environments with high color
temperature.
The setting is suitable for indoor
with incandescent lamp light, or
environments with low color
temperature.
46
Page 48

Normal Make recordings in nature color
B&W
Sepia Make recordings in Sepia-toned color
6.1.4 49BMetering
1. Turn on the Digital Camcorder and make sure it is in the
Video mode.
2. Press the button and move the 4-Way Direction
Button to highlight Metering. Press the button or
touch the icon on the screen to display the submenu.
3. Press the 4-Way Direction Button to select Spot, Center or
Touch AE. Press the button or touch the icon on the
screen to select the item.
Make recordings in B&W (Black and
White) color
47
Page 49

Spot
Center
Touch AE
This setting is to ensure correct exposure for
the object even if the background is very
bright or very dark.
Use this setting to preserve background
details while letting lighting conditions at the
center of the frame define exposure.
Touch the target object on screen for auto
metering the exposure value.
48
Page 50

6.1.5 50BBacklight
1. Turn on the Digital Camcorder and make sure it is in the
Video mode.
2. Press the button and move the 4-Way Direction
Button to highlight Backlight. Press the button or
touch the icon on the screen to display the submenu.
3. Press the 4-Way Direction Button to select On or Off.
Press the button or touch the icon on the screen to
select the item.
6.1.6 51BNight Mode
1. Turn on the Digital Camcorder and make sure it is in the
Video mode.
2. Press the button and press the 4-Way Direction
Button to highlight Night Mode. Press the button or
touch the icon on the screen to display the submenu.
3. Press the 4-Way Direction Button to select On or Off.
Press the
select the item.
button or touch the icon on the screen to
49
Page 51

6.1.7 52BMotion Detection
When Motion Detection is turned on, the camcorder will detect the
motion for Video recording without human intervention. When the
AE variation is detected, the recording will start immediately.
1. Turn on the Digital Camcorder and make sure it is in the
Video mode.
2. Press the button and move the 4-Way Direction
Button to highlight Motion Detection. Press the button
or touch the icon on the screen to display the submenu.
3. Press the 4-Way Direction Button to select On or Off.
Press the
button or touch the icon on the screen to
select the item.
50
Page 52

6.1.8 Burst
1. Turn on the Digital Camcorder and make sure it is in the
Video mode.
2. Press the button and press the 4-Way Direction
Button to highlight Burst. Press the button or touch
the icon on the screen to display the submenu.
3. Press the 4-Way Direction Button to select On or Off.
Press button or touch the icon on the screen to select
the item.
6.1.9
53BEV Compensation
You can adjust the value of the exposure compensation which is
ranged from -2.0EV to +2.0EV (at 0.5EV increment). The higher the
EV value, the brighter the image will be.
51
Page 53

1. Turn on the Digital Camcorder and make sure it is in the
Video mode.
2. Press the button and move the 4-Way Direction
Button to highlight the EV Compensation item. Press the
button or touch the icon on the screen to display the
submenu.
3. Press the 4-Way Direction Button to adjust the Exposure
value (-2.0 ~ + 2.0). Press the button or touch the
icon on the screen to select the item.
52
Page 54

6.2 33BMenu Options in Video Playback Mode
When in Video Playback thumbnail or single view mode, switch to
the video file you would like to set, press the Menu touch icon on
LCD display to show the Video Playback options menu; Or in Video
Playback single view mode of the selected video file, press the
button to show the Video Playback options menu.
6.2.1 55BDelete
1. Enter Video Playback options menu, use the 4-Way
Direction Button to highlight Delete.
2. Press the button or touch the icon on screen to
display the submenu.
3. Use the 4-Way Direction Button to select Delete One or
Delete All. Press the button or touch the icon on the
screen to select the item.
53
Page 55

4. Press the 4-Way Direction Button to select “O” Yes or “X”
NO. Press the button or touch the icon on the screen
to delete the item.
Delete One Delete the current file
Delete All
Note:
The file cannot be recovered once it is deleted. Therefore, please make
sure you have backed up the file before deleting. Protected files cannot
be deleted. Before deleting, you must unlock the file.
Delete all files stored in the Digital
Camcorder
6.2.2 56BProtect
1. Enter Video Playback options menu, use the 4-Way
Direction Button to highlight Protect option.
2. Press the
button or touch the icon on screen to
display the submenu.
3. Use the 4-Way Direction Button to select Lock One, Lock
All, Unlock One or Unlock All. Press the button or
touch the icon on the screen to select the item.
54
Page 56

Protect Lock
Note:
To unlock the file from Protect, repeat steps stated above. When files are
not protected, the key icon is not displayed.
55
Page 57

6.2.3 56BDate Ranking
1. Enter Video Playback options menu, use the 4-Way
Direction Button to highlight Date Ranking.
2. Press the button or touch the on screen to display the
submenu.
3. Use the 4-Way Direction Button to select "Off" or "On".
Press the button or touch the icon on the screen to
select the item.
56
Page 58

8M
5M
3M
6.3 34BMenu Options in Photo Mode
When in Photo Mode, press the button to display the
camcorder mode option Menu.
6.3.1 57
57B
BPhoto Resolution
5757
BB
1. Turn on the Digital Camcorder and make sure it is in the
Photo mode.
2. Press the button and use the 4-Way Direction Button
to highlight Resolution. Press the button or touch the
icon on the screen to display the submenu.
3. Press the 4-Way Direction Button to select 12M, 8M, 5M
or 3M. Press the button or touch the icon on the
screen to select the item.
4608 x 3456 pixels (Interpolation)
3200 x 2400 pixels (Interpolation)
2592 x 1944 pixels
2048 x 1536 pixels
57
Page 59

A
6.3.2 58BWhite Balance
1. Turn on the Digital Camcorder and make sure it is in the
Photo mode.
2. Press the button and use the 4-Way Direction Button
to highlight White Balance. Press the button or touch
the icon on the screen to display the submenu.
3. Use the 4-Way Direction Button to select Auto, Daylight,
Cloudy, Fluorescent or Tungsten. Press the button or
touch the icon on the screen to select the item.
Auto
Daylight
Cloudy
Fluorescent
Tungsten
The Digital Camcorder automatically
adjusts white balance.
The setting is suitable for outdoor
recording in daylight.
The setting is suitable for recording in
cloudy or shady environments.
The setting is suitable for indoor with
fluorescent lamp lighting, or
environments with high color
temperature.
The setting is suitable for indoor with
incandescent lamp light, or
environments with low color
temperature.
58
Page 60

6.3.3 59BApply Artistic Effects
This Digital Camcorder can take standard color images, Black and
White images, or Sepia color tone images.
1. Turn on the Digital Camcorder and make sure it is in the
Photo mode.
2. Press the button and use the 4-Way Direction Button
to highlight Apply Artistic Effects. Press the button or
touch the icon on the screen to display the submenu.
3. Use the 4-Way Direction Button to select Normal, B/W or
Sepia. Press the button or touch the icon on the
screen to select the item.
Normal Make recordings in nature color
B&W
Sepia Make recordings in Sepia-toned color
Make recordings in B&W (Black and White)
color
59
Page 61

6.3.4 60BMetering
1. Turn on the Digital Camcorder and make sure it is in the
Photo mode.
2. Press the button and use the 4-Way Direction Button
to highlight Metering. Press the button or touch the
icon on the screen to display the submenu.
3. Press the 4-Way Direction Button to select Spot, Center or
Touch AE. Press the button or touch the icon on the
screen to select the item.
6.3.5 61BBacklight
1. Turn on the Digital Camcorder and make sure it is in the
Photo mode.
2. Press the button and use the 4-Way Direction Button
to highlight Backlight. Press the button or touch the
icon on the screen to display the submenu.
3. Press the 4-Way Direction Button to select ON or OFF.
Press the
select the item.
button or touch the icon on the screen to
60
Page 62

61
Page 63

6.3.6 62BNight Mode
1. Turn on the Digital Camcorder and make sure it is in the
Photo mode.
2. Press the button and use the 4-Way Direction Button
to highlight Night Mode. Press the button or touch the
icon on the screen to display the submenu.
3. Press the 4-Way Direction Button to select On or Off.
Press the button or touch the icon on the screen to
select the item.
6.3.7 63BSelf-Timer
1. Turn on the Digital Camcorder and make sure it is in the
Photo mode.
2. Press the button and use the 4-Way Direction Button
to highlight Self-Timer. Press the
icon on the screen to display the submenu.
3. Press the 4-Way Direction Button to select OFF, 2 secs.
or 10 secs. Press the button or touch the icon on the
screen to confirm.
button or touch the
62
Page 64

With 2 sec. Self-Timer:
The photo will be taken 2 seconds after the shutter is released.
With 10 sec. Self-Timer:
The photo will be taken 10 seconds after the shutter is released.
63
Page 65

6.3.8 64BBurst
You can continuously shoot three pictures with this function, started
by released the Shutter Button pressed deeply and ended
automatically after three pictures are taken.
1. Turn on the Digital Camcorder and make sure it is in the
Photo mode.
2. Press the button and use the 4-Way Direction Button
to highlight Burst. Press the button or touch the icon
on the screen to display the submenu.
3. Press the 4-Way Direction Button to select OFF or ON.
Press the button or touch the icon on the screen to
select the item.
64
Page 66

6.3.9 65BEV compensation
You can adjust the image exposure value by the Exposure
Compensation function which is ranged from -2.0EV to +2.0EV (at
0.5EV increment). The higher the EV value, the brighter the image
will be.
1. Turn on the Digital Camcorder and make sure it is in the
Photo mode.
2. Press the button and use the 4-Way Direction Button
to highlight EV Compression. Press the button or
touch the icon on the screen to display the submenu.
3. Press the 4-Way Direction Button to adjust the exposure
value (-2.0 ~ +2.0). Press the button or touch the icon
on the screen to select the item.
65
Page 67

6.4 35BMenu Options in Photo Playback Mode
When the camcorder is in Photo Playback thumbnail or single view
mode, switch to the Photo Playback image you would like to set,
press the Menu touch icon on LCD display to show the Photo
Playback options menu; Or in Photo Playback single view mode of
the selected image, press the button to show the Photo
Playback options menu.
6.4.1 66BDelete
1. Enter Photo Playback options menu, use the 4-Way
Direction button to highlight Delete.
2. Press the button or the Delete icon on screen to
display the submenu.
3. Press the 4-Way Direction Button or touch the screen to
select “Delete One” or “Delete All” to display submenu.
66
Page 68

4. Press the 4-Way Direction Button or touch the screen to
select “O” YES or “X” No and press the button to
delete file(s).
Note:
The files cannot be recovered once deleted. Therefore, please make
sure you have a backup the file before deleting. Protected files will not be
able to be deleted. Before deleting a protected file, you must unlock the
file.
67
Page 69

6.4.2 67BProtect
1. Enter Photo Playback options menu.
2. Use the 4-Way Direction Button to highlight Protect.
3. Press the button or touch the Protect icon on screen
to display the submenu.
4. Press the 4-Way Direction Button or touch the screen to
select item. Press the button or touch the screen to
confirm. The key icon will be displayed to indicate the
file is Protected.
Note:
Repeat above steps to unlock the file. When the file is unlocked, the key
icon will disappear.
Protect Lock
68
Page 70

68
68B
B
6868
BB
6.4.3 Date Ranking
1. Enter Photo Playback options menu, use the 4-Way
Direction Button to highlight Date Ranking option.
2. Press the button or touch the on screen to display the
submenu.
3. Use the 4-Way Direction Button to select "Off" or "On".
Press the button or touch the icon on the screen to
select the item.
69
Page 71

6.4.4 Autoplay
This Digital Camcorder includes a slide show function that can
playback each picture at a regular interval.
1. Enter Photo Playback options menu, use the 4-Way
Direction button to highlight Autoplay.
2. Press the button or touch the Autoplay icon on
screen to display the submenu.
3. Press the 4-Way Direction Button or touch the screen to
select “Off”, 1 second, or “3 secs.”. The images will be
displayed automatically.
70
Page 72

6.4.5 69BRotate
1. Enter Photo Playback options menu, use the 4-Way
Direction button to highlight Rotate.
2. Press the button or touch the Rotate icon on screen
to display the submenu.
3. Use the 4-Way Direction Button to select the Left 90 or
Right 90, then press the button or touch the options
on screen to rotate image.
71
Page 73

6.4.6 70BDPOF
Use the DPOF (Digital Print Order Format) function to indicate the
printing information stored in the memory card.
1. Enter Photo Playback options menu, use the 4-Way
Direction button to highlight DPOF.
2. Press the button or touch DPOF icon on screen to
display the submenu.
3. Use the 4-Way Direction Button and press the button
or touch the options on screen to select the item. The
DPOF icon SS will be shown to indicate the files that are
ordered for printing.
DPOF
Note:
1. A memory card is required for the DPOF function.
2. If DPOF is set, the selected pictures will be ordered to print.
72
Page 74

6.5 36BSetup Menu
The Setup Menu can be used for the Digital Camcorder system
settings. You can enter Setup menu by pressing button or the
Menu touch icon on screen at Photo or Video or Audio mode then
switch to Setup menu options.
6.5.1 71BInformation
This function can be used to display information, histogram or no
information on LCD screen.
1. Enter Setup menu, use the 4-Way Direction Button to
highlight Information.
2. Press the button or touch the Information icon on
screen to display the submenu.
3. Use the 4-Way Direction Button to select Normal,
Histogram, or OFF. Press the button or touch the
selected option icon on screen to set.
73
Page 75

6.5.2 72BDate & Time
Please refer to 2.7 for the Setting of Date and time.
6.5.3 73BSound
1. Enter Setup menu, use the 4-Way Direction Button to
highlight Sound.
2. Press the button selection Button or touch the Sound
icon on screen to display the submenu.
3. Use the 4-Way Direction Button to select Off, Low,
Medium or High. Press the button or touch the
selected option icon on screen to set.
74
Page 76

6.5.4 74BDefault
Use this function to reset all settings to the default setting.
1. Enter Setup menu, use the 4-Way Direction Button to
highlight Default.
2. Press the button or touch the Default icon on screen
to display the submenu.
3. Use the 4-Way Direction Button to select "O" YES or "X"
NO. Press button or touch the selected option icon on
screen to select the item.
75
Page 77

NTSC
P A L
6.5.5 75BTV standard
Use the TV standard to set the TV system for your area.
1. Enter Setup menu, use the 4-Way Direction Button to
highlight TV standard.
2. Press the button or touch the TV standard icon on
screen to display the submenu.
3. Use the 4-Way Direction Button to select NTSC or PAL.
Press the button or touch the selected option icon on
screen to set.
TV out standard setting reference
NTSC
USA, Canada, Japan, Korea, Taiwan, Mexico
Australia, Austria, Belgium, China, Denmark,
PAL
Finland, Germany, UK, Italy, Kuwait, Malaysia,
New Zealand, Singapore, Spain, Sweden,
Switzerland, Thailand, Norway
76
Page 78

6.5.6 76BAuto Power Off
This function can be used to turn off the Digital Camcorder
automatically after a period of time.
1. Enter Setup menu, use the 4-Way Direction Button to
highlight Auto Power Off.
2. Press the button or touch the Auto Power Off icon on
screen to display the submenu.
3. Use the 4-Way Direction Button to select Off, 3 mins, or 5
mins. Press the button or touch the selected option
icon on screen to set.
77
Page 79

50 HZ
60 HZ
6.5.7 77BFrequency
Use the Frequency option to set the frequency system for your area.
1. Enter Setup menu, use the 4-Way Direction Button to
highlight Frequency.
2. Press the button or touch the Frequency icon on
screen to display the submenu.
3. Use the 4-Way Direction Button to select 50 Hz or 60 Hz.
Press the button or touch the selected option icon on
screen to set.
Frequency setting reference:
50HZ
60HZ USA, Taiwan, Korea, Japan
UK, Germany, Spain, Italy, France,
Netherlands, Portugal, Russia, China,
Japan
78
Page 80

6.5.8 78BLanguage
1. Enter Setup menu, use the 4-Way Direction Button up and
down to highlight Language.
2. Press the button to confirm or touch the screen to
select.
3. Use the 4-Way Direction Button to select the following
languages: English, German, French, Italian, Japanese,
Spanish, Portuguese, Simplified Chinese, Traditional
Chinese, Turkish, Russian, Thai, or Arabian. Press the
button or touch the selected language icon on screen
to set.
79
Page 81

6.5.9 79BFormat
This function allows you to format the memory card or the built-in
memory.
1. Enter Setup menu, use the 4-Way Direction Button to
highlight the Format.
2. Press the button or touch the Format icon on screen
to display the submenu.
3. Use the 4-Way Direction Button to select "O" Yes or "X"
NO. Press the button or touch the selected option
icon on screen to set.
Warning:
All the data stored in the memory card or flash memory will be deleted
after formatting.
80
Page 82

6.5.10 80BFile Numbering
This setting allows you to control the numbering of the files that are
stored on the memory card.
If “Series” is selected, the file name will be numbered sequentially.
If “Reset” is selected, the next file name will start from 0001 even
after formatting, deleting or inserting a new memory card.
1. Enter Setup menu, use the 4-Way Direction Button to
highlight File Number.
2. Press the button or touch the File Number icon on
screen to display the submenu.
3. Use the 4-Way Direction Button to select Series or Reset.
Press the button or touch the selected option on
screen to set.
81
Page 83

6.5.11 81BLCD Brightness
This function can be used to adjust the brightness of the screen.
1. Enter Setup menu, use the 4-Way Direction Button to
highlight LCD brightness.
2. Press the button or touch the LCD brightness icon on
screen to display the submenu.
3. Use the 4-Way Direction Button to select High, Medium, or
Low. Press the button n or touch the selected option
icon on screen to set.
82
Page 84

6.5.12 82BInstant Review
This function can be used to instantly browse the files after taking a
picture.
1. Enter Setup menu, use the 4-Way Direction Button to
highlight Instant Review.
2. Press the button or touch the Instant Review icon on
screen to display the submenu.
3. Use the 4-Way Direction Button to select 1 second, 3 secs.,
or 5 secs.. Press the button or touch the selected
option icon on screen to set.
83
Page 85

6.5.13 82BMemory
Use this function to select data storage location.
1. Enter Setup menu, use the 4-Way Direction Button to SET
Mode.
2. Press 4-Way Direction Button to highlight Memory item.
Press button to display submenu; or Touch the
screen to select the item.
3. Press 4-Way Direction Button to select Internal, SD1, or
SD2. Press " " button to confirm; or touch the screen
to select the item.
Note:
The photos or videos can be stored in a built-in flash memory or
external SD cards. When the SD cards are inserted, the files will be
stored in the external SD cards rather than the internal flash
memory. On the other hand, the files will be stored in the built-in
flash memory when SD card(s) is not inserted.
84
Page 86

6.5.14 83BStart-up LOGO
Use this function to show the Star-up image on LCD when the digital
camcorder is turned on.
1. Enter Setup menu, use the 4-Way Direction Button to
highlight the Star-up Logo.
2. Press the button or touch the Star-up Logo icon on
screen to display the submenu.
3. Use the 4-Way Direction Button to select Default or User
Setting. Press the button or touch the selected option
icon on screen to set.
85
Page 87

7 6BPC and TV Connection
7.1 37BConnecting to the Computer
As shown in the illustration, use the USB cable provided to connect
the Digital Camcorder to a PC for file transfer.
Connect the HP V5061u Digital Camcorder PC/notebook by using
the USB cable provided with the product. if a second SD card is
inserted in SD slot 2) new drive letters should appear in Windows
Explorer.
These new drive letters represent the V5061u's internal memory and
memory card slot. (see illustration below):
Note:
The above illustrated drive letters may vary depending on the system
environment.
86
Page 88

7.2 38BConnecting to a Standard TV
As shown in the illustration, use the video cable to connect the
Digital Camcorder to a standard TV.
87
Page 89

7.3 39BConnecting to a HD TV
As shown in the illustration, use the HDMI cable provided to connect
the Digital Camcorder to an HD TV for high resolution picture
display.
88
Page 90

8 7BInstalling the Software
1. Place the CD ROM into the CD/DVD drive on your PC.
2. If the installation does not start, please open Windows
Explorer and select the CD/DVD drive on your PC. Then
double click on the Install_CD.exe to start the software
installation.
The following screen will be displayed.
3. Click on the “Arcsoft TotalMedia Extreme” and follow the
instructions on-screen.
4. The Serial number of Arcsoft Total Media Extreme is on
CD package cover.
89
Page 91

9 8BEditing Software
ArcSoft Total Media Extreme(TME)™ provides a way to manage
your media files for you, and provides the ability to create and share
projects featuring your photo, video, and music files.
You can
Create your own videos or photo slide shows complete with a
soundtrack.
Upload your files easily to You Tube™!
Share your files through simple email attachments or popular
photo printing applications.
Go to http://www.arcsoft.com/ for more information.
90
Page 92

10 9BAppendix
Troubleshooting
Problem Possible Cause Solution
1. Battery is not
Can not turn on the
Digital Camcorder.
Camcorder shuts
down suddenly.
Pictures are not
stored in the
memory.
Images are out of
focus
inserted
correctly.
2. Battery
exhausted.
1. Auto Power Off
is enabled.
2. Battery cloud.
3. Battery
exhausted.
Camcorder was
turned off before
file was fully saved
to memory.
Object exceeds the
range of focus.
1. Please insert
battery correctly.
2. Replace the
battery.
3. Charge the
battery.
1. Please turn on
the power again.
2. Replace the
battery.
3. Charge the
battery.
1. Do not power
down the
camcorder until
the file has been
saved.
2. Ensure the
battery is
sufficiently
charged.
Please take the
picture within the
focusing range and
select normal or
Macro Mode.
91
Page 93

Problem Possible Cause Solution
1. Memory card is
writing
Unable to use the
external memory
card.
Camcorder buttons
do not function
Protected.
2. Memory card
contains images
taken by other
camcorders.
Camcorder needs
to be reset.
1. Unlock the
memory card.
2. Reformat the
memory card.
Please make
sure to backup
the files before
reformatting
memory card.
Take out battery
into the camcorder
and re-insert.
92
Page 94

11 10BGetting Help
Should you have a technical support question or your HP Digital
Camcorder requires service within the warranty period, please
contact the original point of purchase or an authorized HP reseller in
your country. If service is not available at those locations, please
contact an HP Branded Product warranty agent from the support
contact list provided below. A service agent will work with you to
troubleshoot your issue and if necessary, issue a Return Material
Authorization (RMA) number in order to replace your HP Branded
Product. For warranty claims, you will be required to provide a copy
of your original dated sales receipt as proof of purchase and the
issued RMA number. You will be responsible for shipping charges
when shipping the product to the service center. The service agent
will provide you with an address and you will also be responsible for
any shipping charges to the warranty service center. Once your
product is received by this service center, a replacement unit will be
shipped back to you, typically within 5 business days.
93
Page 95

Contact/phone Support:
Language Contact/phone Support
Chinese
Deutsch deutsch@hpodd.com
Dutch hollands@hpodd.com
English english@hpodd.com
Espanol espanol@hpodd.com
Français francais@hpodd.com
Italiano italiano@hpodd.com
Japanese nippon@hpodd.com
Korean korean@hpodd.com
Portuguese portugues@hpodd.com
Svensk svensk@hpodd.com
simp.chinese@hpodd.com
trad.chinese@hpodd.com
94
Page 96

Contact/phone Support:
Country Language Number
Europe Region (EMEA)
België Dutch and German
Français French
Deutschland German
Ireland English
Italia Italian
Netherlands Dutch
Espana Spanish
Switzerland German/French/Italian
UK English
North America
United States English
Canada English and French
Latin America
Country Phone number Hours of support
Argentina 54.11.6091.2399 M-F 2pm-11pm GMT-3
Brazil 55.11.5504.6633 M-F 9am-5pm GMT-3 Brasilia
Chile 56.2.581.4977 M-F 12pm-9pm GMT-5
Colombia 57.1.508.2325 M-F 12pm-9pm GMT-5
México
(Mexico City)
México
(Guadalajara)
México
(Monterrey)
52.55.1204.8185 M-F 11am-8pm GMT-6
52.33.1031.3872 M-F 11am-8pm GMT-6
52.81.1107.2639 M-F 11am-8pm GMT-6
+ 32 2700 1724
+ 33 171230454
+ 49 6950073896
+ 353 1850882016
+ 39 269682189
+ 31 202015093
+ 34 914533458
+ 41 18009686
+ 44 2073652400
1.866.694.7633
1.866.694.7633
95
Page 97

Perú 51.1.705.6232 M-F 12pm-9pm GMT-5
Venezuela 58.212.335.4574
M-F 1230pm-930pm
GMT-5
96
Page 98

Image Sensor Type
Total Pixels
Effective Pixels
Movie Recorded
Resolution
Image Resolution
File Format
Lens Specification
Digital Zoom
Focus Range
LCD Monitor Size
LCD Monitor
Resolution
Storage Media
Internal Memory
White Balance
Scene Mode
Battery Type
Approx. Dimensions
Approx. Weight
Interface
Supplied Software
Specification
CMOS
5.51 million (2752 (H) × 2004 (V))
5.03 million (2592 (H) × 1944 (V))
1440 x 1080 @30fps
1280 x 720 @30fps
848 x 480 @60fps
320 x 240 @30fps
4608 x 3456
3200 x 2400
2592 x 1944
2048 x 1536
Video: H.264
Still Image: JPEG
Fixed lens
F/3.2, f=7.5mm
1-4X
(720p: 4X, 1440 x 1080: 2x)
Normal: 1.2 cm ~ infinity
Marcro: 16 cm
3.0" TOUCH
960 x 240
SDHC (up to 16G)
32MB
Auto, Daylight, Cloudy, Fluorescent,
Tungsten
Night shot (Video only)
CNP-40 (1200 mA-H) or Photo Lithium AA
Battery x 2
110 (L) x 58 (H) x 50 (W) mm
260g (without battery)
Mini USB
Mini C HDMI
AV out
ArcSoft TotalMedia Extreme
Page 99

P/N: 7525C00147A
 Loading...