

Page 1

b
Software Guide
Compaq Tablet PC TC1000 Series
Document Part Number: 280125-001
November 2002
This guide explains how to manage power and passwords; use
the Q Menu and the Desktop Profile Manager, Setup, and
Diagnostics utilities; update or restore Compaq software; and
play CDs and DVDs. In addition, this guide provides information
about contacting Compaq.
Page 2

© 2002 Compaq Information Technologies Group, L.P.
Compaq, the Compaq logo, RomPaq, and SoftPaq are trademarks of Compaq
Information Technologies Group, L.P. in the U.S. and/or other countries.
Microsoft and Windows are trademarks of Microsoft Corporation in the U.S.
and/or other countries. All other product names mentioned herein may be
trademarks of their respective companies.
Compaq shall not be liable for technical or editorial errors or omissions
contained herein. The information is provided “as is” without warranty of any
kind and is subject to change without notice. The warranties for Compaq
products are set forth in the express limited warranty statements accompanying
such products. Nothing herein should be construed as constituting an additional
warranty.
Software Guide
First Edition November 2002
Document Part Number: 280125-001
Page 3

Contents
1 Power
Selecting a Power Source. . . . . . . . . . . . . . . . . . . . . . . . . 1–1
Understanding Standby and Hibernation . . . . . . . . . . . . . 1–3
Standby . . . . . . . . . . . . . . . . . . . . . . . . . . . . . . . . . . . 1–3
Hibernation . . . . . . . . . . . . . . . . . . . . . . . . . . . . . . . . 1–3
Choosing Standby, Hibernation or Shutdown . . . . . . . . . 1–4
When You Leave Your Work . . . . . . . . . . . . . . . . . . 1–4
When the Power Supply Is Uncertain . . . . . . . . . . . . 1–4
While Using Drive Media . . . . . . . . . . . . . . . . . . . . . 1–5
Standby, Hibernation and Shutdown Procedures. . . . . . . 1–5
Identifying the Power/Standby Light and
Power Switch. . . . . . . . . . . . . . . . . . . . . . . . . . . . . . . 1–5
Using the Default Power Procedures. . . . . . . . . . . . . 1–6
Using Emergency Shutdown Procedures . . . . . . . . . 1–7
Using the Power Meter Icon . . . . . . . . . . . . . . . . . . . . . . 1–8
Setting Power Preferences . . . . . . . . . . . . . . . . . . . . . . . . 1–9
Changing the Power Switch Function . . . . . . . . . . . . 1–9
Setting a Standby Password. . . . . . . . . . . . . . . . . . . . 1–9
Selecting, Creating or Changing a
Power Scheme . . . . . . . . . . . . . . . . . . . . . . . . . . . . . 1–10
Finding More Battery Power Information . . . . . . . . . . . 1–11
Software Guide iii
Page 4

Contents
2 Q Menu and Desktop Profile Manager Utility
Q Menu. . . . . . . . . . . . . . . . . . . . . . . . . . . . . . . . . . . . . . . 2–1
Identifying Q Menu Controls . . . . . . . . . . . . . . . . . . 2–1
Displaying and Closing the Q Menu . . . . . . . . . . . . . 2–2
Selecting an Item from the Q Menu . . . . . . . . . . . . . 2–2
Obtaining Information About
System-Defined Items . . . . . . . . . . . . . . . . . . . . . . . . 2–3
Setting Q Menu Preferences . . . . . . . . . . . . . . . . . . . 2–3
Using a System-Defined Item . . . . . . . . . . . . . . . . . . 2–8
Desktop Profile Manager Utility . . . . . . . . . . . . . . . . . . 2–15
Identifying Profiles and Modes . . . . . . . . . . . . . . . . 2–15
Using the Default Profiles . . . . . . . . . . . . . . . . . . . . 2–18
Setting Profile Preferences . . . . . . . . . . . . . . . . . . . 2–20
Setting Hotkey Preferences . . . . . . . . . . . . . . . . . . . 2–21
3 Software Updates and Restorations
Updating Software . . . . . . . . . . . . . . . . . . . . . . . . . . . . . . 3–1
Preparing for a Software Update . . . . . . . . . . . . . . . . . . . 3–2
Accessing Tablet PC Model Information . . . . . . . . . 3–2
Accessing ROM Version Information. . . . . . . . . . . . 3–2
Updating Software from a CD . . . . . . . . . . . . . . . . . . . . . 3–4
Updating Software from the Internet . . . . . . . . . . . . . . . . 3–4
Downloading and Installing a System
ROM Update . . . . . . . . . . . . . . . . . . . . . . . . . . . . . . . 3–5
Downloading and Installing a KBC ROM Update . . 3–6
Downloading and Installing a Non-ROM SoftPaq . . 3–8
Restoring Software. . . . . . . . . . . . . . . . . . . . . . . . . . . . . . 3–9
Setting Up Your Hardware . . . . . . . . . . . . . . . . . . . . 3–9
Using the QuickRestore CDs. . . . . . . . . . . . . . . . . . . 3–9
Installing an Alternative Operating System . . . . . . . . . . 3–11
iv Software Guide
Page 5

4 Passwords
Passwords Quick Reference. . . . . . . . . . . . . . . . . . . . . . . 4–1
Managing Passwords . . . . . . . . . . . . . . . . . . . . . . . . . . . . 4–2
Setting Preferences in the Setup Utility. . . . . . . . . . . 4–2
Forgetting Passwords. . . . . . . . . . . . . . . . . . . . . . . . . 4–2
Combining Compaq and Windows Passwords . . . . . 4–3
Determining Password Status . . . . . . . . . . . . . . . . . . 4–4
Using a Power-On Password . . . . . . . . . . . . . . . . . . . . . . 4–5
Setting a Power-On Password . . . . . . . . . . . . . . . . . . 4–5
Responding to a Power-On Password Prompt. . . . . . 4–6
Changing or Clearing a Power-On Password . . . . . . 4–6
Using a Supervisor Password. . . . . . . . . . . . . . . . . . . . . . 4–7
Setting a Supervisor Password . . . . . . . . . . . . . . . . . 4–7
Responding to a Supervisor Password Prompt . . . . . 4–8
Changing or Clearing a Supervisor Password . . . . . . 4–8
Using DriveLock . . . . . . . . . . . . . . . . . . . . . . . . . . . . . . . 4–9
Protecting a Hard Drive with DriveLock . . . . . . . . 4–10
Accessing a Protected Hard Drive. . . . . . . . . . . . . . 4–11
Changing or Clearing a DriveLock Password . . . . . 4–11
Contents
5 CD and DVD Software
Using CDs and DVDs . . . . . . . . . . . . . . . . . . . . . . . . . . . 5–1
Finding Insertion and Removal Instructions . . . . . . . 5–1
Avoiding Standby and Hibernation . . . . . . . . . . . . . . 5–1
Displaying Media Contents . . . . . . . . . . . . . . . . . . . . 5–2
Playing CDs with Windows Media Player. . . . . . . . . . . . 5–3
Playing an Audio CD. . . . . . . . . . . . . . . . . . . . . . . . . 5–3
Playing a Video CD. . . . . . . . . . . . . . . . . . . . . . . . . . 5–3
Accessing Windows Media Player Help . . . . . . . . . . 5–4
Playing DVDs with WinDVD . . . . . . . . . . . . . . . . . . . . . 5–5
Installing WinDVD . . . . . . . . . . . . . . . . . . . . . . . . . . 5–5
Accessing WinDVD Help . . . . . . . . . . . . . . . . . . . . . 5–5
Starting a DVD . . . . . . . . . . . . . . . . . . . . . . . . . . . . . 5–6
Using DVD Regional Settings. . . . . . . . . . . . . . . . . . 5–7
Software Guide v
Page 6

Contents
6 Boot Order
Understanding the Search Sequence . . . . . . . . . . . . . . . . 6–1
Identifying Boot Order Controls . . . . . . . . . . . . . . . . . . . 6–2
Setting a Boot Order Preference . . . . . . . . . . . . . . . . . . . 6–2
Starting Up from a NIC . . . . . . . . . . . . . . . . . . . . . . . . . . 6–3
7 Setup, Diagnostic and Support Utilities
Selecting the Setup Utility or Compaq Diagnostics. . . . . 7–1
Using the Setup Utility. . . . . . . . . . . . . . . . . . . . . . . . . . . 7–2
Identifying Setup Utility Controls . . . . . . . . . . . . . . . 7–3
Restoring the Setup Utility Defaults . . . . . . . . . . . . . 7–3
Setting a Setup Utility Access Preference . . . . . . . . . 7–4
Displaying Information on the Main Menu. . . . . . . . 7–5
Selecting from the Security Menu. . . . . . . . . . . . . . . 7–6
Selecting from the Advanced Menu . . . . . . . . . . . . . 7–7
Selecting from the Exit Menu . . . . . . . . . . . . . . . . . . 7–8
Using Compaq Diagnostics . . . . . . . . . . . . . . . . . . . . . . . 7–9
Detecting Compaq Diagnostics . . . . . . . . . . . . . . . . . 7–9
Installing Compaq Diagnostics . . . . . . . . . . . . . . . . 7–10
Using the Compaq Configuration Record Scan . . . 7–10
Using the Diagnostics Scan . . . . . . . . . . . . . . . . . . . 7–10
Using Compaq Help and Support . . . . . . . . . . . . . . . . . 7–13
Index
vi Software Guide
Page 7

Selecting a Power Source
The tablet PC can run on internal power from a charged battery
pack or on external power. External power can be obtained from:
An AC electrical outlet, by using the AC adapter.
■
Only the AC adapter provided with the tablet PC, a
replacement AC adapter provided by Compaq, or an
AC adapter purchased as an option from Compaq should
be used with the tablet PC.
A vehicle cigarette lighter receptacle, by using an optional
■
Automobile Power Adapter/Charger.
The in-seat power supply available on some commercial
■
aircraft, by using an optional Auto/Air Cable.
A DC electrical outlet, by using an optional DC cable.
■
1
Power
Select a power source from the following table that supports the
way you plan to use the tablet PC.
Software Guide 1–1
Page 8

Power
Task Power Source
Work in most software
applications.
Charged battery pack in the tablet PC
■
or
External power supplied through 1 of
■
the following devices:
AC adapter*
❖
Optional Tablet PC Docking Station
❖
Optional Auto/Air Cable
❖
Optional Automobile Power
❖
Adapter/Charger
Install or update
system software.
Charge a new battery
pack in the tablet PC.
External power supplied through:
AC adapter
■
Optional docking station
■
External power supplied through:
AC adapter
■
Optional Automobile Power
■
Adapter/Charger
Charge an in-use
battery pack in the
tablet PC.
External power supplied through:
AC adapter
■
Optional docking station
■
Optional Automobile Power
■
Adapter/Charger
Calibrate an in-use
battery pack in the
tablet PC.
External power supplied through:
AC adapter
■
Optional Automobile Power
■
Adapter/Charger
*An optional DC cable can be used instead of an AC adapter for
any task.
1–2 Software Guide
Page 9

Understanding Standby and Hibernation
Standby and Hibernation are energy-saving features that conserve
power and reduce startup time. They can be initiated by you or by
the system.
Standby
Standby reduces power to system components that are not in use.
When Standby is initiated, your work is saved in random access
memory (RAM) and the screen is cleared. When you resume
from Standby, your work returns to the screen where you left off.
Hibernation
Hibernation saves your work in RAM to a hibernation file on the
hard drive, then shuts down the tablet PC. When you resume from
Hibernation, your work returns to the screen where you left off.
Compaq recommends that you save your work before initiating
Hibernation whenever:
Power
You plan to dock, undock, or connect an external device to
■
the tablet PC while it is in Hibernation.
You may need to resume from Hibernation from a nearly
■
discharged battery pack.
If a power-on password is set, the password must be entered to
resume from Hibernation.
Hibernation is enabled by default, but can be disabled (usually,
to save space on the hard drive). Disabling Hibernation is not
recommended. When Hibernation is disabled, system-initiated
Hibernation cannot save your work if the tablet PC reaches a
critical low-battery condition while it is on or in Standby.
To verify that Hibernation is enabled, select Start > Control
Panel > Performance and Maintenance icon > Power Options
icon > Hibernate tab. If Hibernation is enabled, the Enable
Hibernation check box is selected.
Software Guide 1–3
Page 10

Power
Choosing Standby, Hibernation or Shutdown
When You Leave Your Work
If you plan to resume shortly: Initiating Standby clears the screen,
uses less power than leaving the tablet PC on, and your work
returns quickly to the screen when you resume from Standby. A
fully charged new battery pack can support Standby for up to
3 days. A battery pack that has been frequently charged and
discharged will support Standby for less time.
If you plan to resume within 2 weeks: Initiating Hibernation clears
the screen, saves your work to the hard drive, and uses much less
power than Standby. Returning to work saved in Hibernation
takes longer than returning to work saved in Standby, but is faster
than returning to your place manually after restarting the
tablet PC. A fully charged battery pack supports Hibernation for
up to 3 months.
If the tablet PC will be disconnected from external power for
more than 1 month: Shutting down the tablet PC and removing
the battery pack extends the useful life of the battery pack.
Store the battery pack in a cool, dry place. For more battery pack
storage information, refer on this CD to the Hardware Guide,
“Battery Packs” chapter, “Storing a Battery Pack.”
When the Power Supply Is Uncertain
If power is interrupted while the tablet PC is in Standby, your
unsaved work is saved for up to 1 minute. Any data not saved
during this time will be lost. If power is interrupted while the
tablet PC is in Hibernation, your unsaved work is protected.
Power may be interrupted if the tablet PC is running on external
power from an unreliable power source, on battery power from a
failing battery pack, or during battery pack replacement. If you pause
your work when the power supply is uncertain, Compaq recommends
that you initiate Hibernation or shut down the tablet PC.
1–4 Software Guide
Page 11
Power
While Using Drive Media
CAUTION: Initiating Standby or Hibernation while playing audio
Ä
or video drive media may stop the play or diminish the quality of
the play.
If Standby or Hibernation is accidentally initiated while a
medium is in use, slide and release the power switch to resume
from Standby or Hibernation, then restart the tablet PC.
You can also resume from Standby by pressing any key or
activating the pointing device on an optional tablet PC keyboard
or by activating an optional USB mouse.
Standby, Hibernation and Shutdown Procedures
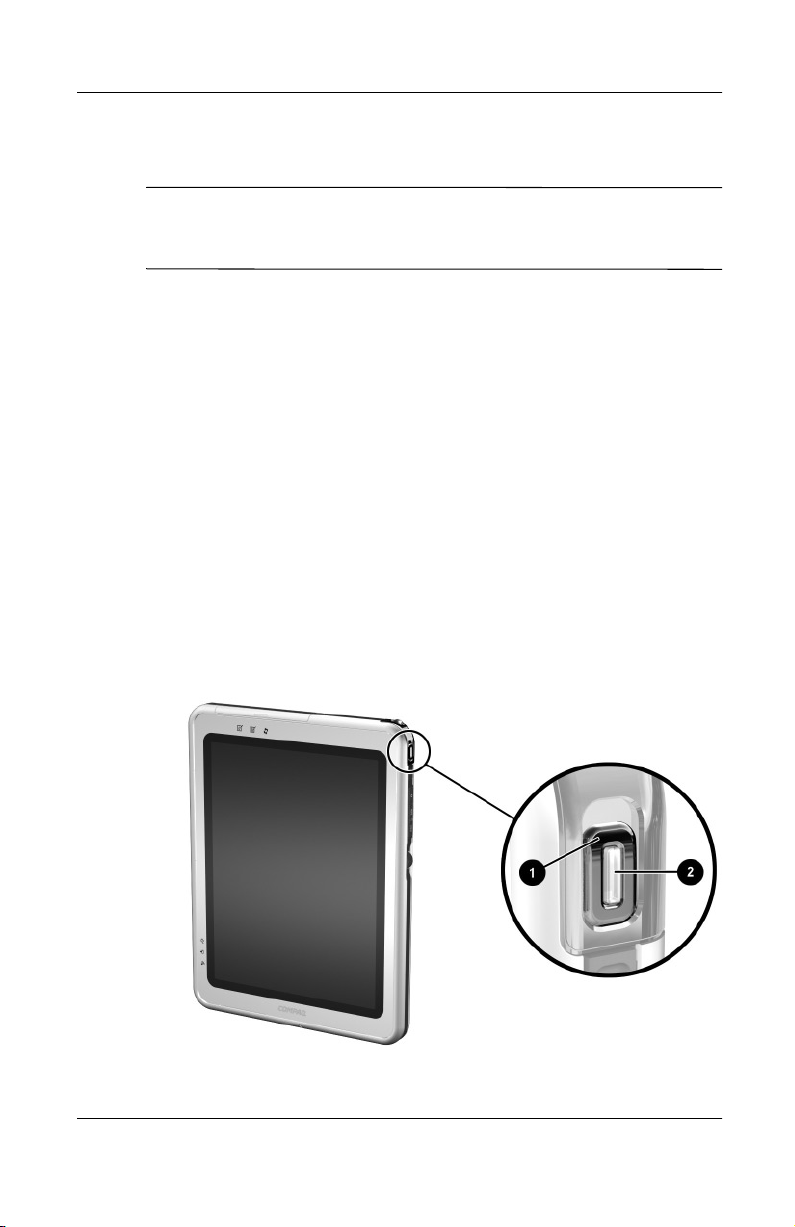
Identifying the Power/Standby Light and Power Switch
The procedures for using Standby, Hibernation, and Shutdown
use the power switch
and the power/standby light 2.
1
Identifying the power switch and the power/standby light
Software Guide 1–5
Page 12

Power
Using the Default Power Procedures
The following table describes the default procedures for turning
on or shutting down the tablet PC and for initiating or resuming
from Standby or Hibernation.
For information about changing the function of the power switch,
see “Setting Power Preferences,” later in this chapter. For
information about initiating Standby or Hibernation or shutting
down the tablet PC from the Q Menu, see the “Q Menu and
Desktop Profile Manager Utility” chapter.
Default Power Procedures
Task Procedure Result
Turn the tablet
PC on from
shutdown.
Shut down the
tablet PC.*
Initiate
Standby.
Resume from
Standby.
*If the system is unresponsive and you are unable to shut down the
tablet PC with this procedure, see “Using Emergency Shutdown
Procedures,” next in this section.
Slide and release the
power switch.
Save your work and close
all open applications, then
select Start > Shut Down >
Shut down.
Slide and release the
power switch or select Start
> Shut Down > Standby. (If
the Standby option is not
displayed and an optional
keyboard is in the system,
press and hold
Slide and release the
power switch. Or, press any
key or activate the pointing
device on an optional
tablet PC keyboard or
activate an optional USB
mouse.
shift.
)
Power/standby light
turns on.
Operating system
loads.
Operating system
closes.
Power/standby light
turns off.
Tablet PC turns off.
Power/standby light
flashes.
Screen clears.
Power/standby light
turns on.
Your work returns to
the screen.
1–6 Software Guide
Page 13

Power
Default Power Procedures
Task Procedure Result
Initiate
Hibernation.
Resume from
Hibernation.
Select Start > Shut Down >
Hibernate. (If the Hibernate
option is not displayed and
an optional keyboard is in
the system, press and hold
)
shift.
If the tablet PC is
✎
in Standby, you
must resume from
Standby before
you can initiate
Hibernation.
Slide and release the
power switch.
(Continued)
Power/standby light
turns off.
Screen clears.
Power/standby light
turns on.
Your work returns to
the screen.
Using Emergency Shutdown Procedures
If the tablet PC is unresponsive and you are unable to turn it off
using the Q Menu or standard Windows shutdown procedures:
If Windows is open, enter the ctrl+alt+del command by
■
pressing the
ctrl+alt+delete
or the Windows Security button on the tablet PC. You can
press the Windows Security button with the tip of the
tablet PC pen or with a small object like the end of a
paper clip.
Then select the Shut Down tab > Turn Off.
keys on an optional keyboard
If the Setup utility is open, press the Windows Security
■
button. (The tablet PC restarts.)
If you are unable to shut down the tablet PC by using the
■
Windows Security button or
ctrl+alt+del
keys, slide and hold
the power switch for 4 seconds.
If you are unable to shut down the tablet PC with the power
■
switch, remove the battery pack and disconnect the tablet PC
from external power.
Software Guide 1–7
Page 14

Power
Using the Power Meter Icon
When the Power Meter icon is displayed in the system tray, the
icon changes shape to indicate whether the tablet PC is running
on battery power or external power.
To show or hide the Power Meter icon:
■
1. Select Start > Control Panel > Performance and
Maintenance icon > Power Options icon > Advanced tab.
2. Select or clear the Always Show Icon On The Task Bar
check box.
3. Select the OK button.
4. If the icon is not displayed, select in the system tray the
icon for Show Hidden Icons.
To change the current power scheme, double-click the icon,
■
then select a power scheme. For more information about
using power schemes, see “Selecting, Creating, or Changing
Power Scheme,” later in this chapter.
To display battery charge information, select the icon, then
■
select Open Power Meter. For more information about
displaying battery charge information, refer on this CD to the
Hardware Guide, “Battery Packs” chapter.
To display the Power Options Properties window, right-click
■
the icon, then select Adjust Power Properties.
1–8 Software Guide
Page 15

Setting Power Preferences
Changing the Power Switch Function
By default, sliding and releasing the power switch while the
tablet PC is on initiates Standby.
To change the function of the power switch:
1. Select Start > Control Panel > Performance and
Maintenance icon > Power Options icon > Advanced tab.
2. Select a power switch function from the list for When I Press
The Power Button On My Computer.
3. Select the OK button.
The Hibernate function is available only if Hibernation is
enabled. Hibernation is enabled by default. To verify that
Hibernation is enabled, select the Hibernate tab in the Power
Options Properties window. If Hibernation is enabled, the Enable
Hibernation check box is selected.
Power
Setting a Standby Password
To set the tablet PC to prompt for a password when exiting
Standby:
1. Select Start > Control Panel > Performance and
Maintenance icon > Power Options icon > Advanced tab.
2. Select the check box for Prompt for Password When
Computer Resumes From Standby.
3. Select the OK button.
At the password prompt that is displayed when resuming from
Standby, enter a password that was set in the operating system,
not a password that was set in the Setup utility. Passwords set in
the operating system and passwords set in the Setup utility can be
the same. For more information about using passwords, see the
“Passwords” chapter.
Software Guide 1–9
Page 16

Power
Selecting, Creating or Changing a Power Scheme
A Windows power scheme assigns power levels to system
components. For example, you can use a power scheme that
turns off the display after a time interval you specify.
Selecting a Preset Power Scheme
To change the current power scheme to a default or previously set
power scheme, use either of the following procedures:
Double-click the Power Meter icon in the taskbar, then select
■
any displayed power scheme.
Select Start > Control Panel > Performance and
■
Maintenance icon > Power Options icon > Power Schemes
tab, select the power scheme from the power schemes list,
then select the OK button.
Creating or Changing a Power Scheme
To set or change a power scheme:
1. Select Start > Control Panel > Performance and
Maintenance icon > Power Options icon > Power Schemes
tab. Then:
To set a new power scheme, select the Save As button,
❏
type a name for the new scheme in the field for Save This
Power Scheme As, then select the OK button. (The new
scheme is displayed in the Power Schemes field on the
Power Schemes tab.) You can now select settings for
the new power scheme from the Settings lists.
To change the settings in an existing power scheme,
❏
select the Power Scheme from the Power Schemes list,
then select settings from the Settings lists.
2. Select the OK button.
1–10 Software Guide
Page 17

Finding More Battery Power Information
For more information about using and storing battery packs
and conserving battery pack power, refer on this CD to the
Hardware Guide, “Battery Packs” chapter.
Power
Software Guide 1–11
Page 18
Q Menu and Desktop Profile
Q Menu
The default settings on the programmable Q Menu provide quick
access to many of the system tasks accessed with the buttons,
keys, or hotkeys found on most notebook computers.
You can set the Q Menu to provide quick access to alternative
system tasks or to any item on a drive, a network, or the Internet.
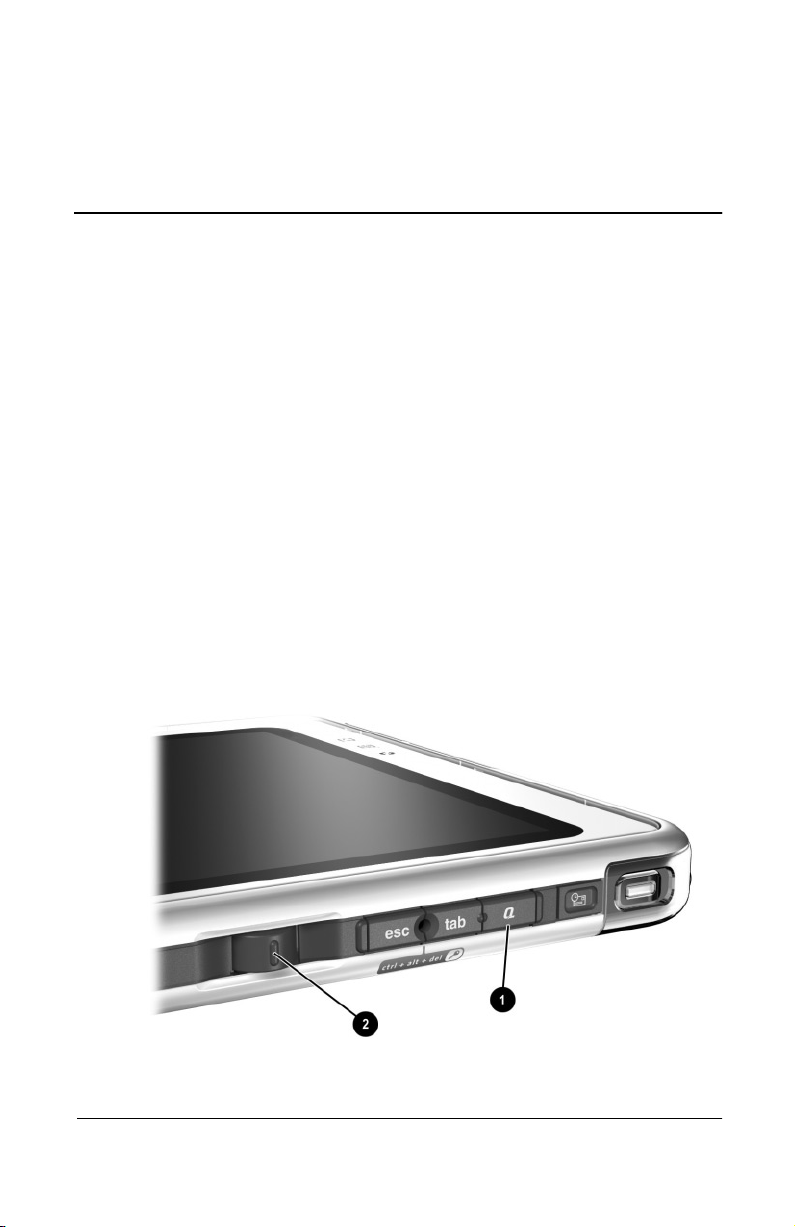
Identifying Q Menu Controls
The Q menu button 1 and the jog dial 2 are used in Q Menu
procedures.
2
Manager Utility
Identifying the Q menu button and the jog dial
Software Guide 2–1
Page 19

Q Menu and Desktop Profile Manager Utility
Displaying and Closing the Q Menu
The Q Menu can be displayed or closed at any time by using any
of the following procedures:
To display the Q Menu, press the Q menu button or select the
■
Q icon in the system tray. If the Q icon is not displayed in
the system tray:
1. Press the Q menu button.
2. Select the Q Menu Properties item.
3. Select the Display Q Menu Icon On System Tray
check box.
4. Select OK.
If the icon is not displayed, select in the system tray the icon
for Show Hidden Icons.
To close the Q Menu, press the Q menu button or click
■
anywhere outside of the Q Menu.
For information about setting a pen-activated button to open
and close the Q Menu, refer on this CD to the Hardware Guide,
“Pen, Command Controls and Keyboards” chapter, “Command
Controls” section.
Selecting an Item from the Q Menu
The items on the Q Menu can be selected with the jog dial, the
pen, an external mouse, or the pointing device on an optional
tablet PC keyboard.
To select an item with the jog dial, rotate the jog dial upward or
downward to scroll vertically through the items, then press the
jog dial inward to select an item.
2–2 Software Guide
Page 20

Q Menu and Desktop Profile Manager Utility
Obtaining Information About System-Defined Items
To display a description of a system-defined Q Menu item or
to test any Q Menu item by executing the item command:
1. Press the Q menu button or select the Q icon in the
system tray.
2. Select the Q Menu Settings item.
3. On the Items to Display On Q Menu list:
To display a description of a system-defined item,
❏
select the item. (A description is displayed in a panel
beneath the list.) Descriptions of user-defined items
cannot be displayed.
To test any item by executing the item command,
❏
select the item, then select the Execute button.
Procedures for using all system-defined items are provided in
“Using a System-Defined Item,” later in this chapter.
Setting Q Menu Preferences
The Q Menu can display up to 30 items. Several system-defined
items are displayed by default. Additional system-defined and
user-defined items can be added. All items, including the default
items, can be removed.
The items on the Q Menu are managed from the Items to Display
On Q Menu list.
Accessing the Items to Display on Q Menu List
The Items to Display on Q Menu list can be accessed at any time
by using either of the following procedures:
Press the Q menu button or select the Q icon in the system
■
tray, then select the Q Menu Settings item.
Select Start > Control Panel > Other Control Panel Options >
■
Q Menu Settings.
Software Guide 2–3
Page 21

Q Menu and Desktop Profile Manager Utility
Removing a Q Menu Item
To remove an item from the Q Menu:
1. Press the Q menu button or select the Q icon in the
system tray.
2. Select the Q Menu Settings item.
3. On the Items to Display On Q Menu list, clear the check box
for the item you want to remove.
4. Select the OK button. (The item is removed from the
Q Menu.)
Adding a Q Menu Item
An item must be displayed on the Items to Display On Q Menu
list before it can be added to the Q Menu.
The Q Menu and the Items to Display on Q Menu list can include
no more than 30 items. If the list currently contains 30 items, the
Add button is dimmed and unavailable. If the Add button is
unavailable, you must remove a listed item before you can add the
new item.
Adding a Listed Item to the Q Menu
To add an item from the Items to Display On Q Menu list to the
Q Menu:
1. Press the Q menu button or select the Q icon in the
system tray.
2. Select the Q Menu Settings item.
3. Select the check box for the item you want to add.
4. Select the OK button. (The item is added to the Q Menu.)
To display the Q Menu after adding the item, press the Q menu
button or select the Q icon in the system tray.
2–4 Software Guide
Page 22

Q Menu and Desktop Profile Manager Utility
Adding an Unlisted Item to the Q Menu
To add an item that is not on the Items to Display on Q Menu
list—for example, an item on a drive, network, or the
Internet—to both the Items to Display on Q Menu list and to the
Q Menu:
1. Press the Q menu button or select the Q icon in the
system tray.
2. Select the Q Menu Settings item.
3. Select the Add button. (The Add New Menu Entry window is
displayed.)
4. In the Add New Menu Entry window, you can add the item
by typing or by browsing:
To add the item using an optional keyboard, type a name
❏
for the item in the Display Name field and type the path
to the item in the File Name field. If you prefer to type
the Display Name, but browse for the File Name, leave
the File Name field blank.
To add an item by browsing, select the Browse button
❏
beside the File Name field. (A window displays the
contents of the system hard drive.)
In the window, select the item. (The full name of the item
is displayed in the File Name field and, if you did not
type a name earlier in the Display Name field, a Display
Name is generated from the item name and displayed in
the Display Name field.)
5. To confirm your preference(s), select the OK button. (The
new item is added to the Items to Display on Q Menu list and
to the Q Menu.)
6. To close the Compaq Q Menu window, select the OK button.
To display the Q Menu after adding the item, press the Q menu
button or select the Q icon in the system tray.
Software Guide 2–5
Page 23

Q Menu and Desktop Profile Manager Utility
Changing a User-Defined Item
User-defined items can be changed, but system-defined items
cannot be changed. If you select a system-defined item on the
Items To Display on Q Menu list, the Modify button is unavailable.
To change the Display Name and/or File Name of a
user-defined item:
1. Press the Q menu button or select the Q icon in the
system tray.
2. Select the Q Menu Settings item.
3. Select the item on the Items To Display On Q Menu list.
4. Select the Modify button. (The Modify New Entry window is
displayed.)
To change the Display Name or File Name of the item
❏
using an optional keyboard, type the new name for the
item in the Display Name field or type the new path to
the item in the File Name field. If you prefer to type the
Display Name, but browse for the File Name, leave
the File Name field blank.
To change the Display Name or File Name by browsing,
❏
select the Browse button beside the File Name field. (A
window displays the contents of the system hard drive.)
In the window, select the item. (The full name of the item
is displayed in the File Name field and, if you did not
type a name earlier in the Display Name field, a Display
Name is generated from the item name and displayed in
the Display Name field.)
5. To confirm your preference(s), select the OK button. (The
Display Name and/or File Name are changed on the Items
to Display on Q Menu list and on the Q Menu.)
6. To close the Compaq Q Menu window, select the OK button.
To display the Q Menu after changing a Display and/or File Name,
press the Q menu button or select the Q icon in the system tray.
2–6 Software Guide
Page 24

Q Menu and Desktop Profile Manager Utility
Repositioning a Q Menu Item
To change the location of an item on the Q Menu:
1. Press the Q menu button or select the Q icon in the
system tray.
2. Select the Q Menu Settings item.
3. Select the item on the Items to Display On Q Menu list, then:
To move the item upward, select the Move Up button.
❏
To move the item downward, select the Move Down
❏
button.
4. To confirm your preference(s) and close the Compaq Q Menu
window, select the OK button.
Removing an Item from the Items to Display on QMenuList
System-defined items cannot be removed from the Items to
Display on Q Menu List. To remove a user-defined item:
1. Press the Q menu button or select the Q icon in the
system tray.
2. Select the Q Menu Settings item.
3. Select the item you want to remove.
4. Select the Remove button. (The item is removed from the
Items to Display on Q Menu List.)
5. To confirm your preference(s) and close the Compaq Q Menu
window, select the OK button.
Software Guide 2–7
Page 25
Q Menu and Desktop Profile Manager Utility
Using a System-Defined Item
As shipped, the Q Menu displays only the items identified below
as default. All the items described below can be added or
removed from the Q Menu. For instructions, see “Setting Q Menu
Preferences,” earlier in this section.
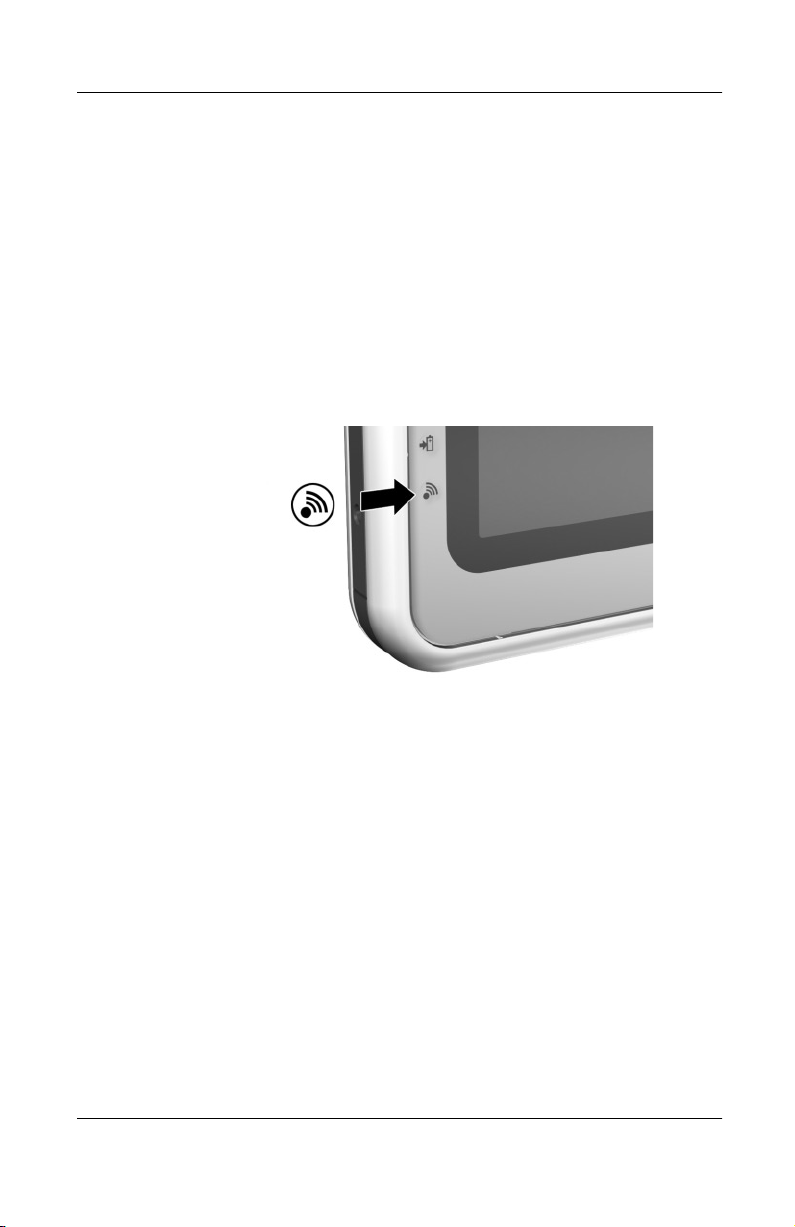
Wireless On/Off (Default)
Select the Wireless On/Off item to turn an internal wireless LAN
on when it is off or off when it is on. The wireless LAN activity
light indicates the status of the internal wireless LAN.
Identifying the wireless LAN activity light
When the wireless LAN activity light is:
Off: The internal wireless LAN is off or not installed.
■
On: The internal wireless LAN is on and connected to a
■
network.
Flashing: The internal wireless LAN is on, but is not
■
connected to a network or properly configured.
The wireless LAN activity light supports only an internal wireless
LAN Mini PCI board, not a wireless LAN CompactFlash or PC Card.
Information about using a preinstalled wireless LAN board is
provided on this CD in the Compaq WLAN Mini PCI User Guide.
If you purchase a wireless device as an option, documentation
about the device is included with the option.
2–8 Software Guide
Page 26

Brightness (Default)
Select the Brightness item to display a pop-up window that
enables you to adjust screen brightness with the jog dial. After
selecting your preferences, select the OK button in the pop-up
window.
Volume (Default)
Select the Volume item to display the operating system volume
control window.
Mute On/Off (Default)
If system volume is on, select the Mute On/Off item to mute
system volume. If system volume is muted, select the
Mute On/Off item to restore system volume.
Capture Screen
Select the Capture Screen item to copy the image currently
displayed on the tablet PC screen to the Windows clipboard.
Q Menu and Desktop Profile Manager Utility
To save or print the image, open an application which supports a
screen image, such as Microsoft Word or Microsoft Paint, then
copy the image into a data file within the application.
For example, to copy the screen image into a Word document:
1. Select the Capture Screen item.
2. Open Word.
3. Open the document file in which you want to paste the image.
4. Place the pointer in the document where you want to paste
the image.
5. On the Word menu bar, select Edit > Paste.
Software Guide 2–9
Page 27

Q Menu and Desktop Profile Manager Utility
Capture Window
Select the Capture Window item to copy the image of the
currently active window on the tablet PC screen to the Windows
clipboard.
To save or print the image, open an application which supports a
screen image, such as Microsoft Word or Microsoft Paint, then
paste the image into a data file within the application.
For example, to copy the an image of the currently active window
into a Word document:
1. Select the Capture Window item.
2. Open Word.
3. Open the document file in which you want to paste the image.
4. Place the pointer in the document where you want to paste
the image.
5. On the Word menu bar, select Edit > Paste.
Internal Only (Default)
When an optional display device, such as an external monitor or
projector, is connected to the external monitor connector on the
tablet PC, select the Internal Only item to display the image only
on the tablet PC.
Selecting the Internal Only item turns off the Extended Desktop
option.
External Only
When an optional display device, such as an external monitor or
projector, is connected to the external monitor connector on the
tablet PC, select the External Only item to display the image only
on the display device.
Selecting the Internal Only item turns off the Extended Desktop
option.
2–10 Software Guide
Page 28

Q Menu and Desktop Profile Manager Utility
Internal and External (Default)
When an optional display device, such as an external monitor or
projector, is connected to the external monitor connector on
the tablet PC, select the Internal and External item to display the
image simultaneously on the tablet PC and the optional display
device.
Selecting the Internal and External item turns off the Extended
Desktop option.
Extended Desktop
When an optional external monitor is connected to the external
monitor connector on the tablet PC, select the Extended Desktop
item to turn on the Extended Desktop option.
The Extended Desktop option extends the display from the
tablet PC screen onto the external monitor screen. For example,
you could use the Extended Desktop item to display an entire
spreadsheet. The left side columns could be displayed on the
tablet PC screen and the right side columns could be displayed on
the external monitor.
To turn off the Extended Desktop option:
1. Press the Q button.
2. Select the Internal Only, External Only, or Internal and
External item.
Presentation Mode On/Off (Default)
Select the Presentation Mode On item to apply or reapply
presentation mode; select the Presentation Mode Off item to close
presentation mode and return the system to the previous Desktop
Profile Manager profile.
This item is displayed as Presentation Mode On while the system
is not in presentation mode and as Presentation Mode Off while
the system is in presentation mode.
Software Guide 2–11
Page 29

Q Menu and Desktop Profile Manager Utility
Presentation mode is a Desktop Profile Manager profile that
provides the optimal configuration for displaying a presentation,
such as a Microsoft PowerPoint presentation, on a projector or
external monitor while displaying speaker’s notes on the
tablet PC.
If you cause the system to initiate a Desktop Profile Manager
profile while presentation mode is applied—for example, by
docking or undocking—you must reapply presentation mode.
For more information about Desktop Profile Manager profiles,
see the “Desktop Profile Manager Utility” section, later in this
chapter.
Portrait-Primary (Default)
If the image is in landscape view, select the Portrait-Primary item
to switch the image clockwise to portrait view.
Landscape-Primary (Default)
If the image is in portrait view, select the Landscape-Primary item
to switch the image clockwise to landscape view.
Portrait-Secondary
If the image is in landscape view, select the Portrait-Secondary
item to switch the image counterclockwise to portrait view.
The default Portrait-Primary item switches the image
clockwise to portrait view. Left-handed users may find the
Portrait-Secondary item, which switches the image
counterclockwise to portrait view, more convenient.
Compaq recommends that you not use the Portrait-Secondary
view while you use the internal wireless. The positions
commonly occupied by the tablet PC, external devices, and users
while the tablet PC is in the Portrait-Secondary view may
obstruct the antennas.
2–12 Software Guide
Page 30

The antennas are not visible from the outside of the tablet PC.
When the tablet PC is in the portrait position, with the logo and
pen-activated buttons in the upper left corner, the antennas are on
the right and left sides of the tablet PC, near the upper corners.
For exact antenna locations, refer on this CD to the Hardware
Guide, “External Components” chapter. Antenna locations are
illustrated in the “Right Side: Jog Dial and Antenna” and
“Left Side: Security Cable Slot, Vent and Antenna” sections.
Landscape-Secondary
If the image is in portrait view, select the Landscape-Secondary
item to switch the image counterclockwise to landscape view.
The default Landscape-Primary item switches the image
clockwise to landscape view. Left-handed users may prefer to
use the Landscape-Secondary item, which switches the image
counterclockwise to landscape view.
Compaq recommends that you not use the Landscape-Secondary
view while using the internal wireless. The positions commonly
occupied by the tablet PC, external devices, and users while the
tablet PC is in the Landscape-Secondary view may obstruct
the antennas. The antennas are not visible from the outside of the
tablet PC. When the tablet PC is in the portrait position, with
the logo and pen-activated buttons in the upper left corner, the
antennas are on the right and left sides of the tablet PC, near
the upper corners.
Q Menu and Desktop Profile Manager Utility
For exact antenna locations, refer on this CD to the Hardware
Guide, “External Components” chapter. Antenna locations are
illustrated in the “Right Side: Jog Dial and Antenna” and
“Left Side: Security Cable Slot, Vent and Antenna” sections.
Standby
Select the Standby item to initiate Standby.
Software Guide 2–13
Page 31

Q Menu and Desktop Profile Manager Utility
Hibernate
Select the Hibernate item to initiate Hibernation if Hibernation is
enabled. Hibernation is enabled by default.
If Hibernation is not enabled, selecting the Hibernate item
initiates Standby.
To verify that Hibernation is enabled, select Start > Control
Panel > Performance and Maintenance icon > Power Options
icon > Hibernate tab. If Hibernation is enabled, the Enable
Hibernation check box is selected.
Shut Down
Select the Shut Down item to immediately close the operating
system and shut down the system. You are not prompted to
confirm your action.
Power Controls
Select the Power Controls item to open the operating system
Power Options Properties window.
Tablet PC Settings (Default)
Select the Tablet PC Settings item to open the operating system
Tablet and Pen Settings window.
Q Menu Settings (Default)
Select the Q Menu Settings item to open the Q Menu Settings
window.
2–14 Software Guide
Page 32

Q Menu and Desktop Profile Manager Utility
Desktop Profile Manager Utility
The programmable Desktop Profile Manager utility can control
the images that are displayed on the tablet PC screen and on an
optional external monitor or projector.
In addition, the Desktop Profile Manager utility controls the
assignment of keystrokes to a selection of system tasks.
Keystrokes that are assigned to system tasks are called hotkeys.
For more information about the hotkey feature in the Desktop
Profile Manager utility, see “Setting Hotkey Preferences,” later in
this section.
Identifying Profiles and Modes
In the Desktop Profile Manager utility, image display information
is contained in profiles. Profiles contain the software
configuration information that can be applied by the system when
a Desktop Profile Manager mode is initiated.
Desktop Profile Manager modes and profiles are not affected by
an optional keyboard.
The following sections identify the 4 Desktop Profile Manager
modes and describe the functions of their profiles.
Software Guide 2–15
Page 33

Q Menu and Desktop Profile Manager Utility
Undocked Mode
The system can apply an undocked profile when the tablet PC
is undocked. An undocked profile provides a configuration for
using the tablet PC as a free-standing tablet or, if an optional
tablet PC keyboard is attached, as a free-standing notebook.
Tablet PC in undocked mode
Viewing Mode
The system can apply a docked profile when the tablet PC is
docked in viewing mode. A docked profile provides a
configuration for working within applications on an external
monitor while another application remains open on the tablet PC
screen.
Tablet PC docked in viewing mode
2–16 Software Guide
Page 34

Writing Mode
Q Menu and Desktop Profile Manager Utility
The system can apply a
is docked in writing mode. A writing mode profile provides a
configuration for writing on the tablet PC screen while retaining
access to applications displayed on an external monitor.
Tablet PC docked in writing mode
Presentation Mode
The
presentation mode
Presentation Mode On item from the Q Menu. The presentation
mode profile provides the optimal configuration for displaying
a presentation, such as a Microsoft PowerPoint presentation, on a
projector or external monitor while displaying speaker’s notes or
messages on the tablet PC.
writing mode
profile when the tablet PC
profile is applied by selecting the
Tablet PC in presentation mode
Software Guide 2–17
Page 35

Q Menu and Desktop Profile Manager Utility
Using the Default Profiles
The Desktop Profile Manager utility provides 1 default version of
each profile. One custom undocked profile, docked profile, and
write profile can be added. For instructions, see the “Setting
Profile Preferences” section, later in this chapter.
Undocked Profile
The system initiates an undocked profile when the tablet PC:
Is started up while undocked.
■
Is undocked from the docking station.
■
Is slid from writing mode to viewing mode while docked.
■
When the default undocked profile is initiated because the
tablet PC is starting up while undocked, the image on
the tablet PC screen retains the same orientation (landscape or
portrait) that was in effect when the tablet PC was shut down.
When the default undocked profile is initiated because the
tablet PC was undocked, the image on the tablet PC screen retains
the orientation that was in effect while the tablet PC was docked.
Whenever the default undocked profile is initiated, all open
application windows on an optional external monitor are
displayed on the tablet PC screen. (If the tablet PC is docked
while in the default undocked profile, most open application
windows are moved to the external monitor screen.)
Docked in Viewing Mode Profile
The system initiates a docked profile when the tablet PC:
Is started up while it is docked in viewing mode.
■
Is docked while in viewing mode.
■
2–18 Software Guide
Page 36

Q Menu and Desktop Profile Manager Utility
When the default viewing mode profile is initiated:
The image on the external monitor is displayed in
■
landscape view.
All applications opened while in viewing mode are displayed
■
on the external monitor screen.
Docked in Writing Mode Profile
The system initiates a writing mode profile when the tablet PC:
Is started up while docked in writing mode.
■
Is docked while in writing mode.
■
Is slid from viewing mode to writing mode while docked.
■
When the default writing mode profile is initiated:
The image on the external monitor screen is displayed in
■
landscape view.
The Journal application is displayed on the tablet PC screen.
■
All active windows open on the external monitor screen
■
remain on the external monitor screen.
All applications opened while in writing mode are displayed
■
on the tablet PC screen.
Presentation Mode Profile
To apply or reapply presentation mode, select the Q menu button
or the Q icon in the system tray > Presentation Mode On item.
To close presentation mode and return the system to the previous
profile, select Q menu button or the Q icon in the system tray >
Presentation Mode Off item.
If you cause the system to initiate a mode change while
presentation mode is applied, for example, by docking or
undocking, you must reapply presentation mode.
Software Guide 2–19
Page 37

Q Menu and Desktop Profile Manager Utility
Setting Profile Preferences
The tablet PC provides 4 default profiles, 1 for each mode.
The presentation mode profile is applied manually. At default
settings, the other 3 profiles (undocked, docked, and write) are
system-initiated.
You can disable some or all system-initiated profile changes.
■
You can create 1 custom undocked profile, 1 custom docked
■
profile, and 1 custom write profile.
Enabling or Disabling a Profile
To specify which types of profiles the system initiates:
1. Select Start > Control Panel > Desktop Profile Manager
icon > Profile tab.
2. In the upper portion of the Profile tab:
To set the system to initiate a profile type, select the
❏
profile check box.
To prevent a profile type from being initiated by the
❏
system, clear the profile check box.
3. Select the OK button.
Creating or Changing a Custom Profile
To create or change a custom undocked, docked, or write profile:
1. Select Start > Control Panel > Desktop Profile Manager
icon > Profile tab.
2. In the lower portion of the Profile tab, select the type of
profile you want to create or change.
3. Select your preferences.
4. Select the Done Editing Profile button.
5. Select the OK button.
2–20 Software Guide
Page 38

Q Menu and Desktop Profile Manager Utility
Selecting a Profile
To set the system to use a default profile or a personal profile that
you have already created:
1. Select Start > Control Panel > Desktop Profile Manager
icon > Profile tab.
2. In the upper portion of the tab, select the field for the type of
profile you want to specify (docked, undocked, or write).
Then use the down arrow to display your preference (the
default profile or your custom profile).
3. Select the check box for the displayed profile.
4. Select the OK button.
Setting Hotkey Preferences
A hotkey is a key or key combination that performs a system task
such as locating the pointer or opening an application.
The Desktop Profile Manager utility does not provide default
hotkeys. Instead, the utility provides a list of system tasks that
you can assign to your choice of keys or key combinations.
Your hotkey assignments are supported in all applications and all
Desktop Profile Manager profiles.
Hotkeys are assigned on the Hotkey tab of the Desktop Profile
Manager window. To access the Hotkey tab, select Start > Control
Panel > Desktop Profile Manager icon > Hotkey tab.
To set, add, or remove a hotkey assignment, follow the
instructions on the Hotkey tab. For more information about any
item on the tab, select the item, then select the question mark
button in the upper right corner of the Desktop Profile Manager
window.
For information about initiating system tasks from the Q Menu,
see the “Q Menu” section, first in this chapter.
Software Guide 2–21
Page 39

Software Updates and
Updating Software
For optimal tablet PC performance and to make sure the tablet PC
remains compatible with changing technologies, Compaq
strongly recommends that you install the latest versions of
Compaq software as they become available.
To update any software, an optional keyboard and pointing device
must be available. Compaq recommends that you use an optional
tablet PC keyboard. The tablet PC keyboard provides both key
and mouse functions while retaining the availability of both USB
ports on the tablet PC.
To update Compaq software:
1. Prepare for any update by identifying your tablet PC type,
series or family, and model. Prepare for a system ROM
(read-only memory) or KBC (keyboard controller)
ROM update by identifying the ROM versions currently
installed on the tablet PC.
2. Access the updates on your local Compaq Web site or the
Compaq Support Software CD.
3. Download and install the updates.
3
Restorations
System ROM stores the BIOS (basic input output system). The
✎
BIOS determines how the tablet PC hardware interacts with the
operating system and external devices and also supports such
tablet PC services as time and date. KBC ROM stores the parts of
the BIOS that support input features such as the pen, some
buttons, and an optional keyboard.
Software Guide 3–1
Page 40

Software Updates and Restorations
Preparing for a Software Update
If your tablet PC connects to a network, Compaq recommends
that you consult with your network administrator before installing
any software updates, particularly system ROM or KBC
(keyboard controller) ROM updates.
Accessing Tablet PC Model Information
To access the updates for your tablet PC, you may need to know
the following information about your tablet PC:
The product category is tablet PC.
■
The product family name and series number are printed in the
■
upper left corner of the display bezel.
Complete model information is provided on the product
■
identification label on the back of the tablet PC.
The tablet PC product name, model, serial number, and other
identification information are also available on the Main tab of
the Setup utility. For access instructions, see “Displaying ROM
Information in the Setup Utility,” later in this section.
Accessing ROM Version Information
To determine whether available ROM updates contain later ROM
versions than those currently installed on the tablet PC, you need
to know the version of the system ROM or KBC ROM currently
installed.
ROM version information can be displayed in either Compaq
Diagnostics or the Setup utility.
Displaying ROM Information in Compaq Diagnostics
Compaq Diagnostics is preloaded, but not preinstalled, on the
tablet PC. For information about detecting or installing Compaq
Diagnostics, see the “Setup, Diagnostic and Support Utilities”
chapter, “Using Compaq Diagnostics” section.
3–2 Software Guide
Page 41

Software Updates and Restorations
To display the currently installed ROM versions in Compaq
Diagnostics after the utility is installed:
1. Select Start > Control Panel > Compaq Diagnostics icon.
2. When the system scan finishes, select the System icon (on the
far left of the Compaq Diagnostics toolbar).
3. In the lower left corner of the System window, set the
Information Level to More. The ROM information is
displayed.
4. To close Compaq Diagnostics, select File > Exit.
Displaying ROM Information in the Setup Utility
The Setup utility is a non-Windows utility. For general
information about using the Setup utility, see the “Setup,
Diagnostic and Support Utilities” chapter, “Using Compaq
Diagnostics” section.
1. To open the Setup utility, turn on or restart the tablet PC.
While the Compaq logo is displayed and a cursor is flashing
in the upper right corner of the screen, press the esc button on
the tablet PC, or press
on an optional keyboard.
F10
To change the language, select Advanced > Languages. To
navigate and select without using an optional keyboard, rotate
the jog dial to scroll and press the jog dial inward to select. To
navigate and select using an optional keyboard, use the arrow
and
enter
keys.
2. Select the Main menu.
The system ROM version is displayed in the BIOS
❏
Version field.
The KBC (keyboard controller) ROM version is
❏
displayed in the KBC Version field.
3. To exit the Setup utility without changing any settings, select
the Exit menu > Exit Discarding Changes, then follow the
instructions on the screen.
Software Guide 3–3
Page 42

Software Updates and Restorations
Updating Software from a CD
The Compaq Support Software CD provides the latest Compaq
software and instructions for installing and using it. In addition to
such software as device drivers, ROM updates, and utilities, the
CD provides links to specific areas of the Compaq Web site.
To purchase the current Compaq Support Software CD or a
subscription that provides both the current version and future
versions of the CD:
If the tablet PC is connected to the Internet, select Start >
■
Compaq Information Center > Support Software CD, then
select the link. Or, visit the Compaq Web site at:
http://www.compaq.com/support/files/notebooks/us/purchase.html
If the tablet PC is not connected to the Internet, refer to the
■
Worldwide Telephone Numbers booklet, included in English
only with the tablet PC, to obtain purchase information from
a Compaq authorized dealer, reseller, or service provider.
Updating Software from the Internet
Most software at the Compaq Web site is packaged in a
compressed file called a SoftPaq. Some ROM updates may be
packaged in a compressed file called a RomPaq. Other ROM
updates may be provided as a CPQFlash SoftPaq.
Most download packages contain a file named Readme.txt. A
Readme.txt file contains detailed descriptive, installation, and
troubleshooting information about the download. The Readme.txt
files included with RomPaqs are English only.
The following sections provide instructions for downloading and
installing:
A system ROM update.
■
A KBC (keyboard controller) ROM update.
■
A SoftPaq containing an update other than a ROM update.
■
3–4 Software Guide
Page 43

Software Updates and Restorations
Downloading and Installing a System ROM Update
CAUTION: To prevent serious damage to the tablet PC or an
Ä
unsuccessful installation, download and install a system ROM only while
the tablet PC is connected to reliable external power using the
AC adapter or an optional docking station. (Do not download or install a
system ROM during an electrical storm or while the tablet PC is running
on battery power or connected to an optional Auto/Air Cable or
Automobile Power Adapter/Charger.) During the download and
installation:
Do not interrupt the power to the tablet PC by unplugging or
■
undocking the tablet PC.
Do not shut down the tablet PC.
■
To download and install a system ROM:
1. To access the page at the Compaq Web site that provides
software for your tablet PC, select Start > Compaq
Information Center > Software & Drivers, then select the
link. Or, visit the Compaq Web site at
http://www.compaq.com/support.
2. Follow the instructions at the site to identify your tablet PC
and to access the latest RomPaq.
For tablet PC identification information, see “Accessing
❏
Tablet PC Model Information,” earlier in this chapter.
For version and date information about the ROM
❏
currently installed in the tablet PC, see “Accessing
ROM Version Information,” earlier in this chapter.
3. Write down the number or name of the RomPaq you plan
to download, so that you can identify it later when it has been
downloaded to your hard drive.
4. Follow the instructions in the download area to download the
RomPaq.
5. When the download is complete, select Start > All
Programs > Accessories > Windows Explorer > My
Computer > your hard drive (usually, Local Disk C).
Software Guide 3–5
Page 44

Software Updates and Restorations
6. In the COMPAQ folder, select the name or number of the
software package containing the system ROM update.
(The system ROM installation begins.)
7. To complete the installation, follow the instructions on the
screen.
After a message on the screen reports a successful installation,
✎
you can delete the download package from the COMPAQ folder.
Downloading and Installing a KBC ROM Update
To update KBC (keyboard controller) ROM from the Internet,
you must download the update to a diskette, then install the
update from the diskette. An optional docking station or External
MultiBay must be in the system before you can update the KBC
ROM from the Internet.
CAUTION: To prevent serious damage to the tablet PC or an
Ä
unsuccessful installation, download and install a KBC (keyboard
controller) ROM only while the tablet PC is connected to reliable external
power using the AC adapter or an optional docking station. (Do not
download or install a KBC ROM during an electrical storm or while the
tablet PC is running on battery power or connected to an optional
Auto/Air Cable or Automobile Power Adapter/Charger.) During the
download and installation:
Do not interrupt the power to the tablet PC by unplugging or
■
undocking the tablet PC.
Do not shut down the tablet PC.
■
Downloading a KBC ROM Update
To download a KBC (keyboard controller) ROM update:
1. Insert a diskette drive into the MultiBay of the docking
station or External MultiBay.
For instructions, refer to the documentation included with
the device.
2. Obtain a formatted 1.44-megabyte or larger diskette.
3–6 Software Guide
Page 45

3. Insert the diskette into the diskette drive.
For instructions, refer on this CD to the Hardware Guide,
“Drives” chapter.
4. To access the page at the Compaq Web site that provides
software for your tablet PC, select Start > Compaq
Information Center > Software & Drivers, then select the
link. Or, visit
http://www.compaq.com/support.
5. Follow the instructions at the site to identify your tablet PC
and to access the latest KBC ROM package.
For tablet PC identification information, see “Accessing
❏
Tablet PC Model Information,” earlier in this chapter.
For version and date information about the ROM
❏
currently installed in the tablet PC, see “Accessing
ROM Version Information,” earlier in this chapter.
6. Follow the instructions at the download area to download any
update that is later than the KBC ROM currently installed on
the tablet PC.
Installing a KBC ROM Update
Software Updates and Restorations
To install a KBC (keyboard controller) ROM update from a
diskette:
1. Shut down the tablet PC.
2. Be sure that:
The tablet PC is connected to reliable external power
❏
through the AC adapter or a docking station.
The diskette containing the KBC ROM update is inserted
❏
in the diskette drive.
3. Turn on the tablet PC, then follow the instructions on the
screen.
4. When a message on the screen reports that the installation is
complete, remove the diskette.
5. Shut down the tablet PC. (Do not restart the tablet PC.)
Software Guide 3–7
Page 46

Software Updates and Restorations
Downloading and Installing a Non-ROM SoftPaq
To update software other than system ROM or KBC (keyboard
controller) ROM:
1. To access the page at the Compaq Web site that provides
software for your tablet PC, select Start > Compaq
Information Center > Software & Drivers. Or, visit
http://www.compaq.com/support.
2. Follow the instructions at the site to find the software
packages for your tablet PC.
3. At the download area:
a. Write down the number or name of the software package,
so that you can identify it later when it has been
downloaded to your hard drive.
b. Follow the instructions on the site to download the
software package.
4. When the download is complete, open Windows Explorer.
To open Windows Explorer from the Start menu, select
Start > All Programs > Accessories > Windows Explorer.
(The Windows Explorer application opens.)
5. In the left pane of the Windows Explorer window, select
My Computer > your hard drive (usually, Local Disk C) >
COMPAQ.
6. In the COMPAQ folder, select the name or number of the
software package containing the update.
7. Select the file that includes an .exe extension, for example,
Filename.exe. (The installation begins.)
8. To complete the installation, follow the instructions on the
screen.
After a message on the screen reports a successful installation,
✎
you can delete the download package from the COMPAQ folder.
3–8 Software Guide
Page 47

Restoring Software
The Compaq QuickRestore CDs included with the tablet PC
contain all the software that shipped preinstalled or preloaded
on the tablet PC and instructions for restoring it.
Setting Up Your Hardware
A QuickRestore CD can be inserted into the MultiBay of an
optional Tablet PC Docking Station or External MultiBay.
You can navigate through QuickRestore software with an optional
USB (Universal Serial Bus) external mouse, the keys on an
optional standard USB keyboard, or with the keys and pointing
device on an optional tablet PC keyboard.
CAUTION: To prevent an unsuccessful installation if you are using
Ä
a standard USB keyboard and a docking station, connect the
keyboard to the tablet PC (not to the docking station).
Using the QuickRestore CDs
Software Updates and Restorations
You can use the QuickRestore CDs included with all models to
restore the tablet PC factory image. You can use the Compaq
Operating System CD included with some models to reinstall
only the operating system or only parts of the operating system.
The tablet PC factory image is the tablet PC software as it was
when the tablet PC was shipped. After a successful restoration
from the Compaq QuickRestore System Recovery CD:
All settings are default settings.
■
All software is the version installed at the factory.
■
No software, including drivers, applications, and utilities, that
■
you may have installed after initial software setup is present.
Software Guide 3–9
Page 48

Software Updates and Restorations
If the tablet PC has become unresponsive, you may be able to
start the tablet PC from the Compaq QuickRestore System
Recovery CD or the Compaq Operating System CD. Both of
these CDs are bootable.
To prevent loss of work or an unsuccessful restoration or
installation, read the following 2 cautions before using any
QuickRestore
CD. For more information about using QuickRestore
CDs, refer to the documentation included with the CDs.
CAUTION: To prevent loss of work, back up any data files that are
Ä
on the hard drive before reinstalling the operating system from a
Compaq QuickRestore System Recovery CD
Operating System CD
CAUTION: To prevent serious damage to the tablet PC or an
Ä
unsuccessful restoration or installation, use a QuickRestore CD only
while the tablet PC is connected to reliable external power using the
AC adapter or an optional docking station or DC cable. (Do not use
a QuickRestore CD during an electrical storm or while the tablet PC is
running on battery power or connected to an optional Auto/Air Cable
or Automobile Power Adapter/Charger.) During the restoration or
installation:
Do not interrupt the power to the tablet PC by unplugging or
■
undocking the tablet PC.
Do not shut down the tablet PC.
■
.
or a
Compaq
3–10 Software Guide
Page 49

Software Updates and Restorations
Installing an Alternative Operating System
The Microsoft Windows XP Tablet PC Edition operating system
provided on the tablet PC or on a QuickRestore CD is enhanced
by Compaq. The Compaq enhancements include support for
tablet PC buttons, the docking profiles provided by the Desktop
Profile Manager utility, and the quick access to system functions
provided by the Q Menu.
CAUTION: Replacing the Windows XP Tablet PC Edition operating
Ä
system enhanced by Compaq with another operating system will
result in the loss of most of the features specific to the tablet PC.
Software Guide 3–11
Page 50

This chapter provides instructions for using Compaq passwords.
For information about using Windows passwords, select Start >
Help and Support > Security and Administration.
Passwords Quick Reference
The following Compaq passwords can be set on the tablet PC.
To Protect Against This Risk Use This Password
Unauthorized use of the tablet PC Power-on password
4
Passwords
Unauthorized access to the Setup
utility
Unauthorized access to the contents
of the system hard drive
Software Guide 4–1
Supervisor password
DriveLock password
Page 51

Passwords
Managing Passwords
Compaq passwords (power-on, supervisor, and DriveLock) do not
display as they are set, changed, deleted, or entered.
Setting Preferences in the Setup Utility
Passwords are set, changed, and deleted in the Setup utility.
Because the Setup utility is a non-Windows utility:
The pen cannot be used.
■
The jog dial or the
■
keyboard are used to select and navigate.
Preferences that require typing, such as setting or changing a
■
password, can be entered only from an optional keyboard.
If you are unfamiliar with non-Windows utilities, Compaq
recommends that you read the “Using the Setup Utility” section
in the “Setup, Diagnostic and Support Utilities” chapter of this
guide before using the utility to set a password preference.
Forgetting Passwords
Whenever you set or change a password, write down the
password and store it in a safe location away from the tablet PC.
If you forget your power-on password, you cannot start up the
■
tablet PC or resume from Hibernation unless you can use a
supervisor password or until a Compaq authorized service
provider resets the tablet PC.
If you forget your supervisor password, you cannot open the
■
Setup utility until a Compaq authorized service provider
resets the tablet PC.
If you forget your DriveLock password, the hard drive is
■
permanently unusable.
and arrow keys on an optional
enter
To contact a Compaq authorized service provider, refer to the
Worldwide Telephone Numbers
with the tablet PC.
4–2 Software Guide
booklet included in English only
Page 52

Passwords
Combining Compaq and Windows Passwords
A Compaq password is a password set in the Setup utility. A
Windows password is a password set in the operating system.
Compaq passwords and Windows passwords work independently.
You must enter a Compaq password at a Compaq password
prompt and a Windows password at a Windows password prompt.
For example:
If a power-on password is set, the power-on password (not a
■
Windows password) must be entered when the tablet PC
starts up or resumes from Hibernation.
If you set Windows to prompt for a password before exiting
■
Standby, a Windows password (not a power-on password)
must be entered to resume from Standby.
A supervisor password set in the Setup utility and a Windows
■
administrator password set in Windows are not
interchangeable.
Any number combination used for a Compaq password can also
be used for other Compaq passwords or as a Windows password,
with these considerations:
All Compaq passwords must be a combination of up to
■
32 numbers.
When the tablet PC is starting up from a hard drive protected
■
with DriveLock, you will not be prompted for a power-on
password if you enter a DriveLock password that is the same
as the power-on password.
If both a power-on password and a supervisor password are
■
set, the supervisor password can be used at the power-on
password prompt.
Software Guide 4–3
Page 53

Passwords
Determining Password Status
You can use the Setup utility to determine whether a power-on,
supervisor, or DriveLock password is set.
If a prompt for a supervisor password is displayed as you attempt
to enter the Setup utility, the prompt itself confirms that a
supervisor password is set.
The status of all Compaq passwords is displayed in the Setup
utility.
1. To open the Setup utility, turn on or restart the tablet PC.
While the Compaq logo is displayed and a cursor is flashing
in the upper right corner of the screen, press the esc button on
the tablet PC, or press
To change the language, select Advanced > Languages. To
navigate and select without using an optional keyboard, rotate
the jog dial to scroll and press the jog dial inward to select. To
navigate and select using an optional keyboard, use the arrow
and
enter
keys.
2. Select the Security menu.
on an optional keyboard.
F10
3. To display the status of a:
Power-on password, select Power-On Password Is.
❏
Supervisor password, select Supervisor Password Is.
❏
DriveLock password, select DriveLock Password Is.
❏
“Set” indicates that the password is set. “Clear” indicates that
the password is not set.
4. To exit the Setup utility without changing any settings, select
Exit > Exit Discarding Changes.
4–4 Software Guide
Page 54

Using a Power-On Password
A power-on password prevents unauthorized use of the tablet PC.
Once set, it must be entered each time the tablet PC is turned on
or resumes from Hibernation.
If you use the same number combination for both a power-on
password and a DriveLock password, you are prompted for the
DriveLock password, but not the power-on password, when the
tablet PC starts up.
Setting a Power-On Password
To set a power-on password, an optional keyboard must be in the
system. The keyboard may be a tablet PC keyboard or a standard
keyboard connected by USB to the tablet PC.
A power-on password is set in the Setup utility.
1. To open the Setup utility, turn on or restart the tablet PC.
While the Compaq logo is displayed and a cursor is flashing
in the upper right corner of the screen, press the esc button on
the tablet PC, or press
on an optional keyboard.
F10
Passwords
To change the language, select Advanced > Languages. To
navigate and select, use the arrow and
2. To access the power-on password settings, select the Security
menu > Set Power-On Password, then press
3. Type any combination of up to 32 numbers in both fields,
then press
4. To save your preference and exit the Setup utility, select
File > Save Changes and Exit, then follow the instructions
on the screen.
Your preference is set as you exit the Setup utility and is in effect
when the tablet PC restarts.
Software Guide 4–5
enter.
enter
keys.
enter.
Page 55

Passwords
Responding to a Power-On Password Prompt
Either a power-on password or a supervisor password can be
entered at a power-on password prompt. Either password can
be entered with or without an optional keyboard.
At the power-on password prompt, a pen-activated on-screen
keypad is displayed. To enter your power-on or supervisor
password, use either of the following methods:
Tap your password onto the on-screen keypad with the
■
pen tip, then select Enter on the on-screen keypad.
Type your password on an optional keyboard, then press
■
After 3 unsuccessful attempts to enter a password, you must
turn off the tablet PC by sliding and holding the power switch for
4 seconds, then turn on the tablet PC to try again. Restarting the
tablet PC will not set the system to accept a fourth attempt.
Changing or Clearing a Power-On Password
To change or clear a power-on password, an optional keyboard
must be in the system. The keyboard may be a tablet PC keyboard
or a standard keyboard connected by USB.
enter.
A power-on password is changed or cleared in the Setup utility.
1. To open the Setup utility, turn on or restart the tablet PC.
While the Compaq logo is displayed and a cursor is flashing
in the upper right corner of the screen, press the esc button on
the tablet PC, or press
on an optional keyboard.
F10
To change the language, select Advanced > Languages. To
navigate and select, use the arrow and
enter
keys.
2. To access the power-on password settings, select the Security
menu > Set Power-On Password, then press
4–6 Software Guide
enter.
Page 56

3. Type the current password in the Enter Old Password field,
enter,
then:
press
To change the password, type the new password, using
❏
any combination of up to 32 numbers, in both fields, then
press
enter.
To clear the password, clear both fields, then press
❏
4. To save your preference and exit the Setup utility, select
File > Save Changes and Exit, then follow the instructions on
the screen.
Your preference is set as you exit the Setup utility and is in effect
when the tablet PC restarts.
Using a Supervisor Password
A supervisor password protects the configuration settings and
system identification information in the Setup utility. Once set,
this password must be entered to access the Setup utility.
A supervisor password can also be entered at a prompt for the
power-on password.
Passwords
enter.
Setting a Supervisor Password
To set a supervisor password, an optional keyboard must be in the
system. The keyboard may be a tablet PC keyboard or a standard
keyboard connected to the tablet PC by USB.
A supervisor password is set in the Setup utility.
1. To open the Setup utility, turn on or restart the tablet PC.
While the Compaq logo is displayed and a cursor is flashing
in the upper right corner of the screen, press the esc button on
the tablet PC, or press
To change the language, select Advanced > Languages. To
navigate and select, use the arrow and
Software Guide 4–7
on an optional keyboard.
F10
enter
keys.
Page 57

Passwords
2. To access the supervisor password settings, select the
Security menu > Set Supervisor Password, then press
enter.
3. Type any combination of up to 32 numbers in both fields,
then press
enter.
4. To save your preference and exit the Setup utility, select the
File menu > Save Changes and Exit, then follow the
instructions on the screen.
Your preference is set as you exit the Setup utility and is in effect
when the tablet PC restarts.
Responding to a Supervisor Password Prompt
A supervisor password can be entered with or without an optional
keyboard.
At the supervisor password prompt, a pen-activated on-screen
keypad is displayed. To enter your password, use either of the
following methods:
Tap your password onto the on-screen keypad with the
■
pen tip, then select Enter on the on-screen keypad.
Type your password on an optional keyboard, then press
■
enter.
After 3 unsuccessful attempts to enter the supervisor password,
you must turn off the tablet PC by sliding and holding the power
switch for 4 seconds, then turn on the tablet PC to try again.
Restarting the tablet PC will not set the system to accept a
fourth attempt.
Changing or Clearing a Supervisor Password
To change or clear a supervisor password, an optional keyboard
must be in the system. The keyboard may be a tablet PC keyboard
or a standard keyboard connected by USB.
4–8 Software Guide
Page 58

Passwords
To change or clear a supervisor password:
1. To open the Setup utility, turn on or restart the tablet PC.
While the Compaq logo is displayed and a cursor is flashing
in the upper right corner of the screen, press the esc button on
the tablet PC, or press
To change the language, select Advanced > Languages. To
navigate and select, use the arrow and
2. To access the supervisor password settings, select the
Security menu > Set Supervisor Password, then press
3. Type the current password in the Enter Old Password field,
enter,
then:
enter.
press
To change the password, type the new password, using
❏
any combination of up to 32 numbers, in both fields, then
press
To clear the password, clear both fields, then press
❏
4. To save your preference and exit the Setup utility, select
the File menu > Save Changes and Exit, then follow the
instructions on the screen.
on an optional keyboard.
F10
enter
keys.
enter.
enter.
Your preference is set as you exit the Setup utility and is in effect
when the tablet PC restarts.
Using DriveLock
CAUTION: If you forget your DriveLock user password, the protected
Ä
hard drive is permanently unusable.
DriveLock prevents unauthorized access to the contents of the
hard drive. Once DriveLock protection is applied to the drive, a
password must be entered to access the drive.
If you enter a DriveLock password that is the same as the
power-on password, you will not be prompted to enter
the power-on password.
Software Guide 4–9
Page 59

Passwords
Protecting a Hard Drive with DriveLock
To access the DriveLock settings in the Setup utility, you must
shut down, then turn on the tablet PC to access the Setup utility.
If you open the Setup utility from a Windows restart, DriveLock
settings are not accessible.
To set a DriveLock password, an optional keyboard must be in the
system. The keyboard may be a tablet PC keyboard or a standard
keyboard connected by USB to the tablet PC.
1. To verify that the tablet PC is off and not in Hibernation, slide
and release the power switch. If your work returns to the
screen, close all open files and applications, then shut down
the tablet PC.
2. To open the Setup utility, turn on or restart the tablet PC.
While the Compaq logo is displayed and a cursor is flashing
in the upper right corner of the screen, press the esc button on
the tablet PC, or press
To change the language, select Advanced > Languages. To
navigate and select, use the arrow and
on an optional keyboard.
F10
enter
keys.
3. To access the DriveLock password settings, select the
Security menu > Set DriveLock Password, then press
enter.
4. Type any combination of up to 32 numbers in both fields,
then press
5. Read the warning. To continue, press
enter.
enter.
6. To confirm DriveLock protection on the drive, type
DriveLock in the confirmation field, then press
enter.
7. To save your DriveLock settings, select the File menu > Save
Changes and Exit, then follow the instructions on the screen.
Your preferences are set as you exit the Setup utility and are in
effect when the tablet PC restarts.
4–10 Software Guide
Page 60

Passwords
Accessing a Protected Hard Drive
A DriveLock password can be entered with or without an optional
keyboard.
At the password prompt, a pen-activated on-screen keypad is
displayed. To enter your password, use either of the following
methods:
Tap your password onto the on-screen keypad with the
■
pen tip, then select Enter on the on-screen keypad.
Type your password on an optional keyboard, then press
■
After 2 unsuccessful attempts to enter the DriveLock password,
you must turn off the tablet PC by sliding and holding the power
switch for 4 seconds, then turn on the tablet PC to try again.
Restarting the tablet PC will not set the system to accept a
third attempt.
Changing or Clearing a DriveLock Password
To access the DriveLock settings in the Setup utility, you must
shut down, then turn on the tablet PC to access the Setup utility.
If you open the Setup utility from a Windows restart, DriveLock
settings are not accessible.
enter.
1. To verify that the tablet PC is off and not in Hibernation, slide
and release the power switch. If your work returns to the
screen, shut down the tablet PC.
2. To open the Setup utility, turn on or restart the tablet PC.
While the Compaq logo is displayed and a cursor is flashing
in the upper right corner of the screen, press the esc button on
the tablet PC, or press
on an optional keyboard.
F10
To change the language, select Advanced > Languages. To
navigate and select, use the arrow and
enter
keys.
3. To access the DriveLock password settings, select the
Security menu > Set DriveLock Password, then press
Software Guide 4–11
enter.
Page 61

Passwords
4. Type the current password in the Enter Old Password field,
enter,
then:
press
To change the password, type the new password, using
❏
any combination of up to 32 numbers, in both fields, then
press
enter.
To clear the password, clear both fields, then press
❏
enter.
5. To save your preference and exit the Setup utility, select
File > Save Changes and Exit, then follow the instructions on
the screen.
Your preference is set as you exit the Setup utility and is in effect
when the tablet PC restarts.
4–12 Software Guide
Page 62

CD and DVD Software
Using CDs and DVDs
Before using any optical drive software, Compaq recommends
that you read the following general information about using CDs
and DVDs.
Finding Insertion and Removal Instructions
You can play CDs or DVDs in an optical drive inserted in the
MultiBay of an optional docking station or External MultiBay.
For drive insertion instructions, refer to the documentation
■
included with an optional External MultiBay or docking station.
For CD insertion and removal instructions, refer on this CD
■
to the Hardware Guide, “Drives” chapter.
Avoiding Standby and Hibernation
5
CAUTION: Initiating Standby or Hibernation while playing audio or
Ä
video drive media may stop the play or diminish the quality of the play.
If Standby or Hibernation is accidentally initiated while a
medium is in use, slide and release the power switch to resume
from Standby or Hibernation, then restart the tablet PC.
You can also resume from Standby by pressing any key or
activating the pointing device on an optional tablet PC keyboard
or by activating an optional USB mouse.
For more information about Standby and Hibernation, see the
“Power” chapter.
Software Guide 5–1
Page 63

CD and DVD Software
Displaying Media Contents
When you insert a diskette, CD, or DVD into the system, the
tablet PC can play the medium, display its contents, take no
action, or display a response prompt on the screen.
You can set the responses of the tablet PC to the insertion of
various types of media by using the operating system AutoPlay
feature.
Setting AutoPlay Preferences
To set AutoPlay preferences:
1. Select Start > My Computer.
2. Right-click a drive.
3. Select Properties > AutoPlay tab, then follow the instructions
on the screen.
4. To save your settings, select the OK button.
Displaying Media Contents Without Using AutoPlay
To display the contents of a drive medium when the contents are
not displayed by AutoPlay:
1. Insert the medium into the drive.
2. Select Start > Run, then type:
explorer x:
(where X = the drive designation of the drive containing
the medium).
3. Select the OK button.
A drive designation is a letter of the alphabet that the tablet PC
✎
uses to identify the drive. To display the drive designation of
every drive in the system, select Start > My Computer.
5–2 Software Guide
Page 64

CD and DVD Software
Playing CDs with Windows Media Player
Playing an Audio CD
To play an audio CD:
1. Read “Using CDs and DVDs,” first in this chapter.
2. If an optical drive is not in the system, insert an optical drive
into the MultiBay of an optional External MultiBay or
docking station.
3. Insert the audio CD into the drive, then close the tray. Wait
several seconds. Then:
If the CD and Windows Media Player open, proceed
❏
to step 5.
If the CD and Windows Media Player do not open,
❏
proceed to step 4.
4. Select Start > All Programs > Accessories > Entertainment >
Windows Media Player.
5. Select the Play button to play the CD and the Stop button to
stop the CD.
Playing a Video CD
1. Read “Using CDs and DVDs,” first in this chapter.
2. If an optical drive is not in the system, insert an optical drive
into the MultiBay of an optional External MultiBay or
docking station.
3. Insert the video CD into the drive, then close the tray. Wait
several seconds. Then:
If AutoPlay is enabled, the CD and Windows Media
❏
open. Proceed to step 9.
If the CD does not play and Windows Media Player
❏
does not open, proceed to step 4.
Software Guide 5–3
Page 65

CD and DVD Software
4. Select Start > All Programs > Accessories > Entertainment >
Windows Media Player.
5. On the Windows Media Player menu bar, select File > Open.
6. In the Browse or Look In field, double-click the drive
designation of the drive containing the CD.
A drive designation is a letter of the alphabet that the tablet PC
✎
uses to identify the drive. To display the drive designation of
every drive in the system, select Start > My Computer.
7. Select the folder containing the video file you want to play.
8. Select the video file, then select the Open button.
9. To stop playing the CD, select the Stop button.
Accessing Windows Media Player Help
The Windows Media Player application is an operating system
feature. Instructions for using Windows Media Player are
included in the Windows Media Player Help file.
To access the Help file, open the Windows Media Player
application, then select Help on the menu bar.
To open Windows Media Player, use any 1 of the following
methods:
Insert a CD into an optical drive, then close the tray.
■
Select the Windows Media Player icon in the system tray.
■
If the icon is not displayed, select in the system tray the icon
for Show Hidden Icons.
Select Start > All Programs > Accessories > Entertainment >
■
Windows Media Player.
5–4 Software Guide
Page 66

Playing DVDs with WinDVD
InterVideo WinDVD is an application that enables you to play
DVD movies. WinDVD is preloaded on the tablet PC, but not
preinstalled.
Installing WinDVD
Although WinDVD can be installed by following the prompts that
appear on the screen the first time you insert a DVD, Compaq
recommends that you install WinDVD from the Software Setup
utility before inserting a DVD.
Some DVDs contain third-party DVD player programs such as
✎
PCFriendly. If you insert a DVD that contains a third-party player
program before you have installed WinDVD, you are prompted
to install that third-party player program and not WinDVD. If
you prefer to install WinDVD, decline the third-party player
installation, usually by pressing a No, Cancel, or Exit button, then
close the installation window.
CD and DVD Software
To install WinDVD from the Software Setup utility, select Start >
All Programs > Software Setup > InterVideo WinDVD > Next
button, then follow the instructions on the screen.
Accessing WinDVD Help
Instructions for using WinDVD are included in the WinDVD
Help file. To access the Help file:
1. To open the WinDVD window, select Start > All Programs >
InterVideo WinDVD > WinDVD.
2. Select the Help button. (The icon on the Help button is a
question mark.)
Software Guide 5–5
Page 67

CD and DVD Software
Starting a DVD
In addition to the instructions in the WinDVD Player Help file,
the following information may be helpful:
General information about using DVDs, including important
■
information about avoiding Standby and Hibernation while
playing DVDs, is in “Using CDs and DVDs,” first in this
chapter.
If your system includes an optional docking station, dock or
■
undock the tablet PC before starting a DVD (not while
playing a DVD).
For best playback quality, save your files and close all open
■
applications before playing a DVD.
For best performance, view the DVD in landscape view.
■
After you insert a DVD, a short pause is normal before
■
AutoPlay opens the DVD and WinDVD Player.
If the DVD displays a Playback Of Content From This
■
Region Is Not Permitted error message, stop the DVD,
change the regional setting as described in the following
section, then restart the DVD.
5–6 Software Guide
Page 68

Using DVD Regional Settings
Most DVDs that contain copyrighted files also contain regional
codes. The regional codes help protect copyrights internationally.
You can play a DVD containing a regional code only if the
regional code on the DVD matches the regional setting on your
optical drive.
If the regional code on a DVD does not match the regional setting
on your drive, a Playback Of Content From This Region Is Not
Permitted message displays when you insert the DVD. To play
the DVD, you must change the regional setting on your optical
drive.
CAUTION: The regional setting on your DVD drive can be changed only
Ä
5times.
The regional setting you select the fifth time becomes the
■
permanent regional setting on the drive.
The number of allowable regional changes remaining on the
■
drive is displayed in the Remaining Times Until Permanent field
in the WinDVD window. The number in the field includes the fifth
and permanent change.
CD and DVD Software
To change the regional setting on a drive:
1. Insert the DVD you want to play into an optical drive inserted
into an optional docking station or External MultiBay.
2. If the WinDVD window does not open after a short pause,
select Start > All Programs > InterVideo WinDVD >
WinDVD.
3. Select the Properties icon in the lower left corner of the
window.
4. Select the General tab.
5. Select the radio button for a region.
6. Select the OK button.
Software Guide 5–7
Page 69

Boot Order
The Setup utility allows you to set the tablet PC to start up from
most bootable devices. A bootable device contains files needed
by the tablet PC to start up and operate properly.
The bootable device may be a hard drive, an internal network
interface card (NIC), or a bootable drive medium. The bootable
drive medium may be a diskette or an optical drive disc.
The tablet PC cannot start up from a NIC until the NIC has been
enabled for startup.
Understanding the Search Sequence
When more than 1 bootable device is in the system, the tablet PC
selects the startup device by searching sequenced locations for,
first, a bootable optical disc; second, a bootable diskette; third, a
bootable hard drive; and fourth, a bootable NIC.
6
Searchable locations include the tablet PC hard drive bay, the
MultiBay in an optional docking station, and the MultiBay in an
optional External MultiBay that is connected to the tablet PC.
The MultiBay in an External MultiBay that is connected to a
docking station cannot be included in a boot order search
sequence.
You can change the sequence of the locations that the tablet PC
searches for a startup device by setting a boot order preference in
the Setup utility.
Software Guide 6–1
Page 70

Boot Order
Identifying Boot Order Controls
To set a boot order preference or start up from a NIC, you may
use the tab button
Identifying the tab button, the esc button, and the jog dial
, the esc button 2, and the jog dial 3.
1
Setting a Boot Order Preference
After you set a boot order preference:
The tablet PC uses your boot order preference each time it is
■
started or restarted.
The logical drive designations used by the system change.
■
For example, if you set the tablet PC to start up from a
removable hard drive in the External MultiBay, that hard
drive becomes drive C and the system hard drive in the hard
drive bay becomes drive D. Starting up from a NIC does not
affect logical drive designations.
6–2 Software Guide
Page 71

Boot Order
Boot order preferences are set in the Setup utility:
1. To open the Setup utility, turn on or restart the tablet PC.
While the Compaq logo is displayed and a cursor is flashing
in the upper right corner of the screen, press the esc button on
the tablet PC, or press
on an optional keyboard.
F10
To change the language, select Advanced > Languages. To
navigate and select without using an optional keyboard, rotate
the jog dial to scroll, and press the jog dial inward to select.
To navigate and select using an optional keyboard, use the
arrow and
enter
keys.
2. Select the Advanced menu. Then:
a. To enable an internal NIC for startup, select I/O Device
Configuration, then enable PXE/Remote Boot.
b. To set a boot order preference, select Boot Order, then
follow the instructions in the right pane of the window.
3. To save your preferences and exit the Setup utility, use the
arrow keys to select Exit > Exit Saving Changes, then follow
the instructions on the screen.
Your preferences are set as you exit the Setup utility and are in
effect when the tablet PC restarts.
Starting Up from a NIC
When an internal NIC is enabled for startup:
The NIC can be included in a boot order preference.
■
A Network Service Boot prompt is displayed very briefly in
■
the lower right corner of the screen each time the tablet PC is
started or restarted.
You can connect to a PXE (Preboot eXecution Environment) or
RPL (Remote Program Load) server during startup by responding
to the Network Service Boot prompt.
Software Guide 6–3
Page 72

Boot Order
To respond to a Network Service Boot prompt, use either of the
following methods:
■
Press the tab button on the tablet PC.
Press
■
tablet PC keyboard, press
on an optional keyboard. To press
F12
Fn+F11/F12.
F12
on the
To connect to the server during startup, you must respond to the
Network Service Boot prompt whether or not you have included
the NIC in a boot order preference.
To enable a NIC for startup, see “Setting a Boot Order Preference,”
earlier in this chapter.
6–4 Software Guide
Page 73

Setup, Diagnostic and
Support Utilities
Selecting the Setup Utility or Compaq Diagnostics
The tablet PC features 2 Compaq system management utilities:
The Setup utility is a system information and customization
■
utility that can be used even when the operating system is not
working or will not load. This utility includes settings that are
not available in Windows. When you exit the Setup utility, the
operating system restarts.
Compaq Diagnostics is a system information and diagnostic
■
utility that is used within the Windows operating system. Use
this utility to:
Compare the tablet PC configuration at the time Compaq
❏
Diagnostics was installed to interim or current
configurations.
7
Display and print system information.
❏
Test system components.
❏
Troubleshoot a device configuration problem.
❏
Software Guide 7–1
Page 74

Setup, Diagnostic and Support Utilities
Using the Setup Utility
The Setup utility is a preinstalled, ROM-based utility which can
be used even when the operating system is not working or will not
load. If the operating system is working, the tablet PC will restart
the operating system after you exit the Setup utility.
Because the Setup utility is not Windows-based, it does not
support the pen, the on-screen keyboard, or the pointing device
on an optional tablet PC keyboard.
To make selections when an optional keyboard is not in the
■
system, navigate by scrolling the jog dial and select by
pressing the jog dial inward.
To make selections when an optional keyboard is in the
■
system, navigate and select with the arrow and
You cannot type, for example, to set a password, in the Setup
■
utility unless an optional keyboard is in the system.
Step-by-step instructions for Setup utility procedures are
provided throughout the tablet PC guides. These procedures can
be used by all users.
enter
keys.
The menu tables later in this chapter provide an overview of the
Setup utility options that may be helpful to advanced users who
prefer to use the Setup utility without following step-by-step
procedures.
7–2 Software Guide
Page 75

Setup, Diagnostic and Support Utilities
Identifying Setup Utility Controls
You must use the esc button 1 to access the Setup utility. You
may use the jog dial
Identifying the esc button and the jog dial
to navigate within the Setup utility.
2
Restoring the Setup Utility Defaults
To return all settings in the Setup utility to their default settings:
1. To open the Setup utility, turn on or restart the tablet PC.
While the Compaq logo is displayed and a cursor is flashing
in the upper right corner of the screen, press the esc button on
the tablet PC, or press
To change the language, select Advanced > Languages.
❏
To navigate and select without using an optional
❏
on an optional keyboard.
F10
keyboard, rotate the jog dial to scroll and press the jog
dial inward to select. To navigate and select using an
optional keyboard, use the arrow and
enter
keys.
2. Select the Exit menu > Load System Defaults.
3. On the Exit menu, select Exit Saving Changes.
When the tablet PC restarts, the default settings are in effect,
but all identification information, including ROM version
information, is current.
Software Guide 7–3
Page 76

Setup, Diagnostic and Support Utilities
Setting a Setup Utility Access Preference
You can access the Setup utility only while a blinking cursor is
displayed during startup. The time in seconds that the cursor is
displayed can be set in the Setup utility:
1. To open the Setup utility, turn on or restart the tablet PC.
While the Compaq logo is displayed and a cursor is flashing
in the upper right corner of the screen, press the esc button on
the tablet PC, or press
To change the language, select Advanced > Languages. To
navigate and select without using an optional keyboard, rotate
the jog dial to scroll and press the jog dial inward to select. To
navigate and select using an optional keyboard, use the arrow
and
enter
keys.
2. Select the Advanced menu > Section 508 Compliance.
3. Select the time in seconds that you want the flashing cursor to
display during startup, then press
4. On the Exit menu, select Exit Saving Changes.
Your preference is set as you exit the Setup utility and is in effect
when the tablet PC restarts.
on an optional keyboard.
F10
enter.
7–4 Software Guide
Page 77

Setup, Diagnostic and Support Utilities
Displaying Information on the Main Menu
This Menu Item Provides This Information
Product name Exact product name of the tablet PC.
You may need this name to access
information about the tablet PC on the
Compaq Web site.
Model Exact model identification of the tablet PC.
You may need this identification to access
information about the tablet PC on the
Compaq Web site.
Processor Type CPU (central processing unit) family and
other identification information.
Processor Speed Maximum clock speed of the CPU in
megahertz.
BIOS Version Version number of the system ROM (read
only memory).
You will need this information to update
the system ROM.
KBC Version Version number of the KBC (keyboard
controller) ROM.
You will need this information to update
the KBC ROM.
Serial Number Serial number of the tablet PC.
You will need this number if you call
Compaq customer support.
Asset Tag DMI (Desktop Management Interface)
values used by network administrators.
Ownership Tag DMI (Desktop Management Interface)
values used by network administrators.
UUID (universally unique
identifier) Number
DMI (Desktop Management Interface)
values used by network administrators.
Software Guide 7–5
Page 78

Setup, Diagnostic and Support Utilities
Selecting from the Security Menu
.
Select This Menu Item To Do This
Supervisor Password Is Display status of supervisor password.
“Set” indicates that a supervisor password
is set; “Clear” indicates that no Supervisor
password is set.
Set Supervisor Password Set, change, or clear a supervisor
password.
Power-On Password Is Display status of power-on password.
“Set” indicates that a power-on password
is set; “Clear” indicates that no power-on
password is set.
Set Power-On Password Set, change, or clear a power-on
password.
DriveLock Display status of DriveLock protection.
“Set” indicates that the system hard drive
is protected by DriveLock; “Clear”
indicates that the system hard drive is not
protected by DriveLock.
Drive Lock Settings are
✎
accessible only when you enter
the Setup utility by turning on
(not restarting) the tablet PC.
DriveLock Password Set, change, or clear a DriveLock
password.
Drive Lock Settings are
✎
accessible only when you enter
the Setup utility by turning on
(not restarting) the tablet PC.
7–6 Software Guide
Page 79

Setup, Diagnostic and Support Utilities
Selecting from the Advanced Menu
Select This Menu Item To Do This
Language Change the Setup utility language.
Boot Order Select a boot order that can include:
The system hard drive.
■
An internal peripheral component
■
interconnect (PCI) Network Interface
Card (NIC).
Any bootable drive in the MultiBay of an
■
optional docking station.
Any bootable drive in the MultiBay of an
■
optional External MultiBay connected to
the tablet PC.
Device Options Enable or disable the ability of the tablet PC
to connect to a PXE (Preboot eXecution
Environment) or RPL (Remote Program Load)
server at startup.
Section 508 Compliance Set the time in seconds that the flashing cursor
is displayed during startup. You can enter the
Setup utility only while the flashing cursor is
displayed.
Hard Drive Self-Test Run a diagnostic test on the system hard drive.
Software Guide 7–7
Page 80

Setup, Diagnostic and Support Utilities
Selecting from the Exit Menu
.
Select This Menu Item To Do This
Exit Saving Changes Save changes entered during the current
session, then exit the Setup utility and
restart the tablet PC.
Exit Discarding Changes Cancel changes entered during the
current session, then exit the Setup utility
and restart the tablet PC.
Load Setup Defaults Replace configuration settings in the
Setup utility with default settings.
(Identification information, including
ROM version information, is retained.)
Discard Changes Cancel changes entered during the
current session without exiting the Setup
utility.
Save Changes Save changes entered during the current
session without exiting the Setup utility.
7–8 Software Guide
Page 81

Setup, Diagnostic and Support Utilities
Using Compaq Diagnostics
The Compaq Diagnostics utility includes 2 system scans:
Compaq Configuration Record compares the tablet PC
■
configuration at the time Compaq Diagnostics was installed
to interim or current configurations.
Compaq Diagnostics provides more complete information
■
about your current configuration as well as options for testing
components.
Both Compaq Diagnostics scans are designed to report on
Compaq components. If non-Compaq components are scanned,
the results may be inconclusive.
Detecting Compaq Diagnostics
The tablet PC ships with the Compaq Diagnostics utility
preloaded, but not preinstalled. You may have installed it earlier,
along with other utilities, or it may have been installed by
another user.
To determine whether Compaq Diagnostics is installed:
1. Select Start > Control Panel > Performance and
Maintenance icon.
2. Look through the displayed icons.
If icons for Compaq Configuration Record and Compaq
❏
Diagnostics are included, the Compaq Diagnostic utility
is installed.
If icons for Compaq Configuration Record and Compaq
❏
Diagnostics are not included, the Compaq Diagnostic
utility is loaded, but not installed.
Software Guide 7–9
Page 82

Setup, Diagnostic and Support Utilities
Installing Compaq Diagnostics
To install the Compaq Diagnostics utility, select Start > All
Programs > Software Setup > Compaq Diagnostics for Windows
> Next button, then follow the instructions on the screen.
Using the Compaq Configuration Record Scan
The Compaq Configuration Record scan compares the tablet PC
configuration at the time the Compaq Diagnostics utility was
installed to interim or current configurations.
1. To run the Compaq Configuration Record scan and open
the Compaq Configuration Record window, select Start >
Control Panel > Performance and Maintenance icon, then
select Compaq Configuration Record.
When the scan displayed on the progress bar is complete,
a window displays your configuration at the time Compaq
Diagnostics was installed and your current configuration.
2. To save the displayed information or view additional
information, such as interim configurations, select the Help
button on the menu bar, then follow the instructions on the
screen. The icon on the Help button is a question mark.
3. To exit the Compaq Configuration Record scan, select
File > Exit.
Using the Diagnostics Scan
When you run the Compaq Diagnostics scan, a scan of all system
components is displayed on the screen before the Compaq
Diagnostics window opens.
You can display more or less information from anywhere within
Compaq Diagnostics by selecting Level on the menu bar.
7–10 Software Guide
Page 83

Setup, Diagnostic and Support Utilities
Obtaining Configuration Information
1. To run the Compaq Diagnostics scan and open the Compaq
Diagnostics window, select Start > Control Panel >
Performance and Maintenance icon > Compaq Diagnostics.
2. Select Categories, then select a category from the list. The
information is displayed.
To save the information, select File > Save As.
❏
To print the information, select File > Print.
❏
3. To close Compaq Diagnostics, select File > Exit.
Obtaining Diagnostic Test Information
1. To run the Compaq Diagnostics scan and open the Compaq
Diagnostics window, select Start > Control Panel >
Performance and Maintenance icon > Compaq Diagnostics.
2. Select the Test tab.
3. In the scroll box, select the category or device you want
to test.
4. Select a test type:
Quick Test runs a quick, general test on each device in a
❏
selected category.
Complete Test performs maximum testing on each device
❏
in a selected category.
Custom Test performs maximum testing on a
❏
selected device.
To run all tests for your selected device, select the
◆
Check All button.
To run only the tests you select, select the Uncheck
◆
All button, then select the check box for each test
you want to run.
Software Guide 7–11
Page 84

Setup, Diagnostic and Support Utilities
5. Select a test mode:
Interactive Mode provides maximum control over the
❏
testing process. You determine whether the test was
passed or failed. You may be prompted to insert or
remove devices.
Unattended Mode does not display prompts. If errors are
❏
found, they are displayed when testing is complete.
6. Select the Begin Testing button.
7. To view a test report after a test has run, select a tab:
The Status tab summarizes the tests run, passed, and
❏
failed during the current testing session.
The Log tab lists tests run on the system, the number of
❏
times each test has run, the number of errors found on
each test, and the total run time of each test.
The Error tab lists all errors found on the tablet PC with
❏
their error codes.
8. To save a test report:
Select the Log tab Save button to save a Log tab report.
❏
Select the Error tab Save button to save an Error tab
❏
report.
9. To print a test report:
If the report is on the Log tab, select File > Save As, then
❏
print the file from your folder.
If the report is on the Error tab, select the Error tab Print
❏
button.
7–12 Software Guide
Page 85

Setup, Diagnostic and Support Utilities
Using Compaq Help and Support
Compaq Help and Support provides links to specific areas of the
Compaq Web site where you can:
Download the latest drivers, utilities, and other software
■
updates for your tablet PC.
Initiate an online service event with a Compaq support
■
specialist.
Obtain information about your tablet PC such as
■
specifications, white papers, customer advisories, and all
documentation included with your tablet PC.
Subscribe to the Compaq Support Software CD.
■
To access these links and descriptions of the options they provide,
select Start > Compaq Information Center. The Compaq Help and
Support menu is displayed in the left panel. Not all links are
available worldwide, and most sites are available in limited
languages.
If you need help and cannot access the Internet:
To obtain troubleshooting information:
■
Refer on this CD to the Troubleshooting guide.
❏
Refer to the “Solving Problems” chapter in the printed
❏
Getting Started guide included with the tablet PC.
To obtain a list of worldwide Technical Support telephone
■
numbers:
Select Start > Control Panel > Performance and
❏
Maintenance icon > System icon. Then, near the lower
edge of the System Properties window, select the Support
Information button.
Refer to the printed Worldwide Telephone Numbers
❏
booklet included in English only with the tablet PC.
Software Guide 7–13
Page 86

Index
A
AC adapter 1–1
administrator password
7–5
5–2
4–3
1–1
1–1
(Windows)
applications. See software;
software updates
asset tag
audio CD. See CD(s)
Auto/Air Cable
Automobile Power
Adapter/Charger
AutoPlay
B
battery pack
monitoring charge in
3–1
1–1
6–1
when to use
BIOS (basic input output
system)
boot order
Brightness item on Q Menu
2–9
1–8
C
cable, DC 1–1
Capture Screen item on Q
2–9
Menu
Capture Window item on Q
2–10
Menu
CD drive
6–1
5–3
5–3
5–3
3–9
5–1
7–1
4–1
3–2
5–2
adding to system
booting from
CD(s)
avoiding Standby and
Hibernation while
3–4
7–9
7–9
7–13
5–1
7–9
7–10
playing
Compaq Support Software
CD
displaying contents of
playing audio
playing video
QuickRestore
Windows Media Player
application
Compaq Configuration Record
7–9
Compaq Diagnostics
detecting
displaying ROM
information with
installing
scans
using
vs. Setup utility
Compaq Information Center
using
Compaq passwords
Compaq QuickRestore CDs
3–9
Software Guide Index–1
Page 87

Index
Compaq Support Software CD
3–4
Compaq Web site
accessing through Compaq
1–3
3–4
7–13
3–1
7–5
Information Center
ordering Compaq Support
Software CD from
updating software from
configuration information,
7–10
7–11
3–4
displaying
conserving power
CPQFlash file
CPU (central processing unit)
displaying information
about, in Compaq
Configuration Record
7–10
displaying information
about, in Setup utility
testing
D
DC cable 1–1
Desktop Profile Manager
utility
for
2–20
2–21
3–2, 7–1
2–15
hotkeys
modes vs. profiles
profiles, setting preferences
diagnostics utility (Compaq
Diagnostics)
diskette
avoiding Standby and
Hibernation while
playing
displaying contents of
downloading KBC ROM to
3–6
diskette drive
adding to system
booting from
DMI values
docking station
affecting presentation
mode
as power source
docking or undocking
before starting DVD
using Desktop Profile
Manager utility with
using while restoring
software
drive designations
drive software
AutoPlay
Windows Media Player
5–3
WinDVD
5–1
7–5
2–12
5–2
3–9
5–5
6–1
6–2
3–6
1–1
5–2
5–6
2–15
Index–2 Software Guide
Page 88

Index
DriveLock password
4–11
4–11
4–9
4–10
5–5
4–11
4–2
5–1
4–3
5–7
6–1
5–1
5–7
4–4
5–5
5–2
changing
clearing
combining with other
passwords
determining status of
entering
features
forgetting
setting
DVD
avoiding Standby and
Hibernation while
playing
displaying contents of
playing
regional codes
WinDVD application
DVD drive
adding to system
booting from
regional settings
E
error message
“Playback of Content From
this Region...”
Compaq Diagnostics error
7–12
tab
esc button, identified
Extended Desktop item on Q
2–11
Menu
External Only item on Q Menu
2–10
5–6
6–2
F
family, identifying tablet PC
3–2
H
hard drive
booting from
protecting with DriveLock
4–9
self-test
Hibernation
avoiding while playing
drive media
described
enabling/disabling
initiating
resuming from
when to use
hotkeys
2–21
6–1
7–7
1–5
1–3
1–7, 2–14
1–4
1–7
I
Internal and External item on
Q Menu
Internal Only item on Q Menu
2–10
InterVideo WinDVD
2–11
J
jog dial, identified 2–1
5–5
1–3
Software Guide Index–3
Page 89

Index
K
KBC (keyboard controller)
ROM
defined
determining current
downloading
installing
obtaining updates for
update procedure
vs. system ROM
keyboard, standard USB
keyboard, tablet PC, supported
by KBC ROM
3–1
version of
3–7
3–2
3–6
3–1
3–6
3–1
3–4
3–9
L
Landscape-Primary item on Q
2–12
Menu
Landscape-Secondary item on
Q Menu
language of Setup utility,
changing
locked system
emergency shutdown
reinstalling software
2–13
7–3
procedures
1–7
3–9
M
model, identifying tablet PC
3–2
modes
2–16
2–17
2–16
2–11, 2–17
presentation
undocked
viewing
writing
Mute On/Off item on Q Menu
2–9
N
Network Service Boot prompt
6–3
NIC (network interface card)
6–1
O
operating system
closing
emergency shutdown
installing alternative
opening
reinstalling
optical disc. See CD(s); DVD
ownership tag
1–6
procedures
1–6
3–9
7–5
1–7
P
passwords
combining Compaq and
Windows
Compaq
Windows
See also specific passwords
PCFriendly
pen, tablet PC, supported by
KBC ROM
Portrait-Primary item on Q
2–12
Menu
Portrait-Secondary item on Q
2–12
Menu
4–3
4–1
1–9, 4–3
5–5
3–1
3–11
Index–4 Software Guide
Page 90

Index
power
1–5
1–1
4–6
4–6
4–5
4–5
1–6
1–5
4–6
4–2
2–17
2–19
1–3
4–3
1–6
1–10
2–11
4–4
1–9
6–3
conservation
controls
1–8
icon
procedures
scheme (Windows)
sources
Power Controls item on Q
2–14
Menu
power switch
default functions
identified
setting preferences for
power/standby light, identified
1–5
power-on password
changing
clearing
combining with other
passwords
determining status of
entering
features
forgetting
setting
presentation mode
described
Presentation Mode On/Off
item on Q Menu
profile for
processor. See CPU (central
processing unit)
profiles, Desktop Manager
Utility
PXE (Preboot eXecution
Environment) prototcol
2–15
Q
Q Menu
closing
controls
displaying
icon
items, number of,
items, obtaining
selecting item from
setting preferences for
testing items on
Q menu button
Q Menu system-defined items
Brightness
Capture Screen
Capture Window
Extended Desktop
External Only
Hibernate
Internal and External
Internal Only
Landscape-Primary
Landscape-Secondary
Mute On/Off
Portrait-Primary
Portrait-Secondary
Power Controls
Presentation Mode On/Off
Q Menu Settings
Shut Down
Standby
2–2
2–1
2–2
2–2
supported
information about
2–4
2–1
2–9
2–10
2–14
2–10
2–13
2–9
2–11
2–14
2–13
2–3
2–9
2–10
2–12
2–14
2–14
2–3
2–2
2–11
2–11
2–12
2–12
2–3
Software Guide Index–5
Page 91

Index
Tablet PC Settings 2–14
Volume
Wireless On/Off
QuickRestore CDs
restoring software from
3–9
2–9
2–8
R
reset procedures (emergency
shutdown procedures)
ROM. See KBC (keyboard
controller) ROM; system
ROM
RomPaq
RPL (Remote Program Load)
protocol
3–4
6–3
1–7
S
scans, system 7–9
7–7
7–6
3–3
7–4
7–3
Section 508 Compliance
7–4
3–2
7–5
7–2
serial number
series, identifying tablet PC
3–2
Setup utility
accessing
Advanced menu
changing language of
displaying ROM
information with
Main menu
navigation in
protecting with password
4–7
restoring default settings
7–3
Security menu
setting an access preference
7–4
setting DriveLock
5–2
7–9
3–9
5–5
5–5
3–9
7–1
4–9
4–5
1–6
7–1
7–7
preferences in
setting power-on password
preferences in
setting supervisor
password preferences in
4–7
vs. Compaq Diagnostics
7–1
shutting down the tablet PC
emergency procedures
Windows procedures
SoftPaq
3–7
Record
7–9
utility
5–3
3–4
2–15
2–1
defined
downloading and installing
software
AutoPlay
Compaq Configuration
Compaq Diagnostics
Desktop Profile Manager
Hard Drive Self-Test
PCFriendly
Q Menu
reinstalling
restoring
Setup utility
Windows Media Player
WinDVD
1–7
,
Index–6 Software Guide
Page 92

Index
software updates
CPQFlash file
determining current
version of KBC ROM
3–2
determining current
version of system ROM
3–2
determining tablet PC
model, family, type
on Compaq Support Soft-
ware CD
preparing for
RomPaq
SoftPaq
updating KBC ROM from
updating system ROM
Standby
avoiding while playing
described
initiating
password (Windows)
resuming from
when to use
Standby item on Q Menu
supervisor password
changing
clearing
combining with other
Internet
from Internet
drive media
passwords
3–4
3–4
3–2
3–4
3–4
3–4
3–4
1–5
1–3
1–6, 2–13
1–6
1–3
4–8
4–8
4–3
3–2
1–9
2–13
3–1
3–9
4–4
3–4
determining status of
4–7
4–8
4–7
3–1
4–2
3–2
1–7
entering
features
forgetting
setting
system lock-up
emergency shutdown
procedures
reinstalling software
system ROM
defined
determining current
version of
downloading and installing
3–5
obtaining updates for
vs. KBC ROM
T
tab button, identified 6–2
tablet PC keyboard, supported
by KBC ROM
tablet PC model, family, type
3–2
Tablet PC Settings item on Q
2–14
Menu
telephone numbers, Compaq
7–13
turning off the tablet PC
emergency shutdown
procedures
Windows shutdown
procedures
turning on the tablet PC
3–1
1–7
1–6
1–6
Software Guide Index–7
Page 93

Index
U
undocked mode
7–5
2–16
2–18
described
profile for
utilities. See software
UUID
V
video CD. See CD(s)
viewing mode
described
profile for
Volume item on Q Menu
2–16
2–18
2–9
W
Windows Media Player 5–3
Windows passwords
WinDVD
wireless LAN activity light
2–8
Wireless On/Off item on Q
Menu
writing mode
5–5
2–8
described
profile for
2–17
2–19
1–9, 4–3
Index–8 Software Guide
 Loading...