

Page 1

t500
Digital Camcorder
User’s Manual
Page 2

Page 3

Contents
Preface ........................................................................................ 1
Photography Terms and Denitions ............................................ 4
1. Getting to Know Your Camera ................................................. 5
1.1 Overview ..........................................................................................................................5
1.2 Accessories .......................................................................................................................5
Front View .............................................................................................................................6
Rear View ...............................................................................................................................6
Side View ...............................................................................................................................7
Bottom View ...........................................................................................................................7
2. Getting Started ........................................................................ 8
2.1 Loading the Battery ...........................................................................................................8
2.2 Charge your battery ..........................................................................................................8
2.3 Inserting and Removing an SD Card ...................................................................................8
2.4 Turning the Digital Camcorder On .......................................................................................9
2.5 Conguring the Initial Date and Time Setup ........................................................................9
2.6 Getting Started .................................................................................................................9
2.7 Turning the Camera Off .....................................................................................................9
3. Enjoying the Record Mode .................................................... 10
3.1 Button Function...............................................................................................................10
3.2 LCD Monitor Information ..................................................................................................11
3.3 Video Recording ..............................................................................................................13
3.4 Photo Capturing ..............................................................................................................13
3.5 Using Zoom Function .......................................................................................................13
3.6 Using Digital Light Function ..............................................................................................14
3.7 Using Stabilization Function ..............................................................................................14
3.8 Showing Information on the screen ..................................................................................14
3.9 Options for Record Menu .................................................................................................15
3.10 Operations for Record Mode ..........................................................................................15
3.11 Video ............................................................................................................................16
3.12 Photo ...........................................................................................................................18
3.13 Effect............................................................................................................................19
4. Enjoying the Playback Mode ................................................. 21
4.1 Button Function ...............................................................................................................21
4.2 LCD Monitor Information ..................................................................................................22
4.3 Operations for Playback Mode .........................................................................................23
4.4 Video Playback Mode .......................................................................................................24
4.5 Photo Playback ................................................................................................................25
5. Setting Your Camera ............................................................ 26
5.1 Setting Menu ..................................................................................................................26
6. Viewing Photos and Videos on TV ......................................... 30
6.1 Connecting to a High-Denition 16:9(Wide) TV ..................................................................30
6.2 Connecting to a non-high-denition 4:3 TV .......................................................................30
7. Viewing Video & Photo on PC ................................................ 31
Page 4

7.1 Installing Bundled Software ..............................................................................................31
7.2 Transferring Photos or Videos to a Computer .....................................................................31
8. Uploading Files to Internet ................................................... 32
9. Troubleshooting .................................................................... 36
10. Getting Help ........................................................................ 37
Specications and System Requirements ................................. 39
Page 5

1
Preface
About this Manual
This manual is designed to assist you in using your new digital camcorder. All information presented is
as accurate as possible but is subject to change without notice.
For the latest revision, please visit www.hp.com/support.
Copyright
This manual contains proprietary information protected by copyright. All rights are reserved. No part
of this manual may be reproduced by any mechanical, electronic or other means, in any form, without
prior written permission of the manufacturer. © Copyright 2010.
Federal Communications Commission (FCC) Compliance
This equipment has been tested and found to comply with the limits for a Class B digital device,
pursuant to Part 15 of the FCC Rules. These limits are designed to provide reasonable protection
against harmful interference in a residential installation. This equipment generates, uses, and can
radiate radio frequency energy and, if not installed and used in accordance with the instructions, may
cause harmful interference to radio communications. However, there is no guarantee that interference
will not occur in a particular installation. If this equipment does cause harmful interference to radio
or television reception, which can be determined by turning the equipment off and on, the user is
encouraged to try to correct the interference by one or more of the following measures:
Reorient or relocate the receiving antenna.•
Increase the distance between the equipment and the receiver.•
Connect the equipment to an outlet on a circuit different from that to which the receiver is •
connected.
Consult the dealer or an experienced radio/TV technician for help.•
Warning: A shielded type power cord is required in order to meet FCC emission limits and
to prevent interference to radio and television reception. Use only shielded cable to connect
I/O devices to this equipment. Any changes or modications not expressly approved by the
manufacturer may void your warranty and service agreement.
Declaration of Conformity
This device complies with Part 15 of the FCC rules. Operation is subject to the following conditions:
This device may not cause harmful interference.•
This device must accept any interference received, including interference that may cause undesired •
operation.
Trademark Recognition
Windows 2000/XP/Vista/7 are registered trademarks of Microsoft Corporation in the United States
and/or other countries. Macintosh and Mac OS are registered trademarks of Apple Inc. In addition,
all other companies or product names are trademarks or registered trademarks of their respective
companies.
Page 6

2
Safety and Handling Precautions
General precautions
Do not try to disassemble the product by yourself. This may damage the product or cause electric •
shock.
Keep the Digital Camcorder away from the reach of children or animals to prevent them from •
swallowing the batteries or small accessories.
Stop using the Digital Camcorder if any kind of liquid or foreign object enters the Digital Camcorder. •
Should this occur, power off the Digital Camcorder and contact your dealer for help.
Do not operate the Digital Camcorder with wet hands, as this may cause electric shock.•
The Digital Camcorder may be damaged in high temperature.•
This camera is designed for use in temperatures between 0°C and 40°C (32°F and 104°F).•
Do not use or store the product in dusty, dirty, or sandy areas or any area that is close to an air •
conditioner or heater.
It is normal that the temperature of the Digital Camcorder body rises if the Digital Camcorder is on •
for a long period of time.
Do not open the battery cover while the camera is recording.•
Doing so will not only make storage of the current image impossible, it can also corrupt other image •
data already stored.
Before using this Digital Camcorder for important occasions, be sure to test this Digital Camcorder •
in order to ensure proper operation of the product.
Power Supply
Be sure to use the type of battery or battery charger provided with this Digital Camcorder. Using •
any other type of battery or battery charger might damage the equipment and may void any
warranty.
Make sure the battery are placed in the correct position. Error in the orientation of battery might •
damage this product.
Please remove the battery to avoid leaking of battery uid if the camera is not to be used for a long •
period of time.
Battery Information
If battery is already installed, make sure to power off the camera before removing and inserting •
new battery.
When using a battery in this product, ensure that it is inserted correctly. Inserting the battery •
upside down can cause damage to the product and possibly cause an explosion.
When the camera is used for an extended period of time, it is normal for the camera body to feel •
warm.
Battery Safety Notice
If the battery pack is mishandled, the battery pack can burst, cause a re or chemical burns. •
Observe the following cautions.
Do not disassemble.•
Do not crush or expose the battery to any shock or excessive force such as hammering or dropping.•
Do not short circuit and do not allow metal objects to come into contact with the battery terminals.•
Page 7

3
Do not expose to high temperature above 45°C (113°F) such as in direct sunlight.•
Do not incinerate or dispose of in a re.•
Do not handle damaged or leaking lithium ion batteries.•
Be sure to charge the battery pack using the appropriate device for this battery pack.•
Keep the battery pack out of the reach of small children.•
Replace the battery with the specied type only.•
Lithium-ion Battery Warning
Caution: Danger of explosion if battery is incorrectly replaced. Replace only with the same or
equivalent type recommended by the manufacturer. Dispose of used batteries according to the
manufacturer’s instructions.
Camera & Battery Recycle Notice
In the European Union, do not discard this product and battery as unsorted municipal
waste. Contact local authorities for recycling program information.
Page 8

4
Photography Terms and Denitions
Terms Denitions
Auto focus refers to a camera lens’ ability to adjust its conguration in
order to focus properly on a subject regardless of whether it is near or
Auto Focus (AF)
White Balance
Auto White Balance
(AWB)
far from the camera. Auto focus lenses generally provide vastly superior
image quality than do their xed focus cousins since they do not have to
rely on their depth of eld. Also known as: “AF”, “auto-focus”.
The adjustment of electronic still picture color channel gains or image
processing so that radiation with relative spectral power distribution
equal to that of the scene illumination source is rendered as a visual
neutral.
With auto white balance, the camera attempts to determine the
color temperature of the light and automatically adjust for that color
temperature. Many people just leave the camera set to auto white
balance all the time.
Digital Print Order
Format (DPOF)
Exif/JPEG
JPEG
Exposure Value
ISO Speed
A standardized ASCII le created in a digital camera and stored on
removable media along with the image les that indicate how many
copies of which images should be printed. It also allows index prints,
cropping, and text overlays to be specied.
A compressed le format for digital cameras in which the images
are compressed using the baseline JPEG standard, described in ISO
12234-2, and metadata and thumbnail images are stored using TIFF
tags within an application segment at the beginning of the JPEG le.
Joint Photographic Experts Group. An image compression method
dened in ISO/IEC 10918-1.
A numerical value that is inversely proportional to the exposure provided
to an image sensor to obtain an image. Images obtained from a camera
using a range of exposure index values will normally provide a range of
image quality levels.
A numerical value calculated from the exposure provided at the focal
plane of an electronic camera to produce specied camera output signal
characteristics using the methods described in the referenced standard.
The ISO speed should correlate with the highest exposure index value
that provides peak image quality for normal scenes.
USB
Universal serial bus, a digital interface for connecting up to 64 devices
in a tiered-star topology. See http://www.usb.org.
Page 9

5
1. Getting to Know Your Camera
1.1 Overview
The camera with 5 Mega Pixel sensor can take H.264 videos. By way of using H.264 technology, more
videos can be taken within certain amount of memory. High quality images with up to 16 mega-pixels
can also be delivered smoothly. With a color LCD monitor, users can compose images and examine
them easily.
The camera features 3” (16:9) LCD touch panel which is an ideal platform for you to operate your
camera. The menu options are accessible with your nger. With the touch panel, you can select the
options directly and quickly.
The camera also features video recording at HD resolution of 1920x1080. You can also connect it
to an HDTV via an HDMI cable, and easily playback the recorded high-denition videos on the wide
screen HDTV.
Moreover, the camera has an advanced uploading feature. With the exclusive built-in Internet Direct
application, you can upload the videos captured by the camera to the web site more effortlessly .
ISO sensitivity and color balance can either be adjusted automatically or changed manually. A 10x
digital zoom helps you to control over the videos and photos you take.
The varied effect options, such as Time Lapse and Slow Motion, make recording more fun.
The built-in memory allows you to take photos and to record videos without a memory card. The
memory card slot allows users to increase the storage capacity.
Note
Partial memory of the built-in memory is used for the camera’s Firmware code• and software.
Install the bundled software application on the CD, ArcSoft MediaImpression, for viewing the •
videos correctly on a PC.
1.2 Accessories
This package should contain the following items:
Camera•
USB Cable•
AV Cable•
HDMI Cable•
AC Adaptor•
Lithium-ion Rechargeable Battery•
Quick Guide•
CD-ROM (Software, User’s Manual)•
Pouch•
Lens Cover Set (Lens cover and Strap)•
Warranty card•
Cleaning Cloth•
Page 10

6
Front View
Microphone
Tele/Wide Toggle
Photo Button
Flash
Lens
Self-timer LED
Rear View
Playback LED Indicator
TV Port
LCD Touch Panel
Record LED Indicator
Video Button
HDMI Port
Mini USB 2.0 Port
Page 11

7
Side View
Power Button
Playback Button
Pause Button
Speaker
Bottom View
Tripod Socket
Stabilization ButtonDigital Light Button
Battery/SD card Cover
Page 12
8
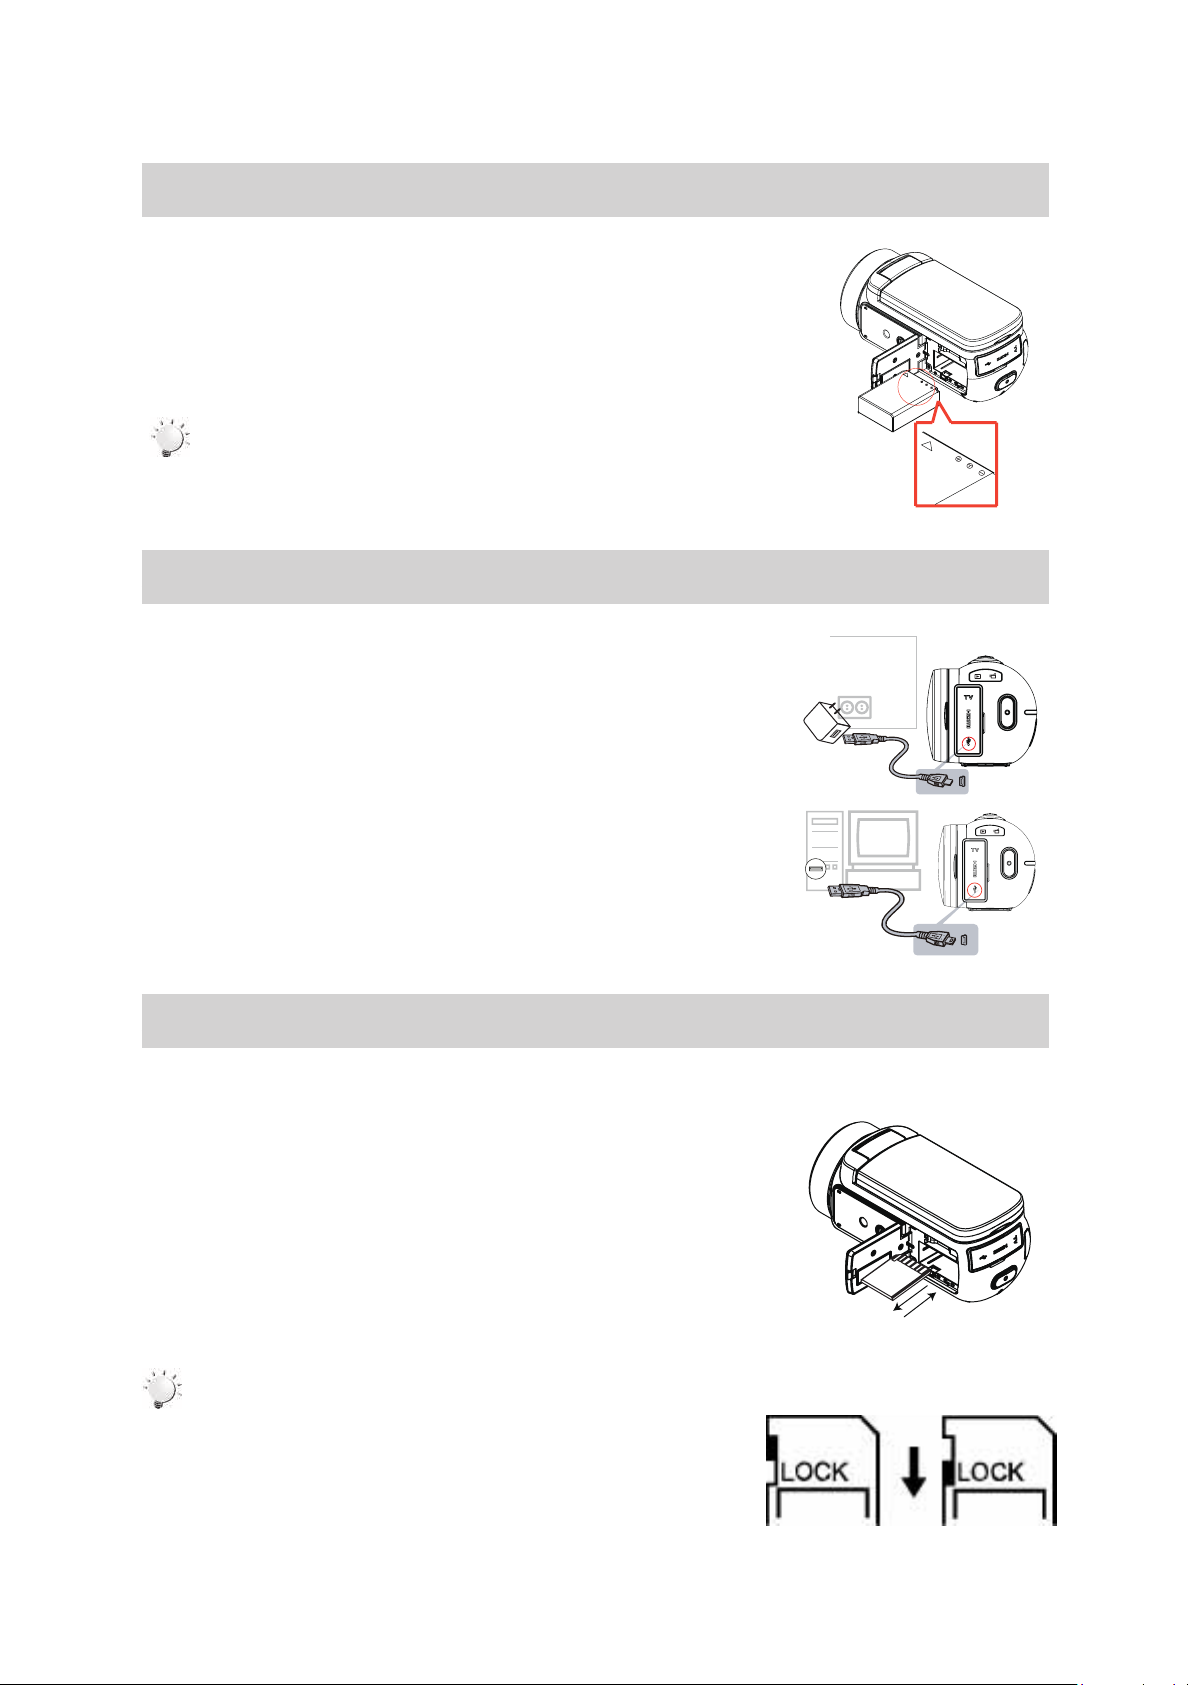
2. Getting Started
2.1 Loading the Battery
Before using the camera, users must load the Lithium-ion
rechargeable battery included within the package.
Insert the battery according to the correct polarity marks ( + or -).1.
Close the battery cover rmly.2.
Note
If the camcorder does not power up, make sure that it is orientated
properly.
2.2 Charge your battery
It is recommended that the AC adaptor and USB cable included with
the camcorder be used for the initial charge.
The camera must be turned OFF; blinking light conrms charging, and
the light becomes constant when the charging has been completed.
In AC charging Mode, the light will turn itself off automatically after
3~5 minutes . The full charge time is about 4 to 5 hours. (Actual
charging time may vary depending on the condition of the battery.)
2.3 Inserting and Removing an SD Card
Although the camera comes with internal memory which allows a
limited number of photos and video to be recorded, it is strongly
recommended that you expand the capacity by using SD/SDHC
memory cards.
Insert the memory card into the slot. Please refer to the gure on 1.
the right side.
To remove an installed SD card, press the card inwards to release it.2.
When the card pops out, gently remove it from its slot.3.
Recommended memory capacity: 1GB or above.4.
Note
When a memory card is installed, videos/photos are saved •
on the card rather than on the built-in memory.
Protecting Data on an SD Card: SD Card is read-only when •
it is locked. No photos or videos can be recorded when the
SD card is locked. Make sure the lock is on the writeable
position before recording any media.
Writeable
position
Write-Protected
Position
Page 13

9
2.4 Turning the Digital Camcorder On
To power on the camera:
Flip out the LCD panel; the camera will turn on automatically.1.
Or press [Power Button] for one second.2.
2.5 Conguring the Initial Date and Time Setup
The time setting screen appears to allow you to setup date and time:
Operation Display Screen
Touch Year, Month, Day, Hour, Minute, and AM/PM to set.1.
Adjust the numeric value by touching 2. /
Touch the [OK] icon to validate the setting.3.
Touch the Exit icon 4. ( ) to exit.
2.6 Getting Started
To record video: • Press [Video Button] to record video. To stop recording, press it again.
To pause recording: • Press [Pause Button] to pause recording. To continue the recording, press it
again.
To take a photo during video recording: When recording video, press [Photo Button] to capture the •
image. The Dual record icon ( ) briey appears on the LCD monitor.
To take a • photo: Press [Photo Button] halfway down until the focusing frame turns from white to
green. Then, press it fully down to take photo.
Focusing Frame: White Focusing Frame: Green
To view stored videos and photos: Press [Playback Button] or touch • on the LCD monitor to
switch to the Playback mode.
2.7 Turning the Camera Off
To turn off the camera: You can either press [Power Button] for one second, or you can close the LCD
panel back to its original position.
Page 14
10
3. Enjoying the Record Mode
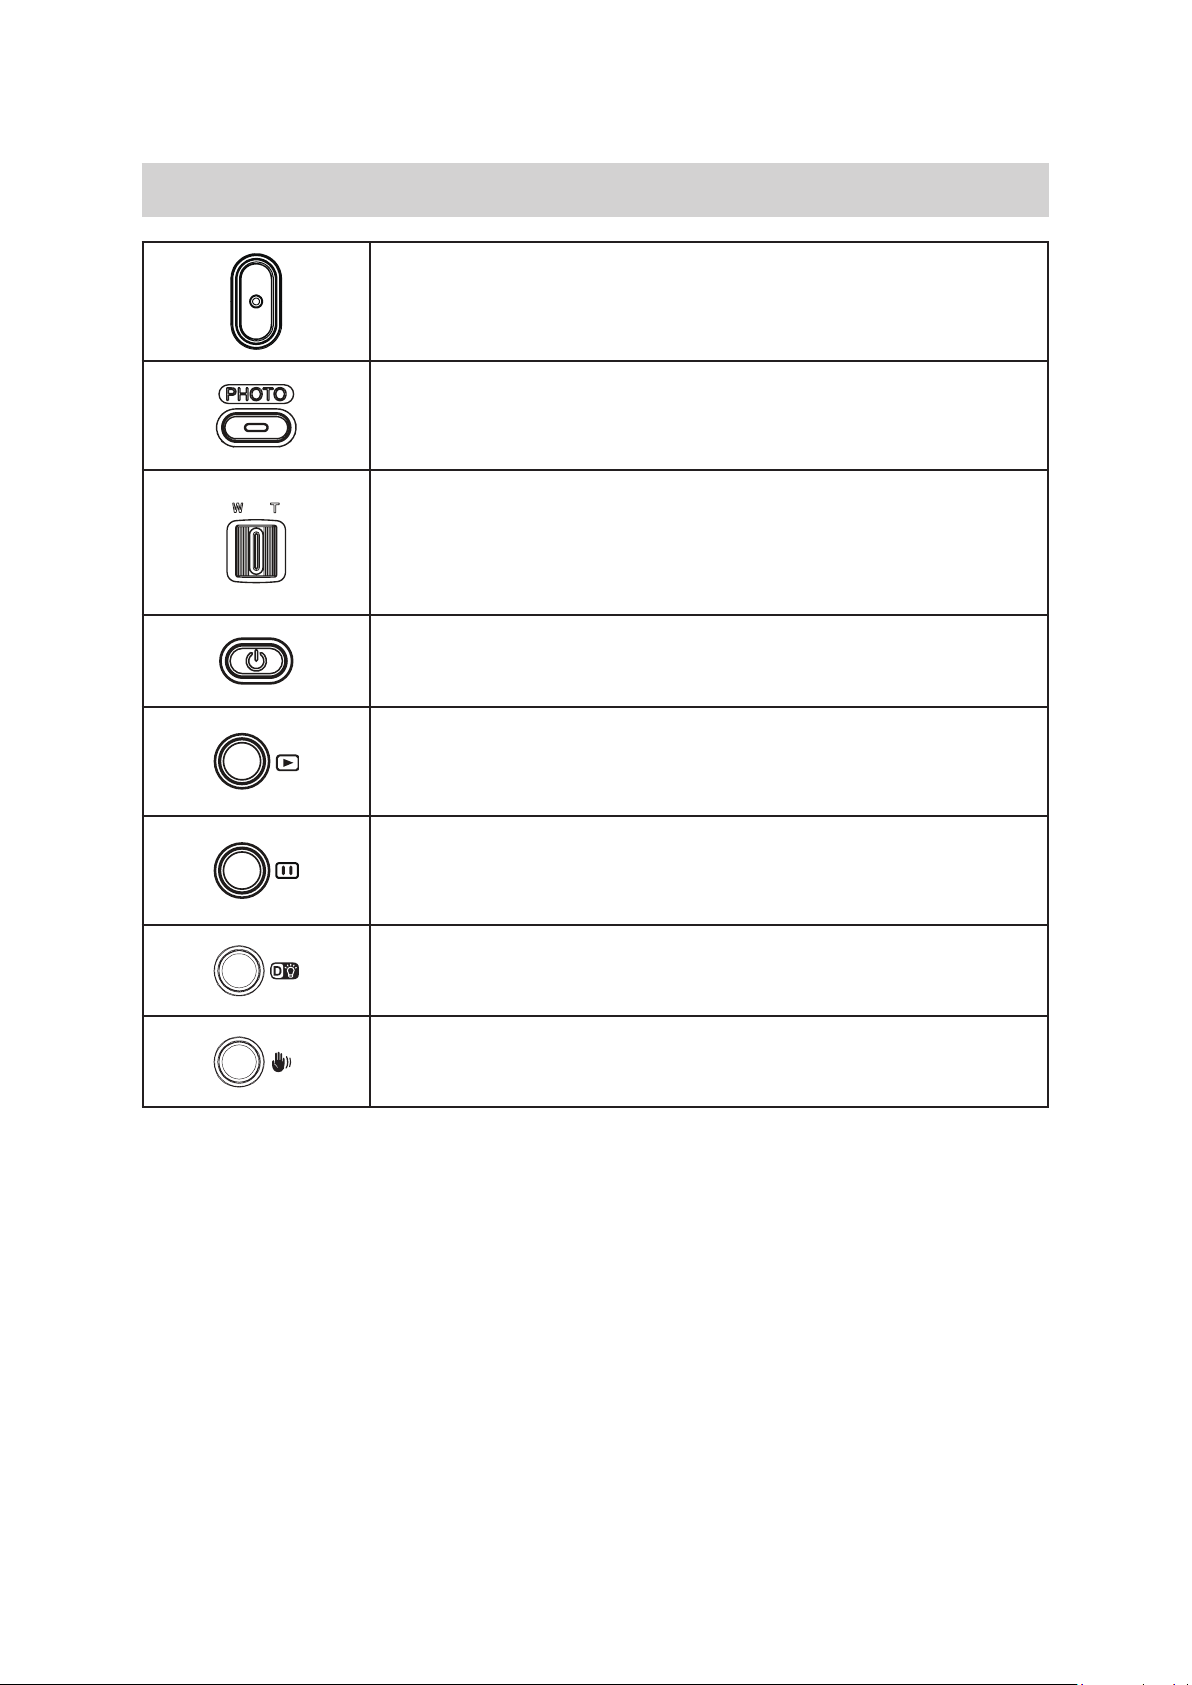
3.1 Button Function
Video Button:
Press to take video. 1.
To stop recording, press it again.2.
Photo Button:
Press to take photo.1.
When recording video, press to capture the image.2.
Tele Button:
Zoom In.1.
Wide Button
Zoom out.1.
Power Button:
Press down for one second to turn on or turn off the camera.1.
Playback Button:
Switch between Record / Playback Mode.1.
For quick review, press it after recording.2.
Pause Button:
Press to pause the recording. 1.
To continue the recording, press it again.2.
Digital Light Button:
Digital Light On/Off.
Stabilization Button:
Stabilization On/Off.
Page 15

11
3.2 LCD Monitor Information
00:05:30
The indicators shown below may display on LCD when videos and photos are recorded:
Video Resolution
(1)
(2)
(3)
Full HD (1080p 30 fps)
HD (720p 60 fps)
HD (720p 30 fps)
VGA (640X480)
Slow Motion (Record video at 432x240(QVGA) resolution.)
Photo Resolution
16MP
5MP
3MP
Recording time of the video that can still be taken at current
resolution
Number of images that can still be taken at current resolution
Self-timer enabled
Dual Record
(4) Playback Mode On
(5) Menu On
(6) Information bar On
Page 16

12
(7) SD Card Inserted
Flash Auto (Photo Recording Only)
(8)
(9) Digital Light On
(10) Stabilization
(11)
(12) Macro Focusing On
(13)
Scene
Red Eye Reduction (Photo Recording Only)
Flash Off
Pre-Record Mode
Time Lapse
Daylight
Fluorescent
Tungsten
Skin
Night
(14)
(15) Date Printing On
(16)
Backlight
Black/White
Classic
Negative
Battery: full power
Battery: medium power
Battery: low power
Battery: empty power
DC power mode
(17) Motion Detection
(18)
Zoom meter:
1X~230X (23X Optical zoom and 10X Digital zoom)
Page 17

13
Note
00:00:36
Stabilization, Time Lapse, and Slow Motion functions can not be used simultaneously.•
Stabilization and Night Mode functions can not be used simultaneously.•
Pre-Record, Motion Detect, Slow Motion, and Time Lapse functions can not be used •
simultaneously.
3.3 Video Recording
Press • [Video Button] to start recording. When a video is being recorded, a time indicator will display
on the LCD monitor ( ). To stop recording, press it again.
To pause recording: • Press [Pause Button] to pause recording (
recording, press it again.
Dual record: press • [Photo Button] to capture the image.The Dual record icon( ) appears on
the LCD monitor.
Press • [Playback Button] or touch on the screen to view the recorded video.
Four resolution settings are available: •
Video Quality
Full HD (1080p 30 fps)
HD (720p 60 fps)
HD (720p 30 fps)
VGA (640X480)
). To continue the
Note
The image resolution captured during video recording is the same as the • video resolution.
The ash can not be used when capturing image during movies recording.•
3.4 Photo Capturing
Press • [Photo Button] halfway down until the focusing frame turns from white to green. Then, press
it fully down to take photo.
Press • [Playback Button] or touch on the screen to view the photos.
Three resolution settings are available: •
Image Quality
16 Mega Pixels
5 Mega Pixels
3 Mega Pixels
3.5 Using Zoom Function
The zoom magnies images when recording video or taking photo.
To zoom in/out, use the Tele/Wide toggle.1.
It can be set from 1X~230X (23X Optical zoom and 10X Digital zoom)2.
Page 18

14
3.6 Using Digital Light Function
The setting allows you to extend the brightness of the objects that are dark or in the shadow. It can
extend the dynamic range for backlight and high contrast sense, so that the objects will be brighter
and clearer.
To use the Digital Light function:
Press [Digital Light Button1. ] in Record Mode. The Digital Light icon( ) appears on the LCD
monitor.
Press 2. [Video Button] to start recording or press [Photo button] to take photo.
3.7 Using Stabilization Function
To record with an effect of reducing camera shake to result in more stable video.•
To use the Stabilization function:•
Press [Stabilization Button1. ] in Record Mode. The Stabilization icon( ) appears on the LCD
monitor.
Press 2. [Video Button] to start recording.
3.8 Showing Information on the screen
Touch the on-screen button to show or not to show the indicators on the LCD screen.
Operation Screen
T1. ouch on the screen. The information bar will show
on the screen.
Touch 2. again to hide all indicators.
Touch3. to display the indicators.
Page 19

15
3.9 Options for Record Menu
Video Photo Effect Setting*
Resolution•
Pre-record•
Motion Detect•
Slow Motion•
Time Lapse•
* Please refer to Section 5 for the detailed information about [Setting].
Resolution•
Flash•
ISO•
Self-Timer•
Scene•
WB(White Balance)•
Macro Mode•
3.10 Operations for Record Mode
Operation Display Screen
T1. ouch on the screen in Record Mode. The options
menu will be displayed on the screen.
Sound•
TV•
Language•
Time Setting•
Date Printing•
Format•
Default Setting•
Touch the option icons on the screen lightly with your 2.
nger. The options are Video, Photo, Effect, and Setting.
The option submenu will pop up on the screen.3.
Touch to select the specic option you want to adjust. 4.
(The selected option will be highlighted.)
Touch the Exit icon (5. ) to exit.
Page 20

16
3.11 Video
Operation Display Screen
T1. ouch on the screen in live view mode. The
options menu will be displayed on the screen.
Touch the [ 2. ] icon on the screen. The video
submenu will be displayed.
The Video submenu contains 5 options-- Resolution, 3.
Pre-record, Motion Detect, Slow Motion, and Time Lapse
--for you to adjust the camera settings.
3.11.1 Video Resolution
Four resolution settings are available.
FHD (1080p 30):• Record videos at 1920x1080p 30 fps resolution.
HD+ (720p 60):• Record videos at 1280x720p 60 fps resolution.
HD (720p 30):• Record videos at 1280x720p 30 fps resolution.
VGA (640X480): • Record videos at 640x480p 30 fps resolution.
Operation Display Screen
In the Video submenu, touch the [ 1. ] icon on the
screen.
Touch to select the desired resolution option.2.
Touch the Exit icon 3. ( ) to exit.
3.11.2 Pre-record
The Pre-record function ensures that you will not miss any critical recording opportunities. The videos
are recorded 3 seconds more before the [Video Button] is pressed.
Operation Display Screen
In the Video submenu, touch the [ 1. ] icon on the
screen.
Touch to select [On] or [Off] 2. ( ).
Touch the Exit icon 3. ( ) to exit.
Note
Aim the camera at the subject and position it securely.•
Enabling the Pre-record function will reduce battery life.•
Turning power off then on will reset the Pre-record to the default setting of OFF.•
Page 21

17
3.11.3 Motion Detection
Record videos automatically when the camera detects a movement.
Operation Display Screen
In the Video submenu, touch the [ 1. ] icon on the
screen.
Touch to select 2. [On] or [Off] ( ).
Touch the Exit icon 3. ( ) to exit.
Camera will start to record video automatically if it 4.
detects a movement. It will stop recording approximately
3 seconds after motion is no longer detected.
Note
Enabling the Motion Detect function will reduce battery life.•
Turning power off then on will reset the Motion Detect to the default setting of O• FF.
3.11.4 Slow Motion
Record videos with slow motion effect. When the video is played, the playback time will be longer
than the actual recording time.
Operation Display Screen
In the Video 1. submenu, touch the [ ] icon on the
screen.
Touch to select 2. [On] or [Off] ( ).
Touch the Exit icon 3. ( ) to exit.
Note
Pause function can not be used when Slow Motion function is activated.•
Enabling the Slow Motion function will reduce video resolution.•
Turning power off then on will reset the Pre-record to the default setting of OFF and return •
the camcorder to the Full HD resolution.
3.11.5 Time Lapse
Record still images at specic intervals you can set and play them as one video le.
Off:• Disable Time Lapse.
• 1 Second.: Record one frame per second.
• 3 Seconds: Record one frame every 3 seconds.
• 5 Seconds: Record one frame every 5 seconds.
Operation Display Screen
In the Video submenu, touch the [ 1. ] icon on the
screen.
Touch to select the desired option.2.
Touch the Exit icon 3. ( ) to exit.
Note
Pause function can not be used when Time Lapse function is activated.•
Turning power off then on will reset the Time Lapse to the default setting of OFF.•
Page 22

18
3.12 Photo
Operation Display Screen
T1. ouch on the screen in live view mode. The
options menu will be displayed.
Touch the [ 2. ] icon on the screen. The photo
submenu will be displayed.
The Photo submenu contains 4 options-- Resolution, 3.
Flash, ISO, and Self-Timer --for you to adjust the
camera settings.
3.12.1 Photo Resolution
Three resolution settings are available.
16MP• :Shoot photo at 4608 x 3456, 16MP quality.
5MP• :Shoot photo at 2592 x 1944, 5MP quality.
3MP• :Shoot photo at 2048 x 1536, 3MP quality.
Operation Display Screen
In the Photo submenu, touch the [ 1. ] icon on the
screen.
Touch to select the desired resolution option.2.
Touch the Exit icon 3. ( ) to exit.
3.12.2 Flash
This camera has three ash settings.
Flash Auto ( • ):The ash res automatically according to light conditions. Use this mode for
general photography.
Red Eye Reduct.• ( ):The pre-ash will re to reduce the red-eye effect.
Flash Off• ( ): The ash will not re under any circumstances. Use this mode when taking
photo in a place where ash photography is prohibited, or when the subject is distant (beyond the
range of the ash).
Operation Display Screen
In the Photo submenu, touch the [1. ] icon on the
screen.
Touch to select the desired option.2.
Touch the Exit icon 3. ( ) to exit.
Note
The ash will be disabled automatically when the battery power is low ( ).
Page 23

19
3.12.3 ISO
The camera adjusts the ISO sensitivity of its images automatically. Four manual ISO sensitivity
settings are available. (800/1600/3200/6400).
It is recommended you leave the setting to Auto. Manually selecting the ISO setting may help
compensate for low light situations or subjects in rapid motion. The higher the ISO value, the lighter
(also “grainer”) the nal photo will be.
Operation Display Screen
In the Photo submenu, touch the [ 1. ] icon on the
screen.
Touch to select the desired option.2.
Touch the Exit icon 3. ( ) to exit.
Note
The image may become noisy when the ISO number is large.
3.12.4 Self-Timer
The self-timer allows you to take photos with a ten-second time delay. The self-timer light on the front
of the camera will also blink. The speed of blinking will increase just before the photo is taken.
Operation Display Screen
In the Photo submenu, touch the [ 1. ] icon on the
screen.
Touch to select [On] or [2. Off] ( ).
Touch the Exit icon 3. ( ) to exit.
The 4. [ ] will be displayed on the live view screen.
Press the photo shutter button to begin the 10 second
countdown.
The Self-timer light on the front of the camcorder 5.
will begin to ash. The frequency of the blinking will
increase until the photo is taken.
3.13 Effect
Operation Display Screen
T1. ouch on the screen in live view mode. The
options menu will be displayed.
Touch the [ 2. ] icon on the screen. The Effect
submenu will be displayed.
The Effect submenu contains 3 options--Scene3. , White
Balance, and Macro Mode --for you to adjust the
camera settings.
Page 24

20
3.13.1 Scene
You can select the mode according to the scene condition.
Auto ( • ): Shoot without any special effect on the image. This is the default setting.
Skin ( • ): Shoot with an effect that softens skin tones.
Night• ( ): Use Night Mode for night scenes or low light conditions.
Backlight• ( ): Take shots when bright light is behind the subject. This may help lighten
subject faces.
Black/White• ( ): The image is converted to black-and-white.
Classic• ( ): The image is converted to a sepia look.
Negative• ( ): The image is converted as the negative of the normal.
Operation Display Screen
In the Effect submenu, touch the [ 1. ] icon on the
screen.
Touch to select the desired scene mode option.2.
Touch the Exit icon 3. ( ) to exit.
Note
To avoid blurry photos, place the camera on a at, steady surface, or use a tripod when taking
shots in the Night Mode.
3.13.2 White Balance
The camera adjusts the color balance of images automatically. However, three manual white balance
settings have been made available if you feel the auto mode is not achieving the desired effect.
Auto( • ): The camera automatically adjusts white balance.
Daylight ( • ): Under outdoor condition.
Fluorescent ( • ): Under uorescent light condition.
Tungsten ( • ): Under tungsten light condition.
Operation Display Screen
In the Effect submenu, touch the [ 1. ] icon on the
screen.
Touch to select the desired white balance option.2.
Touch the Exit icon 3. ( ) to exit.
Page 25

21
3.13.3 Macro Mode
Select Macro mode to record close-up video and photos.
Operation Display Screen
In the Effect submenu, touch the [ 1. ] icon on the
screen.
Touch to select [2. On] or [Off] ( ).
Touch the Exit icon 3. ( ) to exit.
Note
Turning power off then on will reset the Macro mode to the default setting of OFF.
4. Enjoying the Playback Mode
4.1 Button Function
The Buttons have the following functions in Playback Mode.
Video Button:
Press to switch from playback mode to live view mode. Press again 1.
to begin recording video.
Tele/Wide Toggle
Move to the “T” position to zoom in the photo.1.
Move to the “W” position to zoom out of the photo.2.
Playback Button:
Switch between Live view / Playback Mode.1.
For quick review, press it after recording.2.
Pause Button:
In Video Playback Mode, press to pause the recorded video.1.
Page 26

22
4.2 LCD Monitor Information
0003/0005
Indicators on the LCD screen while in Playback Mode:
Video Playback Mode Photo Playback Mode
Video Resolution
Full HD (1080p 30 fps)
HD (720p 60 fps)
HD (720p 30 fps)
VGA (640X480)
(1)
Photo Resolution
(2)
(3) Volume
Slow Motion (432x240(QVGA))
16MP
5MP
3MP
Dual Record (The image resolution captured during videos
recording is the same as the video resolution.)
Video playback time counter.
Current number/ Total number of photo/video.
Return
(4)
Video stop
(5) Previous video/photo
(6) Video fast rewind
Page 27

23
Video play
(7)
Video pause
(8) Video fast forward
(9) Next video/photo
(10) Delete
Slideshow
(11)
Slideshow stop
(12) Magnication Indicator
4.3 Operations for Playback Mode
The Playback Mode is for viewing and managing videos and photos on the built-in memory or on an
SD Card.
Operation Display Screen
Press 1. [Playback Button] or touch on the screen to
switch to the Playback mode.
Touch to select the specic option.2.
Touch ( 3. ) to back to Record Mode.
Page 28

24
4.4 Video Playback Mode
Operation Display Screen
In the Video Playback mode, touch 1. / to play
or pause the videos.
Sweep to the 2. right or touch to go to the previous
video; sweep to the left or touch to go to the
next video.
While playing videos, touch 3. / to fast rewind/
forward.
Touch 4. to increase the volume; touch to
reduce the volume.
Touch ( 5. ) to exit.
Note
When the LCD is idle for a few seconds, the playback function icons will disappear •
automatically. Simply touch the screen to restore the playback function icons.
Delete Videos
Operation Display Screen
T1. ouch to go to the Delete option screen.
Touch [Yes] to delete the current video or [No] to 2.
cancel the operation and to exit; touch [All (Delete
All)] to delete all videos.
Before all videos are about to be deleted, a 3.
conrmation screen will appear; touch [Yes] to
execute the operation and [No] to cancel the
operation.
Note
If a memory card has been inserted, you can only delete those videos stored on the card. •
Videos on a written-protected memory card cannot be deleted.•
Page 29

25
4.5 Photo Playback
Operation Display Screen
In the Photo Playback mode,1. sweep to the right or touch
to go to the previous photo; sweep to the left or
touch to go to the next photo.
While the photo is selected, move the tele/wide toggle to 2.
the “T” position to magnify. (The magnication Indicator
appears on the screen)
To navigate the magnied photo, press on the screen and 3.
move as well. (The inner Magnication Indicator turns
red)
Move to the “W” position to zoom out of the photo or exit 4.
the magnication mode.
Touch 5. / to start or to stop the slide show.
Touch (6. ) to exit.
Note
When the LCD is idle for a few seconds, the playback function icons will disappear •
automatically. Simply touch the screen to restore the playback function icons.
Delete Photo
Operation Display Screen
Touch1. to go to the Delete option screen.
Touch [Yes] to delete the current photo or [No] to cancel 2.
the operation and to exit; touch [All (Delete All)] to
delete all photos.
Before all photos are deleted, a conrmation screen will 3.
appear; touch [Yes] to execute the operation and [No]
to cancel the operation.
Note
If a memory card has been inserted, you can only delete those photos stored on the card. •
Photos on a written-protected memory card cannot be deleted.•
Page 30

26
5. Setting Your Camera
5.1 Setting Menu
Operation Display Screen
T1. ouch on the screen in Live view mode. The
options menu will be displayed.
Touch the [ 2. ] icon on the screen. The settings
submenu will be displayed.
The Setting submenu contains 7 options for conguring 3.
your camera setup. They are Sound (operation sound),
TV, Language, Time Setting, Date Printing, Format, and
Default Setting.
5.1.1 Sound
Enable or disable the keypad tone and the operation sound.
Operation Display Screen
In the Setting menu, touch the [ 1. ] icon on the
screen.
Touch to select [On] or [O2. ff] ( ).
Touch the Exit icon 3. ( ) to exit.
5.1.2 TV
Ensure that the appropriate TV standard of your area is selected – either NTSC or PAL. An incorrect
TV system setting may cause image ickers.
NTSC• (60Hz):USA, Canada, Japan, South Korea and Taiwan, etc.
PAL• (50Hz):UK, Europe, China, Australia, Singapore and Hong Kong, etc.
Operation Display Screen
In the Setting menu, touch the [ 1. ] icon on the
screen.
Touch to select [PAL] or [NTSC].2.
Touch the Exit icon 3. ( ) to exit.
Page 31

27
5.1.3 Language
Use this option to select the language of the user interface.
Operation Display Screen
In the Setting menu, touch the [ 1. ] icon on the
screen.
Touch to select the desired option.2.
Touch the Exit icon 3. ( ) to exit.
5.1.4 Time Setting
Operation Display Screen
In the Setting menu, touch the [ 1. ] icon on the
screen to enter the time setting screen.
Touch Year, Month, Day, Hour, Minute, and AM/PM to set.2.
Adjust the numeric value by touching 3. /
Touch the [OK] icon to save the settings.4.
Touch the Exit icon 5. ( ) to exit.
5.1.5 Date Printing
Imprint the date and time on the video and photo.
Operation Display Screen
In the Setting menu, touch the [ 1. ] icon on the
screen.
Touch to select [On] or [O2. ff] ( ).
Touch the Exit icon 3. ( ) to exit.
Note
Date Printing function can not be used when Slow Motion function is activated.•
Page 32

28
5.1.6 Format
Use this function to format the internal or external (when a SD/SDHC memory card is inserted)
memory. Please note that once a format has been selected, ALL video and photos will be
PERMANETLY erased and CANNOT be restored. Be sure to save any desired video and photos to
another location such as a PC/laptop before formatting.
Operation Display Screen
In the Setting menu, touch the [ 1. ] icon on the
screen.
Touch to select [Yes] or [No] 2. ( ).
(Touch [Yes] to enter the conrmation screen.)
Touch the [Yes3. ] icon to execute the operation
and the [No ] icon to cancel the operation.
Note
All the data will be erased if the SD card is formatted. Make sure all the data are copied to your
PC before formatting the SD card.
5.1.7 Default Setting
To restore the default factory settings, select this option.
Operation Display Screen
In the Setting menu, touch the [ 1. ] icon on the
screen.
Touch to select [Yes] or [No] 2. ( ).
(Touch [Yes] to enter the conrmation screen.)
Touch the [Yes3. ] icon to execute the operation
and the [No ] icon to cancel the operation.
Page 33

29
The following table indicates the camera’s default settings
Setting Default Factory Setting
Resolution FHD (1080p 30) for Video
5MP for Photo
Stabilization Off
Motion Detection Off
Slow Motion Off
Time Lapse Off
Self-Timer Off
ISO Auto
Scene Auto
White Balance Auto
Flash Off
Sound On
TV Depends on shipping area
Language Depends on shipping area
Date Printing Off
Volume Level 6
Page 34

30
6. Viewing Photos and Videos on TV
(16:9)
( 4 : 3 )
R
6.1 Connecting to a High-Denition 16:9(Wide) TV
Connect the HDMI cable to your camera’s HDMI Out port.1.
Connect the other end of the cable to a HDMI compatible television.2.
Set the video input source of your TV to the appropriate HDMI input.3.
The steps for viewing stored videos and photos on HDTV are exactly the same as for viewing them 4.
on the LCD monitor. Review the Playback section of this manual for additional details.
6.2 Connecting to a non-high-denition 4:3 TV
Connect one end of the AV cable to your camera’s AV out port.1.
Connect the other end of the cable to a television.2.
If necessary, set the video input source of your TV to the appropriate video input. The steps for 3.
viewing stored videos and photos on TV are exactly the same as for viewing them on the LCD
monitor. Review the Playback section of this manual for additional details.
Page 35

31
7. Viewing Video & Photo on PC
7.1 Installing Bundled Software
The CD-ROM supplied with this camera contains 2 pieces of software.
ArcSoft MediaImpression • is a user-friendly application that helps you managing your media,
burning your video into DVD, and uploading your les to the web sites easily.
Adobe Reader• is a popular program that you need to have installed to read the User’s Manual.
Many computer users will nd they already have this software installed on their computer.
To install the bundled software:
Insert the CD-ROM into your computer’s CD-ROM drive. The autorun screen appears.1.
Click “Install ArcSoft MediaImpression”. Follow the on-screen instructions to complete the 2.
installation.
Note
The detailed Instructions for the • bundled software can be found within the program once
the installation is completed. Click on [Extras] on the title bar and select [Help] to open the
instruction manual.
Install the bundled software application, ArcSoft MediaImpression, for viewing the videos •
correctly on a PC.
7.2 Transferring Photos or Videos to a Computer
You can transfer photos or videos stored on your camera to a computer and send them in e-mails to
friends or post them on the web sites.
To do this you should:
Connect the computer and camera with the supplied mini USB 2.0 cable. .1.
The videos and photos can be found on your computer at “My Computer\Removable Disk\2.
DCIM\100MEDIA”. (This assumes that a SD/SDHC card is inserted.)
Under this folder, you can view, delete, move, or copy any video/photo you desire.3.
Page 36

32
8. Uploading Files to Internet
The built-in Internet Direct application offers you an easy way to upload your les to Internet
instantly. It helps you share them with your family and friends on the web site.
To upload les to Internet:
Connect the camera to your computer by using the supplied USB cable.1.
After making a USB connection, the AutoPlay window should appear. (It may be different based on 2.
OS recognition.
(In Windows XP)
Page 37

33
If the AutoPlay window does not appear. Please click [My Computer]-->[DVAP]-->[DVAP.exe] to
execute the application.)
The main screen appears automatically on the desktop. (To view the recorded clips on Internet 3.
Direct, it is necessary to install ArcSoft MediaImpression rst. )
On the thumbnail screen, click on the up/down icon to change the pages. Click on the le(s) you 4.
want to upload.
Page 38

34
Click on “ UPLOAD” to start uploading.5.
Click on “ CANCEL” to stop uploading. 6.
To playback the video le:
Double click on the video clip on the thumbnail screen. 1.
Click on the Play/Pause icon 2. to play/pause. Click on the Return icon to return to the
thumbnail preview screen.
Page 39

35
To setup your account information for the website:
1. Click on to go to the setup screen.
2. Fill in your account information in the blanks. Then click on “Save”.
(If you do not have an account, please sign up on the website rst.)
Page 40

36
9. Troubleshooting
Troubleshooting
The ash is not working.1.
The battery power is low.
The camera is in DC power mode.
In ash auto mode, camera ash res ONLY when necessary (in dark setting as example).
The les on the memory card do not display smoothly when the LCD shows the “!” 2.
marking.
The “!” means the SD card is low speed or contains incompatible content. The way to resolve this
condition is to format SD card by the camera instead of a PC (Please refer to the detailed Format
instruction in Section 5).
Or upgrade to a higher speed performance SD/SDHC/SDXC card to a high speed one.
Why do some of my indoor photos look blurry and dark?3.
The camera extends photo exposure time under low light/ indoor condition. Keep the camera
(and the target subject) steady for several seconds when taking photos. The shutter will sound
when photos are being taken.
How do I charge battery?4.
The quickest and preferred method is to use the supplied AC adaptor with the USB cable (See
page 8 in this manual for details). You can use the supplied UB cable with a PC or laptop to
recharge as well. Please note that if you use a laptop, please make sure it is plugged into an AC
source so that it’s battery is not depleted. The camera must be turned OFF; blinking light
conrms charging, and the light becomes constant after the charging is completed.
In AC charging Mode, the light will turn itself off automatically after 3~5 minutes . The full charge
time is about 4 to 5 hours. (Actual charging time may vary depending on the condition of the
battery.)
After connecting the USB cable to the computer, ……5.
The disk [DV] shows the internal memory of the camera. (The disk label may be different a.
according to different model and PC OS.)
[Removable Disk] shows the external memory. (Under the circumstances of within the SD/SDHC/b.
SDXC card in the camera)
The disk [DVAP] shows the built-in Internet Direct application is saved at this disk. Please DO c.
NOT format this disk or delete the application inside; otherwise, the Internet Direct application
can not function.
6. The Camcorder does not power up.
- Make sure the battery is inserted properly.
- The battery may need to be re-charged.
- Try removing the battery for 30 seconds and re-install.
7. The Camcorder does not respond and seems to be locked.
- Try removing the battery for 30 seconds and re-install. Power up the camcorder.
Page 41

37
10. Getting Help
Should you have a technical support question or your HP Digital Camcorder requires service within
the warranty period, please contact the original point of purchase or an authorized HP reseller in your
country. If service is not available at those locations, please contact an HP Branded Product warranty
agent from the support contact list provided below. A service agent will work with you to troubleshoot
your issue and if necessary, issue a Return Material Authorization (RMA) number in order to replace
your HP Branded Product. For warranty claims, you will be required to provide a copy of your original
dated sales receipt as proof of purchase and the issued RMA number. You will be responsible for
shipping charges when shipping the product to the service center. The service agent will provide you
with an address and you will also be responsible for any shipping charges to the warranty service
center. Once your product is received by this service center, a replacement unit will be shipped back to
you, typically within 5 business days.
Contact/phone Support:
Language Contact/phone Support:
中文
日本語
Korean korean@hpodd.com
Deutsch deutsch@hpodd.com
English english@hpodd.com
Español espanol@hpodd.com
Français francais@hpodd.com
Italiano italiano@hpodd.com
Nederlandsk hollands@hpodd.com
Português portugues@hpodd.com
Svenska svensk@hpodd.com
simp.chinese@hpodd.com
trad.chinese@hpodd.com
nippon@hpodd.com
Page 42

38
Contact/phone Support:
Country Language Number
Europe Region (EMEA)
België Nederlandsk/ Deutsch + 32 2700 1724
Deutschland Deutsch + 49 6950073896
España Español + 34 914533458
France Français + 33 171230454
Ireland English + 353 1850882016
Italia Italiano + 39 269682189
Nederland Nederlandsk + 31 202015093
Schweiz Deutsch/ Français/
Italiano
UK English + 44 2073652400
North America
United States English 1.866.694.7633
Canada English and French 1.866.694.7633
Country Language City Number
Mexico City 52.55.1204.8185
México Español
Venezuela Español Caracas 58.212.335.4574
Colombia Español Perú 57.1.508.2325
Perú Español Lima 51.1.705.6232
Chile Español Santiago 55.11.5504.6633
Brasil Argentina Sao Paolo 55.11.5504.6633
Argentina Español Buenos Aires 54.11.6091.2399
Guadalajara 52.33.1031.3872
Monterrey 52.81.1107.2639
+ 41 18009686
Page 43

39
Specications and System Requirements
Specication
Image sensor 5 Mega pixel CMOS sensor
Operation modes Video record, Photo record
Lens Auto Focus Lens (F3.5)
Focus range Macro Mode:1cm~120 cm
Normal Mode: 1 cm ~ innite
Zoom 1X~230X (23X Optical zoom and 10X Digital zoom)
Shutter Electronic
LCD monitor 3” touch LCD (16:9)
Storage media Built-in 128MB memory (partial memory is used for rmware code and sofeware);
SD/SDHC/SDXC card slot support (up to 64GB)
Image resolution High 4608 x 3456 (16M pixels) (Interpolated)
Standard 2592x1944 (5M pixels)
Low 2048x1536 (3M pixels)
Video resolution FHD (1080p 30) 1920X1080(30fps)
HD+ (720p 60) 1280X720(60fps)
HD (720p 30) 1280X720(30fps)
VGA (640X480) 640X480(30fps)
White balance Auto/Manual (Daylight, Fluorescent, Tungsten)
ISO Auto/800/1600/3200/6400
Self-timer 10 seconds delay
Flash Flash Auto/Red-Eye-Reduction/Flash Off
File format Photo: JPG
Video: AVI
Image play Single image/Slideshow
PC interface Mini USB 2.0 port
TV out NTSC/PAL selectable, HDMI
Battery Lithium-ion rechargeable battery
Dimension 126mm (L) x 57mm (H) x 60mm (W)
Weight 340g ( without battery)
System requirements
Microsoft Windows XP/Vista/7•
Intel Pentium 4, 2.4 GHz or above•
Available USB port•
CD-ROM Drive•
512 MB RAM•
16-bit Color Display•
1 GB free HDD space•
Note
The LCD screen is manufactured using extremely high-precision technology, so over 99.99% of
the pixels are operational for effective use. However, some tiny black and/or bright dots (white,
red, blue or green) may appear on the LCD screen. These dots are a normal result of the
manufacturing process, and do not affect the recording.
Page 44

Page 45

P/N: 7525C00252A
 Loading...