


HP PageWide Enterprise Color MFP 780
HP PageWide Enterprise Color Flow MFP 785
User Guide

Copyright and License
Trademark Credits
© Copyright 2018 HP Development Company,
L.P.
Reproduction, adaptation, or translation without
prior written permission is prohibited, except as
allowed under the copyright laws.
The information contained herein is subject to
change without notice.
The only warranties for HP products and
services are set forth in the express warranty
statements accompanying such products and
services. Nothing herein should be construed as
constituting an additional warranty. HP shall not
be liable for technical or editorial errors or
omissions contained herein.
Edition 2, 3/2018
Adobe®, Adobe Photoshop®, Acrobat®, and
PostScript
®
are trademarks of Adobe Systems
Incorporated.
Apple and the Apple logo are trademarks of
Apple Inc., registered in the U.S. and other
countries.
macOS is a trademark of Apple Inc., registered in
the U.S. and other countries.
AirPrint is a trademark of Apple Inc., registered in
the U.S. and other countries.
Google™ is a trademark of Google Inc.
Microsoft®, Windows®, Windows® XP, and
Windows Vista® are U.S. registered trademarks
of Microsoft Corporation.
UNIX® is a registered trademark of The Open
Group.

Table of contents
1 Printer overview ........................................................................................................................................................................................ 1
For more information: .............................................................................................................................................................. 1
Caution icons ............................................................................................................................................................................. 2
Printer views .............................................................................................................................................................................. 3
Printer front view ................................................................................................................................................. 3
Printer front view—780dn, 780dns,785f models ..................................................................... 3
Printer front view—785zs, 785z+ models ................................................................................. 4
Printer back view and interface ports ............................................................................................................... 5
Printer back view and interface ports—780dn, 780dns,785f models .................................. 5
Printer back view and interface ports—785zs, 785z+ models ............................................... 6
Control-panel view ............................................................................................................................................... 7
How to use the touchscreen control panel ............................................................................... 10
Printer specications ............................................................................................................................................................. 11
Technical specications .................................................................................................................................... 11
Supported operating systems ......................................................................................................................... 14
Mobile printing solutions .................................................................................................................................. 17
Printer dimensions ............................................................................................................................................ 17
Power consumption, electrical specications, and acoustic emissions .................................................... 19
Operating environment range ......................................................................................................................... 19
Printer hardware setup and software installation ............................................................................................................ 20
2 Paper trays .............................................................................................................................................................................................. 21
For more information: ........................................................................................................................................................... 21
Load paper to Tray 1 (multipurpose tray) .......................................................................................................................... 22
Introduction ........................................................................................................................................................ 22
Tray 1 paper orientation ................................................................................................................................... 23
Use alternative letterhead mode .................................................................................................................... 28
Enable Alternative Letterhead Mode by using the printer control-panel menus ............... 28
Load paper to Tray 2 ............................................................................................................................................................. 29
Introduction ........................................................................................................................................................ 29
Tray 2 and the 550-sheet trays paper orientation ...................................................................................... 31
Use alternative letterhead mode .................................................................................................................... 35
ENWW iii

Enable Alternative Letterhead Mode by using the printer control-panel menus ............... 35
Load the 4,000-sheet high-capacity input (HCI) tray ....................................................................................................... 36
Introduction ........................................................................................................................................................ 36
HCI paper orientation ........................................................................................................................................ 38
Use alternative letterhead mode .................................................................................................................... 39
Enable Alternative Letterhead Mode by using the printer control-panel menus ............... 40
Load and print envelopes ..................................................................................................................................................... 41
Introduction ........................................................................................................................................................ 41
Print envelopes .................................................................................................................................................. 41
Envelope orientation ......................................................................................................................................... 41
Load and print labels ............................................................................................................................................................. 43
Introduction ........................................................................................................................................................ 43
Manually feed labels ......................................................................................................................................... 43
Label orientation ............................................................................................................................................... 44
Congure inner nisher stapling (785zs model only) ...................................................................................................... 45
Congure the default staple location ............................................................................................................. 45
Congure the operation mode ........................................................................................................................ 46
3 Supplies, accessories, and parts .......................................................................................................................................................... 47
For more information: ........................................................................................................................................................... 47
Order supplies, accessories, and parts ............................................................................................................................... 48
Ordering .............................................................................................................................................................. 48
Supplies and accessories ................................................................................................................................. 48
Maintenance/long-life consumables (LLC) .................................................................................................... 49
Customer self-repair parts ............................................................................................................................... 49
Replace the cartridges ........................................................................................................................................................... 52
Introduction ........................................................................................................................................................ 52
Cartridge information ....................................................................................................................................... 52
Remove and replace the cartridges ................................................................................................................ 53
Replace the service uid container ..................................................................................................................................... 56
Introduction ........................................................................................................................................................ 56
Remove and replace the service uid container ........................................................................................... 56
Replace the staple cartridge in the inner nisher (780dns, 785zs models only) ........................................................ 60
Replace the staple cartridge in the oor standing nisher (785z+ model only) ......................................................... 62
4 Print .......................................................................................................................................................................................................... 65
For more information: ........................................................................................................................................................... 65
Print tasks (Windows) ............................................................................................................................................................ 66
How to print (Windows) .................................................................................................................................... 66
Automatically print on both sides (Windows) ............................................................................................... 66
Manually print on both sides (Windows) ........................................................................................................ 67
iv ENWW

Print multiple pages per sheet (Windows) .................................................................................................... 67
Select the paper type (Windows) .................................................................................................................... 68
Additional print tasks ........................................................................................................................................ 69
Print tasks (macOS) ............................................................................................................................................................... 70
How to print (macOS) ........................................................................................................................................ 70
Automatically print on both sides (macOS) ................................................................................................... 70
Manually print on both sides (macOS) ........................................................................................................... 70
Print multiple pages per sheet (macOS) ........................................................................................................ 71
Select the paper type (macOS) ........................................................................................................................ 71
Additional print tasks ........................................................................................................................................ 71
Store print jobs on the printer to print later or print privately ........................................................................................ 72
Introduction ........................................................................................................................................................ 72
Create a stored job (Windows) ......................................................................................................................... 72
Print a stored job ............................................................................................................................................... 74
Delete a stored job ............................................................................................................................................ 74
Delete a job that is stored on the printer .................................................................................. 74
Change the job storage limit ....................................................................................................... 74
Information sent to printer for Job Accounting purposes ........................................................................... 75
Mobile printing ........................................................................................................................................................................ 76
Introduction ........................................................................................................................................................ 76
Wi-Fi Direct and NFC Connect and Print ......................................................................................................... 76
HP ePrint via email ............................................................................................................................................ 77
HP ePrint software ............................................................................................................................................ 78
AirPrint ................................................................................................................................................................. 78
Android embedded printing ............................................................................................................................. 78
Print from the USB port ........................................................................................................................................................ 80
Introduction ........................................................................................................................................................ 80
Enable the USB port for printing ..................................................................................................................... 80
Print USB documents ........................................................................................................................................ 81
5 Copy .......................................................................................................................................................................................................... 83
For more information: ........................................................................................................................................................... 83
Make a copy ............................................................................................................................................................................. 84
Copy on both sides (duplex) ................................................................................................................................................. 86
Additional copy tasks ............................................................................................................................................................. 88
6 Scan .......................................................................................................................................................................................................... 89
For more information: ........................................................................................................................................................... 89
Set up Scan to Email .............................................................................................................................................................. 90
Introduction ........................................................................................................................................................ 90
Before you begin ................................................................................................................................................ 90
ENWW v

Step one: Access the HP Embedded Web Server (EWS) .............................................................................. 90
Step two: Congure the Network Identication settings ............................................................................ 91
Step three: Congure the Scan to Email feature .......................................................................................... 92
Method one: Basic conguration using the Email Setup Wizard ........................................... 92
Method two: Advanced conguration using the Email Setup ................................................ 96
Step four: Congure the Quick Sets (optional) ........................................................................................... 100
Step ve: Set up Scan to Email to use Oice 365 Outlook (optional) ..................................................... 101
Introduction ................................................................................................................................. 101
Congure the outgoing email server (SMTP) to send an email from an Oice 365
Outlook account .......................................................................................................................... 101
Set up Scan to Network Folder .......................................................................................................................................... 103
Introduction ...................................................................................................................................................... 103
Before you begin ............................................................................................................................................. 103
Step one: Access the HP Embedded Web Server ....................................................................................... 103
Step two: Set up Scan to Network Folder .................................................................................................... 104
Method one: Use the Scan to Network Folder Wizard .......................................................... 104
Method two: Use Scan to Network Folder Setup ................................................................... 105
Step one: Begin the conguration ....................................................................... 105
Step two: Congure the Scan to Network Folder settings .............................. 105
Step three: Complete the conguration ............................................................. 113
Set up Scan to USB Drive .................................................................................................................................................... 114
Introduction ...................................................................................................................................................... 114
Step one: Access the HP Embedded Web Server ....................................................................................... 114
Step two: Enable Scan to USB Drive ............................................................................................................. 115
Step three: Congure the Quick Sets (optional) ......................................................................................... 115
Default scan settings for Scan to USB Drive setup .................................................................................... 116
Default le settings for Scan to USB Drive setup ....................................................................................... 116
Set up Scan to SharePoint® (Flow models only) ............................................................................................................. 118
Introduction ...................................................................................................................................................... 118
Before you begin ............................................................................................................................................. 118
Step one: Access the HP Embedded Web Server (EWS) ........................................................................... 118
Step two: Enable Scan to SharePoint® and create a Scan to SharePoint Quick Set ............................. 119
Quick set scan settings and options for Scan to SharePoint® ................................................................. 120
Scan to email ........................................................................................................................................................................ 123
Introduction ...................................................................................................................................................... 123
Scan to email ................................................................................................................................................... 123
Scan to network folder ....................................................................................................................................................... 126
Introduction ...................................................................................................................................................... 126
Scan to network folder ................................................................................................................................... 126
Scan to USB drive ................................................................................................................................................................. 128
Introduction ...................................................................................................................................................... 128
vi ENWW

Scan to USB drive ............................................................................................................................................ 128
Scan to SharePoint .............................................................................................................................................................. 130
Introduction ...................................................................................................................................................... 130
Scan to SharePoint .......................................................................................................................................... 130
Scan to job storage .............................................................................................................................................................. 132
Introduction ...................................................................................................................................................... 132
Scan to job storage on the printer ................................................................................................................ 132
Print from job storage on the printer ........................................................................................................... 134
HP JetAdvantage business solutions ................................................................................................................................ 135
Additional scan tasks .......................................................................................................................................................... 136
7 Fax .......................................................................................................................................................................................................... 137
For more information: ......................................................................................................................................................... 137
Set up fax .............................................................................................................................................................................. 138
Introduction ...................................................................................................................................................... 138
Set up fax by using the printer control panel ............................................................................................. 138
Change fax congurations ................................................................................................................................................. 139
Fax dialing settings ......................................................................................................................................... 139
General fax send settings .............................................................................................................................. 140
Fax receive settings ........................................................................................................................................ 140
Send a fax ............................................................................................................................................................................. 142
Additional fax tasks ............................................................................................................................................................. 144
8 Manage the printer .............................................................................................................................................................................. 145
For more information: ......................................................................................................................................................... 145
Advanced conguration with the HP Embedded Web Server (EWS) ........................................................................... 146
Introduction ...................................................................................................................................................... 146
How to access the HP Embedded Web Server (EWS) ................................................................................ 146
HP Embedded Web Server features ............................................................................................................. 147
Information tab ........................................................................................................................... 147
General tab .................................................................................................................................. 148
Copy/Print tab ............................................................................................................................. 149
Scan/Digital Send tab ................................................................................................................ 150
Fax tab .......................................................................................................................................... 151
Troubleshooting tab ................................................................................................................... 151
Security tab ................................................................................................................................. 152
HP Web Services tab .................................................................................................................. 152
Networking tab ........................................................................................................................... 152
Other Links list ............................................................................................................................ 154
Create a Quick Set ................................................................................................................................................................ 155
Introduction ...................................................................................................................................................... 155
ENWW vii

Step one: Access the HP Embedded Web Server (EWS) ........................................................................... 155
Step two: Add and manage Quick Sets ........................................................................................................ 156
Add a Quick Set ........................................................................................................................... 156
Edit a Quick Set ........................................................................................................................... 157
Copy a Quick Set ......................................................................................................................... 157
Remove a Quick Set ................................................................................................................... 158
Quick Set settings and options ................................................................................................. 158
Example Quick Sets .................................................................................................................... 163
Congure IP network settings ........................................................................................................................................... 165
Printer sharing disclaimer .............................................................................................................................. 165
View or change network settings ................................................................................................................. 165
Rename the printer on a network ................................................................................................................ 165
Manually congure IPv4 TCP/IP parameters from the control panel ..................................................... 166
Manually congure IPv6 TCP/IP parameters from the control panel ..................................................... 166
Link speed and duplex settings .................................................................................................................... 167
Printer security features ..................................................................................................................................................... 168
Introduction ...................................................................................................................................................... 168
Security statements ....................................................................................................................................... 168
Assign an administrator password ............................................................................................................... 168
IP Security ......................................................................................................................................................... 169
Lock the formatter .......................................................................................................................................... 169
Encryption support: HP High Performance Secure Hard Disks ................................................................ 169
Energy-conservation settings ........................................................................................................................................... 170
Introduction ...................................................................................................................................................... 170
Set the sleep timer and congure the printer to use 2 watts or less of power .................................... 170
Set the sleep schedule ................................................................................................................................... 170
HP Web Jetadmin ................................................................................................................................................................. 171
Software and rmware updates ........................................................................................................................................ 171
9 Solve problems ..................................................................................................................................................................................... 173
For more information: ......................................................................................................................................................... 173
Customer support ................................................................................................................................................................ 174
Control panel help system ................................................................................................................................................. 175
Restore factory settings ..................................................................................................................................................... 176
Introduction ...................................................................................................................................................... 176
Method one: Restore factory settings from the printer control panel ................................................... 176
Method two: Restore factory settings from the HP Embedded Web Server (network-connected
printers only) .................................................................................................................................................... 176
A “Cartridge is low” or “Cartridge is very low” message displays on the printer control panel ............................... 177
Change the “Very Low” settings ................................................................................................................... 177
For printers with fax capability ................................................................................................. 177
viii ENWW

Order supplies .................................................................................................................................................. 178
Printer does not pick up paper or misfeeds .................................................................................................................... 179
Introduction ...................................................................................................................................................... 179
The printer does not pick up paper .............................................................................................................. 179
The printer picks up multiple sheets of paper ............................................................................................ 181
The document feeder jams, skews, or picks up multiple sheets of paper ............................................ 185
Clear paper jams .................................................................................................................................................................. 186
Introduction ...................................................................................................................................................... 186
Paper jam locations ........................................................................................................................................ 187
Auto-navigation for clearing paper jams ..................................................................................................... 188
Experiencing frequent or recurring paper jams? ....................................................................................... 188
Clear paper jams in the document feeder – 31.13.yz ............................................................................... 189
Clear paper jams in Tray 1 - 15.A1.yz; 15.D1.51; 15.D1.81; 15.D2.A1; 15.D2.D1 ............................... 191
Clear paper jams in Tray 2 - 15.A2.yz; 15.D2.52; 15.D2.82; 15.D2.A2; 15.D2.D2 ............................... 194
Clear paper jams in Tray 3 - 15.A3.yz; 15.12.A3; 15.12.D3 ..................................................................... 196
Clear paper jams in the output bin - 15.E1.yz; 15.C1.Az .......................................................................... 200
Clear paper jams in the duplexer - 15.D1.yz; 15.D2.yz; 15.C1.5z; 15.C1.8z; 15.C1.9z ....................... 202
Clear paper jams in the 3X550 trays - 15.A4.yz; 15.A5.yz; 15.A6.yz; 15.A9.yz; 15.37.yz;
15.38.yz; 15.48.yz .......................................................................................................................................... 204
Clear paper jams in the 4,000 sheet HCI - 15.A7.yz; 15.A8.yz; 15.37.yz; 15.38.yz; 15.48.yz ........... 206
Clear paper jams in the inner nisher (785zs model only) - 15.51.yz; 15.62.yz; 15.63.yz;
15.67.yz ............................................................................................................................................................ 211
Clear staple jams (785zs model only) - 15.63.yz ...................................................................................... 213
Clear paper jams in the oor standing nisher rear door (785z+ model only) ..................................... 215
Clear paper jams in the oor standing nisher front door (785z+ model only) ................................... 217
Clear staple jams in the oor standing nisher (785z+ model only) ...................................................... 218
Improve print quality ........................................................................................................................................................... 222
Introduction ...................................................................................................................................................... 222
Check the cartridge status ............................................................................................................................. 222
Update the printer rmware .......................................................................................................................... 223
Change the print quality setting ................................................................................................................... 223
Print from a dierent software program .................................................................................................... 223
Check paper and quality settings ................................................................................................................. 223
Check grayscale and black settings ............................................................................................................. 224
Adjust color settings (Windows) ................................................................................................................... 224
Check paper and the printing environment ................................................................................................ 225
Step one: Use paper that meets HP specications ............................................................... 225
Step two: Check the environment ............................................................................................ 225
Visually inspect the cartridge ........................................................................................................................ 226
Clean the printer .............................................................................................................................................. 227
Print and interpret the Print Quality Report ........................................................................... 227
ENWW ix

Clean the printhead .................................................................................................................... 227
Clean the rollers .......................................................................................................................... 228
Try a dierent print driver .............................................................................................................................. 228
Improve copy image quality ............................................................................................................................................... 230
Check the scanner glass for dirt and smudges .......................................................................................... 230
Calibrate the scanner ...................................................................................................................................... 231
Check the paper settings ............................................................................................................................... 232
Check the paper selection options ........................................................................................... 232
Check the image-adjustment settings ........................................................................................................ 232
Optimize copy quality for text or pictures ................................................................................................... 233
Edge-to-edge copying .................................................................................................................................... 233
Improve scan image quality ............................................................................................................................................... 234
Check the scanner glass for dirt and smudges .......................................................................................... 234
Check the resolution settings ....................................................................................................................... 235
Check the image-adjustment settings ........................................................................................................ 236
Optimize scan quality for text or pictures ................................................................................................... 236
Check the output-quality settings ................................................................................................................ 237
Clean the pickup rollers and separation pad in the document feeder .................................................... 237
Improve fax image quality .................................................................................................................................................. 240
Check the scanner glass for dirt and smudges .......................................................................................... 240
Check the send-fax resolution settings ....................................................................................................... 241
Check the image-adjustment settings ........................................................................................................ 242
Optimize fax quality for text or pictures ...................................................................................................... 242
Check the error-correction settings ............................................................................................................. 242
Check the t-to-page setting ........................................................................................................................ 243
Clean the pickup rollers and separation pad in the document feeder .................................................... 243
Send to a dierent fax machine .................................................................................................................... 245
Check the sender's fax machine ................................................................................................................... 245
Solve wired network problems .......................................................................................................................................... 246
Introduction ...................................................................................................................................................... 246
Poor physical connection ............................................................................................................................... 246
The computer is unable to communicate with the printer ....................................................................... 246
The printer is using incorrect link and duplex settings for the network ................................................. 247
New software programs might be causing compatibility problems ....................................................... 247
The computer or workstation might be set up incorrectly ....................................................................... 247
The printer is disabled, or other network settings are incorrect ............................................................. 247
Solve wireless network problems ..................................................................................................................................... 248
Introduction ...................................................................................................................................................... 248
Wireless connectivity checklist ...................................................................................................................... 248
The printer does not print after the wireless conguration completes ................................................. 249
The printer does not print, and the computer has a third-party rewall installed ............................... 249
x ENWW

The wireless connection does not work after moving the wireless router or printer .......................... 249
Cannot connect more computers to the wireless printer ......................................................................... 250
The wireless printer loses communication when connected to a VPN ................................................... 250
The network does not appear in the wireless networks list .................................................................... 250
The wireless network is not functioning ..................................................................................................... 250
Reduce interference on a wireless network ................................................................................................ 251
Solve fax problems .............................................................................................................................................................. 252
Checklist for solving fax problems ............................................................................................................... 252
What type of phone line are you using? ................................................................................. 252
Are you using a surge-protection device? .............................................................................. 252
Are you using a phone company voice-messaging service or an answering machine? . 252
Does your phone line have a call-waiting feature? ............................................................... 253
Check fax accessory status ....................................................................................................... 253
General fax problems ..................................................................................................................................... 254
The fax failed to send ................................................................................................................ 254
An Out of Memory status message displays on the printer control panel ........................ 254
Print quality of a photo is poor or prints as a gray box ........................................................ 254
You touched the Stop button to cancel a fax, but the fax was still sent ............................ 254
No fax address book button displays ...................................................................................... 254
Not able to locate the Fax settings in HP Web Jetadmin ...................................................... 254
The header is appended to the top of the page when the overlay option is enabled ..... 254
A mix of names and numbers is in the recipients box .......................................................... 254
A one-page fax prints as two pages ........................................................................................ 254
A document stops in the document feeder in the middle of faxing ................................... 255
The volume for sounds coming from the fax accessory is too high or too low ............... 255
Index ........................................................................................................................................................................................................... 257
ENWW xi

xii ENWW

1 Printer overview
For more information:
●
Caution icons
●
Printer views
●
Printer specications
●
Printer hardware setup and software installation
The following information is correct at the time of publication.
For video assistance, see www.hp.com/videos/PageWide.
For current information, see www.hp.com/support/pwcolor780MFP or www.hp.com/support/pwcolor785MFP.
HP's all-inclusive help for the printer includes the following information:
● Install and congure
● Learn and use
● Solve problems
● Download software and rmware updates
● Join support forums
● Find warranty and regulatory information
ENWW For more information: 1
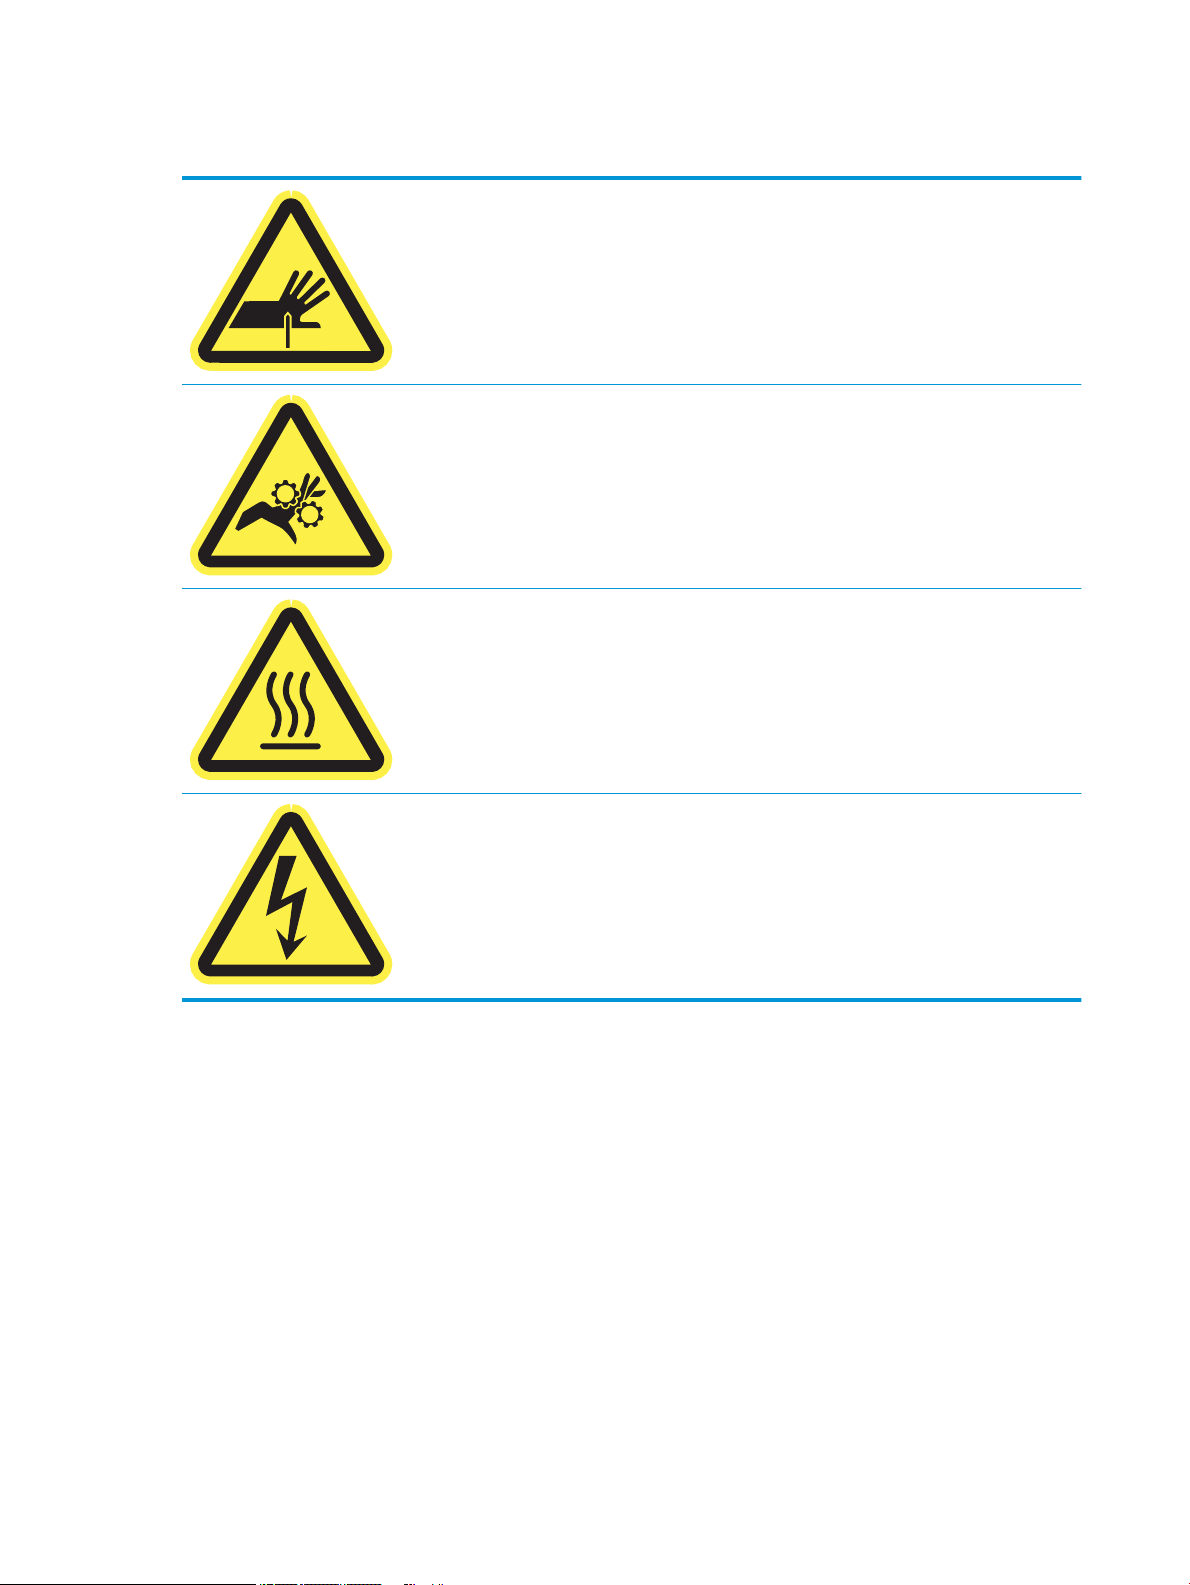
Caution icons
CAUTION: Sharp edge in close proximity.
CAUTION: Keep body parts away from moving parts.
CAUTION: Hot surface.
CAUTION: Electrical shock.
2 Chapter 1 Printer overview ENWW
Printer views
2
3 5 6 7 8 9 10
1
16 15
1314 12
17
18
4
11
●
Printer front view
●
Printer back view and interface ports
●
Control-panel view
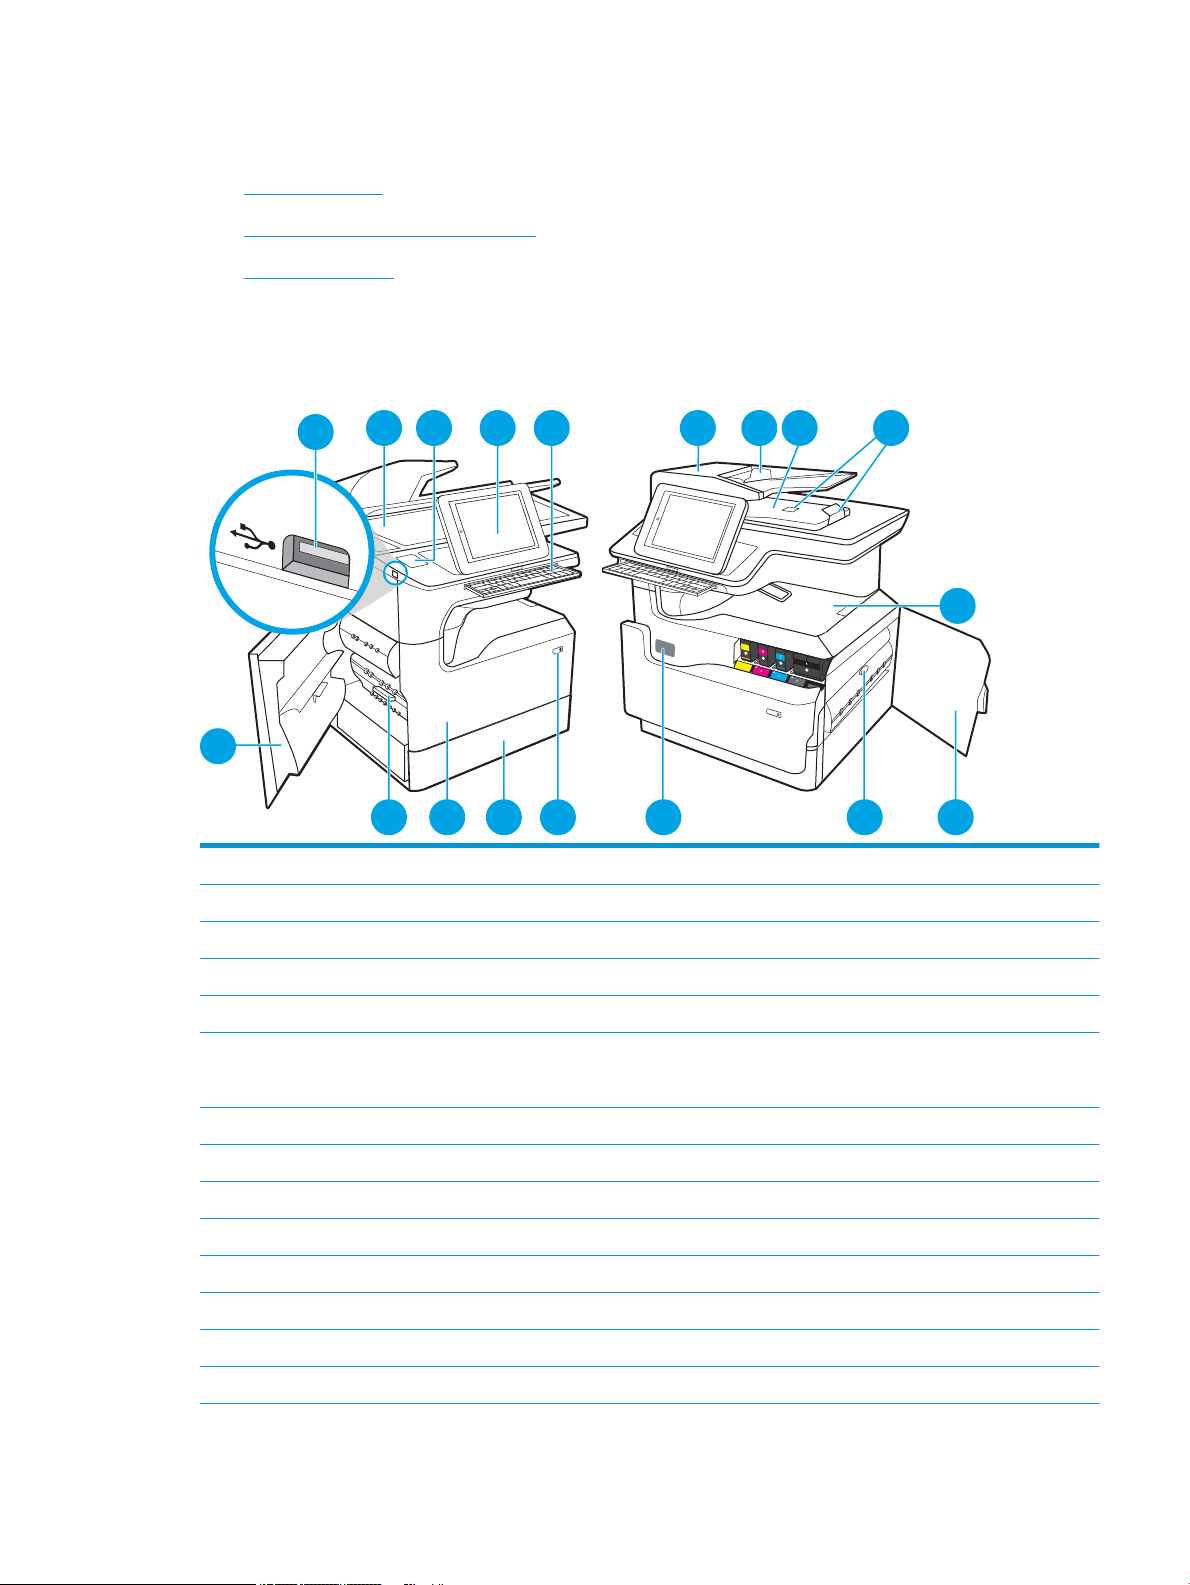
Printer front view
Printer front view—780dn, 780dns,785f models
1 Left door
2 Easy-access USB printing port
3 Scanner assembly
4 Hardware integration pocket (for connecting accessories and third-party devices)
5 Control panel with color touchscreen display (tilts up for easier viewing)
6 Keyboard (785f model only. Push the keyboard in until it clicks, and then pull the keyboard out to use it.)
CAUTION: Close the keyboard when it is not in use.
7 Document-feeder cover (access for clearing jams)
8 Document-feeder input tray
9 Document-feeder output bin and output bin stop
10 Document-feeder output extensions
11 Output bin and output bin stop
12 Right door (access for clearing jams)
13 Duplexer
14 Serial number and product number label
ENWW Printer views 3
15 On/O button
1
3
4
7
2
6
5 8 9 10 11
12
13
14
17 1619 18
21
15
20
16 Tray 2
17 Front door (access to the cartridges)
18 Service uid container
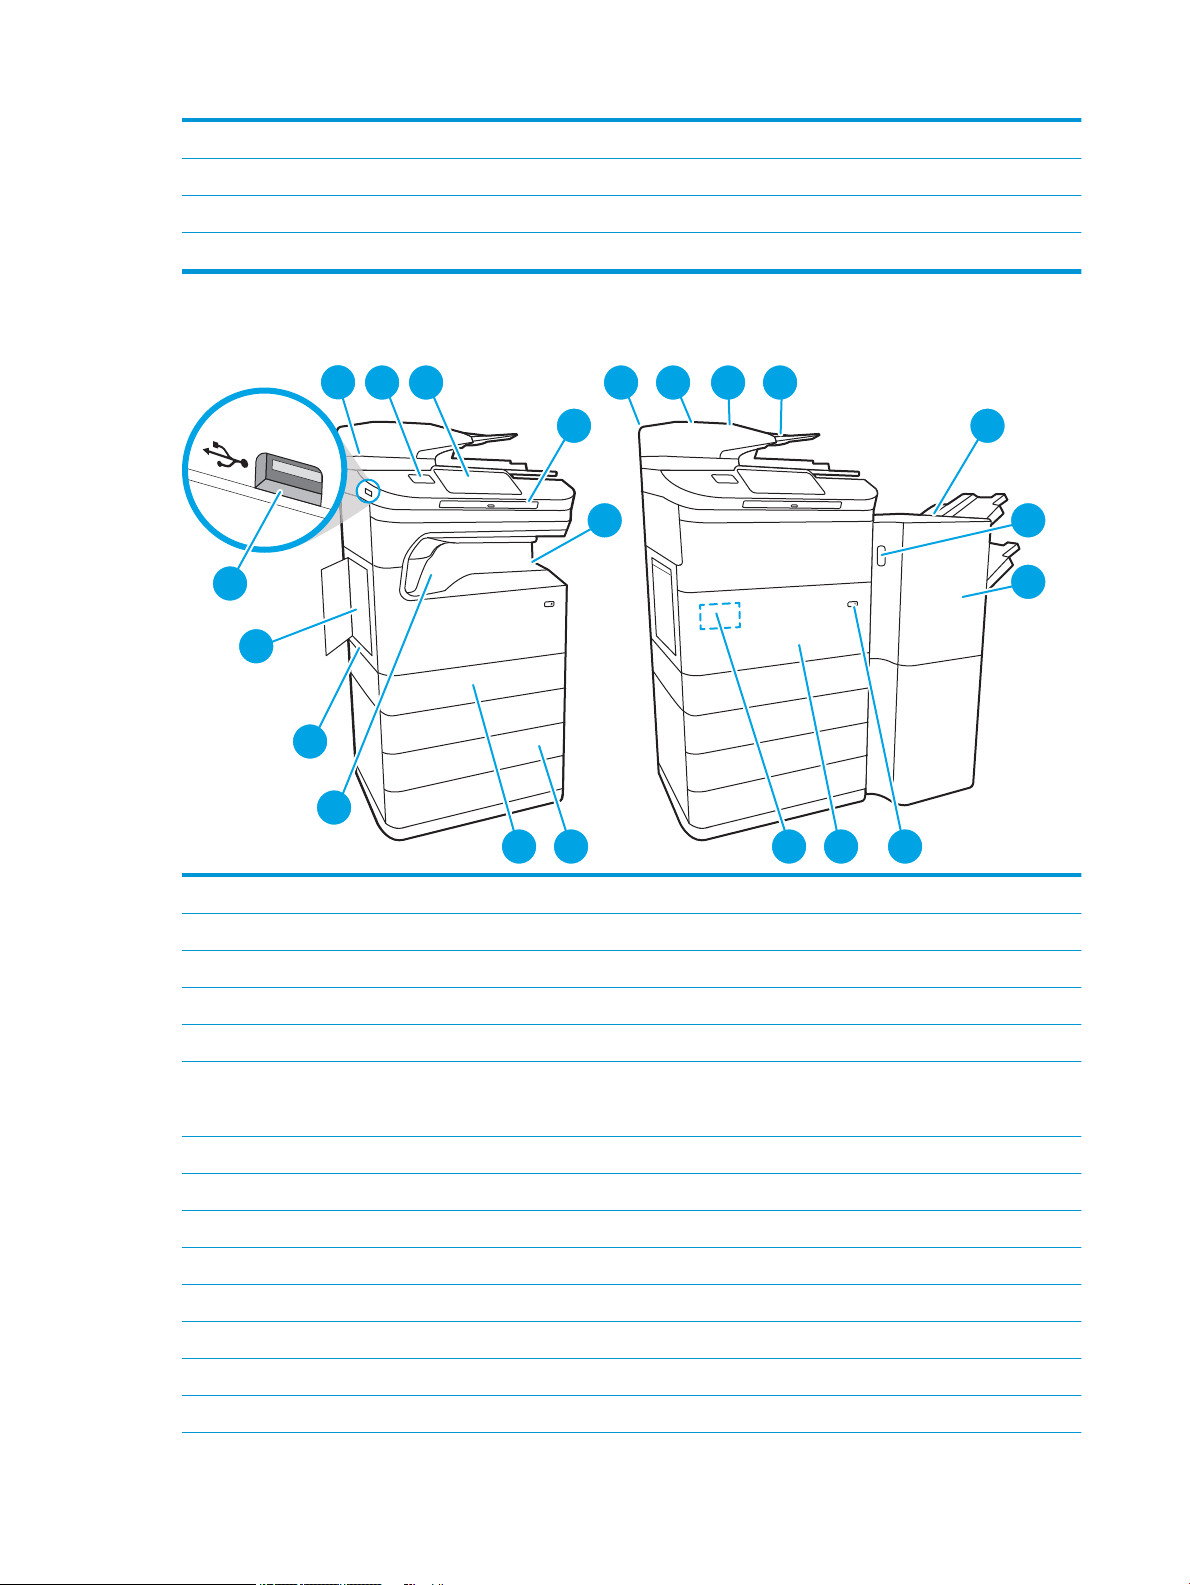
Printer front view—785zs, 785z+ models
1 Left door
2 Easy-access USB printing port
3 Scanner assembly
4 Hardware integration pocket (for connecting accessories and third-party devices)
5 Control panel with color touchscreen display (tilts up for easier viewing)
6 Keyboard. Push the keyboard in until it clicks, and then pull the keyboard out to use it.
CAUTION: Close the keyboard when it is not in use.
7 Output bin and output bin stop
8 Document-feeder cover (access for clearing jams)
9 Document-feeder input tray
10 Document-feeder output bin and output bin stop
11 Document-feeder output extensions
12 Floor-standing nisher (785z+ model only)
13 Floor-standing nisher release latch (785z+ model only)
14 Floor-standing nisher front door (785z+ model only)
4 Chapter 1 Printer overview ENWW
15 On/O button
1
3 4 5 62
16 Front door (access to the cartridges)
17 Serial number and product number label
18 3 x 550 paper trays
19 Tray 2
20 Inline nisher (785zs model only)
21 Service uid container
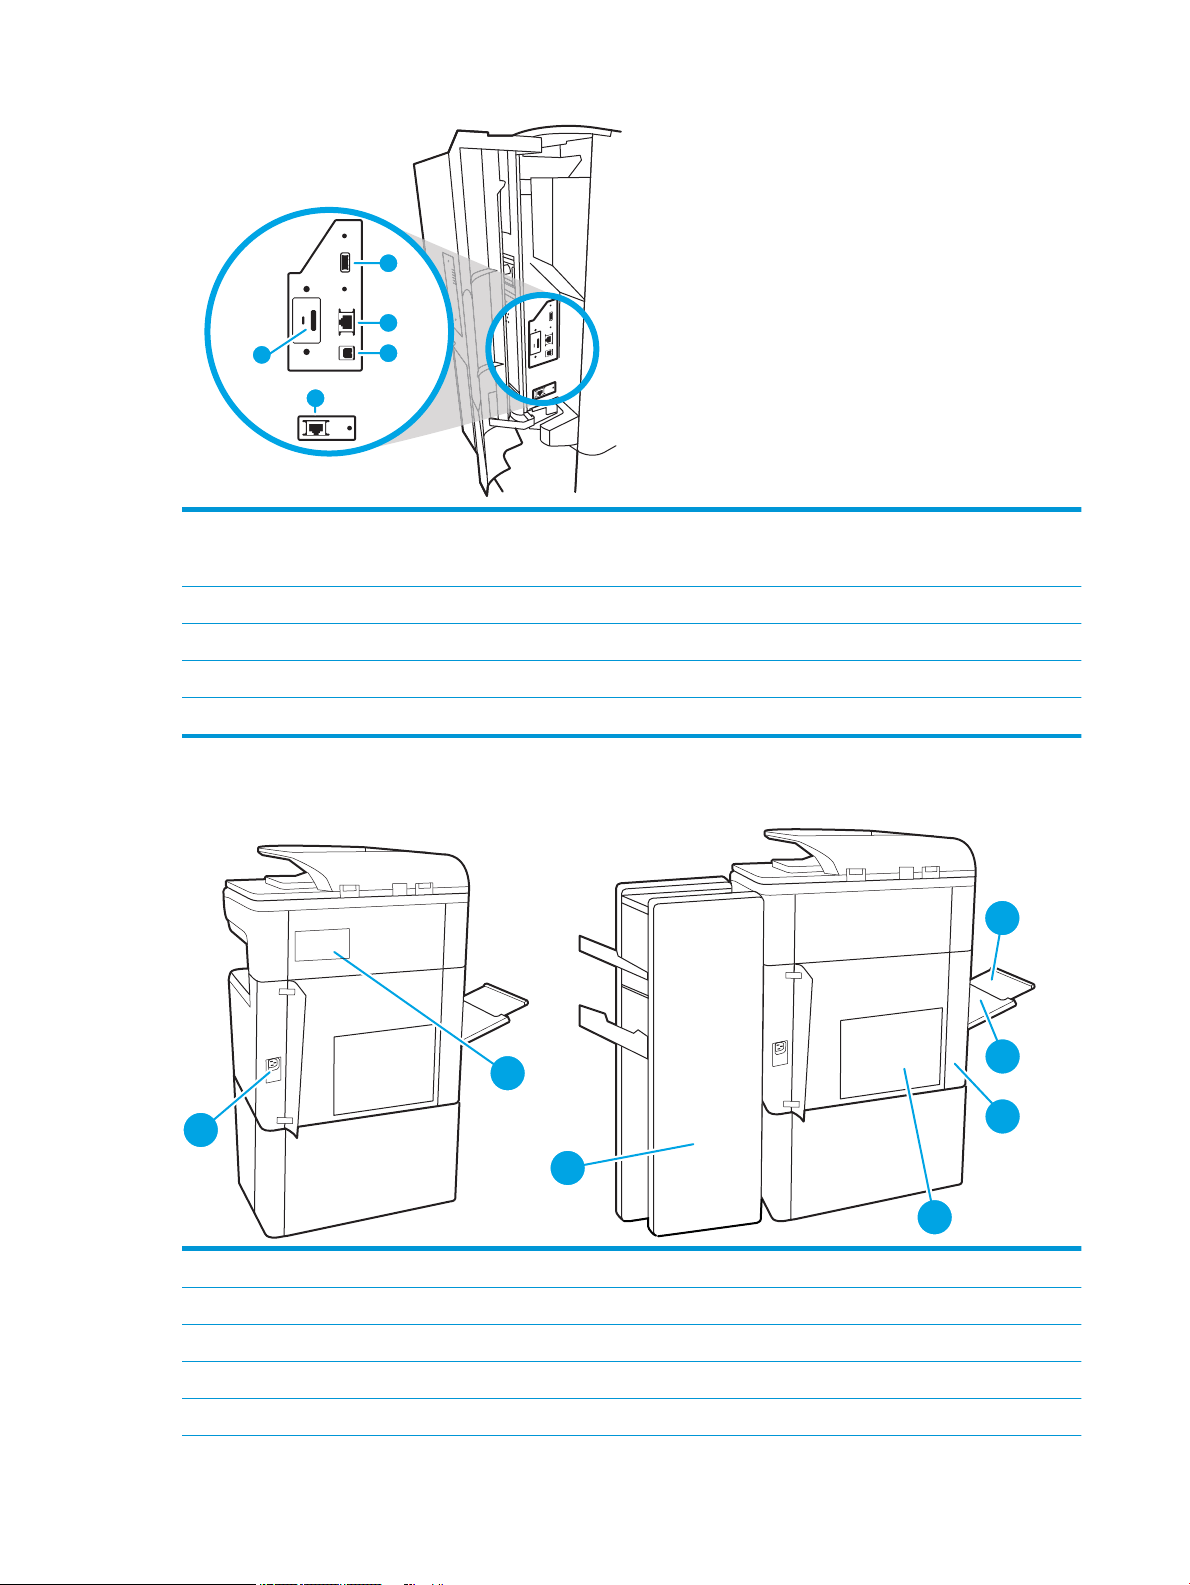
Printer back view and interface ports
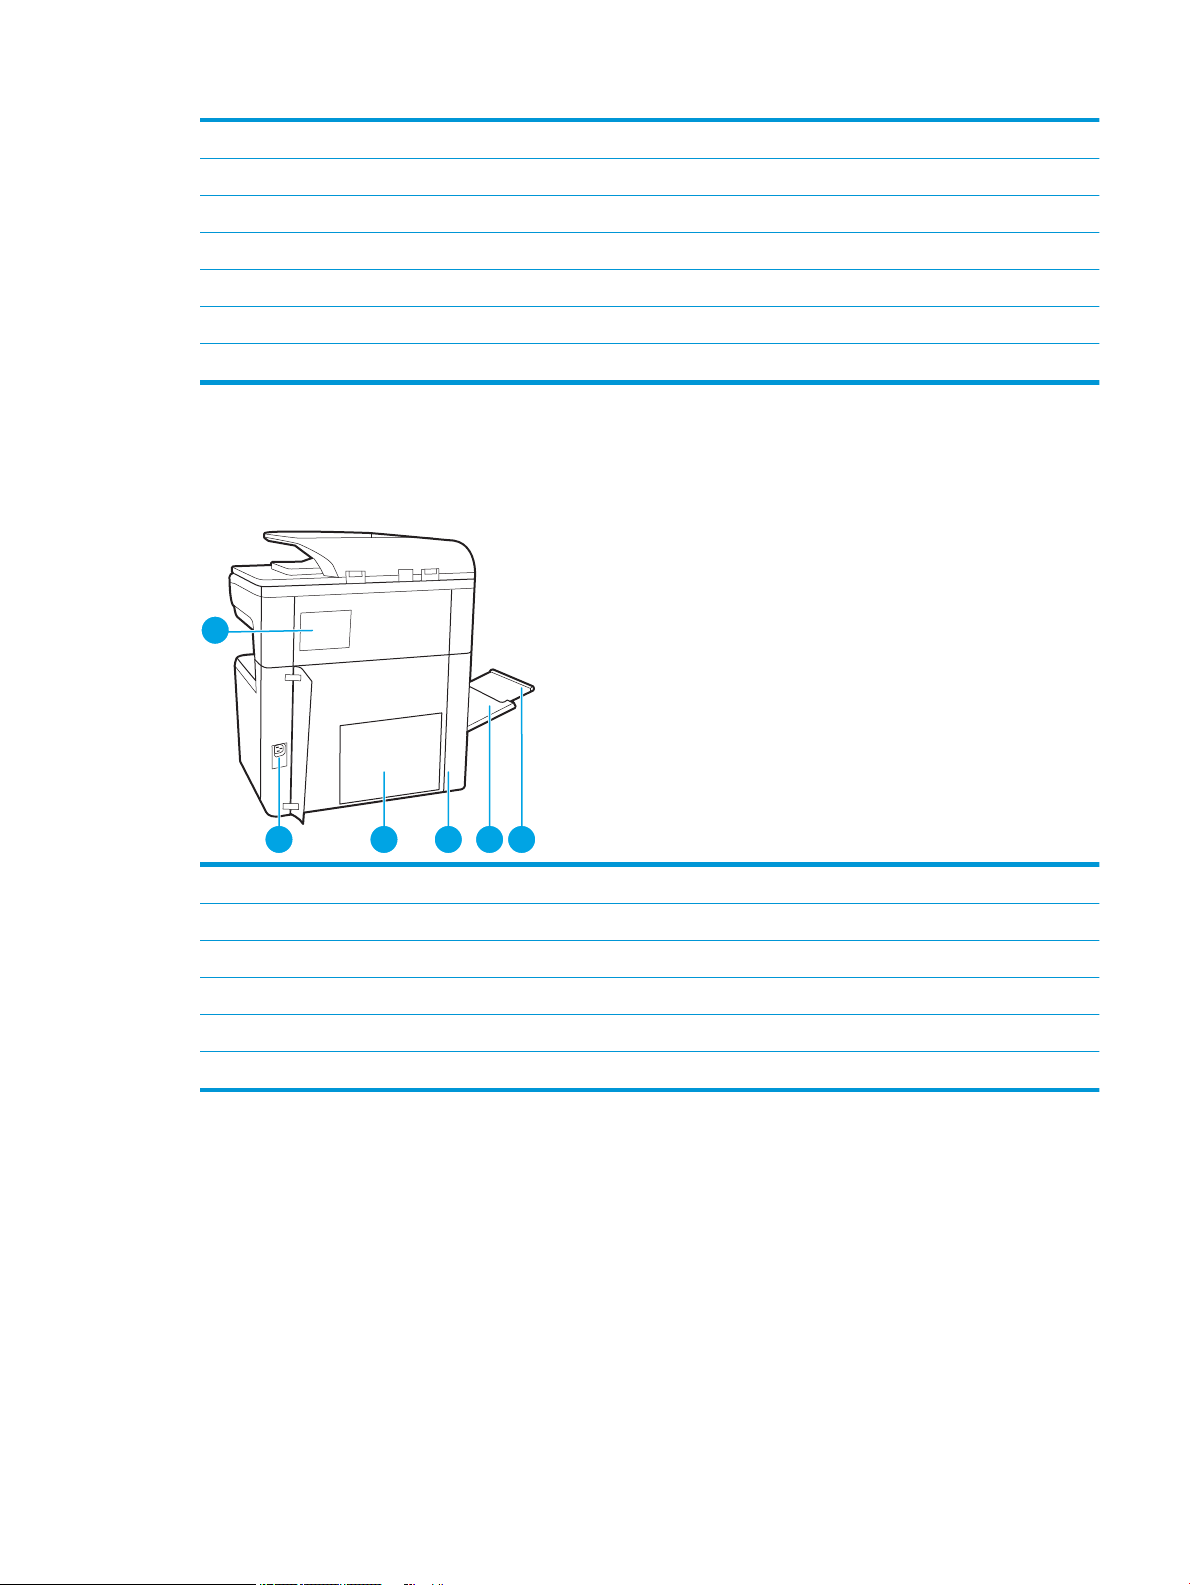
Printer back view and interface ports—780dn, 780dns,785f models
1 Stapler cover (780dns model only)
2 Power connection
3 Formatter plate (contains the interface ports)
4 Access door to interface ports and cable lock slot
5 Tray 1 (multipurpose tray)
6 Tray 1 extension
The printer includes the following interface ports.
ENWW Printer views 5
4
1
2
5
3
1 Host USB port for connecting external USB devices
1
3
4
7
2
5
6
NOTE: For easy-access USB printing, use the USB port near the control panel.
2 Local area network (LAN) Ethernet (RJ-45) network port
3 Hi-Speed USB 2.0 printing port
4 Fax port (785f model only)
5 Cable lock slot
Printer back view and interface ports—785zs, 785z+ models
1 Power connection
2 Stapler cover (785zs model only)
3 Floor-standing nisher rear door (785z+ model only)
4 Formatter plate (contains the interface ports)
5 Access door to interface ports and cable lock slot
6 Chapter 1 Printer overview ENWW
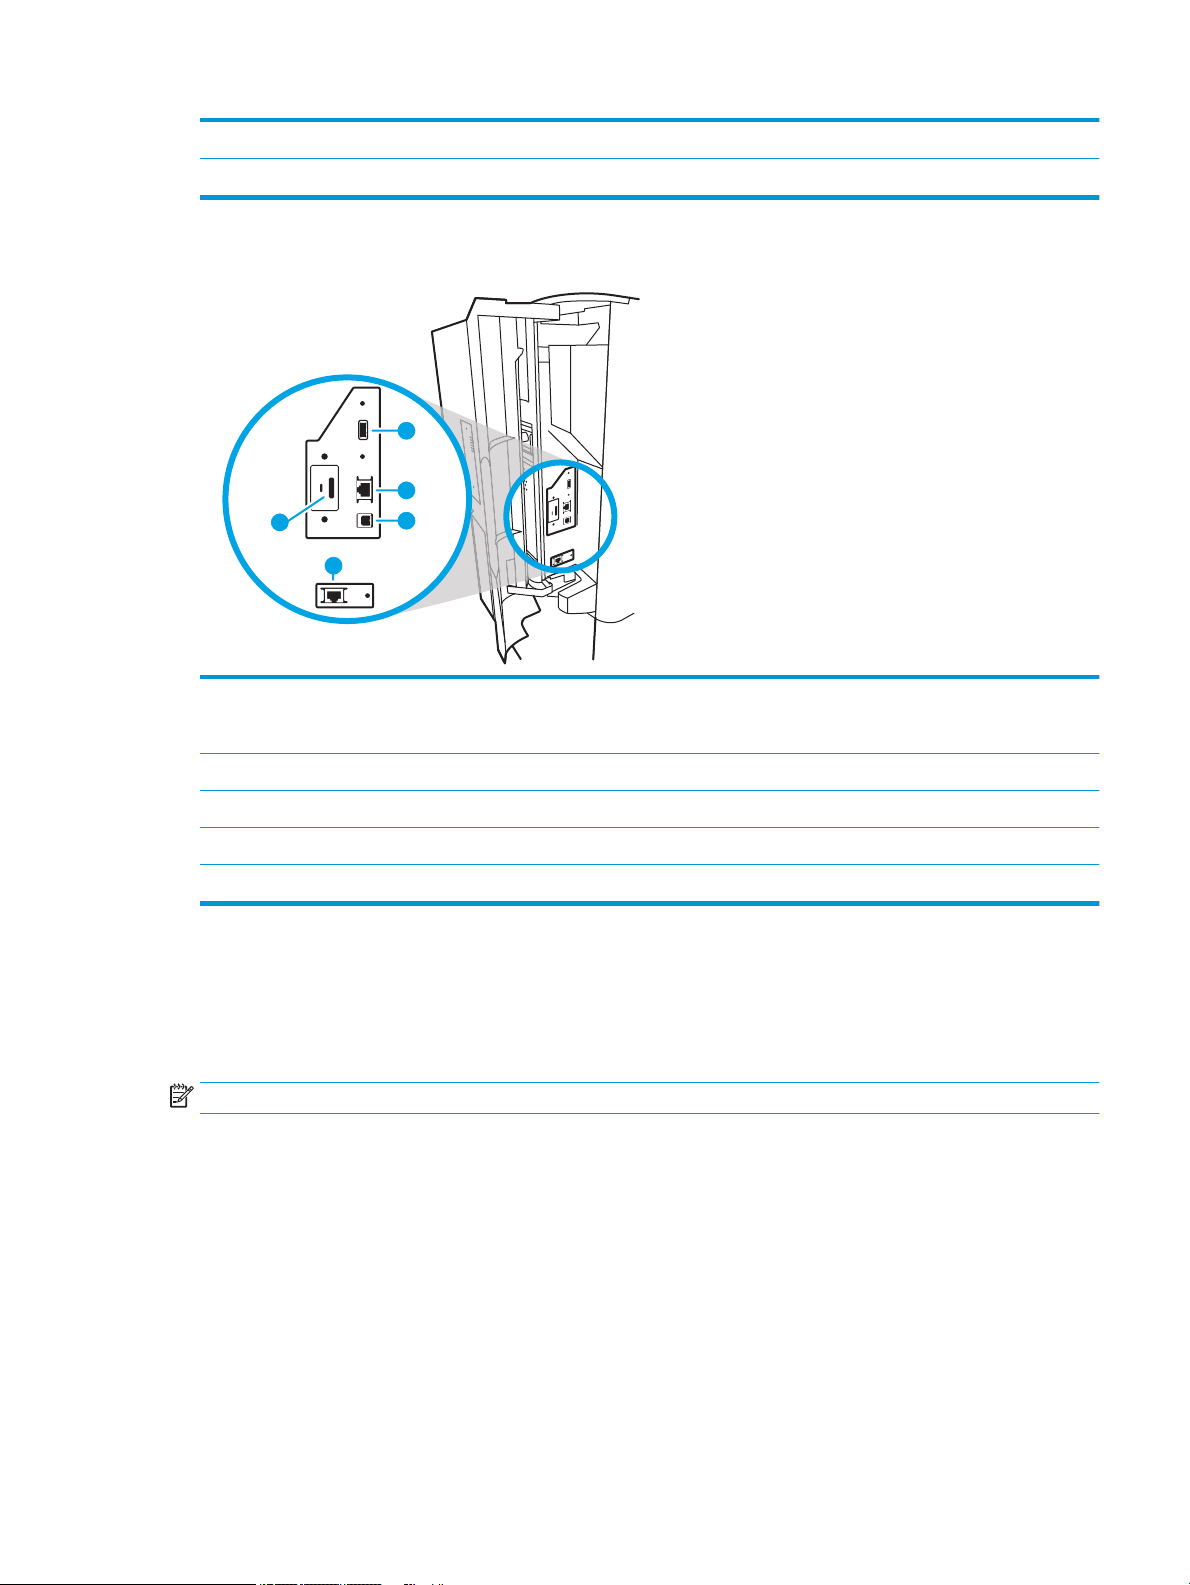
6 Tray 1 (multipurpose tray)
4
1
2
5
3
7 Tray 1 extension
The printer includes the following interface ports.
1 Host USB port for connecting external USB devices
NOTE: For easy-access USB printing, use the USB port near the control panel.
2 Local area network (LAN) Ethernet (RJ-45) network port
3 Hi-Speed USB 2.0 printing port
4 Fax port
5 Cable lock slot
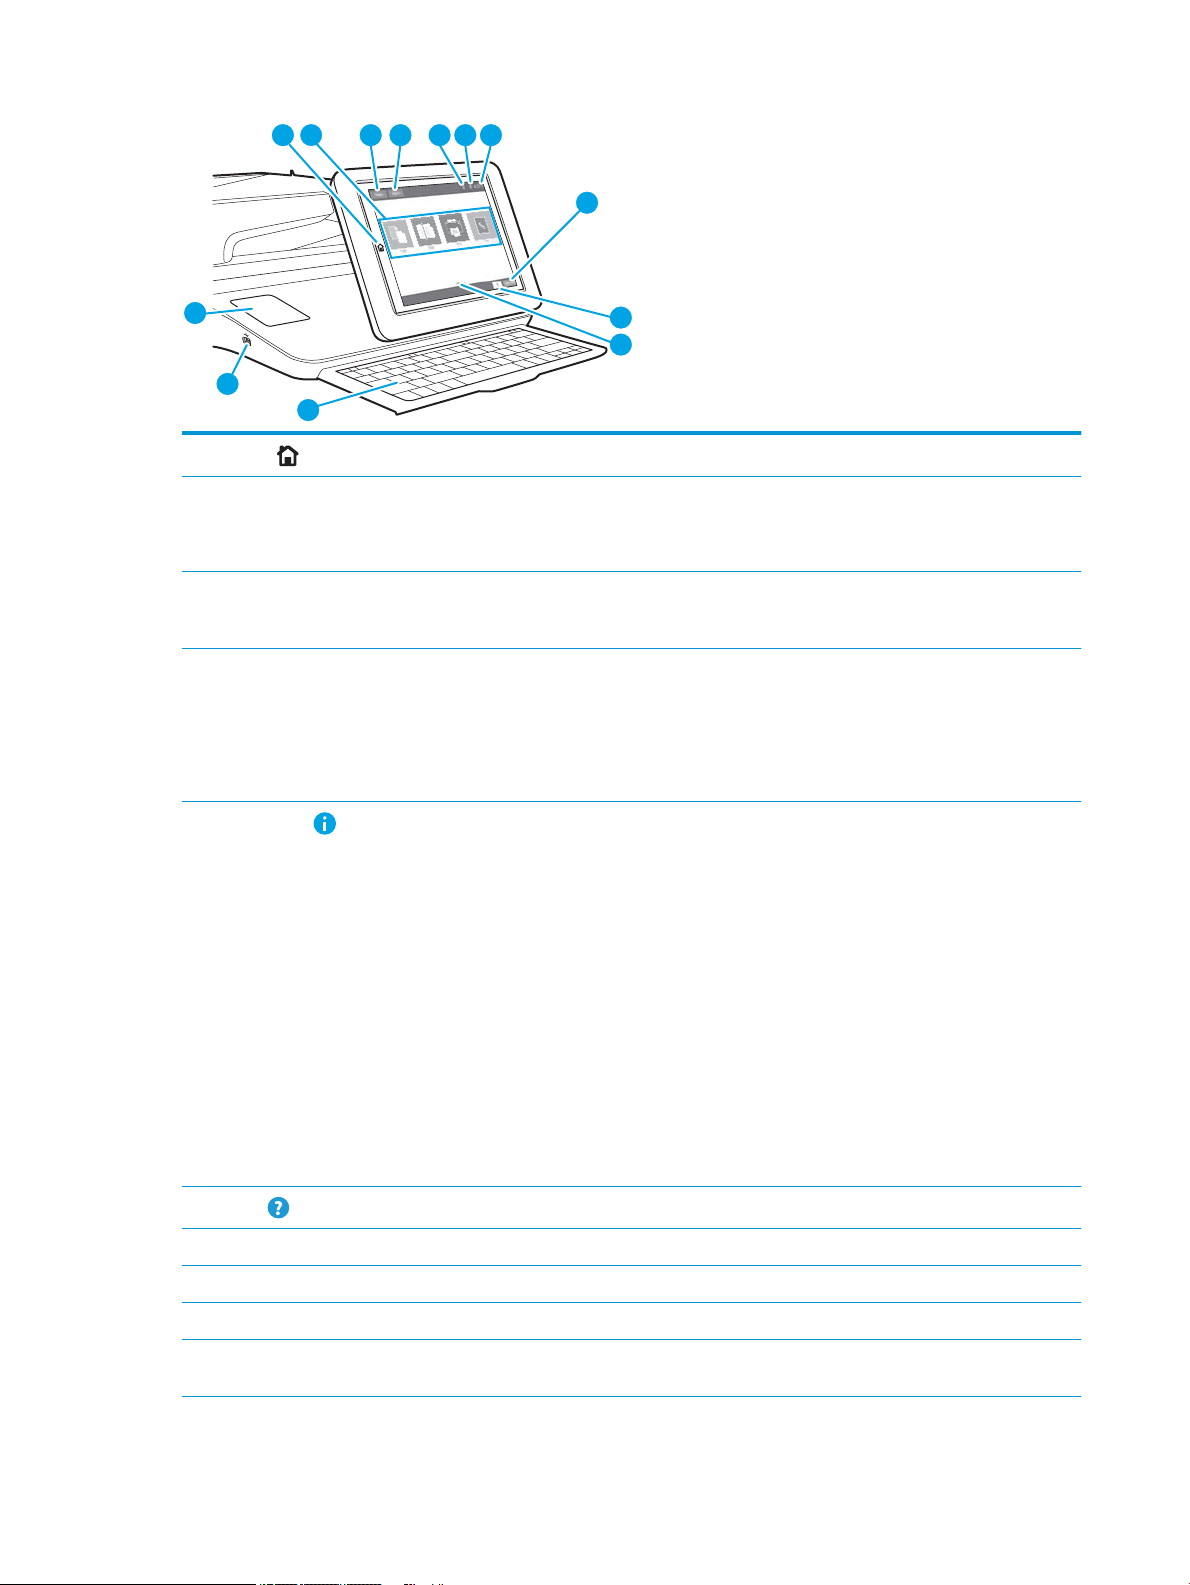
Control-panel view
The Home screen provides access to the printer features and indicates the current status of the printer.
Return to the Home screen at any time by selecting the Home button.
NOTE: The features that appear on the Home screen can vary, depending on the printer conguration.
ENWW Printer views 7
3 4
2
1
5 6 7
8
9
10
12
13
11
1
Home button
2 Applications area Select any of the icons to open the application. Swipe the screen sideways to access more applications.
3 Reset button Select the Reset button to clear changes, release the printer from a paused state, reset the copy count
4 Sign In or Sign Out button Select the Sign In button to access secured features.
Select the Home button to return to the Home screen.
NOTE: The available applications vary by printer. The administrator can congure which applications
appear and the order in which they appear.
eld, display hidden errors, and restore the default settings (including the language and keyboard
layout).
Select the Sign Out button to sign out of the printer. The printer restores all options to the default
settings.
NOTE: This button displays only if the administrator has congured the printer to require permission
for access to features.
5
Information button
6
Help button
7 Current time Displays the current time.
8 Copy button Select the Copy button to start a copy job.
9 Copy count The copy count indicates the number of copies that the printer is set to make.
10 Home-screen page
indicator
Select the information button to access a screen that provides access to several types of printer
information. Select the buttons at the bottom of the screen for the following information:
● Display Language: Change the language setting for the current user session.
● Sleep Mode: Place the printer into sleep mode.
● Wi-Fi Direct: View information for how to connect directly to the printer using a phone, tablet, or
other device with Wi-Fi.
● Wireless: View or change wireless connection settings (for the zs and z+ models and for the dn
and f models only when an optional wireless accessory is installed).
● Ethernet: View or change Ethernet connection settings.
● HP Web Services: View information to connect and print to the printer using HP Web Services
(ePrint).
● Fax Number: View the printer fax number (fax models only).
Select the Help button to open the embedded help system.
Indicates the number of pages on the Home screen or in an application. The current page is highlighted.
Swipe the screen sideways to scroll between pages.
8 Chapter 1 Printer overview ENWW

11 Keyboard
(Flow models only)
12 Easy-access USB port Insert a USB ash drive for printing or scanning without a computer or to update the printer rmware.
Flow models include a physical keyboard. The keys are mapped to a language in the same way the
virtual keyboard on the printer touchscreen is mapped. Whenever the keyboard layout for the virtual
keyboard changes, the keys on the physical keyboard are remapped to match the new settings.
NOTE: In some locations, the printer comes with adhesive keyboard overlays to customize the keys
for dierent languages.
NOTE: An administrator must enable this port before using for print or scan features. A rmware
upgrade does not require that the port be enabled.
13 Hardware integration
pocket (HIP)
For connecting accessory and third-party devices.
ENWW Printer views 9
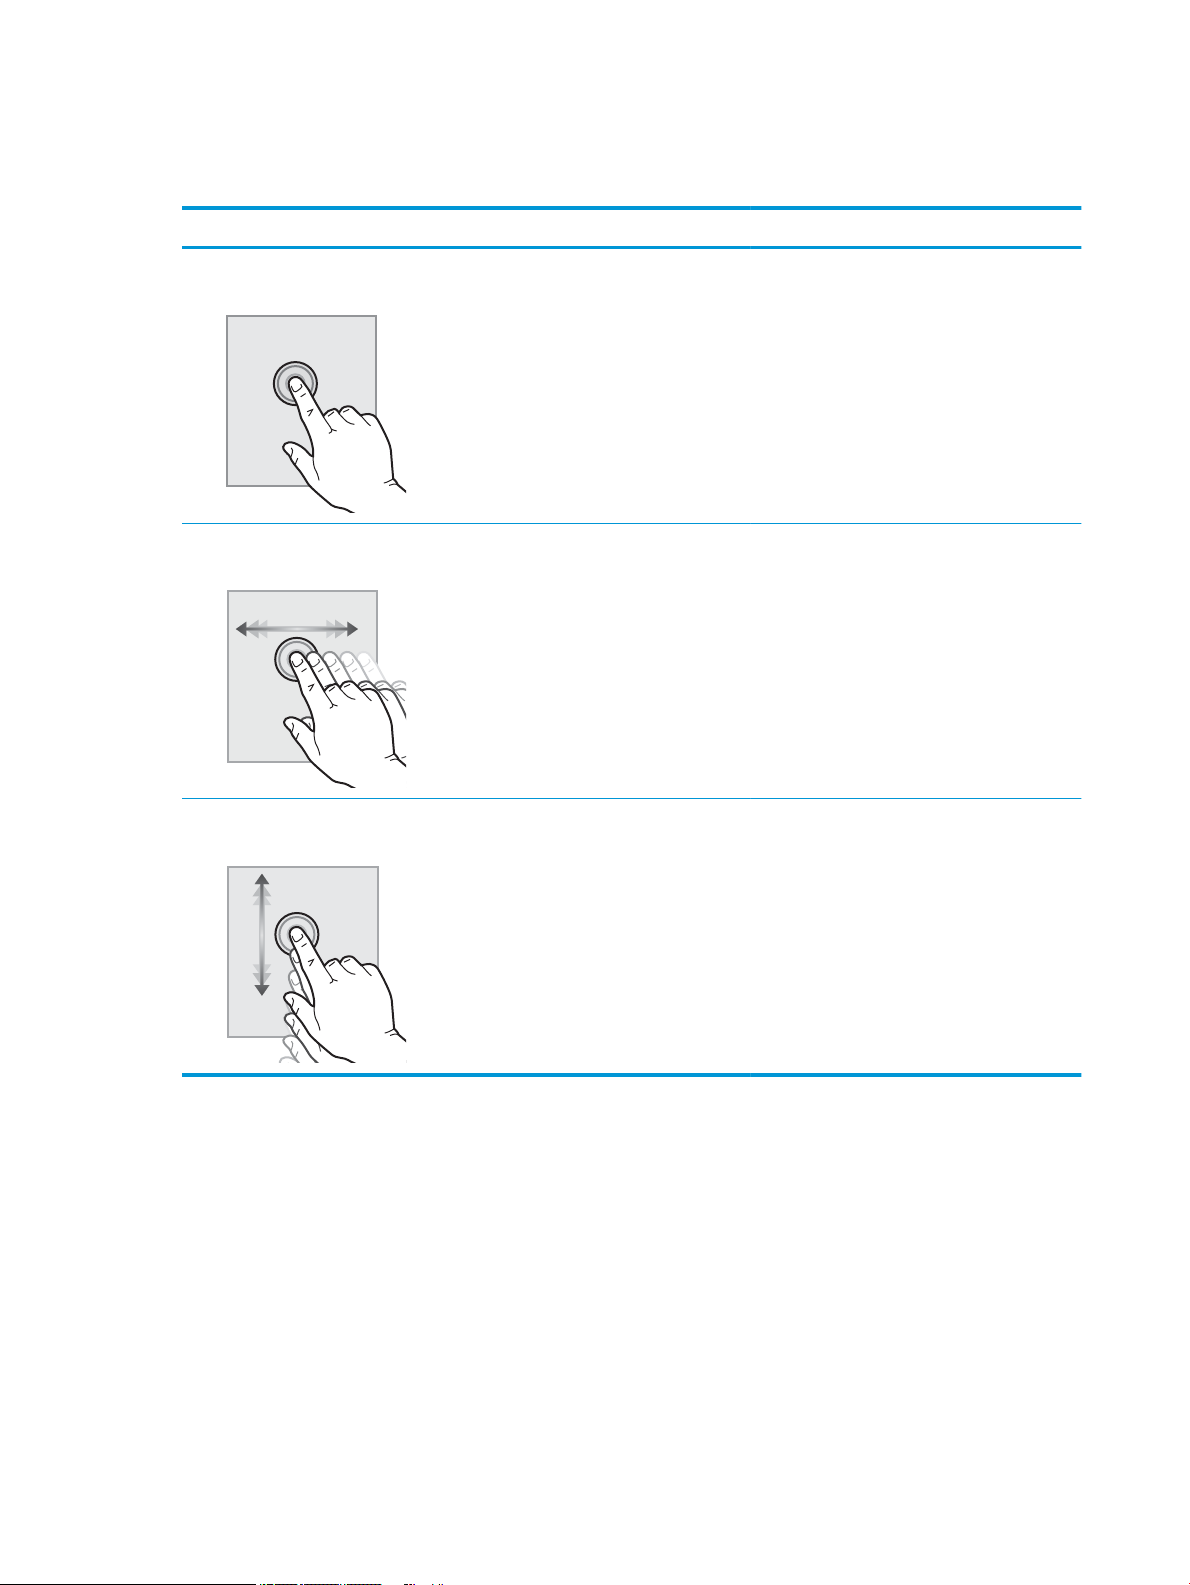
How to use the touchscreen control panel
Use the following actions to use the printer touchscreen control panel.
Action Description Example
Touch Touch an item on the screen to select that item
or open that menu. Also, when scrolling through
menus, briey touch the screen to stop the
scrolling.
Swipe Touch the screen and then move your nger
horizontally to scroll the screen sideways.
Scroll Touch the screen and then move your nger
vertically to scroll the screen up and down. When
scrolling through menus, briey touch the screen
to stop the scrolling.
Touch the Settings icon to open the Settings app.
Swipe until the Settings app displays.
Scroll through the Settings app.
10 Chapter 1 Printer overview ENWW
Printer specications
IMPORTANT: The following specications are correct at the time of publication, but they are subject to change.
For current information, see www.hp.com/support/pwcolor780MFP or www.hp.com/support/pwcolor785MFP.
●
Technical specications
●
Supported operating systems
●
Mobile printing solutions
●
Printer dimensions
●
Power consumption, electrical specications, and acoustic emissions
●
Operating environment range
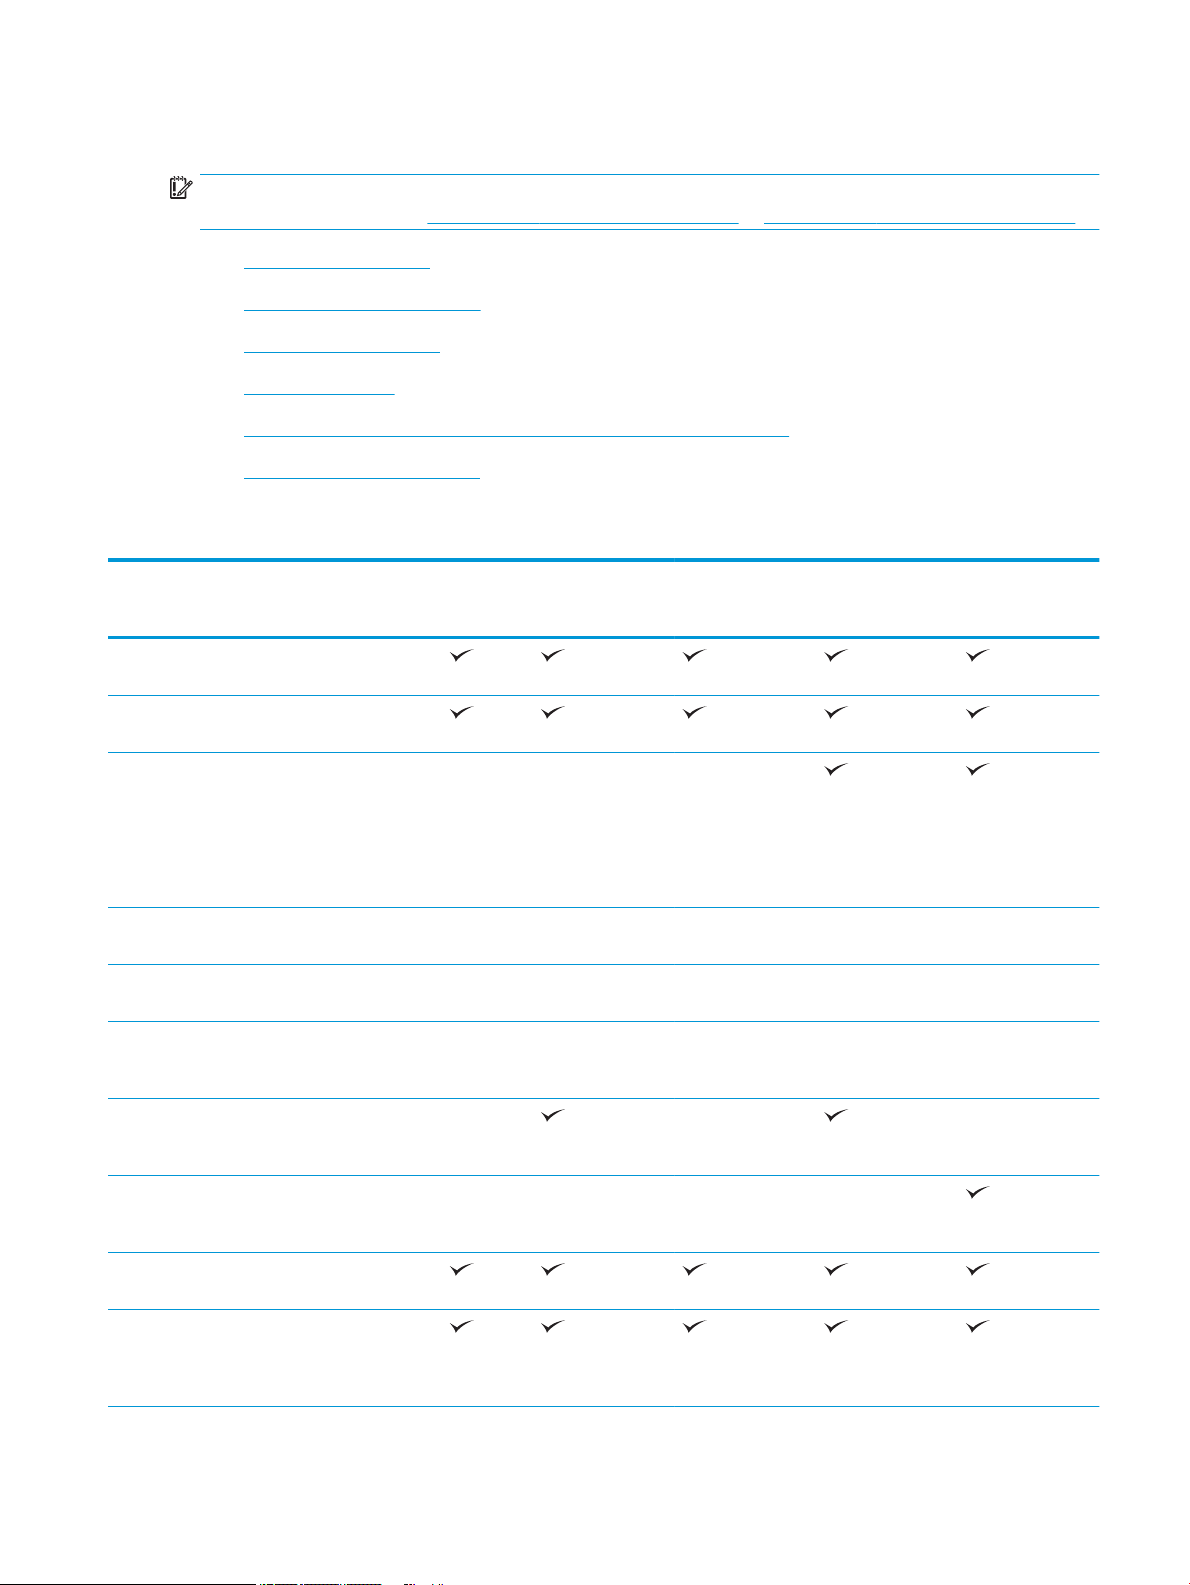
Technical specications
Model name
Product number
Paper handling Tray 1 (100-sheet
capacity)
Tray 2 (550-sheet
capacity)
550-sheet paper
tray
NOTE: The printer
supports one
optional input
accessory.
550-sheet paper
tray and stand
3x550-sheet paper
tray
4,000-sheet high-
capacity input (HCI)
feeder
300-sheet inner
nisher with
stapler
780dn
J7Z09A
Optional Optional Optional
Optional Optional Optional Required Required
Optional Optional Optional Required Required
Optional Optional Optional Required Required
Not supported Not supported Not supported
780dns
J7Z10A
785f
J7Z11A
785zs
J7Z12A
785z+
Z5G75A
3000-sheet
Stapler/Stacker
Finisher
Automatic duplex
printing
Connectivity 10/100/1000
Ethernet LAN
connection with
IPv4 and IPv6
Not supported Not supported Not supported Not supported
ENWW Printer specications 11

Model name
780dn
780dns
785f
785zs
785z+
Product number
Hi-Speed USB 2.0
Easy-access USB
port for printing
and scanning
without a computer
and upgrading the
rmware
Hardware
integration pocket
(HIP) for connecting
accessories and
third-party devices
HP Internal USB
ports
HP Jetdirect 3000w
NFC/Wireless
Accessory for
printing from
mobile devices
HP Jetdirect NFC/
Wireless Accessory
with Bluetooth Low
Energy (BLE) for
printing from
mobile devices
J7Z09A
Optional Optional Optional Optional Optional
Optional Optional Optional Optional Optional
Not supported Not supported Not supported Optional Optional
J7Z10A
J7Z11A
J7Z12A
Z5G75A
HP Jetdirect
2900nw Print
Server Accessory
for wireless
connectivity
HP Foreign
Interface Harness
(FIH)
Memory 320 GB HP High-
Performance
Secure Hard Disk
Base memory:
3.5 GB, expandable
to 4.5 GB by adding
DIMM memory
module
Base memory:
5.6 GB, expandable
to 6.6 GB by adding
DIMM memory
module
HP Secure High
Performance Hard
Disk Drive (FIPS)
Optional Optional Optional Optional Optional
Optional Optional Optional Optional Optional
Not supported Not supported Not supported
Not supported Not supported
Optional Optional Optional Optional Optional
12 Chapter 1 Printer overview ENWW

Model name
780dn
780dns
785f
785zs
785z+
Product number
Security HP Trusted
Platform Module
for encrypting all
data that passes
through the printer
Control-panel
display and input
Retractable
Print Prints 45 pages per
Prints 55 ppm on
Color touchscreen
control panel
keyboard
minute (ppm) on
A4 and letter-size
paper in
Professional mode.
Prints 65 ppm on
A4 and letter-size
paper in General
Oice mode.
A4 and letter-size
paper in
Professional mode.
J7Z09A
Not supported Not supported
J7Z10A
J7Z11A
J7Z12A
Z5G75A
Prints 75 ppm on
A4 and letter-size
paper in General
Oice mode.
Easy-access USB
printing (no
computer required)
Store jobs in the
printer memory to
print later or print
privately
Fax Optional Optional
Copy and scan Copies at speeds of
up to 45 ppm on
A4 and letter-size
paper.
Copies at speeds of
up to 55 ppm on
A4 and letter-size
paper.
200-page
document feeder
with dual-head
scanning for
single-pass duplex
copying and
scanning
ENWW Printer specications 13

Model name
780dn
780dns
785f
785zs
785z+
Product number
HP EveryPage
Technologies
including ultrasonic
multi-feed
detection
Embedded optical
character
recognition (OCR)
provides the ability
to convert printed
pages into text that
can be edited or
searched using a
computer.
SMART Label
feature provides
paper-edge
detection for
automatic page
cropping
Automatic page
orientation for
pages that have at
least 100
characters of text.
J7Z09A
Not supported Not supported
Not supported Not supported
Not supported Not supported
Not supported Not supported
J7Z10A
J7Z11A
J7Z12A
Z5G75A
Automatic tone
adjustment sets
contrast,
brightness, and
background
removal for each
page.
Digital Send Scan to E-mail,
Scan to USB Drive,
and Scan to
Network Folder
Scan to
SharePoint®
Not supported Not supported
Supported operating systems
Linux: For information and print drivers for Linux, go to www.hp.com/go/linuxprinting.
UNIX: For information and print drivers for UNIX®, go to www.hp.com/go/unixmodelscripts.
The following information applies to the printer-specic HP PCL 6 print drivers, HP print drivers for macOS, and to
the software installer.
Windows: Download HP Easy Start from 123.hp.com/PageWide to install the HP print driver. Or go to the printersupport website for this printer: www.hp.com/support/pwcolor780MFP or www.hp.com/support/
pwcolor785MFP to download the print driver or the software installer to install the HP print driver.
14 Chapter 1 Printer overview ENWW

macOS: Mac computers are supported with this printer. Download HP Easy Start from 123.hp.com/PageWide to
install the HP print driver.
1. Go to 123.hp.com/PageWide.
2. Follow the steps provided to download the printer software.
Table 1-1 Supported operating systems and print drivers
Operating system Print driver installed (from the software on
the web)
Windows® XP SP3, 32-bit
Windows Vista®, 32-bit
Windows 7, 32-bit and 64-bit The “HP PCL 6” printer-specic print driver is
Windows 8, 32-bit and 64-bit The “HP PCL 6” printer-specic print driver is
Windows 8.1, 32-bit and 64-bit The “HP PCL-6” V4 printer-specic print
Windows 10, 32-bit and 64-bit The “HP PCL-6” V4 printer-specic print
The “HP PCL.6” printer-specic print driver is
installed for this operating system as part of
the software installation.
The “HP PCL.6” printer-specic print driver is
installed for this operating system as part of
the software installation.
installed for this operating system as part of
the software installation.
installed for this operating system as part of
the software installation.
driver is installed for this operating system
as part of the software installation.
driver is installed for this operating system
as part of the software installation.
Notes
Microsoft retired mainstream support for
Windows XP in April 2009. HP will continue
to provide best eort support for the
discontinued XP operating system. Some
features and page sizes in the print driver
are not supported.
Microsoft retired mainstream support for
Windows Vista in April 2012. HP will
continue to provide best eort support for
the discontinued Vista operating system.
Some features and page sizes in the print
driver are not supported.
Windows 8 RT support is provided through
Microsoft IN OS Version 4, 32-bit driver.
Windows 8.1 RT support is provided through
Microsoft IN OS Version 4, 32-bit driver.
Windows Server 2008 SP2, 32-bit The “HP PCL.6” printer-specic print driver is
available for download from the printersupport website. Download the driver, and
then use the Microsoft Add Printer tool to
install it.
Windows Server 2008 SP2, 64-bit The “HP PCL 6” printer-specic print driver is
available for download from the printersupport website. Download the driver, and
then use the Microsoft Add Printer tool to
install it.
Windows Server 2008 R2, SP 1, 64-bit The “HP PCL 6” printer-specic print driver is
available for download from the printersupport website. Download the driver, and
then use the Microsoft Add Printer tool to
install it.
Windows Server 2012, 64-bit The PCL 6 printer-specic print driver is
available for download from the printersupport website. Download the driver, and
then use the Microsoft Add Printer tool to
install it.
Microsoft retired mainstream support for
Windows Server 2008 in January 2015. HP
will continue to provide best eort support
for the discontinued Server 2008 operating
system. Some features and page sizes in
the print driver are not supported.
Microsoft retired mainstream support for
Windows Server 2008 in January 2015. HP
will continue to provide best eort support
for the discontinued Server 2008 operating
system.
ENWW Printer specications 15

Table 1-1 Supported operating systems and print drivers (continued)
Operating system Print driver installed (from the software on
the web)
Windows Server 2012 R2, 64-bit The PCL 6 printer-specic print driver is
available for download from the printersupport website. Download the driver, and
then use the Microsoft Add Printer tool to
install it.
Windows Server 2016, 64-bit The PCL 6 printer-specic print driver is
available for download from the printersupport website. Download the driver, and
then use the Microsoft Add Printer tool to
install it.
macOS 10.11 El Capitan, macOS 10.12
Sierra, macOS 10.13 High Sierra
Download HP Easy Start from 123.hp.com/
PageWide, and then use it to install the print
driver.
Notes
NOTE: Supported operating systems can change. For a current list of supported operating systems, go to
www.hp.com/support/pwcolor780MFP or www.hp.com/support/pwcolor785MFP for HP's all-inclusive help for
the printer.
NOTE: For details on client and server operating systems and for HP UPD driver support for this printer, go to
www.hp.com/go/upd. Under Additional information, click the links.
Table 1-2 Minimum system requirements
Windows macOS
● Internet connection
● Dedicated USB 1.1 or 2.0 connection or a network connection
● 2 GB of available hard-disk space
● 1 GB RAM (32-bit) or 2 GB RAM (64-bit)
● Internet connection
● Dedicated USB 1.1 or 2.0 connection or a network connection
● 1.5 GB of available hard-disk space
NOTE: The Windows software installer installs the HP Smart Device Agent Base service. The le size is less than
100 kb. Its only function is to check for printers connected via USB hourly. No data is collected. If a USB printer is
found, it then tries to locate a JetAdvantage Management Connector (JAMc) instance on the network. If a JAMc is
found, the HP Smart Device Agent Base is securely upgraded to a full Smart Device Agent from JAMc, which will
then allow printed pages to be accounted for in a Managed Print Services (MPS) account. The driver-only web
packs downloaded from hp.com for the printer and installed through the Add Printer wizard do not install this
service.
To uninstall the service, open the Control Panel, then select Programs or Programs and Features, then select
Add/Remove Programs or Uninstall a Program to remove the service. The le name is
HPSmartDeviceAgentBase.
16 Chapter 1 Printer overview ENWW

Mobile printing solutions
HP oers multiple mobile and ePrint solutions to enable easy printing to an HP printer from a laptop, tablet,
smartphone, or other mobile device. To see the full list and to determine the best choice, go to www.hp.com/go/
MobilePrinting.
NOTE: Update the printer rmware to ensure all mobile printing and ePrint capabilities are supported.
● Wi-Fi Direct (wireless models only, with HP Jetdirect 3000w NFC Wireless accessory installed)
● Wireless Station (wireless models only, with HP Jetdirect 3000w NFC Wireless accessory or HP 2900nw
wireless print server installed)
● HP ePrint via email (Requires HP Web Services to be enabled and the printer to be registered with
HP Connected)
● HP ePrint app (Available for Android and iOS)
● HP ePrint software
● Google Cloud Print
● AirPrint
● Android Printing
● Windows 10 Printing
Printer dimensions
NOTE: These values are subject to change. For current information, go to www.hp.com/support/
pwcolor780MFP or www.hp.com/support/pwcolor785MFP.
Table 1-3 Dimensions for 780dn, 780dns, 785f
Printer fully closed Printer fully opened
Height 780dn, 785f: 682 mm (26.9 in)
Depth 652 mm (25.7 in) 1027 mm (40.4 in)
Width 604 mm (23.8 in) 1530 mm (60.2 in)
Weight (with cartridges) 780dn, 785f: 69.1 kg (152 lb)
Table 1-4 Dimensions for 785zs (includes the 3 x 550-sheet paper feeder)
Printer fully closed Printer fully opened
Height 1222 mm (48.1 in) 1535 mm (60.4 in)
Depth 652 mm (25.7 in) 1027 mm (40.4 in)
780dns: 790 mm (31.1 in)
780dns: 85.1 kg (187.3 lb)
780dn, 785f: 995 mm (39.2 in)
780dns: 1100 mm (43.3 in)
Width 604 mm (23.8 in) 1530 mm (60.2 in)
Weight (with cartridges) 120 kg (263.9 lb)
ENWW Printer specications 17

Table 1-5 Dimensions for 785z+ (includes the 3 x 550-sheet paper feeder and the oor-standing nisher)
Printer fully closed Printer fully opened
Height 1222 mm (48.1 in) 1535 mm (60.4 in)
Depth 693 mm (27.3 in) 1175 mm (46.3 in)
Width 1245 mm (49 in)
Weight (with cartridges) 171 kg (376.3 lb)
1
Dimension measures external nisher separated from printer at the full length of the data cable that connects them.
2495 mm (98.2 in)
1
Table 1-6 Dimensions for the 1 x 550-sheet paper feeder
Printer fully closed Printer fully opened
Height 117 mm (4.6 in) 117 mm (4.6 in)
Depth 520 mm (20.5 in) 685 mm (27 in)
Width 600 mm (23.6 in) 600 mm (23.6 in)
Weight 9.5 kg (21 lb)
Table 1-7 Dimensions for the 1 x 550-sheet paper feeder with stand
Accessory fully closed Accessory fully opened
Height 436 mm (17.2 in) 436 mm (17.2 in)
Depth 520 mm (20.5 in) 685 mm (27 in)
Width 600 mm (23.6 in) 600 mm (23.6 in)
Weight 28.6 kg (63 lb)
Table 1-8 Dimensions for the 3 x 550-sheet paper feeder with stand
Printer fully closed Printer fully opened
Height 436 mm (17.2 in) 436 mm (17.2 in)
Depth 520 mm (20.5 in) 685 mm (27 in)
Width 600 mm (23.6 in) 600 mm (23.6 in)
Weight 34.8 kg (76.6 lb)
Table 1-9 Dimensions for the 4,000-sheet HCI with stand
Accessory fully closed Accessory fully opened
Height 436 mm (17.2 in) 436 mm (17.2 in)
Depth 520 mm (20.5 in) 685 mm (27 in)
18 Chapter 1 Printer overview ENWW

Table 1-9 Dimensions for the 4,000-sheet HCI with stand (continued)
Accessory fully closed Accessory fully opened
Width 600 mm (23.6 in) 600 mm (23.6 in)
Weight 41.3 kg (91 lb)
Table 1-10 Dimensions for oor-standing nisher
Printer fully closed Printer fully opened
Height 1020 mm (40.2 in) 1245 mm (49 in)
Depth 590 mm (23.2 in) 1175 mm (46.3 in)
Width 690 mm (27.2 in) 775 mm (30.5 in)
Weight 40.4 kg (89 lb)
Power consumption, electrical specications, and acoustic emissions
See www.hp.com/support/pwcolor780MFP or www.hp.com/support/pwcolor785MFP for current information.
Operating environment range
Table
1-11 Operating environment range
Environment Recommended Allowed
Temperature 17° to 25°C (62.6° to 77°F) 15° to 30°C (59° to 86°F)
Relative humidity 30% to 70% relative humidity (RH) 10% to 80% RH
Altitude Not applicable 0 to 3048 m (0 to 10,000 ft)
ENWW Printer specications 19

Printer hardware setup and software installation
For basic setup instructions, see the Hardware Installation Guide that came with the printer. For additional
instructions, go to HP support on the Web.
Go to www.hp.com/support/pwcolor780MFP or www.hp.com/support/pwcolor785MFP for HP's all-inclusive help
for the printer. Find the following support:
● Install and congure
● Learn and use
● Solve problems
● Download software and rmware updates
● Join support forums
● Find warranty and regulatory information
20 Chapter 1 Printer overview ENWW

2 Paper trays
For more information:
●
Load paper to Tray 1 (multipurpose tray)
●
Load paper to Tray 2
●
Load the 4,000-sheet high-capacity input (HCI) tray
●
Load and print envelopes
●
Load and print labels
●
Congure inner nisher stapling (785zs model only)
The following information is correct at the time of publication.
For video assistance, see www.hp.com/videos/PageWide.
For current information, see www.hp.com/support/pwcolor780MFP or www.hp.com/support/pwcolor785MFP.
HP's all-inclusive help for the printer includes the following information:
● Install and congure
● Learn and use
● Solve problems
● Download software and rmware updates
● Join support forums
● Find warranty and regulatory information
ENWW For more information: 21

Load paper to Tray 1 (multipurpose tray)
Introduction
CAUTION: Do not extend more than one paper tray at a time. Do not use paper tray as a step. Keep hands out
of paper trays when closing. All trays must be closed when moving the printer.
The following information describes how to load paper in Tray 1. The tray holds up to 100 sheets of 75 g/m2 (20
lb) paper or 14 envelopes.
CAUTION: To avoid jams, never add or remove paper from Tray 1 during printing.
1. Open Tray 1.
NOTE: To print on longer paper, such as legal-
size, pull out the Tray 1 extension.
2. Adjust the paper-width guides to the size of the
paper being used.
22 Chapter 2 Paper trays ENWW

3. Load paper in the tray. For information about how
to orient the paper, see Table 2-1 Tray 1 paper
orientation on page 23.
4. Adjust the width guides so that they touch the
paper stack, but do not bend it.
Tray 1 paper orientation
Table
2-1 Tray 1 paper orientation
Paper type Image orientation Duplex mode Paper size How to load paper
Letterhead or preprinted Portrait 1-sided printing 12x18, 11x17, RA3, A3, 8K
(273x394 mm), 8K
(270x390 mm), 8K
(260x368 mm), B4 (JIS),
Legal, Ocio (8.5x13), Ocio
(216x340 mm), C4, SRA4,
RA4, Arch A, A4, Letter, 16K
(197x273 mm) 16K
(195x270 mm), Executive,
A5, 16K (184x260 mm), B5
(JIS), Arch A, Statement, 5x8,
Double Japan Postcard
(148x200 mm), B6 (JIS), 5x7,
4x6, 10x15 cm, A6, Japanese
Postcard (100x148 mm)
Face-down
Bottom edge leading into the printer
ENWW Load paper to Tray 1 (multipurpose tray) 23

Table 2-1 Tray 1 paper orientation (continued)
Paper type Image orientation Duplex mode Paper size How to load paper
A4, Letter, 16K
(197x273 mm) 16K
(195x270 mm), Executive,
A5, 16K (184x260 mm), B5
(JIS), Arch A, Statement, 5x8,
Double Japan Postcard
(148x200 mm), 16K
(195x270 mm), 16K
(197x273 mm), B6 (JIS), 5x7,
A6, Japanese Postcard
(100x148 mm)
Automatic 2-sided
printing or with
Alternative Letterhead
Mode enabled
12x18, 11x17, RA3, A3, 8K
(273x394 mm), 8K
(270x390 mm), 8K
(260x368 mm), B4 (JIS),
Legal, Ocio (8.5x13), Ocio
(216x340 mm), C4, SRA4,
RA4, Arch A, A4, Letter, 16K
(197x273 mm) 16K
(195x270 mm), Executive,
A5, 16K (184x260 mm), B5
(JIS), Arch A, Statement, 5x8,
Double Japan Postcard
(148x200 mm), B6 (JIS), 5x7,
4x6, 10x15 cm, A6, Japanese
Postcard (100x148 mm)
Face-down
Left side of pre-printed image leading into
the printer
Face-up
Top edge leading into the printer
A4, Letter, 16K
(197x27 3 mm), 16K
(195x270 mm), Executive,
A5, 16K (184x260 mm), B5
(JIS), Arch A, Statement, 5x8,
Double Japan Postcard
(148x200 mm), 16K
(195x270 mm), 16K
(197x273 mm), B6 (JIS), 5x7,
A6, Japanese Postcard
(100x148 mm)
Face-up
Right side of pre-printed image leading into
the printer
24 Chapter 2 Paper trays ENWW

Table 2-1 Tray 1 paper orientation (continued)
Paper type Image orientation Duplex mode Paper size How to load paper
Landscape 1-sided printing 12x18, 11x17, RA3, A3, 8K
(273x394 mm), 8K (270x390
mm), 8K (260x368 mm), B4
(JIS), Legal, Ocio (8.5x13),
Ocio (216x340 mm), C4,
SRA4, RA4, Arch A, A4, Letter,
16K (197x273 mm), 16K
(195x270 mm), Executive,
A5, 16K (184x260 mm), B5
(JIS), Statement, 5x8, Double
Japan Postcard
(148x200 mm), B6 (JIS), 5x7
4x6, 10x15 cm, A6, Japanese
Postcard (these are more
narrow than 5 in and
therefore must be fed shortedge-feed)
Automatic 2-sided
printing or with
Alternative Letterhead
Mode enabled
12x18, 11x17, RA3, A3, 8K
(273x394 mm), 8K (270x390
mm), 8K (260x368 mm), B4
(JIS), Legal, Ocio (8.5x13),
Ocio (216x340 mm), C4,
SRA4, RA4, Arch A, A4, Letter,
16K (197x273 mm), 16K
(195x270 mm), Executive,
A5, 16K (184x260 mm), B5
(JIS), Statement, 5x8, Double
Japan Postcard
(148x200 mm), B6 (JIS), 5x7
Face-down
Left side of pre-printed image leading into
the printer
Face-up
Right side of the pre-printed image leading
into the printer
4x6, 10x15 cm, A6, Japanese
Postcard (these are more
narrow than 5 in and
therefore must be fed shortedge-feed)
1-sided printing A4, Letter, 16K (197x273
mm) 16K (195x270 mm),
Executive, A5, 16K (184x260
mm), B5 (JIS), Arch A,
Statement, 5x8, Double
Japan Postcard, 5x7, B6 (JIS),
A6
Face-down
Bottom edge leading into the printer
ENWW Load paper to Tray 1 (multipurpose tray) 25

Table 2-1 Tray 1 paper orientation (continued)
Paper type Image orientation Duplex mode Paper size How to load paper
Automatic 2-sided
printing or with
Alternative Letterhead
Mode enabled
Prepunched Portrait 1-sided printing 12x18, 11x17, RA3, A3, 8K
A4, Letter, 16K (197x273
mm) 16K (195x270 mm),
Executive, A5, 16K (184x260
mm), B5 (JIS), Arch A,
Statement, 5x8, Double
Japan Postcard, 5x7, B6 (JIS),
A6
(273x394 mm), 8K (270x390
mm), 8K (260x368 mm), B4
(JIS), Legal, Ocio (8.5x13),
Ocio (216x340 mm), C4,
SRA4, RA4, Arch A, A4, Letter,
16K (197x273 mm) 16K
(195x270 mm), Executive,
A5, 16K (184x260 mm), B5
(JIS), Arch A, Statement, A6,
5x8, Double Japan Postcard
(148x200 mm), B6 (JIS), 5x7,
4x6, 10x15 cm, Japanese
Postcard
Face-up
Top edge leading into the printer
Face-down
Holes toward the back of the printer
Automatic 2-sided
printing or with
Alternative Letterhead
Mode enabled
12x18, 11x17, RA3, A3, 8K
(273x394 mm), 8K (270x390
mm), 8K (260x368 mm), B4
(JIS), Legal, Ocio (8.5x13),
Ocio (216x340 mm), C4,
SRA4, RA4, Arch A, A4, Letter,
16K (197x273 mm) 16K
(195x270 mm), Executive,
A5, 16K (184x260 mm), B5
(JIS), Arch A, Statement, A6,
5x8, Double Japan Postcard
(148x200 mm), B6 (JIS), 5x7,
4x6, 10x15 cm, Japanese
Postcard
Face-up
Holes toward the back of the printer
26 Chapter 2 Paper trays ENWW

Table 2-1 Tray 1 paper orientation (continued)
Paper type Image orientation Duplex mode Paper size How to load paper
Landscape 1-sided printing A4, Letter, 16K (197x273
mm) 16K (195x270 mm),
Executive, A5, 16K (184x260
mm), B5 (JIS), Arch A,
Statement, 5x8, Double
Japan Postcard, 5x7, B6 (JIS),
A6
Automatic 2-sided
printing or with
Alternative Letterhead
Mode enabled
A4, Letter, 16K (197x273
mm) 16K (195x270 mm),
Executive, A5, 16K (184x260
mm), B5 (JIS), Arch A,
Statement, 5x8, Double
Japan Postcard, 5x7, B6 (JIS),
A6
Face-down
Holes away from the printer
Face-up
Holes towards the printer
ENWW Load paper to Tray 1 (multipurpose tray) 27

Use alternative letterhead mode
Use the Alternative Letterhead Mode feature to load letterhead or preprinted paper into the tray the same way
for all jobs, whether printing to one side of the sheet of paper or to both sides. When using this mode, load paper
as for automatic duplex printing.
To use the feature, enable it by using the printer control-panel menus.
Enable Alternative Letterhead Mode by using the printer control-panel menus
1. From the Home screen on the printer control panel, open the Settings menu.
2. Open the following menus:
● Copy/Print or Print
● Manage Trays
● Alternative Letterhead Mode
3. Select On.
28 Chapter 2 Paper trays ENWW

Load paper to Tray 2
Introduction
CAUTION: Do not extend more than one paper tray at a time. Do not use paper tray as a step. Keep hands out
of paper trays when closing. All trays must be closed when moving the printer.
The following information describes how to load paper into Tray 2 and the optional 550-sheet trays. These trays
hold up to 550 sheets of 75 g/m
NOTE: The procedure to load paper for all 550-sheet trays is the same as for Tray 2. Only Tray 2 is shown here.
1. Open the tray.
NOTE: Do not open this tray while it is in use.
2. Adjust the paper-length and paper-width guides by
squeezing the blue adjustment latches and sliding
the guides to the size of the paper being used.
2
(20 lb) paper.
ENWW Load paper to Tray 2 29

3. Load paper into the tray. Check the paper to verify
Y
X
that the guides touch the stack, but do not bend it.
For information about how to orient the paper, see
Table 2-2 Tray 2 and the 550-sheet trays paper
orientation on page 31.
NOTE: To prevent jams, do not overll the tray.
Be sure that the top of the stack is below the tray
full indicator.
NOTE: If the tray is not adjusted correctly, an
error message might appear during printing or the
paper might jam.
4. Close the tray.
5. The tray conguration message displays on the
printer control panel.
6. Select the OK button to accept the detected type
and size, or select the Modify button to choose a
dierent paper size or type.
For custom-size paper, specify the X and Y
dimensions for the paper when the prompt
displays on the printer control panel.
30 Chapter 2 Paper trays ENWW

Tray 2 and the 550-sheet trays paper orientation
Table 2-2 Tray 2 and the 550-sheet trays paper orientation
Paper type Image orientation Duplex mode Paper size How to load paper
Letterhead or preprinted Portrait 1-sided printing 11x17, A3, 8K (273x397
mm), 8K (270x390 mm),
8K (260x368 mm), B4
(JIS), Legal, Ocio
(8.5x13), Ocio (216x340
mm), C4, SRA4, RA4, Arch
A, A4, Letter
A4, Letter, 16K (197x273
mm) 16K (195x270 mm),
Executive, A5, 16K
(184x260 mm), B5 (JIS)
Face-down
Top edge at the left side of the tray
Face-down
Top edge at the back of the tray
Automatic 2-sided
printing or with
Alternative Letterhead
Mode enabled
11x17, A3, 8K (273x397
mm), 8K (270x390 mm),
8K (260x368 mm), B4
(JIS), Legal, Ocio
(8.5x13), Ocio (216x340
mm), C4, SRA4, RA4, Arch
A, A4, Letter
Face-up
Top edge at the right side of the tray
ENWW Load paper to Tray 2 31

Table 2-2 Tray 2 and the 550-sheet trays paper orientation (continued)
Paper type Image orientation Duplex mode Paper size How to load paper
A4, Letter, 16K (197x273
mm) 16K (195x270 mm),
Executive, A5, 16K
(184x260 mm), B5 (JIS)
Landscape 1-sided printing 11x17, A3, 8K (273x397
mm), 8K (270x390 mm),
8K (260x368 mm), B4
(JIS), Legal, Ocio
(8.5x13), Ocio (216x340
mm), C4, SRA4, RA4, Arch
A, A4, Letter
Face-up
Top edge at the back of the tray
Face-down
Top edge at the back of the tray
A4, Letter, 16K (197x273
mm) 16K (195x270 mm),
Executive, A5, 16K
(184x260 mm), B5 (JIS)
Face-down
Top edge at the left side of the tray
32 Chapter 2 Paper trays ENWW

Table 2-2 Tray 2 and the 550-sheet trays paper orientation (continued)
Paper type Image orientation Duplex mode Paper size How to load paper
Automatic 2-sided
printing or with
Alternative Letterhead
Mode enabled
A4, Letter, 16K (197x273
11x17, A3, 8K (273x397
mm), 8K (270x390 mm),
8K (260x368 mm), B4
(JIS), Legal, Ocio
(8.5x13), Ocio (216x340
mm), C4, SRA4, RA4, Arch
A, A4, Letter
mm) 16K (195x270 mm),
Executive, A5, 16K
(184x260 mm), B5 (JIS)
Face-up
Top edge at the back of the tray
Face-up
Top edge at the right side of the tray
Prepunched Portrait 1-sided printing 11x17, A3, 8K (273x397
mm), 8K (270x390 mm),
8K (260x368 mm), B4
(JIS), Legal, Ocio
(8.5x13), Ocio (216x340
mm), C4, SRA4, RA4, Arch
A, A4, Letter
Face-down
Holes at the back of the tray
ENWW Load paper to Tray 2 33

Table 2-2 Tray 2 and the 550-sheet trays paper orientation (continued)
Paper type Image orientation Duplex mode Paper size How to load paper
A4, Letter, 16K (197x273
Automatic 2-sided
printing or with
Alternative Letterhead
Mode enabled
mm) 16K (195x270 mm),
Executive, A5, 16K
(184x260 mm), B5 (JIS)
11x17, A3, 8K (273x397
mm), 8K (270x390 mm),
8K (260x368 mm), B4
(JIS), Legal, Ocio
(8.5x13), Ocio (216x340
mm), C4, SRA4, RA4, Arch
A, A4, Letter
Face-down
Holes at the right side of the tray
Face-up
Holes at the back of the tray
A4, Letter, 16K (197x273
mm) 16K (195x270 mm),
Executive, A5, 16K
(184x260 mm), B5 (JIS)
Face-up
Holes at the left side of the tray, with
the top of the form at the rear of the
printer
34 Chapter 2 Paper trays ENWW

Use alternative letterhead mode
Use the Alternative Letterhead Mode feature to load letterhead or preprinted paper into the tray the same way
for all jobs, whether printing to one side of the sheet of paper or to both sides. When using this mode, load paper
as for automatic duplex printing.
To use the feature, enable it by using the printer control-panel menus.
Enable Alternative Letterhead Mode by using the printer control-panel menus
1. From the Home screen on the printer control panel, open the Settings menu.
2. Open the following menus:
● Copy/Print or Print
● Manage Trays
● Alternative Letterhead Mode
3. Select On.
ENWW Load paper to Tray 2 35

Load the 4,000-sheet high-capacity input (HCI) tray
LTR
A4
Introduction
CAUTION: Do not extend more than one paper tray at a time. Do not use paper tray as a step. Keep hands out
of paper trays when closing. All trays must be closed when moving the printer.
The following information describes how to load paper in the high-capacity input tray, which is available as an
accessory for all models. The two trays hold up to 4,000 sheets of 75 g/m
1. Open the tray.
NOTE: Do not open this tray while it is in use.
2. Adjust the paper-size guide to the correct position
for the paper.
2
(20 lb) paper.
36 Chapter 2 Paper trays ENWW

3. Load paper into the tray. Check the paper to verify
the guides lightly touch the stack, but do not bend
it.
NOTE: To prevent jams, do not overll the tray.
Be sure that the top of the stack is below the tray
full indicator.
NOTE: If the tray is not adjusted correctly, an
error message might appear during printing or the
paper might jam.
4. Close the tray.
5. The tray conguration message displays on the
printer control panel.
6. Select the OK button to accept the detected type
and size, or select the Modify button to choose a
dierent paper size or type.
ENWW Load the 4,000-sheet high-capacity input (HCI) tray 37

HCI paper orientation
Table 2-3 HCI paper orientation
Paper type Image orientation Duplex mode Paper size How to load paper
Letterhead or preprinted Portrait 1-sided printing A4, Letter Face-down
Top edge at the back of the tray
Automatic 2-sided
printing or with
Alternative Letterhead
Mode enabled
Landscape 1-sided printing A4, Letter Face-down
A4, Letter Face-up
Top edge at the back of the tray
Top edge at the left side of the tray
38 Chapter 2 Paper trays ENWW

Table 2-3 HCI paper orientation (continued)
Paper type Image orientation Duplex mode Paper size How to load paper
Automatic 2-sided
printing or with
Alternative Letterhead
Mode enabled
Prepunched Landscape 1-sided printing A4, Letter Face-down
A4, Letter Face-up
Top edge at the right side of the tray
Holes at the left side of the tray
Automatic 2-sided
printing or with
Alternative Letterhead
Mode enabled
Use alternative letterhead mode
Use the Alternative Letterhead Mode feature to load letterhead or preprinted paper into the tray the same way
for all jobs, whether printing to one side of the sheet of paper or to both sides. When using this mode, load paper
as for automatic duplex printing.
To use the feature, enable it by using the printer control-panel menus.
A4, Letter Face-up
Holes at the right side of the tray, with
the top of the form to the right side
ENWW Load the 4,000-sheet high-capacity input (HCI) tray 39

Enable Alternative Letterhead Mode by using the printer control-panel menus
1. From the Home screen on the printer control panel, open the Settings menu.
2. Open the following menus:
● Copy/Print or Print
● Manage Trays
● Alternative Letterhead Mode
3. Select On.
40 Chapter 2 Paper trays ENWW

Load and print envelopes
Introduction
The following information describes how to print and load envelopes. Use only Tray 1 to print on envelopes.
Tray 1 holds up to 14 envelopes, depending on envelope design and environmental conditions.
To print envelopes using the manual feed option, follow these steps to select the correct settings in the print
driver, and then load the envelopes into the tray after sending the print job to the printer.
Print envelopes
1. From the software program, select the Print option.
2. Select the printer from the list of printers, and then click or tap the Properties or Preferences button to
open the print driver.
NOTE: The name of the button varies for dierent software programs.
NOTE: To access print features from a Windows 8 or 8.1 Start screen app, select Devices, select Print, and
then select the printer. For Windows 10, select Print, which can vary depending on the application. For
Windows 8, 8.1, and 10, these applications will have a dierent layout with dierent features than what is
described below for desktop applications. For the HP PCL-6 V4 driver, the HP AiO Printer Remote application
will download additional driver features when More settings is selected.
3. Click or tap the Paper/Quality tab.
4. In the Paper size drop-down list, select the correct size for the envelopes.
5. In the Paper type drop-down list, select Envelope.
6. In the Paper source drop-down list, select Manual feed.
7. Click the OK button to close the Document Properties dialog box.
8. In the Print dialog box, click the OK button to print the job.
Envelope orientation
NOTE: The printer does not support duplex printing on envelopes.
ENWW Load and print envelopes 41

Tray Envelope size How to load
Tray 1 Envelope #9, Envelope #10, Envelope
Monarch, Envelope DL, Envelope B5,
Envelope C5 (wallet), Envelope C6
Envelope B5, Japanese Envelope Chou #3,
Envelope C5 (pocket)
Face-down
Top edge toward the back of the printer
Face-down
Bottom edge leading into the printer; top
ap open
42 Chapter 2 Paper trays ENWW

Load and print labels
Introduction
The following information describes how to print and load labels.
To print labels using the manual feed option, follow these steps to select the correct settings in the print driver,
and then load the labels into the tray after sending the print job to the printer. When using manual feed, the
printer waits to print the job until it detects that the tray has been opened.
Manually feed labels
1. From the software program, select the Print option.
2. Select the printer from the list of printers, and then click or tap the Properties or Preferences button to
open the print driver.
NOTE: The name of the button varies for dierent software programs.
NOTE: To access print features from a Windows 8 or 8.1 Start screen app, select Devices, select Print, and
then select the printer. For Windows 10, select Print, which can vary depending on the application. For
Windows 8, 8.1, and 10, these applications will have a dierent layout with dierent features than what is
described below for desktop applications. For the HP PCL-6 V4 driver, the HP AiO Printer Remote application
will download additional driver features when More settings is selected.
3. Click the Paper/Quality tab.
4. In the Paper size drop-down list, select the correct size for the sheets of labels.
5. In the Paper type drop-down list, select Labels.
6. In the Paper source drop-down list, select Manual feed.
7. Click the OK button to close the Document Properties dialog box.
8. In the Print dialog box, click the Print button to print the job.
ENWW Load and print labels 43

Label orientation
Tray How to load labels
Tray 1 Face-down
550-sheet trays Face-down
Bottom edge leading into the printer
Top edge at the left side of the tray
44 Chapter 2 Paper trays ENWW

Congure inner nisher stapling (785zs model only)
1
2
The following information describes how to load staples and congure the options for the stapling accessory.
The stapling accessory can staple documents in the upper left or upper right corners, and it can stack up to 250
sheets of paper in the nisher.
●
Congure the default staple location
●
Congure the operation mode
Congure the default staple location
1. From the Home screen on the printer control panel, swipe until the Settings menu displays. Select the
Settings icon to open the menu.
2. Open the following menus:
● Copy/Print
● Default Print Options
● Staple
3. Select a staple location from the list of options. The following options are available:
● None: No staples
● Top left or right: If the document has portrait orientation, the staple is in the top left corner of the
short edge of the paper. If the document has landscape orientation, the staple is in the top right
corner of the long edge of the paper.
● Top left: The staple is in the top left corner of the short edge of the paper.
● Top right: The staple is in the top right corner of the long edge of the paper.
1 Top left corner of the short edge of the paper
2 Top right corner of the long edge of the paper
ENWW Congure inner nisher stapling (785zs model only) 45

Congure the operation mode
Use this procedure to congure how the printer sorts jobs into the output bins.
1. From the Home screen on the printer control panel, swipe until the Settings menu displays. Select the
Settings icon to open the menu.
2. Open the following menus:
● Manage Stapler/Stacker
● Job Oset
3. Select either On or O. The Job Oset setting, when set to On, separates print or copy jobs by shifting the
output stack of each job to one side or the other. This oset makes it easier to separate multiple jobs that
are printed or copied consecutively.
To congure the HP print driver for the selected operation mode, complete the following steps:
NOTE: Changing the operation mode causes the printer to restart.
Windows XP, Vista, and Server 2008 (32-bit versions for each) HP PCL.6 drivers do not support output devices.
Windows® 7
1. Make sure the printer is turned on and connected to the computer or a network.
2. Open the Windows® Start menu, and then click Devices and Printers.
3. Right-click the name of the printer, and then select Printer Properties.
4. Click the Device Settings tab.
5. Select Update Now. Or, in the drop-down menu next to Automatic Conguration, select Update Now.
Windows® 8.0, 8.1, and 10
1. Right-click on the bottom-left corner of the screen.
2. Select Control Panel. Under Hardware and Sound, select View devices and printers.
3. Right-click the name of the printer, and then select Printer Properties.
4. Click the Device Settings tab.
5. Select Update Now. Or, in the drop-down menu next to Automatic Conguration, select Update Now.
NOTE: Newer HP PCL-6 V4 drivers do not support Update Now. For these drivers, stop and restart the
print spooler. Click the Start button (or open a search box), in the search box type "services.msc", and then
press the Enter key. Right-click Print Spooler in the list of services, select Stop, and then right-click and
select Start. Or, simply shut down and restart the computer.
macOS
▲ The operation mode is congured at the time of printing.
46 Chapter 2 Paper trays ENWW

3 Supplies, accessories, and parts
For more information:
●
Order supplies, accessories, and parts
●
Replace the cartridges
●
Replace the service uid container
●
Replace the staple cartridge in the inner nisher (780dns, 785zs models only)
●
Replace the staple cartridge in the oor standing nisher (785z+ model only)
The following information is correct at the time of publication.
For video assistance, see www.hp.com/videos/PageWide.
For current information, see www.hp.com/support/pwcolor780MFP or www.hp.com/support/pwcolor785MFP.
HP's all-inclusive help for the printer includes the following information:
● Install and congure
● Learn and use
● Solve problems
● Download software and rmware updates
● Join support forums
● Find warranty and regulatory information
ENWW For more information: 47

Order supplies, accessories, and parts
Ordering
Order supplies and paper www.hp.com/go/suresupply
Order genuine HP parts or accessories www.hp.com/buy/parts
Order through service or support providers Contact an HP-authorized service or support provider.
Order using the HP Embedded Web Server (EWS) To access, in a supported web browser on your computer, enter the
Supplies and accessories
Item Description
Supplies
printer IP address or host name in the address/URL eld. The EWS
contains a link to the HP SureSupply website, which provides
options for purchasing Original HP supplies.
Cartridge
number Part number
HP 982X High Yield Black Original PageWide
Cartridge
HP 982X High Yield Cyan Original PageWide
Cartridge
HP 982X High Yield Magenta Original
PageWide Cartridge
HP 982X High Yield Yellow Original PageWide
Cartridge
HP 982A Black Original PageWide Cartridge Standard-capacity replacement black cartridge 982A T0B26A
HP 982A Cyan Original PageWide Cartridge Standard-capacity replacement cyan cartridge 982A T0B23A
HP 982A Magenta Original PageWide
Cartridge
HP 982A Yellow Original PageWide Cartridge Standard-capacity replacement yellow cartridge 982A T0B25A
Accessories
1 GB DDR3 Memory DIMM Memory upgrade kit Not
HP PageWide 550-sheet Paper Tray Optional input tray Not
HP PageWide 550-sheet Paper Tray and
Stand
High-capacity replacement black cartridge 982X T0B30A
High-capacity replacement cyan cartridge 982X T0B27A
High-capacity replacement magenta cartridge 982X T0B28A
High-capacity replacement yellow cartridge 982X T0B29A
Standard-capacity replacement magenta cartridge 982A T0B24A
E5K48-67902
applicable
A7W99A
applicable
Optional input tray and cabinet stand Not
applicable
W1B50A
HP Page Wide 3x550-sheet Paper Tray and
Stand
HP Page Wide 4000-sheet HCI Paper Tray and
Stand
HP Foreign Interface Harness Optional port for connecting third-party devices Not
Optional input trays and stand Not
applicable
Optional high-capacity input feeder and stand Not
applicable
applicable
W1B51A
W1B52A
B5L31-67902
48 Chapter 3 Supplies, accessories, and parts ENWW

Item Description
Cartridge
number Part number
Two-Internal USB Ports for Solutions, AA
Board
HP Secure High Performance Hard Disk Drive
FIPS Drive
HP Jetdirect Wireless Print Server with NFC Wireless accessory for “touch” printing from mobile
HP Jetdirect USB Wireless Print Server USB wireless print server accessory Not
Optional USB ports for connecting third-party
devices
Secure hard drive Not
devices
Maintenance/long-life consumables (LLC)
Maintenance/LLC Kit
HP PageWide ADF Maintenance Kit J8J95A 150,000 pages
HP PageWide Service Fluid Container W1B44A 150,000 pages
HP PageWide Printhead Wiper Kit W1B43A 150,000 pages
HP PageWide Roller Kit W1B45A 150,000 pages
HP Staple Cartridge Kit, inner nisher J8J96A 5,000 staples
HP Staple Cartridge Kit, oor standing nisher Y1G14A 5,000 staples
1
HP Maintenance/Long Life Consumables (LLC) life specications are estimations based on the LLC life test conditions listed below. Actual
individual life/yield during normal use varies depending on usage, environment, paper and other factors. Estimated life is not an implied
guarantee or warrantable.
Not
applicable
applicable
Not
applicable
applicable
Part number Estimated life
B5L28-67902
B5L29-67903
J8031-61001
J8030-61001
1
The LLC life test conditions
● Print coverage: 5% evenly distributed across the page
● Environment: 17° to 25°C (62.6° to 77°F); 30%-70% relative humidity (RH)
● Media size: Letter/A4
● Media weight: 75 g/m2 (20 lb) plain media
● Job size: 4 pages
● Short edge feed (A3) (i.e., Legal size media)
Factors that can reduce life from the conditions above:
● Media narrower than Letter/A4 widths (short edge feeds equal more mechanism activity per page)
● Paper heavier than 75 g/m2 (20 lb) (heavier media creates higher stress on printer components)
● Print jobs smaller than 4 image (smaller jobs mean more mechanism activity per page)
Customer self-repair parts
The following parts are available for the printer.
ENWW Order supplies, accessories, and parts 49

● Parts listed as Mandatory self-replacement are to be installed by customers, unless you are willing to pay
HP service personnel to perform the repair. For these parts, on-site or return-to-depot support is not
provided under the HP product warranty.
● Parts listed as Optional self-replacement can be installed by HP service personnel at your request for no
additional charge during the product warranty period.
Self-replacement
Item Description
Service Fluid Container Kit Replacement service uid unit Mandatory A7W93-67081
Printhead Wiper Kit Replacement printhead wiper Mandatory A7W93-67080
Tray 2-5 Roller Kit Replacement rollers for trays 2-5 Mandatory A7W93-67082
Tray 1 Roller Kit Replacement rollers for tray 1 Optional A7W93-67039
options Part number
ADF Roller Replacement Kit Replacement feed rollers for the document
feeder
Staple Cartridge Kit Replacement staple cartridge Mandatory J7Z09-67933
Tray 2-5 Assembly Kit Replacement Tray 2-5 Mandatory A7X02-67006
HCI Left Tray Replacement left tray for HCI Mandatory A7W97-67008
HCI Right Tray Replacement right tray for HCI Mandatory A7W97-67012
Optional 550-sheet Table Top Feeder Replacement Tray 3 feeder Mandatory A7W99-67001
1x550-sheet Paper Feeder and Stand Replacement Tray 3 feeder and stand Mandatory W1B50-67001
1x550 Feeder Storage Bin Replacement for 1x550 feeder storage bin Mandatory A7W95-67024
3x500-sheet Paper Feeder and Stand Replacement 3x500-sheet paper feeder
and stand
HP Page Wide 4000-sheet HCI Paper Tray and
Stand
HP Secure High Performance Hard Disk Drive
FIPS Drive
320 GB HDD kit Replacement hard drive Mandatory 5851-6712
Scanner White Backing Replacement white plastic backing for the
Optional high-capacity input feeder and
stand
Replacement secure hard drive Mandatory B5L29-67903
scanner
Mandatory 5851-7202
Mandatory W1B51-67001
Mandatory W1B52-67001
Mandatory J7Z09-67926
Retention-Clip Assembly Replacement retention clips that are behind
the scanner white backing
Control Panel Assembly Kit Replacement touchscreen control panel Mandatory J7Z09-67928
HIP 2 Cover Replacement HIP 2 cover Mandatory J7Z09-67901
USB Cover, Center CP (inner nisher models
only)
USB Cover, Left CP Replacement easy access USB cover Mandatory J7Z09-67903
Keyboard Overlay Kit
French, Italian, Russian, German, Spanish,
Ukrainian
Replacement easy access USB cover Mandatory J7Z09-67902
Replacement keyboard overlay (Flow
models)
Mandatory J7Z09-67927
Mandatory 5851-6019
50 Chapter 3 Supplies, accessories, and parts ENWW

Item Description
Self-replacement
options Part number
Keyboard Overlay Kit
Canadian French, Latin American Spanish, U.S.
Spanish
Keyboard Overlay Kit
Swiss French, Swiss German, Danish
Keyboard Overlay Kit
Simplied Chinese, Traditional Chinese
Keyboard Overlay Kit
Spanish, Portuguese
Keyboard Overlay Kit
Japanese (KG and KT)
Overlay-Keyboard Chinese Replacement keyboard overlay (Flow
Overlay-Keyboard Sweden Replacement keyboard overlay (Flow
HP Jetdirect 2900nw Print Server Replacement USB wireless print server
HP Jetdirect 3000w NFC/Wireless Accessory Replacement Wireless Direct Print accessory
Replacement keyboard overlay (Flow
models)
Replacement keyboard overlay (Flow
models)
Replacement keyboard overlay (Flow
models)
Replacement keyboard overlay (Flow
models)
Replacement keyboard overlay (Flow
models)
models)
models)
accessory
for “touch” printing from mobile devices
Mandatory 5851-6020
Mandatory 5851-6021
Mandatory 5851-6022
Mandatory 5851-6023
Mandatory 5851-6024
Mandatory A7W12-67901
Mandatory A7W14-67901
Mandatory J8031-61001
Mandatory J8030-61001
HP 1 GB DDR3x32 144- Pin 800 MHz SODIMM Replacement memory DIMM Mandatory E5K48-67902
HP LaserJet MFP Analog Fax Accessory 500 Replacement fax board Mandatory B5L53-67901
HP Foreign Interface Harness Replacement HP Foreign Interface Harness Mandatory B5L31-67902
Two-Internal USB Ports for Solutions, AA Board Optional USB ports for connecting third-
party devices
Formatter access cover Replacement for formatter cover Mandatory J7Z09-67935
Formatter access cover, lock access Lock cover plate Mandatory J7Z09-67936
Formatter cage cover Formatter cage cover Mandatory J7Z09-67937
Dashboard Cover for Center CP (inner nisher
models only)
Dashboard Cover for Left CP Replacement for CP dashboard cover with
Replacement for CP dashboard cover with
center CP
left CP
Mandatory B5L28-67902
Mandatory J7Z09-67904
Mandatory J7Z09-67905
ENWW Order supplies, accessories, and parts 51

Replace the cartridges
1
Introduction
The following information provides details about the cartridges for the printer, and it includes instructions to
replace them.
Cartridge information
This printer indicates when the cartridge level is low, very low, or depleted.
The printer uses four colors and has a dierent cartridge for each color: yellow (Y), cyan (C), magenta (M), and
black (K).
Do not remove the cartridge from its package until you are ready to use it.
CAUTION: To prevent damage to the cartridge do not touch the gold-colored metal contacts of the cartridge.
The following illustration shows the cartridge components.
1 Metal contact. Do not touch the gold-colored metal contacts of the cartridge. Fingerprints on the contacts can damage the
cartridge.
To purchase cartridges or check cartridge compatibility for the printer, go to HP SureSupply at www.hp.com/go/
suresupply. Scroll to the bottom of the page and verify that the country/region is correct.
3-1 Cartridge information
Table
Item Description Cartridge number Part number
HP 982X High Yield Black Original PageWide
Cartridge
HP 982X High Yield Cyan Original PageWide
Cartridge
HP 982X High Yield Magenta Original PageWide
Cartridge
HP 982X High Yield Yellow Original PageWide
Cartridge
High-capacity replacement black cartridge 982X T0B30A
High-capacity replacement cyan cartridge 982X T0B27A
High-capacity replacement magenta
cartridge
High-capacity replacement yellow cartridge 982X T0B29A
982X T0B28A
52 Chapter 3 Supplies, accessories, and parts ENWW

Table 3-1 Cartridge information (continued)
Item Description Cartridge number Part number
HP 982A Black Original PageWide Cartridge Standard-capacity replacement black
cartridge
HP 982A Cyan Original PageWide Cartridge Standard-capacity replacement cyan
cartridge
HP 982A Magenta Original PageWide Cartridge Standard-capacity replacement magenta
cartridge
HP 982A Yellow Original PageWide Cartridge Standard-capacity replacement yellow
cartridge
NOTE: High-yield cartridges contain more pigment than standard cartridges for increased page yield. For more
information, go to www.hp.com/go/learnaboutsupplies.
NOTE: Information about recycling used cartridges is in the cartridge box.
Remove and replace the cartridges
1. Open the cartridge door.
982A T0B26A
982A T0B23A
982A T0B24A
982A T0B25A
2. Push the old cartridge inward to unlock it.
ENWW Replace the cartridges 53

3. Grasp the edge of the old cartridge and then pull
the cartridge straight out to remove it.
4. Remove the new cartridge from the packaging.
5. Do not touch the gold-colored metal contacts of
the cartridge. Fingerprints on the contacts can
damage the cartridge.
6. Insert the new cartridge into the product. Make
sure the cartridge is rmly in place.
54 Chapter 3 Supplies, accessories, and parts ENWW

7. Close the cartridge door.
8. Pack the used cartridge in the box that the new
cartridge came in. See the enclosed recycling guide
for information about recycling.
HP helps you recycle your Original HP cartridges—
it’s easy and free with the HP Planet Partners
program, available in more than 50 countries/
regions around the world1).
To nd information about how to recycle used HP
cartridges, please go to www.hp.com/recycle.
1)
Program availability varies. For more information, visit www.hp.com/recycle.
ENWW Replace the cartridges 55

Replace the service uid container
●
Introduction
●
Remove and replace the service uid container
Introduction
The following information provides details about the service uid container for the printer, and it includes
instructions to replace it.
The printer indicates when the service uid container is nearly full and when it is completely full. When it is
completely full, printing stops until the service uid container is replaced.
To purchase a service uid container (part number W1B44A), go to the HP Parts Store at www.hp.com/buy/parts.
NOTE: The service uid container is designed for a single use. Do not attempt to empty the service uid
container and reuse it. Doing so could lead to pigment being spilled inside the printer, which could result in
reduced print quality. After use, return the service uid container to HP’s Planet Partners program for recycling.
Remove and replace the service uid container
1. Open the left door.
2. Pull the service uid container away from the
printer.
CAUTION: When pulling out the service uid
container, avoid making direct contact with the
black cylinder to prevent pigment smear on skin or
clothes.
56 Chapter 3 Supplies, accessories, and parts ENWW

3. On the left side of the service uid container,
release the latch that holds the unit in the
alignment track, and then remove the left side of
the unit.
4. Remove the right side from the alignment track,
and then remove the unit from the printer. Set the
unit aside, upright, on a piece of paper to prevent
spills.
5. Remove the new service uid container from its
packaging.
ENWW Replace the service uid container 57

6. Insert the right end of the service uid container
into the alignment track rst.
7. Insert the left end of the service uid container into
the alignment track, and then lock the latch that
holds the unit in the track.
58 Chapter 3 Supplies, accessories, and parts ENWW

8. Push the service uid container into the printer.
9. Close the left door.
ENWW Replace the service uid container 59

Replace the staple cartridge in the inner nisher (780dns, 785zs
models only)
1. Open the stapler door.
2. Pull the colored handle on the staple cartridge, and
then pull the staple cartridge straight out.
60 Chapter 3 Supplies, accessories, and parts ENWW

3. Insert the new staple cartridge into the stapler and
push on the colored handle until it snaps into place.
4. Close the stapler door.
ENWW Replace the staple cartridge in the inner nisher (780dns, 785zs models only) 61

Replace the staple cartridge in the oor standing nisher (785z+
model only)
The following information describes how to clear a paper jam in the oor standing nisher. When a jam occurs,
the control panel displays an error message and an animation that assist in clearing the jam.
NOTE: Remove all paper from the nisher output bins before separating the nisher from the printer.
1. Press the nisher release button, and then slide
the nisher away from the printer.
NOTE: When moving the nisher, you do not
need to disconnect the data cable.
2. Move the nisher to a position where the nisher
rear door is accessible, and then open the nisher
rear door.
3. Turn the green wheel to bring the staple cartridge
carriage toward you until it reaches its closest
position, push down on the staple cartridge tab,
and then slide the cartridge out of the nisher.
62 Chapter 3 Supplies, accessories, and parts ENWW

4. Insert the new staple cartridge by holding the
green wheel with one hand while pushing the
staple cartridge into the slot.
5. Close the nisher rear door.
6. Reinstall the nisher.
ENWW Replace the staple cartridge in the oor standing nisher (785z+ model only) 63

64 Chapter 3 Supplies, accessories, and parts ENWW

4 Print
For more information:
●
Print tasks (Windows)
●
Print tasks (macOS)
●
Store print jobs on the printer to print later or print privately
●
Mobile printing
●
Print from the USB port
The following information is correct at the time of publication.
For video assistance, see www.hp.com/videos/PageWide.
For current information, see www.hp.com/support/pwcolor780MFP or www.hp.com/support/pwcolor785MFP.
HP's all-inclusive help for the printer includes the following information:
● Install and congure
● Learn and use
● Solve problems
● Download software and rmware updates
● Join support forums
● Find warranty and regulatory information
ENWW For more information: 65

Print tasks (Windows)
How to print (Windows)
The following procedure describes the basic printing process for Windows.
1. From the software program, select the Print option.
2. Select the printer from the list of printers. To change settings, click the Properties or Preferences button to
open the print driver.
NOTE: The name of the button varies for dierent software programs.
NOTE: In Windows 10, 8.1, and 8, these applications will have a dierent layout with dierent features
from what is described below for desktop applications. To access the print feature from a Start screen app,
complete the following steps:
● Windows 10: Select Print, and then select the printer.
● Windows 8.1 or 8: Select Devices, select Print, and then select the printer.
For the HP PCL-6 V4 driver, the HP AiO Printer Remote application downloads additional driver features
when More settings is selected.
NOTE: For more information, click the Help (?) button in the print driver.
3. Click the tabs in the print driver to congure the available options. For example, set the paper orientation
on the Finishing tab, and set the paper source, paper type, paper size, and quality settings on the Paper/
Quality tab.
4. Click the OK button to return to the Print dialog box. Select the number of copies to print from this screen.
5. Click the Print button to print the job.
Automatically print on both sides (Windows)
Use this procedure for printers that have an automatic duplexer installed. If the printer does not have an
automatic duplexer installed, or to print on paper types that the duplexer does not support, print on both sides
manually.
1. From the software program, select the Print option.
2. Select the printer from the list of printers, and then click the Properties or Preferences button to open the
print driver.
NOTE: The name of the button varies for dierent software programs.
NOTE: In Windows 10, 8.1, and 8, these applications will have a dierent layout with dierent features
from what is described below for desktop applications. To access the print feature from a Start screen app,
complete the following steps:
● Windows 10: Select Print, and then select the printer.
● Windows 8.1 or 8: Select Devices, select Print, and then select the printer.
For the HP PCL-6 V4 driver, the HP AiO Printer Remote application downloads additional driver features
when More settings is selected.
66 Chapter 4 Print ENWW

3. Click the Finishing tab.
4. Select Print on both sides. Click OK to close the Document Properties dialog.
5. In the Print dialog, click Print to print the job.
Manually print on both sides (Windows)
Use this procedure for printers that do not have an automatic duplexer installed or to print on paper that the
duplexer does not support.
1. From the software program, select the Print option.
2. Select the printer from the list of printers, and then click the Properties or Preferences button to open the
print driver.
NOTE: The name of the button varies for dierent software programs.
NOTE: In Windows 10, 8.1, and 8, these applications will have a dierent layout with dierent features
from what is described below for desktop applications. To access the print feature from a Start screen app,
complete the following steps:
● Windows 10: Select Print, and then select the printer.
● Windows 8.1 or 8: Select Devices, select Print, and then select the printer.
For the HP PCL-6 V4 driver, the HP AiO Printer Remote application downloads additional driver features
when More settings is selected.
3. Click the Finishing tab.
4. Select Print on both sides (manually), and then click OK to close the Document Properties dialog.
5. In the Print dialog, click Print to print the rst side of the job.
6. Retrieve the printed stack from the output bin, and place it in Tray 1.
7. If prompted, select the appropriate control panel button to continue.
Print multiple pages per sheet (Windows)
1. From the software program, select the Print option.
2. Select the printer from the list of printers, and then click the Properties or Preferences button to open the
print driver.
NOTE: The name of the button varies for dierent software programs.
NOTE: In Windows 10, 8.1, and 8, these applications will have a dierent layout with dierent features
from what is described below for desktop applications. To access the print feature from a Start screen app,
complete the following steps:
● Windows 10: Select Print, and then select the printer.
● Windows 8.1 or 8: Select Devices, select Print, and then select the printer.
For the HP PCL-6 V4 driver, the HP AiO Printer Remote application downloads additional driver features
when More settings is selected.
ENWW Print tasks (Windows) 67

3. Click the Finishing tab.
4. Select the number of pages per sheet from the Pages per sheet drop-down.
5. Select the correct Print page borders, Page order, and Orientation options. Click OK to close the Document
Properties dialog.
6. In the Print dialog, click Print to print the job.
Select the paper type (Windows)
1. From the software program, select the Print option.
2. Select the printer from the list of printers, and then click the Properties or Preferences button to open the
print driver.
NOTE: The name of the button varies for dierent software programs.
NOTE: In Windows 10, 8.1, and 8, these applications will have a dierent layout with dierent features
from what is described below for desktop applications. To access the print feature from a Start screen app,
complete the following steps:
● Windows 10: Select Print, and then select the printer.
● Windows 8.1 or 8: Select Devices, select Print, and then select the printer.
For the HP PCL-6 V4 driver, the HP AiO Printer Remote application downloads additional driver features
when More settings is selected.
3. Click the Paper/Quality tab.
4. Select the paper type from the Paper type drop-down list.
5. Click OK to close the Document Properties dialog. In the Print dialog, click Print to print the job.
If the tray needs to be congured, a tray conguration message displays on the printer control panel.
6. Load the tray with the specied type and size of paper, and then close the tray.
7. Touch the OK button to accept the detected type and size, or touch the Modify button to choose a dierent
paper size or type.
8. Select the correct type and size, and then touch the OK button.
68 Chapter 4 Print ENWW

Additional print tasks
Go to www.hp.com/support/pwcolor780MFP or www.hp.com/support/pwcolor785MFP.
Instructions are available for performing specic print tasks, such as the following:
● Create and use printing shortcuts or presets
● Select the paper size, or use a custom paper size
● Select the page orientation
● Create a booklet
● Scale a document to t a specic paper size
● Print the rst or last pages of the document on dierent paper
● Print watermarks on a document
ENWW Print tasks (Windows) 69

Print tasks (macOS)
How to print (macOS)
The following procedure describes the basic printing process for macOS.
1. Click the File menu, and then click the Print option.
2. Select the printer.
3. Click Show Details or Copies & Pages, and then select other menus to adjust the print settings.
NOTE: The name of the item varies for dierent software programs.
4. Click the Print button.
Automatically print on both sides (macOS)
NOTE: This information applies to printers that include an automatic duplexer.
NOTE: This feature is available if you install the HP print driver. It might not be available if you are using AirPrint.
1. Click the File menu, and then click the Print option.
2. Select the printer.
3. Click Show Details or Copies & Pages, and then click the Layout menu.
NOTE: The name of the item varies for dierent software programs.
4. Select a binding option from the Two-Sided drop-down list.
5. Click the Print button.
Manually print on both sides (macOS)
NOTE: This feature is available if you install the HP print driver. It might not be available if you are using AirPrint.
1. Click the File menu, and then click the Print option.
2. Select the printer.
3. Click Show Details or Copies & Pages, and then click the Manual Duplex menu.
NOTE: The name of the item varies for dierent software programs.
4. Click the Manual Duplex box, and select a binding option.
5. Click the Print button.
6. Go to the printer, and remove any blank paper that is in Tray 1.
7. Retrieve the printed stack from the output bin and place it with the printed-side facing down in the input
tray.
8. If prompted, touch the appropriate control panel button to continue.
70 Chapter 4 Print ENWW

Print multiple pages per sheet (macOS)
1. Click the File menu, and then click the Print option.
2. Select the printer.
3. Click Show Details or Copies & Pages, and then click the Layout menu.
NOTE: The name of the item varies for dierent software programs.
4. From the Pages per Sheet drop-down list, select the number of pages that you want to print on each sheet.
5. In the Layout Direction area, select the order and placement of the pages on the sheet.
6. From the Borders menu, select the type of border to print around each page on the sheet.
7. Click the Print button.
Select the paper type (macOS)
1. Click the File menu, and then click the Print option.
2. Select the printer.
3. Click Show Details or Copies & Pages, and then click the Media & Quality menu or the Paper/Quality menu.
NOTE: The name of the item varies for dierent software programs.
4. Select from the Media & Quality or Paper/Quality options.
NOTE: This list contains the master set of options available. Some options are not available on all printers.
● Media Type: Select the option for the type of paper for the print job.
● Print Quality: Select the resolution level for the print job.
● Edge-To-Edge Printing: Select this option to print close to the paper edges.
5. Click the Print button.
Additional print tasks
Go to www.hp.com/support/pwcolor780MFP or www.hp.com/support/pwcolor785MFP.
Instructions are available for performing specic print tasks, such as the following:
● Create and use printing shortcuts or presets
● Select the paper size, or use a custom paper size
● Select the page orientation
● Create a booklet
● Scale a document to t a specic paper size
● Print the rst or last pages of the document on dierent paper
● Print watermarks on a document
ENWW Print tasks (macOS) 71

Store print jobs on the printer to print later or print privately
Introduction
The following information provides procedures for creating and printing documents that are stored on the
printer. These jobs can be printed at a later time or printed privately.
●
Create a stored job (Windows)
●
Print a stored job
●
Delete a stored job
●
Information sent to printer for Job Accounting purposes
Create a stored job (Windows)
Store jobs on the printer for private or delayed printing.
1. From the software program, select the Print option.
2. Select the printer from the list of printers, and then select Properties or Preferences (the name varies for
dierent software programs).
NOTE: The name of the button varies for dierent software programs.
NOTE: In Windows 10, 8.1, and 8, these applications will have a dierent layout with dierent features
from what is described below for desktop applications. To access the print feature from a Start screen app,
complete the following steps:
● Windows 10: Select Print, and then select the printer.
● Windows 8.1 or 8: Select Devices, select Print, and then select the printer.
For the HP PCL-6 V4 driver, the HP AiO Printer Remote application downloads additional driver features
when More settings is selected.
3. Click the Job Storage tab.
4. Select a Job Storage Mode option.
● Proof and Hold: Print and proof one copy of a job, and then print more copies.
● Personal Job: The job does not print until you request it at the printer control panel. For this job-
storage mode, you can select one of the Make Job Private/Secure options. If you assign a personal
identication number (PIN) to the job, you must provide the required PIN at the control panel. If you
encrypt the job, you must provide the required password at the control panel. The print job is deleted
from memory after it prints and is lost if the printer loses power.
● Quick Copy: Print the requested number of copies of a job and store a copy of the job in the printer
memory so you can print it again later.
● Stored Job: Store a job on the printer and allow other users to print the job at any time. For this job-
storage mode, you can select one of the Make Job Private/Secure options. If you assign a personal
identication number (PIN) to the job, the person who prints the job must provide the required PIN at
the control panel. If you encrypt the job, the person who prints the job must provide the required
password at the control panel.
72 Chapter 4 Print ENWW

5. To use a custom user name or job name, click the Custom button, and then enter the user name or the job
name.
Select which option to use if another stored job already has that name:
● Use Job Name + (1-99): Append a unique number to the end of the job name.
● Replace Existing File: Overwrite the existing stored job with the new one.
6. Click the OK button to close the Document Properties dialog box. In the Print dialog box, click the Print
button to print the job.
ENWW Store print jobs on the printer to print later or print privately 73

Print a stored job
Use this procedure to print a document that is in a job storage folder on the printer.
1. From the Home screen on the printer control panel, select Print, and then select Print from Job Storage.
2. Under Stored Jobs to Print, select Choose, and then select the folder where the document is saved.
3. Select the document, and then touch Select.
If the document is private, enter the four-digit PIN in the Password eld, and then select OK.
4. To adjust the number of copies, select the box to the left of the Print button, and then select the number of
copies from the keypad that opens. Select the Close button to close the keypad.
5. Select Print to print the document.
Delete a stored job
You can delete documents that have been saved to when printer when they are no longer needed. You can also
adjust the maximum number of jobs for the printer to store.
●
Delete a job that is stored on the printer
●
Change the job storage limit
Delete a job that is stored on the printer
Follow these steps to delete a job that is stored in the printer memory.
1. From the Home screen on the printer control panel, select Print.
2. Select Print from Job Storage.
3. Select Choose, and then select the name of the folder where the job is stored.
4. Select the name of the job.
5. Select the Trash button to delete the job.
If the job is private or encrypted, enter the PIN or password, and then select OK.
6. Select Delete Jobs on the conrmation prompt.
Change the job storage limit
When a new job is stored in the printer memory, the printer overwrites any previous jobs with the same user and
job name. If a job is not already stored under the same user and job name, and the printer needs additional
space, the printer might delete other stored jobs starting with the oldest. Follow these steps to change the
number of jobs that the printer can store:
1. From the Home screen on the printer control panel, select Settings.
2. Open the following menus:
● Copy/Print or Print
● Manage Stored Jobs
● Temporary Job Storage Limit
74 Chapter 4 Print ENWW

3. Use the keypad to enter the number of jobs that the printer stores.
4. Select Done to save the setting.
Information sent to printer for Job Accounting purposes
Printing jobs sent from drivers on the client (e.g., PC) may send personally identiable information to HP’s
Printing and Imaging devices. This information may include, but is not limited to, user name and client name
from which the job originated that may be used for job accounting purposes, as determined by the Administrator
of the printing device. This same information may also be stored with the job on the mass storage device (e.g.,
disk drive) of the printing device when using the job storage feature.
ENWW Store print jobs on the printer to print later or print privately 75

Mobile printing
Introduction
HP oers multiple mobile and ePrint solutions to enable easy printing to an HP printer from a laptop, tablet,
smartphone, or other mobile device. To see the full list and to determine the best choice, go to www.hp.com/go/
MobilePrinting.
NOTE: Update the printer rmware to ensure all mobile printing and ePrint capabilities are supported.
●
Wi-Fi Direct and NFC Connect and Print
●
HP ePrint via email
●
HP ePrint software
●
AirPrint
●
Android embedded printing
Wi-Fi Direct and NFC Connect and Print
HP provides Wi-Fi Direct Print and NFC (Near Field Communication) printing for printers with a supported
HP Jetdirect 3000w NFC/Wireless Accessory. This accessory is available as an option for HP printers that include
a hardware-integration pocket (HIP).
Wi-Fi Direct Print and NFC connect and print enable Wi-Fi capable (mobile) devices to make a wireless network
connection directly to the printer without using a wireless router.
The printer does not need to be connected to the network for this mobile walk-up printing to work.
Use Wi-Fi Direct Print to print wirelessly from the following devices:
● iPhone, iPad, or iPod touch using Apple AirPrint or the HP ePrint app
● Android mobile devices using the HP ePrint App or the Android embedded print solution
● PC and Mac devices using the HP ePrint Software
● Windows 10 mobile devices
For more information on wireless printing, go to www.hp.com/go/mobileprinting.
NFC and Wi-Fi Direct Print capabilities can be enabled or disabled from the printer control panel.
1. From the Home screen on the printer control panel, select Settings.
2. Open the following menus:
● Networking
● Wi-Fi Direct
● Status
3. Select On, and then select OK to enable wireless printing.
76 Chapter 4 Print ENWW

NOTE: In environments where more than one model of the same printer is installed, it might be helpful to
provide each printer a unique Wi-Fi Direct Name for easier printer identication for HP Wi-Fi Direct printing. The
Wireless network names, e.g., Wireless, Wi-Fi Direct, etc. are available on the Information screen by selecting the
Information icon, and then selecting the Network icon or the Wireless icon.
Complete the following procedure to change the printer Wi-Fi Direct name:
1. From the Home screen on the printer control panel, select Settings.
2. Open the following menus:
● Networking
● Wi-Fi Direct
● Wi-Fi Direct Name
3. Use the keypad to change the name in the Wi-Fi Direct Name text eld, and then select OK.
HP ePrint via email
Use HP ePrint to print documents by sending them as an email attachment to the printer's email address from
any email enabled device.
To use HP ePrint, the printer must meet these requirements:
● The printer must be connected to a wired or wireless network and have Internet access.
● HP Web Services must be enabled on the printer, and the printer must be registered with HP Connected.
Follow this procedure to enable HP Web Services and register with HP Connected:
1. Open the HP Embedded Web Server (EWS):
a. From the Home screen on the printer control panel, select the Information icon, and then select
the Network icon to display the IP address or host name.
b. From a computer on the same network as the printer, open a web browser. In the address line, type
the IP address or host name exactly as it displays on the printer control panel. Press the Enter key on
the computer keyboard. The EWS opens.
NOTE: If the web browser displays a message indicating that accessing the website might not be
safe, select the option to continue to the website. Accessing this website will not harm the computer.
2. Click the HP Web Services tab.
3. Select the option to enable Web Services.
NOTE: Enabling Web Services might take several minutes.
4. Go to www.hpconnected.com to create an HP ePrint account and complete the setup process.
ENWW Mobile printing 77

HP ePrint software
The HP ePrint software makes it easy to print from a Windows or Mac desktop or laptop computer to any HP
ePrint-capable printer. This software makes it easy to nd HP ePrint-enabled printers that are registered to your
HP Connected account. The target HP printer can be located in the oice or at locations across the globe.
● Windows: After installing the software, open the Print option from within your application, and then select
HP ePrint from the installed printers list. Click the Properties button to congure print options.
● macOS: After installing the software, select File, Print, and then select the arrow next to PDF (in the bottom
left of the driver screen). Select HP ePrint.
For Windows, the HP ePrint software supports TCP/IP printing to local network printers on the network (LAN or
WAN) to products that support UPD PostScript®.
Windows and macOS both support IPP printing to LAN or WAN network-connected products that support ePCL.
Windows and macOS also both support printing PDF documents to public print locations and printing using HP
ePrint via email through the cloud.
Go to www.hp.com/go/eprintsoftware for drivers and information.
NOTE: For Windows, the name of the HP ePrint Software print driver is HP ePrint + JetAdvantage.
NOTE: The HP ePrint software is a PDF workow utility for macOS, and is not technically a print driver.
NOTE: HP ePrint Software does not support USB printing.
AirPrint
Direct printing using Apple’s AirPrint is supported for iOS and from Mac computers running macOS 10.7 Lion and
newer. Use AirPrint to print directly to the printer from an iPad, iPhone (3GS or later), or iPod touch (third
generation or later) in the following mobile applications:
● Mail
● Photos
● Safari
● iBooks
● Select third-party applications
To use AirPrint, the printer must be connected to the same network (sub-net) as the Apple device. For more
information about using AirPrint and about which HP printers are compatible with AirPrint, go to
www.hp.com/go/MobilePrinting.
NOTE: Before using AirPrint with a USB connection, verify the version number. AirPrint versions 1.3 and earlier
do not support USB connections.
Android embedded printing
HP's built-in print solution for Android and Kindle enables mobile devices to automatically nd and print to HP
printers that are either on a network or within wireless range for Wi-Fi Direct printing.
The print solution is built into the many versions of the operating system.
78 Chapter 4 Print ENWW

NOTE: If printing is not available on your device, go to the Google Play > Android apps and install the HP Print
Service Plugin.
For more information on how to use Android embedded printing and which Android devices are supported, go to
www.hp.com/go/MobilePrinting.
ENWW Mobile printing 79

Print from the USB port
Introduction
This printer features easy-access USB printing, for quickly printing les without sending them from a computer.
The printer accepts standard USB ash drives in the USB port near the control panel. It supports the following
types of les:
● .pdf
● .prn
● .pcl
● .ps
● .cht
●
Enable the USB port for printing
●
Print USB documents
Enable the USB port for printing
The USB port is disabled by default. Before using this feature, enable the USB port. Use one of the following
methods to enable the port:
Method one: Enable the USB port from the printer control panel
1. From the Home screen on the printer control panel, select Settings.
2. Open the following menus
● Copy/Print or Print
● Enable Device USB
3. Select Enabled to enable the USB port.
Method two: Enable the USB port from the HP Embedded Web Server (network-connected printers only)
1. From the Home screen on the printer control panel, select the Information icon, and then select the
Network icon to display the IP address or host name
2. Open a web browser, and in the address line, type the IP address exactly as it displays on the printer control
panel. Press the Enter key on the computer keyboard. The EWS opens.
NOTE: If the web browser displays a There is a problem with this website’s security certicate message
when attempting to open the EWS, click Continue to this website (not recommended).
Choosing Continue to this website (not recommended) will not harm the computer while navigating within
the EWS for the HP printer.
3. Select the Copy/Print tab for MFP models or the Print tab for SFP models.
4. In the left menu, select Print from USB Drive Settings.
80 Chapter 4 Print ENWW

5. Select Enable Print from USB Drive.
6. Click Apply.
Print USB documents
1. Insert the USB ash drive into the easy-access USB port.
NOTE: The port might be covered. For some printers, the cover ips open. For other printers, pull the
cover straight out to remove it.
2. From the Home screen on the printer control panel, select Print.
3. Select Print from USB Drive.
4. Select Choose, select the name of the document to print, and then touch Select.
NOTE: The document might be in a folder. Open folders as necessary.
5. To adjust the number of copies, touch the box to the left of the Print button, and then select the number of
copies from the keypad that opens. Select the Close button to close the keypad.
6. Select Print to print the document.
ENWW Print from the USB port 81

82 Chapter 4 Print ENWW

5 Copy
For more information:
●
Make a copy
●
Copy on both sides (duplex)
●
Additional copy tasks
The following information is correct at the time of publication.
For video assistance, see www.hp.com/videos/PageWide.
For current information, see www.hp.com/support/pwcolor780MFP or www.hp.com/support/pwcolor785MFP.
HP's all-inclusive help for the printer includes the following information:
● Install and congure
● Learn and use
● Solve problems
● Download software and rmware updates
● Join support forums
● Find warranty and regulatory information
ENWW For more information: 83

Make a copy
Follow these steps to make a copy from the scanner glass or the document feeder.
1. Place the document face-down on the scanner glass, or place it face-up in the document feeder and adjust
the paper guides to t the size of the document.
2. From the Home screen on the printer control panel, select Copy.
3. Select settings from the Sides menu and the Color/Black menu (color printers), and then select Done.
4. If you are using a Quick Set, select Load under Quick Sets and Defaults. Select the Quick Set from the list,
and then select Load in the lower right corner.
NOTE: Quick Sets are predened copy settings for various types of output, such as Text, Photograph, and
High Quality.
5. To adjust settings, such as Reduce/Enlarge and Content Orientation, select Options in the lower left corner,
and then select the settings from the Options menus. Select Done if prompted.
6. Optional Preview: Touch the right pane of the screen to preview the document. You can use the Expand and
Collapse buttons on the left side of the preview pane to expand and collapse the preview screen.
Expand button Collapse button
Use the buttons on the right of the screen to adjust the preview options and to rearrange, rotate, insert, or
remove pages.
Toggle between the two-page view and the thumbnail view. More options are available in the
thumbnail view than in the two-page view.
Zoom in or out on the selected page.
NOTE: Select only one page at a time to use these buttons.
Rotate the page 180 degrees.
NOTE: This button is available only in the thumbnail view.
84 Chapter 5 Copy ENWW

Delete the selected pages.
NOTE: This button is available only in the thumbnail view.
Rearrange the pages within the document. Select one or more pages and move them to the left or
right.
NOTE: These buttons are available only in the thumbnail view.
Add a page to the document. The printer prompts you to scan additional pages.
Clear the changes made in the preview and start over.
7. To adjust the number of copies, touch the box to the left of the Copy button, and then select the number of
copies from the keypad that opens. Select the Close button to close the keypad.
8. When the document is ready, select Copy to begin copying.
ENWW Make a copy 85

Copy on both sides (duplex)
1. Place the document face-down on the scanner glass, or place it face-up in the document feeder and adjust
the paper guides to t the size of the document.
2. From the Home screen on the printer control panel, select Copy.
3. Select the arrow under Sides to view available options.
4. In the Original Sides section, select the option that describes the original document:
● Use 1-sided for originals that are printed on one side of the page.
● Use 2-sided for originals that are printed on both sides of the page.
● Enable or disable Pages Flip Up to determine on which edge of the page a 2-sided original ips.
5. In the Output Sides section, select one of these options:
● Match original: The output will match the format of the original. For example, if the original is 1-sided,
the output will be 1-sided. However, if the administrator has restricted 1-sided printing and the
original is 1-sided, the output will be 2-sided book-style.
NOTE: This feature is not available for all rmware versions. You might need to update the printer
rmware to use this feature.
● 1-sided: The output will be 1-sided. However, if the administrator has restricted 1-sided printing, the
output will be 2-sided book-style.
● 2-sided: The output will be 2-sided.
● Enable or disable Pages Flip Up to determine on which edge of the page the 2-sided output ips.
6. Select Done.
7. Adjust any other settings as needed. Select Done for each setting if prompted.
8. Optional Preview: Touch the right pane of the screen to preview the document. You can use the Expand and
Collapse buttons on the left side of the preview pane to expand and collapse the preview screen.
Expand button Collapse button
Use the buttons on the right of the screen to adjust the preview options and to rearrange, rotate, insert, or
remove pages.
86 Chapter 5 Copy ENWW

Toggle between the two-page view and the thumbnail view. More options are available in the
thumbnail view than in the two-page view.
Zoom in or out on the selected page.
NOTE: Select only one page at a time to use these buttons.
Rotate the page 180 degrees.
NOTE: This button is available only in the thumbnail view.
Delete the selected pages.
NOTE: This button is available only in the thumbnail view.
Rearrange the pages within the document. Select one or more pages and move them to the left or
right.
NOTE: These buttons are available only in the thumbnail view.
Add a page to the document. The printer prompts you to scan additional pages.
Clear the changes made in the preview and start over.
9. To adjust the number of copies, touch the box to the left of the Copy button, and then select the number of
copies from the keypad that opens. Select the Close button to close the keypad.
10. When the document is ready, select Copy to begin copying.
ENWW Copy on both sides (duplex) 87

Additional copy tasks
Go to www.hp.com/support/pwcolor780MFP or www.hp.com/support/pwcolor785MFP.
Instructions are available for performing specic copy tasks, such as the following:
● Copy or scan pages from books or other bound documents
● Copy mixed-size documents
● Copy or scan both sides of an identication card
● Copy or scan a document into a booklet format
88 Chapter 5 Copy ENWW
 Loading...