

Page 1

HP iPAQ 900 Series
Product Guide
Page 2

© Copyright 2008 Hewlett-Packard
Development Company, L.P.
HP iPAQ products are powered by
Microsoft
®
Windows Mobile® 6.1
Professional with Messaging and Security
Feature Pack.
Microsoft Windows, the Windows logo,
Outlook, Windows Mobile Device Center,
and ActiveSync are trademarks of
Microsoft Corporation in the U.S. and other
countries.
Java and all Java-based
trademarks and logos are trademarks or
registered trademarks of Sun
Microsystems, Inc. in the U.S. and other
countries.
SD Logo is a trademark of its
proprietor.
Bluetooth
®
is a trademark owned by its
proprietor and used by Hewlett-Packard
Development Company, L.P. under
license.
Google and Google Maps are trademarks
of Google Inc.
All other product names mentioned herein
may be trademarks of their respective
companies.
Hewlett-Packard Company shall not be
liable for technical or editorial errors or
omissions contained herein. The
information is provided “as is” without
warranty of any kind and is subject to
change without notice. The warranties for
Hewlett-Packard products are set forth in
the express limited warranty statements
accompanying such products. Nothing
herein should be construed as an additional
warranty.
This document contains proprietary
information that is protected by copyright.
No part of this document may be
photocopied, reproduced, or translated to
another language without the prior written
consent of Hewlett-Packard Development
Company, L.P.
Second Edition August 2008
Document Part Number: 456937-002.
Page 3

Table of contents
1 Register your HP iPAQ
2 Box contents
3 Components
Front panel components ................................................................................................................. 3
Top panel components .................................................................................................................... 4
Left and right side components ....................................................................................................... 5
Back panel components .................................................................................................................. 6
4 Set up your HP iPAQ
Step 1: Remove the battery cover and insert the SIM card ............................................................ 7
Step 2: Install the battery and replace the battery cover ................................................................. 8
Step 3: Charge the battery .............................................................................................................. 9
Step 4: Turn on your HP iPAQ ........................................................................................................ 9
Find the serial and model number ................................................................................................. 10
Status icons ................................................................................................................................... 10
5 Learn the basics
The Today screen ......................................................................................................................... 12
Enter text ....................................................................................................................................... 12
Customize your HP iPAQ .............................................................................................................. 13
View the Operating System (OS) information ............................................................................... 18
Modify device name ...................................................................................................... 13
Enter owner information ............................................................................................... 13
Change the regional settings ........................................................................................ 14
Adjust the volume ......................................................................................................... 14
Change the power management settings ..................................................................... 15
Customize screen settings ........................................................................................... 15
Dim or adjust the brightness of the backlight ................................................................ 15
Install and remove programs ........................................................................................ 15
Open and close programs ............................................................................................ 16
Set alarms and clocks .................................................................................................. 16
Use shortcut menus ...................................................................................................... 17
Display the clock in the title bar .................................................................................... 17
Create and assign a category ....................................................................................... 17
Adjust the speed for scrolling through items in a list .................................................... 18
iii
Page 4

Protect your HP iPAQ with a password ......................................................................................... 18
Using device lock .......................................................................................................................... 19
Battery saving tips ......................................................................................................................... 19
6 Use your Business Messenger
Use the Keyboard ......................................................................................................................... 21
Answer/Send key .......................................................................................................... 21
End key ......................................................................................................................... 21
Enter key ...................................................................................................................... 21
Backspace key ............................................................................................................. 21
Softkeys ........................................................................................................................ 21
QWERTY keyboard ...................................................................................................... 21
Scroll wheel ................................................................................................................................... 22
Check connection and signal strength .......................................................................................... 22
Call features .................................................................................................................................. 22
Make a call ................................................................................................................... 22
Answer a call ................................................................................................................ 23
Call waiting ................................................................................................................... 23
Redial a number ........................................................................................................... 23
Call a contact ................................................................................................................ 23
Make a call from the Today screen .............................................................. 23
Make a call from Contacts ........................................................................... 23
Make emergency calls .................................................................................................. 24
Make calls using speed dial .......................................................................................... 24
Voice mail ..................................................................................................................... 25
Handsfree function ....................................................................................................... 25
Make data calls ............................................................................................................. 25
Mute a call .................................................................................................................... 25
Put a call on hold .......................................................................................................... 26
Make a conference call ................................................................................................. 26
Make a call from a hyperlink phone number ................................................................. 26
Dial international numbers ............................................................................................ 26
Call history .................................................................................................................................... 27
Manage calls using call history ..................................................................................... 27
Make calls using call history ......................................................................................... 27
View call details ............................................................................................................ 27
Voice commands ........................................................................................................................... 27
Change the SIM PIN ..................................................................................................................... 28
Change service settings ................................................................................................................ 29
Change phone service settings .................................................................................... 29
Forward calls ................................................................................................ 29
Call waiting ................................................................................................... 29
Configure caller ID ....................................................................................... 30
iv
Page 5

Block calls .................................................................................................... 30
Set up Voice mail or text messaging center number ................................... 30
Change network settings ............................................................................................................... 31
Change phone network settings ................................................................................... 31
View available phone networks .................................................................................... 31
Set preferred networks ................................................................................................. 31
Manually select a phone network ................................................................................. 32
Change the ring tone and ring type ............................................................................................... 32
Take notes during a call ................................................................................................................ 32
Select a frequency band automatically ......................................................................................... 32
Copy all contacts from your HP iPAQ to a SIM ............................................................................. 33
Copy all contacts from a SIM to your HP iPAQ ............................................................................. 33
Add Tele-typewriter (TTY) functionality ......................................................................................... 33
Add TTY functionality for people who are hearing impaired or hard-of-hearing ........... 33
Enable TTY support ...................................................................................................... 34
Make a phone call using the TTY enabled HP iPAQ .................................................... 35
Disable TTY support ..................................................................................................... 35
Add Hearing Aid Compatibility (HAC) functionality for people who use hearing
aids ............................................................................................................................... 35
Enable HAC support .................................................................................... 36
Disable HAC support ................................................................................... 36
Voice notes ................................................................................................................................... 36
Create voice notes ........................................................................................................ 36
Delete voice notes ........................................................................................................ 37
Listen to voice notes ..................................................................................................... 37
Rename voice notes ..................................................................................................... 37
Configure channels ....................................................................................................................... 37
Notes ............................................................................................................................................. 38
Write a note .................................................................................................................. 38
Create a copy of a note ................................................................................................ 38
Reset your HP iPAQ ..................................................................................................................... 38
Perform a Hard Reset ................................................................................................... 39
Perform a Factory Reset .............................................................................................. 39
7 Camera
Use the camera ............................................................................................................................. 41
Capture photos ............................................................................................................. 41
View photos .................................................................................................................. 41
Camera settings ............................................................................................................................ 41
Basic settings ............................................................................................................... 42
Photo settings ............................................................................................................... 42
Video recorder ............................................................................................................................... 42
Record videos ............................................................................................................... 42
Video settings ............................................................................................................... 43
v
Page 6

Options for camera and video recorder ......................................................................................... 43
Transfer images ............................................................................................................................ 44
8 Storage cards
Use storage cards ......................................................................................................................... 46
Insert a storage card ..................................................................................................................... 46
Remove a storage card ................................................................................................................. 47
View contents of a storage card .................................................................................................... 48
9 Synchronization
Synchronization software .............................................................................................................. 50
Copy files ...................................................................................................................................... 50
Migrate data from Palm Desktop to Microsoft Windows Mobile 6.1 .............................................. 51
Wireless synchronization cost saving tips ..................................................................................... 52
Troubleshoot synchronization issues ............................................................................................ 52
Customized links in WMDC ........................................................................................................... 54
Use GPRS .................................................................................................................... 44
Use Bluetooth ............................................................................................................... 44
10 Tasks
Create a new task ......................................................................................................................... 55
Set start and due dates for a task ................................................................................................. 55
Show start and due dates in the task list ....................................................................................... 55
Set options for displaying tasks on the Today screen ................................................................... 55
Mark a task as completed ............................................................................................................. 56
11 Messaging
Understand messages .................................................................................................................. 57
Folder types .................................................................................................................................. 57
Synchronize e-mail ........................................................................................................................ 58
Set up messaging accounts .......................................................................................................... 58
Use messaging ............................................................................................................................. 64
Set up e-mail using Exchange Server .......................................................................... 58
Internet e-mail ............................................................................................................... 59
Create a new POP3 or IMAP4 account ....................................................... 59
Change e-mail download options ................................................................. 60
Delete an account ........................................................................................ 61
Text messaging ............................................................................................................ 61
MMS ............................................................................................................................. 61
MMS composer ............................................................................................................ 62
Receive attachments .................................................................................................... 63
Receive meeting requests ............................................................................................ 63
Create or change a signature ....................................................................................... 64
vi
Page 7

Install an online address book ....................................................................................................... 66
12 Calendar
Access calendar ............................................................................................................................ 67
Change the display of the work week ........................................................................................... 67
Set a default reminder for all new appointments ........................................................................... 67
Create an appointment .................................................................................................................. 68
Update an appointment ................................................................................................................. 68
Cancel an appointment ................................................................................................................. 68
13 Contacts
Create a contact ............................................................................................................................ 69
Delete a contact ............................................................................................................................ 69
Change contact information .......................................................................................................... 69
Copy a contact .............................................................................................................................. 69
Find a contact ................................................................................................................................ 70
Send an e-mail message to a contact ........................................................................................... 70
Send a text message to a contact ................................................................................................. 70
Add and remove a picture ............................................................................................................. 71
Use the contact list ........................................................................................................................ 71
Compose and send messages ..................................................................................... 64
Reply or forward a message ......................................................................................... 65
Add an attachment to a message ................................................................................. 65
Download messages .................................................................................................... 65
Download messages from a server .............................................................................. 65
14 Connections
Use Wireless Manager .................................................................................................................. 73
Wi-Fi .............................................................................................................................................. 73
Bluetooth ....................................................................................................................................... 76
Wi-Fi terms ................................................................................................................... 74
Open Wi-Fi settings ...................................................................................................... 74
Automatically connect to a Wi-Fi network ..................................................................... 74
Manually connect to a Wi-Fi network ............................................................................ 75
Find an IP address ....................................................................................................... 75
Delete a Wi-Fi network ................................................................................................. 75
Bluetooth terms ............................................................................................................ 76
Open Bluetooth settings ............................................................................................... 76
Connect to a computer using Bluetooth ....................................................................... 76
Create, end, and accept a Bluetooth partnership ......................................................... 77
Edit a Bluetooth partnership ......................................................................................... 78
Use your HP iPAQ as a wireless modem with Bluetooth ............................................. 78
Bluetooth device profiles .............................................................................................. 78
vii
Page 8

Access services ............................................................................................................ 79
Set a Bluetooth shared folder ....................................................................................... 79
Set up an incoming or outgoing Bluetooth COM port ................................................... 79
GPRS/EDGE/HSDPA ................................................................................................................... 80
HSDPA ......................................................................................................................... 80
GPRS/EDGE ................................................................................................................ 80
Differences between GSM and GPRS/EDGE/WCDMA/HSDPA technology ............... 80
Configure GPRS network settings ................................................................................ 81
Edit an Internet connection ........................................................................................... 81
Edit MMS settings ......................................................................................................... 82
Edit WAP information settings ...................................................................................... 83
Troubleshoot automatic detection ................................................................................ 84
Advanced settings ......................................................................................................................... 84
Connect to intranet URLs ............................................................................................. 84
Change an intranet URL ............................................................................................... 85
Set up an automatic choice for connections ................................................................. 85
Set up a WAP gateway ................................................................................................. 85
Configure advanced proxy settings .............................................................................. 86
Advanced connection settings ...................................................................................... 86
Set up a VPN server connection .................................................................................. 86
Change a connection group name ............................................................................... 87
End a connection .......................................................................................................... 87
15 Google
Google Maps™ for mobile ............................................................................................................ 88
Google Search .............................................................................................................................. 88
Launch Google Search ................................................................................................. 89
16 Configure Global Positioning System (GPS) on Your HP iPAQ
Set Up the HP iPAQ ...................................................................................................................... 90
Verify Internet Access ................................................................................................................... 91
Verify the Date and Time .............................................................................................................. 91
Download the HP iPAQ GPS QK Position Data File ..................................................................... 91
Verify Compatibility With Your HP iPAQ ....................................................................................... 91
Configure and Manage My GPS Software to Connect to My HP iPAQ's GPS Receiver
Automatically ................................................................................................................................. 92
Identify the COM Port for My GPS Receiver ................................................................................. 92
Improve a Slow GPS Connection .................................................................................................. 92
Troubleshoot Frequent GPS Signal Loss ...................................................................................... 92
Troubleshoot Common Reasons For Interference When Using GPS Software ........................... 93
17 Applications
HP applications ............................................................................................................................. 94
viii
Page 9

HP Help and Support .................................................................................................... 94
HP VoiceReply ............................................................................................................. 94
HP iPAQ Setup Assistant ............................................................................................. 95
HP iPAQ DataConnect ................................................................................................. 96
HP Photosmart Mobile .................................................................................................. 96
View pictures stored on your HP iPAQ or a storage card ............................ 97
Attach a voice note to a picture .................................................................... 97
Print using Storage Card .............................................................................. 97
View a slideshow ......................................................................................... 98
E-mail pictures ............................................................................................. 98
Associate a picture with a contact ................................................................ 98
Assign a picture to the Today screen background ....................................... 98
Snapfish ....................................................................................................... 99
Enhance documents .................................................................................... 99
Set the screen saver .................................................................................... 99
Switch to camera application ..................................................................... 100
Organize images ........................................................................................ 100
Send an image to clipboard ....................................................................... 100
Video support ............................................................................................. 100
HP Printsmart Mobile .................................................................................................. 101
HP iPAQ Keyguard ..................................................................................................... 101
HP Keyboard Status Indicator .................................................................................... 101
HP Asset Viewer ......................................................................................................... 102
HP CertEnroller .......................................................................................................... 102
HP iPAQ Tips ............................................................................................................. 103
HP Enterprise Mobility Agent ...................................................................................... 103
iPAQ File Store ........................................................................................................... 103
HP iPAQ Ring Tone Manager .................................................................................... 104
Manage certificates ..................................................................................................................... 104
Task Manager ............................................................................................................................. 104
Search ......................................................................................................................................... 105
HP iPAQ Audio ............................................................................................................................ 105
Voice Commander ...................................................................................................................... 106
Remote Desktop Mobile .............................................................................................................. 106
Java Virtual Machine ................................................................................................................... 106
Windows Media Player ................................................................................................................ 107
Clear the Now Playing List ......................................................................................... 107
Update a Library ......................................................................................................... 107
Use Voice Commander to play media files ................................................................. 108
Office Mobile applications ........................................................................................................... 108
Word Mobile ............................................................................................................... 108
Excel Mobile ............................................................................................................... 108
PowerPoint Mobile ...................................................................................................... 109
OneNote Mobile .......................................................................................................... 109
ix
Page 10

ClearVue PDF ............................................................................................................................. 110
Games ......................................................................................................................................... 110
Bubble Breaker ........................................................................................................... 110
Solitaire ....................................................................................................................... 111
Internet Sharing ........................................................................................................................... 111
To connect to a laptop using a USB data connection ................................................. 111
To connect to a laptop using Bluetooth data connection ............................................ 112
Pocket Internet Explorer .............................................................................................................. 113
Windows Live .............................................................................................................................. 113
SMS cell broadcast ..................................................................................................................... 115
SIM Toolkit .................................................................................................................................. 116
Power .......................................................................................................................................... 116
Backlight ...................................................................................................................................... 116
18 Product specifications
System specifications .................................................................................................................. 117
Physical specifications ................................................................................................................ 118
Operating environment ................................................................................................................ 118
19 Regulatory notices
Federal Communications Commission Notice ............................................................................ 119
Modifications ............................................................................................................... 119
Cables ........................................................................................................................ 119
Declaration of Conformity for Products Marked with the FCC Logo (United States
Only) ........................................................................................................................... 120
Canadian Notice .......................................................................................................................... 120
Avis Canadien ............................................................................................................................. 120
European Union Notice ............................................................................................................... 120
Products with 2.4–GHz Wireless LAN Devices .......................................................... 122
Battery Warning .......................................................................................................................... 122
Battery Recycling ........................................................................................................................ 122
Battery Disposal .......................................................................................................................... 122
Chemical substances .................................................................................................................. 122
Disposal of Waste Equipment by Users in Private Household .................................................... 123
Equipment Warning ..................................................................................................................... 129
Acoustics Warning ...................................................................................................................... 129
Airline Travel Notice .................................................................................................................... 130
Medical Electronic Equipment ..................................................................................................... 130
SAR Notice .................................................................................................................................. 130
Wireless Notices ......................................................................................................................... 131
U.S. Regulatory Wireless Notice ................................................................................ 131
France ........................................................................................................ 122
Italy ............................................................................................................ 122
x
Page 11

Notices ....................................................................................................... 131
Canadian Regulatory Wireless Notice ........................................................................ 132
Brazilian Notice ........................................................................................................... 132
Singaporean Wireless Notice ..................................................................................... 132
Japanese Notice ......................................................................................................................... 132
Wireless LAN 802.11b Devices .................................................................................. 133
Wireless LAN 802.11g Devices .................................................................................. 133
Bluetooth Devices ....................................................................................................... 133
Taiwan DGT Notice ..................................................................................................................... 134
Korean Notice ............................................................................................................................. 134
20 Frequently Asked Questions
I am having trouble turning on my HP iPAQ. What should I do? ................................................ 135
I am unable to make or receive calls. How do I fix this? ............................................................. 135
Why do my calls keep disconnecting? ........................................................................................ 136
I have trouble connecting to the Internet. What should I do? ...................................................... 136
I am unable to hear voices clearly. How do I resolve this? ......................................................... 136
When I answer calls on my HP iPAQ, the caller is unable to hear my voice clearly. What could
be the problem? .......................................................................................................................... 136
It takes a very long time or I am unable to send an SMS or MMS. What do I do? ...................... 137
I cannot use certain call functions. What should I do? ................................................................ 137
Why do I hear noises in the background during a phone call? ................................................... 137
How can I improve the standby time and talk time on my HP iPAQ? ......................................... 137
Why does the HP iPAQ operate slowly sometimes? .................................................................. 138
I have trouble charging my battery. What should I do? ............................................................... 138
I am unable to synchronize my HP iPAQ with my computer. What should I do? ........................ 138
Which factors degrade the GPS signal and affect accuracy? ..................................................... 138
My HP iPAQ was connected while I was installing WMDC. But, WMDC does not launch even
after installation? ......................................................................................................................... 138
Can I set up an active connection between my HP iPAQ and a computer using Bluetooth for
the first time? ............................................................................................................................... 139
My HP iPAQ becomes very hot when I use it, what has happened? .......................................... 139
21 Safety information
General Precautions ................................................................................................................... 140
Safety Precautions for Power Cords and Accessories ................................................................ 141
Safety Precautions for Battery Packs .......................................................................................... 141
Safety Precautions for Docking Devices ..................................................................................... 142
Safety Precautions for Products with Wireless Devices .............................................................. 142
Safety Precautions for Products with Modems, Telecommunications or Local Area Network
Accessories ................................................................................................................................. 142
22 Guidelines for care and maintenance
Use your HP iPAQ ...................................................................................................................... 143
xi
Page 12

Cleaning your HP iPAQ ............................................................................................................... 143
Carrying or storing your HP iPAQ ............................................................................................... 143
Use accessories .......................................................................................................................... 143
23 Quick reference
Acronyms .................................................................................................................................... 144
Icons used ................................................................................................................................... 145
Index ........................................................................................................................................................... 148
xii
Page 13

1 Register your HP iPAQ
Please register your HP iPAQ with Hewlett-Packard to be able to perform the following tasks:
Access support and services, and get the most out of your HP products.
●
Manage your profile.
●
Sign up for free support alerts, software updates, and personalized newsletters.
●
Visit
http://www.register.hp.com to register your HP iPAQ or update your mail or e-mail address after
registration. You are required to enter your user ID and registration password to edit your profile
online. After registering your HP iPAQ, you will receive an e-mail message regarding special offers
and promotions.
NOTE: Registration is not supported in all countries/regions.
1
Page 14
2 Box contents
ti
n
g
S
ta
r
t
e
d
G
u
i
d
e
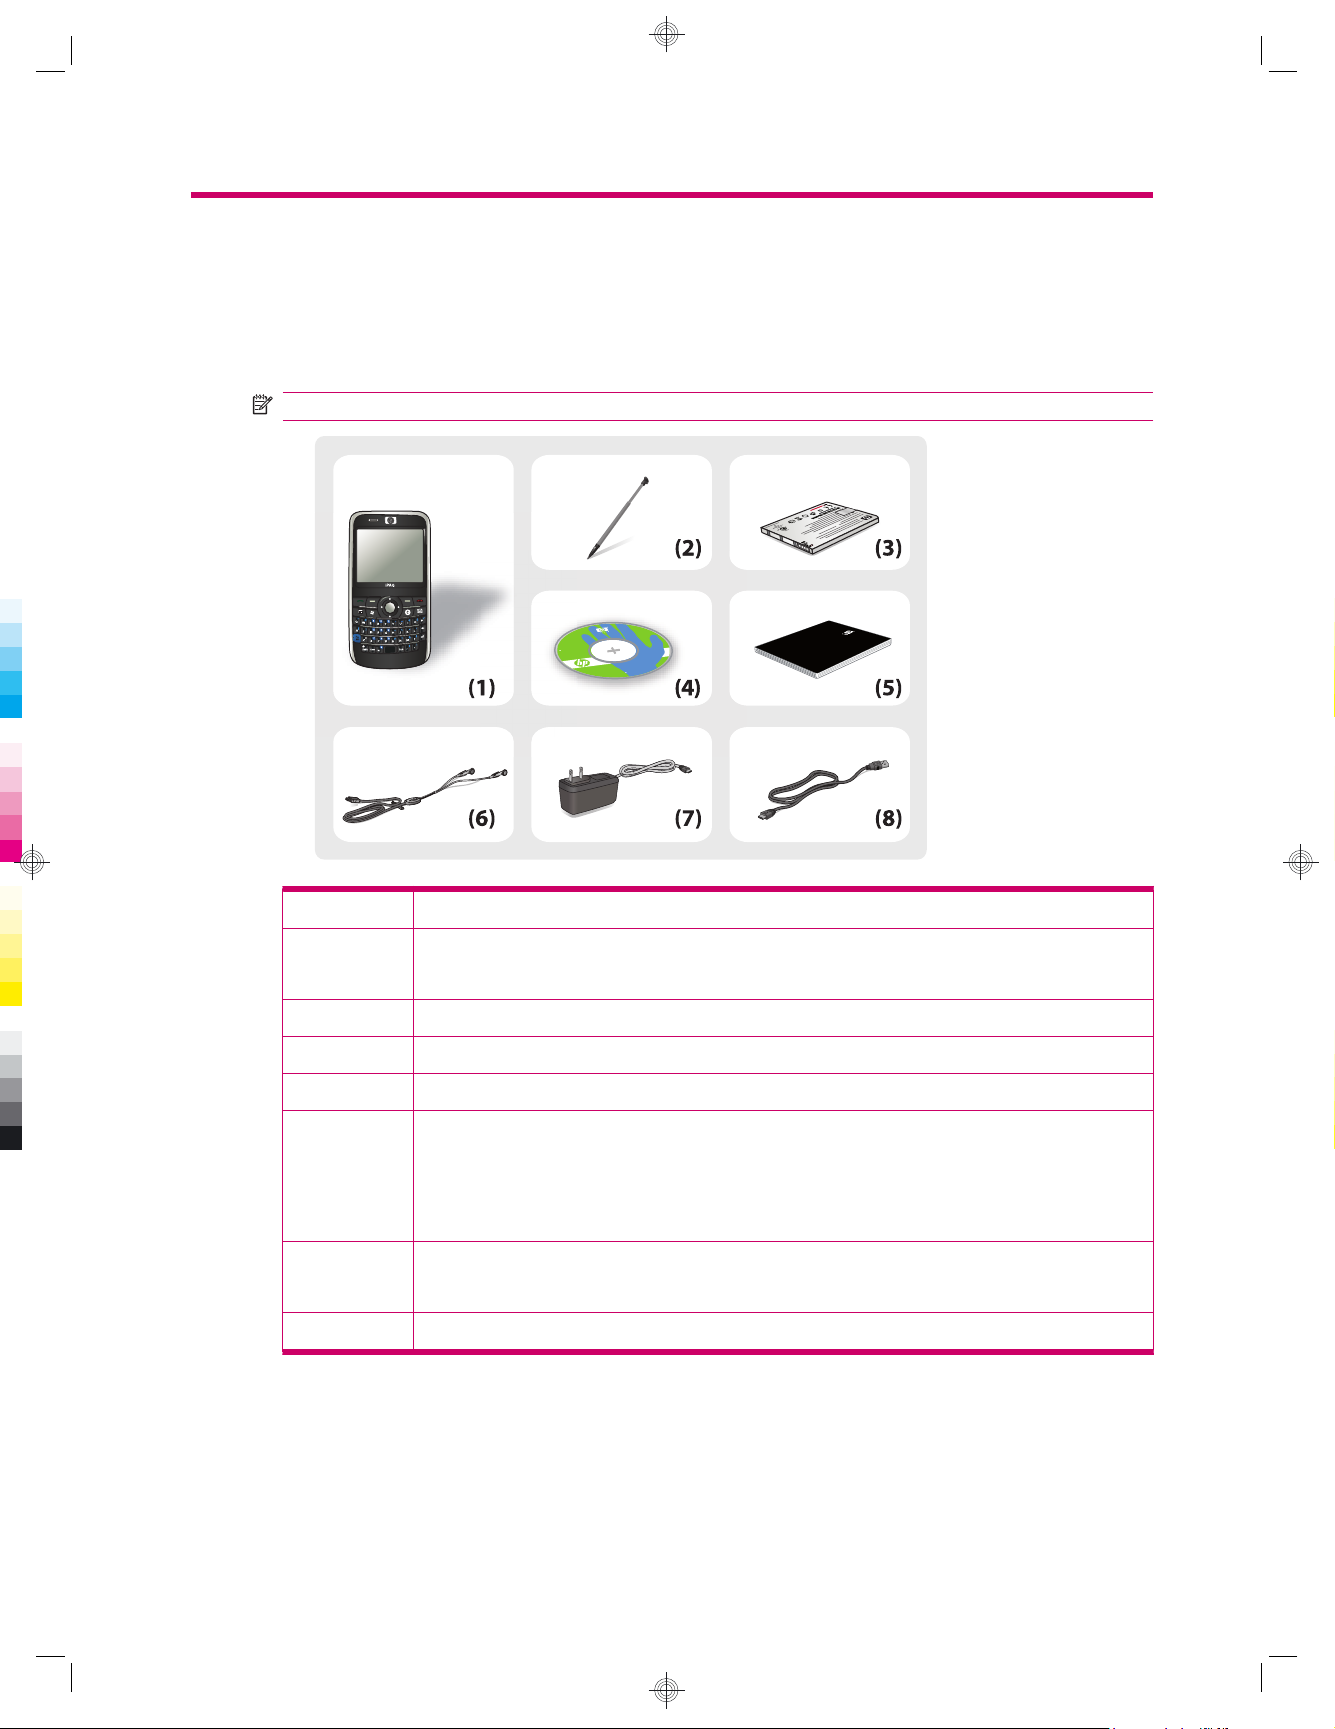
This illustration depicts the items that come in the box with your HP iPAQ.
NOTE: Box contents might vary by model.
h
.
w
w
w
i
t
u
b
i
r
t
s
i
d
r
o
F
M
s
w
o
d
n
i
W
o
D
.
e
c
i
v
e
d
p
o
c
l
a
g
le
l
i
w
e
H
8
0
0
2
t
n
e
m
p
o
l
e
v
e
D
k
c
-Pa
t
t
le
w
e
H
,
y
n
a
p
m
o
C
h
t
o
i
d
E
t
s
r
i
F
:
s
e
d
u
®
l
c
n
i
t
f
o
D
s
C
o
r
s
c
i
i
h
T
M
®
•
c
n
y
S
e
r
e
v
a
i
t
w
c
t
f
A
o
S
y
t
i
v
i
t
c
®
e
n
n
o
e
l
i
C
b
m
co
.
p
a
h
t
i
w
y
l
n
o
n
d
o
e
r
e
w
o
®
p
-
e
l
i
e
b
k
o
a
m
r
o
d
n
le
e
t
r
o
a
n
w
t
f
o
s
s
i
h
t
f
o
s
e
i
rd
a
k
c
a
-P
t
t
P
e
l
H
.
P
.
L
,
y
n
a
p
m
n
o
e
C
m
p
o
l
e
v
e
D
,
d
d
r
n
a
a
S
U
e
h
t
n
i
.
P
.
L
.
s
e
i
r
t
n
u
o
c
r
8
e
0
0
2
y
r
a
u
n
a
J
n
io
t
X
X
-X
X
X
X
X
X
X
o
M
s
w
o
d
n
i
W
r
•
e
t
n
t
e
n
C
a
t
e
s
i
c
i
s
v
s
e
A
D
p
u
t
e
S
Q
A
P
i
P
H
•
.
,
t
iP
P
H
A
™
Q
Windows Mobile
i
r
l
l
A
:
t
a
t
c
m
r
u
o
d
f
o
r
e
l
P
b
Q
ta
n
A
i
P
r
i
p
P
n
I
H
•
0
.
1
n
e
o
i
d
s
i
r
u
e
G
V
r
e
g
n
e
s
s
e
M
s
s
e
n
i
s
u
B
s
ie
r
e
with
S
0
al
0
ion
ted CD
9
ess
rof
ting Star
1 P
.
®
n
o
i
6.
t
Get
a
r
o
p
r
o
C
t
f
o
s
o
r
c
i
M
8
0
0
2
s
n
o
i
t
r
o
P
.
d
e
v
r
e
s
e
r
s
t
h
g
H
P
B
iP
usines
A
Q
9
s Messe
0
0
S
e
ri
es
n
ge
Pro
r
duc
Pro
t G
duc
Pro
u
t G
i
duc
de
ui
t G
de
u
i
de
G
e
t
t
i
n
g
S
t
a
r
t
e
d
G
u
i
d
e
(1) HP iPAQ 900 Series Business Messenger
(2) Stylus
NOTE: The stylus is located on the back panel at the bottom-left corner of your HP iPAQ.
(3) 1940 mAh Li-polymer removable/rechargeable battery
(4) Getting Started CD with additional software
(5) Getting Started Guide
(6) Wired stereo headset
NOTE: Listening to personal stereo equipment at full volume for long periods can damage hearing. To
reduce the risk of hearing loss, do not spend much time listening to personal stereo equipment at full
volume. HP recommends use of the headset manufactured by Merry Corporation, part number
455673-001, that is included with your HP iPAQ.
(7) AC adapter
NOTE: The AC adapter shipped with your HP iPAQ might vary depending on the country/region.
(8) Mini-USB charging/synchronization cable
2 Chapter 2 Box contents
Page 15
3 Components
Know the different components of your HP iPAQ.
NOTE: Not all models or features are available in all countries/regions.
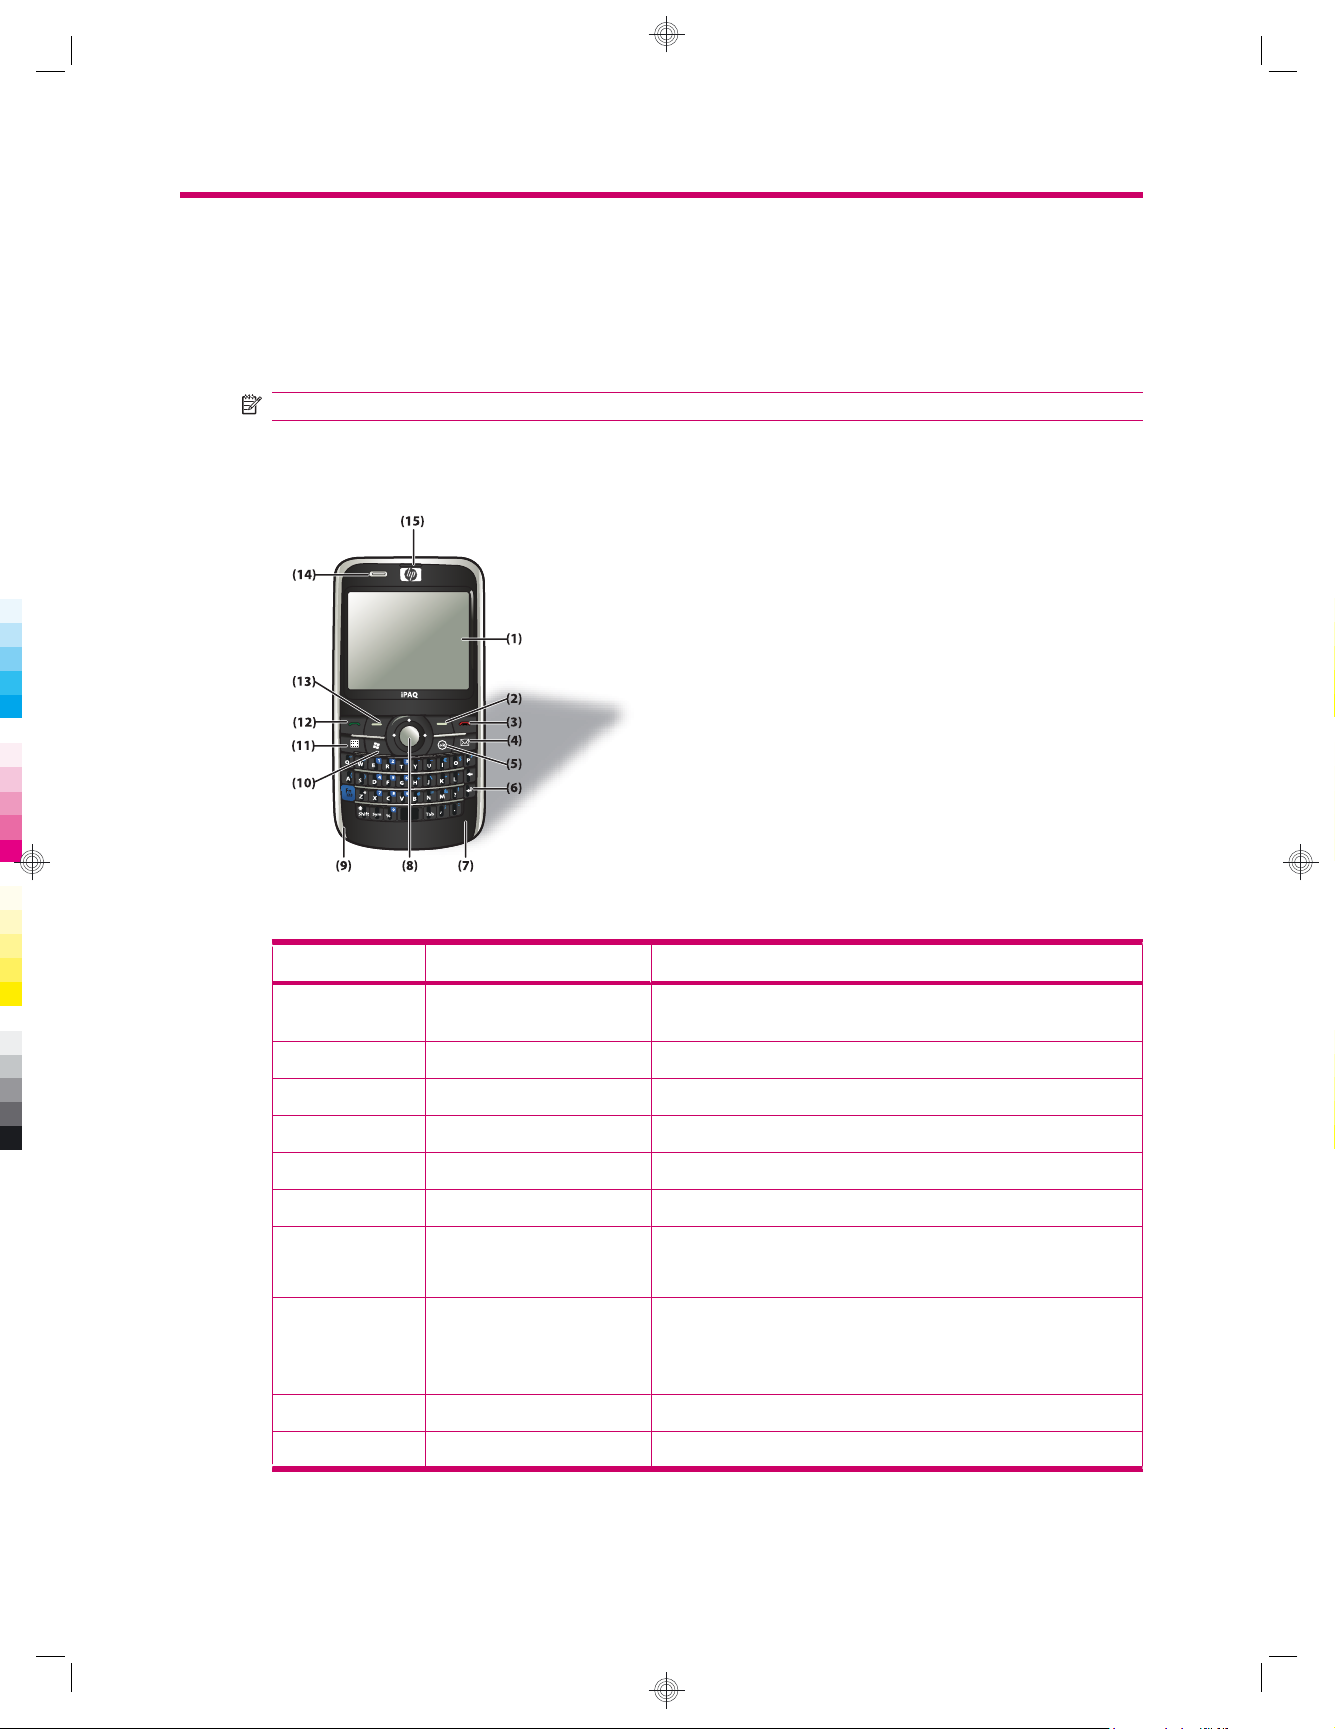
Front panel components
Component Description Function
(1) Touch Screen Display Use to view the on-screen contents. Use the stylus to select items,
navigate menus, change feature settings, and play games.
(2) Right Softkey Press to launch Contacts from the Today screen.
(3) End Key Press to end a phone call.
(4) Messaging Key Press to launch the Messaging application.
(5) ok Key Press to confirm your selection.
(6) QWERTY Keyboard Use keys on the keyboard to enter text or dial numbers.
(7) GSM Antenna Detects GSM signals.
NOTE: This component will not be visible externally.
(8) 5-Way Navigation Key Use to select items, navigate menus, change feature settings, or play
(9) Microphone Use for phone conversations or to record notes.
(10) Windows Key Press to display the Start menu on the screen.
games. Scroll by pressing the button in the direction you want to
scroll. Release the button to stop the scrolling action. Press the
center button to select the item highlighted on the screen.
Front panel components 3
Page 16

Component Description Function
(11) Calendar Key Press to launch the Calendar application.
(12) Answer/Send Key Press to answer a call or to view the Dialer screen.
(13) Left SoftKey Press to launch the Pocket Internet Explorer application from
the Today screen.
(14) LEDs
(15) Earpiece Use to listen to phone calls, sounds, and notifications.
Top panel components
(1)
Solid Amber – Charging
●
Flashing Amber – One or more notifications received
●
Solid Green – Fully charged and power still applied
●
Flashing Green – Within GSM/GPRS/EDGE/3G/HSDPA
●
coverage area
Solid Red – Pre-charge when low battery and power applied
●
Flashing Red – Low battery warning
●
Solid Blue – Wi-Fi on or Wi-Fi and Bluetooth on
●
Flashing Blue – Bluetooth on
●
(3)
(2)
Component Description Function
(1) External GPS Antenna
Connector
(2) Reset Use to soft reset your HP iPAQ.
(3) Power Key Press and hold to turn your HP iPAQ on or off.
Use to attach an external GPS antenna.
NOTE: Press once to put you HP iPAQ into suspend mode, or to
wake it up if it is already in suspend mode.
4 Chapter 3 Components
Page 17

Left and right side components
Component Description Function
(1) Scroll Wheel Use to navigate and scroll through items on the screen and confirm
your selection.
(2) ok Key Press to confirm your selection.
(3) Camera Key Use to launch the camera and capture photos.
(4) Mini-USB Connector Use to connect the mini-USB charging/synchronization cable.
NOTE: You need to open the protective flap to access the slot.
(5) MicroSD Slot Insert a Micro Secure Digital (MicroSD) storage card with the label
(6) Voice Commander Press once to launch Voice Commander.
(7) Volume Up/Down Key Press to increase or decrease the earpiece volume.
side up for data storage.
NOTE: You need to open the protective flap to access the slot.
NOTE: Press and hold to launch Notes.
Left and right side components 5
Page 18
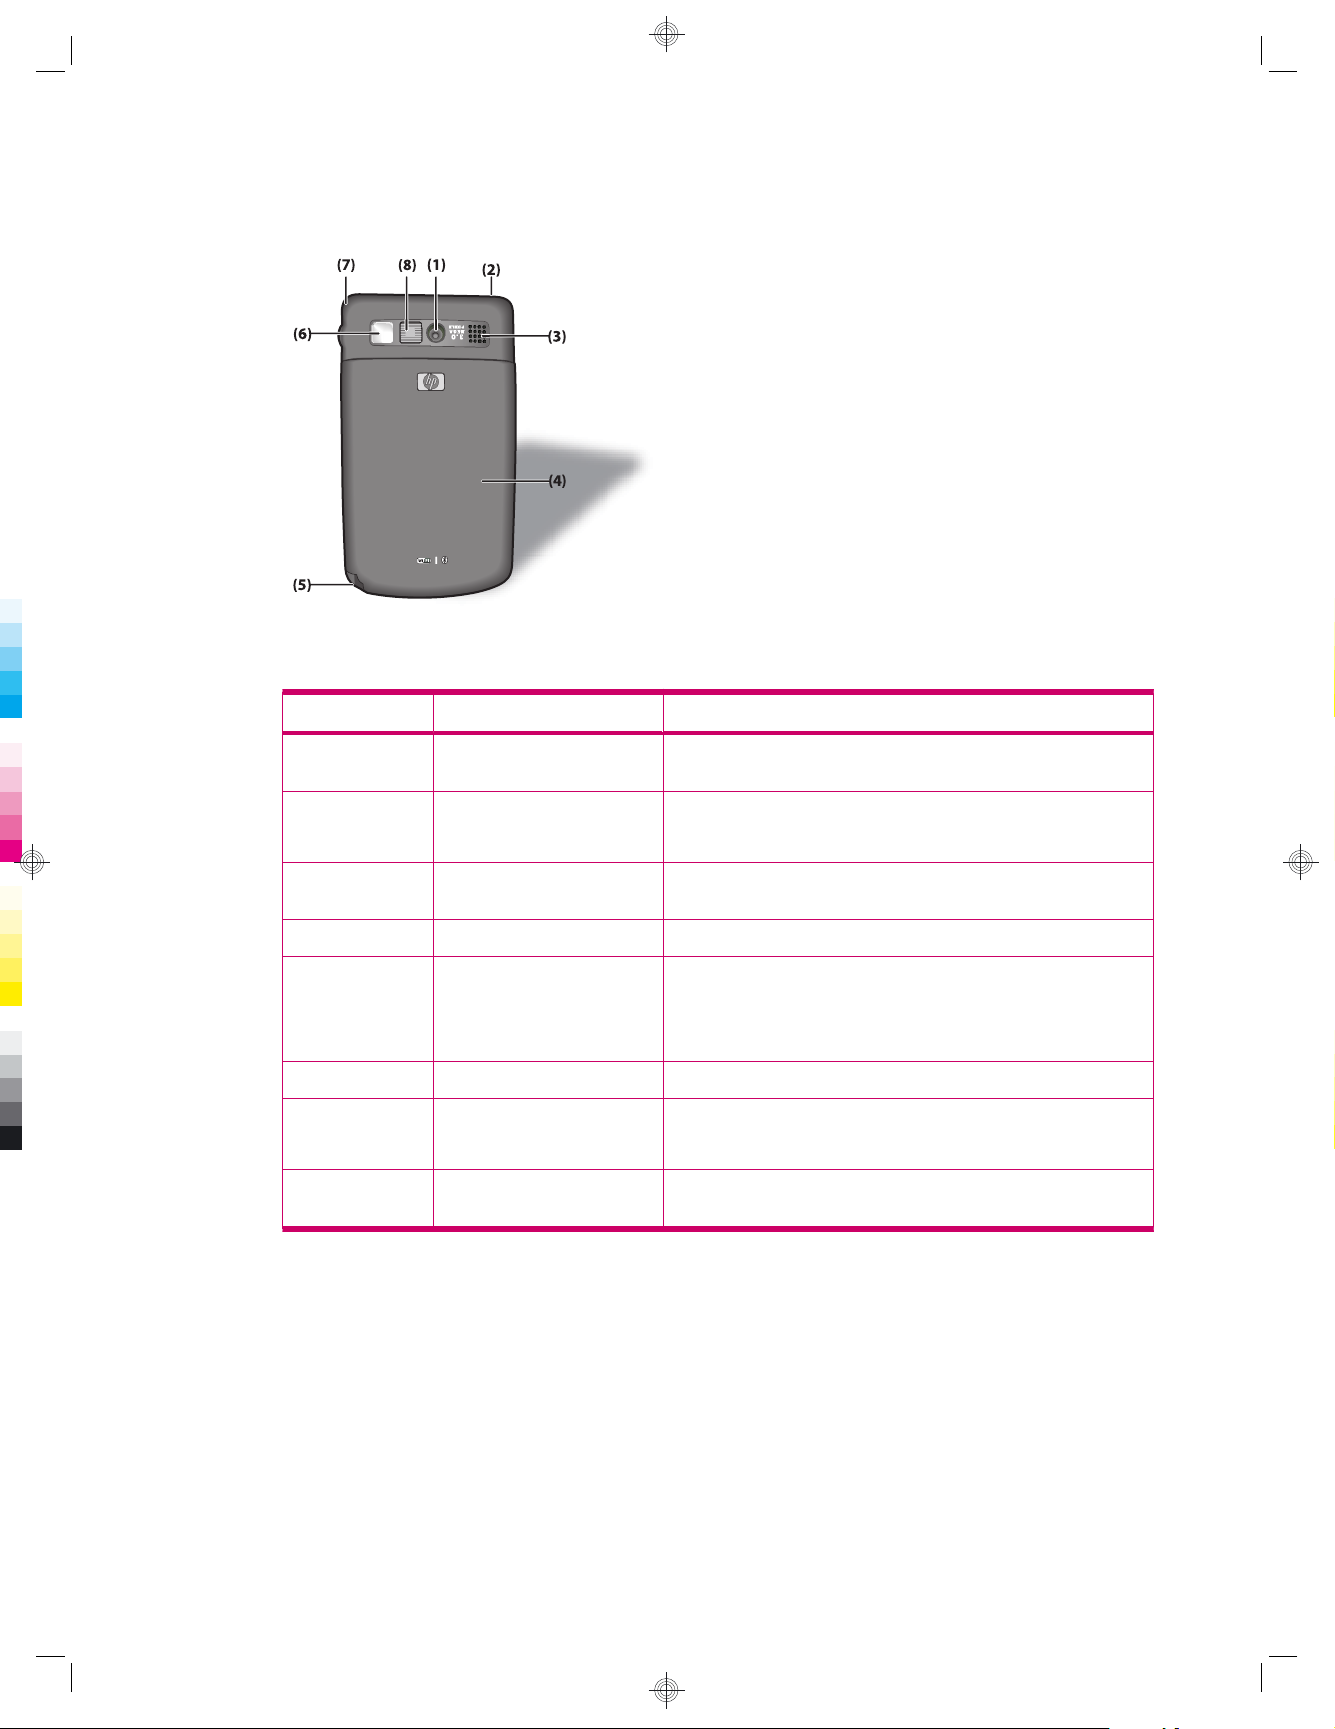
Back panel components
Component Description Function
(1) 3 Mega Pixel Camera Turn on the camera, frame the subject in the camera lens, and view
it on your HP iPAQ screen before capturing the photo.
(2) Wi-Fi Antenna Detects Wi-Fi signals.
NOTE: This component will not be visible externally.
(3) Speaker Use the speaker to listen to music or as a speakerphone to converse
(4) Back Cover Remove to insert or remove the battery and/or the SIM card.
(5) Stylus Use to select elements on the screen and input information.
(6) Mirror Lens Use the mirror lens to center your own image for a self photograph.
(7) GPS Antenna Detects GPS signals.
(8) Camera Flash Use the camera flash to illuminate your subject when you capture
when driving or otherwise occupied.
Slide down to remove the stylus.
Slide up to place the stylus.
NOTE: This component will not be visible externally.
photos.
6 Chapter 3 Components
Page 19
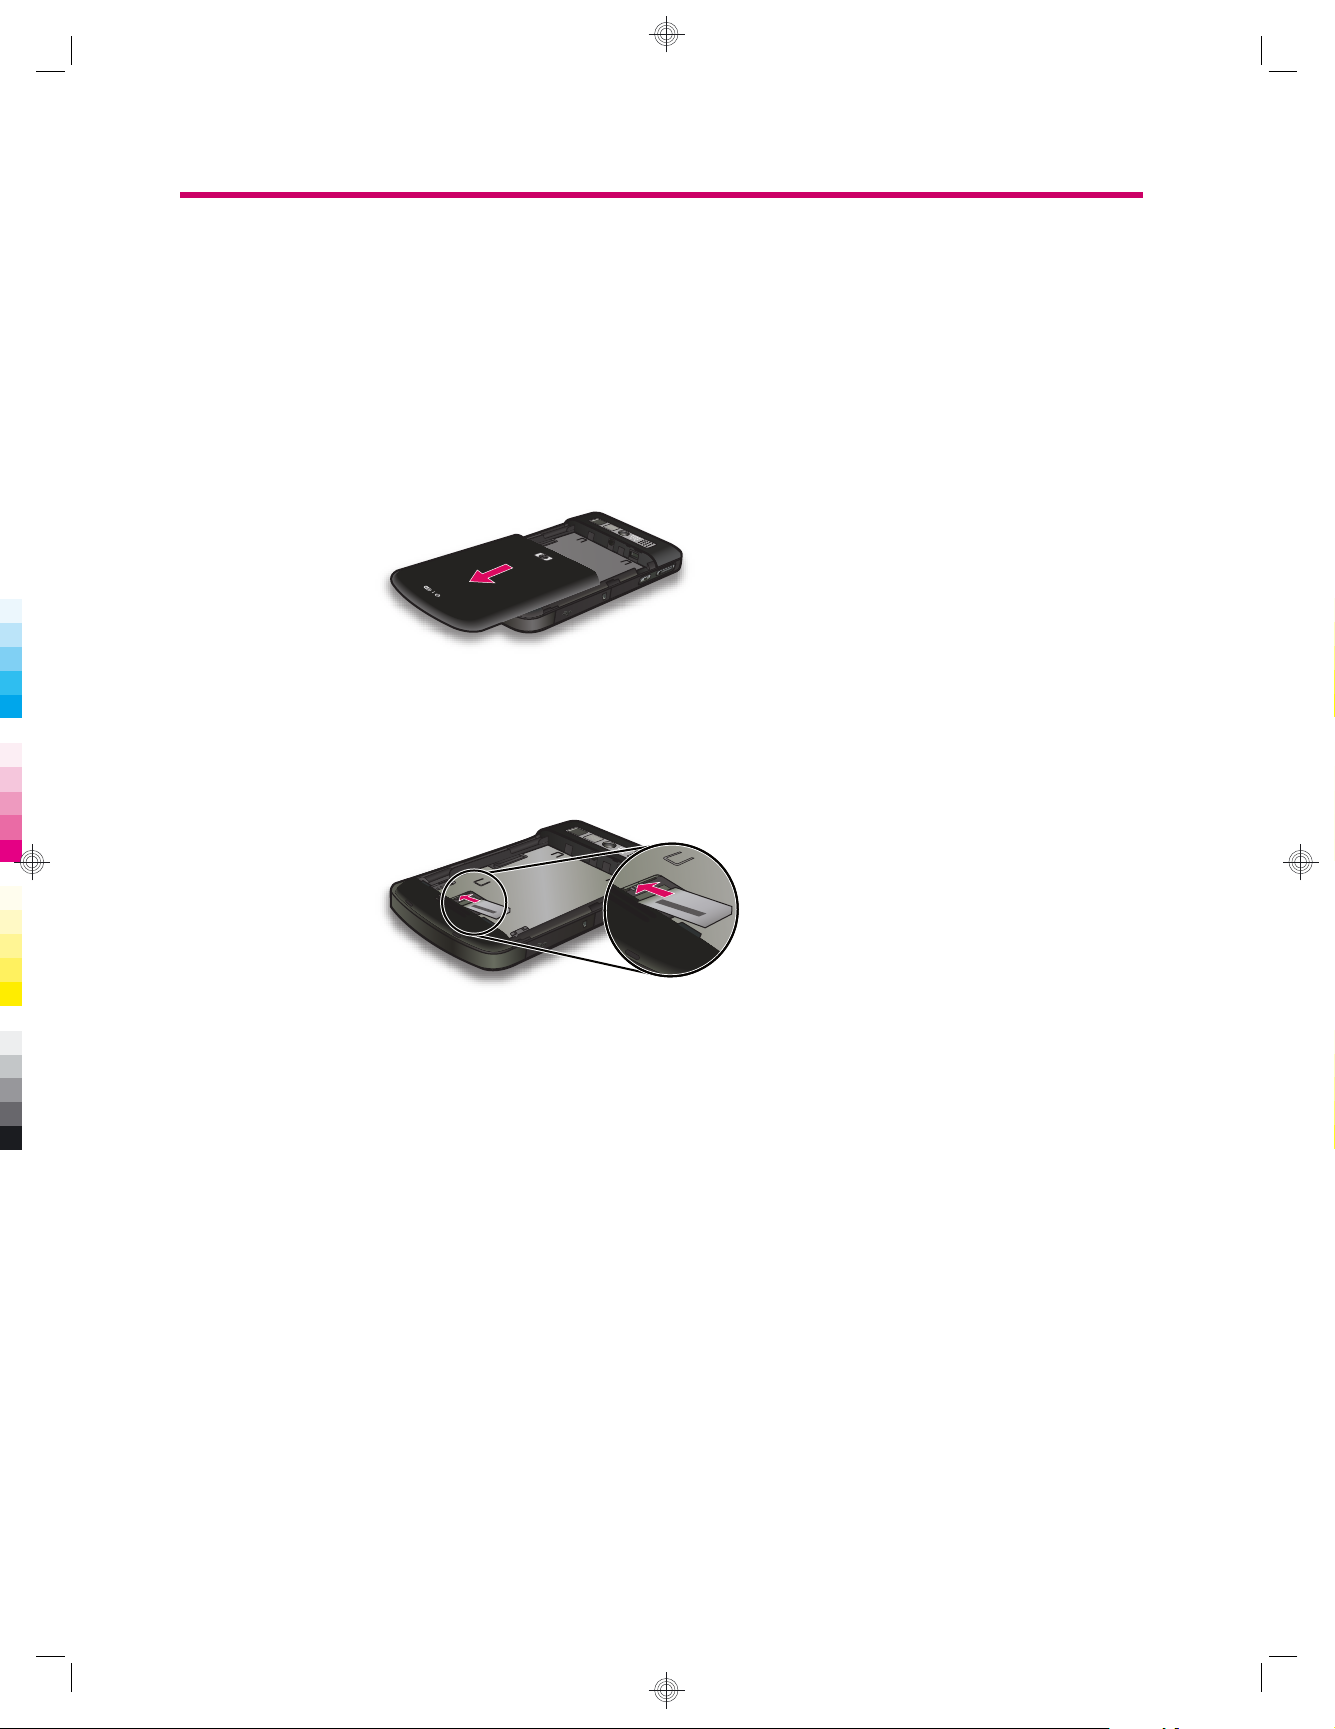
4 Set up your HP iPAQ
Step 1: Remove the battery cover and insert the SIM card
1. Slide the cover down and away from the HP iPAQ.
2. Align the SIM card over the SIM card slot.
Step 1: Remove the battery cover and insert the SIM card 7
Page 20
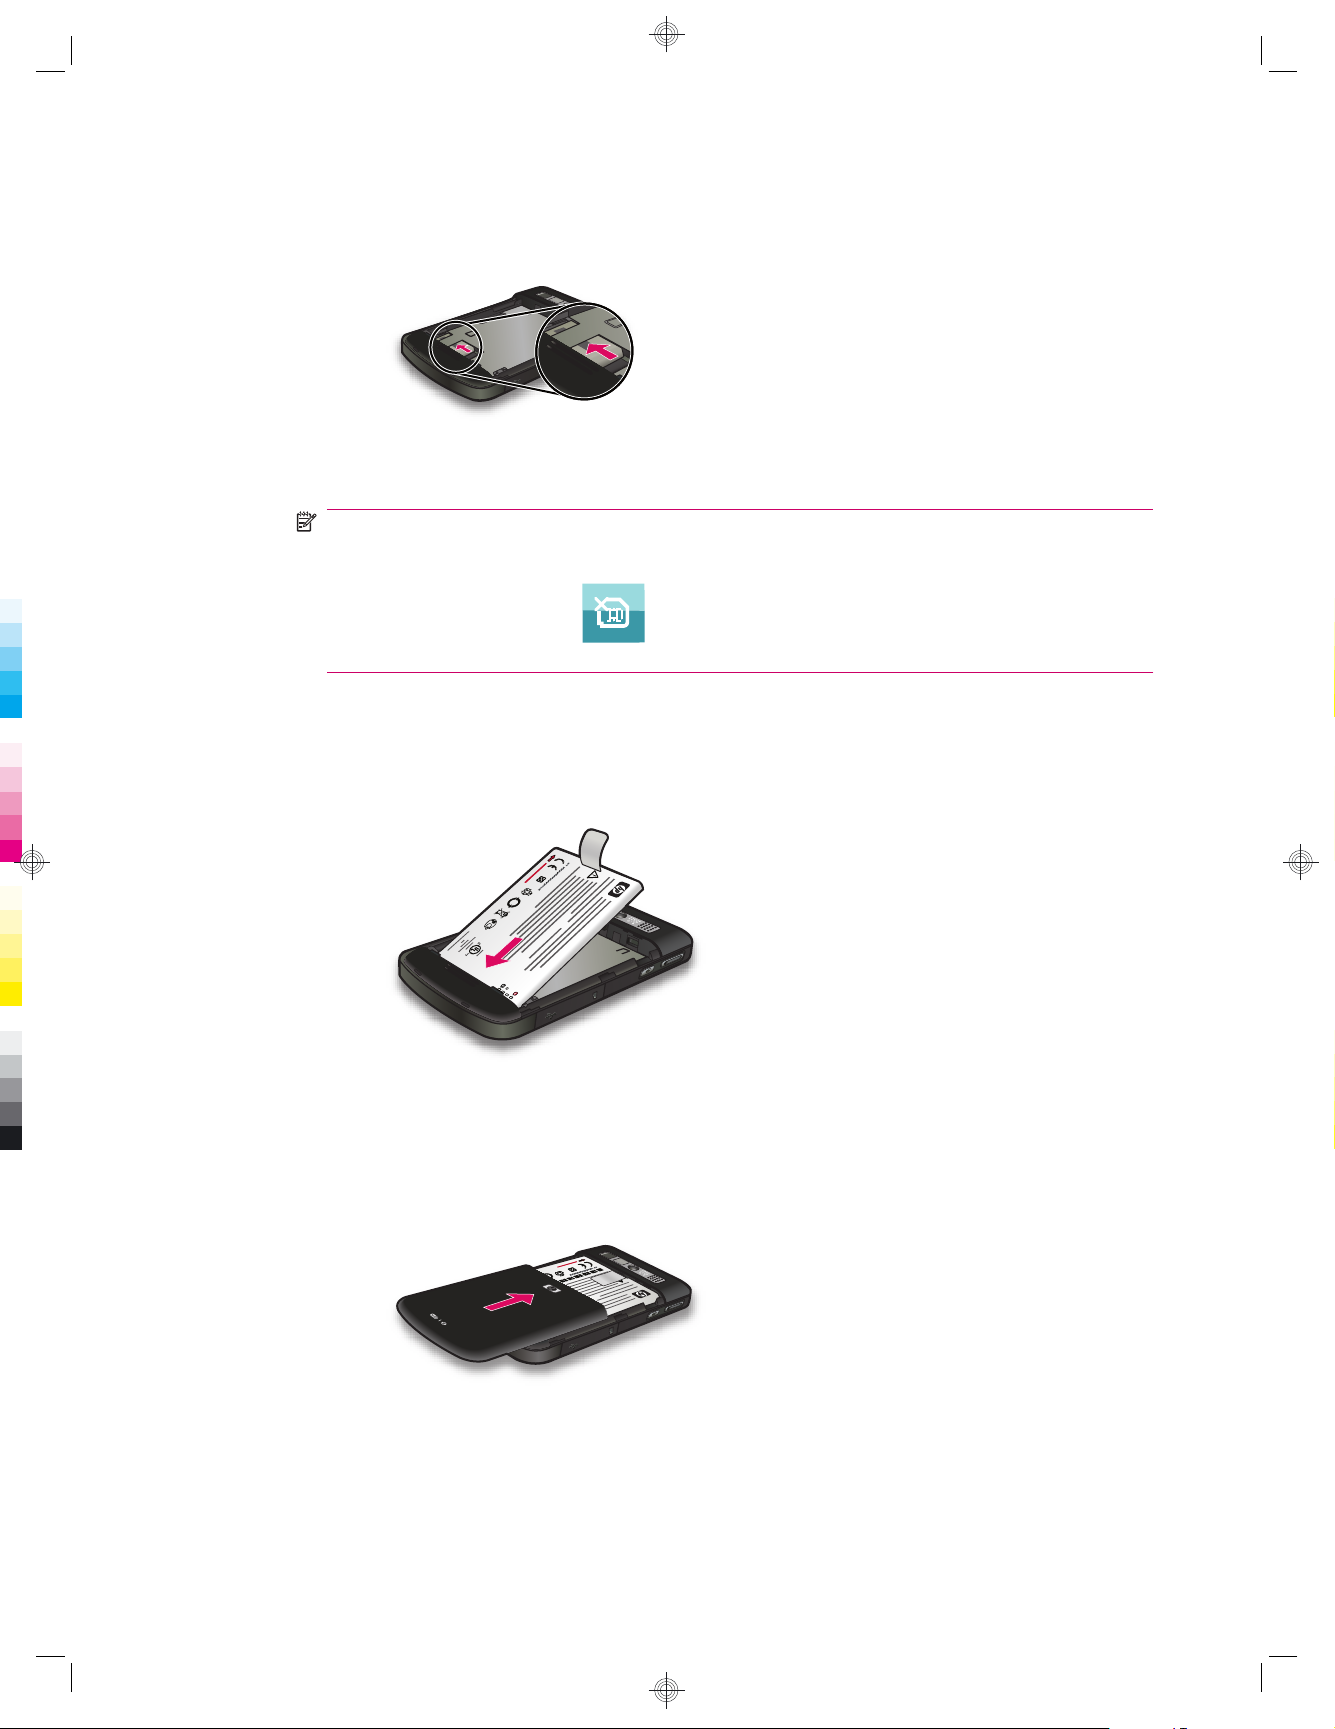
3. Slide the SIM card into the SIM card slot.
NOTE: If the battery is already installed, remove it before inserting the SIM card. The SIM
card is provided by a mobile phone service provider. Also, make sure that the metal contacts
are facing down and the notched corner is in the correct position. If the SIM card is not properly
inserted in the HP iPAQ, the
(No SIM card installed) icon will be displayed on the title
bar located at the top-right corner of the screen.
Step 2: Install the battery and replace the battery cover
1. Align the battery connectors on the battery with the housing pins in the battery compartment,
and insert the battery.
0
89
7
6
5
2. Place the battery cover down and slide up until it locks into place.
8 Chapter 4 Set up your HP iPAQ
Page 21

Step 3: Charge the battery
CAUTION: To avoid damaging your HP iPAQ or the AC adapter, make sure all metal connectors
are properly aligned before connecting.
The battery provides power for your HP iPAQ to operate. Use the AC adapter that comes with your
HP iPAQ to charge the device.
It takes approximately 2-4 hours to fully charge the battery for the first time. Subsequent charging
time might take longer.
To charge the battery:
1. Connect the AC adapter to an electrical outlet.
2. Open the protective flap on the HP iPAQ.
3. Connect the other end of the cable to the mini-USB connector port on your HP iPAQ. The cable
connector only fits one way. If the connector does not insert easily, turn it over.
TIP: You can also charge the battery by connecting your HP iPAQ to a USB port on your
computer using the mini-USB synchronization cable.
To enable USB charging on your HP iPAQ, tap Start > Settings > System > Power > USB
Charging. On the Power screen, select the Use USB Charging check box.
NOTE: Whenever a replacement battery is inserted into your HP iPAQ, press the Power key
for at least two seconds. In case your HP iPAQ does not turn on, connect an AC adapter and
then try turning on your HP iPAQ.
Step 4: Turn on your HP iPAQ
Press and hold the Power key for a few seconds to turn on your HP iPAQ. Next, follow the instructions
on the screen to complete the setup. Use the on-screen keyboard or the QWERTY keyboard to enter
information.
NOTE: The HP iPAQ will take a few minutes for the initial boot up. The keyboard will not be active
during this period.
Step 3: Charge the battery 9
Page 22
Find the serial and model number
Locate the serial and model numbers before contacting HP Customer Support, particularly if you are
calling for in-warranty support.
View the serial and model number by tapping Start > HP Help and Support > Serial and Model
Numbers.
Alternatively, to locate the serial and model number:
1. Remove the battery cover.
2. Remove the battery from your HP iPAQ.
3. Locate the label containing the product ID and serial number on the HP iPAQ.
NOTE: Tap Start > Settings > System > HP Asset Viewer > Identity to view the serial number
and tap Start > Settings > System > HP Asset Viewer > System to view the model number on
your HP iPAQ. For more information, see
HP Asset Viewer on page 102.
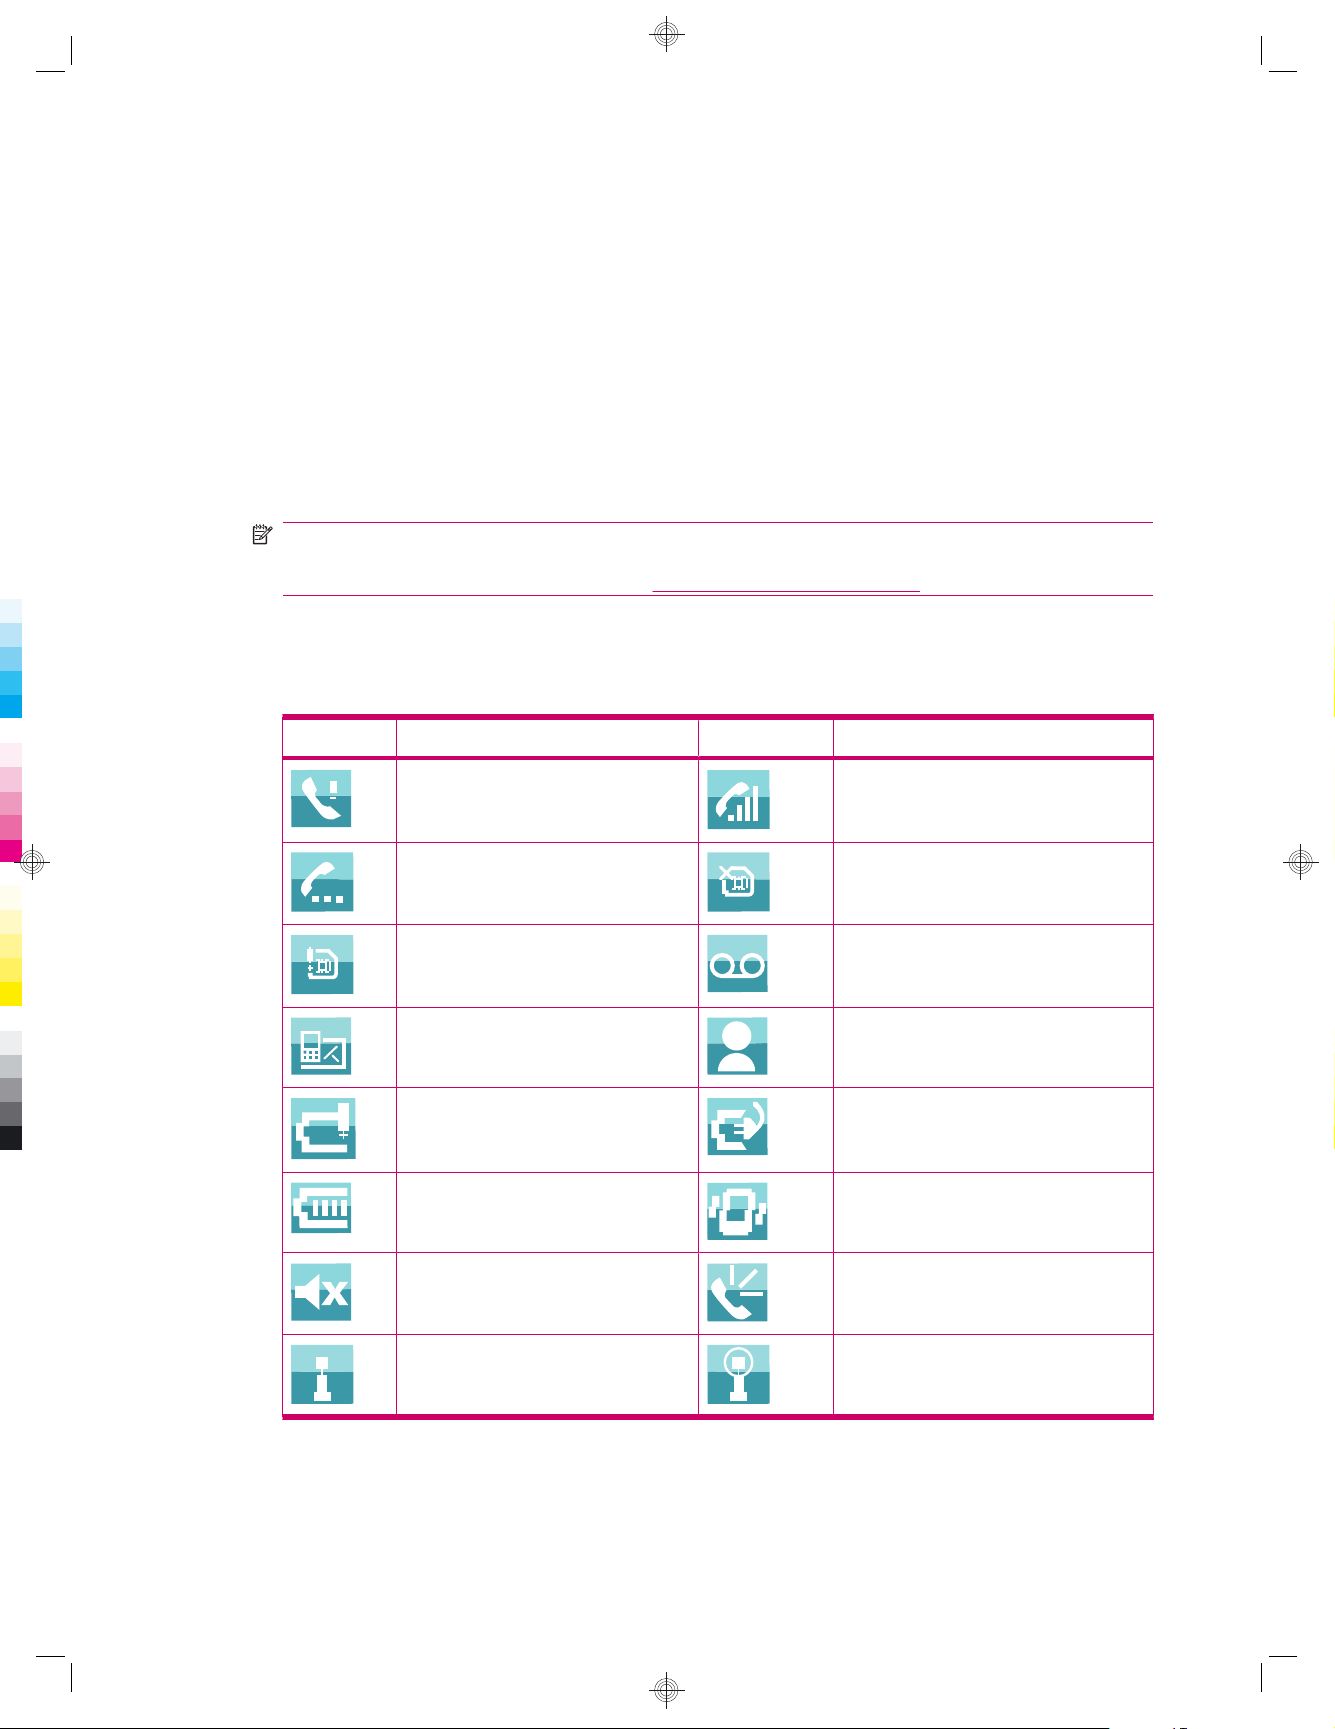
Status icons
The following table lists the common status indicators and their meanings.
Icon Status Icon Status
Missed call Voice call active
Call on hold No SIM card installed
SIM card fault New Voice mail
New e-mail or SMS Instant message received
Battery level low Battery charging
Battery level Silent/Vibrate mode on
Ringer off Speaker phone on
Wi-Fi on Wi-Fi on and network detected
10 Chapter 4 Set up your HP iPAQ
Page 23
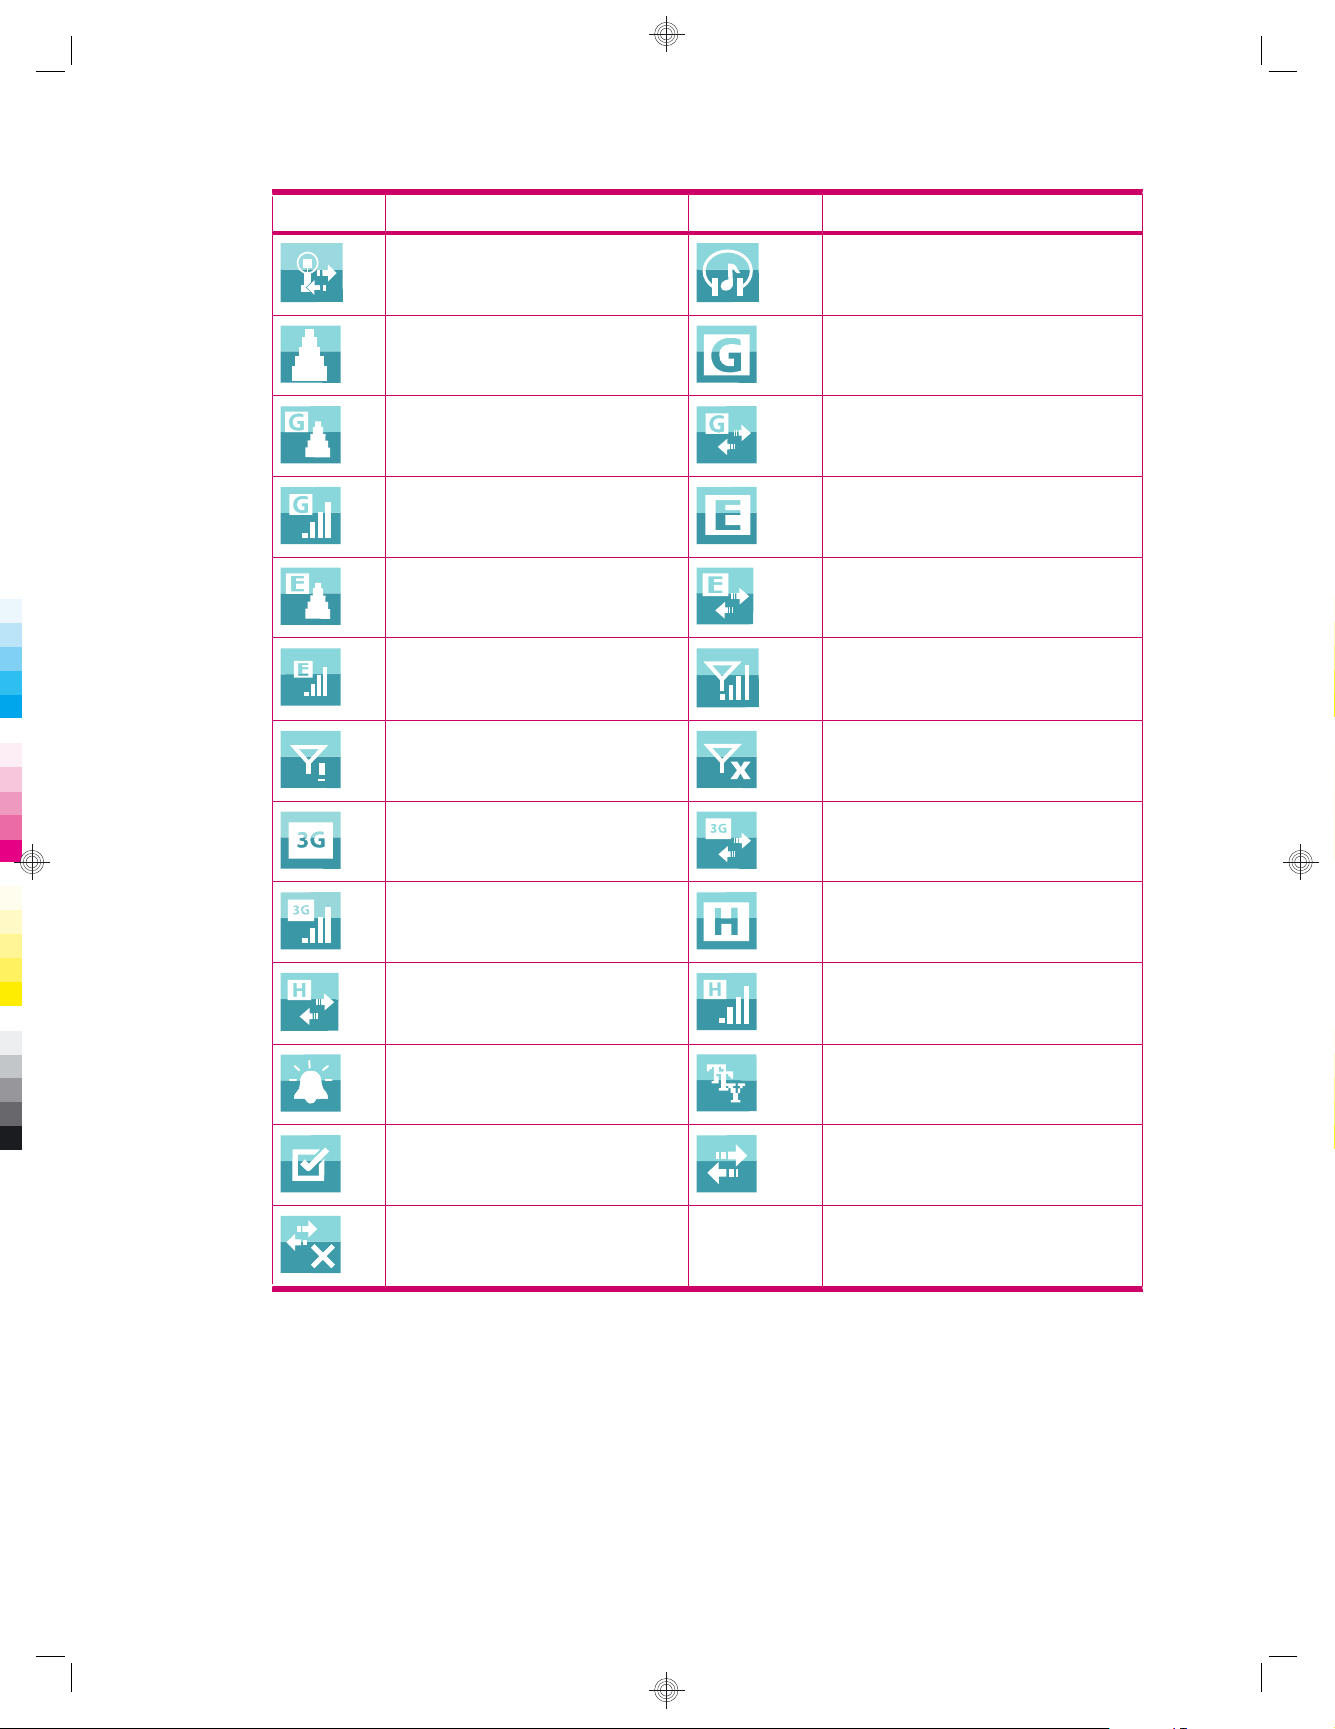
Icon Status Icon Status
Wi-Fi connected Bluetooth stereo headset detected
Roaming General Packet Radio Service (GPRS)
available
GPRS available in roaming GPRS connecting
GPRS in use Enhanced Data Rates for GSM Evolution
(EDGE) available
EDGE available in roaming EDGE connecting
EDGE in use GSM service only
Phone connection unavailable or
network error
3G service available 3G connecting
3G in use High Speed Download Packet Access
HSDPA connecting HSDPA in use
Alarm reminder TTY on
Notification received ActiveSync connected
ActiveSync inactive
Radio off
(HSDPA) service available
Status icons 11
Page 24

5 Learn the basics
Get started with your HP iPAQ by learning the basic functions such as knowing the Today screen,
entering text, and synchronizing data. You can use the Getting Started application to learn to
perform frequently used tasks. To open the application, tap Start > Programs > Getting Started,
and then tap the task that you want to learn.
The Today screen
The Today screen displays the date and time and provides a quick status of the upcoming
appointments, your current profile, and the number of unread text messages. At the top of the
Today screen, connectivity icons, volume indicator, battery indicator, and clock are displayed.
To customize the Today screen:
1. Tap Start > Settings > Personal > Today.
2. On the Appearance tab, select the required theme for the background of the Today screen.
3. On the Items tab, select the items to appear on the Today screen.
TIP: To move the order in which the items appear, tap Start > Settings > Personal > Today. On
the Items tab, tap an item to select it, and then tap Move Up or Move Down.
NOTE: There are two default softkeys at the bottom of the Today screen: Internet Explorer
and Contacts. On the Today screen, the Internet Explorer softkey is also the Notification softkey.
Any type of alert, such as a meeting reminder, is displayed on the Today screen as a notification.
Enter text
Based on your preference, you can use the on-screen keyboard or a handwriting recognition feature
such as Block Recognizer, Keyboard, Letter Recognizer, or Transcriber to enter text.
NOTE: Transcriber is not available in all countries/regions.
To enter text:
1. Tap Start > Settings > Personal > Input.
2. On the Input Method tab, select a text input method and change options as appropriate.
3. Tap ok.
You can now go to a program (such as Notes) and start entering text.
Text-Input Method Definition
Block Recognizer Use a single stroke to write letters, numbers, symbols, and
Keyboard Tap keys on the keyboard to enter text.
punctuation marks that get converted into typed text.
12 Chapter 5 Learn the basics
Page 25

Text-Input Method Definition
Letter Recognizer Write individual letters, numbers, and punctuation marks
Transcriber Write in cursive, print, or mixed handwriting (consisting of
TIP: Change the text-input method from within any program by tapping the (Input
selector) arrow and selecting an input method.
Label Description
ABC Press a text-entry key on the keyboard to enter the desired
123 Enter numbers and symbols using this mode.
Customize your HP iPAQ
that are converted into typed text.
both cursive and print), and convert your writing into typed
text.
NOTE: This feature might not be available in all countries/
regions.
character.
Modify device name
The device name is used to identify the HP iPAQ in the following situations:
Synchronizing with a computer
●
Connecting to a network
●
NOTE: If you synchronize multiple devices with the same computer, each device must have a
unique name.
To change the device name:
1. Tap Start > Settings > System > About > Device ID.
2. Enter a name for the device. The device name must begin with a letter, consist of letters from
A to Z, numbers from 0 to 9, and the special character underscore (_). The device name cannot
contain spaces.
To get detailed information about your HP iPAQ:
Tap Start > Settings > System > About.
▲
The Version tab displays important device information, including the type of processor and the
amount of memory installed.
Enter owner information
You can enter your personal information, such as your name and address, so that the HP iPAQ can
be returned to you if it is lost.
Customize your HP iPAQ 13
Page 26

To enter owner information:
1. Tap Start > Settings > Personal > Owner Information.
2. On the Identification tab, enter your personal information.
TIP: You can edit the owner information directly from the Today screen. To be able to do so, you
need to select the Owner Information check box while customizing the Today screen. For more
information, see
The Today screen on page 12.
Change the regional settings
The style in which regions, numbers, currency, time, and date are displayed is specified in regional
settings.
To change the regional settings:
1. Tap Start > Settings > System > Regional Settings > Region.
2. Select a region. The region you select determines the options available on the other tabs.
3. To customize additional settings, tap the appropriate tabs and select the required options.
On the Region tab, select the required region display options.
●
On the Number tab, select the required number display options.
●
On the Currency tab, select the required currency display options.
●
On the Time tab, select the required time display options.
●
On the Date tab, select the required date display options.
●
Adjust the volume
You can change the volume for various sounds, such as the sound you hear when you tap program
names and menu options.
To adjust volume:
1.
Tap the
2. Move the system volume slider on the screen using the stylus or the scroll wheel of your
HP iPAQ to the required volume level.
3. To mute system sounds, tap Off.
You can also set a specific sound for a specific event.
To set sounds:
1. Tap Start > Settings > Personal > Sounds & Notifications.
2. On the Sounds tab, choose how you want to be notified by selecting the appropriate check
boxes.
3. On the Notifications tab, in the Event list, tap an event name, and then choose how you want
to be notified by selecting the appropriate check boxes. You can choose from several options,
such as a special sound, a message, or a flashing light.
(Speaker) icon at the top of the screen.
NOTE: Turning off sounds and the LED notification helps conserve battery power.
14 Chapter 5 Learn the basics
Page 27

Change the power management settings
To change the power management settings:
1. Tap Start > Settings > System > Power.
2. Tap Advanced and select the length of time the HP iPAQ stays on when using battery power
or AC power.
Customize screen settings
You can customize your HP iPAQ screen settings. You can correct screen tap and alignment
problems, soften the fonts, and adjust the text size.
To correct screen alignment:
1. Tap Start > Settings > System > Screen > General.
2. Tap Align Screen.
3. Follow instructions on the screen.
4. Tap ok.
To soften fonts:
1. Tap Start > Settings > System > Screen > ClearType.
2. Select the Enable ClearType check box.
3. Tap ok.
To adjust text size:
1. Tap Start > Settings > System > Screen > Text Size.
2. Move the slider on the screen to set the required text size.
NOTE: The default text size is set to large.
3. Tap ok.
Dim or adjust the brightness of the backlight
You can set the backlight to dim after a specified amount of time has elapsed.
To dim the backlight after a certain time:
1. Tap Start > Settings > System > Backlight.
2. Tap Battery Power or External Power.
3. Select the backlight options of your choice.
You can also increase or decrease the brightness of the backlight.
To adjust the brightness of the backlight:
1. Tap Start > Settings > System > Backlight > Brightness.
2. Move the slider on the Backlight screen to set the required level of brightness.
Install and remove programs
You can install or remove programs on your HP iPAQ.
Customize your HP iPAQ 15
Page 28

To install programs:
1. Use the WMDC or ActiveSync (WMDC for Windows Vista and ActiveSync for Windows XP) to
connect your HP iPAQ to your computer.
2. Follow the instructions in the installation wizard provided with the program you want to install.
3. Check the screen of your HP iPAQ to see if any further steps are necessary to complete the
program installation.
To remove programs:
1. Tap Start > Settings > System > Remove Programs.
2. Select the program you want to remove, and then tap Remove.
NOTE: You can remove programs you install on your HP iPAQ, however, you will be unable
to remove programs that were installed when you purchased your HP iPAQ.
By removing a program from your HP iPAQ, you might increase available memory on the
HP iPAQ. You can also remove unused programs from your HP iPAQ to increase the available
memory.
If programs are lost from your HP iPAQ for any reason, most of them can be re-installed using the
synchronization software. On your computer, open the synchronization software, click Tools > Add/
Remove Programs > check the program to be added > click OK. Check the screen of your HP iPAQ
to see if any further steps are necessary to complete the program installation.
Open and close programs
You do not need to exit a program to open another or to conserve memory. The system manages
memory automatically.
To open a program, tap Start, and then tap the program you want from the list. If you do not see the
program you want, tap Start > Programs.
In most cases, programs automatically stop to free required memory. However, you can choose to
close programs manually.
To close programs manually:
1. Tap Start > Programs > Task Manager.
2. Tap the program you want to close, and then tap End Task.
Set alarms and clocks
You can change time and set alarms on your HP iPAQ.
To set time:
1. Tap Start > Settings > System > Clock & Alarms > Time.
2. Select Home to set the time zone, local time, and date when you are in your home country.
Select Visiting to set these options while traveling.
To set alarm:
1. Tap Start > Settings > System > Clock & Alarms > Alarms.
2. Tap <Description> to enter a name for the alarm.
16 Chapter 5 Learn the basics
Page 29

3. Tap the day of the week for the alarm. You can select multiple days by tapping each required
day.
4. Tap the time display that appears near the alarm name, and then set the time for the alarm.
5.
Tap the
sound.
6. If you choose to play a sound, tap the list next to the Play sound check box, and then tap the
sound you want to set.
(Alarm) icon to specify the type of alarm. You can choose single sound or a repeating
Use shortcut menus
A shortcut menu is displayed when you tap and hold an item. This menu displays the most common
commands for a specific item. For example, you can delete an appointment or send a text message
to a contact by using commands on a shortcut menu. When the shortcut menu is displayed, tap the
action you want to perform.
To close a shortcut menu without performing an action, tap anywhere outside the menu.
Display the clock in the title bar
When viewing certain programs, the clock might not be displayed in the title bar. You can set your
HP iPAQ to display the clock in the title bar.
To display the clock in the title bar of all programs:
1. Tap Start > Settings > System > Clock & Alarms.
2. On the More tab, tap to select the Display the clock on the title bar in all programs check
box.
Create and assign a category
In the Calendar, Contacts, and Tasks programs, you can use categories to organize and group
your appointments, contacts, and tasks.
To create and assign a category:
1. Open the required program, select an existing item or create a new one.
2. Do one of the following:
For an existing item in Calendar, open the appointment and tap Menu > Edit >
●
Categories.
For an existing item in Tasks, open the task and tap Edit > Categories.
●
For an existing item in Contacts, open the contact and tap Menu > Edit > Categories.
●
NOTE: To assign a category to a contact, the contact needs to be saved in the phone
memory.
For a new item in Calendar, Contacts, and Tasks, create the item, and then select
●
Categories.
3. Select the required check box (Business, Holiday, Personal, or Seasonal) and then tap ok
to assign the category.
4. Tap ok to return to the appointment, task, or contact.
Customize your HP iPAQ 17
Page 30

NOTE: To create a new category, tap New and assign a name to the category for a contact, task,
or an appointment. The new category is assigned automatically to the item.
Adjust the speed for scrolling through items in a list
To change the speed at which scrolling occurs:
1. Tap Start > Settings > Personal > Buttons > Up/Down Control.
2. Under Delay before first repeat, move the slider to reduce or increase the time that elapses
before scrolling begins.
3. Under Repeat rate, move the slider to change the time it takes to scroll from one item to the
next.
View the Operating System (OS) information
You can view details like OS information, processor, memory, and expansion slot on your HP iPAQ.
To view the operating system information on your HP iPAQ:
Tap Start > Settings > System > About.
▲
The OS version is displayed on the screen.
Protect your HP iPAQ with a password
You can secure data on your HP iPAQ by setting a password. Each time you turn on your HP iPAQ,
you will be prompted to enter the password to unlock it. You can also lock your screen to prevent
key press while traveling.
To enable password protection:
1. Tap Start > Settings > Personal > Lock.
2. Select the Prompt if device unused for check box. Then, select the amount of time your
HP iPAQ should remain unused before you are prompted to enter the password.
3. In the Password type list, select the type of password you would like to use. Next, enter the
password, and then confirm the password.
4. On the Hint tab, enter a phrase to help you remember your password. Make sure that your hint
does not allow others to guess your password. The hint is displayed after the wrong password
is entered five times in a row.
5. Tap ok and when prompted, tap Yes. The next time your HP iPAQ is unused for the specified
amount of time, you are prompted to enter your password.
TIP: Use the same steps as above to change or reset your password.
To disable password protection:
1. Tap Start > Settings > Personal > Lock.
2. Enter your password and then tap Unlock.
3. Clear the Prompt if device unused for check box.
4. Tap ok and then tap Yes.
18 Chapter 5 Learn the basics
Page 31

Using device lock
The device lock feature allows you to lock your HP iPAQ to prevent any accidental key press when
travelling. This feature allows you to quickly lock and unlock your HP iPAQ, from the Today screen,
without a password.
NOTE: If this feature is not displayed on the Today screen, tap Start > Settings > Personal >
Today > Items, select the Device Lock check box, and then tap ok.
To lock your HP iPAQ:
On the Today screen, tap Device unlocked.
▲
To unlock your HP iPAQ:
1. Tap Unlock at the bottom-left corner of the screen or press the left softkey.
2. Tap Unlock at the center-right corner of the screen.
TIP: If you decide to keep your HP iPAQ locked, tap Cancel or press the left softkey.
Battery saving tips
You can adjust the settings on your HP iPAQ to fit your individual needs and to help your battery last
as long as possible between charges. Here are some recommendations to conserve battery life:
Connect to AC power – Leave your HP iPAQ connected to AC power at all possible times
●
when not using it. HP also offers a variety of accessories to keep your HP iPAQ charged when
you are out of the office for extended time periods. These include the mini-USB synchronization
cable and travel adapter.
Important: Always use original HP batteries and chargers to charge your HP iPAQ.
Disable Sounds – Every time you are notified of an event, battery power is consumed. Tap
●
Start > Settings > Personal > Sounds & Notifications to turn off any unnecessary
notifications.
Auto Turn Off the Backlight – Tap Start > Settings > System > Backlight. Specify a short
●
amount of wait before turning off the backlight. On the Battery Power tab, set Turn off
backlight if device is not used for to 10 seconds.
Turn off Bluetooth and Wi-Fi – Always turn off Bluetooth and Wi-Fi when not in use. To turn
●
off Bluetooth and Wi-Fi, tap Start > Settings > Connections > Wireless Manager, and then
tap the respective option to turn it off.
Reduce push e-mail synchronization frequency – Every time your HP iPAQ uses push
●
e-mail to send and receive e-mail, your HP iPAQ drains the battery. You should increase the
duration between synchronization cycles to reduce the number of times your HP iPAQ syncs
with the e-mail server. To change the duration, see
on page 60.
Adjust ActiveSync settings – When ActiveSync receives updates, it uses your HP iPAQ's
●
cellular radio to connect to an Exchange Server, which consumes battery power.
To check the battery power, tap Start > Settings > System > Power or tap
the Today screen.
Change e-mail download options
(Battery) icon on
NOTE: In case of a battery drain out, you will lose any unsaved data on your HP iPAQ. Please
ensure that your HP iPAQ is adequately charged at all times.
Using device lock 19
Page 32

WARNING! Removing the battery from your HP iPAQ before turning it off might corrupt data on
your HP iPAQ.
20 Chapter 5 Learn the basics
Page 33

6 Use your Business Messenger
Use the Keyboard
Answer/Send key
Press the (Answer/Send) key to access the Dialer screen as well as make and receive calls.
End key
Press the (End) key to end a call and quit the Dialer screen. You can press this key to wake up
your HP iPAQ from the suspend mode.
Enter key
Select an application and then press the (Enter) key to open an application on any screen. You
can also make a call or move to the next line while entering text by pressing the
Backspace key
Press the (Backspace) key to backspace and clear text or characters one at a time. When
browsing, when the cursor is not in the input field, pressing this key takes you to the previous Web
page.
Softkeys
Press the left softkey to open the Pocket Internet Explorer application and the right softkey to open
Contacts.
QWERTY keyboard
(Enter) key.
The QWERTY keyboard allows you to enter text. The alphabets are arranged using the QWERTY
format that is similar to a computer keyboard.
Use the Keyboard 21
Page 34

Pressing a key allows you to enter the respective character. To enter characters in uppercase, press
the
enable caps lock. The on-screen keyboard displays the
characters will be entered in uppercase. Press the
toggle back to enter lowercase characters.
Some keys have characters marked as superscript. To enter the superscript character, you need to
press the
lock. The on-screen keyboard displays the
superscript characters will be entered. Press the
toggle back to enter main characters.
Press the
Enter a character and repeatedly press the
character entered.
(Shift) key, and then press the required alphabet key. Press the (Shift) key twice to
Scroll wheel
Use the scroll wheel to navigate through on-screen menus, play songs, change settings, and view
information. Press the scroll wheel to select an application. You can also use the scroll wheel to
increase or decrease the speaker volume during a call by moving it up and down.
(Shift lock) icon to indicate that
(Shift) key once to disable caps lock and
(Fn) key, and then the required key. Press the (Fn) key twice to enable function
(Function lock) icon to indicate that
(Fn) key once to disable function lock and
(Tab) key to enter a tab space.
(Sym) key to cycle through special symbols for the
Check connection and signal strength
When you slide your SIM card into your HP iPAQ, your unit automatically connects to your mobile
phone service provider's network. The
connected. The more the vertical bars, the better the connection.
(Signal strength) icon indicates that you are
Call features
Use the call features on your HP iPAQ to make a call, answer a call, put a caller on hold, access
speed dial, and access voice mail.
Make a call
To make a call:
1. Press the
2. Use the Dialer screen to enter the number you want to call.
3. Tap Talk.
TIP: You can also make a call by dialing the numbers using the keyboard, and then pressing the
(Enter) key.
(Answer/Send) key.
22 Chapter 6 Use your Business Messenger
Page 35

Answer a call
To answer a call, press the (Answer/Send) key.
When you receive a call, you can answer or ignore the call. When the phone stops ringing, the caller
might be sent to Voice mail, depending on the settings provided by your mobile phone service
provider. To ignore the call, tap Ignore on the Dialer screen or press the
Call waiting
Use call waiting to be notified of incoming calls when you are on another call.
To turn on call waiting:
(End) key.
1. Press the
2. Tap Menu > Options… > Services.
3. Tap Call Waiting > Get Settings…
4. Under When calls are waiting, tap Notify me.
To use call waiting to answer an incoming call during a phone conversation:
1. Press the
2. Press the
to answer the call.
3. Tap Swap to switch between the calls.
(Answer/Send) key.
(Answer/Send) key to move the current phone call to call waiting.
(Answer/Send) key to answer the incoming call or tap Ignore if you do not want
Redial a number
To redial the last number, press the (Answer/Send) key twice.
Call a contact
You can call a number stored in the contact list. As you enter a contact's name, the HP iPAQ searches
the Contacts, Call History, Speed Dial lists, and the SIM card to find a matching name and number.
Make a call from the Today screen
To make calls from the Today screen:
1. Use the keyboard to enter the contact name.
2. In case there is more than one contact with the same name, scroll to select the required contact.
3. Press the
(Answer/Send) key to make the call.
Make a call from Contacts
You can select a person's name from your contacts list and press the (Answer/Send) key to place
a call. If a contact has more than one phone number, such as Work, Home, and Fax, do the following:
Call features 23
Page 36

To make calls from the contacts list:
1. From the Today screen, tap Contacts or press the right softkey.
2. Scroll to the contact name.
3. Scroll to the required number and press the
place a call.
TIP: If you have a long list of contacts, enter the first few letters of a contact's name. Your
HP iPAQ searches the entire contact's list to display the name. You can also tap the letter
groups at the top of the contact list, to see the contacts in that letter group.
Make emergency calls
You can make calls to emergency service numbers, even if you have locked the SIM card and/or the
HP iPAQ. Your service provider programs one or more emergency phone numbers, such as 911 or
112, which you can call under any circumstances, even when your HP iPAQ is locked or the SIM
card is not inserted.
To dial an emergency number:
1. Press the
NOTE: You need to turn on the phone before you make any emergency calls. To turn the
phone on, tap the
2. Use the keyboard to dial the local emergency number.
3. Press the
NOTE: Emergency numbers vary by country/region. Your HP iPAQ's preprogrammed emergency
number(s) might not work in all locations, and sometimes an emergency call cannot be placed due
to network, environmental, or interference issues.
(Answer/Send) key.
(Answer/Send) key to place the call.
(Answer/Send) key or tap the contact twice to
(Wireless Manager) icon, and then tap Phone.
Make calls using speed dial
You can dial phone numbers quickly by assigning speed dial numbers. You can choose speed dial
entries from 2-99. The speed dial entry 1 is often reserved to set up or dial your Voice mail after the
initial setup.
NOTE: The Speed Dial feature is available only for phone numbers stored in the contact's list.
To create a speed dial shortcut:
1. Press the
2. Tap Menu > New.
3. Tap the contact and select a speed dial number from 2-99 in the Location box and tap ok.
NOTE: You can also assign speed dial by tapping Contacts on the Today screen or pressing the
right softkey, select a contact and tap Menu > Add to Speed Dial…
TIP: You can also assign speed dial numbers to Web addresses and e-mail addresses that are
stored in the Contacts on your HP iPAQ.
(Answer/Send) key > Speed Dial.
24 Chapter 6 Use your Business Messenger
Page 37

To make a speed dial call:
1. Press the
2. Use the keyboard to press and hold the number you assigned as a speed dial entry. For two-digit
speed dial numbers, press the first digit, release it, and then press and hold the second digit of
the number.
Voice mail
To call Voice mail:
1. Press the
2. Use the keyboard to press and hold 1 to automatically call Voice mail.
NOTE: You might need to set up the Voice mail shortcut. For more information, see Set up
Voice mail or text messaging center number on page 30.
Handsfree function
You can turn the speaker on during a call to use the handsfree function.
On the Dialer screen, tap Speaker On to turn the earpiece off.
▲
Make data calls
Use the options available by tapping Start > Settings > Connections > Connections to set up
General Packet Radio Service (GPRS), dial-up, Virtual Private Network (VPN), proxy, and Wi-Fi
connections to connect to the Internet or your corporate network. With a data connection, you can
browse the Web, download e-mail, or synchronize with a server without using cables.
(Answer/Send) key.
(Answer/Send) key.
Network connection time is the elapsed time from the moment you connect to your service provider's
network to the moment you end the data call by pressing the
signals and ringing. The amount of network connection time you track on your reset timer might not
equal the amount of time for which you are billed by your service provider. For billing information,
please contact your service provider.
NOTE: Your HP iPAQ is preconfigured for you to browse and chat. Contact your service provider
for information on mobile Internet plans, configuring e-mail, or wireless synchronization with a server.
Mute a call
You can mute the microphone during an active call. When you mute a call, the microphone is
switched off. This will prevent the person you are talking to from hearing what you say. However,
this will not prevent you from hearing the caller/recipient.
To mute the microphone during a call:
1. Tap Mute on the Dialer screen.
2. To disable the mute option, tap Unmute on the Dialer screen.
(End) key. This time includes busy
Call features 25
Page 38

Put a call on hold
During a call, you can put the call on hold and dial another number or answer an incoming call. If
you have more than one call on the line, you can switch between calls.
To put a call on hold, tap Hold.
●
To switch between calls, tap Swap.
●
NOTE: The Swap feature is available only if a call has already been placed on hold.
These buttons are available only on the Dialer screen.
Make a conference call
To make a conference call:
1. Press the
2. Use the Dialer screen to dial the required number.
3. Tap Talk.
4. Once you are connected, tap Hold.
5. Dial the second number, and then tap Talk.
6. Once you are connected, tap Menu > Conference.
NOTE: To add more parties to the conference call, dial each number, connect, and then tap
Menu > Conference.
(Answer/Send) key.
Make a call from a hyperlink phone number
Use a hyperlinked phone number to quickly dial a phone number from an e-mail or text message. A
hyperlinked phone number is underlined in the same manner as a Web site address.
From an e-mail or text message containing a hyperlinked phone number:
1. Tap the phone number.
2. Tap Talk to dial the number.
Dial international numbers
To make an international call, enter a country code before the phone number:
1. Press the
2. On the Dialer screen, tap and hold 0 until the plus (+) sign displays.
3. Enter the country code and phone number.
NOTE: You can also insert a plus (+) sign into a contact's phone number for quick dialing.
26 Chapter 6 Use your Business Messenger
(Answer/Send) key.
Page 39

Call history
Manage calls using call history
Call history provides the time and duration of all incoming, outgoing, and missed calls, a summary
of total calls, and provides easy access to notes taken during a call.
1. Press the
calls.
2. Tap Menu > Filter and select a different view to change the call history view.
NOTE: Tap Menu > Call Timers… to view call durations. The All Calls timer cannot be reset.
3. Tap Call History > Menu > Delete All Calls to clear the entire call history.
(Answer/Send) key > Call History to view the history of all dialed and received
Make calls using call history
Use call history to quickly call someone whom you recently called or someone who recently called
you.
To make calls using call history:
1. Press the
2. On the Dialer screen, tap Call History.
3. Tap the required number twice or tap Call to place a call.
(Answer/Send) key.
View call details
To view call details:
1. Press the
(Answer/Send) key.
2. On the Dialer screen, tap Call History.
3. Tap the phone number of the contact to view the details.
The date and timestamp, as well as the duration of the call, are displayed.
Voice commands
Use voice commands to look up contacts, dial a contact by name, get calendar information, play and
control your music, and launch applications on your HP iPAQ.
Press the Voice Commander button on the left panel (second button from the top) of your HP iPAQ
to launch the Voice Commander application. Wait for the audio cue to say Say command, and then
begin by saying a command into the microphone.
NOTE: You can also launch the Voice Commander by pressing the hook switch on your HP iPAQ
headset.
To Say
Call a contact saved in the contact list Call followed by the name of the contact and home/work/
Call the last number dialed Redial/Callback
mobile
Call history 27
Page 40

To Say
Dial a number using speed dial Speed Dial followed by the digit assigned to the number
Compose a message, e-mail, or audio e-mail Compose <SMS/email/audio email> To (Contact)
Read messages or e-mails Read <SMS/email>
Check Voice mail or call history Call voice mail/Call history
View appointments <Today's/Tomorrow's/This Week's appointments> to list
the appointments for the day, next day, or the present week
Schedule a call Schedule A Call To (Contact) to call a contact
Create reminders or to record an audio note Reminder/Start recording
Find a contact saved in the contact list Find followed by the name of the contact
View the current time What time is it?
Open an application Start followed by the application name
Play, pause, and/or resume music Play Music/Pause/Resume
Play an existing music file Play followed by the name of the music file
Play the previous or the next song in the playlist Previous/Next
View the different set of commands What can I say?
Close the Voice Commander application Goodbye
Change the SIM PIN
For security purposes, the SIM PIN protects your HP iPAQ against unauthorized access. You can
assign a password to protect your HP iPAQ and information. Your first PIN comes from your wireless
service provider.
To change the SIM PIN:
1. Press the
2. Tap Menu > Options…
3. Under Security, tap Change PIN.
4. Enter your old PIN.
5. Tap Enter.
6. Enter and confirm your new PIN.
7. Tap ok.
To enter a PIN before you make calls, check Require PIN when phone is used.
NOTE: Emergency calls can be placed at any time, without entering a PIN.
To remove the SIM PIN:
1. Enter the PIN to access your HP iPAQ.
(Answer/Send) key.
2. Press
(Answer/Send) key on the keyboard.
28 Chapter 6 Use your Business Messenger
Page 41

3. Tap Menu > Options… > Security.
4. Clear the Require PIN when phone is used check box and tap ok.
Change service settings
Change phone service settings
Once your phone service is set up through your mobile phone service provider, you can change
service settings on your HP iPAQ. For example, you might want to block certain types of incoming
and/or outgoing calls, forward incoming calls to a different phone number, be notified of incoming
calls when you are already in a phone session, or let others know your identity when making calls.
To change phone service settings:
1. Press the
2. On the Dialer screen, tap Menu > Options… > Services.
3. Tap the service you want to change, and then tap Get Settings…
4. Make appropriate changes and tap ok.
NOTE: Some of these services might be charged, please contact your service provider for more
details.
Forward calls
If you do not wish to receive calls on your HP iPAQ, you can forward the calls to some other number
of your choice.
To set call forward:
1. Press the
2. Tap Menu > Options… > Services.
3. Tap Call Forwarding > Get Settings…
4. Select the Forward all incoming phone calls check box.
5. Enter the phone number that is to receive the forwarded calls.
You can set numbers for the following:
(Answer/Send) key.
(Answer/Send) key.
6. Tap ok.
Call waiting
You can enable or disable call waiting to be notified of incoming calls when you are on another call.
To set call waiting:
1. Press the
2. Tap Menu > Options… > Services.
No answer – phone cannot be answered.
●
Unavailable – phone is off.
●
Busy – line is busy.
●
(Answer/Send) key.
Change service settings 29
Page 42

3. Tap Call Waiting > Get Settings…
4. Select the setting you require:
Select Notify me to enable call waiting.
●
Select Do not notify me to disable call waiting.
●
5. Tap ok.
Configure caller ID
Configure caller ID to enable the telephone network to display your identity on the recipient's caller
ID display.
To configure caller ID:
1. Press the
2. Tap Menu > Options… > Services.
3. Tap Caller ID > Get Settings…
4. Select who do you want your identity displayed to and then tap ok.
To prevent your identity from being displayed to others, tap No one.
(Answer/Send) key.
Block calls
If you do not wish to receive calls from certain numbers, you can block the numbers on your HP iPAQ.
To block calls:
1. Press the
2. Tap Menu > Options… > Services.
3. Tap Call Barring > Get Settings…
4. Select the type of calls you want to block and then tap ok.
(Answer/Send) key.
Set up Voice mail or text messaging center number
To use Voice mail or send text messages (SMS), enter the correct Voice mail or text message phone
number in phone settings.
NOTE: Sending text messages is not included in all network service plans. Ask your mobile service
provider if your plan includes this service.
To set up Voice mail or text messaging center number:
1. Press the
2. Tap Menu > Options… > Services.
3. Tap Voice Mail and Text Messages > Get Settings…
4. Enter the Voice mail or text message center number in the appropriate box.
5. Tap ok.
If you do not know the correct Voice mail or text message phone numbers, contact your mobile phone
service provider.
30 Chapter 6 Use your Business Messenger
(Answer/Send) key.
Page 43

Change network settings
Change phone network settings
In phone network settings, you can:
View available wireless phone networks.
●
Determine the order in which your phone accesses other phone networks (if the current one is
●
unavailable).
Specify whether you want to change networks manually or automatically.
●
To change network settings:
1. Tap Start > Settings > Personal > Phone > Network.
2. Select the network setting options you want to change.
NOTE: Some of these services might not be available, please contact your service provider for
more details. The current phone network your HP iPAQ is using is listed at the top of the screen and
remains active until you change it, lose your signal, or change your SIM.
View available phone networks
To view all mobile phone networks available to you:
1. Press the
2. Tap Menu > Options… > Network.
3. In the Network selection list, tap Manual.
4. Select a network from the list.
5. Tap OK.
6. Tap ok.
(Answer/Send) key.
Set preferred networks
You can set preferred phone networks in the order you want your HP iPAQ to access them. For
example, if your first preferred network is unavailable, your HP iPAQ tries to access your second
preferred phone network.
To assign network preferences:
1. Press the
2. Tap Menu > Options… > Network.
3. Tap Set Networks and select your preferred networks.
4. To set the network preference order, tap Move Up or Move Down.
5. Tap ok.
(Answer/Send) key.
6. In the Network screen, tap the Network selection list.
7. Tap Automatic.
Change network settings 31
Page 44

Manually select a phone network
Sometimes you might want to control costs by knowing when connectivity for your current, selected
network is unavailable.
To manually select a network:
1. Press the
2. Tap Menu > Options… > Network.
3. In the Network selection list, tap Manual.
4. Select the network you want to use, and then tap OK.
5. If your current network is unavailable, tap Select, and then manually select a different network.
(Answer/Send) key.
Change the ring tone and ring type
Change the ring tone and type to select a different sound to notify you of incoming calls.
To change ring tone and ring type:
1. Press the
2. On the Dialer screen, tap Menu > Options… > Phone.
3. Tap the Ring type or Ring tone list.
4. Select the sound you want to use.
(Answer/Send) key.
Take notes during a call
To create a note during a call:
1. During a call, tap Menu > Create Note.
2. Enter your text.
3. Tap ok.
To access a note you created during a call:
1. Press the
2. On the Dialer screen, tap Call History.
3. Tap and hold the name or number for the phone call entry containing the note.
4. Tap View Note.
A note created during a call can also be accessed from the Notes application. The note title is the
contact name or the phone number you were connected to when writing the note.
(Answer/Send) key.
Select a frequency band automatically
Your HP iPAQ has an integrated GSM/GPRS/EDGE feature that supports four different frequency
bands (850/900/1800/1900) for international roaming. Your HP iPAQ also supports WCDMA/HSDPA
in three different frequency bands (850/1900/2100). When traveling between countries and/or
wireless network operators, this feature automatically changes the connection settings for frequency
bands if the home band is unavailable. This feature is the default setting on the HP iPAQ.
32 Chapter 6 Use your Business Messenger
Page 45

NOTE: Your HP iPAQ might take several minutes, depending on the environment, to connect to
the network for the first time when roaming in another country.
To avoid problems once you are out of the country, follow these tips before you leave:
Visit your mobile phone service provider's Web site to see if their service is available where you
●
are traveling.
Verify if your mobile phone account is set up for international roaming and if additional charges
●
apply.
Copy all contacts from your HP iPAQ to a SIM
When using the SIM card in multiple devices, you can copy contacts from your HP iPAQ to a SIM.
1. From the Today screen, tap Contacts or press the right softkey.
2. Tap Menu > Copy to SIM.
3. Tap OK to copy the contacts or Cancel to go back to the previous screen.
4. From the Today screen, tap Contacts or press the right softkey and search for the added
contacts to verify if you copied the contacts to your SIM.
Copy all contacts from a SIM to your HP iPAQ
When using multiple SIM cards with your HP iPAQ, you can copy contacts from a SIM to your
HP iPAQ.
1. From the Today screen, tap Contacts or press the right softkey.
2. Tap Menu > Copy from SIM.
3. Tap OK to copy the contacts or Cancel to go back to the previous screen.
4. From the Today screen, tap Contacts or press the right softkey and search for the added
contacts to verify if you copied the contacts to your HP iPAQ.
Add Tele-typewriter (TTY) functionality
Add TTY functionality for people who are hearing impaired or
hard-of-hearing
HP iPAQ products support Tele-typewriter (TTY) functionality, which allows people who are hearing
impaired or with hearing limitations to communicate using existing telephony infrastructure, including
cell phones. To achieve this, separately purchased TTY devices must be connected to the
telephones on both ends of a telephone call session, and the HP iPAQ must be configured for TTY
use. The sending TTY device generates a distinct audio tone for every supported character, and
these tones are decoded and converted back into text on the receiving TTY device.
Due to the use of audio compression codecs in modern digital cell phones, these TTY audio tones
might be unintentionally distorted while being transmitted through cell phones. Therefore, in order
for TTY devices to continue to work in cellular networks, the cell phone must be set into a mode that
optimizes the compression codec to handle TTY tones instead of the human voice.
To use TTY with the HP iPAQ, an optional TTY audio adapter must be plugged into the HP iPAQ
headset connector. This TTY audio adapter converts the pin-out of the headset connector, which is
designed for a wired ear bud and stereo headphones, to the pin-out required by most TTY devices.
Copy all contacts from your HP iPAQ to a SIM 33
Page 46

To purchase the TTY audio adapter (part number: FA709BAC3), visit http://www.hp.com, and then
go to Home and Home office > Handhelds & Calculators > iPAQ accessories.
NOTE: As the HP iPAQ does not support internal Cellular Text Telephone Modem (CTM)
conversion, the TTY device you use must contain CTM conversion, or you must use an external CTM
adapter between the HP iPAQ and the TTY device.
For information on connecting TTY devices or CTM adapters to the HP iPAQ, refer to the TTY device
or CTM adapter manufacturer’s documentation.
HP is committed to developing products, services, and information that are accessible to everyone,
including people with disabilities or age-related limitations. For more information, visit
http://www.hp.com/accessibility.
Enable TTY support
NOTE: Before enabling TTY support on the HP iPAQ, connect a headset into the headset
connector or the setting reverts back to disabled. For example, plug in the optional TTY audio adapter
into the ear bud jack first, as described below. Once you enable TTY support, you can remove the
headset and TTY remains enabled on the HP iPAQ until you disable it.
To enable TTY support:
1. Connect the TTY device to the TTY audio adapter.
2. Connect the TTY audio adapter to the headset connector on the HP iPAQ.
3. Press the
4. Tap Menu > Options… > TTY.
TIP: You can also enable TTY by tapping Start > Settings > Personal > Phone > TTY.
5. Select the TTY Mode option.
6. Select the required TTY mode:
Default: The default mode uses text for incoming and outgoing communication.
●
VCO: The Voice carry over mode uses text for incoming communication and audio for
●
outgoing communication.
HCO: The Hearing carry over mode uses audio for incoming communication and text for
●
outgoing communication.
7.
Tap ok. The
in TTY audio mode.
8. Connect the optional TTY device cable to the TTY audio adapter as stated in the TTY
manufacturer’s documentation.
NOTE: Do not activate TTY audio mode while a telephone call is already in progress.
(Answer/Send) key on the front of the HP iPAQ to launch the Dialer screen.
(TTY) icon displays in the Navigation bar when it is enabled. Now you are
34 Chapter 6 Use your Business Messenger
Page 47

Make a phone call using the TTY enabled HP iPAQ
To make a phone call using the TTY enabled HP iPAQ:
1. Press the
2. Dial the phone number of the person you are trying to reach who also has a Tele-typewriter
(TTY) device connected to his phone. If you are asked if you want to turn on the phone, tap
Yes.
NOTE: Install a SIM card before making your first phone call.
3. When the phone call is answered, start typing on the TTY keyboard.
The letters typed into the TTY device are turned into electrical signals that travel over regular
telephone lines. When the signals reach their destination (another TTY device), they are
converted back into letters that appear on a display screen, are printed on paper, or both.
When you have finished typing your phone conversation, the person on the other end of the
line might begin typing their answers or comments to you.
4. To end the phone call, press and hold the
NOTE: If a normal headset is connected while TTY support is enabled, the audio quality might
decrease. Also, if you make a phone call using a Bluetooth headset while in TTY mode and insert a
plug into the headset connector, TTY audio mode activates thereby reducing the quality of voice
calls.
(Answer/Send) key.
Disable TTY support
To disable TTY support:
(End) key.
1. Press the
2. Tap Menu > Options… > TTY.
TIP: You can also disable TTY by tapping Start > Settings > Personal > Phone > TTY.
3. Select the Disable HAC & TTY option.
4. Tap ok.
NOTE: If you plan to use the HP iPAQ in both normal and (TTY) audio mode, HP recommends
disabling TTY support when the HP iPAQ is not being used for TTY to allow the special network
resources to be used by others.
(Answer/Send) key to launch the Dialer screen.
Add Hearing Aid Compatibility (HAC) functionality for people who use
hearing aids
Your HP iPAQ product supports the Hearing Aid Compatibility (HAC) functionality, which helps
people who use hearing aids to hear audio output. When this feature is enabled, the HP iPAQ
transmits magnetic signals in addition to audio signal. These magnetic signals allow people using
hearing aids to hear the audio signals better.
NOTE: You need to ensure that your hearing aid is HAC-compatible. You also need to ensure that
your handsfree or headphones used, if any, are HAC-compatible.
Add Tele-typewriter (TTY) functionality 35
Page 48

Enable HAC support
To enable HAC support:
1. Press the
2. Tap Menu > Options… > TTY.
TIP: You can also enable HAC by tapping Start > Settings > Personal > Phone > TTY.
3. Select the HAC Mode option.
4. Tap ok.
Disable HAC support
To disable HAC support:
1. Press the
2. Tap Menu > Options… > TTY.
TIP: You can also disable HAC by tapping Start > Settings > Personal > Phone > TTY.
3. Select the Disable HAC & TTY option.
4. Tap ok.
Voice notes
The voice notes application allows the user to record audio notes. You can create a stand-alone
recording, which is recording a note without actually writing it, or you can add a recording to a note.
(Answer/Send) key to launch the Dialer screen.
(Answer/Send) key to launch the Dialer screen.
Create voice notes
You can create stand-alone recording (voice note) or add a recording to a note using the notes
application.
To create a stand-alone recording (voice note):
1. Tap Start > Programs > Notes.
2.
From the note list, tap the
NOTE: If the Recording toolbar does not appear, tap Menu > View Recording Toolbar.
3. Speak into the microphone.
4.
When you have finished recording the note, tap the
To add a recording to a note:
1. Tap Start > Programs > Notes.
2.
Create or open a note, and then tap the
NOTE: If the Recording toolbar does not appear, tap Menu > View Recording Toolbar.
3. Speak into the microphone.
4.
When you have finished recording the note, tap the
(Record) icon.
(Stop) icon on the Recording toolbar.
(Record) icon.
(Stop) icon on the Recording toolbar.
36 Chapter 6 Use your Business Messenger
Page 49

NOTE: If you are recording in an open note, the (Voice Note) icon is displayed in the note. If
you are creating a stand-alone recording, the
the note in the note list.
You can also create a voice note using the HP Photosmart Mobile application and attach the note
to a picture.
Delete voice notes
To delete a stand-alone recording voice note:
1. Tap Start > Programs > Notes.
2. From the note list, tap and hold the note.
3. Tap Delete.
To delete a recording within a note:
1. Tap Start > Programs > Notes.
2. Open a note.
3.
Select the
dots appear and before they form a complete circle, quickly drag across the icon.
4.
Tap and hold the
(Recorded Voice Note) icon is displayed next to
(Voice Note) icon. To select the icon, tap and hold next to the icon. As soon as
(Voice Note) icon.
5. Tap Clear.
Listen to voice notes
To listen to voice notes:
1. Tap Start > Programs > Notes.
2.
Tap the
(Recorded voice note) icon to hear the note.
Rename voice notes
To rename voice notes:
1. Tap Start > Programs > Notes.
2. Tap and hold the note to rename.
3. Tap Rename/Move.
4. Enter the new name in the Name box.
5. Tap ok.
Configure channels
Enable this feature to receive real-time news and information such as traffic news and weather
reports. Check with your mobile phone service provider for availability in your area.
Configure channels 37
Page 50

To configure the phone broadcast channels:
1. Tap Start > Settings > Personal > Phone > More.
2. Select the Cell Broadcast check box.
3. Tap Setting…
4. Tap Add…, and then enter the channel name and number.
5. Tap ok.
Notes
You can store information in the form of notes on your HP iPAQ.
Write a note
To write a note:
1. Tap Start > Programs > Notes.
NOTE: You can press and hold the Voice Commander button on the left panel (second button
from the top) of your HP iPAQ to launch the Notes application. Writing must be selected as the
default input mode.
2. Tap New.
3. Write your text on the screen.
4. When finished, tap ok to return to the note list.
To select handwritten text, tap and hold next to the writing. As soon as dots appear and before they
form a complete circle, quickly drag across the writing.
If a letter crosses three ruled lines, it is treated as a drawing rather than text.
Create a copy of a note
To create a copy of a note:
1. Tap Start > Programs > Notes.
2. Open the note you want to copy.
3. Select the text on the screen, tap Menu > Copy.
4. Open the required note from the note list or a new note to which the selected content is to be
copied.
5. Tap Menu > Paste.
If you paste the contents in a new note, a copy of the note displays in the note list.
Reset your HP iPAQ
You might need to reset your HP iPAQ if it does not respond to your pressing a button or tapping on
the screen. The three types of resets are soft, hard, and clean.
38 Chapter 6 Use your Business Messenger
Page 51

Perform a Hard Reset
A hard reset stops all running applications, but does not erase any programs or saved data. A hard
reset also resets all hardware registers. Be sure to save any unsaved data within a running
application before performing a hard reset.
NOTE: You can also use these steps to perform a soft reset.
To perform a hard reset:
1. Locate the recessed Reset button at the top of your HP iPAQ.
2. Use the stylus to lightly press the Reset button.
3. Release the Reset button.
The HP iPAQ resets and powers on.
Perform a Factory Reset
A factory reset clears all user-installed settings, programs, and data, and it restores your HP iPAQ
to factory settings.
To perform a factory reset:
1. Turn off your HP iPAQ.
2. Press the ok button located on the right side of the unit and the Voice Commander button
located on the left side of the unit.
3. Keeping the ok and the Voice Commander buttons pressed, use the stylus to lightly press the
Reset button.
4. Release the Reset button.
5. Release the ok button and the Voice Commander button when Clean Boot is displayed on
the screen.
NOTE: You can also tap Start > Settings > System > Factory Recovery, and then follow the
on-screen instructions.
Reset your HP iPAQ 39
Page 52

The HP iPAQ restarts and powers on.
CAUTION: If you perform a factory reset, you will lose all the data stored on your HP iPAQ, except
the data in iPAQ File Store.
40 Chapter 6 Use your Business Messenger
Page 53

7Camera
With the built-in 3 megapixel camera, you can record video clips, take pictures, view, and save them
on your HP iPAQ.
NOTE: The camera is not available on all models.
Use the camera
Use the built-in camera on your HP iPAQ to capture and view photos.
Capture photos
You can capture photos and store them in your HP iPAQ or storage card.
NOTE: You cannot use the camera if the battery power is less than 20%.
To capture photos:
1. Press the Camera key or tap Start > Programs > Camera.
2. Press the navigation key down to zoom in and up to zoom out.
NOTE: You will not be able to use these keys to zoom in or out when the camera is used with
3M resolution.
3. Press the navigation key left to increase brightness and right to decrease brightness.
4. Press the Camera key to capture a photo and automatically save it in File Explorer > My
Documents > My Pictures.
NOTE: Tap the (Flash) icon to enable flash while taking pictures.
View photos
To view photos captured on your HP iPAQ:
1. Tap Start > HP Photosmart Mobile.
2. Browse to the required photo.
3. Tap twice to view the photo.
Camera settings
To set up the camera settings, tap Start > Programs > Camera. Tap the (Settings) icon.
Use the camera 41
Page 54

Basic settings
You can set basic options for the camera. The settings on the Basic tab can be applied while taking
photos and also while recording video clips.
Enable Shutter Sound – Select this option to enable the shutter sound while clicking photos.
●
Photo File Prefix – Specify a prefix name for the photos you click.
●
Video File Prefix – Specify a prefix name for the video clips you record.
●
Save file to – Specify a location on your HP iPAQ where you want to store your images and
●
videos.
You can use additional features, such as White Balance, Effect, Contrast, Brightness, Hue,
Saturation, Flicker, and Sharpness, to enhance the appearance of your photos or videos.
Photo settings
Tap the Photo tab, to configure the required settings for capturing photos.
Capture Mode – Enables you to change the mode for capturing photos.
●
◦
Normal – Align the focus rectangle with your object and press the Camera key located on
the right-hand side of your HP iPAQ. When the focus rectangle turns green, press the
Camera key again to capture the photo.
NOTE: This is the default mode for capturing photos.
Timer – Use this mode to capture self portraits. After you press the Camera key, a time
◦
delay of 10 seconds will be displayed in the focus rectangle.
Burst – Use this mode to capture a set of 5 photos by pressing and holding the Camera
◦
key.
Panorama horizontal – Use this mode to create horizontal panoramic images, such as
◦
vast landscapes and city skylines. Press the Camera key to shoot the leftmost photo first.
When shooting the next photo, 1/3 of the previous photo is displayed on the left side of the
screen. This helps match the previous photo when capturing the next photo. After capturing
all photos, tap the
Panorama vertical – Use this mode to create vertical panoramic images, such as
◦
monuments and tall structures. Press the Camera key to shoot the top photo first. When
shooting the next photo, 1/3 of the previous photo is displayed on the top of the screen.
This helps match the previous photo when capturing the next photo. After capturing all
photos, tap the
Resolution – Select a resolution for your photos from the available options: QVGA – 320 X
●
240, VGA – 640 X 480, 1M – 1280 X 960, 1.3M – 1280 X 1024, 2M – 1600 X 1200, and 3M –
2048 X 1536.
Photo Quality: Select the quality of the photo as Low, Normal, or High.
●
Video recorder
(Stitch) icon to stitch them.
(Stitch) icon to stitch them.
Record videos
You can use the built-in camcorder on your HP iPAQ to create short videos and share them with
your friends and family.
42 Chapter 7 Camera
Page 55

To record videos:
3M
1. Tap Start > Programs > Camera.
2.
Tap
3. Press the Camera key to start recording. Press the Camera key again to stop recording.
Video settings
To configure settings for recording videos:
1. Tap Start > Programs > Camera.
2.
Tap the
3. Tap the Video tab.
4. Configure the following settings:
●
●
●
●
(Video) icon to go into the video mode.
(Settings) icon.
Video Format – Select the video format.
Resolution – Select a resolution for your videos from the available options: QCIF(176 X
144) or QVGA(320 X 240).
Record Voice – Select this check box to record audio along with the video.
Fit to MMS – Select this check box to ensure that the recorded video does not exceed the
file size that an MMS can hold.
Options for camera and video recorder
Icon Description
Device – This icon displays the number on the left top corner of the screen that indicates how
many photos you can save to the current storage device. The storage devices available are phone
memory and external storage card.
Flash off – Tap to turn the flash on.
Flash on – Tap to turn the flash off.
Resolution – Tap to change the resolution.
Exit – Tap to exit the application.
HP Photosmart Mobile – Tap to launch HP Photosmart Mobile to view the captured photos.
Video – Tap to switch to the camera mode.
Settings – Tap to change the settings.
Zoom – Move the slider to zoom out or zoom in.
NOTE: You need to tap the screen while capturing photos to view the Zoom slider.
You will not be able to use these keys to zoom in or out when the camera is used with 3M resolution.
Options for camera and video recorder 43
Page 56

Icon Description
Transfer images
Brightness – Move the slider to adjust the brightness.
NOTE: You need to tap the screen while capturing photos to view the Brightness slider.
Panorama – This icon is displayed while capturing panorama photos.
Stitch – Tap to stitch the photo into a panorama after capturing a set of photos in the
Panorama modes.
Photo – Tap to return to the capture mode and capture new photos.
Send As – Tap this icon to select an account and e-mail captured photos.
Delete – Tap to delete the current photo.
HP Photosmart Mobile – Tap to launch HP Photosmart Mobile and view the captured photos.
Play – Tap to play current video clips.
You can Stop, Pause, or Play the video by tapping on the control icons. The time bar shows the
playback progress.
Use GPRS
When the phone radio is turned on for the first time, the HP iPAQ DataConnect application detects
the mobile phone service provider and automatically populates the MMS settings on the HP iPAQ.
NOTE: You need a data-enabled SIM installed in your HP iPAQ.
To transfer pictures using MMS:
1.
Press the
2. Tap Select.
3. Tap Insert picture/video and then tap the picture or the video you want to attach.
4. Specify the recipient's details in the To field.
5. Tap Send.
Use Bluetooth
You can do the following to transfer images from your HP iPAQ to other devices:
To transfer images using Bluetooth:
1. Tap Start > HP Photosmart Mobile.
2. Scroll and select a picture.
(Messaging) key > Text/MMS Messages > Menu > New > MMS.
3. Tap View.
4. Tap Menu > Send… > Bluetooth.
44 Chapter 7 Camera
Page 57

5. Tap Next.
6. Select the device and tap Tap to send.
NOTE: Your Bluetooth connection should be switched on to transfer images.
Transfer images 45
Page 58

8Storage cards
Use storage cards
Use optional storage cards for:
Expanding the memory of your HP iPAQ
●
Storing pictures, video clips, music, and applications
●
NOTE: Storage cards are not included with your HP iPAQ, and must be purchased separately.
For more information about storage cards, visit http://www.hp.com/go/ipaqaccessories.
Insert a storage card
To insert a storage card:
1. Open the cover protecting the storage card slot.
2. Slide the storage card in the MicroSD slot with the metal area inserted first and facing the rear
of the HP iPAQ.
46 Chapter 8 Storage cards
Page 59

3. Push the card in the slot to lock it in place.
4. Close the cover protecting the storage card slot.
If you have trouble inserting a storage card, try the following:
Make sure you are not inserting the card at an angle.
●
Make sure you are inserting the metal area first and it should face the rear of the HP iPAQ.
●
Remove a storage card
To remove a MicroSD storage card from the storage slot on the HP iPAQ:
1. Close all programs that are using the storage card.
2. Press and hold the Power key to turn off your HP iPAQ.
3. Open the cover protecting the storage card slot.
Remove a storage card 47
Page 60

4. Push the card in the slot to unlock the card.
5. Remove the storage card from the storage card slot.
6. Close the cover protecting the storage card slot.
View contents of a storage card
Use File Explorer to view the files that are located on your optional storage card.
To view contents of a storage card:
1. Tap Start > Programs > File Explorer.
2. Tap Up, and then select the storage card folder to see a list of files and folders.
48 Chapter 8 Storage cards
Page 61

If the HP iPAQ does not recognize your storage card, try the following:
Install any drivers that came with the storage card.
●
Reset the HP iPAQ by using the stylus to lightly press the Reset button.
●
NOTE: Make sure that you save your data before you reset.
View contents of a storage card 49
Page 62

9 Synchronization
Synchronization software
If your computer is running Windows XP or an earlier version, synchronization settings are managed
through Microsoft ActiveSync. Microsoft ActiveSync 4.5 is available on the Getting Started CD. You
can also visit
Microsoft ActiveSync.
If your computer is running Windows Vista, synchronization settings are managed through Windows
Mobile Device Center (WMDC). WMDC 6.1 is available on the Getting Started CD. You can also visit
http://www.microsoft.com/windowsmobile to download WMDC.
NOTE: You must install Microsoft ActiveSync or WMDC on your computer before connecting your
HP iPAQ to the computer.
Copy files
You can copy files to and from the computer using ActiveSync.
To configure your HP iPAQ using the Pocket PC sync setup wizard:
1. Connect your HP iPAQ to the computer using the mini-USB synchronization cable and wait for
the synchronization software to launch (WMDC for Windows Vista and ActiveSync for Windows
XP).
http://www.microsoft.com/windowsmobile for more information or to download
2. Tap Next after the Pocket PC sync setup wizard is displayed.
3. You can select one of the following options:
Select the Synchronize directly with a server running Microsoft Exchange. To do this
●
now, you will need to have the server address and your logon credentials check box
and tap Next. Enter the required information on the screen if you want to configure your
e-mail account using the Exchange Server.
If you want to sync your HP iPAQ to the Outlook e-mail account on your computer, clear
●
the Synchronize directly with a server running Microsoft Exchange. To do this now,
you will need to have the server address and your logon credentials check box, and
then tap Next.
4. Select the item you want to synchronize from the Information Type list and select either
Windows PC (This PC) or Microsoft Exchange from the Source list.
5. Tap Next, and then tap Finish to complete the setup.
To copy files using ActiveSync without using the Pocket PC sync setup wizard:
1. Connect your HP iPAQ to the computer using the mini-USB synchronization cable and wait for
the synchronization software to launch (WMDC for Windows Vista and ActiveSync for Windows
XP).
2. After the Pocket PC sync setup wizard launches, tap Cancel to continue copying files without
using the wizard.
3. On the computer, select Start > All Programs > Microsoft ActiveSync.
50 Chapter 9 Synchronization
Page 63

4. In the ActiveSync window, select Explore.
5. Double-click My Windows Mobile-Based Device and select the files to be copied to or from
your computer.
6. Open Windows Explorer on your computer and locate the files to be copied to or from your
HP iPAQ.
7. Drag and drop the files between your HP iPAQ and the computer. ActiveSync converts the files
so that they can be used by the Office Mobile programs, if necessary.
NOTE: You cannot copy preinstalled files or system files.
To copy files using WMDC:
1. Connect your HP iPAQ to the computer and wait for WMDC to launch automatically.
2. Click File Management to open the Mobile Device folder for your HP iPAQ.
3. In the Mobile Device folder, navigate and select the file that you want to copy on your HP iPAQ
or computer.
Move the files directly into My Documents on your HP iPAQ (or into a folder inside My Documents).
Migrate data from Palm Desktop to Microsoft Windows
Mobile 6.1
If you used a Palm OS based device before purchasing your HP iPAQ, you need to migrate your
data from the Palm Desktop software to Microsoft Windows Mobile 6.1.
To migrate data from Palm Desktop to Windows Mobile 6.1:
1. Ensure that you have Microsoft Outlook 98 or higher installed on your computer.
2. To switch synchronization from the Palm Desktop to Outlook, insert the original CD that came
with your Palm device into your computer's CD ROM drive. From the Discover Your
Handheld screen, select Install Microsoft Outlook Conduits. Alternatively, you can reinstall
the Palm Desktop and HotSynch Manager software from the original CD. During the
configuration process, select I want to sync with Microsoft Outlook.
NOTE: Microsoft Outlook must be set as your default e-mail program to properly synchronize
with the Palm Desktop software. If you need to change your settings, open Microsoft Outlook,
then click Tools > Options > Other tab and check the Make Outlook the default program for
E-mail, Contacts, and Calendar check box. Click Apply > OK, and then restart your computer.
3. Use the HotSynch Manager software located on the original CD that came with your Palm device
to synchronize your Palm information with Outlook. Refer to the instructions that came with your
Palm device for help installing or using HotSynch.
4. When Outlook is synchronized with your Palm device, uninstall Hotsynch from your computer.
Click Start > Control Panel > double-click Add or Remove Programs. Select Palm
Desktop, then click Remove. Follow the on-screen instructions.
5. Insert the Getting Started CD into your computer’s CD-ROM drive and follow the on-screen
instructions to install ActiveSync on your computer and create a partnership between your
HP iPAQ and your computer.
Migrate data from Palm Desktop to Microsoft Windows Mobile 6.1 51
Page 64

Wireless synchronization cost saving tips
How you manage the cost of synchronizing without wires from your HP iPAQ depends on your
priorities.
To Do this
Reduce network connection or data transfer costs Increase the time between scheduled synchronizations, or
synchronize manually. Check the details of your rate plan.
Extend battery life Schedule synchronization less frequently or synchronize
manually.
Keep your information up to date During periods of high mail volume, schedule
synchronization at regular but frequent intervals. During
periods of low mail volume, schedule synchronization as
items arrive.
NOTE: The HP iPAQ power-down timer is reset each time you synchronize. If you schedule a
synchronization interval that is smaller than the time interval set for the HP iPAQ to automatically
power down, the HP iPAQ never turns off to save battery power.
Troubleshoot synchronization issues
Following is a list of symptoms that might indicate synchronization issues for Windows Vista:
WMDC does not launch even after installation.
●
Following is a list of symptoms that might indicate synchronization issues for Windows XP:
●
No ActiveSync tone plays (or a
gray icon displays), and there is no activity in the
ActiveSync window on your computer.
●
ActiveSync tone plays, and the ActiveSync icon on your computer changes to a
green icon. The Retrieving settings message displays on your computer, but the
ActiveSync connection drops prior to establishing the partnership.
●
ActiveSync is searching for a connection but cannot establish one. (The
green icon on
your computer continues to spin.)
Synchronization has been established between your HP iPAQ and computer but connection is
●
dropped. (The
Firewall or other network protection software message box is displayed for ActiveSync to
●
green icon on your computer stops spinning and grays out.)
access the network or Internet.
swirling
52 Chapter 9 Synchronization
Page 65

Following is a list of troubleshooting tips if you experience difficulty while synchronizing your HP iPAQ
and computer. Try the following solutions to troubleshoot any synchronization issues:
Check the OS on your computer before you begin synchronizing information between your
●
HP iPAQ and computer. The synchronization method varies depending on the OS running on
the computer.
If your computer is running Windows XP or an earlier version, synchronization settings are
managed through Microsoft ActiveSync. Microsoft ActiveSync 4.5 is available on the Getting
Started CD. Visit
Microsoft ActiveSync.
If your computer is running Windows Vista, synchronization settings are managed through
Windows Mobile Device Center. Visit
Windows Mobile Device Center.
NOTE: HP does not guarantee the accurate functionality of any third party applications with
Windows Vista.
If you are running ActiveSync 4.5 or later and personal firewall software on your computer,
●
please add ActiveSync to the firewall program's exception list.
(Firewall software, such as Sygate Personal Firewall, TrendMicro PC-cillin Internet Security
2005, Norton Personal Firewall, McAfee Personal Firewall, or Zone Alarm Security Suite might
block synchronization.) Refer to the documentation that came with your firewall program to
determine how to add ActiveSync 4.5 or later to the program's exception list. To further
troubleshoot a firewall application and enable ActiveSync 4.5 or later, visit:
http://www.microsoft.com/windowsmobile.
http://www.microsoft.com/windowsmobile for more information or to download
http://www.microsoft.com/windowsmobile to download
During the ActiveSync installation, if you inadvertently left the Microsoft Exchange Server
●
option box checked and are not planning to connect to an Exchange Server, follow these steps:
Connect your HP iPAQ to your computer. Make sure an ActiveSync connection is
◦
established.
On your computer, click Start > All Programs > Microsoft ActiveSync.
◦
Click Tools > Options.
◦
Clear the boxes for the sync items listed under the Server group.
◦
Select the check boxes under the Computer group for those items you want to
◦
synchronize.
Disconnect your HP iPAQ from your computer and wait for the ActiveSync message confirming
●
that your HP iPAQ is no longer connected. Reconnect your HP iPAQ to your computer. Wait to
see if your HP iPAQ connects to your computer.
On your computer, in ActiveSync application, select File > Connection Settings. Confirm that
●
USB is selected as a potential connection method.
Connect your HP iPAQ to a different USB port on your computer.
●
Check your mini-USB synchronization cable. Consider using another mini-USB synchronization
●
cable if one is available to you.
Try synchronizing via a Bluetooth connection. Refer to the printed or CD-based documentation
●
that came with your HP iPAQ for specific instructions.
Troubleshoot synchronization issues 53
Page 66

Unplug your HP iPAQ from your computer, and then re-connect.
●
Uninstall ActiveSync from your computer and then reinstall it. To uninstall ActiveSync from
●
your computer, click Start > Control Panel > Add or Remove Programs > Microsoft
ActiveSync. Then click Remove > Yes.
After trying the above solutions if you still do not have any success in solving your connection
problem, perform a hard reset on your HP iPAQ using the HP iPAQ Setup Assistant.
You can reinstall your applications on your HP iPAQ after the hard or clean reset is complete by
using ActiveSync on your computer. After your HP iPAQ is synchronized properly, go to
ActiveSync on your computer and select Tools > Add/Remove Programs, and then select any
programs you want to reinstall.
Customized links in WMDC
After connecting your HP iPAQ to a Windows Vista system using WMDC 6.1, an image of HP iPAQ
900 Series Business Messenger pops up on the left of the Windows Mobile Device Center screen.
You can set up your HP iPAQ to synchronize the Outlook contacts, e-mail, and other information on
your HP iPAQ or just connect the HP iPAQ by skipping the setup process.
After the HP iPAQ synchronizes with your computer, the following links are displayed on your
computer:
Programs and Services
●
Pictures, Music, and Video
●
File Management
●
Mobile Device Settings
●
To view a list of customized links, navigate to Programs and Services. Click more>> to view
additional links for the various HP services and click <<back to go back to the previous screen.
54 Chapter 9 Synchronization
Page 67

10 Tasks
The tasks application provides you with an easy way to create a to-do list. You can categorize tasks
and mark them as complete, when required. You can also configure tasks to remind you about
upcoming appointments.
Create a new task
To create a new task:
1. Tap Start > Programs > Tasks.
2. Tap Menu > New Task.
NOTE: You can also tap Tap here to add a new task and enter a description for the task to
quickly create a new task.
3. Enter the required fields for the task, and then tap ok.
Set start and due dates for a task
To set dates for a task:
1. Tap Start > Programs > Tasks.
2. Tap the task you want to set start and due dates for.
3. Tap Edit and do one or both of the following:
Tap Starts to enter a start date for the task.
●
Tap Due to enter a due date for the task.
●
4. Tap ok.
Show start and due dates in the task list
To enable display of dates for a task in the task list:
1. Tap Start > Programs > Tasks.
2. Tap Menu > Options…
3. Select the Show start and due dates check box.
4. Tap ok.
Set options for displaying tasks on the Today screen
If you have a large number of tasks, you might want to specify the kind of tasks that are displayed
on the Today screen.
Create a new task 55
Page 68

To enable display of tasks on the Today screen:
1. Tap Start > Settings > Personal > Today.
2. Tap Items, and then select the Tasks check box.
3. Tap Tasks to access options, then tap Options…
4. Under Display number of, select the type of tasks to appear on the Today screen.
5. In the Category list, select whether to display only tasks assigned to a specific category only if
categories have been assigned or to display all tasks.
Mark a task as completed
To mark a task as completed:
1. Tap Start > Programs > Tasks.
2. In the task list, select the check box next to the task you want to mark as completed.
To mark an open task as completed:
1. Tap Edit.
2. In the Status box, tap Completed.
NOTE: You can also select a task and tap Complete to mark the task as completed. To activate
a completed task, select the task and then tap Activate.
56 Chapter 10 Tasks
Page 69

11 Messaging
Understand messages
To send and receive e-mail messages for an e-mail account, you need to connect to the Internet or
your corporate network, depending on the account.
You can send and receive:
Outlook e-mail
●
Internet e-mail through an Internet Service Provider (ISP)
●
Text/MMS messages
●
You can also access e-mail from work using a VPN connection. For more information, see
VPN server connection on page 86
E-mail in the Outlook e-mail account is sent and received through synchronization with a computer
using any synchronizing software or through wireless synchronization directly with an Exchange
Server.
Internet e-mail is sent and received by connecting to a Post Office Protocol 3 (POP3) or Internet
Message Access Protocol 4 (IMAP4) e-mail server. When connecting to a POP3 or IMAP4 server,
you will need to get Internet connectivity, from the carrier GSM, GPRS, EDGE, or a 3G connectivity.
Also connectivity can be using Wi-Fi Wireless, Peer-to-Peer with a PC or Bluetooth to an Internet
connected device. You can also use your HP iPAQ to connect by using a data capable cell phone.
Text messages are sent and received through your wireless service provider using a phone number
as the message address.
Folder types
Each messaging account has a set of folders with five default Messaging folders:
Inbox
●
Outbox
●
Deleted Items
●
Drafts
●
Set up a
Sent Items
●
The messages you receive and send through the account are stored in these folders. You can also
create additional folders for each account.
The way folders work vary by type:
If you use an Outlook e-mail account, e-mail messages in the Inbox folder in Outlook are
●
synchronized automatically with your HP iPAQ. You can select additional folders for
synchronization by assigning them designations. The folders you create and the messages you
move are then mirrored on the e-mail server.
If you use an MMS account or a text message account, messages are stored in the Inbox folder.
●
Understand messages 57
Page 70

If you use a POP3 account and move your e-mail messages to a folder you created, the link
●
between the messages on the HP iPAQ and their copies on the e-mail server breaks. When
you connect, the e-mail server detects that the messages are missing from the Inbox folder on
the HP iPAQ and deletes them from the e-mail server. This prevents having duplicate copies
of a message, but it also means that you no longer have access to messages.
If you use an IMAP4 account, the folders you create and the e-mail messages you move are
●
mirrored on the e-mail server. These messages are therefore available from any location or
device. This synchronization of folders occurs whenever you connect to your e-mail server,
create new folders, or rename/delete folders when connected. You can also set different
download options for each folder.
Synchronize e-mail
When you synchronize Outlook e-mail on the computer with your HP iPAQ, e-mail messages are
synchronized as follows:
Messages in the Inbox folder on your computer or Exchange Server are copied to the Inbox
●
folder of the Outlook e-mail account on your HP iPAQ.
Messages in the Outbox folder on your HP iPAQ are transferred to Exchange Server or Outlook
●
and then sent from those programs.
When you delete a message on your HP iPAQ, it is deleted from your computer or Exchange
●
Server the next time you synchronize.
The default sync settings synchronize messages from the past three days and the first 0.5 KB
●
of each new message is downloaded. It does not download file attachments.
NOTE: For more information on starting Outlook e-mail synchronization or changing
synchronization settings, see the synchronization software's help on the computer.
Text messages are not received via synchronization. Instead, they are sent to your HP iPAQ via your
service provider.
Set up messaging accounts
Set up e-mail using Exchange Server
1.
Press the
2. Enter your e-mail address in the E-mail address box, and then tap Next.
3. Clear the Try to get e-mail settings automatically from the Internet check box.
NOTE: Ensure that you clear the Try to get e-mail settings automatically from the
Internet check box only when you want to manually configure your e-mail.
4. Tap Next.
5. Scroll and select the Exchange server option from the Your e-mail provider list.
6. Tap Next.
(Messaging) key > Setup E-mail.
7. Tap Next to synchronize Outlook with your organization's Exchange e-mail server.
8. Verify your e-mail address, and tap Next.
9. In the Server address box, enter the Outlook Web Access server address and tap Next.
58 Chapter 11 Messaging
Page 71

NOTE: Select This server requires an encrypted (SSL) connection check box to ensure
you always send e-mail from this account using an SSL connection.
10. Enter the User name, Password, and Domain.
11. Tap Next.
12. Select the check box for the items you want to synchronize, and tap Finish.
Internet e-mail
Create a new POP3 or IMAP4 account
You must set up an e-mail account that you have with an ISP or an account that you access using
a VPN server connection (typically a work account) before you can send and receive e-mail.
To create a new POP3 or IMAP4 account:
1.
Press the
(Messaging) key > Setup E-mail.
2. Enter the account name and then tap Next.
3. Clear the Try to get e-mail settings automatically from the Internet check box.
NOTE: Ensure that you clear the Try to get e-mail settings automatically from the
Internet check box only when you want to manually configure your e-mail.
4. Tap Next.
5. Scroll and select the Internet e-mail option from the Your e-mail provider list, and then tap
Next.
6. Enter your name and required account name and tap Next.
7. Enter the incoming mail server name and select the required account type, POP3 or IMAP4.
8. Specify the information required over the next few screens, and then tap Finish.
You can also perform the following functions:
Change the time intervals for downloading new messages.
●
Download attachments.
●
Limit the number of messages that are downloaded.
●
Setting Description
User name Enter the user name assigned to you by your ISP or network
Password Choose a strong password. You have the option to save your
Domain Not required for an account with an ISP. Might be required
Account type Select POP3 or IMAP4.
Account display name Enter a unique name for the account, such as Work or Home.
administrator. This is often the first part of your e-mail
address, which appears before the at sign (@).
password so that you do not need to enter it each time you
connect to your e-mail server.
for a work account.
This name cannot be changed later.
Set up messaging accounts 59
Page 72

Setting Description
Incoming mail server Enter the name of your e-mail server (POP3 or IMAP4).
Outgoing mail server Enter the name of your outgoing e-mail server (SMTP).
Require SSL for Incoming e-mail Select this to ensure you always receive e-mail from this
account using an SSL connection. This enables you to
receive personal information more securely. Note that if you
select this and your ISP does not support an SSL
connection, you might not be able to receive e-mail.
Require SSL for Outgoing e-mail Select this to ensure you always send e-mail from this
account using an SSL connection. This enables you to send
personal information more securely. Note that if you select
this and your ISP does not support an SSL connection, you
might not be able to send e-mail.
Outgoing server requires authentication Select this if your outgoing e-mail server (SMTP) requires
Use the same user name and password for sending
e-mail
Outgoing server settings
User name Enter your user name for the outgoing e-mail server.
Password Enter your password for the outgoing e-mail server.
Domain Enter the domain of the outgoing e-mail server.
TIP: You can set up several e-mail accounts in addition to your Outlook e-mail account. You cannot
add a new account while connected. Tap Menu > Stop Send/Receive to disconnect.
Change e-mail download options
You can customize the following download options for each e-mail account that you have with an
ISP, or any account that you access using a VPN server connection (typically a work account).
You can choose:
Whether messages are downloaded automatically.
●
authentication. Your user name and password from above
are used.
Select this if your outgoing e-mail server uses the same user
name and password as the ones you entered before.
How much e-mail is downloaded.
●
If and how attachments are downloaded (IMAP4 only).
●
To change the e-mail download options for POP3 or IMAP4 e-mail account:
1.
Press the
2. Tap and select the e-mail account.
3. On the Contents screen, tap Edit Account Setup.
4. Tap Next.
5. Enter your changes over the next few screens, and then tap Finish.
60 Chapter 11 Messaging
(Messaging) key > Menu > Options.
Page 73

To change the e-mail download options for Outlook e-mail account:
1.
Press the
2. Tap and select Outlook E-mail account.
3. Tap Next.
4. Enter your changes over the next few screens, and then tap Finish.
TIP: To send and receive messages automatically, tap Connect, check for messages and enter a
time interval. Connecting automatically might result in higher connection charges. In addition, it
consumes excessive battery capacity and reduces the stand-by time.
To save memory, limit the number of e-mails downloaded to your HP iPAQ by lowering the number
of days to display.
To change data you want to sync for an Outlook account, tap Start > Programs > ActiveSync >
Menu > Options.
Delete an account
To delete an account:
1.
Press the
2. Tap Menu > Options.
(Messaging) key > Menu > Options.
(Messaging) key.
3. Tap and hold the account name, and then tap Delete.
NOTE: You cannot delete your text/MMS message, Outlook E-mail, Windows Live, and MMS
accounts.
Text messaging
Text messaging is the transmission of short text messages to and from a mobile phone, fax machine,
and/or IP address. A single text message cannot be longer than 160 alpha-numeric characters or
cannot contain pictures or graphics.
NOTE: The number of characters supported is dependent on your service provider.
Sending text messages might incur extra costs which might vary depending on your service provider.
Messages longer than 160 alpha-numeric characters are sent as multiple text messages. A character
count is visible when text messages (New/Reply/Forward) are composed. The count also shows how
many text messages are generated when the message is sent.
The Text Message Service Center phone number is provided by your mobile phone service provider.
Text messaging should function correctly after activating your account. To verify the number used
or to change the Text Message Service Center phone number, press
Menu > Options… > Services > Voice Mail and Text Messages > Get Settings…
MMS
MMS is a method of transmitting photographs, video clips, sound files, and short text messages over
wireless networks.
(Answer/Send) key >
NOTE: Sending MMSs might incur extra costs which might vary depending on your service
provider.
Set up messaging accounts 61
Page 74

When the phone radio is turned on for the first time, the HP iPAQ DataConnect application detects
the mobile phone service provider and automatically populates the MMS settings on the HP iPAQ.
Alternately, you can access some MMS settings by pressing the
Text/MMS Messages > Menu > MMS Options… It is not recommended to change the MMS settings
provided by your mobile phone service provider unless they request the change.
MMS composer
With MMS composer, you can create and share your own MMS messages. You can also add
pictures, videos, text, and audio to your MMS messages.
To access the MMS application, press the
New > MMS.
MMS account has its own set of folders with five default Messaging folders:
Deleted Items
●
Drafts
●
Inbox
●
Outbox
●
Sent Items
●
To create an MMS message:
1.
Press the
(Messaging) key, then tapping
(Messaging) key > Text/MMS Messages > Menu >
(Messaging) key > Text/MMS Messages > Menu > New > MMS.
2. Select a template or tap Select.
3. To add picture or video to the message, tap the Insert picture/video field, and then tap the
required picture or video to be added.
NOTE: To view the video clip before adding, navigate to the required file and tap the (Play)
icon.
4. To insert text in the message, tap the Insert text here field and enter the required text.
NOTE: You can also insert a smiley by tapping the (Smiley) icon, favorite Web link by
tapping the
icon.
5. To add an audio clip to message, tap Insert audio and tap the required audio to be added.
NOTE: To listen to the audio clip before adding, navigate to the required file and tap (Play)
icon.
6.
To preview the MMS message, tap the
NOTE: To use an available text-message template, tap Menu > Template > New from
template > OK. Select the Always choose custom check box to view a blank message
automatically. You can also add pictures, videos, and text by navigating to the required file and
tapping Select.
(Favorites) icon, and templates stored in My Text by tapping the (Text)
(Play) icon at the left bottom of the screen.
62 Chapter 11 Messaging
Page 75

Receive attachments
An attachment sent with an e-mail message or downloaded from the server is displayed below the
subject of the message. Tapping the attachment opens the attachment if it has been fully downloaded
or marks it for download the next time you send and receive e-mail. You can also download
attachments automatically with your messages if you have an Outlook e-mail or IMAP4 e-mail
account.
If you have an Outlook e-mail account, do the following on your computer:
1. Click Start > Programs > Microsoft ActiveSync.
2. Click Tools > Options…
3. Click E-mail > Settings, and then select the Include file attachments check box.
If you have an IMAP4 e-mail account with an ISP or an account that you access using a VPN server
connection (typically a work account), do the following:
1.
Press the
2. Tap Menu > Options.
3. Tap the name of the IMAP4 account.
4. Tap Download Size Settings and select an option from the Download attachments list.
5. Tap Done twice and then tap ok.
TIP: Embedded pictures and objects cannot be received as attachments.
An embedded message can be viewed as an attachment when using IMAP4 to receive e-mail.
However, this feature does not work if Transport Neutral Encapsulation Format (TNEF) is enabled
so that you can receive meeting requests.
To store attachments on a storage card rather than on the HP iPAQ, press the
> Menu > Options > Storage, and select the When available, use this storage card to store
attachment check box.
(Messaging) key to open the messaging application.
Receive meeting requests
If you receive your e-mail messages through ActiveSync, you can receive meeting requests. When
connecting directly to an e-mail server, the server must be running Microsoft Exchange Server
version 5.5 or later for you to receive meeting requests.
If the server is running Microsoft Exchange Server 2000 or later, your meeting requests are
automatically received in your Inbox. However, to receive meeting requests on Microsoft Exchange
Server 5.5, do the following:
(Messaging) key
Ask your system administrator to activate Rich Text Format (RTF) and TNEF support for your
●
account.
With TNEF enabled, your messages that are included in other messages as attachments are
not received, and you cannot know if a message has an attachment until you get the full copy.
In addition, download time might be longer.
Change e-mail download options if your account is not set up to receive attachments.
●
Set up messaging accounts 63
Page 76

After you are set up to receive meeting requests, do the following:
1. Open the meeting request.
2. Tap Accept, or Menu > Tentative, or Menu > Decline. If you want, you can also include a
message with the response. The response will be sent the next time that you synchronize or
connect to your e-mail server, and your HP iPAQ's calendar will be updated.
Create or change a signature
To create or change a signature:
1.
Press the
2. Tap Menu > Options > Signatures…
3. Select the account for which you want to create or change a signature.
4. Select the Use signature with this account check box if it is not already selected.
5. Select the Use when replying and forwarding check box if required.
6. Enter a signature in the box.
To stop using a signature, clear the Use signature with this account check box.
TIP: You can use a different signature with each messaging account.
(Messaging) key, to open the messaging application.
Use messaging
Compose and send messages
To compose and send messages:
1.
Press the
2. In the message list, tap and select an account.
3. Tap Menu > New.
(Messaging) key to open the messaging application.
4. Enter the e-mail address or text message address of one or more recipients, separating them
with a semicolon. To access addresses and phone numbers from Contacts, tap To or tap
Menu > Add Recipient.
5. Enter your message. To quickly add common messages, tap Menu > My Text, and then tap
the required message.
6. To check the spelling, tap Menu > Spell Check.
7. Tap Send.
TIP: To set the priority, tap Menu > Message Options…
If you are working offline, e-mail messages are moved to the Outbox folder and are sent the next
time you connect.
64 Chapter 11 Messaging
Page 77

Reply or forward a message
To reply or forward a message:
1. Tap on the message to open it, and then tap Menu > Reply > Reply, Reply All, or Forward.
2. Enter your response. To quickly add common messages, tap Menu > My Text and tap the
required message.
3. To check the spelling, tap Menu > Spell Check.
4. Tap Send.
Add an attachment to a message
To add an attachment to a message:
1. In an open message, tap Menu > Insert and tap the item you want to attach: Picture, Voice
Note, or File.
2. Select the file you want to attach or record a voice note.
NOTE: Embedded objects cannot be attached to messages.
Download messages
The manner in which you download messages depends on the type of account you have:
To send and receive e-mail for an Outlook e-mail account, begin synchronization through
●
ActiveSync.
Text messages are automatically received when your HP iPAQ phone mode is switched on.
●
When your HP iPAQ is switched off (in flight mode), messages are held by your service provider
until the next time your HP iPAQ is turned on.
TIP: By default, messages you send are not saved on your HP iPAQ to help conserve memory. If
you want to keep copies of sent messages in the messaging list, tap Menu > Options > Message,
and select the Keep copies of sent items in Sent folder check box. If your account is an Outlook
e-mail or IMAP4 account, you must also select the Sent Items folder for synchronization. To do this,
press the
Folders…, and then select the check box next to the Sent Items folder.
(Messaging) key > Outlook E-mail, and then tap Menu > Tools > Manage
Download messages from a server
To download messages from a server:
1. From any account, tap Menu > Go To and tap the account you want to use.
2. Tap Menu > Send/Receive.
The messages on your HP iPAQ and e-mail server are synchronized. New messages are
downloaded to the HP iPAQ's Inbox folder, messages in the HP iPAQ's Outbox folder are sent,
and messages that have been deleted from the server are removed from the HP iPAQ's
Inbox folder.
Use messaging 65
Page 78

TIP: To read the entire message, tap Menu > Download Message while in the message window.
If you are in the message list, tap and hold the message, and then tap Menu > Download
Message. The message will download the next time you send and receive e-mail. This will also
download message attachments if you have selected those options while setting up your e-mail
account.
The size column in the message list displays the local size and server size of a message. These
numbers might differ because the size of a message can vary between the server and the HP iPAQ.
Install an online address book
Many e-mail servers, including servers running Exchange Server, can verify names with an online
address book called a directory service, using a protocol known as Lightweight Directory Access
Protocol (LDAP). When you create an e-mail account, the directory service of your e-mail server is
added to the Address, and you are given the option to enable it. After it is enabled, Messaging
checks your contact list and then the directory service to verify names that you enter in the To, Cc,
and Bcc fields. To enable a directory service or if you want to use additional services, follow these
steps:
1. If you are adding a new account, ask your network administrator for the name of the directory
service and the server.
2. In the message list, tap Menu > Options > Address.
3. In the In Contacts, get e-mail addresses from list, select which e-mail address book to check
in contacts. Contacts will be checked first unless you select None.
4. If your e-mail server is already listed, select the server's directory service check box to enable
it and tap ok.
5. If your e-mail service is not listed, tap Add…
6. In the Directory name and Server boxes, enter the LDAP directory and server names.
7. Ask your network administrator if authentication is necessary for your server. If so, select the
Authentication is necessary on this server check box, and enter your user name and
password.
8. To have messaging check this service, select the Check name against this server check box.
TIP: To delete a service, tap and hold the service, and then tap Delete.
While synchronizing your Outlook e-mail account, disable any directory services you have installed
by clearing the Check name against this server check box. This helps avoid getting error messages
when Messaging tries to verify names against the service that you are not connected to.
66 Chapter 11 Messaging
Page 79

12 Calendar
Access calendar
Use Calendar to schedule appointments, including meetings and other events. You can display
appointments for the day on the Today screen.
▲
To access Calendar, press the
Today screen.
(Calendar) key or tap the (Calendar) icon on the
Change the display of the work week
You can customize your calendar for a work week to start on Sunday or Monday. You can schedule
your calendar for a five to seven-day week.
To change the display of the work week:
1.
To access Calendar, press the
Today screen.
2. Tap Menu > Tools > Options… and do one or both of the following:
To specify the first day of the week, tap Sunday or Monday in the 1st day of week box.
●
To specify the number of days to appear in a work week, tap 5-day week, 6-day week, or
●
7-day week in the Week view box.
3. Tap ok.
(Calendar) key or tap the (Calendar) icon on the
Set a default reminder for all new appointments
To automatically turn on a reminder for all new appointments:
1.
To access Calendar, press the
Today screen.
2. Tap Menu > Tools > Options… > Appointments.
3. Select the Set reminders for new items check box.
4. Set the time for the reminder to alert you.
5. Tap ok.
(Calendar) key or tap the (Calendar) icon on the
Access calendar 67
Page 80

Create an appointment
To create an appointment on your calendar:
1.
To access Calendar, press the
Today screen.
2. Tap Menu > New Appointment to create an appointment.
3. Enter the required fields for the task, and then tap ok.
Update an appointment
To update an appointment on your calendar:
1.
To access Calendar, press the
Today screen.
2. Tap to open the appointment, and then tap Menu > Edit to make your changes.
3. Tap All, One, or Cancel.
NOTE: This option only appears for recurring appointments.
4. Make the required changes, and then tap ok.
Cancel an appointment
When you delete an appointment in calendar on your HP iPAQ, it is also deleted on your computer
the next time you synchronize. If the appointment has not been synchronized with a computer, it will
be deleted only from your HP iPAQ.
(Calendar) key or tap the (Calendar) icon on the
(Calendar) key or tap the (Calendar) icon on the
To cancel an appointment:
1.
To access Calendar, press the
Today screen.
2. In Agenda view, select the appointment to delete.
3. Tap Menu > Delete Appointment.
4. Tap Yes to delete the appointment, or tap No to keep it.
(Calendar) key or tap the (Calendar) icon on the
68 Chapter 12 Calendar
Page 81

13 Contacts
Create a contact
To create a contact:
1. On the Today screen, tap Contacts or press the right softkey.
2. Tap New and enter the contact information in Outlook Contact or SIM Contact.
3. When finished, tap ok.
NOTE: If your contact list has been filtered by a category when you create a contact, that category
is automatically assigned to the new contact.
If most of the contacts you create have phone numbers that begin with the same area code, in
Contacts, tap Menu > Options…, and then enter that area code in the Area code box and tap
ok.
If you receive a call from a number that is not listed in your contacts, you can create a contact from
the call history.
NOTE: For more information, from the same screen tap Start > Help.
Delete a contact
To delete a contact:
1. On the Today screen, tap Contacts or press the right softkey.
2. Tap and hold the contact to delete.
3. Tap Delete Contact.
4. Tap Yes.
Change contact information
To change contact information:
1. On the Today screen, tap Contacts or press the right softkey.
2. Tap the contact.
3. Tap Menu > Edit and enter the changes.
4. When finished, tap ok.
Copy a contact
To copy a contact:
1. On the Today screen, tap Contacts or press the right softkey.
2. Tap and hold the contact you want to copy.
Create a contact 69
Page 82

3. Tap Copy Contact.
4. Tap the copy of the contact.
5. Tap Menu > Edit.
6. Change the contact information as needed and tap ok.
NOTE: The displayed category is automatically assigned to the new contact.
Find a contact
To find a contact:
1. On the Today screen, tap Contacts or press the right softkey.
2. If you are not in Name view, tap Menu > View By > Name.
3. Do one of the following:
Begin entering a name or phone number in the provided text box until the contact you want
●
is displayed. To show all contacts again, tap the text box and clear the text, or press the
backspace/clear key.
Use the alphabetical index displayed at the top of the contact list.
●
Filter the list by categories. In the contact list, tap Menu > Filter. Then tap a category you
●
have assigned to a contact. To show all contacts again, select All Contacts.
NOTE: To search for a contact by entering a name or number, or by using the alphabetical index,
you need to be in the Name view.
Send an e-mail message to a contact
To send an e-mail message to a contact:
1. On the Today screen, tap Contacts or press the right softkey.
2. Tap the contact you want to send a message to.
3. Tap the address you want to send a message to.
4. Tap the account you want to send the message from.
NOTE: To quickly add a contact's address to a new message, tap To, Cc, or Bcc line, and then
tap Menu > Add Recipient. Tap the contact you want to send the message to and choose the
address, if necessary.
Send a text message to a contact
To send a text message to a contact:
1.
Press the
2. Tap Menu > New > Text.
(Messaging) key > Text/MMS Messages.
3. Enter the phone numbers of one or more recipients, separating them with a semicolon. To
access phone numbers from Contacts, tap To and select the contact.
70 Chapter 13 Contacts
Page 83

4. Enter your message. To quickly add common messages, tap Menu > My Text and tap the
required message.
NOTE: To enter symbols, tap Shift using the on-screen keyboard.
5. To check the spelling, tap Menu > Spell Check.
6. Tap Send.
If you are sending a text message and want to know if it was received, before sending the message,
tap Menu > Message Options… Select the Request message delivery notification check box.
Add and remove a picture
To add a picture to the contact information:
1. On the Today screen, tap Contacts or press the right softkey.
2. Tap the contact.
3. Tap Menu > Edit.
4. Tap Picture.
5. Do one of the following:
Tap the picture you want to add.
●
Tap Camera and take a picture.
●
To remove a picture from the contact information:
1. On the Today screen, tap Contacts or press the right softkey.
2. Tap the contact.
3. Tap Menu > Edit.
4. Tap Menu > Remove Picture.
5. Tap Yes.
Use the contact list
There are several ways to use and customize the contact list. You can also make a call or send a
message from an open contact.
To customize the contact list:
1. On the Today screen, tap Contacts or press the right softkey.
2. In the contact list, do any of the following:
To search for a contact by entering a name or by using the alphabetical index, enter the
●
name into the Enter a name… box.
To see a list of contacts employed by a specific name or company, tap Menu > View
●
By > Name or Company.
To see a summary of information about a contact, tap the contact. From there, you can
●
also make a call or send a message.
To see a list of available actions for a contact, tap and hold the contact.
●
Add and remove a picture 71
Page 84

NOTE: To display a greater number of contacts on the screen, tap Menu > Options…, select the
Show contact names only check box, and clear the Show alphabetical index check box.
72 Chapter 13 Contacts
Page 85

14 Connections
You can use your HP iPAQ to connect and exchange information with other handheld devices,
computer, and other networks. You can connect using:
Wi-Fi
●
Bluetooth
●
GPRS/EDGE/HSDPA/WCDMA
●
You can connect by tapping Start > Settings > Connections.
Use Wireless Manager
Using Wireless Manager, you can easily turn on/off the functions of a Wi-Fi connection, a Bluetooth
connection, and Phone features.
NOTE: When the Phone feature is turned off, you cannot receive or make a call, including
emergency calls. To receive and make a call, turn on the Phone feature and re-engage your phone's
RF capability.
To use wireless manager, press Start > Settings > Connections > Wireless Manager.
Wi-Fi
Option Description
All Tap All to turn on/off the functions of Wi-Fi, Bluetooth, and Phone features.
Wi-Fi Tap Wi-Fi to turn on/off the functions of Wi-Fi connection.
Bluetooth Tap Bluetooth button to turn on/off the functions of Bluetooth connection.
Phone Tap Phone button to turn on/off the functions of Phone features.
Flight mode is a condition when all wireless connections on your HP iPAQ are turned off.
To turn on/off all wireless connections at the same time:
1. To use Wireless Manager, tap Start > Settings > Connections > Wireless Manager.
2. Tap All to turn on/off all wireless connections.
With wireless access, you do not need to use cables to connect your HP iPAQ to the Internet. Instead,
access points transmit data to and from your wireless device. Your HP iPAQ can connect to an
802.11b/g Wi-Fi or connect directly to other Wi-Fi-enabled devices.
NOTE: The alphabet following 802.11 determines the frequency used, speed at which data transfer
takes place, and the signal range for the Wi-Fi-enabled device.
Use Wireless Manager 73
Page 86

With Wi-Fi, you can:
Access the Internet.
●
Send and receive e-mail.
●
Access corporate network information.
●
Use VPNs for secure remote access.
●
Use hotspots for wireless connectivity.
●
Tap Start > Settings > Connections > Wi-Fi.
NOTE: Using dial-up or wireless networks to access a corporate network, e-mail, or other wireless
communications, such as Bluetooth devices might require separate hardware along with a Wi-Fi
infrastructure and a service contract.
Check with your service provider for availability of network coverage in your area. Not all Web content
might be available. Some Web content might require installation of additional software.
Wi-Fi terms
It is recommended that you become familiar with the following terms as you begin to use Wi-Fi.
Term Definition
802.11 standard An approved standard specification of radio technology from the Institute of Electrical and
Electronics Engineers (IEEE) used for wireless local area networks (Wi-Fi).
Device-to-computer or ad-hoc A mode that does not use access points. It provides independent peer-to-peer connectivity
in a wireless LAN.
Domain Name System (DNS) The way that Internet domain names are located and translated into IP addresses. It is an
easy name to remember for an Internet address. Every Web site has its own specific IP
address on the Internet.
Encryption An alphanumeric (letters and/or numbers) conversion process of data primarily used for
protection against any unauthorized access.
Hotspots Public or private areas where you can access Wi-Fi service. These wireless connections
can be located, for example, at a library, cyber cafe, hotel, airport lounge, or convention
center. This service can be free or sometimes requires a fee.
Infrastructure This connection mode uses wireless access points to connect to networks.
Open Wi-Fi settings
To open Wi-Fi settings:
1. Tap Start > Settings > Connections > Wireless Manager.
2. Tap Menu > Wi-Fi Settings.
Automatically connect to a Wi-Fi network
When you try to connect to a Wi-Fi network, the HP iPAQ automatically detects Wi-Fi networks that
are broadcasting their signal. If your Wi-Fi network is not set to broadcast, then you have to connect
to it manually. While trying to connect to a Wi-Fi network if authentication is required, contact your
network administrator for the details and enter the authentication information appropriately.
74 Chapter 14 Connections
Page 87

To automatically connect to a Wi-Fi network:
1. Tap Start > Settings > Connections > Wireless Manager > Wi-Fi.
2. Once your HP iPAQ detects a Wi-Fi network, you are asked to choose if you want to connect.
Select the network you want to connect to and tap Connect.
Manually connect to a Wi-Fi network
You can manually configure a wireless network by entering the required settings information.
To manually connect to a Wi-Fi network:
1. Tap Start > Settings > Connections > Wi-Fi.
2. Tap Wireless > Add New…
3. Enter the network name.
4. Select The Internet to connect to the Internet through an ISP or select Work to connect to a
company network in the Connects to list.
NOTE: You should select Work if the network requires a proxy server.
5. Tap Next.
To use authentication, select an authentication method from the Authentication list.
●
To use data encryption, select an encryption method from the Data Encryption list.
●
To automatically use a network key, tap The key is automatically provided check box,
●
else enter the Network key and Key index.
6. Tap Next.
7. Select the Use IEEE 802.1x network access control, and then specify the EAP type from the
list.
8. Tap Finish.
Find an IP address
You need to determine your IP address to make sure that an address is assigned to the network and
your HP iPAQ is able to access the network.
To find an IP address:
1. Connect to a network automatically or manually by tapping Start > Settings > Connections >
Wi-Fi > Network Adapters.
2. Select an adapter in the Tap an adapter to modify settings list. The Wi-Fi IP address is
displayed in the IP address box.
Delete a Wi-Fi network
You can delete networks you manually entered. However, you cannot delete automatically detected
networks.
To delete an existing or available wireless network:
1. Tap Start > Settings > Connections > Wi-Fi.
2. Tap Wireless.
Wi-Fi 75
Page 88

3. In the Configure Wireless Networks box, select the Wi-Fi network you want to delete.
4. Tap Menu > Remove Settings.
Bluetooth
Bluetooth terms
It is recommended that you become familiar with the following terms as you begin to use Bluetooth
technology.
Term Definition
Authentication Verification of a numeric passkey before a connection or
Authorization Approval of a connection, access, or activity before it can be
Bonding (Paired devices) Creating a trusted connection between your HP iPAQ and
Device address Unique electronic address of a Bluetooth device.
Device discovery Location and recognition of another Bluetooth device.
activity can be completed.
completed.
another device. After a bond is created, the two devices
become paired. A paired device does not require
authentication or authorization.
Device ID Name that a Bluetooth device provides when discovered by
Encryption Method of protecting data.
Passkey Code you enter to authenticate connections or activities
Personal Information Manager (PIM) Collection of programs used to manage daily business tasks
Profiles Collection of Bluetooth settings.
Service discovery Determination of which programs you have in common with
Open Bluetooth settings
To open Bluetooth settings:
1. Tap Start > Settings > Connections > Wireless Manager.
2. Tap Menu > Bluetooth Settings.
Connect to a computer using Bluetooth
For best results, connect your HP iPAQ to the computer using USB to establish a synchronization
before connecting via Bluetooth.
another device.
requested by other devices.
(for example: Contacts, Calendar, and Tasks).
other devices.
76 Chapter 14 Connections
Page 89

To connect to a computer via Bluetooth using ActiveSync:
1. Follow the instructions in synchronization software help on the computer for configuring
Bluetooth on your computer to support ActiveSync.
2. On your HP iPAQ, tap Start > Programs > ActiveSync.
3. Tap Menu > Connect via Bluetooth. Make sure the HP iPAQ and computer are within close
range.
4. If this is the first time you have connected to this computer via Bluetooth, complete the Bluetooth
wizard on your HP iPAQ and set up a Bluetooth partnership with the computer.
5. Tap Sync.
6. When finished, tap Menu > Disconnect Bluetooth.
TIP: To preserve battery power, turn off Bluetooth.
To connect to a computer via Bluetooth using WMDC:
1. Follow the instructions in synchronization software help on the computer for configuring
Bluetooth.
2. On your HP iPAQ, tap Start > Programs > ActiveSync.
3. Tap Menu > Connect via Bluetooth. Make sure the HP iPAQ and computer are within close
range.
4. When prompted, if you would like to set up a partnership, tap Yes.
5. On the computer, when prompted that a Bluetooth device is attempting to connect with the
computer, click To allow this connection.
6. To disconnect, tap Menu > Disconnect.
Create, end, and accept a Bluetooth partnership
You can exchange information between your HP iPAQ and another device that has Bluetooth
capabilities. For this, you will have to first create a Bluetooth partnership between the two devices.
NOTE: To exchange information between two Bluetooth-enabled devices, make sure Bluetooth is
turned on, on both devices. The devices need to be in the discoverable mode.
To create a Bluetooth partnership:
1. Tap Start > Settings > Connections > Bluetooth.
2. Tap Add new device…. Your HP iPAQ searches for other devices with Bluetooth capabilities
and displays them in the list.
3. Tap the name of the other device, and then tap Next.
4. If you want to set a passcode, which is recommended for enhanced security, enter an
alphanumeric passcode between 1 and 16 characters in the Passcode box, and then tap
Next. Else, leave the passcode blank, and tap Next.
NOTE: For creating partnerships with cellular phones, it is mandatory that you provide a
numeric passcode.
5. Enter the same passcode on the other device.
6. Tap Done.
Bluetooth 77
Page 90

To end a Bluetooth partnership:
1. Tap Start > Settings > Connections > Bluetooth.
2. Tap and hold the partnership you want to end.
3. Tap Delete.
To accept a Bluetooth partnership:
1. Make sure that your HP iPAQ is discoverable and placed within close range with the pairing
device.
Tap Start > Settings > Connections > Bluetooth > Mode.
●
Select the Make this device visible to other devices check box.
●
2. When prompted to accept a partnership with the device that is requesting the relationship, tap
Yes.
3. If a passkey is requested, enter an alphanumeric passkey between 1 and 16 characters in
Passkey box, and then tap Next. Enter the same passkey in the device requesting the
partnership. Using a passkey provides greater security.
4. Tap Done.
If you cannot discover another device, try the following:
Make sure Bluetooth is turned on.
●
Move closer to the device.
●
Make sure the device you are attempting to connect is on and is visible to other devices.
●
Edit a Bluetooth partnership
To rename a Bluetooth partnership:
1. Tap Start > Settings > Connections > Bluetooth.
2. Tap and hold the partnership you want to edit.
3. Tap Edit.
4. In the Display Name box, enter a new name for the partnership.
5. Tap Save.
Use your HP iPAQ as a wireless modem with Bluetooth
You can use your HP iPAQ as a wireless modem to connect your Bluetooth-enabled computer to
the Internet. For more information, see
on page 112
To connect to a laptop using Bluetooth data connection
Bluetooth device profiles
The functions that Bluetooth supports are called services or profiles. You can communicate only with
Bluetooth devices that support at least one of the following profiles:
ActiveSync Over Bluetooth
●
Advanced Audio Distribution Profile (A2DP)
●
Generic Access Profile (GAP)
●
78 Chapter 14 Connections
Page 91

Hands-Free Profile (HFP)
●
Handset Profile (HSP)
●
Human Interface Device (HID) Profile Host
●
Generic Object Exchange Profile (GOEP)
●
Object Push Profile (OPP)
●
Serial Port Profile (SPP)
●
Phone Book Access Profile (PBAP)
●
File Transfer Profile (FTP)
●
Basic Image Push Profile (BIP)
●
Basic Printing Profile (BPP)
●
Personal Area Networking (PAN) Profile
●
Audio/Video Remote Control Profile (AVRCP) Client
●
Generic Audio/Video Distribution Profile (GAVDP)
●
Access services
If you choose to require authorization to access services, you have to authorize each connection.
Your HP iPAQ always asks you if the connection should be permitted.
To set authorization to access services:
1. Tap Start > Settings > Connections > Wireless Manager.
2. Tap Menu > Bluetooth Settings.
3. Configure the service you want to enable using the options displayed on the different tabs.
4. Tap ok.
Set a Bluetooth shared folder
You can determine the folder that other devices access when they connect to your HP iPAQ.
1. Tap Start > Settings > Connections > Wireless Manager.
2. Tap Menu > Bluetooth Settings.
3. Tap File Transfer.
4. Enter the folder name where you would like to save the transferred files in the Root
directory box.
5. Tap ok.
Set up an incoming or outgoing Bluetooth COM port
To set up incoming or outgoing Bluetooth COM port:
1. Make sure your HP iPAQ is connected to the other device via Bluetooth.
2. Tap Start > Settings > Connections > Wireless Manager.
3. Tap Menu > Bluetooth Settings.
Bluetooth 79
Page 92

4. Tap COM Ports.
5. Tap New Incoming Port or New Outgoing Port.
NOTE: New Outgoing Port is only available if at least one Bluetooth device supports serial
(COM) connection.
6. Select a numbered COM port from the list.
NOTE: If the port cannot be created, it is in use. Select a different numbered port.
7. To limit communication on this COM port to only devices with which the HP iPAQ has a
Bluetooth partnership, select the Secure Connection check box.
8. Tap Finish.
GPRS/EDGE/HSDPA
Your HP iPAQ is a 3.5G device that supports high and better data throughput. It supports HSDPA
known as 3.5G to transmit data, WCDMA known as 3G to transmit voice and data, EDGE known as
2.75G to transmit data, GPRS known as 2.5G to transmit data, and GSM known as 2G to transmit
voice.
HSDPA
High Speed Download Packet Access (HSDPA), also known as 3.5G, is an enhancement of
Wideband Code Division Multiple Access (WCDMA) which is based on 3G technology, and offers
better data throughput. Your HP iPAQ supports HSDPA 3.6 to 7.2 Mbps for high speed downloads.
HP iPAQ also supports WCDMA over three different frequency bands (850/1900/2100). When
WCDMA or HSDPA is available, the HP iPAQ uses the technology and reverts back to GSM/GPRS/
EDGE if WCDMA or HSDPA is unavailable. Your HP iPAQ also supports WCDMA/HSDPA in three
different frequency bands (850/1900/2100).
GPRS/EDGE
GPRS/EDGE technology provides a connection to the Mobile Phone Network that can be used for
Web browsing, MMS messaging, or accessing your corporate network.
NOTE: EDGE is an enhancement to GPRS technology and enables higher speed data connections
than GPRS. This means faster phone multimedia capabilities such as sending and receiving SMS/
MMS messages, and sharing video clips. Check with your service provider to see if they support
EDGE technology. If your service provider does not support the EDGE network, the HP iPAQ defaults
to GPRS.
Differences between GSM and GPRS/EDGE/WCDMA/HSDPA technology
GSM technology is typically used for voice calls and text messaging, whereas GPRS/EDGE/
WCDMA/HSDPA technology provides a data connection to the Mobile Phone Network that can be
used for Web browsing, Multimedia Messaging Service (MMS), or accessing your corporate network.
NOTE: Using GPRS/EDGE/WCDMA/HSDPA data services are typically an additional charge to
your standard mobile phone service. Check with your mobile phone service provider for data services
and cost.
80 Chapter 14 Connections
Page 93

Configure GPRS network settings
The first time you use your SIM card, HP iPAQ DataConnect automatically detects the phone
network and operator and sets up the GPRS connection information for you. However, if your mobile
phone service providers offer different subscription types, then HP iPAQ DataConnect will show a
window on your screen that list the different subscriptions available. You need to select your
subscription and tap Select for HP iPAQ DataConnect to automatically set up the mobile network
connection parameters. In any case, you can change these settings to suit your preference or create
your own network settings.
To configure GPRS network settings:
1. Tap Start > Settings > Connections > HP iPAQ DataConnect.
2. Select your country from the Country drop-down list.
3. If your operator name displays in the Operator drop-down list, it is recommended that you use
that connection and, if needed, edit the default settings.
4. Tap Select to confirm your settings.
Edit an Internet connection
To edit an Internet connection:
1. Tap Start > Settings > Connections > Connections > Advanced > Select Networks.
2. Select the iPAQ GPRS option from the Programs that automatically connect to the Internet
should connect using list.
3. Tap Edit… > Modem.
4. Select the required ISP from the displayed list and tap Edit…
5. Enter a service provider name in the Enter a name for the connection box, and then tap Next.
6. Enter an access point name of the server to which you are attempting to connect in the Access
point name box and tap Next.
7. Enter the user name and password.
8. Enter a domain name if provided by your ISP.
9. Tap Finish.
Alternatively, you can also follow the steps given below to create a new Internet connection:
1. Tap Start > Settings > Connections > Connections > Advanced > Select Networks.
2. Under Programs that automatically connect to the Internet should connect using, tap
New… > General.
3. Enter a name for the settings. This name is for your reference.
4. Tap Modem > New…
5. Enter a service provider name in the Enter a name for the connection box.
6. Select the appropriate modem from the Select a modem list.
GPRS/EDGE/HSDPA 81
Page 94

To configure settings using a telephone number:
a. Select the Cellular Line option from the Select a modem list.
b. Tap Next.
c. Enter a telephone number in the text box, and then tap Next.
To configure settings using access points:
a. Select the Cellular Line (GPRS, 3G) option from the Select a modem list.
b. Tap Next.
c. Enter an access point name of the server to which you are attempting to connect in the
Access point name box, and then tap Next.
7. Enter the user name and password.
8. Enter a domain name if provided by your ISP.
9. Tap Finish.
Edit MMS settings
To edit an MMS connection:
1. Tap Start > Settings > Connections > Connections > Advanced > Select Networks.
2. Select the iPAQ MMS option from the Programs that automatically connect to the Internet
should connect using list.
3. Tap Edit… > Modem.
4. Select the required ISP from the displayed list, and then tap Edit…
5. Enter a service provider name in the Enter a name for the connection box and tap Next.
6. Enter an access point name of the server to which you are attempting to connect in the Access
point name box and tap Next.
7. Enter the user name and password.
8. Enter a domain name if provided by your ISP.
9. Tap Finish.
Alternatively, you can also follow the steps given below to create a new MMS connection:
1. Tap Start > Settings > Connections > Connections > Advanced > Select Networks.
2. Under Programs that automatically connect to the Internet should connect using, tap
New… > General
3. Enter a name for the settings. This name is for your reference.
4. Tap Modem > New…
5. Enter a service provider name in the Enter a name for the connection box.
6. Select the appropriate modem from the Select a modem list.
.
82 Chapter 14 Connections
Page 95

To configure settings using a telephone number:
a. Select the Cellular Line option from the Select a modem list.
b. Tap Next.
c. Enter a telephone number in the text box, and then tap Next.
To configure settings using access points:
a. Select the Cellular Line (GPRS, 3G) option from the Select a modem list.
b. Tap Next.
c. Enter an access point name of the server to which you are attempting to connect in the
Access point name box, and then tap Next.
7. Enter the user name and password.
8. Enter a domain name if provided by your ISP.
9. Tap Finish.
Edit WAP information settings
To edit a WAP connection:
1. Tap Start > Settings > Connections > Connections > Advanced > Select Networks.
2. Select the iPAQ WAP option from the Programs that automatically connect to the Internet
should connect using list.
3. Tap Edit… > Modem.
4. Select the required ISP from the displayed list and tap Edit…
5. Enter a service provider name in the Enter a name for the connection box, and then tap Next.
6. Enter an access point name of the server to which you are attempting to connect in the Access
point name box and tap Next.
7. Enter the user name and password.
8. Enter a domain name if provided by your ISP.
9. Tap Finish.
Alternatively, you can also follow the steps given below to create a new WAP connection:
1. Tap Start > Settings > Connections > Connections > Advanced > Select Networks.
2. Under Programs that automatically connect to the Internet should connect using, tap
New… > General.
3.
Enter a name for the settings. This name is for your reference.
4. Tap Modem > New…
5. Enter a service provider name in the Enter a name for the connection box.
6. Select the appropriate modem from the Select a modem list.
GPRS/EDGE/HSDPA 83
Page 96

To configure settings using a telephone number:
a. Select the Cellular Line option from the Select a modem list.
b. Tap Next.
c. Enter a telephone number in the text box, and then tap Next.
To configure settings using access points:
a. Select the Cellular Line (GPRS, 3G) option from the Select a modem list.
b. Tap Next.
c. Enter an access point name of the server to which you are attempting to connect in the
Access point name box, and then tap Next.
7. Enter the user name and password.
8. Enter a domain name if provided by your ISP.
9. Tap Finish.
Troubleshoot automatic detection
If the automatic detection setting fails, complete one or more of the following items:
Check to see if the SIM card is present in the HP iPAQ. If it is not present, insert the SIM card
●
and relaunch the application.
Ensure that the metal contacts on your SIM card and your SIM slot are not covered with a
●
residue or dust that would inhibit a connection.
In the HP iPAQ DataConnect application, select the appropriate country and operator name,
●
and then tap ok. The settings automatically update.
Advanced settings
Connect to intranet URLs
To connect to intranet sites that have periods in their URLs (for example,
intranet.companyname.com), add them to the Work URL Exceptions list.
To connect to intranet URLs:
1. Tap Start > Settings > Connections > Connections > Advanced > Exceptions…
2. Tap Add new URL…
3. In Work URL, enter the intranet URL.
4. Tap ok.
NOTE: If you use many URLs that share the same root company name, you can avoid entering
them individually by entering *.companyname.com.
84 Chapter 14 Connections
Page 97

Change an intranet URL
To change an intranet URL:
1. Tap Start > Settings > Connections > Connections > Advanced > Exceptions…
2. Tap the intranet URL exception you want to change, then make the required changes.
3. Tap ok.
NOTE: To delete a work URL exception, tap and hold it in the list, then tap Delete.
Set up an automatic choice for connections
If you have already created more than one connection, you can set up your HP iPAQ to connect to
the best available connection automatically.
To set up an automatic choice for connections:
1. Tap Start > Settings > Connections > Connections > Tasks.
2. Under My ISP or My Work Network, tap Add a new modem connection to create a new
connection.
3. After you create a new connection, under My ISP or My Work Network, tap Manage existing
connections.
4. Tap Auto pick.
NOTE: For Auto pick option to be available, you need more than one connection.
5. Tap ok.
Set up a WAP gateway
To access Wireless Access Point (WAP) sites through Pocket Internet Explorer, configure your
HP iPAQ to use a WAP gateway.
Before you begin, obtain the following information from your ISP or network administrator:
User name
●
Password
●
ISP server phone number
●
WAP gateway server IP
●
Port number
●
To set up a WAP gateway:
1. Tap Start > Settings > Connections > Connections > Advanced > Select Networks >
Edit… to edit iPAQ WAP from the Programs that automatically connect to the Internet
should connect using list. If a proxy server has not been set up, tap New…
2. On the Proxy Settings tab, select the This network connects to the Internet and This
network uses a proxy server to connect to the Internet check boxes.
3. If necessary, enter the proxy server name in the Proxy server box.
4. Tap Advanced > WAP.
Advanced settings 85
Page 98

5. In the Server box, enter the WAP gateway server name. Under Port, enter the port number.
The most common WAP port number is 9201.
6. Enter any logon credentials required by the WAP gateway server.
Configure advanced proxy settings
To configure advanced proxy settings:
1. Tap Start > Settings > Connections > Connections > Advanced > Select Networks >
Edit… to edit iPAQ WAP from the Programs that automatically connect to the Internet
should connect using list. If a proxy server has not been set up, tap New….
2. On the Proxy Settings tab, select the This network connects to the Internet and This
network uses a proxy server to connect to the Internet check boxes.
3. If necessary, enter the proxy server name in the Proxy server box.
4. For the appropriate server type, enter the proxy server name and port.
5. If necessary, enter the credentials for connecting with your proxy server.
6. Tap Advanced > Socks.
7. Select Socks 4 or Socks 5. If using Socks 5, enter the credentials for connecting with your
proxy server.
Advanced connection settings
To set up advanced connections:
1. To connect to a network, tap Start > Settings > Connections > Connections > Advanced >
Select Networks.
2. Select My ISP to connect to the Internet through an ISP or select My Work Network to connect
to a company network. Select My Work Network if the network requires a proxy server. If you
need to change or create a new network management name, tap Edit… or New…, and then
tap ok.
3. On the Connections screen, tap Advanced > Dialing Rules…
4. To avoid creating a new connection for each location, select the Use dialing rules check box.
NOTE: You can edit a dialing rule by tapping Edit on the Dialing Rules screen. To do so,
enter details such as Name, Country code, and Area code.
5. To create URL exceptions, on the Connections screen tap Exceptions… > Add new URL,
enter the URL, and tap ok.
Set up a VPN server connection
A VPN connection helps you to securely connect to servers, such as a corporate network, via the
Internet.
Before you begin, obtain the following information from your network administrator:
User name
●
Password
●
Domain name
●
86 Chapter 14 Connections
Page 99

TCP/IP settings
●
Host name or IP address of the VPN server
●
To set up a VPN server connection:
1. Tap Start > Settings > Connections > Connections > Tasks.
2. Under My Work Network, tap Add a new VPN server connection and follow the instructions
in the New Connection wizard.
3. Under most circumstances, you should not change any advanced settings. However, you need
to change advanced settings when:
The server to which you are connecting does not use dynamically-assigned addresses,
●
and you need to enter your TCP/IP settings.
You need to change server DNS or WINS settings.
●
If either of these circumstances applies, from the My VPN screen, tap Advanced and fill in the
appropriate information. Tap ok to save the changes and return to the My VPN screen.
4. To view additional information for any screen in the wizard or while changing settings, tap Help.
Change a connection group name
Your HP iPAQ is already set up with two groups of connection settings: My ISP and My Work
Network. You can also change the name of these groups. For example, if you put all of your corporate
settings under My Work Network Connections, you can change the name to your company’s name.
To change a connection group name:
1. Tap Start > Settings > Connections > Connections.
2. Under My ISP or My Work Network, tap Add a new modem connection to create a new
connection.
3. After you create a new connection, under My ISP or My Work Network, tap Manage existing
connections.
4. Tap General.
5. Enter a name for the settings group and tap ok.
End a connection
It is advised that you disconnect active connections on your HP iPAQ when not in use. This can save
connection charges.
When connected via cable, detach your HP iPAQ from the cable.
●
When connected via Bluetooth, tap Start > Settings > Connections > Wireless Manager.
●
Next, tap Bluetooth to turn Bluetooth off.
Advanced settings 87
Page 100

15 Google
Google Maps™ for mobile
Google Maps is a free mapping application provided by Google that powers many map-based
services. It offers street maps, a route planner, and an urban business locator for numerous countries
around the world.
NOTE: Google offers maps for mobile for free, but mobile service providers might charge
data-service rates for downloading and using the application with a limited data plan or no data plan.
Contact your mobile service provider for more details.
Google Maps includes the following features to help you enhance your travel experience:
Real-time traffic – Identify the location where congestion exists and estimate delays in over
●
30 major US metropolitan areas.
Detailed directions – Display maps with step-by-step directions whether you plan to walk or
●
drive.
Integrated search results – Display local business locations and contact information all in one
●
place, integrated on your map.
Easily movable maps – Enable you to zoom in or out maps, and move in all directions so you
●
can orient yourself visually.
Satellite imagery – Get a bird's eye view of your desired location.
●
To launch Google Maps:
1. Tap Start > Google Maps.
2. In the Terms and Conditions screen, tap Accept.
3. In the About screen, tap ok.
To navigate Google Maps:
1. Tap Start > Google Maps.
2. Tap Menu > Directions…
3. Enter your current location in the From location box and destination in the To location box.
4. Tap ok to start the search.
NOTE: For more information, tap Start > Google Maps > Menu > Help > Tips.
Google Search
Google Mobile Web Search allows you to search for Web sites that are specifically designed for
mobile phones and devices.
88 Chapter 15 Google
 Loading...