

Page 1

f520
f520
完整版產品使用者手冊請至
完整版產品用戶手冊請至
f520
f520
Page 2

FCC Statement
This equipment has been tested and f ound to comply with the limits for a
Class B digital camcorder, pursuant to Part 15 of the FCC Rules. These limits
are designed to provide reasonable protection against harmful interference
in a residential installation. This equipment generates, uses and can radiate
radio frequency energy and, if not installed and used in accordance with the
instructions, may cause harmful interference to radio communications.
However, there is no guarantee that interference will not occur in a
particular installation. If this equipment does cause harmful interference to
radio or television reception, which can be determined by turning the
equipment off and on, the user is encouraged to try to correct the
interference by one or more of the following measures:
• Reorient or relocate the receiving antenna.
• Increase the separation between the equipment and receiver.
• Connect the equipment into an outlet on a circuit different from that to
which the receiver is connected.
• Consult the dealer or an experienced radio/TV technician for help.
This camcorder complies with Part 15 of the FCC Rules. Operation is subject
to the following two conditions: (1) This camcorder may not cause harmful
interference, and (2) this camcorder must accept any interference received,
including interference that may cause undesired operation.
FCC Caution: Any changes or modifications not expressly approved by the
party responsible for compliance could void the user's authority to operate
this equipment.
CE Regulatory Notice
The product herewith complies with the requirements of the Low Voltage
Directive 2006/95/EC, the EMC Directive 2004/108/EC and the RoHS
Directive 2011/65/EC.
1
Page 3

Battery warning
The battery for this car camcorder is sealed internally. DO NOT
attempt to disassemble the camcorder and remove the battery.
Always charge using the provided system. Improper charging of the
battery may result in explosion.
The battery is designed for this camcorder and is not customer
replaceable.
Batteries may explode if exposed to open fire. Never place the car
camcorder in a fire.
Recycle the camcorder observing local regulations.
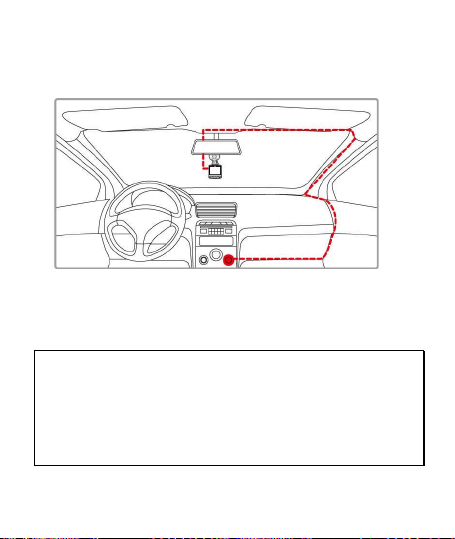
Notes on Installation
1. Install the camcorder near the rear-view mirror to obtain the best
open-field view. Do NOT install the camcorder in a location that will
obstruct your required driving view.
2. Make sure that the lens is within the wiping range of the windscreen
wiper to ensure a clear view even when it rains.
3. Do not touch the lens with your fingers. Finger grease may be left on
the lens and will result in unclear videos or snapshots. Clean the
lens on a regular basis.
Do not install the camcorder on a tinted window. Doing so may
4.
damage the tint film.
5. Make sure that the installation position is not hindered by the tinted
window.
2
Page 4
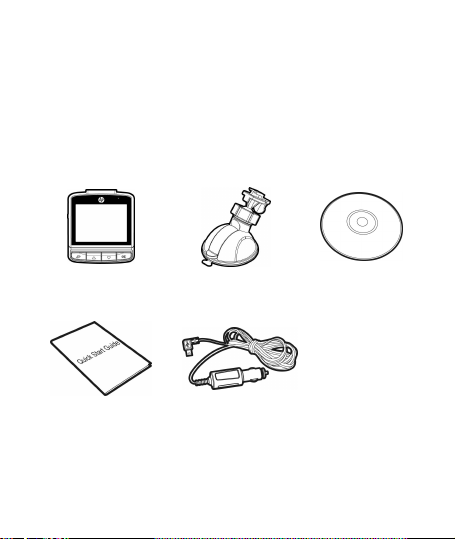
1 Introduction
1.1 Package Contents
The package contains the following items. In case there is any missing
or damaged item, contact your dealer immediately.
Camcorder Bracket CD-ROM
Quick start guide Car adapter
3
Page 5
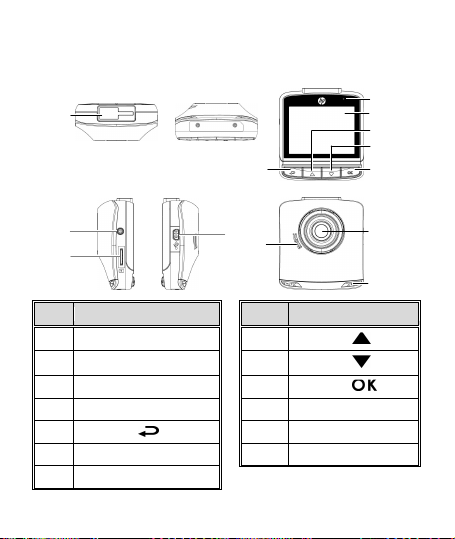
Top and Bottom Views
Front View
1
2
3
8
11
4
12
No. Item
No. Item
1 Bracket Socket
8 Up Button (
)
3 Memory Card Slot
10 Enter Button (
)
4 USB Connector
11 Speaker
5 Back Button (
) 12
Wide Angle Lens
6 LED Indicator
13 Microphone
7 LCD Panel
1.2 Product Overview
Side (Left and Right) Views
6
9
5
10
Rear View
2 Power Button
13
9 Down Button ( )
4
Page 6
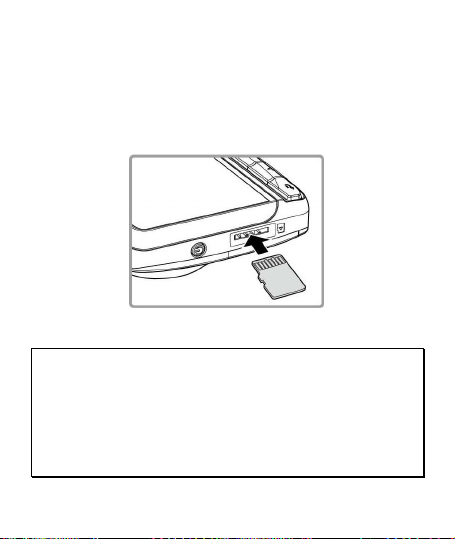
2 Getting Started
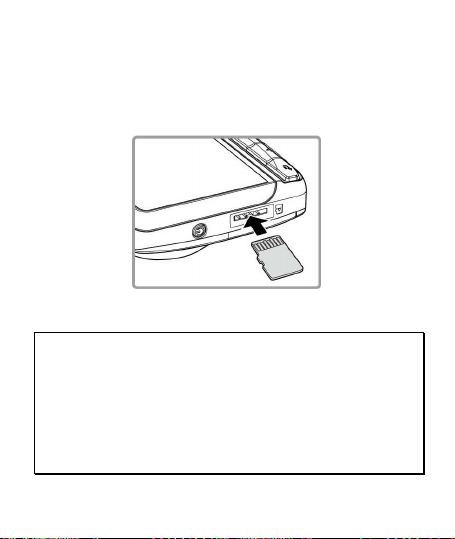
2.1 Inserting the Memory Card
Insert the memory card with the gold contacts facing the back of the
camcorder. Push the memory card until it clicks into place.
To remove the memory card
Push to eject the memory card out of the slot.
Note:
1. Do not remove or insert the memory card when the camcorder is turned on. This
may damage the memory card.
2. Please use a 32GB, Class 10 or above Micro SD card.
3. Please format the micro SD cards before the initial use.
4. If the screen shows “Low Speed Card” while recording, it means the writing speed of
the memory card is too slow. Please replace it with a higher-speed memory card.
5. If “Card is too fragmented” is displayed while recording, it means the card is unable
to save the recording. Please make a copy of existing files in the card and then
reformat it with this camcorder.
5
Page 7
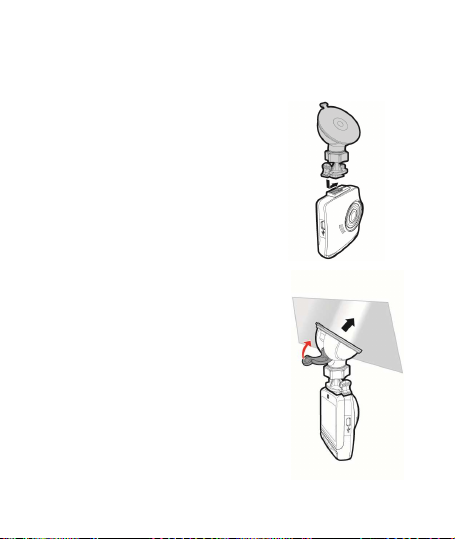
2.2 Installing in Vehicles
2.2.1 Mount to Windshield
1. Attach the bracket to the camcorder.
Slide it into the bracket holder until
you hear a click.
2. Before installing the bracket, please
use alcohol to clean the windshield
and suction cup of the bracket. Wait
for dry and press suction-cup on the
windshield.
3. Hold the base firmly on the
windshield and press down the clamp
to mount the car holder to the
windshield. Make sure the base is
securely locked in place.
6
Page 8

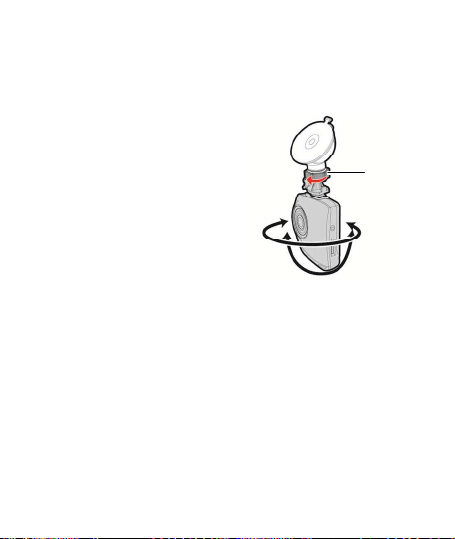
2.2.2 Adjust the camcorder position
1. Loose the knob to swivel the device vertically or horizontally.
2. Then tighten the knob to make sure the camcorder is securely
locked in place.
7
Knob
Page 9
2.3 Connecting to Power
Use only the supplied car adapter to power up the camcorder and
charge the built-in battery.
1.
Connect one end of the car adapter to the USB connector of the
camcorder.
2.
Plug the other end of the car charger to the cigarette lighter
socket of your vehicle. Once the vehicle engine is started, the
camcorder automatically turns on.
Note:
1. To use the products of the attached power charger only, please do not use other
brand power charger, in order to avoid equipment burn or cause the battery
explosion.
2. When first use this camcorder, please charging to battery full.
3. Please take note if the environment temperature reaches 45°C or above, the car
adapter still can supply power to camcorder, but it will not charge the Lithium-ion
battery. This is the characteristic of Lithium-ion and is not a malfunction.
8
Page 10

2.4 Powering the Camcorder On / Off
2.4.1 Auto Power On/Off
Once the vehicle engine is started, the camcorder automatically turns
on. If the Automatic Record function is enabled, the recordi ng will
automatically start right after the camcorder turns on.
2.5 Initial Settings
Before using the camcorder, we recommend you to enable the
Automatic Record function and set up the correct date and time.
9
Page 11
3 Using the Camcorder
3.1 Recording Videos
3.1.1 Motion Detection
If Motion Detection is activated, when power off the camcorder, the
system alert message, “Press OK Key to Power off, or enter motion
detection after 10sec.”, will pop on the screen. This means the
system will enter Motion Detection automatically in 10 se conds; when
the cam corder detects any m otion in front of lens, Video Record will
be activated for a duration the same as the length setting.
To set the motion detection, do the following:
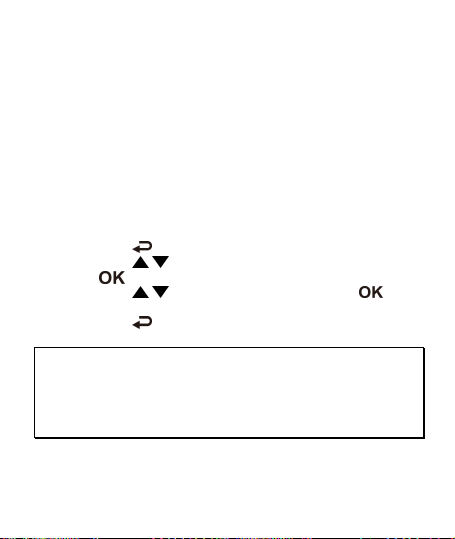
1. Press the button to enter the OSD menu.
2. Press the / button to select Motion Detection and press
the butto n.
3. Press the / button to select On and press the
button.
4. Press the button to exit the menu.
Note:
1. When the battery is fully charged and is in good condition, Motion Detection can
record continuously for about 30 minutes.
2. As the camcorder is used, the battery storage capacity will decrease gradually. This
is a normal phenomenon for the battery
3. The LCD will be off in 30 seconds after the Motion Detection function is enabled.
10
Page 12
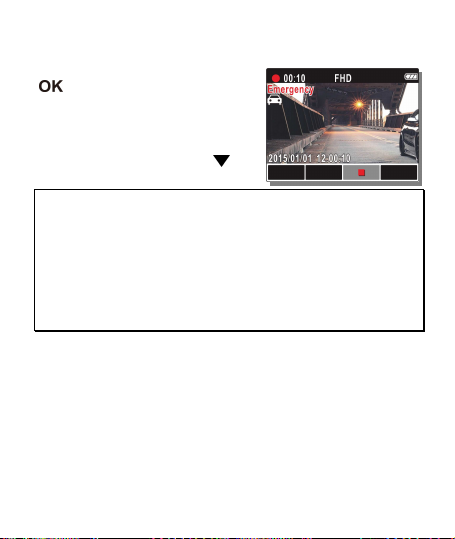
3.1.2 Emergency Recording
During Video Recording, press the
button to enter emergency
recording mode, the “Emergency”
message will be shown immediately
on the upper left corner of the screen,
and the recorded file will be protected.
To stop the recording, press the
button.
Note:
1. If the Collision Detection function is enabled and a collision is detected, the
camcorder will automatically trigger the emergency recording.
2. The emergency recording file is created as a new file, which will be protected to
avoid being overwritten by normal cycling recording. 4G memory card can save up
to 5 emergency video files, and 8G ( or above) memory card can save up to 10
emergency video files. The alert message of “Emergency files are full” will pop up
on the screen when the emergency recording files are full, and the oldest
emergency file will be automatically deleted when a new emergency recording file
is created.
11
Page 13

3.2 Playback Videos and Photos
To playback videos and photos, do the following:
1. During recording, press the
desired video and photo file.
2. Press the / button to select the file category that you
want to browse and press the button.
3. Press the / button to view the next or the previous file
and press the button to view the file in full screen.
3.2.1
Deleting Files
To delete file(s), do the following:
1. If recording is in progress, Press the button to enter the
OSD menu.
2. Press the / button to select File Deletion and press the
button.
3. Press the / button to select the file category and press
the button.
4. Press the / button to select the file that you want to
delete and press the
5. Press the
6. Press the button to confirm delete.
Note:
Deleted files cannot be recovered. Ensure the files have backup before deletion.
/ button to select an option.
Item Description
Delete One Delete the current file.
Delete All Delete all files.
button to browse for the
button to enter the Delete menu.
12
Page 14

FCC Statement
This equipment has been tested and f ound to comply with the limits for a
Class B digital camcorder, pursuant to Part 15 of the FCC Rules. These limits
are designed to provide reasonable protection against harmful interference
in a residential installation. This equipment generates, uses and can radiate
radio frequency energy and, if not installed and used in accordance with the
instructions, may cause harmful interference to radio communications.
However, there is no guarantee that interference will not occur in a
particular installation. If this equipment does cause harmful interference to
radio or television reception, which can be determined by turning the
equipment off and on, the user is encouraged to try to correct the
interference by one or more of the following measures:
• Reorient or relocate the receiving antenna.
• Increase the separation between the equipment and receiver.
• Connect the equipment into an outlet on a circuit different from that to
which the receiver is connected.
• Consult the dealer or an experienced radio/TV technician for help.
This camcorder complies with Part 15 of the FCC Rules. Operation is subject
to the following two conditions: (1) This camcorder may not cause harmful
interference, and (2) this camcorder must accept any interference received,
including interference that may cause undesired operation.
FCC Caution: Any changes or modifications not expressly approved by the
party responsible for compliance could void the user's authority to operate
this equipment.
CE Regulatory Notice
The product herewith complies with the requirements of the Low Voltage
Directive 2006/95/EC, the EMC Directive 2004/108/EC and the RoHS
Directive 2011/65/EC.
1
Page 15

電池注意事項
電池注意事項
電池注意事項電池注意事項
僅可使用本系統充電,未正確處理電池可能會引發爆炸。
請勿自行拆裝、穿刺電池,或使電池短路。
電池接觸明火可能會引起爆炸,請勿將電池丟棄到火中。
請根據當地法規妥善處理使用過的電池。
嚴禁自行更換電池
嚴禁自行更換電池,,,,欲更換電池請洽經銷商
嚴禁自行更換電池嚴禁自行更換電池
安裝須知
安裝須知
安裝須知安裝須知
1. 本產品之安裝應靠近後視鏡,以獲得最佳的視野。
2. 確定鏡頭是在擋風玻璃雨刷的範圍內,確保視野良好,即使
雨天亦然。
3. 不要用手指碰觸鏡頭。手指上的油垢可能會留在鏡頭上,導
致錄像或攝影不清楚。定期清潔鏡頭。
4. 不要將產品安裝在有色車窗上。因為這樣會損壞淺色薄膜。
5. 確定安裝位置不會受有色車窗的阻礙。
欲更換電池請洽經銷商。。。。
欲更換電池請洽經銷商欲更換電池請洽經銷商
2
Page 16

1 導論
導論
導論導論
1.1 包裝內容
包裝內容
包裝內容包裝內容
以下為包裝內容物。若有任何遺漏或損壞項目,請立即聯絡您的經
銷商。
行車記錄器 托架 CD-ROM 光碟
快速使用手冊 汽車連接器
3
Page 17

1
4
5
9
12
13
1.2 產品概要
產品概要
產品概要產品概要
頂視圖與底視圖
頂視圖與底視圖
頂視圖與底視圖頂視圖與底視圖
前視圖
前視圖
前視圖前視圖
6
7
8
側視圖
側視圖 (左側與右側
左側與右側)
側視圖側視圖
左側與右側左側與右側
2
3
編號
編號
編號編號
項目
項目 編號
項目項目
1 托架插孔 8 向上按鈕 ( )
2 電源按鈕
3 記憶卡插槽 10 輸入按鈕 ( )
4 U SB 接頭 11 揚聲器
5 返回按鈕 ( ) 12 廣角鏡
6 L ED 指示燈 13 麥克風
7 LCD 螢幕
4
後視圖
後視圖
後視圖後視圖
11
編號
編號編號
項目
項目
項目項目
9 向下按鈕 ( )
10
Page 18

2 開始
開始
開始開始
2.1 插入記憶卡
插入記憶卡
插入記憶卡插入記憶卡
以黃金接觸點面向設備的背面,插入記憶卡。推記憶卡直到咔嗒一
聲,插入定位時止。
取出記憶卡
取出記憶卡
取出記憶卡取出記憶卡
推記憶卡,彈出插槽。
註註註註:
設備在開機狀態時,不要取出或插入記憶卡,以免損壞記憶卡。
1.
請使用
2.
Micro SD 卡 10 級,
使用前請先格式化
3.
若錄影中螢幕顯示"卡速過慢",表示設備中的記憶卡寫入速度過慢,請更換卡
4.
速較高的記憶卡。
若錄影中螢幕顯示
5.
存起來,請將記憶卡中需要留存的檔案備份之後再以本設備進行格式化。
最高支援
Micro SD 卡。
記憶卡空間過於零散
"
32GB。
,表示記憶卡已無法將錄製的檔案儲
"
5
Page 19

2.2 安裝於車內
安裝於車內
安裝於車內安裝於車內
2.2.1 置於擋風玻璃上
置於擋風玻璃上
置於擋風玻璃上置於擋風玻璃上
1. 將托架基座推入設備上方的托架插
孔中,直到聽到咔嗒聲固定。
2. 用酒精擦拭托架的吸盤及擋風玻璃
至乾淨,並等待酒精乾透,將托架
的吸盤輕壓於擋風玻璃上,再按下
托架的夾子固定托架。
3. 確認托架已牢牢固定。
6
Page 20

2.2.2 調整設備位置
調整設備位置
調整設備位置調整設備位置
1. 鬆開旋鈕,將設備垂直或水平方向調整。
2. 鎖緊旋鈕,並確認設備已牢牢固定。
旋鈕
7
Page 21

2.3 連接電源
連接電源
連接電源連接電源
只使用所供應之汽車連接器,啟動設備以及為內建之電池充電。
1. 將電源連接器的一端連接設備的USB接頭。
2. 將電源連接器的另一端插接汽車內的香煙點火器的插孔。汽
車引擎一旦發動,設備即自動開機。
註註註註::::
本設備僅適用產品所附之電源連接器,請勿使用其他廠牌以免設備燒毀或導
1.
致電池爆炸。
首次使用設備請將電池的電量充滿。
2.
若環境溫度達到
3.
鋰聚合物電池充電。這是鋰的特性,不是故障。
或以上,則電源連接器仍然可以供電給設備,但不會為
45°C
8
Page 22

2.4 設備開
設備開/關關關關
設備開設備開
2.4.1 自動開
自動開/關關關關
自動開自動開
汽車引擎一旦發動,則設備即自動開機。若啟動
在設備開機後,即開始自動錄影 。
2.5 首次設定
首次設定
首次設定首次設定
在使用設備之前,我們建議先啟動
與時間。
自動錄影
自動錄影
自動錄影自動錄影
9
功能,設定正確的日期
自自自自動記錄
動記錄
動記錄動記錄
功能,則
Page 23

3 使用行車記錄器
使用行車記錄器
使用行車記錄器使用行車記錄器
3.1 錄影
錄影
錄影錄影
3.1.1 移動偵測
移動偵測
移動偵測移動偵測
若啟用移動偵測
移動偵測,當行車記錄器關閉電源時,螢幕上會出現 ”
移動偵測移動偵測
鍵將關機
鍵將關機,,,,或或或或10秒後進入移動偵測
鍵將關機鍵將關機
動進入移動偵測模式,當設備偵測到鏡頭前任何物體移動時會自動
啟動錄影,持續錄影的時間同影片長度的設定。
設定移動偵側,其方式如下:
1.
2.
3.
4.
註註註註:
在電池充滿與狀態良好的情況下,移動偵測可連續錄影時間約
1.
電池的蓄電能力會隨著設備使用逐漸減少,此為電池的正常現象。
2.
當設備進入移動偵測模式,螢幕將於
3.
秒後進入移動偵測
秒後進入移動偵測秒後進入移動偵測
“ 。指經過 10 秒後系統會自
按 按鈕,進入 OSD 目錄。
按 / 按鈕選擇移動偵測
按 / 按鈕選擇 開開開開,再按 按鈕。
按 按鈕,退出目錄。
移動偵測 ,再按 按鈕。
移動偵測移動偵測
秒後關閉。
30
10
分鐘。
30
按按按按
OK
Page 24

3.1.2 緊急錄影
緊急錄影
緊急錄影緊急錄影
在錄影期間再按一次 按鈕將
會進入緊急錄影模式,並於螢幕左
上角會顯示 "
緊急錄影
緊急錄影
緊急錄影緊急錄影
" 字樣,在
緊急錄影模式中錄下的檔案會被保
護起來。
按下 ▼ 即會停止錄影。
註註註註::::
若啟動
碰撞偵測
碰撞偵測
功能,並偵測到碰撞,則設備會自動啟用緊急錄影。
碰撞偵測碰撞偵測
1.
緊急錄影的檔案會被另外儲存成被保護檔案,避免檔案被循環錄影覆蓋,
2.
憶卡約可儲存
影檔案。當緊急錄影檔案已滿,螢幕會出現 "
並會自動刪除第一筆緊急錄影檔案。
組緊急錄影檔案,8G (含以上) 記憶卡約可儲存
5
緊急錄影檔案已滿
緊急錄影檔案已滿
緊急錄影檔案已滿緊急錄影檔案已滿
" 的警示, 系統
11
10
4G
組緊急錄
記
Page 25

3.2 播放影片與照片
播放影片與照片
播放影片與照片播放影片與照片
播放影片與照片,其方式如下:
1. 若正在錄影,按 按鈕,進行錄影檔案及拍攝照片的瀏
覽。
2. 按 / 按鈕,選取您要瀏覽的檔案類別,再按 按
鈕。
3. 按 / 按鈕,檢視下一個或上一個檔案,再按 按
鈕,檢視全螢幕中檔案。
3.2.1 檔案刪除
檔案刪除
檔案刪除檔案刪除
檔案刪除,其方式如下:
1. 若正在錄影,按 按鈕,進入 OSD 目錄。
2. 按 / 按鈕選取檔案刪除
3. 按 / 按鈕選取檔案類別,再按 按鈕。
4. 按 / 按 鈕, 選取您想要 刪除 的檔案,再按 按
鈕,進入刪除目錄。
5. 按
6. 按 按鈕,確認刪除。
註註註註
:
刪除的檔案無法回復,刪除前請確認檔案留有備份。
/ 按鈕,選取一個選項。
項目
項目項目項目
刪除單檔
刪除全部
檔案刪除,再按 按鈕。
檔案刪除檔案刪除
說明
刪除目前的檔案。
刪除全部檔案。
說明說明說明
12
Page 26

FCC Statement
This equipment has been tested and f ound to comply with the limits for a
Class B digital camcorder, pursuant to Part 15 of the FCC Rules. These limits
are designed to provide reasonable protection against harmful interference
in a residential installation. This equipment generates, uses and can radiate
radio frequency energy and, if not installed and used in accordance with the
instructions, may cause harmful interference to r adio communications.
However, there is no guarantee that interfe rence will not occur i n a
particular installation. If this equipment does cause harmful interference to
radio or television reception, which can be determ ined by turning the
equipment off and on, the user is encouraged to try to correct the
interference by one or more of the following measures:
• Reorient or relocate the receiving antenna.
• Increase the separation between the equipment and receiver.
• Connect the equipment into an outlet on a circuit different from that to
which the receiver is connected.
• Consult the dealer or an experienced radio/TV technician for help.
This camcorder complies with Part 15 of the FCC Rules. Operation is subject
to the following two conditions: (1) This camcorder may not cause harmful
interference, and (2) this camcorder must accept any interference received,
including interference that may cause undesired operation.
FCC Caution: Any changes or modifications not expressly approved by the
party responsible for compliance could void the user's authority to operate
this equipment.
CE Regulatory Notice
The product herewith complies with the requirements of the Low Voltage
Directive 2006/95/EC, the EMC Directive 2004/108/EC and the RoHS
Directive 2011/65/EC.
1
Page 27

电池警告
电池警告
电池警告电池警告
请务必使用随附的系统进行充电。电池处置不当可能导致爆
炸。
切勿拆卸电池或在电池上钻孔,切勿使电池短路。
电池暴露在明火下可能爆炸。处理电池时切勿放入火中。
请按照当地法规处理废电池。
此电池为内置切勿自行更换电池,请交由经销商进行更换。
安装需知
安装需知
安装需知安装需知
1. 本产品应安装在靠近后视镜之处,并尽量接近前挡风玻璃中
央位置,以获得最好的视野。
2. 确定镜头是在挡风玻璃雨刷的范围内,确保视野良好,即使
雨天也同样好。
3. 不要用手指触摸镜头。手指上的油脂可能会留在镜头上,导
致摄像或摄影不清楚。定期清洁镜头。
4. 不要将产品安装在有色车窗上。因为这样会损坏浅色薄膜。
5. 确定安装位置不会受有色车窗的阻碍。
6. 本设备仅适用产品所附之电源适配器,请勿使用其他厂牌以
免设备烧毁或导致电池爆炸。
2
Page 28

1 介绍
介绍
介绍介绍
1.1 包包包包装装装装清清清清单单单单
以下为包装清单。如果有任何遗漏或损坏项目,请立即联系您的经
销商。
行车记录仪 托架 光盘
快速入门手册
汽车适配器
3
Page 29
1
编号
编号编号
编号 项目
项目项目
项目
编号
编号编号
编号 项目
项目项目
项目
托架插孔
向上按钮
()
存储卡插槽
输入按钮
()
端口
扬声器
返回按钮
()
广角镜
指示灯
麦克风
屏幕
1.2 产
产品概要
产产
品概要
品概要品概要
顶视图与底视 图
顶视图与底视 图
顶视图与底视 图顶视图与底视 图
侧视图
侧视图 ((((左侧与 右侧
左侧与右侧 ))))
侧视图侧视图
左侧与右侧左侧与右侧
前视图
前视图
前视图前视图
5
后视图
后视图
后视图后视图
6
7
8
9
10
2
3
1
2 电源按钮
3
4 USB
5
6 LED
7 LCD
4
11
12
13
8
9 向下按钮 ()
10
11
12
13
4
Page 30
2 入门
入门
入门入门
2.1 插入
插入存储卡
存储卡
插入插入
存储卡存储卡
以黄金接触点面向设备的背面,插入记忆卡。推记忆卡直到咔嗒的
一声,插入到位时止。
取出存储 卡
取出存储 卡
取出存储 卡取出存储卡
推存储卡,弹出插槽。
注注注注:
设备在开机状态时,不要取出或插入存储卡,以免损坏存储卡。
1.
请使用
2.
Micro SD 卡 10
使用前请先格式化
3.
若摄像中屏幕显示
4.
即停止摄像并更换卡速较高的存储卡,以避免造成无效的摄像或文件损坏。
若摄像中屏幕显示
5.
存起来,请将存储卡中需要留存的文件备份之后再以本设备进行格式化。
级,最高支持
Micro SD
卡速过慢
卡速过慢
"
卡速过慢卡速过慢
存储卡空间过于零碎
存储卡空间过于零碎
"
存储卡空间过于零碎存储卡空间过于零碎
32GB。
存储卡。
,表示设备中的存储卡卡速过慢不敷使用,请立
"
,表示存储卡已无法将录制的文件储
"
5
Page 31

2.2 安装在车内
安装在车内
安装在车内安装在车内
2.2.1 固定在挡风玻璃上
固定在挡风玻璃上
固定在挡风玻璃上固定在挡风玻璃上
1. 将托架基座推入设备上方的托架
插孔中,直到听到咔嗒声固定。
2. 用酒精擦试托架的吸盘 及挡风玻璃,
并等待酒精干透,将托架的吸盘轻
压于挡风玻璃上,再按下托架的夹
子固定托架。
3. 确认托架已牢牢固定。
6
Page 32
2.2.2 调整设备位置
调整设备位置
调整设备位置调整设备位置
1. 松开旋钮,将设备垂 直或水平方向调整。
2. 锁紧旋钮,并确认设备已牢牢固定。
旋钮
7
Page 33

2.3 连接电源
连接电源
连接电源连接电源
只使用所提供的汽车适配器,启动设备以及为内置的电池充电。
1. 将汽车适配器的一端连接到设备的 USB 端口。
2. 将汽车充电器的另一端插接汽车内的香烟点火器的插孔。汽
车引擎一旦发动,设备即自动开机。
注注注注:
本设备仅适用产品所附之电源适配器,请勿使用其他厂牌以免设备烧毁或导致
1.
电池爆炸。
首次使用设备请将电池的电量充满。
2.
如果环境温度达到
3.
为锂聚合物电池充电。这是锂的特性,不是故障。
45°C
或以上,则汽车适配器仍然可以供电给设备,但不会
8
Page 34

2.4 设备开
设备开/关关关关
设备开设备开
2.4.1 自动开
自动开/关关关关
自动开自动开
汽车引擎一旦发动,设备就自动开机。如果启动 自动记录
在设备开机后,即开始自动摄像。
2.5 初始设置
初始设置
初始设置初始设置
在使用设备之前,我们建议先打开
与时间。
自动记录 功能,则
自动记录自动记录
自动摄 像
自动摄 像
功能,设置正确的日期
自动摄 像自动摄 像
9
Page 35

3 使用行车记录仪
使用行车记录仪
使用行车记录仪使用行车记录仪
3.1 摄摄摄摄像像像像
3.1.1 运动探测
运动探测
运动探测运动探测
若开启运动探测功能,当行车记录仪关机時,屏幕会出现 ”
键将关机 ,或
键将关机 ,或
键将关机 ,或键将关机 ,或
自动进入运动探测模式,当设备侦测到镜头前任何物体移动时会自
动启动摄像。
开机后打开自动摄像,其设置方式如下:
1. 按 按钮进入 OSD 菜单。
2. 按 / 按钮选择 运动探测
3. 按 / 按钮选择 开开开开,再按 按钮。
4. 按 按钮,弹出菜单。
注注注注:
在电池充满与状态良好的情况下,运动探测可连续摄像时间约
1.
电池的蓄电能力会随着设备使用逐渐减少,此为电池的正常现象。
2.
当设备进入运动探测模式,屏幕将于
3.
10
秒后进入运动探测
秒后进入运 动探测
秒后进入运 动探测秒后进入运 动探测
运动探测 ,再按 按钮。
运动探测运动探测
” 。指经过 10 秒后系统会
秒后关闭。
30
10
30
按按按按
OK
分钟。
Page 36

3.1.2 紧急摄像
紧急摄像
紧急摄像紧急摄像
在摄像期间再按一次 按钮将
会进入紧急摄像模式,并于屏幕左
上角会显示"
紧急摄像
紧急摄像
紧急摄像紧急摄像
" 字样,在紧
急摄像模式中录下的文件会被保护
起来。
按下 按钮即会停止摄像。
注注注注:
若启动
碰撞侦测
碰撞侦测
1.
紧急摄像的文件会被另外储存成被保护的文件,避免文件被循环录像覆盖,
2.
存储卡约可储存5组紧急摄像文件,8G(含以上)存储卡约可储存10组紧急摄
像文件。当紧急摄像的文件已满,屏幕会出现
设备并会自动删除第一笔紧急摄像文件。
功能并侦测到碰撞,则设备会自动启用紧急摄像。
碰撞侦测碰撞侦测
紧急摄像文件已满
紧急摄像文件已满
“
紧急摄像文件已满紧急摄像文件已满
”
11
4G
的警示,
Page 37

3.2 播放视频与照片
播放视频与照片
播放视频与照片播放视频与照片
播放视频与照片,其方式如下:
1. 如果正在摄像,按 按钮,进行摄像文件及拍摄照片的浏
览。
2. 按 / 按钮选取您要 浏览的文件类型,再按 按钮。
3. 按 / 按钮查看下一 个或上一个文件,再按 按钮,
查看全屏幕中文件。
3.2.1
删除文件
删除文件
删除文件删除文件
删除文件,其方式如下:
1. 如果正在摄像,按 按钮,进入 OSD 菜单 。
2. 按 / 按钮,选取 文件删除
3. 按 / 按钮,选取文 件类型,再按 按钮。
4. 按 / 按钮,选取您想要删除的文件,再按 按钮,
进入删除菜单。
5. 按
6. 按 按钮,确认删除。
注注注注
:
删除的文件不能恢复,删除前,确保文件留有备份。
/ 按钮,选取一个选项。
项目
项目 说明
项目项目
删除单档 删除目前的文件。
删除全部 删除全部文件。
文件删除 ,再按 按钮。
文件删除文件删除
说明
说明说明
12
Page 38

12031021300-A
 Loading...