

Page 1

Battery warning
The battery for this car camcorder is sealed internally. DO NOT
attempt to disassemble the camcorder and remove the
battery.
Always charge using the provided system. Improper charging
of the battery may result in explosion.
The battery is designed for this camcorder and is not customer
replaceable.
Batteries may explode if exposed to open fire. Never place the
car camcorder in a fire.
Recycle the camcorder observing local regulations.
Notes on Installation
1. Install the camcorder near the rear-view mirror to obtain the
best open-field view. Do NOT install the camcorder in a
location that will obstruct your required driving view.
2. Make sure that the lens is within the wiping range of the
windscreen wiper to ensure a clear view even when it rains.
3. Do not touch the lens with your fingers. Finger grease may be
left on the lens and will result in unclear videos or snapshots.
Clean the lens on a regular basis.
4. Do not install the camcorder on a tinted window. Doing so may
damage the tint film.
5. Make sure that the installation position is not hindered by the
tinted window.
6.
For more operation details, please refer to CD-ROM.
1
Page 2
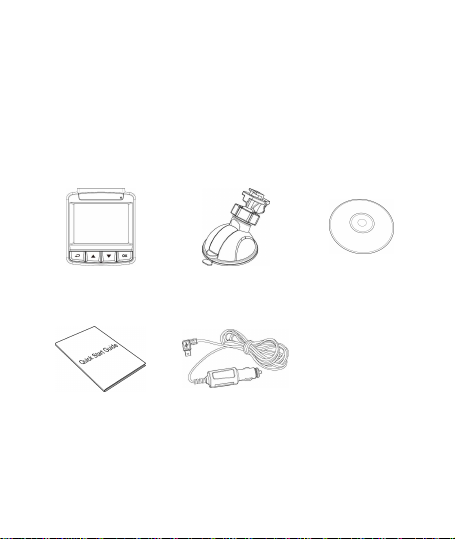
1 Introduction
1.1 Package Contents
The package contains the following items. If there are any missing or
damaged items, contact your dealer immediately.
Camcorder Bracket CD-ROM
Quick start guide Car adapter
2
Page 3
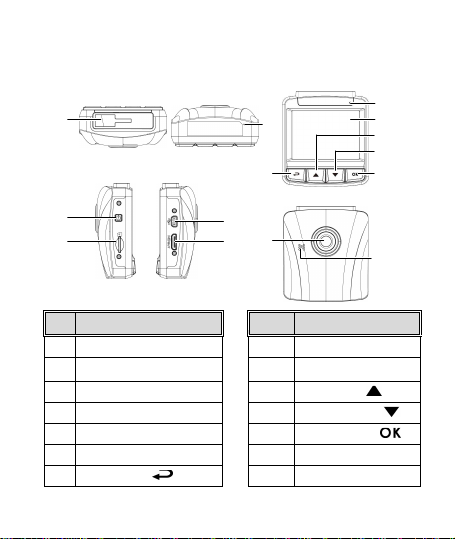
1.2 Product Overview
No. Item
No. Item
1 Bracket Socket
8 LED Indicator
2 Microphone
9 LCD Panel
3 Power Button
10 Up Button (
)
4 Memory Card Slot
11 Down Button (
)
5 USB Connector
12 Enter Button (
)
6 HD(Mini HDMI) Connector
13 Wide Angle Lens
7 Back Button (
) 14
Speaker
1
3
4
10
8
13
5
7
11
12
6
9
Top and Bottom Views
Side (Left and Right) Views
Front View
2
Rear View
14
3
Page 4

2 Getting Started
2.1 Inserting the Memory Card
Insert the memory card with the gold contacts facing the back of the
camcorder. Push the memory card until it clicks into place. (Use class
6 or above the micro SD cards for this camcorder; It is recommended
to format the micro SD cards before the initial use.)
To remove the memory card
Push the edge of the memory card inward until you hear/feel it click,
then allow it to push out until you can remove it from the slot.
Note:
1. Do not remove or insert the memory card when the camcorder is powered on. This
may damage the memory card.
2. It is recommended to use a 32 GB, Class 6 speed or above micro SD card.
3. It is recommended to format the micro SD cards before the initial use.
4
Page 5

2.2 Installing in Vehicles
2.2.1 Mount to Windshield
1. Attach the bracket to the camcorder.
Slide it into the bracket holder until you
hear a click.
2. Before installing the bracket, please
use alcohol to clean the windshield
and suction cup of the bracket. Wait
for dry and press suction-cup on the
windshield.
3. Hold the base firmly on the
windshield and press down the clamp
to mount the car holder to the
windshield. Make sure the base is
securely locked in place.
Warning: Do not install the camcorder on a tinted window. Doing so
may damage the tint film.
5
Page 6

2.2.2 Adjust the camcorder position
1. Loose the knob to swivel the
device vertically or
horizontally.
2. Then tighten the knob to make sure the camcorder is securely
locked in place.
6
Knob
Page 7

2.3 Connecting to Power
Use only the supplied car adapter to power up the camcorder and
charge the built-in battery.
1. Connect one end of the car adapter to the USB connector of the
camcorder.
2. Plug the other end of the car charger to the cigarette lighter
socket of your vehicle. Once the vehicle engine is started, the
camcorder automatically powers on.
Note:
1. Red LED light indicates the battery is charging; when devices are connecting power
cord to charge and the red light flashes, it indicates the device temperature is too high
and should unplug the power cord immediately.
2. Please take note if the environment temperature reaches 45°C or above, the car
adapter still can supply power to camcorder, but it may not charge the battery. This is
characteristic of Lithium polymer battery and is not a malfunction.
7
Page 8

2.4 Powering the Camcorder On / Off
2.4.1 Auto Power On/Off
Once the vehicle engine is started, the device automatically turns on.
If the Automatic Record function is enabled, the recording will
automatically start right away after the device turns on.
Once the v ehicle engine is shut down, the camcorder automatically
saves the recording and turns off the power within 10 seconds.
Note:
Automatic power up and shut down assumes the power socket is linked to the car
ignition.
3 Using the Camcorder
3.1 Recording Videos
3.1.1
Record videos while driving
When the vehicle engine starts up, the camcorder automatically turns
on and starts recording.
Recording will automatically stop when the engine is switched off.
8
Page 9

3.1.2
Emergency Recording
During normal video recording,
press the button to
begin emergency recording
mode.
The “Emergency” message will
be displayed immediately on
the upper left corner of the
screen, and the recorded file
will be continuous and
protected from being overwritten.
After complete the emergency recording, it will be back to normal
recording mode.
Note:
1. If the Collision Detection function is enabled and a collision is detected, the
camcorder will automatically trigger the emergency recording feature.
2. The emergency recording file is created as a new file, which will be protected to
avoid being overwritten by normal loop recording. 8 GB (or above) memory card can
save up to 10 emergency video files. The alert message of “Emergency files are full”
will pop up on the screen when the emergency recording files are full, and the oldest
emergency file will be automatically deleted when a new emergency recording file is
created.
9
Page 10

3.2 Playback Videos and Photos
1. During recording, press button to browse for the desired
video and photo file.
2. Press the / button to select the file that you want to
browse and press the button.
3. Press the / button to view the next or the previous file
and press the button to view the file in full screen.
4. When user want to playback the emergency video file, they
could check on file name as EMER.
3.2.1
Deleting Files
To delete file(s), do the following:
1. If recording is in progress, press the button to enter the
OSD menu.
2. Press the / button to select File Deletio n and press the
button.
3. Press the / button to select Delete One or Delete All,
then press the
4. After select Delete One, press the / button to select that
you want to delete, then press the
5. After select Delete All, press the / button to select Video
File or Image File that you want to delete, then select YES or NO
to delete.
Note:
1. Deleted files CANNOT be recovered. Ensure the files have backup before deletion.
2. Emergency files cannot be deleted from this operation. They can be deleted by
inserting memory card into your PC or format memory card.
button.
button.
10
 Loading...