

Page 1
Page 2

Preface
About this Quick Start Guide
This QSG is designed to demonstrate the features of your HP f100 Car
Camcorder. All information presented is as accurate as possible but is
subject to change without notice. HP shall not be liable for technical or
editorial errors or omissions contained herein. For the latest reversion, visit
www.hp.com/support.
Copyright
This manual contains proprietary information protected by copyright. All
rights are reserved. No part of this manual may be reproduced by any
mechanical, electronic or other means, in any form, without prior
written permission of the manufacturer. © Copyright 2014
Federal Communications Commission notice
This equipment has been tested and found to comply with the limits
for a Class B digital device, pursuant to Part 15 of the FCC Rules. These
limits are designed to provide reasonable protection against harmful
interference in a residential installation. This equipment generates, uses,
and can radiate radio frequency energy and, if not installed and used in
accordance with the instructions, may cause harmful interference to radio
communications. However, there is no guarantee that interference will
not occur in a particular installation. If this equipment does cause harmful
interference to radio or television reception, which can be determined by
turning the equipment o and on, the user is encouraged to try to correct
the interference by one or more of the following measures:
· Reorient or relocate the receiving antenna.
· Increase the separation between the equipment and receiver.
· Connect the equipment to an outlet on a circuit dierent from that to which
the receiver is connected.
· Consult the dealer or an experienced radio or television technician for help.
1
Page 3

Modications:
The FCC requires the user to be notied that any changes or modications
made to this device that are not expressly approved by HP may void the
user’s authority to operate the equipment.
Trademark Recognition
Windows XP/Vista/Windows 7/Windows 8 are registered trademarks of
Microsoft Corporation in the United States and/or other countries. Macintosh
and Mac OS are registered trademarks of Apple Inc. In addition, all other
companies or product names are trademarks or registered trademarks of
their respective companies.
Safety and Handling Precautions
WARNING:
Follow these instructions to prevent damage to the camcorder:
· DO NOT USE UNPROTECTED IN RAIN OR WATER. PREVENT CONTACT WITH
ANY KIND OF LIQUIDS
· USE RECOMMENDED ACCESSORIES ONLY
· DO NOT DISASSEMBLE OR ATTEMPT REPAIRS ON YOUR OWN.
DISASSEMBLING THE CAMCORDER MAY VOID THE WARRANTY
· THERE ARE NO PARTS OR COMPONENTS INSIDE THAT NEED TO BE
MAINTAINED
· REPAIRS WILL BE MADE BY AUTHORIZED SERVICE CENTERS ONLY
· Do not touch the camcorder lens
· Do not use abrasive chemicals, cleaning solvents or strong detergents to
clean the product. Wipe the product with a clean slightly damp soft cloth.
ATTENTION!
· ELECTROSTATIC DISCHARGE OR STRONG ELECTROMAGNETIC FIELDS CAN
AFFECT THE CAMCORDER. RESTART THE CAMCORDER IN THIS CASE.
2
Page 4

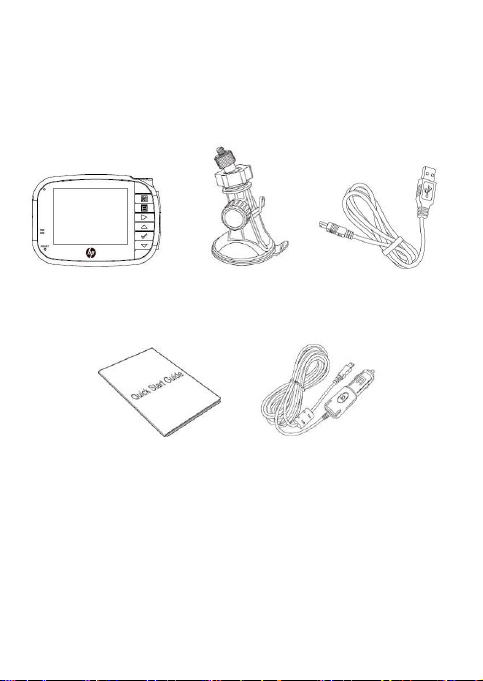
Package Contents
The package contains the following items. In case there is any missing or
damaged item, contact your dealer immediately.
Car Camcorder
Quick Start Guide Car adapter
Bracket USB Cable
3
Page 5
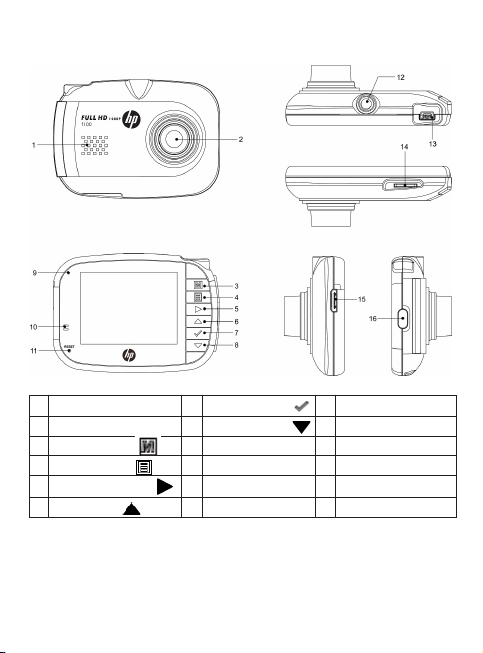
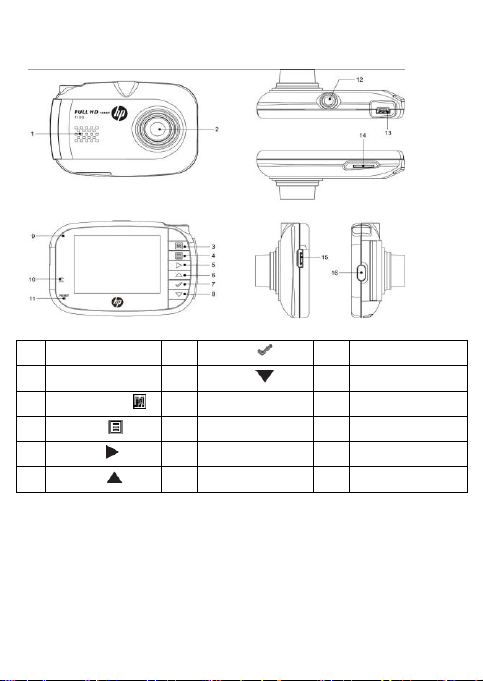
Product Overview
1
Speaker
2
Wide Angle Lens
3
Mode button /
4
Menu button/
5
Playback Button/
6
UP Button /
1. To operate the device, press the corresponding buttons (9~14)
according to the guide icons shown on the screen.
2. Insert the Micro SDHC card and remove the lens protection lm if
needed before recording.
3. The Micro SDHC card is not included, we suggest using Class 6 or above.
7
Enter Button /
8
Down Button /
9
LED Light
10
MIC
11
Reset
12
Bracket Socket
4
13
USB Connector
14
Memory Card Slot
15
HDMI Connector
16
16 - Power Button
Page 6
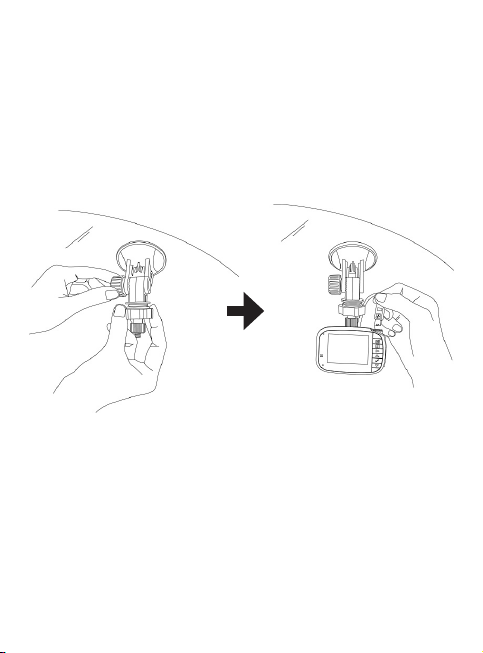
Get Ready To Install Your Car Camcorder
1. Insert the Micro SD Card* to the Micro SD Card Slot
2. Insert the bracket to the car recorder
3. Choose a good spot on the windshield which will not block your view
while driving and attach it to the windshield
4. Connect your car recorder to the car lighter with car adapter
* Note: The SD Card is not included in the package. 4GB Class 6 is recommended.
Cautions
1. Attach the driving recorder to a suitable spot which does not block your
view while driving.
2. Do back-up your SD card before format it.
3. Do NOT remove the SD card when the driving recorder is on.
4. If your car lighter provides electricity after your car is o, make sure to
unplug the car charger otherwise the car battery will run out.
5
Page 7

前言
關於本快速入門指南
本快速入門指南乃為示範您手上的 HP f100 行車紀錄器設計。載於本
指南之資訊皆盡可能正確,但若有更改不另行通知。此處可能包含之
技術、編輯上的錯誤或遺漏事項 HP 不負責任。如需最新版本,請至
www.hp.com/support 。
版權
本指南包含受著作權保護之內容。本公司保留一切版權。本指南之任
何部分皆不得以紙本、電子或其他方式複製為任何形式,除非得到
製造商事先書面允許。© Copyright 2014
美國聯邦通信委員會 (FCC) 聲明
本設備經測試證明符合 FCC 規定第 15 條之 B 類數位裝置之條件。這些
條件之訂定乃為合理保護住家安裝環境不受有害干擾。本設備產生、
使用並釋放電磁波能量。若未依使用說明操作,可能對無線電通信產
生有害之干擾。我們無法保證安裝後是否會有干擾產生。若此設備對
無線電或電視產生有害干擾(可藉關閉再啟動此裝置來判定),使用
者可透過一或多種下列方式來嘗試解決干擾:
·將接收天線轉向或重新定位。
·加大此設備與接收裝置之距離。
·將此設備接至與接收裝置不同線路之電源。
·向經銷商或有經驗之無線電、電視技術人員尋求協助。
1
Page 8

改裝
FCC 提醒使用者,非經 HP 同意而對本裝置進行變更或改裝將使使用者
失去操作本設備之權益。
商標識別
Windows XP/Vista/Windows 7/Windows 8 乃屬於美國及其他國家微軟公
司之註冊商標。Macintosh 及 Mac OS 乃屬蘋果公司之註冊商標。此外,
其他公司名或產品名各為屬於其公司之商標或註冊商標。
安全及操作注意事項
警告:
依下列指示操作以防行車紀錄器損壞:
·請勿於無遮蔽之雨中或水中使用。避免與任何液體接觸。
·請勿使用非推薦之配件。
·請勿自行拆解或嘗試維修。拆解行車記錄器可能導致保固失效。
·本產品不包含需要保養之零件。
·維修請交由經授權之服務中心處理。
·請勿觸摸行車紀錄器鏡頭。
·請勿使用研磨性物質、清潔溶劑或強力清潔劑來清潔本產品。以軟布
稍微沾濕來擦拭本產品。
注意!
·靜電或強磁場可能影響行車紀錄器。遇此情形,請重新啟動行車紀錄
器。
2
Page 9
包裝內容
本包裝含有下列品項。若有短少或損壞之物品,請立即聯絡經銷商。
行車紀錄器 支架 USB 連接線
快速入門指南 車上電源轉接器
3
Page 10
產品概觀
1
喇叭 7 確認鍵/
13
USB 連接孔
2
廣角鏡頭
8
向下鍵/
14
記憶卡插槽
3
模式選擇鍵/
9
LED 燈
15
HDMI 連接孔
4
選單鍵/
10
麥克風
16
電源鍵
5
回放鍵/
11
重置鍵
6
向上鍵/
12
支架孔
1. 請以螢幕顯示之指示圖示按下對應的按鍵(9~14) 。
2. 錄影前插入 Micro SDHC 卡,需要時移除鏡頭保護膜。
3. 本包裝不含 Micro SDHC 卡。建議使用 Class 6 以上卡片。
4
Page 11

安裝行車紀錄器
1. 將 Micro SDHC 卡*插入所屬插孔。
2. 將行車紀錄器鎖於支架上。
3. 將行車紀錄器吸附於擋風玻璃上,且於駕駛時不阻礙視線之適當位
置。
4. 以車上電源轉接器連接行車紀錄器與點菸器。
* 注意:本包裝不含 SD 卡。建議使用 4GB Class 6 以上之卡片。
注意事項
1. 將行車紀錄器吸附適當位置,於駕駛時不阻礙視線為主。
2. 將 SD 卡格式化前請先備份。
3. 請勿於行車紀錄器運作時移除 SD 卡。
4. 若您的點菸器於汽車熄火時仍提供電源,則需拔除電源轉接器,以
免汽車電池耗盡。
5
Page 12

前言
关于本快速入门指南
本快速入门指南是为示范您手上的 HP f100 行车纪录设计。载仪于本
指南的信息都尽可能正确,但若有更改不另行通知。此处可能包含的
技术、编辑上的错误或遗漏事项 HP 不负责任。如需最新版本,请至
www.hp.com/support 。
版权
本指南包含受著作权保护的内容。本公司保留一切版权。本指南的任
何部分不得以纸本、电子或其它方式复制为任何形式,除非得到制
造商事先书面允许。© Copyright 2014
美国联邦通信委员会 (FCC) 声明
本设备经测试证明符合 FCC 规定第 15 条的 B 类数字装置的条件。这些
条件的订定是为合理保护住家安装环境不受有害干扰。本设备产生、
使用并释放电磁波能量。若未依使用说明操作,可能对无线电通信产
生有害的干扰。我们无法保证安装后是否会有干扰产生。若此设备对
无线电或电视产生有害干扰(可以关闭再启动此装置来判定),使用
者可透过一或多种下列方式来尝试解决干扰:
·将接收天线转向或重新定位。
·加大此设备与接收装置的距离。
·将此设备接至与接收装置不同线路的电源。
·向经销商或有经验的无线电、电视技术人员寻求协助。
1
Page 13

改装
FCC 提醒使用者,非经 HP 同意而对本装置进行变更或改装将使使用者
失去操作本设备的权益。
商标识别
Windows XP/Vista/Windows 7/Windows 8 属于美国及其它国家微软公司
的注册商标。Macintosh 及 Mac OS 属苹果公司注册商标。此外,其它
公司名或产品名各为属于其公司商标或注册商标。
安全及操作注意事项
警告:
依下列指示操作以防行车纪录仪损坏:
·请勿于无遮蔽的雨中或水中使用。避免与任何液体接触。
·请勿使用非推荐的配件。
·请勿自行拆解或尝试维修。拆解行车记录器可能导致保固失效。
·本产品不包含需要保养的零件。
·维修请交由经授权的服务中心处理。
·请勿触摸行车纪录仪镜头。
·请勿使用研磨性物质、清洁溶剂或强力清洁剂来清洁本产品。以软布
稍微沾湿来擦拭本产品。
注意!
·静电或强磁场可能影响行车纪录仪。遇此情形,请重新启动行车纪录
仪。
2
Page 14

包装内容
本包装含有下列配件。若有短少或损坏的物品,请立即联系经销商。
行车纪录仪 支架 USB 连接线
快速入门指南 车上电源转接器
3
Page 15

产品示意图
1
喇叭
7
确认键/
13
USB 连接孔
2
广角镜头
8
向下键/
14
记忆卡插槽
3
模式选择键/
9
LED 灯
15
HDMI 连接孔
4
选单键/
10
麦克风
16
电源键
5
回放键/
11
重置键
6
向上键/
12
支架孔
1. 请以屏幕显示的指示图标按下对应的按键(9~14) 。
2. 录像前插入 Micro SDHC 卡,需要时移除镜头保护膜。
3. 本包装不含 Micro SDHC 卡。建议使用 Class 6 以上卡片。
4
Page 16

安装行车纪录仪
1. 将 Micro SDHC 卡*插入所属插孔。
2. 将行车纪录仪锁固在支架上。
3. 将行车纪录仪吸附于挡风玻璃上驾驶时不阻碍视线之适当位置。
4. 以车上电源转接器连接行车纪录仪与点烟器。
* 注意:本包装不含 SD 卡。建议使用 4GB Class 6 以上之卡片。
注意事项
1. 将行车纪录仪吸附适当位置,驾驶时不阻碍行车视线。
2. 将 SD 卡格式化前请先备份。
3. 请勿在行车纪录仪运作时移除 SD 卡。
4. 若您的点烟器在汽车熄火时仍提供电源,则需拔除电源转接器,以
免汽车电池耗尽。
5
Page 17

前書き
このクイックガイドについて
このクイックガイドはお持ちの HP F100ドライブレコ ーダーの為に作成し
たものです。このガイドに含まれる情報は正しいですが 、予告なしで変
更する場合、別途に知らせないことをご了承してくださ い。または技術
的、編集上の誤りを含めて、脱落事項の場合、 HPは 責任を負いません。
最新バージョンを求める方は、次の web サイトに アクセスして下さい。
www.hp.com/support
著作権
このガイドには、著作権で保護されたコンテンツ が含まれます。当社は
すべての権利を保留します。このガイドは製造 元が事前に書面による許
可なしで、紙、電子、またはいかなる手段でその他の形に複製してはな
らない。© Copyright 2014
米国連邦通信委員会 (FCC) の声明
この設備はテストに通して、FCC の定める15 条のB 類、デジ タル機器の条
件に満たします。こ れらの条件は合理的にホー ムの設置環境で有害な妨
害を受けない保護す る為に設定します。この設 備は電磁エネルギーを生
成し、使用、放出します。使用説明書を従わない操作する場合、恐らく
無線通信に対して有害な妨害が発生します。設 置してから干渉しないこ
とを保証できません。もしこの設備はラジオまたはテレビに対して有害
な妨害(この装置を リセットして判定できる)を引き起こす場合、ユー
ザーが一つ、または下記の複数方法で試して解 決して下さい。
·受信アンテナの方向または位置を変え ます。
·設備と受信機の距離を増やします。
·この設備をレシーバーと違い電源に接続します。
·販売店または経験のあるラジオ、テレ ビ技術者に協力を求めます。
1
Page 18

改造
FCC はユーザーに警告します。HPの同意せずにこの設備を変更または改造
する場合、ユーザーがこの設備の操作権益が失います。
商標の識別
Windows XP/Vista/Wi ndows 7/Windows 8 は、アメリ カ合衆国及び他の国、
マイクロソフトの登録商標です。Macintosh及び Mac OS はアップル社の商
標です。その他の会社名、製品名は、その会社の 商標または登録商標に
属する。
安全及び操作上の注意事項
警告:
ドライブレコーダーが破損ならない為に、次の 手順に従って操作して下
さい。
·雨や水に曝される場所で使用しないで下さい。いかなる液体と接触する
ことを避けて下さい。
·非推薦する部品を使わないで下さい。
·分解または修復しようとしないで下さ い。ドライブレコーダーを分解す
る場合、保証ボイドを引き起こす恐れがあります。
·当製品は必要なメンテナンス部品が含まれません。
·メンテナンスする場合、サービスセンターに手渡して下さい。
·ドライブレコーダー のレンズに触れ ないで下さい。
· 研磨性の物質、清潔溶剤又は強力洗剤で当製 品を洗浄しないで下さい。
柔らかい布で少し濡 れ付けて製品を拭きます。
注意!
・静電気または強磁場は恐らくドライブレコー ダーに影響します。この
場合に、ドライブレ コーダーをリセットして下 さい。
2
Page 19

パッケージのコンテンツ
このパッケージには、次の商品が含まれます。欠損または破損する
場合、代理店までお問い合わせ下さい。
ドライブレコーダー ブラケット USB 接続線
クイックガイド カー電源アダプター
3
Page 20

製品の概要
1
スピーカ
7
確認キー/
13
USB 接続穴
2
広角のレンズ
8
下矢印キー/
14
メモリ カード スロット
3
モード選択キー/
9
LED ランプ
15
HDMI接続穴
4
メニュー キー/
10
マイク
16
電源キー
5
再生キー/
11
リセットキー
6
上矢印キー/
12
ブラケット締め付穴
1.スクリーンのアイコンに従って、対応するプッシュ・ボタ ンを押し付け
て下さい(9~14)。
2. 録画する前にM icro SDH C カードを挿入します、必要の時、レンズの保護
フィルムをはずして下さい。
3. このパッケージは、 マイクロ SDHC カードが含 まれません。クラス 6 以
上のカードを推奨し ます。
4
Page 21

ドライブレコーダー の取り付け
1. マイクロ SDHC カードをスロ ットに挿入します
2. ドライブレコーダー をブラ ケットに締め付けて下さい 。
3.運転する時、視線を妨害しない適切な位置にドライブレコーダー をウ
ィンドシールドガラスの上に吸着して下さい。
4. カー電源アダプターでドライ ブレコーダーと車のシガー ライターを接
続して下さい。
* 注意:このパッケージ は、マイクロ SD カードが含まれません。4GBクラ
ス 6 以上のカードを推奨します。
注意事項注意事項
1. 運転する時、視線を妨害しな い適切な位置にドライブレ コーダー をウ
ィンドシールドガラスの上に吸着して下さい。
2. SD カードをフォーマットする 前にバックアップして下さい。
3.ドライブレコーダーの操作中に SD カードを取り外さないで 下さい。
4. カーシガレット ライターをオフしても、まだ電力を提供する場合、バ
ッテリーの電力が完全に尽くさない為に、カー電源アダプターを取り外
して下さい。
5
Page 22

머리말
빠른 시작 가이드
연방 통신위원회 성명서
본 QSG 에는 HP F100 자동차 캠코더 기능 설명을 위해 제작되었습니다.
본 가이드에는 최대한 정확한 내용을 기재하였으며 사전 예고없이 변경
될 수 있습니다. HP 는이 문서에 포함된 기술 또는 편집 상의 오류 또는
누락된 내용에 대해 책임을 지지 않습니다. 최근 업데이트 내용은
www.hp.com / support 를 이용해 주십시오.
저작권
본 가이드에는 저작권법의 보호를 받는 소유권 정보가 포함되어 있으며
모든 권리는 보호됩니다. 본 가이드의 어떠한 부분도 제조업체의 사전
서면 승인없이 전자, 기계 또는 어떠한 다른 방법으로도 변경 및 복제
를 할 수 없습니다. © 저작권 2014
본 장치는 FCC 규정의 Part 15 에 의거하여 검사를 진행하였고 Class B
디지털 장치의 기준을 준수하는 것으로 확인되었습니다. 이러한 규정에
대한 제한은 거주 지역 설치에 따른 유해한 장애로부터 적절한 보호를
제공하도록 설계되었습니다. 이 장비는 사용 상에 무선주파수를 생성 및
방출할 수 있으며, 설치 지침에 따라 설치 사용하지 않을 경우 무선
통신에 유해한 전파 간섭을 일으킬 수 있습니다. 단, 설지 지침에 따라
설치하였을 경우 전파 간섭이 발생하지 않을 것이라는 보장은 없습니다.
이 장비의 전원을 켜고 끄는 상황에 따라 라디오 또는 텔레 비전 수신에
유해한 간섭을 일으킬 경우, 사용자는 다음 조치들을 이용해 문제를
해결해 보실 것을 권장 드립니다.
수신 안테나의 방향이나 위치를 변경해 보십시오.
장비와 수신기 사이의 거리를 멀리 유지해 보십시오.
수신기가 연결된 것과 다른 회로의 콘센트에 장치를 연결해
보십시오.
대리점이나 숙달된 라디오 / TV 기술자에게 문의해 보십시오.
1
Page 23

수정
상표 인정
안전 및 취급상 주의 사항
경고
경고
정전기나 강력한 전자기장은 본 캠코더에 영향을 미칠 수 있습니다
이러한 경우 제품을 재시작해 주십시오
:
FCC 의 규정에 따라 HP 측에서는 명시된 규정을 준수하지 않고 사용자가
임의로 승인되지 않은 변경이나 개조를 할 경우 본 장비의 작 동에 대한
사용자의 권한을 무효화할 수 있습니다.
윈도우 XP / 비스타 / 윈도우 7 및 8 은 미국 및 / 또는 기타 국가 에서
Microsoft Corporat ion 의 등록 상표입니다. 매킨토시와 Mac OS 는 또한
애플의 등록 상표입니다. 본 가이드 내의 다른 모든 회사 또는 제품의
이름은 해당 회사에 상표 또는 등록 상표임을 밝혀둡니다.
:
본 제품의 손상을 방지하려면 아래 내용을 준수해 주십시오.:
비나 물이 묻지않도록 해 주십시오. 어떠한 액체류와도 접촉을 피해
주십시오.
사용 권장되는 악세사리만 사용해 주십시오.
본 제품을 임의로 분해 및 개조하지 마십시오. 본 제품을 임의로
분해할 경우 품질 보증이 무효화될 수 있습니다.
내부에는 임의로 수리하거나 교체될 부품이나 구성 요소가 없습니다.
수리는 인증된 서비스 센터만을 이용해 주십시오.
캠코더의 렌즈를 만지지 마십시오.
화학 세정제, 연마제, 날카로운 물체로 본 제품을 청소하지 마십시오.
약간 습기가 있는 부드러운 헝겊으로 청소하길 권장드립니다.
!
.
.
2
Page 24

패키지 내용물
본
패키지에는 다음과 같은 내용물이 포함되어 있습니다. 내용물
중 어떠한 하자나 누락된 내용물이 있으시면 즉시 구매처로 연락해
주십시오.
자동차
캠코더 브랫킷 USB 케이블
빠른
시작 가이드 자동차 어댑 터
3
Page 25

제품 외관
스피커
1
광각 렌즈
2
3
4
5
6
1. 본
모드버튼
/
메뉴버튼
/
재생버튼
/
위로가기 버튼
/
장치를 작동하려면 가이드에 표시된 내용에 따라 화면에
엔터 버튼
7
아래로가기 버튼
8
LE
D 등
9
마이크
0
1
리셋
1
1
브랫킷 소켓
1
2
/
/
커넥터
USB
1
3
메모리카드 슬롯
1
4
HDMI
15
전원 버튼
16
커넥트
표시되는 해당 버튼 (9~14)을 조작해 주십시오.
2. 마이크로 SDHC 카드를 설치하고 녹화 전에 렌즈 보호 필름을 제거해
주십시오.
3. 마이크로 SDHC 카드는 본 제품에 포함되어 있지 않으며 Class 6 혹은
그 이상의 제품을 사용하길 권장드립니다.
4
Page 26

귀하의 자동차에 캠코더 설치하기
경고
1. 마이크로
2. 브랫킷을 자동차 레코더에 장착하기
3. 앞유리 중 운전 시야를 가리지 않는 적합한 장소를 선택하여
4. 자동차 어댑터의 자동차 라이터 자리에 본 자동차 레코더를
* 주의: SD
1. 운전 시야가 가려지지 않는 적합한 곳에 본 제품을 설치해 주십시오.
2. SD 카드를 포맷하기 전에 백업을 하십시오.
3. 운전 녹화 중일 때 SD 카드를 제거하지 말아 주십시오.
4. 자동차 라이터를 이용하는 경우, 자동차 충전이 완료되면 충전
SD 카드를 마이크로 SD 카드 슬롯에 장착하기
정확하게 고정시키기
장착하기
카드는 본 제품에 포함되어 있지 않으며
권장드립니다
.
4GB Class 6 을
사용하실 것을
플러그를 제거해 주십시오. 그렇지 않으면 자동차 배터리가
방전되는 상황이 발생할 염려가 있습니다.
5
Page 27

Page 28

235
Page 29

Page 30

Page 31

Page 32

P/N: 8PHP8040210
 Loading...