

User Guide
HP OfficeJet 8010 series

HP company notices
THE INFORMATION CONTAINED HEREIN IS SUBJECT TO CHANGE WITHOUT NOTICE.
ALL RIGHTS RESERVED. REPRODUCTION, ADAPTATION, OR TRANSLATION OF THIS MATERIAL IS PROHIBITED WITHOUT PRIOR WRITTEN PERMISSION OF
HP, EXCEPT AS ALLOWED UNDER THE COPYRIGHT LAWS. THE ONLY WARRANTIES FOR HP PRODUCTS AND SERVICES ARE SET FORTH IN THE EXPRESS
WARRANTY STATEMENTS ACCOMPANYING SUCH PRODUCTS AND SERVICES. NOTHING HEREIN SHOULD BE CONSTRUED AS CONSTITUTING AN ADDITIONAL
WARRANTY. HP SHALL NOT BE LIABLE FOR TECHNICAL OR EDITORIAL ERRORS OR OMISSIONS CONTAINED HEREIN.
© Copyright 2019 HP Development Company, L.P.
Microsoft and Windows are either registered trademarks or trademarks of Microsoft Corporation in the United States and/or other countries.
Mac, OS X, macOS, and AirPrint are trademarks of Apple Inc., registered in the U.S. and other countries.
ENERGY STAR and the ENERGY STAR mark are registered trademarks owned by the U.S. Environmental Protection Agency.
Android and Chromebook are trademarks of Google LLC.
Amazon and Kindle are trademarks of Amazon.com, Inc. or its ailiates.
iOS is a trademark or registered trademark of Cisco in the U.S. and other countries and is used under license.
Safety information
Always follow basic safety precautions when using this product to reduce risk of injury from re or electric shock.
- Read and understand all instructions in the documentation that comes with the printer.
- Observe all warnings and instructions marked on the product.
- Unplug this product from wall outlets before cleaning.
- Do not install or use this product near water, or when you are wet.
- Install the product securely on a stable surface.
- Install the product in a protected location where no one can step on or trip over the line cord, and the line cord cannot be damaged.
- If the product does not operate normally, see Solve a problem.
- There are no user-serviceable parts inside. Refer servicing to qualied service personnel.

Table of contents
1 Get started .................................................................................................................................................... 1
Accessibility ............................................................................................................................................................ 2
HP EcoSolutions (HP and the Environment) .......................................................................................................... 3
Understand the printer parts ................................................................................................................................. 6
Use the printer control panel ................................................................................................................................. 9
Paper basics ......................................................................................................................................................... 12
Load paper ........................................................................................................................................................... 15
Load an original on the scanner glass ................................................................................................................. 25
Load an original in the document feeder ............................................................................................................ 27
Update the printer ............................................................................................................................................... 28
Open the HP printer software (Windows) ............................................................................................................ 29
Use the HP Smart app to print, scan, and troubleshoot ..................................................................................... 30
Turn the printer o .............................................................................................................................................. 31
2 Print ........................................................................................................................................................... 32
Print using a computer ........................................................................................................................................ 33
Print using the HP Smart app .............................................................................................................................. 39
Print with mobile devices .................................................................................................................................... 40
Tips for successful printing ................................................................................................................................. 41
3 Copy and scan .............................................................................................................................................. 43
Copy ..................................................................................................................................................................... 44
Scan ...................................................................................................................................................................... 45
Tips for copy and scan success ............................................................................................................................ 51
4 Web Services ............................................................................................................................................... 52
What are Web Services? ....................................................................................................................................... 53
Set up Web Services ............................................................................................................................................. 54
Print with HP ePrint ............................................................................................................................................. 56
Remove Web Services .......................................................................................................................................... 57
ENWW iii

5 Work with cartridges ................................................................................................................................... 58
Information on cartridges and the printhead ..................................................................................................... 59
Some color ink is used even when printing with black cartridge only ................................................................ 60
Check the estimated ink levels ............................................................................................................................ 61
Replace the cartridges ......................................................................................................................................... 62
Order cartridges ................................................................................................................................................... 66
Store printing supplies ........................................................................................................................................ 67
Anonymous usage information storage .............................................................................................................. 68
Cartridge warranty information .......................................................................................................................... 69
6 Network setup ............................................................................................................................................. 70
Set up the printer for wireless communication ................................................................................................... 71
Change network settings ..................................................................................................................................... 74
Use Wi-Fi Direct .................................................................................................................................................... 75
7 Printer management tools ........................................................................................................................... 78
Toolbox (Windows) .............................................................................................................................................. 79
Embedded web server ......................................................................................................................................... 80
8 Solve a problem ........................................................................................................................................... 83
Get help with HP online troubleshooting ............................................................................................................ 84
Get help from the printer control panel .............................................................................................................. 85
Get help from the HP Smart app ......................................................................................................................... 86
Get help in this guide ........................................................................................................................................... 87
Understand printer reports ............................................................................................................................... 103
Solve problems using Web Services .................................................................................................................. 105
Maintain the printer ........................................................................................................................................... 106
Restore original factory defaults and settings ................................................................................................. 110
HP support ......................................................................................................................................................... 111
9 Technical information ................................................................................................................................ 112
Specications ..................................................................................................................................................... 113
Regulatory notices ............................................................................................................................................. 115
Environmental product stewardship program .................................................................................................. 121
Index ........................................................................................................................................................... 129
iv ENWW

1 Get started
This guide provides details about how to use the printer and how to resolve problems.
●
Accessibility
●
HP EcoSolutions (HP and the Environment)
●
Understand the printer parts
●
Use the printer control panel
●
Paper basics
●
Load paper
●
Load an original on the scanner glass
●
Load an original in the document feeder
●
Update the printer
●
Open the HP printer software (Windows)
●
Use the HP Smart app to print, scan, and troubleshoot
●
Turn the printer o
ENWW 1

Accessibility
The printer provides a number of features that make it accessible for people with disabilities.
● Visual
The HP software is accessible for users with visual impairments or low vision by using your operating
system's accessibility options and features. The software also supports most assistive technology such
as screen readers, Braille readers, and voice-to-text applications. For users who are color blind, colored
buttons and tabs used in the HP software have simple text or icon labels that convey the appropriate
action.
● Mobility
For users with mobility impairments, the HP software functions can be executed through keyboard
commands. The HP software also supports Windows accessibility options such as StickyKeys,
ToggleKeys, FilterKeys, and MouseKeys. The printer doors, buttons, paper trays, and paper-width guides
can be operated by users with limited strength and reach.
For more information about accessibility solutions for HP products, visit the HP Accessibility and Aging
website (www.hp.com/accessibility).
2 Chapter 1 Get started ENWW

HP EcoSolutions (HP and the Environment)
HP is committed to helping you optimize your environmental footprint and empowering you to print
responsibly—at home or in the oice.
For more detailed information about environmental guidelines that HP follows during the manufacturing
process, see Environmental product stewardship program. For more information about HP's environmental
initiatives, visit www.hp.com/ecosolutions.
●
Power Management
●
Quiet Mode
●
Optimize Printing Supplies
Power Management
Use Sleep Mode, Auto-o, and Schedule Printer On/O to conserve electricity.
Sleep mode
Power usage is reduced while in Sleep mode. After initial setup of printer, the printer will enter Sleep mode
after ve minutes of inactivity.
Use the following instructions to change the period of inactivity before the printer sleeps.
1. From the printer control panel, touch ( Setup ).
2. Touch Power Management, touch Sleep Mode, and then touch the desired option.
Auto-O
This feature turns the printer o after 8 hours of inactivity to help reduce energy use. Auto-O turns the
printer o completely, so you must use the Power button to turn on the printer again.
If your printer supports this energy saving feature, Auto-O is automatically enabled or disabled depending
on printer capabilities and connection options. Even when Auto-O is disabled, the printer enters Sleep mode
after 5 minutes of inactivity to help reduce energy use.
● Auto-O is enabled when the printer is turned on, if the printer does not have network or Wi-Fi Direct
capability or is not using these capabilities.
● Auto-O is disabled when a printer’s wireless or Wi-Fi Direct capability is turned on or when a printer
with USB connectivity establishes a USB connection.
Schedule Printer On and O
Use this feature to automatically turn the printer on or o on selected days. For example, you can schedule
the printer to turn on at 8 a.m. and turn o at 8 p.m. from Monday to Friday. In this way, you save energy
during the night and weekends.
Use the following instructions to schedule the day and time for On and O.
ENWW HP EcoSolutions (HP and the Environment) 3

1. From the printer control panel, touch ( Setup ).
2. Touch Power Management and touch Schedule Printer On/O.
3. Touch Schedule On or Schedule O to turn the feature on, and then follow the onscreen instructions to
CAUTION: Always turn the printer o properly, using either Schedule O or (the Power button) located
on the front left side of the printer.
If you improperly turn the printer o, the print carriage might not return to the correct position, causing
problems with the cartridges and print quality issues.
Never turn o the printer when cartridges are missing. HP recommends that you replace any missing
cartridges as soon as possible to avoid print quality issues, possible extra ink usage from the remaining
cartridges, or damage to the ink system.
Quiet Mode
Quiet Mode slows down printing to reduce overall noise without aecting print quality. It only works when
printing on plain paper. Additionally, Quiet Mode is disabled if you are printing using the best or presentation
print quality. To reduce printing noise, turn on Quiet Mode. To print at normal speed, turn Quiet Mode o.
Quiet Mode is o by default.
NOTE: Quiet Mode does not work if you print photos or envelopes.
set the day and time to turn on or turn o the printer.
You can create a schedule by selecting the time when the printer prints in Quiet Mode. For example, you can
schedule the printer to be in Quiet Mode from 10 p.m. to 8 a.m. everyday.
To turn on Quiet Mode from the printer control panel
1. From the Home screen, touch Setup .
2. Touch Quiet Mode.
3. Touch On or O next to Quiet Mode.
To create a schedule for Quiet Mode from the printer control panel
1. From the printer control panel, touch ( Setup ).
2. Touch Quiet Mode .
3. Turn on Quiet Mode .
4. Touch the toggle button next to Schedule to turn it on, and then change the start time and end time of
the schedule.
To turn on Quiet Mode while the printer is printing
● On the printer control panel display, from the printing screen, touch (Quiet Mode) to turn on Quiet
Mode.
NOTE: Quiet Mode is turned on only after the current page is printed and is only used for the current
print job.
4 Chapter 1 Get started ENWW

To turn Quiet Mode on or o from the printer software (Windows)
1. Open the HP printer software. For more information, see Open the HP printer software (Windows).
2. Click Quiet Mode .
3. Select On or O .
4. Click Save Setting.
To turn Quiet Mode on or o from the Embedded Web Server (EWS)
1. Open the EWS. For more information, see Open the embedded web server .
2. Click the Settings tab.
3. In the Preferences section, select Quiet Mode , and then select On or O .
4. Click Apply.
Optimize Printing Supplies
To optimize printing supplies such as ink and paper, try the following:
● Recycle used original HP ink cartridges through HP Planet Partners. For more information, visit
www.hp.com/recycle.
● Optimize paper usage by printing on both sides of the paper.
● Change the print quality in the printer driver to a draft setting. The draft setting uses less ink.
● Do not clean the printhead unnecessarily. Doing so wastes ink and shortens the life of the cartridges.
ENWW HP EcoSolutions (HP and the Environment) 5
Understand the printer parts
This section contains the following topics:
●
Top and front view
●
Printing supplies area
●
Back view
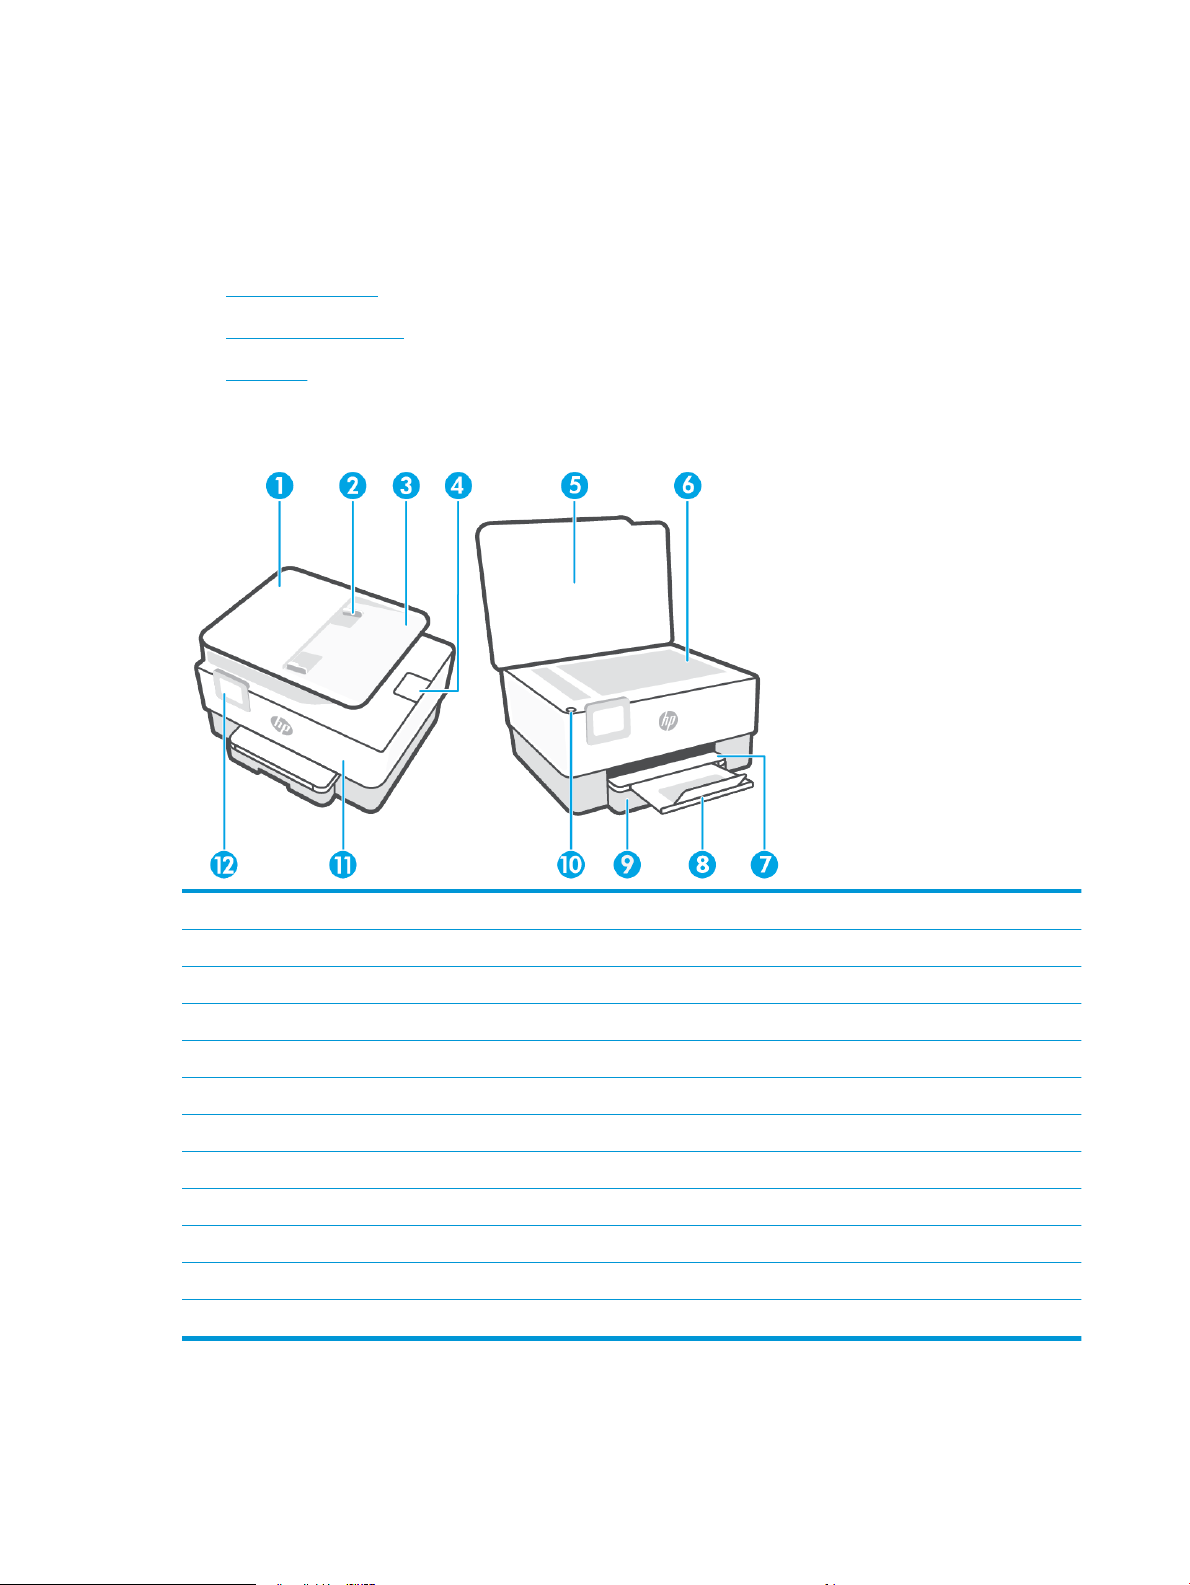
Top and front view
1 Document feeder
2 Document feeder paper-width guides
3 Document feeder tray
4 Document feeder output extension
5 Scanner lid
6 Scanner glass
7 Output tray
8 Output tray extension
9 Input tray
10 Power button
11 Front door
12 Control panel display
6 Chapter 1 Get started ENWW
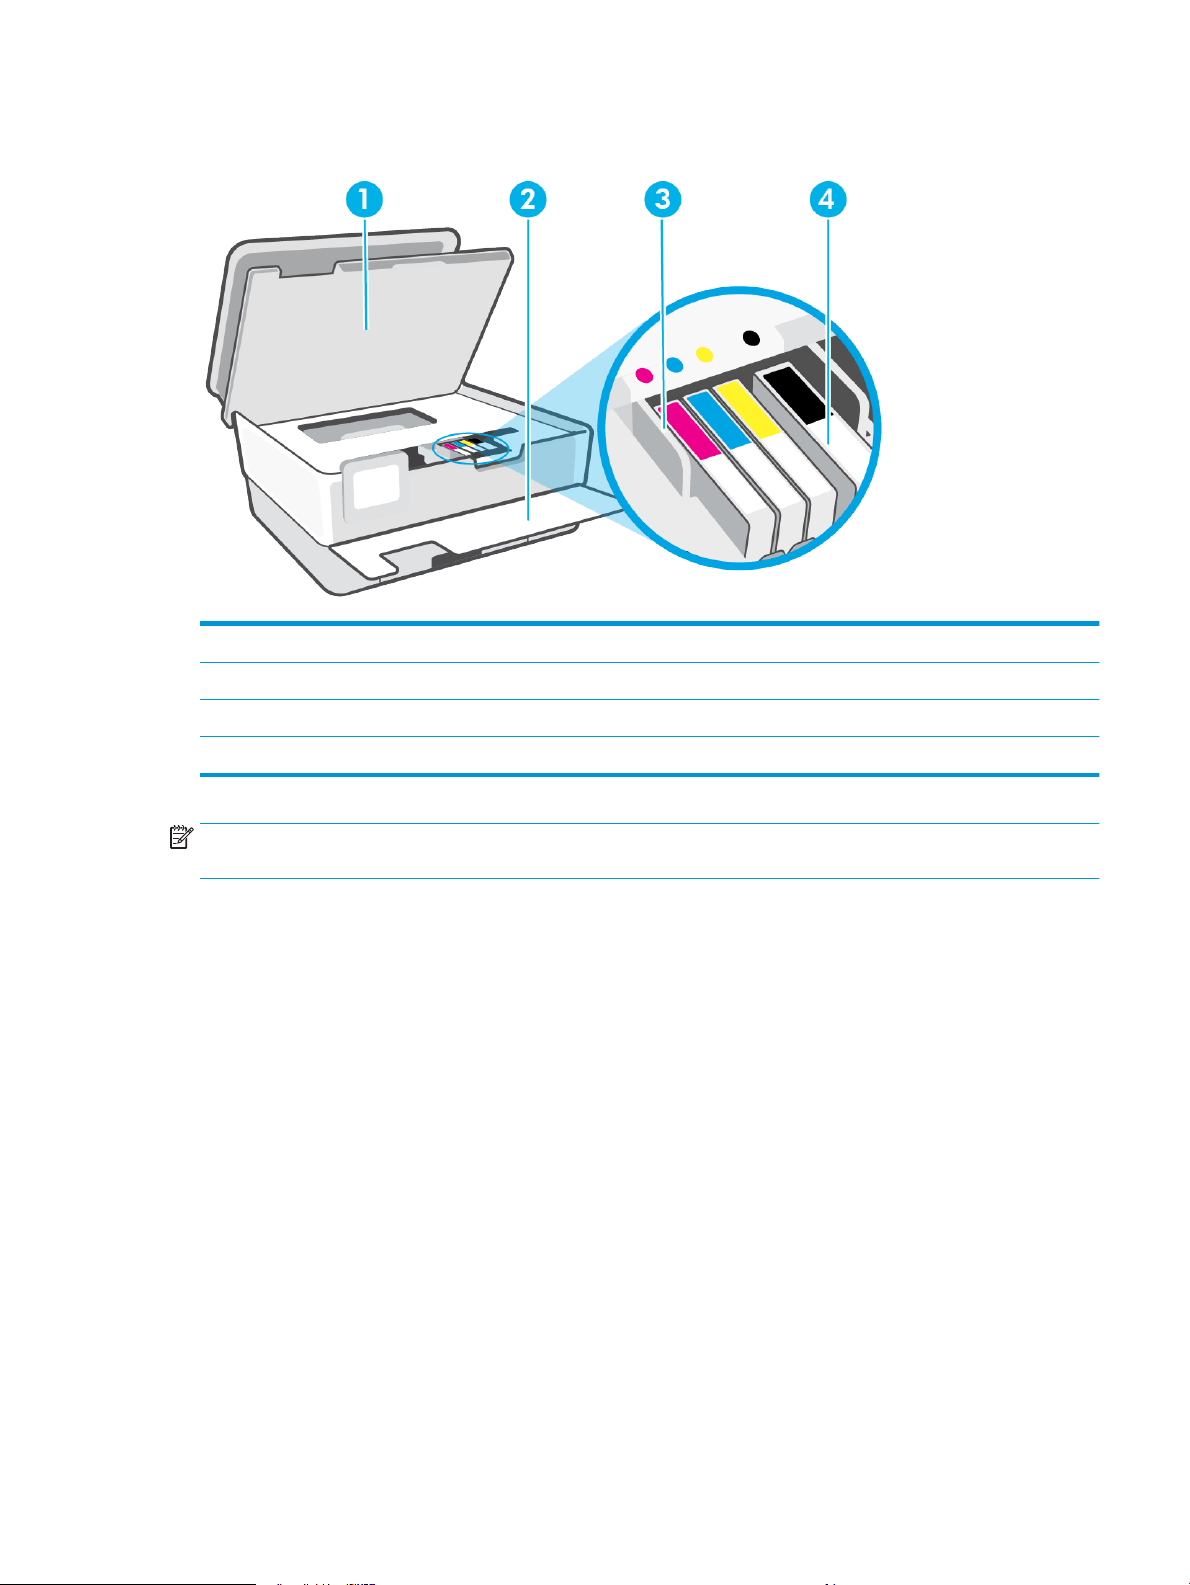
Printing supplies area
1 Cartridge access door
2 Front door
3 Printhead
4 Cartridges
NOTE: Cartridges should be kept in the printer to prevent possible print quality issues or printhead damage.
Avoid removing supplies for extended periods of time. Do not turn the printer o when a cartridge is missing.
ENWW Understand the printer parts 7
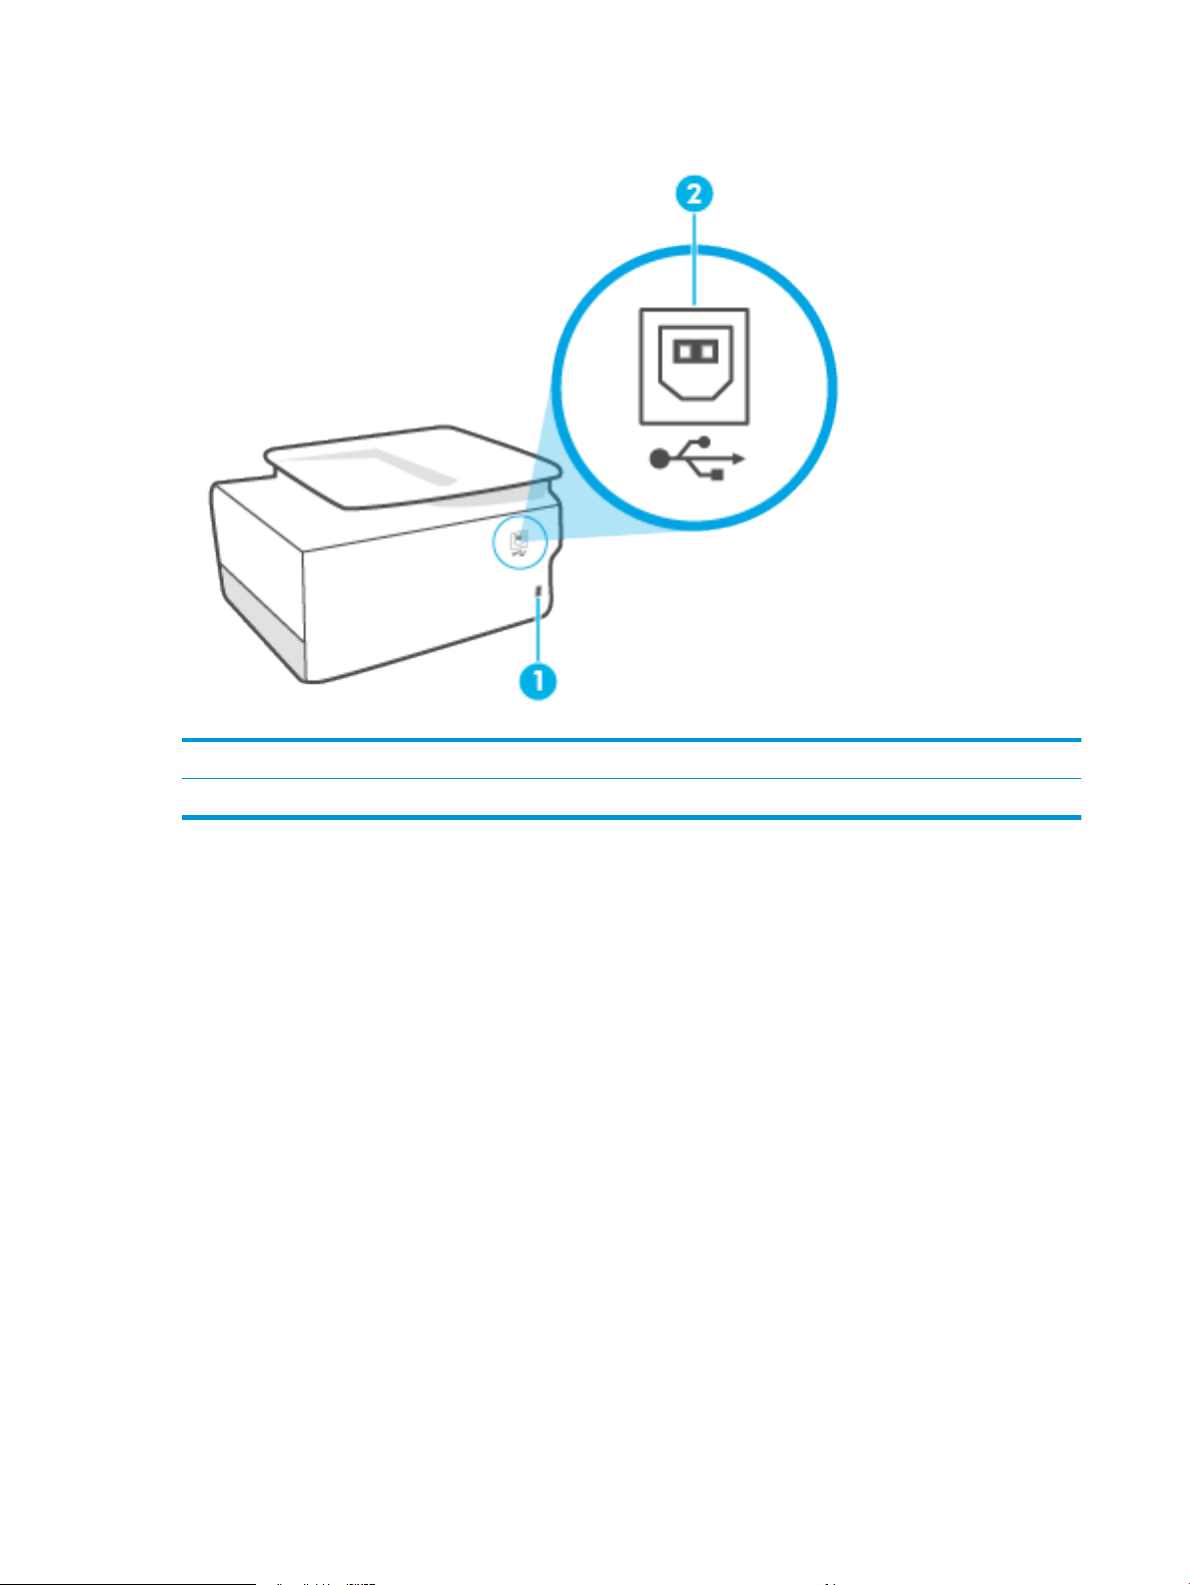
Back view
1 Power input
2 Rear USB port
8 Chapter 1 Get started ENWW
Use the printer control panel
This section contains the following topics:
●
Lift the control panel
●
Overview of buttons and lights
●
Function buttons
●
Toolbar icons
●
Change printer settings
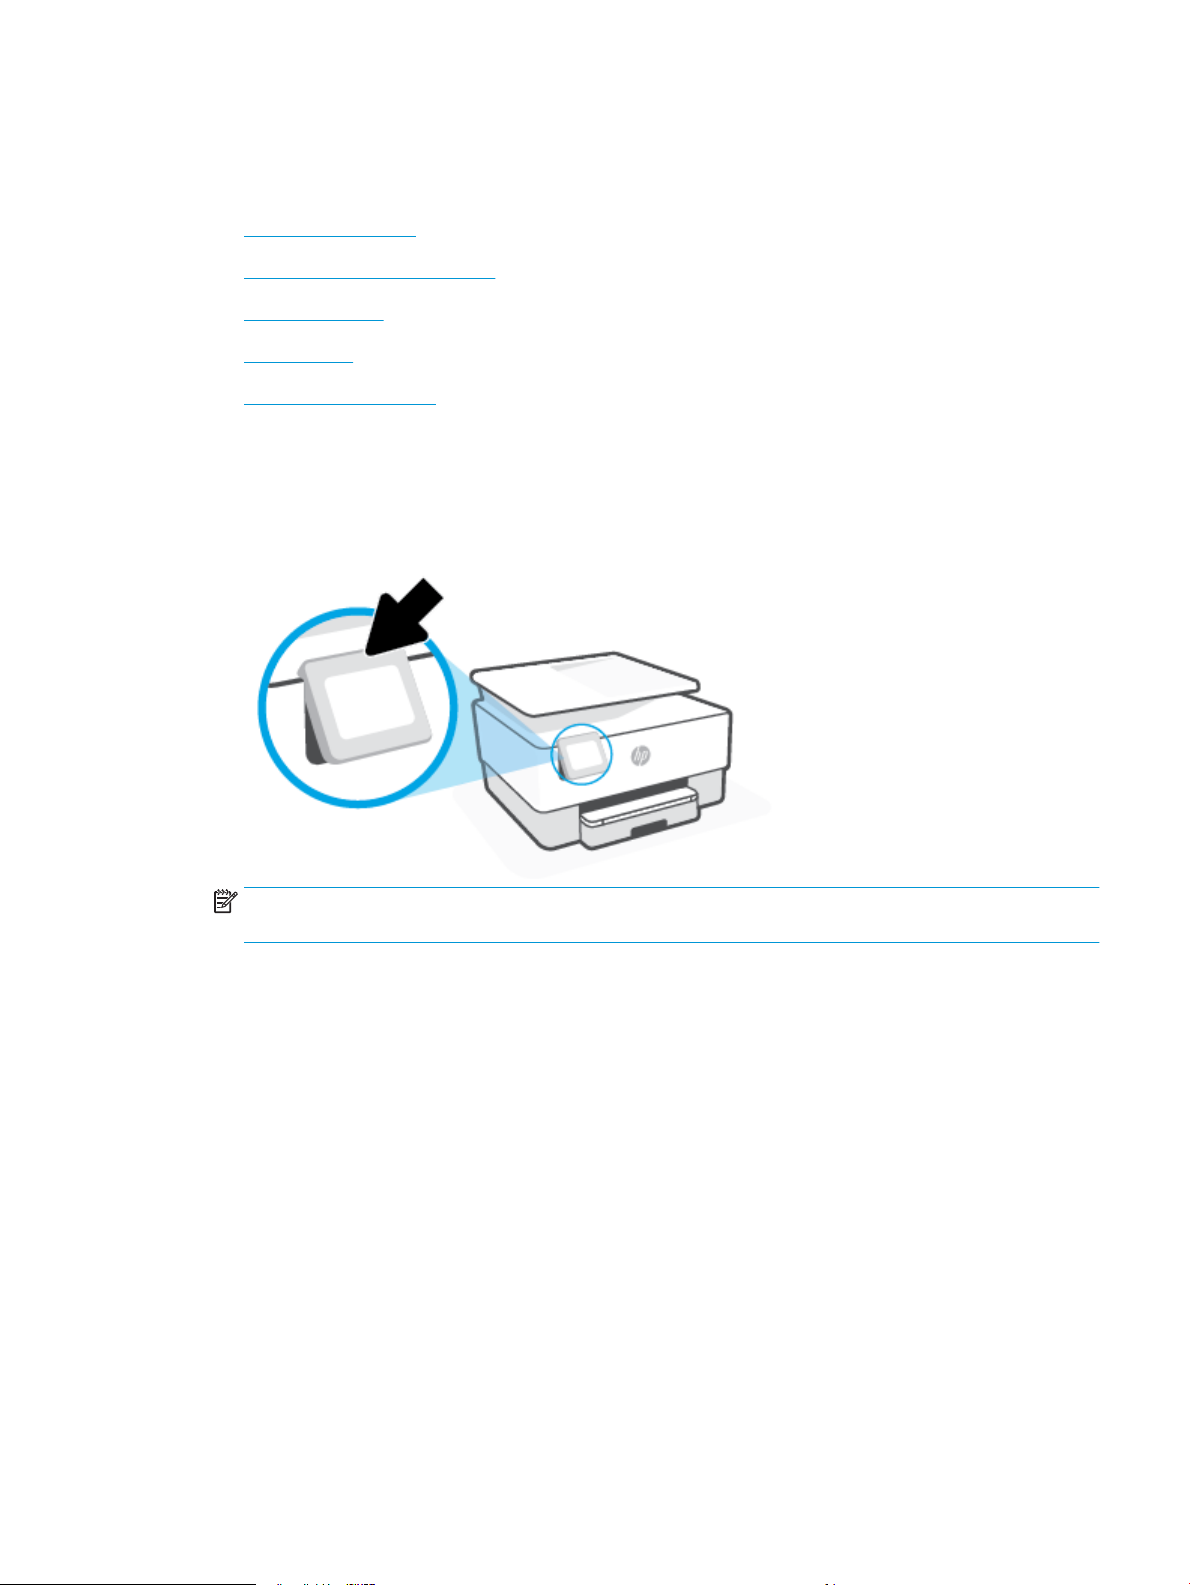
Lift the control panel
You can move the control panel for easier use.
● Push the upper part of the control panel to lift it.
NOTE: Return the control panel to its original position by pushing down the bottom until it is back in
place.
Overview of buttons and lights
The following diagram and related table provide a quick reference to the printer control panel features.
ENWW Use the printer control panel 9
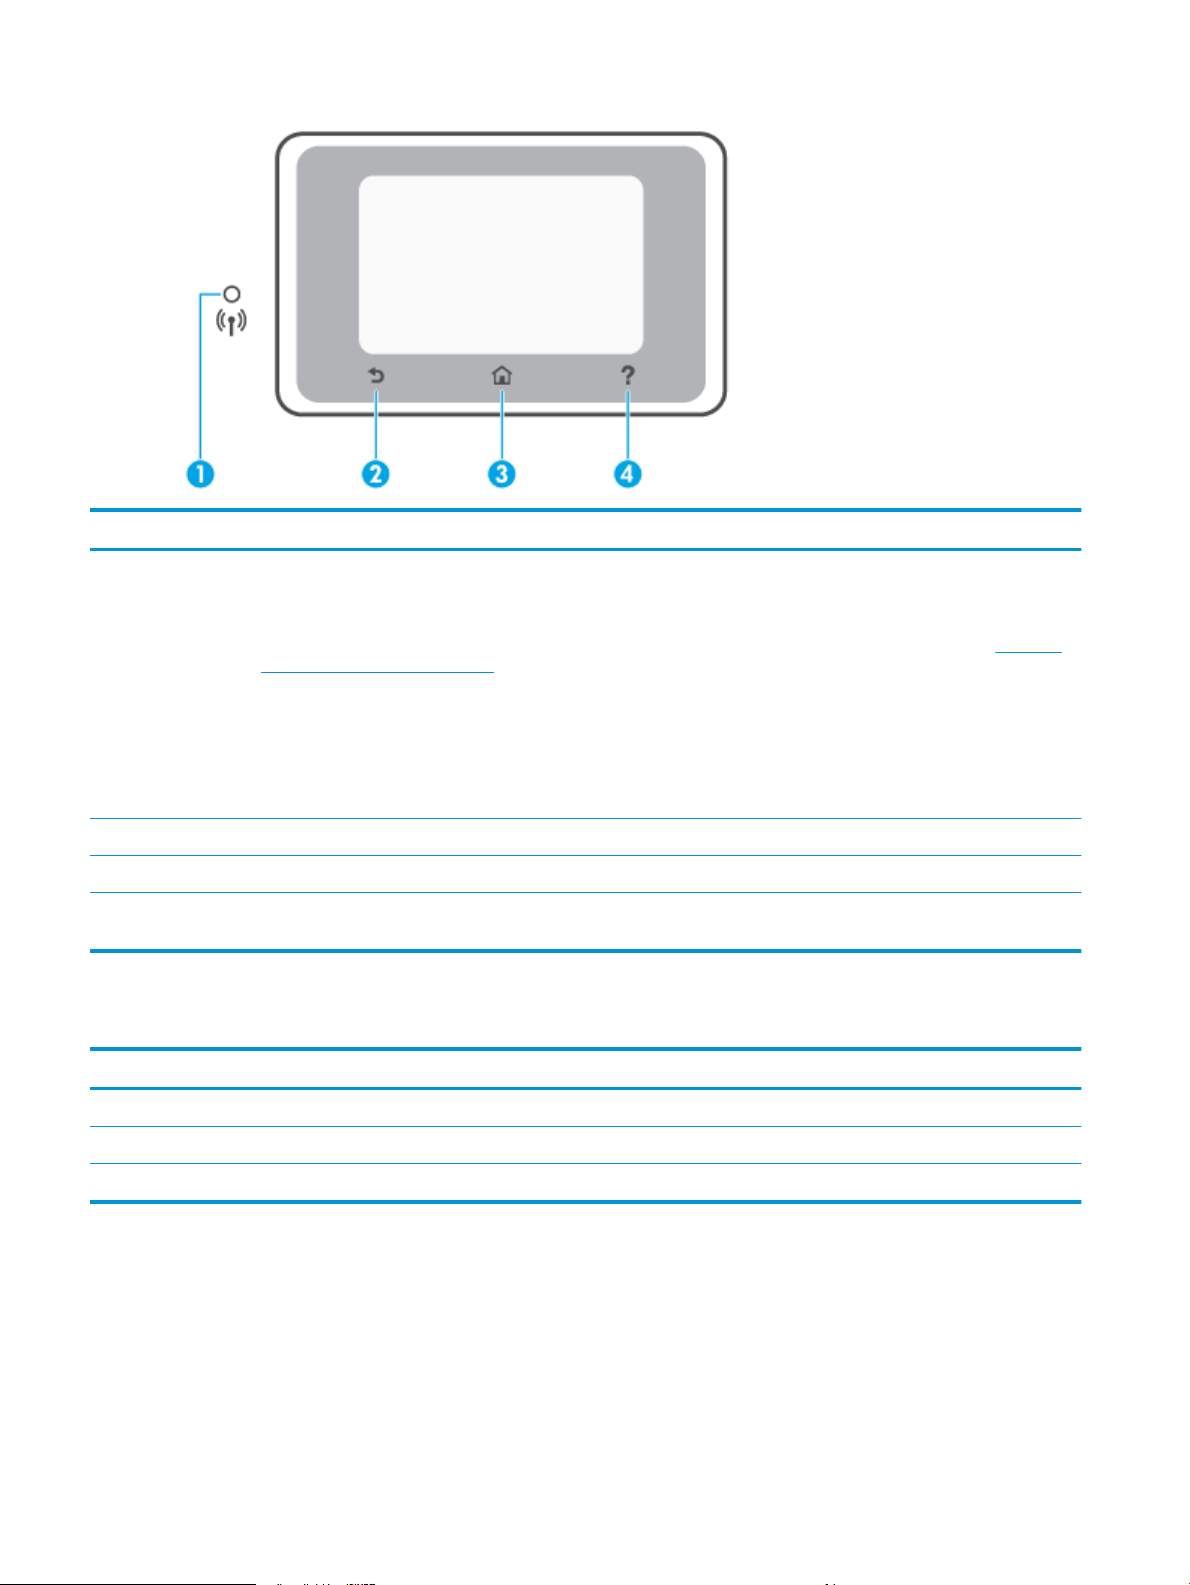
Label Name and Description
1 Wireless light: Indicates the status of the printer's wireless connection.
● Solid blue light indicates that wireless connection has been established and you can print.
● Slow blinking light with clear pause indicates that wireless is on, but not congured. To connect your printer, see Set up the
printer for wireless communication .
● Slow blinking light indicates that wireless is on, but the printer is not connected to a network. Make sure your printer is
within the range of wireless signal.
● Fast blinking light indicates wireless error. Refer to the message on the printer display.
● If the wireless light is o, wireless is turned o.
2 Back button: Returns to the previous menu.
3 Home button: Returns to the Home screen from any other screen.
4 Help button: Opens the Help menu when on the Home screen, or shows contextual help content if it is available for the current
operation when on other screens.
Function buttons
Function button Purpose
Copy Copy document, ID card, or photo.
Scan Scan document or photo.
Setup Change preferences and use tools to perform maintenance functions.
Toolbar icons
The Toolbar on the printer control panel lets you access the icons on the display, check the status of the
printer, or monitor and manage current and scheduled printer tasks.
10 Chapter 1 Get started ENWW

Icon Purpose
Wireless: Displays wireless status and menu options. For more information, see Set up the printer for wireless
communication .
HP ePrint: Displays the Web Services Summary menu, where you can check ePrint status details, change ePrint
settings, or view the printer email address. For more information, see Print with HP ePrint .
Wi-Fi Direct: Displays the status, name, and password for Wi-Fi Direct, and the number of devices connected. You
can also change settings and print a guide.
Ink: Displays the estimated ink levels.
NOTE: Ink level alerts and indicators provide estimates for planning purposes only. When you receive a low-ink
alert, consider having a replacement cartridge available to avoid possible printing delays. You do not have to
replace the cartridges until prompted to do so.
Change printer settings
Use the control panel to change the printer functions and settings, print reports, or get help for the printer.
TIP: If the printer is connected to a computer, you can also change the printer settings using the printer
management tools in the software.
For more information about these tools, see Printer management tools.
To change settings for a function
The Home screen of the control panel display shows the available functions for the printer. Some features of
the functions allows you to change settings.
1. Select Copy or Scan and then select the desired option.
2. After selecting a function, touch ( Settings ), scroll through the available settings, and then touch
the setting you want to change.
3. Follow the prompts on the control panel display to change the settings.
Touch (Home) to return to the Home screen.
TIP:
To change the printer settings
To change the printer settings or print reports, use the options available on the Setup menu.
1. From the printer control panel, touch ( Setup ).
2. Touch and scroll through the screens.
3. Touch the screen items to select screens or options.
TIP:
Touch (Home) to return to the Home screen.
ENWW Use the printer control panel 11

Paper basics
The printer is designed to work well with most types of oice paper. It is best to test a variety of print paper
types before buying large quantities. Use HP paper for optimum print quality. Visit the HP website at
www.hp.com for more information about HP paper.
This section contains the following topics:
●
Recommended papers for printing
●
Order HP paper supplies
●
Tips for selecting and using paper
HP recommends plain papers with the ColorLok logo for printing everyday documents. All
papers with the ColorLok logo are independently tested to meet high standards of
reliability and print quality, and produce documents with crisp, vivid color, bolder blacks,
and that dry faster than ordinary plain papers. Look for papers with the ColorLok logo in
a variety of weights and sizes from major paper manufacturers.
Recommended papers for printing
If you want the best print quality, HP recommends using HP papers that are specically designed for the type
of project you are printing.
Depending on your country/region, some of these papers might not be available.
Photo printing
● HP Premium Plus Photo Paper
HP Premium Plus Photo Paper is HP’s highest-quality photo paper for your best photos. With HP
Premium Plus Photo Paper, you can print beautiful photos that are instant-dry so you can share them
right o the printer. The printer supports several sizes, including A4, 8.5 x 11 inches, 4 x 6 inches (10 x
15 cm), and 5 x 7 inches (13 x 18 cm) in two nishes - glossy or soft gloss (semi-gloss). Ideal for framing,
displaying, or gifting your best photos and special photo projects. HP Premium Plus Photo Paper delivers
exceptional results with professional quality and durability.
● HP Advanced Photo Paper
This glossy photo paper features an instant-dry nish for easy handling without smudging. It resists
water, smears, ngerprints, and humidity. Your prints have a look and feel comparable to a storeprocessed photo. It is available in several sizes, including A4, 8.5 x 11 inches, 10 x 15 cm (4 x 6 inches),
13 x 18 cm (5 x 7 inches), 11 x 17 inches. It is acid-free for longer lasting documents.
● HP Everyday Photo Paper
Print colorful, everyday snapshots at a low cost, using paper designed for casual photo printing. This
aordable photo paper dries quickly for easy handling. Get sharp, crisp images when you use this paper
with any inkjet printer. It is available in glossy nish in several sizes, including A4, 8.5 x 11 inches, 5 x 7
inches and 4 x 6 inches 10 x 15 cm. It is acid-free for longer lasting documents.
12 Chapter 1 Get started ENWW

Business documents
● HP Premium Presentation Paper 120g Matte or HP Professional Paper 120 Matte
These paper are heavy two-sided matte paper perfect for presentation, proposals, reports, and
newsletters. They are heavyweight for an impressive look and feel.
● HP Brochure Paper Glossy or HP Professional Paper Glossy
These papers are glossy-coated on both sides for two-sided use. They are the perfect choice for nearphotographic reproductions and business graphics for report covers, special presentations, brochures,
mailers, and calendars.
● HP Brochure Paper Matte or HP Professional Paper Matte
These papers are matte-coated on both sides for two-sided use. They are the perfect choice for nearphotographic reproductions and business graphics for report covers, special presentations, brochures,
mailers, and calendars.
Everyday printing
All the papers are listed below for everyday printing feature ColorLok Technology for less smearing, bolder
blacks, and vivid colors.
● HP Bright White Inkjet Paper
HP Bright White Inkjet Paper delivers high-contrast colors and sharp text. It is opaque enough for twosided color usage with no show-through, which makes it ideal for newsletters, reports, and yers.
● HP Printing Paper
HP Printing Paper is a high-quality multifunction paper. It produces documents that look and feel more
substantial than documents printed on standard multipurpose or copy paper. It is acid-free for longer
lasting documents.
● HP Oice Paper
HP Oice Paper is a high-quality multifunction paper. It is suitable for copies, drafts, memos, and other
everyday documents. It is acid-free for longer lasting documents.
● HP Multipurpose Paper
HP Multipurpose Paper is a versatile, eicient, and smear-resistant paper for use in copiers and printers
machines. It eliminates the need to keep specialty papers on hand, saving time and money.
Order HP paper supplies
The printer is designed to work well with most types of oice paper. Use HP paper for optimum print quality.
To order HP papers and other supplies, go to www.hp.com . At this time, some portions of the HP website are
available in English only.
HP recommends plain papers with the ColorLok logo for printing and copying of everyday documents. All
papers with the ColorLok logo are independently tested to meet high standards of reliability and print quality,
and produce documents with crisp, vivid color, bolder blacks and shorter dry-time than ordinary plain papers.
Look for papers with the ColorLok logo in a variety of weights and sizes from major paper manufacturers.
ENWW Paper basics 13

Tips for selecting and using paper
For the best results, observe the following guidelines.
● Load only one type and one size of paper at a time into a tray or document feeder.
● Make sure the paper is loaded correctly when loading from the input tray or document feeder.
● Do not overload the tray or document feeder.
● To prevent jams, poor print quality, and other printing problems, avoid loading the following paper in the
tray or document feeder:
– Multipart forms
– Media that is damaged, curled, or wrinkled
– Media with cutouts or perforations
– Media that is heavily textured, embossed, or does not accept ink well
– Media that is too lightweight or stretches easily
Media that contains staples or clips
–
14 Chapter 1 Get started ENWW
Load paper
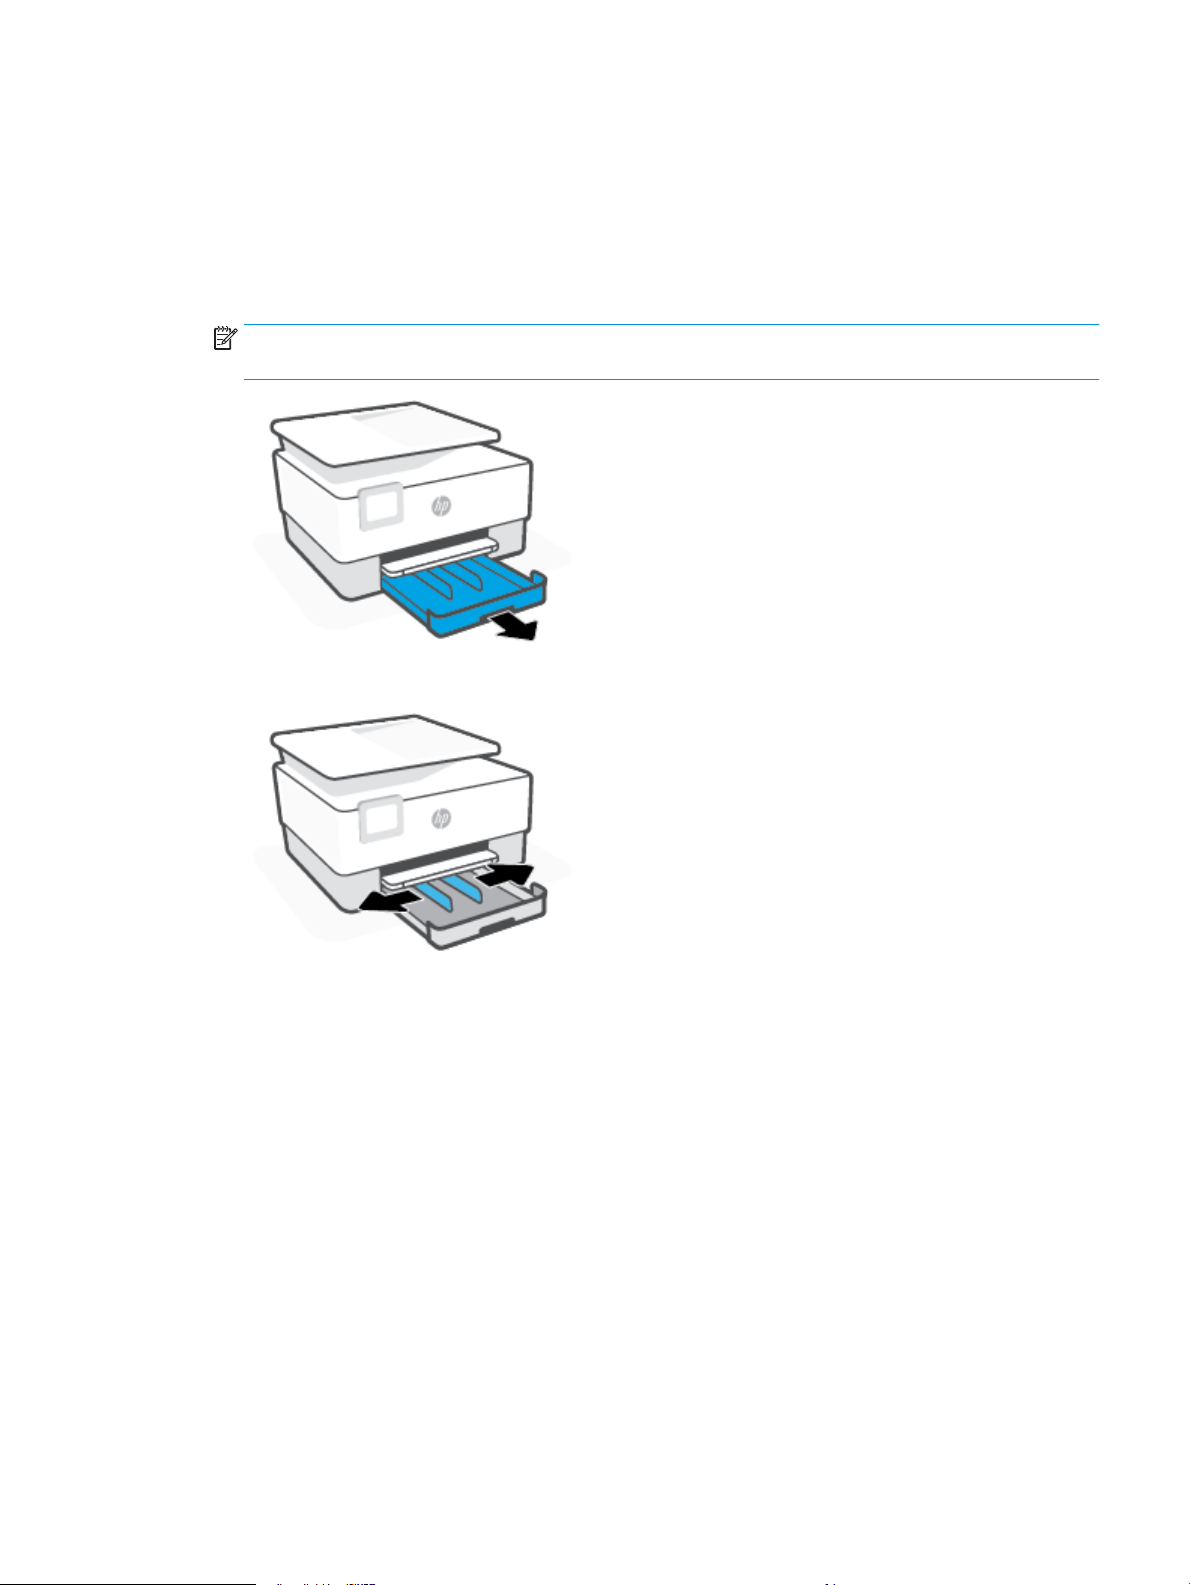
To load standard paper
1. Pull out the input tray.
NOTE: If there is other paper in the input tray, remove the paper before loading a dierent paper type
or size.
2. Slide the paper-width guides to the edges of the input tray.
ENWW Load paper 15
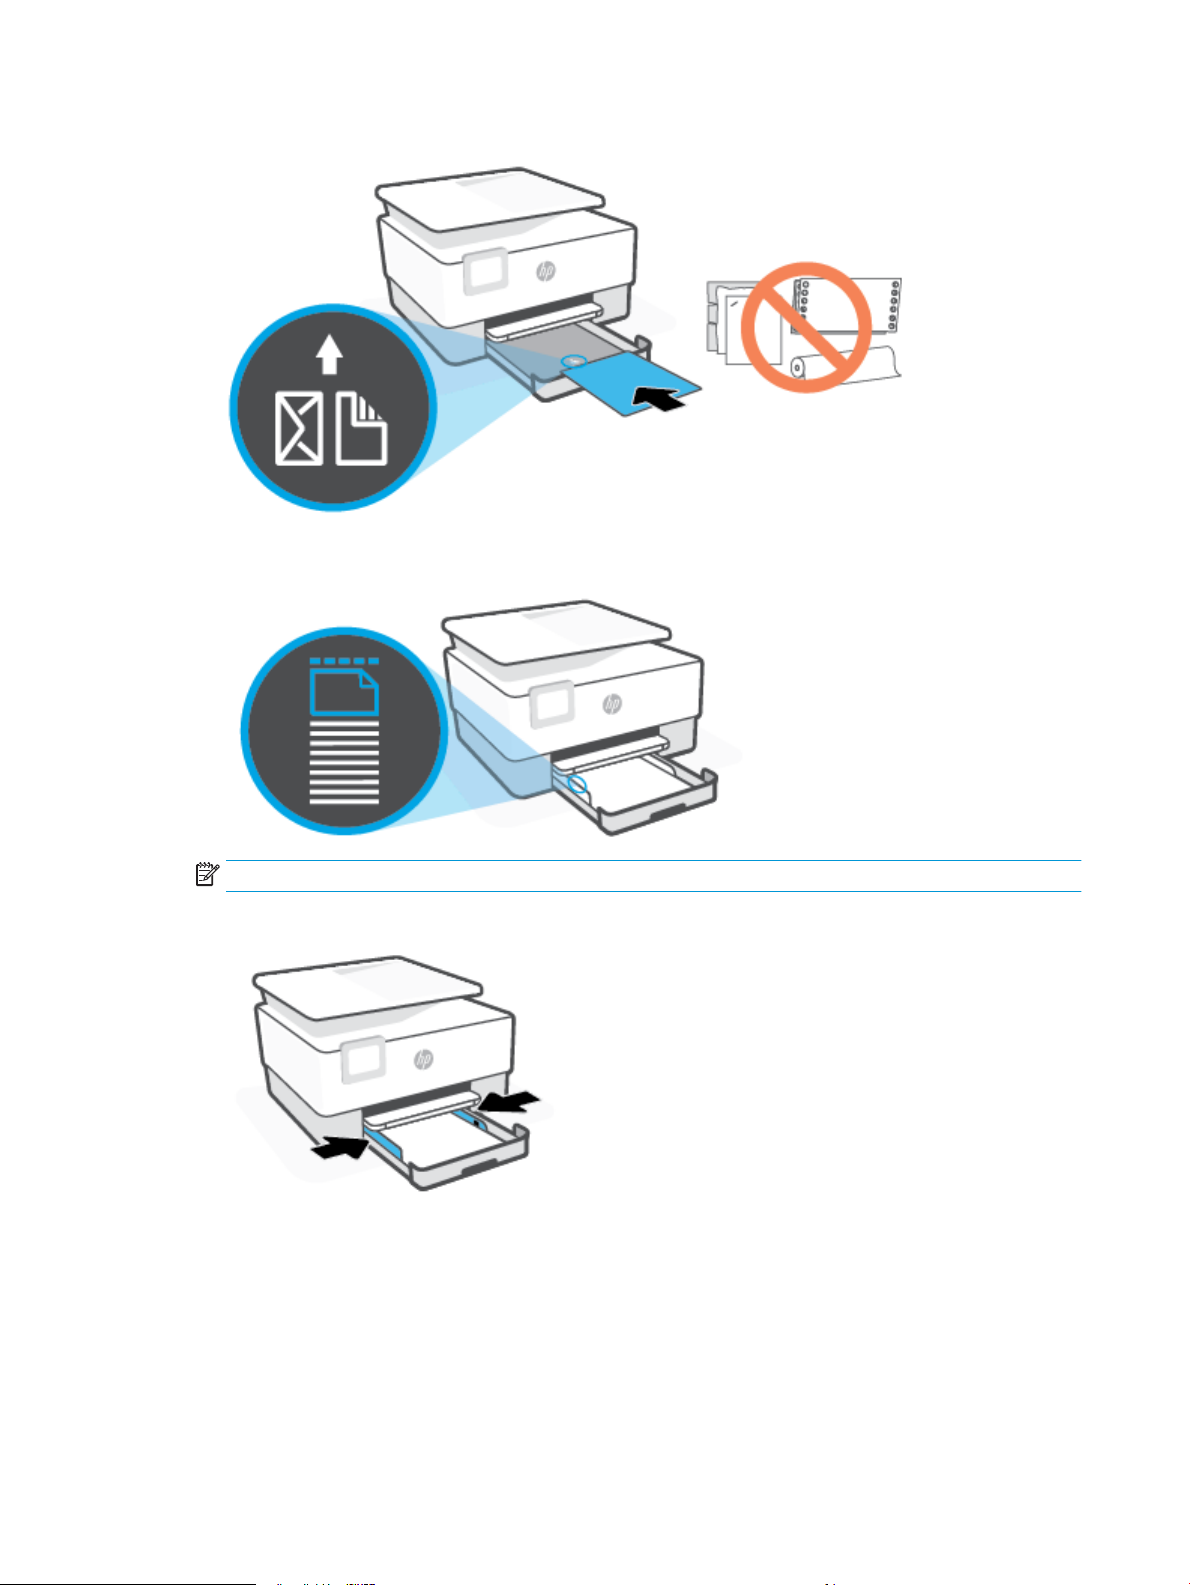
3. Insert the paper in portrait orientation and with the side to be printed facing down.
Make sure the stack of paper is aligned with the appropriate paper size lines on the front of the tray.
Also, make sure the stack of paper does not exceed the stack height marking on the left edge of the tray.
NOTE: Do not load paper while the printer is printing.
4. Adjust the paper-width guides until they touch the left and right edges of the stack of paper.
16 Chapter 1 Get started ENWW
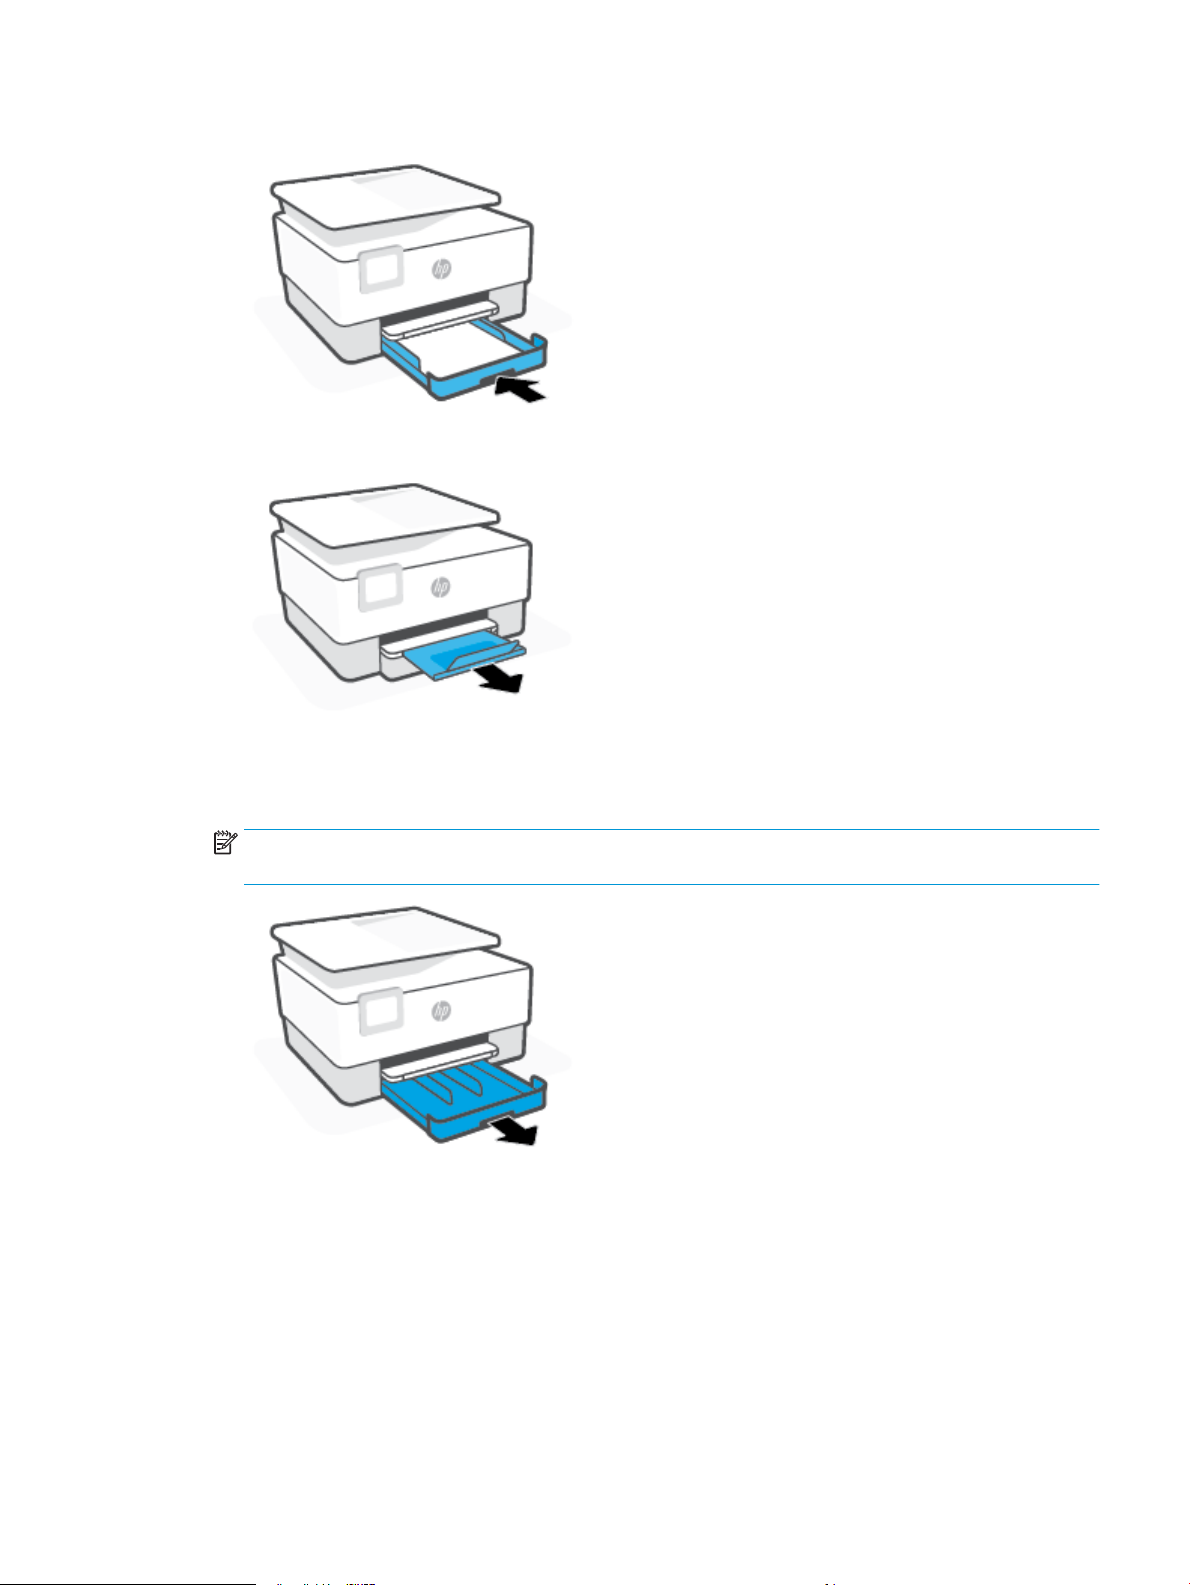
5. Reinsert the input tray into the printer.
6. Pull out the output tray extension as shown.
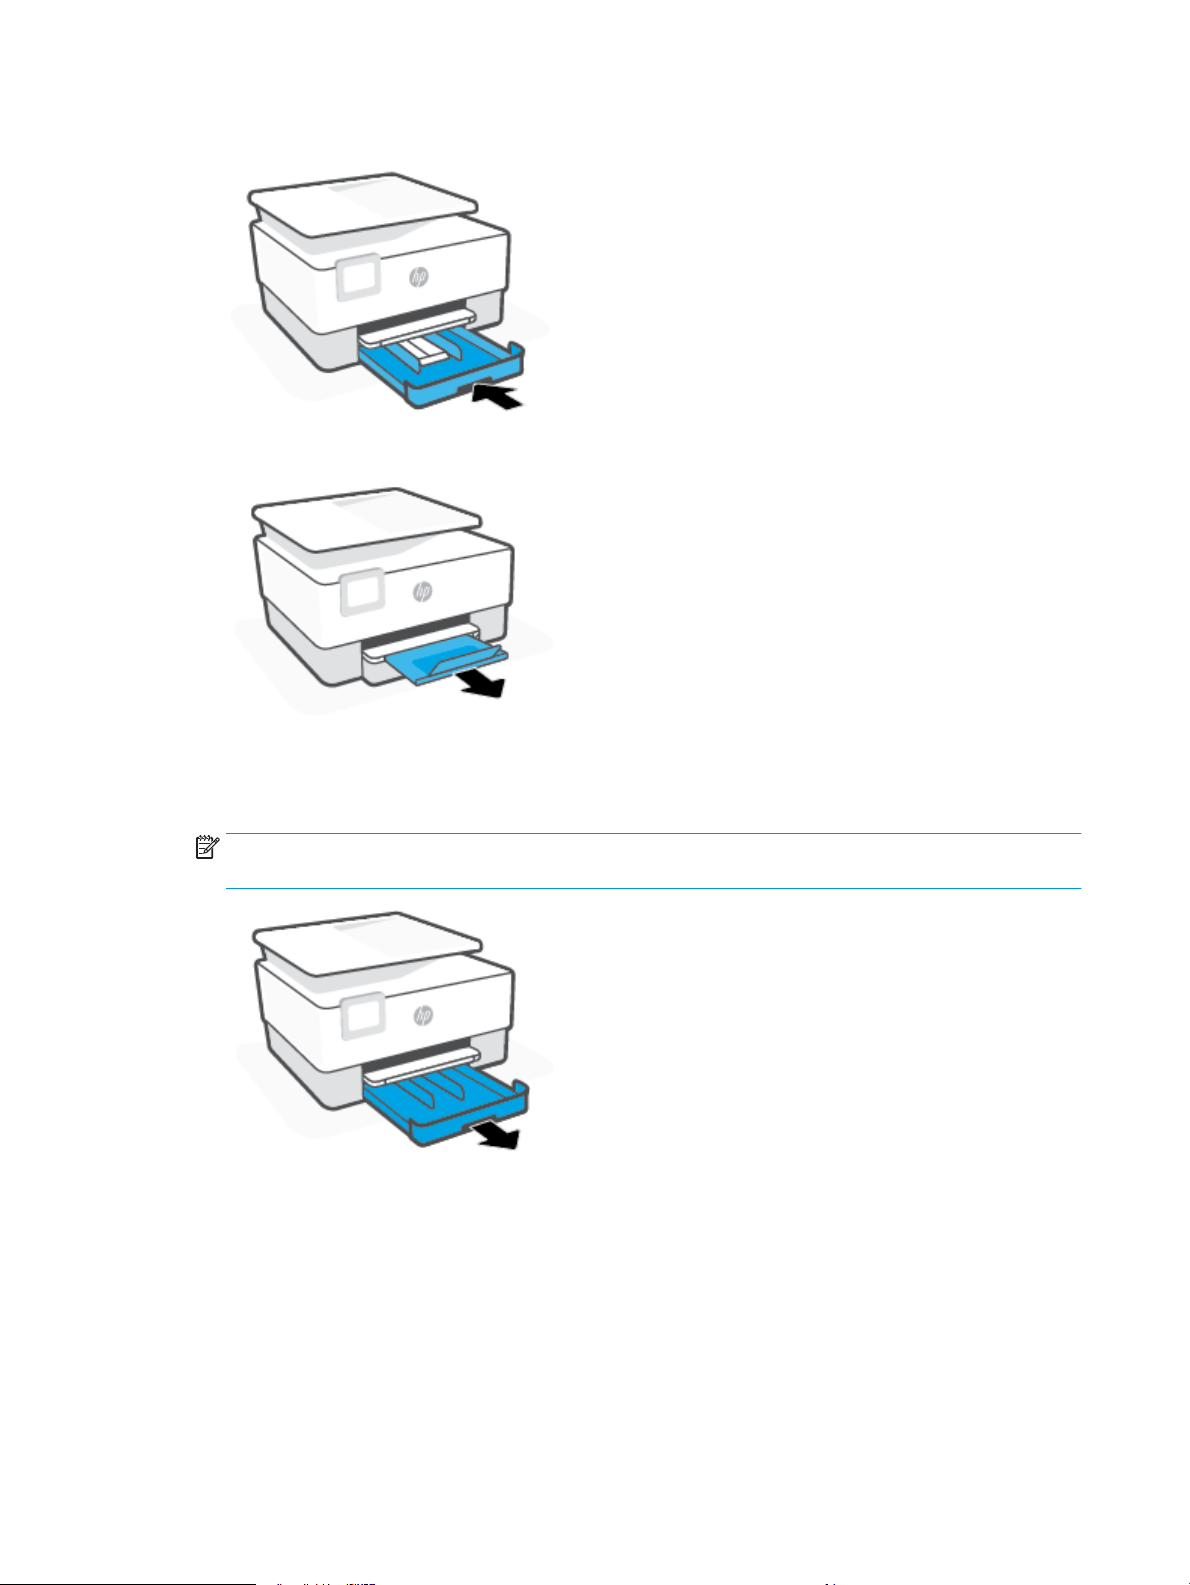
To load legal paper
1. Pull out the input tray.
NOTE: If there is other paper in the input tray, remove the paper before loading a dierent paper type
or size.
ENWW Load paper 17
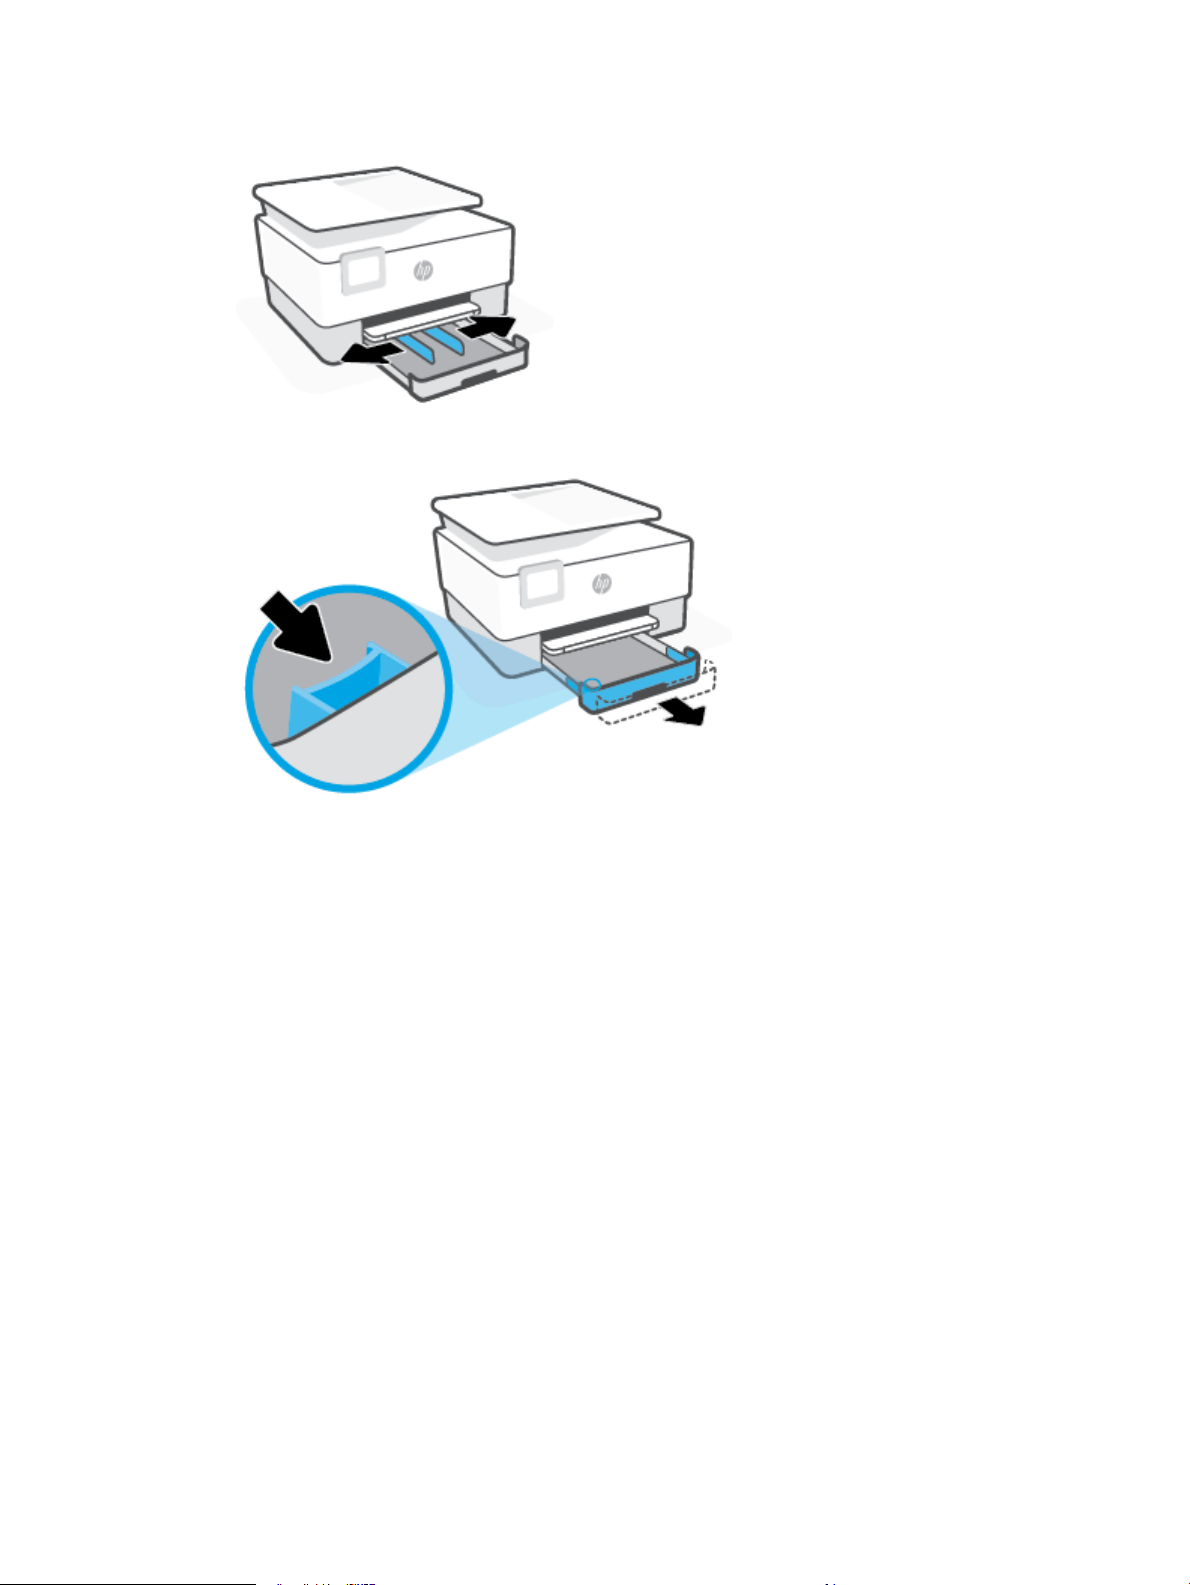
2. Slide the paper-width guides to the edges of the input tray.
3. Press the button near the front left of the tray to extend the input tray.
18 Chapter 1 Get started ENWW
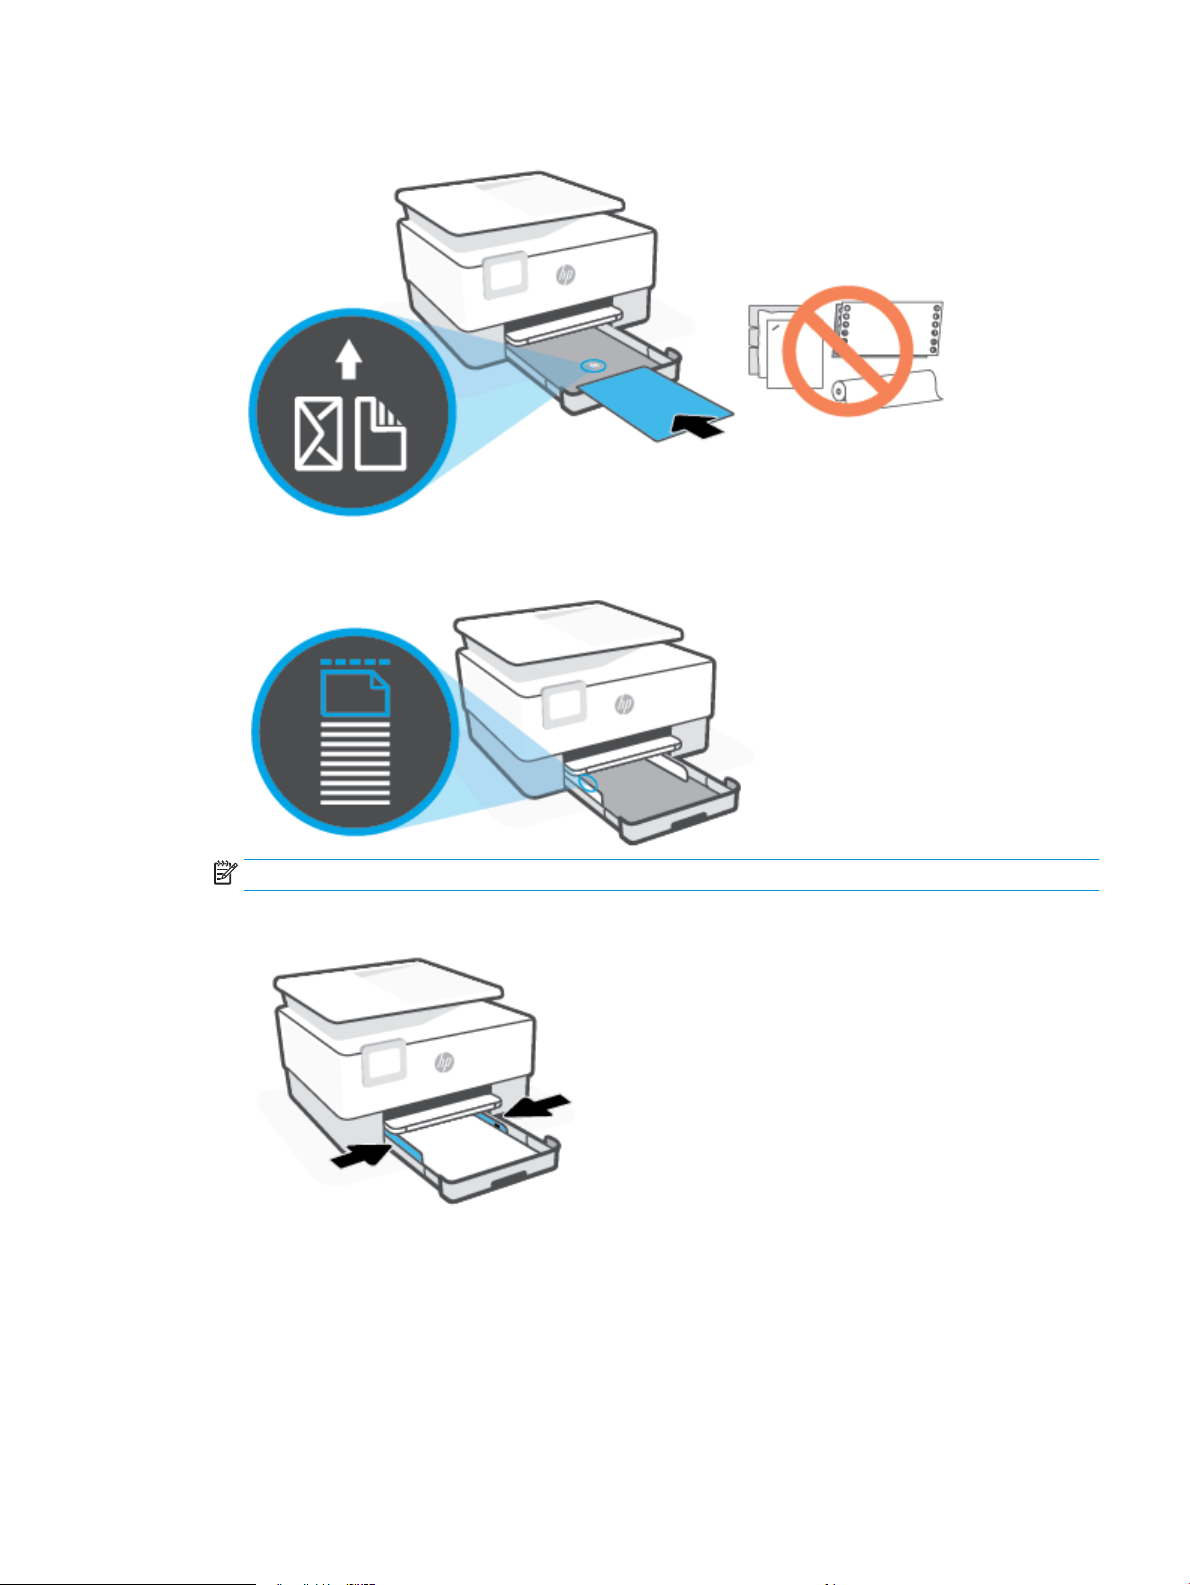
4. Insert the paper in portrait orientation and with the side to be printed facing down.
Make sure the stack of paper is aligned with the appropriate paper size lines on the front of the tray.
Also, make sure the stack of paper does not exceed the stack height marking on the left edge of the tray.
NOTE: Do not load paper while the printer is printing.
5. Adjust the paper-width guides until they touch the left and right edges of the stack of paper.
ENWW Load paper 19
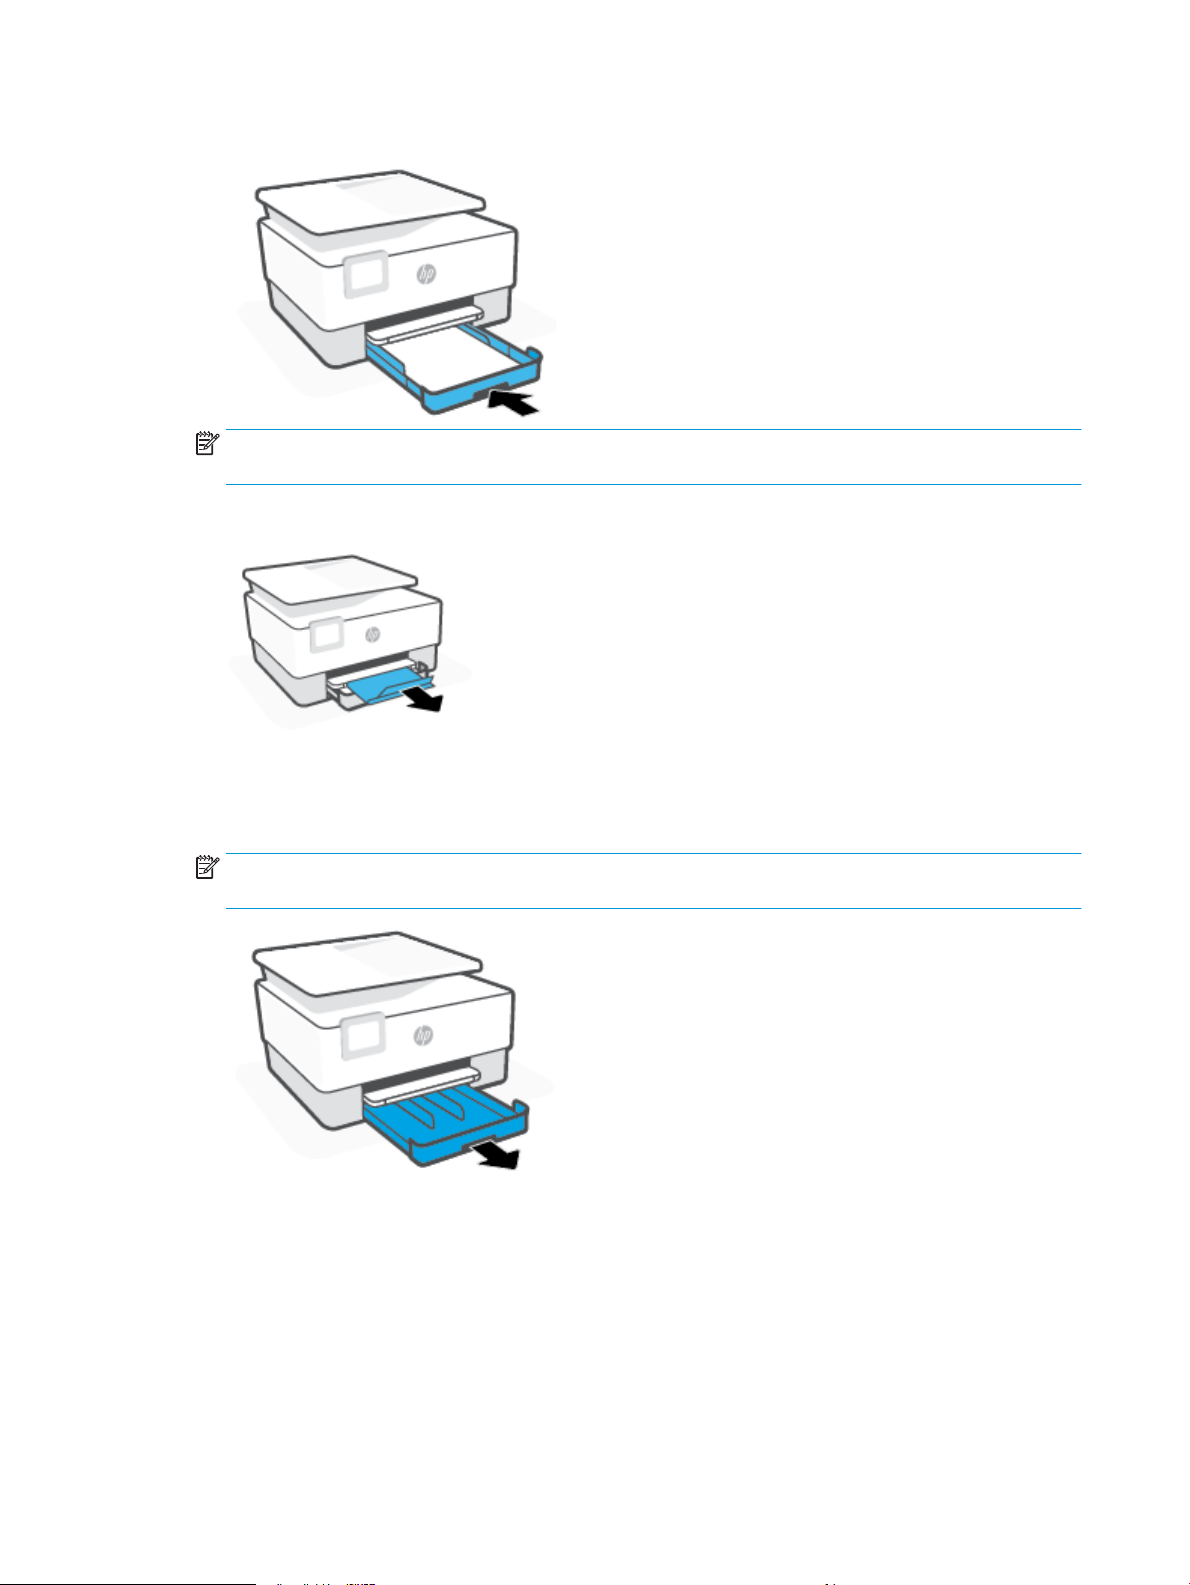
6. Reinsert the input tray into the printer.
NOTE: When you insert the input tray, the input tray extension remains outside of the printer. This is
the expected result.
7. Pull out the output tray extension as shown.
To load an envelope
1. Pull out the input tray.
NOTE: If there is other paper in the input tray, remove the paper before loading a dierent paper type
or size.
20 Chapter 1 Get started ENWW
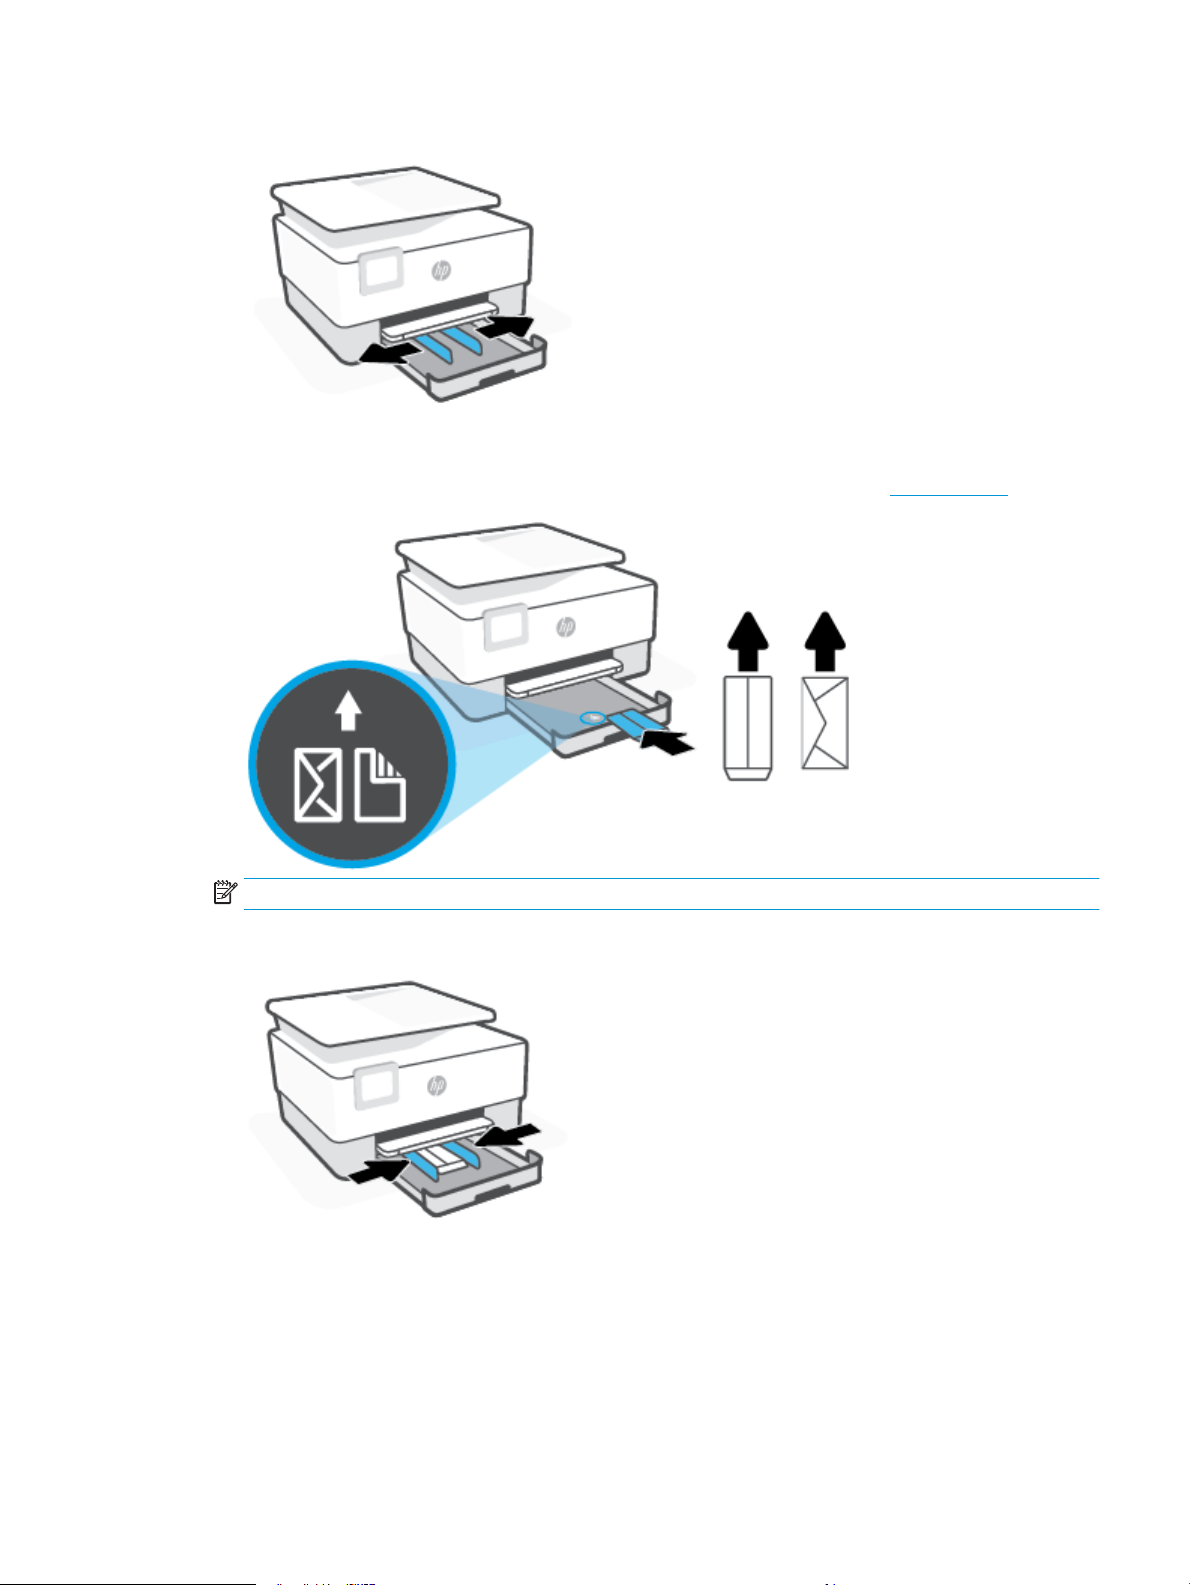
2. Slide the paper-width guides to the edges of the input tray.
3. Insert the envelope in portrait orientation and with the side to be printed facing down.
For information on the maximum number of envelopes allowed in the tray, see Specications .
NOTE: Do not load paper while the printer is printing.
4. Adjust the paper-width guides until they touch the left and right edges of the stack of envelopes.
ENWW Load paper 21
5. Reinsert the input tray into the printer.
6. Pull out the output tray extension as shown.
To load cards and photo paper
1. Pull out the input tray.
NOTE: If there is other paper in the input tray, remove the paper before loading a dierent paper type
or size.
22 Chapter 1 Get started ENWW
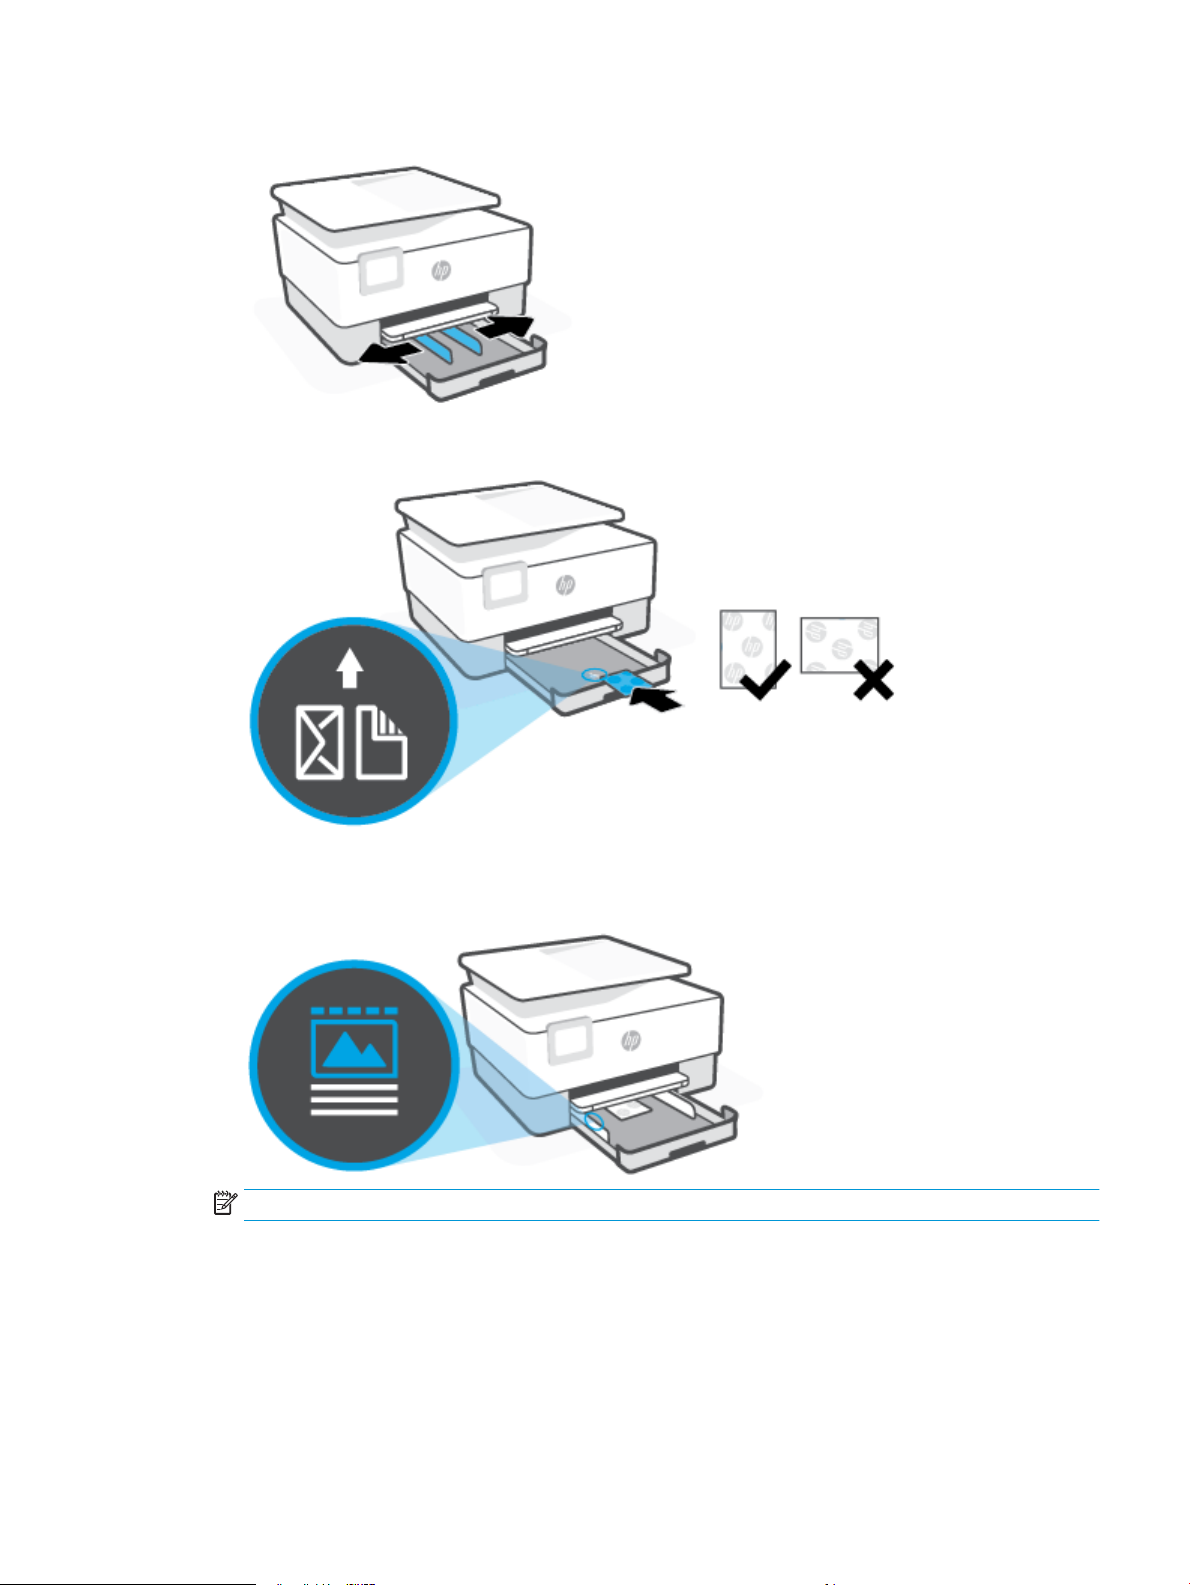
2. Slide the paper-width guides to the edges of the input tray.
3. Insert the cards or photo paper in portrait orientation and with the side to be printed facing down.
Make sure the stack of card or photo is aligned with the appropriate paper size lines on the front of the
tray. Also, make sure the stack of card or photo does not exceed the stack height marking on the left
edge of the tray.
NOTE: Do not load paper while the printer is printing.
ENWW Load paper 23
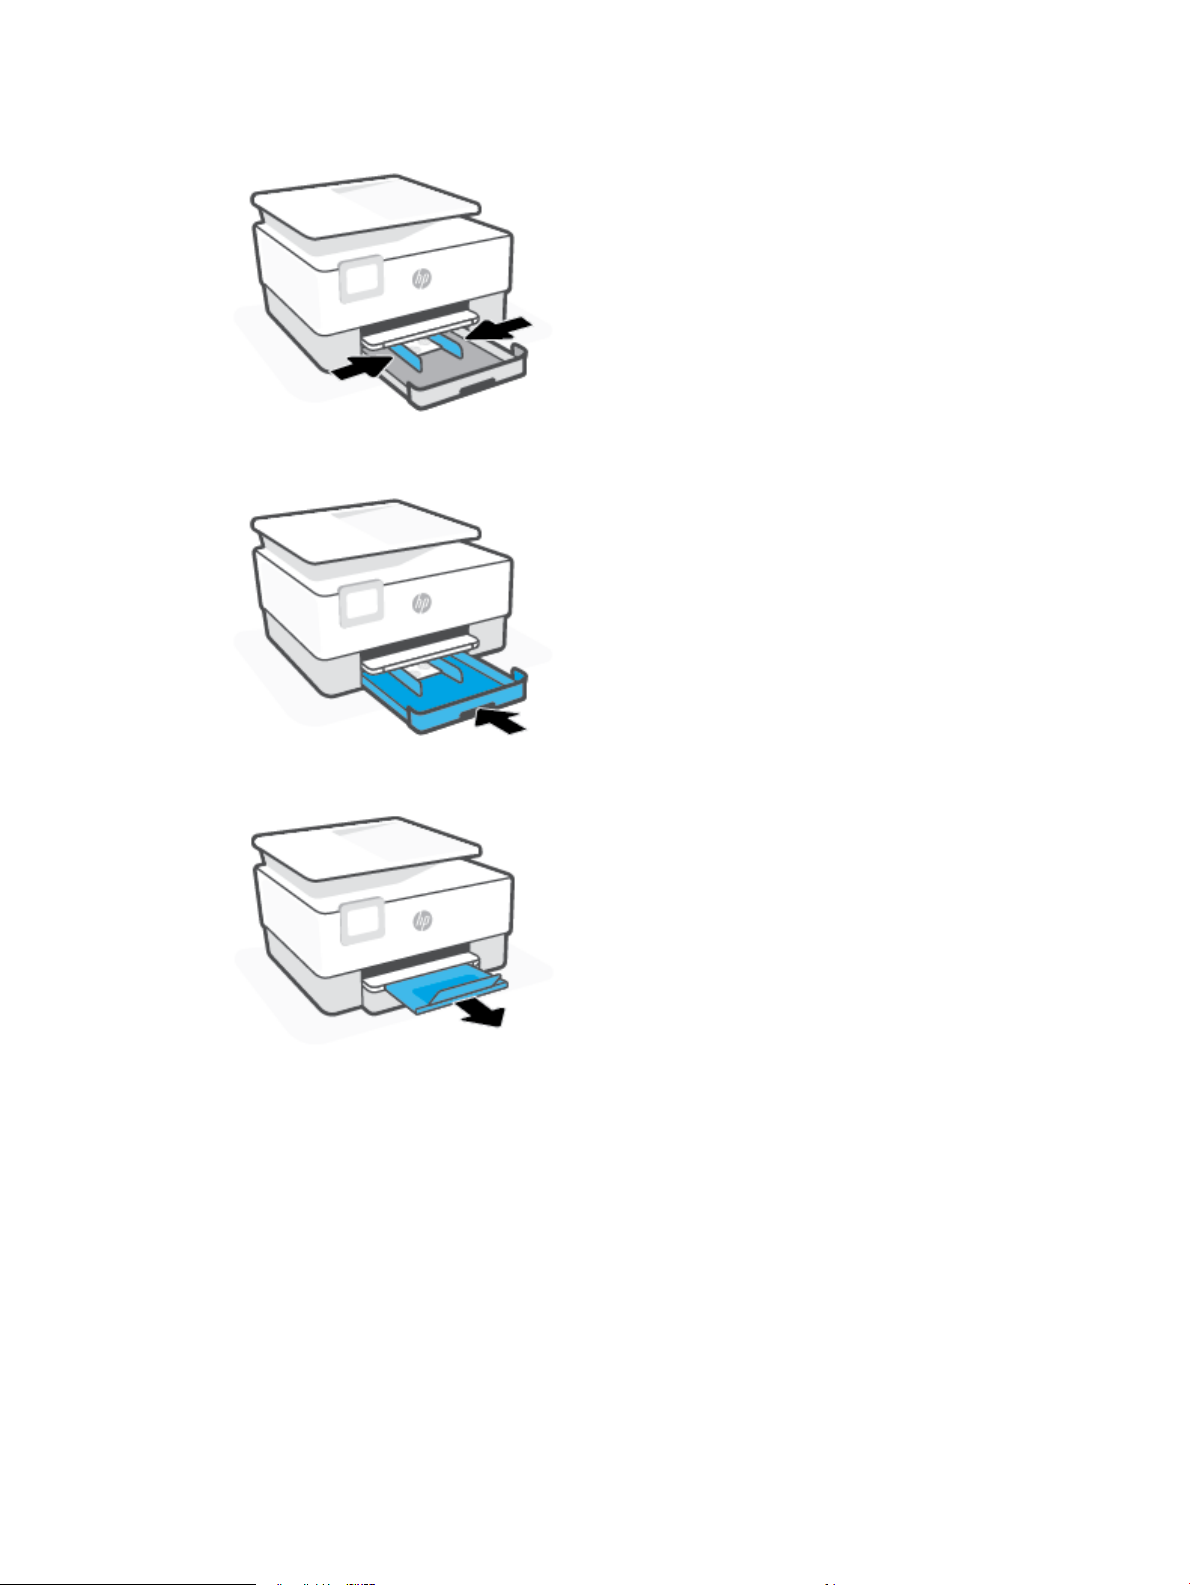
4. Adjust the paper-width guides until they touch the left and right edges of the stack of paper.
5. Reinsert the input tray into the printer.
6. Pull out the output tray extension as shown.
24 Chapter 1 Get started ENWW

Load an original on the scanner glass
You can copy or scan originals by loading them on the scanner glass.
NOTE: The scanner might not work correctly if the scanner glass and lid backing are not clean. For more
information, see Maintain the printer.
NOTE: Remove all originals from the document feeder tray before lifting the lid on the printer.
To load an original on the scanner glass
1. Lift the scanner lid.
ENWW Load an original on the scanner glass 25
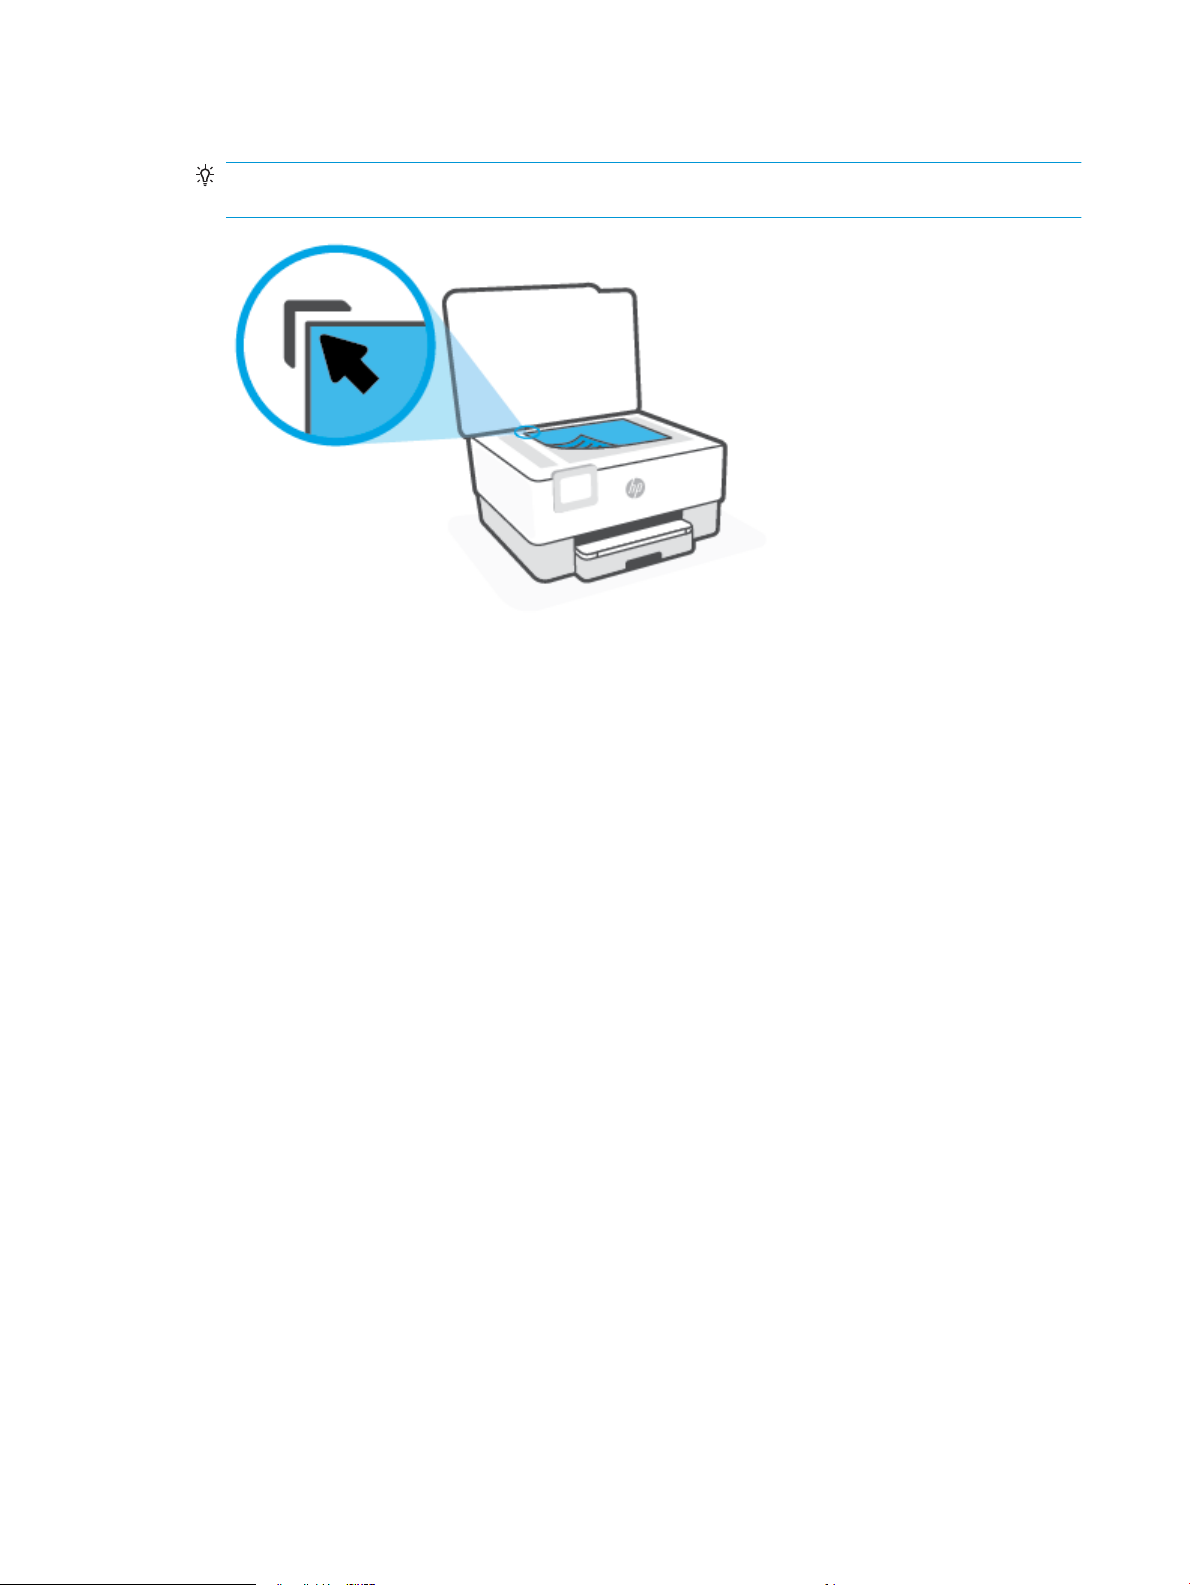
2. Load your original print-side down and align it with the marking on the rear left corner of the glass.
TIP: For more help on loading an original, refer to the engraved guides along the edge of the scanner
glass.
3. Close the lid.
26 Chapter 1 Get started ENWW

Load an original in the document feeder
You can copy or scan a document by placing it in the document feeder.
CAUTION: Do not load photos in the document feeder, this might cause damage to your photos. Use only
paper that is supported by the document feeder.
NOTE: Some features, such as the Fit to Page copy feature, do not work when you load your originals in the
document feeder. For those features to work, load your originals on the scanner glass.
To load an original in the document feeder
1. Load your original print-side up into the document feeder.
a. If you are loading an original printed in portrait orientation, place the pages so that the top edge of
the document goes in rst. If you are loading an original printed in landscape orientation, place the
pages so that the left edge of the document goes in rst.
b. Slide the paper into the document feeder until you hear a tone or see a message on the printer
control panel display indicating that the loaded pages were detected.
TIP: For more help on loading originals in the document feeder, refer to the diagram on the document
feeder tray.
2. Slide the paper-width guides inward until they stop at the left and right edges of the paper.
ENWW Load an original in the document feeder 27

Update the printer
By default, if the printer is connected to a network and Web Services has been enabled, the printer
automatically checks for updates.
To update the printer using the printer control panel
1. From the printer control panel display, touch ( Setup ).
2. Touch Tools.
3. Touch Update the Printer .
4. Touch Check Now.
To enable the printer to automatically check for updates
NOTE: The default setting of Auto Update is On .
1. From the printer control panel display, touch ( Setup ).
2. Touch Tools.
3. Touch Update the Printer.
4. Touch Printer Update Options.
5. Select Install Automatically (Recommended), Alert When Available or Do Not Check.
To update the printer using the embedded web server
1. Open the EWS.
For more information, see Embedded web server .
2. Click the Tools tab.
3. In the Printer Updates section, click Firmware Updates, and then follow the onscreen instructions.
NOTE: If a printer update is available, the printer downloads and installs the update, and then restarts.
NOTE: If prompted for proxy settings and if your network uses proxy settings, follow the onscreen
instructions to set up a proxy server. If you do not have the details, contact your network administrator or the
person who set up the network.
28 Chapter 1 Get started ENWW

Open the HP printer software (Windows)
After installing the HP printer software, depending on your operating system, do one of the following:
● Windows 10: From the computer desktop, click Start, select HP from the app list, and then select the
icon with the printer name.
● Windows 8.1: Click the down arrow in the lower left corner of the Start screen, and then select the
printer name.
● Windows 8: Right-click an empty area on the Start screen, click All Apps on the app bar, and then select
the printer name.
● Windows 7: From the computer desktop, click Start, select All Programs, click HP, click the folder for
the printer, and then select the icon with the printer name.
NOTE: If you have not installed the HP printer software, visit 123.hp.com to download and install the
necessary software.
ENWW Open the HP printer software (Windows) 29

Use the HP Smart app to print, scan, and troubleshoot
HP Smart helps you to set up, scan, print, share, and manage your HP printer. You can share documents and
images through email, text messages, and popular cloud and social media services (such as iCloud, Google
Drive, Dropbox, and Facebook). You can also set up new HP printers, as well as monitor and order supplies.
NOTE: The HP Smart app is supported on iOS, Android, Windows 10, OS X 10.11, and macOS 10.12 and later
devices. The app might not be available in all languages. Some features might not be available with all printer
models.
Get more information about the HP Smart app
For basic instructions on how to print, scan, and troubleshoot using HP Smart, see Print using the HP Smart
app, Scan using the HP Smart app, and Get help from the HP Smart app. For more information, you can also
visit:
● iOS/Android: www.hp.com/go/hpsmart-help
● Windows: www.hp.com/go/hpsmartwin-help
● Mac: www.hp.com/go/hpsmartmac-help
To install the HP Smart app and connect to your printer
1. To get the HP Smart app, visit 123.hp.com to download and install the app.
Users of iOS, Android, and Windows 10 devices can also get the app from the device's app store.
2. After installation, open the app.
● iOS/Android: From the device desktop or app menu, tap HP Smart.
● Windows 10: From the computer desktop, click Start, and then select HP Smart from the app list.
● Mac: From the Launchpad, select the HP Smart app.
3. Connect to your printer. For information, see Connect your printer by using the HP Smart app.
30 Chapter 1 Get started ENWW

Turn the printer o
Press (the Power button) to turn o the printer. Wait until the power light turns o before unplugging the
power cord or turning o a power strip.
CAUTION: If you incorrectly turn the printer o, the print carriage might not return to the correct position,
causing problems with the cartridges and print quality issues.
ENWW Turn the printer o 31

2 Print
Most print settings are automatically handled by the software application. Change the settings manually only
when you want to change print quality, print on specic types of paper, or use special features.
●
Print using a computer
●
Print using the HP Smart app
●
Print with mobile devices
●
Tips for successful printing
32 Chapter 2 Print ENWW

Print using a computer
●
Print documents
●
Print brochures
●
Print on envelopes
●
Print photos
●
Print on special and custom-size paper
●
Print on both sides (duplexing)
●
Print using a Mac desktop or laptop
NOTE: You can also use the HP Smart app to print from mobile devices. For more information, see Print
using the HP Smart app.
Print documents
To print documents (Windows)
1. Load paper in the input tray. For more information, see Load paper.
2. From your software, select Print.
3. Make sure your printer is selected.
4. Click the button that opens the Properties dialog box.
Depending on your software application, this button might be called Properties, Options, Printer Setup,
Printer Properties, Printer, or Preferences.
NOTE: To set print settings for all print jobs, make the changes in the HP software. For more
information on the HP software, see Printer management tools.
5. Select the appropriate options.
● On the Layout tab, select Portrait or Landscape orientation.
● On the Paper/Quality tab, select the appropriate paper type from the Media drop-down list in the
Tray Selection area, select the appropriate print quality in the Quality Settings area, and then
select the appropriate color in the Color area.
● Click Advanced to select the appropriate paper size from the Paper Size drop-down list.
NOTE: If you change the paper size, be sure to load the correct paper in the input tray and set the
paper size on the printer control panel.
If you want to change other print settings, click the other tabs. For more printing tips, see Printer
settings tips .
6. Click OK to close the Properties dialog box.
7. Click Print or OK to begin printing.
ENWW Print using a computer 33

Print brochures
To print brochures (Windows)
1. Load paper in the input tray. For more information, see Load paper.
2. On the File menu in your software application, click Print .
3. Make sure your printer is selected.
4. To change settings, click the button that opens the Properties dialog box.
Depending on your software application, this button might be called Properties , Options , Printer
Setup , Printer , or Preferences .
NOTE: To set print settings for all print jobs, make the changes in the HP software. For more
information on the HP software, see Printer management tools.
5. Select the appropriate options.
● On the Layout tab, select Portrait or Landscape orientation.
● On the Paper/Quality tab, select the appropriate paper type from the Media drop-down list in the
Tray Selection area, select the appropriate print quality in the Quality Settings area, and then
select the appropriate color in the Color area.
● Click Advanced to select the appropriate brochure size from the Paper Size drop-down list.
NOTE: If you change the paper size, be sure to load the correct paper in the input tray and set the
paper size on the printer control panel.
If you want to change other print settings, click the other tabs. For more printing tips, see Printer
settings tips .
6. Click OK to close the Properties dialog box.
7. Click Print or OK to begin printing.
Print on envelopes
Avoid envelopes with the following characteristics:
● Very slick nish
● Self-stick adhesives, clasps, or windows
● Thick, irregular, or curled edges
● Areas that are wrinkled, torn, or otherwise damaged
Make sure the folds of envelopes you load in the printer are sharply creased.
NOTE: For more information about printing on envelopes, see the documentation available with the
software program you are using.
34 Chapter 2 Print ENWW

To print envelopes (Windows)
1. Load paper in the input tray. For more information, see Load paper.
2. On the File menu in your software, click Print.
3. Make sure your printer is selected.
4. Click the button that opens the Properties dialog box.
Depending on your software application, this button might be called Properties, Options, Printer Setup,
Printer Properties, Printer, or Preferences.
NOTE: To set print settings for all print jobs, make the changes in the HP software. For more
information on the HP software, see Printer management tools.
5. Select the appropriate options.
● On the Layout tab, select Portrait or Landscape orientation.
● On the Paper/Quality tab, select the appropriate paper type from the Media drop-down list in the
Tray Selection area, select the appropriate print quality in the Quality Settings area, and then
select the appropriate color in the Color area.
● Click Advanced to select the appropriate envelope size from the Paper Size drop-down list.
NOTE: If you change the paper size, be sure to load the correct paper in the input tray and set the
paper size on the printer control panel.
If you want to change other print settings, click the other tabs. For more printing tips, see Printer
settings tips .
6. Click OK to close the Properties dialog box.
7. Click Print or OK to begin printing.
Print photos
You can print a photo from a computer.
NOTE: Do not leave unused photo paper in the input tray. The paper might start to curl, which could impair
the quality of your printout. Photo paper should be at before printing.
TIP: You can use this printer to print documents and photos on your mobile device (such as a smartphone or
tablet). For more information, visit the HP Mobile Printing website ( www.hp.com/go/mobileprinting ). (At this
time, this website might not be available in all languages.)
To print a photo from the computer (Windows)
1. Load paper in the input tray. For more information, see Load paper.
2. From your software, select Print.
3. Make sure your printer is selected.
4. Click the button that opens the Properties dialog box.
Depending on your software application, this button might be called Properties, Options, Printer Setup,
Printer Properties, Printer, or Preferences.
ENWW Print using a computer 35

5. Select the appropriate options.
● On the Layout tab, select Portrait or Landscape orientation.
● On the Paper/Quality tab, select the appropriate paper type from the Media drop-down list in the
Tray Selection area, select the appropriate print quality in the Quality Settings area, and then
select the appropriate color in the Color area.
● Click Advanced to select the appropriate photo size from the Paper Size drop-down list.
NOTE: If you change the paper size, be sure to load the correct paper in the input tray and set the
paper size on the printer control panel.
If you want to change other print settings, click the other tabs. For more printing tips, see Printer
settings tips .
6. Click OK to close the Properties dialog box.
7. Click Print or OK to begin printing.
NOTE: After the printing is nished, remove unused photo paper from the input tray. Store the photo paper
so it does not start to curl, which could reduce the quality of your printout.
Print on special and custom-size paper
If your application supports custom-size paper, set the size in the application before printing the document. If
not, set the size in the printer driver. You might need to reformat existing documents to print them correctly
on custom-size paper.
To set up custom sizes (Windows)
1. Depending on your operating system, do one of the following:
● Windows 10: From the Windows Start menu, select Windows System from the app list, select
Control Panel, and then click View devices and printers under Hardware and Sound. Select the
printer name, and click Print server properties .
● Windows 8.1 and Windows 8: Point to or tap the upper-right corner of the screen to open the
Charms bar, click the Settings icon, click or tap Control Panel, and then click or tap View devices
and printers. Click or tap the printer name, and click or tap Print server properties.
● Windows 7: From the Windows Start menu, click Devices and Printers. Select the printer name,
and select Print server properties.
2. Select the Create a new form checkbox.
3. Enter the name of the custom size paper.
4. Enter the dimensions of the custom size in the Form description (measurements) section.
5. Click Save Form, and then click Close.
36 Chapter 2 Print ENWW

To print on special or custom-size paper (Windows)
NOTE: Before you can print on custom-size paper, you must set up the custom size in the Print Server
Properties.
1. Load the appropriate paper in the input tray. For more information, see Load paper.
2. From the File menu in your software application, click Print.
3. Make sure your printer is selected.
4. Click the button that opens the Properties dialog box.
Depending on your software application, this button might be called Properties, Options, Printer Setup,
Printer Properties, Printer, or Preferences.
NOTE: To set print settings for all print jobs, make the changes in the HP software. For more
information on the HP software, see Printer management tools.
5. On the Layout tab or Paper/Quality tab, click the Advanced button.
6. In the Paper/Output area, select the custom size from the Paper Size drop-down list.
NOTE: If you change the paper size, be sure to load the correct paper in the input tray and set the
paper size on the printer control panel.
7. Select any other print settings that you want, and then click OK.
8. Click Print or OK to begin printing.
Print on both sides (duplexing)
To print on both sides of the page (Windows)
1. Load paper in the input tray. For more information, see Load paper.
2. From your software, select Print.
3. Make sure your printer is selected.
4. Click the button that opens the Properties dialog box.
Depending on your software application, this button might be called Properties, Options, Printer Setup,
Printer Properties, Printer, or Preferences.
NOTE: To set print settings for all print jobs, make the changes in the HP software. For more
information on the HP software, see Printer management tools.
5. Select the appropriate options.
● On the Layout tab, select Portrait or Landscape orientation, and then select an appropriate
ipping paper option from the Print on Both Sides drop-down list.
● On the Paper/Quality tab, select the appropriate paper type from the Media drop-down list in the
Tray Selection area, select the appropriate print quality in the Quality Settings area, and then
select the appropriate color in the Color area.
● Click Advanced to select the appropriate paper size from the Paper Size drop-down list.
ENWW Print using a computer 37

NOTE: If you change the paper size, be sure to load the correct paper in the input tray and set the
paper size on the printer control panel.
If you want to change other print settings, click the other tabs. For more printing tips, see Printer
settings tips .
NOTE: The printer supports automatic two-sided printing of A4, Letter, Executive, and JIS B5 paper
sizes.
6. Click OK to close the Properties dialog box.
7. Click Print or OK to begin printing.
Print using a Mac desktop or laptop
Instructions for HP AirPrint-compatible printers and Mac computers with macOS and OS X 10.7 (Lion) and
later.
Printer connected to network
If your printer is already set up and connected to your wireless network, you can enable printing from a Mac
desktop or laptop using the System Preferences menu.
1. Open System Preferences and select Printers and Scanners.
2. Click Add + to set up the printer on your Mac. Choose your printer from the displayed list of network
printers, then click Add. This will install the available print or scan drivers for your printer.
These instructions let you print from your Mac. Continue to use the HP Smart app to monitor ink levels and
printer alerts.
Printer not connected to network
● If you have not set up or connected your printer to your network, go to 123.hp.com to install the
necessary software. When you complete printer setup, use the HP Utility from the Applications folder to
monitor ink levels and printer alerts.
38 Chapter 2 Print ENWW

Print using the HP Smart app
This section provides basic instructions for using the HP Smart app to print from your iOS, Android, Windows,
and Mac devices. For more information about the app, see Use the HP Smart app to print, scan, and
troubleshoot.
To begin using the HP Smart app to print
1. Load paper in the input tray. For more information, see Load paper.
2. Open the HP Smart app on your device.
3. On the Home screen of HP Smart, make sure your printer is selected.
TIP: If a printer is already set up, you can select it from the Home screen of HP Smart by swiping left or
right and selecting it.
To use a dierent printer, click or tap (Plus icon) on the Home screen, and then select a dierent
printer or add a new printer.
To print from Android or iOS device
1. On the Home screen of HP Smart, tap a printing option (for example, Print Photos or Print Facebook
Photos, etc.). You can print photos and documents from your device, cloud storage, or social media
sites.
2. Select the photo or document you want to print.
3. Tap Print.
To print from a Windows 10 device
1. On the Home screen of HP Smart, click or tap Print at the bottom of the screen.
2. Select Print Photo, locate a photo you want to print, and then click or tap Select Photos to Print.
Select Print Document, locate a PDF document you want to print, and then click or tap Print.
3. Select the appropriate options. To view more settings, click or tap More settings.
For more information about printing settings, see Printer settings tips .
4. Click or tap Print to begin printing.
To print from a Mac device
1. On the Home screen of HP Smart, click Print tile, and then click Print Document or Print Photo.
2. Locate the document or photo in the Documents folder or Pictures library, or browse to another folder
where the le is saved.
3. Select the document or photo you want, and then click Print.
4. Select a dierent printer or make any changes to the print settings, such as paper size or output quality.
5. Click Print.
ENWW Print using the HP Smart app 39

Print with mobile devices
Print from mobile devices
You can print documents and photos directly from your mobile devices, including iOS, Android, Windows
Mobile, Chromebook and Amazon Kindle.
NOTE: You can also use the HP Smart app to print from mobile devices. For more information, see Print
using the HP Smart app.
1. Make sure your printer is connected to the same network as your mobile device.
2. Enable printing on your mobile device:
● iOS: Use the Print option from the Share menu or .
NOTE: Devices running iOS 4.2 or later have AirPrint preinstalled.
● Android: Download the HP Print Service Plugin (supported by most Android devices) from the
Google Play Store and enable it on your device.
NOTE: The HP-print plugin is supported on Android OS 4.4 KitKat and later.
● Windows Mobile: Tap Print from the Device menu. No setup is required since the software is
preinstalled.
NOTE: If your printer is not listed, you might need to do a one-time setup of the printer using the
Add Printer wizard.
● Chromebook: Download and install the HP Print for Chrome app from the Chrome Web Store to
enable both Wi-Fi and USB printing.
● Amazon Kindle Fire HD9 and HDX: The rst time you select Print on your device, the HP Print
Service Plugin is automatically downloaded to enable mobile printing.
NOTE: For detailed information about enabling printing from your mobile devices, visit the HP Mobile
Printing website ( www.hp.com/go/mobileprinting ). If a local version of this website is not available in
your country/region or language, you might be directed to the HP Mobile Printing website in another
country/region or language.
3. Make sure the loaded paper matches the paper settings of the printer (see Load paper for more
information). Accurately setting the paper size for the paper that is loaded enables your mobile device to
know what paper size it is printing.
40 Chapter 2 Print ENWW

Tips for successful printing
To print successfully, the HP cartridges should be functioning properly with suicient ink, the paper should be
loaded correctly, and the printer should have the appropriate settings.
●
Ink tips
●
Paper loading tips
●
Printer settings tips
Ink tips
Following are the ink tips for successful printing:
● If the print quality is not acceptable, see Printing issues for more information.
● Use Original HP cartridges.
Original HP cartridges are designed and tested with HP printers and papers to help you easily produce
great results, time after time.
NOTE: HP cannot guarantee the quality or reliability of non-HP supplies. Product service or repairs
required as a result of using a non-HP supply will not be covered under warranty.
If you believe you purchased Original HP cartridges, go to www.hp.com/go/anticounterfeit.
● Install both the black and color cartridges correctly.
For more information, see Replace the cartridges.
● Check the estimated ink levels in the cartridges to make sure there is suicient ink.
For more information, see Check the estimated ink levels.
NOTE: Ink level warnings and indicators provide estimates for planning purposes only. When an
indicator shows low ink levels, consider having a replacement cartridge available to avoid possible
printing delays. You do not need to replace cartridges until you are prompted to.
● Always turn o the printer with (the Power button) to allow the printer to protect the nozzles.
Paper loading tips
For more information, also see Load paper.
● Ensure the paper is loaded in the input tray properly, and set the correct media size and media type.
Upon loading paper in input tray, you will be prompted to set the media size and media type from the
control panel.
● Load a stack of paper (not just one page). All the paper in the stack should be of the same size and type
to avoid a paper jam.
● Load paper with the print-side down.
● Ensure that paper loaded in the input tray lays at and the edges are not bent or torn.
● Adjust the paper-width guides in the input tray to t snugly against all paper. Make sure the guides do
not bend the paper in the tray.
ENWW Tips for successful printing 41

Printer settings tips
Software settings selected in the print driver only apply to printing, they do not apply to copying or scanning.
You can print your document on both sides of the paper. For more information, see Print on both sides
(duplexing).
Printer settings tips (Windows)
● To change default print settings, open the HP printer software, click Print & Scan and then click Set
Preferences. For information how to open the printer software, see Open the HP printer software
(Windows).
● To understand paper and paper tray settings:
– Paper Size: Select the paper size you loaded in the input tray.
– Media: Select the paper type you are using.
● To understand color or black and white settings:
– Color: Uses ink from all cartridges for full color prints.
– Black & White or Black Ink Only: Uses the black ink only for normal or lower quality black and
white prints.
– High Quality Grayscale: Uses ink from both the color and black cartridges to produce a wider range
of black and grey tones for high quality black and white prints.
● To understand print quality settings:
The print quality is measured in print resolution dots per inch (dpi). Higher dpi produces clearer and
more detailed prints, but slows print speed and might use more ink.
– Draft: Lowest dpi typically used when ink levels are low or when high quality prints are not needed.
– Better: Suitable for most print jobs.
– Best: Better dpi than Better.
– Max DPI Enabled: Highest dpi setting available for print quality.
● To understand page and layout settings:
– Orientation: Select Portrait for vertical prints or Landscape for horizontal prints.
– Print on Both Sides: Automatically ip the pages after one side of the paper prints out so that you
can print on both sides of the paper.
○ Flip on Long Edge: Select it if you want to ip pages by the long edge of the paper when
printing on both sides of the paper.
○ Flip on Short Edge: Select it if you want to ip pages by the short edge of the paper when
printing on both sides of the paper.
– Pages per Sheet: Helps you specify the order of the pages if you print the document with more
than two pages per sheet.
42 Chapter 2 Print ENWW

3 Copy and scan
●
Copy
●
Scan
●
Tips for copy and scan success
ENWW 43

Copy
The Copy menu on the printer display allows you to easily select number of copies and color or black and
white for copying on plain paper. You can also easily access advanced settings, such as changing the paper
type and size, adjusting the darkness of the copy, and resizing the copy.
To make a copy
1. Load your original print-side down on the scanner glass.
2. On the printer control panel display, from the Home screen, touch Copy .
3. Specify the desired number of copies. Do either of the following to specify the number:
4. Touch (Settings) to specify paper size, paper type, quality, or other settings.
● Select a number in the spinner. You can swipe left or right in the spinner to increase or decrease
the number.
● Touch the keypad button on the right side of the spinner to enter a specic number.
● To copy two pages of the original to 2 sides of a sheet, touch the toggle button next to 2–Sided to
set it to ON.
● Touch (Back) to return to the Copy menu.
5. Touch Start Black or Start Color to start the copy job.
44 Chapter 3 Copy and scan ENWW

Scan
You can scan documents, photos, and other paper types, and send them to a variety of destinations, such as a
computer or an email recipient.
When scanning a borderless original, use the scanner glass and not the document feeder.
NOTE: Some scan functions are only available after you have installed the HP printer software.
TIP: If you have problems scanning documents, see Copy and scan issues.
This section contains the following topics:
●
Scan to a computer
●
Scan using the HP Smart app
●
Scan using Webscan
●
Create a new scan shortcut (Windows)
●
Change scan settings (Windows)
Scan to a computer
Before scanning to a computer, make sure you have already installed the HP recommended printer software.
The printer and computer must be connected and turned on.
In addition, on Windows computers, the printer software must be running prior to scanning.
To enable the scan to a computer feature (Windows)
If the printer is connected to the computer with a USB connection, the feature for scanning to computer is
enabled by default and cannot be disabled.
If you are using network connection, follow these instructions if the feature has been disabled, and you wish
to enable it again.
1. Open the HP printer software. For more information, see Open the HP printer software (Windows).
2. Click Print & Scan , and then click Scan .
3. Select Manage Scan to Computer.
4. Click Enable.
To scan an original to a computer from the printer control panel
Make sure the printer has already connected to the computer before scanning.
1. Load your original print-side down on the scanner glass or print-side up in the document feeder.
2. Touch Scan from the control panel, and then select your Computer name.
3. Touch Start Scan.
ENWW Scan 45

To scan a document or photo to a le (Windows)
1. Load your original print-side down on the scanner glass or print-side up in the document feeder.
2. Open the HP printer software. For more information, see Open the HP printer software (Windows).
3. In the printer software, click Scan a Document or Photo .
4. Select the type of scan you want and then click Scan .
● Choose Save as PDF to save the document (or photo) as a PDF le.
● Choose Save as JPEG to save the photo (or document) as an image le.
NOTE: The initial screen allows you to review and modify basic settings. Click the More link at the top
right corner of the Scan dialog box to review and modify detailed settings.
For more information, see Change scan settings (Windows).
If Show Viewer After Scan is selected, you can make adjustments to the scanned image in the preview
screen.
Scan using the HP Smart app
This section provides basic instructions for using the HP Smart app to scan from your iOS, Android, Windows,
and Mac devices. For more information about the app, see Use the HP Smart app to print, scan, and
troubleshoot.
You can use the HP Smart app to scan documents or photos from the printer's scanner, and you can also scan
using your device camera. HP Smart includes editing tools that allow you to adjust the scanned image before
saving or sharing. You can print, save your scans locally or in cloud storage, and share them via email, SMS,
Facebook, Instagram, etc. To scan with HP Smart, follow the instructions provided in the appropriate section
below, depending on the type of device you are using.
●
Scan from an iOS or Android device
●
Scan from the printer to your Mac device
●
Scan from a Windows 10 device
Scan from an iOS or Android device
1. Open the HP Smart app on your device.
2. On the Home screen of HP Smart, make sure your printer is selected.
TIP: If a printer is already set up, you can select it from the Home screen of HP Smart by swiping left or
right and selecting it.
To use a dierent printer, click or tap (Plus icon) on the Home screen, and then select a dierent
printer or add a new printer.
3. Tap the scanning option you want to use.
46 Chapter 3 Copy and scan ENWW

● If you are using the device camera, make sure you are in a well-lit area, and the photo or document
does not blend in with the surface it rests on.
● If you are using the printer scanner, tap the Settings icon to select the input source and change the
scan settings, and then tap the Scan icon.
● If you select the option for les and photos, follow onscreen instructions to select the desired le,
make the desired changes, and save the changes.
4. When you have nished adjusting the scanned document or photo, save, share, or print it.
Scan from the printer to your Mac device
1. Load the original print-side down near the icon at the corner of the scanner glass on the printer.
2. Open the HP Smart app on your device.
3. On the Home screen of HP Smart app, make sure your printer is selected.
4. Click the Scan tile.
5. From the Scan window, make the desired changes, and then click Scan.
6. In the scan preview, click Edit to make the desired changes, and then apply the changes.
7. Click Add Pages to add pages to your scan job, if necessary, and then print, save, or share the scan.
Scan from a Windows 10 device
To scan a document or photo using the printer scanner
1. Load the original print-side down near the icon at the corner of the scanner glass on the printer.
2. Open HP Smart. For more information, see Use the HP Smart app to print, scan, and troubleshoot.
3. Select Scan, and then select Scanner.
4. Click or tap the Settings icon to modify the basic settings.
Select Glass from the Source drop-down list.
5. Click or tap the Preview icon to preview and adjust the image if necessary.
6. Click or tap the Scan icon.
7. Make other adjustments if necessary:
● Click or tap Add Pages to add more documents or photos.
● Click or tap Edit to rotate or crop the document or image, or adjust its contrast, brightness,
saturation, or angle.
8. Select the le type you want, and then click or tap the Save icon to save it or click or tap the Share icon
to share it with others.
ENWW Scan 47

To scan a document or photo using the device camera
If your device has a camera, you can use the HP Smart app to scan a printed document or photo with the
device camera. You can then use HP Smart to edit, save, print or share the image.
1. Open HP Smart. For more information, see Use the HP Smart app to print, scan, and troubleshoot.
2. Select Scan, and then select Camera.
3. Put a document or photo in front of the camera, and then click or tap the round button at the bottom of
the screen to take an image.
4. Adjust boundaries if needed. Click or tap the Apply icon.
5. Make other adjustments if necessary:
● Click or tap Add Pages to add more documents or photos.
● Click or tap Edit to rotate or crop the document or image, or adjust its contrast, brightness,
saturation, or angle.
6. Select the le type you want, and then click or tap the Save icon to save it or click or tap the Share icon
to share it with others.
To edit a previously scanned document or photo
HP Smart provides editing tools, such as crop and rotate, which you can use to adjust a previously scanned
document or photo on your device.
1. Open HP Smart. For more information, see Use the HP Smart app to print, scan, and troubleshoot.
2. Select Scan, and then select Import.
3. Select the document or photo that you want to adjust, and then click or tap Open.
4. Adjust boundaries if needed. Click or tap the Apply icon.
5. Make other adjustments if necessary:
● Click or tap Add Pages to add more documents or photos.
● Click or tap Edit to rotate or crop the document or image, or adjust its contrast, brightness,
saturation, or angle.
6. Select the le type you want, and then click or tap Save or Share to save the le or share it with others.
Scan using Webscan
Webscan is a feature of the embedded web server that lets you scan photos and documents from your printer
to your computer using a web browser.
This feature is available even if you did not install the printer software on your computer.
For more information, see Embedded web server .
NOTE: By default, Webscan is o. You can enable this feature from the EWS.
If you are unable to open Webscan in the EWS, your network administrator might have turned it o. For more
information, contact your network administrator or the person who set up your network.
48 Chapter 3 Copy and scan ENWW

To enable Webscan
1. Open the embedded web server. For more information, see Embedded web server .
2. Click the Settings tab.
3. In the Security section, click Administrator Settings.
4. Select Webscan from EWS to enable Webscan.
5. Click Apply.
To scan using Webscan
Scanning using Webscan oers basic scan options. For additional scan options or functionality, scan from the
HP printer software.
1. Load your original print-side down on the scanner glass or print-side up in the document feeder.
2. Open the embedded web server. For more information, see Embedded web server .
3. Click the Scan tab.
4. Click Webscan in the left pane, change any settings, and then click Start Scan .
Create a new scan shortcut (Windows)
You can create your own scan shortcut to make scanning easier. For example, you might want to regularly
scan and save photos in PNG format, rather than JPEG.
1. Load your original print-side down on the scanner glass or print-side up in the document feeder.
2. Open the HP printer software. For more information, see Open the HP printer software (Windows).
3. In the printer software, click Scan a Document or Photo .
4. Click Create New Scan Shortcut .
5. Enter a descriptive name, choose an existing shortcut on which to base your new shortcut, and then click
Create .
6. Change the settings for your new shortcut to meet your needs, and then click the save icon to the right
of the shortcut.
NOTE: The initial screen allows you to review and modify basic settings. Click the More link at the top
right corner of the Scan dialog box to review and modify detailed settings.
For more information, see Change scan settings (Windows).
Change scan settings (Windows)
You can modify any of the scan settings either for a singular use or save the changes to use permanently.
These settings include options such as page size and orientation, scan resolution, contrast, and the folder
location for saved scans.
1. Load your original print-side down on the scanner glass or print-side up in the document feeder.
2. Open the HP printer software. For more information, see Open the HP printer software (Windows).
ENWW Scan 49

3. In the printer software, click Scan a Document or Photo .
4. Click the More link in the top right corner of the HP Scan dialog box.
The detailed settings pane appears on the right. The left column summarizes the current settings for
each section. The right column allows you to change the settings in the highlighted section.
5. Click each section at the left of the detailed settings pane to review the settings in that section.
You can review and change most settings using drop-down menus.
Some settings allow greater exibility by displaying a new pane. These are indicated by a + (plus sign) at
the right of the setting. You must either accept or cancel any changes on this pane to return to the
detailed settings pane.
6. When you have nished changing settings, do one of the following:
● Click Scan . You are prompted to save or reject the changes to the shortcut after the scan is
nished.
● Click the save icon to the right of the shortcut. It saves the changes into the shortcut so that you
can reuse them next time. Otherwise, the changes only aect the current scan. Then click Scan .
Go online to learn more about using the HP Scan software. Learn how to do the following:
● Customize scan settings, such as image le type, scan resolution, and contrast levels.
● Scan to network folders and cloud drives.
● Preview and adjust images before scanning.
50 Chapter 3 Copy and scan ENWW

Tips for copy and scan success
Use the following tips to copy and scan successfully:
● Keep the glass and the back of the lid clean. The scanner interprets anything it detects on the glass as
part of the image.
● Load your original print-side down on the scanner glass and align it with the marking on the rear left
corner of the glass.
● To make a large copy of a small original, scan the original into the computer, resize the image in the
scanning software, and then print a copy of the enlarged image.
● If you want to adjust scan size, output type, scan resolution, or le type, and so on, start scan from the
printer software.
● To avoid incorrect or missing scanned text, make sure the brightness is set appropriately in the
software.
● If you want to scan a document with several pages into one le instead of multiple les, start the scan
with the printer software instead of selecting Scan from the printer display, or use document feeder to
scan.
● If you scan from a mobile camera, make sure to scan in a well-lit area so that the original has good
contrast with the surface it is lying on.
ENWW Tips for copy and scan success 51

4 Web Services
This section contains the following topics:
●
What are Web Services?
●
Set up Web Services
●
Print with HP ePrint
●
Remove Web Services
52 Chapter 4 Web Services ENWW

What are Web Services?
The printer oers innovative, web-enabled solutions that can help you quickly access the Internet, obtain
documents, print them faster with less hassle, and all without using a computer.
NOTE: To use these web features, the printer must be connected to the Internet. You cannot use these web
features if the printer is connected using a USB cable.
HP ePrint
● HP ePrint is a free service from HP that allows you to print to your HP ePrint-enabled printer anytime,
from any location. It's as simple as sending an email to the email address assigned to your printer when
you enable Web Services on the printer. No special drivers or software are needed. If you can send an
email, you can print from anywhere, using HP ePrint .
NOTE: You can sign up for an account on HP Connected (might not be available in all countries/
regions), and sign in to congure the ePrint settings.
Once you have signed up for an account on HP Connected (might not be available in all countries/
regions), you can sign in to view your HP ePrint job status, manage your HP ePrint printer queue, control
who can use your printer's HP ePrint email address to print, and get help for HP ePrint .
ENWW What are Web Services? 53

Set up Web Services
Before you set up Web Services, make sure your printer is connected to the Internet using a wireless
connection.
To set up Web Services, use one of the following methods.
To set up Web Services using the printer control panel
1. On the printer control panel display, from the Home screen, touch ( Setup ).
2. Touch Web Services Setup .
3. Touch Accept to accept the Web Services terms of use and enable Web Services.
4. On the screen that appears, touch OK to allow the printer to automatically check for product updates.
NOTE: If prompted for proxy settings and if your network uses proxy settings, follow the onscreen
instructions to set up a proxy server. If you do not have the proxy details, contact your network
administrator or the person who set up the network.
5. If the Printer Update Options screen is displayed, select Install Automatically (Recommended) or Alert
When Available.
6. When the printer is connected to the server, the printer prints an information page. Follow the
instructions on the information page to nish the setup.
To set up Web Services using the embedded web server
1. Open the EWS. For more information, see Embedded web server .
2. Click the Web Services tab.
3. In the Web Services Settings section, click Setup , click Continue, and follow the onscreen instructions
to accept the terms of use.
4. If prompted, choose to allow the printer to check for and install printer updates.
NOTE: When updates are available, they are automatically downloaded and installed, and then the
printer restarts.
NOTE: If prompted for proxy settings and if your network uses proxy settings, follow the onscreen
instructions to set up a proxy server. If you do not have the proxy details, contact your network
administrator or the person who set up the network.
5. When the printer is connected to the server, the printer prints an information page. Follow the
instructions on the information page to nish the setup.
To set up Web Services using the HP printer software (Windows)
1. Open the HP printer software. For more information, see Open the HP printer software (Windows).
2. In the window that appears, double-click Print & Scan and then select Printer Home Page (EWS) under
Print. The printer's home page (embedded web server) opens.
3. Click the Web Services tab.
54 Chapter 4 Web Services ENWW

4. In the Web Services Settings section, click Setup , click Continue, and follow the onscreen instructions
to accept the terms of use.
5. If prompted, choose to allow the printer to check for and install printer updates.
NOTE: When updates are available, they are automatically downloaded and installed, and then the
printer restarts.
NOTE: If prompted for proxy settings and if your network uses proxy settings, follow the onscreen
instructions to set up a proxy server. If you do not have the details, contact your network administrator
or the person who set up the network.
6. When the printer is connected to the server, the printer prints an information page. Follow the
instructions on the information page to nish the setup.
ENWW Set up Web Services 55

Print with HP ePrint
To use HP ePrint , do the following:
● Be sure you have an Internet-and email-capable computer or mobile device.
● Enable Web Services on the printer. For more information, see Set up Web Services.
TIP: For more information about managing and conguring HP ePrint settings and to learn about the latest
features, visit HP Connected (this site might not be available in all countries/regions).
To print documents using HP ePrint
1. On your computer or mobile device, open your email application.
2. Create a new email message, and then attach the le that you want to print.
3. Enter the HP ePrint email address in the “To” eld, and then select the option to send the email
message.
NOTE: Do not enter any additional email addresses in either the "To" or "Cc" elds. The HP ePrint
server does not accept print jobs if there are multiple email addresses.
To nd the HP ePrint email address
1. On the printer control panel display, from the Home screen, touch ( Setup ).
2. Touch Web Services.
3. Touch Display Email Address.
NOTE: Touch Print Info to print an information page that contains the printer code and instructions on
how to customize the email address.
To turn o HP ePrint
1. On the printer control panel display, from the Home screen, touch ( HP ePrint ), and then touch
(Web Services Settings).
2. Touch the toggle button next to HP ePrint to turn it o.
NOTE: To remove all Web Services, see Remove Web Services.
56 Chapter 4 Web Services ENWW

Remove Web Services
Use the following instructions to remove Web Services.
To remove Web Services using the printer control panel
1. On the printer control panel display, from the Home screen, touch ( HP ePrint ), and then touch
(Web Services Settings).
2. Touch Remove Web Services.
To remove Web Services using the embedded web server
1. Open the EWS. For more information, see Embedded web server .
2. Click the Web Services tab, and then click Remove Web Services in the Web Services Settings section.
3. Click Remove Web Services.
4. Click Yes to remove Web Services from your printer.
ENWW Remove Web Services 57

5 Work with cartridges
To ensure the best print quality from the printer, you need to perform some simple maintenance procedures.
TIP: If you have problems copying documents, see Printing issues.
This section contains the following topics:
●
Information on cartridges and the printhead
●
Some color ink is used even when printing with black cartridge only
●
Check the estimated ink levels
●
Replace the cartridges
●
Order cartridges
●
Store printing supplies
●
Anonymous usage information storage
●
Cartridge warranty information
58 Chapter 5 Work with cartridges ENWW

Information on cartridges and the printhead
The following tips help maintain HP cartridges and ensure consistent print quality.
● The instructions in this guide are for replacing cartridges, and are not intended for rst time installation.
● Keep all cartridges in the original sealed packages until they are needed.
● Be sure to turn o the printer properly. For more information, see Turn the printer o .
● Store cartridges at room temperature (15-35° C or 59-95° F).
● Do not clean the printhead unnecessarily. This wastes ink and shortens the life of the cartridges.
● Handle cartridges carefully. Dropping, jarring, or rough handling during installation can cause temporary
printing problems.
● If you are transporting the printer, do the following to prevent ink leaking from the printer or other
damage from occurring to the printer:
– Make sure you turn o the printer by pressing (the Power button). Wait until all sounds of
internal motion stop before unplugging the printer.
– Make sure you leave the cartridges installed.
– The printer must be transported sitting at; it should not be placed on its side, back, front, or top.
CAUTION: HP recommends that you replace any missing cartridges as soon as possible to avoid print quality
issues and possible extra ink usage or damage to the ink system. Never turn o the printer when cartridges
are missing.
NOTE: This printer is not designed to use continuous ink systems. To resume printing, remove continuous
ink system and install original HP (or compatible) cartridges.
NOTE: This printer is designed for ink cartridges to be used until they are empty. Relling cartridges prior to
depletion might cause your printer to fail. If this happens, insert a new cartridge (either genuine HP or
compatible) to continue printing.
ENWW Information on cartridges and the printhead 59

Some color ink is used even when printing with black cartridge only
Ink is used in a number of ways throughout the inkjet printing process. In general, ink in a cartridge is used for
printing documents, photographs and other such materials. Some ink, however, must be used to maintain the
health of the printhead; some ink is residual; and some ink evaporates. For more information on ink usage,
visit www.hp.com/go/learnaboutsupplies and click HP Ink. (You might need to select your country/region
using the Select Country button on the page.)
60 Chapter 5 Work with cartridges ENWW

Check the estimated ink levels
You can check the estimated ink levels from the printer software or from the printer control panel.
To check the estimated ink levels from the printer control panel
● From the printer control panel, touch (Ink) to check the estimated ink levels.
NOTE: Ink level alerts and indicators provide estimates for planning purposes only. When you receive a low-
ink alert, consider having a replacement cartridge available to avoid possible printing delays. You do not have
to replace the cartridges until prompted to do so.
NOTE: If you have installed a relled or remanufactured cartridge, or a cartridge that has been used in
another printer, the ink level indicator might be inaccurate or unavailable.
NOTE: Ink from the cartridges is used in the printing process in a number of dierent ways, including in the
initialization process, which prepares the printer and cartridges for printing, and in printhead servicing, which
keeps print nozzles clear and ink owing smoothly. In addition, some residual ink is left in the cartridge after
it is used. For more information, see www.hp.com/go/inkusage .
ENWW Check the estimated ink levels 61
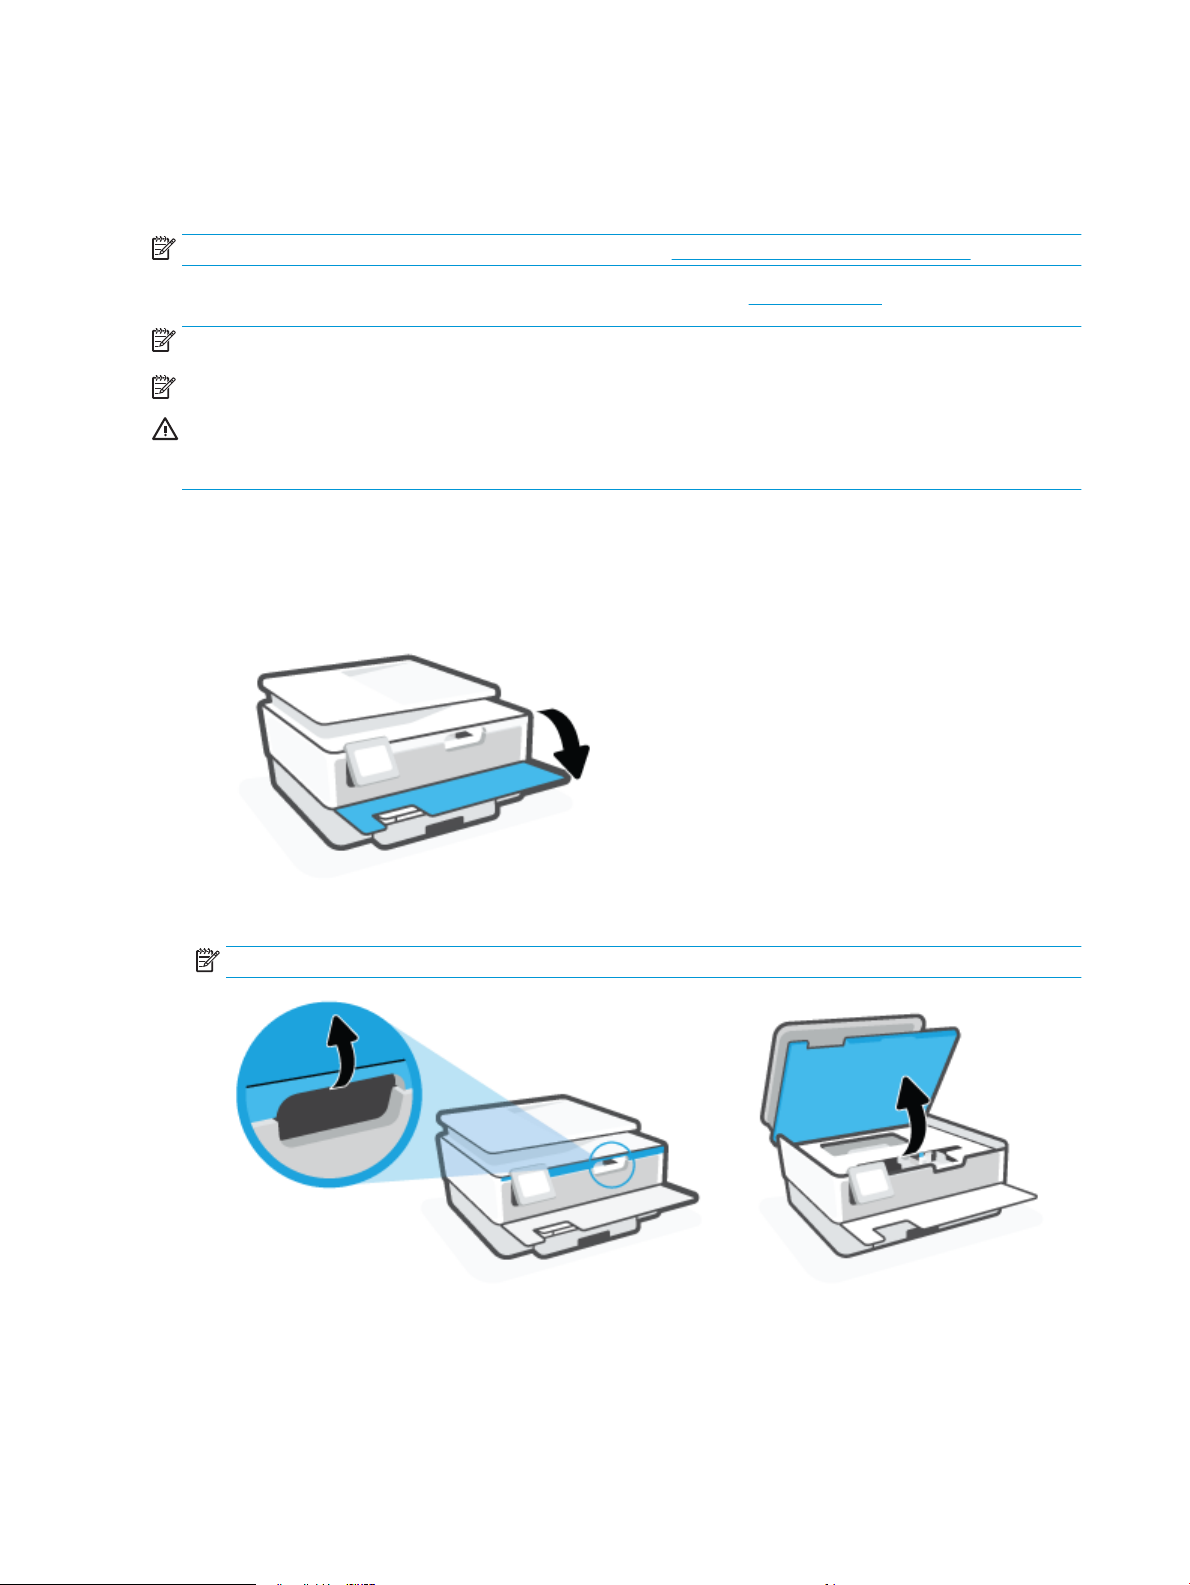
Replace the cartridges
NOTE: For information on recycling used ink supplies, see HP inkjet supplies recycling program.
If you do not already have replacement cartridges for the printer, see Order cartridges.
NOTE: At this time, some portions of the HP web site are available in English only.
NOTE: Not all cartridges are available in all countries/regions.
CAUTION: HP recommends that you replace any missing cartridges as soon as possible to avoid print quality
issues and possible extra ink usage or damage to the ink system. Never turn o the printer when cartridges
are missing.
To replace the cartridges
1. Make sure the printer is turned on.
2. Open the front door.
3. Open the cartridge access door.
NOTE: Wait until the print carriage stops moving before proceeding.
62 Chapter 5 Work with cartridges ENWW

4. Press on top of the cartridge to release it, and then remove it from the slot.
5. Remove the new cartridge from its packaging.
ENWW Replace the cartridges 63

6. Using the color-coded letters for help, slide the cartridge into the empty slot until it is securely installed
in the slot.
NOTE: Make sure that the color-coded letter on the cartridge matches that on the slot.
7. Repeat steps 4 through 6 for each cartridge you are replacing.
8. Close the cartridge access door.
64 Chapter 5 Work with cartridges ENWW

9. Close the front door.
ENWW Replace the cartridges 65

Order cartridges
To order cartridges, go to www.hp.com . (At this time, some portions of the HP website are available in
English only.) Ordering cartridges online is not supported in all countries/regions. However, many countries
have information on ordering by telephone, locating a local store and printing a shopping list. In addition, you
can visit the www.hp.com/buy/supplies page to obtain information about purchasing HP products in your
country.
Use only the replacement cartridges that have the same cartridge number as the cartridge you are replacing.
You can nd the cartridge number in the following places:
● In the embedded web server, click the Tools tab, and then click Supply Status under Product
Information. For more information, see Embedded web server .
● On the printer status report (see Understand printer reports).
● On the label of the cartridge you are replacing.
● On a sticker inside the printer. Open the cartridge access door to locate the sticker.
NOTE: The Setup cartridge that comes with the printer is not available for separate purchase.
66 Chapter 5 Work with cartridges ENWW

Store printing supplies
Cartridges can be left in the printer for extended periods of time. However, to assure optimal cartridge health,
be sure to turn o the printer properly when the printer is not in use.
For more information, see Turn the printer o .
ENWW Store printing supplies 67

Anonymous usage information storage
The HP cartridges used with this printer contain a memory chip that assists in the operation of the printer. In
addition, this memory chip stores a limited set of anonymous information about the usage of the printer,
which might include: the number of pages printed using the cartridge, the page coverage, frequency of
printing, and the printing modes used.
This information helps HP design future printers to meet our customers' printing needs. The data collected
from the cartridge memory chip does not contain information that can be used to identify a customer or user
of the cartridge or their printer.
HP collects a sampling of the memory chips from cartridges returned to HP's free return and recycling
program (HP Planet Partners: www.hp.com/recycle ). The memory chips from this sampling are read and
studied in order to improve future HP printers. HP partners who assist in recycling this cartridge might have
access to this data, as well.
Any third party possessing the cartridge might have access to the anonymous information on the memory
chip. If you prefer to not allow access to this information, you can render the chip inoperable. However, after
you render the memory chip inoperable, the cartridge cannot be used in an HP printer.
If you are concerned about providing this anonymous information, you can make this information inaccessible
by turning o the memory chip's ability to collect the printer's usage information.
To disable the usage information function
1. From the printer control panel, touch ( Setup ).
2. Touch Preferences .
3. Touch On next to Store Anonymous Usage Information to turn it o.
NOTE: To turn the usage information function on, restore the factory defaults. For more information about
how to restore the defaults, see Restore original factory defaults and settings.
NOTE: You can continue to use the cartridge in the HP printer if you turn o the memory chip's ability to
collect the printer's usage information.
68 Chapter 5 Work with cartridges ENWW

Cartridge warranty information
The HP cartridge warranty is applicable when the cartridge is used in its designated HP printing device. This
warranty does not cover HP ink cartridges that have been relled, remanufactured, refurbished, misused, or
tampered with.
During the warranty period the cartridge is covered as long as the HP ink is not depleted and the end of
warranty date has not been reached. The end of warranty date, in YYYY/MM format, may be found on the
cartridge as indicated:
For a copy of the HP Limited Warranty Statement, visit www.hp.com/go/orderdocuments.
ENWW Cartridge warranty information 69

6 Network setup
Additional advanced settings are available from the printer's home page (embedded web server or EWS). For
more information, see Embedded web server .
This section contains the following topics:
●
Set up the printer for wireless communication
●
Change network settings
●
Use Wi-Fi Direct
70 Chapter 6 Network setup ENWW

Set up the printer for wireless communication
●
Before you begin
●
Set up the printer on your wireless network
●
Connect your printer by using the HP Smart app
●
Change the connection type
●
Test the wireless connection
●
Turn on or o the wireless capability of the printer
NOTE: If you encounter problems connecting the printer, see Network and connection issues.
TIP: For more information about setting up and using the printer wirelessly, visit the HP Wireless Printing
Center ( www.hp.com/go/wirelessprinting ).
Before you begin
Ensure the following:
● The wireless network is set up and working properly.
● The printer and the computers that use the printer are on the same network (subnet).
While connecting the printer, you might be prompted to enter the wireless network name (SSID) and a wireless
password.
● The wireless network name is the name of your wireless network.
● The wireless password prevents other people from connecting to your wireless network without your
permission. Depending on the level of security required, your wireless network might use either a WPA
passphrase or WEP key.
If you have not changed the network name or the security passkey since setting up your wireless network,
you can sometimes nd them on the back or side of the wireless router.
If you cannot nd the network name or the security password or cannot remember this information, see the
documentation provided with your computer or with the wireless router. If you still cannot nd this
information, contact your network administrator or the person who set up the wireless network.
Set up the printer on your wireless network
Use the Wireless Setup Wizard from the printer control panel display to set up wireless communication.
NOTE: Before you proceed, go through the list at Before you begin.
1. From the printer control panel display, touch (Wireless).
2. Touch ( Settings ).
3. Touch Wireless Settings.
4. Touch Wireless Setup Wizard or Wi-Fi Protected Setup.
5. Follow the display instructions to complete the setup.
ENWW Set up the printer for wireless communication 71

If you are already using the printer with a dierent type of connection, such as a USB connection, follow the
instructions in Change the connection type to set up the printer on your wireless network.
Connect your printer by using the HP Smart app
To set up using the HP Smart app
You can use the HP Smart app to set up the printer on your wireless network. The HP Smart app is supported
on iOS, Android, Windows, and Mac devices. For information about the app, see Use the HP Smart app to print,
scan, and troubleshoot.
1. Make sure your printer and device are turned on and connected to the same wireless network.
2. If more than two hours have passed since you rst turned on the printer and you have not set up the
printer wirelessly, place the printer in the network setup mode by restoring the printer network settings.
For information on how to restore the printer network settings, see Restore original factory defaults and
settings.
3. If you are using an iOS or Android mobile device, make sure the device has Bluetooth turned on.
NOTE:
● HP Smart uses Bluetooth for printer setup only. This helps to make the setup process faster and
easier on iOS and Android mobile devices.
● Printing using Bluetooth is not supported.
4. Open the HP Smart app on your device.
5. iOS/Android: On the Home screen of HP Smart, tap (Plus icon), and then select the printer. If the
printer is not in the list, tap Add a new printer.
Windows: On the Home screen of HP Smart, click or tap (Plus icon), and then select or add a printer.
Mac: On the Home screen of HP Smart, click (Plus icon), and then select the printer. If the printer is
not in the list, click Printer, and select Set up a new printer.
Follow the onscreen instructions on your device to add the printer to your network.
To change wireless settings (HP Smart app)
1. If more than two hours have passed since you rst turned on the printer and you have not set up the
printer wirelessly, place the printer in network setup mode by restoring the printer network settings.
The setup mode will last for two hours. For information on how to restore the printer network settings,
see Restore original factory defaults and settings.
2. Tap (Plus icon) on the Home screen of HP Smart, and then select the option to add a new printer.
Change the connection type
After you have installed the HP printer software and connected the printer to your computer or to a network,
you can use the software to change the connection type (for example, from a USB connection to a wireless
connection).
72 Chapter 6 Network setup ENWW

To change from a USB connection to a wireless network (Windows)
Before you proceed, go through the list at Before you begin.
1. Open the HP printer software. For more information, see Open the HP printer software (Windows).
2. Click Tools.
3. Click Device Setup & Software.
4. Select Convert a USB connected printer to wireless. Follow the onscreen instructions.
Learn more about how to change from a USB to wireless connection. Click here to go online for more
information. At this time, this website might not be available in all languages.
To change from a wireless connection to a USB connection (Windows)
● Connect the printer and the computer with a USB cable. This USB port is at the rear of the printer. For the
specic location, see Back view .
Test the wireless connection
Print the wireless test report for information about the printer wireless connection. The wireless test report
provides information about the printer status, hardware (MAC) address, and IP address. If there is a problem
with the wireless connection or if a wireless connection attempt failed, the wireless test report would provide
diagnostic information. If the printer is connected to a network, the test report displays details about the
network settings.
To print the wireless test report
1. From the printer control panel display, touch (Wireless), and then touch ( Settings ).
2. Touch Print Reports.
3. Touch Wireless Test Report.
Turn on or o the wireless capability of the printer
The blue Wireless light on the printer control panel is lit when the wireless capability of the printer is on.
1. From the printer control panel display, touch (Wireless), and then touch ( Settings ).
2. Touch the toggle button next to Wireless to turn the wireless capability on or o.
ENWW Set up the printer for wireless communication 73

Change network settings
From the printer control panel, you can set up and manage your printer's wireless connection and perform a
variety of network management tasks. This includes viewing and changing network settings, restoring
network defaults, and turning the wireless function on or o.
CAUTION: Network settings are provided for your convenience. However, unless you are an advanced user,
you should not change some of these settings (such as the link speed, IP settings, default gateway, and
rewall settings).
To print network settings
Do one of the following:
● On the printer control panel display, from the Home screen, touch (Wireless) to display the network
status screen. Touch
● On the printer control panel display, from the Home screen, touch ( Setup ), touch Tools, and then
touch
To change IP settings
The default IP setting for the IP settings is Automatic, which sets the IP settings automatically. If you are an
advanced user and want to use dierent settings (such as the IP address, subnet mask, or the default
gateway), you can change them manually.
Network Conguration Report.
Print Info to print the network conguration page.
TIP: Before setting a manual IP address, it is recommended to rst connect the printer to the network using
Automatic mode. This allows the router to congure the printer with other needed settings like subnet mask,
default gateway and DNS address.
CAUTION: Be careful when manually assigning an IP address. If you enter an invalid IP address during the
installation, your network components cannot connect with the printer.
1. From the printer control panel display, touch (Wireless), and then touch ( Settings ).
2. Touch Advanced Settings.
3. Touch IP Settings.
A message appears warning that changing the IP address removes the printer from the network.
4. Touch OK to continue.
5. Automatic is selected by default. To change the settings manually, touch Manual, and then enter the
appropriate information for the following settings:
● IP Address
● Subnet Mask
● Default Gateway
● DNS Address
6. Enter your changes, and then touch Apply.
74 Chapter 6 Network setup ENWW

Use Wi-Fi Direct
With Wi-Fi Direct, you can print wirelessly from a computer, smart phone, tablet, or other wireless-capable
device—without connecting to an existing wireless network.
Guidelines for using Wi-Fi Direct
● Make sure your computer or mobile device has the necessary software.
– If you are using a computer, make sure you have installed the HP printer software.
If you have not installed the HP printer software on the computer, connect to Wi-Fi Direct rst and
then install the printer software. Select Wireless when prompted by the printer software for a
connection type.
– If you are using a mobile device, make sure you have installed a compatible printing app. For more
information about mobile printing, visit www.hp.com/global/us/en/eprint/
mobile_printing_apps.html.
● Make sure Wi-Fi Direct for your printer is turned on.
● Up to ve computers and mobile devices can use the same Wi-Fi Direct connection.
● Wi-Fi Direct can be used while the printer is also connected either to a computer using a USB cable or to
a network using a wireless connection.
● Wi-Fi Direct cannot be used to connect a computer, mobile device, or printer to the Internet.
To turn on Wi-Fi Direct
1. On the printer control panel display, from the Home screen, touch (Wi-Fi Direct).
2. Touch ( Settings ).
3. If the display shows that Wi-Fi Direct is O , touch the toggle button next to Wi-Fi Direct to turn it on.
TIP: You can also turn on Wi-Fi Direct from the EWS. For more information about using the EWS, see
Embedded web server .
To change connection method
1. On the printer control panel display, from the Home screen, touch (Wi-Fi Direct).
2. Touch ( Settings ).
3. Touch Connection Method and then select Automatic or Manual.
● If Automatic was selected during Wi-Fi Direct setup on the printer, the mobile device automatically
connects to the printer.
● If Manual was selected during the Wi-Fi Direct setup on the printer, acknowledge the connection on
the printer display or enter the printer PIN on your mobile device. The PIN is provided by the printer
when a connection attempt is made.
ENWW Use Wi-Fi Direct 75

To print from a wireless-capable mobile device that supports Wi-Fi Direct
Make sure you have installed the latest version of HP Print Service Plugin on your mobile device. You can
download this plugin from the Google Play application store.
1. Make sure you have turned on Wi-Fi Direct on the printer.
2. Turn on Wi-Fi Direct on your mobile device. For more information, see the documentation provided with
the mobile device.
3. From your mobile device, select a document from a print enabled application, and then select the option
to print the document.
The list of available printers appears.
4. From the list of available printers, choose the Wi-Fi Direct name shown such as DIRECT-**-HP OiceJet
8010 (where ** are the unique characters to identify your printer), and then follow the onscreen
instructions on the printer and your mobile device.
5. Print your document.
To print from a wireless-capable mobile device that does not support Wi-Fi Direct
Make sure you have installed a compatible printing app on your mobile device. For more information, visit
www.hp.com/global/us/en/eprint/mobile_printing_apps.html.
1. Make sure you have turned on Wi-Fi Direct on the printer.
2. Turn on the Wi-Fi connection on your mobile device. For more information, see the documentation
provided with the mobile device.
NOTE: If your mobile device does not support Wi-Fi, you are not able to use Wi-Fi Direct.
3. From the mobile device, connect to a new network. Use the process you normally use to connect to a
new wireless network or hotspot. Choose the Wi-Fi Direct name from the list of wireless networks
shown such as DIRECT-**-HP OiceJet 8010 (where ** are the unique characters to identify your
printer).
Enter the Wi-Fi Direct password when prompted.
4. Print your document.
To print from a wireless-capable computer (Windows)
1. Make sure you have turned on Wi-Fi Direct on the printer.
2. Turn on the computer's Wi-Fi connection. For more information, see the documentation provided with
the computer.
NOTE: If your computer does not support Wi-Fi, you are not able to use Wi-Fi Direct.
3. From the computer, connect to a new network. Use the process you normally use to connect to a new
wireless network or hotspot. Choose the Wi-Fi Direct name from the list of wireless networks shown
such as DIRECT-**-HP OiceJet 8010 (where ** are the unique characters to identify your printer).
Enter the Wi-Fi Direct password when prompted.
76 Chapter 6 Network setup ENWW

4. Proceed to step 5 if the printer has been installed and connected to the computer over a wireless
network. If the printer has been installed and connected to your computer with a USB cable, follow the
steps below to install the printer software using the Wi-Fi Direct connection.
a. Open the HP printer software. For more information, see Open the HP printer software (Windows).
b. Click Tools.
c. Click Device Setup & Software, and then select Connect a new device.
NOTE: If you have previously installed the printer over USB and want to convert to Wi-Fi Direct,
do not select the Convert a USB connected printer to wireless option.
d. When the Connection Options software screen appears, select Wireless.
e. Select your HP printer from the detected printer list.
f. Follow the onscreen instructions.
5. Print your document.
Click here for online troubleshooting for Wi-Fi Direct, or for more help with setting up Wi-Fi Direct. At this
time, this website might not be available in all languages.
ENWW Use Wi-Fi Direct 77

7 Printer management tools
This section contains the following topics:
●
Toolbox (Windows)
●
Embedded web server
78 Chapter 7 Printer management tools ENWW

Toolbox (Windows)
The Toolbox provides maintenance information about the printer.
To open the Toolbox
1. Open the HP printer software. For more information, see Open the HP printer software (Windows).
2. Click Print & Scan .
3. Click Maintain Your Printer.
ENWW Toolbox (Windows) 79

Embedded web server
When the printer is connected to a network, you can use the printer's embedded web server (EWS) to view
status information, change settings, and manage it from your computer.
NOTE: To view or change some settings, you might need a password.
NOTE: You can open and use the embedded web server without being connected to the Internet. However,
some features are not available.
●
About cookies
●
Open the embedded web server
●
Embedded web server cannot be opened
About cookies
The embedded Web server (EWS) places very small text les (cookies) on your hard drive when you are
browsing. These les let the EWS recognize your computer the next time you visit. For example, if you have
congured the EWS language, a cookie helps remember which language you have selected so that the next
time you access the EWS, the pages are displayed in that language. Some cookies (such as the cookie that
stores customer-specic preferences) are stored on the computer until you clear them manually.
You can congure your browser to accept all cookies, or you can congure it to alert you every time a cookie is
oered, which allows you to decide which cookies to accept or refuse. You can also use your browser to
remove unwanted cookies.
Depending on your printer, if you disable cookies, you also disable one or more of the following features:
● Using some setup wizards
● Remembering the EWS browser language setting
● Personalizing the EWS Home page
For information about how to change your privacy and cookie settings and how to view or delete cookies, see
the documentation available with your Web browser.
Open the embedded web server
You can access the embedded web server through either a network or Wi-Fi Direct.
To open the embedded web server through a network
1. Find out the IP address or hostname of the printer by touching (Wireless) or by printing a network
conguration page.
NOTE: The printer must be on a network and must have an IP address.
2. In a supported web browser on your computer, type the IP address or hostname assigned to the printer.
For example, if the IP address is 123.123.123.123, type the following address into the web browser:
http://123.123.123.123.
80 Chapter 7 Printer management tools ENWW

To open the embedded web server through Wi-Fi Direct
1. On the printer control panel display, from the Home screen, touch (Wi-Fi Direct).
2. Touch ( Settings ).
3. If the display shows that Wi-Fi Direct is O , touch the toggle button next to Wi-Fi Direct to turn it on.
4. From your wireless computer, turn wireless on, search for and connect to the Wi-Fi Direct name, for
example: DIRECT-**-HP OiceJet 8010 (where ** are the unique characters to identify your printer).
Enter the Wi-Fi Direct password when prompted.
5. In a supported web browser on your computer, type the following address: http://
192.168.223.1
.
Embedded web server cannot be opened
Check your network setup
● Make sure you are not using a phone cord or a crossover cable to connect the printer to the network.
● Make sure the network cable is securely connected to the printer.
● Make sure the network hub, switch, or router is turned on and working correctly.
Check the computer
● Make sure the computer that you are using is connected to the same network as the printer.
Check your web browser
● Make sure the web browser meets the minimum system requirements.
● If your web browser uses any proxy settings to connect to the Internet, try turning o these settings. For
more information, see the documentation available with your web browser.
● Make sure JavaScript and cookies are enabled in your web browser. For more information, see the
documentation available with your web browser.
Check the printer IP address
● Make sure the printer IP address is correct.
To nd out the printer IP address, on the printer control panel display, from the Home screen, touch
(Wireless).
To obtain the printer IP address by printing a network conguration page, on the printer control panel
display, from the Home screen, touch ( Setup ), touch Tools, and then touch Network Conguration
Report.
● Make sure the printer IP address is valid. The printer IP address should have the similar format as the
router IP address. For example, the router IP address might be 192.168.0.1 or 10.0.0.1 and the printer IP
address is 192.168.0.5 or 10.0.0.5.
If the printer IP address is similar to 169.254.XXX.XXX or 0.0.0.0, it is not connected to the network.
ENWW Embedded web server 81

TIP: If you are using a computer running Windows, you can visit the HP online support website at
www.support.hp.com . This website provides information and utilities that can help you correct many
common printer problems.
82 Chapter 7 Printer management tools ENWW

8 Solve a problem
The information in this section suggests solutions to common problems. If your printer is not operating
correctly and these suggestions did not solve your problem, try using one of the support services listed in HP
support to obtain assistance.
This section contains the following topics:
●
Get help with HP online troubleshooting
●
Get help from the printer control panel
●
Get help from the HP Smart app
●
Get help in this guide
●
Understand printer reports
●
Solve problems using Web Services
●
Maintain the printer
●
Restore original factory defaults and settings
●
HP support
ENWW 83

Get help with HP online troubleshooting
You can use an HP online troubleshooting tool to solve your printer issues. Use the table below to identify
your problem and click the appropriate link.
NOTE: The HP online troubleshooting tools may not be available in all languages.
Online troubleshooting tool Use this tool to learn how to:
Troubleshoot paper jam issues Clear jammed paper from the printer and resolve paper or paper feed issues.
Troubleshoot a print carriage jam Clear obstructions that are blocking the print carriage.
Troubleshoot issues with print job not printing Resolve issues with printer responsiveness, pages not printing, or “Unable to print”
errors.
Troubleshoot print quality issues Improve the quality of your prints.
Troubleshoot copy and scan issues Determine why the printer will not copy or scan, or improve the quality of your copies
or scans.
Troubleshoot wireless network connection
issues
Troubleshoot a rewall or antivirus issue Determine if a rewall or antivirus program is preventing your computer from
Find network settings for a wireless
connection
Troubleshoot Wi-Fi Direct issues Resolve Wi-Fi Direct problems or congure Wi-Fi Direct.
Troubleshoot mobile network issues Resolve issues with connecting a mobile device to your printer.
HP Print and Scan Doctor
(For Windows operating systems only)
HP Virtual Agent Chat with HP Virtual Agent to troubleshoot issues.
Resolve wireless networking issues, including issues with setting up a wireless
connection for the rst time or xing a connection that is no longer working.
connecting to the printer and resolve the issue.
Find your wireless network name (SSID) and password.
Automatically diagnose and resolve printer issues.
84 Chapter 8 Solve a problem ENWW

Get help from the printer control panel
You can use the printer’s help topics to learn more about the printer, and some help topics include animations
that guide you through procedures, such as loading papers.
To access the Help menu from the Home screen or contextual help for a screen, touch on the printer control
panel.
ENWW Get help from the printer control panel 85

Get help from the HP Smart app
The HP Smart app provides alerts for printer issues (jams and other problems), links to help content, and
options to contact support for additional assistance. For more information about the app, see Use the HP
Smart app to print, scan, and troubleshoot.
1. Open the HP Smart on your device.
2. On the Home screen of HP Smart, make sure your printer is selected.
TIP: If a printer is already set up, you can select it from the Home screen of HP Smart by swiping left or
right and selecting it.
To use a dierent printer, click or tap (Plus icon) on the Home screen, and then select a dierent
printer or add a new printer.
3. To view the printer status, click or tap the printer.
86 Chapter 8 Solve a problem ENWW

Get help in this guide
This section contains the following topics:
●
Jams and paper-feed issues
●
Printing issues
●
Copy and scan issues
●
Network and connection issues
●
Printer hardware issues
Jams and paper-feed issues
What do you want to do?
●
Clear a paper jam
●
Clear a print carriage jam
●
Learn how to avoid paper jams
●
Solve paper-feed problems
Clear a paper jam
Paper jams can occur in several locations inside the printer.
CAUTION: To prevent possible damage to the printhead, clear paper jams as soon as possible.
To clear a paper jam from input tray
1. Press and hold the two buttons on both sides of the output tray to move out the output tray from the
printer.
ENWW Get help in this guide 87
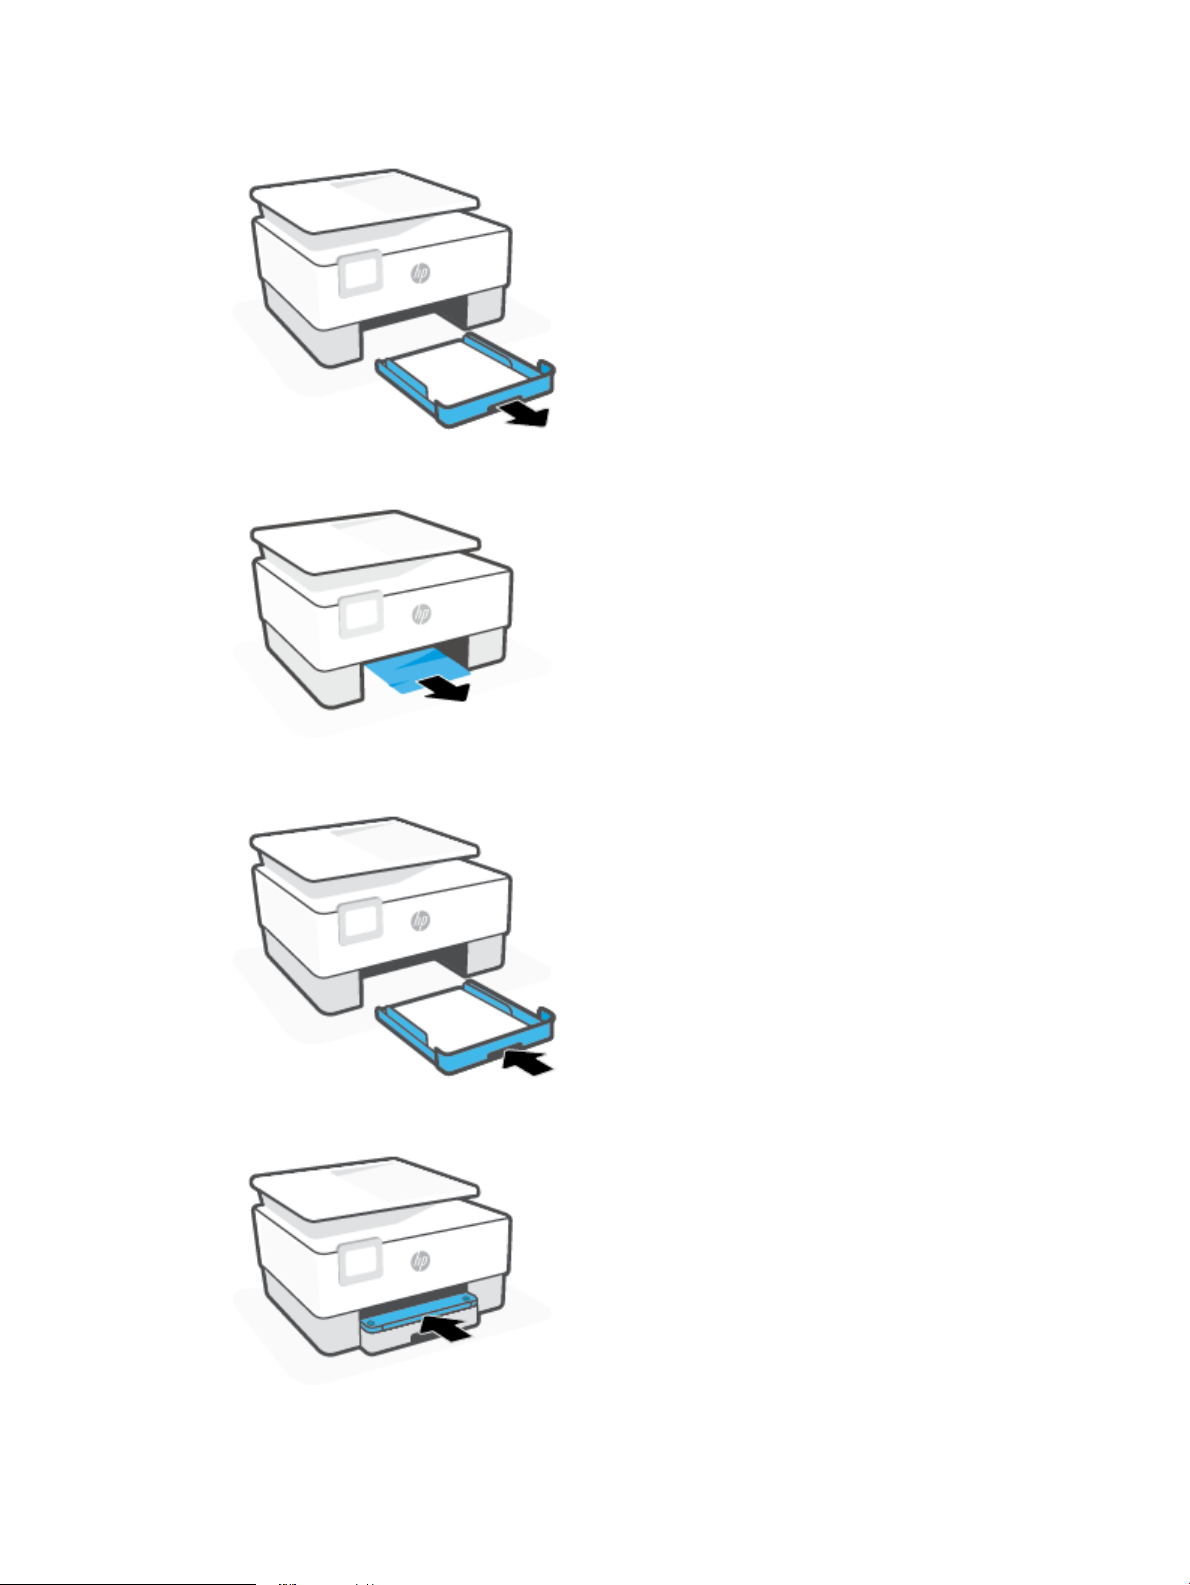
2. Remove the input tray by pulling it all the way out of the printer.
3. Check the input tray area underneath the printer. Remove the jammed paper.
4. Insert the input tray back until it snaps into place.
5. Insert the output tray back into the printer.
88 Chapter 8 Solve a problem ENWW

To clear a paper jam from print zone
1. Open the front door.
2. Open the cartridge access door.
3. If the print carriage is not obstructed, move the print carriage to the far left of the printer and remove
the jammed paper.
4. If needed, move the carriage to the far right of the printer, and remove any jammed or torn pieces of
paper.
ENWW Get help in this guide 89
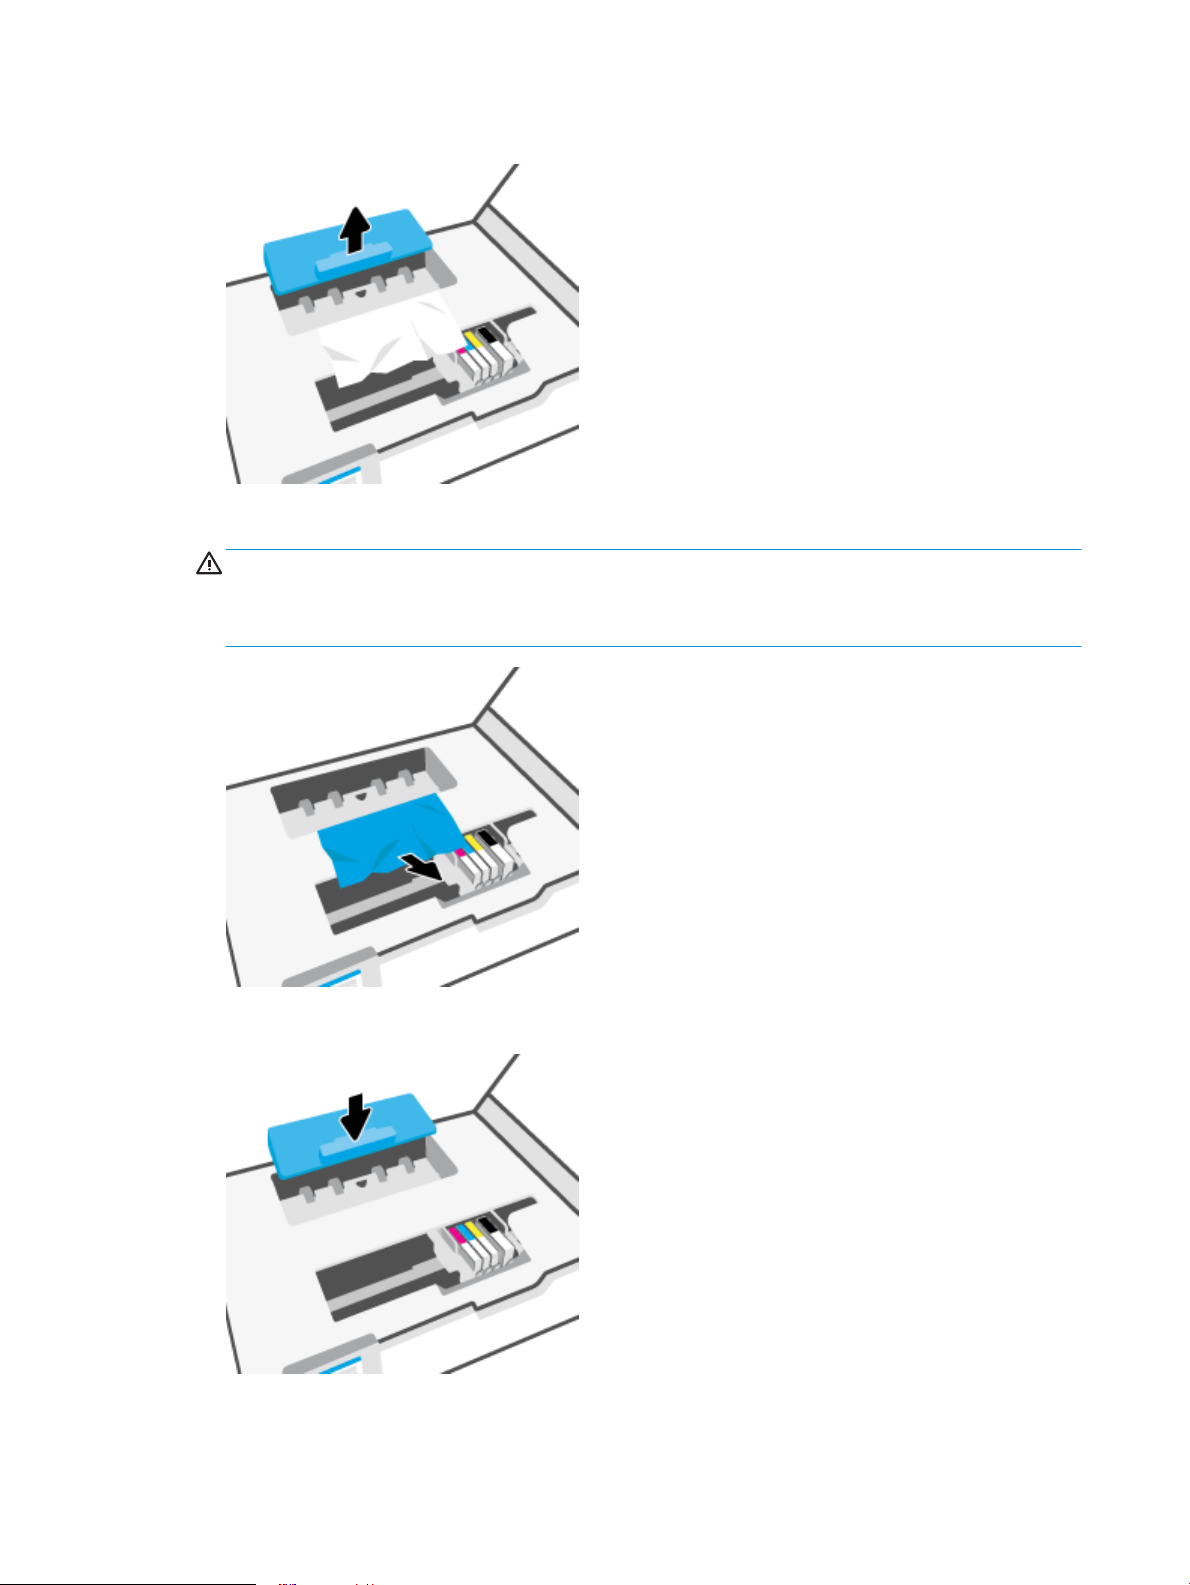
5. Lift the handle of the paper path cover and remove the cover.
6. Locate any jammed paper inside the printer, grasp it with both hands and pull it towards you.
CAUTION: If the paper tears when you are removing it from the rollers, check the rollers and wheels
for torn pieces of paper that might be remaining inside the printer.
If you do not remove all the pieces of paper from the printer, more paper jams are likely to occur.
7. Reinsert the paper path cover until it snaps into place.
90 Chapter 8 Solve a problem ENWW

8. Close the cartridge access door.
9. Close the front door.
To clear a paper jam from the document feeder
1. Lift the cover of the document feeder.
ENWW Get help in this guide 91

2. Pull any jammed paper out of the rollers.
3. Lift the document feeder tab from the center.
4. Pull any jammed paper out under the rollers.
92 Chapter 8 Solve a problem ENWW

5. Close the document feeder tab.
6. Close the cover of the document feeder until it snaps into space.
7. Lift up the document feeder tray.
ENWW Get help in this guide 93

8. Remove any jammed paper under the tray.
9. Put down the document feeder tray.
Clear a print carriage jam
Remove any objects, such as paper, that are blocking the print carriage.
NOTE: Do not use any tools or other devices to remove jammed paper. Always use caution when removing
jammed paper from inside the printer.
Learn how to avoid paper jams
To help avoid paper jams, follow these guidelines.
● Do not place too much paper in the printer trays. For information on tray capacity, see Specications .
● Remove printed papers from the output tray frequently.
● Make sure that you are printing with paper that is not wrinkled, folded, or damaged.
● Prevent curled or wrinkled paper by storing all unused paper at in a resealable bag.
● Do not use paper that is too thick or too thin for the printer.
● Make sure that the trays are loaded correctly and are not too full. For more information, see Load paper.
● Ensure that paper loaded in the input tray lays at and the edges are not bent or torn.
● Do not mix dierent paper types and paper sizes in the input tray; the entire stack of paper in the input
tray must be the same size and type.
● Do not force paper too far inside the input tray.
● If you are printing on both sides of a page, do not print highly saturated images on lightweight paper.
94 Chapter 8 Solve a problem ENWW

● Use paper types that are recommended for the printer.
● If the printer is about to run out of paper, allow the printer to run out of paper rst, and then add paper.
Do not load paper when the printer is printing.
● When removing the input tray, it is recommended to remove the tray completely from the printer to
make sure no paper is stuck at the rear of the tray. You might need to check the opening in the printer
where the tray was, and reach into the gap to remove any paper.
Solve paper-feed problems
What kind of problem are you having?
● Paper is not picked up from a tray
– Make sure paper is loaded in the tray. For more information, see Load paper. Fan the paper before
loading.
– Make sure the paper-width guides are set to the correct markings in the tray for the paper size you
are loading. Also make sure the paper guides are snug, but not tight, against the stack.
– Ensure that the stack of paper is aligned with the appropriate paper size lines on the bottom of the
input tray, and does not exceed the stack height indicated by one or more label on the side or
paper-width guide of the input tray.
– Make sure paper in the tray is not curled. Uncurl paper by bending it in the opposite direction of the
curl.
● Pages are skewing
– Make sure the paper loaded in the input tray is aligned to the paper-width guides. If needed, pull
– Load paper into the printer only when it is not printing.
● Multiple pages are being picked up
– Make sure the paper-width guides are set to the correct markings in the tray for the paper size you
– Ensure that the stack of paper is aligned with the appropriate paper size lines on the bottom of the
– Make sure the tray is not overloaded with paper.
– Use HP paper for optimum performance and eiciency.
Printing issues
What do you want to do?
●
Fix problems with page not printing (unable to print)
out the input tray from the printer and reload the paper correctly, making sure that the paper
guides are aligned correctly.
are loading. Also make sure the paper-width guides are snug, but not tight, against the stack.
input tray, and does not exceed the stack height indicated by one or more label on the side or
paper-width guide of the input tray.
●
Fix print quality issues
ENWW Get help in this guide 95

Fix problems with page not printing (unable to print)
To resolve print issues (Windows)
Make sure that the printer is turned on and that there is paper in the tray. If you are still unable to print, try
the following in order:
1. Check for error messages from the printer display and resolve them by following the onscreen
instructions.
2. If your computer is connected to the printer with a USB cable, disconnect and reconnect the USB cable. If
your computer is connected to the printer with a wireless connection,
working.
3. Verify that the printer is not paused or oine.
To verify that the printer is not paused or oine
a. Depending on your operating system, do one of the following:
● Windows 10: From the Windows Start menu, select Windows System from the app list, select
Control Panel, and then click View devices and printers under Hardware and Sound.
● Windows 8.1 and Windows 8: Point to or tap the upper-right corner of the screen to open the
Charms bar, click the Settings icon, click or tap Control Panel, and then click or tap View
devices and printers.
conrm that the connection is
● Windows 7: From the Windows Start menu, click Devices and Printers.
b. Either double-click the icon for your printer or right-click the icon for your printer and select See
what’s printing to open the print queue.
c. On the Printer menu, make sure there are no check marks next to Pause Printing or Use Printer
Oine.
d. If you made any changes, try to print again.
4. Verify that the printer is set as the default printer.
To verify that the printer is set as the default printer
a. Depending on your operating system, do one of the following:
● Windows 10: From the Windows Start menu, select Windows System from the app list, select
Control Panel, and then click View devices and printers under Hardware and Sound.
● Windows 8.1 and Windows 8: Point to or tap the upper-right corner of the screen to open the
Charms bar, click the Settings icon, click or tap Control Panel, and then click or tap View
devices and printers.
● Windows 7: From the Windows Start menu, click Devices and Printers.
b. Make sure the correct printer is set as the default printer.
The default printer has a check mark in a black or green circle next to it.
96 Chapter 8 Solve a problem ENWW
 Loading...