

Page 1
30-October-2015
User’s Guide USA
Revision 8.1
Pb200i Alpha
NOT FOR RELEASE OR DISTRIBUTION
Before operating the Pb200i, read this entire user guide.
1
Page 2
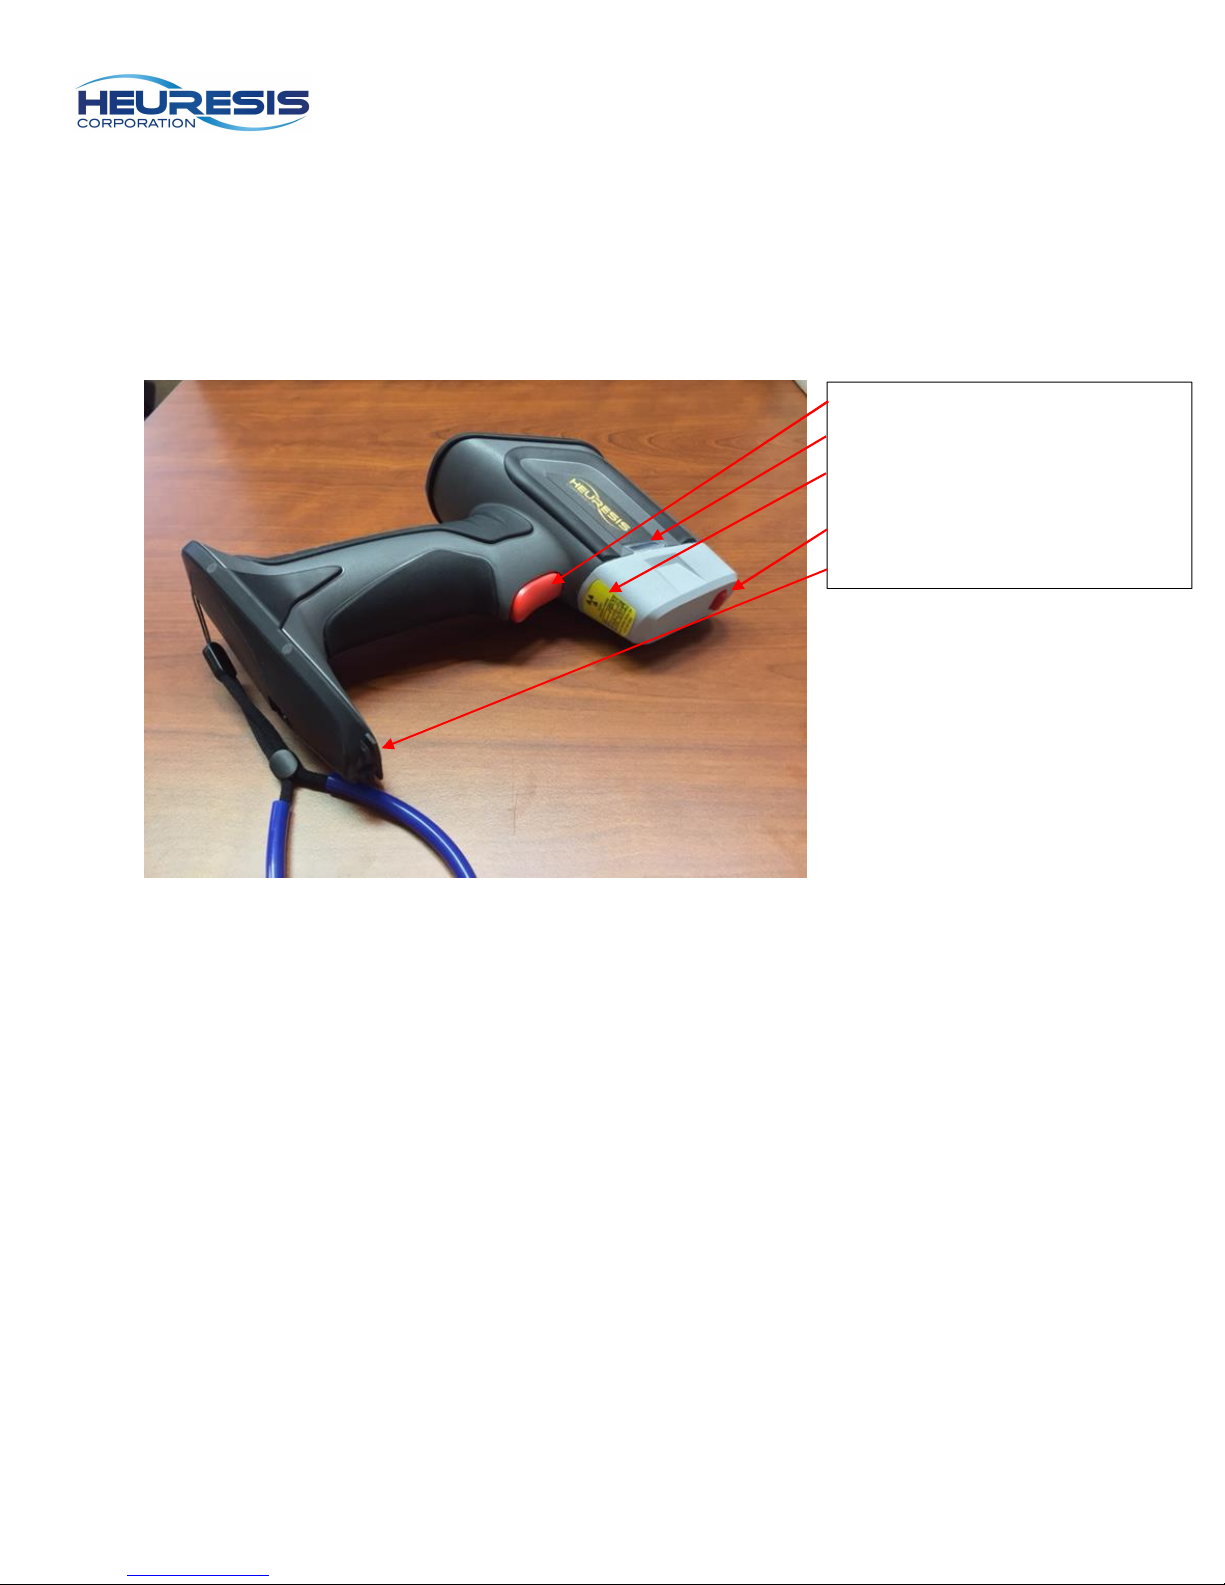
Trigger
Pb 200i Features:
LED indicator (Warning Lights)
System Label (includes serial
numbers)
Proximity Button
Foot Stabilizer
2
Page 3
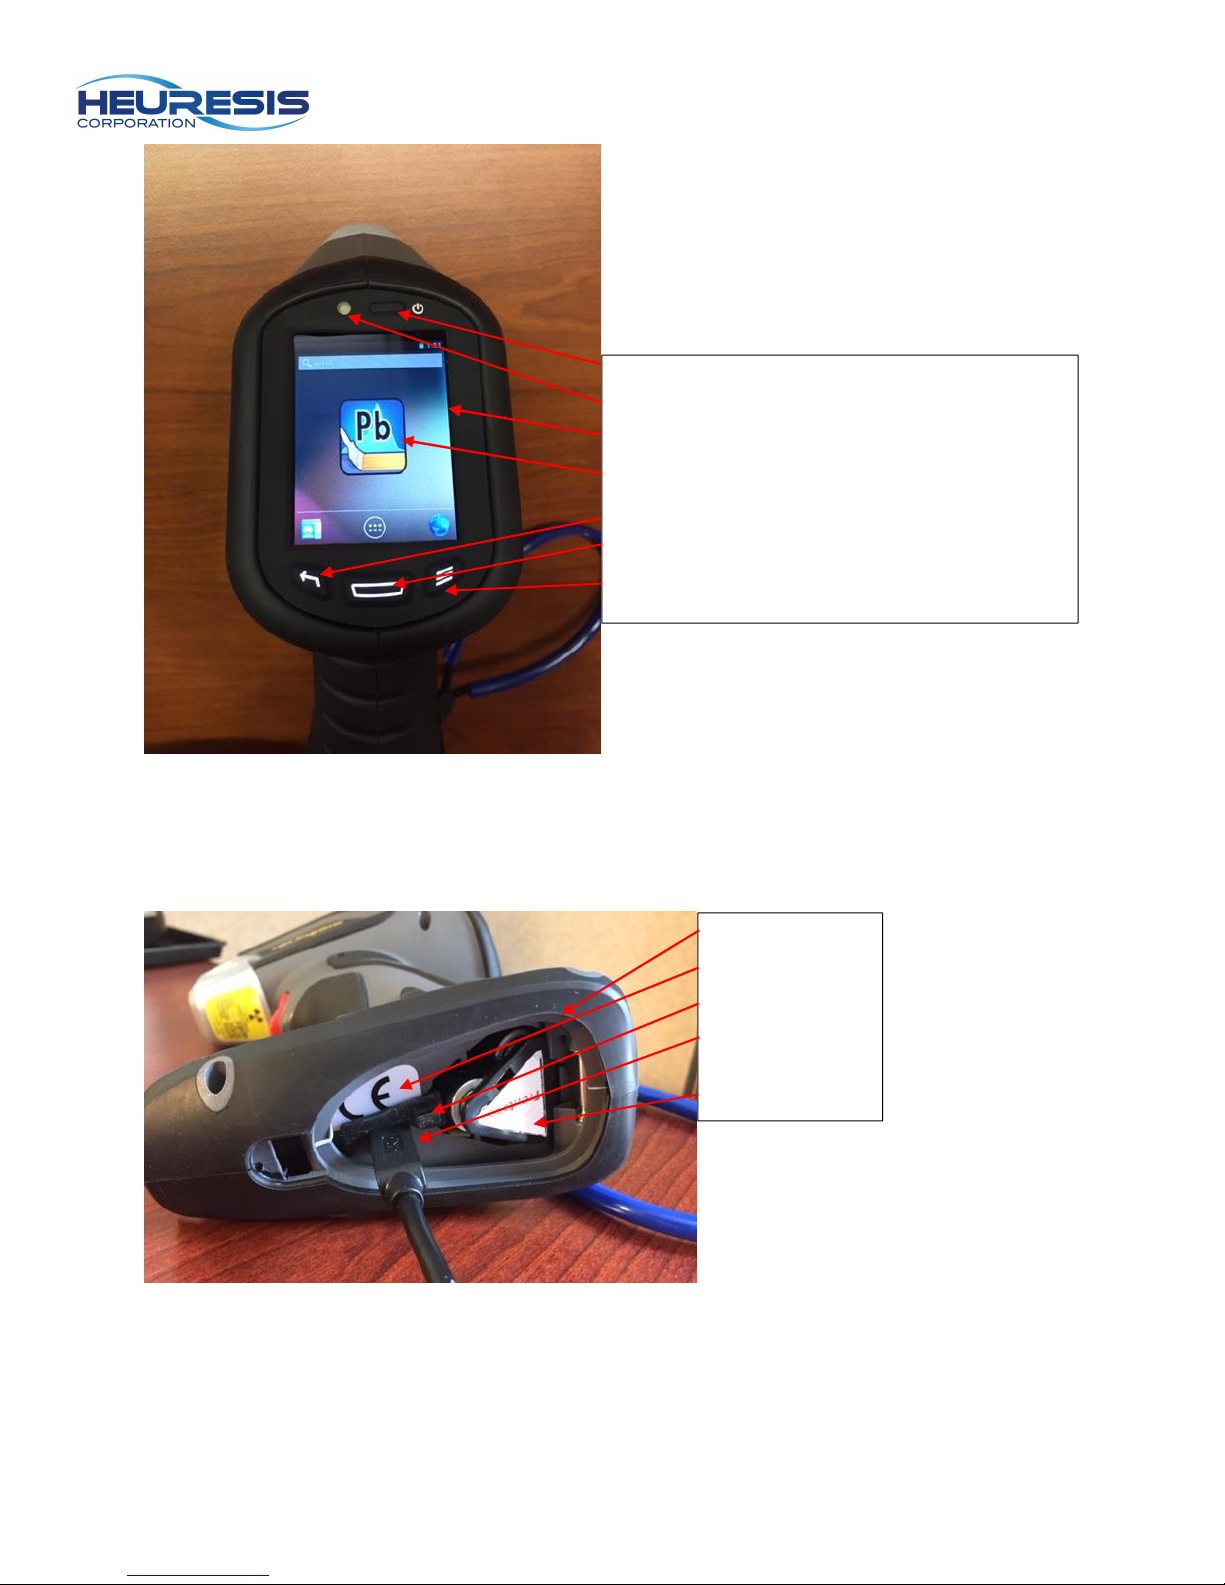
Power button
Battery
Door
Power indicator LED
LCD
Pb200i Widget/App
Back Button
Center Button
Menu Button
CE Mark
Battery Wedge
Mini USB Port
w/ Cable
Battery Pack
3
Page 4
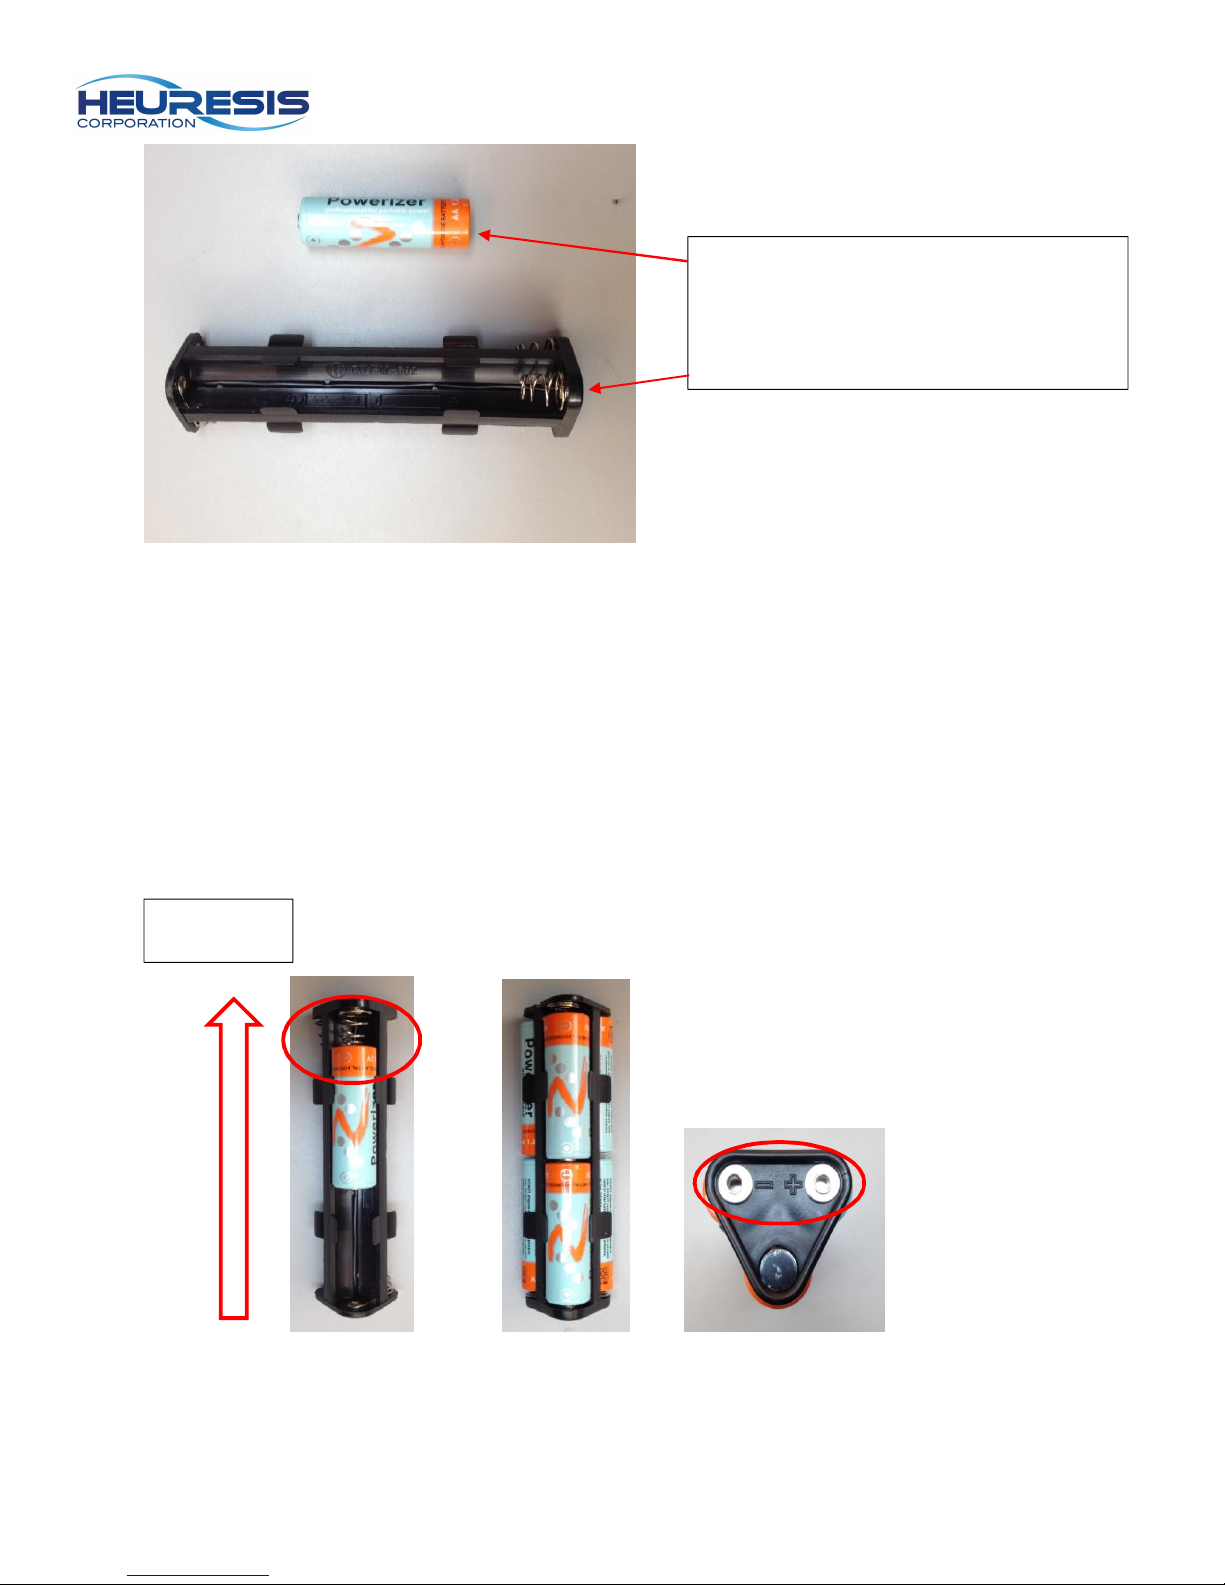
-
Metal Hydride cell
Rechargeable Nickel
or disposable Lithium Ion
Battery holder
Installing the Batteries
The Pb200i requires 6 AA batteries. Only rechargeable Nickel-Metal Hydride cells or disposable
lithium cells should be used in the system. Insert the battery with the negative pole towards the
spring, two batteries per side, until all six chambers are filled (Fig.1, 2). Note that the positive
and negative positions are marked on the top of the battery assembly (Fig. 3).
Top; this end
goes in first.
Figure 1 Figure 2 Figure 3
Remove the battery door of the system. Place the battery holder in the system, positive
terminal facing the left side of the instrument (Fig.4). The end of the battery holder with the +-
4
Page 5
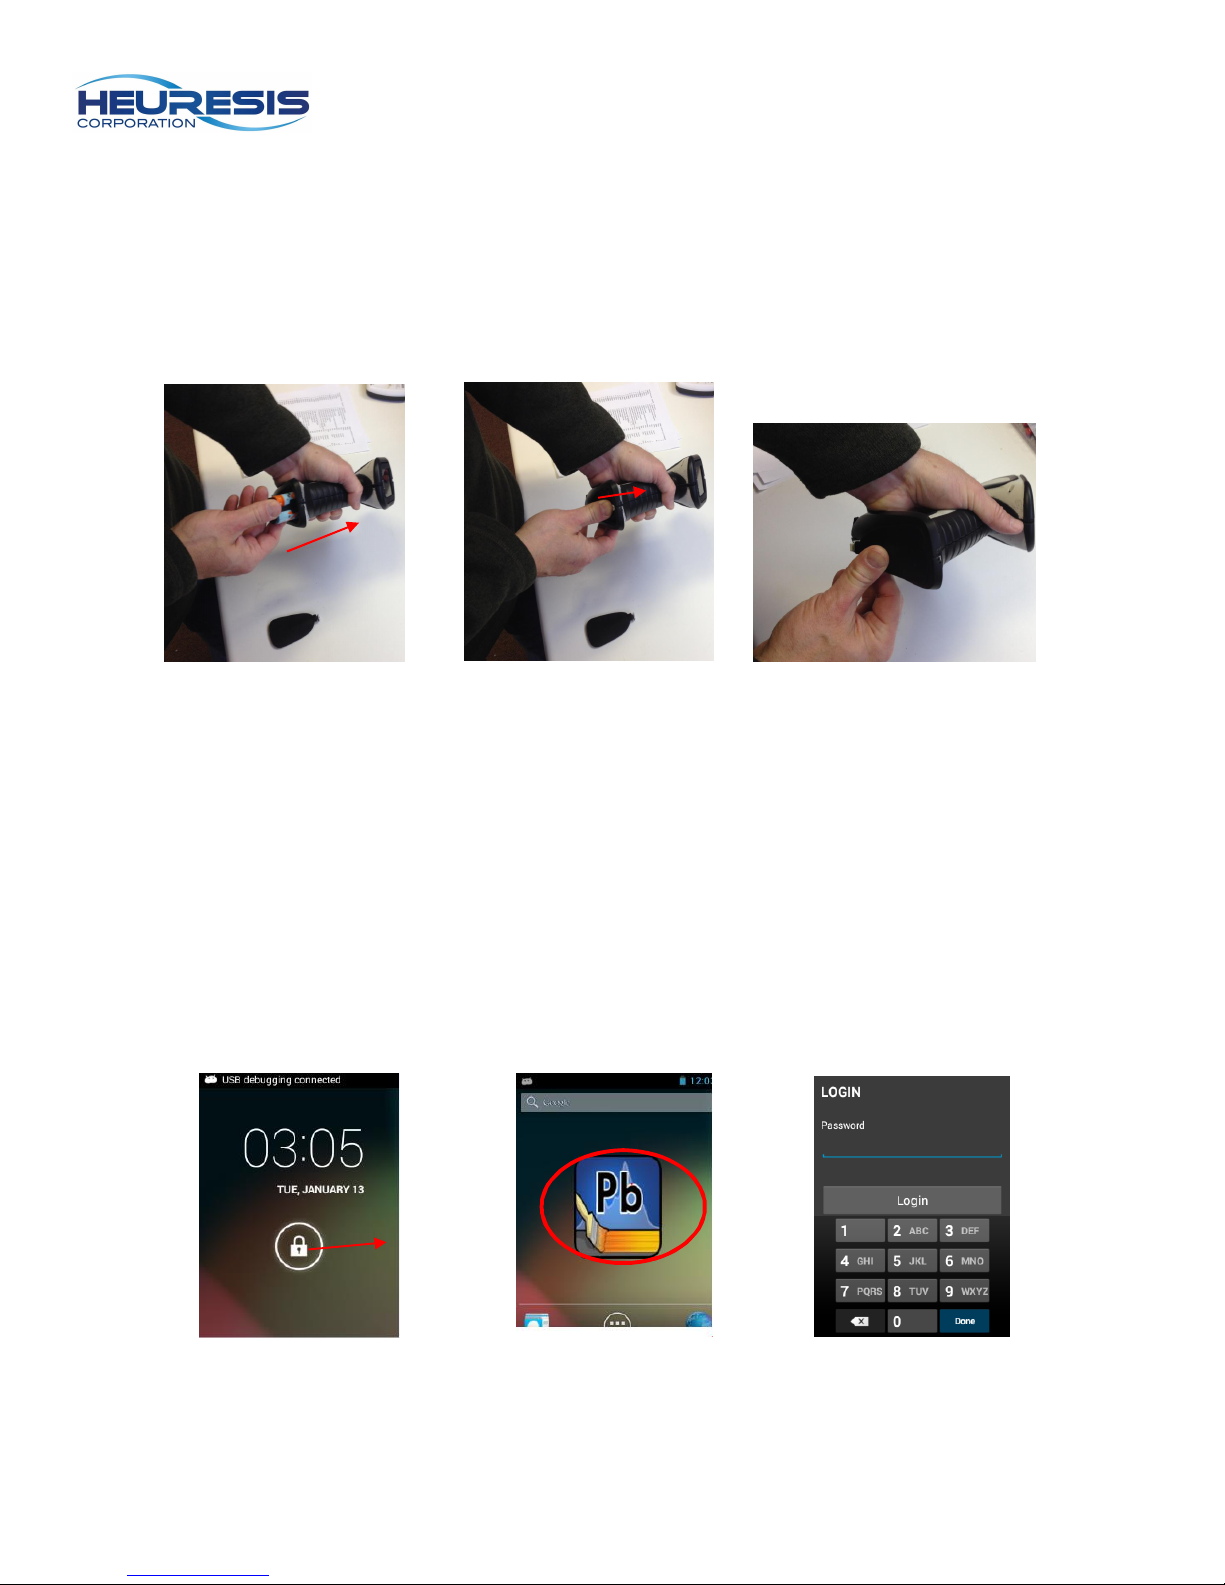
marked end should be inserted so it faces the top of the instrument. Apply upward force to seat
the battery holder properly, and when fully inserted, push to the rear to have the battery holder
sit on a ledge in the handle (Fig. 5). Replace the battery door (Fig.6). With the software currently
on the system, the unit will immediately boot, as indicated by the LCD illuminating and the LED
above the LCD turning red and then green when energized.
Note: placing the battery holder in with the incorrect orientation will not damage the system. It
simply will not start.
Figure 4 Figure 5 Figure 6
Taking a Measurement
1) When the system has completed its boot up sequence, the home screen will display an
Android application called Pb200i. To access the application:
a. Swipe the “lock” icon on the home screen to the right (Fig. 7).
b. Select the Pb200i application by touching the app on the LCD (Fig. 8).
c. Enter the password assigned by the Compliance or Safety officer using the
keyboard provided (Fig. 9).
d. Accept the acknowledgment that you understand that the system produces
radiation when the lights are on (Fig. 10).
e. Select “Test” (Fig.11).
Figure 7 Figure 8 Figure 9
5
Page 6
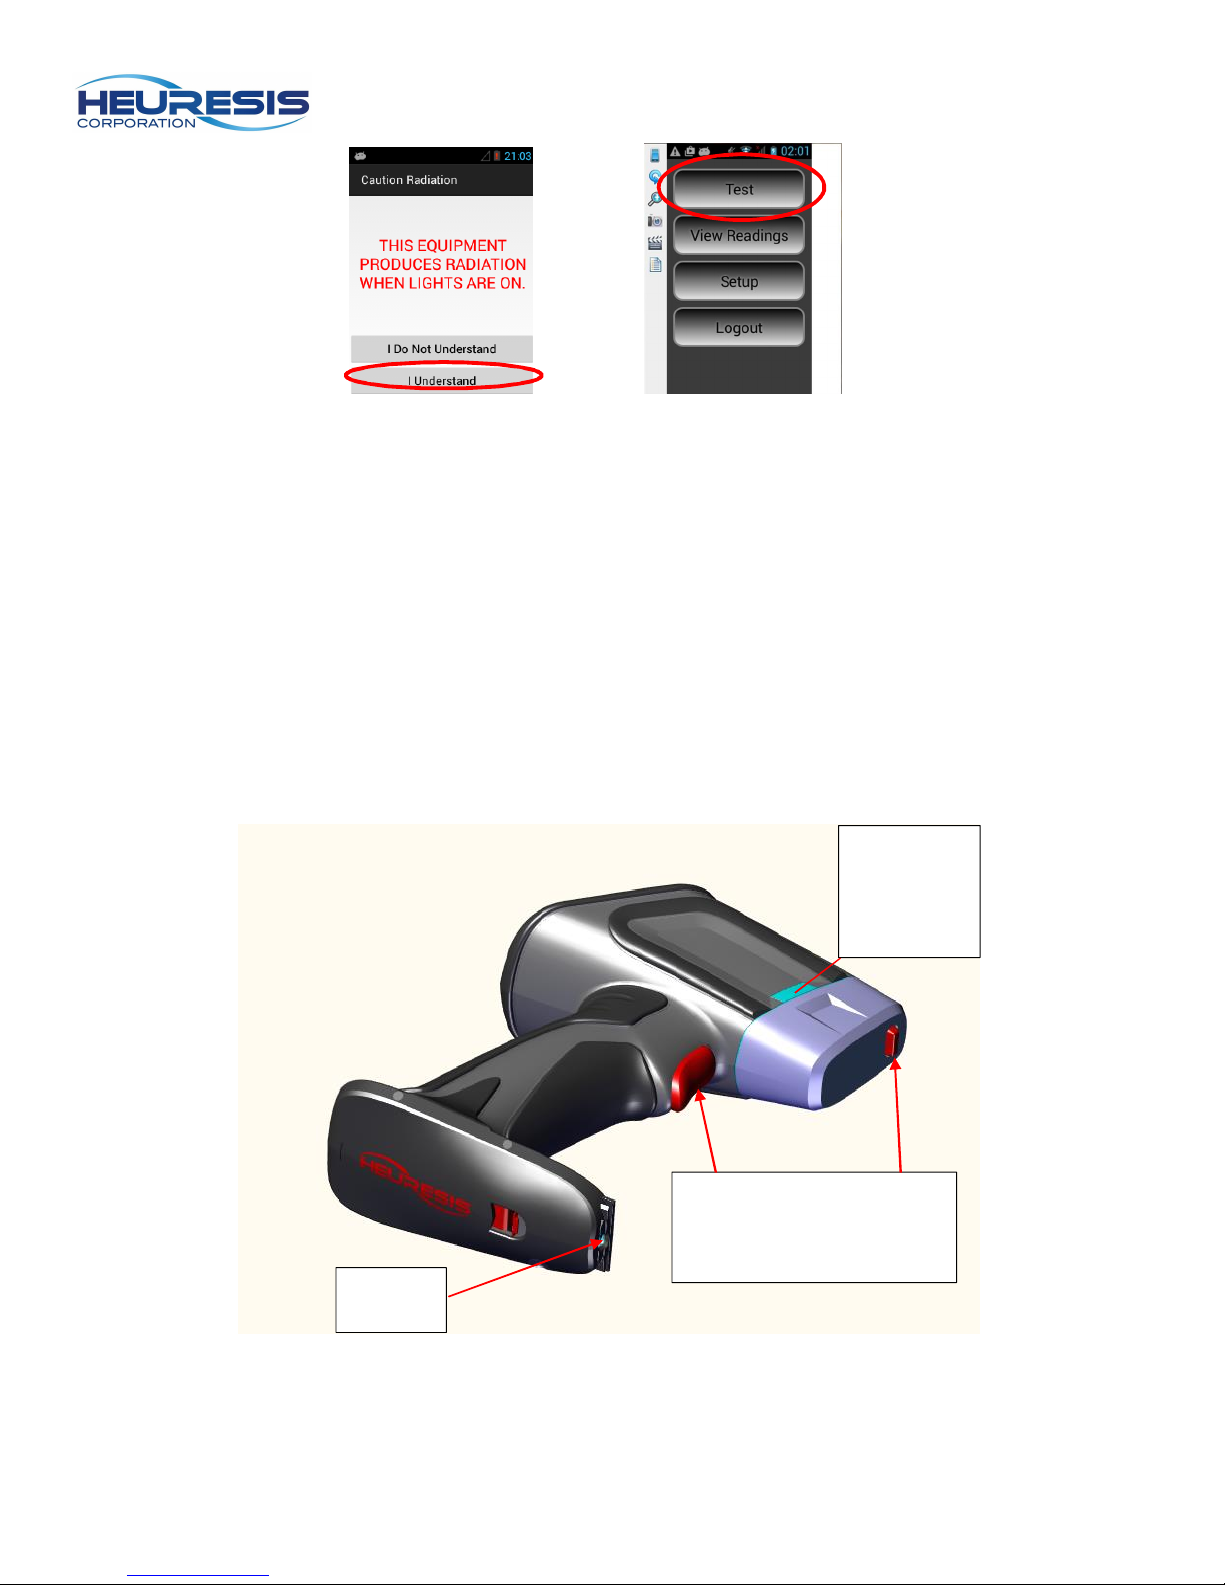
Figure 10 Figure 11
2) The software is designed to open and close the shutter of the system, exposing the
radioactive source. To open the shutter, certain conditions must be met. These
conditions are:
a. The proximity button must be depressed.
b. The trigger must be pulled.
Once these conditions are met, the shutter will open. This will cause the LEDs on the left and
right side of the system to turn on, emitting a red light. If anyone of the conditions stated above
are not met during the measurement process, the shutter will close immediately and the LEDs
will shut off. Once the shutter is opened, there is a maximum time limit of five minutes that the
shutter will remain open for, if all the above conditions are met.
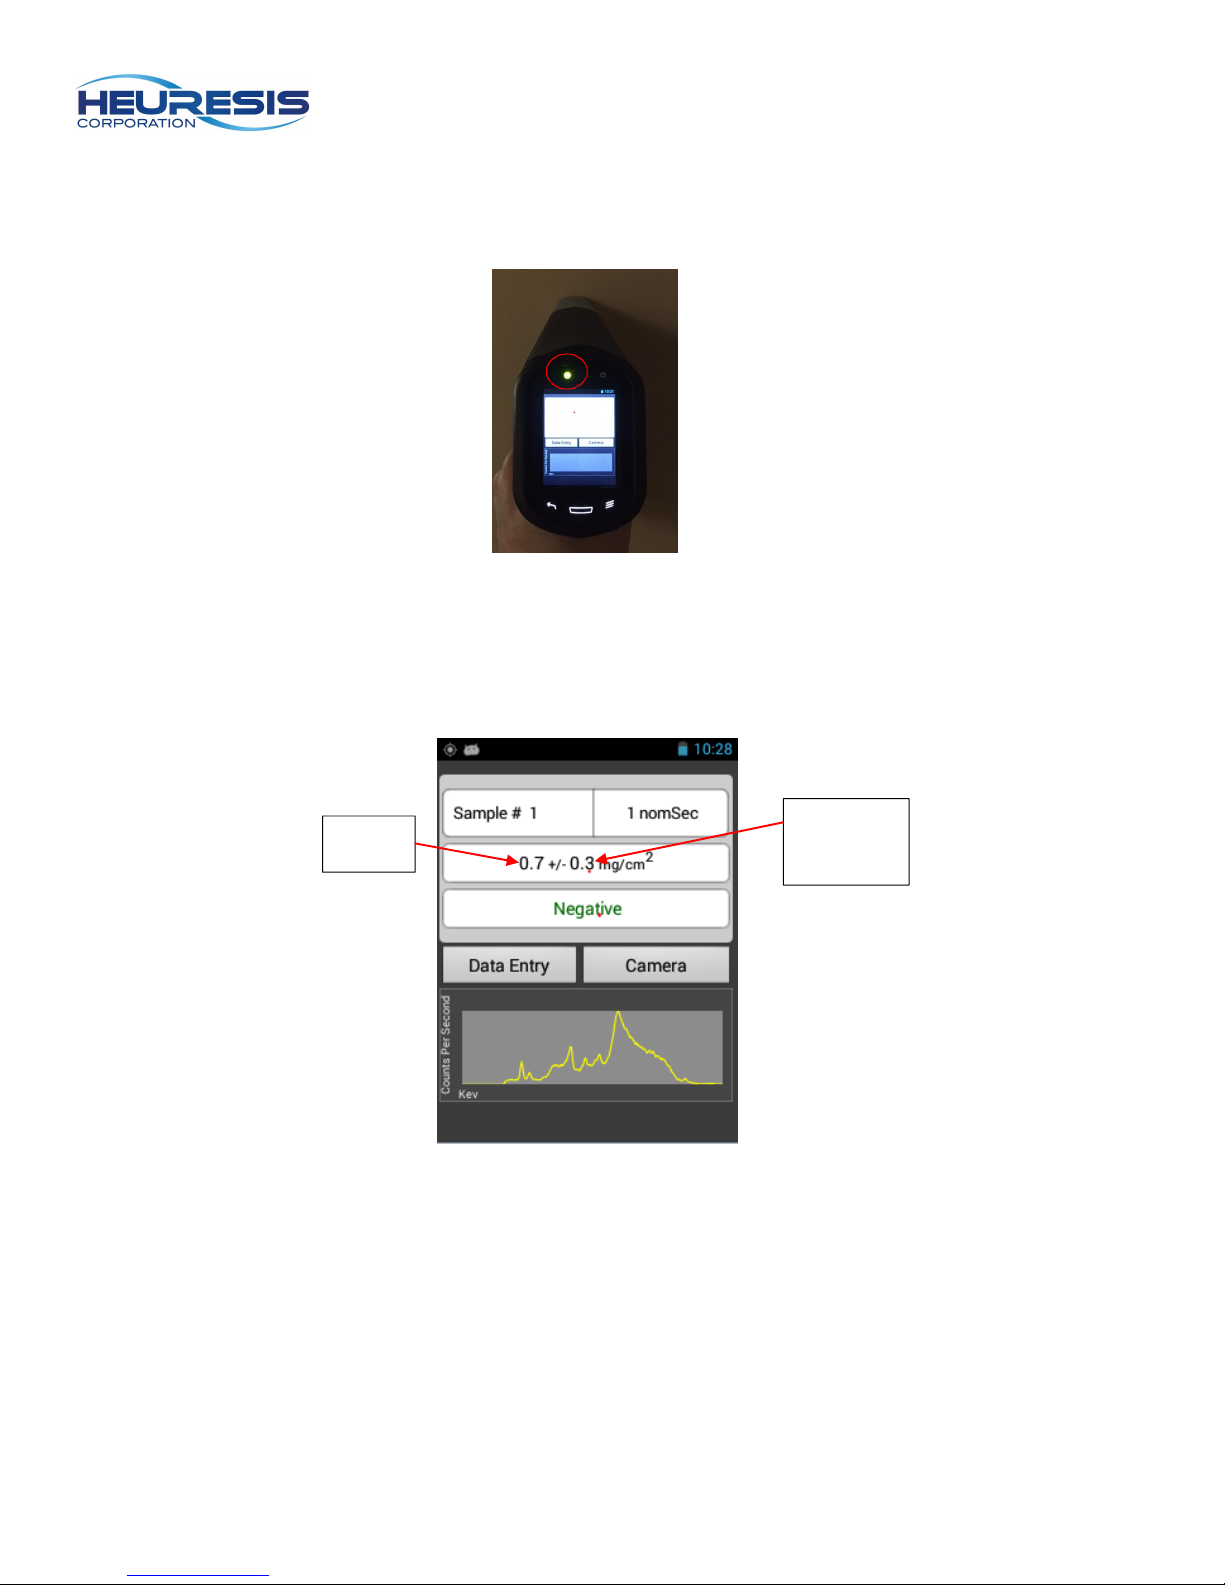
Foot
Stabilize
LED window
will be red
when the
shutter is
open
Proximity button and trigger
need to be depressed to
open the shutter and initiate
a reading.
Figure 12
The instrument should be flush against the object you are measuring so that the proximity
button is fully engaged. Use the foot stabilizer to balance the instrument directly against the
6
Page 7
Standard
surface you are measuring (see figures 12,13). When the proximity button is depressed fully,
the green light will give the user a visual que indicating that the instrument is ready to take a
measurement.
Figure 13
When the measurement begins, you will notice the numbers on screen changing as it
calculates a result:
Result
Figure 14
deviation
(2 sigma)
7
Page 8
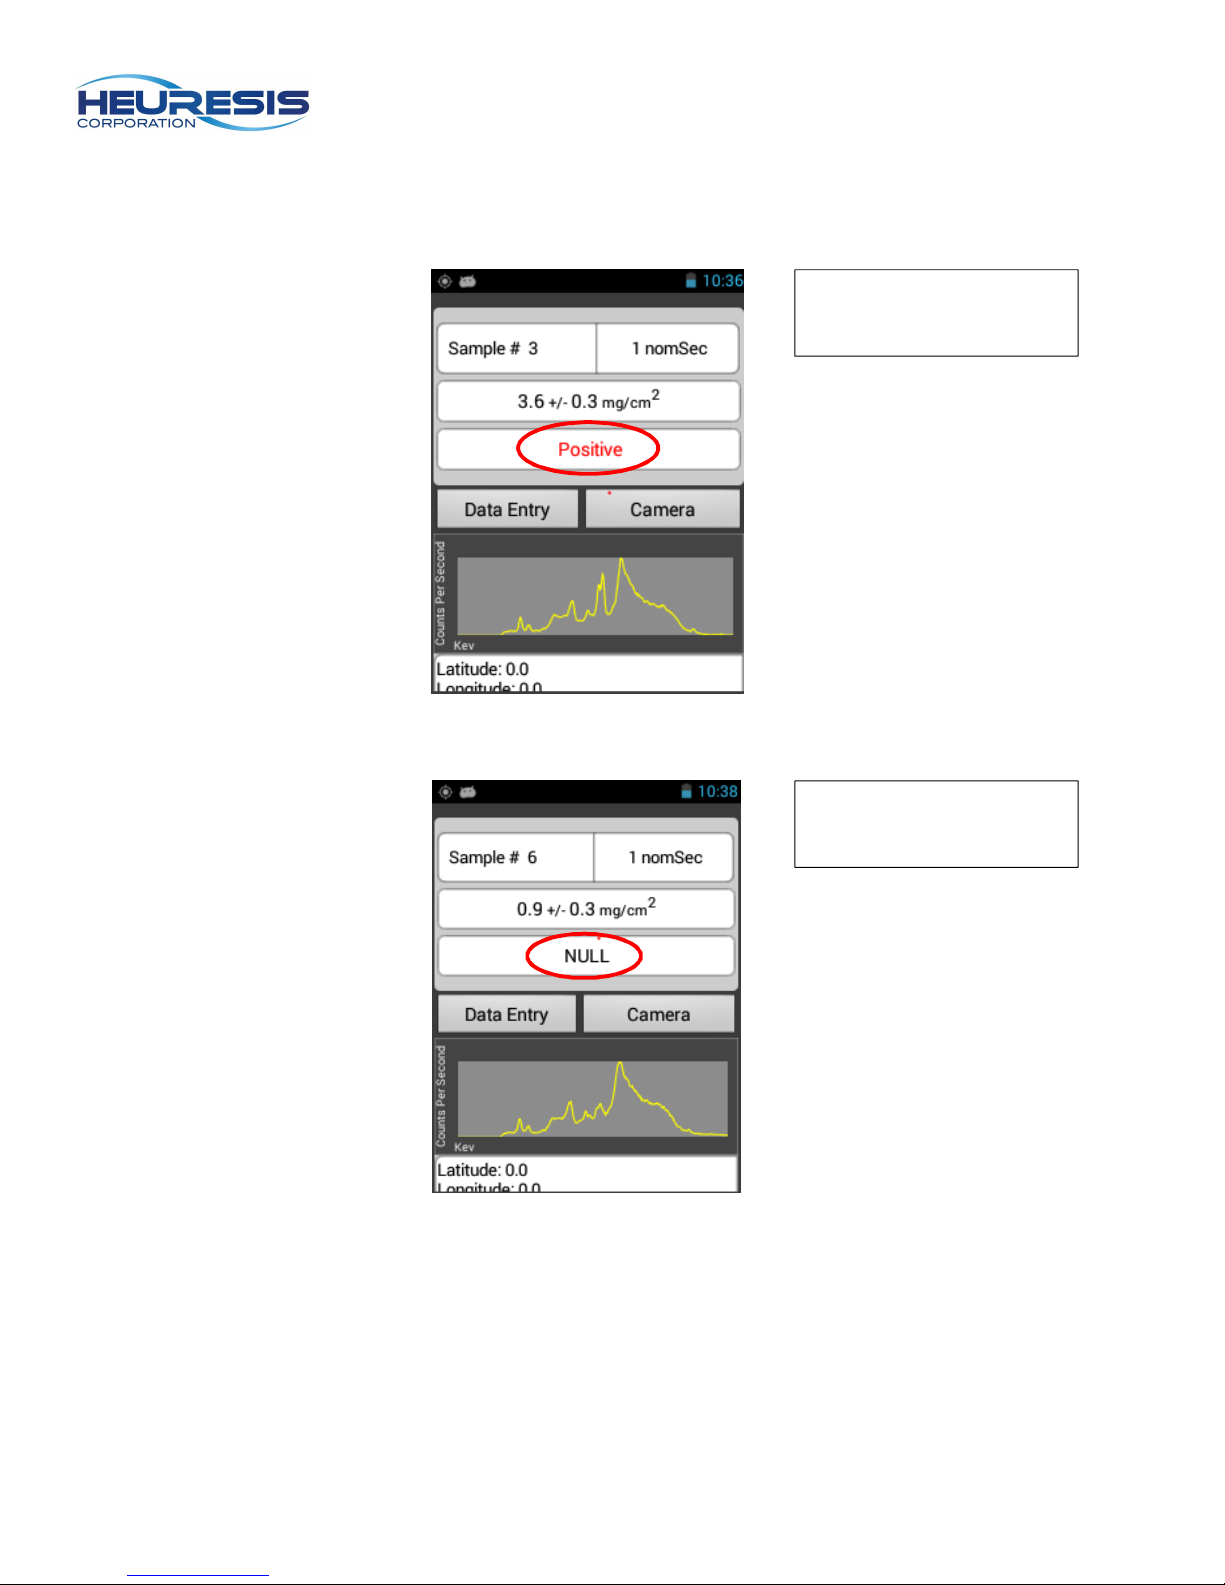
“Positive”
– lead present.
“Null”
– instrument has
Once the measurement has been completed, the final result will be posted, the shutter will close
and the LEDs will turn off. Typical measurements in paint mode will take anywhere from one to
three seconds. Results in examples below are based off an action level of 1.0 mg/cm2.
Result above selected
threshold.
Figure 15
Figure 16
not made a decision. Null
readings are not valid.
8
Page 9
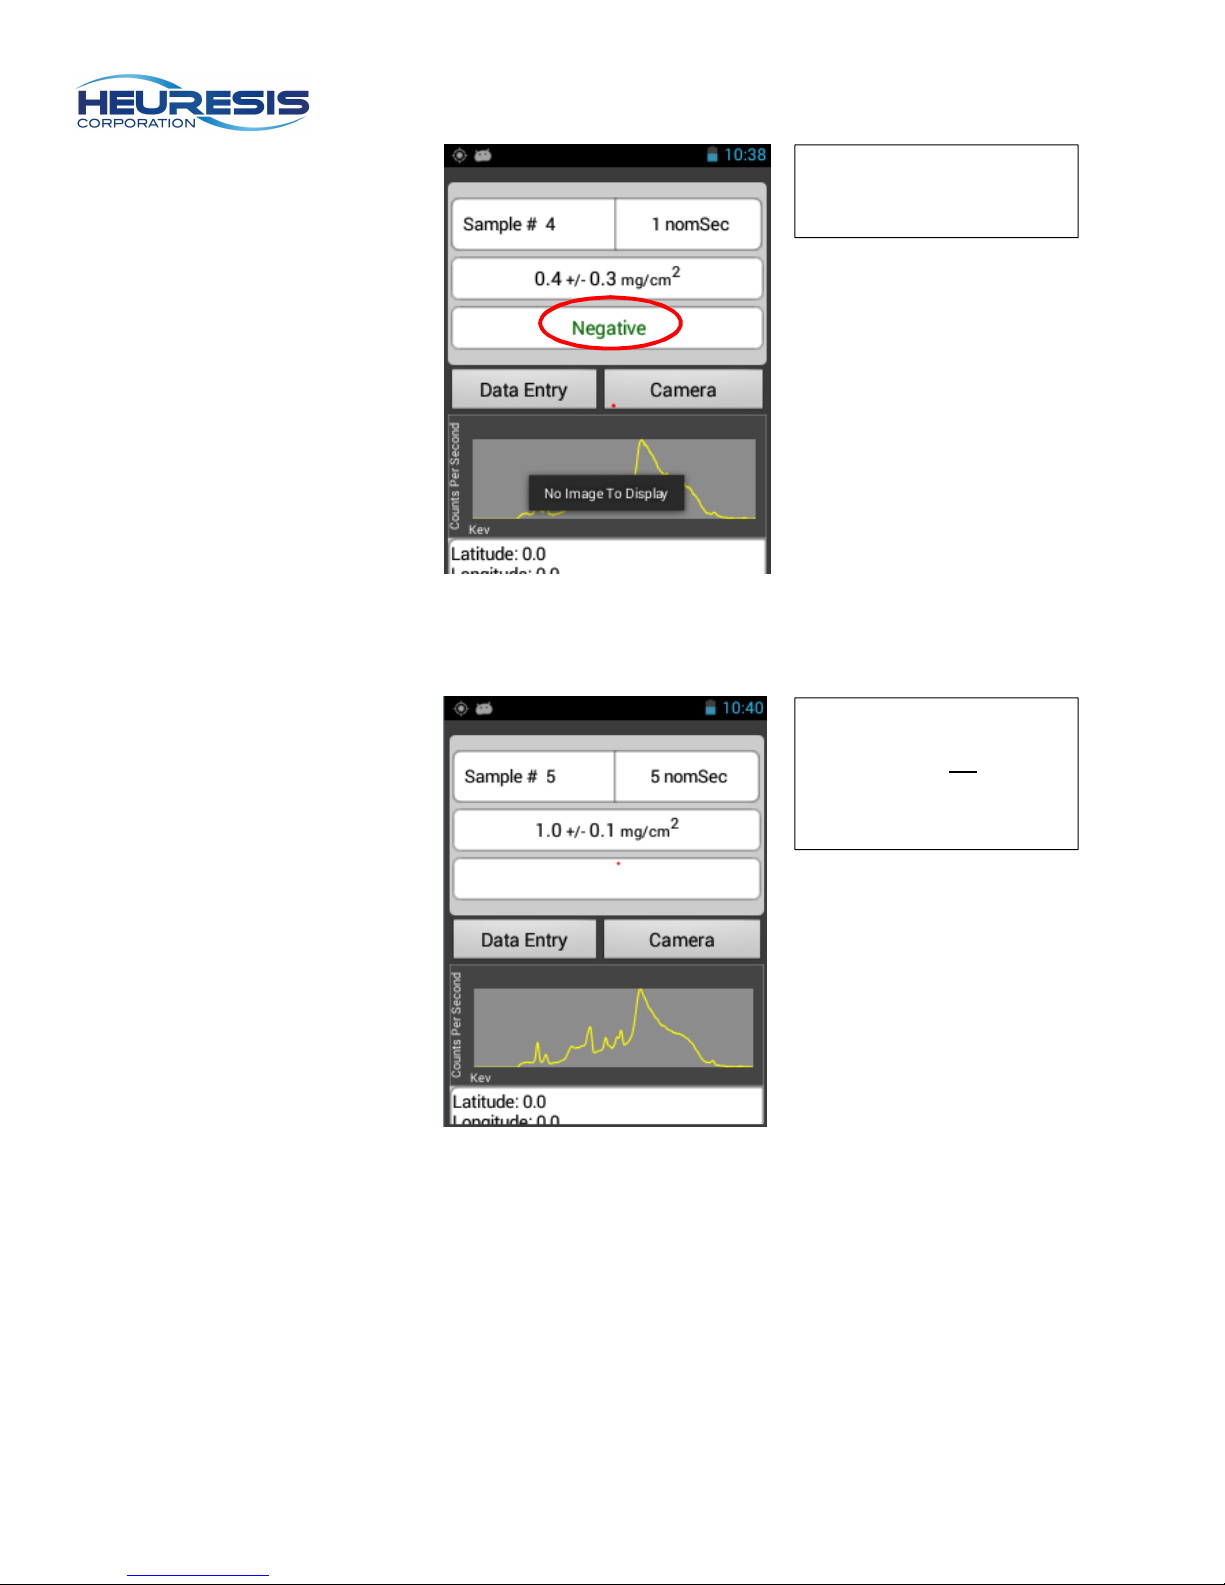
“Negative”
– lead either
No text displayed
– lead
below action level 1.0.
Figure 17
not present or below
selected threshold.
Figure 18
Sleep function: The system will go to sleep after 30 minutes of inactivity. You may
press any button to wake the system back up again. **Be advised, a bug exists in the
version of code on the two RAD systems running the RAD safety application, where if
the system sleeps for too long, the LCD does not wake back up. The length of time to
create this scenario is unknown. If this happens, please remove the battery and restart
the system.
content is right on the
action level of 1.0.
“Positive” or “Negative”
displayed above and
9
Page 10
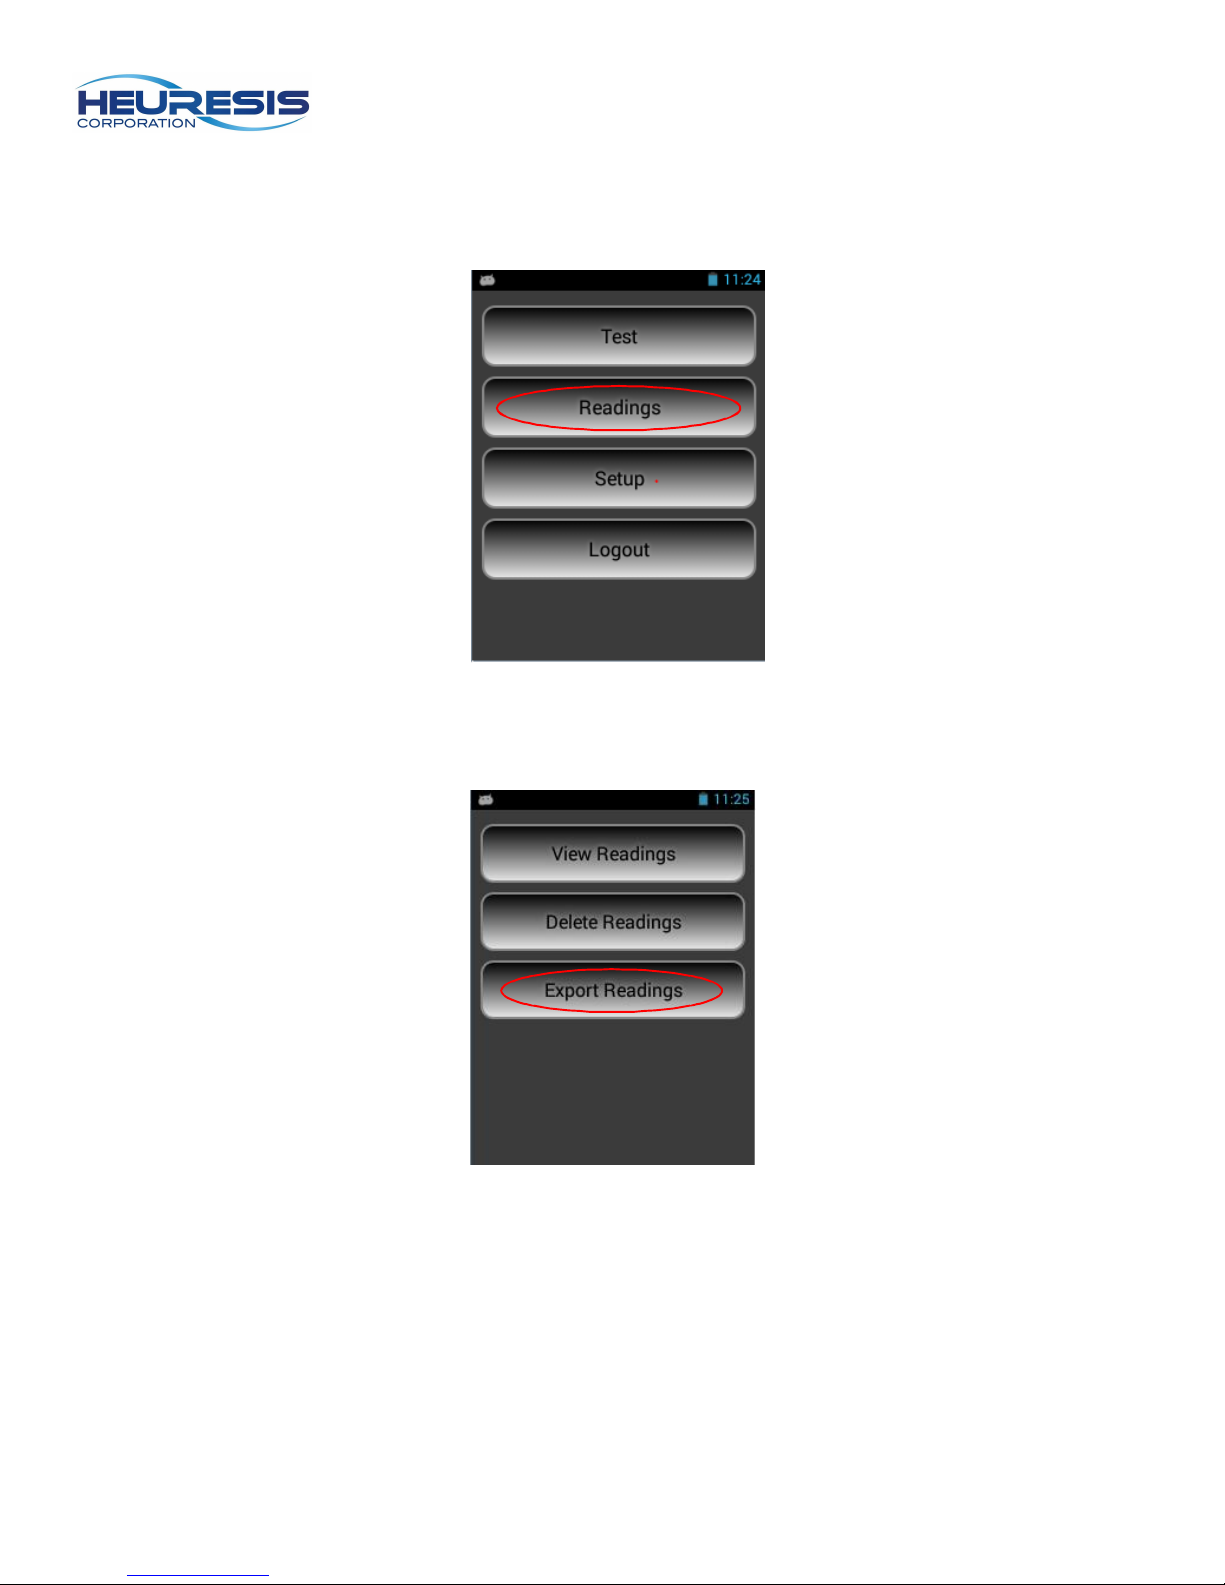
Down
loadin
a) On the main menu, select “Readings”.
Figure 19
g Data:
b) Select “Export Readings”.
Figure 20
10
Page 11
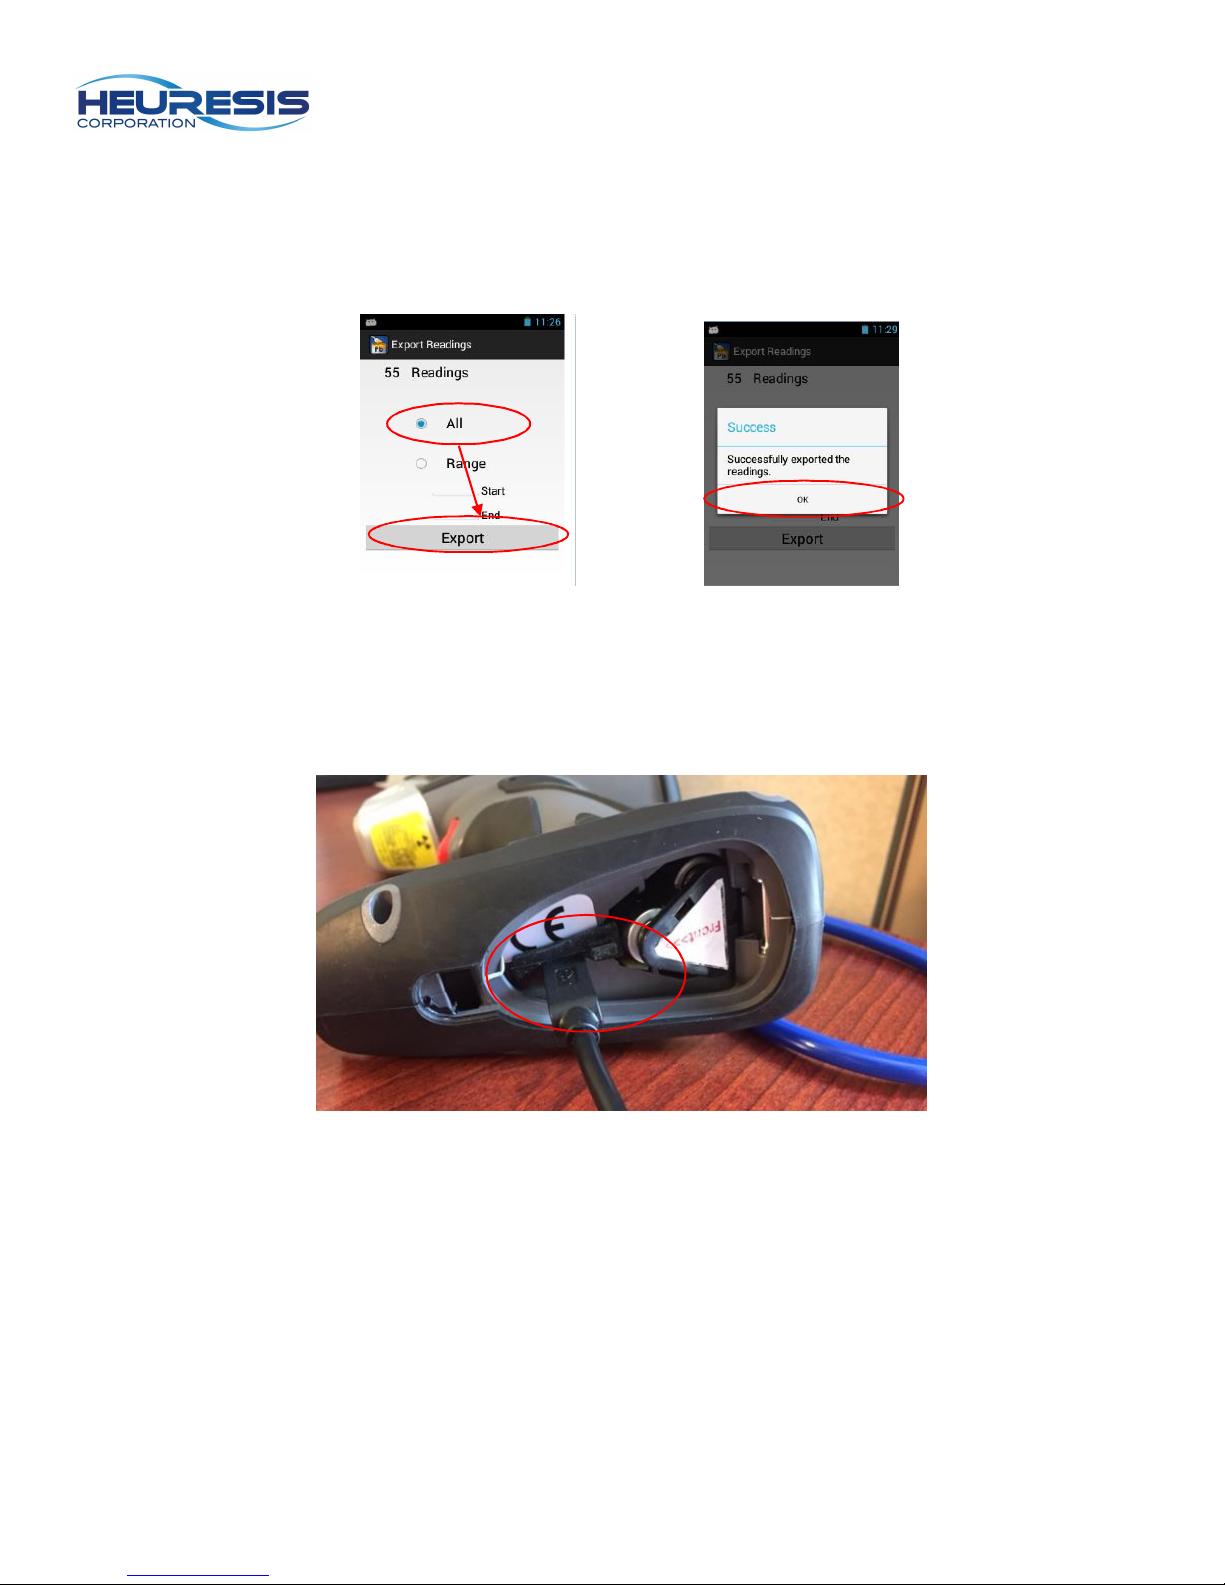
c) You may export all the readings, or you may choose a range to download. Choose your
selection then “Export”. You will receive a confirmation; select “OK”.
Figure 21 Figure 22
d) Remove the battery door of the Pb200i and insert the mini USB cable, making sure the
battery wedge is in place.
Figure 23
11
Page 12
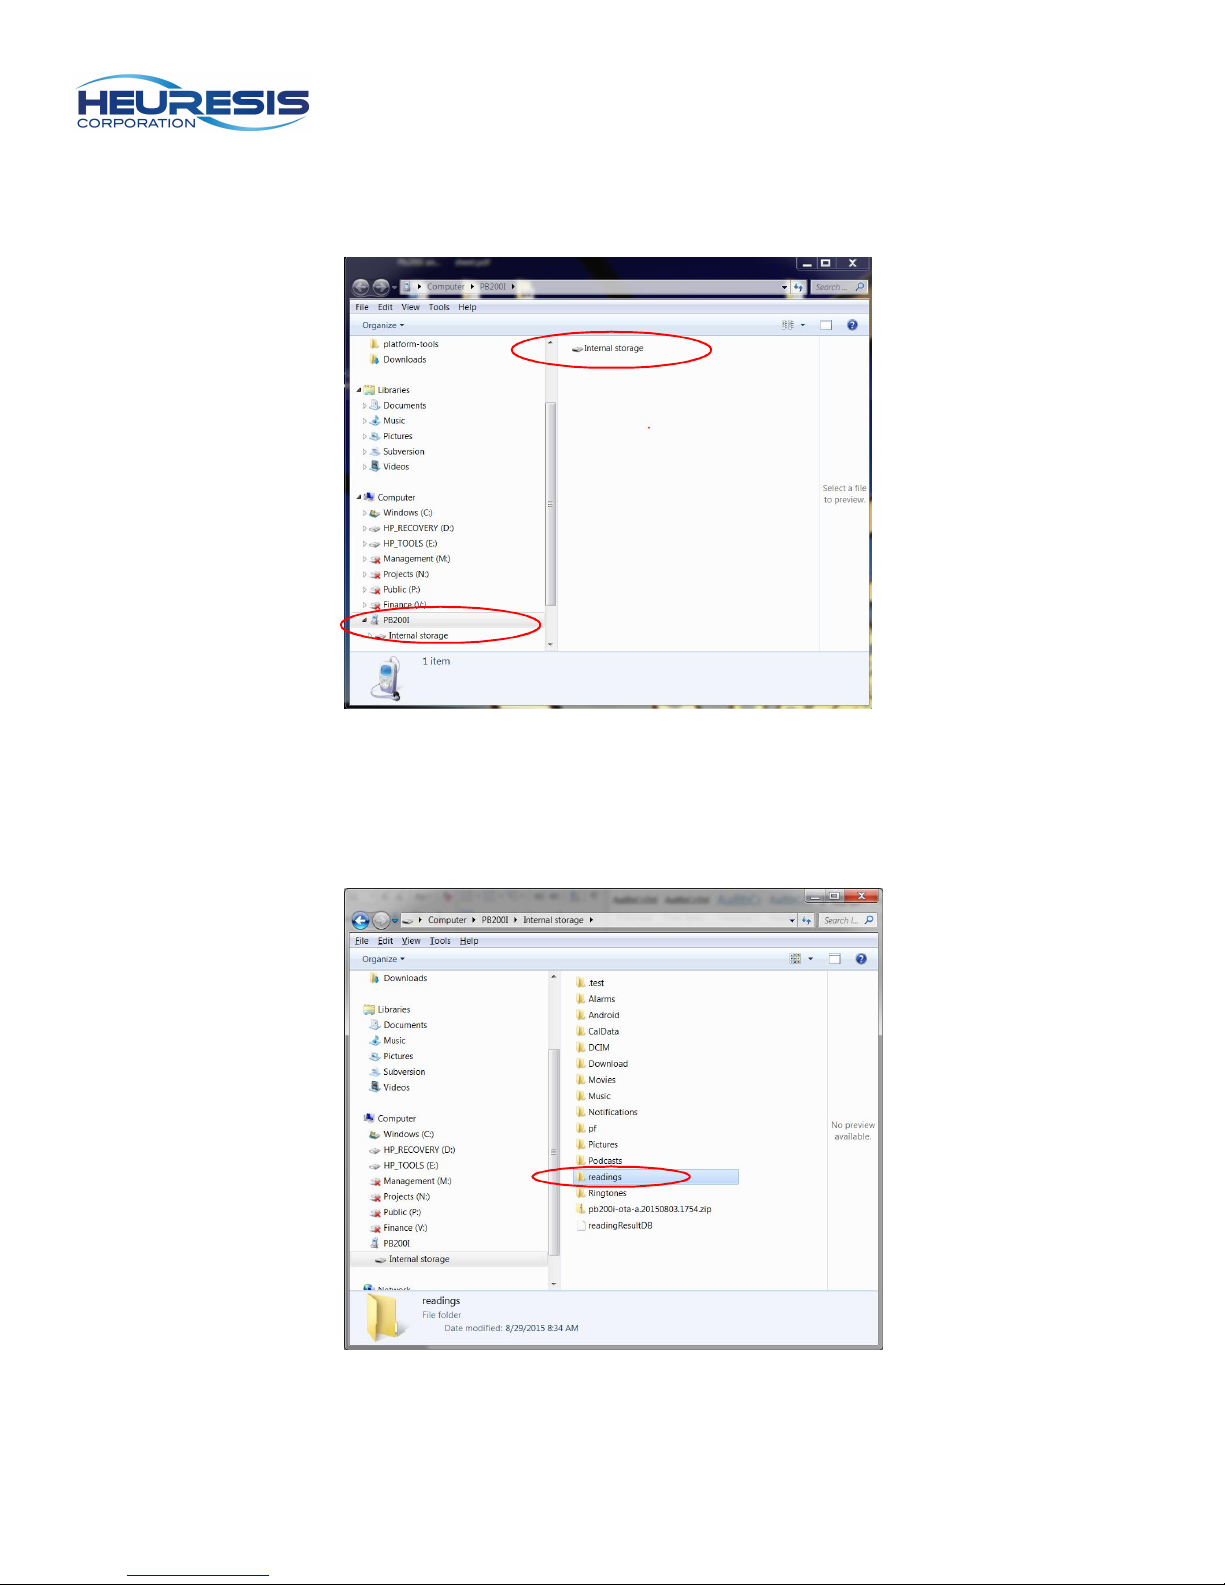
e) Connect the mini USB cable up to the PC. You will see this screen; you may also get a
message on the analyzer, “Allow USB Debugging?” - select “Yes”.
Figure 24
f) Double click on the internal storage icon, then double click the “Readings” folder.
Figure 25
12
Page 13
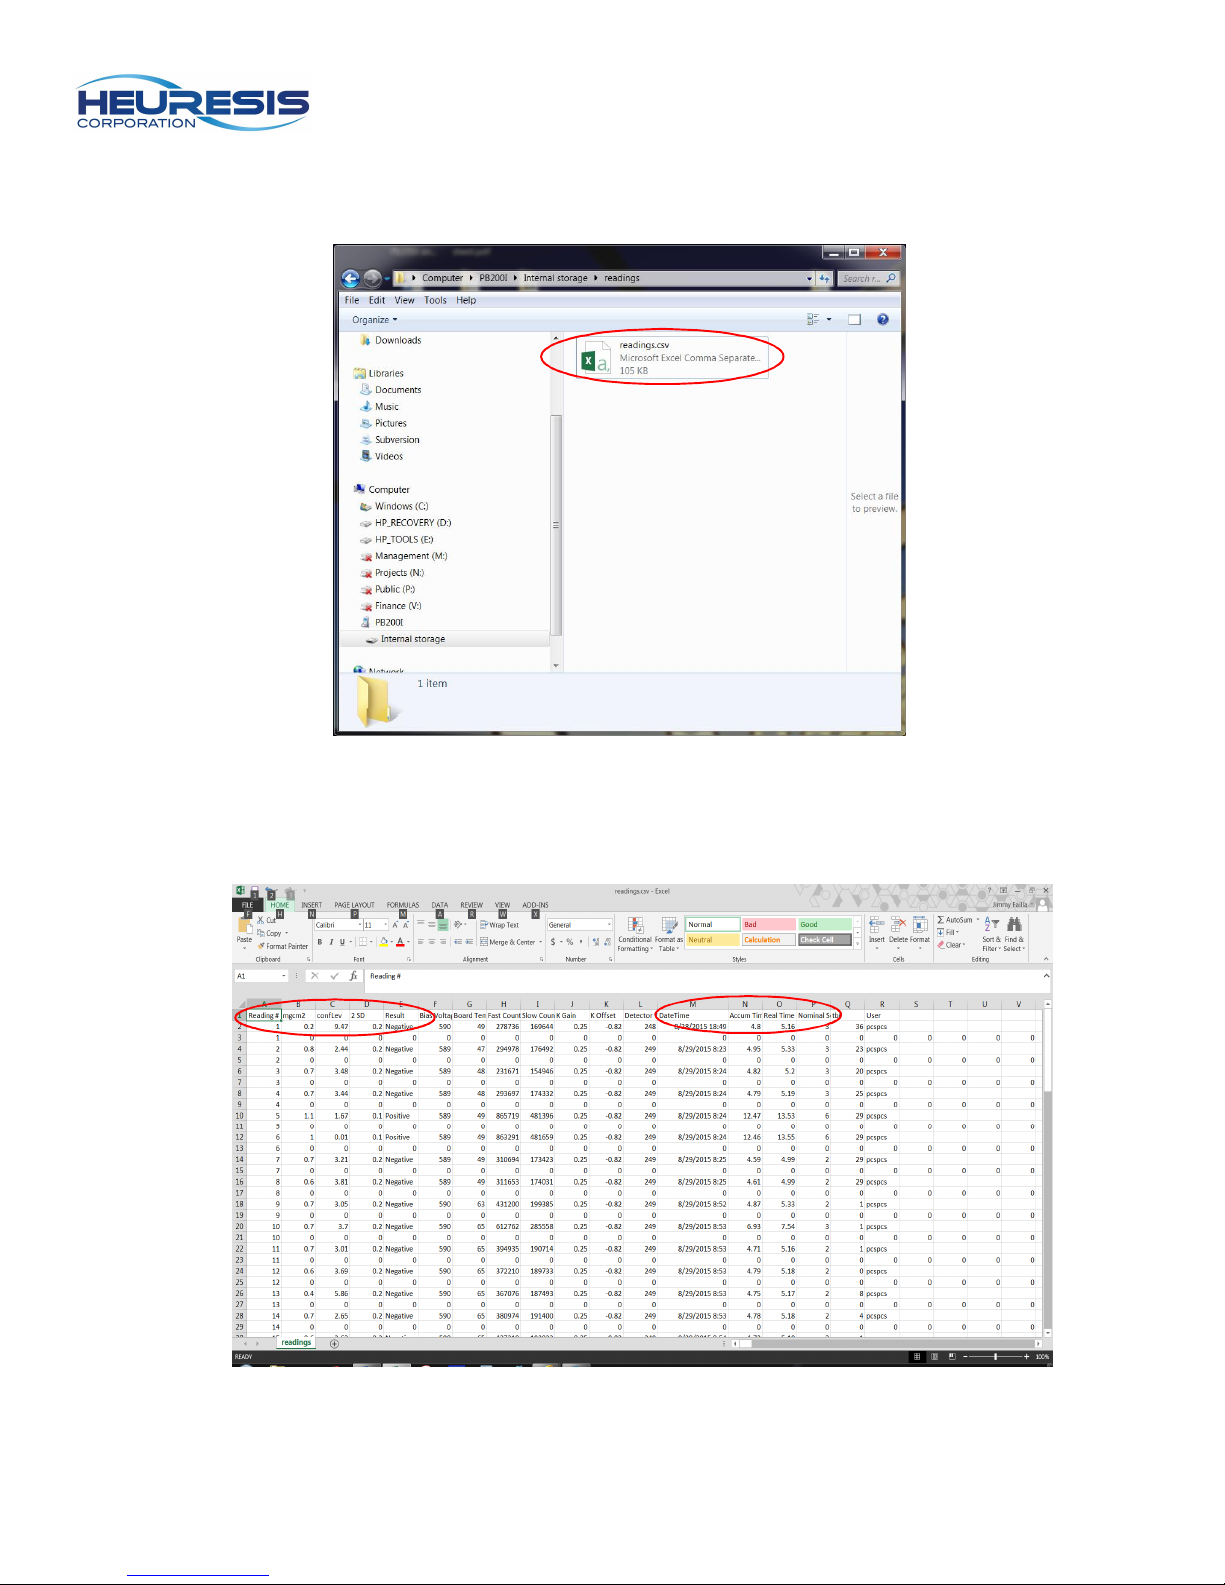
g) There will be a .csv file; this file contains your readings. Drag the file to your desktop or any
other location you like. Double clicking on the file will open it.
Figure 26
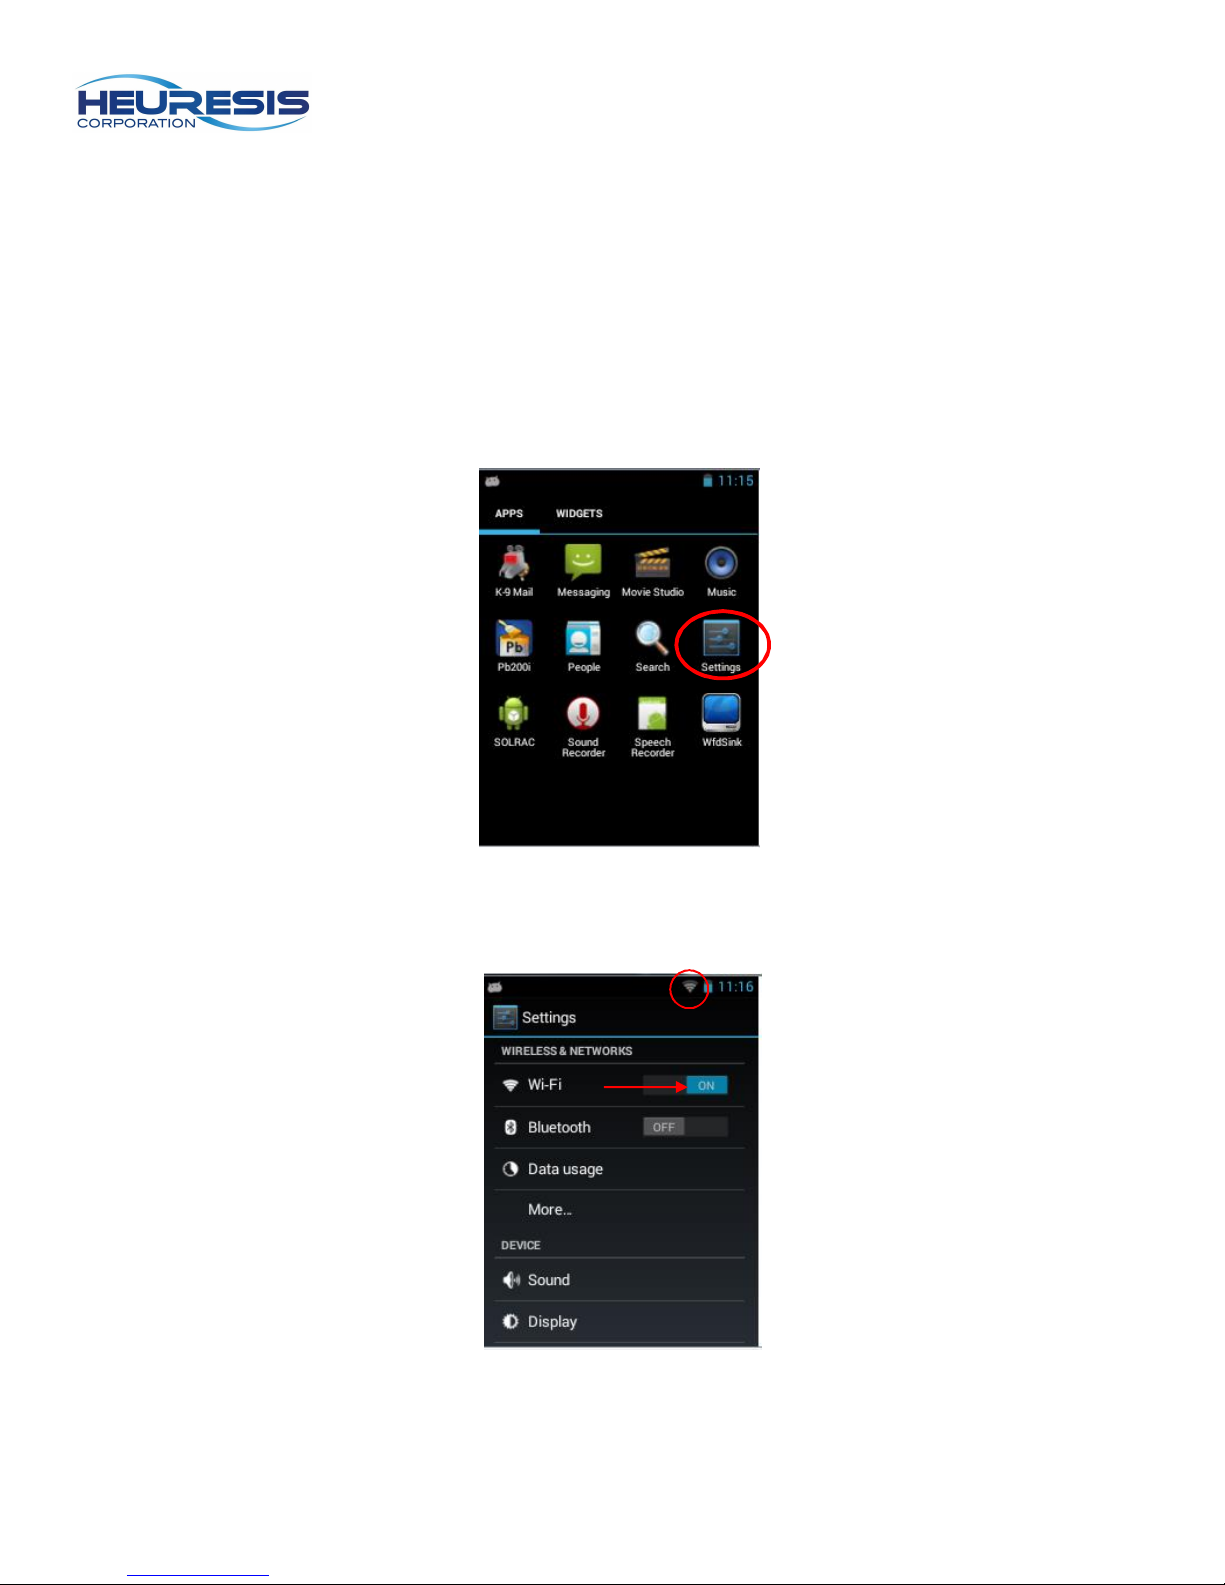
h) There is debug information in the file as well (you can graph spectra as well using
the second line of data associated with the reading); the main columns of interest
are circled here.
Figure 27
13
Page 14
i) Check to make sure all the data is there that you required in the download. If it is not, unplug
the analyzer from the PC, and repeat steps C through G.
Wi-Fi Connectivity:
You may use Wi-Fi to download your system as well. To enable Wi-Fi usage:
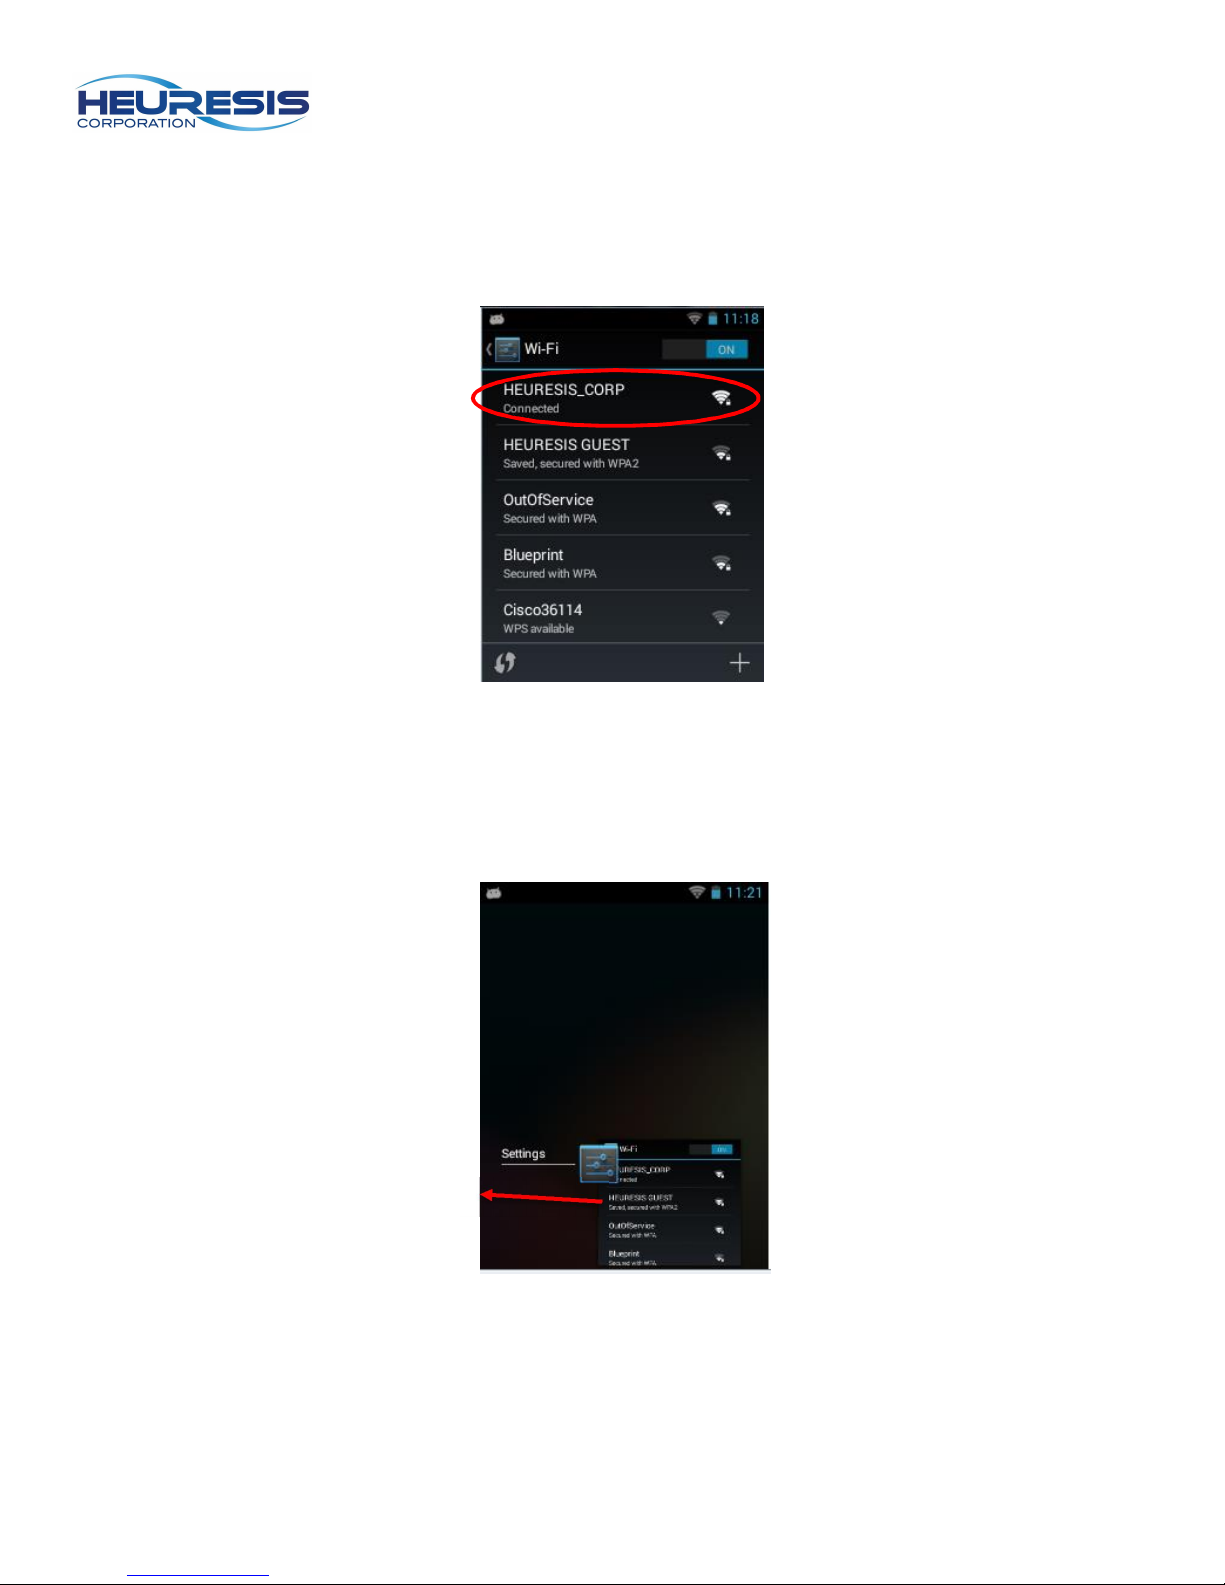
a) Select the “settings” app:
Figure 28
b) Enable Wi-Fi by swiping right; the “Wi-Fi” icon will appear.
Figure 29
14
Page 15
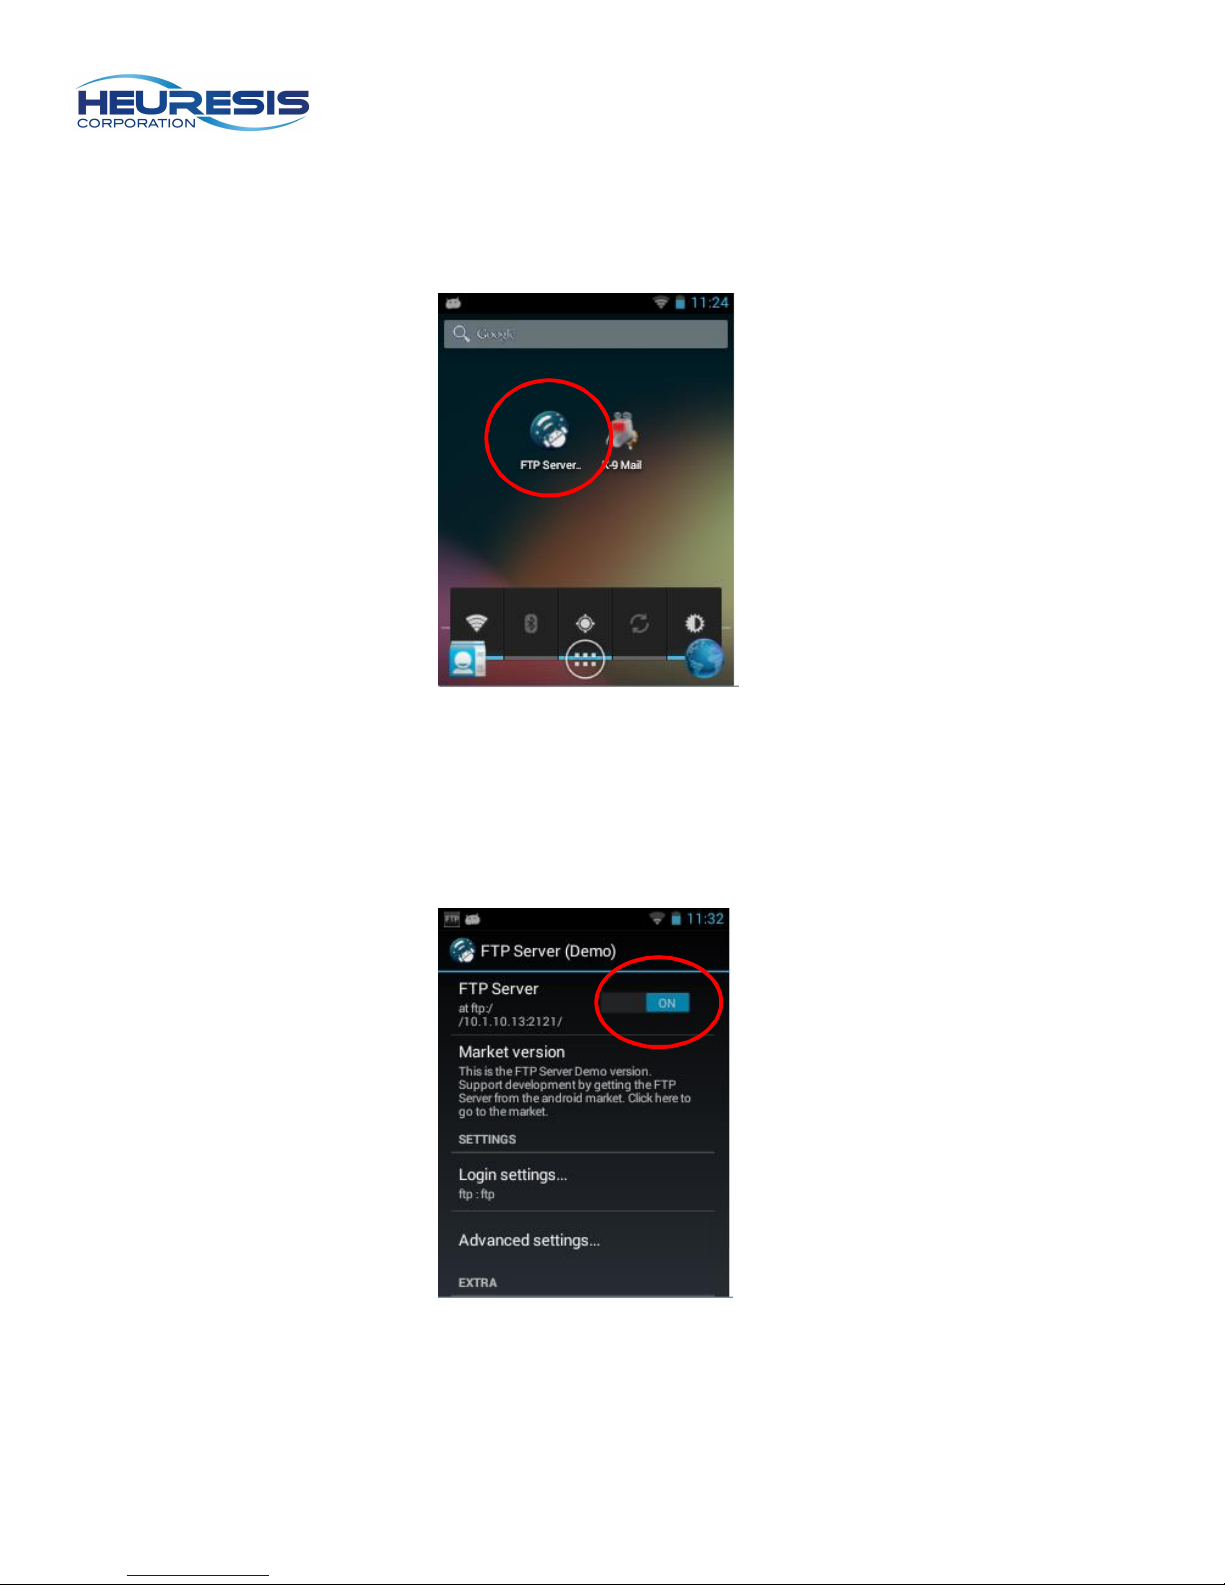
c) Find the desired network, select and connect.
Figure 30
d) Exit out using the left arrow shut the “Settings” app off by holding the center button down
until it appears and swiping left. Note: turning Wi-Fi on will decrease your battery life. It is
best to leave it off until it is being used.
Figure 31
15
Page 16
e) Select and open the FTP Server app.
Figure 32
f) Enable the FTP server. Note: this will default to the “off” position due to security reasons
every time the instrument is power cycled.
Figure 33
16
Page 17
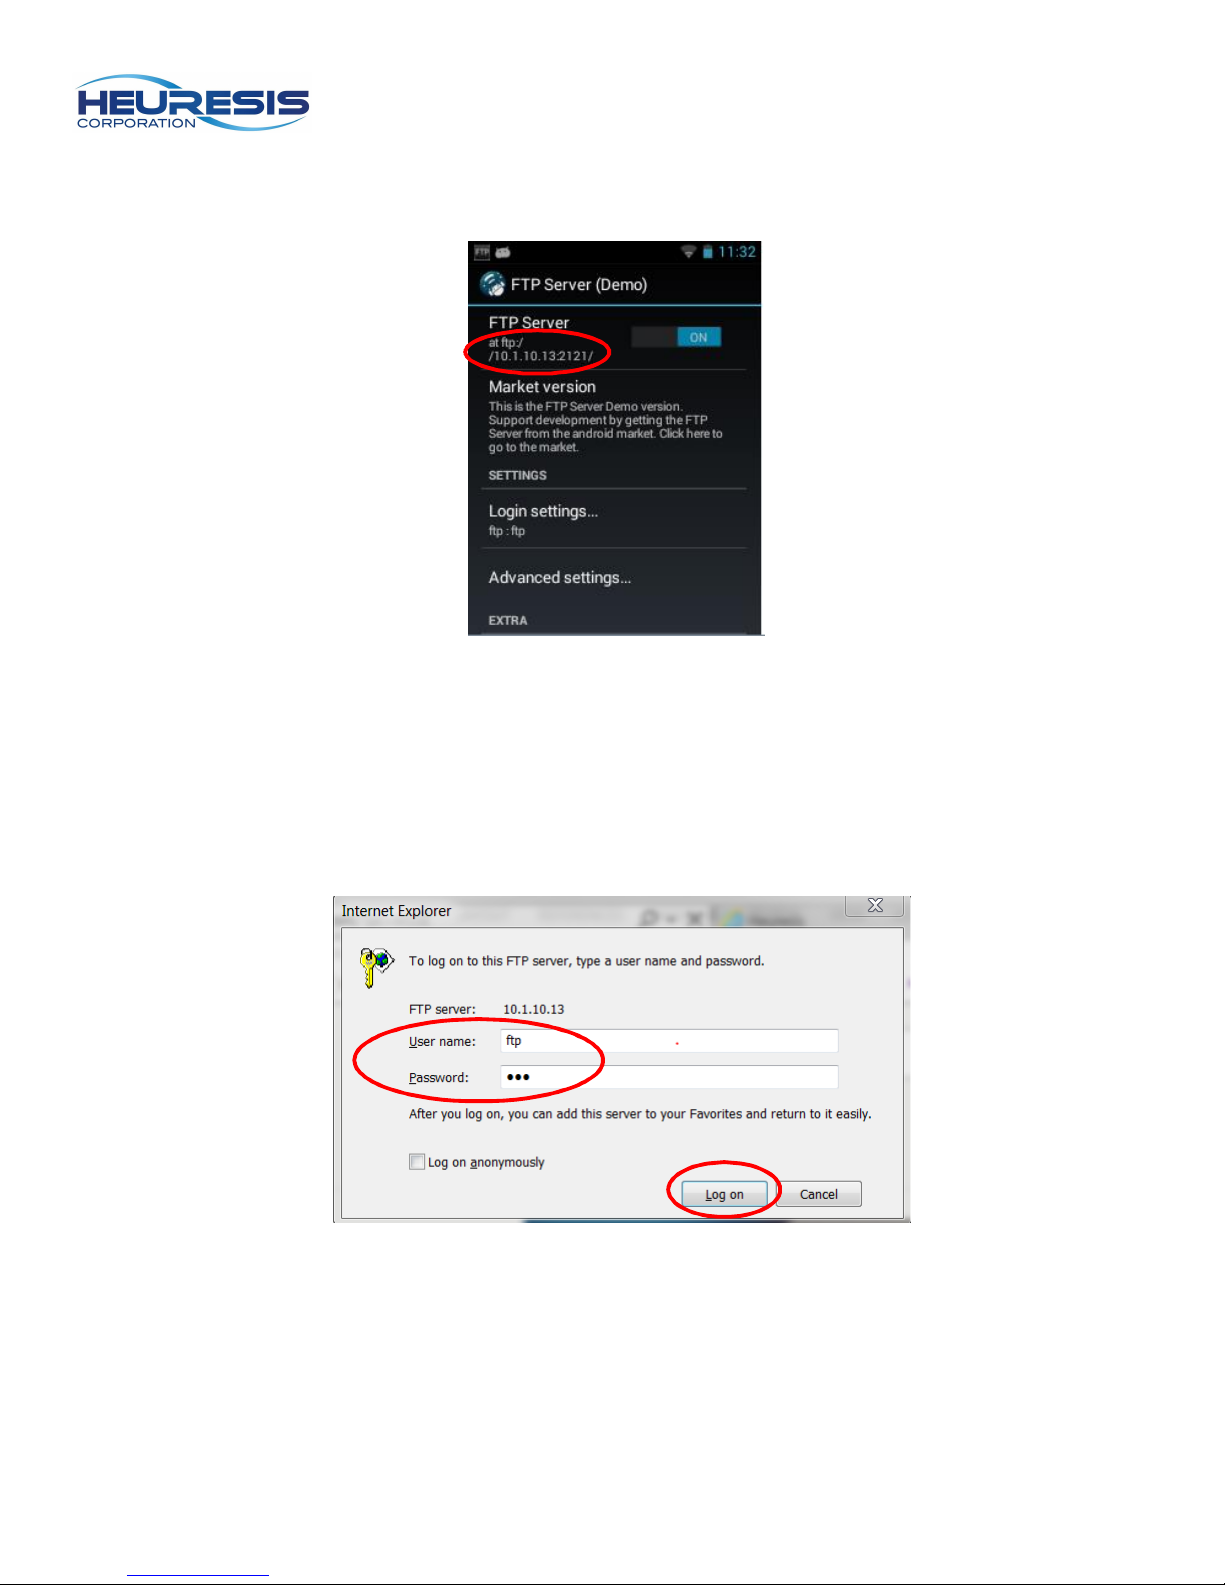
g) Place the number circeld below in your web browser; example here would be
ftp://10.1.10.13:2121.
Figure 34
h) You will be prompted to enter a user name and password. They are the same for both –
“ftp”. Select “Log on” after enetering.
Figure 35
17
Page 18
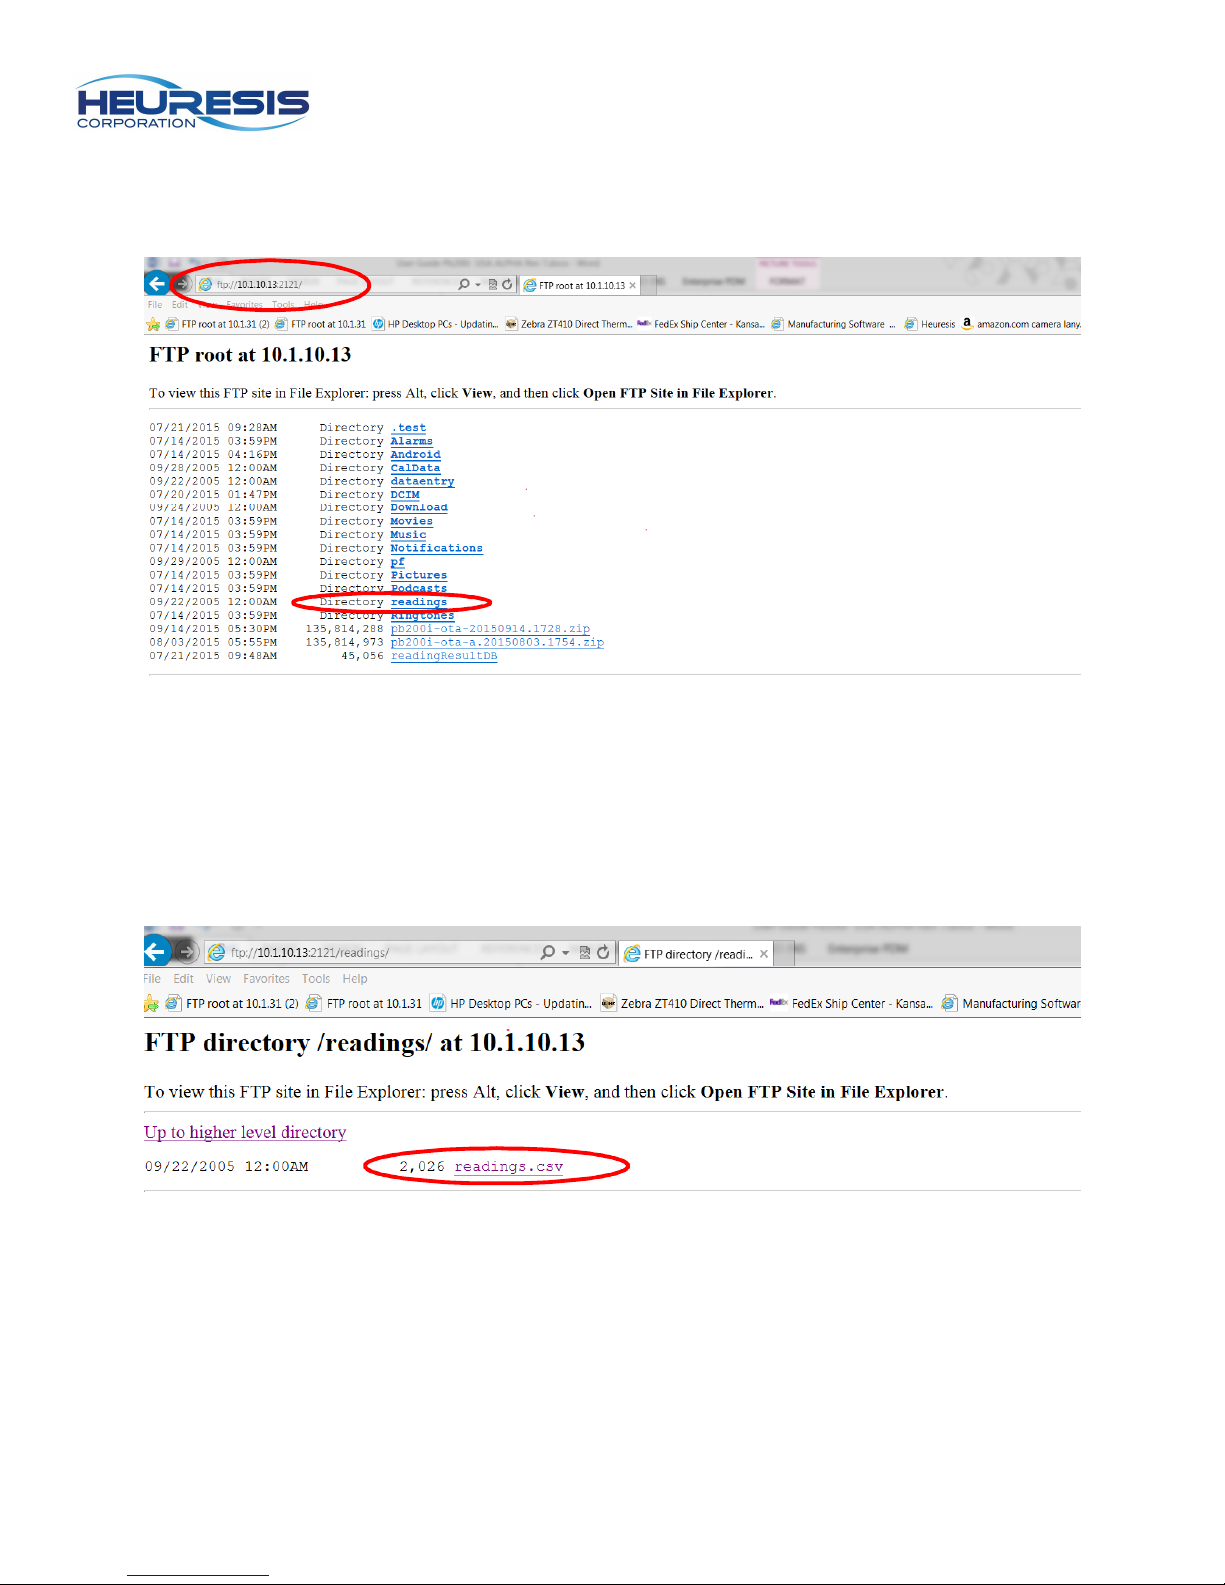
i) Your screen will look like this. You should bookmark this page in your browser at this time.
Note: the ID number you input in your browser should come up each time you enable the FTP
app. In the event that it does not, simply inout the number that does and repeat steps g and h.
Select the “readings” folder.
Figure 36
j) You will be taken to this screen; select “readings”. You will then be prompted to save the
readings in a location of your choice (.csv file format). You may choose to open the file at this
time if you wish or just have it save.
Figure 37
18
Page 19
Bluetooth Connectivity:
The Pb200i is also equipped with Bluetooth. You may use this to pair to an external keyboard,
etc. Please be aware that there are numerous Bluetooth equipped items on the market. This
system may not be compatible with them all.
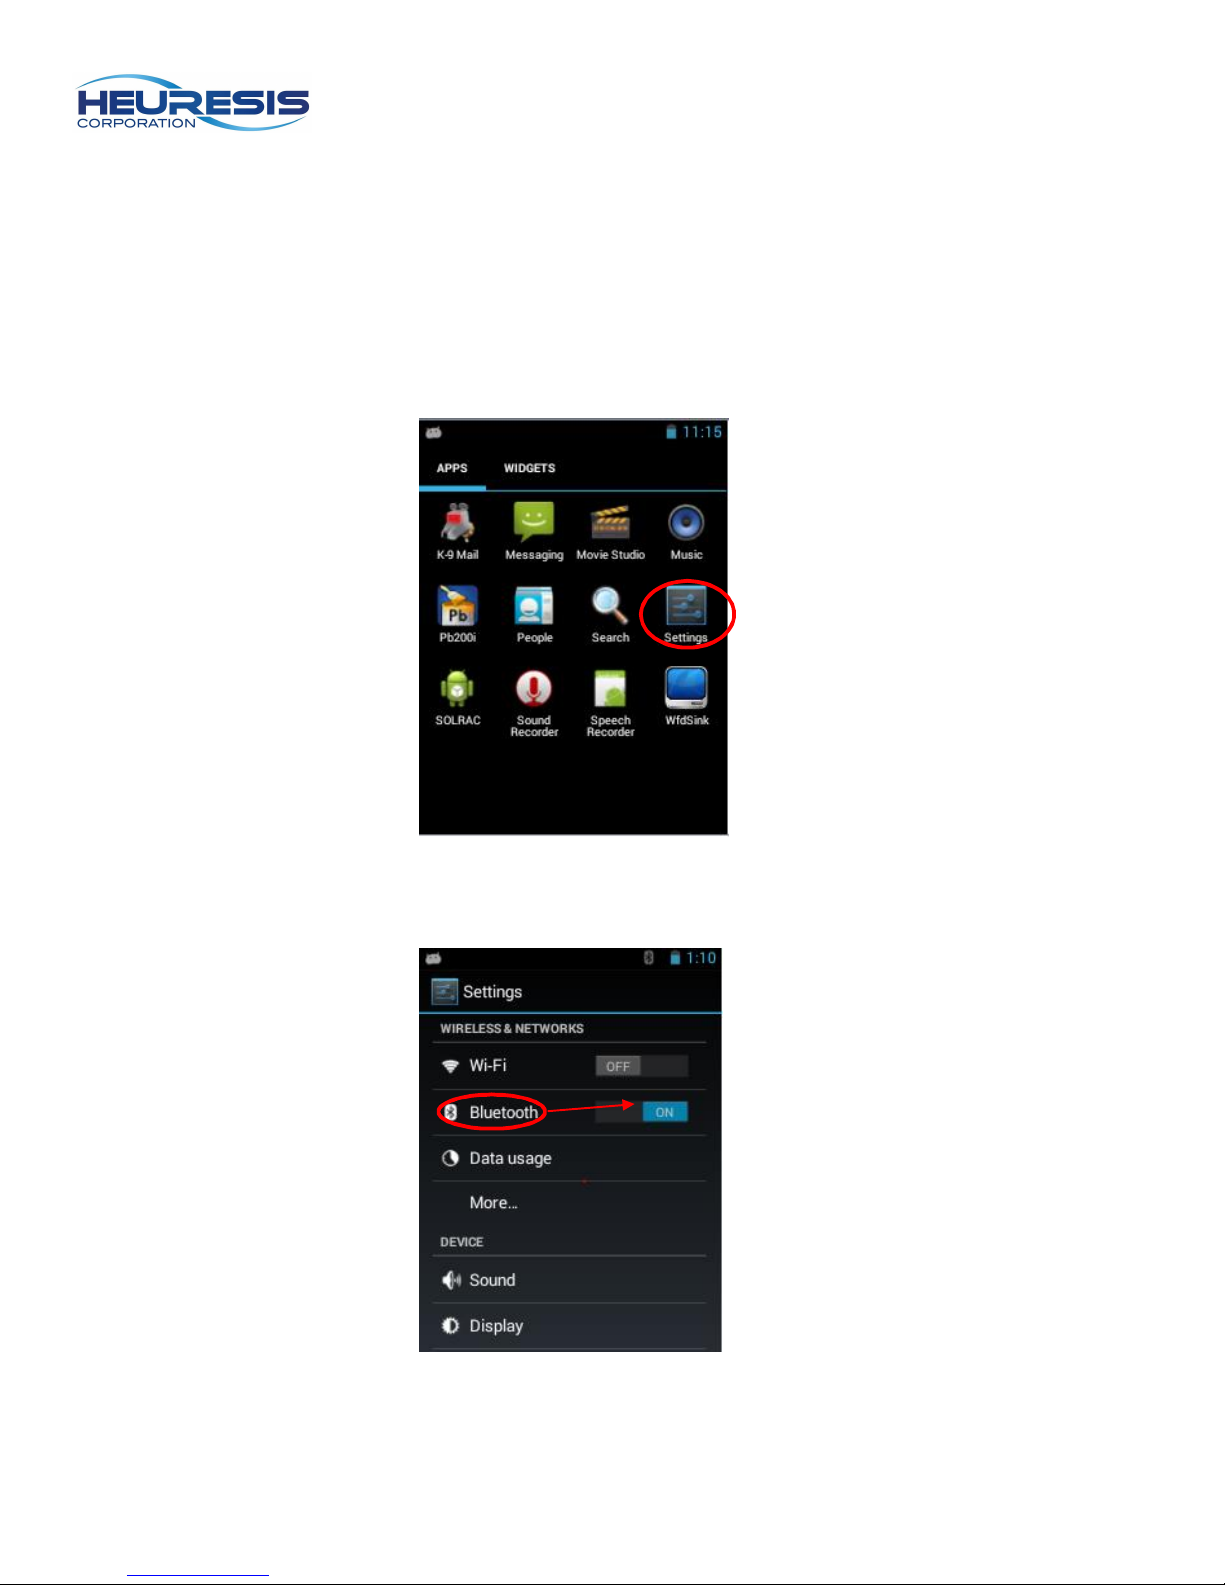
a) Select the “Settings” app
Figure 38
b) Enable Bluetooth by swiping right; click on “Bluetooth”
Figure 39
19
Page 20
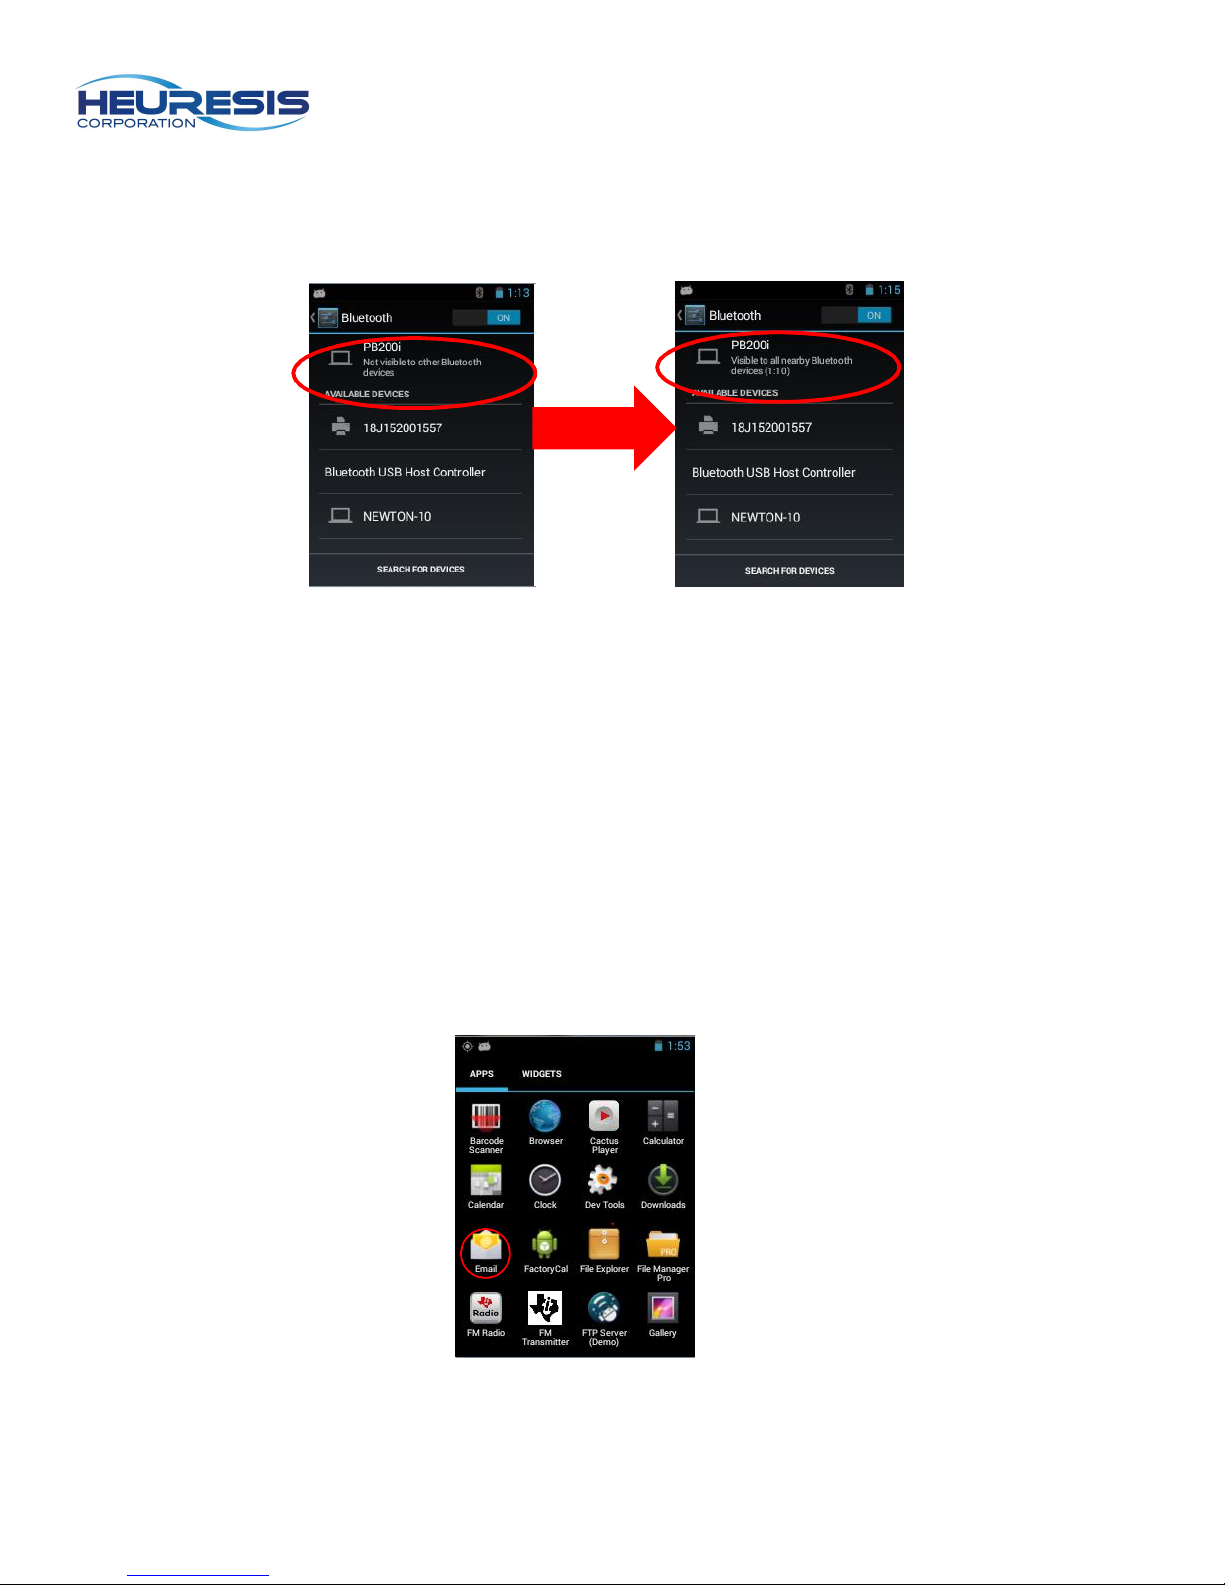
c) A list of available devices will populate; click on the Pb200i. This will make it visible for
other devices to see.
Figure 40 Figure 41
d) Pair with desired device.
E-mail:
The Pb200i allows you the flexibility to e-mail your readings, etc. directly from the analyzer. You
must set up the email app to do this that is provided with the system. Please follow the prompts
on screen to do this.
To email your readings, follow the export the desired readings you want as outlined in the
“Downloading Readings” section.
Open the email app and select the email address you wish to send them to and click on the
“attachment” icon.
Figure 42
20
Page 21
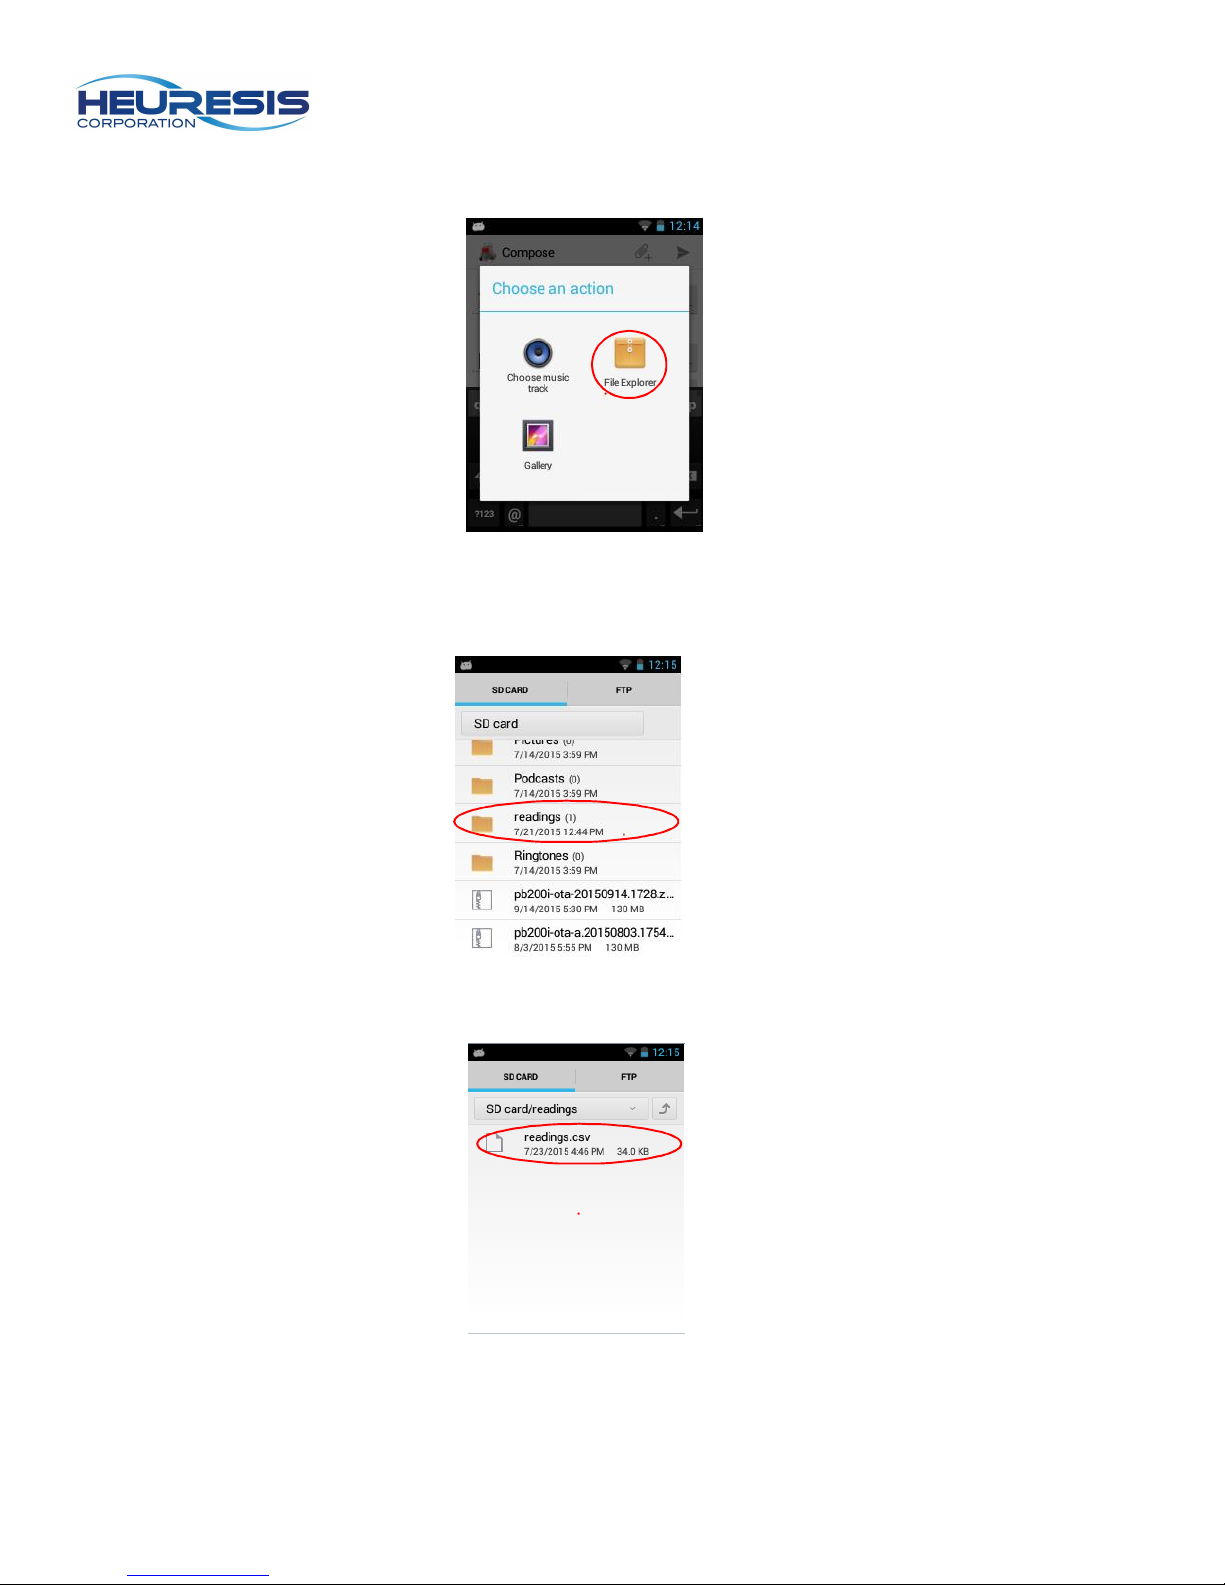
Select the “File Explorer”.
Figure 43
Click on the “Readings” folder.
Figure 44
Select the “readings.csv” file.
Figure 45
21
Page 22
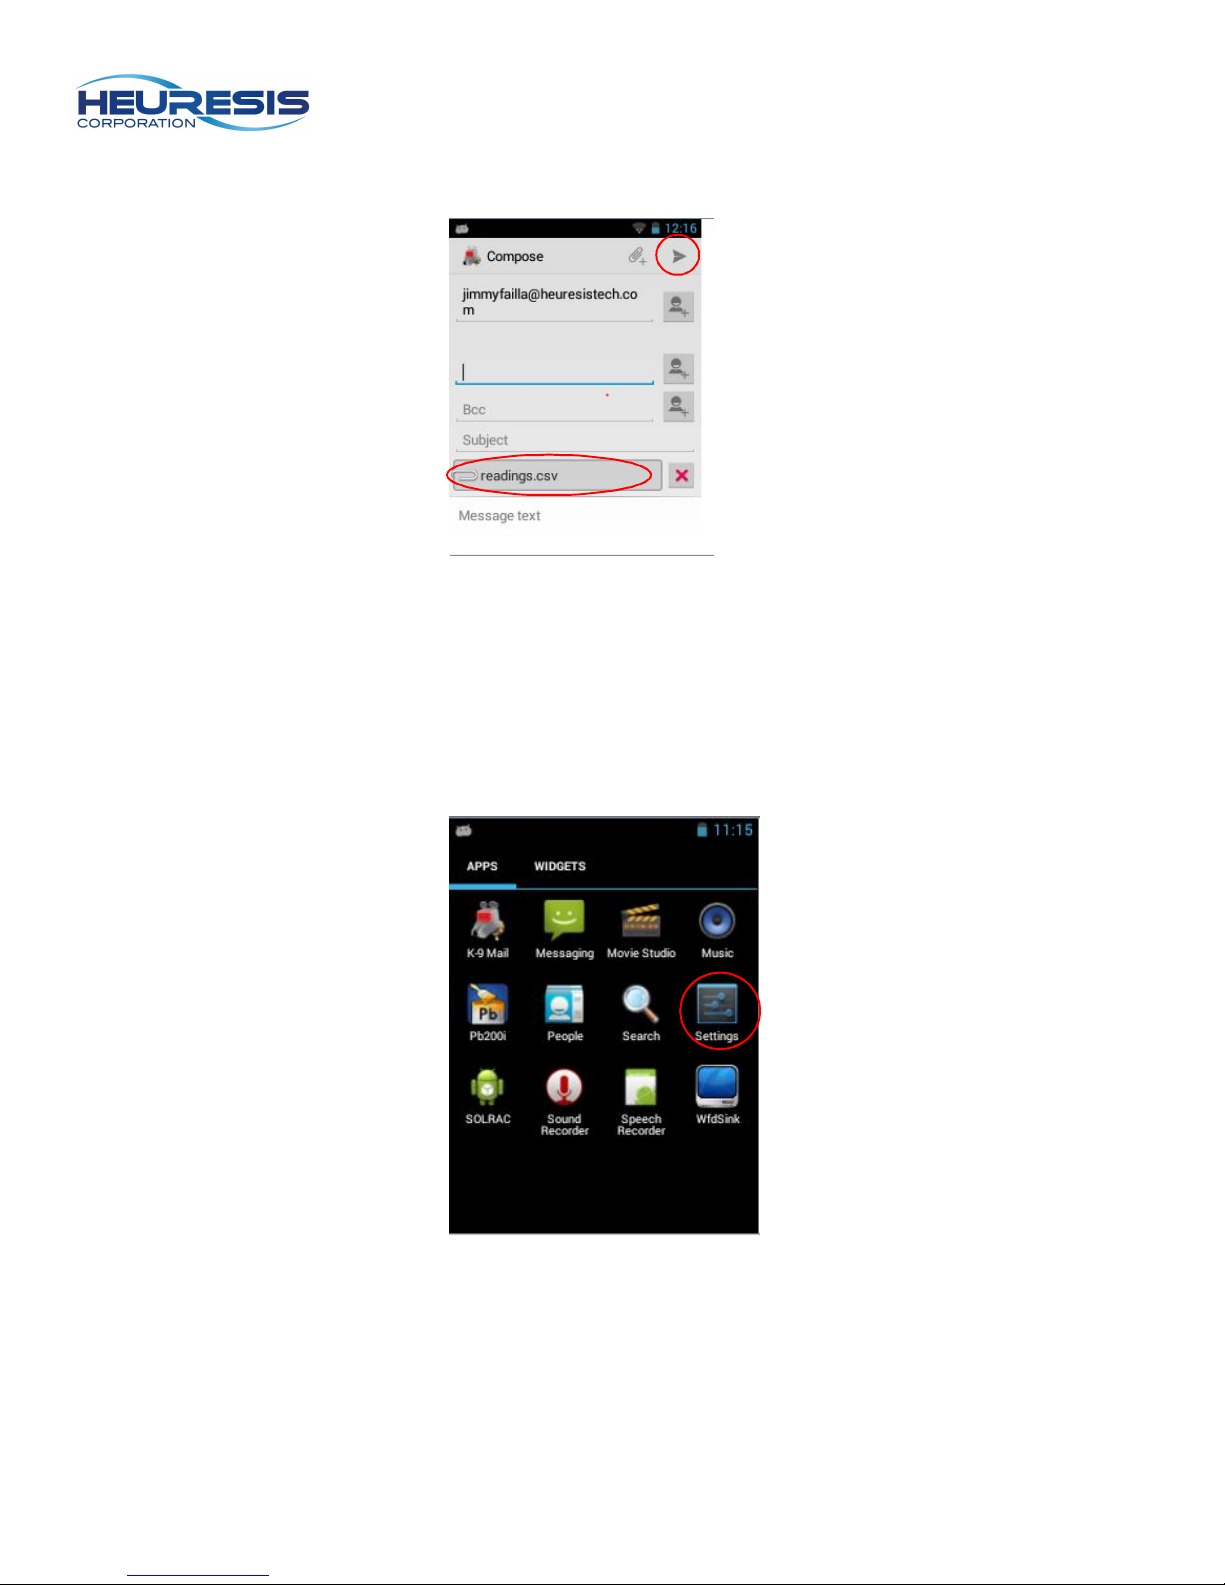
The attachment will now appear on your email. Select “Send”.
Figure 46
GPS: The Pb200i is equipped with on board GPS as well. To turn the GPS on please follow the
following steps:
Select the “Settings” app.
22
Page 23
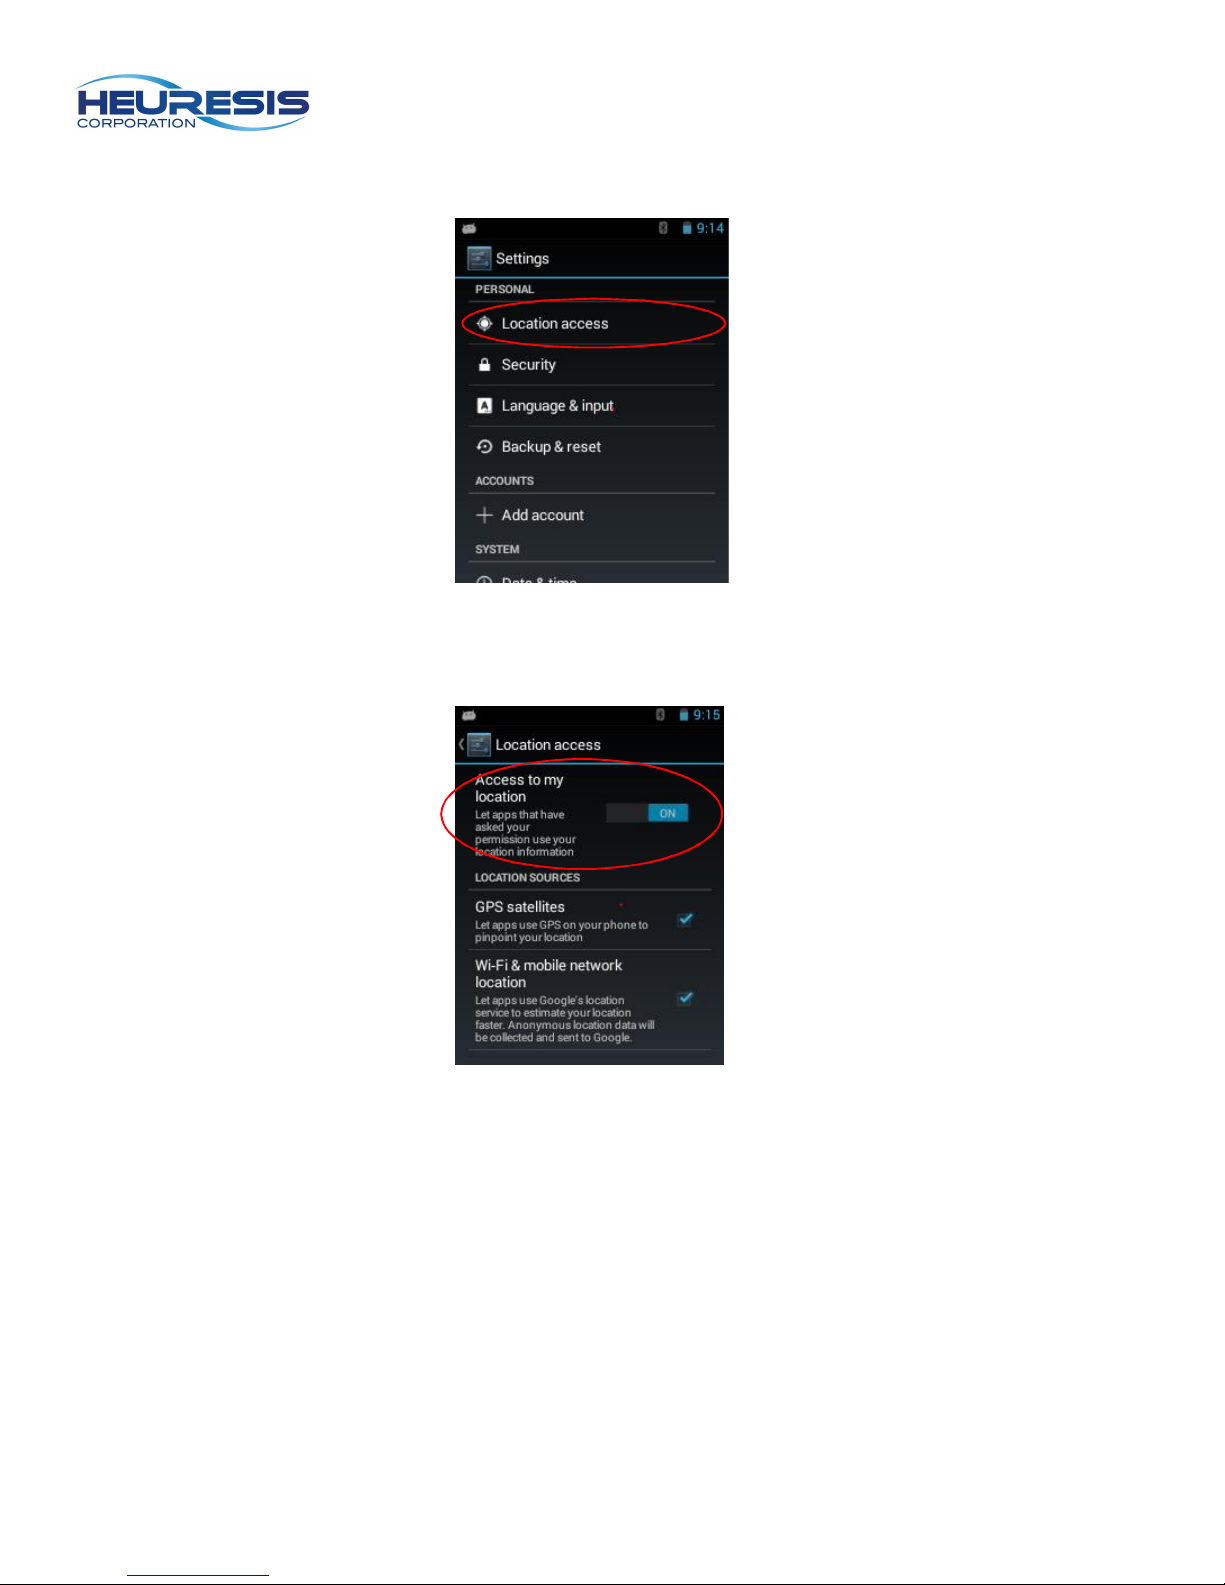
Scroll down to “Location Access” and select.
Enable “Access to my location”
23
Page 24
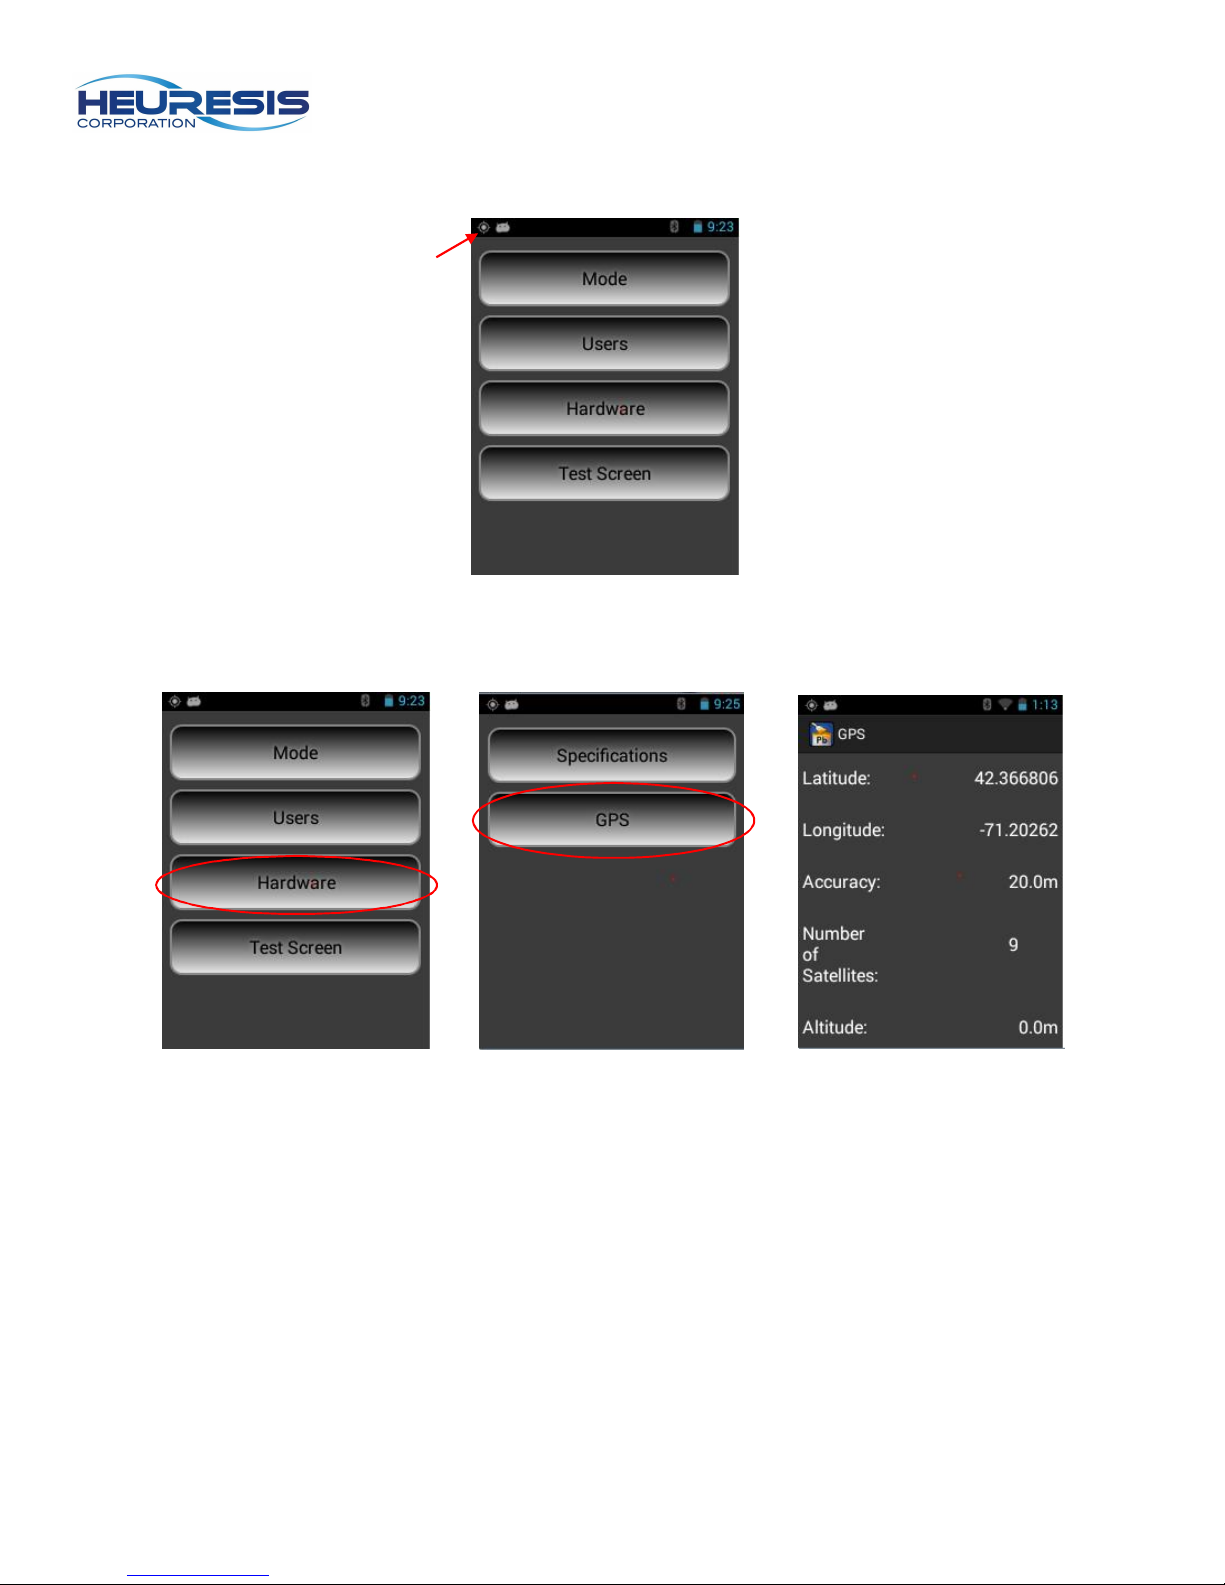
This icon will appear, indicating that GPS is enabled.
To check the status of you GPS, go to the following screens.
24
Page 25
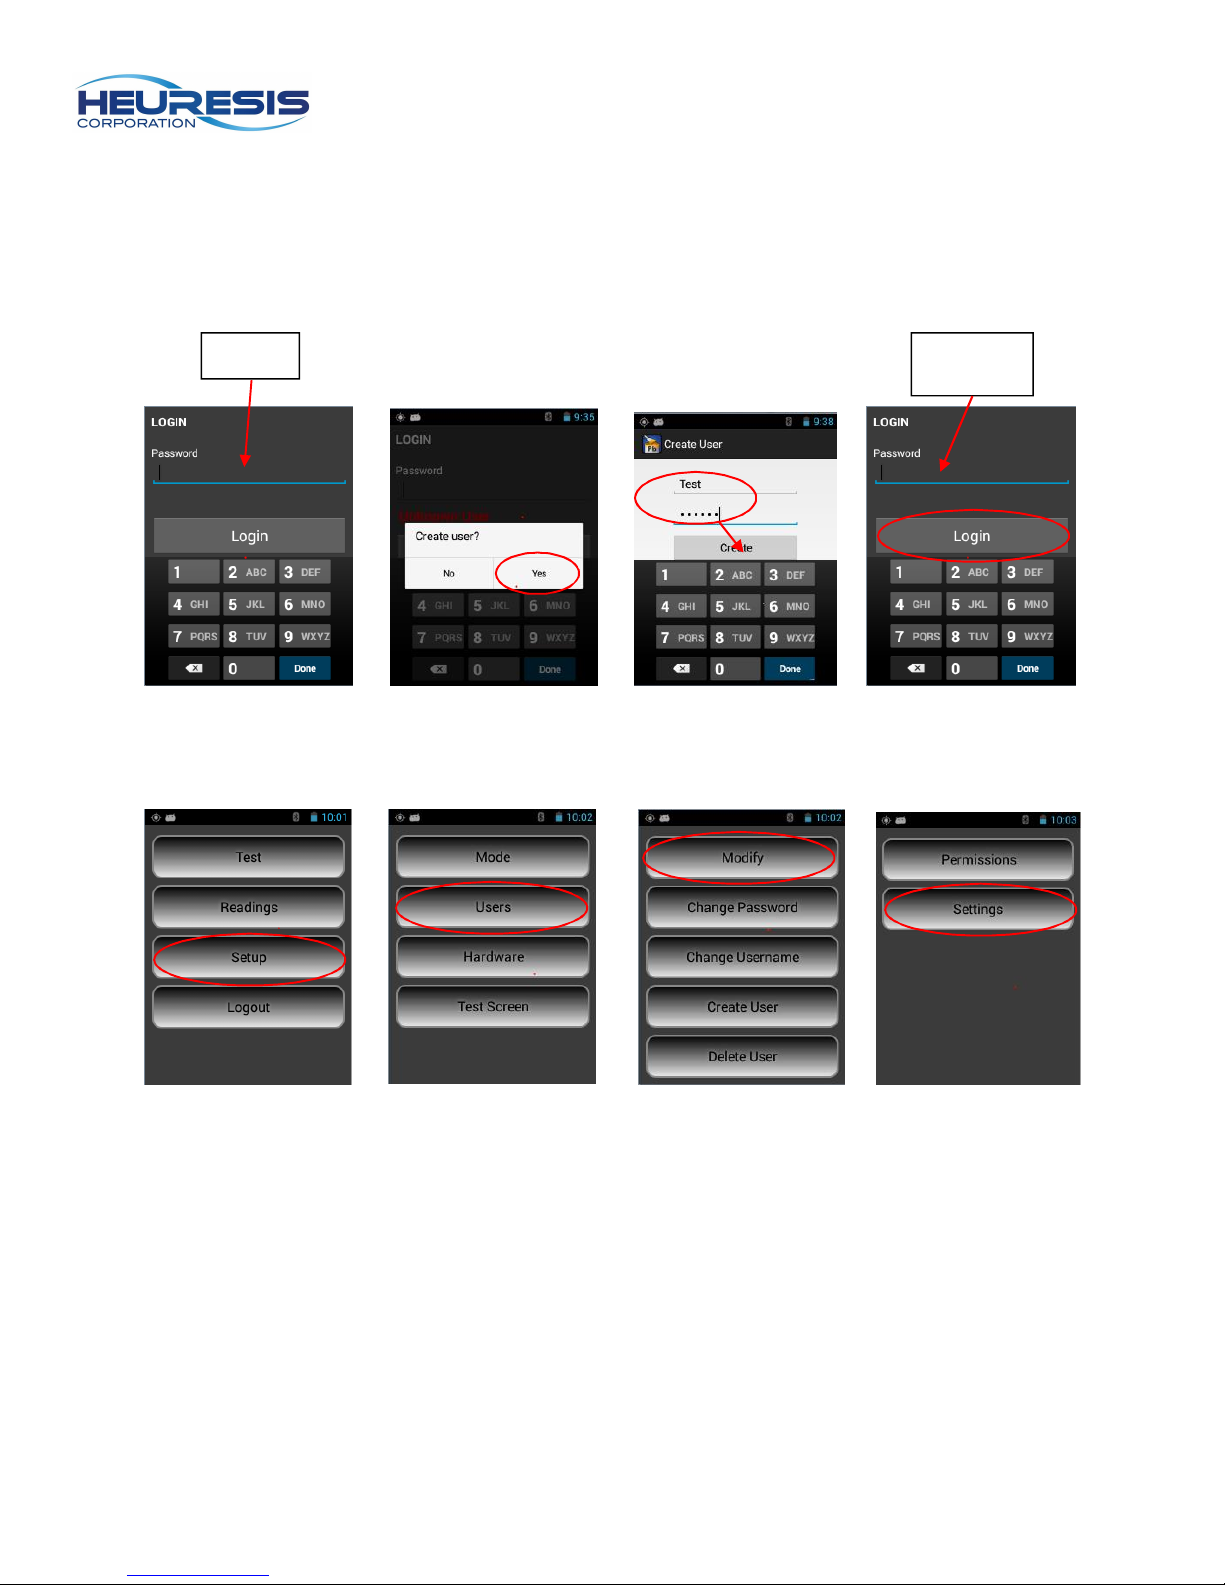
Creating a User:
When first logging on to the Pb200i, you will need to input the factory default password, 371945.
You will then be prompted to create a user. This person will be a super user, and can administer
rights to other users as they see fit. This person should be a high level employee, in charge of
the system, possibly the radiation safety officer (RSO).
371945 New
To view the rights of the super user, follow these steps.
password
25
Page 26
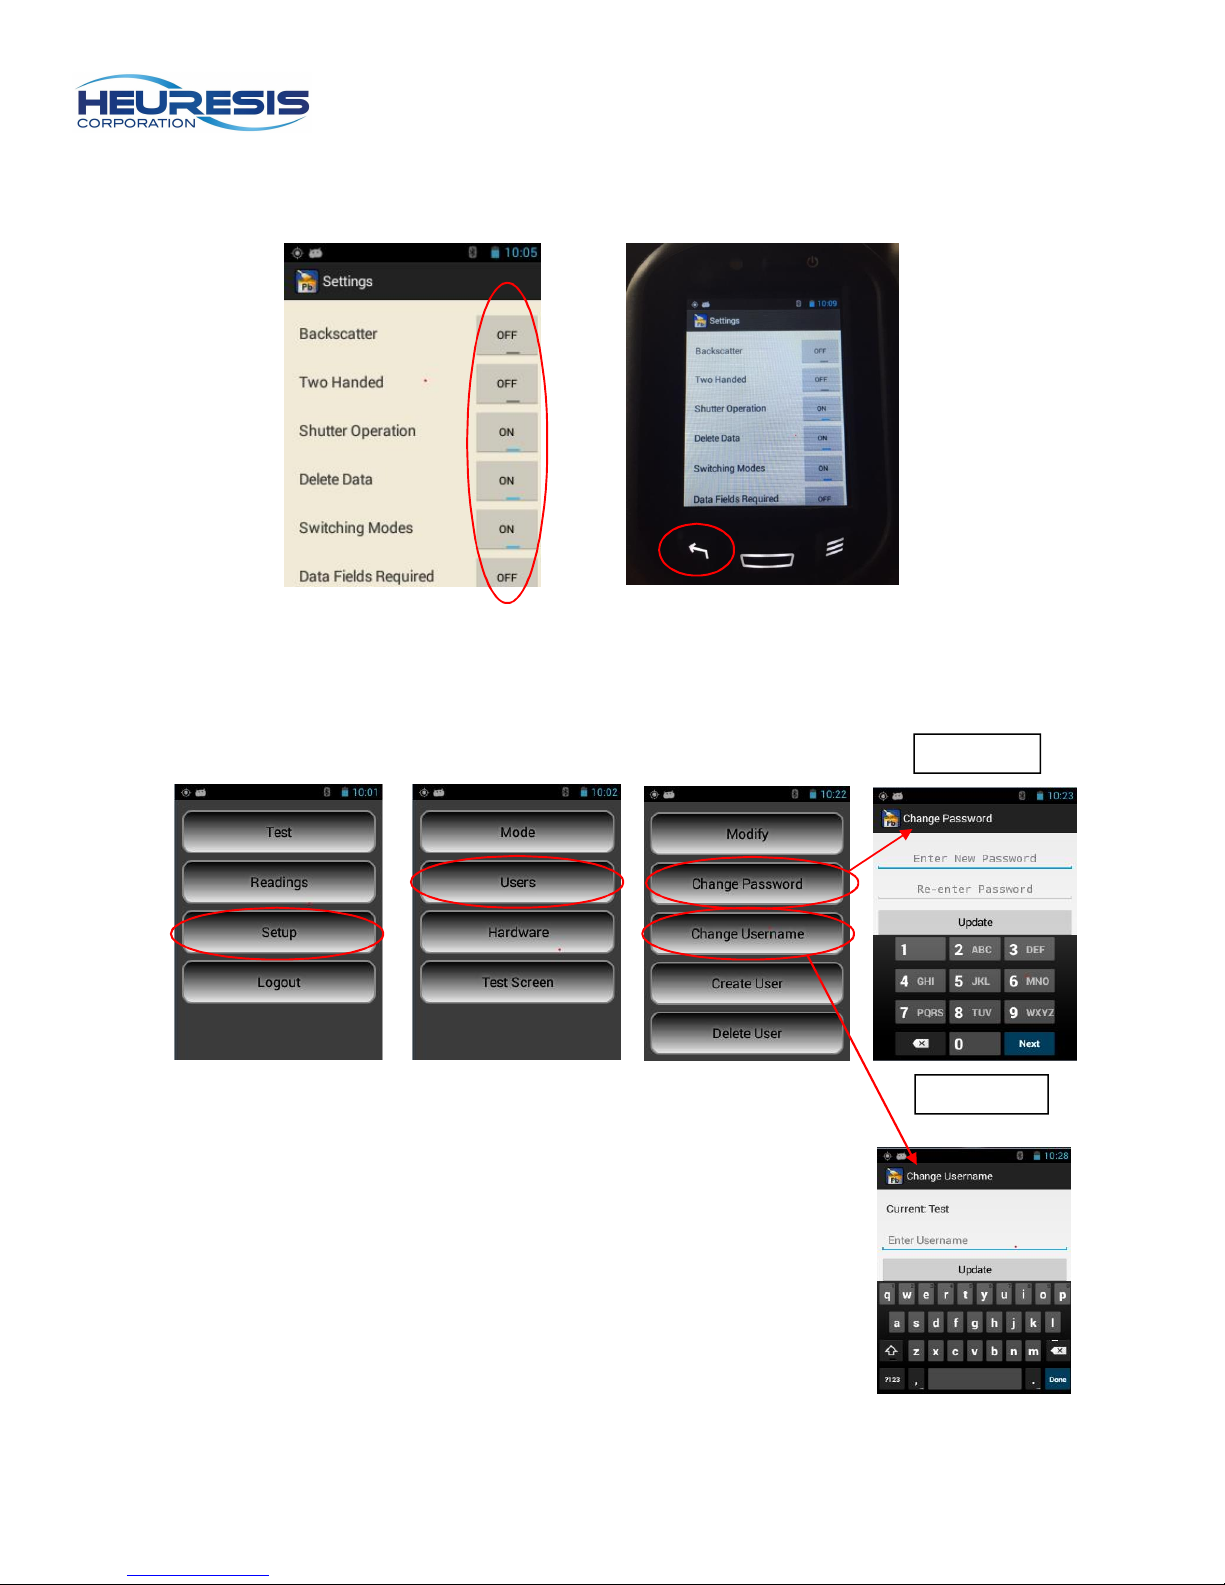
As a super user, you may turn on/off any of the available options. To save, select the back
arrow on the analyzer and exit the menu.
Changing passwords/User Name:
You may change your password or user name by following these steps.
Password
User Name
26
Page 27
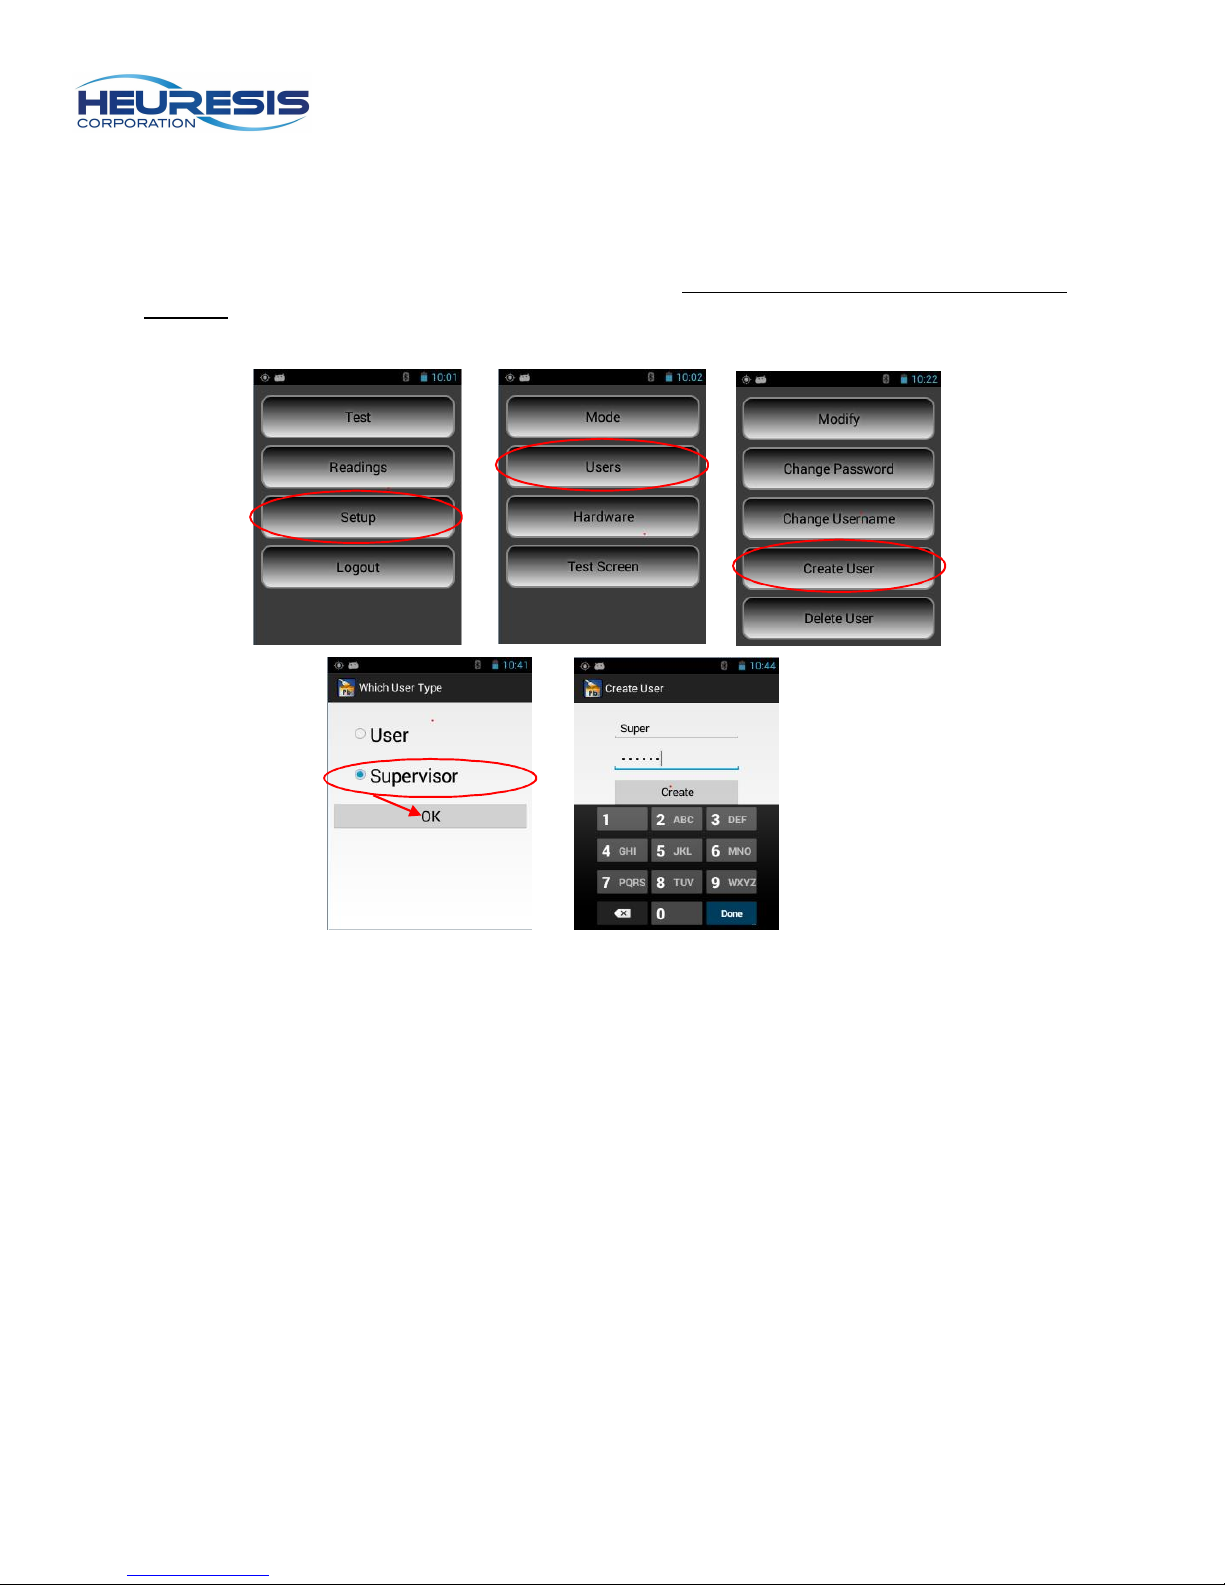
Creating a User/Supervisor:
You may create another user/supervisor ID on the Pb200i so that you may easily identify who
was using the instrument and restrict certain areas of the system so that errors are reduced. To
create supervisor ID on the Pb200i, follow these steps. Only a super user (RSO) may set these
rights up.
27
Page 28
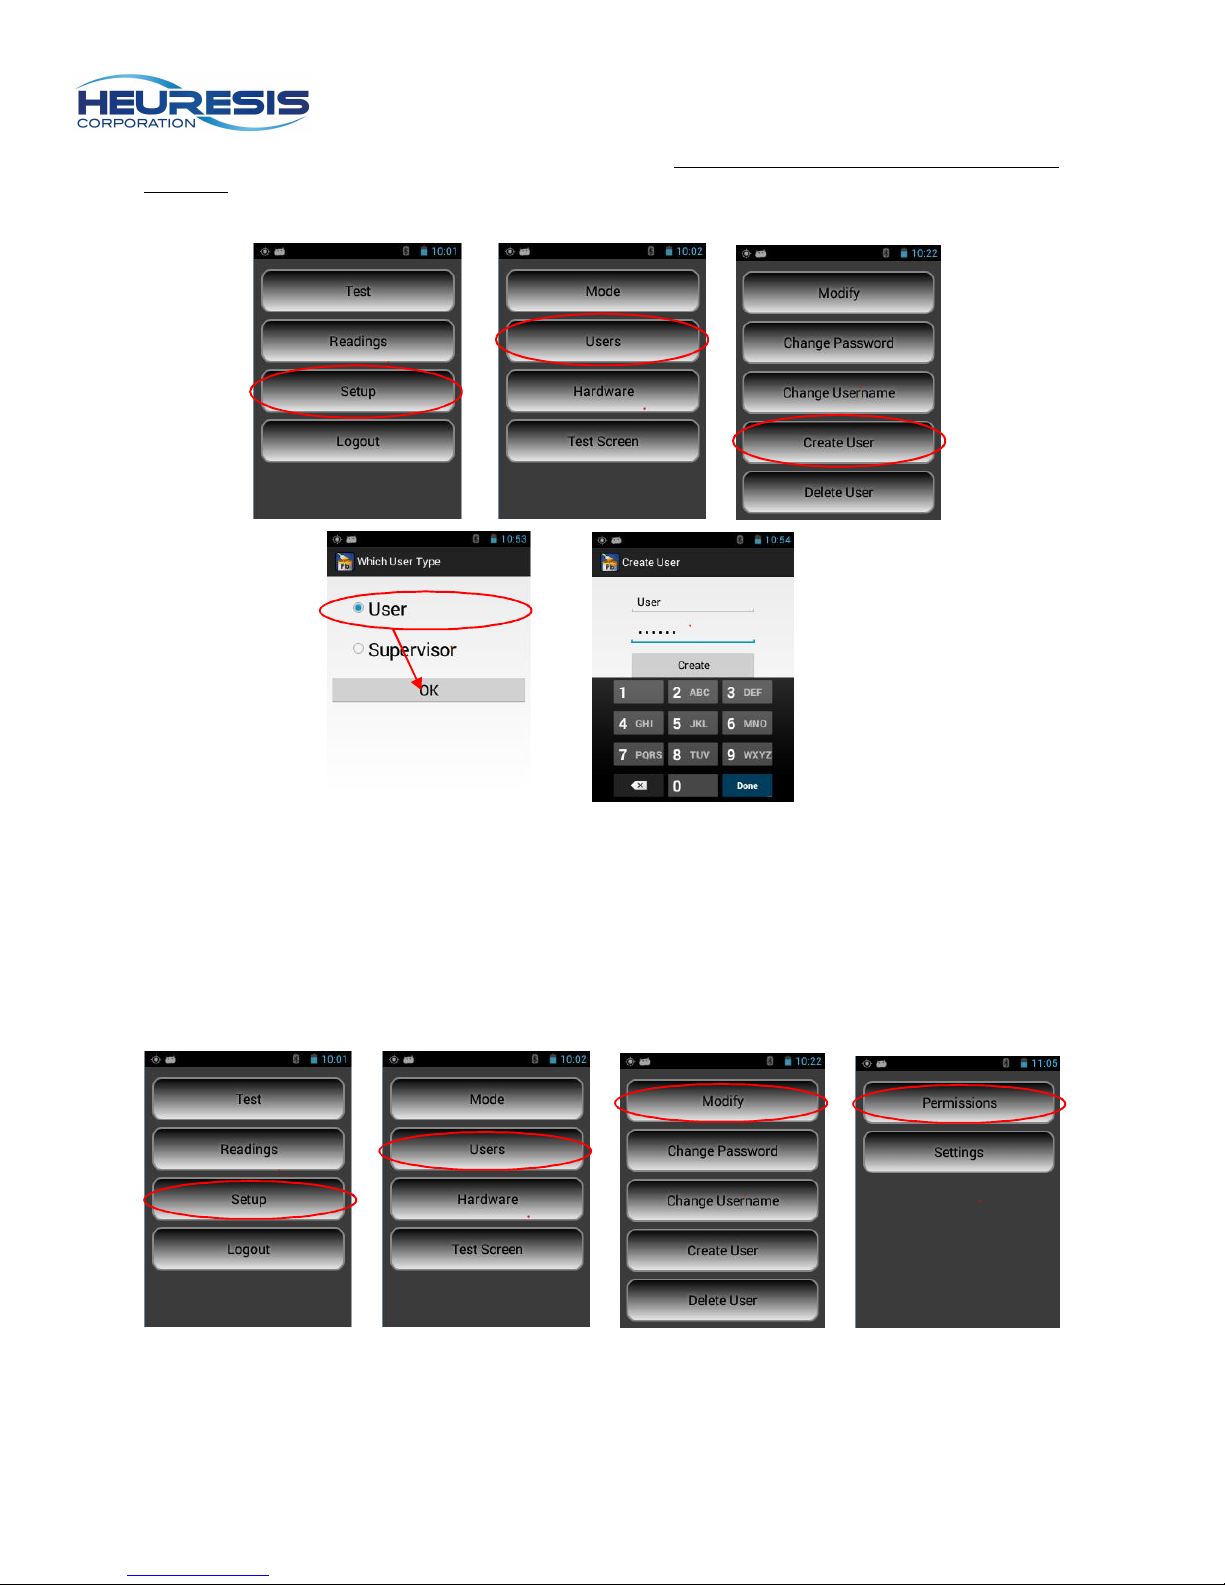
To create a user ID on the Pb200i, follow these steps. Only a super user (RSO) may set these
rights up.
Permissions:
A super user (RSO) may modify permissions themselves, a supervisor or a user. A supervisor
may only modify permissions for a user. The example below illustrates a person logged in as a
super user (RSO) revoking the default permission to delete data for a user’s ID.
28
Page 29
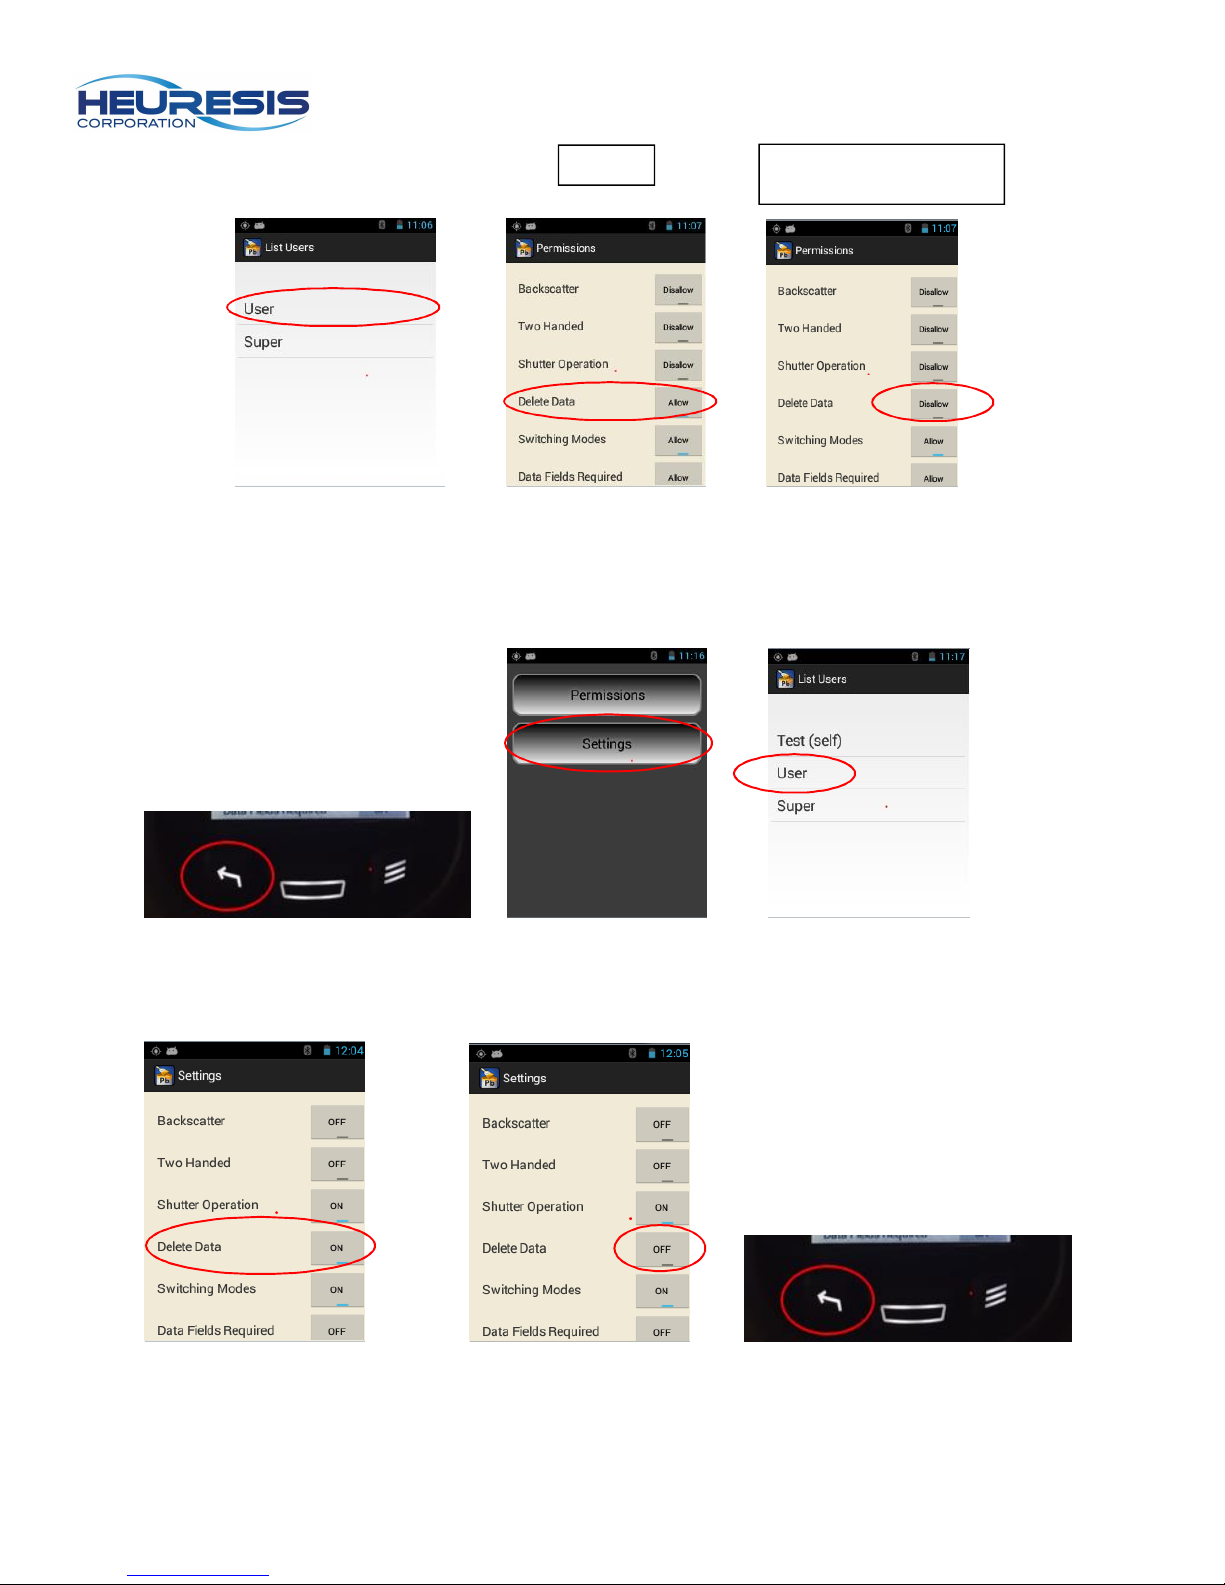
disallowed for user
Default
Delete Data permission
Back out using the left arrow to save and go to “Settings” and select “User”
Turn the “Delete Data” toggle to the “off” position and back out with the left arrow
29
Page 30
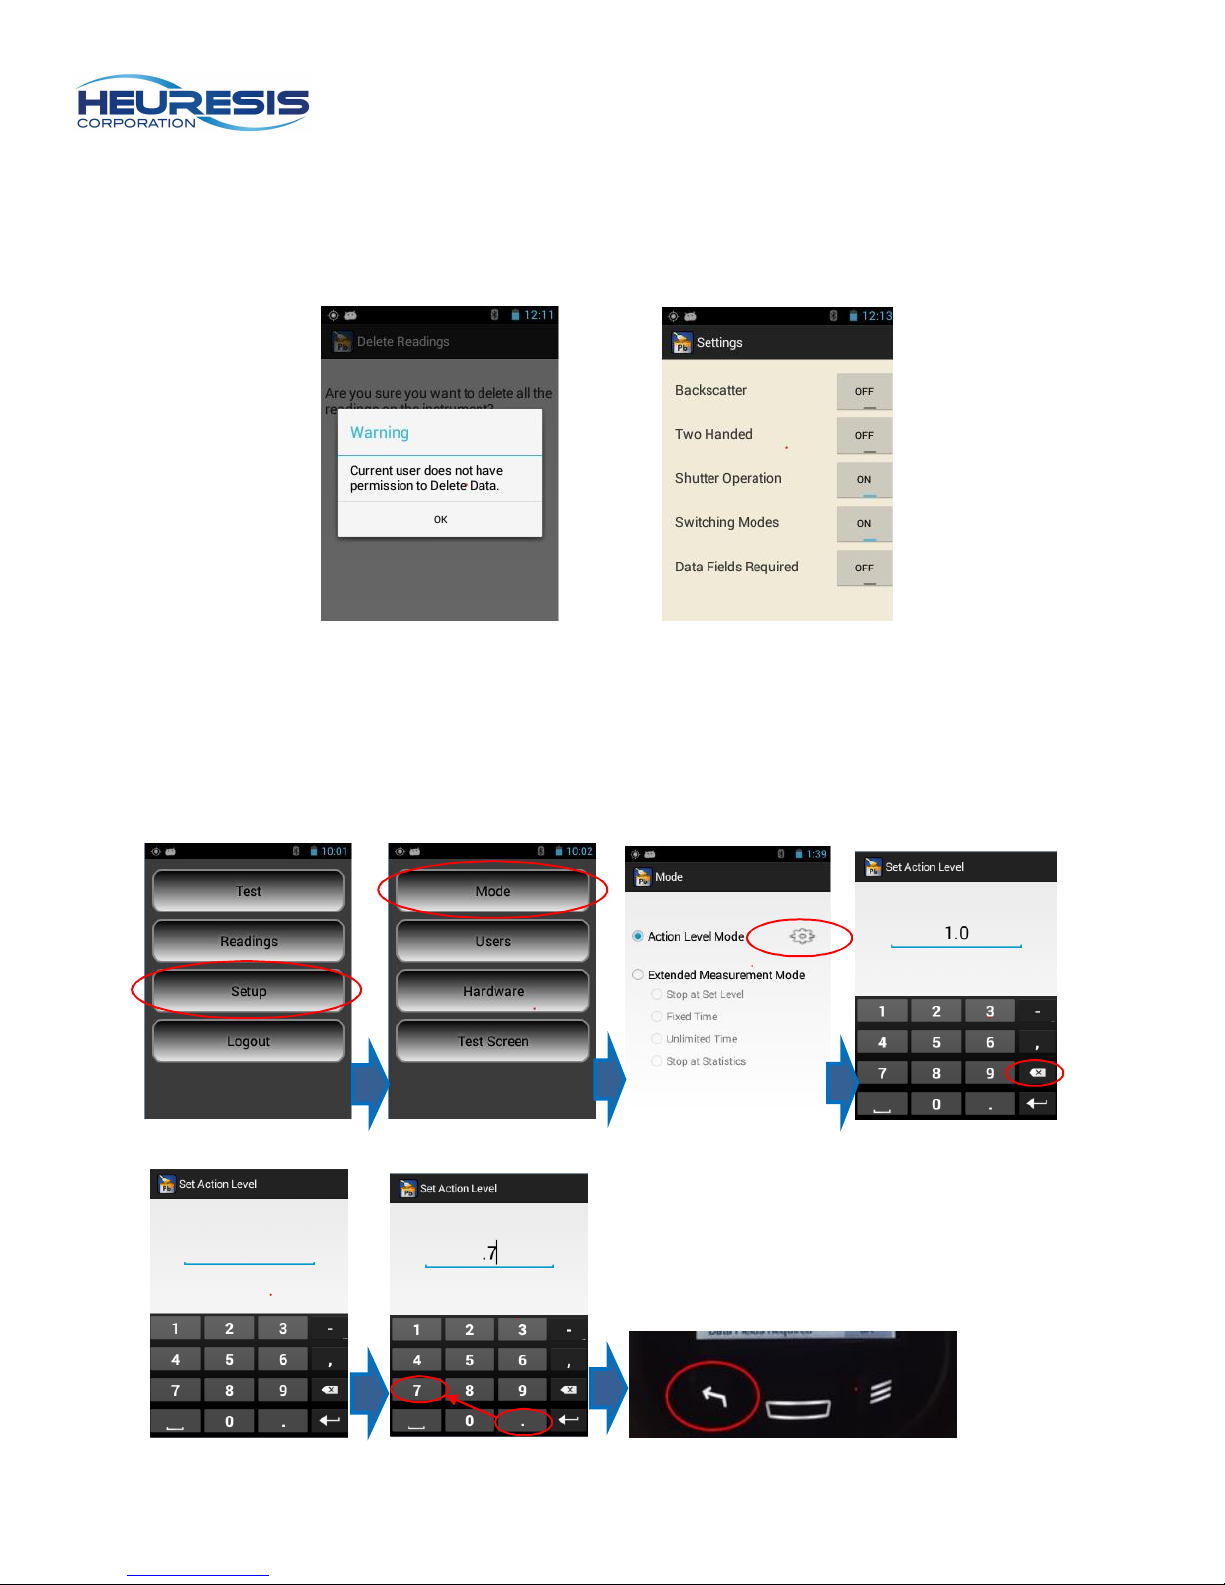
In this case, when the user logs in, if they were to try to delete data, this is the error message
they would see. If they went to their settings, “Delete Data” is no removed from the list of items
they may modify.
Changing the Action Level in Action Level Mode:
In some instances, the user may want to change the action level to accommodate a certain
threshold other than the defaulted 1.0 mg/cm2. This may be done by following this sequence:
30
Page 31
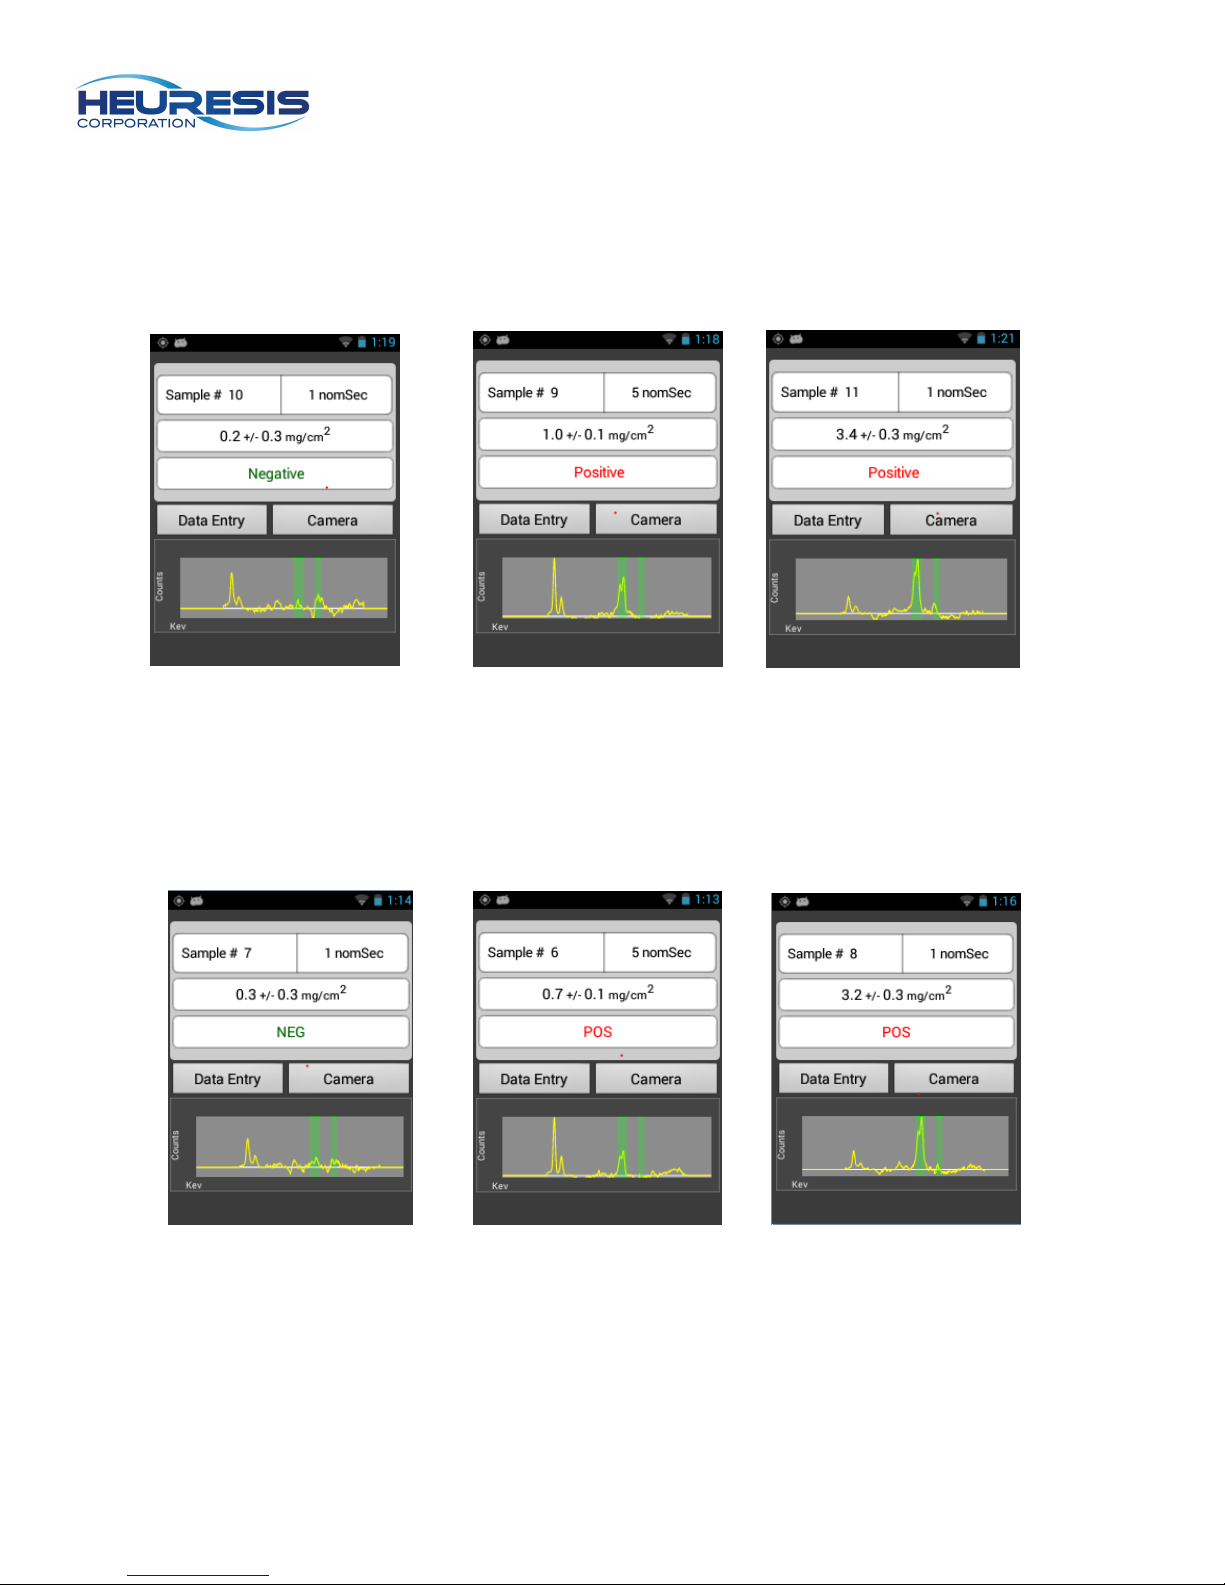
When the action level is set to 1.0 mg/cm2, the instrument will display results in this fashion:
When the action level is set to anything but 1.0 mg/cm2, the instrument will display results
differently. In this example, the action level has been set to .7 mg/cm2:
31
Page 32
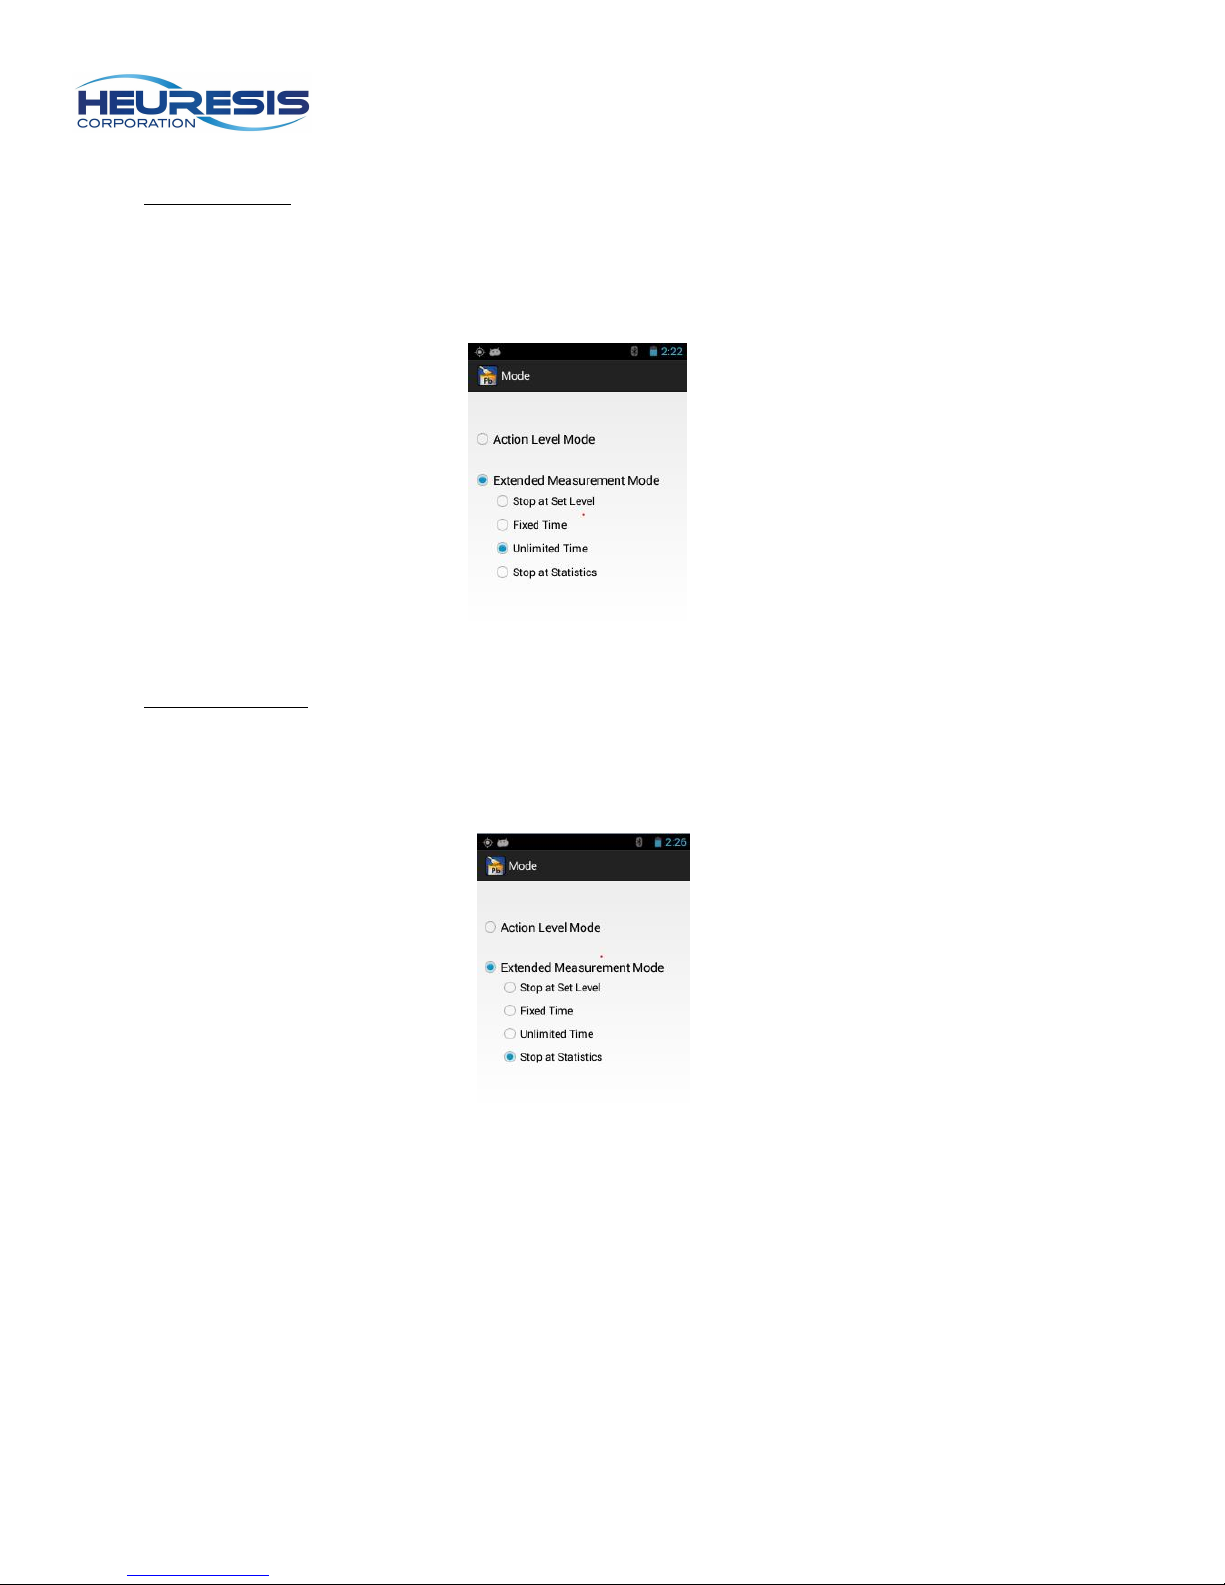
Extended Reading Mode:
Extended reading mode is used for occupational inspection work where the quantification of
lower levels of lead may be required. This usual means longer reading times for the instrument.
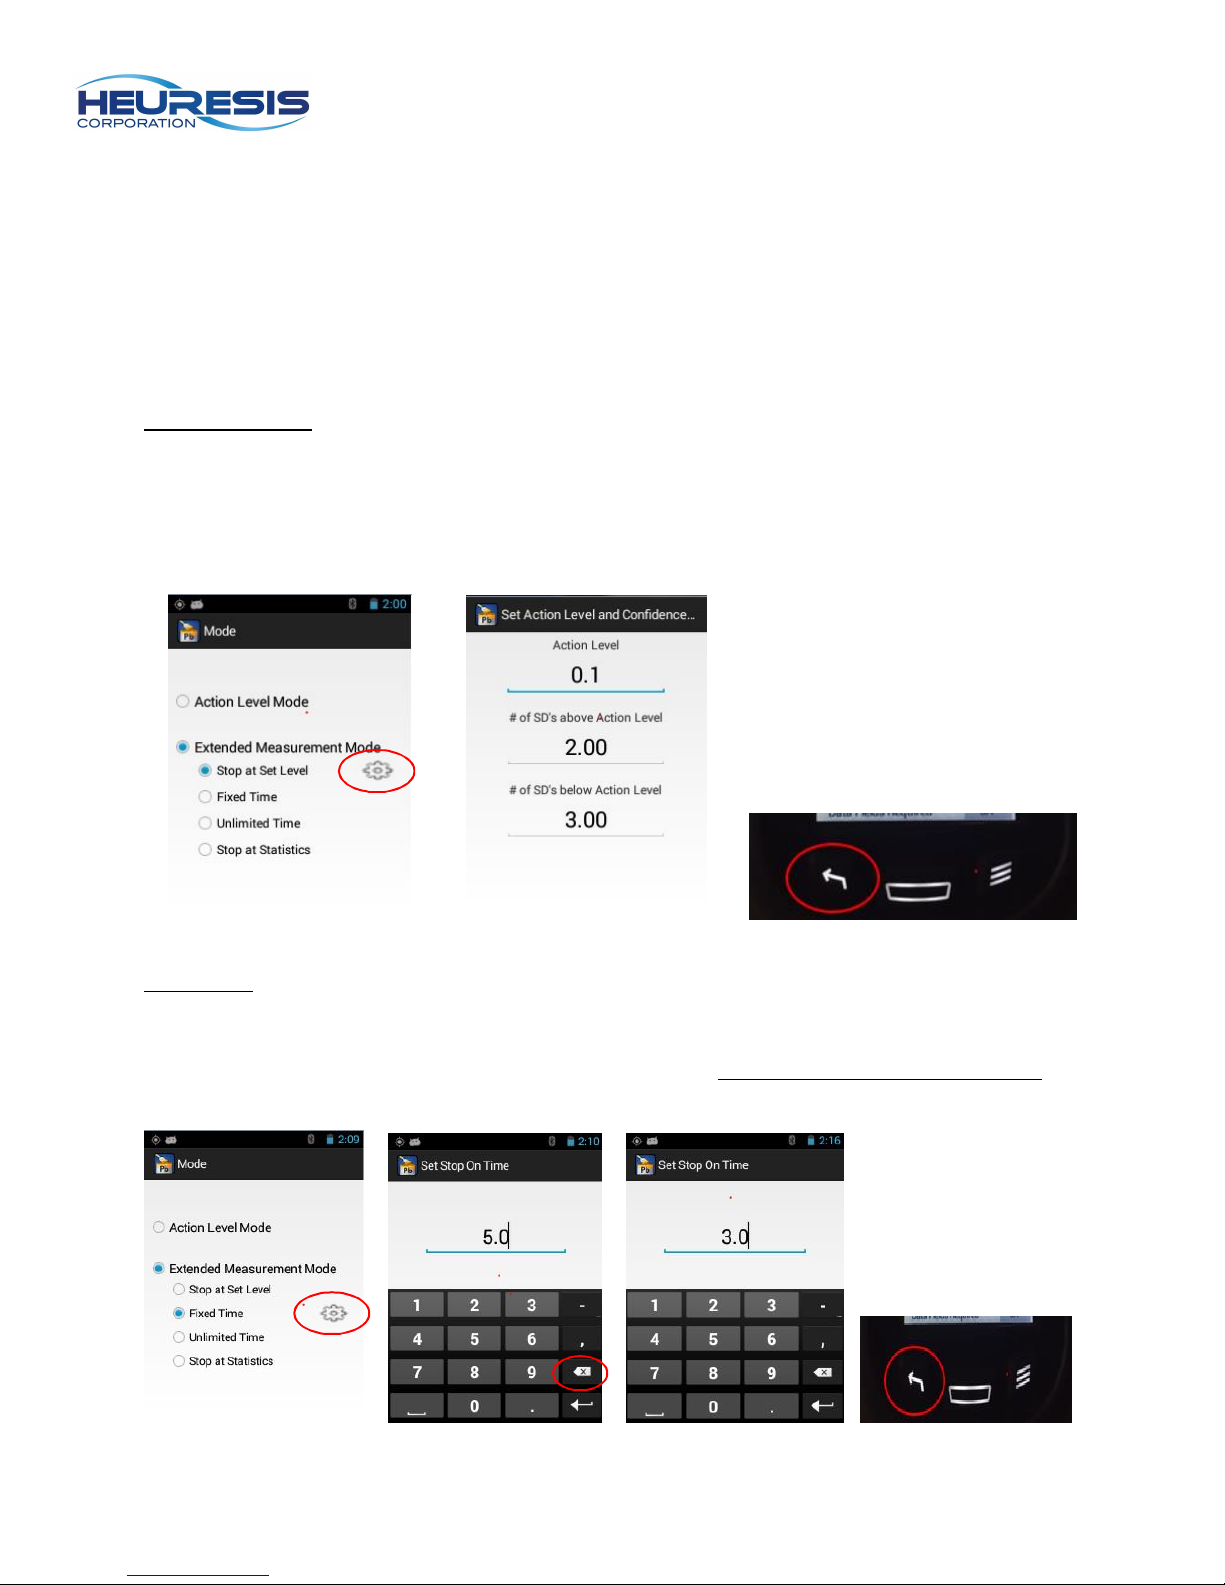
Extended Reading Mode is broken down into four sub modes for the user: Stop at Set Level,
Fixed Time, Unlimited Time and Stop at Statistics.
Stop at Set Level
Stop at Set Level allows the user to set up the system with three variables: action level, number
of standard deviations above the action level and number of standard deviations below the
action level. Once these preset thresholds have been reached, the instrument will stop taking a
reading and display the result.
Fixed Time
Allows the user to set a maximum time the instrument will take a reading for will the trigger is
pulled. Once the instrument reaches this set time, it will stop taking data and display a result.
The value of time that can be input is in real time seconds, up to a maximum of 300 seconds.
32
Page 33
Unlimited Time
Unlimited Time allows the user to simply pull the trigger until they are satisfied with the result for
a maximum reading time of 300 seconds. Releasing the trigger will prompt the system to display
the final result.
Stop at Statistics
33
Page 34

Radiation Safety:
Each Heuresis Pb200i is designed to be safe as possible. As with any device that produces
ionizing radiation, you will need to follow basic radiation protection precautions. This will ensure
the maximum safety for you and for those around you.
The Heuresis Pb200i contains a 185 MBq (5 mCi), Co-57 radioactive source. The radioactive
material is contained in a sealed capsule (a “sealed source capsule”). The capsule is fully
contained by the shutter mechanism and cannot be accidentally nor deliberately removed from
the device without a complete disassembly of the instrument.
The radioactive source is located in the snout of the instrument. When the shutter is opened the
gamma rays from the radioactive source are directed forward, from the front of the device.
There are three controls that need to be activated before the shutter will open. First, the
proximity switch at the front of the snout needs to be depressed. This is accomplished by
pressing the front of the instrument against the surface to be measured. Next the trigger on the
handle and a trigger activation on the screen needs to be pressed. This requires a two hand
operation of the device. Opening the shutter starts the reading. Releasing any of the three
activation requirements will close the shutter and stop the reading. In a measurement mode
where the measurement stops automatically, the shutter will automatically close when the
reading is complete. (To repeat; The proximity switch must be pressed before the trigger is
pressed or the shutter will not open.)
The shutter should only be opened when the instrument is placed against the measurement
surface. Do not hold the sample to be measured, nor place any body parts in the path of the
gamma ray beam. When measuring a surface such as a wall or door, ensure that there is
nobody within a meter on the direct opposite side of the surface being measured.
During testing, a strong beam of radiation (gamma-rays and x-rays) is continuously emitted
through the beryllium window at the bottom of the Heuresis Pb200i. There will be some radiation
at the front and top-front of the instrument. There is negligible radiation where your hand should
be holding the instrument.
34
Page 35

Warning: Always treat radiation with respect. Do not put your hand on the front end of the
Heuresis Pb200i while taking a measurement. Never point the Heuresis Pb200i at yourself or
anyone else when the shutter is open.
Caution: When testing the exterior of the window from the inside of a room, avoid standing in
the path of the Heuresis Pb200i's radiation beam. The direction of the beam is from the front of
the instrument, and upwards.
Typical dose rates (5 millicuries (185 MBq) source)
with the shutter closed,
in millirem/hr,
are as follows:
5 cm 30 cm 100 cm
Left 0.75 0.03 <0.01
Right 0.48 0.025 <0.01
Top 0.25 0.025 <0.01
Bottom 0.55 0.025 <0.01
Front 1.0 0.035 <0.01
Rear 0.05 0.015 <0.01
Typical dose rates (5 millicuries(185 MBq) source)
with the shutter open,
taking a reading on wood,
in millirem/hr,
are as follows:
5 cm 30 cm 100 cm
Left 1.3 0.045 <0.01
Right 1.7 0.06 <0.01
35
Page 36

Top 1.9 0.055 0.015
Bottom 0.70 0.04 <0.01
Rear 0.20 0.025 <0.01
Shutter Safety
Your Heuresis Pb200i is designed so you cannot accidently open the shutter. The instrument
requires a password to operate the shutter. Release the trigger before you remove the
instrument from the surface to be tested. If you accidentally when you lift the instrument from a
surface, the shutter will close automatically, as the proximity switch will not be activated. The
large majority of the instrument readings will take less than two seconds. The shutter of the
device will automatically close when the reading is complete, even if you continue to hold the
instrument against the surface being measured.
The operating conditions for using the Heuresis Pb200i are as follows:
- The radiation safety officer (RSO) of your organization should set up and assign the
passwords to give access to open the shutter to take a measurement. The non-mandatory
safety options for users can be mandated and assigned by the RSO.
- To take a reading with the Heuresis Pb200i, the instrument must be held against a surface.
(The shutter will not open unless the proximity switch is activated. The shutter will close as
soon as the Heuresis Pb200i is no longer pressed against a surface. The shutter will close at
the end of each reading.)
- The shutter should be open only during a measurement.
- The shutter be open only when the instrument is in use, taking a measurement.
- Never point the Heuresis Pb200i at yourself or anyone else when the shutter is open.
Remember, the radiation can penetrate doors, walls, etc., and there should be nobody within
two meters of the wall opposite of the measurement location.
- Your Heuresis Pb200iclearly indicates any time the shutter is open with warning lights at the
front of the instrument. Always observe the status of the warning lights.
- Always transport the device in accordance with the regulations of the jurisdiction that you are
in. Always transport the device in the hard plastic case supplied with the instrument. This case
may be transported in an over pack. Use all transportation labels required by the regulatory
jurisdiction that you are transporting in.
36
Page 37

- Access to the device must be limited to those trained and authorized in its use. The Heuresis
Pb200i must be under the control of and authorized user and stored in an authorized and
secure location at all times.
- When removing an instrument from its storage location, a log must be maintained with dates
and times removed and returned, location of use, authorized user using the instrument. A
comments section should also be maintained for issues related to the use of the instrument.
-The holster for the instrument has shielding in it for emergency situations. If you suspect an
issue with the shutter not closing, return the instrument firmly in its holster. This will allow it to
be handled safely.
37
Page 38
Radiation Dosimetry
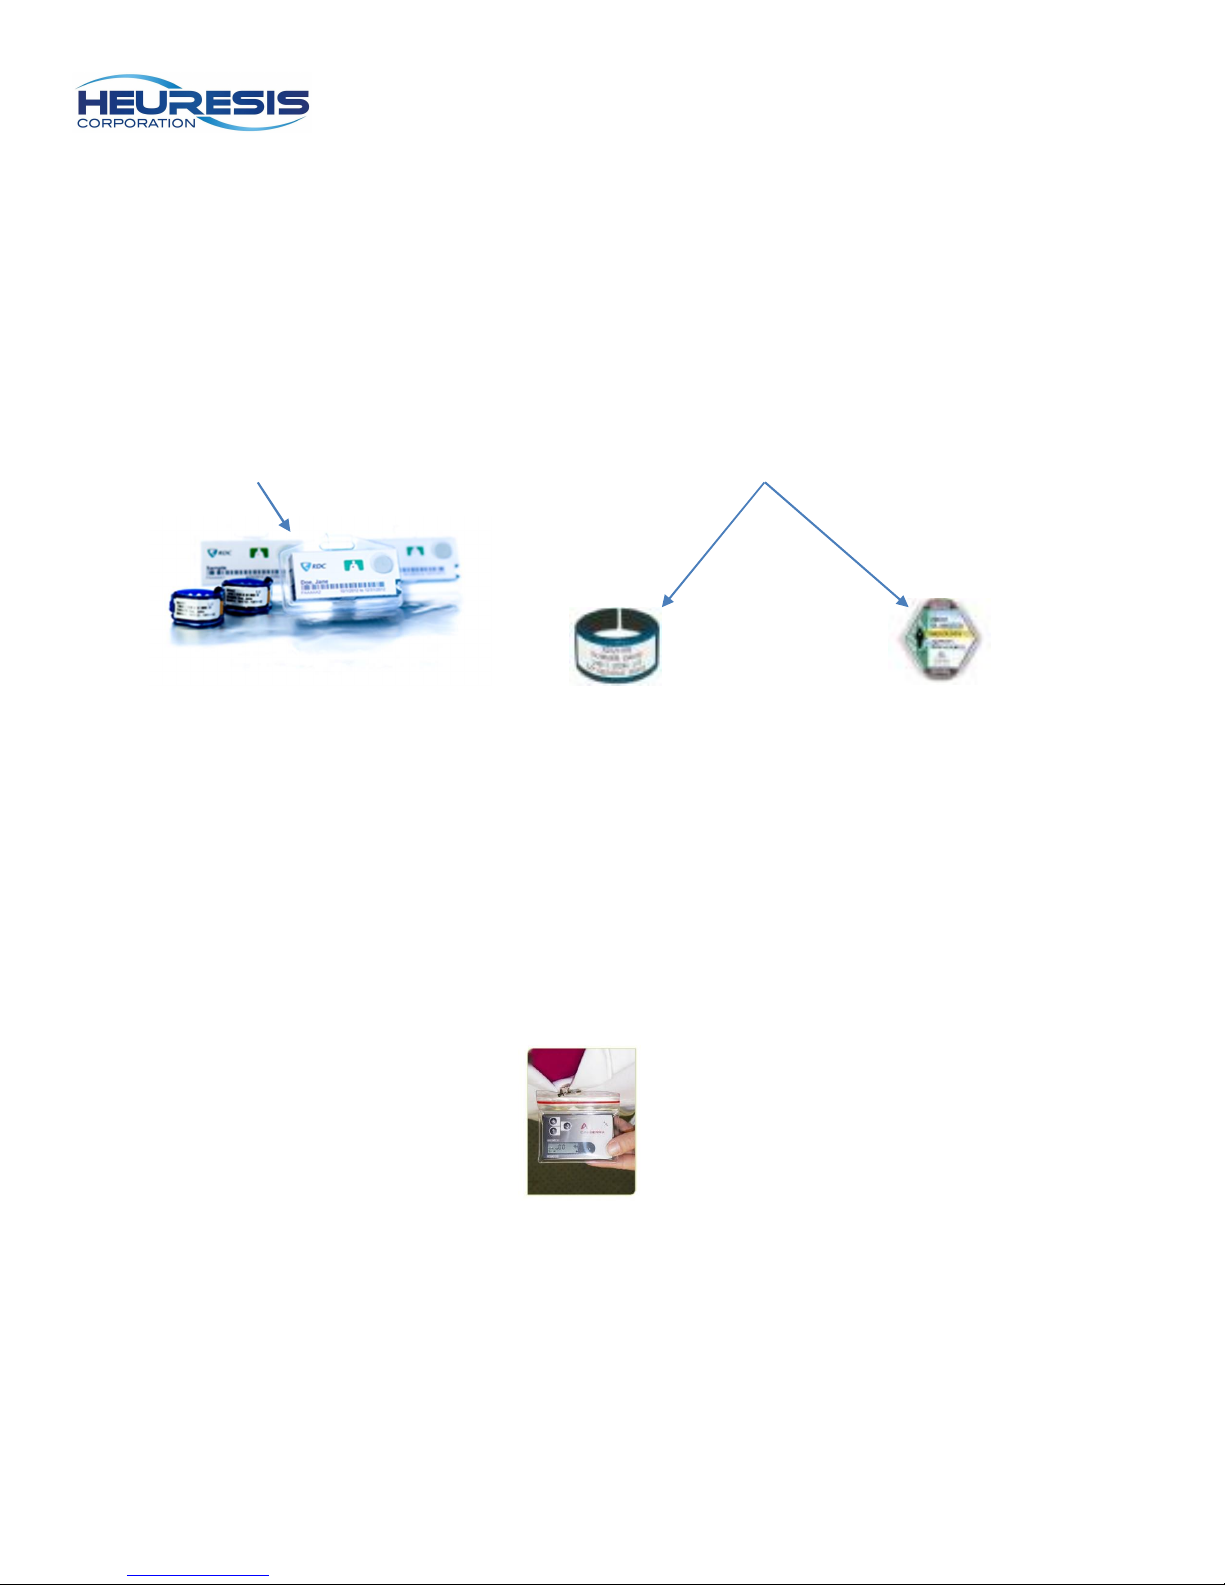
Radiation dosimetry is worn when indicated by the dose received by the operator. Usually,
several rounds of dosimetry are used, along with exposure time and use estimates to determine
whether dosimetry should be discontinued. If no dosimetry is used, a written justification must
be kept on file.
Doisimetry can be obtained for companies such as:
Radiation Detection Company
3527 Snead Drive or
Georgetown, TX 78626
Landauer Corporate Office
2 Science Road
Glenwood, Illinois 60425-1586
Dosimeters can be worn on a finger with a ring badge or on the body with a whole body badge.
Your organization needs to have an established dosimetry program to determine the use and
type of dosimeters needed. Operators need to follow the instructions in the use of dosimetery
badges provided by the vendor. Dosimeters are sent back to the vendor for analysis.
Dosimetry badges are either changed on a monthly or quarterly basis. Which option you
choose depends upon the dose received. If dosimetry is used, most operators will use quarterly
dosimetry. This is depending on whether the operator is receiving a dose from another source.
There are other options that can be utilized. Electronic dosimeters can be used to electronically
display dose.
Canberra Industries, Inc.
800 Research Parkway, Meriden
CT 06450, U.S.A.
Whichever choice is made proper records are mandated by your local regulatory agency. Check for the
time required in your juristiction. Some regulators require the records to be kept until the license is
terminated, and then transferred to the regulatory agency.
38
Page 39

Leak Testing:
The Heuresis Pb200i is required to have a leak test performed every twelve months (reference
SS&DR when completed). The leak test kit is provided by the laboratory that performs the leak
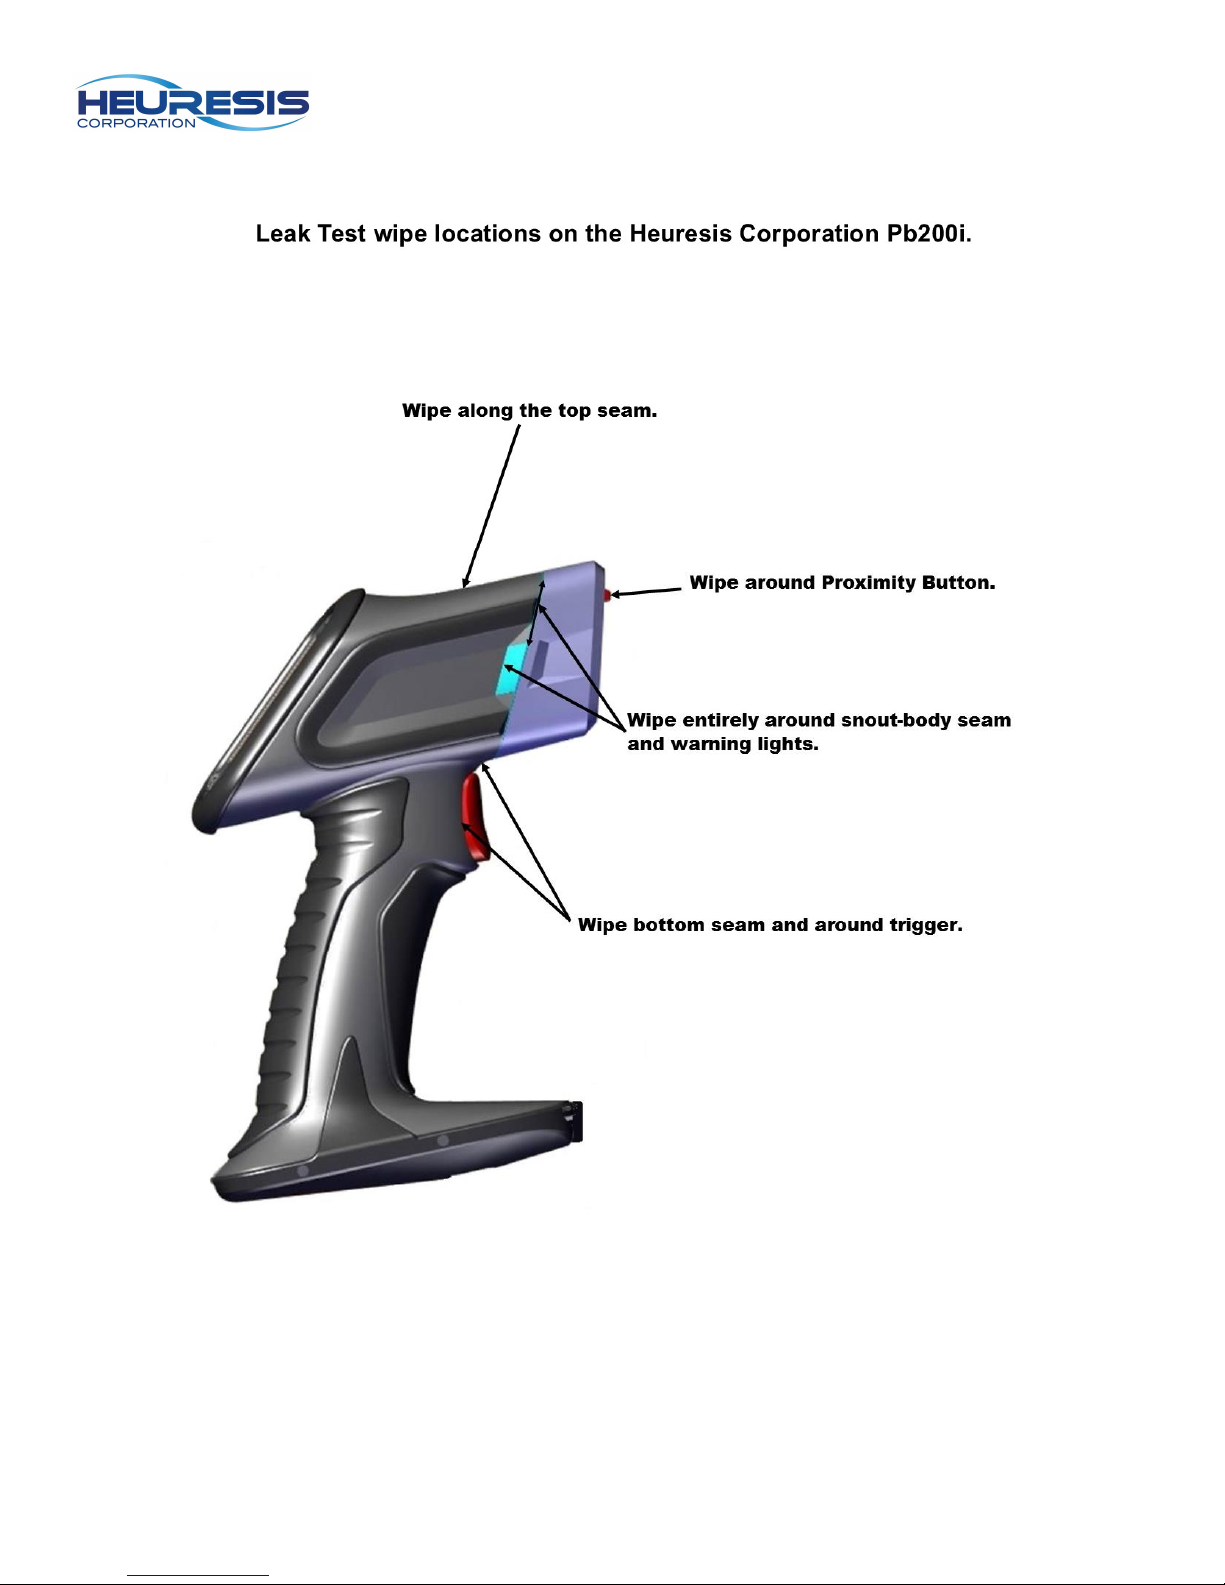
test analysis. A leak test is a wipe test of the outside of the instrument (See locations at the end
of this section.). The seams of the front of the instrument are wiped to see whether radioactive
contamination from the source has leaked for the sealed source (an extremely unlikely event)
and contaminated the outside of the instrument.
State radiation control programs keep lists of approved leak test laboratories. Two options are
as follows:
Valley Safety Services Associates
330 Old Enfield Rd.
Belchertown, MA 01007
Troxler Electronic Laboratories, Inc.
3008 Cornwallis Road
P.O. Box 12057
Research Triangle Park, NC 27709
A copy of the leak test is required to be kept on file at your primary location of storage. It is
useful to have with the instrument as well, and may be required or desired in certain transport
situations. Heuresis recommends that you keep a copy of the leak test with the instrument
transport case at all times.
It is important to keep all leak test reports, even after they expire. Regulations vary as to how
long you need to keep them, but a minimum of two years of the leak test records should be
kept. You should check your regulations if you do not keep all of the leak tests for an
instrument.
If your leak test expires on an instrument, it
location. The instrument must be clearly marked not to be used until a valid leak test is received. The
instrument must have a valid leak to be transported.
must be taken out of use and placed in its secure storage
Where to wipe:
Following the instructions of the leak test kit provider, wipe the areas shown on the following
page.
39
Page 40
40
Page 41

Emergency Procedures
THIS PAGE CONTAINS INFORMATION THAT SHOULD BE AVAILABLE TO THE PB200I
OPERATOR AT ALL TIMES.
Lost or Stolen Instrument:
If this instrument is lost or stolen, notify your Radiation Safety Officer (RSO) or the equivalent
responsible individual at your organization. You or your RSO need to notify the local radiation
regulatory authority and the local police. Also, please notify Heuresis Corporation of the loss.
Damaged Instrument
Minor damage:
If the instrument is intact but there is an indication of a cracked case, a shutter mechanism
failure, or the warning lights stay lighted when you think that the shutter should be closed, do
the following:
Place instrument securely in its holster, which contains shielding if the shutter is open. This
should eliminate any external hazard from radiation.
Place the instrument and carrying case securely in the instrument’s carrying case.
Notify your RSO or the equivalent responsible individual at your organization.
You or your RSO should contact Heuresis Corporation for help and instructions.
Major damage:
If the instrument is not intact, i.e. the shout of the instrument is broken open, crushed, melted,
etc., you should:
Do not touch or move the instrument.
Establish a 10 foot control area around the damaged instrument.
Do not leave the area unattended.
Approach the instrument only with a radiation survey meter capable of measuring in the millirem
range. Ensure that you have proper training to perform this operation.
Contact hazardous materials response operations in your area for assistance, if required.
Contact your RSO or you need to notify the local radiation regulatory authority and the local
police.
You or your RSO should contact Heuresis Corporation for help and instructions.
It should be noted that a broken instrument does not necessarily mean that there is radioactive
contamination from the event. While there may be radiation coming from the instrument, the
radioactive material can still be sealed in the source capsule. Contamination surveys should be
taken in the event of major damage.
41
Page 42

Some Emergency Numbers
Please fill out the following before the emergency:
Regulatory authority_________________________________________________
Your organization’s RSO _____________________________________________
Other of your organization’s contacts____________________________________
Storage location city police____________________________________________
State police________________________________________________________
Storage location fire department________________________________________
Heuresis emergency contact: Ken Martin 1-617-751-8286 (call or message any time)
You should also know the contact information for the police and fire departments in which you
are using the instrument in.
Police____________________________ Fire____________________________
Other contacts:
_____________________________________ __________________________
_____________________________________ __________________________
Your organization contact information (in case it is lost and somebody finds it and is trying to
return it to you):
These contacts should be kept on the operator’s person and with the instrument.
If you encounter any issues or have questions related to the safe operation of the device, call
the Heuresis Radiation Safety Officer, Ken Martin, 1-617-751-8286,
42
 Loading...