

Page 1
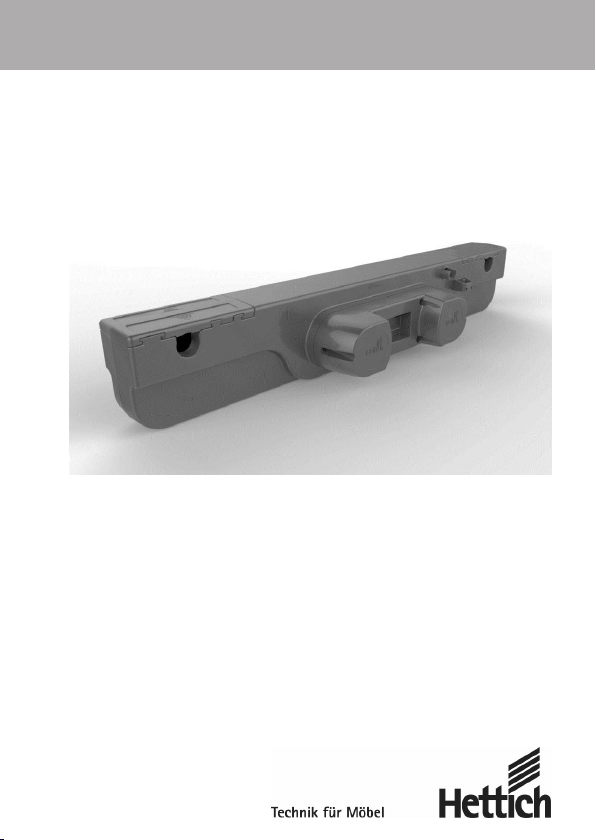
AxisDrive
Bedienungsanleitung/ Operating instructions/
Mode d‘emploi/ manuale d‘uso
Page 2
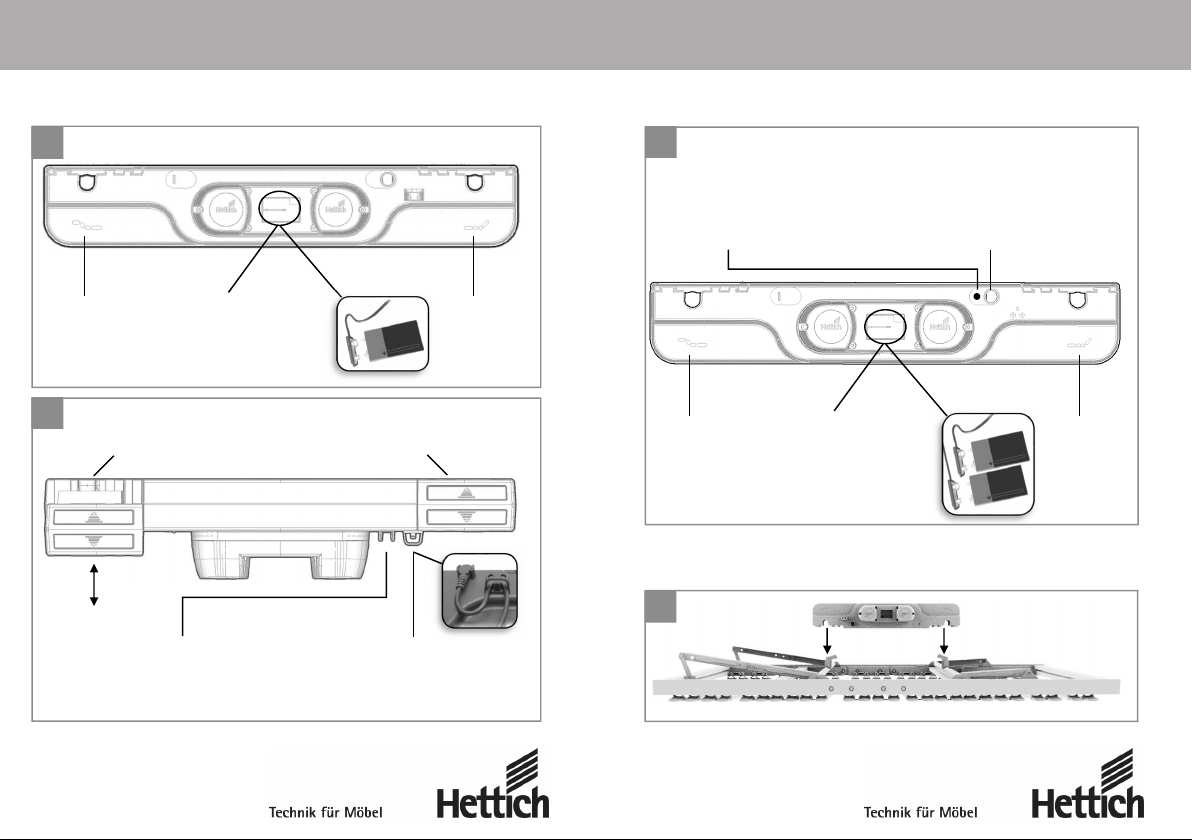
AxisDrive IPS
1
Fuß
Foot
Pied
Piedi
Batteriefach
Battery compartment
Logement de piles
Alloggiamento batterie
2
Seitenschieber / sliding cover / glissière laterale / chiusura scorrevole
Buchse für Kabelfernbedienung
Entry for cable of handset
Prise pour câble de la télécommande
Ingresso per il cavo del telecomando
Zugentlastung
Stress release
Délestage de traction
Ancoraggio cavo
Kop
Head
Tête
Testa
AxisDrive IPS RF
3
Codierungs-Taste
Coding button
Touche de codage
Tasto di codifica
f
Fuß
Foot
Pied
Piedi
Montage / assembly / montage / montaggio
4
Batteriefach
Battery compartment
Logement de piles
Alloggiamento batterie
(Optional) Buchse für Kabelfernbedienung
(Optional) Entry for cable of handset
(Facultativ) Prise pour câble de la télécommande
(Opzionale) Ingresso per il cavo del telecomando
Kop
Head
Tête
Testa
f
2
3
Page 3
4
6
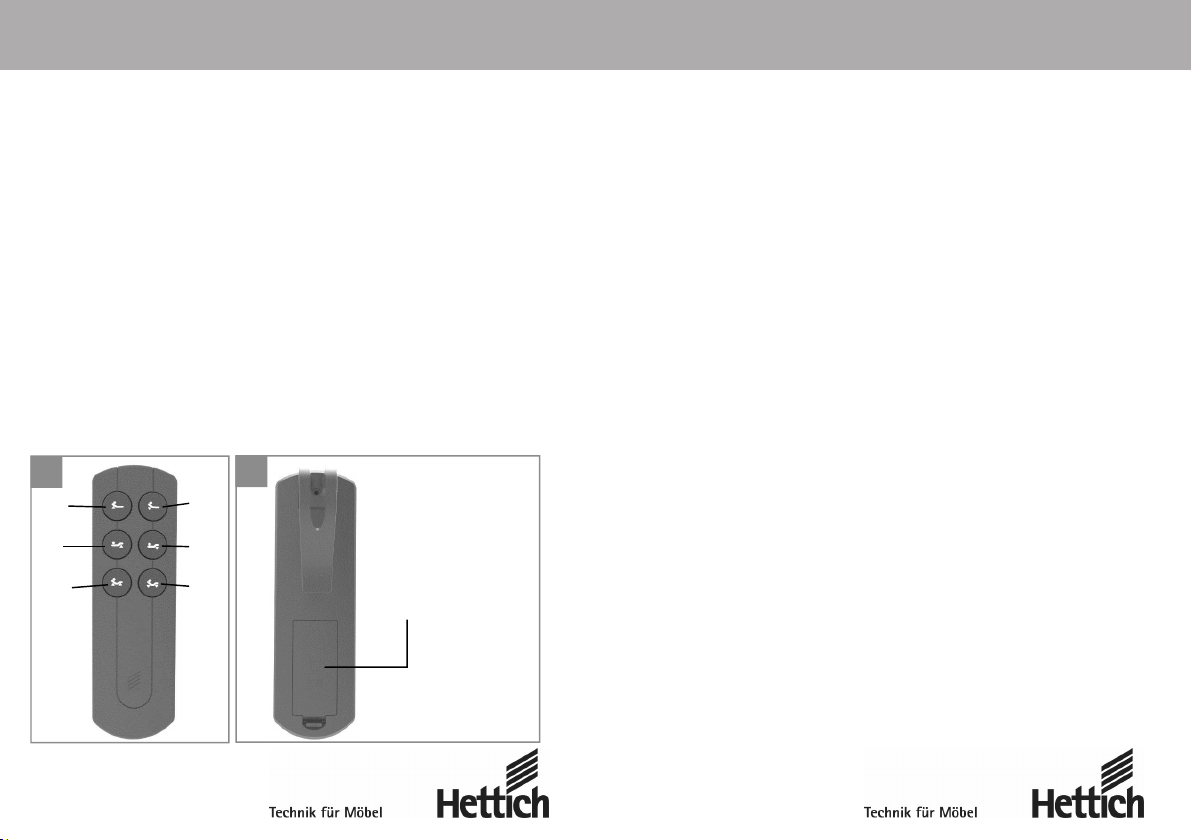
Fernbedienungsfunktionen / Tastenbelegung
1 Kopfteil heben 2 Kopfteil senken
3 Fußteil heben 4 Fußteil senken
5 Kopfteil + Fußteil heben 6 Kopfteil + Fußteil senken und
Taste für Codierung
Handset functions / key assignments
1 Lifting head section 2 Lowering head section
3 Lifting foot section
5 Lifting head + foot section 6 Lowering head + foot section
Lowering foot section
and coding button
Fonctions de la télécommande / Affectation des touches
1 Relever la têtière 2 Abaisser la têtière
3 Relever la partie pied 4 Abaisser la partie pied
5 Relever la têtière et la partie pied
Abaisser la têtière et la partie
pied et touche de codage
Funzioni di telecomando / Configurazione tasti
1 Sollevamento sezione testa 2 Abbassamento sezione testa
3 Sollevamento sezione piedi 4 Abbassamento sezione piedi
5 Sollevamento sezione testa e
pediera
5
6 Abbassamento sezione testa e
pediera e tasto per la codifica
6
(nur bei RF) Batteriefach
(RF only) battery compartment
(uniquement pour RF)
logement de piles
(soltanto per RF)
alloggiamento batterie
Bedienungshinweise AxisDrive IPS / IPS RF
Liebe Kundin, lieber Kunde,
wir gratulieren Ihnen, dass Sie sich für ein Qualitätserzeugnis der Firma Hettich Franke
GmbH & Co. KG entschieden haben. Diese Anleitung ist vor der Inbetriebnahme des
Produktes sorgfältig zu lesen, um die Bedienung kennenzulernen.
Funktion: Stufenloses Verstellen von Kopf- und Fußteil entweder einzeln oder
gemeinsam.
Einbauanleitung: AxisDrive wird einbaufertig geliefert. Falls sich die Motoren
nicht in der Einbaulage befinden, schließen Sie bitte den Netzstecker an und betätigen
Sie die Tasten
Die Motoren fahren jetzt in die Einbaulage.
Ziehen Sie aus Sicherheitsgründen den Netzstecker.
Montage: Legen Sie zur einfacheren Montage den Lattenrost auf den Rücken, so dass
die Elektrobeschläge nach oben zeigen (Abb. 4). Drücken Sie nun den AxisDrive
über die Motorhebel fest auf, bis die Rohre in den vorgesehenen U-förmigen
Aussparungen verrasten. Dabei ist zu beachten, dass das am Antrieb befindliche
Rückensymbol in Richtung Kopfende des Lattenrostes zeigt. Zur Fixierung des
AxisDrive an den Elektrobeschlägen werden nun die Seitenschieber an der
Deckelöffnung geschlossen. Achten Sie darauf, dass die Seitenschieber (Abb. 2)
mittig in die dafür vorgesehenen Führungsnuten eingeschoben werden.
Legen Sie jetzt den Lattenrost in das Bettgestell.
Inbetriebnahme IPS mit Kabelfernbedienung:
Inbetriebnahme IPS RF mit Funkfernbedienung:
Möglichkeit 1:
und am Handschalter (Abb. 5).
Stecken Sie den Stecker der Kabelfernbedienung in die Buchse (Abb. 2)
Sichern Sie das Kabel gegen unbeabsichtigtes Ausstecken mit der dafür
vorgesehenen Zugentlastung (Abb. 2)
Stecken Sie den Netzstecker in die Steckdose
Ihr motorisch verstellbares Bett ist jetzt funktionsbereit
Die beiden 9V Blockbatterien für die Notabsenkung dürfen nicht
angeschlossen sein
Legen Sie die Batterien in das Batteriefach der Funkfernbedienung ein
(Abb. 6). Achten Sie dabei auf die richtige Polarität
4
5
Page 4

Stecken Sie den Netzstecker in die Steckdose
Der Antrieb befindet sich nun für ca. 30 Sekunden im „Lernmodus“
Drücken Sie während des Lernzeitraums die Taste Kopf- und Fußteil senken
auf der Funkfernbedienung (Abb. 5 Taste
Bei erfolgreicher Codierung ertönt ein akustisches Signal
Ihr motorisch verstellbares Bett ist jetzt funktionsbereit
Möglichkeit 2:
Überprüfen Sie, ob die Batterien im Batteriefach der Funkfernbedienung
eingelegt und sich der Netzstecker in der Steckdose befindet
Drücken und halten Sie die Taste Kopf- und Fußteil senken auf der
Funkfernbedienung (Abb. 5 Taste
Codierungs-Taste auf dem AxisDrive (Abb. 3)
Bei erfolgreicher Codierung ertönt ein akustisches Signal
Ihr motorisch verstellbares Bett ist jetzt funktionsbereit
Sollte der Codiervorgang nicht erfolgreich abgeschlossen werden können, wiederholen Sie
die Inbetriebnahme nach einer Wartezeit von ca. 2 Minuten. Nach einer
Stromunterbrechung bzw. einem Stromausfall ist es nicht erforderlich den AxisDrive neu
einzulernen, da dieser den ursprünglichen Betriebszustand (Codierung) beibehält.
Notabsenkung: Damit Sie im Falle eines Stromausfalls in die Liegeposition fahren können,
ist im AxisDrive eine Notabsenkung installiert, die durch die eingebaute 9V Blockbatterie
ermöglicht wird. Schließen Sie die Batterie gemäß Abb. 1, bzw. Abb. 3 an (bei AxisDrive
mit Funkfernbedienung müssen 2 Batterien angeschlossen werden).
Bei Verlust der Fernbedienung Funk oder im Falle eines Stromausfalls besteht die
Möglichkeit über die Codierungs-Taste (Abb. 3) den AxisDrive in die Liegeposition zu
verstellen.
Achtung! Bei kurzer Betätigung der Codierungs-Taste verstellt sich der Lattenrost
selbsttätig in die Liegeposition.
Hinweis: Bei zwei oder mehreren Systemen nehmen Sie diese nacheinander und nicht
gleichzeitig in Betrieb.
Wir wünschen Ihnen mit unserem Qualitätserzeugnis einen geruhsamen und entspannten
Schlaf.
)
) und drücken Sie gleichzeitig die
Behebung von Störungen
AxisDrive lässt sich nicht verstellen, obwohl Fernbedienung betätigt wird.
a. Netzanschluss überprüfen
b. Stecker der Fernbedienung überprüfen
c. Bei Funkfernbedienung: Codiervorgang wiederholen
Hettich Franke GmbH & Co. KG
Hinter dem Ziegelwasen 6/1
72336 Balingen
Technische Daten:
Netzanschluss 100 – 240 VAC, 50/60Hz.
Geringe elektromagnetische Strahlung durch integriertes SMPS Netzteil.
Erfüllt die Öko-Design Richtlinie 2009/125/EG mit einer
Standbyleistung ≤ 0,5 W.
Schutzart: IP 20
Gefertigt nach VDE Schutzklasse II
Leistungsbedarf: je nach Belastung 30 – 300 Watt
Achtung! Der vorliegende Doppelantrieb AxisDrive dient ausschließlich zur
Verwendung in Betten, Lattenrosten und/oder Boxspringbetten, zum Heben und
Senken des Kopf- und Fußteils. AxisDrive ist somit nur für diesen Verwendungszweck
bestimmt.
Achtung! Betreiben Sie AxisDrive nur im Aussetzbetrieb (AB 2min/18min).
Vermeiden Sie elektrische und mechanische Überlastung.
Fernbedienung stets korrekt anschließen. Netzstecker korrekt und fest in die Steckdose
stecken. AxisDrive darf nur von autorisiertem Fachpersonal geöffnet werden. Vor dem
Öffnen / Ausbauen aus dem Lattenrost den Netzstecker ziehen. Für jeglichen Schaden
durch Demontage des Antriebes trägt der Benutzer selbst die Verantwortung!
Weitere Informationen finden Sie auf unserer Homepage unter
www.hettich.com (Service – Mediathek)
6
7
Page 5

Operating instructions AxisDrive IPS / IPS RF
Dear customer,
Congratulations on choosing a high-quality product from Hettich Franke GmbH & Co. KG.
Before attempting to install and put the product into operation, read these instructions
carefully and make yourself familiar with its operation.
Function: Gradual adjustment of head and foot sections, either individually or
simultaneously.
Installation instructions: AxisDrive is delivered ready for installation. If the motors are
not in the installation position, connect the mains plug and push the buttons
of the handset (Fig. 5). The motors move into the installation position.
For safety reasons isolate from the mains power supply by disconnecting the motor
plug.
Assembly: For easier assembly, turn over the slatted bed frame so that the motor action
faces upwards (Fig. 4). Push the AxisDrive firmly onto the motor hooks until the tubes
latch into the U-shaped motor openings. Observe that the head symbol at the drive points
towards the head-end of the slatted bed frame. For fastening the AxisDrive to the motor
action, push the sliding covers over the lid openings. Observe that the sliding covers (Fig.
2) are pushed into the provided guide grooves centred.
Place the slatted bed frame in the bed.
Commissioning of the IPS with handset cable:
• Plug handset cable into the socket (Fig. 2)
• Secure cable against accidental disconnection by means of the stress relief
(Fig. 2)
• Connect mains plug into mains outlet
• Your motor-adjustable bed is now ready for use
Commissioning of the IPS RF with handset RF (radio frequency):
Option 1:
• The two 9V block batteries for emergency lowering must not be connected
• Put the batteries into the battery compartment of the handset RF (Fig. 6).
Ensure proper polarity.
• Connect mains plug into mains outlet
• The drive is now in "learn mode" for approx. 30 seconds
and
• Push the button for lowering the head and foot section on the handset RF
during the learn mode (Fig. 5, button
• Successful encoding is confirmed by an acoustic signal
• Your motor-adjustable bed is now ready
Option 2:
• Check that the batteries are inserted in the handset RF battery
compartment and that the mains plug is connected to the mains outlet
• Push and hold the button for lowering the head and foot rests on the
handset RF (Fig. 5, button
at the same time (Fig. 3)
• Successful encoding is confirmed by an acoustic signal
• Your motor-adjustable bed is now ready for use
If encoding fails, wait for approx. 2 minutes and then repeat commissioning.
After a current interruption or power failure there is no need to encode the AxisDrive
again. It maintains the previous encoding.
Emergency lowering capability: The AxisDrive has an emergency lowering capability.
Thanks to the integrated 9V block battery it is possible to move to the lying position in
case of power outage. Connect the battery according to Fig. 1 or Fig. 3 (AxisDrive with
handset RF requires 2 batteries). If you loose the handset RF or in case of a power
failure, AxisDrive can be returned to the lying position by means of the coding button
(fig. 3).
Attention! When the coding button is pushed briefly, the slatted bed frame will
move to the lying position automatically.
Note: If you have two or more systems, take them into operation in sequence rather
than at the same time.
Have a refreshing and relaxed sleep with our high-quality product.
) and push the coding button on the AxisDrive
)
Troubleshooting
AxisDrive cannot be adjusted although the handset is operated.
a. Check mains connection
b. Check handset plug
c. For handset RF: repeat encoding
8
9
Page 6

Hettich Franke GmbH & Co. KG
Hinter dem Ziegelwasen 6/1
72336 Balingen - Germany
Technical Data
Mains connection 100 – 240 VAC, 50/60Hz.
Low electromagnetic radiation from integrated SMPS mains unit.
Meets ecodesign directive 2009/125/EC at a standby power of ≤ 0.5 W.
Protection type: IP 20
Produced according to VDE protection class II
Power consumption: 30 – 300 Watt depending on load
Attention! This AxisDrive double drive is only meant for use in beds, slatted bed frames
and/or boxspring beds, for lifting and lowering the head and foot section. AxisDrive is
intended for this use only.
Attention! Operate AxisDrive only in intermittent duty (ID 2min/18min). Avoid electrical
and mechanical overload.
Always connect the handset correctly. Plug the mains plug correctly and firmly into socket
outlet. AxisDrive must only be opened by authorised specialists. Pull the mains plug before
opening/removing from the slatted bed frame. The user is held responsible for any damage
from disassembly of AxisDrive!
For further information, see our website at
www.hettich.com (Service – Media centre)
10
Consignes d’utilisation AxisDrive IPS / IPS RF
Chère cliente, cher client,
nous vous remercions d’avoir choisi un produit de qualité de la société Hettich Franke
GmbH & Co. KG. Cette notice doit être lue attentivement avant d’utiliser le produit
pour la première fois afin de se familiariser avec son utilisation simplifiée.
Fonctionnement: Réglage individuel ou simultané de la têtière et de la partie pied.
Instructions de montage: AxisDrive est fourni prêt à être monté. Si le moteur ne se
trouve pas en position de montage, veuillez raccorder la fiche secteur et appuyer sur
les touches
Les moteurs se placent alors en position de montage.
Débranchez la fiche secteur par mesure de précaution.
Montage: Pour simplifier le montage, placez le sommier à lattes sur le dos afin que la
mécanique électrique se trouve vers le ha
AxisDrive sur les blocs de poussé moteur ju
les parties évidées en U en veillant à ce que le symbole tête situé au dos du moteur
soit placé en direction de la têtiere du sommier à lattes. Les glissières latérales de
l’ouverture du couvercle doivent ensuite être fermées afin de fixer AxisDrive aux
raccords électriques. Veillez à ce que les glissières latérales (ill. 2) soient insérées au
milieu dans les rainures de guidage prévues à cet effet.
Placez maintenant le sommier à lattes dans le châssis du lit.
Mise en service IPS avec télécommande à fil:
Mise en service IPS RF avec télécommande sans fil:
Possibilité 1:
11
et sur la télécommande à fil (ill. 5).
ut (ill. 4). Appuyez ensuite fermement
squ’à ce que les tubes s’enclenchent dans
Insérez la fiche du câble de la télécommande dans la douille (ill. 2)
Sécurisez le câble contre tout débranchement involontaire à l’aide du
délestage de traction prévu à cet effet (ill. 2)
Branchez la fiche secteur dans la prise
Votre lit réglable motorisé est maintenant prêt à l’emploi
Les deux piles 9V pour l’abaissement d’urgence ne doivent pas être
raccordées
Placez les piles dans le logement pour piles de la télécommande sans fil
(ill. 6) en veillant à ce que la polarité soit correcte
Branchez la fiche secteur dans la prise
Le moteur est maintenant en «mode apprentissage» pendant 30 secondes
environ
Page 7

Pendant la période d’apprentissage, appuyez sur la touche «abaisser la têtiere
et la partie pied» sur la télécommande (ill. 5 bouton
Un bip sonore est émis en cas de codage correct
Votre lit réglable motorisé est maintenant prêt à l’emploi
Possibilité 2:
Vérifiez que les piles soient placées dans le logement pour piles de la
télécommande sans fil et que la fiche secteur se trouve dans la prise
Appuyez sur le bouton «Abaisser la têtière et la partie pied et touche de
codage» sur la radiotélécommande (ill. 5 bouton
temps sur le bouton de codage sur l’AxisDrive (ill. 3)
Un bip sonore est émis en cas de codage correct
Votre lit réglable motorisé est maintenant prêt à l’emploi
Si le processus de codage ne peut pas être terminé correctement, répétez les étapes de
mise en service après 2 minutes environ. Il n’est pas nécessaire de réinitialiser AxisDrive
après une coupure ou panne de courant car il conserve l’état de fonctionnement (codage)
d’origine.
Abaissement d’urgence: Afin de pouvoir retourner en position couchée en cas de panne
de courant, AxisDrive dispose d’une fonction d’abaissement d’urgence fonctionnant grâce
à la pile 9V intégrée. Mettez la pile en place conformément aux ill. 1 et 3 (2 piles sont
nécessaires pour AxisDrive avec radiotélécommande). En cas de perte de la
radiotélécommande ou de panne de courant, il est possible de retourner AxisDrive en
position couchée grâce au bouton de codage (ill. 3).
Attention! En appuyant brièvement sur le bouton de codage, le sommier à lattes se
règle automatiquement en position couchée.
Remarque: si vous possédez deux systèmes ou plus, mettez-les en service l’un après l’autre
et pas simultanément.
Nous vous souhaitons un sommeil tranquille et serein avec notre produit de qualité.
)
et appuyez en même
Réparation des pannes
AxisDrive ne bouge pas malgré l’actionnement de la télécommande
a) Vérifier que la prise est bien branchée au secteur
b) Vérifier la fiche de la télécommande
c) S’il s’agit d’une télécommande sans fil: répéter le processus de codage
Hettich Franke GmbH & Co. KG
Hinter dem Ziegelwasen 6/1
72336 Balingen - Allemagne
Caractéristiques techniques:
Alimentation électrique 100 - 240 VAC, 50/60Hz.
Faible rayonnement électromagnétique grâce à l’alimentation SMPS intégrée.
Répond aux exigences de la directive d’écoconception 2009/125/CE avec une
puissance en mode veille ≤ 0,5 W.
Type de protection IP 20
Fabriqué d’après classe de protection VDE II
Puissance: 30 - 300 Watt selon la charge
Attention! Le présent moteur double AxisDrive doit exclusivement être utilisé dans les
lits, sommiers à lattes et/ou lits boxspring pour relever et abaisser la têtière et la partie
pied. AxisDrive est ainsi exclusivement destiné à être utilisé dans ce but.
Attention! Utilisez uniquement AxisDrive en service intermittent (2min/18min).
Évitez les surcharges électriques et mécaniques.
Raccordez toujours la télécommande correctement. Insérez la fiche secteur
correctement et fermement dans la prise. AxisDrive doit uniquement être ouvert par
un spécialiste autorisé. Débranchez la fiche secteur avant de l’ouvrir / de l’ôter du
sommier à lattes. L’utilisateur est seul responsable pour tout dommage entraîné par le
démontage du moteur!
Vous trouverez des informations supplémentaires sur notre site
www.hettich.com (Service - Médiathèque)
12
13
Page 8

Istruzioni per l'uso di AxisDrive IPS / IPS RF
Gentile cliente,
ci congratuliamo con Lei per aver scelto un prodotto di qualità della ditta Hettich Franke
GmbH & Co. KG. Prima di mettere in funzione il prodotto, leggere attentamente le
presenti istruzioni, in modo da comprendere il semplice funzionamento del dispositivo.
Funzione: Regolazione continua della sezione testa e della pediera, sia singolarmente che
simultaneamente.
Istruzioni per l'installazione: AxisDrive viene consegnato pronto per l'installazione. Se il
motore non è nella posizione di installazione, collegare il cavo di alimentazione e premere
e sul telecomando (Fig. 5).
i tasti
Il motore si sposterá così in posizione di installazione.
Scollegare il cavo di alimentazione per motivi di sicurezza.
Montaggio: Per facilitare il montaggio, rivoltare la rete a doghe, in modo che la
meccanica elettrica sia rivolta verso l'alto (Fig. 4). Dopodiché, premere saldamente
AxisDrive sui naselli per albero motore, fino all’incastro dei tubi nelle apposite
scanalature ad “U” del motore. Assicurarsi che il simbolo della sezione testa raffigurato sul
motore sia rivolto verso la sezione testa della rete a doghe.
Per connettere AxisDrive ai raccordi elettrici, le chiusure scorrevoli laterali all’apertura del
coperchio dovranno essere chiuse. Assicurarsi che le chiusure scorrevoli laterali (Fig. 2)
siano inserite centralmente nell’apposita scanalatura guida.
A questo punto potrete inserire la rete a doghe nel telaio del letto.
Messa in funzione dell’IPS con telecomando a cavo:
• Inserire la spina del telecomando a cavo nell’ingresso sul motore (Fig. 2)
• Assicurarsi che il cavo non possa scollegarsi accidentalmente fissandolo
all’apposito ancoraggio (Fig. 2)
• Collegare il cavo di alimentazione ad una presa
• Il vostro letto regolabile motorizzato è adesso pronto all’uso
Messa in funzione dell’IPS RF con radiocomando:
Opzione 1:
• Le due batterie da 9V per l'abbassamento di emergenza non devono essere
collegate
• Inserire le batterie nell’apposito alloggiamento batterie del radiocomando
(Fig. 6), facendo attenzione alla corretta polarità
• Collegare il cavo di alimentazione alla presa
• L'unità di azionamento rimarrà ora, per circa 30 secondi, in "modalità di
apprendimento"
• Mentre l’unità si trova in “modalità di apprendimento”, premere il tasto
"Abbassamento sezione testa e pediera" sul radiocomando (Fig. 5 tasto
• Se la codifica è avvenuta correttamente, verrà emesso un segnale acustico
• Il vostro letto regolabile motorizzato è adesso pronto all’uso
Opzione 2:
• Controllare che le batterie siano inserite nell’alloggiamento batterie del
radiocomando e che la spina sia inserita nella presa di corrente
• Premere il tasto "Abbassamento sezione testa e pediera" sul radiocomando
(Fig. 5 tasto
presente sul motore AxisDrive (Fig. 3)
• Se la codifica è avvenuta correttamente, verrà emesso un segnale acustico
• Il vostro letto regolabile motorizzato è adesso pronto all’uso
Qualora non si riesca a completare il processo di codifica con successo, ripetere la
procedura di messa in funzione dopo aver atteso circa 2 minuti. A seguito di
un'interruzione di corrente, o di una mancanza di corrente, non sarà necessario
riprogrammare AxisDrive, in quanto manterrà lo stato operativo (codifica) originale.
Abbassamento di emergenza: al fine di poter riportare il letto in posizione sdraiata, in
caso di mancanza di corrente, AxisDrive è dotato di un sistema di abbassamento di
emergenza, reso possibile grazie alla batteria a 9V incorporata. Collegare la batteria
come illustrato nelle Figg. 1 e 3 (per l’AxisDrive con radiocomando dovranno essere
collegate 2 batterie). Nel caso in cui si perda il radiocomando o in caso di mancanza di
energia elettrica, è possibile regolare l’AxisDrive in posizione sdraiata premendo il
tasto di codifica (Fig. 3).
Attenzione! Premendo brevemente il tasto di codifica, la rete a doghe verrà
regolata automaticamente in posizione sdraiata.
Nota: In presenza di due o più sistemi, azionateli uno alla volta e non
simultaneamente.
Ci auguriamo che il nostro prodotto di qualità vi garantisca sonni ristoratori e notti
tranquille!
) e, contemporaneamente, premere il tasto di codifica
)
14
15
Page 9

Risoluzione dei problemi
Nel caso non si riesca a regolare AxisDrive, nonostante l’azionamento del telecomando:
a. Controllare l’alimentazione elettrica
b. Controllare che la spina del telecomando sia inserita
c. Nel caso in cui si usi il radiocomando: ripetere la codifica.
Hettich Franke GmbH & Co. KG
Hinter dem Ziegelwasen 6/1
72336 Balingen – Germania
Specifiche tecniche:
Alimentazione 100 – 240 VAC, 50/60Hz.
Bassa radiazione elettromagnetica, grazie all’alimentatore integrato SMPS.
Soddisfa la direttiva sulla progettazione ecocompatibile 2009/125/CE con un consumo
energetico in standby 0,5 W.
Grado di protezione: IP 20
Prodotto conformemente alle norme VDE classe di protezione II
Requisiti di alimentazione: a seconda del carico, da 30 a 300 watt
Attenzione! L’uso del sistema AxisDrive a doppia trazione è concepito esclusivamente
(impiego previsto) per il sollevamento e l’abbassamento della sezione schiena e della
pediera di letti, reti a doghe e/o letti boxspring. AxisDrive è pertanto destinato unicamente
ai suddetti usi.
Attenzione! Azionare AxisDrive solo con servizio intermittente (2 min / 18 min).
Dopo un funzionamento continuo della durata massima di 2 minuti, attendere
necassariamente almeno 18 minuti.
Evitare sovraccarichi elettrici e meccanici.
Collegare sempre il telecomando in modo corretto e inserire il cavo di alimentazione
correttamente e saldamente nella presa. AxisDrive può essere aperto solo da personale
autorizzato. Prima di aprire/smontare il motore, sconnettere sempre il cavo del motore
dalla rete elettrica (disinserire la spina dalla presa di corrente). L'utente si assume ogni
responsabilità per qualsiasi danno che dovesse derivare dallo smontaggio del motore!
Per ulteriori informazioni consultare il nostro sito:
www.hettich.com (Servizio – Media Centre)
03/2016
0071
16
 Loading...